

Page 1
Multi-Steamer
Household Type
Steam Cleaner
Owner’s Guide
370 Series
INDEX
Important Safeguards................... 2
Service Information ...................... 5
Use & Assembly........................6-9
Maintaining.................................10
Problem Solving ......................... 11
Customer Order Form ................13
Warranty..................................... 15
For location of nearest Eureka
Warranty Station or Service
Information, call 1-800-282-2886.
IMPORTANT
Do not return this
product to the store.
For assembly problems or
questions contact: Eureka’s
Customer Service Division
toll free at 1-800-282-2886*, 7
a.m. to 8 p.m., Central Standard
Time, Monday through Saturday.
For replacement of broken or
missing items to be shipped
direct to you, call 1-800-4387352*, 8 a.m. to 4:45 p.m.,
Central Standard Time,
Monday through Friday.
*En Mexico llame al 5670-6169
www.eureka.com
Page 2

IMPORTANT SAFEGUARDS
When using an electrical appliance, basic precautions should always be followed, including the following:
READ ALL INSTRUCTIONS BEFORE USING THIS STEAM CLEANER.
WARNING
To reduce the risk of fire, electric shock, or injury:
• Do not leave steam cleaner when plugged in. Unplug the electrical cord when not in use and before servicing.
• Do not allow to be used as a toy. Close attention is necessary when used near children, pets and plants.
• Use only as described in this manual. Use only manufacturer’s recommended accessories.
• Do not use with damaged cord or plug. If steam cleaner is not working as it should, has been dropped, damaged, left
outdoors, or dropped into water, return it to a service center before using.
• Do not pull or carry by cord, use cord as a handle, close a door on cord, or pull cord around sharp edges or corners.
Keep cord away from heated surfaces.
• Do not use extension cords or outlets with inadequate current carrying capacity.
• Do not unplug by pulling on cord. To unplug, grasp the plug, not the cord.
• Do not handle plug or steam cleaner with wet hands or operate without shoes.
• Do not put any object into openings. Do not use with any opening blocked.
• Store your steam cleaner indoors in a cool, dry area.
• Keep your work area well lighted.
• Never turn the appliance over or on its side when using steam. Never direct steam towards people, animals,
plants, and equipment with electrical components.
• Do not immerse the steam cleaner into water or other liquids. Always unplug the power cord from the electrical socket
when filling the steam cleaner.
• Never put descaling, aromatic, alcoholic or detergent products into the steam cleaner, as this may damage it or
make it unsafe for use.
• Before filling, proceed as follows: 1) turn off appliance, 2) unplug the power supply, 3) relieve pressure by
depressing steam delivery button, 4) allow steamer to cool down for three minutes, 5) relieve any built up pressure
again by depressing steam delivery button, 6) slowly unscrew safety cap (see page 6, item 2) and wait 5 seconds
before removing.
• Metal tips on nozzles will get hot during use. Do not touch hot surfaces. Allow the attachments to cool down
before replacing them while the appliance is being used.
• This appliance is intended for household use only.
• Any repair work, including the replacement of the power cord must only be carried out by an Authorized Eureka Service
technician because a special tool is required. Call for nearest service location 1-800-282-2886.
SAVE THESE INSTRUCTIONS
2
Page 3

CONSEILS DE SÉCURITÉ
Lors de l’utilisation d’un appareil électrique, quelques précautions élémentaires doivent être observées, incluant les suivantes:
LISEZ TOUTES LES INSTRUCTIONS AVANT D’UTILISER VOTRE NETT OYEUR À V APEUR.
AVERTISSEMENT
Pour réduire le risque de feu, de choc électrique ou de blessure:
• Ne pas laisser le nettoyeur à vapeur seul quand il est branché. Débrancher le nettoyeur à vapeur lorsque vous ne
l’utilisez pas ou avant l’entretien.
• Ne pas permettre que le nettoyeur à vapeur soit utilisé comme un jouet. Une attention particulière est nécessaire lorsqu’il
est utilisé par ou près d’un enfant, animales ou plantes.
• Suivre strictement les recommandations d’utilisation de ce manuel. Utiliser uniquement les accessoires recommandés
par le fabricant.
• Ne jamais utiliser le nettoyeur à vapeur si le cordon ou la fiche sont endommagés. Si le nettoyeur à vapeur ne fonctionne
pas comme il le devrait, s’il a été échappé, s’il est endommagé, s’il a été laissé à l’extérieur ou échappé dans de l’eau, le
retourner à un centre de service avant de l’utiliser.
• Ne pas tirer ou transporter le nettoyeur à vapeur par le cordon. Ne pas utiliser le cordon en guise de poignée. Ne pas
fermer une porte sur le cordon ou tirer le cordon sur des bordures ou des coins pointus. Tenir le cordon à distance des
surfaces chauffantes.
• Ne pas utiliser des cordons de rallonge ou des prises qui n’ont pas une capacité suffisante pour transporter le courant.
• Ne pas débrancher le nettoyeur à vapeur en tirant sur le cordon. Pour débrancher saisir la fiche et non pas le cordon.
• Ne pas manipuler la fiche ou le nettoyeur à vapeur avec les mains mouillées ou faire fonctionner pieds nus.
• Ne rien insérer dans les ouvertures. Ne pas utiliser si des ouvertures sont bloquées.
• Entreposer votre nettoyeur à vapeur à l’intérieur, dans un endroit propre et sec.
• Maintenir un bon éclairage à l’endroit où vous travaillez.
• Ne jamais retourner l’appareil, ou le mettre sur son côté lors de l’emploi de la vapeur . Ne jamais diriger la vapeur
vers une personne, un animal ou une plante et tous les appareils comportant des pièces électriques.
• Ne pas immerger le nettoyeur à vapeur dans de l’eau, ou d’autres liquides. Toujours débrancher le cordon électrique de la
prise lors de remplissage du nettoyeur.
• Ne jamais mettre des produits détartrants, aromatiques, alcooliques ou détergents dans le nettoyeur à vapeur.
Ceux-ci peuvent l’abîmer ou le rendre dangereux à utiliser.
• Avant de remplir, faites le suivant : 1) débranchez le cordon électrique, 2) réduisez la tension en appuyant sur le
bouton qui règle l’arrivée de la vapeur, 3) attendez 3 minutes pour que l’appareil se refroidisse, 4) appuyez de nouveau
sur le bouton qui règle l’arrivée de la vapeur afin d’être sûr que toute tension accumulée se dissipe, 5) dévissez lentement
le casque de protection (voir l’article 2 à la page 6) et attendez 5 secondes avant de l’enlever.
• La pointe en métal de la lance chauffe pendant l’emploi. Ne touchez pas les surfaces chaudes.
• Permettez aux accessoires de se refroidir avant de les remettre pendant l’emploi de l’appareil.
• Cet appareil est conçu uniquement pour l’usage ménager. Tout travail d’entretien, y compris le remplacement du cordon
électrique doit être fait par un technicien Eureka autorisé parce qu’un outil spécial est nécessaire.
CONSERVEZ CES INSTRUCTIONS
3
Page 4
GROUNDING INSTRUCTIONS
This appliance must be grounded. If it should malfunction or breakdown, grounding provides a path of least resistance for
electric current to reduce the risk of electric shock. This appliance is equipped with a cord having an equipment-grounding
conductor and grounding plug. The plug must be inserted into an appropriate outlet that is properly installed and grounded
in accordance with all local codes and ordinances.
Instructions Visant la Mise à la Terre
Cet appareil doit être mise à la terre. En cas défaillance ou de panne éventuelles, la mise à la terre fournit au courant un
chemin de moindre résistance qui réduit le risque de choc électrique. Cet appareil est pourvu d’un cordon muni d’un
conducteur de terre et d’une fiche avec broche de terre. La fiche doit être branchée dans une prise appropriée correctement
installée et mise à la terre conformément aux règlements et ordonnances municipaux.
DANGER
Improper connection of the equipment-grounding conductor can result in a risk of electric shock. Check with a qualified
electrician or service person if you are in doubt as to whether the outlet is properly grounded. Do not modify the plug
provided with the appliance - if it will not fit the outlet, have a proper outlet installed by a qualified electrician.
AVERTISSEMENT
Un conducteur de terre mal raccordé peut entraîner un risque de choc électrique. Consulter un électricien ou un technicien
d’entretien qualifié si vous n’êtes pas certain que la prise est correctement mise à la terre. Ne pas modifier la fiche fournie
avec l’appareil-si elle ne peut être insérée dans la prise, faire installer une prise adéquate par un électricien qualifié.
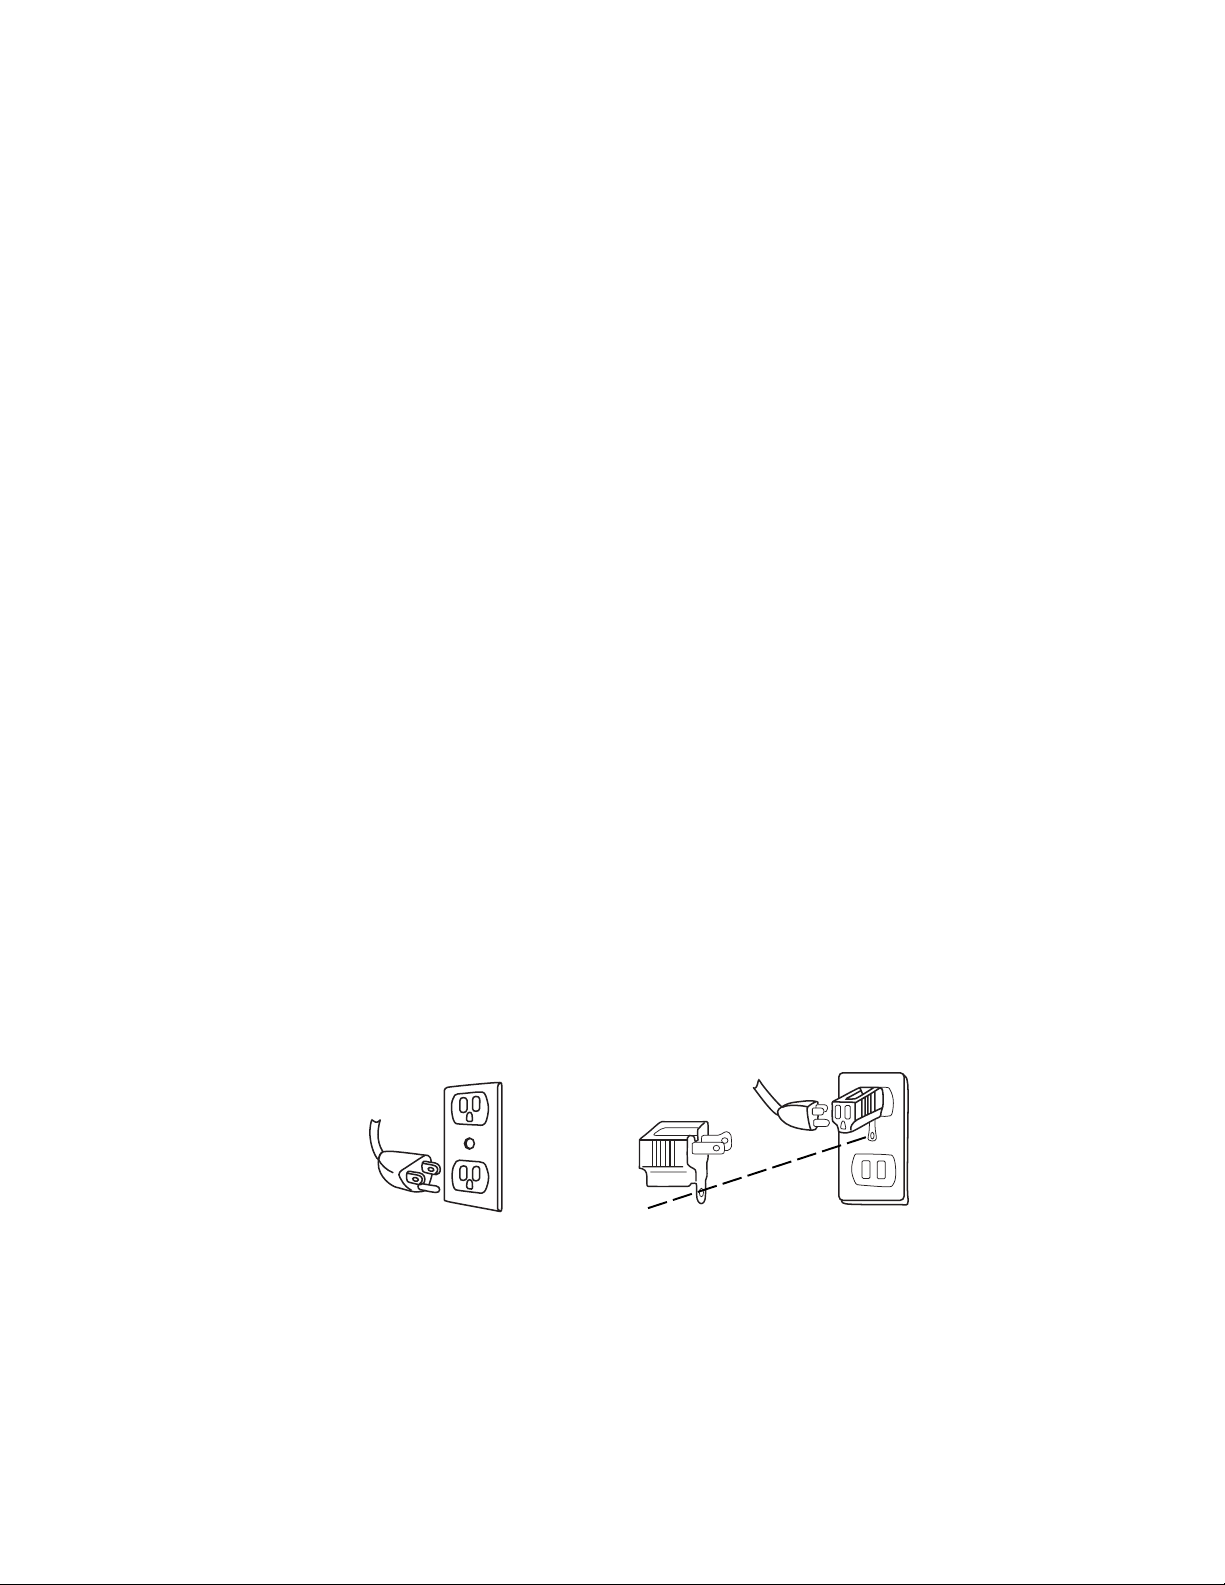
This appliance is for use on a nominal 120 volt circuit and has a grounding plug that looks like the plug illustrated in Figure A.
A temporary adapter which looks like the adapter illustrated in Figure B may be used to connect this plug to a two-pole
receptacle, as shown, if a properly grounded outlet is not available. The temporary adapter should be used only until a
properly grounded outlet, Figure A, can be installed by a qualified electrician. The green colored rigid ear, lug, or the like
extending from the adapter must be connected to a permanent ground such as a properly grounded outlet box cover.
Whenever the adapter is used, it must be held in place by a metal screw.
NOTE: In Canada, the use of a temporary adapter is not permitted by the Canadian Electrical Code.
Cet appareil est destiné à un circuit de 120 V et est muni d’une fiche de mise à la terre semblable à celle illustrée par le
Figure A. S’assurer que l’appareil est branché à une prise de courant ayant la même configuration que la fiche. Aucun
adaptateur ne devrait être utilisé avec cet appareil.
Note:Au Canada, l’utilisation d’un adaptateur temporaire n’est pas autorisée par le Code canadien de l’électricité.
GROUNDING BLADE
IS LONGEST OF THE
THREE BLADES
GROUNDED
OUTLET BOX
..
..
.
FIGURE A
METAL
SCREW
ADAPTER
GROUNDING
..
..
.
TAB
GROUNDED
OUTLET BOX
FIGURE B
4
Page 5

GENERAL INFORMATION
The steam cleaner is designed as a complete change from old methods of traditional cleaning. This appliance is designed
as a multi-purpose cleaner with a variety of applications.
Service Information
The instructions in this booklet serve as a guide to routine maintenance. For additional service information telephone our toll
free number for the nearest Eureka Authorized Warranty Station. You should know the model and type numbers when
you call:
USA: 1-800-282-2886
Mexico: 5670-6169
Canada: 1-800-282-2886
If you prefer, you can write to The Eureka Company, Service Division, 807 North Main Street, Bloomington, Illinois 61701,
USA. In Canada write to The Eureka Company , 866 Langs Drive, Cambridge, Ontario N3H 2N7. Refer to The Eureka Warranty
for complete service information.
Rating Plate
The model and type are indicated on the rating plate located on the bottom of the
cleaner. For prompt and complete service information, always refer to these numbers
when inquiring about service.
Model & Type ______________________
MODEL TYPE
WATTS HERTZ
SERVICE INFORMATION: 1-800-282-2886
THE EUREKA COMPANY
BLOOMINGTON, ILLINOIS 61701
Main Features of the Multi-Steamer steam cleaner
Thank you for having chosen our product and allow us to congratulate you for having purchased the Eureka Multi-Steamer
steamer.
The Eureka Multi-Steamer steam cleaner achieves a high degree of hygienic and degreasing power on many surfaces. It
turns water into steam in just a few minutes, so when contact is made with surfaces dirt and grime is removed.
Since the Eureka Multi-Steamer steam cleaner uses the active power of steam without the use of detergents or soap, it is
safe for the environment.
Some surfaces that can be cleaned with the Multi-Steamer steam cleaner are: sealed hard floor surfaces, upholstery , sealed
grout, bathroom and kitchen tile, stove tops, removable exhaust filter over stoves, windows and mirrors.
The fabric tool may be used to steam wrinkles out of clothing, window coverings, etc. CAUTION: Do not direct steam at the
body .
Other Advantages of the Eureka Multi-Steamer steam cleaner
The Eureka Multi-Steamer steam cleaner can kill dust mites and some types of bacteria, such as salmonella and E-coli when
used properly.
T o disinfect a specific area, position the steam cleaner over the area, not more than 1 inch away and slowly move across the
surface. This allows the surface under the steam cleaner to reach approximately 1707F. Use this procedure to disinfect
surfaces in: the bathroom, food preparation areas, pillows and bedding, pet sleeping quarters, etc.
5
Page 6

Description of the Multi-Steamer Steam Cleaner
1. Handle
2. Safety filler cap
3. Steam ready amber indicator light
4. Power on green indicator light
5. On (I) Off (O) Switch
6. Cleaner body
7. Floor cloth
8. Floor brush
9. Accessory connector for use with wand
10. Extension wands
11. Round brush (1 brass, 1 plastic)
12. Angle nozzle
15
14
13. Cloth for fabric brush
14. Window squeegee
15. Fabric brush
16. Straight nozzle
17. Nozzle connection
18. Steam lock slider button
19. Steam delivery trigger
20. Spray nozzle
21. Hose
22. Measuring cup and liquid dispensor
23. Funnel
19
18
20
16
17
21
12
13
9
8
11
10
2
3
1
4
5
6
7
22
6
23
Page 7

INSTRUCTIONS FOR USE
The Eureka Multi-Steamer steam cleaner is designed to thoroughly clean hard surfaces and upholstery that will withstand
high heat. Do not use on soft plastics, unsealed wood, and cold glass.
WARNING:On surfaces that have been treated with wax or some no wax floors, the sheen may be removed by the
heat and steam action. Do not use on unsealed wood. This could cause the woodgrain to rise.
It is therefore recommended that a sample cleansing be carried out on an isolated area of the surface to
be cleaned. Also, check use and care instructions from the manufacturer on the object you want to
clean.
HOW TO ASSEMBLE AND USE
Do not plug unit into an electrical outlet until Step 10.
WARNING: After every use, turn unit off, unplug unit and press steam delivery button until all pressure has been
released before removing safety cap.
1. Unscrew the safety cap. (After first use, turn the appliance over in order to completely empty the
boiler.)
2. Fill the measuring cup with water to the marked water line, once. Use the funnel to pour the
water into the boiler. The boiler takes one measuring cup of water at a time. Do not overfill.
NOTE: Never put descaling, aromatic, alcoholic or detergent products into the appliance, as
this may damage it or make it unsafe for use.
3.Screw the cap back onto the appliance.
Attachments
4. Insert the straight nozzle and push it onto the fixed section of the spray nozzle. Align
the straight nozzle groove with the line on the spray nozzle, then rotate the straight
nozzle 90° (clockwise) in the direction of the arrow until it locks into place.
Straight Nozzle
5.The round brush and curved nozzle can be fitted to the straight nozzle or the spray
nozzle connection.
Curved Nozzle Round Brush (1 brass, 1 plastic)
7
Page 8

HOW TO ASSEMBLE AND USE (continued)
Attachments
6.Fabric brush and window squeegee. The fabric brush can be attached to spray nozzle. The brush can be fitted with the
window squeegee. Insert window squeegee side hooks into brush tabs and join the two parts together. The brush can
also be fitted with a cloth for cleaning fabrics, sofas and mattresses. Be sure to drain all water from the hose before
steaming fabrics, sofas, etc. It is suggested that the cloth be used for fabrics, sofas, etc...
Squeegee
Side Hooks
CAUTION: Do not use the window cleaning tool on cold glass. It may break the glass.
7.Extension Wands. To extend the reach of the appliance, the spray nozzle can be fitted with wand/wands and accessory
connector. Different accessories can then be attached depending on the job to be done.
Accessory Connector
8.Floor Brush. This accessory is used with wands, and is provided with a floor cloth. To attach the cloth, rest the brush on
the center of cloth and then pull the cloth edges one by one under retaining springs as shown below.
The slide indicator may be used to retract the center of the floor brush to expose the bristles. In this position the floor
brush may be used to clean abrasive surfaces, such as garage floors, basement floors and sidewalks.
Retaining Springs
Brush T abs
Extension
Wands
Nozzle
Connection
Spray
Nozzle
Slide Indicator
8
Page 9

FILLING THE BOILER TANK BEFORE USE
NOTE: Before unscrewing the safety cap, always be sure that the cleaner is off and unplugged from the electrical
outlet.
9. Unscrew safety cap and using funnel, pour into the tank one
measuring cup (included) filled with water to the maximum level.
Screw safety cap back on.
(Always empty the Multi-Steamer after use to avoid
overfilling.)
TURNING ON THE APPLIANCE
10.Plug the appliance into an electrical outlet.
Press on/off switch. The green (power) indicator light and the amber (steam ready) indicator light will both come on. As
soon as the amber (steam ready) indicator light goes out, the appliance is ready for use. Press steam delivery button to
supply steam. To prevent steam from being accidentally supplied, shift back safety slider to the vv position.
Green (power)
Indicator Light
Amber (steam
ready) Indicator
Light
On/off Switch
CAUTION: When using the steam cleaner for the first time, keep the gun higher than cleaner
body. This prevents water forming in the hose. When first using the cleaner and
every time it is left unused for a few minutes, press steam delivery button and
discharge any water that has formed in the hose into a container. Then, as soon as
the cleaner begins supplying steam only , direct the steam jet towards the floor and
press steam delivery button at least two or three times.
Steam Delivery Button
Safety Slider
FILLING THE BOILER TANK DURING USE
11. When the water runs out, steam is no longer supplied when steam delivery button is pressed. T o fill up boiler tank. Follow
these steps:
a. Turn off the cleaner by pressing on/off button.
b. Unplug the cleaner from electrical outlet.
c. Press steam delivery button until all pressure has been released.
d. Wait for about 3 minutes before carefully unscrewing the safety cap.
e. Turn slowly a half turn and wait for the hissing noise created by residual steam to stop.
f. Unscrew the safety cap completely and allow to cool. CAUTION: Cap may be hot.
g. Slowly pour one measuring cup (included) into the boiler using the funnel (included). Do not overfill.
h. Screw the safety cap back on the appliance.
i. Plug the appliance into electrical outlet and press on/off button. Steam will start to be produced as before.
WARNING: This unit is under pressure. After every use, press steam delivery button until all pressure has been
released before removing safety cap.
9
Page 10

CLEANING AND MAINTENANCE OF THE MULTI-STEAMER
NOTE: The appliance must be unplugged from the electrical outlet and allowed to cool down before all cleaning and
maintenance tasks.
12. Let the appliance cool down completely before cleaning it or putting it away.
13. After each use empty any remaining water from the boiler.
14. Store in a dry, cool place.
15. In order to guarantee perfect functioning over a long period of time, the boiler needs to be rinsed out with water once a
month to eliminate any accumulated calcium deposits. Do not use vinegar or other descaling substances. Put in one
measure of water, replace the safety cap and shake to loosen any accumulated deposits. Remove safety cap and
immediately empty water into a sink. CAUTION: Do not immerse the appliance in water.
TO STORE APPLIANCE
Wind hose around the cleaner body and press it gently in the two side wings. Place the spray nozzle on the specially
designed handle.
10
Page 11

PROBLEM SOL VING
NOTE: Unplug the electrical cord before servicing.
PROBLEM CAUSE SOLUTION
Appliance won’t start Electric plug Push plug securely into outlet. Verify power
Appliance spits water Too much water in tank. Do not Check the water level in the tank.
out of nozzle. overfill.
Water boils out of fill spout Water tank too hot. Allow more time for cooling.
when adding water.
3
on light is on.
Try another outlet.
Check circuit breaker.
3
No water in tank. Check the tank for water.
3
3
Water condensed in wand and the Press steam delivery button and discharge
hose. any water that has formed in wand and hose
into a container. As soon as the appliance is
supplying steam only, direct steam jet
towards the floor and press steam delivery
button at least two or three times.
3
Not fully preheated. Allow more time for water to heat up.
3
Add water slowly.
Use special funnel provided.
Accessories will not stay Not properly installed. Check for proper assembly.
on.
General questions. Assembly or related accessories. Call 1-800-438-7352 between 8:00 AM -
3
Review this guide for assembly instructions.
3
4:45 PM, Monday through Friday, central
standard time. Know the Model and Type
numbers when you call.
11
Page 12

Page 13

The Eureka Company
P.O. Box 2799
VACUUM CLEANERS
Name
S
O
Address (street address needed for UPS)
L
D
City State Zip
T
Telephone (Day) (Eve) (Fax)
O
Bloomington, IL 61702-2799
IMPORTANT:
Be sure to include
your model, type,
and serial numbers.
These numbers
may be found on
the rating plate.
Genuine Eureka Parts
Brush - Nylon Bristle
Model Number:
ORDER FORM
(Not applicable in Canada)
Name
S
H
Address (street address needed for UPS)
I
P
City State Zip
T
Telephone (Day) (Eve) (Fax)
O
Part No. Qty. Price (USD) Total
61313
3.09
6/01
Type:
Serial Number:
To Order
By Phone
1-800-
438-7352*
HOURS:
Call between 8 a.m.
and 4:45 p.m.,
central standard time
Monday through Friday.
By FAX
#
1-309-
823-5789
T o Answer Problems
or Questions for U.S.A.
and Canada call:
1-800-
282-2886*
7 a.m. to 8 p.m.
central standard time
Monday through Saturday
*En Mexico llame al
5670-6169
By Mail
Brush - Brass Bristle
Angular Nozzle
Cleaning Cloth
Upholstery Nozzle
Window Cleaner
Hose/Nozzle Assembly
Nozzle
Upper Wand
Lower Wand
Wand Adapter
Funnel
61323
61015
61016
61017
61018
61311
61020
61314
61342
61327
60741
5.99
2.09
2.59
8.19
5.69
87.99
5.69
19.99
16.39
8.19
1.09
Simply fill out
this Order Form.
Please be sure to
include day
and evening
phone numbers
www.eureka.com
Measuring Cup
Floor Cloth - package of 2
Floor Tool
Method of payment (no C.O.D. orders)
Check or money order (payable to The Eureka Company). Do not send currency.
Charge to my Visa (13/15 digits) MasterCard (13 digits) Amer. Express (15 digits)
Acct. number
Signature (full name as shown on acct.)
© 2001 White Consolidated Industries, Inc.
70889
Expiration Date
Printed in Italy
61315
61345
61317
Total (prices subject to change without notice)
Tax (add state tax & local taxes as required by law)
Postage & Handling Charge (within U.S.A.)
2.99
19.99
26.99
TOT AL
TOTAL ENCLOSED
5.50
Page 14

Page 15

THE EUREKA LIMITED WARRANTY
hat This Warranty Covers
W
Your Eureka cleaner is warranted to be free from all defects in material and workmanship in normal household use for a period of one year. The warranty is granted only to the
original purchaser and members of his or her immediate household. The warranty is subject to the following provisions.
hat This Warranty Does Not Cover
W
• Parts of the cleaner that require replacement under normal use, such as disposable dust bags, filters, drive belts, light bulbs, and brush roll bristles.
• Damages or malfunctions caused by negligence, abuse, or use not in accordance with the Owner’s Guide.
• Defects or damages caused by unauthorized service or the use of other than Genuine Eureka parts.
hat The Eureka Company Will Do
W
The Eureka Company will, at its option, repair or replace a defective cleaner or cleaner part that is covered by this warranty. As a matter of warranty policy , the Eureka Company
will not refund the consumer’s purchase price.
arranty Registration
W
Please fill out and return the warranty registration card accompanying your cleaner.
btaining Warranty Service
O
To obtain warranty service you must return the defective cleaner or cleaner part along with proof of purchase to any Eureka Authorized W arranty Station.
You will find the nearest location in the Yellow Pages, under “Vacuum Cleaners–Service and Repair.” Be certain that the Warranty Station is “Eureka Authorized.”
For the location of the nearest Eureka Authorized Warranty Station or for service information, telephone toll free:
USA: 1-800-282-2886
Mexico: 5670-6169
Canada: 1-800-282-2886
If you prefer, you can write to The Eureka Company, Service Division, 807 North Main Street, Bloomington, Illinois 61701, USA. In Canada write to The Eureka Company,
866 Langs Drive, Cambridge, Ontario N3H 2N7.
If it is necessary to ship the cleaner outside your community to obtain warranty repair, you must pay the shipping charges to the Eureka Authorized W arranty Station.
Return shipping charges will be paid by the W arranty Station. When returning parts for repair , please include the model, type, and serial number from the data plate on the cleaner.
urther Limitations and Exclusions
F
Any warranty that may be implied in connection with your purchase or use of the cleaner, including any warranty of Merchantability or any warranty for Fitness For A Particular
Purpose is limited to the duration of this warranty. Some states do not allow limitations on how long an implied warranty lasts, so the above limitations may not apply to you.
Y our relief for the breach of this warranty is limited to the relief expressly provided above. In no event shall Eureka be liable for any consequential or incidental damages you
may incur in connection with your purchase or use of the cleaner. Some states do not allow the exclusion or limitation of incidental or consequential damages, so the above
limitation or exclusion may not apply to you.
This warranty gives you specific legal rights. You may also have other rights which vary by state.
GENUINE
EUREKA PRODUCT
uestions & Answers about Genuine Eureka Products
Q
Q: Why should I use only Genuine Eureka paper bags, belts, and parts in my Eureka vacuum cleaner?
A:
Using Genuine Eureka Products, which are made to our exacting specifications and engineered with emphasis on quality, performance, and customer satisfaction,
ensures the long life and cleaning efficiency of your vacuum cleaner. Overall, this saves you money and helps to keep your home clean.
Q: How can I be sure I am using only genuine Eureka products in my vacuum cleaner?
Typically, packaged products and paper bags can be identified by a “Genuine Eureka Product” symbol (see illustration above). For further identification assistance,
A:
you may call our toll-free number, 1-800-282-2886, for the location of a nearby Eureka Authorized Warranty Station.
Q: Are there any differences between “made to fit” or “imitation” and Genuine Eureka paper bags, belts, and parts?
Yes, there are some very important differences in materials, quality, and reliability. Many customers have mistakenly purchased “imitation” paper bags and parts
A:
while thinking they purchased genuine. Unfortunately, many of these customers discovered the differences after they experienced related difficulties.
For Genuine Eureka Value, Accept No Imitations!
THE EUREKA COMPANY
Bloomington, Illinois 61701
Household Warranty
abs 190
15
Page 16

Part No. 70888
(1/01) Printed in Italy
©2000 White Consolidated Industries, Inc.
 Loading...