

Page 1
EuCon Application Setup Guide
Document Revision: K
AUDIO | VIDEO MEDIA CONTROLLERS
Page 2

AUDIO | VIDEO MEDIA CONTROLLERS
MC Control, MC Mix, MC Transport, Studio Monitor Express, Studio Monitor Pro, EuControl,
EuCon and EuCon Powered are trademarks of Euphonix Inc. All other product names are
trademarks of their respective manufacturers.
EuCon APPLICATION SETUP GUIDE
ii
Page 3

AUDIO | VIDEO MEDIA CONTROLLERS
Table of Contents
Section 1: Introduction......................................................................................... 5
Section 2: Logic Pro..............................................................................................6
2.1 Tips and Shortcuts .......................................................................7
2.1.1 Instantiate and Control Any Plugin ................................... 7
2.1.2 Flip to Faders (MC Mix) .................................................... 7
2.1.3 Instrument Control........................................................... 8
2.1.4 Create and use Markers (MC Control) ............................... 8
2.1.5 Create and Control Surround Panner ................................ 9
Section 3: Final Cut Pro...................................................................................... 10
3.1 Final Cut Pro Tips and Shortcuts ................................................. 11
Section 4: Soundtrack Pro .................................................................................13
Section 5: Nuendo .............................................................................................. 14
EuCon APPLICATION SETUP GUIDETABLE OF CONTENTS
5.1 EuCon Device Setup ...................................................................15
5.1.1 EuConized channel types ...............................................17
5.1.2 Global Settings.............................................................. 17
5.2 Tips and Shortcuts ..................................................................... 18
5.2.1 Instantiate and Control Any Plugin ................................. 18
5.2.2 Toggle Steinberg Plugin Presets..................................... 19
5.2.3 Flip to faders (MC Mix)................................................... 19
5.2.4 Wheel Edit Modes (MC Control)...................................... 20
5.2.5 Create and Control Surround Panner .............................. 20
5.3 New Features in Nuendo 5.......................................................... 21
5.3.1 PAN ...............................................................................21
5.3.2 Quick Controls............................................................... 21
5.3.3 VSTi Controls................................................................. 21
5.3.4 MIX and GROUP Knobsets .............................................. 22
iii
Page 4

AUDIO | VIDEO MEDIA CONTROLLERS
Section 6: Cubase ...............................................................................................23
6.1 EuCon Device Setup ...................................................................24
6.1.1 EuConized channel types ...............................................25
6.1.2 Global Settings.............................................................. 25
6.2 Tips and Shortcuts ..................................................................... 26
6.2.1 Instantiate and Control Any Plugin ................................. 26
6.2.2 Toggle Steinberg Plugin Presets..................................... 27
6.2.3 Flip to faders (MC Mix)................................................... 27
6.2.4 Wheel Edit Modes (MC Control)...................................... 28
6.2.5 Create and Control Surround Panner .............................. 28
Section 7: Digital Performer.............................................................................. 29
7.1 Tips and Shortcuts ..................................................................... 30
EuCon APPLICATION SETUP GUIDE
7.1.1 Instantiate and Control Any Plugin ................................. 30
7.1.2 Flip to faders (MC Mix)................................................... 31
7.1.3 Create and use Markers (MC Control) .............................31
iv
7.1.4 EQ Knobset.................................................................... 32
7.1.5 Assign Inputs................................................................. 32
Section 8: Mackie Control.................................................................................. 33
8.1 Setting Up EuCon for Mackie Control .......................................... 33
8.2 Ableton Live ............................................................................... 36
8.3 Reason....................................................................................... 38
Section 9: Pro Tools (HUI) ................................................................................. 40
9.1 Setting up EuCon to Control Pro Tools ........................................40
9.2 Setting up Pro Tools to Control the Artist Media Controllers........ 42
9.3 Tips and Shortcuts .....................................................................44
9.3.1 Instantiate and control any plugin.................................. 44
9.3.2 Wheel Edit Modes (MC Control)...................................... 45
9.3.3 Create and Use Wheel Nudge ......................................... 45
9.3.4 EQ Knobset.................................................................... 46
9.3.5 DYN Knobset ................................................................. 46
Page 5

AUDIO | VIDEO MEDIA CONTROLLERS
Section 1: Introduction
The EuCon Application Setup Guide helps you setup EuControl to work with your
specific application. EuControl must be installed before proceeding to your application’s section in this Guide. See the Installation section in the Quickstart or
User Guides to install EuControl if you have not already done so.
The Shift key is used in conjunction with other keys to access secondary functions
labeled in blue above the primary function. Two Shift keys are located at the MC
Mix’s bottom-left and -right.
The following simplified terminology is used describe Shift functions:
“Press and hold the Shift key then press the AUX key”
is written as
“press the GROUP key”
The Shift key can be locked on like caps lock on a computer keyboard by pressing
both Shift keys simultaneously. This is useful if you plan to access several Shift
functions consecutively. Press either Shift key to unlock.
EuCon APPLICATION SETUP GUIDE
5
INTRODUCTION
Page 6
AUDIO | VIDEO MEDIA CONTROLLERS
Section 2: Logic Pro
Logic Pro works with your Artist media controller with very little additional setup.
Make sure the EuControl software is running. Launch Logic Pro and click in a
Logic window so it is the front-most application. Your surface now controls Logic
Pro.
To make sure your Artist media controller works correctly with Logic Pro:
1. In Logic Pro, choose Logic Pro -> Preferences -> Control Surfaces -> Setup...
The Logic Control Surface Setup window appears.
EuCon APPLICATION SETUP GUIDE
6
LOGIC PRO
Figure 2-1 Logic Control Surface Setup window
2. In Control Surface Group 1 on the left side of the window, locate Channel
Strip View Mode (fourth parameter from top).
3. Set this parameter to Arrange, not one of the other settings.
Use Software Update so your Mac stays updated the latest version of Logic Pro.
Page 7

AUDIO | VIDEO MEDIA CONTROLLERS
2.1 Tips and Shortcuts
2.1.1 Instantiate and Control Any Plugin
Placing plugins on a track and controlling them from the Artist media controllers
can speed up your workflow. Using knobs instead of a mouse to control a plugin
not only provides more intuitive, higher resolution control, but also enables simultaneous control of multiple parameters. You can dial in settings or automate
plugin control without mousing around or drawing lines in the arrange window.
1. Select a track on the Artist media controller.
2. Press the INSERTS key (MC Mix) or the INSERTS Knob Top (MC Control).
3. Press both PAGE keys simultaneously to enter Config mode.
4. Push the Knob Top beside the Insert you wish to assign the plugin to.
5. Push the type for the type of plugin you wish to instantiate.
6. Press the Knob Top to select the actual plugin.
7. Press the Knob Top to select the channel format.
8. Press both PAGE keys simultaneously to exit Config mode.
9. Push the Knob Top to open the plugin.
10. Control plugin parameters; press the PAGE keys to access more.
11. Press the BACK key to close plugin.
Instantiate and control works for sends, input, output, and groups.
2.1.2 Flip to Faders (MC Mix)
Flipping the plugin’s parameters from knobs to faders allows changing eight parameters simultaneously. Flipping bus sends to faders makes it easier to send
multiple signals to an effect and better controls effects textures in your mix.
1. Select the track on the Artist media controller.
EuCon APPLICATION SETUP GUIDE
7
2. Press the INSERTS key (MC Mix) or Knob Top (MC Control).
3. Push the desired plugin’s Knob Top.
LOGIC PRO
Page 8

AUDIO | VIDEO MEDIA CONTROLLERS
4. Press the FLIP key to flip to faders.
You can now control that plugin on the faders.
5. Press the FLIP key to flip back to knobs.
6. Press the BACK key to close plugin.
Flip also works for AUX, PAN, EQ, and other knobsets.
2.1.3 Instrument Control
Controlling instruments on the knobs or faders allows fast, high resolution, and
intuitive automation of single or multiple synth/sampler parameters in Logic.
1. Select Instrument track.
2. Press the INPUTS key (MC Mix) or the INPUTS Knob Top (MC Control).
EuCon APPLICATION SETUP GUIDE
8
2.1.4 Create and use Markers (MC Control)
3. Press the labeled Knob Top to open an instrument.
4. Control parameters using the knobs and press the PAGE keys to access
more parameters.
Using markers in your project makes navigating your project much faster.
1. Touch Softkeys on the Touchscreen to enter Softkeys view.
2. Touch Marker on the Touchscreen to display the Marker page.
3. Use the transport controls or Jog wheel to navigate the timeline.
4. Touch Create Marker.
Repeat steps 1–4 for additional markers. Marker Softkeys change color as
they become active. Use the Marker keys to navigate the project.
LOGIC PRO
Page 9

AUDIO | VIDEO MEDIA CONTROLLERS
2.1.5 Create and Control Surround Panner
Use knobs and faders without looking at the screen to control the balance of
your surround mix and be more a part of your sonic environment.
1. Select a track.
2. Press the MIX key (MC Mix), or the OUTPUT Knob Top (MC Control) to enter
the Mix knobset.
3. Press the SURROUND Knob Top to create a Surround panner.
4. Press the BACK key to exit.
5. Press the PAN knobset selector (MC Mix) or the PAN Knob Top (MC Control).
You can now control the Surround panner on the knobs.
6. Press the BACK key to exit.
EuCon APPLICATION SETUP GUIDE
9
LOGIC PRO
Page 10
AUDIO | VIDEO MEDIA CONTROLLERS
Section 3: Final Cut Pro
Configuring Final Cut Pro to operate with the Artist media controllers is simple.
1. In Final Cut Pro, choose Tools->Control Surfaces.
The Control Surface Configuration dialog opens.
EuCon APPLICATION SETUP GUIDE
10
2. Select Euphonix from the Use drop-down menu.
3. Press OK.
Your Artist media controller should now be controlling your application. If not,
make sure Final Cut Pro is the front-most application (i.e., the one receiving key-
strokes and mouse clicks). The Artist media controllers control only the frontmost application.
FINAL CUT PRO
Figure 3-1 Control Surface Configuration dialog
You will see the Euphonix logo with the message in Figure 3-1.
The Artist media controllers connect and update automatically. When you
open your audio mixer your Euphonix media controller(s) will control Final
Cut Pro.
Page 11

AUDIO | VIDEO MEDIA CONTROLLERS
3.1 Final Cut Pro Tips and Shortcuts
Keyframe Audio (MC Control)
Using faders to keyframe automation in Final Cut Pro allows balancing the level
of multiple tracks simultaneously, smoothly and quickly ramp sounds up or
down, and adjust levels without using the pen tool.
1. Touch Softkeys on the Touchscreen to display the Softkeys view.
2. Touch Timeline on the Touchscreen to display the Timeline.
3. Touch Audio Mixer on the Touchscreen.
4. Touch Toggle Audio Automation on the Touchscreen.
5. Press the Play transport key.
6. Use the faders to mix audio.
7. Press the Stop transport key.
You have just keyframed multiple audio tracks simultaneously!
Adjust Clip I/O markers (MC Control)
This feature quickly moves through the clips in your bin and prepares them for
editing to the timeline without using key commands to navigate through the different areas of Final Cut Pro. Use preset macros to work faster than your hands
can handle the keyboard and mouse.
1. Touch Softkeys on the Touchscreen to display the Softkeys view.
2. Press Browser on the Touchscreen to display the Browser.
3. Touch the previous item/next item buttons in the Softkeys section to select
clips.
4. Press the Send to Viewer button in the Softkeys section.
MC Control updates its Viewer page.
EuCon APPLICATION SETUP GUIDE
11
5. Use the Jog Wheel to scroll through clips.
6. Press Mark In/Mark Out buttons.
7. Use Preview Previous/Preview Next to load previous and next clips in brows-
er into viewer.
FINAL CUT PRO
Page 12

AUDIO | VIDEO MEDIA CONTROLLERS
Edit From Browser (MC Control)
After adjusting your clip I/O markers, you can quickly edit them into the timeline
from Final Cut Pro’s browser.
1. Touch Softkeys on the Touchscreen to display the Softkeys view.
2. Press Browser on the Touchscreen to display the Browser.
3. Press previous item/next item buttons in the Softkeys section to select clips.
4. Touch the Write to Track buttons on the Touchscreen to select track patching.
5. Press Overwrite, Insert, etc. on the Touchscreen to perform edits to Time-
line.
Create Macro for Favorite Effect (MC Control)
Because the MC Control allows creating your own custom macros, and Final Cut
EuCon APPLICATION SETUP GUIDE
Pro allows creating Favorite Effects that are assigned key commands, you can
create a button that marks, selects, and adds a favorite.
1. Create an effect favorite in Final Cut Pro.
12
2. Open the Softkey Editor in EuControl.
3. Select a Softkey.
4. Create a Key command “x” to mark clip.
5. Create a second key command in the sequence for “option a” to select clip.
6. Create a third key with the key command assigned to your effect favorite.
7. Name and save your Softkey.
This Macro marks and selects a clip, and adds your favorite!
Use Favorite Effect Macro (MC Control)
1. Create a Macro to call your effect favorite.
2. Touch Timeline on the Touchscreen.
3. Press Prev/Next edit buttons in the Softkeys section or use the transport
control keys to move the playhead to a clip.
4. Press your Macro button to apply favorite effect.
FINAL CUT PRO
Page 13
AUDIO | VIDEO MEDIA CONTROLLERS
Section 4: Soundtrack Pro
Configuring Soundtrack Pro to operate with the Artist media controllers is simple.
1. In Soundtrack Pro, choose Soundtrack Pro->Preferences.
2. Click the Control Surfaces tab.
The Control Surfaces dialog opens.
EuCon APPLICATION SETUP GUIDE
13
3. Select Euphonix from the Use drop-down menu.
You will see a Euphonix logo with the message in Figure 4-1.
4. Close the Control Surfaces dialog.
The Artist media controllers connect and update automatically.
Your Artist media controller should now be controlling your application. If not,
make sure Soundtrack Pro is the front-most application (i.e., the one receiving
keystrokes and mouse clicks). The Artist media controllers control only the
front-most application.
Figure 4-1 Control Surfaces dialog
SOUNDTRACK PRO
Page 14

AUDIO | VIDEO MEDIA CONTROLLERS
Section 5: Nuendo
Nuendo 4 is a powerful DAW that can handle as many tracks and effects as your
workstation’s CPU can support. It offers multitrack recording, editing, and
monitoring. Steinberg’s EuCon adapter enables fully integrated control of all of
Nuendo’s functions from the Artist media controller.
NOTE: The adapter works with Nuendo version 4.1.2 and later.
To enable Nuendo to work with the Artist media controller, you must obtain an
activation code:
1. Create a user account in the MySteinberg area of Steinberg’s web site.
If you already have a MySteinberg account and have already registered your
EuCon APPLICATION SETUP GUIDE
version of Nuendo 4, continue with Step 4.
2. Check your email and activate your user account by clicking the link in the
confirmation email.
14
3. Log into your MySteinberg account, click on Product Registration, choose
Register Product and select Product with Steinberg Key or Soft-eLicenser.
4. Log into your MySteinberg account if you have not already. Click on Activation & Reactivation, choose Euphonix Artist Series EuCon Adapter and select
Permanent Activation. Enter your Artist media controller’s serial number.
You will receive an email containing the activation code.
5. Launch the License Control Center (LCC) Software from the Applications
folder, choose Wizards->License Download, enter your activation code and
follow the instructions.
For Nuendo to communicate with the Artist media controllers, Nuendo’s EuCon
device must be added in the Device Setup dialog:
1. Open Nuendo.
2. Choose Devices->Device Setup.
The Device Setup dialog opens.
NUENDO
Page 15

AUDIO | VIDEO MEDIA CONTROLLERS
3. Click the + button (add) on the top-left.
A drop-down list of devices appears with EuCon near the top of the list.
4. Select EuCon from the drop-down list.
The EuCon device is added, the control surface immediately updates, the
faders and knobs display track functions, and the EuCon Device Setup dialog
appears (Figure 5-1).
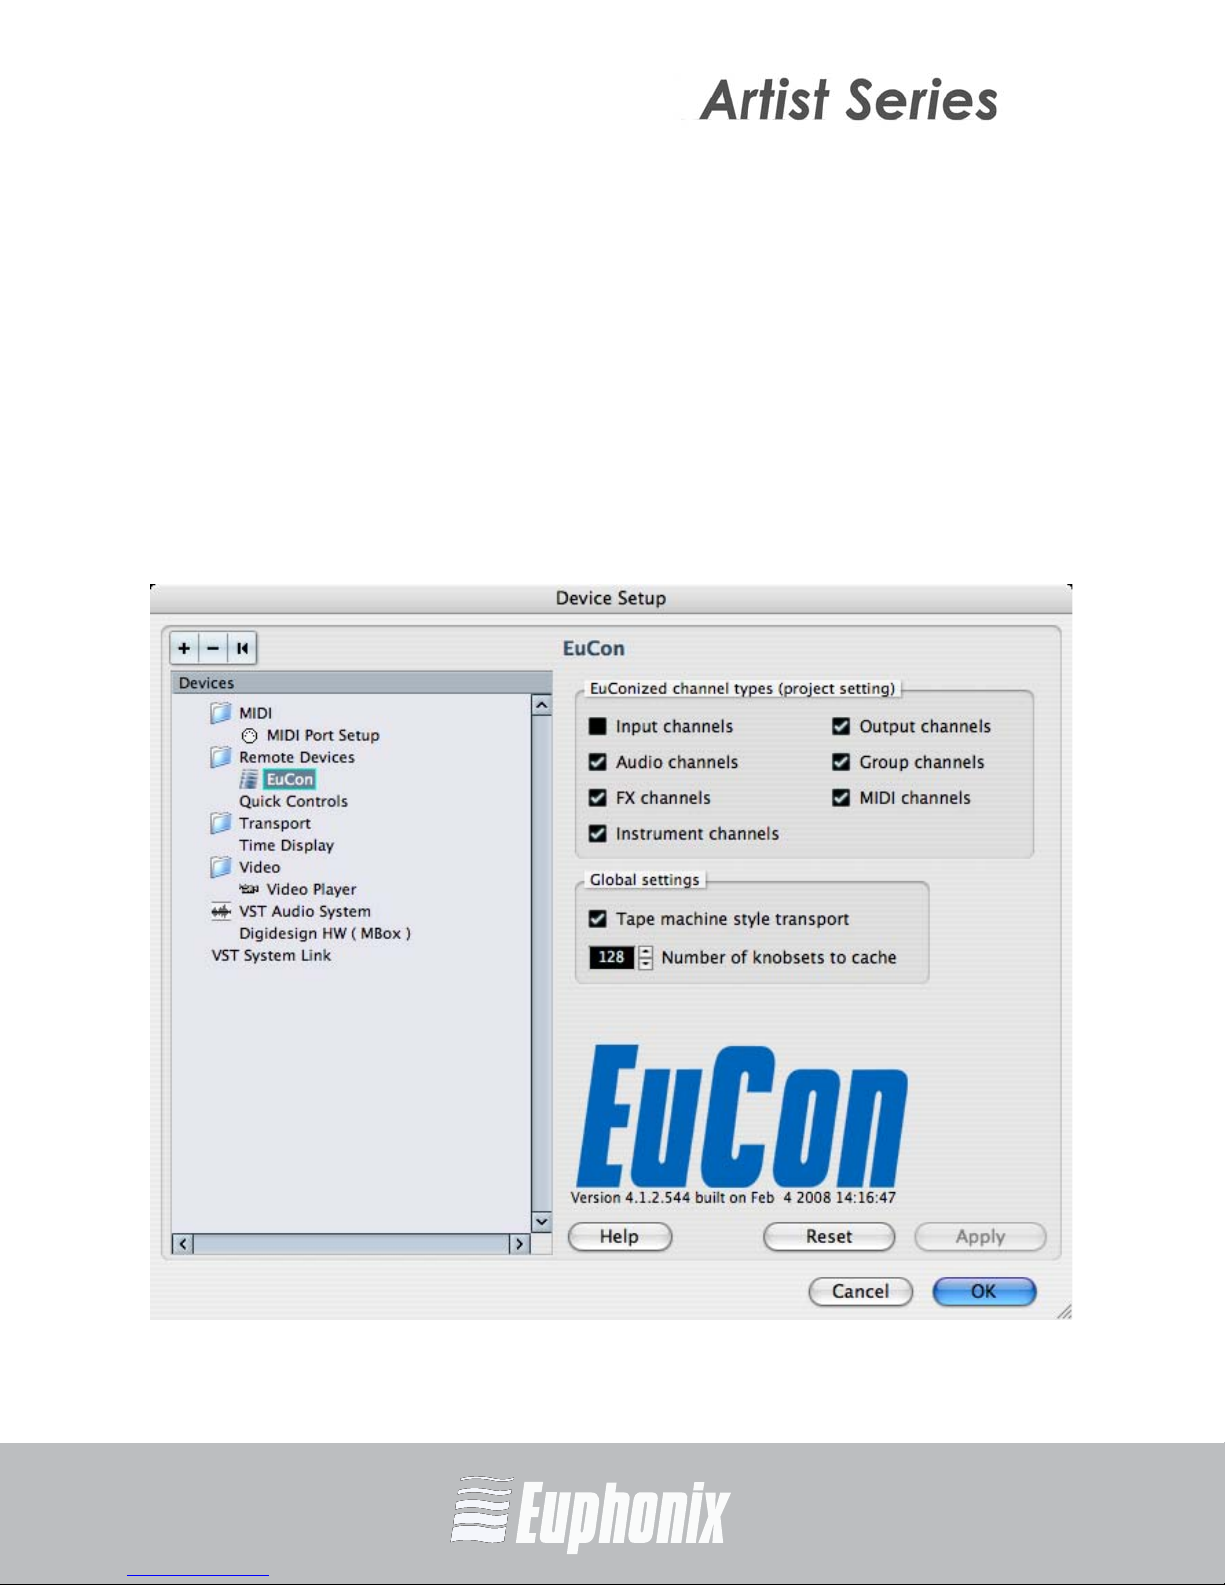
5.1 EuCon Device Setup
This section discusses the EuCon Device Setup dialog which allows editing track
assignment and transport control parameters. If the EuCon Device setup dialog
is not open: From Nuendo choose Devices->Device Setup, then select EuCon
from the Remote Devices folder in the Devices section.
EuCon APPLICATION SETUP GUIDE
15
NUENDO
Page 16

AUDIO | VIDEO MEDIA CONTROLLERS
EuCon APPLICATION SETUP GUIDE
16
Figure 5-1 EuCon Device Setup
NUENDO
Page 17

AUDIO | VIDEO MEDIA CONTROLLERS
5.1.1 EuConized channel types
The EuConized channel types section contains checkboxes that determine
which channel types appear on your control surface. If a certain channel is
available in Nuendo and the corresponding checkbox is selected, that channel
can be selected to appear on the surface. This channel is called EuConized.
All channels except Input channels are EuConized by default and can appear on
the surface. This is useful to eliminate tracks from the surface, reduce memory
usage, and reduce the time needed to build the EuCon mixer model when connecting, adding, or removing tracks from the Nuendo project.
To enable/disable EuConized tracks, select the checkbox next to each type.
Tracks without a checkmark do not appear on the surface. This setting applies
only to the open project.
5.1.2 Global Settings
The Global Settings section has two parameters: Tape machine style transport
and Number of knobsets to cache.
EuCon APPLICATION SETUP GUIDE
Tape machine style transport
Two Nuendo transport control modes are available for the control surface.
Toggle the modes from the Tape machine style transport option.
These transport modes affect the operation of the Stop, Fast Forward and Rewind
buttons in the following manner:
Tape machine style transport checked
Stop: The control surface STOP button halts the transport and keeps the play
head at the current position (even multiple presses), independent from Nuendo’s preferences.
Fast Forward/Rewind: The FF/RW buttons always latch independent of the
control surface latch time preference. Repeatedly pressing the same FF/RW
button has no effect. The current action can be stopped by pressing the opposite wind button, STOP, or PLAY. The FF/RW also stops if it reaches the beginning or end of the project.
17
NUENDO
Page 18

AUDIO | VIDEO MEDIA CONTROLLERS
Tape machine style transport not checked
Stop: The control surface STOP button copies the Nuendo stop button.
Fast Forward/Rewind: The FF/RW buttons function as EuCon Momentary/
Latch-Switches. If the button is pressed and released quickly, the switches
do NOT latch but behave momentarily, resembling the way these buttons
work in the Nuendo GUI. If the Artist media controller’s FF/RW buttons are
held down longer than the latch time set in the Preferences-Setup page, they
latch.
Number of knobsets to cache
Nuendo creates knobsets for EQ, Dynamic, Inserts, Aux sends and other functions.
A certain number of these knobsets are kept, or cached, in RAM. For large projects on a large control surface, increasing the number of knobsets in the cache can
access them faster but uses more RAM. It is rare to change this value.
EuCon APPLICATION SETUP GUIDE
5.2 Tips and Shortcuts
5.2.1 Instantiate and Control Any Plugin
18
NUENDO
Placing plugins on a track and controlling them from the Artist media controller
can speed up your workflow. Controlling a plugin with knobs instead of a mouse
not only provides more intuitive, higher resolution control, but can also control
multiple parameters simultaneously. You can dial in settings or automate plugin
control without mousing around or drawing lines in the arrange window.
1. Select a track on the Artist media controller.
2. Press the INSERTS key (MC Mix) or the INSERTS Knob Top (MC Control).
3. Press both PAGE keys simultaneously to enter Config mode.
4. Push the Knob Top beside the Insert you wish to assign the plugin to.
5. Push the type for the type of plugin you wish to instantiate.
6. Press the Knob Top to select the actual plugin.
7. Press the Knob Top to select the channel format.
8. Press both PAGE keys simultaneously to exit Config mode.
9. Push the Knob Top to open the plugin.
Page 19

AUDIO | VIDEO MEDIA CONTROLLERS
10. Control plugin parameters; press the PAGE keys to access more.
11. Press the BACK key to close plugin.
5.2.2 Toggle Steinberg Plugin Presets
You can see your plugin presets for proprietary Steinberg plugins on the Artist
media controller to quickly find your starting point for effects processing.
1. Select a track on the Artist media controller.
2. Press the INSERTS knobset selector (MC Mix) or the INSERTS Knob Top
(MC Control).
3. Open a Steinberg VST 3 plugin.
4. Press the PAGE keys simultaneously to enter config mode.
Plugin presets spill across knobs.
5. Select a preset.
6. Press the two PAGE keys simultaneously to exit config mode.
7. Press the BACK key to exit the plugin.
5.2.3 Flip to faders (MC Mix)
Flipping the plugin’s parameters from knobs to faders allows changing eight parameters simultaneously. Flipping bus sends to faders makes it easier to send
multiple signals to an effect and better controls effects textures in your mix.
1. Select a track on the Artist media controller.
2. Press the INSERTS knobset selector (MC Mix) or the INSERTS Knob Top
(MC Control).
3. Press a Knob Top to open a plugin.
4. Press the FLIP key to flip the knobs to the faders.
You can now control the plugin on the faders.
5. Press the FLIP key to flip the faders back to the knobs.
EuCon APPLICATION SETUP GUIDE
19
6. Press the BACK key to close the plugin.
Flip also works for sends, pan, dyn, and EQ.
NUENDO
Page 20

AUDIO | VIDEO MEDIA CONTROLLERS
5.2.4 Wheel Edit Modes (MC Control)
Using the Jog Wheel instead of the mouse is a faster way to trim head and tail of
a region, fade a region in and out, and adjust gain.
1. Select a track on the Artist media controller.
2. Select an audio region on the track.
3. Zoom in to the region using the Jog Wheel.
4. Page down twice on the Softkeys.
5. Select Fade In.
6. Use the Jog Wheel to select the fade in region.
7. Repeat using gain, fade out, move.
EuCon APPLICATION SETUP GUIDE
20
5.2.5 Create and Control Surround Panner
Using knobs and faders without looking at the screen to control the balance of
your surround mix allows you to remain more engaged with your mix.
1. Create a 5.1-channel bus in the project.
2. Press the MIX knobset selector (MC Mix) or MIX Knob Top (MC Control).
3. Select 5.1.
4. Press the BACK key to exit.
5. Press the Pan knobset selector (MC Mix) or Pan Knob Top (MC Control).
You can now control the surround panning.
6. Press the BACK key to exit
NUENDO
Page 21

AUDIO | VIDEO MEDIA CONTROLLERS
5.3 New Features in Nuendo 5
5.3.1 PAN
The Pan knobset now provides access to Nuendo 5’s new Surround Controls:
Speaker Solo, Surround Panner modes, and Rotation controls.
5.3.2 Quick Controls
Quick Controls for the selected track are now accessible from the surface.
MC Control
1. From top level knobset, press PAGE =
2. Press the QC knobtop.
Each of the selected track’s eight Quick Controls are displayed and can be adjusted with the encoders.
MC Mix
Press and hold the EQ knobset selector until it blinks and then release.
Each of the selected track’s eight Quick Controls are displayed and can be adjusted with the encoders.
5.3.3 VSTi Controls
VSTi parameters are now accessible from the surface for Synth and Instrument
tracks. They can be changed using CFG mode on instrument tracks.
MC Control
1. Select an instrument track.
2. From the top level knobset, press PAGE =>.
>.
EuCon APPLICATION SETUP GUIDE
21
3. Press the VSTi knobtob.
Parameters for the instrument on the selected track are displayed and can be
adjusted with the encoders.
NUENDO
Page 22

AUDIO | VIDEO MEDIA CONTROLLERS
MC Mix
1. Select an instrument track.
2. Press and hold the INSERTS knobset selector until it blinks, then release.
Parameters for the instrument on the selected track are displayed and can be
adjusted with the encoders.
5.3.4 MIX and GROUP Knobsets
The MIX and GROUP knobsets now access Nuendo 5’s Direct Routing features.
1. Select a track.
2. Press the MIX knobset selector.
Selected routing is displayed in the top-left knobcell.
EuCon APPLICATION SETUP GUIDE
22
The SEL key toggles between summing mode and intercancel.
The ON button enables the routing destination.
3. Press the top-left knobtop to display routing selections.
4. Press a knobtop to select the desired destination.
NUENDO
Page 23

AUDIO | VIDEO MEDIA CONTROLLERS
Section 6: Cubase
NOTE: Cubase version 4.1.2 and higher is required. Download the latest version of Cu-
base from Steinberg's web site.
To enable Cubase to work with your Artist media controller, you must obtain an
activation code:
1. Create a user account in the MySteinberg area of Steinberg’s web site.
If you already have a MySteinberg account and have already registered your
version of Cubase 4, continue with Step 4.
2. Check your email and activate your user account by clicking the link in the
confirmation email.
3. Log into your MySteinberg account, click on Product Registration, choose
Register Product and select Product with Steinberg Key or Soft-eLicenser.
4. Log into your MySteinberg account if you have not already. Click on Activation & Reactivation, choose Euphonix Artist Series EuCon Adapter and select
Permanent Activation. Enter your Artist media controller’s serial number.
You will receive an email containing the activation code.
5. Launch the License Control Center (LCC) Software from the Applications
folder, choose Wizards->License Download, enter your activation code and
follow the instructions.
For Cubase to communicate with the Artist media controller, Cubase’s EuCon device must be added in the Device Setup dialog:
1. Open Cubase but do not open a project.
If Cubase automatically opens a project, close it.
2. Choose Devices->Device Setup.
The Device Setup dialog opens.
EuCon APPLICATION SETUP GUIDE
23
3. Click the + button (add) on the top-left.
A drop-down list of devices appears with EuCon near the top of the list.
CUBASE
Page 24
AUDIO | VIDEO MEDIA CONTROLLERS
4. Select EuCon from the drop-down list.
The EuCon device is added, the control surface immediately updates, the
faders and knobs display track functions, and the EuCon Device Setup dialog
appears (Figure 6-1).
6.1 EuCon Device Setup
This section discusses the EuCon Device Setup dialog which allows editing track
assignment and transport control parameters. If the EuCon Device setup dialog is
not open: From Cubase choose Devices->Device Setup, then select EuCon from
the Remote Devices folder in the Devices section.
EuCon APPLICATION SETUP GUIDE
24
CUBASE
Figure 6-1 EuCon Device Setup
Page 25

AUDIO | VIDEO MEDIA CONTROLLERS
6.1.1 EuConized channel types
The EuConized channel types section contains checkboxes that determine
which channel types appear on your control surface. If a certain channel is
available in Cubase and the corresponding checkbox is selected, that channel
can be selected to appear on the surface. This channel is called EuConized.
All channels except Input channels are EuConized by default and can appear on
the surface. This is useful to eliminate tracks from the surface, reduce memory
usage, and reduce the time needed to build the EuCon mixer model when connecting, adding, or removing tracks from the Cubase project.
To enable/disable EuConized tracks, select the checkbox next to each type.
Tracks without a checkmark do not appear on the surface. This setting applies
only to the open project.
6.1.2 Global Settings
The Global Settings section has two parameters: Tape machine style transport
and Number of knobsets to cache.
EuCon APPLICATION SETUP GUIDE
Tape machine style transport
Two Cubase transport control modes are available for the control surface. Toggle
the modes from the Tape machine style transport option.
These transport modes affect the operation of the Stop, Fast Forward and Rewind
buttons in the following manner:
Tape machine style transport checked
Stop: The control surface STOP button halts the transport and keeps the play
head at the current position (even multiple presses), independent from Nuendo’s preferences.
Fast Forward/Rewind: The FF/RW buttons always latch independent of the
control surface latch time preference. Repeatedly pressing the same FF/RW
button has no effect. The current action can be stopped by pressing the opposite wind button, STOP, or PLAY. The FF/RW also stops if it reaches the beginning or end of the project.
25
CUBASE
Page 26

AUDIO | VIDEO MEDIA CONTROLLERS
Tape machine style transport not checked
Stop: The control surface STOP button copies the Cubase stop button.
Fast Forward/Rewind: The FF/RW buttons function as EuCon Momentary/
Latch-Switches. If the button is pressed and released quickly, the switches
do NOT latch but behave momentarily, resembling the way these buttons
work in the Nuendo GUI. If the Artist media controller’s FF/RW buttons are
held down longer than the latch time set in the Preferences-Setup page, they
latch.
Number of knobsets to cache
Cubase creates knobsets for EQ, Dynamic, Inserts, Aux sends and other functions.
A certain number of these knobsets are kept, or cached, in RAM. For large projects on a large control surface, increasing the number of knobsets in the cache can
access them faster but uses more RAM. It is rare to change this value.
EuCon APPLICATION SETUP GUIDE
6.2 Tips and Shortcuts
6.2.1 Instantiate and Control Any Plugin
26
CUBASE
Placing plugins on a track and controlling them from the Artist media controller
can speed up your workflow. Controlling a plugin with knobs instead of a mouse
not only provides more intuitive, higher resolution control, but can also control
multiple parameters simultaneously. You can dial in settings or automate plugin
control without mousing around or drawing lines in the arrange window.
1. Select a track on the Artist media controller.
2. Press the INSERTS key (MC Mix) or the INSERTS Knob Top (MC Control).
3. Press both PAGE keys simultaneously to enter Config mode.
4. Push the Knob Top beside the Insert you wish to assign the plugin to.
5. Push the type for the type of plugin you wish to instantiate.
6. Press the Knob Top to select the actual plugin.
7. Press the Knob Top to select the channel format.
8. Press both PAGE keys simultaneously to exit Config mode.
9. Push the Knob Top to open the plugin.
Page 27

AUDIO | VIDEO MEDIA CONTROLLERS
10. Control plugin parameters; press the PAGE keys to access more.
11. Press the BACK key to close plugin.
6.2.2 Toggle Steinberg Plugin Presets
You can see your plugin presets for proprietary Steinberg plugins on the Artist
media controller to quickly find your starting point for effects processing.
1. Select a track on the Artist media controller.
2. Press the INSERTS knobset selector (MC Mix) or the INSERTS Knob Top (MC
Control).
3. Open a Steinberg VST 3 plugin.
4. Press the PAGE keys simultaneously to enter config mode.
Plugin presets spill across knobs.
5. Select a preset.
6. Press the two PAGE keys simultaneously to exit config mode.
7. Press the BACK key to exit the plugin.
6.2.3 Flip to faders (MC Mix)
Flipping the plugin’s parameters from knobs to faders allows changing eight parameters simultaneously. Flipping bus sends to faders makes it easier to send
multiple signals to an effect and better controls effects textures in your mix.
1. Select a track on the Artist media controller.
2. Press the INSERTS knobset selector (MC Mix) or the INSERTS Knob Top
(MC Control).
3. Press a Knob Top to open a plugin.
4. Press the FLIP key to flip the knobs to the faders.
You can now control the plugin on the faders.
EuCon APPLICATION SETUP GUIDE
27
5. Press the FLIP key to flip the faders back to the knobs.
6. Press the BACK key to close the plugin.
Flip also works for AUX, PAN, DYN, EQ, and other knobsets.
CUBASE
Page 28

AUDIO | VIDEO MEDIA CONTROLLERS
6.2.4 Wheel Edit Modes (MC Control)
Using the Jog Wheel instead of the mouse is a faster way to trim head and tail of
a region, fade a region in and out, and adjust gain.
1. Select a track on the Artist media controller.
2. Select an audio region on the track.
3. Zoom in to the region using the Jog Wheel.
4. Page down twice on the Softkeys.
5. Select Fade In.
6. Use the Jog Wheel to select the fade in region.
7. Repeat using gain, fade out, move.
EuCon APPLICATION SETUP GUIDE
28
6.2.5 Create and Control Surround Panner
Using knobs and faders without looking at the screen to control the balance of
your surround mix allows you to remain more engaged with your mix.
1. Create a 5.1-channel bus in the project.
2. Press the MIX knobset selector (MC Mix) or MIX Knob Top (MC Control).
3. Select 5.1.
4. Press the BACK key to exit.
5. Press the Pan knobset selector (MC Mix) or Pan Knob Top (MC Control).
You can now control the surround panning.
6. Press the BACK key to exit
CUBASE
Page 29

AUDIO | VIDEO MEDIA CONTROLLERS
Section 7: Digital Performer
NOTE: Digital Performer version 6.01 or higher is required. Download the latest version
of Digital Performer from MOTU’s web site. Digital Performer must be installed
prior to installing EuControl.
For Digital Performer to communicate with Artist media controllers, the EuCon
driver must be added in the Control Surface dialog.
1. Open Digital Performer.
2. Choose Setup->Control Surface Setup.
The Control Surface dialog opens.
EuCon APPLICATION SETUP GUIDE
29
Figure 7-1 Control Surface dialog
3. Click the + button (add) on the right.
A pull-down list with Drivers appears with EuCon at the top.
DIGITAL PERFORMER
Page 30

AUDIO | VIDEO MEDIA CONTROLLERS
Figure 7-2 Control Surface dialog with EuCon added
4. If EuCon isn’t already selected, choose it from the pull-down list.
5. Press OK.
EuCon APPLICATION SETUP GUIDE
Your Artist media controller now controls Digital Performer.
NOTE: A single EuCon driver will communicate with all of your Artist media controllers,
30
so do not add more than one.
7.1 Tips and Shortcuts
7.1.1 Instantiate and Control Any Plugin
Placing plugins on a track and controlling them from the Artist media controller
can speed up your workflow. Controlling a plugin with knobs instead of a mouse
not only provides more intuitive, higher resolution control, but can also control
multiple parameters simultaneously. You can dial in settings or automate plugin
control without mousing around or drawing lines in the arrange window.
1. Select a track on the Artist media controller.
2. Press the INSERTS key (MC Mix) or the INSERTS Knob Top (MC Control).
3. Press both PAGE keys simultaneously to enter Config mode.
4. Push the Knob Top beside the Insert you wish to assign the plugin to.
5. Push the type for the type of plugin you wish to instantiate.
DIGITAL PERFORMER
Page 31

AUDIO | VIDEO MEDIA CONTROLLERS
6. Press the Knob Top to select the actual plugin.
7. Press the Knob Top to select the channel format.
8. Press both PAGE keys simultaneously to exit Config mode.
9. Push the Knob Top to open the plugin.
10. Control plugin parameters; press the PAGE keys to access more.
11. Press the BACK key to close plugin.
7.1.2 Flip to faders (MC Mix)
Flipping the plugin’s parameters from knobs to faders allows changing eight parameters simultaneously. Flipping bus sends to faders makes it easier to send
multiple signals to an effect and better controls effects textures in your mix.
1. Select a track on the Artist media controller.
2. Press the INSERTS knobset selector (MC Mix) or the INSERTS Knob Top (MC
Control).
3. Press a Knob Top to open a plugin.
4. Press the FLIP key to flip the knobs to the faders.
You can now control the plugin on the faders.
5. Press the FLIP key to flip the faders back to the knobs.
6. Press the BACK key to close the plugin.
Flip also works for AUX, PAN, EQ, and other knobsets.
7.1.3 Create and use Markers (MC Control)
Using markers in your project makes navigating your project much faster.
1. Touch Softkeys on the Touchscreen to enter Softkeys view.
2. Touch Sequence on the Touchscreen to display the Sequence page.
EuCon APPLICATION SETUP GUIDE
31
3. Use the transport controls or Jog wheel to navigate the timeline.
4. Touch Drop Marker in the Softkeys section.
Repeat steps 1–4 for additional markers.
DIGITAL PERFORMER
Page 32

AUDIO | VIDEO MEDIA CONTROLLERS
5. Touch Marker on the Touchscreen to enter Marker view.
6. Use Marker buttons to navigate the project.
7.1.4 EQ Knobset
The Euphonix EQ knobset allows control of four fully parametric EQ bands. Q
and band On/Off are accessible from the knobs.
1. Create Masterworks EQ and exit the INSERTS knobset.
2. Press the EQ key (MC Mix) or EQ Knob Top (MC Control).
You can now use the knobs to control EQ bands.
3. Press the ON button to toggle bands on/off (MC Mix). Touch GAIN on the
Touchscreen to toggle bands on/off (MC Control).
EuCon APPLICATION SETUP GUIDE
4. Press the SELECT key to toggle Freq/Q (MC Mix). Press and hold the Shift
key and press GAIN on the Touchscreen to toggle Freq/Q (MC Control).
5. Press the BACK key to exit.
7.1.5 Assign Inputs
32
You can change Inputs from the Artist media controller when tracking a session.
1. Select a track on the Artist media controller.
2. Press the INPUTS key (MC Mix) or INPUTS Knob Top (MC Control).
3. Select the track to assign to that input.
DIGITAL PERFORMER
Page 33

AUDIO | VIDEO MEDIA CONTROLLERS
Section 8: Mackie Control
Mackie Control Universal is a widely used MIDI-based protocol that controls application parameters and supports metering in many DAW applications. The extent to which Mackie Control can be used depends on the specific application’s
implementation. The Artist media controllers use EuCon-to-Mackie Control conversion software along with a special EuCon MIDI Driver. These use internal
MIDI ports to easily control these programs without external MIDI cables.
8.1 Setting Up EuCon for Mackie Control
Before proceeding, make sure you have installed and are running EuControl as
described in the Installation section of your Quickstart or User Guides.
All applications that use Mackie Control must perform the following steps:
1. From the Apple Menu, open System Preferences.
EuCon APPLICATION SETUP GUIDE
33
Figure 8-1 System Preferences
MACKIE CONTROL
Page 34

AUDIO | VIDEO MEDIA CONTROLLERS
2. Double-click the Euphonix icon in the Other section at the bottom of the
window.
The Euphonix preference pane opens.
EuCon APPLICATION SETUP GUIDE
34
Figure 8-2 Euphonix preference pane
3. Locate the Application you want to control in the Finder.
This is found in your Applications folder or in the program’s own folder at
the top level of the hard drive.
4. Drag the Application icon into the middle of the Euphonix preference pane
and release the mouse button.
Its name and location appears in the Application and Path columns, respectively.
5. Click in the Protocol column and select Mackie Control (see Figure 8-3).
MACKIE CONTROL
Page 35

AUDIO | VIDEO MEDIA CONTROLLERS
Figure 8-3 Euphonix preference pane with application selected and Mackie Control set
6. Close the Euphonix preference pane and reboot your computer if prompted
to do so.
EuCon APPLICATION SETUP GUIDE
The next steps configure your specific application to be controlled by Mackie
Control. This differs for each application and instructions can be found in the application’s user manual. For your convenience, we’ve included instructions for
several applications in the following sections.
When setting up an application to be controlled by Mackie Control, use the MIDI
ports of the EuCon MIDI Driver that were specified in the Euphonix preference
pane (i.e., 1–4 in Figure 8-3). Examples are shown in the following sections.
More than one application can be controlled using Mackie Control by dragging
multiple application icons into the Euphonix preference pane. Make sure each
application has it’s own unique set of MIDI ports.
To access the Mackie Control Master fader, press the ASSIGN key (lights) on any
fader strip on any Artist media controller in the network.
35
MACKIE CONTROL
Page 36
AUDIO | VIDEO MEDIA CONTROLLERS
8.2 Ableton Live
Before proceeding, you must already have completed the steps described in
Setting Up EuCon for Mackie Control on page 33.
To finish the configuration:
1. Choose Live->Preferences.
The Preferences dialog opens.
2. Click the MIDI tab on the left (Figure 8-4).
EuCon APPLICATION SETUP GUIDE
36
3. Select Mackie Control or Mackie Control Classic from the Control Surface
column.
4. We recommend Mackie Control.
5. Select the desired MIDI emulation ports from the Input and Output columns
for the Mackie Control Surface.
MACKIE CONTROL
Figure 8-4 Live MIDI Preferences dialog
Page 37

AUDIO | VIDEO MEDIA CONTROLLERS
6. Repeat steps 3 and 5 for each additional Artist media controller in your network.
The MIDI ports selected here should match those specified in the Euphonix
Preferences Pane.
7. Close the Preferences dialog.
Your Artist media controller should now be controlling your application. If not:
• Make sure Live is the front-most application (i.e., the one receiving keystrokes and mouse clicks). The Artist media controllers control only the
front-most application.
• Check that all steps in Setting Up EuCon for Mackie Control on page 33 and
in this section have been performed correctly, and reboot your Mac.
• Make sure the Euphonix MIDI device in Applications->Utilities->Audio MIDI
Setup is blue (active) and not gray (inactive). If inactive, select it, click Remove Device, and click Rescan MIDI.
EuCon APPLICATION SETUP GUIDE
37
MACKIE CONTROL
Page 38
AUDIO | VIDEO MEDIA CONTROLLERS
8.3 Reason
Before proceeding, you must already have completed the steps described in
Setting Up EuCon for Mackie Control on page 33.
To finish the configuration:
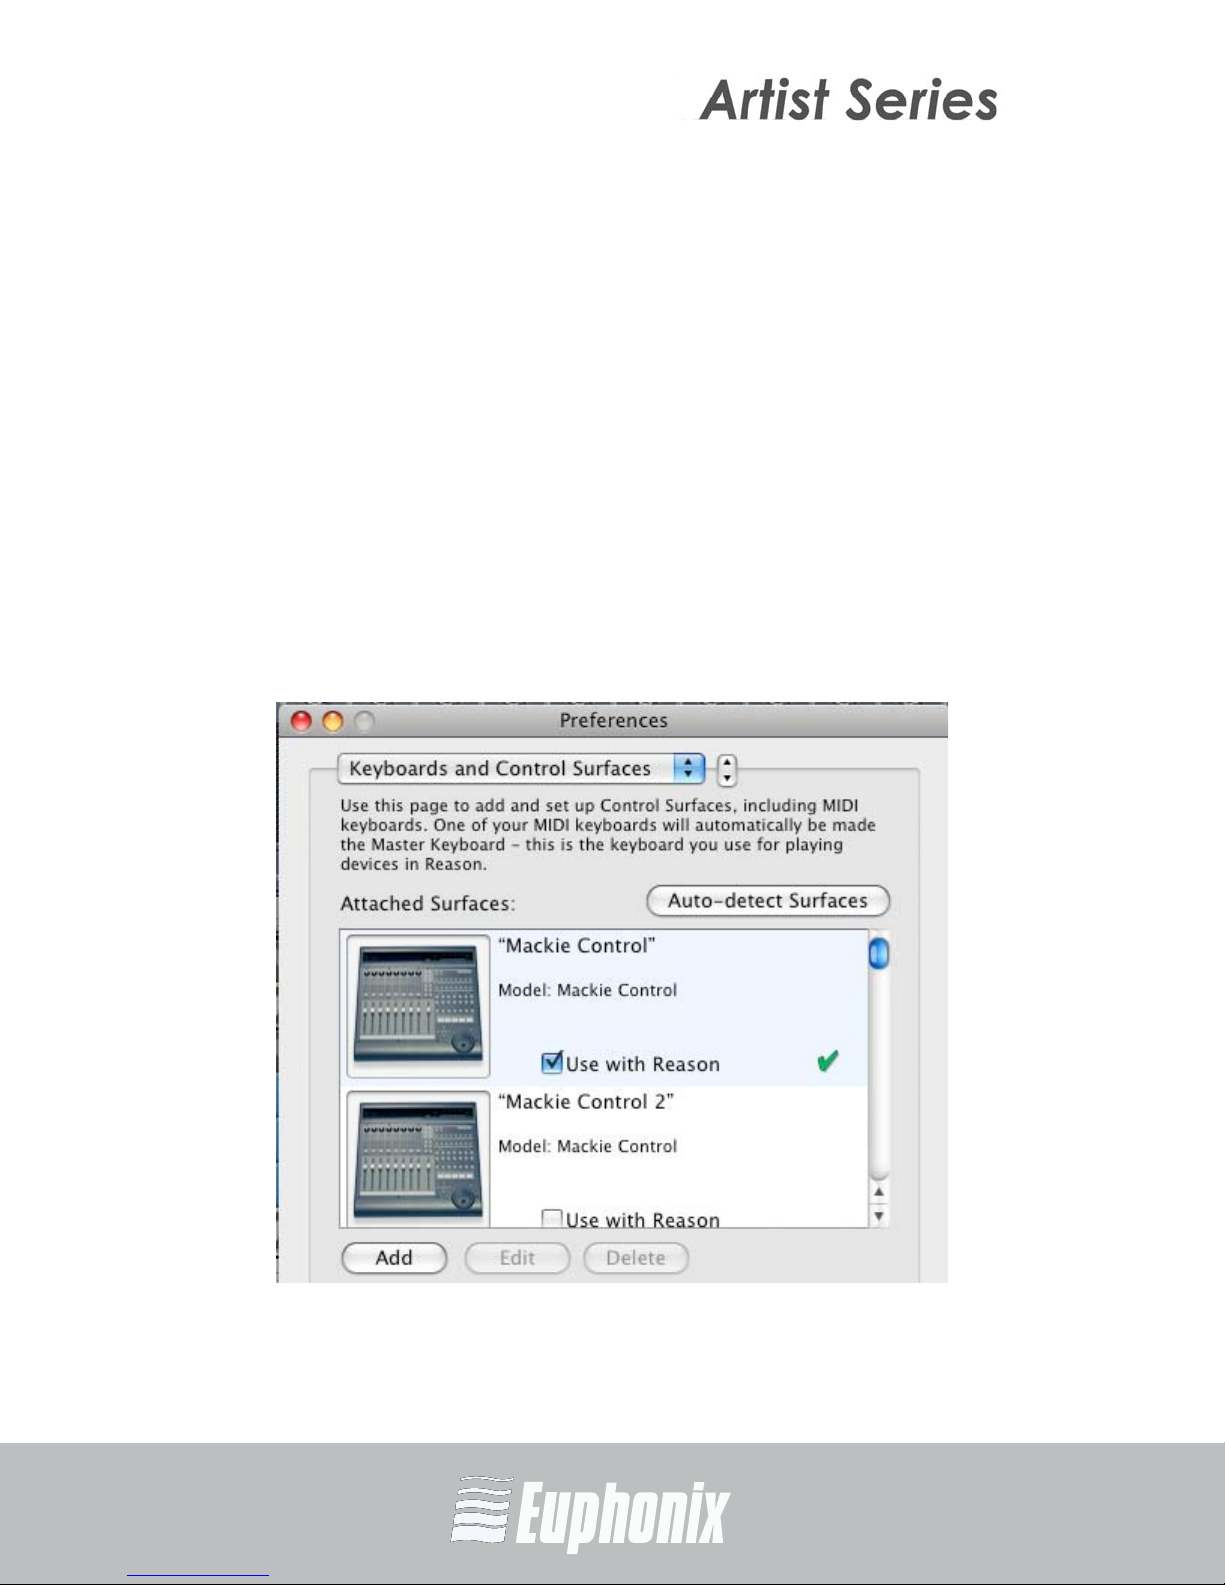
1. Choose Reason->Preferences.
2. Choose Keyboards and Control Surfaces from the dialog box at the top.
3. Press the Auto-Detect Surfaces button.
Reason scans to find the Mackie-enabled Euphonix MIDI ports from the Euphonix Preferences pane.
4. Select the Use with Reason checkbox for each Artist media controller on
your network that you wish to use with Mackie Control.
EuCon APPLICATION SETUP GUIDE
38
Figure 8-5 Selecting Mackie Control for each Artist media controller
MACKIE CONTROL
Page 39

AUDIO | VIDEO MEDIA CONTROLLERS
5. Double-click on each Artist media controller instance and select the same
Euphonix MIDI ports that were assigned in the Euphonix Preferences pane.
EuCon APPLICATION SETUP GUIDE
Figure 8-6 Assigning MIDI ports
6. Right-click a module in your Reason project and select Lock Mackie Control
to this Device to lock it to the Artist media controller instance you wish to
use.
Figure 8-7 Locking Mackie Control to an Artist media controller
39
MACKIE CONTROL
Page 40

AUDIO | VIDEO MEDIA CONTROLLERS
Section 9: Pro Tools (HUI)
HUI is a control protocol developed by Mackie that works with Pro Tools. The
Artist media controllers uses HUI commands and extensive Pro Tools key commands to control Pro Tools operations. It has the additional advantage of being
able to control multiple workstations from one surface in a studio with multiple
Pro Tools systems.
9.1 Setting up EuCon to Control Pro Tools
Before proceeding, make sure you have installed and are running EuControl as
described in the Installation section of your Quickstart or User Guides.
To setup HUI to control Pro Tools:
1. From the Apple Menu, open System Preferences.
EuCon APPLICATION SETUP GUIDE
40
PRO TOOLS (HUI)
Figure 9-1 System Preferences
Page 41

AUDIO | VIDEO MEDIA CONTROLLERS
2. Double-click the Euphonix icon in the Other section at the bottom of the
window.
The Euphonix preference pane opens.
EuCon APPLICATION SETUP GUIDE
Figure 9-2 Euphonix preference pane
3. Locate the Application you want to control in the Finder.
This is found in your Applications folder or in the program’s own folder at
the top level of the hard drive.
4. Drag the Application icon into the middle of the Euphonix preference pane
and release the mouse button.
Its name and location appears Application and Path columns, respectively.
5. Click in the Protocol column and select HUI (see Figure 9-3).
41
PRO TOOLS (HUI)
Page 42

AUDIO | VIDEO MEDIA CONTROLLERS
EuCon APPLICATION SETUP GUIDE
Figure 9-3 Euphonix preference pane with application selected and HUI protocol set
6. Close the Euphonix preference pane and reboot your computer if prompted
to do so.
42
9.2 Setting up Pro Tools to Control the Artist Media
Controllers
1. Launch Pro Tools.
2. Choose Peripherals from the Operations menu.
The Peripherals dialog opens.
3. Click the MIDI Controllers tab.
PRO TOOLS (HUI)
Page 43

AUDIO | VIDEO MEDIA CONTROLLERS
Figure 9-4 Pro Tools Peripherals dialog
4. Configure a HUI controller for each Artist media controller in your network
(up to four).
5. Select HUI from the Type drop-down box for each controller to configure.
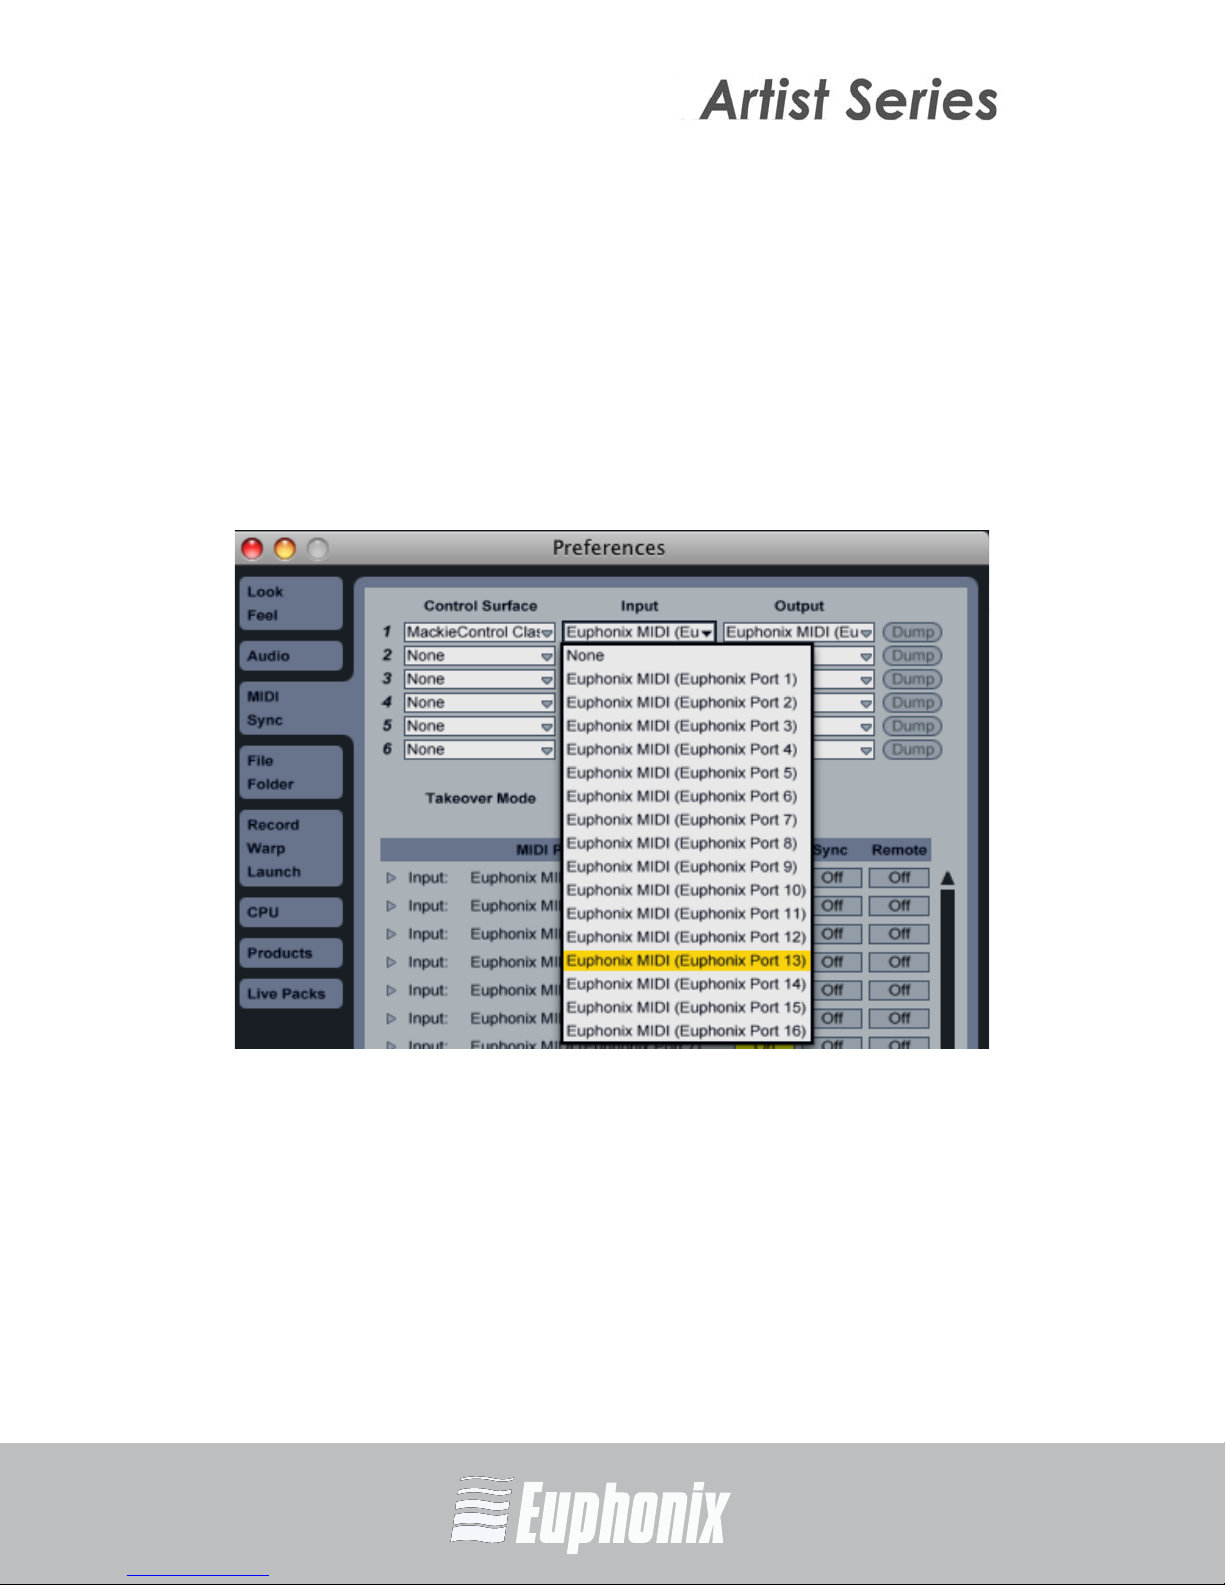
6. Configure each controller to have the input and output MIDI ports set for Pro
Tools in the Euphonix Preferences Pane. Click on the Receive From and Send
To drop-down menus, hover over Predefined, then select from the Euphonix
MIDI ports.
For example, if you set Pro Tools to use MIDI ports 1–4, your first HUI controller’s receive and transmit ports should be set to EphMIDIEP1.
Figure 9-5 Excerpt from Pro Tools MIDI menu
EuCon APPLICATION SETUP GUIDE
43
PRO TOOLS (HUI)
Page 44

AUDIO | VIDEO MEDIA CONTROLLERS
7. Select 8 from the Ch # drop-down menu as the number of channels for each
controller.
8. Press OK.
Pro Tools updates the channel and track information and transmits that to
the Artist media controllers.
Your Artist media controller should now be controlling Pro Tools. If not:
• Make sure Pro Tools is the front-most application (i.e., the one receiving
keystrokes and mouse clicks). The Artist media controllers control only the
front-most application.
• Check that all steps in Setting up EuCon to Control Pro Tools on page 40 and
in this section have been performed correctly, and reboot your Mac.
EuCon APPLICATION SETUP GUIDE
9.3 Tips and Shortcuts
9.3.1 Instantiate and control any plugin
Placing plugins on a track and controlling them from the Artist media controller
44
can speed up your workflow. Controlling a plugin with knobs instead of a mouse
not only provides more intuitive, higher resolution control, but can also control
multiple parameters simultaneously. You can dial in settings or automate plugin
control without mousing around or drawing lines in the arrange window.
1. Select a track on the Artist media controller.
2. Press the INSERTS key (MC Mix) or the INSERTS Knob Top (MC Control).
3. Press both PAGE keys simultaneously to enter Config mode.
4. Push the Knob Top beside the Insert you wish to assign the plugin to.
5. Push the type for the type of plugin you wish to instantiate.
6. Press the Knob Top to select the actual plugin.
7. Press the Knob Top to select the channel format.
8. Press both PAGE keys simultaneously to exit Config mode.
9. Push the Knob Top to open the plugin.
10. Control plugin parameters; press the PAGE keys to access more.
11. Press the BACK key to close plugin.
PRO TOOLS (HUI)
Page 45

AUDIO | VIDEO MEDIA CONTROLLERS
9.3.2 Wheel Edit Modes (MC Control)
Use the Jog Wheel to trim the head/tail of a region, move a region, or slip audio
in a region without clicking and dragging with the mouse.
1. Select a track on the Artist media controller.
2. Select a Region on the track.
3. Touch the Softkeys button on the Touchscreen to display Softkey view.
4. Press Editing on the Touchscreen.
5. Zoom into the region.
6. Touch Region on the Touchscreen to trim head and tail with Jog Wheel.
7. Adjust nudge value with Nudge + and Nudge - on the Touchscreen.
9.3.3 Create and Use Wheel Nudge
Scroll your Artist media controllers through the Pro Tools tracks in the session
you wish to control with the Jog Wheel. This is much like moving a chair into the
proper position in front of a large console.
1. Open the Softkey editor.
2. Select a Softkey in the editor.
3. Press the Command button.
4. Add a EuCon command
5. Select the EuCon->Left Edit->Nudge command.
6. Save the command and exit.
7. Change the focus to Pro Tools.
8. Open the Mix window by pressing Shift + <Nudge (mixer nudge).
9. Press the Nudge button you've just created.
EuCon APPLICATION SETUP GUIDE
45
10. Use the Jog Wheel to nudge through tracks.
PRO TOOLS (HUI)
Page 46

AUDIO | VIDEO MEDIA CONTROLLERS
9.3.4 EQ Knobset
The Euphonix EQ knobset can control settings for four parametric EQ bands and
access Q and band On/Off from the knobs.
1. Enter the INSERTS knobset, create Digirack EQ, and exit the INSERTS knobset.
2. Press the EQ button (MC Mix) or EQ Knob Top (MC Control).
3. Use the knobs to control EQ bands.
4. Press the ON button to toggle bands on/off (MC Mix). Press the Touchscreen
GAIN button to toggle bands on/off (MC Control).
5. Press the Select button to toggle Freq/Q (MC Mix). Press and hold the Shift
key and press FREQ on the Touchscreen to toggle Freq/Q (MC Control).
6. Press the BACK key to exit.
EuCon APPLICATION SETUP GUIDE
9.3.5 DYN Knobset
Quickly edit Digirack Dynamics plugin parameters.
46
1. Create a Digirack compressor and exit the INSERTS knobset.
2. Press DYN button (MC Mix) or DYN Knob Top (MC Control).
3. Use knobs to control compressor parameters.
4. Press the BACK key to exit.
PRO TOOLS (HUI)
 Loading...