

MUSIC | AUDIO POST | VIDEO | FILM
professional control surface
Artist Series
QUICKSTART GUIDE
Document Revision: A
END
CLOSE
NUDGE
BANK
POWER
ION
MC MIX
T
A
T
S
ICATION
PL
ORK
P
W
A
HOME
MIXER
NUDGE
SEL
SEL
SEL
SEL
BANK
RECPLAYNEXT FF
ON
STOPPREVRTZ REW
ON
ON
ON
6
0
12
O
N
UT
A
REC
6
12
O
N
UT
A
REC
6
12
O
N
T
U
A
REC
6
12
O
N
T
U
A
REC
6
12
5
10
20
30
Y
SSIGN
SEL
A
0
5
10
20
30
Y
SSIGN
SEL
A
0
5
10
20
30
Y
L
SE
ASSIGN
0
5
10
20
30
Y
L
SE
ASSIGN
0
5
10
20
30
8
60
40
8
60
40
8
60
40
8
60
40
8
60
40
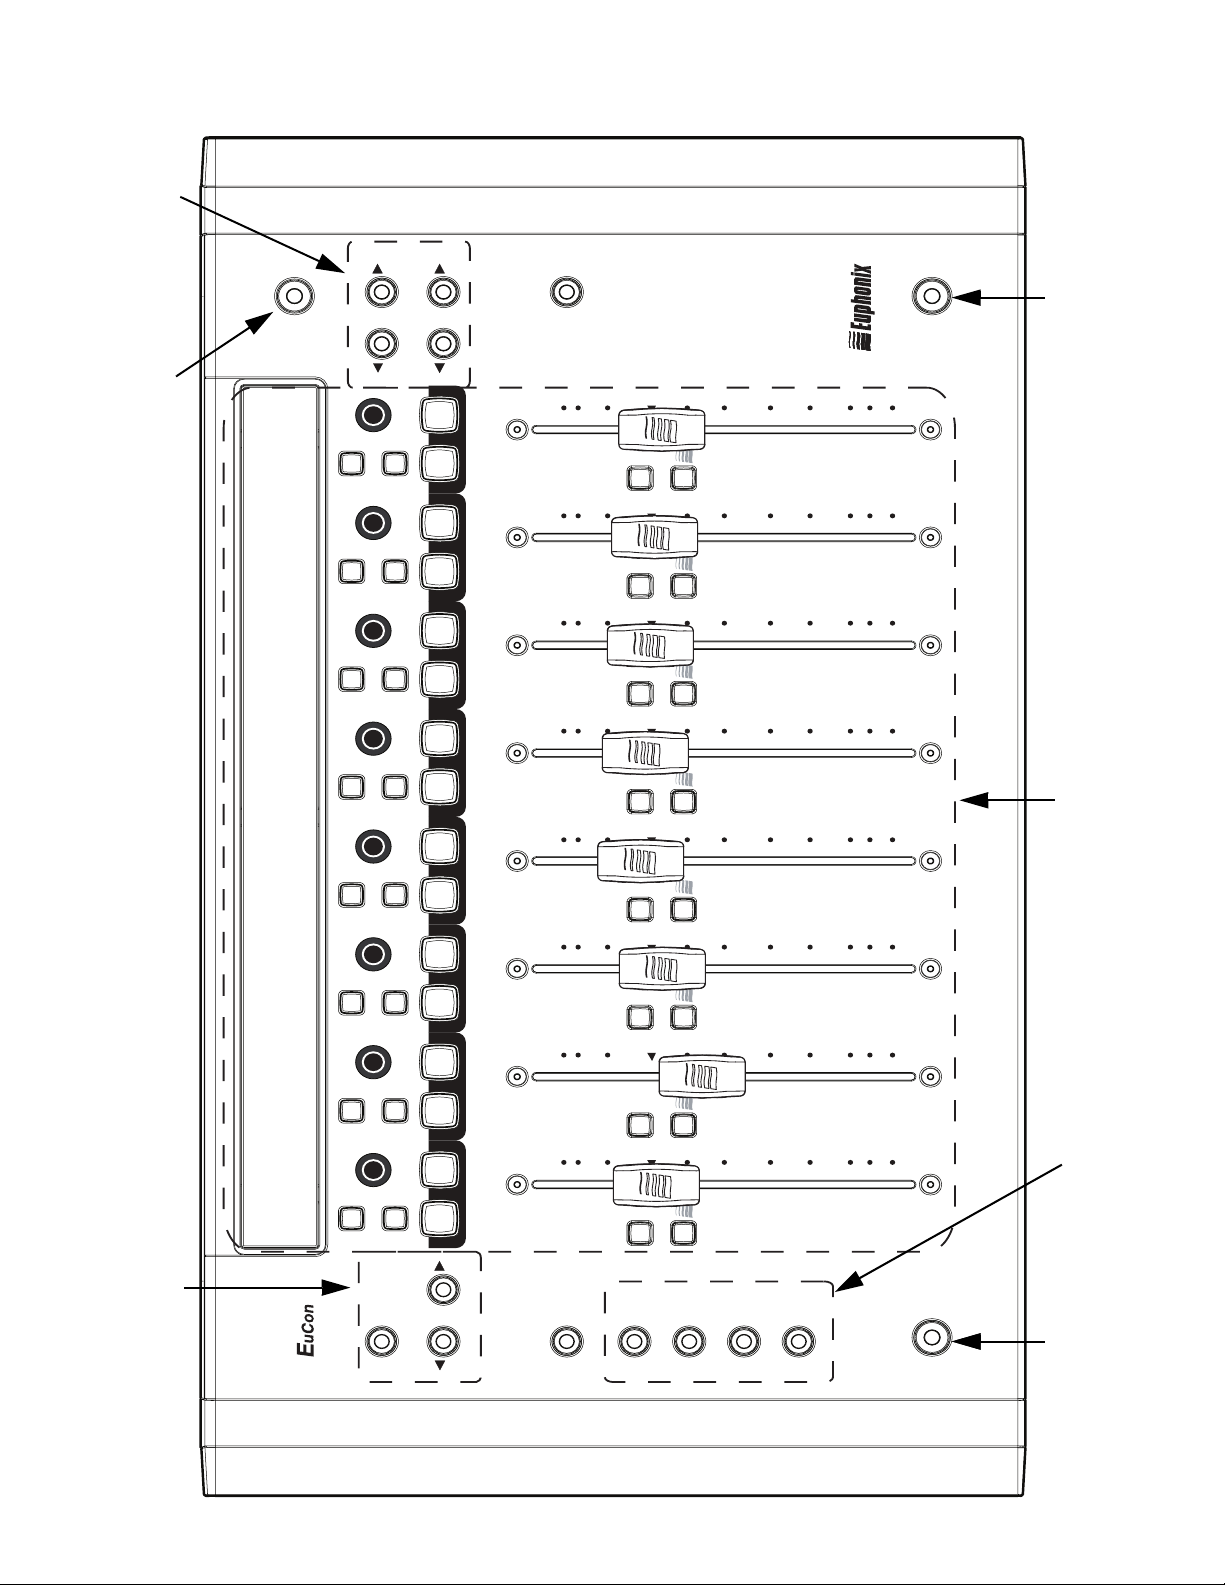
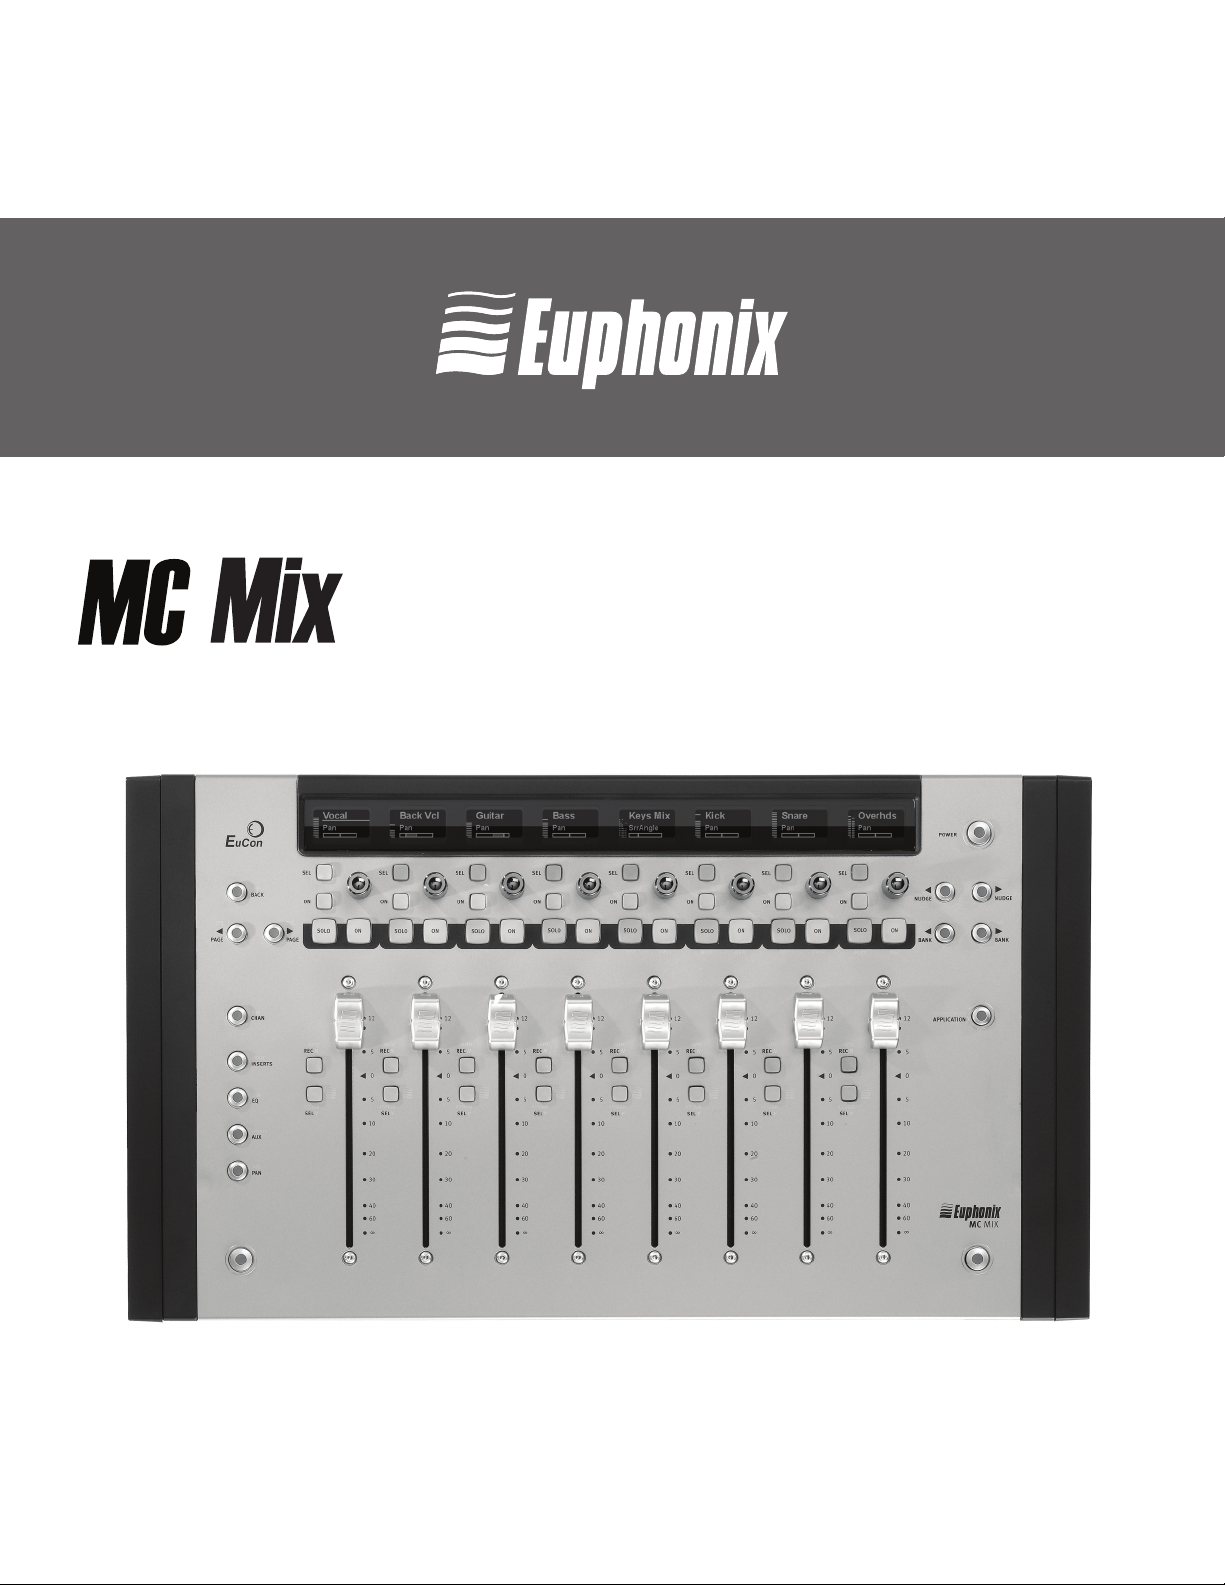
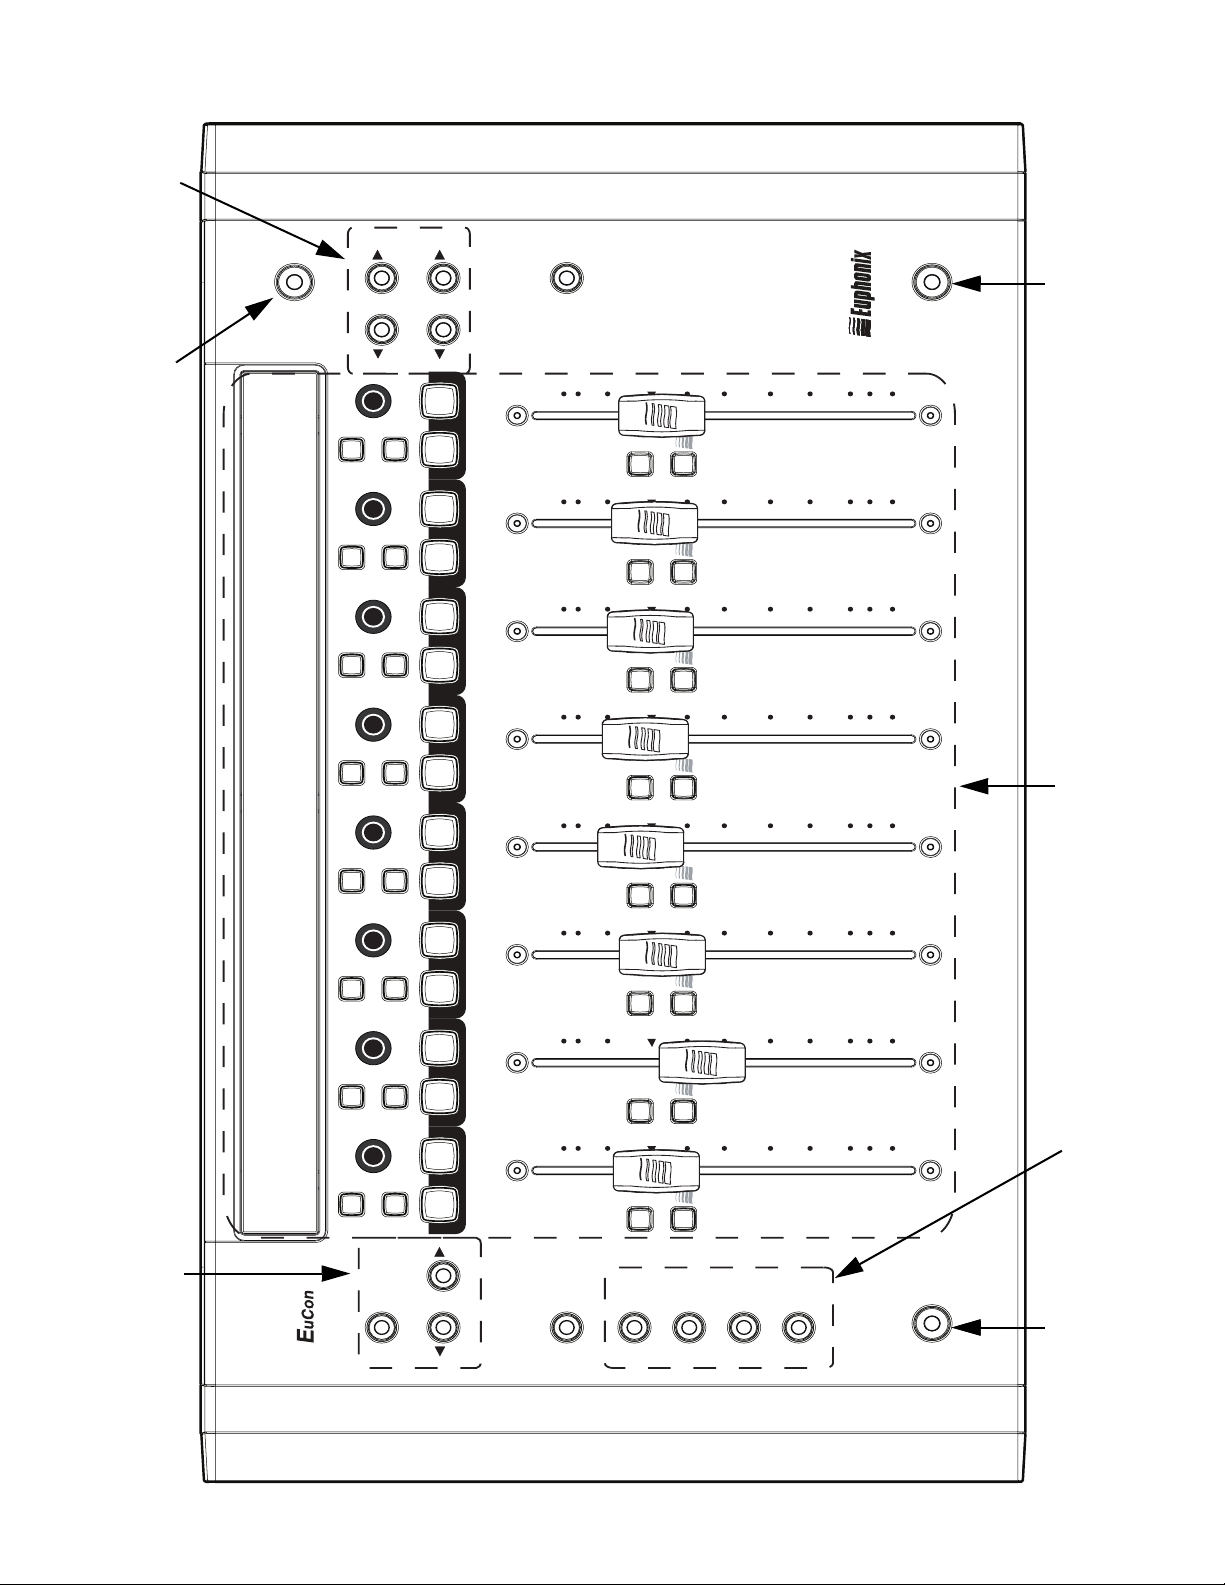
Knob Set navigation Fader navigationPower switch
Display Screens
SOLOSOLOSOLOSOLO ON ON ON ON SOLO ONSOLO ON SOLO ON SOLO ON
ON
SEL
ON
SEL
ON
SEL
ON
SEL
CFG
PAGE
BACK
TOP
CFG
PAGE
O
N
T
U
A
REC
6
12
12
12
CHAN
FLIP
0
O
N
T
U
A
REC
6
0
O
N
UT
A
REC
6
0
O
N
UT
A
REC
INSERTS
INPUT
Y
L
SE
ASSIGN
5
10
20
30
Y
L
SE
ASSIGN
5
10
20
30
Y
L
SE
ASSIGN
5
10
20
30
Y
L
SE
ASSIGN
EQ
DYN
AUX
GROUP
PAN
MIX
8
60
40
8
60
40
8
60
40
Knob Set selectors
Shift key
Shift key Fader strips
professional control surface
1 Installation and Setup
Euphonix is dedicated to making your MC Mix experience enjoyable and trouble-free
so we will periodically update the following software and documentation:
• EuControl: This software runs your MC Mix and communicates to your audio/video appli-
cation. Always download the new version if prompted to do so when you launch EuControl.
• MC Mix User Guide (PDF): This is the complete user guide for your MC Mix.
• EuCon Application Setup Guide (PDF): The MC Mix supports many applications, each with a
slightly different setup procedure. This document includes supplementary instructions for
each application.
Before proceeding, download the latest versions from: www.euphonix.com/artist/support
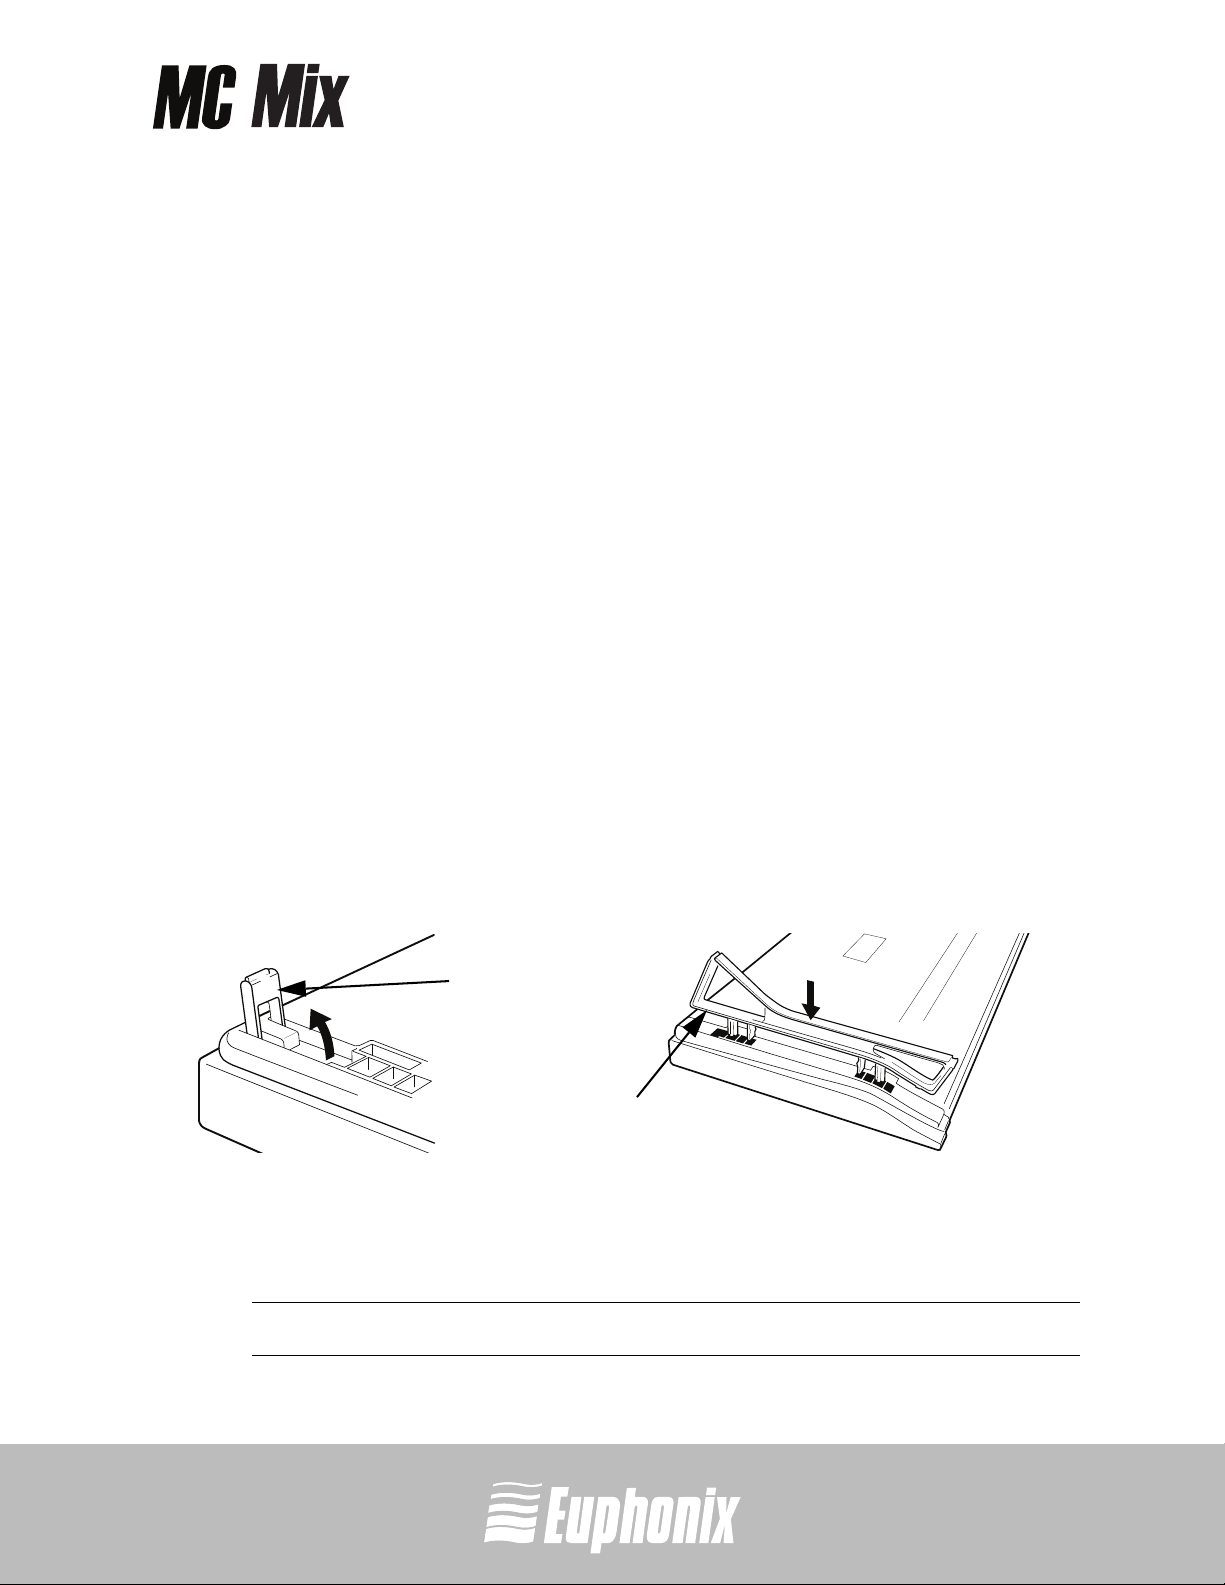
Unpacking and Elevating the MC Mix
Unpack your MC Mix, power adapter, AC power cord, installation CD, Ethernet crossover
cable, and riser brackets from its box.
QUICKSTART GUIDEINSTALLATION AND SETUP
The MC Mix can be elevated or angled using small foldout legs on the bottom of the
unit or elevated and angled by attaching the larger riser brackets. Since either method
requires turning the MC Mix over, it is easier to do this before attaching any cables.
Turn it over and place it on a soft surface.
Pull out all four of the small foldout legs to moderately elevate the unit; pull out only
the back two to angle the unit towards you (Figure 1-1 left).
Foldout
leg
Riser
bracket
Figure 1-1 Foldout leg (left); riser bracket (right)
Two larger, detached riser brackets elevate and angle the unit more than the foldout
legs. Use moderate force to snap them into the bottom panel as shown in Figure 1-1.
3
NOTE: To remove the riser brackets, see the MC Mix User Guide.
Artist Series
professional control surface
Installation
1. Insert the installation CD into your Macintosh and follow the instructions to install the
software.
If prompted to download the most current version of EuControl, follow the onscreen
instructions.
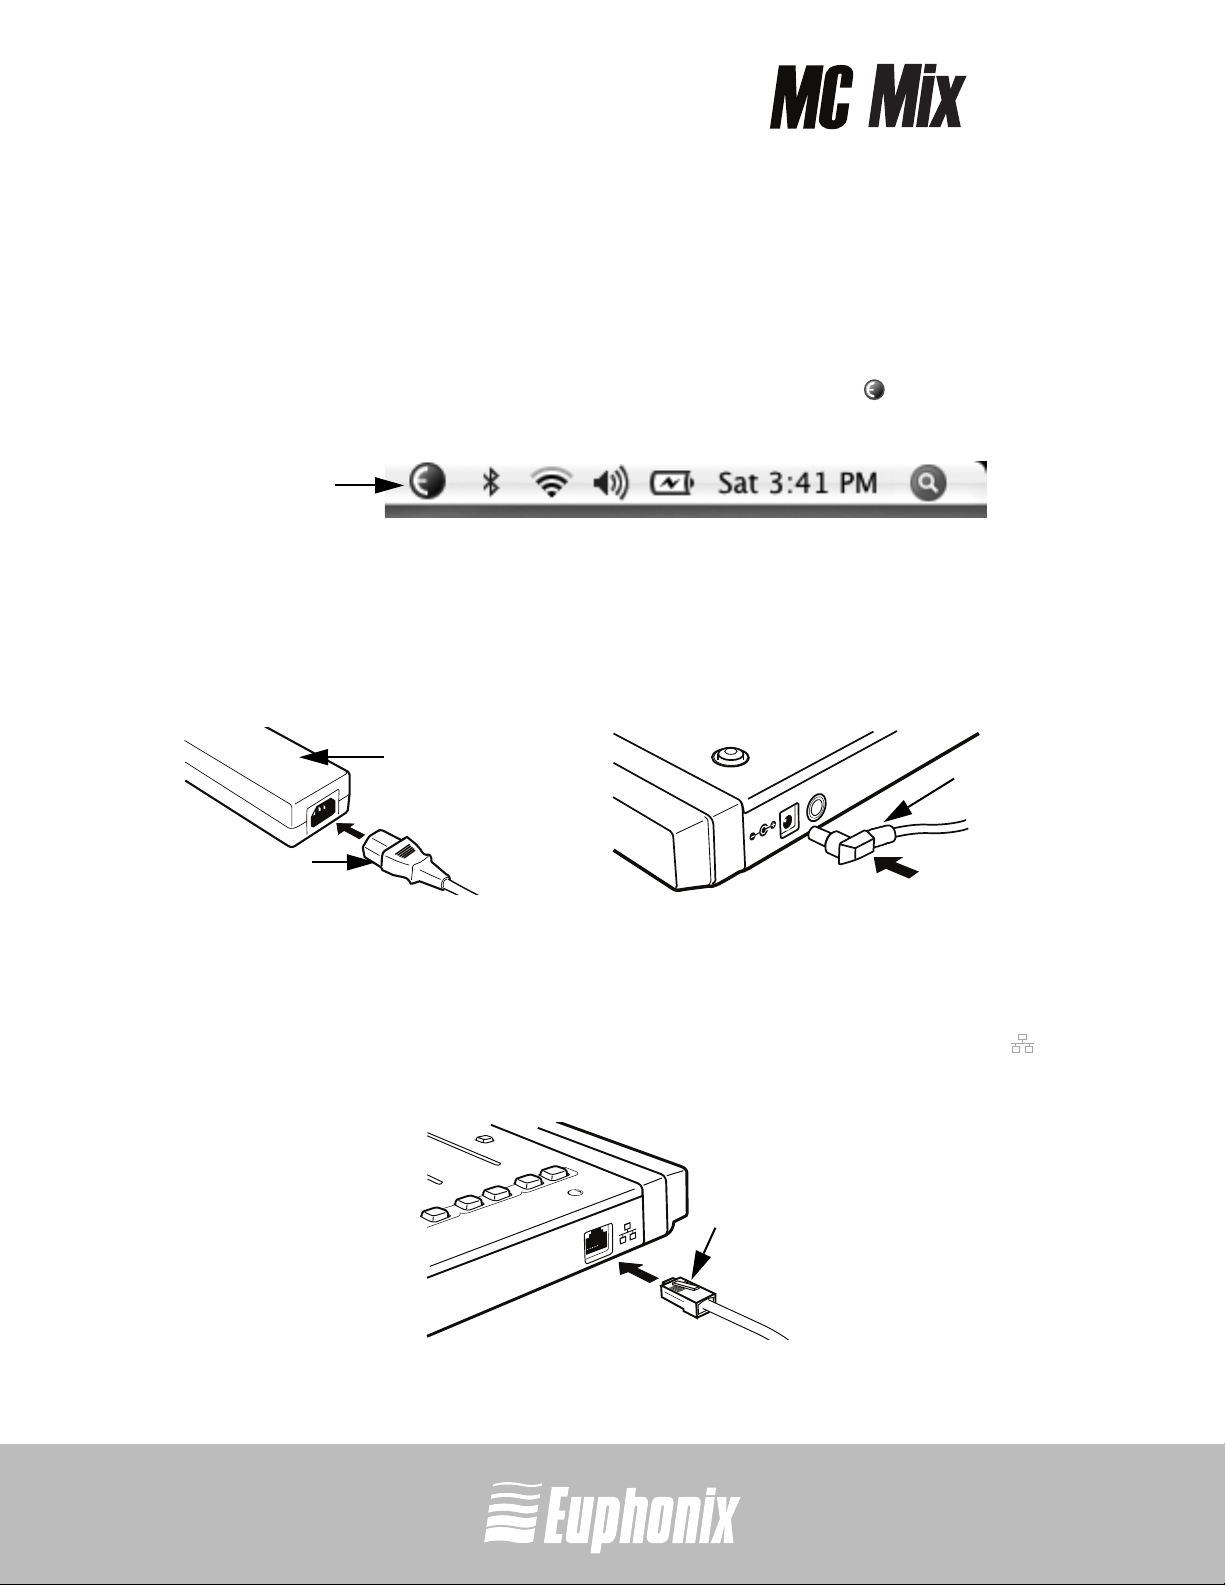
EuControl will launch automatically and is running when this icon appears in your
menu bar.
EuControl
QUICKSTART GUIDEINSTALLATION AND SETUP
icon
Figure 1-2 Menu bar with EuControl icon
2. Shut down your Macintosh.
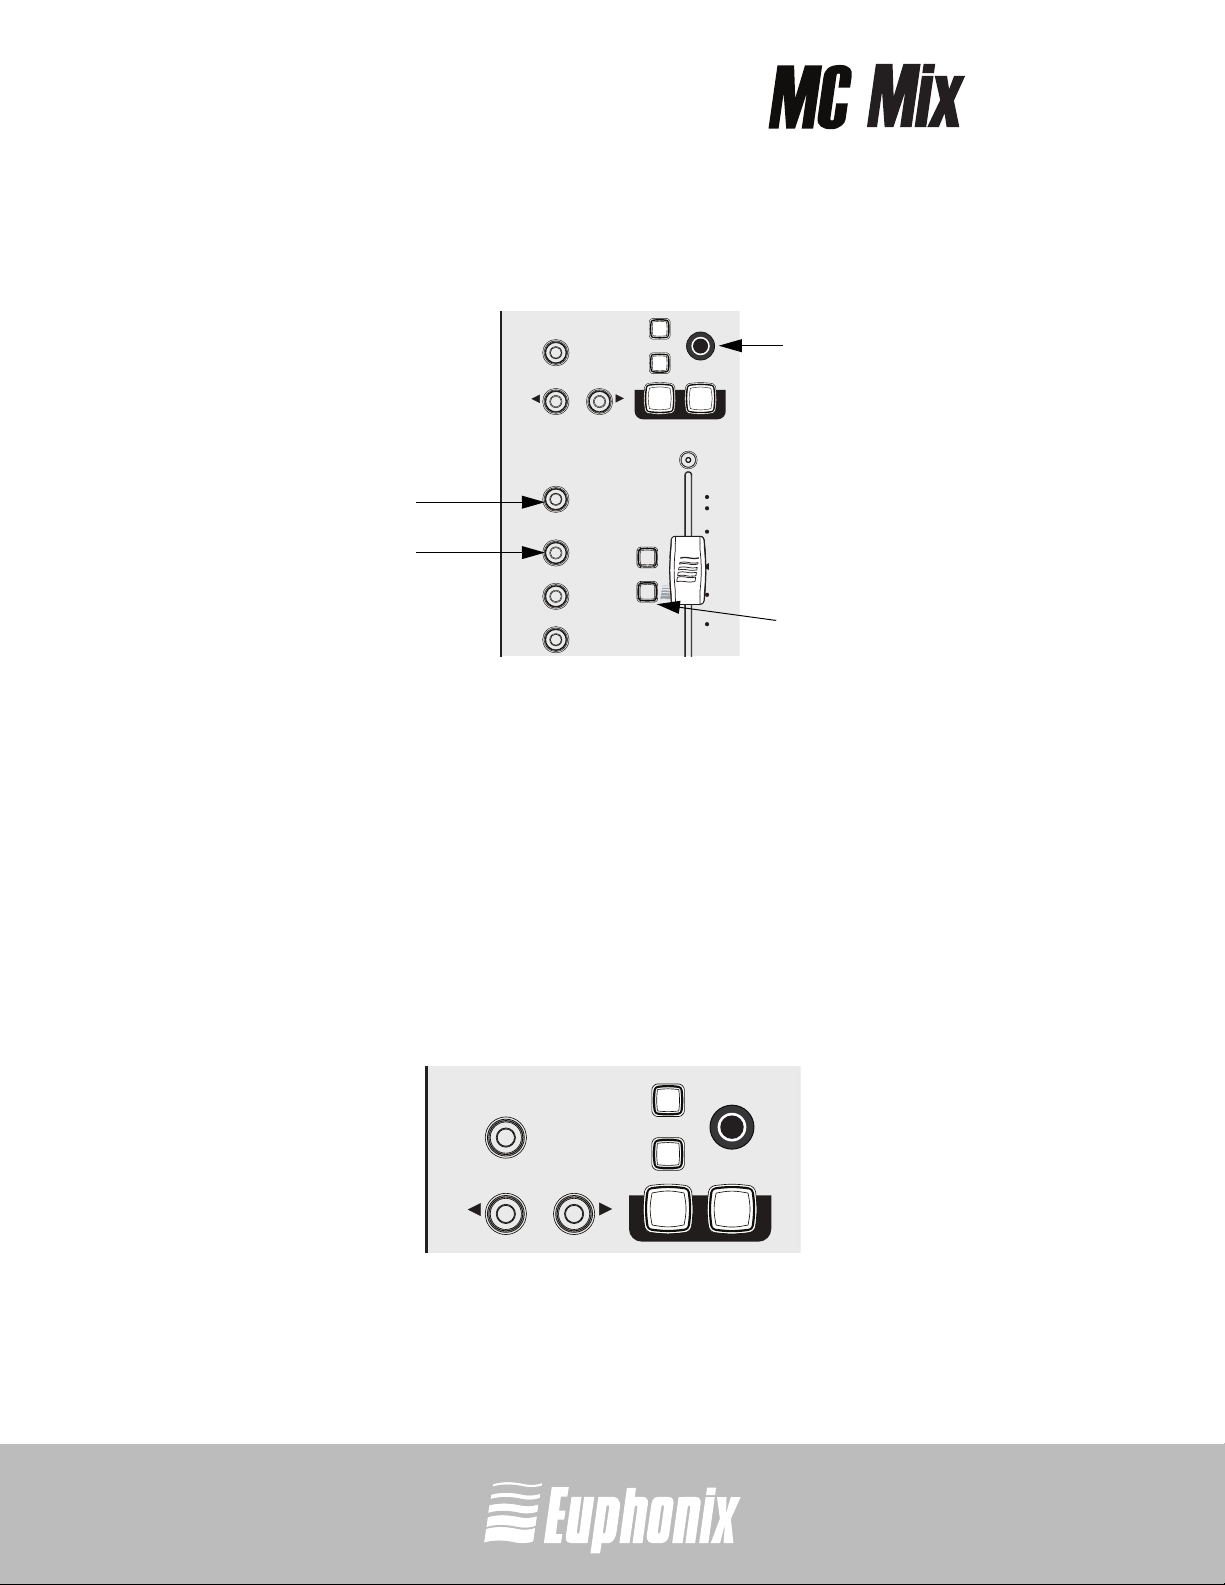
3. Plug one end of the AC power cord into the power adapter (Figure 1-3 left) and the other
into a power outlet.
4
power adapter
FOOTSWITCH
DC In 15 V
AC power cord
Figure 1-3 Connecting the power adapter
DC output
cable
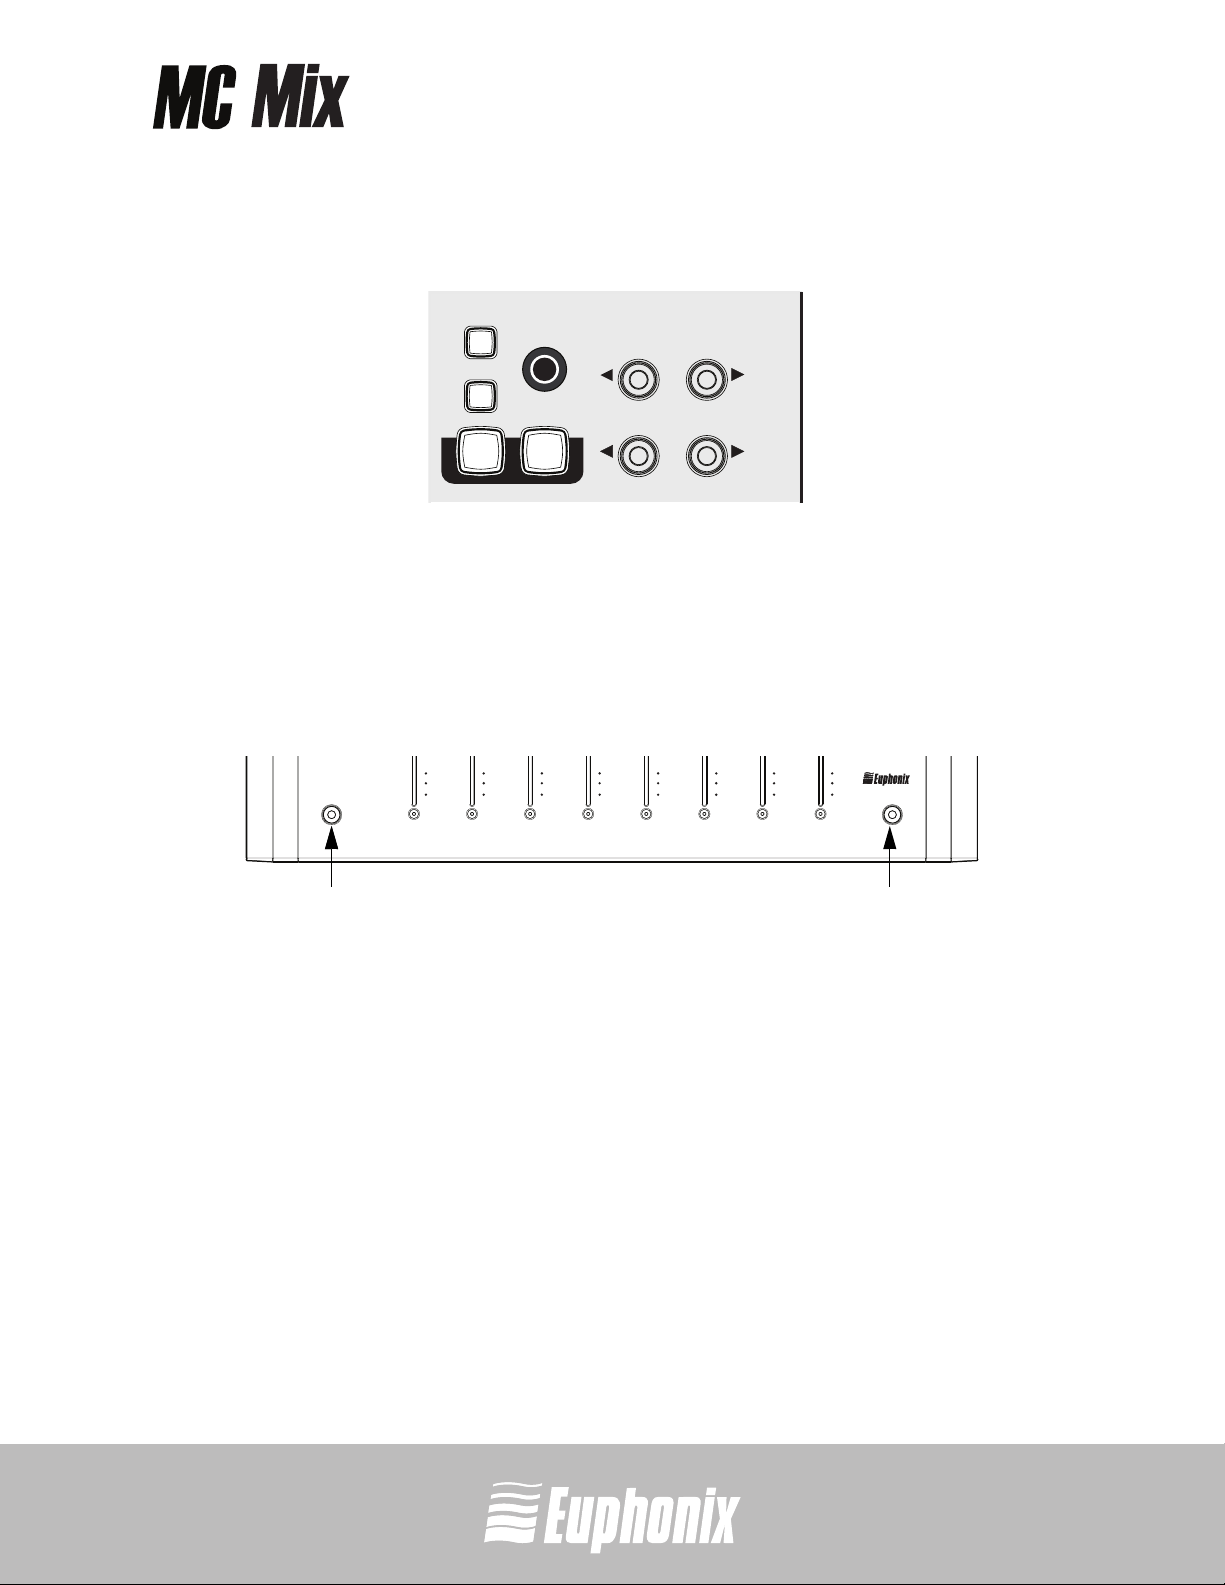
4. Connect the DC output cable from the power adapter to DC In on the left side of the rear
panel (Figure 1-3 right).
5. Plug one end of the Ethernet crossover cable into the Ethernet jack (labeled with ) on
the rear panel of the MC Mix (Figure 1-4).
Eucon
Ethernet
cable
Figure 1-4 Ethernet cable and rear panel jack
Artist Series
professional control surface
6. Plug the other end of the Ethernet crossover cable into an open Ethernet jack on your
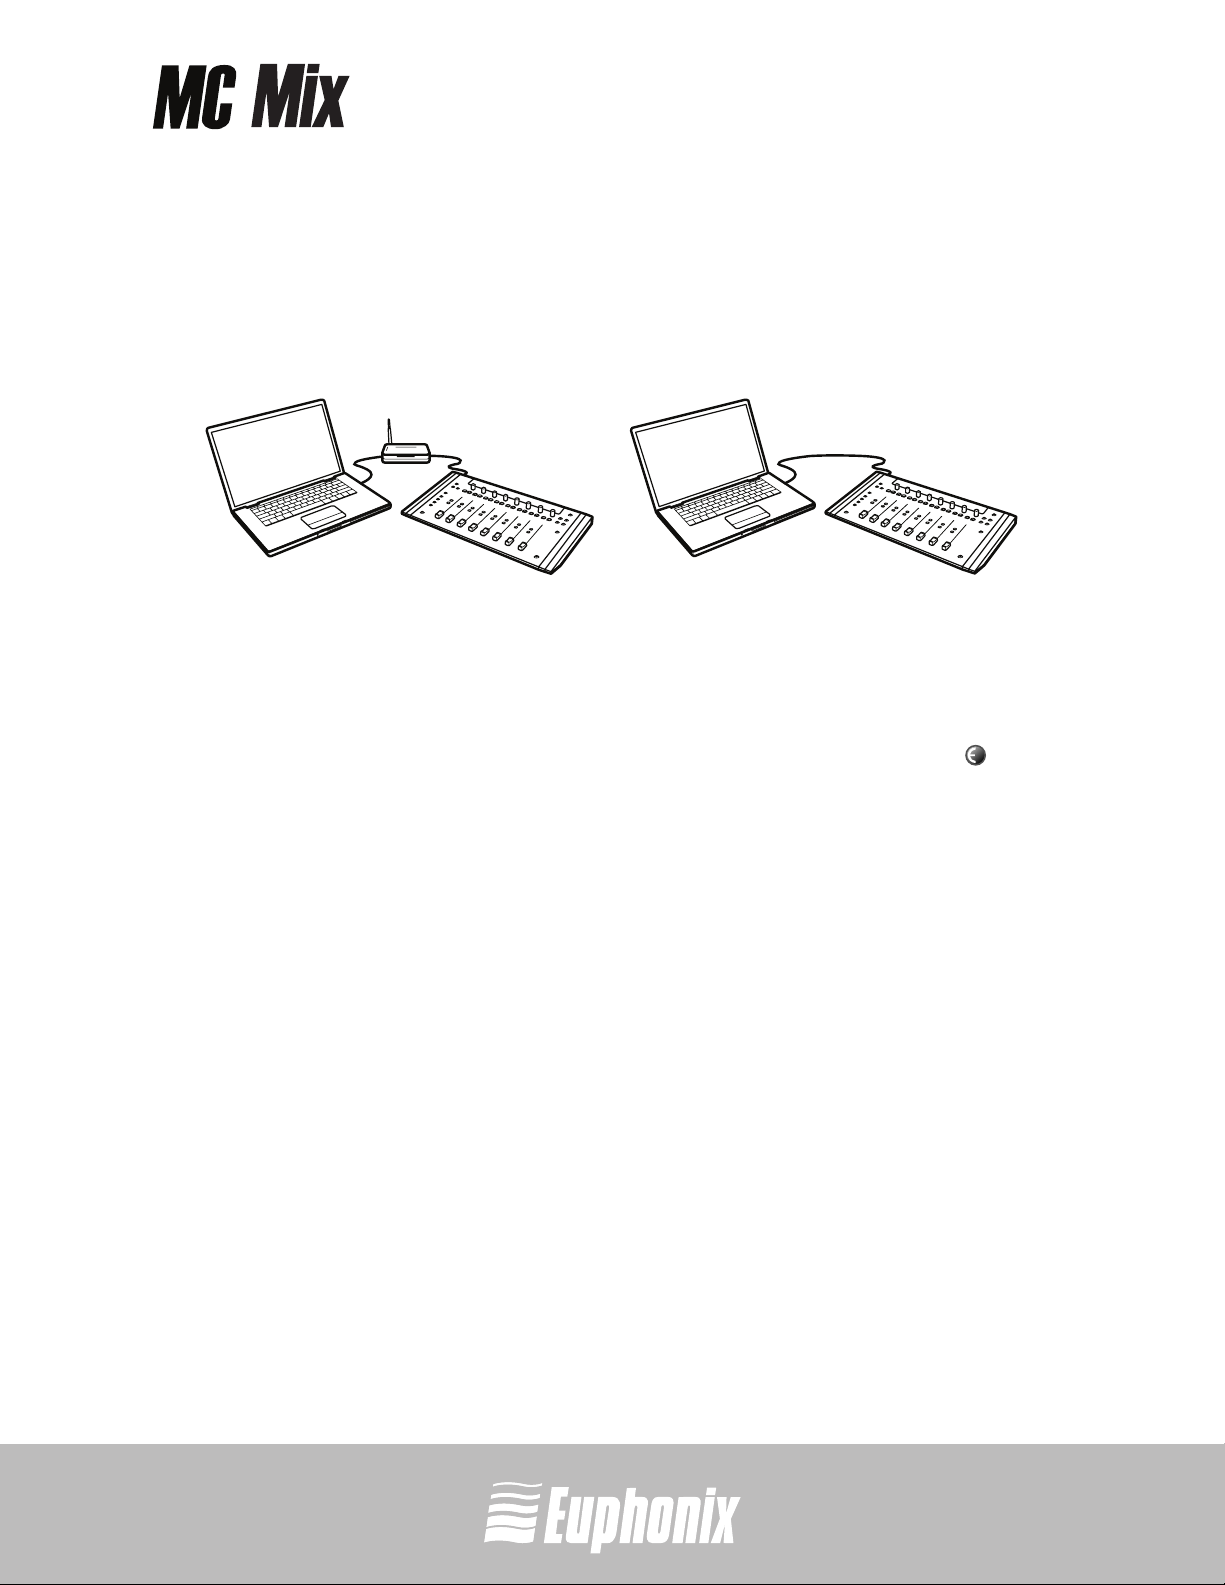
computer, router, or Ethernet switch (Figure 1-5).
An Ethernet router or switch is required to connect additional MC Mix units or to a local
area network. Note that connecting directly to the computer (Figure 1-5-right) may require
removing your Internet cable.
Figure 1-5 MC Mix connected to router (left) and directly to computer (right)
7. Turn on your router (if applicable), then turn on your Mac and wait until it finishes starting up.
8. Press and release the POWER switch on your MC Mix.
QUICKSTART GUIDEINSTALLATION AND SETUP
Look at the top-right of your screen and wait up to 60 seconds. A green icon in the
menu bar indicates correct installation.
If you did not see the green icon: If your Mac is pre-2002 and you are using an Ethernet
router or switch, you need to purchase a normal straight-through Ethernet cable (instead
of the crossover Ethernet cable supplied) from a computer store.
9. Launch your application and open a project (Logic, Cubase, Digital Performer, Pro Tools, etc.).
10. To setup your application to work with the MC Mix, refer to the EuCon Application Setup
Guide that you downloaded at the beginning of this section.
Logic users do not need this document because additional setup is not required.
5
Artist Series

professional control surface
2 Common Tasks
If you completed the steps in Section 1: Installation and Setup, you are ready to start
learning about your MC Mix. We recommend performing these simple tutorials of
common tasks in the order presented.
Fader Strip
1. Press the MC Mix’s strip 1 fader SEL key (Figure 2-1).
QUICKSTART GUIDECOMMON TASKS
The corresponding track is selected in your application.
2. Move the MC Mix’s strip 1 fader up and down.
You are now controlling the level of your application’s first track with your MC Mix. The
display at the top of strip 1 shows track information.
6
PAN
key
PAGE
FLIP
CHAN
INPUT
INSERTS
DYN
EQ
GROUP
AUX
MIX
PAN
CFG
PAGE
REC
ASSIGN
SE
SOLO
ON
12
A
U
T
O
N
L
Y
6
0
5
10
20
30
40
60
8
fader
SEL key
CFG
3. When the MC Mix is first powered up, the PAN key is lit by default. If it is not press the PAN
key (Figure 2-1).
Each strip’s Soft Knob now controls pan for its application’s corresponding track.
Figure 2-1 Strip 1 fader SEL key
Artist Series
professional control surface
4. Press the NUDGE X key to move all eight tracks over one strip (Figure 2-2).
If tracks 1–8 were assigned to strips 1–8, tracks 2–9 are now assigned to strips 1–8.
SEL
MIXER
ON
RECPLAY
NUDGE
HOME
BANK
ON
SOLO
CLOSE
NUDGE
END
BANK
Figure 2-2 NUDGE and BANK keys
5. Press and hold the Shift key (Figure 2-3) and press the BANK W key (Figure 2-2) to restore
tracks 1–8 to strips 1–8.
The Shift key accesses the functions labeled in blue on the MC Mix, in this case the
HOME function.
For convenience, another Shift key is located at the bottom-right of the MC Mix.
40
40
40
40
40
40
40
60
60
60
60
60
8
8
8
8
60
8
8
Shift key Shift key
40
60
60
8
MC MIX
8
QUICKSTART GUIDECOMMON TASKS
7
Figure 2-3 Shift keys
6. Press the BANK X key to shift tracks over eight at a time (Figure 2-2).
If tracks 1–8 were assigned to strips 1–8, tracks 9–16 are now assigned to strips 1–8.
NUDGE W and BANK W keys perform the same operations in the opposite direction.
Inserts
1. Add a plug-in on track 1 of your application.
2. If tracks 1–8 are not assigned to strips 1–8, press and hold the Shift key (Figure 2-3) and
press the BANK W key (Figure 2-2).
Artist Series
professional control surface
3. Press the MC Mix’s strip 1 fader SEL key (Figure 2-4).
4. Press the CHAN key to enter channel mode (Figure 2-4).
QUICKSTART GUIDECOMMON TASKS
5. Press the INSERTS key (Figure 2-4).
The names of the plug-ins on that track spill across the display screens.
8
6. Press the Soft Knob (Figure 2-4) below the desired plug-in’s name to select it.
The Soft Knobs can be turned like a conventional knob and pressed like a switch to access
an additional function.
SEL
ON
CFG
SOLO
PAGE
REC
ASSIGN
SE
ON
12
A
U
T
O
N
L
Y
6
0
5
10
CHAN
key
INSERTS
key
TOP
BACK
CFG
PAGE
FLIP
CHAN
INPUT
INSERTS
DYN
EQ
GROUP
AUX
Figure 2-4 Fader strip, INSERTS and CHAN keys
Soft
Knob
fader
SEL key
The parameters of that plug-in spill across the display screens.
7. Turn the Soft Knob below the desired parameter to adjust its value.
8. Press the PAGE keys to access more parameters (Figure 2-5).
SEL
TOP
BACK
CFG
PAGE
CFG
PAGE
ON
SOLO
ON
Figure 2-5 BACK and PAGE keys
9. Press the BACK key to exit that plug-in (Figure 2-5).
10. Press the CHAN key to exit channel mode (Figure 2-4).
Artist Series
MUSIK | AUDIO POST | VIDEO | FILM
professional control surface
Artist Series
SCHNELLSTART-ANLEITUNG
Dokument-Revision: A
END
CLOSE
NUDGE
BANK
POWER
ION
MC MIX
T
A
T
S
ICATION
PL
ORK
P
W
A
HOME
MIXER
NUDGE
SEL
SEL
SEL
SEL
BANK
RECPLAYNEXT FF
ON
STOPPREVRTZ REW
ON
ON
ON
6
0
12
O
N
UT
A
REC
6
12
O
N
UT
A
REC
6
12
O
N
T
U
A
REC
6
12
O
N
T
U
A
REC
6
12
5
10
20
30
Y
SSIGN
SEL
A
0
5
10
20
30
Y
SSIGN
SEL
A
0
5
10
20
30
Y
L
SE
ASSIGN
0
5
10
20
30
Y
L
SE
ASSIGN
0
5
10
20
30
8
60
40
8
60
40
8
60
40
8
60
40
8
60
40
Knob Set-Navigation Fader-NavigationPower-Schalter
Display-Bildschirme
SEL
SEL
SEL
SEL
TOP
SOLOSOLOSOLOSOLO ON ON ON ON SOLO ONSOLO ON SOLO ON SOLO ON
ON
ON
ON
ON
CFG
PAGE
BACK
CFG
PAGE
O
N
T
U
A
REC
6
12
12
12
CHAN
FLIP
0
O
N
T
U
A
REC
6
0
O
N
UT
A
REC
6
0
O
N
UT
A
REC
INSERTS
INPUT
Y
L
SE
ASSIGN
5
10
20
30
Y
L
SE
ASSIGN
5
10
20
30
Y
L
SE
ASSIGN
5
10
20
30
Y
L
SE
ASSIGN
EQ
DYN
AUX
GROUP
PAN
MIX
8
60
40
8
60
40
8
60
40
Knob Set-Wahltasten
Shift-Taste
Shift-Taste Fader-KanalzÐê¬

professional control surface
1 Installieren und Einrichten
Euphonix möchte Ihre Erfahrungen mit der MC Mix erfreulich und problemlos gestalten. Daher werden wir die folgende Software und Dokumentation regelmäßig aktualisieren:
• EuControl: Diese Software betreibt Ihre MC Mix und kommuniziert mit Ihrer Audio/Video-Applika-
tion. Laden Sie nach dem Starten von EuControl immer die neueste Version herunter, wenn Sie dazu
aufgefordert werden.
• MC Mix Bedienungshandbuch (PDF): Komplettes Handbuch für Ihre MC Mix.
• EuCon Applikation Einrichtungsanleitung (PDF): Die MC Mix unterstützt viele Applikationen, die alle
etwas unterschiedlich eingerichtet werden. Dieses Dokument enthält ergänzende Anleitungen für
jede Applikation.
Bevor Sie fortfahren, sollten Sie die neuesten Versionen unter:
www.euphonix.com/artist/support herunterladen.
MC Mix auspacken und hochstellen
Nehmen Sie die MC Mix, den Netzadapter, das Netzkabel, die Installations-CD, das Ethernet
Crossover-Kabel und die Hochstellbügel aus der Verpackung.
Die MC Mix kann mit den unterseitigen kleinen Klappfüßen hoch- oder schräggestellt werden.
Oder sie kann nach Befestigung der größeren Hochstellbügel hoch- und schräggestellt werden.
Da die MC Mix bei beiden Verfahren umgedreht werden muss, sollte man dies vor dem Anbringen der Kabel durchführen. Drehen Sie das Gerät um und legen Sie es auf einer weichen Unterlage ab.
Ziehen Sie alle vier kleinen Ausklappfüße heraus, um die MC Mix etwas zu erhöhen. Ziehen Sie
nur die beiden hinteren Füße heraus, um das Gerät in Ihre Richtung schrägzustellen (Abb. 1-1
links)
.
SCHNELLSTART-ANLEITUNGINSTALLIEREN UND EINRICHTEN
3
Ausklapp-
fкÐ
Hochstellbкge
Abb. 1-1 Ausklappfuß (links); Hochstellbügel (rechts)
Zwei größere separate Hochstellbügel können das Gerät stärker als die Ausklappfüße hochund schrägstellen. Drücken Sie die Bügel vorsichtig in die unterseitigen Halterungen, bis sie
einrasten – siehe Abb. 1-1.
HINWEIS:Wie die Bügel entfernt werden, erklärt das MC Mix Bedienungshandbuch.
Artist Series
professional control surface
Installieren
1. Legen Sie die Installations-CD in Ihren Macintosh ein und befolgen Sie die Anleitungen
zum Installieren der Software.
Wenn Sie zum Downloaden der aktuellsten Version von EuControl aufgefordert werden,
befolgen Sie die Bildschirmanleitungen.
EuControl startet automatisch und läuft, wenn dieses Icon in der Menüleiste erscheint.
EuControl
Icon
Abb. 1-2 Menüleiste mit EuControl Icon
2. Fahren Sie Ihren Macintosh herunter.
3. Schließen Sie ein Ende des AC-Netzkabels an den Netzadapter (Abb. 1-3 links) und das
andere Ende an eine Netzsteckdose an.
SCHNELLSTART-ANLEITUNGINSTALLIEREN UND EINRICHTEN
4
Netzadapter
FOOTSWITCH
DC In 15 V
AC-Netzkabel
Abb. 1-3 Netzadapter anschließen
DC
Ausgangskabel
4. Schließen Sie das DC-Ausgangskabel des Netzadapters an DC In auf der Rückseite links
an (Abb. 1-3 rechts).
5. Stecken Sie ein Ende des Ethernet Crossover-Kabels in die Ethernet-Buchse (markiert
mit ) auf der Rückseite der MC Mix (Abb. 1-4).
Eucon
EthernetKabel
Abb. 1-4 Ethernet-Kabel und rückseitige Buchse
Artist Series
professional control surface
6. Stecken Sie das andere Ende des Ethernet Crossover-Kabels in eine freie EthernetBuchse an Ihrem Computer, Router oder Ethernet Switch (Abb. 1-5).
Ein Ethernet Router oder Switch ist erforderlich, um zusätzliche MC Mix-Einheiten oder ein
LAN (Local Area Network) anzuschließen. Beim direkten Anschluss an den Computer (Abb.
1-5-rechts) müssen Sie eventuell das Internet-Kabel entfernen.
Abb. 1-5 MC Mix, verbunden mit dem Router (links) und direkt mit dem Computer (rechts)
7. Schalten Sie Ihren Router (falls zutreffend) und dann Ihren Mac ein und warten Sie, bis er
hochgefahren ist.
8. Drücken Sie die POWER-Taste der MC Mix.
Beobachten Sie die obere rechte Ecke des Bildschirms und warten Sie bis zu 60
Sekunden. Ein grünes Icon in der Menüleiste zeigt die korrekte Installation an.
Wenn das grüne Icon nicht erscheint: Wenn Ihr Mac vor 2002 hergestellt wurde und Sie
einen Ethernet Router oder Switch verwenden, müssen Sie in einem Computerladen ein
normales „gerades” Ethernet-Kabel (anstelle des mitgelieferten Crossover EthernetKabels) kaufen.
9. Starten Sie Ihre Applikation und öffnen Sie ein Projekt (Logic, Cubase, Digital Performer,
Pro Tools etc.).
10. Um Ihre Applikation für die Zusammenarbeit mit der MC Mix einzurichten, informieren Sie
sich bitte über die Details in der EuCon Applikation Einrichtungsanleitung, die Sie am Anfang dieses Abschnitts heruntergeladen haben.
Logic-Nutzer benötigen dieses Dokument nicht, da eine zusätzliche Einrichtung nicht
erforderlich ist.
SCHNELLSTART-ANLEITUNGINSTALLIEREN UND EINRICHTEN
5
Artist Series
professional control surface
2Übliche Aufgaben
Wenn Sie die Schritte in Section 1: Installieren und Einrichten durchgeführt haben, können Sie
nun Ihre MC Mix näher kennen lernen. Sie sollten die folgenden einfachen Tutorials zu den
üblichen Aufgaben der Reihe nach durchgehen.
Fader-Kanalzug
1. Drücken Sie die Fader SEL-Taste (Abb. 2-1) des Kanalzugs 1 der MC Mix.
Die entsprechende Spur wird in Ihrer Applikation gewählt.
2. Bewegen Sie den Fader von Kanalzug 1 der MC Mix hoch und runter.
Jetzt steuern Sie den Pegel der ersten Spur Ihrer Applikation mit der MC Mix. Auf dem Display am oberen Rand von Kanalzug 1 werden Spurinformationen angezeigt.
SCHNELLSTART-ANLEITUNGÜBLICHE AUFGABEN
PAGE
CFG
CFG
PAGE
SOLO
ON
6
PANTaste
FLIP
CHAN
INPUT
INSERTS
DYN
EQ
GROUP
AUX
MIX
PAN
REC
ASSIGN
SE
A
U
T
O
N
L
Y
12
6
0
5
10
20
30
Fader
SELTaste
40
60
8
Abb. 2-1 Fader SEL-Taste von Kanalzug 1
3. Nach dem Einschalten der MC Mix leuchtet standardmäßig die PAN-Taste. Andernfalls
drücken Sie die PAN-Taste (Abb. 2-1).
Der Soft Knob eines Kanalzugs steuert jetzt das Panning der entsprechenden Spur der Applikation.
Artist Series

professional control surface
4. Drücken Sie die NUDGE X Taste, um alle acht Spuren über einen Kanalzug zu schieben
(Abb. 2-2).
Wenn die Spuren 1–8 den Kanalzügen 1–8 zugewiesen waren, dann sind jetzt die Spuren 2–
9 den Kanalzügen 1–8 zugewiesen.
SEL
MIXER
ON
RECPLAY
NUDGE
HOME
BANK
ON
SOLO
CLOSE
NUDGE
END
BANK
Abb. 2-2 NUDGE- und BANK-Tasten
5. Halten Sie die Shift-Taste gedrückt (Abb. 2-3) und drücken Sie die BANK W Taste (Abb. 2-
2), um die Spuren 1–8 erneut den Kanalzügen 1–8 zuzuweisen.
Die Shift-Taste ruft die blau markierten Funktionen der MC Mix auf, in diesem Fall die
HOME-Funktion.
Praktischerweise befindet sich in der unteren rechten Ecke der MC Mix eine weitere
Shift-Taste.
40
40
40
40
40
40
40
60
60
60
60
60
8
8
8
8
60
8
8
40
60
60
8
MC MIX
8
SCHNELLSTART-ANLEITUNGÜBLICHE AUFGABEN
7
Shift-Taste Shift-Taste
Abb. 2-3 Shift-Tasten
6. Drücken Sie die BANK X Taste, um acht Spuren gleichzeitig zu verschieben (Abb. 2-2).
Wenn die Spuren 1–8 den Kanalzügen 1–8 zugewiesen waren, sind jetzt die Spuren 9–16
den Kanalzügen 1–8 zugewiesen.
Die NUDGE W und BANK W Tasten erfüllen die gleichen Aufgaben, aber in entgegengesetzte
Richtungen.
Inserts
1. Fügen Sie ein Plug-in auf Spur 1 Ihrer Applikation hinzu.
2. Wenn die Spuren 1–8 nicht den Kanalzügen 1–8 zugewiesen sind, halten Sie die Shift-
Taste gedrückt (Abb. 2-3) und drücken Sie die BANK W-Taste (Abb. 2-2).
Artist Series

professional control surface
3. Drücken Sie die Fader SEL-Taste von Kanalzug 1 der MC Mix (Abb. 2-4).
4. Drücken Sie die CHAN-Taste, um in den Channel-Modus umzuschalten (Abb. 2-4).
SCHNELLSTART-ANLEITUNGÜBLICHE AUFGABEN
5. Drücken Sie die INSERTS-Taste (Abb. 2-4).
Die Namen der Plug-ins dieser Spur werden über die Display-Bildschirme verteilt.
8
6. Drücken Sie den Soft Knob (Abb. 2-4) unter dem Namen des gewünschten Plug-ins, um es
zu wählen.
Die Soft Knobs lassen sich wie ein herkömmlicher Drehregler drehen und wie ein Schalter
drücken, um eine zusätzliche Funktion aufzurufen.
CHANTaste
INSERTSTaste
TOP
BACK
CFG
PAGE
FLIP
CHAN
INPUT
INSERTS
DYN
EQ
GROUP
AUX
SEL
ON
CFG
SOLO
PAGE
REC
ASSIGN
SE
ON
12
A
U
T
O
N
L
Y
6
0
5
10
Soft
Knob
Fader
SELTaste
Abb. 2-4 Fader-Kanalzug, INSERTS- und CHAN-Tasten
Die Parameter dieses Plug-ins werden über die Display-Bildschirme verteilt.
Drehen Sie den Soft Knob unter dem gewünschten Parameter, um dessen Wert einzustellen.
7.
8. Drücken Sie die PAGE-Tasten, um weitere Parameter aufzurufen (Abb. 2-5).
SEL
TOP
BACK
CFG
PAGE
CFG
PAGE
ON
SOLO
ON
Abb. 2-5 BACK- und PAGE-Tasten
9. Drücken Sie die BACK-Taste, um dieses Plug-in zu verlassen (Abb. 2-5).
10. Drücken Sie die CHAN-Taste, um den Channel-Modus zu verlassen (Abb. 2-4).
Artist Series

MUSIQUE| AUDIO POST | VIDÉO | FILM
professional control surface
Artist Series
GUIDE DE PRISE EN MAIN
Révision du document : A

Navigation
END
CLOSE
NUDGE
BANK
Power
Interrupteur
POWER
ION
MC MIX
T
A
T
S
ICATION
PL
ORK
P
W
A
HOME
MIXER
NUDGE
SEL
SEL
SEL
SEL
BANK
RECPLAYNEXT FF
ON
STOPPREVRTZ REW
ON
ON
ON
6
0
12
O
N
UT
A
REC
6
12
O
N
UT
A
REC
6
12
O
N
T
U
A
REC
6
12
O
N
T
U
A
REC
6
12
5
10
20
30
Y
SSIGN
SEL
A
0
5
10
20
30
Y
SSIGN
SEL
A
0
5
10
20
30
Y
L
SE
ASSIGN
0
5
10
20
30
Y
L
SE
ASSIGN
0
5
10
20
30
8
60
40
8
60
40
8
60
40
8
60
40
8
60
40
Tou che Shift
Afficheur
Tou ch es de na vi ga ti on
des groupes de boutons
SOLOSOLOSOLOSOLO ON ON ON ON SOLO ONSOLO ON SOLO ON SOLO ON
ON
SEL
ON
SEL
ON
SEL
ON
SEL
CFG
PAGE
BACK
TOP
CFG
PAGE
O
N
T
U
A
REC
6
12
12
12
CHAN
FLIP
0
O
N
T
U
A
REC
6
0
O
N
UT
A
REC
6
0
O
N
UT
A
REC
INSERTS
INPUT
Y
L
SE
ASSIGN
5
10
20
30
Y
L
SE
ASSIGN
5
10
20
30
Y
L
SE
ASSIGN
5
10
20
30
Y
L
SE
ASSIGN
EQ
DYN
AUX
GROUP
PAN
MIX
8
60
40
8
60
40
8
60
40
Sélecteurs de
groupes de boutons
Touche Shift Faders de voie

professional control surface
1 Installation et configuration
La société Euphonix tient à ce que l’utilisation de votre MC Mix soit exempte de
problème et aussi agréable que possible. C’est pourquoi nous offrons des mises à jour
périodiques pour le logiciel et les documents suivants:
• EuControl : Ce logiciel tourne sur votre MC Mix afin d’établir la communication avec l’application
audio/vidéo. Assurez-vous de télécharger la version la plus récente lorsqu’un message vous invite
à le faire lors du démarrage d’EuControl.
• MC Mix - Mode d’emploi (PDF) : Il s’agit du mode d’emploi complet de votre MC Mix.
• Guide de configuration de l’application EuCon (PDF) : Votre MC Mix est compatible avec de nombreuses
applications, qui nécessitent toutes une procédure de configuration différente. Ce guide fournit des
instructions supplémentaires pour chaque application.
Téléchargez les versions les plus récentes sur ce site : www.euphonix.com/artist/support
Déballage de la MC Mix et réglage de la hauteur
Sortez la MC Mix, l’adaptateur et le cordon secteur, le CD d’installation, le câble Ethernet croisé et les montants de la boîte.
Vous pouvez installer la MC Mix en position surélevée ou inclinée en dépliant les petites
pattes sous l’appareil, ou en position surélevée et inclinée en fixant les montants de
plus grande taille. Comme ces deux méthodes nécessitent que vous retourniez la MC
Mix pour déterminer la hauteur, il est préférable de la régler avant de connecter les
câbles. Retournez la MC Mix et posez-la sur une surface douce.
Dépliez les quatre petites pattes pour élever légèrement l’appareil, ou dépliez uniquement les deux à l’arrière pour l’incliner vers vous (partie gauche de la Figure 1-1).
Patte
repliable
Montant
GUIDE DE PRISE EN MAININSTALLATION ET CONFIGURATION
3
Figure 1-1 Patte repliable (gauche); support/montant (droite)
Les deux montants permettent d’obtenir une élévation et une inclinaison plus importantes. Installez-les sous l’appareil en appliquant une force modérée (voir Figure 1-1).
REMARQUE : Pour retirer les montants, consultez le mode d’emploi de la MC Mix.
Artist Series

professional control surface
Installation
1. Insérez le CD d’installation dans le lecteur de votre Macintosh et suivez les instructions
pour installer le logiciel.
Si un message s’affiche pour vous demander de télécharger la plus récente version
d’EuControl, suivez les instructions à l’écran.
EuControl est lancé automatiquement. Le logiciel tourne lorsque l’icône apparaît dans
la barre de menu.
Icône
EuControl
Figure 1-2 Barre de menu avec l’icône EuControl
GUIDE DE PRISE EN MAININSTALLATION ET CONFIGURA-
2. Mettez le Macintosh hors tension.
3. Connectez l’une des extrémités du cordon secteur à l’adaptateur secteur (partie gauche
de la Figure 1-3), et l’autre extrémité à une prise secteur.
Adaptateur secteur
4
Cordon secteur
Figure 1-3 Connexion de l’adaptateur secteur
4. Connectez le câble d’alimentation en courant continu de l’adaptateur secteur au connecteur
DC In situé sur le côté gauche, à l’arrière de l’appareil (partie droite de la Figure 1-3).
5. Connectez l’une des extrémités du câble Ethernet croisé au connecteur Ethernet ( )
situé à l’arrière de la MC Mix (Figure 1-4).
Câble CC
FOOTSWITCH
DC In 15 V
Eucon
Câble
Ethernet
Figure 1-4 Connecteur Ethernet en face arrière
Artist Series

professional control surface
6. Connectez l’autre extrémité du câble Ethernet croisé à un connecteur Ethernet libre sur
votre ordinateur, routeur ou commutateur Ethernet (Figure 1-5).
Un routeur ou commutateur Ethernet est nécessaire pour la connexion de MC Mix supplémentaires, ou la connexion à un réseau local. Veuillez noter que pour relier la MC Mix directement à l’ordinateur (partie droite de la Figure 1-5), il peut être nécessaire de
déconnecter le câble Internet.
Figure 1-5 MC Mix reliée à un routeur (gauche) et directement à l’ordinateur (droite)
7. Mettez le routeur sous tension (s’il y a lieu), puis votre Mac. Attendez que la procédure d’ini-
tialisation soit terminée.
GUIDE DE PRISE EN MAININSTALLATION ET CONFIGURATION
8. Appuyez sur l’interrupteur POWER de votre MC Mix et relâchez-le.
Vérifiez le coin supérieur droit de votre écran et attendez jusqu’à 60 secondes. Une icône
verte ( ) apparaît dans la barre de menu si l’installation a été effectuée avec succès.
Si l’icône verte n’apparaît pas : Si votre Mac a été fabriqué avant 2002 et que vous utilisez
un routeur ou commutateur Ethernet, vous devez vous procurer un câble Ethernet intermédiaire standard dans une boutique d’équipements informatiques pour remplacer le
câble Ethernet croisé fourni.
9. Lancez votre application et ouvrez un projet (Logic, Cubase, Digital Performer, Pro Tools,
etc.).
10. Pour configurer votre application afin qu’elle puisse fonctionner avec la MC Mix, reportezvous au Guide de configuration de l’application EuCon, que vous avez téléchargé au début
de ce chapitre.
Les utilisateurs de Logic n’ont pas besoin de ce guide car aucune configuration supplémentaire n’est requise pour cette application.
5
Artist Series

professional control surface
2 Opérations type
Si vous avez suivi les étapes de la Section 1: Installation et configuration, vous pouvez
maintenant en apprendre un peu plus sur la MC Mix. Nous vous conseillons de suivre
ces tutoriels simplifiés dans l’ordre indiqué pour effectuer les opérations type.
Fader de voie
1. Appuyez sur la touche SEL du Fader de voie 1 sur votre MC Mix (Figure 2-1).
La piste correspondante est sélectionnée dans votre application.
2. Déplacez le Fader de voie 1 vers le haut et le bas.
Vous contrôlez maintenant le niveau de la première piste de votre application avec la
GUIDE DE PRISE EN MAINOPÉRATIONS TYPE
MC Mix. Des informations sur la piste apparaissent alors sur l’afficheur dans la partie
supérieure de la voie 1.
6
FLIP
CHAN
INPUT
INSERTS
DYN
EQ
GROUP
AUX
MIX
PAN
CFG
PAGE
REC
ASSIGN
SE
SOLO
ON
12
A
U
T
O
N
L
Y
6
0
5
10
20
30
40
60
8
Touche
SEL
du Fader
CFG
PAGE
Touche
PAN
Figure 2-1 Touche SEL du Fader de voie 1
3. Lors de la mise sous tension de la MC Mix, la touche PAN s’allume par défaut. Sinon,
appuyez sur la touche PAN (Figure 2-1).
Les boutons programmables des voies contrôlent alors le panoramique des pistes
correspondantes dans l’application.
Artist Series

professional control surface
4. Appuyez sur la touche NUDGE X pour décaler les huit pistes d’une voie (Figure 2-2).
Si les pistes 1–8 étaient assignées aux voies 1–8, les pistes 2–9 sont alors assignées aux
voies 1–8.
SEL
MIXER
ON
RECPLAY
NUDGE
HOME
BANK
ON
SOLO
CLOSE
NUDGE
END
BANK
Figure 2-2 Touches NUDGE et BANK
5. Maintenez la touche Shift enfoncée (Figure 2-3) puis appuyez sur la touche BANK W (Figure
2-2) pour réassigner les pistes 1–8 aux voies 1–8.
La touche Shift permet d’accéder aux fonctions indiquées en bleu, comme dans ce cas
la fonction HOME. Pour plus de commodité, une autre touche Shift est située dans le
coin inférieur droit de la MC Mix.
40
40
40
40
40
40
40
60
60
60
60
60
8
8
8
8
60
8
8
Touche Shift Touche Shift
40
60
60
8
MC MIX
8
GUIDE DE PRISE EN MAINOPÉRATIONS TYPE
7
Figure 2-3 Touches Shift
6. Appuyez sur la touche BANK X pour déplacer les pistes par groupe de huit (Figure 2-2).
Si les pistes 1–8 étaient assignées aux voies 1–8, les pistes 9–16 sont alors assignées aux
voies 1–8.
Les touches NUDGE W et BANK W servent à déplacer les pistes dans les directions opposées.
Insertions
1. Ajoutez un Plug-in sur la piste 1 de votre application.
2. Si les pistes 1–8 ne sont pas assignées aux voies 1–8, maintenez la touche Shift enfoncée
(Figure 2-3), puis appuyez sur la touche BANK W (Figure 2-2).
Artist Series

professional control surface
3. Appuyez sur la touche SEL du Fader de voie 1 (Figure 2-4).
4. Appuyez sur la touche CHAN pour passer en mode voie (Figure 2-4).
GUIDE DE PRISE EN MAINOPÉRATIONS TYPE
5. Appuyez sur la touche INSERTS (Figure 2-4).
8
Les noms des Plug-ins sur cette piste apparaissent sur l’afficheur.
6. Pour sélectionner le Plug-in souhaité, appuyez sur le bouton (Figure 2-4) sous son nom.
Les boutons programmables peuvent être tournés comme des boutons conventionnels.
Vous pouvez aussi appuyer sur ces boutons pour accéder à une fonction supplémentaire.
Touche
CHAN
Touche
INSERTS
TOP
BACK
CFG
PAGE
FLIP
CHAN
INPUT
INSERTS
DYN
EQ
GROUP
AUX
SEL
ON
CFG
SOLO
PAGE
REC
ASSIGN
ON
A
U
T
O
N
SE
L
Y
Bouton
programmable
12
6
0
5
10
Figure 2-4 Fader de voie, touches INSERTS et CHAN
Touche
SEL
du Fader
Les paramètres du Plug-in sélectionné apparaissent sur l’afficheur.
7. Tournez les boutons sous les paramètres pour modifier leur valeur de réglage.
8. Appuyez sur les touches PAGE pour afficher des paramètres supplémentaires (Figure 2-5).
SEL
TOP
BACK
CFG
PAGE
CFG
PAGE
ON
SOLO
ON
Figure 2-5 Touches BACK et PAGE
9. Appuyez sur la touche BACK pour quitter le Plug-in (Figure 2-5).
10. Appuyez sur la touche CHAN pour quitter le mode voie (Figure 2-4).
Artist Series

MUSICA | POST AUDIO | VIDEO | PELICULAS
professional control surface
Artist Series
GUIA DE ARRANQUE RAPIDO
Versión de documento: A

END
CLOSE
NUDGE
BANK
ION
MC MIX
T
A
T
S
ICATION
PL
POWER
HOME
MIXER
NUDGE
SEL
Interruptor Porer
SEL
SEL
SEL
BANK
RECPLAYNEXT FF
ON
STOPPREVRTZ REW
ON
ON
ON
ORK
P
W
A
6
0
12
O
N
UT
A
REC
6
12
O
N
UT
A
REC
6
12
O
N
T
U
A
REC
6
12
O
N
T
U
A
REC
6
12
5
10
20
30
Y
SSIGN
SEL
A
0
5
10
20
30
Y
SSIGN
SEL
A
0
5
10
20
30
Y
L
SE
ASSIGN
0
5
10
20
30
Y
L
SE
ASSIGN
0
5
10
20
30
8
60
40
8
60
40
8
60
40
8
60
40
8
60
40
Pantallas
Navegación de los grupos de mandos Navegación faders
SOLOSOLOSOLOSOLO ON ON ON ON SOLO ONSOLO ON SOLO ON SOLO ON
ON
SEL
ON
SEL
ON
SEL
ON
SEL
CFG
PAGE
BACK
TOP
CFG
PAGE
O
N
T
U
A
REC
6
12
12
12
CHAN
FLIP
0
O
N
T
U
A
REC
6
0
O
N
UT
A
REC
6
0
O
N
UT
A
REC
INSERTS
INPUT
Y
L
SE
ASSIGN
5
10
20
30
Y
L
SE
ASSIGN
5
10
20
30
Y
L
SE
ASSIGN
5
10
20
30
Y
L
SE
ASSIGN
EQ
DYN
AUX
GROUP
PAN
MIX
8
60
40
8
60
40
8
60
40
Selectores grupos de mandos
Tecla Shi ft
Tecla Shift Bandas de fader

professional control surface
1 Instalación y configuración
En Euphonix nos esforzamos para hacer que su experiencia con el MC Mix sea algo
agradable y sin problemas, por lo que periódicamente actualizamos el siguiente software
y documentación:
• EuControl:
Descague siempre la nueva vesión si el sistema se lo pide al ir a ejecutar el EuControl
•
Manual de instrucciones del
• Manual de configuración del programa EuCon (P DF): El MC Mix admit e diversos programa s de contro l,
con procedimientos de configuración ligeramente diferentes. Este documento incluye instrucciones
complementarias para cada programa.
Antes de seguir, descargue la última versión desde la dirección:
Este software hace que funcione su
MC Mix (PDF):
Es el manual de instrucciones de su
MC Mix
y se comunica con su programa de audio/video.
.
MC Mix.
www.euphonix.com/artist/support
Desembalaje del MC Mix
Saque del embalaje su MC Mix, fuente de alimentación, cable de alimentación, CD de
instalación, cable trenzado cruzado de Ethernet y elevador.
El MC Mix puede ser elevado o colocado en ángulo utilizando las pequeñas patas
plegables que hay en la parte inferior de la unidad, o elevado y colocado en ángulo si
coloca el elevador incluido. Dado que ambos métodos requieren colocar el MC Mix boca
abajo, resulta más sencillo hacerlo antes de conectar ningún cable. Ponga la unidad boca
abajo sobre una superficie blanda.
Saque las cuatro patas plegables para elevar un poco la unidad; saque solo las dos
traseras para inclinar la unidad hacia usted (Figura 1-1 izquierda).
GUIA DE ARRANQUE RAPIDO
3
Patas
plegables
Elevador
Figura 1-1 Pata plegable (izquierda); elevador (derecha)
Dispone de dos patas desplegables más largas que elevan y colocan en ángulo la
unidad más que las cuatro anteriores. Para sacarlas del panel inferior tal y como
aparece indicado en la Figura 1-1, use un poco más de fuerza.
NOTA: Para quitar los elevadores, vea el manual de instrucciones del MC Mix.
INSTALACIÓN Y CONFIGURACIÓN
Artist Series

professional control surface
Instalación
1. Introduzca el CD de instalación en su Macintosh y siga las instrucciones para instalar el
software.
Si el sistema le pide que descargue la última versión del EuControl, siga las
instrucciones en pantalla.
El EuControl arrancará automáticamente y estará en funcionamiento cuando aparezca el
icono en la barra de menú.
Icono
EuControl
Figura 1-2 Barra de menú con el icono EuControl
2. Apague su Macintosh.
GUIA DE ARRANQUE RAPIDO
3. Conecte un extremo del cable de alimentación al adaptador de corriente (Figura 1-3
izquierda) y el otro a una salida de corriente.
adaptador de corriente
4
Cable de
alimentación
Figura 1-3 Conexión del cable de alimentación
4. Conecte el cable de salida DC del adaptador de corriente a la entrada DC In que hay en la
parte izquierda del panel trasero (Figura 1-3 derecha).
5. Conecte un extremo del cable trenzado cruzado de Ethernet a la toma de Ethernet
(marcada como ) en el panel trasero del MC Mix (Figura 1-4).
Cable de
FOOTSWITCH
DC In 15 V
Eucon
salida DC
INSTALACIÓN Y CONFIGURACIÓN
Figura 1-4 Toma de Ethernet del panel trasero
Cable
Ethernet
Artist Series

professional control surface
6. Conecte el otro extremo del cable trenzado cruzado de Ethernet a una toma de Ethernet
abierta de su ordenador, router o switch (Figura 1-5).
Para conectar unidades MC Mix adicionales o para crear una red de area local se necesita
un router o switch. Tenga en cuenta que para la conexión directa al ordenador
derecha) es posible que deba quitar el cable de Internet.
Figura 1-5 MC Mix connectado a un router (izquierda) y directamente al ordenador (derecha)
7. Encienda el router (si es necesario), encienda después su Mac y espere hasta que arranque.
8. Pulse el interruptor POWER de su MC Mix.
(Figura 1-5-
GUIA DE ARRANQUE RAPIDO
Observe la parte superior derecha de la pantalla y espere unos 60 segundos. Un icono
verde en la barra de menú le indicará que la instalación se ha llevado a cabo
correctamente.
Si no aparece el icono verde: Si su Mac es anterior al 2002 y está utilizando un router o
switch, tendrá que comprar un cable de Ethernet trenzado recto (en lugar del cable
trenzado cruzado incluido).
9. Arranque su programa de control(Logic, Cubase, Digital Performer, Pro Tools, etc.) y abra
un proyecto.
10. Para configurar su programa para trabajar con el MC Control, consulte el Manual de
configuración de la aplicación EuCon que habrá descargado al principio de esta sección.
Los usuarios del programa Logic no necesitarán este documento porque en este caso no
es necesaria ninguna configuración adicional.
5
Artist Series
INSTALACIÓN Y CONFIGURACIÓN

professional control surface
2 Tareas comunes
Si ha realizado todos los pasos indicados en la Sección 1 Instalación y configuración,
ya estará listo para comenzar el aprendizaje de su nuevo MC Mix. Le recomendamos
que realice estos sencillos tutoriales en el orden en el que aparecen aquí.
Banda de fader
1. Pulse la tecla SEL de la banda de fader 1 del MC Mix (Figura 2-1).
La pista correspondiente es seleccionada en su programa.
2. Mueva el fader de la banda 1 del MC Mix hacia arriba y abajo.
Ahora estará controlando con el MC Mix el nivel de la primera pista de su programa. La
pantalla de la parte superior de la banda 1 le muestra información de la pista.
GUIA DE ARRANQUE RAPIDO
6
FLIP
CHAN
INPUT
INSERTS
DYN
EQ
GROUP
AUX
MIX
PAN
CFG
PAGE
REC
ASSIGN
SE
SOLO
ON
12
A
U
T
O
N
L
Y
6
0
5
10
20
30
tecla
SEL del
CFG
PAGE
tecla
PAN
fader
40
60
8
Figura 2-1 Tecla SEL de banda de fader 1
3. La primera vez que ponga en marcha el MC Mix, la tecla PAN estará encendida por defecto.
Si no lo está, pulse dicha tecla PAN (Figura 2-1).
El mando de soft de cada banda controlará ahora el panorama stereo para la pista
correspondiente de su programa.
TAREAS COMUNES
Artist Series

professional control surface
4. Pulse la tecla NUDGE X ara colocar las ocho pistas en una única banda (Figura 2-2).
Si tenía las pistas 1–8 asignadas a las bandas 1–8, ahora las pistas 2–9 estarán asignadas
a las bandas 1–8.
SEL
MIXER
ON
RECPLAY
NUDGE
HOME
BANK
ON
SOLO
CLOSE
NUDGE
END
BANK
Figura 2-2 Teclas NUDGE y BANK
5. Mantenga pulsada la tecla Shift (Figura 2-3) y pulse la tecla BANK W (Figura 2-2) para
volver a hacer que las pistas 1–8 queden en las bandas 1–8.
La tecla Shift le permite acceder a las funciones que aparecen indicadas en color azul
en el MC Mix, en este caso la función HOME.
Para una mayor comodidad, hay otra tecla Shift situada en la parte inferior derecha del MC Mix
40
40
40
40
40
40
40
60
60
60
60
60
8
8
8
8
60
8
8
tecla Shift tecla Shift
40
60
60
8
MC MIX
8
GUIA DE ARRANQUE RAPIDO
.
7
Figura 2-3 Teclas Shift
6. Pulse la tecla BANK X para cambiar de golpe el grupo de pistas controladas (Figura 2-2).
Ahora, si tenía las pistas 1–8 asignadas a las bandas 1–8, ahora estarán allí las pistas 9–16.
Las teclas NUDGEW y BANK W realizan operaciones similares pero al revés.
Inserciones
1. Añada un plug-in en la pista 1 de su programa.
2. Si las pistas 1–8 no están asignadas a las bandas 1–8, mantenga pulsada la tecla Shift
(Figura 2-3) y pulse la tecla BANK W (Figura 2-2).
Artist Series
TAREAS COMUNES

professional control surface
3. Pulse la tecla SEL de la banda de fader 1 del MC Mix (Figura 2-4).
4. Pulse la tecla CHAN para acceder al modo e canal (Figura 2-4).
Tecla
CHAN
Tecla
INSERTS
GUIA DE ARRANQUE RAPIDO
Figura 2-4 Banda de fader y teclas INSERTS y CHAN
5. Pulse la tecla INSERTS (Figura 2-4).
Los nombres de los plug-ins de esa pista aparecerán en las pantallas.
8
6. Pulse el mando Soft (Figura 2-4) que esté debajo del nombre del plug-in que quiera para
elegirlo.
Los mandos Soft pueden ser girados como un mando giratorio convencional, y también
puede pulsarlos como un interruptor para acceder a funciones adicionales.
TOP
BACK
CFG
PAGE
FLIP
CHAN
INPUT
INSERTS
DYN
EQ
GROUP
AUX
SEL
ON
CFG
SOLO
PAGE
REC
ASSIGN
SE
ON
12
A
U
T
O
N
L
Y
6
0
5
10
Mando
soft
Tecla
SEL de
fader
Los parámetros del plug-in elegido aparecerán en las pantallas.
7. Gire el mando Soft que esté debajo del parámetro que quiera para ajustar su valor.
8. Pulse la tecla PAGE si quiere acceder a más parámetros (Figura 2-5).
9. Pulse la tecla BACK para salir de ese plug-in (Figura 2-5).
10. Pulse la tecla CHAN para salir del modo de canal (Figura 2-4).
TAREAS COMUNES
SEL
TOP
BACK
CFG
PAGE
CFG
PAGE
ON
SOLO
Figura 2-5 Teclas BACK y PAGE
ON
Artist Series

MUSIC | AUDIO POST | VIDEO | FILM
professional control surface
Artist Series
クイックスタート・ガイド
Document Revision: A

END
CLOSE
NUDGE
BANK
POWER
ION
MC MIX
T
A
T
S
ICATION
PL
ORK
P
W
A
HOME
MIXER
NUDGE
SEL
SEL
SEL
SEL
BANK
RECPLAYNEXT FF
ON
STOPPREVRTZ REW
ON
ON
ON
6
0
12
O
N
UT
A
REC
6
12
O
N
UT
A
REC
6
12
O
N
T
U
A
REC
6
12
O
N
T
U
A
REC
6
12
5
10
20
30
Y
SSIGN
SEL
A
0
5
10
20
30
Y
SSIGN
SEL
A
0
5
10
20
30
Y
L
SE
ASSIGN
0
5
10
20
30
Y
L
SE
ASSIGN
0
5
10
20
30
8
60
40
8
60
40
8
60
40
8
60
40
8
60
40
シ フ ト・キ ー
ノブセット・ナビゲーション フェーダー・ナビゲーションパワー・スイッチ
ディスプレイ・スクリーン
SOLOSOLOSOLOSOLO ON ON ON ON SOLO ONSOLO ON SOLO ON SOLO ON
ON
SEL
ON
SEL
ON
SEL
ON
SEL
CFG
PAGE
BACK
TOP
CFG
PAGE
O
N
T
U
A
REC
6
12
12
12
CHAN
FLIP
0
O
N
T
U
A
REC
6
0
O
N
UT
A
REC
6
0
O
N
UT
A
REC
INSERTS
INPUT
Y
L
SE
ASSIGN
5
10
20
30
Y
L
SE
ASSIGN
5
10
20
30
Y
L
SE
ASSIGN
5
10
20
30
Y
L
SE
ASSIGN
EQ
DYN
AUX
GROUP
PAN
MIX
8
60
40
8
60
40
8
60
40
ノブセット・セレクター
シフト・キー フェーダー・ストリップ

professional control surface
1 インストールとセットアップ
MCMix をより円滑にご使用いただくために、Euphonix は次のソフトウェアとドキュメンテーションを定期的
にアップデートいたします。
・ EuControl:このソフトウェアは MCMix を駆動し、オーディオ/ヴィデオ・アプリケーションとの交信を行
います。EuControl の起動時に新しいヴァージョンが使用できる旨表示された場合は、常に最新版をダウン
ロードしてご使用ください。
・ MCMix ユーザー・ガイド(PDF):MCMix の完全版ユーザー・ガイドです。
・ EuCon アプリケーション・セットアップ・ガイド(PDF):MCMix は多くのアプリケーションをサポートし
ており、セットアップの手順はアプリケーションによって若干異なります。このドキュメントはアプリケー
ション毎の補足的な情報を含みます。
先に進む前に、最新版をwww.euphonix.com/artist/support からダウンロードしてください。
MCMix の開梱と卓上への設置
MCMix を開梱し、箱からパワーサプライ、AC 電源ケーブル、インストール CD、イーサーネット・クロス
ケーブル、ライザー・ブラケットを取り出してください。
MCMix は、本体底面に設置された折り畳み式の足で本体を浮かせるまたは角度をつけることができます。ま
た、大型のライザー・ブラケットを取り付けることにより、角度をつけながら本体を浮かせることも可能です。
いずれの場合にも一度 MCMix の底面を上に向けることが必要となりますので、この作業は配線の前に行う方
が楽でしょう。柔らかい表面に底面を上にして置きます。
4 つの折り畳み式の足を全て引き出すと本体を浮かせることができます。上の 2 つのみを引き出すことによっ
て、手前側に向けて角度をつけることができます(図 1-1 左)。
折り畳み式
足
ライザー・
ブラケット
クイックスタート・ガイドインストールとセットアップ
3
図1-1折り畳み式足(左)、ライザー・ブラケット(右)
より大型の脱着式ライザー・ブラケット 2 つは、折り畳み式の足に比べてより高く設置でき、より鋭角な角度
をつけることができます。図 1-1 の通り、若干の力を加えて底面パネルに取り付けます。
NOTE: ライザー・ブラケットを外す方法は、MCMix ユーザーガイドをご参照ください。
Artist Series

professional control surface
インストール
1.
コンピュータにインストール CD を挿入します。マッキントッシュの指示に従ってインストールを行います。
最新ヴァージョンのダウンロードを促すメッセージが表示された場合は、表示された指示に従います。
EuControl は自動的に起動し、起動時にはこのアイコン がメニューバーに表示されます。
EuControl
アイコン
図1-2EuControl アイコンが表示された状態のメニューバー
2. マッキントッシュをシャットダウンします。
3. AC 電源ケーブルの片側をパワーサプライ(図 1-3 左)に、もう片側をコンセントに接続します。
クイックスタート・ガイドインストールとセットアップ
4
電源アダプター
FOOTSWITCH
DC In 15 V
AC 電源ケーブル
図1-3電源アダプターの接続
DC 出力
ケーブル
4. パワーサプライの DC 出力ケーブルをリアパネル左側の DCIn に接続します。( 図 1-3 右)。
5. イーサーネット・クロスケーブルの片側を MCMix リアパネルのイーサーネット端子( )に接続します
(図 1-4)。
Eucon
イーサー
ネット
ケーブル
図1-4リアパネルのイーサーネット端子
Artist Series

professional control surface
6. イーサーネット・クロスケーブルの反対側をコンピュータのイーサーネット・ジャック、ルーター、イー
サーネット・スイッチのいずれかに接続します(図 1-5)。
他の MCMix 機または LAN に接続する場合は、イーサーネット・ルーターまたはスイッチが必要となりま
す。コンピュータに直接接続する場合(図 1-5 右)は、インターネット用のケーブルを外すことが必要と
なることがあります。
図1-5MCMix のルーターへの接続図(左)、ならびにコンピュータへの接続図(右)
7. ルーターを使用する場合は電源を投入します。次に、マッキントッシュの電源を投入し、起動を待ちます。
8. MCMix の POWER スイッチを押し、離します。
画面右上を確認し、約 60 秒待ちます。インストールが正しく完了すると、メニューバーにグリーンのア
イコン が表示されます。
グリーンのアイコンが表示されない場合 :2002 年以前のマッキントッシュでイーサーネット・ルーターま
たはスイッチを使用する場合、付属のクロスケーブルの代わりに通常のストレート・ケーブルをコン
ピュータ店で別途購入する必要があります。
9. アプリケーションを起動し、新規プロジェクトを開きます(Logic、Cubase、DigitalPerformer、Pro
Tools 等)。
10. アプリケーションを MCMix 用にセットアップする手順については、本セクション冒頭でダウンロードし
た EuCon アプリケーション・セットアップ・ガイドをご参照ください。
Logic では追加のセットアップ作業は必要ありませんので、この文書は必要ありません。
クイックスタート・ガイドインストールとセットアップ
5
Artist Series

professional control surface
2 基本操作
クイックスタート・ガイド基本操作
セクション 1「インストールとセットアップ」を完了したら、MCMix を使用する準備が整いました。まずは、
このセクションの順番通りに一般的な操作のシンプルなチュートリアルを行うことをお勧めいたします。
フェーダー・ストリップ
1. ストリップ 1 のフェーダー SEL キーを押します(図 2-1)。
アプリケーション側で該当するトラックが選択され、タッチスクリーン上にハイライトされます。
2. ストリップ 1 のフェーダーを上下に動かします。
MCMix からアプリケーションの最初のトラックのレベルをコントロールしています。ストリップ 1 上部
のディスプレイにトラックの情報が表示されます。
6
FLIP
CHAN
INPUT
INSERTS
DYN
EQ
GROUP
AUX
MIX
PAN
CFG
PAGE
REC
ASSIGN
SE
SOLO
ON
12
A
U
T
O
N
L
Y
6
0
5
10
20
30
40
60
8
フェーダー
SEL キー
CFG
PAGE
PAN
キー
図2-1ストリップ 1 フェーダー SEL キー
3. 初回 MCMix の電源を入れた時には、PAN キーがディフォルトで点灯している状態となります。点灯して
いない場合は、PAN キーを押します(図 2-1)。
これで、各ストリップのソフト・ノブは、アプリケーションの該当トラックのパンをコントロールします。
Artist Series

professional control surface
4. NUDGE右矢印キー(図 2-2)を押すと、8 つのトラックが 1 ストリップ分ずれます。
ストリップ 1-8 にトラック 1-8 がアサインされていた状態でこの操作を行うと、ストリップ 1-8 にトラッ
ク 2-9 がアサインされます。
SEL
MIXER
ON
RECPLAY
NUDGE
HOME
BANK
ON
SOLO
CLOSE
NUDGE
END
BANK
図2-2NUDGE / BANK キー
5. シフト(図 2-3)を押しながら BANK 左矢印キー(図 2-2)を押すと、ストリップ 1-8 にトラック 1-8 がアサ
インされる状態に戻ります。
シフト・キーはブルーにラベリングされた機能(この場合は HOME 機能)にアクセスします。
シフト・キーは MCMix の手前左側にも用意されています。
40
40
40
40
40
40
40
60
60
60
60
60
8
8
8
8
60
8
8
シフト・キー シフト・キー
図2-3シフト・キー
40
60
60
8
MC MIX
8
クイックスタート・ガイド基本操作
7
6. BANK 右矢印キー(図 2-2)を押すと、8 つ単位でトラックを移動します。
ストリップ 1-8 にトラック 1-8 がアサインされている状態でこの操作を行うと、ストリップ 1-8 にトラッ
ク 9-16 がアサインされます。
NUDGE 左矢印と BANK左矢印キーは同様の操作を逆方向に行います。
インサート
1. アプリケーションのトラック 1 にプラグインを追加します。
2. ストリップ 1-8 にトラック 1-8 がアサインされていない場合、シフト・キーを(図 2-3)を押しながら BANK
左矢印キー(図 2-2)を押します。
Artist Series

professional control surface
3. ストリップ 1 のフェーダー SEL キーを押します。
4. CHAN キーを押し、チャンネル・モードに切り替えます。
クイックスタート・ガイド基本操作
8
CHAN
キー
INSERTS
キー
TOP
BACK
CFG
PAGE
FLIP
CHAN
INPUT
INSERTS
DYN
EQ
GROUP
AUX
SEL
ON
CFG
SOLO
PAGE
REC
ASSIGN
SE
ON
12
A
U
T
O
N
L
Y
6
0
5
10
ソフト・
ノブ
フェーダー
SEL
キー
図2-4フェーダー・ストリップ、INSERTS / CHAN キー
5. INSERTS キー(図 2-4)を押します。
トラック上のプラグインの名称がディスプレイに表示されます。
6. 操作したいプラグイン名が表示されている下のソフト・ノブを押して、選択します。
ソフト・ノブは通常のノブのように回転させることができ、またスイッチのように押すことによって追加
の機能にアクセスすることができます。
プラグインのパラメータがディスプレイに表示されます。
7. 操作したいパラメータ名の下にあるソフト・ノブを回して、値を調節します。
8. PAGE キー(図 2-5)を押すことにより、他のパラメータにアクセスできます。
SEL
TOP
BACK
CFG
PAGE
CFG
PAGE
ON
SOLO
ON
図2-5BACK / PAGE キー
9. BACK キー(図 2-5)を押すことにより、プラグインの操作を終了します。
10. CHAN キー(図 2-4)を押すと、チャンネル・モードを終了します。
Artist Series

MUSIC | AUDIO POST | VIDEO | FILM
professional control surface
Artist Series
QUICKSTART GUIDE
Document Revision: A
Korean

END
CLOSE
NUDGE
BANK
POWER
ION
MC MIX
T
A
T
S
ICATION
PL
ORK
P
W
A
HOME
MIXER
NUDGE
SEL
SEL
SEL
SEL
BANK
RECPLAYNEXT FF
ON
STOPPREVRTZ REW
ON
ON
ON
6
0
12
O
N
UT
A
REC
6
12
O
N
UT
A
REC
6
12
O
N
T
U
A
REC
6
12
O
N
T
U
A
REC
6
12
5
10
20
30
Y
SSIGN
SEL
A
0
5
10
20
30
Y
SSIGN
SEL
A
0
5
10
20
30
Y
L
SE
ASSIGN
0
5
10
20
30
Y
L
SE
ASSIGN
0
5
10
20
30
8
60
40
8
60
40
8
60
40
8
60
40
8
60
40
Knob Set navigation Fader navigationPower switch
Display Screens
SOLOSOLOSOLOSOLO ON ON ON ON SOLO ONSOLO ON SOLO ON SOLO ON
ON
SEL
ON
SEL
ON
SEL
ON
SEL
CFG
PAGE
BACK
TOP
CFG
PAGE
O
N
T
U
A
REC
6
12
12
12
CHAN
FLIP
0
O
N
T
U
A
REC
6
0
O
N
UT
A
REC
6
0
O
N
UT
A
REC
INSERTS
INPUT
Y
L
SE
ASSIGN
5
10
20
30
Y
L
SE
ASSIGN
5
10
20
30
Y
L
SE
ASSIGN
5
10
20
30
Y
L
SE
ASSIGN
EQ
DYN
AUX
GROUP
PAN
MIX
8
60
40
8
60
40
8
60
40
Knob Set selectors
Shift key
Shift key Fader strips

professional control surface
1 제품설치
•Euphonix는 MC Mix 사용자의 편리함과 만족감을 위하여 정기적으로 업데이트된 Software 및 메뉴
얼 등을 제공한다 :
• EuControl: MC Control 을 구동하고 , audio/video software 와 MC Mix 를 연동 시키기 위한 기본 soft-
ware 이다 . EuControl 을 실행한 후 버젼을 확인하여 새로운 버젼 software 를 download 한다 .
• MC Mix User Guide (PDF):MC Mix 의 사용 자 메 뉴얼 .
• EuCon Application Setup Guide (PDF): MC Mix 는 다양한 Application 을 지원하며 , 각각의 Application
들은약간씩 다른 설정이 필요하다 . 각각의 Application 에 필요한 추가 설명들을 포함하고 있다 .
제품을 설치하기 전 , Euphonix 홈페이지에서 최신 버젼을 software 를 확인한다 .
: www.euphonix.com/artist/support
MC Mix 본체의 높이와 기울기 조절
포장된 박스에서 MC Mix 본체 , 파워서플라이 , AC power cord, installation CD, Ethernet
crossover cable, 브라켓 (Riser bracket) 등을 꺼낸다 .
MC Mix 의 높이나 각도를 조절하기 위해 본체 밑의 작은 foldout leg 을 올리거나 별도의 riser
bracket 을 사용할 수 있다 . 두가지 방법 모두 MC Mix 의 본체를 뒤집어야 하므로 , 케이블들을
본체에 연결하기 전에 높이나 각도를 조절하는 것이 좋다 . 본체를 부드러운 곳에 올려놓고 작
업한다 .
본체를 적당한 높이로 올리기 위해서는 네 개의 작은 foldout leg 들을 모두 사용한다 . 뒤에 두
개의 foldout leg 을 들어 올리면 사용자 쪽으로 본체를 기울일 수 있다 . (Figure 1-1 좌측 ).
Foldout
leg
Riser
bracket
QUICKSTART GUIDE
3
Figure 1-1 Foldout leg ( 좌 ); riser bracket ( 우 )
좀더 높게 본체를 올리기 위해서는 별도의 riser bracket 을 이용하면 된다 . Figure 1-1 과 같이
적당한 힘을 주어 riser bracket 을 본체의 밑면에 설치한다 .
NOTE: riser brackets
을 제거하기 위해서는
Artist Series
, MC Control
사용가 가이드를 참조한다 .
제품설치

professional control surface
설치
1. software 를 설치하기 위해 , 설치 CD 를 Macintosh 컴퓨터에 넣고 , 설치가이드를 따른다 .
만약 , 최신 버전을 download 하라는 내용이 보이면 스크린의 지시를 따른다 .
메뉴 바 (menu bar) 에 다음과 같은 아이콘이 나타나면 EuControl 은 자동적으로 실행 .
되고 있는것이다
EuControl
icon
QUICKSTART GUIDE
2. Macintosh 컴퓨터를 끈다 .
3. AC 파워코드를 power adapter 에 꽂고 (Figure 1-3 좌 ), 반대 쪽을 전원에 연결한다 .
4
AC power cord
4. Power Adapter의 DC output 케이블을 본체 뒷면 좌측 부분 DC In 에 연결한다(Figure 1-3 우).
5. Ethernet crossover 케이블의 한쪽 끝을 본체 뒷면 Ethernet jack ( 표시 ) 에 연결한다 .
(Figure 1-4).
Figure 1-2 Menu bar with EuControl icon
power adapter
Figure 1-3 Connecting the power adapter
DC In 15 V
FOOTSWITCH
DC output
cable
제품설치
Eucon
Ethernet
cable
Figure 1-4 뒷면의 Ethernet jackl
Artist Series

professional control surface
6. Ethernet crossover 케이블 다른 한쪽을 컴퓨터 , Router, 혹은 Ethernet switch 의 Ethernet
jack 에 연결한다 (Figure 1-5).
Ethernet router 이나 switch 는 추가의 MC Mix 유닛을 연결하거나 local area network 에 연
결이 필요할때 사용한다 . 컴퓨터에 MCMix 를 직접 연결하면 (Figure 1-5 우 ) 인터넷 케이
블을 줄일 수 있다 .
Figure 1-5 MC Mix 를 router 로 연결 ( 좌 ) 컴퓨터에 직접 연결 (우)
7. Router 의 전원을 켜고 ( 필요하다면 ), Mac 을부팅시킨 후 , 부팅이 끝날때 까지 기다린다 .
8. MCMix 의 POWER 스위치를 누른다 .
QUICKSTART GUIDE
60 초 정도 기다리며 스크린의 우측 상단을 주목한다 . 초록색 아이콘이 메뉴 바에 나
타나면 설치가 성공적으로 이루어진 것이다 .
만약 초록색 아이콘이 나타나지 않는다면 : 만약 Mac 이 2002년 이전의 모델이면
Ethernet router 나 switch, 그리고 Euphonix 에서 제공한 crossover Ethernet 케이블 외에
일반적인 Ethernet 케이블을 별도로 준비해야 한다 .
9. Application (Logic, Cubase, Digital Performer, Pro Tools, 등등 ) 을 실행한다 .
10. MC Mix 를 사용자의 application 과 사용하기 위해서는 ,
Guide 를 참조한다 .
Logic 사용자는 별도의 설정이 필요없기 때문에 위의 사용자 가이드가 필요하지 않다 .
제공 된
EuCon Application Setup
5
Artist Series
제품설치

professional control surface
2 일반사용법 Tutorial
Section 1
제품설치
다음에 소개되는 , 일반 사용법에 대한 Tutorial 을 따라하기를 권유한다 .
Fader Strip
1. MC Mix strip 1 의 fader SEL key (Figure 2-1)를 누른다 .
Strip 에 대응하는 트랙이 application 에서 선택된다 .
QUICKSTART GUIDE
2. Srip 1 의 fader 를 위 , 아래로 움직인다 .
MC Mix 로 application 의 첫번째 트랙을 컨트롤 할 수 있다 . 첫번째 Strip 의 상단 display
에 트랙 정보가 나타난다 .
6
를 완료했다면 이제 MCMix 를 사용할 준비가 되었다 . Euphonix 는
FLIP
CHAN
INPUT
INSERTS
DYN
EQ
GROUP
AUX
MIX
PAN
CFG
PAGE
REC
ASSIGN
SE
SOLO
ON
12
A
U
T
O
N
L
Y
6
0
5
10
20
30
fader
SEL key
CFG
PAGE
PAN
key
3. MC Mix 의 전원을 켜면 PAN key 가 켜져있다 . (Figure 2-1)
MC Mix 각 Strip 의 Soft Knob 에서 application 의 트렉에 대응되는 pan 포지션을 컨트롤 할
수 있다 .
일반사용법 TUTORIAL
40
60
8
Figure 2-1 Strip 1 fader SEL key
Artist Series

professional control surface
4. 다른 트랙을 선택하기 위해서 NUDGE X key 를 누른다 (Figure 2-1).
만약 트랙 1~8 이 strips 1~8 에 지정되어 있었다면 , 트랙 2~9 가 스트립 1~8 에 지정된다 .
SEL
MIXER
ON
RECPLAY
NUDGE
HOME
BANK
ON
SOLO
CLOSE
NUDGE
END
BANK
Figure 2-2 NUDGE and BANK keys
5. Shift key (Figure 2-3) 를 누른 상태에서 BANK W key (Figure 2-1) 를 누르면 다시 트랙 1~8
이 스트립 1~8 에 지정된다 .
파란색으로 표시된 기능들을 사용하기 위해 Shift key 를 누른다 . 이경우엔 HOME 기능
이다 . 사용자의 편의를 위해 MC Mix 좌 , 우측 하단에 shift key 가 있다 .
40
40
40
40
40
40
40
60
60
60
60
60
8
8
8
8
60
8
8
Shift key Shift key
Figure 2-3 Shift keys
40
60
60
8
MC MIX
8
QUICKSTART GUIDE
7
6. BANK X key (Figure 2-1) 를 누르면 한번에 여덟 개의 트랙을 옮길 수 있다 .
만약 트랙 1~8 이 strips 1~8 에 지정되어있다면 , 트랙 9~16 이 strips 1~8 에 지정될것이다 .
NUDGE W 와 BANK W key 는 같은 기능을 하지만 트랙이 반대방향으로 움직인다 .
Inserts
1. application 의 트랙 1 에 plug-in 을 지정한다 .
2. 만약 트랙 1~8 이 strips 1~8 에 지정되지 않았다면 , Shift key (Figure 2-3) 를 누른 상태에
서 BANK W key 를 누른다 .
일반사용법 TUTORIAL
Artist Series

professional control surface
3. MC Mix Strip 1 의 fader SEL key 를 누른다 (Figure 2-4).
4. 채널 모드에 접근하기 위해 CHAN key 를 누른다 (Figure 2-4).
QUICKSTART GUIDE
5. INSERTS key 를 누른다 (Figure 2-4).
트랙에 지정된 plug-in 의 이름이 디스플레이 스크린 주위에 나타난다 .
8
6. 편집 하고자 원하는 Plug-in 을 선택하기 위해서는 plug-in 이름 아래의 Soft Knob (Figure
2-4) 을 누른다 .
Soft Knob 은 일반적인 knob 과 같이 사용되고 , 부가적인 메뉴에 접근하기 위한 switch 로
도 사용된다 .
SEL
ON
CFG
SOLO
PAGE
REC
ASSIGN
SE
ON
12
A
U
T
O
N
L
Y
6
0
5
10
CHAN
key
INSERTS
key
TOP
BACK
CFG
PAGE
FLIP
CHAN
INPUT
INSERTS
DYN
EQ
GROUP
AUX
Figure 2-4 Fader strip, INSERTS and CHAN keys
Soft
Knob
fader
SEL key
7. 원하는 plug-in parameter 를 조절하기위해 parameter 밑의 Soft Knob 을 돌린다 .
8. 더 많은 parameter 를 조절하려면 PAGE key 를 누른다 (Figure 2-5).
9. plug-in 모드에서 나오려면 BACK key 를 누른다 (Figure 2-5).
일반사용법 TUTORIAL
10. 채널 모드에서 나오려면 CHAN key 를 누른다 (Figure 2-4).
디스플레이 스크린 주위에 plug-in parameter 가 표시된다 .
SEL
TOP
BACK
CFG
PAGE
Figure 2-5 BACK and PAGE keys
CFG
PAGE
ON
SOLO
ON
Artist Series
 Loading...