

Page 1
CS3000
CS2000
MixView Software Supplement
Version 3.2
Revision 3
Page 2

CS3000/2000
MixView Software Supplement
Version 3.2
Revision 3
Corporate HQ, Euphonix Inc. 220 Portage Ave, Palo Alto, CA 94306-2242
Voice: (650) 855-0400 / Fax: (650) 855-0410 / Web Page: www.euphonix.com
Publish Date: July 1998
Operation Manual Part Number: 840-06048-01
In the interest of continued product development, Euphonix reserves the right to make improvements
in this manual and the product it describes at any time, without notice or obligation.
CS3000, CS2000, MixView, Crescendo, Total Automation, SnapShot Recall, Audio CUBE, Digital Studio Controller,
DSC, GainBall, GainCurve, TrackPanner and PanBall are trademarks of Euphonix Inc.
©1998 Euphonix Inc. All rights reserved worldwide. No part of this publication may be reproduced, transmitted,
transcribed, stored in a retrieval system, or translated into any language in any form
ii Euphonix CS3000/2000 MixView 3.2 Software Supplement
by any means without written permission of Euphonix Inc.
Page 3

TABLE OF CONTENTSTABLE OF CONTENTS
TABLE OF CONTENTS
TABLE OF CONTENTSTABLE OF CONTENTS
SECTION 1 : FADER ENHANCEMENTS ..................... 1 - 3
Fader Names ........................................................................................ 1 - 3
Fader dB Level Displays ..................................................................... 1 - 4
Fader Swap ........................................................................................... 1 - 4
Backstop Pre Fader Listen (PFL) ....................................................... 1 - 5
SECTION 2 : MONITORING ENHANCEMENTS ............. 1 - 7
Monitor Set Status Lock ..................................................................... 1 - 7
Monitor Source Grouping................................................................... 1 - 7
Monitor Level Linking .......................................................................... 1 - 8
Source Grouping and Level Linking Menu Indicators ............................................. 1 - 8
SECTION 3 : SNAPSHOT ENHANCEMENTS ................ 1 - 9
Snapshot List Management ............................................................... 1 - 9
Merging Snapshot Lists .................................................................... 1 - 10
Bouncing Snapshots Between Existing Titles...................................................... 1 - 10
Merging Lists Between Titles ............................................................................... 1 - 10
Create a set of utility type Snapshots................................................................... 1 - 10
SECTION 4 : MISC ENHANCEMENTS ......................1 - 11
Dynamics Headroom Extension ...................................................... 1 - 11
Multiple Console Solo Linking ......................................................... 1 - 11
Project Dates ...................................................................................... 1 - 12
Stereo EQ Linking............................................................................... 1 - 12
Copying linked EQs ................................................................................................1 - 12
Automating linked EQs ..........................................................................................1 - 13
I/O and DSC Status Lock .................................................................. 1 - 13
Cue Skip............................................................................................... 1 - 13
The LIST Key ....................................................................................... 1 - 14
SECTION 5 : AUTOMATION ENHANCEMENTS ............ 1 - 15
Automated Punch-in/out .................................................................. 1 - 15
On-the-Fly Punch-in/out ................................................................... 1 - 15
Loop mode ............................................................................................................. 1 - 16
Build mode............................................................................................................. 1 - 17
A Note On ..............................................................................................................1 - 17
Out vs. P-Out........................................................................................................ 1 - 17
Automation Glide ............................................................................... 1 - 18
Desk Automation Glide ......................................................................................... 1 - 18
CUBE Automation Glide ........................................................................................ 1 - 18
CUBE Aux Send Automation ............................................................ 1 - 19
CUBE Panner Automation ................................................................ 1 - 19
Abs vs. Trim ........................................................................................................... 1 - 19
All Punch and All Clear.......................................................................................... 1 - 20
CUBE Automation Editing ................................................................. 1 - 20
Cutting Automation Moves ................................................................................... 1 - 21
Copying and Bouncing Automation Moves ...........................................................1 - 22
Enhanced Pass Control Show System ........................................... 1 - 23
Track Panner ...................................................................................... 1 - 23
Page 4

This page intentionally left blank
Page 5
Section 1: Fader Enhancements
SECTION 1 : FADER ENHANCEMENTS
3.1
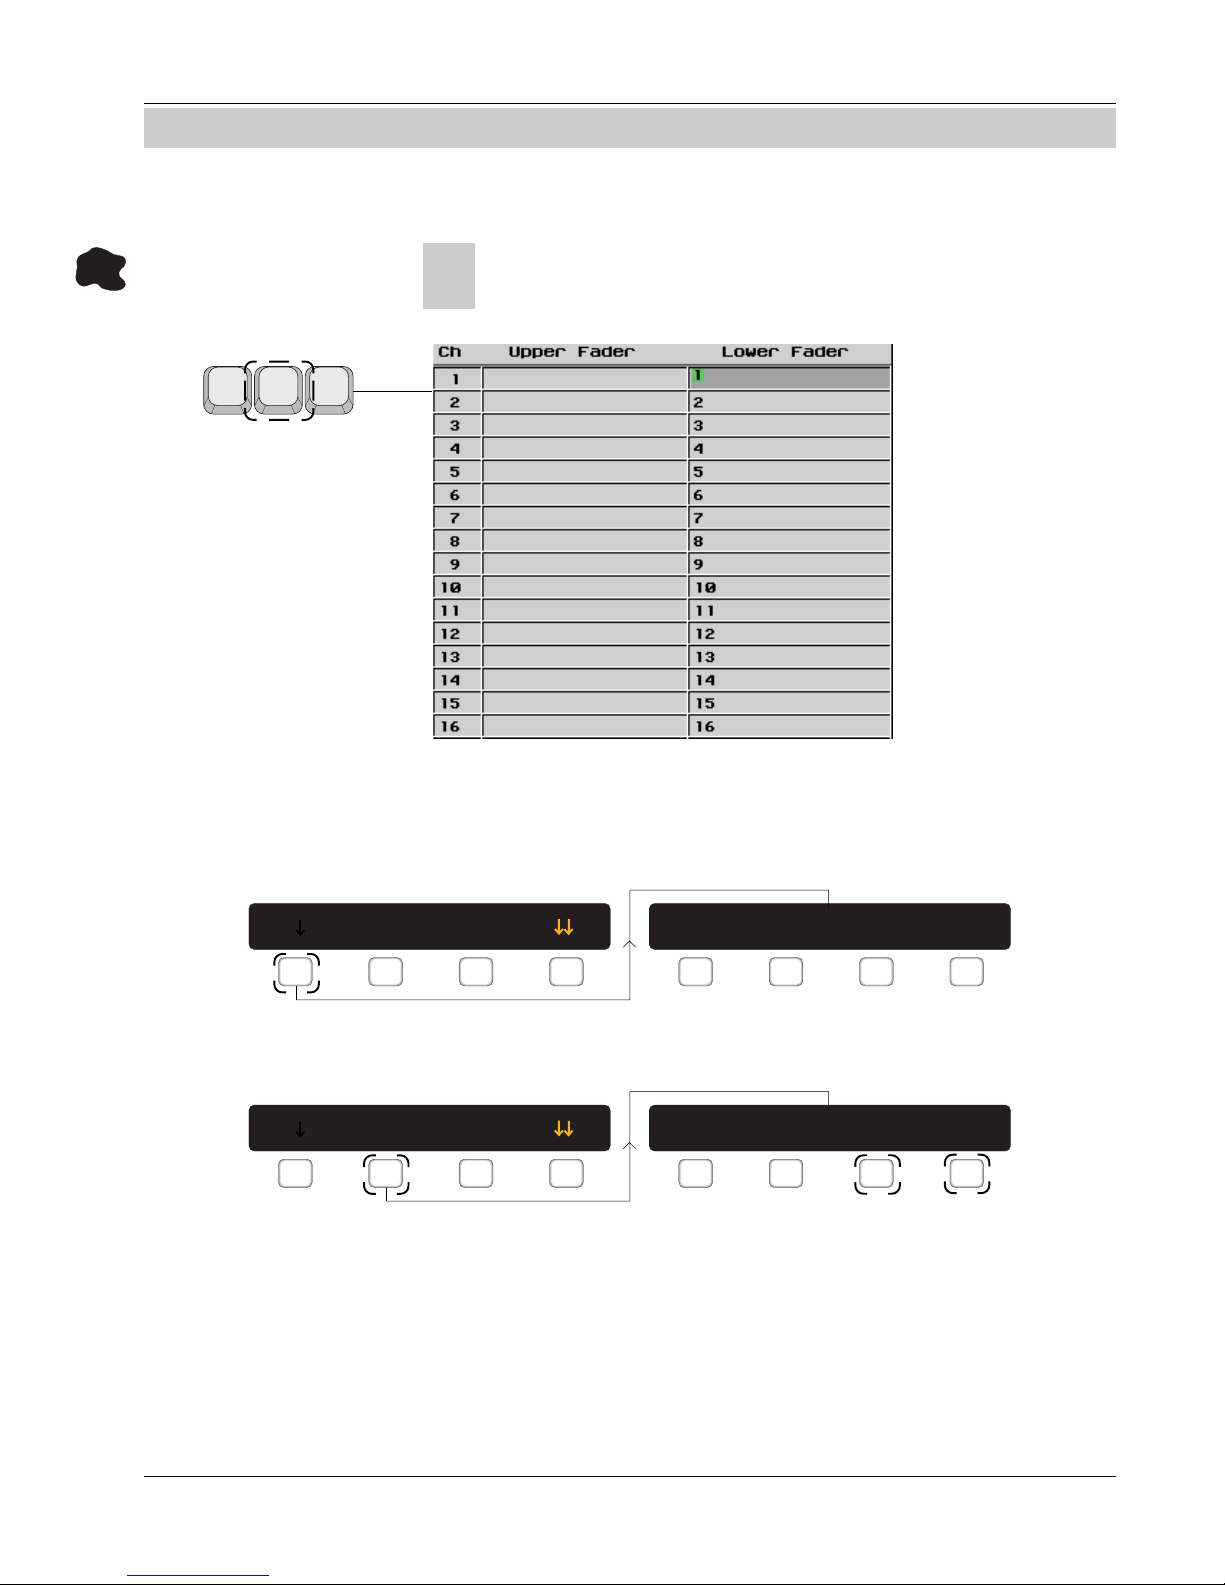
Fader Names
F1 F2 F3
ader naming/display has been enhanced. There are now 50 possible
F
Fader Names sets per Title since they are now stored with console
Snapshots. Pressing the QWERTY keyboard [F2] key brings up the fader
naming window on the
DSC screen display as
before. Pressing the
keyboard [Return] key
moves the cursor
vertically from channel
to channel. The
keyboard [up arrow]/
[down arrow] keys
also move the cursor
vertically. Pressing the
keyboard [Tab] key
moves the cursor
horizontally between
upper and lower fader names. Additionally, console faders are now automatically named with consecutive number legends for any new title.
To clear all upper and lower fader names for any SnapShot, recall the
SnapShot, press the QWERTY keyboard [F2] key and then [F1] (Clear):
Fader Name Menu
Clear Renum SS : On
F1 F2 F3 F4
Clear All ? Yes [No]
F1 F2 F3 F4
From the Fader Name menu, press [F2] (Renum) to manually renumber all
upper or lower fader names:
Fader Name Menu
Clear Renum SS : On
F1 F2 F3 F4
Renumber : [UF] [LF]
F1 F2 F3 F4
Now select either [F3]/[F4] to display the channel numbers.
With SS:On, all fader names associated with a SnapShot are recalled whenever a SnapShot is recalled. Setting SS:Off will leave the currently displayed
fader names unchanged as new SnapShots are recalled. This suggests a way
to copy the names from one SnapShot to another by first setting SS:On and
then recalling the desired SnapShot and its associated fader names. By then
setting SS:Off, recalling the desired destination SnapShot, then storing to it
again, the displayed fader names will be added to the second SnapShot.
Euphonix CS3000/2000 MixView 3.2 Software Supplement 1 - 3
Page 6

Section 1: Fader Enhancements
3.1
Fader dB Level
Displays
F1 F2 F3
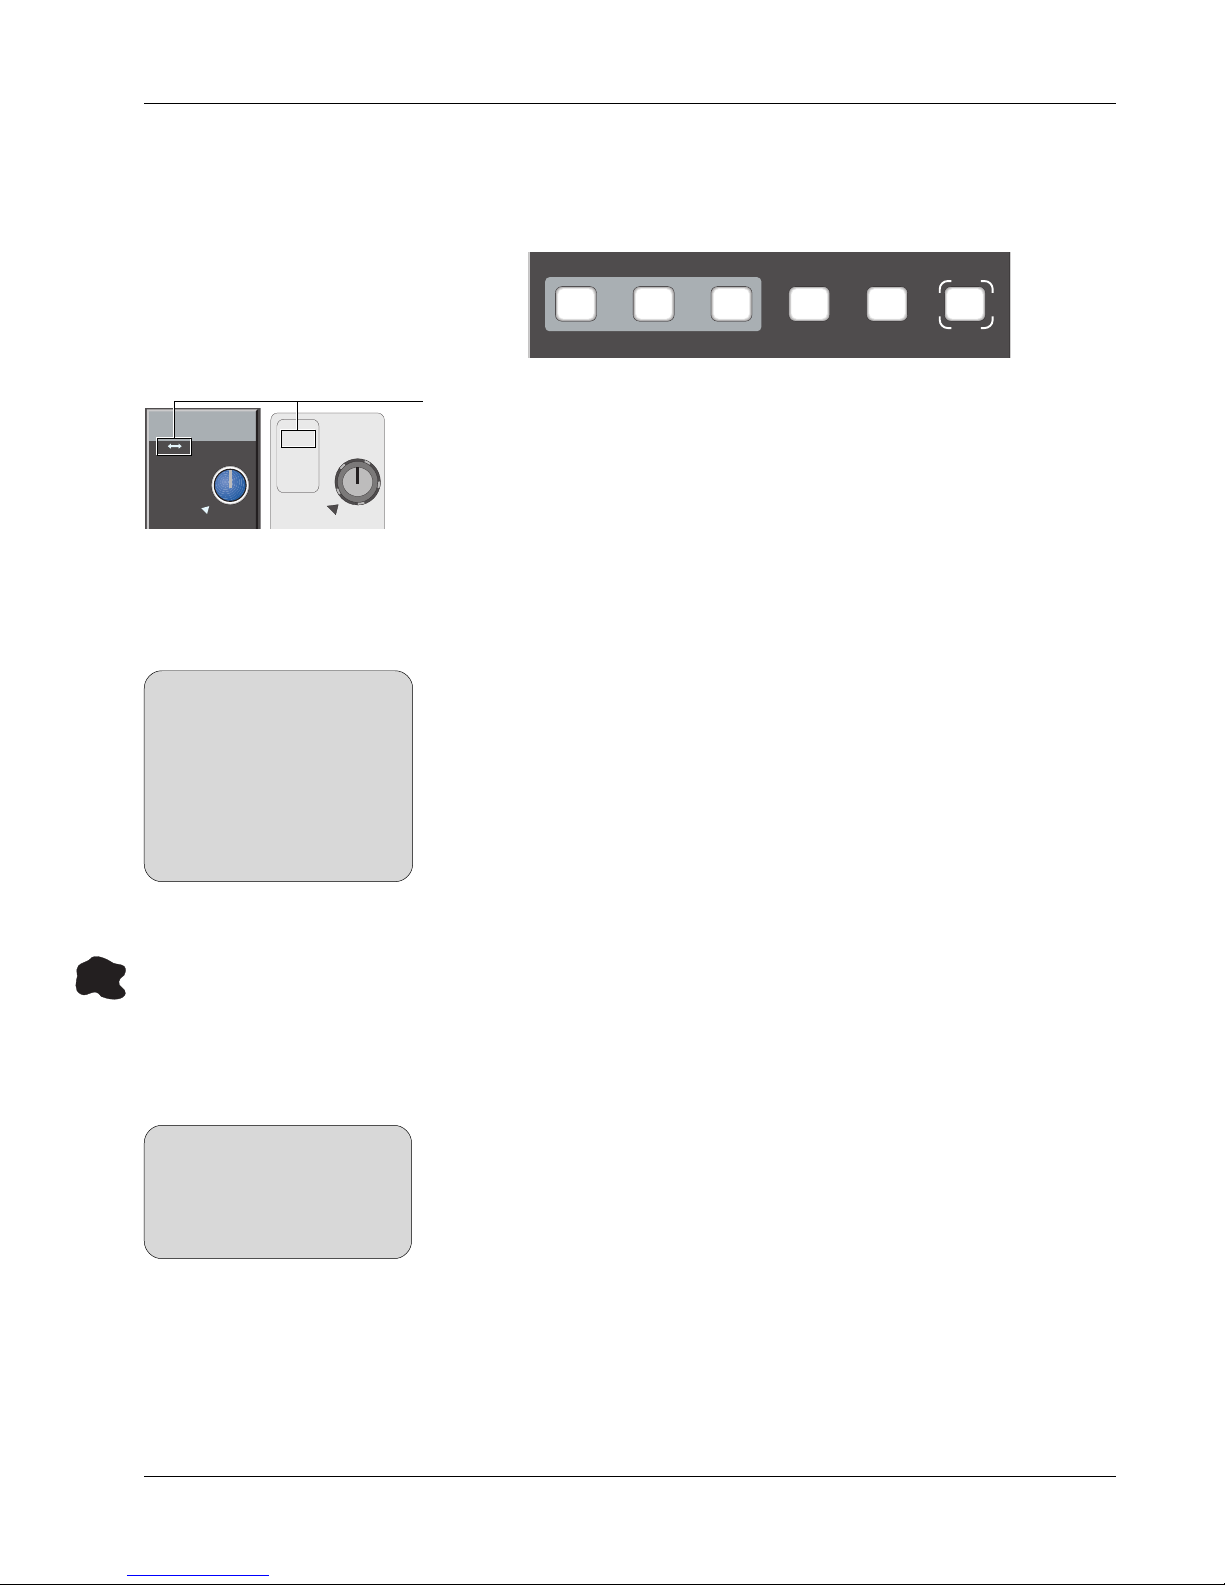
The display of fader dB levels has been enhanced. Previously, fader levels
were only displayed while in automation mode. Now, a fader’s dB level is
momentarily displayed in the fader name field of the Title Bar DSC display
screen. If your console is outfitted with CleaR Displays, fader dB levels for
each channel are displayed there as well. The dB Display Delay (the time it
takes the display to revert back to fader names) is adjustable from 0-9.9 secs
using the DSC SpinKnob. To set the delay timeout, press the QWERTY keyboard [F2] key, [F4] (down arrows) and then the [F4] (Delay) key:
Fader Name Menu
3.1
Fader Swap
Clear Renum SS : Off
F1 F2 F3 F4
dB Display Delay : 2.0 s
F1 F2 F3 F4
The Fader Names Prefs menu controls how the fader dB levels are displayed.
By setting the ”Fdr” option with the [F1] (Fdr) key, a Moving Fader’s dB level is
displayed as long as your finger remains in contact with the fader, and continues to display for the duration of the specified delay timeout after contact with
the fader is ended. For non-motorized faders, the dB level is displayed as long
as the fader is in motion and continues to display for the specified delay
timeout after fader motion ceases. [F2] (Attn) and [F3] (DSC) control whether
levels are displayed when you press any channel attention or DSC Channel
Select key respectively. Levels will continue to display according to the delay
timeout for these buttons as well.
Fader Swap (a.k.a. fader flip) allows you to temporarily “exchange” the
functions of your Upper and Lower faders. When UF and LF banks are
swapped, all data relative to each fader block is swapped (i.e., mute, solo,
pan, fader, routing, source, mode and assign). Post fader associations such as
Post Fader Aux Sends and Fader Source Tracking maintain their proper assignments based on UF and LF names. This means that an Aux set to follow UF for
channel 1 would correctly react to the Lower Fader on channel 1 when Swap is
active. This is because the UF block has been “swapped” in place of the LF
block.
Fdr Attn DSC Delay
F1 F2 F3 F4
Fader Names
Prefs Menu
The ability to swap the control of the Upper and Lower Fader banks is a handy
capability if your console is fitted with lower motorized faders. For instance, if
you want to make a touch-activated fader move on a channel’s non-motorized
upper fader, Fader Swap allows you to “virtually” swap the physical faders of
1 - 4 Euphonix CS3000/2000 MixView 3.2 Software Supplement
Page 7
Section 1: Fader Enhancements
all console channels. The lower faders will then control all functions which
were assigned to the upper faders and vice-versa. Fader Swap is applicable to
consoles with or without moving faders. To toggle all the console’s channel
faders, press the unmarked right-most swap key above the SmartDisplay:
Input
M1 M2
L1 L2
L3 L4
PAN BAL
SOURCE
REV
M1 M2
L1 L2
L3 L4
BALPAN
CS3000 CS2000
SIDE NOTE:
Fader Swap may be initiated at
any time. If a fader/pan/mute is
“swapped-out” while it is
currently punched in, the automation mode and punch status will
be swapped as well. Snapshots
will store and recall correctly
regardless of Swap status.
Mix
On
Pass
Rec
Pass
Ctrl
Grps Mtrs
You will notice that all fader block assignments are now swapped between
upper and lower faders. You can also tell at a glance whether the console is in
Fader Swap mode as all channel reverse mode indicators for both upper and
lower fader blocks, are
lit across the entire console
. Note that this function
overrides the usual Rev LED function indicating that a fader is in Stereo
Reverse (StRev) or Stereo Ind Reverse (StIRev) mode.
All upper fader automation moves can now be written using the lower motorized fader just as if you were using the upper fader and vice-versa.
If a moving fader is swapped while it is being touched, the incoming fader will
not be affected by the touch sensor until the fader is released and then retouched. Null lights will indicate that the moving fader is not aligned with the
“swapped-in” audio until the fader is released and allowed to null. If the
incoming fader is punched-in during a swap AND the destination moving fader
is being touched, the automation will not be affected until the fader is released and re-touched. If a fader is being automated by touch sensor and
is"swapped-out", it will remain punched-in on the non-touch sensitive fader.
3.1
Backstop Pre
Note: The Backstop PFL feature will primarily be used by broadcast industry
professionals and requires the factory backstop channel I/O fader option.
Fader Listen (PFL)
Backstop PFL allows you to momentarily monitor audio input without actually
bringing the fader up “on-air”. A Backstop PFL is accomplished by pulling back
SIDE NOTE:
Pressing the PFL key on any
channel does not call attention to
that channel anymore. Pressing an
AFL key still calls attention when
added but not when removed.
Euphonix CS3000/2000 MixView 3.2 Software Supplement 1 - 5
on the spring-loaded fader cap while the fader is at its lowest travel position
(fader level off or bottomed out). Pulling back on the fader will trigger a
momentary PFL for as long as the fader is held back. The signal is then fed to
the PFL bus. The standard PFL switch remains unaffected. This makes it
possible to leave some channels in PFL while letting others only momentarily
enter PFL.
Page 8

Section 1: Fader Enhancements
Setup is accomplished with the new Fader Solo menu. From the top-level main
menu press [F1] (Setup), [F2] (Cnsl), [F2] (Cnfg), [F4] (Solo) and then [F1] (BPFL):
Setup Snap System Grps
F1 F2 F3 F4
Mstr Cnsl Meter MFdr
F1 F2 F3 F4
Cnfg Diag Backup
F1 F2 F3 F4
The console default is OFF
Misc Power DSC Solo
F1 F2 F3 F4
BPFL Ext Solo
F1 F2 F3 F4
Backstop PFL : ON
F1 F2 F3 F4
. Press [F4] to set the feature ON.
Fader Solo
Menu
BPFL Menu
1 - 6 Euphonix CS3000/2000 MixView 3.2 Software Supplement
Page 9
Section 2: Monitoring Enhancements
SECTION 2 : MONITORING
ENHANCEMENTS
3.2
Monitor Set Status
Lock
monitor SET
A1•2 A3•4 A5•6 A7•8
Ext 1 Ext 2 ST1 ST2
Left Right Stereo Mono
3.2
Monitor Source
Grouping
Once you have setup a console Monitor Send, the Monitor Set Status Lock can
be used to disable all functioning of that Monitor’s Set key. Each Send (A, B or
C) may be configured individually. To lock the Monitor Set keys for Monitor A,
press the A Monitor [Set] key and then [F1] (mA):
mA -> AA -> I/C CUT
F1 F2 F3 F4
Monitor Menu
Parentheses are added to the [F1] key designator in the SmartDisplay indicating that the Monitor Set keys for Monitor A, in this example, are disabled:
(mA) -> AA -> I/C CUT
F1 F2 F3 F4
Monitor Menu
Another press of the [F1] key unlocks this feature.
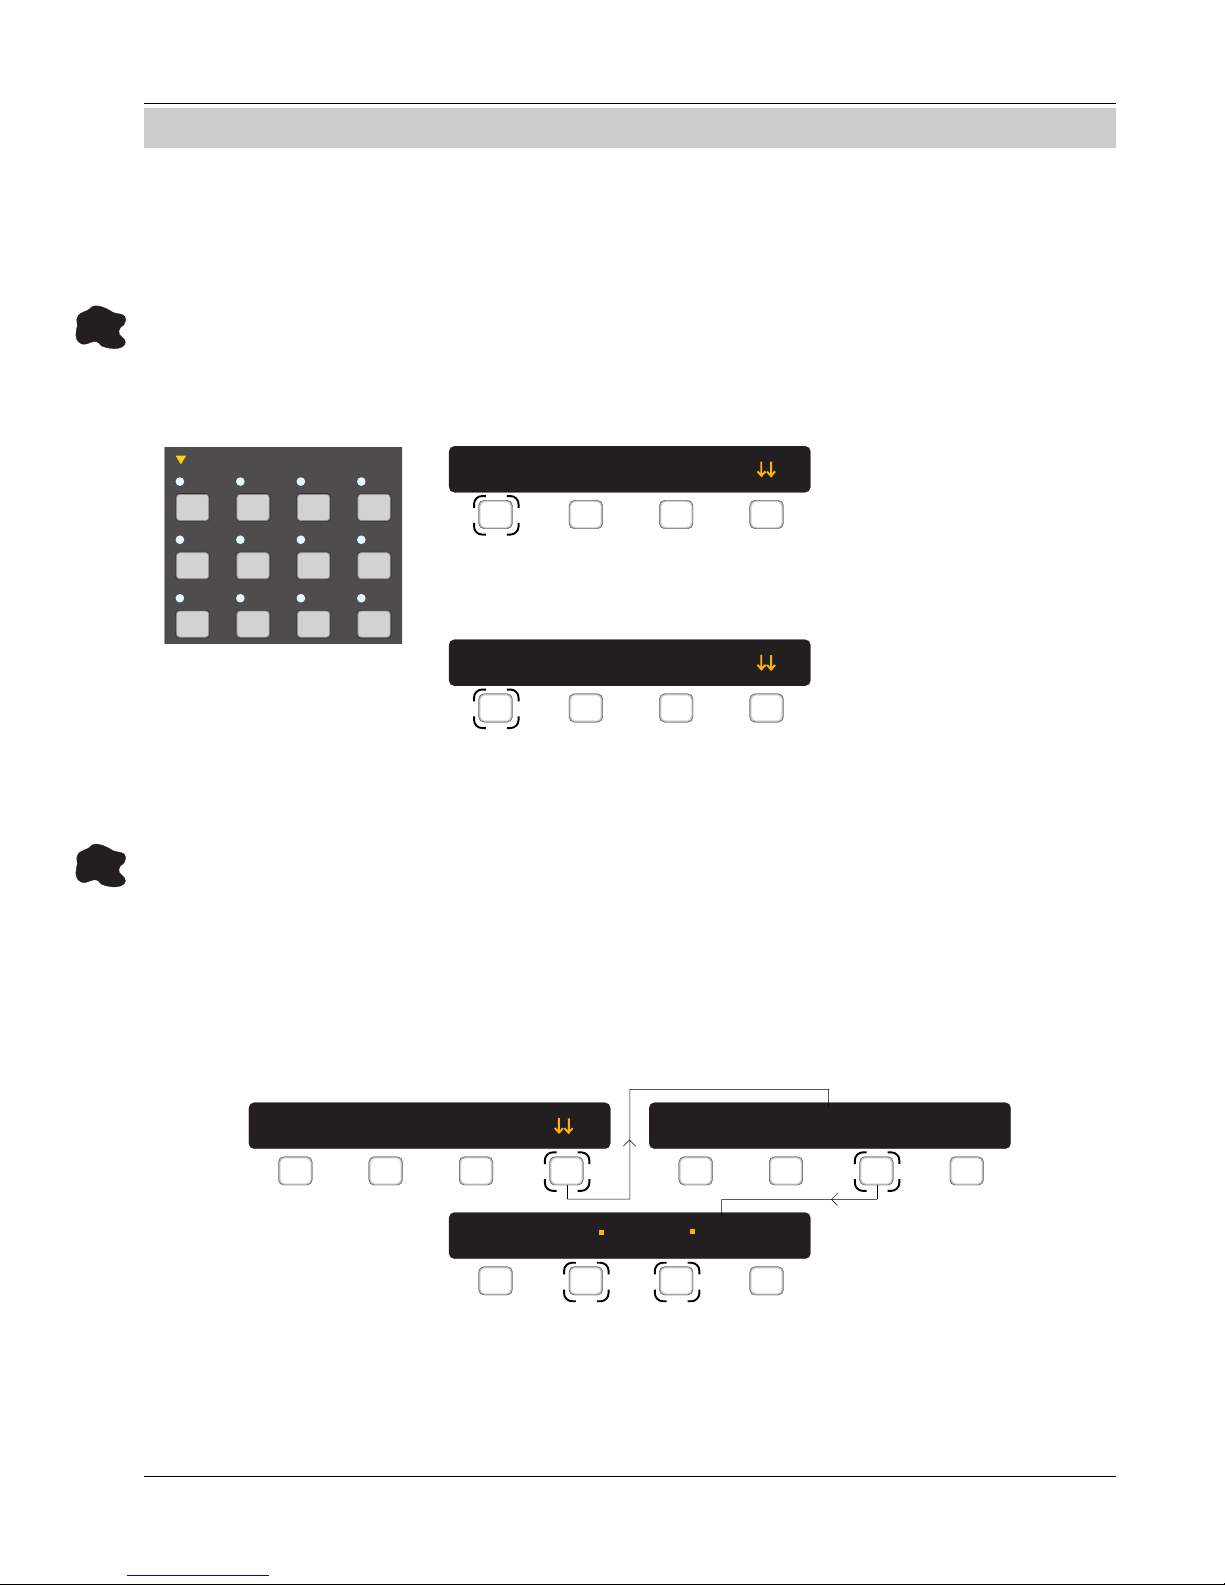
Monitor Source selection may be grouped. This allows a single monitor source
selection panel to be used to set sources for any or all of the three (3) monitor
outputs.
A single Source Grouping menu is shared between all three Monitors and may
be accessed from any Monitor Set key. To have Monitor B take on Monitor A's
settings, press the Monitor A [Set] key, [F4] (down arrows), [F3] (SRC) and then
[F2] (A) & [F3] (B):
mA -> AA -> I/C CUT
F1 F2 F3 F4
mA -> A B C
F1 F2 F3 F4
mA DIM SRC LVL
F1 F2 F3 F4
Source Grouping Menu
Simply select which monitor sources should be grouped. Subsequently, any
source selection changes made on one panel will be reflected in all other
panels in the group. In this example, Monitor A’s source selection parameters
have been copied to Monitor B. Remember that the currently selected Monitor,
(mA, mB or mC), determines which parameters are used for the group.
Euphonix CS3000/2000 MixView 3.2 Software Supplement 1 - 7
Page 10

Section 2: Monitoring Enhancements
3.2
Monitor Level
Linking
Monitor Level Linking allows one or two Monitor levels to track the third
Monitor level. To have Monitor A’s level track Monitor B’s level, press the
Monitor A [Set] key, [F4] (down arrows) and then [F4] (LVL):
mA -> AA -> I/C CUT
F1 F2 F3 F4
SIDE NOTE:
Linking Monitor levels does not
allow for a dB level tracking
offset between linked Monitors.
All linked Monitors track at
identical dB levels.
Source Grouping and
Level Linking Menu
Indicators
Source Grouped to Monitor A
mA DIM SRC LVL
mA -> L e v e l f o l l o w: B
F1 F2 F3 F4
F1 F2 F3 F4
Press [F4] (A) to cycle through all three Monitors until the designator indicates
B. Monitor A’s level now tracks any Monitor B level changes. Level Tracking
can be set for each Monitor individually.
The top-level Monitor menu contains a dedicated Monitor [CUT] key and
display for both Source Grouping and Level Linking status:
Level Linked to Monitor C
mA -> AC -> I/C CUT
F1 F2 F3 F4
Monitor Menu
SIDE NOTE:
It is not recommended that
Monitors be linked with circular
references such as A linked to B, B
linked to C and C linked to A.
Monitor A is currently Cut
The first alpha character after the first arrow indicates the Source Grouping
status for the selected Monitor. If the Source Grouping character matches the
currently selected Monitor (A = A), there is no Grouping selected for that
Monitor. Any other alpha character here indicates the Monitor to which the
selected Monitor is grouped, (C in the example above). If the Source Grouping
character is an asterisk (*), then the currently selected Monitor is grouped to
both of the other remaining Monitors.
The second alpha character after the first arrow indicates the Level Linking
status for the selected Monitor. A Monitor may only be linked to one other
Monitor. Two Monitors may be linked to the same Master (i.e., A & B linked to
C).
1 - 8 Euphonix CS3000/2000 MixView 3.2 Software Supplement
Page 11

SECTION 3 : SNAPSHOT
ENHANCEMENTS
Section 3: Snapshot Enhancements
3.2
Snapshot List
Management
SIDE NOTE:
Toggling a Snapshot State does not
immediately impact a Snapshot’s
availability. Any Snapshot Tagged
as “RAM only” is still available to
the user until that Snapshot location
is ovewritten, or until the Snapshot
List is cleared.
Snapshots may now be managed individually, rather than as a global group of
50. Individual Snapshots may now be excluded or included whenever a Title
Save occurs. This allows you the freedom to store Snapshots at will during a
session, and then later review the list to identify which of the Snapshots
remain useful. Mixview will then use your selection list to determine which of
the 50 Snapshots are to be saved with the Title.
Typically, a Snapshot marked with a GREEN tag indicates that it has been
loaded from a previously saved Title. A RED tagged Snapshot indicates that it
has been newly created since the last Title load. Snapshots without a RED or
GREEN tag have, in the past, indicated that they are “blank”, or that no user
defined data has been stored in those locations. It is this BLANK state that
has been modified in Version 3.2.
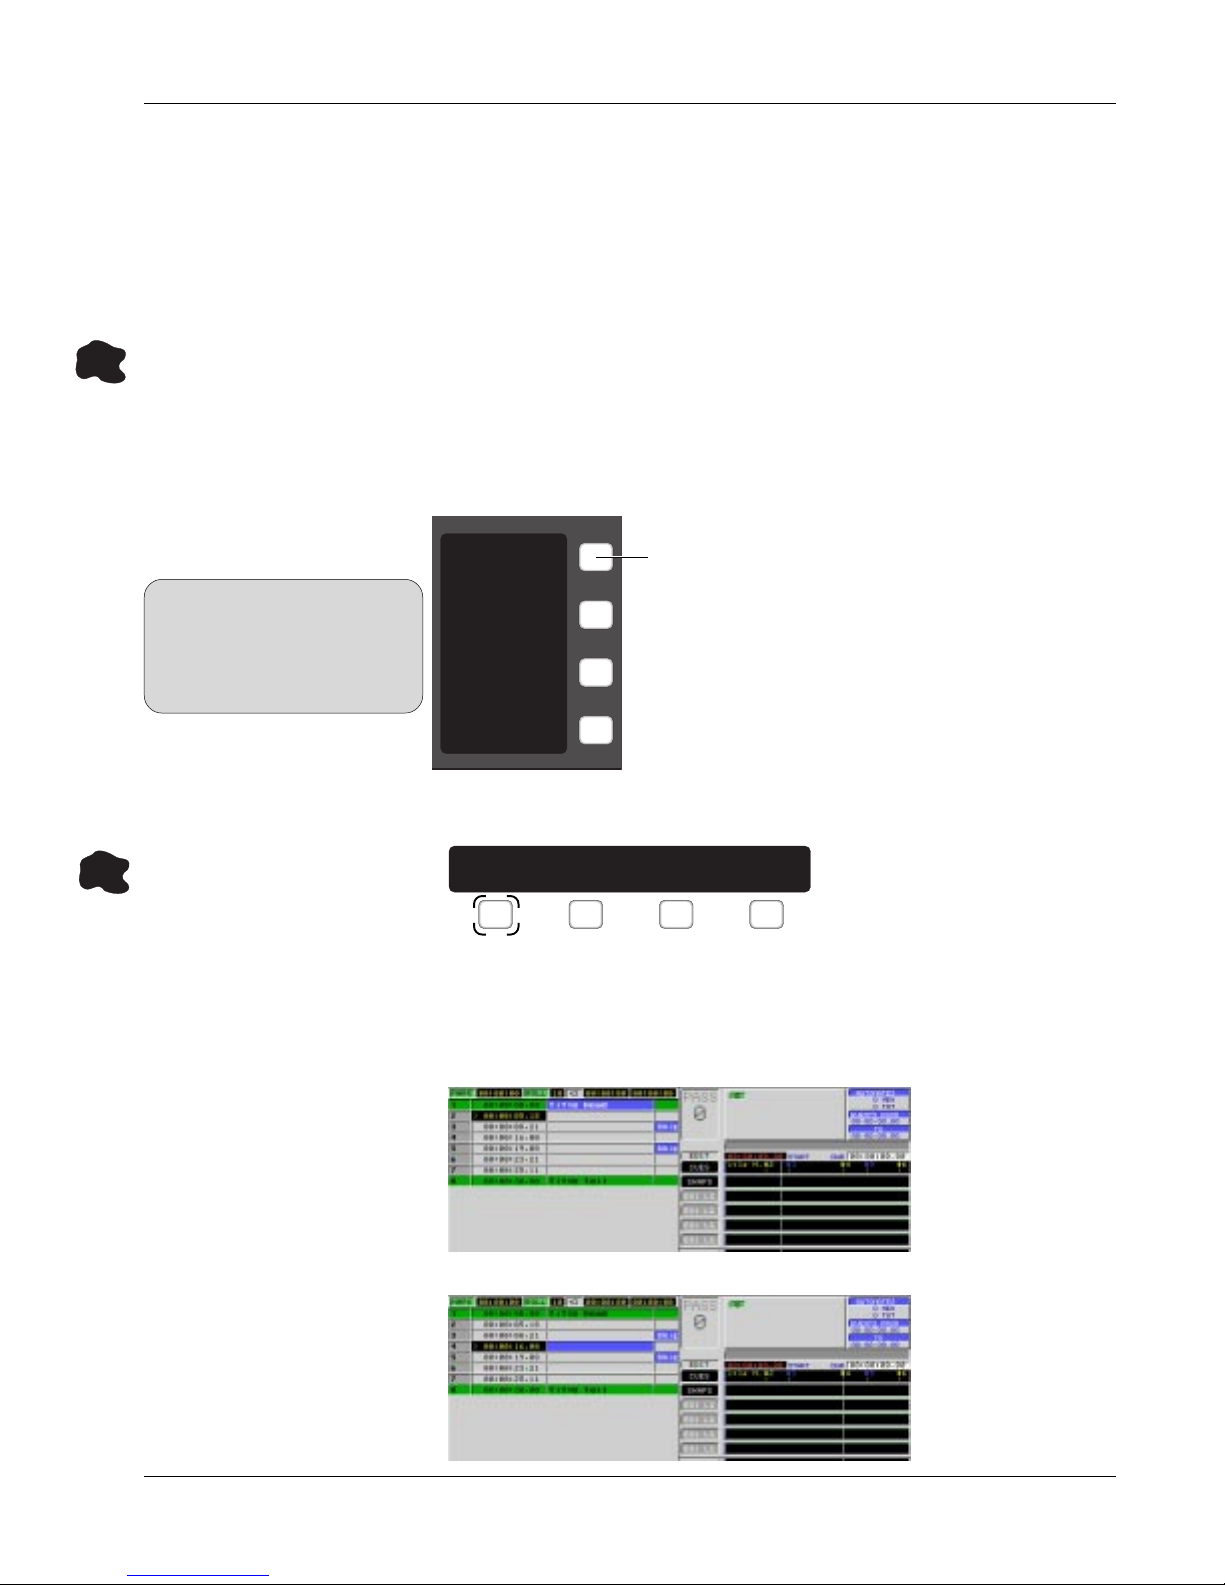
After scrolling to or selecting a particular Snapshot you may now use the Left
and Right Arrow keys below the SmartDisplay to toggle the state of the
Snapshot. Use the Left Arrow to toggle the display to a BLANK tag. This
indicates that the Snapshot will be omitted from any future Title saves. Use
the Right Arrow to toggle the display to a RED tag. This indicates that the
Snapshot will be saved with the Title. Notice that it is possible to toggle from
a GREEN tag to BLANK as well. This indicates that it is possible to deselect
previously saved Snapshots, thereby removing them from future Title Saves.
≠≠
Euphonix CS3000/2000 MixView 3.2 Software Supplement 1 - 9
Currently Active SnapShot
RED, GREEN, or BLANK tags
indicate whether or not a
Snapshot will be stored with
the Title on the next Title
Save request.
UNDO REDO
AC BD
BLANK RED
Page 12

Section 3: SnapShot Enhancements
3.2
Merging Snapshot
Lists
Set preference to clear all
Snapshots on Title loads or
allow Snapshot Lists to be
Merged on Title loads
This feature requires a general understanding of how the current Title load
system operates. Typically, a Title load request first clears all 50 Snapshot
registers in the Mix Controller and then loads Snapshots from the incoming
Title into corresponding Snapshot registers.
By selecting a preference in the F10 System Menu it is now possible to defeat
the clearing of Snapshots before a Title load. The result is that the only time a
Snapshot register will be overwritten is when an incoming Title has data
requiring that same register number. (Example: Snapshot #1 would be overwritten only if an incoming Title contains a Snapshot that requires register #1)
Useful Applications:
Bouncing Snapshots Between Existing Titles
SIDE NOTE:
The Tag Associated with any
Merged or Bounced Snapshot must
be manually set to RED in order for
that Snapshot to be saved as part of
the current Title. Otherwise it will
be available for recall, but it will not
be included in any Title Saves.
WARNING!:
Merging Snapshots that refer to
differing Cube bussing configurations will produce indeterminite
results. Always attempt to maintain
a common bussing configuration to
ensure reliable performance
Useful Snapshots from one title can be bounced into a second, working title.
First, relocate the Snapshots within the source title by placing them into
unused registers relative to the working title. Next, load the working title.
When the Working Title loads it will not erase the relocated Snapshots
because the Working Title has no need to affect those registers (it has no
Snapshot information to put in them). The result is that the Working Title will
now include both it’s own Snapshots and those that were “bounced”into it as
a single Snapshot List. This list can be managed to save the bounced Snapshots with the Working Title on the next Title save.
Merging Lists Between Titles
Useful Snapshots from various Titles can be condensed into a single Title.
Create a set of utility type Snapshots
Reserve a certain area of Snapshot registers for system use. . If no Title load
ever requires these registers, the Snapshots will remain there indefinitely.*
Typically the higher register numbers are used infrequently and could be used
to store these utility type Snapshots.
A backup Title containing ONLY the utility Snapshots is advised to A backup Title containing ONLY the utility Snapshots is advised to
A backup Title containing ONLY the utility Snapshots is advised to
A backup Title containing ONLY the utility Snapshots is advised to A backup Title containing ONLY the utility Snapshots is advised to
ensure against accidentally overwriting a utility Snapshotensure against accidentally overwriting a utility Snapshot
ensure against accidentally overwriting a utility Snapshot
ensure against accidentally overwriting a utility Snapshotensure against accidentally overwriting a utility Snapshot
* Cube Panning and Cube Aux sends are not retained in battery backed
memory. This information is lost in the case of a power failure to the
Mixview Platform. In the case of a Broadcast System an Uninteruptable
Power Solution is recommended to ensure system performance. Contact Euphonix Customer Support for a list of tested UPS solutions.
1 - 10 Euphonix CS3000/2000 MixView 3.2 Software Supplement
Page 13

Section 4: Misc Automation
SECTION 4 : MISC ENHANCEMENTS
3.1
Dynamics
Headroom
Extension
3.1
Multiple Console
Solo Linking
Solo Menu
Ext Solo Menu
With a required hardware modification, ES108A Dynamics gain can be adjusted to provide 6dB more headroom capacity over a stock console with
MixView 3.1. This option is recommended for users that have experienced
problems in dealing with transient dynamic signals and provides more gain
before clipping, standardizing the headroom between the console and the
Dynamics modules. For information on this modification, please call Euphonix
customer support.
With a required hardware modification, the console’s Solo bus logic may be
linked across multiple consoles. This provides dual-operator systems the
ability to operate the two Solo buses as if they were one. Setup is accomplished with the new Ext Solo menu. From the Solo menu, press [F2] (Ext Solo):
BPFL Ext Solo
F1 F2 F3 F4
Resync Ext Solo : ON
F1 F2 F3 F4
Note: In the event that the Solo bus logic between consoles become
unsynchronized, i.e., one console is in solo and the other isn’t, the consoles
may be re-synced by pressing [F1] (Resync) in the Ext Solo menu. The F1 key
function is renamed “Resync” whenever Ext Solo is set ON.
Setup logic for the originating console is as follows (x = feature set ON):
Normal mode Kill mode Inter-cancel Signal result
x x uses Ext Solo bus
x sums to Ext Solo bus
x x uses Stereo Program bus
x sums to Stereo Program bus
The following steps should be done on all consoles to be linked in order to
ensure successful operation of this feature:
1. From the Ext Solo menu, press [F1] (Resync);
2. Set both consoles to the same solo mode (see table above for modes).
Note: Consoles may be configured for different Solo modes but this is not
recommended as the potential for confusion is greatly increased.
Euphonix CS3000/2000 MixView 3.2 Software Supplement 1 - 11
Page 14

Section 4: Misc Automation
3.1
Project Dates
When copying projects between hard disks, the project copy now retains the
original project date rather than the current date and time. Additionally,
MixView 3.1 is now year 2000 compliant. All date fields contain all four year
numerals.
3.2
Stereo EQ Linking
Current horizontal link
Stereo EQ Link Menu
Linking two adjacent EQ modules is a handy mixing feature in any console. On
the CS3000/2000, EQ linking now operates between any two adjacent odd/
even module pairs, i.e., 1/2, 3/4 or 23/24 (horizontal linking) as well as between EQ 1 and EQ 2 within a single channel module (vertical linking). Horizontal linking can be accomplished starting with either of the channel pairs. We
will now show how to EQ link channels 23 and 24.
To link two console EQ modules, press channel 23’s EQ•Dyn1 attention key:
23E1-> lmG 0.0dB –>L1 >–
F1 F2 F3 F4
Once you have selected a target channel EQ object, press the DSC [*ST] key:
link: <–>
F1 F2 F3 F4
<->
The Stereo EQ Link Menu is where you decide in which orientation to link.
Press [F3] (<–>) to link channel 24’s EQ 1 to channel 23’s EQ 1:
23E1-> lmG 0.0dB –>L1>–
F1 F2 F3 F4
*
23E1-> lmG 0.0dB –>L1>–
*
F1 F2 F3 F4
Current vertical link
Both EQ 1 & 2 LEDs will now track each other and all changes made to either
SIDE NOTE:
Horizontal and Vertical EQ object
linking are mutually exclusive,
one replacing the other when
either is established.
channel’s EQ 1 is now reflected in the other linked channel. Notice the asterisk
to the left of the SmartDisplay [F2] key designator. The presence of the asterisk and its position in the display shows at a glance that the channel whose
EQ menu we are currently observing contains a horizontal link. The vertical link
asterisk is located further to the left. Eq links are stored with the console’s
SnapShot information. Breaking a link leaves each EQ in whatever state it was
in at the time the link was removed.
Copying linked EQs
As before, only vertical EQ links can be copied between console channels.
1 - 12 Euphonix CS3000/2000 MixView 3.2 Software Supplement
Page 15
Automating linked EQs
Section 4: Misc Automation
When automating linked EQs, two identical automation data streams are
written separately to each of the EQs and always play back as two independent, unlinked data streams. This means that establishing and removing links
never alters either EQ’s previously recorded automation data since the actual
links are not tracked in automation. This characteristic allows links to be
established and removed during any automation pass.
3.2
I/O and DSC Status
Lock
SIDE NOTE:
Fader ON keys are only inhibited
from manual toggling. SnapShot,
Fader Linking and MIDI In controls
may still be used to toggle ON/Mute
status while Status lock is ON.
3.2
Cue Skip
I/O and DSC Status Lock disables all I/O channel [ON] keys. Additionally, all
DSC Fader Level, [ON] and [Solo] keys are also disabled. To engage the Status
Lock, press the DSC Lock key. The button will light and the key designator will
switch to “LOCK ON” for easy status identification. Another press of the key
unlocks this feature.
LOCK
ComMic
Talk
Skip PIn POut Off
F1 F2 F3 F4
Key toggles Lock On/Off
Cue Punch Menu
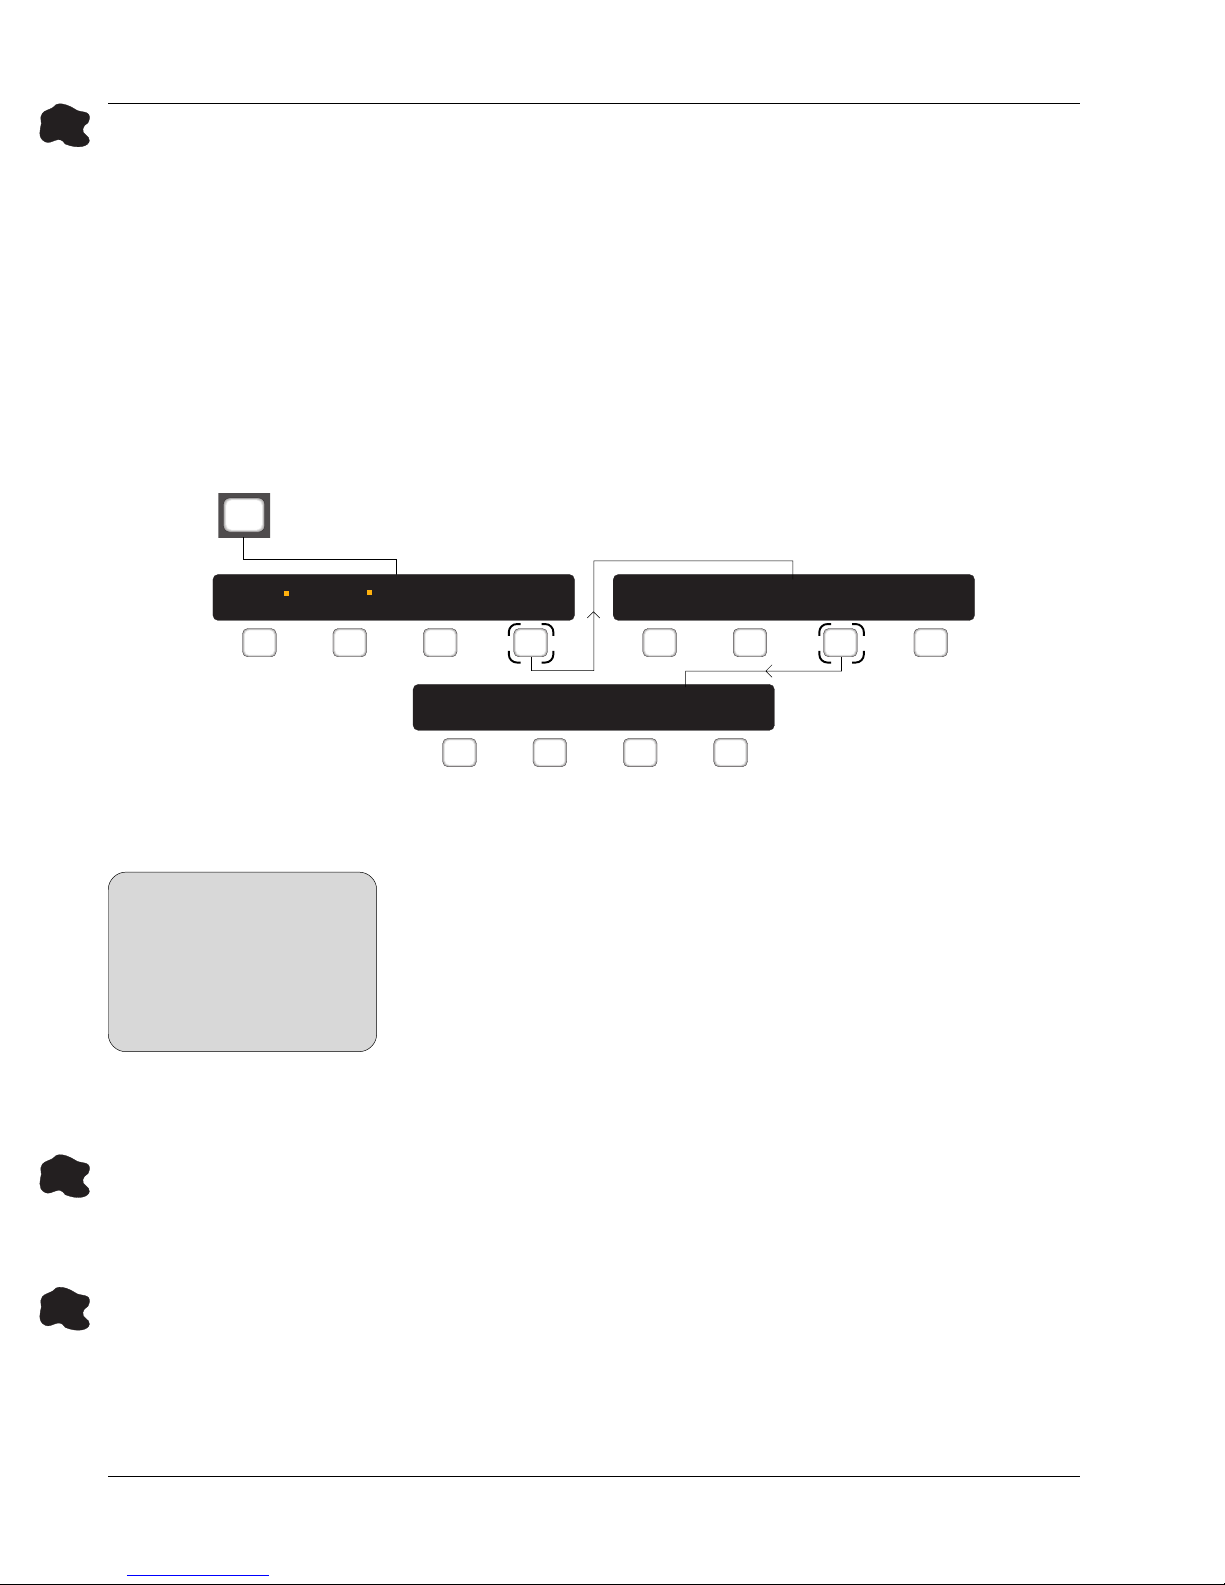
The Skip function is used to auto-locate the master machine to the next cue in
the list. Primarily this is a live venue feature which allows automation and
audio to be played back as manually triggerable scenes. The Skip event
triggers playback to stop and locates the audio deck for the next stage cue.
Timeline approaches
cue #3 set to skip
Timeline jumps to cue #4
after reaching cue #3
Euphonix CS3000/2000 MixView 3.2 Software Supplement 1 - 13
Page 16

Section 4: Misc Automation
3.2
The LIST Key
A dedicated key has been activated for the purpose of allowing instant access
to the Cue List. The functionality of the Locate Menus has not changed, the
LIST key simply serves as a shortcut to the Cue List Menu. Cues may be added
to the list either by direct access (the LIST key) or via the existing Locate menu
system.
LIST key immediately
accesses the Cue List
Loc
Page 1
Loc
EQ
Loc Loc Loc Loc Loc
Page 2 Page 3
Loc
Dyn
Loc
Aux
Page 4
Loc
Pan
Loc
Bus
Chan
List
Loc
1 - 14 Euphonix CS3000/2000 MixView 3.2 Software Supplement
Page 17

Section 5: Automation Enhancements
SECTION 5 : AUTOMATION
ENHANCEMENTS
3.1
Automated
Punch-in/out
Loc
ixview software has the ability to enter multiple Punch-in/out markers
M
to any cue in the Cue List to trigger automation recording. These cue
markers are typically set before tape rolls via the Cue Punch menu. To begin
entering automated Punch-in/out cue markers, be sure you have a title loaded.
Press the DSC [Loc] key, [F1] (down arrows), [F1] (down arrows) and then [F1]
(down arrows):
00:00:00.00 Mark Cue
F1 F2 F3 F4
Cycle Head Edit
F1 F2 F3 F4
Select or create a cue you would like to designate as a punch-in point and
press [F2] (In). Observe that a
Preroll Roll
designate the cue as a punch-out point, press [F3] (Out)
and observe that a
the cue. To deactivate a cue’s punch-in or out designation without removing its punch status, press [F4] (Off)
in which case the designator will invert color and
display in
cue section of the Pass Control screen as red and green
numbers.
F1 F2 F3 F4
Skip PIn POut Off
F1 F2 F3 F4
red
“Pin” designation appears in the cue. To
green
“Pout” designation appears in
white
. The punch markers also show in the
Cue Punch Menu
3.1
On-the-Fly
Punch-in/out
Euphonix CS3000/2000 MixView 3.2 Software Supplement 1 - 15
To remove a selected cue’s punch status, press the DSC [Del] key. To remove
all punch markers from all cues, press the DSC [Clr] key.
Note: The Title Head and Title Tail cue entries cannot be used for automated
punch.
Another way to use automated Punch-in/out is while tape is rolling. There are
two modes for “on-the-fly” automated punch-in/out. Loop mode provides the
ability to capture timecode values on-the-fly. Build mode provides the capability to automatically set a punch-in marker at the timecode address where the
last Pass was ended.
Page 18

Section 2: Monitoring Enhancements
Loop mode
Loop mode is handy when you want to write automation moves over the same
portion of material many times. Loop mode is set via the AutoPunch menu. To
enter Loop mode, press the DSC [Pnch] key and then the [F3] (Tplt) key. Select
all objects you wish to write automation for, then press [F4] (Setup) followed
by [F4] (Auto):
Pnch
Punch Menu
Touch Rel Tplt Setup
F1 F2 F3 F4
AutoPunch Menu
SIDE NOTE:
Numeric keypad keys 4, 5, 7 and 8
only operate as automation punch
markers in Loop mode.
Filter Wthru Glide Auto
Loop Build Clr
F1 F2 F3 F4
F1 F2 F3 F4
Now press [F1] (Loop) to activate Loop mode. For help in visualizing the
following process, press the DSC [Pass Ctrl] key to display the Pass Control
screen. Rewind the source and press play.
Temporary In and Out addresses are set using the DSC Numeric keypad. Keys
[7] and [8] set the In and Out points respectively while keys [4] and [5] enable/
disable the In/Out points set with keys 7 and 8. Once you have set both
addresses, rewind the source and press play. When the Pass Control screen’s
current location indicator reaches the In location, all objects selected in the
automation template will begin recording automation.
You can manually punch other objects in and out of automation record during
any Loop pass but only those objects selected in the automation template
screen will punch out automatically when the Punch-out point has been
reached.
F1 F2 F3 F4
Save Mix
Set IN Set OUT
789
Copy Cut
LOOP
MODE
Enable Enable
456
Overwrite Repeat
Full
123
Gap INS
0 Enter Del
Clear OVR Set Mark
Bounce
Confirm
Set Cue
Edit Start
Insert
Edit End Next Pass
Fill
Distribute
AC BD
+
Bus
Prev PassZoom
DIR
Punch Group
*
ST
Clear/PackUNDO REDO
Clr Esc
Pass Control Keypad Template
1 - 16 Euphonix CS3000/2000 MixView 3.2 Software Supplement
Page 19

Build mode
Section 2: Monitoring Enhancements
Build mode allows you to assemble automation from beginning to end as you
go, a popular automated mixdown style. As with Loop mode, Build mode is set
via the AutoPunch menu. To enter Build mode, be sure you have a title loaded
and the DSC [Mix On] key is lit. From the AutoPunch menu, press [F2] (Build):
SIDE NOTE:
You can use Punch-in/out Cue List
markers along with either Loop or
Build modes. However, caution is
warranted as the resulting
automation punch operation could
become quite complicated.
A Note On
Out vs. P-Out
AutoPunch Menu
Loop Build Clr
F1 F2 F3 F4
In Build mode, any objects armed in the Punch template will continue to drop
into automation record whenever you play your source. Objects may also be
punched in or out of record as you normally would. Each time the automation
pass is stopped, the Punch template is updated to include only those objects
that were in record at the end of the last pass. Additionally, the Pass Control
current timecode indicator is repositioned to the stop location. Pressing play
again immediately puts all console objects armed in the Punch template back
into record as you move on. If you rewind the source, automation recording
begins again as you cross over the last set punch-in marker. As in Loop mode,
this is best visualized in the Pass Control screen. If desired, pressing the DSC
Numeric Keypad [0] key at any time will clear the current IN Point.
A useful tip is that the Out Marker in Loop mode and the P-Out marker in the
Cue list system have slightly differing properties.
The Out marker (Ctrl Key #9) will punch out any object that is in the punch
template. The exception being that if a touch sensitive fader is writing that
fader will continue to write through the Out marker. This allows music to
transition a scene for instance, while the background FX are cut out abruptly
against picture
The P-Out event is a hard “safety net“ of sorts. It punches all objects out
regardless of whether they are touch-sensitive or not. The P-Out event
actually triggers the end of a pass, preventing you from inadvertantly writing
over the following scene by forcing you to either stop timecode and restart, or
re-light the Pass Record Key.
In a Television Post situation each of these functions will prove useful at
different times. Experiment with each to discover how best they can work for
you.
Euphonix CS3000/2000 MixView 3.2 Software Supplement 1 - 17
Page 20
Section 2: Monitoring Enhancements
3.1
Automation Glide
Glide allows for automated, seamless punch-outs of automation over a user
specified time interval. In Glide mode, any punch-out will terminate write
mode and return to read gradually by “gliding” from the last write level to the
automation level corresponding to the previously recorded underlying automation level, over the glide time interval. It is important to understand that after
you punch-out, the automation data continues to be written for the glide time
interval. The software generates the required data to connect the old and new
automation levels. When the object’s automation data level reaches the
underlying automation level, the object will then be punched out. If you punch
the object in again while the glide is in progress, the glide is aborted and you
again have control of the object.
Pnch
Fader Name Menu
Touch Rel Tplt Setup
F1 F2 F3 F4
SIDE NOTE:
Desk Glide operates only on Fader
Objects. All other desk Objects are
unaffected when Glide is active.
Desk Glide only operates in ABS
(Absolute) Mode. Glide is inactive
whenever a fader is in Trim Mode.
The Glide feature is activated by pressing the DSC [Glide] key. Make sure that
there is a Title loaded and the DSC [Mix On] and [Fader A] keys are lit. To set
Filtr Wthru Glide Auto
Desk: 150 Cube: 150
F1 F2 F3 F4
F1 F2 F3 F4
the Glide times, press the DSC [Pnch] key, [F4] (Setup) and then [F3] (Glide):
The Glide feature is available on Upper and Lower Desk Fader objects as well
as CUBE Aux Send and Panner objects. Press [F1] (Desk) to set the glide time
for fader objects or [F3] (Cube) to set the glide time for CUBE objects. The
SpinKnob can be used to adjust the time values in single frame increments
from 1-999. Alternatively, the DSC Numeric Keypad can be used to enter a
specific value within the same range. Entering a value via the Numeric Keypad
locks out changes via the SpinKnob. This lockout is indicated by a small
rectangle next to the current SmartDisplay key designator as shown in the
previous menu figure for F1 (Desk). Press the [Enter] key to commit the
settings. Now let’s take a look at how to use the Glide feature.
3.2
Desk Automation Glide
With the [Glide] key lit, just punch-in and out as you normally would during a
standard automation pass. When you punch-out, glide will write a linear
automation move, for the designated period of time set in the Glide menu, to a
point where it seemlessly joins with underlying automation and punches out.
3.1
CUBE Automation Glide
CUBE Glides operate in the same manner as Desk Glides, except that CUBE
Glide additionally supports the TRIM automation mode.
1 - 18 Euphonix CS3000/2000 MixView 3.2 Software Supplement
Page 21

3.1
CUBE Aux Send
Automation
Section 2: Monitoring Enhancements
Console automation covers dynamic level and mute capabilities of the first
twelve (1-12) Aux Sends provided by the Audio CUBE. The “idt” automation
status LEDs operate identically to dynamic EQ automation. However, unlike
EQ, the CUBE also allows automation in Trim as well as Absolute, Win, Wout
and MBR (Monitor Before Record). SnapShot automation is still possible for
Aux Sends 13-48 although they are not dynamically automatable.
3.1
CUBE Panner
Automation
Abs vs. Trim
d t
i
d t
i
Punch key for level
d t
i
d t
i
Punch key for mute
MixView allows dynamic automation of the first eight (8) Panners provided by
the Audio CUBE. The following list and graphic details which panner parameters can be automated:
• Front Pan
• Front Focus
• Front Div
• Surround
• Rear Pan
• Panner Level
• Boom Level
When automating Panners in Abs mode, the yellow PanBall indicator in the
Panner screen shows the position of the
audio within the
four-quadrant
panning space. In
Green PanBall
indicator
subsequent automation passes, audio
position from the
Yellow PanBall
indicator
underlying automation data is shown by a green PanBall
indicator, allowing you to see the
relative positions of both the old and new positions as you are writing the new
automation. A red PanBall indicator signifies that the current and underlying
audio positions are nulled (i.e., occupy the same position).
d t
i
Euphonix CS3000/2000 MixView 3.2 Software Supplement 1 - 19
In Abs mode, the “d” portion of the idt
LEDs will light. In Trim
mode, the “t” LED will
light and the associ-
Red PanBall
indicator
ated DSC MixView
screen knobs turn green.
Page 22

Section 2: Monitoring Enhancements
i
d t
i
d t
i
d t
i
d t
All Punch and All Clear
You can place multiple panner parameters into record by pressing the rightmost Special function (All) Punch key:
SIDE NOTE:
When automating Aux Sends
or Panners, there is no DSC
object key specifically
designated to arm punch-ins.
3.2
CUBE Automation
Editing
d t
i
d t
i
d t
i
d t
i
d t
i
d t
i
d t
i
d t
i
It is important to note that only those panner parameters which are currently
active
are punched into record. This is a very convenient feature allowing you
to repeatedly punch those panner parameters needing updating. The (All)
Clear key resets all panner parameters to their default positions.
Editing CUBE Aux Send and Pan automation data operates in a slightly different manner from editing standard desk automation. Normally, each individual
desk object (fader, mute, EQ, etc.) can be edited separately. CUBE Automation
Editing operates on a more global scale (individual Pan and Aux moves are not
editable) and is mainly intended for overall time insert and cut manipulation.
For a one-per-channel CUBE, any edit will affect console Lower Fader Block
Auxes 1-12 simultaneously and Panners 1-8 (of 16) simultaneously for each
console channel. Please refer to the CS3000 Manual for information on CUBE
Setup. The following figure shows a one-per-channel CUBE setup:
Panners 1-8 for channel #24 (Lower Fader Block only) are selected for edit operation
Total Panners selected = 8
1 - 20 Euphonix CS3000/2000 MixView 3.2 Software Supplement
Page 23
Section 2: Monitoring Enhancements
For a two-per-channel CUBE, the same rules apply but editing also affects
both console Upper and Lower Fader Blocks simultaneously. This is an important distinction. The following figure shows a two-per-channel CUBE setup:
Panners 1-8 for channel #24 (Upper Fader AND Lower Fader Blocks) are selected for edit operation
Total Panners selected = 16
Cutting Automation
Moves
Pass
Ctrl
Pass 0 Undo? Redo?
F1 F2 F3 F4
Clr? Pack? Edit Util
F1 F2 F3 F4
To begin editing CUBE Aux automation you must define the edit’s Start and
End times. Be sure you have a Title loaded and some CUBE automation written
to the source channel, then press the DSC [Pass Ctrl] key, [F4] (down arrows),
[F3] (Edit) and then [F4] (T/C):
COPY? [Yes] Tplt T/C
F1 F2 F3 F4
Start: 00:00:00.00 Cue
F1 F2 F3 F4
Automation
Edit Menu
Start
(red)
Euphonix CS3000/2000 MixView 3.2 Software Supplement 1 - 21
End
(green)
Page 24

Section 2: Monitoring Enhancements
Set the edit’s start and end time locations. These are set in a similar manner to
standard automation editing using the DSC Numeric Keypad and/or SpinKnob.
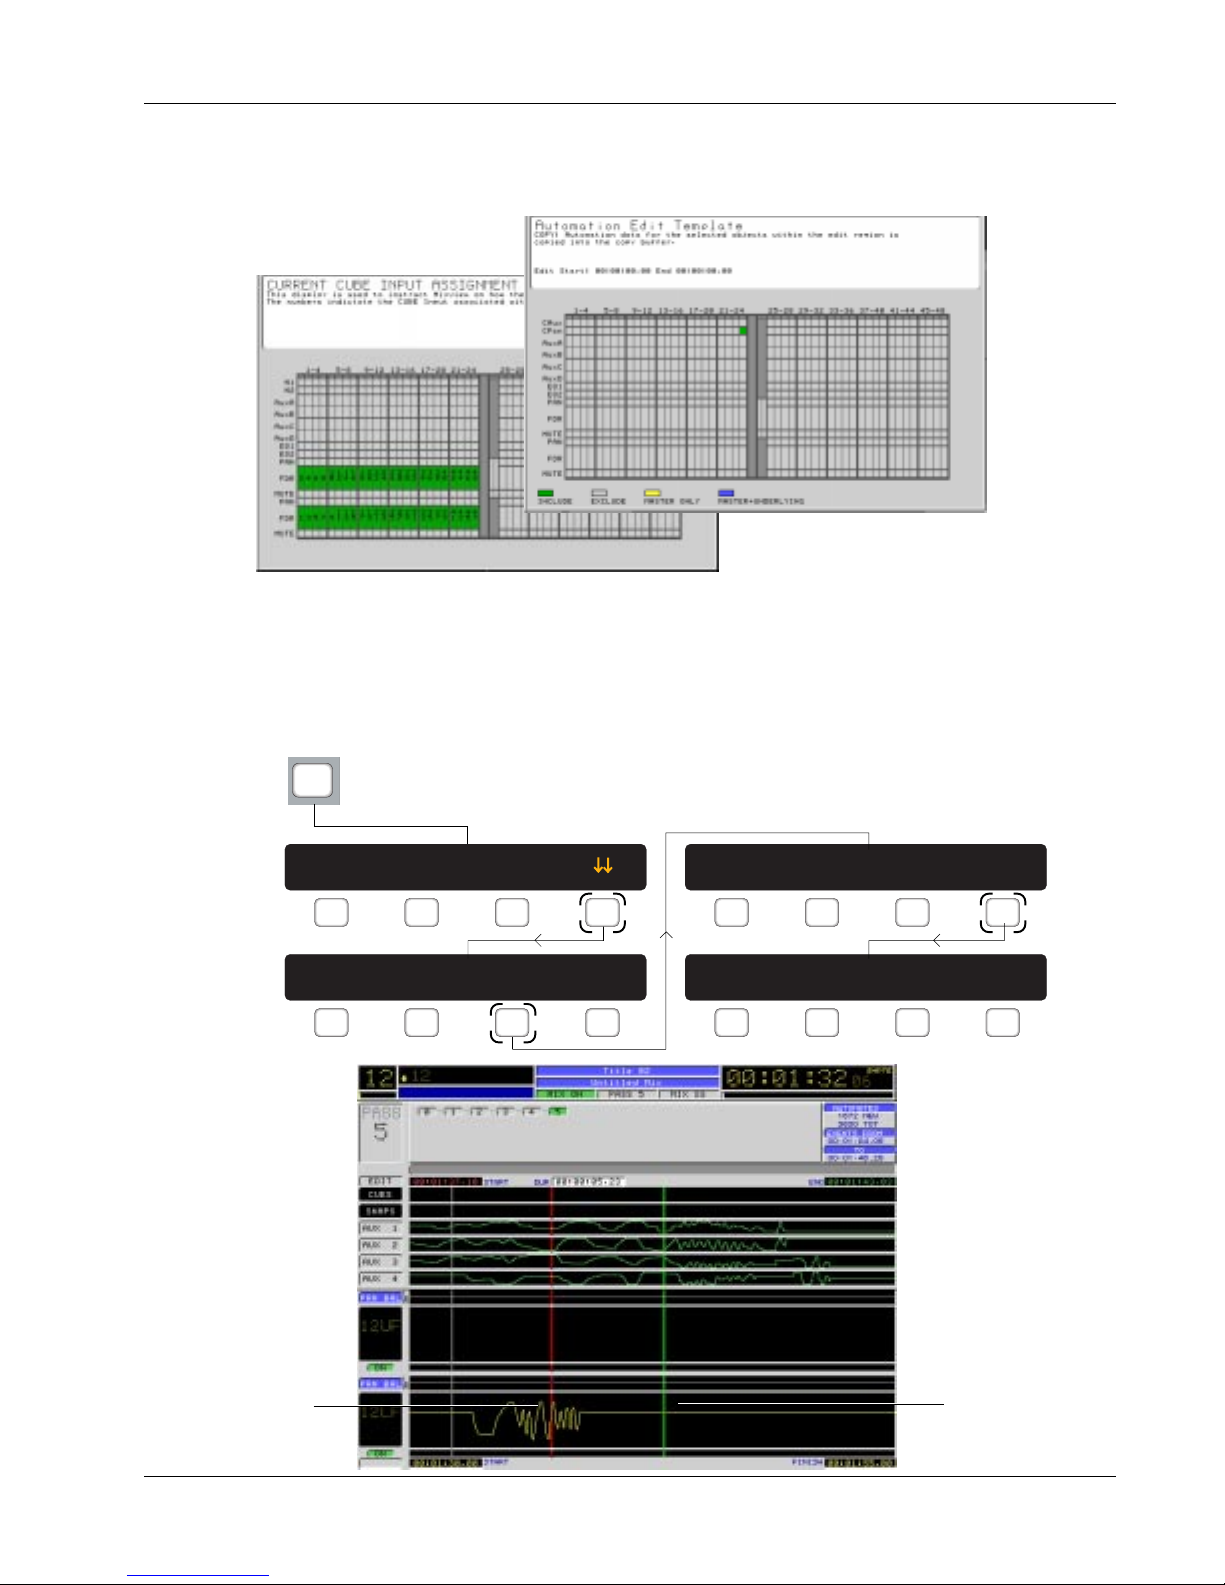
Press the DSC [Esc] key to back up to the Automation Edit menu, then press
[F3] (Tplt). You will now see the Automation Edit Template screen:
New Designations
Notice that the normal Edit Template M1 and M2 designators have been
replaced with the CAux (CUBE Aux) and CPan (CUBE Pan) designators. These
designators are active whenever you are viewing the Automation Edit Template. Select channel 12’s [M1] key to select the source CUBE automation
channel. Next, press [F3] (View) to view the Pass Control screen. Once you
have set the start and end locations for your edit, perform a standard automation Cut. Notice that the remaining portions of automation are now joined.
Copying and Bouncing
Automation Moves
1 - 22 Euphonix CS3000/2000 MixView 3.2 Software Supplement
Copying and Bouncing of CUBE Aux and Panner automation data to other
console channels in sync, can also be done. The steps are the same as described above with the addition of an additional trip to the Automation Edit
Template to deselect the source data channel followed by the selection of the
destination channels and the final Bounce operation.
Page 25

3.1
Track Panner
Section 2: Monitoring Enhancements
The Euphonix TrackPanner I/O module, allows you to set the relative positions
of audio objects within the surround soundstage in a very natural manner
using a trackball-style panning interface.
Before the TrackPanner can be used, it must be activated. To activate the
TrackPanner, press the QWERTY keyboard [F10] key and select the
control
Press the DSC [F4] toggle key until the Trackball interface option appears in
the field followed by the [Enter] key.
The two keys located on either side of the TrackPanner are now active.
Pressing the left key is the TrackPanner attention key and brings up the
TrackPanner menu:
field using the SpinKnob:
Film pan
3.1
Enhanced Pass
Control Show
System
OFF Pan Srnd A-P
F1 F2 F3 F4
The key to the right of the TrackPanner is your Pan/Surround Punch key. Press
the [F1] (OFF) key to activate the TrackPanner. [F2] (Pan) and [F3] (Srnd) lock
their respective parameter movements so precise pans can be made either
front-to-back or side-to-side. For right-handed operation, the functions of the
two TrackPanner keys can be swapped by pressing [F4] (A-P). The Punch key
will then appear as the left button and F4 is renamed (P-A).
When selecting DSC EQ, Auxes or Pan Assign modes, the Pass Control screen
changes automatically to show either EQs, Auxes or Panners in the Automation Viewer portion of the display, depending on what DSC mode you are in:
TrackPanner Menu
Aux 1-4
Euphonix CS3000/2000 MixView 3.2 Software Supplement 1 - 23
Page 26

Section 2: Monitoring Enhancements
However, if you want to show Auxes 5-8 instead of 1-4 for instance, you must
select your choice manually. To display another combination, be sure to start
within the mode you want to modify (EQ, Aux or Pan) then press the DSC
[Pass Ctrl] key, [F4] (down arrows), [F4] (Util), [F1] (View) and then [F3] (Show):
Pass
Ctrl
Pass 0 Undo? Redo?
F1 F2 F3 F4
Clr? Pack? Edit? Util
F1 F2 F3 F4
Set: Pan 1 P / S / Lv / Bm
F1 F2 F3 F4
You can now use the SpinKnob or DSC [+]/[–] keys to select the Display Set
you want. Press the DSC [Enter] key to complete the operation:
View Join Group Trim
F1 F2 F3 F4
Zoom Full Show ZFac
F1 F2 F3 F4
Aux 5-8
1 - 24 Euphonix CS3000/2000 MixView 3.2 Software Supplement
 Loading...