

Page 1
Ultraviolet radiation. Follow instructions. Avoid overexposure. As with
natural sunlight, overexposure can cause eye and skin injury and
allergic reactions. Repeated exposure may cause premature aging of the skin and skin cancer.
WEAR PROTECTIVE EYEWEAR; FAILURE TO MAY RESULT IN SEVERE BURNS OR
LONGTERM INJURY TO THE EYES. Medications or cosmetics may increase your sensitivity
to the ultraviolet radiation. Consult physician before using sunlamp if you are using medications
or have a history of skin problems or believe yourself especially sensitive to sunlight. If you do
not tan in the sun, you are unlikely to tan from the use of this product. Children, the elderly, or
fair skinned people who always burn easily and either never tan or tan minimally should not use
this equipment.
To use, lie down under canopy and pull down as far as adjustment will allow. Do not use without
clear plastic panel and wire grill in place. Untanned persons should not tan on consecutive days
during their first week of tanning. Never tan more than once a day. Tanning normally appears after
the first few sessions and maximizes after approximately four weeks. Tan once or twice per week
thereafter to maintain appearance. Persons already having a base tan may begin at advanced
levels corresponding to the extent of their base tan.
Skin Type:
I Sensitive Skin (Burns easily and severely and does not tan.)
II Light Skin (Burns easily and severely and tans minimally.)
III Normal Skin (Burns moderately and tans average.)
IV Dark Skin (Burns minimally, tans easily and above average.)
New lamps emit approximately 10% more ultraviolet radiation during the first 50 hours of
operation. Recommended tanning times should therefore be reduced by approximately 10%
during that period.
WARNING
: • Read these instructions before using this sunlamp product. • All persons in the
room should wear protective eyewear when lamps are on. Recommended eyewear: provided
eyeshields or equivalent eyewear as defined under 21 CFR 1040.20. Other types of eyewear
may not provide adequate protection. Failure to use protective eyewear may result in severe
burns or other eye injury. If discomfort develops, discontinue use and consult a physician.
THE FOLLOWING LAMPS HAVE BEEN CERTIFIED FOR USE IN THE 16RS:
DARK TAN™ Wolff® Model DT71-T12-100W BI-PIN
Triple Twister Model F71T12/BL/HO/BP
THIS EQUIPMENT MUST BE EARTH GROUNDED.
This product is in conformity with performance standards for sun lamp
products under 21 CFR PART 1040.20 and ANSI/UL Standard 482.
88465
DISCONNECT POWER CORD BEFORE ATTEMPTING TO CLEAN, RELAMP,
OR ENGAGE IN THE MAINTENANCE OF THIS PRODUCT.
WARNING
Wear protective eyewear.
Failure to may result in severe burns or longterm injury to the eyes.
DANGER
Shock hazard.
Disconnect power before servicing or removing any protective covers.
Do not operate this device near water or while you are wet.
DANGER
Some medications may increase your sensitivity to ultraviolet light. It
is recommended that you consult a physician before using this
sunbed if taking any medication or if you suspect that your skin might
be especially sensitive to sunlight.
CAUTION
Air from the room is used to cool the sunbed. Maximum ambient room
temperature should be 80°F. Place your sunbed no closer than 6” from
any wall. Make sure nothing obstructs the airflow into the sunbed’s
endcaps or out of the fan openings. A poorly ventilated room may
cause the unit to become hot and cause discomfort to the user.
Unpacking and Inspection
Your sunbed comes in two cardboard cartons. Pull back the plastic
sheet and, with a helper, grasp the bench and pull it from the carton
bottom, leaving the plastic wrap and the carton packaging. Do not try
to lift the unit with the plastic still on as it may slip. Do the same with
the canopy.
The canopy box contains the canopy and a pair of gas springs. The
bench box contains the bench, assembly hardware and stand legs.
Inspect the items and make sure they are free from any visible damage.
Report the extent of any damage to the transportation company.
Electrical Requirements
Your sunbed operates from a 120V AC source. You should have a
NEMA 5-15R electrical outlet (below), on a dedicated circuit capable
of providing 15 Amp service, installed in the room in which you will
use the unit. We recommend installation by a professional electrician.
The outlet must be earth grounded.
15 AMP NEMA #5-15R
RECEPTACLE
29008-01A
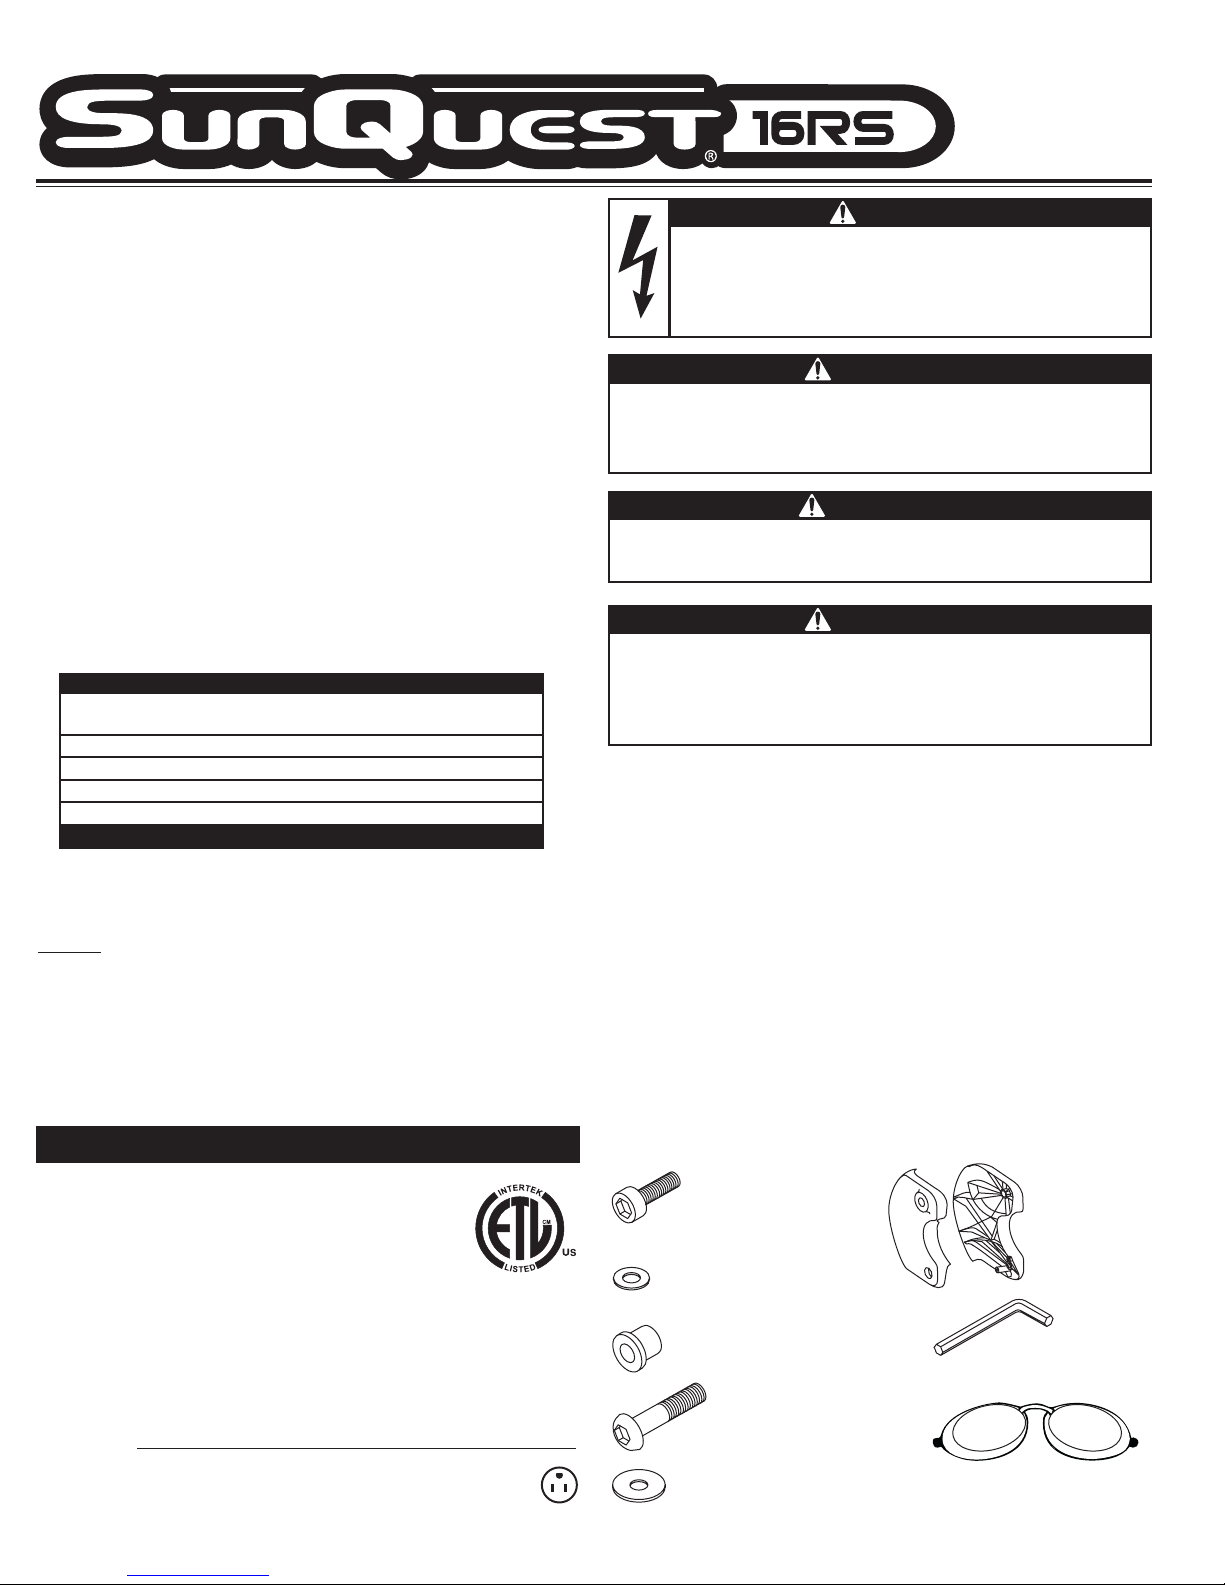
Allen-head Bolt 5/16” x 1”
Quantity 2
5/16” Metal Washer
Quantity 2
Bushing
Quantity 2
Allen-head Bolt 5/16” x 1 1/2”
Quantity 2
Nylon Washer
Quantity 2
Hinge Brackets
(1) left, (1) right
Hex (Allen) Wrench
Quantity 1
Safety Goggles
Quantity 1
Hardware Inventory (These items and a small pillow)
RECOMMENDED EXPOSURE TIMES IN MINUTES
Level 1/Week 1
Level 2 Level 3 Level 4 Level 5
Skin Type: 1st-3rd Sessions
I Sensitive NOT RECOMMENDED FOR TANNING
II Light 4 8 12 16 20
III Normal 6 10 15 20 20
IV Dark 8 12 16 20 20
MAXIMUM EXPOSURE TIME IS 20 MINUTES
DANGER
Page 2
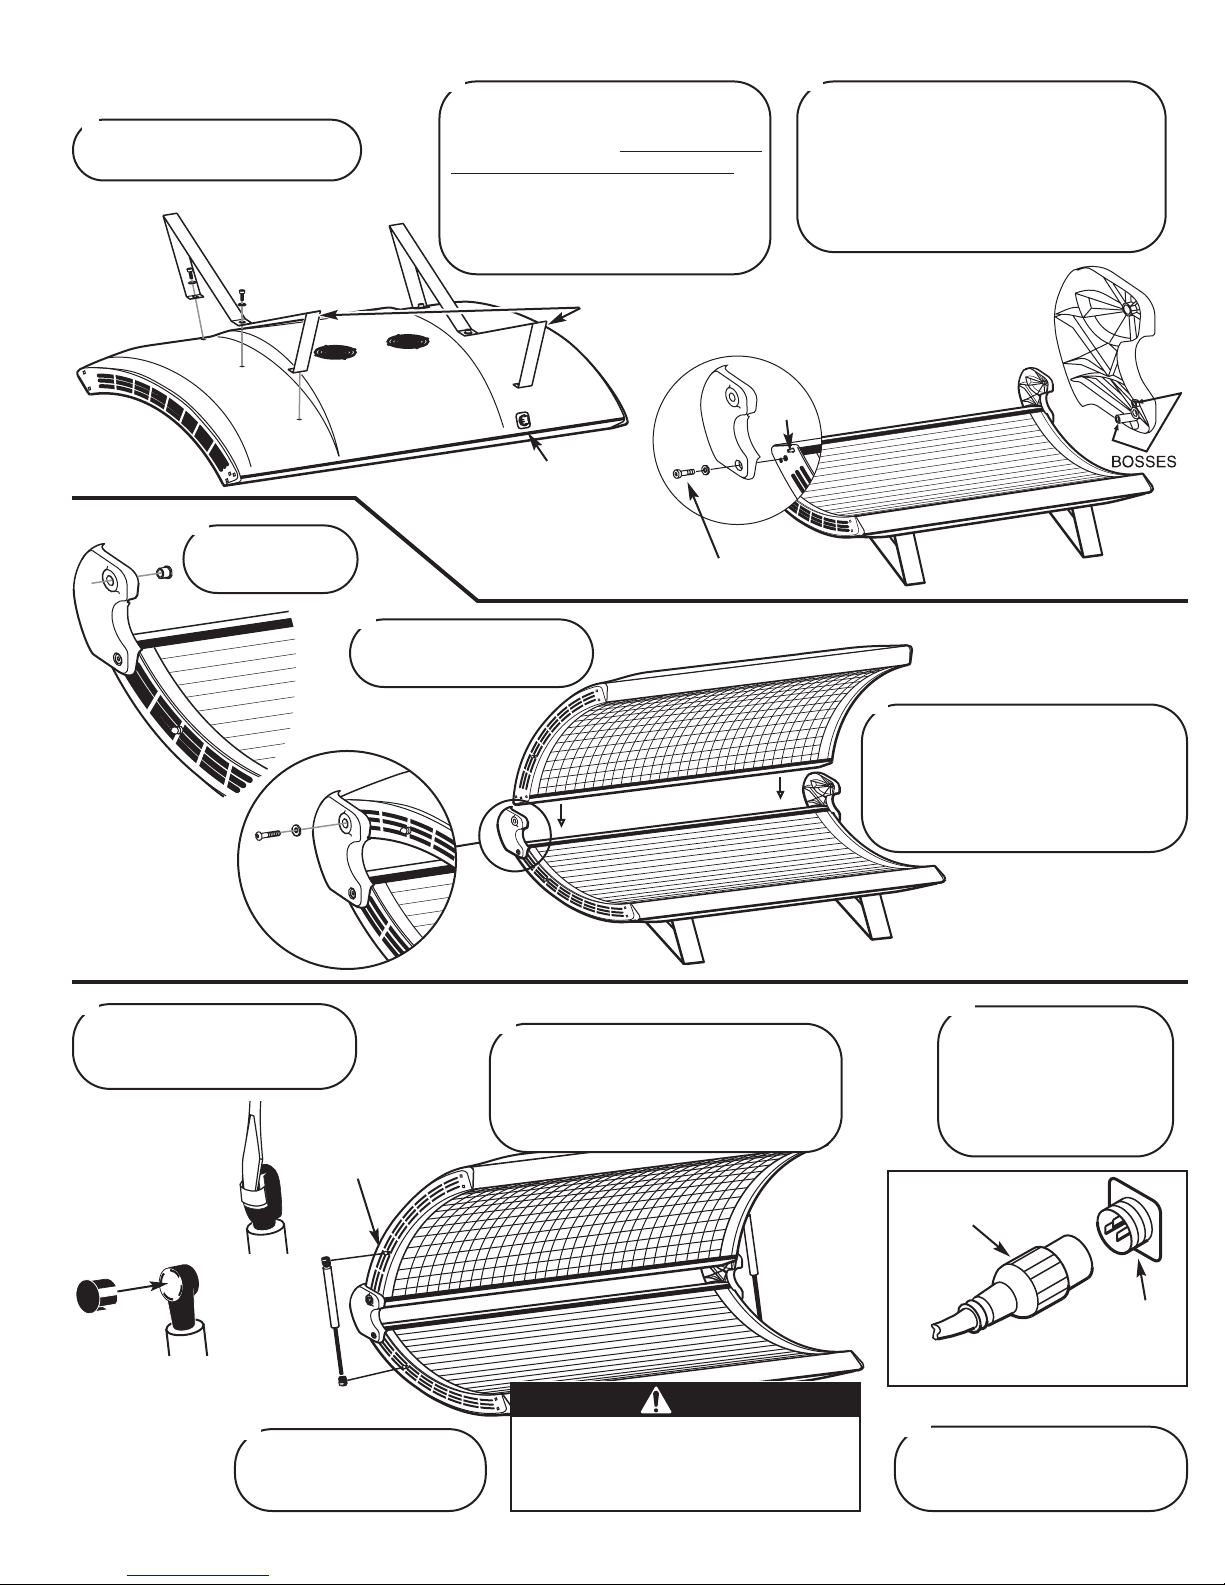
Remove the six 5/16” x 1” bolts and
5/16” washers installed in the bench.
Attach the stand legs, with the two small
skirt mounting holes toward the back, by
installing the center bolt first. You may
have to gently push the sides of the legs
in to align holes. Tighten with the Allen
wrench.
2
SKIRT MOUNTING HOLES
Assembly Procedures
(ELECTRICAL CONNECTOR
INDICATES BACK OF BENCH)
SHORT BOLT
Lay the bench upside down on the
floor. Locate the two stand legs.
1
Turn bench over. Install hinge brackets to
ends of bench such that the short boss
engages the stud above the bolt hole, and the
long boss engages the hole below the bolt
hole. Secure using 5/16” x 1” Allen-head
bolts and 5/16” metal washers. Tighten bolt
snug, then an additional half turn.
3
Place the bushings
into hinge brackets.
4
Lift the canopy and hold it
between the hinge brackets.
5
Insert 5/16” x 1 1/2” bolts with nylon
washers into both hinge brackets.
Tighten bolts into the endcap threaded
inserts until snug, then an additional
half turn. Do not overtighten to avoid
damaging threaded inserts.
6
PIVOT STUD
CAUTION
Failure to engage locking clips may
result in the ball joints working loose,
allowing the canopy to fall, which may
result in damage to the unit and injury.
Ty p e 1
Pry back the
locking clip
with a flat
screwdriver.
The gas springs have a locking
mechanism. Follow the directions
below for the type you received.
7
With a helper holding the canopy open,
align ends of gas spring ball joints with
pivot studs and push into place. Be sure
rod end is down as shown. DO NOT lower
canopy until both gas springs are engaged!
8
Lift and lower canopy a few
times to lubricate gas springs
for optimum performance.
9
THREADED
LOCKING RING
RECEPTACLE
ON BENCH
CANOPY TO BENCH
POWER CORD
Connect the canopy to
bench power cord to the
bench receptacle. Align the
terminals and firmly push
on until seated then tighten
the threaded locking ring.
10
Plug the three-prong 120V AC
power cord into a dedicated outlet
(see Electrical Requirements).
11
STUD
Ty p e 2
Remove locking
clip to install or
remove gas spring.
Page 3
Care and Maintenance
Cleaning After Use
Clean and disinfect your tanning bed’s bench and canopy after each
use. Use a non-abrasive disinfectant cleaner that does not contain
ammonia or ammonia derivatives. Ammonia may damage the acrylic
shield. Spray the acrylic lightly with disinfectant and wipe dry with a
clean soft cloth. Wipe the canopy grill with a soft cloth slightly dampened with disinfectant, then wipe dry.
Thorough Periodic Cleaning
The cooling fans draw air through the bed and will cause a dust
buildup on the lamps and reflectors. When a dust buildup is observed,
it is necessary to thoroughly clean the inside of the bench and canopy.
1 Remove the acrylic shield, metal grill and lamps.
2 With a soft cloth, wipe the entire length of each lamp.
3 Clean both sides of the acrylic shield and grill with a non-ammo-
nia disinfectant cleaner.
4 Wipe the reflectors with a clean damp cloth.
5 Re-install the lamps, acrylic shield and grill.
Mechanical Inspection
Inspect the unit’s mechanical integrity every 400-500 hours of use.
• Inspect the unit’s fasteners verifying that all are firmly in place.
Pay particular attention to the hinge bolts.
• Inspect gas springs for signs of wear. Replace gas springs that will
not hold the canopy in the full open position when raised.
• Inspect the AC power cord and its connections.
• Inspect the acrylic. Replace if broken, cracked or badly scratched.
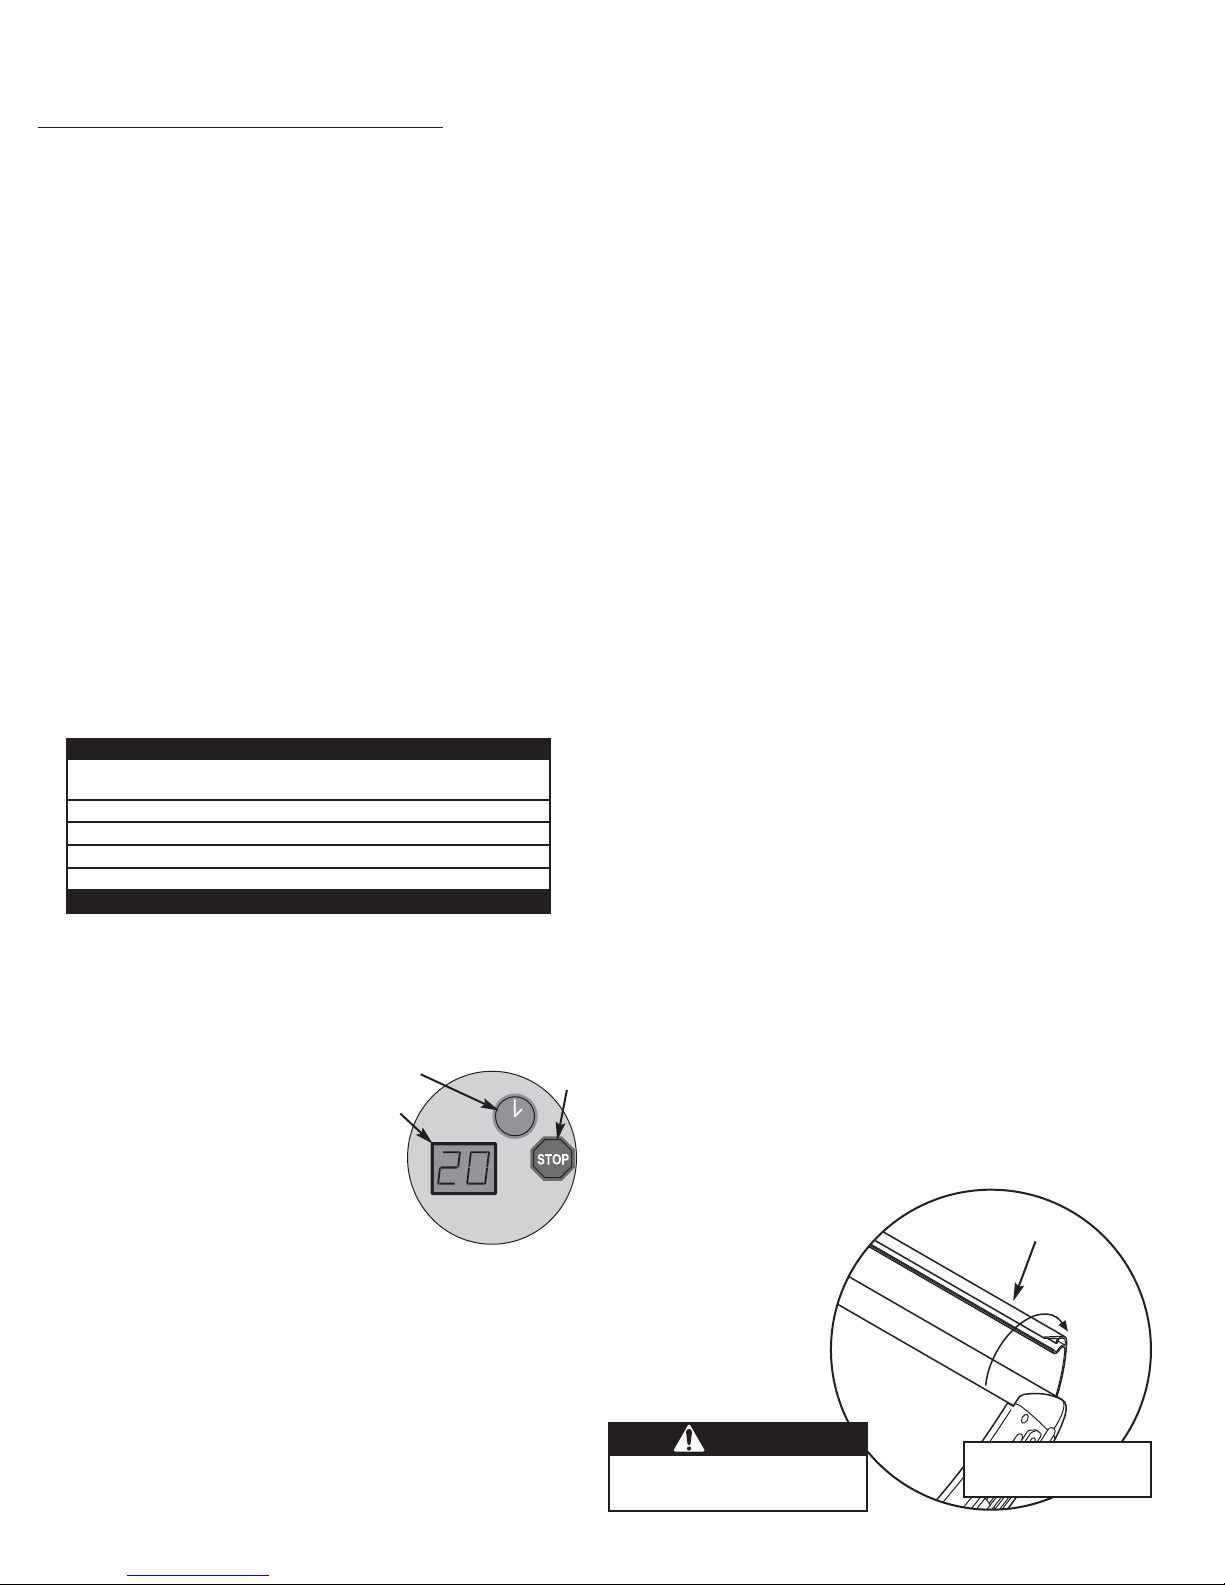
Removing/Replacing Acrylic Shield (bench)
The acrylic shield in the bench and metal grill in the canopy are
secured in place by hinged profiles which run the length of the bed,
both front and back. Simply pry up on the inside edge of the profile
until it releases its latching action (see figure below). Continue to pry
up the profile across its entire length until it swings back freely. Repeat
for the other profile. The long edges of the acrylic shield are now
exposed. Standing in front of the sunbed, grasp the long exposed edge
of the acrylic and carefully slide it toward you until it is removed.
Removing/Replacing Canopy Grill
Follow the above directions for opening the hinged profiles. As you
pry the hinged profile open the canopy grill should start to drop out
on its own. If you need to, slide the grill toward the head or foot end
of the sunbed and it will drop out easily.
After changing the lamps, replace the bench acrylic shield and canopy
grill by reversing the above directions. Close the hinged profile by
pushing it back into place until it snaps tight.
PROFILE
CAUTION
Be careful. The edges of the
acrylic shield may be sharp.
Start pulling from the
middle of the profile!
A Timer display - Displays remaining time.
B Timer button - Turns bed on. Timer dis-
play shows remaining time. If a lesser
time is desired, press timer button
until desired time is displayed.
C Stop button - Interrupts tanning session.
1 Press the timer button (B) to begin the tanning session. The timer dis-
play (A) displays the remaining time. The lamps will turn on and the
timer will begin to count down from the maximum tanning session
time. If a tanning time less than the displayed time is desired, repeatedly press the timer button (B) to decrease the remaining time.
2 Lift the canopy, lie down on the bench (face up), lower the canopy
as close to your body as possible.
3 When the timer reaches “0” the lamps turn off. If you want to stop
your session before time expires, press the stop button (C).
4 Raise the canopy by pushing the outer edge of the canopy.
Operation
This sunbed is equipped with a control key lock directly below the
timer, allowing you to monitor usage by children and/or others. To
activate, insert the key into the lock and turn, horizontal to lock and
vertical to unlock. You may remove the key in either position.
A
B
C
Using Your Sunbed
Before using your sunbed, please note the following:
• Your skin should be free of cosmetics, tanning oils, or other body
lotions prior to tanning except for those specifically made for use
with tanning devices. However, do not remove natural body oils by
bathing or showering immediately before tanning.
• Keep treated hair from contacting sunbed surfaces. Many hair products can damage the sunbed acrylic. Wear a shower cap or towel if
you use gels, mousses, sprays, or other hair products.
• Your sunbed is designed for individual use. Always wear the safety
goggles supplied with your sunbed or another approved pair of goggles, as defined under 21 CFR 1040.20. Regular sunglasses do not
provide adequate protection from ultraviolet light.
Exposure Times
Follow the guidelines for skin type and exposure times as shown in the
table below. Untanned persons should not tan on consecutive days
during their first week of tanning. Never tan more than once a day.
Tanning normally appears after the first few sessions and maximizes
after approximately four weeks. Tan once or twice per week thereafter
to maintain appearance. Persons already having a base tan may begin
at advanced levels corresponding to the extent of their base tan.
Skin Type:
I Sensitive Skin (Burns easily and severely and does not tan.)
II Light Skin (Burns easily and severely and tans minimally.)
III Normal Skin (Burns moderately and tans average.)
IV Dark Skin (Burns minimally, tans easily and above average.)
RECOMMENDED EXPOSURE TIMES IN MINUTES
Level 1/Week 1
Level 2 Level 3 Level 4 Level 5
Skin Type: 1st-3rd Sessions
I Sensitive NOT RECOMMENDED FOR TANNING
II Light 4 8 12 16 20
III Normal 6 10 15 20 20
IV Dark 8 12 16 20 20
MAXIMUM EXPOSURE TIME IS 20 MINUTES
Page 4
Replacing Lamps
To be assured of maximum tanning effectiveness, change lamps after
approximately 800-1000 hours of use. Tanning will continue after this
time but at a slower rate. To ensure trouble-free operation of your
sunbed, replace the lamp starters whenever the lamps are replaced. We
recommend using the lamps specified below. Use of uncertified lamps
is a violation of Federal regulations and may void your warranty.
1 Grasp a lamp at one end and at the middle, then turn the lamp a
quarter turn. The lamp may then be gently removed from its holder.
2 To reinstall lamp, insert pins on the ends of the lamp into the slots
on top of the lamp holder and turn the lamp a quarter turn.
The following lamps have been certified for use in the 16RS:
DARK TAN™ Wolff® Model DT71-T12-100W BI-PIN
Triple Twister Model F71T12/BL/HO/BP
If you did not find the solution to your problem above, contact your
place of purchase for additional assistance
Problem
Troubleshooting
Solution
Sunbed not tanning
1. Clean sunbed, see Thorough Periodic Cleaning.
2. Replace lamps if lamp hours are greater than 800hrs.
3. Replace acrylic.
Lamps fail to light and timer display is blank
1. Check source of AC power. Reset circuit breaker or replace
fuse if necessary.
2. Make sure the unit is plugged into outlet.
3. Make sure canopy to bench cord is properly connected.
5. Make sure Control Lock is in the vertical position.
One or more lamps fail to light
1. Check that lamp is installed correctly.
2. Switch unlit lamp with a lamp that lights. If the new lamp
lights and the old lamp still does not, replace old lamp.
The canopy will not stay up
NOTE: Gas springs are manufactured to hold the canopy in its
fully open position as well as allow it to rest fully closed. If
left open for an extended period of time some creep down
may occur. This is considered normal. Keep the unit closed
when not in use. If the canopy will not stay fully open when
raised...
1. Raise and lower the canopy a few times to lubricate gas
spring internal seals.
2. Replace gas springs.
Sunbed does not stay lit
Check source of AC power. Reset circuit breaker or
replace fuse if necessary.
Record this information for ease of service:
Date of purchase:
Bench serial number:
Canopy serial number:
18 MONTH “BRONZE MEDAL” WARRANTY
Your ETS Distributor (including ETS, LLC if purchased directly), through a manufacturer’s
warranty, warrants your tanning unit to be free of structural defects in material and workmanship, under normal use, for its lifetime. Your ETS Distributor will, at its discretion, repair
any structural defect which materially affects the performance of the tanning unit, or replace
the tanning unit.
For eighteen (18) months following the purchase date of your tanning unit, your ETS
Distributor will provide replacements for parts that prove to be defective in material or
workmanship, with the following exceptions: gas springs are warranted against manufacturer’s defects for a period of one (1) year; ballasts are warranted against manufacturer’s
defects for a period of six (6) months; fluorescent lamps, lamp starters and cracked or broken endcaps are warranted against manufacturer’s defects for a period of ninety (90) days;
blue and clear filter glass (for face tanners) are warranted against manufacturer’s defects
for a period of thirty (30) days; acrylics are warranted against manufacturer’s defects for a
period of ninety (90) days following the purchase date of your tanning unit.
Your ETS Distributor (including ETS, LLC if purchased directly), also extends to you a two
(2) year parts warranty on all T-Max® remote system components. External voltage transformers (buck-boosters) are covered by a one (1) year parts and labor warranty, provided
you send back the defective transformer.
Labor costs associated with repair or replacement work covered by this warranty will be
reimbursed for repair or replacement work required to be performed for a period of thirty
(30) days following the purchase date of your tanning unit. Normal wear and tear, damage
from misuse or abuse, damage incurred in transit or damages resulting from unauthorized
repairs or modifications are not covered by this warranty. Warranty coverage does not
include cosmetic abnormalities such as scratches, nicks, dents, or other cosmetic changes
that do not materially interfere with the function of the tanning unit.
THIS 18 MONTH “BRONZE MEDAL” WARRANTY IS EXPRESSLY MADE IN LIEU OF
ANY OTHER WARRANTIES, EXPRESS OR IMPLIED, INCLUDING ANY IMPLIED
WARRANTIES OF MERCHANTABILITY AND FITNESS FOR A PARTICULAR PURPOSE, WHICH ARE HEREBY DISCLAIMED. No one has the authority to change or modify
this 18 Month “Bronze Medal” Warranty in any respect. To obtain service under this 18 Month
“Bronze Medal” Warranty, contact your authorized ETS Distributor (or ETS, LLC if purchased
directly). Proof of purchase, including serial number, is required.
IN NO EVENT SHALL YOUR DISTRIBUTOR OR THE MANUFACTURER BE LIABLE
AT LAW OR IN EQUITY FOR ANY LOSS, LIABILITY, DAMAGE OR EXPENSE IN AN
AMOUNT IN EXCESS OF THE PURCHASE PRICE RECEIVED, OR FOR LOSS OF USE
OR PROFITS, LOSS OF TIME, INCONVENIENCE, RENTAL OR SUBSTITUTE PRODUCTS, LOSS OF BUSINESS, LOSS OF INCOME, OR ANY OTHER INCIDENTAL, INDIRECT, SPECIAL OR CONSEQUENTIAL DAMAGES. Some states do not allow the exclusion
or limitation of incidental or consequential damages, and the above limitation or exclusion will
not apply to residents of some states. This 18 Month “Bronze Medal” Warranty gives you specific, legal rights and you may have other rights which may vary from state to state.
All warranty service must be performed by an authorized service person using only ETS
authorized replacement parts. Use of non-authorized parts may void your warranty. All labor
charges must be authorized by your ETS Distributor prior to the start of repairs and must not
exceed the established rates and time allotment policies established by your ETS Distributor.
If your tanning unit must be returned for service, all freight charges shall be at your expense.
Contact your ETS Distributor for the authorized Service Center nearest you. This warranty is
serial number specific and only applies to tanning units purchased through an authorized ETS
Distributor. This warranty is extended to the individual or legal entity whose name appears on
the original sales document and may not be transferred to any other individual or legal entity.
This warranty is void if the tanning unit is modified in any manner from its original design.
1•800•449•3605
7445 Company Drive
Indianapolis, IN 46237-9296
To obtain warranty service contact your place of purchase. Proof of
purchase, including serial number, is required for verification.
Contact ETS, LLC only if you purchased your equipment directly.
Proudly manufactured in the U.S.A.
 Loading...