

Page 1
Page 2

CONTENTS
2
1. Parts description
2. Cautions
2-1 Caution ! Operation Guide .............................................. 6
2-2 Use of SD memory card ................................,,,,,,........... 8
3. Functions
4. Installation instructions
4-1. Installation order of the product ................................ 12
4-2. Installation order for viewer program ......................... 14
4-3. Viewing saved images in SD Card ............................. 20
5. Specifications
Page 3

1. Parts description
Main body
3
Camera Lens
Recording button
SD Memory Card Slot
Power LED
On indicates enough
battery power to operate
REC LED
On indicates recording
Page 4
Main body
4
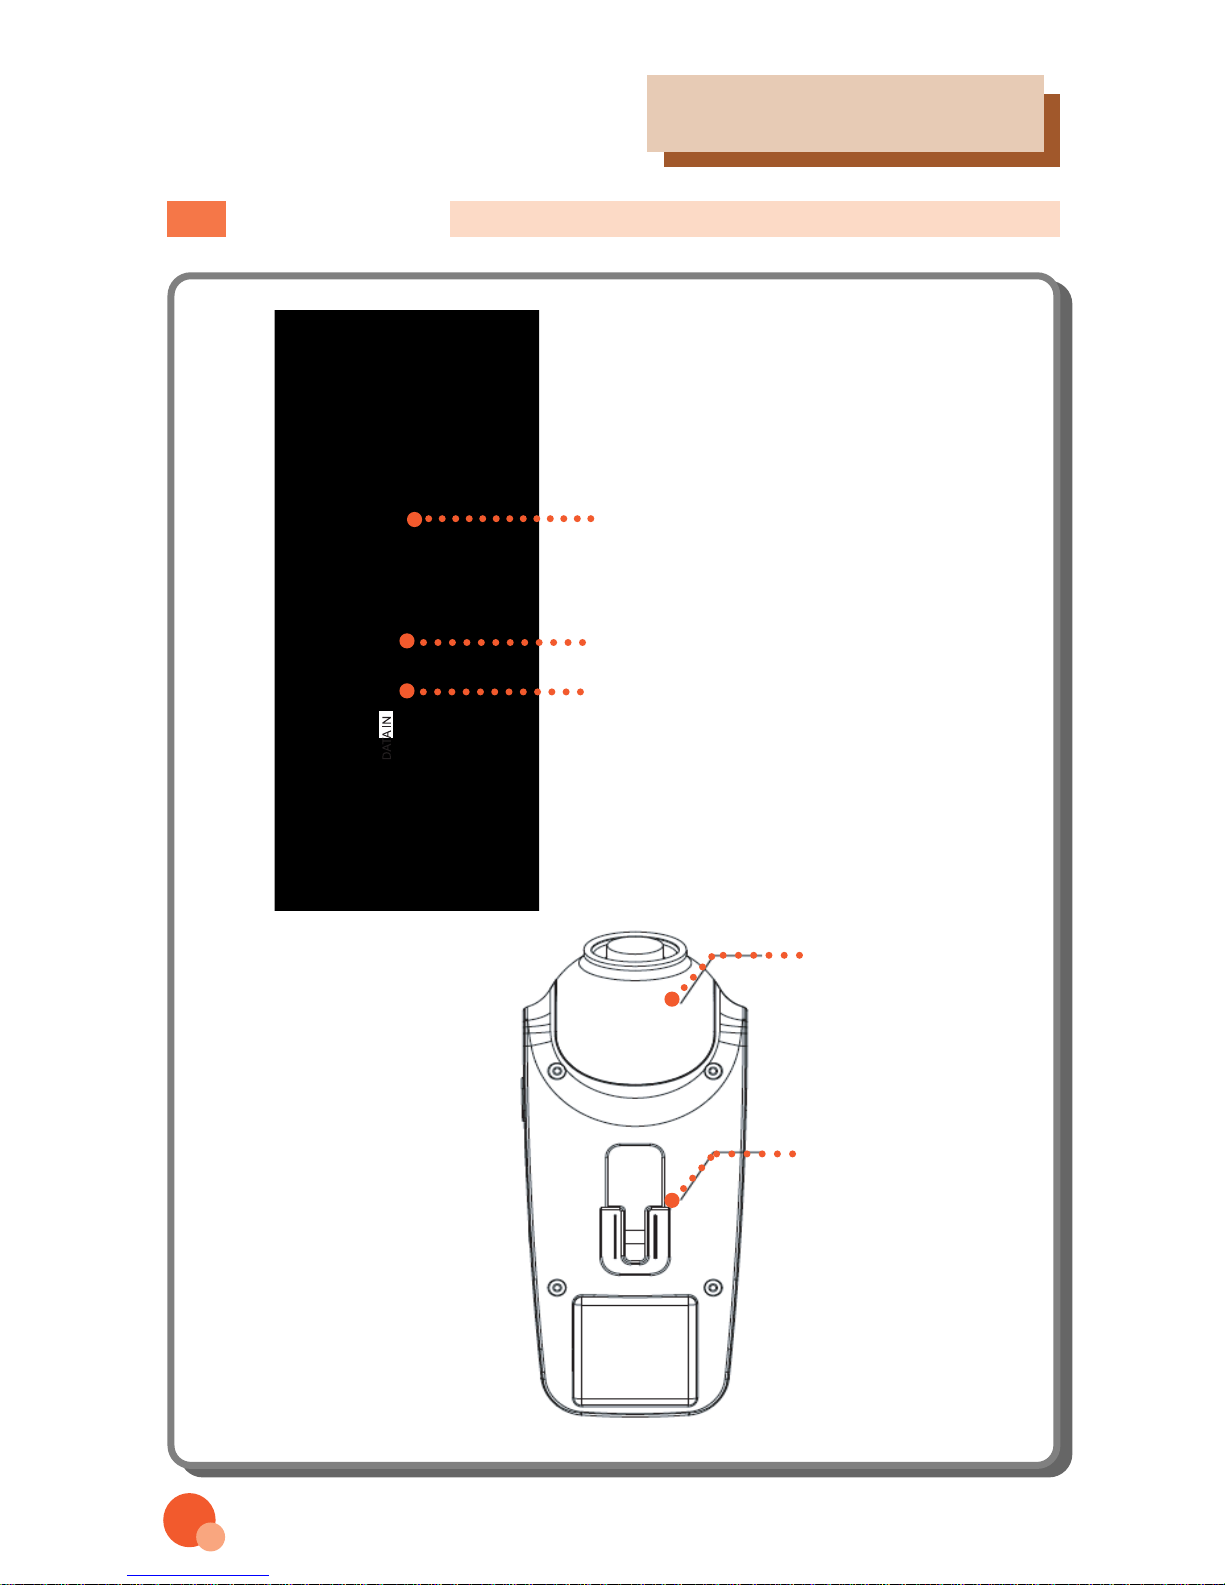
1. Parts description
DC power connection
Video Output(Audio Output:Optional)
Data In
Camera Case
Mounting
Bracket
Page 5
Contents of the product
5
1. Parts description
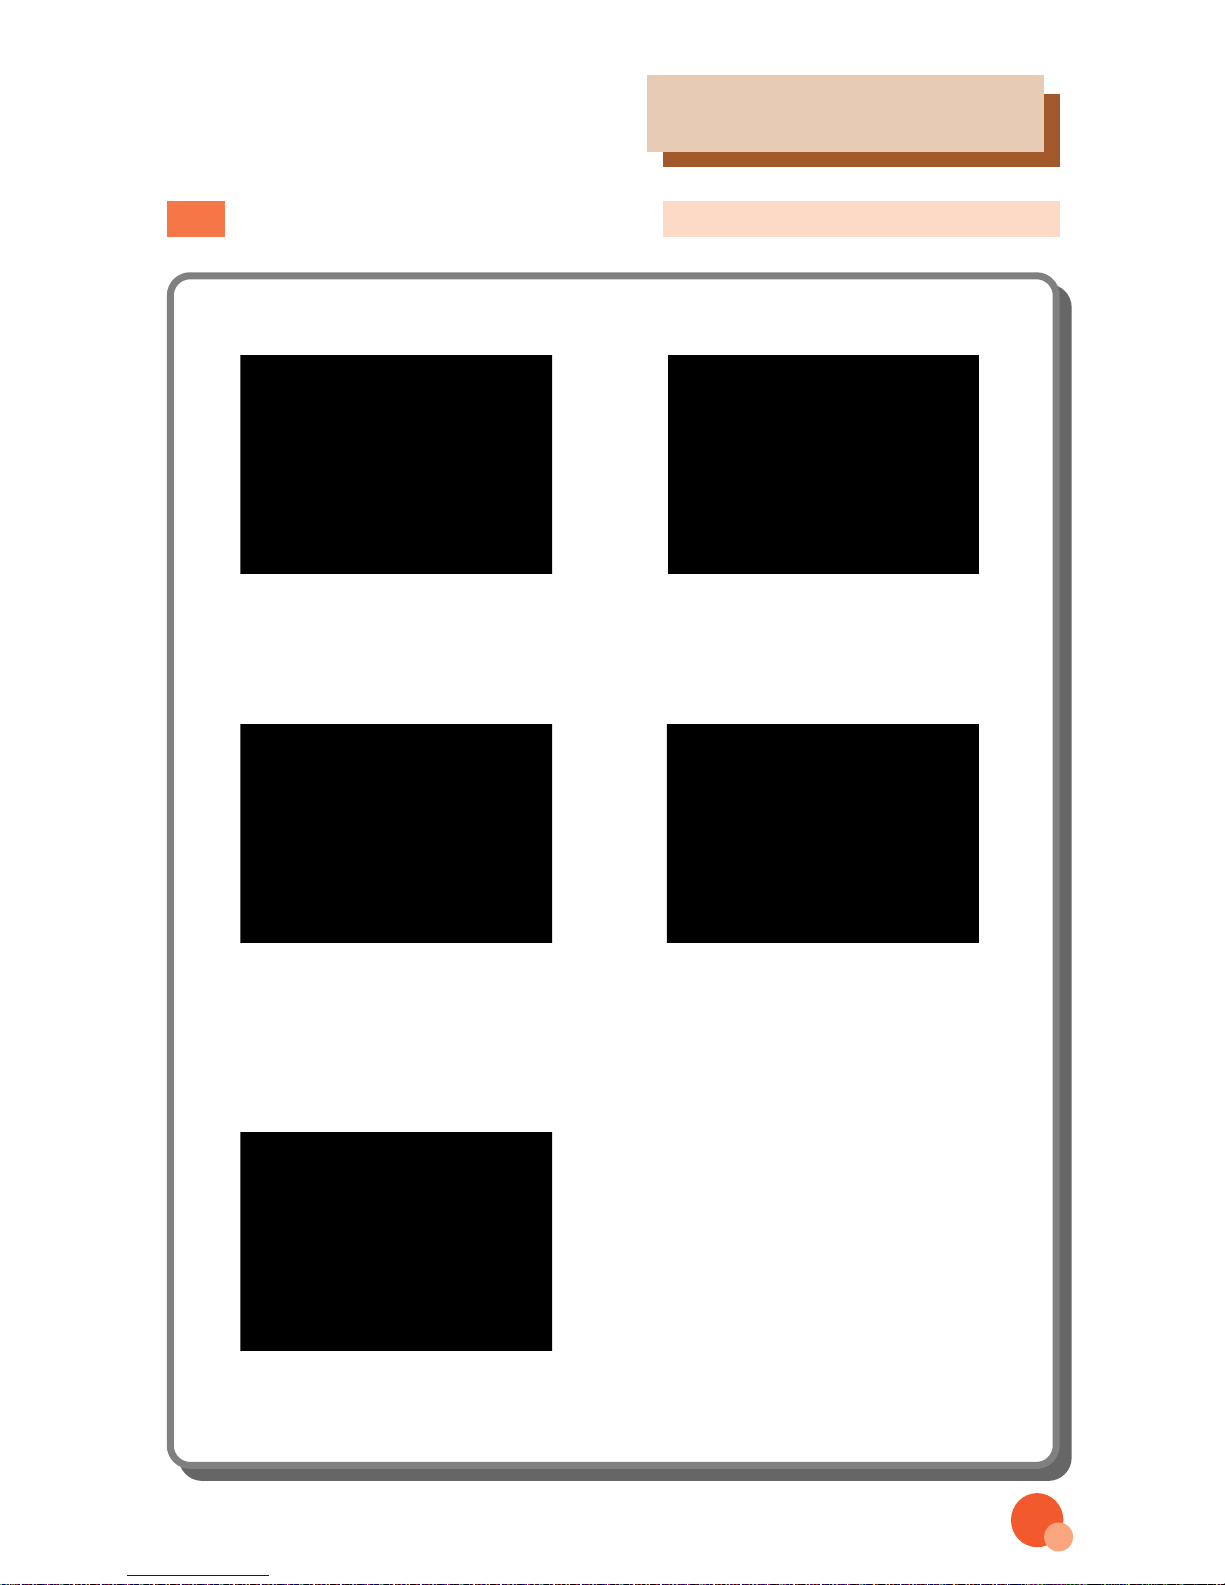
Automobile Video Black
Box, SD card & Reader
Power cable
Video output cable Holder & Adhesive
Tape
Remote Controller
(Optional)
• User Manual and program
installation CD
• RemoteController(Optional)
If any of these items is missing
or damaged, contact your
dealer or installer immediately
for repair or replacement.
Keep the package for future
storage or shipping.
Page 6

2. Cautions
2-1 CAUTION! OPERATION GUIDE
6
Do not use water or any solvent when cleaning the
device or inside the car. (It may cause damage to the
product, fire or electric shock.)
Tunnels, backlight and nighttime may prevent from
optimal recording.
Do not attempt to open, repair or modify device
(Manufacture will not be responsible for any problems
caused by user.)
Do not operate the device while driving. (It can lead to
accident)
After a severe vibration or shock is applied to the
device, please recheck and readjust device setup
location while vehicle is still and relatively flat
location. (Device might have trouble receiving GPS
signal, image or voice signal.)
Be sure the device has clear view to sky inside of
windshield and not covered while mounted inside of
car. (It may cause trouble in receiving GPS signal.)
Our device is produced and designed mainly for recording and saving
audio and video signals of the front and rear view (optional), but it does
not guarantee recording and saving of all video and audio signal.
Manufacture doesn't provide a warranty for any damamge made by
mechanical problem or loss of DATA. Instructions below are guidance for
user's safety to prevent any financial loss or inconvenience caused by
accident. Read the instructions below before using the device.
Page 7

7
Avoid severe shock and do not try to insert or put
unknown object into unit. ( It might cause a fire or
electric shock.)
Do not change product Installation location
frequently. (It may cause trouble receiving GPS
signal.)
Avoid heavy sun shade. (Image will be faint or
distorted. After out of shade, user need to check
recording result for proper operation)
Avoid dust and direct sunlight into the lens.
(It may cause trouble in normal recording.)
Use only provided cable and indicated 12V DC Car
Power Accessory Outlet. (It may cause damage, fire
and trouble.)
Replace with a new product if the G sensor value is
lower than what is set for drive and parking. (Do not
use anymore when see failure in operation or smoke
from the unit and contact your dealer or installer for
support.)
Replace with a new product when unit is not turn on
due to car accident. (Do not use anymore when see
failure in operation or smoke from the unit and
contact your dealer or installer for support.)
Instrutions below are guidance for user’s safety and prevent any financial
loss or inconvenience caused by accident. Read the installations below before
using the device.
2. Cautions
Page 8

2-2 Use of SD memory card
8
2. Cautions
Instructions below is for proper use of SD memory card as storage device.
Insertion or removal of SD card
① Turn off the car's ignition. ② Turn off the power from device.
③ Insert or remove SD card from device.
* If SD card inserted or removed while the unit is on, it might
cause of loss of data.
Managing SD card
◆ Use well known brand SD card or the one came with device.
◆ Check disk or format SD card once or more per week for reliable data
storage.
◆ Replace with a new SD card monthly.
* Based on 9 hour sequence record per day ,using 2G SD card
* 4G : 2 months, 8G : 4 months : 16G : 8 months
* Operation setting can fluctuate usage duration of SD card.
◆ Avoid hot and humid environment
Store card in a case when moving or keeping in order to avoid static
electricity or external electrical shock.
◆ The manufacture is not responsible for the lose of data, damage
caused by user.
◆ Please keep a copy of any important data in other storage unit.
◆ SD card includes user manual and video managing program.
Page 9

9
3. Functions
SD card folder structure
Movie Room : A folder includes unit's real time videos.
Event Room : A folder includes recorded event triggered by internal sensor
or by pressing REC key.
MAIN MENU
RECORDING SETUP
VIDEO SETUP
SENSOR & INPUT
OTHERS
▲▼: MOVE ● : ENTER MENU : EXIT
MENU Explanation
Pressing menu key turns
unit On/Off the main menu.
(Auto Menu off function*)
MENU is automaticlly tumed off if there
is no input signal from the remote
control for twenty seconds after the
menu is on.
RECORDING SETUP
CLOCK SETUP
EVENT SETUP
MAIN MENU
▲▼: MOVE ● : ENTER MENU : EXIT
Set record related options
Press the ▲ or ▼ KEY to move the
cursor. Press the ●(Enter) key when
the cursor to change option.
CLOCK SETUP
CURRENT TIME 00:00:2000 00:00
TIME FORMAT MM:DD:YY HH:MM
UP MENU
▲▼: MOVE ◀▶: SELECT ●: ENTER MENU : EXIT
1
2
Press the ● key to apply setting on OSD (On screen display).
Choose one from one of time format by ▲ or ▼.-MM:DD:YY HH:MM or
DD:MM:YY HH:MM.
Press the ● key when done, choose the Up Menu to move to Main Menu.
Set time
Setting current time.
Press ◀or▶to set date and
time. After setting the date
and time, press●to move
cursor
3
Page 10
- TIME PRE : Setting recording time prior to event.
(Selectable the recording time is 10 or 20 or 60sec.)
- Time POST : Setting recording time after to event.
(Selectable the recording time is 10 or 20 or 60sec.)
- Overwriting can be done with deleting the oldest file when SD card is reached
maximum capacity.
10
3. Functions
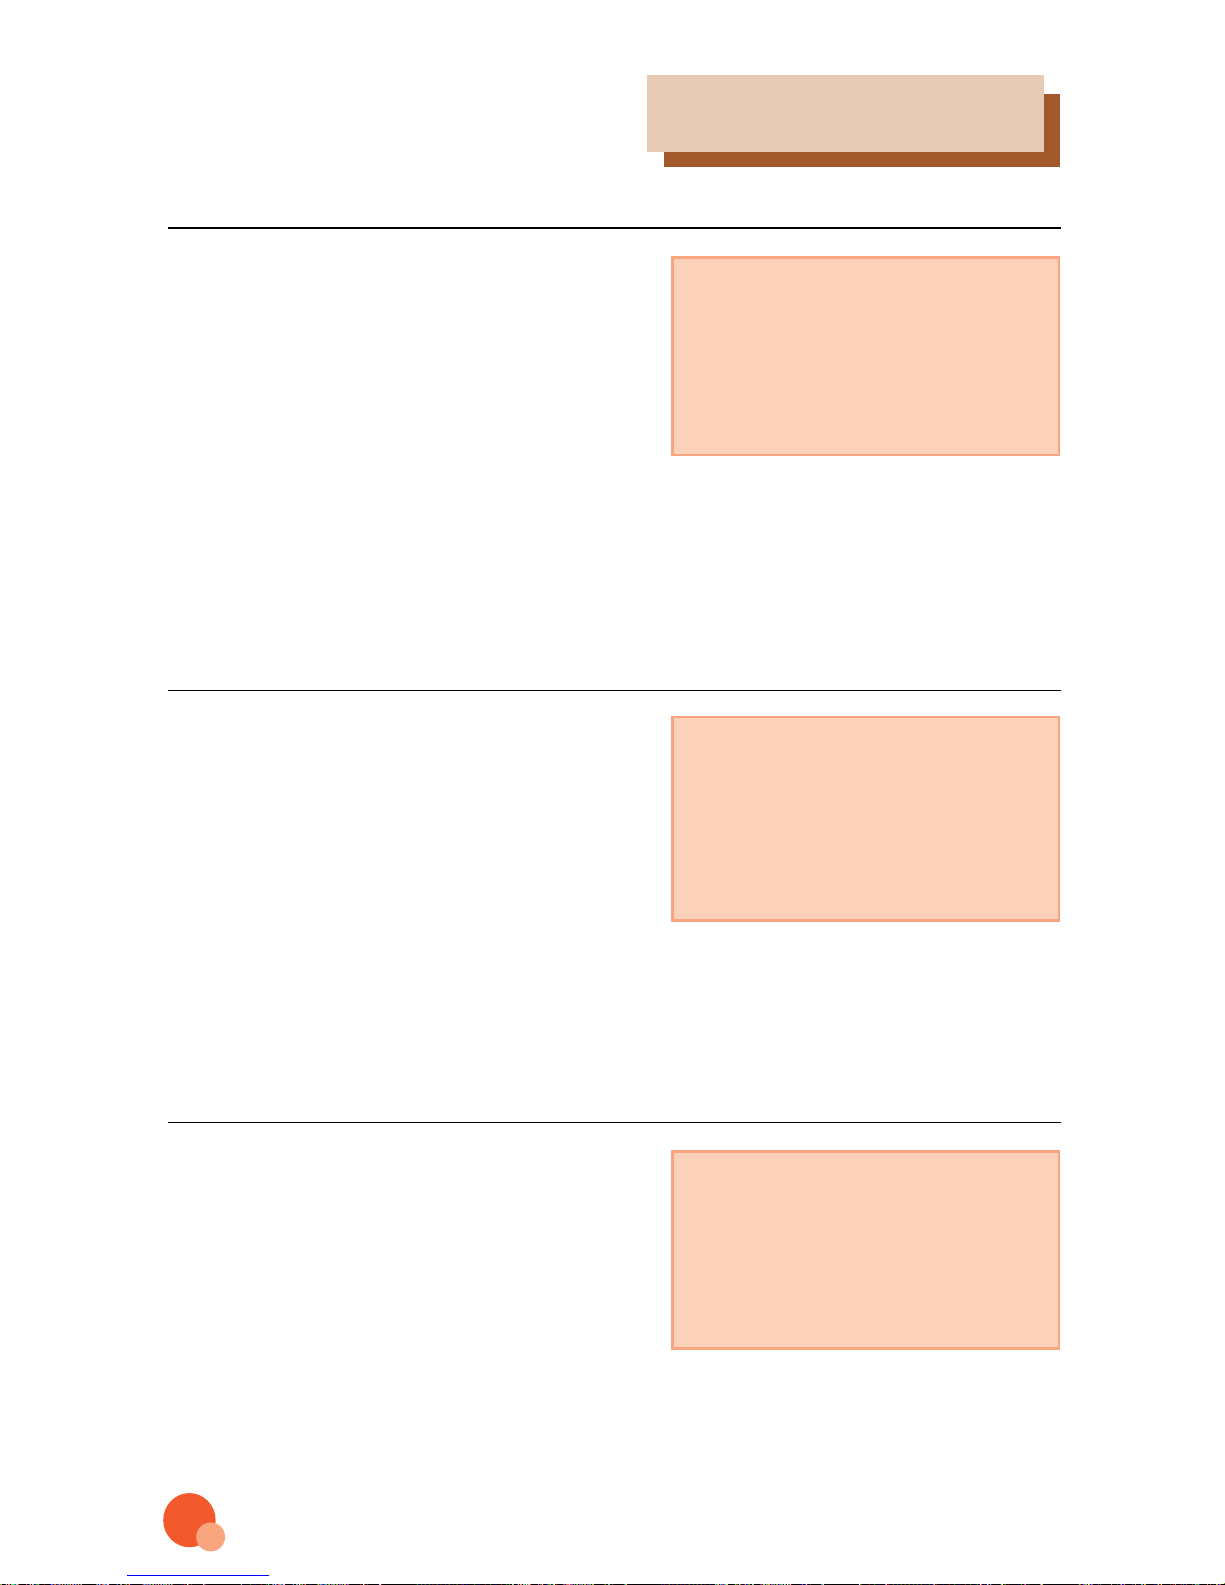
EVENT SETUP
Event recording is triggered by
G-sensor or pressing the REC
key when event occurred. The
recording files are saved in
rooms.
- Room Capacity : The number of storing
room for event recording.
EVENT SETUP
ROOM 20 PIECE
TIME PRE 10 SEC(10,20,60SEC)
TIME POST 10 SEC(10,20,60SEC)
OVERWRITE YES
UP MENU
▲▼: MOVE ◀▶: SELECT MENU : EXIT
VIDEO SETUP
VIDEO Setup : Press the menu key .
Press the▼ key three times and
●key
to choose the video set up.
Choose the recording picture
size-VGA(640x480),QVGA(320x240)
Sensor sensitivity
Set up the sensitivity of sensor
while you drive ( Level 1 to 5,
lower level is more sensitive.)
- Gx indicates the shock level of
Surge (motion back and forth along the
main axis of the vehicles).
- Gy indicates the shock level of sway (Motion back and
forth along the lateral axis of a vehicles).
- Gz indicates the shock level of heave (up and down
motion of vehicle).
4
5
6
SENSOR and INPUT
Sensor X Level 1 2 3 4 5
Sensor Y Level 1 2 3 4 5
Sensor Z Level 1 2 3 4 5
MAIN MENU
▲▼: MOVE ◀▶: SELECT MENU : EXIT
Setting up two cameras.
-Tint : Control density of the tone of colors(1~100 Higher number. denser)
-Color : Control density of hue(1~100 Higher number. denser)
-Brightness : Control the brightness of picture color.(1~100 Higher number.denser)
-Contrast : Control the shading of picture.(1~100 Higher number. denser)
VIDEO SETUP
TINT 50 (1~100)
BRIGHTNESS 50 (1~100)
CONTRAST 50 (1~100)
MAIN MENU
▲▼: MOVE ◀▶: SELECT MENU : EXIT
Page 11

11
33.. FFuunnccttiioonnss
OTHERS
- Formatting SD memory card will
permanently delete all movies and
events and will not be able to
retrieve files.
- Press MENU key to select OTHERS menu,
choose SD CARD FORMAT to format SD
card.
- After formatting SD card, screen will display DONE, you can go back to
main menu by pressing ENTER key.
- EVENT DELETE deletes the recorded files(0~20) that are selected from
the EVENT ROOM.
UPGRADE
- Delete the 'bsac.bin' and 'mcode.bin' in the Firm folder of SD
Memory Card.
- Insert SD MEMORY CARD, set MENU-OTHERS-UPGRADE to YES
then press ENTER key.
- If there is no FIRM FOLDER, after create FIRM FOLDER then
'bsac.bin' and 'mcode.bin' should be stored in SD CARD.
- Exit from the MENU when displays "UPGRADE DONE" on MENU.\
- The unit will be initialized by pressing the ENTER key after
changing FACTORY SETTING to YES.
- PROGRAM VERSION is displayed on the right side of FACTORY
SETTING.
7
OTHERS
SDCARD FORMAT NO
EVENT DELETE NO EVENT
UPGRADE VER_090717_3
FACTORY SETTING NO
MAIN MENU
▲▼: MOVE ◀▶: SELECT MENU : EXIT
Page 12

4. Installation instructions
4-1.
Set up order of the product
12
1. Checkist before set up
Make sure your car's engine is turned off, parked in bright, safe and flat
surface before you setup device.
2. Set up instruction
① Insert SD CARD to the unit.
Insert the card facing the side with contact side to upward
(Won’t insert in other direction)
② Attach adhesive bracket.
Attach adhesive tape to mounting bracket by removing protective tape
and adjust mounting position in windshield where unit can receive
good GPS signal.
SD CARD inserting direction Correctively insetted SD CARD
Adhesive tape stick to
the mounting bracket
face firmly.
Mounting bracket
should be sticked to
the windshield where
unit has clear view to
sky.
Page 13
13
③ Unfasten screw
Loosening screw will help putting unit and mounting bracket together.
④ Assemble unit and bracket together aligning units groove.
⑤ Insert power cable to DC power connection port of unit to car's 12V DC
accessory port.
⑥ After completion of set up and connection, turn your car on, unit will turn on
automatically. The product is in operation when REC LED is lightened
up.
After joining, tighten
screws.
Readjust camera viewing angle
[Right view] [Left view]
4.
Installation instructions
Page 14

4.2 Video managing program installation instruction
14
4.
Installation instructions
Locate program setup folder in SD card provided.
3 Cautions after installation
① Don’t turn off the device for the first thirty seconds of the first opertion.
Let units initialize and detect GPS signals.
It may cause trouble if power is turned off during the automatic set up.
② Note: Due to location and surrounding, unit might take longer time to
receive good GPS signal.
③ Adjust the camera set up angle, cheking recorded screen of SD CARD.
Completion of the
product installation
viewed from outside.
Page 15

15
4.
Installation instructions
Within SD memory card's
program folder, run or double
click SETUP.EXE.
Installation in progress
Read warning message and
click NEXT to go next step.
Page 16

16
4.
Installation instructions
Select INSTALL to begin
installation
Click next to install video
viewing program (Quick time
alternative)
Page 17

17
4.
Installation instructions
Click next on user agreement
screen to proceed.
Click next to use default
directory or choose different
folder as you prefer.
Choose option and click next
(recommend default value).
Page 18

18
4.
Installation instructions
Choose folder name within
Windows's start menu or leave
default, and click NEXT.
Leave as is and click NEXT.
Click INSTALL to install video
management program.
Page 19

19
4.
Installation instructions
Press Finish.
Press Finish to finish installation.
Page 20

20
4.
Installation instructions
Video Black Box icon
of the right side will
be displayed on the
desktop.
Insert SD CARD into supplied
SD CARD READER.
Run viewer program by
double click the VIDEO BLACK
BOX icon on the desktop
Right side screen will be
displayed.
4-3. View saved pictures in SD CARD
Page 21

21
4.
Installation instructions
Click SETUP to check and
configure, select Drive letter with
SD card.
Press DOWNLOAD after
selecting the folder that contains
files
Input the number as the
example below when Video
Black Box Serial No. window is
displayed.
ex) 2907291
29 : Year 2009
07 : July
29 : Day 29
1 : Managing file No.
"Download Complete" will
appear when File download
is completed.
Input number will be
displayed on Car info of the
right screen.
Close the File Download
window.
Page 22

22
4.
Installation instructions
Right windows displays all
files stored in SD card.
File can be seared 10
minute interval by date or
time.
After choosing file from
right window, video and
audio can be viewed by
pressing PLAY button.
The map screen will be
displayed by selecting the
MAP button on the bottom
of window with the internet
connection.
Full screen is supported
by pressing Full Screen.
Due larger display screen,
picture quality will be little
fuzzy.
Back to the original
screen when pressing
"ESC".
Page 23

23
4.
Installation instructions
Pause video by pressing PAUSE
button
Press PRINT OUT button to print
captured screen
The vehicle odometer
information will be
displayed by pressing
"Show Car GRP"
Original graph window
will appear when pressing
"Close GRP".
Select wanted folder and
play saved Data without
downloading Data from SD
Card by selecting “Select Dir”.
Press "OK".
Page 24

24
4.
Installation instructions
The screen will appear
when pressing "Play".
To change the Set up,
press "Set up Write
after modifying the
set up
Page 25
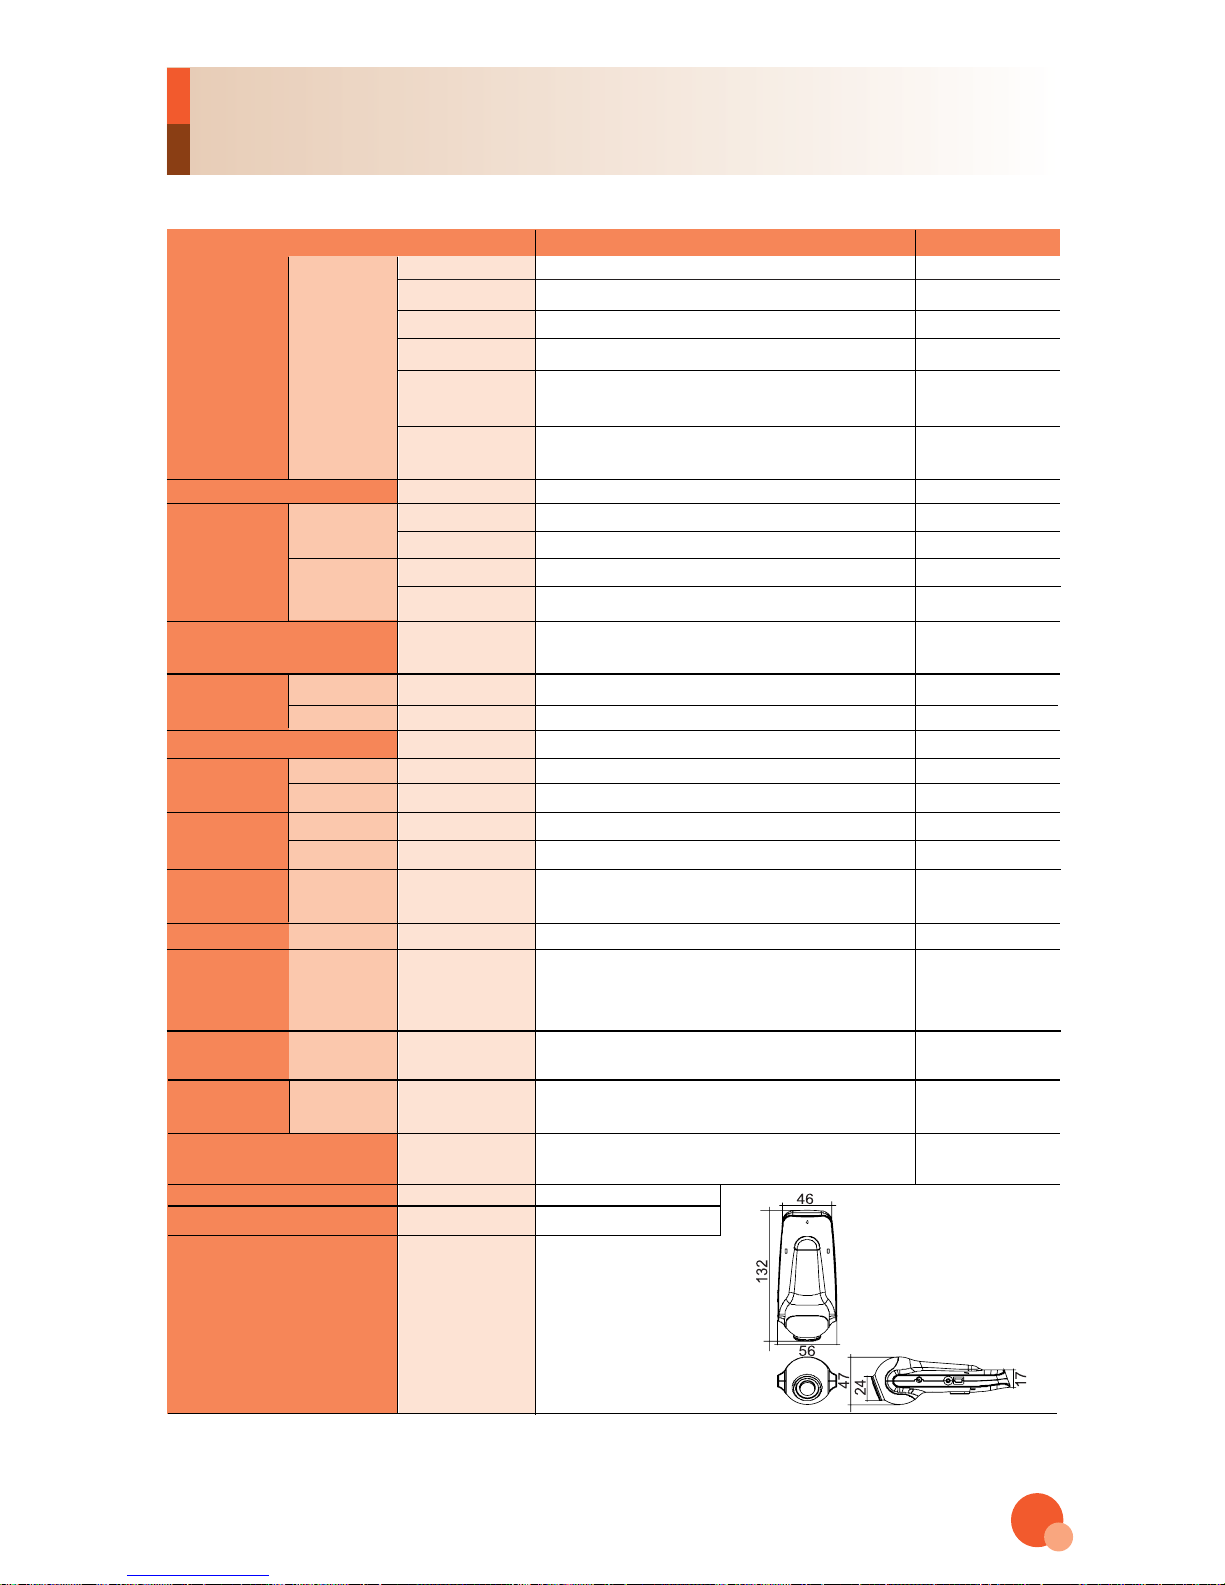
Category Detail Remarks
Recording Unit 10 Sec
Recording Frame 1ch : 30fps ,2ch : 30fps(Each 30fps)
CCD Camera Used
Recording Time 90Min Continuous Recording, 16.5MB Stored 2GB Memory
Rec.condition Recording Rec.Bit rate 2.2M bps
Generate Event Event file information stored in Log file
file Log. Generate Log. file in **.txt format
Playback Event When replay event file, enent file paly function
file will be added in private viewer.
Resolution VGA
1ch
Type Normal Type
Camera
View angle 90~120
2ch
Type Infrared equipped (option)
View angle 150~160
G sensor ○
Saves 3axes values, Shock / Deceleration
/ Acceleration detection
A/V Format
Video MPEG-4
Audio AAC
Memory SD Card 2GB (Usable up to 32GB)
TV-out
Setting preview 2ch View Set-up screen
Self play 1ch&2ch View Recorded file
Power supple
Cigar jack ○
AC adaptor ○
Backup Battery Hi - temperature
○
Continuous recording available for 20Mins,
Li - Ion 200-Hr non-stop stand-by (NO POWER)
GPS ○
Connection with the odometer RS-232 Vechicle Speed,
Engine RPW
Injection Duration Time/Throttle Position Sensor
Brake Switch
Shock detection recording
○
10 Sec-20 Sec Event Recording (NO POWER)
function during parking
Button Self REC
Random event file generation(Max,5Mins Recording)
Viewer ○
Speed, Location, 3axes values, Player, Map matched,
Video playback,Sensitivity control, Vehicle speed setting
User control Remote Controller
Weight 140g
Dimensions (W xH xD)
25
5. Specifications
Page 26

26
 Loading...