

Page 1

Multilingual Version
English
日本語
Français
日本語
Deutsch
Page 2

459a(h)_359a(h)_552a(h)_837_403_565a_561(h)_561f_552b(h)_459b(h)_458(h)_358(h)_552c_459c_807c_552f_561e_305a_V1.8
IP CAMERA SERIES
OPERATION GUIDE
Please read instructions thoroughly before operation and retain it for future reference.
Page 3

IMPORTANT SAFEGUARD
All lead-free products offered by the company comply with the requirements of the
European law on the Restriction of Hazardous Substances (RoHS) directive, which means
our manufacture processes and products are strictly “lead-free” and without the hazardous
substances cited in the directive.
The crossed-out wheeled bin mark symbolizes that within the European Union the product
must be collected separately at the product end-of-life. This applies to your product and
any peripherals marked with this symbol. Do not dispose of these products as unsorted
municipal waste. Contact your local dealer for procedures for recycling this equipment.
This is a class A product. In a domestic environment this product may cause radio
interference in which case the user may be required to take adequate measures.
Federal Communications Commission Interference Statement
This equipment has been tested and found to comply with the limits for a Class A digital device, pursuant to
Part 15 of the FCC Rules. These limits are designed to provide reasonable protection against harmful
interference when the equipment is operated in a commercial environment. This equipment generates, uses,
and can radiate radio frequency energy and, if not installed and used in accordance with the instruction
manual, may cause harmful interference to radio communications. Operation of this equipment in a residential
area is likely to cause harmful interference in which case the user will be required to correct the interference at
his own expense.
This device complies with Part 15 of the FCC Rules. Operation is subject to the following two conditions:
(1) This device mat not cause harmful interference, and
(2) This device must accept any interference received, including interference that may cause undesired
operation.
Trademark Acknowledgements
iPad® & iPhone® are the registered trademarks of Apple Inc.
Android™ is a trademark of Google Inc. Use of this trademark is subject to Google Permissions.
Microsoft®, Windows® & Internet Explorer® are registered trademarks of Microsoft Corporation in the United
States and/or other countries.
Disclaimer
We reserve the right to revise or remove any content in this manual at any time. We do not warrant or assume
any legal liability or responsibility for the accuracy, completeness, or usefulness of this manual. The content of
this manual is subject to change without notice.
This product doesn’t have a standby / off mode.
Page 4

MPEG4 Licensing
THIS PRODUCT IS LICENSED UNDER THE MPEG4 VISUAL PATENT PORTFOLIO LICENSE FOR THE
PERSONAL AND NON-COMMERCIAL USE OF A CONSUMER FOR (i) ENCODING VIDEO IN
COMPLIANCE WITH THE MPEG4 VISUAL STANDARD (“MPEG-4 VIDEO”) AND/OR (ii) DECODING
MPEG4 VIDEO THAT WAS ENCODED BY A CONSUMER ENGAGED IN A PERSONAL AND
NON-COMMERCIAL ACTIVITY AND/OR WAS OBTAINED FROM A VIDEO PROVIDER LICENSED BY
MPEG LA TO PROVIDE MPEG4 VIDEO. NO LICENSE IS GRANTED OR SHALL BE IMPLIED FOR ANY
OTHER USE. ADDITIONAL INFORMATION INCLUDING THAT RELATING TO PROMOTIONAL INTERNAL
AND COMMERCIAL USES AND LICENSING MAY BE OBTAINED FROM MPEG LA, LLC. SEE
HTTP://WWW.MPEGLA.COM.
GPL Licensing
This product contains codes which are developed by Third-Party-Companies and which
are subject to the GNU General Public License (“GPL”) or the GNU Lesser Public License
(“LGPL”).
The GPL Code used in this product is released without warranty and is subject to the
copyright of the corresponding author.
Further source codes which are subject to the GPL-licenses are available upon request.
We are pleased to provide our modifications to the Linux Kernel, as well as a few new
commands, and some tools to get you into the code. The codes are provided on the FTP
site, and please download them from the following site or you can refer to your distributor:
Model 1, 2, 3 & 4: http://download.dvrtw.com.tw/GPL/IPCAM/F-Seriers/linux.tar.gz
Model 5: http://download.dvrtw.com.tw/GPL/IPCAM/A-Seriers/linux.tar.gz
Model 6 & 7: http://download.dvrtw.com.tw/GPL/IPCAM/S-Seriers/linux.tar.gz
Page 5

TABLE OF CONTENTS
1. OVERVIEW......................................................................................................................................... 1
1.1 Product Features....................................................................................................................................... 1
1.2 Package Content....................................................................................................................................... 1
1.3 Cable Overview.........................................................................................................................................1
1.4 External Alarm Connection (For selected models only) ............................................................................ 2
1.5 Insert a Micro SD card (For selected models only) ................................................................................... 2
2. CAMERA ACCESS WITH INTERNET EXPLORER............................................................................ 3
2.1 Camera Login............................................................................................................................................ 3
2.2 Control Panel Overview ............................................................................................................................ 3
2.3 Digital PTZ (DPTZ) Operations ................................................................................................................. 6
2.4 Event Record Search & Playback ............................................................................................................. 7
3. CAMERA CONFIGURATIONS............................................................................................................ 8
3.1 System configuration menu....................................................................................................................... 8
3.2 Network ................................................................................................................................................... 10
3.2.1 Network ..........................................................................................................................................................10
3.2.2 QoS ................................................................................................................................................................10
3.2.3 DDNS .............................................................................................................................................................10
3.2.4 SNTP..............................................................................................................................................................10
3.2.5 FTP.................................................................................................................................................................11
3.2.6 MAIL ...............................................................................................................................................................11
3.2.7 SMS................................................................................................................................................................12
3.2.8 Filter ...............................................................................................................................................................13
3.2.9 UPnP / Bonjour...............................................................................................................................................13
3.2.10 RTP ..............................................................................................................................................................14
3.2.11 SNMP (For selected models only)................................................................................................................16
3.2.12 IEEE 802.1X (For selected models only) .....................................................................................................17
3.2.13 Network Share (For selected models only)..................................................................................................18
3.2.14 Network Failure Detection (For selected models only) ................................................................................18
3.3 Camera ................................................................................................................................................... 18
3.3.1 Camera...........................................................................................................................................................18
3.3.2 Video ..............................................................................................................................................................18
3.3.3 ROI (For selected models only) .....................................................................................................................19
3.3.4 Color...............................................................................................................................................................20
3.3.5 Advanced........................................................................................................................................................20
3.3.6 Privacy Mask (For selected models only) ......................................................................................................21
3.4 VA (For selected models only)................................................................................................................. 22
3.4.1 TA...................................................................................................................................................................22
3.4.2 DIS .................................................................................................................................................................22
3.5 Record..................................................................................................................................................... 22
3.5.1 Record............................................................................................................................................................22
3.5.2 Record Timer..................................................................................................................................................22
3.6 Storage.................................................................................................................................................... 23
3.6.1 Memory ..........................................................................................................................................................23
3.7 Trigger.....................................................................................................................................................23
3.7.1 Trigger ............................................................................................................................................................23
3.7.2 Push Video (For selected models only) .........................................................................................................25
3.7.3 Snapshot (For selected models only) ............................................................................................................26
3.8 General ................................................................................................................................................... 26
3.8.1 General...........................................................................................................................................................26
3.8.2 Time................................................................................................................................................................27
3.8.3 Server Log......................................................................................................................................................27
3.8.4 Online .............................................................................................................................................................28
3.8.5 Account...........................................................................................................................................................28
3.8.6 Google Maps..................................................................................................................................................29
3.8.7 Maintenance...................................................................................................................................................29
APPENDIX 1 PRODUCT SPECIFICATIONS........................................................................................ 31
Page 6

APPENDIX 2 BIT RATE TABLE FOR REFERENCE ............................................................................ 40
APPENDIX 3 POE CONNECTION .......................................................................................................42
APPENDIX 4 API ID APPLICATION FOR SMS MESSAGING.............................................................. 43
APPENDIX 5 Q&A ................................................................................................................................ 45
APPENDIX 6 RECORDING TIME TABLE ............................................................................................ 46
APPENDIX 7 MICRO SD CARD COMPATIBLE LIST........................................................................... 47
APPENDIX 8 ENABLE PUSH VIDEO................................................................................................... 48
A8.1 What’s Push Video................................................................................................................................ 48
A8.2 Prerequisites.........................................................................................................................................48
A8.3 Enable Push Video ............................................................................................................................... 48
A8.3.1 From iOS devices ........................................................................................................................................48
A8.3.2 From Android Mobile Device........................................................................................................................49
APPENDIX 9 PREREQUISITES FOR NETWORK SHARE.................................................................. 50
A9.1 Check PC IP Address ........................................................................................................................... 50
A9.2 Create "Administrator" Account.............................................................................................................50
A9.3 Share Folder ......................................................................................................................................... 51
Page 7
1
1. OVERVIEW
1.1 Product Features
Easy network setup with your iPhone / iPad
1.3 / 2 Megapixel solution with HDTV 720p quality, allowing users to notice minor details more easily
Solid light series featuring better overexposure prevention (Advanced Smart Light Control)
ONVIF standard supported to simplify system integration
POE (Power-over-Ethernet) support to eliminate the use of power cables and reduce installation costs
IR LEDs built-in for night surveillance
(For selected model only) External alarm I/O device connection
(For selected model only) Equipped with a vari-focal lens of f2.8 ~ 12mm, suitable for various monitoring environments.
(For selected model only) WDR to increase image recognizability in overexposure and dark areas.
(For selected model only) Zoom lens of f6.0 ~ 60mm with 10x optical zoom, 10x digital zoom and auto focus, suitable for
various monitoring environments.
(For selected model only) Micro SD card support for video storage.
(For selected model only) Built-in heater which can operate at temperatures as low as -40℃.
(For selected model only) Push Video to send event notifications to iOS or Android devices immediately
Remote Surveillance
-- Full compatibility on iPhone & iPad, and Internet Explorer® on Windows® operating system
1.2 Package Content
Standard Package
IR Camera Quick Guide
Optional Accessories
Screws & wall plugs CD manual
Wrench Bracket
Desiccant Sun shield
Installation sticker
1.3 Cable Overview
Cable Description
Power cable
Connect to DC12V power supply.
Note: The power adapter is optional.
RJ45 network cable
Connect it to the supplied RJ45 cable extender adapter for cable extension, and prepare
another RJ45 network cable with suitable length for your connection.
GND
Ground wire, used for reset default or external device connection.
Alarm-in*
Reserved for connecting to an external alarm device. For details, please refer the user
manual of your alarm device.
Alarm-out*
Reserved for connecting to an external alarm device. For details, please refer the user
manual of your alarm device.
RESET
Remove the insulating coating of this wire, and twist it with a ground wire together to reset
default. This will reset all parameters, including the IP address to factory default settings.
Note: Disconnect power before twisting these two wires together, and connect to
power again for reset default.
* For selected models only
Page 8
2
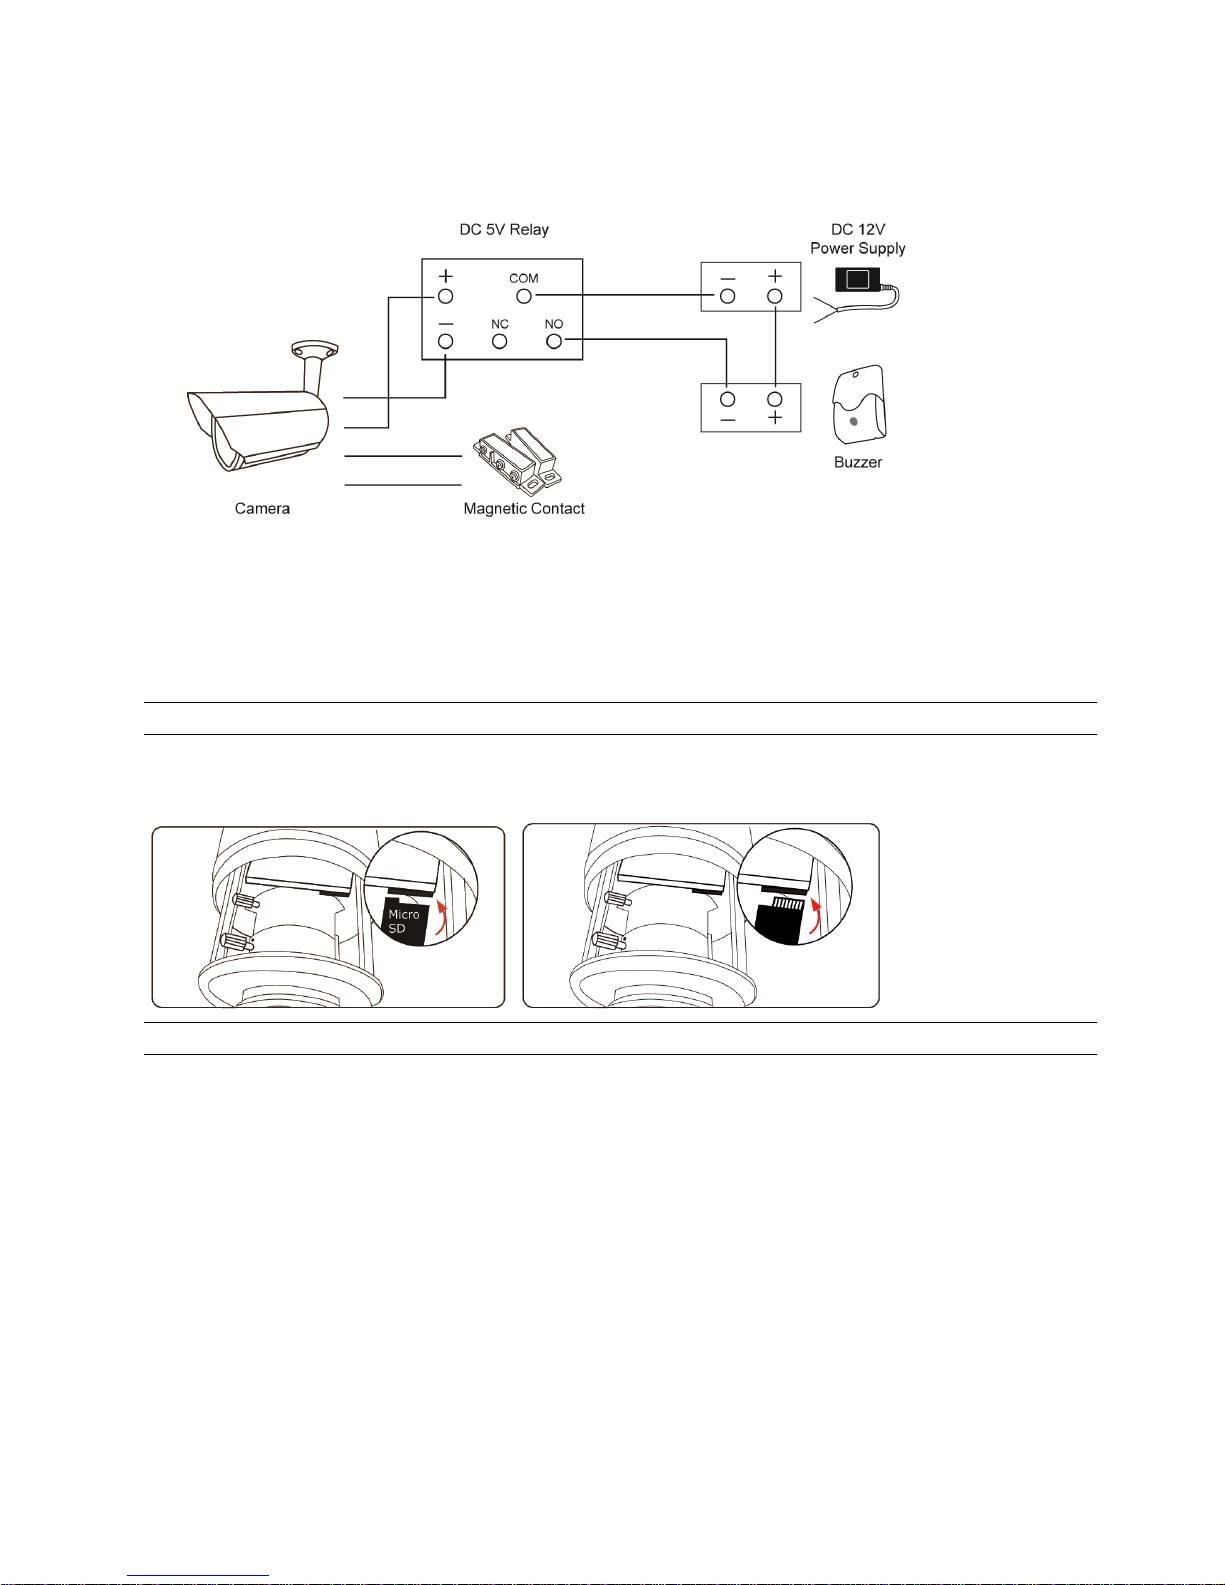
1.4 External Alarm Connection (For selected models only)
This camera supports external I/O device connection for easy connection.
Below shows you how to connect an external device to this camera.
1.5 Insert a Micro SD card (For selected models only)
For local video recording, a micro SD card slot can be found on the camera. The camera doesn’t support
hot-swapping. Please insert or remove the micro SD card with power disconnected. The data originally saved in the
micro SD card (if any) will be removed after inserting it to the camera.
Note: Only selected models are equipped with a micro SD card slot for local video recording.
Please follow the directions in the below graphic to insert Micro SD card properly:
Type A: Type B:
Note: It’s recommended to use tweezers for inserting / removing Micro SD card.
Page 9

3
2. CAMERA ACCESS WITH INTERNET EXPLORER
This network camera can be accessed via Microsoft® Internet Explorer® and iPhone / iPad / Android mobile devices
with our self-developed program “EagleEyes” installed depending on different using situations.
Note: For details about accessing network cameras via iPhone / iPad / Android mobile devices, please
refer to http://www.eagleeyescctv.com.
Before using the camera, make sure you have configured the network settings, and the network connection is fine.
For network configurations, please refer to:
“ADVANCED NETWORK SETUP” downloadable from www.surveillance-download.com/user/m359a.swf if your
network environment is not wireless.
2.1 Camera Login
Step1: Open your web browser, and key in http://ipaddress:portnum in the URL address box.
For example, for the IP address 60.121.46.236 and port No. 888, please key in ”http://60.121.46.236:888” into
the URL address box, and press “Enter”.
Step2: In the login page, key in the user name and password, and enter the security code from the image below if any.
Then, click “LOGIN”.
Step3: The wizard is then started.
‧ To skip the wizard and directly access the camera live view, click “Close”.
‧ To directly access the camera live view without starting the wizard for the login next time, check “Do not start wizard at login”.
Note: If you’re prompted to install “VLC player”, “Software” and “H264 Streaming Viewer”, please
agree to proceed the installation.
Step5: When the login is successful, the live view is shown.
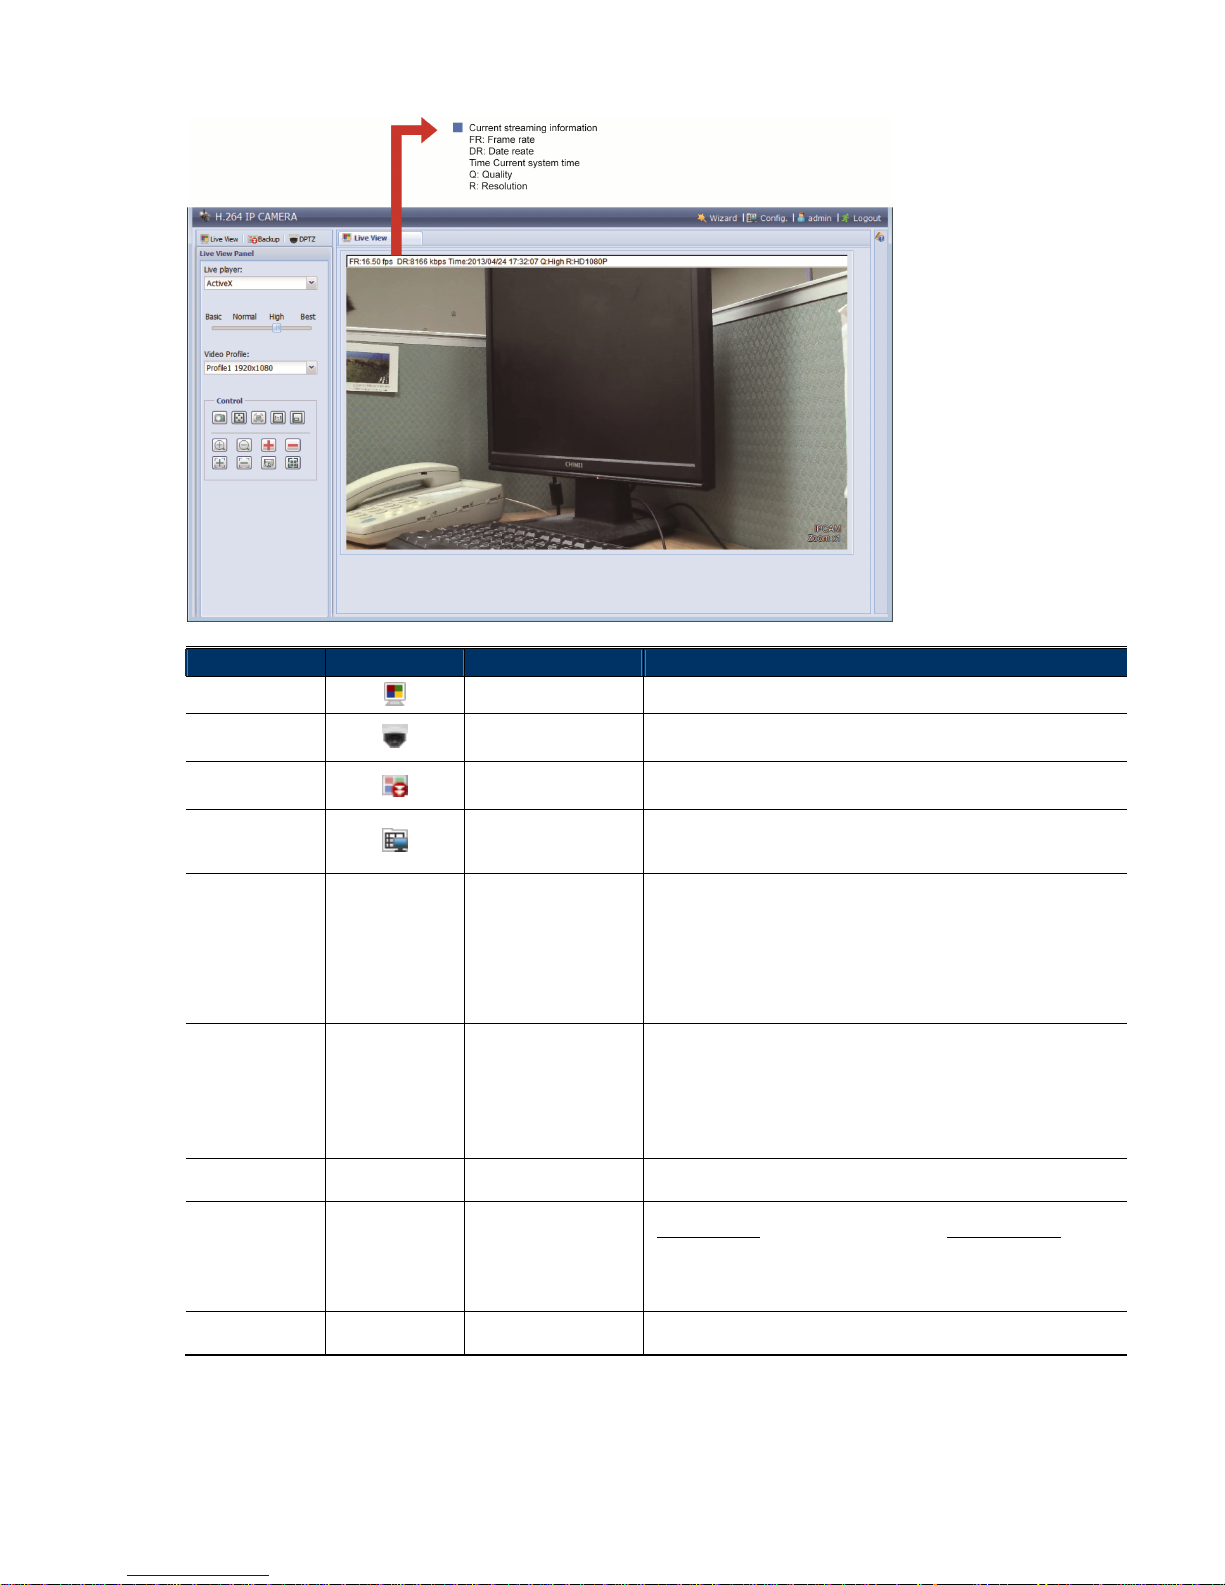
2.2 Control Panel Overview
Note: The buttons available depend on the user level used to log in.
Type A:
Page 10
4
Type B:
Function Icon User Level Description
Live
Supervisor / Power User
/ Normal User / Guest
Switch to the live view page.
DPTZ
Supervisor / Power User
/ Normal User
Switch to the DPTZ configuration page.
For details, please refer to “2.3 Digital PTZ (DPTZ) Operations” at page 5.
Backup
Supervisor / Power User
Enter the event record list for video playback.
For details, please refer to “2.4 Event Record Search & Playback’ at page 7.
Config.
Supervisor / Power User
Switch to the system configuration page, and the functions available for
“Supervisor” and “Power User” are different.
For details, please refer to “3.1 System configuration menu” at page 8.
Select the image player from the drop-down list: Media Type* -- Supervisor / Power User
/ Normal User / Guest
H.264 / MPEG-4 / Motion JPEG
QuickTime
QuickTime is Apple Inc.’s multimedia software. You need to have QuickTime
installed in your operating system before selecting “QuickTime”. When it is
selected, you will be promoted to enter the user name and password to access
the camera.
VLC
Select the image player from the drop-down list: Live player* -- Supervisor / Power User
/ Normal User / Guest
ActiveX
QuickTime
QuickTime is Apple Inc.’s multimedia software. You need to have QuickTime
installed in your operating system before selecting “QuickTime”. When it is
selected, you will be promoted to enter the user name and password to access
the camera.
VLC
Quality -- Supervisor / Power User
/ Normal User
Click & drag the slider to select the video quality:
BASIC / NORMAL / HIGH / BEST.
Select the image resolution from the drop list:
2 megapixel model 1.3 megapixel model
HD1080P (1920 x 1080) SXGA (1280 x 1024)
HD720P (1280 x 720) HD720P (1280 x 720)
VGA (640 x 480) or D1 (720 x 480) VGA (640 x 480)
Video Resolution -- Supervisor / Power User
/ Normal User
QVGA (320 x 240) or CIF (352 x 288) QVGA (320 x 240)
Video Profile* -- Supervisor / Power User
/ Normal User
Select the pre-defined video set from the drop list. The video set could be
configured in “Config” -> “Camera” -> “Video”.
Page 11
5
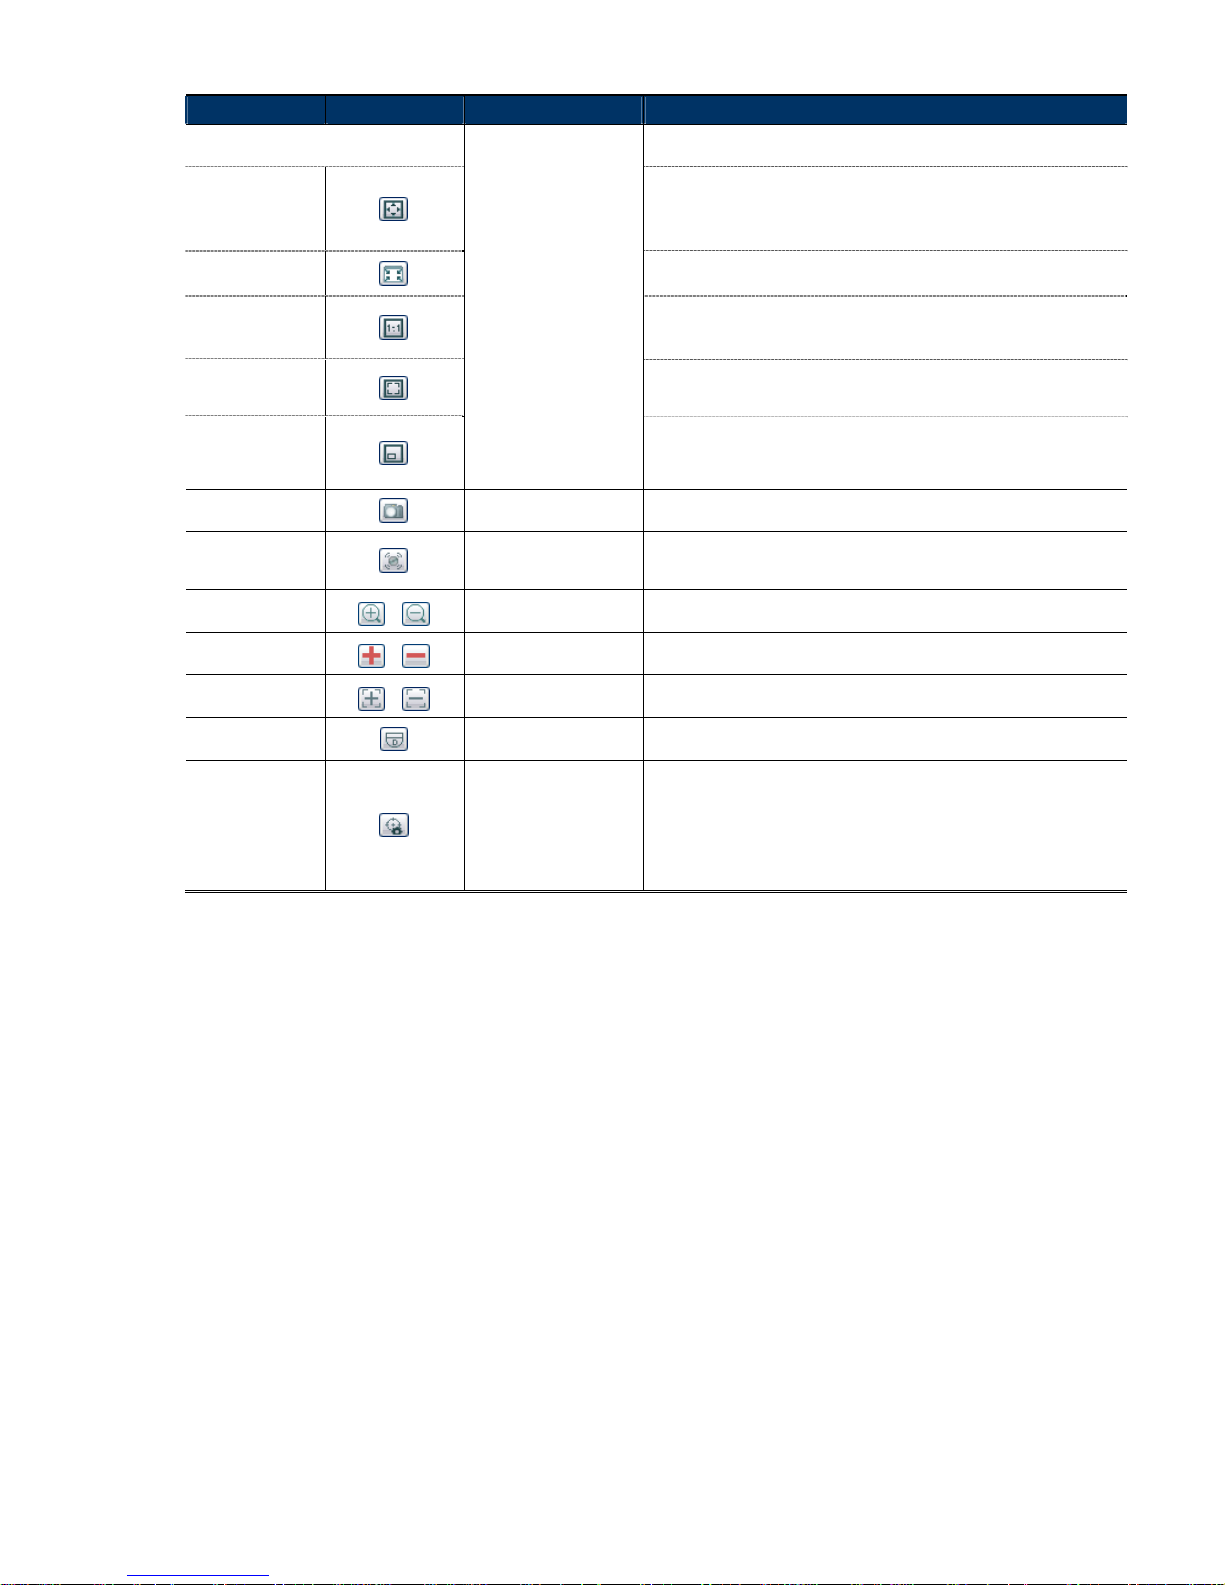
Function Icon User Level Description
Live View Size:
Supervisor / Power User
/ Normal User
Full Screen
Click to display the image in full screen.
To exit the full screen mode, press “Esc” on your keyboard.
This icon appears only when the selected resolution is HD1080P, SXGA or HD720P
& VGA.
Double size
The QVGA resolution is resized to fit into the current live view size.
This icon appears only when the selected resolution is QVGA.
Normal Size
The current live view size is the same as the selected resolution.
This icon appears only when the selected resolution is SXGA or HD720P or
HD1080P.
Fit to screen
The selected resolution is resized to fit into the current live view size.
This icon appears only when the selected resolution is SXGA or HD720P or
HD1080P.
No Scale
Click and hold the movable square on the left bottom corner of the live view
to move
This icon appears only when the selected resolution is SXGA or HD720P or
HD1080P.
Snapshot
Supervisor / Power User
/ Normal User
Click to take a snapshot of the current view on a new window. Right click
on the picture and re-save it to the location you want.
Alarm Out*
Supervisor / Power User
/ Normal User
Click to force your alarm-out device to work. For example, when your
alarm device is a buzzer, click this button and your buzzer will start to
sound even if there’s no alarm event.
Zoom-in / out*
/
Supervisor / Power User
/ Normal User
Click to zoom in / out the current image.
Max. Zoom-in / out*
/
Supervisor / Power User
/ Normal User
Click to zoom in the image to the largest / zoom out the image to its
original size.
Focus near / far*
/
Supervisor / Power User
/ Normal User
Click to adjust the clearness of the video images.
DPTZ
Supervisor / Power User
/ Normal User
Click to enable digital PTZ functions with zoom-in ratio up to 16X.
Focus Assist*
Supervisor / Power User
/ Normal User
Click to help you determine whether the image clearness is adjusted well
when you're adjusting your camera focus. Two values will be calculated
and shown as “XX / YY”.
YY is the best focus value for your current camera view
XX is your current focus value
When XX is closer to YY, the clearer and sharper images you’ll get for your
camera view.
* For selected models only
Page 12
6
2.3 Digital PTZ (DPTZ) Operations
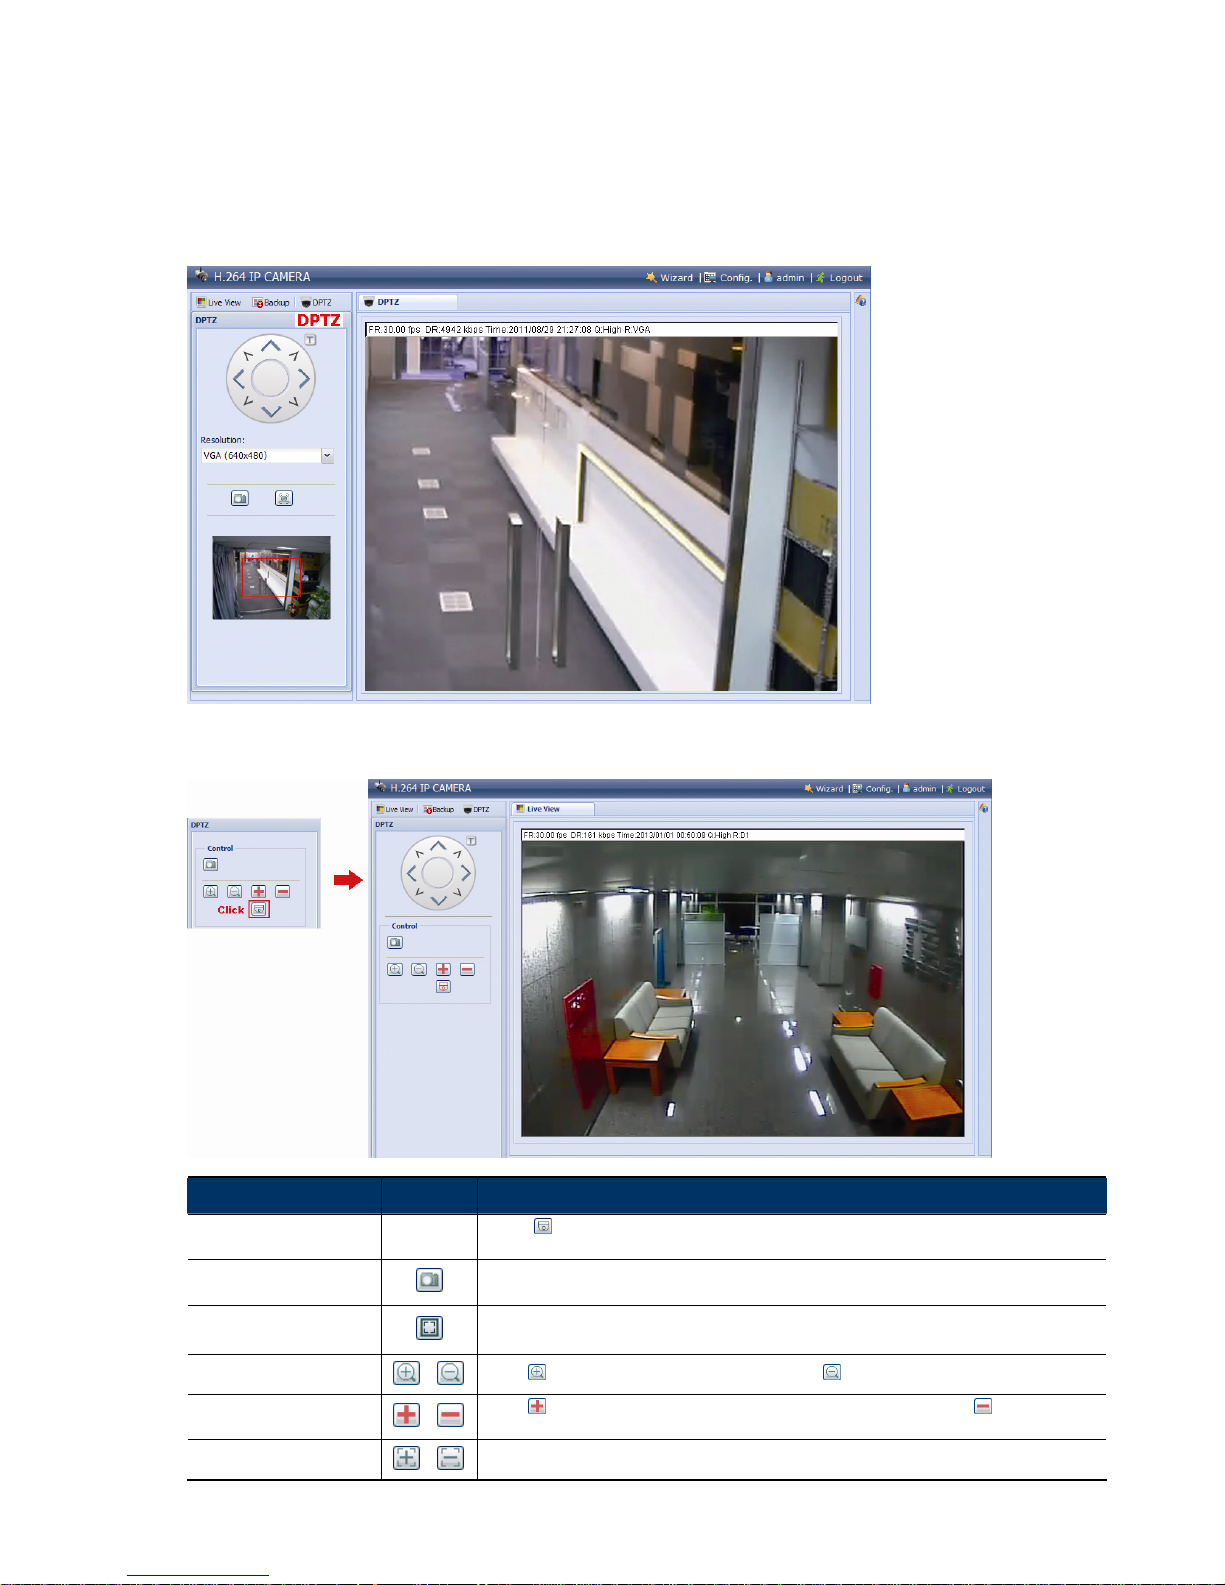
This camera has PTZ capability, i.e. digital PTZ (hereafter called “DPTZ”), for wide area monitoring.
STEP1: Click “DPTZ” to show the DPTZ control panel.
Type A:
Type B:
FUNCTION ICON DESCRIPTION
Moving panel
--
When is selected, the moving control panel will be shown to move the picture after zoom-in is
performed.
Take snapshots
Click to take a snapshot of the current view on a new window. Right click on the picture and re-save
it to the location you want.
Scale
The selected resolution is resized to fit into the current live view size.
This icon doesn’t work when the selected resolution is VGA or QVGA.
Zoom in / out
/
Click once to enlarge the picture by 1X, and click once to restore the zoom ratio by 1X.
Max. zoom in / out
/
Click
once to enlarge the picture to the max zoom ratio by 16X, and click once to restore
the picture ratio to 1X.
Focus near / far
/
Click to adjust the clearness of the video images.
Page 13
7
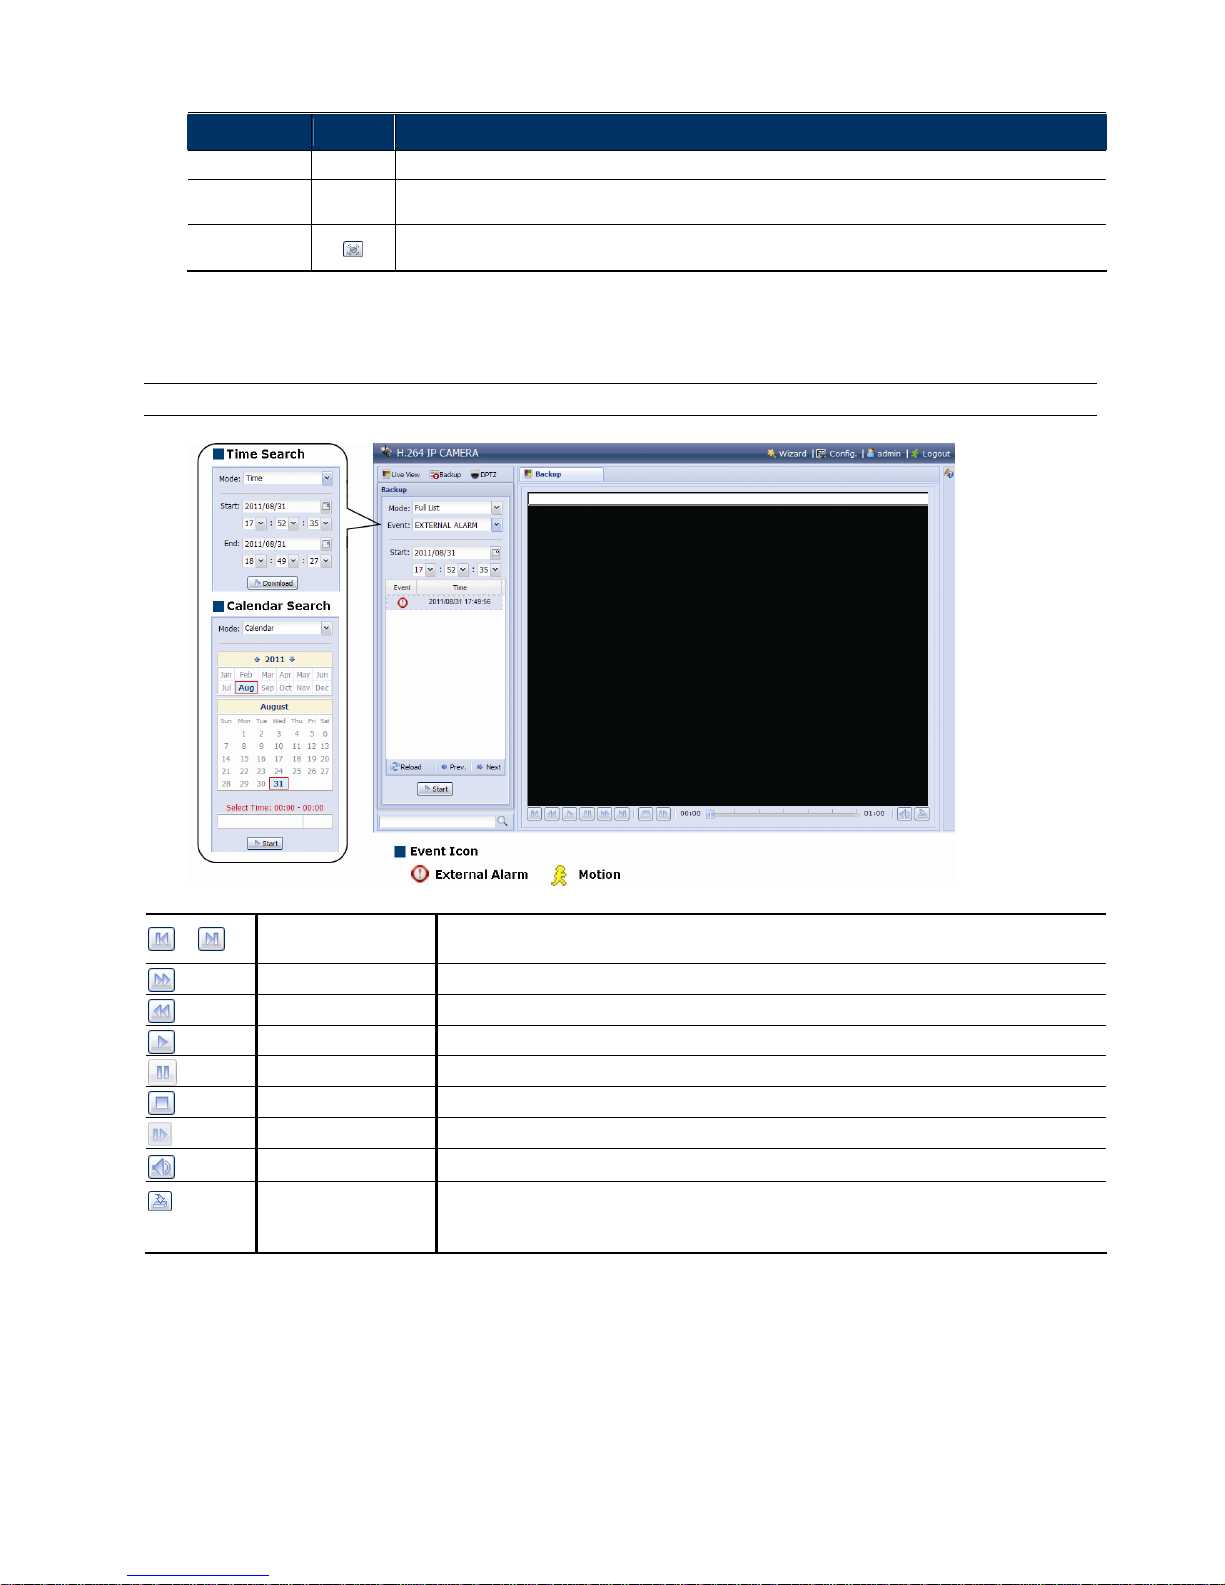
STEP2: Select the functions when needed:
FUNCTION ICON DESCRIPTION
Resolution
--
Select the video resolution for the DPTZ function. Only “VGA” and “QVGA” are available.
Take snapshots
Click to take a snapshot of the current view on a new window. Right click on the picture and re-save it to the
location you want.
Alarm Out*
Click to force your alarm-out device to work. For example, when your alarm device is a buzzer, click this button
and your buzzer will start to sound even if there’s no alarm event.
* For selected models only
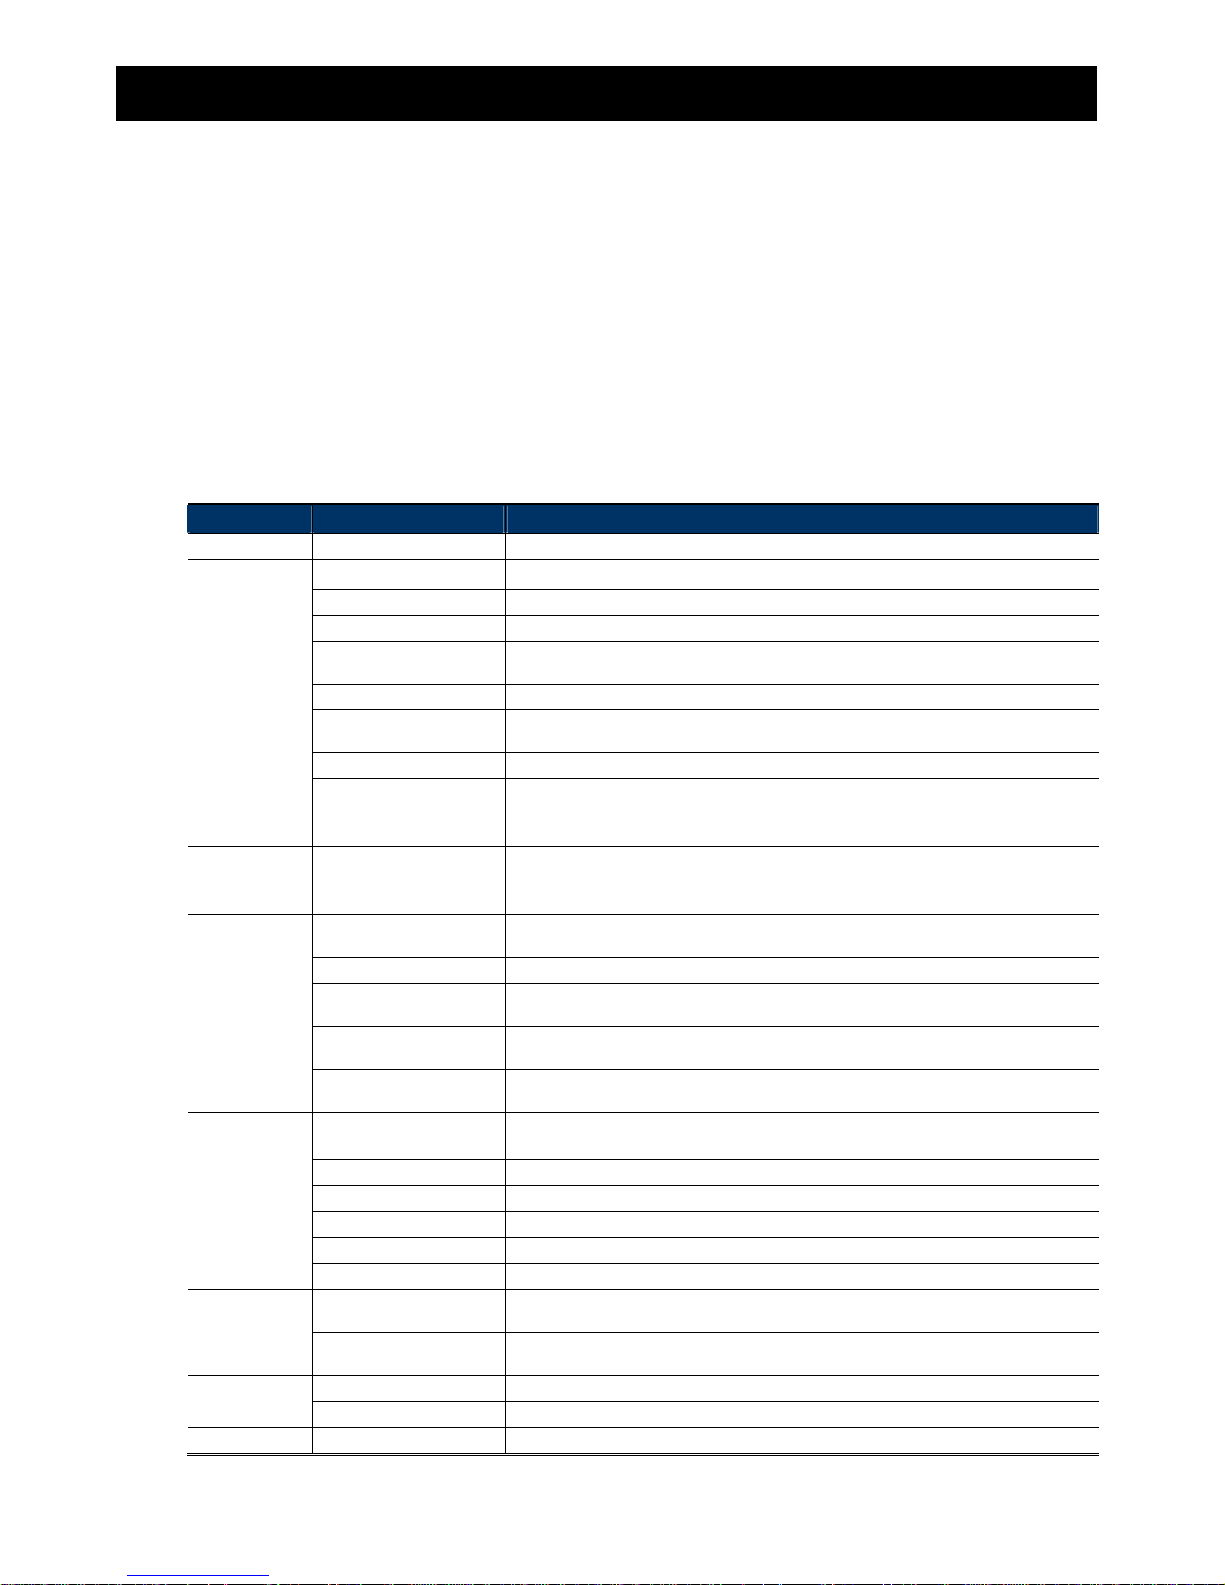
2.4 Event Record Search & Playback
Note: To save more recorded data, it’s recommended to use this camera with a compatible NVR.
/
Previous / Next Hour
Click to jump to the next / previous time interval in an hour, for example, 11:00 ~ 12:00 or 14:00
~ 15:00, and start playing the earliest event video clip recorded during this whole hour.
Fast Forward Increase the speed for fast forward. Click to get 2X, 4X, 8X & 16X speed forward eventually.
Fast Rewind Increase the speed for fast rewind. Click to get 2X, 4X, 8X & 16X speed rewind eventually.
Play
Click to play the current video clip.
Pause
Click to pause the video playback.
Stop
Click to stop the video playback.
Step In the pause mode, click to get one frame forward.
Audio Click to mute the playback if necessary, and click again to restore.
Download
Click to download the current video clip to the specified path in your PC.
The downloaded video can only be opened by our own video player. Please go to “General” → “Maintenance” to
download the video player, or get the player from the CD supplied with the sales package.
Page 14
8
3. CAMERA CONFIGURATIONS
Users can further configure this network camera by accessing via Internet Explorer.
3.1 System configuration menu
Click “Config.” to enter the configuration page.
The functions are categorized into seven menus: Network, Camera, VA, Record, Storage, Trigger and General.
For details about “Network”, please refer to “3.2 Network” at page 10.
For details about “Camera”, please refer to “3.3 Camera” at page 17
For details about “VA”, please refer to “3.4 VA (For selected models only)” at page 22.
For details about “Record”, please refer to “3.5 Record” at page 21.
For details about “Storage”, please refer to “3.6 Storage” at page 22.
For details about “Trigger”, please refer to “3.7 Trigger” at page 23.
For details about “General”, please refer to “3.8 General” at page 26.
Main Menu Sub-Menu Reference
Network Network Configure network settings.
QoS Limit the data flow for live streaming.
DDNS Enter DDNS information when the network type is PPPOE or DHCP.
SNTP Synchronize your camera time with the networked computer systems.
FTP
Enter the FTP information for event notifications when “FTP” is chosen in “Trigger” →
“Trigger”.
Mail Enter Email information for event notifications when “Email” is chosen in “Trigger” → “Trigger”.
SMS
Enter text messaging information for SMS notifications when “SMS” is chosen in “Trigger” →
“Trigger”.
Filter Choose to permit or block the IP address(es) which can access this camera.
UPnP
*Suitable for Windows-based operating system.
Allow this camera to be detected among devices within the same network area for easy and
quick usage.
Bonjour
*Suitable for Apple Mac-based operating system.
Allow this camera to be detected among devices within the same network area for easy and
quick usage.
RTP
Set the parameters for video data transmission when you’re using multimedia other than web
browsers and Video Viewer for remote access.
SNMP*
Configure SNMP to remotely manage network devices.
IEEE 802.1X*
The settings here enable the camera to access a network protected by 802.1X/EAPOL
(Extensible Authentication Protocol Over LAN).
Network Share*
Assign a location in the LAN environment to save the snapshot of events when “Network
Share” is chosen in “Trigger” → “Snapshot”.
Network Failure Detection*
Configure this camera to check the network connection of other device periodically, and send
notifications via Email or FTP for disconnection events.
Camera Camera
1. Rename the camera.
2. Change the place where the camera name is shown on the screen.
Video Adjust video-related settings in different video format.
ROI*
Select a specific area to reinforce the image quality of that area.
Color Adjust the color performance.
Advanced Adjust the camera parameters if necessary.
Privacy Mask* Cover certain areas on the camera image.
VA* TA*
This function should be used with the mini-guard control switch for alarm system integration.
For details, please check with your distributor or installer.
DIS*
Enable this function to reduce blurring associated with the motion of a camera during
exposure.
Record Record Configure the record function.
Record Timer Schedule external alarm recording.
Storage Memory Check the current storage capacity and clear all recorded data when needed.
*Selected models only
Page 15
9
Main Menu Sub-Menu Reference
Trigger
Trigger
1. Enable / disable the motion detection.
2. Set the motion detection area.
3. Configure how the camera reacts for any event.
Push Video*
Configure to receive active alarm notifications within 5 seconds after event occurrence on
mobile devices.
Snapshot*
Schedule the camera to take snapshots periodically or at a specific time, and send to E-Mail,
FTP and / or Network Share for backup. Time-lapse recording could also be configured here.
General General
1. Select the language of the web browser.
2. Check the MAC address of the camera.
3. Lock camera access after the specified time.
Time Set daylight saving time and the current time.
Server Log Check the system event logs.
Online Check the current online user(s).
Account
1. Create a new user account with different access privilege.
2. Modify or delete an existing user account.
Google Maps Allow you to know where the network camera is.
Maintenance
1. Check the current firmware version and upgrade your camera.
2. Copy system configurations.
3. Reboot the camera.
4. Download the video player to play the recorded data.
*Selected models only
Page 16

10
3.2 Network
3.2.1 Network
You can set the network configuration of the network camera depending on your network type.
For details, please refer to “Advanced Network Setup” from www.surveillance-download.com/user/
m359a.swf.
3.2.2 QoS
QoS, Quality of Service, is the ability to control the data flow for real-time streaming. This function is important if
your network bandwidth is insufficient and you have other devices to share the network bandwidth.
Check “QoS Enable”, and set the max. upload rate from 256 to 10240 kbps.
3.2.3 DDNS
Select “On” when the selected network type in “Network” is “PPPOE” or “DHCP”.
For details, please refer to “Advanced Network Setup” from www.surveillance-download.com/user/m359a.swf.
3.2.4 SNTP
SNTP (Simple Network Time Protocol) is used to synchronize your camera time with the networked computer..
Function Description
GMT Once users choose the time zone, the network camera will adjust the local area time of the system
automatically.
NTP Server Simply use the default SNTP server (For example, tock.stdtime.gov.tw) or change to another server with
which users are familiar.
Sync. Period Select “Daily” to synchronize the camera time with the network time every day or “None” to turn off this
function.
Sync Click and the network camera will synchronize the time with the network time.
Page 17
11
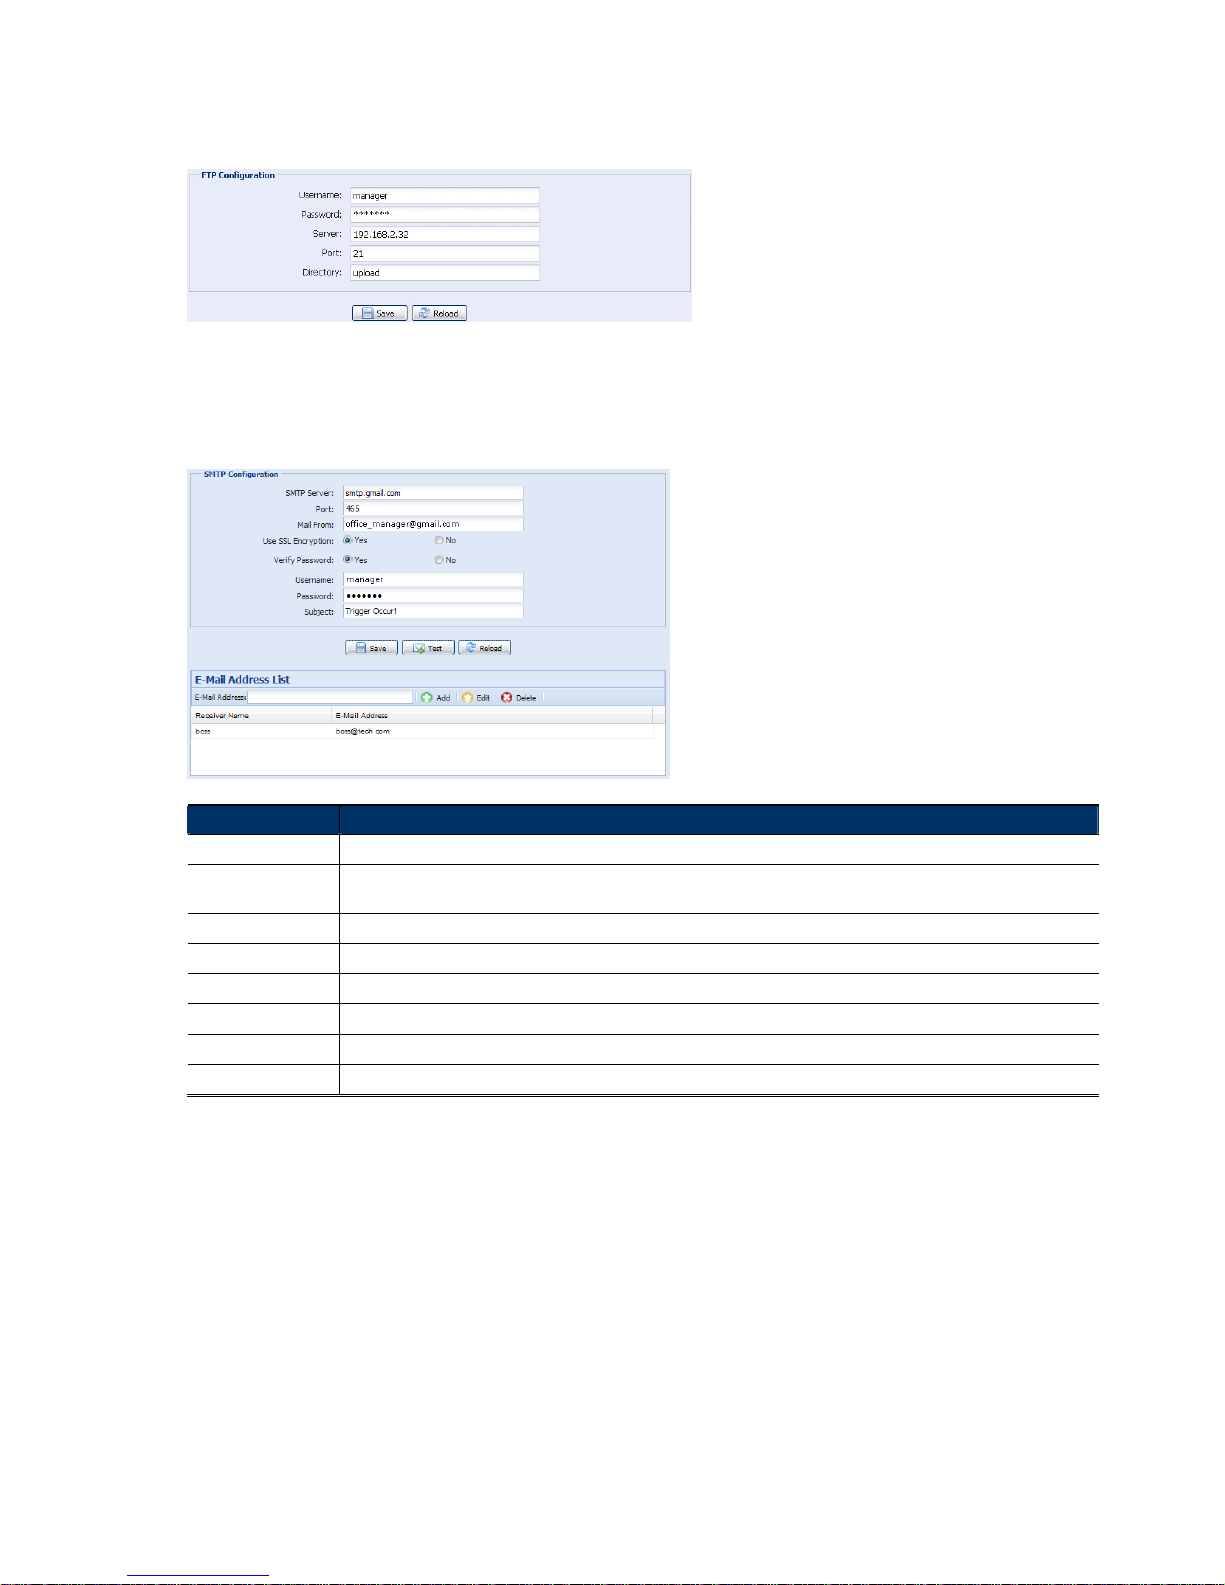
3.2.5 FTP
Enter the detailed FTP information and click “Save” to confirm. The information you set here will be applied
when “FTP” is selected in “Trigger” → “Trigger”.
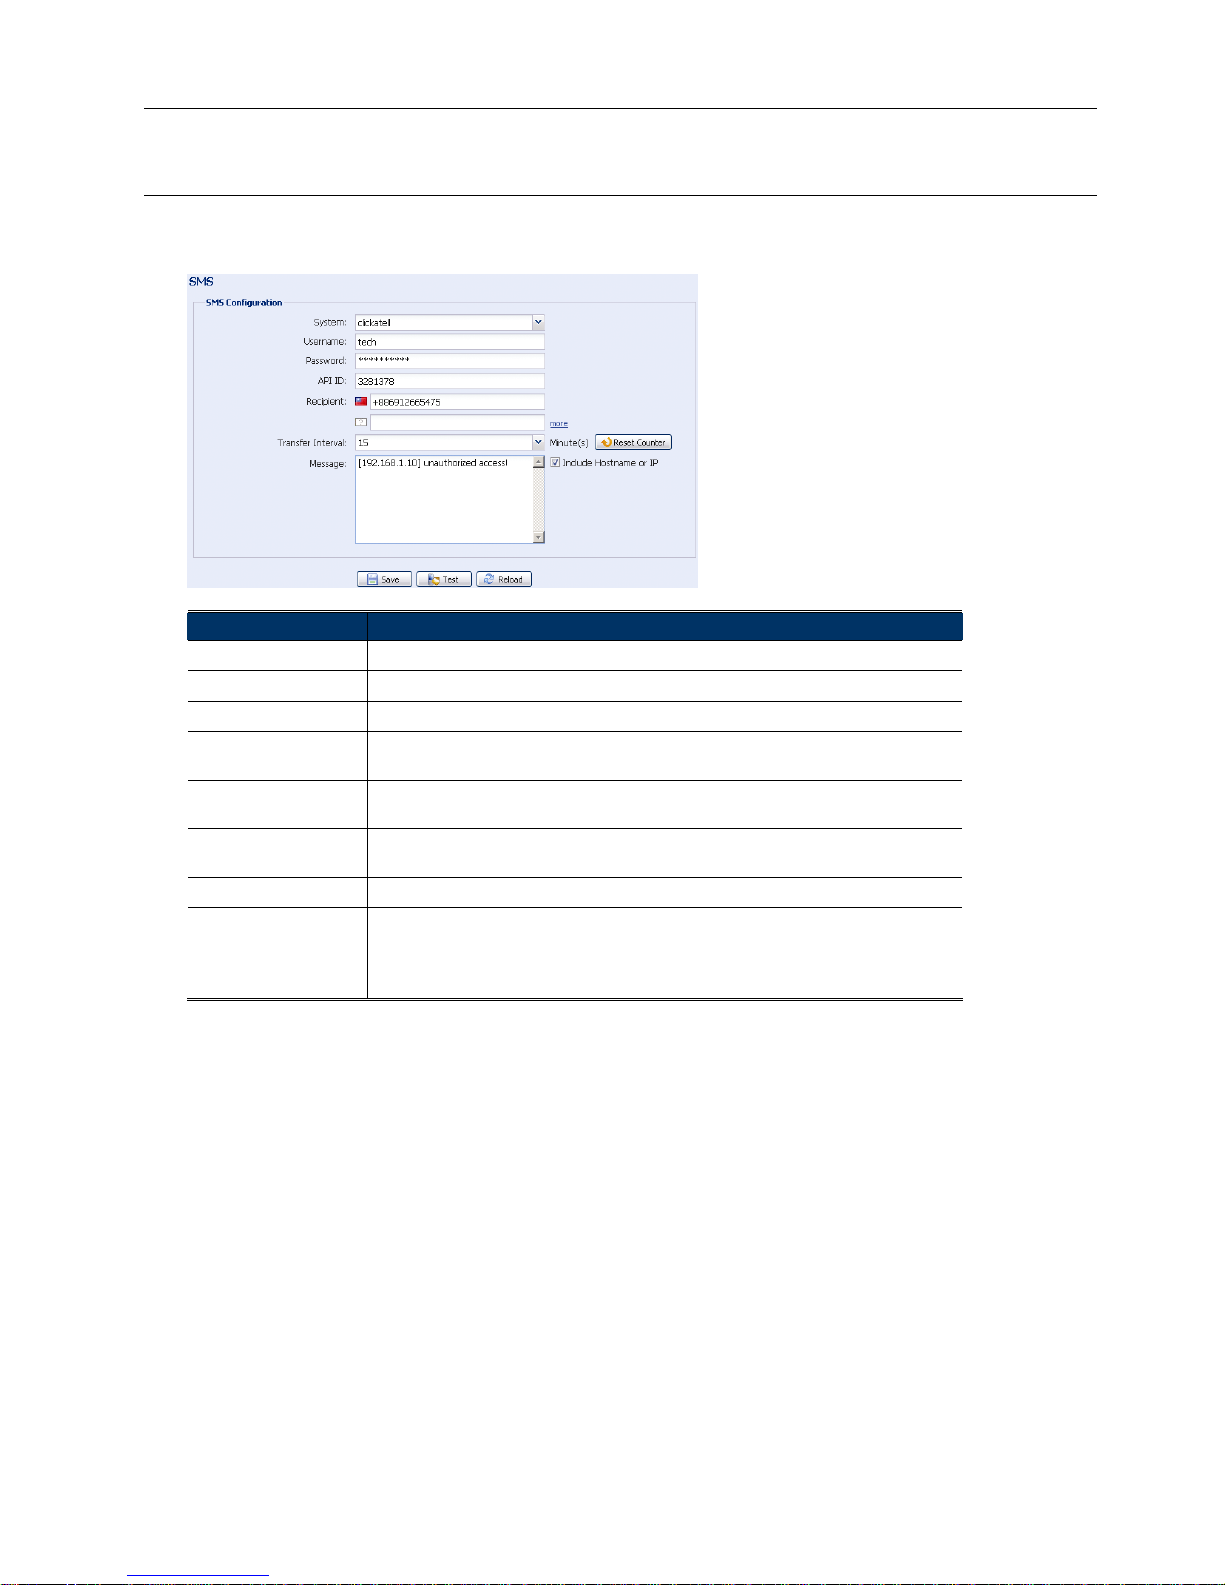
3.2.6 MAIL
Enter the detailed e-mail information and click “Save” to confirm. The information you set here will be applied
when “Email” is selected in “Trigger” → “Trigger”.
Function Description
SMTP Server Enter the SMTP server address provided from your e-mail system supplier.
Port Enter the port number provided from your e-mail system supplier. If this column is left blank, the e-mail server will use
port 25 to send e-mails.
Mail From Enter the name of the sender.
SSL Encryption Select “Yes” if your e-mail server is using SSL encryption to protect your e-mail content from unauthorized access.
Verify Password Some mail servers are required to verify the password. Please enter the “user name” and “password”.
Subject Enter the subject for the E-Mail.
E-Mail Address List Add the e-mail address(s) of the assigned recipient(s).
Test When all information is entered, click “Test Mail” to try if the receipt.
Page 18
12
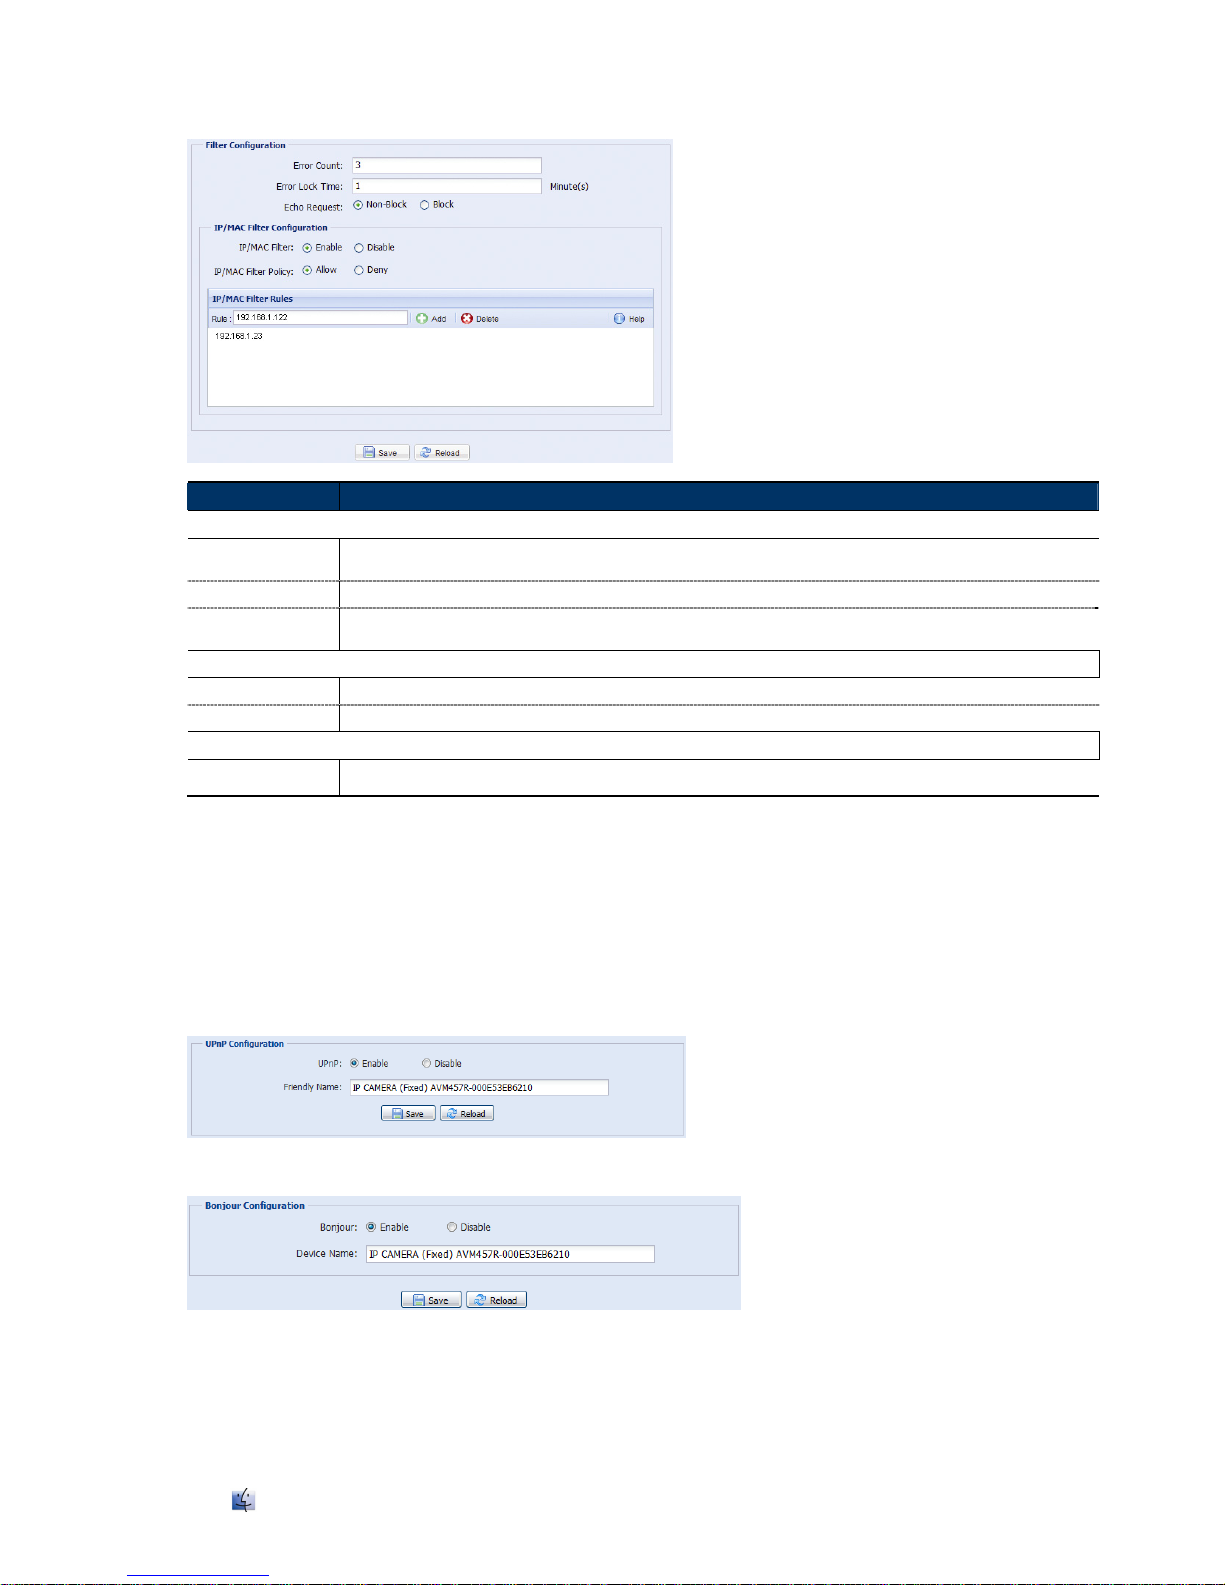
3.2.7 SMS
Note: Before using this function, you need to apply an account and get an API ID from the mobile
messaging company, such as Clickatell and EVERY8D. For details, please refer to “APPENDIX 4
API ID APPLICATION FOR SMS MESSAGING” at page 43.
Enter the detailed information needed for text messaging, and click “Save” to confirm. The information you set
here will be applied when “SMS” is selected in “General” → "Trigger".
Function Description
System The text messaging service provider is Clickatell.
User name / Password Enter the account user name and password you created in Clickatell.
API ID Enter the API ID you applied from Clickatell.
Recipient Click “Add” to enter the phone number, including the country code, to receive the text
message. Five sets of phone numbers are allowed.
Transfer Interval Set the interval time in minutes between two-message sending.
The options are 0, 15, 30 & 60.
Reset Counter Click to restart the text messaging, and the SMS will be sent after the specified time interval
since you click this button.
Message Enter the text content (up to 70 characters) you want to send with the text message.
Test To know whether your SMS setting is correct, click this button to immediately send a SMS to
your phone.
Note: This testing is not free and you will be charged for SMS sending base on your
local rate.
Page 19
13
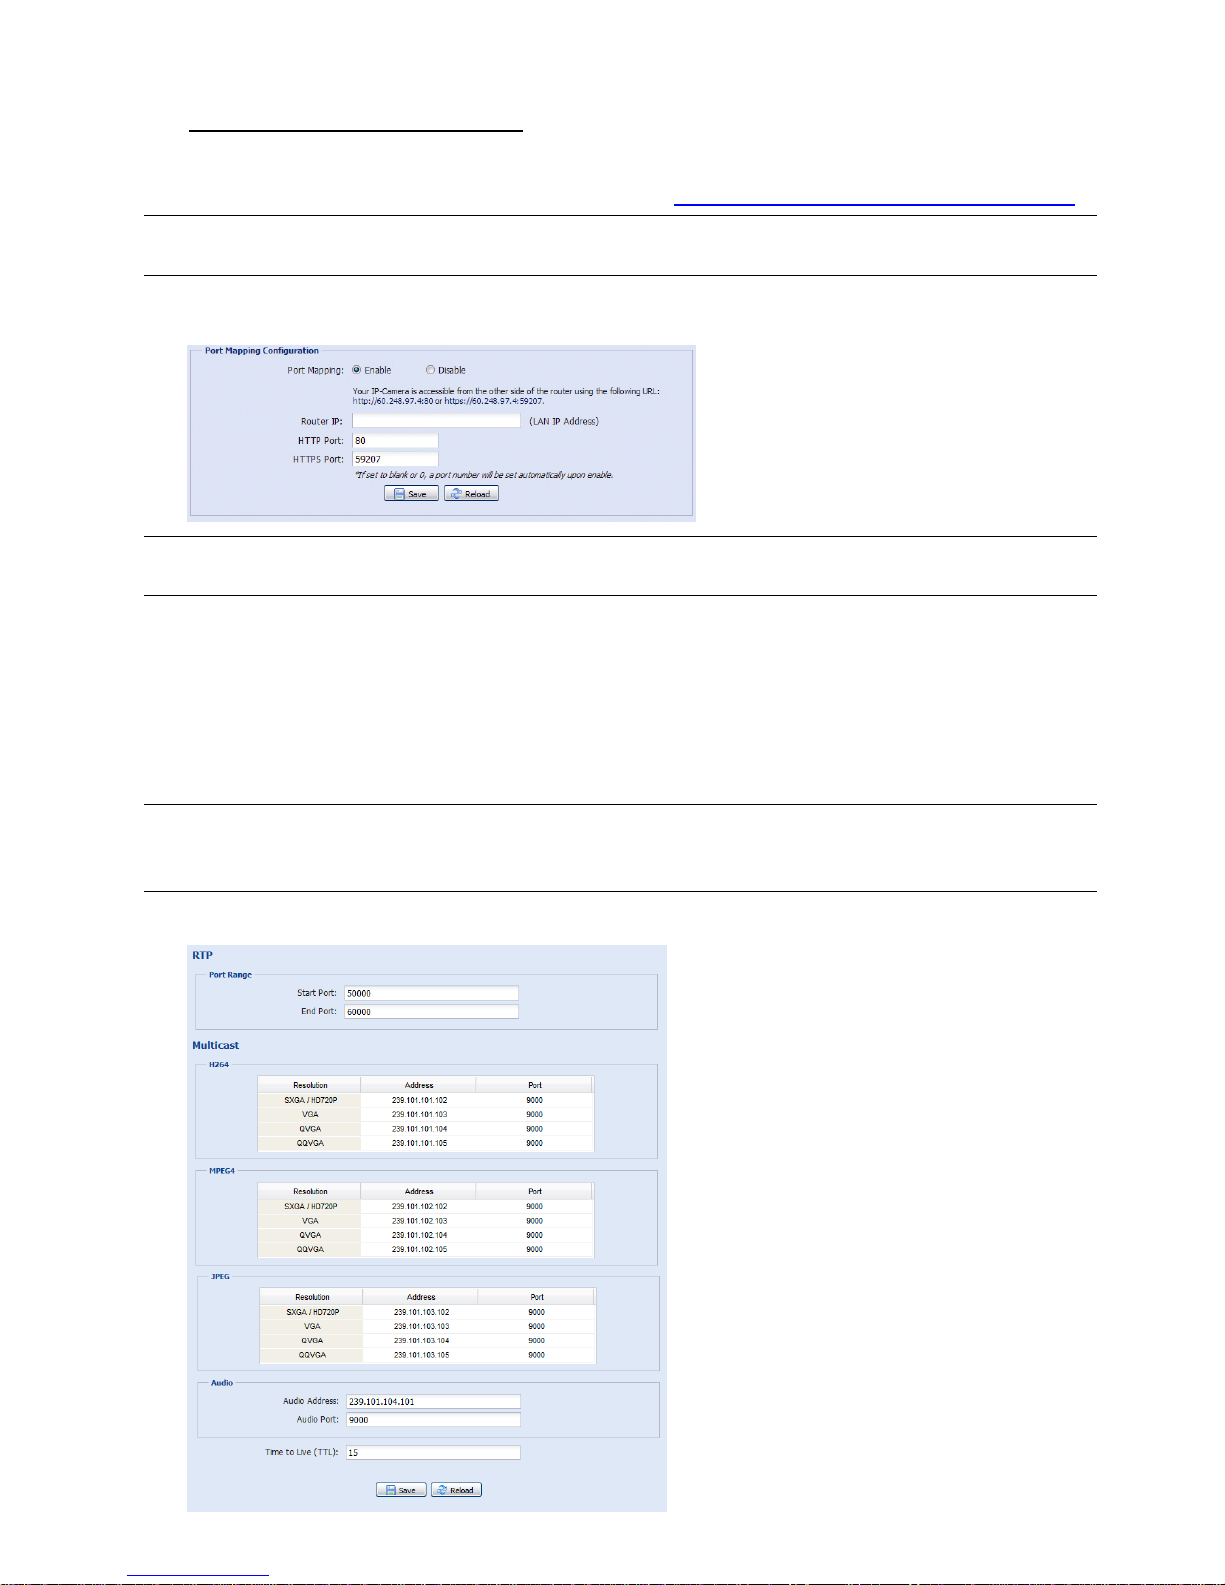
3.2.8 Filter
Choose to permit or block the IP address(es) which can access this camera, and click “Save” to confirm.
Function Description
Filter Configuration
Error Count Set the maximum count for login failure. When the maximum count is reached, the IP address trying to access the
network camera will be locked.
Error Lock Time Set the lock time in minutes when the maximum count of error login for an IP address is reached.
Echo Request Select “Non-Block” to allow other users to use the ping command to detect the IP address of your network camera, or
“Block” to deny the ping command request.
IP/MAC Filter Configuration
IP/MAC Filter Choose to enable or disable the filter function.
IP/MAC Filter Policy If “Enable” is selected, choose whether you want to permit (Allow) or block (Deny) the IP address list below.
IP/MAC Filter Rules
Rule
‧ To add an item to the IP address list, key in the IP address in “Rule”, and click “Add”.
‧ To remove an existing item in the IP address list, click the item you want to remove, and click “Delete”.
3.2.9 UPnP / Bonjour
“UPnP” stands for “Universal Plug and Play”, which allows devices to connect seamlessly in the home and
corporate environments and simplify installation of computer components, and is only suitable for Microsoft
Windows-based operating system.
“Bonjour” functions the same as “UPnP”, but it’s only suitable for Apple Mac-based operating system.
UPnP
Bonjour
Check “Enable” to allow the network camera to be detected among devices within the same network area, and
set the identification name of the camera in “Friendly name”.
When this function is activated, the other PC within the same domain as this camera will be able to search this
camera in:
“Network Neighbor” with the identification name set in “Friendly name” for Windows-based PC, or
“
” (finder) or “Bookmark” with the identification name set in “Device Name” for Mac-based PC.
Page 20
14
Double-click it to quickly open the web browser for camera access.
Port Mapping (Available only in UPnP)
This function can eliminate the need to additionally access the router for port forwarding.
For details, please refer to “Advanced Network Setup” from www.surveillance-download.com/user/m359a.swf.
Note: Before using this function, make sure your router supports UPnP, and this function is enabled. If
not, please access your router additionally for port forwarding.
When “Port Mapping” is set to “Enable”, the system will automatically assign an IP address or port number for
you if no IP address or port number is entered.
Note: When the configurations are saved successfully, you’ll see a message indicating the IP address
and port number assigned to this network camera.
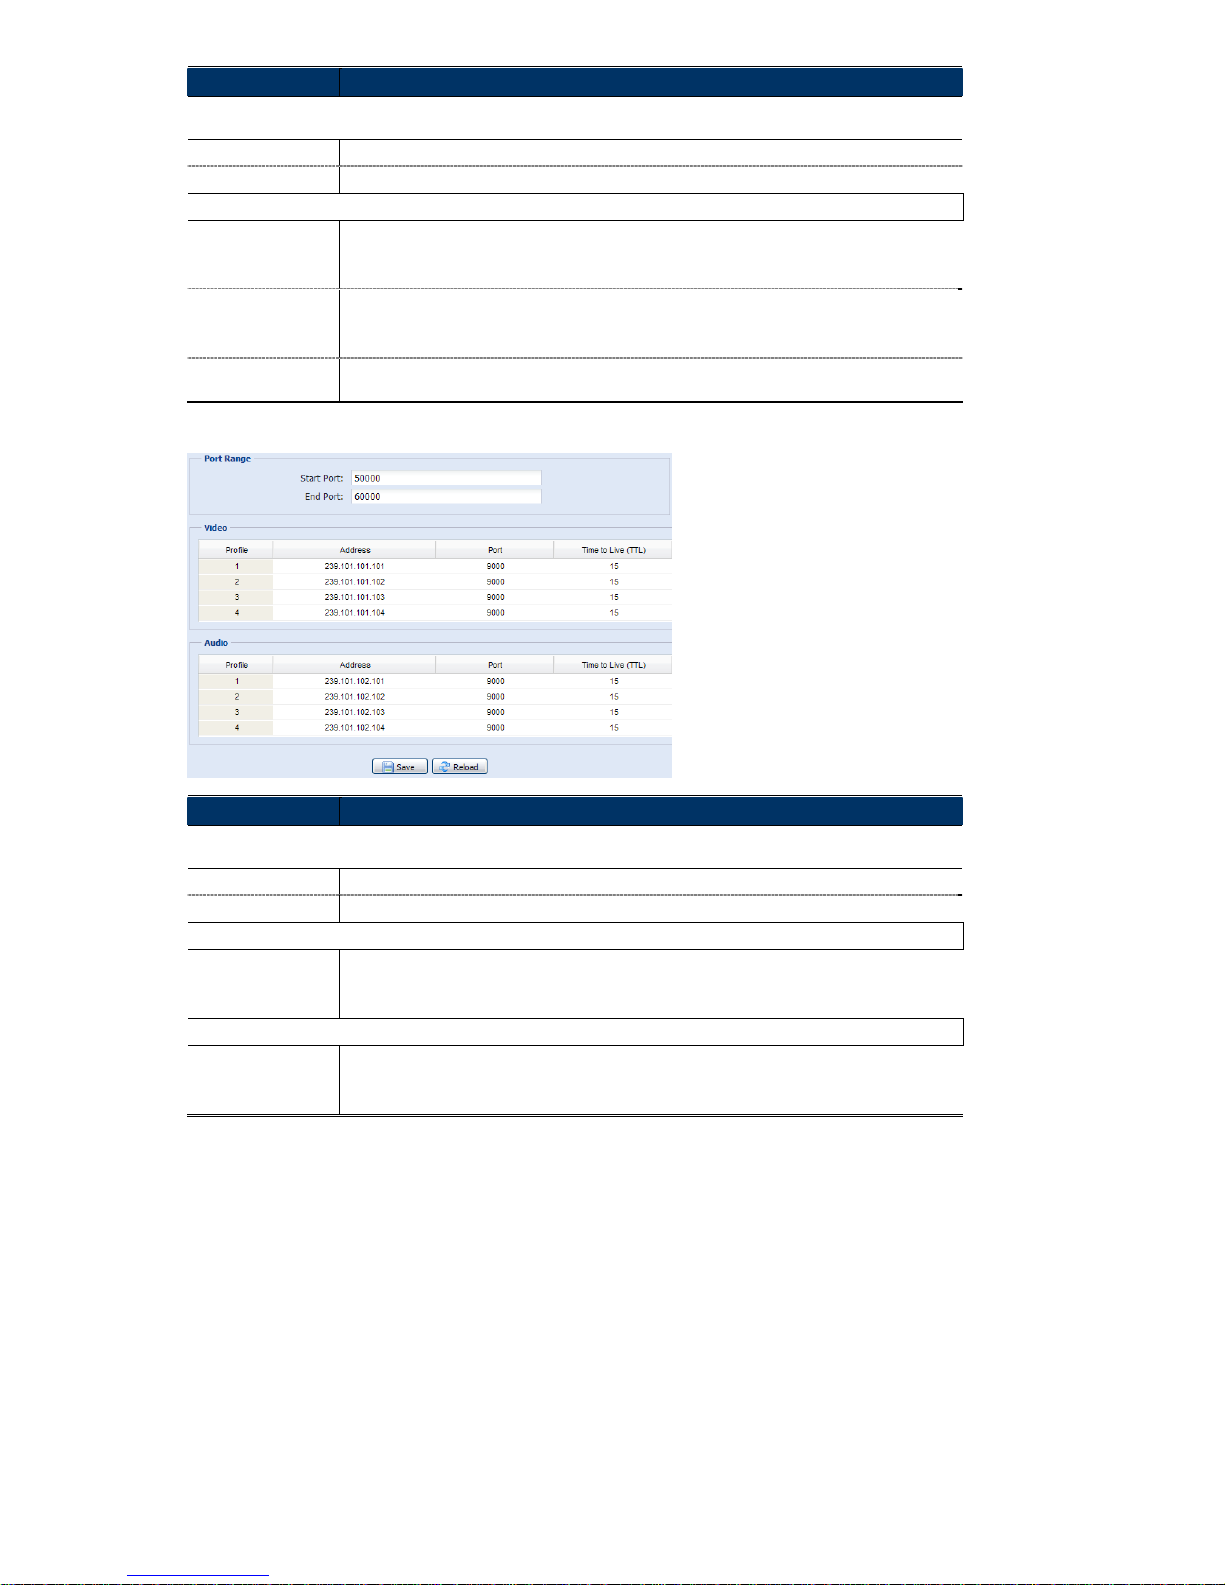
3.2.10 RTP
The Real-time Transport Protocol (RTP) is an Internet protocol standard to manage the real-time transmission of
multimedia, such as VLC player.
The media player you want to use for remote access must support RTP transmission for this function to work
normally.
Note: When you’re about to end the remote access, please press the stop button on your media player
first, and then close the program. This is to ensure the server receives the stop command, and
also help to protect the server from redundant data transmission.
Type A
Page 21
15
Function Description
Port Range
The port range used by RTP is limited, and preserving 100 ports between the start port and end port is necessary.
Start Port The range of the start port is 1024 ~ 65434.
End Port The range of the end port is 1124 ~ 65534.
Multicast
Address and port for
H264 / MPEG4 /
JPEG transmission
Set a specific address and port for multicast of each stream format (H264/ MPEG4/ JPEG).
The range of the address is limited between 224.0.0.1 ~ 239.255.255.255.
The port for multicast must be an even number.
Address and port for
audio transmission
Set a specific address and port for multicast of audio.
The range of the address is limited between 224.0.0.1 ~ 239.255.255.255.
The port for multicast must be an even number.
Time to Live (TTL) The range of Time to Live of the package is between 1 ~ 255. As soon as Time to Live of the
package is 0, it will be dropped.
Type B
Function Description
Port Range
The port range used by RTP is limited, and preserving 100 ports between the start port and end port is necessary.
Start Port The range of the start port is 1024 ~ 65434.
End Port The range of the end port is 1124 ~ 65534.
Video
Address and port for
video transmission
Set a specific address and port for multicast of profile 1 ~ 4.
The range of the address is limited between 224.0.0.1 ~ 239.255.255.255.
The port for multicast must be an even number.
Audio*
Address and port for
audio transmission
Set a specific address and port for multicast of audio.
The range of the address is limited between 224.0.0.1 ~ 239.255.255.255.
The port for multicast must be an even number.
*For selected models only
Page 22
16
3.2.11 SNMP (For selected models only)
SNMP, Simple Network Management Protocol, is used to facilitate the exchange of management information
between network-attached devices, and network administrators could use it to monitor those devices.
The SNMP consists of three basic components:
Network-management systems (NMSs) to monitor and control the managed devices.
Managed devices as network nodes to save all network and management information, such as routers, access
servers, switches, bridges, hubs, etc.
Agents as network management software modules on managed devices to provide the status of managed devices
to NMSs.
Note: Before configuring SNMP settings, make sure your NMS is enabled first.
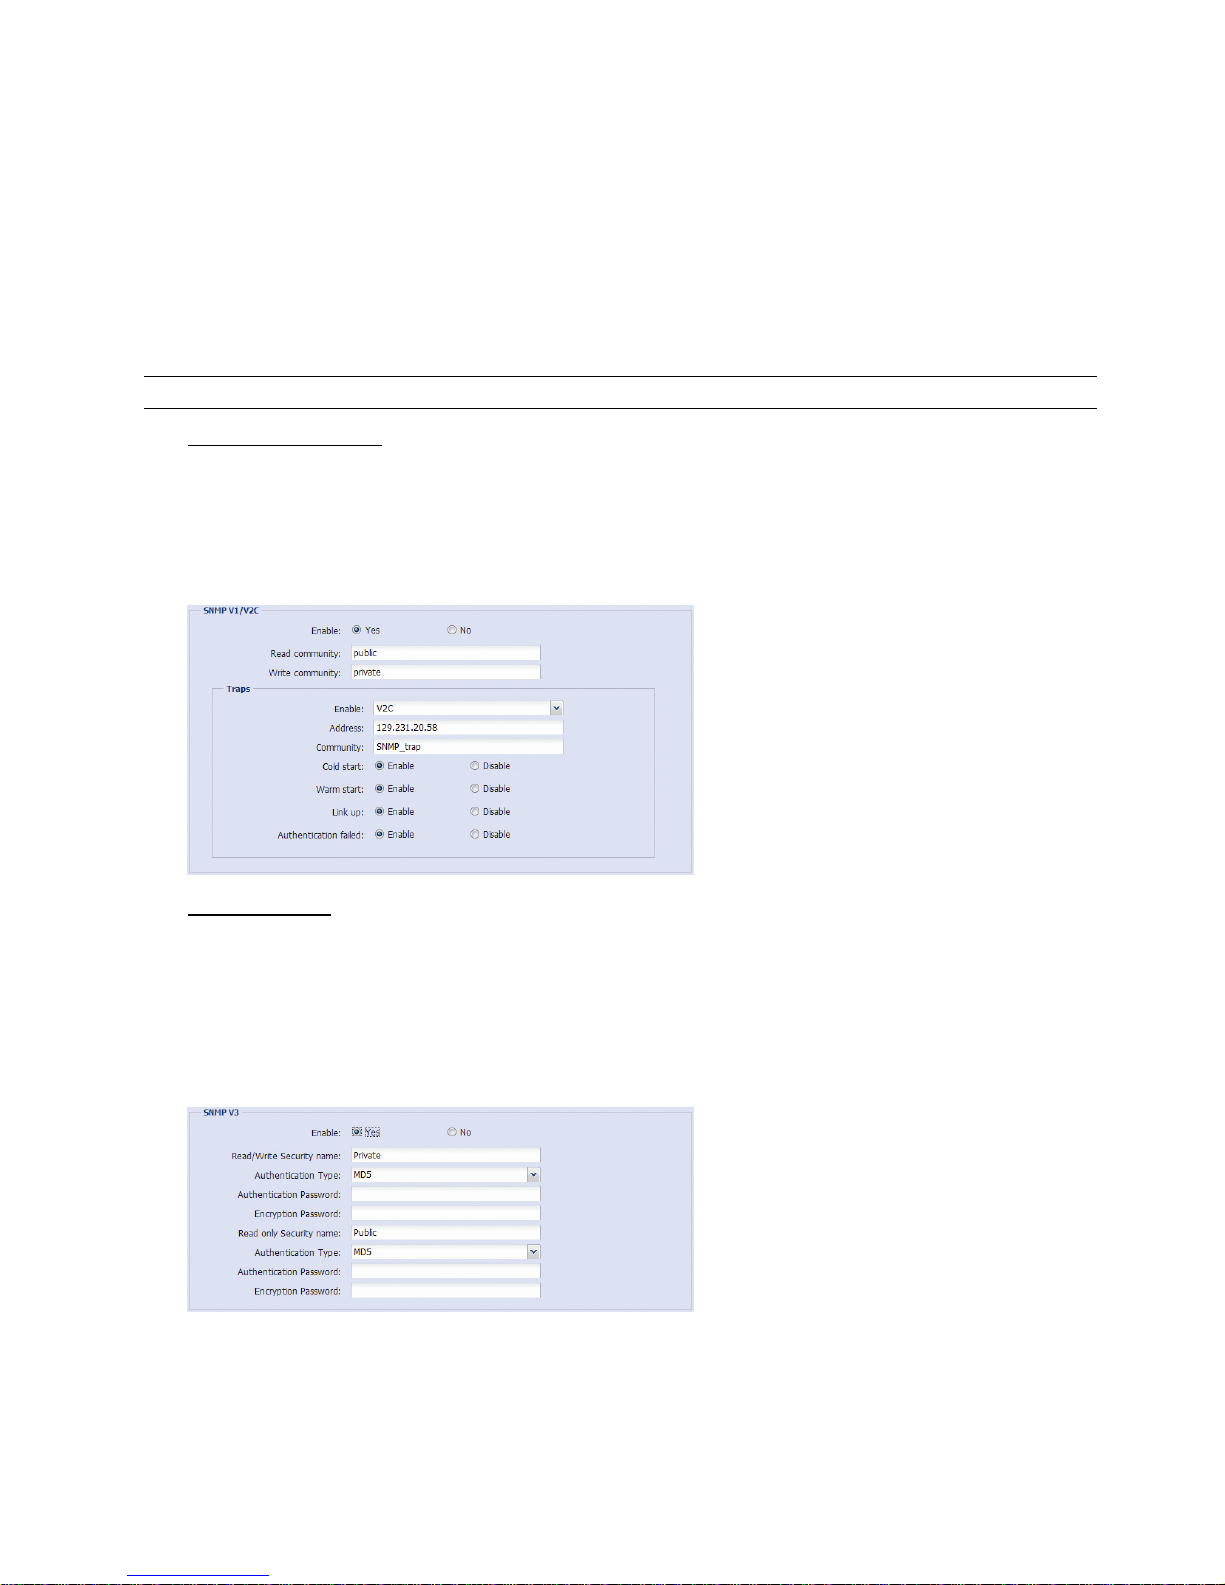
Enable SNMP V1 / V2C
Select “Yes” to enable this function, and enter the names of “Read community” and “Write community” based on
your NMS configurations.
To enable “Traps” to notify the management station of important events, choose “V1” or “V2C” in “Enable”, enter
the address and community name, and select the event type(s) needed.
Enable SNMP V3
SNMP V3 has a higher security level than SNMP V1 / V2C to allow configuring the authentication password and
encryption password.
Choose “Read/Write Security name” or “Read only Security name” based on your NMS settings, and enter the
community name. Then, select the authentication type from “MD5” or “SHA”, and enter the password for
authentication and encryption. The password length is from 8 to 31 characters.
Page 23

17
3.2.12 IEEE 802.1X (For selected models only)
The settings here enable the camera to access a network protected by 802.1X/EAPOL (Extensible
Authentication Protocol Over LAN).
Note: For authentication to work properly, it's important to synchronize the time in the camera with an
NTP server.
Before using this function, make sure:
The switch and RADIUS server you have in the LAN environment supports IEEE 802.1X, and IEEE 802.1X
settings are enabled.
You’ve applied a digital certificate from a Certificate Authority which can be validated by a RADIUS server,
and the identity and password used.
Then, follow the steps below:
Step1: Connect this camera to a PC or laptop directly, and go to its login page to log in.
Note: To know how to connect the camera to a PC or laptop directly, please check “4 Modem / Hub +
Modem” in “ADVANCED NETWORK SETUP”.
Step2: Log into the camera, and go to “Config” “Network” “IEEE 802.1X”. Enable this function, and select
the EAP method you want to use.
Note: This camera supports “EAP-PEAP”, “EAP-TLS” and “EAP-TTLS”.
Step3: Enter the identity and password you get from the Certificate Authority, and select the EAPOL version
used in your switch.
Step4: Upload the certificate(s) issued by the Certificate Authority, and save.
Step5: Disconnect the camera from your PC or laptop, and connect it to the switch in the LAN environment you
want to use IEEE 802.1x, and the camera will start the authentication later.
Page 24
18
3.2.13 Network Share (For selected models only)
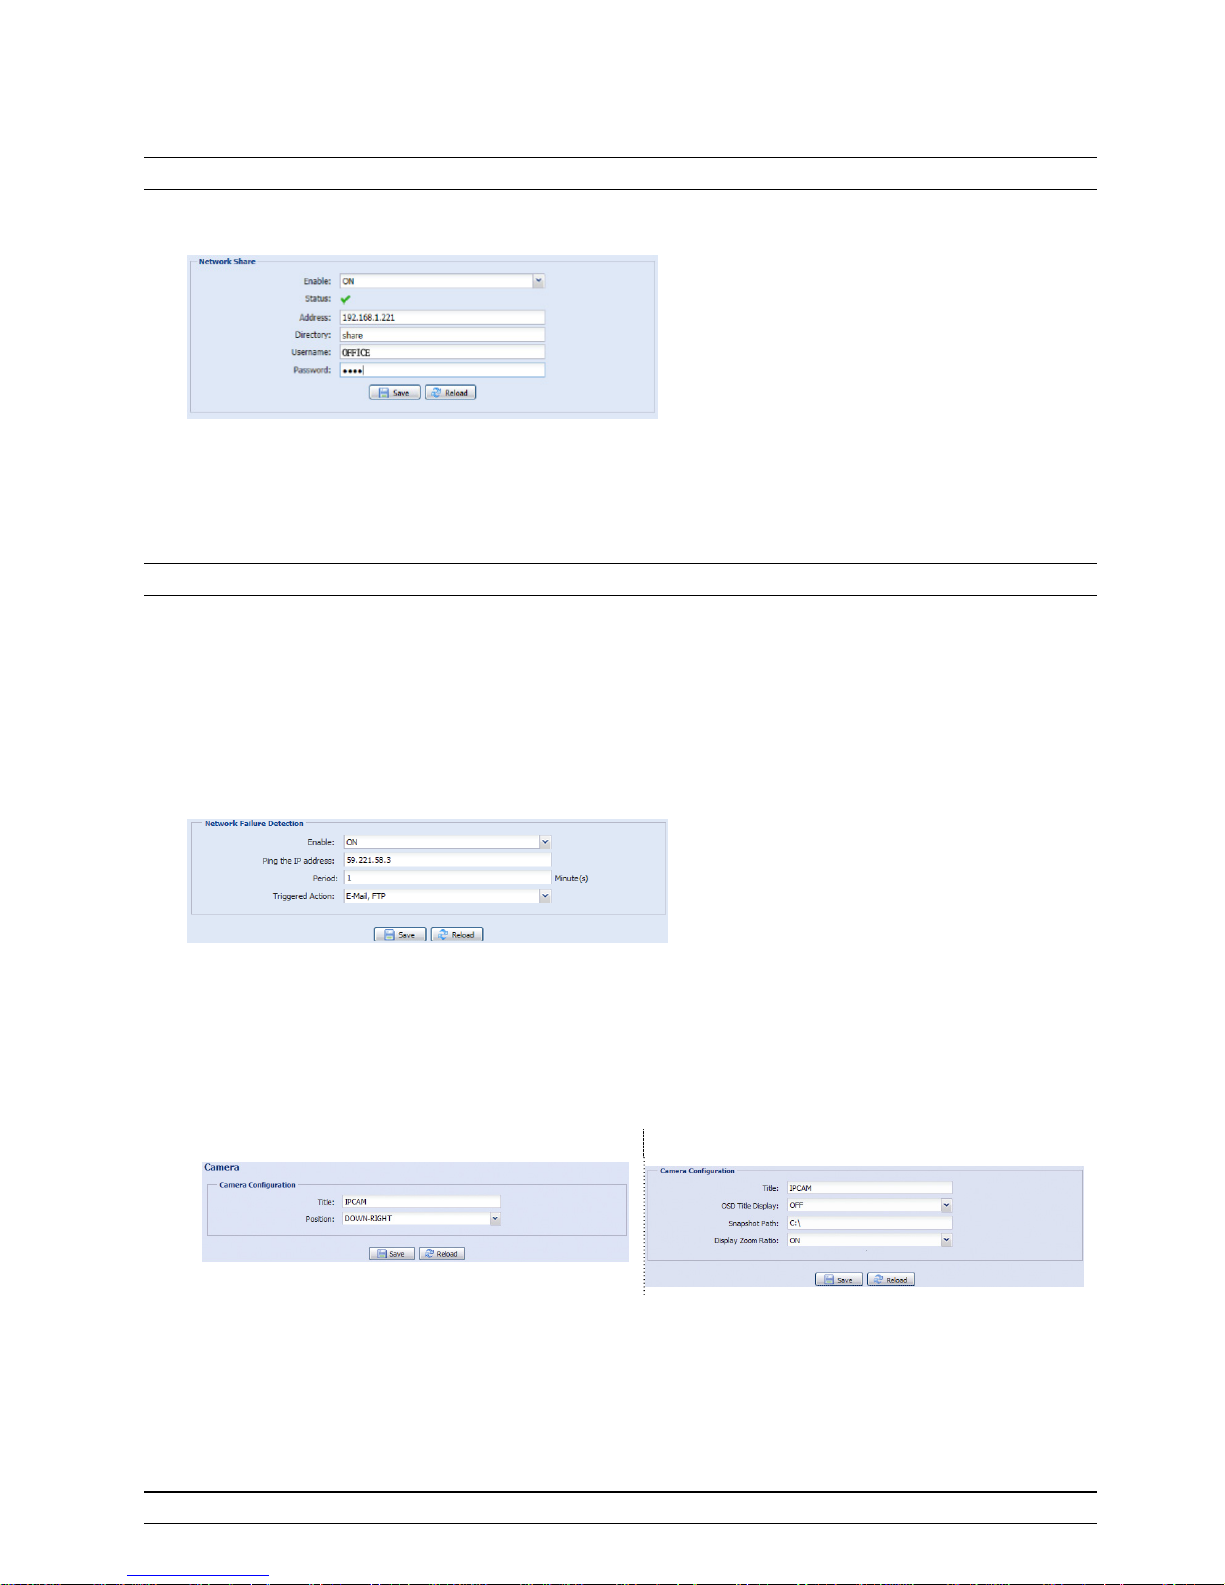
This function is used to assign a location in the LAN environment to save the snapshot of events.
Note: This function is available only for Windows operating systems.
The information you set here will be applied when “Network Share” is selected in “Trigger” → “Snapshot” →
“Storage Mode”.
To use this function, make sure:
A PC is installed in the same LAN environment as this camera, and you know the IP address of the PC.
A PC account is created as “Administrator” with a user name and password.
A folder in the PC is opened as shared to the user account you assigned.
Note: Please check “APPENDIX 9 PREREQUISITES FOR NETWORK SHARE” at page 50 for more details.
Enable this function, and enter the address of the PC, the folder being shared, and the user name and password
to access the PC. If the information is all correct, you'll see a check in the “Status” column, and you’re ready to
go to “Trigger” → “Snapshot” for further configurations.
3.2.14 Network Failure Detection (For selected models only)
Configure this camera to check the network connection of other device periodically, and send notifications via
Email or FTP for disconnection events.
3.3 Camera
3.3.1 Camera
Rename the camera, and change the place where the camera name is shown on the screen, UP-LEFT /
UP-RIGHT / DOWN-LEFT / DOWN-RIGHT. "Snapshot Path” is used to specify the path to save snapshot files.
Type A Type B
3.3.2 Video
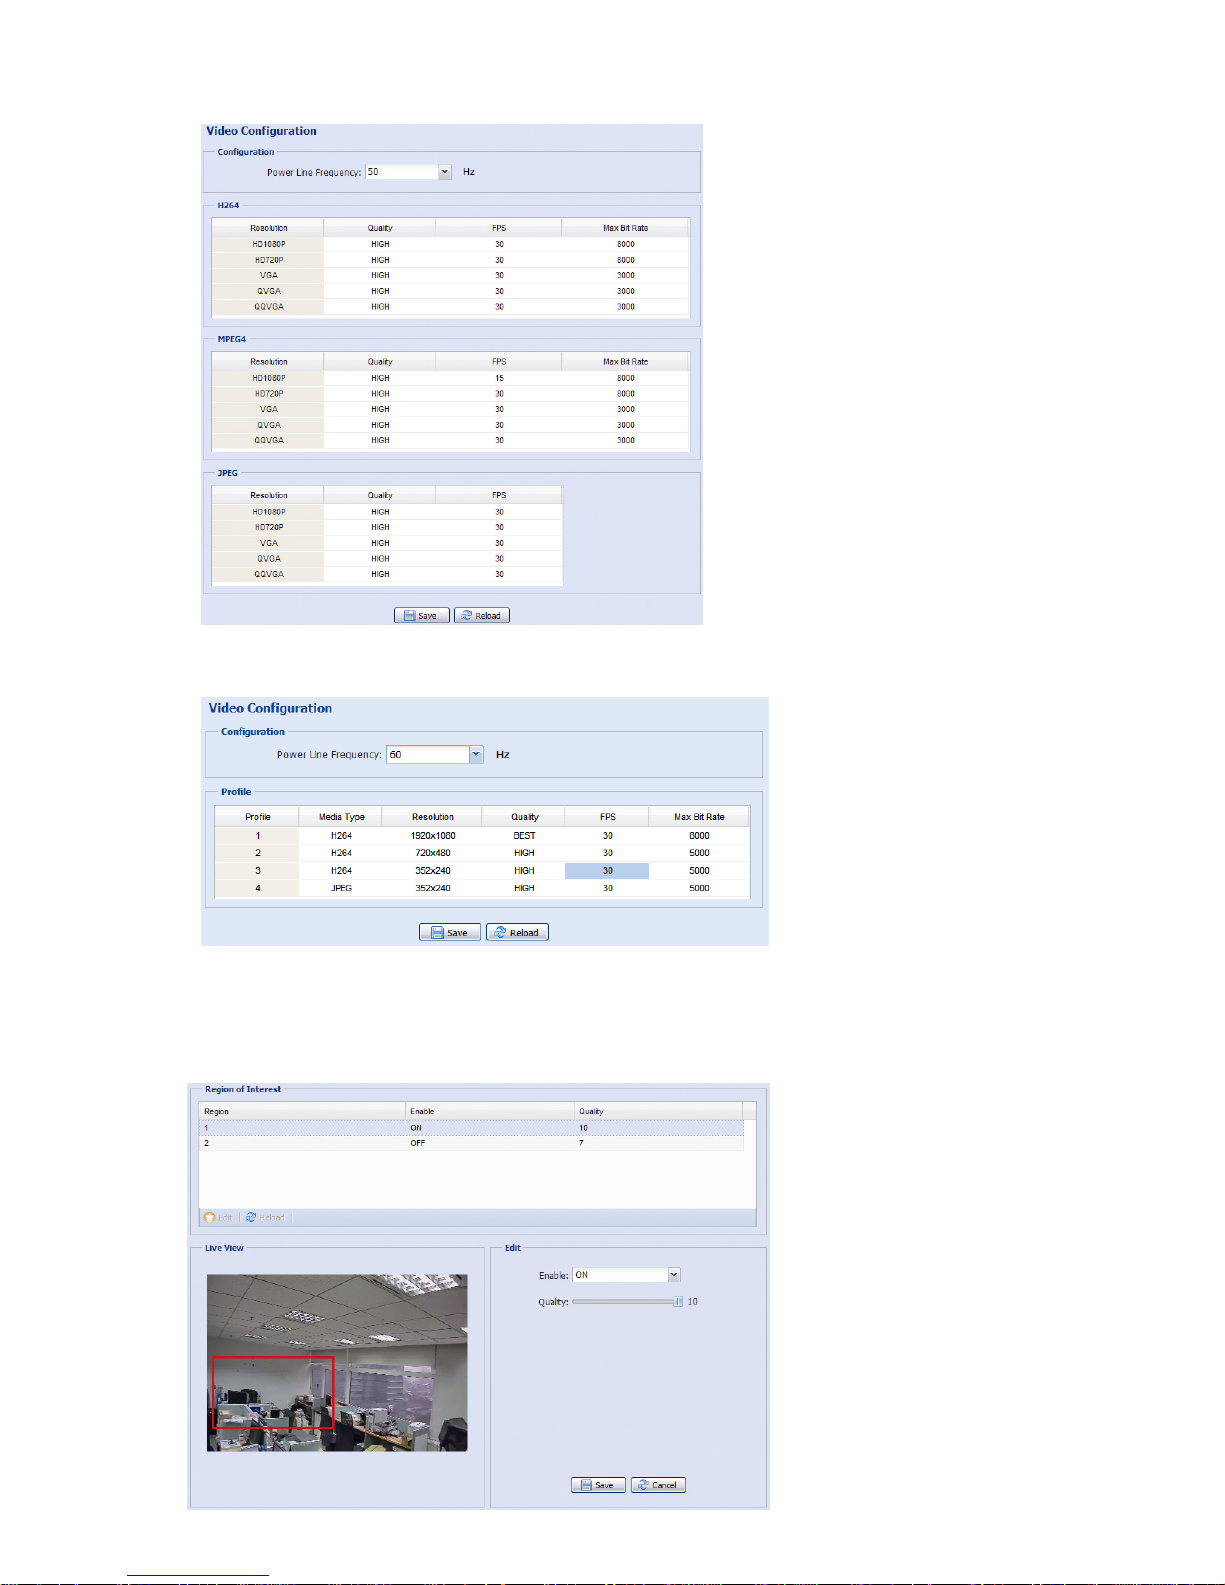
Adjust video-related settings in different video format.
“Quality” is related to image clearness.
“FPS” is related to the fluency of the video. The more the FPS, the more fluent the video.
“Max Bit Rate” is the maximum limitation of data transmission in the selected image format and resolution.
Take 2 megapixel model as an example below. For 1.3 megapixel model, please refer to its actual display.
Note: QQVGA is for mobile surveillance only.
Page 25
19
Type A:
Type B:
3.3.3 ROI (For selected models only)
ROI, Region of Interest, is used to reinforce the image quality of the selected area(s). Users could specify two
areas in the camera view.
Page 26
20
3.3.4 Color
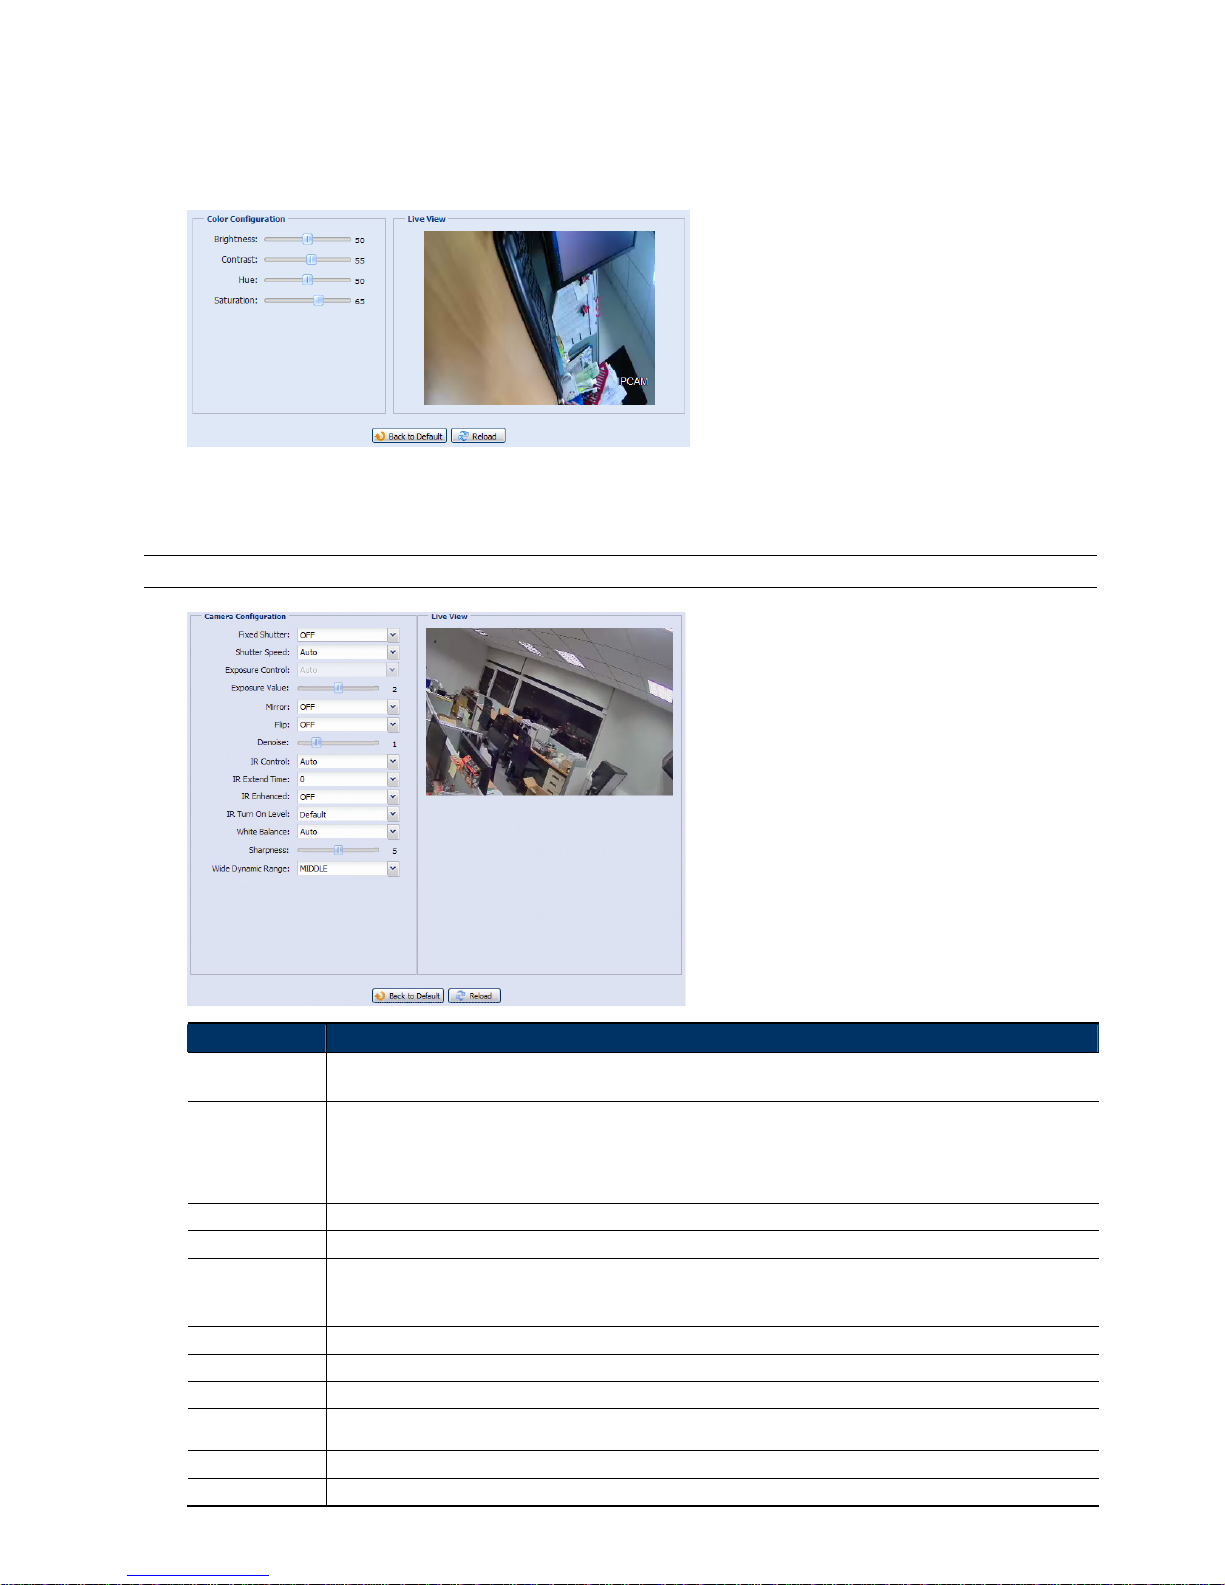
Adjust the color performance from Brightness, Contract, Saturation, and Hue (for selected models only). Click
and drag the slider to preview the color change on the right side of this page and adjust the image color.
To restore the default values, click “Back to Default”.
3.3.5 Advanced
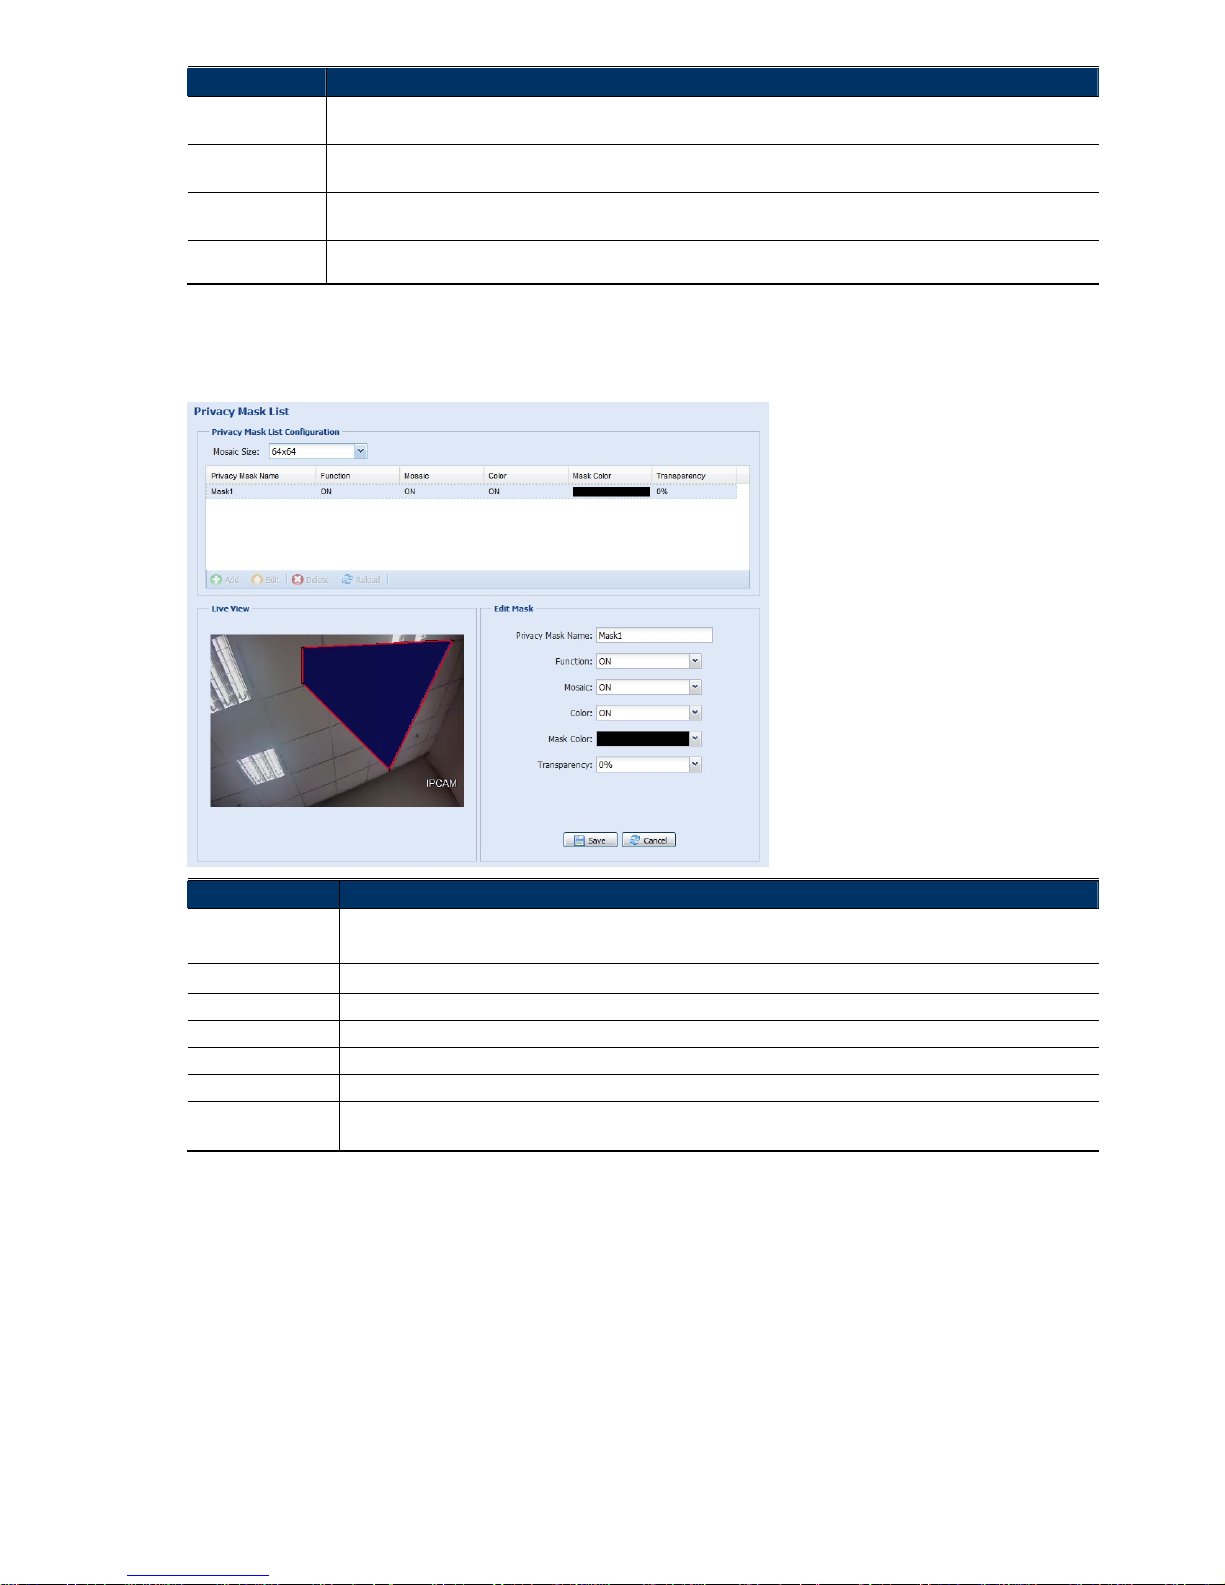
Adjust the camera parameters if necessary.
Note: The functions available depend on the model number used.
Item Description
Fixed Shutter*
Shutter Speed is a function that can adjust the duration of the electronic shutter to produce optimum image quality. Select
the shutter speed suitable for your environment.
Shutter Speed
Select the shutter speed suitable for your environment.
A slower shutter speed in dark conditions will help to produce a brighter image, but will produce fewer frames per second,
which may cause images to get blurry during motion.
When “Auto” is selected, the iris mode is “AES”.
When a certain speed is selected, the iris mode is switched to “AI”, and the image brightness is available to adjust from “IRIS”.
Exposure Control* This function is used to synchronize the shutter time to the fluorescent light to suppress image flickering.
Exposure Value* Drag the slider to adjust the exposure level from 0 ~ 4.
Back light* It is the function to adjust the image to compensate for an area that is overpowered by brightness because of excessive light.
The image will be properly exposed for clearness. Select to activate (ON) or disable (OFF) this function.
Note: This function is available only in the day mode.
Mirror Select “ON” to rotate the images horizontally based on your installation situation when necessary.
Flip Select “ON” to rotate the image 180° when necessary.
De-noise* Click and drag the slider to adjust the level from 0 ~ 10 to decrease the noise shown in the dark environment.
IR Control Select “Auto” to automatically enable IR LEDs at night or in the dark environment, “On” to always enable IR LEDs, or “OFF”
to disable this function.
IR Enhanced* Select “On” to enhance IR LEDs performance.
IR Turn On Level* Select the level for IR light to activate.
Page 27
21
Item Description
White Balance Process the current image to retain color balance over a color temperature range.
The options are: Auto, 2500K, 3200K, 4200K, 5800K & 9500K.
Sharpness Sharpness enhances the clarity of image detail by adjusting the aperture and sharpening the edges in the pictures.
Hold and drag the slider to adjust the level of sharpness. The higher the value, the sharper the image.
Wide Dynamic
Range*
Wide Dynamic Range (WDR) is used when users need to increase image recognizability in overexposure and dark areas.
The options are: LOW / MIDDLE / HIGH / OFF
Digital WDR* Digital WDR is used to simulate the effect of WDR when users need to increase image recognizability in overexposure and
dark areas.
*Selected models only
3.3.6 Privacy Mask (For selected models only)
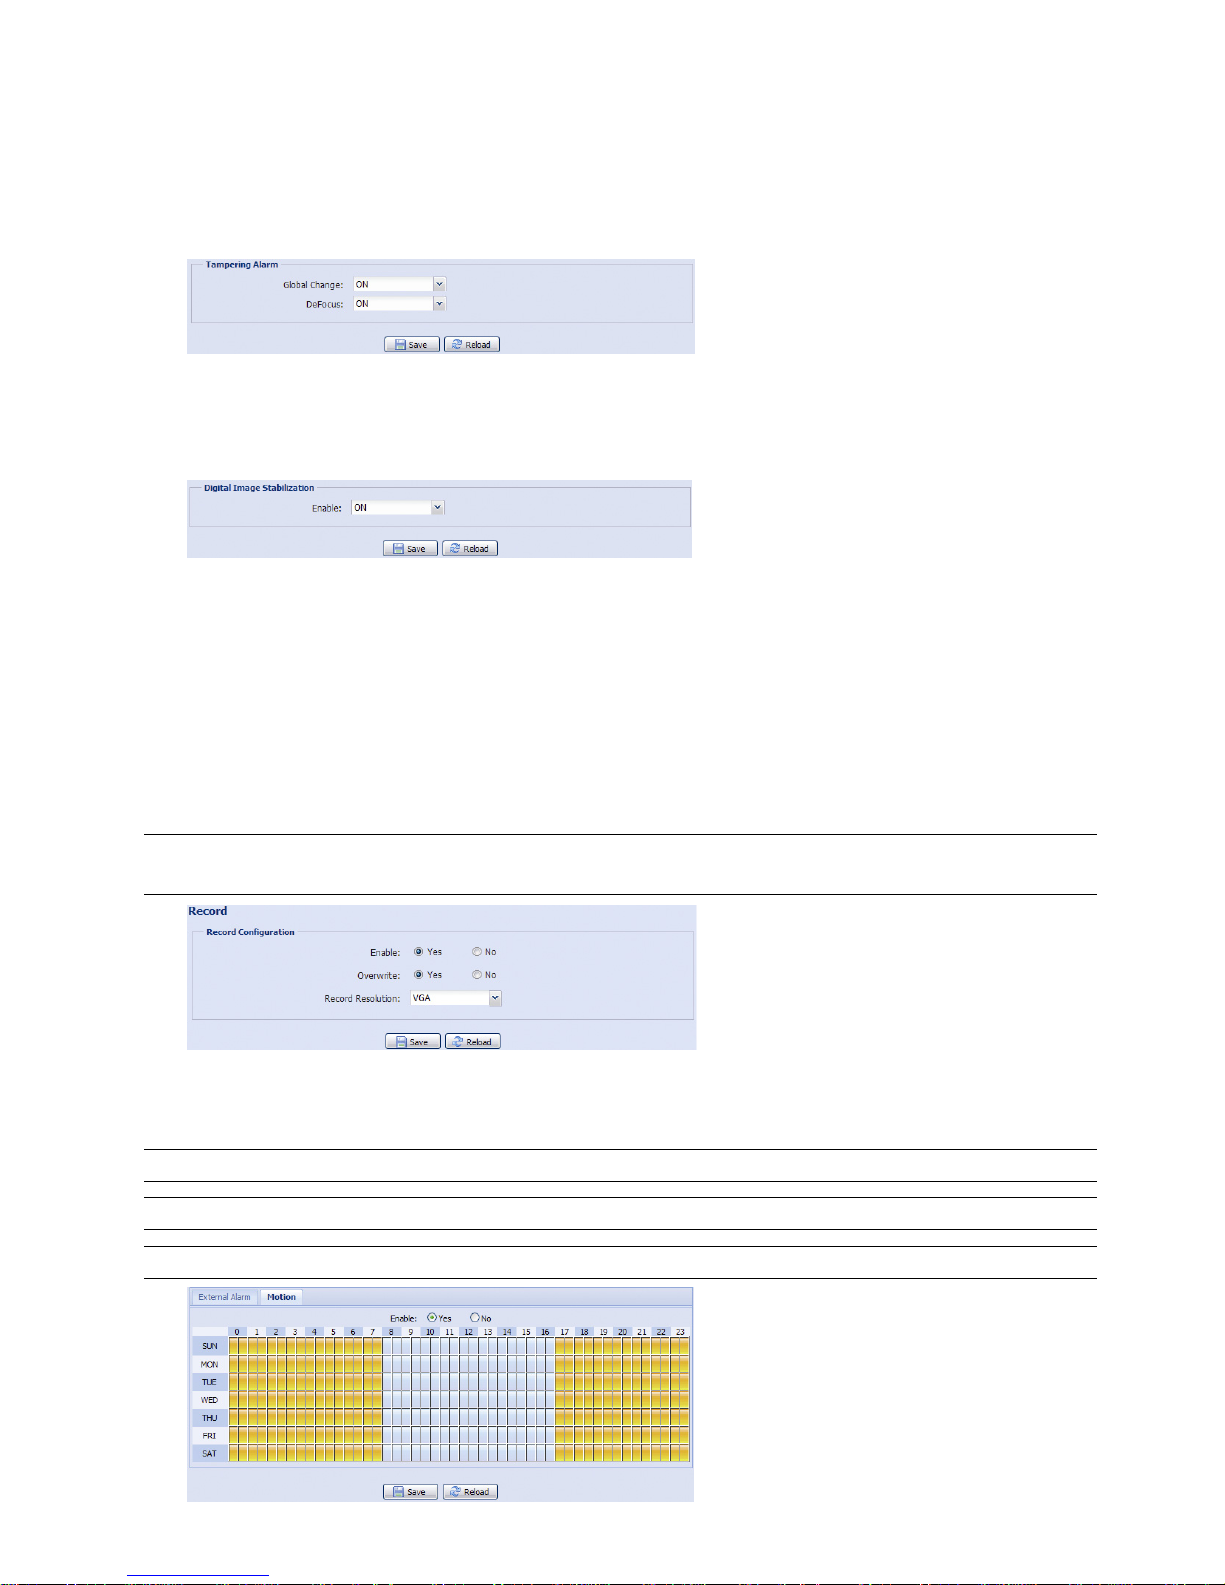
You can cover certain areas on the camera image with privacy masks.
Item Description
Mosaic Size
Choose the mosaic size of the privacy mask.
The options are: 8×8, 32×32, and 64×64.
Privacy Mask Name
Name your privacy mask.
Function Select “On” to enable the privacy mask function.
Mosaic Select “ON” to have the mosaic effect.
Color Select “ON” to color the privacy mask. In the meantime, you can’t see the mosaic effect.
Mask Color Select the color for the privacy mask.
Transparency Select the transparency for your privacy mask.
The options are: 0%, 25%, 50%, and 100%.
Page 28
22
3.4 VA (For selected models only)
3.4.1 TA
TA, tampering alarm, should be used with the mini-guard control switch for alarm system integration. For more
details, please check with your distributor or installer.
3.4.2 DIS
DIS, digital image stabilization, is used to reduce blurring associated with the motion of a camera during
exposure.
3.5 Record
3.5.1 Record
In “Record Configuration”, you can:
Enable or disable the alarm record function. When “Enable” is set to “No”, the alarm record function is
disabled even if you enable it in other configuration pages.
Select if the data should be overwritten when the memory storage is full.
Select the video resolution for event recording.
Note: The higher resolution you choose, the more accuracy and higher image quality the recording will
be, but the faster the memory storage is consumed and become full
3.5.2 Record Timer
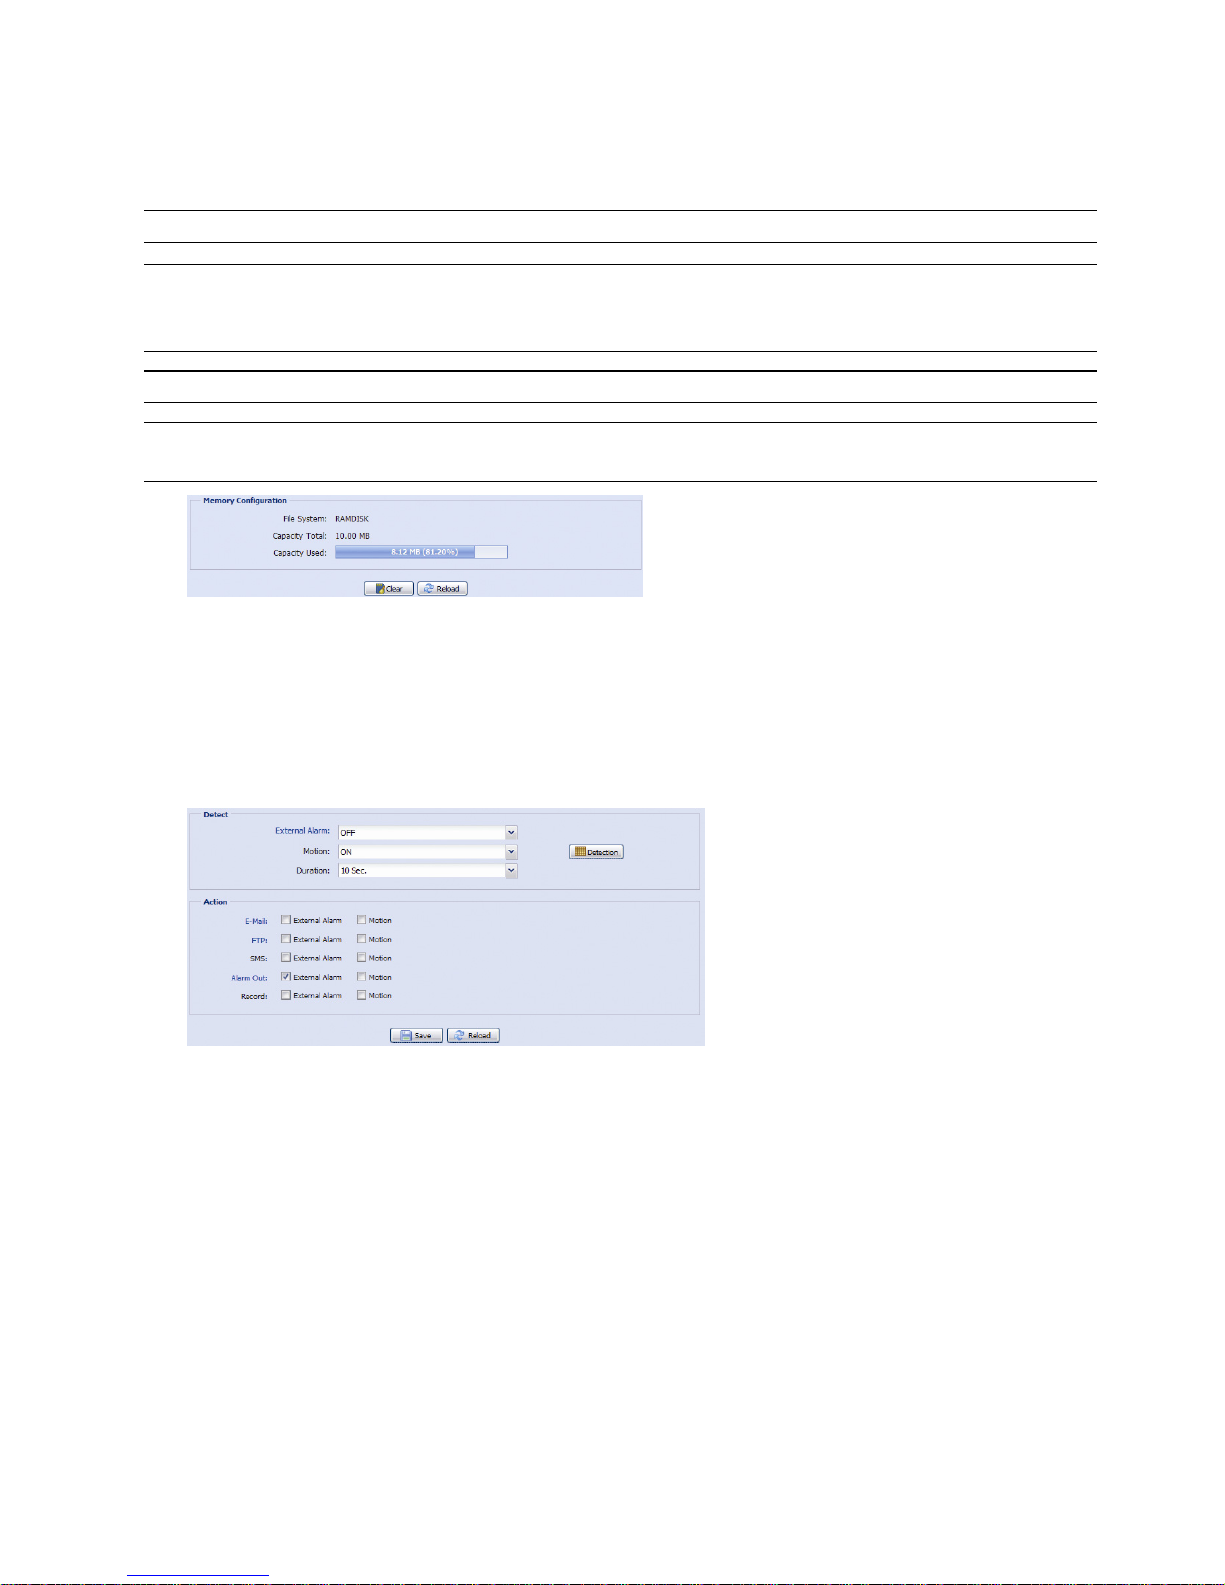
To schedule alarm and motion recording, enable it, and select the day and time for recording.
Note: The timer must be enabled for the record function to work properly.
Note: The timer for external alarms is for selected models only.
Note: The selected time will be yellow-colored.
Page 29
23
3.6 Storage
3.6.1 Memory
In “Memory”, you can check the remaining capacity for recording, or clear all recorded data saved if needed.
Note: The recorded data will be removed also when you reset or reboot this camera.
Note: To know how and where to insert a micro SD card, please refer to the installation guide. To know
the compatible list of micro SD cards, please refer to “APPENDIX 7 MICRO SD CARD COMPATIBLE
LIST” at page 47.
Note: To save more recorded data, it’s recommended to use this camera with the compatible NVR.
Note: To know the total recording time per recording resolution, please refer to “APPENDIX 6
RECORDING TIME TABLE” at page 46.
The total capacity may vary depending on different models. Please check the actual display of your model.
3.7 Trigger
3.7.1 Trigger
You can configure how this camera reacts when there’s an alarm or motion event.
Page 30
24
Detect
Item Description
External Alarm* Enable or disable detection from external alarm-in device, and click the title “External Alarm” (in blue) to set “N.O.”
or “N.C.” depending on the configuration of your alarm-in device.
Motion Enable or disable motion detection.
Motion detection is not supported when the stream format is Motion JPEG.
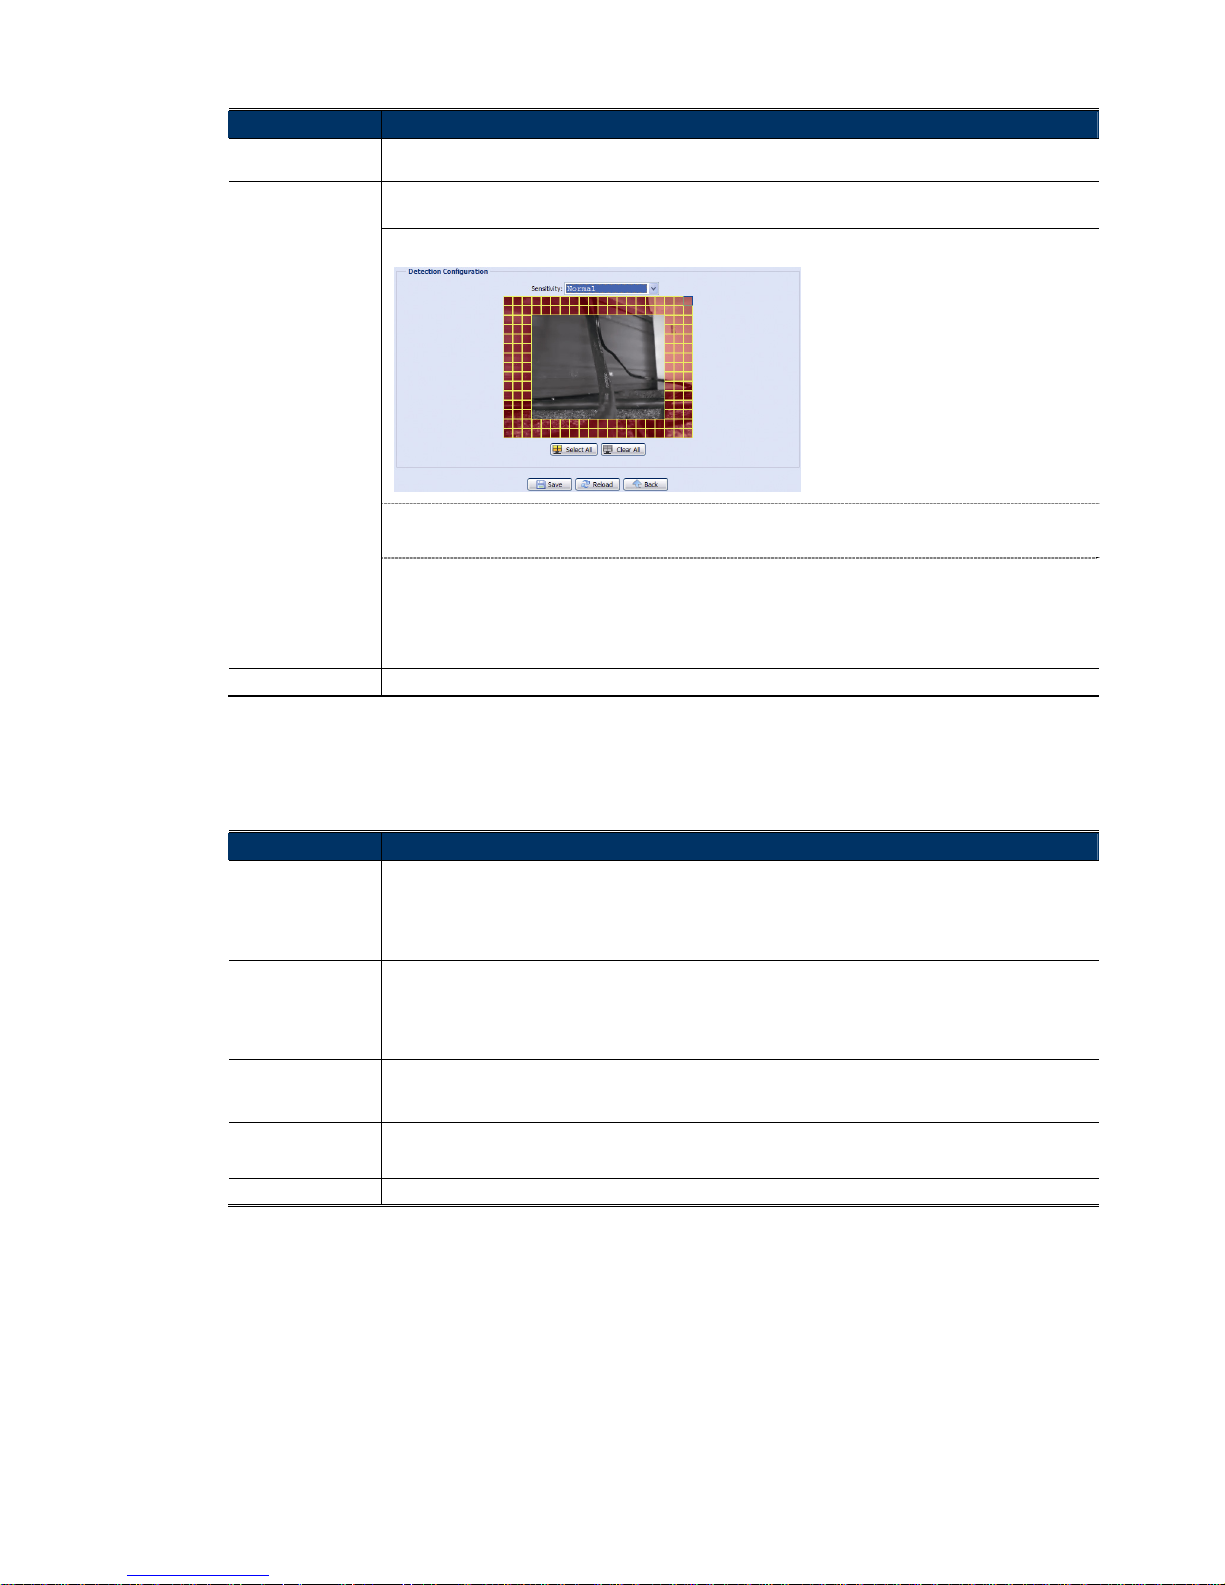
When “Enable” is selected, click “Detection” to enter the motion detection area setting page as follows:
Sensitivity:
Set the detection sensitivity from the drop-down list: High, Normal or Low.
Area Setting:
Set the motion detection area by selecting the area grids with your mouse. Pink grids represent the area that is not being
detected while the transparent grids are the area under detection. You can set multiple areas under detection.
Click “Clear All” to set the whole area undetected.
Click “Select All” to set the whole area under detection.
Duration Set the duration time for trigger recording (5 / 10 / 20 / 40 seconds).
*For selected models only
Action
Here defines how the camera delivers alerts to you for any event.
Item Description
E-Mail Select the event type you want to receive E-mail notifications when it occurs.
Then, click the title “E-Mail” (in blue) to configure the media type (H264 / JPEG / MPEG4), file format (AVC / AVI),
and record time (1 ~ 5 seconds) for the event video clip.
The camera will send the captured video clip to the E-mail address(s) you assigned in “Network” “Mail” once the
selected event type occurs.
FTP Select the event type you want to receive FTP notifications when it occurs.
Then, click the title “FTP” (in blue) to configure the media type (H264 / JPEG / MPEG4), file format (AVC / AVI), and
record time (1 ~ 5 seconds) for the event video clip.
The camera will upload the captured video clip to the FTP site you assigned in “Network” “FTP” once the
selected event type occurs.
SMS* Select the event type you want to receive a text message when it occurs.
The camera will send a text message to the mobile phone number you assigned in “Network” “SMS” once the
selected event type occurs.
Alarm Out*
Select the event type you want to trigger the alarm-out device to work when it occurs.
Then, click the title “Alarm Out” (in blue) to configure the trigger rule (LOW / HIGH).
Record Select the event type you want to enable event recording when it occurs.
*Selected models only
Page 31
25
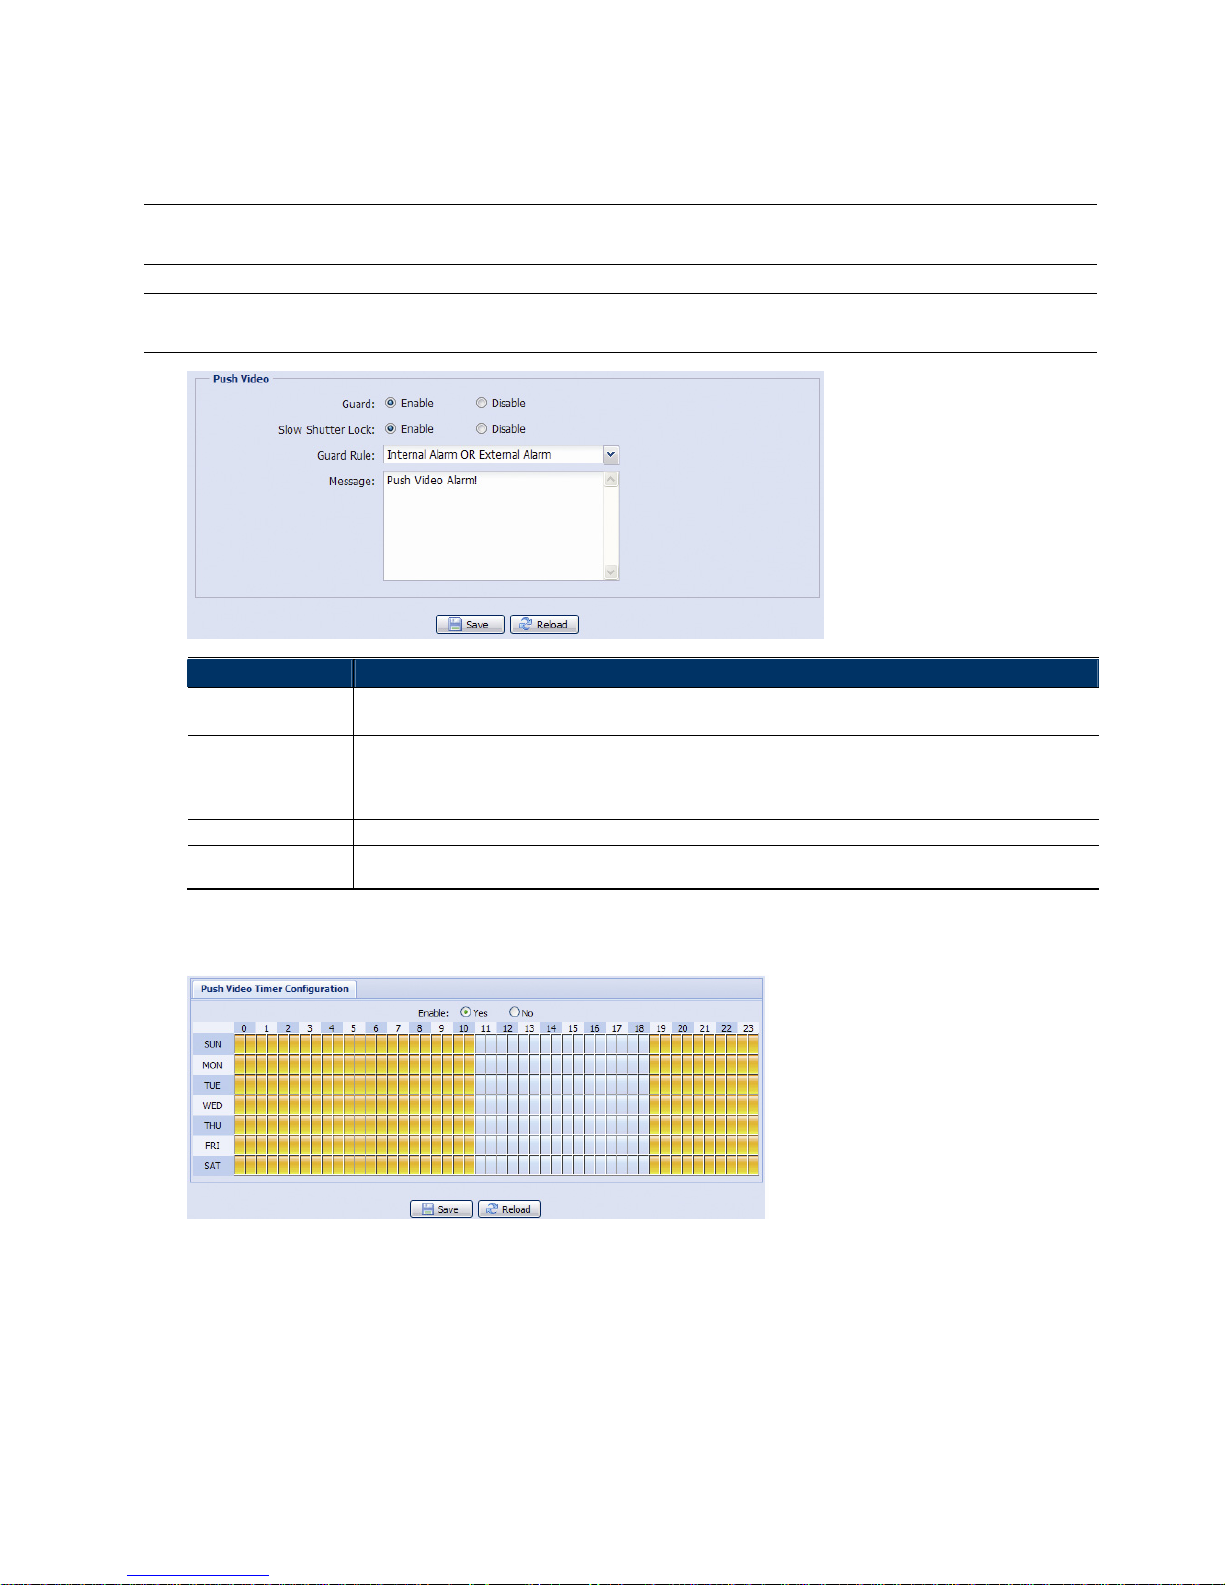
3.7.2 Push Video (For selected models only)
“Push Video” is an active notification system integrated with smart phones. Users are able to receive alarm
notifications within 5 seconds after event occurrence, check what happened with video playback, and take
actions immediately.
Note: For Push Video to work properly, make sure the record function is on in “Record” “Record”, and
the record timer for the external alarm is on in “Record” “Record Timer”.
Note: When the camera is configured, go to your smart phone and enable “Push Video”. For details,
please refer to “APPENDIX 8 ENABLE PUSH VIDEO” at page 48.
Item Description
Guard Select to enable or disable Push Video. This function can also be enabled from your iPhone or Android mobile devices.
When this function is enabled, the image resolution is fixed to “VGA”.
Slow Shutter Lock Select to fix the slow shutter level to level 2 (Enable) or remain the current slow shutter level (Disable) when Push Video
is enabled.
When this function is enabled, it could ensure Push Video recording to get clear images when the environment is dark.
This function is set to “Enable” by default.
Guard Rule Select the rule to enable Push Video from “External Alarm”.
Message Define the context when you receive the Push Video message on your iPhone or Android mobile device. Up to 28
characters are allowed.
To configure Push video to enable in the specified time, select “Yes” to enable the timer function, and select the
time you want to enable.
Page 32
26
3.7.3 Snapshot (For selected models only)
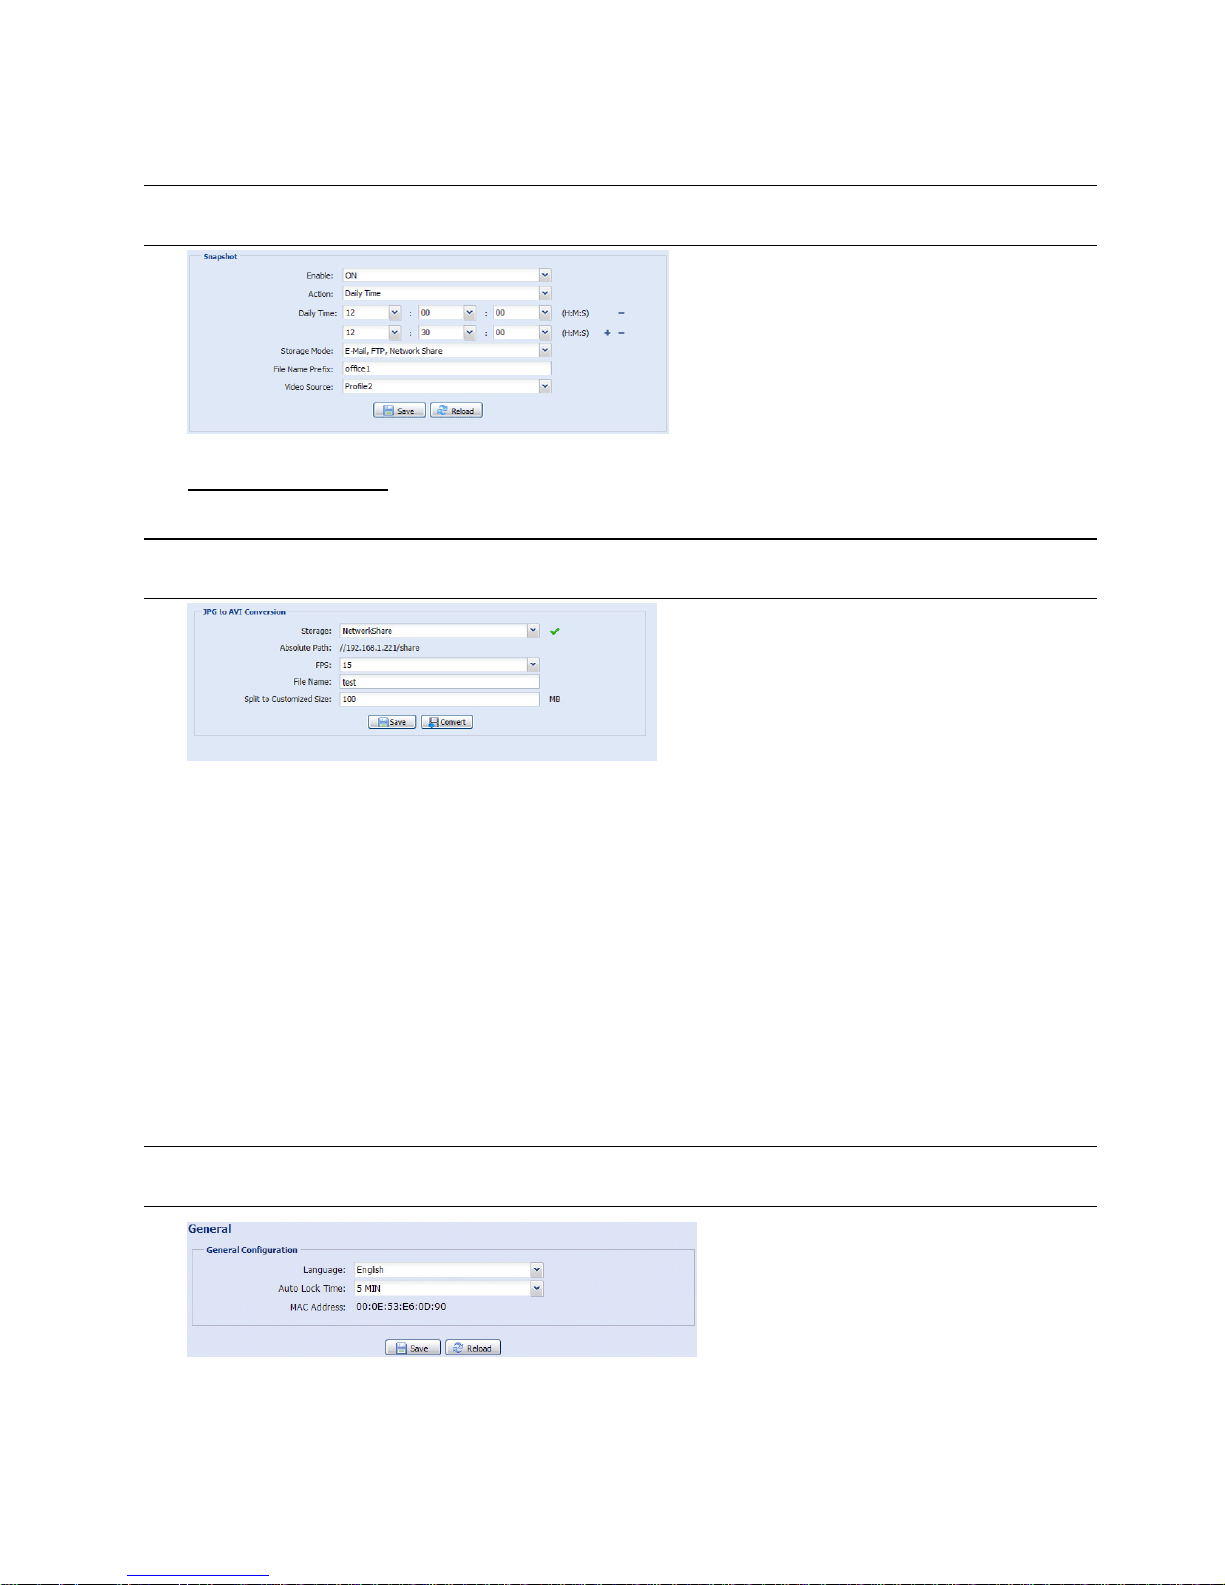
Enable this function to schedule the camera to take snapshots periodically or at a specific time, and send the
snapshots to E-Mail, FTP, and / or Network Share for backup.
Note: Before using E-Mail, FTP and Network Share, make sure the related configurations are done in
“Network” “Mail”, “Network” “FTP”, and “Network” “Network Share”.
Time-lapse Recording
This function allows users to create time-lapse recording by combining snapshots together.
Note: To use this function, make sure “Network Share” is configured well in “Network” “Network
Share”. For details, please go to “3.2.13 Network Share (For selected models only)” at page 18.
Step1: Configure when to take snapshots in “Snapshot”, and choose “Network Share” as the storage mode.
Step2: In “JPG to AVI Conversion”, choose how many images you want to see per second in “FPS”, name the
video file, and specify the file size.
Step3: Click “Convert” to start file conversion, and go to the path specified to store snapshots in “Network Share”
to check the video file.
3.8 General
3.8.1 General
To change the language of UI interface, select from the drop-down list in “Language”.
To lock camera access when it’s not used after the specified time, select “5 MIN”, “15 MIN” or “30 MIN” from the
drop-down list of “Auto Lock Time”, or select “NEVER” to disable this function.
Note: When the camera access is locked after the specified time, to resume camera access, please
enter the password.
Page 33
27
3.8.2 Time
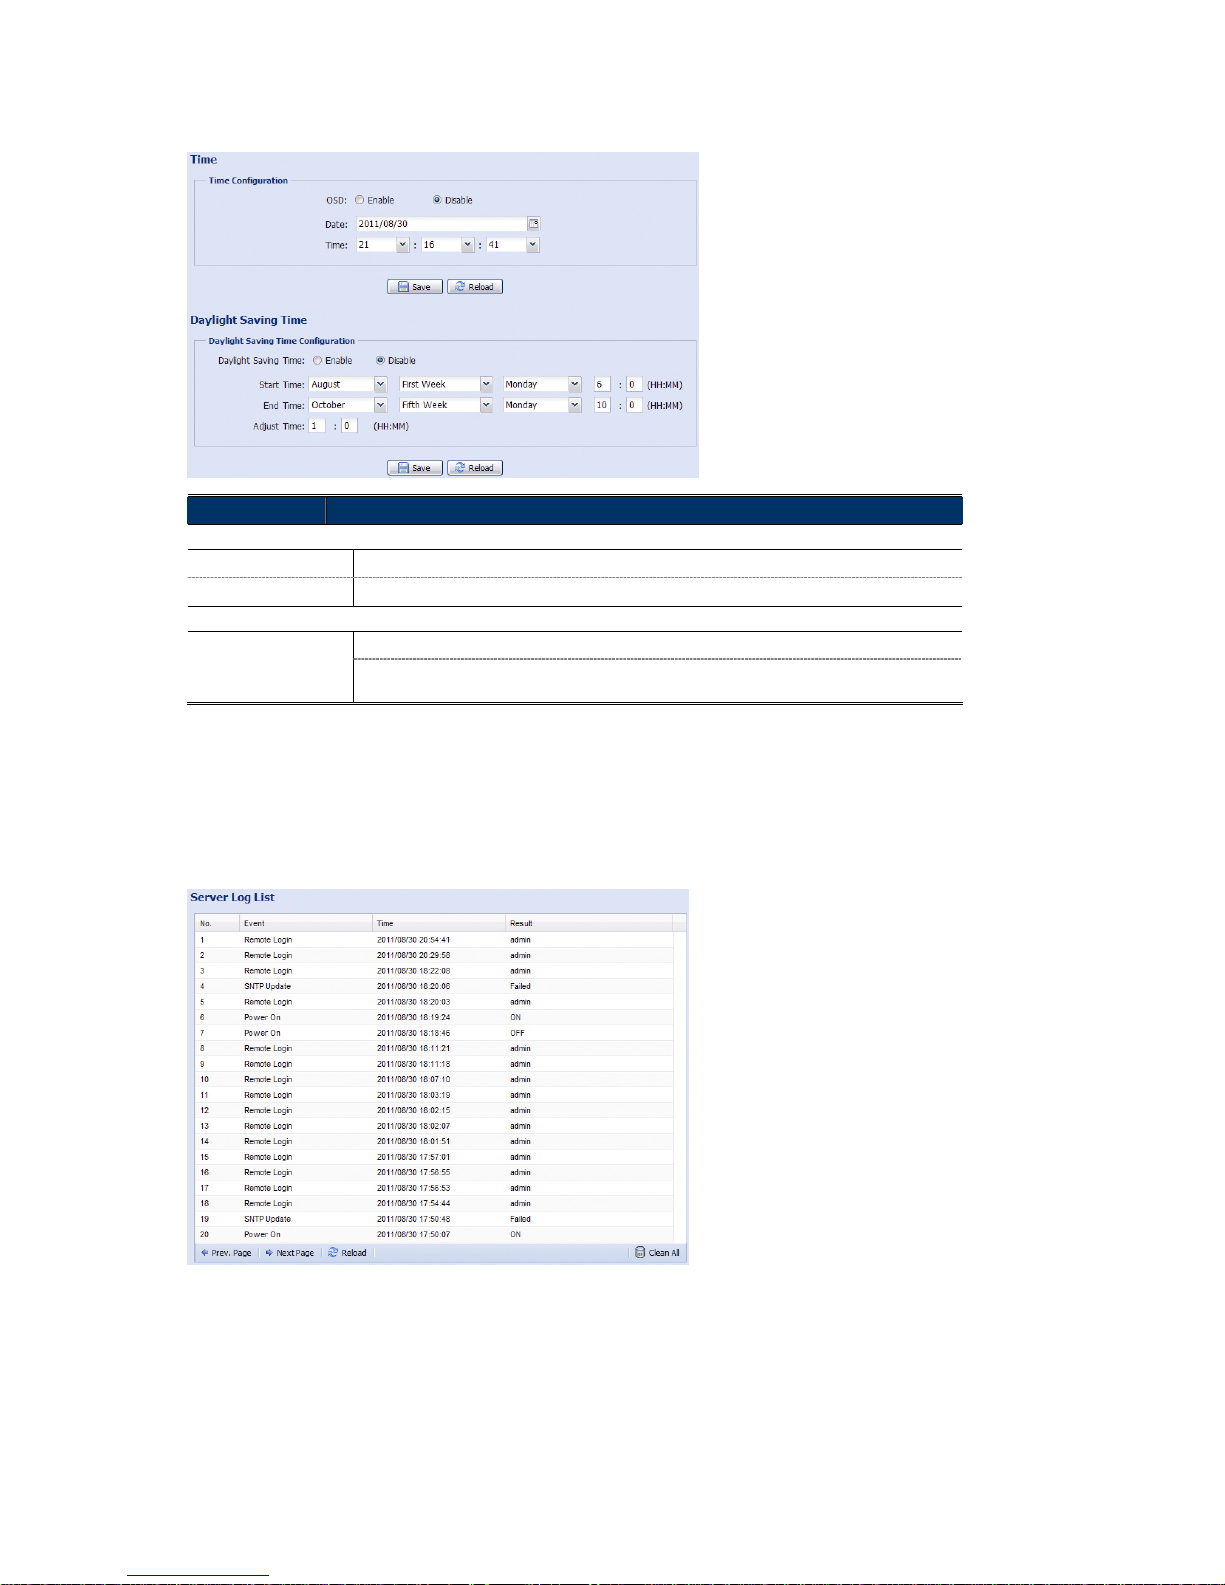
Set daylight saving time and the current time, and click “Save” to confirm.
Function Description
Time Configuration
Date
Set the current date.
Time
Set the current time.
Daylight Saving Time Configuration
Daylight Saving Time
Specify whether to use daylight saving time (Enable / Disable).
If this function is enabled, set the time period (Start Time / End Time), and adjust the daylight
saving time in hours (Adjust Time).
3.8.3 Server Log
To quickly search the system logs you want by event type, click “Prev. Page” or “Next Page” to find the logs you
want, or check the event type(s) and click “Reload” to start searching.
To clear all system event logs, click “Clear All”.
Page 34
28
3.8.4 Online
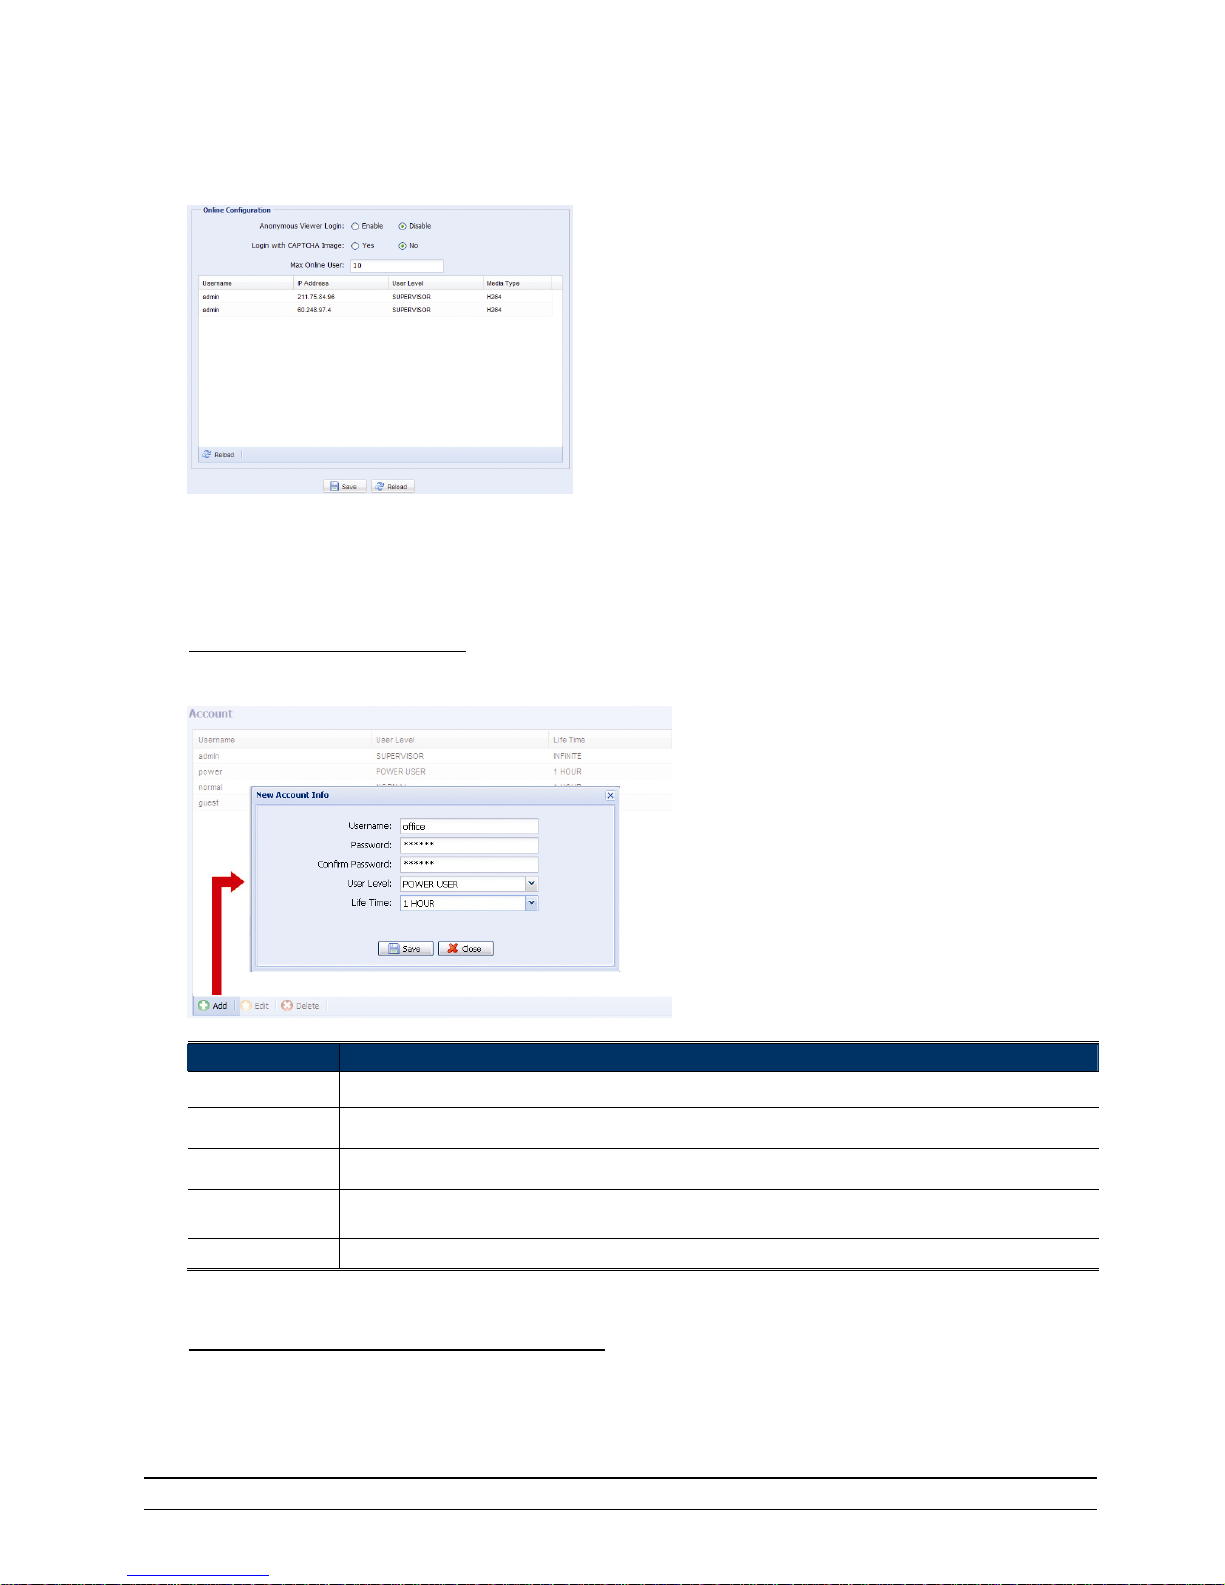
You can check the current online user(s) with respective online information. To refresh the list, click “Reload”.
To allow anonymous login, select “Enable” in “Anonymous Viewer Login”.
To disable image code verification at login, select “No” in “Login with CAPTCHA Image”.
3.8.5 Account
You can create a new account with different user access privilege, or delete or modify an existing account
setting.
How to create a new account
Step1: Click “New”, and fill in the following columns.
Column Description
User Name Set a user name that will be used for camera access. The user name allows up to 16 alphanumeric characters.
Password Set the password that will be used for remote login. The password allows up to 16 alphanumeric characters.
Confirm Password Enter the password again to confirm.
User Level Set the security level of an account to give the permission to control different functions. There are four user levels:
SUPERVISOR, POWER USER, NORMAL USER and GUEST.
Life Time Select how long this account is allowed to stay online (1 MIN / 5 MIN / 10 MIN / 1 HOUR / 1 DAY / INFINITE)
Step2: Then, click “Save” to save your setting and create a new account.
How to modify or delete an existing account
Step1: Select the account you want to modify or delete.
Step2: To modify the account, click “Edit” to change the settings, and click “Save”.
To remove the account, click “Delete”.
Note: It’s not allowed to remove an account when there’s only one account in the account list.
Page 35
29
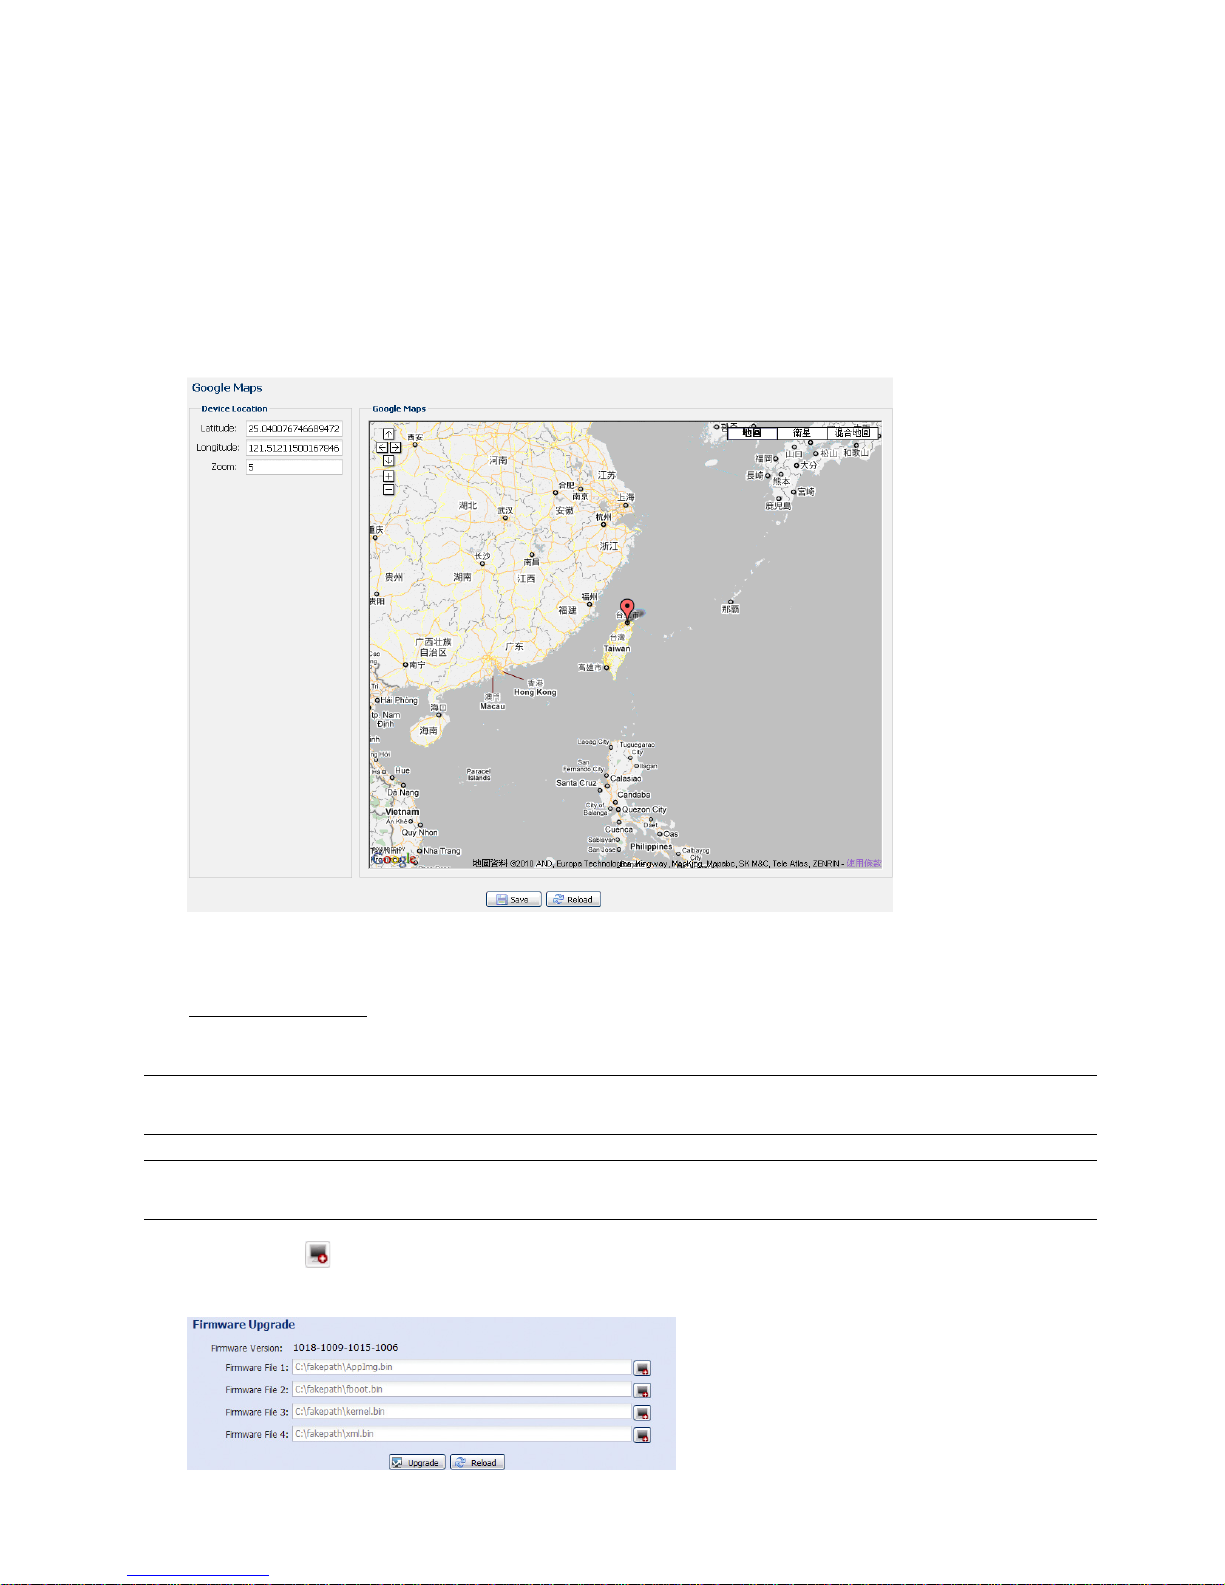
3.8.6 Google Maps
This function is used to let you know where the network camera is.
The system will prompt you to apply a Google Maps Key if your access is denied. Please follow the instructions
below when you’re denied:
Step1: Click “Sign up for a Google Maps key” to enter the application page.
Step2: Check the terms and conditions, and enter the IP address of the network camera. Then, click “Generate
API Key”.
Step3: Copy the generated API key, and click “Update Google Maps Key” on the web browser to paste it.
3.8.7 Maintenance
Firmware Upgrade
This function is used when users need to upgrade the camera for function scalability.
Note: Before using this function, make sure you have the correct upgrade files provided by your
installer or distributor.
Note: The event videos saved in the camera will be removed after firmware upgrade. Make sure you’ve
copied important events to your PC before firmware upgrade.
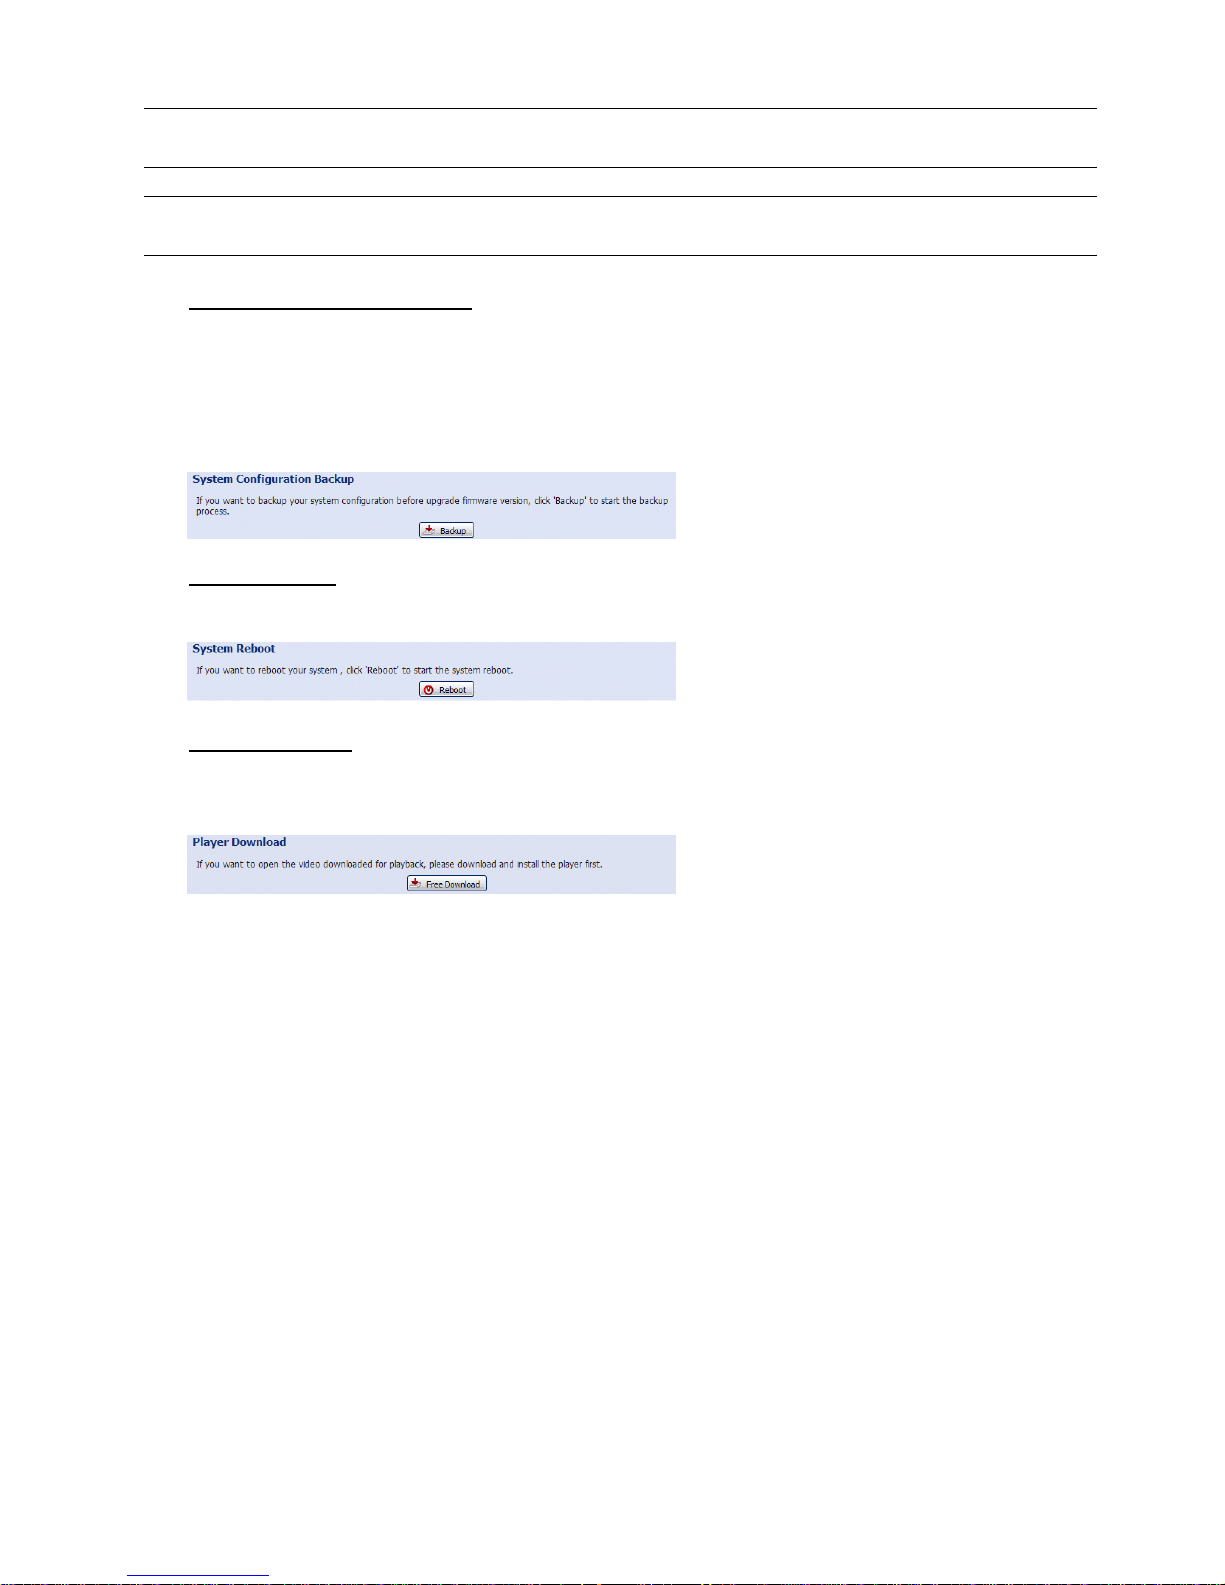
Step1: Select “ ” to browse to where you save the upgrade files, and select them one by one until all files are
selected (up to four files).
Page 36
30
Step2: Select “Upgrade” to start system upgrading.
Note: You’ll be prompted to keep current configurations. It’s recommended to keep them, or all
configurations will be restored to default values after upgrade.
Note: It takes a few minutes to finish the upgrade process. Do not disconnect the power during
firmware upgrade, or the upgrade may be failed. The camera will reboot after the upgrade.
System Configuration Backup
This function is used to copy your system configuration to a “System.bin” file.
You may import the same system configuration to another camera, or restore your system configuration when
the camera is reset to default values.
Select “System.bin” in “Firmware Upgrade”, and select “Upgrade” to import the system configuration.
System Reboot
Select “Reboot” to restart your camera if needed.
Player Download
To see the event video clips downloaded to your PC, you need to first install our own video player in your PC.
Select “Free Download” to download the video player, and double click the file to install it.
Page 37
31
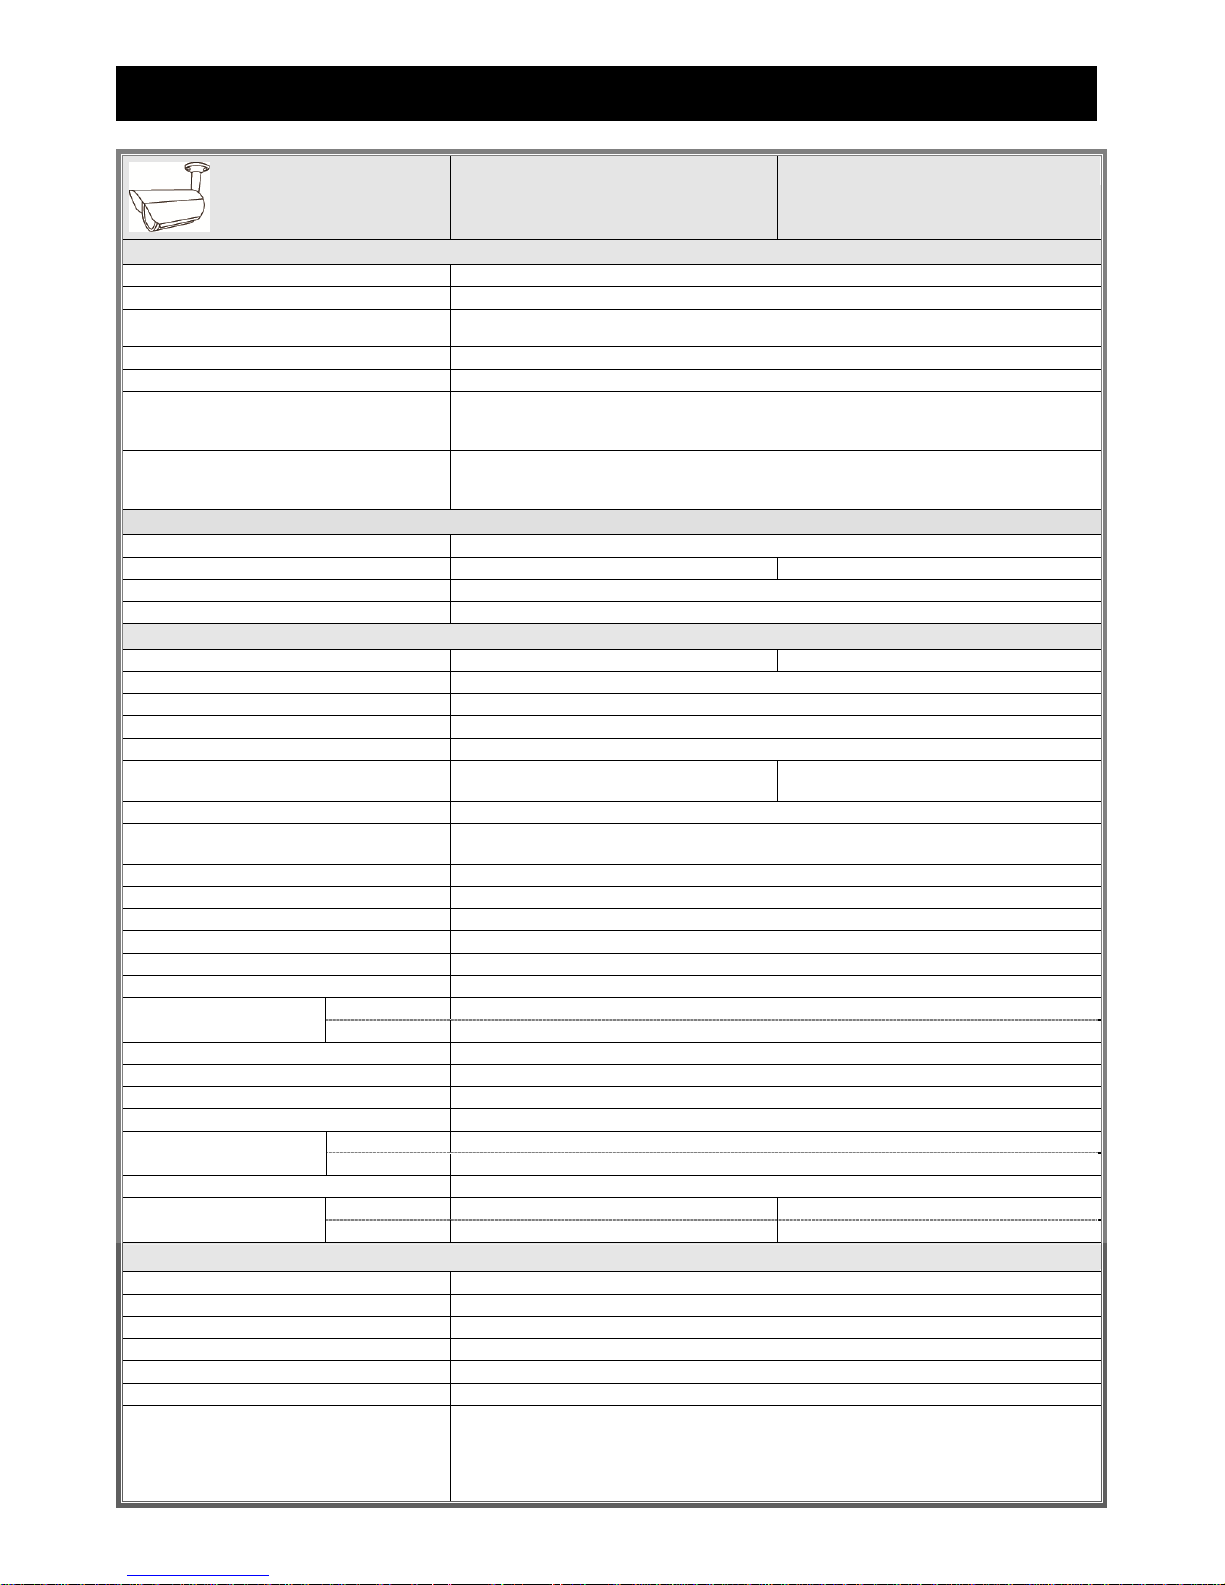
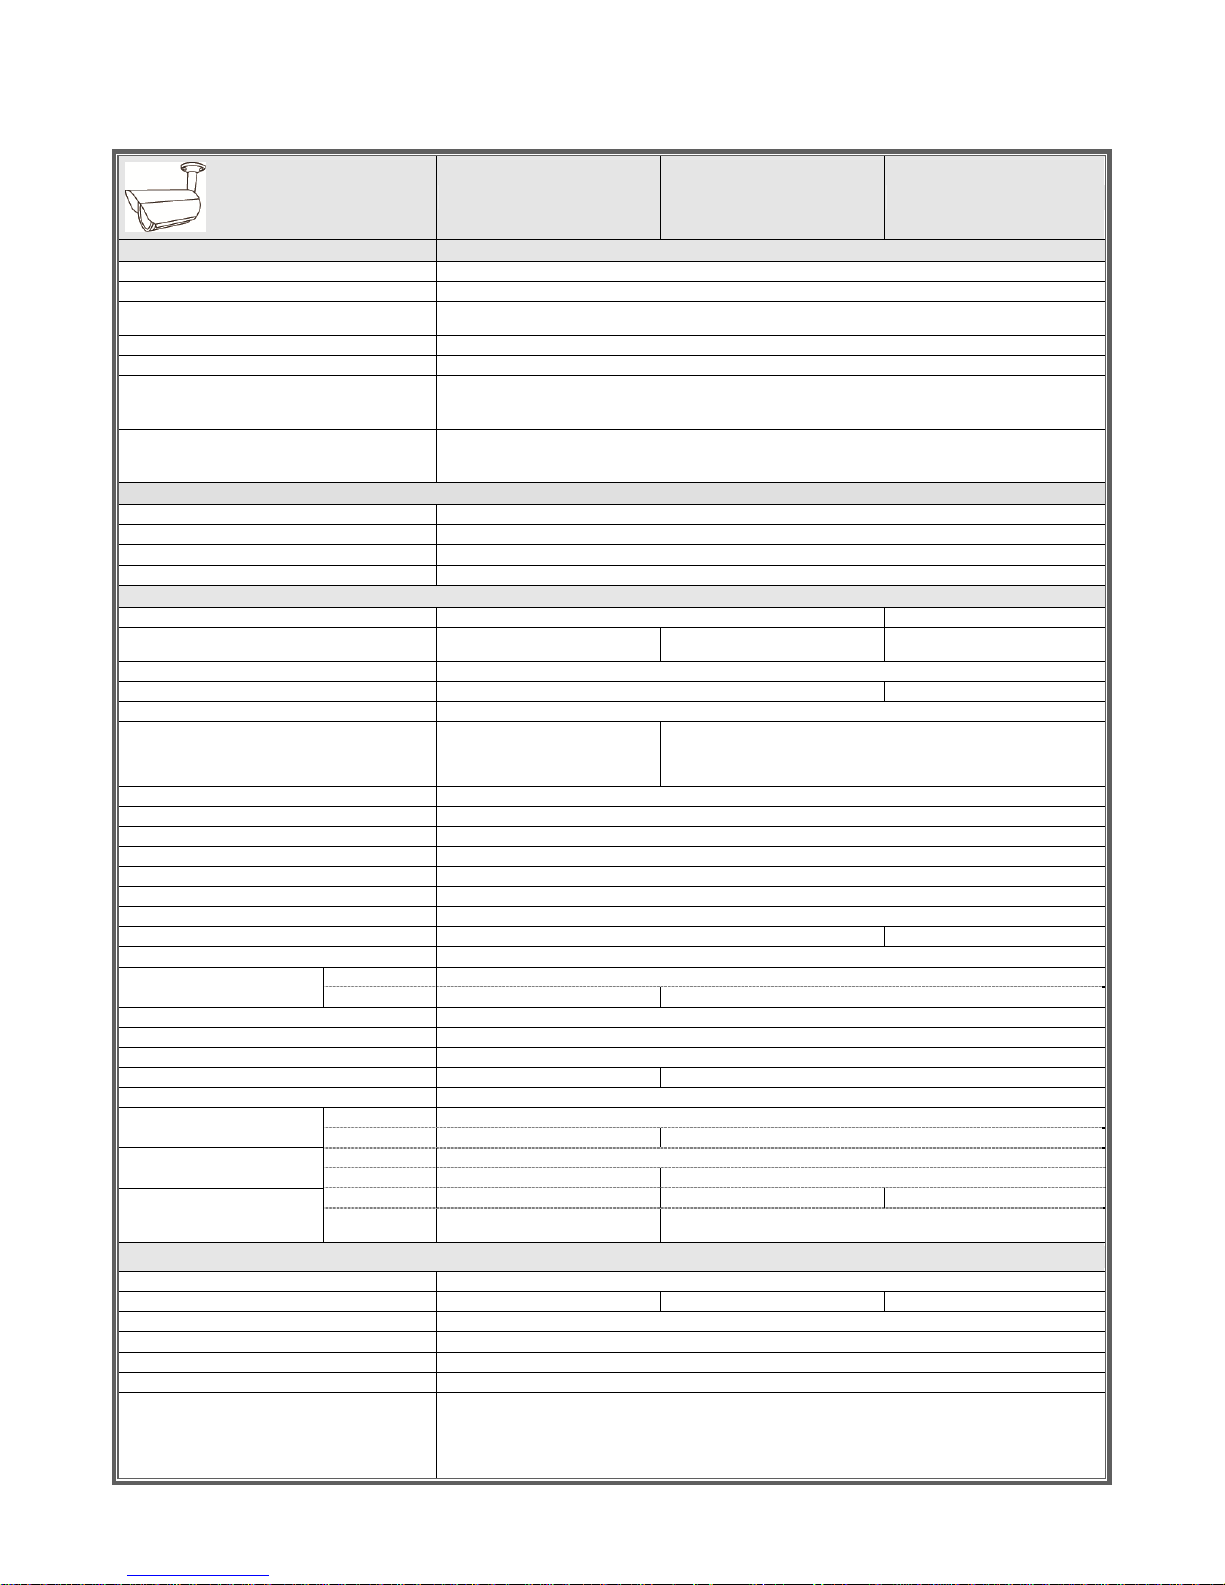
APPENDIX 1 PRODUCT SPECIFICATIONS
Model 1 Model 2
▓ Network
LAN Port YES
LAN Speed 10/100 Based-T Ethernet
Supported Protocols
DDNS, PPPoE, DHCP, NTP, SNTP, TCP/IP, ICMP, SMTP, FTP, HTTP, RTP, RTSP, RTCP,IPv4, Bonjour, UPnP,
DNS,UDP,IGMP, QoS, SNMP
Number of Online Users 10
ONVIF Compatible YES
Security
(1) Multiple user access levels with password
(2) IP address filtering
(3) Digest authentication
Remote Access
(1) Internet Explorer on Windows operating system
(2) 16CH Video Viewer on Windows & MAC operating system
(3) EagleEyes on iPhone, iPad & Android mobile devices
▓ Video
Video Compression H.264 / MPEG4 / MJPEG
Resolution 1920 x 1080 / 1280 x 720 / 640 x 480 / 320 x 240 1280 x 1024 / 1280 x 720 / 640 x 480 / 320 x 240
Frame Rate 30fps
Multiple Video Streaming 4 (H.264, MJPEG, MPEG4)
▓ General
Image Sensor 1/2.9" SONY CMOS image sensor 1/4" SONY CMOS image sensor
Min Illumination 1 Lux / F1.4, 0 Lux (LED ON)
S/N Ratio More than 48dB (AGC off)
Electronic Shutter 1/2 to 1/10,000 sec
Lens f2.8 ~ 12mm / F1.4 ~ F2.8
Viewing Angle
Wide: 109° (Horizontal) / 76° (Vertical) / 116° (Diagonal)
Tele: 24° (Horizontal) / 13.5° (Vertical) / 27° (Diagonal)
Wide: 66° (Horizontal) / 52° (Vertical) / 90° (Diagonal)
Tele: 16° (Horizontal) / 10° (Vertical) / 22° (Diagonal)
IR LED 2 Units
IR Effective Range **
Default : up to 25 meters
IR Enhanced Mode : up to 35 meters
IR Shift YES
IRIS Mode AES
White Balance ATW
AGC Auto
WDR NO
Privacy Mask NO
POE (Power-over-Ethernet) Without heater YES (IEEE 802.3af)
With heater YES (IEEE 802.3at)
External Alarm I/O YES (1 input / 1 output)
Micro SD Card Slot YES (up to 64GB)
Heater Optional
IP Rating IP66
Operating Temperature Without heater -25℃ ~ 50℃
With heater -40℃ ~ 50℃
Power Source (±10%) 12V / 1.5A
Power Consumption (±10%) Without heater PoE & PoN: 11.8W; DC Adapter: 9.5W (IR On) PoE & PoN: 13.8W; Adapter: 11W (IR On)
With heater PoE & PoN: 9.5W; Adapter: 16.6W (IR On) PoE & PoN: 18.6W; Adapter: 15.8W (IR On)
▓ Others
Mobile Surveillance iPad / iPhone / Android mobile device
Push Video NO
Event Notification FTP / Email / SMS
Digital Pan / Tilt / Zoom YES
Motion Detection YES
RTC (real-time clock) YES
Minimum Web Browsing Requirements
‧Intel core i3 or higher, or equivalent AMD
‧2GB RAM
‧AGP graphics card, Direct Draw, 32MB RAM
‧Windows 7, Vista & XP, DirectX 9.0 or later
‧Internet Explorer 7.x or later
* The specifications are subject to change without notice. ** Dimensional tolerance: ± 5mm
Page 38
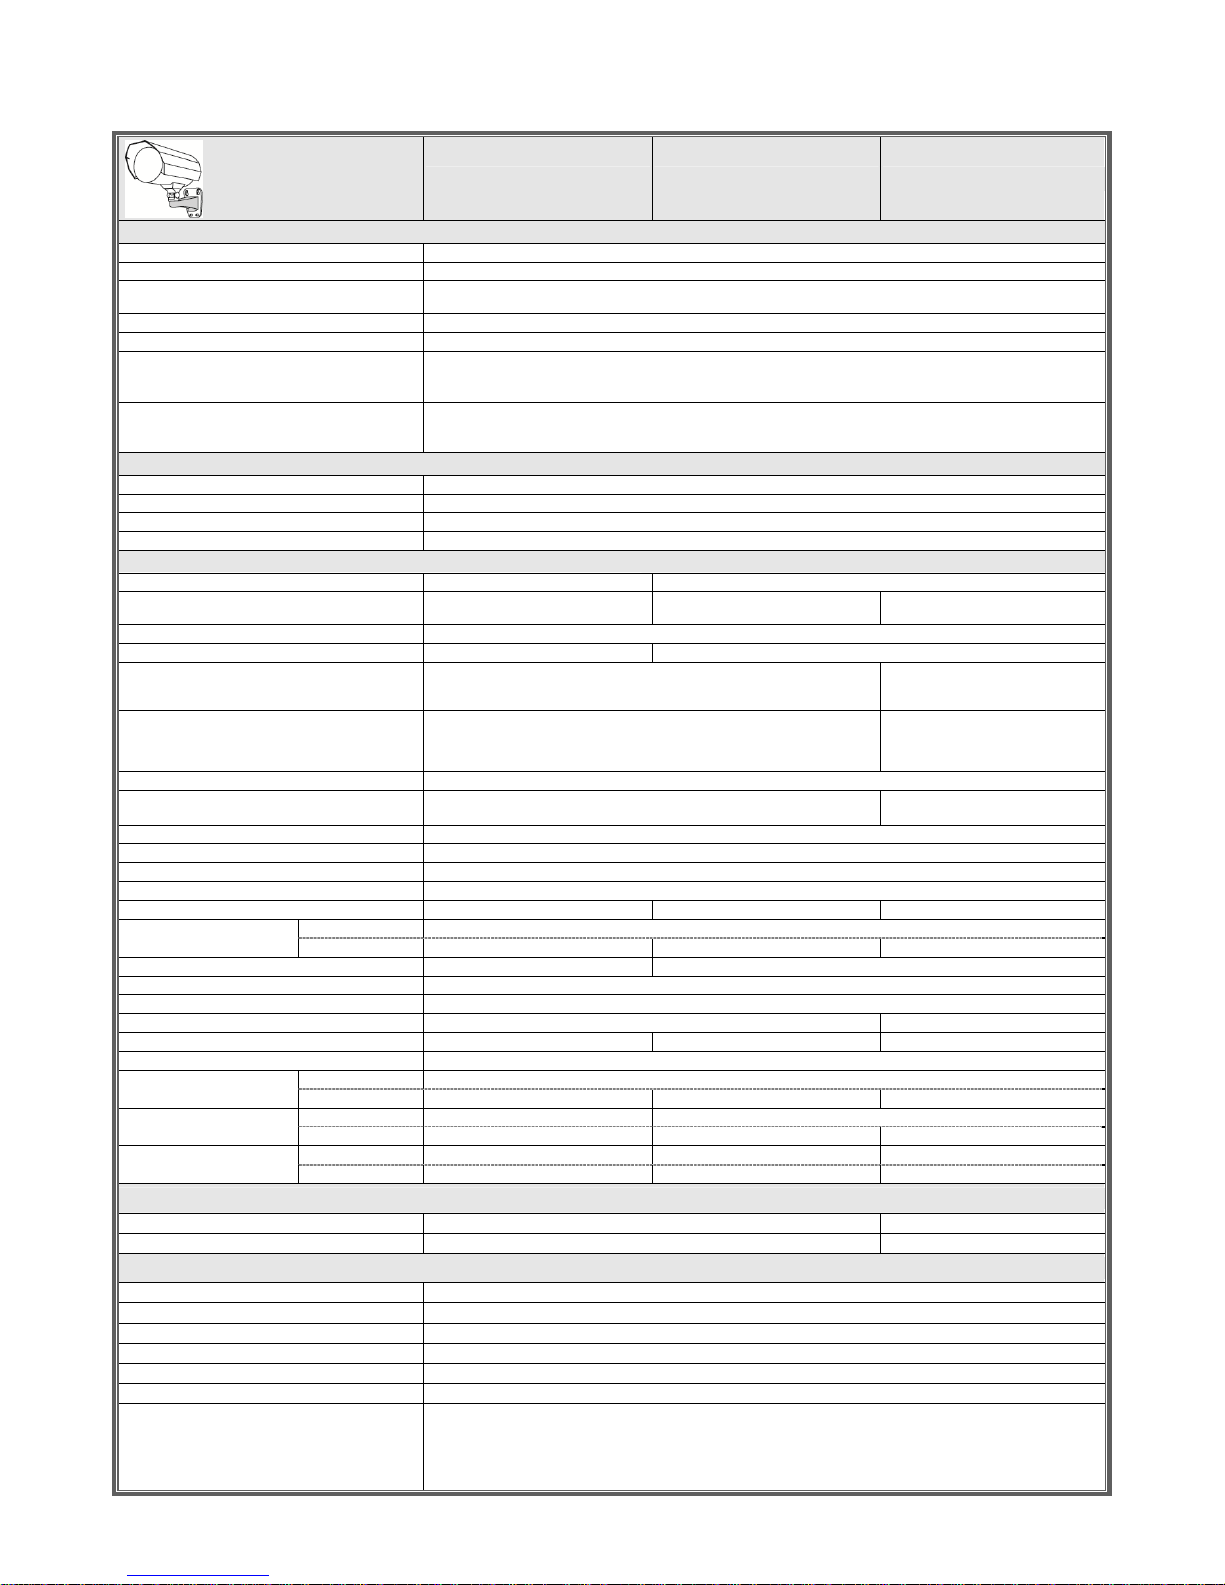
32
Model 3 Model 4 Model 5
▓ Network
LAN Port YES
LAN Speed 10/100 Based-T Ethernet
Supported Protocols
DDNS, PPPoE, DHCP, NTP, SNTP, TCP/IP, ICMP, SMTP, FTP, HTTP, RTP, RTSP, RTCP,IPv4, Bonjour, UPnP,
DNS,UDP,IGMP, QoS, SNMP
Number of Online Users 10
ONVIF Compatible YES (Profile S)
Security
(1) Multiple user access levels with password
(2) IP address filtering
(3) Digest authentication
Remote Access
(1) Internet Explorer on Windows operating system
(2) 16CH Video Viewer on Windows & MAC operating system
(3) EagleEyes on iPhone, iPad & Android mobile devices
▓ Video
Video Compression H.264 (Main Profile) / MJPEG
Resolution 1920 x 1080 / 1280 x 720 / 720 x 480 / 352 x 240
Frame Rate 30/25 fps
Multiple Video Streaming 4 (H.264, MJPEG)
▓ General
Image Sensor 1/2.8” CMOS image sensor
Min Illumination
0.1 Lux / F1.4(Wide)~F2.8(Tele), 0 Lux
(LED ON)
1 Lux / F1.4, 0 Lux (IR LED ON)
0.1 Lux / F1.4(Wide)~F2.8(Tele), 0 Lux
(IR LED ON)
S/N Ratio More than 48dB (AGC off)
Electronic Shutter 1/10,000 ~ 1/7.5 (Slow shutter) 1/7.5 to 1/8000 sec
Lens f2.8 ~ 12mm / F1.4 ~ F2.8
Viewing Angle
Wide: 97.4° (Horizontal) / 58.1°
(Vertical) / 111.7° (Diagonal)
Tele: 27.1° (Horizontal) / 15.2° (Vertical)
/ 31.1°(Diagonal)
Wide: 103° (Horizontal) / 54° (Vertical) / 122° (Diagonal)
Tele: 31° (Horizontal) / 17° (Vertical) / 36°(Diagonal)
IR LED 2 Units
IR Effective Range** Default : up to 25 meters / IR Enhanced Mode : up to 35 meters
IR Shift YES
Smart Light Control YES
IRIS Mode AES
White Balance ATW
AGC Auto
WDR YES DWDR
Privacy Mask YES
POE (Power-over-Ethernet) Without heater YES (IEEE 802.3af)
With heater YES (IEEE 802.3at) --
External Alarm I/O YES (1 input / 1 output)
MicroSD Card Slot YES (up to 64GB)
Privacy Mask YES
Heater Optional --
IP Rating IP66
Operating Temperature Without heater -25℃ ~ 50℃
With heater -40℃~ 50℃ --
Power Source (±10%) Without heater 12V / 1A
With heater 12V / 2A --
Power Consumption (±10%) Without heater PoE & PoN: 10.5W; DC Adapter: 8.4W PoE & PoN: 10.5W; DC Adapter: 8.4W PoE & PoN: 9W; DC Adapter: 7.23W
With heater
PoE & PoN: 23.5W (PoE & PoN);
DC Adapter: 20W
--
▓ Others
Mobile Surveillance iOS & Android
Push Video NO YES NO
Event Notification FTP / Email / SMS
Digital Pan / Tilt / Zoom YES
Motion Detection YES
RTC (real-time clock) YES
Minimum Web Browsing Requirements
‧Intel core i3 or higher, or equivalent AMD
‧2GB RAM
‧AGP graphics card, Direct Draw, 32MB RAM
‧Windows 7, Vista & XP, DirectX 9.0 or later
‧Internet Explorer 7.x or later
*The specifications are subject to change without notice **Using IR enhanced mode and slow shutter speed, the distance can be extended even longer.
Page 39
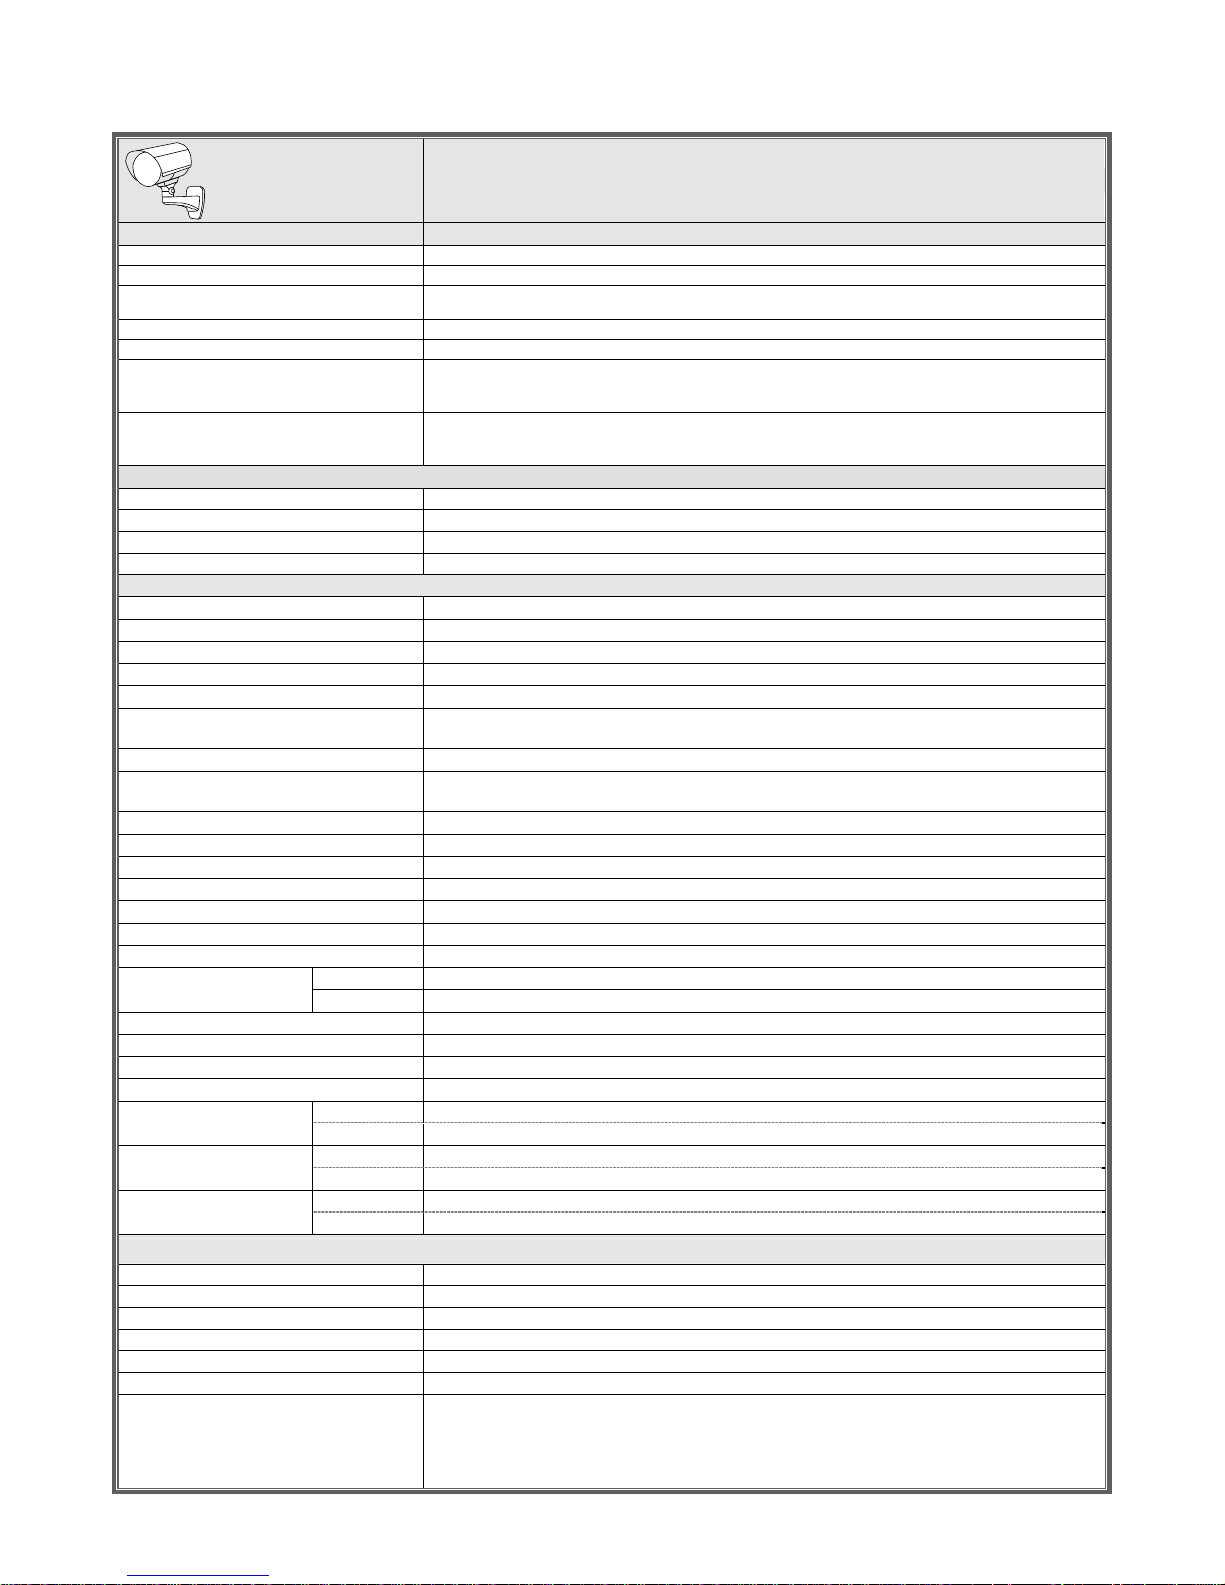
33
Model 6 Model 7 Model 8
▓ Network
LAN Port YES
LAN Speed 10/100 Based-T Ethernet
Supported Protocols
DDNS, PPPoE, DHCP, NTP, SNTP, TCP/IP, ICMP, SMTP, FTP, HTTP, RTP, RTSP, RTCP,IPv4, Bonjour, UPnP,
DNS,UDP,IGMP, QoS
Number of Online Users 10
ONVIF Compatible YES (Profile S)
Security
(1) Multiple user access levels with password
(2) IP address filtering
(3) Digest authentication
Remote Access
(1) Internet Explorer on Windows operating system
(2) 16CH Video Viewer on Windows & MAC operating system
(3) EagleEyes on iPhone, iPad & Android mobile devices
▓ Video
Video Compression H.264 (Main Profile) / MJPEG
Resolution 1920 x 1080 / 1280 x 720 / 720 x 480 / 352 x 240
Frame Rate 30fps
Multiple Video Streaming 4 (H.264, MJPEG)
▓ General
Image Sensor 1/2.9" SONY CMOS image sensor 1/2.8" SONY CMOS image sensor
Min Illumination 1 Lux / F2.0, 0 Lux (LED ON)
0.1 Lux / F2.0 (wide)~F2.8(Tele),
0 Lux (LED ON)
0.1 Lux / F1.8(Wide)~F3.2(Tele), 0 Lux
(IR LED ON)
S/N Ratio More than 48dB (AGC off)
Electronic Shutter 1/7.5 to 1/8000 sec 1/10,000 ~ 1/7.5 (Slow shutter)
Lens
f6.0 ~ 60mm / F2.0 ~ 2.8
10X Optical Zoom, Auto Focus,
Near focus limit 10cm (wide) or 80cm (tele) to infinity
f5.0~50mm / F1.8 ~ 3.2
10x Optical Zoom, auto focus
Viewing Angle
1X: 47.3° (Horizontal) x 27.5° (Vertical) x 53.5° (Diagonal)
10X: 5.3° (Horizontal) x 3.0° (Vertical) x 6.1° (Diagonal)
1X: 58.8° (Horizontal) x 34.2° (Vertical)
x 66° (Diagonal)
10X: 6.35° (Horizontal) x 3.6° (Vertical)
x 7.25° (Diagonal)
IR LED YES
IR Effective Range**
Default mode: up to 40 meters
IR enhanced mode: up to 60 meters
Default mode: up to 50 meters
IR enhanced mode: up to 70 meters
IR Shift YES
Smart Light Control YES
White Balance ATW
AGC Auto
IRIS Mode YES (Two stage) AES AI mode/Iris Priority mode
POE Without heater YES (IEEE 802.3af)
With heater -- YES (IEEE 802.3at) --
WDR -- YES
Privacy Mask NO
External Alarm I/O YES (1 input / 1 output)
MicroSD Card Slot NO YES (up to 64GB)
Heater NO Optional NO
IP Rating IP67
Operating Temperature Without heater -25℃ ~ 50℃
With heater -40℃ ~ 50℃ --
Power Source (±10%) Without heater 12V / 1A 12V / 1.5A
With heater -- 12V / 2A --
Power Consumption Without heater DC Adapter: 9W (Max) DC Adapter: 9W (Max) PoE & PoN: 15.3W; DC Adapter: 13W
With heater -- PoE & PoN: 28.5W; DC Adapter: 24W
▓ Audio
Line in NO YES
Line out NO YES
▓ Others
Mobile Surveillance iPad / iPhone / Android mobile device
Push Video NO
Event Notification FTP / Email / SMS
Digital Pan / Tilt / Zoom YES
Motion Detection YES
RTC (real-time clock) YES
Minimum Web Browsing Requirements
‧Intel core i3 or higher, or equivalent AMD
2 ‧ GB RAM
AGP graphics card, Direct Draw, 32MB RAM‧
Windows ‧ 7, Vista & XP, DirectX 9.0 or later
Internet Explorer ‧ 7.x or later
* The specifications are subject to change without notice. ** Dimensional tolerance: ± 5mm
Page 40
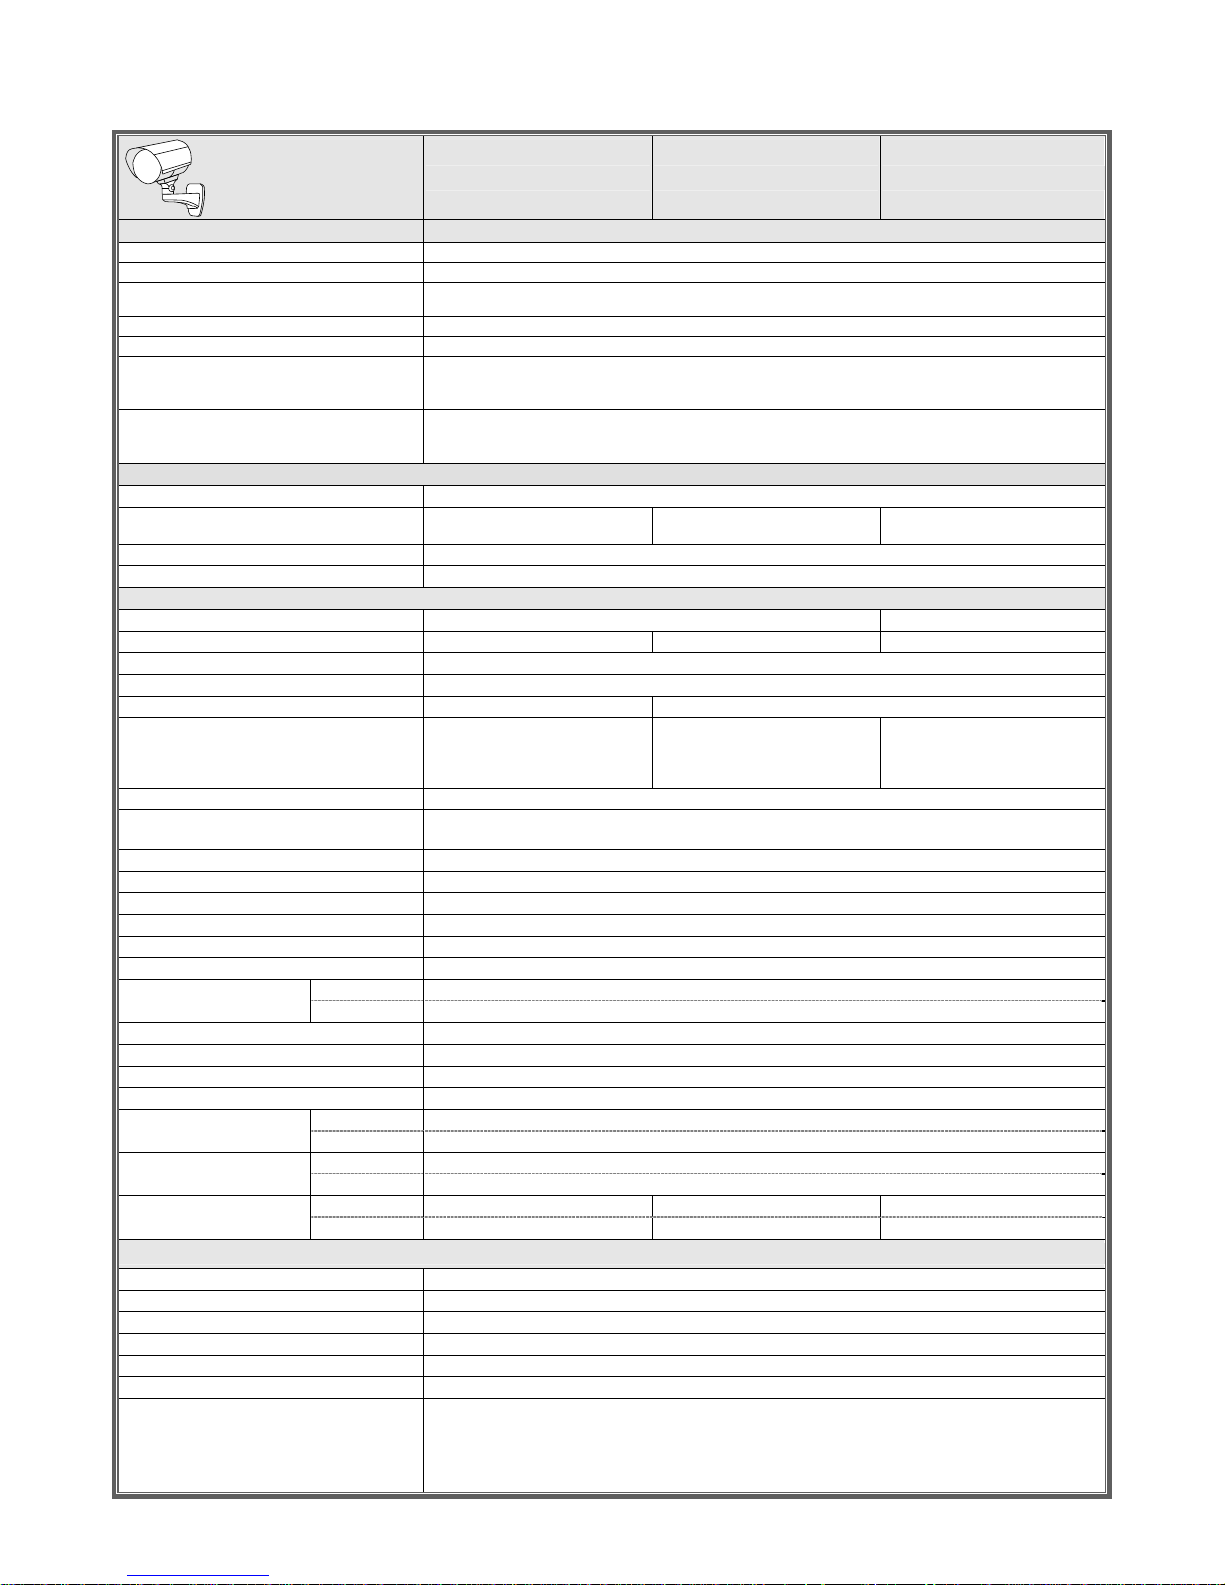
34
Model 9
▓ Network
LAN Port YES
LAN Speed 10/100 Based-T Ethernet
Supported Protocols
DDNS, PPPoE, DHCP, NTP, SNTP, TCP/IP, ICMP, SMTP, FTP, HTTP, RTP, RTSP, RTCP,IPv4, Bonjour, UPnP,
DNS,UDP,IGMP, QoS
Number of Online Users 10
ONVIF Compatible YES (Profile S)
Security
(1) Multiple user access levels with password
(2) IP address filtering
(3) Digest authentication
Remote Access
(1) Internet Explorer on Windows operating system
(2) 16CH Video Viewer on Windows & MAC operating system
(3) EagleEyes on iPhone, iPad & Android mobile devices
▓ Video
Video Compression H.264 / MJPEG
Resolution 1920 x 1080 / 1280 x 720 / 720 x 480 / 352 x 240
Frame Rate 30fps
Multiple Video Streaming 4 (H.264, MJPEG)
▓ General
Image Sensor 1/2.8” CMOS image sensor
Min Illumination 0.1 Lux / F1.4(Wide)~F2.8(Tele), 0 Lux (IR LED ON)
S/N Ratio More than 48dB (AGC off)
Electronic Shutter 1/10,000 ~ 1/7.5 (Slow shutter)
Lens f2.8 ~ 12mm / F1.4 ~ F2.8
Viewing Angle
Wide: 103° (Horizontal) / 54° (Vertical) / 122° (Diagonal)
Tele: 31° (Horizontal) / 17° (Vertical) / 36°(Diagonal)
IR LED 2 Units
IR Effective Range**
Default : up to 25 meters
IR Enhanced Mode : up to 35 meters
IR Shift YES
Smart Light Control YES
IRIS Mode AES
White Balance ATW
AGC Auto
WDR YES
Privacy Mask YES
POE (Power-over-Ethernet) Without heater YES (IEEE 802.3af)
With heater YES (IEEE 802.3at)
External Alarm I/O YES (1 input / 1 output)
MicroSD Card Slot YES (up to 64GB)
Heater Optional
IP Rating IP66
Operating Temperature Without heater -25℃ ~ 50℃
With heater -40℃ ~ 50℃
Power Source (±10%) Without heater 12V / 1A
With heater 12V / 2A
Power Consumption (±10%) Without heater PoE & PoN: 10.5W; DC Adapter: 8.4W
With heater PoE & PoN: 23.5W; DC Adapter: 20W
▓ Others
Mobile Surveillance iOS & Android
Push Video NO
Event Notification FTP / Email / SMS
Digital Pan / Tilt / Zoom YES
Motion Detection YES
RTC (real-time clock) YES
Minimum Web Browsing Requirements
‧Intel core i3 or higher, or equivalent AMD
‧2GB RAM
‧AGP graphics card, Direct Draw, 32MB RAM
‧Windows 7, Vista & XP, DirectX 9.0 or later
‧Internet Explorer 7.x or later
*The specifications are subject to change without notice **Using IR enhanced mode and slow shutter speed, the distance can be extended even longer.
Page 41
35
Model 10 Model 11 Model 12
▓ Network
LAN Port YES
LAN Speed 10/100 Based-T Ethernet
Supported Protocols
DDNS, PPPoE, DHCP, NTP, SNTP, TCP/IP, ICMP, SMTP, FTP, HTTP, RTP, RTSP, RTCP,IPv4, Bonjour, UPnP,
DNS,UDP,IGMP, QoS
Number of Online Users 10
ONVIF Compatible YES (Profile S)
Security
(1) Multiple user access levels with password
(2) IP address filtering
(3) Digest authentication
Remote Access
(1) Internet Explorer on Windows operating system
(2) 16CH Video Viewer on Windows & MAC operating system
(3) EagleEyes on iPhone, iPad & Android mobile devices
▓ Video
Video Compression H.264 / MPEG4 / MJPEG
Resolution
1920 x 1080 / 1280 x 720 / 720 x 480 /
352 x 240
1920 x 1080 / 1280 x 720 / 640 x 480 /
320 x 240
1280 x 1024 / 1280 x 720 / 640 x 480 /
320 x 240
Frame Rate 30fps
Multiple Video Streaming 4 (H.264, MJPEG, MPEG4)
▓ General
Image Sensor 1/2.9" CMOS image sensor 1/ 3" SONY CMOS image sensor
Min Illumination 1 Lux / F1.4, 0 Lux (IR LED ON) 0.1 Lux / F1.5, 0 Lux (IR LED ON) 1 Lux / F1.5, 0 Lux (IR LED ON)
S/N Ratio More than 48dB (AGC off)
Electronic Shutter 1/2 to 1/10,000 sec
Lens f2.8 ~ 12mm / F1.4 ~ F2.8 f3.8mm / F1.5
Viewing Angle
Wide: 109° (Horizontal) / 76° (Vertical) /
116° (Diagonal)
Tele: 24° (Horizontal) / 13.5° (Vertical) /
27°(Diagonal)
73.2° (Horizontal) / 42.8° (Vertical) /
83.2° (Diagonal)
65.4° (Horizontal) / 49.9° (Vertical) /
80.4° (Diagonal)
IR LED 2 Units
IR Effective Range**
Default : up to 25 meters
IR Enhanced Mode : up to 35 meters
IR Shift YES
Smart Light Control NO
IRIS Mode AES
White Balance ATW
AGC Auto
WDR NO
POE (Power-over-Ethernet) Without heater YES (IEEE 802.3af)
With heater YES (IEEE 802.3at)
External Alarm I/O YES (1 input / 1 output)
MicroSD Card Slot YES (up to 64GB)
Heater Optional
IP Rating IP66
Operating Temperature Without heater -25℃ ~ 50℃
With heater -40℃ ~ 50℃
Power Source (±10%) Without heater 12V / 1A
With heater 12V / 2A
Power Consumption (±10%) Without heater PoE & PoN: 12.5W; DC Adapter: 10.25W PoE & PoN: 10W; DC Adapter: 8.5W PoE & PoN: 9.74W; DC Adapter: 8.28W
With heater PoE & PoN: 25W; DC Adapter: 21.1W PoE & PoN: 20.73W; DC Adapter: 17.62W PoE & PoN: 20.5W; DC Adapter: 17.42W
▓ Others
Mobile Surveillance iOS & Android
Push Video NO
Event Notification FTP / Email / SMS
Digital Pan / Tilt / Zoom YES
Motion Detection YES
RTC (real-time clock) YES
Minimum Web Browsing Requirements
‧Intel core i3 or higher, or equivalent AMD
‧2GB RAM
‧AGP graphics card, Direct Draw, 32MB RAM
‧Windows 7, Vista & XP, DirectX 9.0 or later
‧Internet Explorer 7.x or later
*The specifications are subject to change without notice **Using IR enhanced mode and slow shutter speed, the distance can be extended even longer.
Page 42
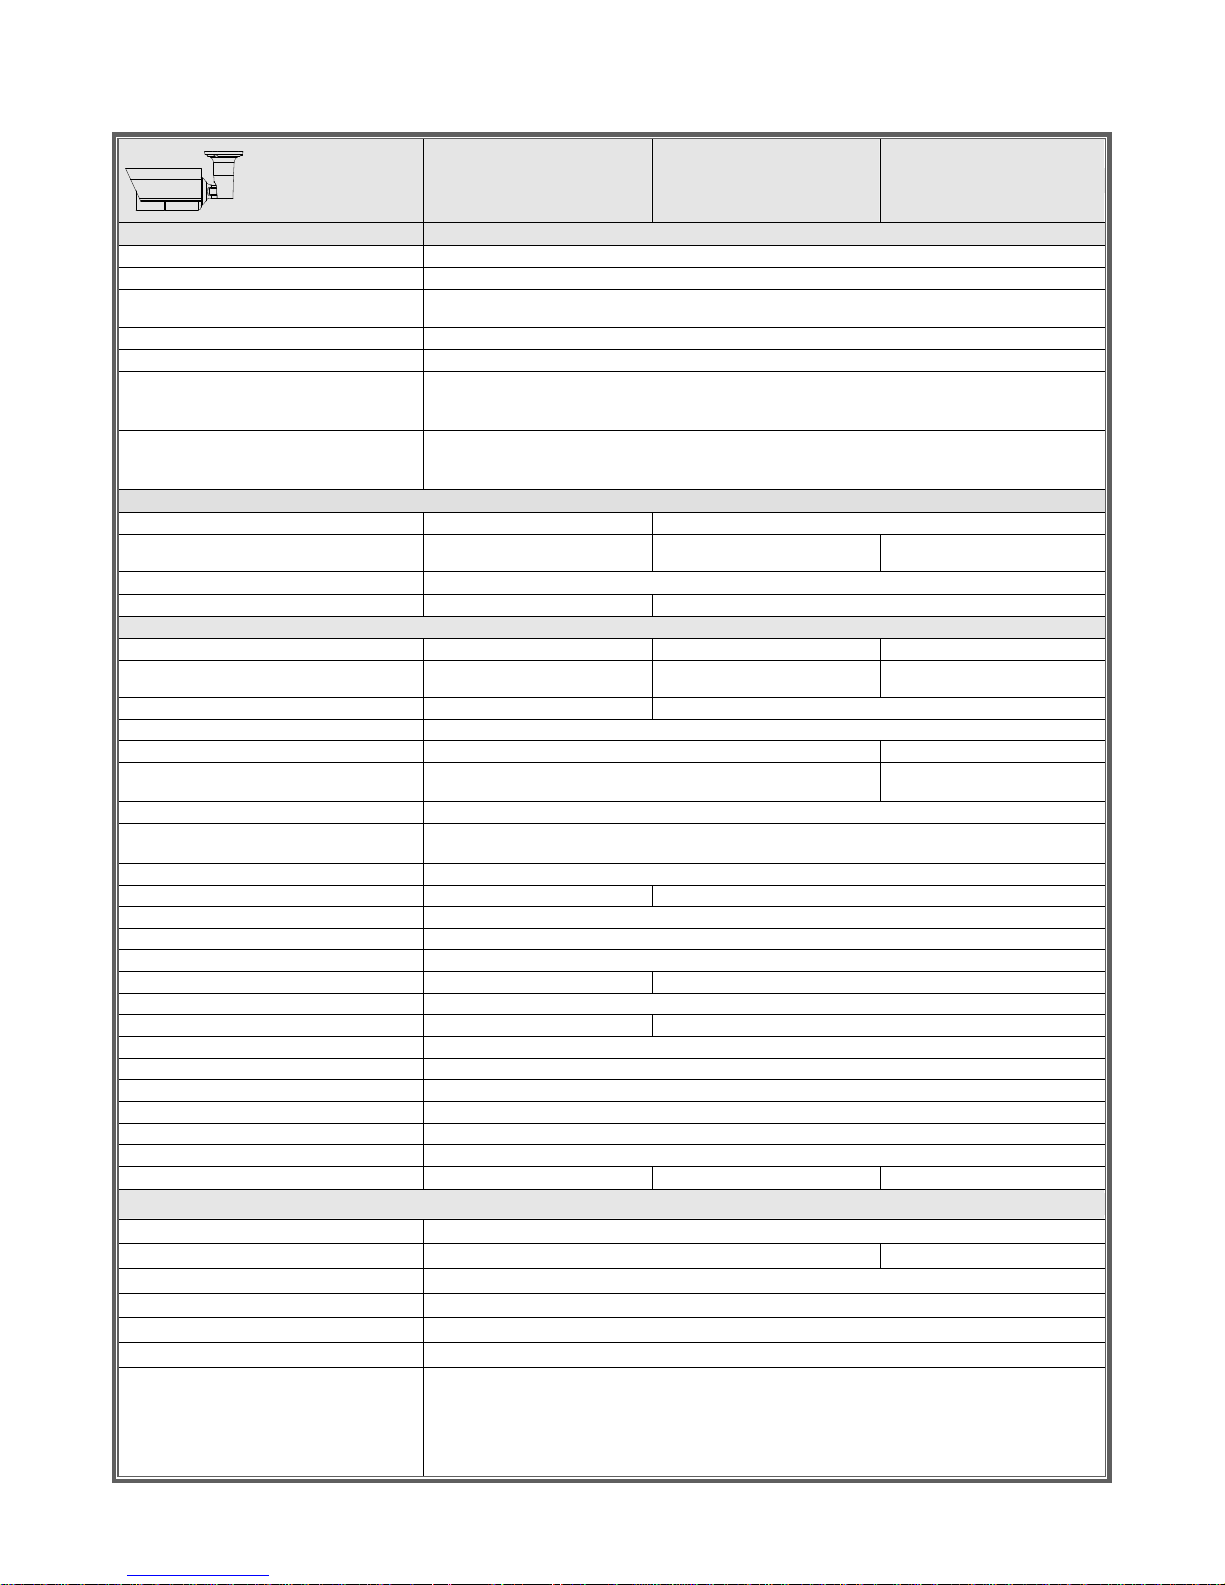
36
Model 13 Model 14 Model 15
▓ Network
LAN Port YES
LAN Speed 10/100 Based-T Ethernet
Supported Protocols
DDNS, PPPoE, DHCP, NTP, SNTP, TCP/IP, ICMP, SMTP, FTP, HTTP, RTP, RTSP, RTCP,IPv4, Bonjour, UPnP,
DNS,UDP,IGMP, QoS
Number of Online Users 10
ONVIF Compatible YES (Profile S)
Security
(1) Multiple user access levels with password
(2) IP address filtering
(3) Digest authentication
Remote Access
(1) Internet Explorer on Windows operating system
(2) 16CH Video Viewer on Windows & MAC operating system
(3) EagleEyes on iPhone, iPad & Android mobile devices
▓ Video
Video Compression H.264 (Main Profile) / MJPEG H.264 / MPEG4 / MJPEG
Resolution
1920 x 1080 / 1280 x 720 / 720 x 480 /
352 x 288
1920 x 1080 / 1280 x 720 / 640 x 480 /
320 x 240
1280 x 1024 / 1280 x 720 / 640 x 480 /
320 x 240
Frame Rate 30fps
Multiple Video Streaming 4 (H.264, MJPEG) 4 (H.264, MJPEG, MPEG4)
▓ General
Image Sensor 1/2.8" SONY CMOS image sensor 1/2.9" SONY CMOS image sensor 1/ 3" SONY CMOS image sensor
Min Illumination
0.1 Lux / F1.4(Wide)~F2.8(Tele), 0 Lux
(IR LED ON) 1 Lux / F1.4, 0 Lux (IR LED ON) 1 Lux / F1.5, 0 Lux (IR LED ON)
Shutter Speed 1/10,000 ~ 1/7.5 (Slow shutter) 1/2 to 1/10,000 sec
S/N Ratio More than 48dB (AGC off)
Lens f2.8 ~ 12mm / F1.4 ~ F2.8 f3.8mm / F1.5
Viewing Angle
Wide: 103° (Horizontal) / 54° (Vertical) / 122° (Diagonal)
Tele: 31° (Horizontal) / 17° (Vertical) / 36°(Diagonal)
65.4° (Horizontal) / 49.9° (Vertical) /
80.4° (Diagonal)
IR LED 2 units
IR Effective Distance**
Default : up to 25 meters
IR Enhanced Mode : up to 35 meters
IR Shift YES
Smart Light Control YES NO
White Balance ATW
AGC Auto
IRIS Mode AES
WDR YES NO
POE YES (IEEE 802.3af)
Privacy Mask YES NO
External Alarm I/O YES (1 input / 1 output)
MicroSD Card Slot YES (up to 64GB)
Heater NO
IP Rating IP66
Operating Temperature -25℃ ~ 50℃
Power Source (±10%) DC12V / 1A
Power Consumption (±10%) PoE & PoN: 10.5W ; DC Adapter: 8.4W PoE & PoN: 12.5W; DC Adapter: 10.25W PoE & PoN: 9.74W; DC Adapter: 8.28W
▓ Others
Mobile Surveillance iOS & Android mobile devices
Push Video NO YES
Event Notification FTP / Email / SMS
Digital Pan / Tilt / Zoom YES
Motion Detection YES
RTC (real-time clock) YES
Minimum Web Browsing Requirements
‧Intel core i3 or higher, or equivalent AMD
‧2GB RAM
‧AGP graphics card, Direct Draw, 32MB RAM
‧Windows 7, Vista & XP, DirectX 9.0 or later
‧Internet Explorer 7.x or later
*The specifications are subject to change without notice. **By using IR enhanced mode and slow shutter speed, the distance can be extended even longer.
Page 43
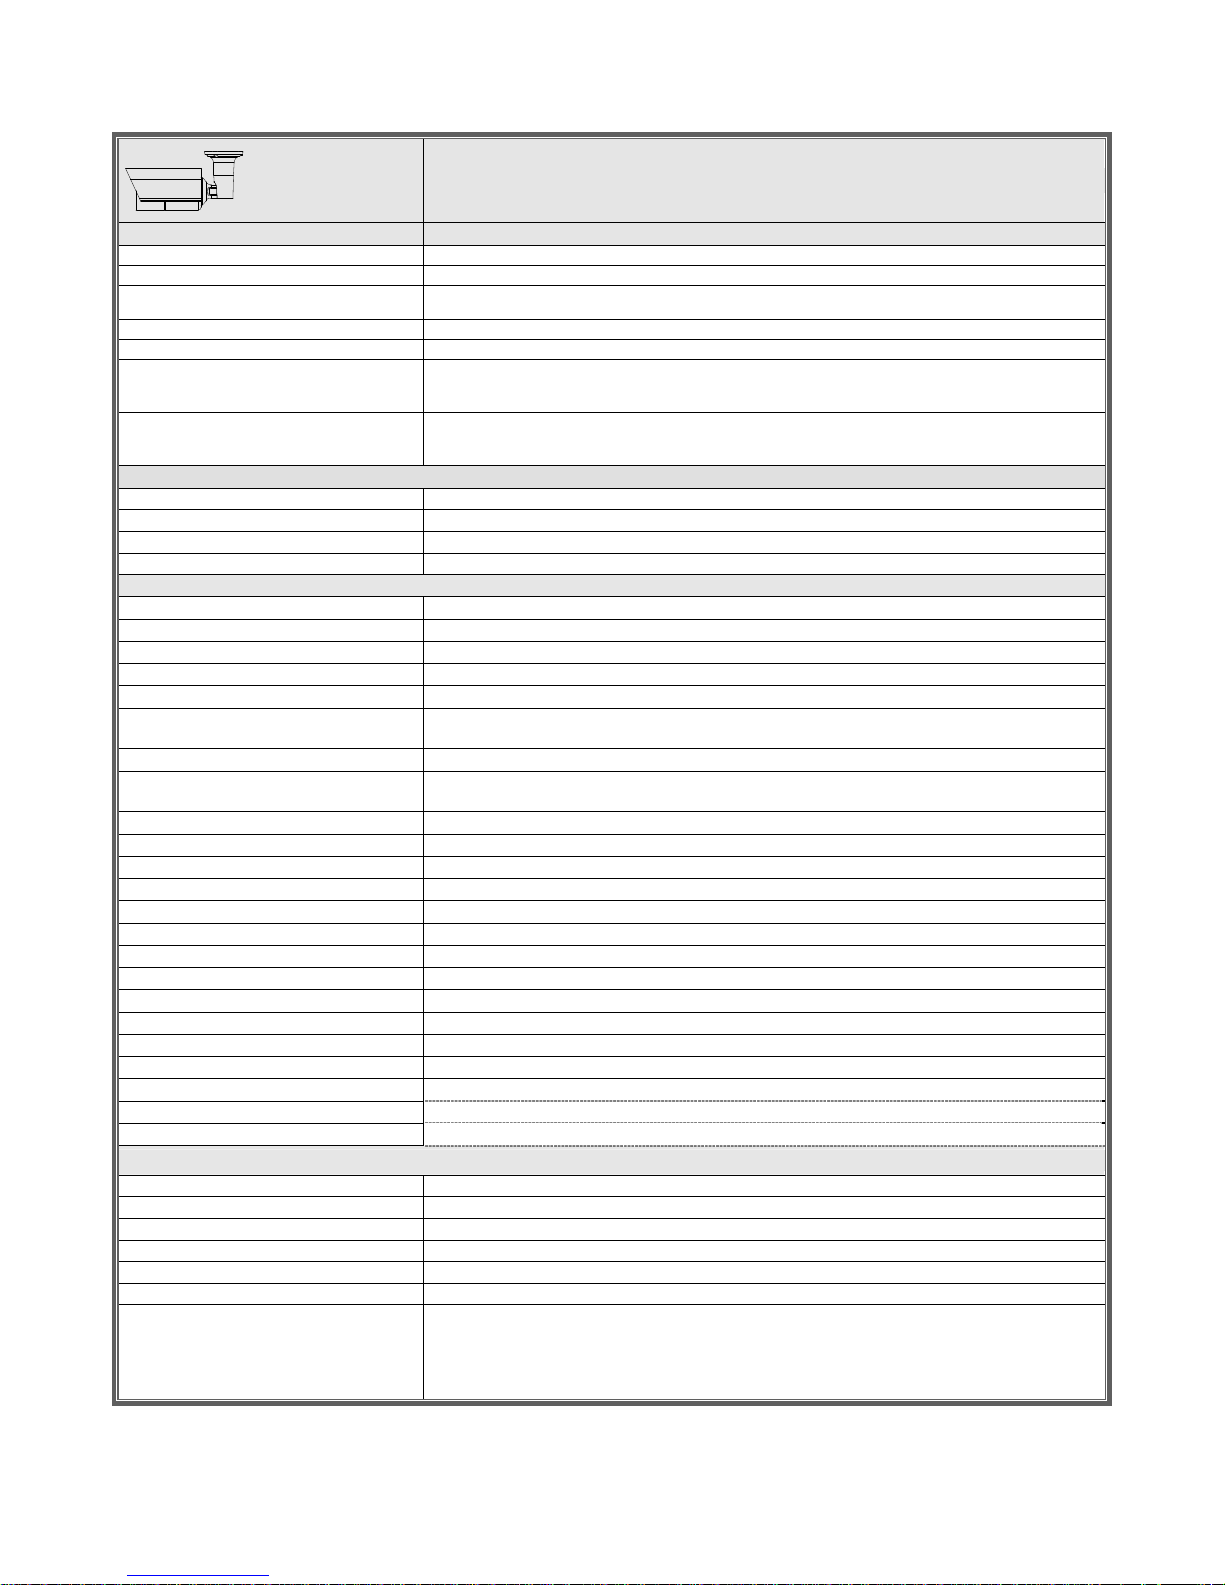
37
Model 16
▓ Network
LAN Port YES
LAN Speed 10/100 Based-T Ethernet
Supported Protocols
DDNS, PPPoE, DHCP, NTP, SNTP, TCP/IP, ICMP, SMTP, FTP, HTTP, RTP, RTSP, RTCP,IPv4, Bonjour, UPnP,
DNS,UDP,IGMP, QoS
Number of Online Users 10
ONVIF Compatible YES (Profile S)
Security
(1) Multiple user access levels with password
(2) IP address filtering
(3) Digest authentication
Remote Access
(1) Internet Explorer on Windows operating system
(2) 16CH Video Viewer on Windows & MAC operating system
(3) EagleEyes on iPhone, iPad & Android mobile devices
▓ Video
Video Compression H.264 / MJPEG
Resolution 1920 x 1080 / 1280 x 720 / 720 x 480 / 352 x 240
Frame Rate 30fps
Multiple Video Streaming 4 (H.264, MJPEG)
▓ General
Image Sensor 1/2.8” CMOS image sensor
Min Illumination 0.1 Lux / F1.4(Wide)~F2.8(Tele), 0 Lux (IR LED ON)
S/N Ratio More than 48dB (AGC off)
Electronic Shutter 1/10,000 ~ 1/7.5 (Slow shutter)
Lens f2.8 ~ 12mm / F1.4 ~ F2.8
Viewing Angle
Wide: 103° (Horizontal) / 54° (Vertical) / 122° (Diagonal)
Tele: 31° (Horizontal) / 17° (Vertical) / 36°(Diagonal)
IR LED 2 Units
IR Effective Range**
Default : up to 25 meters
IR Enhanced Mode : up to 35 meters
IR Shift YES
Smart Light Control YES
IRIS Mode AES
White Balance ATW
AGC Auto
WDR YES
Privacy Mask YES
POE (Power-over-Ethernet) YES (IEEE 802.3af)
External Alarm I/O YES (1 input / 1 output)
MicroSD Card Slot YES (up to 64GB)
Heater NO
IP Rating IP66
Operating Temperature -25℃ ~ 50℃
Power Source (±10%) 12V / 1A
Power Consumption (±10%) PoE & PoN: 10.85W; DC Adapter: 9.5W
▓ Others
Mobile Surveillance iOS & Android
Push Video NO
Event Notification FTP / Email / SMS
Digital Pan / Tilt / Zoom YES
Motion Detection YES
RTC (real-time clock) YES
Minimum Web Browsing Requirements
‧Intel core i3 or higher, or equivalent AMD
‧2GB RAM
‧AGP graphics card, Direct Draw, 32MB RAM
‧Windows 7, Vista & XP, DirectX 9.0 or later
‧Internet Explorer 7.x or later
*The specifications are subject to change without notice **Using IR enhanced mode and slow shutter speed, the distance can be extended even longer.
Page 44
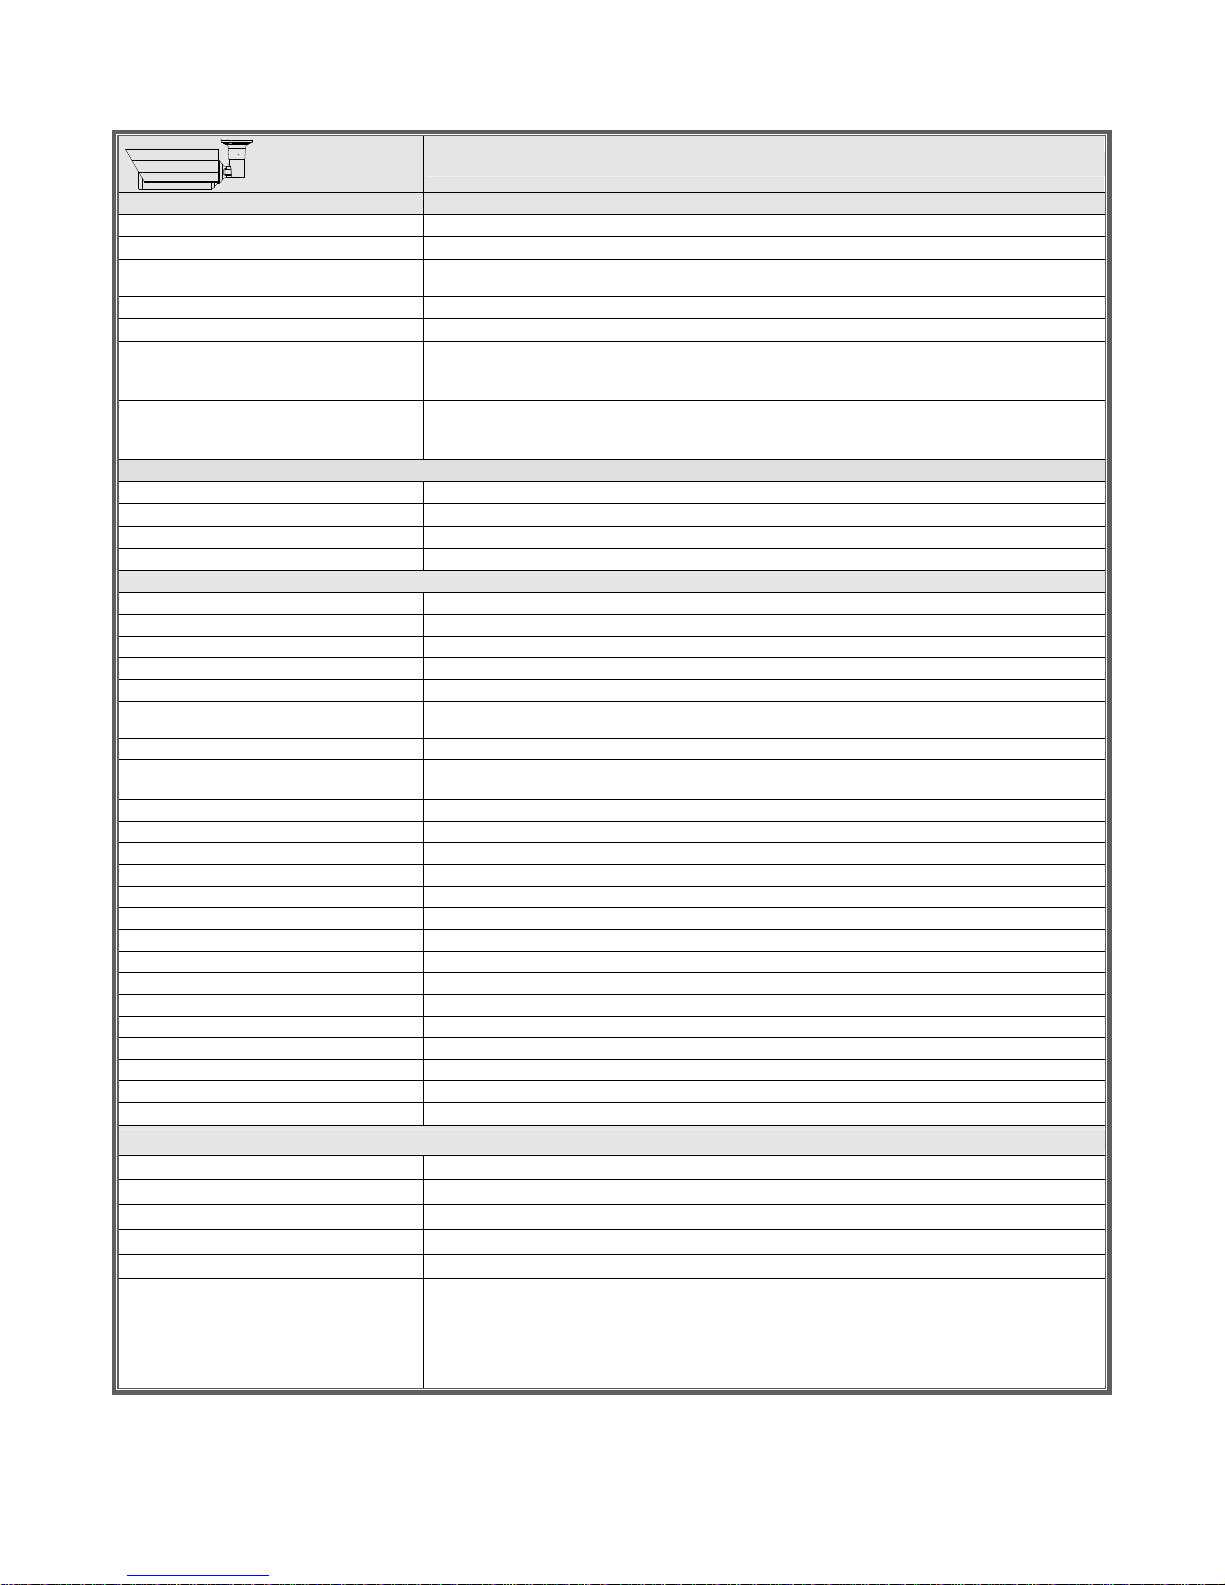
38
Model 17
▓ Network
LAN Port YES
LAN Speed 10/100 Based-T Ethernet
Supported Protocols
DDNS, PPPoE, DHCP, NTP, SNTP, TCP/IP, ICMP, SMTP, FTP, HTTP, RTP, RTSP, RTCP,IPv4, Bonjour, UPnP,
DNS,UDP,IGMP, QoS
Number of Online Users 10
ONVIF Compatible YES (Profile S)
Security
(1) Multiple user access levels with password
(2) IP address filtering
(3) Digest authentication
Remote Access
(1) Internet Explorer on Windows operating system
(2) 16CH Video Viewer on Windows & MAC operating system
(3) EagleEyes on iPhone, iPad & Android mobile devices
▓ Video
Video Compression H.264 (Main Profile) / MJPEG
Resolution 1920 x 1080 / 1280 x 720 / 720 x 480 / 352 x 288
Frame Rate 30fps
Multiple Video Streaming 4 (H.264, MJPEG)
▓ General
Image Sensor 1/2.8" SONY CMOS image sensor
Min Illumination 0.1 Lux / F1.8(Wide)~F3.2(Tele), 0 Lux (IR LED ON)
Shutter Speed 1/10,000 ~ 1/7.5 (Slow shutter)
S/N Ratio More than 48dB (AGC off)
Lens f5.0~50mm / F1.8 ~ 3.2
Viewing Angle
1X: 58.8° (Horizontal) x 34.2° (Vertical) x 66° (Diagonal)
10X: 6.35 (Horizontal) x 3.6° (Vertical) x 7.25° (Diagonal)
IR LED 3 units
IR Effective Distance**
Default : up to 50 meters
IR Enhanced Mode : up to 70 meters
IR Shift YES
Smart Light Control YES
White Balance ATW
AGC Auto
IRIS Mode AI mode/Iris Priority mode
WDR YES
POE YES (IEEE 802.3af)
Privacy Mask YES
External Alarm I/O YES (1 input / 1 output)
MicroSD Card Slot NO
Heater NO
IP Rating IP67
Operating Temperature -25℃ ~ 50℃
Power Source (±10%) DC12V / 1.5A
Power Consumption (±10%) PoE & PoN: 10.89W ; DC Adapter: 13.71W
▓ Others
Mobile Surveillance iOS & Android mobile devices
Event Notification FTP / Email / SMS
Digital Pan / Tilt / Zoom YES
Motion Detection YES
RTC (real-time clock) YES
Minimum Web Browsing Requirements
‧Intel core i3 or higher, or equivalent AMD
‧2GB RAM
‧AGP graphics card, Direct Draw, 32MB RAM
‧Windows 7, Vista & XP, DirectX 9.0 or later
‧Internet Explorer 7.x or later
*The specifications are subject to change without notice. **By using IR enhanced mode and slow shutter speed, the distance can be extended even longer.
Page 45
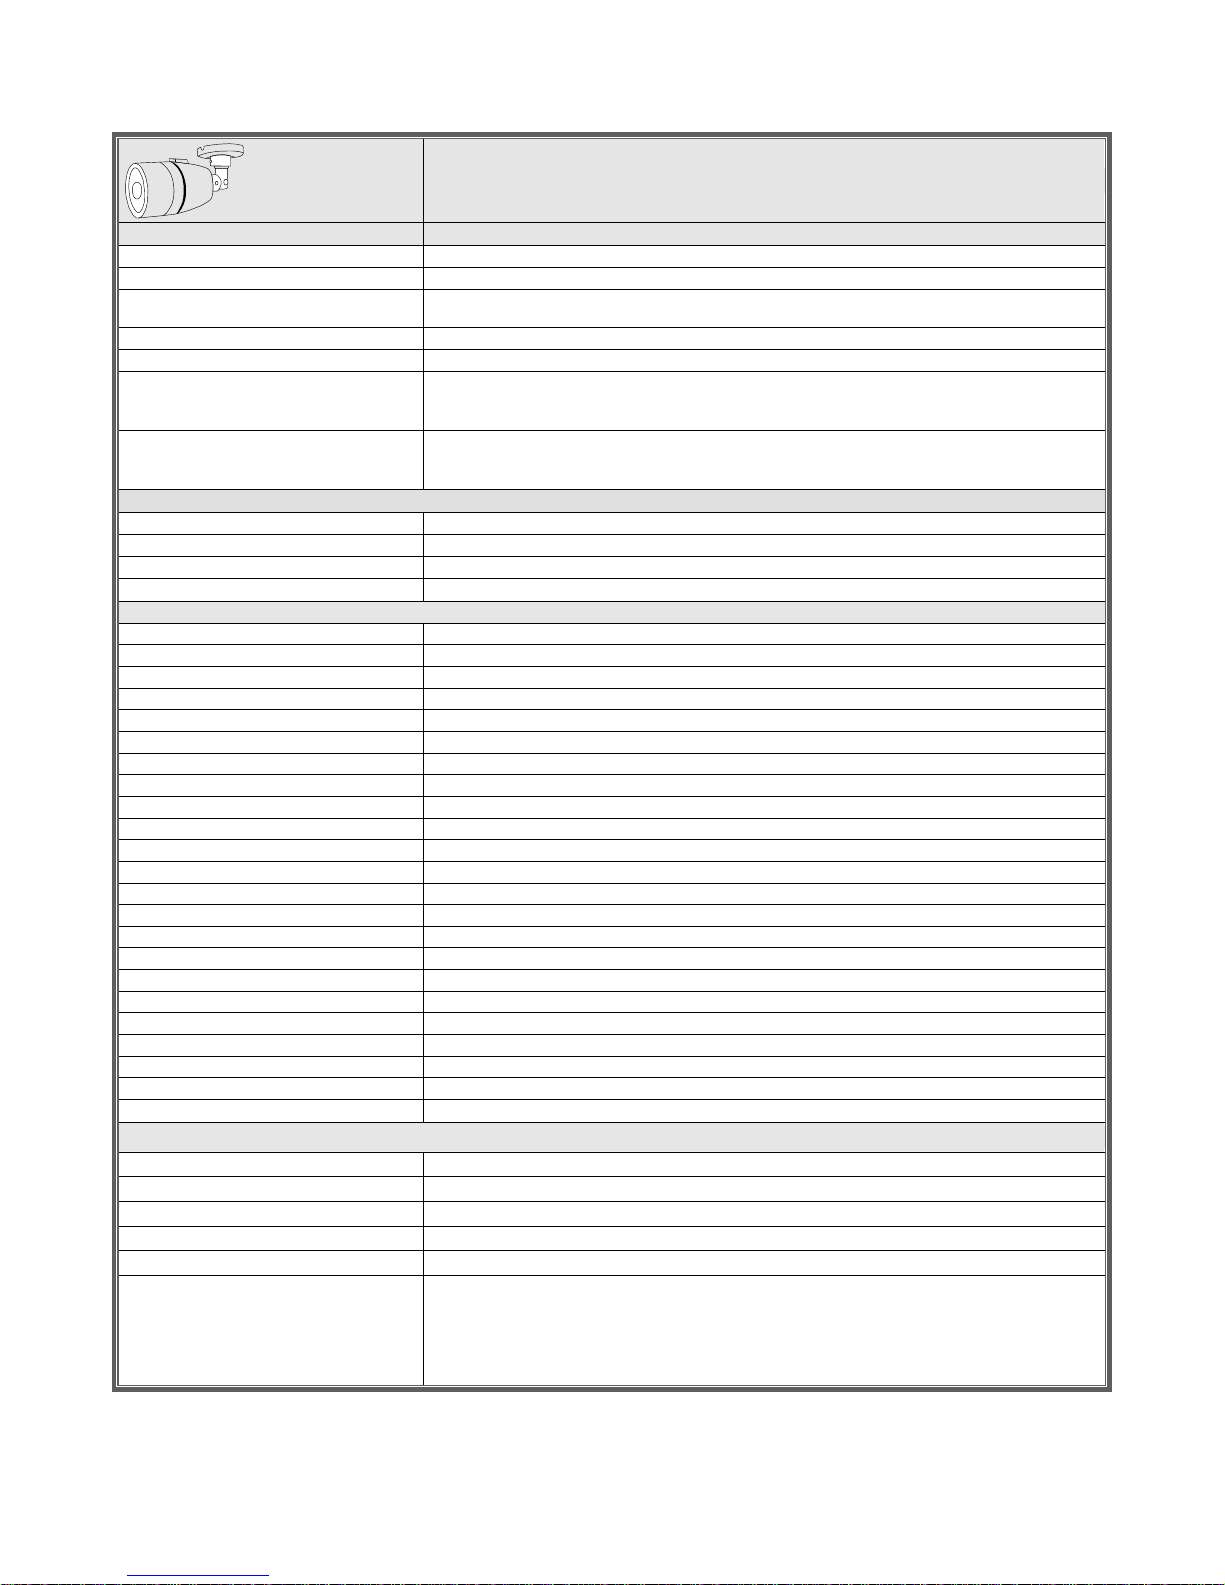
39
Model 18
▓ Network
LAN Port YES
LAN Speed 10/100 Based-T Ethernet
Supported Protocols
DDNS, PPPoE, DHCP, NTP, SNTP, TCP/IP, ICMP, SMTP, FTP, HTTP, RTP, RTSP, RTCP,IPv4, Bonjour, UPnP,
DNS,UDP,IGMP, QoS
Number of Online Users 10
ONVIF Compatible YES (Profile S)
Security
(1) Multiple user access levels with password
(2) IP address filtering
(3) Digest authentication
Remote Access
(1) Internet Explorer on Windows operating system
(2) 16CH Video Viewer on Windows & MAC operating system
(3) EagleEyes on iPhone, iPad & Android mobile devices
▓ Video
Video Compression H.264 / MPEG4 / MJPEG
Resolution 1280 x 1024 / 1280 x 720 / 640 x 480 / 320 x 240
Frame Rate 30fps
Multiple Video Streaming 4 (H.264, MJPEG, MPEG4)
▓ General
Image Sensor 1/ 3” SONY CMOS image sensor
Min Illumination 1 Lux / F1.5, 0 Lux (IR LED ON)
Shutter Speed 1/2 to 1/10,000 sec
S/N Ratio More than 48dB (AGC off)
Lens f3.8mm / F1.5
Viewing Angle 65.4° (Horizontal) x 49.9° (Vertical) x 80.4° (Diagonal)
IR LED 14 units
IR Effective Distance** 20 meters
IR Shift YES
Smart Light Control YES
White Balance ATW
AGC Auto
IRIS Mode AES
WDR NO
POE YES (IEEE 802.3af)
Privacy Mask NO
External Alarm I/O YES (1 input / 1 output)
MicroSD Card Slot NO
Heater NO
IP Rating IP66
Operating Temperature -20℃ ~ 40℃
Power Source (±10%) DC12V / 1A
Power Consumption (±10%) PoE & PoN: 5.5W ; DC Adapter: 4.7W
▓ Others
Mobile Surveillance iOS & Android mobile devices
Event Notification FTP / Email / SMS
Digital Pan / Tilt / Zoom YES
Motion Detection YES
RTC (real-time clock) YES
Minimum Web Browsing Requirements
‧Intel core i3 or higher, or equivalent AMD
‧2GB RAM
‧AGP graphics card, Direct Draw, 32MB RAM
‧Windows 7, Vista & XP, DirectX 9.0 or later
‧Internet Explorer 7.x or later
*The specifications are subject to change without notice. **By using IR enhanced mode and slow shutter speed, the distance can be extended even longer.
Page 46
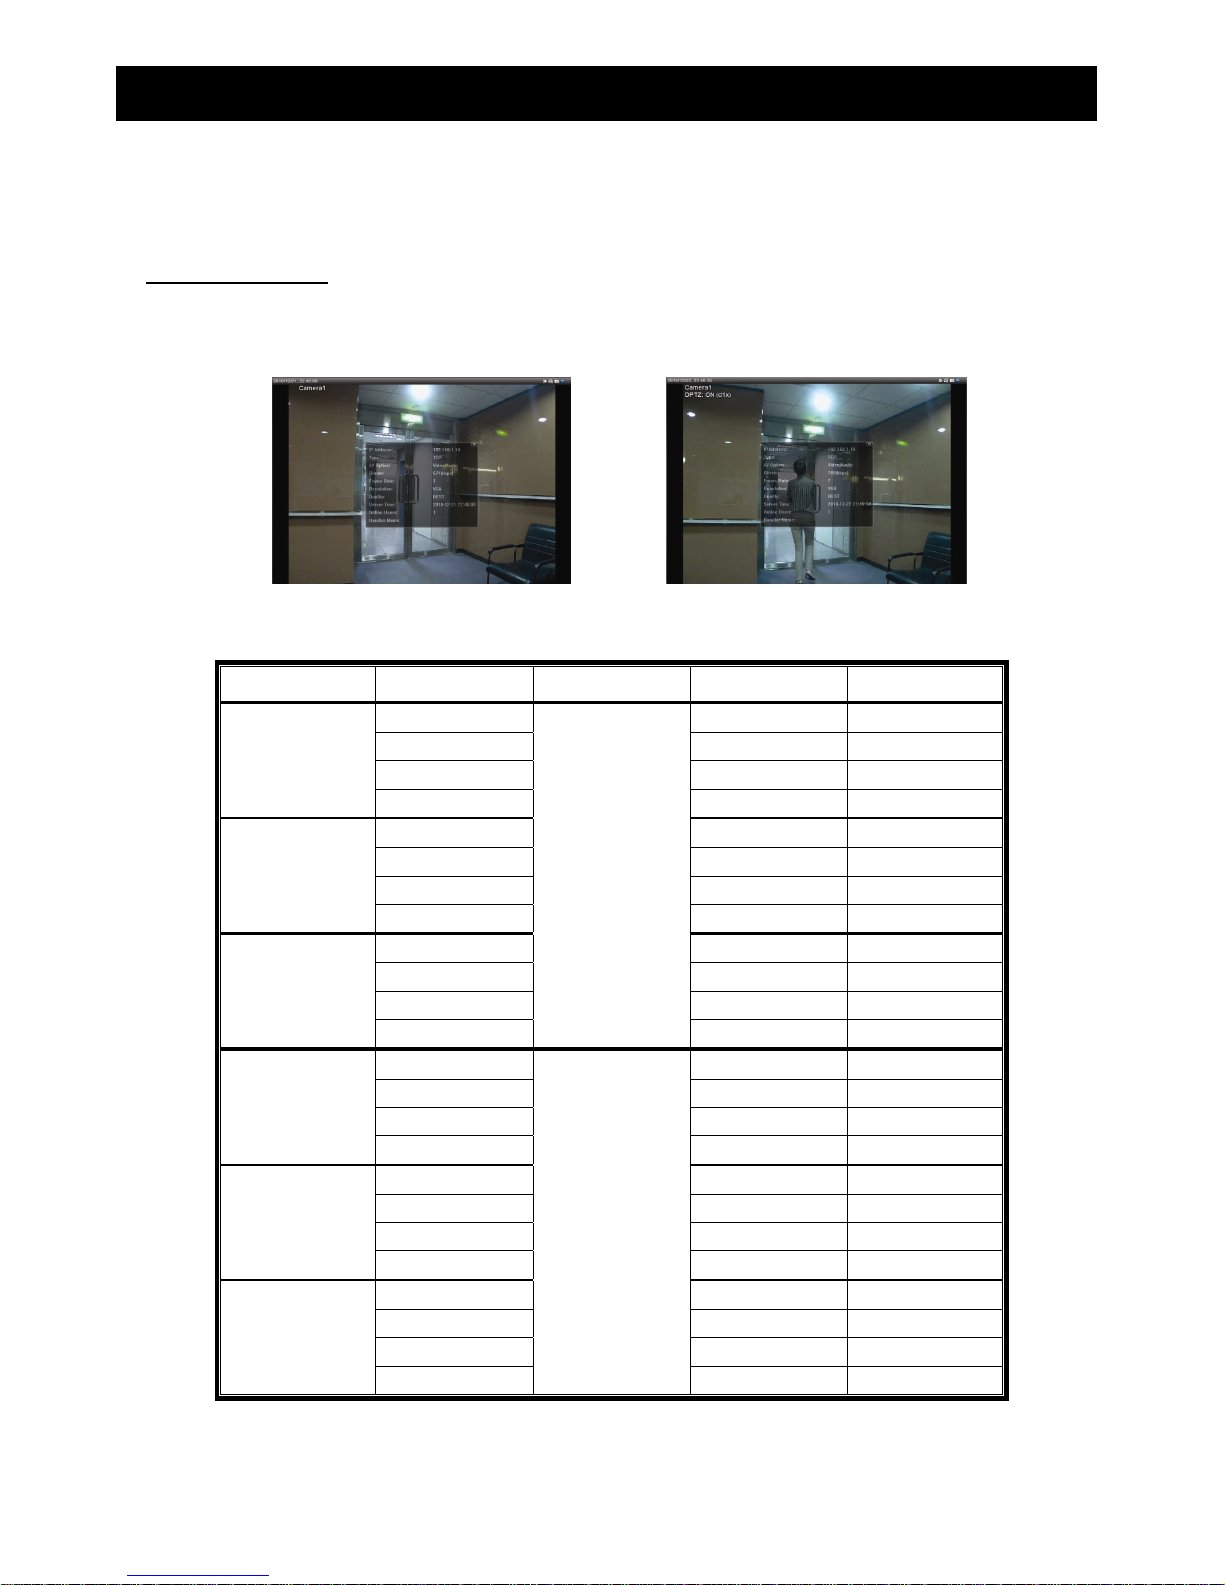
40
APPENDIX 2 BIT RATE TABLE FOR REFERENCE
The data below is for reference only.
The bit rates listed here may vary depending on the resolution, image quality & frame rate you choose, the
complexity of your monitoring area, and how often the moving objects show in your monitoring area.
Testing Environment
Place: Office Entrance
Network translation: H.264
Camera type: Megapixel camera
Static: No one coming in and out Dynamic: One or two people coming in and out
Resolution Quality Frame Rate (Dynamic) kbps (Static) kbps
SXGA Best FULL 3253 3216
High 2375 2160
Normal 1571 1266
Basic 1465 873
VGA Best 2010 1261
High 1042 1034
Normal 685 572
Basic 457 350
QVGA Best 646 366
High 482 350
Normal 302 286
Basic 168 161
SXGA Best 1/4 1163 1076
High 989 715
Normal 855 534
Basic 719 443
VGA Best 789 571
High 451 447
Normal 349 237
Basic 217 165
QVGA Best 269 147
High 182 131
Normal 164 113
Basic 97 71
Page 47
41
Resolution Quality Frame Rate (Dynamic) kbps (Static) kbps
SXGA Best 1/15 581 374
High 405 342
Normal 487 248
Basic 337 141
VGA Best 358 79
High 201 63
Normal 180 28
Basic 92 15
QVGA Best 111 84
High 99 68
Normal 97 54
Basic 58 42
Page 48
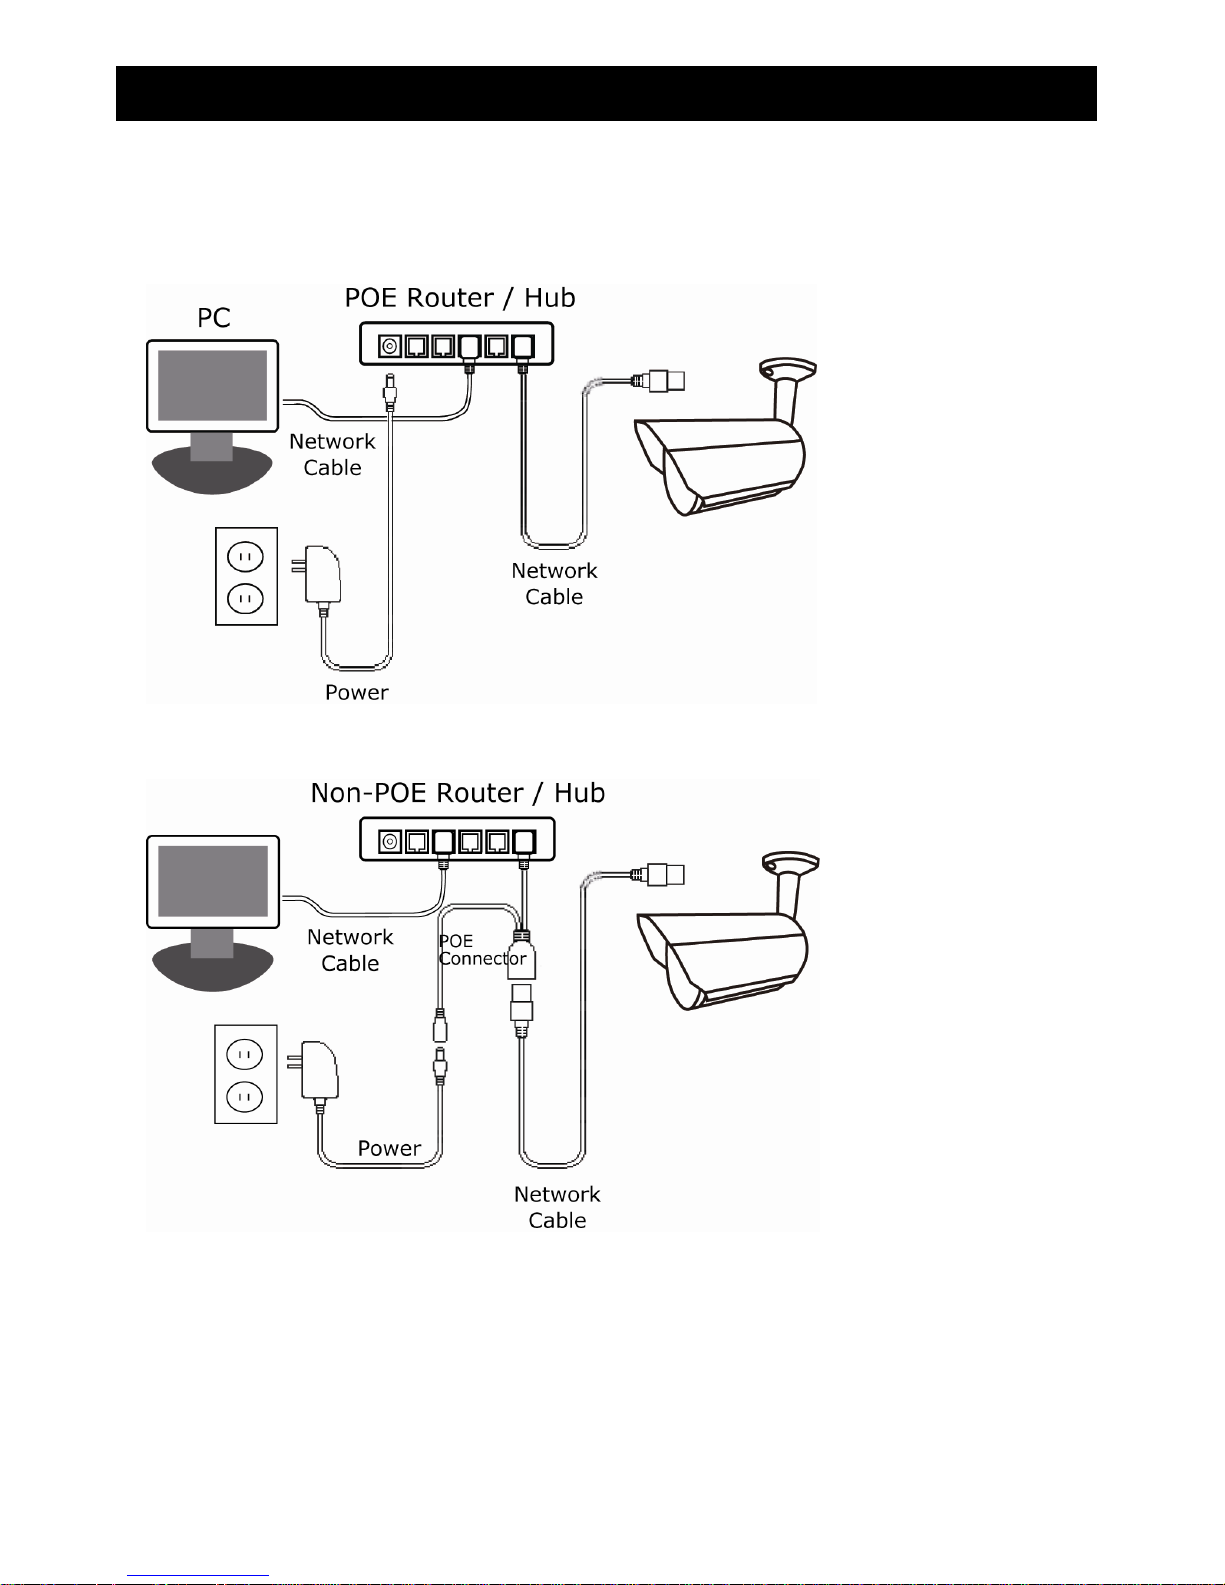
42
APPENDIX 3 POE CONNECTION
This device supports PoE (Power-over-Ethernet), developed by the IEEE802.3af or IEEE802.3at task force, and
power can be supplied over the same network (Ethernet) cable as the one used to connect to Internet. No power
cable is needed. Below shows two examples of POE application for reference.
When your router / hub supports POE connection
When your router / hub doesn’t support POE connection (An optional POE connected required)
Page 49
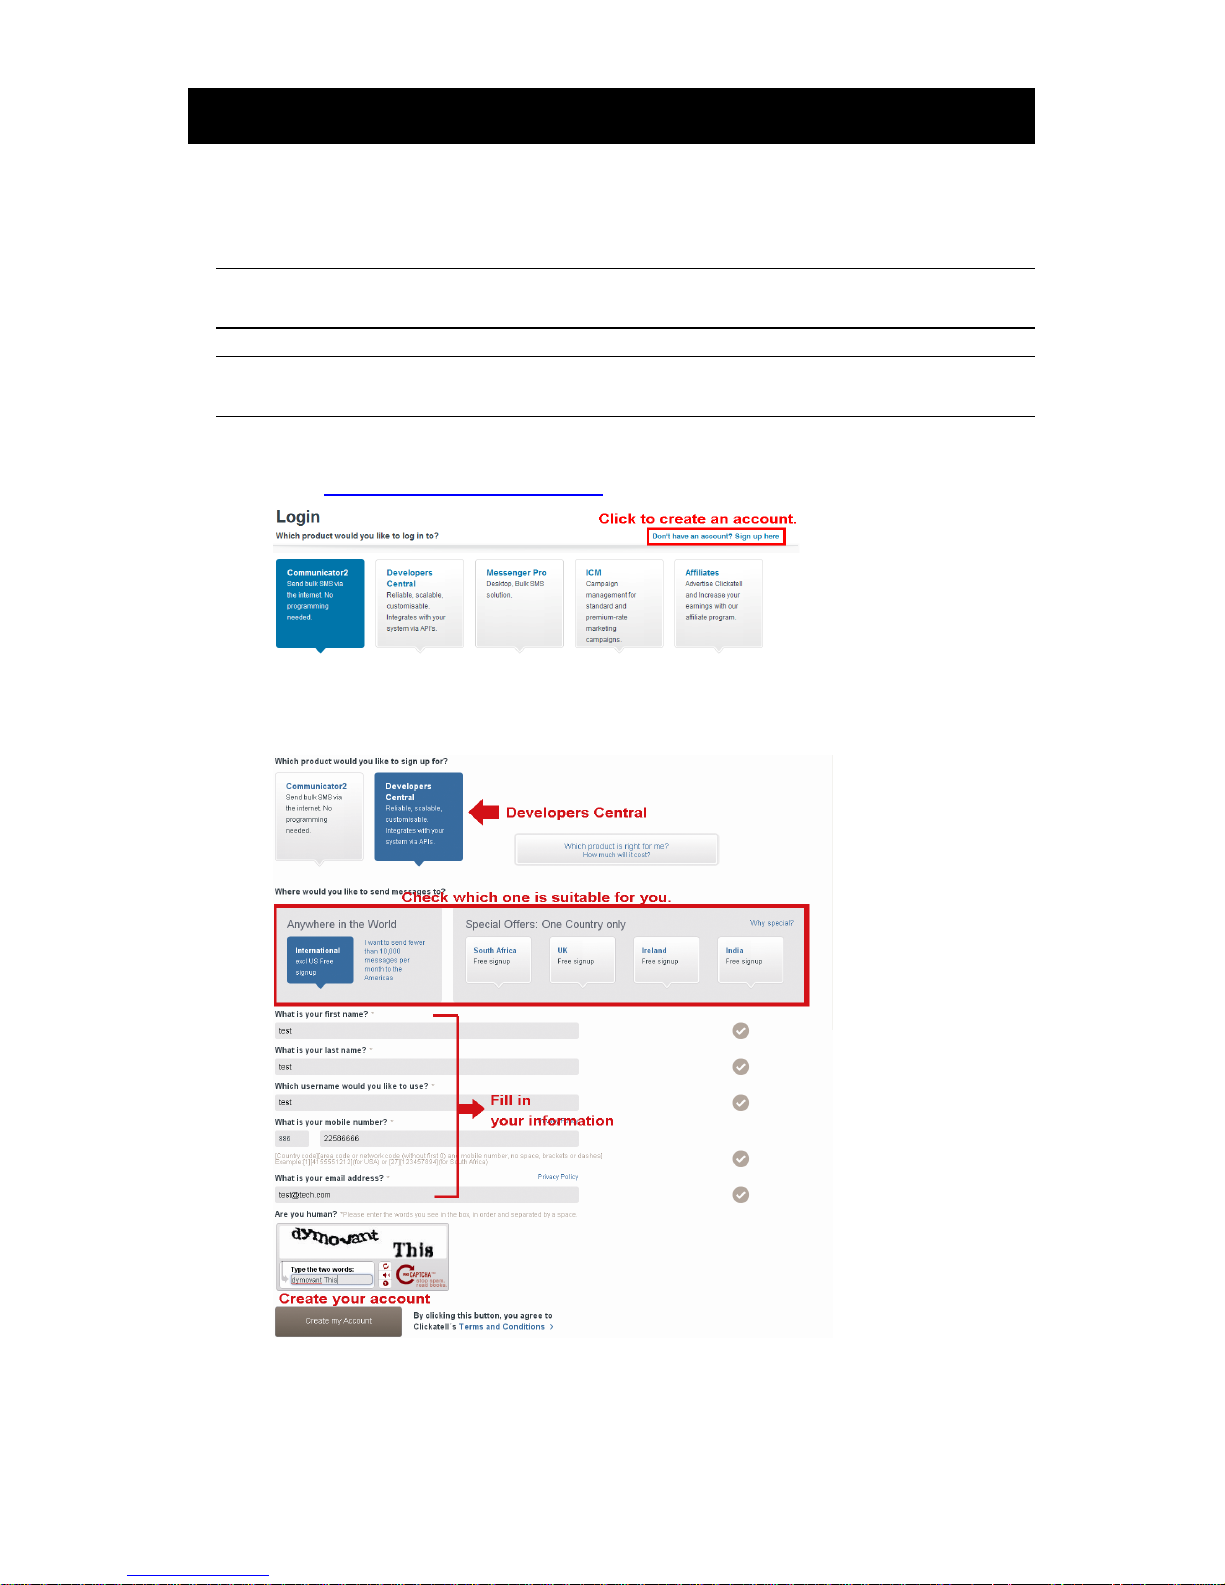
43
APPENDIX 4 API ID APPLICATION FOR SMS MESSAGING
To allow the camera automatically sending a text message when an event happens, you need to
apply an API ID from a mobile messaging company first, such as Clickatell or EVERY8D.
Below shows an example of how to get an API ID from Clickatell.
Note: The SMS messaging may not be totally free. Please check the charge policy of the
messaging service you use.
Note: The instructions below are for reference only and may vary when Clickatell’s
official website is updated.
Please follow the steps below for application.
Step1: Go to http://www.clickatell.com/login.php. Sign up an account first.
Step2: Select “Developers Central”, select the location where you want to use this service, and fill in
your information to create an account.
Step3: When the account is created, the system will automatically send an Email to your specified
Email address with the user name, password, and client ID used to log into the service.
Step4: Click the link within the email to log in, and you will be prompted to validate your mobile phone
number. Select “SEND ACTIVATION CODE”. The system will send an activation code to that
number for verification.
Check if you receive a text message from Clickatell, and enter the activation code.
Page 50
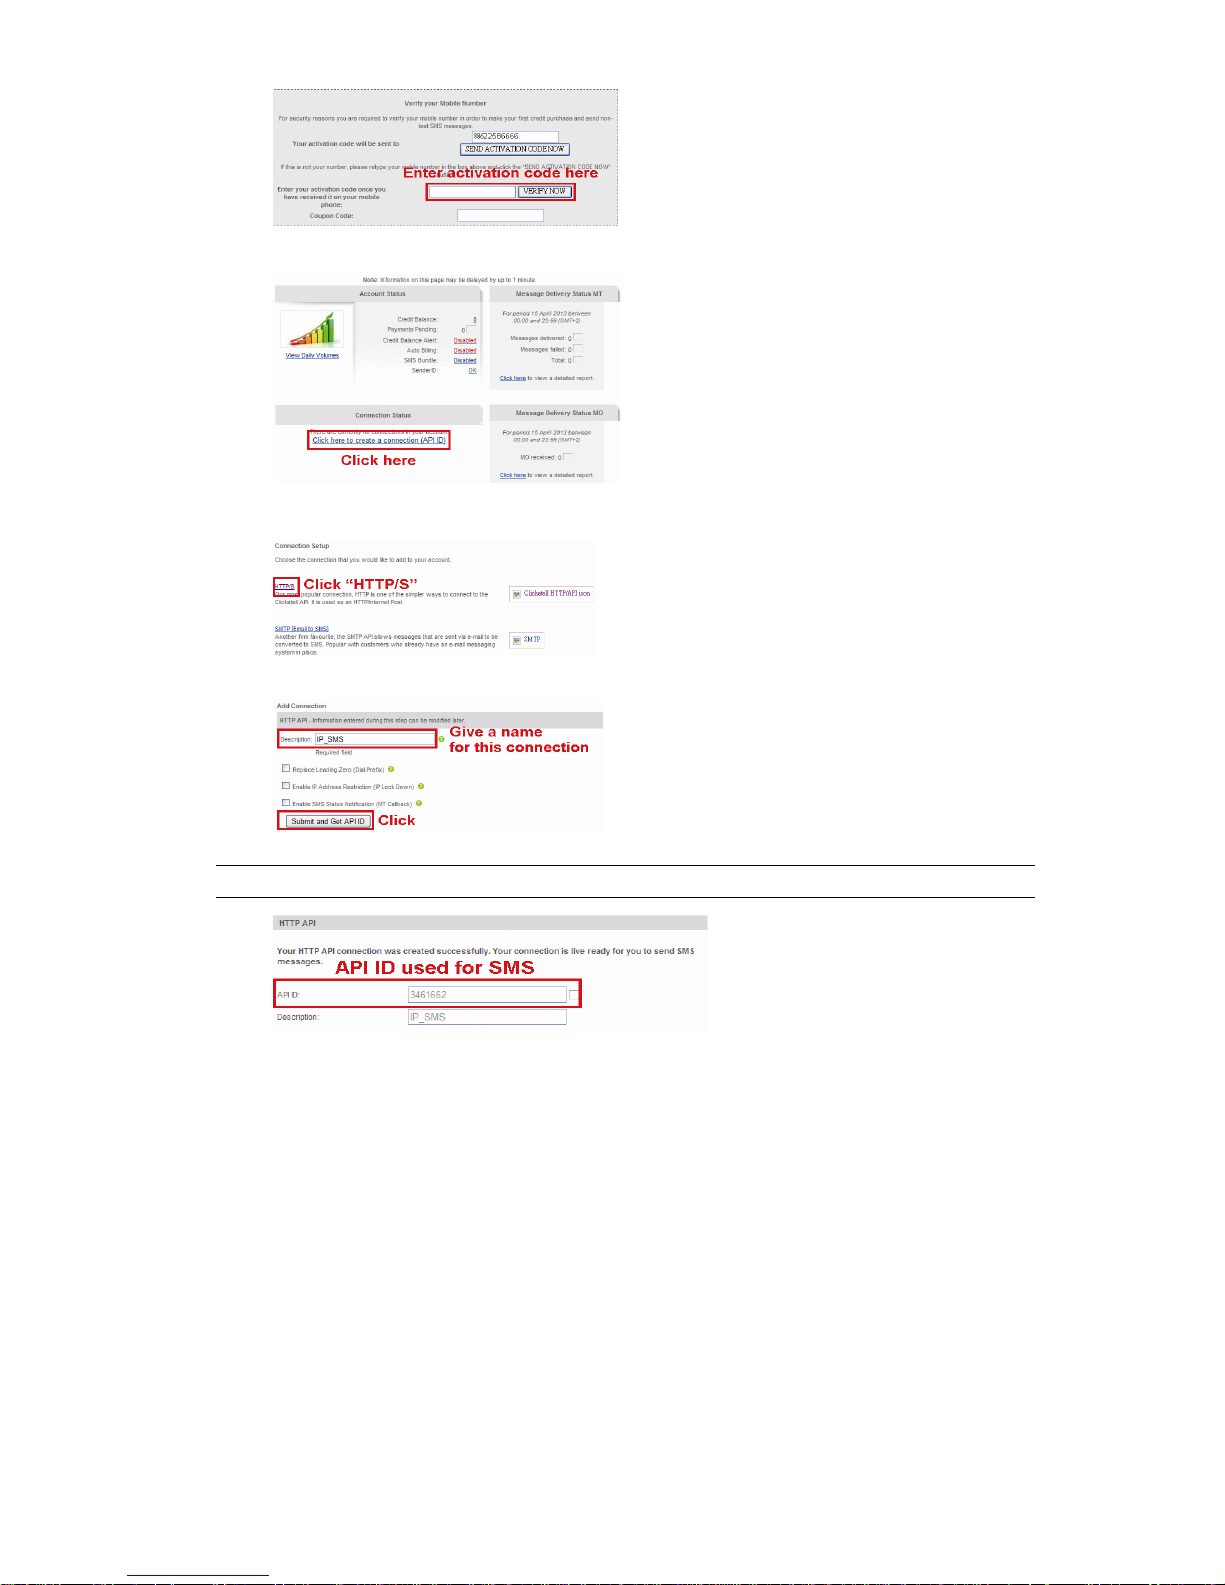
44
Step4: In your account, find “Connection Status” and create a connection (API ID).
Step5: Select “HTTP/S”.
Give a meaning name for this connection, and click “Submit and Get API ID”.
Step5: An API ID will be generated as follows.
Note: Note down the API ID for SMS notification setting later.
Page 51
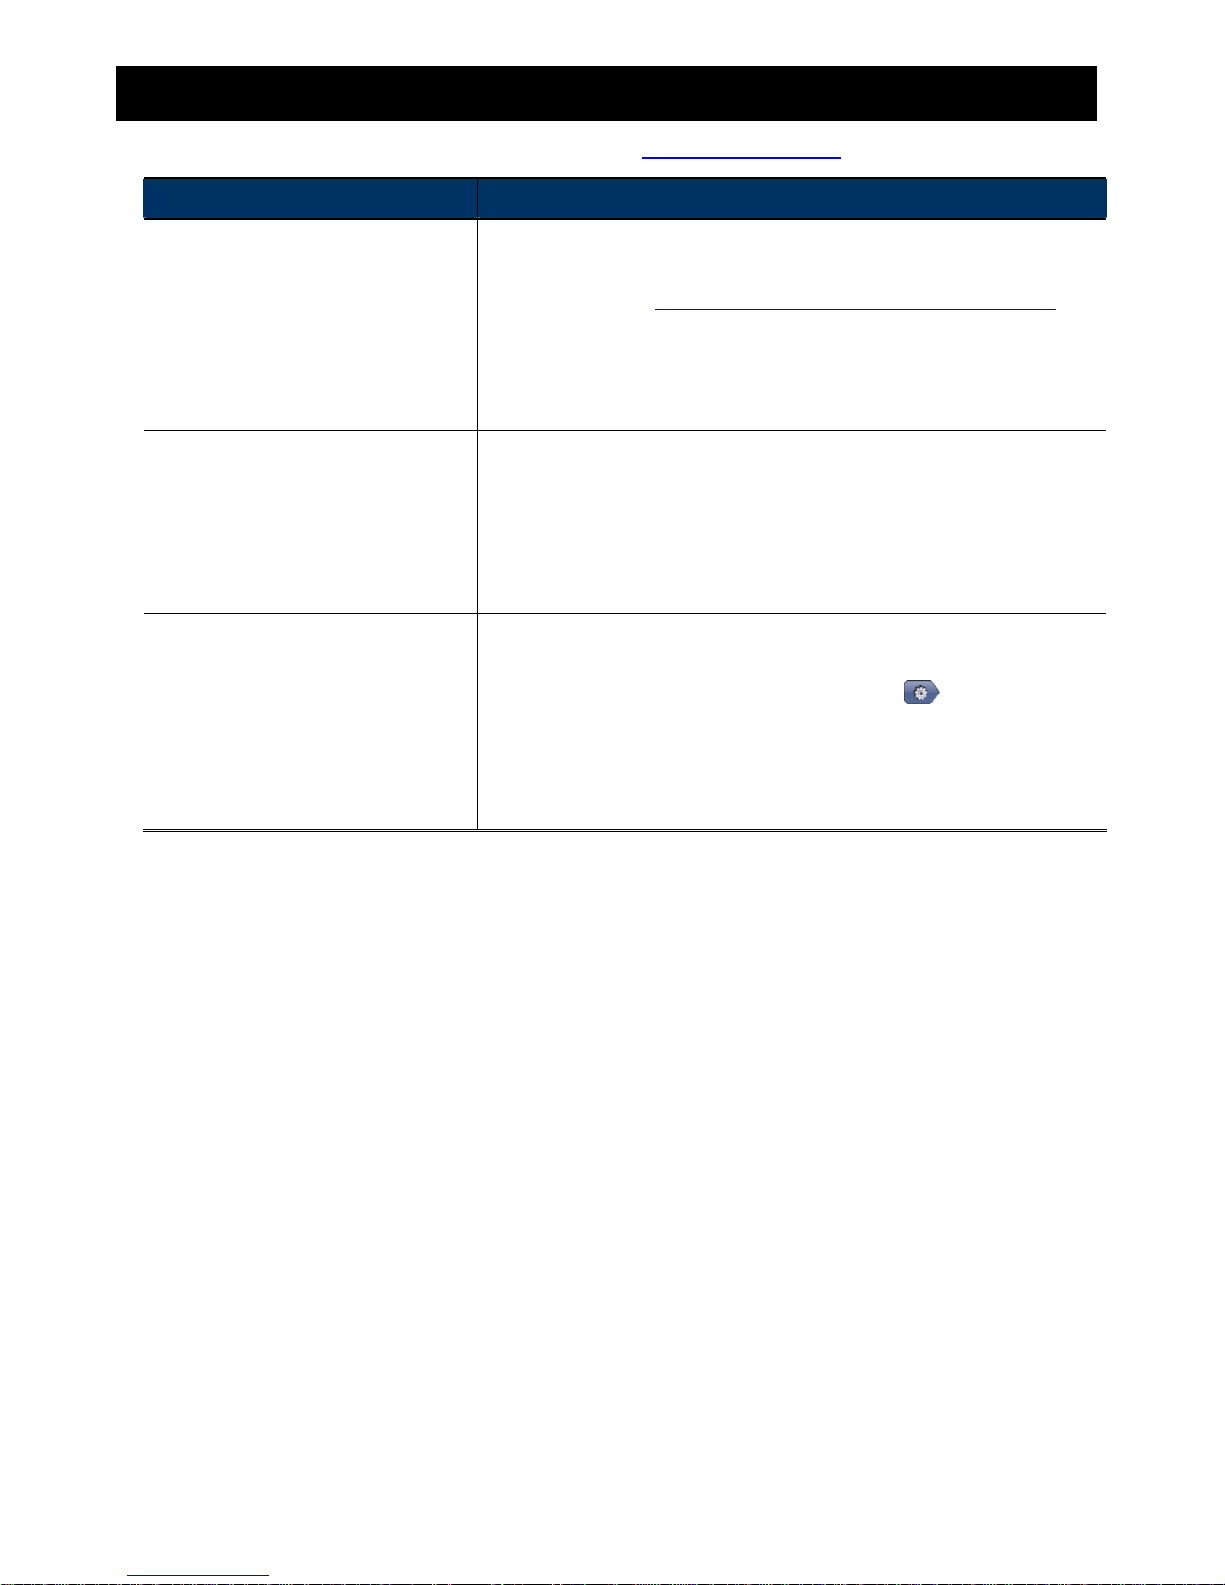
45
APPENDIX 5 Q&A
For more details about Q&A, please visit our official website: www.eagleeyescctv.com
Question Answer
I can connect to this camera in my
house or office where it’s installed
with wireless network.
But when I leave my house or office, I
can’t connect to it from my mobile
phone (with 3G network), or other PC
(connected to Internet). Why?
You didn’t configure this camera to Internet, but only in LAN.
Please follow the steps in the advanced network setup guide
downloadable from www.surveillance-download.com/user/m359a.swf to
complete network configurations, or it’s recommended for you to check
with your local installer or reseller for this service because it’s usually hard
for a person who doesn’t have network knowledge to set network
configurations.
My live images are not fluent. Why?
Image fluency could be affected by the local network upload bandwidth,
router efficiency, client network download bandwidth, complexity of live
view, and more.
(Recommended) To have the best image fluency, select QVGA; to have
the best image quality, select “SXVGA” based on the model you have; to
have normal image fluency and quality, select “VGA”.
The live video keeps flickering. Why?
Please try adjusting the power line frequency to “60 Hz” or “50 Hz” for the
camera.
For iPhone users, access the camera, and select “ ” on the top right
corner to enter IPCAM Configuration page. Then, go to “Advance Setup”
“Camera” to change setting.
For access from Internet Explorer, log into the camera, and select
“Config.” “Camera” “Camera”.
Page 52
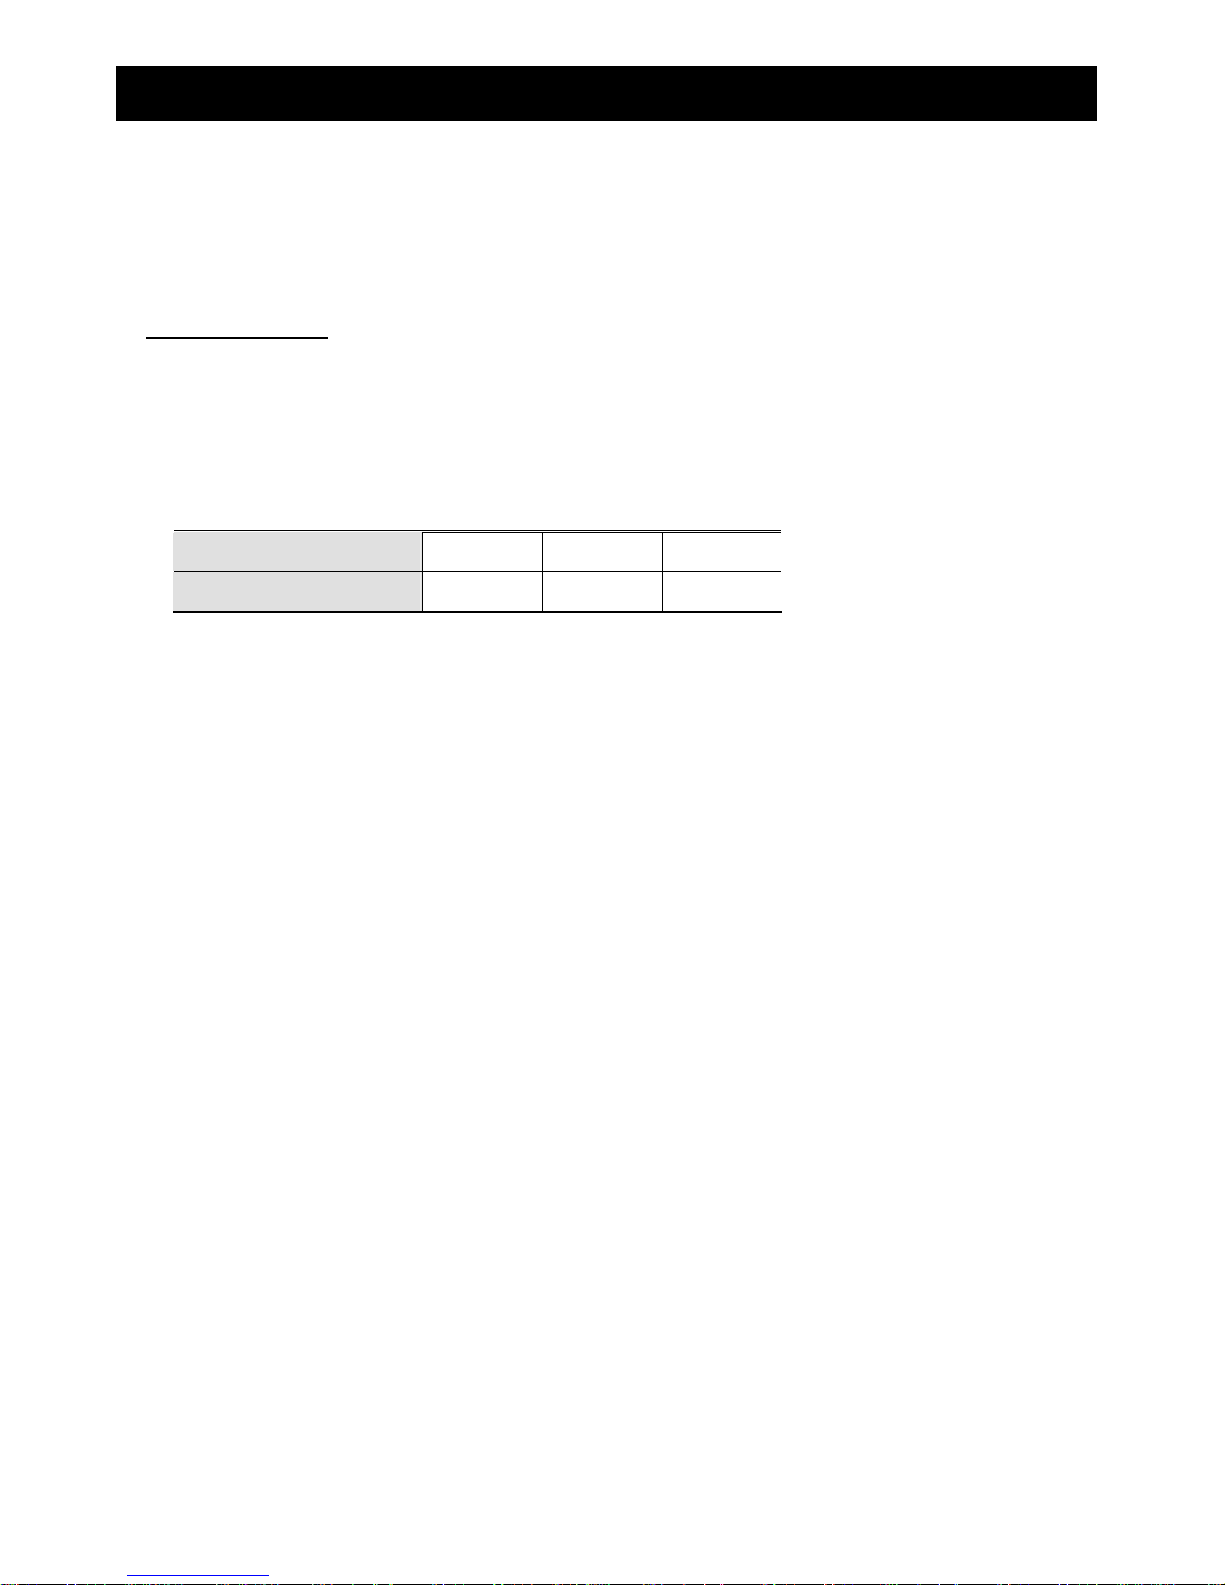
46
APPENDIX 6 RECORDING TIME TABLE
Below shows the estimated total recording time for each recording resolution.
The recording time per resolution is the average value collected from the both alarm trigger conditions indicated in
“Testing Environment”, and is for reference only.
The time may vary depending on the resolution, image quality & frame rate you choose, the complexity of your
monitoring area, and how often the moving objects show in your monitoring area.
Testing Environment
Place: Office
Monitoring area: 1.5 meters away from the camera
Alarm trigger conditions:
(1) One person walks by the monitoring area and leaves immediately.
(2) Two persons walk by the monitoring area. One goes away immediately, and the other one stays a while and
goes away.
RecordingResolution SXGA VGA QVGA
Recordingtime(second) 25 115 211
Page 53
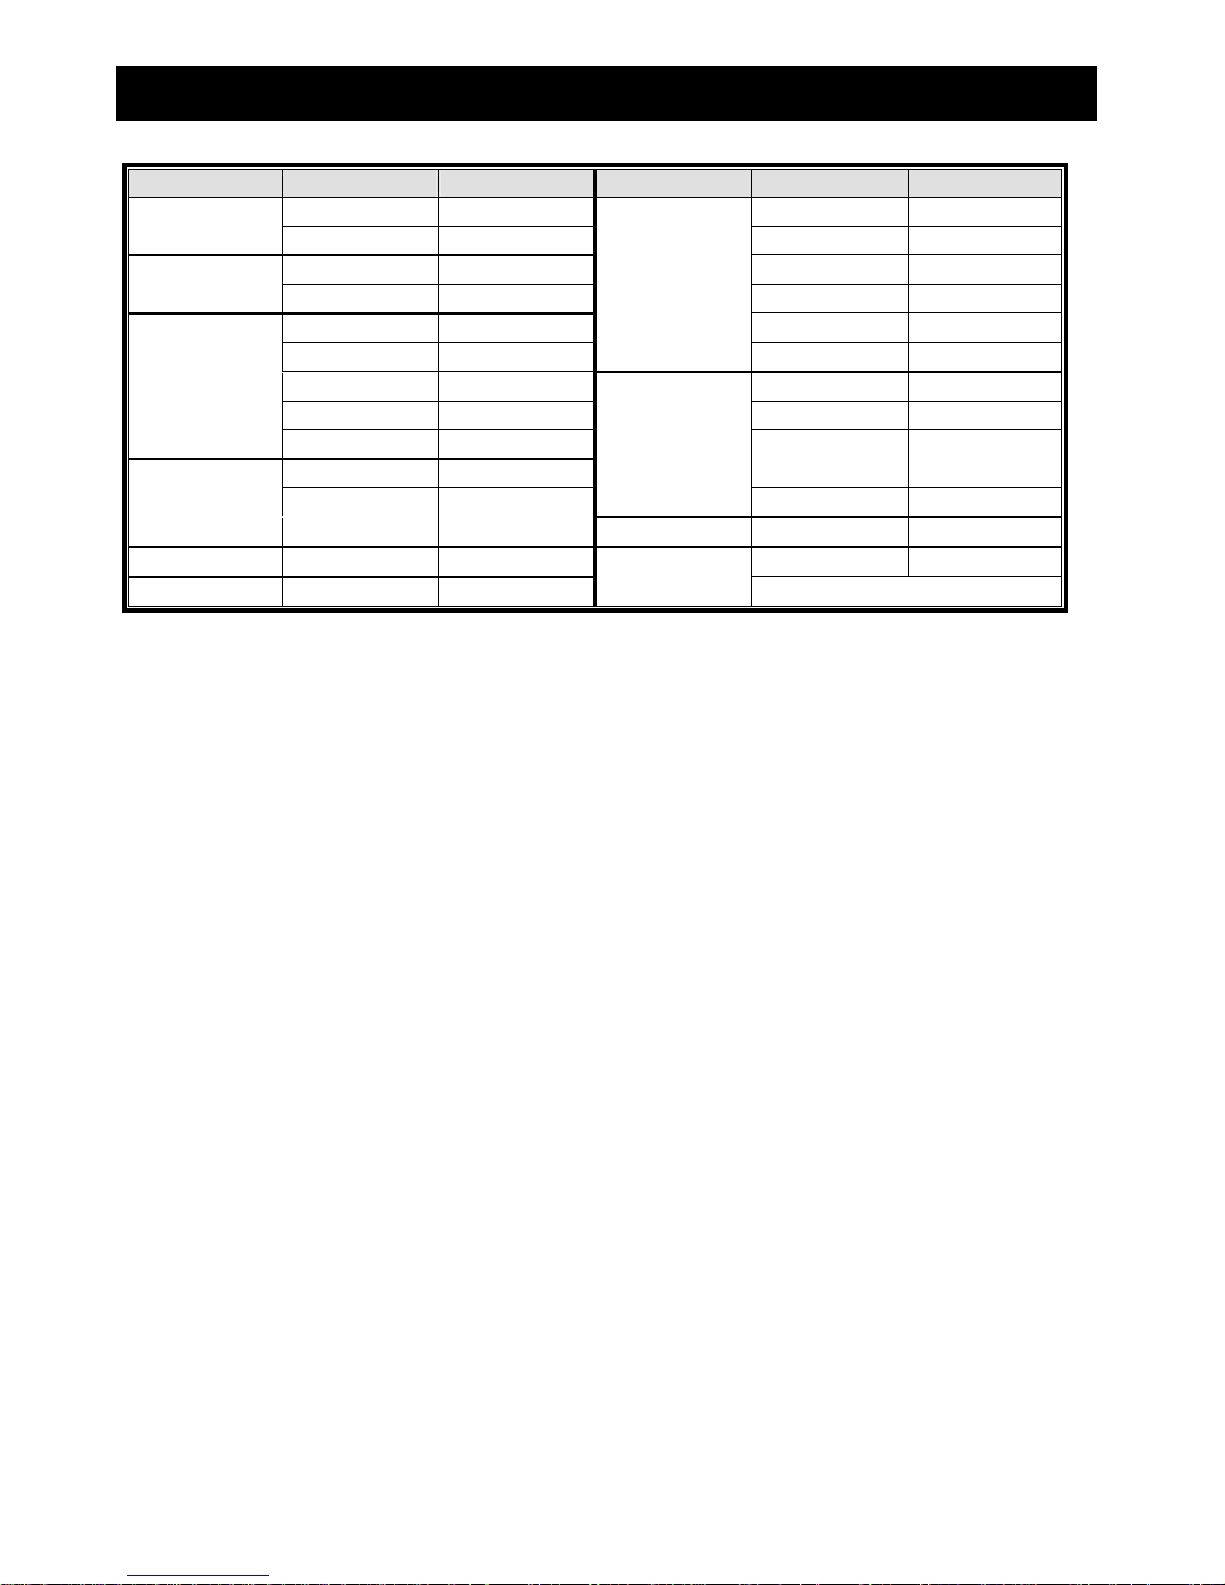
47
APPENDIX 7 MICRO SD CARD COMPATIBLE LIST
Manufacturer Capacity Class Manufacturer Capacity Class
ADATA 2GB -- Transcend 2GB --
4GB Class 6 4GB Class 2
Apacer 2GB -- 4GB Class 4
4GB Class 4 4GB Class 6
SanDisk 2GB -- 8GB Class 6
4GB Class 4 16GB Class 10
8GB Class 4 Kingston 2GB --
16GB Class 4 4GB Class 4
32GB Class 4 8GB Class 4
Verico 2GB -- 32GB Class 4
4GB Class 4 64GB Class 10
16GB Class 10 TOSHIBA 16GB Class 4
Silicon Power 64GB -- TOPRAM 32GB Class 10
Kingmax 64GB --
Page 54
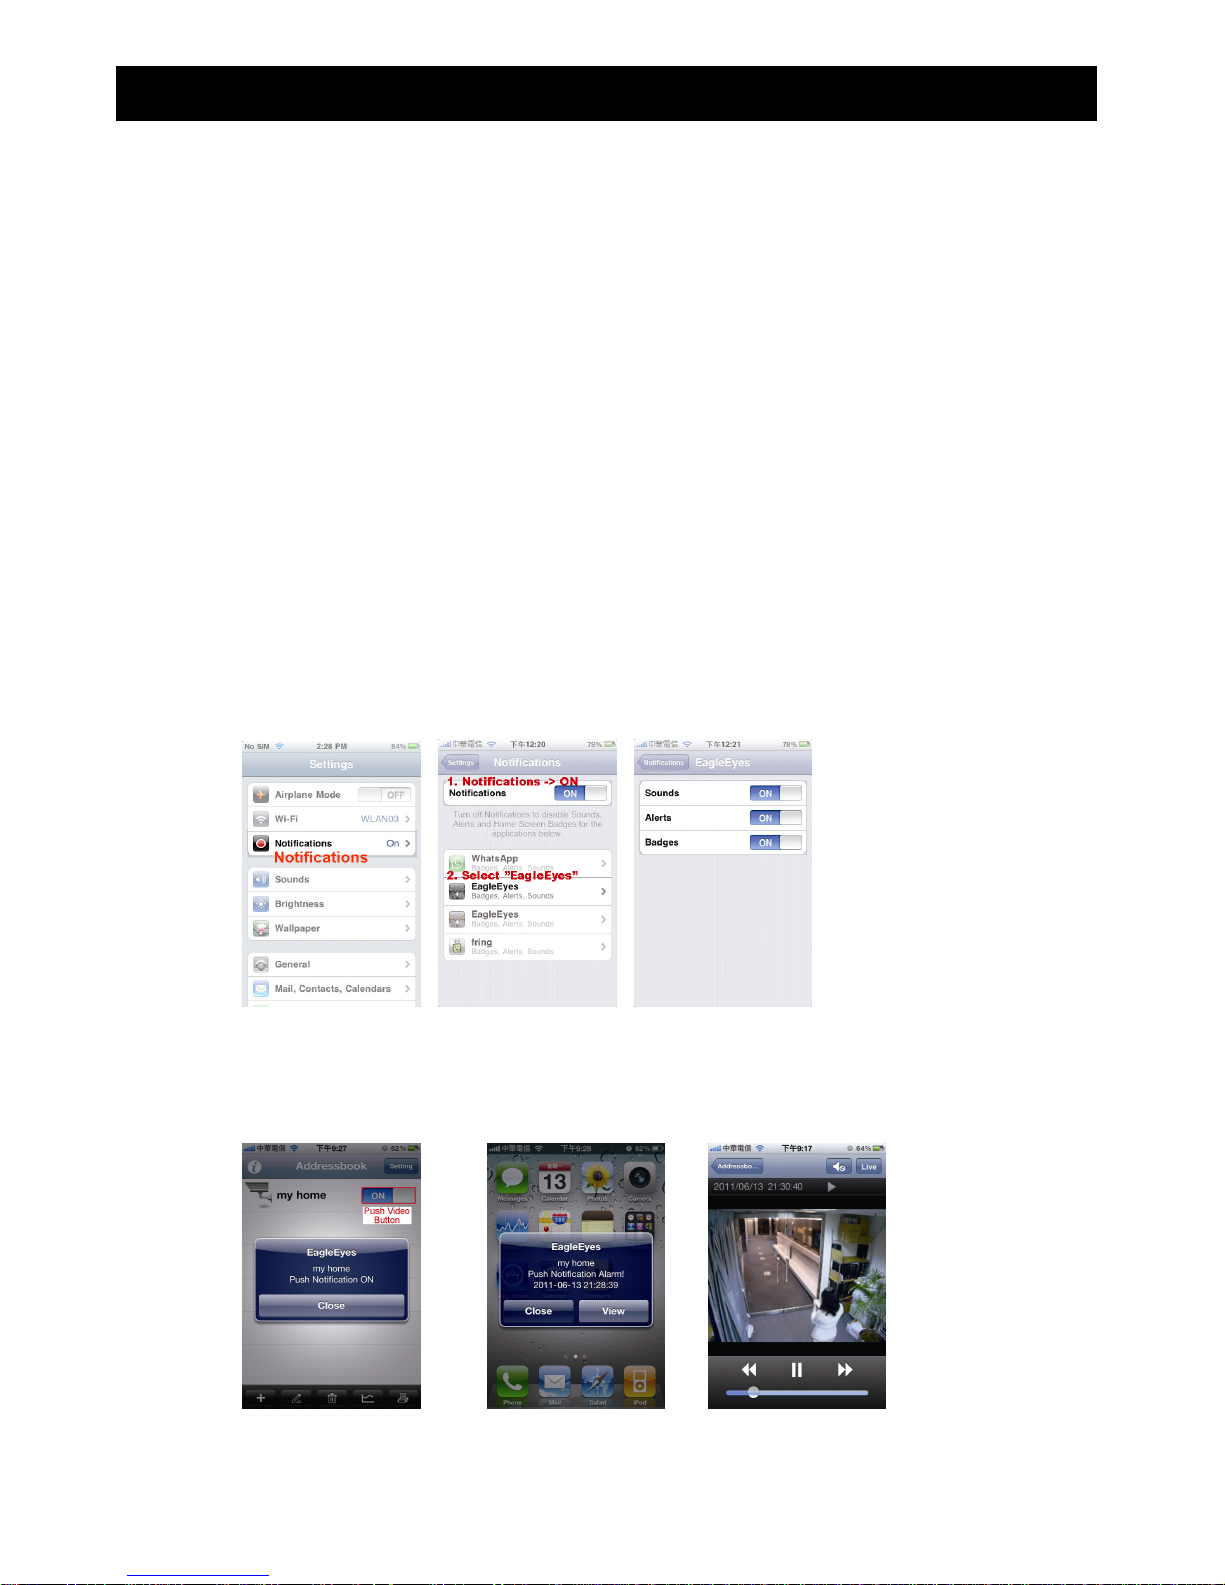
48
APPENDIX 8 ENABLE PUSH VIDEO
A8.1 What’s Push Video
“Push Video” is an active notification system, different from traditional FTP & Email notification methods. It’s more
active and stable, but also easier to be affected by your network bandwidth.
When “Push Video” is enabled and any alarm event occurs, you’ll be able to receive notifications on your iPhone /
iPad / Android mobile device within 5 seconds.
A8.2 Prerequisites
Before configure Push Video, make sure you have checked the following:
You have an iOS or Android mobile device with our self-developed APP, “EagleEyes”, installed.
You have configured the IP address of your camera in the EagleEyes address book, and it’s accessible from
your iOS or Android mobile device.
A8.3 Enable Push Video
A8.3.1 From iOS devices
Step1: In the main screen, select “Settings” “Notifications”.
-- Make sure “Notifications” is set to “ON”.
-- Select “EagleEyes”, and make sure its settings are set to “ON”.
Step2: Open “EagleEyes”, and switch the Push Video button to “ON”. You’ll receive the message indicating that
Push Notification (Push Video) is on.
Step3: Return to the main menu of your iPhone / iPad. You’ll receive event notifications when there’s a human
detection event. Select “View” to immediately play the recorded clip.
Page 55
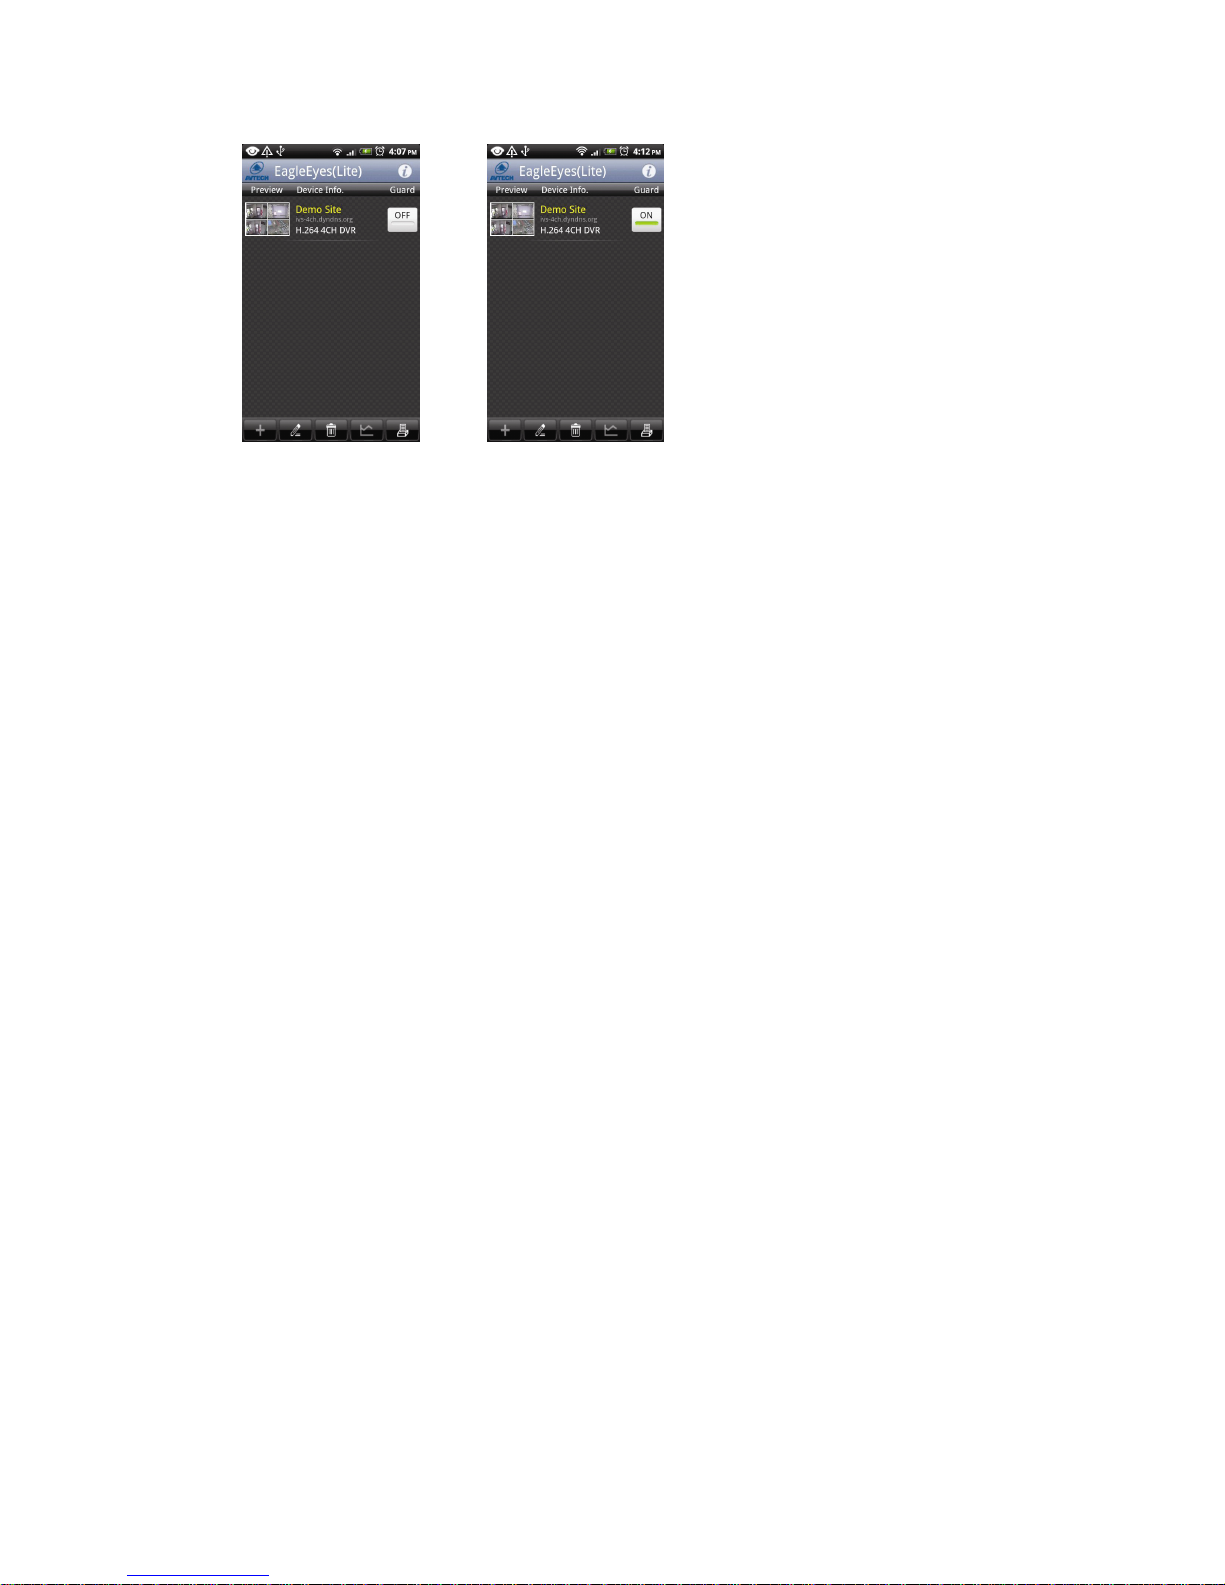
49
A8.3.2 From Android Mobile Device
In the address book, switch “Guard” from “OFF” to “ON”.
Page 56
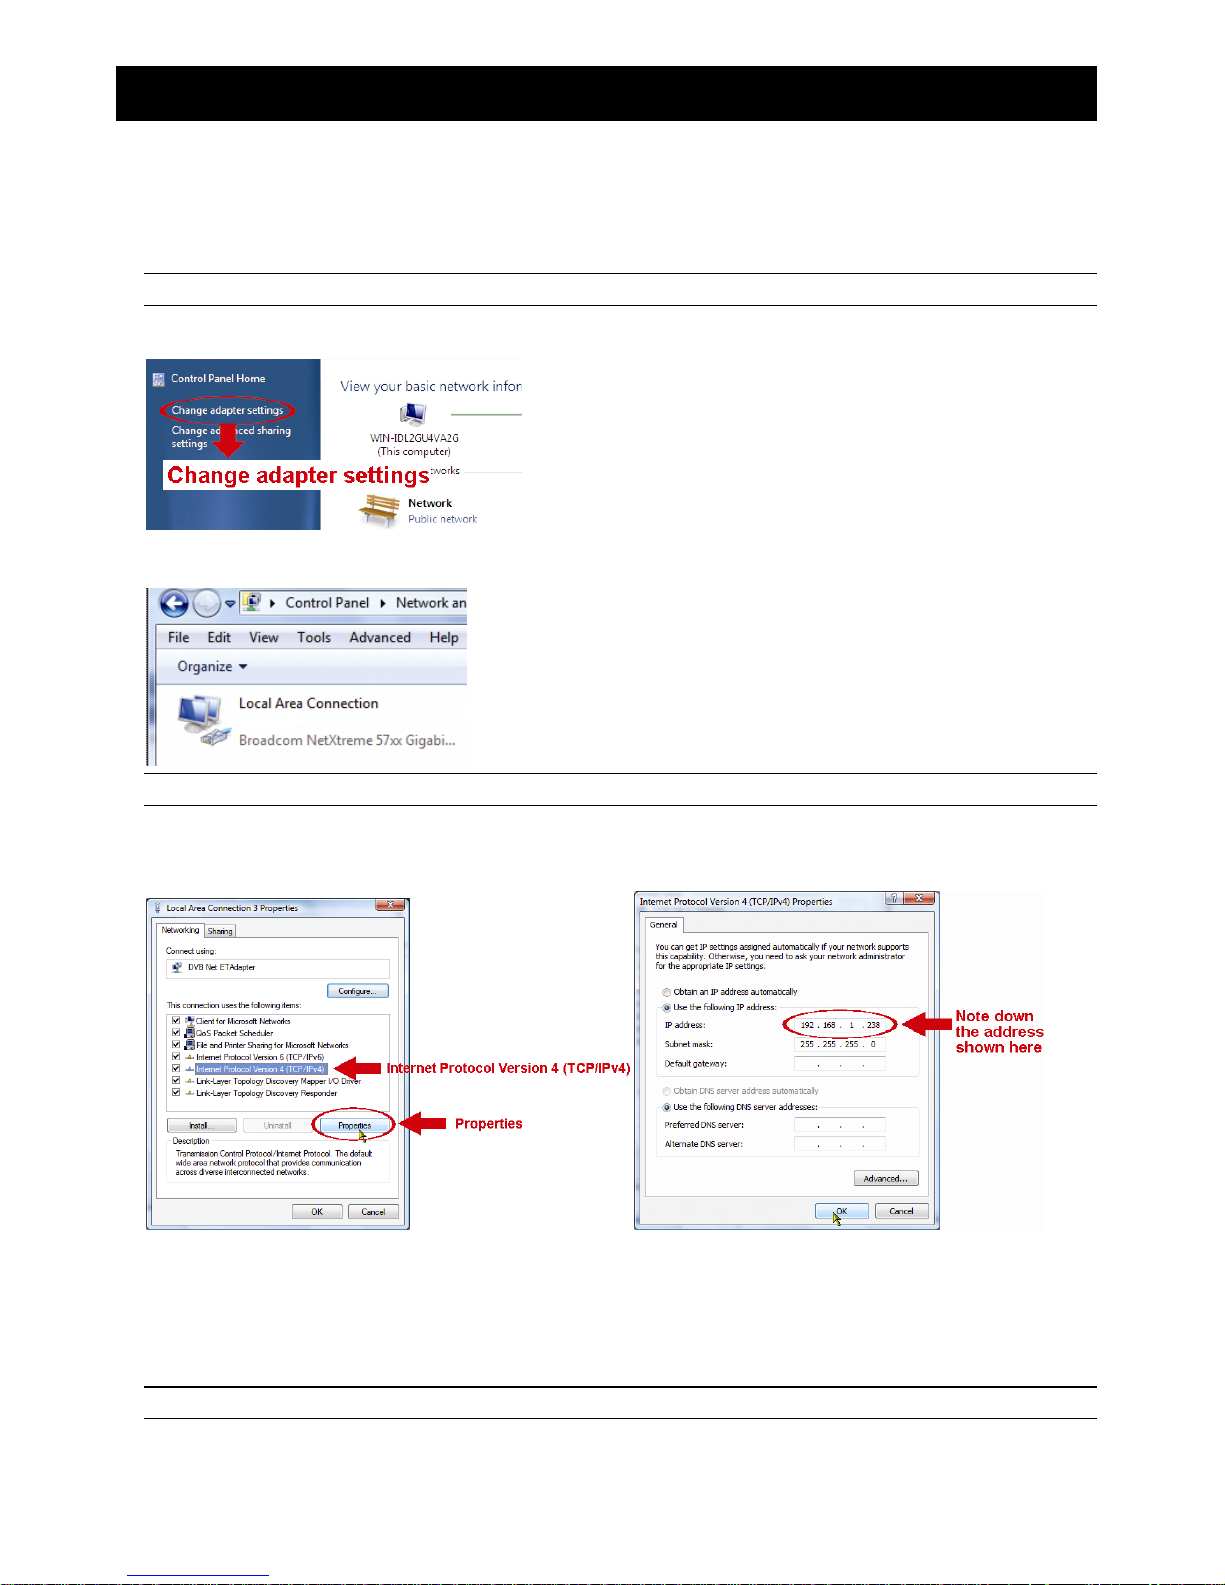
50
APPENDIX 9 PREREQUISITES FOR NETWORK SHARE
“Push Video” is an active notification system, different from traditional FTP & Email notification methods. It’s more
active and stable, but also easier to be affected by your network bandwidth.
A9.1 Check PC IP Address
Note: The instructions below are taking Windows 7 and 8 for an example.
Step1: Go to "Network and Sharing Center”, and select “Change adapter settings”.
Step2: Right-click on “Local Area Connection”, and select “Properties”.
Note: If your local area connection is not enabled, please also enable it.
Step3: In the “Networking” tab, select “Internet Protocol Version 4 (TCP/IPv4)”, and select “Properties”.
Step4: In the “General” tab, note down the IP address in “Use the following IP address”.
A9.2 Create "Administrator" Account
It’s recommended to create a new administrator account on the PC for “Network Share” to use, or user could use the
existing administrator account.
Note: The instructions below are taking Windows 7 and 8 for an example.
Step1: Go to "User Accounts” “Manage Accounts”, and select “Create a new account”.
Page 57
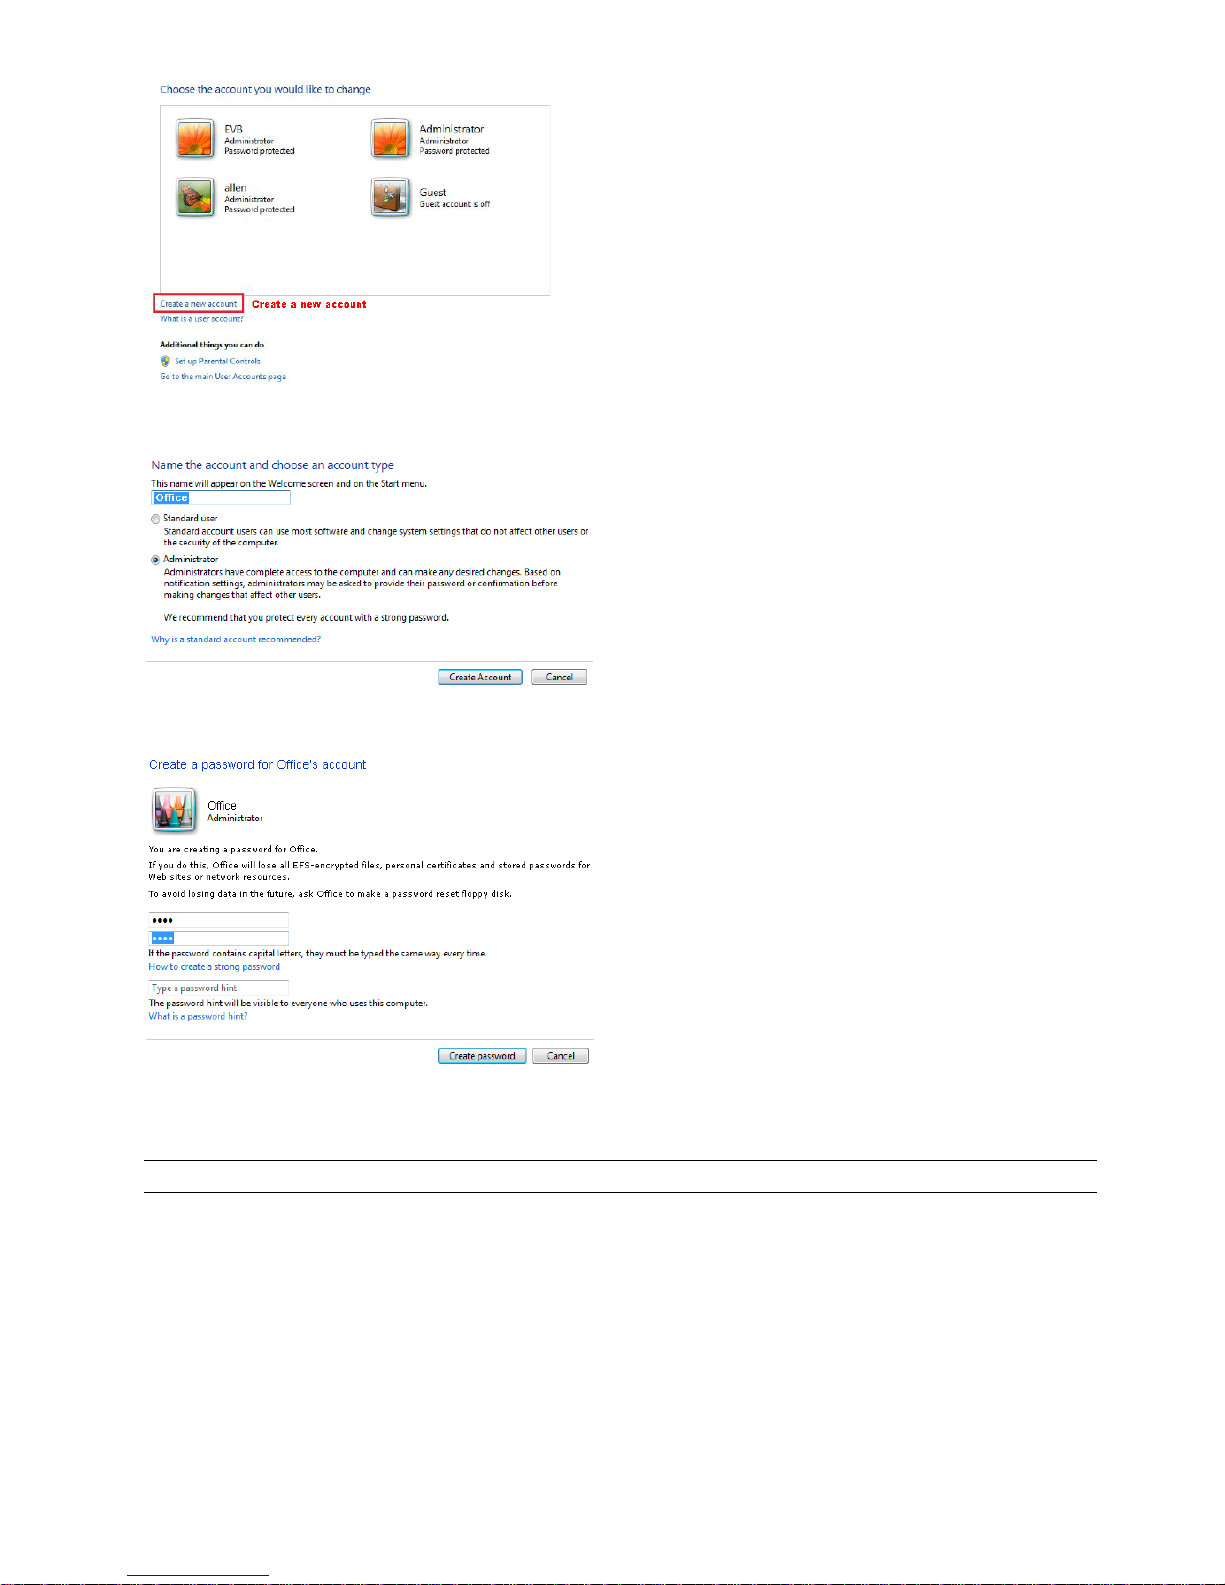
51
Step2: Set a user name, and choose “Administrator” for this account. Then, click “Create Account”.
Step3: Set the password, and click “Create Account”.
A9.3 Share Folder
Note: The instructions below are taking Windows 7 and 8 for an example.
Step1: Right-click the folder you want to use to save snapshots for “Network Share”, and choose “Properties”.
Step2: In “Share Properties”, select the tab of “Sharing”, and choose “Share…”.
Page 58
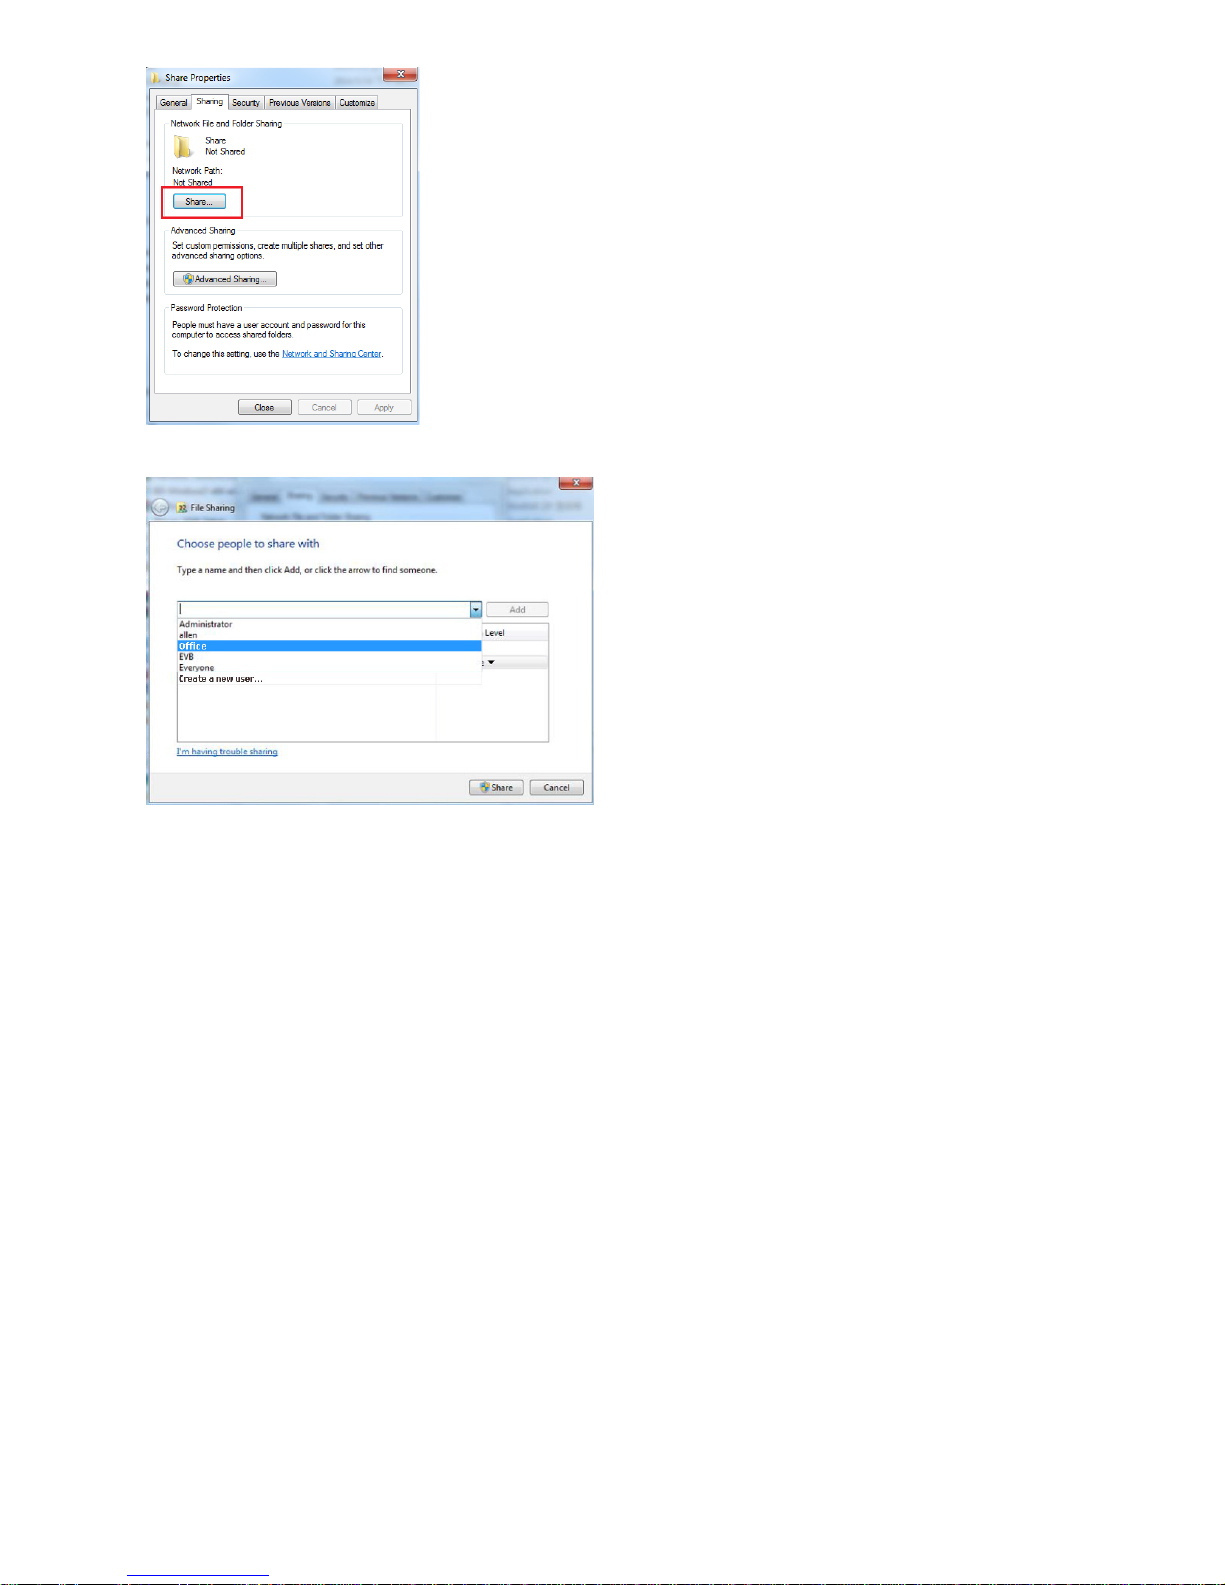
52
Step3: Choose the account you want to share with, and click “Share” to save.
Page 59

459a_359a_459ah_359ah_552a_552ah_565a_561_561h_552b_552bh_459b_459bh_552C_553_V1.5
IP カメラ・シリーズ
操作ガイド
今後ご参考のため、この取扱説明書をよくお読みになった上、よく保管してください。
Page 60
重要な安全ガード
会社が提供する無鉛製品はすべて、指令に基づく危険物質に対する規制(RoHS)に関する欧
州法が規定する要件を満たしています。これは、我々の製造プロセスと製品は、厳格に「無
鉛であり」で、指令が引用している危険物質を全く含んでいないことを意味します。
罰点を付けた引き車付きの大型容器のマークは、欧州連合の領域中で製品は、寿命が尽き
ら別に収集されなければならないことを象徴化して示します。これはあなたの製品並びに
シンボルマークが付いた周辺機器にも適用されます。これらの製品を分別する必要のない
都市ゴミと同じように処分しないでください。この装置をリサイクルする手順について、
あなたの地元ディーラーに問い合わせてください。
これはクラス A 製品です。家庭内の環境では、本製品により電磁波障害が発生する場合が
あります。その場合には、ユーザーは適切な対策を取る必要がある場合があります。
FCC
障害声明
本装置は、FCC 基準パート 15 に準ずる Class A のデジタル電子機器の制限事項に準拠しています。これら
の制限事項は、商業地域で使用した場合に生じる可能性のある電磁障害を規制するために制定されたもので
す。本装置は高周波エネルギーを生成し使用しています。また、高周波エネルギーを放射する可能性がある
ため、指示に従って正しく設置しなかった場合は、無線通信に障害を及ぼす可能性があります。本装置を住
宅地域で使用した場合無線通信に障害を及ぼす可能性があるため、ユーザーは自費でこれらの障害を修正す
る必要があります。
本デバイスは、FCC 基準パート 15 に準じています。操作は次の 2 つの条件に従うものとします。
(1) 本装置により障害を発生させることはできません、また、
(2) 誤動作の原因となる電波障害を含む、受信されたすべての電波障害に対して正常に動作すること。
商標に関するご注意
iPad®および iPhone®は Apple Inc.の登録商標です。
Android™ は Google Inc. の商標です。本商標の使用には Google の許可が必要です。
Microsoft®、Windows®および Internet Explorer®は米国および/または各国において Microsoft Corporation の
登録商標です。
否認声明
我々はこのマニュアルの内容をいつでも修正もしくは除去してもよい権利を保留します。我々は本マニュア
ルの精度、完全性あるいは有用性に対して法的責任あるいは義務を正当化もしくは適用しません。本マニュ
アルの内容は、将来予告なしに変更することがあります。
本製品にはスタンバイ/オフモードはありません。
Page 61

MPEG4
に対する使用免許
本製品は、MPEG4 ビジュアル特許ポートフォリオライセンスに基づき、個人的使用及び非営利活動に従事
している消費者に、以下を対象としてライセンス供与されます:(i) MPEG4 ビジュアル基準(「MPEG-4
VIDEO」)に準拠したビデオのエンコーデング、(ii)個人的活動および非営利活動に従事している消費者によっ
てエンコードされたか MPEG LA によって MPEG4 ビデオを供給できるライセンスが供与されているビデオ
プロバイダーから取得した MPEG4 ビデオのエンコーデング。他のいかなる使用に対してもライセンスを供
与もしくは暗示することは禁止されています。そして、商業の用途と認可される場合、追加情報を得ること
ができます。HTTP://WWW.MPEGLA.COM をご参照ください。
GPL
ライセンス
当製品には、サードパーティーによって開発されたコードが含まれており、これは GNU
ジェネラルパブリックライセンス(「GPL」)または GNU レッサーパブリックライセンス
(「LGPL」)に準拠しています。
当製品で使用される GPL コードは保証なしで提供され、これは発行者の著作権に準拠し
ています。
GPL ライセンス準拠の追加ソースコードは、要求に応じて利用可能です。
Linux カーネル用の修正、新しいコマンド数種、またコードに組み込める幾つかのツール
を発表できることを喜ばしく思います。コードは FTP サイトから供給されます。下記の
サイトからダウンロードされるか、代理店にお問い合わせください:
モデル 1、2、3 および 4:
http://download.dvrtw.com.tw/GPL/IPCAM/F-Seriers/linux.tar.gz
モデル 5:http://download.dvrtw.com.tw/GPL/IPCAM/A-Seriers/linux.tar.gz
モデル 6 ならびに 7:
http://download.dvrtw.com.tw/GPL/IPCAM/S-Seriers/linux.tar.gz
Page 62

目次
1. 概要 1
1.1 製品の特徴 ............................................................................................................................................... 1
1.2 パッケージの内容 ..................................................................................................................................... 1
1.3 ケーブル概要 ............................................................................................................................................ 2
1.5 外部アラームの接続 ................................................................................................................................. 2
2. Internet Explorer を利用するカメラへのアクセス ............................................................................ 4
2.1 カメラへのログイン ................................................................................................................................. 4
2.2 コントロールパネルの概要 ...................................................................................................................... 4
2.3 デジタル PTZ(DPTZ)の操作 ................................................................................................................ 6
2.4 イベント・レコード検索と再生 ............................................................................................................... 8
3. カメラの設定 ...................................................................................................................................... 9
3.1 システム設定メニュー.............................................................................................................................. 9
3.2 ネットワーク .......................................................................................................................................... 10
3.2.1 ネットワーク ................................................................................................................................................. 10
3.2.2 QoS ................................................................................................................................................................ 10
3.2.3 DDNS ............................................................................................................................................................. 10
3.2.4 SNTP .............................................................................................................................................................. 10
3.2.5 FTP ................................................................................................................................................................. 11
3.2.6 電子メール ..................................................................................................................................................... 11
3.2.7 SMS ................................................................................................................................................................ 12
3.2.8 フィルタ ........................................................................................................................................................ 13
3.2.9 UPnP/Bonjour ................................................................................................................................................ 13
3.2.10 RTP .............................................................................................................................................................. 14
3.3 カメラ ..................................................................................................................................................... 16
3.3.1 カメラ ............................................................................................................................................................ 16
3.3.2 ビデオ ............................................................................................................................................................ 16
3.3.3 カラー ............................................................................................................................................................ 17
3.3.4 詳細 ............................................................................................................................................................... 17
3.4 録画 ........................................................................................................................................................ 18
3.4.1 録画 ............................................................................................................................................................... 18
3.4.2 録画予約 ........................................................................................................................................................ 18
3.5 ストレージ ............................................................................................................................................. 18
3.5.1 メモリ ............................................................................................................................................................ 18
3.6 トリガ ..................................................................................................................................................... 19
3.6.1 トリガ ............................................................................................................................................................ 19
3.7 全般 ........................................................................................................................................................ 20
3.7.1 全般 ............................................................................................................................................................... 20
3.7.2 時刻 ............................................................................................................................................................... 20
3.7.3 サーバー・ログ ............................................................................................................................................. 21
3.7.4 オンライン ..................................................................................................................................................... 21
3.7.5 アカウント ..................................................................................................................................................... 22
3.7.6 Google マップ ............................................................................................................................................... 22
3.7.7 保守 ............................................................................................................................................................... 23
付録 1 製品仕様 ................................................................................................................................... 25
付録 2 ビット・レート・テーブル(参照用) .................................................................................... 31
付録 3 POE 接続 ................................................................................................................................. 33
付録 4 SMS メッセージング用 API ID アプリケーション ................................................................... 34
付録 5 Q&A .......................................................................................................................................... 36
付録 6 録画タイムテーブル ................................................................................................................. 37
付録 7 マイクロ SD カード互換性リスト ............................................................................................ 38
Page 63
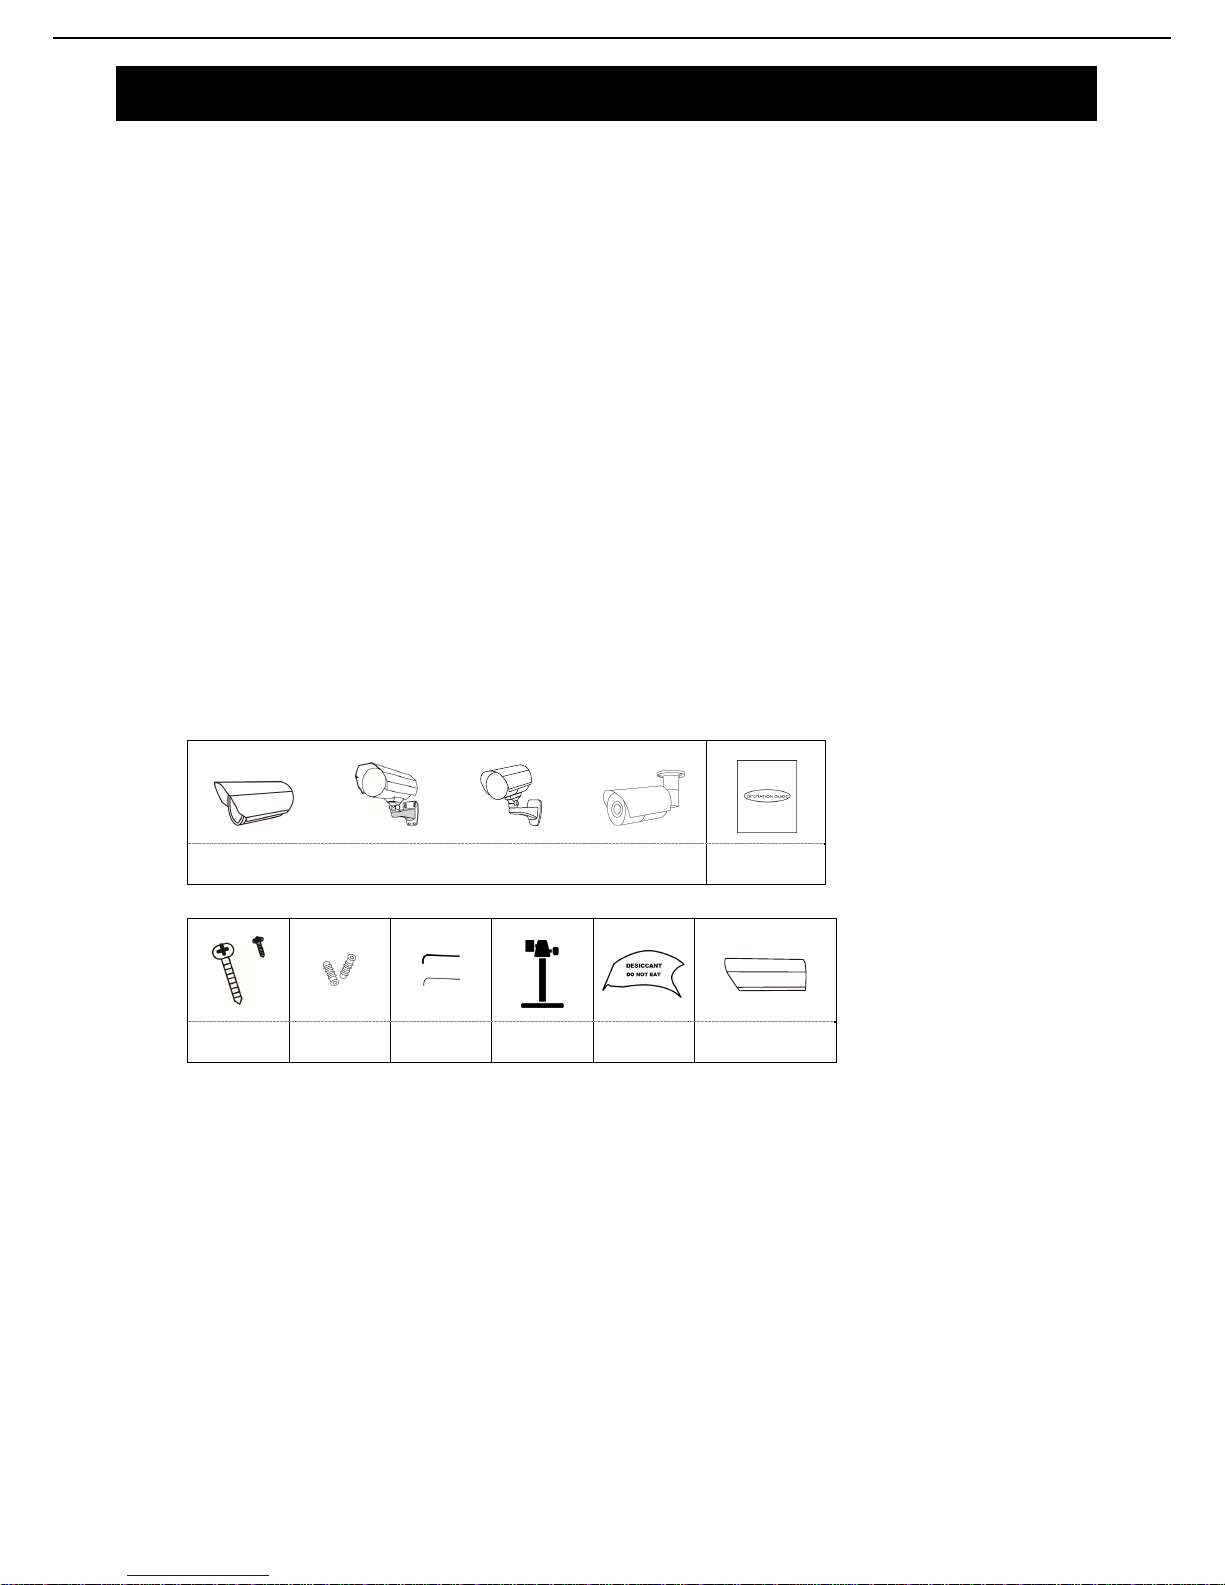
1
1. 概要
1.1 製品の特徴
お使いの iPhone/iPad で簡単にネットワーク設定を行うことができます
HDTV 720p 品質の 1.3/2 メガピクセルソリューションで、ユーザーがより簡単に細部に気づくことを可能にします
ソリッドライトシリーズは、より優れた露出オーバー防止機能(アドバンストスマートライトコントロール)を搭載しています
ONVIF 規格が、システム統合の簡素化をサポートします
POE(パワー·オーバー·イーサネット)が電源ケーブル使用の排除、また設置コストの削減をサポートします
外部アラーム I/O デバイス接続
夜間監視用の IR LED を内蔵しています
(上位モデルのみ)
f2.8~12mm の可変焦点レンズを搭載し、様々な監視環境に適しています。
(上位モデルのみ)
WDR が露出オーバー部分および暗い部分の画像認識性を向上させます。
(指定モデルのみ)
10 倍光学ズーム、10 倍デジタルズームと自動フォーカス機能を装備する f6.0~60mm のズームレンズは、様々
な監視環境に適しています。
(上位モデルのみ)
ビデオ格納用のマイクロ SD カードに対応しています。
(上位モデルのみ)
内蔵ヒーターにより、-40℃の低温でも動作します。
リモート監視
-- iPhone および iPad、Windows®オペレーティングシステム上の Internet Explorer®に完全互換です
1.2 パッケージの内容
または または または
カメラ
クイック
ガイド
上位モデルのみ:
ネジ
ウォール
プラグ
レンチ ブラケット 乾燥剤 サンシールド
Page 64
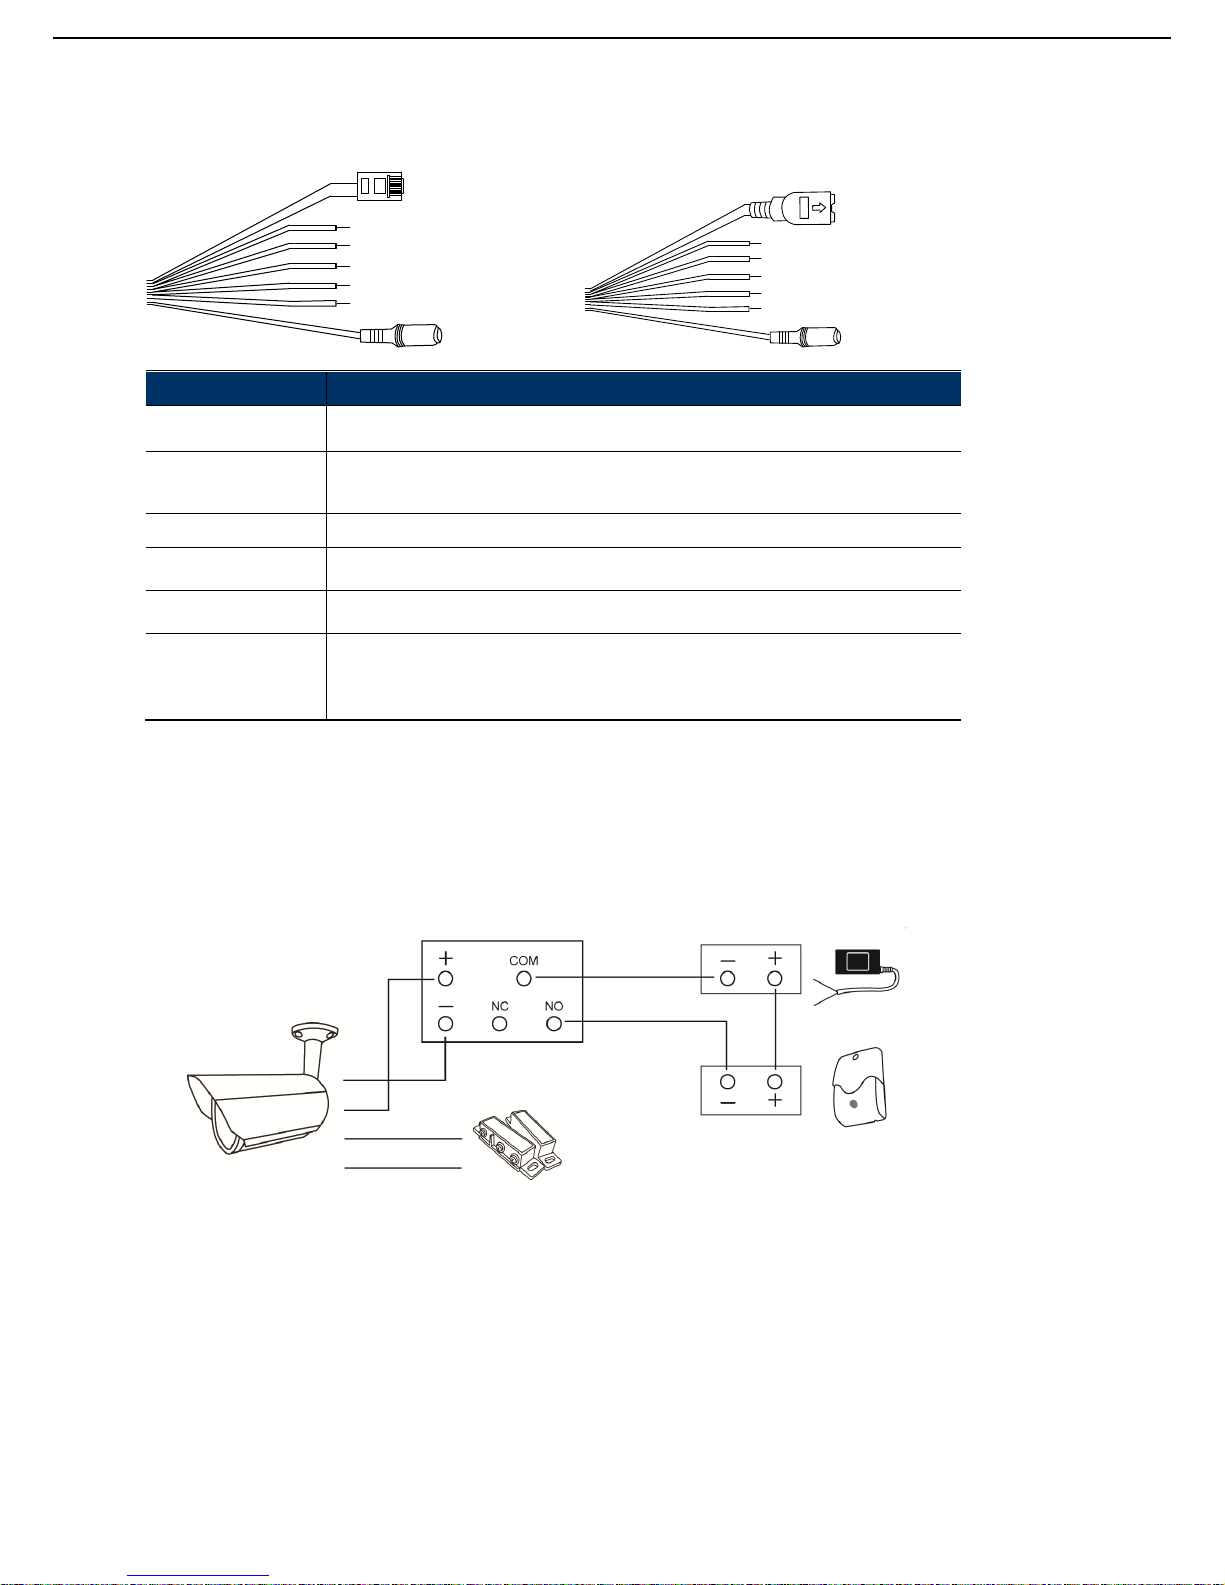
2
1.3 ケーブル概要
タイプ A: タイプ B:
Power cable
RJ45 network cabl
e
RESET
GND
Alarm-out
Alarm-in
GND
Power cable
RJ45 network cabl
e
RESET
GND
Alarm-out
Alarm-in
GND
ケーブル 説明
電源ケーブル
DC12V 電源に接続します。
注意: 電源アダプタはオプションです。
RJ45 ネットワーク・
ケーブル
ケーブル延長用に供給された RJ45 ケーブル延長アダプタに接続し、接続に適した長さを
持つ別の RJ45 ネットワークケーブルをご用意ください。
GND
デフォルトへのリセットまたは外部機器接続に使用されるアース線です。
アラーム入力
外部アラーム装置に接続するために予約されています。詳しくは、お使いのアラーム装置
のマニュアルを参照してください。
アラーム出力
外部アラーム装置に接続するために予約されています。詳しくは、お使いのアラーム装置
のマニュアルを参照してください。
リセット確認
デフォルトにリセットするために、この電線の絶縁被覆を外し、アース線と一緒にそれを
ねじってください。これにより、IP アドレスを含むすべてのパラメータを工場出荷時の
設定にリセットします。
注意: 本の電源をねじる前に電源を抜き、再度電源に接続し、デフォルトにリセットします。
1.4 外部アラームの接続
このカメラは、簡単に接続するために、外部 I/O デバイス接続をサポートしています。
以下に、このカメラに外部デバイスを接続する方法を示します。
RJ45 ネットワーク・ケーブル
RJ45 ネットワーク・ケーブル
電源ケーブル 電源ケーブル
アラーム入力
GND
リセット確認
GND
アラーム出力
アラーム入力
GND
リセット確認
GND
アラーム出力
DC 5V リレー
DC 12V
電源装置
ブザー
電磁接点
カメラ
Page 65
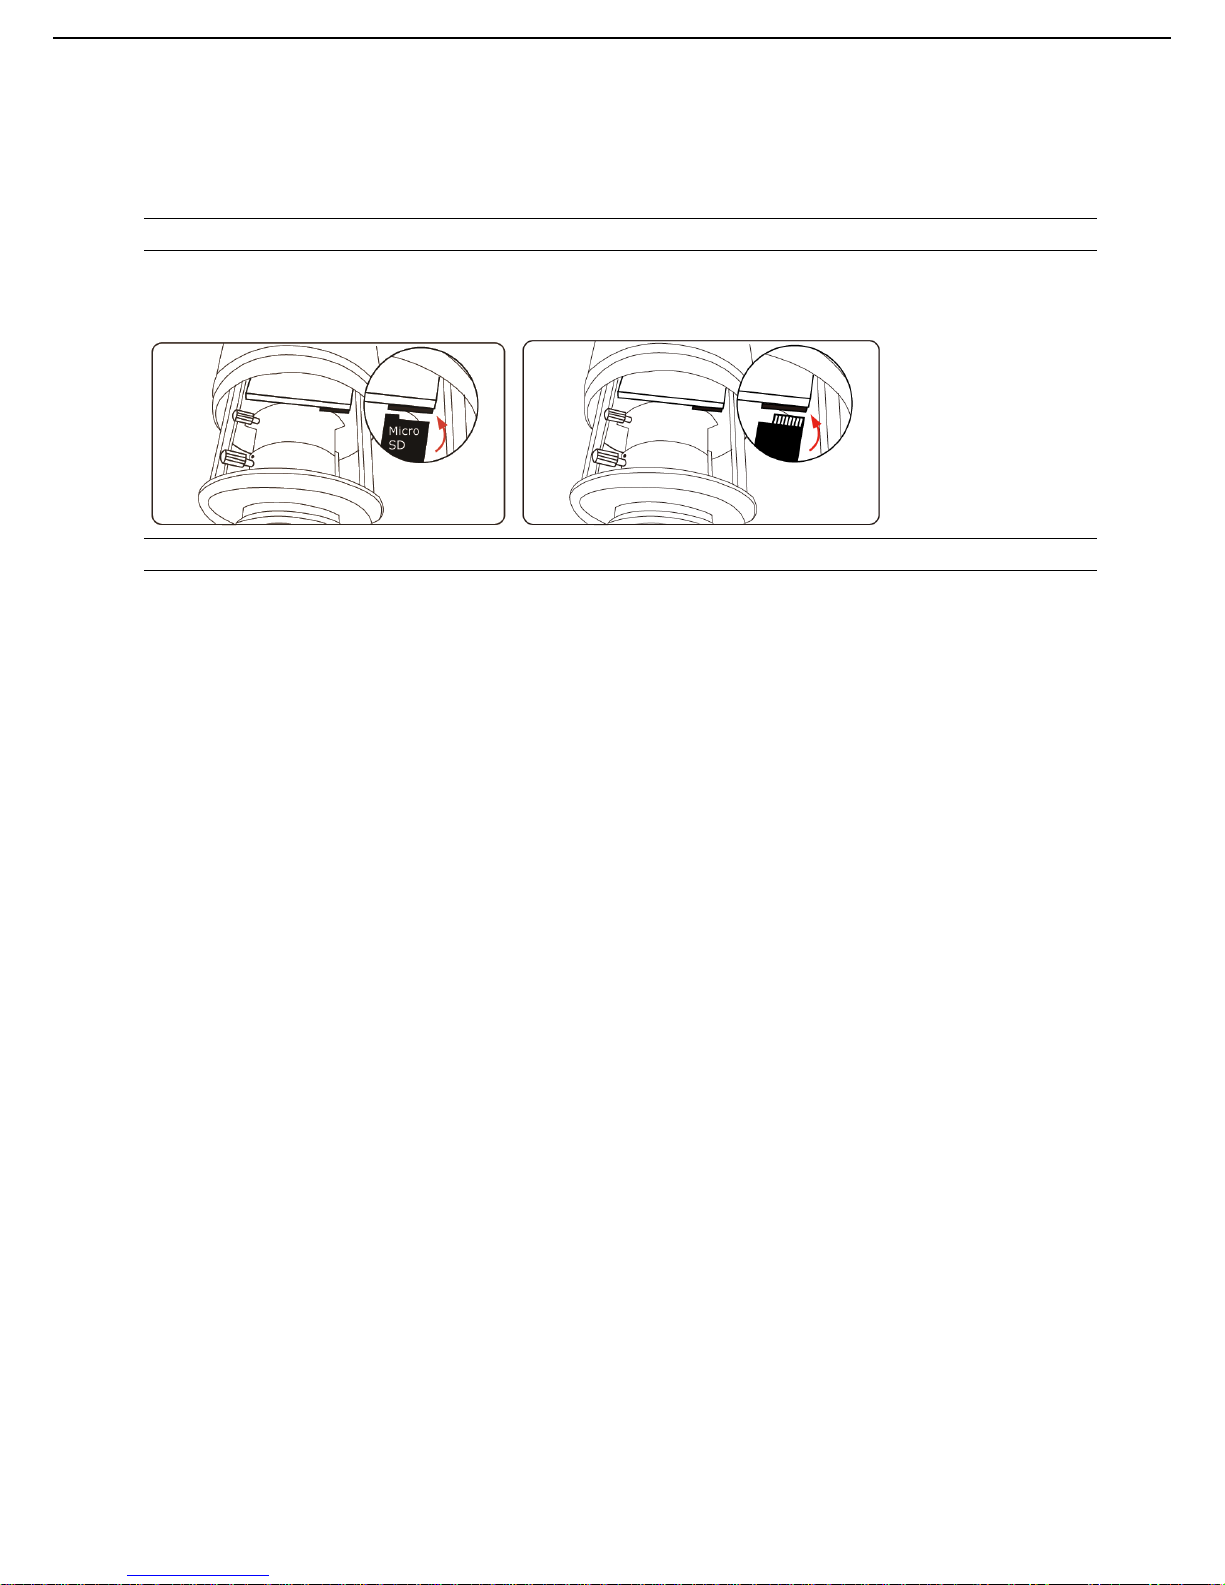
3
1.5 マイクロSDカードの挿入(上位モデルのみ)
ローカルビデオ録画用に、マイクロ SD カードスロットがカメラにあります。カメラはホット・スワップに対応して
いません。電源を切った状態で、マイクロ SD カードを抜き差ししてください。元々マイクロ SD カードに保存さ
れたいたデータ(もしある場合)は、カードを挿入すると消去されます。
注意: 指定されたモデルのみがローカルビデオ録画用のマイクロ SD カードスロットを装備しています。
マイクロ SD カードを正しく挿入するために、下図の指示に従ってください:
タイプ A: タイプ B:
注意:マイクロ SD カードを取り出し/挿入する際はピンセットを使用することをお勧めします。
Page 66
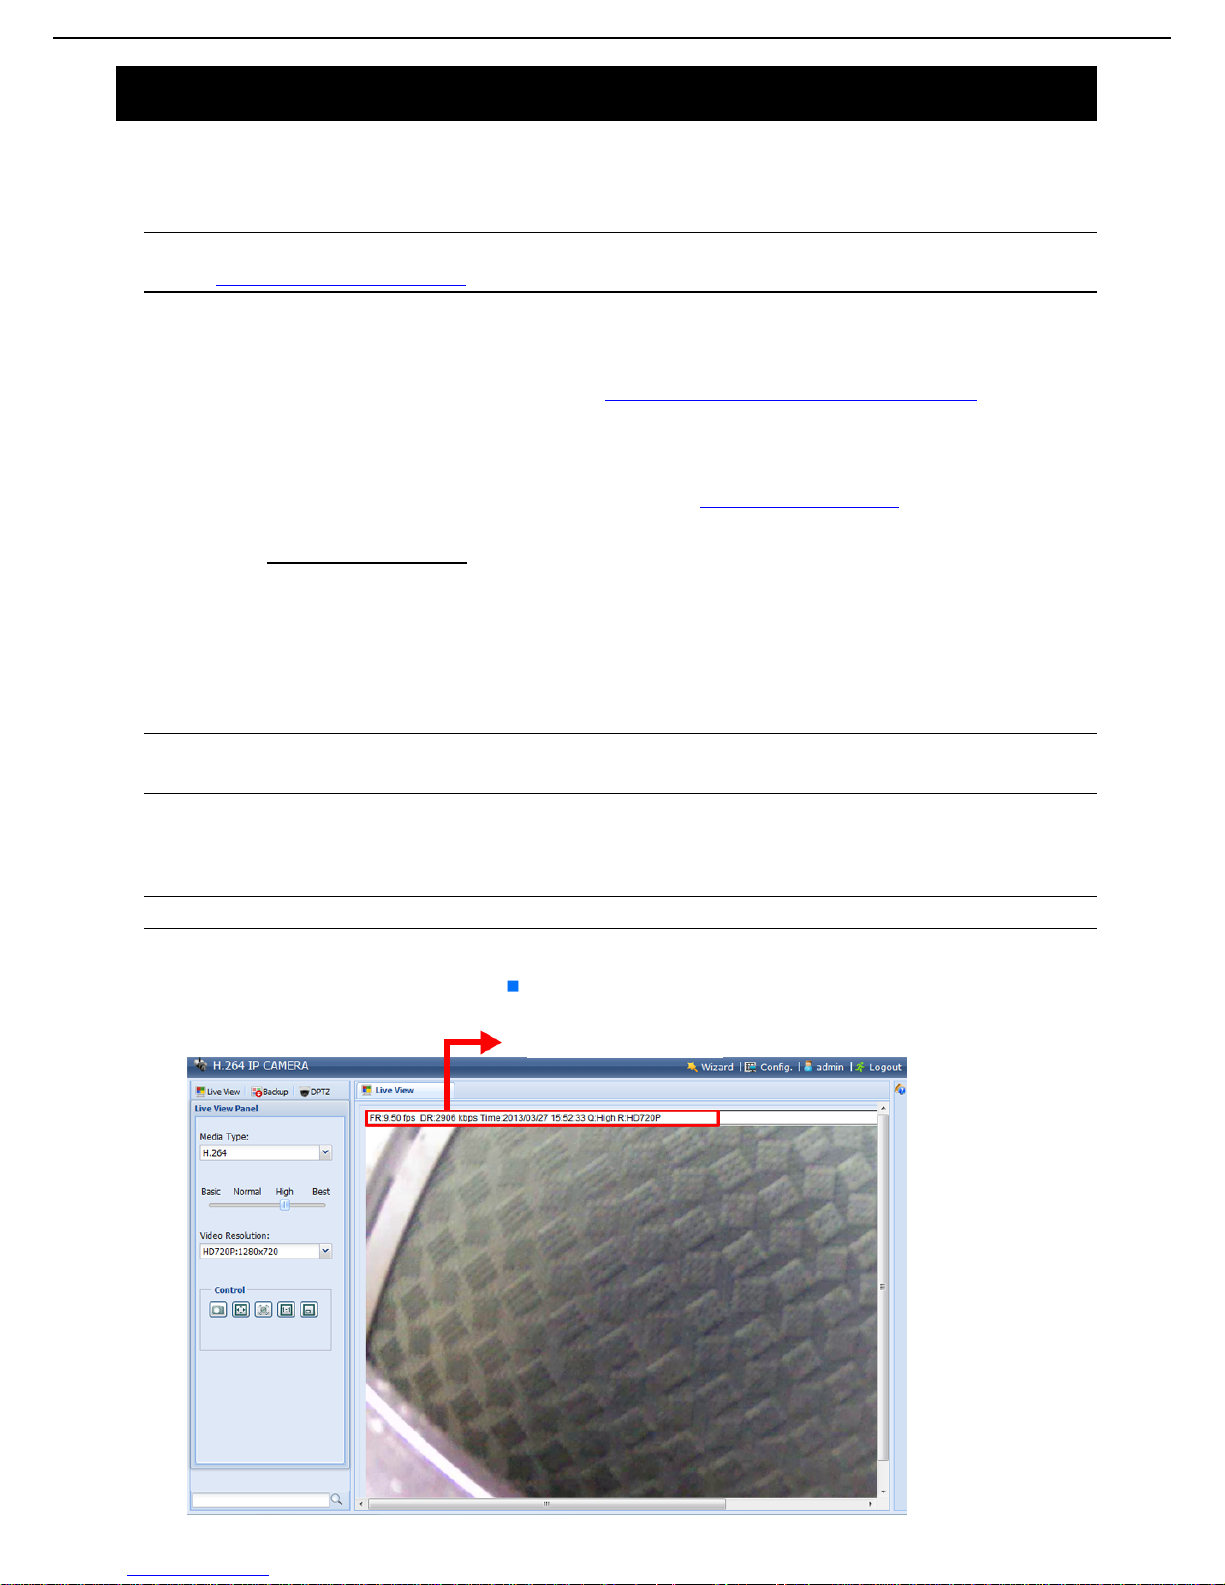
4
2. Internet Explorer を利用するカメラへのアクセス
このネットワークカメラには、Microsoft® Internet Explorer®、および、様々な使用状況に応じて当社自社開発プロ
グラム「EagleEyes」がインストールされた iPhone/iPad/Android モバイルデバイスを経由してアクセスすることが
できます。
注意: このネットワークカメラへの iPhone/iPad/Android モバイルデバイスを経由するアクセスについては、
http://www.eagleeyescctv.com を参照してください。
このカメラを使用する前にネットワーク設定を行い、ネットワーク接続が良好であることを確認して下さい。
ネットワーク設定については、以下を参照してください:
お使いのネットワーク環境がワイヤレスではない場合、www.surveillance-download.com/user/m359a.swf からダウンロー
ド可能な「詳細ネットワーク設定」。
2.1 カメラへのログイン
ステップ 1: ウェブ・ブラウザを開き、URL アドレス・ボックスに http://ipaddress:portnum をキー入力します。例
えば、IP アドレスが 60.121.46.236 で、ポート番号が 888 の場合、URL アドレス・ボックスに
「http://60.121.46.236:888」と入力して、「Enter(確認)」を押します。
ステップ 2: ログイン・ページで、ユーザー名とパスワードをキー入力し、下の画像から暗証番号がある場合は入力
します。その後、「LOGIN(ログイン)」をクリックします。
ステップ 3: ウィザードが起動します。
‧ ウィザードをスキップし、カメラ・ライブ・ビューに直接アクセスするには、「Close(閉じる)」をクリックします。
‧ 次回からログイン時にウィザードを起動せず、カメラ・ライブ・ビューに直接アクセスするには、「Do not start wizard at
login(ログイン時にウィザードを起動しない)」にチェックを入れます。
注意: 「VLC プレーヤー」、「ソフトウェア」および「H264 ストリーミングビュワー」をインストールするよう求
められた場合は、同意し、インストールに進みます。
ステップ 5: 正常にログイン後、ライブ・ビューが表示されます。
2.2 コントロールパネルの概要
注意: 利用可能なボタンは、ログインに使用したユーザーレベルに依存します。
タイプ A:
現在のストリーミング情報
FR:フレームレート
DR:データレート
時間:現在のシステム時刻
Q:画質
R:解像度
Page 67
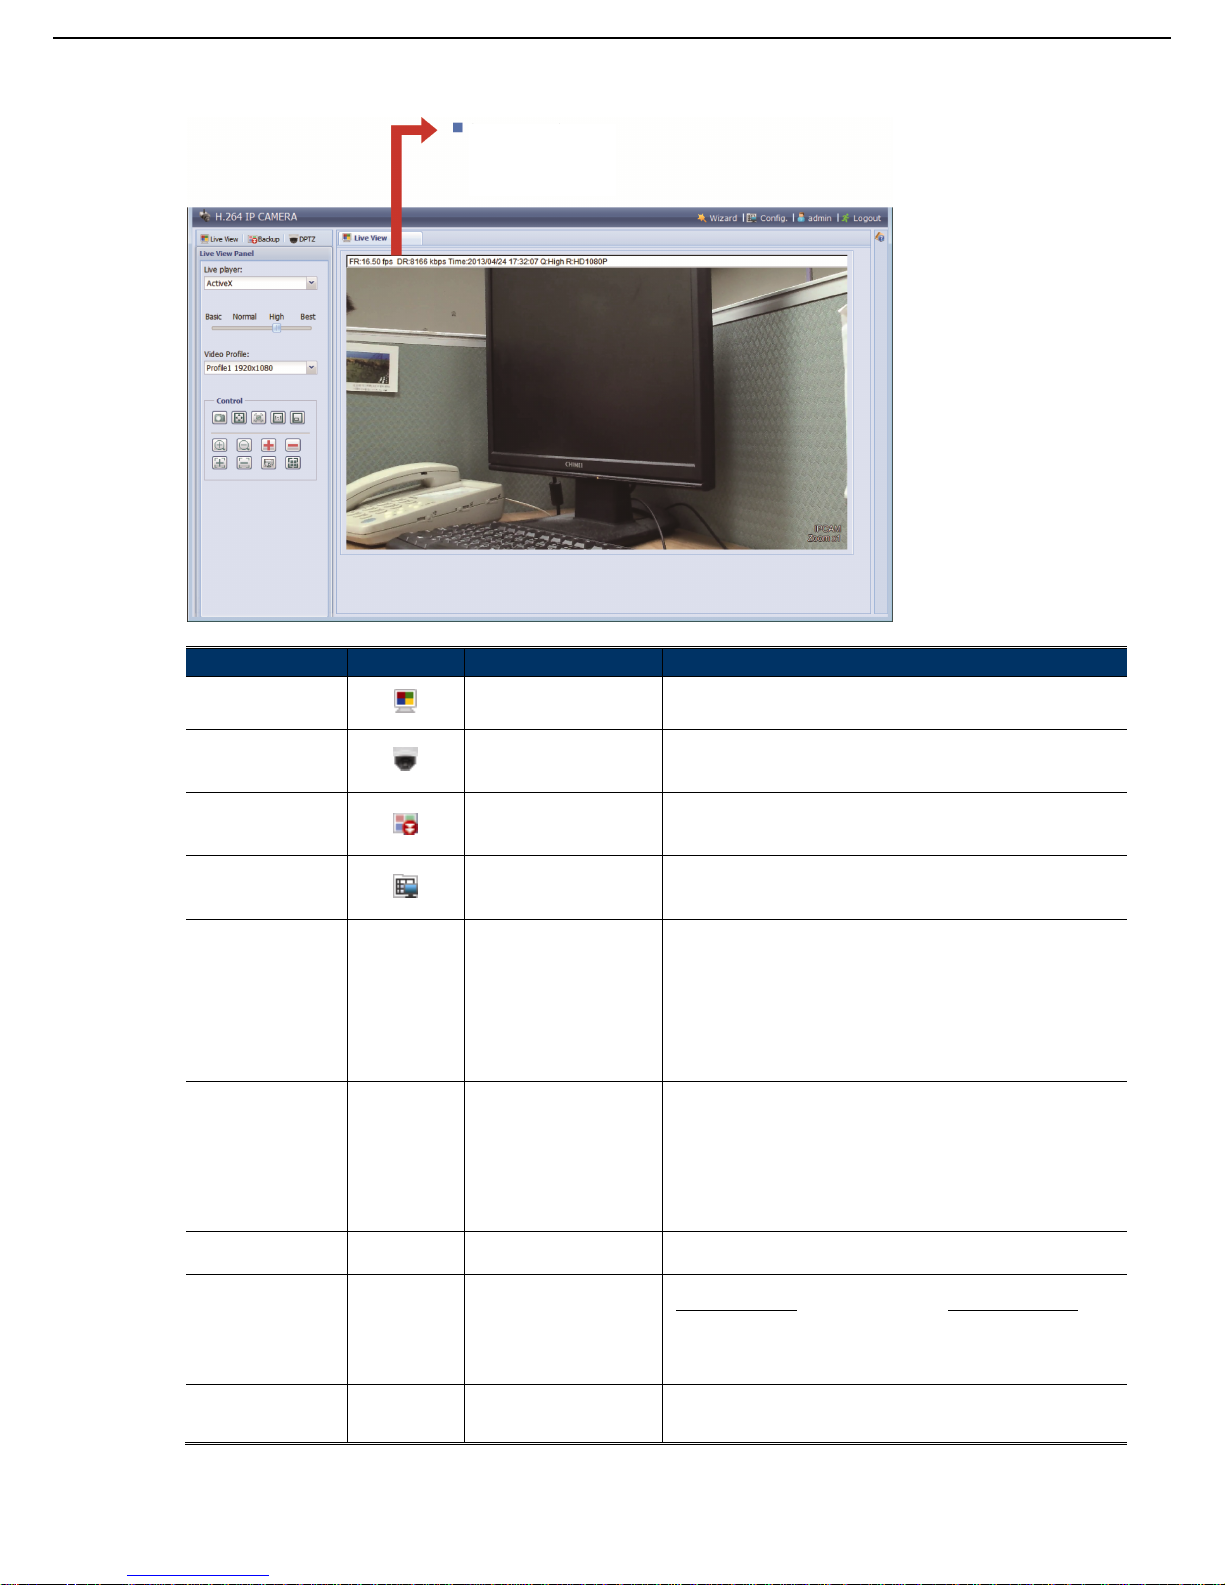
5
タイプ B:
機能 アイコン ユーザーレベ 説明
ライブ
スーパーバイザ/パワーユ
ーザー/ノーマルユーザー
/ゲスト
ライブ・ビュー・ページに切り替えます。
DPTZ
スーパーバイザ/パワーユ
ーザー/ノーマルユーザー
DPTZ 設定ページに切り替えます。
詳細は「2.3 デジタル PTZ(DPTZ)の操作」(6 ページ)を参照して下
さい。
バックアップ
スーパーバイザ/パワーユ
ーザー
ビデオ再生用のイベントレコードリストを入力します。
詳細は「2.4 イベント・レコード検索と再生」(8 ページ)を参照して下
さい。
構成
スーパーバイザ/パワーユ
ーザー
システム設定ページに切り替えます。「Supervisor(スーパーバイザ)」と
「Power User(パワーユーザー)」で、利用可能な機能は異なります。
詳細は「3.1 システム設定メニュー」(9 ページ)を参照して下さい。
メディア・タイプ* -- スーパーバイザ/パワーユ
ーザー/ノーマルユーザー
/ゲスト
ドロップダウン・リストから画像プレーヤーを選択します:
H.264/MPEG-4/モーション JPEG
QuickTime
QuickTime は Apple Inc.のマルチメディア ソフトウェアです。
「QuickTime」を選択する前に、QuickTime をお使いのオペレーティング・
システムにインストールする必要があります。 QuickTime を選択すると、
カメラにアクセスするためユーザー名とパスワードを入力するよう求めら
れます。
VLC
ライブ・プレーヤー* -- スーパーバイザ/パワーユ
ーザー/ノーマルユーザー
/ゲスト
ドロップダウン・リストから画像プレーヤーを選択します:
ActiveX
QuickTime
QuickTime は Apple Inc.のマルチメディア ソフトウェアです。
「QuickTime」を選択する前に、QuickTime をお使いのオペレーティング・
システムにインストールする必要があります。QuickTime を選択すると、
カメラにアクセスするためユーザー名とパスワードを入力するよう求めら
れます。
VLC
画質 -- スーパーバイザ/パワーユ
ーザー/ノーマルユーザー
スライダーをクリックし、ドラッグして、ビデオ品質を選択します:
ベーシック/ノーマル /ハイ/ベスト。
ビデオ解像度 -- スーパーバイザ/パワーユ
ーザー/ノーマルユーザー
ドロップ・リストから画像解像度を選択します:
2 メガピクセルモデル 1.3 メガピクセルモデル
HD1080P(1920 x 1080) SXGA (1280 x 1024)
HD720P(1280 x 720) HD720P(1280 x 720)
VGA(640 x 480)または D1(720 x 480) VGA(640 x 480)
QVGA(320 x 240)また は CIF(352 x 288) QVGA(320 x 240)
ビデオ・プロファイル* -- スーパーバイザ/パワーユ
ーザー/ノーマルユーザー
ドロップダウンリストから事前定義されたビデオセットを選択します。
ビデオセットは、「Config(設定)」 -> 「Camera(カメラ)」 -> 「Video
(ビデオ)」で設定することができます。
現在のストリーミン
グ
情報
FR:フレームレート
DR:データレート
時間:現在のシステム時刻
Q:画質
R:解像度
Page 68
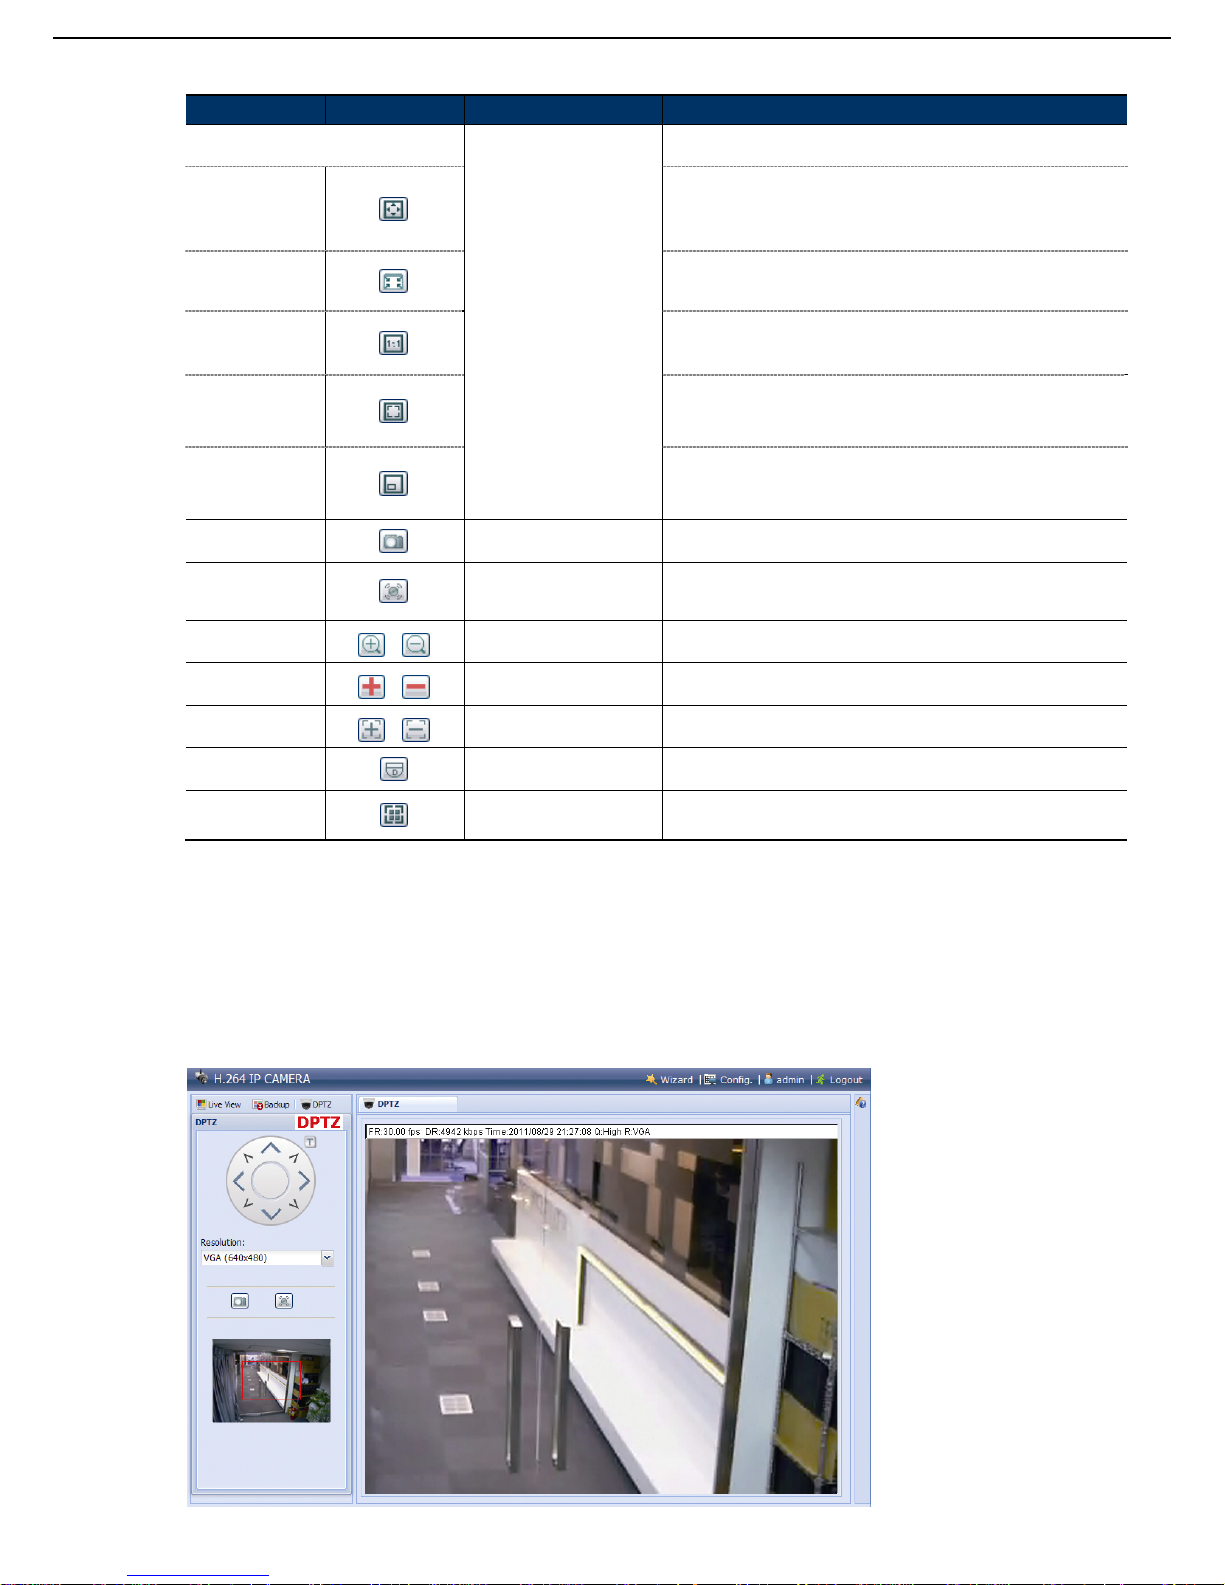
6
機能 アイコン ユーザーレベ 説明
ライブ・ビュー・サ
イズ:
スーパーバイザ/パワーユ
ーザー/ノーマルユーザー
フルスクリーン
クリックして、フル画面モードで画像を表示します。
フル画面モードを解除するには、キーボードの「Esc」キーを押します。
このアイコンは、選択した解像度が
HD1080P、SXGA、HD720P
または
VGA
場合のみ表示されます。
2 倍サイズ
QVGA 解像度は、現在のライブ・ビュー・サイズに収まるようリサイ
ズされます。
このアイコンは、選択した解像度が
QVGA
の場合のみ表示されます。
ノーマルサイズ
現在のライブ・ビュー・サイズは、選択した解像度と同じです。
このアイコンは、選択した解像度が
SXGA、HD720P
または
HD1080P
の場合
にのみ表示されます。
画面に合わせる
選択された解像度は、現在のライブ・ビュー・サイズに収まるようリサ
イズされます。
このアイコンは、選択した解像度が
SXGA、HD720P
または
HD1080P
の場合に
のみ表示されます。
スケールなし
ライブ・ビューの左下隅のムーバブル・スクエアをクリック・アンド・
ホールドして、移動します
このアイコンは、選択した解像度が
SXGA、HD720P
または
HD1080P
の場合に
のみ表示されます。
静止画保存
スーパーバイザ/パワーユ
ーザー/ノーマルユーザー
クリックして、新しいウィンドウ上で現在のビューのスナップショットを
撮ります。写真を右クリックして、必要な場所にそれを再保存します。
アラーム出力
スーパーバイザ/パワーユ
ーザー/ノーマルユーザー
クリックして、お使いのアラーム出力デバイスを強制的に動作させま
す。 例えば、お使いのアラーム装置がブザーの場合、このボタンをク
リックすると、アラーム・イベントがない場合でもブザーが鳴ります。
ズームイン/アウト*
/
スーパーバイザ/パワーユ
ーザー/ノーマルユーザー
クリックして現在の画像をズームイン/アウトします。
最大ズームイン/ア
ウト*
/
スーパーバイザ/パワーユ
ーザー/ノーマルユーザー
クリックして画像を最大ズームイン/画像をオリジナルサイズにズーム
アウトします。
フォーカス遠/近*
/
スーパーバイザ/パワーユ
ーザー/ノーマルユーザー
クリックしてビデオ画像のフォーカスを調節します。
DPTZ
スーパーバイザ/パワーユ
ーザー/ノーマルユーザー
最大 16 倍のズーム比のデジタル PTZ 機能を、クリックして有効化し
ます。
フォーカスゾーン
スーパーバイザ/パワーユ
ーザー/ノーマルユーザー
クリックして、フォーカス調整のためのポイントを割り当てます。
DPTZ
が有効になっている場合、この機能は無効になります。
*
指定モデルのみ
2.3 デジタル PTZ(DPTZ)の操作
このカメラには、PTZ 機能、つまり、広域監視のためのデジタル PTZ(ここでは、「DPTZ」と呼びます)があ
ります。
ステップ 1: 「DPTZ」をクリックして、DPTZ コントロールパネルを表示します。
タイプ A:
Page 69
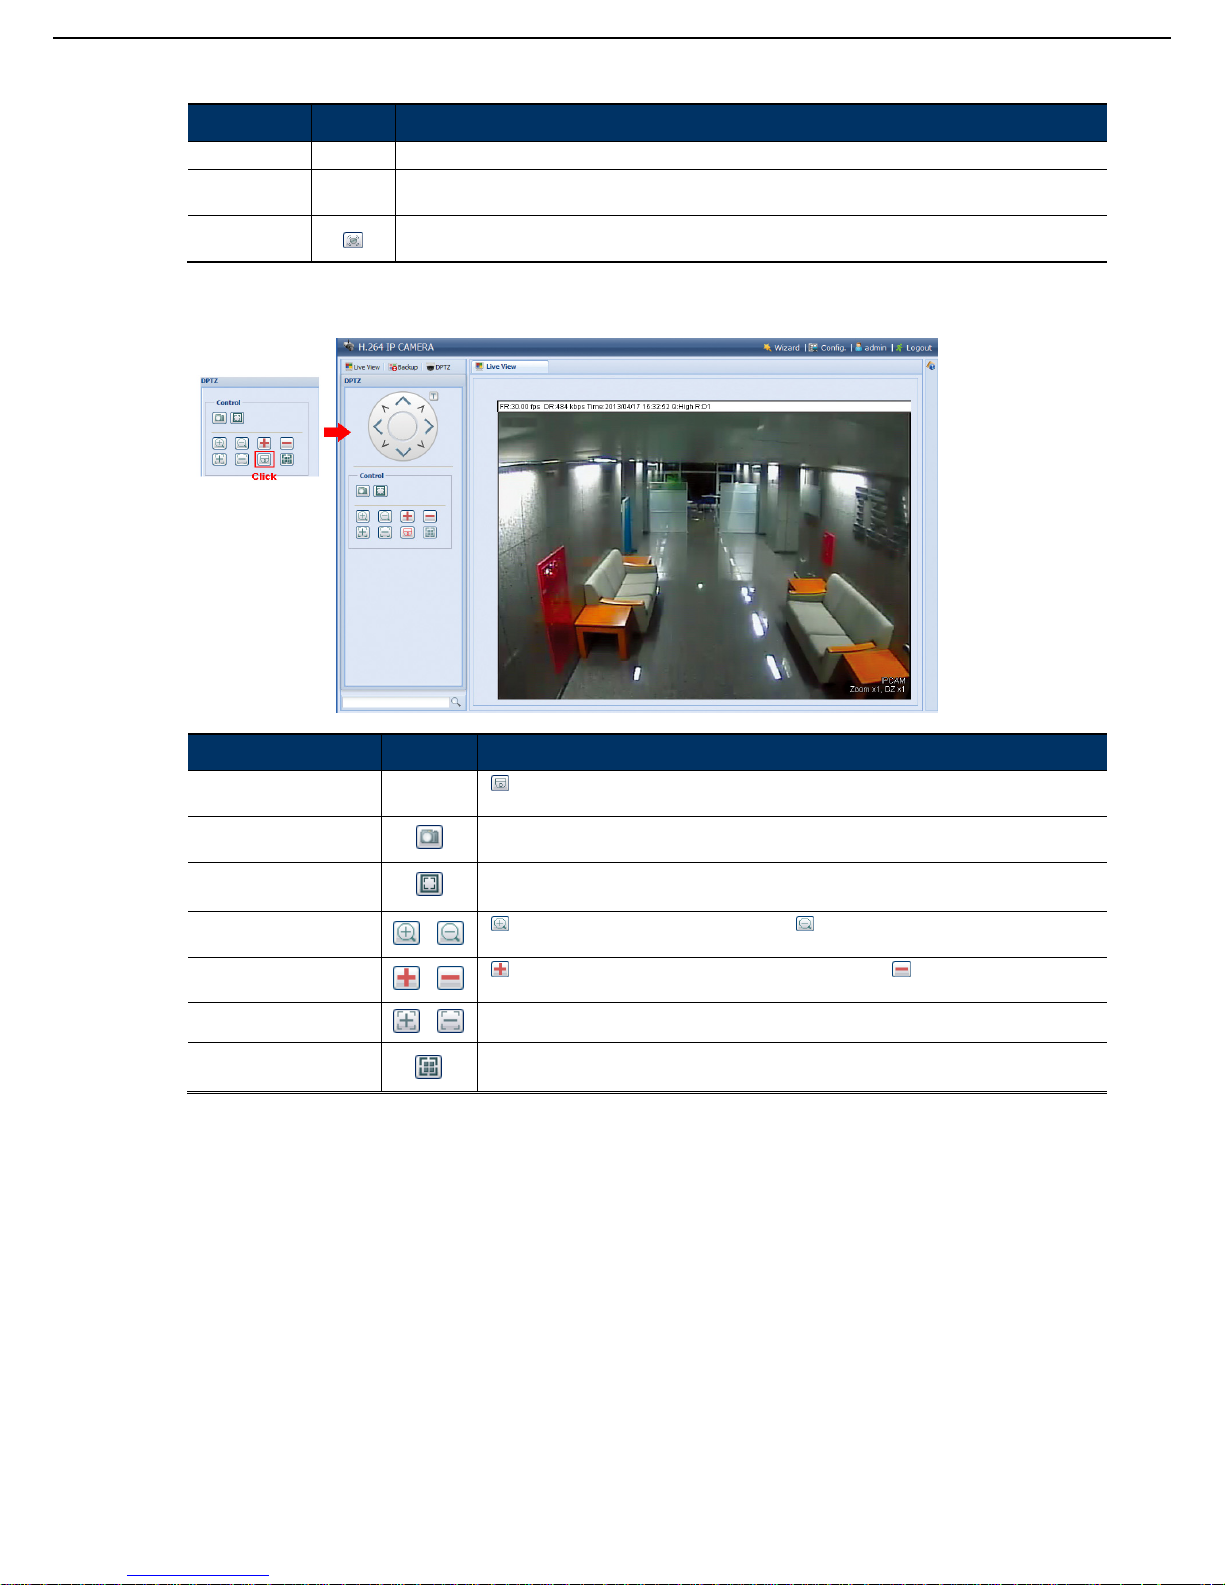
7
ステップ 2: 必要な場合に機能を選択します。
機能 アイコン 説明
解像度
--
DPTZ 機能におけるビデオ解像度を選択します。「VGA」ならびに「QVGA」のみが利用可能です。
スナップショッ
トを撮る
クリックして、新しいウィンドウ上で現在のビューのスナップショットを撮ります。写真を右クリックして、
必要な場所にそれを再保存します。
アラーム出力
クリックして、お使いのアラーム出力デバイスを強制的に動作させます。例えば、お使いのアラーム装置がブ
ザーの場合、このボタンをクリックすると、アラーム・イベントがない場合でもブザーが鳴ります。
タイプ B:
機能 アイコン 説明
移動パネル
--
を選択すると、移動コントロールパネルが表示され、ズームイン実施後の画像を移動すること
ができます。
スナップショットを撮る
クリックして、新しいウィンドウ上で現在のビューのスナップショットを撮ります。写真を右ク
リックして、必要な場所にそれを再保存します。
画面に合わせる
選択された解像度は、現在のライブ・ビュー・サイズに収まるようリサイズされます。
選択した解像度が
VGA
または
QVGA
である場合、このアイコンは動作しません。
ズームイン/アウト
/
を 1 回クリックすると画像を 1 倍ずつ拡大し、 を 1 回クリックするとズーム比を 1 倍ずつ戻
します。
最大ズーム・イン/アウト
/
を 1 回クリックすると画像を最大ズーム比 16 倍まで拡大し、 を 1 回クリックすると画像を
ズーム比 1 倍に戻します。
フォーカス遠/近
/
クリックしてビデオ画像のフォーカスを調節します。
フォーカスゾーン
クリックして、フォーカス調整のためのポイントを割り当てます。
DPTZ
が有効になっている場合、この機能は無効になります。
Page 70
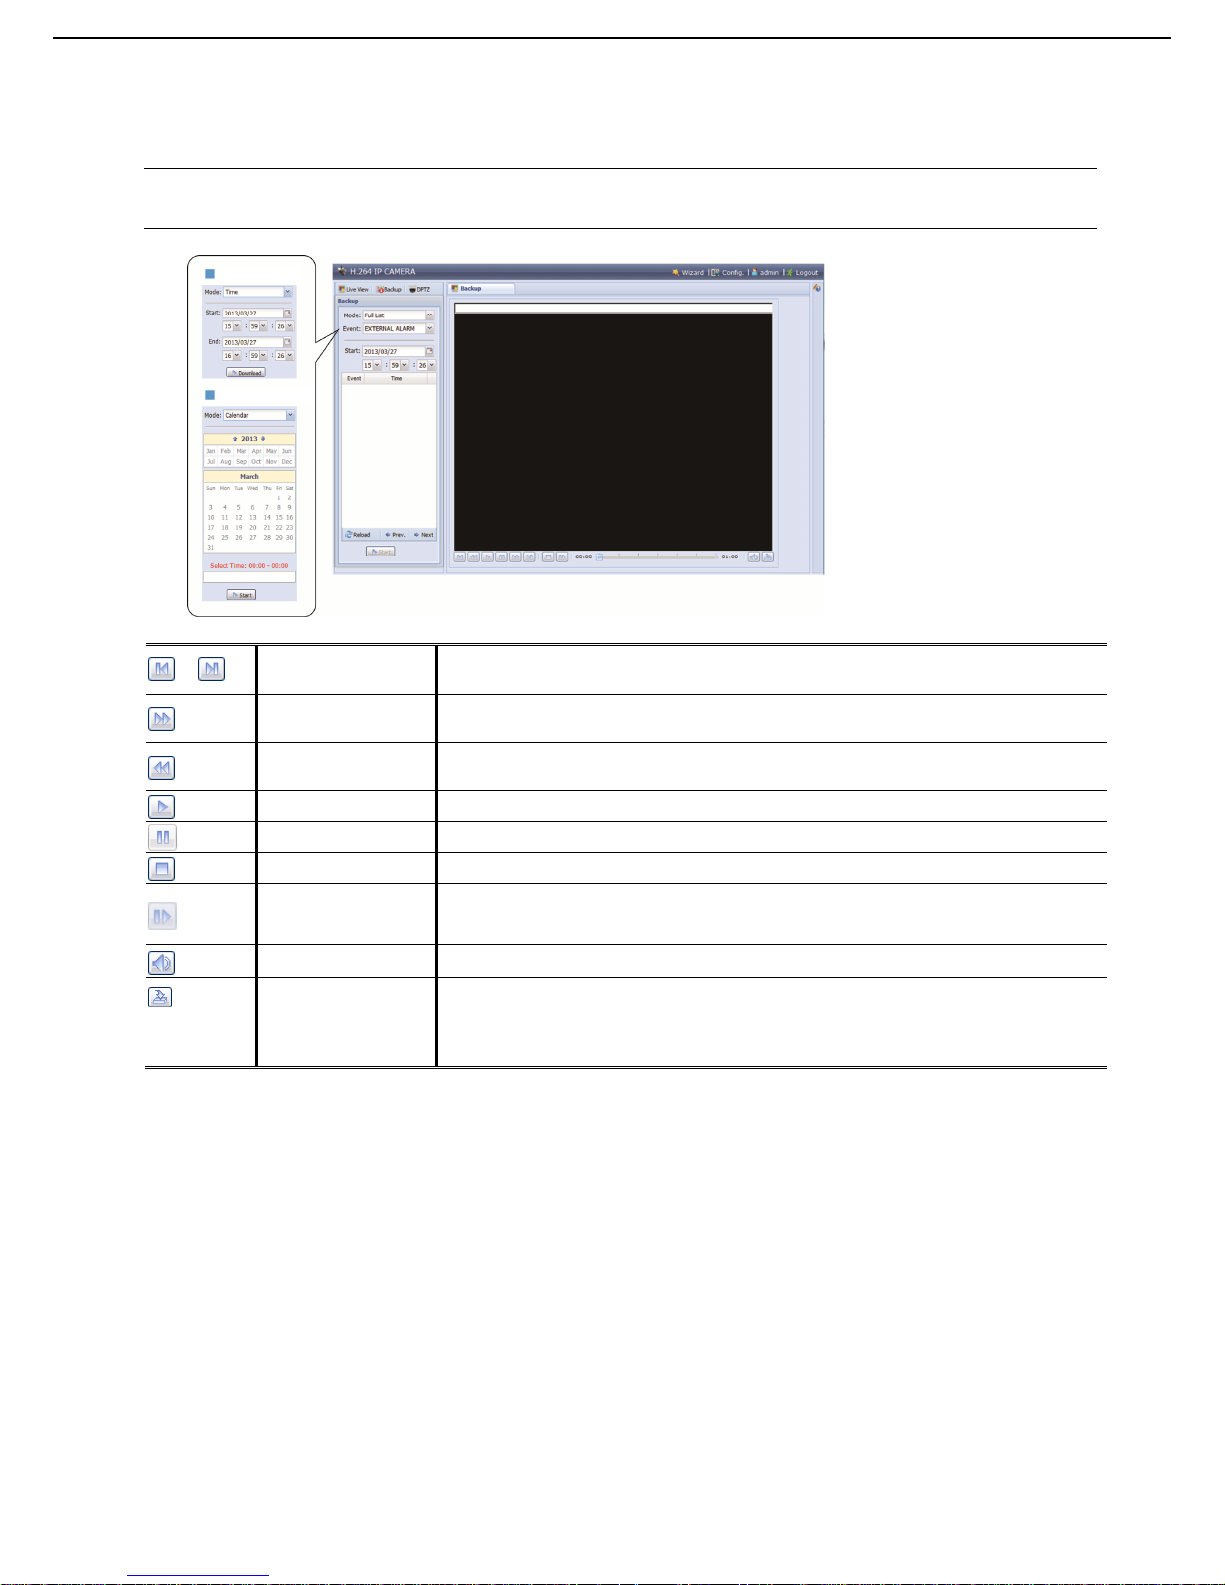
8
2.4 イベント・レコード検索と再生
このカメラは、最大 3 つのアラーム録画を保存できます。
注意: より多くの記録データを保存する場合は、このカメラを互換性のある NVR と共に使用することが推奨され
ます。
/
前の時間/次の時間
クリックすると時間単位で再生タイミングを移動して、指定時間の頭から録画を再生します
(例:11: 00~12:00、14:00~15:00)。
早送り
早送りのスピードを速めます。クリックして、2 倍速、4 倍速、8 倍速そして最終的には 16 倍
速で早送りします。
巻き戻し
巻戻しのスピードを速めます。クリックして、2 倍速、4 倍速、8 倍速そして最終的には 16 倍
速で巻戻します。
再生
クリックして現在のビデオクリップを再生します。
一時停止
クリックしてビデオ再生を一時停止します。
停止
クリックすると録画再生を停止します。
ステップ
一時停止モードで、クリックしてフレームを 1 つ先に進めます。
オーディオ 必要な際にクリックして再生をミュートします。再びクリックすると元に戻ります。
ダウンロード
クリックして現在のビデオクリップを PC 内の指定パスにダウンロードします。
ダウンロードしたビデオは、弊社独自のビデオ・プレーヤーでのみ開くことができます。「
General
(全般)」
→
「
Maintenance
(保守)」に移動し、ビデオ・プレーヤーをダウンロードする、または販売パッケージに付属のCDか
らプレーヤーを入手します。
時間検索
カレンダー検索
Page 71
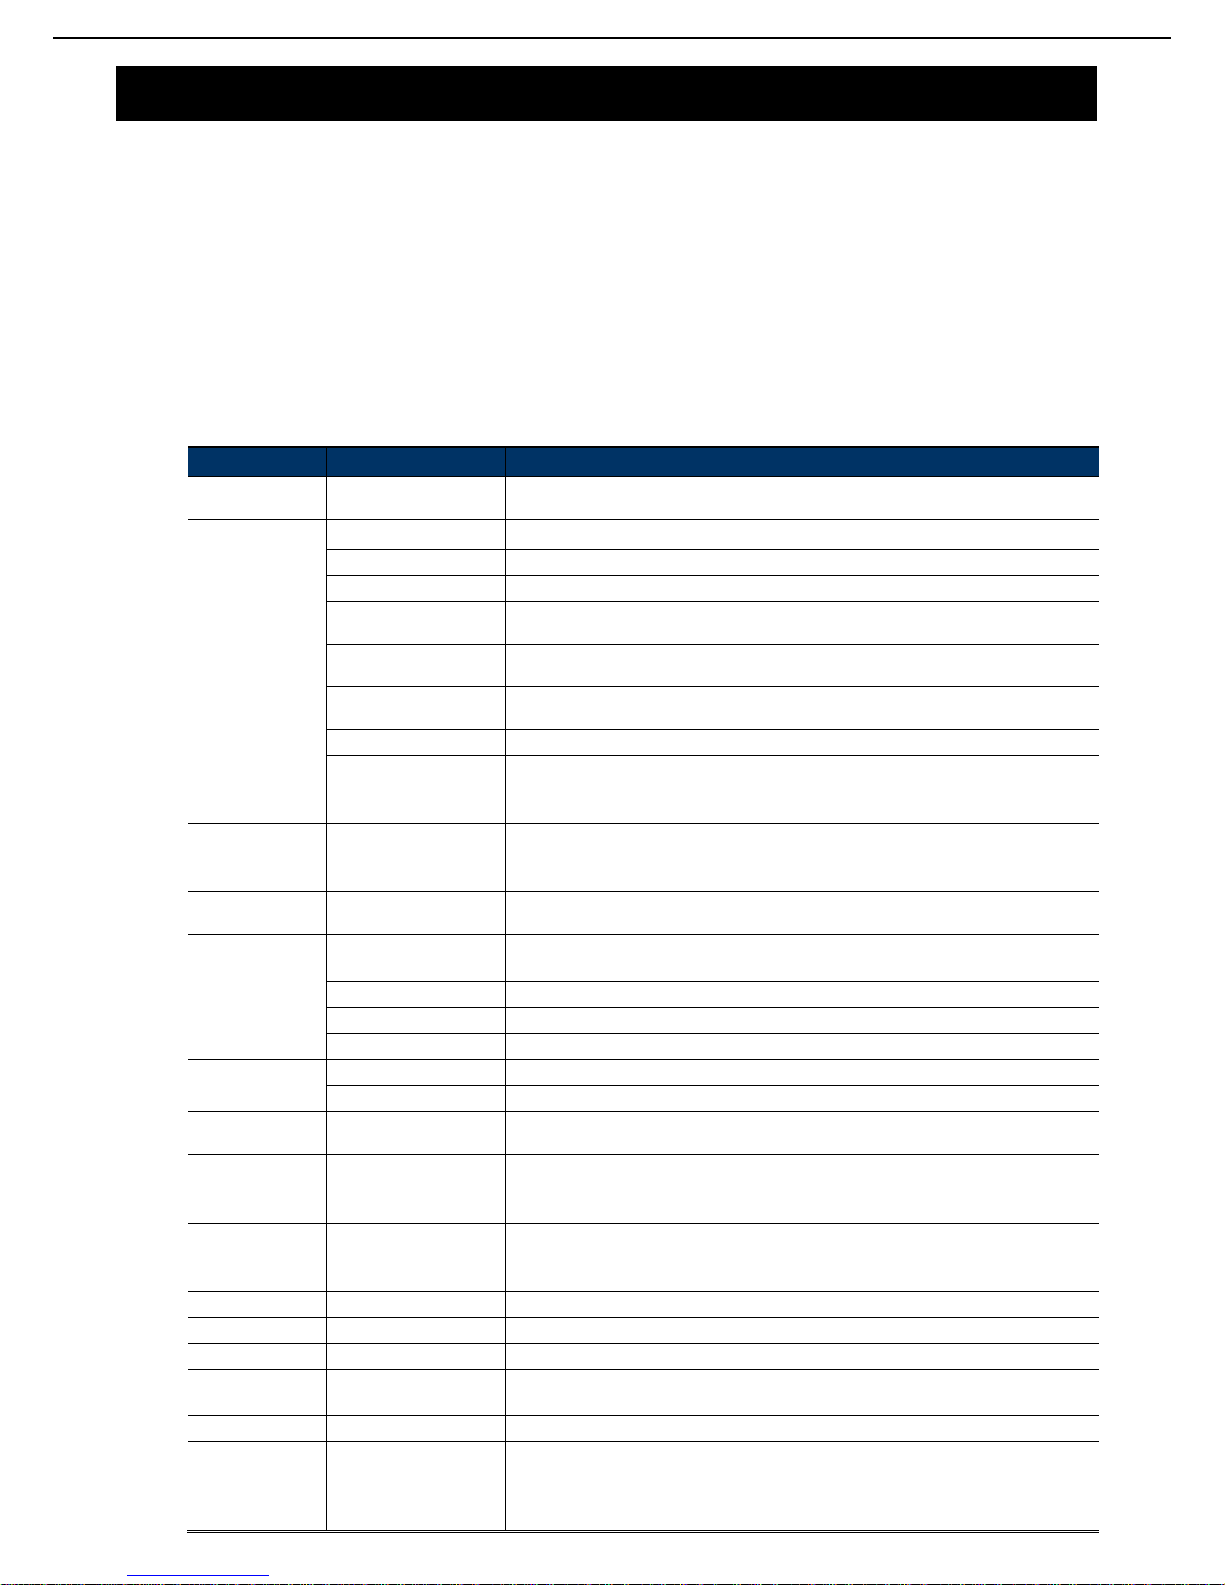
9
3. カメラの設定
Internet Explorer を経由してアクセスすることでこのネットワークカメラを詳細に設定することができます。
3.1 システム設定メニュー
「Config(設定)」をクリックして、設定ページに移動します。
この機能は、6 つのメニューに分類されます:ネットワーク、カメラ、レコード・タイマー、ストレージ、ト
リガ、また全般です。
「Network(ネットワーク)」の詳細については、「3.2 ネットワーク」(10 ページ)を参照してください。
「Camera(カメラ)」の詳細は、「3.3 カメラ」(16 ページ)を参照して下さい。
「Record(録画)」の詳細については、「3.4 録画」(18 ページ)を参照してください。
「Storage(ストレージ」の詳細については、「3.5 ストレージ」(18 ページ)を参照してください。
「Trigger(トリガ)」の詳細は、「3.6 トリガ」(19 ページ)を参照して下さい。
「General(全般)」の詳細については、「3.7 全般」(20 ページ)を参照してください。
メインメニュー サブ・メニュー 参照
Network
(ネットワーク)
ネットワーク
ネットワーク設定を行います。
QoS ライブ・ストリーミングに対するデータフローを制限します。
DDNS ネットワーク・タイプが PPPOE または DHCP である場合、DDNS 情報を入力します。
SNTP ネットワーク接続されたコンピュータ・システムを使用して、カメラの時刻を同期化します。
FTP
「Trigger(トリガ)」→「Trigger(トリガ)」で「FTP」が選択されている場合、イベント通知
に対する FTP 情報を入力します。
電子メール
「Trigger(トリガ)」→「Trigger(トリガ)」で「Email(電子メール)」が選択されている場
合、イベント通知に関する電子メール情報を入力します。
SMS
「Trigger(トリガ)」→「Trigger(トリガ)」で「SMS」が選択されている場合、SMS 通知に
対するテキスト・メッセージング情報を入力します。
フィルタ このカメラにアクセスできる、IP アドレスの許可またはブロックを選択します。
UPnP
*Windows
基盤のオペレーティング・システムに適しています。
簡単かつ迅速に利用できるよう、同一ネットワーム内のデバイス間で、このカメラを検出する
ことを可能にします。
Bonjour
*Mac
基盤のオペレーティング・システムに適しています。
簡単かつ迅速に利用できるよう、同一ネットワーム内のデバイス間で、このカメラを検出する
ことを可能にします。
RTP
リモートアクセス用にウェブブラウザまたはビデオビュワー以外のマルチメディアを使用す
る場合、ビデオデータ伝送に対するパラメータを設定します。
Camera(カメラ) カメラ
1. カメラの名前を変更します。
2. カメラ名を画面上に表示する場所を変更します。
ビデオ 様々なビデオ・フォーマットで、ビデオに関連する設定を調整します。
カラー カラー・パフォーマンスを調整します。
詳細 必要な場合、カメラのパラメータを調整します。
Record(録画) 録画 レコード機能を設定します。
録画予約 外部アラーム・レコードをスケジュール化します。
Storage
(ストレージ)
メディア
現在のストレージ容量を確認し、必要な場合は全レコードを消去します。
Trigger(トリガ)
トリガ
1. モーション検出を有効または無効にします。
2. モーション検出エリアを設定します。
3. イベントに対するカメラの作動方法を設定します。
General(概要) 概要
1. ウェブ・ブラウザの使用言語を選択します。
2. カメラの MAC アドレスを確認します。
3. 指定された時刻後のカメラ・アクセスをロックします。
時間 サマータイムと現在時刻を設定します。
サーバー・ログ システム・イベント・ログを確認します。
オンライン 現在のオンライン・ユーザーを確認します。
アカウント
1. 異なるアクセス権限がある新規ユーザー・カウントを作成します。
2. 既存ユーザー・アカウントを変更または削除します。
Google マップ ネットワークカメラがどこにあるかを特定することができます。
保守
1. 現在のファームウェア・バージョンを確認し、お使いのカメラをアップグレードします。
2. システム設定をコピーします。
3. カメラを再起動します。
4. 記録したデータを再生するため、ビデオ・プレーヤーをダウンロードします。
Page 72
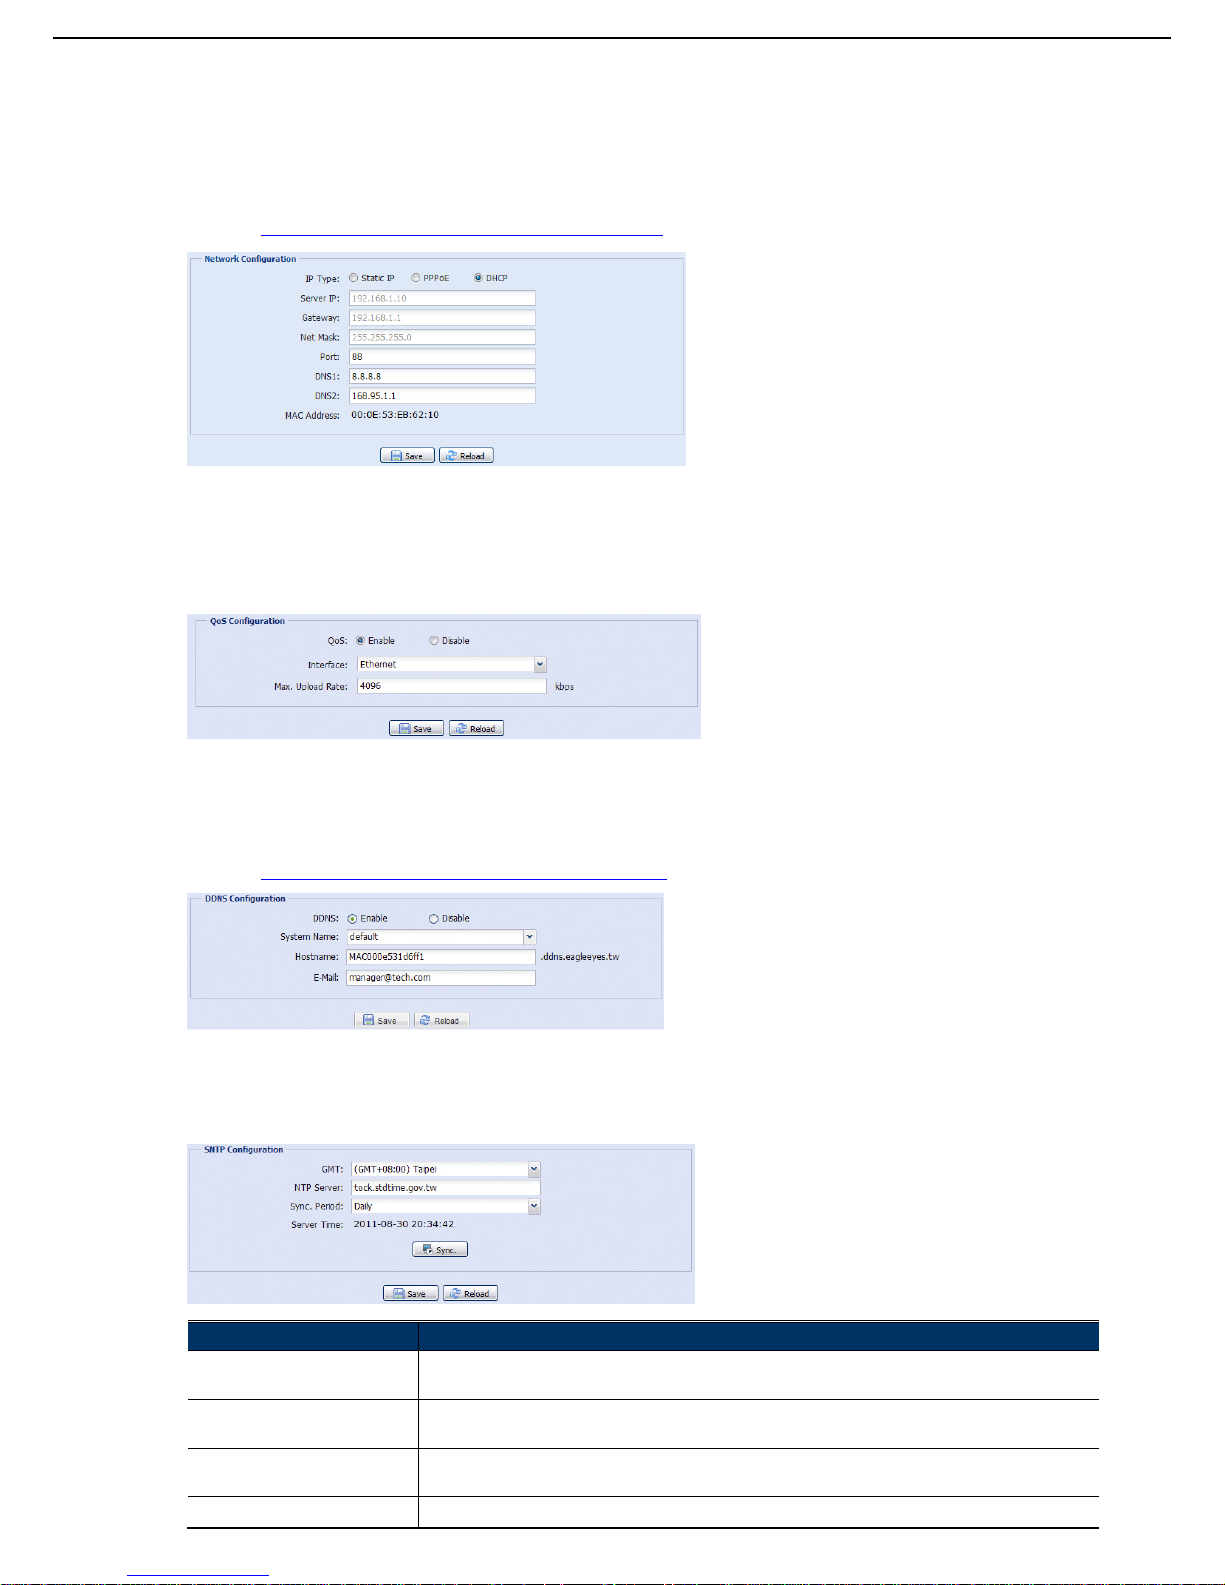
10
3.2 ネットワーク
3.2.1 ネットワーク
ネットワークタイプに応じて、ネットワークカメラのネットワーク設定を行うことができます。
詳細は、www.surveillance-download.com/user/m359a.swf の「詳細ネットワーク設定」を参照してください。
3.2.2 QoS
QoS(サービス品質)は、リアルタイム・ストリーミングについてデータフローを制御する機能です。お使いのネッ
トワーク帯域幅が不十分で、ネットワーク帯域幅を共有するその他デバイスがある場合、この機能は重要です。
「QoS Enable(QoS 有効化)」にチェックを入れ、最大アップロード比を 256 Kbps から 10240 Kbps で設定します。
3.2.3 DDNS
「Network(ネットワーク)」で選択したネットワーク・タイプが、「PPPOE」または「DHCP」である場合、「On
(オン)」を選択します。
詳細は、www.surveillance-download.com/user/m359a.swf の「詳細ネットワーク設定」を参照してください。
3.2.4 SNTP
SNTP(簡易ネットワークタイムプロトコル)は、ネットワーク接続されたコンピュータを使用して、カメラ時
刻を同期するために使用されます。
機能 説明
GMT ユーザーがタイムゾーンを選択すると、ネットワークカメラは自動的にシステムのローカルエリア時刻を
調整します。
NTP Server(NTP サーバー) デフォルト SNTP サーバー(例:tock.stdtime.gov.tw)を使用するか、ユーザーが使い慣れている別のサー
バーに変更します。
Sync. Period(同期化 期間) 「Daily(毎日)」を選択してカメラ時刻をネットワーク時刻と同期化する、または「None(なし)」を選択
して、この機能をオフにします。
Sync(同期化) クリックすると、ネットワークカメラは時刻をネットワーク時刻に同期します。
Page 73
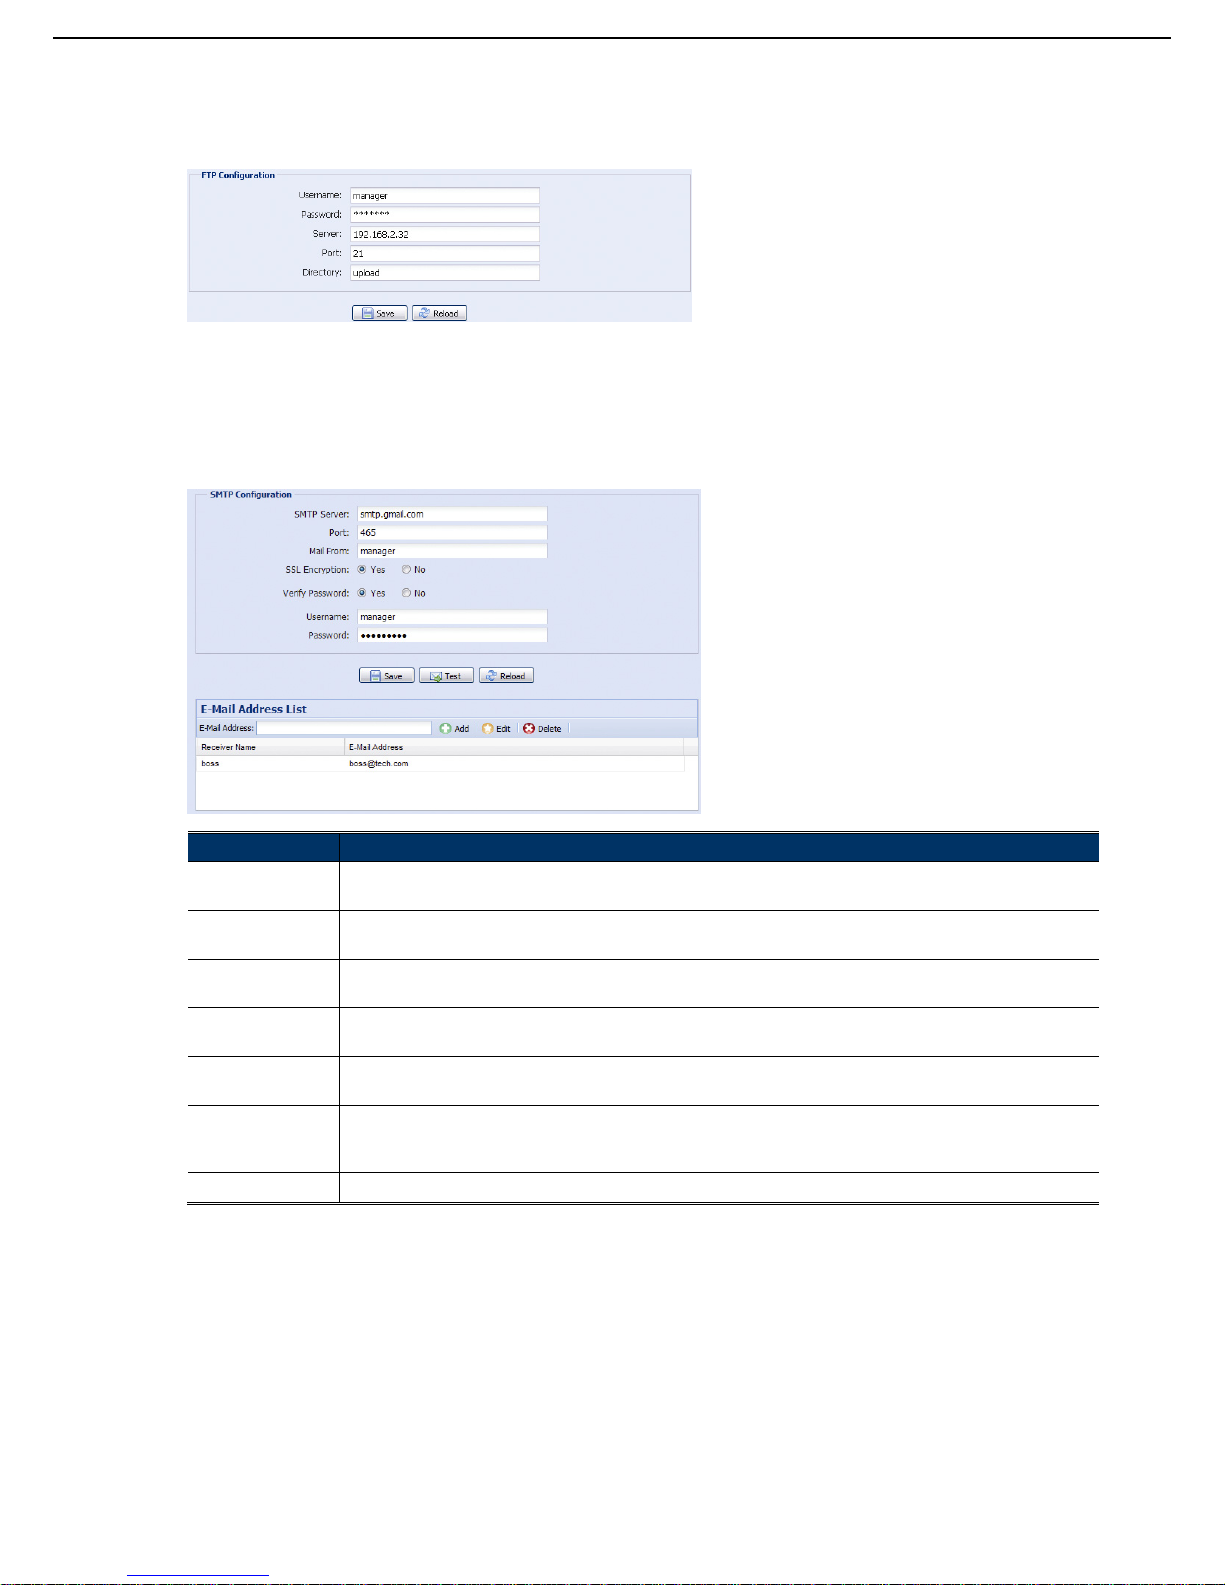
11
3.2.5 FTP
詳細に渡る FTP の情報を入力し、「Save(保存)」をクリックして確定します。「Trigger(トリガ)」→「Trigger
(トリガ)」で「FTP」が選択されている場合、ここで選択した情報が適用されます。
3.2.6 電子メール
電子メールの詳細情報を入力し、「Save(保存)」をクリックして確定します。「Trigger(トリガ)」→「Trigger
(トリガ)」で「Email(電子メール)」が選択されている場合、ここで選択した情報が適用されます。
機能 説明
SMTP Server
(SMTP サーバー)
ご使用の E メールシステム供給者からの SMTP サーバアドレスを入力します。
PORT ご利用の電子メール・システム供給者からのポート番号を、入力します。このコラムが空白のままになっている場合、
電子メール・サーバーはポート 25 を使用して電子メールを送信します。
Mail From
(メール発信者)
送信者の名前を入力します。
SSL Encryption
(SSL 暗号化)
不正アクセスから電子メール・コンテンツを保護するため、電子メール・サーバーが SSL 暗号化を使用している場合、
「Yes (はい)」を選択します。
Verify Password
(パスワードの確認)
メールサーバーによっては、パスワード認証を必要とすることがあります。「user name(ユーザー名)」と「password
(パスワード)」を入力して下さい。
E-Mail Address List
(電子メールアドレ
ス・リスト)
指定した宛先の電子メールアドレスを追加します。
Te st (テスト) 全ての情報を入力後、「Te st Ma il (テストメール)」をクリックし、受信できるかどうか確認します。
Page 74
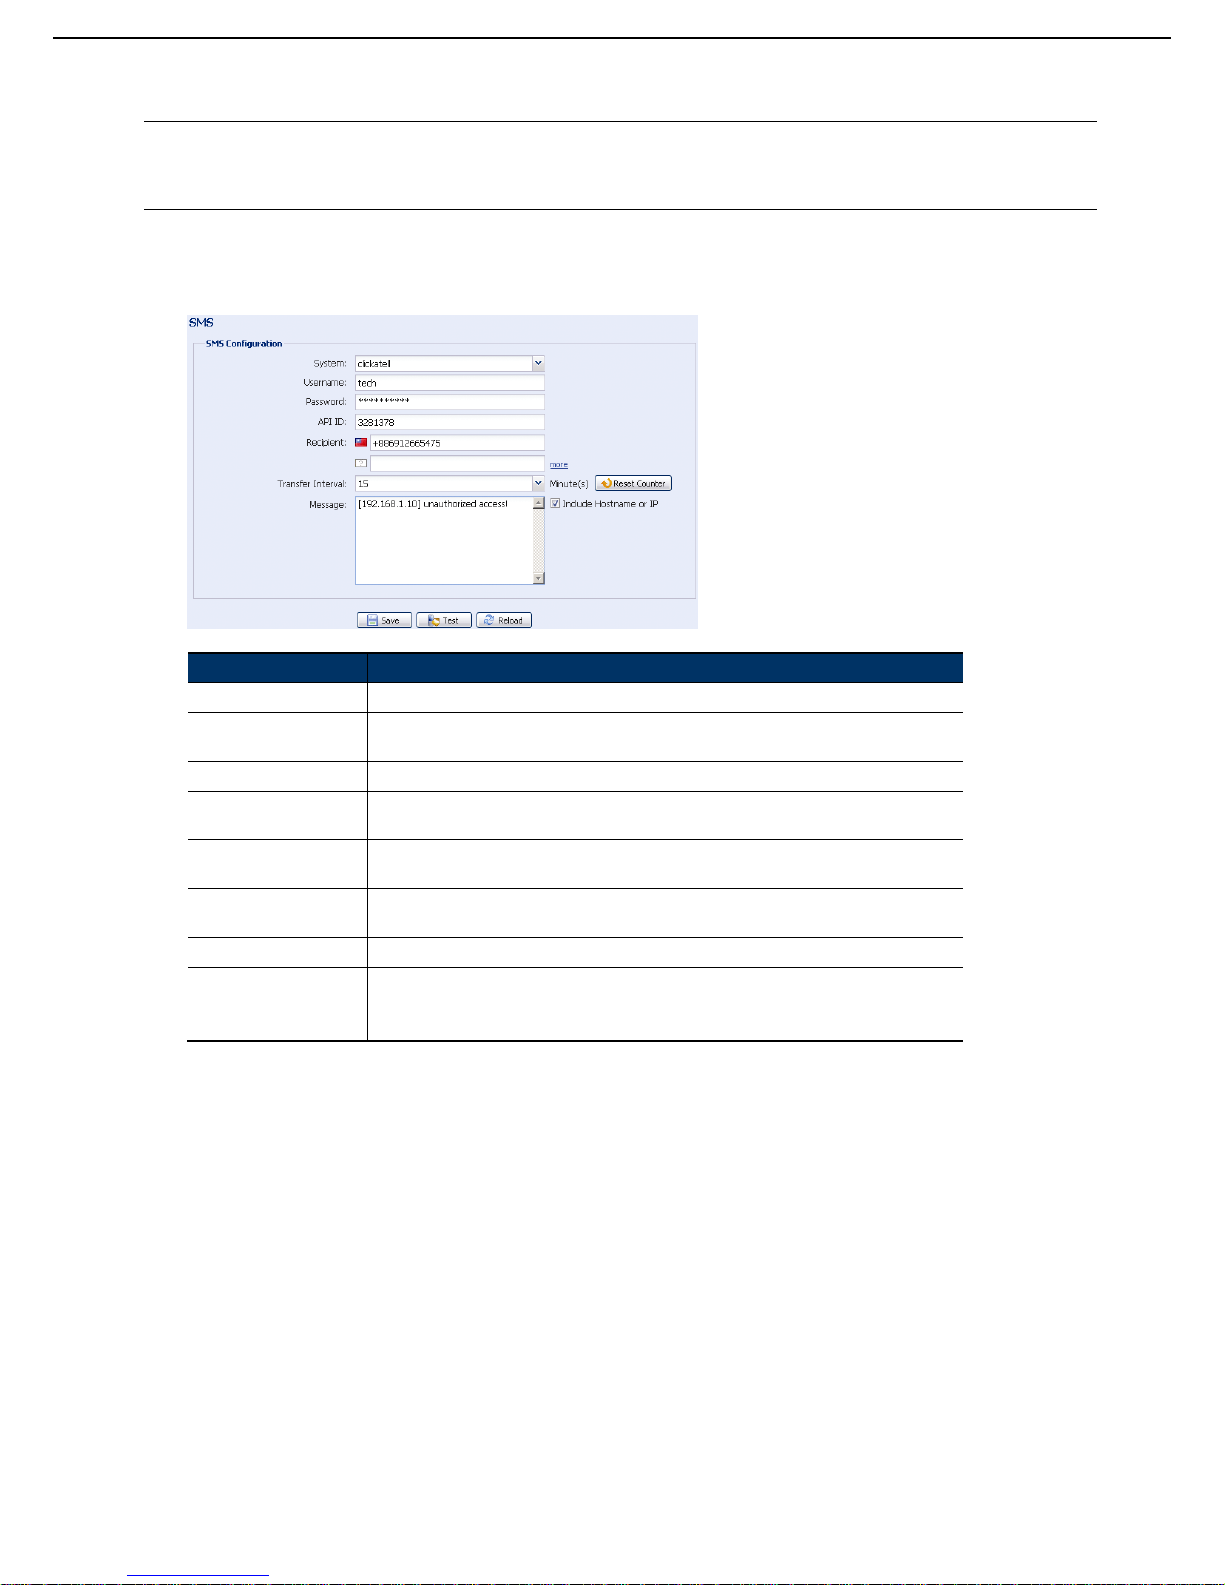
12
3.2.7 SMS
注意: この機能を使用する前に、アカウントを適用し、Clickatell および EVERY8D などのモバイルメッセージン
グ会社から API ID を取得する必要があります。詳細については、「付録 4 SMS メッセージング用 API ID ア
プリケーション」ページの「34」をご参照ください。
テキスト・メッセージングについて必要な詳細情報を入力し、「Save(保存)」をクリックして確定します。
「General(全般)」→「Trigger(トリガ)」で「SMS」が選択されている場合、ここで選択した情報が適用さ
れます。
機能 説明
System(システム) テキスト・メッセージングのサービス・プロバイダは、Clickatell です。
User name / Password
(ユーザー名/パスワード)
Clickatell で作成したユーザー名とパスワードを入力します。
API ID Clickatell から提供される API ID を入力します。
Recipient(受信者) 「Add(追加)」をクリックして、テキスト・メッセージを受け取るため、国別コードを含む
電話番号を入力します。 5件の電話番号が許可されます。
Transfer Interval
(伝送間隔)
2 つのメッセージを送信する間隔を、分単位で設定します。
選択肢は、0、15、30 および 60 です。
Reset Counter
(リセット・カウンター)
クリックして、テキスト・メッセージングを再開します。また、このボタンをクリックして
から、指定された間隔の後に SMS が送信されます。
Message(メッセージ) テキスト・メッセージと共に送信する、テキスト・コンテンツ(最大 70 文字)を入力します。
Te st (テスト) SMS 設定が正しいかどうかを確認するため、このボタンを押すとお使いの電話に直ちに SMS
が送信されます。
注意: このテストは無料ではありません。現地レートに基づき SMS 送信料金が課金されます。
Page 75
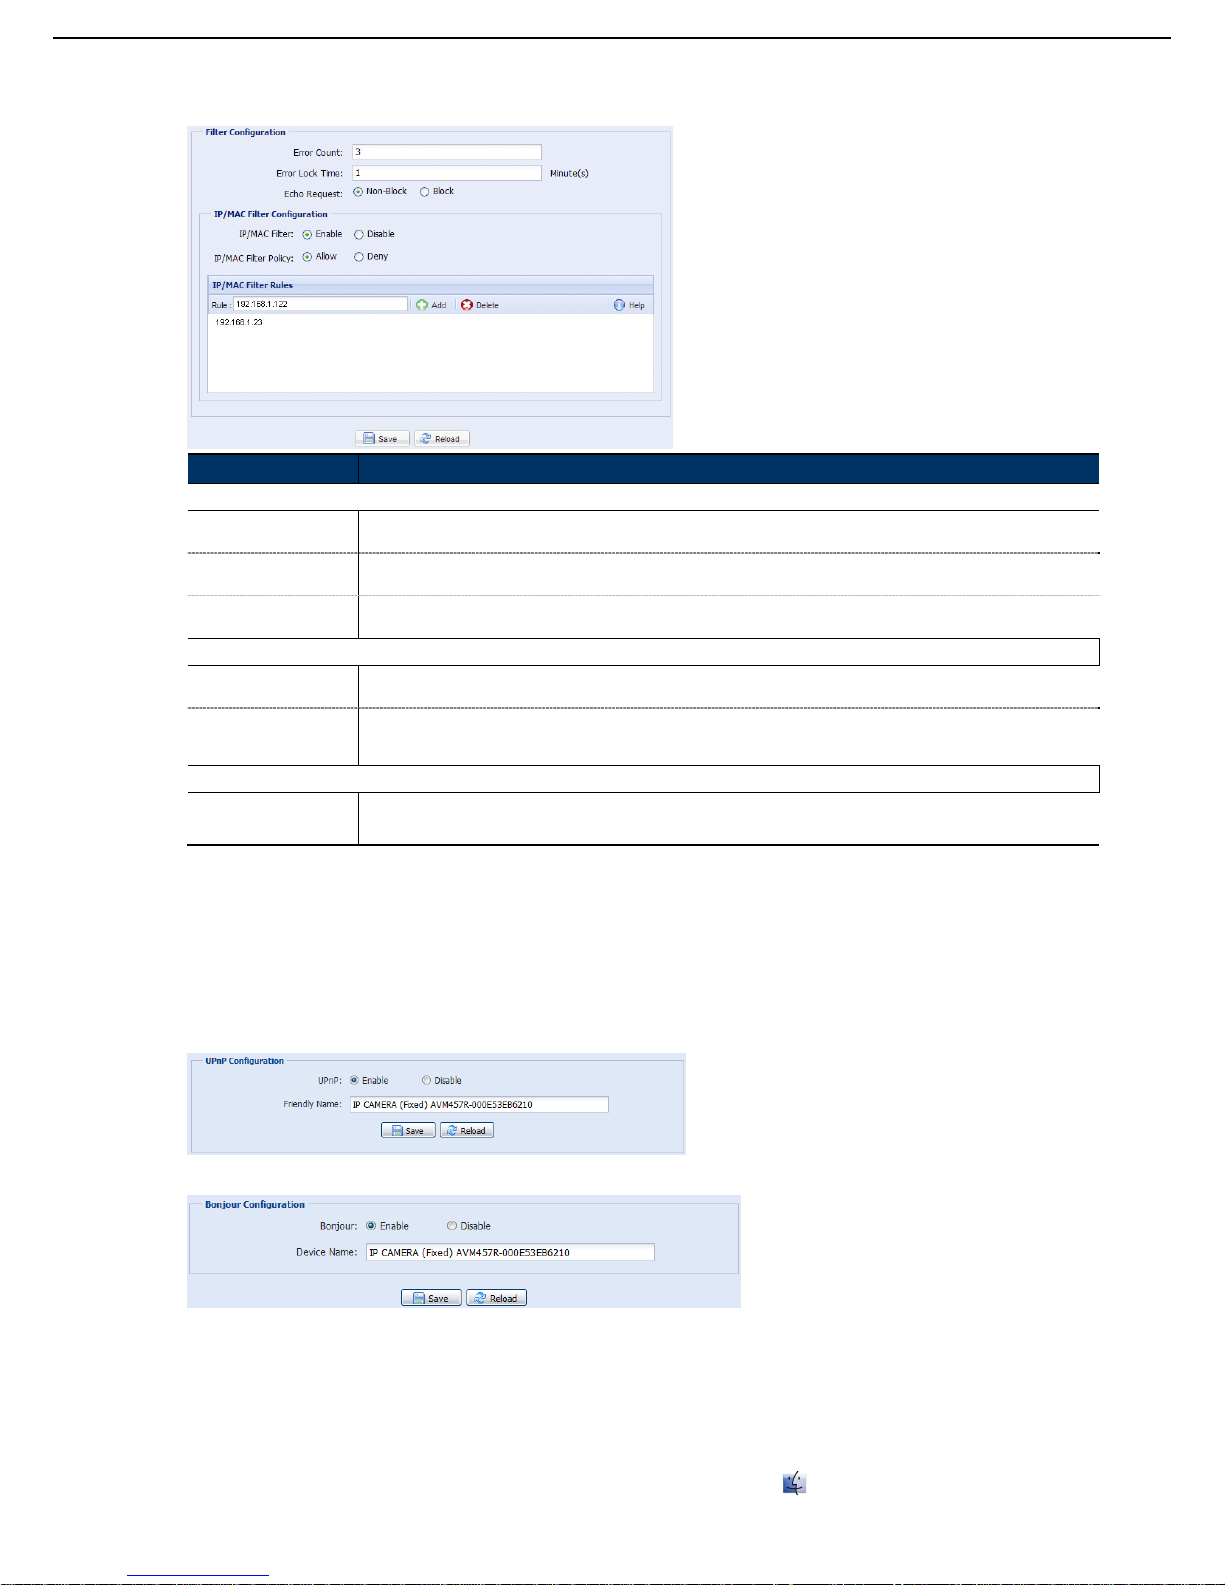
13
3.2.8 フィルタ
このカメラにアクセスできる、IP アドレスの許可またはブロックを選択し、「Save(保存)」をクリックして確定します。
機能 説明
Filter Configuration(フィルタ設定)
Error Count
(エラー回数)
ログイン失敗の最大回数を設定します。最大回数に達すると、ネットワークカメラにアクセスしようとする IP アドレスがロックさ
れます。
Error Lock Time
(エラー・ロック時間)
最大ログイン・エラー回数に達した IP アドレスに対するロック時間を、分単位で設定します。
Echo Request
(エコー・リクエスト)
「Non-Block(非ブロック)」を選択して、他のユーザーにお使いのネットワークカメラを検出するために Ping コマンドの使用を許
可する、または、「Block(ブロック)」を選択して、Ping コマンドリクエストを拒否します。
IP/MAC Filter Configuration(IP/MAC フィルタ設定)
IP/MAC Filter
(IP/MAC フィルタ)
フィルタ機能の有効または無効を選択します。
IP/MAC Filter Policy
(IP/MAC フィルタのポリ
シー)
「Enable(有効)」が選択されている場合、以下の IP アドレス・リストを(Allow(許可))またはブロック(Deny(拒否))するかどう
か選択します。
IP/MAC Filter Rules(IP/MAC フィルタのルール)
Rule(ルール)
‧ IP アドレス・リストにアイテムを追加するには、「Rule(ルール)」の IP アドレスをキー入力して「Add(追加)」をクリックし
ます。
‧ IP アドレス・リストから既存アイテムを削除するには、削除するアイテムを選択して「Delete(削除)」をクリックします。
3.2.9 UPnP/Bonjour
「UPnP」はデバイスに家庭また企業環境でシームレスに接続し、コンピュータ・コンポーネントのインストール簡素化
を可能にする、「Universal Plug and Play (ユニバーサル・プラグ&プレイ)」の略で Microsoft Windows 基盤のオペレーテ
ィング・システムにのみ適します。
「Bonjour」の機能は「UPnP」と同じですが、Apple 社の Mac 基盤のオペレーティング・システムにのみ適します。
UPnP
Bonjour
「Enable(有効)」のチェックを入れて、同じネットワークエリア内でデバイス間でのネットワークカメラの検出を許可
し、「Friendly name(
フレンドリー名)」にカメラの識別名を設定します。
この機能が有効化されている場合、このカメラと同じドメイン内のその他 PC は、以下でこのカメラを検索可能になります:
Windows 基盤である PC の場合、「Friendly name(
フレンドリー名)」で設定した識別名の「Network Neighbor(ネッ
トワーク・ネイバー)」、または
Mac 基盤 PC の場合、「Device Name(デバイス名)」で設定した識別名の「
」(ファインダ)または Bookmark (ブ
ックマーク)」
Page 76
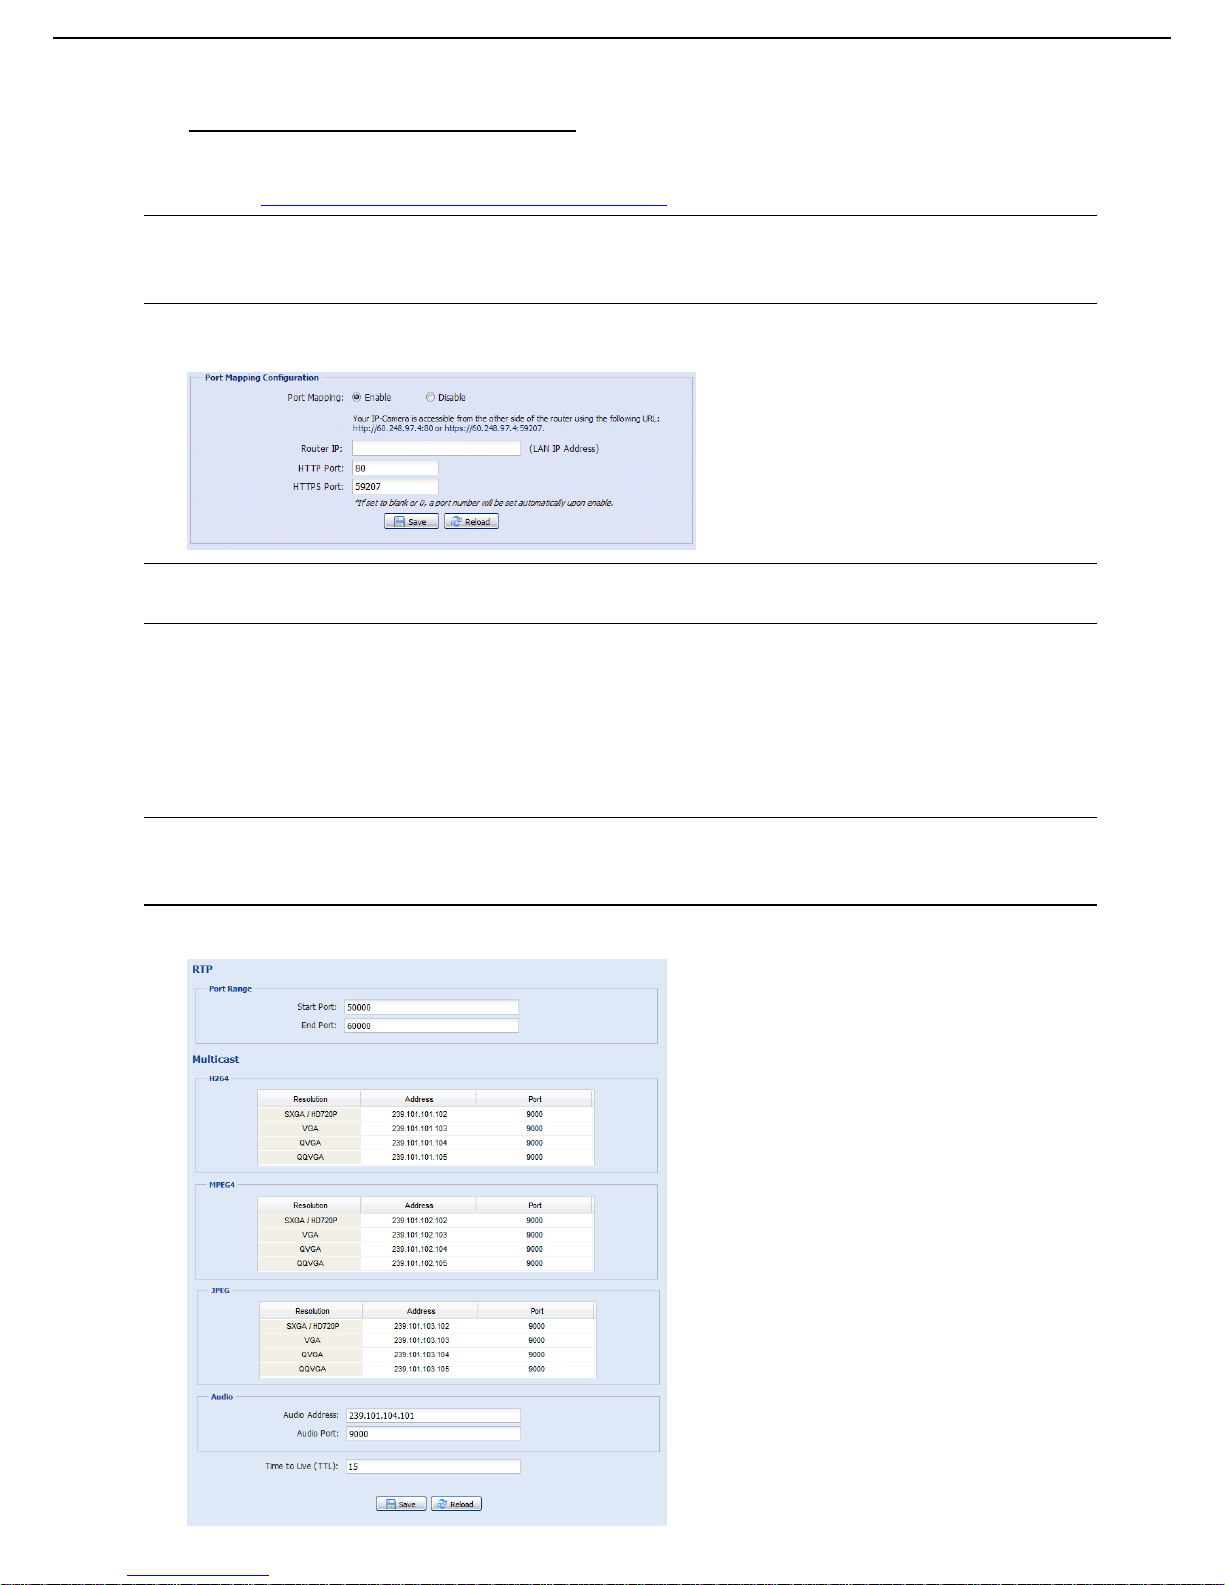
14
カメラにアクセスするには、いずれかをダブルクリックして素早くウェブ・ブラウザを開きます。
ポート・マッピング(UPnP でのみ利用可能)
この機能により、追加的にポート・フォワーディングのためルーターにアクセスする必要がなくなります。
詳細は、www.surveillance-download.com/user/m359a.swf の「詳細ネットワーク設定」を参照してください。
注意: この機能を使用する前にお使いのルーターが、UPnP をサポートすることを確認し、この機能を有効化して
下さい。サポートしていない場合、お使いのルーターにポート・フォワーディングのため追加的にアクセス
して下さい。
「Port Mapping (ポート・マッピング)」が「Enable (有効)」に設定されている場合、システムは自動的に IP ア
ドレスまたはポート番号を割り当てます。そうでない場合、IP アドレスまたはポート番号を入力します。
注意: 設定が正常に保存されると、IP アドレスおよびポート番号がこのネットワークカメラに割り当てられたこと
を示すメッセージが表示されます。
3.2.10 RTP
リアルタイム・トランスポート・プロトコル(RTP)は、VLC プレーヤーなど多重媒体のリアルタイム伝送を
管理するためのインターネット・プロトコル規格です。
この機能が正常に動作するために、リモート・アクセスで使用するメディア・プレーヤーが、RTP 伝送をサポ
ートする必要があります。
注意: リモート・アクセスを終了する場合、最初にメディア・プレーヤーで停止ボタンを押し、その後プログラム
を閉じます。これによりサーバーが停止コマンドを受信することを保証し、サーバーの冗長データ伝送を防
ぐのに役立ちます。
タイプ A
Page 77
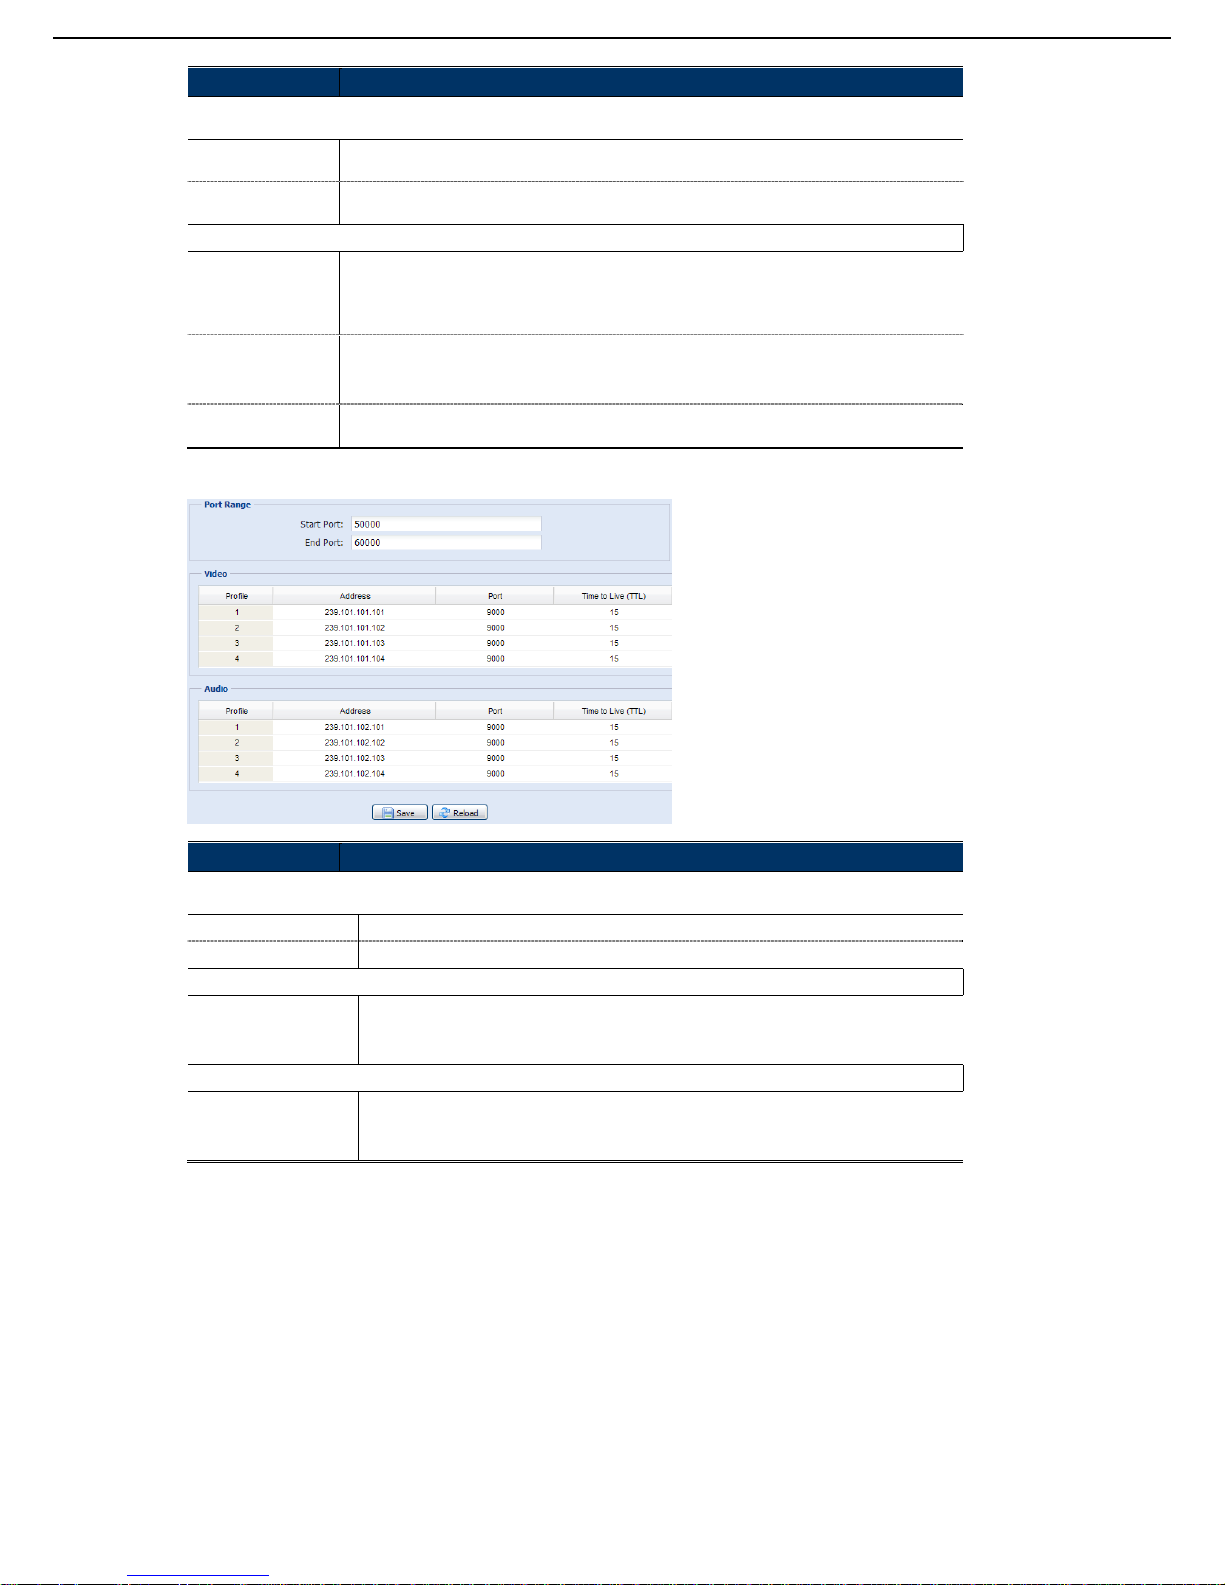
15
機能 説明
Port Range(ポート範囲)
RTP により使用されるポート範囲が制限され、開始ポートと終了ポートの間に 100 ポート予約されることが必要です。
Star t Port
(開始ポート)
開始ポートの範囲は、1024~65434 です。
End Port
(終了ポート)
終了ポートの範囲は、112 4~65534 です。
Multicast(マルチキャスト)
H264/MPEG4/
JPEG 伝送用のアド
レスならびにポート
各ストリーム・フォーマット(H264/MPEG4/JPEG)のマルチキャストに対する、特定のアド
レスならびにポートを設定します。
アドレスの範囲は、224.0.0.1~239.255.255.255 の範囲に制限されます。
マルチキャスト用ポートは偶数である必要があります。
音声伝送用のアドレ
スならびにポート
音声のマルチキャストにおける、特定のアドレスならびにポートを設定します。
アドレスの範囲は、224.0.0.1~239.255.255.255 の範囲に制限されます。
マルチキャスト用ポートは偶数である必要があります。
存続期間(TTL) パッケージの有効期間の範囲は、1~255 の間です。パッケージの存続時間が 0 になると、それは
停止します。
タイプ B
機能 説明
Port Range(ポート範囲)
RTP により使用されるポート範囲が制限され、開始ポートと終了ポートの間に 100 ポート予約されることが必要です。
Star t Port(開始ポート) 開始ポートの範囲は、1024~65434 です。
End Port(終了ポート) 終了ポートの範囲は、112 4~65534 です。
Video(ビデオ)
ビデオ伝送用のアドレス
ならびにポート
プロファイル 1~4 のマルチキャストに対する、特定のアドレスならびにポートを設定します。
アドレスの範囲は、224.0.0.1~239.255.255.255 の範囲に制限されます。
マルチキャスト用ポートは偶数である必要があります。
Audio(オーディオ)
音声伝送用のアドレスな
らびにポート
音声のマルチキャストにおける、特定のアドレスならびにポートを設定します。
アドレスの範囲は、224.0.0.1~239.255.255.255 の範囲に制限されます。
マルチキャスト用ポートは偶数である必要があります。
Page 78
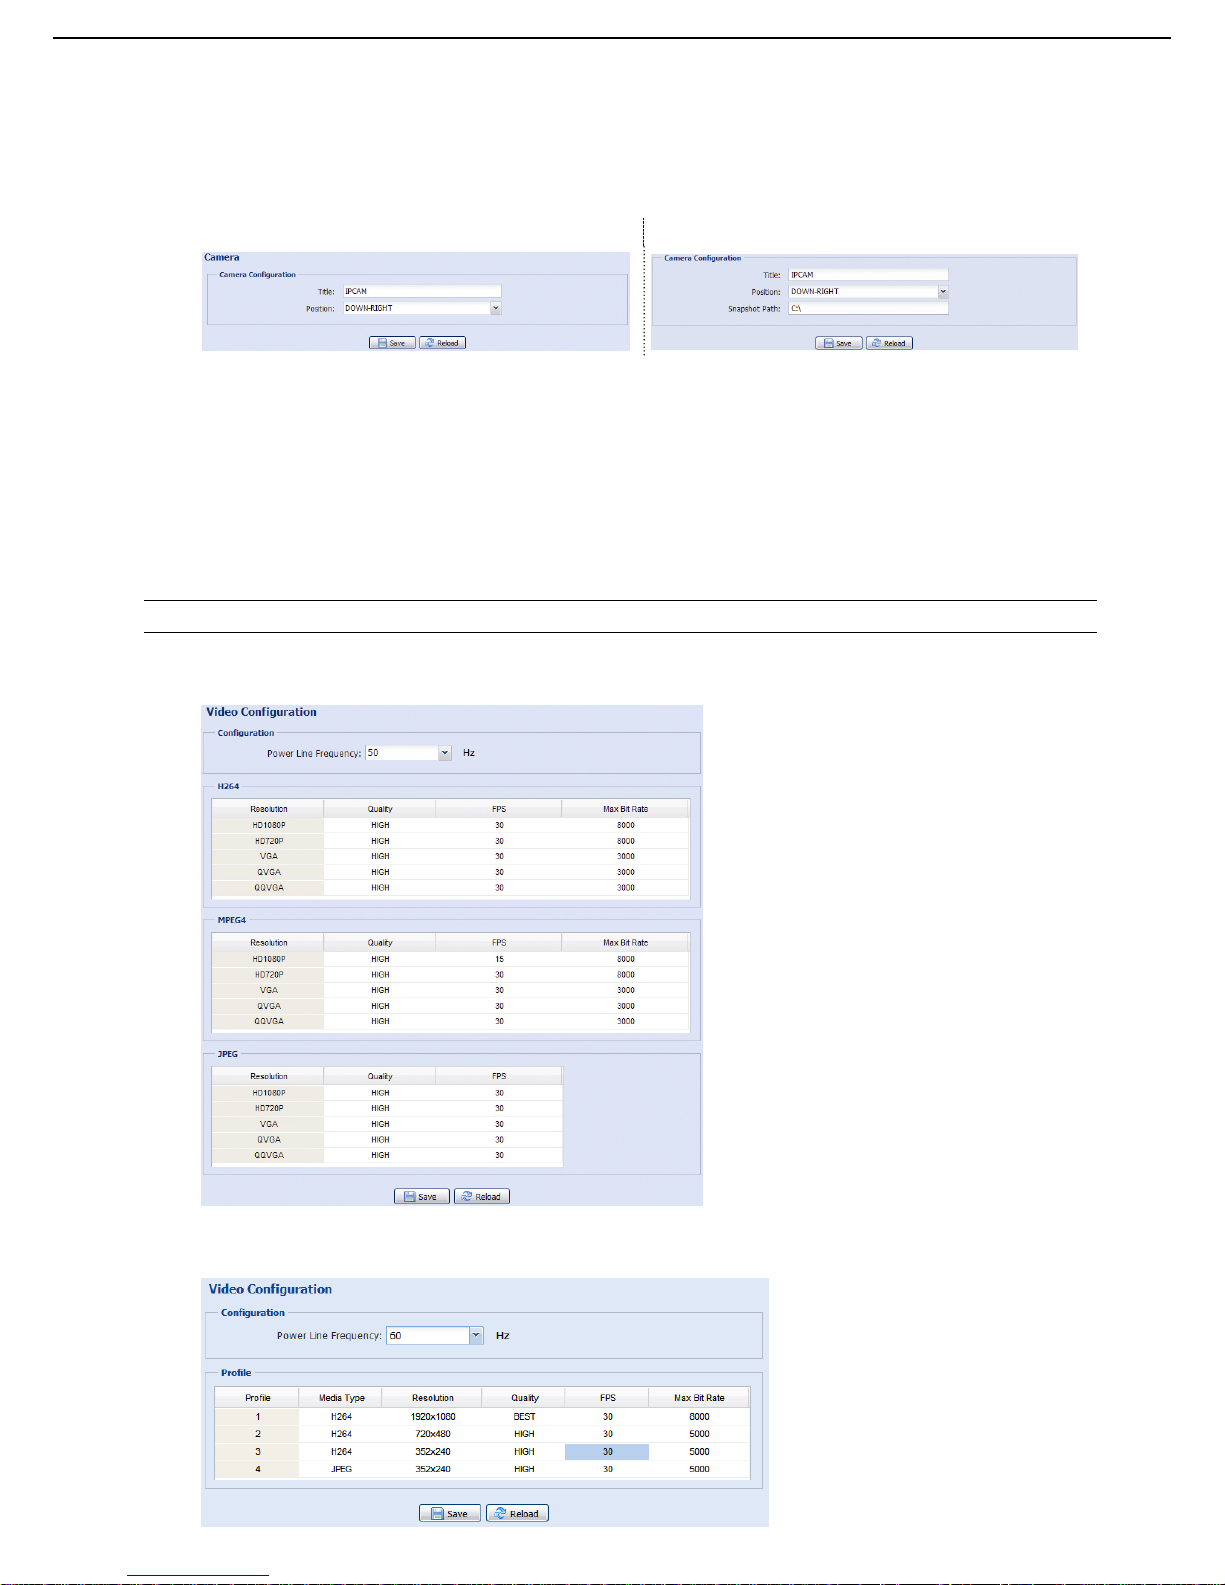
16
3.3 カメラ
3.3.1 カメラ
カメラの名前を変更し、カメラ名が画面上に表示される場所(左上/右上/左下/右下)を変更します。「Snapshot
Path(スナップショットパス)」は、スナップショットファイルを保存するパスを指定するために使用されます。
タイプ A タイプ B
3.3.2 ビデオ
様々なビデオ・フォーマットで、ビデオに関連する設定を調整します。
「Quality(品質)」は、写像性に関連しています。
「FPS」は、ビデオのなめらかさに関連しています。FPS が大きくなれば、ビデオは一層なめらかになります。
「Max Bit Rate(最大ビットレート)」とは、選択した画像フォーマットと解像度でのデータ伝送の最大制限です。
以下では、2 メガピクセルモデルを例にします。1.3 メガピクセルモデルの場合は、その実際の表示を参照して
ください。
注意: QQVGA は、モバイル監視用のみです。
タイプ A:
タイプ B:
Page 79
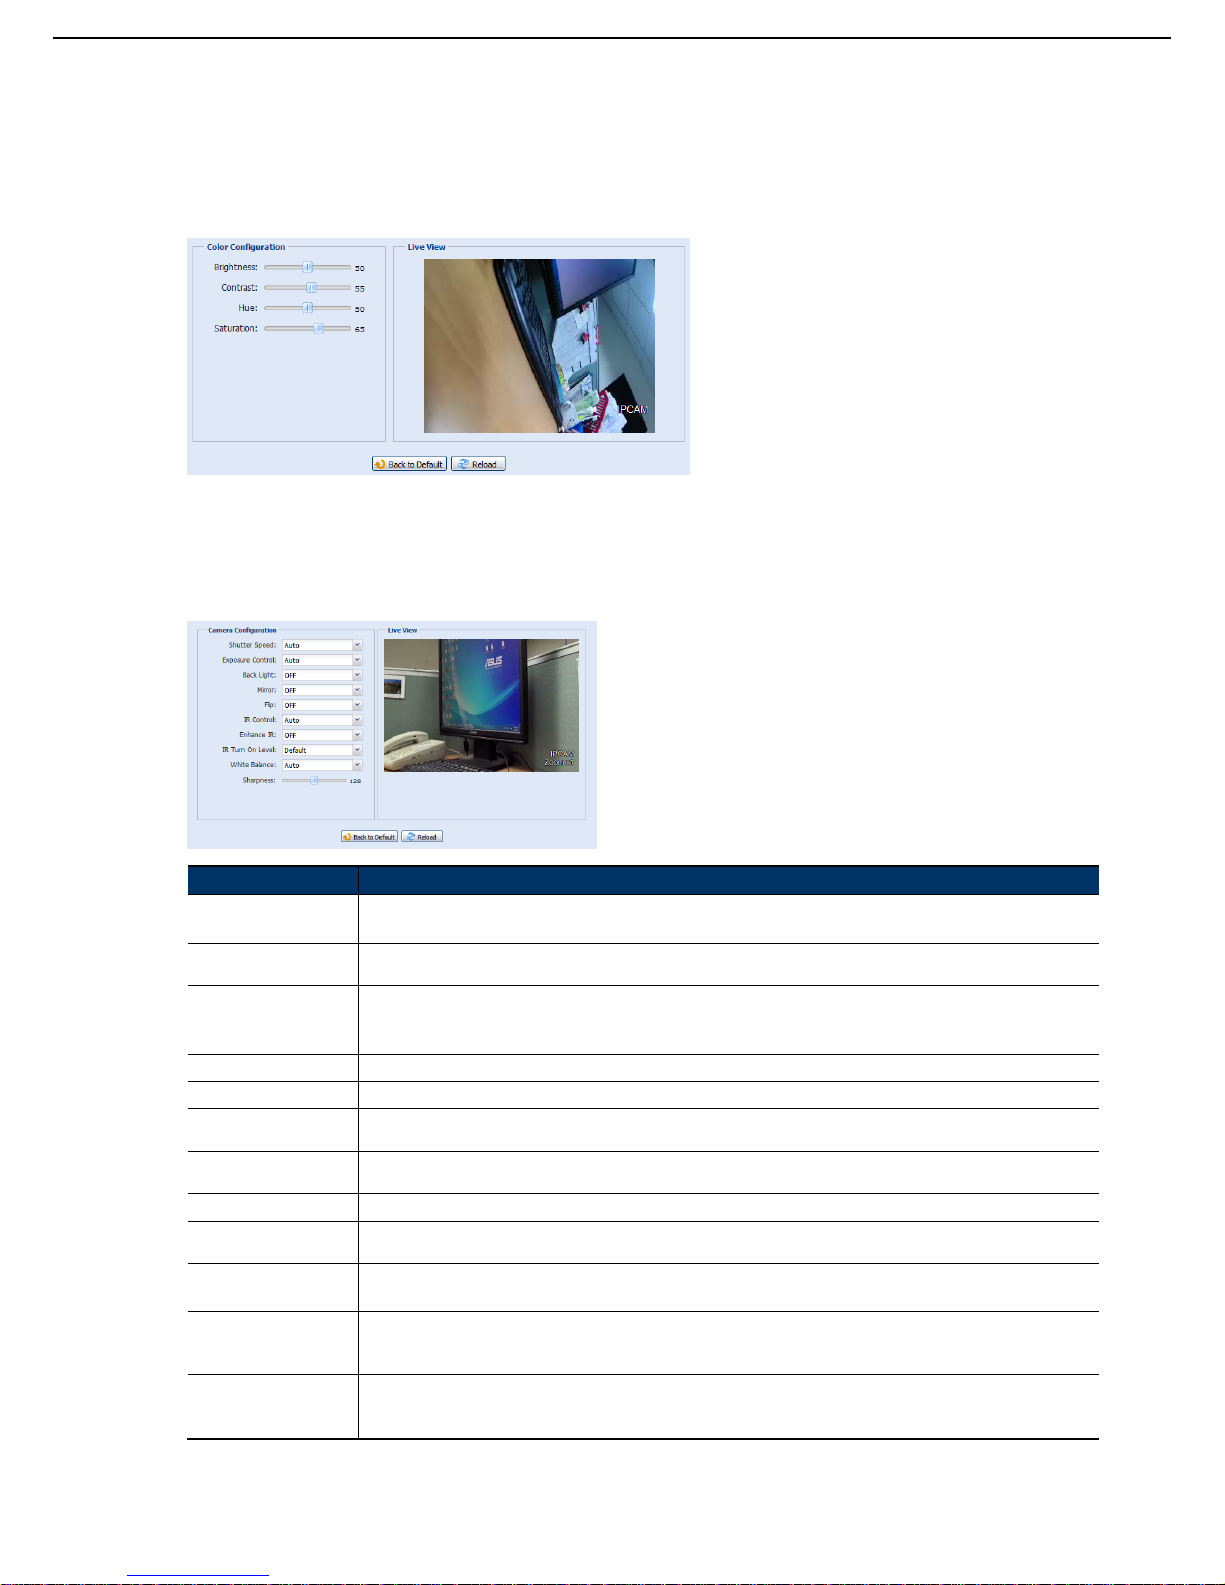
17
3.3.3 カラー
明るさ、コントラスト、彩度および色相でカラーパフォーマンスを調整します(上位モデルのみ)。このページ
の右側でスライドをクリックアンドドラッグしてカラー変更をプレビューして、画像の色を調整します。
初期値を復元するには、「Back to Default(初期値に戻す)」をクリックします。
3.3.4 詳細
必要な場合、カメラのパラメータを調整します。
アイテム 説明
Shutter Speed Set
(シャッター・スピード)
必要に応じて、シャッタースピードを設定します。
オプションは次の通りです。最大 1/10 秒、最大 1/30 秒、最大 1/15 秒、最大 1/6 秒、最大 1 秒および最大 2 秒。
Exposure Control*
(露光制御*)
この機能は、蛍光灯の光にシャッタ時間を同期させ、画像のちらつきを抑制するるために使用されます。
Back light*(逆光*) これは、過剰な光の明るさによって圧倒されている領域を補正するために画像を調整する機能です。
適切な鮮明さを得られるよう画像が露光されます。この機能を有効(ON)または無効(OFF)を選択します。
注意: この機能は、デイモードでのみ使用できます。
Mirror(ミラー) 「ON(オン)」を選択し必要な場合に設置状況に基づき、画像を水平方向に回転します。
Flip(フリップ) 「ON(オン)」を選択し、必要な場合に画像を 180 度回転します。
(ノイズ除去*) スライダーをクリック・アンド・ドラッグして、レベルを 0~10 で調整し、暗い環境において表示されるノイズを低
減します。
IR Control
(IR コントロール)
「Auto(自動)」を選択して、IR LED を夜間または暗い環境で自動的に有効化します、「On(オン)」を選択して、常
に IR LED を有効化し、また、「OFF(オフ)」を選択し、この機能を無効化します。
Enhance IR(強化 IR) 「On(オン)」を選択し、IR LED の性能を強化します。
IR Turn On Level
(IR オンレベル)
IR 光を有効化するレベルを選択します。
White Balance
(ホワイト・バランス)
色温度範囲に渡り、カラー・バランスを保持するため現在の画像を処理します。
オプションは次の通りです。自動、白熱、クールライト、太陽光、曇りおよび日陰。
Sharpness(輪郭) 輪郭は開口を調整し、画像内のエッジを鋭くすることで、画像細部の明瞭さを向上させます。
スライダーをホールドしてドラッグし、鮮明さのレベルを 0~100 の範囲で調整します。値が高くなると、画像はよ
りシャープになります。
Wide Dynamic Range*
(ワイド・ダイナミッ
ク・レンジ*)
露出オーバー部分と暗い部分の画像認識性を高めるため、必要ある時にワイド・ダイナミック・レンジ(WDR)が使
用されます。
オプションは次の通りです。低/中/高/オフ
*
上位モデルのみ
Page 80
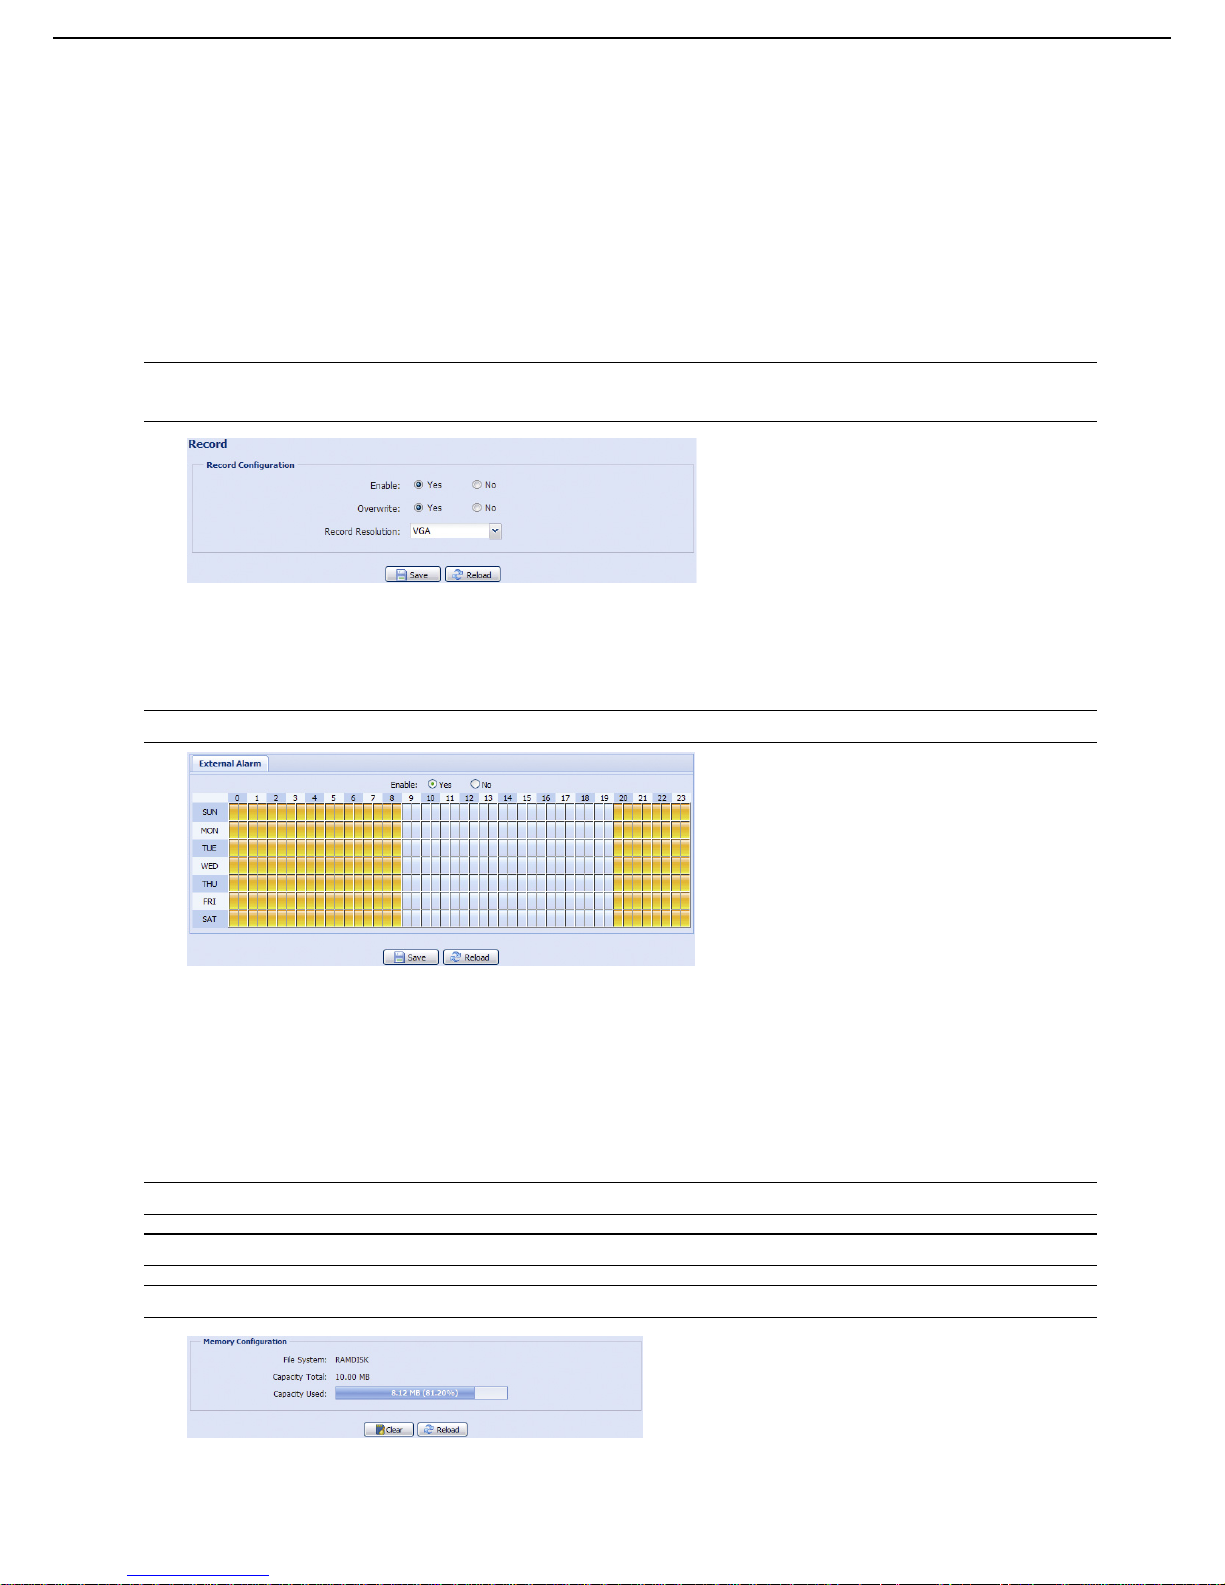
18
3.4 録画
3.4.1 録画
「Record Configuration (録画設定)」で以下を行うことができます:
アラーム録画機能を、有効または無効にします。「Enable(有効)」を「No(いいえ)」に設定すると、その
他設定ページで有効化しても、アラーム録画機能は無効になります。
メモリ・ストレージが一杯の場合、データを上書きするかどうか選択します。
イベント録画用のビデオ解像度を選択します。
注意: より高い解像度を選ぶと、より精度かつ高画質で記録されますが、メモリストレージは高速に消費され、一
杯になります
3.4.2 録画予約
アラーム録画をスケジューリングするには、それを有効化し、録画のための曜日と時刻を選択します。
注意: 録画機能を正常に動作させるため、録画機能を有効にする必要があります。
3.5 ストレージ
3.5.1 メモリ
「Memory(メモリ)」で録画の残り容量を確認したり、必要に応じ保存されている全ての記録されたデータを
消去できます。
注意: このカメラをリセットまたは再起動する時も、記録されたデータは削除されます。
注意: より多くの記録データを保存する場合、このカメラを互換性ある NVR と共に使用することが推奨されます。
注意: 録画解像度当りの合計録画時間については、「付録 6 録画タイムテーブル」(37 ページ)を参照して下さい。
合計容量は、モデルにより異なる場合があります。モデルの実際の表示を確認してください。
Page 81
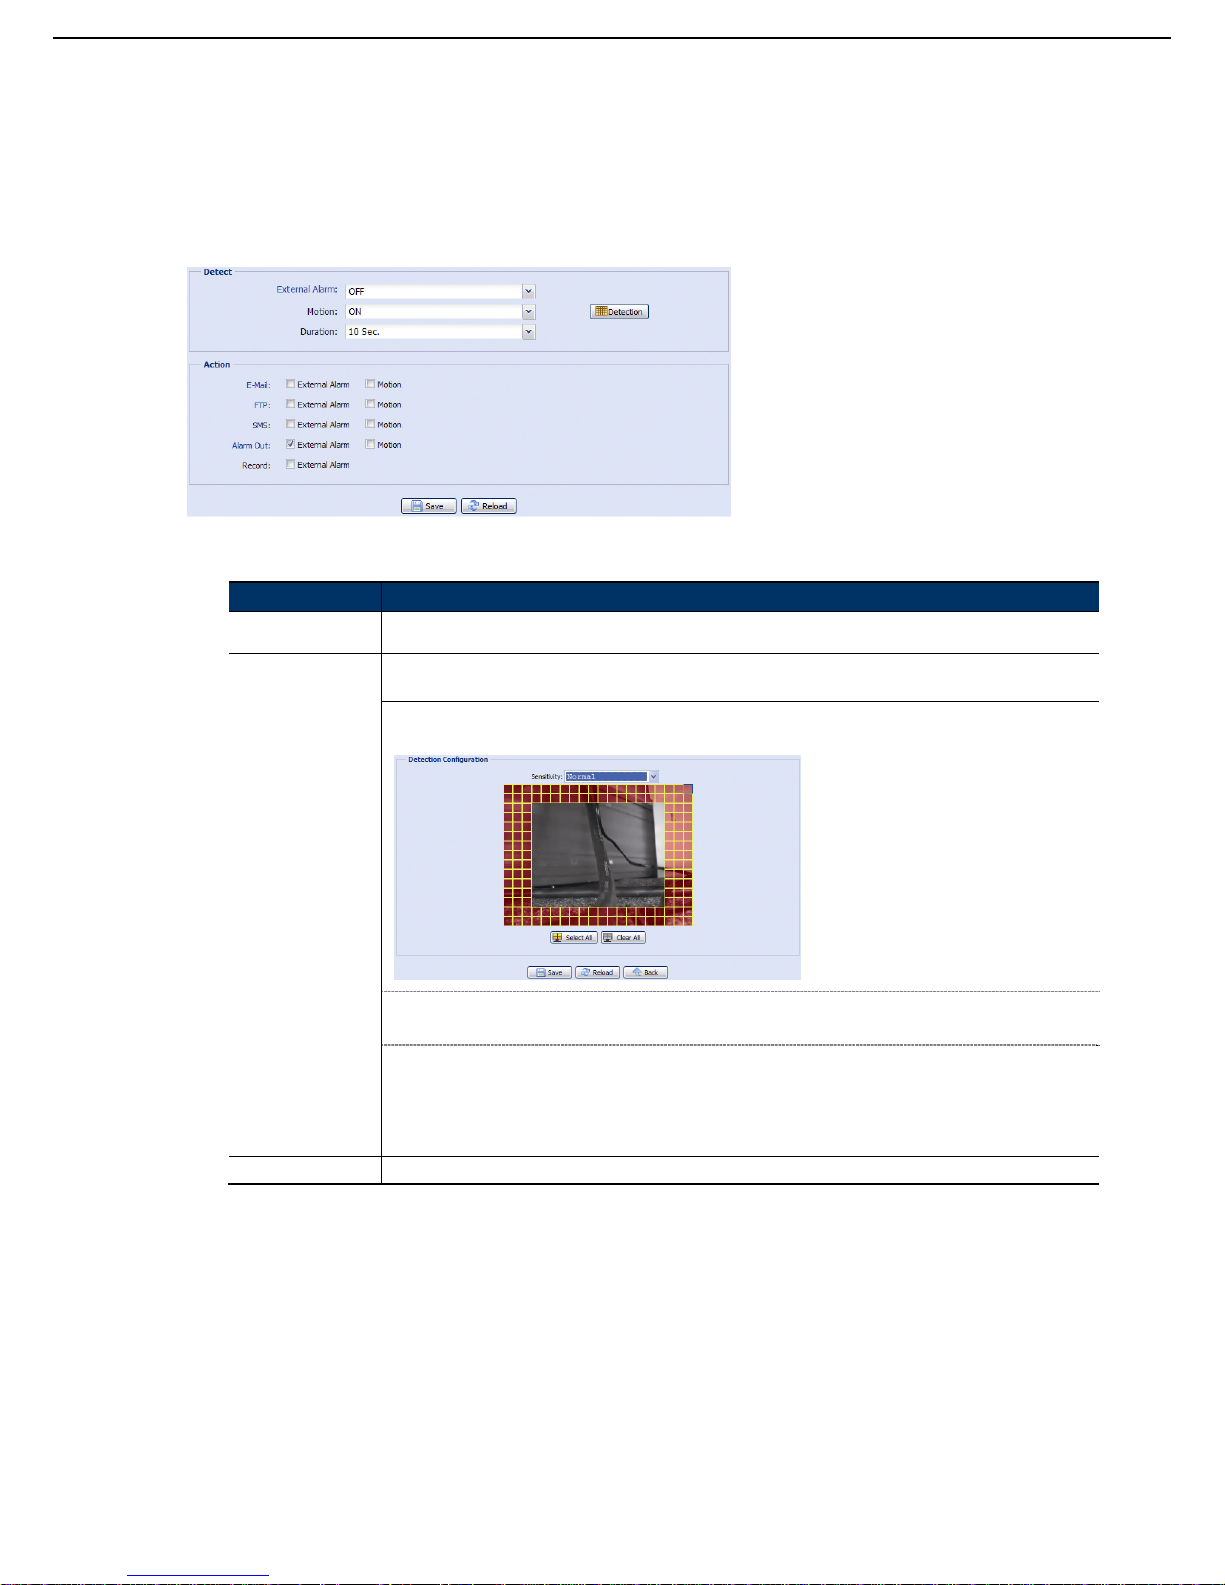
19
3.6 トリガ
3.6.1 トリガ
アラームまたはモーションイベントがあったときに、このカメラがどのように反応するか設定することができます。
Detect (検出)
アイテム 説明
External Alarm
(外部アラーム)
外部アラーム・デバイスからの検出を有効または無効にし、「External Alarm(外部アラーム)」(青色)のタイトル
をクリックし、お使いのアラーム入力デバイスの設定に応じ、「N.C.」または「N.O.」に設定します。
Motion(動体検知) モーション検出を、有効または無効にします。
ストリーム形式がモーション
JPEG
の場合、モーション検出はサポートされません。
「Enable(有効)」が選択されている場合、「Detection(検出)」をクリックして、以下のモーション検出エリア設
定ページに移動します。
Sensitivity (感度):
ドロップ・ダウン・リストから検出感度を設定します: ハイ、ノーマルまたはローです。
エリア設定:
マウスを使いエリア・グリッドを選択し、モーション検出エリアを設定します。ピンクのグリッドは未検出エリアを、透明なグ
リッドは検出中のエリアをそれぞれ示します。 複数の検出エリアを設定できます。
「Clear All(クリア・オール)」をクリックして、検出されていない全エリアを設定します。
「Select All(全て選択)」をクリックして、全エリアを検出エリアに設定します。
Duration(時間) トリガ録画の持続時間(5/10/20/40 秒)を設定します。
Page 82
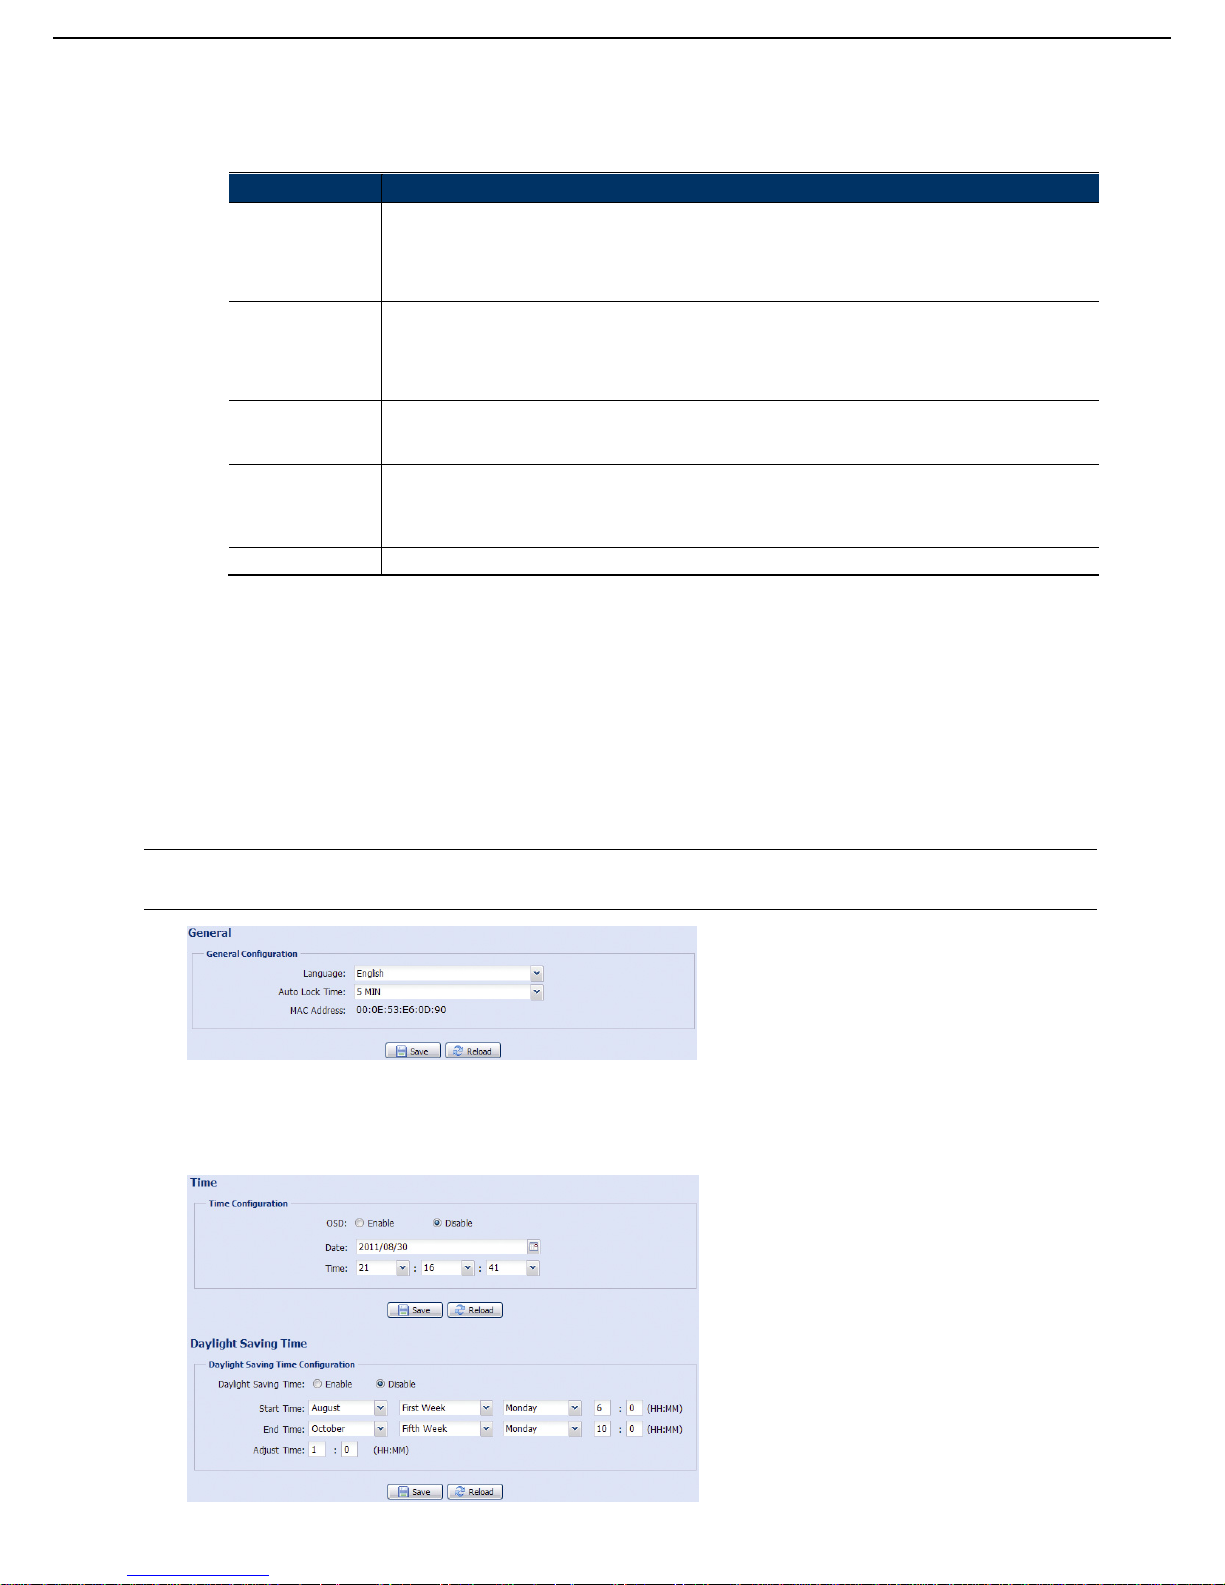
20
アクション
ここで、カメラがイベントに対してアラートを配信する方法を定義します。
アイテム 説明
E-Mail(電子メール) 発生した場合、受け取る電子メール通知のイベント・タイプを選択します。
その後、「E-Mail(電子メール)」(青色)をクリックして、イベントビデオクリップに対するメディアタイプ(H264
/ JPEG / MPEG4)、ファイル形式(AVC / AVI)および録画時間(1~5 秒)を設定します。
選択したイベントタイプが発生した場合、カメラは、「Network(ネットワーク)」「Mail(電子メール)」で割り
当てた電子メールアドレスに対してキャプチャしたビデオを送信します。
FTP 発生した場合、受け取る FTP 通知のイベント・タイプを選択します。
その後、「FTP」(青色)をクリックして、イベント・ビデオ・クリップに対するメディア・タイプ(H264 / JPEG
/ MPEG4)、ファイル形式(AVC / AVI)と録画時間(1~5 秒)を設定します。
選択したイベント・タイプが発生した場合、カメラは、「Network(ネットワーク)」「FTP」で割り当てた FTP
サイトにキャプチャしたビデオ・クリップがアップロードされます。
SMS* 発生した場合、テキストメッセージを受け取るイベントタイプを選択します。
選択したイベントタイプが発生した場合、カメラは、「Network(ネットワーク)」「SMS」で割り当てた携帯電
話番号に対してテキストメッセージを送信します。
Alarm Out
(アラーム出力)
発生した場合、アラーム出力デバイスをトリガするイベント・タイプを選択します。
その後、「Alarm Out(アラーム出力)」(青色)のタイトルをクリックして、トリガ・ルール(ロー/ハイ)を設定
します。
Record(録画) 発生した場合、イベント録画を有効化するイベント・タイプを選択します。
*
上位モデルのみ
3.7 全般
3.7.1 全般
UI インタフェースの言語を変更するには、「Language(使用言語)」ドロップ・ダウン・リストから選択します。
指定された時間が使用されない状態で経過した後、カメラへのアクセスをロックするには、「Auto Lock Time(自
動ロック時間)」のドロップ・ダウン・リストから「5 MIN(5 分)」、「15 MIN(15 分)」または「30 MIN(30
分)」を選択します。この機能を無効するには、「NEVER(無効)」を選択します。
注意: 指定された時間経過後にカメラへのアクセスがロックされ、カメラへのアクセスを再開する場合、パスワー
ドを入力して下さい。
3.7.2 時刻
サマータイムならびに現在時刻を設定し、「Save(保存)」をクリックして確定します。
Page 83
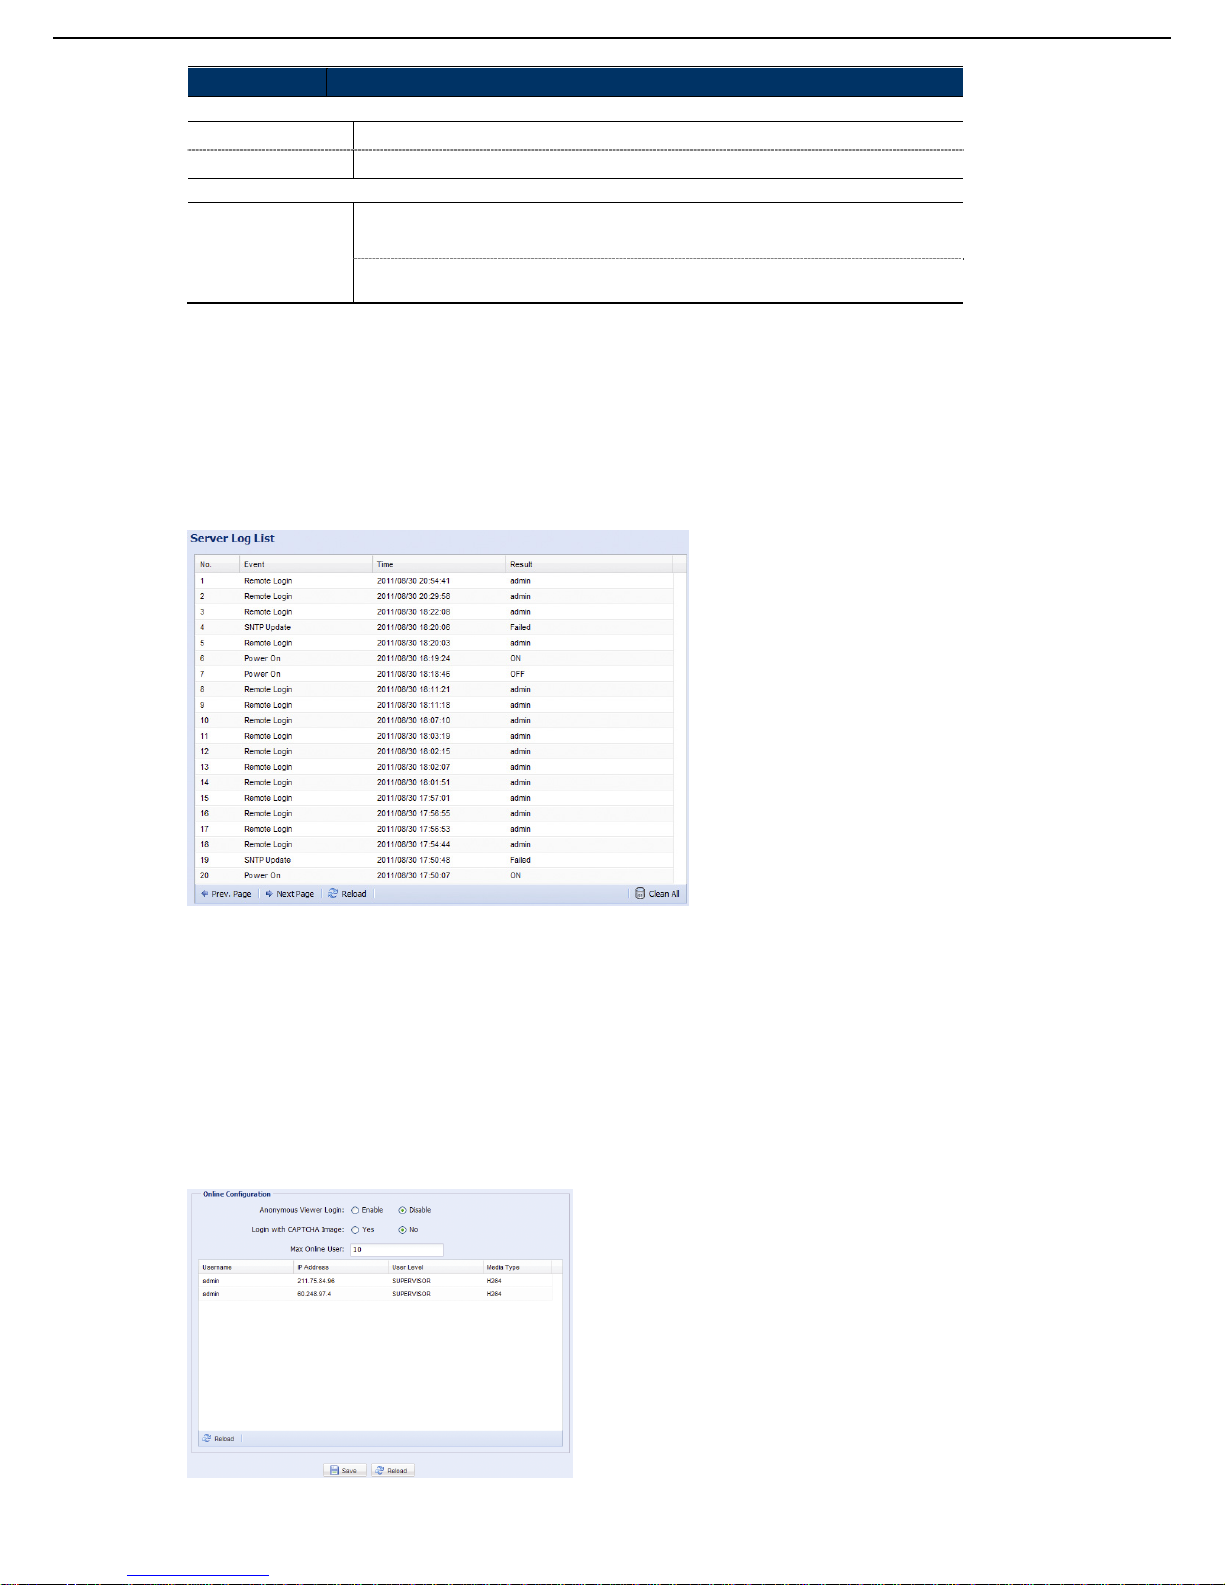
21
機能 説明
Time Configuration(時刻設定)
Date(日付)
現在の日付を設定します。
Time(時間)
現在時刻を設定します。
Daylight Saving Time Configuration(サマータイム設定)
Daylight Saving Time
(サマータイム)
サマータイムを使用するかどうか指定します(Enable (有効)/Disable (無効))。
この機能が有効である場合、期間(Start Time / End Time (開始時間/終了時間))を設定し、サ
マータイムを時間を単位として調整(Adjust Time (時間調整))します。
3.7.3 サーバー・ログ
イベント・タイプによりシステム・イベントを素早く検索するには、「Prev. Page (前 ページ)」または「Next Page
(次ページ)」をクリックしてログを検索します。またはイベント・タイプにチェックを入れ、「Reload(リロー
ド)」をクリックして検索を開始します。
全システム・イベント・ログを消去するには、「Clear All(全て消去)」をクリックします。
3.7.4 オンライン
それぞれのオンライン情報と、現在のオンライン・ユーザーを確認できます。 リストをリフレッシュするには、
「Reload(リロード)」をクリックします。
匿名ログインを許可するには、「Anonymous Viewer Login(匿名ビュワー・ログイン)」で「 Enable(有効)」
を選択します。
ログイン時の画像コード検証を無効化するには、「Login with CAPTCHA Image(CAPTCHA 画像でログイン)」
で「No(いいえ)」を選択します。
Page 84
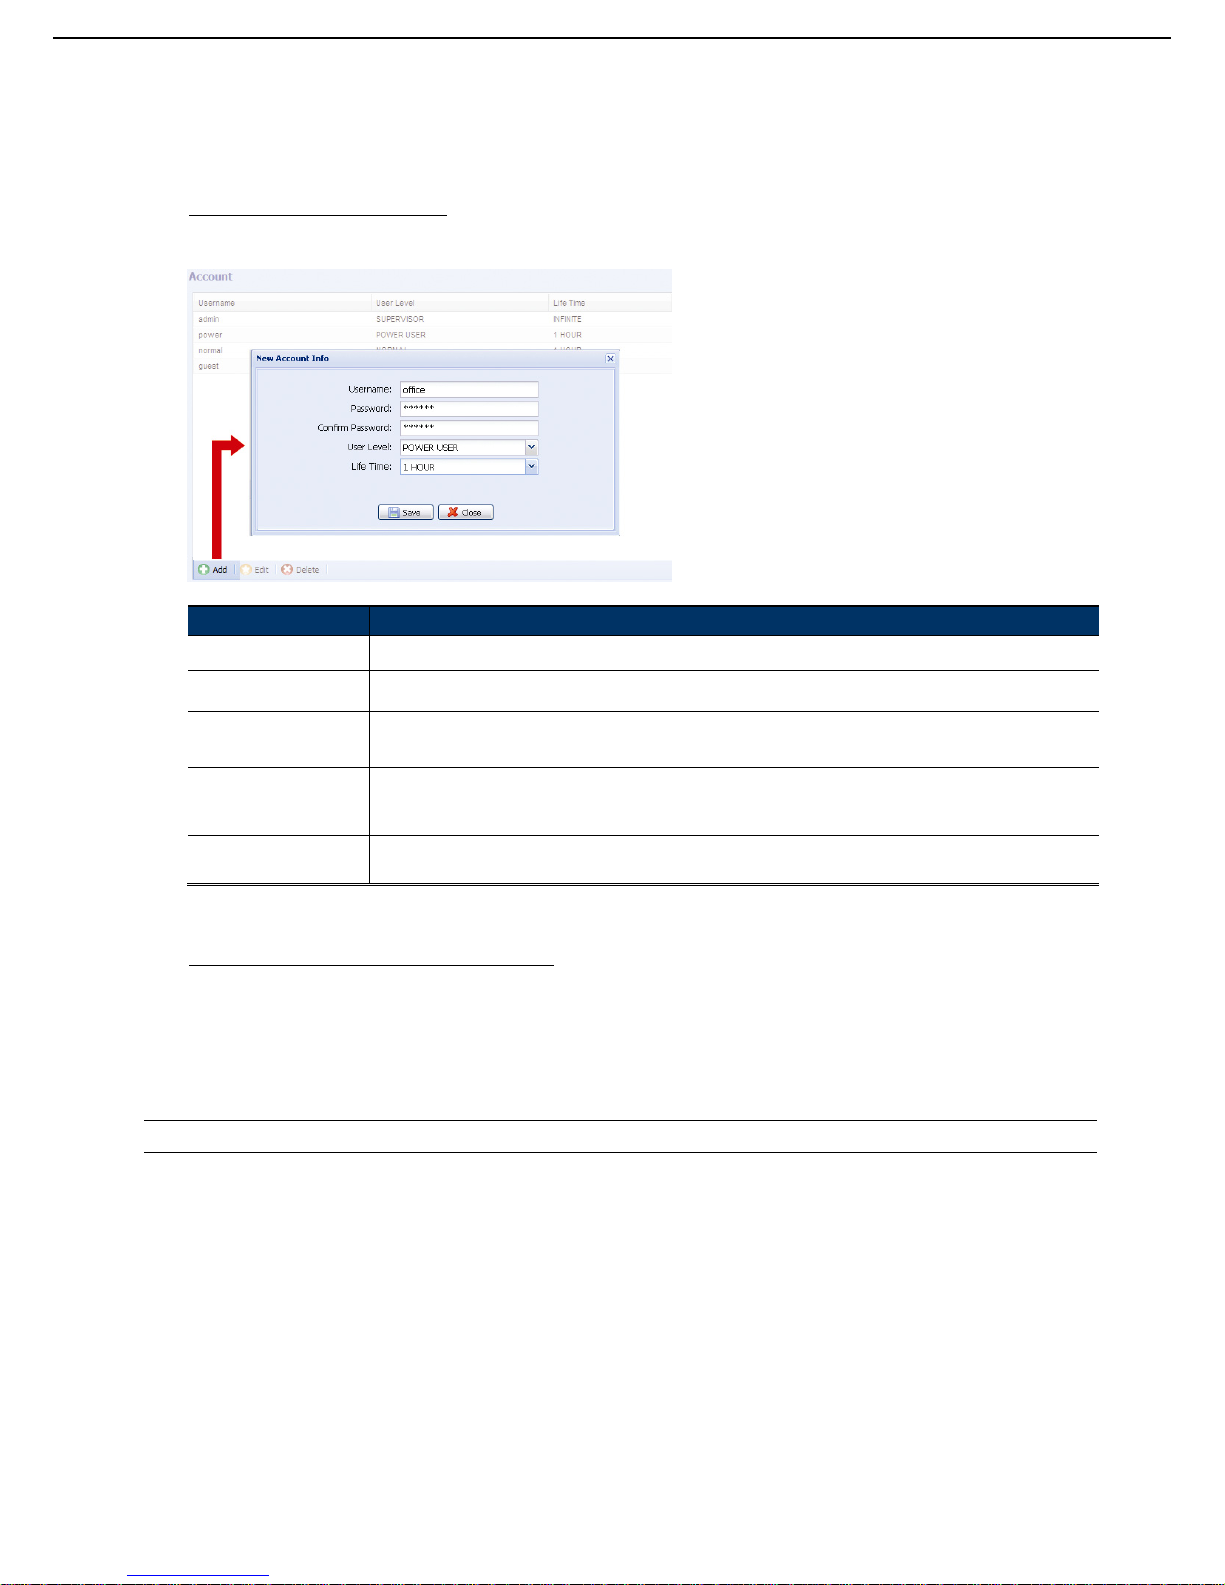
22
3.7.5 アカウント
異なるユーザー・アクセス権限がある新規アカウントを作成したり、既存アカウント設定を削除したり、変更
したりできます。
新規アカウントの作成方法
ステップ 1: 「New(新規)」をクリックして、以下の欄に該当する情報入力します。
欄 説明
User Name(ユーザー名) カメラ・アクセスに使用するユーザー名を設定します。ユーザー名は、最大 16 文字の英数字が許可されます。
Password(パスワード) 遠隔ログインに使用するパスワードを設定します。パスワードは、最大 16 文字の英数字が許可されます。
Confirm Password
(パスワード確認)
確認のため、再度パスワードを入力します。
User Level(ユーザーレベ) 異なる機能の制御を可能にする権限を与えるため、アカウントにセキュリティ・レベルを設定します。 4つの
ユーザー・レベルがあります:SUPERVISOR (スーパーバイザ)、POWER USER (パワーユーザー)、NORMAL
USER (ノーマルユーザー) ならびに GUEST (ゲスト)です。
Life Time(ライブタイム) このアカウントがそれだけオンラインの時間が取られるかを選択。(1 MIN / 5 MIN / 10 MIN / 1 HOUR / 1 DAY /
INFINITE (1 分/5 分/10 分/1 時間/1 日/無限))
ステップ 2: その後、「Save(保存)」をクリックして設定を保存し、新しいアカウントを作成します。
既存アカウントの変更または削除方法
ステップ 1: 変更または削除するアカウントを選択します。
ステップ 2: アカウントを変更するには、「Edit(編集)」をクリックして設定を変更し、「Save(保存)」をクリ
ックします。
アカウントを削除するには、「Delete(削除)」をクリックします。
注意: アカウント・リスト内に 1 つのみのアカウントしか存在しない場合、アカウントの削除は許可されません。
3.7.6 Google マップ
この機能は、ネットワークカメラがどこにあるかを通知するために使用されます。
システムは、アクセスが拒否された場合、Google Maps キーを適用するように求めます。拒否された場合、以
下の手順に従って下さい。
ステップ 1: 「Sign up for a Google Maps key(Google マップ・キーにサインアップ)」をクリックして、アプ
リケーション・ページに移動します。
ステップ 2: 利用条件を確認し、ネットワークカメラの IP アドレスを入力します。その後、「Generate API Key
(API キーの生成)」をクリックします。
ステップ 3: 生成された API キーをコピーし、ウェブ・ブラウザ上にで「Update Google Maps Key(Google マ
ップ・キーの更新)」をクリックして貼り付けます。
Page 85
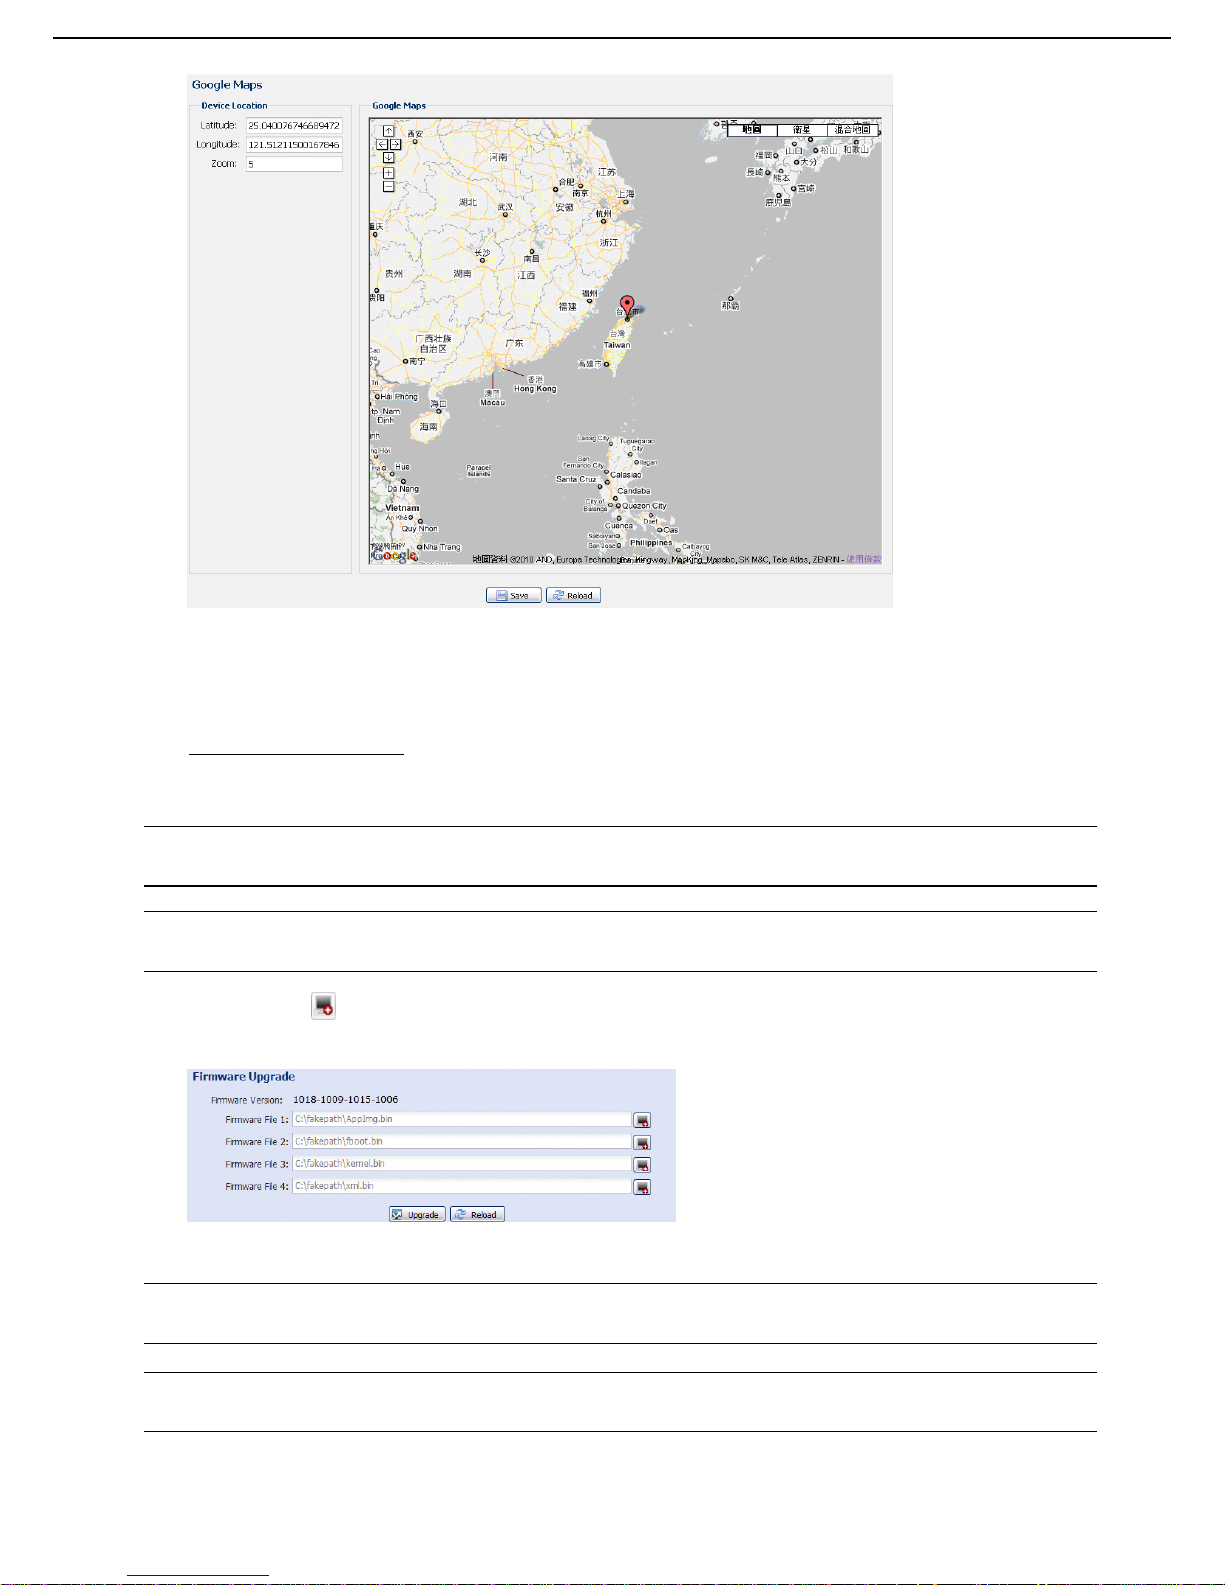
23
3.7.7 保守
ファームウェアの更新
機能拡張性のためカメラをアップグレードする必要がある場合、この機能を使用します。
注意: この機能を使用する前に、インストーラまたは販売業者によって提供されている適切な更新ファイルをお持
ちであることを確認してください。
注意: ファームウェアのアップグレード後は、カメラ内に保存されたイベントは消去されます。ファームウェア・
アップグレードの前に、重要なイベントを PC にコピー済であることを確認します。
ステップ 1: 「 」を選択して、アップグレード・ファイルを保存する場所を参照し、全ファイルが保存され
るまで、一つずつ選択します(最大 4 ファイル)。
ステップ 2: 「Upgrade(アップグレード)」を選択して、システムのアップグレードを開始します。
注意: 現在の設定を維持するよう求められます。それらを維持することが推奨されます。そうしなければ、全ての
設定は、アップグレード後に初期値へ復元されます。
注意: 更新のプロセスには数分間かかります。ファームウェアの更新中は電源を切らないでください。電源を切る
と更新は正常に行われません。アップグレードが完了すると、カメラは再起動されます。
Page 86
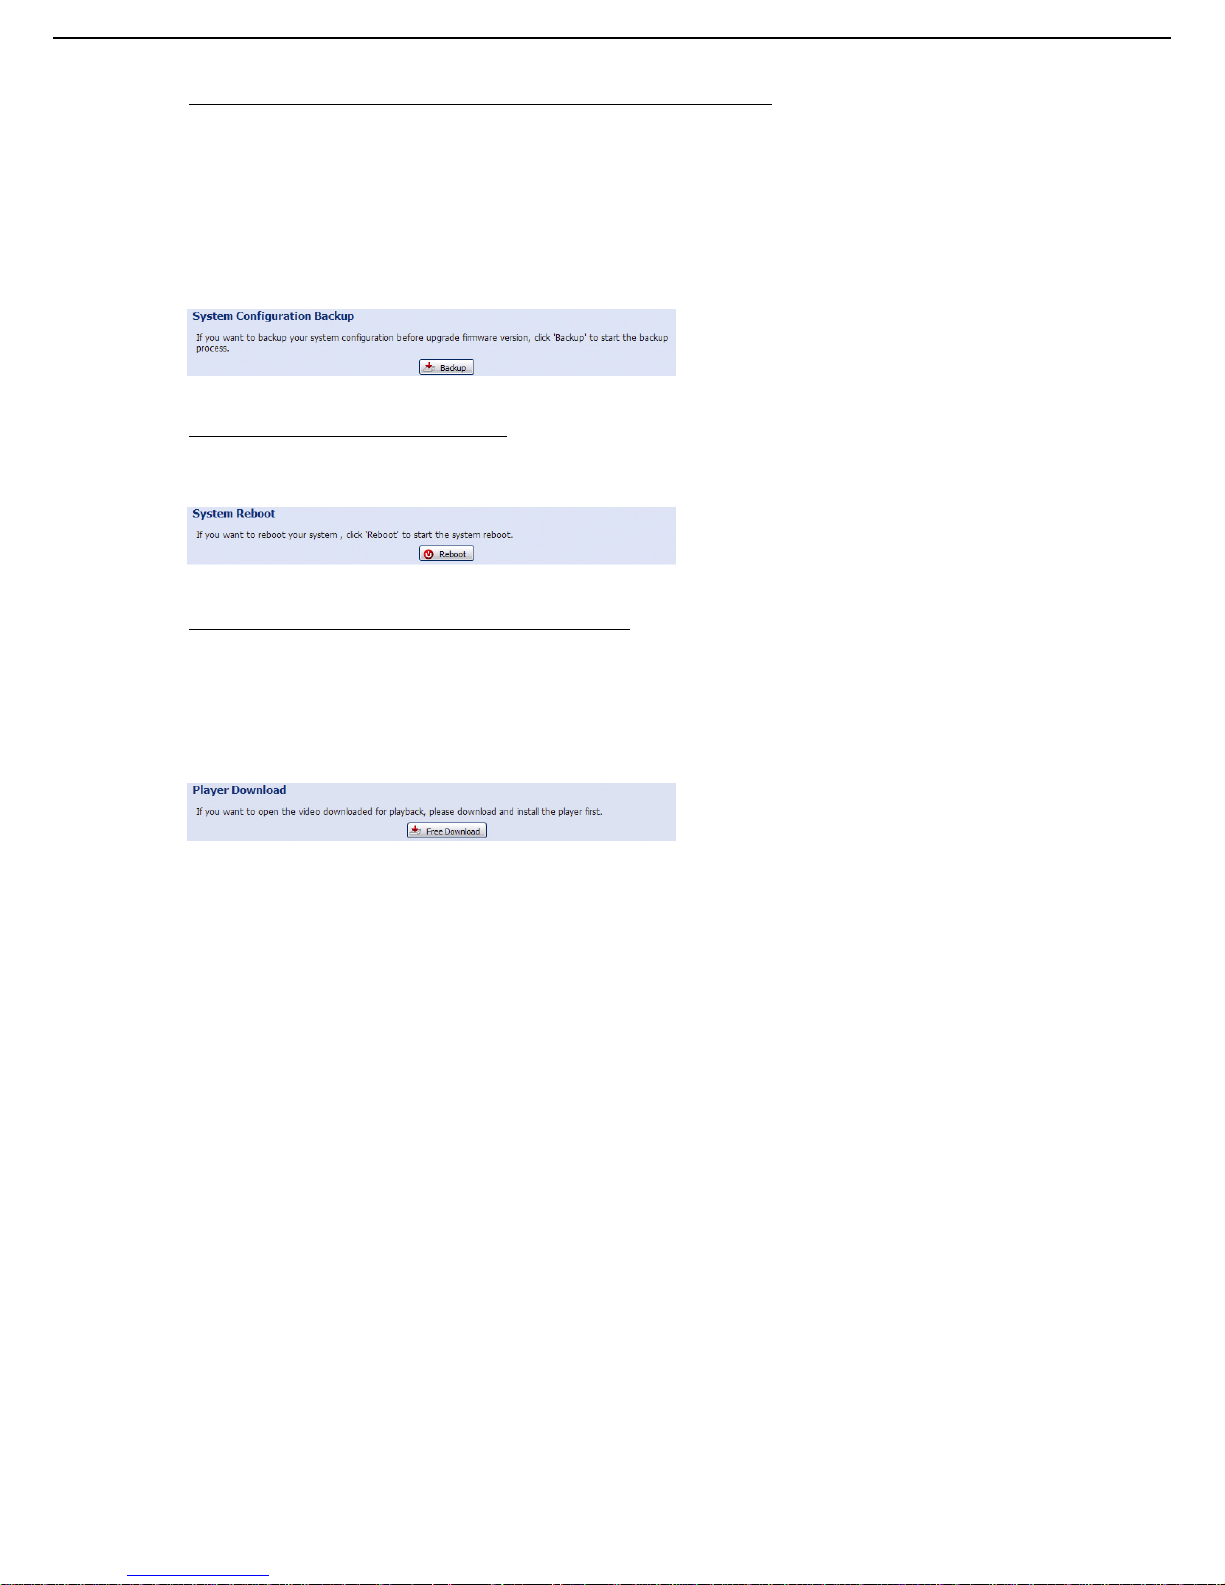
24
System Configuration Backup (システム設定のバックアップ)
この機能は、お使いのシステム設定を「System.bin(システム bin)」ファイルにコピーするため使用します。
同じシステム設定を別のカメラにインポートしたり、カメラを初期値にリセットする際、システム設定を復元
できます。
「Firmware Upgrade(ファームウェア・アップグレード)」で「System.bin(システム bin)」を選択し、「Upgrade
(アップグレード)」をクリックして、システム設定をインポートします。
System Reboot (システム再起動)
必要がある場合、「Reboot(再起動)」を選択し、お使いのカメラを再起動します。
Player Download (プレーヤーのダウンロード)
お使いの PC にダウンロードしたイベント・ビデオ・クリップを参照するには、PC に弊社独自のビデオ・プレ
ーヤーを最初にインストールする必要があります。
「Free Download(無料ダウンロード)」を選択し、ビデオ・プレーヤーをダウンロードして、ファイルをダブ
ルクリックし、インストールします。
Page 87
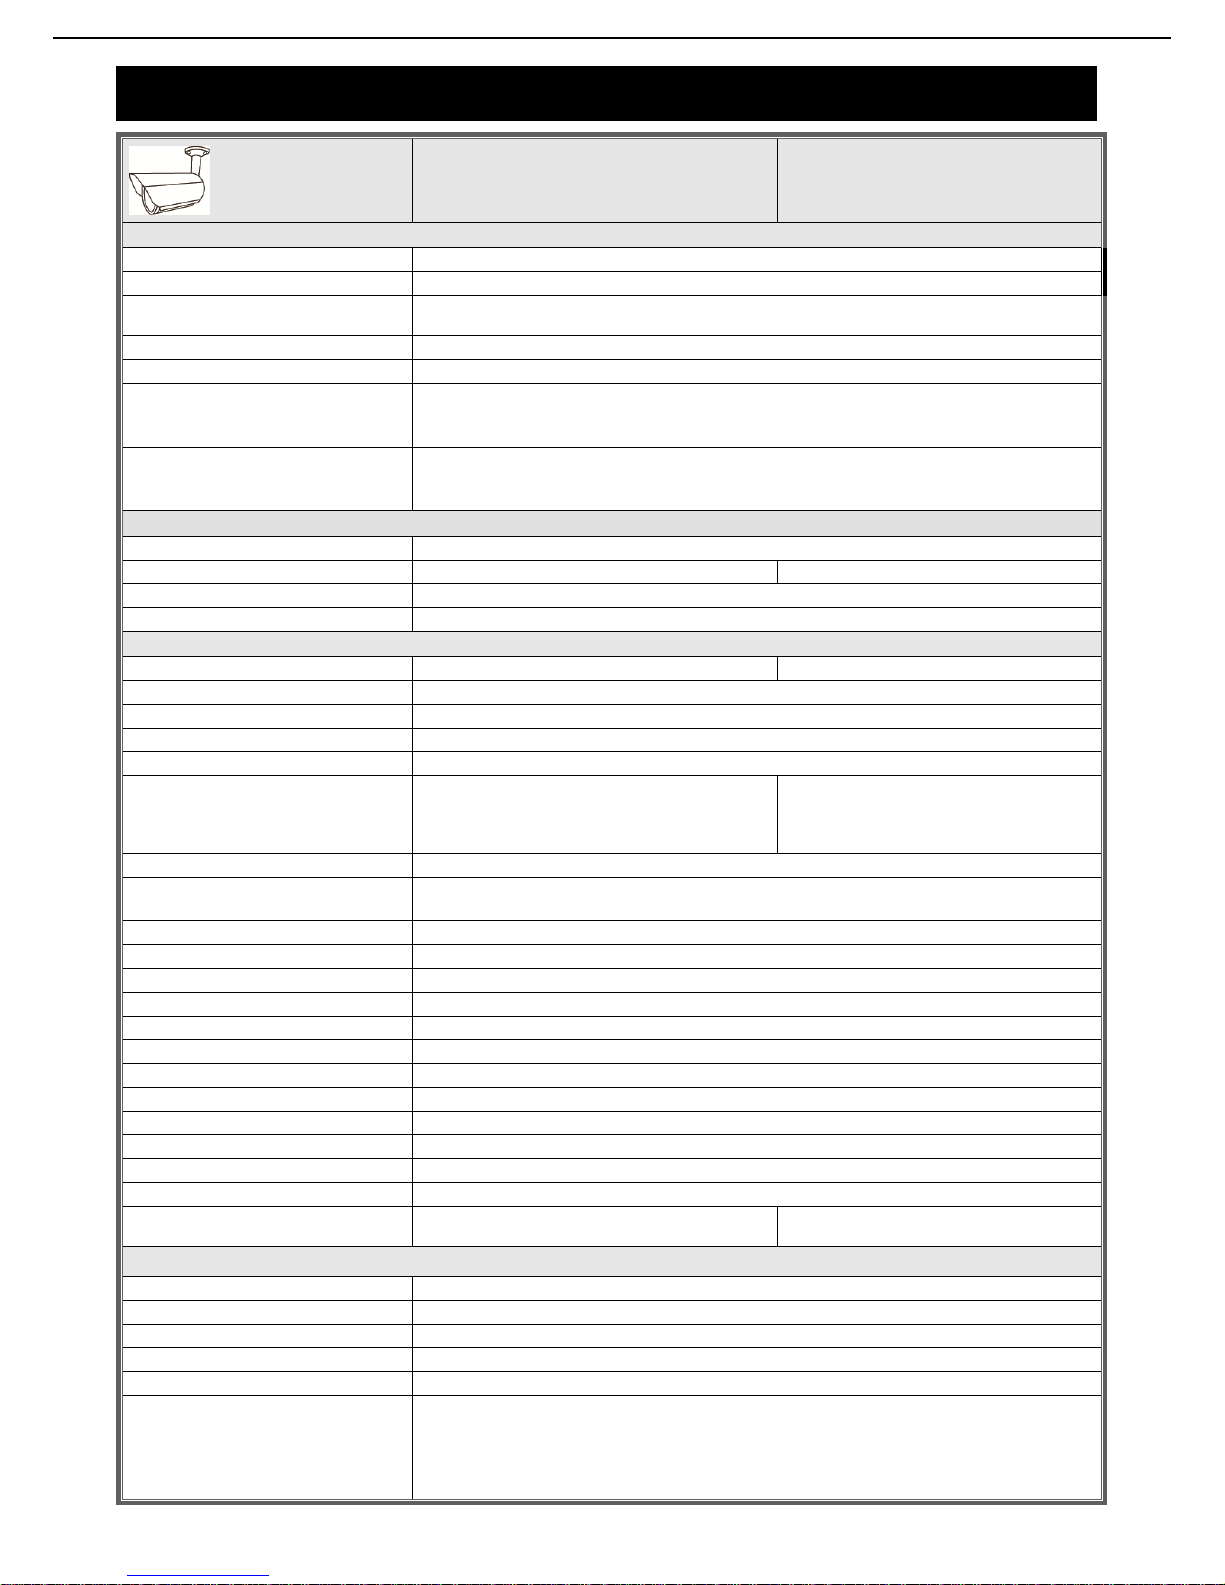
25
付録 1 製品仕様
モデル 1 モデル 2
▓ ネットワーク
LAN ポート はい
LAN 速度 10/100 基盤の T イーサネット
サポートするプロトコル
DDNS、PPPoE、DHCP、NTP、SNTP、TCP/IP、ICMP、SMTP、FTP、HTTP、RTP、RTSP、
RTCP、IPv4、Bonjour、UPnP、DNS、UDP、IGMP、QoS
オンライン・ユーザーの数 10
ONVIF 準拠 はい
セキュリティ
(1) パスワードによる複数のユーザー・アクセス・レベル
(2) IP アドレス・フィルタリング
(3) ダイジェスト認証
リモートアクセス
(1) Windows オペレーティングシステム上の Internet Explorer
(2) Windows および MAC オペレーティングシステム上の 16 チャンネルビデオビュワー
(3) iPhone、iPad および Android モバイルデバイス上の EagleEyes
▓ ビデオ
ビデオ圧縮 H.264/MPEG4/MJPEG
解像度 1080P、SXGA、720P、VGA、QVGA SXGA、720P、VGA、QVGA
フレーム・レート 30fps
複数ビデオ・ストリーミング 4(H.264、MJPEG、MPEG4)
▓ 全般
画像センサー 1/2.8 インチ SONY CMOS 画像センサー 1/4 インチ SONY CMOS 画像センサー
最小照度 1ルクス/F1.4、0 ルクス(LED オン)
S/N 比 48dB 以上(AGC オフ)
電子シャッター 1/2 から 1/10,000 秒
レンズ f2.8~12mm/F1.4~F2.8
視角
広角:109 度(水平)/76 度(垂直)/
116 度(対角)
望遠:24 度(水平)/13.5 度(垂直)/
27 度(対角)
広角:66 度(水平)/52 度(垂直)/
90 度(対角)
望遠:16 度(水平)/10 度(垂直)/
22 度(対角)
IR LED 2 ユニット
IR 有効範囲**
デフォルト:最大 25 メートル
IR 強化モード:最大 35 メートル
IR シフト はい
IRIS モード AES
ホワイト・バランス ATW
AGC オート
WDR いいえ
POE(パワー·オーバー·イーサネット) 対応(IEEE 802.3af)
外部アラーム I/O 対応(入力 1/出力 1)
マイクロ SD カード・スロット はい
ヒーター いいえ
IP 定格 IP66
運転温度 -20℃~40℃
電源(±10%) 12V/1.5A
消費電力(±10%)
PoE および PoN:11 .8W 、DC アダプタ:9.5W(IR
オン)
PoE および PoN:13.8W、DC アダプタ:11 W
(IR オン)
▓ その他
モバイル監視 iPad/iPhone/Android モバイルデバイス
イベント通知 FTP/電子メール/SMS
デジタル・パン/傾き/ズーム はい
モーション検出 はい
RTC(リアルタイム・クロック) はい
最小ウェブ参照要件
‧Intel core i3 以上、または同等の AMD
‧2GB RAM
‧AGP グラフィックカード、Direct Draw、32MB RAM
‧Windows 7、Vista および XP、DirectX 9.0 または以降
‧Internet Explorer 7.x またはそれ以降
* 仕様は予告なく変更されることがあります。 ** 寸法公差: ±5mm
Page 88
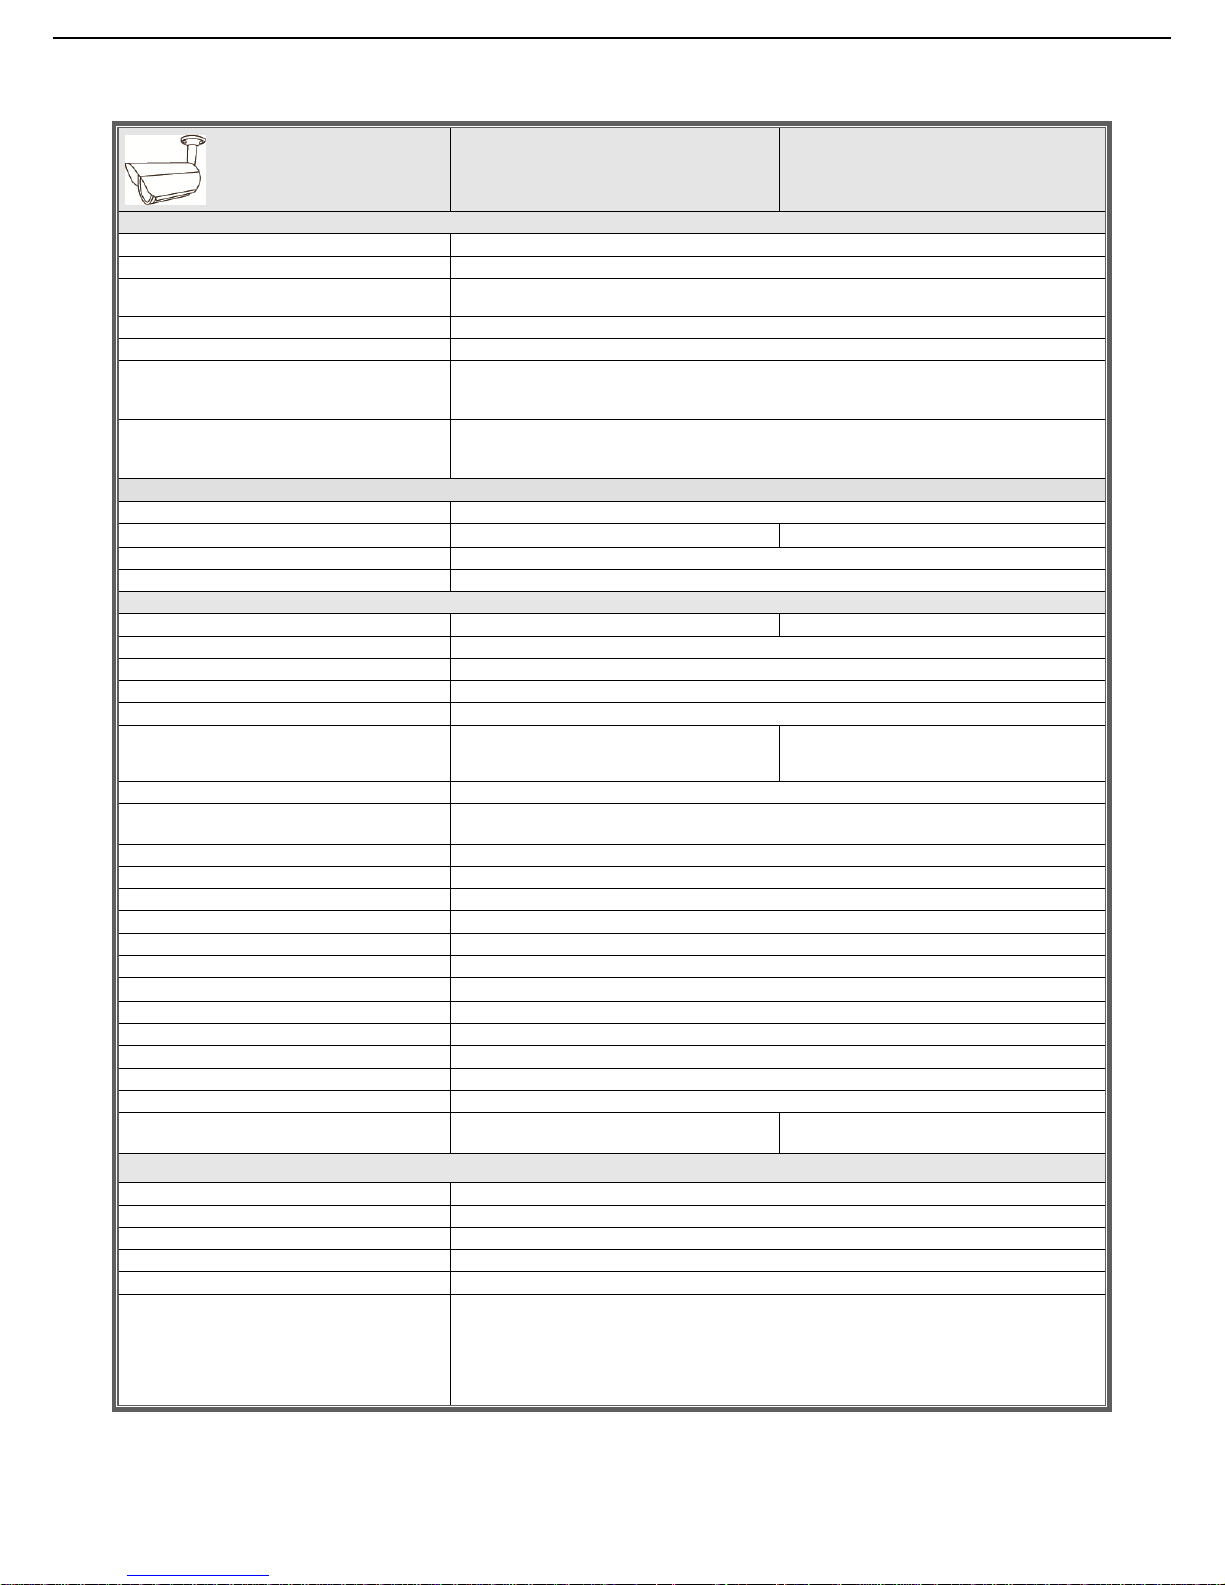
26
モデル 3 モデル 4
▓ ネットワーク
LAN ポート はい
LAN 速度 10/100 基盤の T イーサネット
サポートするプロトコル
DDNS、PPPoE、DHCP、NTP、SNTP、TCP/IP、ICMP、SMTP、FTP、HTTP、RTP、RTSP、
RTCP、IPv4、Bonjour、UPnP、DNS、UDP、IGMP、QoS
オンライン・ユーザーの数 10
ONVIF 準拠 対応(プロファイル S)
セキュリティ
(1) パスワードによる複数のユーザー・アクセス・レベル
(2) IP アドレス・フィルタリング
(3) ダイジェスト認証
リモートアクセス
(1) Windows オペレーティングシステム上の Internet Explorer
(2) Windows および MAC オペレーティングシステム上の 16 チャンネルビデオビュワー
(3) iPhone、iPad および Android モバイルデバイス上の EagleEyes
▓ ビデオ
ビデオ圧縮 H.264/MPEG4/MJPEG
解像度
1080P、SXGA、720P、VGA、QVGA SXGA、720P、VGA、QVGA
フレーム・レート 30fps
複数ビデオ・ストリーミング 4(H.264、MJPEG、MPEG4)
▓ 全般
画像センサー 1/2.8 インチ SONY CMOS 画像センサー 1/4 インチ SONY CMOS 画像センサー
最小照度 1ルクス/F1.4、0 ルクス(LED オン)
S/N 比 48dB 以上(AGC オフ)
電子シャッター 1/2 から 1/10,000 秒
レンズ f2.8~12mm/F1.4~F2.8
視角
広角:109 度(水平)/76 度(垂直)/
116 度(対角)
望遠 24 度(水平)/13.5 度(垂直)/27 度(対角)
広角:66 度(水平)/52 度(垂直)/
90 度(対角)
望遠:16 度(水平)/10 度(垂直)/22 度(対角)
IR LED 2 ユニット
IR 有効範囲**
デフォルト:最大 25 メートル
IR 強化モード:最大 35 メートル
IR シフト はい
IRIS モード AES
ホワイト・バランス ATW
AGC オート
WDR いいえ
POE(パワー·オーバー·イーサネット) 対応(IEEE 802.3at)
外部アラーム I/O 対応(入力 1/出力 1)
マイクロ SD カードスロット はい
ヒーター はい
IP 定格 IP66
運転温度 -40℃ ~ 40℃
電源(±10%) 12V/1.5A
電流消費
PoE および PoN:19.5W、DC アダプタ:16.6W
(IR オン)
PoE および PoN:18.6W、DC アダプタ:15.8W
(IR オン)
▓ その他
モバイル監視 iPad/iPhone/Android モバイルデバイス
イベント通知 FTP/電子メール/SMS
デジタル・パン/傾き/ズーム はい
モーション検出 はい
RTC(リアルタイム・クロック) はい
最小ウェブ参照要件
‧Intel core i3 以上、または同等の AMD
‧2GB RAM
‧AGP グラフィックカード、Direct Draw、32MB RAM
‧Windows 7、Vista および XP、DirectX 9.0 または以降
‧Internet Explorer 7.x またはそれ以降
* 仕様は予告なく変更されることがあります。
** 寸法公差:±5mm
Page 89
27
モデル 5 モデル 6
▓ ネットワーク
LAN ポート はい
LAN 速度 10/100 基盤の T イーサネット
サポートするプロトコル
DDNS、PPPoE、DHCP、NTP、SNTP、TCP/IP、ICMP、SMTP、FTP、HTTP、RTP、RTSP、
RTCP、IPv4、Bonjour、UPnP、DNS、UDP、IGMP、QoS
オンライン・ユーザーの数 10
ONVIF 準拠 対応(プロファイル S)
セキュリティ
(1) パスワードによる複数のユーザー・アクセス・レベル
(2) IP アドレス・フィルタリング
(3) ダイジェスト認証
リモートアクセス
(1) Windows オペレーティングシステム上の Internet Explorer
(2) Windows および MAC オペレーティングシステム上の 16 チャンネルビデオビュワー
(3) iPhone、iPad および Android モバイルデバイス上の EagleEyes
▓ ビデオ
ビデオ圧縮 H.264(メインプロファイル)/MJPEG
解像度 1080P から CIF
フレーム・レート 30/25 fps
複数ビデオ・ストリーミング 4(H.264、MJPEG)
▓ 全般
画像センサー 1/2.8 インチ CMOS 画像センサー
最小照度 0.1 ルクス/F1.4(広角)~F2.8(望遠)、0 ルクス(LED オン)
S/N 比 48dB 以上(AGC オフ)
電子シャッター 1/10,000~1/7.5(低速シャッター)
レンズ f2.8~12mm/F1.4~F2.8
視角
広角:97.4 度(水平)/58.1 度(垂直)/111.7 度(対角)
望遠:27.1 度(水平)/15.2 度(垂直)/31.1 度(対角)
IR LED 2 ユニット
IR 有効範囲**
デフォルト:最大 25 メートル
IR 強化モード:最大 35 メートル
IR シフト はい
スマートライトコントロール はい
IRIS モード AES
ホワイト・バランス ATW
AGC オート
WDR はい
POE(パワー·オーバー·イーサネット) 対応(IEEE 802.3af) 対応(IEEE 802.3at)
外部アラーム I/O 対応(入力 1/出力 1)
マイクロ SD カードスロット はい
ヒーター いいえ はい
IP 定格 IP66
運転温度 -20℃~40℃ -40℃~40℃
電源(±10%) 12V/1A 12V/2A
消費電力(±10%) PoE および PoN:10.5W、DC アダプタ:8.4W PoE および PoN:23.5W、DC アダプタ:20W
▓ その他
モバイル監視 iOS および Android
イベント通知 FTP/電子メール/SMS
デジタル・パン/傾き/ズーム はい
モーション検出 はい
RTC(リアルタイム・クロック) はい
最小ウェブ参照要件
‧Intel core i3 以上、または同等の AMD
‧2GB RAM
‧AGP グラフィックカード、Direct Draw、32MB RAM
‧Windows 7、Vista および XP、DirectX 9.0 または以降
‧Internet Explorer 7.x またはそれ以降
* 仕様は予告なく変更されることがあります
** IR 強化モードと低速シャッタースピードを使用して、距離を更に延ばすことができます。
Page 90
28
モデル 7 モデル 8 モデル 9
▓ ネットワーク
LAN ポート はい
LAN 速度 10/100 基盤の T イーサネット
サポートするプロトコル
DDNS、PPPoE、DHCP、NTP、SNTP、TCP/IP、ICMP、SMTP、FTP、HTTP、RTP、RTSP、
RTCP、IPv4、Bonjour、UPnP、DNS、UDP、IGMP、QoS
オンライン・ユーザーの数 10
ONVIF 準拠 対応(プロファイル S)
セキュリティ
(1) パスワードによる複数のユーザー・アクセス・レベル
(2) IP アドレス・フィルタリング
(3) ダイジェスト認証
リモートアクセス
(1) Windows オペレーティングシステム上の Internet Explorer
(2) Windows および MAC オペレーティングシステム上の 16 チャンネルビデオビュワー
(3) iPhone、iPad および Android モバイルデバイス上の EagleEyes
▓ ビデオ
ビデオ圧縮 H.264(メインプロファイル)/MJPEG
解像度 1080P から CIF
フレーム・レート 30fps
複数ビデオ・ストリーミング 4(H.264、MJPEG)
▓ 全般
画像センサー 1/2.9 インチ SONY CMOS 画像センサー
最小照度
1 ルクス/F2.0、0 ルクス(LED
オン)
0.1 ルクス/F2.0(広角)~F2.8(望遠)、
0 ルクス(LED オン)
S/N 比 48dB 以上(AGC オフ)
電子シャッター 1/7.5 から 1/8000 秒 1/10,000~1/7.5(低速シャッター)
レンズ
f6.0~60mm/F2.0~2.8
10 倍光学ズーム、自動フォーカス、
近焦点限界 10cm(広角)または 80cm(望遠)から無限大
視角
1 倍:47.3 度(水平)x27.5 度(垂直)x53.5 度(対角)
10 倍:5.3 度(水平)x3.0 度(垂直)x6.1 度(対角)
IR LED はい
IR 有効範囲**
デフォルトモード:最大 40 メートル
IR 強化モード:最大 60 メートル
IR シフト はい
IRIS モード 対応(2 段階) AES
POE 対応(IEEE 802.3af) 対応(IEEE 802.3at)
WDR -- はい
外部アラーム I/O 対応(入力 1/出力 1)
ヒーター いいえ はい
IP 定格 IP67
ホワイト・バランス ATW
AGC オート
運転温度 -10℃~40℃ -20℃~40℃ -40℃ ~ 40℃
電源(±10%) 12V/1A 12V/1.5A 12V/2A
消費電力 DC アダプタ:9W(最大)
PoE および PoN:28.5W、
DC アダプタ:24W
▓ その他
モバイル監視 iPad/iPhone/Android モバイルデバイス
イベント通知 FTP/電子メール/SMS
デジタル・パン/傾き/ズーム はい
モーション検出 はい
RTC(リアルタイム・クロック) はい
最小ウェブ参照要件
‧Intel core i3 以上、または同等の AMD
‧2 GB RAM
‧AGP グラフィックカード、Direct Draw、32MB RAM
‧Windows 7、Vista および XP、DirectX 9.0 または以降
‧Internet Explorer 7.x またはそれ以降
* 仕様は予告なく変更されることがあります。
** 寸法公差: ±5mm
Page 91
29
モデル 10 モデル 11
▓ ネットワーク
LAN ポート はい
LAN 速度 10/100 基盤の T イーサネット
サポートするプロトコル
DDNS、PPPoE、DHCP、NTP、SNTP、TCP/IP、ICMP、SMTP、FTP、HTTP、RTP、RTSP、
RTCP、IPv4、Bonjour、UPnP、DNS、UDP、IGMP、QoS
オンライン・ユーザーの数 10
ONVIF 準拠 対応(プロファイル S)
セキュリティ
(1) パスワードによる複数のユーザー・アクセス・レベル
(2) IP アドレス・フィルタリング
(3) ダイジェスト認証
リモートアクセス
(1) Windows オペレーティングシステム上の Internet Explorer
(2) Windows および MAC オペレーティングシステム上の 16 チャンネルビデオビュワー
(3) iPhone、iPad および Android モバイルデバイス上の EagleEyes
▓ ビデオ
ビデオ圧縮 H.264/MJPEG
解像度 1080P から CIF
フレーム・レート 30fps
複数ビデオ・ストリーミング 4(H.264、MJPEG)
▓ 全般
画像センサー 1/2.9 インチ CMOS 画像センサー
最小照度 1/10,000~1/7.5(低速シャッター)
S/N 比 48dB 以上(AGC オフ)
電子シャッター 1/2から 1/10,000 秒
レンズ f2.8~12mm/F1.4~F2.8
視角
広角:97.4 度(水平)/58.1 度(垂直)/111.7 度(対角)
望遠:27.1 度(水平)/15.2 度(垂直)/31.1 度(対角)
IR LED 2 ユニット
IR 有効範囲**
デフォルト:最大 25 メートル
IR 強化モード:最大 35 メートル
IR シフト はい
スマートライトコントロール はい
IRIS モード AES
ホワイト・バランス ATW
AGC オート
WDR はい
POE(パワー·オーバー·イーサネット) 対応(IEEE 802.3af) 対応(IEEE 802.3at)
外部アラーム I/O 対応(入力 1/出力 1)
マイクロ SD カードスロット はい
ヒーター いいえ はい
IP 定格 IP66
運転温度 -20℃ ~ 40℃ -40℃ ~ 40℃
電源(±10%) 12V/1A 12V/2A
消費電力(±10%) PoE および PoN:10.5W、DC アダプタ:8.4W PoE および PoN:23.5W、DC アダプタ:20W
▓ その他
モバイル監視 iOS および Android
イベント通知 FTP/電子メール/SMS
デジタル・パン/傾き/ズーム はい
モーション検出 はい
RTC(リアルタイム・クロック) はい
最小ウェブ参照要件
‧Intel core i3 以上、または同等の AMD
‧2GB RAM
‧AGP グラフィックカード、Direct Draw、32MB RAM
‧Windows 7、Vista および XP、DirectX 9.0 または以降
‧Internet Explorer 7.x またはそれ以降
* 仕様は予告なく変更されることがあります
** IR 強化モードと低速シャッタースピードを使用して、距離を更に延ばすことができます。
Page 92
30
モデル 12 モデル 13
▓ ネットワーク
LAN ポート はい
LAN 速度 10/100 基盤の T イーサネット
サポートするプロトコル
DDNS、PPPoE、DHCP、NTP、SNTP、TCP/IP、ICMP、SMTP、FTP、HTTP、RTP、RTSP、
RTCP、IPv4、Bonjour、UPnP、DNS、UDP、IGMP、QoS
オンライン・ユーザーの数 10
ONVIF 準拠 対応(プロファイル S)
セキュリティ
(1) パスワードによる複数のユーザー・アクセス・レベル
(2) IP アドレス・フィルタリング
(3) ダイジェスト認証
リモートアクセス
(1) Windows オペレーティングシステム上の Internet Explorer
(2) Windows および MAC オペレーティングシステム上の 16 チャンネルビデオビュワー
(3) iPhone、iPad および Android モバイルデバイス上の EagleEyes
▓ ビデオ
ビデオ圧縮 H.264/MPEG4/MJPEG
解像度 1080P、SXGA、720P、VGA、QVGA
フレーム・レート 30fps
複数ビデオ・ストリーミング 4(H.264、MJPEG、MPEG4)
▓ 全般
画像センサー 1/2.9 インチ CMOS 画像センサー
最小照度 1ルクス/F1.4、0 ルクス(IR LED オン)
S/N 比 48dB 以上(AGC オフ)
電子シャッター 1/2から 1/10,000 秒
レンズ f2.8~12mm/F1.4~F2.8
視角
広角:109 度(水平)/76 度(垂直)/116 度(対角)
望遠:24 度(水平)/13.5 度(垂直)/27 度(対角)
IR LED 2 ユニット
IR 有効範囲**
デフォルト:最大 25 メートル
IR 強化モード:最大 35 メートル
IR シフト はい
スマートライトコントロール いいえ
IRIS モード AES
ホワイト・バランス ATW
AGC オート
WDR いいえ
POE(パワー·オーバー·イーサネット) 対応(IEEE 802.3af) 対応(IEEE 802.3at)
外部アラーム I/O 対応(入力 1/出力 1)
マイクロ SD カードスロット はい
ヒーター いいえ はい
IP 定格 IP66
運転温度 -20℃ ~ 40℃ -40℃ ~ 40℃
電源(±10%) 12V/1A 12V/2A
消費電力(±10%) PoE および PoN:12.5W、DC アダプタ:10.25W PoE および PoN:25W、DC アダプタ:21.1W
▓ その他
モバイル監視 iOS および Android
イベント通知 FTP/電子メール/SMS
デジタル・パン/傾き/ズーム はい
モーション検出 はい
RTC(リアルタイム・クロック) はい
最小ウェブ参照要件
‧Intel core i3 以上、または同等の AMD
‧2GB RAM
‧AGP グラフィックカード、Direct Draw、32MB RAM
‧Windows 7、Vista および XP、DirectX 9.0 または以降
‧Internet Explorer 7.x またはそれ以降
* 仕様は予告なく変更されることがあります
** IR 強化モードと低速シャッタースピードを使用して、距離を更に延ばすことができます。
Page 93
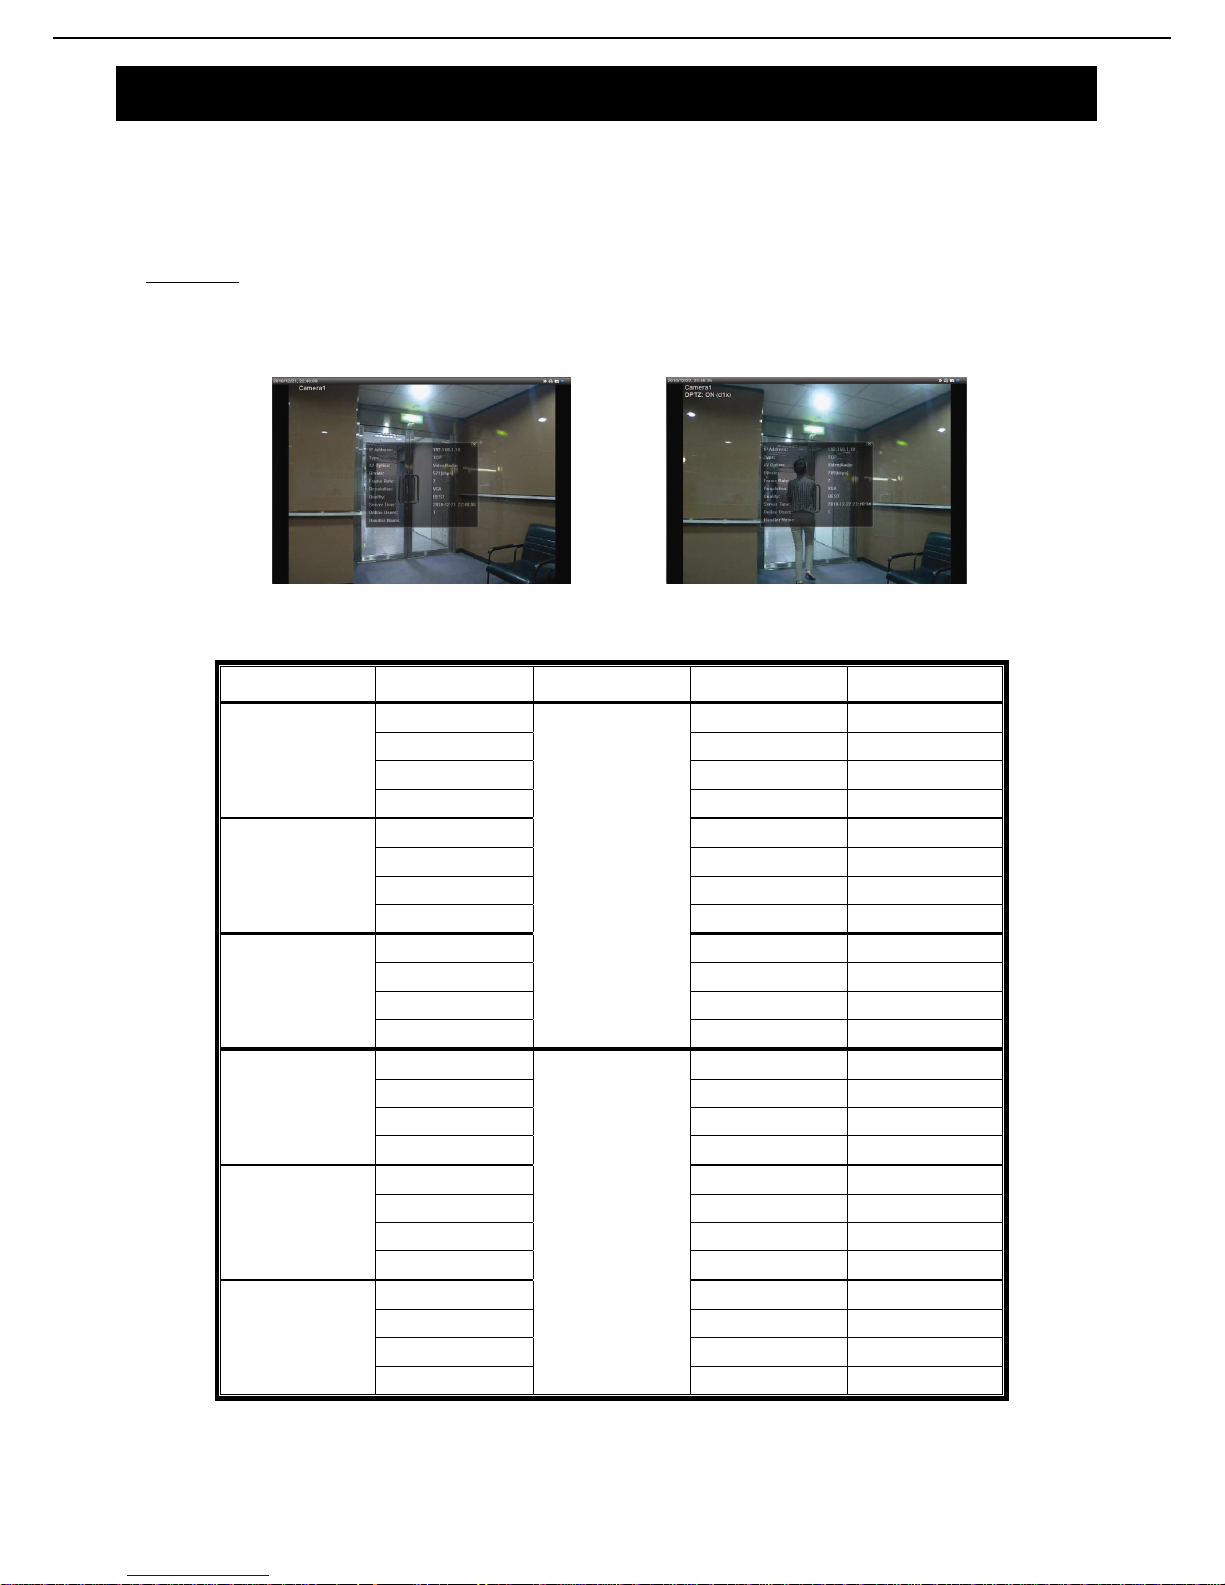
31
付録 2 ビット・レート・テーブル(参照用)
以下のデータは参照用のみです。
ここに掲載するビット・レートは選択した解像度、画質とフレーム・レート、監視エリアの複雑性、監視エリアに
移動物体が現れる頻度により異なる場合があります。
テスト環境
場所:オフィス入口
ネットワーク変換:H.264
カメラ・タイプ:メガピクセル・カメラ
静的: 出入りする人がいない
動的
: 1~2
人の人が出入りする
解像度 画質 フレーム・レート (動的)kbps (静的)kbps
SXGA
最高 フル
3253 3216
高
2375 2160
普通
1571 1266
標準
1465 873
VGA
最高
2010 1261
高
1042 1034
普通
685 572
標準
457 350
QVGA
最高
646 366
高
482 350
普通
302 286
標準
168 161
SXGA
最高
1/4 1163 1076
高
989 715
普通
855 534
標準
719 443
VGA
最高
789 571
高
451 447
普通
349 237
標準
217 165
QVGA
最高
269 147
高
182 131
普通
164 113
標準
97 71
Page 94
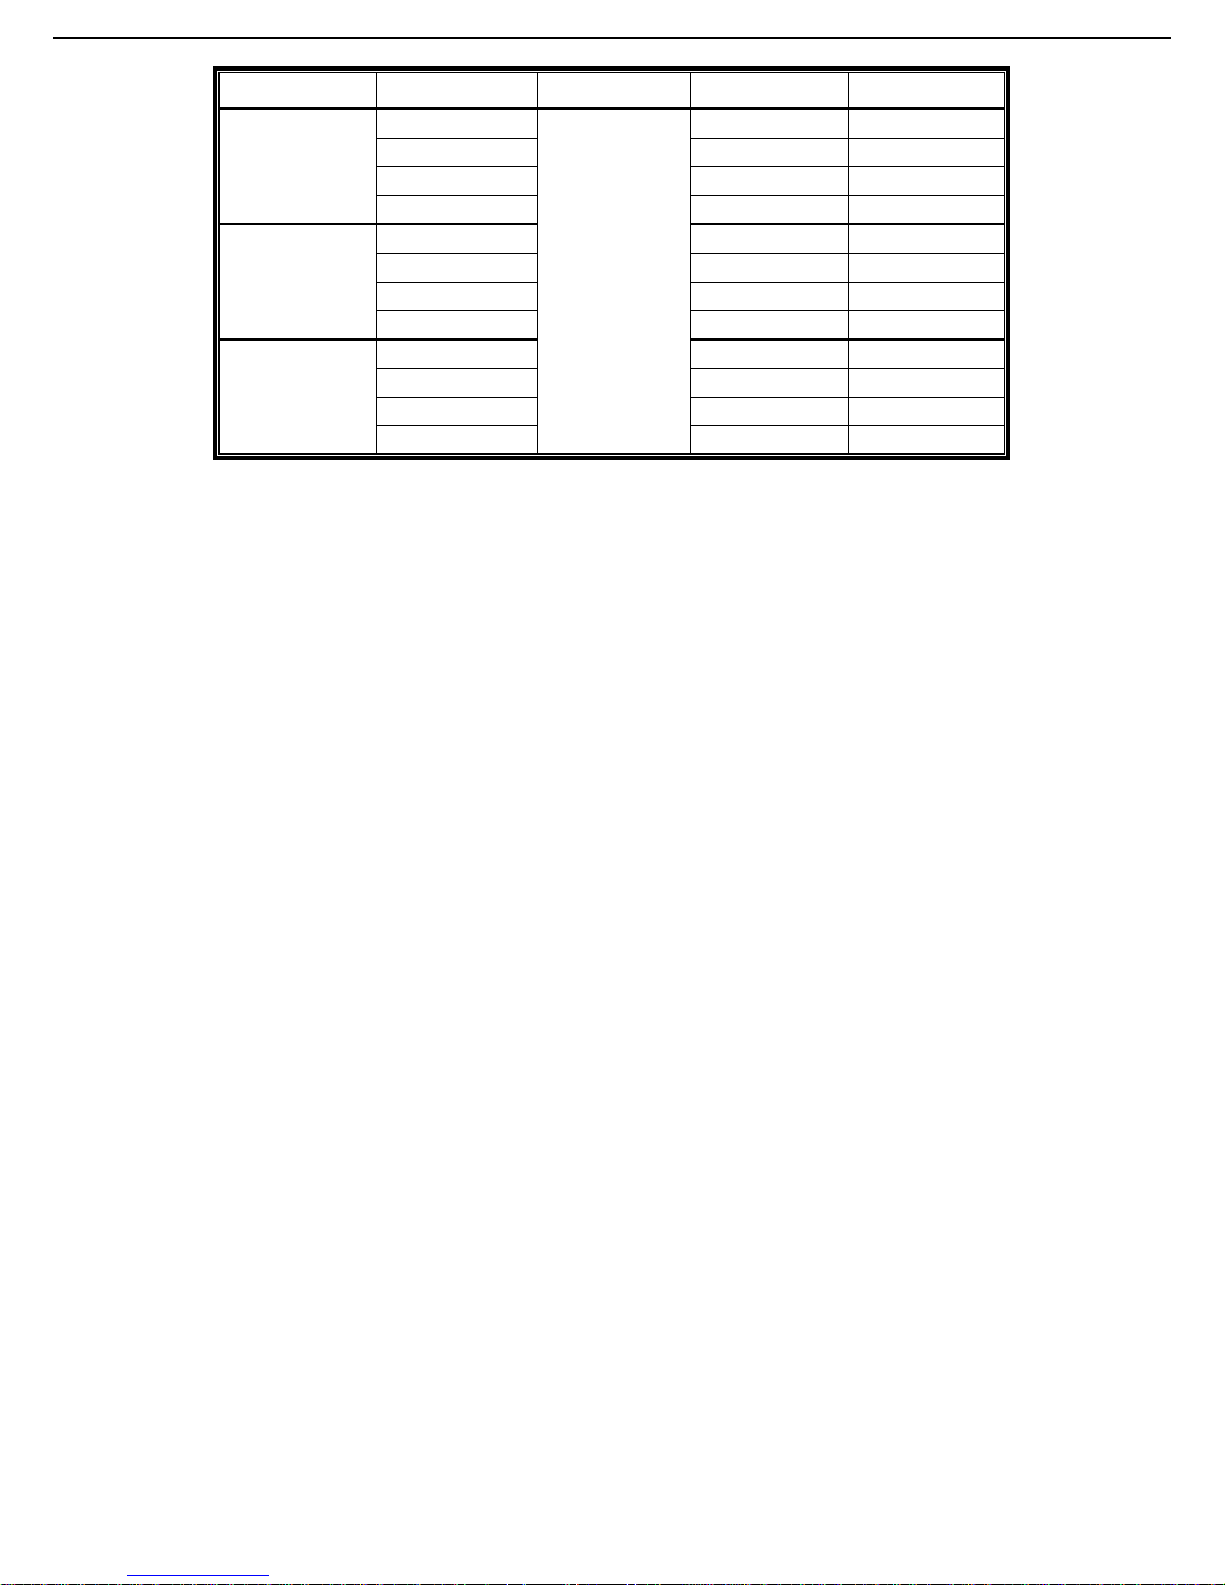
32
解像度 画質 フレーム・レート (動的)kbps (静的)kbps
SXGA
最高
1/15 581 374
高
405 342
普通
487 248
標準
337 141
VGA
最高
358 79
高
201 63
普通
180 28
標準
92 15
QVGA
最高
111 84
高
99 68
普通
97 54
標準
58 42
Page 95
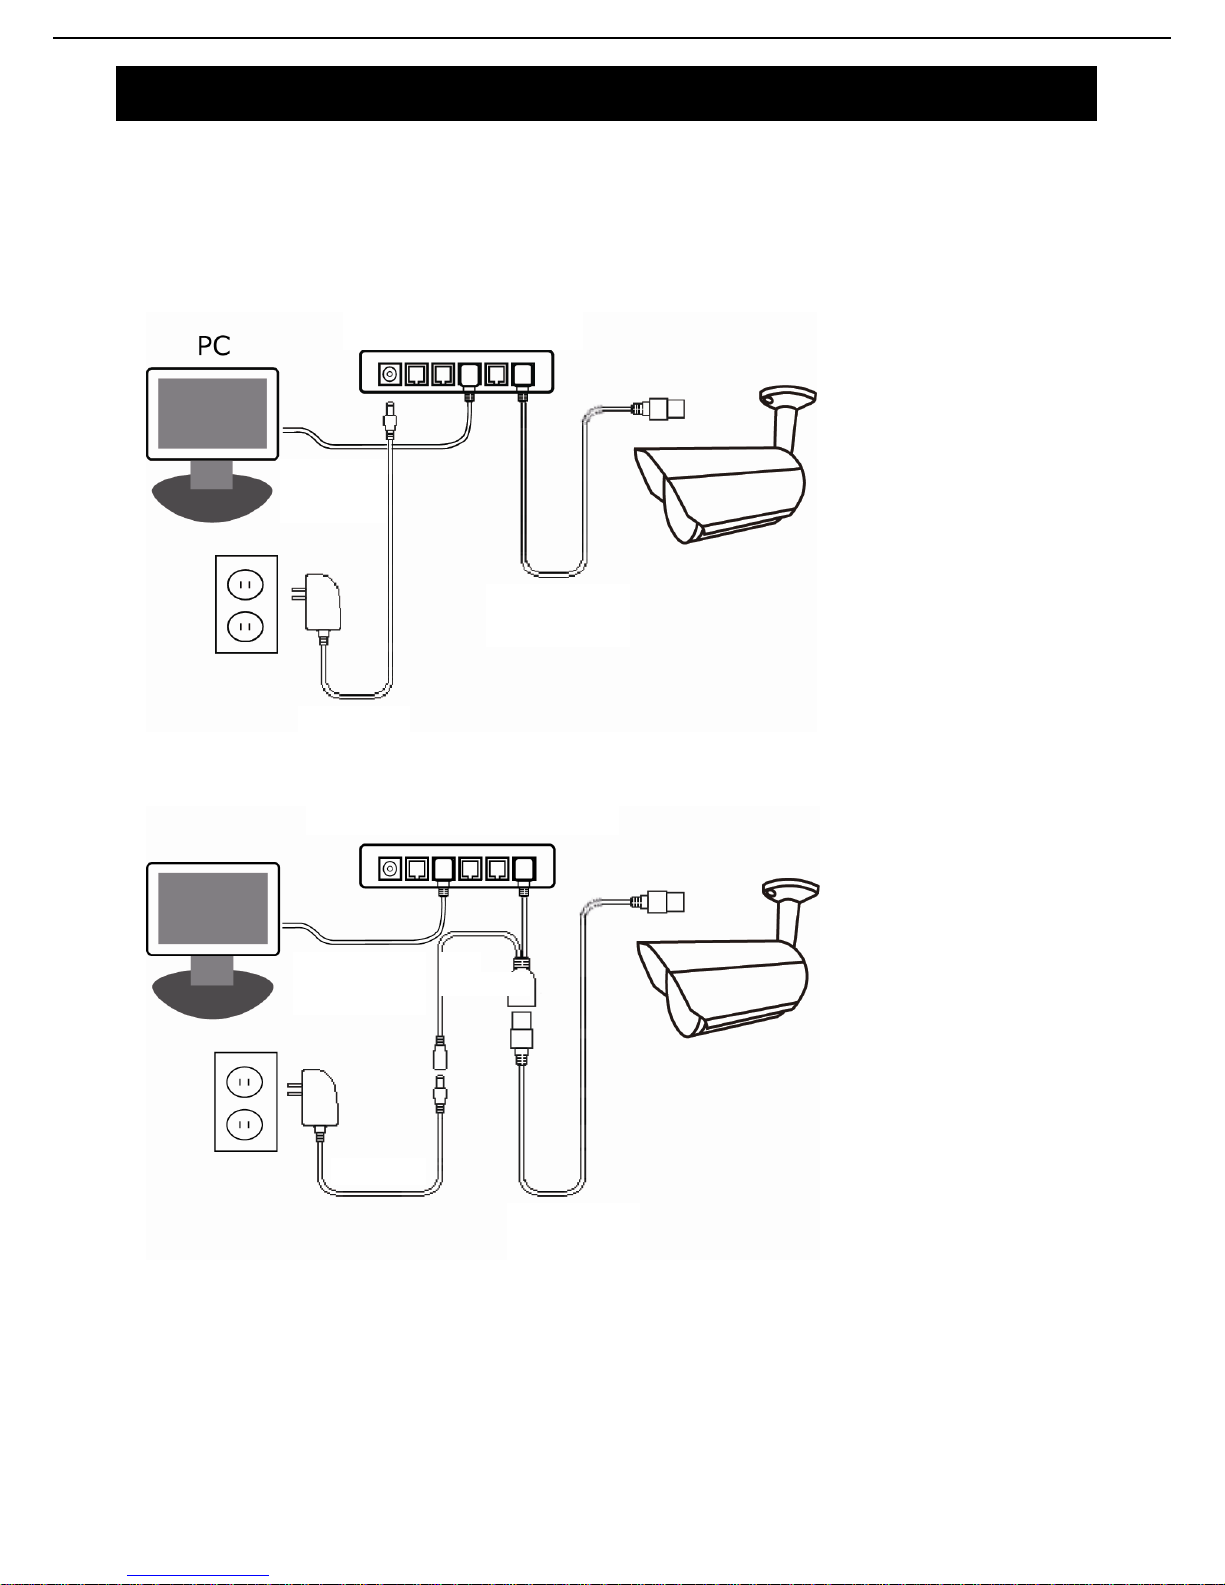
33
付録 3 POE 接続
このデバイスは、IEEE802.3af または IEEE802.3at タスクフォースが開発した、PoE(パワー·オーバー·イーサネッ
ト)をサポートし、インターネットに接続するために使用されるものと同じネットワーク(イーサネット)ケーブル
を介して電源を供給することができます。電源ケーブルは必要ありません。下記は、参照用に PoE アプリケーショ
ンの 2 つの例を示しています。
ルーター/ハブが POE 接続をサポートする場合
ルーター/ハブが POE 接続をサポートしていない場合(オプションの POE 接続が必要です)
POE ルーター/ハブ
ネットワーク
ケーブル
ネットワー
クケーブル
電源
非 POE ルーター/ハブ
ネットワーク
ケーブル
電源
ネットワー
クケーブル
POE
コネクタ
Page 96
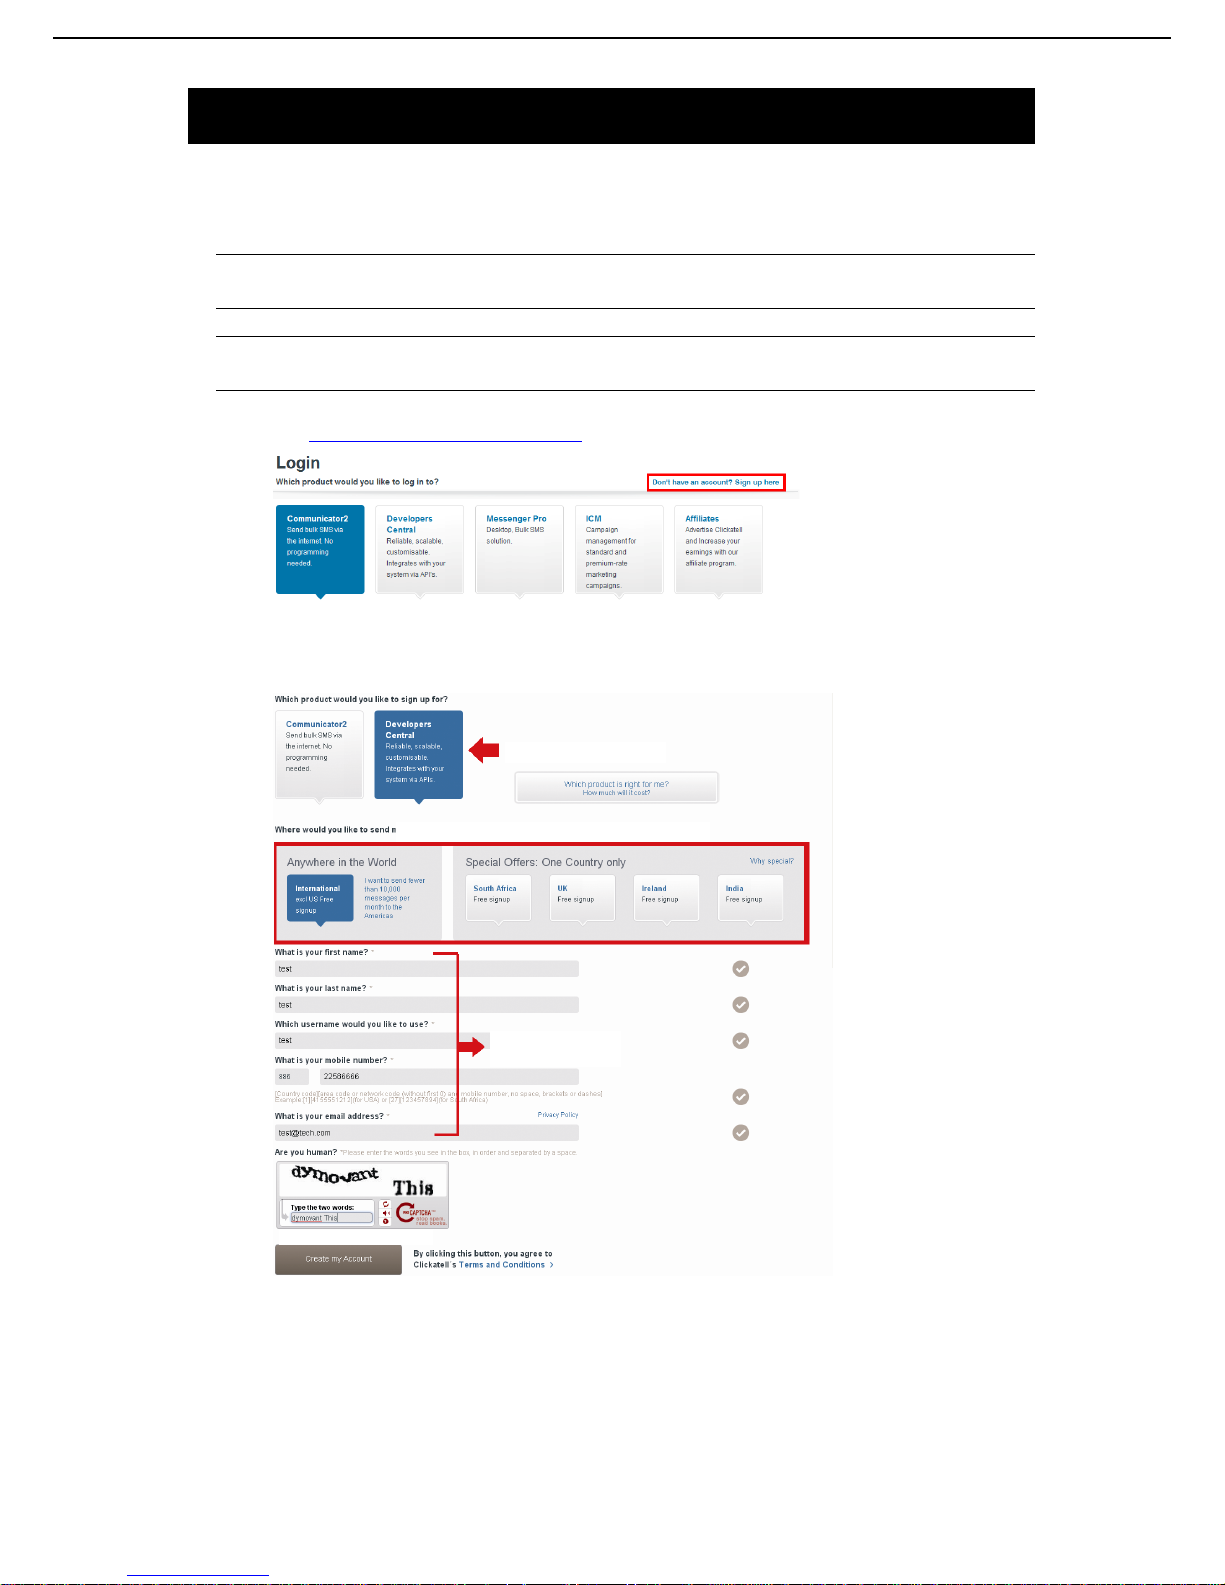
34
付録 4 SMS メッセージング用 API ID アプリケーション
イベント発生時に、カメラが自動的にテキスト・メッセージを送信可能にするには、Clickatell と
EVERY8D などモバイル・メッセージング会社からの API ID を最初に適用する必要があります。
以下は、Clickatell から API ID を取得する方法の例を示します。
注意: SMS メッセージは、完全に無料ではありません。お使いのメッセージング・サービスの課
金ポリシーをご確認下さい。
注意: 以下の手順は参考情報として記載され、Clickatell の公式サイトが更新されると異なる場合
があります。
アプリケーションについて、次の手順に従って下さい。
ステップ 1: http://www.clickatell.com/login.php に移動します。最初にアカウントにサインアップします。
ステップ 2: 「Developers Central(開発者中心)」を選択し、このサービスを利用する場所を選択し、
アカウントを作成するため情報を入力します。
ステップ 3: アカウントが作成されると、システムは自動的にサービスへのログインに使用するユー
ザー名、パスワード、またクライアント ID を含む電子メールを指定した、電子メール
アドレスに送信します。
ステップ 4: 電子メール内のリンクをクリックしてログインすると、携帯電話番号の確認を求められ
ます。「SEND ACTIVATION CODE(アクティベーション・コードの送信)」を選択しま
す。システムは、検証のため携帯電話番号にアクティベーション・コードを送信します。
Clickatell からテキスト・メッセージを受信しているかどうか確認し、アクティベーシ
ョン・コードを入力します。
クリックしてアカウントを作成します。
開発者中心
どれが適しているかを確認します。
情報を入力します。
アカウントの作成
Page 97
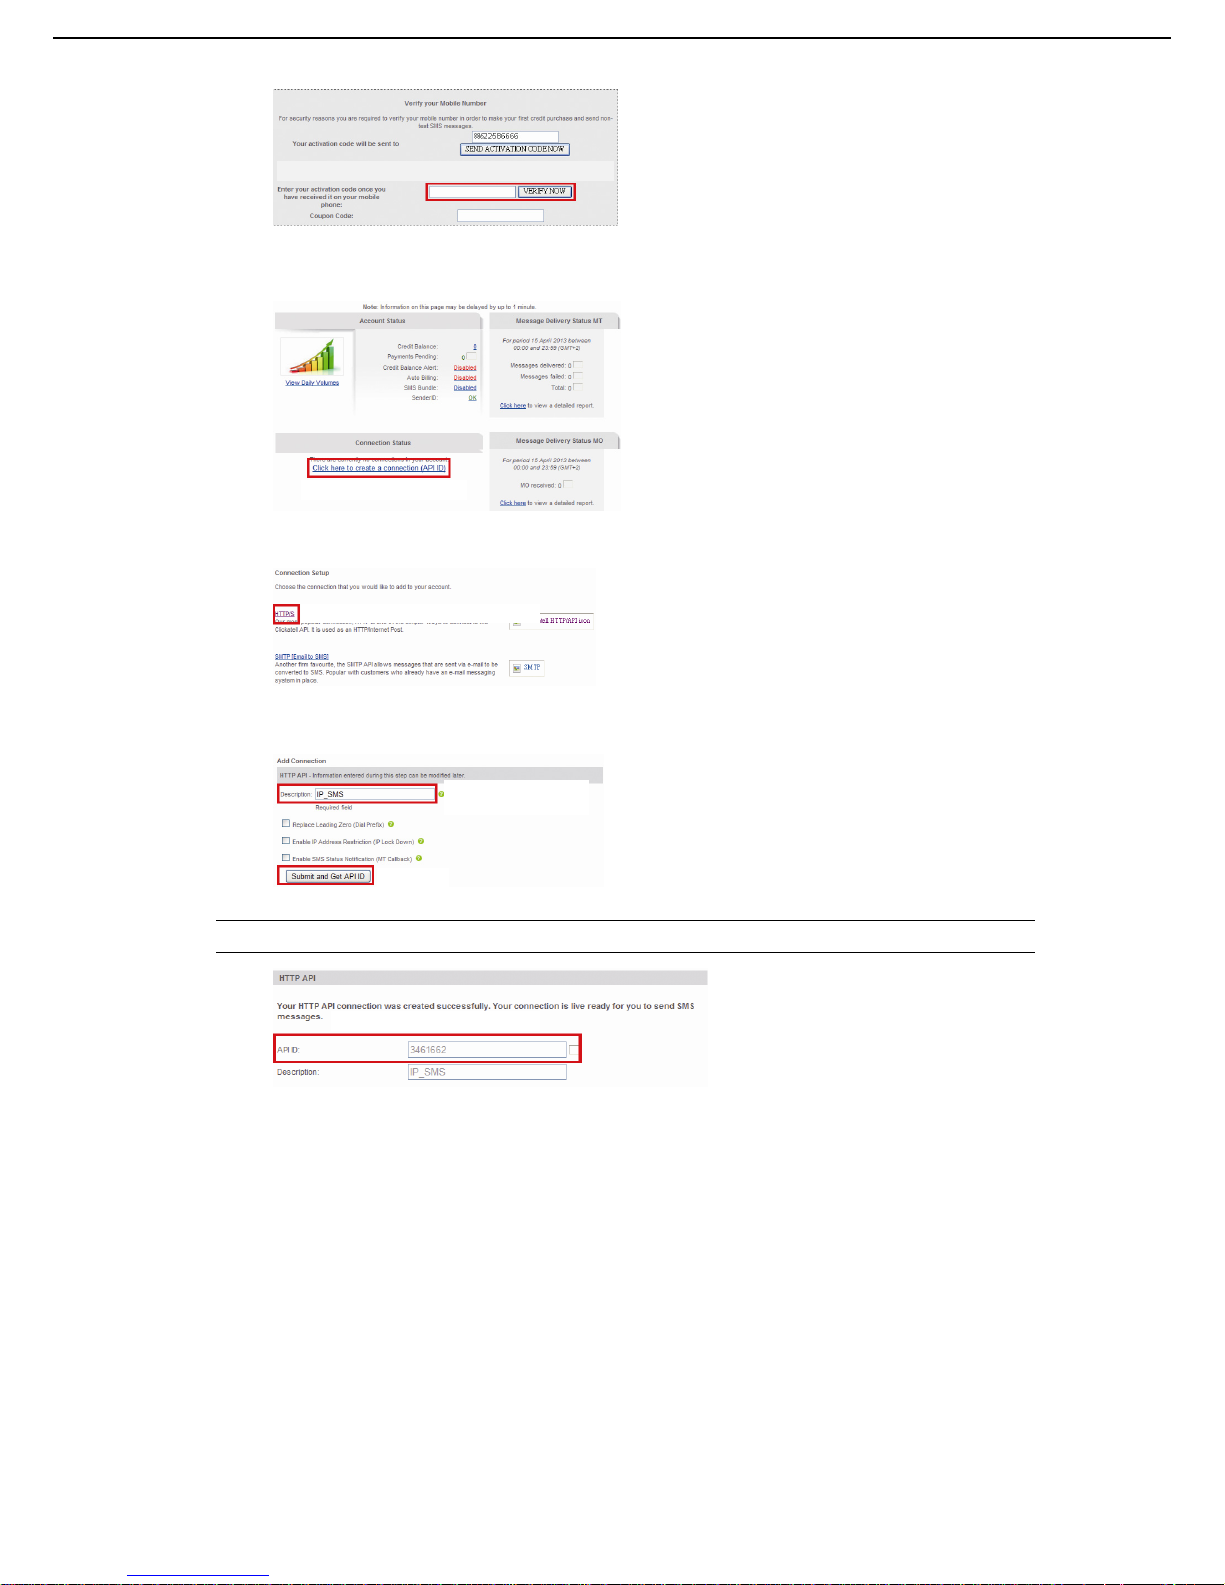
35
ステップ 4: アカウント内で「Connection Status(接続ステータス)」を確認し、接続(API ID)を
作成します。
ステップ 5: 「HTTP/S」を選択します。
この接続に対して分かりやすい名前を付け、「Submit and Get API ID(送信し API ID を取得)」
をクリックします。
ステップ 5: API ID が次のように作成されます。
注意: 後で SMS 通知設定を行うため、API ID をメモします。
ここにアクティベーション・コードを入力します
ここをクリックします
「HTTP/S」をクリックします。
この接続に対して名
前を付けます
クリック
SMS に使用するAPI ID
Page 98
36
付録 5 Q&A
Q&A に関する詳細は、当社公式ウェブサイトを参照してください: www.eagleeyescctv.com
質問 回答
無線ネットワークがインストールさ
れている自宅やオフィスでこのカメ
ラを接続することができます。
しかし、自宅やオフィスを離れると、
携帯電話(3G ネットワーク)または
他の PC(インターネットに接続され
ている)から、このカメラに接続でき
ません。なぜですか?
このカメラを LAN 接続のみに設定し、インターネット接続に設定してい
ません。
www.surveillance-download.com/user/m359a.swf からダウンロード可能
な詳細ネットワーク設定ガイドの手順に従ってネットワーク設定を完了
してください、または、これはネットワーク設定を行うネットワーク知識
のない人にとっては通常難しいため、この作業をお近くのインストーラま
たは再販業者に確認することをお勧めします。
ライブ画像がなめらかではありませ
ん。なぜですか?
映像の滑らかさは、ローカルネットワークのアップロード帯域幅、ルータ
ーの効率、クライアントネットワークのダウンロード帯域幅、ライブビュ
ーの複雑さなど多くの影響を受ける可能性があります。
(推奨)映像の滑らかさを重視する場合は「QVGA」を、画質を重視する
場合は「SXVGA」をそれぞれ選択し、標準的な滑らかさと画質にするに
は「VGA」を選択します
ライブ画像がちらつき続けています。
なぜですか?
カメラに対する電源周波数を「60 ヘルツ」または「50 ヘルツ」に調整し
てみてください。
iPhone ユーザーの場合、カメラにアクセスし、右上隅の「
」を選択
して、IPCAM 設定ページに移動します。その後、「Advanced Setup(詳
細設定)」「Camera(カメラ)」に移動し、設定を変更します。
Internet Explorer からアクセスする場合、カメラにログインして「Config.(設
定)」「Camera(カメラ)」、「Camera(カメラ)」を選択します。
Page 99
37
付録 6 録画タイムテーブル
以下は、各録画解像度での推定される合計録画時間です。
各解像度の録画時間は、「Testing Environment(テスト環境)」で示された両方のアラーム・トリガ条件で収集され
た平均値で、参照のみを目的とします。
録画時間は選択した解像度、画質およびフレームレート、監視エリアの複雑性、監視エリアに移動物体が現れる頻度
により異なることがあります。
テスト環境
場所:オフィス
監視エリア:カメラから 1.5 メートル離れている
アラーム・トリガ条件:
(1) 1 人が監視エリアを通過し、直ちに立ち去る場合。
(2) 監視エリアを 2 人が通過する。1 人が直ちに立ち去り、1 人がしばらく留まってから立ち去る場合。
録画解像度
SXGA VGA QVGA
録画時間(秒)
25 115 211
Page 100
38
付録 7 マイクロ SD カード互換性リスト
メーカー 容量 クラス メーカー 容量 クラス
ADATA 2GB -- Transcend 2GB --
4GB
クラス 6
4GB
クラス 2
アペサー
2GB -- 4GB
クラス 4
4GB
クラス 4
4GB
クラス 6
サンディスク
2GB -- 8GB
クラス 6
4GB
クラス 4
16GB
クラス 10
8GB
クラス 4 キンストン
2GB --
16GB
クラス 4
4GB
クラス 4
32GB
クラス 4
8GB
クラス 4
Verico 2GB -- 32GB
クラス 4
4GB
クラス 4
64GB
クラス 10
16GB
クラス 10 東芝
16GB
クラス 4
Silicon Power 64GB -- TOPRAM 32GB
クラス 10
Kingmax 64GB --
 Loading...