

Page 1

1111111111111111111Page 1 of 53
1
04
1
EV3
EV3EV3
EV3130A & EV3131
130A & EV3131 130A & EV3131
130A & EV3131
Video Server
Video Server Video Server
Video Server
User Manual v 3.5
Advanced Information
Etrovision Proprietary and Confidential
Disclaimer
© 2007 Etrovision Technology. All rights reserved.
Etrolink™ & AnyUSB™ are
trademarks of Etrovision Technology; other product or service names mentioned herein are the trademarks of their respective
owners. Information contained in this document may
be superseded by updates. No representation or warranty is given and no liability is assumed by
Etrovision Technology with respect to the accuracy or use of the information, or infringement of patents or other intellectual property
rights. No licenses
are conveyed, implicitly or otherwise, under any intellectual property rights.
Page 2

About this document
This user manual is intended for administrator and/or user of
Etrovision EV3130A & EV3131 Video Server. Operational instructions
& network configuration are elaborated. Prior knowledge about
network setup and configuration will be helpful.
IMPORTANT
Check PC specification requirements.
Check OS platform requirements.
Install EtroStation™ software before you start working with video
server.
Read special notes and important configuration information.
Page 3

3333333333333333333Page 3 of 53
3
04
3
TABLE OF CONTENTS
1. PRODUCT OVERVIEW ................................................................................................................. 5
PACKAGE &CONTENTS .................................................................................................................. 6
2. SOFTWARE CD ............................................................................................................................. 6
3. BEFORE YOU INSTALL SOFTWARE............................................................................................. 7
4. LANGUAGE SUPPORT................................................................................................................. 7
5. HOUSING AND CONNECTORS................................................................................................. 7
EV3131 ...............................................................................................................................................7
EV3130A ............................................................................................................................................8
6. FIRST TIME USE INSTRUCTIONS (READ CAREFULLY)..............................................................9
INSTALL ETROSTATION™.................................................................................................................9
WHICH BROWSER TO USE? ............................................................................................................ 9
POWER ON VIDEO SERVER............................................................................................................9
CONNECTING TO NETWORK ...................................................................................................... 10
FACTORY SETTING - INITIAL IP ADDRESS.................................................................................... 10
NETWORK DOMAIN....................................................................................................................... 10
USING ETROSCAN™......................................................................................................................10
CHANGE NETWORK SETTINGS BY ETROSCAN™ ..................................................................... 11
7. ACCESS VIDEO SERVER ........................................................................................................... 13
BROWSER......................................................................................................................................... 13
INITIAL USERNAME & PASSWORD...............................................................................................14
VIEWING PAGE .............................................................................................................................. 14
CONTROL PANEL SETTINGS ......................................................................................................... 16
8. WEB INTERFACE SETTINGS ....................................................................................................... 18
STATUS .............................................................................................................................................. 18
NETWORK ........................................................................................................................................19
STATIC IP .....................................................................................................................................20
DYNAMIC IP ................................................................................................................................ 21
PPPoE SETTINGS........................................................................................................................ 22
VIDEO............................................................................................................................................... 23
VIDEO SETTINGS........................................................................................................................23
COLOR SETTINGS....................................................................................................................... 25
VIDEO PREVIEW......................................................................................................................... 25
Page 4

4444444444444444444Page 4 of 53
4
04
4
CLIENT LIMIT..............................................................................................................................26
EVENT ...............................................................................................................................................26
EVENTS HANDLED.....................................................................................................................28
ACTIONS TRIGGERED ............................................................................................................... 28
RULE LISTS - ADDING/DELETING ...........................................................................................29
MODIFYING RULE LISTS...........................................................................................................29
DATE & TIME .................................................................................................................................... 29
OSD...................................................................................................................................................30
PTZ ..................................................................................................................................................... 32
SERVICES.......................................................................................................................................... 33
E-MAIL – SMTP SETTINGS......................................................................................................... 33
FTP SETTINGS............................................................................................................................. 34
PORT ................................................................................................................................................. 34
ACCOUNT.......................................................................................................................................35
DDNS ................................................................................................................................................38
VIDEO RECORD ............................................................................................................................. 39
EVENT INPUT ....................................................................................................................................40
Digital INPUT............................................................................................................................... 41
PERIODIC TIMER ........................................................................................................................41
MOTION DETECTION................................................................................................................ 41
SECURITY.......................................................................................................................................... 43
FIRMWARE UPDATE ....................................................................................................................... 44
9. FACTORY DEFAULT.................................................................................................................... 45
10.
REBOOT................................................................................................................................... 45
11.
LOGOUT.................................................................................................................................. 45
12.
ETROLINK™ - FIRST TIME EXPERIENCE..............................................................................46
SUPPORTED OS............................................................................................................................... 46
NO SOFTWARE INSTALLATION REQUIRED.................................................................................47
STEPS FOR USING ETROLINK™
PORT (WINDOWS XP
PC)............................................................ 47
WHAT IF QUICKCONFIG DOES NOT AUTORUN?.....................................................................51
Page 5
04
5
1. PRODUCT OVERVIEW
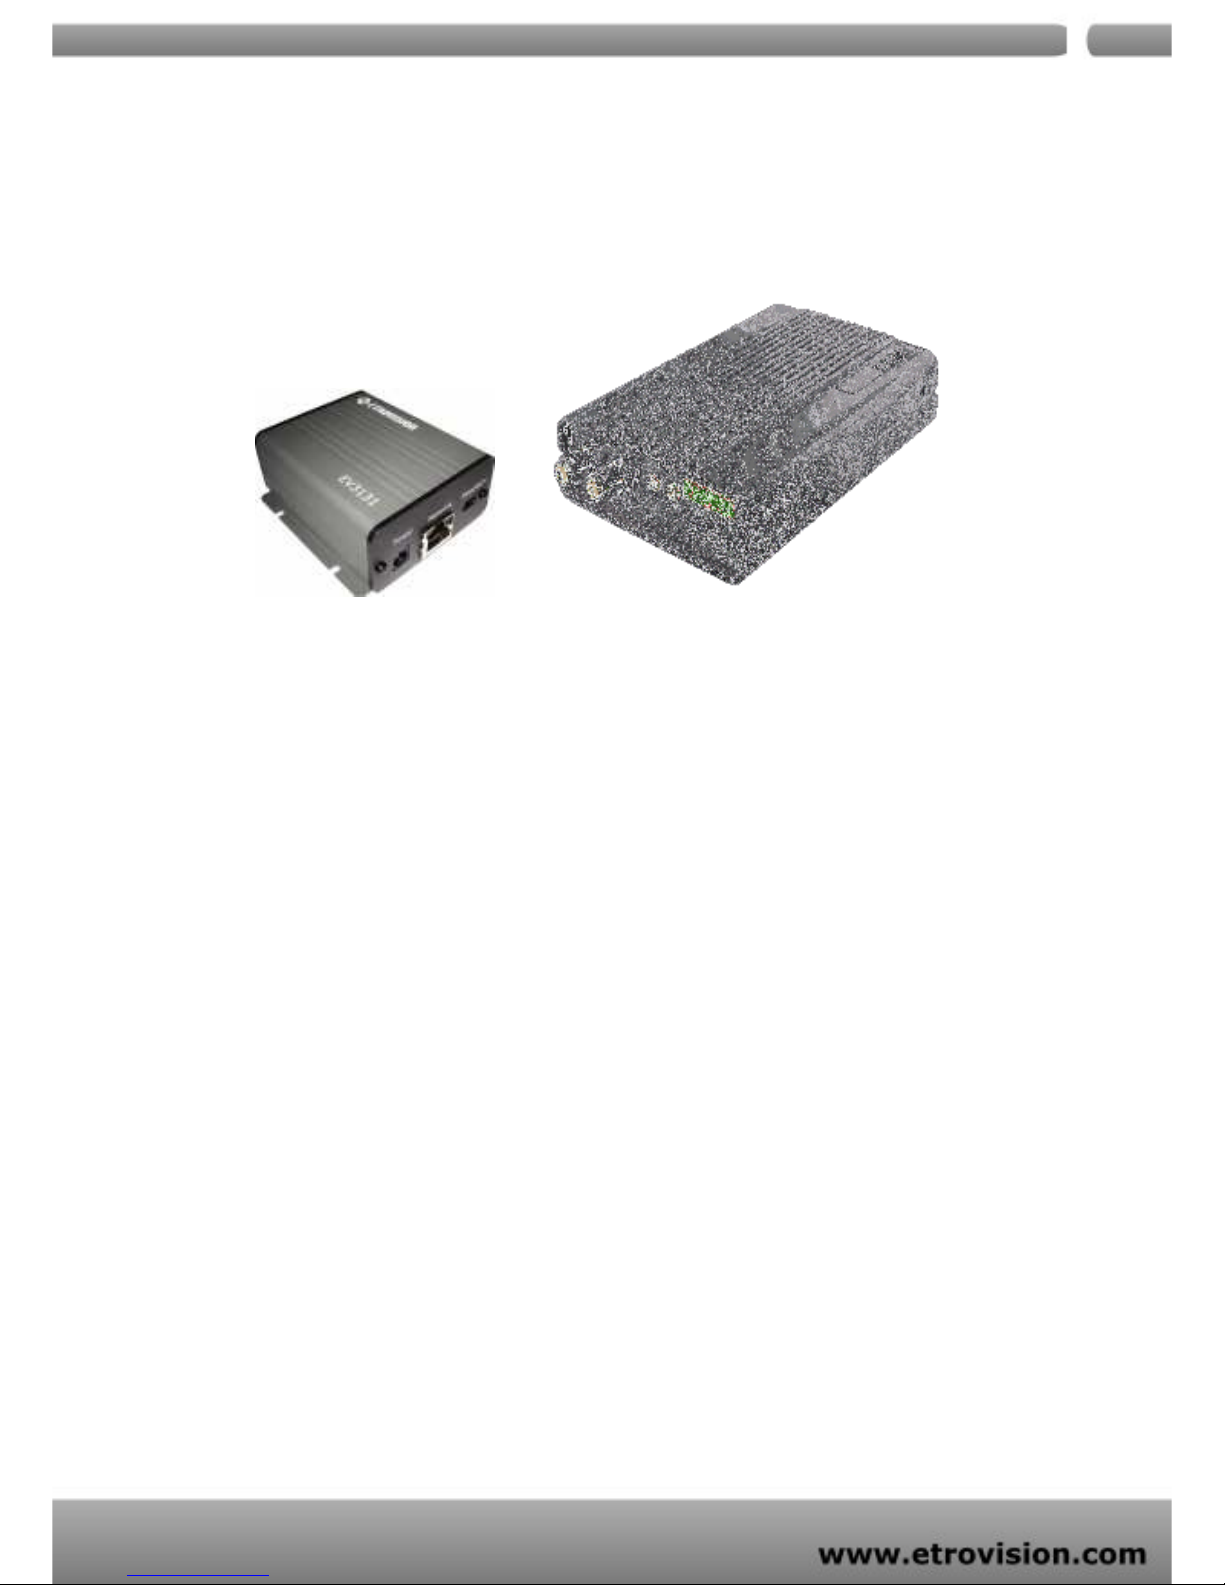
EV3131 & EV3130A are stand-alone video/audio streaming servers
designed for professional IP surveillance applications. With
embedded web viewer, streaming video/audio over network can
be accessed like browsing a website.
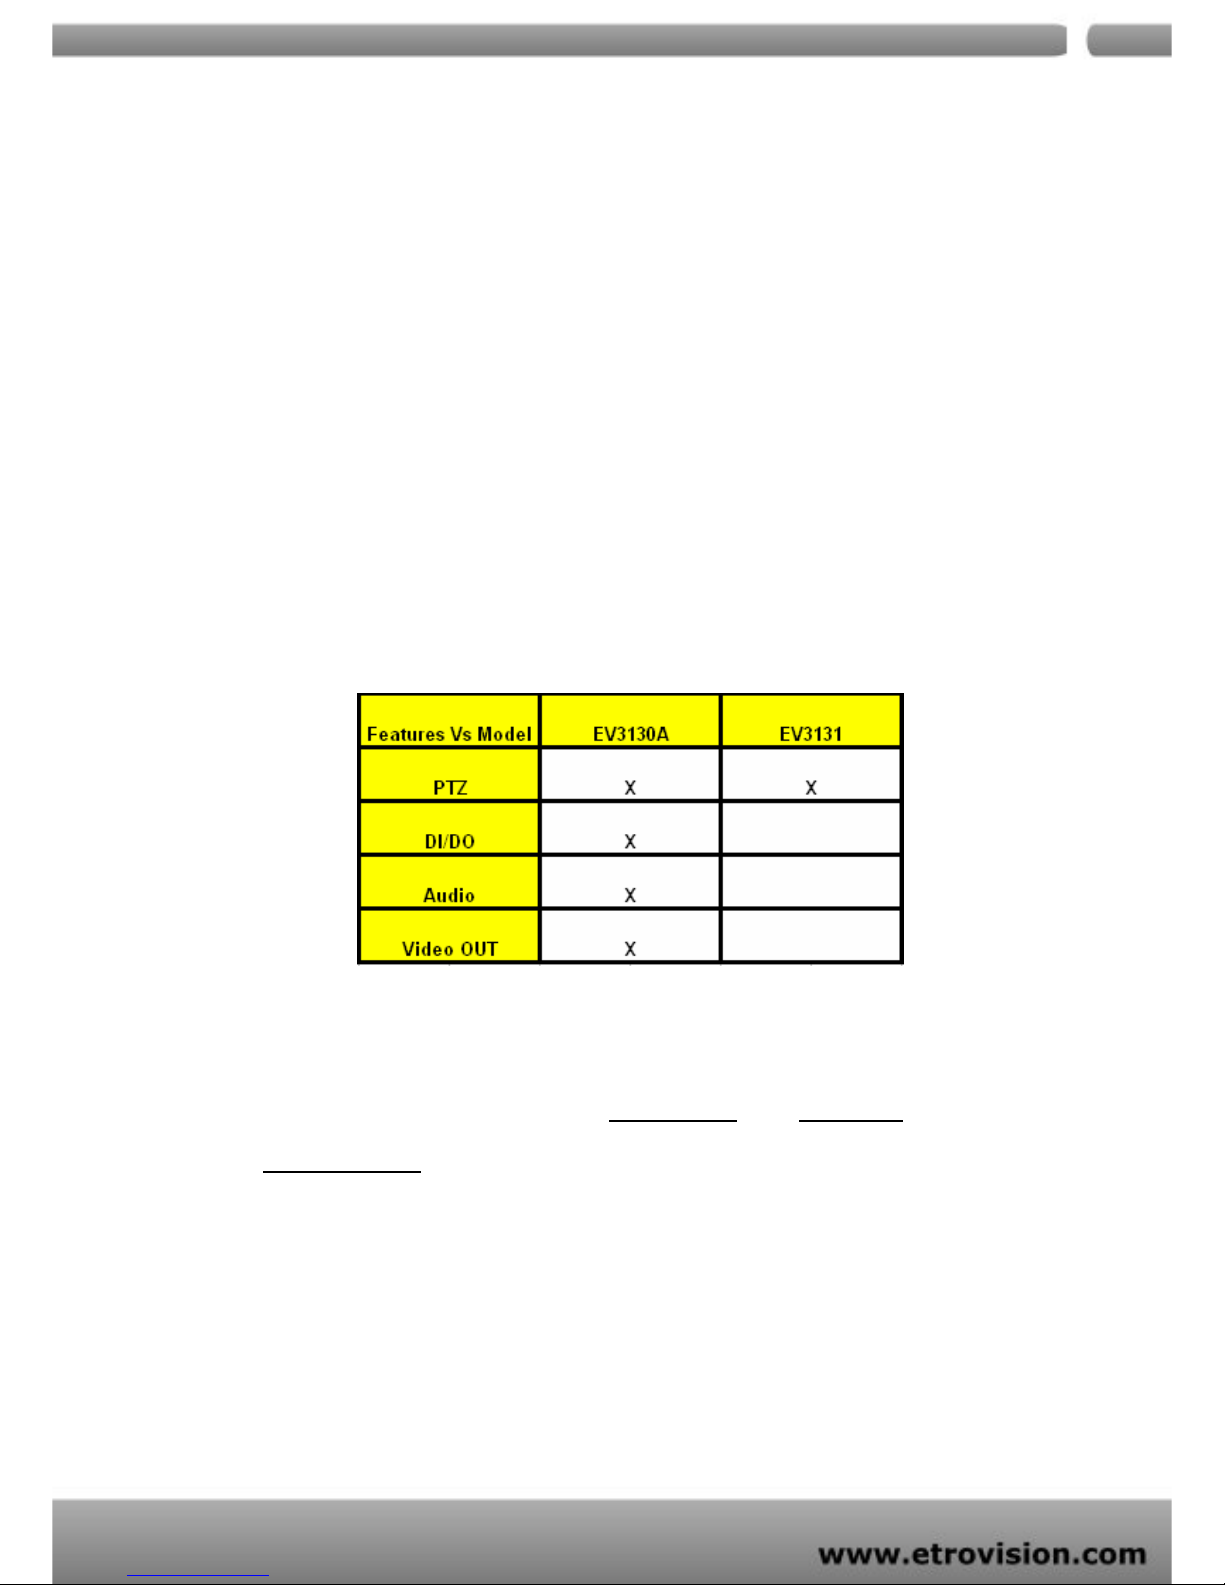
Both EV3130A & EV3131 are capable of encoding MPEG4 stream.
Major differences are…
EV3131 & EV3130A features the proprietary Etrolink™ service port,
making it the only digital surveillance product in the market with
proprietary design for "Ease-of-use", "Reliability", and
"Manageability".
Page 6
04
6
PACKAGE &CONTENTS
Video server unit X 1
Power adapter X 1
USB cable X 1
Terminal block connector X 1
Wall mount Frame + screws (EV3130A)
Product CD X 1
2. SOFTWARE CD
Software CD in the package contains the following:
EtroStation™ IP surveillance management software
User Manuals
Brochures
Page 7
04
7
3. BEFORE YOU INSTALL SOFTWARE
PC running Microsoft Windows 2000 or above is only capable of
running EtroStation™ software.
PLEASE go through EtroStation™ users’ manual before
installation to check further PC requirements in order to ensure
smooth software operation.
4. LANGUAGE SUPPORT
ENGLISH
NOTE
EtroStation™ setup will auto-run when inserting CD. Pay attention to
dialog box questions before you press OK button.
5. HOUSING and CONNECTORS
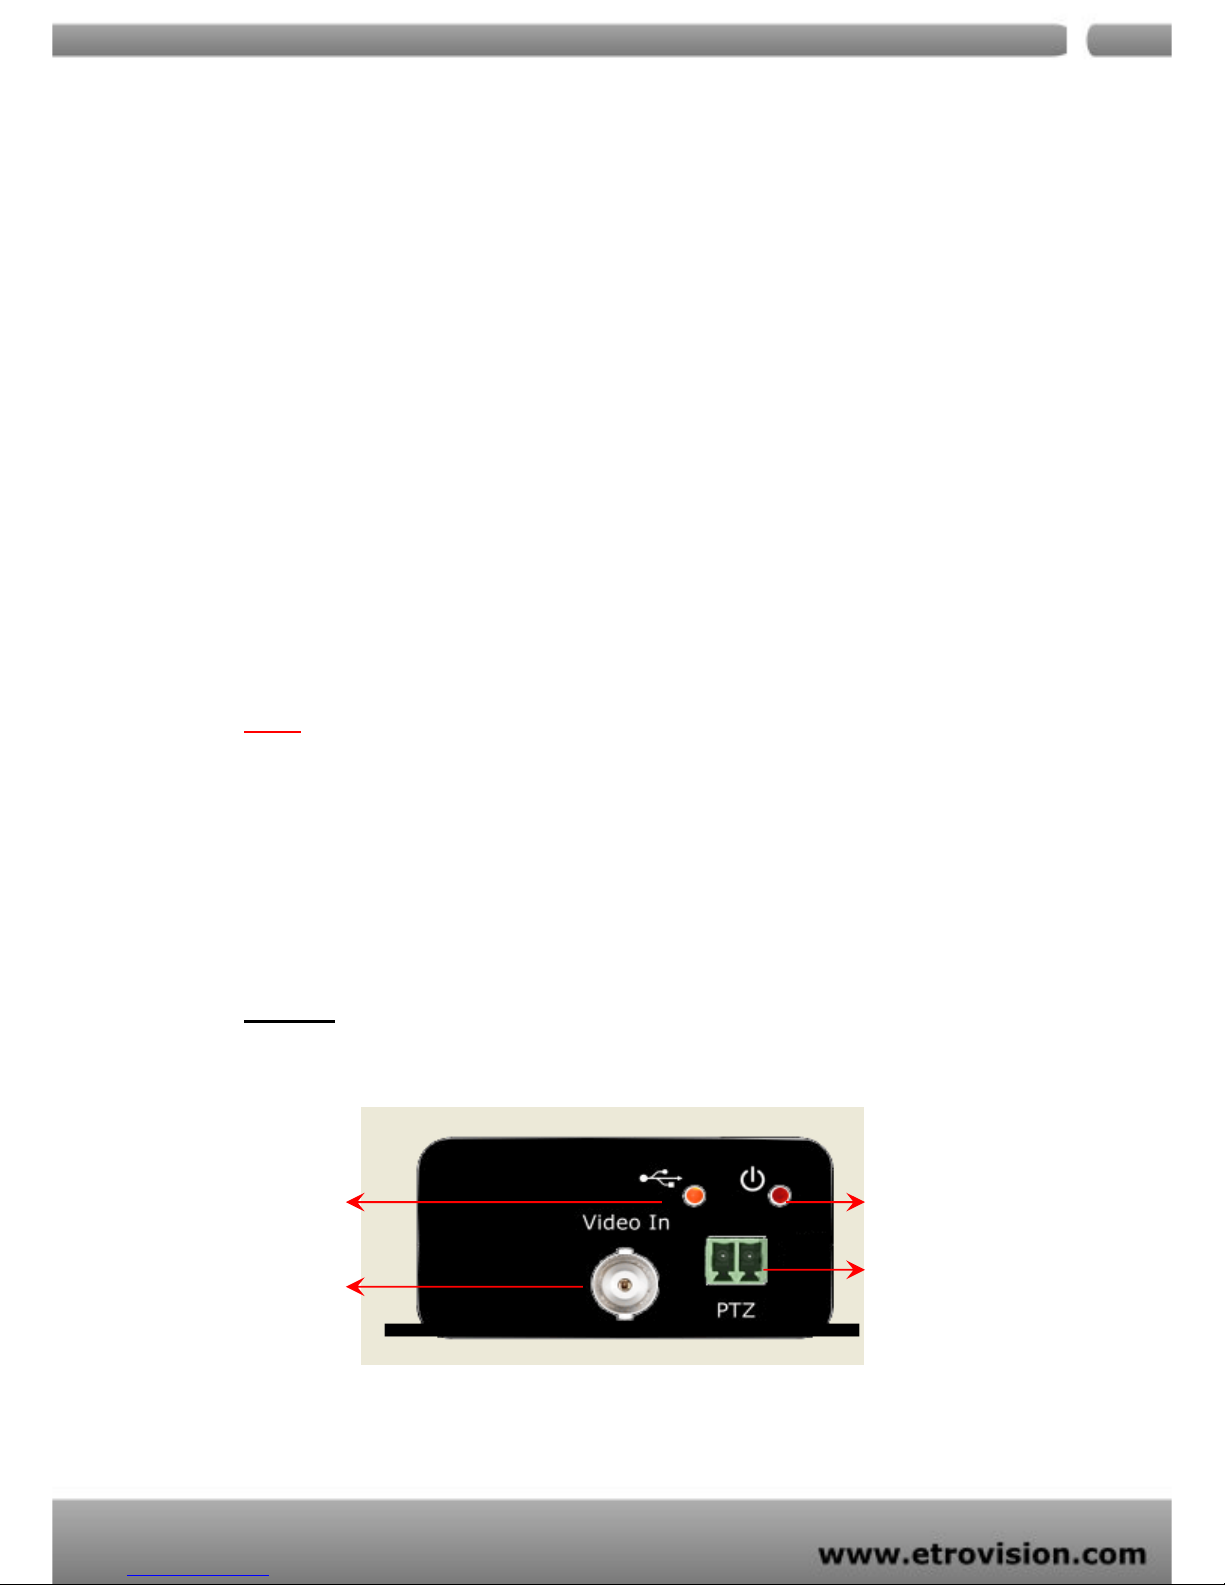
EV3131
POWER LED
PTZ
Etrolink LED
Video IN
Page 8
04
8
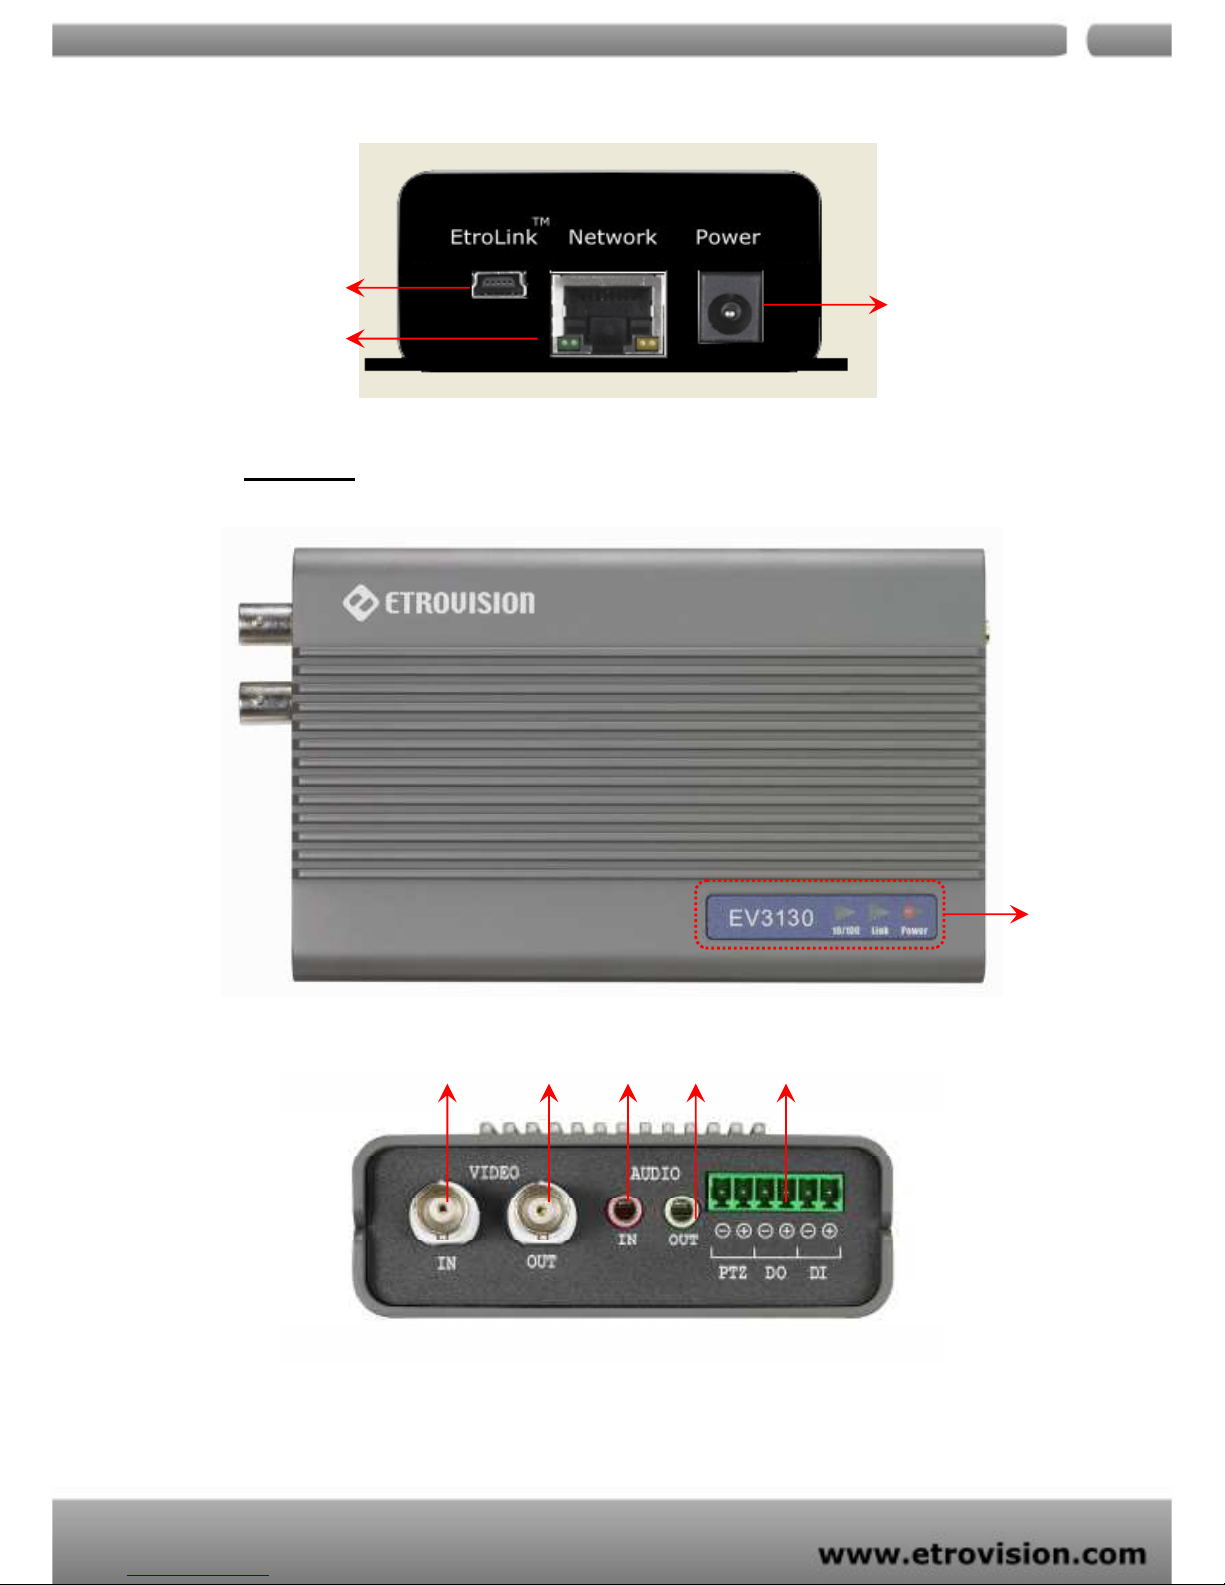
EV3130A
POWER LED
RJ-45 socket
Etrolink port
LED
indicators
Video
IN
Video
Out
Audio
In
Audio
Out
RS-485 (PTZ), DO/DI
Page 9

04
9
6. FIRST TIME USE INSTRUCTIONS
(read carefully)
INSTALL ETROSTATION™
Install EtroStation™ software. EtroScan™ is a software utility to find your
video server on the network. It is a part of EtroStation™.
WHICH BROWSER TO USE?
We strongly recommend Microsoft IE browser version 6 or higher.
Mozilla Firefox and similar others are not guaranteed to work with
EV3131 / EV3130A.
POWER ON VIDEO SERVER
Power on video server by using power adapter provided in the
product package. Connect power adapter to 110-220v AC socket.
Power
socket
RJ-45
socket
Etrolink™
port
Page 10
04
10
CONNECTING TO NETWORK
Connect a standard CAT5 ethernet cable to R45 socket on EV3131 /
EV3130A and connect other end to your network hub/switch. Make
sure the PC you want to access EV3131 / EV3130A is on the same
network domain.
FACTORY SETTING - INITIAL IP ADDRESS
IP Address: - 192.168.1.2
Gateway: - 192.168.1.1
NETWORK DOMAIN
Change the IP of the PC you want to access EV3131 / EV3130A inline
with 192.168.1.2. You can change the video server IP later as per your
convenience using EtroScan™ as described below.
USING ETROSCAN™
EtroScan™ software is the quickest way to make sure we can find
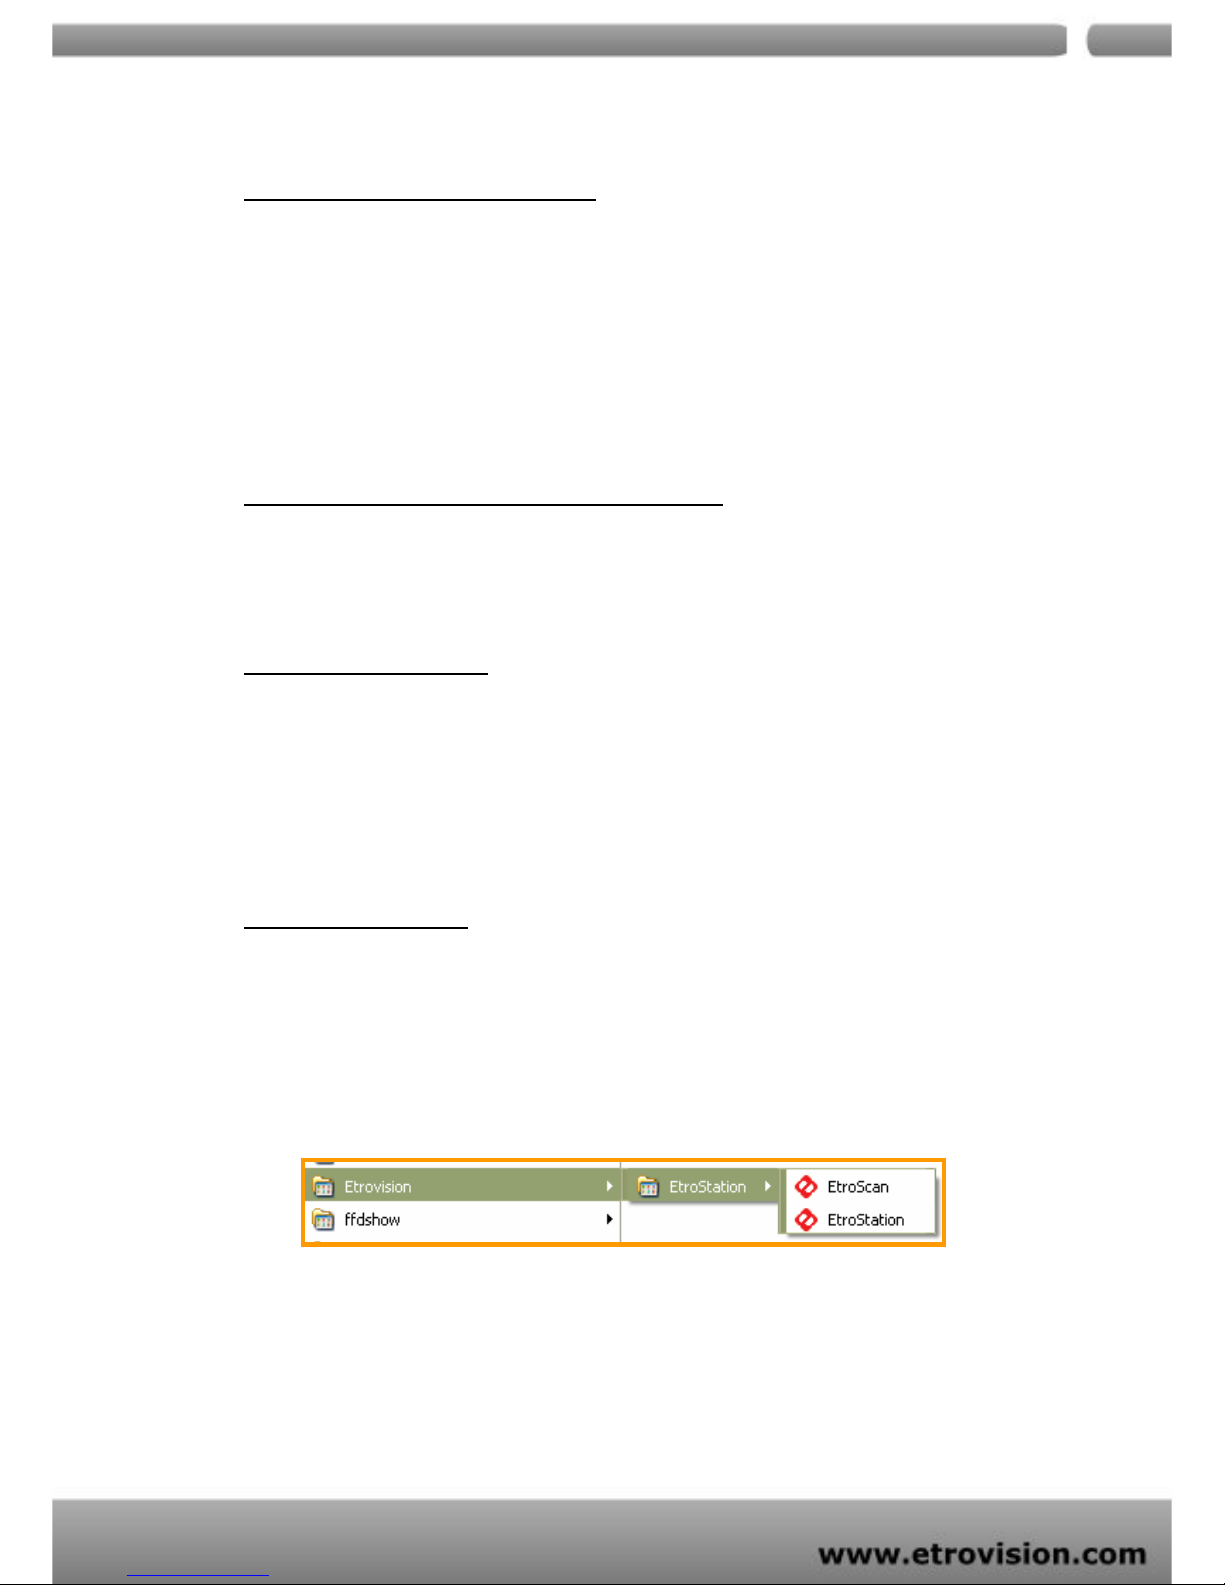
EV3131 / EV3130A on your network. EtroStation™ setup will install two
applications. You can see as shown below.
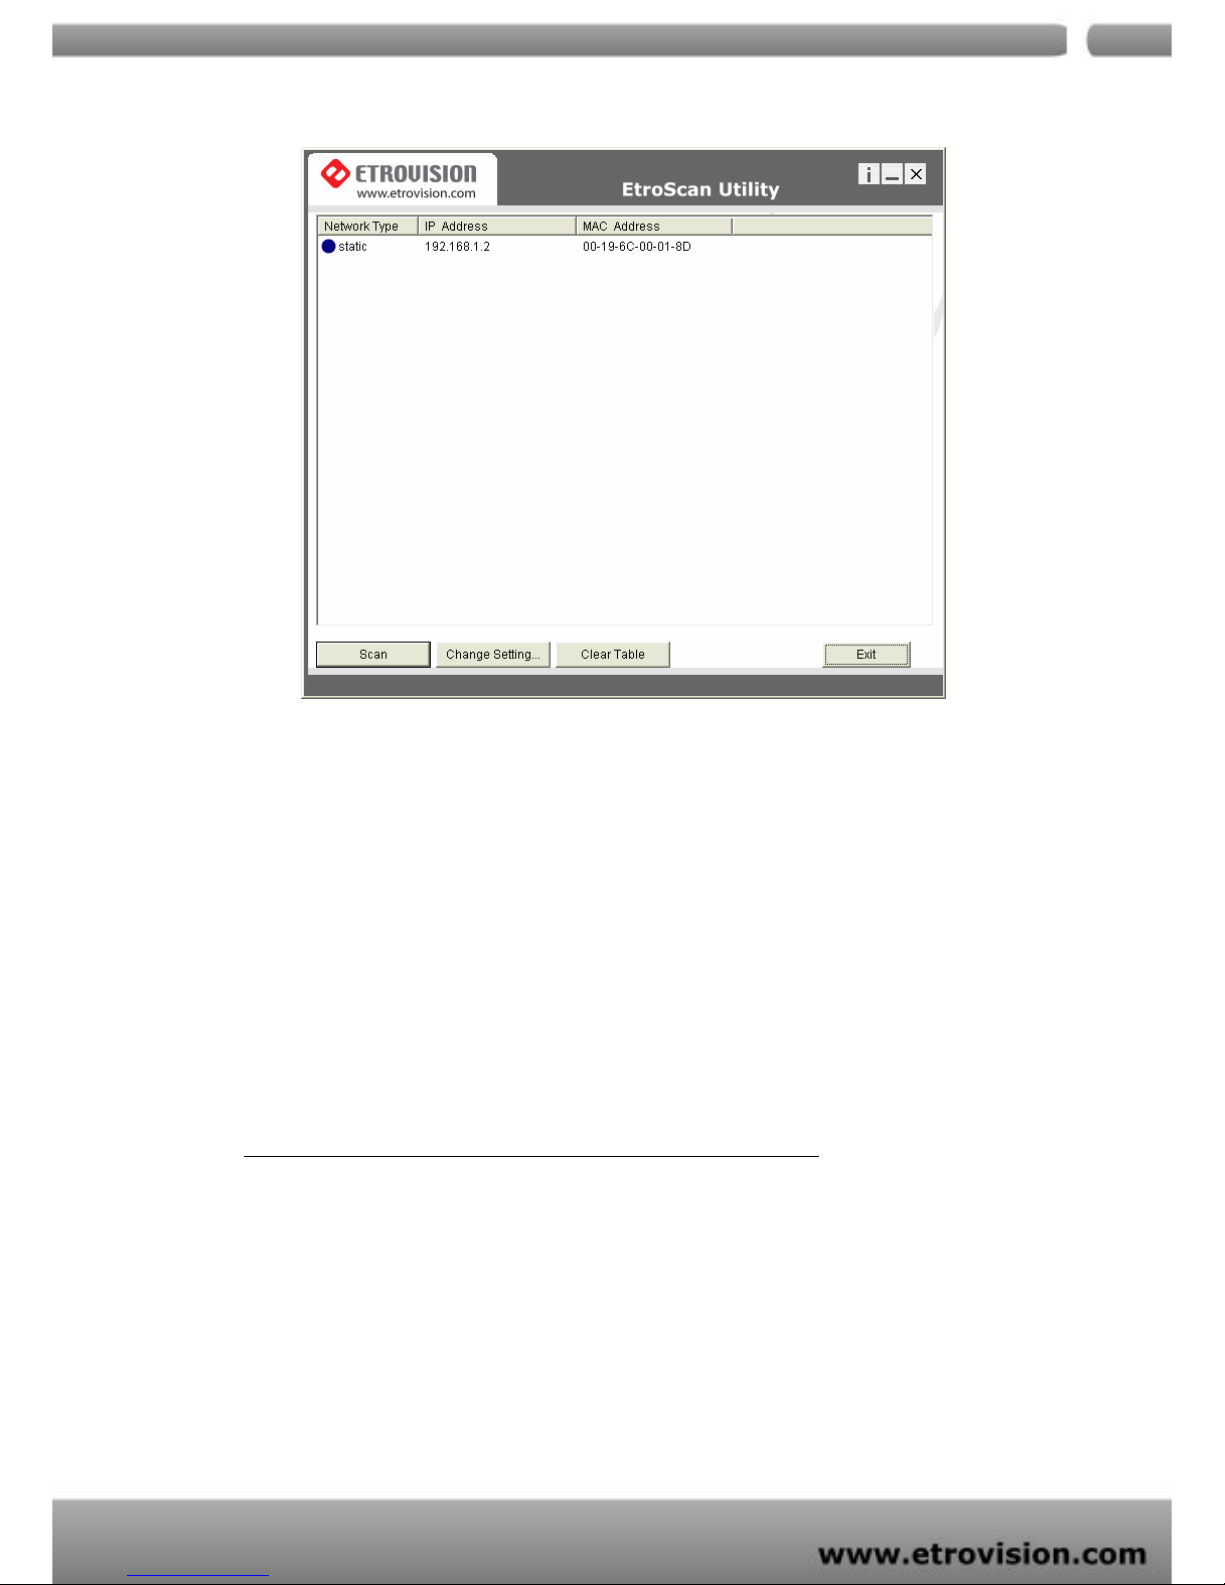
Select EtroScan™. The following window appears after you select
“EtroScan™” from start menu.
Page 11
04
11
Press Scan button to list the IP and MAC address table. To refresh,
press Clear Table and press Scan again.
You will find the list of IP and MAC address listed. To identify your
EV3131 / EV3130A you can flip over the video server and on the
bottom side you check the label for MAC address.
CHANGE NETWORK SETTINGS BY ETROSCAN™
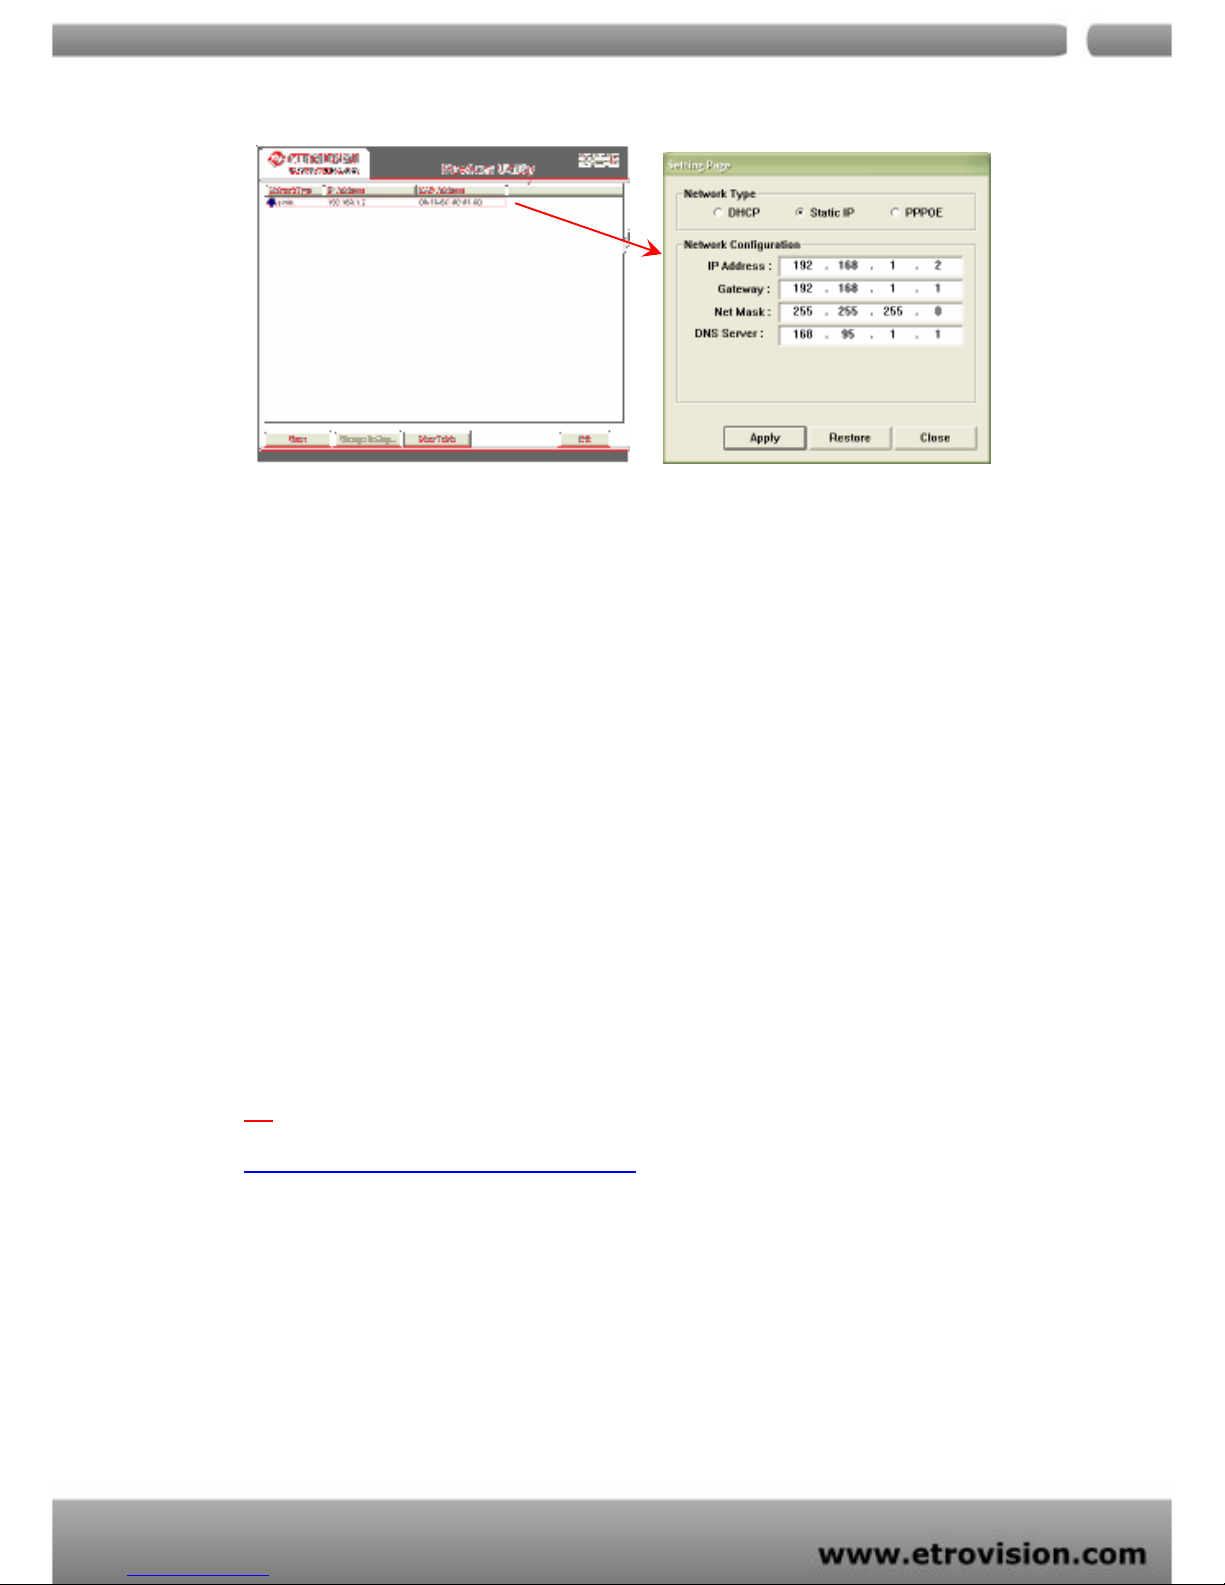
You can double click a specific IP address and change some basic
network parameters. A dialog box will appear as follows.
Page 12
04
12
Change any settings you want to make and make sure you have
correct values in all fields. Click Apply.
Within 10 seconds, the dialog box should disappear to indicate new
settings are accepted and being applied. Wait for 30 seconds,
before trying to refresh IP list. Click Clear Table and click scan again.
You should be able to find MAC address of video server under new IP
address. EV3131 / EV3130A is online on your network. Use ping
command from Windows command prompt to double check if IP is
reachable.
TIP
“DOUBLE RIGHT CLICK” ADVANTAGE
If you want to quickly open the IP you see on Etroscan™ on your
browser, select an IP and do a “double right click” on your
mouse/touchpad. You can see the browser window open that IP.
To quit Etroscan™ anytime, click Exit.
Page 13
04
13
7. ACCESS VIDEO SERVER
BROWSER
Open IE browser
Type IP address of video server that you found on EtroScan™
software. For ex.
default IP is 192.168.1.2
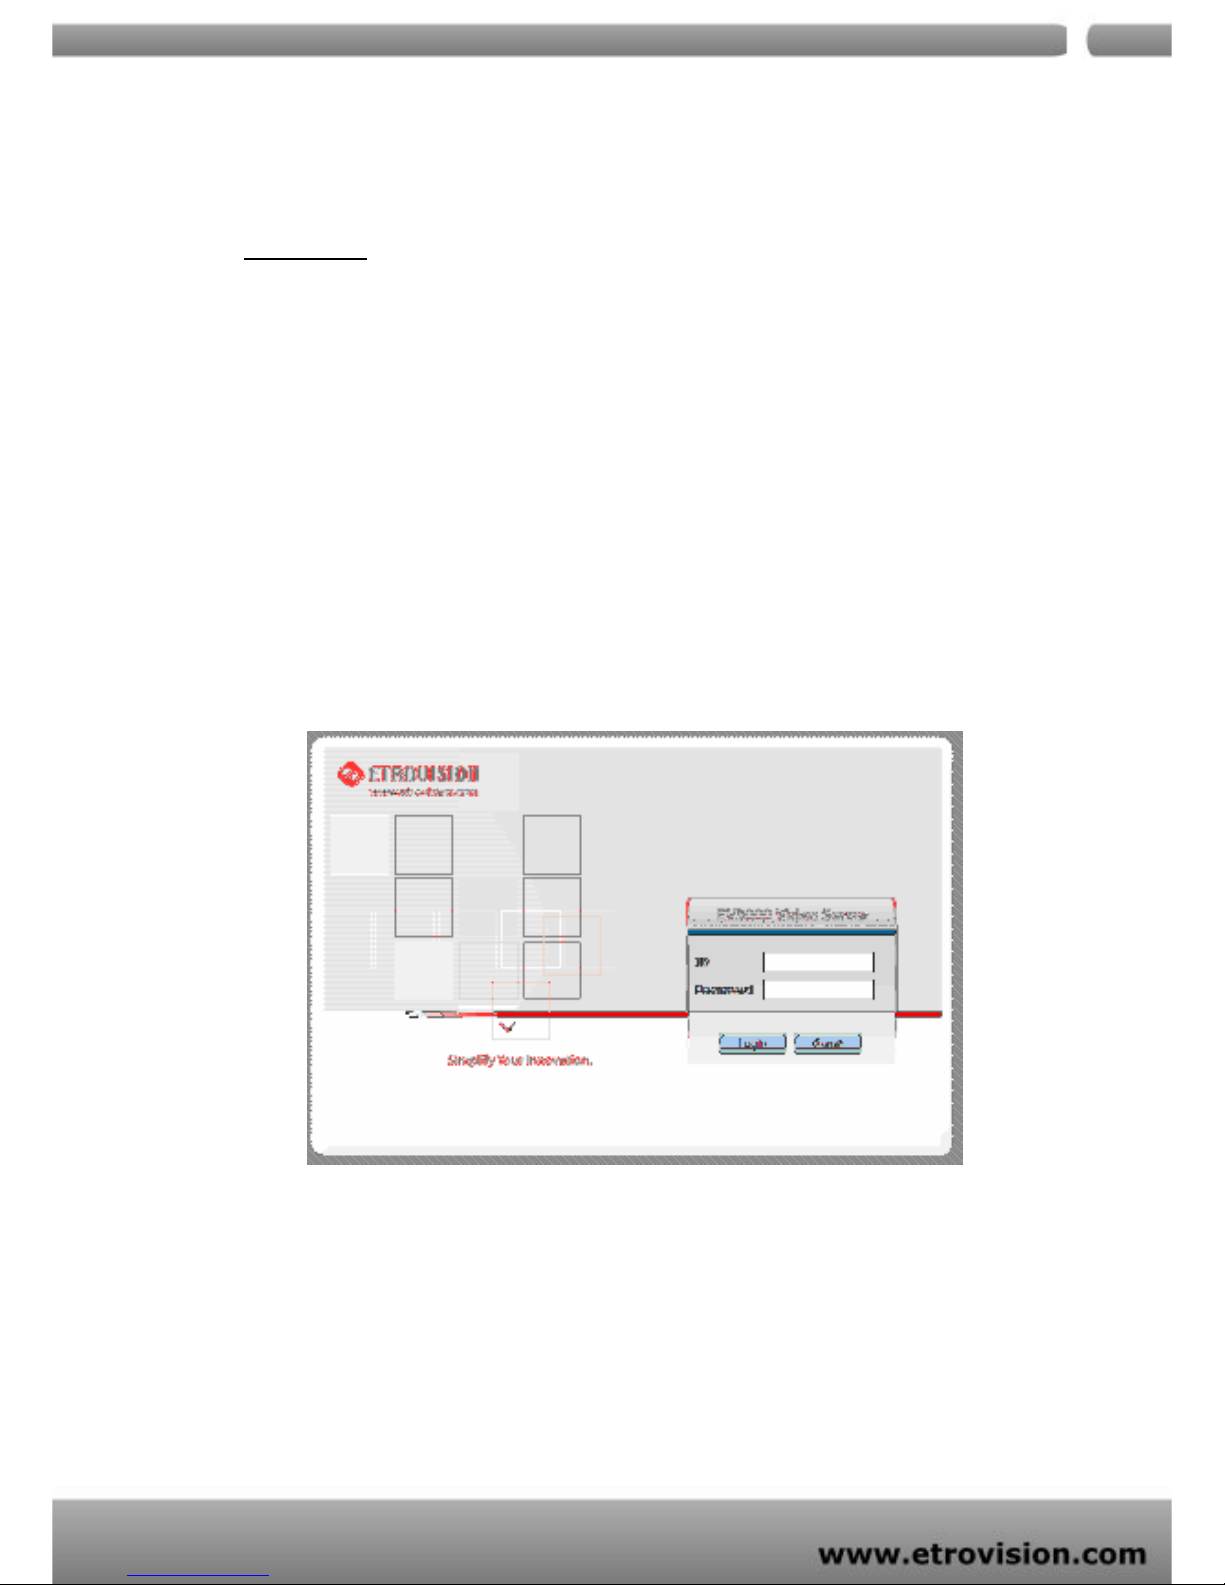
Initial username and password are…
Login: root
Password: pass
Click Login button to go to web view.
After successful login with root/pass, you will briefly see a screen as
below.
Page 14
04
14
INITIAL USERNAME & PASSWORD
Administrator
Default ID/Password =
root/pass
.
Only password is changeable.
Full access right to view, control system settings.
Guest accounts
ID/Password not necessary.
Basic view and some action buttons can work.
VIEWING PAGE
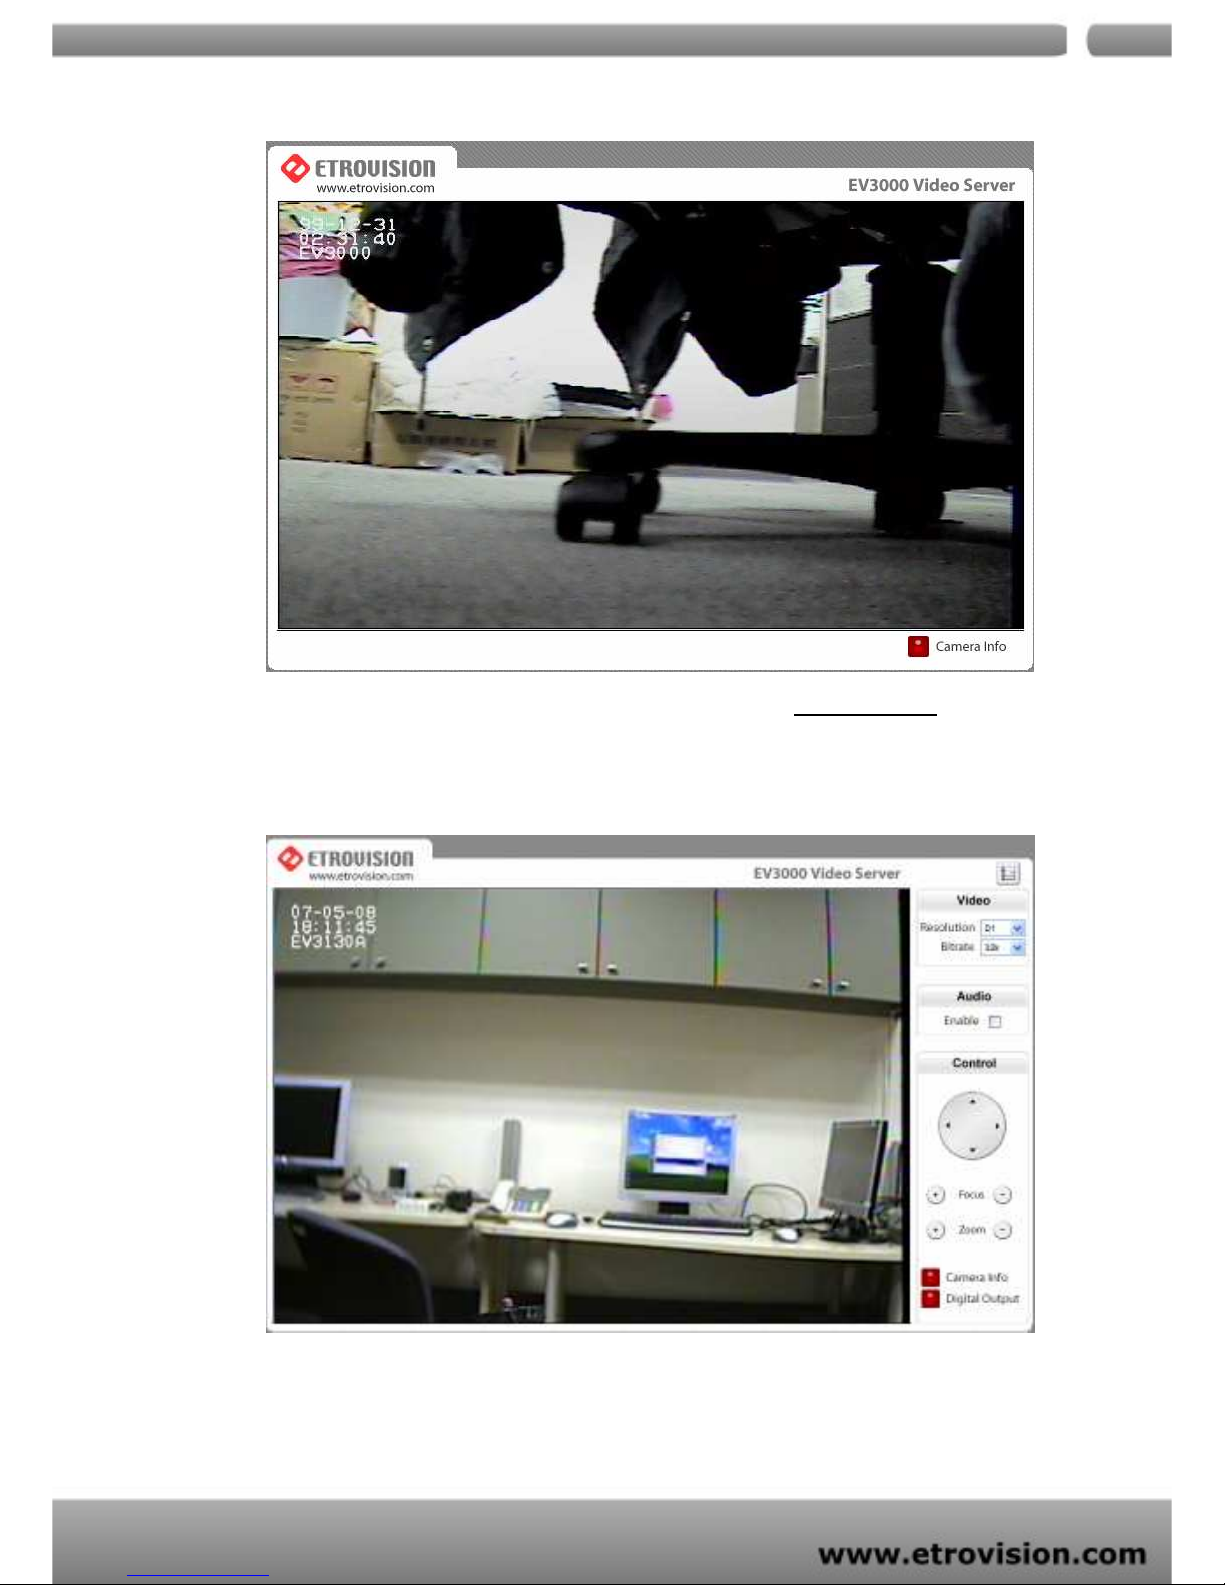
After successful log in as guest, the viewing page will appear as
follows. The “camera info” button when clicked shows FPS, camera
name and resolution values. This applies to both EV3130A & EV3131
Page 15
04
15
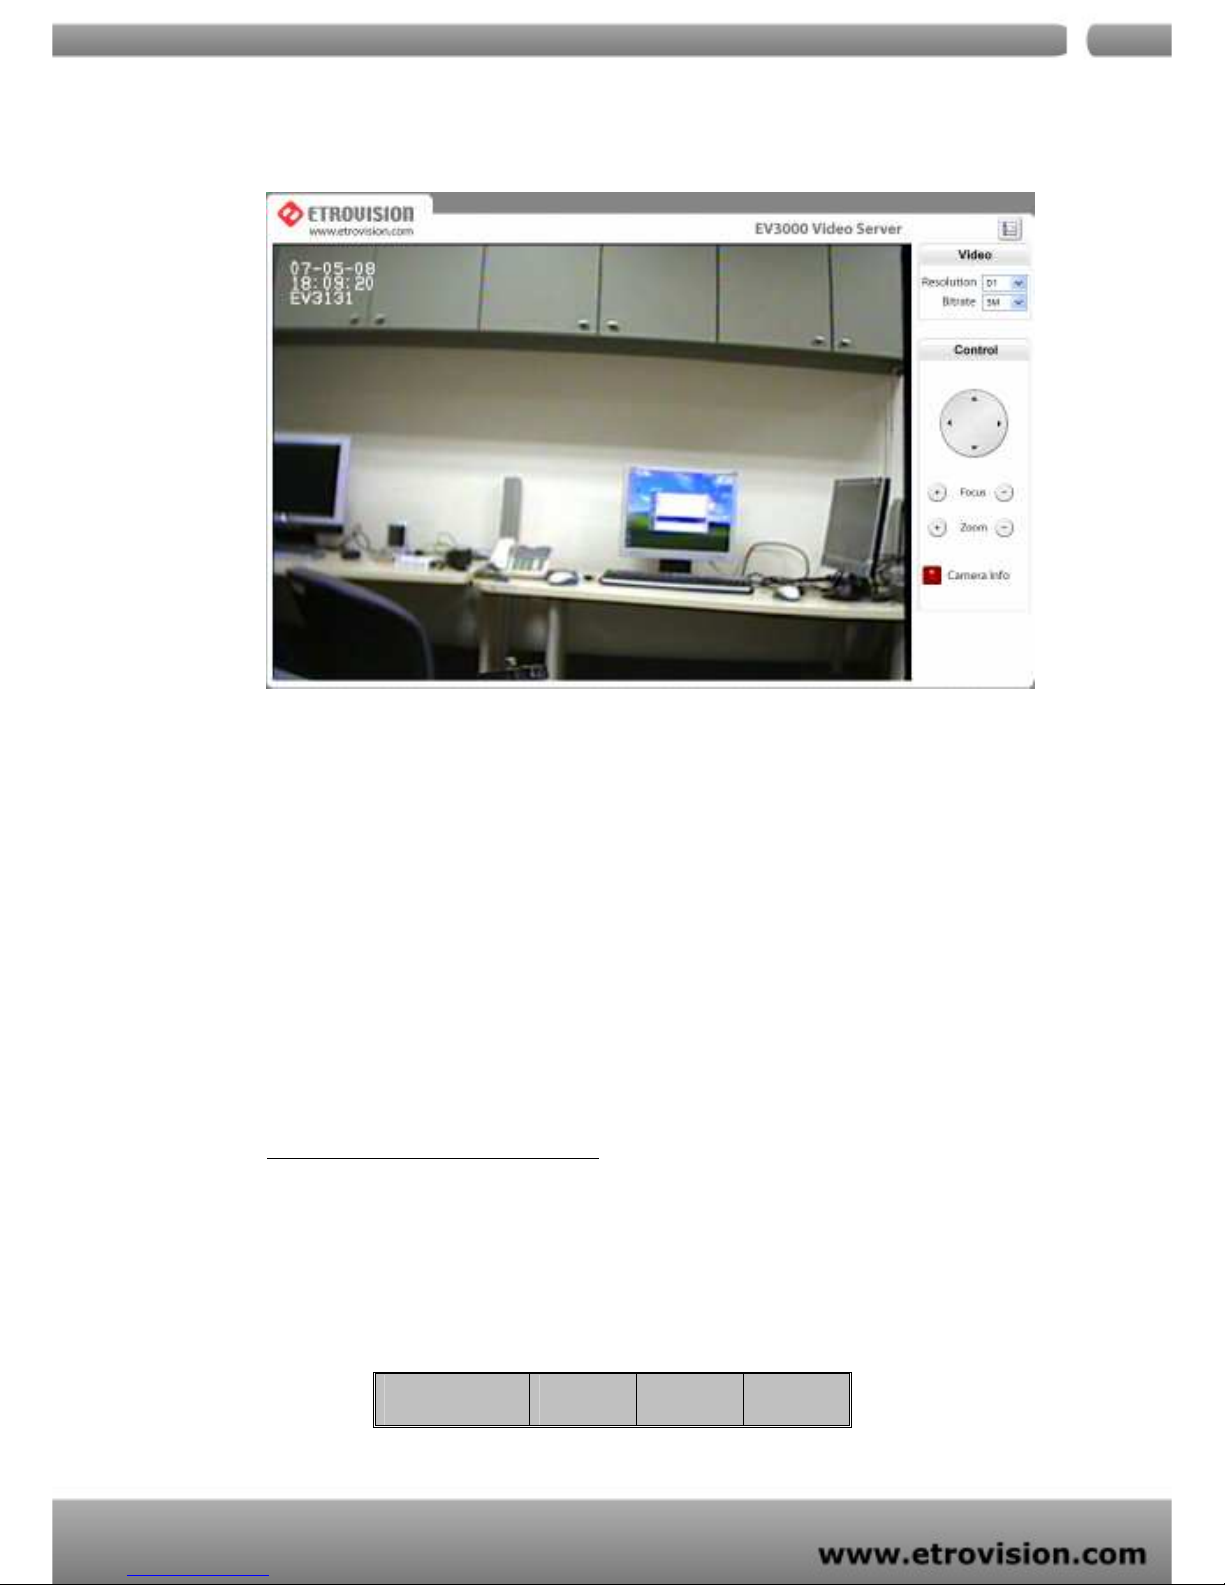
When you log in successfully with ROOT/PASS as administrator, the
viewer screen will display as shown below.
EV3130A
Page 16
04
16
EV3131
1. Notice top right corner of viewing page has a toggle button to
take you between web configuration page & viewing page.
Always click that if you want to move from one page to the
other.
2. Several controls options are available on the right side.
3. OSD is displayed on top left corner of the screen (time, date,
camera name)
CONTROL PANEL SETTINGS
Video/Resolution
Following table describes resolution values for each video
format
Resolution CIF QCIF D1
Page 17
04
17
Video \ Bit rates
Choose a particular value and it is applied within few
seconds. Video on the screen will pause briefly.
32/64/128/256/384/500/750/1000/1500/2000/3000 (kbps)
Audio \ Enable check box (only EV3130A)
Enable or disable function for audio will result in video
flicker for a second and then return back to normal. This is
not an error.
P/T/Z controls (will need PTZ controller)
Z (Zoom): zoom in (+) / zoom out (-).
Pan/Tilt.
F (Focus): focus in (+) / focus out (-).
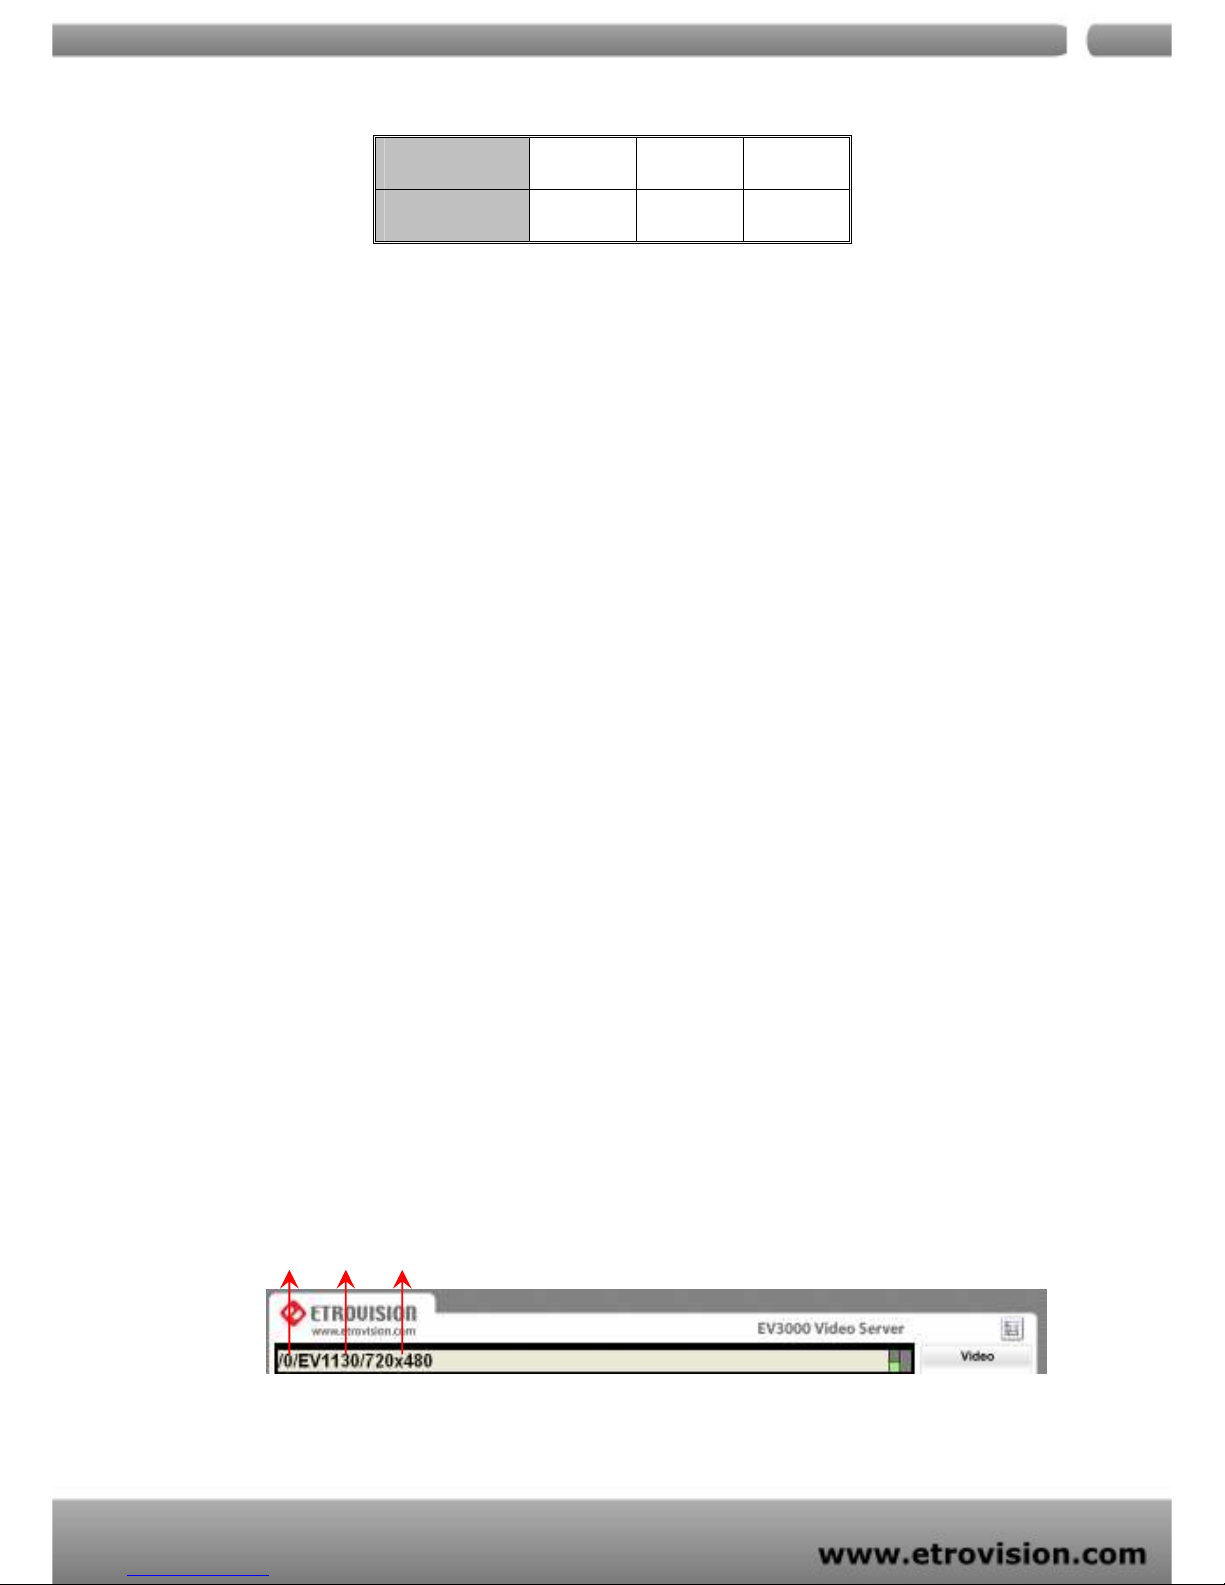
Camera Information.
Shows video information of the transferred data on the
upper left corner of the video screen such as frame rate
(fps), channel name, resolution.
NTSC
352X240 704X480 720X480
PAL
352X288 704X576 720X576
FPS
FPSFPS
FPS Name
Name Name
Name Resolution
ResolutionResolution
Resolution
Page 18
04
18
Digital Output (only EV3130A)
When enabled, DO provide contact close and acts purely
as a switch.
8. WEB INTERFACE SETTINGS
EV3131 / EV3130A built-in web interface offers more advanced
settings. On the main viewing page, click on (top-right)
, to enter server settings page. It is a toggle
button to switch between Config and view pages.
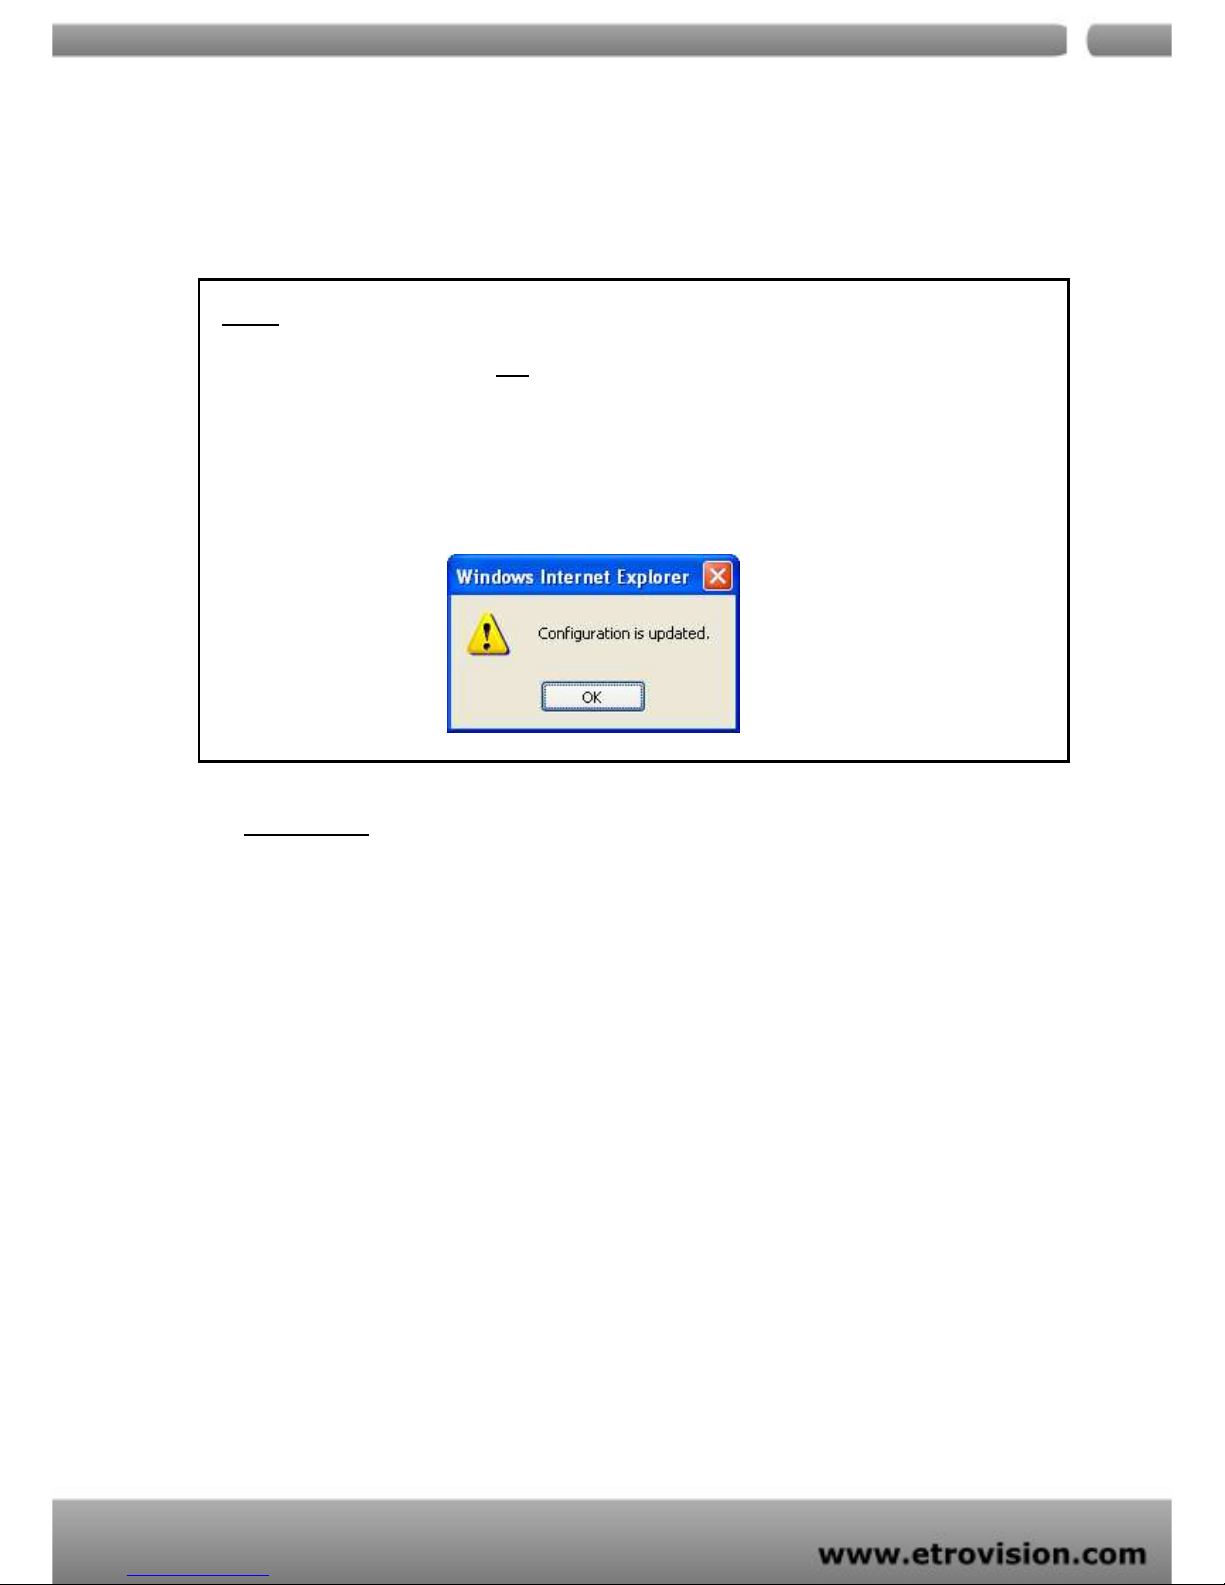
STATUS
Initial view of web Config interface is status page.
Page 19
04
19
Hardware & Firmware information along with network status
such as current IP and related details are clearly shown.
NOTE
Remember to press “OK” after you have changed settings in a
particular settings page which has “OK” button. After few seconds,
you can see a confirmation dialog box informing that settings have
been updated. Pressing OK will return to the same page.
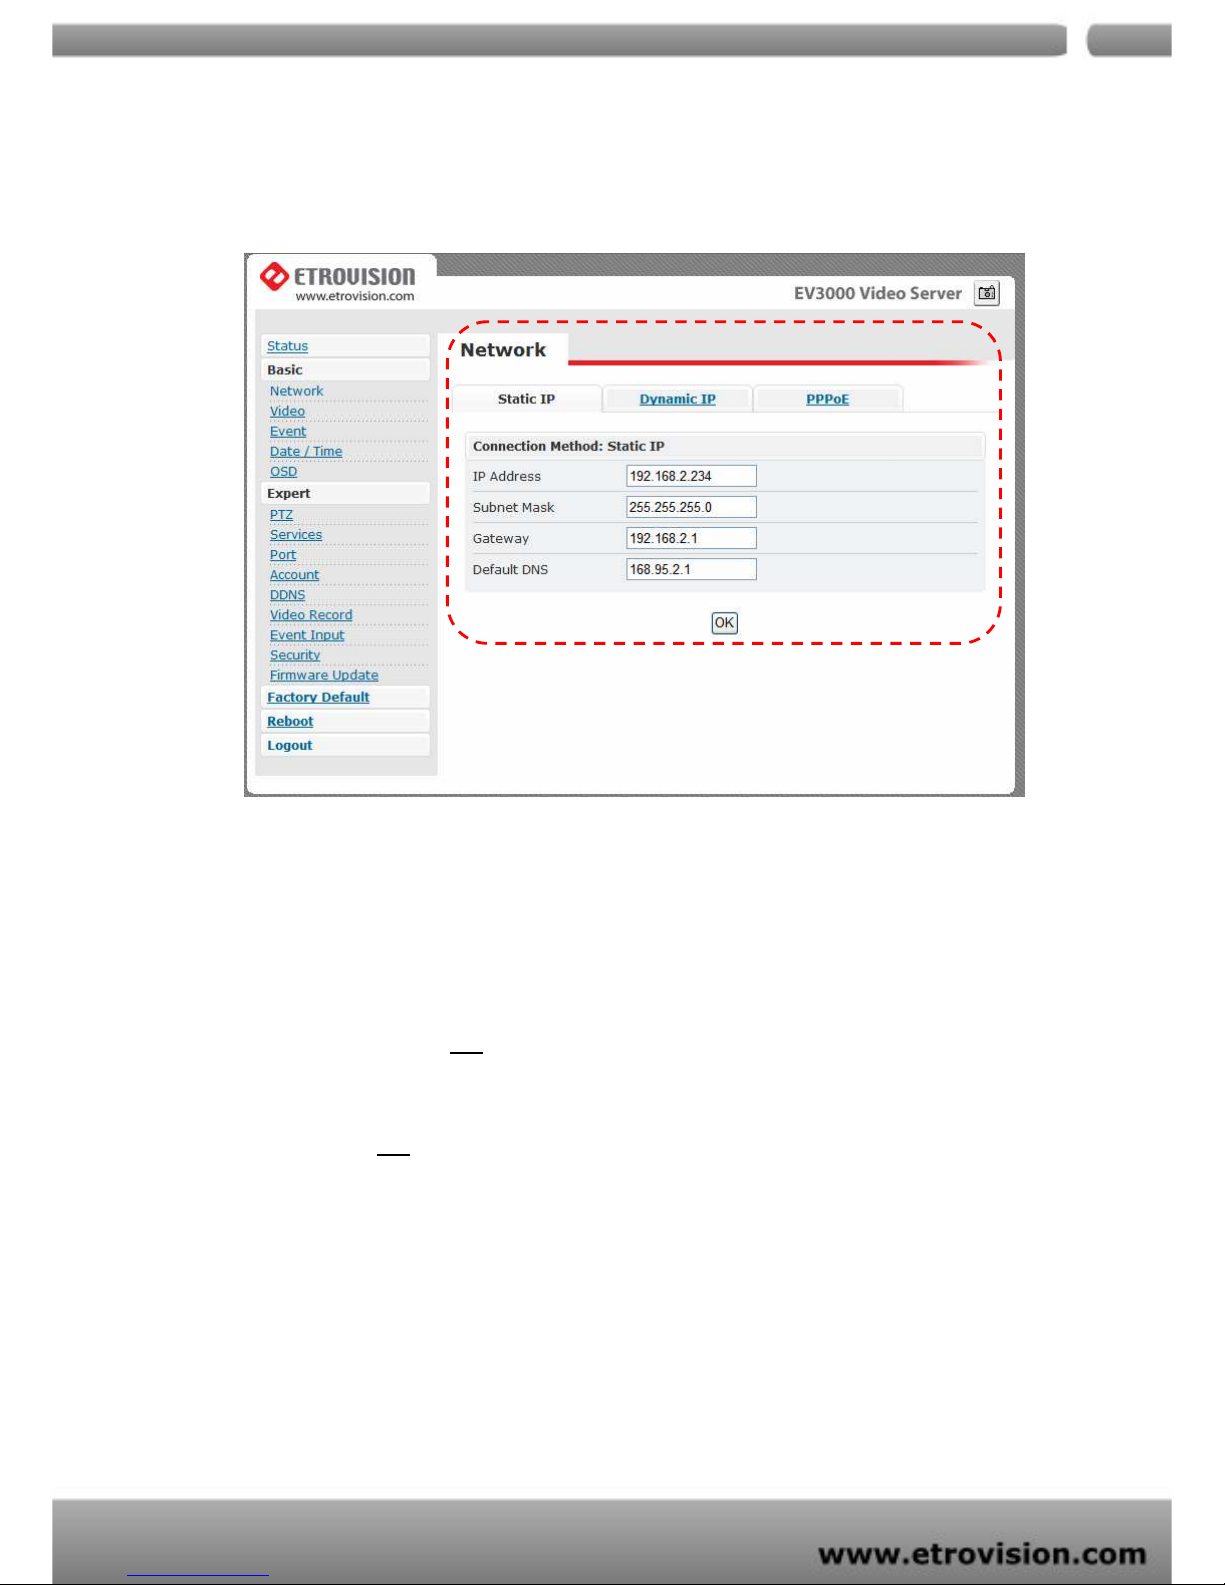
NETWORK
Three configuration types are available for wired network connection
STATIC, DYNAMIC & PPPoE.
Page 20
04
20
STATIC IP
IP Address
Confirm with network administrator.
Subnet Mask/Gateway/Default DNS
Confirm with network administrator.
Always click “OK” to save changes in a particular page.
Reboot is required and will be automatically triggered after you
press “OK”. Wait for count down timer to finish and page will
refresh automatically and you should see initial login page.
Note:
Always use EtroScan™ to find the MAC address after reboot and
double check the IP address is correct. If IP was changed in web
configuration, you cannot return to initial login page after reboot.
Page 21
04
21
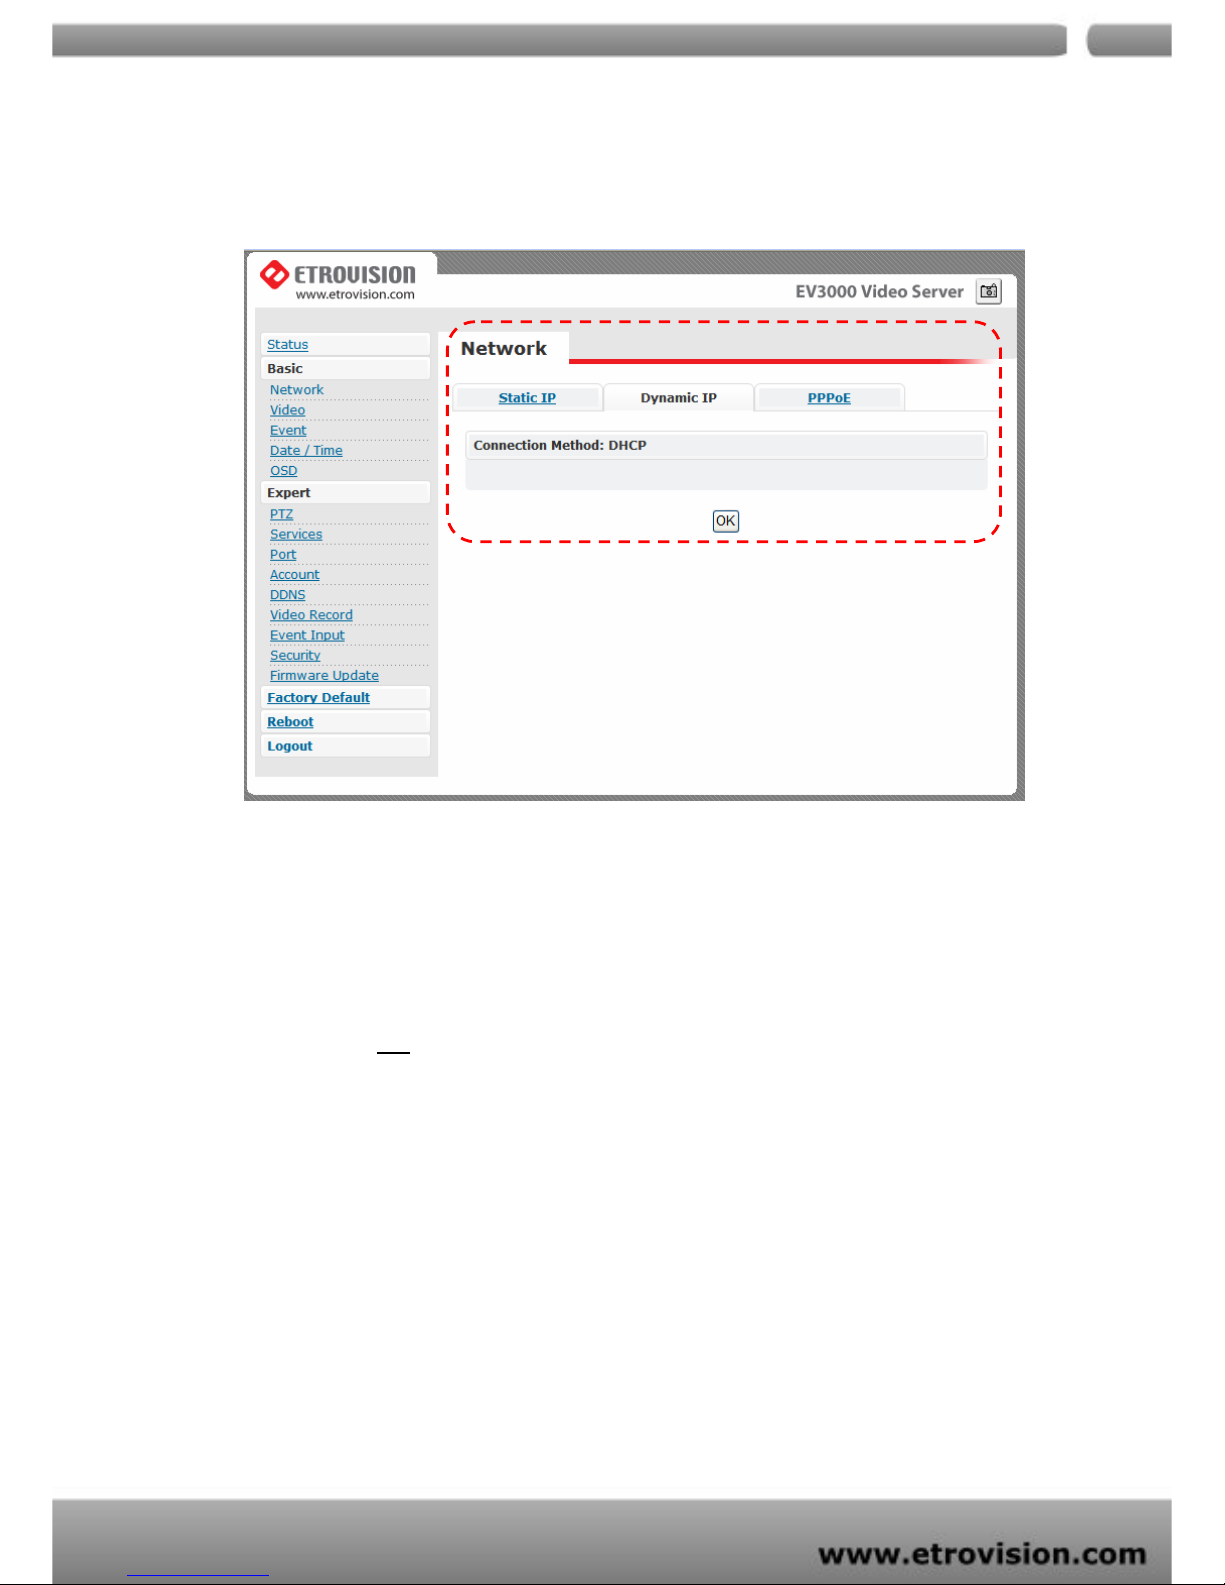
DYNAMIC IP
If DHCP server is on LAN and you want to allocate Dynamic IP
address, use DHCP.
Click “OK” button.
Reboot is required and will be automatically triggered after you
press “OK”. Wait for count down timer to finish and page will
refresh automatically and you should see initial login page.
Note:
Always use EtroScan™ to find the MAC address after reboot and
double check the IP address is correct. If IP was changed in web
configuration, you cannot return to initial login page after reboot.
Page 22
04
22
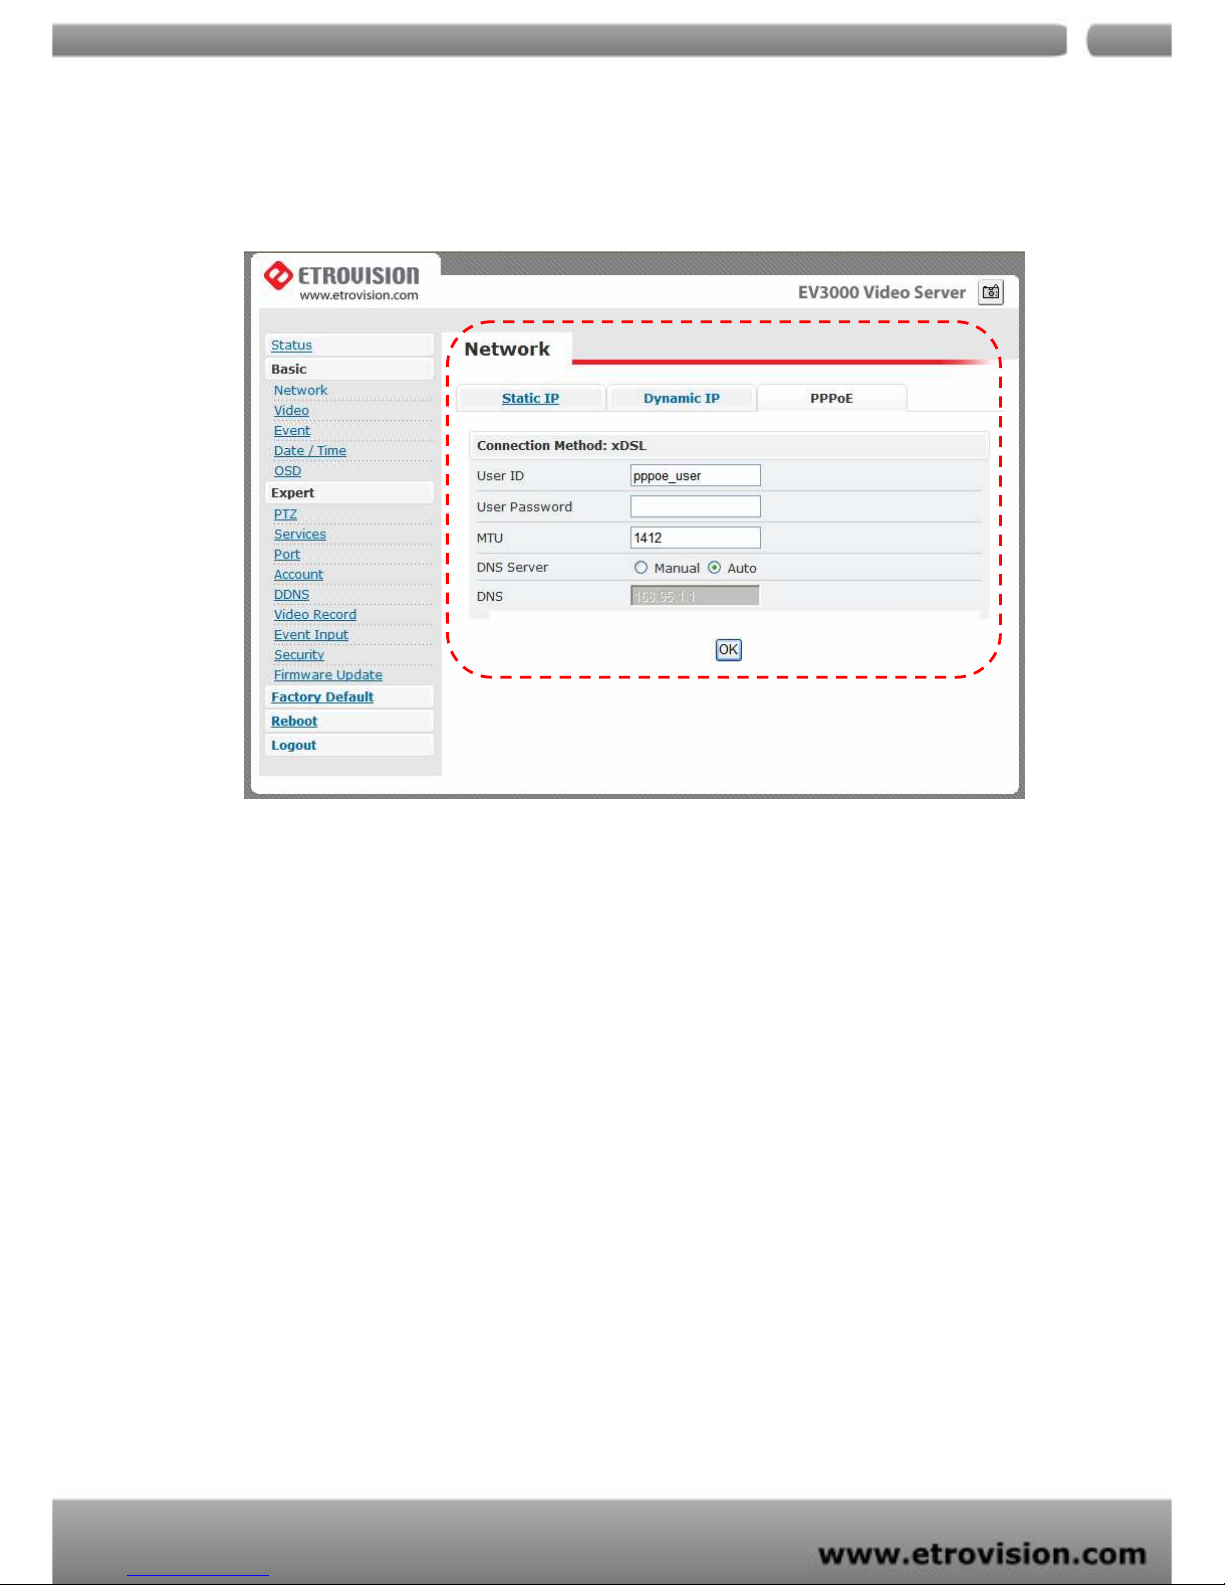
PPPoE SETTINGS
PPPoE is used in case network supports PPPoE like xDSL
Request Internet Service Provider for PPPoE ID/Password
User ID / Password
PPPoE user ID / Password
Service Name
Service name of ISP
MTU
Maximum transmission unit of data
IP address of DNS sever can be set to be created automatically.
If xDSL does not use static IP, you should use DHCP.
Page 23
04
23
VIDEO
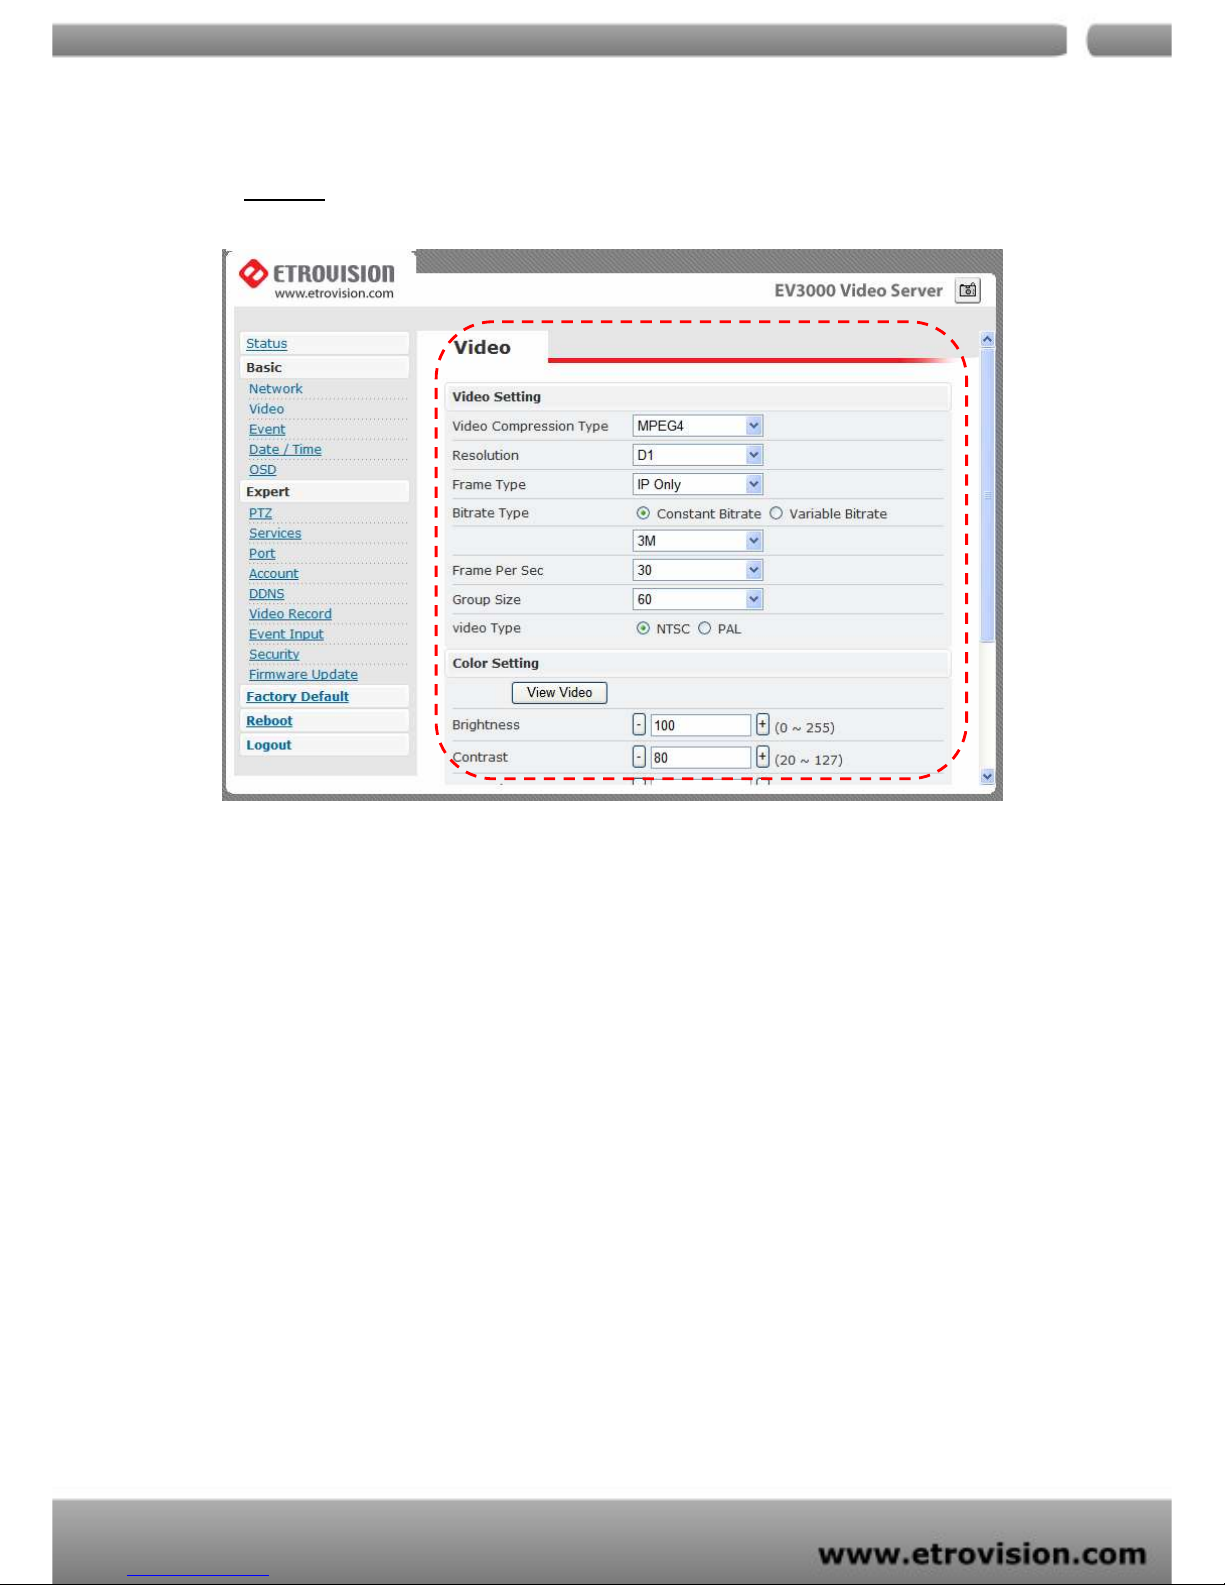
VIDEO SETTINGS
Video Compression Type
MPEG4
Resolution
CIF /QCIF / D1
Frame Types
This setting deals with the Group of Pictures (GOP) structure -
which could be a combination of I and P frames.
I - I frames - also referred to as Key frames contain information
for a complete picture, and can be decoded independent of
any other frame. I frames are the largest (and least compressed)
frames. Therefore for same quality, they consume high bit rate.
Page 24

04
24
P - P frames are encoded using information from the previous I or
P frame, and can only be decoded correctly if the previous I / P
frame is available. P frames are smaller than I frames.
I Only / IP Only
IP - Simple Profile - Medium bit rates for same quality.
I - Highest bit rates for same quality.
Bit rate Type
Constant and Variable bit rates control allows flexibility in
choosing how much bandwidth is available on network
and quality of video required.
Constant Bit rates
3M / 2M / 1.5M / 1M / 750K / 500K / 384K / 256K / 128K / 64K
/ 32K
Variable Bit rates
2 ~ 31 (quality is best in case value is “2”)
Frame per Second.
1 ~ 30
Group Size
Adjusts the ration between “I” frames and “P” frames.
Lower the group size better the quality.
5 / 10/ 15 / 30 / 60 / 90
Video Type
NTSC / PAL
Page 25
04
25
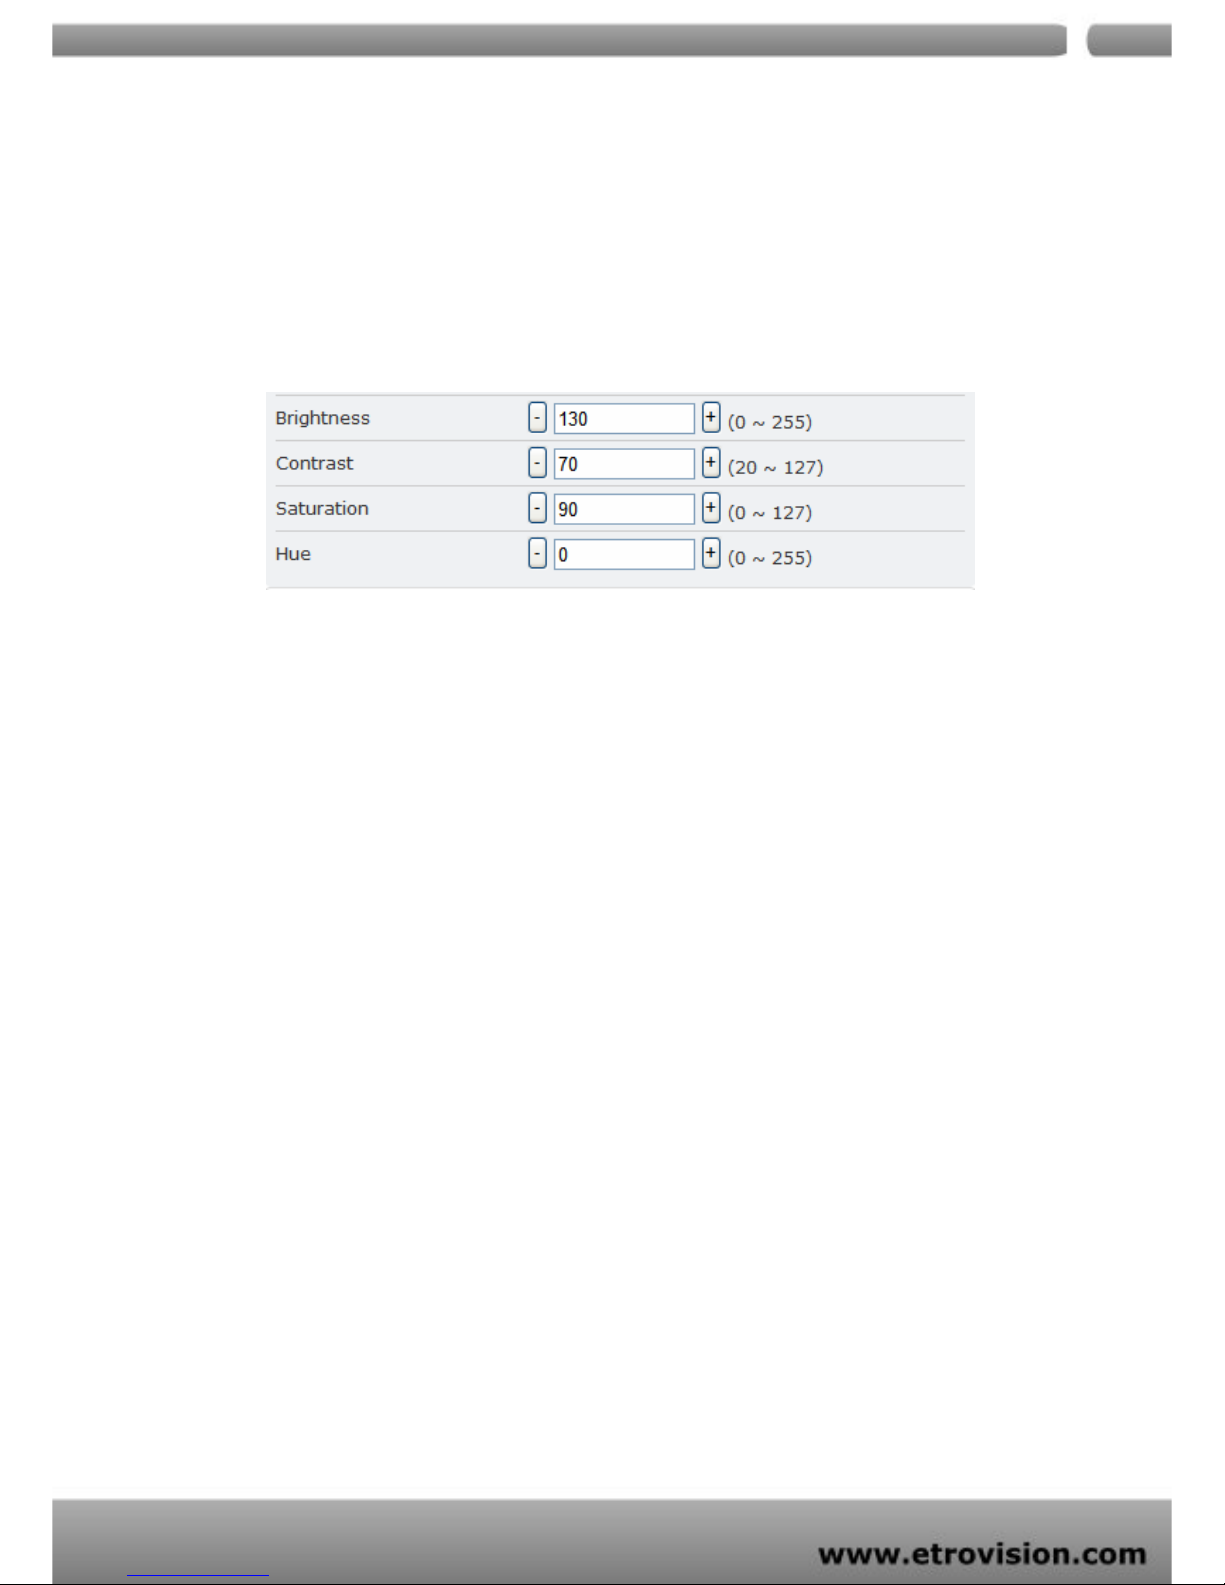
COLOR SETTINGS
Fine adjustments to video quality can be made using more detailed
settings as shown below.
BRIGHTNESS
Adjusts the image on a scale from darkness to brightness.
CONTRAST
Adjusts the extent to which adjacent areas on a video differ in
brightness
SATURATION
Adjusts the chromatic purity of video thereby effecting vividness.
HUE
Adjusts the video by effecting color depth
VIDEO PREVIEW
Preview makes choices easier when tuning video settings for
specific locations. By clicking the View Video button, you can see
the following
Page 26

04
26
Click Stop to exit preview. You could change other video
parameters and press TEST to see how the changes look like. You
can press Reset anytime to return back to the default settings. Click
Enable Preview checkbox to save the current settings – and its takes
effect right after settings have been changed.
CLIENT LIMIT
Maximum users (client) limit allows users accessing the video stream.
For higher bit rates and resolution, the client limit is much lower and
vice versa.
Maximum number of clients can be restricted depending on
how much video quality is required and network band with is
available.
0 ~ 10 (value 0 means maximum allowable)
DO NOT FORGET TO PRESS “OK” BUTTON TO SAVE YOUR SETTINGS.
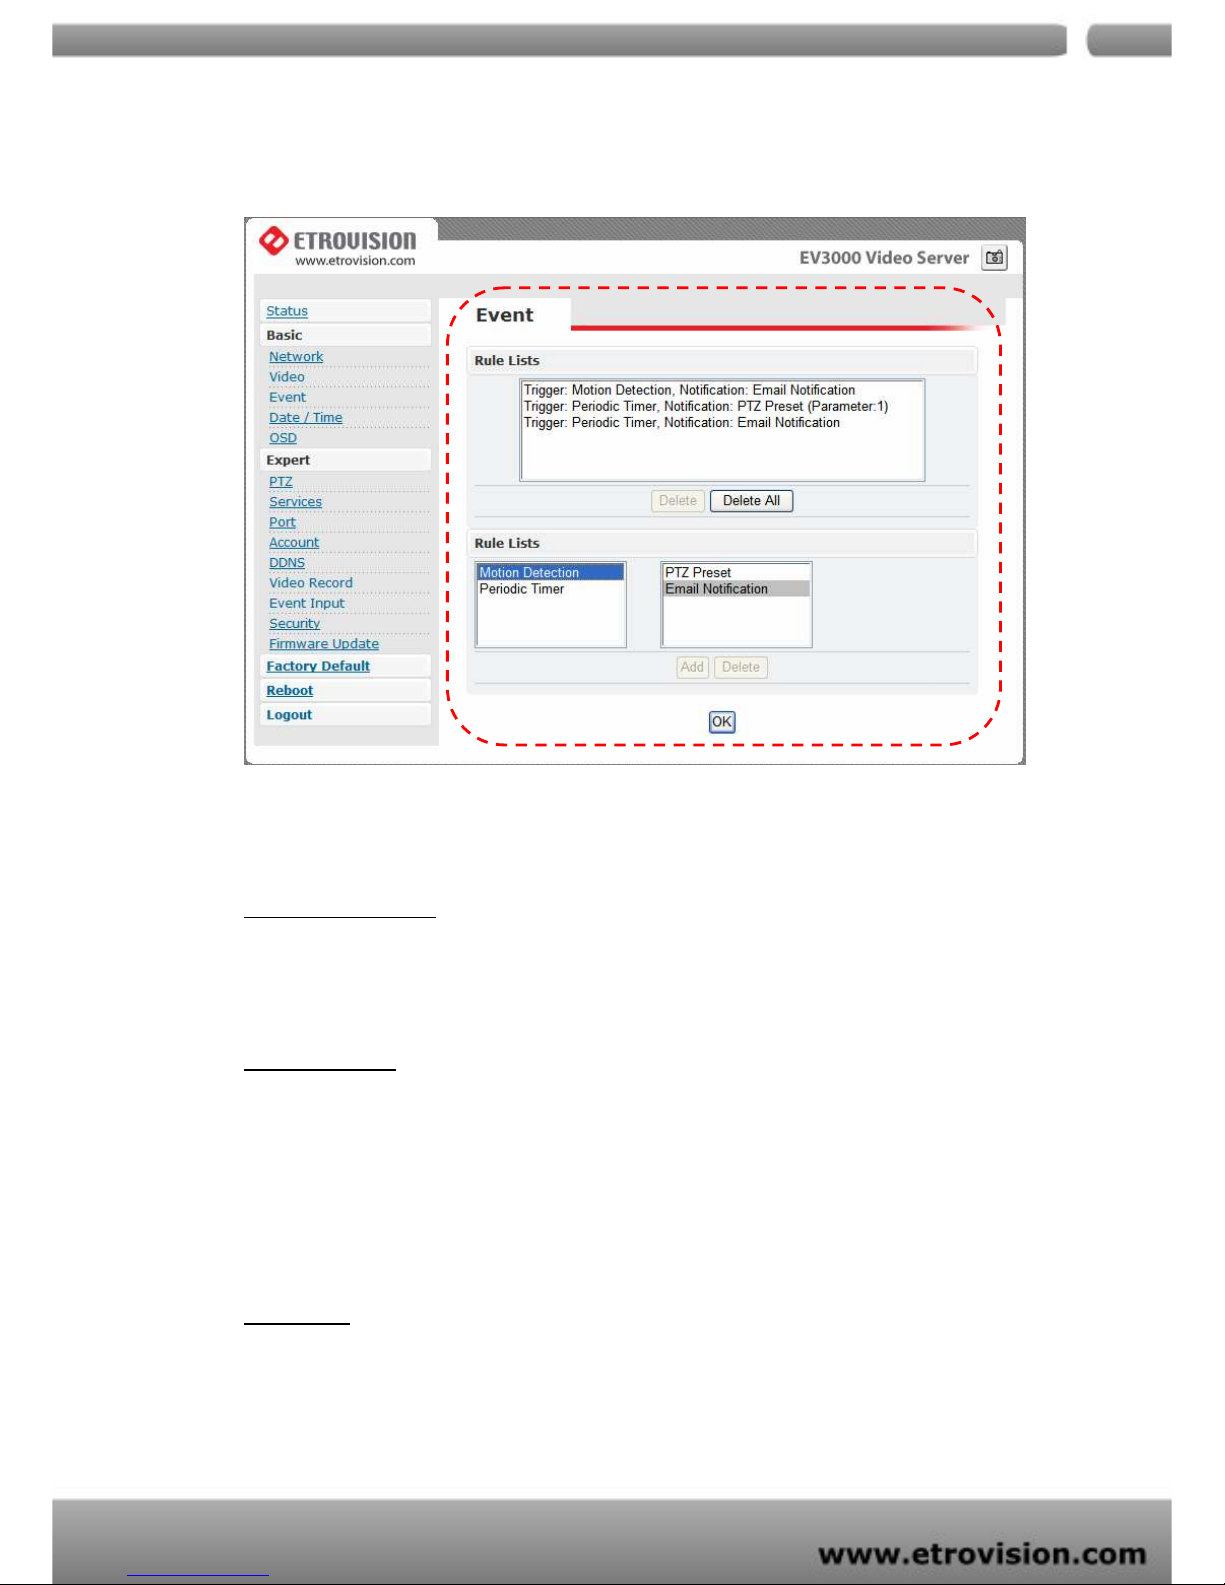
EVENT
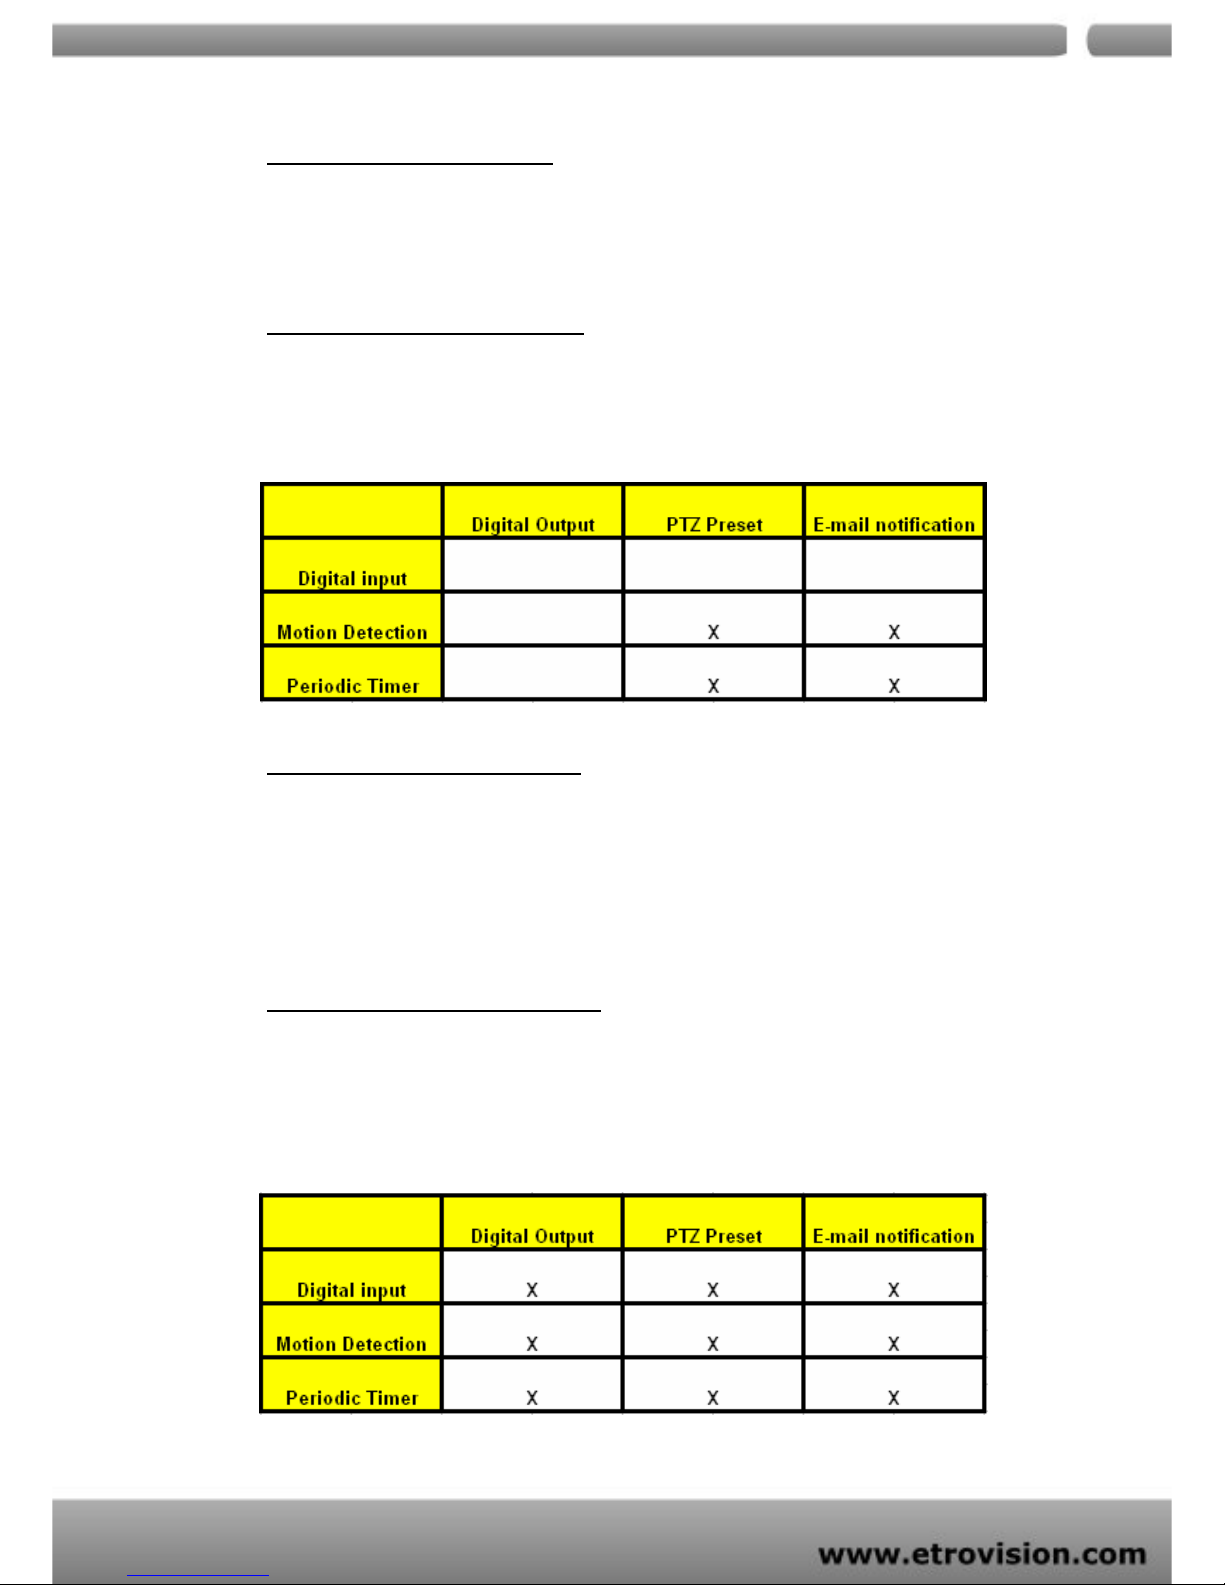
Basically, EV3130A is capable of handling all standard events. EV3131
having limited input sockets (only PTZ), only handles motion detection
and periodic timer.
Page 27
04
27
Events handled by EV3131
1. Motion Detection
2. Periodic Timer
Actions supported by EV3131
1. PTZ Preset
2. E-mail Notification
Events handled by EV3130A
1. Digital IN
2. Motion Detection
3. Periodic Timer
Actions supported by EV3130A
1. Digital Output
2. PTZ Preset
3. E-mail Notification
Page 28
04
28
EVENTS HANDLED
Motion Detection
If motion is detected on the areas defined on the video stream, an
event will be triggered based on the rule lists.
Periodic Timer
In a pre-defined time interval, an event will be triggered based on the
rule lists.
ACTIONS TRIGGERED
PTZ Preset
PTZ set to a particular preset value can be triggered based on
occurrence of an event listed out in “Rule Lists”.
Page 29
04
29
E-mail Notification
E-mail can be sent based on occurrence of an event listed out in
“Rule Lists”.
RULE LISTS - ADDING/DELETING
Select an event and select corresponding action. Click add button
and notice that is added in the Rule lists Information box.
MODIFYING RULE LISTS
Rule list items can be deleted individually or wholly by clicking Delete
All button.
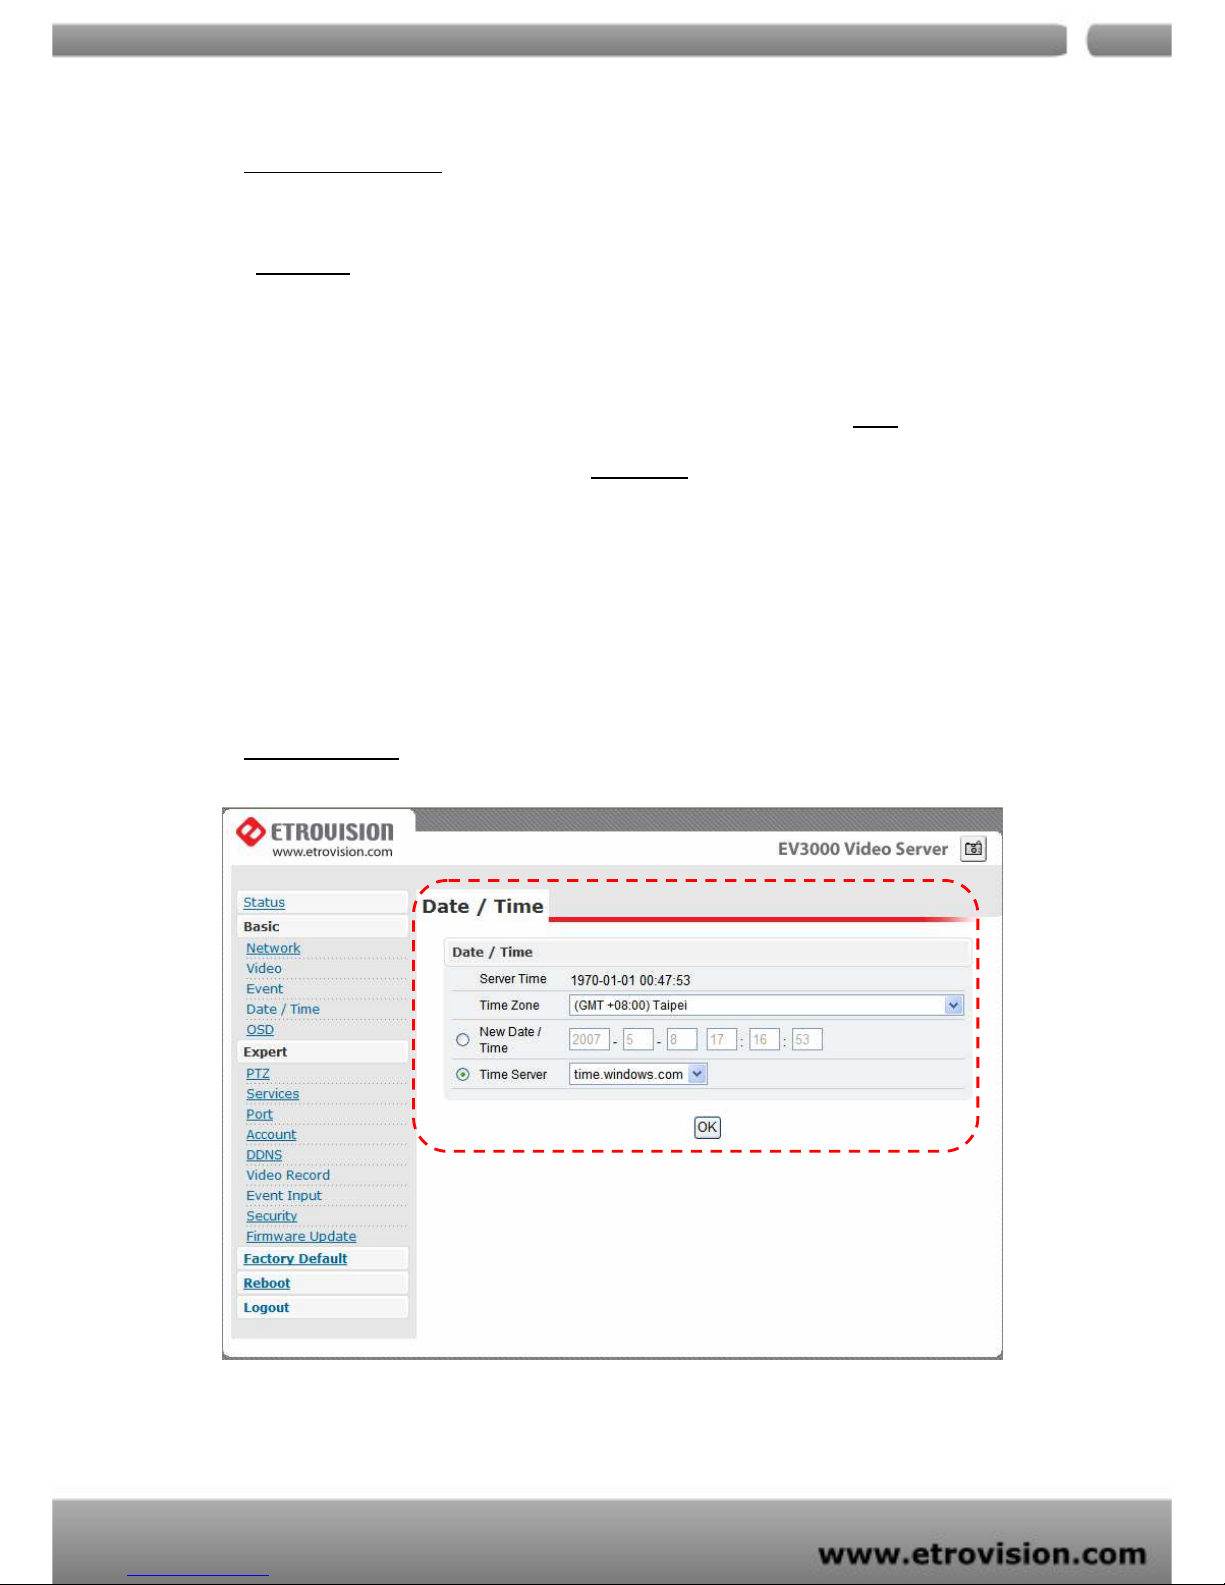
DATE & TIME
Date and time settings can be changed directly by editing the
Page 30
04
30
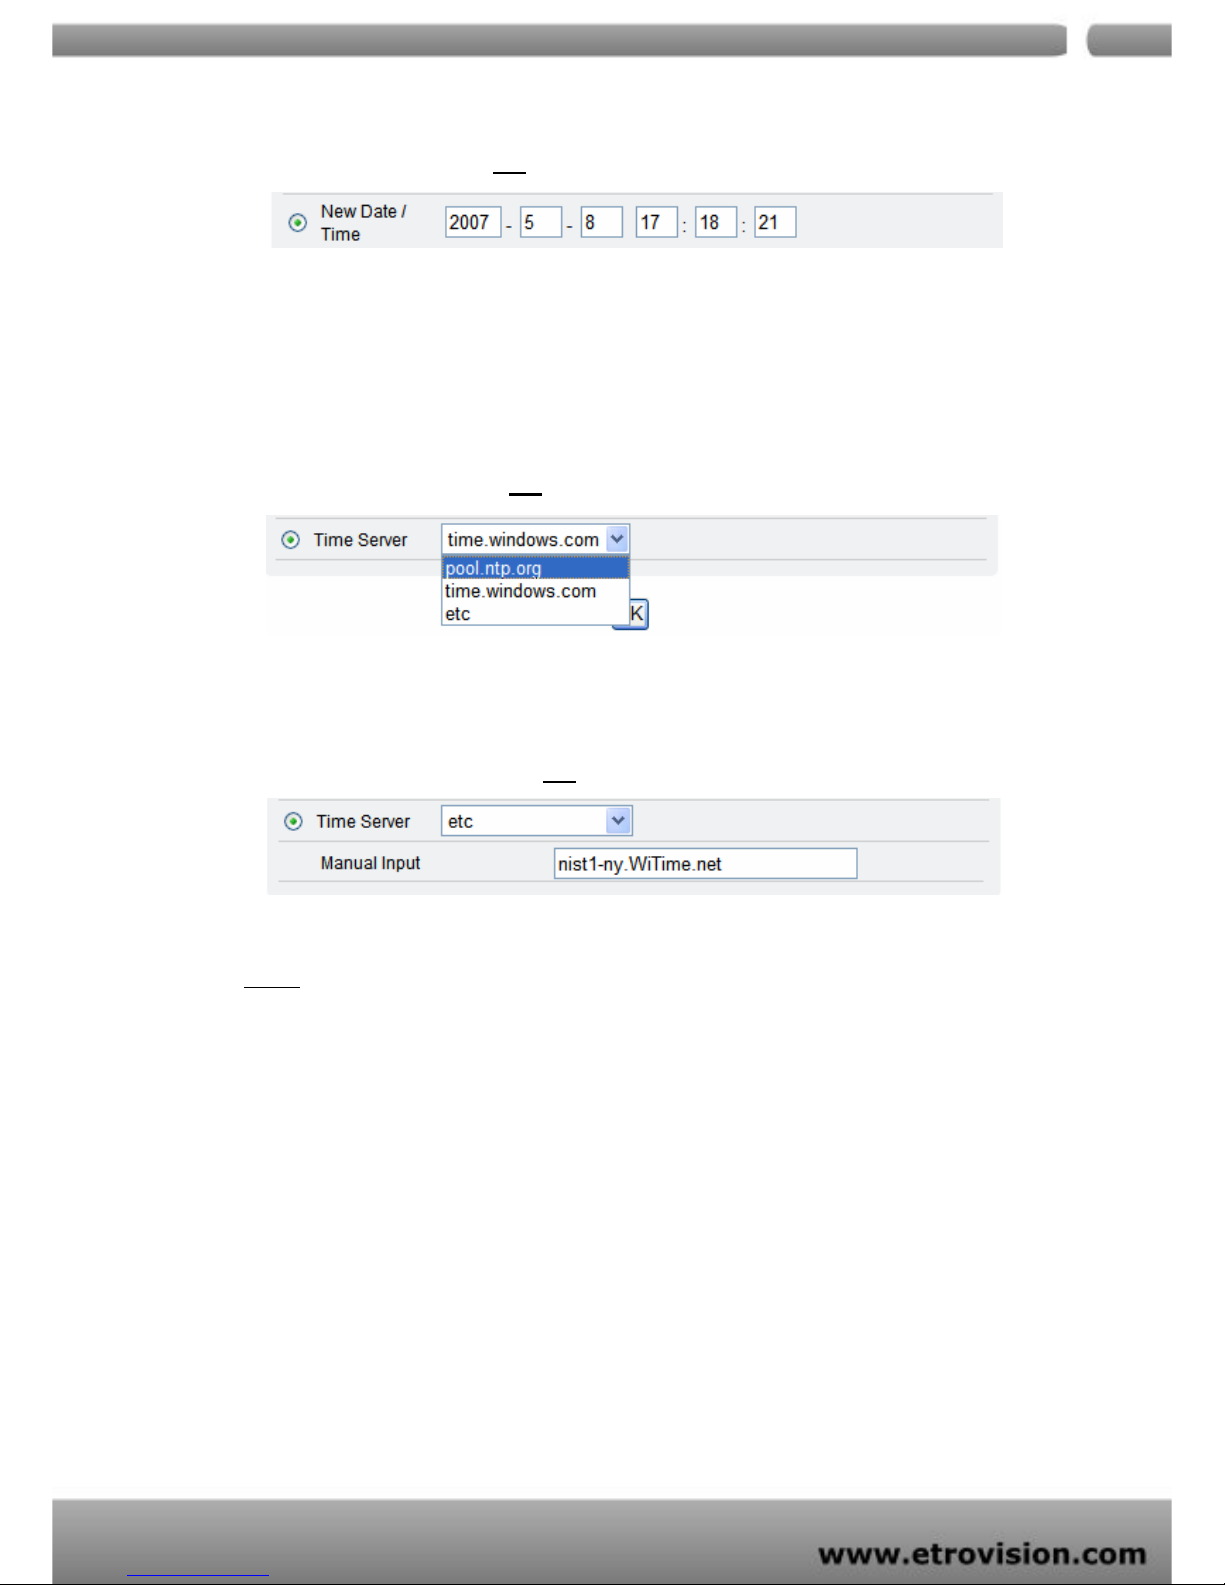
time fields. Click “OK” after you have made selection.
Time zone can be chosen by choosing either of the two time
servers listed
Either of the two time servers can be chosen to synchronize
video server time. They are listed as follows should you choose
Time Server. Click “OK” after you have changed settings.
If you want to manually input time server, choose “etc” then you
can find a manual input edit box appear. Key in your preferred
time server and click “OK”.
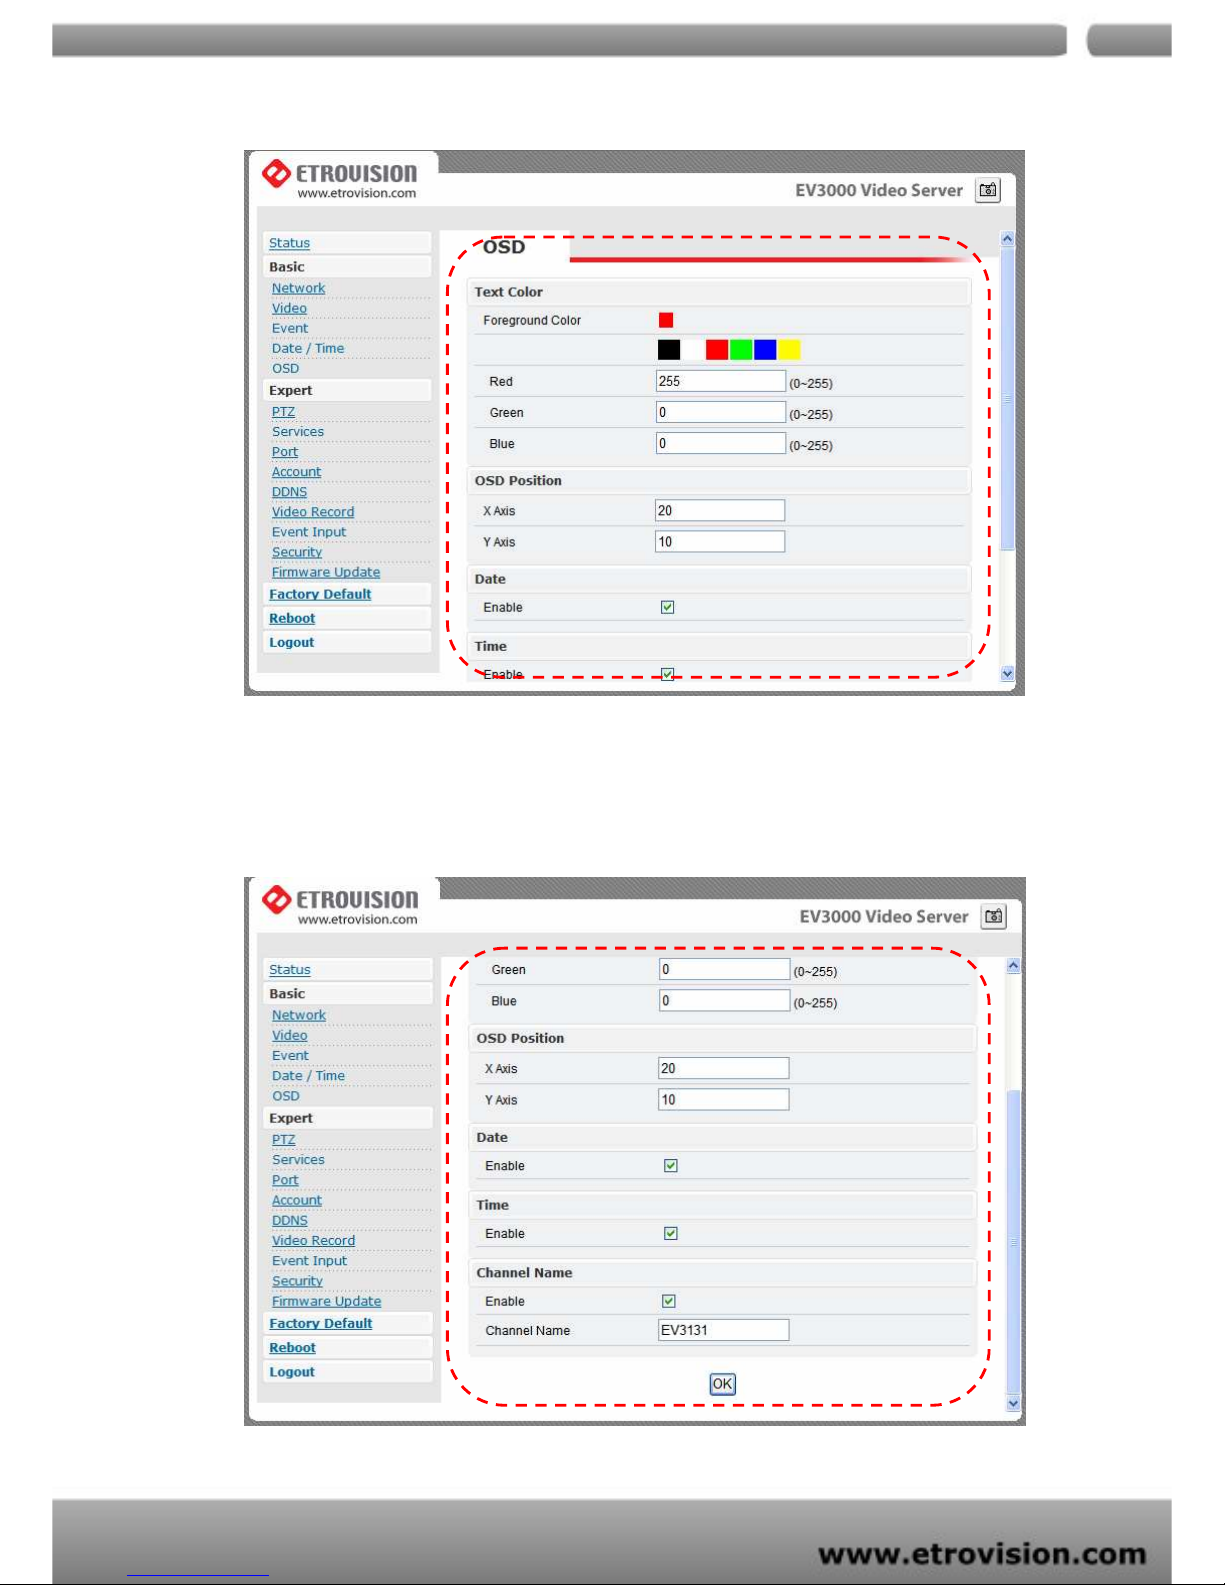
OSD
Click on your desired choice of color. Values will change accordingly
for R, G, and B. If you desire some other color, you can manually
define those corresponding R, G, B values in the boxes as appropriate.
Position of OSD can be changed by defining the X, Y values. Date &
Time can be individually enabled/disable by checkboxes.
Page 31
04
31
Channel name can be shown/hidden by the channel name “Enable”
checkbox. It can be manually typed in the “Channel name” text box
and changes can be noticed.
Page 32
04
32
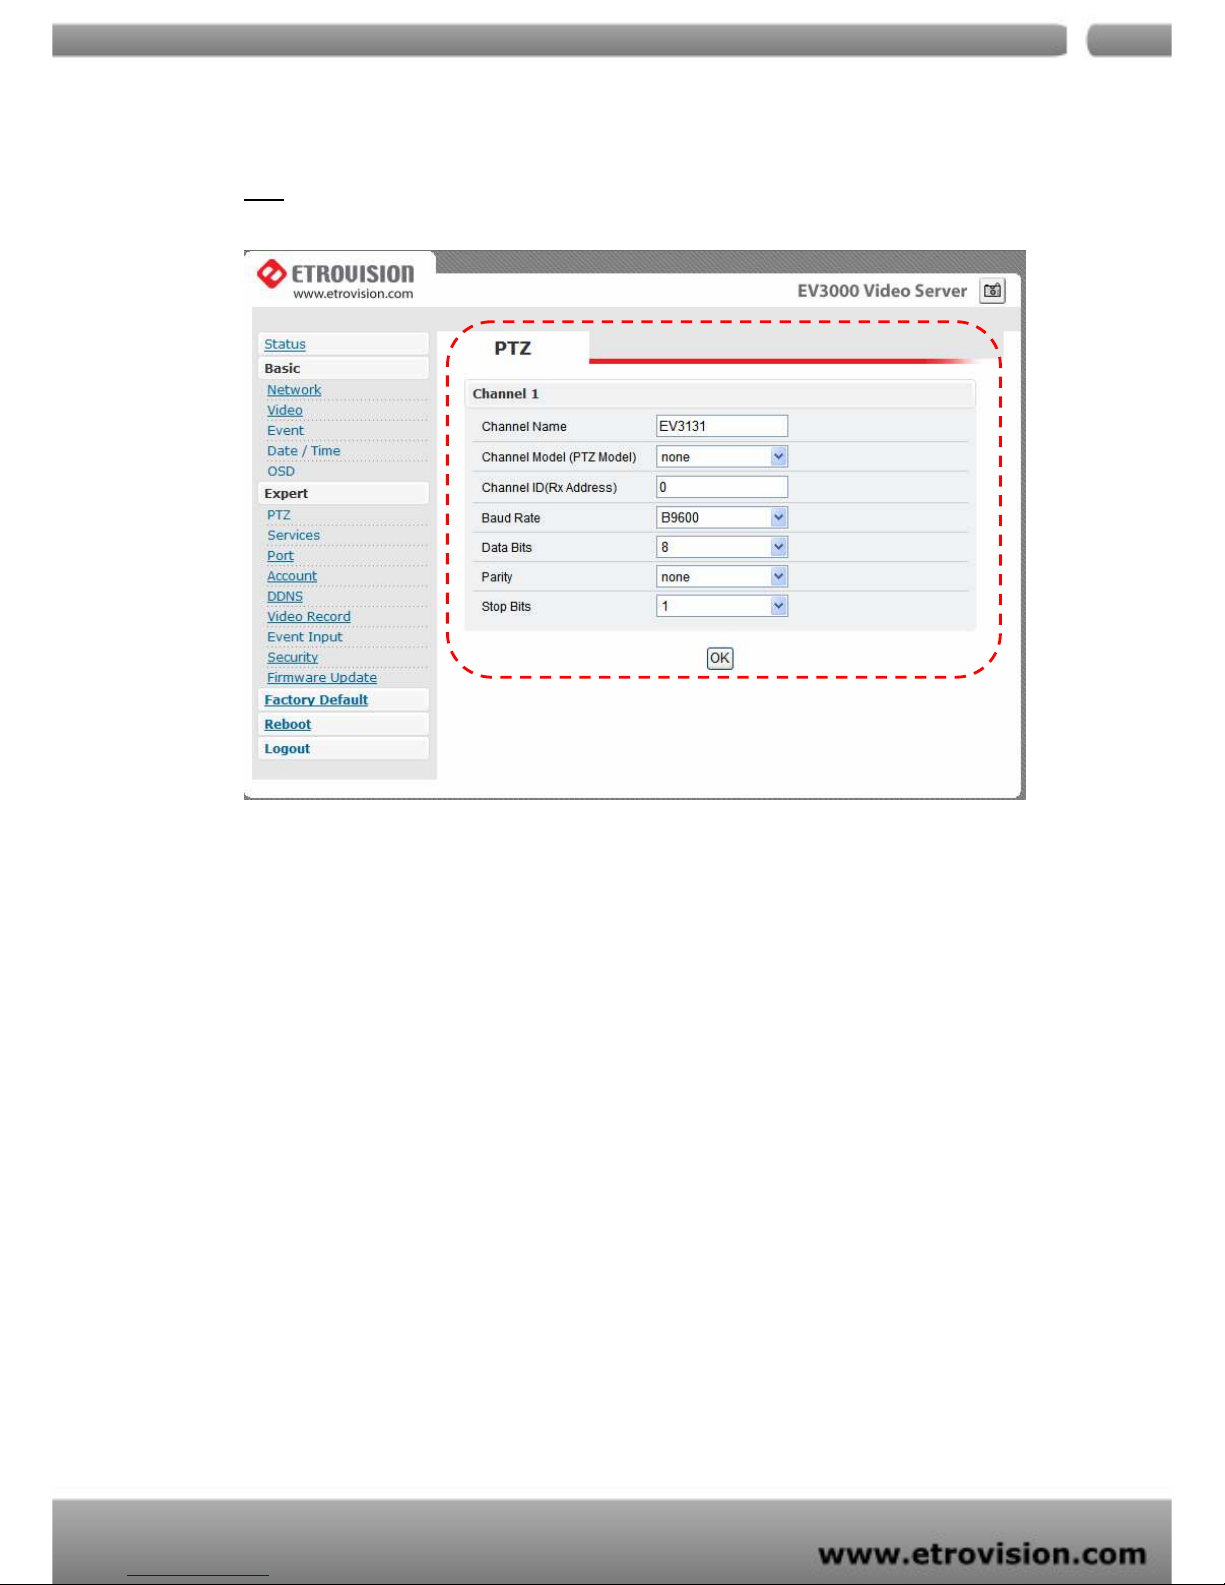
PTZ
Channel name
Give a channel name in the edit box.
PTZ model
Default is none.
PelcoP/PelcoD/Merit-Lilin/Transparent can be chosen.
RS-485 Address
Give address value - default is zero.
Baud rate / Data bits / Parity / Stop bits
Depending on the protocol used, the values of baud and
related settings are to be assigned accordingly.
Page 33
04
33
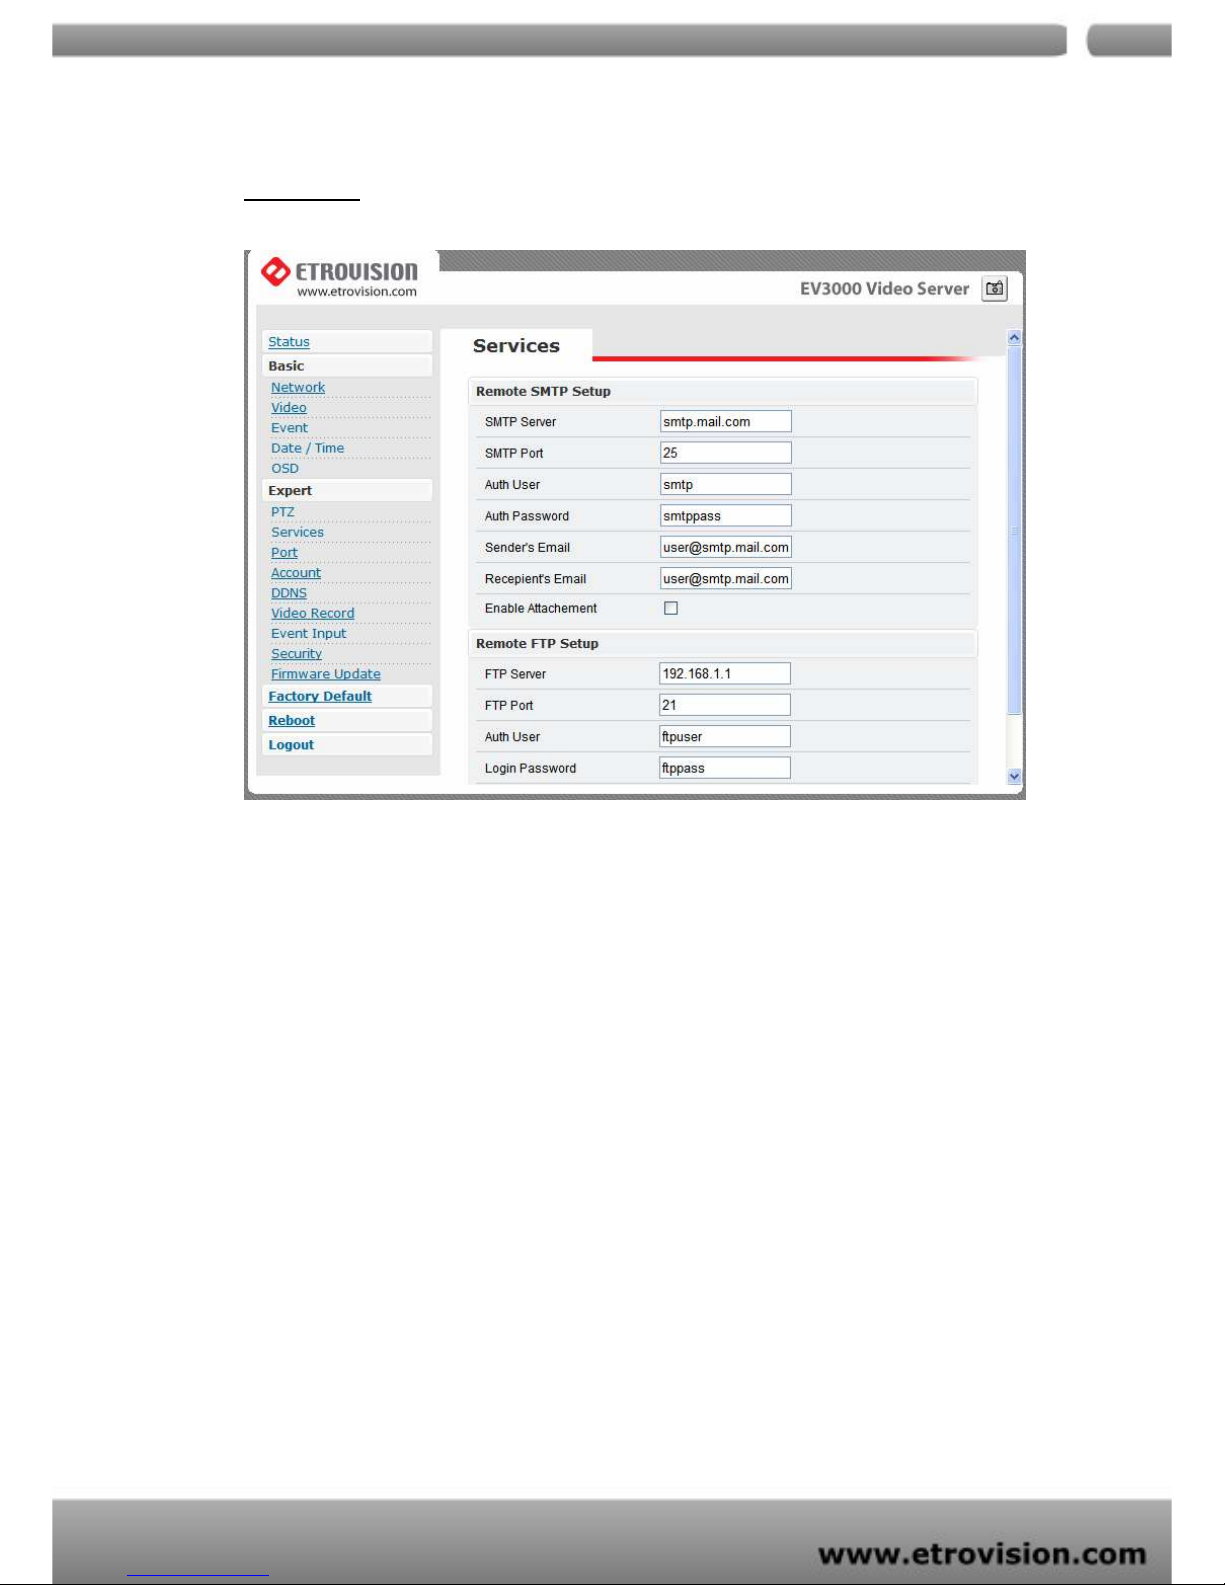
SERVICES
An e-mail notification & FTP upload service offered by EV3131 /
EV3130A notifies events or uploads snapshots to a remote FTP server.
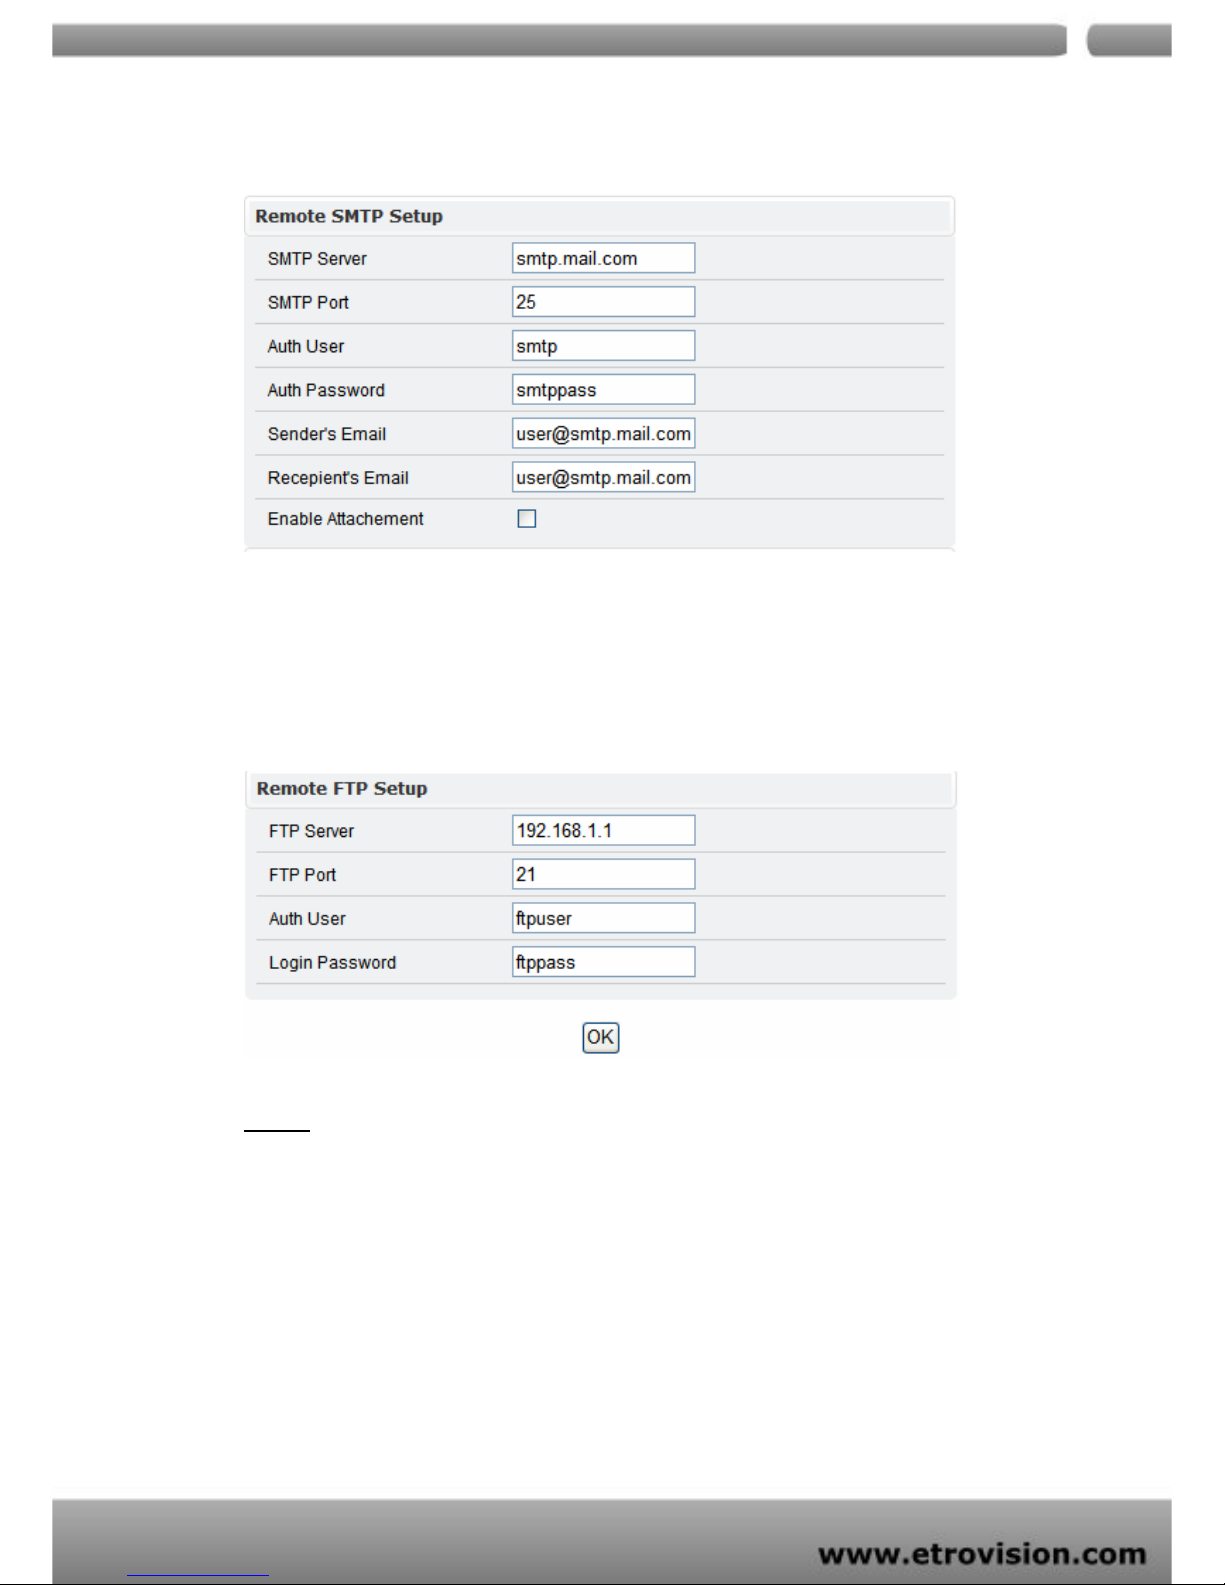
E-MAIL – SMTP SETTINGS
Fill in the details of SMTP server such as port number, user name,
password, server name information. If you would wish to send
attached snapshots, please check the appropriate check box.
Sometimes Authentication is not always required by SMTP servers.
Wherein only the SMTP server name and e-mail address details are
enough to be input.
Page 34
04
34
FTP SETTINGS
Fill in the details of remote FTP server, port number and user name,
password.
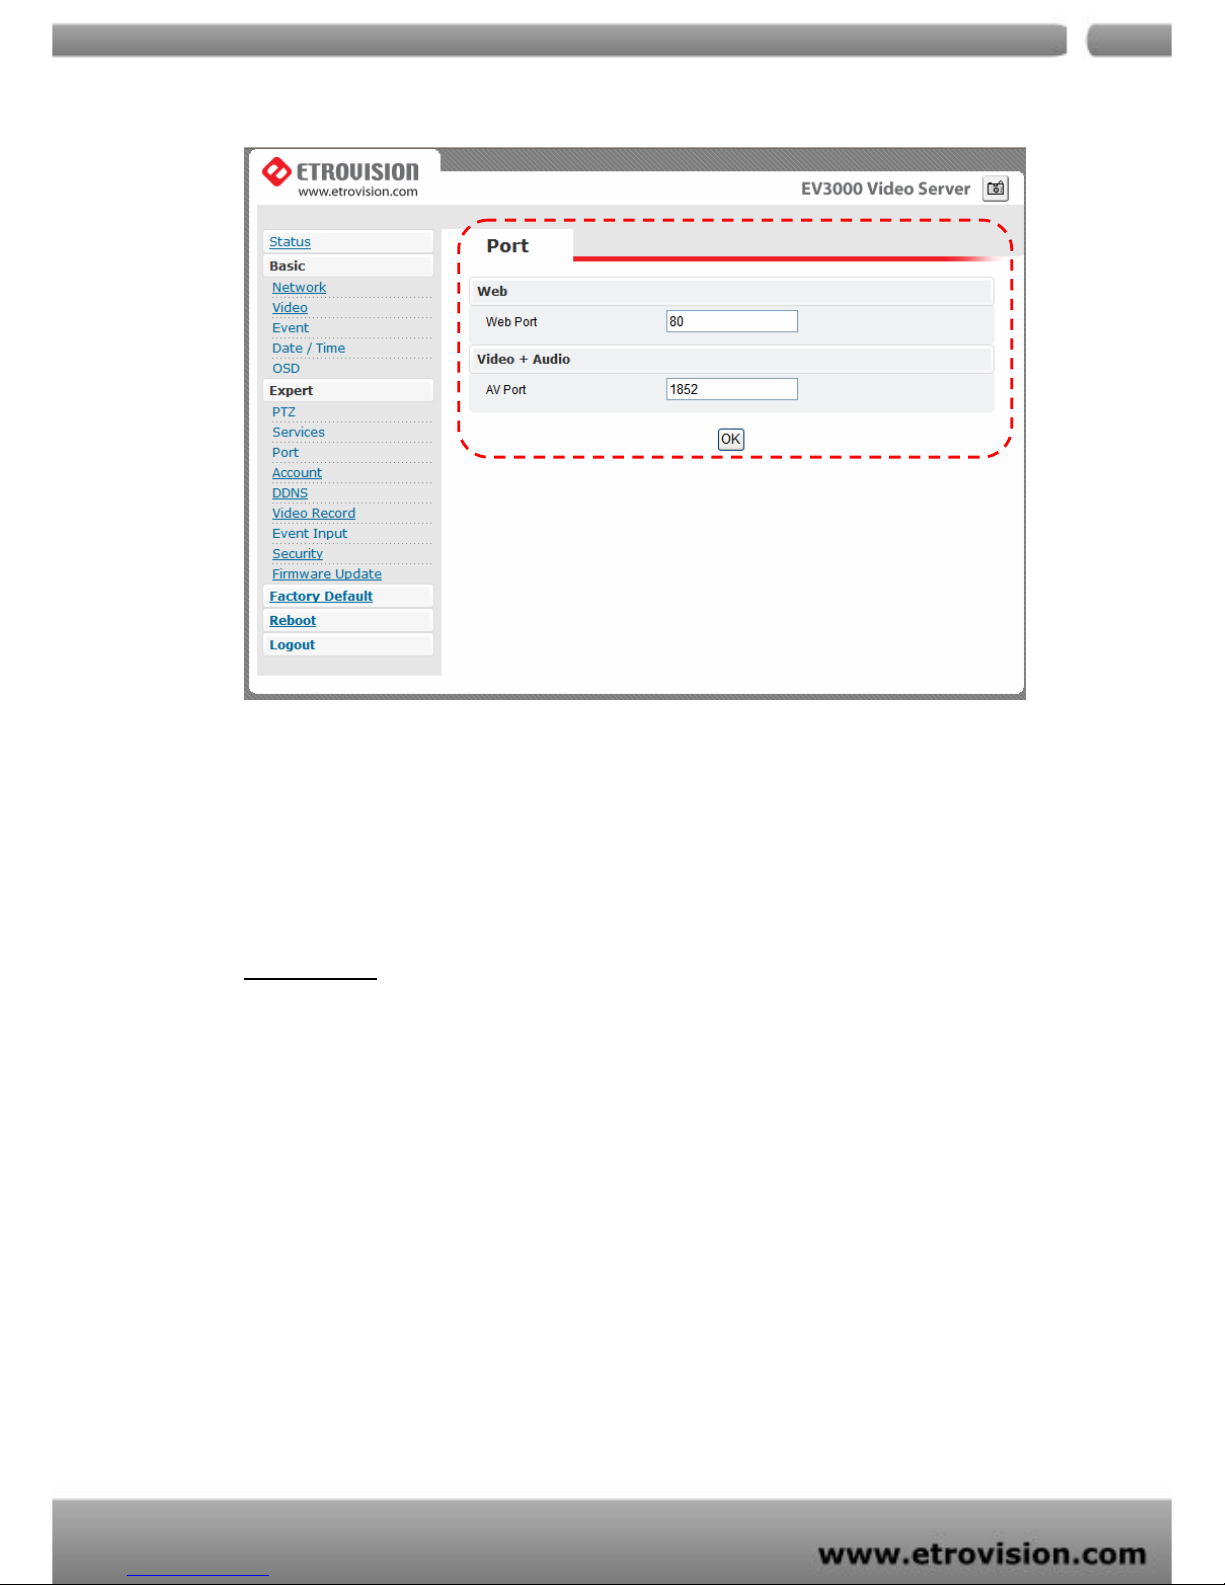
PORT
The values of WEB and AV port can be changed as necessary.
Page 35
04
35
Web
Web Port default is 80
Video + Audio
Default is 1852 for video/audio data transmission.
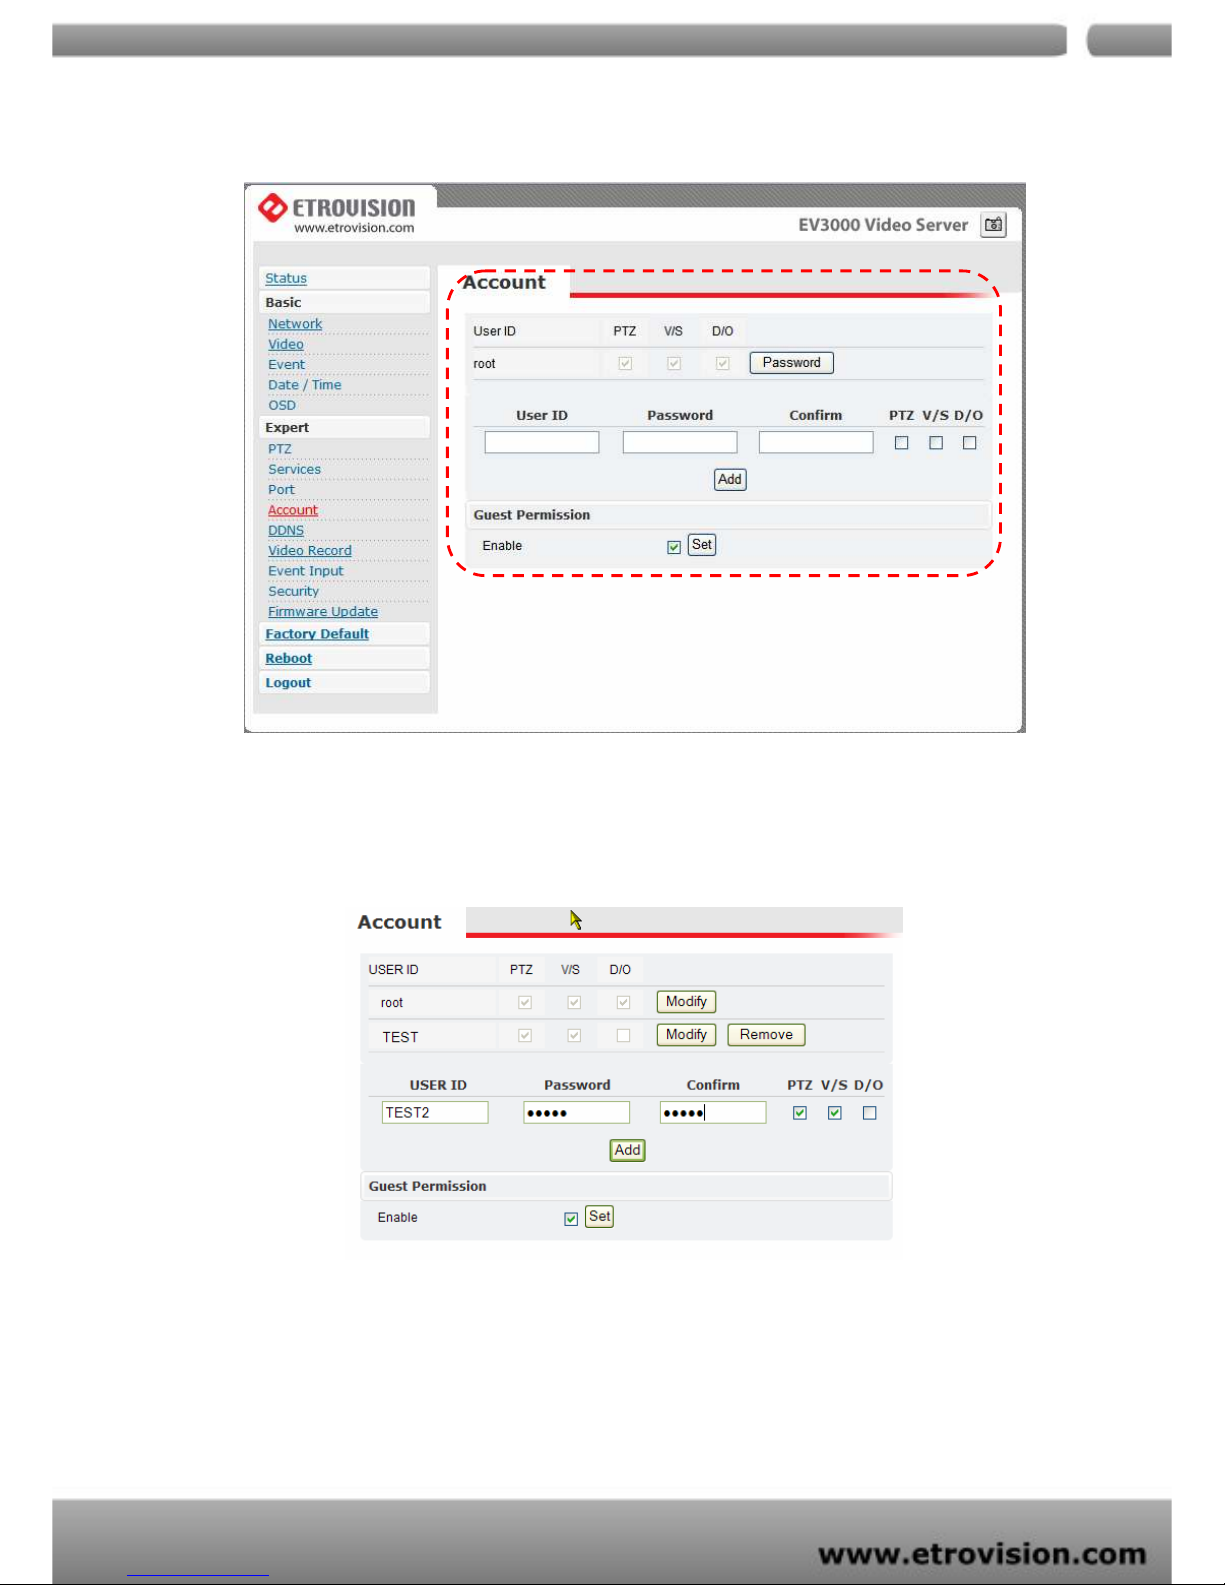
ACCOUNT
Administrator can create user accounts. Login as an administrator
and create user accounts by pressing “Add”. Each account has PTZ,
Video settings and Digital Out privileges. They can be turned on or off
anytime by the administrator.
There are limits on user name and password length and will be
notified by dialog boxes if the user name/password exceeds or
under-runs that limit.
Page 36
04
36
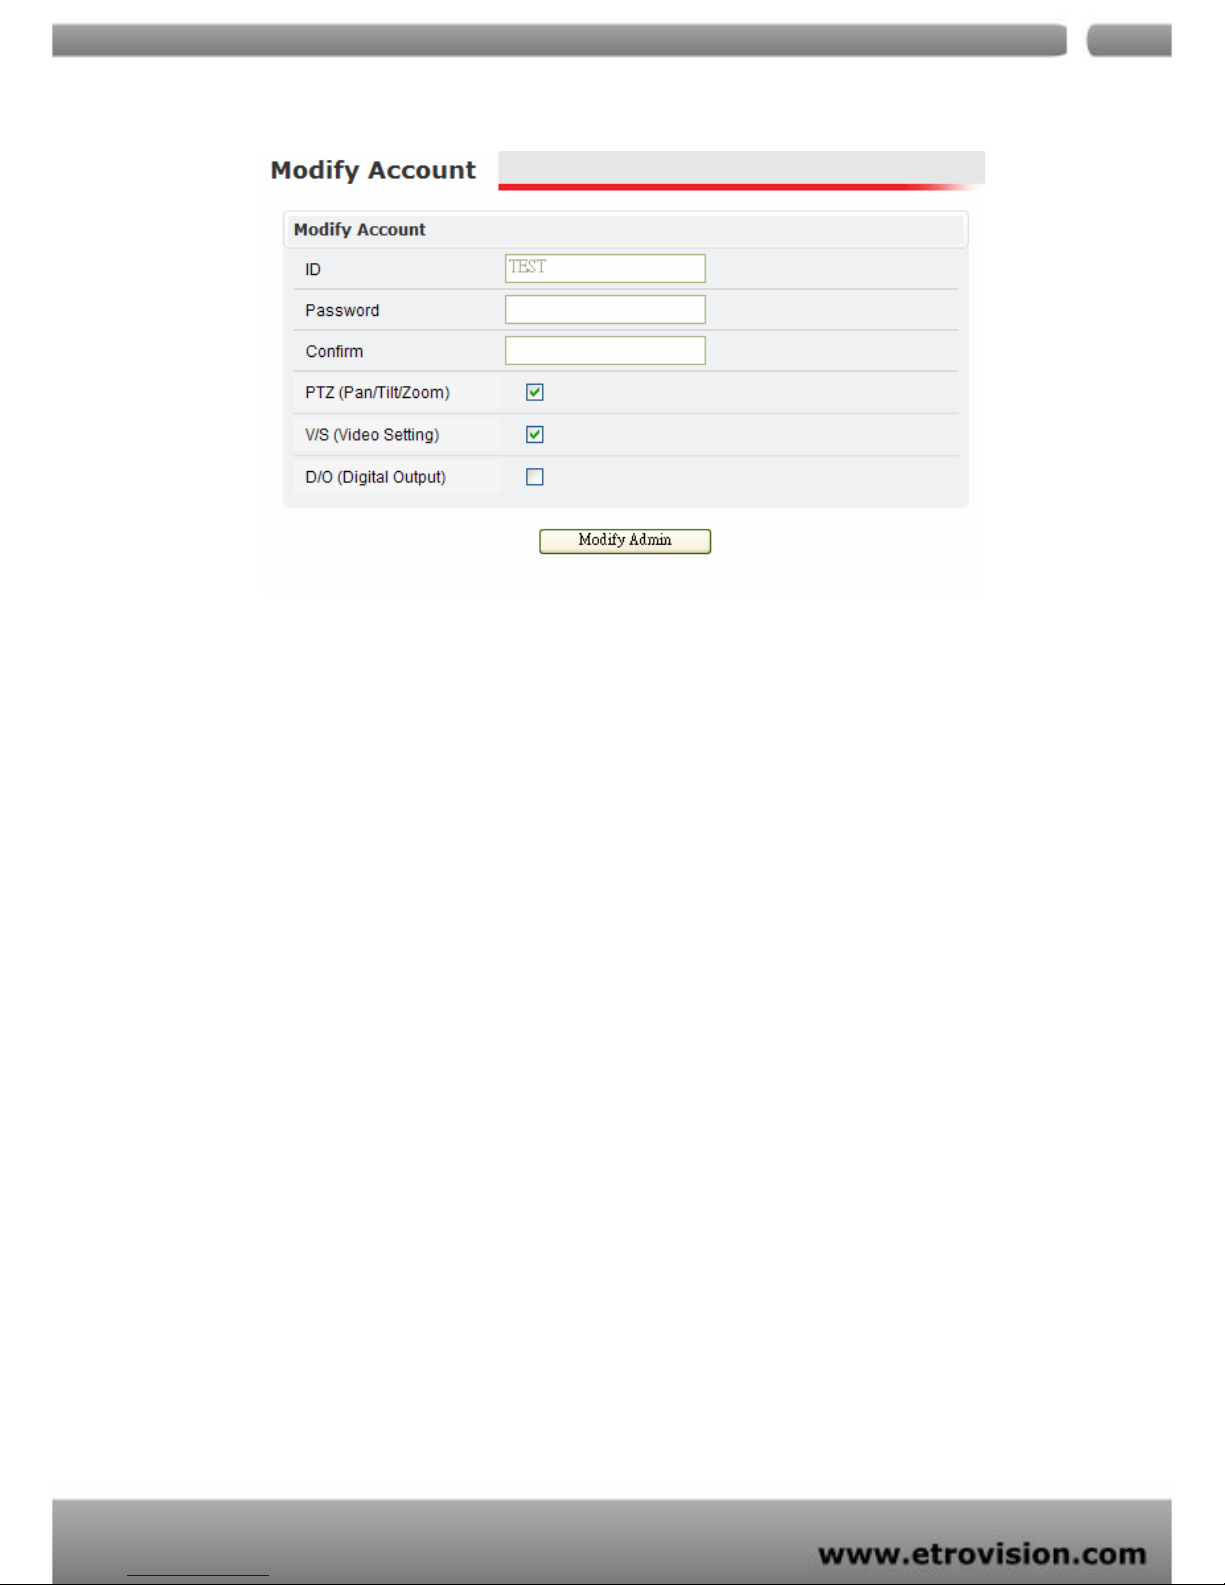
For each account, guest permissions can be turned ON/OFF. Any
time, an account’s settings can be modified by pressing the “Modify”
button.
Administrator account can also be modified by the same modify
button. Changing password needs confirmation.
Page 37
04
37
Account Limitations
Administrator can add up to a maximum of 5 users and assign
properties for each of them.
Guest Permissions
Guest account can be turned ON/OFF anytime.
Page 38
04
38
DDNS
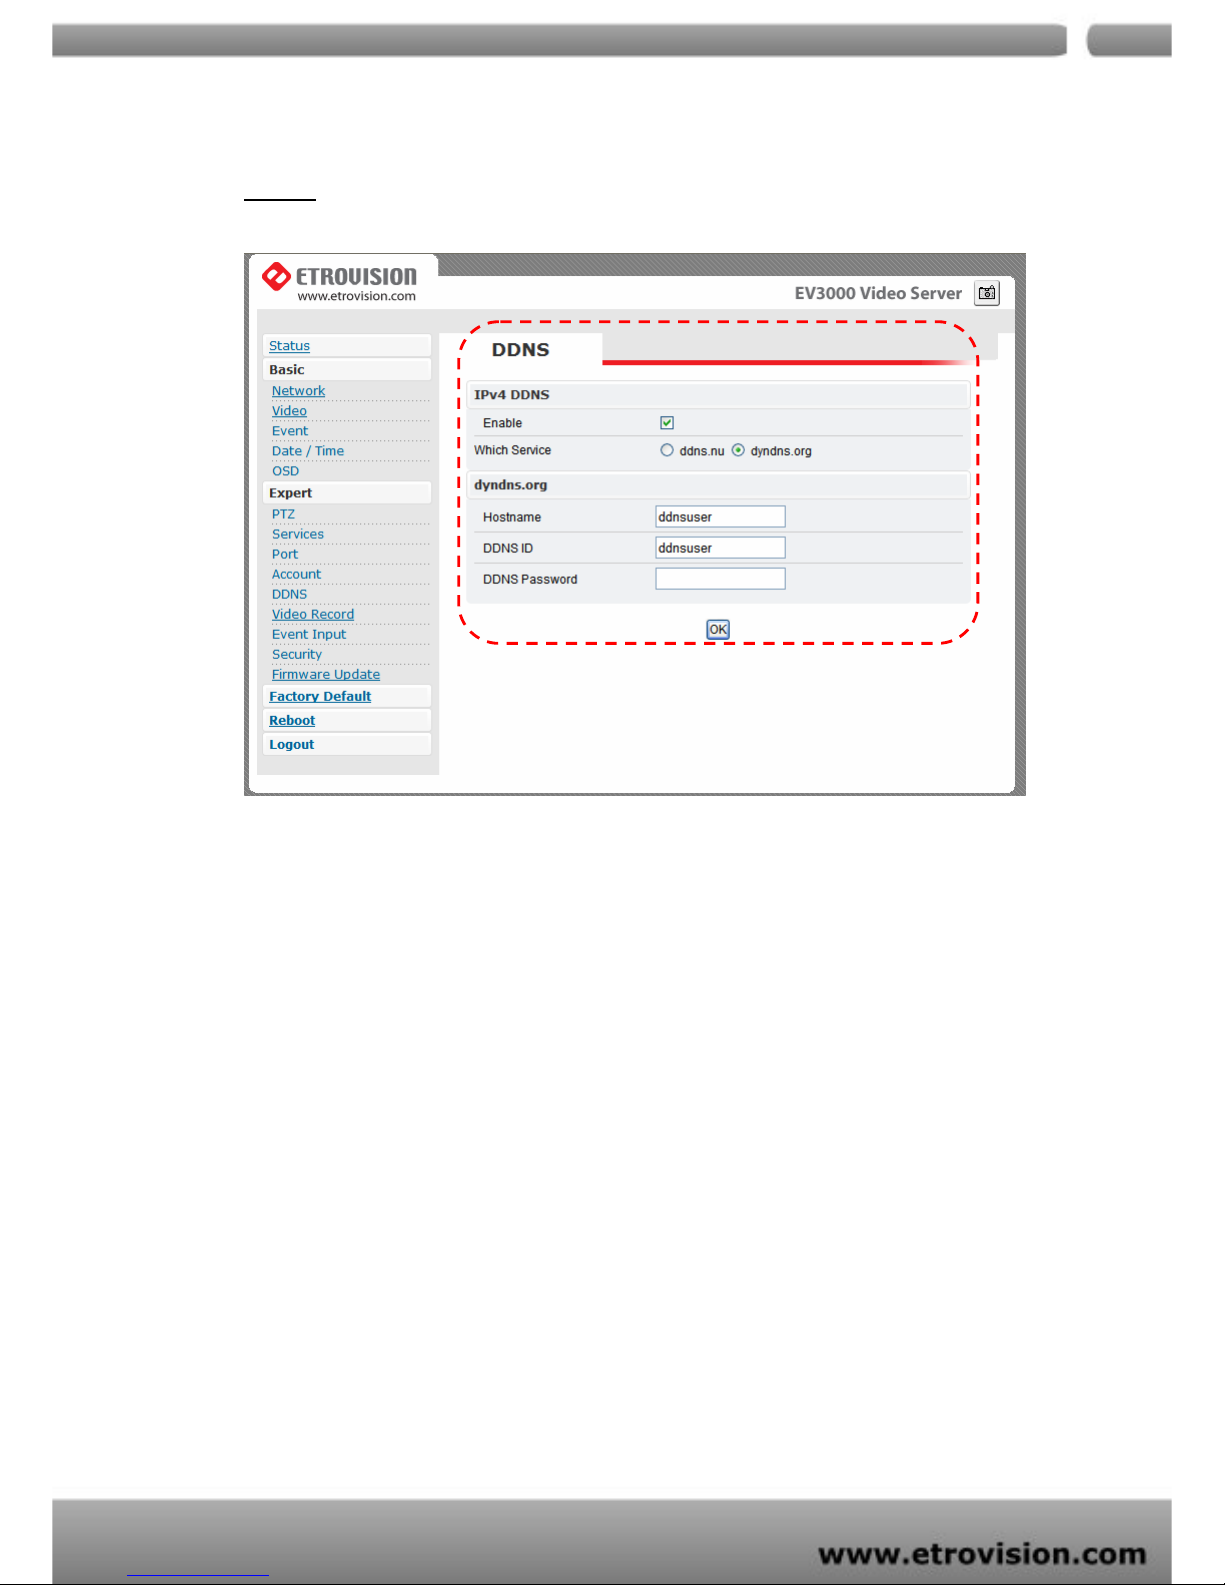
DDNS is the function that maps an IP address to a host name. If
EV3131 / EV3130A are set to dynamic IP address, the host name by
DDNS (Dynamic Domain Name Service) must be used instead of
the IP address for credibility of network connection.
IPv4 DDNS
Check “Enable” and select a service out of available two.
Both services are required to register some items on each DDNS
service site.
For use of “ddns.nu” register at www.ddns.nu and for dyndns
find the information at dyndns.org
Page 39
04
39
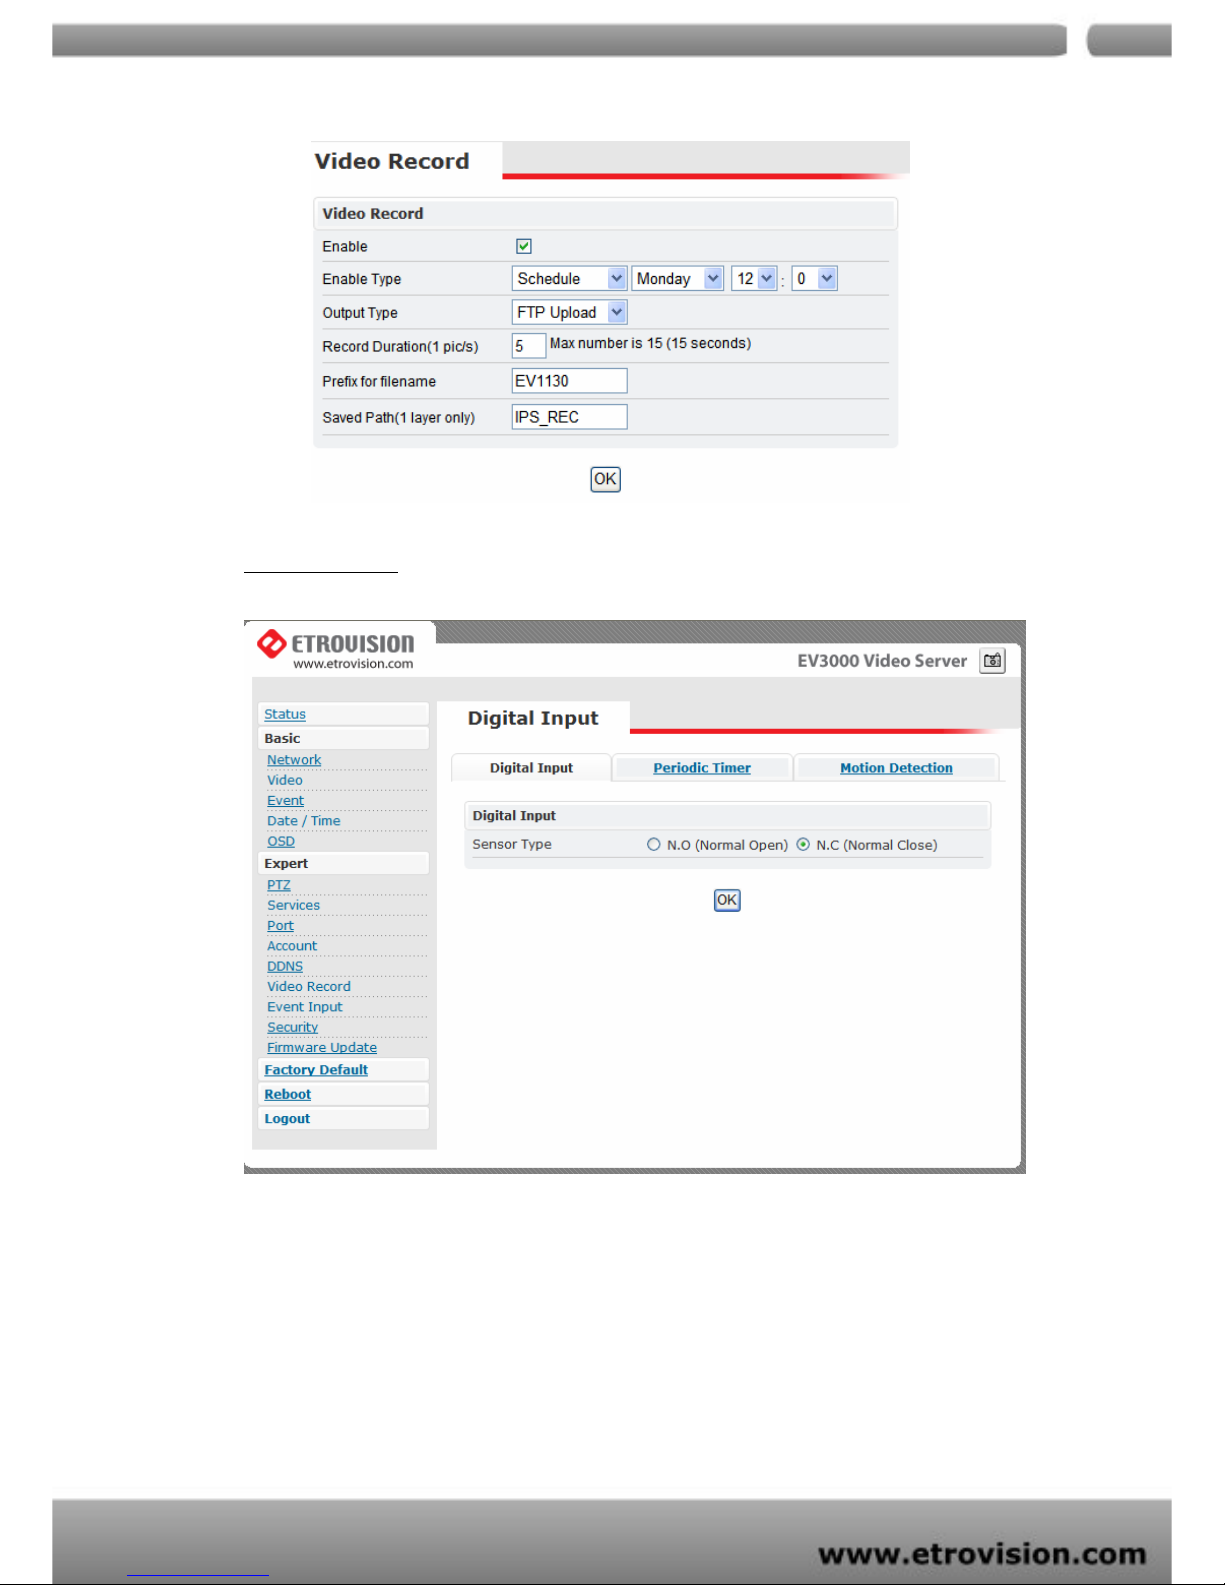
VIDEO RECORD
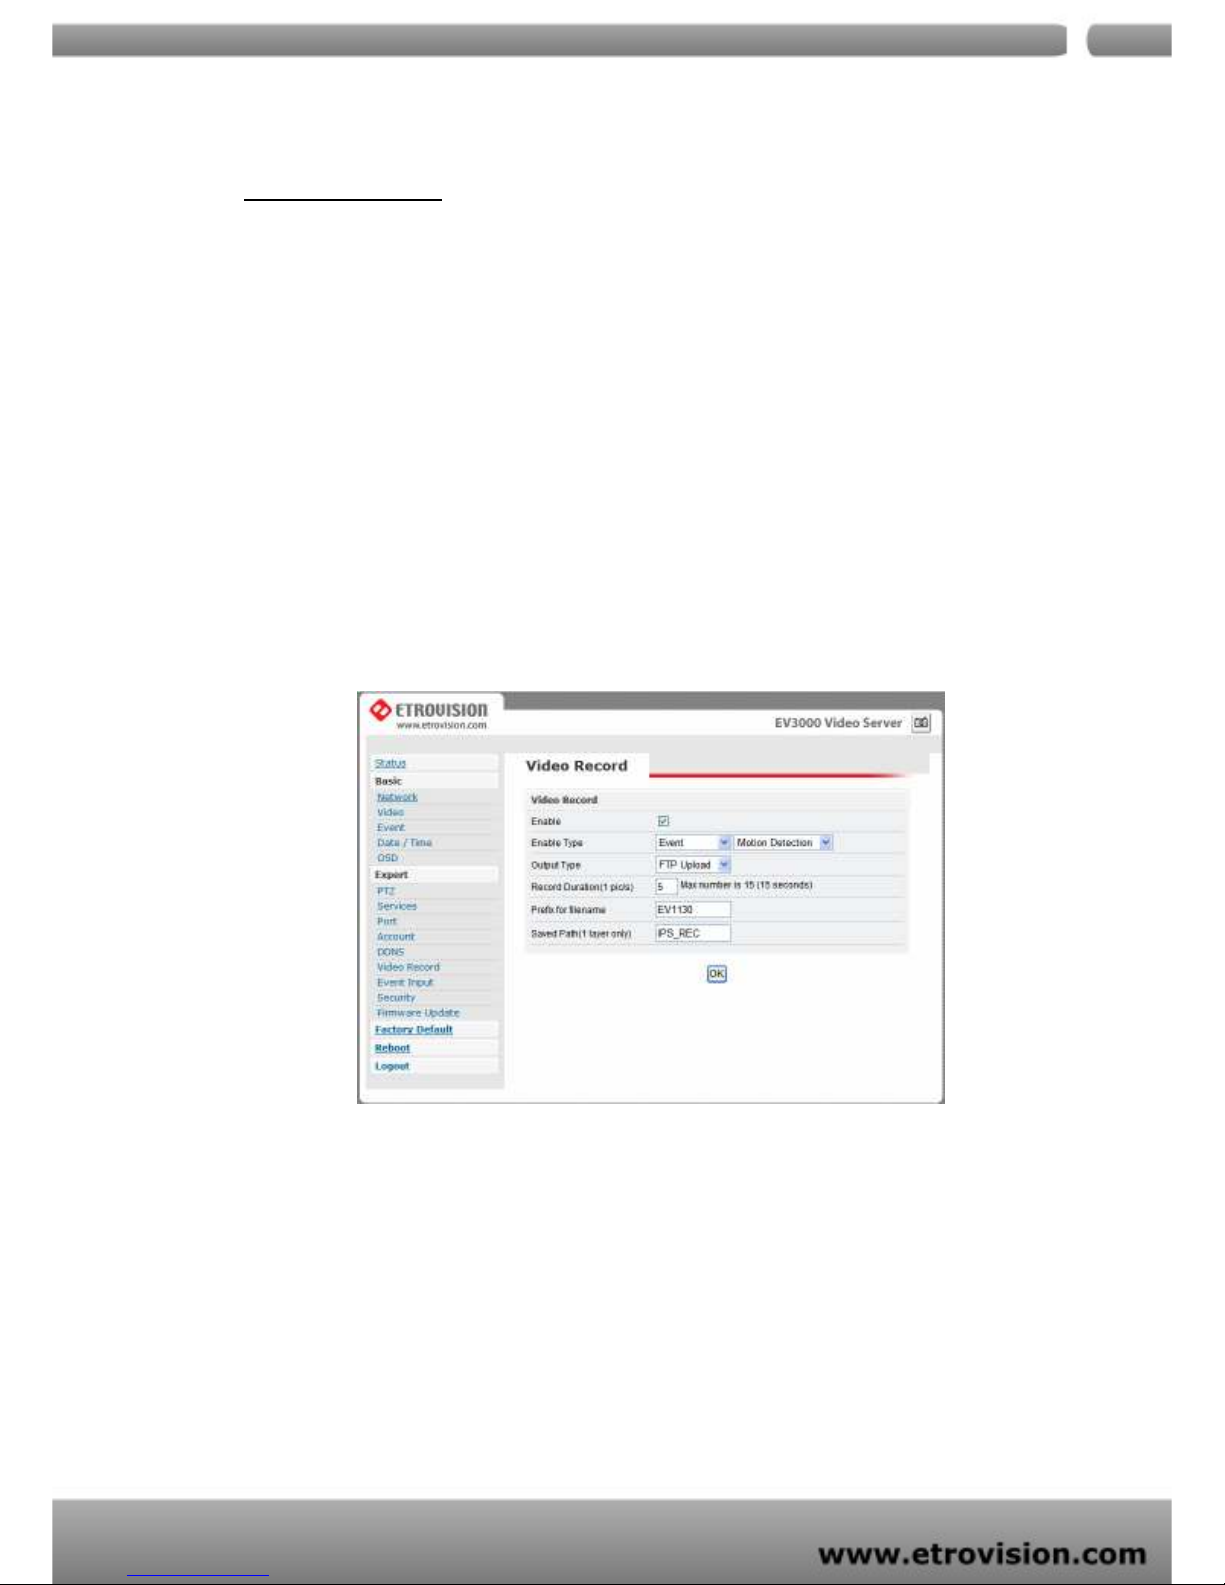
Choose Enable checkbox to record video/snapshot during a Motion
detection or Digital IN event.
Choose between two kinds of events – Motion detection / Digital IN
Default option of output is FTP upload
Video file size - max... 15 seconds duration
File name prefix – user defined
You can also define the folder name (path).
Scheduled recording can also be done by defining the time and day.
Page 40
04
40
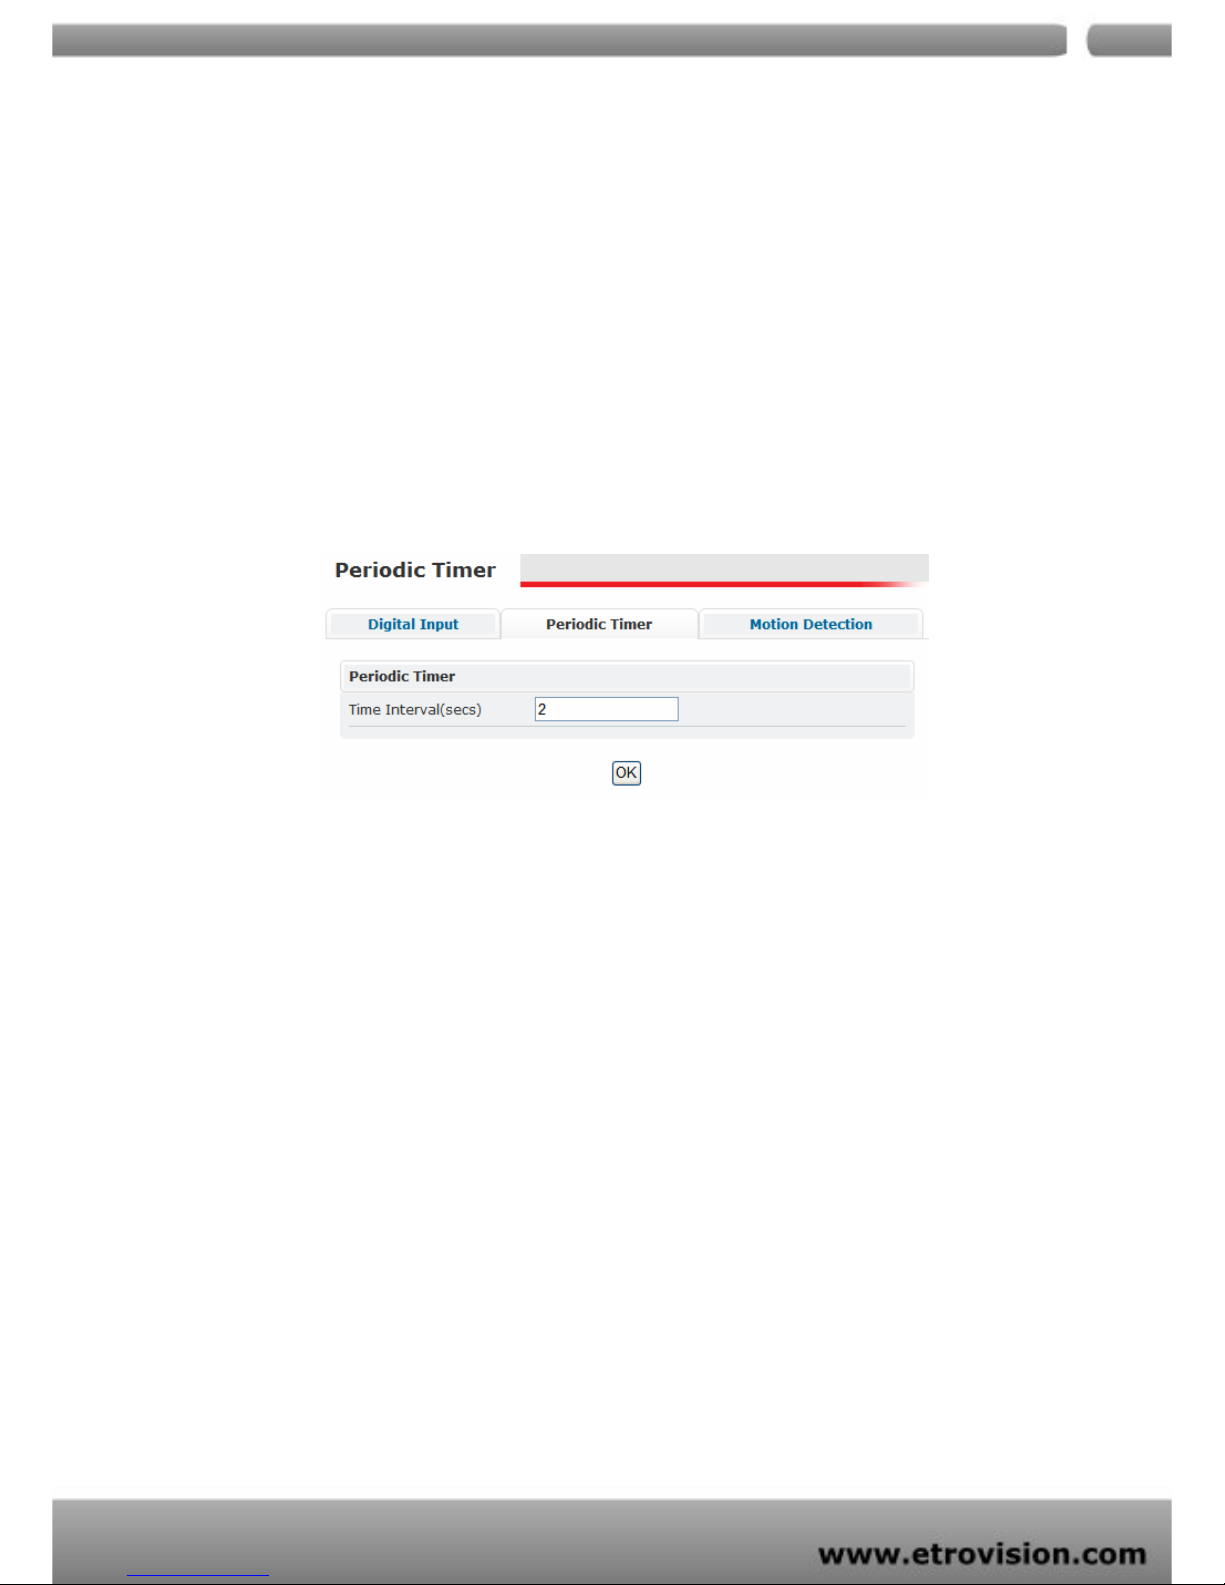
EVENT INPUT
Three different types of EVENTS can be configured.
Page 41
04
41
Digital INPUT
Can be Normal OPEN (N.O) or Normal Close (N.C)
Choose based on the type of input and press OK to save the settings.
PERIODIC TIMER
Timer interval can be set in terms of seconds. This will trigger an event
when the time out is achieved.
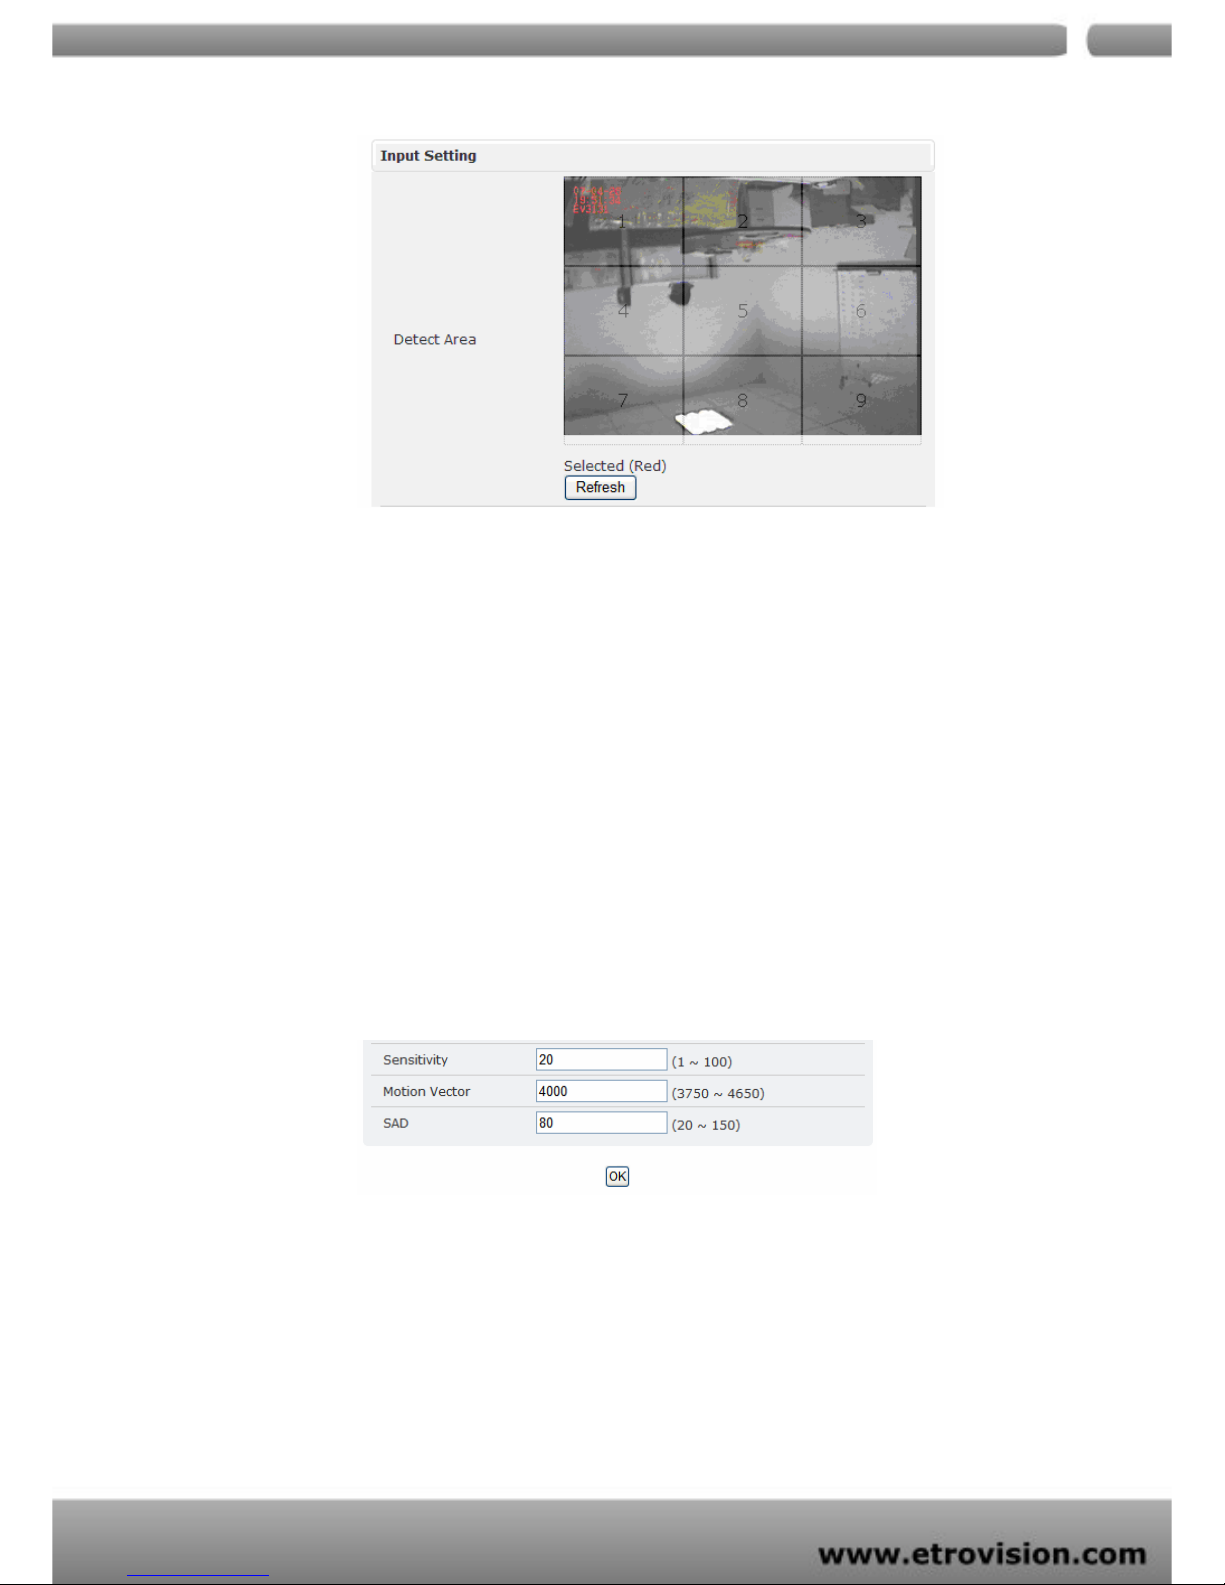
MOTION DETECTION
Detection Area
Total viewing screen area is divided into 9 square blocks
and each of them is called area 1, area 2 etc., Click
specific areas you want motion detection to be enabled. If
a detection area is selected color changes to dark gray.
Page 42
04
42
Sensitivity value
Defines sensitivity of the motion detection. The range of the
value is 1 to 100.
Motion Vector value
To detect even slightest movement for objects in selected
area, please select a lower motion vector value. The range
of the value is 3750 to 4650.
SAD value.
To only detect flashing light or any such significant activities
on immovable objects, low SAD value should be chosen. In
most cases, high SAD level is recommended. The range of
the value is 20 to 150.
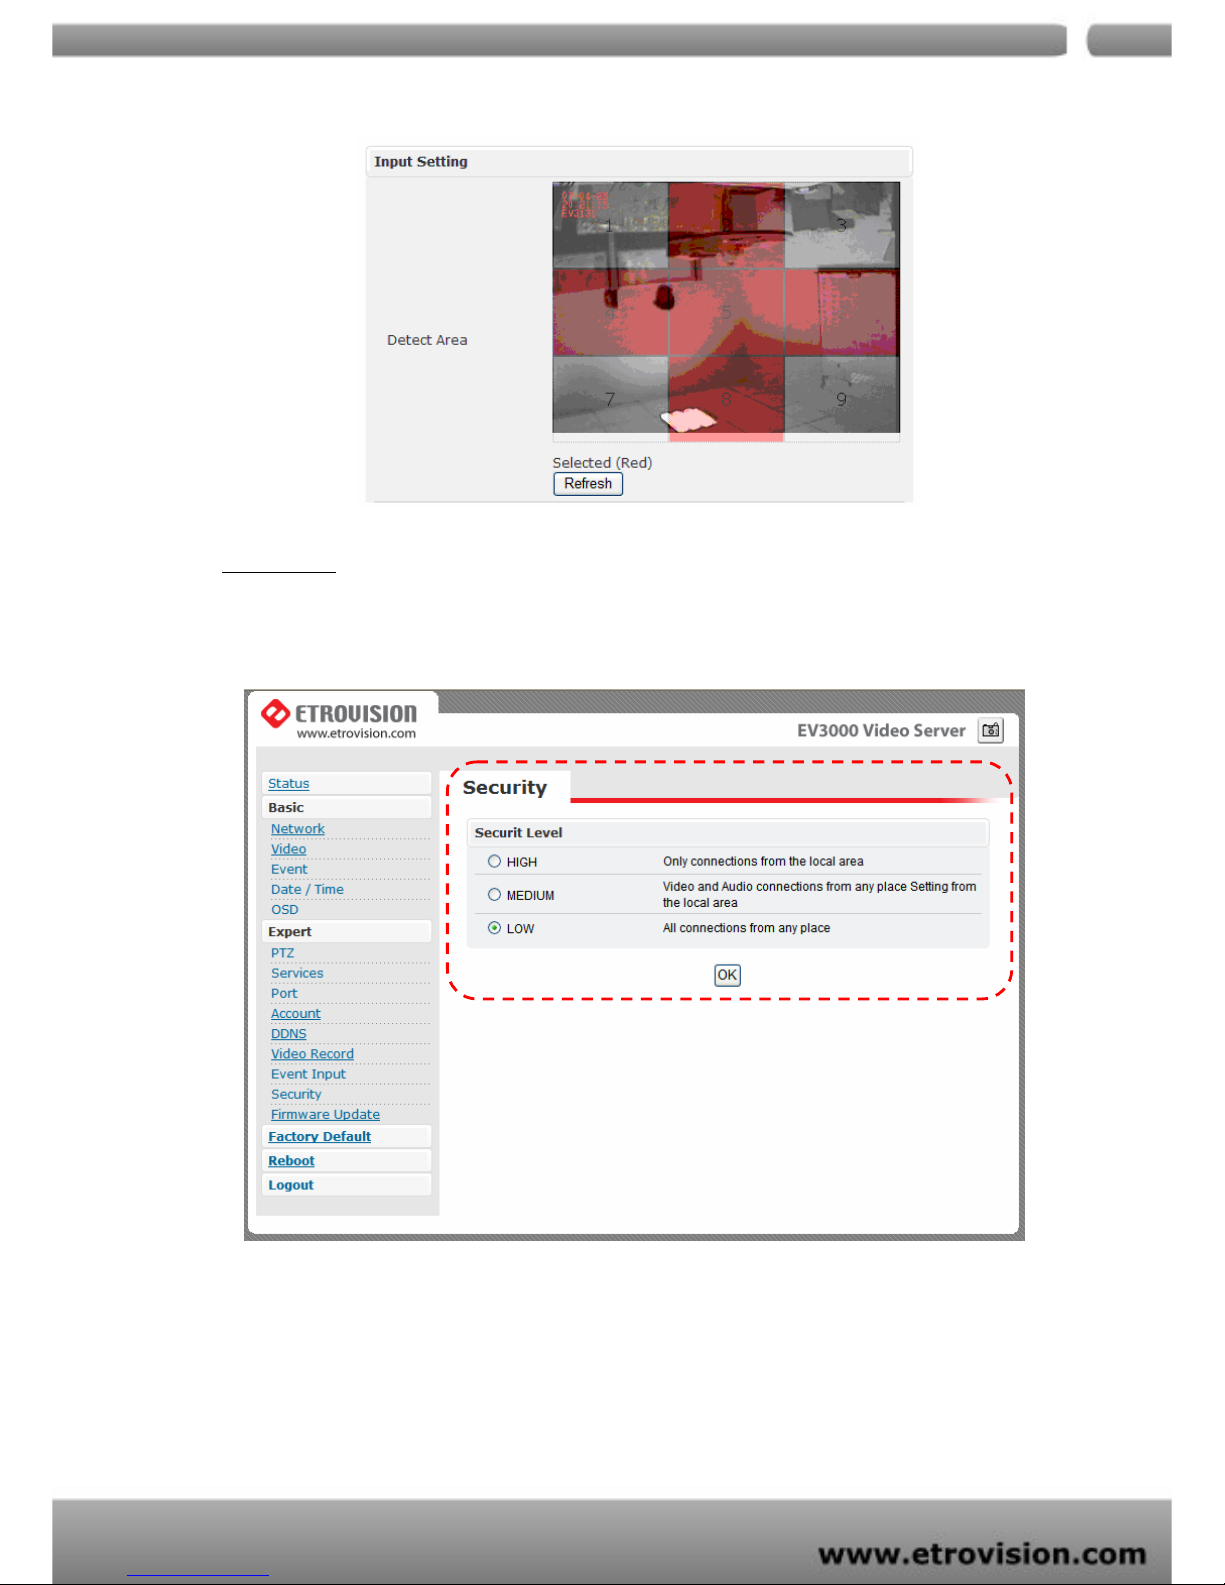
Motion detection enabled areas look as shown below. A simple
click can select any of the boxes on detect area.
Page 43
04
43
SECURITY
The basic settings are LOW by default.
HIGH
ONLY LAN connections are allowed.
MEDIUM
Page 44
04
44
Video and audio connections from any location and
settings from LAN are permitted.
LOW
All connections from any location are permitted.
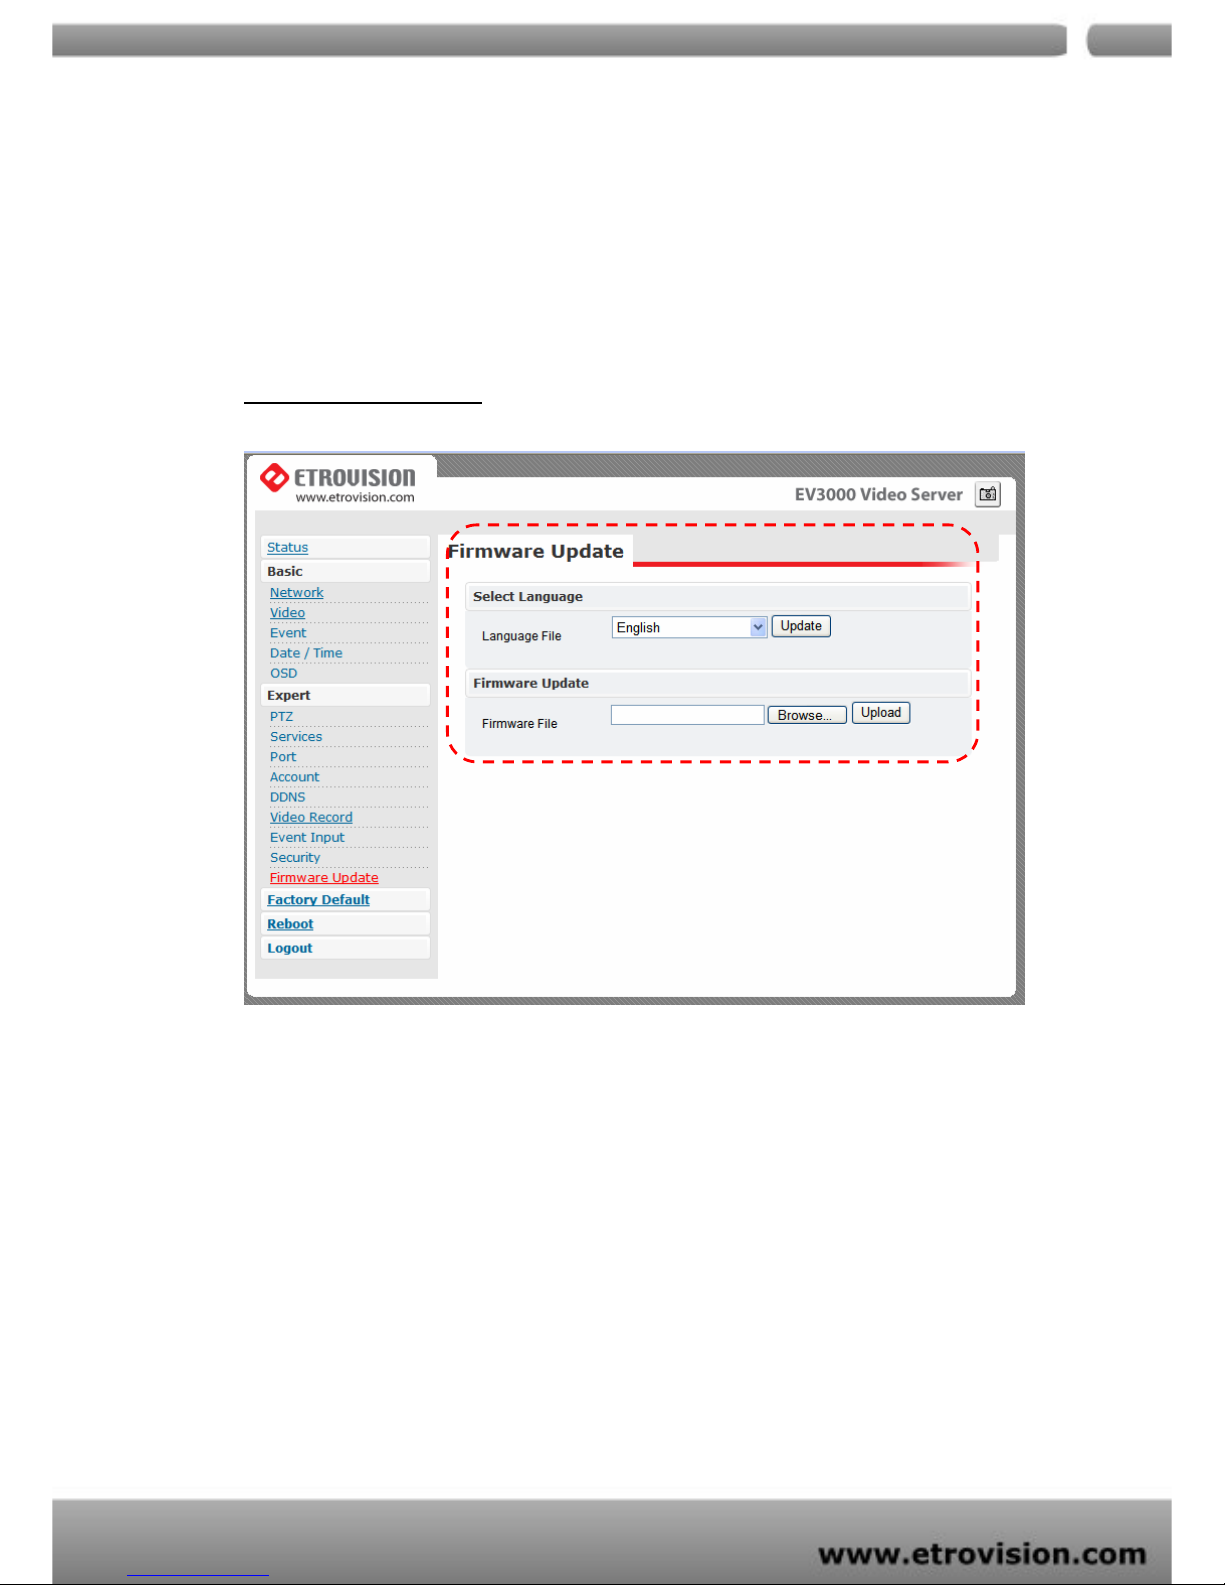
FIRMWARE UPDATE
Language
• Default settings are in English. A choice of Traditional Chinese is
available.
Firmware update
• Firmware update binary file can be obtained from Etrovision
Technology. Choose that and click upload. When uploading is
done, reboot is required and will be automatically triggered.
Page 45
04
45
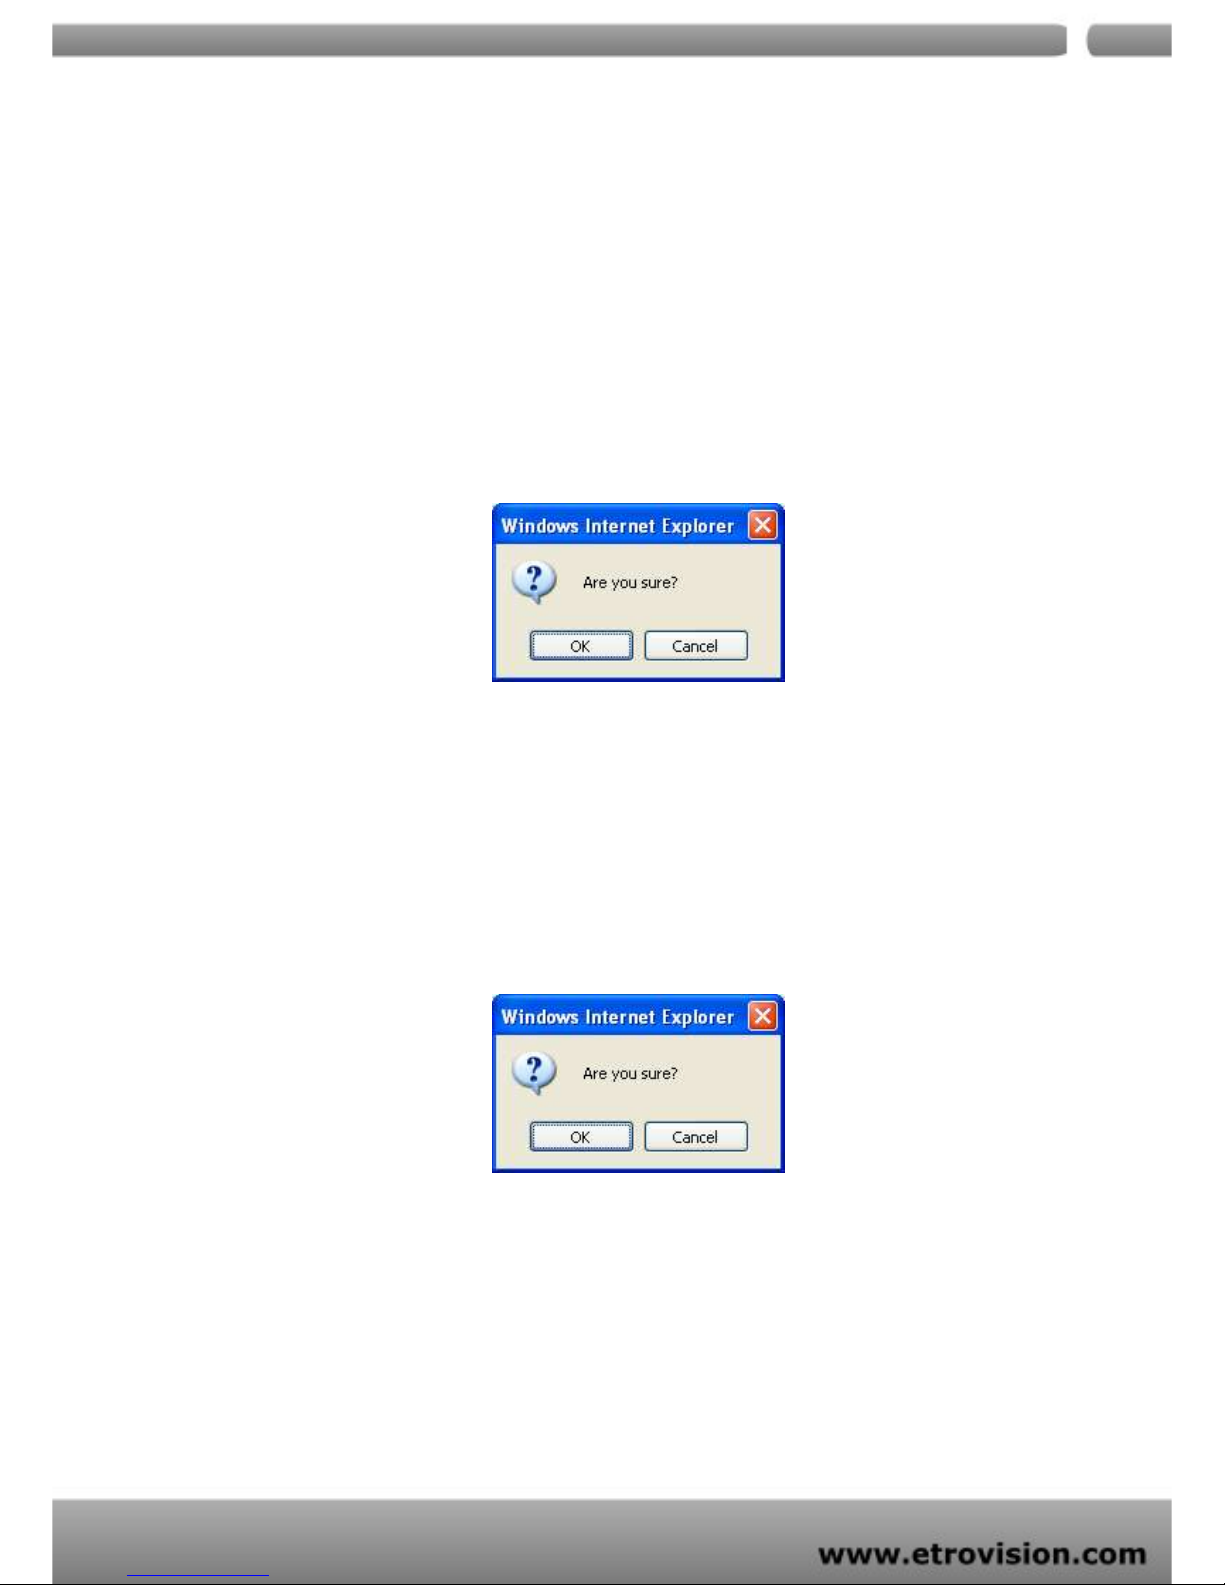
9. FACTORY DEFAULT
After a confirmation dialog box, clicking OK button, will load default
settings and do a reboot. You will see the reboot countdown timer
running. Once done, you will see the login page. Please login with
root/pass.
10. REBOOT
If you click OK on the dialog box, you will see the reboot countdown
timer running. Once done, you will see the login page. Please login with
root/pass or other appropriate login information.
11. LOGOUT
To return to the login screen, simply click logout. You should see yourself
in the login page within seconds.
Page 46

04
46
12. ETROLINK™ - FIRST TIME EXPERIENCE
If video server has to be quickly configured or has to be set to factory
default settings, Etrolink™ port is used to achieve that. Etrolink™ port is
a special USB port.
Insert mini USB cable onto Etrolink port and connect other end to PC.
When video server is powered on, Etrolink will not be operational. Once
you are done working with Etrolink™ port, remember to unplug USB
cable from Etrolink™ port.
NOTE
REMOVE ETROLINK (USB) CABLE WHEN YOU ARE FINISHED WITH QUICK
CONFIGURATION.
SUPPORTED OS
PC running the following operating systems can support auto run of
Quick Config application.
1. Windows XP (all editions) - auto run.
2. Windows 2000 (all editions) – needs to be manually run.
3.
Windows 98 (SE) – needs to be manually run
(Generic USB mass storage class driver (Microsoft) will be requested – prepare one
in prior if you plan to use Etrolink™ based device recovery on Windows 98)
Page 47
04
47
NO SOFTWARE INSTALLATION REQUIRED
There is no installation or setup of any software for Windows XP/2000
platforms.
STEPS FOR USING ETROLINK™ port (
Windows XP PC)
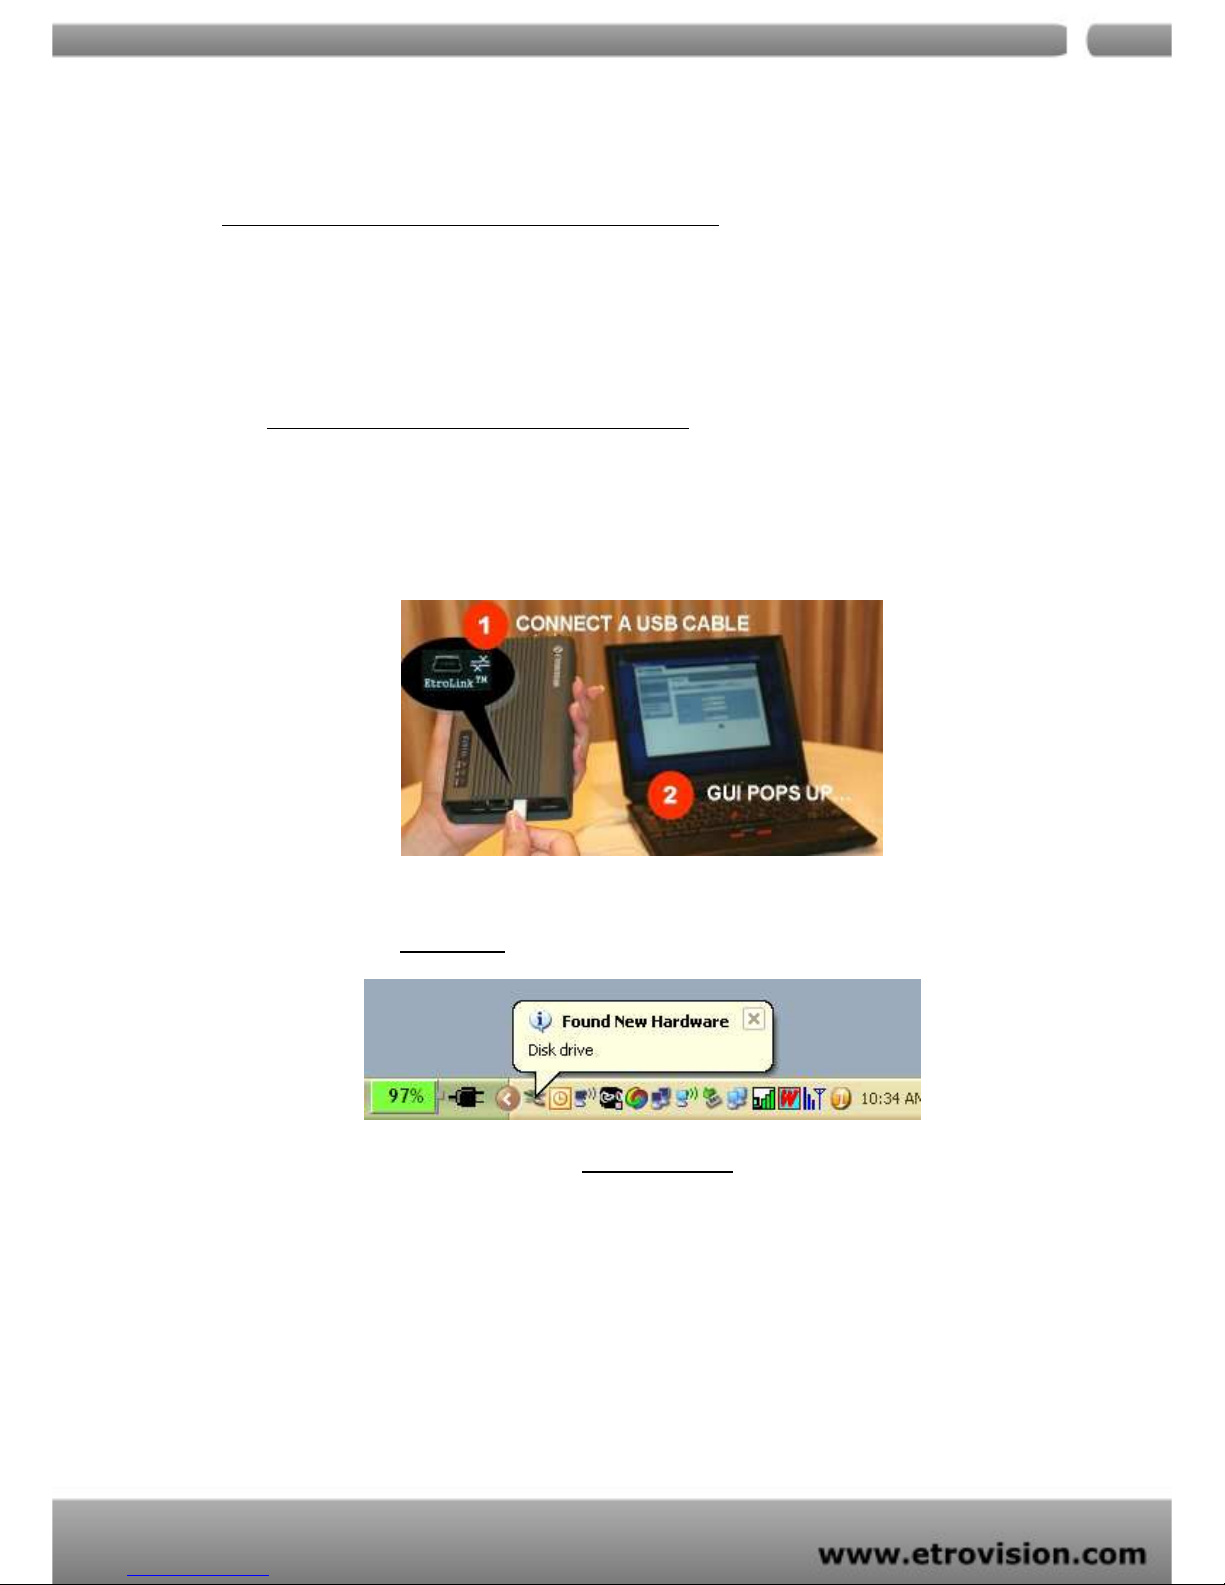
1. Disconnect power cable connected to EV3131 / EV3130A.
2. Use mini-USB cable and connect appropriate end to Etrolink™
port and connect other end to PC USB port.
3. After 5 ~ 10 seconds depending on how fast your PC is, you can
notice “Disk drive” being detected.
4. A POP-UP dialog shows “Config Wizard” is ready to run. Press OK.
Page 48
04
48
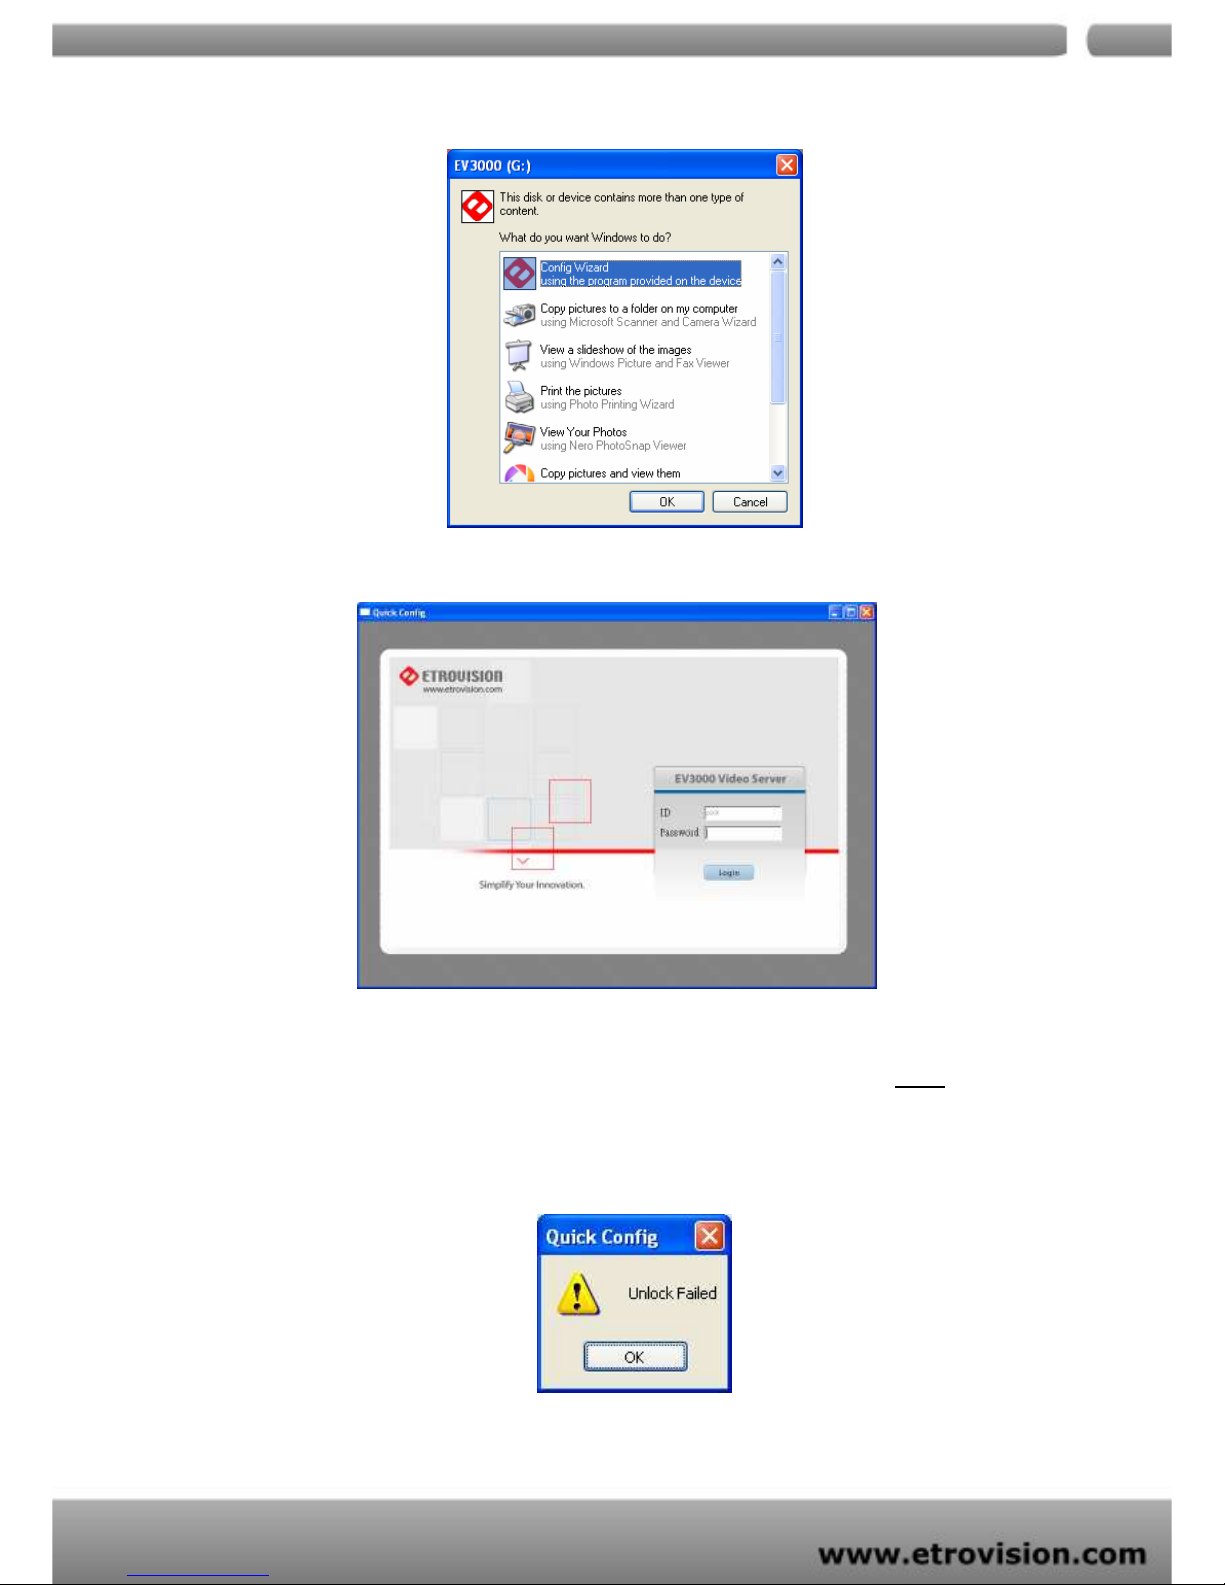
5. Double click Config Wizard. You will see a screen as follows.
You will be asked for password. Earlier, if you have never
changed the password for user root, please type pass as the
password. Then click login button. If you input wrong
password, you will get this dialog box.
Page 49
04
49
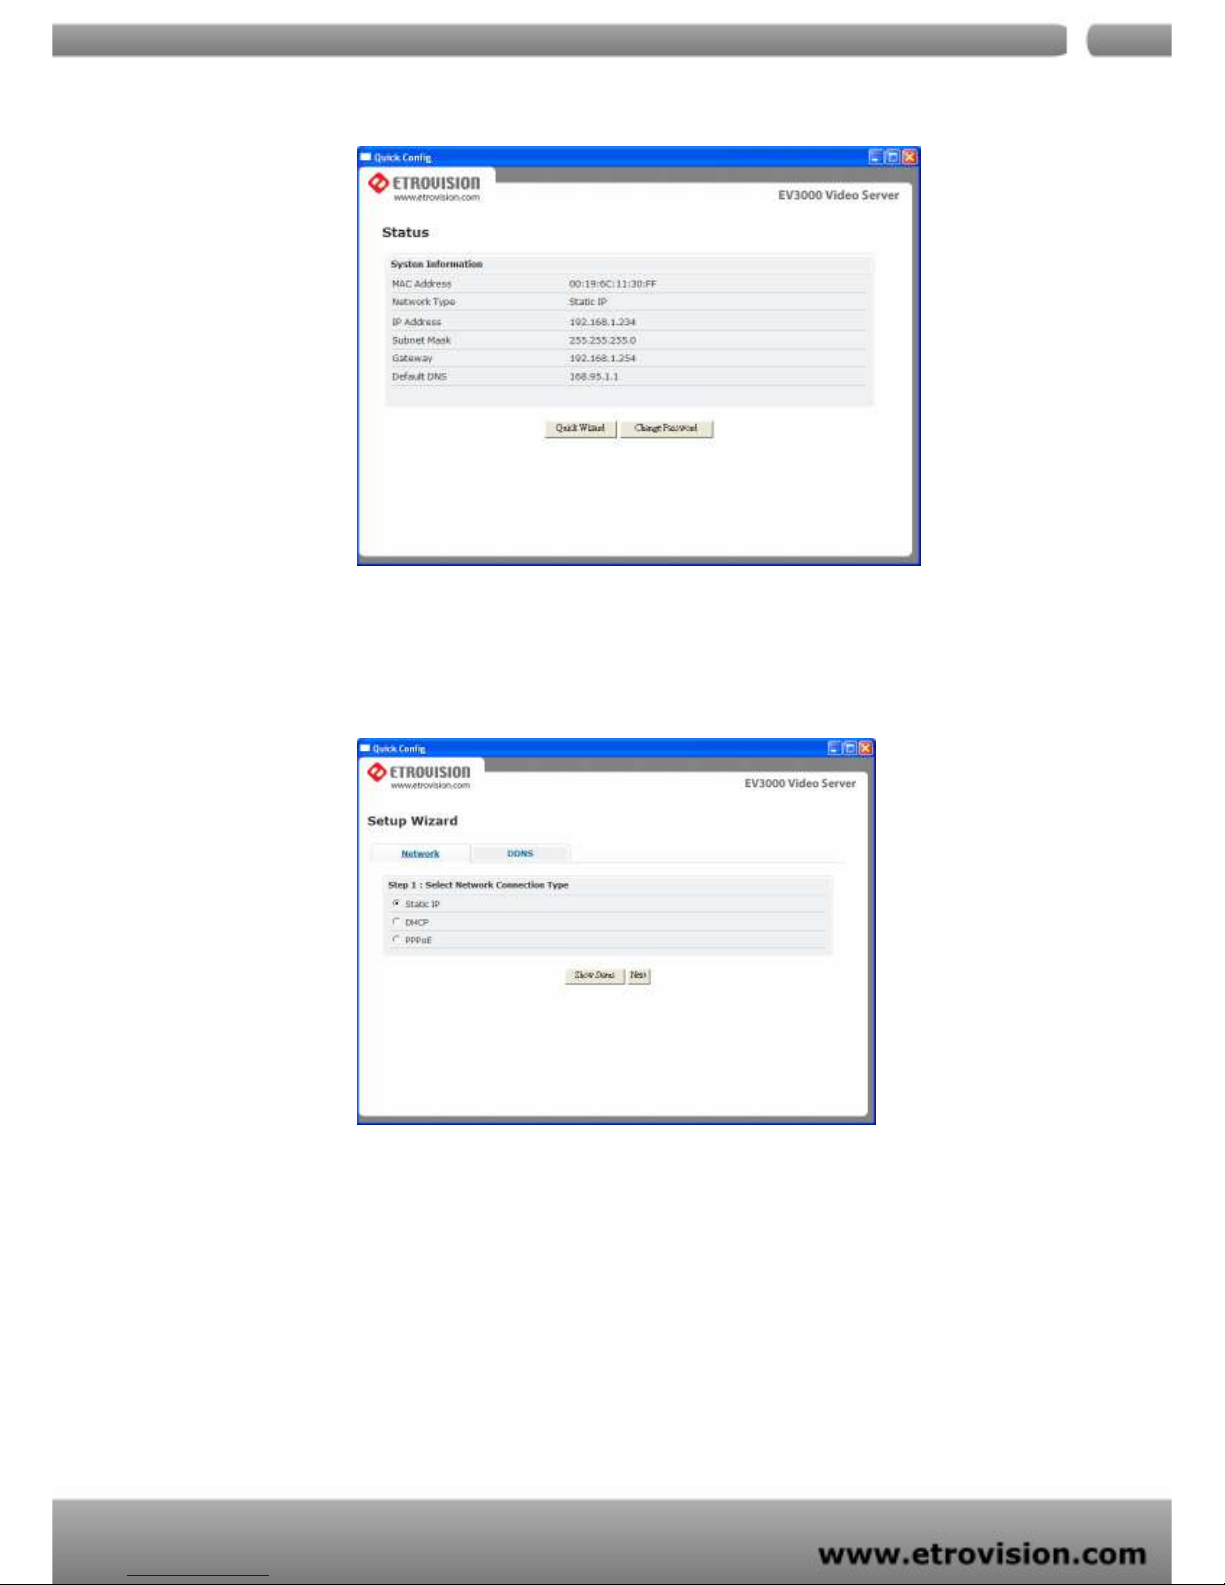
You will see the network status of EV3131 / EV3130A .To
navigate through Quick Wizard, click it and you will find a
window appear as below.
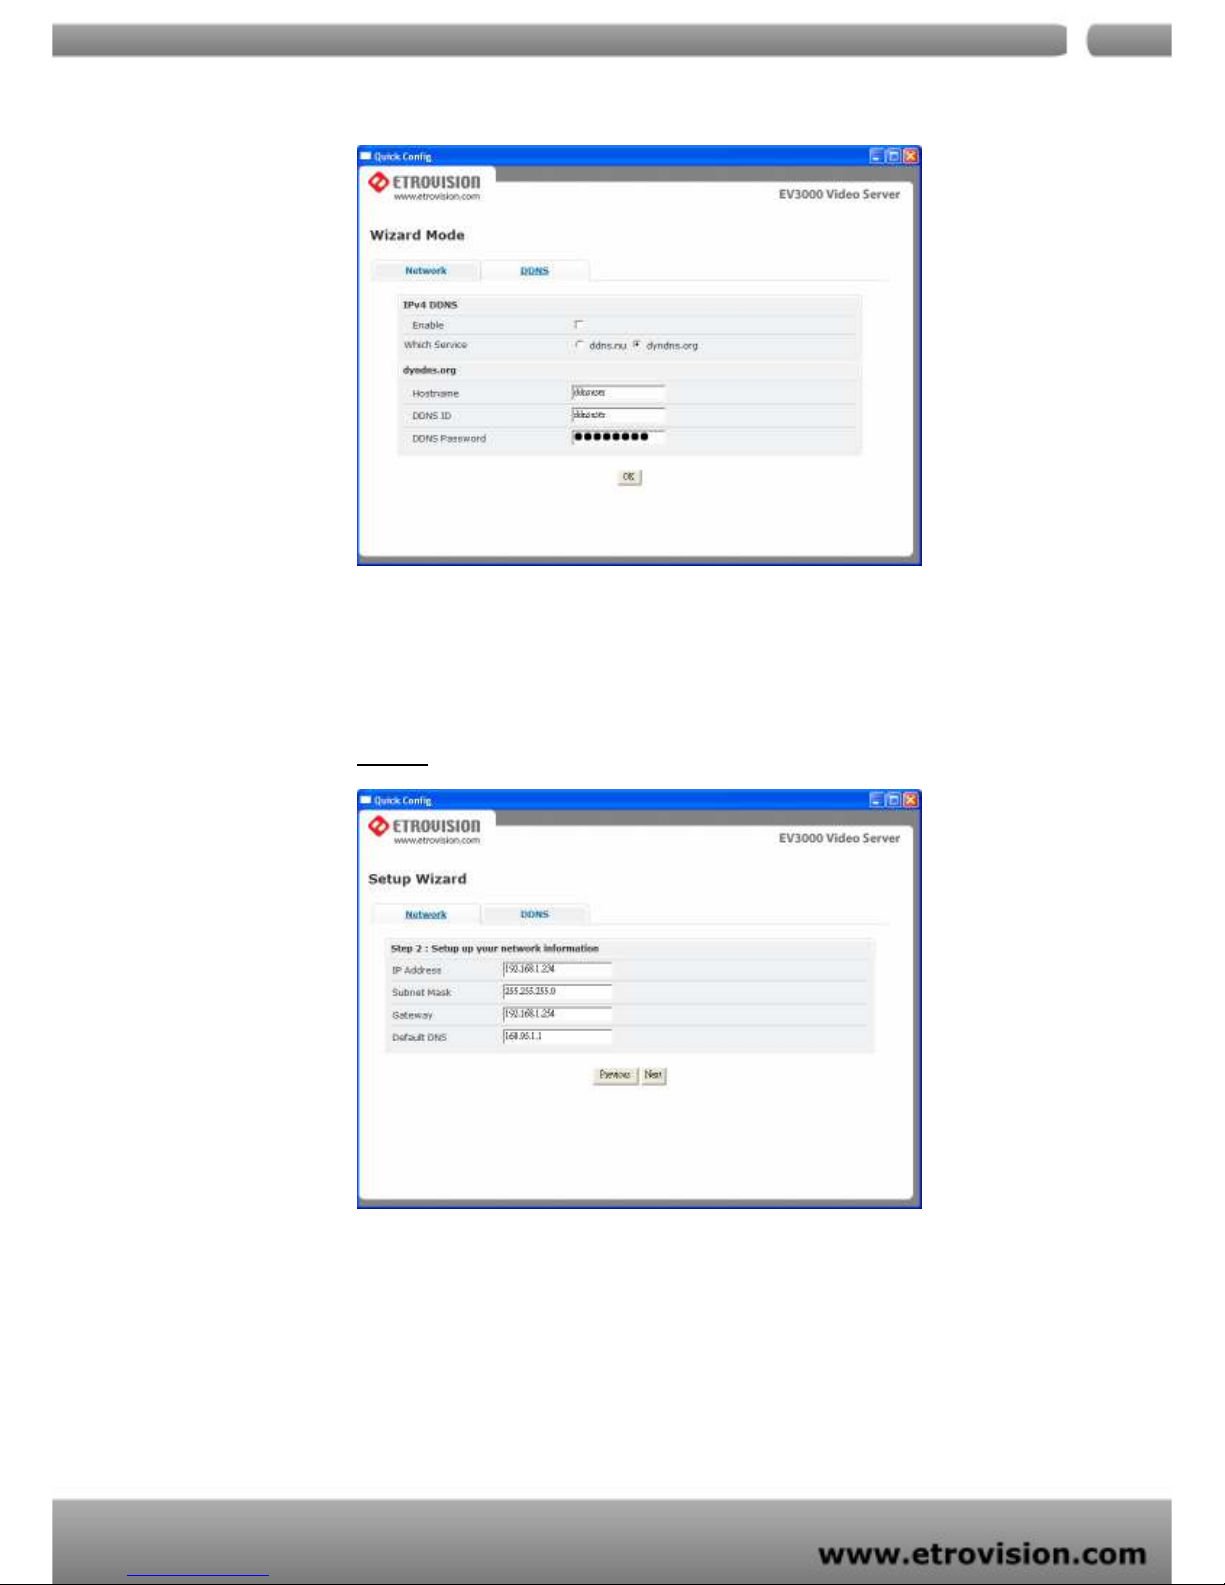
If you would wish to change network settings of either
STATIC / DHCP / PPPoE
If you would want to setup DDNS, please click on the same
for detailed configuration.
Page 50
04
50
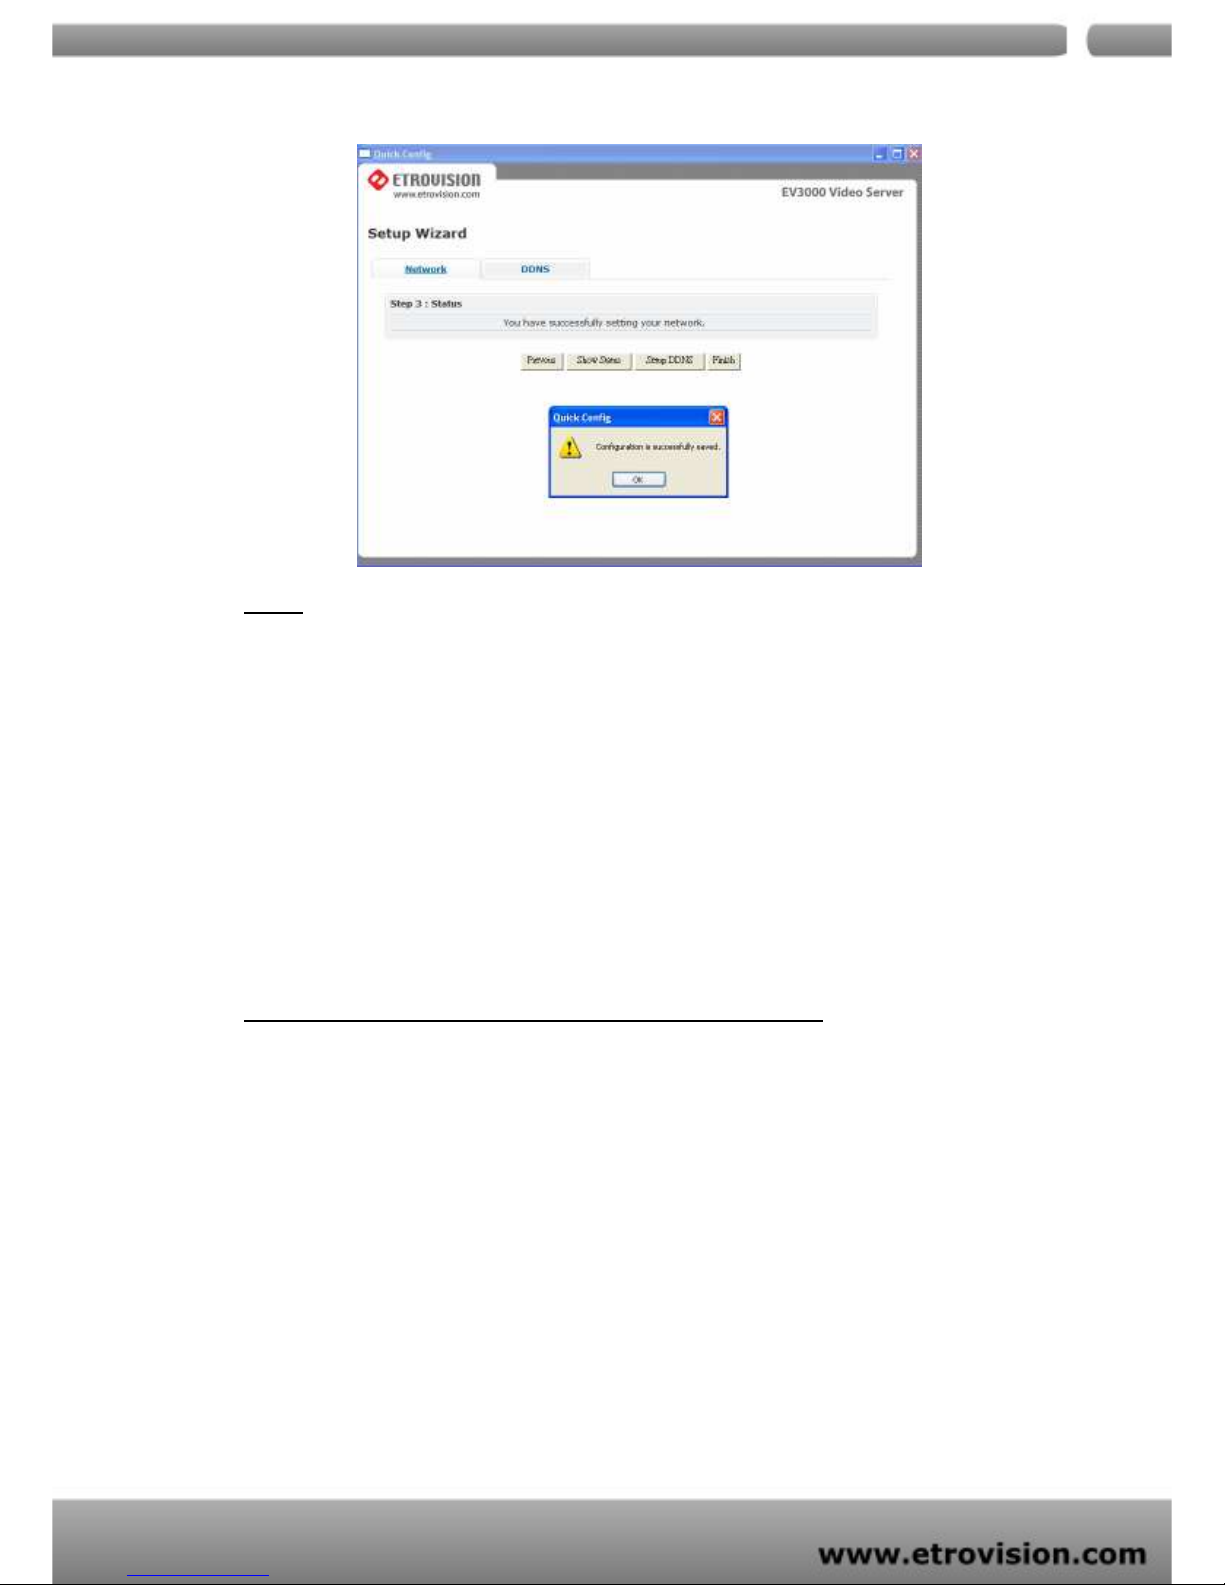
Return to Network page to setup network further.
Please choose and click next for detailed configuration
page. For instance, shown below is a screen which has
STATIC network configuration page. Click next to proceed.
Clicking next will show that settings are saved. You can
click finish if you are done or go back or change other
settings. Similarly you can change other settings at ease.
Page 51
04
51
Note:
Connect EV3131 / EV3130A to your network by using a standard
Cat-5 cable.
Connect the video output of your camera with video in of video
server, using standard 75Ω coaxial cable with BNC type
connector.
Connect speaker and active microphone to Audio Out/In.
WHAT IF QUICKCONFIG DOES NOT AUTORUN?
In some PC, after connecting USB cable with Etrolink™ port, there
might not be auto run of Quick Config application.
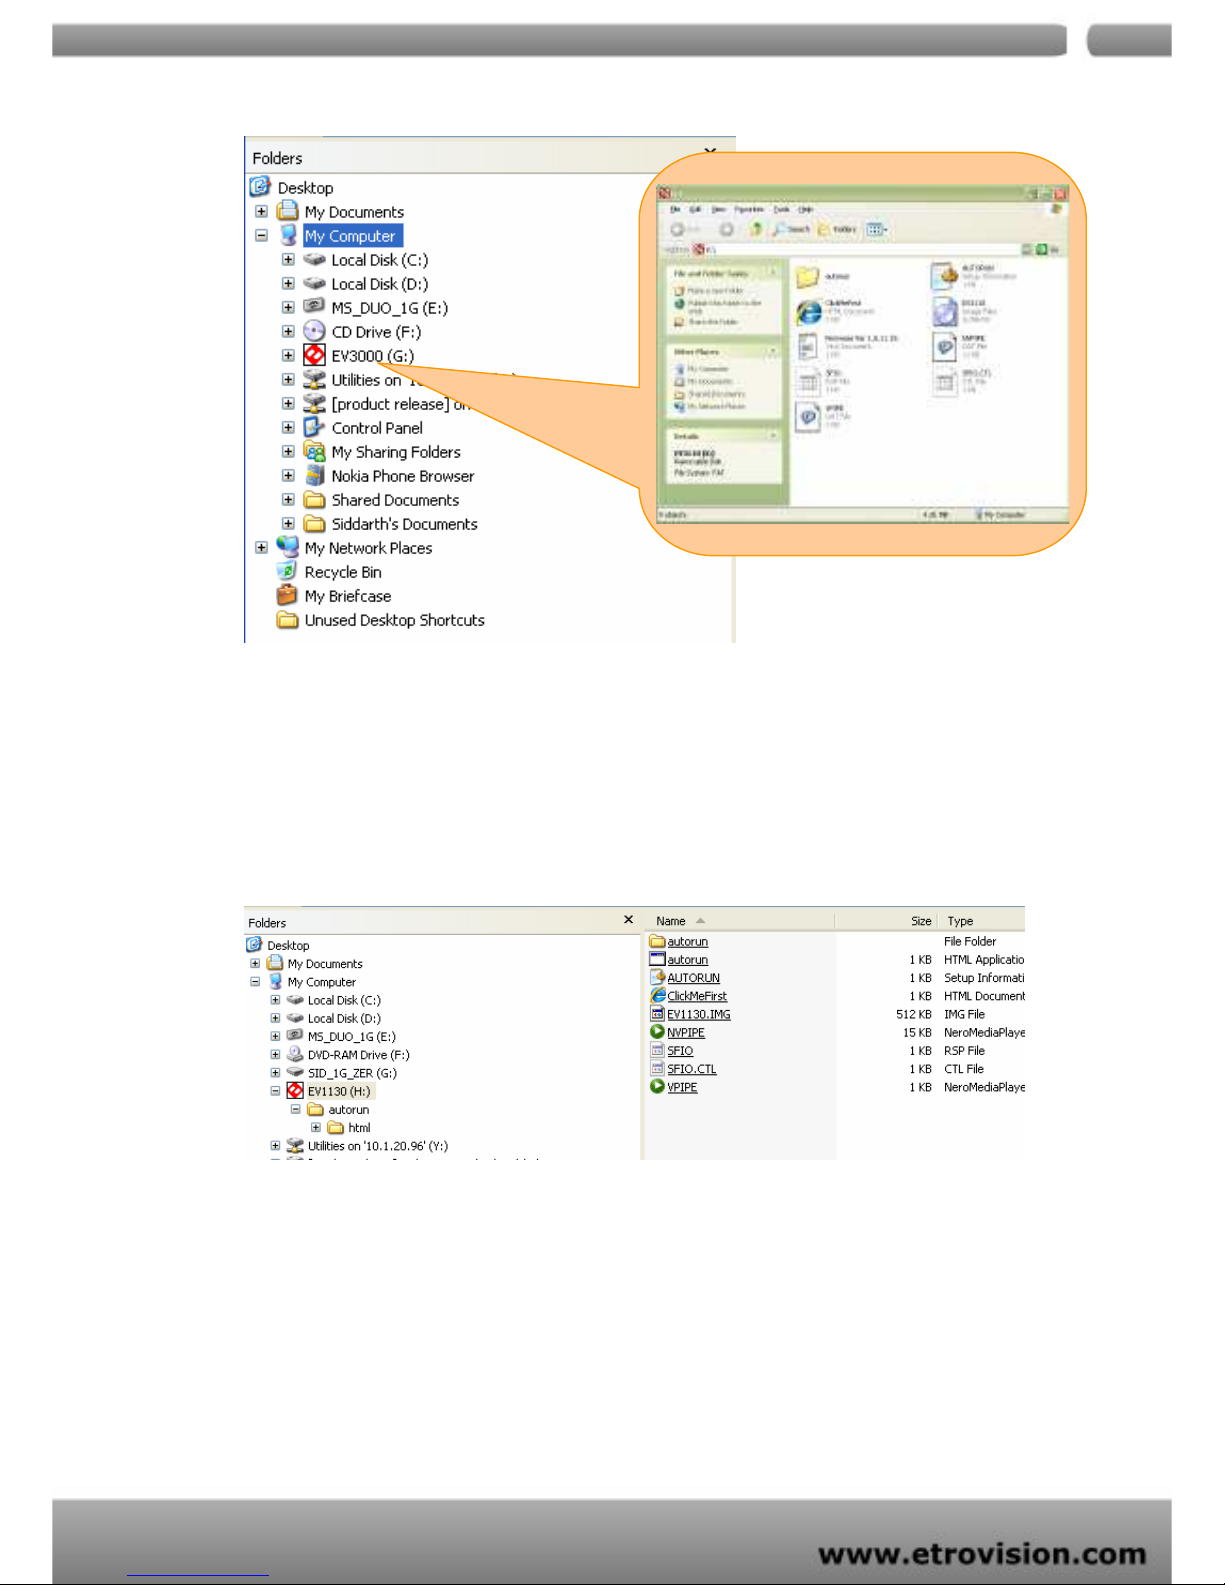
In that case, just open disk drive which looks like shown on screenshot
below. It should have volume name starting with EVxxxx.
Page 52
04
52
Open up a folder named “autorun”. That folder contains a HTML
executable file named “autorun”. Double click that to run. You will
find that it is the same “Quick Config” application is running. See the
screenshots below to find that file on the disk drive.
Page 53

04
53
 Loading...