

Page 1

ETREL INCH
USER MANUAL
Document version: 0.1
Page 2

Etrel Inch | User Manual
1 SAFETY INFORMATION
Etrel INCH charging station has been designed and tested in
accordance with up-to-date international standards. The charging
station is compliant with IEC 61851-1 international standard
which defines conductive AC electric vehicle charging (Part 1, Part
21 and Part 23) and supports Mode 3 charging for safe recharging
of any standard electric vehicle.
Use the charging station exclusively for the purpose intended.
Preparation of charging station installation site and installation of
Etrel INCH are described in separate documents. In this document
it is predisposed that charging station is installed properly and
working.
INTENDE D USE
Etrel INCH charging station is intended only for charging of
electric vehicles and should not be used to charge any other
appliances or devices or for any other purposes. The manufacturer
accepts no responsibility for damage or injuries resulting from
incorrect installation or inappropriate use of the product.
Mai n t enan c e
Charging station can be maintained and repaired by qualified
personnel only.
Charging station’s power supply should always be switched
off during the maintenance and repair.
Avoid hazardous risks. Only the manufacturer, an authorized
service technician, or technically qualified personnel may
replace damaged charging station or its components.
Ope r at ion
Do not operate your charging station if there is visible
damage to the unit or charging cable. Call manufacturer’s or
reseller’s support department for advice how to proceed.
Do not put fingers into the charging connector.
Do not operate the charging station with wet hands.
The charging station manufacturer cannot be made liable for
damage or injury caused by improper handling, installation, or
use of the product.
Any usage of the product not covered in this document is not
allowed and could cause injury or death.
2 | 26
Page 3
Etrel Inch | User Manual
2 ETREL INCH DESCRIPTION
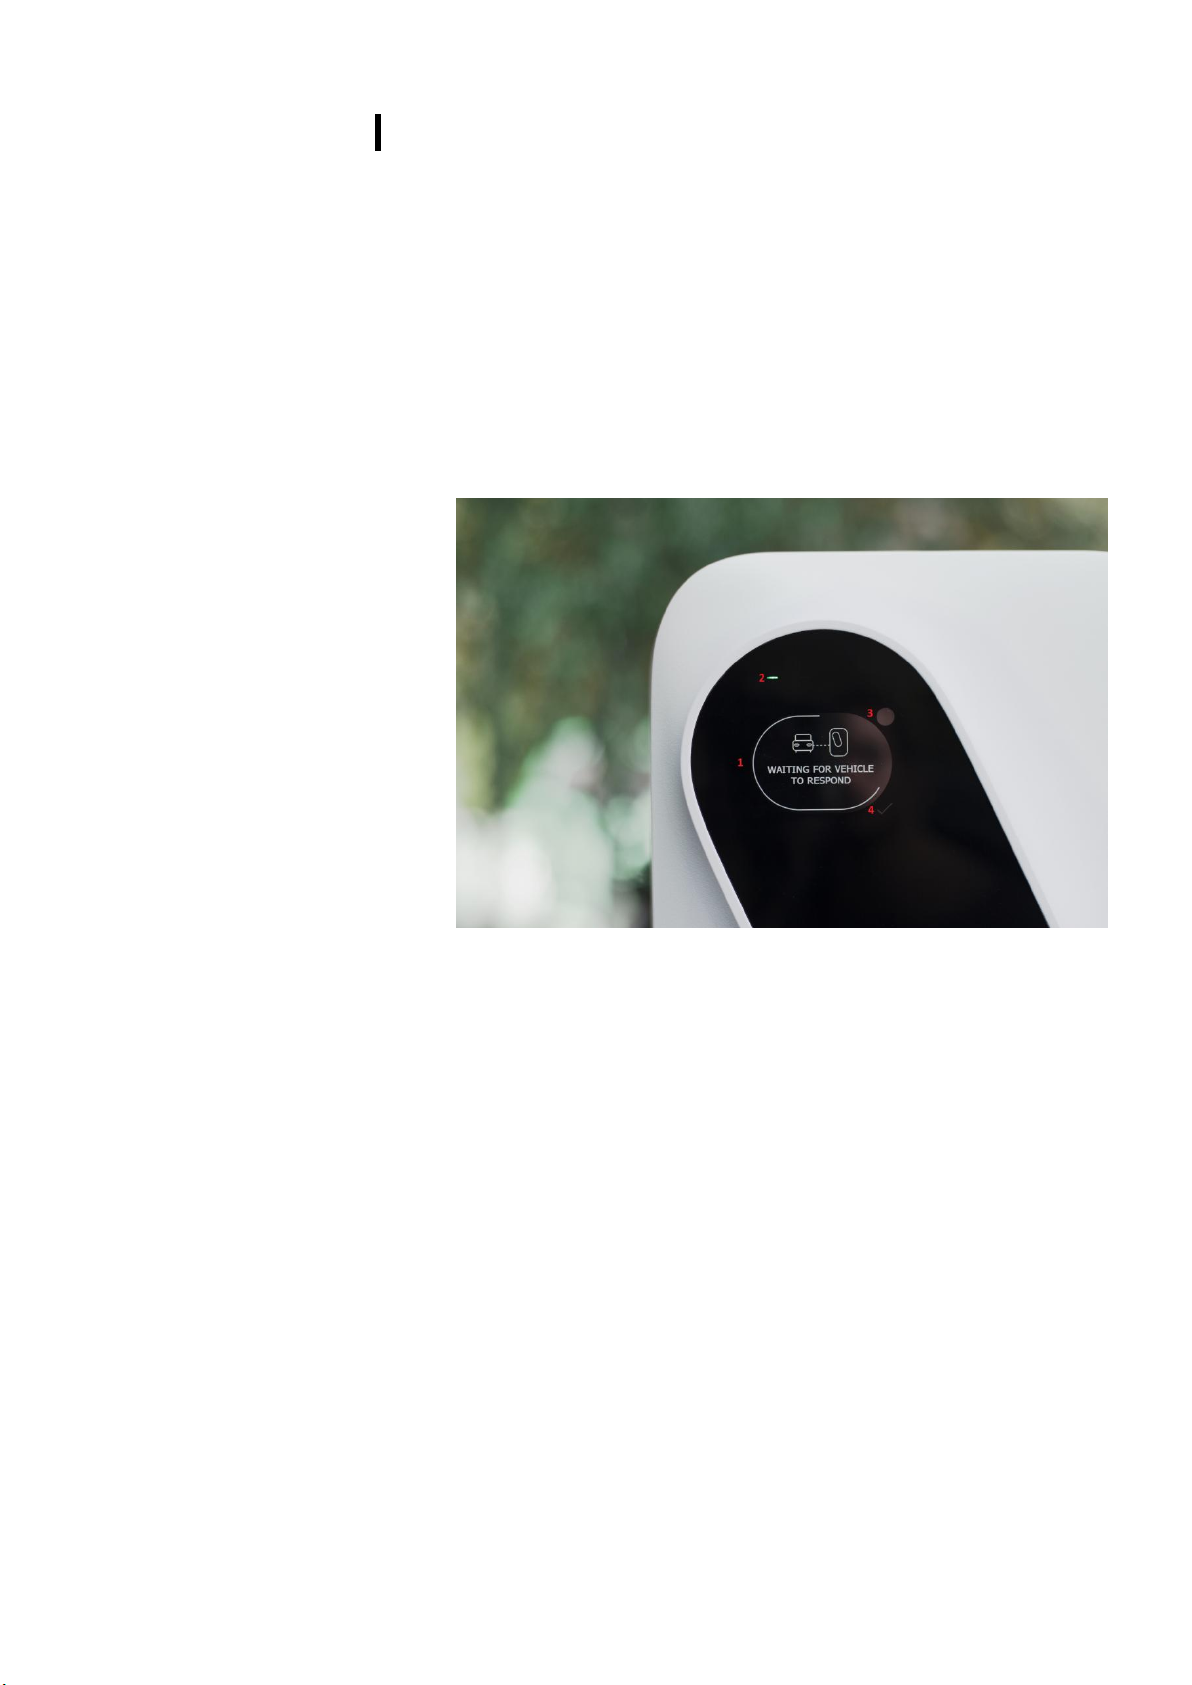
Etrel INCH is a smart charging station that can predict your EV
charging habits and help you charge the car by the time you need it,
at the lowest possible cost. Charging station comes with the LCD
screen that guides you through the charging process and provides
important charging information. Charging station comes with several
connectivity options (including PLC, WIFI, GSM and Ethernet) and
open protocol support and can be seamlessly integrated in your
smart home.
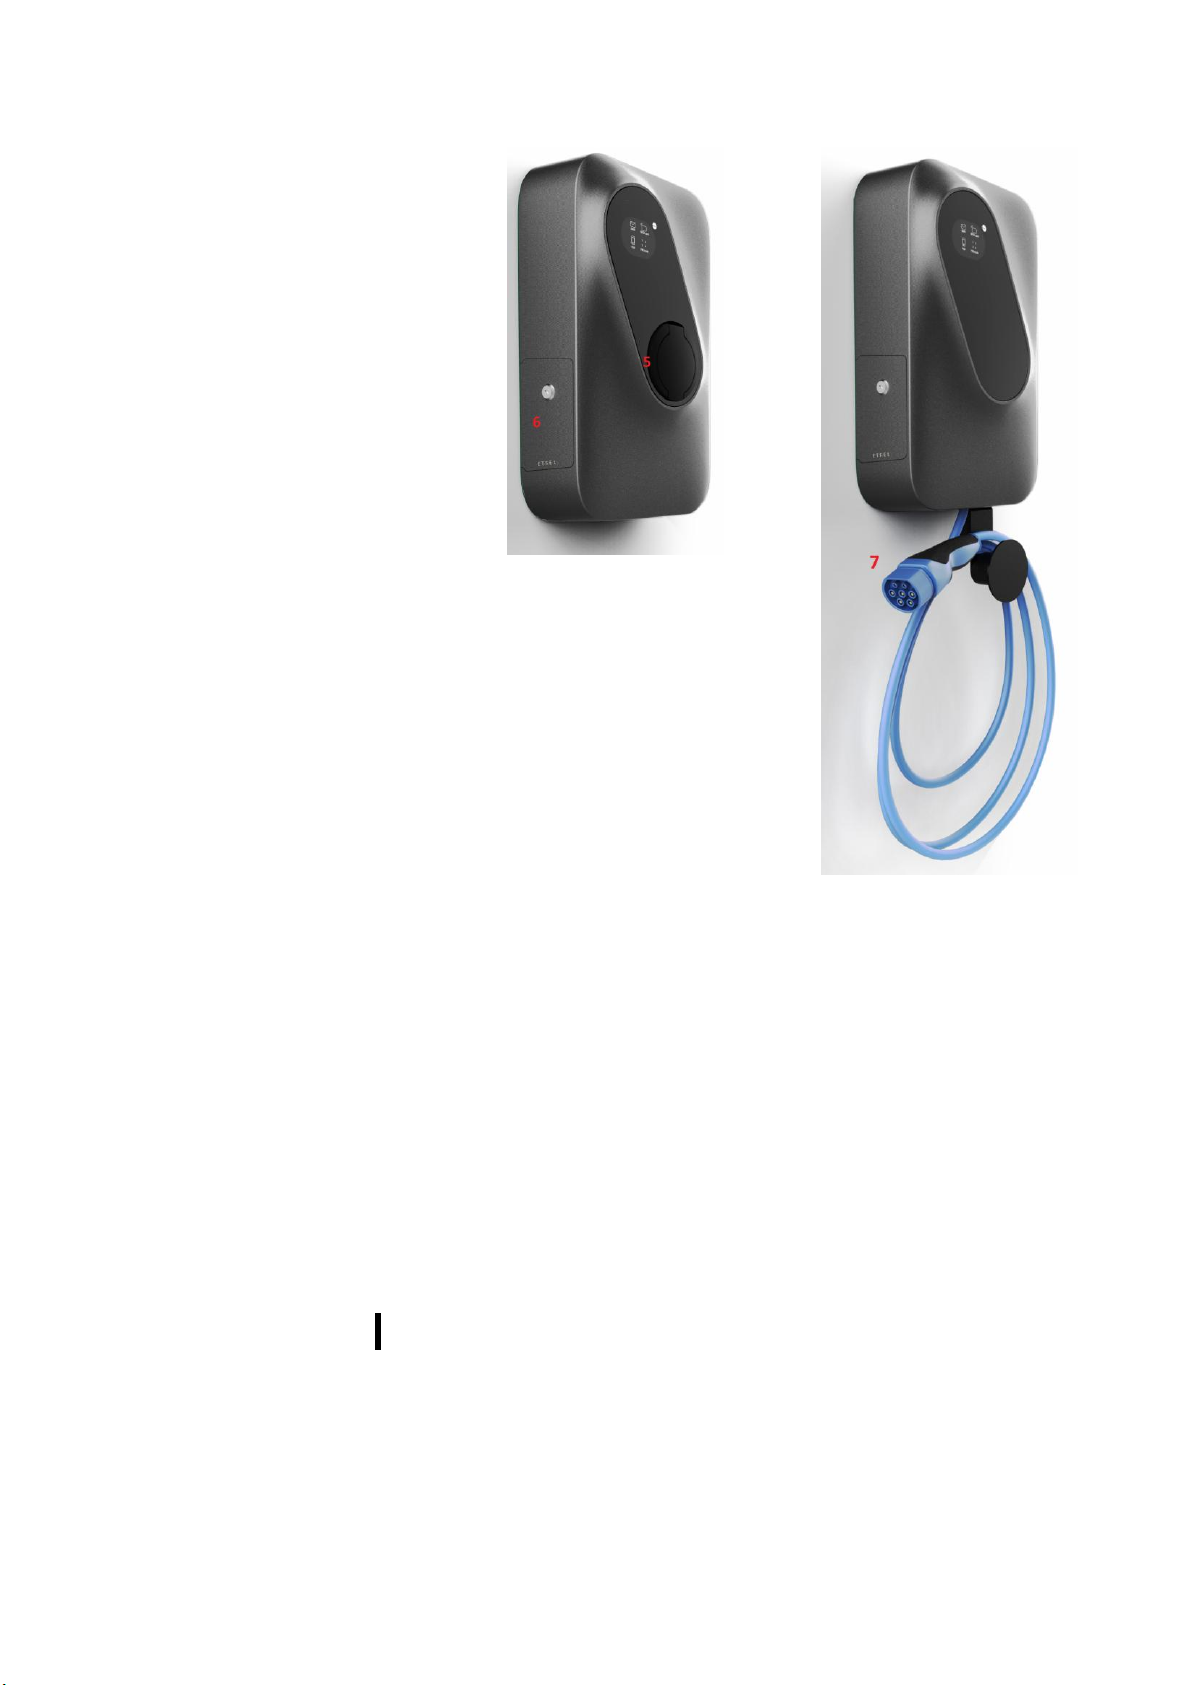
To connect your EV Etrel INCH charging station either comes with
the socket or cable. Depending on the type of charging station.
Figure 1: Etrel INCH GUI
3 | 26
Page 4
Etrel Inch | User Manual
Figure 2: Etrel INCH with socket
Figure 3: Etrel INCH with cable
1. LCD screen
2. Status light
3. Settings button
4. Confirmation button
5. Socket
6. Maintenance doors
7. Charging cable
3 IDENTIFY YOUR PRODUCT VARIANT
Etrel INCH has multiple variants that differ based on connector type
and connectivity option. In order to identify your charging station,
you have two possibilities. Either look on the manufacturer sticker or
on the Web interface in Diagnostics menu. Model number is located
on all stickers. Identification of your charging station is sometimes
needed by the support, so they can identify potential issue, if you are
experiencing some problems with charging station.
4 | 26
Page 5
Etrel Inch | User Manual
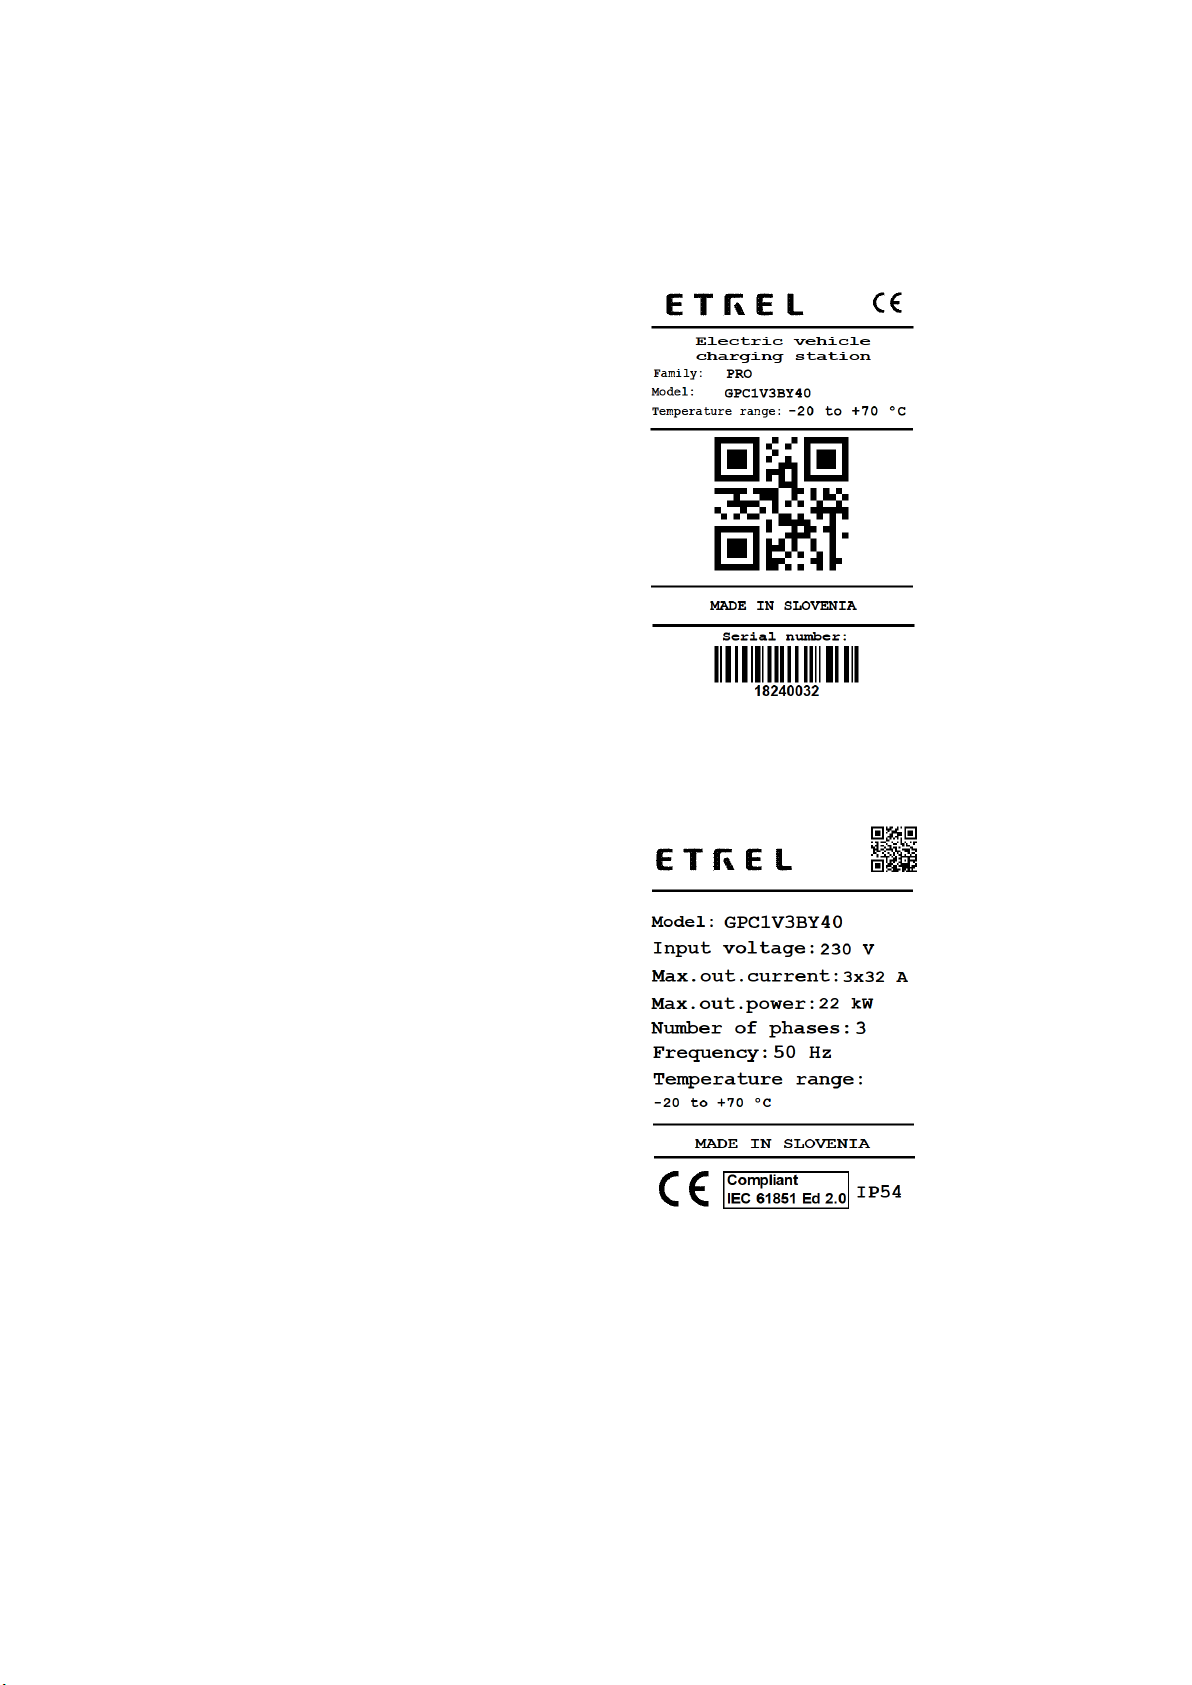
Charging station or its packaging has 3 stickers. Sticker with basic
information is located on the delivery package, one at the back of
the charging station has all the technical information and last one is
located inside the side maintenance doors, containing information
about connectivity. Regular user will get all the needed information
on the sticker located on the inside of maintenance doors.
Figure 4: Sticker located on the charging station packaging
Figure 5: Sticker with electrical information located at the back of the charging
station
5 | 26
Page 6
Etrel Inch | User Manual
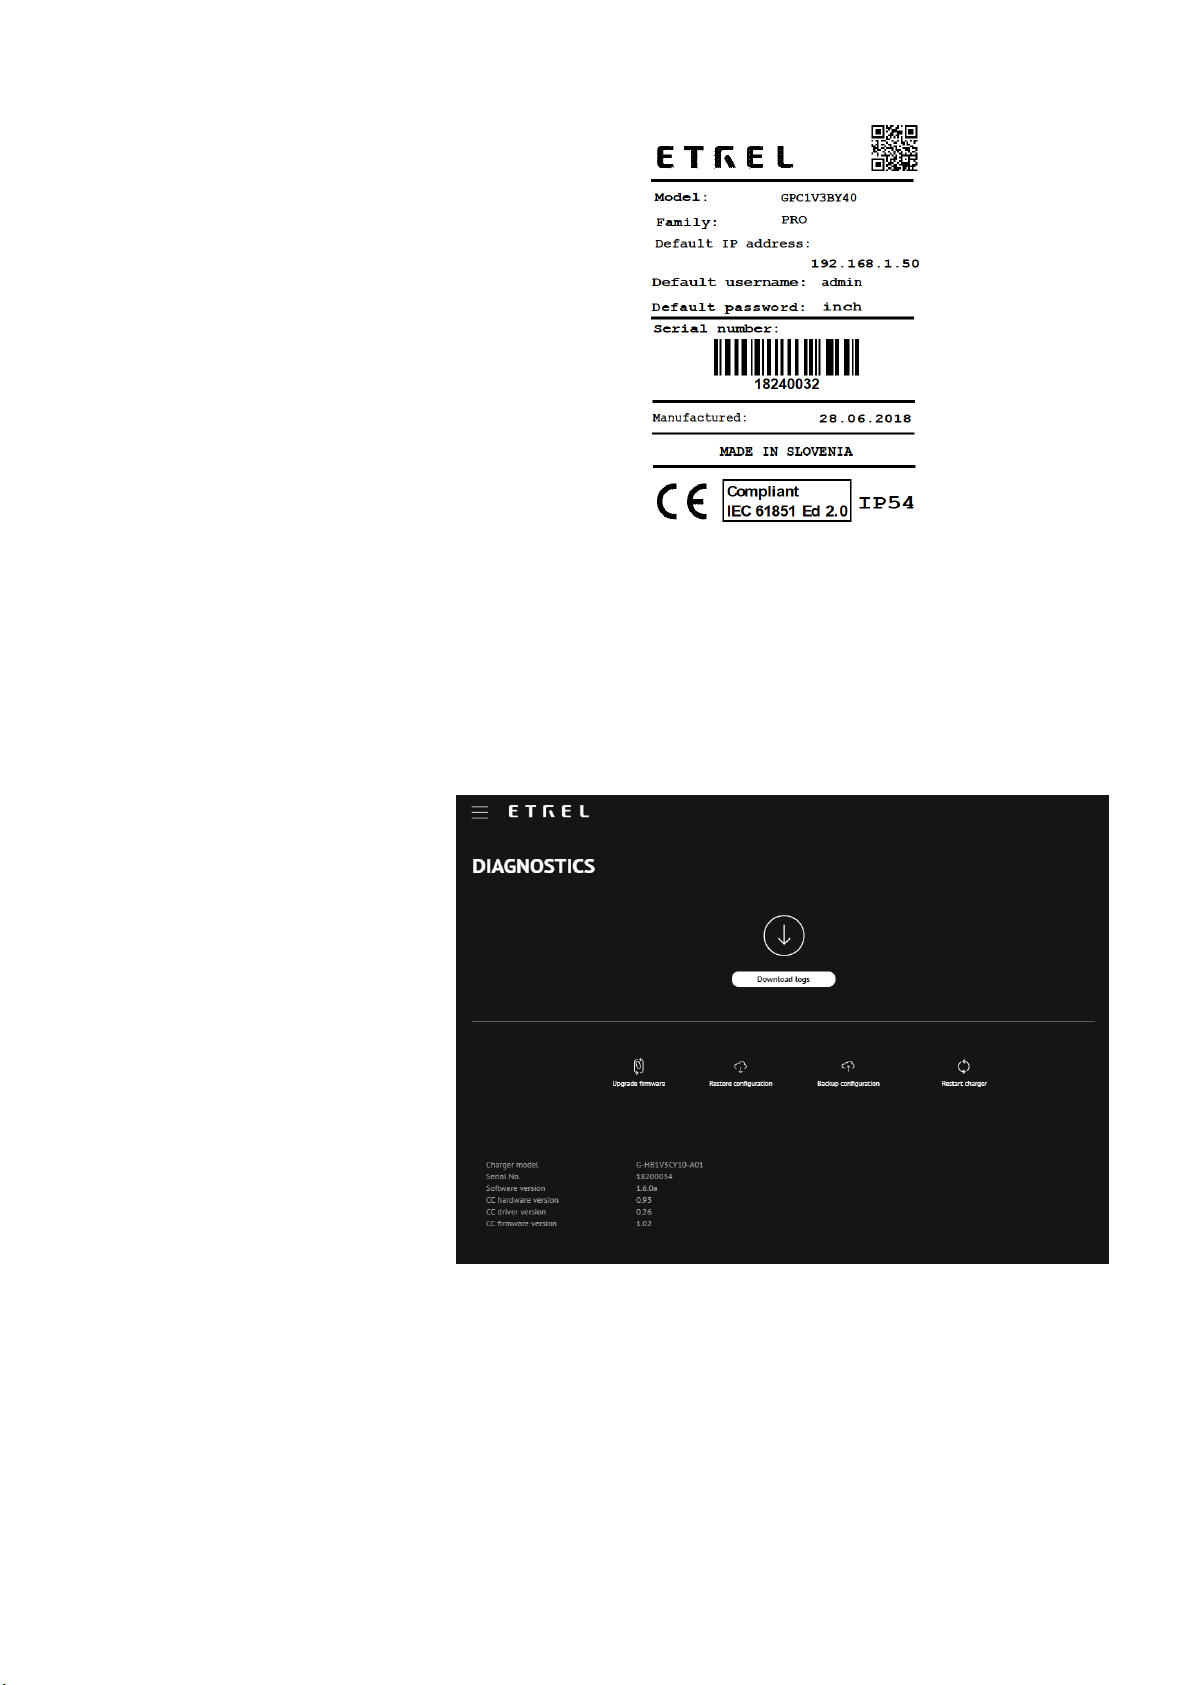
Figure 6: Sticker with connectivity information located inside the maintenance doors
On the web interface you can obtain Etrel INCH charging station
information about charger model, serial number, software version
and version of cc hardware, cc driver and cc firm ware. How to
connect to web interface is described below in the chapter 4 Web
interface.
6 | 26
Page 7
Etrel Inch | User Manual
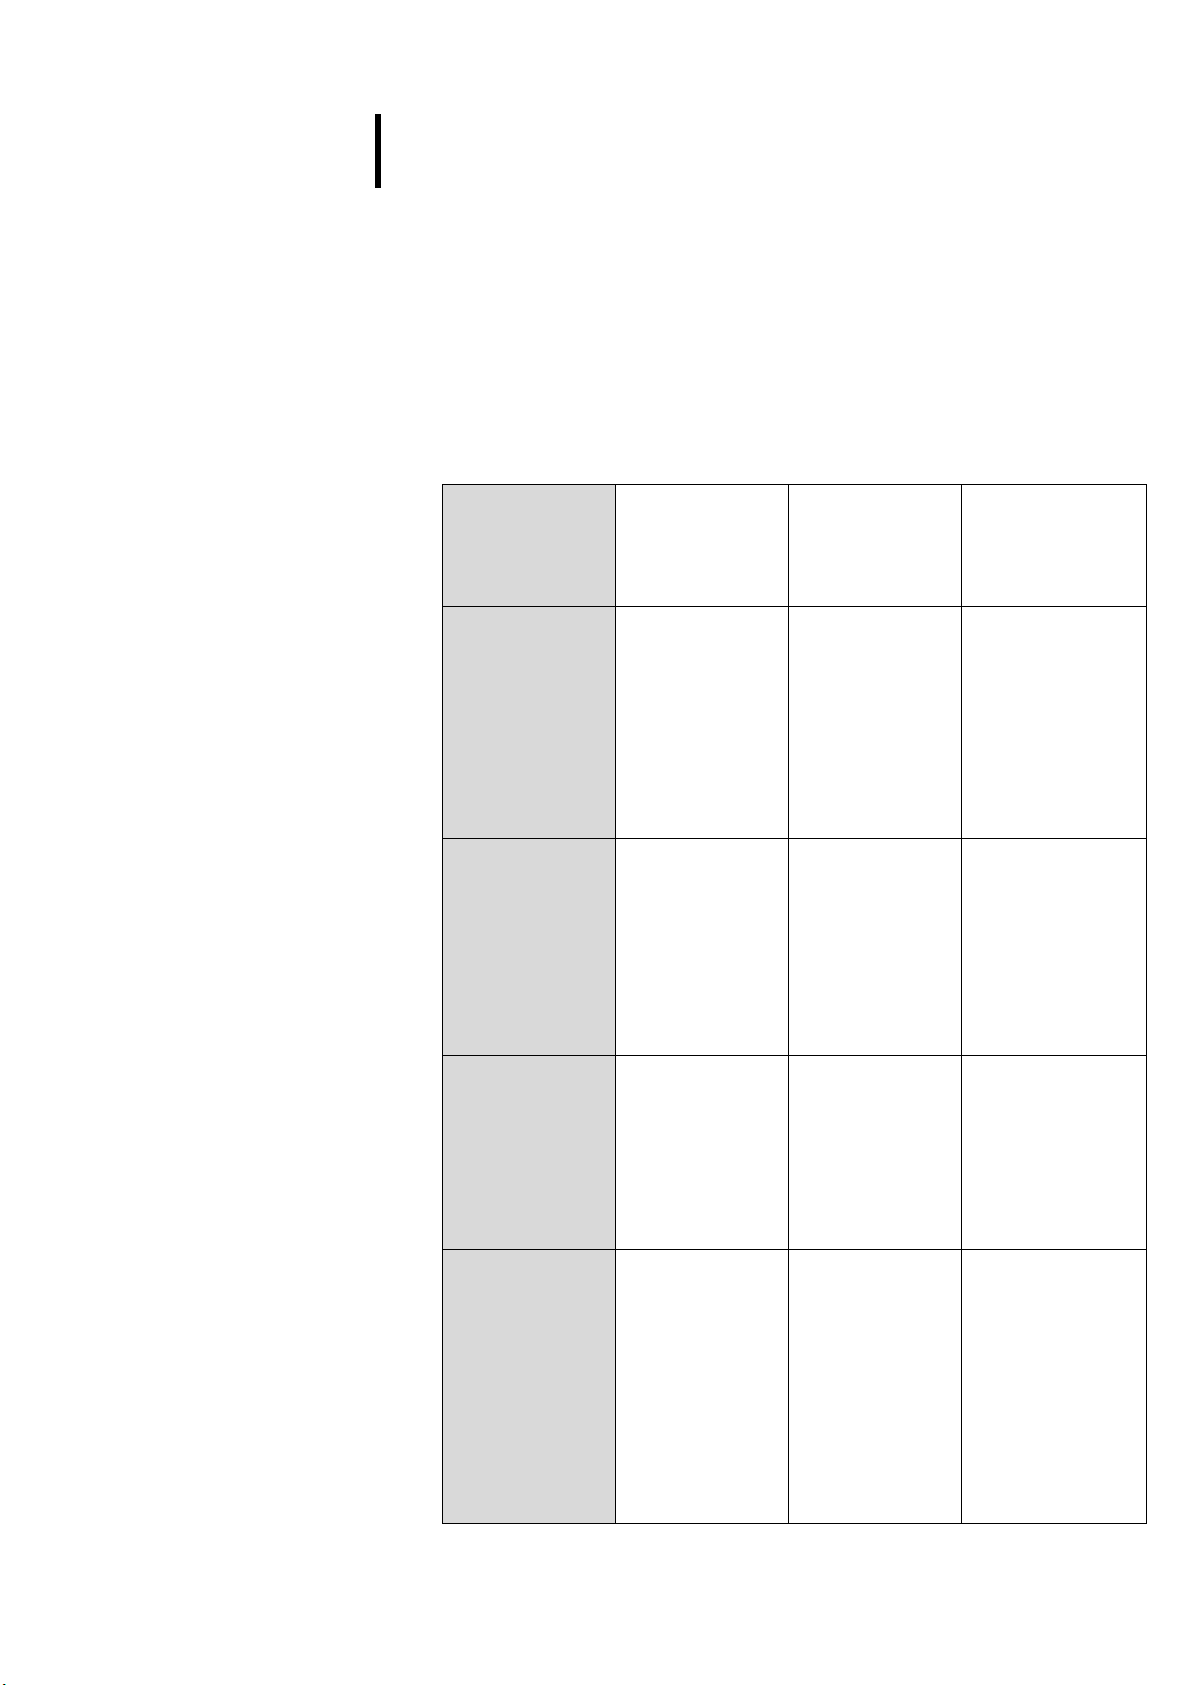
STATUS LIGHT
NORMAL
OPERATION
PROBLEM
SOLUTION
Fast blinking
green light
Charging
station’s backup
batteries are
charging. At the
first power, up it
can take up to 10
min. If backup
battery is full
green light will
blink slowly.
If the light is
blinking fast
more than 10
min there might
be a problem
with the backup
battery.
Inform the support
about the status of
your charging
station.
Slowly blinking
green light
LCD screen is
preparing to turn
on. Heating
system is trying
to heat the LCD
before it is
turned ON.
If the green light
is blinking slowly
for more than 10
minutes and the
LCD hasn’t been
turned on, there
might be a
problem with the
LCD.
You should call
the support.
Steady glowing
green light
Charging station
is ready to be
used.
/
/
No lights
/
If charging
station is not
responding after
it is powered up,
something might
be wrong with
connection.
Check the
protection
elements if either
RCD or
overcurrent
protection has
been tripped.
Activate the
protection. If
nothing helps call
the support or
installer.
4 OPERATION OF CHARGING STATION AND
CHARGING PROCEDURE
FIRST CHARGING STATION POWER UP
When you power up the charging station for the first time it can take
several minutes for station to get ready to start using it to charge EV.
Charging station is powered up automatically when it is connected
to the electricity. In the table below, you can see all the possible
events that can occur when you start the station and what should
you do in case something is wrong.
7 | 26
Page 8

Etrel Inch | User Manual
Green light is
blinking
LCD is turned on
and charging
station is ready
to be used.
When the LCD
starts the logo
will be first
displayed and
after that you can
start using the
charging station.
LCD is turned on
but freezes and is
unresponsive.
Try resetting the
charging station. If
the problem
repeats there
might be a
problem with the
software. You
should call the
support.
You can read the
resetting
procedure in
chapter 6
Troubleshooting.
YOUR FIRST CHARGING SESSION
When the charging station is ready to be used you can simply follow
the procedures described on the Etrel INCH’s LCD screen. You can
choose between two charging modes:
Fast charging (default)
Interactive charging
Charging modes are chosen during the charging session.
During the fast charging your EV will be charged with the max
available charging power as fast as possible. Max power is set by the
installer based on the grid capabilities where charging station is
installed.
When Interactive charging is chosen charging schedule will be
modified based on the inserted departure time or if it is not inserted
based on historic session data. Historic data is used from the first
charging session onward. More charging session means more
accurate session prognosis and schedules. Charging schedule will be
created based on electricity prices, other loads and PV production to
make sure EV is charged in appropriate time while taking in
consideration other constraints.
Chargi ng proce dure
Step 1 : WA K E
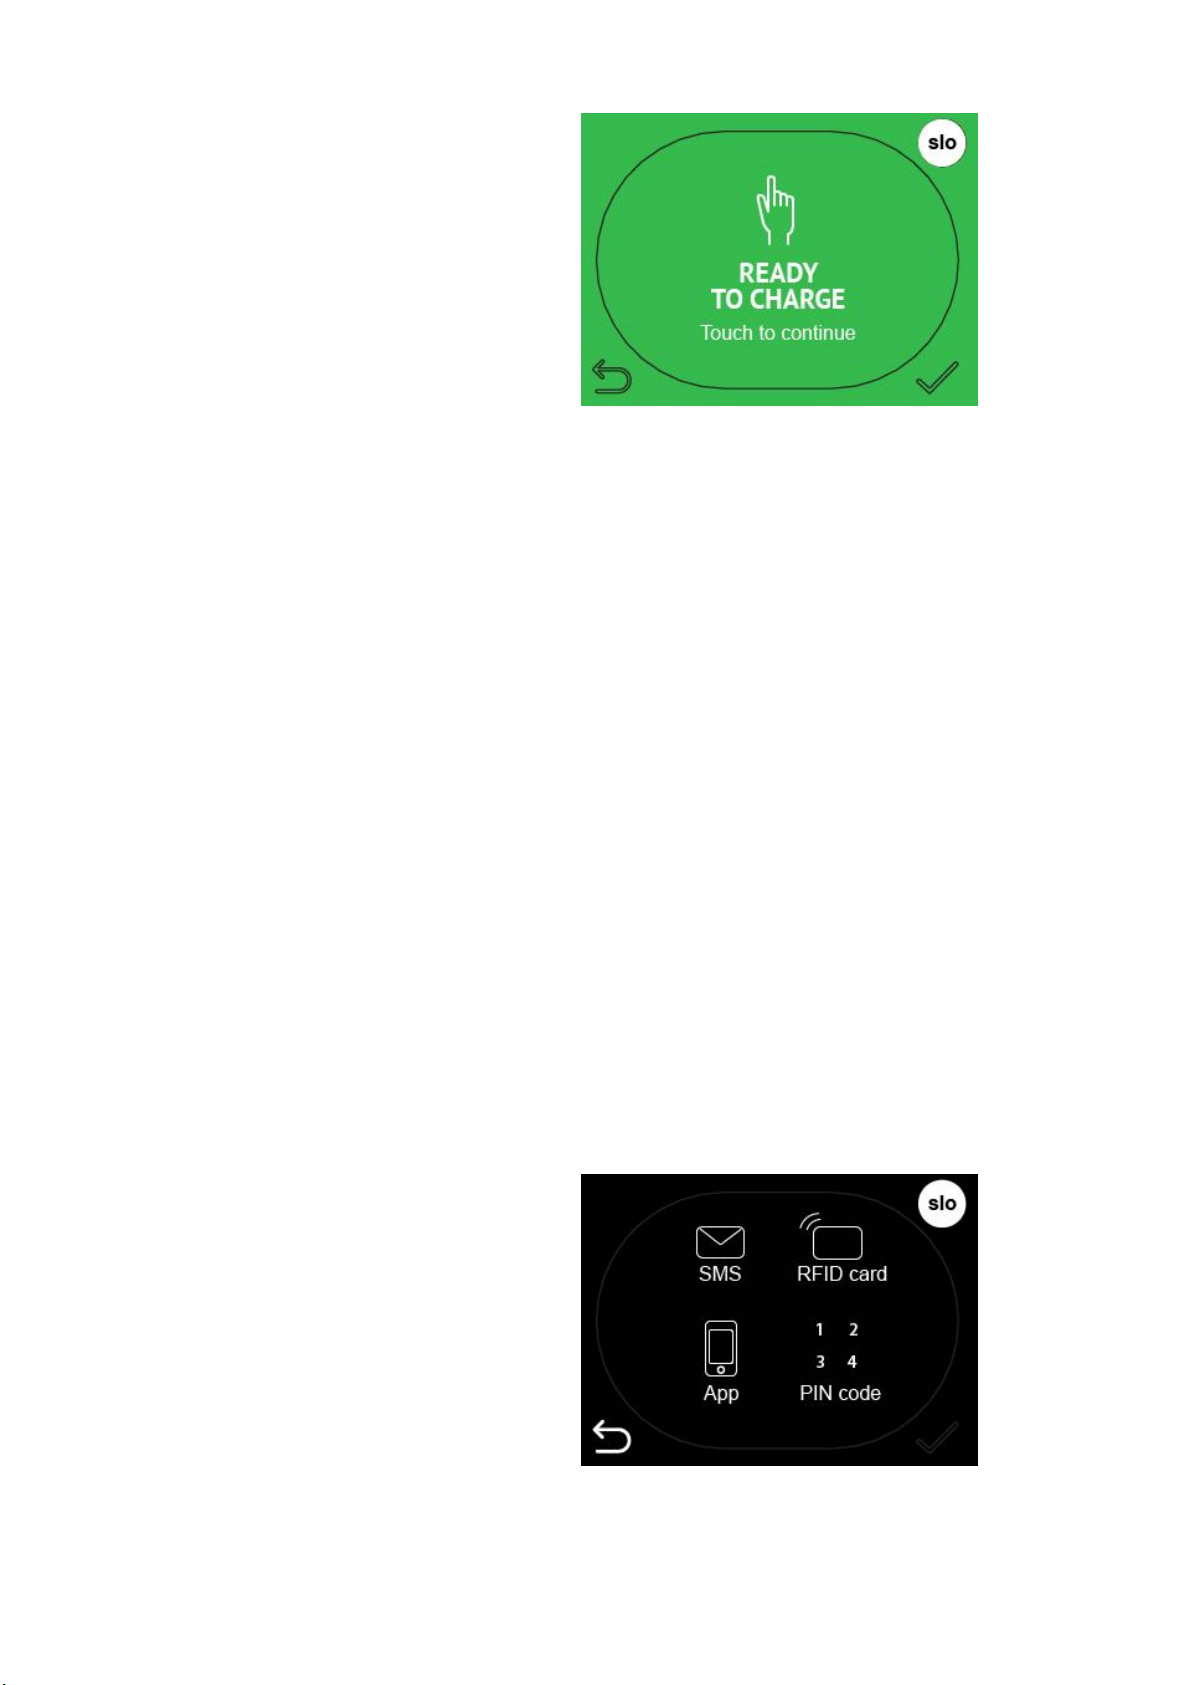
When you come to the charging station its LCD screen will likely be
in the screen saver mode. You can wake it up by simply tapping the
screen.
8 | 26
Page 9
Etrel Inch | User Manual
Figure 7: Screen saver
Screen saver mode can be chosen in the charging station’s web
interface. Three options exist: turned on all the time, it can be
blinking or turned off until touched. Description how to change this
setting can be found in the Etrel INCH configuration guide.
Step 2 : AU T H ORISA TION
Depending on the charging station authentication mode chosen
different screens will be shown that will need different actions from
user in order to continue with the charging session. What
authorization is allowed to be used can be setup in the charging
station’s web interface Configuration menu. Procedure is described
in the document Etrel INCH configuration guide.
Plug and charge mode
In the plug and charge mode user will see message to insert the
cable and start the charging session.
Needed authentication
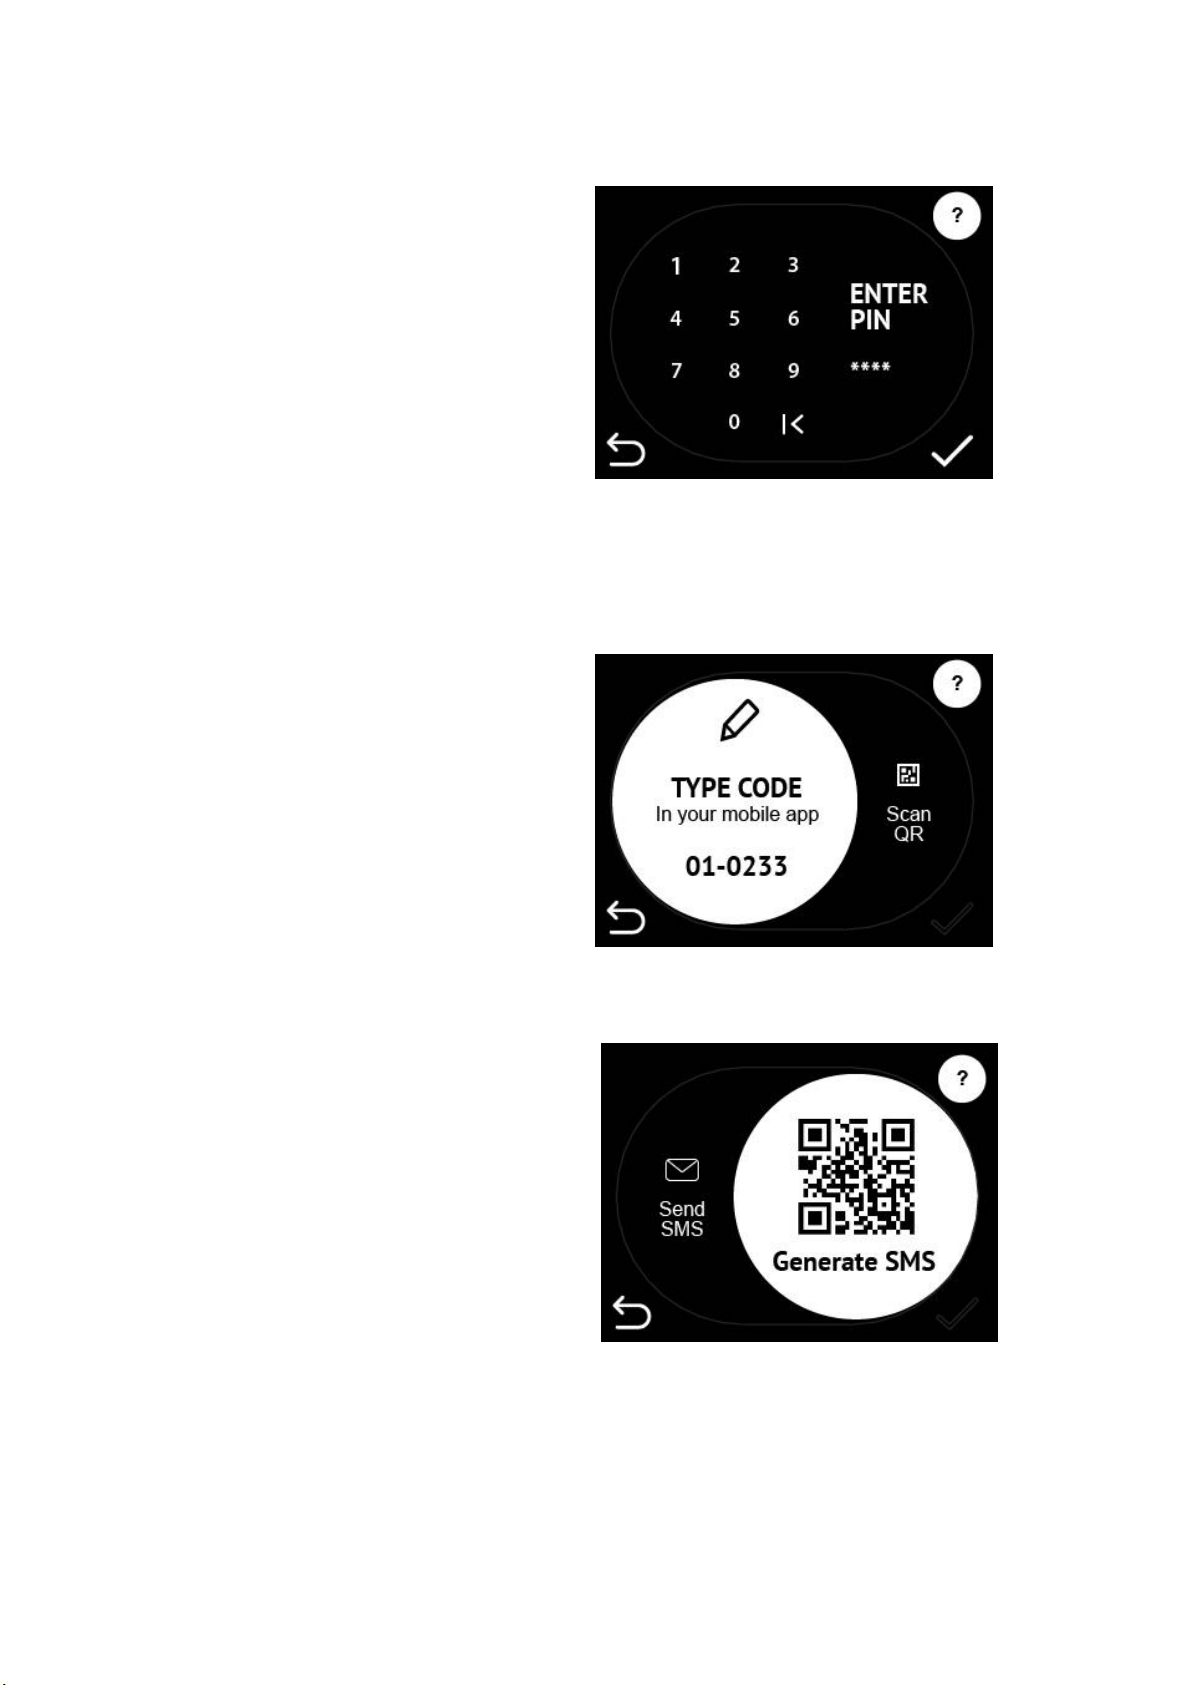
If authentication is needed you can simply press the authentication
you will use to authorize and continue with the charging session.
Figure 8: Chose authorisation method
9 | 26
Page 10
Etrel Inch | User Manual
a. Insert pin
Figure 9: Insert PIN code
b. Use mobile app to authenticate
Figure 10: Insert charging station's EVSE code
Figure 11: Scan QR code
You can either type the code of the station to your
mobile app or scan QR code with mobile.
10 | 26
Page 11
Etrel Inch | User Manual
c. Swipe RFID card
By simply swiping the RFID card below the LCD touch
screen where the RFID module is installed you can
authorize on the charging station and begin the
charging session
Step 3 : CO N N ECTI N G THE CA BLE
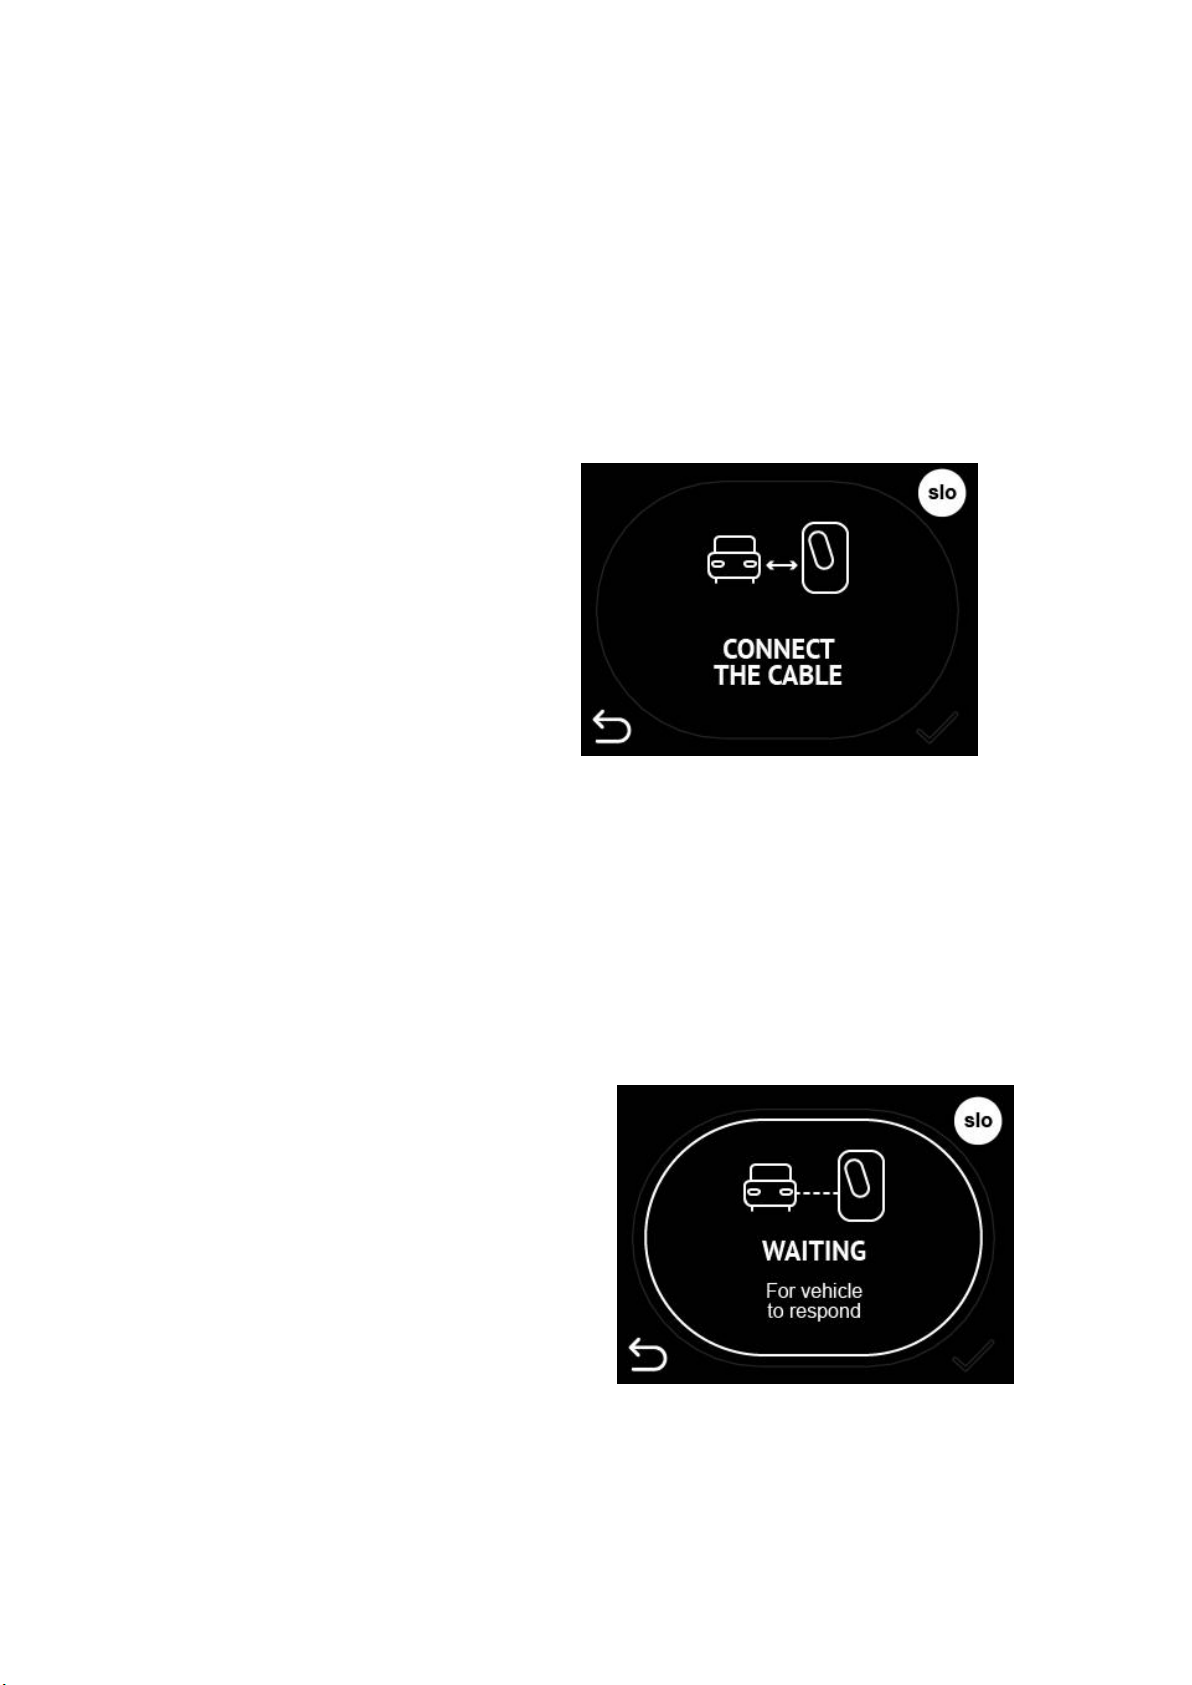
After the successful authorization you are going to see the screen
with the description to connect the cable.
Figure 12: Connect the cable to charging station and EV
If the cable is connected before the authorisation this screen will be
left out and after the authorisation next screen “Waiting for vehicle
to respond” will be shown.
When the cable is connected charging station will start charging as
soon as EV responds.
Figure 13: Charging station is waiting for EV to responds and starts charging
11 | 26
Page 12
Etrel Inch | User Manual
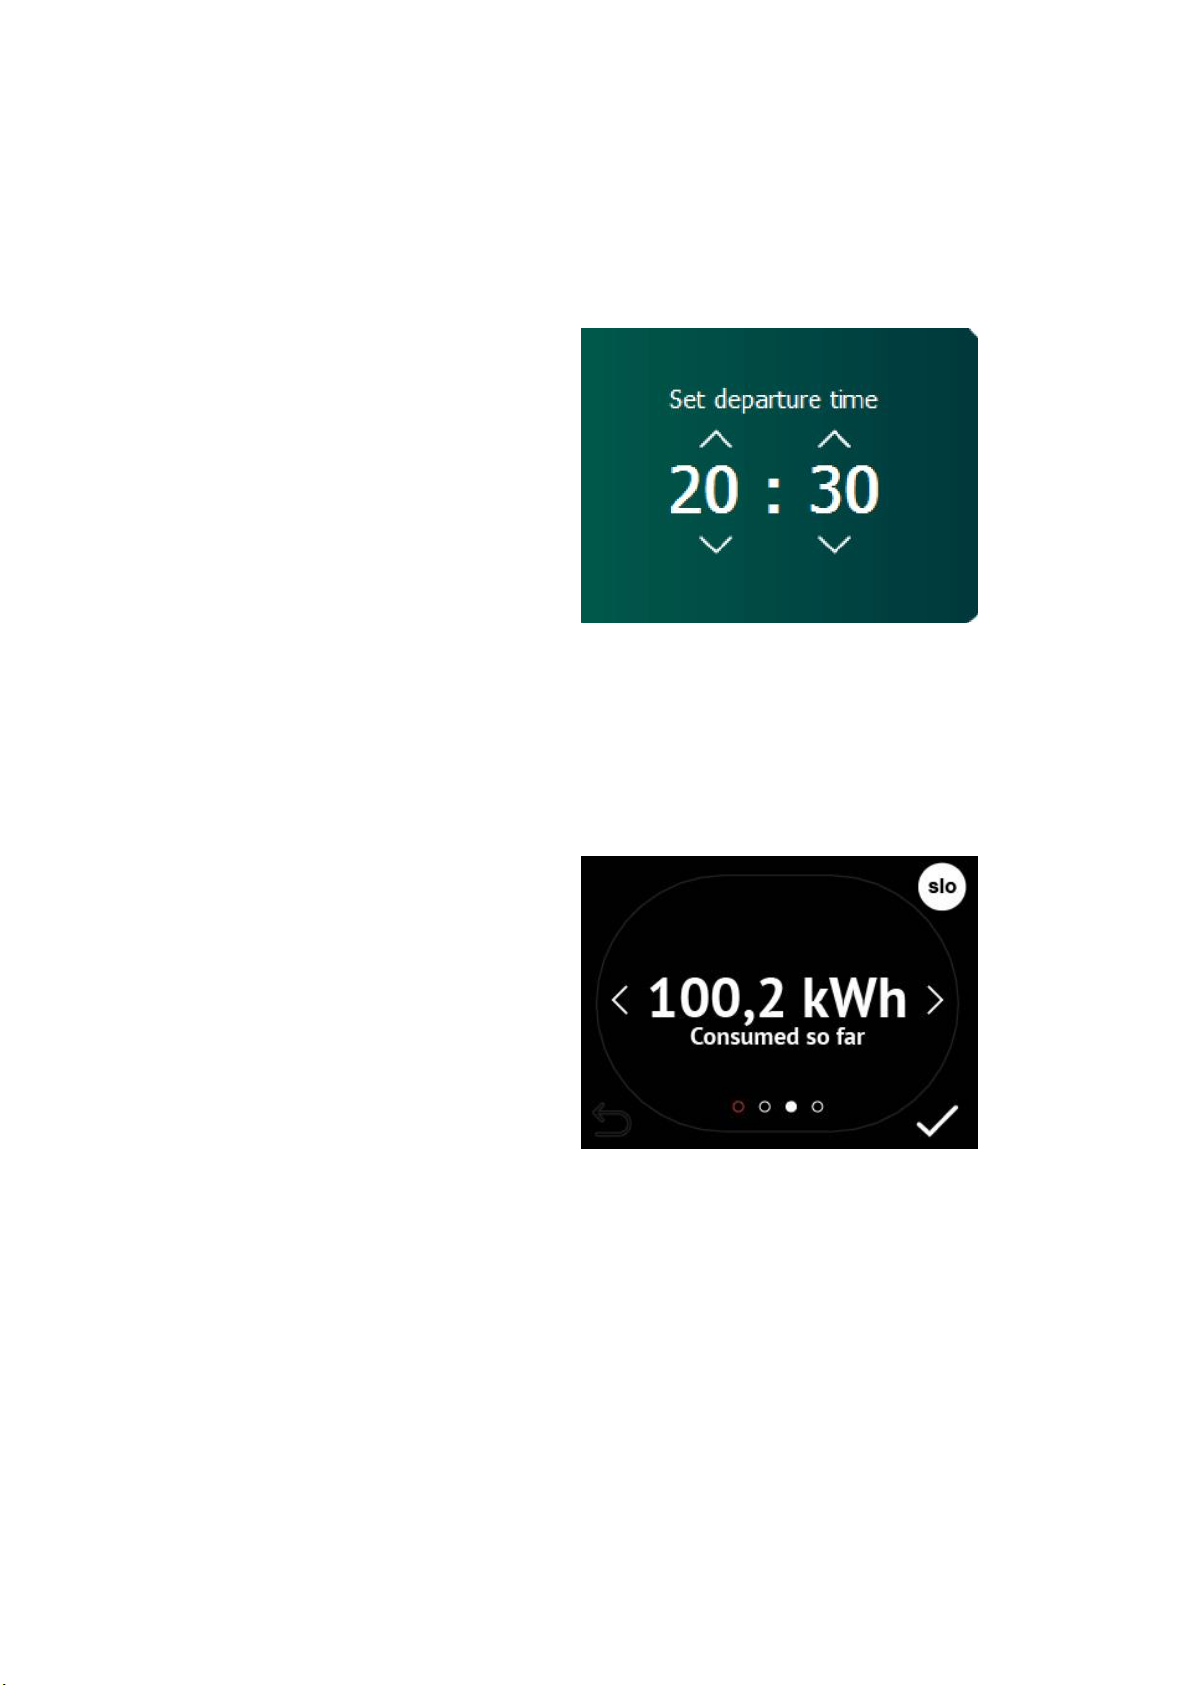
Step 4 : DE P A RTU R E TIM E I NPUT
As soon as the charging session begins you will be presented with
the screen to input your departure time. Departure time presented is
the one calculated by the charging station based on you previous
charging habits. You can change the presented departure time to
make sure you EV is charged.
Figure 14: Set the departure time
When the departure time is set or default setting is let through
charging data will be shown to you. What charging information is
shown to you depends on the settings in the configuration of Web
interface. Operator chooses which screens will be displayed.
Figure 15: Example of shown energy on the Etrel INCH LCD screen
12 | 26
Page 13
Etrel Inch | User Manual
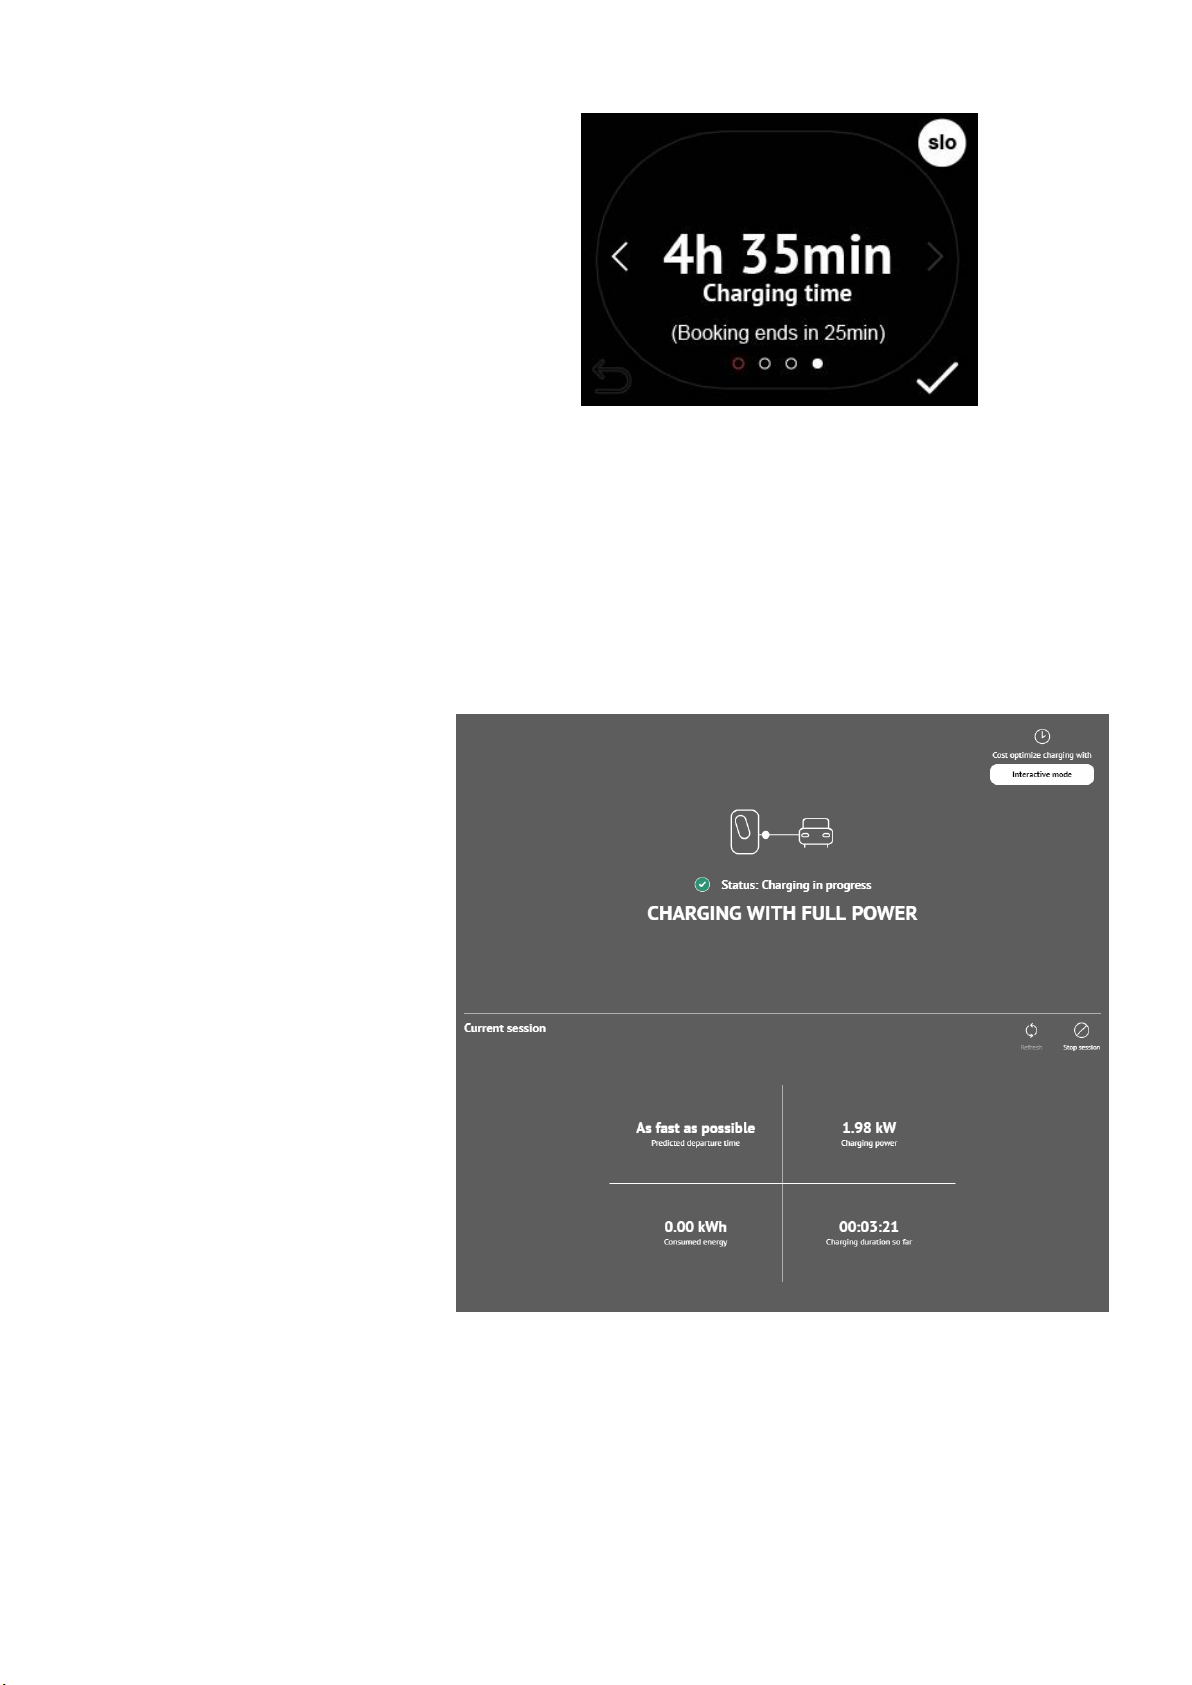
Figure 16: Display of charging time
Check status o f the chargin g stati on
In the web interface you can check information of the current
session. You can change the departure time using web interface by
pressing the »Interactive mode« button. Procedure how to access
this screen is described in the chapter 4 Web interface.
Figure 17: Current session information displayed in the web interface
Stop t he char ging s ession
You are able to stop the charging station locally or remotely.
13 | 26
Page 14
Etrel Inch | User Manual
Loc a ll y
When you are next to charging station, you can simply end the
charging session directly in your car and by disconnecting the
charging cable.
Rem o t ely
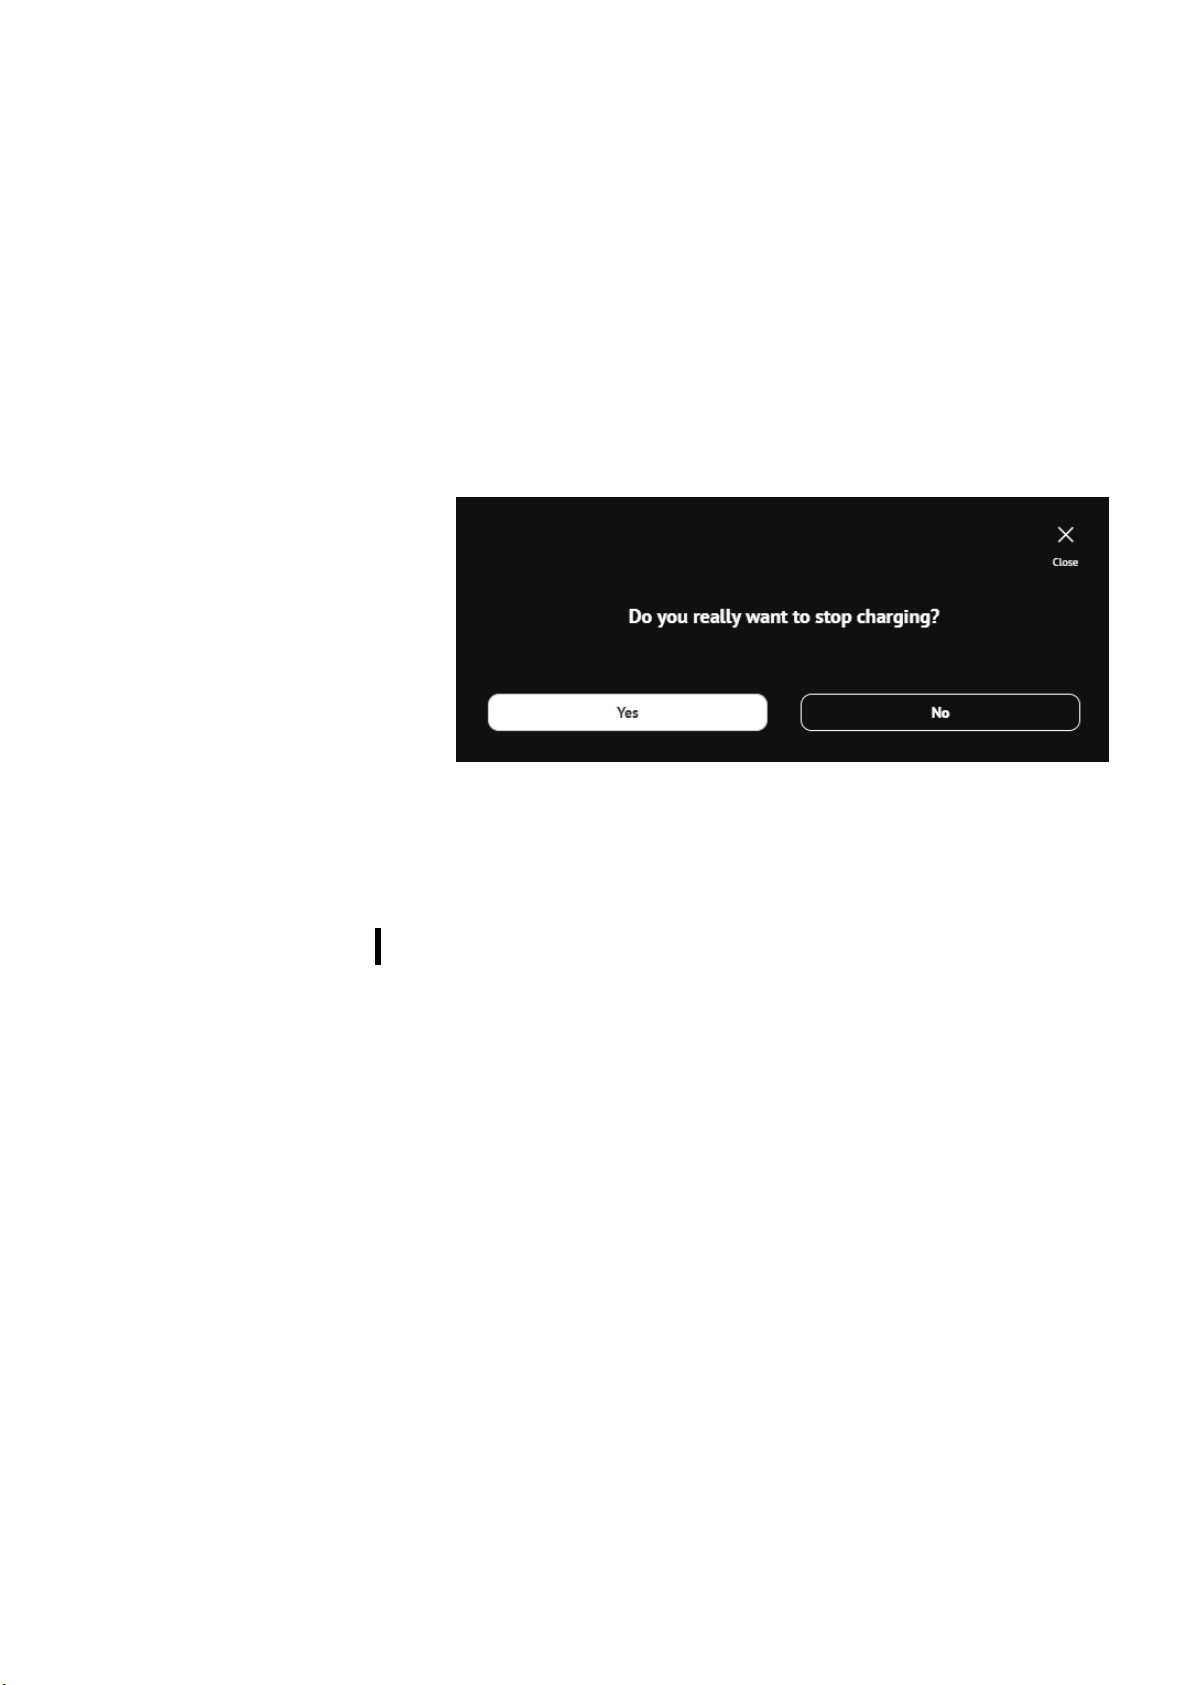
If you want to do this remotely you can use Web interface. On the
picture above, you can see the button “Stop session” in the middle
on the right side. When pressing this button new window will pop up
to confirm the action. After that the session will stop. In similar
fashion you can stop the charging using app on the mobile phone.
Figure 18: Confirmation window to stop the charging session using web interface
5 WEB INTERFACE
Charging station’s web interface allows you to connect to the
charging station platform to configure its settings as well as check
the charging session and station data, check the connectivity status
and errors description when they occur.
CONNECT TO WEB INTERFACE
Users can connect to the charging station web interface using the
charging station IP address. Default IP address can be found on the
information sticker on the inner part of the maintenance doors. IP of
the charging station can be manually changed. If you did this and
forgot the new created IP you can always revert back to the default
IP by resetting the charging station to the manufacturer settings
(procedure is described in chapter 6 Troubleshooting).
When IP address is written in the internet browser and the computer
is in the same local network you will be connected to the web
interface.
14 | 26
Page 15
Etrel Inch | User Manual
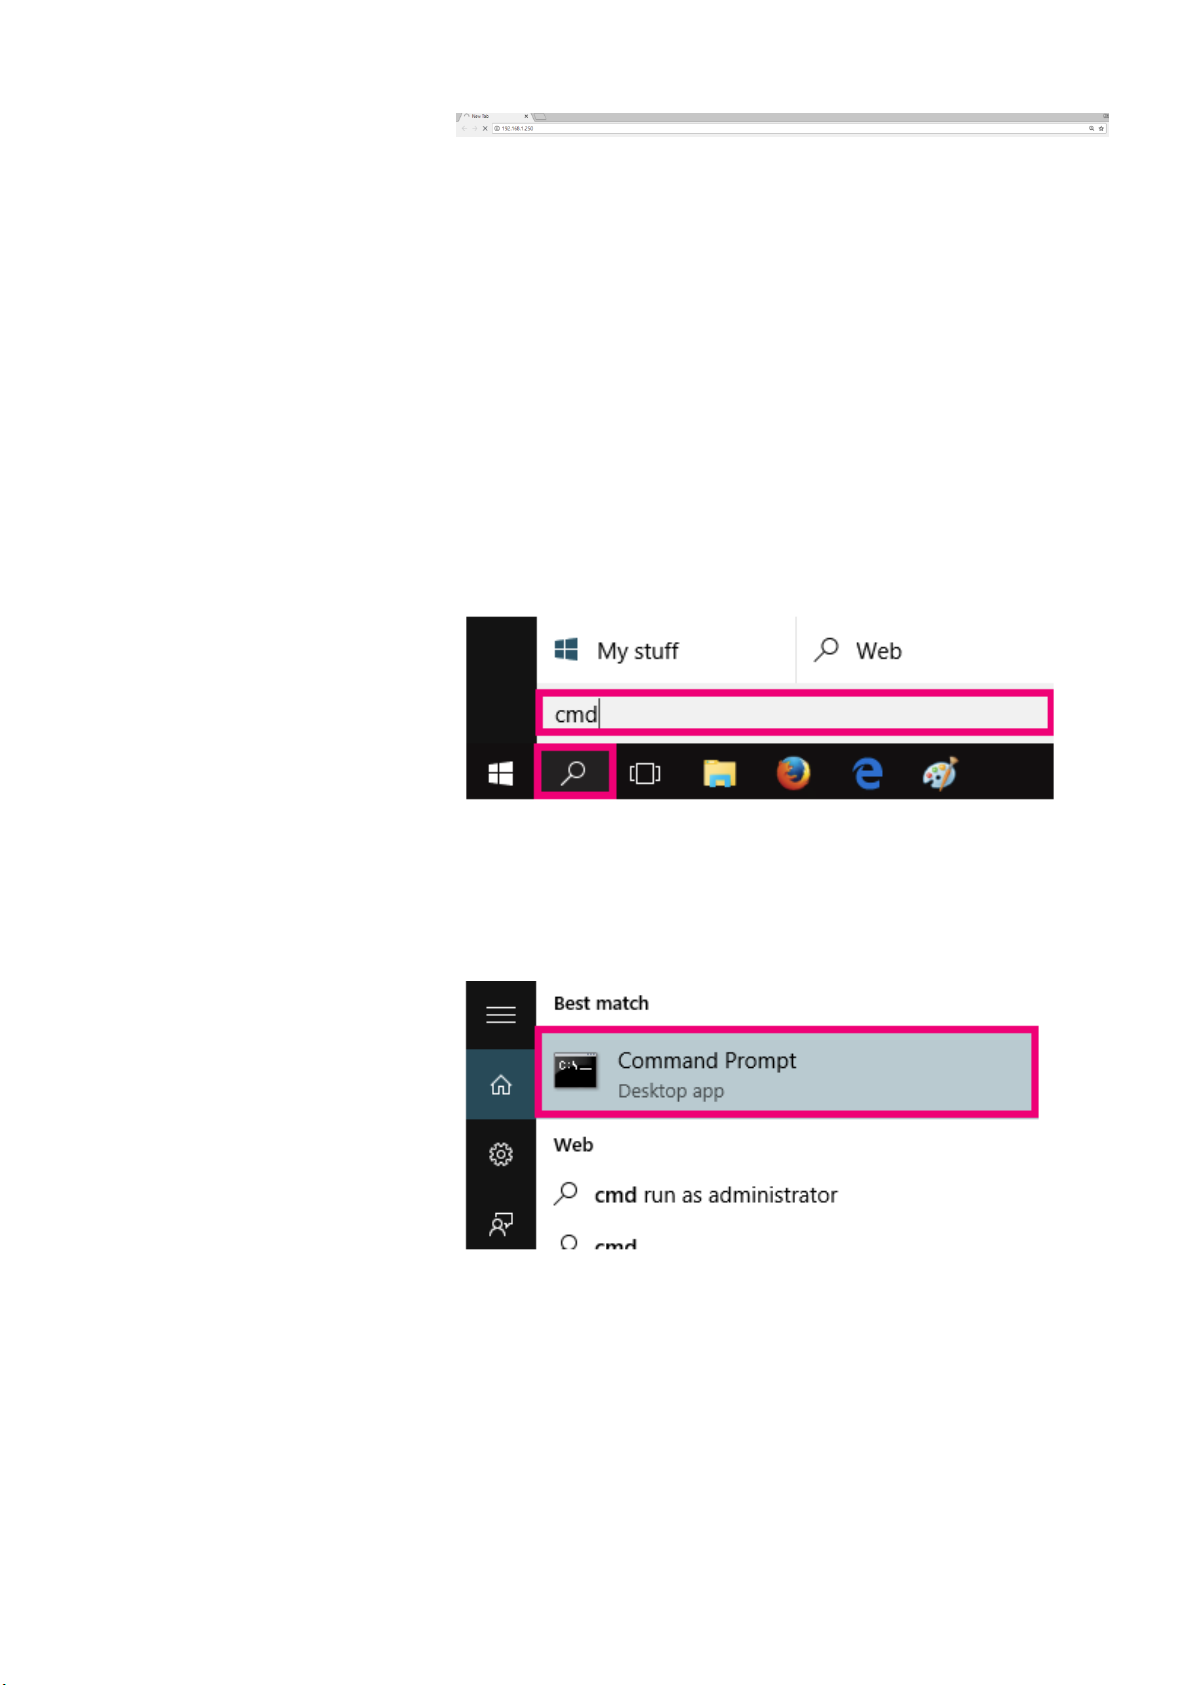
Figure 19: Insert the default IP into the browser to connect to web interface
Ping ch arging s tation from co mputer in sam e
netwo rk
Wind ows
To determine if your computer is in the same network as charging
station ping the station using the CMD command ping with the IP of
the station. You can change computer network in the network
settings.
To ping the station, connect to Command Prompt by searching for it
in windows search functionality.
Figure 20: Search for CMD using windows search functionality
Figure 21: Open Command Prompt
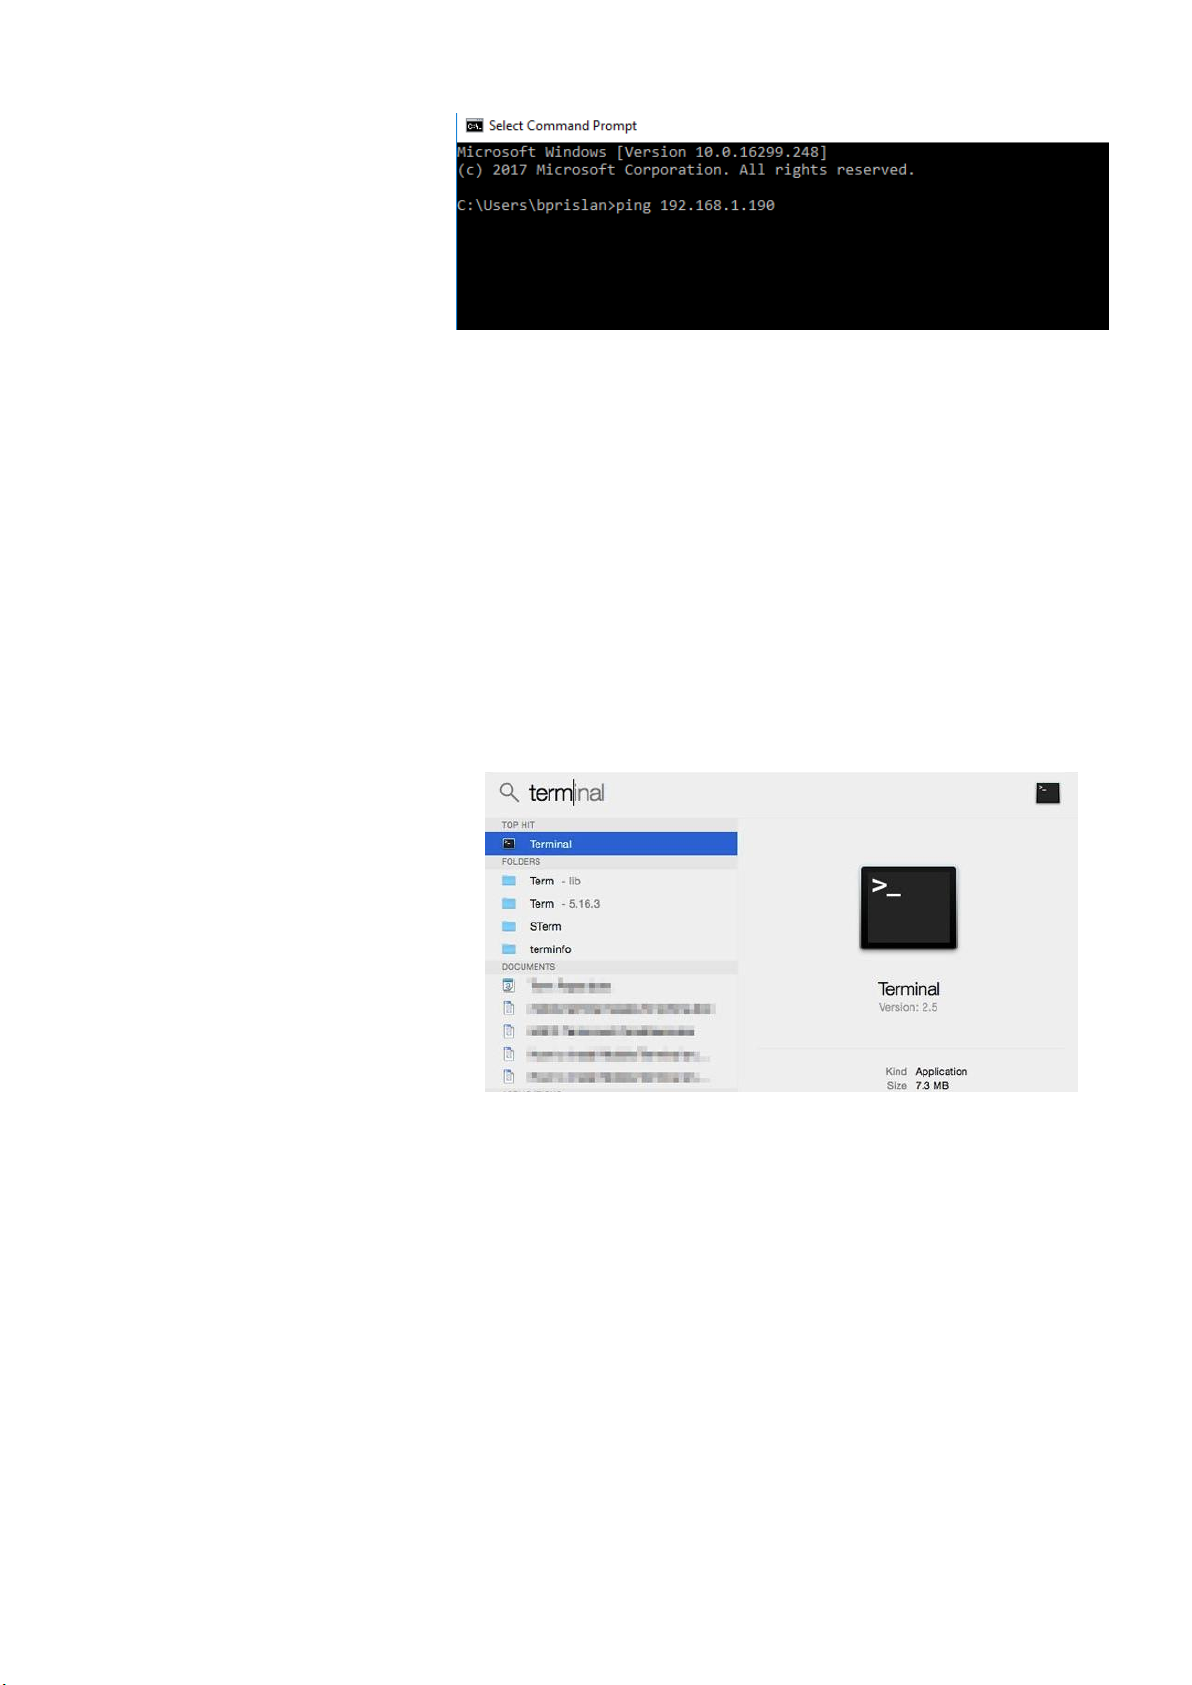
In the Command Prompt write ping and IP address you would like to
ping (eg. ping 192.168.1.190).
15 | 26
Page 16
Etrel Inch | User Manual
Figure 22: Ping the charging station IP address
If the ping is not successful your computer might be in different
network segment and you can change the segment in network
settings to the one of the charging station.
App l e com p u ter
If you are using apple computers you can ping the station using
Terminal. You can access it by going to the “Applications” where you
select “Utilities”.
Search for “Terminal” and run it.
Figure 23: Run Terminal software
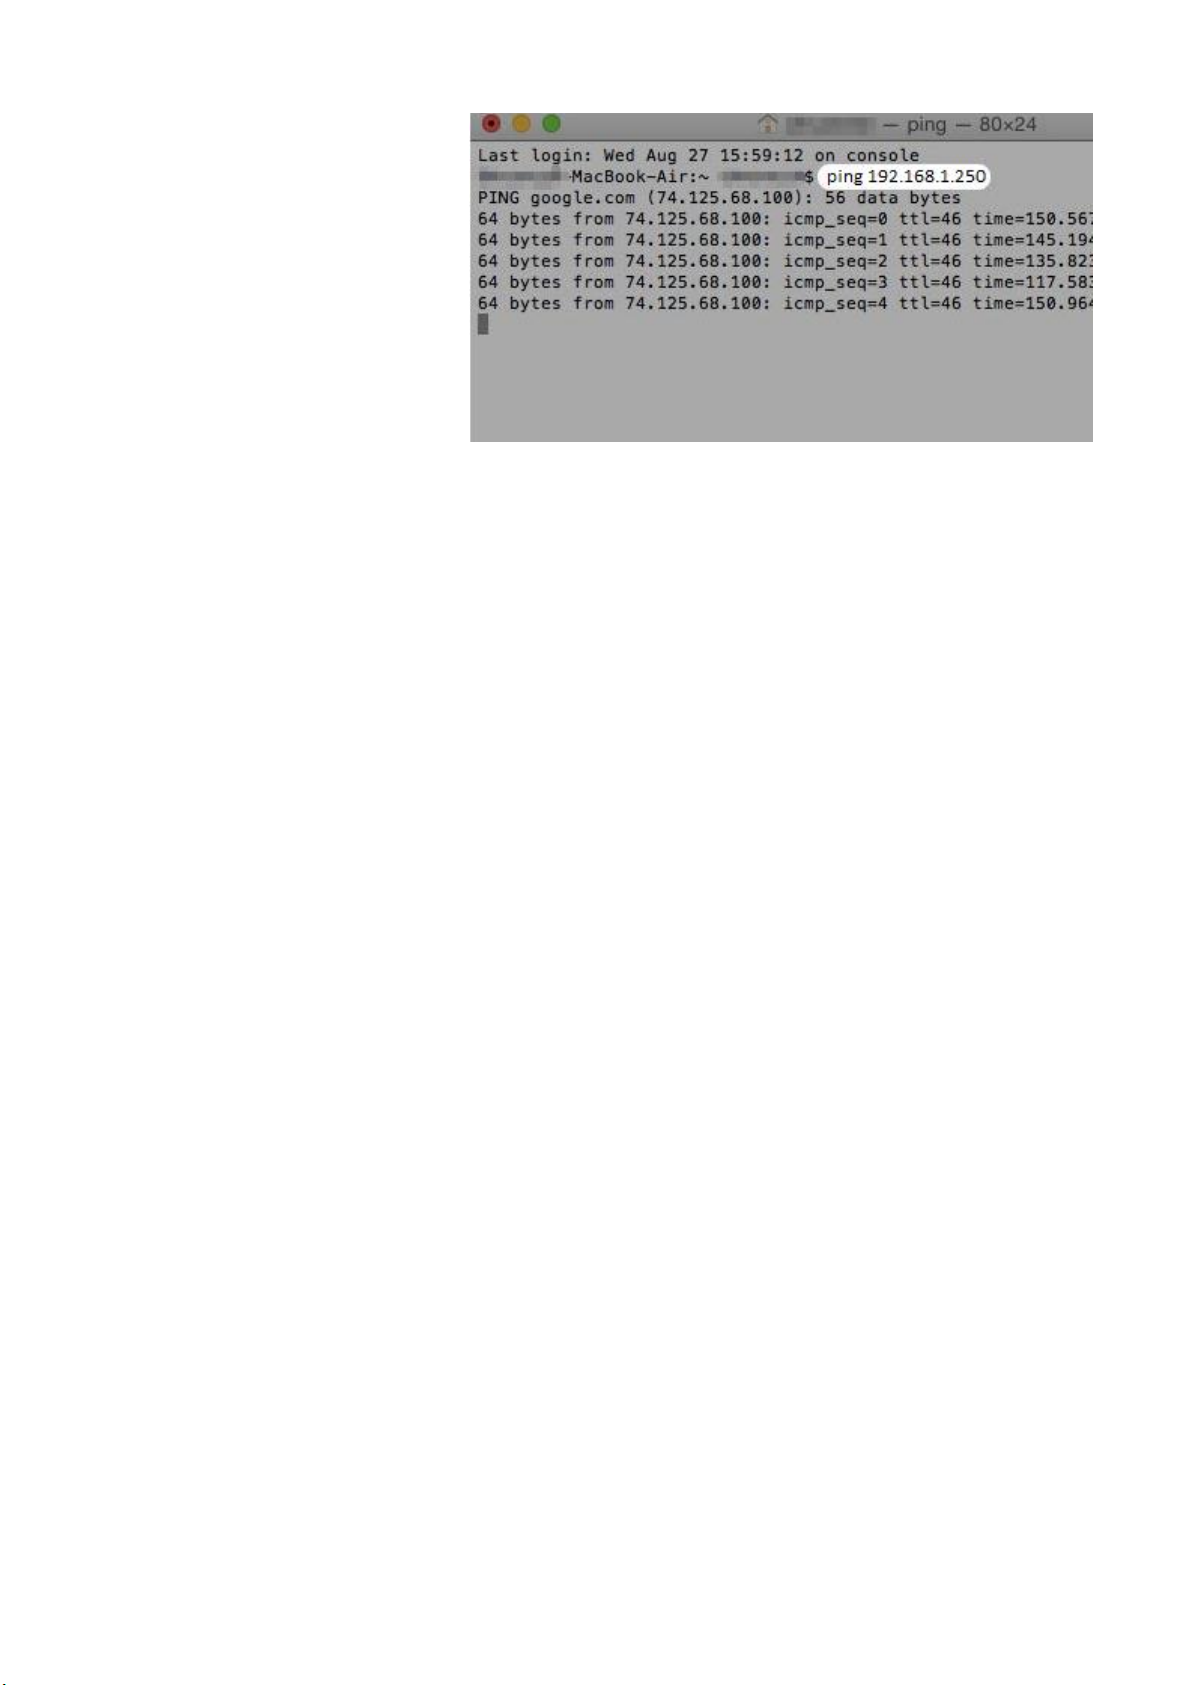
When Terminal is running write ping and IP (eg. ping 192.168.1.250).
16 | 26
Page 17
Etrel Inch | User Manual
Figure 24: Ping charging station by writing ping and charging station's IP
Change the comp uter net work set tings
If you can't ping charging station using your computer you won't be
able to connect to the charging station's web interface. You will have
to change your computer's IP and network settings in order to
configure the charging station.
Wind ows
In order to change the network of your computer in Windows OS you
should locate your network settings. They are located in the Control
panel. How to locate the settings is shown below in the figure.
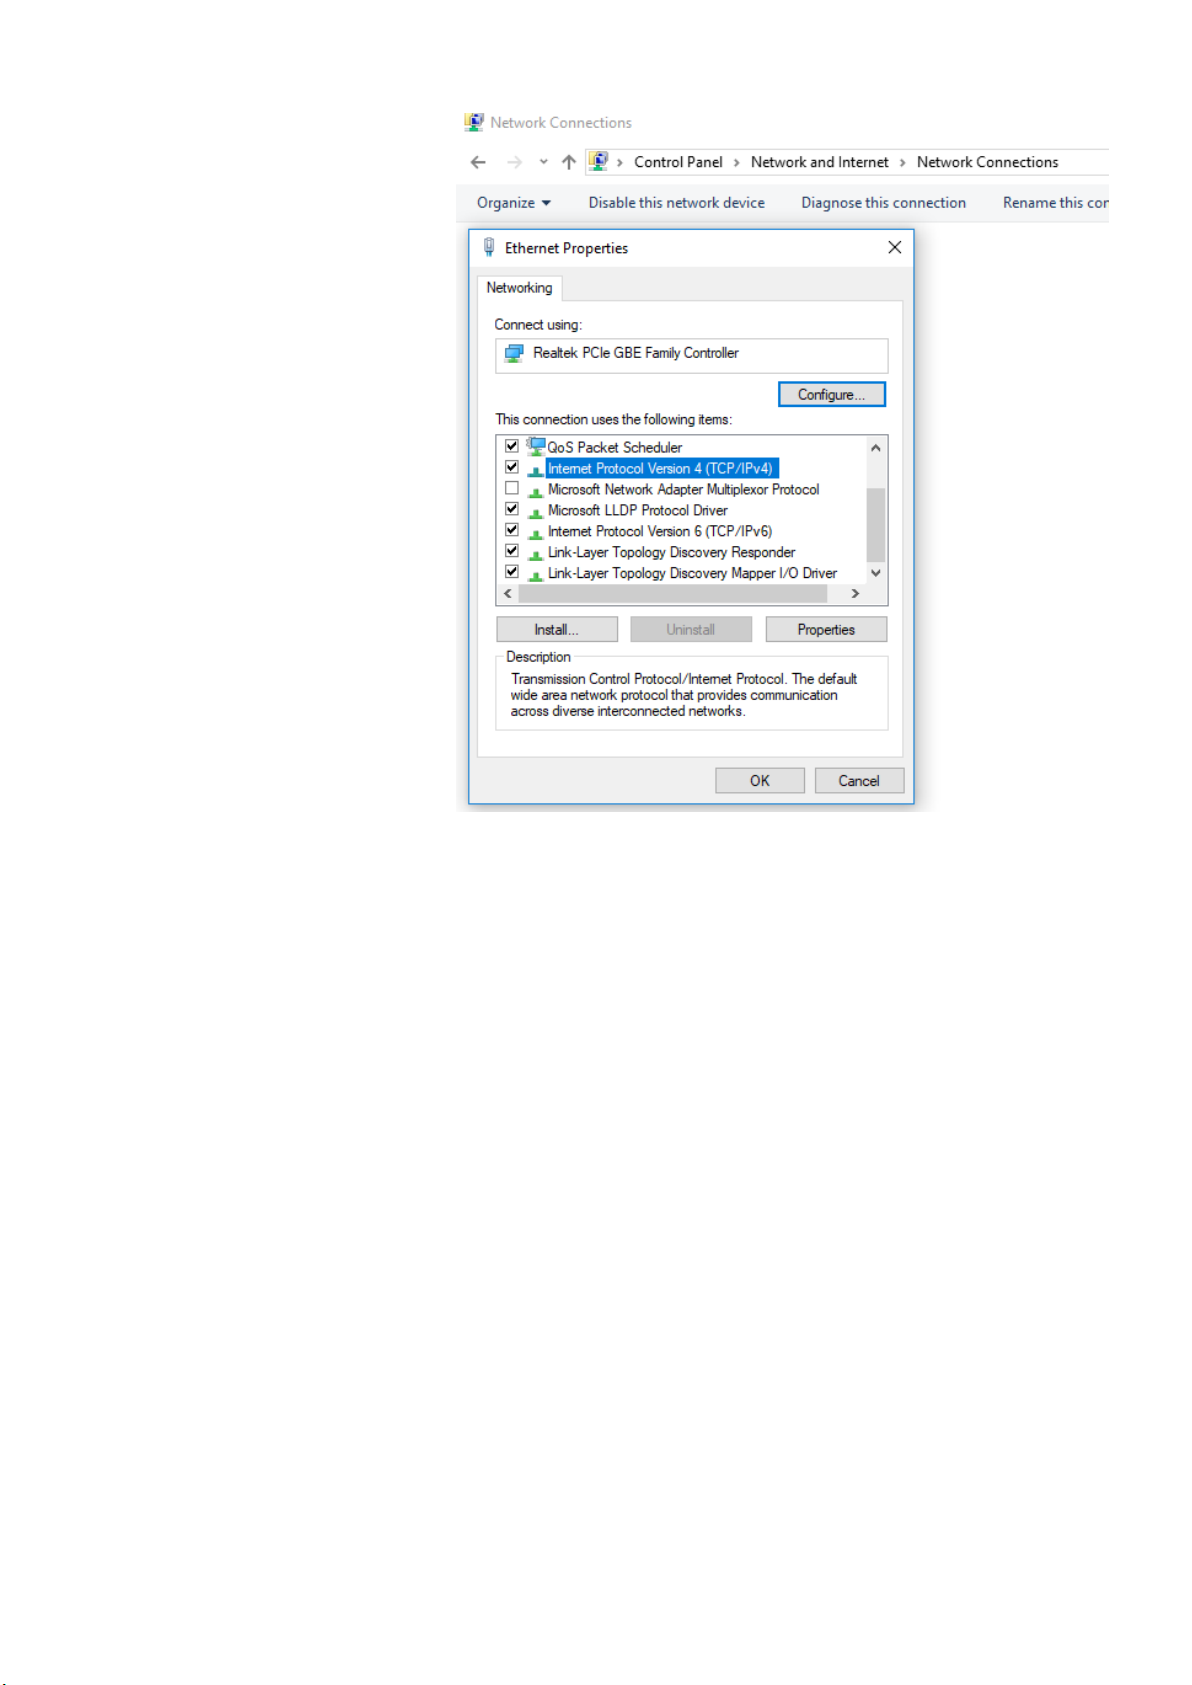
Once you find the Internet protocol Version 4 (TCP/IPv4) press
“Properties” this will show you a new window where you can type
new IP address of the computer that is in the same network segment
as the station’s IP.
17 | 26
Page 18
Etrel Inch | User Manual
Figure 25: Locate Internet Protocol Version 4(TCP/IPv4) in network properties
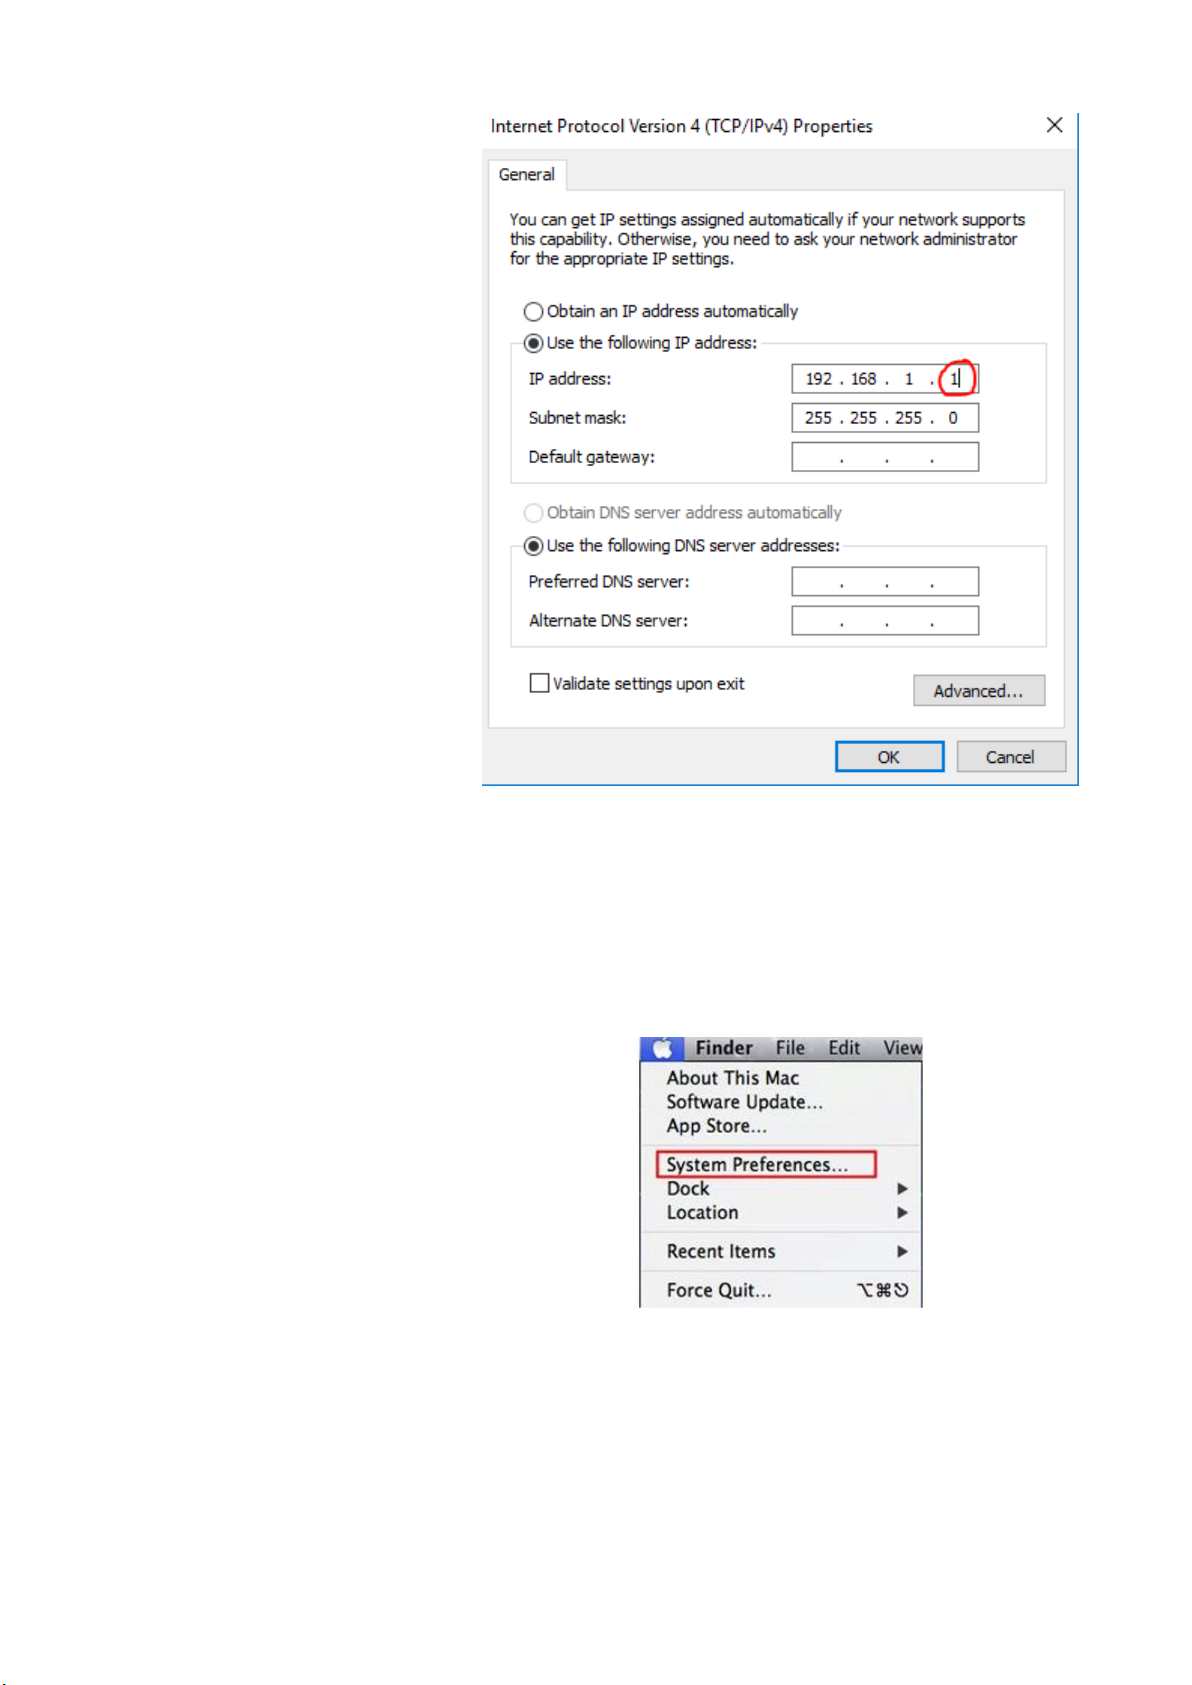
If the station default IP is 192.168.1.250 you should change IP
address to 192.168.1.1. Last bolded number can be random as long
as it is not used by some other appliance in the network. For the
subnet mask you should write 255.255.255.0. You will now be able
to ping the station as it is shown above.
18 | 26
Page 19
Etrel Inch | User Manual
Figure 26: Change the IP of your computer and subnet mask
Apple Computer
To change the IP settings of your Apple computer press »Appie«
button and go to »System preferences«
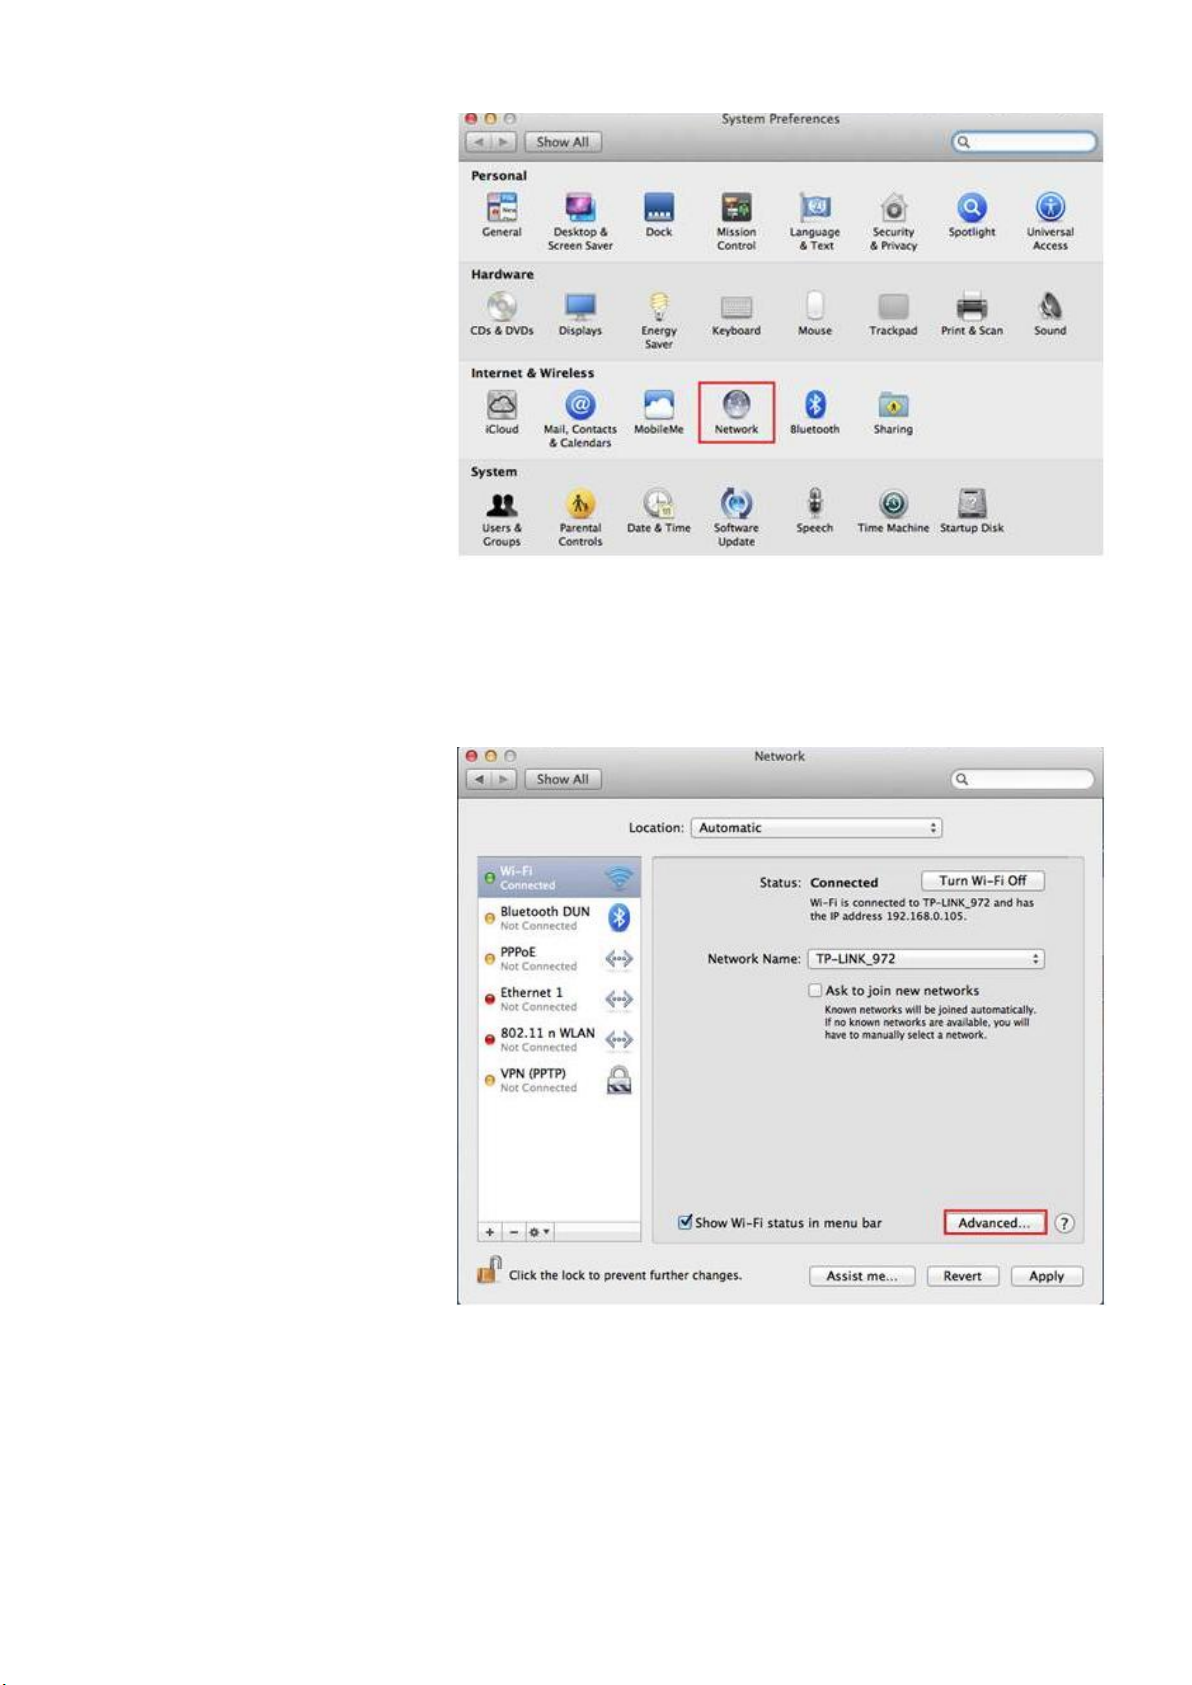
Figure 27: Locate System Preferences
Click on the Network icon.
19 | 26
Page 20
Etrel Inch | User Manual
Figure 28: Click Network icon
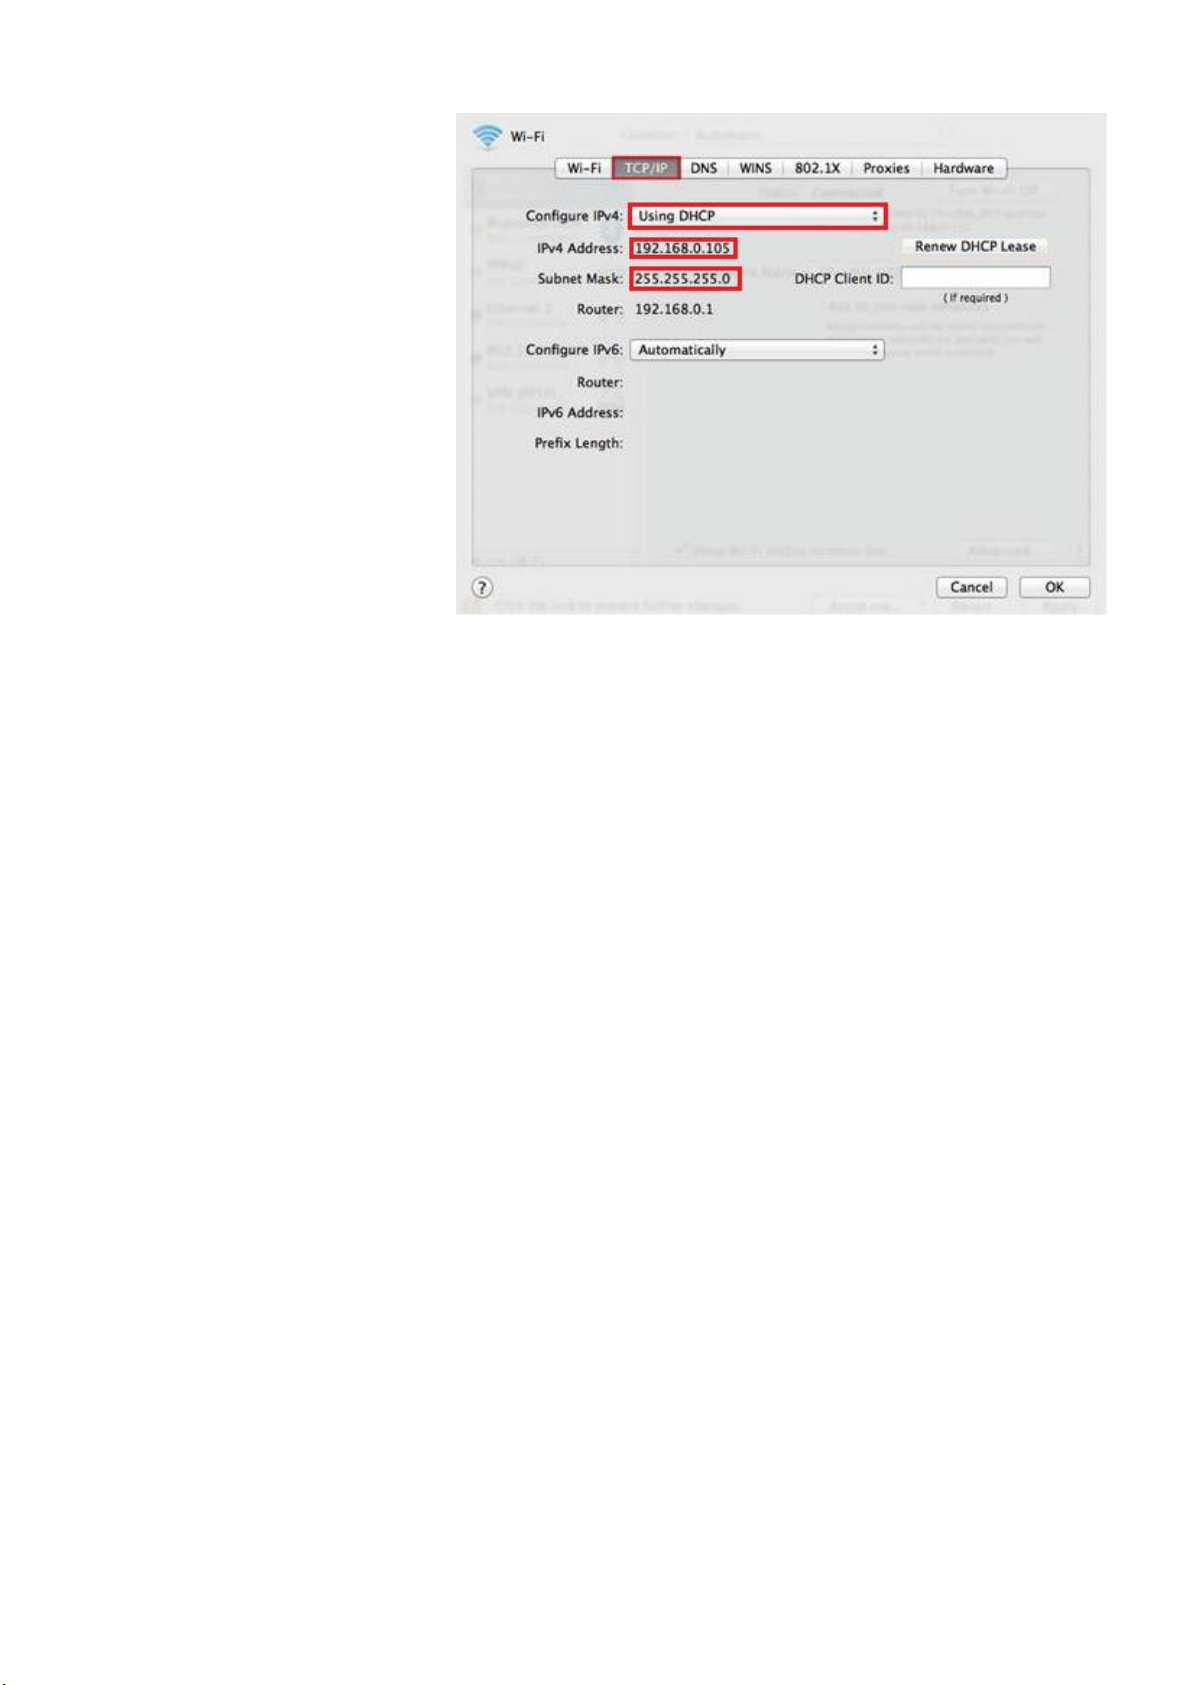
Click on the Wi-Fi or Ethernet connection (Depends on which one is
used) and press Advanced button in the bottom right.
Figure 29: Go to advanced settings of internet connection you are using
Choose TCP/IP. In the Configure IPv4 option choose Manual and
change IPv4 Address to 192.168.1.1, where last bolded number can
be a random number as long as it is different than 250 (used by
station) and is not used by any other appliance in the network. Set
subnet mask to 255.255.255.0
20 | 26
Page 21
Etrel Inch | User Manual
Figure 30: Set network settings
Using DHCP fo r conn ection
If the charging station uses DHCP (Dynamic Host Configuration
Protocol) this will be written on the sticker located on the inside of
the side maintenance doors. When DHCP is used router
automatically assigns IP address to the charging station connected
to it. To acquire DHCP address you will have to hold the charging
station reset button for 4 s until the first beep sound is heard.
Address will be displayed on the LCD screen. (detailed procedure
described in chapter 6).
USING WEB INTERFACE
In the web interface each type of user has different rights what he
can see and edit in the web interface. Operators will have biggest
rights in order to set up all the configuration and connectivity
settings. As a regular home user, you will have only basic rights that
will allow you to see Dashboard and Diagnostics module.
Configuration of charging station using web interface and more
detailed description of web interface is available in document Etrel
INCH configuration guide.
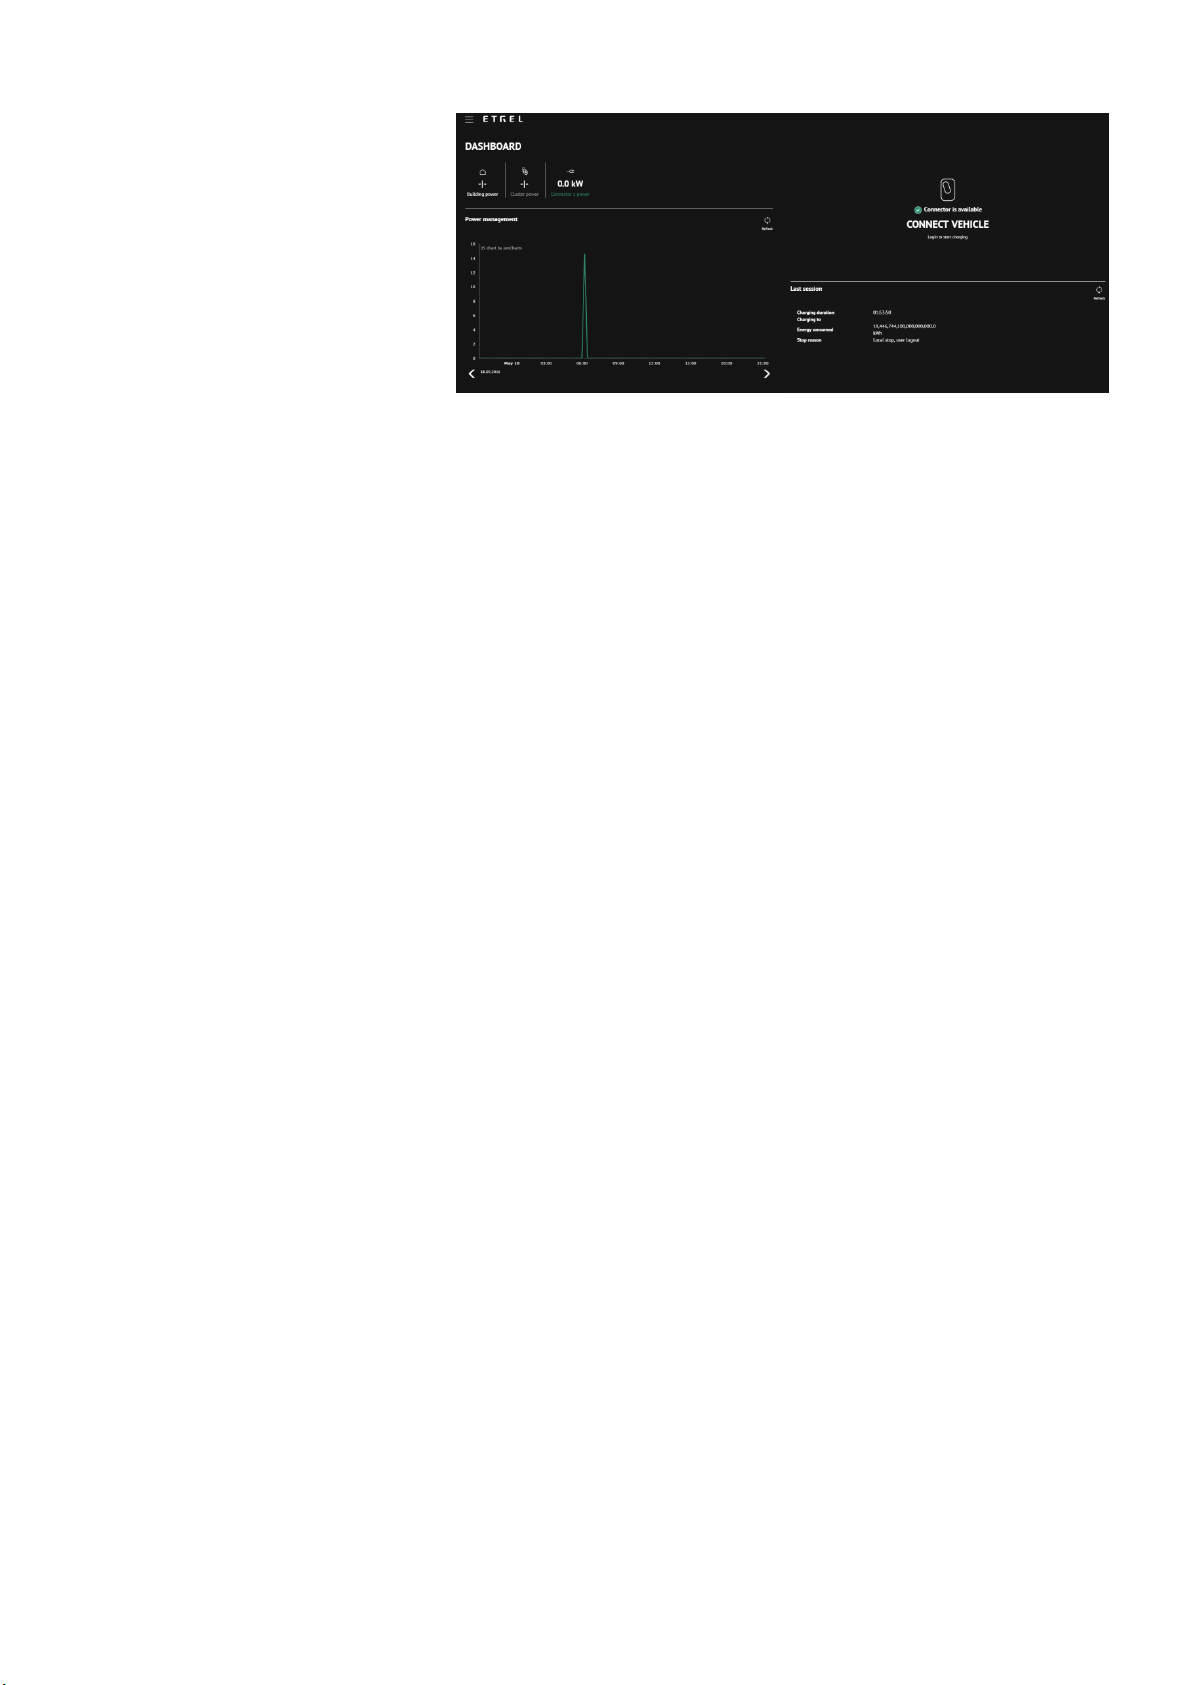
Main da shboard
Main dashboard window allows you to see current power, cluster
power if the charging station is part of the cluster, building power
load, charging station availability and information about the last
session.
21 | 26
Page 22
Etrel Inch | User Manual
Figure 31: Web interface main Dashboard view
Last session status will be shown on the right screen. If anything
went wrong during the session additional information can be
acquired in the Diagnostics menu accessed using the burger menu.
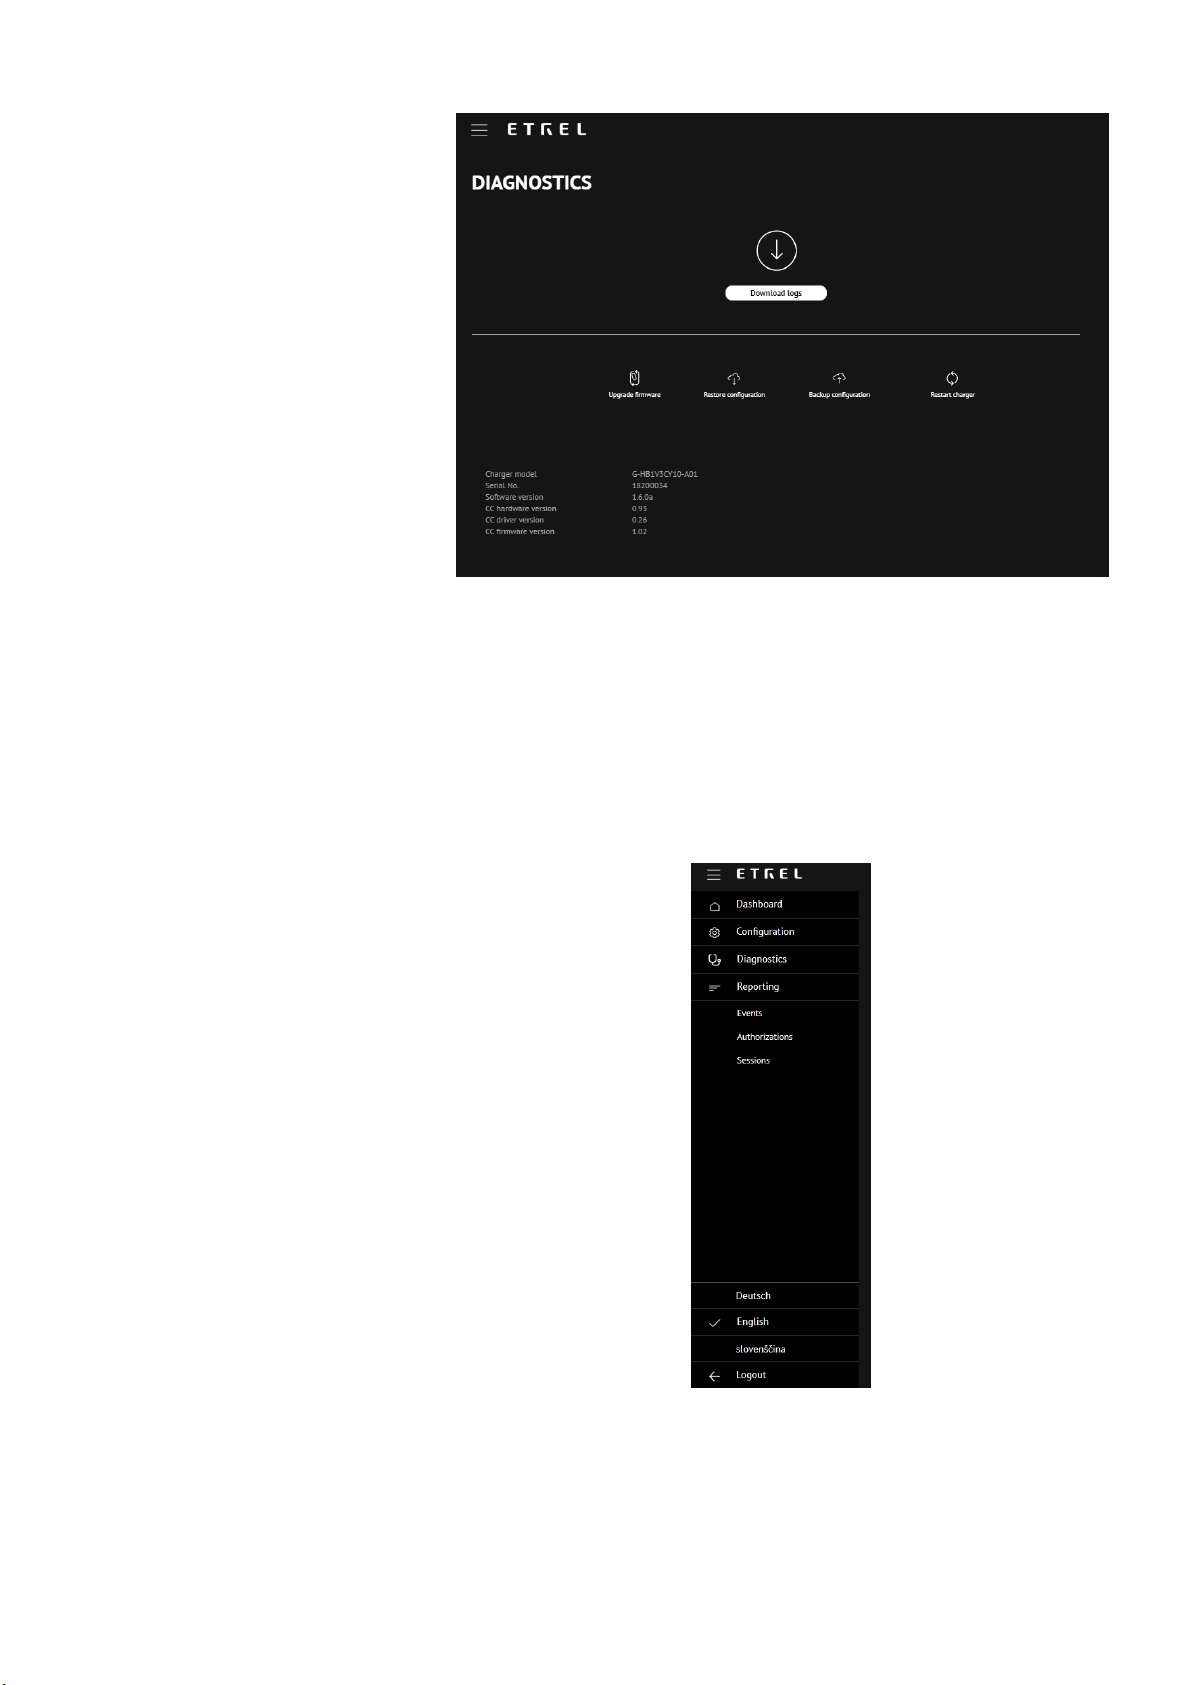
Diagno stics
If you are experiencing problems you can go to the “Diagnostic”
menu where you are going to be able to download logs, which can
be sent to the operator to check what is wrong with charging station.
You will also get basic information about the charging station:
Model,
Serial number,
Hardware version,
Software version,
CC hardware version,
CC driver version and
CC firmware version.
“Diagnostic” module can also be used to upgrade firmware, restore
data and backup your charging session data and reset charging
station remotely.
Backup configuration gives operator option to restore charging
station to the same configuration if something malfunctions with the
system and charging station needs to be restored to default settings.
22 | 26
Page 23
Etrel Inch | User Manual
Figure 32: Diagnostics web interface module
Change the We b interfa ce langu age
You are able to change the language of web interface by pressing
the burger menu and selecting the language at the bottom left
corner. Only languages supported by web interface are available.
Figure 33: Burger menu with the language choices
23 | 26
Page 24
Etrel Inch | User Manual
6 TROUBLESHOOTING
Etrel INCH charging station provides you quick access to the side
maintenance area to execute basic troubleshooting and to reset the
charging station in case there are some problems. You are also able
to reset the charging station straight from the web interface.
ACCESS TO THE SIDE MAINTENANCE AREA
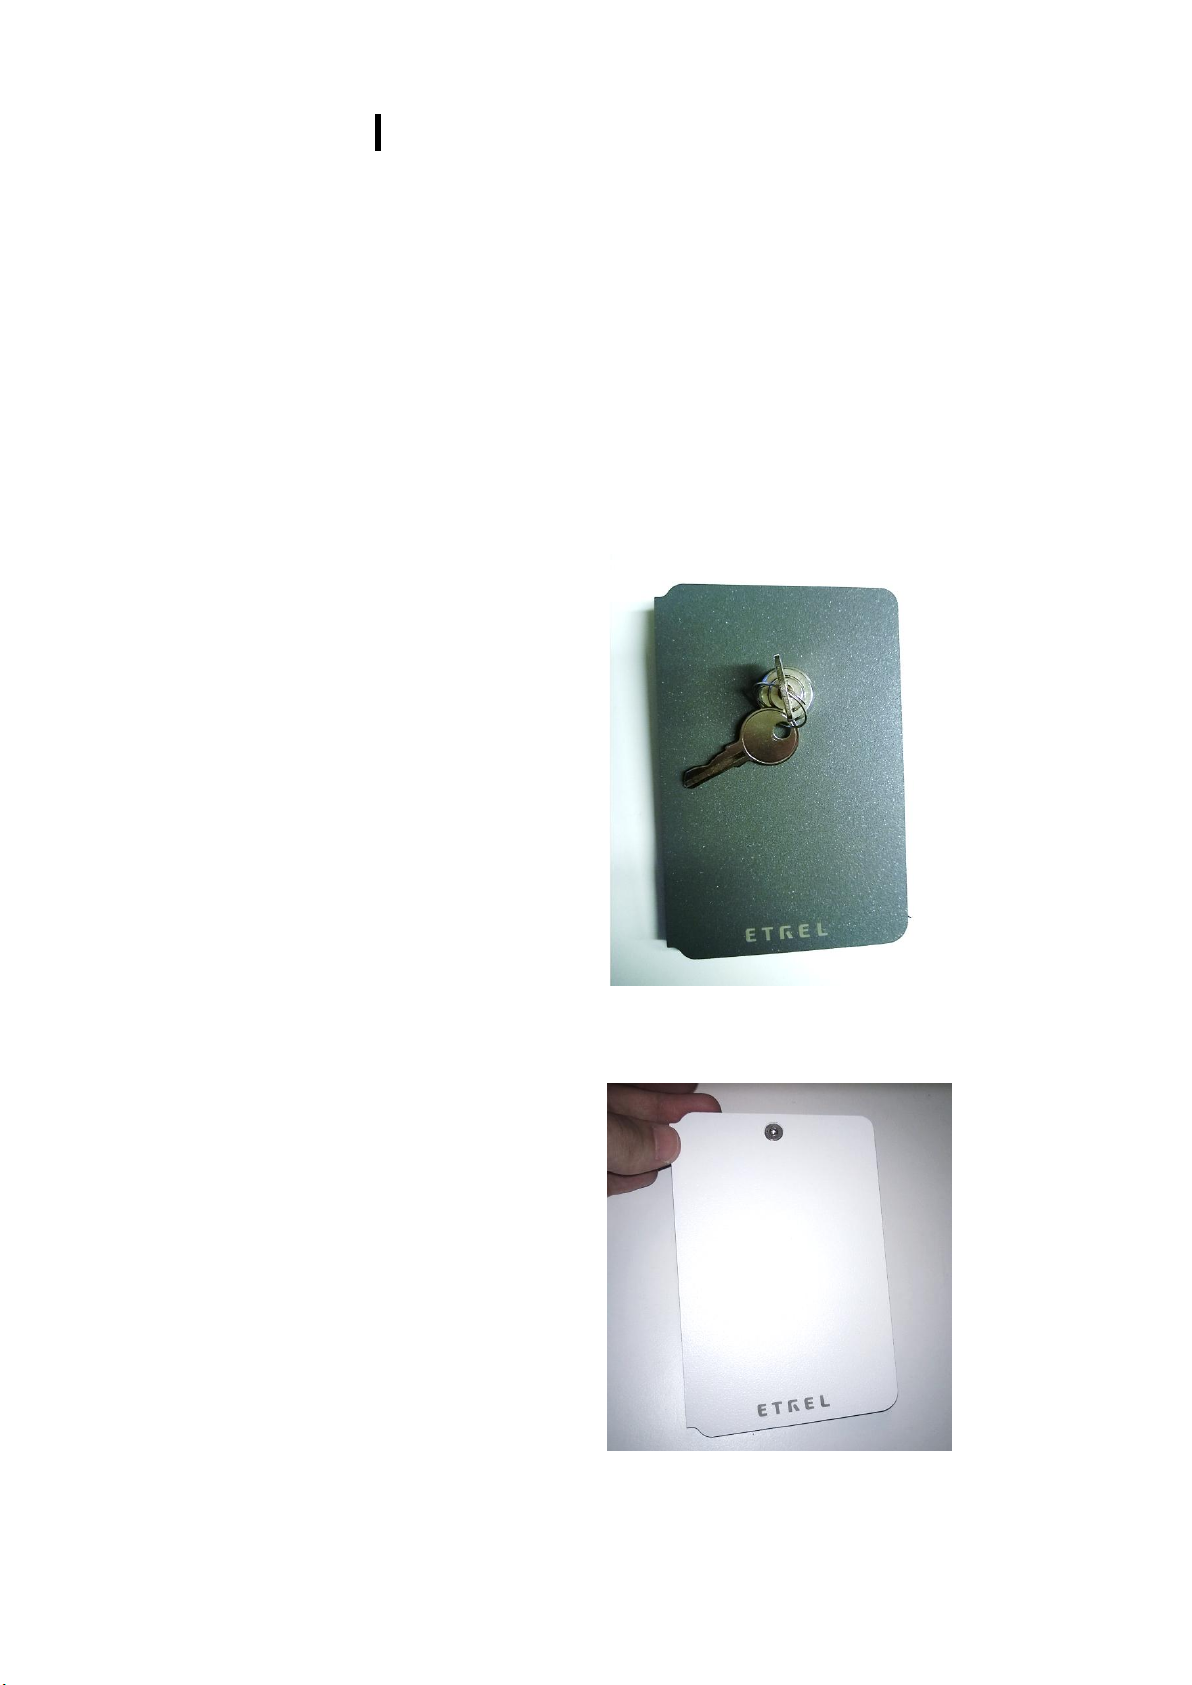
Side maintenance area is protected by the maintenance doors.
Depending on the type of Etrel INCH charging station you are using,
two different doors are available. One with the regular key lock and
one with hex screw (2.5 mm). To access the area, you will need
either key or a hex screw driver.
Figure 34: Maintenance doors with regular key lock
Figure 35: Maintenance doors with hex screw
24 | 26
Page 25
Etrel Inch | User Manual
Important: RCD and Ocervurrent
protection element needs to be tested and
reset by pressing the button on the device
at least once per month. By doing this,
appropriate operation of RCD and
Overcurrent are ensured. If this is not done
the protected device can be dangerous to
users and potential malfunction can be
life-threatening.
On the inside of maintenance doors, you will find sticker with
technical information including basic charging station information,
model type and serial number. When support is contacted it is
important that you know the charging station model type so the
support can quickly help you solve the issue. This information can be
gathered on the web interface in the Diagnostics menu.
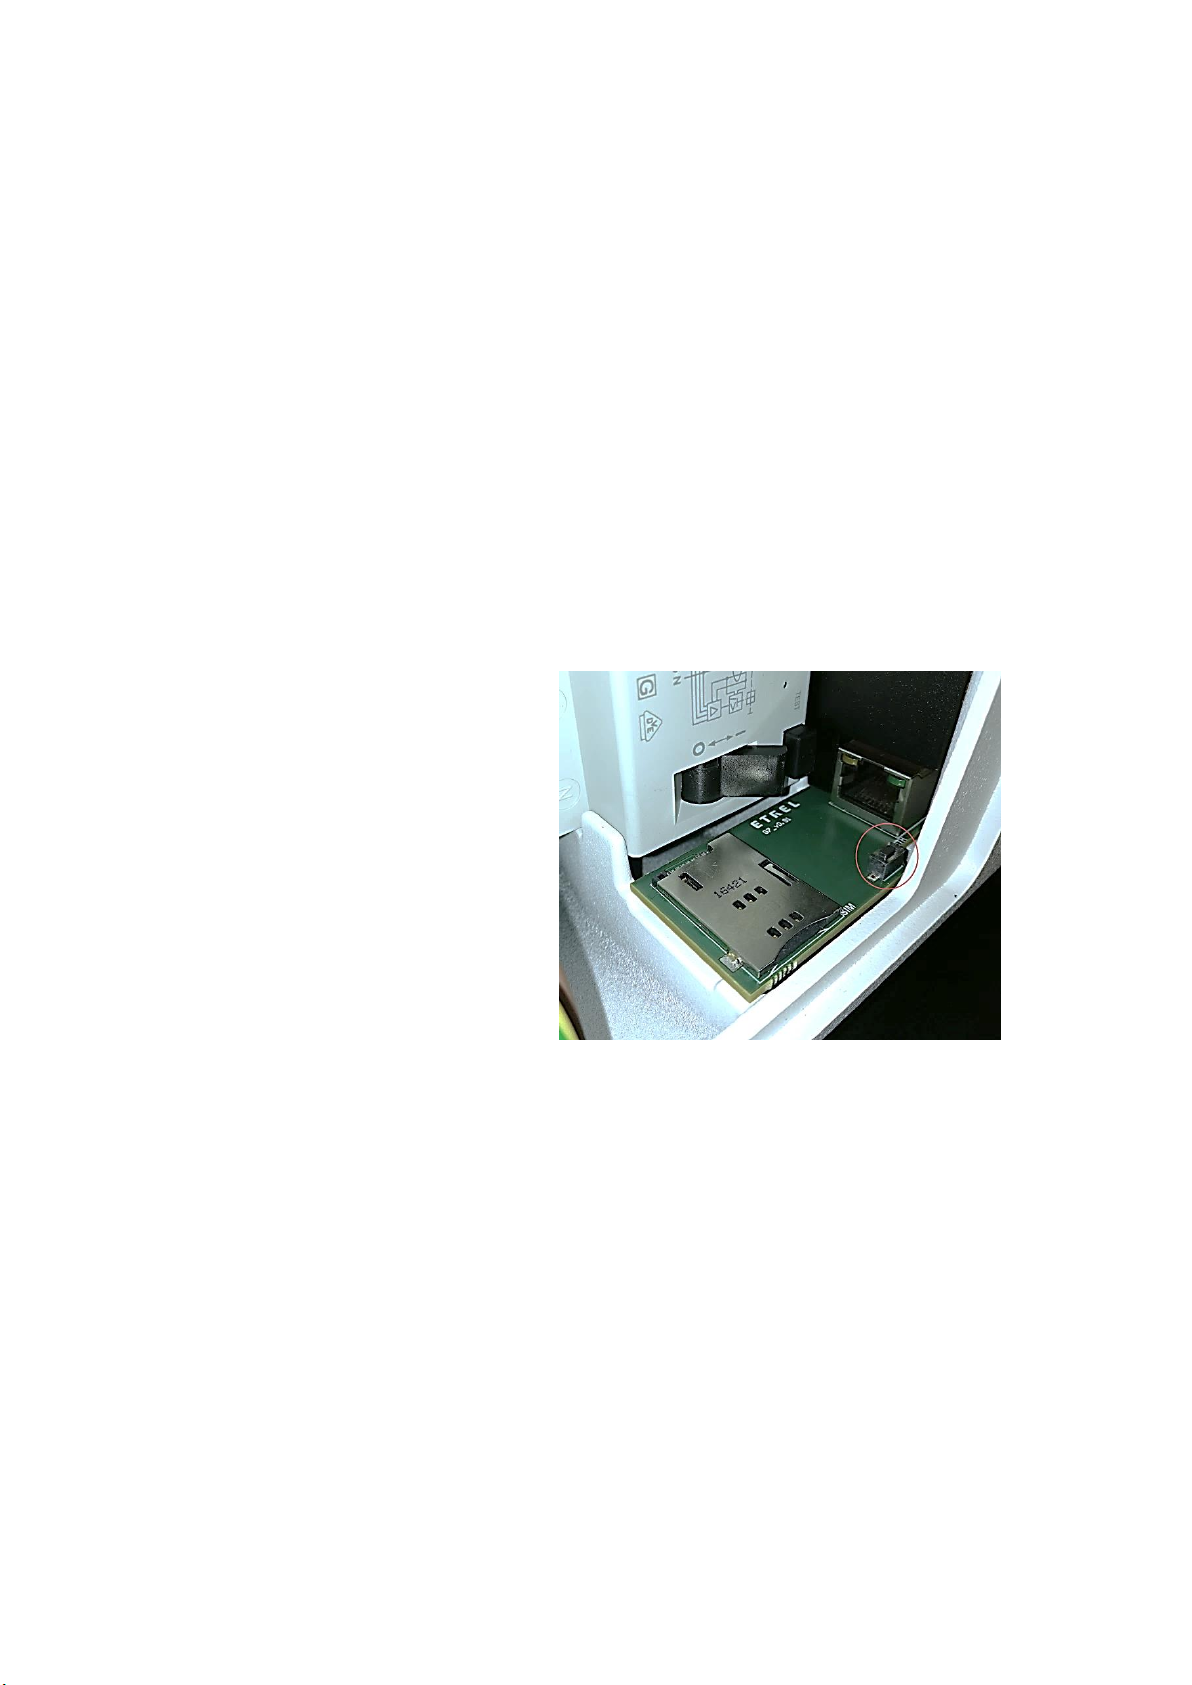
RESETING THE CHARGING STATION
Charging station can be reset by opening the side maintenance doors
and pressing the button inside the maintenance opening.
If you hold the button 4 s the charging station will respond with the
beep after which you will have options on the screen to check the IP
address of the station or to reset the station. You can do the basic
reset and factory reset, which will restore charging station’s factory
settings (username, password, default IP and other settings).
25 | 26
Figure 36: Reset button inside the maintenance opening
RESET AND TEST THE PROTECTION ELEMENTS
One protection element can be installed inside the charging station.
In order to ensure that the element is working properly you need to
test it. This should only be done if RCD or overcurrent protection is
installed inside the charging station.
RCD
The test button on the RCD unit allows user to verify the correct
operation of the device by passing a small current through the RCD
unit. This simulates a fault by creating an imbalance in the sense
coil. If the RCD does not trip when this button is pressed, then the
device must be replaced. You have to change the device also when
Page 26
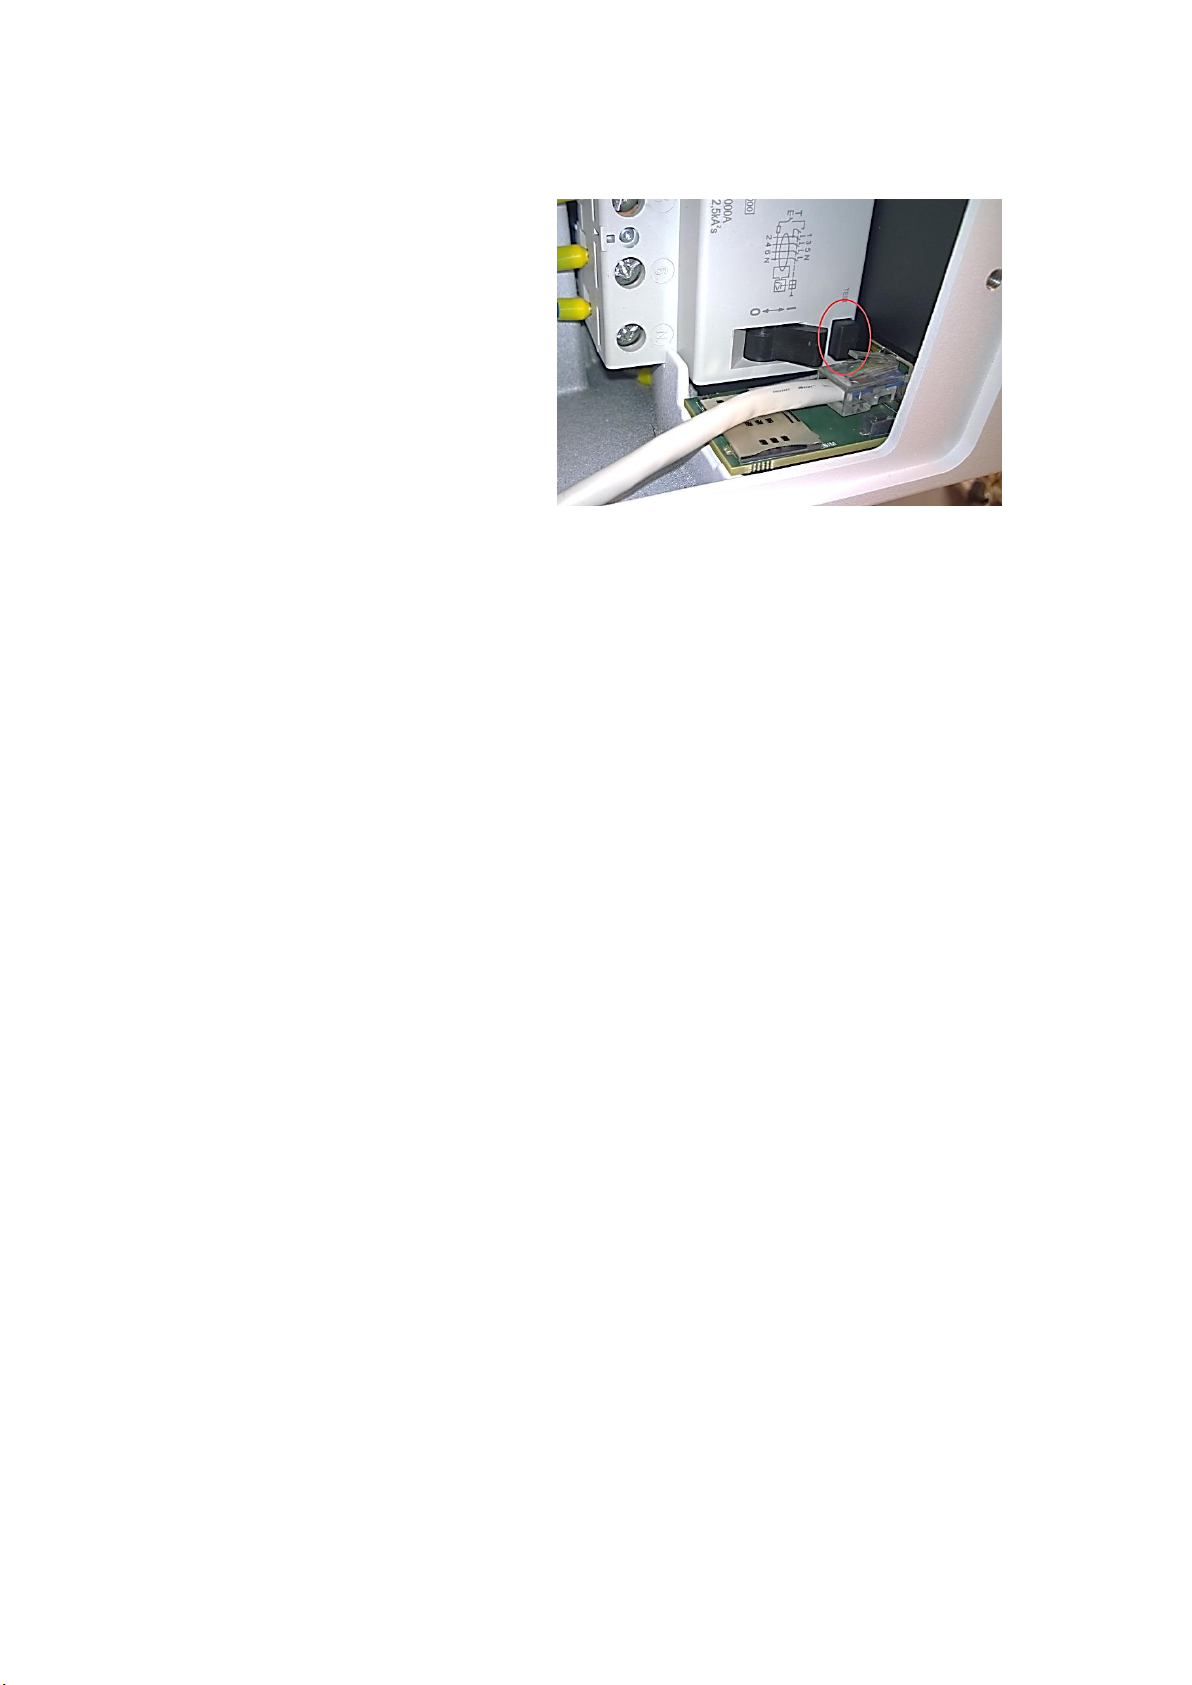
Etrel Inch | User Manual
the fid was tripped but you can’t move the switch back into active
position. To change the RCD please call the support number.
Figure 37: RCD test button
Overcu rrent pr otecti on
Check the overcurrent protection (if installed) once a year for any
visible damages on the surface. If the overcurrent protection is
tripped and the switches can’t return to the active position
something is wrong with the protection and needs to be changed by
maintenance crew.
USING WEB INTERFACE FOR
TROUBLESHOOTING
You can also use web interface for trouble shooting like it is
described in the diagnostics section of chapter 4 Web interface.
For more extensive troubleshooting you should read the
Troubleshooting document for users named: Etrel INCH
Troubleshooting user.
26 | 26
 Loading...