

Page 1
C1 User Manual
350-06710 | TDE03Z
1
Page 2

E-Tourer C1 User Manual……………………
Thank you for purchasing a E-Tourer E Bike.
With care and correct usage your electric bicycle will give many years of service.
Please read this manual fully before use.
Table of Contents Page
Introduction………………………………………………………………………..2
Safety Notice………………………………………………………………………3
Parts & Assembly…………………………………………………………………..5
Specification………………………………………………………..………………7
Understanding Your Battery…………………………………………………………. 8
Safety Checks Before Cycling……………………………………………………….. 9
Bicycle Usage…………………………………………………………..................... 9
Display Operation………………………………………………….............................10
Regular Maintenance………………………………………………….......................12
Warranty Information…………………………………………...................................14
Introduction
Fully charge the battery before use.
This manual contains important information about how to safely use your bike.
It is extremely important that you follow the safety guidelines contained in this manual in order to ensure maximum
safety
It is the owner's responsibility to carefully read all of the contents of this manual and to comply with all laws pertaining
to the operation of bicycles and/or electric bikes in your local jurisdiction
2
Page 3

Safety Notice……………………
Please read these instructions carefully before using the E-Bike. Important information about your new E-Bike is in this
manual.
Warning
Before beginning any exercise program, consult your GP. Evaluate your present fitness level & determine the
exercise program that is most suited to your age & condition.
If you experience any pain or tightness in your chest, irregular heartbeat, shortness of breath, lightheaded or
any other unusual discomfort whilst exercising, stop & consult your GP before continuing.
Maximum Weight Capacity
Your E-Bike is designed for cyclists (inclusive of luggage) weighing up to 120Kg.
General Safety
Safe cycling is an important concern for all bike manufacturers. Using common sense is usually the best way to cycle
safely & get the most out of your E-Bike. Here are some common sense ideas to keep in mind whenever you go for a
bike ride:
Familiarise yourself with your state laws
Many states require different safety devices. It is your responsibility to familiarise yourself with the laws of the state in
which you are cycling, & to comply with those laws (including properly equipping your bike if need be)
Be sure to thoroughly understand how to operate the components of your E-Bike
Always do a mechanical safety check before cycling
Be sure all equipment is adjusted properly, especially the brakes, & that all quick release devices are in the ‘closed’
position before cycling. When you need to react quickly, you need to know how your bike will respond.
Always cycle defensively
While you may be in the right, in a contest between a car & a bike, the car will always win. Always be on the lookout
for potentially dangerous situations.
3
Page 4

Wear a helmet
Wet weather
Take extra care when cycling in wet weather
Brake earlier as you will need a longer distance to stop
Slow down, avoid sudden braking & take corners with added caution
Be more visible on the road
Potholes & slippery surfaces (such as line markings & train tracks) all become more hazardous when
wet
Night riding
Cycle at night only if necessary. Slow down & use familiar roads with ample street lighting if possible
Ensure your bike is equipped with a full set of correctly positions & clean reflectors
Use a properly functioning lighting set, comprising of a white front lamp & a red rear lamp
If using battery powered lights, make sure the batteries are well charged
Some rear lights available have a flashing mechanism - this would enhance visibility
Pedaling technique
Learn to operate the gears properly
Position the ball of your foot on the centre of the pedal
When pedaling, ensure your knees are parallel to the bike frame
To absorb shock, keep your elbows slightly bent
Always wear a helmet when cycling, no matter how short the route may be. Always keep the chin strap securely
buckled. A helmet meeting the appropriate safety standards, would be ideal to protect against head injuries. It must fit
& be worn correctly to do the job efficiently.
4
Page 5
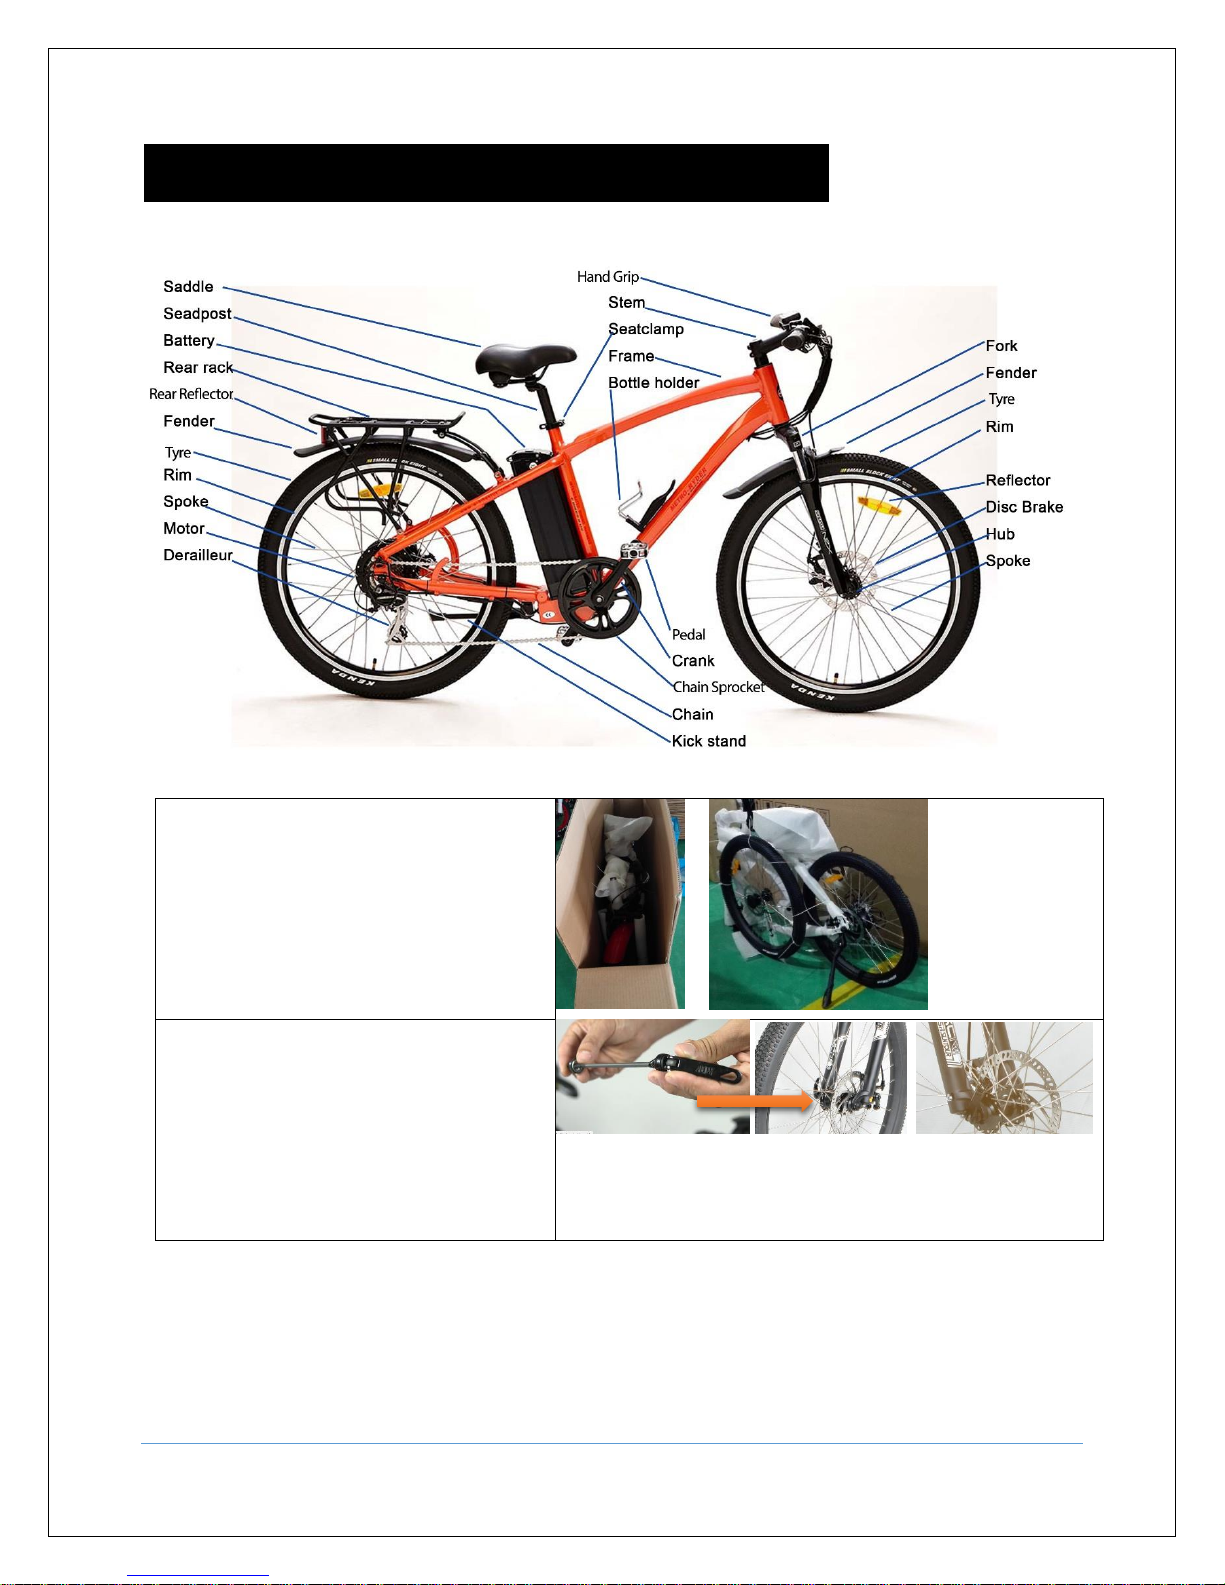
Parts & Assembly……………………
1. Carefully remove the bike from packing carton,
removing all of the protective material, being
careful do not to scratch the painted parts and pull
the cables of the bike.
The assembly must be an operation by two
adults, in the correct order not to incur
accidents or fall.
2. Insert the front wheel into the housings of the
front fork, tighten the wheel with the special
quick-closing device.
5
Page 6
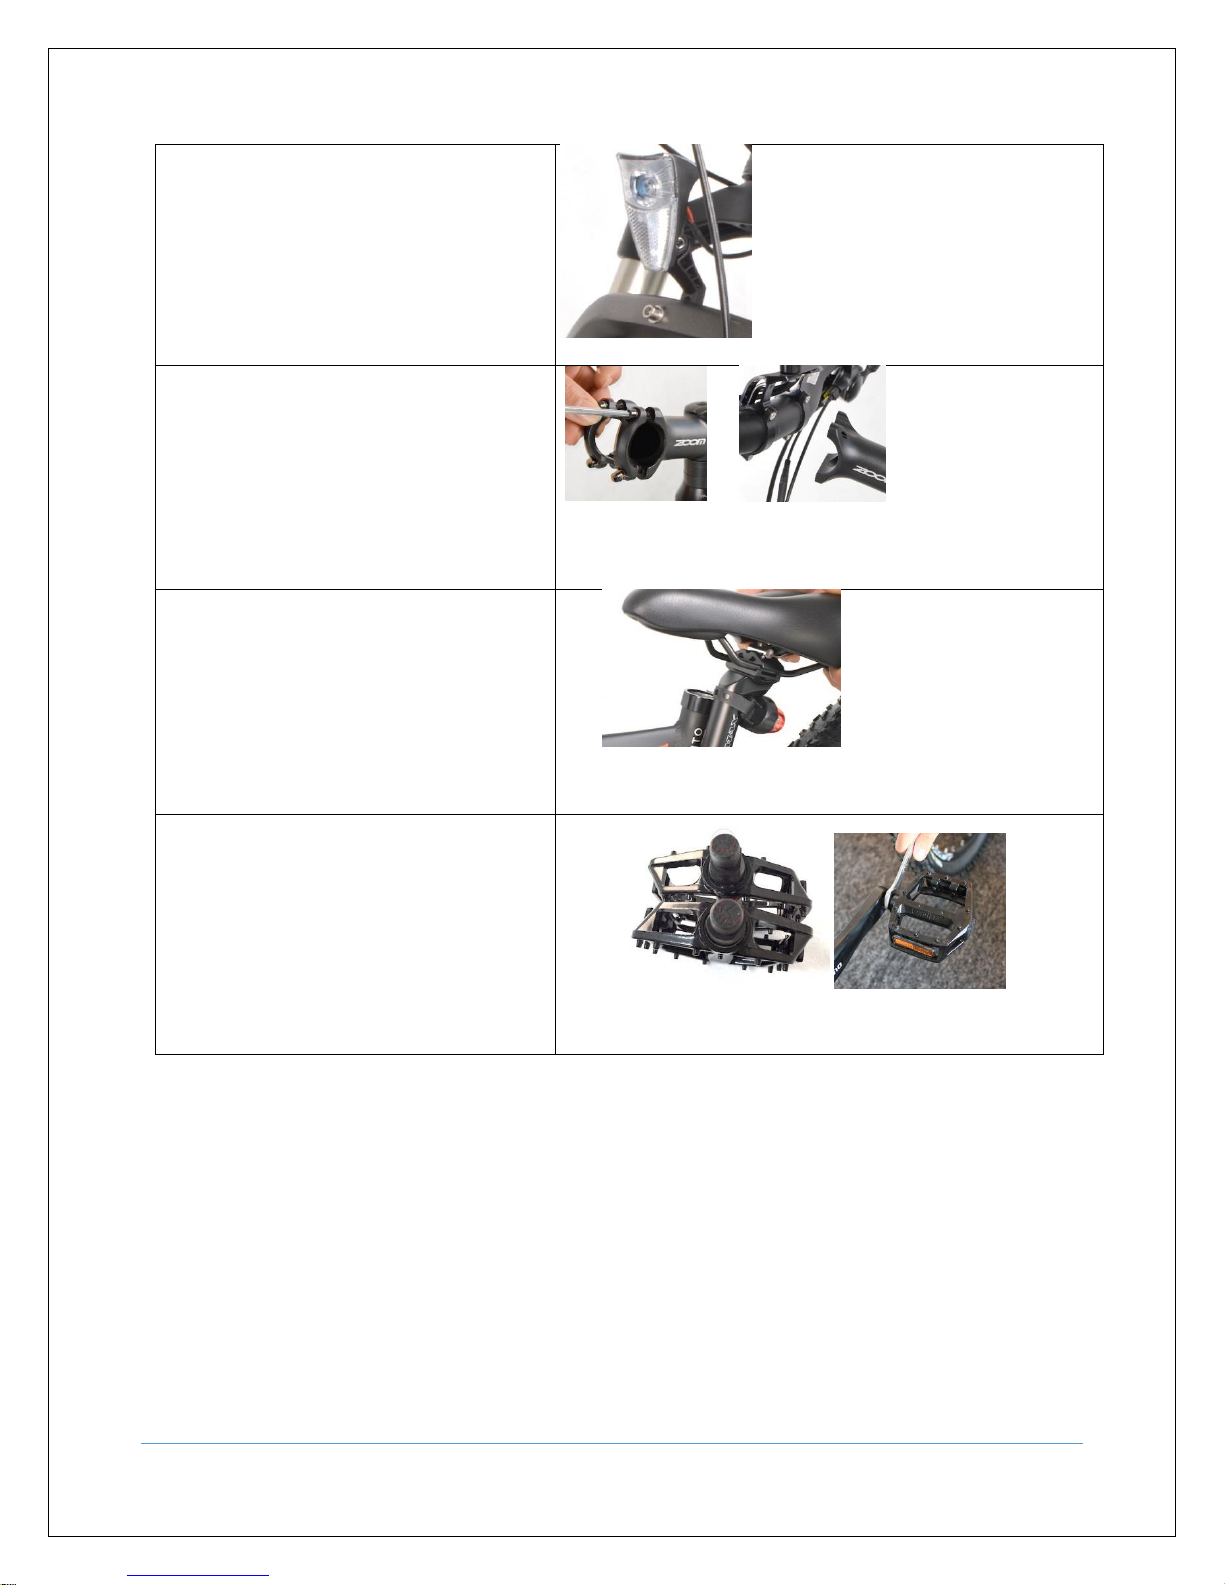
3. Tighten the front light through your bolt, make
sure that the front light is correctly aligned in the
center of the fork.
4. Remove the front plate located on the handlebar
column.
Insert the handlebar in the appropriate housing on the
handlebar column.
Position the previously removed plate in its original
position and tighten the respective 4 bolts; Make sure
the handlebar is in the center position with respect to
the handlebar column.
5. Insert the Saddle column into the bike, making
sure to orient the saddle and tighten the saddle
with the appropriate device on the frame as shown
in the right photo.
6. Identify the right pedal via the R mark on the
pedal axle, meet the L mark identifies the left pedal.
Tighten the left pedal counterclockwise and the
right pedal clockwise in their respective positions to
avoid serious injury when using the bike and
damage to the bike.
CONFIRM that all the bolts and the pedals are
tightened well
6
Page 7
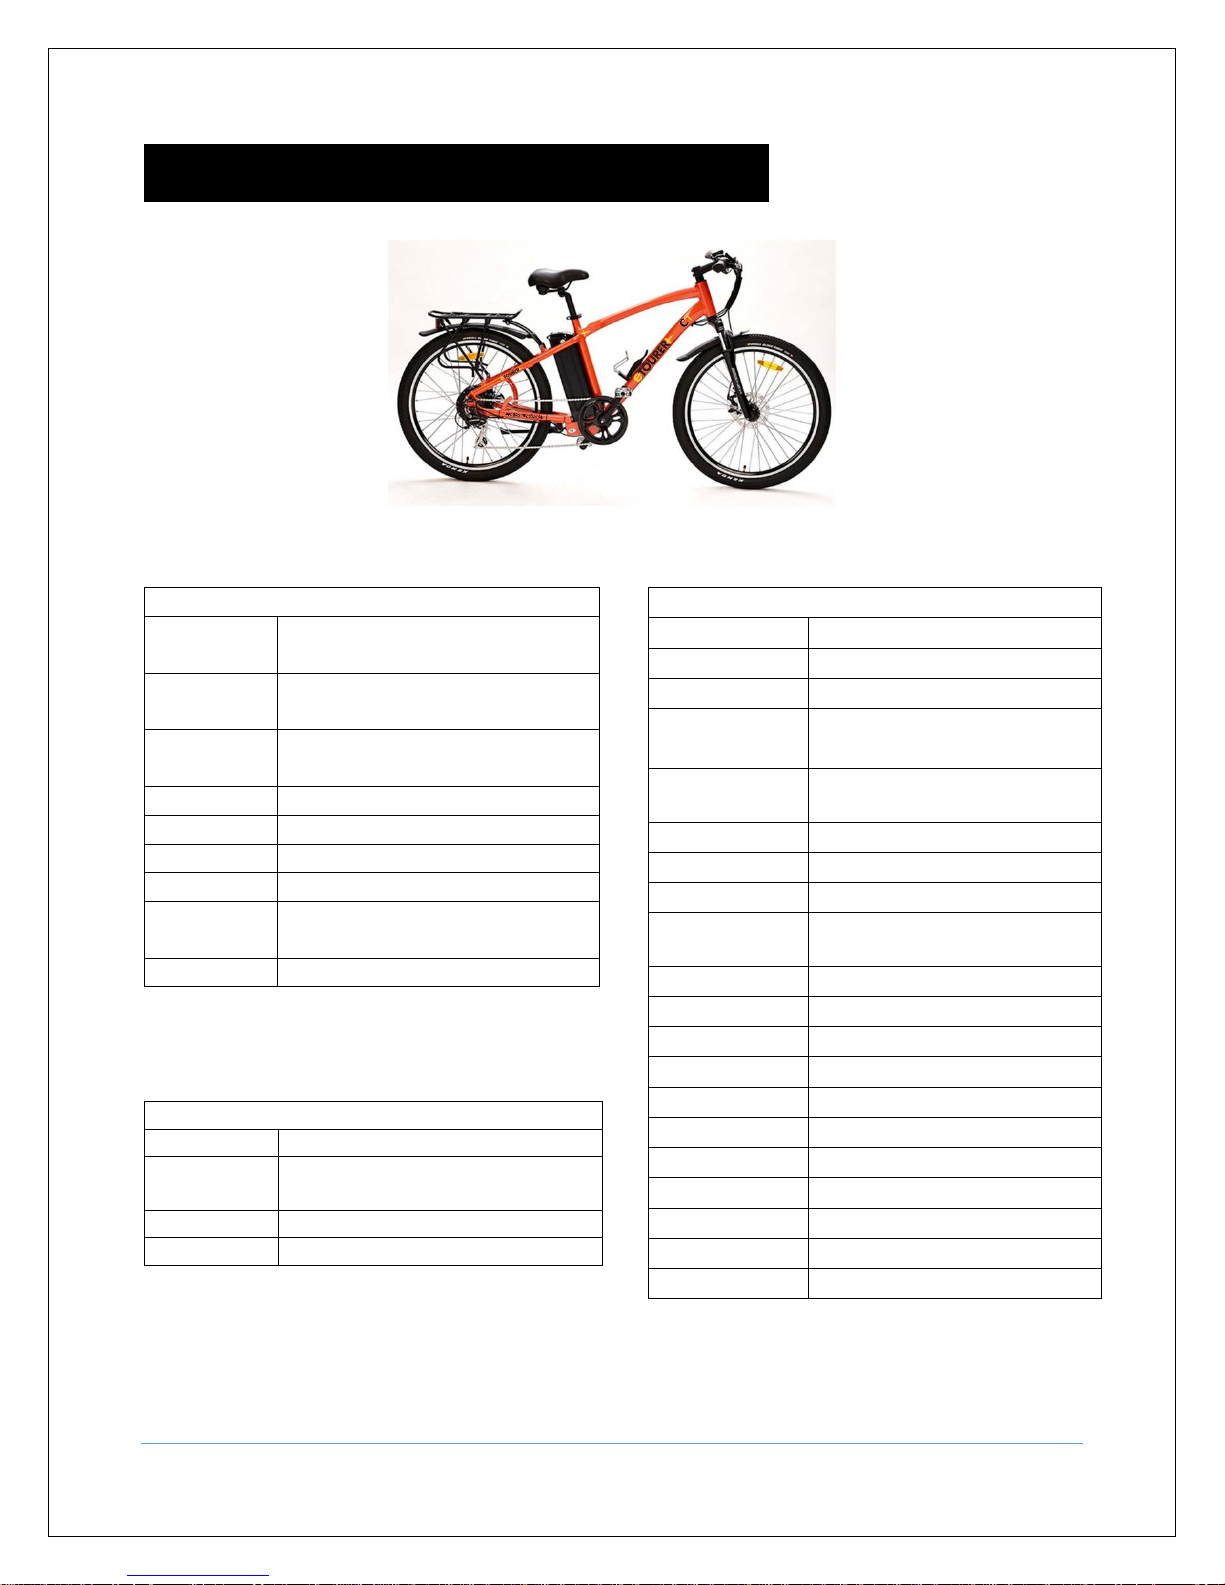
Specifications……………………
Electrical Systems
Motor
250,front driving Brushless motor
with easy release connection
Battery
36V 10 Ah Li-ion Battery, with USB
Port, removable
Charger
100~240V, 50-60Hz, Smart charger,
Plug in AU standard
Charge time
3-5 hours
Display
5-lever LCD display
Operation
Pedal Assisted System & Throttle Grip
PAS
Speed Sensor
Controller
high efficiency intelligent controller,
low noise & durable
Light
LED
Performance
Max Speed
25Km/h
Range
50-55km by PAS,40-50km by only
electric
Max Load
120Kg
N.W / G.W
25kg / 30kg
Main Components
Frame
6061 Alloy Aluminum
Fork
Adjustment suspension
Derailleur
7 gears, Shimano
Brake(F/R)
Mechanical Disc-brake
Brake lever
Alloy lever, power cut when
braking
Tires
26*2.1,with reflective strip
Rim
Alloy Aluminum, Double Wall
Spokes
13g Stainless steel
Hand Grip
Comfort grip with ergonomic
shape
Handle Bar
Alloy aluminum
Stem
Alloy aluminum
Saddle
Soft comfortable
Seat post
Alloy aluminum
Hub
Quick release Hub
Chain wheel
46T,Alloy Aluminum crank
Chain
Rust resistant chain, KMC
Pedal
Alloy Aluminum with reflector
Kickstand
Alloy aluminum, adjustment
Fender
Sports, ABS
Rear rack
Alloy Aluminum
7
Page 8

Understanding Your Battery……………………
The key switch on the battery has 3 positions, 2 o'clock which is turned off and disengaged from the bike ready to be
withdrawn, 4 o'clock which is locked in the bike but switched off and 6 o'clock which is locked and turned on ready to
go. The key cannot be removed when it is in the ‘on’ position
To get maximum life out of your battery please try to maintain a charge in it at all times, this is especially important if
you are not using the bike regularly
A USB port is available on the battery to charge a portable device such as a phone, light or GPS system. The battery
itself cannot be charged via this port
How to Charge the Battery
• Turn the key to OFF
• Insert the plug of the charger into the charging socket of the battery box
• Insert the charger into a wall outlet, a red light should now appear.
• Leave the battery charging for 5-6 hours in a well ventilated area
• When the light on the charger turns green your battery is fully charged
• The charger will become warm whilst charging, this is perfectly normal
• You can charge the battery either while it is on the bike or when it has been removed
• To remove the battery, with the key in the off position, push the key into the battery and turn in an anti-clockwise
direction, you will see a small lug at the top of the battery disappear within the casing, now flip the saddle up and slide
the battery up and off the retaining rail. To replace the battery carry out the opposite procedure and ensure that the
locking lug locates within the hole in the battery rail
Make sure when inserting the battery that the rail engages in the slot provided in the rear of the battery
Precautions whilst Charging the Battery
• Always charge your battery in a dry and clean place, keep the charger dry and clean
• Always turn off the motor and remove the key from ignition before and during charging to prevent serious damage
to the controller and the battery
• Do not attempt to open or make any amendments/repairs to the battery
• Keep out of reach of children
• Do not place anything on top of the charger or battery whilst they are charging
- it is normal for these to get warm during the charging process
• If you do not use your bicycle for a long period of time then please ensure you check the battery on a monthly basis
and charge if necessary
• Never leave the battery in a fully discharged state for more than 24 hours
8
Page 9

Safety Checks Before Cycling……………………
• Before riding, make sure that the battery has sufficient charge for the journey
• Check that the air pressure in the tyres is within limits shown on tyre wall. Please note that riding on underinflated
tyres will reduce the battery range considerably and increase the risk of punctures and broken spokes
• Check that the front and rear brakes are operating correctly
• Check that the front and rear wheels are securely fastened especially quick release skewer, if fitted, is tight when
locked and facing in an upwards direction
• Check that the seat post and handlebars are securely fastened and within the marked limits
• Check lights operate correctly
• Only turn the battery on once you are on the bicycle and ready to go, making sure that the red button that controls
the throttle is not pushed in, if it is you may accidentally touch the accelerator while pushing or moving the bike and
initiate the motor and the bike will jump forward possibly causing you to injure yourself or damage the bike
Bicycle Usage……………………
• Your E-Bike can be used as a normal pedal bike by simply not switching on the battery
• Electric bikes must not be ridden by anyone under the age of 14 on public property
• Frequent braking and starting, low tyre pressures, riding uphill, travelling against a strong wind, excessive use of
throttle and riding on rough or muddy roads will consume extra battery power and shorten the range
• Your electric bike can be used in rain; however, it must not be submerged in water. The controller, batteries, motor
and other electrical devices may be short circuited causing damage and a potentially dangerous situation
• All other operations of your E-Bike are as per a normal pedal cycle
9
Page 10
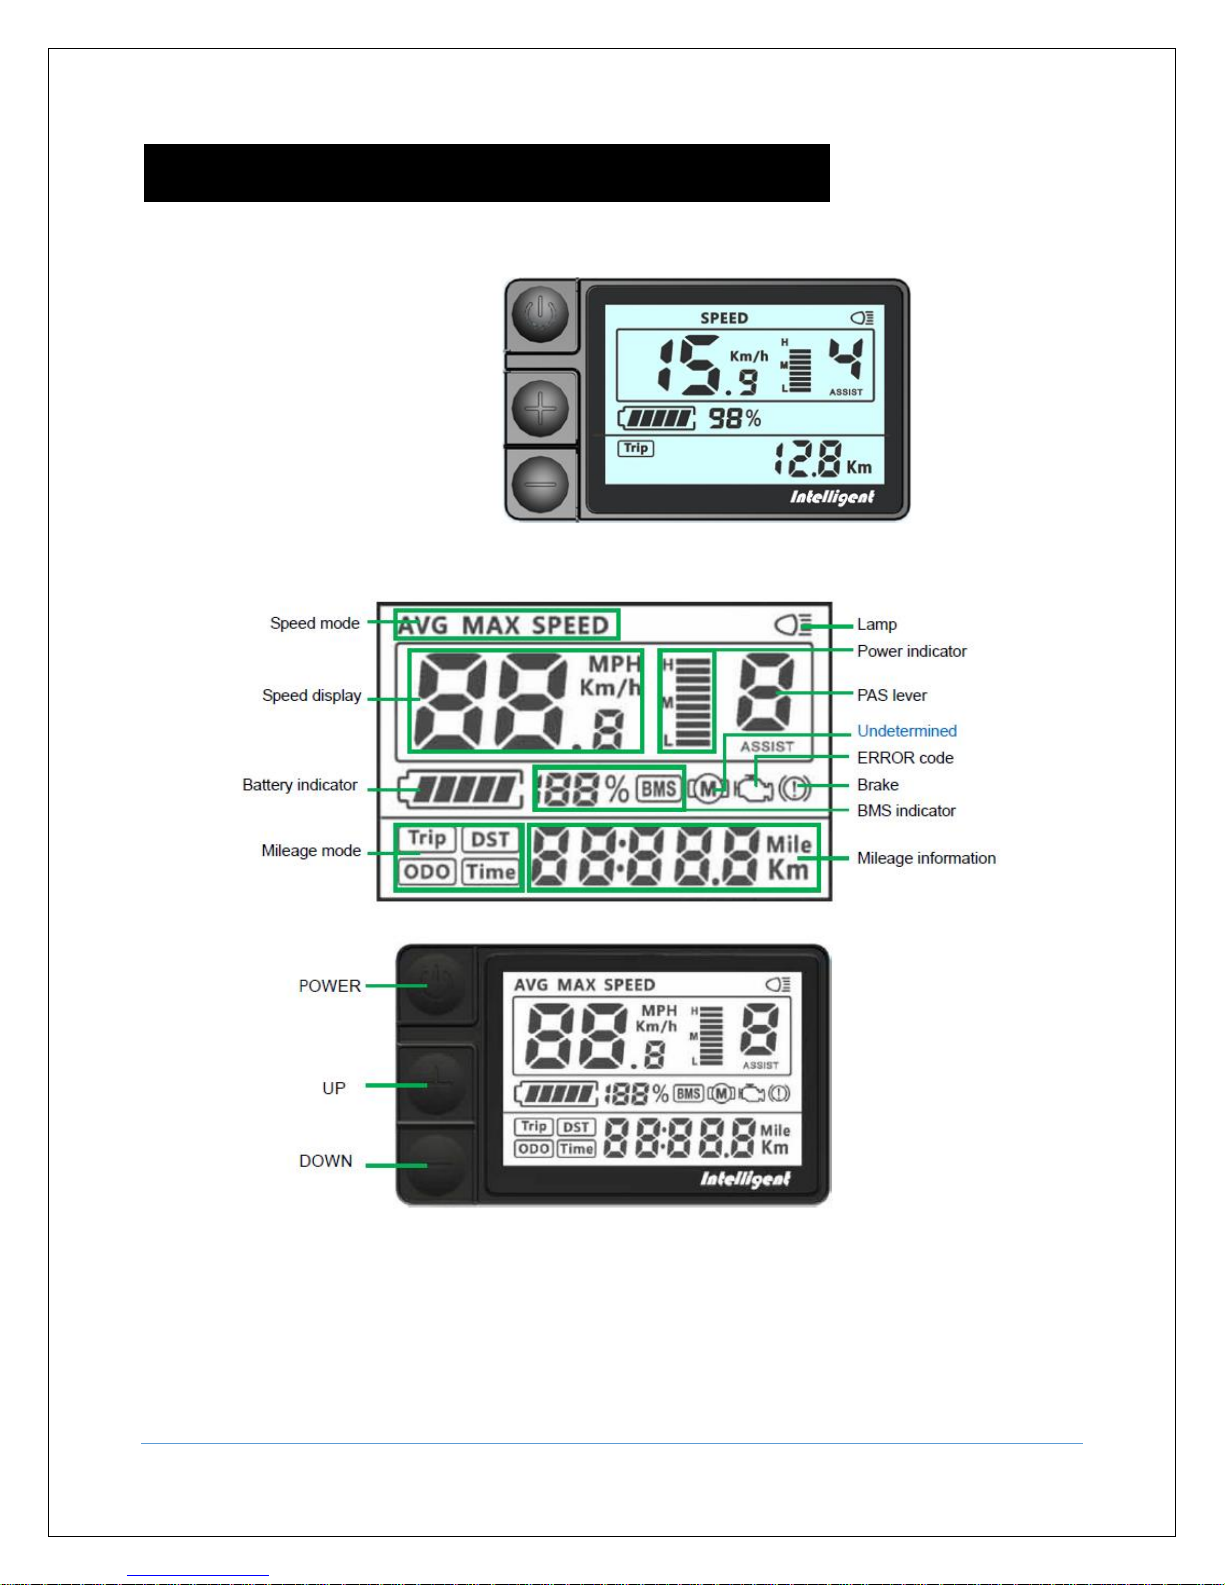
Display Operation……………………
Functions
Serial Communications
Speed (Max/Avg.)
Distance (Trip/Total)
Power Indicator
9-level PAS
Backlight
Parameter Settings
Error code readout
Interface
ON/OFF - Press and hold Power button for 1.5 second can turn on/off the display. The Display can automatically shut
down when there is no operate & ride for X minutes(X could be 0~9).
10
Page 11

Speed mode switch& Mileage mode switch - Short press POWER button can change the speed mode& the mileage
mode, Speed->AVG Speed->MAX Speed->Trip->ODO-> Time.
Headlight/backlight On/Off - Press and hold UP button for 1 second can turn on/off the headlight/backlight.
6km walk - Press and hold DOWN button for 2 seconds can get into walk mode, out of the mode when release the
button.
Data cleanup - Press and hold UP & DOWN buttons together for 1 second to reset temporary data, temporary data
includes AVG Speed / MAX Speed / Trip / Time.
Parameter setting
Double press the POWER button (press interval less than 0.3 second) can get into the parameter setting state. Short
press UP/DOWN buttons to change the parameter value, short press POWER button can switch to the next
parameter. Double press POWER button (press interval less than 0.3 second) can quit from the parameter setting
state. The display will automatically quit the parameter setting state when there is no operation for 10 seconds.
Kilometer / Mile - Press UP/DOWN button to rotate display the symbol km/h / MPH (Km / Mile)
Backlight brightness – Press UP/DOWN button display symbol 1~5 to change the brightness of the backlight.
Level - Short press UP/DOWN button can change the PAS level. Top PAS level is 9, 0 for neutral. Level quantities can
be adjusted according to the customer requirements.
Auto off time - Press UP/DOWN button to change the value from1 to 9, the number represent delay time (minutes)
before display shutdown automatically, default value is 5 minutes.
Wheel diameter - Press UP/DOWN button rotate display the symbol 16/18/20/22/24/26/700C/28/29, value represents
the diameter of the wheel (inch). Wrong value for wheel diameter will cause speed & mileage abnormalities.
Voltage set - Press UP/DOWN button rotate display the symbol 24V/36V/UbE, UbE means user-defined voltage
setting, this parameter can be set through computer.
Password/Speed limit set - Press UP/DOWN buttons to change the password value (0~9), short press POWER button
to switch the password item, password is 4 digits, the default password is "1919". Press POWER button when
password adjustment is completed. Display will return to the Voltage set item if the password is incorrect. Correct
password will enter the Speed limit set item.
Speed limit set - The default value is 25km/h. Press UP/DOWN buttons to modify the value, the value can be set from
10 to 45km/h. Press POWER button to confirm when you finish the adjustment.
11
Page 12

Regular Maintenance……………………
Wheels
The wheels should be centred in the fork or dropouts, if you hear any irregular noise from the wheels inspect them as
they may need repairs. The wheels should rotate smoothly without wobbling from side to side, if this happens, please
ensure they are fastened correctly. You can check the bearing play of the hubs by lifting the bicycle and spinning the
wheel, it should continue to spin for several times after you have stopped spinning manually
To check the play of the hubs try to move the rim from side to side between the forks, no play should exist. If you
detect play or if the wheel is difficult to turn, the bearing must be adjusted or replaced.
Brake levers
There is an automatic power SHUT OFF sensor on the brake levers; every time the brake is applied the power will
automatically shut off and when released the power will return.
Rims
The rims should be smooth and without cracks, breaks or bulges
Spokes
Check that no spokes are broken or becoming loose. If there is some minor loosening of the spokes they may need
tightening. If there is a loose spoke or the rim has side play of more than 4mm, we recommend you immediately take
your bike to a local bike stockist to be repaired. Riding with loose spokes will cause the wheel to fail
Tyres
Inflate your tyres to the pressure embossed on the sidewall before use. Every time you ride make sure the tyres are
inflated according to the psi as stated on the sidewall of your tyre i.e. 40-65psi. Improper tyre pressure will make
riding more difficult, cause excessive wear and premature failure of the tyre. The tyre should be properly seated in the
rim and the fitting of the tyre bead should be checked.
If the tube is pinched between the rim and the tyre it will fail when inflated. Make sure the tyre is not cracked or worn
unevenly. Check the tyres for bulges. Check and make sure that the valve stem is straight in the rim. Irregular tyres
should be replaced immediately. Please note that riding on underinflated tyres will reduce the battery range
considerably
12
Page 13

Brakes
Riding with brakes that are worn or damaged, or with worn cables or wheels that are in poor condition may result in
losing control of your bike. Wet weather may hinder your brake performance so please take extra care in these
conditions.
Before each ride check to make sure your brake cables are free of obstacles and are working properly before operating
the bike. It is also good practice to make sure the wheels spin freely i.e. the brakes are not binding
Power On/Off
The power on and off is controlled by turning the key located at the side of the battery. This key also locks the battery
to the bike. The LCD display, located on the handlebars also indicates the charge level of the battery
Batteries/Fuse
The battery is a 36v lithium and must not be tampered with in any way. All the batteries have an accessible fuse. This
fuse is 30amps as main protection for the circuit.
Do not attempt to open the lithium battery, doing so may cause chemical, electrical or fire hazards.
Unauthorised opening of the battery casing will negate any warranty
Lubrication
To maintain a smooth operation of the chain and the gear cogs put a small amount of lubricating oil on them every 6
months or sooner if they look dry
13
Page 14

Warranty Information……………………
Warranty Against Defects
1 WHAT THIS WARRANTY RELATES TO
1.1 This warranty covers goods supplied by Coast RV Pty Ltd T/A Coast to Coast RV Services ("Supplier") to the Client ("Goods") and relates
to any defects in materials and workmanship under normal use and maintenance (“Defect”).
2 WHAT THE SUPPLIER WILL DO TO HONOUR THE WARRANTY
2.1 The Supplier will:
(i) replace or repair the Goods or the defective part of the Goods free of charge;
(ii) arrange for the Goods or the defective part of the Goods to be repaired or replaced by a qualified repairer free of charge.
2.2 The Supplier reserves the right to replace defective parts of the Goods with parts and components of similar quality, grade or composition
where an identical part or component is not available.
2.3 Goods presented for repair may be replaced by refurbished goods of the same type rather than being repaired. Refurbished parts may be
used to repair the goods.
3 WHAT THE CLIENT MUST DO TO CLAIM THE WARRANTY
3.1 To claim the benefit of the warranty, the Client will need to (sequentially):
(i) first contact the Supplier; and
(ii) present the defective Goods to the Supplier for inspection, including inspection for defective workmanship, or otherwise provide
evidence of the claimed Defect, accompanied by evidence of proof of purchase and date of delivery, and if applicable, evidence
of maintenance performed in accordance with the relevant maintenance schedules.
3.2 The claim listed in clause 3.1 may be made in person, or the claim may be sent to the address listed on this form, including the particulars
required under clauses 3.1(i) and 3.1(ii).
3.3 The appropriate form for making a claim for warranty is as attached.
4 DURATION OF WARRANTY
4.1 The frame of your new E-Bike is warrantied for 3 years from date of purchase
4.2 The motor and controller is warrantied for 24 months from the date of purchase
4.3 The battery is warrantied for 18 months from the date of purchase
4.4 The Charger is warrantied for 12 months from the date of purchase
4.5 All other compenents are warrantied for 6 months (excludes consumable items such as tyres, brake pads, cables, chain and sprockets)
4.6 Failure due to poor care and maintenance, accidental damage, overloading with excessive weight, towing or misuse will not be covered
by warranty
4.7 If a Defect does not materialise in the Goods prior to the date provided in clause 4.1, the Supplier will have no liability to the Client under
this warranty.
5 RESPONSIBILITY FOR COSTS OF CLAIM UNDER THIS WARRANTY
5.1 The Supplier is responsible for the costs directly associated with repairing or replacing the Goods in accordance with clause 2.1 only.
5.2 Any works required to be completed in addition to fixing the Defect are the responsibility of the Client. Additional works includes any
costs associated with any testing or repair of the Goods or any goods to which they are fitted, undertaken by a third party in relation to
any defect without prior authorisation from the Supplier.
14
Page 15

5.3 Where it is determined that the Goods do not have a Defect, the Client will be charged a GST exclusive inspection fee of forty-five dollars
($45.00AUD in Australia or $45.00NZD in New Zealand) plus freight costs for the return of the Goods, this is subject to change without
notice.
5.4 The cost of delivery and insurance of the Goods to and from the Supplier, travel costs to and from the Supplier, and the cost of inspecting
and testing the Goods are the sole responsibility of the Client.
6 WARRANTY LIMITATIONS
6.1 The Supplier makes no warranties or representations other than those set out in this warranty document except as is required by law.
6.2 The Supplier will not be liable under this warranty:-
(i) to the Client or any other person for any consequential, direct or indirect loss, damage or costs incurred or suffered by the Client
or any other person, including but not limited to damage to persons, other property, loss of turnover, loss of profits, loss of
business or goodwill;
(ii) to the Client for transportation or travel costs which are the Client's responsibility;
(iii) for damage or defects in any Goods caused by improper transportation, storage or any other misuse, neglect or accident.
(iv) for the installation of the Goods. Any fault or defect due to installation should be referred to the installer. The Goods must be
installed in accordance with the Manufacturer’s instructions and any relevant legislation or code.
6.3 This warranty covers the Client only and it is not transferrable if the Goods are sold by the Client during the warranty period.
7 WARRANTY EXCLUSIONS
7.1 This warranty will not apply where:
(i) the Goods have been improperly modified or repaired or the Good's defect has arisen due to the Client's failure to properly install,
fit, maintain, service or use the Goods in accordance with the specifications and instructions provided by the Manufacturer,
including a failure to comply with the relevant maintenance schedule (where applicable);
(ii) the Supplier cannot establish any Defect in the Goods after testing;
(iii) the Goods have been used other than for the purpose for which they were designed;
(iv) the Goods have been subject to abnormal conditions, including but not limited to temperature, pressure, stress, load or similar;
(v) the Client or installer have used or fitted non-genuine or non-approved parts and accessories to the Goods or have failed to use
recommended parts and accessories;
(vi) the Good's defect has arisen due to abuse, misuse, neglect or accident;
(vii) the Goods have not been installed in accordance with the relevant instructions;
(viii) the Good’s defect is caused by use or fair wear and tear of the Goods (or expendable parts).
8 RIGHTS AT LAW
8.1 The benefits given to the Client under this warranty are in addition to other rights and remedies of the Client at law in rel ation to the
Goods.
8.2 In Australia our Goods come with guarantees that cannot be excluded under the Australian Consumer Law. You are entitled to a
replacement or refund for a major failure and for compensation for any other reasonably foreseeable loss or damage. You are also entitled
to have the Goods repaired or replaced if the Goods fail to be of acceptable quality and the failure does not amount to a major failure.
15
Page 16

WARRANTY CLAIM FORM
Warranty Providers Name:
Coast RV Pty Ltd trading as Coast to Coast RV Services
ABN 49 097 104 492 - ACN 101 461 330
Warranty Providers Address:
PO Box 6287, Silverwater NSW 1811 Australia OR;
PO Box 58-054 Botany AUCKLAND 2163 New Zealand
Client:
Contact No.
Description of Goods provided:
Receipt enclosed: (tick box)
Yes No
Receipt No:
Description of defects (Give as much detail as
possible. Use a separate page if required):
Date of purchase/services provided:
I hereby declare that the information provided above is true and correct and to the best of my knowledge and belief and I have
complied with all the conditions of the warranty.
Signed:
Name:................................................................................................
(please print)
Dated: ................................................................................................
[Please note, the issue or completion of this form by the Client does not constitute an admission of liability by the Supplier]
16
 Loading...