

E-TOP NR620g User Manual
NR620G Router
Quick Setup Guide
1
Quick Setup Guide V1.0

Table of Contents
TABLE OF CONTENTS........................................................................................................................... 2
FCC CAUTION........................................................................................................................................... 4
CHAPTER 1 NAVI NR620G’S ROUTER MODE QUICK SETUP.......................................... 5
1.1 ROUTER MODE’S QUICK SETUP INSTRUCTION.................................................................. 5
1.2 THE INTRODUCTION OF ROUTER MODE’S QUICK SETUP................................................. 9
1.2.1 WAN Setup.................................................................................................................. 10
1.2.1.1 WAN Setup–Static IP....................................................................................................... 11
1.2.1.2 WAN Setup–Dynamic IP................................................................................................12
1.2.1.3 WAN Setup–PPPoE............................................................................................................12
1.2.1.4 WAN Setup–PPTP ..............................................................................................................13
1.2.2 LAN Setup.................................................................................................................... 14
1.2.3 Wireless Setup.......................................................................................................... 16
1.2.4 Time Server Setup.................................................................................................. 17
1.2.5 Change Password.................................................................................................... 17
1.2.6 Router Basic Setup Finish.................................................................................. 18
1.3 ROUTER MODE’S APPLICATION SETUP OF QUICK SETUP.............................................. 19
1.3.1 Folder Management Setup................................................................................. 20
1.3.2 User Account Management Setup................................................................. 22
1.3.3 Firewall Setup........................................................................................................... 23
1.3.4 QoS Configuration Setup.................................................................................... 24
1.3.5 FTP Server Setup..................................................................................................... 25
1.3.6 Printer Server Setup ............................................................................................. 26
1.3.7 Web Camera Server Setup................................................................................. 27
1.3.8 Download Server Setup....................................................................................... 28
1.3.9 Samba Server Setup.............................................................................................. 29
1.3.10 Application Setup Finish..................................................................................... 30
CHAPTER 2 NAVI NR620G’S AP MODE QUICK SETUP.....................................................31
2.1 AP MODE’S QUICK SETUP INSTRUCTION......................................................................... 31
2.2 THE INTRODUCTION OF AP MODE’S QUICK SETUP ........................................................ 34
2.2.1 LAN Setup.................................................................................................................... 35
2.2.2 Wireless Setup.......................................................................................................... 37
2.2.3 Time Server Setup.................................................................................................. 38
2.2.4 Change Password.................................................................................................... 38
2.2.5 AP Basic Setup Finish........................................................................................... 39
2.3 AP MODE’S APPLICATION SETUP OF QUICK SETUP ....................................................... 40
2
Quick Setup Guide V1.0

2.3.1
Folder Management Setup................................................................................. 41
2.3.2 User Account Management Setup................................................................. 43
2.3.3 FTP Server Setup..................................................................................................... 44
2.3.4 Printer Server Setup ............................................................................................. 45
2.3.5 Web Camera Server Setup................................................................................. 46
2.3.6 Download Server Setup....................................................................................... 47
2.3.7 Samba Server Setup.............................................................................................. 48
2.3.8 Application Setup Finish..................................................................................... 49
3
Quick Setup Guide V1.0

Federal Communication Commission Interference Statement
This equipment has been tested and found to comply with the limits for a Class B
digital device, pursuant to Part 15 of the FCC Rules. These limits are designed to
provide reasonable protection against harmful interference in a residential
installation.
This equipment generates uses and can radiate radio frequency energy and, if not
installed and used in accordance with the instructions, may cause harmful
interference to radio communications. However, there is no guarantee that
interference will not occur in a particular installation. If this equipment does cause
harmful interference to radio or television reception, which can be determined by
turning the equipment off and on, the user is encouraged to try to correct the
interference by one of the following measures:
. Reorient or relocate the receiving antenna.
. Increase the separation between the equipment and receiver.
. Connect the equipment into an outlet on a circuit different from that to which the
receiver is connected.
. Consult the dealer or an experienced radio/TV technician for help.
FCC Caution: To assure continued compliance, any changes or modifications not
expressly approved by the party responsible for compliance could void the user's
authority to operate this equipment. (Example - use only shielded interface cables
when connecting to computer or peripheral devices).
FCC Radiation Exposure Statement
This equipment complies with FCC RF radiation exposure limits set forth for an
uncontrolled environment. This equipment should be installed and operated with a
minimum distance of 20 centimeters between the radiator and your body.
This transmitter must not be co-located or operating in conjunction with any other
antenna or transmitter.
The antennas used for this transmitter must be installed to provide a separation
distance of at least 20 cm from all persons and must not be co-located or operating
in conjunction with any other antenna or transmitter.
This device complies with Part 15 of the FCC Rules. Operation is subject to the
following two conditions:
(1) This device may not cause harmful interference, and (2) This device must
accept any interference received, including interference that may cause undesired
operation.
4
Quick Setup Guide V1.0

Chapter 1 Navi NR620G’s Router Mode Quick Setup
1.1 Router Mode’s Quick Setup Instruction
Please open a Microsoft Internet Explorer, and enter http://192.168.1.1
(Default Gateway) into browser’s blank:
Then you will see the configuration page below:
Product Home Page
Please click on Administrator button to login to setup at first time, also can
change any settings in future. Only the Administrator has the right to set and
change all settings.
User Name and Password
5
Quick Setup Guide V1.0

Please input in the blanks, the factory default values for User Name and Password
are “admin” and “admin” (all in lowercase letters); after inputting, please click on
“Login” to enter the homepage as below:
6
Quick Setup Guide V1.0
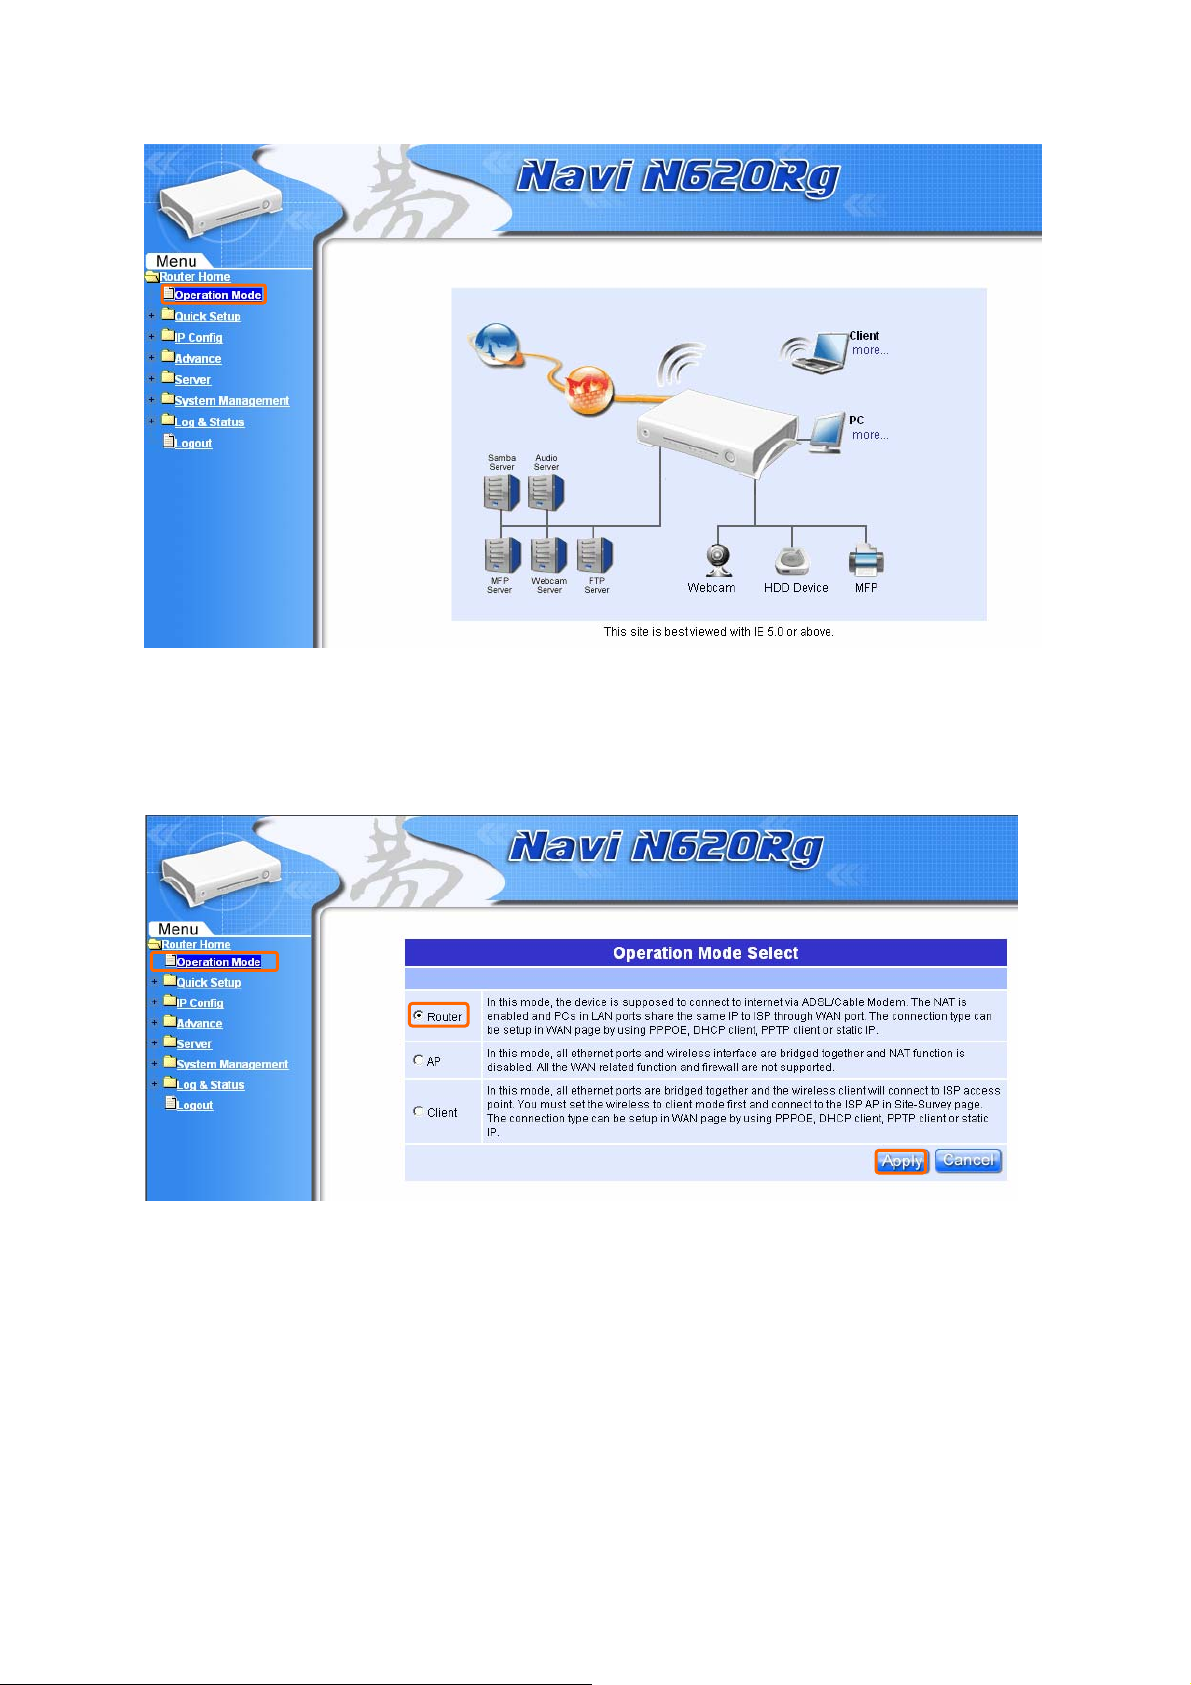
Please select the “Operation Mode” , and then select “Router” and click on “Apply”:
Then you will go to the page of “Reboot”.
7
Quick Setup Guide V1.0

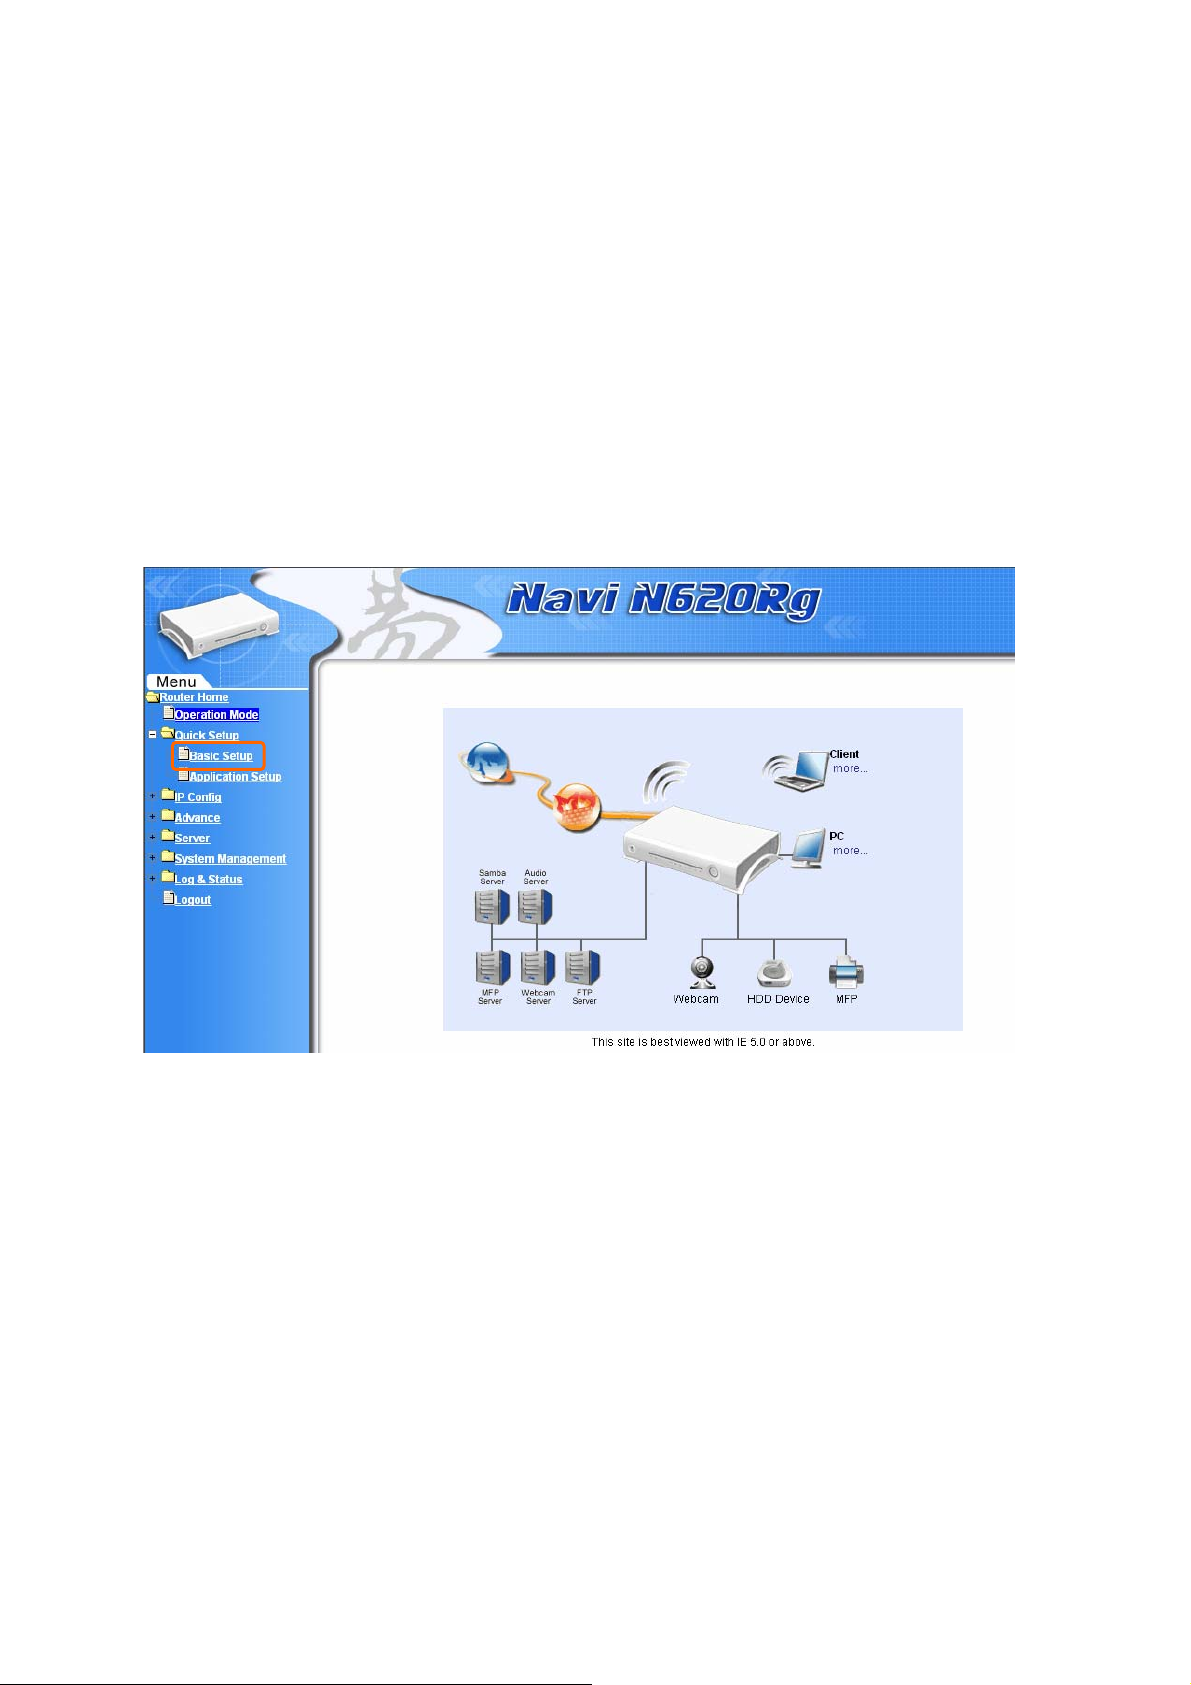
After 65 seconds, you will go back to the homepage, then please click on “Quick
Setup”, which leads you to start the step of “Router mode Quick Setup”.
8
Quick Setup Guide V1.0
1.2 The Introduction of Router mode’s Quick Setup
The typical homepage of NR620G consists of two separate frames. The left
frame contains all available means for device configuration. Menus are indicated
by file icons, and related menus are grouped into categories.
Click on Basic Setup at the left screen of the main menu. Then you’ll see the
full function selected screen appears and do the setting for each items.
Router Basic Setup full action table list:
9
Quick Setup Guide V1.0
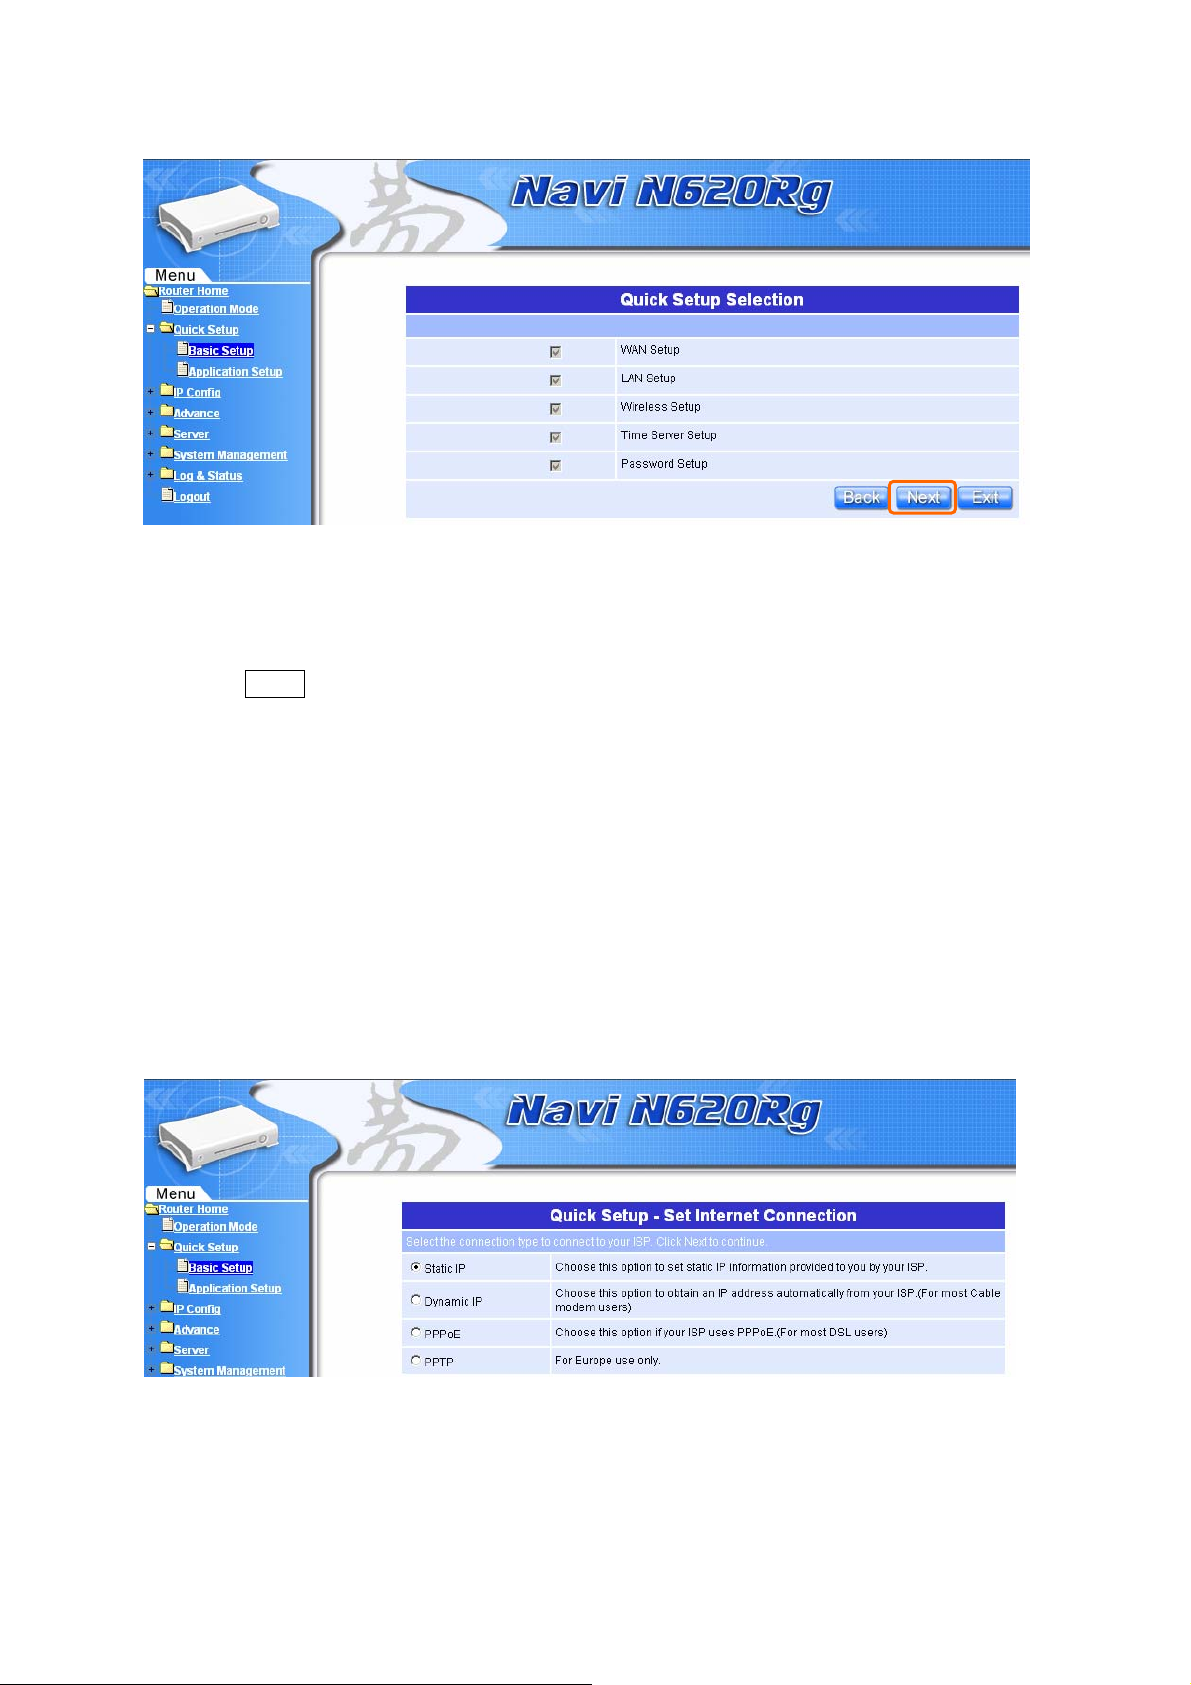
All of the 5 major items must be se t in configur ing Router Basic Setup. Please
click on “Next” button to start configuring.
1.2.1 WAN Setup
The WAN settings can be referred to as the Public setting. All IP information in
the WAN settings is public IP addresses which are accessible on the Internet.
The NR620G supports 4 connection types to WAN. Select one of the WAN
connection modes required by your ISP in following Internet Connection
Configuration page, the WAN setting pages will differ from depending on what
kind of WAN Type you select.
10
Quick Setup Guide V1.0
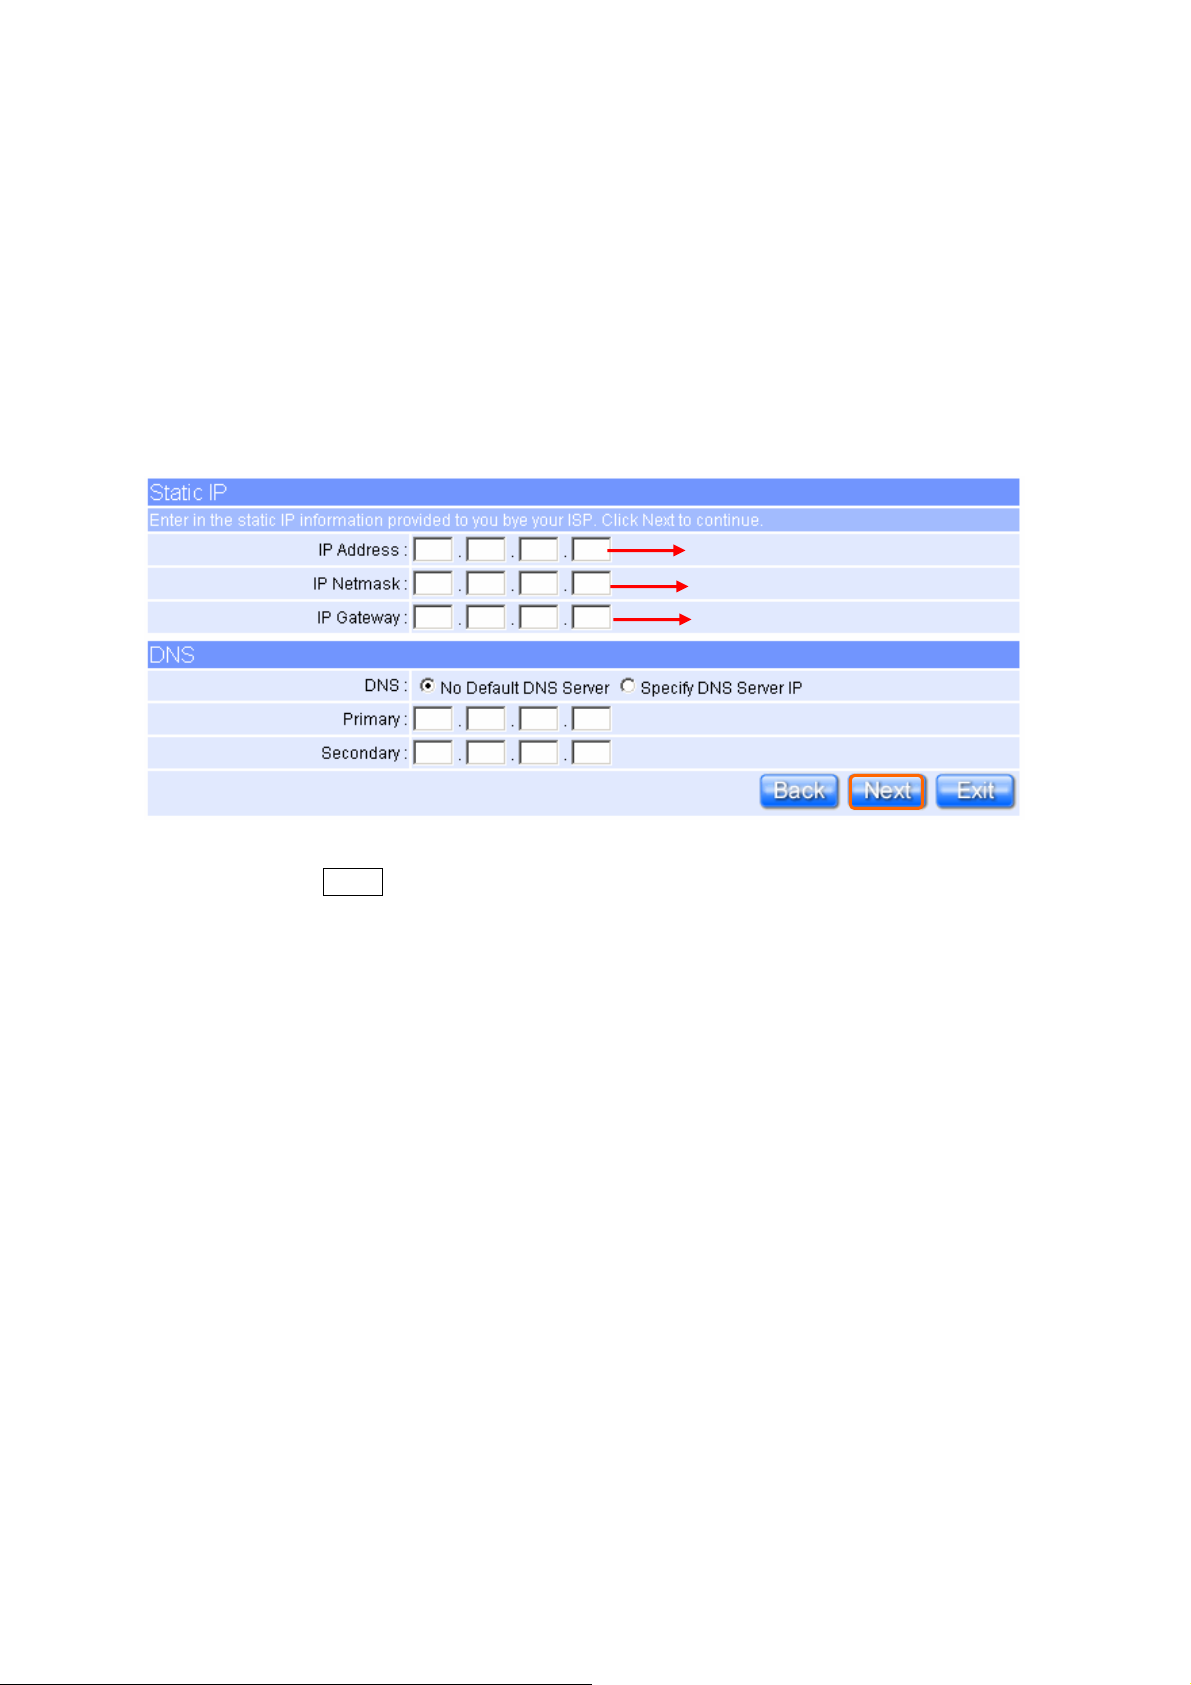
1.2.1.1 WAN Setup–Static IP
Choose Static IP Address if all WAN IP information is provided to you by your ISP.
You will need to enter in the IP address, IP Netmask, IP Gateway and DNS
address(es) provided by your ISP . Each IP address entered in the fields must be
in the appropriate IP form, which are four IP octets separated by a dot (x.x.x.x).
The Router will not accept the IP address if it is not in this format.
Input the data provided by ISP
Input the data provided by ISP
Input the data provided by ISP
Please click on “Next” button to connect to next step.
11
Quick Setup Guide V1.0
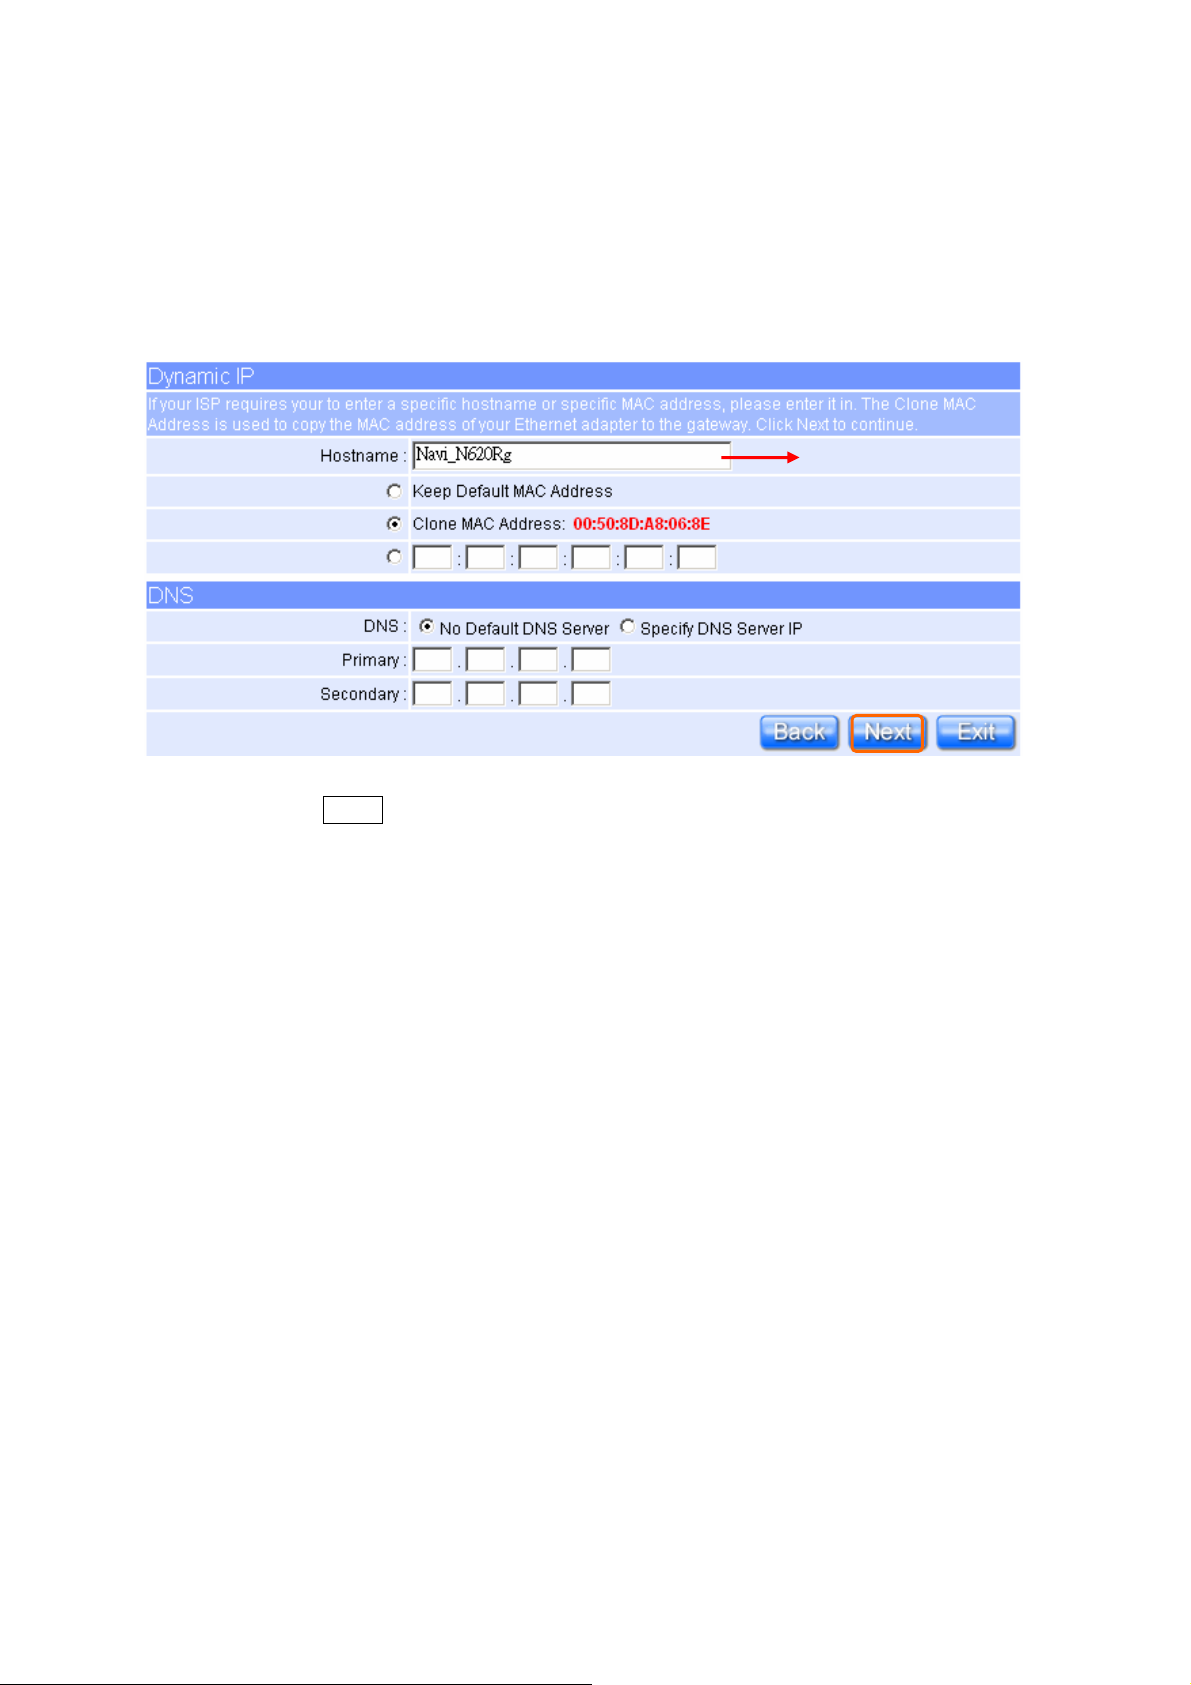
1.2.1.2 WAN Setup–Dynamic IP
Fill Host Name in if required by your ISP. The default MAC address is set to keep
the WAN’s physical interface MAC address on the Router. It is not recommended
that you change the default MAC address unless required by your ISP.
It’s suggested to use
Please click on “Next” button to connect to next step.
1.2.1.3 WAN Setup–PPPoE
Choose PPPoE (Point to Point Protocol over Ethernet) if your ISP uses PPPoE
connection. Your ISP will provide you with a username and password. This
option is typically used for DSL services.
12
Quick Setup Guide V1.0
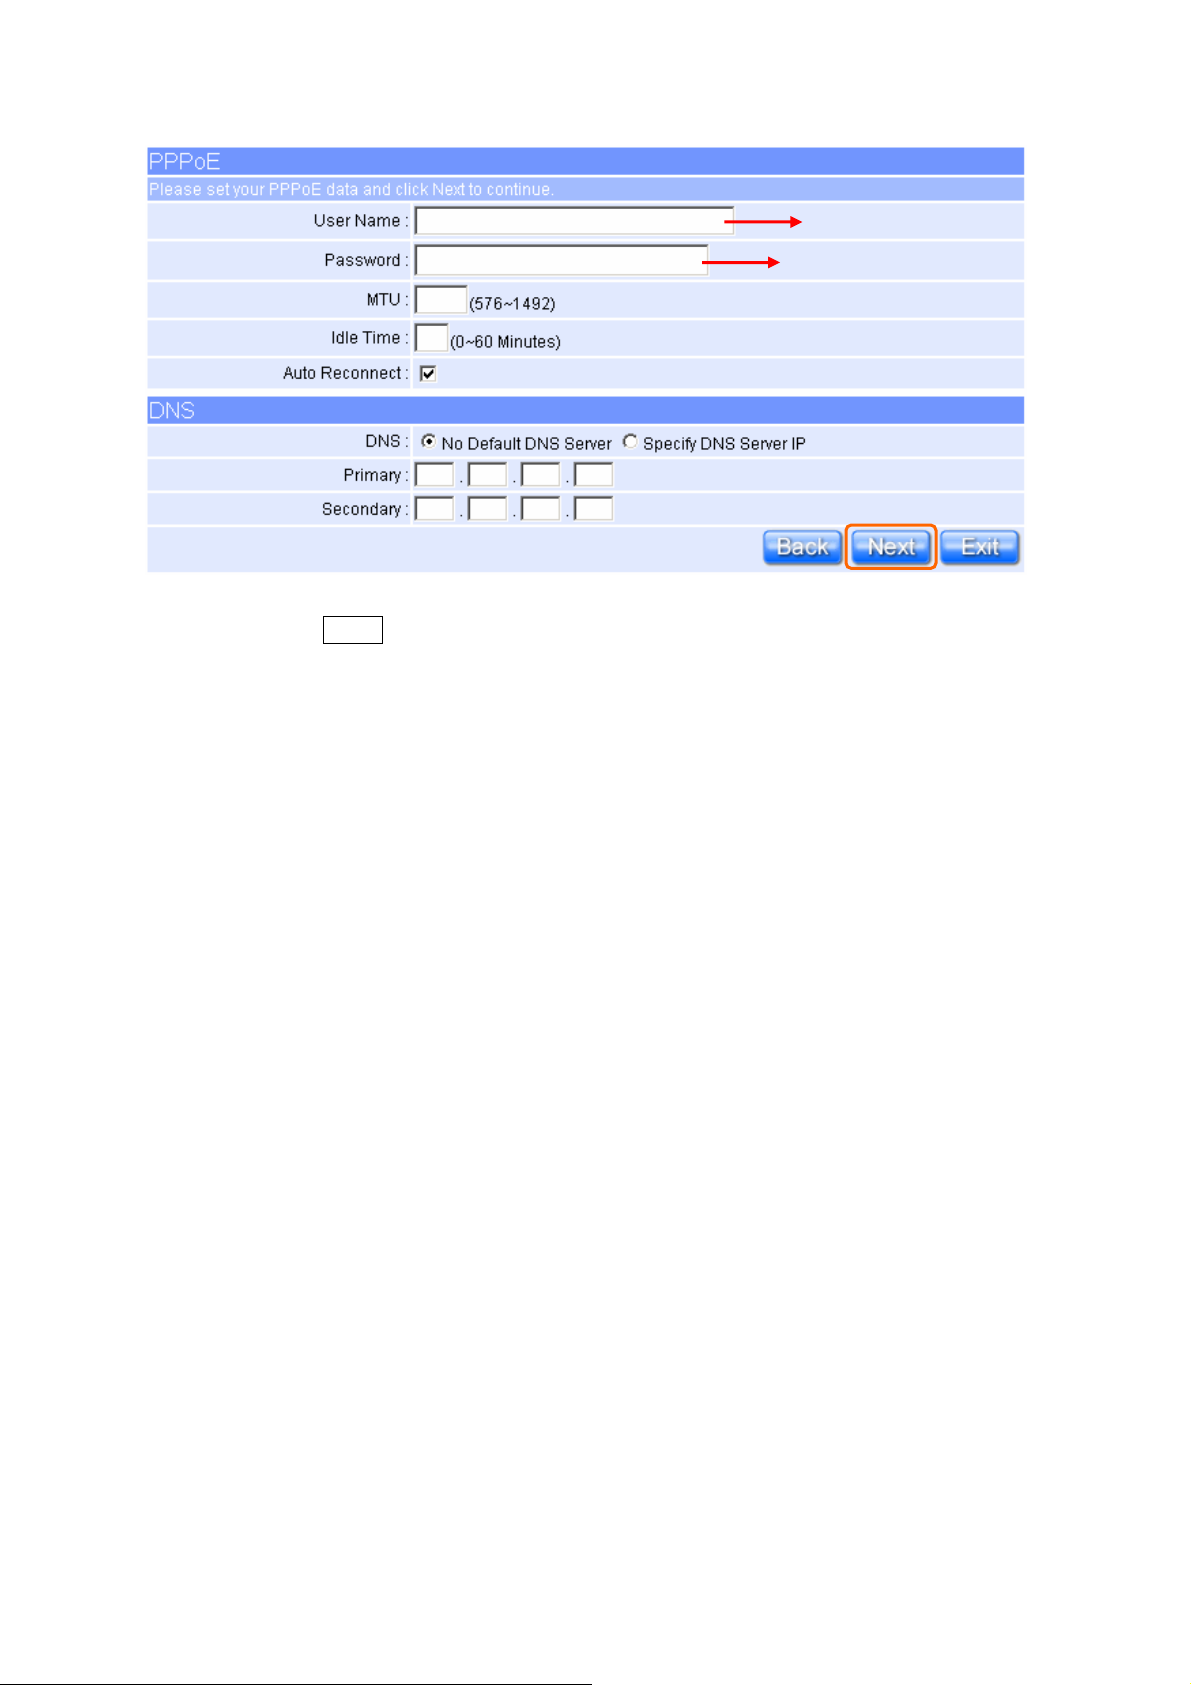
Input it by your ISP provided.
Input it by your ISP provided.
Please click on “Next” button to connect to next step.
1.2.1.4 WAN Setup–PPTP
Some DSL service providers supply a special DSL modem in Europe or Big P ond
Cable in Australia. This kind of modem only supports the PPTP tunnel to access
the Internet; Please enter the account’s information of Account and Password
which provided by your ISP.
13
Quick Setup Guide V1.0
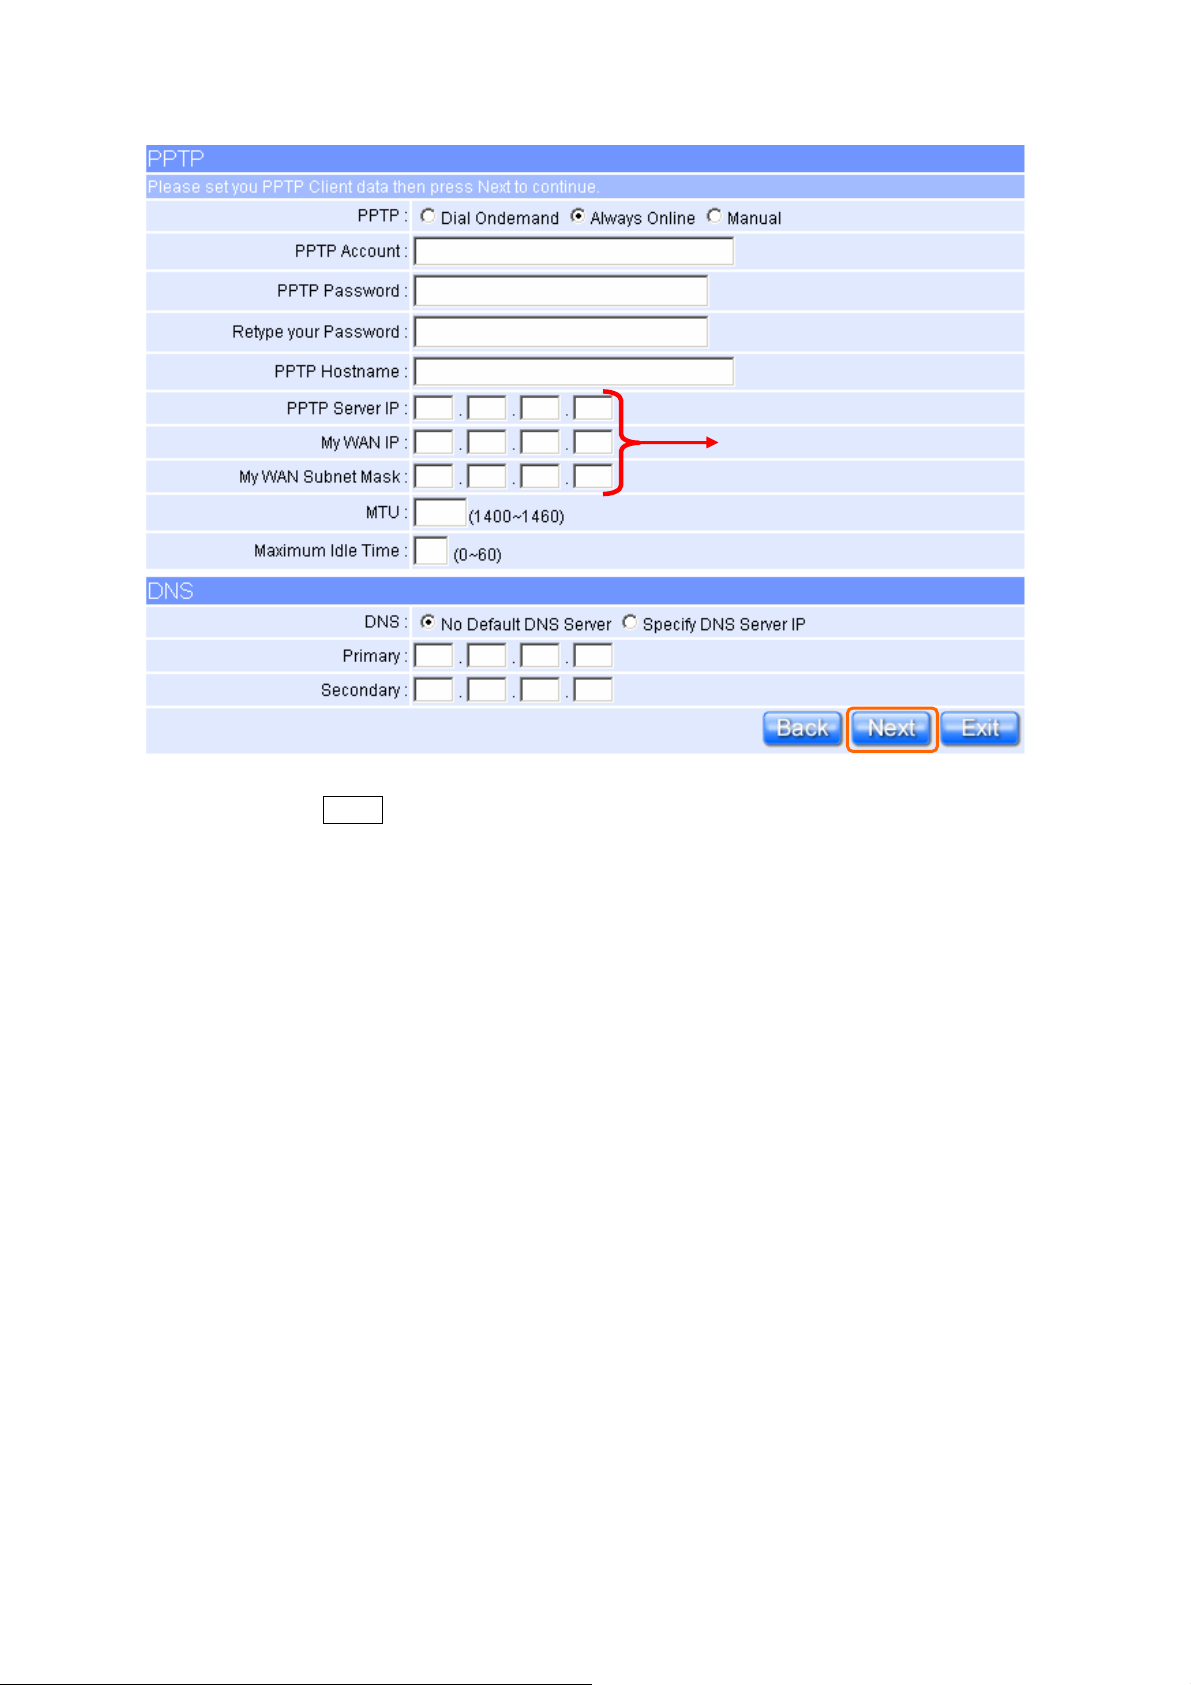
My WAN IP, Server IP and My
WAN Subnet Mask are all
input as necessary.
Please click on “Next” button to connect to next step.
1.2.2 LAN Setup
If you are using the NR620G with multiple PCs on your LAN, you must connect
the LAN via the Ethernet ports on the built-in Ethernet switch. You must assign
a unique IP address to each device residing on your LAN. The LAN IP address
identifies the router as a node on your network; that is, its IP address must be
in the same subnet as the PCs on your LAN. The default LAN IP for the NR620G
is 192.168.1.1.
14
Quick Setup Guide V1.0
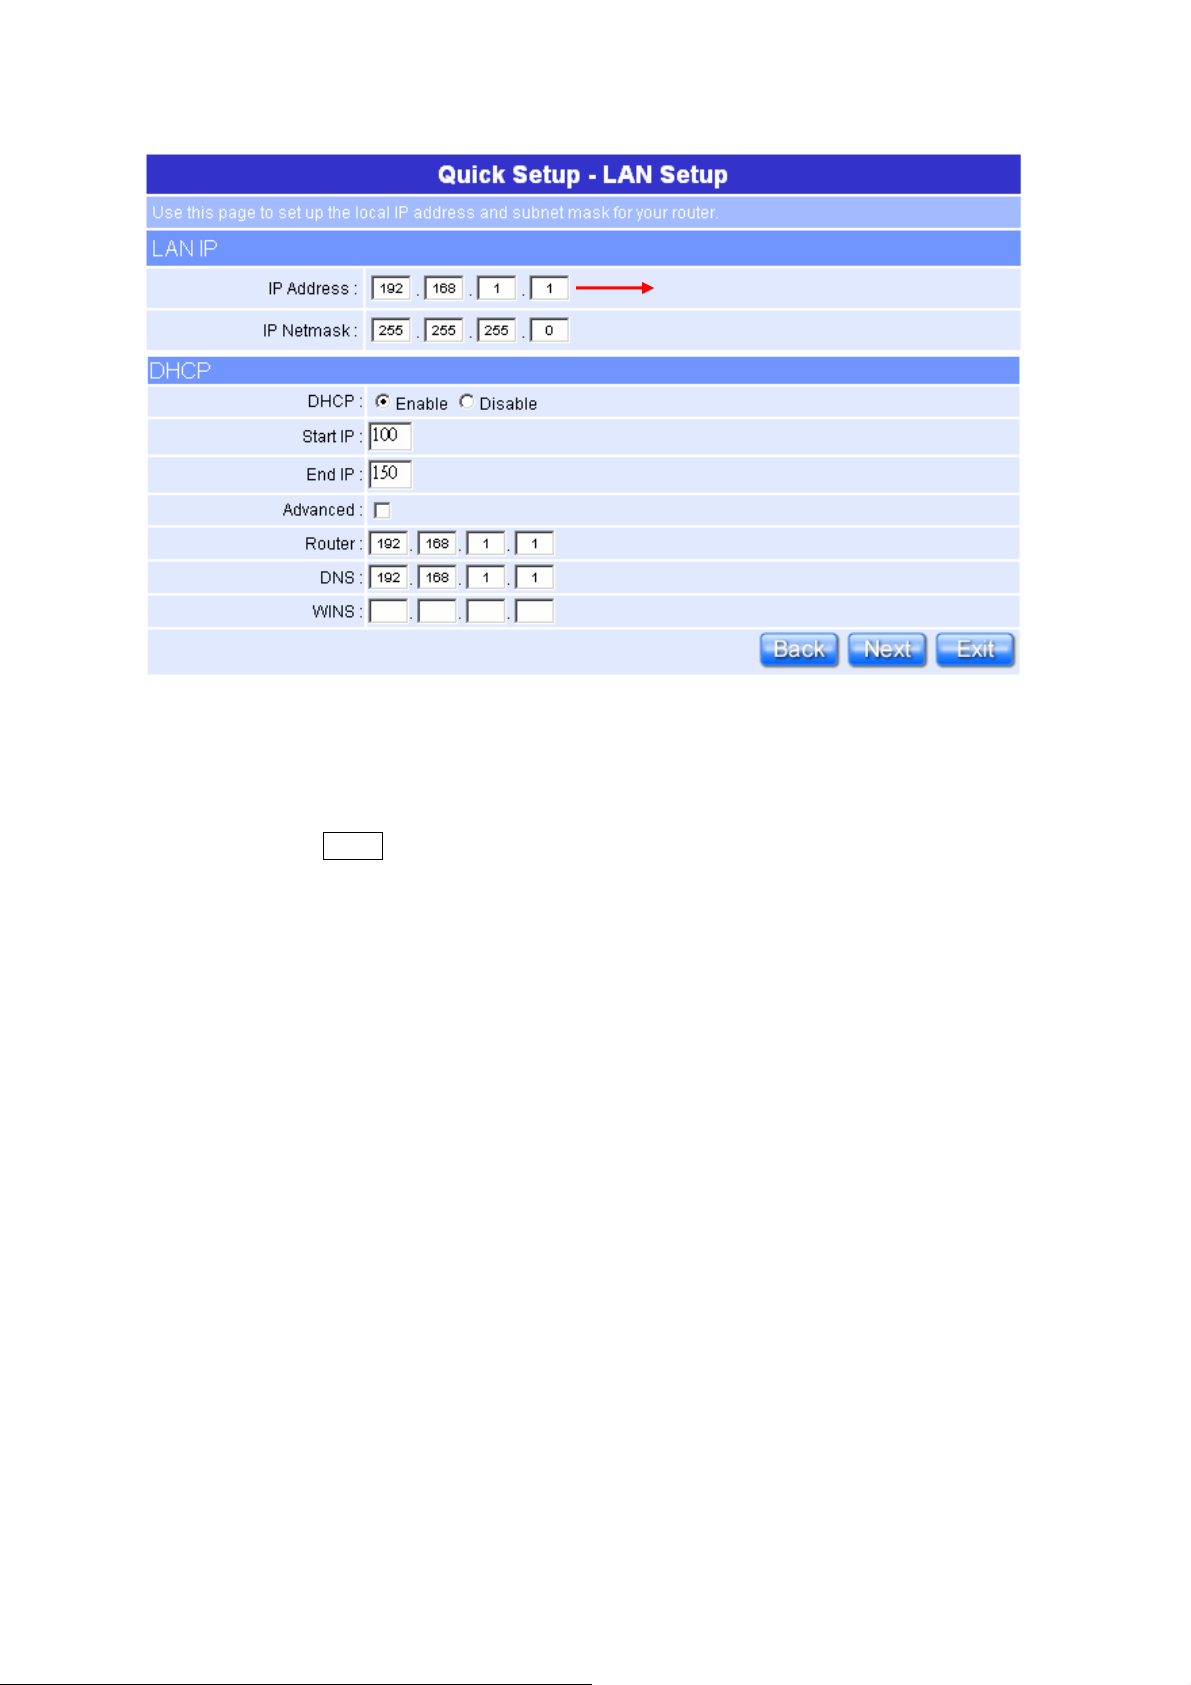
Default Gateway IP Address.
Please don’t change the default LAN IP settings at this point until you have
completed the rest of the configurations and confirm that your Internet
connection is working.
Please click on “Next” button to connect to next step.
15
Quick Setup Guide V1.0
 Loading...