


E-TOP BR182n User Manual
N+ Mobile Router
BR182n User Manual
1

Table of Contents
FCC Caution ..........................................................................................................................................4
Safe Seating Gestures..........................................................................................................................5
Chapter 1 Introduction.................................................................................................................6
1.1 Overview ......................................................................................................................6
1.2 Features.......................................................................................................................7
1.3 Specifications..............................................................................................................8
1.3.1 Six Views of Product Appearance....................................................................9
1.3.2 LED Indicator Status Description.....................................................................9
1.4 System Requirements ..............................................................................................10
1.5 Get Y our IP Automatically & Manually ....................................................................10
1.5.1 Network Testing................................................................................................13
1.5.2 T esting with Internet Browser.........................................................................13
1.5.2.1 Testing with DOS (Windows XP Platform).........................................................13
Chapter 2 One Button Setup......................................................................................................16
2.1 One Button Setup configuration for Router Mode ................................................16
Chapter 3 Advanced Configuration for Router Mode .............................................................19
3.1 IP Configuration........................................................................................................19
3.1.1 WAN...................................................................................................................19
3.1.1.1 WAN Interface– Ethernet Port.............................................................................20
3.1.1.2 WAN Interface– Wireless ....................................................................................21
3.1.1.3 WAN Access Type – Static IP..............................................................................22
3.1.1.4 WAN Access Type –Dynamic IP .........................................................................24
3.1.1.5 WAN Access T y pe –PPPoE.................................................................................26
3.1.1.6 WAN Access Type – PPTP..................................................................................29
3.1.1.7 WAN Access Type – L2TP...................................................................................31
3.1.2 LAN Interface Setup.........................................................................................33
3.1.3 Dynamic DNS Setting.......................................................................................35
3.2 Wireless Setup ..........................................................................................................36
3.2.1 Wireless Basic Settings...................................................................................37
3.2.2 Wireless Advanced Settings ...........................................................................41
3.2.3 Wireless Security Setup ..................................................................................42
3.2.4 Wireless Access Control .................................................................................45
3.2.5 WDS Settings....................................................................................................46
3.2.6 WPS ...................................................................................................................51
3.3 NA T.............................................................................................................................55
3.3.1 Visual Server.....................................................................................................55
2

Visual DMZ........................................................................................................57
3.3.2
3.4 Firewall.......................................................................................................................58
3.4.1 Port Filtering.....................................................................................................59
3.4.2 IP Filtering.........................................................................................................61
3.4.3 MAC Filtering....................................................................................................62
3.4.4 URL Filtering.....................................................................................................63
3.5 System Management ................................................................................................64
3.5.1 Change Password ............................................................................................65
3.5.2 Upgrade Firmware............................................................................................65
3.5.3 Save / Reload Settings.....................................................................................66
3.5.4 Time Zone Setting............................................................................................70
3.5.5 UPnP Setting.....................................................................................................72
3.5.6 Language Setting .............................................................................................72
3.6 Log & Status..............................................................................................................73
3.6.1 Network Config.................................................................................................74
3.6.2 Event Log..........................................................................................................74
3.7 Logout........................................................................................................................76
Chapter 4 DDNS Service Application........................................................................................77
Chapter 5 Q & A ..........................................................................................................................82
5.1 Installation.................................................................................................................82
5.2 LED.............................................................................................................................82
5.3 IP Address..................................................................................................................83
5.4 OS Setting..................................................................................................................83
5.5 11N Broadband Router Setup..................................................................................85
5.6 Wireless LAN.............................................................................................................87
5.7 Support ......................................................................................................................89
5.8 Others.........................................................................................................................90
5.9 USB Device................................................................................................................90
Chapter 6 Appendices................................................................................................................91
6.1 Operating Systems ...................................................................................................91
6.2 Browsers....................................................................................................................91
6.3 Communications Regulation Information ..............................................................91
3

FCC Caution
1. The device complies with Part 15 of the FCC rules. Operation is subject to the following
conditions:
2. This device may not cause harmful interference, and this device must accept any
interference received, including interference that may cause undesired operation.
3. FCC RF Radiation Exposure Statement: The equipment complies with FCC RF radiation
exposure limits set forth for an uncontrolled environment. This equipment should be
installed and operated with a minimum distance of 20 centimeters between the radiator
and your body.
4. This Transmitter must not be co-located or operating in conjunction with any other
antenna or transmitter.
5. Changes or modifications to this unit not expressly approved by the party responsible for
compliance could void the user authority to operate the equipment.
4
Safe Seating Gestures
You should follow the manufacturer’s instructions for adjusting the backrest to fit your body
properly.
An adjustable chair that provides firm, comfortable support is best.
Adjust the height of the chair so your thighs are horizontal and your feet flat on the floor.
The back of the chair should support your lower back (lumbar region).
CE Statement of Conformity
Our product has been tested in typical configuration by Ecom Sertech Corp and was found to
comply with the essential requirement of “Council Directive on the Approximation of the Laws
of the Member States relating to Electromagnetic Compatibility” (89/336/EEC; 92/31/EEC;
93/68/EEC)
5

Chapter 1 Introduction
1.1 Overview
This 11N Broadband Router allows user to share the wireless network on a moving vehicle
and be an alternative or backup to fixed broadband as well.
6

1.2 Features
y Small in size but huge in functionality; the world No.1 Mobile Router for traveler
y Multiple Power Supplies; Li-On battery , AC/DC changeable plugs plus USB power port,
you can use the 11N Broadband Router anywhere.
y WPS button provides not only an easy and secured wireless network but also a WDS
repeater in one push
y Friendly user interface with 12 languages supported; takes only 10 seconds to switch
to your preferred language
y Multiple APs Supported; adds or limits the properties for classed SSID, increasing the
flexibility and efficiency of the network.
y Inside battery:2200mAH x2 inside,user can use this device anywhere and do
not need power socket
7

1.3 Specifications
LAN/WAN Port 1 x 10/100 Mbps RJ45, with auto MDI/MDIX
Mini USB Port For power supply
Interface
Function
Others
Application
USB2.0 Port 1 x Standard _A type
Wireless Built-in Mini PCI
Web-Base Windows IE / Linux Firefox / MAC Safari
WAN Protocol PPPoE / PPTP / Static IP/ Dynamic IP
WLAN
Routing UPnP / DHCP / DNS / WINS / DDNS
NAT Virtual Server / Virtual DMZ
Firewall MAC Filter / URL Filter / SPI / DoS Protection / IP Packet Filter
Operation
Requirement
Peak Gain of the
Antenna
Transmitted Power
(Typical)
Receive
Sensitivity (Typical)
Dimension 91mm (L) x 878mm (W) x 31mm (H)
Power
WDS / WEP Key / WPA / WPA-PSK / WPA2 / WPA2-PSK / MAC Access
Control /Hidden SSID
Operating Temp. 0°C~40°C (32°F~104°F)
Storage Temp. -20°C~70°C (-14°F~158°F)
Operating Humidity 10% to 85% Non-Condensing
Storage Humidity 5% to 90% Non-Condensing
Two antennas (2dBi and 0dBi )
802.11b: 18±2dBm @ normal temp. rang e
802.11g: 22±2dBm @ normal temp. rang e
802.11n (20MHz/40MHz): 22±2dBm @ normal temp. range
11Mbps : TYP. -83dBm @ 8% PER
54Mbps: TYP. -70dBm @ 10% PER
11n (20MHz): TYP. -64dBm @ 10% PER
11n (40MHz): TYP. -61dBm @ 10% PER
Adapt AC 100 V ~ 240 V in / DC 12V 1A output
Mini USB DC 5V
Li-On Battery x2 7.4V
Note
1. USB devices with power more than 500mA are not supported
2. There are battery in product,please make sure battery positive and negative is
correct,otherwise battery or device can be damaged
3. Before take off or put in battery,please make sure the device is power off for
safety. If battery take off when device is using,please turn off device and put in
battery.
4. If battery energy is not enough for device,please plug in power adapter for
battery charging and turn on device
8
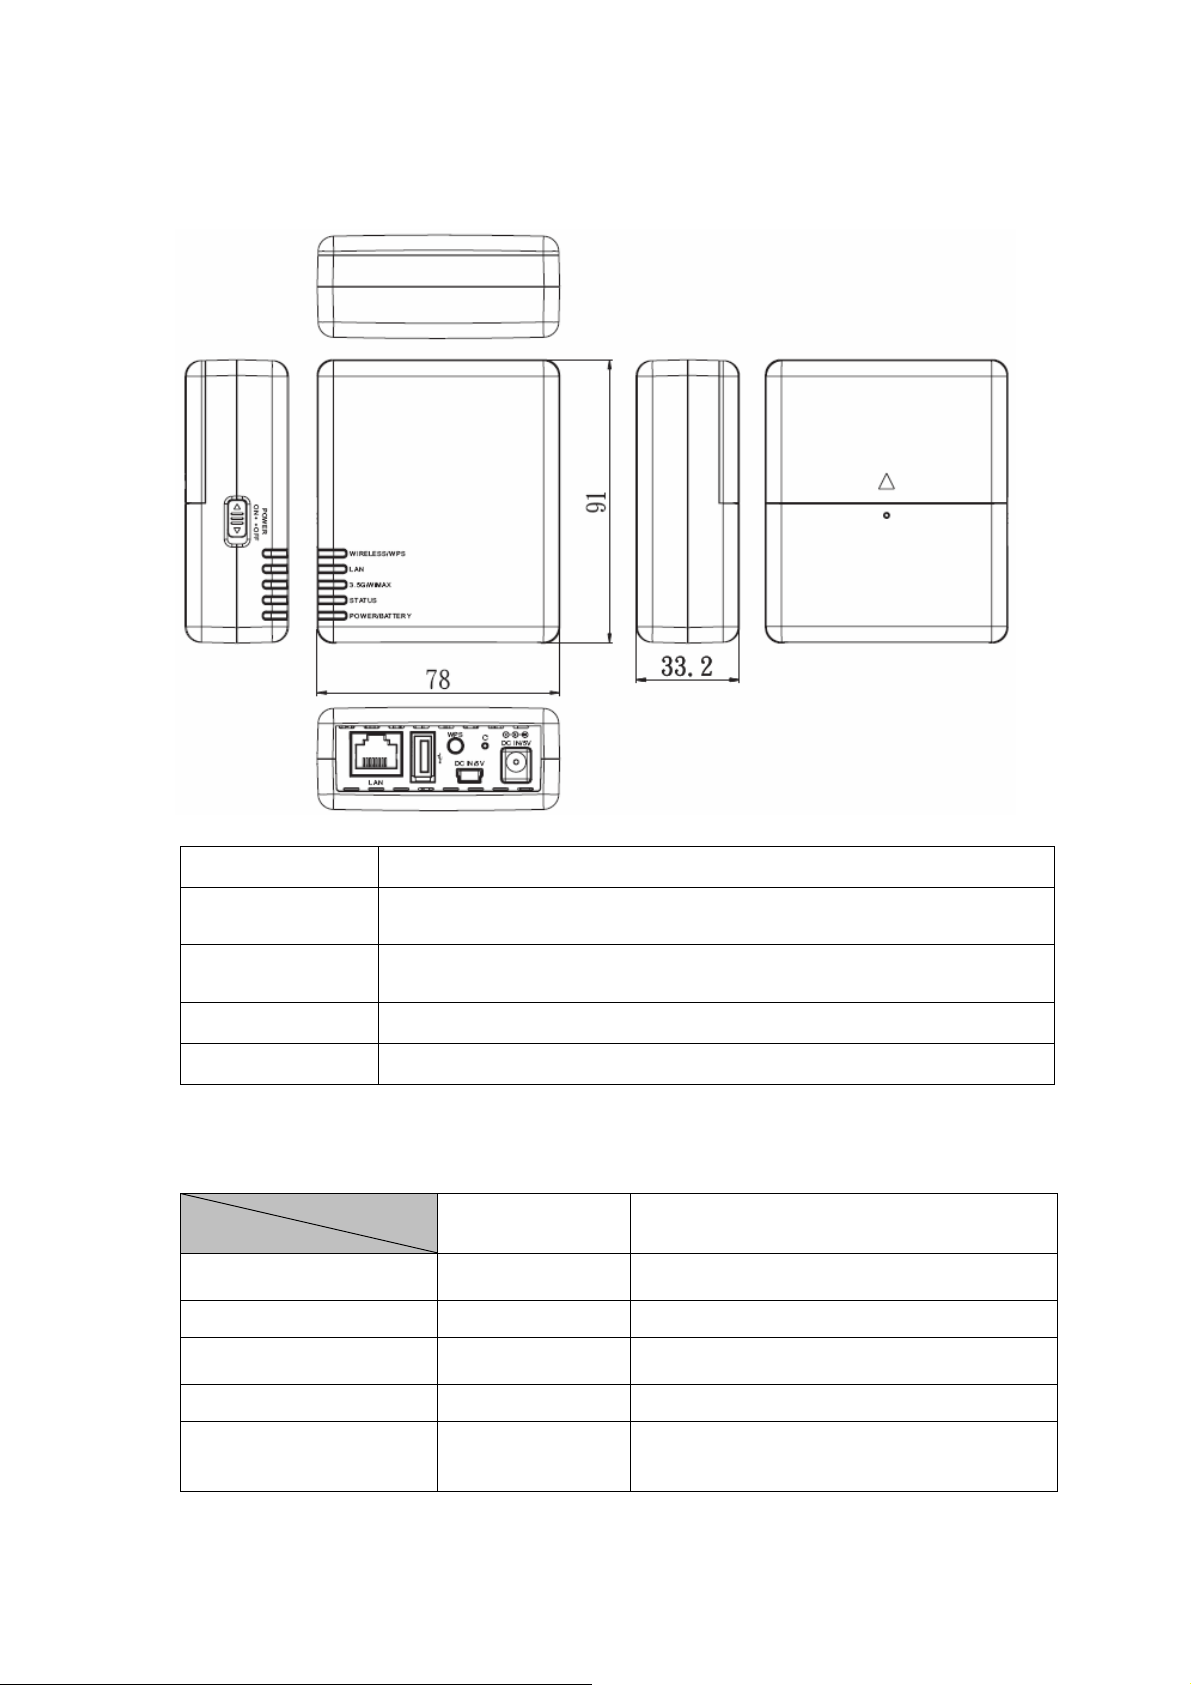
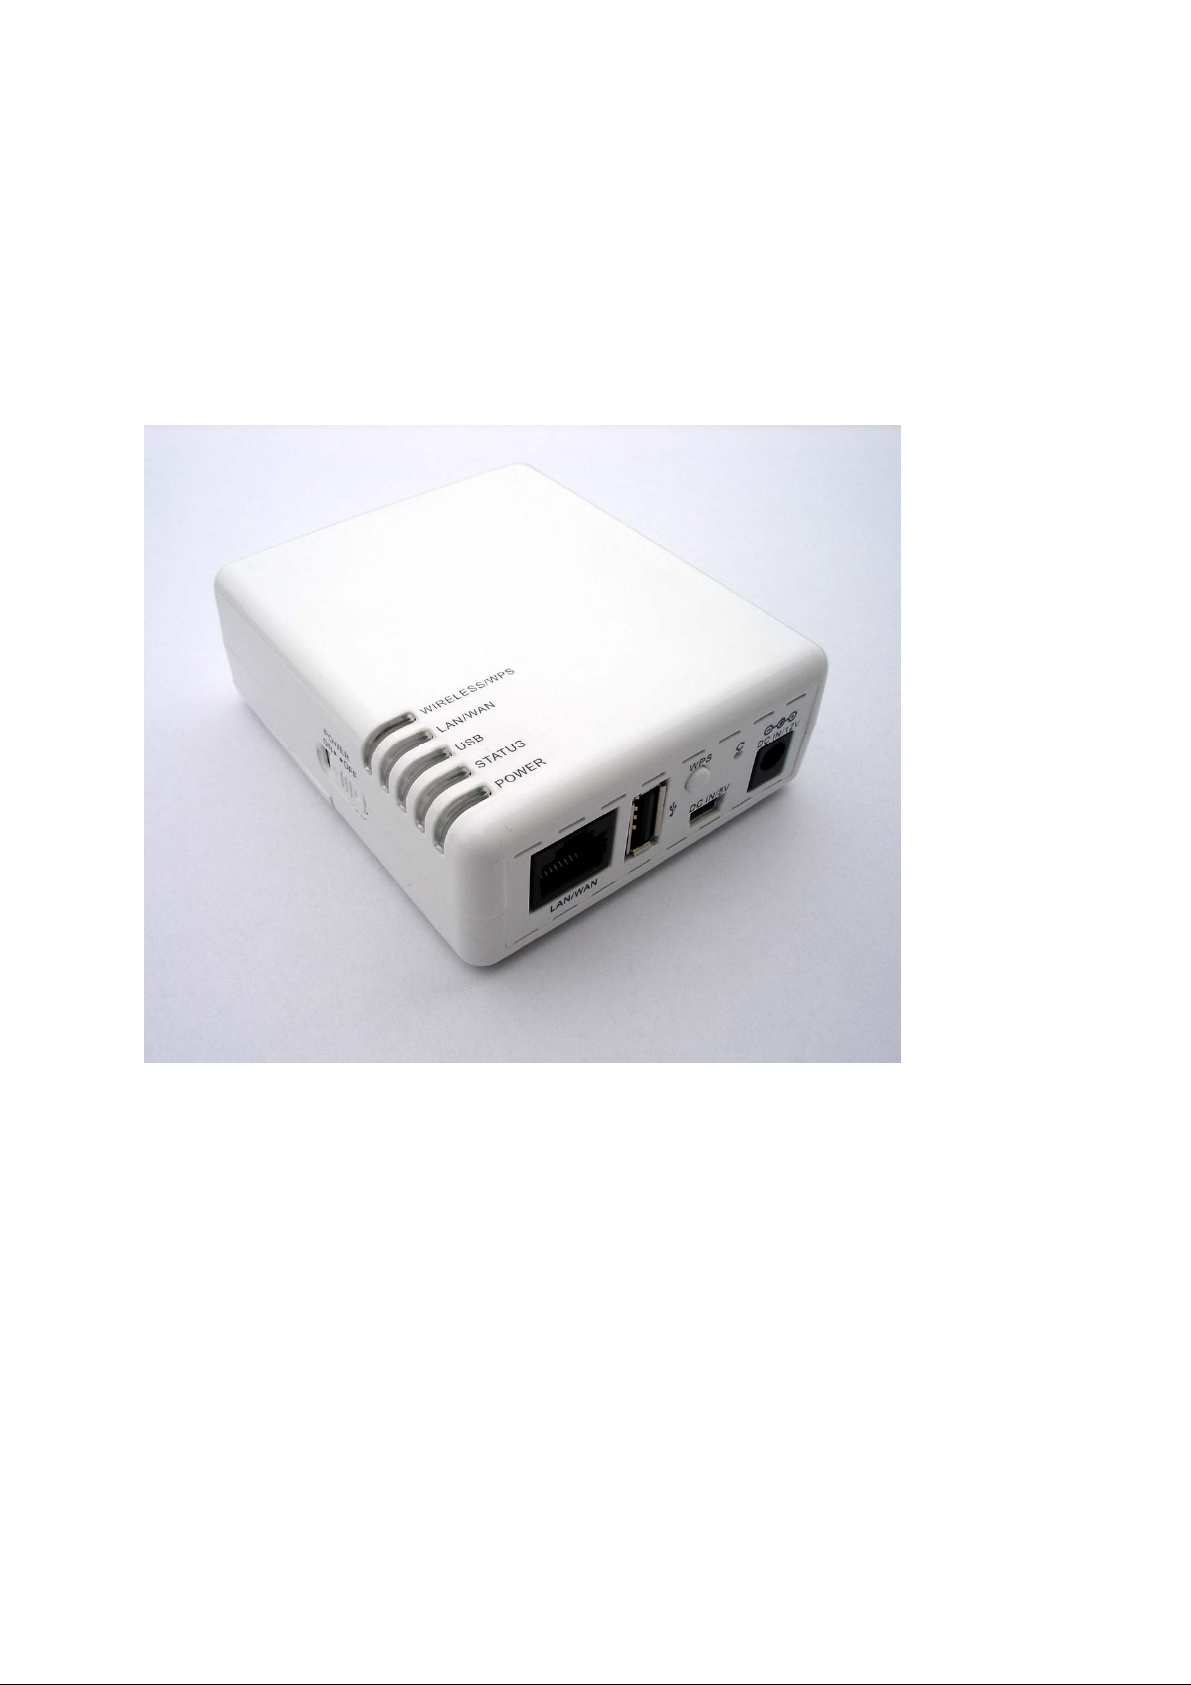
1.3.1 Six Views of Product Appearance
Power Plug
WPS Button
Reset Button
Ethernet Port
USB2.0 Ports
100V ~ 240V Input
WPS function
Press “Reset” button over 10 seconds. When status indicator turns from
flashing to solid, the process is completed. All settings are back to default.
RJ-45 Ethernet 10/100 Ports
1 USB Ports
1.3.2 LED Indicator Status Description
Status
LED Indicator
WIRELESS /WPS Operation OK
LAN/WAN Ethernet OK Transmitting Data
USB
STATUS Operation OK Green: Reset / Firmware updates in progress
POWER
Solid Flashing
Green: Transmitting Data
Reddish Orange:WPS enabled
USB dongle
plugged
Green:Operation
OK
Red:Low Battery
Transmitting Data
9
1.4 System Requirements
To begin with 11N Broadband Router, you must have the following minimum system
requirements. If your system can’t correspond to the following requirements, you might get
some unknown troubles on your system.
XDSL/Cable Modem and broadband Internet Account.
One Ethernet (10 BASE-T or 10/100 BASE-TX) network interface card.
CP/IP and at least one web browser software installed (E.g.: Internet Explorer 5.0,
Netscape Navigator 7.x, Apple Safari 2.03 or higher version).
At lease one 802.11g (54Mbps) or one 802.11b (11Mbps) wireless adapter for wireless
mobile clients.
Recommended OS: Win2000 or WinXP / Linux.
1.5 Get Your IP Automatically & Manually
After 11N Broadband Router connected with your computer, please make sure your IP is in
the automatic IP position or you adjust it manually in order to activate the Internet network
from home to Internet. If you don’t know how to enter the settings, please follow the steps as
below.
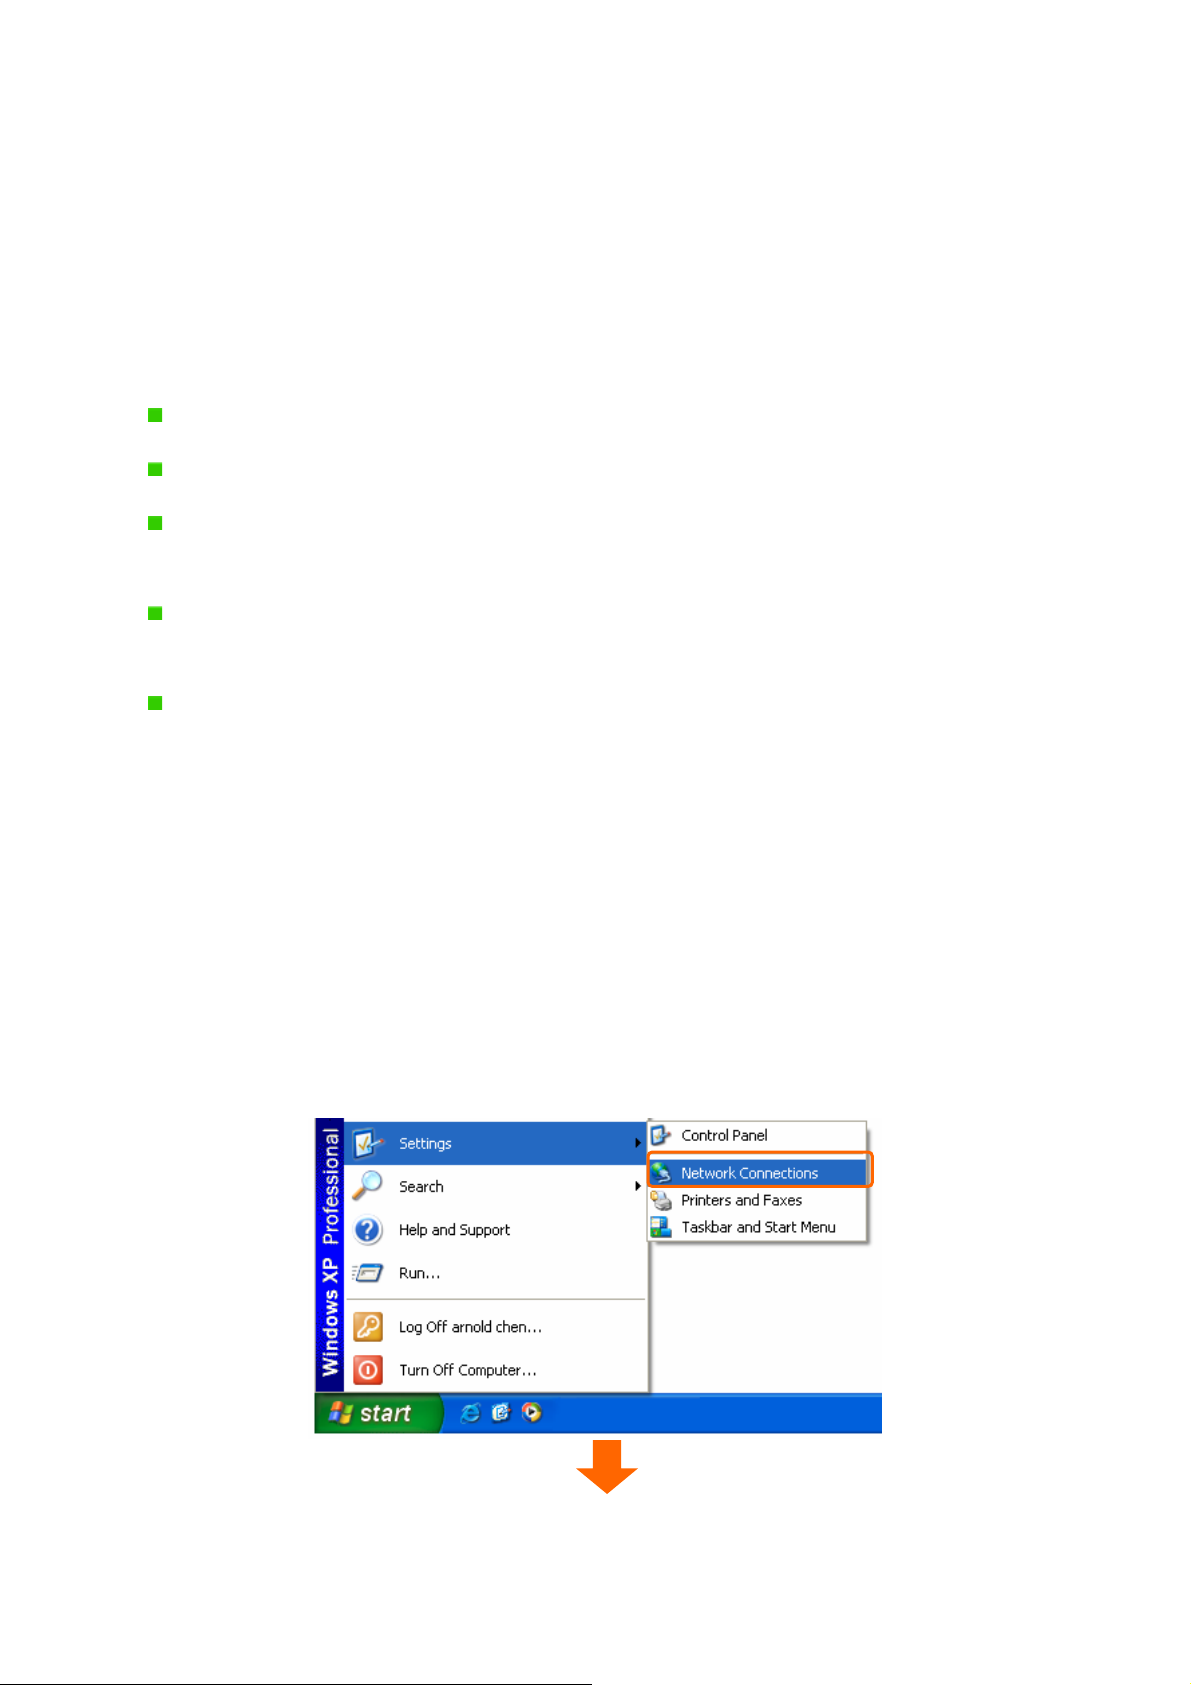
Step 1. Go to St art>Settings> Network Connections and then select Local Area
Connection.
10
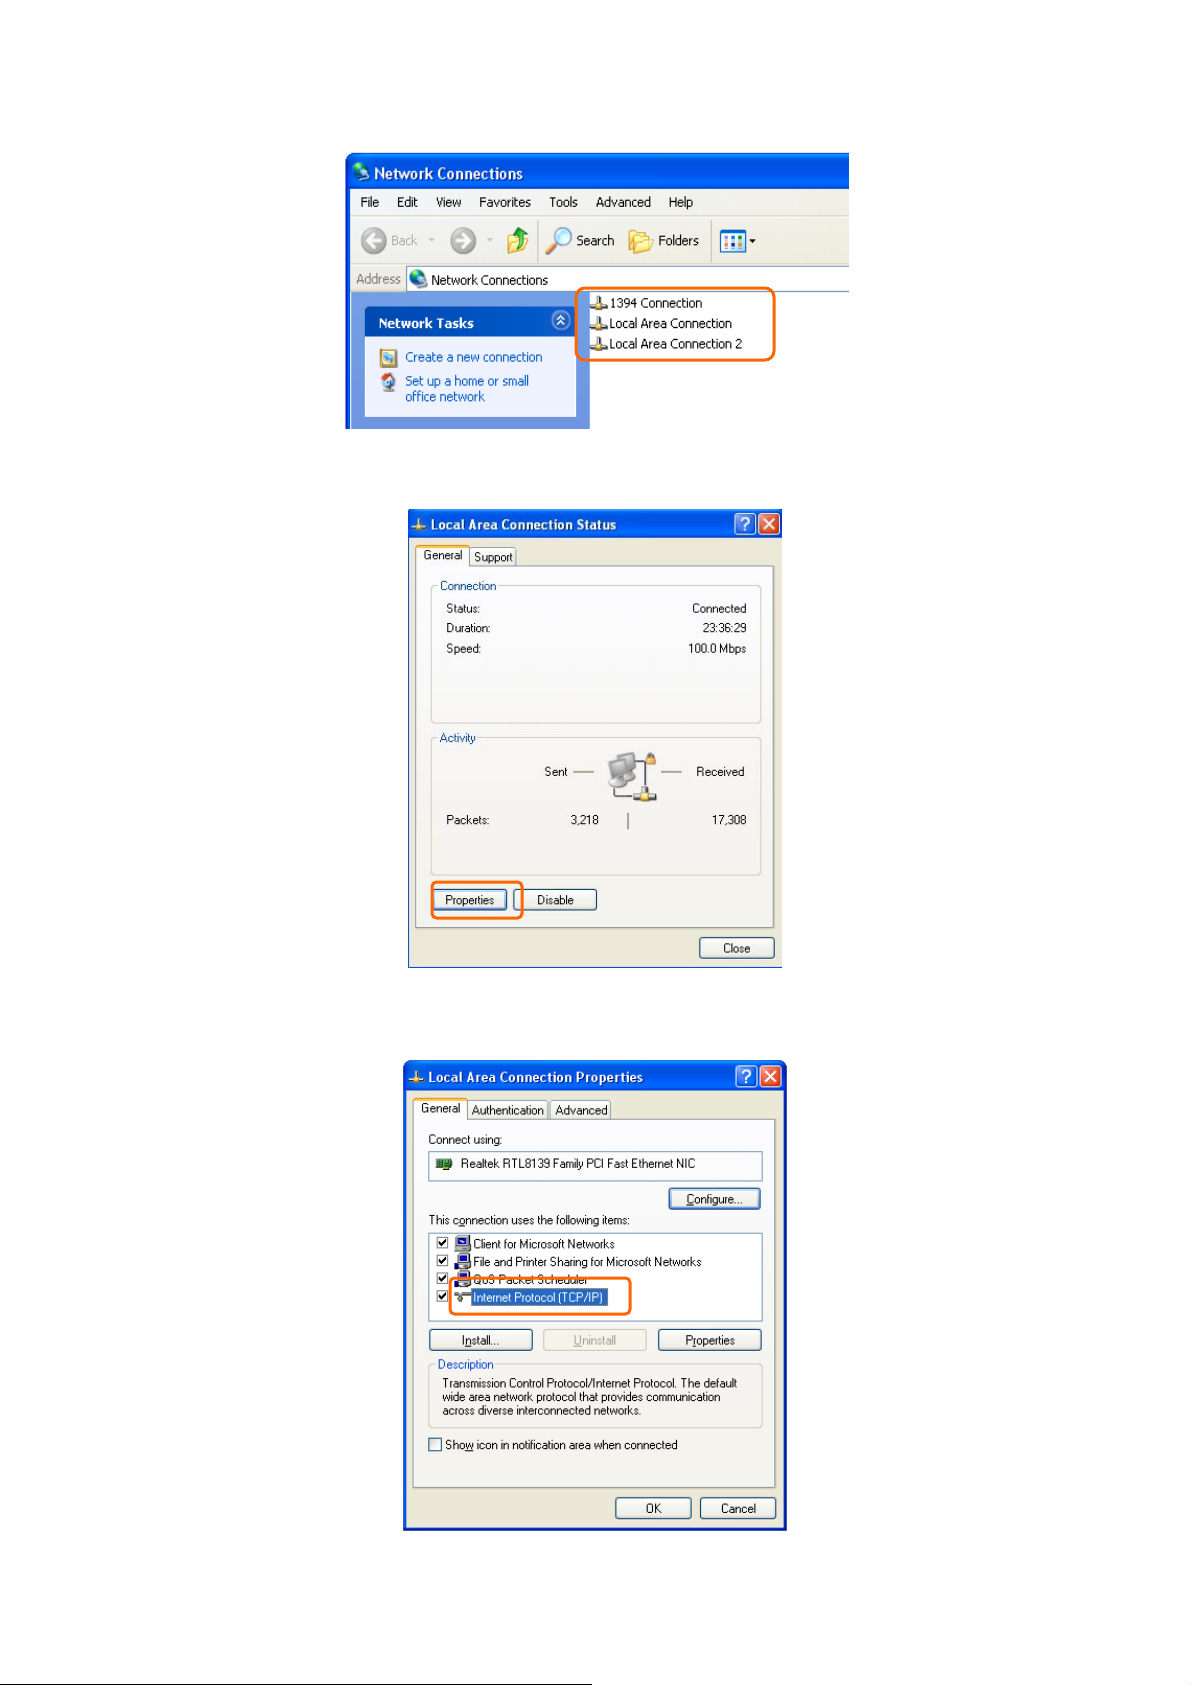
Step 2. Click on Properties
Step 3. Double click on Internet Protocol (TCP/IP).
11
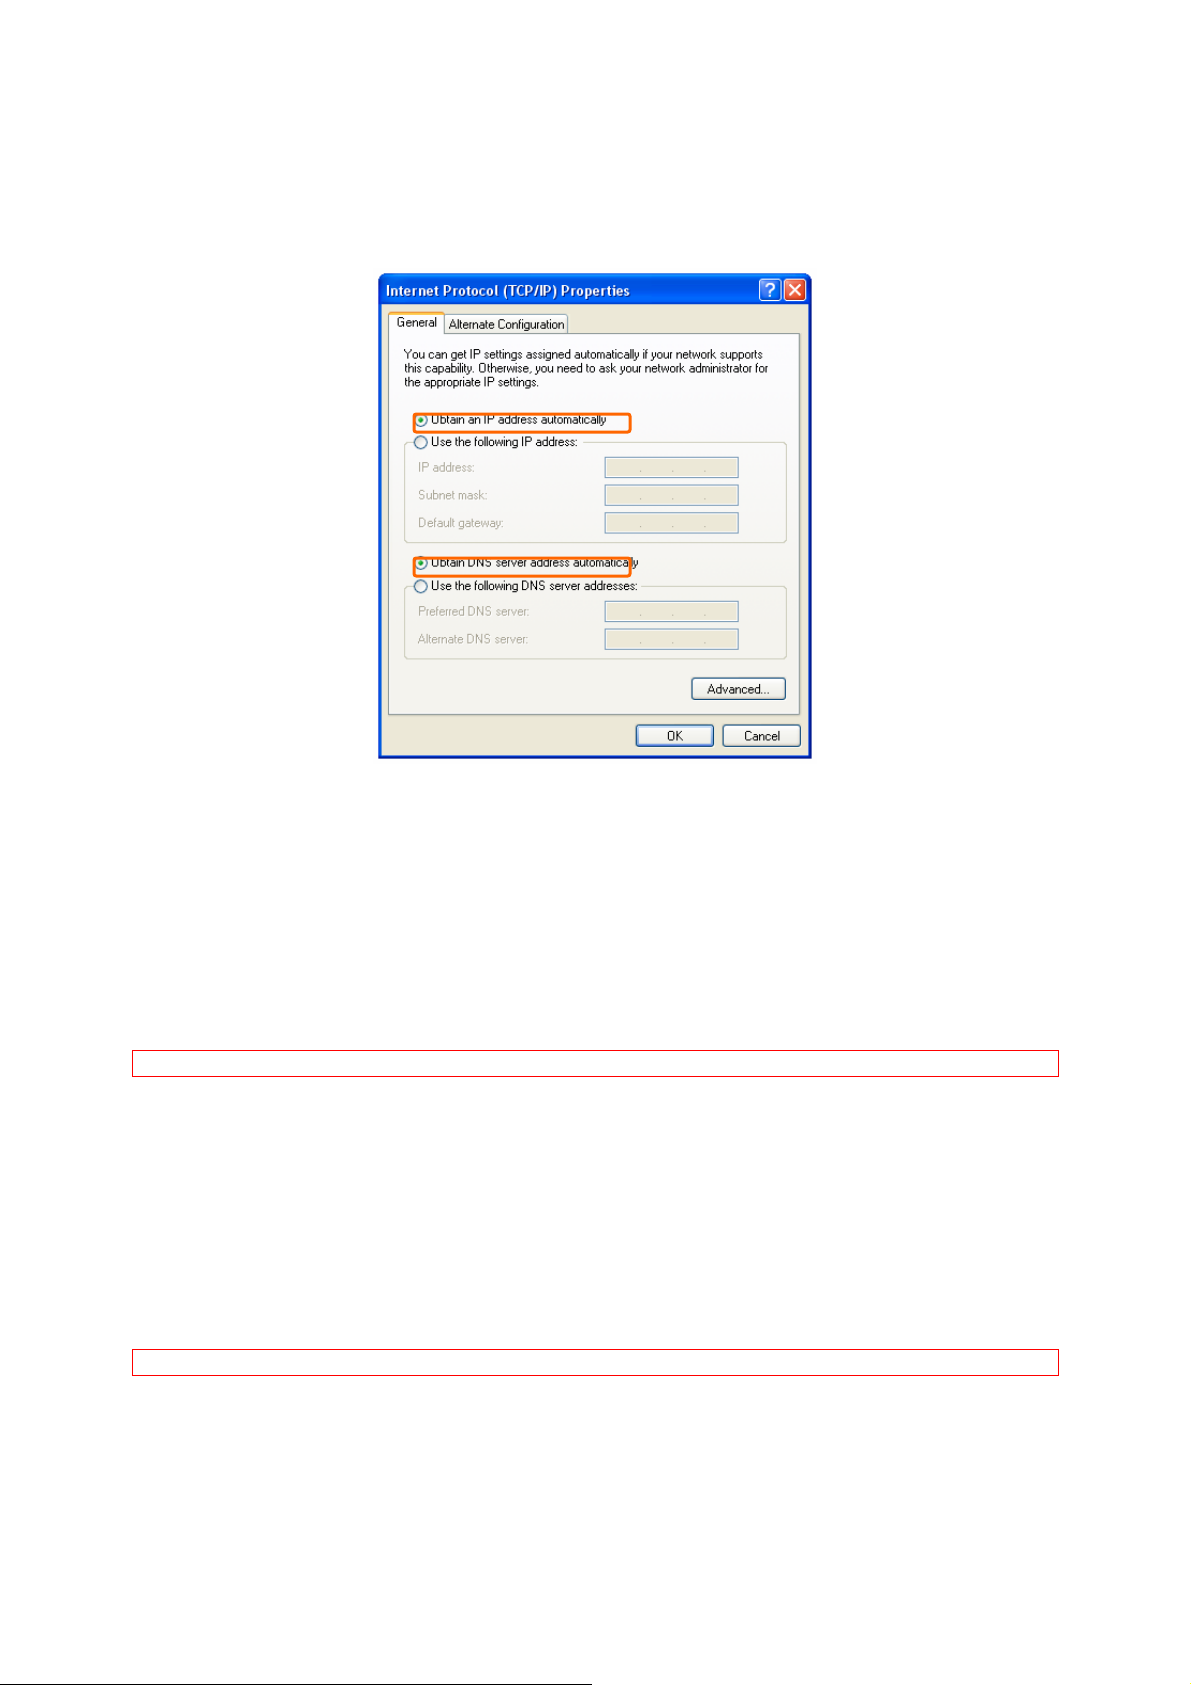
Step 4-1. For getting IP automatically if you are one of the users under 11N Broadband
Router, please skip Use the following IP address and then select Obtain an IP address
automatically and Obtain DNS server address automatically and then click on OK button.
Step 4-2. For getting IP manually in order to specify a Virtual Server, such as Print Server,
FTP Server and so on, please skip Obtain an IP address automatically and then select Use
the following IP address. And the following default setting of 11N Broadband Router should
be noted:
y IP Address: 192.168.1.10 (as your Print Server for example)
y Subnet Mask: 255.255.255.0
y Default Gateway: 192.168.1.1
Note: If you configure your computer’s IP Address manually, it needs to be on the same network segment.
For example:
z IP Address: 192.168.1.xxx (xxx can be any number between 2 and 253, but it can’t be
repeated, we use 100 to be the example.)
z Subnet Mask: 255.255.255.0
z Gateway: 192.168.1.1 (this is the IP address of 11N Broadband Router in Router Mode)
z DNS: 192.168.1.1 (use 11N Broadband Router’s IP address or on your own choice)
Note: IP address and Default gateway cannot be the same.
12
1.5.1 Network Testing
There are two ways to test your Network whether it can work on Internet or not. They are
“Testing with Internet Browser” and “Testing with Dos”.
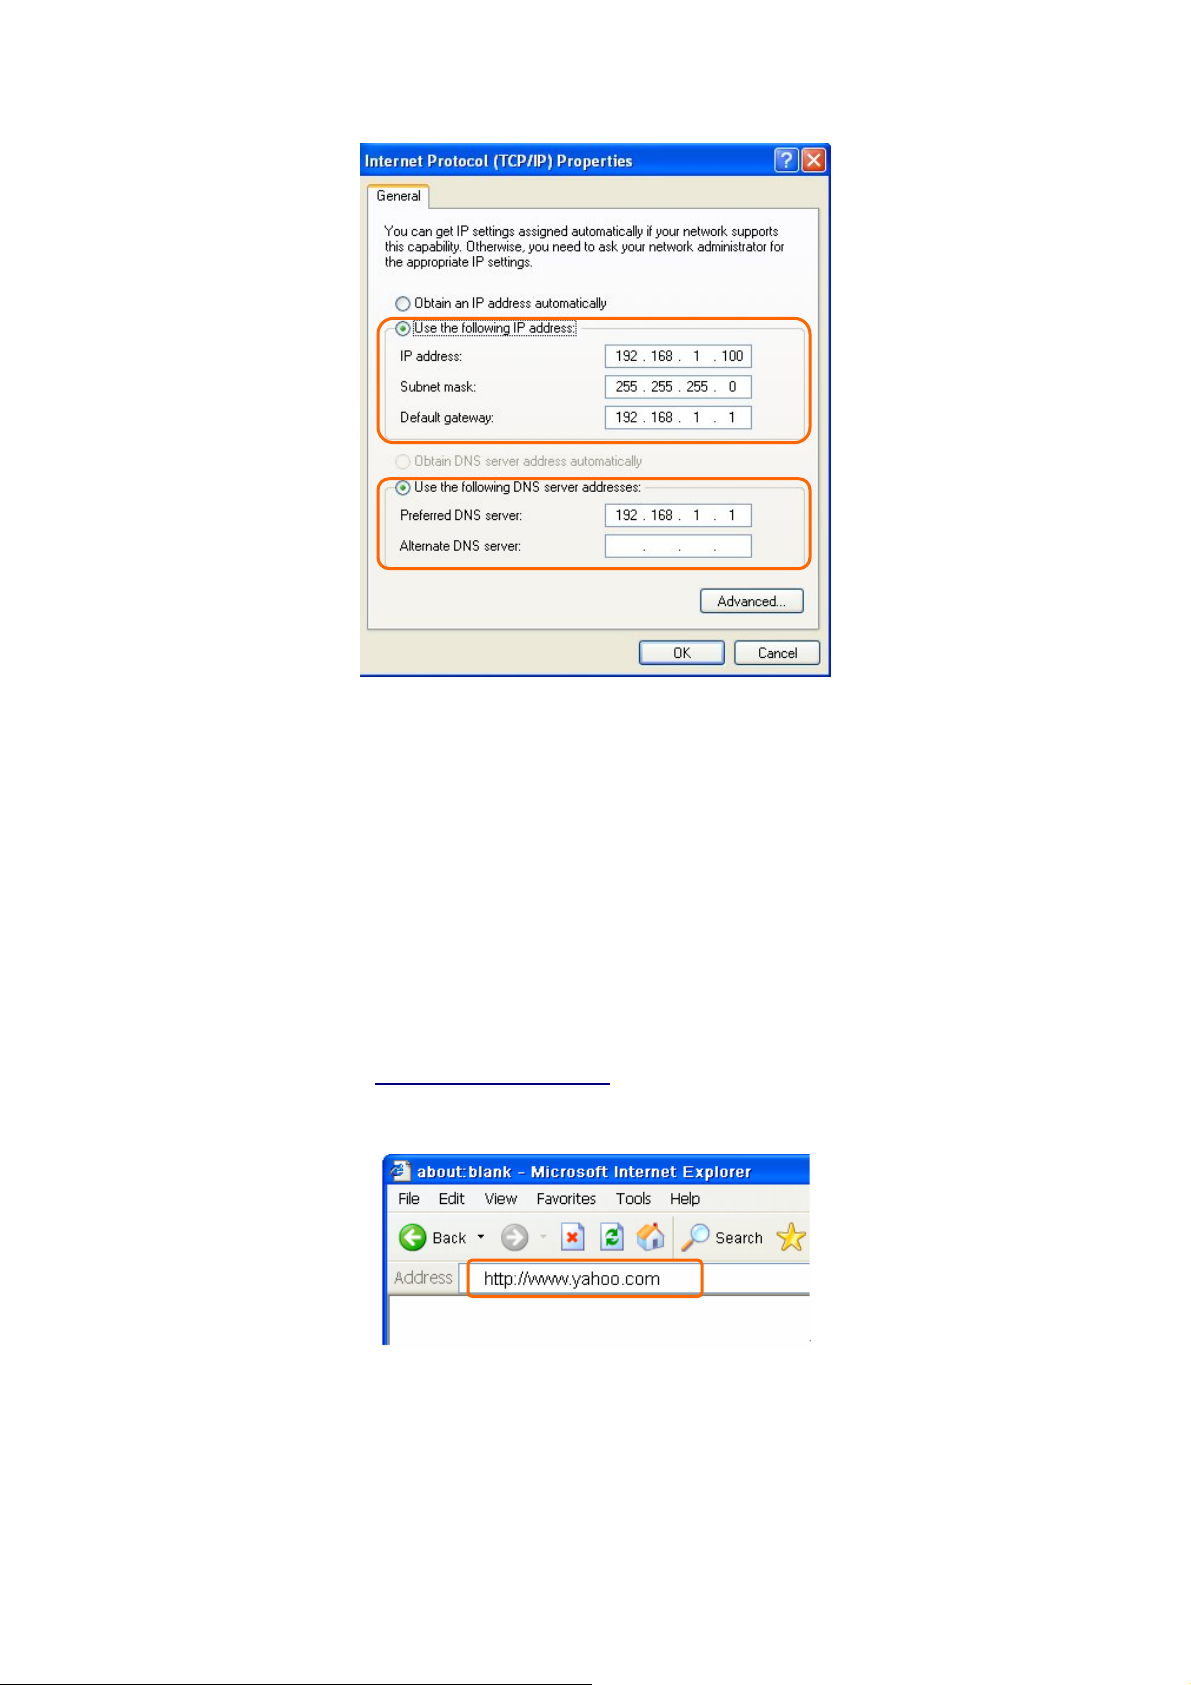
1.5.2 Testing with Internet Browser
Open an Internet Browser, such as Internet Explore or Netscape. Input a valid web address
you like, for example,
enter. If the website appears, that means your Internet is working under normal situation.
http://www.yahoo.com in the web address blank and then press
1.5.2.1 Testing with DOS (Windows XP Platform)
Step 1. Go to start -> Run.
13
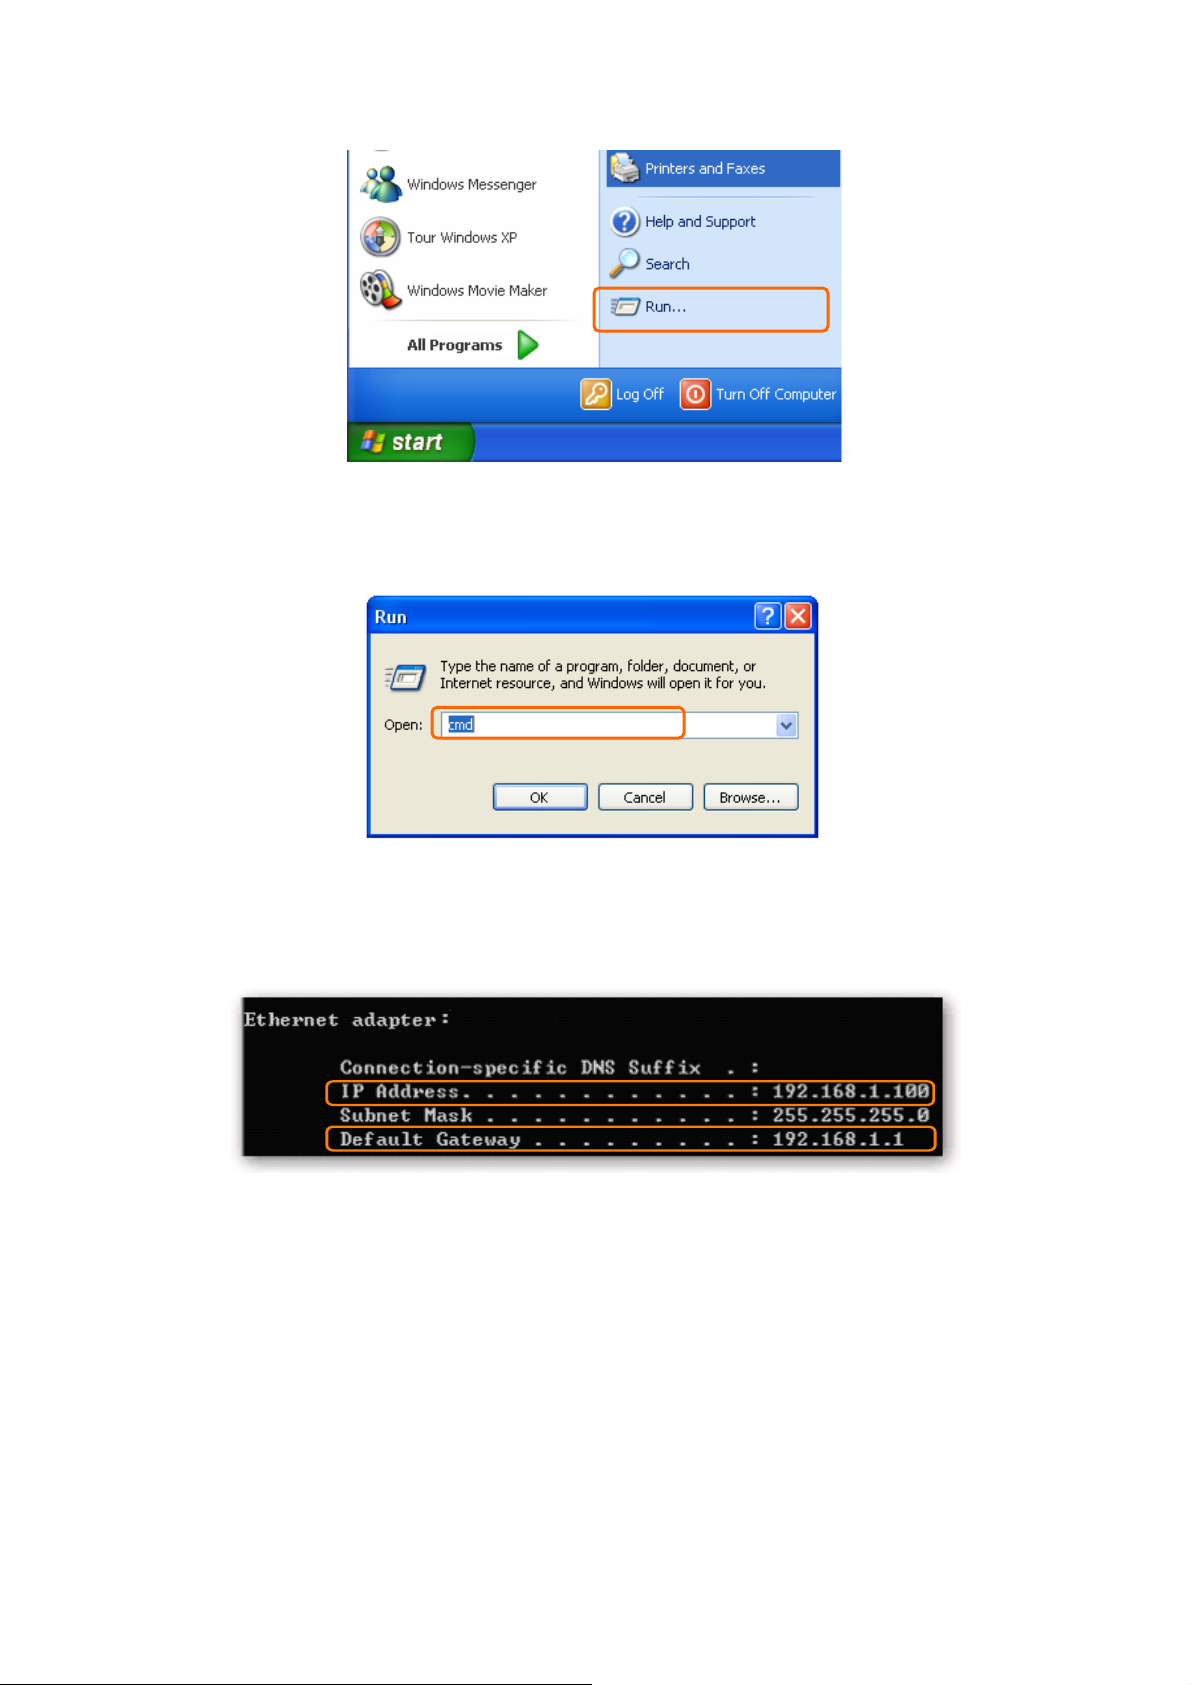
Step 2. Input cmd in the blank, and then click OK button. The Command Prompt window
appears.
Step 3. Input ipconfig in the flashing area then press enter. You will get an IP Address
192.168.1.100, for example, and Default Gateway as 192.168.1.1.
Step 4. Ping a legal WAN Address such as 192.168.1.1. If Internet works, it will show Reply
from 192.168.1.1: bytes = 32 time = 3ms TTL =64, for example.
14
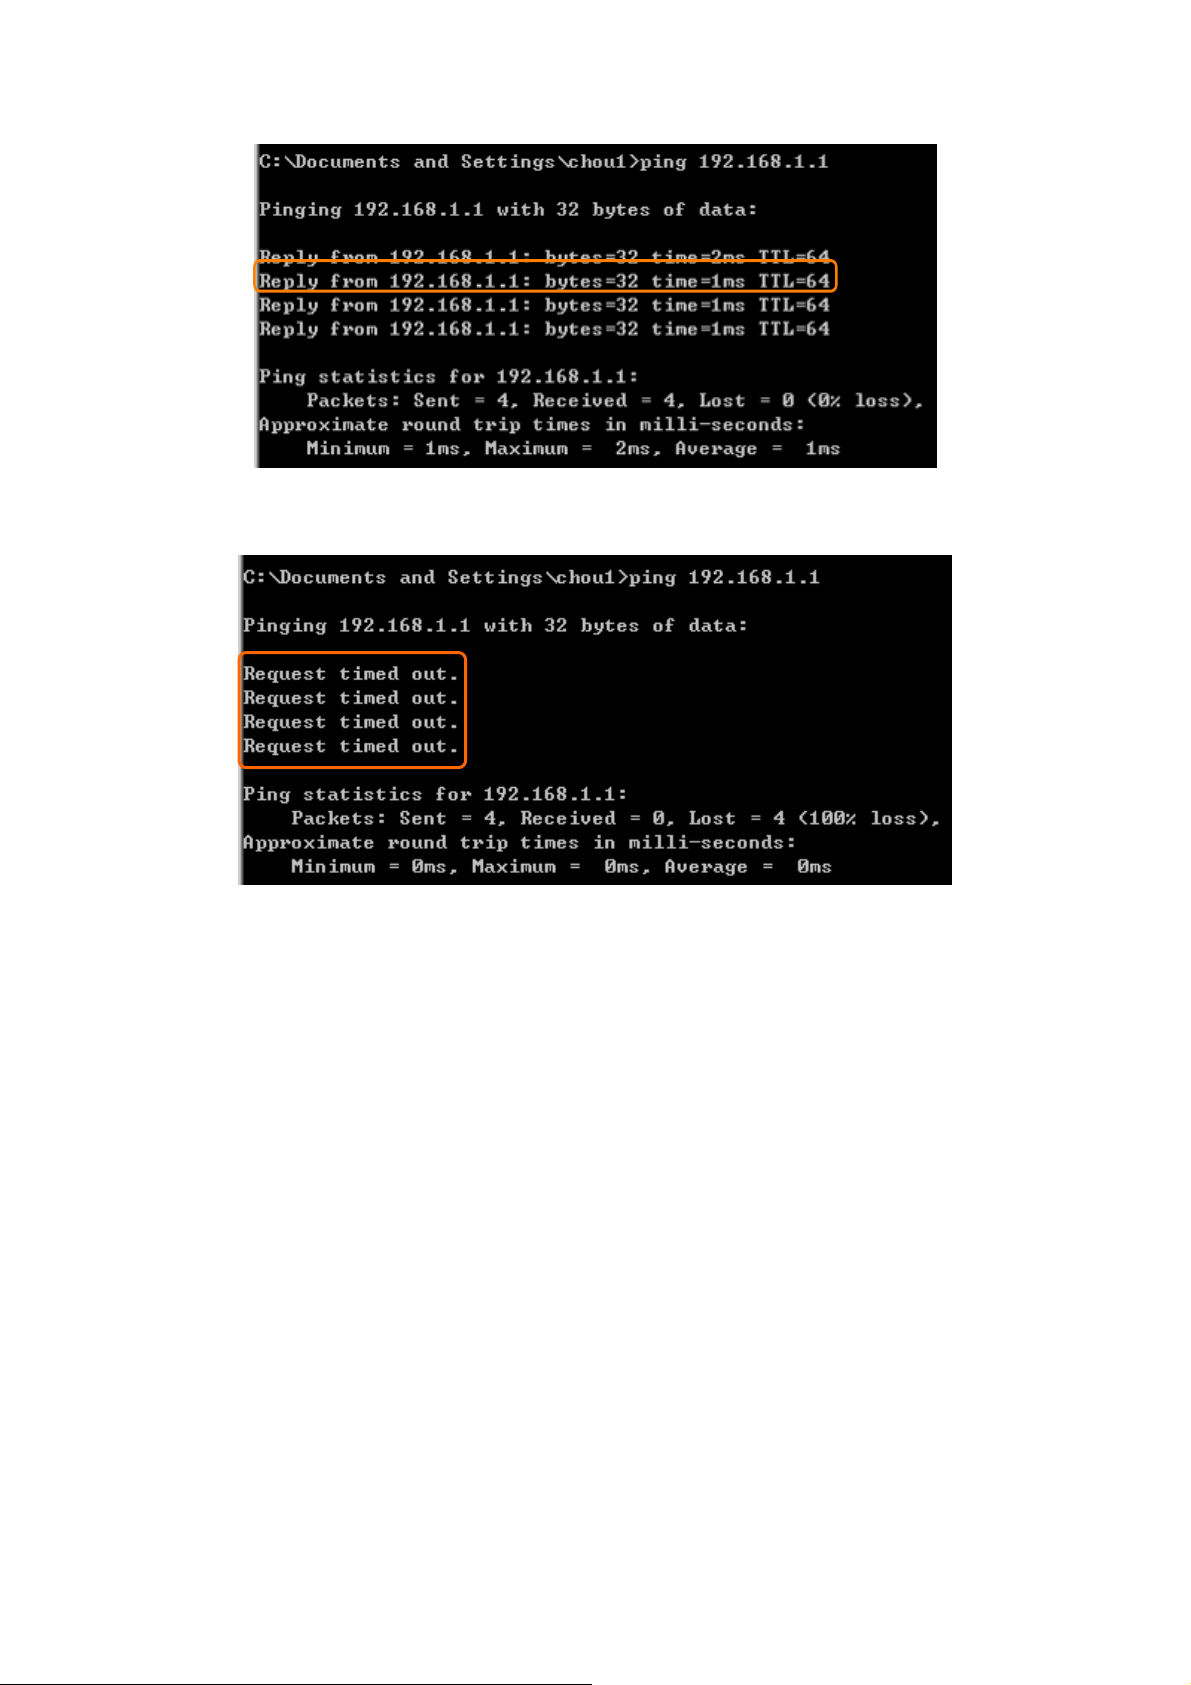
If it can’t work, it will show Request timed out.
15
Chapter 2 One Button Setup
The advanced One Button Setup provides users a simple way to set up the complicated
network. Instead of numbers of IPs to be memorized, you just need to fill in some necessary
information and then enjoy the secured internet by clicking the “Finished” button.
2.1 One Button Setup configuration for Router Mode
The default UPnP of 11N Broadband Router is ON.
16
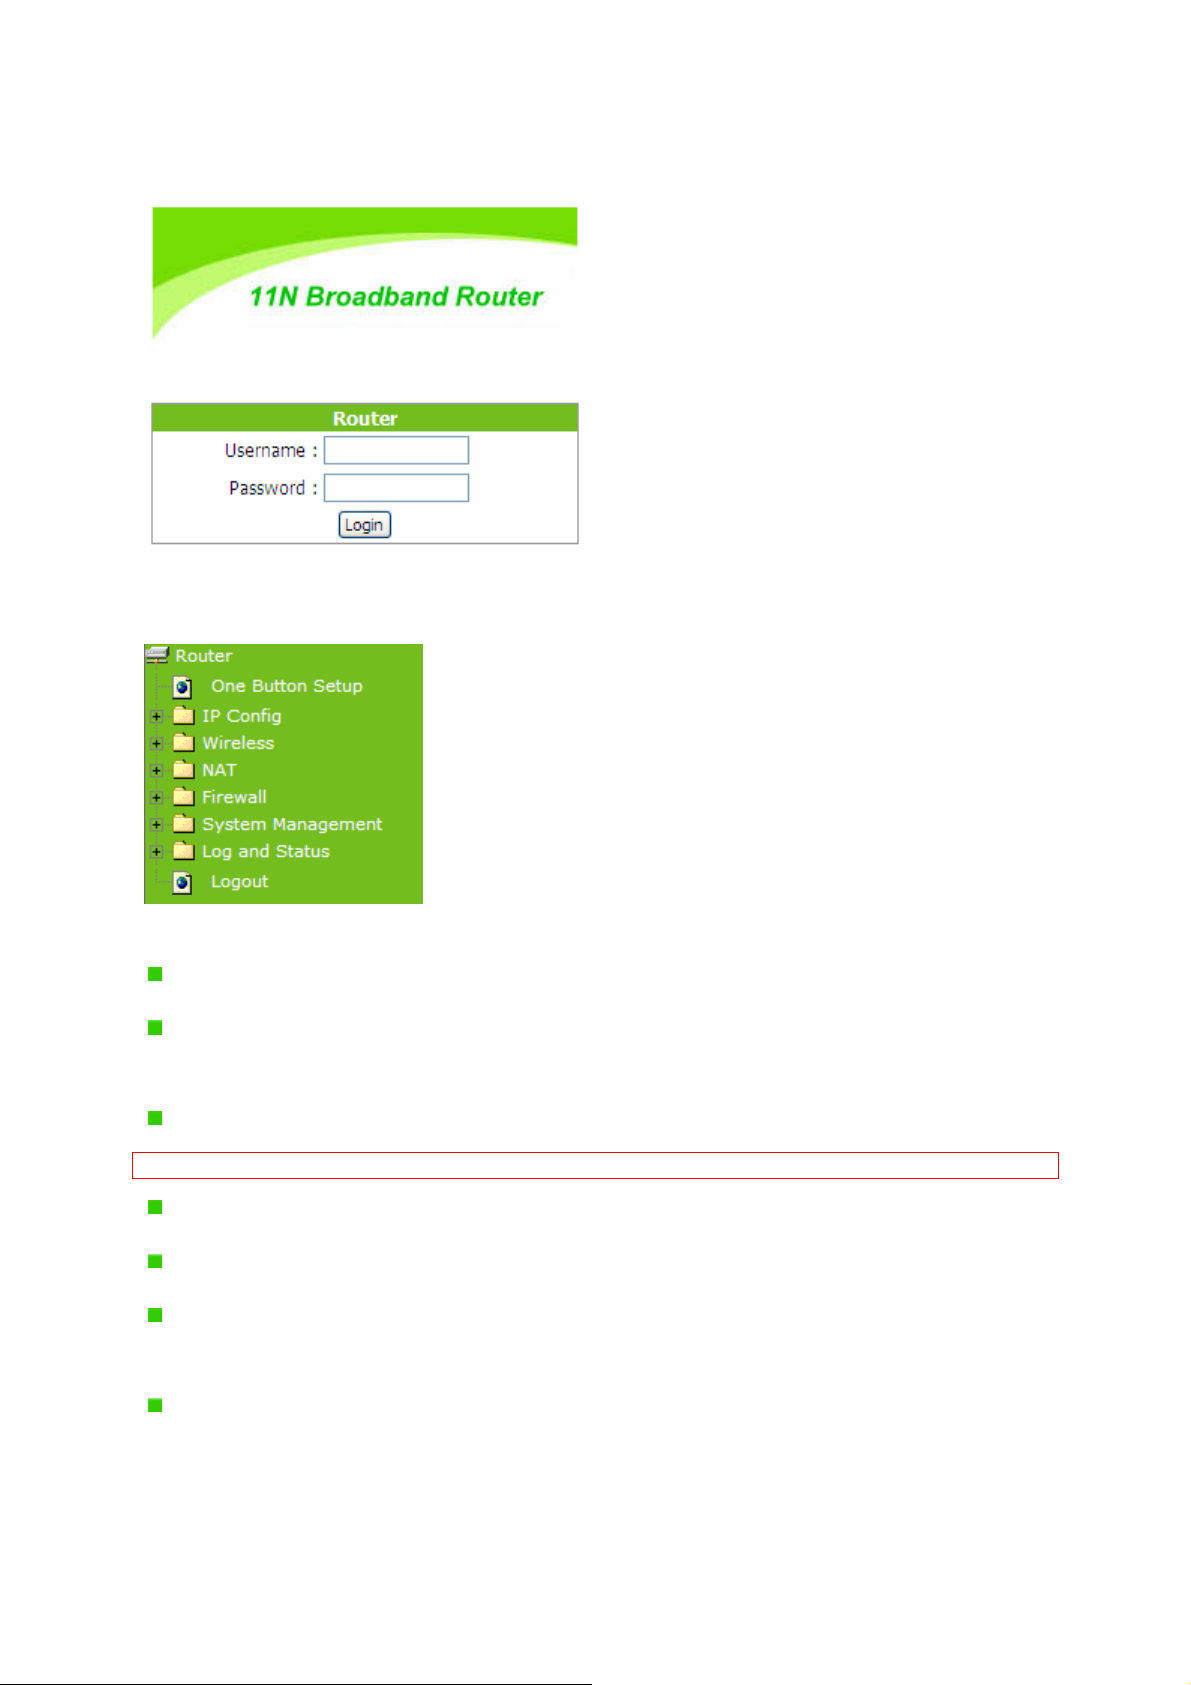
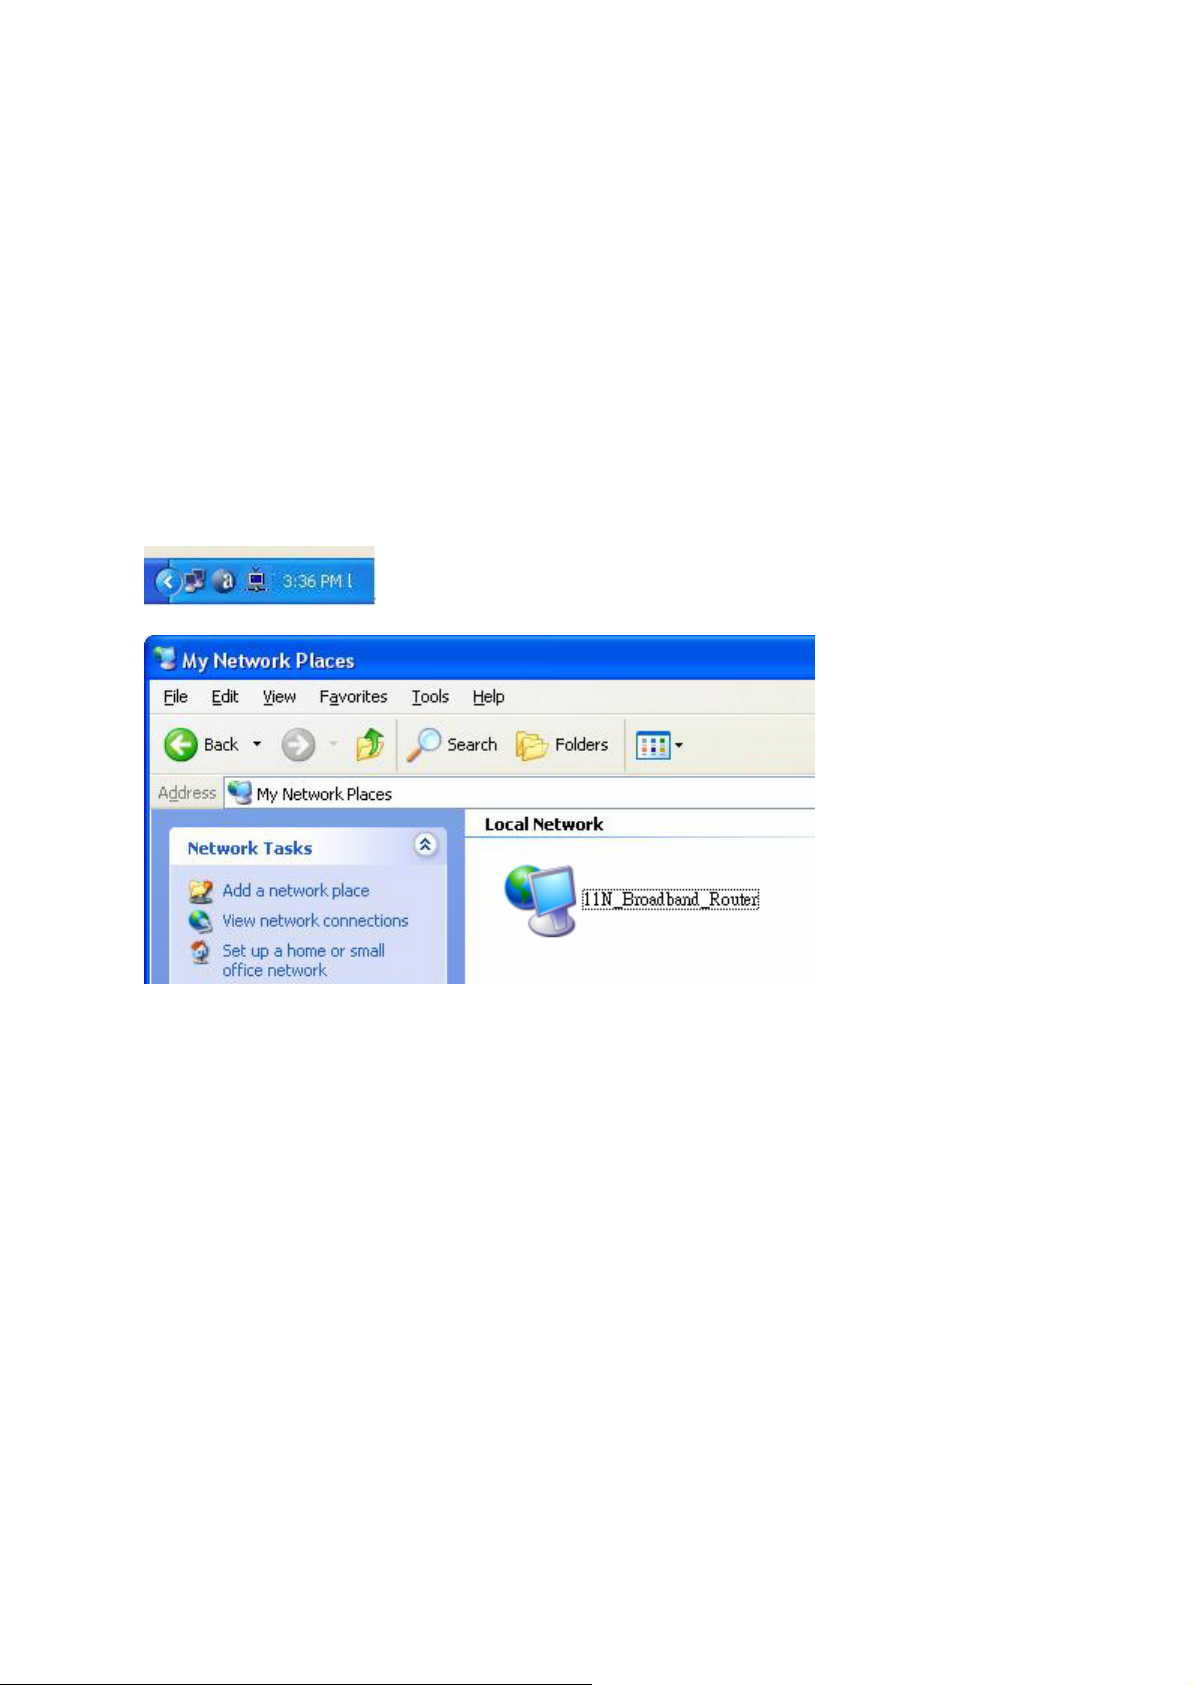
Step 1. Click the Internet Gateway Device to open the login page.
Step 2. Click One Button Setup on the left of the main menu under router mode.
Time Zone Select: Select your time zone from the Time Zone drop-down list.
Change Password: For changing password, please fill the password information into
the blank.
Device Name: Name your device here. The default is 11N_Broadband_Router.
Note: System will automatically copy the last 6 numbers of this device’s MAC address after your device name.
WAN Interface Setup: Select the WAN Interface from the drop-down list.
WAN Type Setup: Please choose the access type.
Wireless Setup: Fill in the ESSID if it is blank, and your prefer Encryption type. The
default is 11N_Broadband_Router.
Finished: Click finished button to complete the setting.
17

18
Chapter 3 Advanced Configuration for Router Mode
3.1 IP Configuration
This function allows you to add routing rules into 11N Broadband Router. It is useful if you
connect several computers behind 11N Broadband Router to share the same connection to
Internet.
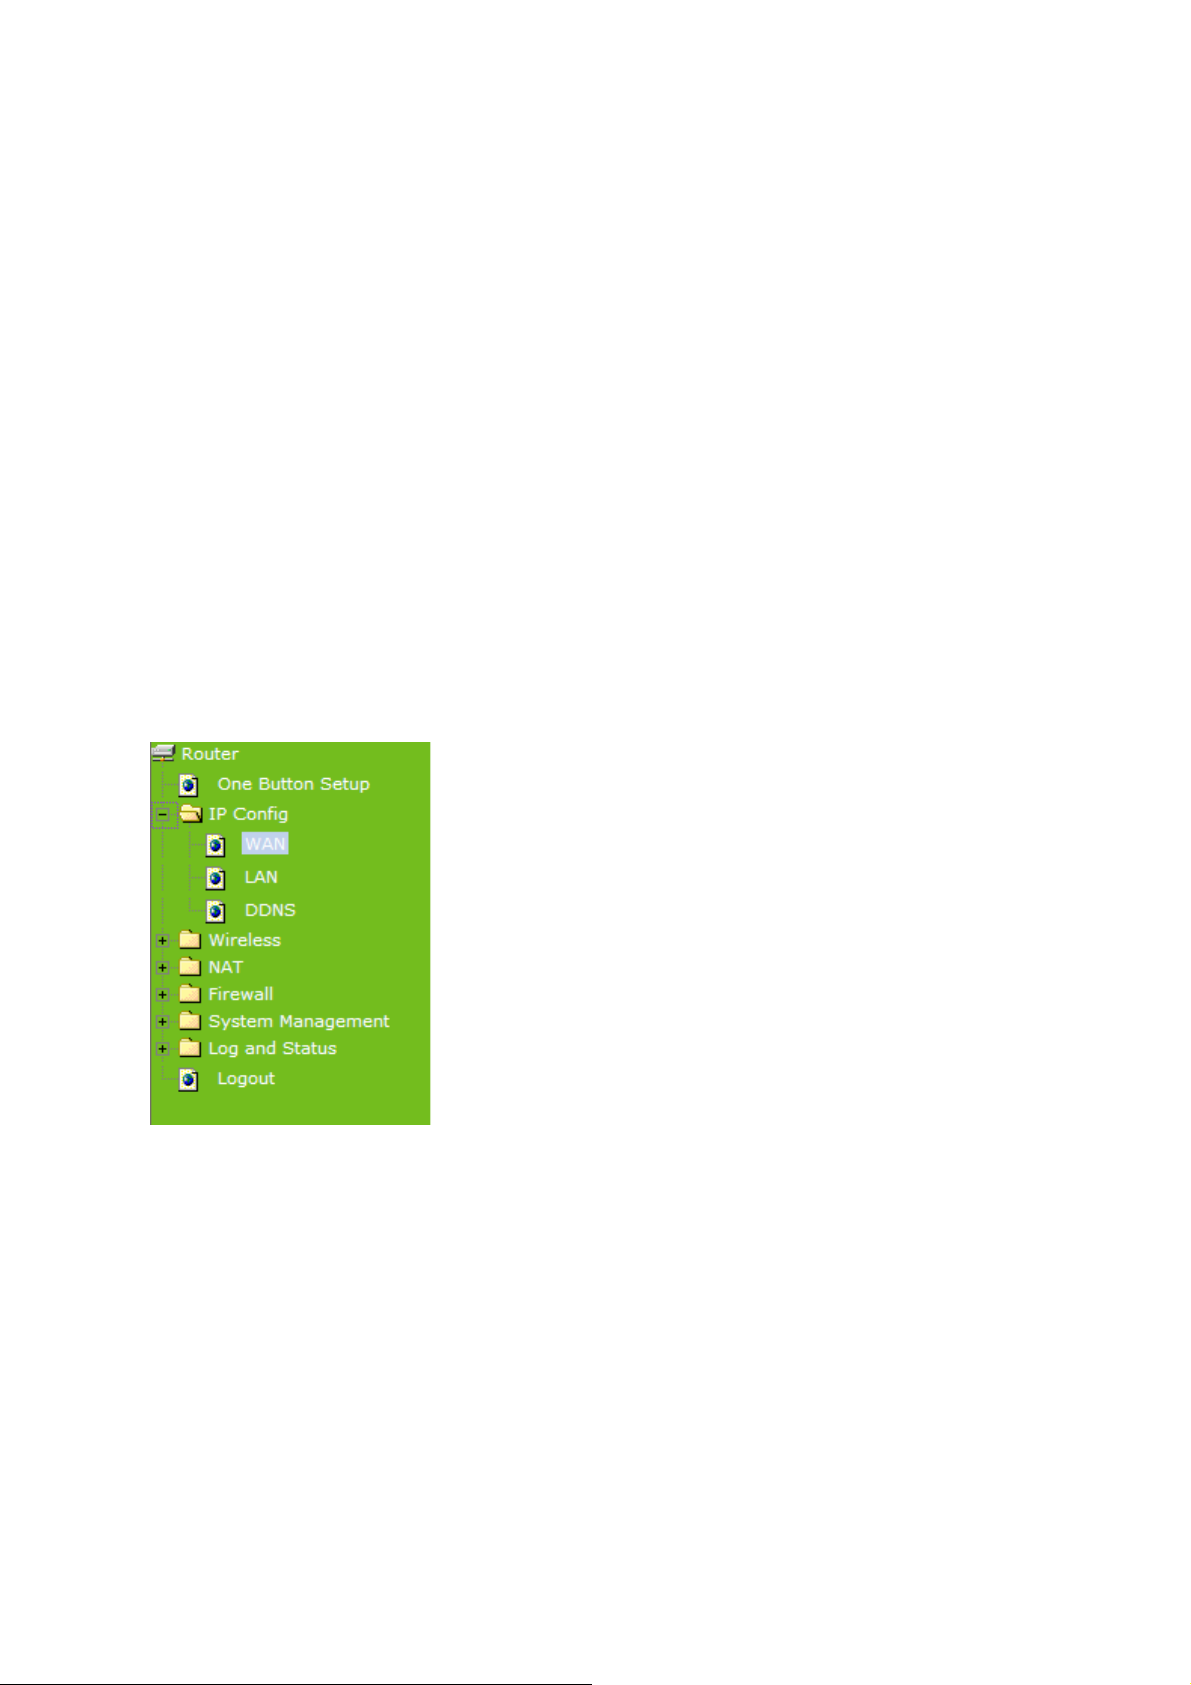
3.1.1 WAN
Select WAN under the IP Config menu. 11N Broadband Router supports 3 interfaces and 4
access types. Follow the instructions below for each to set up accordingly.
Choose your WAN Interface and WAN type, and click Next, its associated settings will show
up.
19

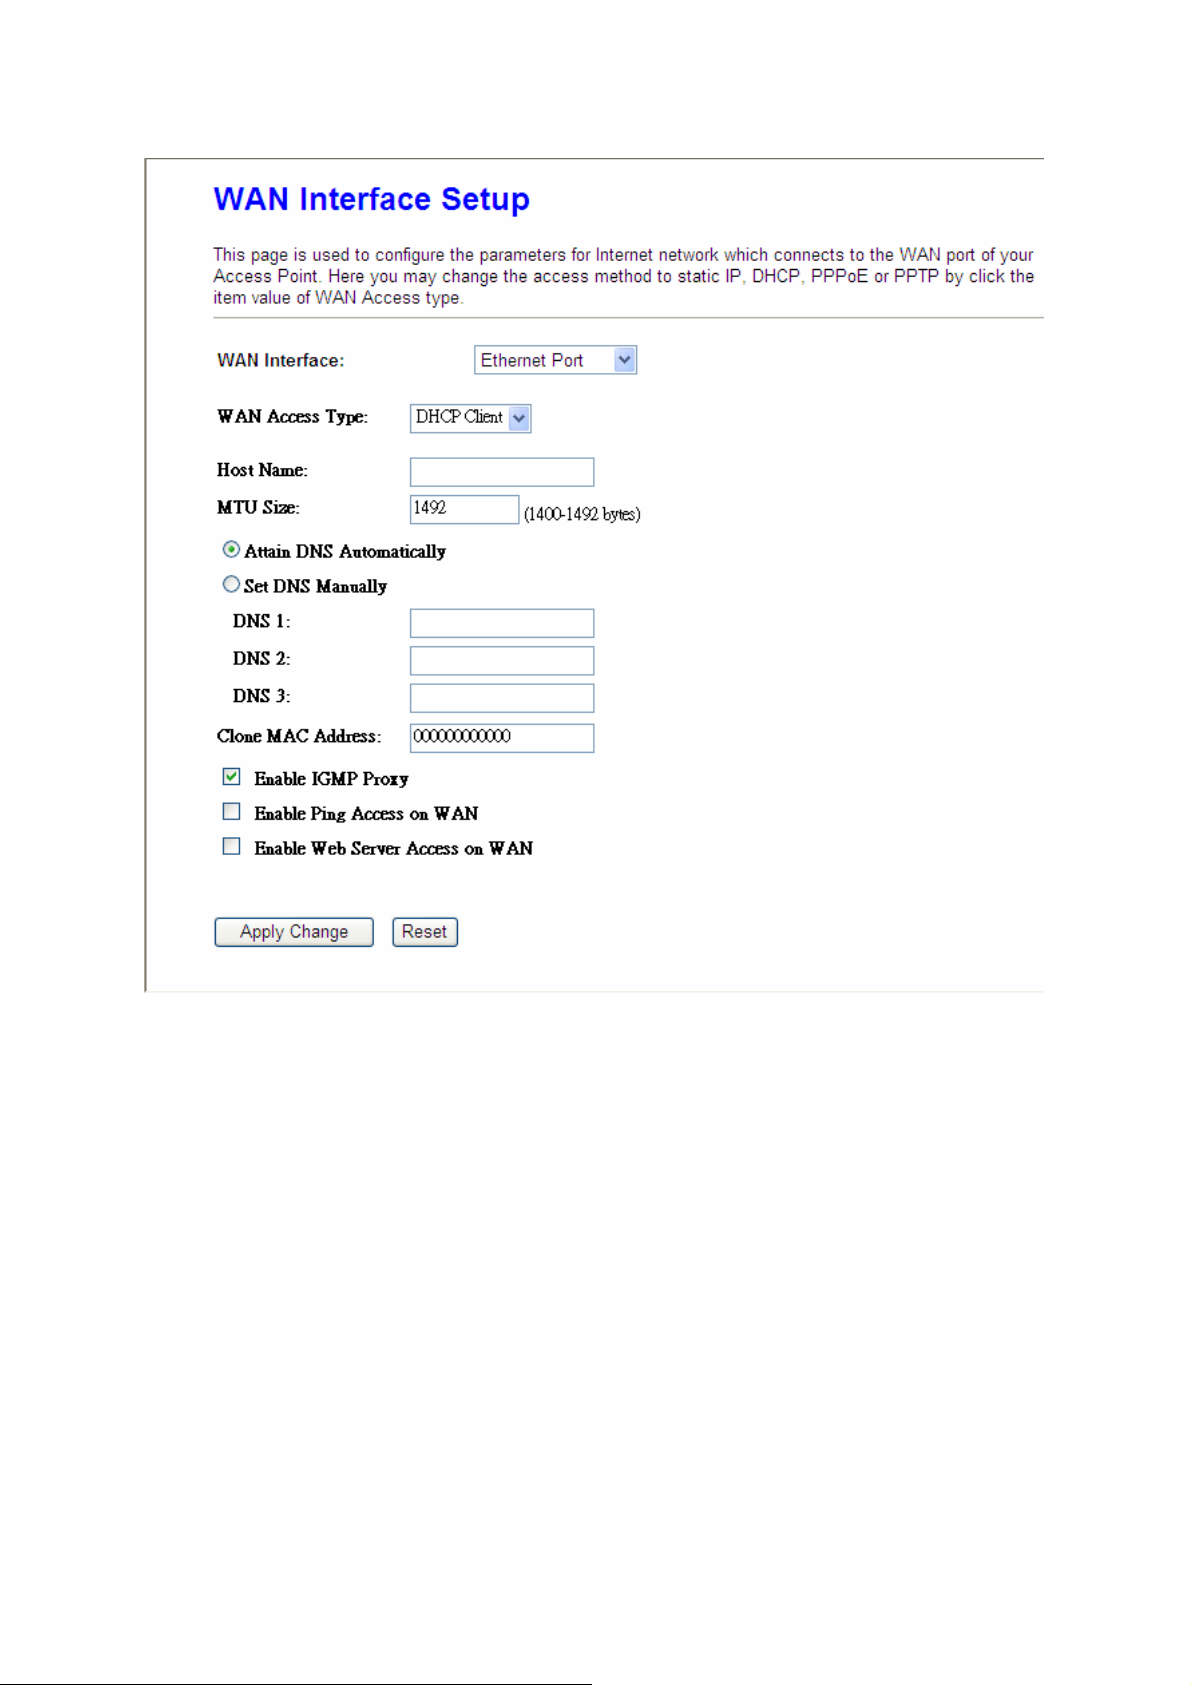
3.1.1.1 WAN Interface– Ethernet Port
If you are using an Ethernet cable to connect the Internet, please select Ethernet port.
20
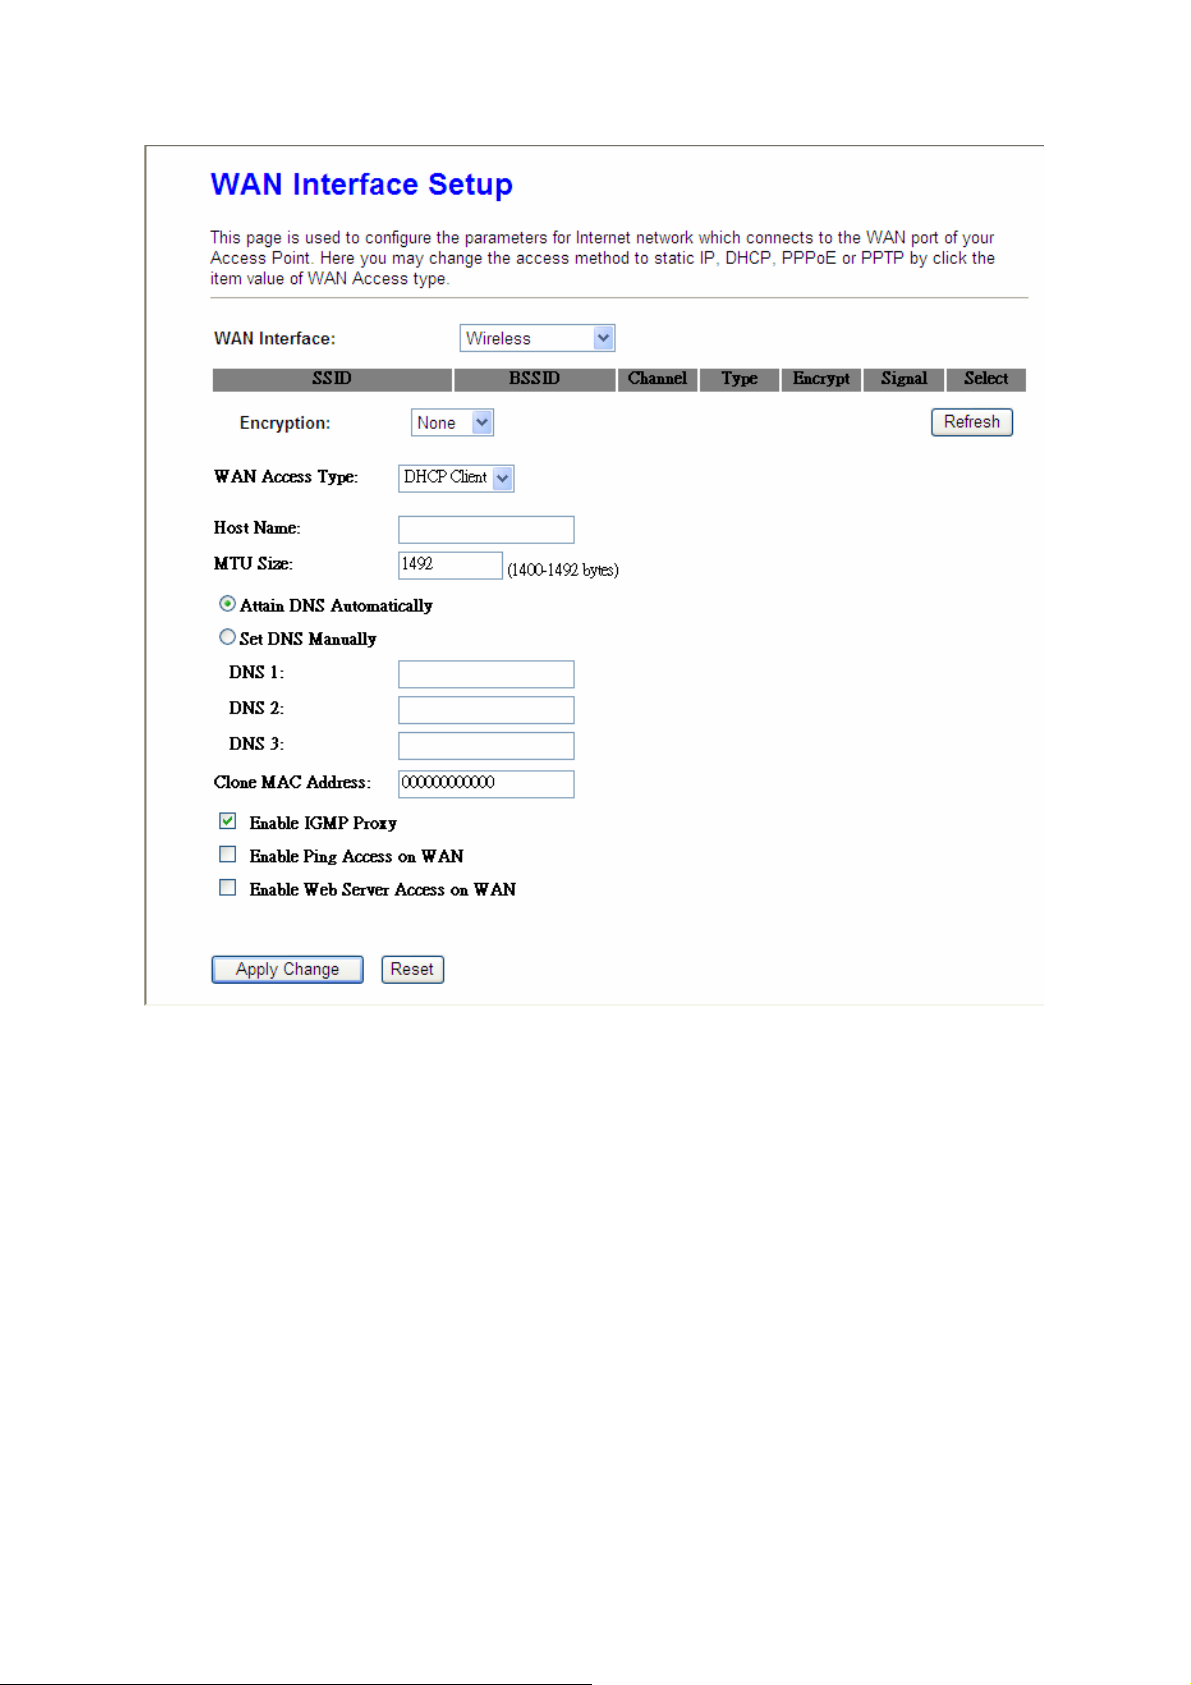
3.1.1.2 WAN Interface– Wireless
If you are connecting the internet via wireless, please select Wireless and its associated
settings will show up underneath at the same time.
You can see a list of available Wireless networks. Select you preferred one to connect and
the Encryption type form the drop-down list.
21
3.1.1.3 WAN Access Type – Static IP
If you applied for a Static IP connection type from ISP, please follow the steps to set up your
WAN connection.
22

1. IP Address
Input your IP Address supplied by ISP. If you don’t know, please check with your ISP.
2. Subnet Mask
Input Subnet Mask, normally it is 255.255.255.0.
3. Default Gateway
Input ISP Default Gateway Address. If you don’t know, please check with your ISP.
4. MTU Size
MTU stands for Maximum Transmission Unit. For Static IP connection, the default MTU
should be provided by computer operating systems (OS). Advanced users can set the MTU
manually for increasing the internet performance. The largest number allowed by Ethernet at
23

the network layer is 1500 byte
5. DNS
If ISP provides you DNS information, please select Attain DNS automatically, otherwise
select Set DNS Manually and input the DNS information into the blank.
6. Clone MAC Address
Copy the MAC address from the device you had registered to your ISP if your ISP asks for
the specific MAC Address.
7. Enable IGMP Proxy
The Internet Group Management Protocol (IGMP) is a communication protocol used to
manage the membership of Internet Protocol multicast groups. IGMP is used by IP hosts and
adjacent multicast routers to establish multicast group memberships. You can choose to
enable IGMP Proxy to provide service.
8. Enable Ping Access on WAN
Select Enable Ping Access on WAN, will make WAN IP address response to any ping
request from Internet users. It is a common way for hacker to ping public WAN IP address, to
see is there any WAN IP address available.
9. Enable Web Server Access on WAN
This option is to enable Web Server Access function on WAN.
10. Apply Changes & Reset
Click on Apply Changes to save the setting data. Or you may click on Reset to clear all the
input data.
3.1.1.4 WAN Access Type –Dynamic IP
If your WAN access type is Dynamic IP, please complete the settings as following
instructions.
24
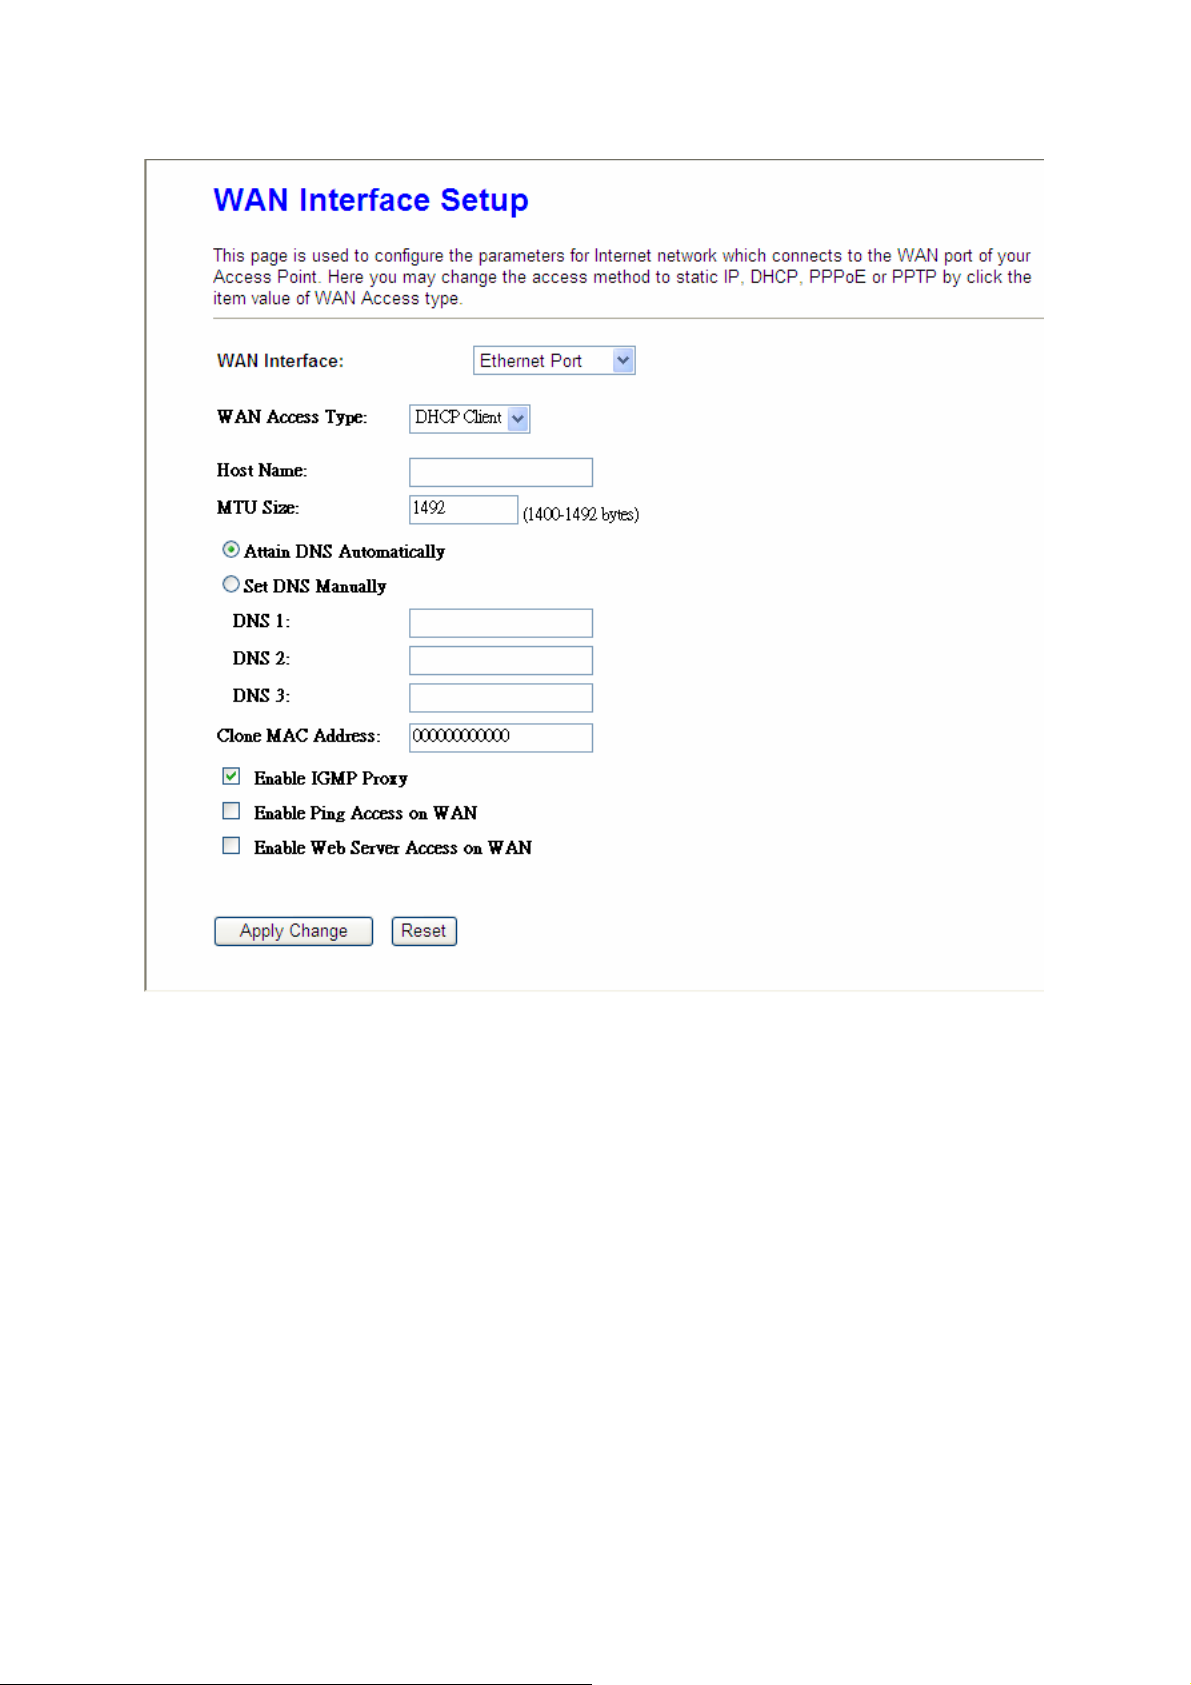
1. Host Name
The host name is optional; but if your ISP requires you to input a specific host name, please
put it in, for example, 11N Broadband Router applied from ISP. Generally, Cable Modem will
provide the hostname information.
2. MTU Size
MTU stands for Maximum Transmission Unit. For Static IP connection, the default MTU
should be provided by computer operating systems (OS). Advanced users can set the MTU
manually for increasing the internet performance. The largest number is 1492 byte
3. DNS
If ISP provides you DNS information, please select Attain DNS automatically, otherwise
select Set DNS Manually and input the DNS information into the blank.
25

4. Clone MAC Address
Copy the MAC address from the device you had registered to your ISP if your ISP asks for
the specific MAC Address.
5. Enable IGMP Proxy
The Internet Group Management Protocol (IGMP) is a communication protocol used to
manage the membership of Internet Protocol multicast groups. IGMP is used by IP hosts and
adjacent multicast routers to establish multicast group memberships. You can choose to
enable IGMP Proxy to provide service.
6. Enable Ping Access on WAN
Select Enable Ping Access on WAN, will make WAN IP address response to any ping
request from Internet users. It is a common way for hacker to ping public WAN IP address, to
see is there any WAN IP address available.
7. Enable Web Server Access on WAN
This option is to enable Web Server Access function on WAN.
8. Apply Changes & Reset
Click on Apply Changes to save the setting data. Or you may click on Reset to clear all the
input data.
3.1.1.5 WAN Access Type –PPPoE
If you applied for a PPPoE connection type from ISP, please follow the steps to set up your
WAN connection.
26
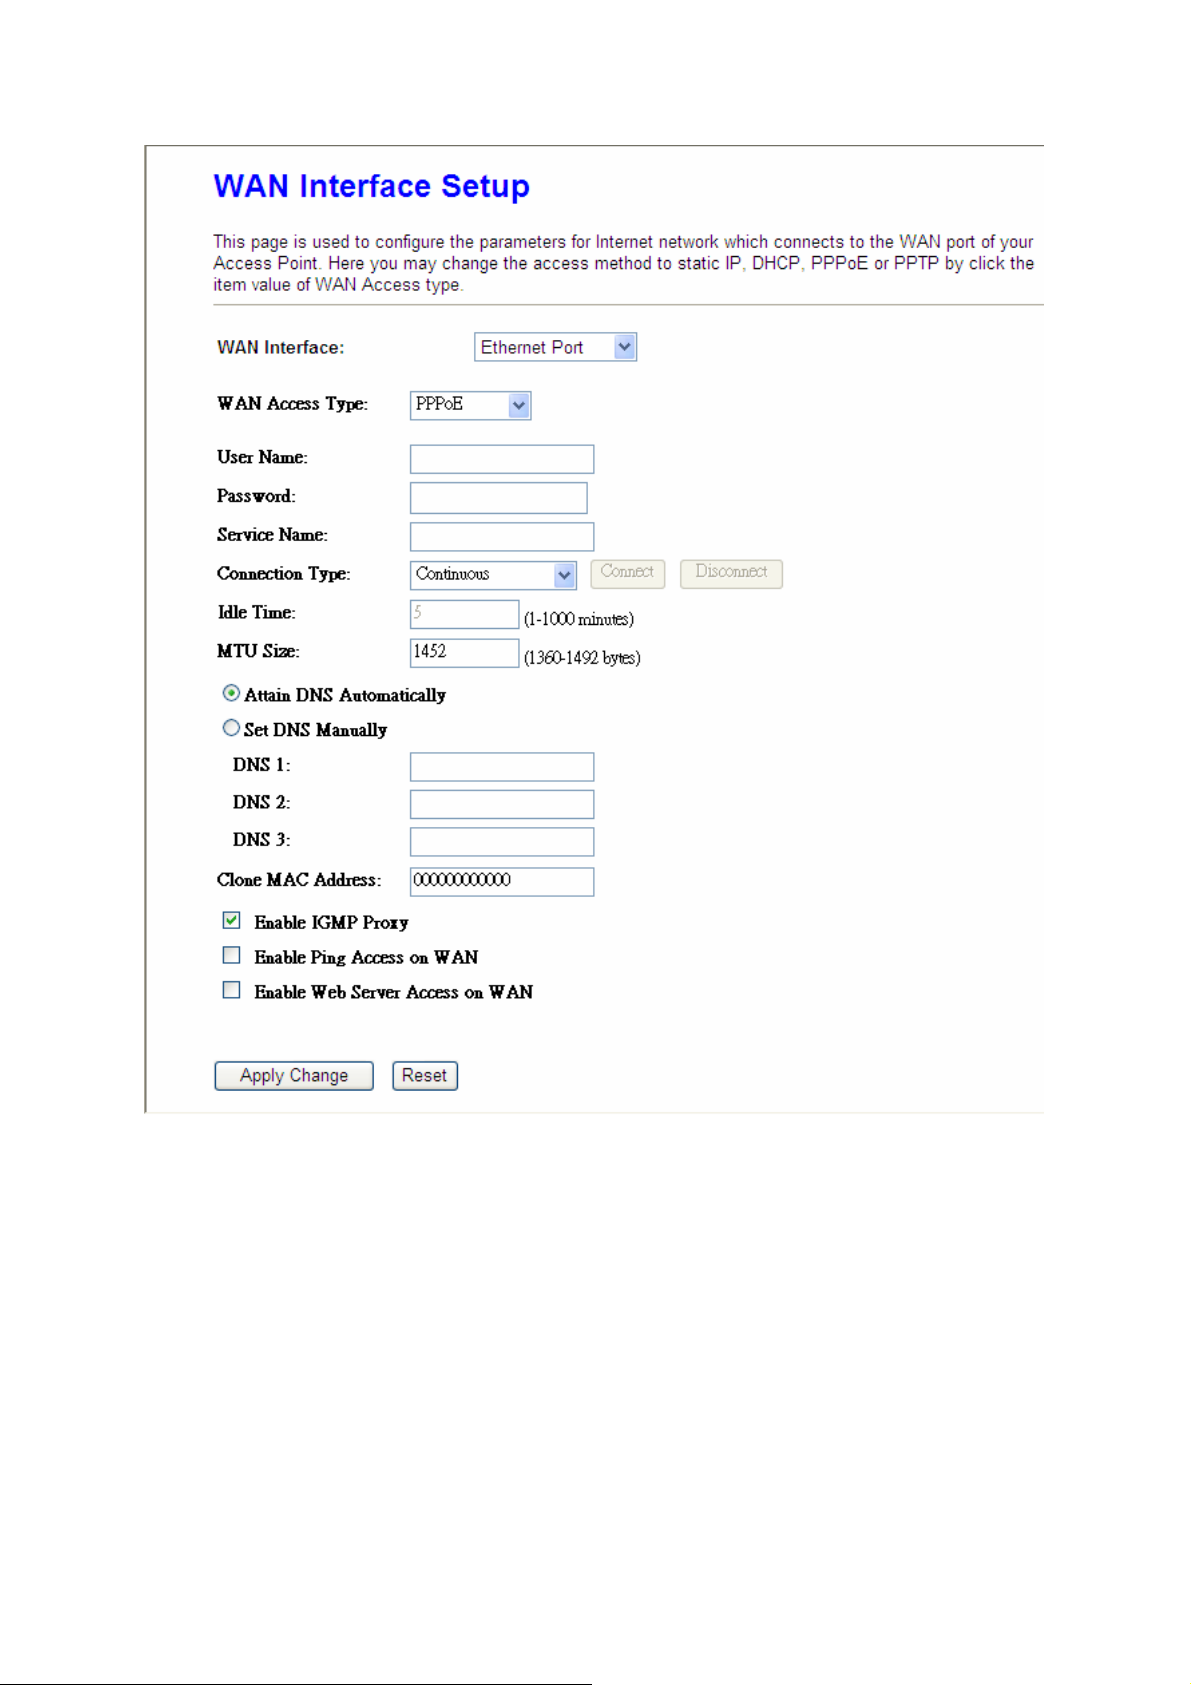
1. User Name
Input your user name supplied by ISP. If you don’t know, please check with your ISP.
2. Password
Input your Password supplied by ISP.
3. Service Name
Input the service name supplied by ISP.
4. Connection Type
It has three types: Continuous, Connect on Demand, and Manual.
27

5. Idle Time
It is the time of inactivity before disconnecting your PPPoE session. Enter an Idle Time (in
minutes) to define a maximum period of time for which the Internet connect is maintained
during inactivity. If the connection is inactive for longer than the defined Idle Time, then the
connection will be dropped. Either set this to zero or enable Auto-reconnect to disable this
feature.
6. MTU Size
MTU stands for Maximum Transmission Unit. For PPPoE connection, the default MTU should
be provided by computer operating systems (OS). Advanced users can set the MTU
manually for increasing the internet performance. The largest number allowed by Ethernet at
the network layer is 1492 byte
7. DNS
If ISP provides you DNS information, please select Attain DNS automatically, otherwise
select Set DNS Manually and input the DNS information into the blank.
8. Clone MAC Address
Copy the MAC address from the device you had registered to your ISP if your ISP asks for
the specific MAC Address.
9. Enable IGMP Proxy
The Internet Group Management Protocol (IGMP) is a communications protocol used to
manage the membership of Internet Protocol multicast groups. IGMP is used by IP hosts and
adjacent multicast routers to establish multicast group memberships. You can choose to
enable IGMP Proxy to provide service.
10. Enable Ping Access on WAN
Select Enable Ping Access on WAN, will make WAN IP address response to any ping
request from Internet users. It is a common way for hacker to ping public WAN IP address, to
see is there any WAN IP address available.
11. Enable Web Server Access on WAN
This option is to enable Web Server Access function on WAN.
12. Apply Changes & Reset
Click on Apply Changes to save the setting data. Or you may click on Reset to clear all the
input data.
28