

Page 1
TIEF-/MITTELTÖNER
BASS / MIDRANGE DRIVER
GRAPHIT 16
GRAPHIT 16
EINBAU-ANLEITUNG
INSTRUCTION MANUAL
E90-8286
Page 2

Inhalt
Contents
Einführung 1
Sicherheitshinweise 2
Montage der Lautsprecher 3
Elektrischer Anschluss 5
Anschlussdiagramm 6
Technische Daten 7
Einführung
ETON bedankt sich ausdrücklich für den Kauf
dieses Systems und beglückwünscht Sie zu
der Wahl dieses ausgezeichneten Produktes.
ETON Lautsprecher garantieren hervorragende Leistungen. Die elektrischen, mechanischen und klanglichen Eigenschaften bleiben
über die gesamte Lebensdauer des Produktes erhalten. Wir wünschen Ihnen viel Freude
beim Hören.
Introduction 1
Safety instructions 2
Mounting 3
Connection 5
Connection diagram 6
Technical data 8
Introduction
ETON expressly thanks you for deciding to
purchase this system and congratulates you
on the selection of this excellent product.
The ETON loudspeakers are a guarantee for
outstanding performance. The electrical, mechanical and tonal characteristics will be maintained at the original high standard throughout
the entire operational life of this product. We
wish you many pleasant listening hours.
Die vorliegende Bedienungsanleitung wurde
so konzipiert, dass Sie Ihnen eine korrekte Installation ermöglicht. Sie enthält Informationen
und grundsätzliche Vorgehensweisen für die
korrekte Funktionsweise des Produktes und deren daran angeschlossenen externen Geräte.
Bitte lesen Sie die Bedienungsanleitung sorgfältig, bevor Sie mit der Installation oder dem
Anschluss der Lautsprecher beginnen.
1
The current operational instructions are designed to ensure correct installation of the
loudspeakers. They contain information and
essential procedures for the correct operation of the product and its attached external
devices. Please carefully study the operating
instructions before beginning with the installation or the connection of the loudspeakers.
Page 3

Sicherheitshinweise Safety instructions
Achtung !
Bitte lesen Sie alle Warnungen in dieser Anleitung. Diese Informationen sind hervorgehoben und eingefügt, um Sie über mögliche persönliche Schäden oder Beschädigungen von
Sachwerten zu informieren.
Hörschäden
DAUERHAFTES AUSGESETZTSEIN VON
LAUTSTÄRKEN ÜBER 85 dB KANN ZUR
SCHÄDIGUNG DES GEHÖRS FÜHREN.
VERSTÄRKER BETRIEBENE AUTOHIFIANLAGEN KÖNNEN LEICHT SCHALLDRÜCKE ÜBER 130 dB ERZEUGEN UND IHR
GEHÖR NACHHALTIG SCHÄDIGEN. BITTE
BENUTZEN SIE DEN GESUNDEN MENSCHENVERSTAND UND VERMEIDEN SIE
SOLCHE RISIKEN.
Lautstärke und Fahrerbewusstsein
Der Gebrauch von Musikanlagen kann
das Hören von wichtigen Verkehrsgeräuschen
behindern und dadurch während der Fahrt
Gefahren auslösen.
ETON übernimmt keine Verantwortung für
Gehörschäden, körperliche Schäden oder
Sachschäden, die aus dem Gebrauch oder
Missbrauch seiner Produkte entstehen.
Attention !
Please read all warnings found in this manual.
This information is highlighted and included to
inform you of the potential danger of personal
injury or damage to property.
Hearing Damage
CONTINOUS EXPOSURE TO SOUND
PRESSURE LEVELS OVER 85 dB MAY
CAUSE PERMANENT HEARING LOSS.
HIGH POWERED AUTO-SOUND SYSTEMS
MAY PRODUCE SOUND PRESSURE LEVELS OVER 130 dB. THIS MAY CAUSE DAMAGE OF HEARING. USE COMMON SENSE AND AVOID SUCH RISKS!
Volume and Driver Awareness
Use of sound components can impair your
ability to hear necessary trafc sounds and
may constitute a hazard while driving your
automobile.
ETON accepts no liability for hearing
loss, bodily injury or property damage
as a result of use or misuse of this
product.
2
Page 4

Montage Mounting
Nehmen Sie Ihr Fahrzeug nicht in Betrieb, bevor alle Komponenten des
Lautsprechersystems fest und sicher
eingebaut sind. Lose Teile können im
Falle eines plötzlichen Bremsmanövers oder eines Unfalls zu gefährli-
chen, iegenden Geschossen werden.
Bohren oder schrauben Sie nicht in
eine Fahrzeugverkleidung oder einen
teppichbezogenen Boden, bevor Sie
sich versichert haben, dass darunter keine wichtigen Teile oder Kabel
sind. Achten Sie auf Benzin-, Brems-,
Ölleitungen und elektrische Kabel bei
der Planung für die Montage.
Wir empfehlen die Fahrzeugbatterie
abzuklemmen. Bitte erfragen Sie in Ihrer Fachwerkstatt ob ein Trennen der
Batterie ohne Probleme möglich ist.
Einbauplätze wählen
Für eine einfache Montage benutzen Sie die
vorgesehenen Original-Einbauplätze. Diese
Wahl bringt erheblich kürzere Montagezeiten
mit sich und beste optische Integration. Vermeiden Sie Plätze hinter dicken Stoffen. Dies
kann, besonders bei Hochtönern, den Klang
und die Lautstärke beeinträchtigen.
Do not use your automobile until all
components of the loudspeaker system have been secured to the interior
framework. Failure to do so may turn
a component into a dangerous, ying
projectile during a sudden stop or accident.
Do not drill or drive screws through
any vehicle interior or carpeted oor
before inspecting the underside for
potential punctures to control lines or
cables. Be sure to avoid all fuel lines,
brake lines, electrical cables or oil lines
when planning the installation.
We recommend to disconnect the
battery. Please ask your car dealer if
disconnecting the battery is possible
without any problem.
Choosing a location
For simple installation use the original factory
speaker location. Using these positions will
save considerable installation time and provide the best optical integration. Avoid installing
speakers behind thick stock fabric or cloth.
This could - espacially in the case of tweeters
- restrict output and reduce sound volume.
Zu nahe Montage der Tief-/Mitteltöner an
reektierenden Flächen kann den Stereoeffekt beeinträchtigen. Jedes Tieftöner-Paar
sowie Hochtöner-Paar sollte nicht weiter als
60 cm auseinander liegen. Wenn Sie zuerst
die Mittel- und Tieftöner montieren und die
Anschlusskabel verlegen, können Sie die optimale Position für die Hochtöner an verschiedenen Plätzen ausprobieren, bevor Sie diese
fest einbauen.
Einbau der Tief-/Mitteltöner
Können Sie den Lautsprecher nicht am Original-Einbauplatz montieren, ist der allgemein
meistgenutzte Ort die Türverkleidung.
3
Too near installation close to reective surfaces can negatively affect stereo imaging. The
distance between each mid/woofer and tweeter pair should not exceed 60 cm. We suggest
rst mounting the mid/woofer and attaching
cables. Then you can determine the optimum
tweeter location by auditioning the tweeters
at several positions in your automobile before
permanent installation.
Installation of bass / midrange driver
If is not possible to install the loudspeaker in
the original factory speaker location, the most
used position is in the door panel.
Page 5
Montage Mounting
Nach der Wahl des entsprechenden Platzes
entfernen Sie vorsichtig die Verkleidung. Versichern Sie sich, dass genügend Einbautiefe
vorhanden ist und keine beweglichen Teile
(Fenster, Fensterkurbel) in ihrer Funktion behindert werden.
Vorsicht beim Entfernen von Innenverkleidungen. Die Fahrzeughersteller verwenden verschiedenste Befestigungsteile die bei der Demontage
beschädigt werden können.
Schneiden Sie ggf. unter Zuhilfenahme einer
Bohrschablone (nicht beilliegend) ein entsprechendes Loch in die Verkleidung und eventuell in das dahinterliegende Karosserieblech
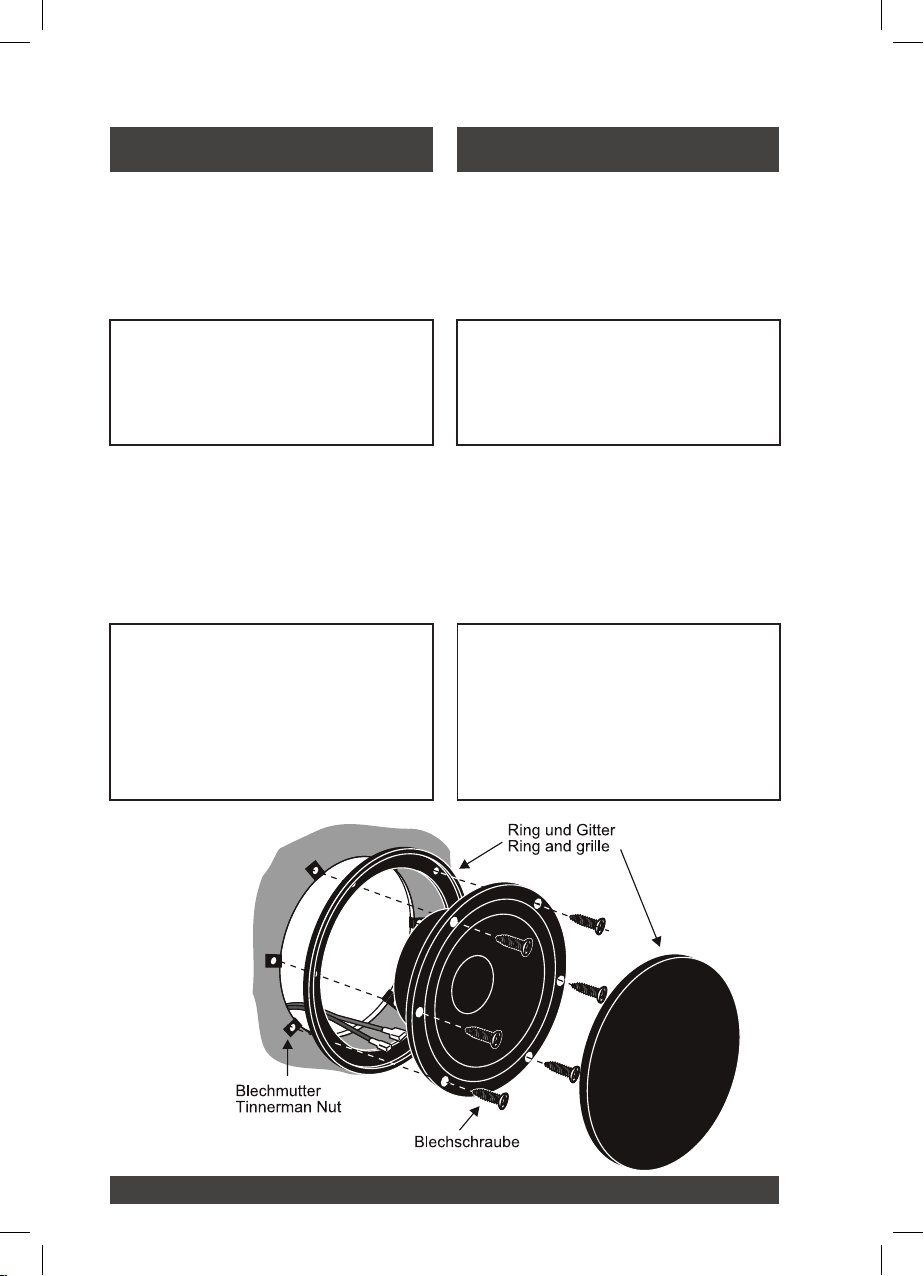
und bohren die Löcher für die Befestigungsschrauben. Montieren Sie die Teile wie in
Abbildung 1 dargestellt.
ACHTUNG!
Sollen Karosseriebleche ausgeschnitten oder entfernt werden,
nehmen Sie Kontakt mit Ihrer Fahrzeug-Vertragswerkstatt auf.
Bei Beschädigungen tragender
Karosserieteile kann die Betriebserlaubnis erlöschen.
After choosing a location, carefully remove
the trim panels. Be sure that sufcient mounting depth is available and that no moveable,
mechanical parts (window, window regulator
handle) are restricted in their functionality.
Caution: Use care when removing interior trim panels. Car manufacturers
use a variety of fastening devices
that can be damaged in the disassembly process.
Use, if necesarry, a drilling template (not included) to cut a suitable hole in the trim panel
and, if necessary, in the sheet metal behind.
Drill holes for the fastening screws. Mount the
parts as shown in gure 1.
ATTENTION!
If sheet metal must be cut or
removed contact your authorized
car dealer for professional advice.
By damage to supporting body
structures the safety certicate
may be withdrawn.
Abbildung 1
gure 1
(nicht im Lieferumfang enthalten)
(not in Set included)
4
Page 6

Montage Mounting
Bei der Verwendung von Gittern oder Verkleidungen vor dem Lautsprecher versichern Sie
sich, dass genügend Raum für den Weg des
Lautsprecher-Konus vorhanden ist. Sollte der
Abstand nicht ausreichen, kann der Konus
gegen die Verkleidung vibrieren und der Lautsprecher dadurch beschädigt werden.
If you plan to use grilles or panels in front of
the loudspeaker, ensure that sufcient space
is available for the path of the loudspeaker
cone. Should the distance not be sufcient,
the cone could vibrate against the grille or panel thus damaging the loudspeaker.
Elektrischer Anschluss Connection
Achten Sie immer darauf, wenn Sie Kabel
durch ein Blech verlegen, dass das Kabel
durch eine Kunststoffdurchführung geschützt
ist und nicht von einer scharfen Blechkante
beschädigt werden kann, um Kurzschlüsse
und daraus resultierende Schäden am Verstärker oder der Lautsprecher zu vermeiden.
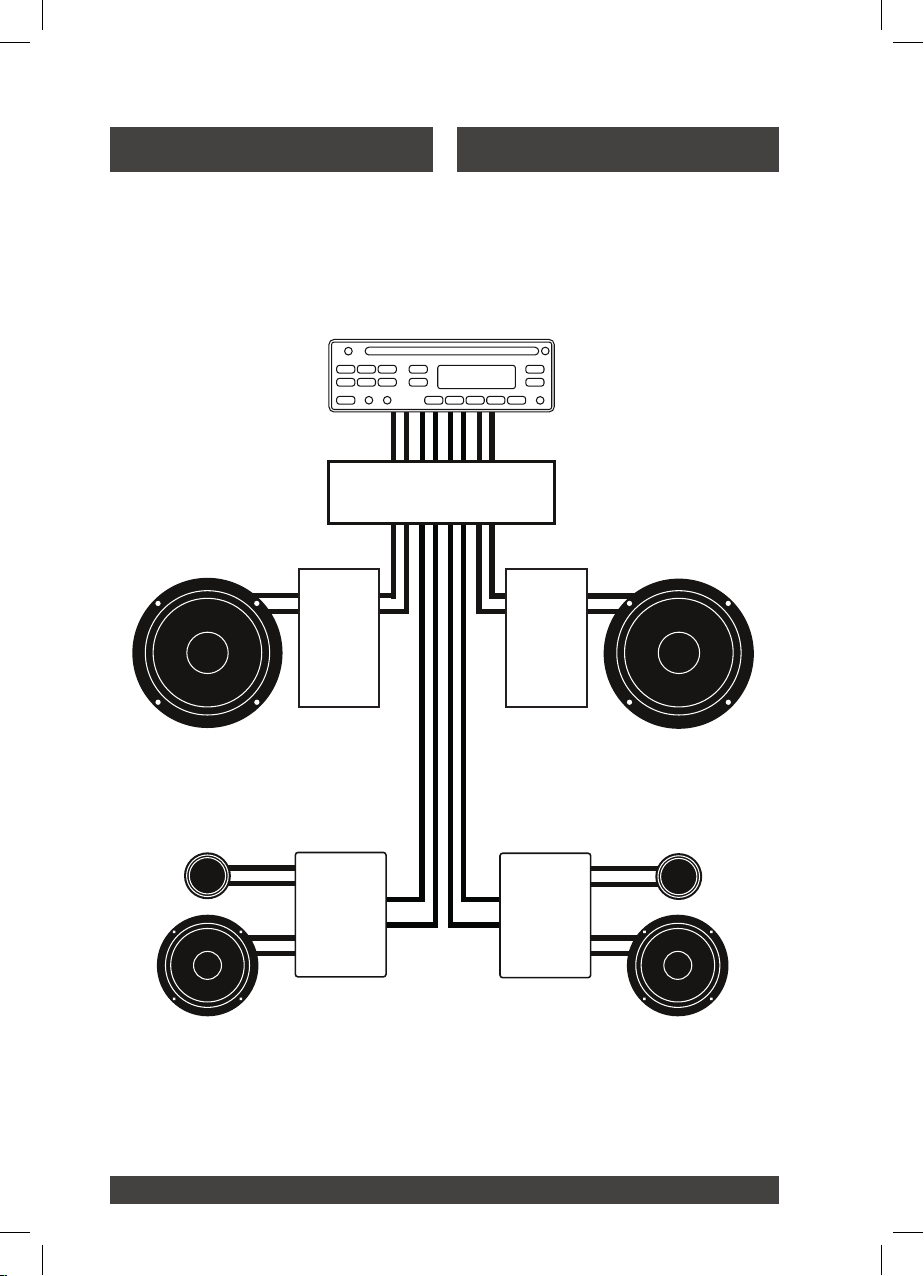
Folgen Sie den Anschlussplänen der Abbil-
dungen 2, um das Lautsprechersystem mit
Ihrem Autoradio und eventuell mit einem Verstärker zu verbinden.
Mitteltöner sollten nur über eine Weiche angeschlossen sein. Sollten Sie das GRAPHIT
System vollaktiv ansteuern wollen, ist dennoch eine aktive Frequenztrennung für die
Mitteltöner erforderlich, stellen Sie hierzu
die nötigen Werte in Ihrem DSP oder an Ihrem Verstärker / Quelle ein. Eine empfohlene
Trennfrequenz für Mitteltöner sowie auch für
die Hoch- & Tieftöner nden Sie auf unserer
Website sowie in der Bedienungsanleitung.
Whenever you run wires through sheet metal, use tape or grommets to properly insulate the metal edges from cable jackets. This
technique prevents chang and possible short
circuits that could damage an amplier or the
loudspeakers.
Follow the wiring diagrams gures 2 to
connect the loudspeaker system to your auto-
mobile radio and possibly to an amplier.
Midrange drivers should only be connected
via a crossover. If you want to drive the GRAPHIT system fully active, an active frequency
separation for the midrange speakers is still
necessary, set the necessary values in your
DSP or on your amplier / source. A recommended crossover frequency for midrange
drivers as well as for the tweeters & woofers
can be found on our website as well as in the
user manual.
Achtung: Geben Sie keine Spannung
auf die Hochtöner, bevor Sie sie an die
passive Weiche / DSP mit Trennfrequenz angeschlossen haben!
Nun können Sie die Fahrzeug-Batterie wieder
anklemmen und das Lautsprecher-System
testen.
5
Attention: Do not apply voltage to the
tweeters before connecting them to the
passive crossover / DSP with crossover frequency!
Replace the automobile battery connector
and test the loudspeaker system.
Page 7
Anschlussdiagramm Connection diagram
Abbildung
Figure
2
2
Anschlußplan für
4 Kanal
3-Wege 3-way
3-Wege teilaktiv
Wiring diagram for
2-channel
3-way partly active
AUTORADIO / SOURCE UNIT
VERSTÄRKER
AMPLIFIER
GRAPHIT 16
TIEFTÖNER
WOOFER
GRAPHIT 28 GRAPHIT 28
HOCHTÖNER
TWEETER
Frequenztrennung:
DSP / Weiche
/ Aktiv-Filter
Verstärker
Frequency
separation:
DSP / crossover
/ active lter
amplier
Frequenz-
trennung:
WEICHE
DSP / Weiche
/ Aktiv-Filter
CROSSOVER
Verstärker
Frequency
separation:
DSP / crossover
/ active lter
amplier
Frequenz-
trennung:
DSP / Weiche
/ Aktiv-Filter
Verstärker
Frequency
separation:
DSP / crossover
/ active lter
amplier
Frequenz-
trennung:
DSP / Weiche
WEICHE
/ Aktiv-Filter
CROSSOVER
Verstärker
Frequency
separation:
DSP / crossover
/ active lter
amplier
GRAPHIT 16
TIEFTÖNER
WOOFER
HOCHTÖNER
TWEETER
MITTELTÖNER
MIDRANGE
GRAPHIT 80
MITTELTÖNER
MIDRANGE
GRAPHIT 80
6
Page 8

Technische Daten
Modell GRAPHIT 16
Tief-/Mitteltöner 165 mm (6.5") Carbon-Vlies Sandwich Membrane
Nennimpedanz Z
Nennbelastbarkeit 90 W
Musikbelastbarkeit 140 W
empfohlene obere Trennfrequenz (Aktiv-Betrieb) LPF 2-3 kHz / 6 oder 12 dB
empfohlene untere Trennfrequenz (Aktiv-Betrieb) HPF 40-80 Hz / 12 oder 24 dB
Mittlerer Kennschalldruckpegel 1W/1m 87 dB
Ausschnittdurchmesser 146 mm
Einbautiefe 68,8 mm
Außendurchmesser 165 mm
(Ω) 4 Ω
n
Gleichstromwiderstand R
Resonanz Frequenz f
Nachgiebigkeit der Aufhängung C
Mechanische Güte Q
Elektrische Güte Q
Gesamtgüte Q
Mechanischer Widerstand R
TS
Gesamt bewegte Masse (inkl. Luftmasse) M
Effektive Abstrahläche S
Schwingspuleninduktivität Le (mH) 0,32 mH
Kraftfaktor B
Äquivalentvolumen V
xl (Tm) 5,7 Tm
L
(Ω) 3,3 Ω
e
(Hz) 66 Hz
r
MS
ES
(dm3) 7,3 dm
AS
(mm/N) 0,29 mm/N
MS
(kg/s) 0,93 kg/s
MS
(cm2) 132 cm
D
(g) 19,8 g
MD
8,72
0,82
0,75
2
3
7
Page 9

Technical Data
Model GRAPHIT 16
Bass-/Midrange driver 165 mm (6.5") carbon eece sandwich cone
Nominal impedance Z
Nominal power 90 W
Music power 140 W
Recommended upper freq (active mode) LPF 2-3 kHz / 6 or 12 dB
Recommended lower freq (active mode) HPF 40-80 Hz / 12 or 24 dB
Characteristic SPL 1W/1m 87 dB
Cut out diameter 146 mm
Installation depth 68.8 mm
Outer diameter 165 mm
(Ω) 4 Ω
n
DC resistance R
Resonance freq f
Suspension compliance C
Mechanical Q
Electrical Q
Total Q
Mechanical resistance R
Total moving mass (incl. air mass) M
Effective piston area S
Voice coil inductance Le (mH) 0.32 mH
Force factor B
Equivalent air vol. of suspension V
(Ω) 3.3 Ω
e
(Hz) 66 Hz
r
MS
ES
TS
xl (Tm) 5.7 Tm
L
(mm/N) 0.29 mm/N
MS
(kg/s) 0.93 kg/s
MS
(cm2) 132 cm
D
(g) 19.8 g
MD
(dm3) 7.3 dm
AS
8.72
0.82
0.75
2
3
8
Page 10

Notizen Notes
9
Page 11

Notizen Notes
10
Page 12

ETON behält sich das Recht vor, die beschriebenen Produkte ohne jegliche
Vorankündigung zu verändern oder zu verbessern. Alle Rechte sind vorbehalten. Die auch teilweise Vervielfältigung des vorliegenden Handbuchs ist
untersagt.
ETON reserves the right to make modications or improvements to the products illustrated without notice thereof. All rights belong to the respective owners. Total or partial reproduction of this User‘s Guide is prohibited.
 Loading...