

Page 1
FIELD RADIO 550
The AM/FM/Shortwave radio that’s outstanding in its eld
OWNER’S MANUAL
Page 2

FIELD OWNER’S MANUAL
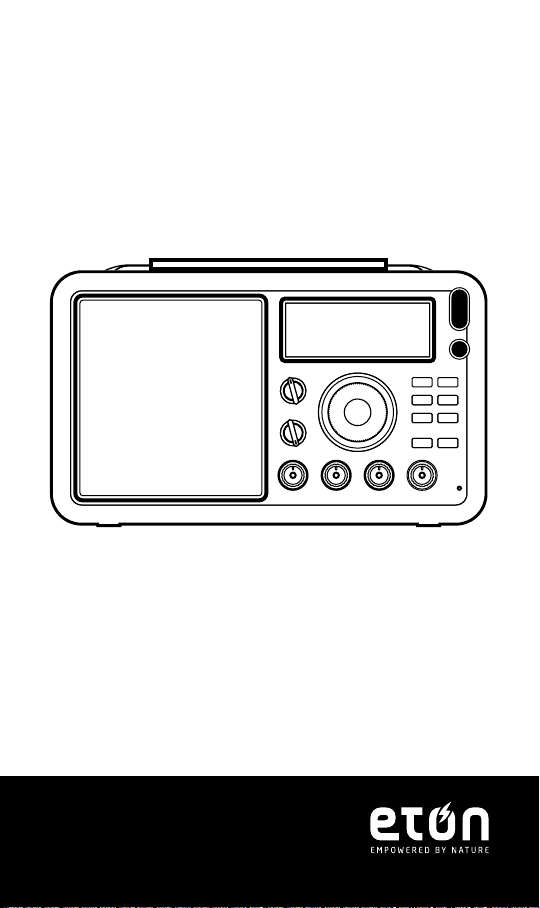
MEET THE FIELD
Thank you for purchasing the Etón FIELD AM/FM/SW
Radio. We want you to thoroughly enjoy the use of this
product. To take advantage of its many excellent and
unique features, we urge you to carefully read the user’s
manual.
INSTALLING BATTERIES
The battery compartment is on the back of the radio.
Remove it by pressing the two tabs and pulling up. To
prevent battery acid leakage, follow these instructions.
Battery acid leakage is not covered by the radio’s
warranty. Install only fresh, new alkaline D cells, all of
the same brand and type. Never install or replace with
batteries of different brands and types. Never mix old
batteries with new ones. When not using the radio for
more than 30 days, remove the batteries.
BATTERY TYPE AND OPERATION
Use 4 D size alkaline batteries. Install them with
correct polarity using the diagram inside the battery
compartment. Replace them if the battery strength
indicator in the display shows one bar or the sound
becomes distorted. The radio will turn off automatically if
the batteries become too weak.
BATTERY LEVEL INDICATOR
The battery level indicator is in the upper left corner of the
display. When batteries are full,
will be displayed in the
2
Page 3

FIELD OWNER’S MANUAL
LCD; if ashes, it indicates that batteries are low and
the radio will soon turn off automatically.
USING AC POWER
Plug AC adapter into the socket on the right side of the
radio. Use only the AC adapter supplied. When the AC
adapter is plugged in, the
will show in the upper left
corner of the display. If you lose the AC adapter that came
with the radio, use one with 6 Volt DC output, negative
polarity, 500 milliampere and a plug with 5.5 millimeter
outer diameter, 2.1 millimeter inner diameter.
POWER FAILURE BACKUP FEATURE
If batteries are in the unit and it is powered via its AC
adapter, it will automatically switch to battery use if there
is an AC power failure.
TURNING THE FIELD ON AND OFF
Turn on the radio by pressing the red POWER & SLEEP
button on the front top right corner of the radio. When
the unit is on, press the POWER & SLEEP again to turn the
radio off.
TUNING
There are several ways to tune the radio to a desired
station:
• Rotate the tuning knob to select the frequency
• Short press the UP or DOWN button to step by step
change the frequency higher or lower
3
Page 4

FIELD OWNER’S MANUAL
• Long press the UP or DOWN button to seek the next
station up or down in frequency
• Press the PRESET button to tune to the next preset
station
Short press the Q.TUNE button to increment quickly up
the frequency range. The Q.TUNE button steps up in
frequency by 1000kHz in FM mode and SW modes and
100kHz in MW (AM) mode. Long press the Q.TUNE button
to continuously increment by the steps noted above.
TUNING IN FM STATIONS
The FM frequency range is from 87.5 to 108 MHz.
Fully extend the telescopic antenna and turn on the radio.
Place the top BANDWIDTH control onto the MONO or
STEREO position. Stereo is needed only when you’re using
headphones and STEREO appears to the bottom left of
the frequency in the display. FM mono has better signal
and noise ratio as well as anti-multiplex interference.
RDS/INFO:
The FIELD Radio supports RDS Data Streaming while
tuning in the FM band. A short press of the RDS button
will enable the display of RDS information as PS/PTY/RT/
DATA in cycle. The
left corner of the display in RDS mode.
icon will be displayed in the lower
PS: station name , when no station information, just
display “NO PS”;
PTY: program category, no program, just display “ NO PTY”
RT: Radio text, no text, just display “NO RT”
4
Page 5

FIELD OWNER’S MANUAL
DATA: Clock/Date/program call information, if no
information, just display “NO DATA”. If the information is
available, the display format is:
Station call Weekly Month-Day-Year Hour:Minute
Weekly format:
“MON”, “TUE”, “WED” “THU”, “FRI” “SAT”, “SUN”,
For example, the LCD will roll to display as WGSS, TUE 0325-2014 02:15,
TUNING INTO MW (AM) STATIONS
Place the top BANDWIDTH switch into the W or N position
(wide or narrow). Place bottom BANDWIDTH switch into
the MW position.
Place SW RF GAIN switch into the 5 position, higher if
necessary.
Tune in the station with the TUNING knob or by pressing
the UP/DOWN button or by pressing and holding the UP/
DOWN button for one second to engage auto tuning.
Use WIDE if no interference is present. Use NARROW
if interference is present.
CHANGING THE TUNING STEPS (9kHz or 10kHz)
MW, or medium wave stations, known as AM stations in
North America, range from 520 to 1710 KHz in North
America and from 522 to 1620 KHz in other parts of the
world. In North America they tune in 10 KHz steps and in
other parts of the world they may tune in 9 KHz steps.
The radio is set up for 10 KHz tuning by default, but to
change the steps to 9 KHz, With the radio off, long press
the PRESET button to select.
5
Page 6
FIELD OWNER’S MANUAL
Long press to switch 9K or 10K, the LCD displays 9K or
10K.
USING THE SW RF GAIN KNOB
When listening to SW broadcast stations, this control knob
should be dialed to or near position 5. If you are listening
to a weak station, increase the gain, when listening to
extremely strong stations, decrease the gain. For listening
to Shortwave stations, place this control to maximum gain
and decrease the gain as necessary.
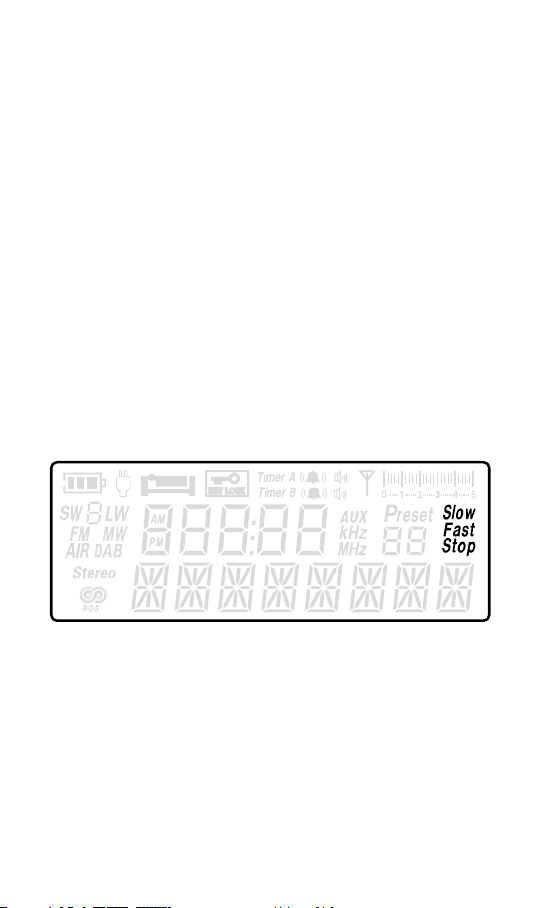
CHANGING THE TUNING SPEED USING THE TIMER
A / TUNING STEP BUTTON
With the radio on, short press TIMER A / TUNING STEP
button, the LCD will display:
For“SLOW” mode, rotate tuning knob to increase or
decrease frequency for FM at 10kHz, MW at 1kHz, SW at
1kHz;
For “FAST” mode,rotate tuning knob to increase or
decrease frequency for FM at 100kHz, MW at 9kHz or
10kHz, SW at 5kHz;
For “STOP” mode, the rotating tuning knob is disabled.
6
Page 7

FIELD OWNER’S MANUAL
ANTENNA DX/LOCAL SWITCH
If the station you’re listening to is so strong that it
sounds distorted, turn this switch to the LOCAL position.
Otherwise, leave it on DX, which stands for maximum
distance.
TUNING IN SW (shortwave) STATIONS
Turn on radio.
Place the upper BANDWIDTH switch in the W or N
position. Place the lower switch into SW1, SW2 or SW3.
Initially set the SW RF Gain dial to the max position for
the highest sensitivity. This will aid in picking up even
the weakest of signals. However, if the signal of desired
station is strong, the maximum gain setting will cause
signal to be overloaded and distorted, in this case rotate
RF Gain knob counterclockwise to reduce the gain until the
distortion is eliminated.
The SW RF gain can be adjusted to increase or decrease
sensitivity as necessary to minimize interference.
SW appears in frequency range of 1711 to 29999 KHz.
Tune in the station with the TUNING knob or by pressing
the UP/DOWN button or by pressing and holding the UP/
DOWN button for one second to engage auto tuning.
TUNING TO SW FREQUENCY RANGES (BANDS)
Tune to these frequency ranges for best results. The radio
can also tune between these ranges.
7
Page 8

FIELD OWNER’S MANUAL
Meter Band (m) Frequency Best Time of Day
90m 3,200-3,400 kHz
75m 3,900-4,000 kHz
60m 4,750-5,050 kHz night
49m 5,800-6,200 kHz night
41m 7,100-7,500 kHz night
31m 9,500-10,000 kHz night
25m 11,650-12,200 kHz
19m 15,100-15,800 kHz day
16m 17,550-17,900 kHz day
15m 18,900-19,020 kHz
13m 21,450-21,850 kHz day
11m 25,600-26,100 kHz day
OPTIMIZING SHORTWAVE RECEPTION
Shortwave enables listening to broadcasts over vast
distances including other countries and continents. The
following information will help you get the best results.
During the day, frequencies above 13 MHz are usually
best.
At night, frequencies below 13 MHz are usually best.
Around sunset and sunrise, the entire shortwave range
may be good.
Getting very close to a window and holding the radio
improves shortwave reception.
8
Page 9
FIELD OWNER’S MANUAL
To learn about shortwave we recommend the publication
below, published yearly and available from major
booksellers. Additionally, the Internet is a great resource
for learning about shortwave. Type ‘shortwave reception’
into your favorite search engine.
WORLD RADIO TV HANDBOOK
Published in the USA by Watson-Guptill
Publications, 770 Broadway, 7th Floor, New York, NY
10003-9595. www.watsonguptill.com
STORING STATIONS TO PRESET LOCATIONS
With the radio on, press ALARM button to preset stations
in to memory.
When listening to radio, rotate the tuning knob or press
the UP/DOWN arrow or Q.TUN buttons to select your
desired station. Press ALARM button, “
ash in the display. Press UP/DOWN arrow buttons to
select memory address (1~10) ”
”, press the ALARM
button again to store station to selected address and exit
memory status. The user can repeat this procedure to
store other favorites, then press PRESET button to recall
memorized stations.
” icon will
Note: The radio can store a total 50 memories, 10 presets for each band.
9
Page 10

FIELD OWNER’S MANUAL
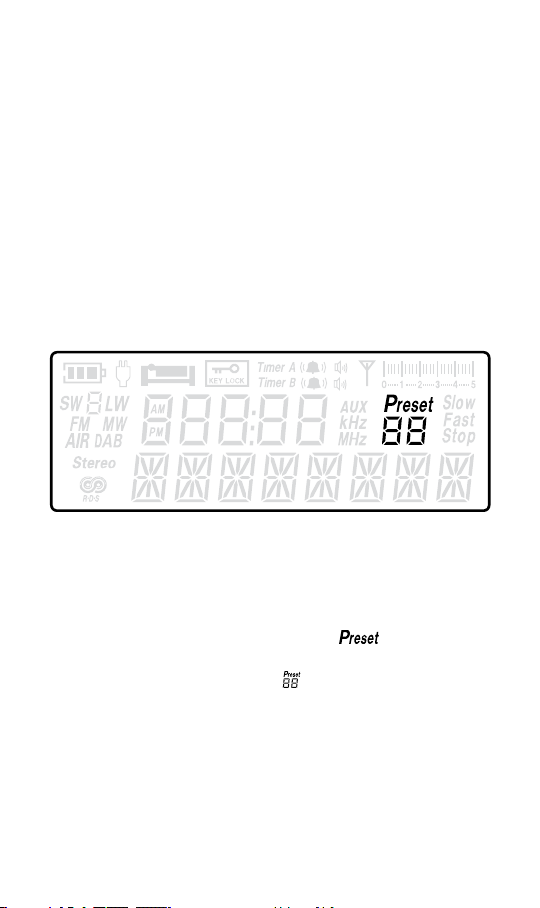
RETRIEVING STATIONS FROM PRESETS
With the radio on, press the PRESET button continuously
to retrieve the stations that have been stored. Notice
that the frequency in the display changes and the ‘Preset’
number shows on the right side of the display.
A station cannot be erased from memory. Simply store
another station over it.
SETTING THE CLOCK
The FIELD’s clock works in either the 12 hour or 24 hour
mode. To change the clock from one mode to another,
turn the radio off, press and hold the UP button for 1
second.
To set the clock:
1. Turn radio off.
2. Press and hold the T.SET button until the hour starts
ashing.
3. Turn the tuning knob in either direction or press the UP
button to set the hour.
4. Quick press the DOWN button and the minutes will
begin to ash, turn the tuning knob to set the minutes
5. Quick press the T.SET button to nalize the entry.
Note: If the above steps are not completed quickly enough the time set
mode will exit. If it exits, if this occurs, simply start over.
SETTING, ACTIVATING AND DEACTIVATING THE
ALARM CLOCK
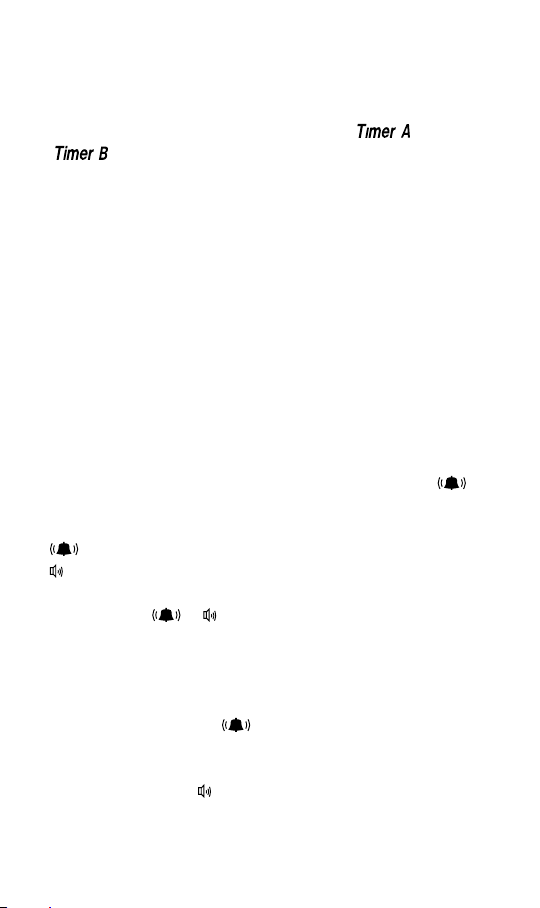
With the radio off, both buttons have the TIMER A/TIMER
B function meaning that they can set two different
alarms.
10
Page 11
FIELD OWNER’S MANUAL
Display Timer A/Timer B
Short press TIMER A or TIMER B button, “
“
” icon will ash indicating which timer’s time
” or
is currently being displayed.
SETTING TIMER A / TIMER B values
Long press TIMER A or TIMER B until the timer is ashing.
Press ▲ button to change hour, then rotate tuning knob
to adjust hour;
Press ▼ button to change hour, then rotate tuning knob
to adjust hour;
Finally press TIMER A or TIMER B to conrm timer
adjustment.
Select Alarm by Radio or Buzzer
While in TIMER A or TIMER B, adjust mode press the
to select between buzzer and radio alarm.
: indicates buzzer alarm
: indicates radio alarm
If neither the
or icons are displayed the ALARM is
off.
Buzzer or Radio Alarm (via TIMER) function
When buzzer timer alarm is activated, the buzzer signal
will last 2 minutes, the
icon will ash;
When the radio timer alarm is activated, the radio will play
for 60 minutes, the
icon will ash;
11
Page 12
FIELD OWNER’S MANUAL
Pressing any button other than the power button will
activate the Snooze function. The
or icons will
continue to ash but the buzzer or radio will be off during
the Snooze time. After 5 minutes, the buzzer or radio
will come on again. The Snooze function can be enabled
4 times, after the 4th time the press of any button will
disable the Timer alarm.
To immediately disable the Timer alarm, press the Power
button.
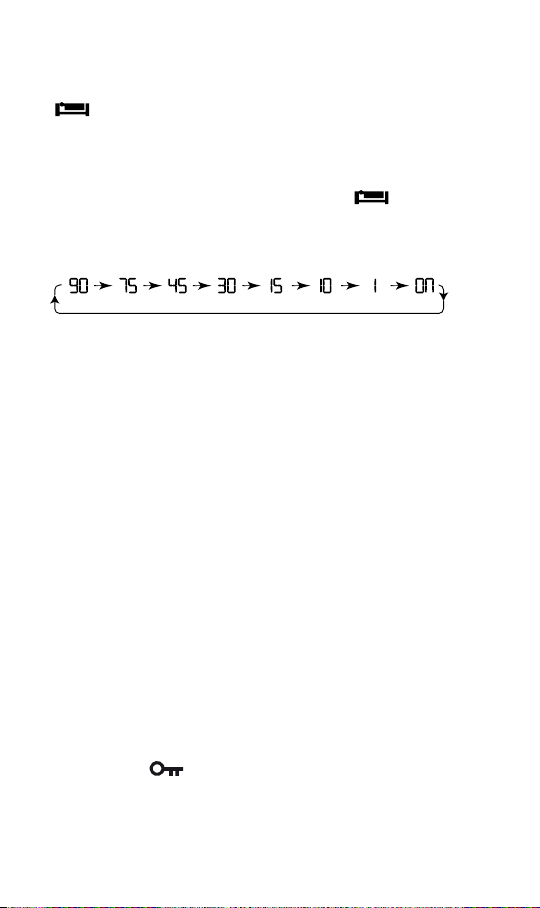
SETTING AND DEACTIVATING THE SLEEP TIMER
Press the red POWER & SLEEP button on the front top
right corner of the radio. When the radio turns on you will
briey see the word “ON” on the display, Press the POWER
& SLEEP button agiain to activate the sleep timer, the
icon will appear in the upper left of the display and a
number will appear in the center of the display, this is the
sleep time. The radio will play for this amount of minutes
and then shut off. It can be deactivated by repeatedly
pressing the power button until ‘on’ appears in the bottom
of the display; with each press you will see the numbers
going down from 90 to 60 to 45 to 30 to 15 to 10 to 5 to
1 minute and then to ‘on’. When ‘on’ appears, stop pressing
the button. The sleep timer is now deactivated.
<Alternatively you can mix and match the text below for
the sleep timer description>
Press Power & sleep button, the LCD will display “60”
12
Page 13
FIELD OWNER’S MANUAL
“ ”icon, which indicates the unit will turn off
automatically after 60 seconds.
If you want to change sleep timer, press Power & Sleep
button continuously when the “60” and “
” icon is
displayed, the digit will be changed to your desired time.
The “ON” icon indicates the power is on .
With the radio on, press Power & Sleep button to turn off
radio and display clock status.
When the “ON” icon is displayed, the radio will remain on
until it is manually turned off again.
SETTING DEFAULT BACKLIGHT BRIGHTNESS
With the radio off, press the Q.TUNE button, the display
backlight will toggle between LOW, MEDIUM and HIGH
backlight brightness. The last setting selected will be
activated when the radio is playing.
Note: The backlight will go to sleep after 10 seconds while the radio is
playing. To keep the backlight always-on slide the BACKLIGHT switch on the
side of the radio to the “ON” setting.
USING THE LOCK BUTTON
To lock all of the keys and buttons press and hold the
LOCK button
symbol of a key appears in the top, middle of the display.
Press the same button for 2 seconds to unlock it.
(front top of the radio) until you see a
13
Page 14

FIELD OWNER’S MANUAL
ENABLING AND DISABLING BUTTON FEEDBACK
With the Radio off, Press and hold the ALARM button, the
text BUZZER ON will be displayed. In this mode, a button
press feedback beep will be played each time, the user
presses a button. Release the ALARM button and press
and hold again to turn the buzzer off, BUZZER OFF will be
displayed on the screen. At this time the user feedback
beeps will be disabled.
AUDIO VOLUME AND TONE CONTROLS
Volume Control
Turn up the volume by turning the volume knob (lower left
corner knob of radio) clockwise (right), down by turning the
knob counterclockwise (left).
Adjust Audio Tone
Rotate Bass/Treble knob to get desired Bass or Treble
audio quality
USING THE EARPHONE JACK
The earphone jack can be used with stereo headphones
using an 1/8 inch (3.5 millimeter) plug. FM sound is in
stereo if the signal is sent in stereo and the ST position
is selected with the BANDWIDTH switch. The internal
speaker will be muted when a device is connected to the
Earphone jack.
USING THE LINE IN/OUT SOCKETS
These sockets are on the right side of the FIELD, an 1/8
inch stereo type (3.5 mm). An external audio device (such
as an MP3 player) can be played by connecting an AUX
line from the device into the Line-In socket. When a device
14
Page 15

FIELD OWNER’S MANUAL
is connected to the Line-in socket the word “AUX” will be
displayed on the screen.
The Line-Out socket can be used to feed audio from the
FIELD to amplied external speakers. The internal speaker
will still be functional when a device is connected to the
Line-Out socket.
EXTERNAL ANTENNAS
ANT. SELECTOR SWITCH: EXT or INT
Use this switch to enable the use of FM or SW internal or
external antennas.
MW EXT. ANT. – This is a 500 ohm impedance socket, for
use with long wire antennas.
FM/SW EXT. ANT.socket – Located on the back of the radio
is primarily for antennas designed to be fed with 50 or 75
ohm coaxial cable, such as dipoles or comparable antennas.
It can also be used for long wire antennas. Use F plugs for
feeding this socket.
USING THE GRUNDIG AN200 ANTENNA FOR
IMPROVED AM(MW) PERFORMANCE (NOT
INCLUDED)
The AN200 AM broadcast band (MW) loop antenna or any
similar model does not need to be plugged in, simply set it
next to the radio and tune it to the same frequency that
the radio is tuned to. Swivel the radio and the antenna
15
Page 16

FIELD OWNER’S MANUAL
to achieve maximum performance. This antenna can be
purchased by contacting Eton or one of our distributors.
Call us for details.
TO RESET THE FIELD
If the radio malfunctions or doesn’t work properly, insert a
paper clip into the hole on the front lower right side. Make
sure the paper clip is inserted until the display reappears.
NEED HELP? CONTACT US.
Etón Corporation
1015 Corporation Way, Palo Alto, CA 94303, USA 1-800872-2228 (U.S.)
1-800-637-1648 (Canada)
650-903-3866 (worldwide)
M-F, 8:00AM-4:30PM, Pacic Standard Time
www.etoncorp.com.
16
Page 17

FIELD OWNER’S MANUAL
WARNING
• Do not expose this appliance to rain or moisture.
• Do not submerge or expose for extended period to water.
• Protect from high humidity and rain.
• Only operate within specied temperature range (0 °C to
40 °C).
• Unplug immediately if liquid has been spilled or any
object has fallen into the apparatus.
• Clean only with a dry cloth. Do not use detergents or
chemical solvents as this might damage the nish.
• Unplug and disconnect external antennas during
lightning storms.
• Do not remove cover [or back].
• Refer servicing to qualied service personnel.
17
Page 18

FIELD OWNER’S MANUAL
ENVIRONMENT
Disposal
According to the European Directive 2002/96/EC all
electrical and electronic products must be collected
separately by a local collection system.
Please act according to your local rules and do not dispose
of your old products with your normal household waste.
Please dispose of all types of batteries per your
Government, State or Local rules and/or regulations. If you
are unsure, please call the appropriate local authority to
nd out how to dispose of them safely and help protect
the environment.
WARRANTY REGISTRATION
To ensure full warranty coverage or product updates,
registration of your product should be completed as soon
as possible after purchase or receipt.
Please go to
http://www.etoncorp.com/productregistration to
register your product.
LIMITED WARRANTY
Retain your proof of purchase or the receipt. Limited
Warranty information can be viewed at www.etoncorp.
com in the Support section.
18
Page 19

FIELD OWNER’S MANUAL
SERVICE FOR YOUR PRODUCT
To obtain service for your product, we recommend
rst contacting an Etón service representative at 800872-2228 US, 800-637-1648 Canada or (650) 903-3866
for problem determination and trouble-shooting. If further
service is required, the technical staff will instruct how to
proceed based on whether the radio is still under warranty
or needs non-warranty service.
WARRANTY
If your product is still in warranty and the Etón service
representative determines that warranty service
is needed, a return authorization will be issued and
instructions for shipment to an authorized warranty repair
facility. Do not ship your radio back without obtaining the
return authorization number.
NON-WARRANTY
If your product is no longer under warranty and requires
service our technical staff will refer you to the nearest
repair facility that will be able to best handle the repair.
For service outside of North America, please refer
to the distributor information included at time of
purchase/receipt.
19
Page 20

FIELD MANUEL D’UTILISATION
DÉCOUVREZ LA FIELD
Nous vous remercions d’avoir acheté la radio FIELD AM/
FM/OC Etón. Nous voulons que vous protiez pleinement
de l’utilisation de ce produit. An de proter de ses
nombreuses fonctionnalités uniques et excellentes, nous
vous encourageons à lire attentivement le mode d’emploi.
INSTALLATION DES PILES
Le compartiment de la batterie est situé au dos de la
radio. Enlevez-le en appuyant sur les deux languettes et
en tirant vers le haut. Pour empêcher la fuite d’acide des
piles, suivez ces instructions. Les fuites de l’acide des
piles ne sont pas couvertes par la garantie de la radio.
Installez uniquement des piles alcalines D neuves, toutes
de la même marque et du même type. N’installez ou ne
les remplacez jamais par des piles de différentes marques
et types. Ne mélangez jamais des piles usagées avec des
piles neuves. Lorsque la radio n’est pas utilisée pendant
plus de 30 jours, retirez les piles.
TYPE DE PILES ET FONCTIONNEMENT
Utilisez 4 piles alcalines de type D. Installez-les
avec la polarité correcte en suivant le diagramme du
compartiment des piles. Remplacez-les lorsque l’indicateur
de puissance de la batterie sur l’écran afche une
barre ou lorsque le son est déformé. La radio s’éteint
automatiquement si les piles deviennent trop faibles.
20
Page 21

FIELD MANUEL D’UTILISATION
INDICATEUR DU NIVEAU DE BATTERIE
L’indicateur du niveau de batterie est situé dans le
coin supérieur gauche de l’écran. Lorsque les piles sont
pleines,
s’afche sur l’écran LCD ; Si clignote, cela
indique que les piles sont faibles et que la radio va bientôt
s’éteindre automatiquement.
UTILISER UNE ALIMENTATION SECTEUR
Branchez l’adaptateur secteur dans la prise sur le côté
droit de la radio. Utilisez uniquement l’adaptateur secteur
fourni. Lorsque l’adaptateur secteur est branché,
s’afche dans le coin supérieur gauche de l’écran. Si vous
perdez l’adaptateur secteur fourni avec la radio, utilisezen un avec une sortie 6 volts CC, polarité négative, 500
milliampères et muni d’une che d’un diamètre extérieur
de 5,5 millimètres, 2,1 millimètres de diamètre intérieur.
FONCTION DE SECOURS EN CAS DE PANNE DE
COURANT
Si des batteries se trouvent dans l’appareil et qu’il est
alimenté par l’intermédiaire de son adaptateur secteur, il
utilisera automatiquement la batterie en cas de coupure
de courant.
ALLUMER ET ÉTEINDRE LA FIELD
Allumez la radio en appuyant sur le bouton rouge POWER
& SLEEP situé en haut du coin droit de la face avant de la
radio. Lorsque l’appareil est allumé, appuyez sur POWER &
SLEEP à nouveau pour éteindre la radio.
21
Page 22

FIELD MANUEL D’UTILISATION
SYNTONISATION
Il existe plusieurs façons de régler la radio à la station de
votre choix :
• Tournez la molette de syntonisation pour sélectionner la
fréquence
• Appuyez de façon brève sur la touche Up ou DOWN
(haut ou bas) pour un changement étape par étape à la
fréquence supérieure ou inférieure
• Appuyez longuement sur la touche Up ou DOWN (haut ou
bas) pour rechercher la prochaine station vers le haut ou
vers le bas en fréquence
• Appuyez sur le bouton PRESET pour syntoniser à la
prochaine station préréglée
Appuyez brièvement sur le bouton Q.TUNE pour
incrémenter rapidement vers le haut de la plage de
fréquence. Le bouton Q.TUNE s’intensie en fréquence par
1000 kHz en mode FM et en modes SW (OC) et 100 kHz en
mode PO (MA). Appuyez longuement sur le bouton Q.TUNE
pour incrémenter de façon continue par les mesures
indiquées ci-dessus.
SYNTONISER DES STATIONS FM
La plage de fréquences FM est de 87,5 à 108 MHz.
Déployez l’antenne télescopique et allumez la radio.
Placez la commande du haut de la bande passante sur
la position MONO ou STEREO. Le mode Stéréo n’est
nécessaire que lorsque vous utilisez des écouteurs et
STÉRÉO s’afche en bas à gauche de la fréquence à
l’écran. Mono FM a le meilleur rapport signal sur bruit ainsi
que d’interférences anti-multiplex.
22
Page 23

FIELD MANUEL D’UTILISATION
RDS/INFO :
La radio FIELD prend en charge le Streaming de données
RDS pendant la syntonisation sur la bande FM. Une
brève pression sur la touche RDS permet l’afchage des
informations RDS comme PS/PTY/RT/DATA en cycle.
L’i cô ne
s’afche dans le coin inférieur gauche de l’écran
en mode RDS.
PS : nom de la station, lorsqu’aucune information de
station, afche simplement « No PS » ;
PTY : catégories de programmation, pas de programme,
afche simplement « NO PTY »
RT : texte Radio, aucun texte, afche simplement « NO
RT »
DATA : informations d’appel horloge/Date/programme, si
aucune information, afche simplement « NO DATA ». Si
l’information est disponible, le format d’afchage est :
Appel station hebdomadaire Jour-mois-année heure :
minute
Format hebdomadaire :
« LUN », « MAR », «MER », « JEU », « VEN », « SAM »,
« DIM »,
Par exemple, l’écran LCD va dérouler pour afcher sous la
forme WGSS, mardi 25 mars 2014 2h15,
SYNTONISATION DES STATIONS MW (MA)
Placez le commutateur du haut de bande passante en
position W ou N (large ou étroite). Placez le commutateur
du bas de la bande passante sur la position MW.
Placez le commutateur SW RF GAIN en position 5, plus
haut si nécessaire.
23
Page 24

FIELD MANUEL D’UTILISATION
Syntonisez la station avec le bouton TUNING ou en
appuyant sur le bouton UP/DOWN ou en maintenant le
bouton UP/DOWN pendant une seconde pour engager
l’autoréglage.
Utilisez WIDE si aucune interférence n’est présente.
Utilisez NARROW si une interférence est présente.
MODIFIER LE PAS DE SYNTONISATION (9 kHz ou 10 kHz)
MW, ou stations à ondes moyennes, appelées stations
AM en Amérique du Nord, vont de 520 à 1710 KHz
en Amérique du Nord et de 522 à 1620 KHz dans les
autres parties du monde. En Amérique du Nord, elles se
syntonisent par pas de 10 kHz et dans les autres parties
du monde elles peuvent être syntonisées par pas de 9 kHz.
La radio est congurée pour un réglage par pas de 10kHz
par défaut, mais pour modier le pas à 9 KHz, avec la radio
éteinte, appuyez longuement sur le bouton PRESET pour
sélectionner.
Un appui long pour passer à 9 K ou 10 K, l’écran LCD
afche 9 K ou 10 K.
UTILISER LE BOUTON SW RF GAIN
Lorsque vous écoutez des stations de radiodiffusion SW,
ce bouton de réglage doit être composé à ou près de la
position 5. Si vous écoutez une station faible, augmenter
le gain, en écoutant les stations extrêmement puissantes,
diminuer le gain. Pour écouter les stations en ondes
courtes, placez cette commande de gain au maximum et
diminuez le gain si nécessaire.
24
Page 25

FIELD MANUEL D’UTILISATION
CHANGER LA VITESSE DE SYNTONISATION À
L’AIDE DU BOUTON DE PAS DE SYNTONISATION
« MINUTERIE A »
Avec la radio allumée, appuyez de façon brève sur le
bouton de pas de syntonisation TIMER A, l’écran LCD
s’afche :
Pour le mode « SLOW » (lent), tournez la molette de
syntonisation pour augmenter ou diminuer la fréquence
pour la FM à 10 kHz, MW à 1 kHz, SW à 1 kHz ;
Pour le mode « FAST » (rapide), tournez la molette de
syntonisation pour augmenter ou diminuer la fréquence
pour la FM de 100 kHz, MW à 9 kHz ou 10 kHz, SW à 5 kHz ;
Pour le mode « STOP », le bouton de syntonisation rotatif
est désactivé.
COMMUTATEUR DX/ANTENNE LOCALE
Si la station que vous êtes en train d’écouter est
si puissante que le son est déformé, tournez ce
commutateur à la position « LOCAL ». Sinon, laissez-le sur
DX, qui correspond à la distance maximale.
25
Page 26

FIELD MANUEL D’UTILISATION
SYNTONISATION DES STATIONS OC (ondes courtes)
Allumez la radio.
Placez le commutateur à la bande passante supérieure en
position W ou N. Mettez le commutateur inférieur sur SW1,
SW2 ou SW3. Positionnez au départ le cadran SW RF Gain
à la position maxi pour une sensibilité la plus élevée. Ceci
aide à capter même les signaux les plus faibles. Toutefois,
si le signal de la station souhaitée est puissant, le réglage
maximum du gain provoquera une surcharge et une
déformation du signal, dans ce cas tournez le bouton RF
Gain RF vers la gauche pour réduire le gain jusqu’à ce que
la distorsion soit éliminée.
Le gain RF OC peut être ajusté pour augmenter ou
diminuer la sensibilité, si nécessaire, an de minimiser les
interférences.
Les ondes courtes (OC) apparaissent dans la gamme de
fréquences de 1711 à 29999 KHz.
Syntonisez la station avec le bouton TUNING ou en
appuyant sur le bouton UP/DOWN ou en maintenant le
bouton UP/DOWN pendant une seconde pour engager
l’autoréglage.
SYNTONISATION POUR LES PLAGES DE FRÉQUENCES
(BANDES) OC
Syntonisez à ces plages de fréquences pour de meilleurs
résultats. La radio peut aussi capter entre ces plages.
26
Page 27

FIELD MANUEL D’UTILISATION
Bande de mètres (m) Fréquence Meilleur moment
de la journée
90 m 3 200 à 3 400 kHz
75 m 3 900 à 4 000 kHz
60 m 4 750 à 5 050 kHz nuit
49 m 5 800 à 6 200 kHz nuit
41 m 7 100 à 7 500 kHz nuit
31 m 9 500 à 10 000 kHz nuit
25 m 11 650 à 12 200 kHz
19 m 15 100 à 15 800 kHz journée
16 m 17 550 à 17 900 kHz journée
15 m 18 900 à 19 020 kHz
13 m 21 450 à 21 850 kHz journée
11 m 25 600 à 26 100 kHz journée
OPTIMISER LA RÉCEPTION DES ONDES COURTES
Les ondes courtes permettent d’écouter des émissions
sur de grandes distances, y compris des autres pays et
continents. Les informations suivantes vous aideront à
obtenir les meilleurs résultats.
Pendant la journée, les fréquences supérieures à 13 MHz
sont généralement les meilleures.
Pendant la nuit, les fréquences inférieures à 13 MHz sont
généralement préférables.
Au coucher et au lever du soleil, toute la gamme d’ondes
courtes peut être bonne.
27
Page 28

FIELD MANUEL D’UTILISATION
Mettre la radio très près d’une fenêtre et la tenir
améliorent la réception des ondes courtes.
Pour en savoir plus sur les ondes courtes, nous vous
recommandons la publication ci-dessous, publiée chaque
année et disponible en grandes librairies. De plus, l’Internet
est une excellente ressource pour en savoir plus sur les
ondes courtes. Tapez « réception ondes courtes » dans
votre moteur de recherche favori.
WORLD RADIO TV HANDBOOK
Publié aux USA par Watson-Guptill Publications, 770
Broadway, 7th Floor, New York, NY 10003-9595.
www.watsonguptill.com
MÉMORISER DES STATIONS POUR PRÉRÉGLER LES
EMPLACEMENTS
Avec la radio allumée, appuyez sur le bouton ALARM pour
prérégler des stations en mémoire.
28
Page 29

FIELD MANUEL D’UTILISATION
Lorsque vous écoutez la radio, tournez la molette de
syntonisation ou appuyez sur la èche UP/DOWN ou sur
les boutons Q.TUN pour sélectionner la station de votre
choix. Appuyez sur le bouton ALARM, l’icône “
”
clignote à l’écran. Appuyez sur les boutons èche UP/
DOWN pour sélectionner l’adresse mémoire (1 ~ 10)
,
appuyez sur le bouton ALARM pour mémoriser la station
à l’adresse sélectionnée et quittez l’état de mémoire.
L’utilisateur peut répéter cette procédure pour stocker
d’autres favoris, puis appuyez sur le bouton PRESET
pour rappeler les stations mémorisées.
Remarque : la radio peut stocker un total de 50 mémoires, 10 présélections
pour chaque bande.
RÉCUPÉRATION DES STATIONS DEPUIS PRESETS
Avec la radio allumée, appuyez sur le bouton PRESET de
façon continue pour récupérer les stations qui ont été
mémorisées. Notez que la fréquence dans l’afchage
change et le nombre de « Preset » s’afche sur le côté
droit de l’écran.
Une station ne peut pas être effacée de la mémoire. Il
suft d’enregistrer une autre station dessus.
RÉGLAGE DE L’HORLOGE
L’horloge de la radio FIELD fonctionne soit en mode 12
heures ou 24 heures. Pour passer l’horloge d’un mode à
l’autre, éteignez la radio, appuyez et maintenez le bouton
UP pendant 1 seconde.
29
Page 30

FIELD MANUEL D’UTILISATION
Pour régler l’horloge :
1. Éteignez la radio.
2. Appuyez et maintenez le bouton T.SET jusqu’à ce que
l’heure commence à clignoter.
3. Tournez le bouton de syntonisation dans n’importe quel
sens, ou appuyez sur la touche UP pour régler l’heure.
4. Appuyez rapidement sur le bouton DOWN et les
minutes commenceront à clignoter, tournez la molette
de syntonisation pour régler les minutes
5. Appuyez rapidement sur le bouton T.SET pour naliser
l’entrée.
Remarque : si les étapes ci-dessus ne sont pas achevées assez rapidement,
le mode réglage de l’heure s’arrêtera. S’il s’arrête, dans ce cas, recommencez
simplement.
RÉGLER, ACTIVER ET DÉSACTIVER LE RÉVEIL
Avec la radio éteinte, deux boutons ont la fonction TIMER
A / TIMER B, ce qui signie qu’ils peuvent régler deux
alarmes différentes.
Afchage Minuterie A / minuterie B
Appuyez brièvement sur le bouton TIMER A ou le bouton
TIMER B, l’icône “
indiquer que le temps de la minuterie est actuellement
afché.
” ou “ ” clignote pour
RÉGLAGE des valeurs de la minuterie A / minuterie B
Appuyez longuement sur TIMER A ou TIMER B jusqu’à ce
que le minuteur clignote.
Appuyez sur le bouton ▲ pour modier l’heure, puis
tournez le bouton de syntonisation pour régler l’heure ;
30
Page 31

FIELD MANUEL D’UTILISATION
Appuyez sur le bouton ▼ pour modier l’heure, puis
tournez le bouton de syntonisation pour régler l’heure ;
Enn, appuyez sur TIMER A ou TIMER B pour conrmer le
réglage de la minuterie.
Sélectionnez Alarme Radio ou vibreur sonore d’alarme
Lorsque vous êtes dans le TIMER A ou TIMER B de
la minuterie, réglez le mode, appuyez
sur pour
sélectionner vibreur ou radioréveil.
: indique vibreur sonore d’alarme
: indique le radioréveil
Si ni l’icône
ou n’est afché l’ALARME est
désactivée.
Fonction vibreur sonore d’alarme ou fonction d’alarme
Radio (via TIMER)
Lorsque le signal sonore de la minuterie d’alarme est
activé, le signal de sonnerie dure 2 minutes, l’icône
clignote ;
Lorsque l’alarme radio de la minuterie est activée, la radio
joue pendant 60 minutes, l’icône
clignote ;
Appuyer sur n’importe quel bouton autre que le bouton
d’alimentation active la fonction « Snooze » (répéter).
L’i cô ne
ou continue à clignoter mais le vibreur ou
la radio est éteint pendant le temps du Snooze. Après
5 minutes, le vibreur ou la radio s’allume à nouveau. La
fonction Snooze peut être activée 4 fois, après la 4ème
pression d’un bouton qui désactive l’alarme de la minuterie.
31
Page 32

FIELD MANUEL D’UTILISATION
Pour désactiver immédiatement l’alarme de minuterie,
appuyez sur le bouton d’alimentation.
RÉGLER ET DÉSACTIVER LA MINUTERIE DE
SOMMEIL
Appuyez sur le bouton rouge POWER & SLEEP sur le coin
avant droit de la radio. Lorsque la radio s’allume, vous
voyez brièvement le mot « ON » sur l’écran. Appuyez à
nouveau sur le bouton POWER & SLEEP pour activer la
minuterie de SOMMEIL, l’icône
supérieure gauche de l’écran et un nombre apparaît dans
le centre de l’écran, c’est l’heure de sommeil. La radio
joue pendant cette quantité de minutes et puis s’éteint.
Elle peut être désactivée en appuyant plusieurs fois sur
le bouton power jusqu’à ce que « on » s’afche en bas
de l’écran ; à chaque pression, vous verrez les chiffres
descendre de 90 à 60 à 45 à 30 à 15 à 10 à 5 à 1 minute,
puis à « on ». Lorsque « on » apparaît, cessez d’appuyer
sur le bouton. La fonction minuterie de sommeil est
maintenant désactivée.
< Alternativement vous pouvez mélanger et assortir le
texte ci-dessous pour la description de la minuterie de
sommeil >
s’afche dans la partie
Appuyez sur le bouton Power & Sleep, l’écran LCD afche
« 60 » l’icône “
,” qui indique que l’appareil s’éteint
automatiquement au bout de 60 secondes.
Si vous souhaitez changer la minuterie de sommeil,
appuyez sur le bouton Power & Sleep de façon continue
quand le « 60 » et l’icône
est afché, le chiffre
32
Page 33

FIELD MANUEL D’UTILISATION
passe à l’heure de votre choix. L’icône « ON » indique que
l’appareil est sous tension.
Avec la radio allumée, appuyez sur bouton Power & Sleep
pour éteindre la radio et afcher l’état de l’horloge.
Lorsque l’icône « ON » s’afche, la radio reste allumée
jusqu’à ce qu’elle soit éteinte manuellement à nouveau.
RÉGLAGE DE LA LUMINOSITÉ DU
RÉTROÉCLAIRAGE PAR DÉFAUT
Avec la radio éteinte, appuyez sur le bouton Q.TUNE, le
rétro-éclairage de l’écran bascule entre BASSE, MOYENNE
et HAUTE luminosité du rétro-éclairage. Le dernier réglage
sélectionné est activé quand la radio joue.
Remarque : le rétro-éclairage se mettra en veille après 10 secondes de
fonctionnement de la radio. Pour conserver le rétro-éclairage toujours
allumé, faites glisser le commutateur de rétro-éclairage sur le côté de la radio
à la position « ON ».
UTILISER LE BOUTON DE VERROUILLAGE
Pour verrouiller toutes les touches et boutons, appuyez
et maintenez le bouton de verrouillage
supérieure avant de la radio) jusqu’à ce que le symbole
d’une clé s’afche dans le haut, au milieu de l’écran.
33
(partie
Page 34

FIELD MANUEL D’UTILISATION
Appuyez sur le même bouton pendant 2 secondes pour le
déverrouiller.
ACTIVER ET DÉSACTIVER LE BOUTON RETOUR
(FEEDBACK)
Avec la Radio éteinte, appuyez et maintenez le bouton
ALARM, le texte BUZZER ON s’afche. Dans ce mode,
un bip sonore de retour sera émis à chaque fois que
l’utilisateur appuie sur un bouton. Relâchez le bouton
ALARM et appuyez et maintenez à nouveau pour
désactiver le vibreur, BUZZER OFF s’afche sur l’écran.
À ce moment les bips de rétroaction d’utilisateur seront
désactivés.
COMMANDES DU VOLUME AUDIO ET DE LA
TONALITÉ
Contrôle du volume
Augmentez le volume en tournant le bouton volume
(bouton au coin inférieur gauche de la radio) dans le sens
horaire (vers la droite), baissez en tournant le bouton dans
le sens antihoraire (vers la gauche).
Régler la tonalité Audio
Tournez le bouton Bass/Treble pour obtenir la qualité
audio des graves ou aigus souhaitée
UTILISER LA PRISE D’ÉCOUTEUR
La prise d’écouteur peut être utilisée avec un casque
stéréo en utilisant une prise 1/8 pouce (3,5 mm). Le son
FM est en stéréo, si le signal est envoyé en stéréo et la
position ST est sélectionnée par le commutateur de bande
passante. Le haut-parleur interne est coupé lorsqu’un
périphérique est connecté à la prise d’écouteur.
34
Page 35

FIELD MANUEL D’UTILISATION
UTILISER LES PRISES DE LA LIGNE ENTRÉE/
SORTIE
Ces prises se trouvent sur le côté droit de la radio
FIELD, type stéréo 1/8 pouce (3,5 mm). Un périphérique
audio externe (tel qu’un lecteur MP3) peut être joué en
connectant une ligne AUX du périphérique dans la prise
d’entrée audio. Lorsqu’un périphérique est connecté à la
prise d’entrée audio, le mot « AUX » s’afche sur l’écran.
La prise de sortie audio peut être utilisée pour alimenter
la radio FIELD à des haut-parleurs externes ampliés. Le
haut-parleur interne sera toujours fonctionnel lorsqu’un
périphérique est connecté à la prise de sortie audio.
ANTENNES EXTERNES
COMMUTATEUR SÉLECTEUR D’ANT. : EXT ou INT
Utilisez ce commutateur pour activer l’utilisation des
antennes internes ou externes FM ou SW (OC).
ANT. MW EXT. : Il s’agit d’une prise d’impédance 500 ohms,
pour une utilisation avec des antennes à long l.
PRISE ANT. EXT. FM/SW : située à l’arrière de la radio
est principalement pour les antennes conçues pour être
alimentée par un câble coaxial 50 ou 75 ohms, tels que
les dipôles ou antennes comparables. Elle peut également
être utilisée pour une antenne à long l. Utilisez des ches
F pour alimenter cette prise.
35
Page 36

FIELD MANUEL D’UTILISATION
UTILSEZ UNE ANTENNE AN200 GRUNDIG POUR
UNE PERFORMANCE AM(MW) AMELIOREE (NON
FOUNIE)
L’antenne en boucle AN200 à bande de radiodiffusion
AM (MW) ou tout autre modèle similaire ne doit pas être
branchée, mettez-la simplement à côté de la radio et
syntonisez-la sur la même fréquence que celle sur laquelle
la radio est réglée. Faites pivoter la radio et l’antenne
pour obtenir une performance maximale. Cette antenne
peut être achetée en contactant Etón ou l’un de nos
distributeurs.
Appelez-nous pour plus de détails.
POUR RÉINITIALISER LA RADIO FIELD
Si la radio fonctionne mal ou ne fonctionne pas
correctement, insérez un trombone dans l’orice sur le
côté droit inférieur de la face avant. Assurez-vous que le
trombone est inséré jusqu’à ce que l’écran s’afche de
nouveau.
BESOIN D’AIDE ? CONTACTEZ-NOUS.
Etón Corporation
1015 Corporation Way, Palo Alto, CA 94303, USA 1-800872-2228 (U.S.)
1-800-637-1648 (Canada)
650-903-3866 (dans le monde entier)
M-F, 8h00 -16h30, heure normale du Pacique
www.etoncorp.com.
36
Page 37

FIELD MANUEL D’UTILISATION
MISE EN GARDE
• N’exposez pas cet appareil à la pluie ou à l’humidité.
• Ne l’immergez ou ne l’exposez pas pendant une période
prolongée à l’eau.
• Protégez-le de la pluie et de l’humidité élevée.
• Faites-le seulement fonctionner au sein de la plage de
températures spéciée (0°C à 40°C).
• Débranchez immédiatement si du liquide a été renversé
ou si tout objet est tombé dans l’appareil.
• Nettoyez uniquement avec un chiffon sec. N’utilisez pas
de solvants chimiques ou détergents car cela pourrait
endommager le ni.
• Débranchez et déconnectez les antennes extérieures
pendant les orages.
• N’enlevez pas le capot [ou dos].
• Adressez-vous à un technicien qualié.
ENVIRONNEMENT
MISE AU REBUT
Selon la Directive européenne 2002/96/CE, tous les
produits électriques et électroniques doivent être
collectés séparément par un système de collecte local.
Agissez selon vos règles locales et ne jetez pas vos vieux
produits avec vos ordures ménagères.
Veuillez éliminer tous les types de piles selon les règles et/
ou règlements de votre gouvernement, État ou règles et/
ou règlements locaux. Si vous n’êtes pas sûr, renseignezvous auprès de votre mairie pour savoir comment les
37
Page 38

FIELD MANUEL D’UTILISATION
éliminer en toute sécurité et contribuer à protéger
l’environnement.
ENREGISTREMENT DE GARANTIE
Pour assurer une garantie complète ou des mises à jour
du produit, l’enregistrement de votre produit doit être
effectué dès que possible après l’achat ou réception.
Veuillez aller à
http://www.etoncorp.com/productregistration
pour enregistrer votre produit.
GARANTIE LIMITÉE
Conservez votre preuve d’achat ou de réception. Les
informations sur la Garantie limitée peuvent être
consultées sur www.etoncorp.com dans la section
Assistance.
MAINTENANCE DE VOTRE PRODUIT
Pour obtenir une réparation de votre produit, nous vous
recommandons de contacter en premier un représentant
du service Etón au 800-872-2228 pour les États-Unis,
800-637-1648 pour le Canada ou (650) 903-3866 an de
déterminer le problème et le dépannage. S’il faut continuer
la réparation, le personnel technique indiquera comment
procéder selon si la radio est encore sous garantie ou
nécessite une réparation hors garantie.
38
Page 39

FIELD MANUEL D’UTILISATION
GARANTIE
Si votre produit est toujours sous garantie et que le
représentant du service Etón détermine qu’une réparation
sous garantie est nécessaire, une autorisation de retour
sera délivrée ainsi que des instructions pour l’expédition à
un centre de réparation agréé. N’expédiez pas votre radio
sans avoir reçu le numéro d’autorisation de retour.
HORS GARANTIE
Si votre produit n’est plus sous garantie et doit être réparé
notre équipe technique vous adressera à l’atelier de
réparation le plus proche qui sera le mieux adapté pour la
réparation.
Pour les réparations en dehors de l’Amérique du Nord,
veuillez consulter les informations du distributeur incluses
au moment de l’achat/réception.
39
Page 40

FIELD MANUAL DE USUARIO
CONOZCA LA FIELD
Gracias por adquirir la radio Etón FIELD AM/FM/
OC. Queremos que disfrute del uso de este producto
en su totalidad. Para aprovechar todas sus magnícas
y exclusivas funciones, le recomendamos que lea
cuidadosamente el manual del usuario.
INSTALACIÓN DE BATERÍAS
El compartimento de la batería está en la parte trasera
de la radio. Quítelo presionando las dos lengüetas y luego
tire. Para evitar una fuga de ácido de la batería, siga estas
instrucciones. La fuga de ácido de la batería no está
cubierta por la garantía de la radio. Instale, únicamente,
baterías de alcalina nuevas de celdas D, todas de la misma
marca y tipo. Nunca combine baterías viejas y nuevas.
Cuando no utilice la radio por más de 30 días, quítele las
baterías.
TIPO DE BATERÍA Y FUNCIONAMIENTO
Utilice 4 baterías de alcalina tamaño D. Instálelas con la
polaridad correcta, usando el diagrama que está dentro
del compartimento de la batería. Reemplácelas si el
indicador de potencia de la batería en la pantalla muestra
una barra o se distorsiona el sonido. La radio se apagará
automáticamente si las baterías se tornan muy débiles.
INDICADOR DE NIVEL DE LA BATERÍA
El indicador de nivel de la batería está en la esquina
superior izquierda de la pantalla. Cuando las baterías están
totalmente cargadas, aparecerá
destella, indica que las baterías están bajas y la radio
pronto se apagará automáticamente.
en la pantalla LCD; si
40
Page 41

FIELD MANUAL DE USUARIO
UTILIZACIÓN DE ENERGÍA AC
Enchufe el adaptador AC en el tomacorriente en el lateral
derecho de la radio. Utilice solo el adaptador AC que se
le suministró. Cuando el adaptador AC está enchufado,
aparecerá
en la esquina superior izquierda de la pantalla.
Si pierde el adaptador AC que venía juntamente con
la radio, utilice uno con una salida de CC de 6 voltios,
polaridad negativa, 500 miliamperios y un tomacorriente
de 5.5 milímetros de diámetro exterior, 2.1 milímetros de
diámetro interior.
FUNCIÓN DE REEMPLAZO POR FALLA EN
SUMINISTRO
Si las baterías están en la unidad y esta recibe el
suministro mediante el adaptador AC, comenzará a utilizar
la batería automáticamente, si hay una falla en la fuente
de AC.
CÓMO ENCENDER Y APAGAR LA FIELD
Encienda la radio presionando el botón rojo POWER &
SLEEP en la esquina superior derecha de la parte frontal de
la radio. Cuando la unidad esté encendida, presione POWER
& SLEEP nuevamente para apagar la radio.
SINTONIZACIÓN
Hay varias maneras de sintonizar la radio en la estación
deseada:
• Gire la perilla de sintonización para seleccionar la
frecuencia
• Presione rápidamente el botón UP (POSTERIOR) o DOWN
(ANTERIOR) para cambiar paso a paso la frecuencia e ir
más adelante o más atrás
41
Page 42

FIELD MANUAL DE USUARIO
• Presione prolongadamente el botón UP o DOWN para
buscar la siguiente estación para ir más adelante o más
atrás en la frecuencia
• Presione el botón PRESET para sintonizar la siguiente
estación precongurada
Presione rápidamente el botón Q.TUNE para incrementar
velozmente hacia adelante el rango de frecuencia. El
botón Q.TUNE adelanta en la frecuencia 1000 kHz en los
modos FM y OC y 100 kHz en el modo OM (AM). Presione
prolongadamente el botón Q.TUNE para incrementar de
continuo los pasos detallados anteriormente.
SINTONIZACIÓN EN ESTACIONES FM
El rango de frecuencia FM es de 87.5 a 108 MHz
Extienda la antena telescópica por completo y encienda la
radio.
Ubique la parte superior del control de ancho de banda
en la posición MONO o STEREO (ESTÉREO). El estéreo
solo se utiliza al usar audífonos y aparecerá STEREO en la
parte inferior izquierda de la frecuencia en la pantalla. FM
mono tiene mejor señal y relación señal-ruido, además de
interferencia antimúltiplex.
RDS/INFORMACIÓN:
La radio FIELD admite RDS Data Streaming, ujo de datos
del sistema de radiodifusión de información, mediante
la sintonización de la banda FM. Si presiona una vez
rápidamente el botón RDS, se activará la presentación de
información de RDS, como PS/PTY/RT/DATA (nombre de
la estación, tipo de programa, radio texto, información) en
ciclos. El
ícono aparecerá en la esquina inferior izquierda
de la pantalla en modo RDS.
42
Page 43

FIELD MANUAL DE USUARIO
PS (nombre de la estación): cuando no hay información
sobre la estación, se verá “NO PS” (Sin nombre de
estación);
PTY (tipo de programa): si no hay programa, dirá “NO PTY”
RT (radio texto): si no hay texto, dirá: “NO RT”
DATA (información de indicativo de programa/reloj/fecha):
si no aparece información, dirá “NO DATA”. Si la información
está disponible, el formato de la pantalla es:
Indicativo de estación Semana Mes-Día-Año
Hora:Minutos
Formato de la semana:
“MON”, “TUE”, “WED”, “THU”, “FRI”, “SAT”, “SUN”
(lunes, martes, miércoles, jueves, viernes, sábado,
domingo)
Por ejemplo, en la pantalla LCD aparecerá WGSS, TUE 0325-2014 02:05
SINTONIZACIÓN EN ESTACIONES DE OM (AM)
Ubique el interruptor superior de ancho de banda en la
posición W o N (ancho o angosto). Posicione el interruptor
BANDWITH (ancho de banda) en la posición MW.
Posicione el interruptor SW RF GAIN en la posición 5, o más
alto si es necesario.
Sintonice la estación con la perilla TUNING
(SINTONIZACIÓN) o presione el botón UP/DOWN o
presione y mantenga por un segundo el botón UP/DOWN
para llevar a cabo la sintonización automática.
Utilice WIDE (ancho) si no hay interferencias. Utilice
NARROW (angosto) si hay interferencias.
43
Page 44

FIELD MANUAL DE USUARIO
CÓMO CAMBIAR LA SINTONIZACIÓN (9 kHz o 10 kHz)
Las estaciones de OM, u onda corta, conocidas como
estaciones AM en Norteamérica, comprenden desde 520
a 1710 KHz en Norteamérica y desde 522 a 1620 KHz en
otras partes del mundo. En Norteamérica sintonizan en
10 KHz y en otras partes del mundo pueden sintonizar en
9 KHz. La radio está congurada
para una sintonización
de 10 KHz por defecto, pero si se desea cambiar a 9 KHz,
con la radio apagada, presione prolongadamente el botón
PRESET para seleccionar.
Presione prolongadamente el interruptor 9 K o 10 K, la
pantalla LCD mostrará 9 K o 10 K.
CÓMO UTILIZAR LA PERILLA SW RF GAIN
Cuando está escuchando estaciones de OC, la perilla
de control debe estar en o cerca de la posición 5. Si
está escuchando una estación débil, aumente la perilla;
cuando está escuchando estaciones con buena recepción,
atrase la perilla. Para escuchar estaciones de Onda corta,
posicione el control al máximo y gírelo para disminuir lo
necesario.
44
Page 45

FIELD MANUAL DE USUARIO
CÓMO CAMBIAR LA VELOCIDAD DE
SINTONIZACIÓN CON EL TEMPORIZADOR A/
BOTÓN DE SINTONIZACIÓN
Con la radio encendida, presione rápidamente TIMER A/
botón TUNING STEP, en la pantalla LCD aparecerá:
Para el modo “SLOW” (LENTO), gire la perilla de
sintonización para aumentar o disminuir la frecuencia para
FM en 10 kHz, OM en 1 kHz, OC en 1 kHz;
Para el modo “FAST” (RÁPIDO), gire la perilla de
sintonización para aumentar o disminuir la frecuencia para
FM en 100 kHz, OM en 9 kHz o 10 kHz, OC en 5 kHz;
Para el modo “STOP” (PARAR), la perilla de sintonización se
deshabilita.
45
Page 46

FIELD MANUAL DE USUARIO
ANTENNA DX/INTERRUPTOR LOCAL
Si la estación que está escuchando tiene tanta recepción
que suena distorsionada, ubique el interruptor en la
posición LOCAL. De lo contrario, déjelo en DX, que signica
distancia máxima.
SINTONIZACIÓN DE ESTACIONES DE OC (onda corta)
Encienda la radio.
Ubique el interruptor superior BANDWIDTH en la posición
W o N. Posicione el interruptor inferior en SW1, SW2 o SW3.
Primero coloque el sintonizador SW RF Gain en la posición
más potente para obtener la más alta sensibilidad. Esto
ayudará a captar aun las señales más débiles. Sin embargo,
si la señal de la estación deseada tiene buena recepción,
la conguración en la potencia máxima hará que la señal
se sobrecargue y distorsione, en este caso, gire la perilla
RF Gain en dirección contraria a las agujas del reloj para
reducir la recepción hasta que no haya distorsión.
El interruptor SW RF gain se puede ajustar para aumentar
o disminuir la sensibilidad cómo sea necesario para
minimizar la interferencia. La OC aparece en un rango de
frecuencia de 1711 a 29999 KHz.
Sintonice la estación con la perilla de SINTONIZACIÓN
o presione el botón UP/DOWN o presione y mantenga
por un segundo el botón UP/DOWN para llevar a cabo la
sintonización automática.
46
Page 47

FIELD MANUAL DE USUARIO
SINTONIZACIÓN EN RANGOS DE FRECUENCIA DE OC
(BANDAS)
Sintonice estos rangos de frecuencia para mejores
resultados. La radio puede, además, sintonizar entre estos
rangos.
Banda e n metros (m) Frecuencia Mejor momento del día
90 m 3,200-3,400 kHz
75 m 3,900-4,000 kHz
60 m 4,750-5,050 kHz noche
49 m 5,800-6,200 kHz noche
41 m 7,100-7,500 kHz noche
31 m 9,500-10,000 kHz noche
25 m 11,650-12,200 kHz
19 m 15,100-15,800 kHz día
16 m 17,550-17,900 kHz día
15 m 18,900-19,020 kHz
13 m 21,450-21,850 kHz día
11 m 25,600-26,100 kHz día
OPTIMIZACIÓN DE LA RECEPCIÓN DE LA ONDA
CORTA
La onda corta permite escuchar transmisiones de larga
distancia, que incluyen otros países y continentes. La
siguiente información le ayudará a conseguir mejores
resultados.
47
Page 48

FIELD MANUAL DE USUARIO
Durante el día, las frecuencias mayores a 13 MHz son, por
lo general, mejores.
Por la noche, las frecuencias menores a 13 MHz son,
generalmente, mejores.
Sobre el atardecer y el amanecer, es probable que el rango
de onda corta, en su totalidad, sea bueno.
Si se acerca considerablemente a una ventana con la radio
en mano, la recepción de la onda corta mejora.
Para saber más sobre la onda corta, le recomendamos la
publicación a continuación, que se publica anualmente
y está disponible en las librerías más conocidas. Además,
Internet es una muy buena fuente para aprender sobre la
onda corta. Escriba “recepción de onda corta” en su motor
de búsqueda favorito.
WORLD RADIO TV HANDBOOK
Publicado en Estados Unidos por Watson-Guptill
Publications, 770 Broadway, Piso 7, Nueva York, NY
10003-9595. www.watsonguptill.com
CÓMO GUARDAR ESTACIONES EN UBICACIONES
PRECONFIGURADAS
48
Page 49

FIELD MANUAL DE USUARIO
Con la radio prendida, presione el botón ALARM (ALARMA)
para preestablecer estaciones en la memoria.
Cuando esté escuchando la radio, gire la perilla o presione
la echa UP/DOWN o los botones Q.TUN para seleccionar
la estación deseada. Presione el botón ALARM, el ícono
“
” destellará en la pantalla. Presione los botones
con echas UP/DOWN para seleccionar direcciones
en la memoria (1~10) “
”, presione el botón ALARM
nuevamente y guarde la estación para la dirección
seleccionada y salga del estado de memoria. El usuario
puede repetir este procedimiento para guardar otros
favoritos, luego presionar el botón PRESET para referirse a
las estaciones guardadas en la memoria.
Nota: la radio puede almacenar un total de 50 memorias, 10 preestablecidas
para cada banda.
RECUPERACIÓN DE ESTACIONES A PARTIR DE
PRECONFIGURACIONES
Con la radio encendida, presione el botón PRESET
prolongadamente para recuperar estaciones que se
guardaron. Tenga en cuenta que la frecuencia cambia en
la pantalla y el número “precongurado” aparece en la
esquina derecha de la pantalla.
No se puede borrar una estación de la memoria. Solo
almacene otra estación sobre la anterior.
CONFIGURACIÓN DEL RELOJ
El reloj FIELD funciona en los formatos de 12 o 24 horas.
Para cambiar el reloj de un modo a otro, apague la radio,
presione y mantenga el botón UP por un segundo.
49
Page 50

FIELD MANUAL DE USUARIO
Para congurar el reloj:
1. Apague la radio.
2. Presione y mantenga el botón T.SET hasta que la hora
comience a destellar.
3. Gire la perilla de sintonización en cualquier dirección o
presione el botón UP para congurar la hora.
4. Presione rápidamente el botón DOWN y los minutos
comenzarán a destellar, gire la perilla de sintonización
para congurar los minutos.
5. Presione rápidamente el botón T.SET para nalizar la
entrada.
Nota: si los pasos antes mencionados no se completan lo sucientemente
rápido, el modo de conguración de horario se saldrá. Si se sale, si esto
sucede, comience de nuevo.
CONFIGURACIÓN, ACTIVACIÓN Y DESACTIVACIÓN
DEL RELOJ DE LA ALARMA
Con la radio apagada, ambos botones tienen las
funciones TIMER A/TIMER B, lo que signica que se
pueden establecer dos alarmas distintas.
Timer A/Timer B en la pantalla
Presione rápidamente los botones Timer A o
Timer B, los íconos “
indicando qué horario del temporizador se está
mostrando en ese momento.
” o “ ” destellarán
CONFGURACIÓN DE los valores TIMER A/TIMER B
Presione prolongadamente TIMER A o TIMER B hasta que
el temporizador destelle. Presione el botón ▲ para cambiar
la hora, luego gire la perilla para ajustar la hora;
50
Page 51

FIELD MANUAL DE USUARIO
Presione el botón ▼ para cambiar la hora, luego gire la
perilla para ajustar la hora;
Finalmente, presione TIMER A o TIMER B para conrmar el
ajuste del temporizador.
Selección de alarma con radio o timbre
Mientras en TIMER A o TIMER B, en el modo de ajuste
presione
para seleccionar entre alarma con timbre o
radio.
: indica alarma con timbre
: indica alarma con radio
Si ninguno de los íconos
o aparece en la pantalla, la
ALARMA está apagada.
Función de alarma con timbre o radio (mediante
temporizador)
Cuando la alarma del temporizador con timbre está
activada, la señal del timbre durará 2 minutos, el ícono
destellará;
Cuando la alarma del temporizador con radio está activada,
la radio sonará por 60 minutos, el ícono
destellará;
Al presionar cualquier botón que no sea el botón de
encendido, se activará la función de repetición de alarma.
Los íconos
o continuarán destellando, aunque el
timbre o la radio estarán apagadas durante el tiempo
de repetición de alarma. Luego de 5 minutos, el timbre o
la radio sonarán nuevamente. La función de repetición
de alarma se puede activar 4 veces, luego de la 4ta vez
51
Page 52

FIELD MANUAL DE USUARIO
se desactivará la alarma del temporizador al presionar
cualquier botón.
Para desactivar la alarma del temporizador de inmediato,
presione el botón de Encendido.
CONFIGURACIÓN Y DESACTIVACIÓN DEL
TEMPORIZADOR DE DESCANSO
Presione el botón rojo POWER & SLEEP en la esquina
superior derecha del frente. Cuando la radio se encienda,
verá la palabra “ON” en la pantalla por un momento.
Presione el botón POWER & SLEEP nuevamente para
activar el temporizador de descanso, el ícono
aparecerá en la parte superior izquierda de la pantalla y
aparecerá un número en el centro de la pantalla, este es
el horario de descanso. La radio sonará por esa cantidad
de minutos y luego se apagará. Se puede desactivar
presionando repetidamente el botón de encendido hasta
que aparezca “on” en la parte inferior de la pantalla; con
cada vez que presione, verá los números decreciendo
desde 90 a 60 a 45 a 30 a 15 a 10 a 5 a 1 minuto y
después a “on”. Cuando aparece “on”, deje de presionar el
botón. El temporizador de tiempo está ahora desactivado.
<También puede combinar y relacionar el texto a
continuación para la descripción del temporizador de
descanso>
Presione el botón Power & sleep, la pantalla LCD mostrará
“60” y el ícono “
”, que indica que la unidad se apagará
automáticamente luego de 60 segundos.
52
Page 53

FIELD MANUAL DE USUARIO
Si desea cambiar el temporizador de descanso, presione el
botón Power & Sleep de continuo cuando aparezca “60”
y el ícono “
”, el dígito cambiará al horario deseado. El
ícono “ON” indica que está encendido.
Con la radio encendida, presione el botón Power & Sleep
para apagar la radio y mostrar el estado del reloj.
Cuando el ícono “ON” aparece en la pantalla, la
radio permanecerá encendida hasta que se apague
manualmente de nuevo.
CONFIGURACIÓN DE BRILLO DE FONDO POR
DEFECTO
Con la radio apagada, presione el botón Q.TUNE, la luz
de fondo de la pantalla alternará entre brillo de fondo
LOW, MEDIUM y HIGH (BAJO, MEDIO, ALTO). La última
conguración seleccionada se activará cuando esté
prendida la radio.
Nota: la luz de fondo se apagará luego de 10 segundos, mientras la radio
funciona. Para que la luz de fondo permanezca siempre prendida, deslice el
interruptor BACKLIGHT (LUZ DE FONDO) que está en el lateral de la radio a la
posición “ON”.
UTILIZACIÓN DEL BOTÓN DE BLOQUEO
Para bloquear todas las teclas y botones, presione y
mantenga el botón LOCK (BLOQUEO)
frontal de la radio) hasta que vea el símbolo de una llave en
53
(parte superior
Page 54

FIELD MANUAL DE USUARIO
la parte superior, centro de la pantalla. Presione el mismo
botón por 2 segundos para desbloquearlo.
ACTIVACIÓN Y DESACTIVACIÓN DE DEVOLUCIÓN
DE BOTONES
Con la radio apagada, presione y mantenga el botón
ALARM, aparecerá el texto BUZZER ON (TIMBRE
ENCENDIDO) en la pantalla. En este modo, se escuchará un
sonido de devolución de botones cada vez que el usuario
presione un botón. Libere el botón ALARM y presione y
mantenga nuevamente para apagar el timbre, aparecerá
BUZZER OFF en la pantalla. En este momento, los sonidos
de devolución del usuario se desactivarán.
CONTROLES DE VOLUMEN DEL AUDIO Y TONOS
Control del volumen
Aumente el volumen girando la perilla del volumen (perilla
de la esquina inferior izquierda de la radio) en dirección a
las agujas del reloj (derecha), y bájelo girando la perilla en
dirección contraria a las agujas del reloj (izquierda).
Ajuste del tono del audio
Gire la perilla Bass/Treble (bajos/agudos) para obtener la
calidad de audio de bajos y agudos deseada.
UTILIZACIÓN DEL TOMA DE AURICULARES
El toma de auriculares se puede usar con audífonos
estéreo utilizando un toma de 1/8 pulgadas (3.5
milímetros). El sonido FM es estéreo si la señal se envía
como estéreo y si está seleccionada la posición ST en el
interruptor BANDWIDTH. El altavoz interno se silenciará
cuando se conecte un dispositivo al toma de auriculares.
54
Page 55

FIELD MANUAL DE USUARIO
UTILIZACIÓN DE LOS TOMACORRIENTES DE
ENTRADA/SALIDA DE LÍNEA
Estos tomacorrientes están en el lateral derecho de la
FIELD, un tipo de estéreo de 1/8 pulgadas (3.5 mm). Se
puede reproducir un dispositivo de audio externo (como
un reproductor MP3) al conectar una línea AUXILIAR del
dispositivo al tomacorriente de entrada de línea. Cuando
se conecta un dispositivo al tomacorriente de entrada de
línea, la palabra “AUX” aparece en la pantalla.
El tomacorriente de salida de línea se puede usar para
alimentar el audio desde la FIELD a altavoces externos
amplicados. El altavoz interno aún será funcional cuando
el dispositivo se conecte al tomacorriente de salida de
línea.
ANTENAS EXTERNAS
INTERRUPTOR DE SELECCIÓN DE ANTENA: EXTERIOR o
INTERIOR
Utilice este interruptor para permitir el uso de antenas FM
o de OC internas o externas.
ANTENA EXTERNA DE OM: este es un tomacorriente de
500 ohmios de impedancia, para utilizar con antenas de
cable largas.
Tomacorriente para ANTENA EXTERNA DE OM: ubicado
en la parte trasera de la radio, principalmente para antenas
diseñadas para que se alimenten con cables coaxiales de
50 o 70 ohmios, como dipolos o antenas similares. También
se puede usar para antenas de cable largas. Utilice
enchufes F para alimentar este tomacorriente.
55
Page 56

FIELD MANUAL DE USUARIO
UTILIZACIÓN DE LA ANTENA GRUDIG AN200
PARA UN RENDIMIENTO MEJORADO DE LA
FRECUENCIA AM (OM) (NO INCLUIDA)
No es necesario que conecte la antena de bucle de banda
AN200 AM (OM) o cualquier modelo similar, solo colóquela
al lado de la radio y sintonícela en la misma frecuencia que
la radio. Gire la radio y la antena para alcanzar el máximo
rendimiento. Esta antena se puede comprar contactando a
Etón o alguno de nuestros distribuidores.
Llámenos para recibir más detalles.
PARA REINICIAR LA FIELD
Si la radio funciona mal o no funciona adecuadamente,
inserte un clip en el agujero en el lateral inferior derecho
del frente. Asegúrese de que el clip quede insertado hasta
que la pantalla reaparezca.
¿NECESITA AYUDA? CONTÁCTENOS.
Etón Corporation
1015 Corporation Way, Palo Alto, CA 94303, Estados
Unidos
1-800-872-2228 (EE.UU.)
1-800-637-1648 (Canadá)
650-903-3866 (en todo el mundo)
M-F, 8:00AM-4:30PM, hora estándar del pacíco
www.etoncorp.com.
56
Page 57

FIELD MANUAL DE USUARIO
ADVERTENCIA
• No exponga este dispositivo a la lluvia o humedad.
• No lo sumerja o exponga al agua por periodos
prolongados.
• Protéjalo de los altos niveles de humedad y lluvia.
• Debe funcionar solo dentro del rango de temperaturas
especicado (0 °C a 40 °C).
• Desenchúfelo inmediatamente si se ha derramado líquido
o algún objeto ha caído sobre el aparato.
• Límpielo solo con un paño seco. No use detergente o
solventes químicos, ya que esto podría dañar el acabado.
• Desenchufe y desconecte las antenas externas durante
tormentas eléctricas.
• No le quite la tapa o cobertor trasero.
• Solo personal de servicio calicado podrá repararlo.
MEDIO AMBIENTE
Eliminación
Según la Directiva Europea 2002/96/CE, todos los
productos eléctricos y electrónicos se deben recolectar
por separado mediante un sistema local de recolección.
Actúe de acuerdo con las reglas locales y no elimine los
productos viejos junto con el desecho habitual del hogar.
Elimine todos los tipos de baterías según las reglas y/o
normas de su gobierno, estado o localidad. Si no está
seguro, llame a la autoridad local adecuada para averiguar
cómo eliminar los desechos de manera responsable y así
ayudar a proteger el medio ambiente.
57
Page 58

FIELD MANUAL DE USUARIO
REGISTRO DE GARANTÍA
Para asegurar la cobertura completa en la garantía
o actualizaciones de productos, debe completar la
registración de su producto lo antes posible luego de la
compra o de obtener la factura.
Diríjase a
http://www.etoncorp.com/productregistration
para registrar el producto.
GARANTÍA LIMITADA
Conserve la información de la garantía en su tarjeta de
garantía con el comprobante de compra o también puede
ver la información de la Garantía Limitada en www.
etoncorp.com.
SERVICIO DE REPARACIÓN DEL PRODUCTO
Para recibir el servicio de reparación de su producto,
recomendamos que primeramente se contacte con
un representante de atención de Etón al 800-8722228 Estados Unidos, 800-637-1648 Canadá o (650)
903-3866 para determinar el problema y obtener un
diagnóstico. Si se precisa de otro servicio, el personal
técnico brindará instrucciones sobre cómo proseguir,
basadas en si la radio está bajo garantía o precisa de un
servicio no cubierto por la garantía.
58
Page 59

FIELD MANUAL DE USUARIO
GARANTÍA
Si el producto continúa bajo la cobertura de la garantía y
el representante de atención de Etón determina que se
precisa del servicio de garantía, se emitirá una autorización
de devolución e instrucciones para el envío a un taller de
reparación autorizado por la garantía. No envíe la radio sin
obtener un número de devolución autorizado.
SIN GARANTÍA
Si el producto no está cubierto por la garantía y debe ser
reparado, nuestro personal técnico lo derivará al taller de
reparación más cercano apto para realizar la reparación.
Para acceder al servicio de reparación fuera de
Norteamérica, tome como referencia la información del
distribuidor incluida al momento de la compra o cuando
haya obtenido la factura.
59
Page 60

Etón Corporation
Corporate Headquarters
1015 Corporation Way
Palo Alto, California 94303 USA
tel +1 650-903-3866
tel +1 800-872-2228
fax +1 650-903-3867
Etón Canada
5580 Explorer Drive, Suite 503
Mississauga, Ontario L4W 4Y1 Canada
tel +1 416-214-6885
tel +
1 800-637-1648
fax +1 416-214-6886
www.etoncorp.com
Designed by Etón Corporation and assembled in China.
© Copyright 2014 Etón Corporation. All rights reserved.
v.06132014
 Loading...