

Page 1
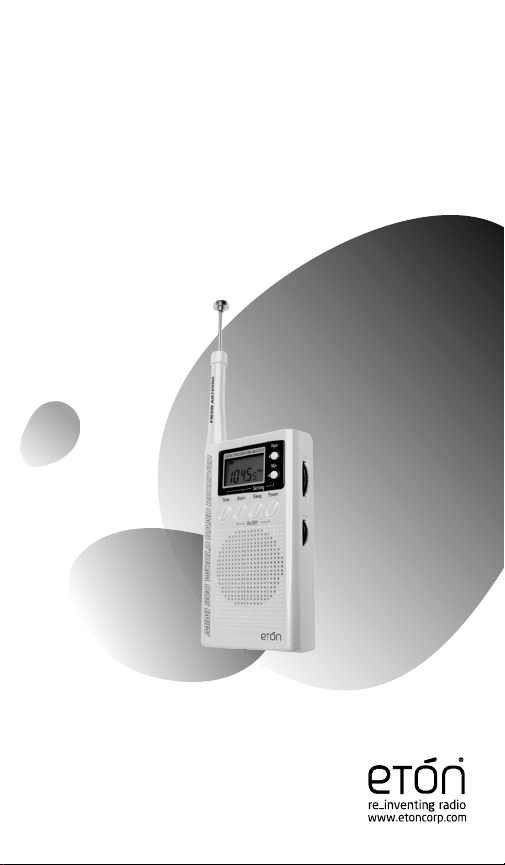
MINI 300PE
AM/FM/Shortwave Radio
OWNER’S MANUAL
Page 2

Page 3
MINI 300PE OWNER’S MANUAL
DO YOU NEED HELP? Contact Us
Etón Corporation
1015 Corporation Way
Palo Alto, CA 94303, USA. 1-800-872-2228 (U.S.); 1-800-637-1648
(Canada); 650-903-3866 (worldwide); M-F, 8:30-4:30, Pacic Standard
Time; www.etoncorp.com.
WARNING
• Do not submerge or expose for extended period to water.
• Only operate within specied temperature range (0 °C to 40 °C).
• Unplug immediately if liquid has been spilled or object have fallen
into the apparatus.
• Clean only with a dry cloth. Do not use detergents or chemical
solvents as this might damage the nish.
• Unplug and disconnect external antennas during lightning storms.
• Do not remove cover [or back].
• Refer servicing to qualied service personnel.
ENVIRONMENT
Disposal
According to the European Directive 2002/96/EC all
electrical and electronic products must be collected
separately by a local collection system.
Please act according to your local rules and do not dispose of your old
products with your normal household waste.
1
Page 4

MINI 300PE OWNER’S MANUAL
TABLE OF CONTENTS
BASIC CONTROLS...........................................................................................................................
1
BATTERIES.........................................................................................................................................
2
POWER ON/OFF/VOLUME.......................................................................................................
3
FM RADIO............................................................................................................................................
4
AM/SW1-7 RADIO.........................................................................................................................
5
ANTENNA............................................................................................................................................
6
CLOCK.....................................................................................................................................................
7
ALARM...................................................................................................................................................
8
SLEEP FUNCTION..........................................................................................................................
9
INTRODUCTION TO SHORTWAVE...................................................................................
10
SHORTWAVE BANDS................................................................................................................
11
GUIDELINES.....................................................................................................................................
12
STATIONS.........................................................................................................................................
13
SERVICE INFORMATION........................................................................................................
14
ONE YEAR LIMITED WARRANTY.....................................................................................
15
3
4
4
5
5
5
6
7
8
10
10
11
12
13
13
2
Page 5
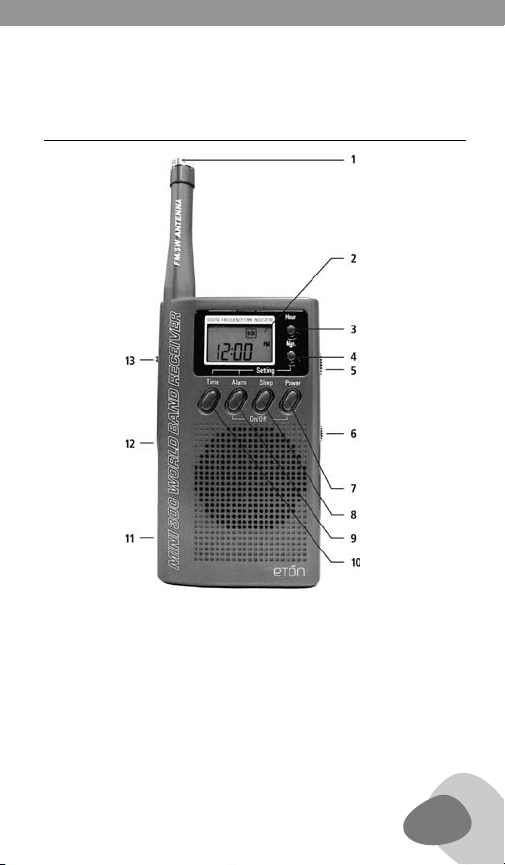
1 BASIC CONTROLS
MINI 300PE OWNER’S MANUAL
ANTENNA
1
DISPLAY
2
HOUR
3
MINUTES
4
TUNING KNOB
5
VOLUME KNOB
6
POWER
7
8
SLEEP
9
ALARM
10
TIME
11
BATTERY COVER
12
EAR PHONE JACK
13
BAND SWITCH
3
Page 6
MINI 300PE OWNER’S MANUAL
2 BATTERIES
Remove the battery compartment’s cover by pushing the cover in
the direction of arrow. Install two ‘AA’ batteries according to the polarity. For easy removal, place the batteries on top of lift out ribbon.
If the sound becomes low or distorted, replace with new batteries. If
the radio will not be used for a long time, remove all the batteries to
prevent possible battery leakage.
3 POWER ON/OFF/VOLUME
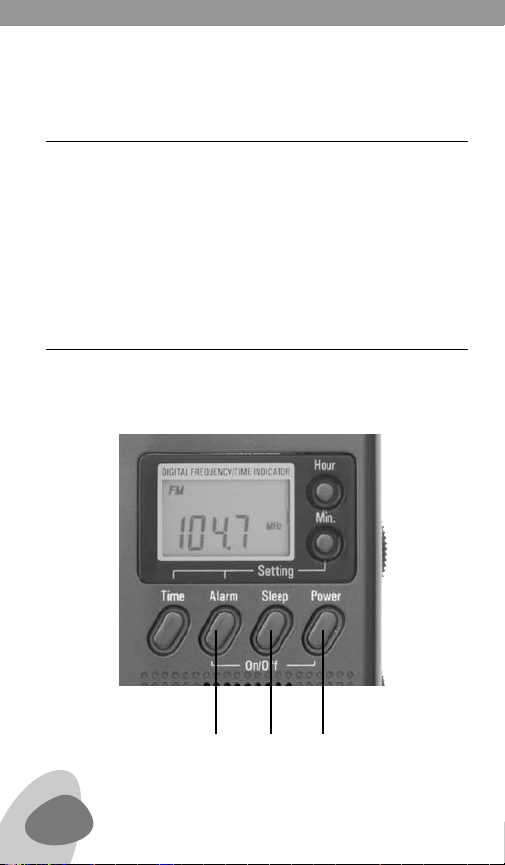
Turn the radio on by pressing the POWER button (7). Use the volume
knob (6) to adjust the volume.
9 8 7
4
Page 7

MINI 300PE OWNER’S MANUAL
4 FM RADIO
Select the FM band by using the band selector switch (13). Use the
tuning knob (5) to tune the radio to the desired frequency.
5 AM/SW1-7 RADIO
Select the desired band, AM or SW 1-7, by using the band selector
switch (13). Turn the tuning knob (5) to the desired frequency, which
appears in the display (2) or just tune around and listen for stations.
Note that MW appears in the display when AM is selected, as the AM
band is called MW for medium wave in some parts of the world. SW
appears in the display when SW1-8 is selected.
6 ANTENNA
A. For AM (MW) the radio uses an internal, directional, ferrite bar
antenna. Rotate the radio for best reception.
B. For FM/SW, fully extend the telescopic antenna (1). For FM, rotate
the antenna for best reception.
5
Page 8
MINI 300PE OWNER’S MANUAL
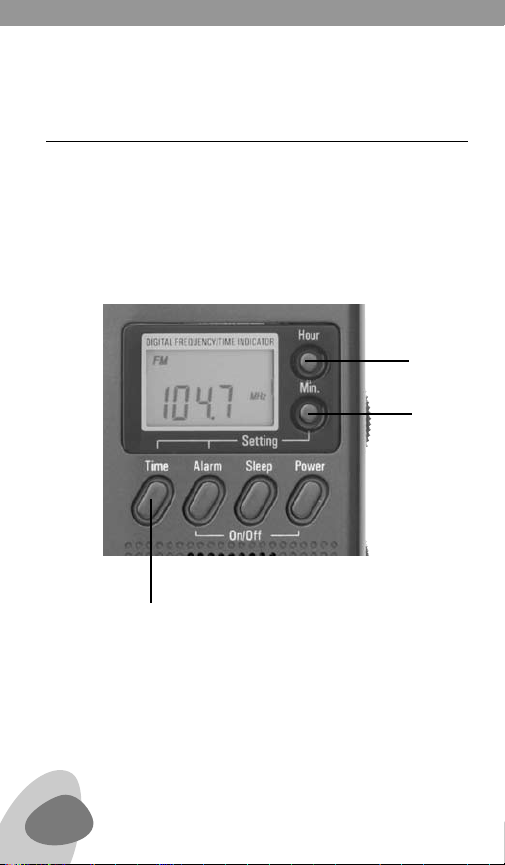
7 CLOCK
The clock displays time in 12 hour, AM/PM format. While keeping the
TIME button (10) pressed, set the correct hour and minutes with the
HOUR (3) and MINUTE (4) buttons. They can be pressed with quick,
short presses to advance slowly or they can be kept pressed down to
advance rapidly. When nished, release the TIME button.
3
2
10
6
Page 9
MINI 300PE OWNER’S MANUAL
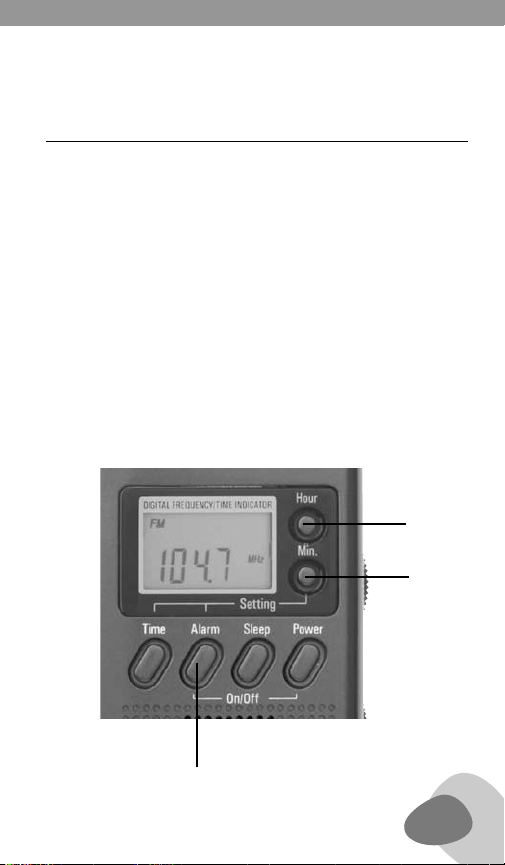
8 ALARM
With the radio turned off, keeping the ALARM button (9) pressed, set
the correct wake up hour and minutes with the HOUR (3) and MINUTE (4). They can be pressed with quick, short presses to advance
slowly or they can be kept pressed rapidly. When nished, release the
ALARM button and this will cause the loudspeaker symbol appears
in the display. If you want to deactivate the alarm, press the ALARM
button (9) again and the loudspeaker symbol will disappear from the
display.
When the activated alarm turns the radio on, it can be turned off by
pressing the ALARM button (9) again. The Power button (7) cannot
be used for this purpose.
While the radio is playing in alarm mode and without any manual
interruption to deactivate the alarm, it will turn off automatically
after 60 minutes.
3
4
9
7
Page 10

MINI 300PE OWNER’S MANUAL
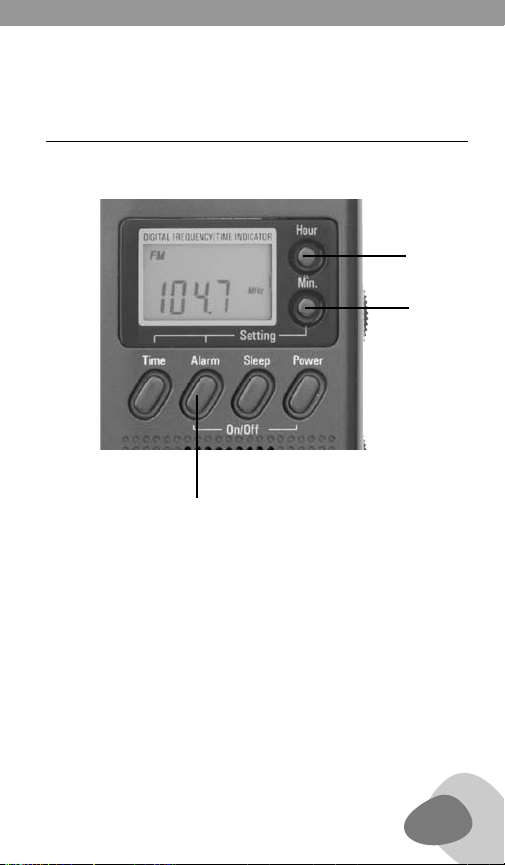
9 SLEEP FUNCTION
The sleep function enables the radio to play for a specied time
before automatically shutting off (from 1 hour 59 minutes to just
one minute).
With the radio turned off, press and do not release the SLEEP button
(8). This turns the radio on and “0:59” appears in the display. This
also activates the sleep timer activation symbol in the display.
To set SLEEP function for 59 minutes, release the SLEEP button. To
set SLEEP function as desired, continue to keep the SLEEP button
pressed and use the HOUR and MINUTE buttons to adjust the sleep
time for you needs. When nished, release the SLEEP button.
While it is playing in sleep mode, it can be turned off by pressing
the SLEEP button. The power button (7) cannot be used for this
purpose. The sleep timer activation symbol will disappear from the
display. If the POWER button is pressed, you need to press SLEEP
button again to deactivate the SLEEP function (The symbol will
disappear from display) and press POWER button again to turn off
the radio.
Note: The sleep function cannot be activated again within 2 minutes after this function was deactivated before.
8
Page 11
9 SLEEP FUNCTION continued
9
MINI 300PE OWNER’S MANUAL
3
4
9
Page 12

MINI 300PE OWNER’S MANUAL
10 INTRODUCTION TO SHORTWAVE
Shortwave enables you to hear stations from around the world.
Now that you have a shortwave radio, no doubt you’ll want to hear
worldwide stations right away. If you’re new to shortwave, please
take some time to learn the basics outlined below. To successfully
listen to shortwave stations you must know how to nd them. They
are found in the shortwave ‘bands’. On the Mini 300, the shortwave
bands are numbered 1-7. The chart below and the one on the back of
the radio show the relationship of bands 1-7 to their ofcial names
and the frequency ranges covered by them.
11 SHORTWAVE BANDS
MINI 300
SWITCH
SETTING
SW1
SW2
SW3
SW4
SW5
SW6
SW7
10
OFFICIAL
SHORT-WAVE
BAND NAME
49 meters
41 meters
31 meters
25 meters
22 meters
19 meters
16 meters
FREQUENCY
RANGE
IN MHz
5.950-6.20
7.10-7.30
9.50-9.95
11.600-12.100
13.600-13.800
15.10-15.80
17.500-17.90
Page 13

MINI 300PE OWNER’S MANUAL
12 GUIDELINES
HERE ARE SOME GENERAL GUIDELINES
• In general, the bands with frequencies below 13 MHz are better at
night and the bands with frequencies above 13 MHz are best during the day. This guideline, while approximate, is a useful general
rule of thumb.
• During the day, listen in SW5-7. These may start getting good just
before sunrise and may stay good all day, until just after sunset.
• At night, listen in SW1-4. These may start getting good just before
sunset and may stay good all night, until just after sunrise.
• Around sunrise and sunset, both the day and night bands might be
good, sometimes exceptionally good.
• Winter shortwave is generally somewhat better than summer
shortwave.
• Holding the radio while listening to shortwave will improve signal
strengths.
• Getting close to a window may substantially improve your
reception because the construction materials of some buildings do
not let signals in very well. Signals penetrate wood frame buildings
easiest, while concrete and brick buildings usually block signals. If
you are in a building with one or more stories above you, signals
can also be impaired in strength. In such a situation, get as close to
a window as possible while listening.
11
Page 14

MINI 300PE OWNER’S MANUAL
12 GUIDELINES continued
• These guidelines can be used worldwide and are not dependent on
location.
13 STATIONS
HOW TO IDENTIFY WHAT YOU’RE LISTENING TO AND HOW
TO FIND STATIONS THAT YOU WANT TO HEAR
For this, you’ll need to use a shortwave directory. We recommend the
use of a comprehensive shortwave directory, especially if you want
to hear specic countries or to identify the station you’re listening
to. Such a directory will alphabetically list the countries broadcasting
on shortwave, showing their language, target area, broadcast time
and frequency that is used. The easiest to use shortwave directory
is PASSPORT TO WORLD BAND RADIO, available in major bookstores
and directly from the publisher. Published by International Broadcasting Services, Ltd., Box 300, Penn’s Park, Pennsylvania 18943 (www.
passband.com). This publication has separate chapters for English and
non-English broadcasts, titled World-Wide Broadcasts In English and
Voices From Home.
12
Page 15

MINI 300PE OWNER’S MANUAL
14 SERVICE INFORMATION
You may contact the Etón Service Department for additional
information or assistance by calling toll-free Monday through
Friday, 8:30am - 4:00pm Pacic Standard Time:
1-800-872-2228 (United States)
1-800-673-1648 (Canada)
1-650-903-3866 (Worldwide)
Call for a Return Authorization prior to shipping your unit. Should you
want to return your unit for service, pack the receiver carefully using
the original carton or other suitable container. Write your return address clearly on the shipping carton and on an enclosed cover letter
describing the service required, symptoms or problems. Also, include
your daytime telephone number and a copy of your proof of purchase.
The receiver will be serviced under the terms of the Etón Limited
Warranty and returned to you.
13
Page 16

MINI 300PE OWNER’S MANUAL
15 ONE YEAR LIMITED WARRANTY
Etón warrants to the original purchaser this product shall be
free from defects in material or workmanship for one year from the
date of original purchase. During the warranty period Etón or an
authorized Etón service facility will provide, free of charge, both parts
and labor necessary to correct defects in material and workmanship.
At their option, Etón may replace a defective unit.
1. Complete and send in the Warranty Registration Card
within ten (10) days of purchase.
2. Call Etón or the nearest authorized service facility, as soon
as possible after discovery of a possible defect.
Have ready:
(a) The model and serial number.
(b) The identity of the seller and the approximate date
of purchase.
(c) A detailed description of the problem, including
details on the electrical connection to associated
equipment and the list of such equipment.
3. Etón will issue a Return Authorization number and the address to
which the unit can be shipped. Ship the unit in its original container or equivalent, fully insured and shipping charges prepaid.
Correct maintenance, repair, and use are important to obtain
proper performance from this product. Therefore carefully read the
13
Page 17

MINI 300PE OWNER’S MANUAL
15 ONE YEAR LIMITED WARRANTY continued
Instruction Manual. This warranty does not apply to any defect that
Etón determines is due to:
1. Improper maintenance or repair, including the installation
of parts or accessories that do not conform to the quality and
specication of the original parts.
2. Misuse, abuse, neglect or improper installation.
3. Accidental or intentional damage.
4. Battery leakage.
All implied warranties, if any, including warranties of merchantability
and tness for a particular purpose, terminate one (1) year from the
date of the original purchase.
The foregoing constitutes Etón entire obligation with respect
to this product, and the original purchaser shall have no other remedy
and no claim for incidental or consequential damages, losses, or expenses. Some states do not allow limitations on how long an implied
warranty lasts or do not allow the exclusions or limitation of incidental or consequential damages, so the above limitation and exclusion
may not apply to you. This warranty give you specic legal rights and
you may also have other rights which vary from state to state.
For service information contact:
Etón Corporation
1015 Corporation Way
Palo Alto, CA 94303
U.S.A.
14
Page 18

MINI 300PE OWNER’S MANUAL
15
Page 19

Etón Corporation
Corporate Headquarters
1015 Corporation Way
Palo Alto, California 94303 USA
tel +1 650-903-3866
tel +1 800-872-2228
fax +1 650-903-3867
Etón Europe/Lextronix Germany
Rosenstrasse 2
D-10178 Berlin, Germany
tel +49 [0]30 243102142
Etón Canada
1 Yonge Street, Suite 1801
Toronto, Ontario M5E 1W7 Canada
tel +1 416-214-6885
v. 01-12-06
 Loading...