

Page 1
Projector A1332
User Manual
Page 2

Safety Instructions
Read all instructions before you use this device. Do not make any changes
that are not described in this manual. If physical injury, loss of data, or
damage is caused by failure to follow instructions, the warranty does not
apply.
Setup
• To reduce the risk of fire and/or electric shock, do not expose the device
to rain or moisture, and objects filled with liquids, such as vases, should
not be placed on the device.
• Do not place the device on soft surfaces such as tablecloths or carpets
as doing so could be a fire-hazard.
• Do not place the device in areas susceptible to excessive dust and dirt or
near any appliance generating a strong magnetic field.
• To prevent overheating, do not block or clog the ventilation openings.
Never place the device in a confined space. Always leave enough space
around the device for ventilation.
• Protect the device against direct sunlight, heat, large temperature
fluctuations and moisture.
• When the device runs for a long period of time and the surface becomes
hot, shut it down and unplug the power cord. Resume operation only after
the device has cooled.
• Always handle the device with care. Avoid touching the lens.
• Never place heavy or sharp objects on the device or the power cord.To
avoid electric shock, do not disassemble.
• Only use attachments or accessories specified by the manufacturer.
Avoid extreme vibration. It may damage the internal components.. Do not
allow children to handle the device without supervision.
• Under the following conditions, a layer of moisture can appear inside the
device which can lead to malfunctions:
a) if the device is moved from a cold to a warm area;
b) after a cold room is heated;
c) when the device is placed in a damp room.
To avoid any moisture, seal the device in a plastic bag before moving it
to another room, and wait for one to two hours before you take it out of
the bag.
01
Page 3

Power Supply
• Use only the provided power adapter.
• Power off the device before removing the power supply from the socket.
• Protect the power cord from being walked on or pinched, particularly at
plugs, convenience receptacles, and the point where they exit from this
device.
• Unplug this device if there are lightning storms or when unused for a
long period of time.
• Where the power plug or an appliance coupler is used as the disconnect
device, the disconnect device shall remain readily operable.
• Before you make or change any connections, ensure that all devices are
disconnected from the power outlet.
• Do not touch the power cable or the power connector with wet hands.
Hearing Safety
To avoid hearing damage, do not listen for extended periods at high volume.
Set the volume at a safe level.
Cleaning
• Power off the device and remove it from the power supply before cleaning
the surface.
• Use a soft, lint-free cloth. Never use liquid, gaseous, or easily flammable
cleansers (like sprays, abrasives, polishes, and alcohol). Wipe over the
surfaces gently. Be careful that you do not scratch the surfaces.
• Do not use any liquid cleaning agents to clean the lens as they may
damage the protective coating on the lens. Use lens cleaning paper to
clean the lens of the projector.
Repairs
• Do not make any repairs to the device by yourself. Only have your device
repaired by an authorized service center.
• Improper maintenance can result in injuries or damage to the device.
• Refer all servicing to qualified service personnel.
Caution
• Do not stare at operating beam, the bright light may hurt your eyes.
02
Page 4
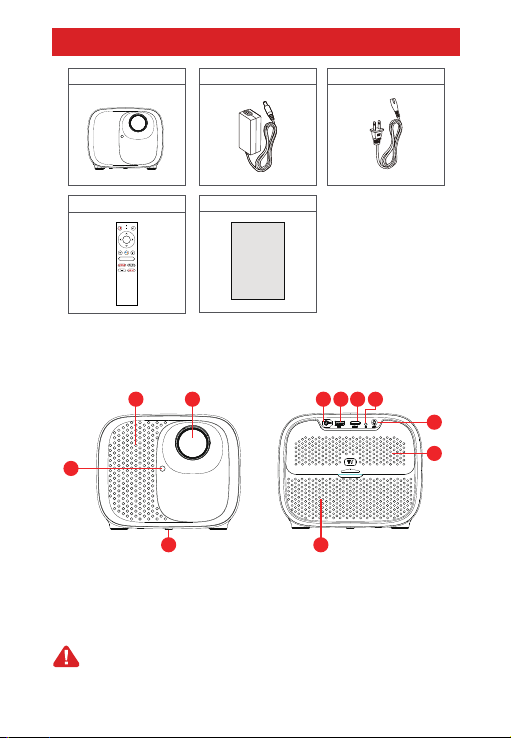
What’s Included
Projector x 1 Adapter AC cord x 1
Adapter x 1
Remote control x1
User manual x 1
User Manual
Overview
Projector
3
①
②
③
⑩
Front View Rear View
6
1
51
⑦
HDMI Port
⑧
IR receiver
⑨
Aux Port
2 7 8
4
Air ventilation
Lens
Tof (Auto focus)
Back cover
Attention:
• Please do not look into the lens directly to avoid harm for your eyes.
• Please do not block the air ventilation.
④
Tripod screw hole
⑤
DC -in
⑥
USB port
03
9
10
Page 5
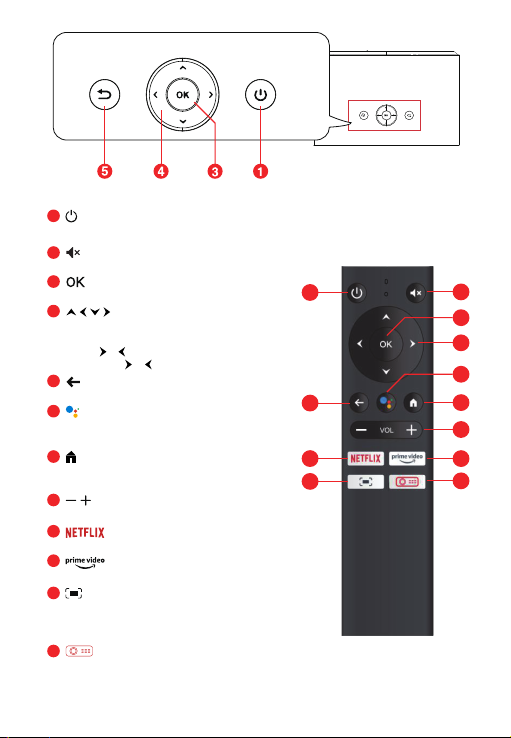
1
• Press the button once: power on
• Press the button twice: power off
2
Mutes the projector’s audio
3
Press to confirm a selection or entry
4
Navigate menus or adjust the selected content
When playing videos/music:
Press / button to volume up / down
Long-press / button to fast forward / backward
5
Return to the previous menu
6
Activate Google assistant, Google's
voice-powered virtual assistant service
7
Press the button for once, go to
Android TV homepage
8
Volume down / up
9
Preset Netflix button
10
Preset Prime Video button
11
• Adjust the focus for the projector
• Long-press to launch the projector's on-screen
settings menu
12
Press the button once, go to projector Homepage
04
1
2
3
4
6
5
9
11
7
8
10
12
Page 6
Get Started
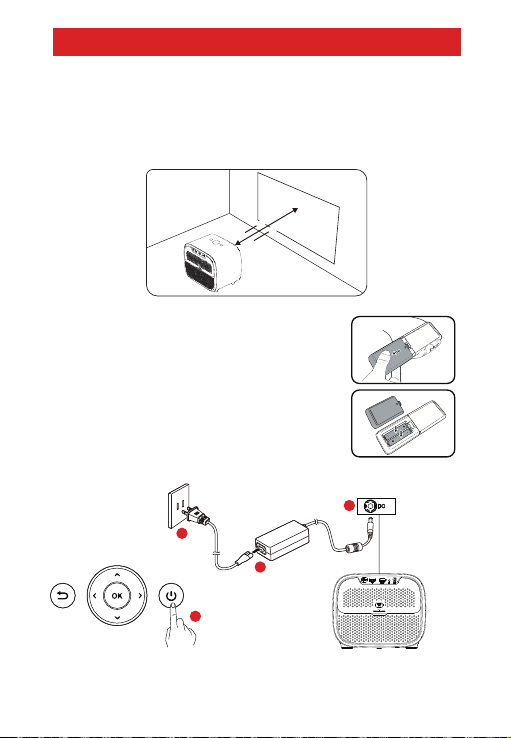
1.1m
4.1m
40"
150"
Placement
① Place the projector right towards the projection surface to get a
rectangle picture.
② The distance between the projector and the projection surface
determines the picture size.
③ Check the projection distance and screen size on the specifications part.
Prepare the Remote Control
Install the remote control batteries (batteries not
included).
① Press and open the battery cover, as illustrated.
② Install two AAA batteries. Make sure that the
positive and negative ends are positioned
correctly, as illustrated.
Place the battery cover back until it clicks into place.
③
④ The distance between the remote and the projector
should not exceed 10 m / 33 ft.
Power On
3
2
1
4
• Press the power button once to power on.
• Press the power button twice to power off.
05
Page 7
Focus
Auto Focus
Place the projector towards a suitable projection surface or wall, the projector
will automatically focus the image.
Manual Focus
You can also manually focus through the remote control. Press the button
on the remote control, and press the or button, until the picture is clear.
Note:The projection distance must between 1.1m to 4.1m.
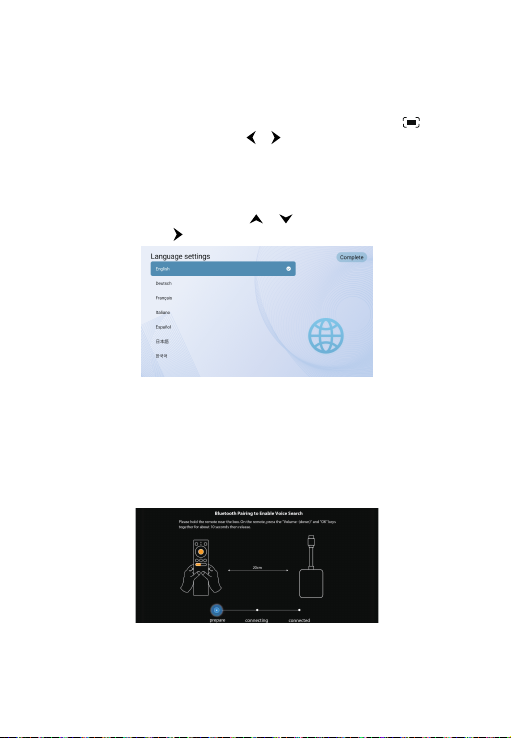
Select Your Language
When start the projector for the first time, you will be guided to a page to
select language, use remote control or to select your language. Then
press the right button and select "Complete" to enter the next page.
Pair Remote Control in Bluetooth Mode
After selecting a language, you will be at a Bluetooth remote pairing page,
follow the instructions on the page.
① Please hold the remote near the projector.
② Press the [Volume-] and [OK] keys together for about 10 seconds.
③ When the screen shows
turns blue, and the remote control is paired
"Connected", your remote LED indicator
06
Page 8

Set up Android TV
Follow the setup wizard on Android TV, select your language, set up a Wi-Fi
connection, sign in to a Google account, and carry out other related
procedures.
When you complete the Android TV setup wizard, the Android TV home
screen will appear. Now you can start watching your favorite shows by
downloading streaming apps.
07
Page 9
Settings
Android TV Setting
Bluetooth Pairing
If you want to connect to Bluetooth speakers/headphones on the Android
TV interface, select
then select the device to be connected. Bluetooth connection only works
while on the Android TV system.
Android TV Remote App
The Android TV system could be controlled by downloading the remote app
on a smartphone.
Make sure your device is connected to the same Wi-Fi network as the
projector, Bluetooth is turned on, and your Android/iOS device is updated to
the newest version.
• Android Devices:
Download the “Android TV Remote" app from Google Play, open the app,
choose "HAKO mini" from Remote tab, click "connect", enter the
verification code displayed on the projector screen.
•
iOS Devices:
Download the “Android TV" app from the App Store, open the app, allow it
to use the local network to set up and control your connected devices,
choose "HAKO mini" from Remote tab, click "connect", enter the verification
code displayed on the projector screen.
Adding Accounts
For new Google users, sign up for a new Google account using the TV for
easier login and payment security. Add an account or switch accounts
under Accounts in the Settings Menu.
Dolby Audio not Supported
The projector does not support Dolby Audio. If you are watching videos
with Dolby Audio, please turn off all Dolby Digital-related output on your
video resource.
Projection Settings
Press the button on the remote control, go to projector homepage,
and select Settings.
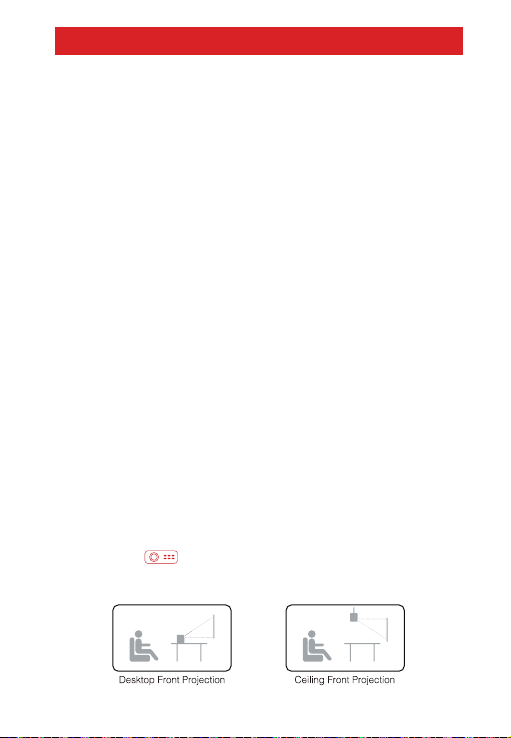
Projection Mode
Settings→Remotes&Accessories→Add accessory,
08
Page 10
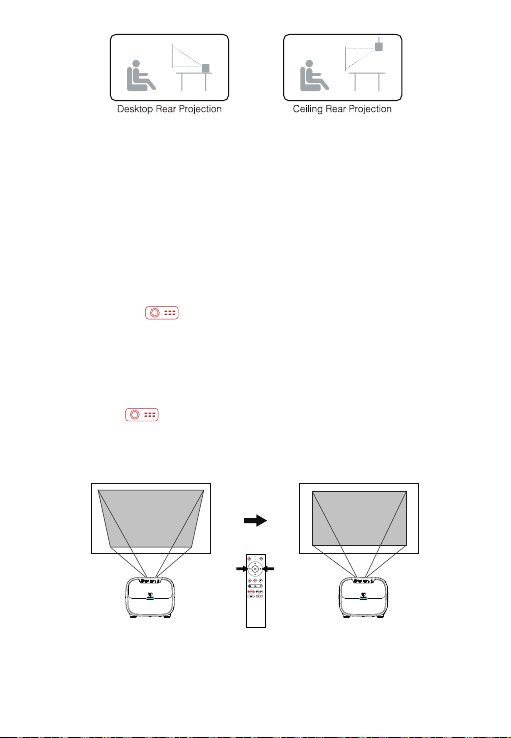
Zoom in/out
Use the remote control to resize the picture size from 50% to 100%
without moving the projector.
Keystone Correction
This Projector support Auto keystone correction, digital keystone
correction, and remote four-point keystone correction.
• Auto Keystone Correction
When the projector image is distorted, it will perform auto keystone
correction to restore the image to a rectangle. If you find the auto
keystone correction does not work as well as before, follow the
instructions below to optimize it.
① Press the button to go to projector homepage, into
[Settings] -> [Projection Settings] -> [Calibration Settings].
② Select [Keystone Benchmark Correction], and adjust the projector
for the correct image.
• Digital Keystone Correction
When fixing your projector in a place, use digital keystone correction.
Press the button to go to projector homepage, select [Settings]
-> [Projection Settings] -> [Vertical Correction] / [Horizontal Correction],
press left or right button on the remote control to adjust.
Vertical Correction
09
Page 11
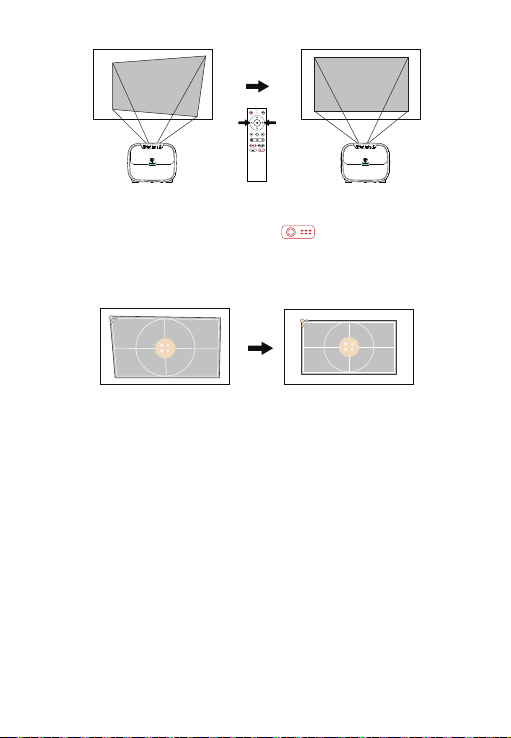
Horizontal Correction
• Four Point Correction
If the projected image is stretched or distorted along both axes due
to the angle of the projection, press the button to go to
projector homepage, and select [Settings] -> [Projection Settings]
-> [Four point Correction], choose the corner you want and press left
or right button on the remote control to adjust.
• Keystone Correction Reset
To restore the default settings, select Keystone Correction Reset and
press “OK”.
Four Point Correction
Other Settings
Screen Saver
The screen saver automatically starts whenever your projector sits idle
for the default time. You could change the default time or turn it off.
Screensaver Timeout Shutdown
Set the shutdown timer for the projector.
Language Settings
Select an on-screen display language.
Restore Factory Settings
Reset your device and restore factory setting.
10
Page 12
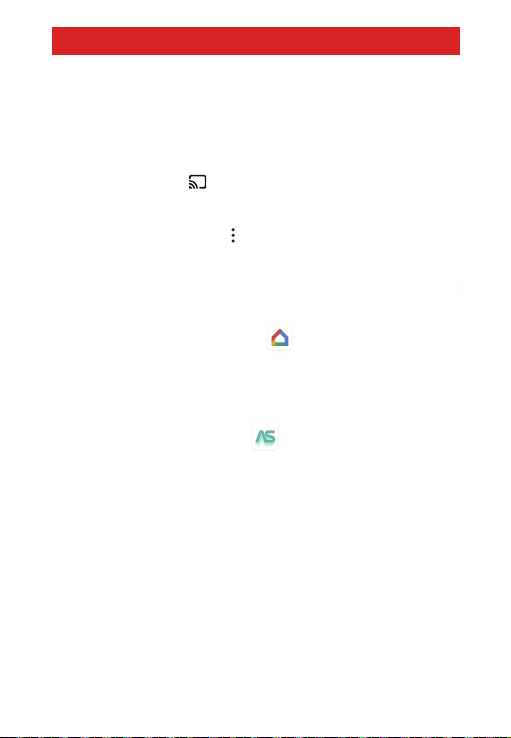
Chromecast (Wireless Connection)
The Chromecast feature only works while you are in the Android TV system.
• Cast from Chromecast-enabled Sites/Apps (for Android/iOS devices)
① Make sure your device and the Android TV (HAKO mini) are
connected to the same Wi-Fi network, and that you are running the latest
version of the Chromecast-enabled app.
② Launch the Chromecast-enabled site/app.
③ Tap the cast button and choose the HAKO mini.
• Cast from Chrome Browser tab (for Computers)
① Connect your computer and projector to the same Wi-Fi network.
② Click "Cast" at the top right of the Chrome browser tab, and then
choose from the sources whether you want to cast the tab or the screen.
③ Choose the HAKO mini to cast.
• Mirror from Android Devices
① Make sure your Android device is on the same Wi-Fi network as your
Android TV (HAKO mini).
② Download the "Google Home" app on your Android device.
③ Open the "Google Home" app, choose "HAKO Mini."
④ Tap "Cast my screen".
• Mirror from iOS Devices
① Make sure your iOS device is connected to the same Wi-Fi network
as your Android TV (HAKO mini) .
② Download the " AirScreen" app from the Google Play Store of
Android TV system.
③ Open the "AirScreen" app and follow the on-screen instructions on
AirScreen.
11
Page 13
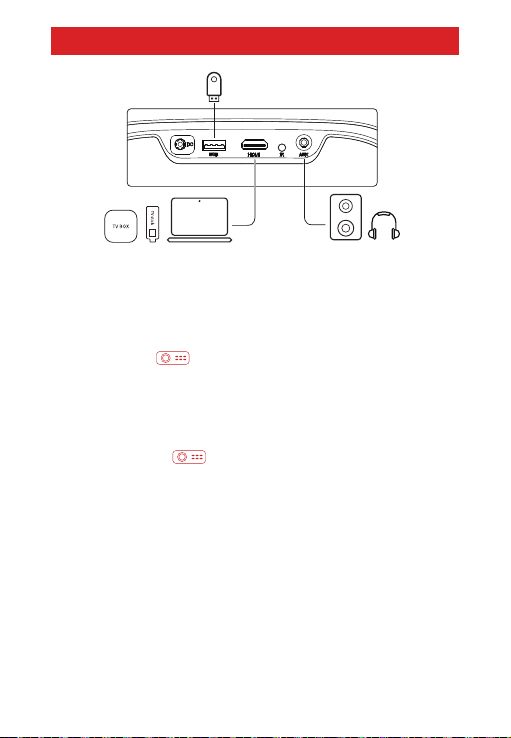
Wired Connections
1. Connect to an HDMI Playback Device
This projector supports connections with various HDMI playback devices
such as PC, TV stick, TV box, DVD player, set-top box (STB), game console
or other devices.
① Connect this projector to an HDMI playback device with an HDMI cable
(not provided).
② Press the button on remote control to go to projector homepage,
[HDMI], and press[OK].
select
2. Connect to a Flash Drive
With this projector, you can enjoy music, video, and pictures, that are stored
on a USB storage device.
① Plug in the USB storage device.
② Press the button on remote control to go to projector homepage,
select
[USB], and press.
③ Select the file you plan to play from the file and folder menu.
④ Press [OK] to start playing.
3. Connect to a Headphone via AUX Cable
You can connect a headphone or speaker to Projector via AUX cable as well.
① Plug in the 3.5mm AUX cable connector to projector AUX port.
② Plug the other connector of the 3.5mm AUX cable to your headphone or
speaker.
③ Play your media on projector.
12
Page 14
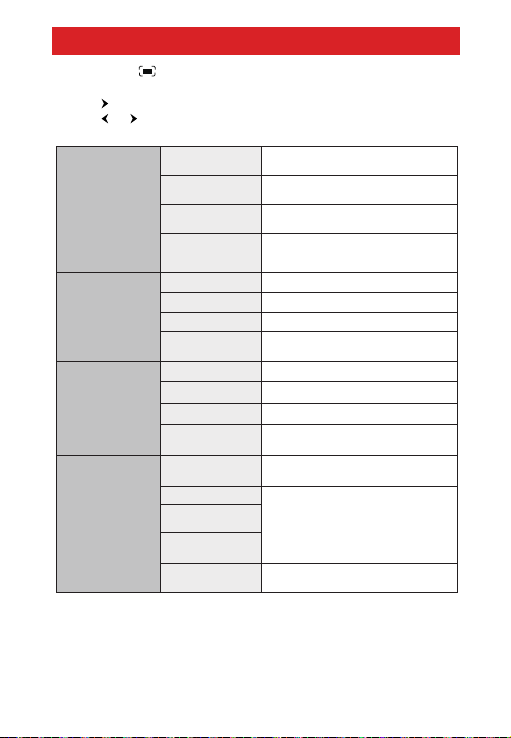
Shortcut Menu
Long-press the button to pop up the shortcut menu
• Press navigation button to select the option
• Press button to go to the next page
• Press or button to adjust parameter
• Press "OK" button to save
Keeps natural looking colors with
a balance of warm and cool tones
Provides more picture details and
color sharpness
Provides warm colors with
lower light
Manually set the Brightness,
contrast, Saturation, Sharpness
and Hue
Provides cold color temp
Provides cold normal temp
Provides cold warm temp
Manually set the Red,
Green and Blue
Provides standard tones
Provides more detailed tone
Provides home theater-style sound
Manually set the sound of each
frequency band
Zoom in or out of the
projection image
Perform keystone correction
Reset keystone correction
Image Mode
Color Temp
Sound Mode
Projection Setting
Standard
Light
Soft
Personal
Cold
Normal
Warm
Personal
Standard
Music
Movie
Personal
Zoom In/Out
Vertical Correction
Horizontal
Correction
Four Point
Correction
Keystone
Correction Reset
13
Page 15
Specifications
Specifications
CPU: ARM Quad 64-bit Cortex-A53
Android OS: Android ™ 10.0
Bluetooth: Bluetooth 5.1
Wi-Fi: 2.4G/5 G Hz 802.11a/b/g/n/ac
Native Resolution: 1920*1080
Throw ratio: 1.22
Contrast ratio: 3000:1
Aspect Ratio: 16:9 / 4:3 Adaptive
Speaker: 10W*2 Stereo Speaker
Connection port: HDMI*1; USB*1; AUX*1
Projection size: 40"-150"
Zoom: 50%-100%
Keystone Correction: ±45°, Auto keystone support
Recommended ambient: 41°F to 95°F / 5°C to 35°C
Relative humidity: 15% ~ 85% (non-condensing)
Warranty
30-Day Money-Back Guarantee for Any Reason
You may return your undamaged product within 30 days of the date of
purchase to receive a full refund for any reason.
For non-quality related warranty claims, the buyer is responsible for
shipping costs.
12-Month Warranty for Quality-Related Issues
Every ETOE product comes with one year of quality-related issues coverage.
If you submit a claim to our support mail, ETOE will, at its option:
1. Replace the ETOE Product with a replacement product of the same model
and cover any return shipping costs.
2. Exchange the ETOE Product for a refund of your purchase price.
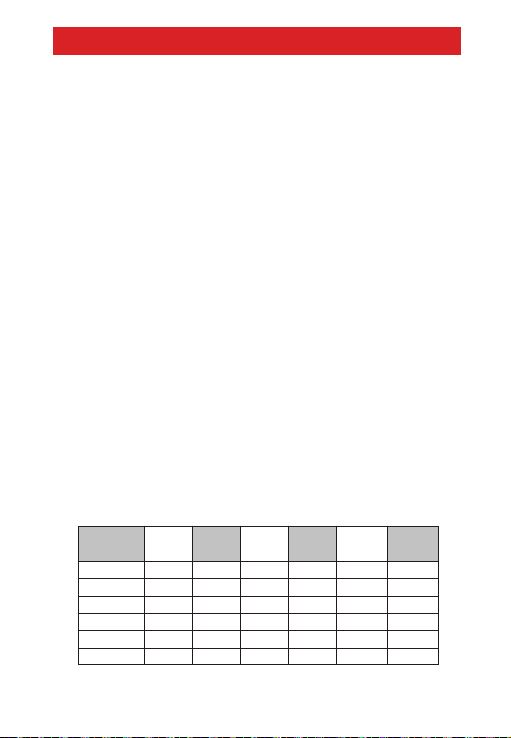
Projection Distance and Screen Size
Screen size
(inch)
Width
(inch)
Width
(cm)
Hight
(inch)
Hight
(cm)
Distance
(ft)
3.5 108.049.819.688.634.940
5.3 162.174.729.4132.852.360
7.1 216.199.639.2177.169.780
8.9 270.1124.549.0221.487.2100
10.6 324.1149.458.8265.7104.6120
13.3 405.1186.873.5332.1130.7150
Distance
(cm)
14
Page 16

FCC Notice
This device complies with the FCC rules, Part 15. Operation is subject to the
following two conditions: (1) This device may not cause harmful interference,
and (2) This device must accept any interference received, including
interference that may cause undesired operation.
Warning: Changes or modifications not expressly approved by the partly
responsible for compliance could void the user’s authority to operate the
equipment.
Note: This equipment has been tested and found to comply with the limits
for a Class B digital device, pursuant to part 15 of the FCC Rules.
These limits are designed to provide reasonable protection against harmful
interference in a residential installation.
This equipment generates, uses and can radiate radio frequency energy
and, if not installed and used in accordance with the instruction energy
and, if not installed and used in accordance with the instruction manual,
may cause harmful interference to radio communications.
However, there is no guarantee that interference will not occur in a particular
installation. If this equipment does cause harmful interference to radio or
television reception, which can be determined by turning the equipment off
and on, the user is encouraged to try to correct the interference by one or
more of the following measures:
• Reorient or relocate the receiving antenna.
• Increase the separation between equipment and receiver.
• Connect the equipment into an outlet on a circuit different from that to
which the receiver is connected.
• Consult the dealer or an experienced radio / TV technician for help.
RF Exposure Warning Statements
This equipment complies with FCC radiation exposure limits set forth for an
uncontrolled environment. This equipment should be installed and operated
with minimum distance 20cm between the radiator & your body.
15
 Loading...