

Page 1

GEBRUIKSAANWIJZING
INSTRUCTIONS FOR USE
INDUCTIEKOOKPLAAT
INDUCTION HOB
KIF880DS
KIF880ZT
KIF890ZT
Page 2

NL Gebruiksaanwijzing NL 3 - NL 30
EN Instructions for use EN 3 - EN 30
NL 4
Gebruikte pictogrammen – Pictograms used
Gevaar! Risico op letsel – Danger! Risk of injury
Let op! Risico op schade aan het apparaat
Caution! Risk of damaging the appliance
Let op! – Note!
Page 3

INHOUD
Uw kookplaat
Inleiding 4
Inductiekookplaat 5
Bedieningspaneel 6
Veiligheid
Temperatuurbeveiliging 7
Kookduurbegrenzer 7
Gezond koken 7
Gebruik
Geluiden bij inductie 8
Pannen 8
Vermogen instellen 9
Warmhoudfunctie 10
Automatisch opwarmen 10
Overige functies 10
Meldingen op het display 11
Gebruik van de timer 11
Kookinstellingen 12
Bediening
Bereiding starten 13
Klaar met koken 15
De automatische opwarmfunctie inschakelen 15
De warmhoudfunctie inschakelen 15
De Bridge-inductiekookzones koppelen 16
Timerbediening 17
Koken pauzeren 20
Kinderslot 20
Grillfunctie 21
Herstelfunctie 22
Instellingen
De gebruikersinstellingen wijzigen 23
Installatie
Vermogensbegrenzer 24
Onderhoud
Reinigen 26
Technische specificaties
Informatie over EU-verordening 66/2014 27
Problemen oplossen
Algemeen 28
Milieuaspecten
Verpakking en toestel afdanken 30
NL 3
Page 4

UW KOOKPLAAT
Inleiding
Deze kookplaat is ontworpen voor de echte kookliefhebber. Koken op een inductiekookplaat
heeft een aantal voordelen. Het is makkelijk, omdat de kookplaat snel reageert en ook op een
zeer laag vermogen is in te stellen. Bovendien kunt u dankzij het hoge vermogen gerechten zeer
snel aan de kook brengen. Door de ruime afstanden tussen de kookzones kunt u comfortabel
koken.
Koken op een inductiekookplaat is anders dan koken op een traditioneel toestel. Bij
inductiekoken wordt een magnetisch veld gebruikt om warmte op te wekken. Hierdoor kunt u
niet zomaar een willekeurige pan gebruiken. In het hoofdstuk 'Pannen' vindt u hierover meer
informatie.
Voor optimale veiligheid is de inductiekookplaat uitgerust met meerdere temperatuurbeveiligingen
en een restwarmte-indicator, waardoor u kunt zien welke kookzones nog heet zijn.
In deze handleiding wordt beschreven hoe u de inductiekookplaat optimaal kunt benutten. Naast
informatie over de bediening vindt u hier ook achtergrondinformatie die van pas kan komen bij
het gebruik van het product. In de handleiding staan ook kooktabellen en onderhoudstips.
Lees de handleiding door voordat u het toestel in gebruik neemt en bewaar deze op een
veilige plaats voor toekomstig gebruik.
Daarnaast dient de handleiding als referentie voor de servicedienst. Plak daarom het
gegevensplaatje in het daarvoor bestemde kader, achter in de handleiding. Het
gegevensplaatje bevat alle informatie die de servicedienst nodig heeft om adequaat op uw
vragen te reageren.
De installatie-instructies worden afzonderlijk meegeleverd.
Veel kookplezier!
NL 4
Page 5
UW KOOKPLAAT
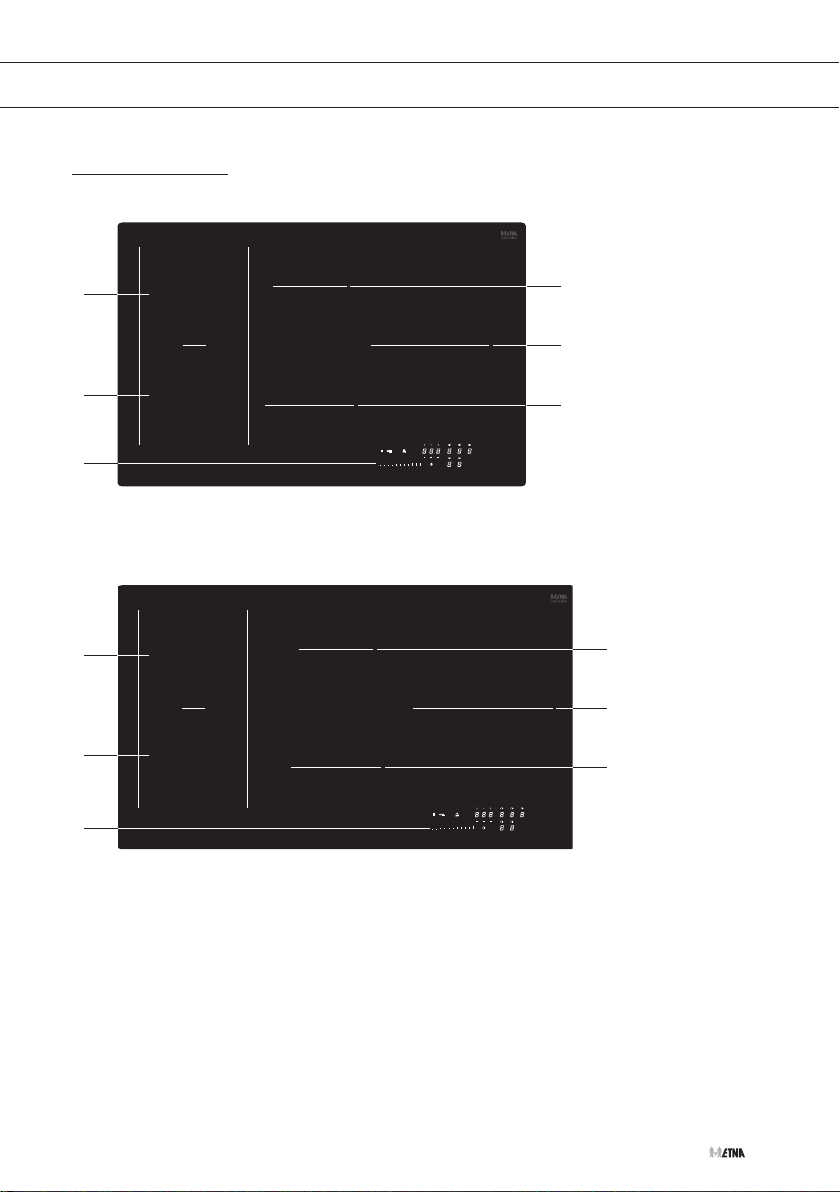
Inductiekookplaat
3
3
6
3
3
6
2
5
4
2
1
4
1. Kookzone ø 27,5 cm / 2,3 kW - 3,0 kW (boost)
2. Kookzone ø 14,5 cm / 1,4 kW - 1,85 kW (boost)
3. Bridge-inductiekookzone 19,5 x 20,5 cm / 2,1 kW - 3,0 kW (boost)
4. Kookzone ø 17,5 cm / 1,4 kW - 2,1 kW (boost)
5. Kookzone ø 23 cm / 2,3 kW - 3,0 kW (boost)
6. Bedieningspaneel
NL 5
Page 6
UW KOOKPLAAT
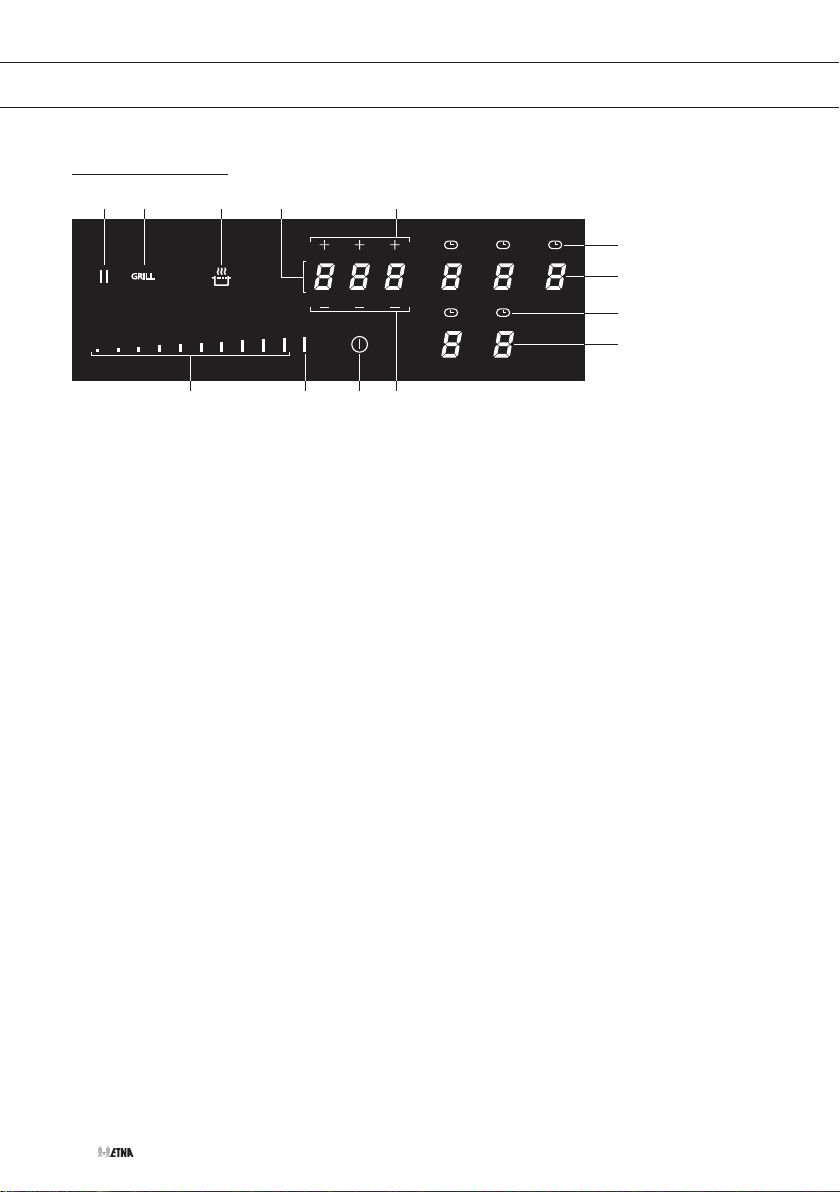
Bedieningspaneel
76 5 4 8
12 3 7
1. Aan-/uittoets
2. Schuifregelaar (van stand 0 t/m stand 9) voor:
▷ het instellen van een waarde
3. Boost-toets
4. Warmhoudtoets
5. Grillfunctie
6. Pauzefunctie
7. Min-/plus-toets timer
8. Timerdisplay
9. Kookzonetoets en kookzonedisplay
10. Timerfunctie voor elke kookzone
10
9
10
9
NL 6
Page 7
VEILIGHEID
Lees eerst de afzonderlijke veiligheidsinstructies
voordat u het toestel gaat gebruiken!
Bij de eerste keer dat de kookplaat wordt aangezet, knippert de warmhoudtoets.
De kookplaat staat in de instelmodus. Laat de vermogensbegrenzer instellen door
een installateur (zie hoofdstuk ‘Installatie’) of wacht 2 minuten. Na 2 minuten is de
kookplaat klaar voor gebruik.
Temperatuurbeveiliging
Een sensor controleert continu de temperatuur van bepaalde onderdelen van de kookplaat.
Elke kookzone is voorzien van een sensor die continu de temperatuur van de bodem van de
pan controleert om risico op oververhitting te voorkomen wanneer een pan droogkookt. Als de
temperatuur te hoog wordt, wordt het vermogen van de kookplaat automatisch verlaagd of wordt
de kookplaat automatisch uitgeschakeld.
Kookduurbegrenzer
De kookduurbegrenzer is een veiligheidsfunctie van uw kookplaat. Deze begrenzer wordt
geactiveerd als u vergeet de kookplaat uit te schakelen. Afhankelijk van de gekozen
instelling wordt de kookduur als volgt begrensd:
Kookstand Maximale gebruikstijd Kookstand Maximale gebruikstijd
1 516 minuten 7 138 minuten
2 402 minuten 8 108 minuten
3 318 minuten 9 90 minuten
4 258 minuten P 5 minuten
5 210 minuten
6 138 minuten Warmhoud 120 minuten
(schakelt dan terug naar niveau 9)
Gezond koken
Rookpunt van diverse oliesoorten
Om zo gezond mogelijk te bakken, wordt geadviseerd om de oliesoort af te stemmen op de
baktemperatuur. Elke oliesoort heeft een ander rookpunt, waarop er giftige gassen kunnen
vrijkomen. Onderstaande tabel toont het rookpunt van diverse oliesoorten.
Olie Rookpunt in °C Olie Rookpunt in °C
Extra vergine olijfolie 160 °C Zonnebloemolie 227 °C
Boter/kokosolie 177 °C Maisolie/arachideolie 232 °C
Koolzaadolie 204 °C Olijfolie 242 °C
Vergine olijfolie 216 °C Rijstolie 255 °C
NL 7
Page 8
GEBRUIK
Geluiden bij inductie
Tikkend geluid
• Dit wordt veroorzaakt door de vermogensbegrenzer op de linker- en rechterzone. Ook bij
lagere instellingen kunt u een tikkend geluid horen.
Pannen maken geluid
• Pannen kunnen tijdens het koken geluid maken. Dit wordt veroorzaakt door de energie die
van de kookplaat naar de pan stroomt. Dit is normaal bij bepaalde pannen wanneer een
hoge kookstand wordt gebruikt. Dit is niet schadelijk voor de pannen of de kookplaat.
De ventilator maakt geluid
• Het apparaat is voorzien van ventilators om de levensduur van de elektronica te verlengen.
Als u het toestel intensief gebruikt, wordt de ventilator ingeschakeld om het toestel te
koelen. Dit zorgt voor een zoemend geluid. De ventilator blijft nog enkele minuten actief
nadat de kookplaat wordt uitgeschakeld.
Pannen
• Plaats een pan altijd in het midden van een kookzone.
• Voor inductiekoken zijn pannen van een bepaalde kwaliteit vereist.
• Gebruik alleen pannen die geschikt zijn voor elektrisch koken en inductiekoken met:
▷ een dikke bodem (minimaal 2,25 mm);
▷ een schone en vlakke onderkant.
• Het meest geschikt zijn pannen die zijn voorzien van het keurmerk 'Class Induction'.
Pannen waarmee al eerder op een gaskookplaat is gekookt, zijn niet meer geschikt
voor een inductiekookplaat.
U kunt zelf met een magneet controleren of uw pannen geschikt zijn. De pan is geschikt
als de magneet door de bodem wordt aangetrokken.
Geschikt Ongeschikt
Speciale roestvrijstalen pannen Aardewerk
Class Induction Roestvrij staal
Slijtvaste geëmailleerde pannen Porselein
Geëmailleerde gietijzeren pannen Koper/aluminium/kunststof
Wees voorzichtig met geëmailleerde pannen van plaatstaal. Als u de kookplaat op
een hoge stand inschakelt terwijl de pan (te) droog is, kan het email afsplinteren (hierbij
laat het email los van het staal). De panbodem kan kromtrekken, bijvoorbeeld door
oververhitting of door gebruik van een te hoog vermogen.
NL 8
Page 9

GEBRUIK
• Gebruik nooit een pan met een vervormde bodem. Een holle of bolle bodem kan de werking
van de oververhittingsbeveiliging belemmeren, waardoor het toestel te warm wordt. Hierdoor
kan de glasplaat barsten en de panbodem smelten.
• Schade als gevolg van het gebruik van ongeschikte pannen of van droogkoken, valt buiten
de garantie.
Minimale pandiameter
• De minimale diameter van de panbodem:
▷ 9 cm voor zone ø 14,5 en 17,5 cm
▷ 11 cm voor zone 19,5 x 20,5 cm en voor zone ø 23 en 27,5 cm
▷ 23 cm voor verbonden bridge-zones
• U bereikt het beste resultaat met een pan van dezelfde diameter als de kookzone. Als de
pan te klein is, wordt de kookzone niet ingeschakeld.
Pandetectie
De kookzone detecteert automatisch een geschikte pan die op een kookzone wordt geplaatst.
Het display van de kookzone licht op. Een vermogensniveau kan worden ingesteld.
• Als er geen (geschikte) pan op een kookzone staat, wordt het pandetectiesymbool
weergegeven als u een vermogensniveau instelt. Het symbool verdwijnt wanneer er een
geschikte pan op de kookzone wordt geplaatst.
• Haalt u tijdens het koken een pan van de kookzone af, dan verschijnt het
pandetectiesymbool. De kookzone schakelt uit. Het symbool verdwijnt als u de pan weer
terug plaatst. De kookzone schakelt weer in met het eerder ingestelde vermogensniveau.
Grillplaten
De kookplaat heeft een grillfunctie (afhankelijk van het model) voor het gebruik van een grillplaat.
De functie houdt de grillplaat op een ideale temperatuur om te grillen.
Vermogen instellen
De kookzones hebben 9 niveaus. Daarnaast is er nog een boost-niveau (P). Nadat u de kookplaat
hebt ingeschakeld, kunt u binnen 5 seconden de gewenste kookzone kiezen. Stel het vermogen
in door de schuifregelaar aan te raken. Bij de eerste aanraking wordt het niveau ingesteld op
het deel van de schuifregelaar dat u aanraakt. De instelling van het vermogensniveau verandert
wanneer u met uw vinger over de schuifregelaar gaat.
Het niveau wordt hoger wanneer u naar rechts schuift. Het niveau wordt lager wanneer u naar
links schuift. Als u uw vinger van de schuifregelaar haalt, begint de kookzone op het ingestelde
niveau te werken.
Boostfunctie
U kunt de boostfunctie gebruiken om gedurende een korte periode (maximaal 5 minuten) op
het hoogste vermogensniveau te koken. Na het verstrijken van de maximale boosttijd wordt het
vermogen verlaagd naar stand 9.
NL 9
Page 10
GEBRUIK
Vermogensbegrenzer
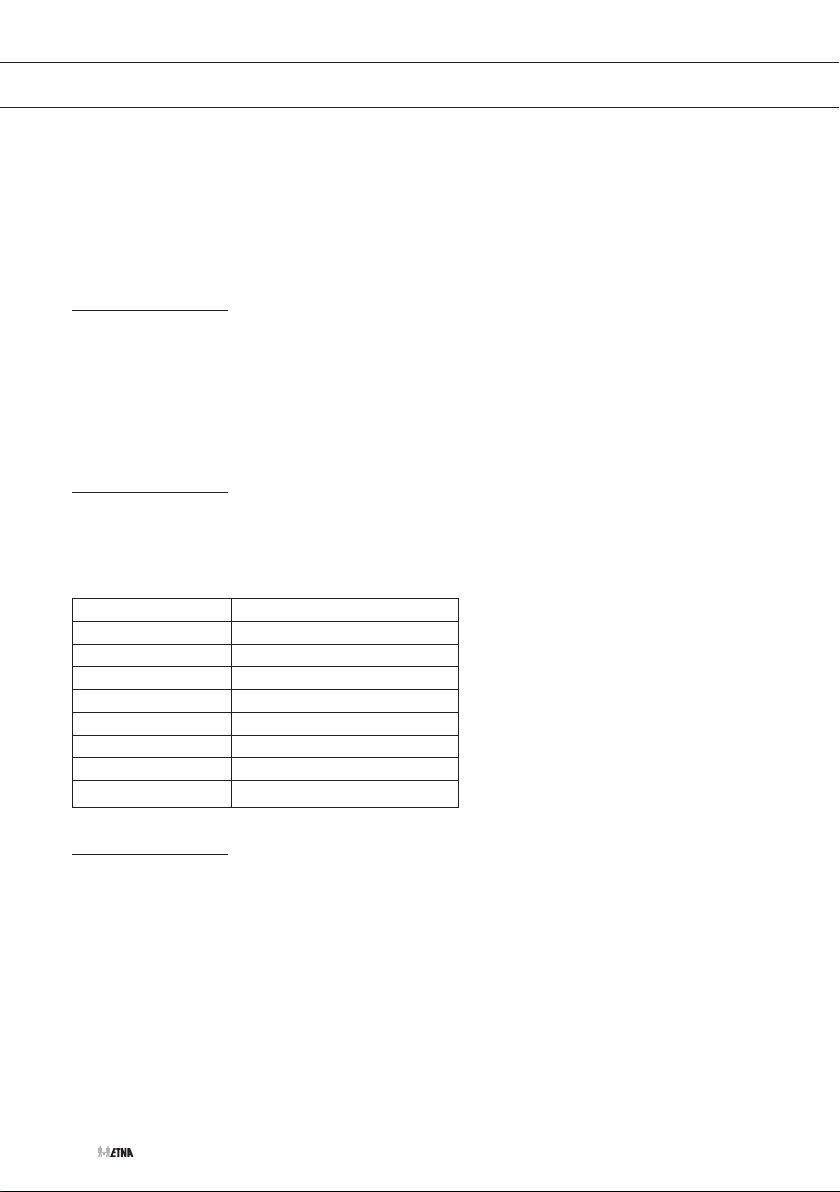
De kookplaat is voorzien van een vermogensbegrenzer. Als het totale vermogen van de actieve
kookzones het maximaal beschikbare vermogen overschrijdt, wordt het vermogen automatisch
verlaagd. Het display van de kookzone die in vermogen wordt verlaagd knippert eerst; het niveau
wordt dan automatisch verlaagd naar het hoogste beschikbare vermogen.
Warmhoudfunctie
Gebruik deze functie om voedsel na het koken warm te houden (op ongeveer 70 °C).
• Zo wordt voorkomen dat vloeistoffen overstromen en aan de bodem van de pan branden.
• Deze functie kan onafhankelijk van elkaar op alle kookzones worden gestart.
• Wanneer de pan van de kookzone wordt gehaald, blijft de warmhoudfunctie ongeveer
10 minuten actief. De maximale duur van warmhouden is 2 uur.
Automatisch opwarmen
Met deze functie wordt de kookzone op niveau 9 opgewarmd zodat deze snel op de gewenste
temperatuur is. Na verloop van een bepaalde tijd keert het vermogensniveau weer terug naar het
ingestelde vermogen. Deze functie is beschikbaar voor de vermogensniveaus 1 tot 8.
Vermogens niveau Opwarmtijd (seconden)
1 40
2 72
3 120
4 176
5 256
6 432
7 120
8 192
Overige functies
• Pauzefunctie
▷ Met deze functie wordt de kookactiviteit van de gehele kookplaat tijdelijk gestopt en kan
• Kinderslot
▷ Om te voorkomen dat de instelling van de kookzones per ongeluk wordt geactiveerd,
• Grillfunctie
▷ Met deze functie kunt u een grillplaat optimaal gebruiken op ‘verbonden’ kookzones en
NL 10
opnieuw worden gestart met dezelfde instellingen.
met name tijdens het schoonmaken, kan het bedieningspaneel worden vergrendeld (met
uitzondering van de aan/uit-toets).
het juiste vermogen gebruiken.
Page 11
GEBRUIK
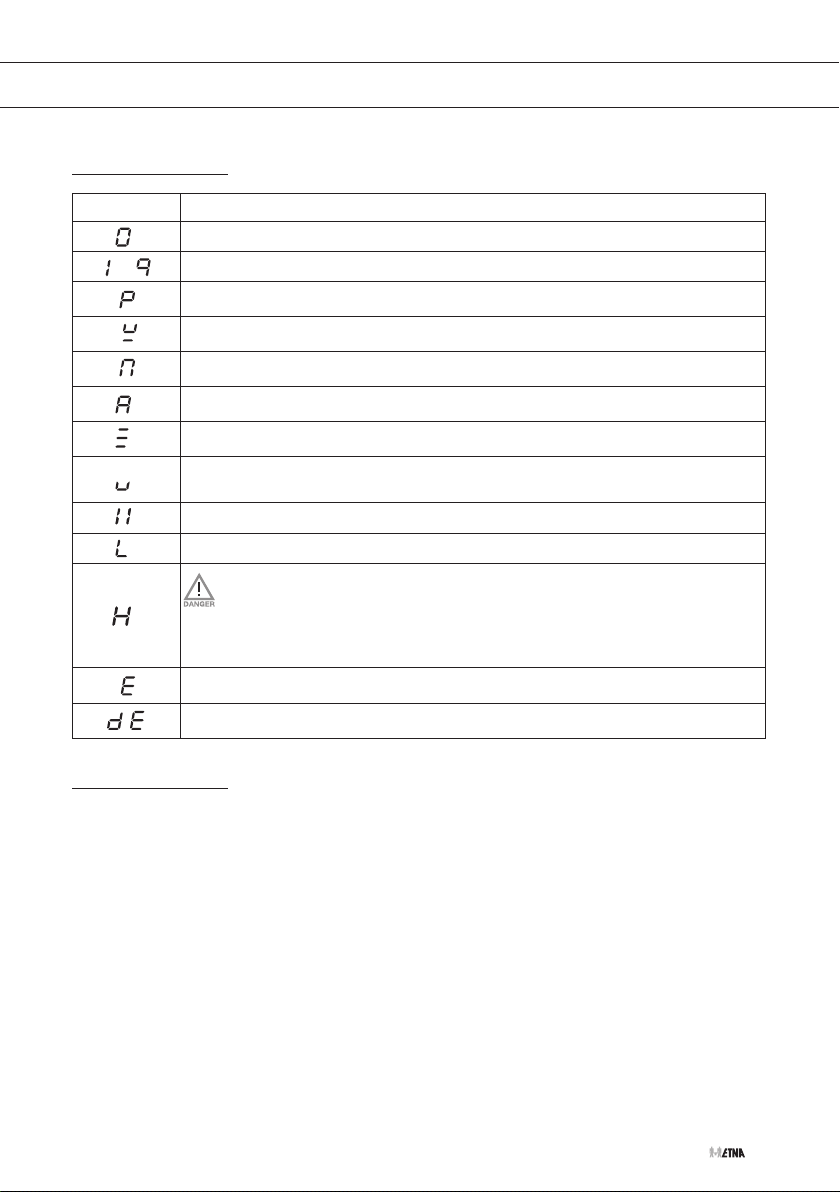
Meldingen op het display
Op display
Status
Vermogensniveau ‘0’ voor een kookzone
Ingesteld vermogensniveau van een kookzone: 1 = laag, 9 = hoog
Boostfunctie actief
Geen (geschikte) pan op de kookzone (pandetectiesymbool)
De Bridge-kookzones zijn gekoppeld (afhankelijk van het model beschikbaar)
Automatisch opwarmen is geactiveerd
Grillfunctie is geactiveerd
Warmhoudfunctie is geactiveerd; wordt automatisch op ongeveer 70 °C
gehouden
Pauzefunctie geactiveerd; de kookplaat staat in de pauzestand
Kinderslot is geactiveerd; het bedieningspaneel is vergrendeld
Restwarmte-indicator: de kookplaat heeft voor elke kookzone een
restwarmte-indicator waarmee wordt aangegeven welke kookzone nog
warm is. Hoewel de kookplaat is uitgeschakeld, blijft indicator H zichtbaar
zolang de kookzone warm is. Raak de kookzones niet aan wanneer deze
indicator brandt. Gevaar! Risico op brandwonden.
Foutcode: zie hoofdstuk ‘Problemen oplossen’
Demo mode actief
Gebruik van de timer
De timer kan op drie verschillende manieren worden gebruikt:
• Als eierwekker (tijd is aflopend) — na afloop van de ingestelde tijd klinkt er een alarm.
▷ De eierwekker kan worden ingesteld op maximaal 9 uur en 59 minuten.
▷ De eierwekker kan onafhankelijk van de werking van de kookplaat worden gebruikt.
▷ De eierwekker kan alleen worden uitgeschakeld of versteld als de kookplaat is
ingeschakeld.
▷ Druk op de timertoets om het alarm uit te schakelen.
• Als kookwekker — de timer is gekoppeld aan een actieve kookzone. Na afloop van de
ingestelde tijd wordt de kookzone automatisch uitgeschakeld en klinkt er een alarm.
▷ Een kookwekker kan worden ingesteld voor elke actieve kookzone op maximaal 1 uur en
59 minuten.
▷ Druk op de timertoets om het alarm uit te schakelen.
• Als kookduur teller (tijd is oplopend) — geeft de kookduur aan.
▷ De kookduur teller is gekoppeld aan een kookzone.
NL 11
Page 12

GEBRUIK
Kookinstellingen
Aangezien de standen afhankelijk zijn van de hoeveelheid en samenstelling van het gerecht in de
pan, geldt de onderstaande tabel alleen als richtlijn.
Gebruik de boost-stand voor:
• snel aan de kook brengen van voedsel of vloeistoffen;
• slinken van groenten;
• verhitten van olie en vet;
• wokken.
Gebruik stand 9 voor het:
• aanbraden van vlees;
• bereiden van vis;
• bakken van omeletten;
• bakken van gekookte aardappelen;
• frituren van voedsel.
Gebruik stand 7 en 8 voor het:
• bakken van dikke pannenkoeken;
• bakken van dikke lappen gepaneerd vlees;
• bakken van bacon (vet);
• koken van rauwe aardappelen;
• bakken van wentelteefjes;
• bakken van gepaneerde vis;
• doorkoken pasta;
• bakken van dunne (gepaneerde) lappen vlees.
Gebruik stand 4-6 voor het:
• doorkoken van grote hoeveelheden;
• ontdooien van harde groenten;
• bakken van dikke lappen gepaneerd vlees.
Gebruik stand 1-3 voor het:
• trekken van bouillon;
• stoven van vlees;
• zacht koken van groenten;
• smelten van chocolade;
• pocheren;
• smelten van kaas.
NL 12
Page 13
BEDIENING
Bereiding starten
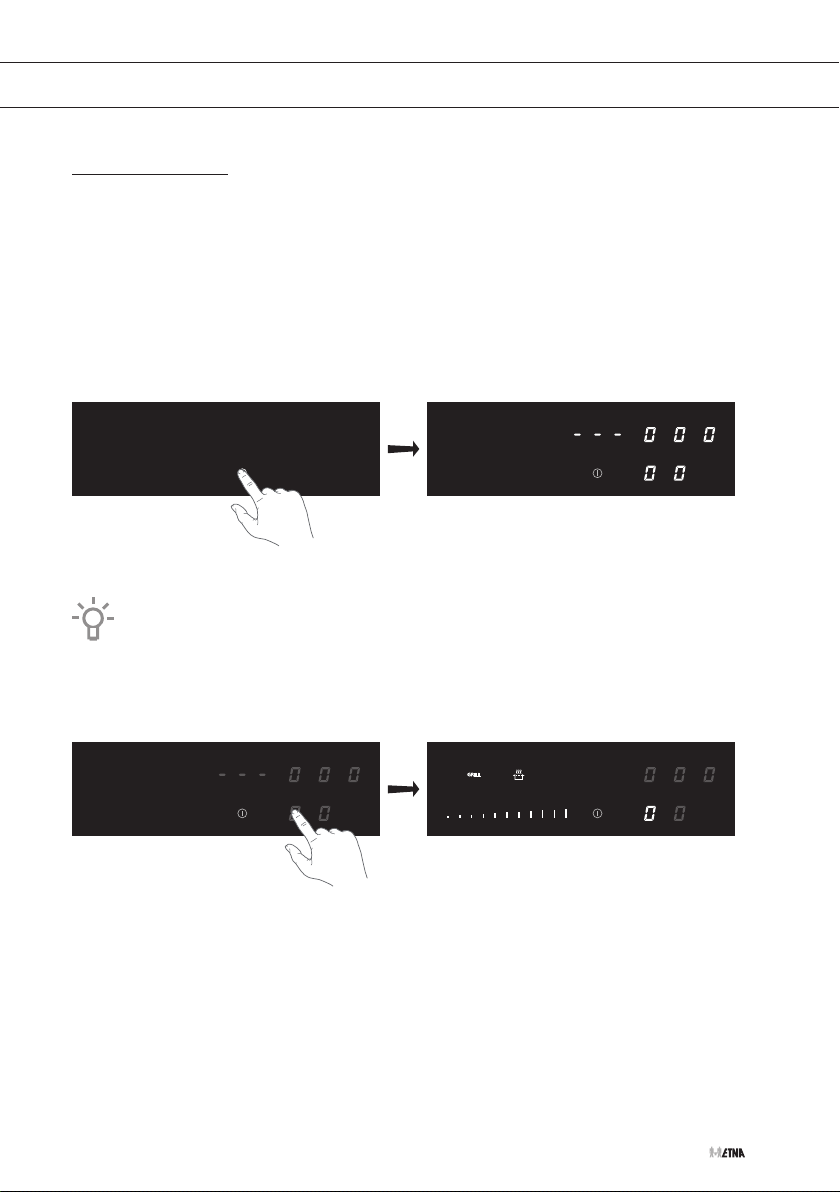
Gebruik van de aanraaktoetsen en de schuifregelaar
Plaats uw vingertop plat op een toets of op de schuifregelaar voor het beste resultaat. U hoeft
geen druk uit te voeren. De aanraaktoetsen reageren alleen op lichte druk van een vingertop.
Bedien de toetsen niet met andere objecten.
Na activering van een toets of schuifregelaar klinkt een geluidssignaal.
1. Raak de aan/uit-toets aan en houd deze 2 seconden vast totdat u een geluidssignaal hoort.
▷ Alle kookzonedisplays geven ‘0’ weer, wat aangeeft dat de inductiekookplaat in de stand-
by modus staat.
2. Plaats een geschikte pan op een kookzone.
Zorg ervoor dat de onderzijde van de pan en het oppervlak van de kookzone schoon en
droog zijn.
3. De kookzone detecteert de pan automatisch.
▷ Er klinkt één enkel geluidssignaal.
▷ De ‘0’ van de geselecteerde kookzone licht gedurende 10 seconden op.
▷ Om een andere kookzone te selecteren, raakt u de toets van de gewenste kookzone aan
of plaatst u een tweede pan op een kookzone.
NL 13
Page 14
BEDIENING
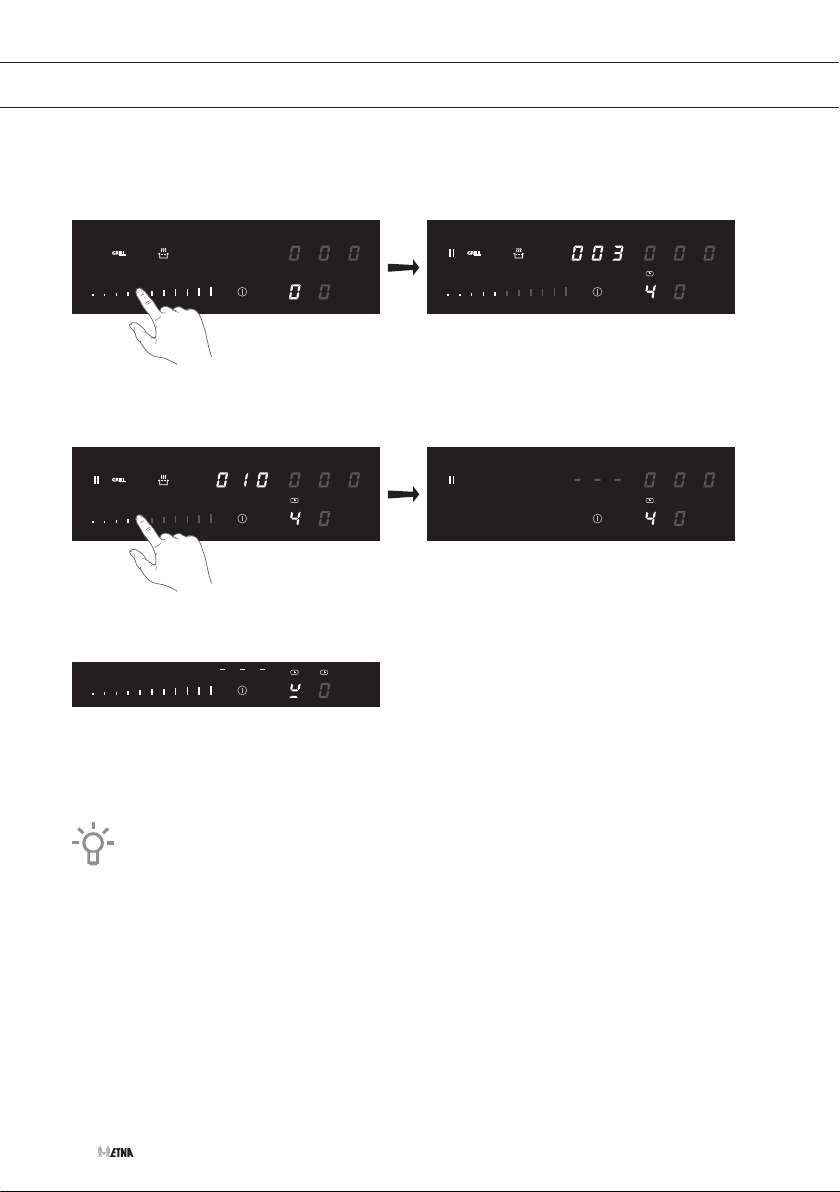
4. Stel binnen 10 seconden het vermogen in door de schuifregelaar of de boost-toets aan te
raken.
▷ De kookzone start automatisch op het ingestelde niveau.
▷ Stel een hoger of lager vermogensniveau in met de schuifregelaar.
▷ Na 10 seconden wordt de schuifregelaar uitgeschakeld en de kookduur teller wordt
verborgen.
Wanneer het symbool voor pandetectie op het display verschijnt:
• hebt u de pan niet op de juiste kookzone geplaatst;
• is de gebruikte pan niet geschikt voor inductiekoken;
• is de pan te klein of niet goed op de kookzone geplaatst.
▷ De kookzone werkt niet totdat er een geschikte pan op de kookzone is geplaatst.
Als de kookplaat 20 seconden niet wordt gebruikt, wordt deze automatisch
uitgeschakeld.
NL 14
Page 15
BEDIENING
Klaar met koken
1. Zet het vermogensniveau op ‘0’ om de kookzone uit te schakelen.
2. Schakel de inductiekookplaat uit door de aan/uit-toets aan te raken.
Het symbool H wordt weergegeven op het display van de kookzone, als die te heet is
om te worden aangeraakt. Het symbool verdwijnt wanneer het oppervlak is afgekoeld tot
een veilige temperatuur. U kunt ook energie besparen door een nog hete kookzone te
gebruiken om andere pannen te verwarmen.
De automatische opwarmfunctie inschakelen
1. Schakel de kookplaat in en selecteer de gewenste kookzone .
2. Raak de schuifregelaar ten minste 3 seconden op het gewenste niveau aan.
▷ In het display verschijnt een ‘A’ afgewisseld met het geselecteerde vermogensniveau. Na
afloop van de automatische opwarmtijd schakelt de kookzone automatisch over naar het
gekozen niveau, dat permanent op het display wordt weergegeven.
3. Stop de automatische opwarmfunctie door de kookzone te selecteren en de schuifregelaar
aan te raken.
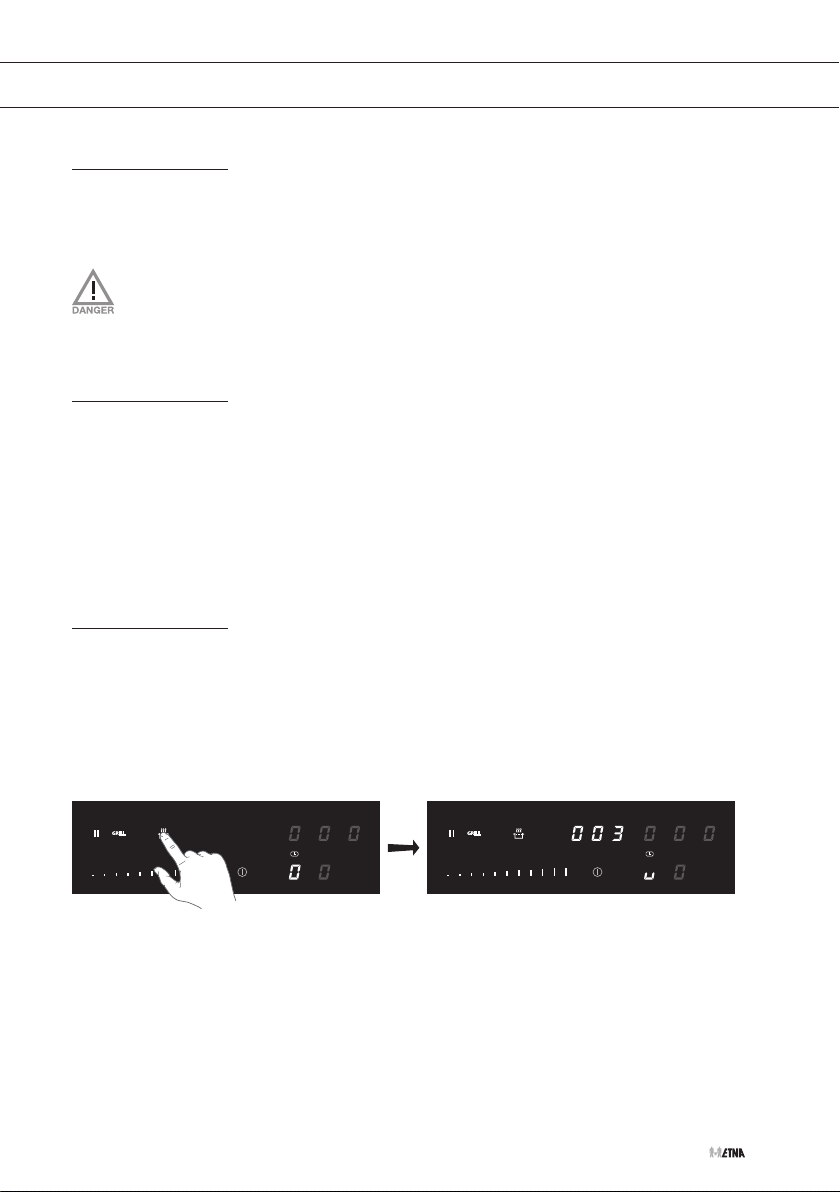
De warmhoudfunctie inschakelen
1. Schakel de kookplaat in en plaats een geschikte pan op een van de kookzones.
2. Raak de kookzonetoets van de gewenste kookzone aan.
▷ De ‘0’ van de geselecteerde kookzone licht duidelijk op en er klinkt een enkele pieptoon.
3. Raak de warmhoudtoets aan.
▷ Het warmhoudsymbool ‘u’ verschijnt op het display. De warmhoudfunctie is
geselecteerd.
NL 15
Page 16
BEDIENING
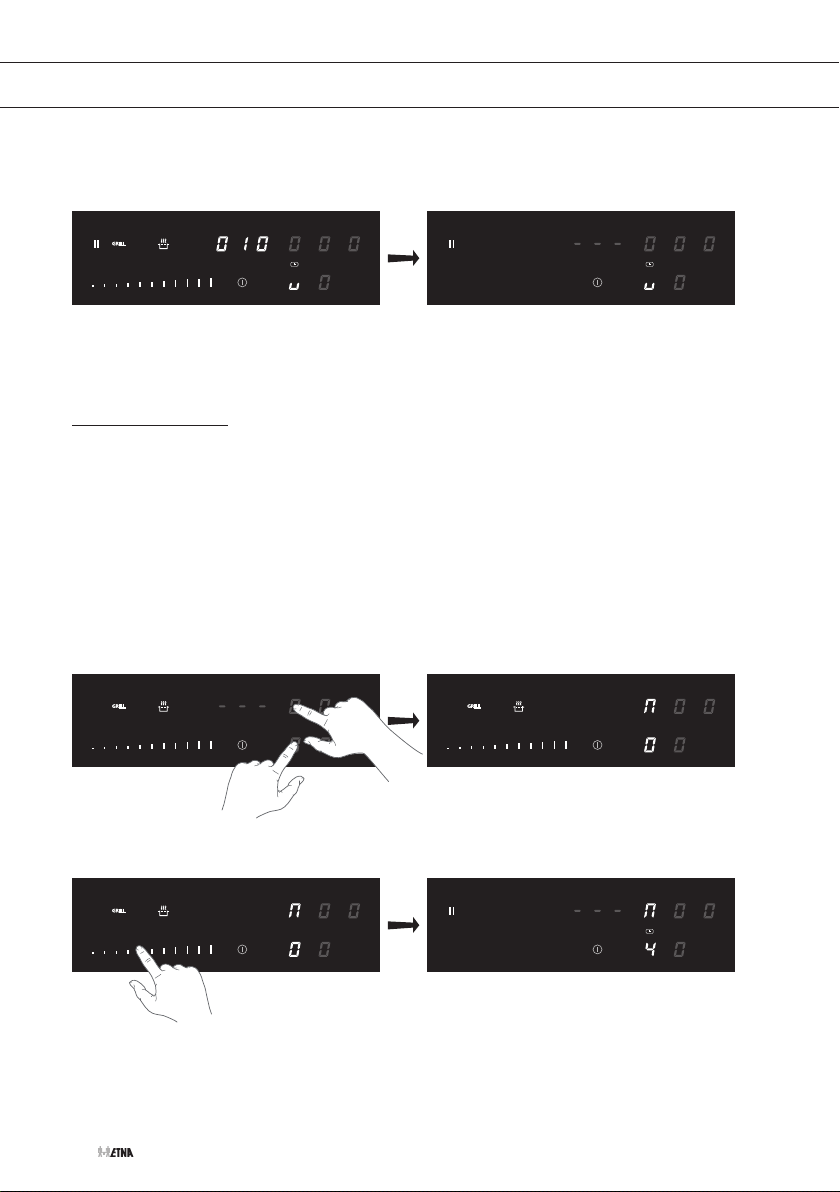
▷ Na 10 seconden wordt de schuifregelaar uitgeschakeld en de kookduur teller wordt
verborgen.
4. Zet het vermogensniveau op ‘0’ of raak de warmhoudtoets aan om de warmhoudfunctie uit
te schakelen.
De Bridge-inductiekookzones koppelen
Twee Bridge-inductiezones kunnen aan elkaar worden gekoppeld. Hierdoor ontstaat één grote
zone die kan worden gebruikt voor bijvoorbeeld een grillplaat of een grote vispan op hetzelfde
vermogen. De pan moet groot genoeg zijn om het midden van de voorste en achterste kookzone
te bedekken.
Koppeling van Bridge-inductiekookzones
1. Schakel de kookplaat in en plaats een grote pan op de twee Bridge-inductiekookzones.
2. Raak tegelijkertijd de kookzonetoetsen aan de linkerzijde aan.
▷ Een verbindingssymbool verschijnt op het display van de achterste kookzone om aan te
geven dat de twee kookzones zijn verbonden.
3. Gebruik de schuifregelaar om het gewenste kookvermogen voor de twee verbonden
kookzones in te stellen.
4. Om later het kookvermogen van de verbonden zones te wijzigen, drukt u eerst op de
kookzonetoets van de voorste kookzone.
NL 16
Page 17
BEDIENING
Ontkoppeling van Bridge-inductiekookzones
1. Raak de kookzonetoetsen van de verbonden kookzones tegelijk aan.
▷ Het verbindingssymbool verdwijnt op het display van de achterste kookzone.
Timerbediening
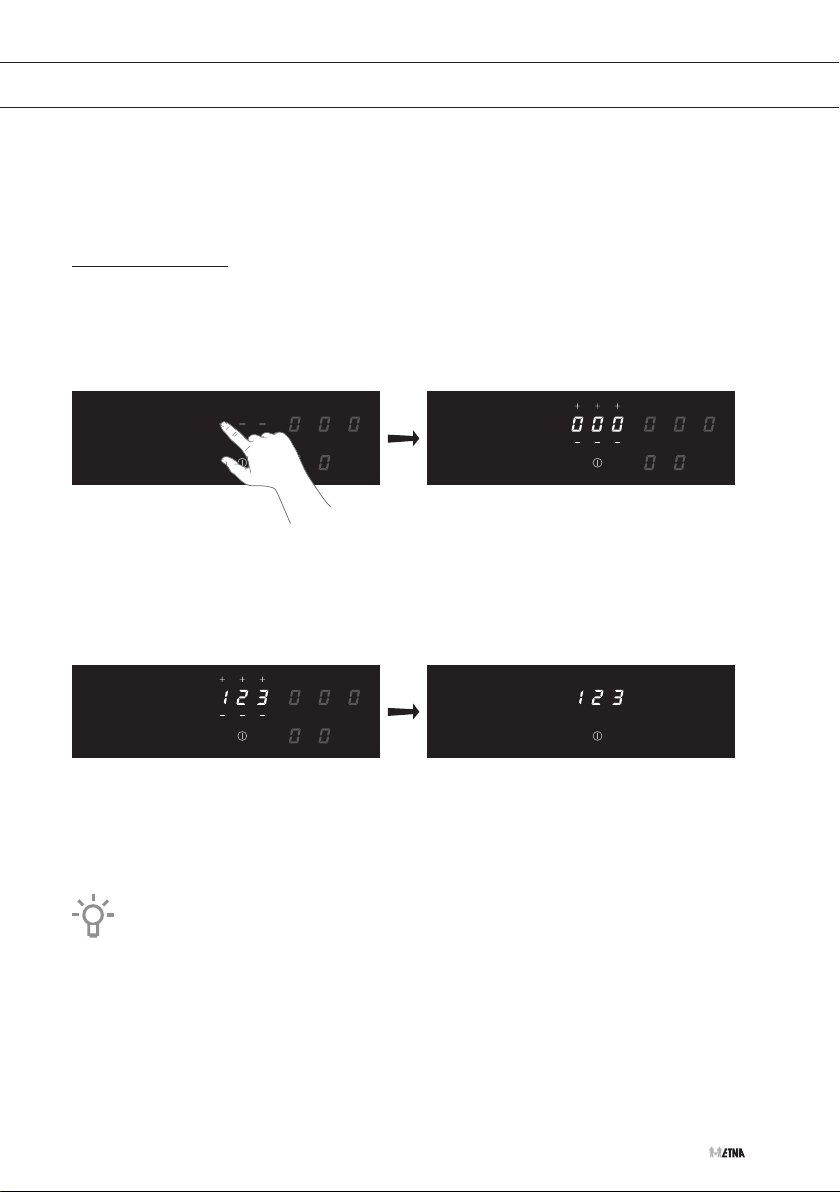
De eierwekker gebruiken (tijd is aflopend)
De kookplaat is ingeschakeld en er is geen kookzone geselecteerd.
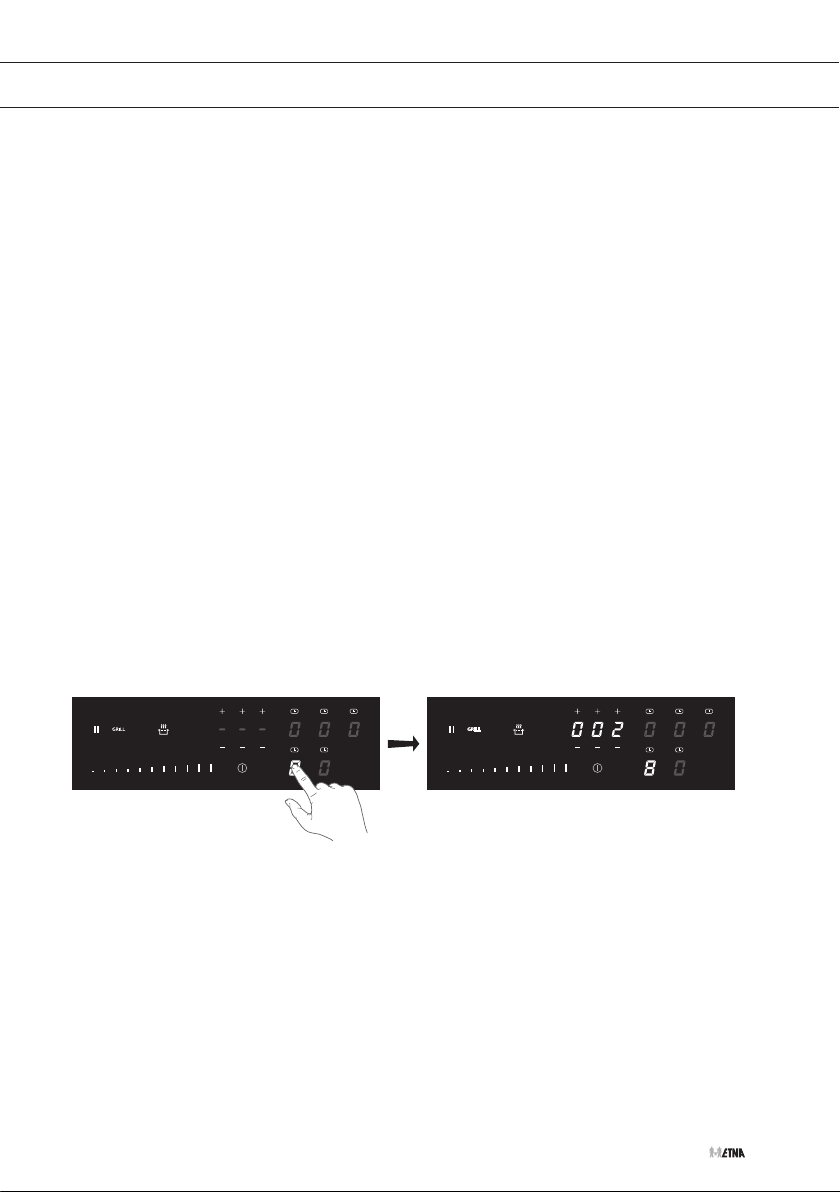
1. Raak het timerdisplay aan om de eierwekker in te schakelen.
▷ Op het display van de timer verschijnt ‘000’.
2. Gebruik de toets ‘+’ of ‘-’ om de gewenste tijd in te stellen (van 1 minuut tot 9 uur en 59
minuten).
▷ De linkerpositie van het timerdisplay geeft de uren weer, de overige posities de minuten.
▷ Wanneer de tijd is ingesteld, begint de tijd na 5 seconden af te tellen.
▷ Op het timerdisplay wordt de resterende tijd weergegeven.
▷ De laatste 10 minuten wordt in seconden weergegeven.
▷ De timer knippert en het alarm klinkt wanneer de ingestelde tijd is verstreken.
3. Raak het timer display aan om het alarm uit te schakelen.
▷ Het alarm stopt na 2 minuten automatisch.
Raak het timerdisplay aan en raak vervolgens de toetsen ‘-’ aan om de tijd in te stellen
op ‘000’ om voortijdig de eierwekker uit te schakelen.
NL 17
Page 18
BEDIENING
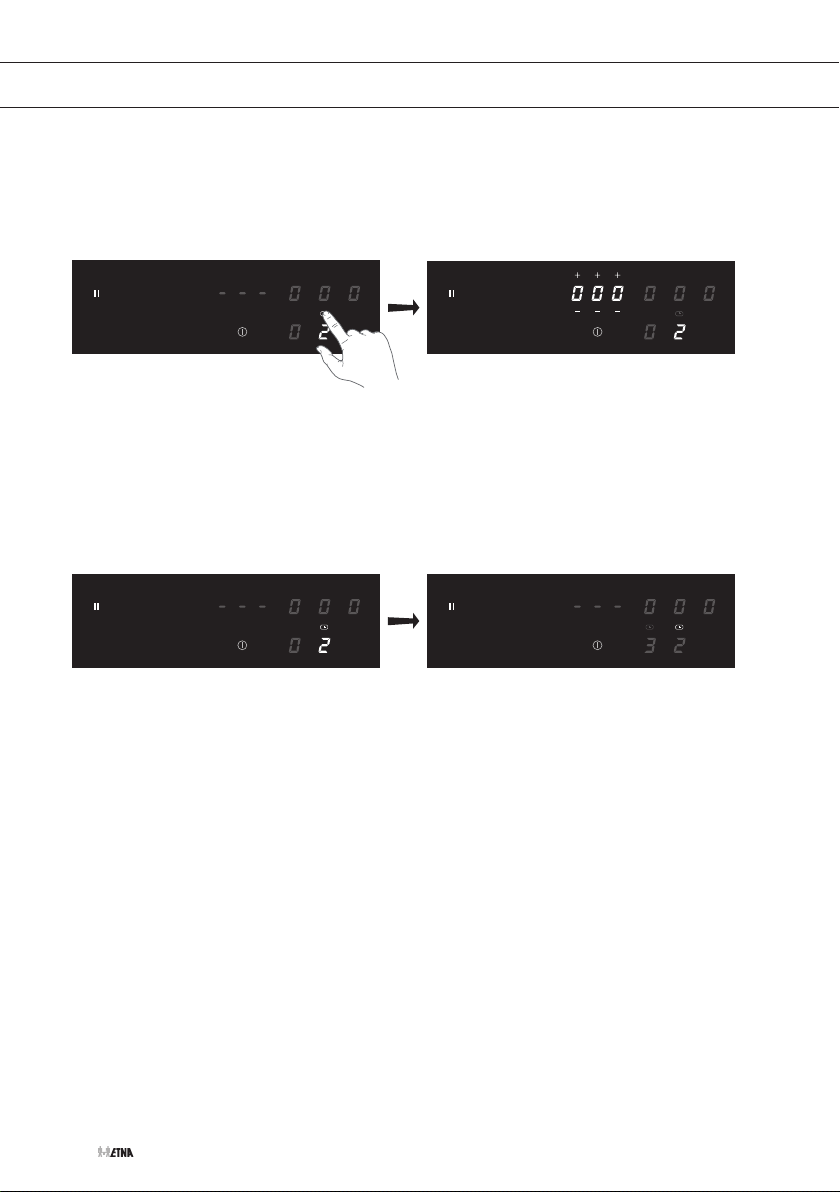
De kookwekker gebruiken
1. Selecteer de gewenste kookzone en gebruik de schuifregelaar om het gewenste
vermogensniveau in te stellen.
2. Raak het timersymbool boven de betreffende kookzone aan.
▷ Op het display van de timer verschijnt ‘000’ en het geselecteerde timersymbool knippert.
3. Gebruik de toets ‘+’ of ‘-’ om de gewenste tijd in te stellen (van 1 minuut tot 1 uur en 59
minuten).
▷ De linkerpositie van het timerdisplay geeft de uren weer, de overige posities de minuten.
▷ Stel op het linkerdisplay de waarde ‘0’ in als u minder dan 1 uur in wilt stellen.
▷ Wanneer de tijd is ingesteld, begint de tijd na 5 seconden af te tellen.
▷ Raak de betreffende kookzone toets aan om de resterende tijd weer te geven.
▷ Het timersymbool van de actieve kookwekkers licht helder op.
▷ De geselecteerde kookzone wordt automatisch uitgeschakeld zodra de ingestelde tijd is
verstreken.
▷ De timer knippert en het alarm klinkt wanneer de ingestelde tijd is verstreken.
4. Raak een toets aan om het alarm uit te schakelen.
▷ Het alarm stopt automatisch na 2 minuten.
De vooraf ingestelde kookduur wijzigen
U kunt de kookduur op elk gewenst moment wijzigen.
1. Raak het timersymbool boven de betreffende kookzone aan om de zone te selecteren waarvan u
de kookwekker wilt aanpassen.
▷ Een aan de kookwekker gekoppelde zone is te herkennen aan het helder verlichte
timersymbool boven het kookzonedisplay.
▷ Het timerdisplay toont de ingestelde tijd.
2. Gebruik de toets ‘+’ of ‘-’ om de tijd te wijzigen.
NL 18
Page 19
BEDIENING
De resterende kookduur controleren
1. Druk op de kookzonetoets om de zone te selecteren waarvan u de resterende tijd wilt
bekijken.
▷ Een aan de kookwekker gekoppelde zone is te herkennen aan het helder verlichte
timersymbool boven het kookzonedisplay.
▷ De timer geeft de resterende tijd van de geselecteerde kookzone weer.
▷ Tijdens de laatste 10 minuten van de looptijd wordt de resterende tijd in seconden
weergegeven.
De kookwekker uitschakelen
Voer de volgende stappen uit om de kookwekker uit te schakelen voordat de ingestelde tijd is
verstreken:
1. Druk op
u de kookwekker wilt uitschakelen.
2. Raak de toets(en) ‘-’ aan om de tijd in te stellen op '000'.
De kookduur teller gebruiken (tijd is oplopend)
1. Selecteer de gewenste kookzone.
het timersymbool boven de betreffende kookzone
▷ Een aan de kookwekker gekoppelde zone is te herkennen aan het helder verlichte
timersymbool boven het kookzonedisplay.
▷ Het timersymbool is nu niet meer helder verlicht.
▷ Het timerdisplay geeft de actieve kookduur van de geselecteerde kookzone oplopend
weer.
▷ Na 10 seconden is de kookduur verdwenen en verschijnt ‘---’.
om de zone te selecteren waarvan
2. Om de kookduur teller te stoppen, schakelt u de kookzone uit.
NL 19
Page 20
BEDIENING
Koken pauzeren
Deze functie stopt de kookactiviteit tijdelijk (max. 10 minuten); timers en tellers worden ook
gepauzeerd.
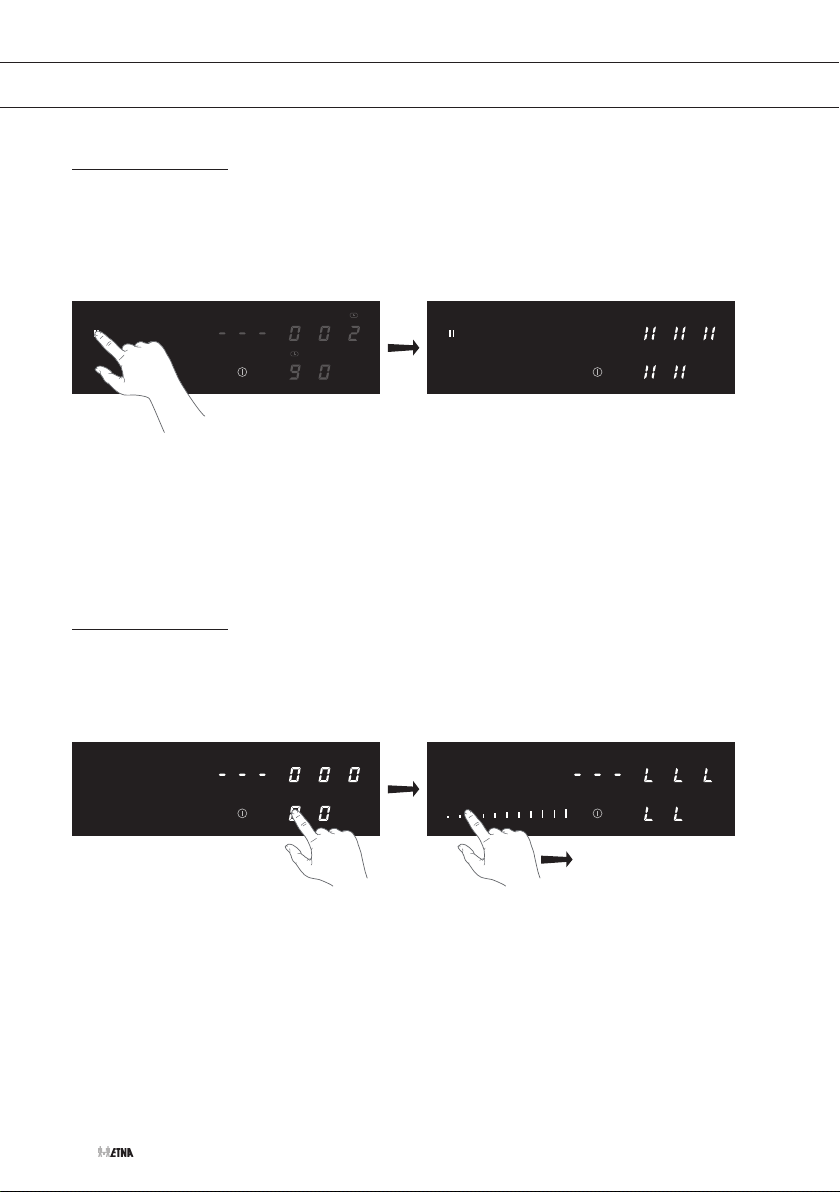
1. Raak de pauzetoets aan en houd deze 2 seconden vast.
▷ Het pauzesymbool wordt weergegeven.
2. Raak opnieuw de pauzetoets aan en houd deze 2 seconden vast tot er een geluidssignaal
klinkt.
▷ De pauze toets knippert.
3. Raak de kookzonetoets aan en het kook proces wordt vervolgd.
▷ De kookplaat schakelt na 10 minuten automatisch uit als de pauzefunctie niet tussentijds
is uitgeschakeld.
Kinderslot
1. Schakel de kookplaat in.
2. Raak een kookzonetoets aan, houd deze 3 seconden vast tot er een geluidssignaal klinkt.
Beweeg vervolgens binnen 10 seconden van links naar rechts over de schuifregelaar.
▷ Het symbool “L” verschijnt in alle displays.
▷ De kookplaat is nu vergrendeld. Na 10 seconden wordt de kookplaat automatisch
uitgeschakeld.
3. Om te ontgrendelen, schakelt u de kookplaat in en raakt u een kookzonetoets aan, houd
deze 3 seconden vast tot er een geluidssignaal klinkt. Beweeg vervolgens van rechts naar
links over de schuifregelaar.
▷ Het symbool “L” verdwijnt in alle displays en “0” of het symbool “H” verschijnt.
▷ Het kinderslot is nu gedeactiveerd.
NL 20
Page 21
BEDIENING
Grillfunctie
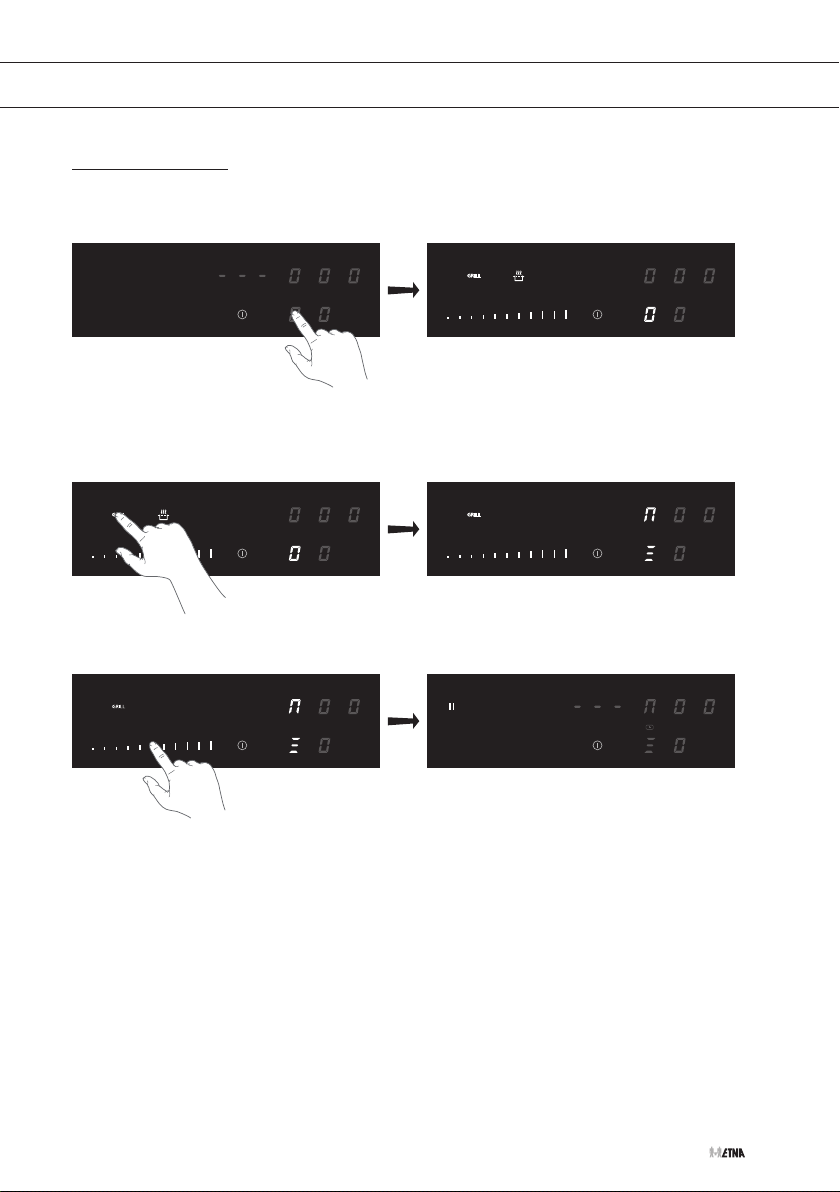
1. Schakel de kookplaat in en plaats een grillplaat op twee bridge-inductiekookzones.
2. Raak de kookzonetoets van de zone linksvoor aan.
3. Raak vervolgens de grilltoets aan.
▷ Het verbindingssymbool verschijnt op het achterste kookzonedisplay en het grillsymbool
op het voorste kookzonedisplay.
4. Stel een vermogensniveau in voor de grill door de schuifregelaar aan te raken.
▷ De grillfunctie is geactiveerd.
Wijzigen grillstand of grillfunctie uitschakelen
1. Raak de kookzonetoets van de zone linksvoor aan en wijzig de grillstand door de
schuifregelaar aan te raken of raak vervolgens de grilltoets aan om de grillfunctie uit te
schakelen.
NL 21
Page 22

BEDIENING
Herstelfunctie
Als de kookplaat met de aan/uit-toets per ongeluk werd uitgeschakeld, kunnen met behulp van
de herstelfunctie alle instellingen worden teruggezet.
1. Raak binnen 6 seconden de aan/uit-toets aan en houd deze 2 seconden vast.
▷ Het pauzesymbool knippert.
2. Raak onmiddelijk daarna de pauzetoets aan.
▷ De vorige instellingen zijn weer actief.
NL 22
Page 23
INSTELLINGEN
De gebruikersinstellingen wijzigen
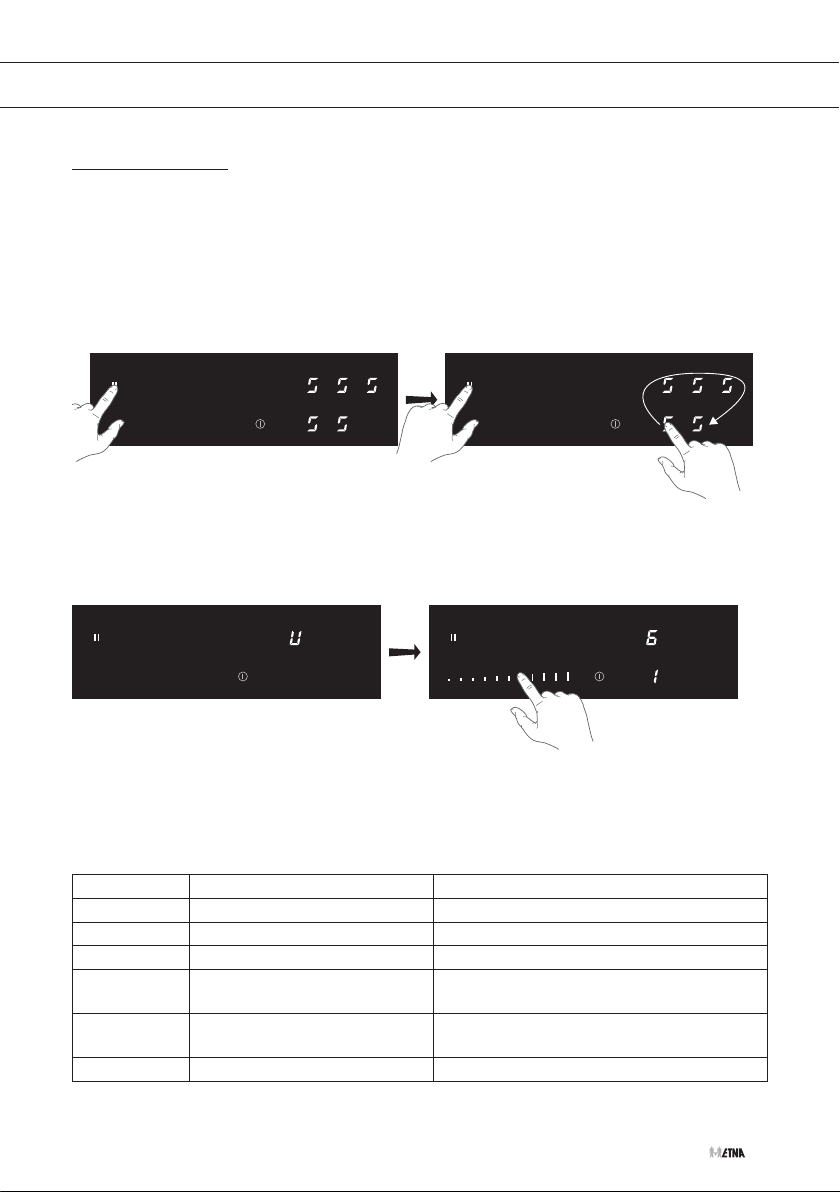
1. Raak de aan/uit-toets aan om de kookplaat aan te zetten. Raak binnen 3 seconden de aan/
uit-toets opnieuw aan.
▷ De kookplaat gaat in standby.
▷ De pauzetoets knippert (maximaal 60 seconden).
2. Raak de pauzetoets aan en houd deze vast.
3. Raak vervolgens, met de klok mee, elke kookzonetoets aan (begin met de kookzonetoets
linksvoor).
▷ De menufunctie verschijnt op het display van de kookzone linksachter. “U” knippert
afwisselend met een waarde op het display.
4. Selecteer de instelling die u wilt wijzigen met de schuifregelaar.
▷ De waarde van de menufunctie verschijnt op het display van de kookzone linksvoor.
5. Raak de aan/uit-toets aan en houd deze 2 seconden vast om de instellingen te bewaren en
het menu te verlaten.
▷ Raak de pauzetoets aan om het menu te verlaten zonder de wijzigingen op te slaan.
Onderstaande tabel geeft de mogelijke instellingen weer.
Menuwaarde Functie Waarde
U2 Volume van de toetsen 1 - 9 (standaard: 9)
U3 Volume van geluidssignaal 1 - 9 (standaard: 9)
U4 Helderheid van display 0 - 9 (standaard: 0, meest helder)
U5 Timer animatie 0: Timer animatie uit
1: Timer animatie aan (standaard)
U6 Automatische pandetectie 0: Automatische pandetectie uit
1: Automatische pandetectie aan (standaard)
U7 Lengte van geluidssignaal 0 - 2 (standaard: 0)
NL 23
Page 24
INSTALLATIE
Vermogensbegrenzer
Het instellen van de vermogensbegrenzer mag alleen worden uitgevoerd door een
erkende en gekwalificeerde installateur. Lees de veiligheidsvoorschriften en de
installatie-instructies zorgvuldig door.
De kookplaat is voorzien van een vermogensbegrenzer. Als het totale vermogen van de actieve
kookzones het maximaal beschikbare vermogen overschrijdt, wordt het vermogen automatisch
verlaagd. Het display van de kookzone die in vermogen wordt verlaagd knippert eerst; het niveau
wordt dan automatisch verlaagd naar het hoogste beschikbare vermogen.
• De begrenzer is af fabriek ingesteld op 7400 W, maar het is mogelijk om deze instelling te
wijzigen naar 1400 W, 2300 W, 3000 W, 3700 W, 4600 W, 6000 W of 10400 W.
Configuratie van de vermogensbegrenzer
Controleer voordat u begint of er geen potten of pannen op de kookplaat staan.
1. Koppel het apparaat los van de hoofdvoeding door de stekker uit het stopcontact te halen,
de zekering te verwijderen of de stroomonderbreker uit te schakelen.
2. Sluit het apparaat weer aan op de stroomvoorziening.
▷ De warmhoudtoets knippert.
• Voer, binnen 2 minuten na het opnieuw aansluiten van de kookplaat op de
stroomvoorziening, de volgende stappen uit.
• Zorg ervoor dat alle kookzones uitgeschakeld zijn.
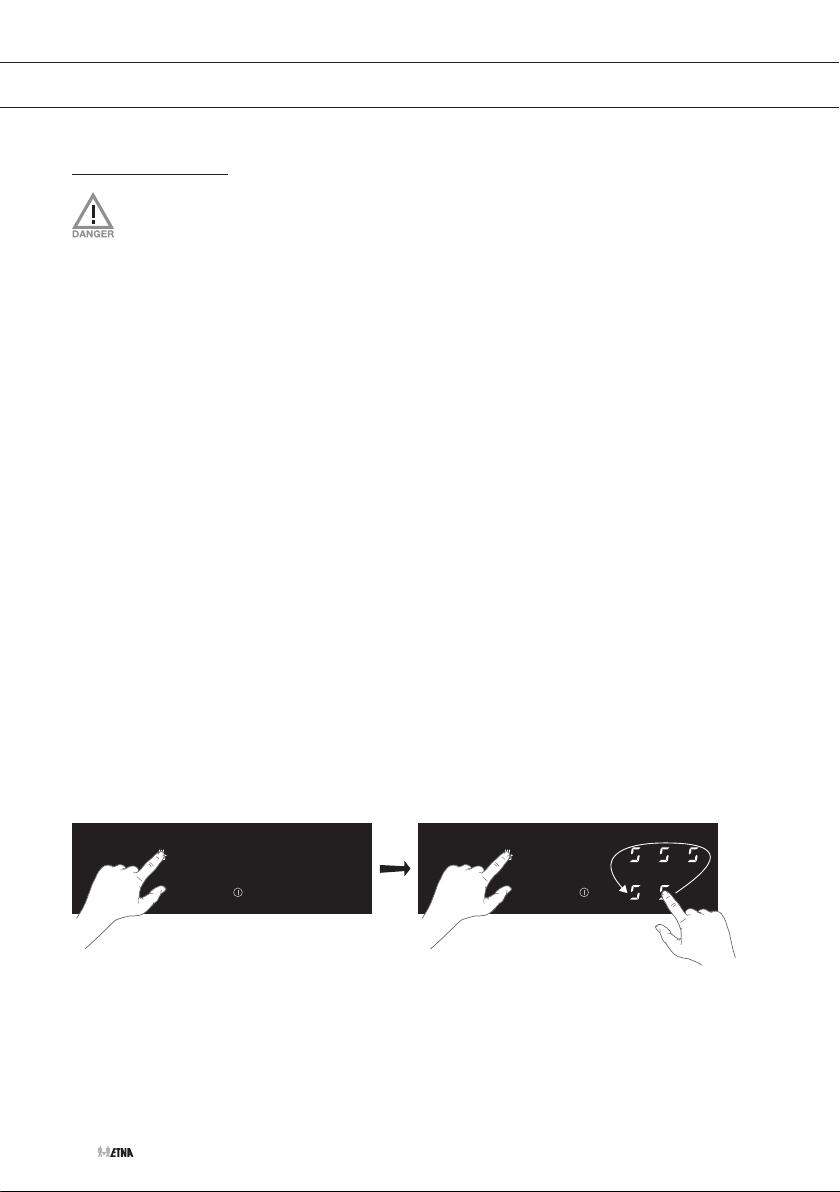
3. Raak de warmhoudtoets aan en houd deze vast.
4. Raak vervolgens, tegen de klok in, elke kookzonetoets aan (begin met de kookzonetoets
middenvoor).
NL 24
Page 25
INSTALLATIE
▷ Een dubbel geluidssignaal geeft een fout in de operatie aan. Herhaal in dat geval de
procedure vanaf stap 3.
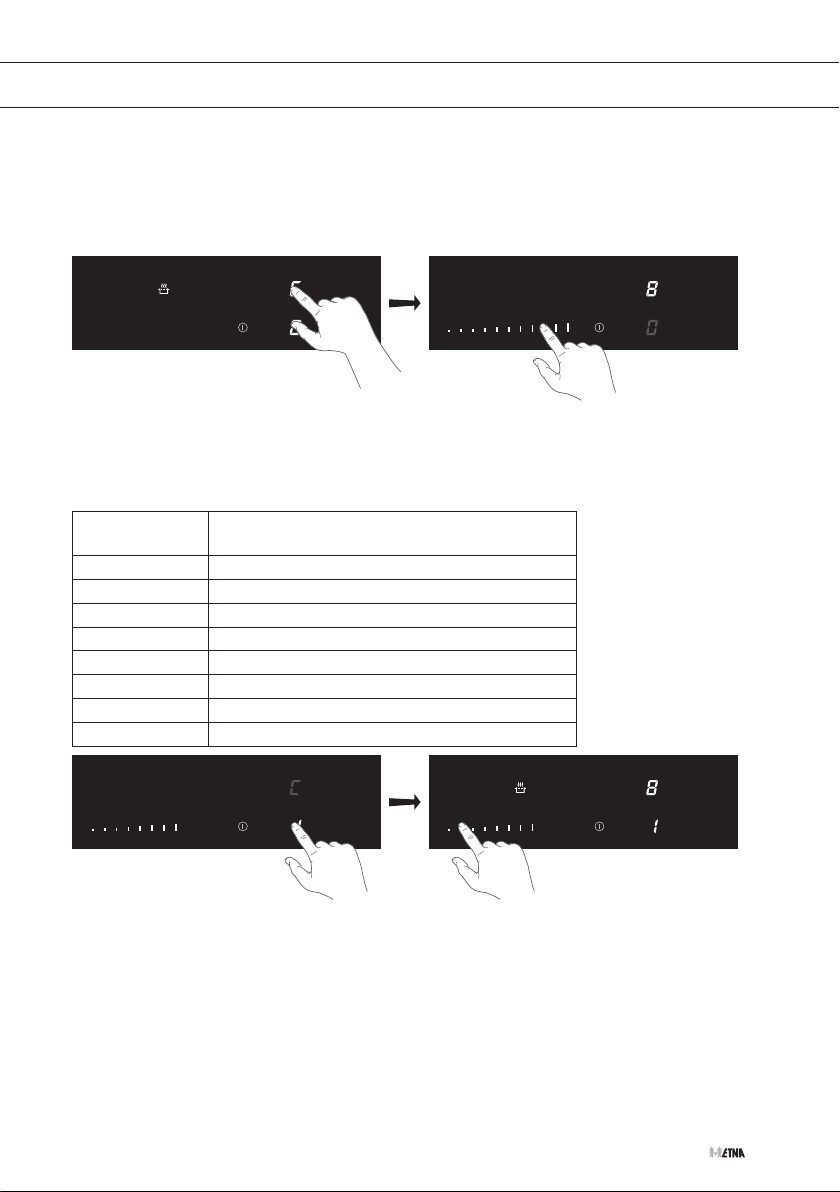
▷ "C" knippert afwisselend met “0” op het display van de kookzone linksachter.
▷ De configuratiewaarde verschijnt op het display van de kookzone linksvoor.
5. Raak de kookzonetoets linksachter aan en kies "8" met behulp van de schuifregelaar.
▷ “C” knippert afwisselend met “8” in het display van de kookzone middenachter.
6. Raak de kookzonetoets linksvoor aan en selecteer de gewenste vermogensbegrenzing met
de schuifregelaar.
Stand
schuifregelaar
0 10400 W
1 7400 W
2 6000 W
3 4600 W
4 3700 W
5 3000 W
6 2300 W
7 1400 W
Instelling van de vermogensbegrenzing:
7. Raak vervolgens de aan/uit-toets aan en houd vast totdat alle segmenten van het display
zijn verdwenen.
▷ De kookplaat is nu klaar voor gebruik met de geselecteerde vermogensbegrenzer.
NL 25
Page 26
ONDERHOUD
Reinigen
Activeer het kinderslot voordat u begint met het reinigen van de kookplaat.
Wij raden u aan het apparaat na elk gebruik te reinigen. Zo voorkomt u dat overgekookt
eten de glasplaat kan beschadigen.
Dagelijkse reiniging
1. Gebruik een vochtige doek en een mild reinigingsmiddel (afwasmiddel) om het apparaat te
reinigen.
2. Droog het apparaat af met een stukje keukenrol of een doek.
Sterk vervuild glas
1. Verwijder resten van voedsel, verbrand vet, suiker of hardnekkige vlekken direct met
een schraper van de kookplaat, zelfs als de kookplaat nog heet is! Suiker en/of andere
voedselresten kunnen het glaskeramische oppervlak blijvend beschadigen.
2. Nadat u de hardnekkige vlekken van het glas hebt verwijderd, voert u de stappen van de
dagelijkse reiniging uit om de kookplaat schoon te maken.
3. Als het reinigingsresultaat niet naar wens is, kunt u de bovenstaande reinigingsstappen zo
vaak als nodig herhalen.
Gebruik geen bijtende reinigingsmiddelen; deze kunnen krassen veroorzaken.
Gebruik geen staalwol, schuursponsjes of andere scherpe voorwerpen om het
apparaat te reinigen.
NL 26
De kookplaat kan door het kookproces nog steeds erg heet zijn! Raak het
oppervlak niet rechtstreeks aan. Gebruik indien gewenst ovenwanten om
verbranding te voorkomen tijdens het schoonmaken direct na het koken.
Page 27
TECHNISCHE SPECIFICATIES
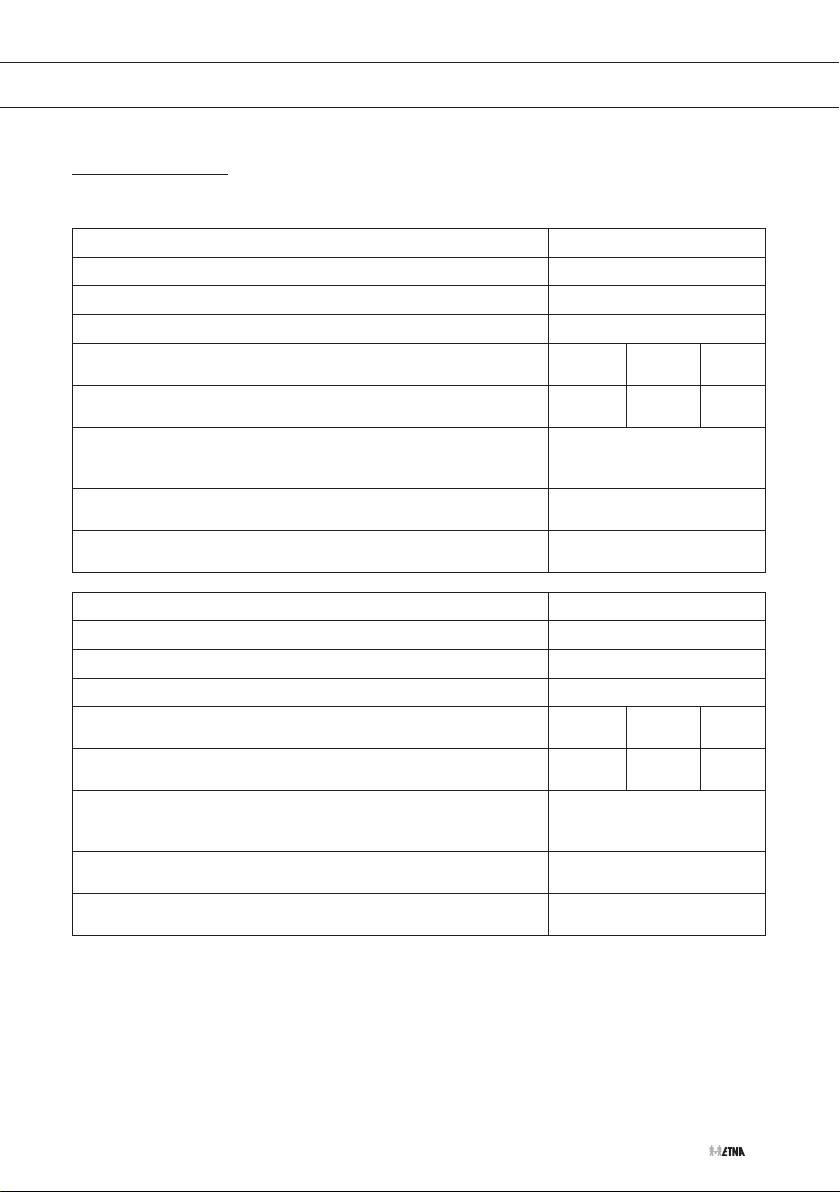
Informatie over EU-verordening 66/2014
Metingen volgens EN 60350-2
Modelaanduiding KIF880DS / KIF880ZT
Type kookplaat Inductiekookplaat
Aantal elektrische kookzones en/of -gebieden 5
Verwarmingstechnologie Inductiekookzones
Voor ronde elektrische kookzones: de diameter van het bruikbare
oppervlak per elektrisch verwarmde kookzone in cm
Energieverbruik per kookzone of -gebied, berekend
per kg (EC
elektrische kookplaat
) in Wh/kg
Voor niet-ronde kookzones of kookgebieden: de lengte en
breedte van het bruikbare oppervlak per elektrisch verwarmde
kookzone of kookgebied
L/B in cm
Energieverbruik per kookzone of -gebied, berekend
per kg (EC
elektrische kookplaat
) in Wh/kg
Energieverbruik van de kookplaat, berekend
per kg (EC
elektrische kookplaat
) in Wh/kg
Modelaanduiding KIF890ZT
Type kookplaat Inductiekookplaat
Aantal elektrische kookzones en/of -gebieden 5
Verwarmingstechnologie Inductiekookzones
Voor ronde elektrische kookzones: de diameter van het bruikbare
oppervlak per elektrisch verwarmde kookzone in cm
Energieverbruik per kookzone of -gebied, berekend
per kg (EC
elektrische kookplaat
) in Wh/kg
Voor niet-ronde kookzones of kookgebieden: de lengte en
breedte van het bruikbare oppervlak per elektrisch verwarmde
kookzone of kookgebied
L/B in cm
Energieverbruik per kookzone of -gebied, berekend
per kg (EC
elektrische kookplaat
) in Wh/kg
Energieverbruik van de kookplaat, berekend
per kg (EC
elektrische kookplaat
) in Wh/kg
23 14,5 17,5
182,6 170,5 162,7
2x
19,5x20,5
159,5
166,9
27,5 14,5 17,5
196,5 170,5 162,7
2x
19,5x20,5
159,5
169,7
NL 27
Page 28
PROBLEMEN OPLOSSEN
Algemeen
Wanneer u een barst in het glas ziet (hoe klein ook), schakelt u de kookplaat onmiddellijk uit,
haalt u de stekker uit het stopcontact en zet u de (automatische) zekering(en) in de meterkast
uit. Bij een permanente aansluiting zet u de stroomtoevoer op nul. Neem contact op met de
servicedienst.
Tabel voor probleemoplossing
Als het toestel niet naar behoren werkt, betekent dit niet altijd dat het defect is. Probeer het
probleem eerst zelf op te lossen door de onderstaande punten na te lopen. U kunt voor meer
informatie ook terecht op de website.
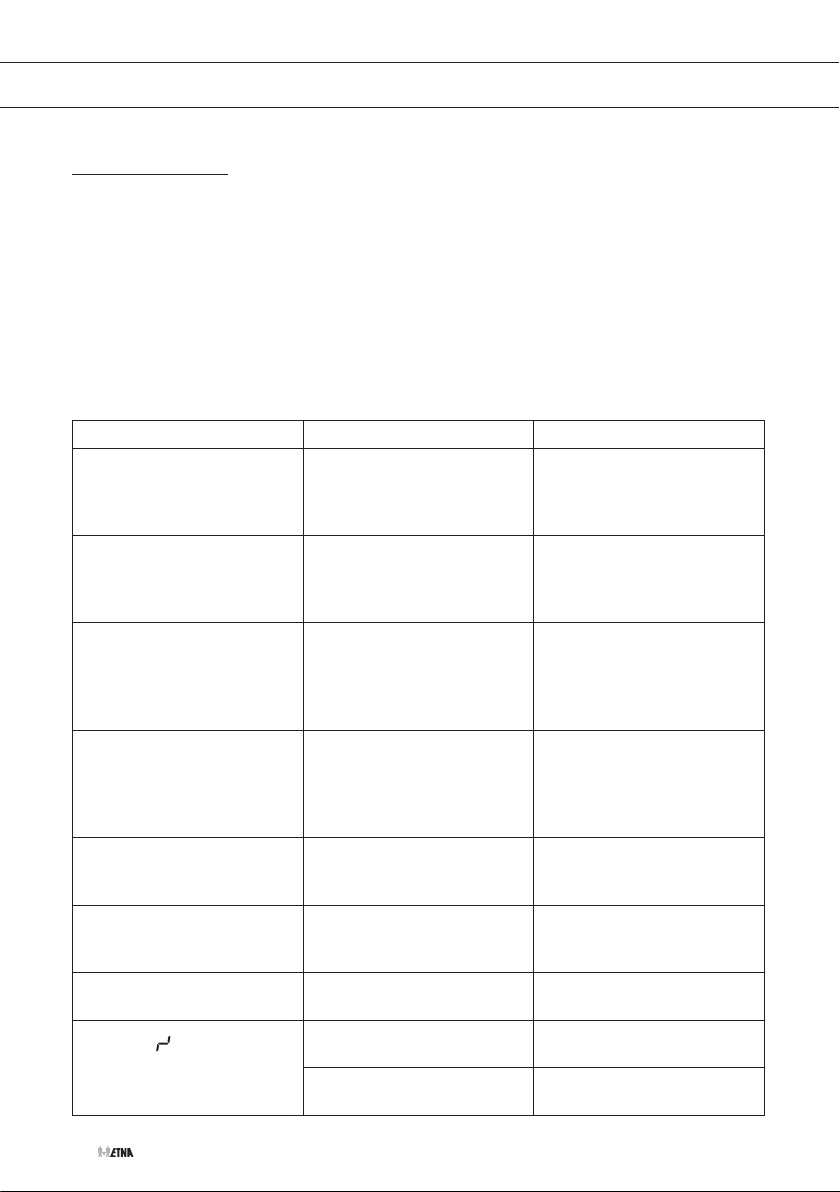
Probleem Mogelijk oorzaak Oplossing
Wanneer u de kookplaat voor
het eerst inschakelt, gaat het
display branden.
De kookplaat geeft bij de
eerste paar kookbeurten een
lichte geur af.
De pannen maken geluid
tijdens het koken.
De cirkel van de panbodem
blijft zichtbaar na reiniging.
Een kookzone stopt
plotseling en er klinkt een
geluidssignaal.
De kookplaat werkt niet en
het display geeft niets weer.
Bij het inschakelen van de
kookplaat springt de zekering.
Foutcode
of Er03
Dit is de standaardprocedure
bij opstarten.
Het nieuwe toestel wordt
opgewarmd.
Dit wordt veroorzaakt door de
energie die van de kookplaat
naar de pan stroomt.
Er is een vieze panbodem
gebruikt op de kookzone.
De vooraf ingestelde tijd is
verstreken.
Het toestel krijgt geen stroom
door een defecte kabel of
onjuiste verbinding.
De kookplaat is verkeerd
aangesloten.
Het bedieningspaneel is vuil
ofer ligt water op.
U hebt twee of meer toetsen
tegelijk aangeraakt.
Het toestel werkt correct.
Wacht 2 minuten voordat
u de kookplaat in gebruik
neemt.
Dit is normaal en verdwijnt
wanneer het toestel een paar
keer is gebruikt. Ventileer de
keuken.
Dit is normaal bij bepaalde
pannen wanneer een hoge
kookstand wordt gebruikt.
Dit is niet schadelijk voor de
pannen of de kookplaat.
Reinig de inductiekookplaat
met een reinigingsmiddel
voor keramische kookplaten
en verwijder het vuil/vet van
de bodem van de pan.
Schakel het alarm uit door de
timertoets aan te raken.
Controleer de zekeringen en
de elektriciteitsschakelaar en
het stopcontact.
Controleer de elektrische
aansluitingen.
Reinig het bedieningspaneel.
Bedien maar één toets
tegelijk.
NL 28
Page 29

PROBLEMEN OPLOSSEN
Probleem Mogelijk oorzaak Oplossing
Foutcode E2 of EH
Foutcode E5 of E6
Foutcode E8
Andere foutcode
Het apparaat is te heet. Laat het apparaat afkoelen.
Stroomuitval/
voedingsspanning verkeerd.
De luchtinlaat is geblokkeerd. Controleer de luchtinlaat.
Ander defect. Neem contact op met de
Laat de stroomaansluiting
controleren door een
installateur.
servicedienst.
NL 29
Page 30
MILIEUASPECTEN
Verpakking en toestel afdanken
Bij de vervaardiging van dit toestel is gebruik gemaakt van duurzame materialen. Dit toestel moet
aan het eind van zijn levenscyclus op verantwoorde wijze worden afgevoerd. De overheid kan u
hierover informatie verschaffen.
De verpakking van het toestel is recyclebaar. Gebruikt kunnen zijn:
• karton;
• polyetheenfolie (PE);
• CFK-vrij polystyreen (PS-hardschuim).
Deze materialen dient u op verantwoorde wijze en conform de overheidsbepalingen af te voeren.
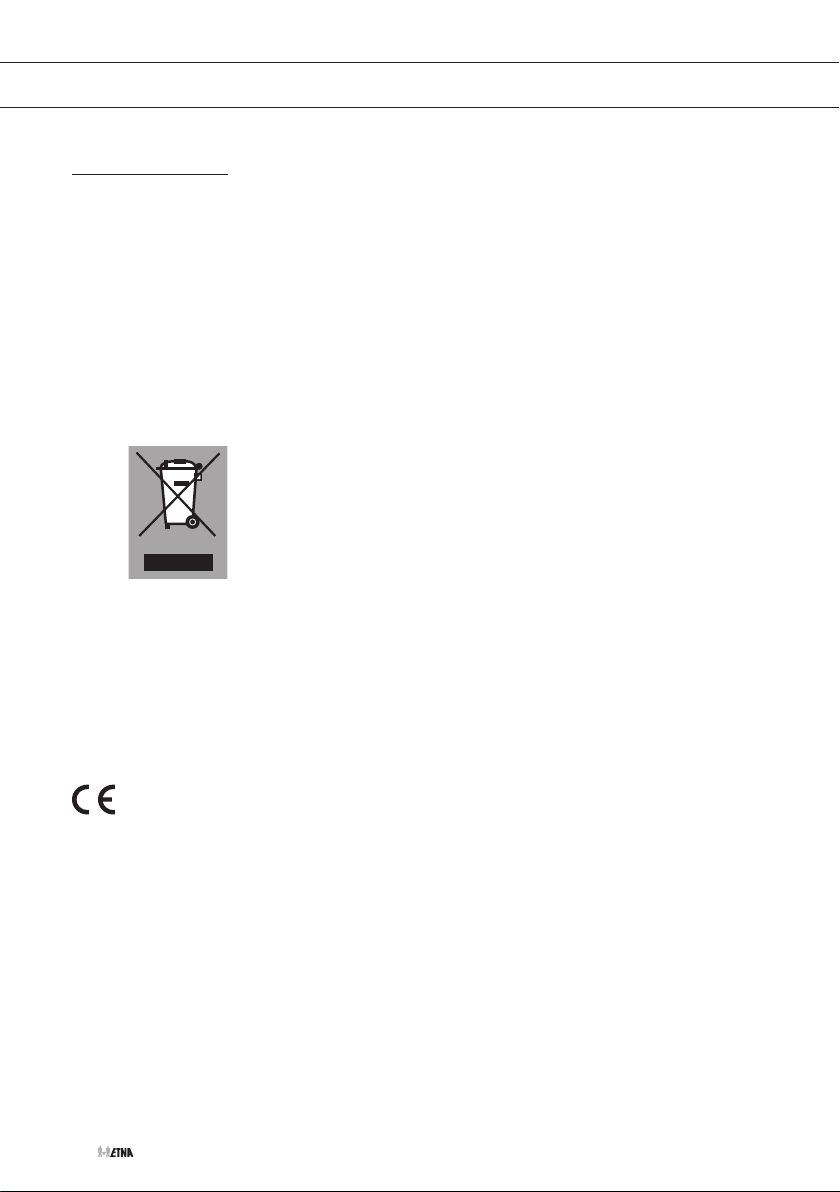
Om op de verplichting tot gescheiden verwerking van elektrische
huishoudelijke apparatuur te wijzen, is op het product het symbool
van een doorgekruiste vuilnisbak aangebracht. Dit betekent dat het
apparaat aan het einde van zijn levensduur niet bij het gewone huisvuil
mag worden gevoegd. Het toestel moet naar een speciaal centrum voor
gescheiden afvalinzameling van de gemeente worden gebracht of naar
een verkooppunt dat deze service verschaft.
Het apart inleveren van huishoudelijke apparaten voorkomt mogelijk
negatieve gevolgen voor het milieu en de gezondheid, en zorgt ervoor
dat de materialen in deze apparaten kunnen worden teruggewonnen,
waardoor in aanzienlijke mate kan worden bespaard op energie en
grondstoffen.
Verklaring van conformiteit
Wij verklaren dat onze producten voldoen aan de toepasselijke Europese richtlijnen,
normen en voorschriften, evenals aan alle vereisten in de normen waarnaar wordt
verwezen.
NL 30
Page 31

CONTENTS
Your hob
Introduction 4
Induction hob 5
Control panel 6
Safety
Temperature safety 7
Cooking-time limiter 7
Healthy cooking 7
Use
Induction noises 8
Pans 8
Power level setting 9
Keep warm function 10
Automatic heat-up 10
Other functions 10
Indications in the display 11
Timer use 11
Cooking settings 12
Operation
Starting cooking 13
Finishing cooking 15
Switching on the automatic heat-up function 15
Switching on the keep warm function 15
Connecting the bridge induction cooking zones 16
Timer control 17
Pause cooking 20
Child lock 20
Grill function 21
Recall function 22
Settings
Changing user settings 23
Installation
Power limiter 24
Maintenance
Cleaning 26
Technical specifications
Information according regulation (EU) 66/2014 27
Troubleshooting
General 28
Environmental aspects
Disposal of packaging and appliance 30
EN 3
Page 32

YOUR HOB
Introduction
This hob has been designed for the real lover of cooking. Cooking on an induction hob has
a number of advantages. It is easy, because the hob reacts quickly and can also be set to a very
low power level. Because, moreover, it can also be set to a high power level, it can bring dishes to
the boil very quickly. The ample space between the cooking zones makes cooking comfortable.
Cooking on an induction hob is different from cooking on a traditional appliance. Induction
cooking makes use of a magnetic field to generate heat. This means that you cannot use just any
pan on it. The pans section gives more information about this.
For optimum safety the induction hob is equipped with several temperature protections and
a residual heat indicator, which shows which cooking zones are still hot.
This manual describes how you can make the best possible use of the induction hob. In addition
to information about operation, you will also find background information that can assist you in
using this product. You will also find cooking tables and maintenance tips.
Read the manual thorougly before using the appliance, and store these instructions in
a safe place for future reference.
The manual also serves as reference material for service technicians. Please, therefore,
stick the appliance identification card in the space provided, at the back of the manual.
The appliance identification card contains all the information that the service technician will need
in order to respond appropriately to your needs and questions.
The installation instructions are included separate.
Enjoy your cooking!
EN 4
Page 33
YOUR HOB
Induction hob
3
3
6
3
3
6
2
5
4
2
1
4
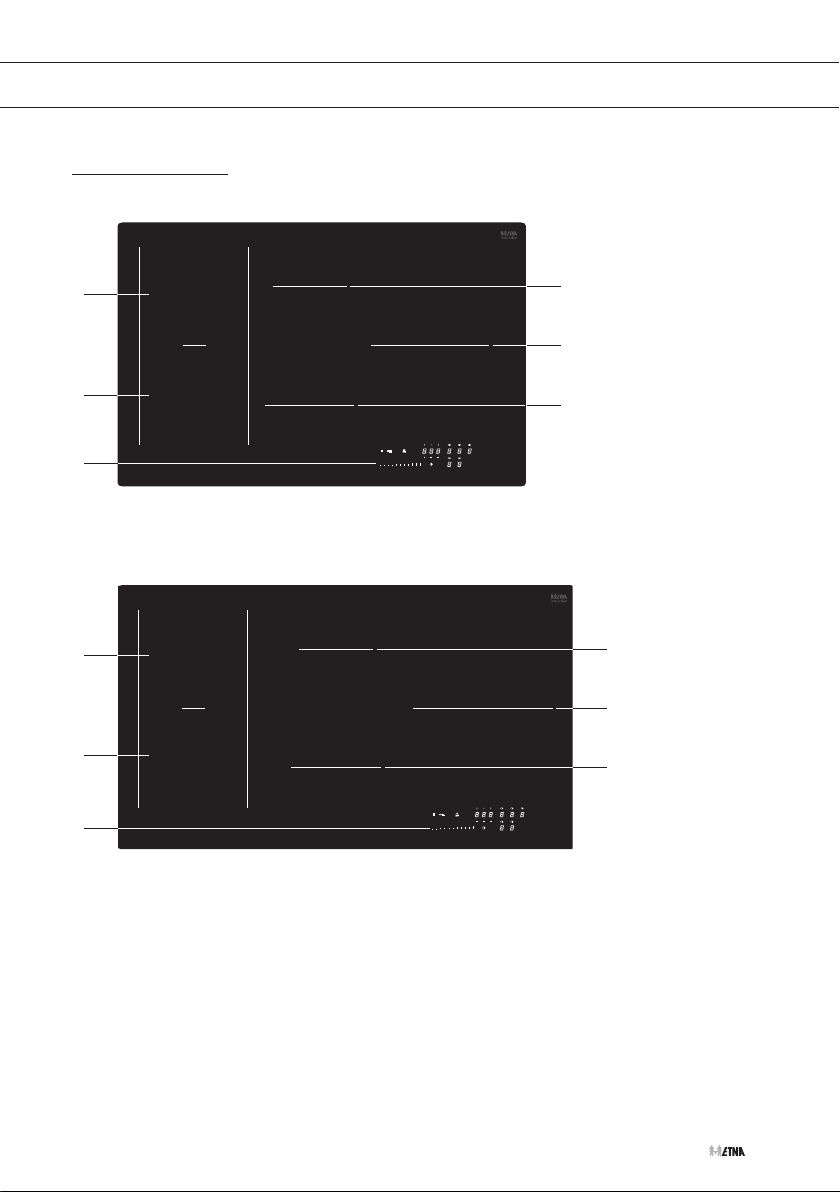
1. Cooking zone ø 27.5 cm / 2.3 kW - 3.0 kW (boost)
2. Cooking zone ø 14.5 cm / 1.4 kW - 1.85 kW (boost)
3. Bridge induction cooking zone 19.5 x 20.5 cm / 2.1 kW - 3.0 kW (boost)
4. Cooking zone ø 17.5 cm / 1.4 kW - 2.1 kW (boost)
5. Cooking zone ø 23 cm / 2.3 kW - 3.0 kW (boost)
6. Control panel
EN 5
Page 34
YOUR HOB
Control panel
76 5 4 8
12 3 7
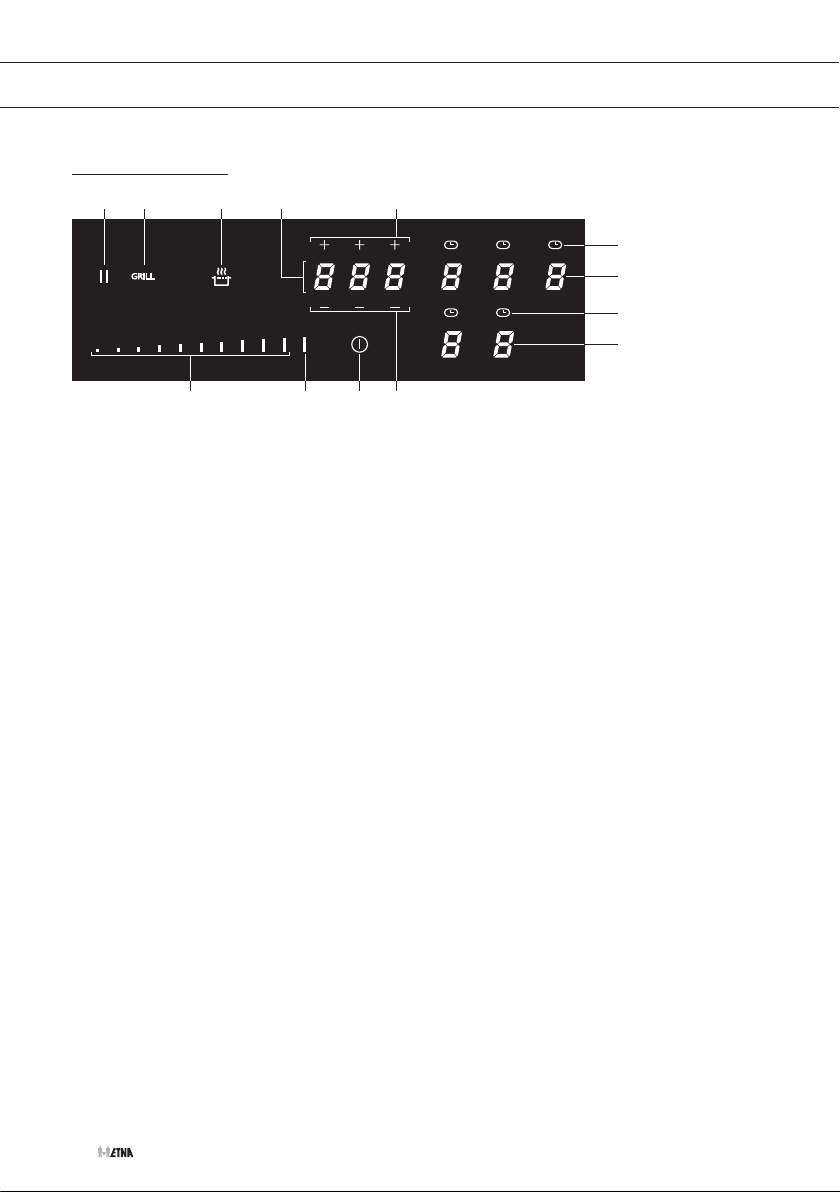
1. On/off key
2. Slide control (from position 0 to position 9) for:
▷ setting a value
3. Boost key
4. Keep warm key
5. Grill function
6. Pause function
7. Minus/plus key for timer
8. Timer display
9. Cooking zone key and cooking zone display
10. Timer function for each cooking zone
10
9
10
9
EN 6
Page 35
SAFETY
Before use, read the separate safety instructions first!
At first power on the hob the keep warm key will flash. The hob is in the settings
mode. Let the power limiter set by an installer (see chapter ‘Installation’) or
wait 2 minutes. After 2 minutes the hob is ready to be used.
Temperature safety
A sensor continuously measures the temperature of certain parts of the hob. Every cooking zone
is equipped with a sensor that measures the temperature of the bottom of the pan to avoid any
risk of overheating when a pan boils dry. In case of temperatures rising too high, the power is
reduced automatically, or the hob switches off automatically.
Cooking-time limiter
The cooking-time limiter is a safety function of your cooking appliance. It will operate
if you forget to switch off your hob. Depending on the setting you have chosen, the
cooking time will be limited as follows:
Cooking level Max. operating time Cooking level Max. operating time
1 516 minutes 7 138 minutes
2 402 minutes 8 108 minutes
3 318 minutes 9 90 minutes
4 258 minutes P 5 minutes
5 210 minutes
6 138 minutes Keep warm 120 minutes
(then switches back to level 9)
Healthy cooking
Burning point of different types of oil
To ensure your food is fried as healthily as possible, it’s recommended to choose the type of oil
according to the frying temperature. Each oil has a different burning point at which toxic gasses
are released. The below table shows the burning points for various types of oil.
Oil Smoke point °C Oil Smoke point °C
Extra virgin olive oil 160 °C Sunflower oil 227 °C
Butter / Coconut oil 177 °C Corn oil / Peanut oil 232 °C
Canola oil 204 °C Olive oil 242 °C
Virgin olive oil 216 °C Rice oil 255 °C
EN 7
Page 36
USE
Induction noises
A ticking sound
• This is caused by the capacity limiter on the left and right zones. Ticking can also occur at
lower settings.
Pans are making noise
• Pans can make some noise during cooking. This is caused by the energy flowing from the
hob to the pan. At high settings this is perfectly normal for some pans. It will not damage
either the pans or the hob.
The fan is making noise
• To enlarge the lifespan of the electronics, the appliance is equipped with fans. If you use
the appliance intense, the fan is activated to cool down the appliance and you will hear
a buzzing sound. The fan runs on for several minutes after the hob has been switched off.
Pans
• Always place a pan in the middle of a cooking zone.
• Induction cooking requires a particular quality of pan.
• Only use pans that are suitable for electric and induction cooking with:
▷ a thick base (minimum 2.25 mm);
▷ a clean and flat base.
• The best are pans with the ‘Class Induction’ quality mark.
Pans that have already been used for cooking on a gas hob are no longer suitable
for use on an induction hob.
You can check for yourself whether your pans are suitable using a magnet. A pan is suitable
if the base of the pan is attracted by the magnet.
Suitable Unsuitable
Special stainless-steel pans Earthenware
Class Induction Stainless-steel
Hard-wearing enamelled pans Porcelain
Enamelled cast-iron pans Copper / Aluminium / Plastic
Be careful with enamelled sheet-steel pans! The enamel may chip (the enamel comes
loose from the steel), if you switch the hob on at a high setting when the pan is (too) dry.
The base of the pan may warp - due, for example, to overheating or to the use of too
high a power level.
EN 8
Page 37

USE
• Never use pans with a misshapen base. A hollow or rounded base can interfere with
the operation of the overheating protection, so that the appliance becomes too hot.
This may lead to the glass top cracking and the pan base melting.
• Damage arising from the use of unsuitable pans or from boiling dry is excluded from the
guarantee.
Minimum pan diameter
• The diameter of the bottom of the pan must be at least:
▷ 9 cm for zone ø 14.5 and 17.5
▷ 11 cm for zone 19.5 x 20.5 cm and for zone ø 23 and 27.5 cm
▷ 23 cm for connected Bridge zones
• You will achieve the best results by using a pan with the same diameter as the zone.
If a pan is too small the cooking zone will not work.
Pan detection
The cooking zone automatically detects a suitable pan placed on a cooking zone. The cooking
zone display lights up. A power level can be set.
• If there is no (suitable) pan on a cooking zone, the pan detection symbol shows when you
set a power level. The symbol disappears when a suitable pan is put on the cooking zone.
• If you remove a pan from the cooking zone during cooking, the pan detection symbol
shows. The cooking zone switches off. The symbol disappears when you put the pan back.
The cooking zone switches on again with the power level set before.
Grill plates
The hob has a Grill function (depending on the model) for using a grill plate. The function keeps
the grill plate at an ideal temperature for grilling.
Power level setting
The cooking zones have 9 levels. Beside it there is a level ‘boost’ (P). If you have switched on
the hob the required cooking zone can be chosen within the next 5 seconds. Set the power level
by touching the slide control. At the first touch, the level is set according to the part of the slide
control that you touch. By sliding along the control, the power level setting is changing.
By sliding to the right, the level increases, while sliding to the left decreases the level. When you
move your finger away from the slide control, the cooking zone starts to operate at the level set.
Boost function
You can use the boost function to cook at the highest power level during a short period of time
(max. 5 minutes). After the maximum boost time the power will be reduced to setting 9.
EN 9
Page 38

USE
Power limiter
The hob is equipped with a power limiter. If the total power of operating cooking zones exceeds
the maximum available amount of power, the power is automatically reduced. The display of the
cooking zone who is being reduced in its power is first flashing; the level is then automatically
reduced to the highest available power.
Keep warm function
Use this function to keep food warm directly after cooking (at approximately 70 °C).
• This will avoid liquids overflowing and burning on the bottom of the pan.
• This function can be started independently on all cooking zones.
• When the pan is removed from the cooking zone, the “Keep warm” function remains active
for approximately 10 minutes. The maximum duration of “keeping warm” is 2 hours.
Automatic heat-up
This function heats the cooking zone at level 9 in order to bring it rapidly up to the required
temperature. After a given time interval, the power level returns to the established setting. This
function is available for power level 1 to 8.
Power level Heat-up time (seconds)
1 40
2 72
3 120
4 176
5 256
6 432
7 120
8 192
Other functions
• Pause function
▷ This function stops the entire hob’s cooking activity temporarily and allows restarting
• Child lock
▷ To avoid accidentally activating the cooking zones, in particular during cleaning, the
• Grill function
▷ This function allows the optimal use of a grill plate with ‘connected’ cooking zones and
EN 10
with the same settings.
control panel can be locked (with exception of the On/off key).
using appropriate power.
Page 39
USE
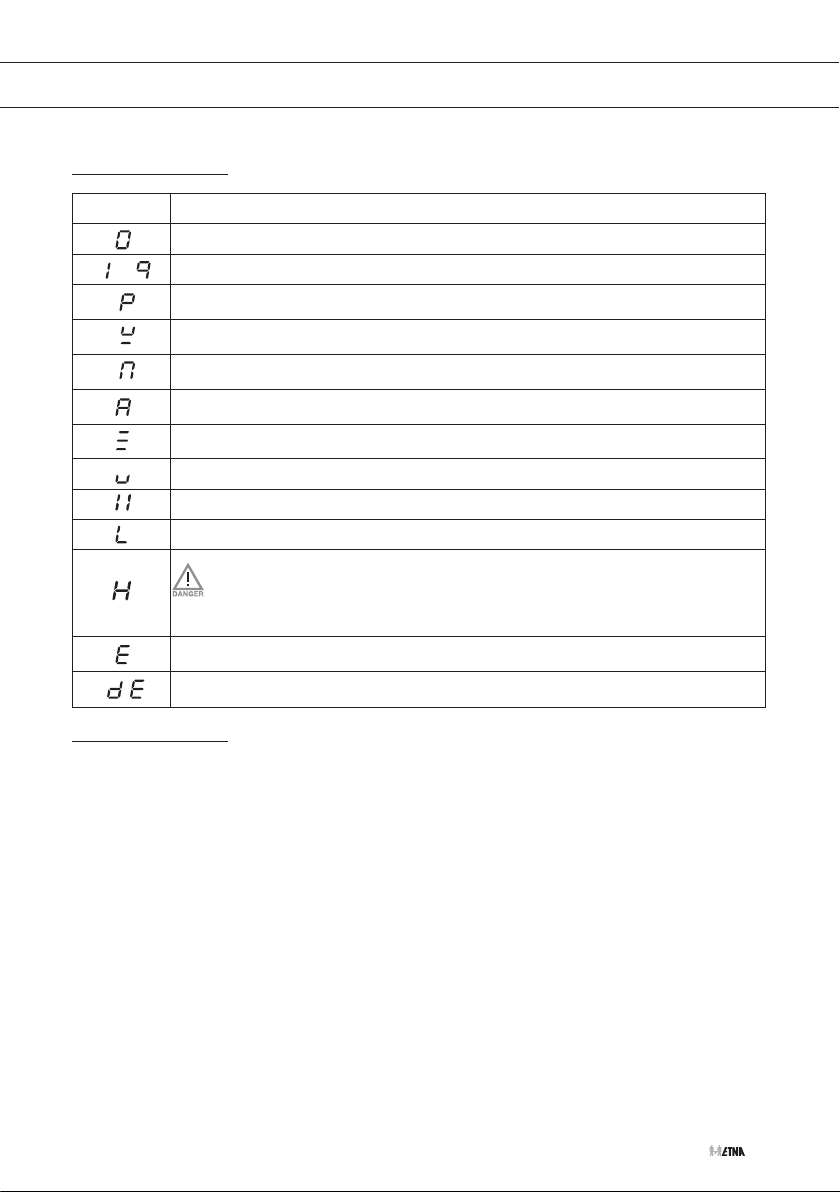
Indications in the display
In display
Status
Power level ‘0’ for a cooking zone
Power level that is set for a cooking zone; 1 = low / 9 = high
Boost function active
No (suitable) pan on cooking zone (pan detection symbol)
Bridge cooking zones are connected (present depending on model).
Automatic heat-up function is activated
Grill function is activated
Keep warm function is activated; maintain automatically at approximately 70°C
Pause function activated; the hob is in pause mode
Child lock is activated; the control panel is locked
Residual heat indicator; The hob has a residual heat indicator for each
cooking zone to show those which are still hot. Although the hob is switched
off, the indicator ‘H’ will remain on for as long as the cooking zone is hot!
Avoid touching them when this indicator is lit. Danger! Risk of burns.
Fault code; See chapter ‘Troubleshooting’
Demo mode active
Timer use
The timer can be used in 3 different ways:
• As a minute minder (count-down timer) — after the set time has elapsed, an alarm will
sound.
▷ The minute minder can be set for a maximum of 9 hours and 59 minutes.
▷ The minute minder can be used independently of whether the hob is operating.
▷ The minute minder can only be switched off or adjusted when the hob is switched on.
▷ Touch the timer key to stop the alarm.
• As a cooking timer — the timer is connected to an active cooking zone. After the set time
has elapsed, the cooking zone will switch off automatically and an alarm will sound.
▷ A cooking timer can be set for each active cooking zone and can be set for a maximum
of 1 hour and 59 minutes.
▷ Touch the timer key to stop the alarm.
• As a cooking duration counter (count-up timer) — shows the cooking time duration.
▷ The cooking duration counter is connected to a cooking zone.
EN 11
Page 40

USE
Cooking settings
Because the settings depend on the quantity and composition of the contents of the pan,
the table below is intended as a guideline only.
Use setting ‘boost’ to:
• bring the food or liquid to the boil quickly;
• ‘shrink’ greens;
• heat oil and fat;
• wok.
Use setting 9 to:
• sear meats;
• cook fish;
• cook omelettes;
• fry boiled potatoes;
• deep fry foods.
Use setting 7 and 8 to:
• fry thick pancakes;
• fry thick slices of breaded meat;
• fry bacon (fat);
• cook raw potatoes;
• make French toast;
• fry breaded fish;
• cook through pasta;
• fry thin slices of (breaded) meat.
Use setting 4-6 to:
• complete the cooking of large quantities;
• defrost hard vegetables;
• fry thick slices of breaded meat.
Use settings 1-3 to:
• simmer bouillon;
• stew meats;
• simmer vegetables;
• melt chocolate;
• poach;
• melt cheese.
EN 12
Page 41
OPERATION
Starting cooking
Use of the touch keys and slide control
Place the tip of your finger flat on a key or the slide control to achieve the best results. You do not
have to apply any pressure. The touch keys only react to the light pressure of a fingertip.
Do not operate the controls with any other objects.
Each key or slide control activation is followed by an audio signal.
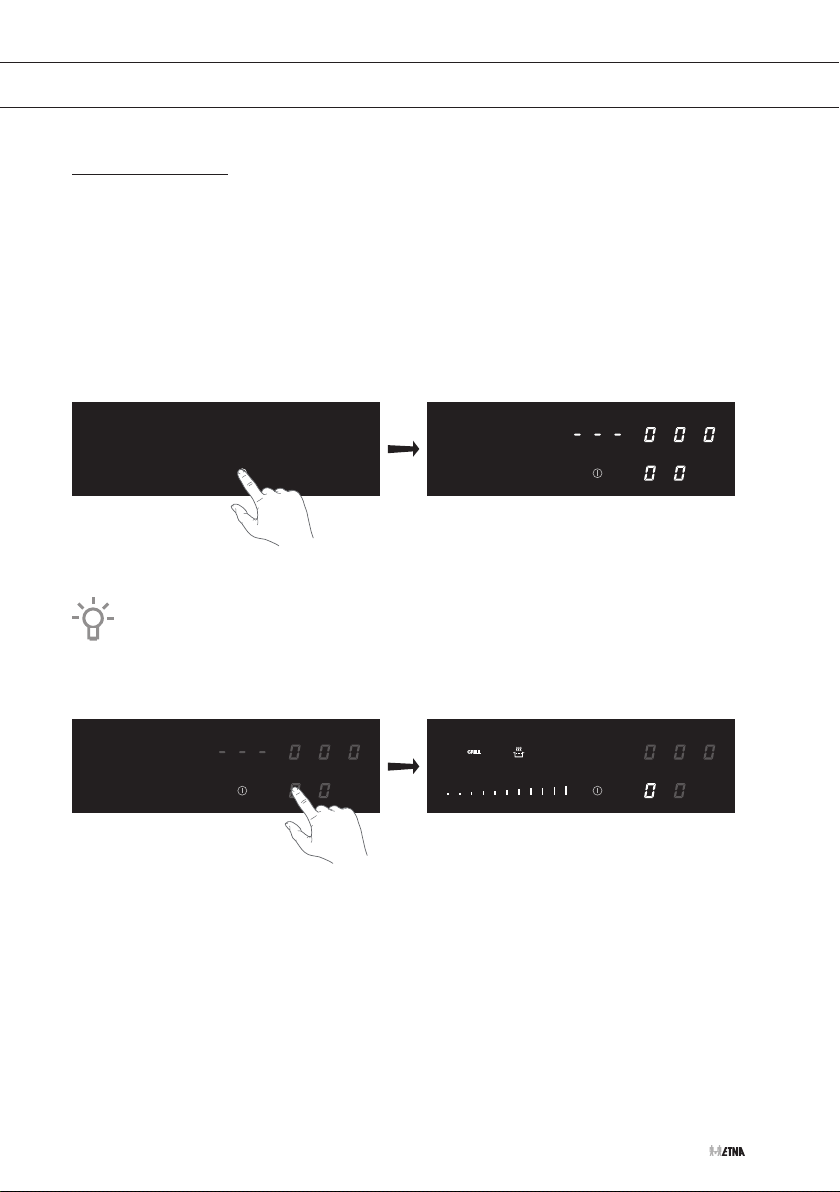
1. Touch and hold the On/off key for 2 seconds until you hear an audio signal.
▷ All cooking zone displays show ‘0’, indicating that the induction hob has entered the
standby mode.
2. Place a suitable pan on the cooking zone.
Make sure the bottom of the pan and the surface of the cooking zone are clean and dry.
3. The cooking zone automatically detects the pan.
▷ A single beep sounds.
▷ The ‘0’ of the selected cooking zone will light up clearly for approx. 10 seconds.
▷ To select another cooking zone, touch the cooking zone key for the desired cooking zone
or place a second pan on a cooking zone.
EN 13
Page 42
OPERATION
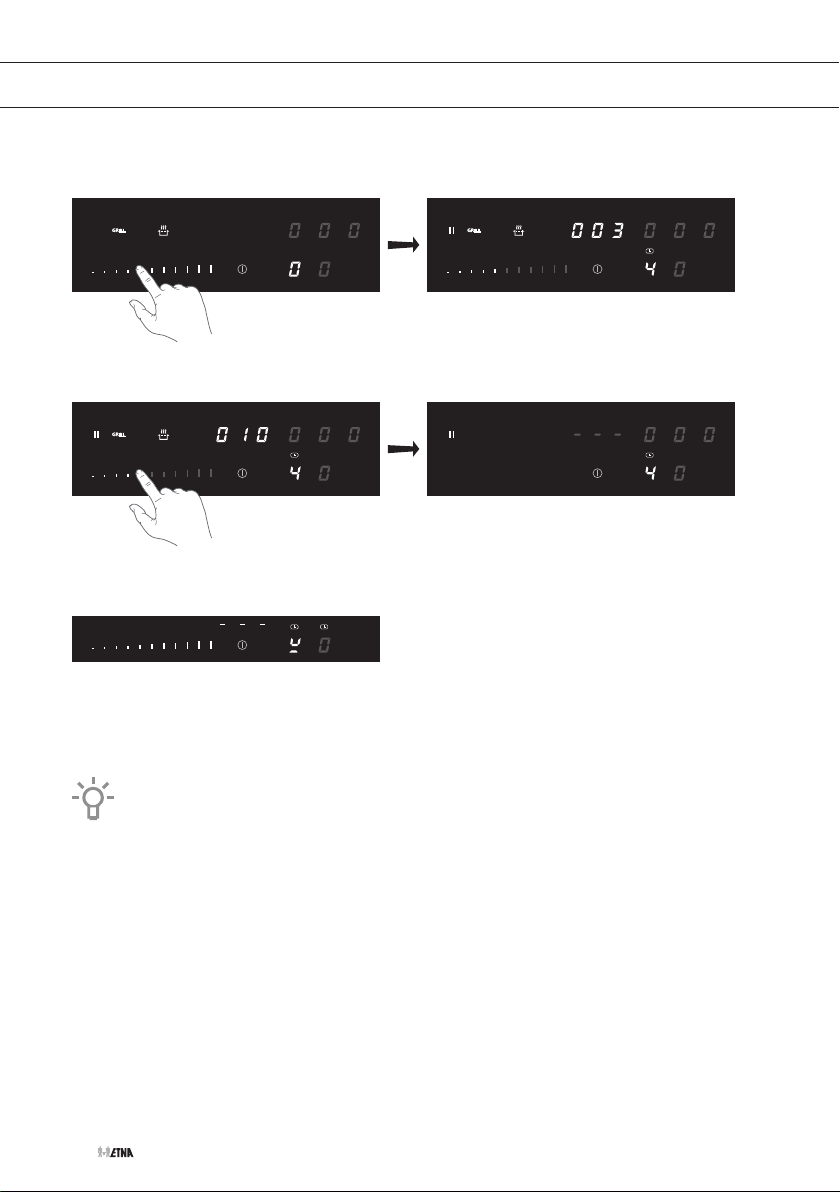
4. Within 10 seconds, set the power level by touching the slide control or the boost key.
▷ The cooking zone starts automatically at the level that has been set.
▷ Set a higher or lower power level with the slide control.
▷ After 10 seconds the slide control will switch off and the cooking time counter is hidden.
When the pan detection symbol appears in the display:
• you have not placed a pan on the correct cooking zone;
• the pan you’re using is not suitable for induction cooking;
• the pan is too small or not properly centred on the cooking zone.
▷ The cooking zone does not work until a suitable pan is placed on the cooking zone.
If the hob is not used for 20 seconds, it will shut off automatically.
EN 14
Page 43
OPERATION
Finishing cooking
1. Set the power level to ‘0’ to turn off the cooking zone.
2. Turn the induction hob off by touching the On/off key.
The ‘H’ symbol will appear in the display of the cooking zone which is too hot to touch.
The symbol disappears when the surface has cooled down to a safe temperature. It
can also be used as an energy saving function; if you want to heat other pans, use the
cooking zone that is still hot.
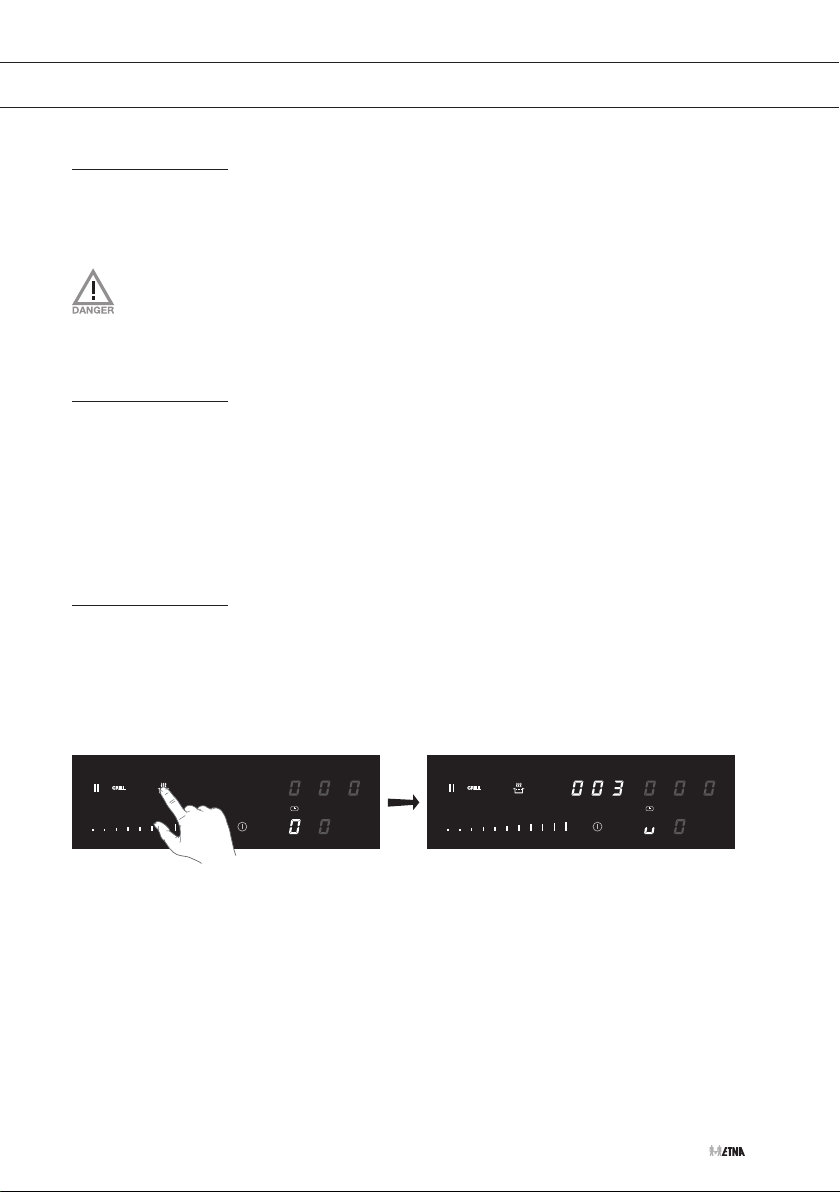
Switching on the automatic heat-up function
1. Switch on the hob and select the desired cooking zone .
2. Touch and hold the slide control for at least 3 seconds at the desired level.
▷ An ‘A’ appears in the display alternating with the selected power level. When the
automatic heat-up time has expired, the cooking zone will switch automatically to the
selected level, which will show permanently in the display.
3. To stop the automatic heat-up function, select the cooking zone and touch the slide control.
Switching on the keep warm function
1. Switch on the hob and place a suitable pan on one of the cooking zones.
2. Press the cooking zone key of the desired cooking zone.
▷ The ‘0’ of the selected cooking zone will light up clearly and a single beep sounds.
3. Touch the keep warm key.
▷ The keep warm symbol ‘u’ appears in the display. The keep warm function is selected.
EN 15
Page 44
OPERATION
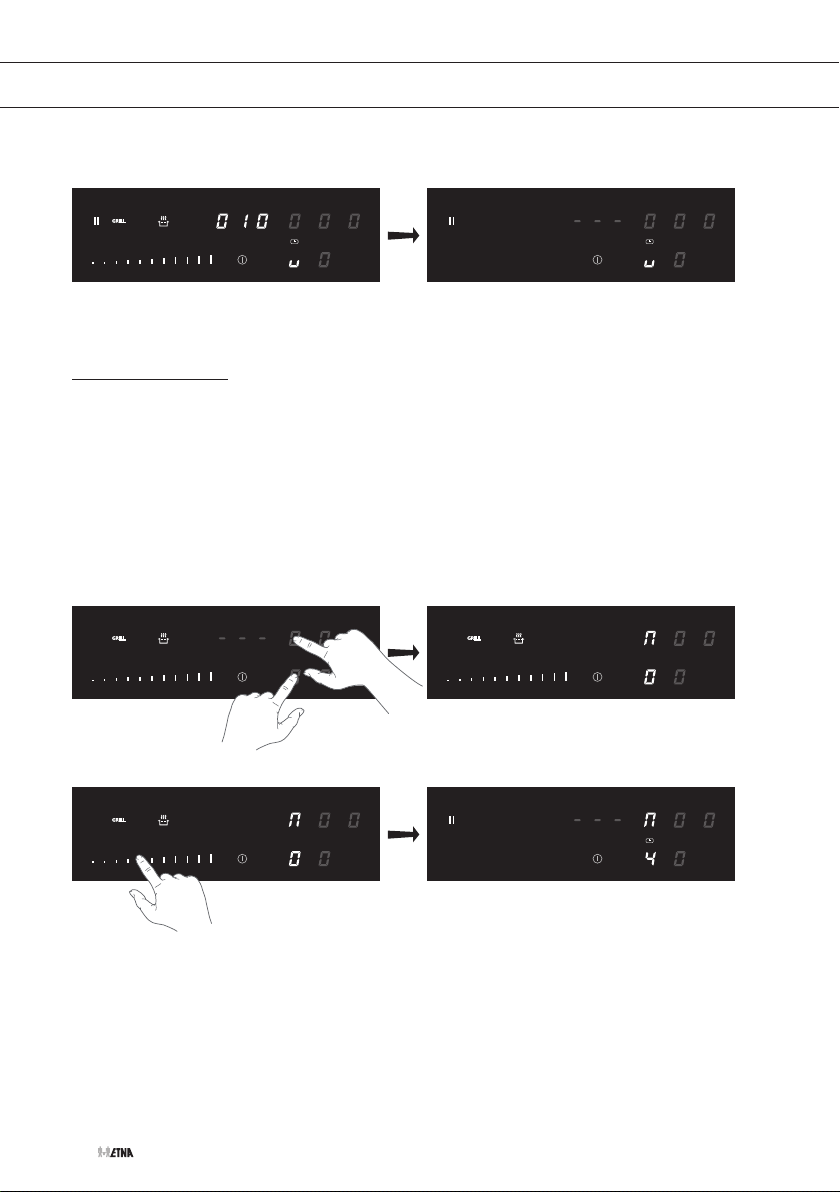
▷ After 10 seconds the slide control will switch off and the cooking time counter is hidden.
4. Set the power level to ‘0’ or touch the keep warm key to switch off the keep warm function.
Connecting the bridge induction cooking zones
Two bridge induction zones can be connected to each other. This creates one large zone that can
be used, for example, with a grill plate or a large fish pan on the same power. The pan must be
large enough to cover the centres of the front and rear cooking zones.
Connecting bridge induction cooking zones
1. Switch on the hob and put a large pan on two bridge induction cooking zones.
2. Simultaneously touch the left-hand side cooking zone keys.
▷ The rear zone display shows a connection symbol to indicate that the two cooking zones
are connected.
3. Use the slide control to set the desired cooking power for the two connected cooking zones.
4. To change the connected zone’s cooking power later, first touch the cooking zone key of the
front cooking zone.
EN 16
Page 45
OPERATION
Disconnecting bridge induction cooking zones
1. Simultaneously touch the cooking zone keys of the connected cooking zones.
▷ The connection symbol will disappear on the rear cooking zone display.
Timer control
Using the minute minder (count-down timer)
The hob is switched on and no cooking zone is selected.
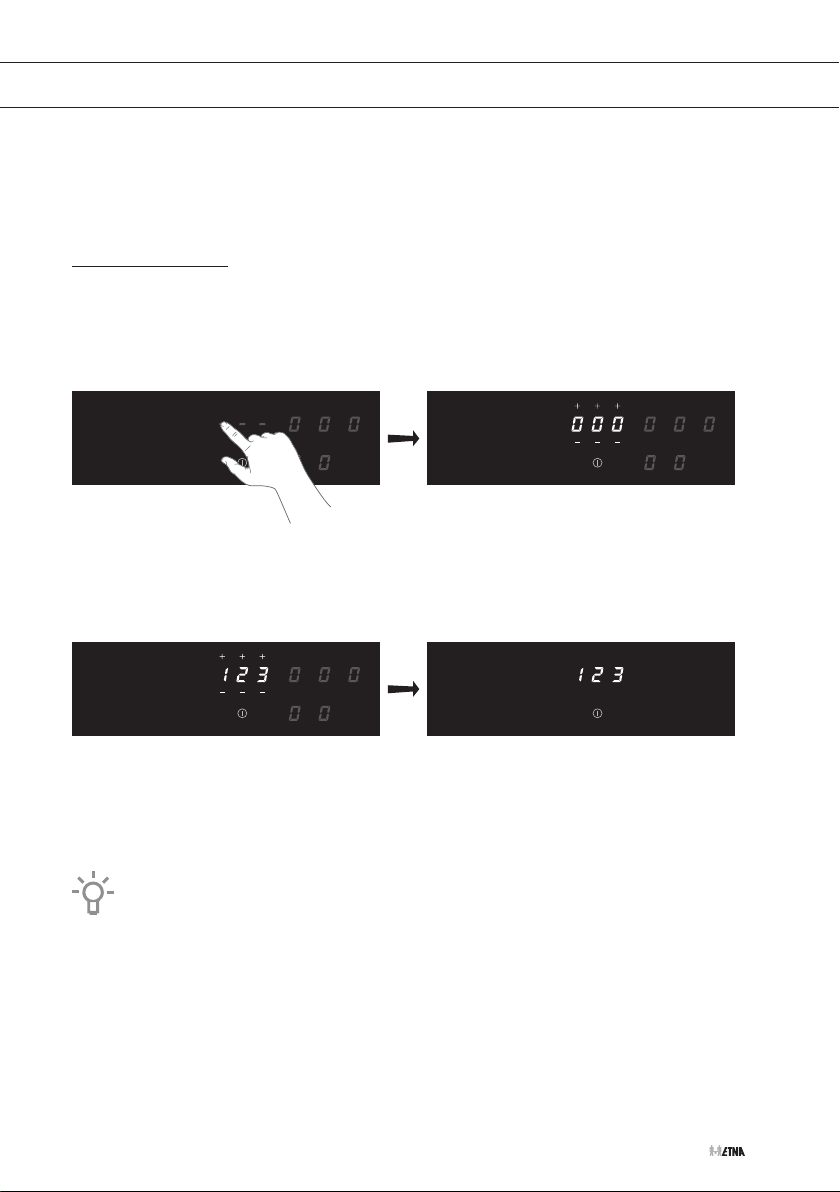
1. Touch the timer key to switch on the minute minder.
▷ ‘000’ flashes in the timer’s display.
2. Use the ‘+’ or ‘-’ key to set the desired time (from 1 minute to 9 hours and 59 minutes).
▷ The left position of the timer display shows the hours, the other positions the minutes.
▷ When the time is set, it starts counting down after 5 seconds.
▷ The timer display will show the remaining time.
▷ The last 10 minutes will be displayed in seconds.
▷ The timer flashes and the alarm beeps after the set time has passed.
3. Touch the timer display to stop the alarm.
▷ The alarm stops automatically after 2 minutes.
Touch the timer display and then touch the ‘-’ key to set the time to ‘000’ to switch off
the minute minder before the time has passed.
EN 17
Page 46
OPERATION
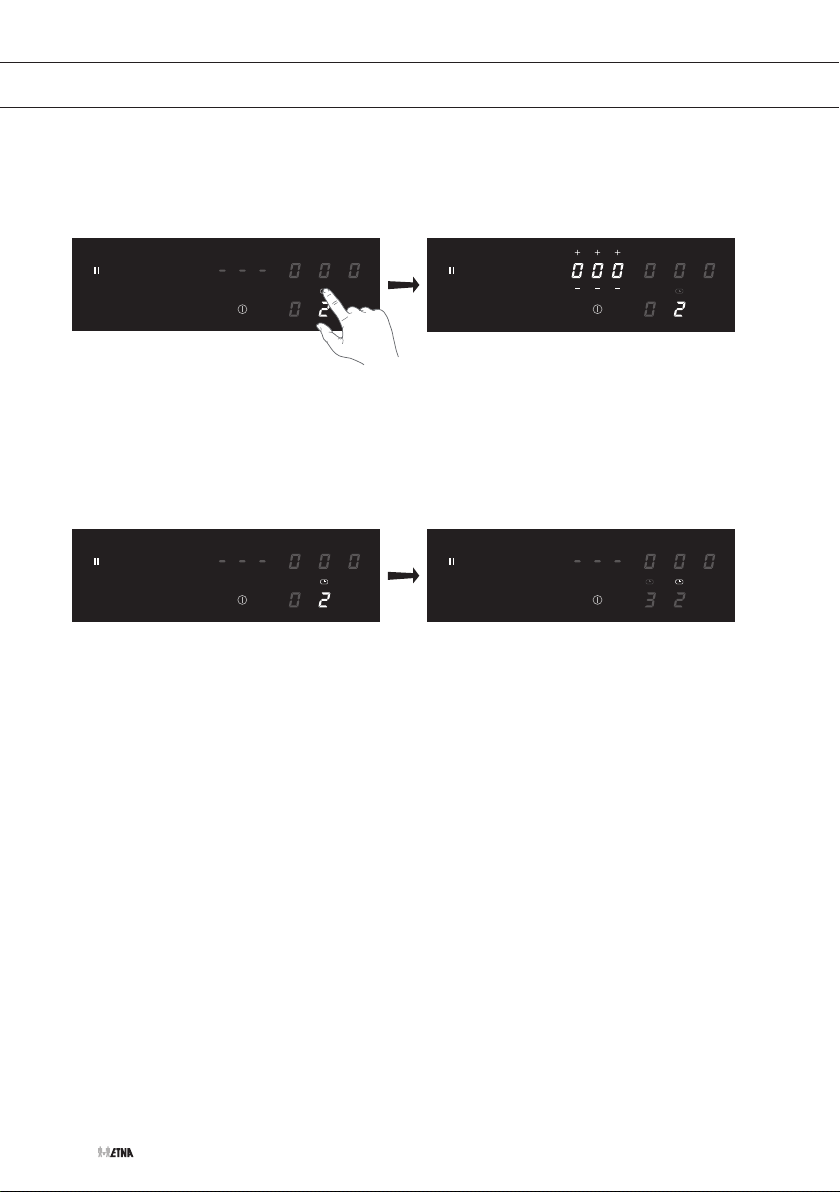
Using the cooking timer
1. Select the desired cooking zone and use the slide control to set the desired power level.
2. Touch the timer symbol above the corresponding cooking zone.
▷ The timer display shows ‘000’ and the selected timer symbol flashes.
3. Use the ‘+’ or ‘-’ key to set the desired time (from 1 minute to 1 hours and 59 minutes).
▷ The left position of the timer display shows the hours, the other positions the minutes.
▷ Set the value ‘0’ on the left display if you want to set less than 1 hour.
▷ When the time is set, it starts counting down after 5 seconds.
▷ Touch the corresponding cooking zone key to display the remaining time.
▷ The timer symbol of the active cooking timers lights up brightly.
▷ The selected cooking zone will switch off automatically once the set time has elapsed.
▷ The timer flashes and the alarm beeps after the set time has passed.
4. Touch any key to stop the alarm.
▷ Alarm stops automatically after 2 minutes.
Changing pre-set cooking time
The cooking time can be changed anytime during the operation.
1. Touch the timer symbol above the corresponding cooking zone for which you want to adjust the
cooking timer.
▷ A zone connected to the cooking timer can be identified by the brightly lit timer symbol
above the cooking zone display.
▷ The timer display shows the set time.
2. Use the slide control to change the time.
EN 18
Page 47
OPERATION
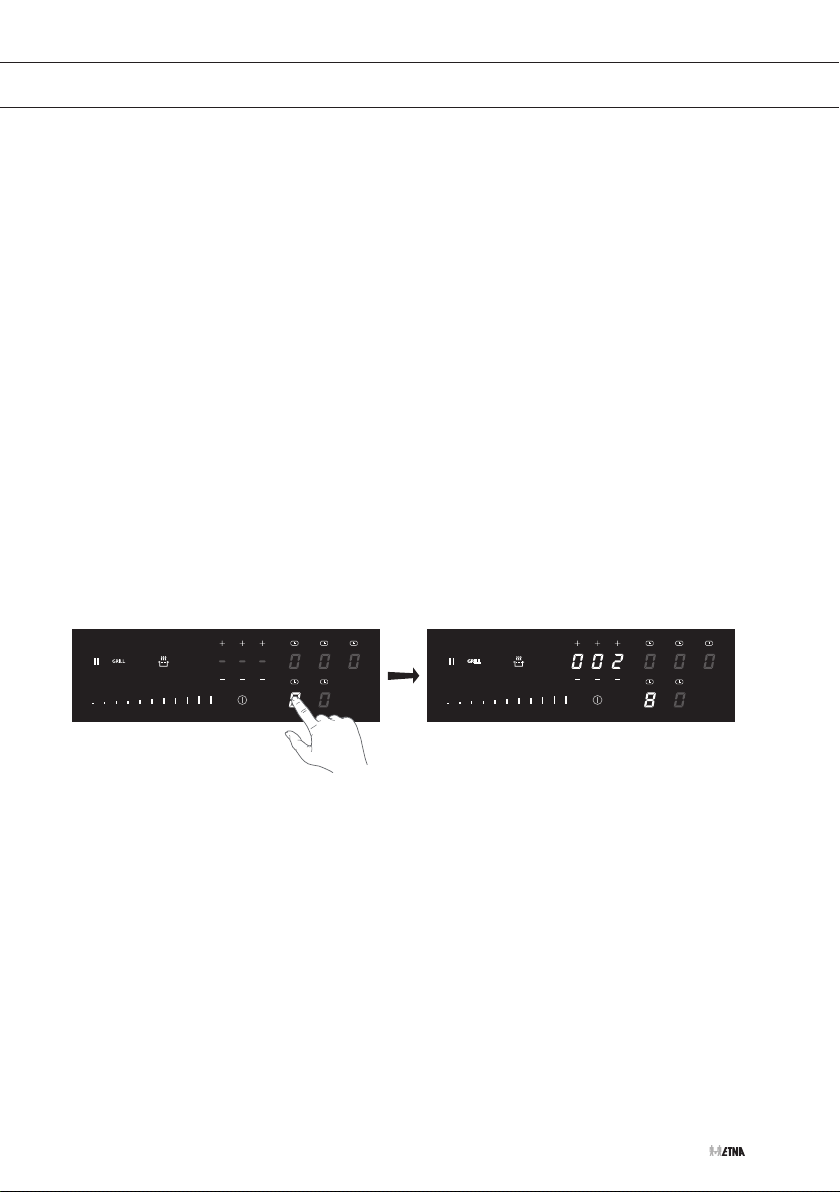
Checking remaining cooking time
1. Touch the cooking zone key to select the zone for which you want to see the remaining
time.
▷ A zone connected to the cooking timer can be identified by the brightly lit timer symbol
above the cooking zone display.
▷ The timer will display the remaining time of the selected cooking zone.
▷ During the last 10 minutes of countdown, remaining time will be displayed in seconds.
Switching off cooking timer
If you want to switch off the cooking timer before the end of pre-set time:
1. Touch the
you want to switch off the cooking timer.
▷ A zone connected to the cooking timer can be identified by the brightly lit timer symbol
2. Touch the ‘-’ key(s) to set the time to ‘000’.
▷ The timer symbol is now no longer lit brightly.
Using the cooking duration counter (count-up timer)
1. Select the desired cooking zone.
▷ The timer display shows the increasing cooking duration of the selected cooking zone.
▷ After 10 seconds, the cooking time disappears and ‘---’ appears.
timer symbol above the corresponding cooking zone
above the cooking zone display.
to select the zone for which
2. To stop the cooking time counter, switch off the cooking zone.
EN 19
Page 48
OPERATION
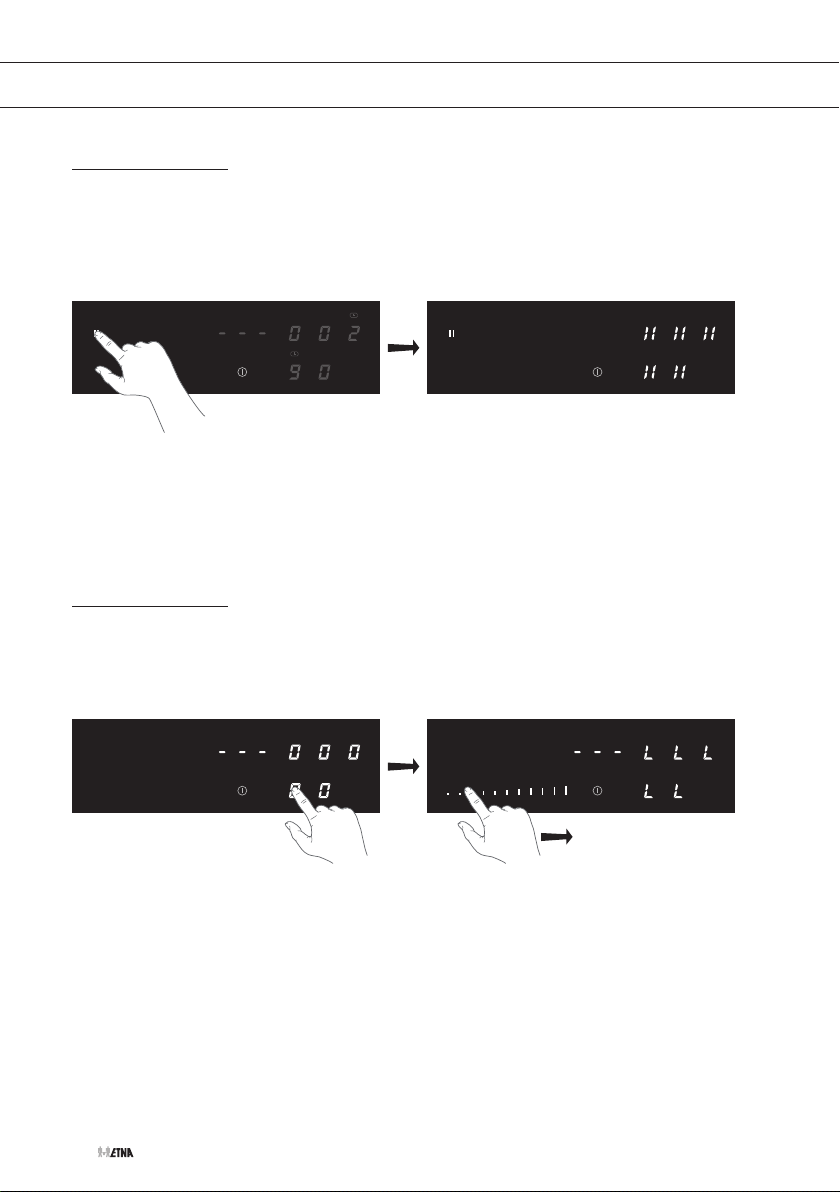
Pause cooking
This function temporarily stops the cooking activity (max. 10 minutes); timers and counters are
also paused.
1. Touch and hold the pause key for 2 seconds.
▷ The pause symbol is shown.
2. Touch and hold the pause key for 2 seconds again until a beep sounds.
▷ The pause key flashes.
3. Touch the cooking zone key and the cooking process resumes.
▷ The hob will automatically switch off after 10 minutes if the pause function is not
switched off in the meantime.
Child lock
1. Switch on the hob.
2. Touch and hold a cooking zone key for 3 seconds until a beep sounds. Then move the slide
control from left to right within 10 seconds.
▷ The ‘L’ symbol appears in all displays.
▷ The hob is now locked. After 10 seconds, the hob will switch off automatically.
3. To unlock, switch on the hob and touch and hold a cooking zone key for 3 seconds until a
beep sounds. Then move from right to left over the slide control.
▷ The ‘L’ symbol disappears in all displays, and the ‘0’ or ‘H’ symbol appears.
▷ The child lock is now de-activated.
EN 20
Page 49
OPERATION
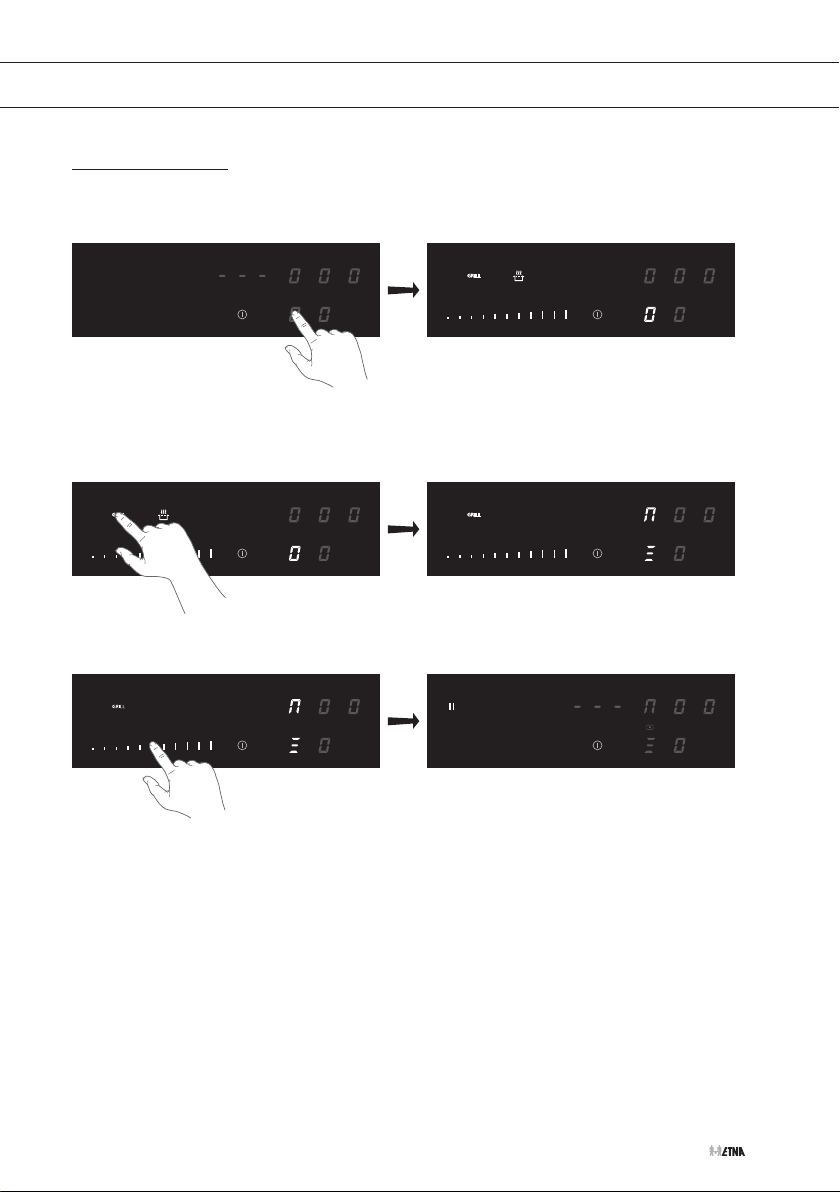
Grill function
1. Switch on the hob and put a grill plate on two bridge induction cooking zones.
2. Touch the cooking zone key for the front-left zone.
3. Then touch the grill key.
▷ The connection symbol appears on the rear cooking zone display and the grill symbol on
the front cooking zone display.
4. Set the power level for the grill by touching the slide control.
▷ The grill function is active.
Changing grill setting or switching grill function off
1. Touch the left-front cooking zone key and change the grill setting by touching the slide
control or then touch the grill key to swtich off the grill function.
EN 21
Page 50

OPERATION
Recall function
If the hob was switched off accidentally with the On/off key, all settings can be restored using the
recall function.
1. Touch the On/off key within 6 seconds and hold it for 2 seconds.
▷ The pause symbol flashes.
2. Now immediately touch the pause key.
▷ The previous settings are active again.
EN 22
Page 51
SETTINGS
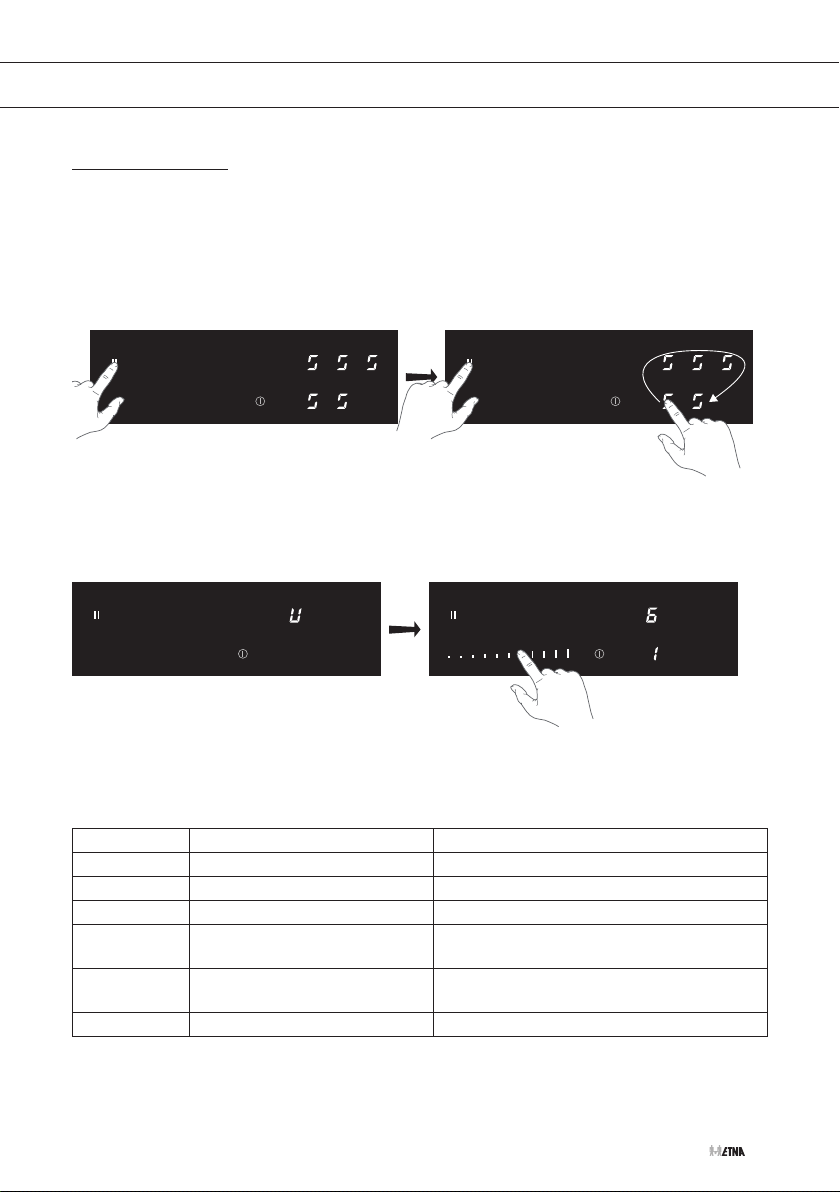
Changing user settings
1. Touch the On/Off key to switch on the hob. Touch the On/off key again within 3 seconds.
▷ The hob goes into standby.
▷ The pause key flashes (maximum 60 seconds).
2. Touch and hold the pause key.
3. Now touch each cooking zone key, starting with the left-front cooking zone button and
proceeding in the clockwise direction.
▷ The menu function appears in the display for the left-front cooking zone. ‘U’ and a value
flash alternately on the display.
4. Select the setting you want to change using the slide control.
▷ The menu function value appears in the display for the left-front cooking zone.
5. Touch and hold the On/off key for 2 seconds to save the settings and exit the menu.
▷ Touch the pause key to exit the menu without saving the changes.
The table below shows the available settings.
Menu value Function Value
U2 Volume for keys 1 - 9 (default: 9)
U3 Volume for audio signal 1 - 9 (default: 9)
U4 Brightness of display 0 - 9 (default: 0, brightest)
U5 Timer animation 0: Timer animation off
1: Timer animation on (default)
U6 Automatic pan detection 0: Automatic pan detection off
1: Automatic pan detection on (default)
U7 Length of audio signal 0 - 2 (default: 0)
EN 23
Page 52
INSTALLATION
Power limiter
Setting the power limiter should only be carried out by a registered and qualified
installer. Please read the safety regulations and the installation instructions
carefully.
The hob is equipped with a power limiter. If the total power of operating cooking zones exceeds
the maximum available amount of power, the power is automatically reduced. The display of the
cooking zone who is being reduced in its power is first flashing; the level is then automatically
reduced to the highest available power.
• The limiter is set at 7400 W by the factory, but it is possible to change it to 1400 W, 2300 W,
3000 W, 3700 W, 4600 W, 6000 W or 10400 W.
Power limiter configuration
Make sure there are no pots or pans on the hob before you start!
1. Disconnect the appliance from the main power supply by removing the power connector
from the socket, by removing the fuse or turning the circuit breaker off.
2. Reconnect the appliance to the power supply.
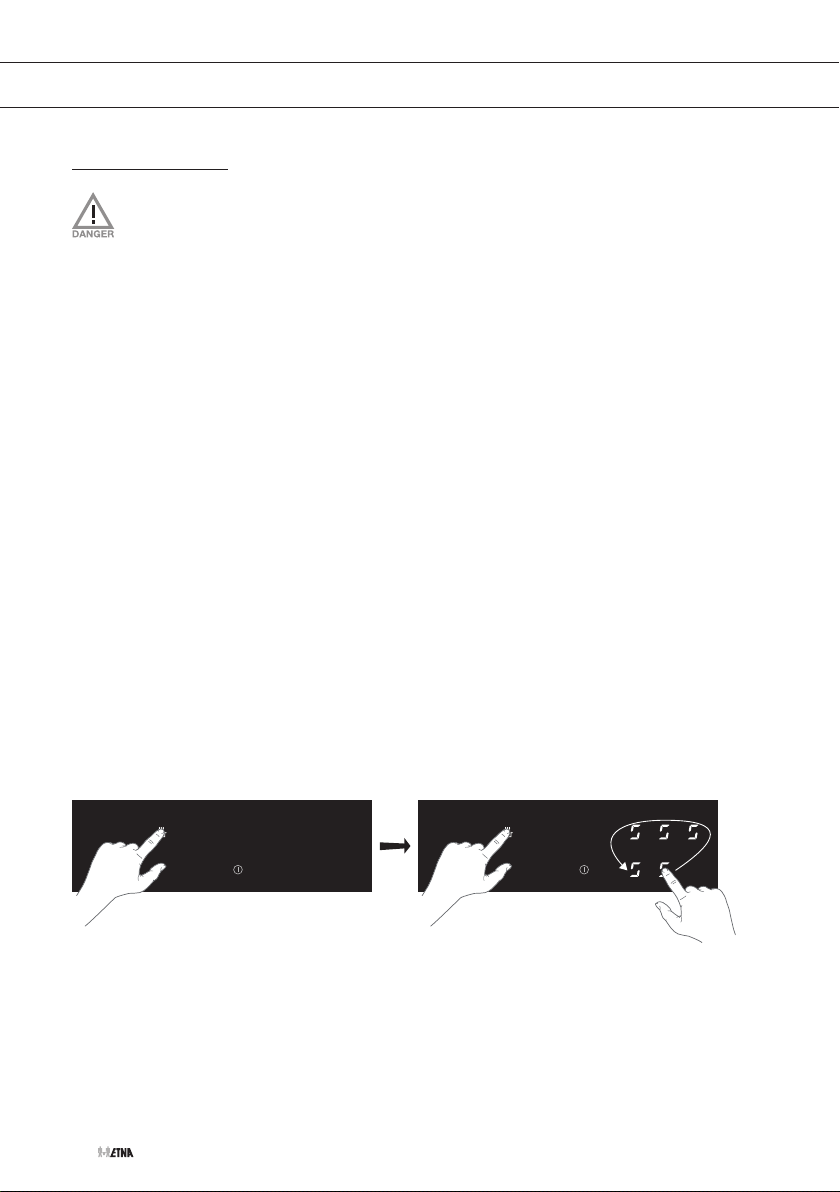
▷ The keep warm key is flashing.
• Perform, within 2 minutes after reconnecting the hob to the power supply, the
following steps.
• Make sure all cooking zones are switched off.
3. Touch and hold the keep warm key.
4. Now touch each cooking zone key, starting with the middle-front cooking zone button and
proceeding in the anticlockwise direction.
EN 24
Page 53
INSTALLATION
▷ A double beep indicates an error in the operation. If this happens, repeat the procedure
from step 3.
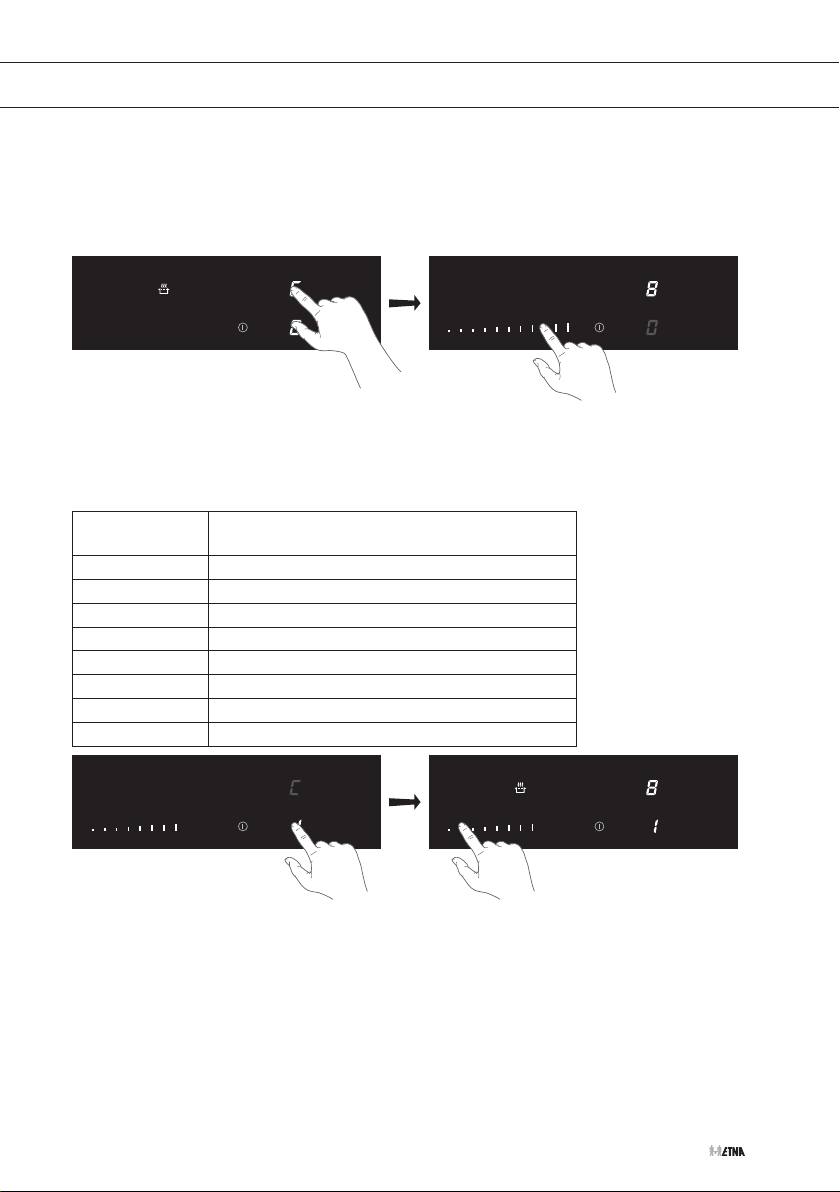
▷ ‘C’ and ‘0’ flash alternately on the display for the left-rear cooking zone.
▷ The configuration value appears in the left-front cooking zone display.
5. Touch the left-rear cooking zone key and choose ‘8’ using the slide control.
▷ ‘C’ and ‘8’ flash alternately on the display for the middle-rear cooking zone.
6. Touch the left-front cooking zone key and select the desired power limitation with the slide
control.
Slide control
position
0 10400 W
1 7400 W
2 6000 W
3 4600 W
4 3700 W
5 3000 W
6 2300 W
7 1400 W
Setting power limitation:
7. Now touch and hold the On/off key until all the display segments disappear.
▷ The hob is now ready to be used with the selected power limiter active.
EN 25
Page 54
MAINTENANCE
Cleaning
Set the child lock before you start cleaning the hob.
We recommend that you clean the appliance after each use. This prevents that over
cooked food can damage the glass surface.
Daily cleaning
1. Use a damp cloth and a mild cleaning agent (washing-up liquid) to clean the appliance.
2. Dry the appliance with a paper towel or a cloth.
Heavily polluted glass
1. Immediately remove any food remains, burned grease, sugar or stubborn stains from the
hob using a scraper, even if the hob is still hot! Sugar and/or other food related remains may
permanently damage the glass ceramic surface.
2. After you have removed the stubborn stains from the glass, use the steps of the daily
cleaning to clean the hob.
3. If the cleaning result is not at your satisfaction you can repeat the above cleaning steps as
often as needed.
Do not use abrasive cleaning agents, because they can cause scratches.
Do not use steelwool, scourers or any type of sharp objects to clean the appliance.
The hob can be still very hot due to the cooking process! Do not touch the surface
directly. If desired use oven gloves to prevent burning while cleaning directly after
cooking.
EN 26
Page 55
TECHNICAL SPECIFICATIONS
Information according regulation (EU) 66/2014
Measurements according EN60350-2
Model identification KIF880DS / KIF880ZT
Type of hob Induction hob
Number of electric cooking zones and/or areas 5
Heating technology Induction cooking zones
For circular electric cooking zones: diameter of useful surface
area per electric heated cooking zone in cm
Energy consumption per cooking zone or area calculated perkg
electric hob
) in Wh/kg
(EC
For non-circular cooking zones or areas: lenght and width of
useful surface area per electric heated cooking zone or area
L/W in cm
Energy consumption per cooking zone or area calculated perkg
electric hob
) in Wh/kg
electric hob
) in
(EC
Energy consumption for the hob calculated per kg (EC
Wh/kg
Model identification KIF890ZT
Type of hob Induction hob
Number of electric cooking zones and/or areas 5
Heating technology Induction cooking zones
For circular electric cooking zones: diameter of useful surface
area per electric heated cooking zone in cm
Energy consumption per cooking zone or area calculated perkg
electric hob
) in Wh/kg
(EC
For non-circular cooking zones or areas: lenght and width of
useful surface area per electric heated cooking zone or area
L/W in cm
Energy consumption per cooking zone or area calculated perkg
electric hob
) in Wh/kg
electric hob
) in
(EC
Energy consumption for the hob calculated per kg (EC
Wh/kg
23 14.5 17.5
182.6 170.5 162.7
2x
19.5x20.5
159.5
166.9
27.5 14.5 17.5
196.5 170.5 162.7
2x
19.5x20.5
159.5
169.7
EN 27
Page 56
TROUBLESHOOTING
General
If you notice a crack in the glass top (however small), switch the hob off immediately, unplug the
hob, turn off the (automatic) fuse switch(es) in the meter cupboard or, in the event of a permanent
connection, set the switch in the power supply lead to zero.) Contact the service department.
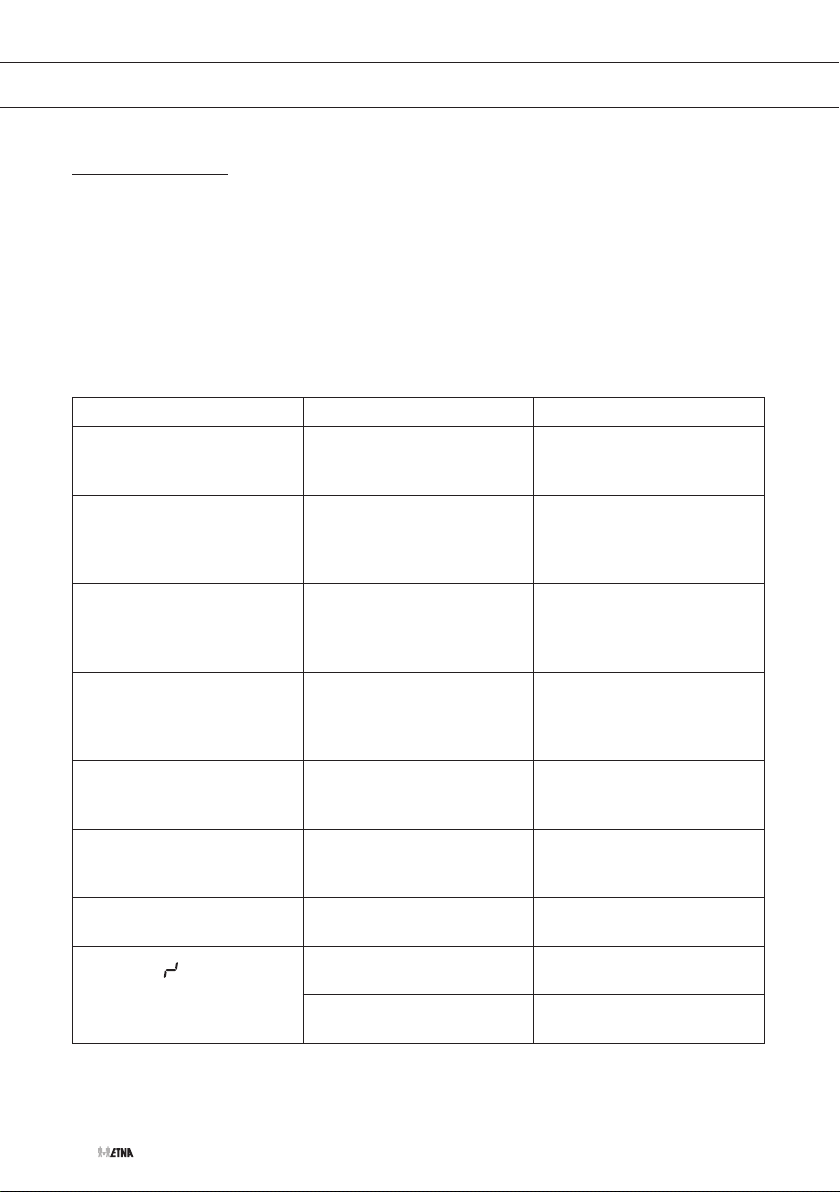
Troubleshooting table
If the appliance does not work properly, this does not always mean that it is defective.
Try to deal with the problem yourself first by checking the points mentioned below or
check for more information the website.
Symptom Possible cause Solution
The display lights up when
the hob is activated for the
first time.
A slight smell is noticeable
the first few times the hob
is used.
The pans make a noise while
cooking.
Circle of pan bottom remains
visible after cleaning.
A cooking zone suddenly
stops working and you hear
a signal.
The hob is not working
and nothing appears in
the display.
A fuse blows as soon as the
hob is switched on.
Error code
or Er03
This is the standard
set-up routine.
The new appliance is
heating up.
This is caused by the energy
flowing from the hob to the
saucepan.
Contaminated pan bottom
used on the cooking zone.
The pre-set time has ended. Switch off the bleep by
There is no power supply
due to a defective cable or
a faulty connection.
The hob has been wrongly
connected.
The control panel is dirty or
has water lying on it.
You have touched two or more
keys at the same time.
Normal operation. Wait 2
minutes before operating the
hob.
This is normal and will
disappear once it has been
used a few times. Ventilate
the kitchen.
At high settings this is
perfectly normal for some
pans. It will not damage either
the pans or the hob.
Clean the induction hob with
a ceramic hob cleaner and
remove the dirt / grease from
the pan bottom.
touching the timer key.
Check the fuses and the
electric switch and the power
socket.
Check the electrical
connections.
Clean the control panel.
Do not operate more than one
key at the same time.
EN 28
Page 57

TROUBLESHOOTING
Symptom Possible cause Solution
Error code E2 or EH
Error code E5 or E6
Error code E8
Other error code
Appliance is too hot. Let the appliance cool down.
Power supply failure/Power
voltage wrong.
The air inlet is obstructed. Check air inlet.
Other defect. Contact the service
Let the power connection
checked by an installer.
department.
EN 29
Page 58
ENVIRONMENTAL ASPECTS
Disposal of packaging and appliance
In the manufacturing of this appliance durable materials were used. Make sure to dispose of
this equipment responsibly at the end of its lifecycle. Ask the authorities for more information
regarding this.
The appliance packaging is recyclable. The following may have been used:
• cardboard;
• polythene film (PE);
• CFC-free polystyrene (PS hard foam).
Dispose of these materials in a responsible manner and in accordance with government regulations.
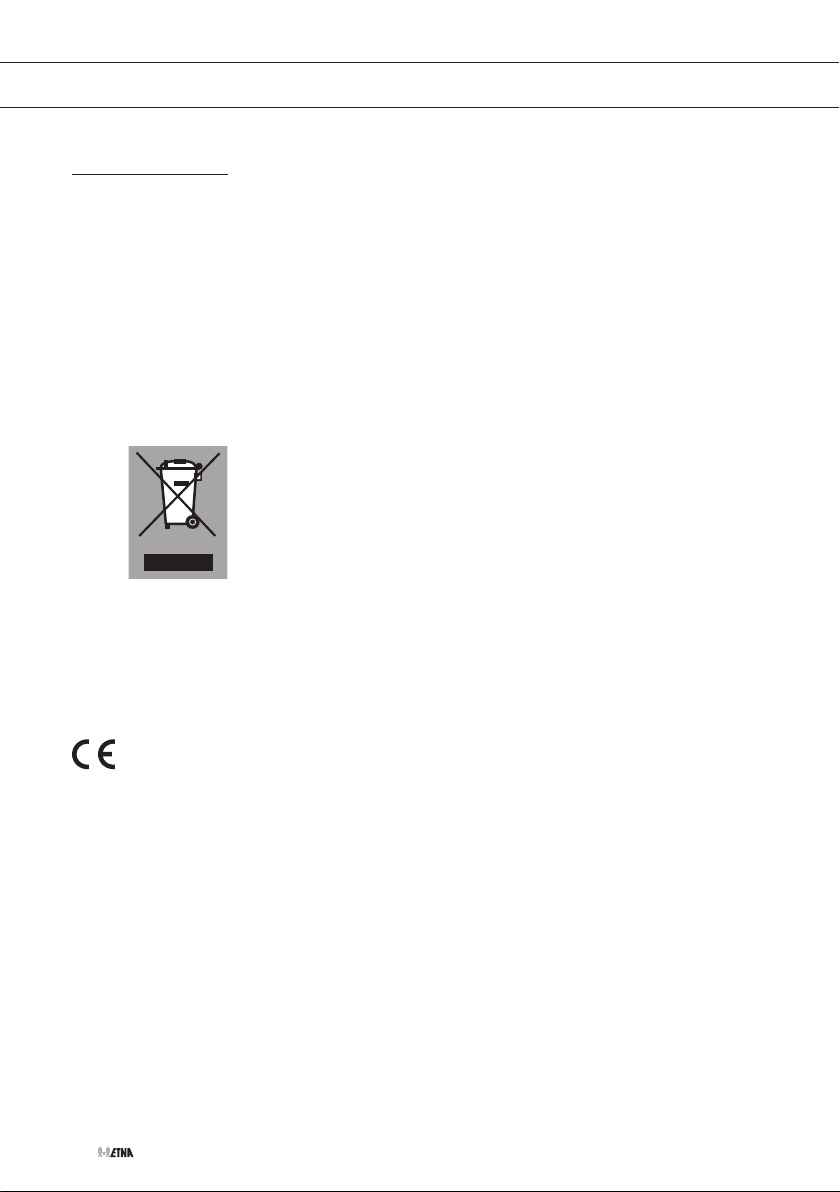
As a reminder of the need to dispose of household appliances
separately, the product is marked with the symbol of a crossed-out
wheeled dustbin. This means that at the end of its working life, the
product must not be disposed of as urban waste. It must be taken to
a special local authority differentiated waste collection centre or to
adealer providing this service.
Disposing of a household appliance separately avoids possible
negative consequences for the environment and health deriving from
inappropriate disposal and enables the constituent materials to be
recovered to obtain significant savings in energy and resources.
Declaration of conformity
We declare that our products meet the applicable European Directives, Decisions and
Regulations and the requirements listed in the standards referenced.
EN 30
Page 59

EN 31
Page 60
Het toestel-identificatieplaatje bevindt zich aan de
onderkant van het toestel.
The appliance identification card is located on the bottom of the appliance.
Plak hier het toestel-identificatieplaatje.
Stick the appliance identification card here.
Houd, wanneer u contact opneemt met de serviceafdeling, het complete
typenummer bij de hand.
When contacting the service department,
have the complete type number to hand.
Adressen en telefoonnummers van de serviceorganisatie vindt u op de
garantiekaart.
You will find the addresses and phone numbers of the service organisation
on the guarantee card.
*838732*
838732
838732 / VER 1 / 24-07-2020
 Loading...