

Page 1

GEBRUIKSAANWIJZING
INSTRUCTIONS FOR USE
GASKOOKPLAAT
GAS HOB
KGV158WIT
KGV358H
KGV358RVS
KGV358WIT
KGV558WRVS
KGV558WIT
Page 2
NL Handleiding NL 3 - NL 10
EN Manual EN 3 - EN 10
Gebruikte pictogrammen - Pictograms used
Belangrijk om te weten - Important information
Tip
Page 3
BEDIENING
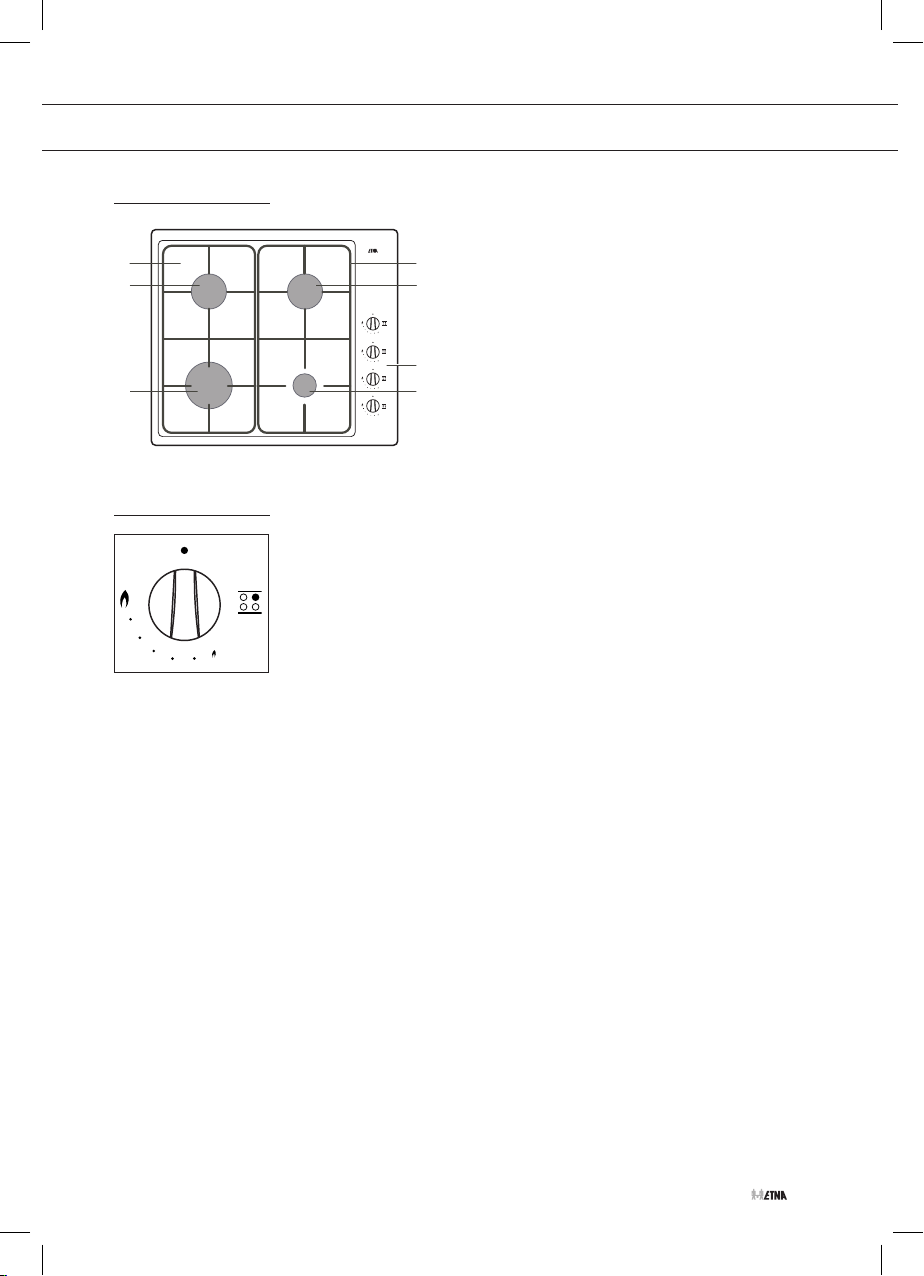
Beschrijving
03 04
02 02
01
Ontsteken en instellen
1. Sterkbrander of wokbrander (KGV558W)
2. Normaalbrander
3. Vangschaal
4. Pandragers geëmailleerd of gietijzer (KGV558W)
5. Bedieningspaneel
05
6. Sudderbrander
06
2
3
1. Zone aanduiding
2. 0-stand
1
3. Volstand
4. Kleinstand
4
Elke brander kan traploos worden geregeld tussen vol- en kleinstand.
• Druk de bedieningsknop in en draai deze linksom. Ontsteek de brander
met een lucifers of een aansteker. De vlam is traploos in te stellen, van
groot naar klein.
• Houd de bedieningsknop minimaal 3 seconden volledig ingedrukt tussen
volstand en kleinstand. De thermokoppelbeveiliging is geactiveerd.
Elektrische vonkontsteking (indien van toepassing)
• Druk de bedieningsknop in en draai hem linksom. De brander
ontsteekt. De vlam is traploos in te stellen, van groot naar klein.
• Mocht de brander na herhaalde pogingen niet ontsteken, controleer
dan of de branderdop goed op z’n plaats ligt.
Vlambeveiliging
• De vlambeveiliging zorgt ervoor dat de gastoevoer gesloten wordt
als de vlam tijdens het kookproces dooft.
• Houd de bedieningsknop minimaal 5 seconden volledig ingedrukt tussen
volstand en kleinstand. De thermokoppelbeveiliging is nu geactiveerd.
NL 3
Page 4
BEDIENING
Gebruik
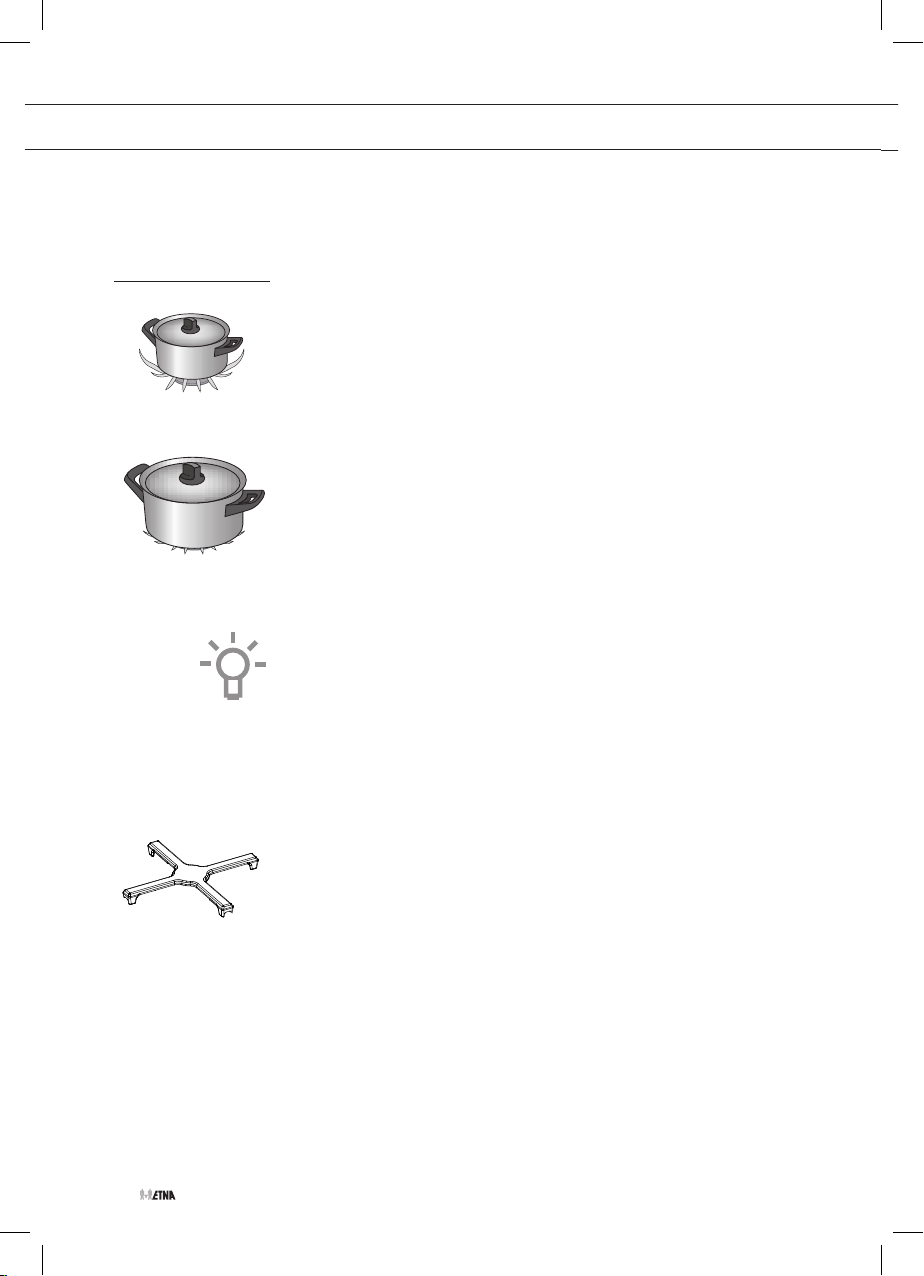
fout
goed
Lees de separate veiligheidsvoorschriften
voordat u het toestel in gebruik neemt!
Pannen
• Zorg er altijd voor dat de vlammen onder de pan blijven. Als
vlammen om de pan heen spelen gaat veel energie verloren.
Bovendien kunnen de handgrepen dan te heet worden.
• Gebruik geen pannen met een kleinere bodemdiameter dan 12 cm.
Kleinere pannen staan niet stabiel.
De aanbevolen panbodem diameters zijn:
• sterkbrander minimaal 24 cm
• normaalbrander minimaal 20 cm
• sudderbrander minimaal 12 cm
Tip
Kook met een deksel op de pan en u bespaart tot 50% energie.
Schone pannen nemen beter warmte op.
NL 4
Pandrager
Plaats de pandragers rechtstandig naar beneden, zonder over de
vangschaal te schuiven. Positioneer de pandragers op de vangschaal
met behulp van de positioneernokken.
Verkleinrooster
Het verkleinrooster dat is meegeleverd of als accessoire verkrijgbaar is
zorgt ervoor dat u extra kleine pannen kunt gebruiken.
Wokring
De wokring dat ten behoeve van de wokbrander is meegeleverd of als
accessoire verkrijgbaar is zorgt voor extra stabiliteit bij een wok met
een ronde bodem.
Page 5

ONDERHOUD
Onderhoud
Reinig het toestel dagelijks met een sopje van afwasmiddel of
allesreiniger. Gebruik niet te veel vocht, omdat dit de brander of
ventilatieopeningen binnen kan dringen.
• Hardnekkige vlekken op email verwijderen met een vloeibaar
schuurmiddel of kunststof schuursponsje. Gebruik nooit
schuurpoeders, agressieve reinigingsmiddelen en groene
schuursponsjes.
• Schuursponsjes bevatten schuurmiddelen die krassen veroorzaken
op roestvrijstaal. Het roestvrijstaal is voorzien van een structuur. Bij
schuren of polijsten ontstaan (glanzende) vlekken in het oppervlak.
Deze schades vallen niet onder de garantie.
Let op:
Hete branderdoppen en pandragers nooit onderdompelen in koud
water. Door de sterke afkoeling kan het email beschadigd raken.
Raadpleeg de website www.etnaservice.nl voor aanvullende
onderhouds- en reinigingsinstructies!
NL 5
Page 6

INSTALLATIE
Algemeen
Dit toestel mag alleen door een erkend gas-technisch installateur
aangesloten worden.
Let op:
Dit toestel wordt niet aangesloten op een rookgas-afvoerkanaal. Zorg
dus voor voldoende ventilatie.
Elektrische aansluiting
230 V - 50 Hz.
Dit toestel voldoet aan de voorschriften van de richtlijn 89/336/EEG
inzake elektro-magnetische compatibiliteit.
• De elektrische aansluiting moet voldoen aan de nationale en lokale
voorschriften. Voor Nederland is dit onder andere NEN 1010.
• Stopcontact en stekker moeten te allen tijde bereikbaar blijven.
Gasaansluiting: RC 1/2” (ISO 228/RC 1/2”)
• De gasaansluiting moet voldoen aan de nationale en lokale
voorschriften. Voor Nederland zijn dit onder andere de GAVO-
voorschriften (NEN 1078).
• Deze bepalen onder andere dat:
– uitsluitend goedgekeurde materialen gebruikt mogen worden.
Let op:
De gassoort en het land waarvoor het toestel is ingericht staan vermeld
op het gegevensplaatje.
NL 6
• Wij adviseren de kookplaat aan te sluiten door middel van een
speciaal daarvoor bestemde veiligheidsslang. In alle gevallen moet
er voor het toestel een aansluitkraan geplaatst worden op een
makkelijk bereikbare plaats.
Page 7
INSTALLATIE
Let op:
Wanneer de kookplaat wordt geplaatst naast een hoge kast of een
andere wand van brandbaar materiaal, houd dan minimaal 100 mm
afstand tussen de kookplaat en deze wanden. Houd ook een afstand
van minimaal 650 mm aan tussen de kookplaat en een eventueel boven
de kookplaat geplaatste afzuigkap.
• Alvorens het toestel in gebruik te nemen de aansluitingen met
zeepsop controleren op gasdichtheid.
• Controleer na installatie van het toestel of de branders goed
werken; het vlambeeld moet regelmatig en stabiel zijn in volstand,
terwijl de branders niet mogen uitgaan in kleinstand.
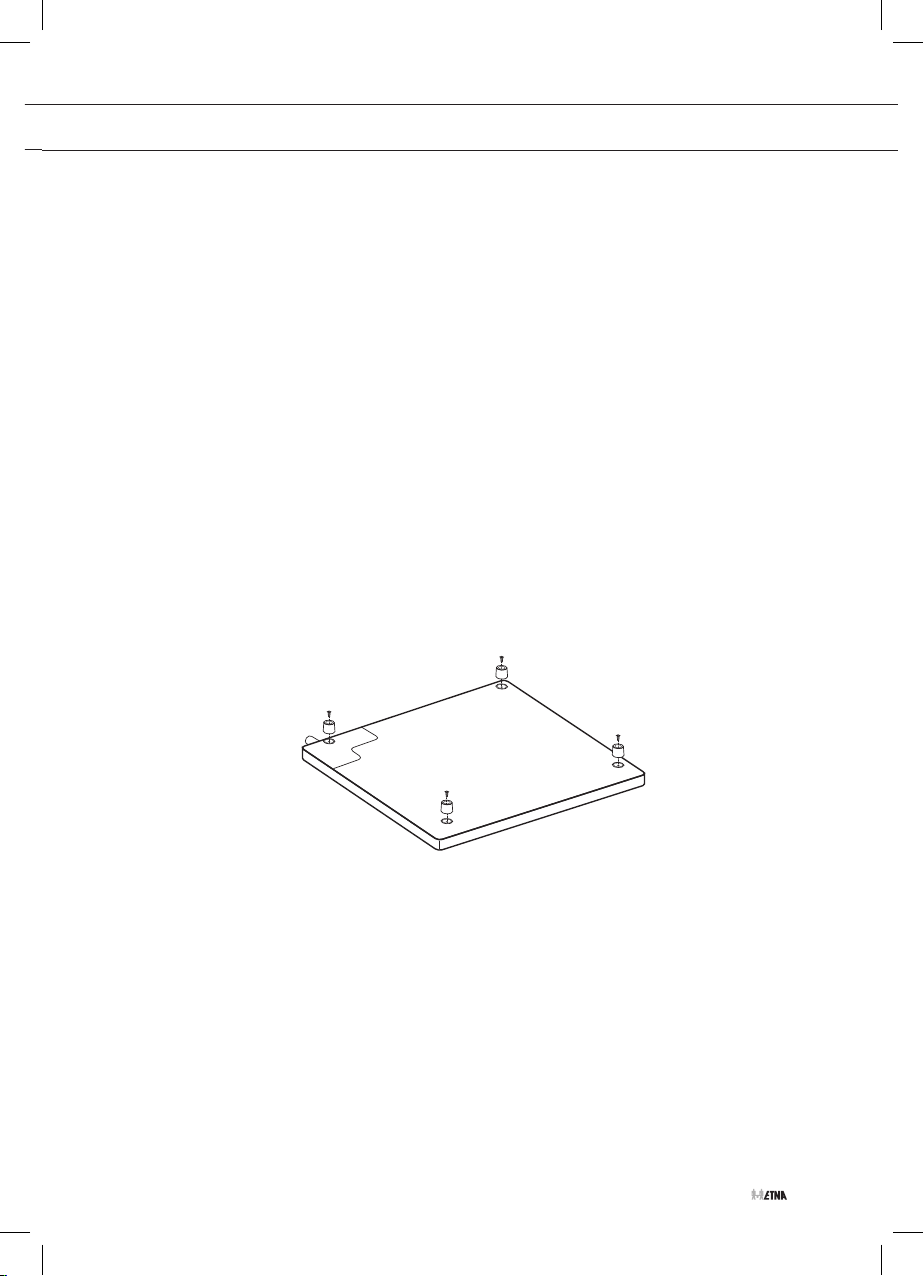
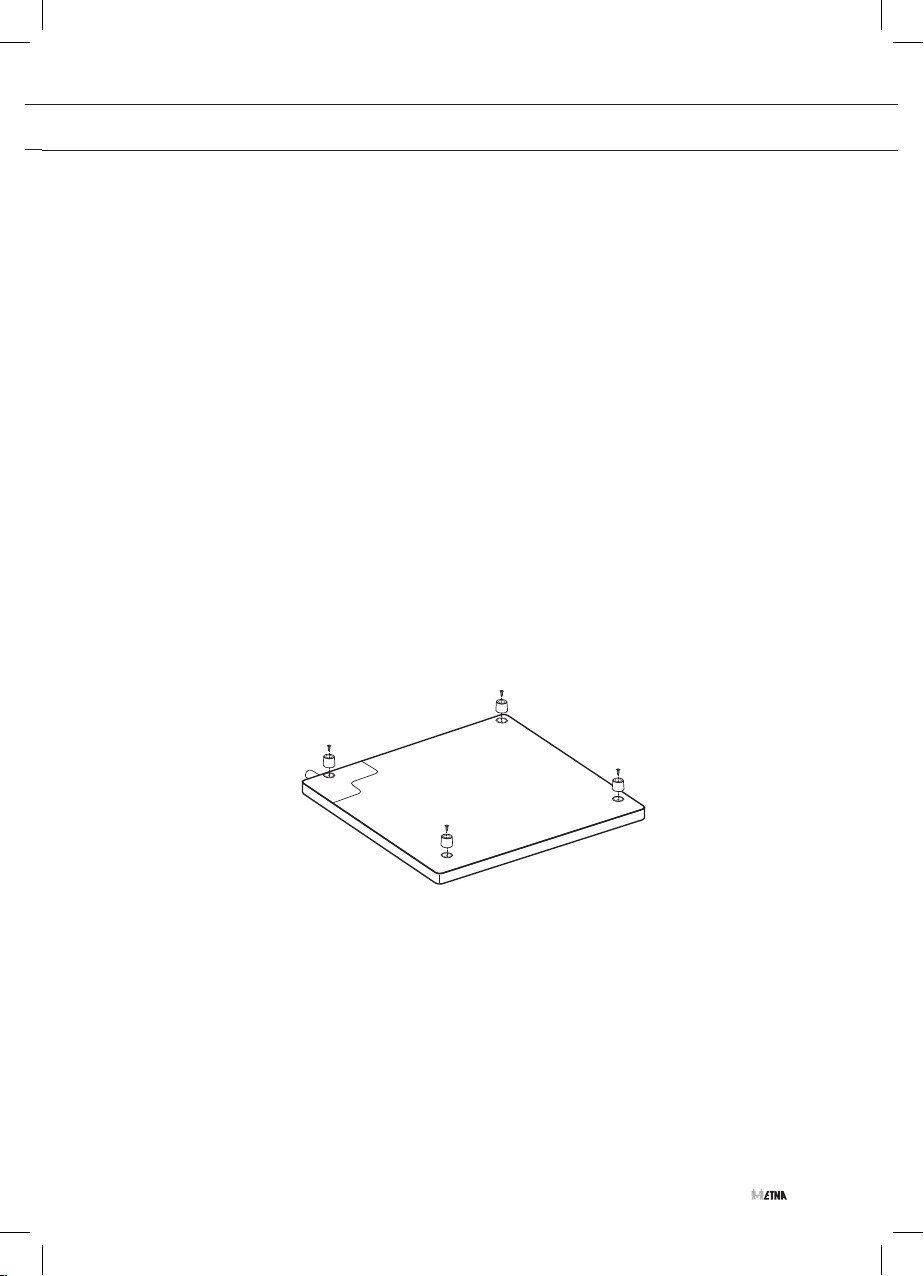
Monteren rubber voetjes
Schroef de 4 rubber voetjes handvast op de onderzijde van het toestel
(zie figuur).
NL 7
Page 8
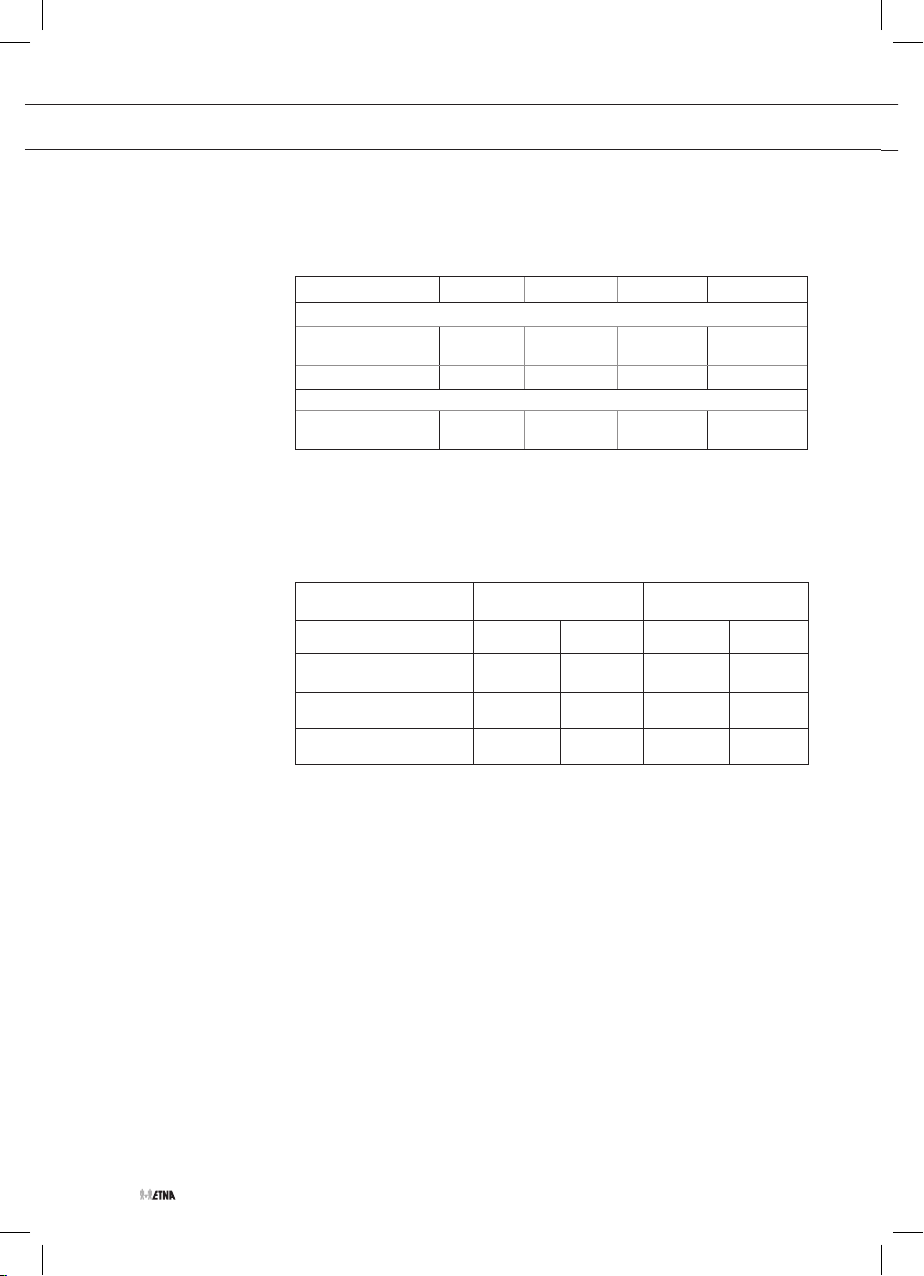
TECHNISCHE GEGEVENS
Toestel gegevens:
Kookplaat KGV158 KGV358H KGV358 KGV558
Elektrisch:
Aansluiting
230 V - 50Hz
Vonkontsteking
Gas:
Aansluiting
G1/2”
De kookplaat is standaard ingesteld voor Nederlands gas
(G25/G25.3-25 mbar).
Spuitstuk diameter en belastingen gemeten op bovenwaarde:
3
3
3 3 3 3
G25/G25.3 (25 mbar) G30 (28-30 mbar)
-
-
3 3
3 3
NL 8
Sterkbrander 1,25 mm
Sudderbrander 0,72 mm 1,0 kW 0,50 mm 1,0 kW
Normaalbrander 0,94 mm 1,75 kW 0,65 mm 1,75 kW
Wokbrander 1,48 mm 3,8 kW 0,98 mm 3,8 kW
3,0 kW
0,85 mm
3,0 kW
Page 9

STORINGEN
Storingstabel
Wanneer u twijfelt over de goede werking van uw gaskookplaat
betekent dit niet automatisch dat er een defect is. Controleer in elk
geval de volgende punten in onderstaande tabel of kijk voor meer
informatie op de website ‘www.etnaservice.nl’.
SYMPTOOM MOGELIJKE OORZAAK OPLOSSING
Het ruikt naar gas bij
het toestel.
Een brander ontsteekt
niet (elektrische
vonkontsteking).
De aansluiting van het
toestel lekt.
Stekker niet in stopcontact.
Zekering defect/zekering in
meterkast uitgeschakeld.
Sluit de gashoofdkraan. Neem contact op met
uw installateur.
Steek de stekker in het stopcontact.
Monteer een nieuwe zekering of schakel de
zekering weer in.
De brander brandt
niet egaal.
Brander dooft na het
ontsteken.
Bougie vervuild/vochtig.
Brander vervuild/vochtig.
Hoofdgaskraan gesloten.
Storing aan het gasnet.
Gasfles of -tank is leeg.
Verkeerd soort gas gebruikt.
Brander vervuild/vochtig.
Verkeerd soort gas gebruikt.
U heeft de bedieningsknop
niet lang en/of diep genoeg
(minimaal 5 seconden)
ingedrukt gehouden.
Thermokoppel is vervuild.
Reinig/droog de bougie.
Reinig/droog de brander. Let er hierbij op dat de
uitstroomgaten open zijn.
Open de hoofdgaskraan.
Informeer bij uw gas-leverancier.
Sluit een nieuwe gasfles aan of laat de tank
vullen.
Controleer of het gebruikte gas geschikt is voor
het toestel. Indien dit niet juist is, neem dan
contact op met uw installateur.
Reinig/droog de brander. Let er hierbij op dat de
uitstroomgaten open zijn.
Controleer of het gebruikte gas geschikt is voor
het toestel. Indien dit niet juist is, neem dan
contact op met uw installateur.
Houd de bedieningsknop minimaal 5 sec.
volledig ingedrukt tussen de vol- en de kleinstand. Bij eerste gebruik kan dit langer duren
i.v.m. aanvoer van gas.
Reinig/droog het thermokoppel
NL 9
Page 10
MILIEU ASPECTEN
Afvoeren toestel en verpakking
Bij de vervaardiging van dit toestel is gebruik gemaakt van duurzame
materialen.
De verpakking van het toestel is recyclebaar. Gebruikt kunnen zijn:
• karton;
• papier;
• polyethyleenfolie (PE);
• CFK-vrij polystyreen (PS-hardschuim);
• polypropyleenband (PP).
Deze materialen op verantwoorde wijze en conform de overheids-
bepalingen afvoeren.
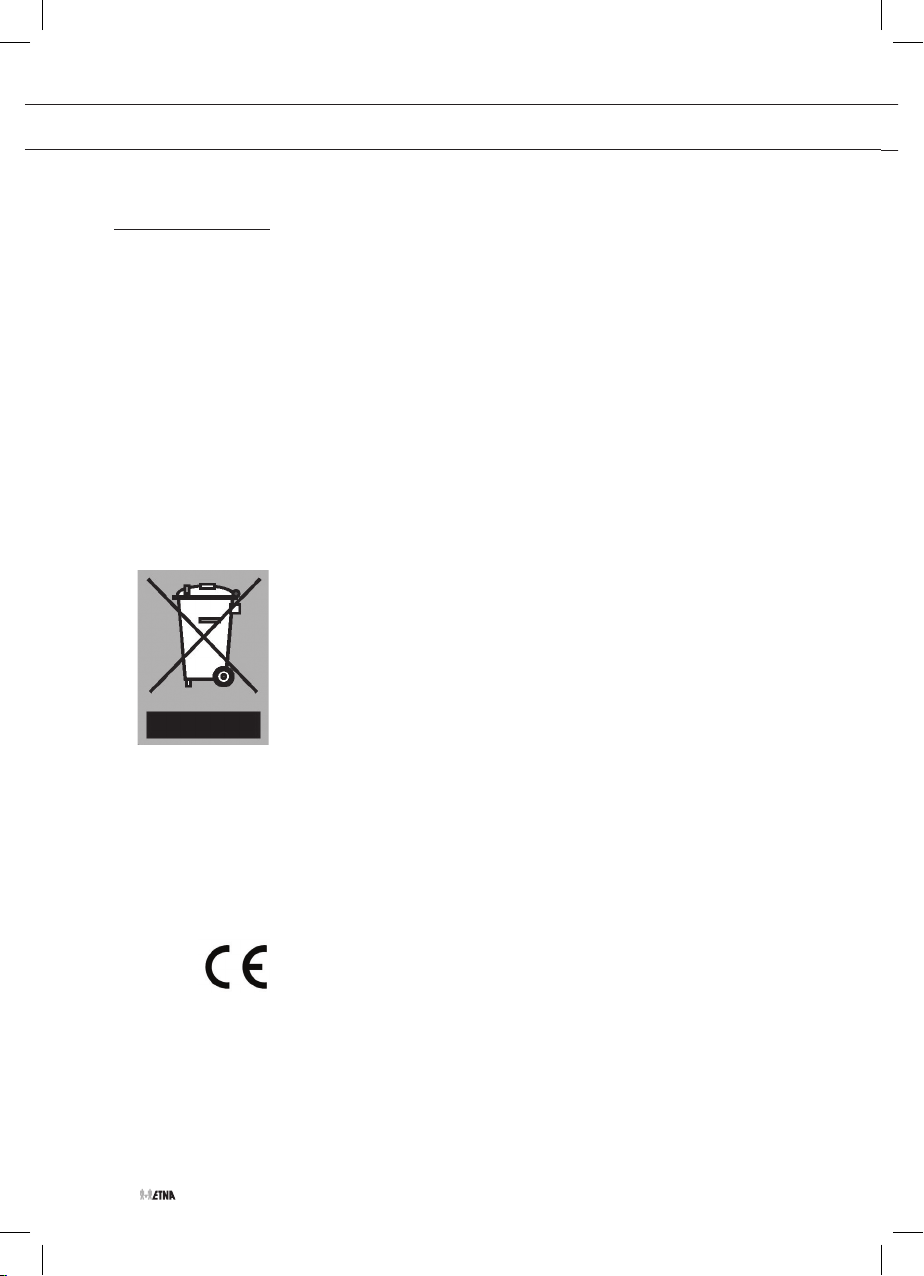
Om op de verplichting tot gescheiden verwerking van elektrische
huishoudelijke apparatuur te wijzen, is op het product het symbool van
een doorgekruiste vuilnisbak aangebracht.
Dit betekent dat het apparaat aan het einde van zijn levensduur
niet bij het gewone huisvuil mag worden gevoegd, maar naar een
speciaal centrum voor gescheiden afvalinzameling van de gemeente
moet worden gebracht of naar een verkooppunt dat deze service
verschaft. Het apart verwerken van een huishoudelijk apparaat zoals
deze kookplaat voorkomt mogelijk negatieve gevolgen voor het milieu
en de gezondheid dat de materialen waaruit het apparaat bestaat
teruggewonnen kunnen worden om een aanmerkelijke besparing van
energie en grondstoffen te verkrijgen.
NL 10
Conformiteitsverklaring
Hiermee verklaren wij dat onze producten voldoen aan de van
toepassing zijnde Europese Richtlijnen, Besluiten en Verordeningen en
de eisen die zijn vermeld in de normen waar naar wordt verwezen.
Page 11
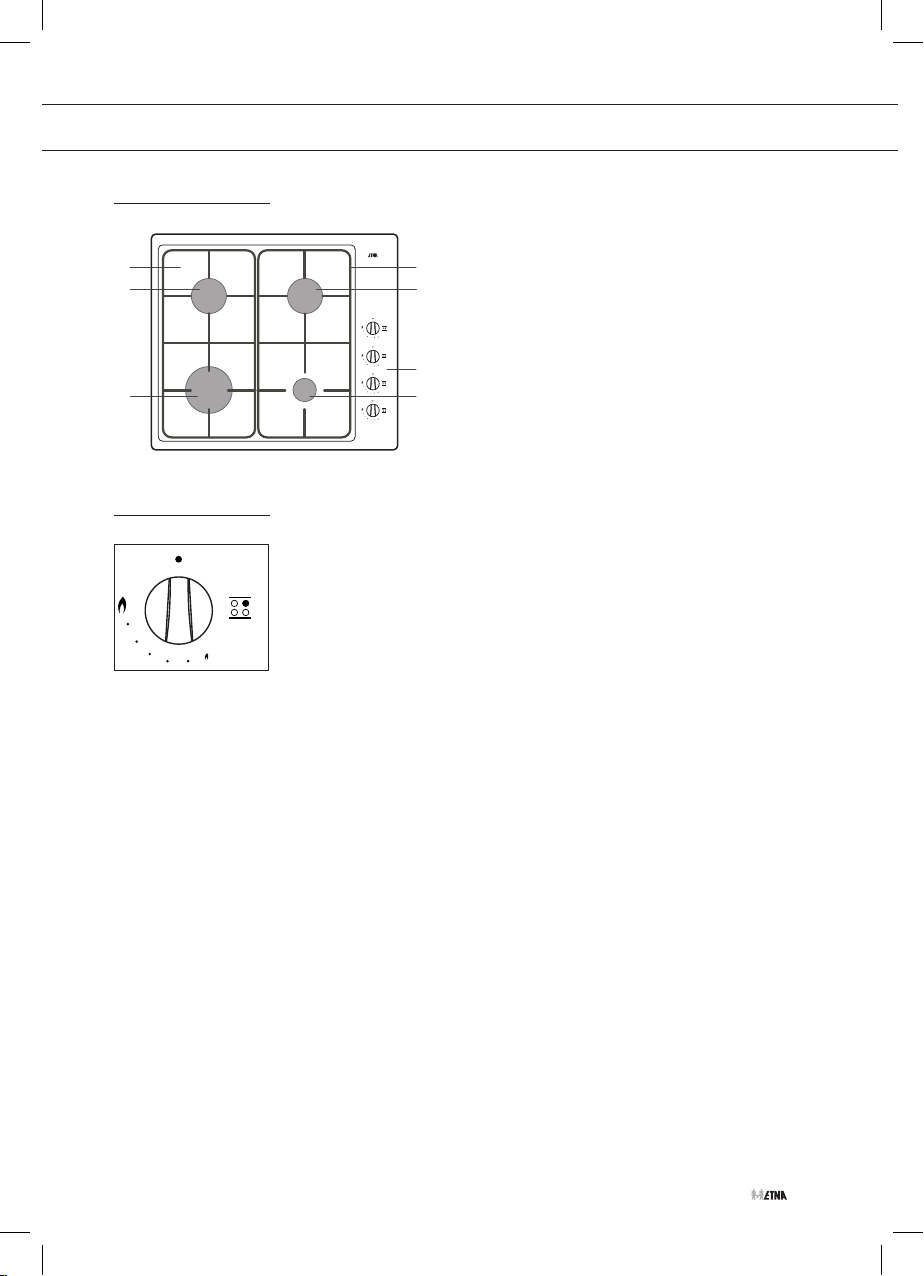
OPERATION
Description
03 04
02 02
01
Ignition and adjustment
1. Rapid or wok burner (KGV558W)
2. Standard burner
3. Drip tray
4. Pan support enamelled or cast iron (KGV558W)
5. Control knobs
6. Simmer burner
05
06
2
3
1. zone indication
2. 0 position
1
3. High setting
4. Low setting
4
Each burner is fully adjustable between high and low settings.
• While keeping the knob of the burner depressed, turn the knob to
the left and light the burner with a match. The gas flame can now be
smoothly adjusted from high to low.
• Keep the control knob fully depressed for at least 5 seconds
between high and low settings. The thermocouple safety pilot has
been activated.
Electrical spark switch (if applicable)
• Press the control knob and turn it anti-clockwise. The burner ignites.
The gas flame can now be smoothly adjusted from high to low.
• If the burner fails to light after repeated attempts, check to ensure
that the burner cap is properly positioned.
Flame failure device
• The flame failure device ensures that the gas supply is closed if the
flame goes out during the cooking process.
• Keep the control knob fully depressed for at least 5 seconds
between high and low settings. The thermocouple safety pilot has
been activated.
EN 3
Page 12
OPERATION
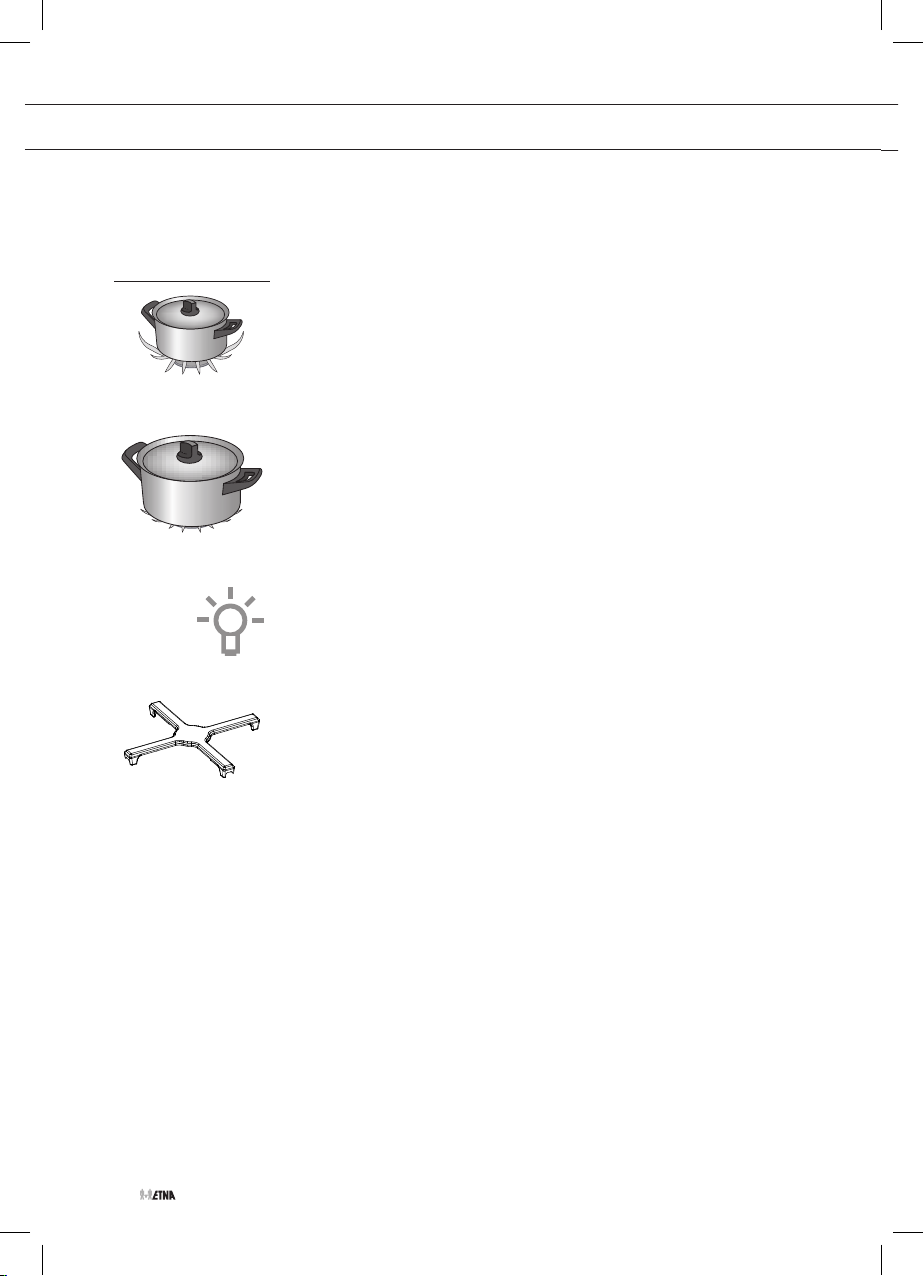
Use
error
good
Read the separate safety instructions before
using the device!
Pans
• Always ensure than the flames stay under the pan. A lot of energy
is lost if flames burn around the pan. The handles may also become
too hot.
• Do not use pans with a base diameter smaller than 12 cm. Smaller
pans are not as stable.
The recommended saucepan diameters are:
• rapid burner minimum 24 cm
• semi-rapid burner minimum 20 cm
• simmer burner minimum 12 cm.
Tip
Cooking with a lid on the pan saves up to 50% on energy.
Clean saucepans absorb heat more efficiently
Pan support
Place the pan supports vertically, without sliding over the drip tray. Use
the leads to position the pan supports on the drip tray.
EN 4
Wok ring
The wok ring for use with the wok burner supplied or obtainable as an
accessory provides extra stability for woks with a round base.
Page 13

MAINTENANCE
Maintenance
Clean the appliance daily with water and a detergent or all purpose
cleaner. Avoid using too much water to prevent it entering the burner or
ventilation openings.
• Remove stubborn stains on enamel with a non-abrasive cream or a
soft sponge.
Never use scouring powders, aggressive cleaning agents, green
scours.
• Scourers contain abrasives that cause scratches on stainless steel.
The stainless steel has a surface structure. Scouring or polishing
will cause (shiny) patches on the surface. This damage is excluded
from the guarantee.
Please note:
Do not drop hot burner caps or pan supports in cold water. Because of
the strong cooling they might get damaged.
Consult the www.etnaservice.nl website for additional maintenance
and cleaning instructions!
EN 5
Page 14

INSTALLATION
General
The fitting of the appliance should only be carried out by a registered
Corgi gas fitter.
Please note:
This appliance is not connected to a flue duct. Take care to ensure that
there is sufficient ventilation.
Electrical connection (solely for appliances with a spark switch)
230 V - 50 Hz.
This appliance complies the regulations concerning
electromagnetic compatibility in directive 89/336/EEC.
• The electrical connection must comply with national and local
regulations.
• Wall socket and plug must be accessible at all times.
Gasconnection RC 1/2” (ISO 228/RC 1/2”)
• The gas connection must comply with national and local
regulations.
• Amongst other things these regulations instruct that:
– only approved materials are to be used;
EN 6
Please note:
The type of gas and the country for which the appliance has been
designed are indicated on the data badge.
• We recommend that the hob be connected by means of a fixed
pipe. Connection using a specially designed safety hose is also
permitted. In all cases the connection tap for the appliance must be
positioned such that it is easily accessible, in an adjacent kitchen
cupboard, for example.
Page 15
INSTALLATION
Attention:
If the hob is fitted next to a high cupboard or next to some other
structure that is made of a flammable material, maintain a minimum
distance of 100 mm between the hob and these structures. Maintain a
minimum distance of 650 mm between the hob and any extractor hood
that is fitted above it.
• Before using the appliance for the first time check the connections
using water and washing-up liquid to ensure that there are no gas
leaks.
• After installation check that the appliance and the burners are
working properly; the gas flames should be regular and stable when
full on and the burners should not go out when turned to the lowest
setting.
Mounting carrier feet
Screw the carrier feet on the bottom cover of the appliance with low
clamping force (see figure).
EN 7
Page 16
TECHNICAL SPECIFICATIONS
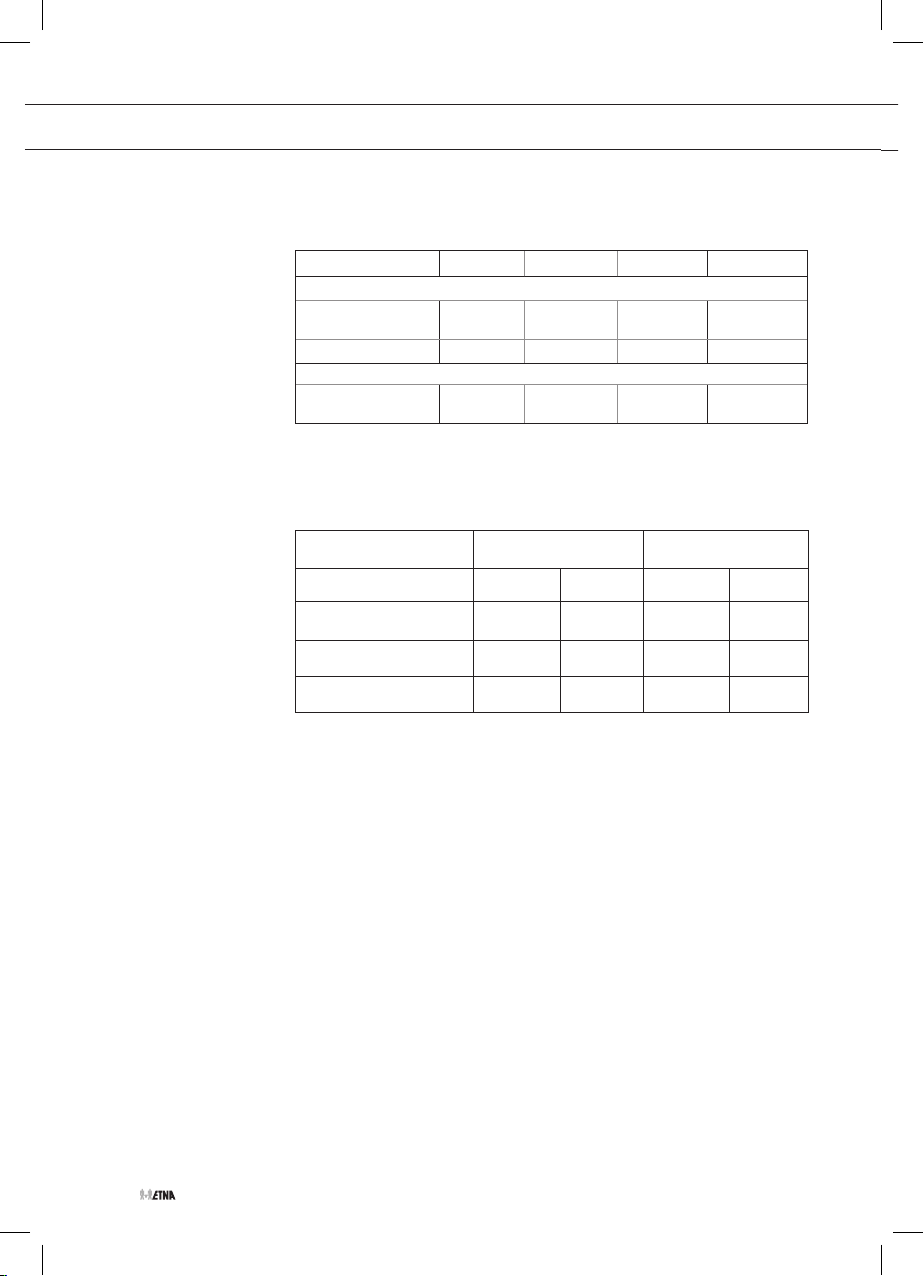
Appliance specifications:
Model number KGV158 KGV358H KGV358 KGV558
Electric:
Connection
230 V - 50Hz
Spark ignition
Gas:
Connection
G1/2”
The hob is default usable for natural gas (G25/G25.3-25 mbar).
Injector diameter and heat input measured on gross C.V.
3
3
3 3 3 3
G25/G25.3 (25 mbar) G30 (28-30 mbar)
-
-
3 3
3 3
Rapid burner 1.25 mm
Simmer burner 0.72 mm 1.0 kW 0.50 mm 1.0 kW
Semi-rapid burner 0.94 mm 1.75 kW 0.65 mm 1.75 kW
Wok burner 1.48 mm 3.8 kW 0.98 mm 3.8 kW
3.0 kW
0.85 mm
3.0 kW
EN 8
Page 17

ERRORS
Fault list
If your gas hob does not work properly, this does not always mean that
it is defective. Try to deal with the problem yourself first by checking
the points below or check the 'www.etnaservice.nl' website for more
information.
SYMPTOM POSSIBLE CAUSE SOLUTION
You smell gas near
the appliance.
A burner does
not ignite (spark
ignition).
The appliance connection
is leaking.
Plug not in socket.
Fuse defective/fuse
switched off in fuse
cupboard.
Close the main gas switch. Contact the your
installer.
Put the plug into the socket.
Put in a new fuse or switch on the fuse in the
fuse box.
The burner does not
burn evenly.
Burner extinguishes
after igniting.
Spark plug dirty/damp.
Burner parts not placed
correctly.
Burner parts dirty/damp.
Main gas tap closed.
Fault in gas mains.
Gas bottle or tank is empty.
Wrong type of gas used.
Burner parts dirty/damp.
Wrong type of gas used.
The control knob has not
been depressed long or
deep enough (at least
5 seconds).
Thermocouple is dirty.
Clean/dry the spark plug.
Use the centring leads to put the burner parts
together.
Clean/dry the burner parts. Make sure that
the outflow holes are open.
Open the main gas tap.
Consult you gas supplier.
Connect a new gas bottle or have the tank
refilled.
Check whether the gas used is suitable for
the appliance. Contact your installer if it is not
correct.
Clean/dry the burner parts. Make sure that
the outflow holes are open.
Check whether the gas used is suitable for
the appliance. Contact your technician if it is
not correct.
Keep the control knob fully depressed for
at least 5 seconds between high and low
settings. This can take longer the first time
because of the gas supply.
Clean/dry thermocouple.
EN 9
Page 18
ENVIRONMENTAL CONSIDERATIONS
Disposal of the appliance and packaging
Sustainable materials have been used during manufacture of this
appliance.
The appliance packaging is recyclable. The following may have been
used:
• cardboard;
• paper;
• polyethylene film (PE);
• CFC-free polystyrene (PS-rigid foam);
• polypropylene tape (PP).
Dispose of these materials in a responsible manner and in accordance
with government regulations.
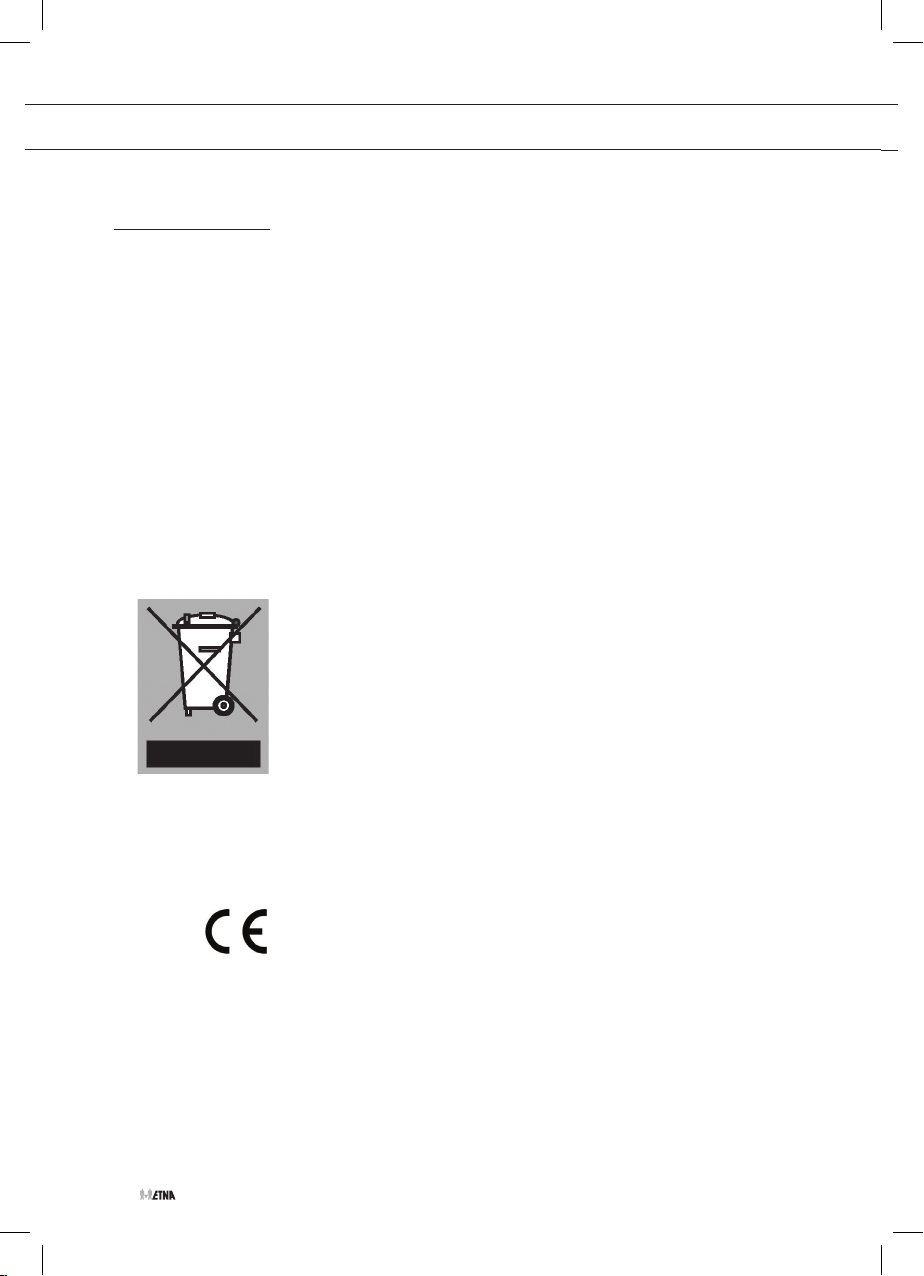
To designate the requirement for separate collection of household
electrical appliances, the symbol of a crossed-out dustbin is applied to
the product.
This means that at the end of its working life, the product must not
be disposed of as urban waste. It must be taken to a special local
authority differentiated waste collection centre or to a dealer providing
this service. Disposing of a household appliance such as this hob
separately avoids possible negative consequences for the environment
and health and enables the constituent materials to be recovered,
resulting in significant savings in energy and resources.
EN 10
Declaration of conformity
We hereby declare that our products satisfy the applicable European
directives, orders and regulations, as well as the requirements stated in
the referenced standards.
Page 19

EN 11
Page 20

Houd, wanneer u contact opneemt met de serviceafdeling, het complete
typenummer bij de hand.
When contacting the service department, have the complete type number
to hand.
Adressen en telefoonnummers van de serviceorganisatie vindt u op de garantiekaart.
You will find the addresses and phone numbers of the service organisation on the
guarantee card.
*620946*
620946
620946 / VER 1 / 01-12-2016
 Loading...