

Page 1
GEBRUIKSAANWIJZING
INSTRUCTIONS FOR USE
KOELVRIESCOMBINATIE
REFRIGERATOR-FREEZER
KCV186NRVS
KCV186NZWA
Page 2
INHOUDSOPGAVE
Uw koelkast
Inleiding 4
Link naar de EPREL-database van de EU 4
Veiligheidsvoorschriften 5
Voor het eerste gebruik
Voordat u het toestel de eerste keer gebruikt 11
Advies om energie te besparen 11
Installeren en aansluiten
De keuze van de ruimte 13
Toestel aansluiten 14
Draairichting deur wijzigen 15
Toestelbeschrijving
Bediening van het toestel
NL 2
Toestel 19
Bedieningspaneel 20
Het toestel in-/uitschakelen 21
Temperatuur instellen 21
Intensief vriezen 21
ECO-functie 22
Alarm bij open deur 23
Lade met handmatige vochtregeling 23
FreshZone lade 23
Page 3
INHOUDSOPGAVE
Voedsel bewaren en invriezen
Aanbevolen indeling 24
Voorkom het bederven van voedsel 25
Vers voedsel bewaren in de koelkast 25
Invriezen en bewaren van voedsel in het vriescompartiment 26
Bevroren voedsel ontdooien 27
Onderhoud
Het toestel ontdooien 28
Het toestel reinigen 29
Storingen
Storingstabel 30
Milieuaspecten
Verpakking en toestel afdanken 32
Gebruikte pictogrammen
Belangrijk om te weten
Tip
Waarschuwing; Brandgevaar / ontvlambare materialen
NL 3
Page 4
UW KOELKAST
Inleiding
Gefeliciteerd met uw keuze voor deze koelkast van Etna. In het ontwerp van dit product heeft
eenvoudige bediening en optimale gebruiksvriendelijkheid centraal gestaan.
In deze handleiding leest u hoe u dit toestel het best kunt gebruiken. Naast informatie over de
bediening, vindt u hier ook achtergrondinformatie die u tijdens het gebruik van het toestel van
pas kan komen.
Lees eerst de veiligheidsvoorschriften voordat u het toestel
gebruikt!
Lees deze handleiding door voordat u het toestel in gebruik neemt, en berg de handleiding
daarna veilig op voor toekomstig gebruik.
Link naar de EPREL-database van de EU
De QR-code op het energielabel dat bij het apparaat wordt geleverd, biedt een weblink naar de
registratie van dit apparaat in de EPREL-database van de EU. Bewaar het energielabel samen
met de gebruikershandleiding en alle andere documenten die bij dit apparaat zijn geleverd ter
referentie.
Het is mogelijk om informatie over de prestaties van het product te vinden in de EU EPREL-
database met behulp van de link https://eprel.ec.europa.eu en de modelnaam en het
productnummer op het typeplaatje van het apparaat.
Kijk voor meer informatie over het energielabel op www.theenergylabel.eu.
NL 4
Page 5
VEILIGHEIDSVOORSCHRIFTEN
Lees zorgvuldig de meegeleverde instructies voor installatie en
gebruik van het apparaat. De fabrikant is niet verantwoordelijk
voor letsel en schade veroorzaakt door een foutieve installatie.
Bewaar de instructies van het apparaat voor toekomstig gebruik.
Veiligheid van kinderen en kwetsbare mensen
• Het apparaat is niet bedoeld voor gebruik door personen
(waaronder kinderen) met een lichamelijke, zintuiglijke of
verstandelijke beperking of personen met te weinig kennis
en ervaring, tenzij iemand die verantwoordelijk is voor hun
veiligheid toezicht houdt of hun instructies heeft gegeven
over het gebruik van het apparaat.
• Houd toezicht op kinderen om ervoor te zorgen dat ze niet
met het apparaat spelen.
• Reiniging en onderhoud mogen niet door kinderen worden
uitgevoerd zonder toezicht.
• Houd alle verpakkingsmaterialen uit de buurt van kinderen.
Alleen voor Europese markten
• Dit apparaat kan worden gebruikt door kinderen van 8jaar
en ouder, mensen met een lichamelijke, zintuiglijke of
verstandelijke beperking of mensen die weinig ervaring met
en kennis van het apparaat hebben, mits zij onder toezicht
staan of zijn geïnstrueerd hoe zij het apparaat veilig moeten
gebruiken en zij de mogelijke gevaren begrijpen.
• Laat kinderen niet met het apparaat spelen.
• Reiniging en onderhoud mogen niet door kinderen worden
uitgevoerd als er geen toezicht is.
• Kinderen van 3 tot 8 jaar mogen producten in toestellen met
een koelfunctie leggen en ook eruit halen.
Vertaling van originele instructie
NL 5
Page 6
VEILIGHEIDSVOORSCHRIFTEN
Algemene veiligheid
• De lamp in dit huishoudelijke apparaat is uitsluitend bedoeld
voor verlichting van dit apparaat. De lamp is niet geschikt
voor de verlichting van een huishoudelijke ruimte.
• WAARSCHUWING! Dit apparaat is bestemd voor
huishoudelijk of daarmee vergelijkbaar gebruik, zoals:
– in personeelskeukens in winkels, kantoren en andere
werkomgevingen;
– voor gasten in gastboerderijen, hotels, motels en andere
overnachtingsgelegenheden;
– in bed & breakfast-achtige omgevingen;
– voor catering en vergelijkbare niet-zakelijke doeleinden.
• WAARSCHUWING! Houd de ventilatieopeningen altijd
vrij van obstructies; dit geldt zowel voor vrijstaande als
ingebouwde modellen.
• WAARSCHUWING! Gebruik geen mechanische of andere
middelen om het ontdooiproces te versnellen, behalve die
middelen die door de fabrikant zijn aanbevolen.
• WAARSCHUWING! Let op dat u het koelcircuit niet beschadigt.
• WAARSCHUWING! Gebruik geen elektrische apparaten
in de koelkast, tenzij deze door de fabrikant worden
aanbevolen.
• WAARSCHUWING! Gebruik geen waterstralen of stoom om
het apparaat te reinigen.
• WAARSCHUWING! Maak het apparaat schoon met
een vochtige, zachte doek. Gebruik alleen neutrale
schoonmaakmiddelen. Gebruik geen schuurmiddelen,
schuursponsjes, oplosmiddelen of metalen voorwerpen.
• WAARSCHUWING! Bewaar geen explosieve substanties
zoals spuitbussen met drijfgas in dit apparaat.
• WAARSCHUWING! Als het netsnoer beschadigd is,
moet het vervangen worden door de fabrikant, een
servicemedewerker of personen met vergelijkbare
kwalificaties om gevaarlijke situaties te voorkomen.
NL 6
Page 7
VEILIGHEIDSVOORSCHRIFTEN
Installatie
• WAARSCHUWING! Dit apparaat mag uitsluitend door een
erkende monteur worden geïnstalleerd.
• Verwijder alle verpakkingsmaterialen.
• Controleer het apparaat op transportschade. Sluit het apparaat
niet aan als het beschadigd is.
• Volg altijd de installatie-instructies in de bijgeleverde
installatiehandleiding.
• Wees voorzichtig met het verplaatsen van het apparaat, het is
zwaar. Draag altijd veiligheidshandschoenen.
• Zorg ervoor dat rond het apparaat lucht kan circuleren.
• Wacht ten minste 4 uur alvorens het apparaat aan de
netstroom aan te sluiten. Hierdoor kan de olie terug in de
compressor stromen.
• Installeer het apparaat niet in de nabijheid van radiators,
fornuizen, ovens of kookplaten.
• Installeer het apparaat niet op een plaats met direct zonlicht.
• Gebruik dit apparaat niet in gebieden die te vochtig of te koud
zijn, zoals bijgebouwen, garages of kelders.
• Til de voorkant van het apparaat op als u hem wilt verplaatsen,
om krassen op de vloer te voorkomen.
• WAARSCHUWING! Zorg er bij het plaatsen van het apparaat
voor dat het netsnoer niet bekneld of beschadigd raakt.
Elektrische aansluiting
• WAARSCHUWING! Gevaar voor brand en elektrische
schokken.
• Dit apparaat moet worden aangesloten op een geaard
stopcontact.
• Alle elektrische aansluitingen moeten door een gediplomeerd
elektromonteur worden gemaakt.
NL 7
Page 8
VEILIGHEIDSVOORSCHRIFTEN
• Controleer of de elektrische informatie op het typeplaatje
overeenkomt met de stroomvoorziening. Zo niet, neem dan
contact op met een elektromonteur.
• Gebruik altijd een correct geïnstalleerd, schokbestendig
stopcontact.
• Gebruik niet meerdere stekkers of verlengsnoeren.
• Zorg dat u de elektrische onderdelen (hoofdstekker,
kabel, compressor) niet beschadigt. Neem contact met de
Servicedienst of een elektrotechnicus om de elektrische
onderdelen te wijzigen.
• De stroomkabel moet lager blijven dan het niveau van het
stopcontact.
• Steek de stekker pas in het stopcontact als de installatie is
voltooid. Zorg ervoor dat het netsnoer na installatie bereikbaar
is.
• Pak altijd de stekker vast als u de kabel uit het stopcontact wilt
halen. Trek nooit aan de voedingskabel.
• WAARSCHUWING! Plaats geen meervoudige stekkerdozen of
draagbare voedingen aan de achterkant van het apparaat.
• Als een vast apparaat niet is voorzien van een netsnoer en
een stekker, of van een andere manier om de verbinding met
het elektriciteitsnet te verbreken, waarbij sprake is van een
contactverbreker in alle polen die volledige verbreking biedt
in de situaties die onder overspanningscategorie III vallen,
moet er in de vaste elektriciteitskabel een verbreker worden
aangebracht volgens de geldende richtlijnen. Bij gebruik van
een omnipolaire schakelaar met een contactafstand van ten
minste 3 mm in het netsnoer wordt aan deze eis voldaan.
NL 8
Page 9
VEILIGHEIDSVOORSCHRIFTEN
Gebruik
• WAARSCHUWING! Gevaar voor letsel, brandwonden,
elektrische schokken of brand.
• De specificatie van het apparaat mag niet worden veranderd.
• Plaats geen elektrische apparaten (bijv. ijsmachines) in het
apparaat tenzij uitdrukkelijk geschikt verklaard door de
fabrikant.
• Zorg ervoor dat u het koelcircuit niet beschadigt. Het bevat
isobutaan (R600a), aardgas met een hoge ecologische
compatibiliteit. Dit gas is ontvlambaar.
• Als er schade aan het koelcircuit optreedt, zorg er dan voor
dat er zich geen vlammen en andere ontstekingsbronnen in de
kamer bevinden. Ventileer de kamer goed.
• Zet geen hete items op de kunststofonderdelen van het
apparaat.
• Bewaar geen ontvlambare gassen en vloeistoffen in het
apparaat.
• Plaats geen ontvlambare producten of items die vochtig zijn
door ontvlambare producten in, bij of op het apparaat.
• Raak de compressor niet aan. Deze is heet.
Onderhoud en reiniging
• WAARSCHUWING! Gevaar voor letsel of schade aan het
apparaat.
• Schakel het apparaat uit en trek de stekker uit het stopcontact
voordat u onderhoudshandelingen verricht.
• Het koelcircuit van dit apparaat bevat koolwaterstoffen. Enkel
bevoegde personen mogen de eenheid onderhouden en
herladen.
• Controleer regelmatig de afvoer van het apparaat en reinig
het indien nodig. Als de afvoer verstopt is, zal er water op de
bodem van het apparaat liggen.
NL 9
Page 10
VEILIGHEIDSVOORSCHRIFTEN
Verwijdering
• WAARSCHUWING! Gevaar voor letsel of verstikking.
• Haal de stekker uit het stopcontact.
• Snij het netsnoer van het apparaat af en gooi dit weg.
• Verwijder de deur om te voorkomen dat kinderen en huisdieren
opgesloten raken in het apparaat.
• Het koelcircuit en de isolatiematerialen van dit apparaat zijn
ozonvriendelijk.
• Het isolatieschuim bevat ontvlambare gassen. Neem contact
met uw plaatselijke overheid voor informatie m.b.t. correcte
afvalverwerking van het apparaat.
• Veroorzaak geen schade aan het deel van de koeleenheid dat
zich naast de warmtewisselaar bevindt.
NL 10
Page 11
VOOR HET EERSTE GEBRUIK
Voordat u het toestel de eerste keer gebruikt
Sluit het toestel pas aan op het elektriciteitsnet nadat u de aanwijzingen over een correct en
veilig gebruik van het toestel zorgvuldig hebt doorgelezen. De aanwijzingen zijn van toepassing
op verschillende types en modellen; dat betekent dat de gebruiksaanwijzing instellingen of
onderdelen kan bevatten die niet beschikbaar zijn op uw toestel. We raden u aan om deze
instructies te bewaren voor toekomstig gebruik en deze bij het toestel te voegen wanneer dit in
de toekomst wordt verkocht.
Controleer het toestel op beschadigingen of onregelmatigheden. Wanneer het toestel beschadigd
is, stelt u de winkel waar u het toestel hebt gekocht hiervan op de hoogte.
Laat het toestel minimaal 4 uur in verticale positie stilstaan, voordat u het toestel op het
elektriciteitsnet aansluit. Dit verkleint de kans op storingen als gevolg van de invloed van het
transport op het koelsysteem.
Voordat u het toestel voor de eerste keer gaat gebruiken, moeten de binnenzijde en alle
accessoires schoongemaakt worden met lauw water met een neutraal reinigingsmiddel. Neem na
het reinigen de delen af met schoon water en droog ze zorgvuldig.
Als u het toestel voor de eerste keer gaat gebruiken, plaats dan geen voedsel in het toestel
voordat de temperatuur tot de gekozen instelling is gedaald.
Advies om energie te besparen
• Installeer het toestel zoals in de gebruiksaanwijzing aangegeven.
• Open de deur niet vaker dan noodzakelijk.
• Houd de ventilatieluchtopeningen altijd vrij.
• Wanneer het deurrubber is beschadigd of niet meer volledig afsluit, moet deze zo snel
mogelijk worden vervangen.
• Bewaar voedsel in goed sluitende bakjes of een geschikte verpakking.
• Laat voedsel afkoelen tot kamertemperatuur voordat u het in het toestel plaatst.
• Ontdooi voedsel in het koelcompartiment.
• Ontdooi een conventioneel vriescompartiment wanneer zich een laag rijp of ijs van ongeveer
2 tot 3 millimeter aan de binnenzijde heeft gevormd.
• Zorg voor een gelijkmatige verdeling van de plateaus in het koelcompartiment.
Plaats het voedsel zo dat de lucht vrij door de binnenkant van het toestel kan circuleren
(houd u aan de aanbevolen plaatsing van voedsel in de instructies).
NL 11
Page 12
VOOR HET EERSTE GEBRUIK
• Als het toestel is voorzien van een ventilator, zorg er dan voor dat de openingen niet
geblokkeerd raken.
• Hoe lager de temperatuur wordt ingesteld, hoe hoger het energieverbruik zal zijn.
• Hoge omgevingstemperaturen beïnvloeden het energieverbruik nadelig. Ook direct zonlicht
of andere warmtebronnen in de buurt van het toestel hebben een ongunstige invloed op het
energieverbruik.
• Zorg voor voldoende ruimte rondom het toestel zodat een goede ventilatie en luchtstroming
rondom het toestel mogelijk is.
• De condensor aan de achterwand moet altijd schoon en vrij van stof of ongerechtigheden
worden gehouden.
NL 12
Page 13
INSTALLEREN EN AANSLUITEN
De keuze van de ruimte
• Dit koelapparaat is niet bedoeld om te worden gebruikt als inbouwapparaat.
• Plaats het toestel niet in de buurt van warmtebronnen, bijvoorbeeld een gasfornuis,
verwarming, boiler enz. en stel het niet bloot aan directe zonnestraling.
• Plaats het toestel in een droge en regelmatig geventileerde ruimte. De toegestane
temperatuur van de omgeving voor de juiste werking van het toestel is afhankelijk van de
uitvoering (klasse) van het toestel, die op het typeplaatje van het toestel vermeld is.
Beschrijving Klasse Omgevingstemperatuur °C Relatieve vochtigheid
Uitgebreid gematigd SN +10 tot +32
Gematigd N +16 tot +32
Subtropisch ST +16 tot +38
Tropisch T +16 tot +43
Plaats het toestel niet in een ruimte waar de temperatuur kan dalen tot onder de laagst
toegestane omgevingstemperatuur, want dit kan een onjuiste werking veroorzaken!
Plaats het toestel niet in een ruimte waar de temperatuur kan dalen tot onder 5 °C, want
dit kan een storing veroorzaken!
Het toestel is niet geschikt voor buitengebruik en het mag niet bloot worden gesteld aan
regen.
≤ 75%
3
Plaats het toestel in een ruimte die groot genoeg is. Er moet ten minste 1 m
8 gram koelmiddel zijn. De hoeveelheid koelmiddel is aangegeven op het typeplaatje aan
de binnenzijde van het toestel.
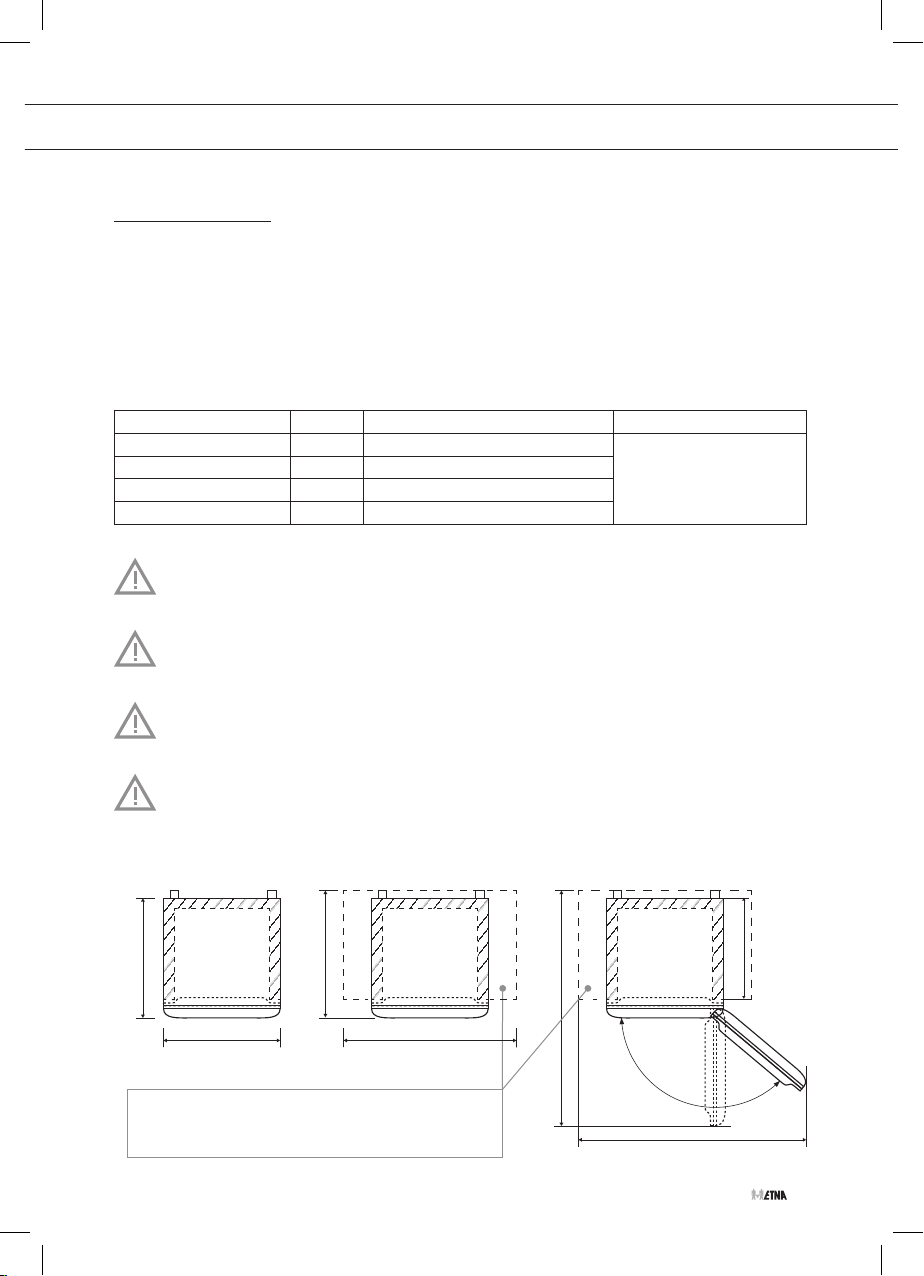
Totale afmetingen Benodigde ruimte in gebruik Totale benodigde ruimte in gebruik
590
595 795
Zorg voor voldoende ruimte rondom het
toestel zodat een goede ventilatie en
luchtstroming rondom het toestel mogelijk is.
640
1220
ruimte per
940
NL 13
Page 14
INSTALLEREN EN AANSLUITEN
• Het toestel moet tenminste 5 cm van het elektrisch of gasfornuis respectievelijk 30 cm
van de verwarming of kachel worden geïnstalleerd. Bij kleinere afstanden moet er een
isolatieplaat worden gebruikt.
• De afstand tot de muur, achter en aan de zijkanten van de kast, moet ongeveer 5 cm te
bedragen. Een keukenkastje boven het toestel moet aan de achterzijde een ruimte van
tenminste 5 cm hebben. Daardoor wordt een voldoende koeling gewaarborgd.
• Na installatie moet de stekker toegankelijk zijn!
• De luchtuitlaat van het toestel bevindt zich bovenaan aan het toestel; voorkom blokkering
van de luchtstroom. Door blokkering kan het toestel beschadigd raken.
• Het toestel moet door minimaal twee personen worden verplaatst en geïnstalleerd.
• Wees voorzichtig bij het verplaatsen van het toestel om te voorkomen dat de vloer
beschadigd raakt.
• Zorg ervoor dat het toestel tijdens de installatie de voedingskabel niet beschadigd.
• Plaats het toestel op een vlakke, stabiele ondergrond.
• Met de stelvoeten kunt u het toestel waterpas zetten.
• Om de deuren zelf te laten sluiten, kantelt u de bovenkant ongeveer 0,5 ° naar achteren door
aan de stelvoeten te draaien.
Toestel aansluiten
• Sluit het toestel met het netsnoer aan op het elektriciteitsnet. Het stopcontact moet geaard
zijn. De nominale spanning en de frequentie van het toestel vindt u op het typeplaatje/label
met basisinformatie op het toestel.
• Het toestel moet in overeenstemming met de geldende normen en regels op het
elektriciteitsnet worden aangesloten en geaard. Het toestel is bestand tegen kortstondige
afwijkingen in de nominale spanning, echter niet meer dan +/- 6%.
NL 14
Wanneer u het toestel langere tijd niet gebruikt, schakelt u het uit met de daarvoor
bestemde toets en koppelt u het los van de stroomvoorziening. Maak het toestel leeg,
ontdooi het, maak het schoon en laat de deur op een kier staan.
Gevaar van bevriezing
Steek bevroren voedsel nooit in uw mond en voorkom aanraking van bevroren voedsel,
omdat dit bevriezing kan veroorzaken.
Open het vriescompartiment niet als er een fout is opgetreden of de stroomvoorziening is
uitgevallen, tenzij het toestel langer buiten werking is dan de uren die staan aangegeven
op het typeplaatje (temperatuurstijgingstijd). Na die periode moet u het ingevroren
voedsel gebruiken of zorgen voor voldoende koeling (in een vervangend toestel).
Page 15
INSTALLEREN EN AANSLUITEN
fi
④
fi
④
④
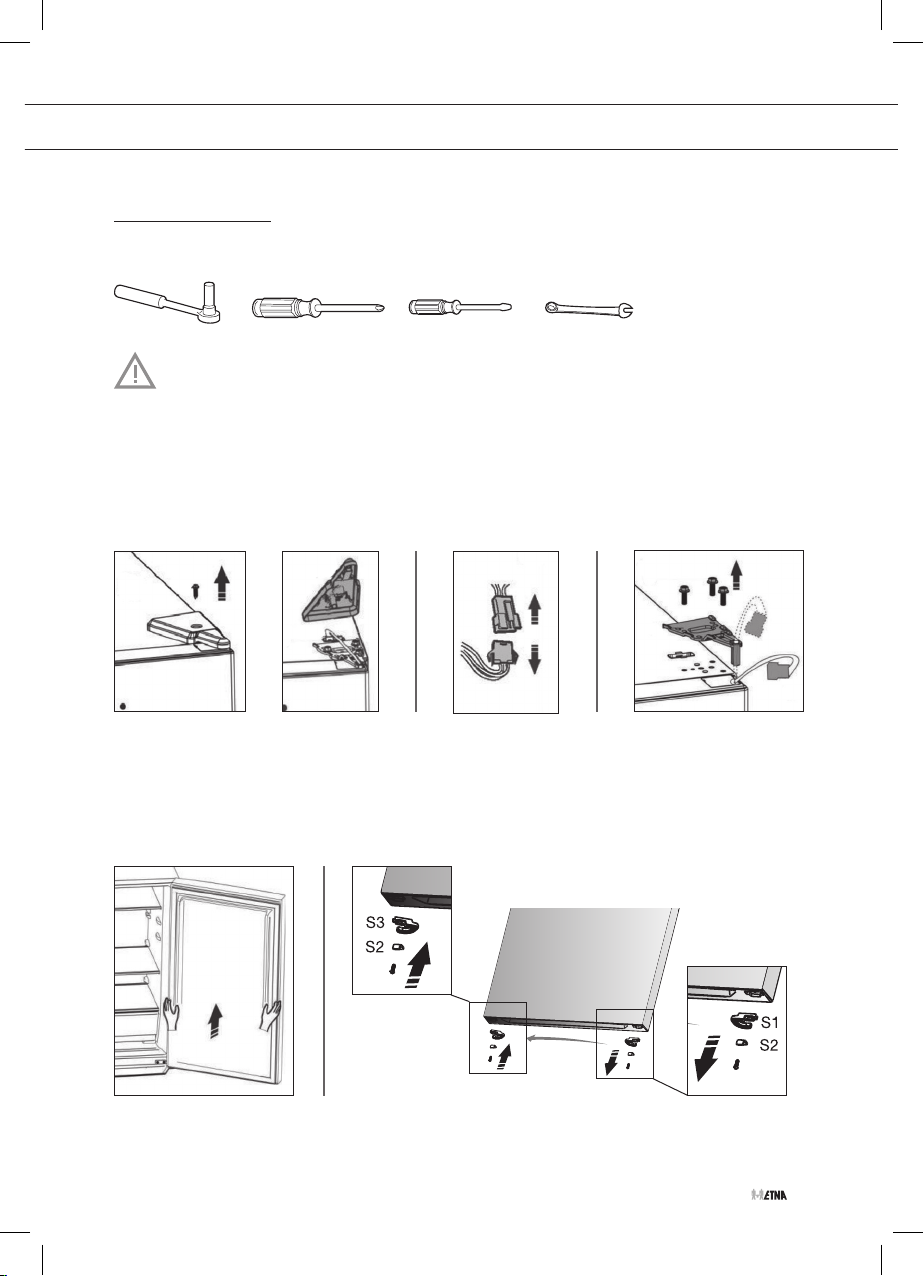
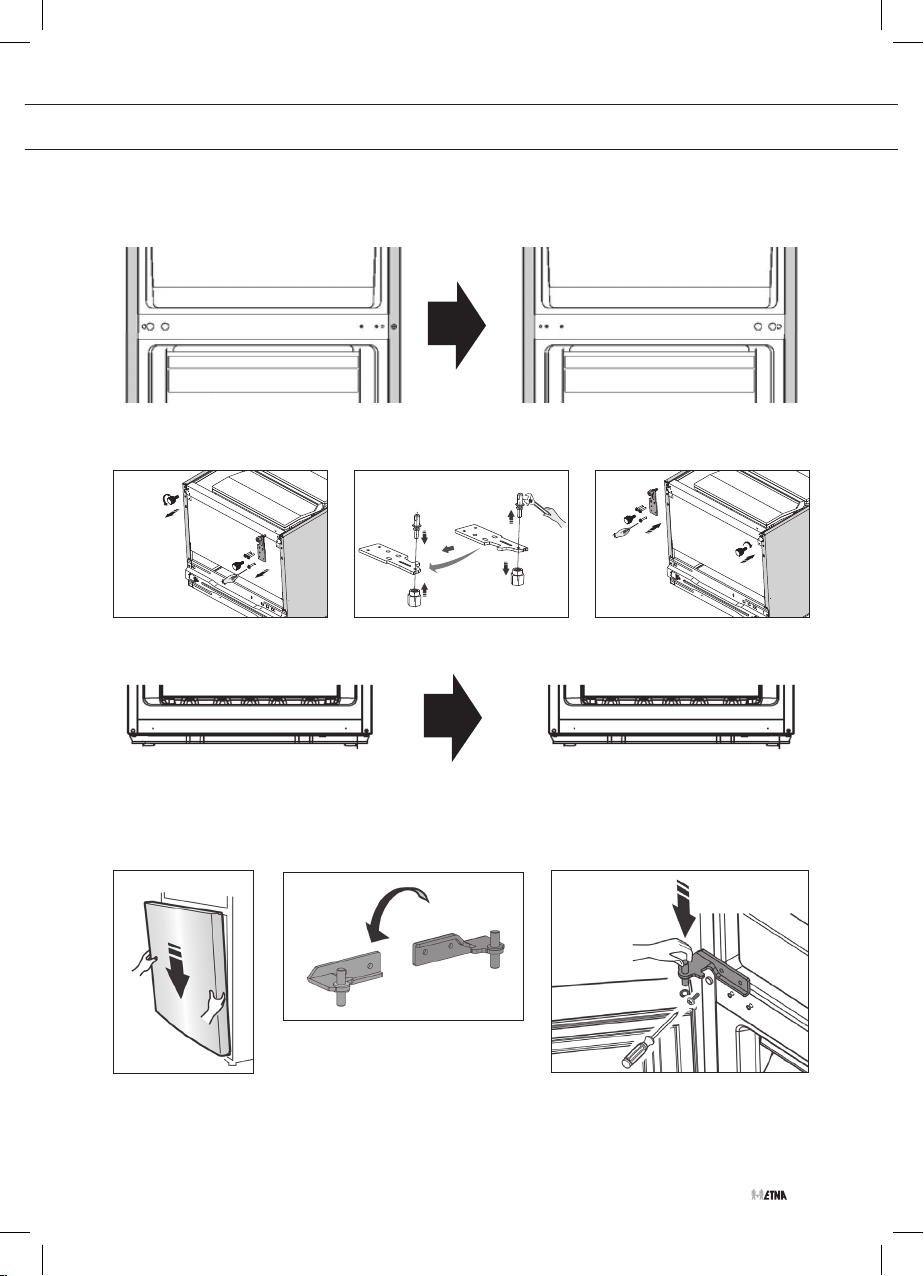
Draairichting deur wijzigen
Gereedschap
Haal eerst de stekker uit het stopcontact.
1. Verwijder alle deurvakken en sluit de deur.
2. Verwijder de schroef en het afdekplaatje.
3. Maak de elektrische verbinding los.
4. Verwijder de schroeven en het bovenste scharnier. Houd de deur goed vast.
5. Til de de bovenste deur voorzichtig uit het middelste scharnier en plaats hem op een zachte
ondergrond om krassen te voorkomen.
6. Schroef onderdelen ‘S1’ en ‘S2’ los en bevestig ‘S2’ en ‘S3’ (bijgeleverd) aan de andere kant
met de schroeven.
NL 15
Page 16
INSTALLEREN EN AANSLUITEN
fl
e
fi
④
④
-
screw screw
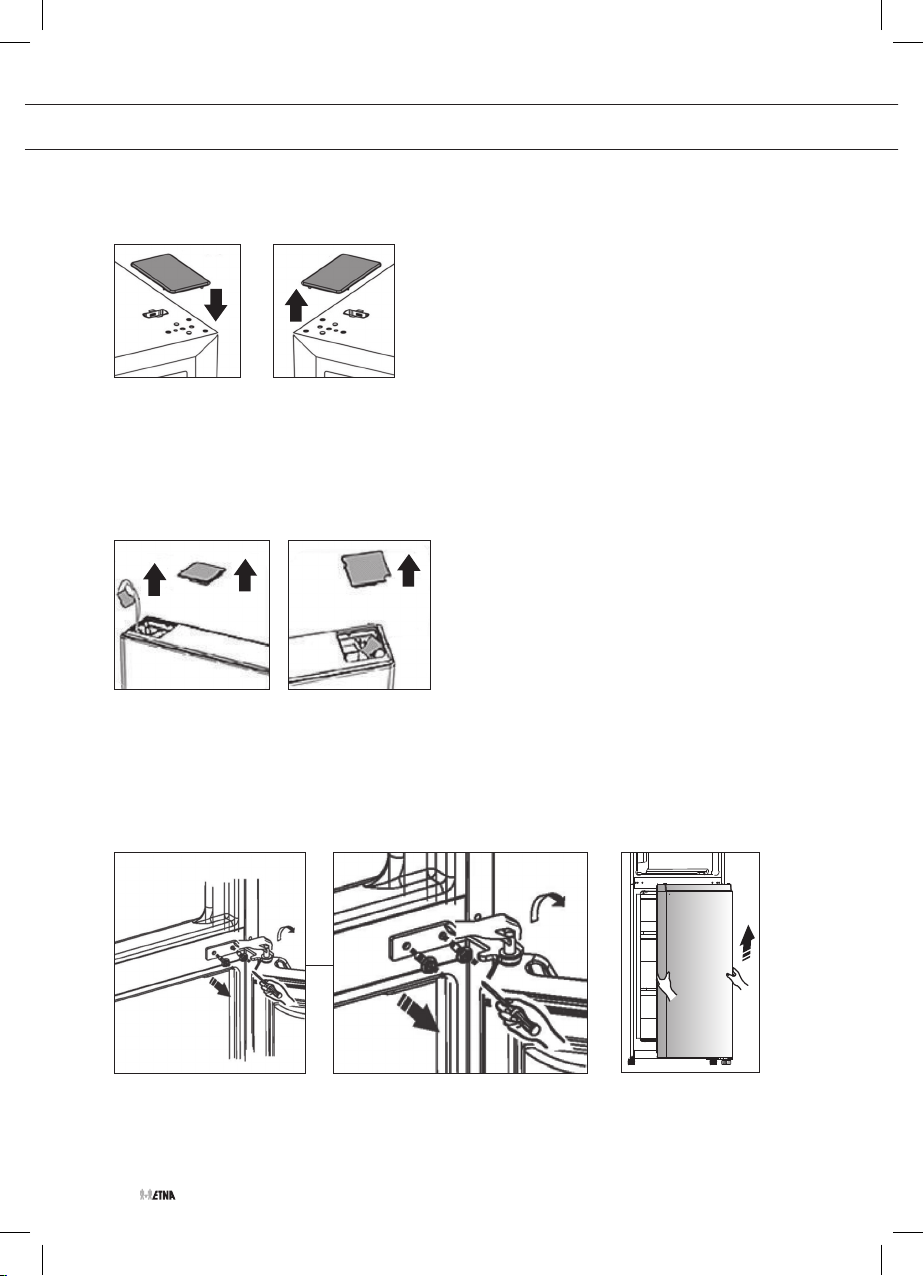
7. Plaats het bijgeleverde afdekplaatje aan de rechterkant. Verwijder het afdekplaatje aan de
linkerkant.
8. Verwijder het afdekplaatje van de deur linksboven, maak de elektrische verbinding los en
haal dit onderdeel eruit.
9. Verwijder het afdekplaatje van de deur rechtsboven
10. Plaats het linker afdekplaatje aan de rechterkant en plaats het rechter afdekplaatje aan de
linkerkant.
11. Verwijder de schroeven en het middelste scharnier.
12. Til de de onderste deur voorzichtig uit het onderste scharnier en plaats hem op een zachte
ondergrond om krassen te voorkomen.
13. Schroef onderdelen ‘S1’ en ‘S2’ los en bevestig ‘S2’ en ‘S3’ (bijgeleverd) aan de andere kant
met de schroeven (zie stap 6).
NL 16
Page 17
INSTALLEREN EN AANSLUITEN
fi
④
④
-
fi
④
-
fi
④
④
-
14. Verplaats de afdekplaatjes voor de schroefdraadgaten van het middelste scharnier naar de
andere zijde.
15. Draai de stelvoet los en het onderste scharnier en bevestig deze aan de andere kant.
16. Verplaats de afdekplaatjes onderaan naar de andere zijde.
17. Plaats de onderste deur in het onderste scharnier, zodanig dat de pin van het onderste
scharnier in het gat onderin de deur past.
18. Plaats het middelste scharnier in de deur. Let op eventueel terug te plaatsen afstelringen.
19. Positioneer de deur en zet de schroeven van het middelste scharnier vast.
NL 17
Page 18
INSTALLEREN EN AANSLUITEN
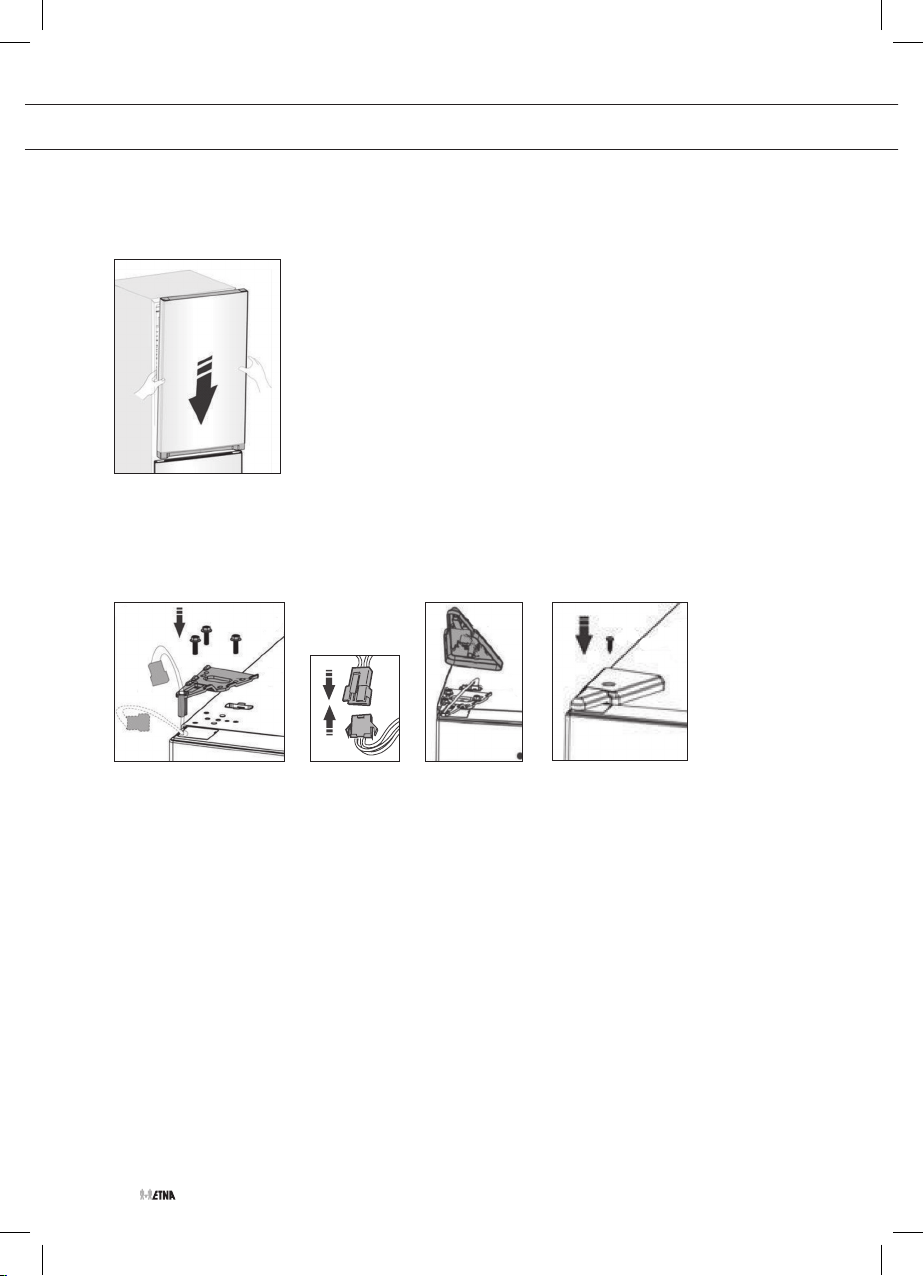
20. Plaats de bovenste deur in het middelste scharnier, zodanig dat de pin van het middelste
scharnier in het gat onderin de deur past.
21. Bevestig het bovenste scharnier aan de andere kant met de schroeven.
22. Maak de elektrische verbinding
23. Plaats het afdekkapje.
24. Controleer of de deur horizontaal en verticaal goed uitgelijnd is en of hij goed sluit voordat u
het onderste scharnier helemaal vastdraait. Zet het toestel weer waterpas met de stelvoeten.
NL 18
Page 19
TOESTELBESCHRIJVING
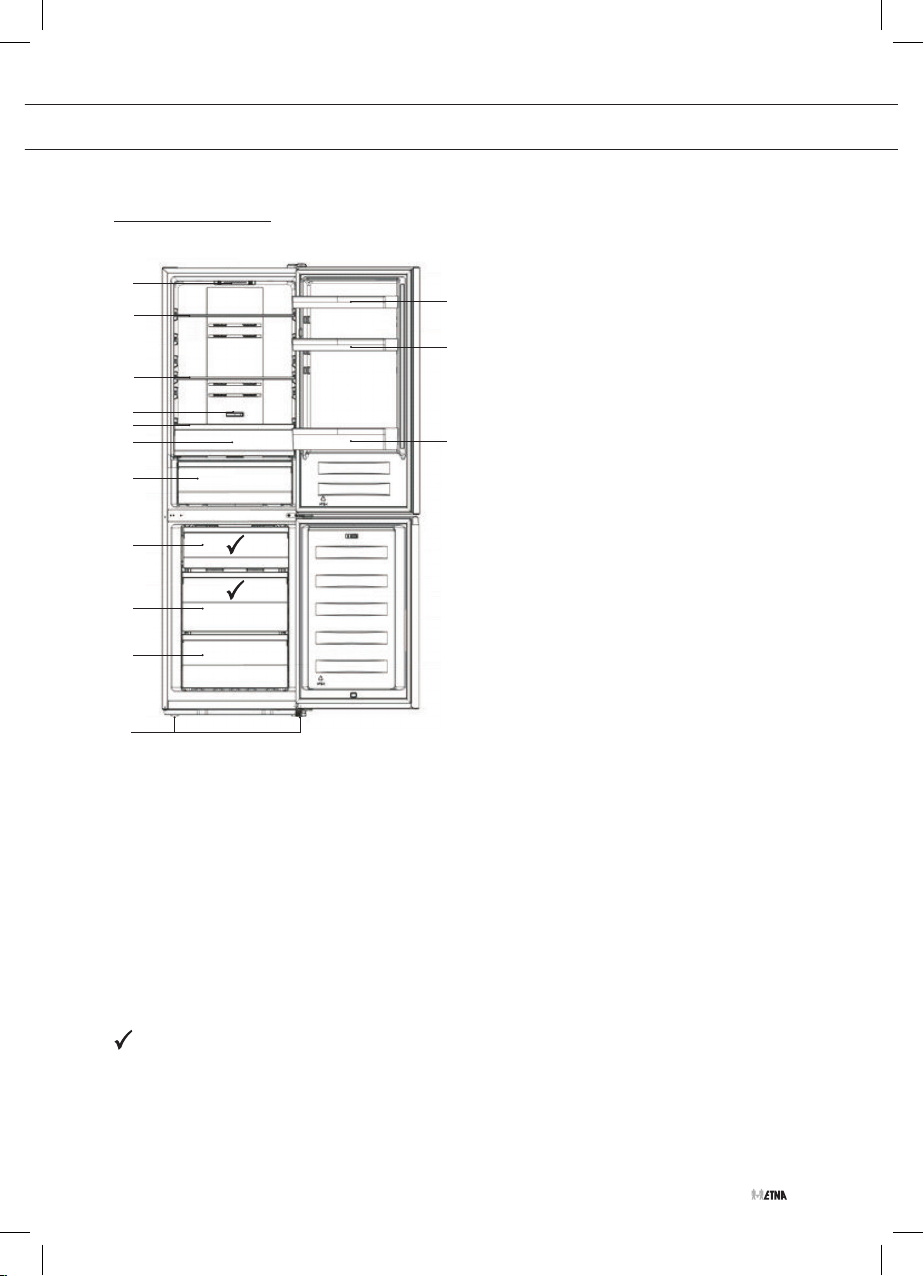
Toestel
1
2
2
3
2
4
5
6
6
6
7
1. Interieurverlichting
2. Draagplateau
3. FreshZone temperatuurregeling
4. FreshZone lade
5. Groentelade
6. Vrieslade
7. Stelvoeten
8. Deurvak
▷ Het onderste deurvak is geschikt voor flessen.
8
8
8
Beste locatie voor het invriezen van vers voedsel.
NL 19
Page 20
TOESTELBESCHRIJVING
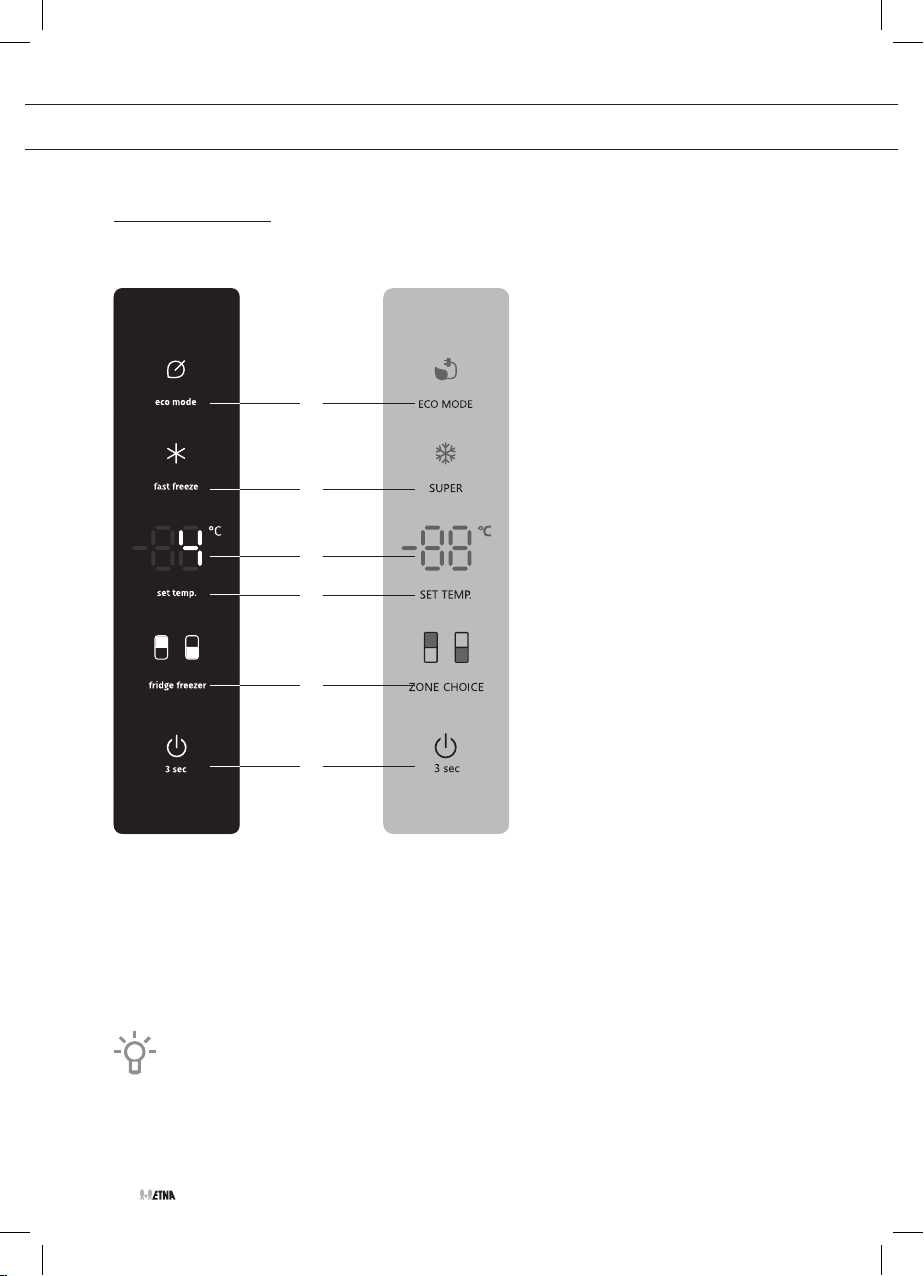
Bedieningspaneel
KCV186NRVS KCV186NZWA
A
B
C
D
E
F
A. ECO-toets
B. FastFreeze toets (intensieve vriesfunctie)
C. Weergave temperatuur
D. Temperatuurtoets
E. Zonetoets
F. Aan-/uittoets
De aanbevolen temperatuur is 4 °C voor het koelcompartiment en -18 °C voor het
vriescompartiment.
NL 20
Page 21
8
BEDIENING VAN HET TOESTEL
Het toestel in-/uitschakelen
1. Raak gedurende drie seconden de aan-/uittoets aan.
▷ Het toestel schakelt uit (stand-by).
▷ In het display verschijnt ‘OF’.
Volg dezelfde stappen als u het toestel weer wilt inschakelen.
Als u het toestel helemaal wilt uitschakelen, trekt u de stekker uit het stopcontact.
Temperatuur instellen
1. Druk op de zonetoets om de koelkast of de vriezer te selecteren.
▷ Het pictogram van de gekozen zone knippert.
2. Druk (meerdere keren) op de temperatuurtoets om de temperatuur in te stellen.
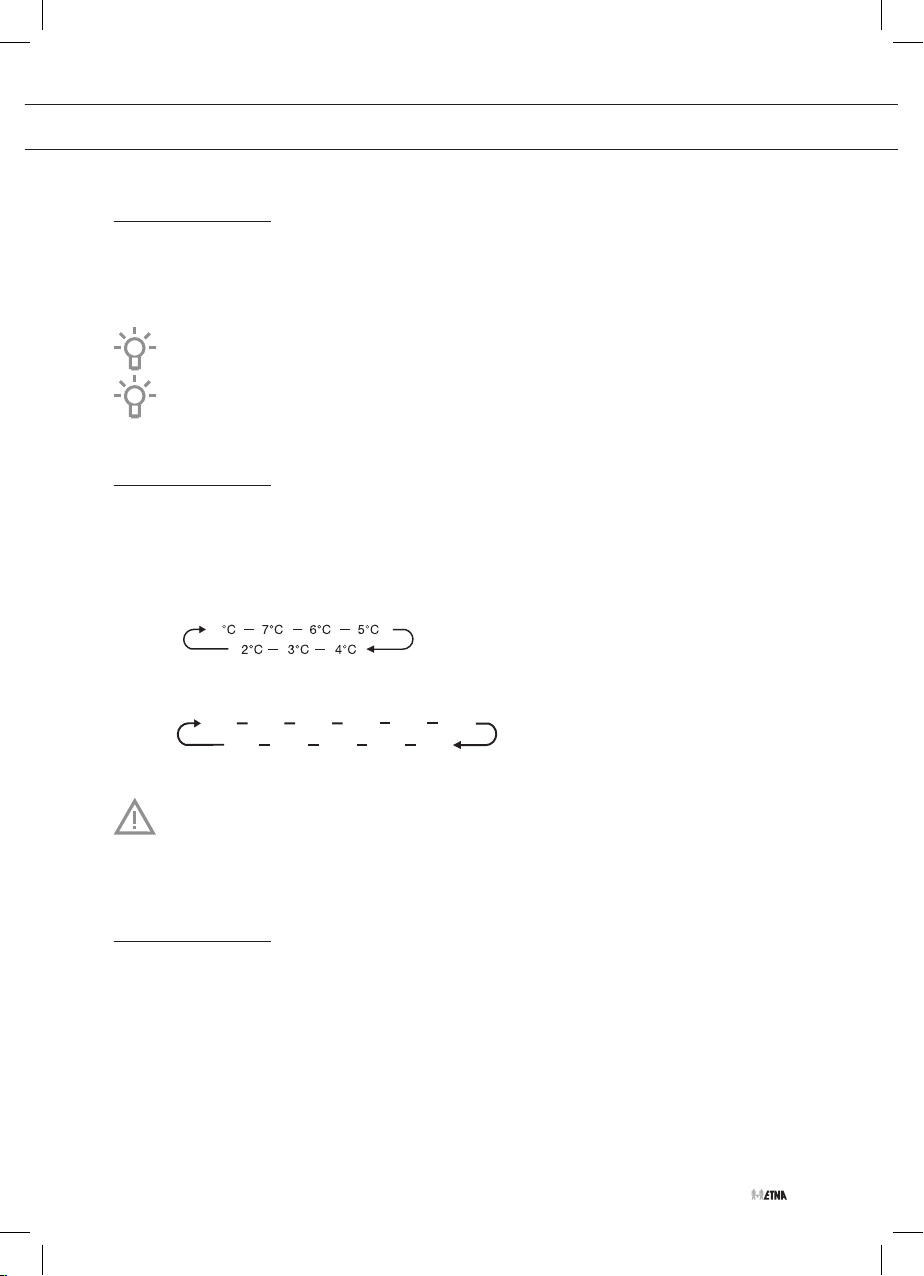
▷ De temperatuur van de koelkast zal in de onderstaande volgorde worden ingesteld:
8
▷ De temperatuur van de vriezer zal in de onderstaande volgorde worden ingesteld:
-18°C - 19°C
-17°C -16 °C -15°C -14°C -24°
-20°C
-21°C
-22°C - 23°C
C
Nadat u het toestel hebt ingeschakeld, duurt het enkele uren voordat de ingestelde
temperatuur is bereikt. Plaats geen voedsel in het toestel voordat de temperatuur tot de
gekozen instelling is gedaald.
Intensief vriezen
Dit toestel beschikt over een intensieve vriesfunctie. Deze functie zorgt ervoor dat de temperatuur
in het vriescompartiment zo snel mogelijk daalt. Schakel deze functie 24 uur van tevoren in
voordat u een grote hoeveelheid vers voedsel in het toestel legt.
De intensieve vriesfunctie in-/uitschakelen
1. Druk op de FastFreeze toets.
▷ De toets en de temperatuur -24 °C worden verlicht.
▷ De functie is ingeschakeld.
NL 21
Page 22
BEDIENING VAN HET TOESTEL
2. Druk op de FastFreeze toets.
▷ De toets gaat uit.
▷ De functie is uitgeschakeld.
▷ De temperatuur keert terug naar de meest recent ingestelde waarde.
Als de intensieve vriesfunctie niet handmatig wordt uitgeschakeld, wordt de functie
(na ongeveer 2 dagen) automatisch uitgeschakeld.
Wanneer u een andere temperatuur instelt terwijl de intensieve vriesfunctie actief is,
wordt intensief vriezen onmiddellijk uitgeschakeld.
ECO-functie
Dit toestel beschikt over een ECO-functie. De ECO-functie heeft geen tijdslimiet en blijft actief
totdat de functie wordt uitgeschakeld
De ECO-functie in-/uitschakelen
1. Druk op de ECO-toets.
▷ De toets en de temperatuur -17 °C worden verlicht (indien het vriesgedeelte
geselecteerd is).
▷ De toets en de temperatuur 6 °C worden verlicht (indien het koelgedeelte geselecteerd
is).
▷ De functie is ingeschakeld.
2. Druk op de ECO-toets.
▷ De toets gaat uit.
▷ De functie is uitgeschakeld.
▷ De temperatuur keert terug naar de meest recent ingestelde waarde.
NL 22
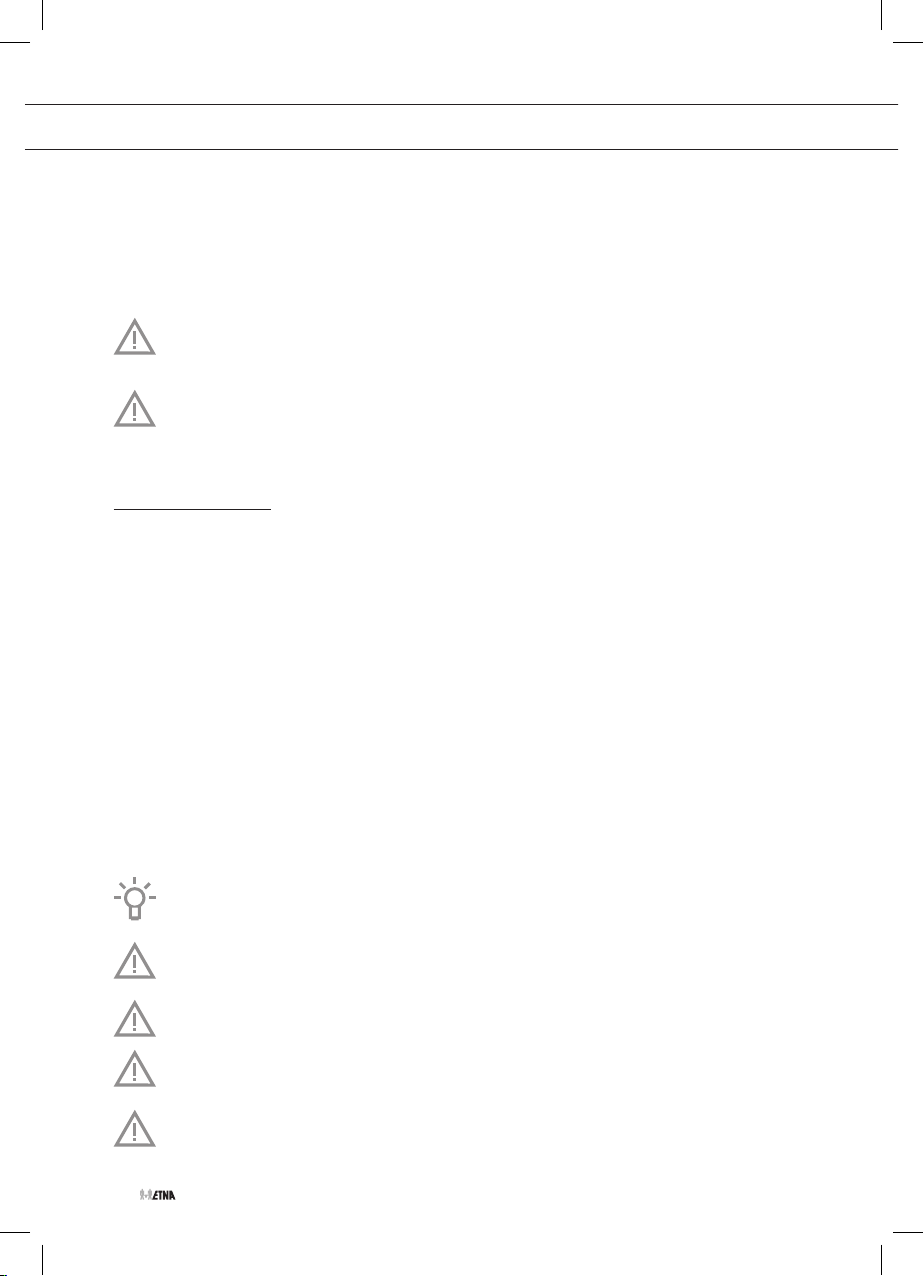
De ECO-functie is niet geschikt om vers voedsel in te vriezen of om ijsblokjes te maken.
Let op!
Het inschakelen van de ECO-functie schakelt de functie FastFreeze uit.
Als de ECO-functie actief is, kan de bewaartijd van voedsel korter worden.
Schakel de ECO-functie niet in tijdens het invriezen van vers voedsel.
Wanneer u een andere temperatuur instelt terwijl de ECO-functie actief is, wordt de ECO-
functie onmiddellijk uitgeschakeld.
Page 23
BEDIENING VAN HET TOESTEL
Alarm bij open deur
Als de deur van een compartiment te lang open staat, hoort u een geluidssignaal en ‘dr’
verschijnt in de display.
Het alarm uitschakelen
1. Sluit de deur.
▷ Het geluidssignaal stopt.
Indien na 8 minuten de deur nog niet gesloten is, stopt het geluidssignaal automatisch.
Lade met handmatige vochtregeling
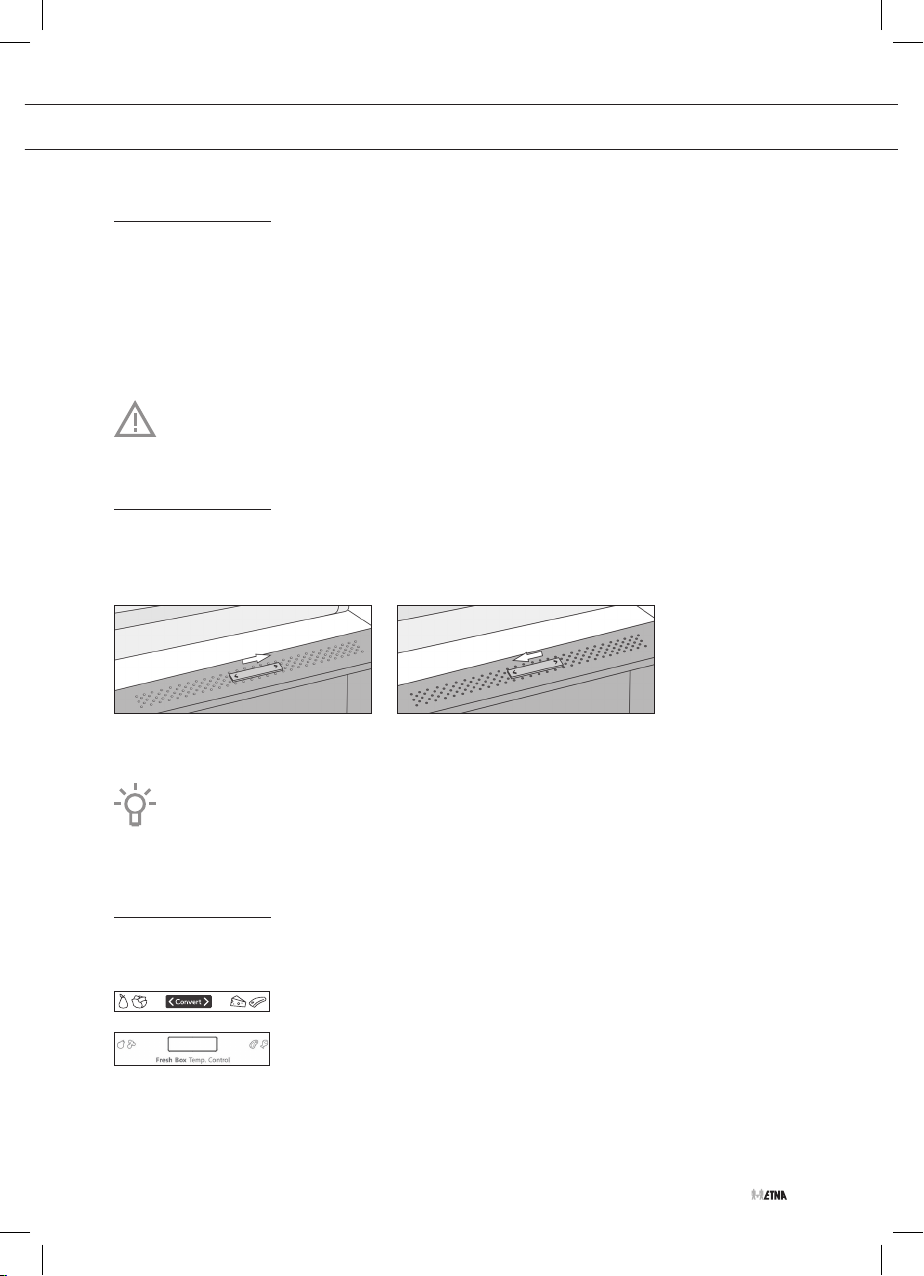
De groentelade heeft een geïntegreerde vochtregelaar waarmee u de luchtvochtigheid kunt
regelen. Zo wordt voorkomen dat het voedsel uitdroogt.
• Schuif naar rechts: ventilatieopening sluiten voor een hogere luchtvochtigheid in de lade.
• Schuif naar links: ventilatieopening openen voor een lagere luchtvochtigheid in de lade.
Wanneer zich waterdruppels op het glazen draagplateau vormen, opent u de
ventilatieopening en veegt u het plateau af.
FreshZone lade
De temperatuur in de FreshZone lade kan aangepast worden.
• Schuif naar links: de temperatuur is gelijk aan die van het
koelcompartiment.
• Schuif naar rechts: de temperatuur ligt ca. 2 graden lager dan de
temperatuur van het koelcompartiment. Geschikt voor het bewaren
van vlees en vis. Het kan zijn dat het oppervlak van het voedsel
iets bevroren is.
NL 23
Page 24
VOEDSEL BEWAREN EN INVRIEZEN
Aanbevolen indeling
Delen van het koelcompartiment
• Bovenste deel: voedsel in blik, brood, wijn, deegwaren etc.
• Middelste deel: zuivel, kant-en-klaarmaaltijden, toetjes, frisdrank, bier, gekookt voedsel etc.
• Onderste deel: vlees, vleeswaren, zuivel.
• Groentelade: groenten en vers fruit
Delen van de deur
• Bovenste/middelste deurvak: eieren, boter, kaas, sauzen etc.
• Onderste deurvak: dranken, blikjes, flessen etc.
Bewaar snel bedervend voedsel achteraan op een draagplateau of achter in een lade
waar de temperatuur het laagst is.
Let op; het bewaren van groente met een hoog watergehalte kan condensvorming
veroorzaken op de glazen schappen van de groenten- en fruitlade: dit beïnvloedt het
correct functioneren van het toestel niet.
Bewaar fruit (bananen, ananas, papaja, citrusvruchten) en groenten (courgettes,
tomaten, aubergines, komkommers, paprika’s en aardappelen) die gevoelig zijn voor lage
temperaturen niet in de koelkast.
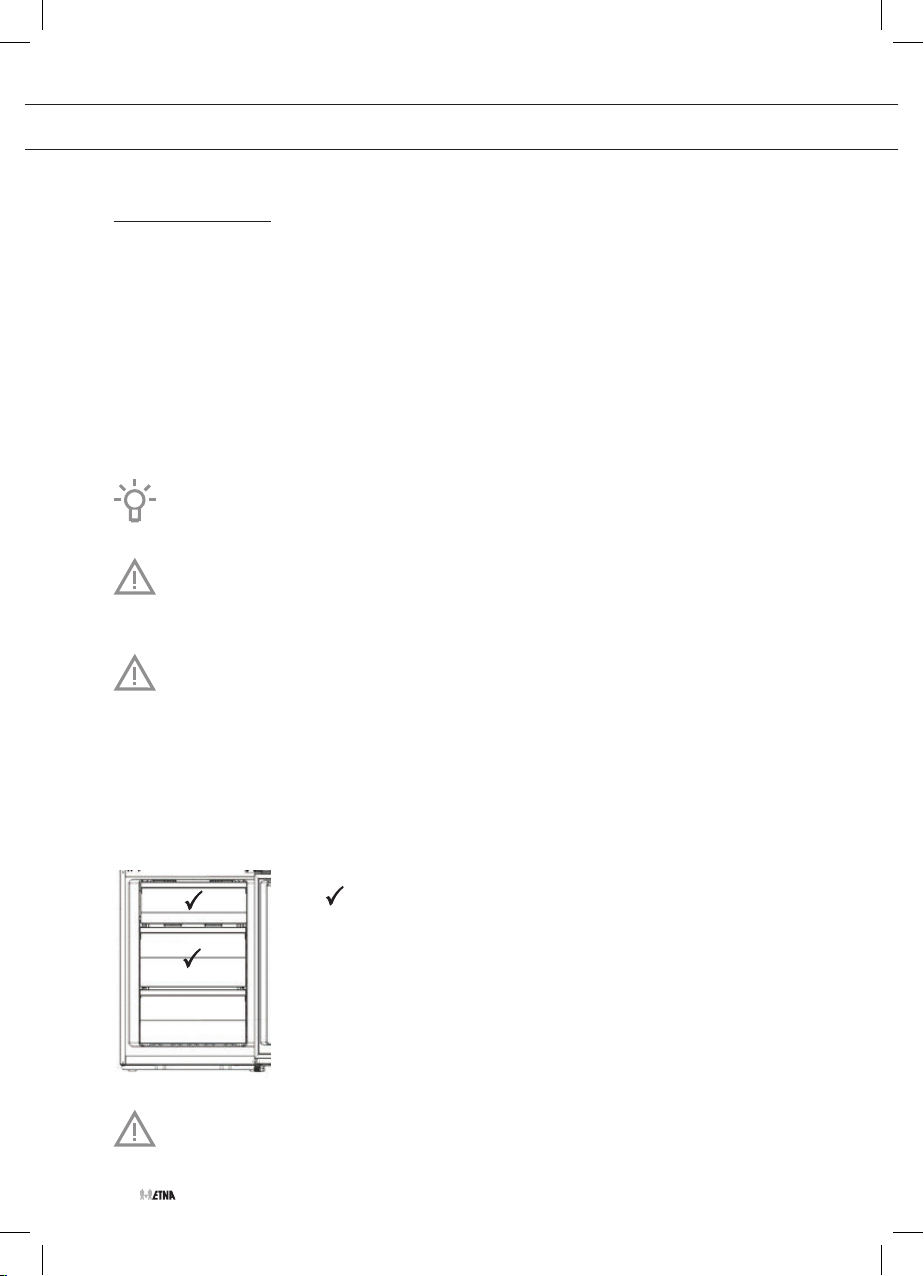
Delen van het vriescompartiment
• Bovenste deel: restjes eten, ijs, pizza.
• Middelste deel: vlees, vis, brood.
• Onderste deel: standaard vriescompartiment, groente en fruit.
De beste locatie voor het invriezen van vers voedsel is gemarkeerd met
een .
Bewaar sla, eieren, appels, peren, druiven, perziken, yoghurt, karnemelk, zure room en
mayonaise niet in het vriescompartiment.
NL 24
Page 25
VOEDSEL BEWAREN EN INVRIEZEN
Voorkom het bederven van voedsel
Volg de onderstaande instructies om het bederven van voedsel te voorkomen:
• Als u de deur gedurende lange tijd opent, kan de temperatuur in de compartimenten van het
toestel aanzienlijk stijgen.
• Reinig regelmatig de oppervlakken die in contact kunnen komen met voedsel. Reinig ook
regelmatig het afvoergootje.
• Bewaar rauw vlees en vis in geschikte bakjes in de koelkast, zodat het niet in contact komt
met of druppelt op ander voedsel.
• Als het toestel met koelfunctie gedurende een lange periode leeg blijft, schakelt u het
uit. Ontdooi het toestel, maak het schoon en laat het drogen. Laat de deur open om
schimmelvorming in het toestel te voorkomen.
Vers voedsel bewaren in de koelkast
Belangrijke aanwijzingen bij het bewaren van vers voedsel
• Om de kwaliteit van het verse voedsel te waarborgen, is het belangrijk dat:
▷ het voedsel goed verpakt is;
▷ het toestel de juiste temperatuur heeft;
▷ het toestel schoon is.
• Let op de houdbaarheidsdatum op de verpakking van het voedsel.
• Plaats voedsel in de koelkast in gesloten bakjes of in een geschikte verpakking. Dit
voorkomt besmetting door of verspreiding van geuren en het houdt het voedsel droog.
• Bewaar geen ontvlambare, instabiele of explosieve materialen in de koelkast.
• Bewaar flessen die al een keer zijn geopend rechtop en sluit ze goed af.
• Sommige organische oplossingen, essentiële oliën in schillen van citroenen en
sinaasappelen, boterzuur etc. kunnen plastic oppervlakken bij langdurig contact
beschadigen, waardoor het materiaal vroegtijdig veroudert.
• Een onprettige geur is een indicatie dat het toestel onvoldoende schoon wordt gehouden of
van bedorven voedsel (zie het hoofdstuk ‘Onderhoud’).
• Wanneer u langere tijd niet thuis bent, haalt u bederfelijke artikelen uit de koelkast.
NL 25
Page 26
VOEDSEL BEWAREN EN INVRIEZEN
Invriezen en bewaren van voedsel in het vriescompartiment
Belangrijke aanwijzingen bij het invriezen van vers voedsel
• De maximale hoeveelheid vers voedsel die u in een keer in het vriescompartiment kunt
plaatsen, is op het typeplaatje aangegeven. Wanneer de hoeveelheid in te vriezen voedsel
groter is dan de aangegeven hoeveelheid, neemt de kwaliteit van het invriezen af. Daarnaast
zal ook de kwaliteit van het al ingevroren voedsel dalen.
• Gebruik alleen vers voedsel van een goede kwaliteit dat geschikt is om in te vriezen.
• Laat warm voedsel eerst afkoelen naar kamertemperatuur.
• Het is belangrijk om het voedsel snel in te vriezen. Daarom wordt gebruik van kleine
verpakkingen aanbevolen.
• Gebruik een lucht- en waterdichte verpakking, zodat het voedsel niet uitdroogt en zijn
vitamines verliest.
• Noteer het soort voedsel, de hoeveelheid en de invriesdatum op de verpakking.
• Laat vers voedsel niet in contact komt met voedsel dat al ingevroren is.
Invriezen van kleine hoeveelheden vers voedsel / ijsblokjes maken
Zie hoofdstuk ‘Aanbevolen indeling’ voor de beste locatie voor het invriezen van vers voedsel
(1 à 2 kilo) en het maken van ijsblokjes.
Invriezen van grote hoeveelheden vers voedsel
• Activeer de intensieve vriesfunctie 24 uur voordat u voedsel gaat invriezen.
• Verdeel het verse voedsel evenredig over alle laden in het vriescompartiment.
• Na 24 uur kunt u het voedsel verplaatsen naar een ander vak in de vriezer en kunt u ander
voedsel gaan invriezen.
Belangrijke aanwijzingen bij het bewaren van bevroren voedsel
• Houdt u bij het bewaren of gebruik van ingevroren voedsel aan de instructies van de
fabrikant. Let op de aanbevolen bewaartemperatuur en de houdbaarheidsdatum op de
verpakking.
• Gebruik alleen voedsel waarvan de verpakking onbeschadigd is en dat bewaard wordt bij
een temperatuur van -18 °C of lager.
• Koop geen voedsel dat bedekt is met rijp. Dat betekent namelijk dat het voedsel meerdere
keren gedeeltelijk is ontdooid en daarom van inferieure kwaliteit is.
• Voorkom dat het voedsel tijdens het vervoer ontdooit. Bij een toename van de temperatuur
wordt de bewaartijd korter en neemt de kwaliteit af.
NL 26
Page 27
VOEDSEL BEWAREN EN INVRIEZEN
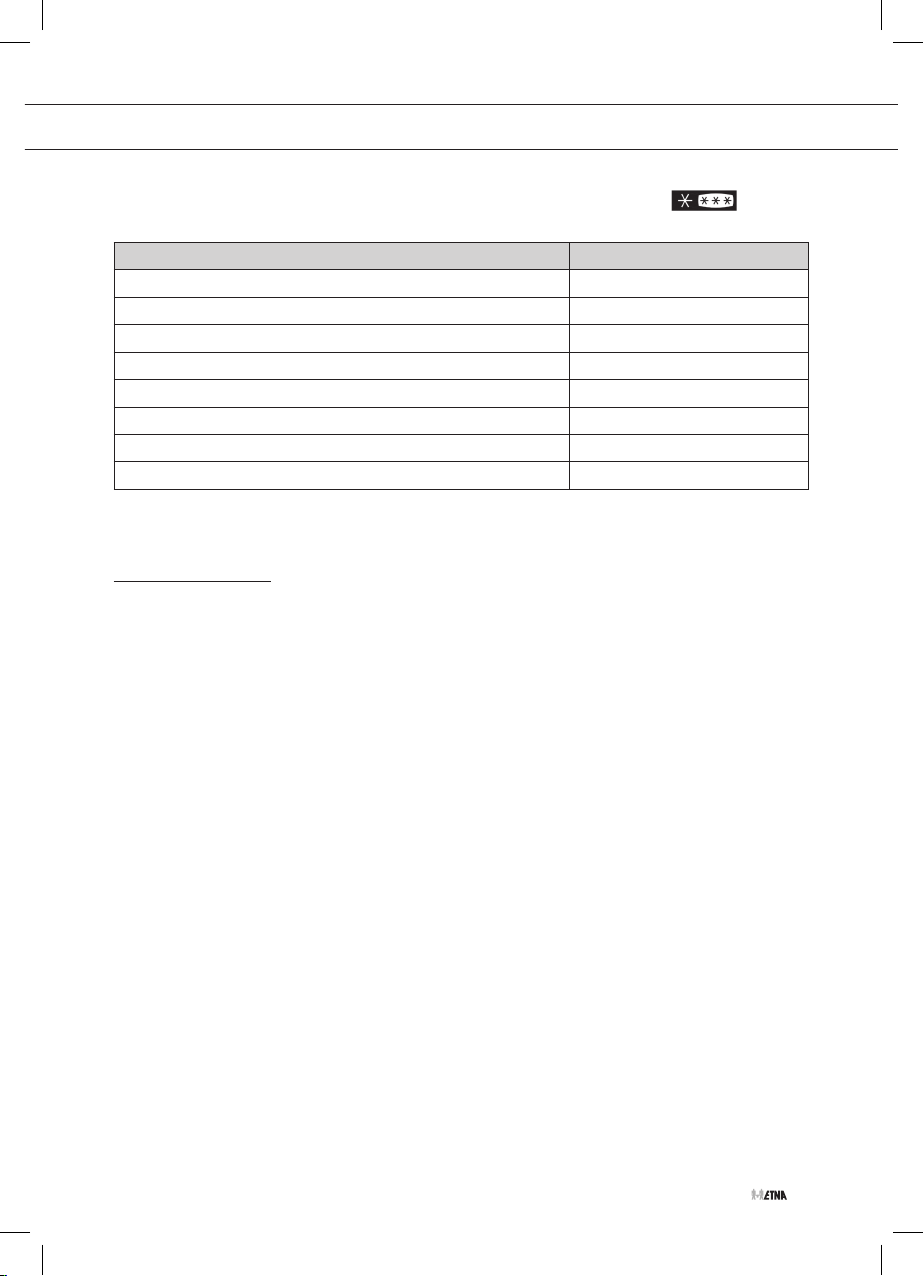
Aanbevolen bewaartijd van ingevroren voedsel in het vriescompartiment
Soort voedsel Bewaartijd
Fruit, rundvlees 10 tot 12 maanden
Groenten, kalfsvlees, gevogelte 8 tot 10 maanden
Hert 6 tot 8 maanden
Varkensvlees 4 tot 6 maanden
Fijngesneden of gemalen vlees 4 maanden
Brood, deegwaren, gekookte gerechten, magere vis 3 maanden
Ingewanden 2 maanden
Gerookte worst, vette vis 1 maand
Bevroren voedsel ontdooien
• Ontdooien is een belangrijke stap in het bewaren van voedsel door bevriezing. Het is van
belang dat het voedsel op de juiste manier wordt ontdooid.
• Geschikte manieren om voedsel te ontdooien:
▷ in de koelkast;
▷ in koud water;
▷ in een magnetron of oven met een geschikt ontdooiprogramma.
• Sommige bevroren producten kunnen bereid worden zonder het eerst te ontdooien. Dit is
aangegeven door de fabrikant op de verpakking.
• Het is belangrijk dat het voedsel is verpakt in kleine porties. Op deze manier gaat het
ontdooien een stuk sneller.
• Gebruik gedeeltelijk of geheel ontdooid voedsel zo snel mogelijk. Nadat het voedsel is
ontdooid, worden bacteriën weer actief en bederft voedsel snel. Dat geldt met name voor
fruit, groenten en kant-en-klaar voedsel.
• Vries gedeeltelijk of geheel ontdooid voedsel niet meer in.
NL 27
Page 28
ONDERHOUD
Het toestel ontdooien
Automatisch ontdooien van het koelcompartiment
Het koelcompartiment ontdooit van tijd tot tijd geheel automatisch.
Ontdooien van de NoFrost vriezer
Ontdooien van de NoFrost vriezer gaat automatisch. Rijp dat zich af en toe afzet zal vanzelf
verdwijnen.
Als er toch ijs of rijpafzetting in de vriesruimte aanwezig is, kan dat het gevolg zijn van een
ongewoon gebruik van het toestel (te vaak en te lang de deur openen, slechte sluiting van de
deur, etc.). Ontdooi in dit geval de vriezer handmatig.
Zet bij extreme ijsvorming het toestel uit. Neem de etenswaren uit de vriezer en bescherm
ze zodat ze niet (deels) kunnen ontdooien. Reinig en droog het interieur van de vriezer.
Zet, voordat u de etenswaren in de vriezer doet, het toestel aan en kies de gewenste
instelling.
Het toestel reinigen
Schakel het toestel uit en haal de stekker uit het stopcontact voordat u het gaat
schoonmaken.
Gebruik geen reinigingsmiddelen die schurende bestanddelen bevatten; hierdoor kan het
oppervlak beschadigd raken.
Activeer de intensieve vriesfunctie 24 uur voordat u de vriezer gaat schoonmaken.
• Voor het schoonmaken moeten de levensmiddelen uit het vriescompartiment in diverse
lagen dekens of kranten worden gewikkeld en op een koele plaats worden bewaard. De niet
te voorkomen temperatuurstijging van de bevroren levensmiddelen zal de bewaartijd doen
verkorten. Denk er aan deze levensmiddelen binnen niet al te lange tijd te consumeren.
• Maak regelmatig de binnenzijde van het toestel schoon met lauw water met eventueel een
neutraal reinigingsmiddel of speciale koelkastreiniger. Maak alle oppervlakken schoon met een
zachte doek. Neem na het reinigen de delen af met schoon water en droog ze zorgvuldig.
• Plaats geen onderdelen van het toestel in de vaatwasser; hierdoor zouden ze beschadigd
kunnen raken.
NL 28
Page 29
ONDERHOUD
• Droog het interieur van het toestel. Schakel het apparaat in en zet de thermostaatknop op
de laagste temperatuurstand. Na 24 uur kunt u de thermostaat terug op de normale stand
zetten.
• Reinig de buitenkant met een zachte doek.
• Reinig regelmatig de condensor en ventilatieroosters aan de achterkant van het apparaat
met een stofzuiger of een borstel.
Wanneer u het toestel langere tijd niet gebruikt, schakelt u het uit en koppelt u het los van
de stroomvoorziening. Maak het toestel leeg, ontdooi het, maak het schoon en laat de
deur op een kier staan.
NL 29
Page 30
STORINGEN
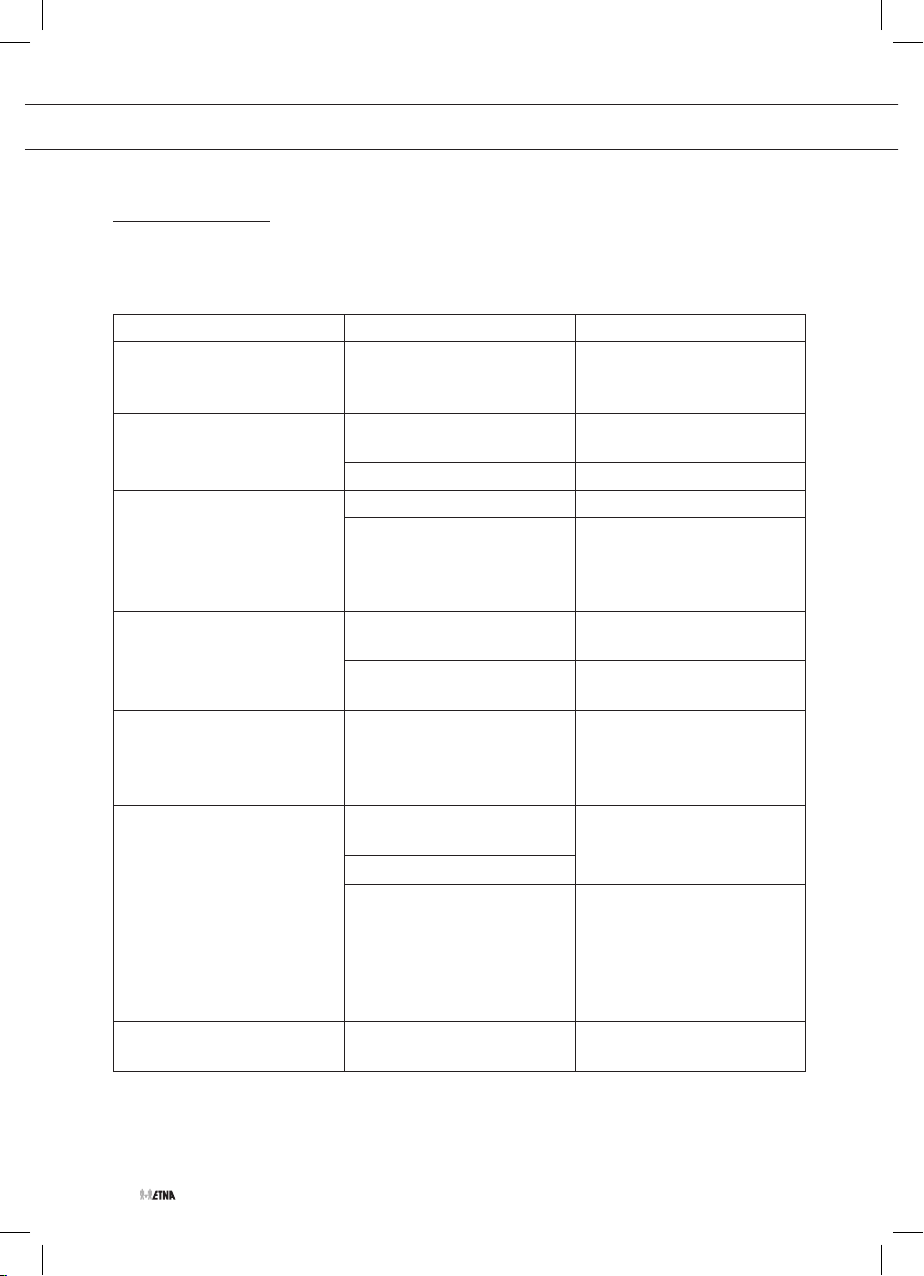
Storingstabel
Wanneer u twijfelt over de goede werking van uw toestel betekent dit niet automatisch dat er een
defect is. Controleer in elk geval de volgende punten in onderstaande tabel.
Probleem Mogelijk oorzaak Oplossing
Het toestel geeft een lichte
geur af.
Het toestel doet niets;
verlichting brandt niet.
Temperatuur in het toestel te
hoog of te laag.
Toestel maakt lawaai. Onjuiste opstelling
De LED verlichting werkt niet. LED verlichting stuk. Wanneer de LED verlichting
Er is veel ijsvorming in de
vriezer.
Er staat ‘dr’ in de display.
Nieuw toestel. Dit is normaal en verdwijnt
wanneer het toestel gaat
koelen.
Stekker niet in het
stopcontact.
Thermostaat uit. Schakel de thermostaat in.
Thermostaat foutief ingesteld. Stel de thermostaat goed in.
Deurrubbers vervuild of
beschadigd.
levensmiddelen in het toestel.
Er ligt een voorwerp tegen het
toestel.
De deur is te lang of te vaak
geopend.
De deur is niet goed gesloten.
De deur sluit niet goed
(vervuiling op de afdichting,
de deur zit scheef, de
afdichting is beschadigd,
etc.).
De deur staat te lang open. Zorg dat de deur goed
Steek de stekker in het
stopcontact.
Reinig de deurrubbers.
Neem contact op met het
servicecentrum als de
deurrubbers beschadigd zijn.
Plaats levensmiddelen op de
juiste wijze in het toestel.
Verwijder het voorwerp.
niet werkt, raadpleegt u een
servicemonteur. U mag niet
zelf LED verlichting repareren.
Zorg dat de deur goed
gesloten is.
Zorg dat de deur goed
gesloten is. Reinig de
deurrubbers. Neem contact
op met het servicecentrum
als de deurrubbers
beschadigd zijn.
gesloten is.
NL 30
Page 31
STORINGEN
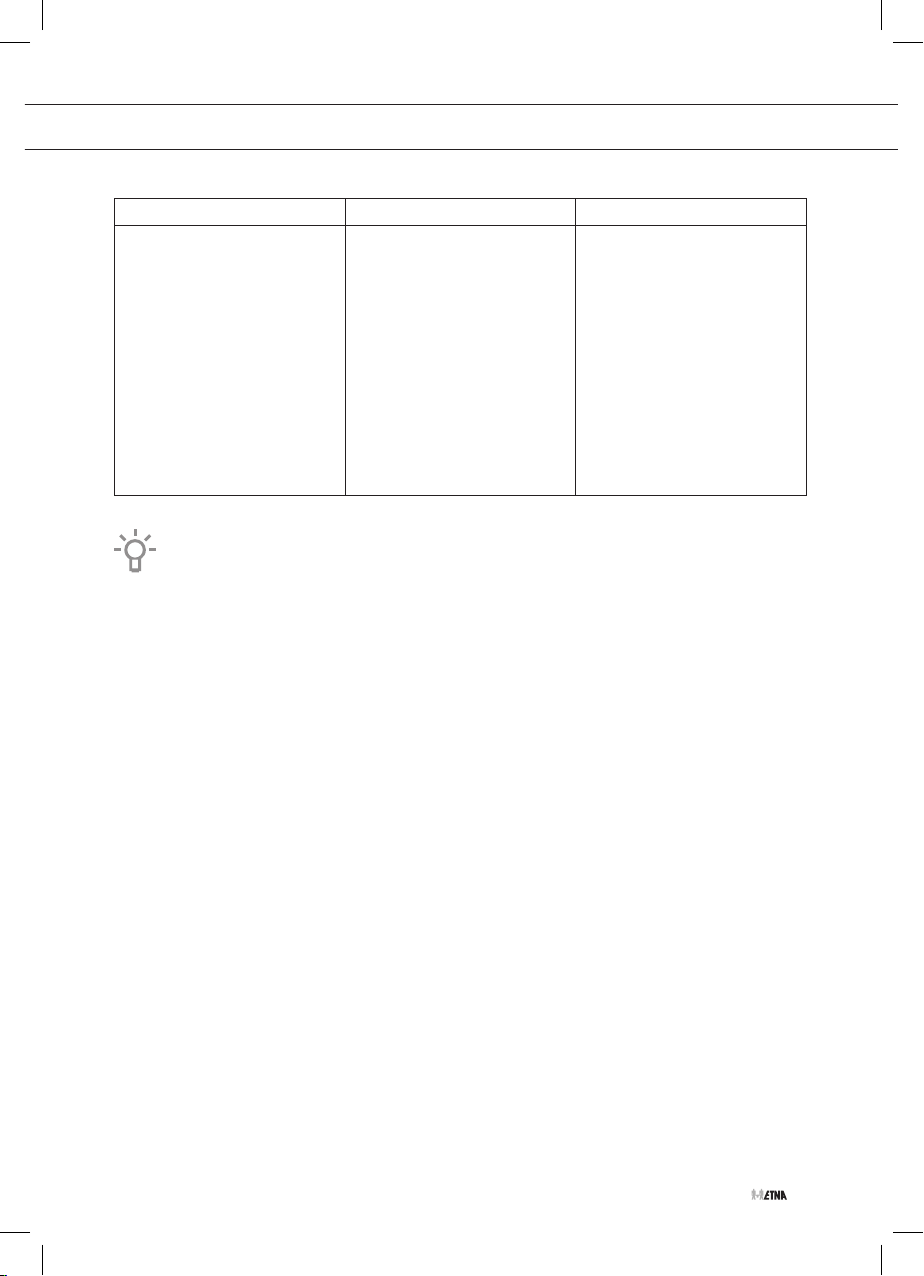
Probleem Mogelijk oorzaak Oplossing
De deur gaat moeilijk open. U probeert een deur van het
toestel te openen nadat u de
deur net hebt gesloten. Het
openen gaat dan moeilijk.
Wanneer u de deur opent,
ontsnapt er koele lucht uit het
toestel, die wordt vervangen
door warme omgevingslucht.
Tijdens het koelen van deze
lucht ontstaat er negatieve
druk, waardoor de deur
moeilijk opengaat.
Let op
Het koelcircuit kan borrelen of expansiegeluiden maken; dat is normaal.
Wanneer het probleem blijft bestaan, neemt u contact op met het servicecentrum en geeft u het
type, model en het serienummer door die op het typeplaatje of het label aan de binnenzijde van
het toestel worden vermeld.
Na een paar minuten is de
situatie weer normaal en gaat
de deur gemakkelijk open.
NL 31
Page 32
MILIEUASPECTEN
Verpakking en toestel afdanken
Dit toestel is gemaakt van duurzame materialen. Het toestel moet aan het einde van zijn
levensduur op verantwoorde wijze worden afgedankt. Informeer bij de plaatselijke autoriteiten
hoe u dit kunt doen.
Zie ook het hoofdstuk ‘Verwijdering’ in de veiligheidsvoorschriften.
De verpakking van het toestel is recyclebaar. Mogelijk zijn de volgende materialen gebruikt:
• Karton.
• Polyethyleenfolie (PE).
• CFC-vrij polystyreen (hard PS-schuim).
Deze materialen moeten op verantwoorde wijze en conform de overheidsvoorschriften worden
afgedankt.
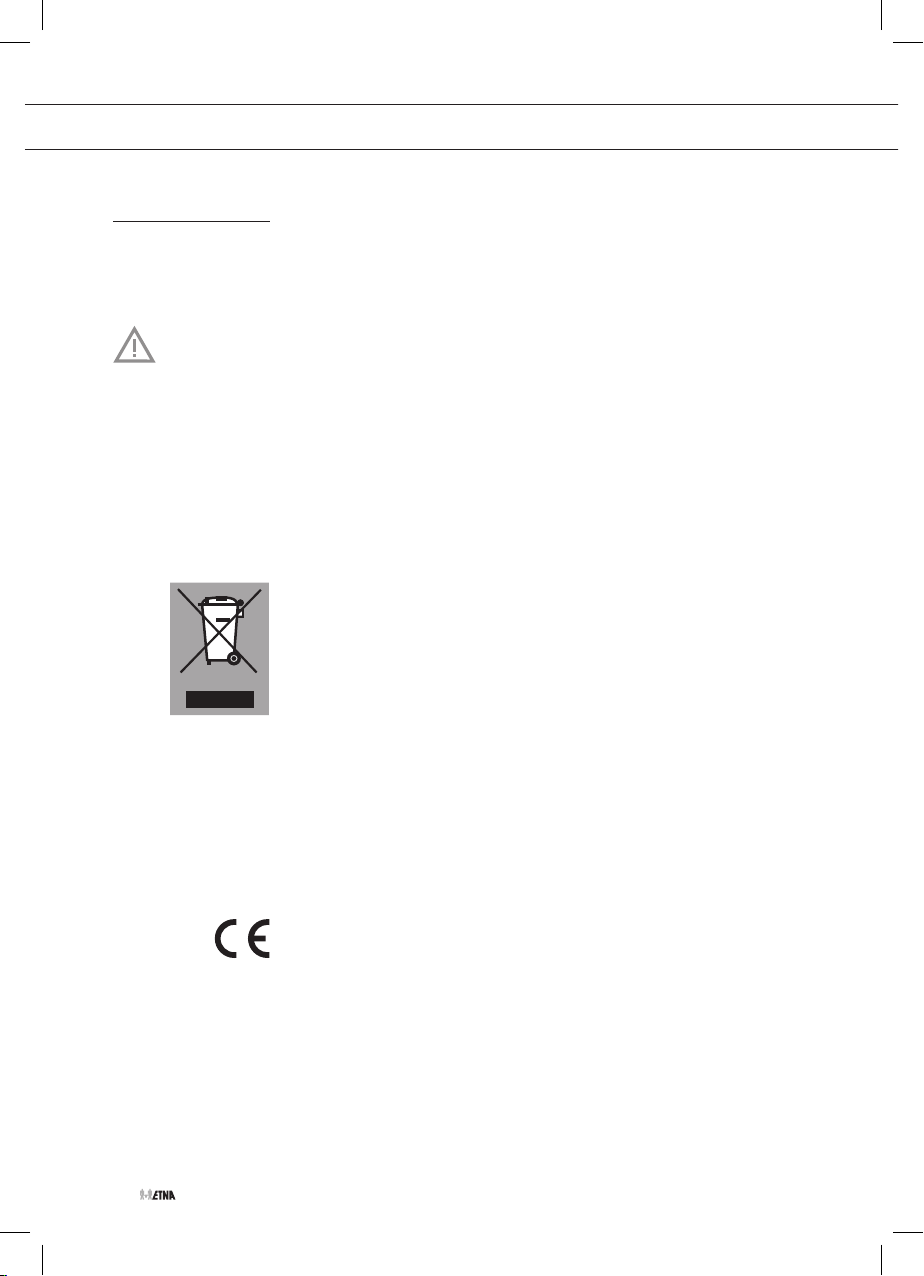
Het toestel is gemarkeerd met een vuilnisbaksymbool met een kruis
erdoor om u erop te wijzen dat elektrische huishoudelijke apparaten
afzonderlijk moeten worden afgedankt. Dit houdt in dat het toestel
aan het einde van zijn levensduur niet met het gewone huisvuil mag
worden meegegeven. Het toestel moet naar een speciale gemeentelijke
afvalverwerkingslocatie voor gescheiden afval worden gebracht of naar
een dealer die deze service verleent.
NL 32
Negatieve gevolgen voor mens en milieu worden voorkomen door
huishoudelijke apparaten apart in te zamelen en op de juiste wijze af
te danken. Dit zorgt ervoor dat de materialen waaruit het apparaat
bestaat, kunnen worden teruggewonnen en aanzienlijke besparingen op
energie en grondstoffen kunnen worden gerealiseerd.
Verklaring van conformiteit
Wij verklaren dat onze producten voldoen aan de van toepassing zijnde
Europese richtlijnen, verordeningen en voorschriften, evenals aan de
eisen die staan beschreven in de normen waarnaar wordt verwezen.
Page 33
NL 33
Page 34
CONTENTS
Your refrigerator
Introduction 4
Link to the EU EPREL database 4
Safety instructions 5
Before using the appliance for the first time
Before you use the appliance for the first time 11
Energy-saving advice 11
Installation and connection
Selecting the location 13
Connecting the appliance 14
Changing the side on which the door opens 15
Description of the appliance
Appliance 19
Control panel 20
Operating the appliance
EN 2
Switching the appliance on/off 21
Setting the temperature 21
Intensive freezing 21
ECO function 22
Open door alarm 23
Drawer with manual humidity control 23
FreshZone drawer 23
Page 35
CONTENTS
Storing and freezing food
Recommended distribution 24
Avoid contamination of food 25
Storing fresh food in the refrigerator 25
Freezing and storing foods in the frozen compartment 26
Defrosting frozen food 27
Maintenance
Defrosting the appliance 28
Cleaning the appliance 29
Faults
Faults table 30
Environmental aspects
Disposal of packaging and appliance 32
Pictograms used
Important information
Tip
Warning; Risk of fire / flammable materials
EN 3
Page 36
YOUR REFRIGERATOR
Introduction
Congratulations on choosing this Etna refrigerator with freezer. This product is designed with
simple operation and optimum comfort in mind.
These instructions for use explain how you can make best use of this appliance. These
instructions contain information about the operation of the appliance and background information
that may be of help to you during its use.
Read the safety instructions before using the appliance!
Read these instructions thoroughly before you first use the appliance, and keep the
instructions for future use.
Link to the EU EPREL database
The QR code on the energy label supplied with the appliance provides a web link to the
registration of this appliance in the EU EPREL database. Keep the energy label for reference
together with the user manual and all other documents provided with this appliance.
It is possible to find information related to the performance of the product in the EU EPREL
database using the link https://eprel.ec.europa.eu and the model name and product number that
you can find on the rating plate of the appliance.
For more detailed information about the energy label, visit www.theenergylabel.eu.
EN 4
Page 37
SAFETY INSTRUCTIONS
Before the installation and use of the appliance, carefully read
the supplied instructions. The manufacturer is not responsible if
an incorrect installation and use causes injuries and damages.
Always keep the instructions with the appliance for future
reference.
Safety of children and vulnerable people
• The appliance is not intended for use by persons (including
children) with reduced physical, sensory or mental capabilities,
or lack of experience and knowledge, unless they have
been given supervision or instruction concerning use of the
appliance by a person responsible for their safety.
• Children should be supervised to ensure that they do not play
with the appliance.
• Cleaning and user maintenance shall not be made by children
without supervision.
• Keep all packaging away from children.
For European markets only
• This appliance can be used by children aged from 8 years and
above and persons with reduced physical, sensory or mental
capabilities or lack of experience and knowledge if they have
been given supervision or instruction concerning use of the
appliance in a safe way and understand the hazards involved.
• Children shall not play with the appliance.
• Cleaning and user maintenance shall not be made by children
without supervision.
• Children aged from 3 to 8 years are allowed to load and unload
refrigerating appliances.
Original instruction
EN 5
Page 38
SAFETY INSTRUCTIONS
General safety
• The lamp in this household appliance is only suitable for
illumination of this appliance. The lamp is not suitable for
household room illumination.
• WARNING! This appliance is intended to be used in household
and similar applications such as
– staff kitchen areas in shops, offices and other working
environments;
– farm houses and by clients in hotels, motels and other
residential type environments;
– bed and breakfast type environments;
– catering and similar non-retail applications.
• WARNING! Keep ventilation openings, in the appliance
enclosure or in the built-in structure, clear of obstruction.
• WARNING! Do not use mechanical devices or other means
to accelerate the defrosting process, other than those
recommended by the manufacturer.
• WARNING! Do not damage the refrigerant circuit.
• WARNING! Do not use electrical appliances inside the food
storage compartments of the appliance, unless they are of the
type recommended by the manufacturer.
• WARNING! Do not use water spray and steam to clean the
appliance.
• WARNING! Clean the appliance with a moist soft cloth. Only
use neutral detergents. Do not use abrasive products, abrasive
cleaning pads, solvents or metal objects.
• WARNING! Do not store explosive substances such as aerosol
cans with a flammable propellant in this appliance.
• WARNING! If the supply cord is damaged, it must be replaced
by the manufacturer, its service agent or similarly qualified
persons in order to avoid a hazard.
EN 6
Page 39
SAFETY INSTRUCTIONS
Installation
• WARNING! This appliance should only be connected by a
registered installer.
• Remove all the packaging.
• Do not install or use a damaged appliance.
• Obey the installation instruction supplied with the appliance.
• Always be careful when you move the appliance because it is
heavy. Always wear safety gloves.
• Make sure the air can circulate around the appliance.
• Wait at least 4 hours before connecting the appliance to
the power supply. This is to allow the oil to flow back in the
compressor.
• Do not install the appliance close to radiators or cookers, oven
or hobs.
• Do not install the appliance where there is direct sunlight.
• Do not install this appliance in areas that are too humid or too
cold, such as the construction appendices, garages or wine
cellars.
• When you move the appliance, lift it by the front edge to avoid
scratching the floor.
• WARNING! When positioning the appliance, ensure the supply
cord is not trapped or damaged.
Electrical connection
• WARNING! Risk of fire and electrical shock.
• The appliance must be earthed.
• All electrical connections should be made by a qualified
electrician.
EN 7
Page 40
SAFETY INSTRUCTIONS
• Make sure that the electrical information on the rating plate
agrees with the power supply. If not, contact an electrician.
• Always use a correctly installed shockproof socket.
• Do not use multi-plug adapters and extension cables.
• Make sure not to cause damage to the electrical components
(e.g. mains plug, mains cable, compressor). Contact the
Service or an electrician to change the electrical components.
The mains cable must stay below the level of the mains
•
plug.
• Connect the mains plug to the mains socket only at the end
of the installation. Make sure that there is access to the mains
plug after the installation.
• Do not pull the mains cable to disconnect the appliance.
Always pull the mains plug.
• WARNING! Do not locate multiple portable socket-outlets or
portable power supplies at the rear of the appliance.
• If a stationary appliance is not fitted with a supply cord and a
plug, or with other means for disconnection from the supply
mains having a contact separation in all poles that provide full
disconnection under overvoltage category III conditions, the
means for disconnection must be incorporated in the fixed
wiring in accordance with the wiring rules. Using an omnipolar
switch with a contact separation of at least 3 mm fitted in the
supply cable will fulfill this requirement.
EN 8
Page 41
SAFETY INSTRUCTIONS
Use
• WARNING! Risk of injury, burns, electrical shock or fire.
• Do not change the specification of this appliance.
• Do not put electrical appliances (e.g. ice cream makers)
in the appliance unless they are stated applicable by the
manufacturer.
• Be careful not to cause damage to the refrigerant circuit. It
contains isobutene (R600a), a natural gas with a high level of
environmental compatibility. This gas is flammable.
• If damage occurs to the refrigerant circuit, make sure that there
are no flames and sources of ignition in the room. Ventilate the
room.
• Do not let hot items to touch the plastic parts of the appliance.
• Do not store flammable gas and liquid in the appliance.
• Do not put flammable products or items that are wet with
flammable products in, near or on the appliance.
• Do not touch the compressor or the condenser. They are hot.
Care and cleaning
• WARNING! Risk of injury or damage to the appliance.
• Before maintenance, deactivate the appliance and disconnect
the mains plug from the mains socket.
• This appliance contains hydrocarbons in the cooling unit.
Only a qualified person must do the maintenance and the
recharging of the unit.
• Regularly examine the drain of the appliance and if necessary,
clean it. If the drain is blocked, defrosted water collects in the
bottom of the appliance.
EN 9
Page 42
SAFETY INSTRUCTIONS
Disposal
• WARNING! Risk of injury or suffocation
• Disconnect the appliance from the mains supply.
• Cut off the mains cable and discard it.
• Remove the door to prevent children and pets to be closed
inside of the appliance.
• The refrigerant circuit and the insulation materials of this
appliance are ozone friendly.
• The insulation foam contains flammable gas. Contact your
municipal authority for information on how to discard the
appliance correctly.
• Do not cause damage to the part of the cooling unit that is
near the heat exchanger.
EN 10
Page 43
BEFORE USING THE APPLIANCE FOR THE FIRST TIME
Before you use the appliance for the first time
Do not connect the appliance to the mains until you have carefully read the instructions for the
correct and safe use of the appliance. As these instructions are for various types and models,
it is possible that the instructions for use refer to settings or parts that are not available on
your appliance. We recommend that you keep these instructions for future use. If you sell the
appliance, enclose them with the appliance.
Inspect the appliance for damage and/or irregularities. If the appliance is damaged, contact the
store that sold you the appliance.
Allow the appliance to stand upright for at least 4 hours before you connect the appliance to the
mains.
This reduces the risk of malfunctions resulting from transport effects on the refrigerant unit
Before using the appliance for the first time, the interior and all internal accessories should be
cleaned with lukewarm water and a neutral cleaning agent. Wipe the cleaned parts with a cloth
with clean water and then dry them thoroughly.
If you use the appliance for the first time, do not put food into the appliance until the temperature
has decreased to the set temperature.
.
Energy-saving advice
• Install the appliance as stated in the instructions for use.
• Do not open the door more than necessary.
• Never cover or obstruct the ventilation openings.
• Replace a door seal that is damaged or no longer seals properly as quickly as possible.
• Store food in well-sealed containers or suitable packaging.
• Allow food to cool to room temperature before you put it in the appliance.
• Defrost food in the refrigerator compartment.
• Defrost a conventional frozen compartment once a layer of about 2 to 3 millimetres of frost
or ice has formed on the inside.
• Space the shelves evenly in the refrigerator compartment.
Place the food so that the air can circulate freely in the appliance (follow the
recommendations for the location of foods enclosed in the instructions).
EN 11
Page 44
BEFORE USING THE APPLIANCE FOR THE FIRST TIME
• When the appliance is equipped with a fan then make sure that the ventilation openings are
kept clear.
• The lower the set temperature, the higher the power consumption.
• High ambient temperatures have an adverse effect on the energy consumption. Direct
sunlight or other heat sources in the vicinity of the appliance also have an adverse effect on
the energy consumption.
• Provide sufficient space around the appliance to allow for proper ventilation and air flow
around the appliance.
• The condenser on the back wall must always be kept clean and free of dust and foreign
matter.
EN 12
Page 45
INSTALLATION AND CONNECTION
Selecting the location
• This refrigerating appliance is not intended to be used as a built-in appliance.
• Do not place the appliance near a source of heat, such as a gas cooker, radiator or boiler,
etc., and do not expose it to direct sunlight.
• Place the appliance in a dry and well aired room. The permitted ambient temperature range
for the appliance depends on the appliance’s climate class, which is shown on the type
plate.
Description Class Ambient temperature range °C Relative humidity
Extended temperate SN +10 to +32
Temperate N +16 to +32
Subtropical ST +16 to +38
Tropical T +16 to +43
Do not place the appliance in a room where the temperature can fall below the lowest
permitted ambient temperature: the appliance may not work properly!
Do not place the appliance in a room where the temperature can fall below 5 °C: the
appliance may become defective!
≤ 75%
The appliance is not suitable for outdoor use and may not be exposed to rain.
Place the appliance in a room with a sufficient volume of air. The room must have a
volume of at least 1 m
shown on the type plate on the inside of the appliance.
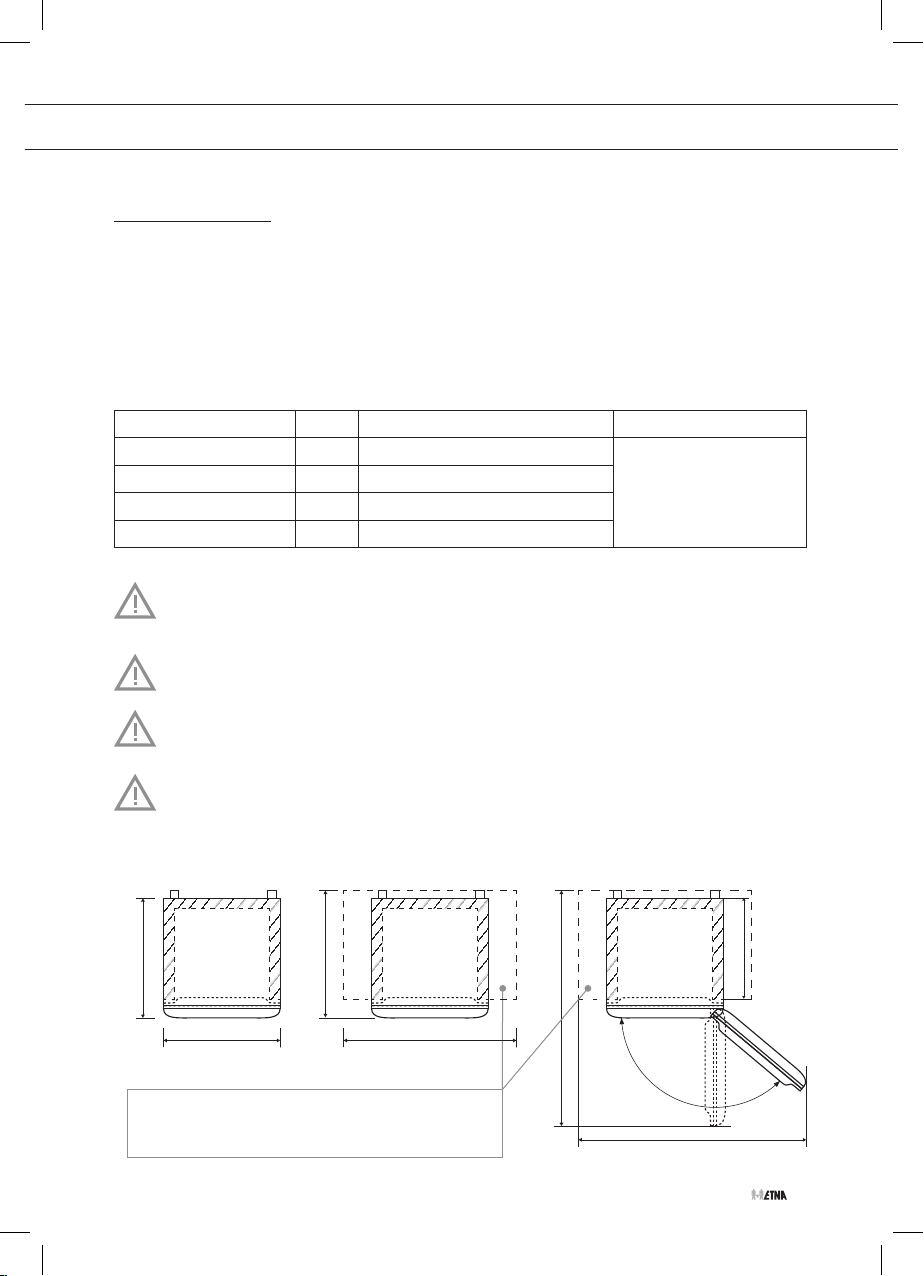
Overall dimensions Required space in use Total space required in use
590
595 795
Provide sufficient space around the appliance
to allow for proper ventilation and air flow
around the appliance.
3
of air for every 8 grams of refrigerant. The quantity of refrigerant is
640
1220
940
EN 13
Page 46
INSTALLATION AND CONNECTION
• The appliance must be placed at a distance of at least 5 cm from an electric or gas cooker
and at least 30 cm from a radiator or heater. An insulation panel must be fitted when these
distances cannot be achieved.
• The appliance must be placed at a distance of about 5 cm from the wall, back and sides
of a cupboard. A kitchen cupboard above the appliance must have a gap of at least 5 cm
between the back of the cupboard and the wall. This is needed to provide sufficient cooling.
• The plug of the installed appliance must remain accessible!
• The appliance's air outlet is at the top. Make sure that the outlet is not blocked. Blocking the
outlet can result in damage to the appliance.
• The appliance must be moved and installed by at least two people.
• Use caution when moving the appliance, to avoid damaging the floor.
• Make sure the appliance does not damage the power cable during installation.
• Place the appliance on a flat, stable surface.
• The adjustable feet allow you to level the appliance.
• To allow the doors to self-close, tilt the top backwards for about 0.5° by turning the
adjustable feet.
Connecting the appliance
• Connect mains lead of the appliance to the mains supply. The socket must be earthed. The
nominal voltage and frequency required for the appliance are shown on the appliance's type
plate/label with basic information.
• The appliance must be connected to the mains and earthed in accordance with the
prevailing standards and regulations. The appliance can withstand small variations in the
mains voltage to a maximum of plus or minus 6%.
EN 14
When you are not going to use the appliance for a longer period then switch it off with
the appropriate key and disconnect it from the mains. Empty, defrost and clean the
appliance, and leave the door ajar.
Freeze burn hazard
To avoid freeze burn, never put frozen food in your mouth and do not touch frozen food.
In the event of a defect or power cut, do not open the frozen compartment unless
the appliance has been out of operation for longer than the hours indicated on the
appliance’s type plate (temperature rise time). After this time, you must either use the
frozen food or make sure that it is properly cooled (for example, by transferring it to
another appliance).
Page 47
fi
④
fi
④
④
INSTALLATION AND CONNECTION
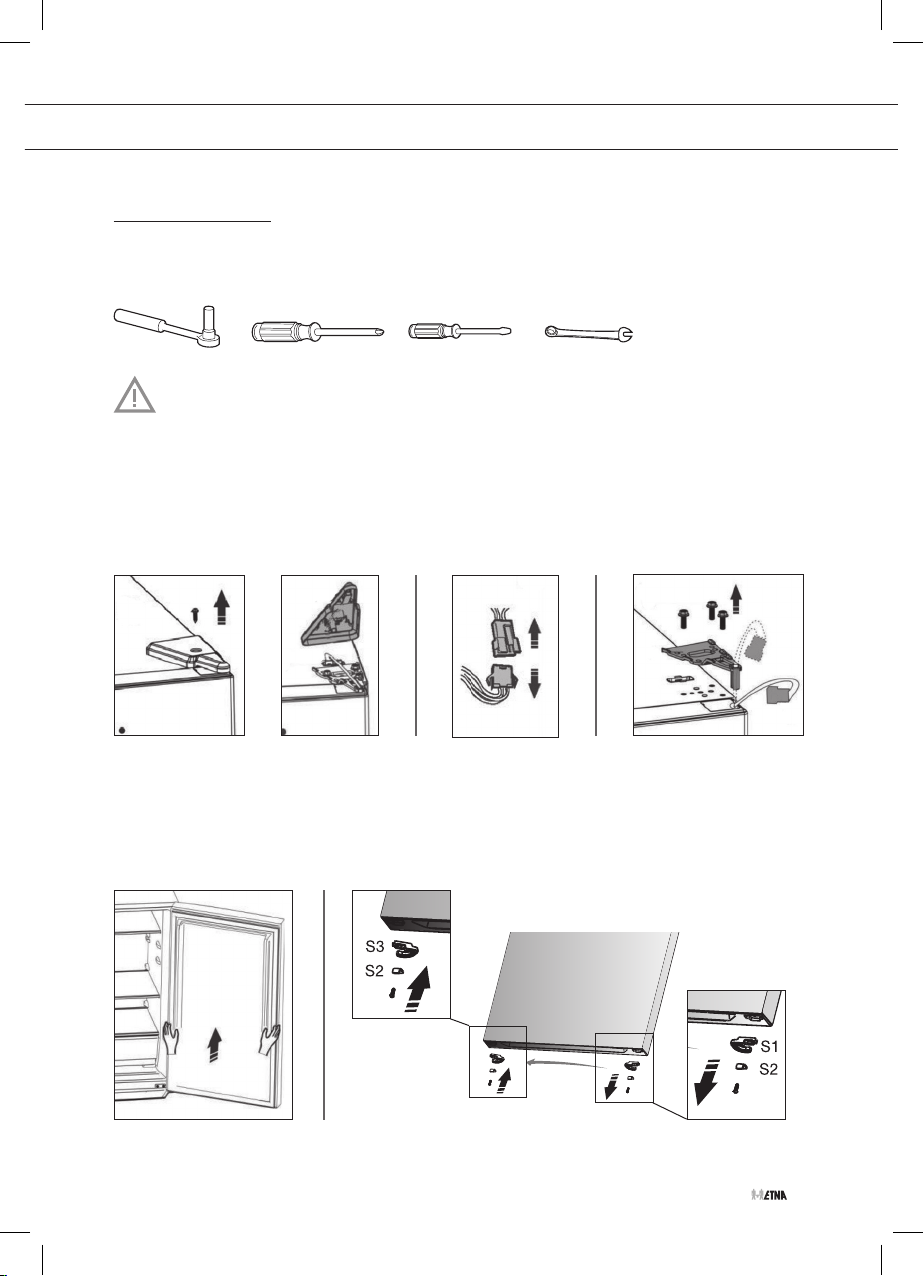
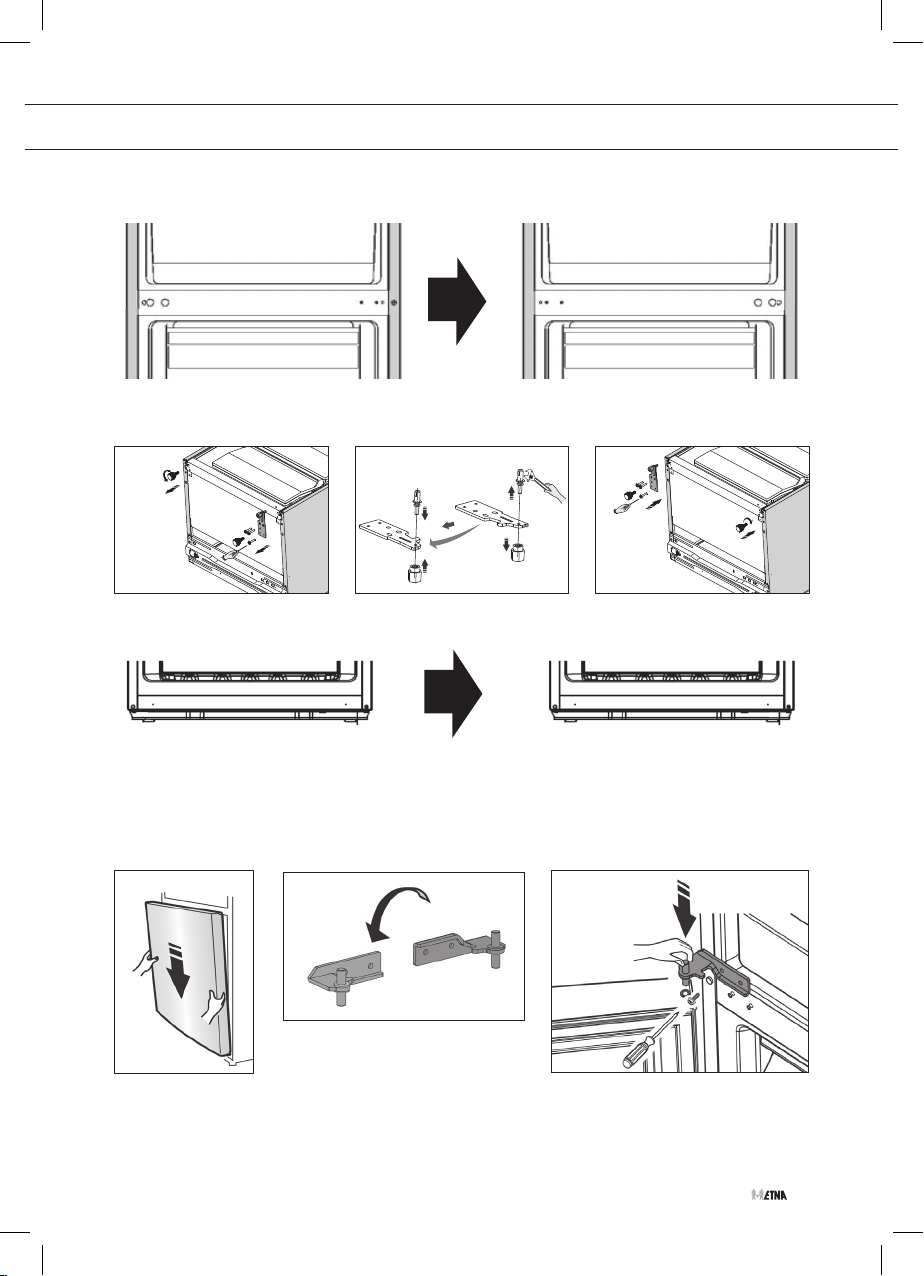
Changing the side on which the door opens
Tools
Switch off the appliance and disconnect it from the mains.
1. Remove all door compartments and close the door.
2. Remove the screw and cover plate.
3. Disconnect the electrical connection.
4. Remove the screws and upper hinge. Hold the door firmly.
5. Carefully lift the top door from the middle hinge and place it on a padded surface to prevent
scratching.
6. Unscrew parts ‘S1’ and ‘S2’ and attach ‘S2’ and ‘S3’ (included) to the other side with the
screws.
EN 15
Page 48
fl
e
fi
④
④
-
screw screw
INSTALLATION AND CONNECTION
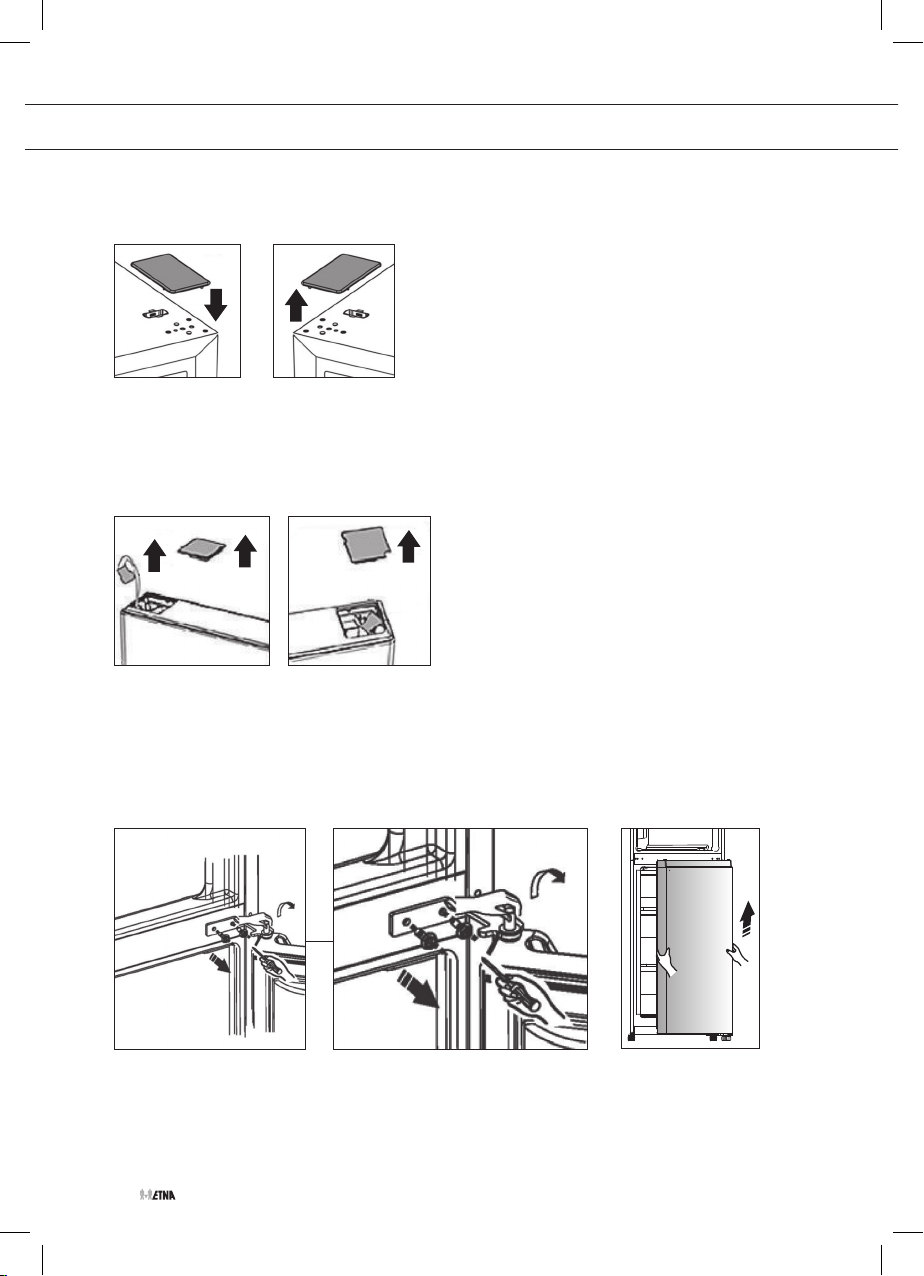
7. Place the supplied cover plate on the right-hand side. Remove the cover plate from the left-
hand side.
8. Remove the cover plate from the top-left corner of the door, disconnect the electrical
connection, and remove this part.
9. Remove the cover plate from the top-right corner of the door.
10. Place the left cover plate at the right, and place the right cover plate at the left.
11. Remove the screws and the middle hinge
12. Carefully lift the bottom door from the lower hinge and place it on a padded surface to
prevent scratching.
13. Unscrew parts ‘S1’ and ‘S2’ and attach ‘S2’ and ‘S3’ (included) to the other side with the
screws (see step 6).
EN 16
Page 49
fi
④
④
-
fi
④
-
fi
④
④
-
INSTALLATION AND CONNECTION
14. Move the cover plates in the threaded holes for the middle hinge to the other side.
15. Loosen the adjustable feet and the lower hinge and attach them on the other side.
16. Move the cover plates at the bottom to the other side.
17. Slide the bottom door back on to the lower hinge, making sure that the lower hinge pin fits
into the lower hole of the door.
18. Place the middle hinge in the door. Pay attention to the positioning of any adjustment
washers.
19. Position the door and tighten the screws of the middle hinge.
EN 17
Page 50
INSTALLATION AND CONNECTION
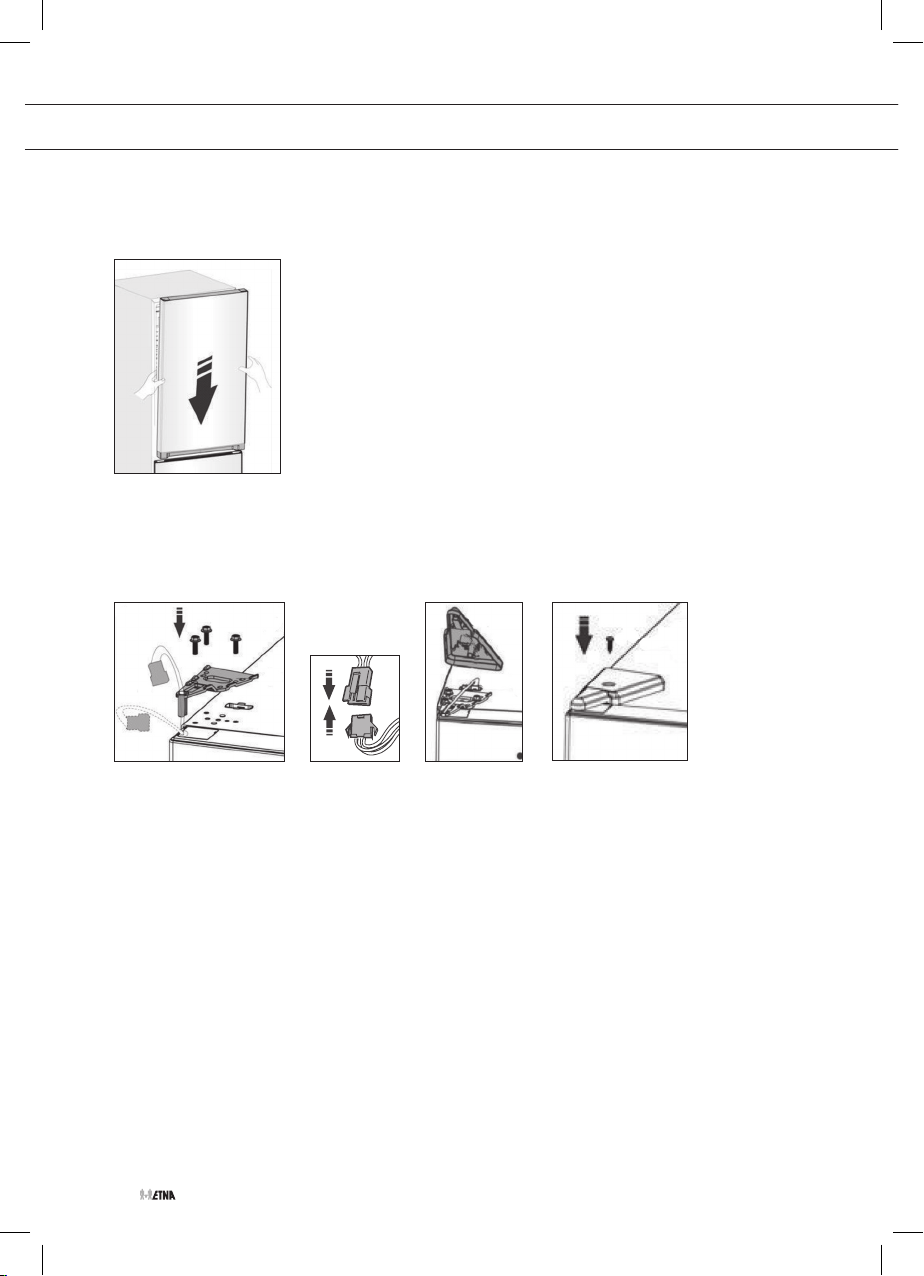
20. Slide the top door back on to the middle hinge, making sure that the middle hinge pin fits
into the lower hole of the door.
21. Fit the upper hinge on the opposite side with the screws.
22. Connect the electrical connection.
23. Fit the cover.
24. Check that the door is aligned horizontally and vertically and that the seals are closed on all
sides before finally tightening the bottom hinge. Level the appliance with the adjustable feet.
EN 18
Page 51
DESCRIPTION OF THE APPLIANCE
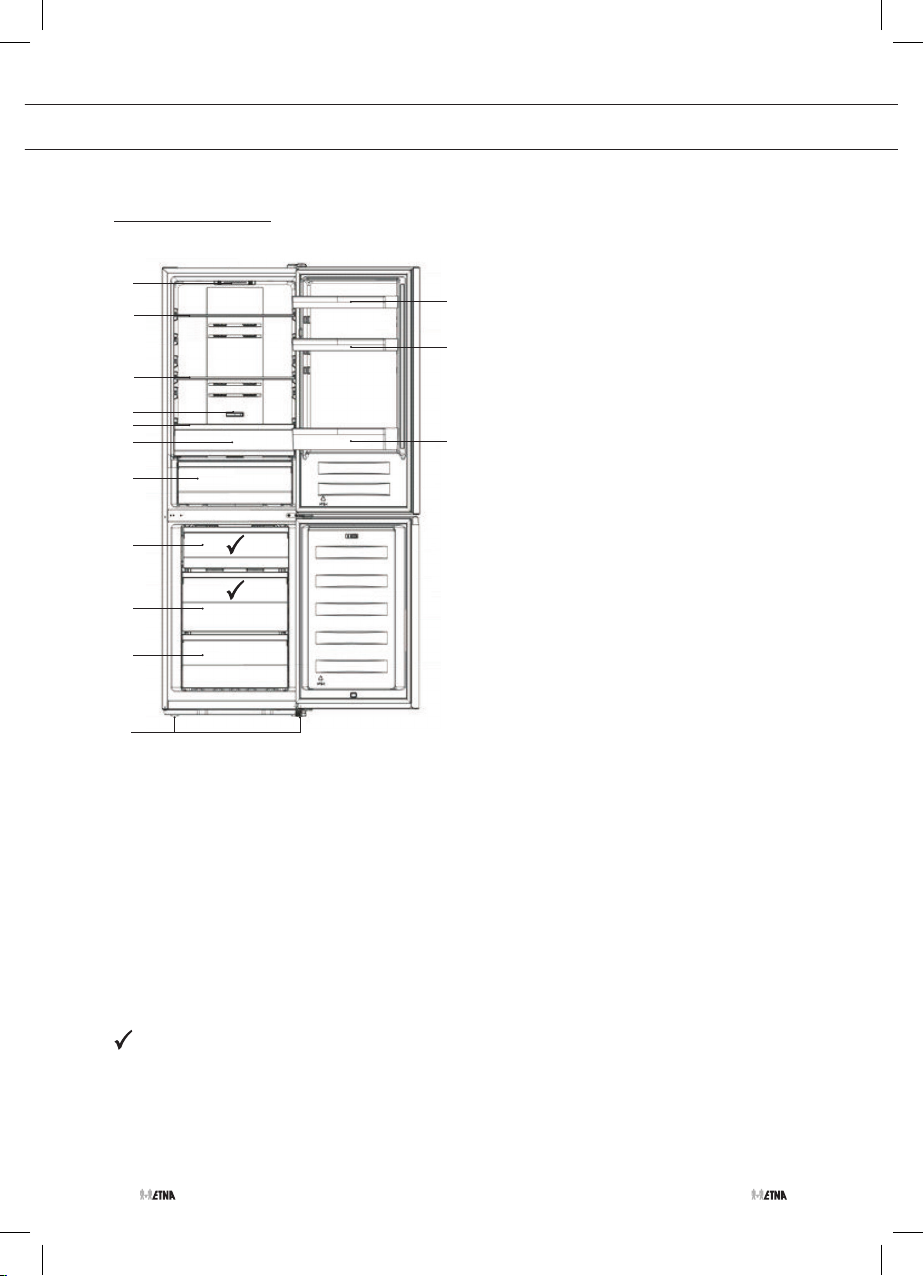
Appliance
1
2
2
3
2
4
5
6
6
6
7
1. Interior lighting
2. Shelf
3. FreshZone temperature control
4. FreshZone drawer
5. Vegetable drawer
6. Freezer drawer
7. Adjustable feet
8. Door compartment
▷ The bottom door compartment is suitable for bottles.
8
8
8
Best location for freezing fresh food.
EN 19
Page 52
DESCRIPTION OF THE APPLIANCE
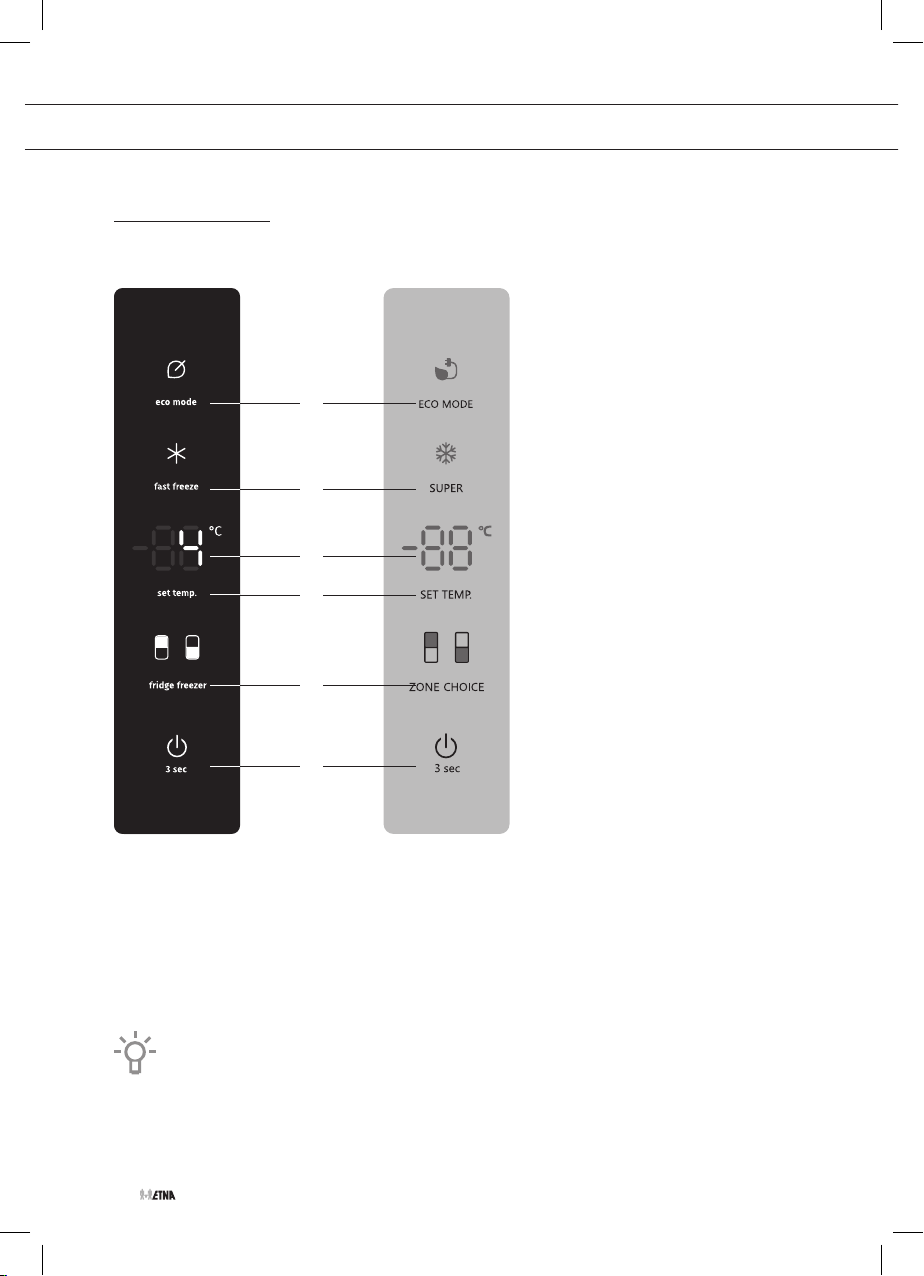
Control panel
KCV186NRVS KCV186NZWA
A
B
C
D
E
A. ECO key
B. FastFreeze key (intensive freezing)
C. Temperature display
D. Temperature adjustment key
E. Zone key
F. On/Off key
The recommended temperature is 4 °C for the refrigerator compartment and -18 °C for
the freezer compartment.
EN 20
F
Page 53
8
OPERATING THE APPLIANCE
Switching the appliance on/off
1. Touch the on/off key for 3 seconds.
▷ The appliance switches off (stand-by).
▷ The display shows ‘OF’.
Follow the same steps to switch on the appliance.
Disconnect from the power mains; the appliance is off.
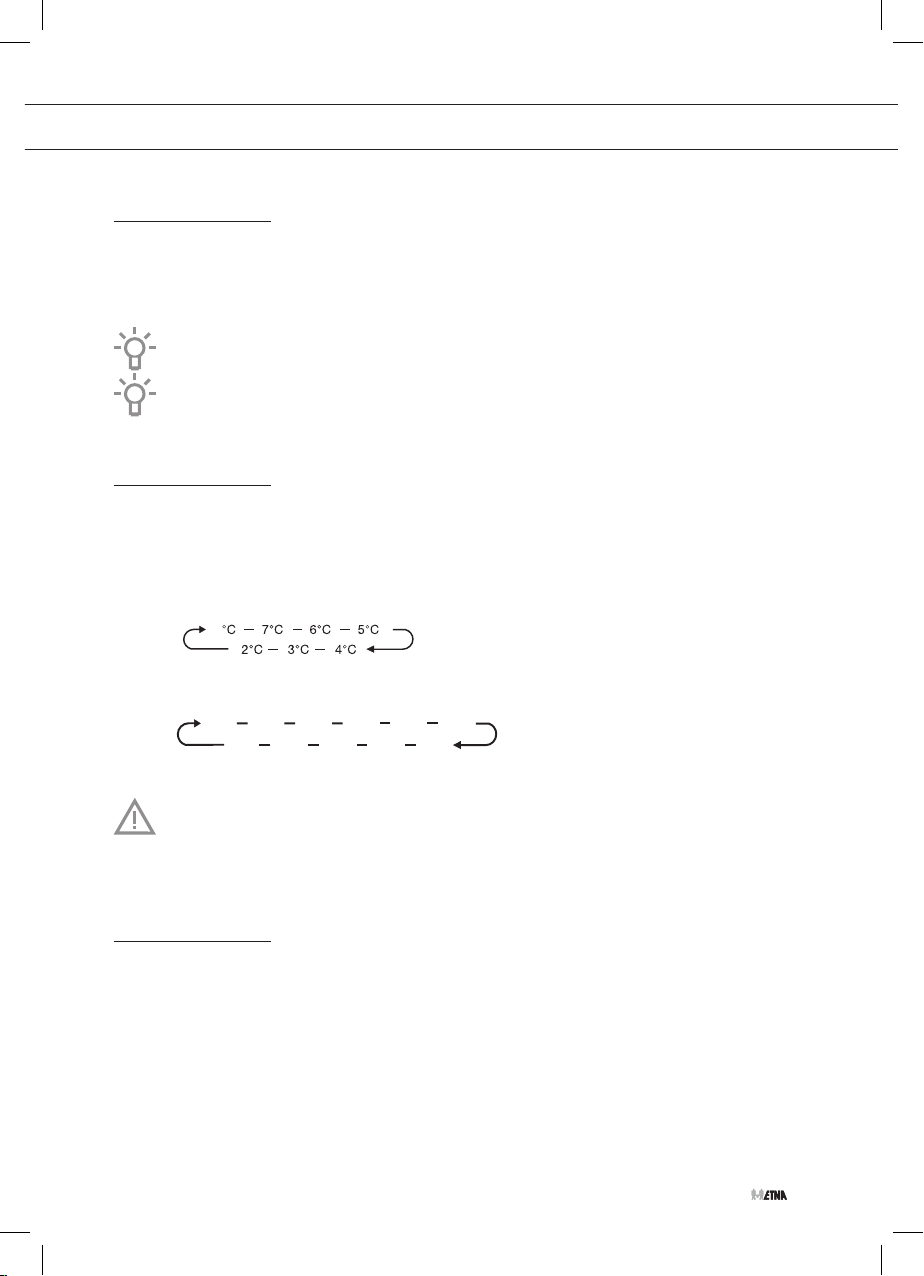
Setting the temperature
1. Touch the zone key to select the refrigerator or the freezer.
▷ The pictogram of the selected zone flashes.
2. Touch (several times) the temperature key to set the temperature.
▷ The temperature of the refrigerator will be set in the following order:
8
▷ The temperature of the freezer will be set in the following order:
-18°C - 19°C
-17°C -16 °C -15°C -14°C -24°
-20°C
-21°C
-22°C - 23°C
C
After you have switched on the appliance it will take several hours for the temperature to
decrease to the set temperature. Do not put food into the appliance until the temperature
has decreased to the set temperature.
Intensive freezing
This appliance has an intensive freezing function. This function decreases the temperature in
the freezer compartment as quickly as possible. Activate this function 24 hours before you put a
large quantity of fresh food in the appliance.
Activating/disabling the intensive freezing function
1. Touch the FastFreeze key.
▷ The key and temperature -24 °C are illuminated.
▷ The function is activated.
EN 21
Page 54
OPERATING THE APPLIANCE
2. Touch the FastFreeze key.
▷ The key is no longer illuminated.
▷ The function is disabled.
▷ The temperature returns to the latest temperature setting.
When the intensive freezing function is not switched off manually, the function will be
switched off automatically (after about 2 days).
Adjusting the temperature while the intensive freezing function is activated will
immediately disable the intensive freezing function.
ECO function
This appliance has an ECO function. The ECO function has no time limit and remains activated
until the function is disabled.
Activating/disabling the ECO function
1. Touch the ECO key.
▷ The key and temperature -17 °C are illuminated (if the freezer compartment is selected).
▷ The key and temperature 6 °C are illuminated (if the cooling compartment is selected).
▷ The function is activated.
2. Touch the ECO key.
▷ The key is no longer illuminated.
▷ The function is disabled.
▷ The temperature returns to the latest temperature setting.
EN 22
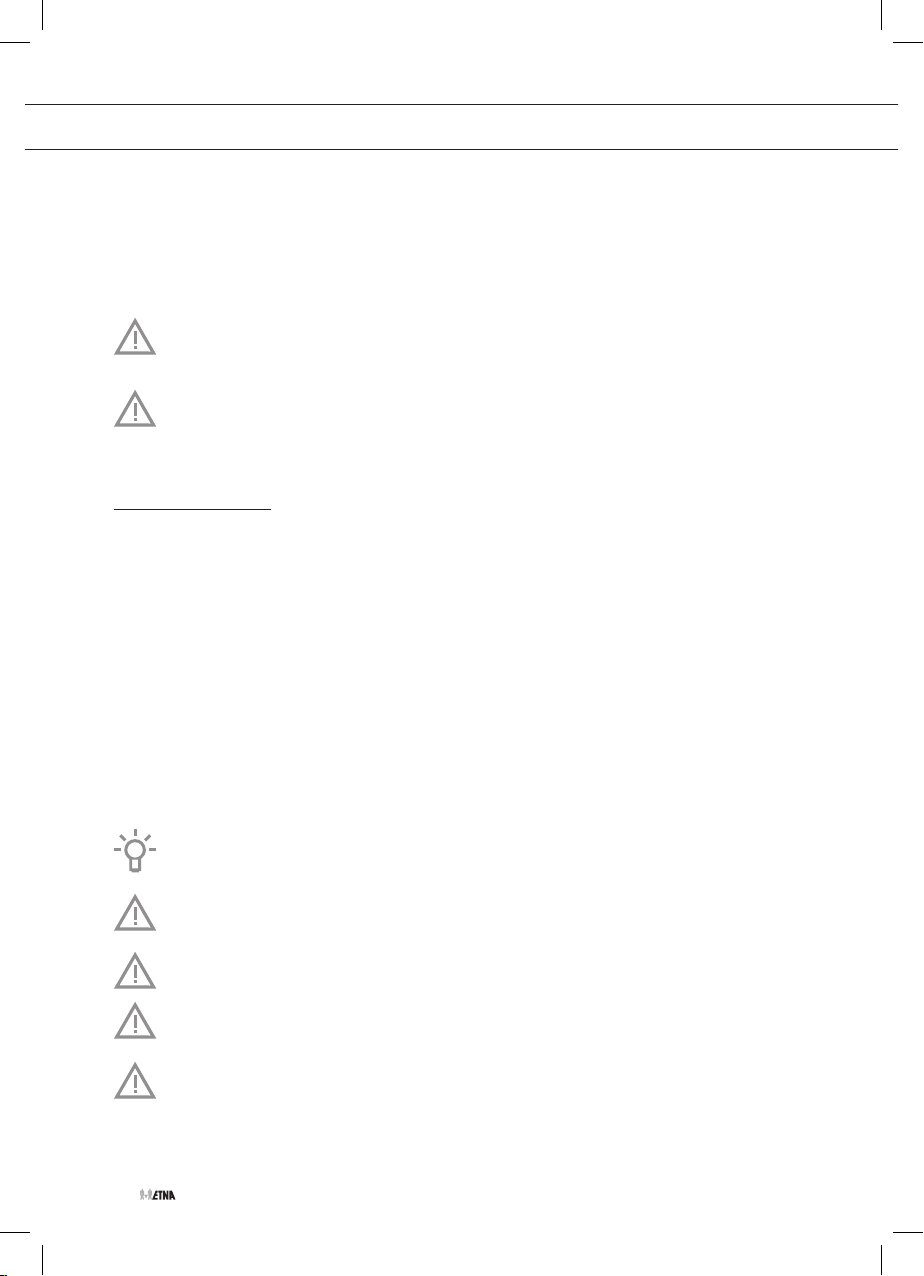
The ECO function is not suitable for freezing fresh food or making ice cubes.
Note!
Activating the ECO function disables the FastFreeze function.
The storage life of food may be shorter when the ECO function is active.
Do not activate the ECO function when freezing fresh food.
Adjusting the temperature while the ECO function is activated will immediately disable
the ECO function.
Page 55
OPERATING THE APPLIANCE
Open door alarm
When a compartment door is open for too long, an alarm signal sounds and ‘dr’ shows on the
display.
Stopping the alarm
1. Close the door.
▷ The alarm will stop sounding.
If the door is still open after 8 minutes, the alarm will stop automatically.
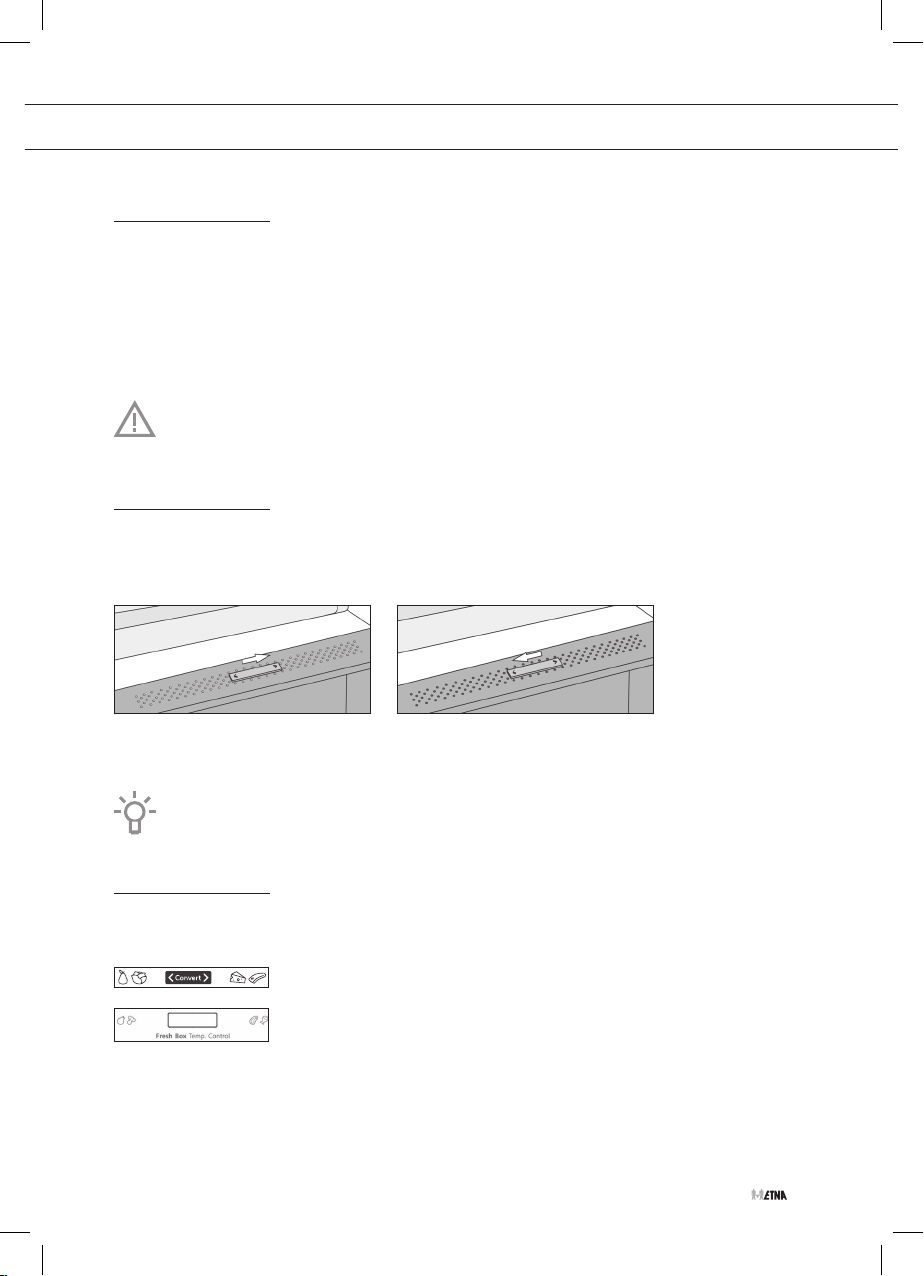
Drawer with manual humidity control
The vegetable drawer has an integrated humidity regulator with which you can adjust the
humidity. This prevents the food from drying out.
• Slider position to the right: close the vent to increase the humidity in the drawer.
• Slider position to the left: open the vent to reduce the humidity in the drawer.
If you observe dropslets of water on the glass shelf, open the vent and wipe the shelf.
FreshZone drawer
You can change the temperature in the FreshZone drawer.
• Slider position to the left: the temperature is the same as the
temperature of the refrigerator compartment.
• Slider position to the right: the temperature is about 2 degrees
lower than the temperature of the refrigerator compartment. It is
used to store meat or fish. The food surface may be slightly frozen.
EN 23
Page 56
STORING AND FREEZING FOOD
Recommended distribution
Sections of the refrigeration compartment
• Upper section: canned food, bread, wine, pastas etc.
• Middle section: dairy products, ready-to-cook meals, desserts, soft drinks, beer, cooked
food etc.
• Lower section: meat, meat products, dairy.
• Vegetable drawer: vegetables and fresh fruit.
Sections of the door
• Top/middle door compartment: eggs, butter, cheese, sauces etc.
• Bottom door compartment: drinks, cans, bottles etc.
Store food that spoils rapidly at the back of a shelf or at the back of the drawer at the
lowest temperature.
Please note that the storage of vegetables with a high water content can cause
condensation on the glass shelves of the fruit and vegetable drawer; this will not affect
the proper operation of the appliance.
Do not store fruit (bananas, pineapples, papaya, citrus fruits) and vegetables (courgettes,
tomatoes, aubergines, cucumber, sweet peppers and potatoes) that are sensitive to low
temperatures in the refrigerator.
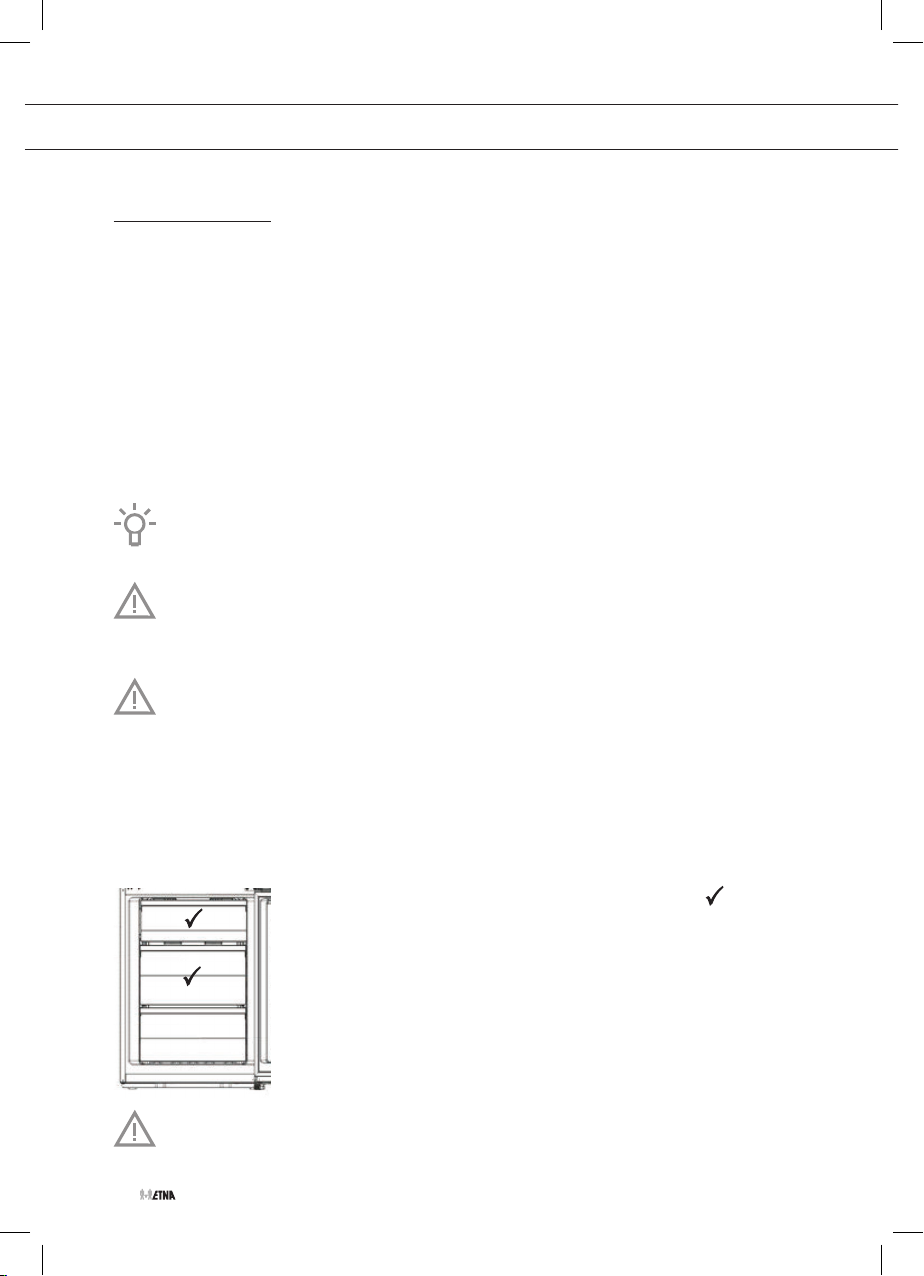
Sections of the frozen compartment
• Top section: leftovers, ice, pizza.
• Middle section: meat, fish, bread.
• Bottom section: standard frozen compartment, vegetables and fruit.
The best location for freezing fresh food is marked with a .
Do not store lettuce, eggs, apples, pears, grapes, peaches, yoghurt, buttermilk, sour
cream or mayonnaise in the frozen compartment.
EN 24
Page 57
STORING AND FREEZING FOOD
Avoid contamination of food
To avoid contamination of food, please respect the following instructions:
• Opening the door for long periods can cause a significant increase of the temperature in the
compartments of the appliance.
• Regularly clean surfaces that can come in contact with food and accessible drainage
systems.
• Store raw meat and fish in suitable containers in the refrigerator, so that it is not in contact
with or drip onto other food.
• If the refrigerating appliance is left empty for long periods, switch off, defrost, clean, dry, and
leave the door open to prevent mould developing within the appliance.
Storing fresh food in the refrigerator
Important recommendations for storing fresh food
• To ensure the quality of fresh food, it is important that:
▷ the food is well-packaged;
▷ the appliance is at the correct temperature;
▷ the appliance is clean.
• Take good note of the use-by date stated on the food packaging.
• Put food in the refrigerator in sealed containers or in suitable packaging. This will prevent
the food from picking up or spreading odours and will keep it dry.
• Do not store flammable, unstable or explosive materials in the refrigerator.
• Store bottles that have been opened upright and close them tightly.
• Some organic solutions, such as essential oils, in the skin of lemons and oranges, and
butyric acid, that come into long-term contact with plastics can eat into the material and
cause premature ageing.
• A disagreeable odour is an indication that the appliance is not clean or that it contains food
that has spoiled (see the chapter ‘Maintenance’).
• Take perishable foods out of the refrigerator when you will be away from home for a longer
time.
EN 25
Page 58
STORING AND FREEZING FOOD
Freezing and storing foods in the frozen compartment
Important recommendations for freezing fresh food
• The maximum quantity of food that you can put in the frozen compartment in one go is
stated on the type plate. Putting more than this maximum quantity of food into the frozen
compartment will slow the freezing process and reduce the quality. Moreover, this will also
harm the quality of frozen food already stored in the frozen compartment.
• Use only good-quality fresh food that is suitable for freezing.
• Allow hot food to cool to room temperature.
• Food needs to be frozen quickly. It is recommended that you use small packs.
• Use air and watertight packaging to prevent the food from drying out and lose its vitamins.
• Note the type and quantity of the food on the packaging, together with the date on which it
was frozen.
• Do not allow fresh food to come into contact with frozen food.
Freezing small quantities of fresh food/making ice cubes
See the chapter ‘Recommended distribution’ for the best location for freezing fresh food
(1 to 2 kilograms) and making ice cubes.
Freezing large quantities of fresh food
• Activate the intensive freezing function 24 hours before you plan to freeze the food.
• Distribute the fresh food equally between all the drawers in the freezer compartment.
• After 24 hours, you can transfer the food to another compartment in the freezer and then
freeze a new batch of food.
Important recommendations for storing frozen food
• Follow the manufacturer’s instructions for the storage and use of frozen food. Take note of
the recommended storage temperature and use-by date stated on the packaging.
• Use only food in undamaged packaging that has been stored at a temperature of -18 °C or
lower.
• Do not buy food covered in frost. This indicates that the food has thawed or partially thawed
several times and, as a result, is of inferior quality.
• Make sure that the food does not thaw during transport. An increase in its temperature will
shorten the storage life and harm the quality of the food.
EN 26
Page 59
STORING AND FREEZING FOOD
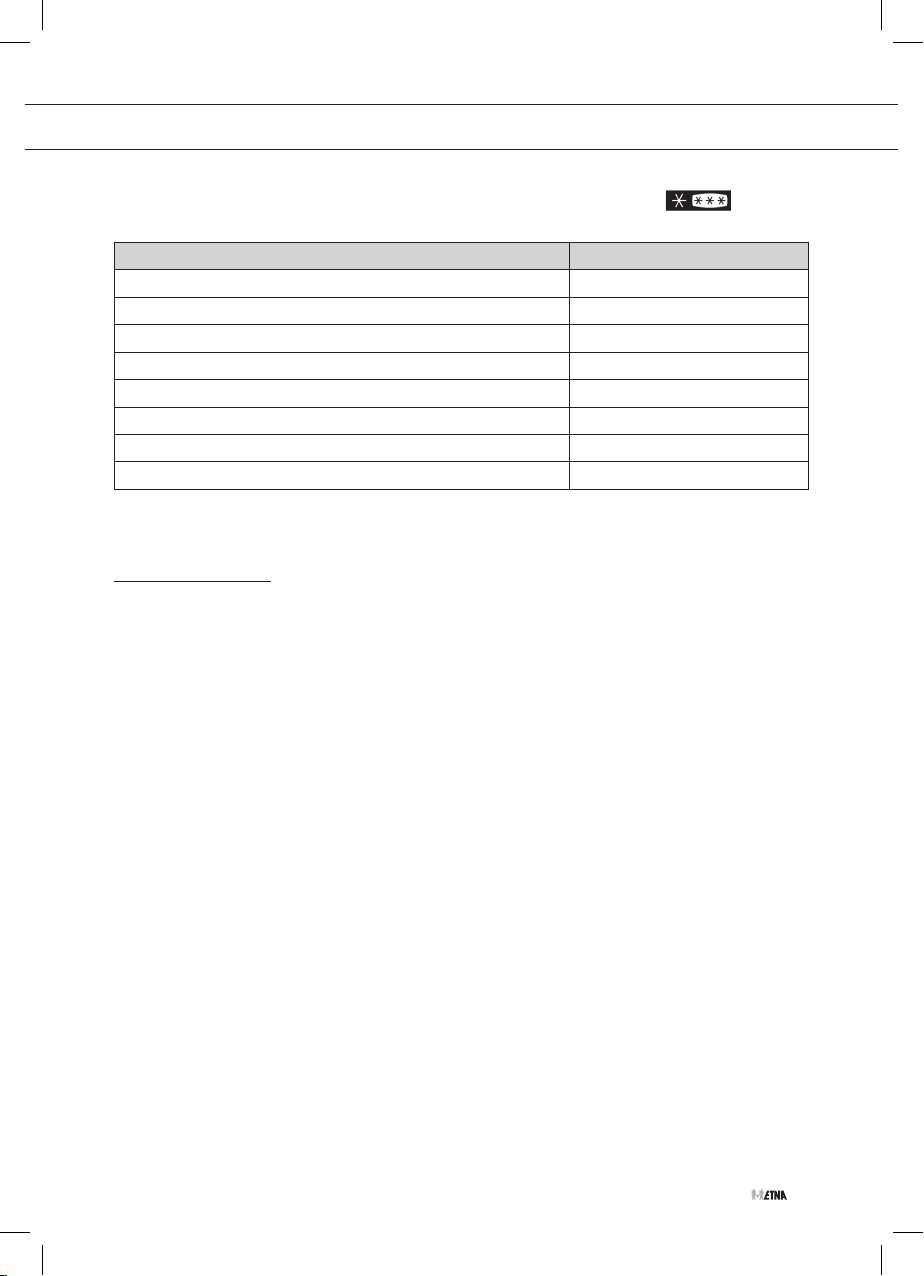
Recommended storage times of frozen food in the frozen compartment
Type of food Storage life
Fruit, beef 10 to 12 months
Vegetables, veal, poultry 8 to 10 months
Venison 6 to 8 months
Pork 4 to 6 months
Finely chopped or minced meat 4 months
Bread, pastas, cooked dishes, whitefish 3 months
Offal 2 months
Smoked sausage, bluefish 1 month
Defrosting frozen food
• Thawing is an important step in storing food preserved by freezing. Food must be thawed in
the correct way.
• Suitable methods of thawing food are:
▷ in the refrigerator;
▷ in cold water;
▷ in a microwave or conventional oven with a suitable thaw program.
• Some frozen products can be prepared without needing to thaw them first. The
manufacturer will state this on the packaging.
• The food needs to be packed in small portions. In this way the food thaws faster.
• Use partially or completely thawed food as quickly as possible. The bacteria in thawed food
are reactivated and the food will spoil rapidly. This applies in particular to fruit, vegetables
and ready-made food.
• Do not refreeze partially or completely thawed food.
EN 27
Page 60
MAINTENANCE
Defrosting the appliance
Automatic defrost of the refrigeration compartment
The refrigeration compartment defrosts automatically from time to time.
Defrosting of the NoFrost freezer
The NoFrost freezer defrosts automatically. Any frost deposits will then disappear.
Any ice or frost deposits that nevertheless form in the freezer compartment can be caused by
unusual use of the appliance (opening the door too often and too long or poorly sealing door,
etc.). The freezer will then need to be defrosted manually.
Switch off the appliance in the event of extreme ice formation. Remove the food in the
freezer and protect it so that it cannot partially or completely thaw. Clean and dry the
interior of the freezer. Switch on the appliance and adjust the temperature to the required
setting before you put the food back into the freezer.
Cleaning the appliance
Switch off the appliance and disconnect it from the mains before you start cleaning it.
Do not use abrasive cleaning agents, as they can damage the surface.
Activate the intensive freezing function 24 hours before you plan to clean the freezer.
• Before cleaning, frozen foods should be wrapped in several layers of paper and kept in a
cool place. The inevitable rise in temperature will shorten their storage life. Remember to use
these foods within a relatively short period of time.
• Regularly clean the interior of the appliance with lukewarm water. If so required, add a
neutral cleaning agent or special refrigerator cleaner to the water. Clean all surfaces with
a soft cloth. Wipe the cleaned parts with a cloth with clean water and then dry them
thoroughly.
• Do not put parts of the appliance in a dishwasher: this could damage them.
EN 28
Page 61
MAINTENANCE
• Dry the inside of the unit, plug on the mains, and set the thermostat knob to the lowest
temperature setting. After 24 hours, set the thermostat to the normal position.
• Clean the outside using a soft cloth.
• Regularly clean the air vents and the condenser at the rear of the appliance with a vacuum
cleaner or a brush.
When you are not going to use the appliance for a longer period then switch it off and
disconnect it from the mains. Empty, defrost and clean the appliance, and leave the door
ajar.
EN 29
Page 62
FAULTS
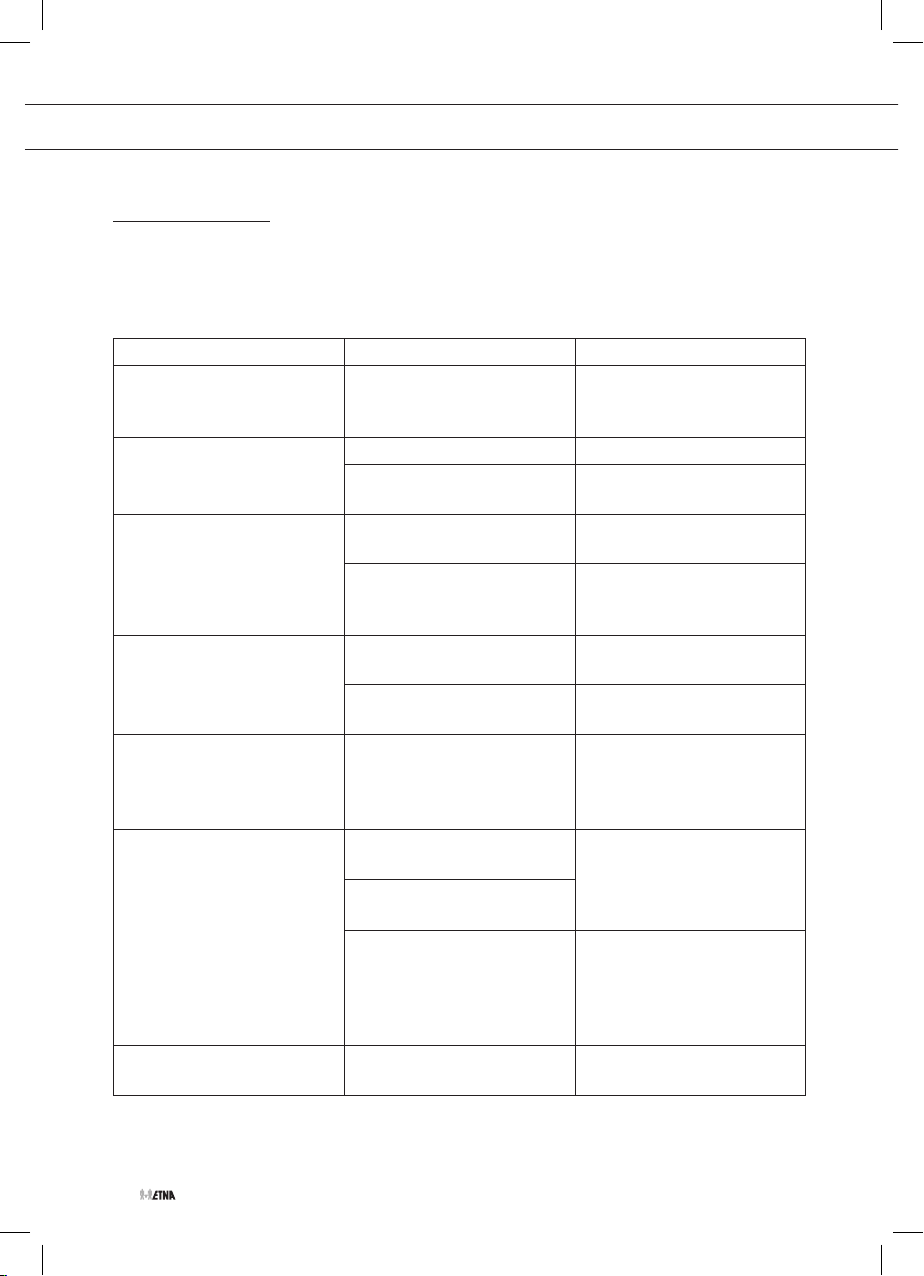
Faults table
When you have any doubts about whether your appliance is working properly you should not
immediately assume that it is defective. We recommend that you should in any case check the
points in the following table.
Symptom Possible cause Solution
The appliance emits a slight
odour.
The appliance does not
operate; the lighting does not
go on.
Temperature inside appliance
too high or too low.
Appliance makes a noise. Incorrect positioning of food
The LED lighting does not
work.
Excessive ice formation in the
freezer.
‘dr’ shows on the display. The door has been opened
New appliance. This is normal and disappears
when the appliance starts
cooling.
Plug not in socket. Insert the plug in the socket.
Thermostat off. Adjust the thermostat to the
correct setting.
Thermostat setting incorrect. Adjust the thermostat
properly.
The door seals are dirty or
damaged.
in the freezer.
There is an object against the
appliance.
LED lighting defective. Call an authorized service
The door has been opened for
too long or too frequently.
The door is not closed
properly.
The door does not seal
properly (the seal is dirty, the
door is misaligned or the seal
is damaged, etc.).
for too long.
Clean the door seals.
Call the service centre if the
door seals are damaged.
Place foods in the proper
manner in the freezer.
Remove the object.
technician. Do not attempt
to replace the LED lighting
yourself.
Make sure that the door is
closed properly.
Make sure that the door is
closed properly. Clean the
door seals. Call the service
centre if the door seals are
damaged.
Make sure that the door is
closed properly.
EN 30
Page 63
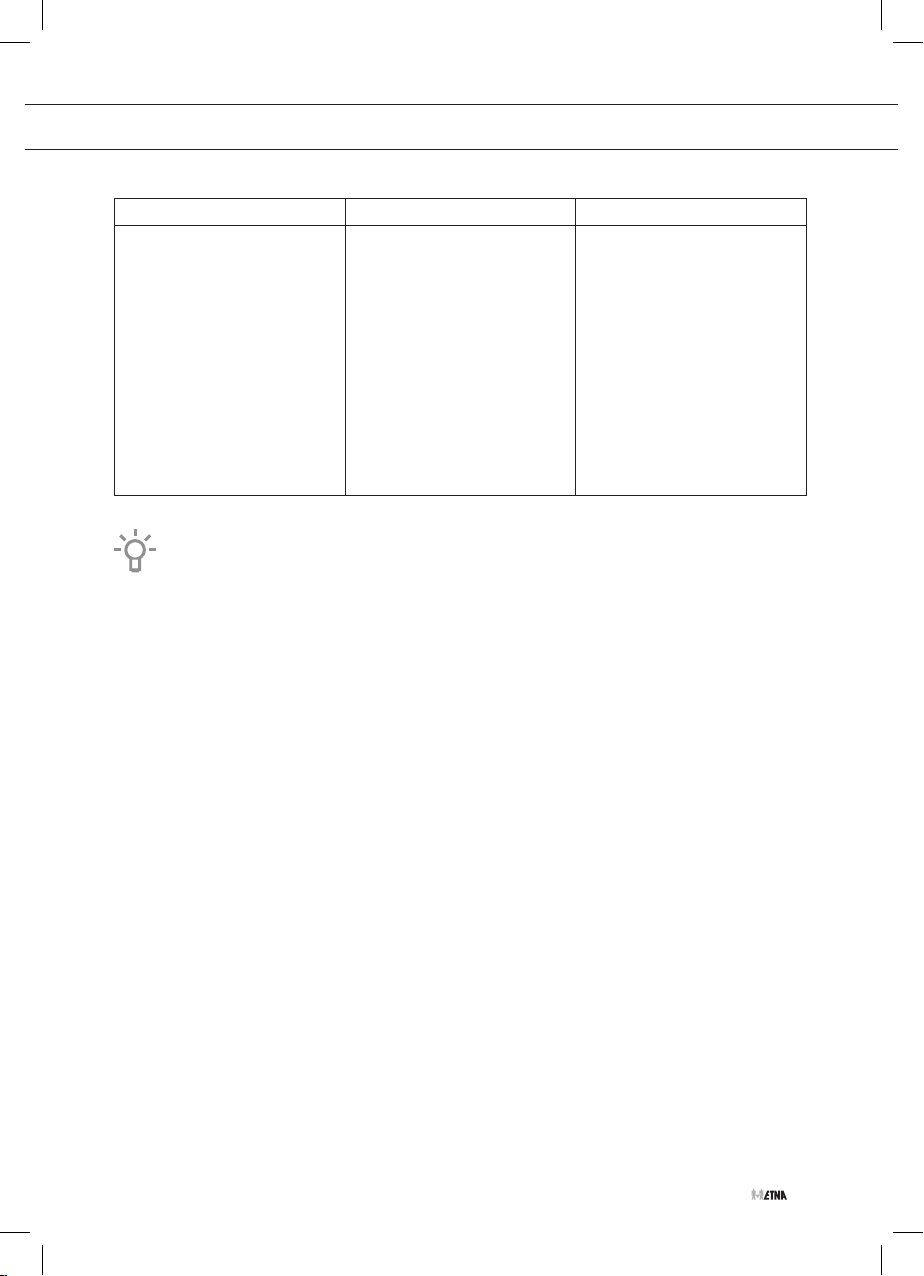
FAULTS
Symptom Possible cause Solution
Door does not open easily. You are trying to open the
appliance’s door just after
you have closed the door.
Then opening the door is
difficult. When you open
the door, cold air escapes
from the appliance and is
replaced by warm air from
the surroundings. As this
air cools a slight vacuum is
created that makes it more
difficult to open the door.
Warning
It is normal for the cooling circuit to make gurgling or expansion noises.
If you are unable to solve the problem then contact the service centre. When you do so, state the
type, model and serial number shown on the type plate or label on the inside of the appliance.
The situation returns to
normal after a few minutes,
and the door opens easily
again.
EN 31
Page 64
ENVIRONMENTAL ASPECTS
Disposal of packaging and appliance
This appliance is made from sustainable materials. This appliance must be disposed of in a
responsible manner at the end of its service life. Contact the local authorities for information
about the method.
See also the ‘Disposal’ chapter in the Safety instructions.
The packaging of the appliance is recyclable. The following materials may have been used:
• Cardboard.
• Polyethylene film (PE).
• CFC-free polystyrene (hard PS foam).
These materials must be disposed of in a responsible manner and in accordance with
government regulations.
The appliance is marked with a crossed out wheeled bin symbol to
draw your attention to the requirement for the separate disposal of
domestic electrical appliances. This means that the appliance may
not be disposed of in unsorted household waste at the end of its
service life. The appliance must be taken to a special municipal waste
processing location for separated waste or to a dealer who provides
this service.
EN 32
Collecting and disposing of domestic appliances separately avoids
detrimental consequences for humans and the environment. This
ensures that the materials used to make the appliance can be
recovered and that substantial savings in the use of energy and raw
materials can be achieved.
Declaration of conformity
We hereby declare that our products conform to the applicable
European Directives, Regulations and requirements, as well as all
requirements in the standards to which reference is made.
Page 65
EN 33
Page 66
EN 34
Page 67
EN 35
Page 68
De gebruiksaanwijzing is ook te vinden op onze website:
The instructions for use can also be found on our website:
www.etna.nl
www.etna.be
*860369*
860369
860369 / VER 1 / 14-04-2021
 Loading...