

Page 1

GEBRUIKSAANWIJZING
INSTRUCTIONS FOR USE
FORNUIS
COOKER
FG890ZT
Page 2

NL Handleiding NL 3 - NL 30
EN User manual EN 3 - EN 30
Gebruikte pictogrammen - Pictograms used
Belangrijk om te weten - Important information
Tip
Page 3

INHOUD
Uw fornuis
Inleiding 4
Beschrijving 5
Bedieningspaneel 6
Vóór het eerste gebruik
Gebruik van de oven 7
Bak- en braadtips 7
Sierdeksel 9
Gebruik van de gaskookplaat 9
Bediening van de oven
Instellen van de klok 10
Bediening van de oven 10
Ovenfuncties 11
Bediening van de oven met de schakelklok 12
Bediening gaskookplaat
Ontsteken en instellen 15
Comfortabel koken
De kookplaat optimaal gebruiken 16
Onderhoud
Reinigen van de oven 17
Ovendeur demonteren 19
Ovenlamp vervangen 20
Reinigen van de kookplaat 20
Storingen
Storingstabel 22
Installatie
Algemeen 24
Gasaansluiting 25
Elektrische aansluiting 25
Plaatsing 26
Technische gegevens
27
Milieuaspecten 30
NL 3
Page 4

UW FORNUIS
Inleiding
U heeft gekozen voor een fornuis van Etna. Optimaal gebruikscomfort
en een eenvoudige bediening stonden voorop bij de ontwikkeling van
dit product. De uitgebreide instelmogelijkheden maken het mogelijk
exact dìe bereidingswijze te kiezen die u voor ogen staat.
De gaskookplaat is ontworpen voor de echte kookliefhebber.
De verschillen in brandercapaciteit zorgen ervoor dat u ieder gerecht
kunt bereiden. Dankzij de geïntegreerde vonkontsteking ontsteekt
én bedient u de branders met één hand. Tevens is de gaskookplaat
voorzien van een vlambeveiliging die ervoor zorgt dat de gastoevoer
gesloten wordt als de vlam tijdens het kookproces dooft.
De ovenfuncties zijn in een logische volgorde op de functieknop
ondergebracht. Daarnaast heeft de oven een schakelklok. Deze
schakelt de oven automatisch uit als de bereidingstijd verstreken is.
Doelmatig en zonder poespas.
In deze handleiding staat beschreven op welke manier u het fornuis zo
optimaal mogelijk kunt benutten. Naast informatie over de bediening
treft u ook achtergrondinformatie aan die u van dienst kan zijn bij het
gebruik van dit product.
NL 4
Lees eerst de gebruiksaanwijzing geheel en aandachtig door
voordat u het apparaat gaat gebruiken en bewaar deze zorgvuldig
voor latere raadpleging.
Lees de separate veiligheidsvoorschriften
voordat u het toestel in gebruik neemt!
De handleiding dient bovendien als referentie voor de servicedienst.
Het gegevensplaatje bevat alle informatie die de servicedienst nodig
heeft om adequaat op uw vragen te reageren.
Veel kookplezier!
Page 5
UW FORNUIS
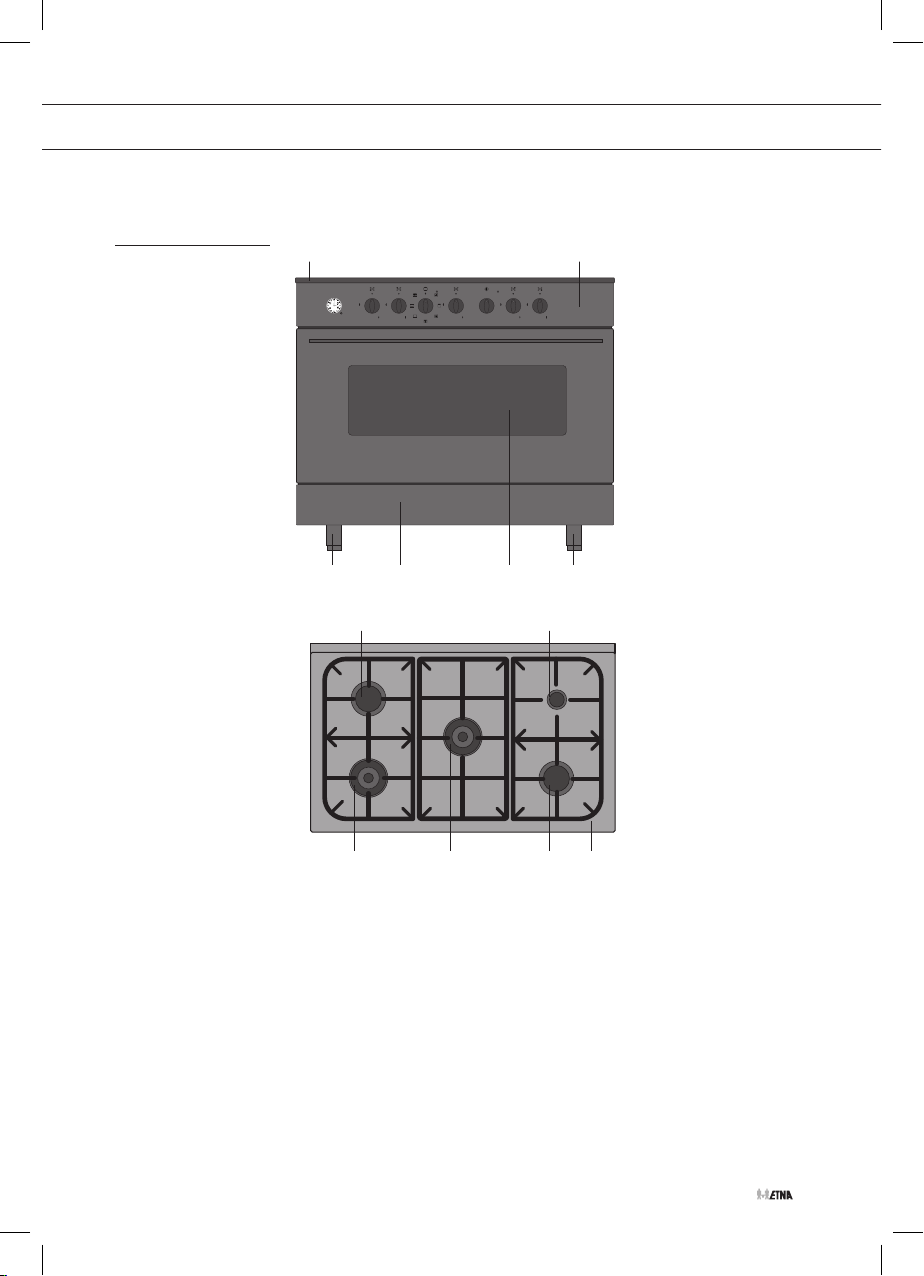
Beschrijving
1 2
0
°C
70
250
100
230
120
210
150
180
6 7
44 5 3
8 9 10 11
1. Sierdeksel
2. Bedieningspaneel
3. Oven
4. Stelvoeten
5. Klep opbergruimte
6. Sterkbrander
7. Sudderbrander
8. Wokbrander
9. Wokbrander
10. Sterkbrander
11. Pandrager
NL 5
Page 6
UW FORNUIS
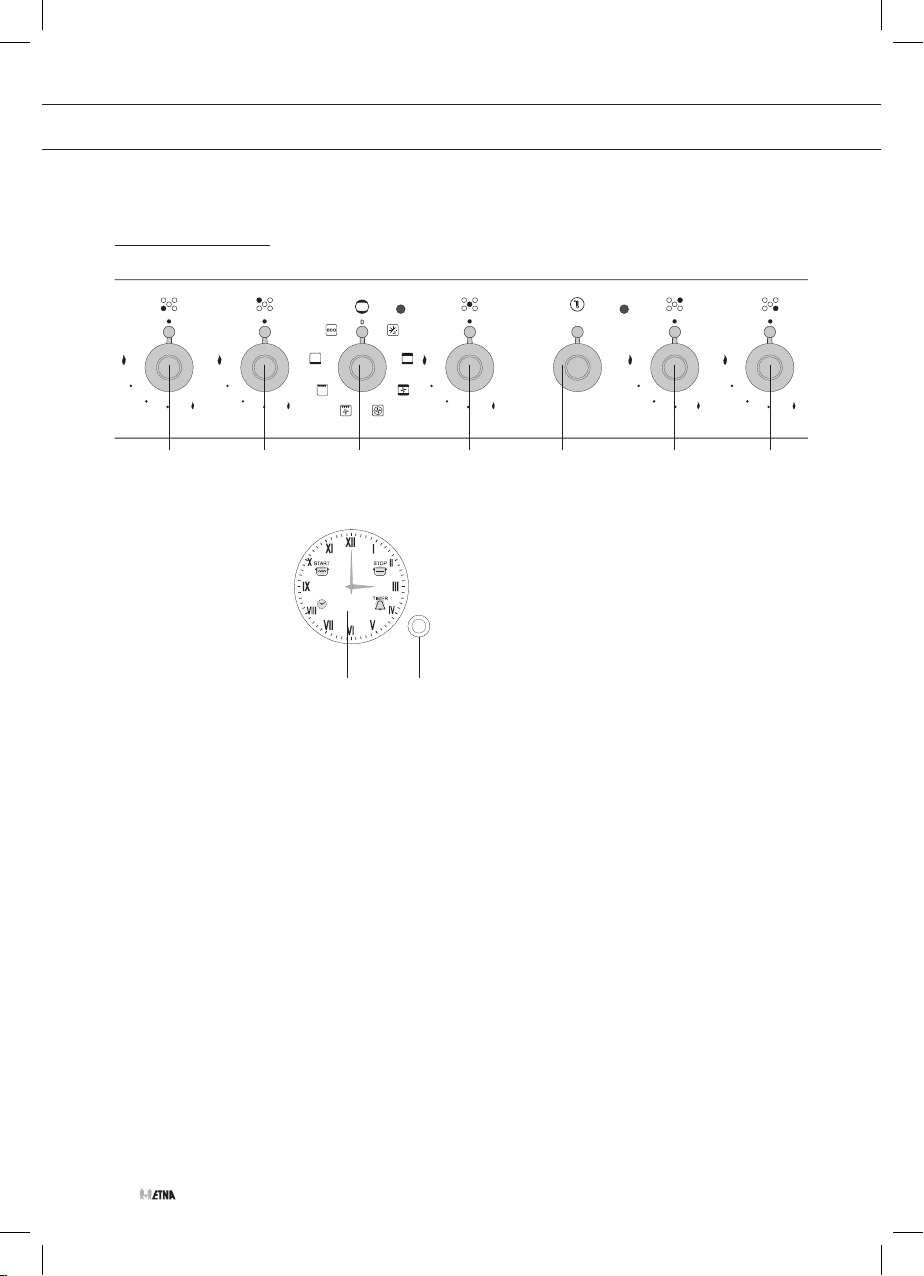
Bedieningspaneel
0
°C
250
230
210
1 2 3 4 5 6 7
8 8a
70
100
120
150
180
NL 6
1. Bedieningsknop wokbrander linksvoor
2. Bedieningsknop sterkbrander linksachter
3. Ovenfuncties knop
4. Bedieningsknop wokbrander midden
5. Thermostaatknop oven
6. Bedieningsknop sudderbrander rechtsachter
7. Bedieningsknop sterkbrander rechtsvoor
8. Schakelklok
8a. Instelknopje schakelklok
Page 7

VÓÓR HET EERSTE GEBRUIK
Gebruik van de oven
• Verwijder alle delen van het toebehoren uit de oven en reinig ze met
een warm sopje. Gebruik geen schurende schoonmaakmiddelen.
• Schakel de oven één uur lang in op de hoogste temperatuur
met boven- en onderwarmte. Tijdens de fabricage gebruikte
beschermingsvetten worden dan verwijderd.
• Als de oven voor de eerste maal sterk verhit wordt, zult u een
‘nieuwigheidsluchtje’ ruiken. Dit is normaal. Schakel eventueel de
afzuigkap in.
• Na het afkoelen de oven deze met warm water reinigen.
• Verwarm de oven alleen voor als dit in het recept of in de tabellen
van deze gebruiksaanwijzing is vermeld.
Bak- en braadtips
Energiebewust ovengebruik
• Open de ovendeur zo weinig mogelijk.
• Bereid gerechten met ongeveer dezelfde bereidingstemperatuur
(bijvoorbeeld appeltaart en een ovenschotel) tegelijk op hetzelfde
rooster of met een hete lucht functie boven elkaar. Vlees laten
meestoven kan ook.
• Bereid meer gerechten na elkaar, bijvoorbeeld een ovenmaaltijd na
een cake. Vaak kan de bereidingstijd van het tweede gerecht dan
10 minuten korter zijn omdat de oven nog veel warmte in zich heeft.
• Dankzij de ovenisolatie kunnen gerechten met een langere
bereidingstijd (vanaf 1 uur) nagaren op de restwarmte van de oven.
Schakel de oven 10 minuten eerder uit dan aangegeven staat, maar
laat de deur dicht.
• Voorverwarmen is in het algemeen niet nodig, met uitzondering van
gerechten waarvan de bereidingstijd korter dan 30 minuten is of
wanneer een recept dit aangeeft.
• Haal alles wat u niet nodig heeft voor de bereiding uit de oven.
• Schakel de oven uit voordat u het gare gerecht eruit haalt.
Ovenservies
• In principe kunt u elk soort hittebestendig servies gebruiken.
• Spoel glazen servies niet direct na gebruik af onder koud water.
Door het plotselinge temperatuurverschil kan het glas barsten.
• Gebruik donkere of zwarte bakvormen. Deze geleiden de warmte
beter en laten het gerecht gelijkmatiger garen.
NL 7
Page 8

VÓÓR HET EERSTE GEBRUIK
Bodem niet afdekken
• Het afdekken van de ovenbodem met bijvoorbeeld aluminiumfolie
of een bakplaat kan tot oververhitting en beschadiging van het
email leiden.
• Vervuiling van de ovenbodem door het lekken uit een springvorm
wordt voorkomen door van aluminiumfolie een bakje te vouwen en
dat onder de vorm op het rooster te zetten of door bakpapier onder
de vorm te leggen.
Tijdinstelling
• Kies een 5 minuten kortere bereidingstijd dan in het recept staat
aangegeven. Daardoor kunt u in de laatste fase controleren of het
gerecht of gebak gaar en goed van kleur is. Zo niet, sluit dan de
ovendeur en controleer na enige tijd opnieuw. Het openen en sluiten
van de deur moet langzaam gebeuren. Bij voorkeur niet voordat
driekwart van de bereidingstijd is verstreken.
Warm houden
• U kunt de oven gebruiken voor het warm houden van reeds bereide
gerechten. Kies hiervoor de hete lucht functie en een temperatuur
van 75 °C. Dek gerechten die u warm wilt houden af om uitdrogen
te voorkomen.
NL 8
Vlees braden
• Het meest geschikt is ‘groot vlees’ vanaf 1 kg. Het vlees krijgt
een regelmatig gevormde, krokante korst, waarbij vrijwel geen
gewichtsverlies optreedt.
• Wrijf het vlees een kwartier van tevoren in met zout en kruiden.
Gebruik voor het braden 80 tot 100 g boter of vet (of een mengsel
hiervan) per 500 g vlees.
Braadtijden
• Platte, dunne stukken hebben gemiddeld 5 minuten minder
braadtijd nodig dan dikke of opgerolde stukken vlees. Bij gebruik
van grotere stukken vlees moet per 500 gram meer een 15 tot
20 minuten langere braadtijd worden aangehouden.
Page 9

VÓÓR HET EERSTE GEBRUIK
• Leg het vlees in een braadslede en overgiet het met hete boter en/
of vet. Als het vlees een vette kant heeft, dan legt u deze tijdens
het braden boven. Vlees zonder vette kant om de 15 minuten
bedruipen. Vlees met vette kant om de 30 minuten bedruipen.
• Voeg, als de jus te donker wordt, tijdens het braden nu en dan
enkele lepels water toe.
• Laat het vlees na de bereiding 10 minuten rusten, afgedekt met
aluminiumfolie, voordat u het aansnijdt.
Geleiders
• Aan de ovenwanden bevinden zich geleiders waarmee het
ovenrooster of de bakplaat op verschillende niveaus kan worden
geplaatst. Voor de juiste hoogte raadpleegt u een bakgids of de
instructies op de verpakking van het voedsel.
Sierdeksel
• Open het sierdeksel altijd voordat u de kookplaat gebruikt.
Controleer of het sierdeksel droog is voordat u het deksel opent.
• Het sierdeksel kan door hitte breken. Zorg ervoor dat alle branders/
kookzones uitgeschakeld en afgekoeld zijn voordat u het sierdeksel
sluit.
• Wanneer er water op het sierdeksel staat, maakt u het deksel eerst
droog voordat u het opent. Anders kan er vocht in de eenheid
komen.
• Gebruik het sierdeksel niet als kookoppervlak.
Gebruik van de gaskookplaat
• Controleer regelmatig of de branderdoppen en branderringen juist
op de branderkelken liggen; onjuiste positionering kan slechte
ontsteking, ongunstige verbranding of beschadiging van de doppen
tot gevolg hebben.
• De pandrager wordt door de kookbrander zeer sterk verhit,
waardoor na verloop van tijd het email op de dragerpunt kan
inbranden. Dit is niet te voorkomen en valt dan ook niet onder de
garantie.
NL 9
Page 10
BEDIENING VAN DE OVEN
150
180
Instellen van de klok
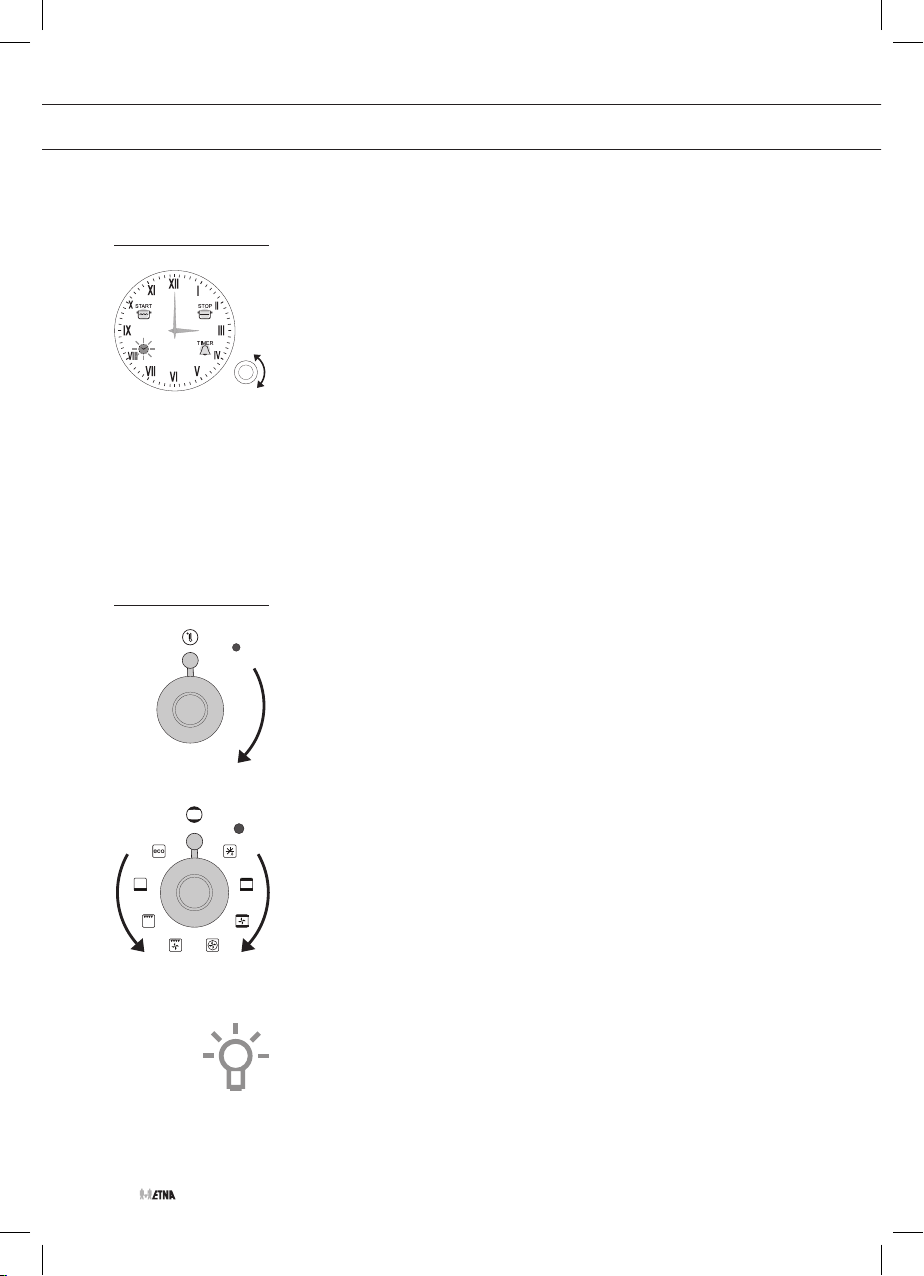
Als u het toestel voor de eerste keer aansluit, moet de juiste dagtijd
worden ingesteld. Het indicatielampje van de klok knippert.
1. Druk één keer op het instelknopje.
Het indicatielampje van de klok gaat uit.
2. Druk nu vier keer op het instelknopje.
Het indicatielampje van de klok gaat weer knipperen.
3. Draai het instelknopje rechtsom of linksom om de wijzers op de
juiste plaats te zetten.
4. Druk tot slot nogmaals op het instelknopje.
De huidige tijd is ingesteld, het indicatielampje gaat uit.
▷ Wanneer u na het instellen van de tijd niet op het instelknopje
drukt, zal het indicatielampje na 10 seconden automatisch
uitgaan.
Bediening van de oven
1. Zet de oven op ‘handmatig’.
°C
250
230
210
70
100
120
▷ Wanneer er geen indicatielampje brandt, is de oven ingesteld
op handbediening. Brandt er wel een lampje, dan moet u eerst
de programmering annuleren. U kunt een ingesteld programma
annuleren door de instelknop enkele seconden in te drukken
tot de desbetreffende indicatielampjes uitgaan en u een tweede
geluidssignaal hoort.
2. Selecteer een temperatuur met de thermostaatknop en een
ovenfunctie met de functieknop.
Het rode programmalampje en het oranje lampje van de
temperatuur gaan branden; de oven is ingeschakeld.
▷ Zie tabel voor meer informatie over de verschillende
ovenfuncties die u kunt kiezen.
3. Zet de thermostaatknop en de functieknop na afloop van de
bereidingstijd op ‘0’ om de oven uit te schakelen.
NL 10
Let op; Wanneer de oven niet werkt is het mogelijk dat de
schakelklok geprogrammeerd is. Annuleer het programma door
de instelknop van de schakelklok enkele seconden in te drukken!
De indicatielampjes gaan uit en er klinkt een geluidssignaal.
Page 11
BEDIENING VAN DE OVEN
0
°C
0
°C
70
250
0
°C
0
°C
70
100
120
230
250
0
°C
70
100
120
150
180
210
230
250
0
°C
70
250
0
°C
70
100
120
230
250
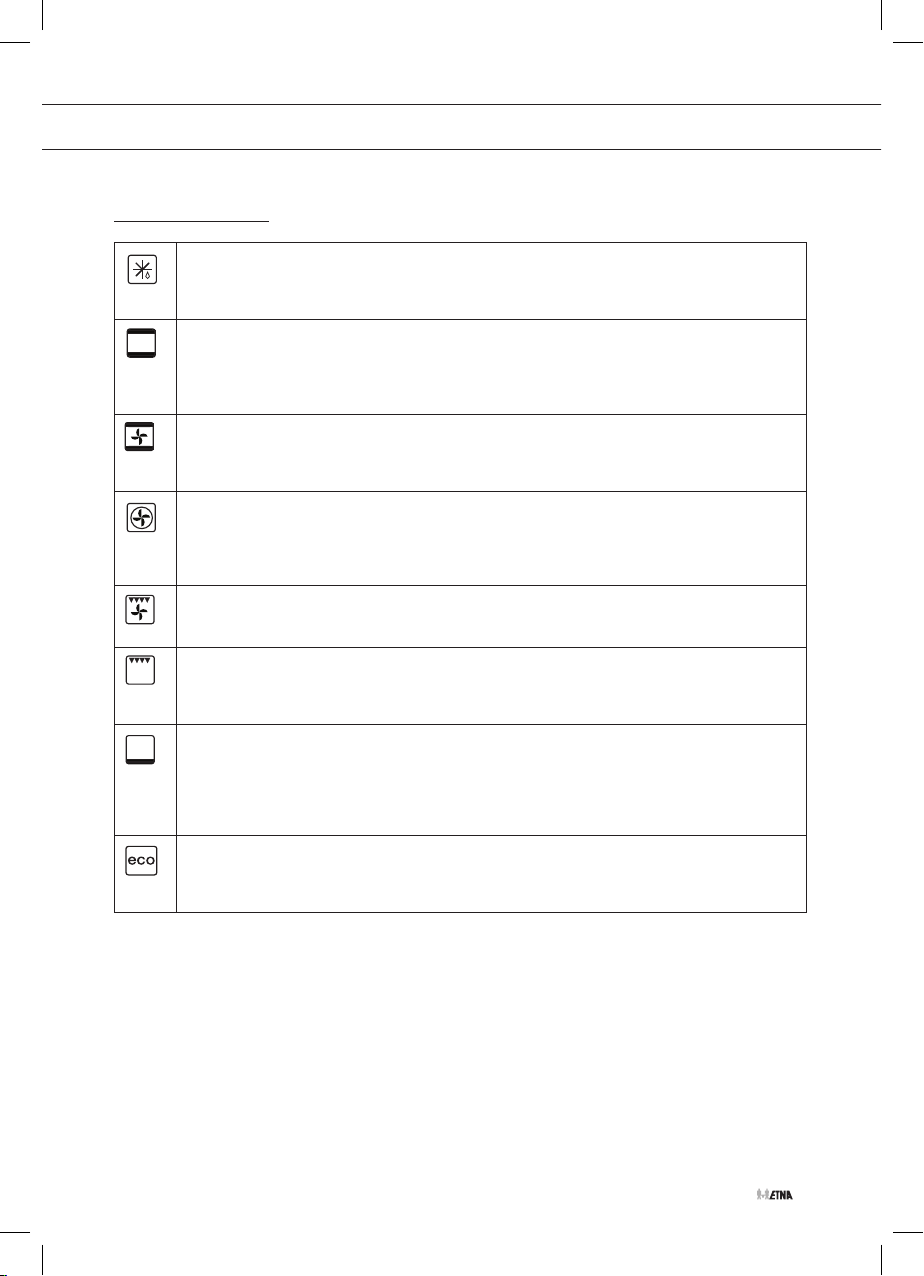
Ovenfuncties
Ovenverlichting/ontdooien
De ovenverlichting gaat branden, het rode indicatielampje gaat aan en de ventilator gaat draaien.
De lucht circuleert in de oven zonder dat er verwarmingselementen zijn ingeschakeld. Deze
methode wordt gebruikt voor langzaam ontdooien van levensmiddelen.
Boven- en onderwarmte (conventioneel)
Een boven- en onderelement verwarmen het gerecht, geschikt voor de bereiding van één gerecht.
Deze functie wordt gebruikt voor luchtig gebak en taarten, waarbij de warmtetoevoer van boven
en onder gelijk moet zijn om een luchtig resultaat te krijgen. Het gerecht bij voorkeur in een voorverwarmde oven plaatsen, d.w.z. als het indicatielampje naast de thermostaatknop uitgegaan is.
Conventioneel met ventilator
Het boven- en onderelement zijn ingeschakeld. De ventilator verspreidt de warmte gelijkmatig
door de ovenruimte. Deze functie is geschikt voor het braden van vlees en het bakken van
taarten. Met deze functie kunt u ook voedsel ontdooien. Zet hiervoor de thermostaatknop op ‘0’.
Hetelucht
De lucht in de oven wordt verwarmd door het heteluchtelement. De ventilator in de achterwand
blaast hete lucht in de oven. Hiermee worden de gerechten verwarmd. U kunt op meer niveaus
tegelijk bakken, waardoor u energie kunt besparen. Door de intensieve warmte overdracht kunt u
een ca. 20 - 30 °C lagere temperatuur kiezen dan bij conventionele recepten staat aangegeven.
Ventilator met grill
U kunt grillen met ingeschakelde ventilator. De stralingswarmte wordt door de ventilator rondom
het gerecht geblazen.
Grill
Het bovenelement verhit het gerecht. Deze functie is geschikt voor het grillen van biefstuk,
worstjes en tosties. Ideaal voor grotere grillgerechten zoals gevogelte en grotere stukken vlees.
Zet een ovenschaal onder het gerecht om afdruipend vet op te vangen.
Onderwarmte
Deze functie wordt aanbevolen voor gerechten waarbij de bodem goed gaar moet worden. De
bodems van gerechten worden goed doorbakken.Vóór het einde van het bakproces (met nog een
kwart van de baktijd te gaan) draait u de functieknop op onderwarmte. Stel de temperatuurknop
in op de maximale stand. Het gerecht wordt dan voornamelijk door het onderelement verwarmd,
maar kleurt wel door aan de bovenzijde.
ECO
ECO-functie regelt software-matig de werktijd van het verwarmingselement. Door gebruik te
maken van de restwarmte wordt het energieverbruik verminderd. De ECO-stand maakt gebruik
van een langere kooktijd. Deze functie is o.a geschikt voor het bereiden van vlees.
NL 11
Page 12
BEDIENING VAN DE OVEN
Bediening van de oven met de schakelklok
De schakelklok kunt u op verschillende manieren gebruiken:
• U kunt het eindtijdstip van het bakken/braden/grillen bepalen.
De oven start onmiddelijk. Zodra de ingestelde tijd is verstreken,
schakelt de oven automatisch uit en er gaat een geluidsalarm af.
• Ook kunt u met de schakelklok zowel een starttijdstip als ook
een eindtijdstip ingeven (een automatisch bakproces). De oven
start automatisch en eindigt automatisch. Als het automatische
bakproces is afgelopen, schakelt de oven automatisch uit en er
gaat een geluidsalarm af.
• De schakelklok is ook als kookwekker te gebruiken. De kookwekker
schakelt de oven niet uit.
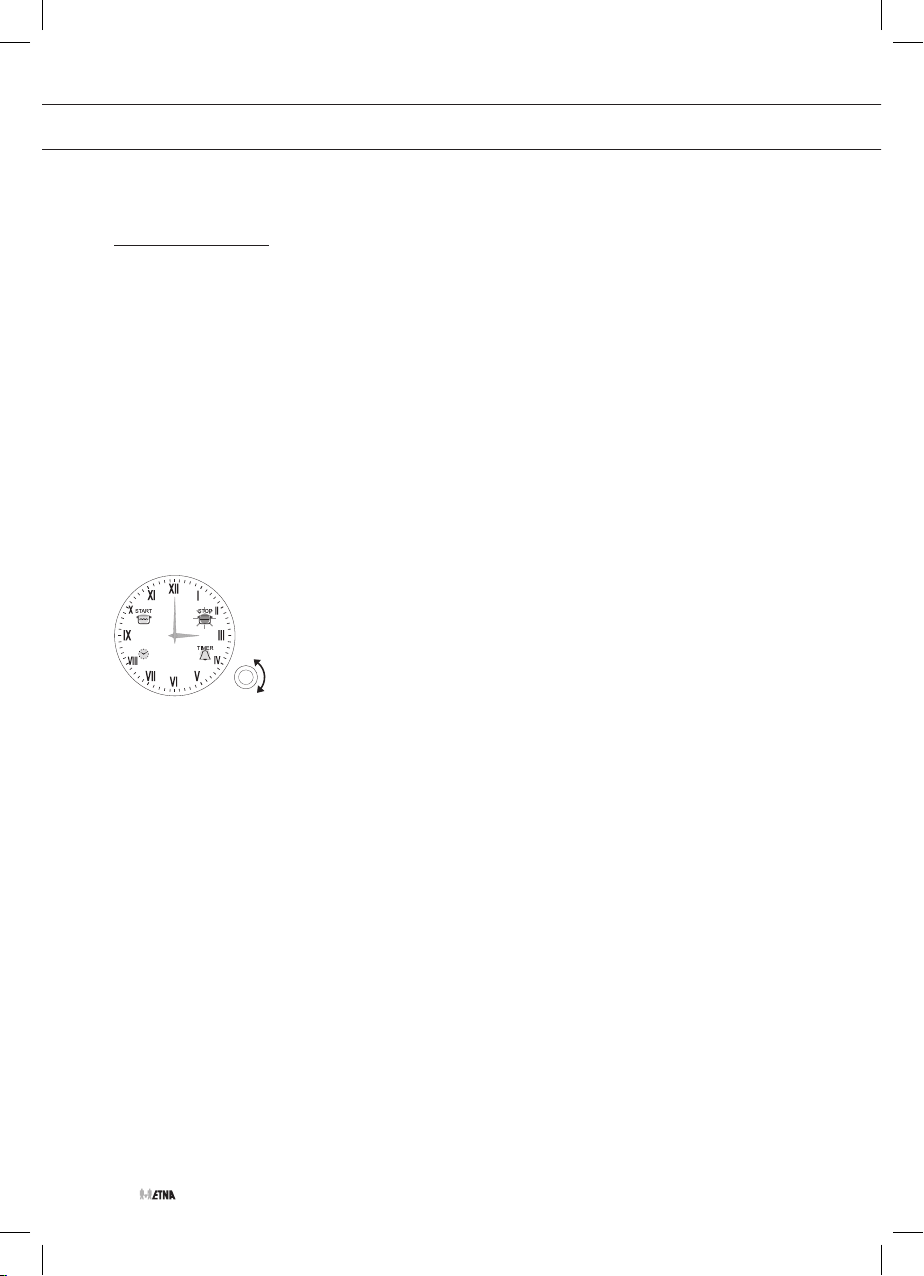
Het eindtijdstip programmeren
1. Druk twee keer op het instelknopje.
Het indicatielampje ‘stop’ gaat knipperen.
2. Draai het instelknopje rechtsom of linksom om het eindtijdstip in te
stellen.
3. Druk nogmaals op het instelknopje.
Het eindtijdstip is ingesteld, het indicatielampje ‘stop’ brandt.
4. Selecteer een temperatuur met de thermostaatknop en een
ovenfunctie met de functieknop.
Het rode programmalampje en het oranje lampje van de
temperatuur gaan branden; de oven is ingeschakeld.
▷ Wanneer de ingestelde tijd verstreken is, gaat het alarm af en
knippert het indicatielampje. Druk het instelknopje in om het
alarm en het indicatielampje uit te schakelen.
▷ Wanneer u niks doet, zal het alarm na 1 minuut automatisch
uitschakelen. Het indicatielampje blijft knipperen totdat u op het
instelknopje hebt gedrukt.
5. Zet de thermostaatknop en de functieknop na afloop van de
bereidingstijd op ‘0’ om ook de indicatielampjes van de oven uit te
schakelen.
NL 12
Page 13
BEDIENING VAN DE OVEN
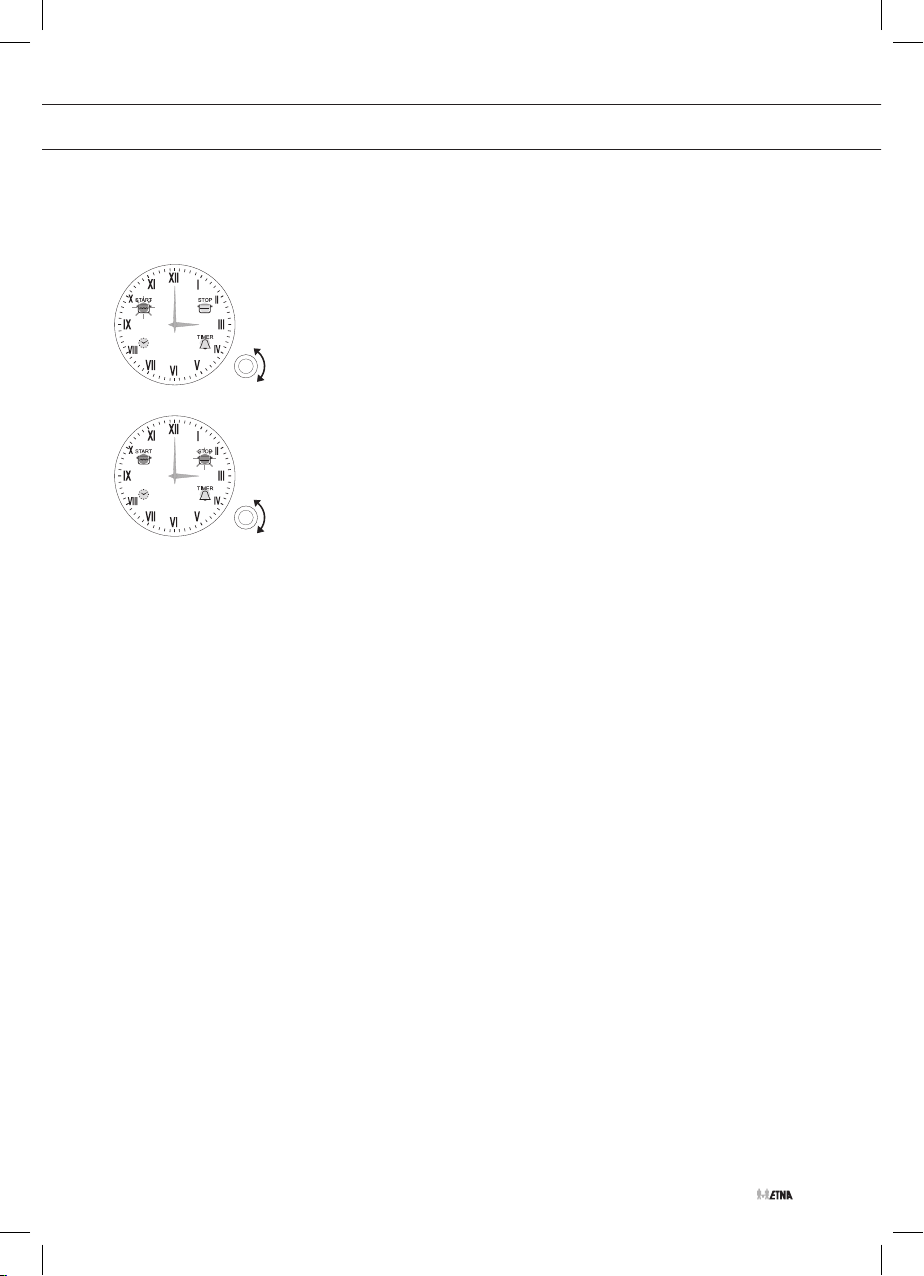
Het begin- en eindtijdstip programmeren
1. Druk één keer op het instelknopje.
Het indicatielampje ‘start’ gaat knipperen.
2. Draai het instelknopje rechtsom of linksom om het starttijdstip in te
stellen.
3. Druk weer op het instelknopje.
Het starttijdstip is ingesteld, het indicatielampje ‘start’ brandt en het
indicatielampje ‘stop’ gaat knipperen.
4. Draai het instelknopje rechtsom of linksom om het eindtijdstip in te
stellen.
5. Druk nogmaals op het instelknopje.
Het eindtijdstip is ingesteld, het indicatielampje ‘stop’ brandt.
6. Selecteer een temperatuur met de thermostaatknop en een
ovenfunctie met de functieknop.
Het rode programmalampje en het oranje lampje van de
temperatuur gaan branden; de oven schakelt in als de starttijd is
bereikt.
▷ Wanneer de ingestelde tijd verstreken is, gaat het alarm af en
knipperen de indicatielampjes. Druk het instelknopje in om het
alarm en de indicatielampjes uit te schakelen.
▷ Wanneer u niks doet, zal het alarm na 1 minuut automatisch
uitschakelen. De indicatielampjes blijven knipperen totdat u op
het instelknopje hebt gedrukt.
7. Zet de thermostaatknop en de functieknop na afloop van de
bereidingstijd op ‘0’ om ook de indicatielampjes van de oven uit te
schakelen.
NL 13
Page 14

BEDIENING VAN DE OVEN
Kookwekker
De kookwekker geeft alleen een signaal na het verstrijken van de
ingestelde tijd. De kookwekker schakelt de oven niet uit.
1. Druk drie keer op het instelknopje.
Het indicatielampje van de timer gaat knipperen.
2. Draai het instelknopje rechtsom of linksom om het tijdstip in te
stellen wanneer het geluidsalarm moet afgaan.
3. Druk tot slot nogmaals op het instelknopje.
Het alarm is ingesteld, het indicatielampje van de timer brandt.
▷ Wanneer de ingestelde tijd verstreken is, gaat het alarm af en
knippert het indicatielampje van de timer. Druk het instelknopje
in om het alarm en het indicatielampje uit te schakelen.
▷ Het alarm schakelt automatisch na 1 minuut uit.
▷ Het indicatielampje blijft knipperen totdat u op het instelknopje
hebt gedrukt.
Weergave van het ingestelde programma
U kunt een ingesteld programma weergeven door kort op het
instelknopje te drukken. De wijzers verplaatsen zich naar het
ingestelde tijdstip en het bijbehorende indicatielampje knippert. Daarna
verplaatsen de wijzers zich weer automatisch naar de huidige tijd en
wordt het ingestelde programma voortgezet.
NL 14
Tussentijds uitschakelen van de oven
1. Druk het instelknopje enkele seconden in tot de desbetreffende
indicatielampjes van het lopende programma uitgaan en u een
tweede geluidssignaal hoort.
2. Draai de functieknop en de thermostaatknop op ‘0’.
De indicatielampjes gaan uit en het toestel is uitgeschakeld.
Annulering van het ingestelde programma
U kunt een ingesteld programma annuleren door de instelknop enkele
seconden in te drukken tot de desbetreffende indicatielampjes uitgaan
en u een geluidssignaal hoort.
Page 15
BEDIENING GASKOOKPLAAT
Ontsteken en instellen
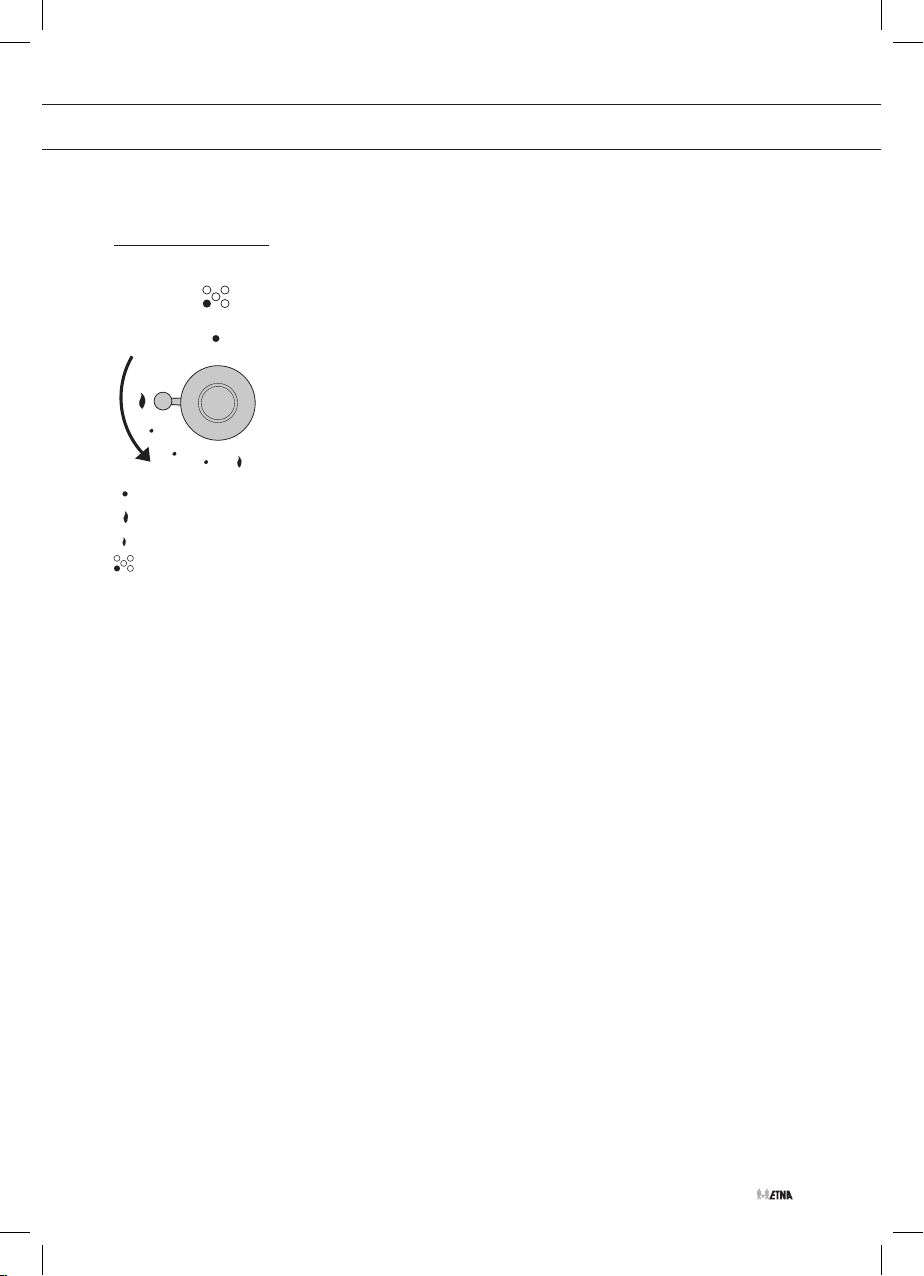
Een symbool bij de bedieningsknop geeft aan welke brander wordt
bediend. Elke brander kan traploos worden geregeld tussen vol- en
kleinstand.
Aansteken met vonkontsteking
Druk de bedieningsknop in en draai deze linksom naar de volstand.
De brander ontsteekt.
▷ De bedieningsknop moet ongeveer 10 seconden ingedrukt
gehouden worden in verband met de vlambeveiliging.
0-stand
Volstand
Kleinstand
Zone-aanduiding
Vlambeveiliging
Uw gaskookplaat is uitgerust met vlambeveiliging. Deze zorgt ervoor
dat de gastoevoer gesloten wordt als de vlam tijdens het kookproces
dooft.
Ontsteekt de brander niet, controleer dan of:
• de branderdop goed op de brander ligt;
• de brander/bougie schoon en droog is.
NL 15
Page 16
COMFORTABEL KOKEN
De kookplaat optimaal gebruiken
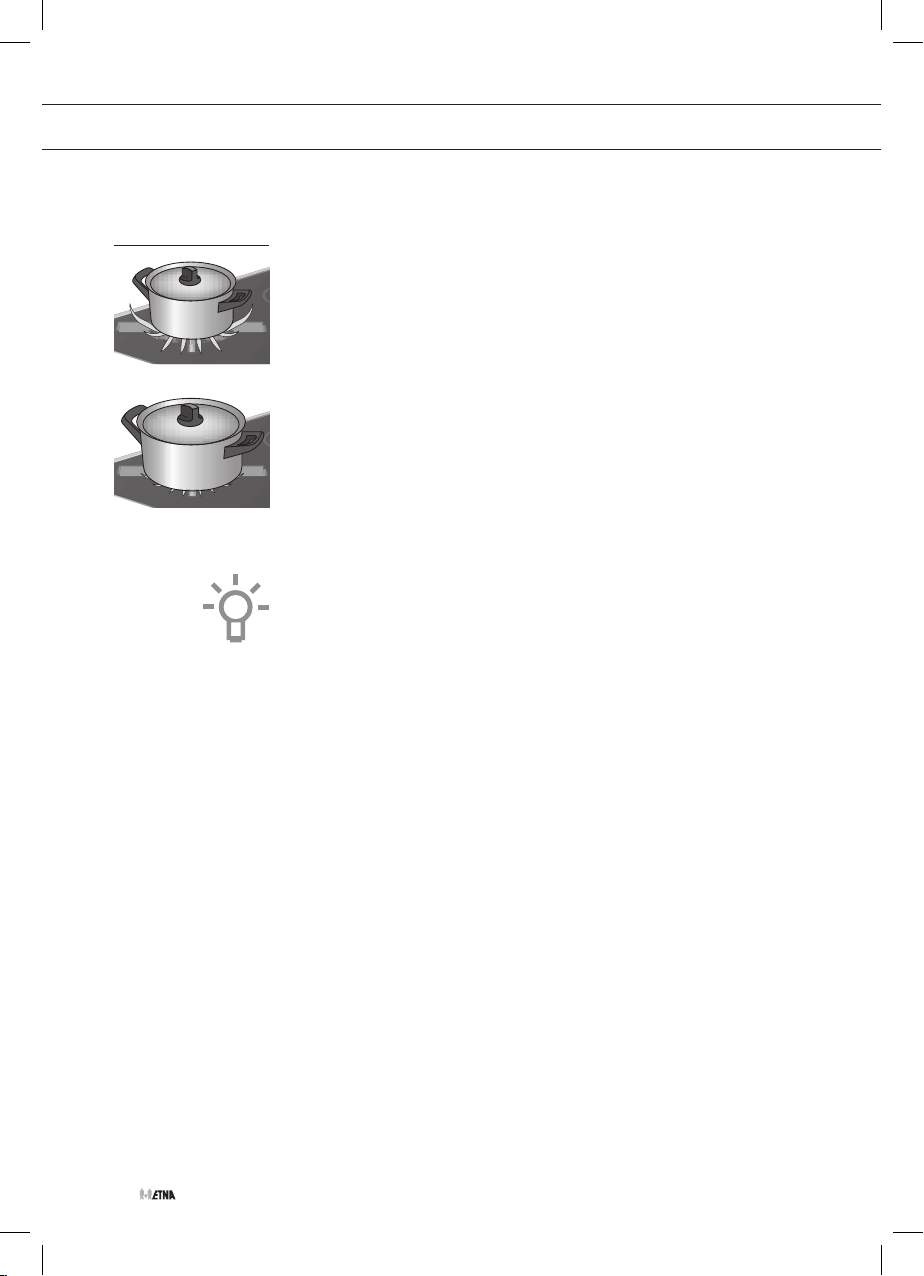
Zorg er altijd voor dat de vlammen onder de pan blijven. Als vlammen
om de pan heen spelen gaat veel energie verloren. Bovendien kunnen
de handgrepen dan te heet worden. Gebruik geen pannen met een
kleinere bodemdiameter dan 12 cm. Deze staan niet stabiel.
Fout
Goed
• (Roer)bakken, doorkoken van grote hoeveelheden en frituren kunt u
het beste op de sterk- of wokbrander.
• Gebruik de sudderbrander voor het bereiden van sauzen, sudderen
en doorkoken van gerechten. Op de volstand is deze brander groot
genoeg voor het doorkoken.
• Kook met het deksel op de pan. U bespaart dan tot 50% energie.
• Gebruik pannen met een vlakke, schone en droge bodem. Pannen
met een vlakke bodem staan stabiel en pannen met een schone
bodem dragen de warmte beter over op het gerecht.
NL 16
Wokbrander
Met de wokbrander kunt u gerechten op een zeer hoge temperatuur
bereiden. Het is hierbij van belang dat u:
• van te voren de ingrediënten in reepjes, plakjes of stukjes snijdt.
• bij het roerbakken olie van goede kwaliteit gebruikt, zoals olijf-,
maïs-, zonnebloem- of arachideolie. Een klein beetje is al genoeg.
Boter en margarine verbranden door de grote hitte.
• de gerechten met de langste bereidingstijd het eerst in de pan doet,
zodat aan het eind van de bereidingstijd alle ingrediënten tegelijk
(beet)gaar zijn.
Page 17

ONDERHOUD
Reinigen van de oven
Let op!
Maak het toestel spanningsloos voordat met reparatie of schoonmaken
wordt gestart. Bij voorkeur door de stekker uit het stopcontact te halen
of de schakelaar in de meterkast op nul te zetten.
Gebruik geen stoomreiniger of hogedruk-stoomreiniger om het
toestel te reinigen.
Voorzijde van toestel
Reinig het oppervlak met een vloeibaar, niet-schurend schoonmaak-
middel voor gladde oppervlakken en een zachte doek. Breng het
schoonmaakmiddel aan op de doek en veeg het vuil weg; spoel
daarna met water. Breng het schoonmaakmiddel niet rechtstreeks
op het oppervlak aan. Gebruik geen agressieve of schurende
reinigingsmiddelen, scherpe voorwerpen of staalwol, want hierdoor
ontstaan er krassen op het toestel.
Aluminium oppervlakken
Aluminium oppervlakken moeten worden gereinigd met niet-schurende,
vloeibare schoonmaakmiddelen die voor dergelijke materialen bedoeld
zijn. Breng het schoonmaakmiddel aan op een vochtige doek en reinig
het oppervlak; spoel het oppervlak vervolgens met water. Breng het
reinigingsmiddel niet rechtstreeks op het aluminium oppervlak aan.
Gebruik geen schurende reinigingsmiddelen of schuursponsjes. Het
oppervlak mag niet in contact komen met ovensprays.
Roestvrijstalen frontpanelen
Reinig het oppervlak met een zacht reinigingsmiddel (zeepsop) en een
zacht sponsje dat het materiaal niet krast. Gebruik geen schurende
of op oplosmiddelen gebaseerde reinigingsmiddelen. Als u deze
instructies niet opvolgt, kan de behuizing beschadigd raken.
Gelakte en kunststof oppervlakken
Reinig de knoppen / toetsen en de deurhandgreep met een zachte
doek en vloeibare schoonmaakmiddelen die geschikt zijn om gladde,
gelakte oppervlakken te reinigen. U kunt ook reinigingsmiddelen
gebruiken die speciaal voor dit soort oppervlakken werden ontwikkeld.
In dit geval volgt u de instructies van de fabrikant.
NL 17
Page 18

ONDERHOUD
Geëmailleerde delen
De binnenkant van de ovendeur, de gehele binnenoven alsook de
zwarte vangschaal van het kookgedeelte en de bak- en braad plaat zijn
geheel geëmailleerd. U kunt ze het beste reinigen met een warm sopje.
Buitenkant
Reinig de buitenkant van het fornuis met een warm sopje of vloeibare
zeep. Nabehandelen met schoon water.
Glas
Reinig de ovenruit met een sopje of met Glassex.
Oven
• De oven kan op de klassieke manier worden gereinigd (met
schoonmaakmiddelen, ovenspray), maar alleen wanneer de oven
zeer vuil is en wanneer de vlekken zeer hardnekkig zijn.
• Om de oven regelmatig te reinigen (na elk gebruik), wordt de
volgende procedure aanbevolen:
▷ Gebruik de ovenfunctie: onder en bovenwarmte voor het reinigen van
de oven. Stel de temperatuurkeuzeknop in op 50 °C.
▷ Giet 0,6 l water in het bakblik en plaats het op de onderste richel. Na
een half uur worden de voedselresten op het email van de oven zacht
en kunt u ze met een vochtige doek afvegen.
NL 18
Voor hardnekkige vlekken dient u rekening te houden met het
volgende:
De oven moet afgekoeld zijn voor u hem reinigt.
• Reinig de oven en de accessoires na elk gebruik, om te voorkomen
dat het vuil inbrandt in de oven.
• De eenvoudigste manier om vet te verwijderen, is met behulp van
warm zeepsop terwijl de oven nog warm is.
• Bij zeer hardnekkig vuil gebruikt u de klassieke ovenreinigings-
middelen. Spoel de oven daarna grondig met schoon water om alle
resten van het reinigingsmiddel te verwijderen.
• Gebruik nooit agressieve reinigingsmiddelen zoals staalwol,
schuursponsjes, vlekverwijderaars enz.
• Gelakte, roestvrijstalen en verzinkte oppervlakken en aluminium
onderdelen mogen nooit in contact komen met ovensprays, want
daardoor raken ze beschadigd en verkleuren ze. Hetzelfde geldt voor
de thermostaatsensor (als het toestel uitgerust is met een timer met
een sensor) en voor de verwarmingselementen die aan de
bovenzijde toegankelijk zijn.
Page 19
ONDERHOUD
• Wanneer u schoonmaakmiddelen aankoopt en gebruikt, dient u
Praktische tips
• Wanneer u grote stukken vetrijk vlees bereidt, is het aan te bevelen
• Wanneer u vlees op het rooster grilt, dient u een druipschaal onder
Accessoires
Was de accessoires (bakplaten, rooster, enz.) met warm water en een
klassiek afwasmiddel.
Speciale emailcoating
De oven, de binnenzijde van de deur en de bakplaten zijn behandeld
met speciaal email, dat een glad en sterk oppervlak vormt. Dankzij deze
speciale coating is reinigen bij kamertemperatuur gemakkelijker.
Ovendeur demonteren
rekening te houden met het milieu en met de instructies van de
fabrikant van het reinigingsmiddel.
ze in aluminiumfolie of een geschikte braadzak te plaatsen, zodat
het vet niet op de ovenwanden kan spatten.
het vlees te plaatsen.
Als u de binnenkant van de oven wilt reinigen, kunt u de ovendeur
demonteren.
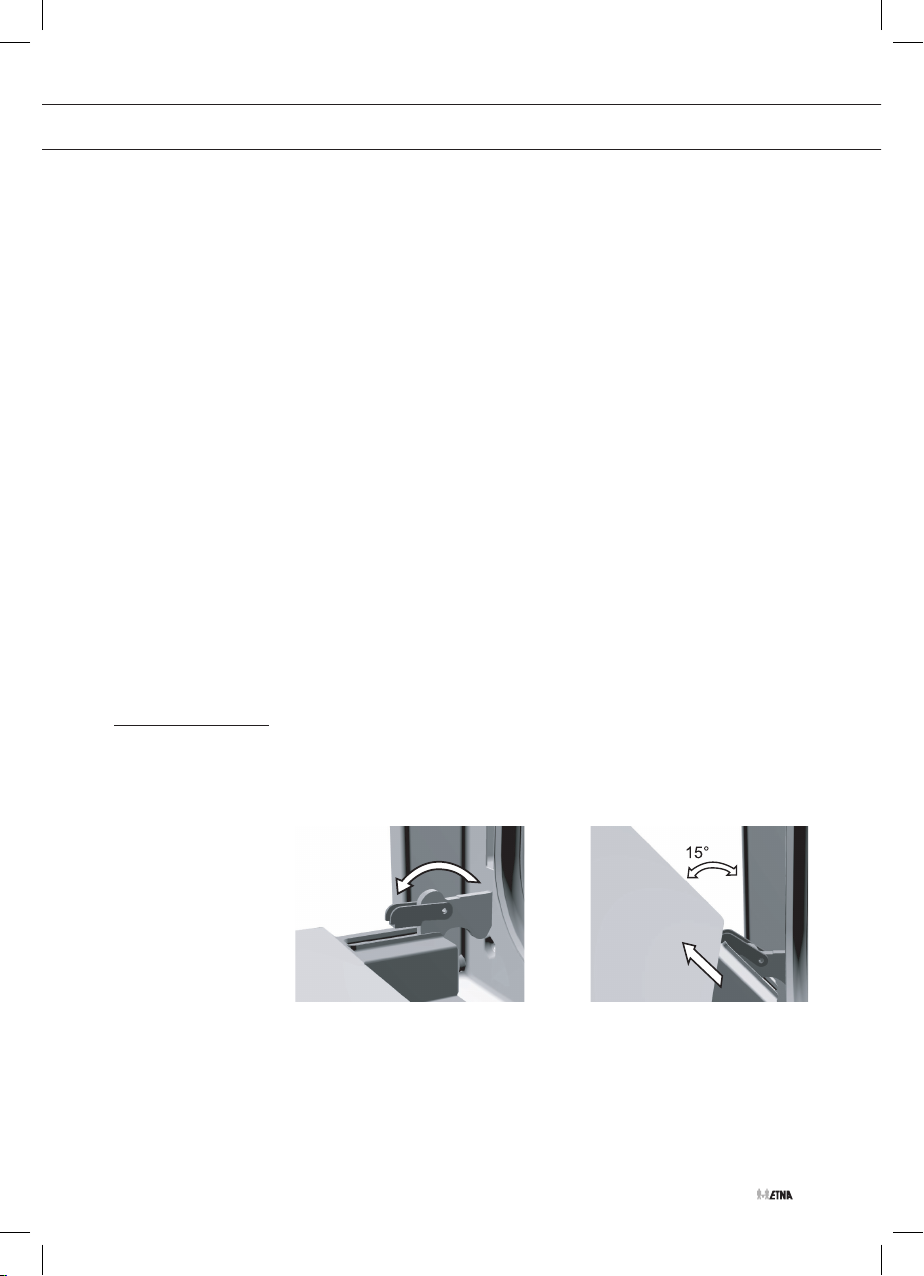
1. Open de ovendeur volledig en draai de pallen zo ver mogelijk terug.
2. Sluit de deur langzaam zodat de klemmen in de flenzen vallen
(waarin de pallen passen).
3. Til de deur enigszins op onder een hoek van ongeveer 15° (ten
opzichte van de positie van de gesloten deur) en hef deze uit de
beide scharnierhouders.
NL 19
Page 20
ONDERHOUD
Ovenlamp vervangen
Voer de bovenstaande procedure in omgekeerde volgorde uit om
de deur terug te plaatsen.
1. Plaats de deur onder een hoek van 15° in de scharnieren aan
de voorkant van het apparaat. Druk de deur naar voren en naar
beneden zodat de scharnieren in de uitsparingen schuiven.
Controleer of de scharnieruitsparingen goed zijn geplaatst.
2. Open de ovendeur vervolgens volledig en draai de pallen terug naar
hun beginpositie.
3. Sluit de deur langzaam en controleer of deze goed sluit.
Als de deur niet goed opent of sluit, controleert u of de
scharnieruitsparingen goed in de scharnierhouders zijn geplaatst.
Maak het toestel spanningsloos voordat u de lamp vervangt.
Bij voorkeur door de stekker uit het stopcontact te halen of de
schakelaar in de meterkast op nul te zetten.
De lamp in dit huishoudelijk apparaat is alleen geschikt voor de
verlichting van het apparaat. De lamp is niet geschikt voor het
verlichten van een kamer. De lamp is verbruiksmateriaal en valt niet
onder de garantie.
Reinigen van de gaskookplaat
NL 20
1. Draai het glazen afdekkapje linksom los en vervang de ovenlamp.
2. Plaats een nieuwe lamp met dezelfde specificaties.
3. Draai het glazen afdekkapje weer vast.
Let op: de lamp kan erg heet zijn! Draag handbescherming wanneer u
de lamp verwijdert.
Uw gaskookplaat is vervaardigd uit hoogwaardige materialen, die u
eenvoudig reinigt.
• Regelmatig onderhoud direct na gebruik voorkomt dat overgekookt
voedsel lange tijd kan inwerken en hardnekkige, moeilijk te
verwijderen vlekken veroorzaakt. Gebruik hiervoor een mild
reinigingsmiddel. Gebruik niet te veel vocht, aangezien dit de
brander of ventilatieopeningen kan binnendringen.
Page 21

ONDERHOUD
• Reinig eerst de bedieningsknoppen, branders en pandragers en dan
pas de vangschaal. Hiermee voorkomt u dat de vangschaal tijdens
het reinigen opnieuw vuil wordt.
• Reinig de ontstekingsbougies bij voorkeur met een doekje. Betracht
hierbij wel enige voorzichtigheid. De bougie kan anders defect
raken. De bougie werkt alleen goed in een droge omgeving.
Bij zware vervuiling kunt u de bougie met een fijn borsteltje reinigen.
• Plaats de pandragers rechtstandig naar beneden, zonder over de
vangschaal te schuiven.
• Zet de branderdelen in elkaar met behulp van de geleidings nokken.
Let hierbij op de uitsparingen voor de bougie en thermokoppel.
Zorg ervoor dat de branderdelen vlak liggen.
Reinigen pandragers
Reinig de pandragers niet in de vaatwasser. Het emaille op de
pandragers is geschikt voor reiniging in de vaatwasser, maar de
verbinding met de rubber voetjes echter niet. Bovendien kan bij
reiniging in de vaatwasser lichte verkleuring van de pandragers
optreden. Bij verlies van de rubber voetjes zal de pandrager de
vangschaal beschadigen.
Hardnekkige vlekken op emaille (pandragers, branderdoppen en
vangschaal
Hardnekkige vlekken kunt u het beste verwijderen met een vloeibaar
reinigingsmiddel. Gebruik nooit schuurpoeders, schuurpads, scherpe
voorwerpen of agressieve reinigingsmiddelen.
Reinigen verwijderbare branderdelen
Branderdelen mogen niet in de vaatwasser gereinigd worden.
De onderdelen kunnen door het vaatwasmiddel aangetast worden!
De verwijderbare branderdelen (ook die van de wok) kunt u het beste
reinigen met een mild schoonmaakmiddel en een zachte doek.
Bij hardnekkige vlekken kunt u de branderdelen verwijderen en de delen
laten weken in een sopje. Gebruik nooit schuurpoeders, schuurpads,
scherpe voorwerpen of agressieve reinigingsmiddelen.
NL 21
Page 22
STORINGEN
Storingstabel
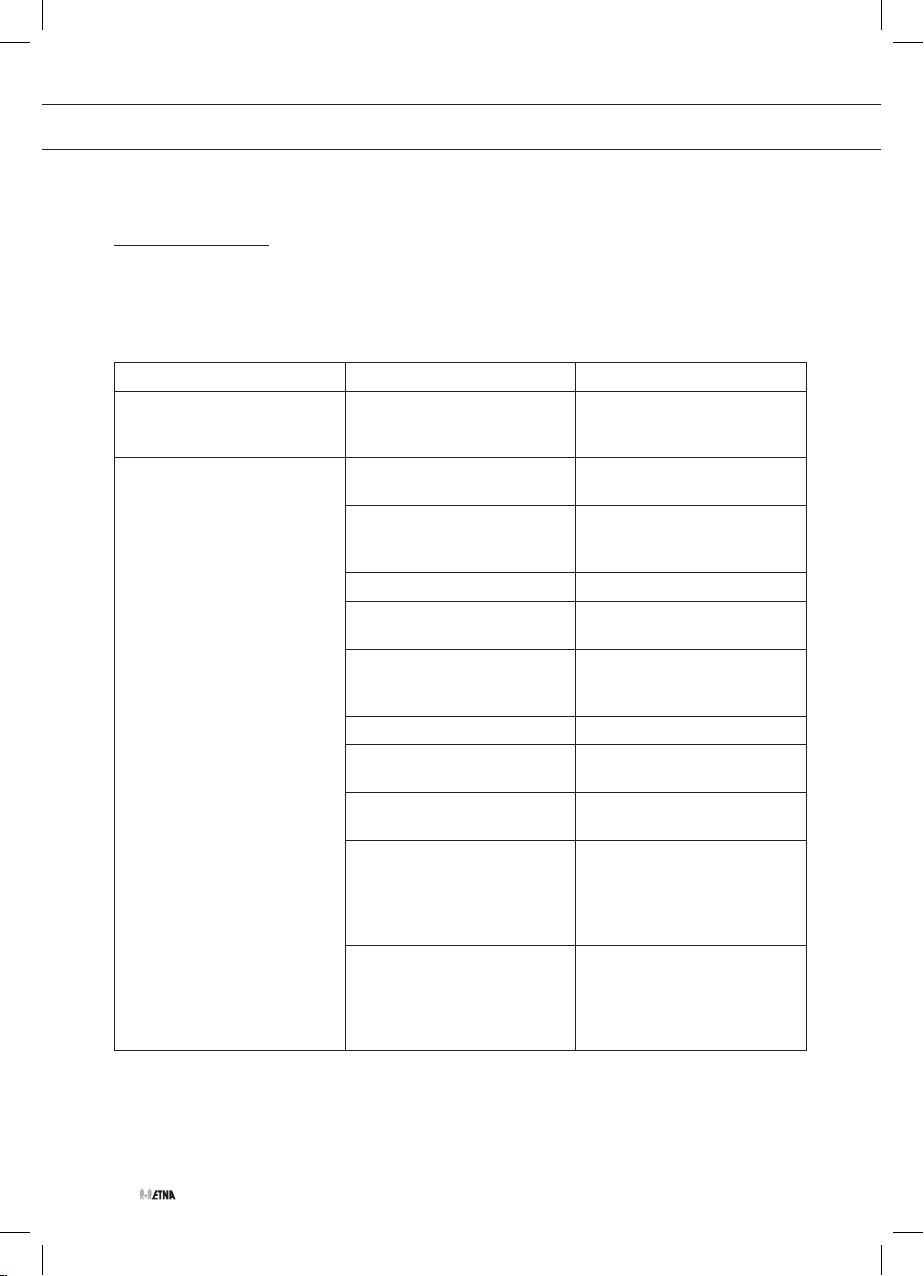
Wanneer u twijfelt over de goede werking van uw toestel, betekent
dit niet automatisch dat er een defect is. Controleer in elk geval de
volgende punten in onderstaande tabel of kijk voor meer informatie op
de website ‘www.etna.nl’.
Storing bij de kookplaat Mogelijke oorzaak Oplossing
Het ruikt naar gas in de
omgeving van het toestel.
Een brander ontsteekt niet. Stekker niet in stopcontact. Steek de stekker in het
De aansluiting van het toestel
lekt.
Zekering defect/zekering in
meterkast uitgeschakeld.
Bougie vervuild/vochtig. Reinig/droog de bougie.
Branderdelen niet juist
geplaatst.
Branderdelen vervuild/
vochtig.
Hoofdgaskraan gesloten. Open de hoofdgaskraan.
Storing aan het gasnet. Informeer bij uw gas-
Gasfles of -tank is leeg. Sluit een nieuwe gasfles aan
Verkeerde gassoort gebruikt. Controleer of het gebruikte
Bedieningsknop niet diep
genoeg ingedrukt.
Sluit de hoofdgaskraan.
Neem contact op met uw
installateur.
stopcontact.
Monteer een nieuwe zekering
of schakel de zekering weer
in.
Zet de branderdelen via de
centreernokken in elkaar.
Reinig/droog de branderdelen. Let er hierbij op dat de
uitstroomgaten open zijn.
leverancier.
of laat de tank vullen.
gas geschikt is voor het
toestel. Indien dit niet juist is,
neem dan contact op met uw
installateur.
Houd de bedieningsknop
voldoende diep ingedrukt
tussen vol- en kleinstand. Bij
eerste gebruik kan dit langer
duren i.v.m. aanvoer van gas.
NL 22
Page 23
STORINGEN
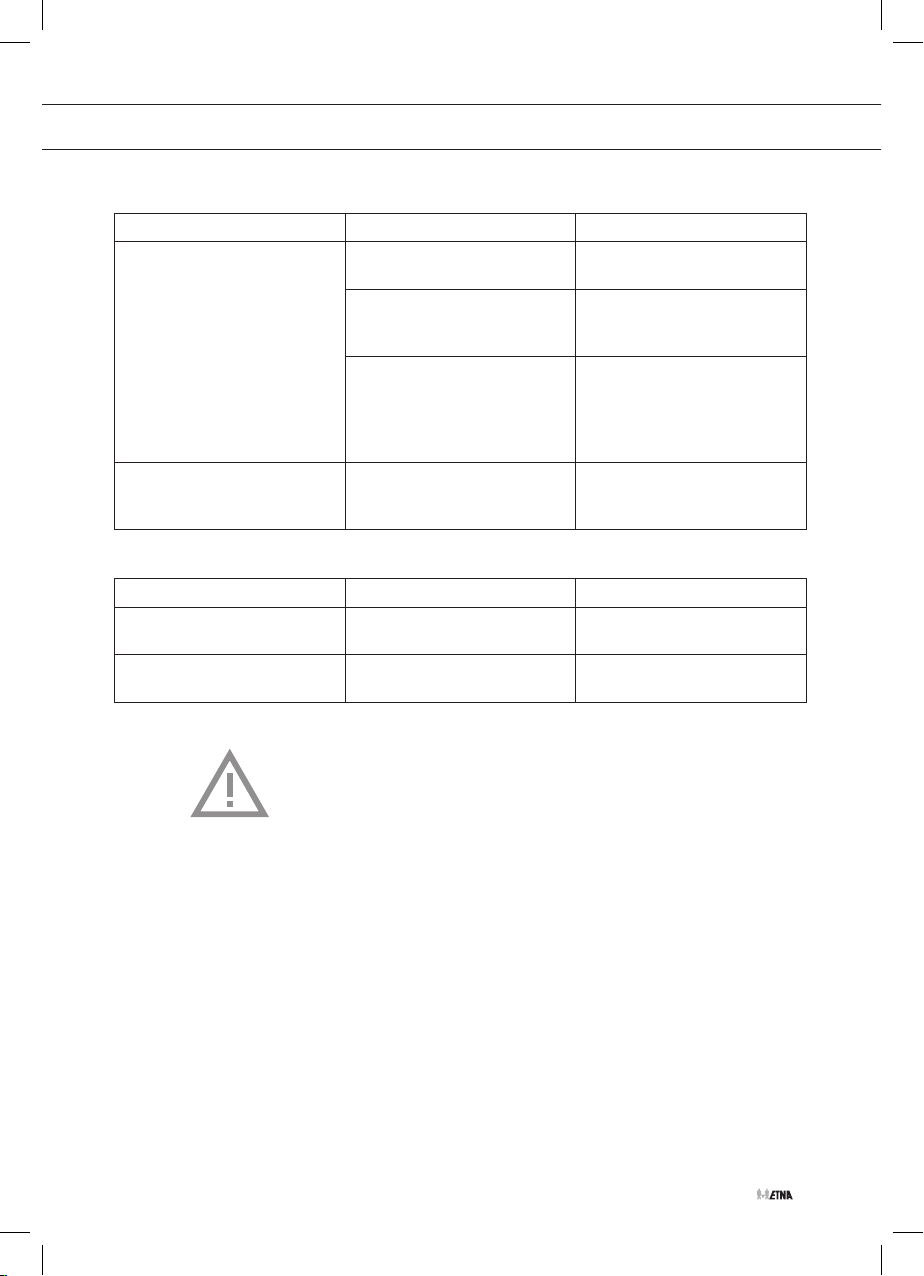
Storing bij de kookplaat Mogelijke oorzaak Oplossing
De brander brandt niet egaal. Branderdelen niet juist
De brander dooft na
ontsteken.
Storing bij de oven Mogelijke oorzaak Oplossing
De oven schakelt niet in. De ovenklok staat niet op
De oven wordt niet warm. Geen temperatuur ingesteld. Stel met de thermostaatknop
geplaatst.
Branderdelen vervuild/
vochtig.
Verkeerde soort gas gebruikt. Controleer of het gebruikte
Bedieningsknop niet lang
genoeg ingedrukt.
handbediening.
Zet de branderdelen via de
centreernokken in elkaar.
Reinig/droog de branderdelen. Let er hierbij op dat de
uitstroomgaten open zijn.
gas geschikt is voor het
toestel. Indien dit niet juist is,
neem dan contact op met uw
installateur.
Houd de bedieningsknop
minimaal 10 seconden
ingedrukt.
Zet de ovenklok op handbediening.
de temperatuur in.
Een bezoek van de servicedienst tijdens de garantieperiode is niet
gratis wanneer bij deze controle blijkt dat het apparaat niet goed werkt
door onjuiste behandeling!
NL 23
Page 24

INSTALLATIE
Algemeen
Dit toestel mag alleen door een erkend installateur worden aangesloten.
De gasaansluiting en de elektrische aansluiting moeten voldoen aan de
nationale en lokale voorschriften.
Lees eerst de separate veiligheidsinstructies!
Let op!
Dit toestel moet altijd geaard zijn.
Laat installatie-, onderhouds- en reparatiewerkzaamheden uitsluitend
uitvoeren door vakmensen die door de fabrikant zijn geautoriseerd,
anders vervalt de garantie.
Bij installatie-, onderhouds- en reparatiewerkzaamheden moet het
apparaat spanningsvrij gemaakt worden. Het apparaat is alleen
spanningsvrij als:
• de hoofdschakelaar van de huisinstallatie is uitgeschakeld, of
• de zekering van de huisinstallatie er geheel is uitgedraaid, of
• de stekker uit het stopcontact is getrokken.
NL 24
Defecte onderdelen mogen alleen vervangen worden door originele
ETNA onder delen. Alleen van die onderdelen kan ETNA garanderen dat
zij aan de veiligheidseisen voldoen.
Indien de aansluitkabel beschadigd is mag deze alleen worden
vervangen door de fabrikant, zijn service-organisatie of gelijkwaardig
gekwalificeerde personen, teneinde gevaarlijke situaties te voorkomen.
Page 25
INSTALLATIE
Gasaansluiting
• Wij adviseren de kookplaat aan te sluiten met een vaste leiding.
• Achter een oven moet een volledig metalen slang worden gebruikt.
Let op!
• Een veiligheidsslang mag niet worden geknikt en niet in aanraking
• In alle gevallen moet er bij het toestel een aansluitkraan geplaatst
• De gassoort en het land waarvoor het toestel is ingericht staan
Voordat u het toestel in gebruik neemt moet u de aansluitingen met
zeepsop controleren op gasdichtheid!
Elektrische aansluiting
230-240 V~ - 50/60 Hz
• Wandcontactdoos en stekker moeten altijd bereikbaar blijven.
• Zorg ervoor dat de aansluitkabel niet in contact kan komen met
• Als u een vaste aansluiting wilt maken, moet u er voor zorgen dat er
• Het apparaat mag niet via een verdeelstekker of verlengsnoer op
Aansluiting door middel van een speciaal daarvoor bestemde
veiligheidsslang is ook toegestaan.
komen met bewegende delen van het keukenmeubel.
worden op een makkelijk bereikbare plaats.
vermeld op het gegevensplaatje.
delen van het apparaat die heet kunnen worden.
een omnipolaire schakelaar met een contactafstand van minimaal
3 mm in de toevoerleiding wordt aangebracht.
het elektriciteitsnet worden aangesloten. Hiermee kan veilig gebruik
van het apparaat niet worden gewaarborgd.
NL 25
Page 26
0
150
180
210
230
250
0
°C
70
100
120
150
180
210
230
250
INSTALLATIE
Plaatsing
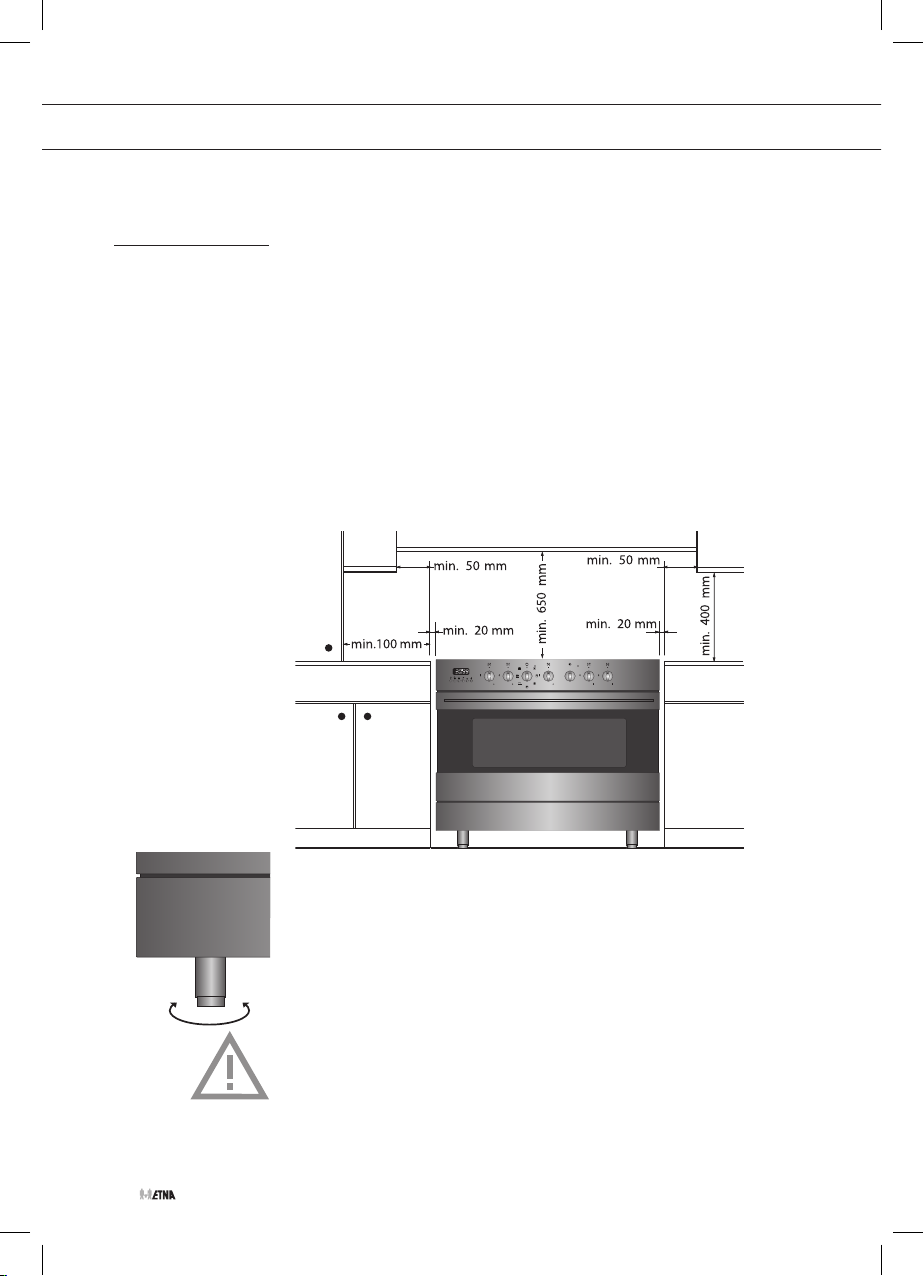
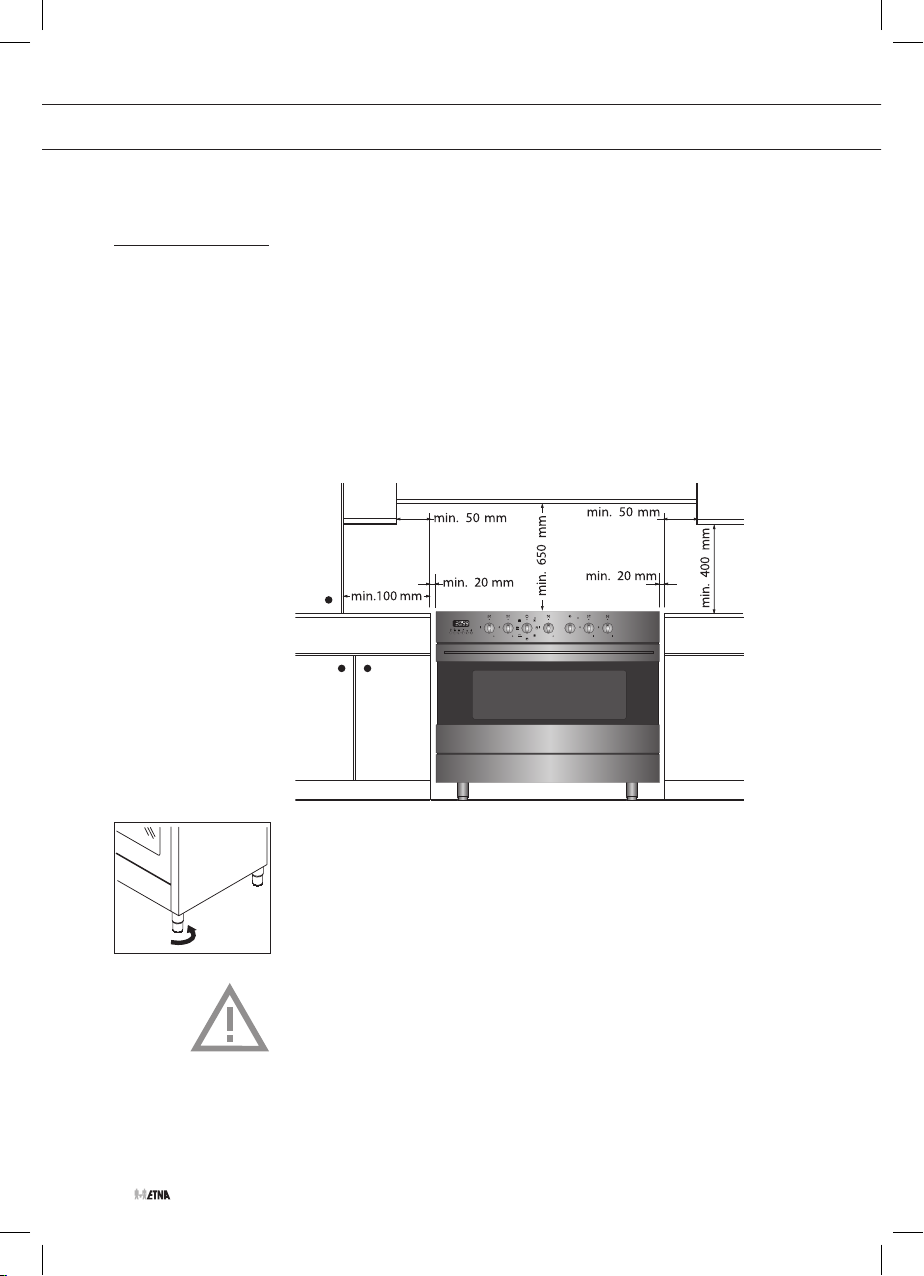
• Wanneer het fornuis wordt geplaatst naast een hoge kast of een
andere wand van brandbaar materiaal, houd dan minimaal 50 mm
afstand tussen het fornuis en deze wanden.
• Houd ook een afstand van minimaal 650 mm aan tussen de
kookplaat en een eventueel boven de kookplaat geplaatste
afzuigkap.
• Als het fornuis in een keukenmeubel wordt geplaatst moet de
minimale ruimte worden aangehouden.
• Als het fornuis vast tussen keukenkastjes wordt ingebouwd dan
moet de bekleding van het meubel bestand zijn tegen temperaturen
van minimaal 90 °C.
NL 26
0
°C
70
250
100
230
120
210
150
180
Waterpas stellen
Met de stelvoetjes is het fornuis in hoogte verstelbaar.
Wilt u het fornuis op een verhoging plaatsen, zorg er dan voor dat deze
hier niet vanaf kan glijden.
Let op!
Controleer na installatie van het toestel of de branders goed werken.
Het vlambeeld moet regelmatig en stabiel zijn in volstand, terwijl de
branders niet mogen uitgaan in kleinstand.
Page 27
TECHNISCHE GEGEVENS
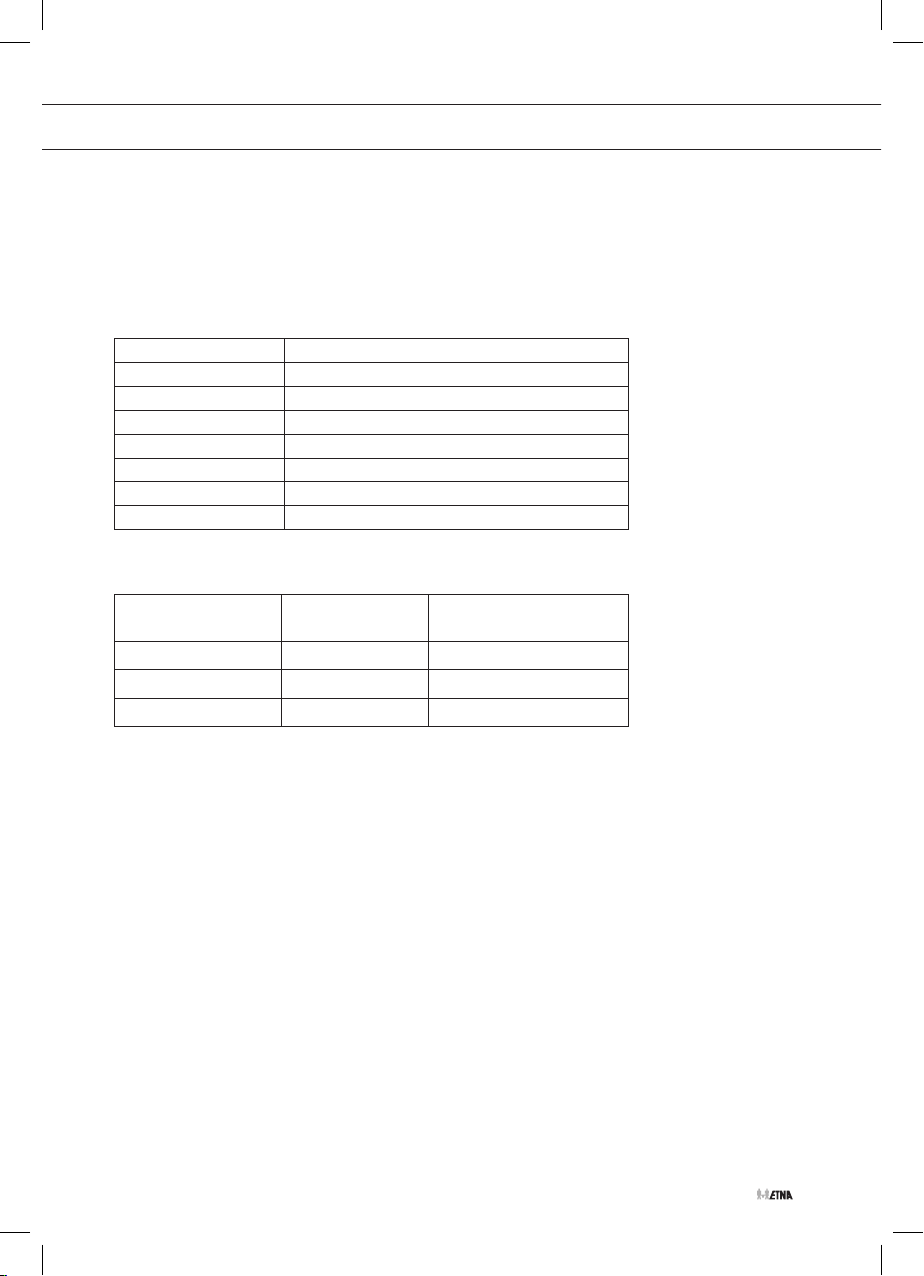
Op het gegevensplaatje aan de onderzijde van het toestel worden de totale
aansluitwaarde, de vereiste spanning en de frequentie aangegeven.
Dit toestel voldoet aan alle relevante CE richtlijnen.
Aansluiting 230V - 50Hz
Vermogen 2,85 kW
Buitenmaten (mm)
Breedte 900
Hoogte 850-950
Diepte 590 / 1000 met open deur
Volume 114 liter
Gastechnische gegevens
Brander Gas
Werkings druk
mbar
Sterk (2,8 kW) G25.3 25
Sudder (1 kW) G25.3 25
Wok (4 kW) G25.3 25
NL 27
Page 28
TECHNISCHE GEGEVENS
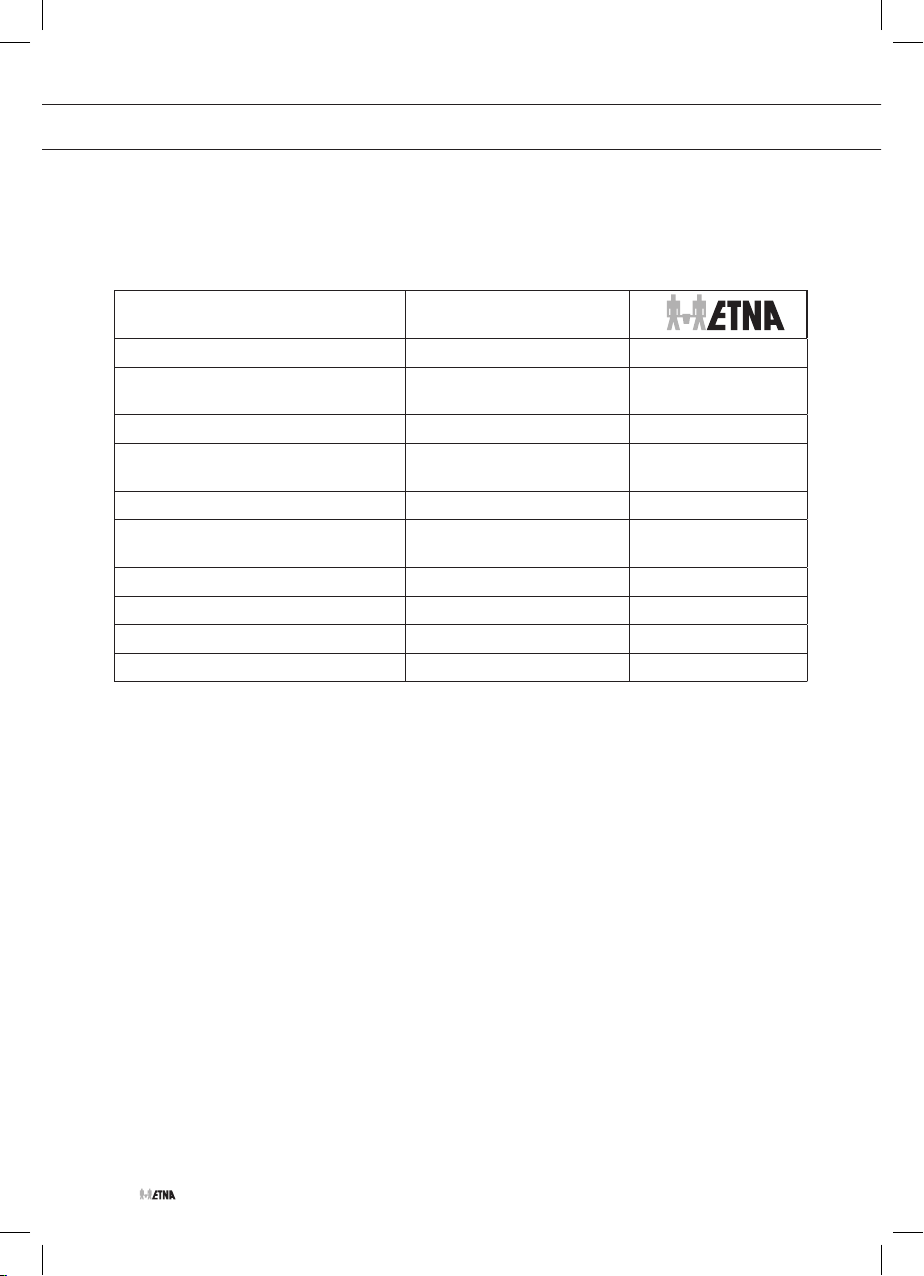
Informatie volgens verordening (EU) 66/2014
Metingen volgens EN60350-2
Merk
Model
Type oven
Massa
Kg 81,2
Energie-efficiëntie-index - per
ovenruimte
Energieklasse
Energieverbruik (elektriciteit) -
kWh/cyclus 1,33
conventioneel
Energieverbruik (elektriciteit) - hete lucht
kWh/cyclus 0,89
Aantal ovenruimten
Warmtebron
Volume
Tips voor energiebesparing voor de oven
• Bereid de gerechten indien mogelijk tegelijk.
• Houd de voorverwarmingstijd kort.
• Verleng de bereidingstijd niet.
• Vergeet niet de oven uit te zetten na afloop van een bereiding.
• Open de oven niet tijdens de bereidingsperiode.
FG890ZT
Elektrisch
87,5
A
1
Elektrisch
114
NL 28
Page 29
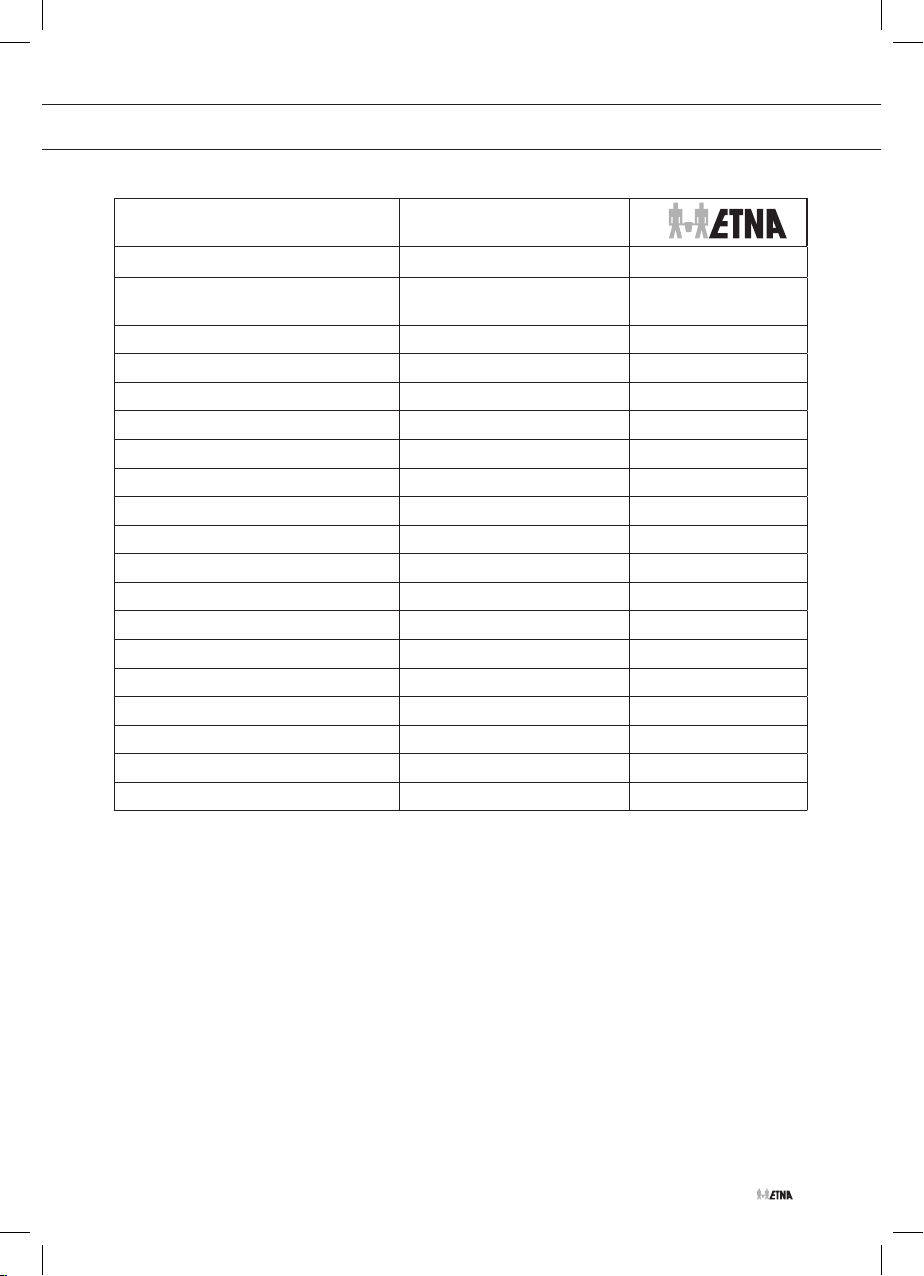
TECHNISCHE GEGEVENS
Merk
Model
Type kookplaat Gas
Aantal kookzones 5
Verwarmingstechnologie-1 Gas
Maat-1 / Gas rechtsachter cm Sudder
Energie-efficiëntie-1 % N.v.t.
Verwarmingstechnologie-2 Gas
Maat-2 / Gas rechtsvoor cm Sterk
Energie-efficiëntie-2 % 55,4
Verwarmingstechnologie-3 Gas
Maat-3 / Gas midden cm Wo k
Energie-efficiëntie-3 % 55,5
Verwarmingstechnologie-4 Gas
Maat-4 / Gas linksvoor cm Wo k
Energie-efficiëntie-4 % 56
Verwarmingstechnologie-5 Gas
Maat-5 / Gas linksachter cm Sterk
Energie-efficiëntie-5 % 55,4
Energie-efficiëntie kookplaat % 55,6
FG890ZT
Tips voor energiebesparing voor de kookplaat
• Gebruik kookgerei met een vlakke bodem.
• Gebruik kookgerei met de juiste maat.
• Gebruik kookgerei met een deksel.
• Beperk de hoeveelheid vloeistof of vet.
• Wanneer de vloeistof begint te koken, verlaagt u de stand.
NL 29
Page 30
MILIEUASPECTEN
Verpakking en toestel afvoeren
Bij de vervaardiging van dit toestel is gebruik gemaakt van duurzame
materialen. Dit toestel moet aan het eind van zijn levenscyclus op
verantwoorde wijze worden afgevoerd. De overheid kan u hieromtrent
informatie verschaffen.
De verpakking van het toestel is recyclebaar. Gebruikt kunnen zijn:
• karton;
• polyethyleenfolie (PE);
• CFK-vrij polystyreen (PS-hardschuim).
Deze materialen op verantwoorde wijze en conform de overheids-
bepalingen afvoeren.
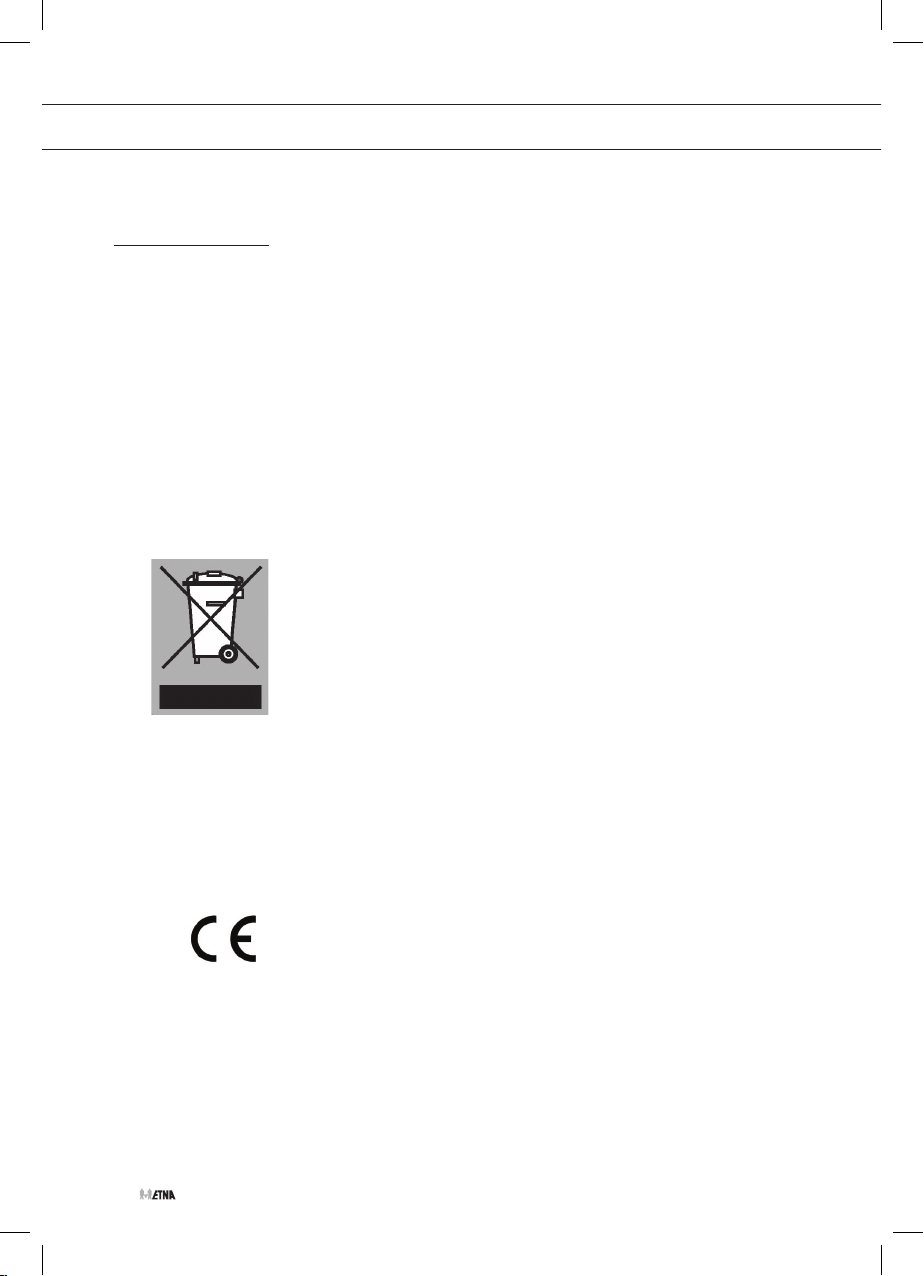
Om op de verplichting tot gescheiden verwerking van elektrische
huishoudelijke apparatuur te wijzen, is op het product het symbool
van een doorgekruiste vuilnisbak aangebracht. Dit betekent dat het
apparaat aan het einde van zijn levensduur niet bij het gewone huisvuil
mag worden gevoegd. Het toestel moet naar een speciaal centrum voor
gescheiden afvalinzameling van de gemeente worden gebracht of naar
een verkooppunt dat deze service verschaft.
NL 30
Het apart verwerken van huishoudelijke apparaten voorkomt mogelijk
negatieve gevolgen voor het milieu en de gezondheid die door een
ongeschikte verwerking ontstaat. Het zorgt ervoor dat de materialen
waaruit het apparaat bestaat, teruggewonnen kunnen worden om een
aanmerkelijke besparing van energie en grondstoffen te verkrijgen.
Conformiteitsverklaring
Wij verklaren dat onze producten voldoen aan de van toepassing zijnde
Europese Richtlijnen, Besluiten en Verordeningen en de eisen die zijn
vermeld in de normen waar naar wordt verwezen.
Page 31

CONTENTS
Your cooker
Introduction 4
Description 5
Control panel 6
Before first use
Using the oven 7
Cooking and baking tips 7
Decorative cover 9
Using the gas hob 9
Operating the oven
Setting the clock 10
Operating the oven 10
Oven functions 11
Operating the oven with timer 12
Kitchen timer 14
Operating the gas hob
Ignition and adjustment 15
Comfortable cooking
Optimal use of the hob 16
Wok burner 16
Maintenance
Cleaning the oven 17
Remving the oven door 19
Replacing the oven lamp 20
Cleaning the gas hob 21
Faults
Fault table 22
Installation
General 24
Gas connection 25
Electrical connection 25
Installation 26
Technical data
27
Environmental aspects
Disposal of packaging and appliance 30
EN 3
Page 32

YOUR COOKER
Introduction
You have chosen an Etna cooker. Optimum user comfort and easy
operation were paramount during the development of this product.
The wide range of programming options makes it possible to choose
your preparation method precisely.
The gas hob has been designed for people who love to cook. The many
different burner capacities ensure that you can prepare every dish. The
integrated spark ignition allows you to ignite and operate the burners
with one hand. The gas hob is also fitted with a flame safeguard that
will shut off the gas supply if the flame goes out while cooking.
The oven functions are grouped logically under the function knob.
The oven is also fitted with a timer. The timer switches off the oven
when the cooking time has elapsed. Efficient and no fuss.
This manual describes how you can make the best possible use of the
cooker. In addition to information about operation, you will also find
background information that may help you in using this product.
EN 4
Before using the appliance for the first time
please read the separate safety instructions!
Read the manual thoroughly before using the appliance, and store
the instructions in a safe place for future reference.
The manual also serves as reference material for service technicians.
The appliance identification card contains all the information that the
service technician will need in order to respond appropriately to your
questions.
Happy cooking!
Page 33
YOUR COOKER
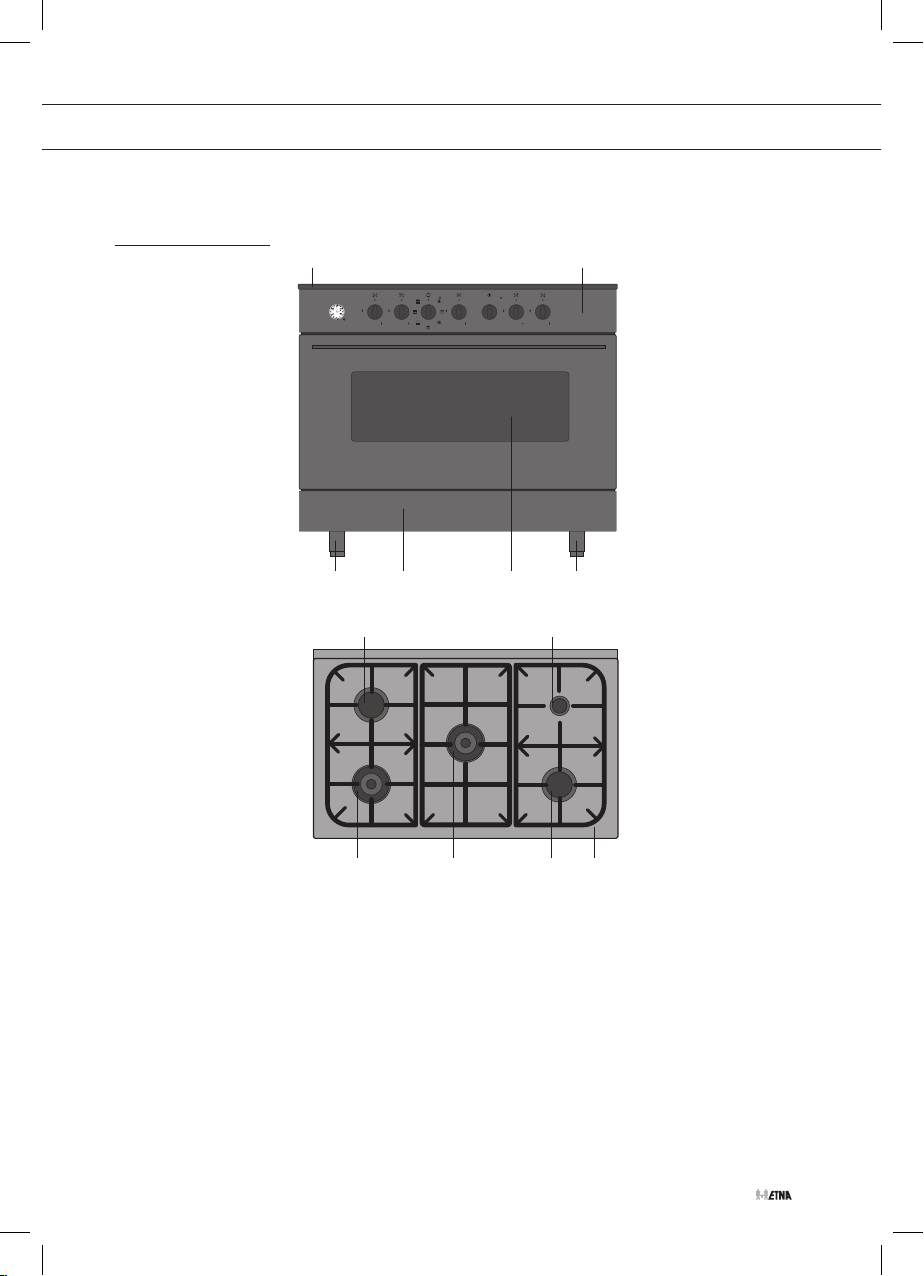
Description
1 2
0
°C
70
250
100
230
120
210
150
180
6 7
44 5 3
8 9 10 11
1. Glass cover
2. Control panel
3. Oven
4. Levellers
5. Flap storage space
6. Rapid burner
7. Simmer burner
8. Wok burner
9. Wok burner
10. Rapid burner
11. Pan support
EN 5
Page 34
YOUR COOKER
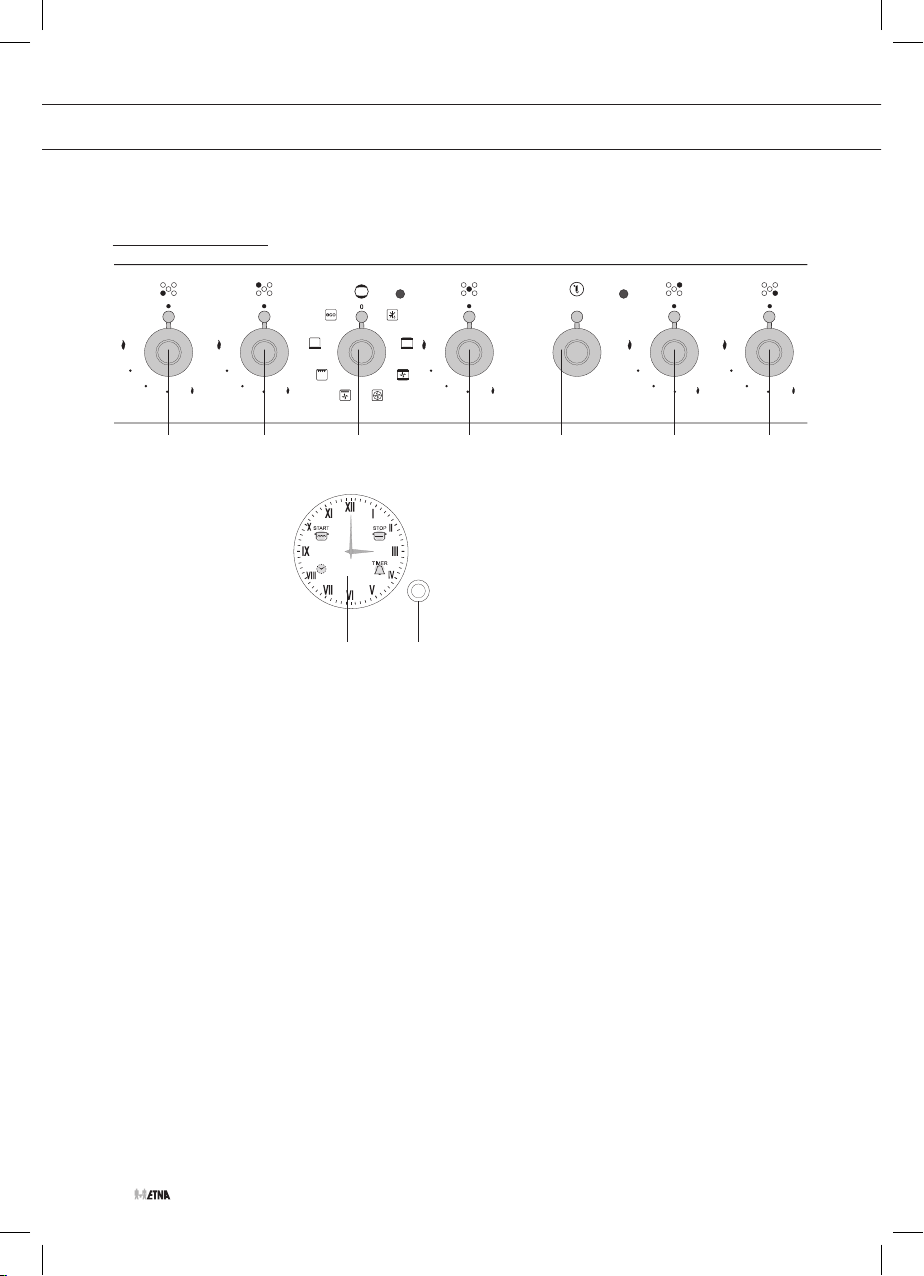
Control panel
0
°C
250
230
210
1 2 3 4 5 6 7
8 8a
1. Control knob wok burner front left
2. Control knob rapid burner rear left
3. Oven function knob
4. Control knob wok burner centre
5. Oven temperature knob
6. Control knob simmer burner rear right
7. Control knob rapid burner front right
8. Timer
8a. Timer setting dial
70
100
120
150
180
EN 6
Page 35

BEFORE FIRST USE
Using the oven
• Remove all accessories from inside the oven and clean them with
warm soapy water. Do not use any abrasive cleaning materials.
• Set the oven at its highest setting for one hour with top and
bottom heat. This will remove any protective grease used during
manufacture.
• When heating the oven for the first time you will notice a ‘new-
oven smell’. Don’t worry, this is normal. If necessary, switch on the
cooker hood.
• After letting it cool down, clean the oven with warm water.
• Only preheat the oven if it is required in the recipe or in the tables
of this manual.
Cooking and baking tips
Energy-conscious use of the oven
• Open the oven door as little as possible.
• Prepare dishes with the same cooking temperature (e.g. an apple
pie and an oven dish) on the same grid at the same time, or above
each other using the hot air function. You can also let meat stew at
the same time.
• Prepare more meals consecutively, for example an oven meal after
a cake. Often, the preparation time of the second dish will be
10 minutes shorter because the oven is still hot.
• Because the oven is insulated, the residual heat from the oven will
continue to cook dishes with longer cooking times (from 1 hour).
Turn the oven off 10 minutes earlier than indicated, but leave the
door closed.
• Preheating is generally not necessary, with the exception of dishes
with cooking times of less than 30 minutes, or when indicated by
a recipe.
• Remove everything you don’t need for the dish from the oven.
• Turn the oven off before taking out the cooked dish.
Ovenware
• In principle, you can use any type of heat-resistant ovenware.
• Do not rinse glass ovenware with cold water immediately after use.
The sudden temperature difference can cause the glass to crack.
• Use black or dark baking tins. These conduct heat better and allow
the food to cook more evenly.
EN 7
Page 36

BEFORE FIRST USE
Do not cover the oven floor
• Covering the oven bottom with, for example, aluminium foil or a
baking tray can lead to overheating and damage to the enamel.
• It is possible to prevent springforms from leaking onto the oven
floor by folding a container out of aluminium foil and placing it on
the grid under the form or by laying baking paper under it.
Time setting
• Choose a 5 minute shorter cooking time than indicated in the recipe.
This will allow you to check whether your food or cake is cooked
through and golden brown at the last moment. If not, close the oven
door and check again after some time. Open and close the door
slowly. Preferably not before three quarters of the cooking time has
elapsed.
Keeping food warm
• You can use the oven to keep already-prepared dishes warm.
To do so, select the hot air setting and a temperature of 75°C.
Cover dishes you want to keep warm to prevent them from
drying out.
EN 8
Roasting meat
• Large pieces of meat, from 1 kg, are the most suitable. The meat will
get a regularly shaped, crispy crust, with virtually no weight loss.
• Rub the meat with salt and spices fifteen minutes beforehand. Use
80 to 100 g of butter or fat (or a mixture of the two) per 500 g of meat
for roasting.
Cooking times
• Flat, thin pieces require approximately 5 minutes less cooking time
than thick or rolled pieces of meat. When cooking larger pieces of
meat, cook for 15 to 20 minutes longer per 500 grams extra.
• Put the meat in a roasting pan and douse in hot butter or fat. Place
the meat in the roasting pan with the fatty side facing up. Make sure
to baste meat without a fatty side every 15 minutes. Meat with a fatty
side should be basted every 30 minutes.
Page 37

BEFORE FIRST USE
• If the gravy is too dark, add a few spoonfuls of water now and then
during roasting.
• Cover the meat loosely with foil and let it stand for 10 minutes
before serving.
Oven runners
• The oven walls are fitted with runners so that the oven grid or
baking sheet can be placed at different levels. For the correct level,
consult a baking guide or food packaging instructions.
Decorative cover
• Always raise the decorative cover when using the hob. Before lifting
the decorative cover, you should make sure it is dry.
• The decorative cover can break through heating. Ensure that all
burners / cooking zones are switched off and cooled down before
closing the decorative cover.
• If there is water on the decorative cover, dry it before opening.
If you fail to do so, moisture may enter the unit.
• Do not use the decorative cover as a cooking surface.
Using the gas hob
• Regularly check that the burner caps and burner rings are correctly
positioned on the burner bases. Incorrect positioning can result in
poor ignition, poor combustion or damage to the caps.
• Over time, the enamel on the support point can become burnt-in
because the pan support is heated very strongly by the burner.
This is unavoidable and is therefore not covered by the guarantee.
EN 9
Page 38
OPERATING THE OVEN
180
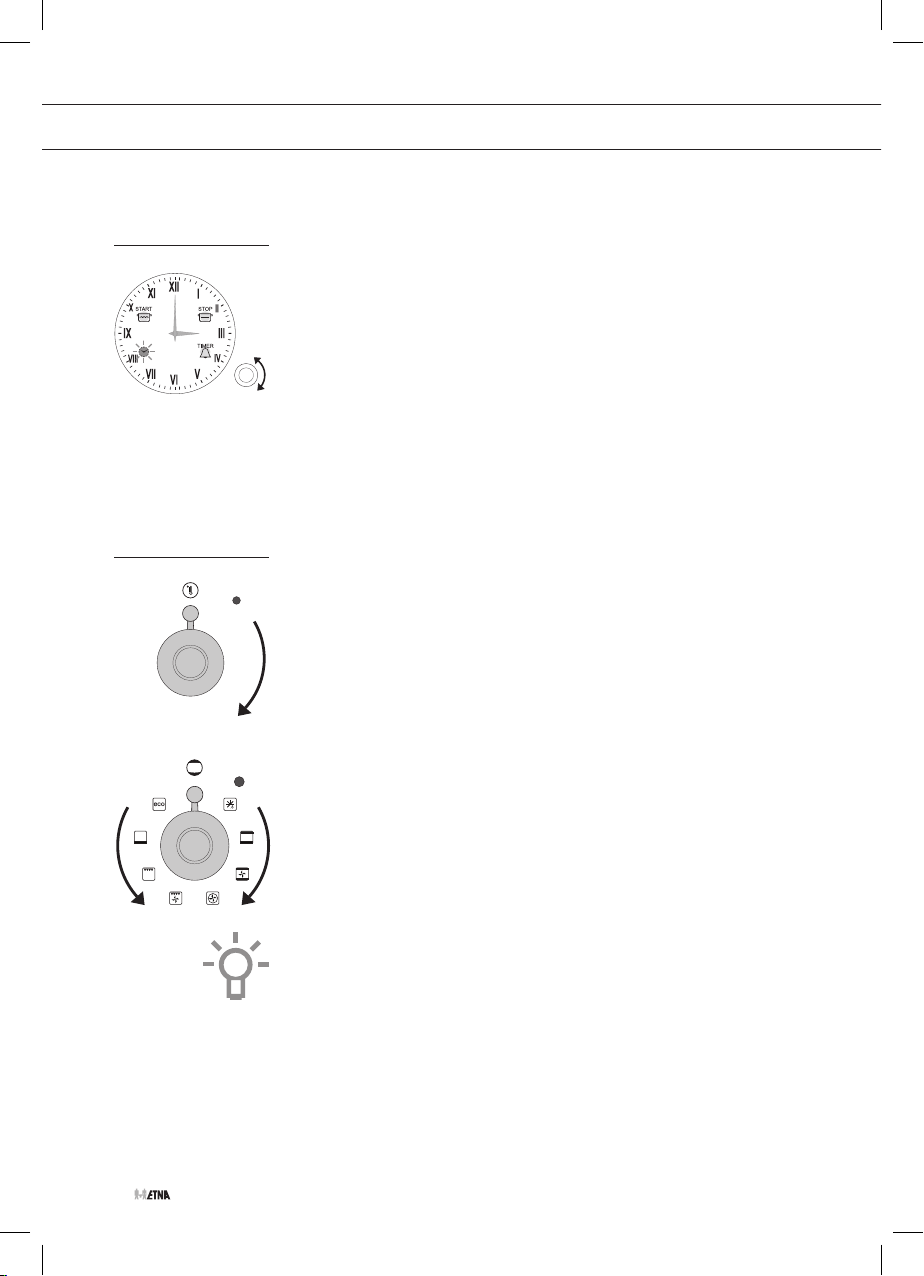
Setting the clock
The correct current time of day needs to be set when connecting the
unit for the first time. The clock indicator lamp flashes.
1. Press the timer setting dial once.
The clock indicator lamp goes out.
2. Now press the setting dial four times.
The clock indicator lamp flashes again.
3. Turn the setting dial right or left to set the hands to the correct position.
4. Press the setting dial again.
The current time has been set; the indicator lamp will go out.
▷ If you don’t press the setting dial after setting the time, the indicator
lamp will go out automatically after 10 seconds.
Operating the oven
1. Set the oven to ‘manual operation’.
▷ If no indicator lamp is on, the oven is set to manual operation.
°C
250
230
210
70
100
120
150
If a lamp is on, you first need to cancel the programming.
You can cancel a set programme by pressing the setting dial for
a few seconds until the indicator lamps concerned go out and
you hear a second audible signal.
2. Select a temperature with the temperature knob and an oven function
with the function knob.
The red function indicator light and the orange temperature indicator
light will light up; the oven is switched on.
▷ See the ‘oven functions’ table for more information on the various
oven functions that are available.
3. After the cooking time has elapsed, turn the temperature knob and
the function knob to ‘0’ to switch the oven off.
EN 10
Please note: If the oven doesn’t work, it is possible that the timer is
programmed. Cancel the programme by pressing the timer switch
setting dial for a few seconds! The indicator lamp goes out and an
audible signal sounds.
Page 39
OPERATING THE OVEN
0
°C
0
°C
70
250
0
°C
0
°C
70
100
120
230
250
0
°C
70
100
120
150
180
210
230
250
0
°C
70
250
0
°C
70
100
120
230
250
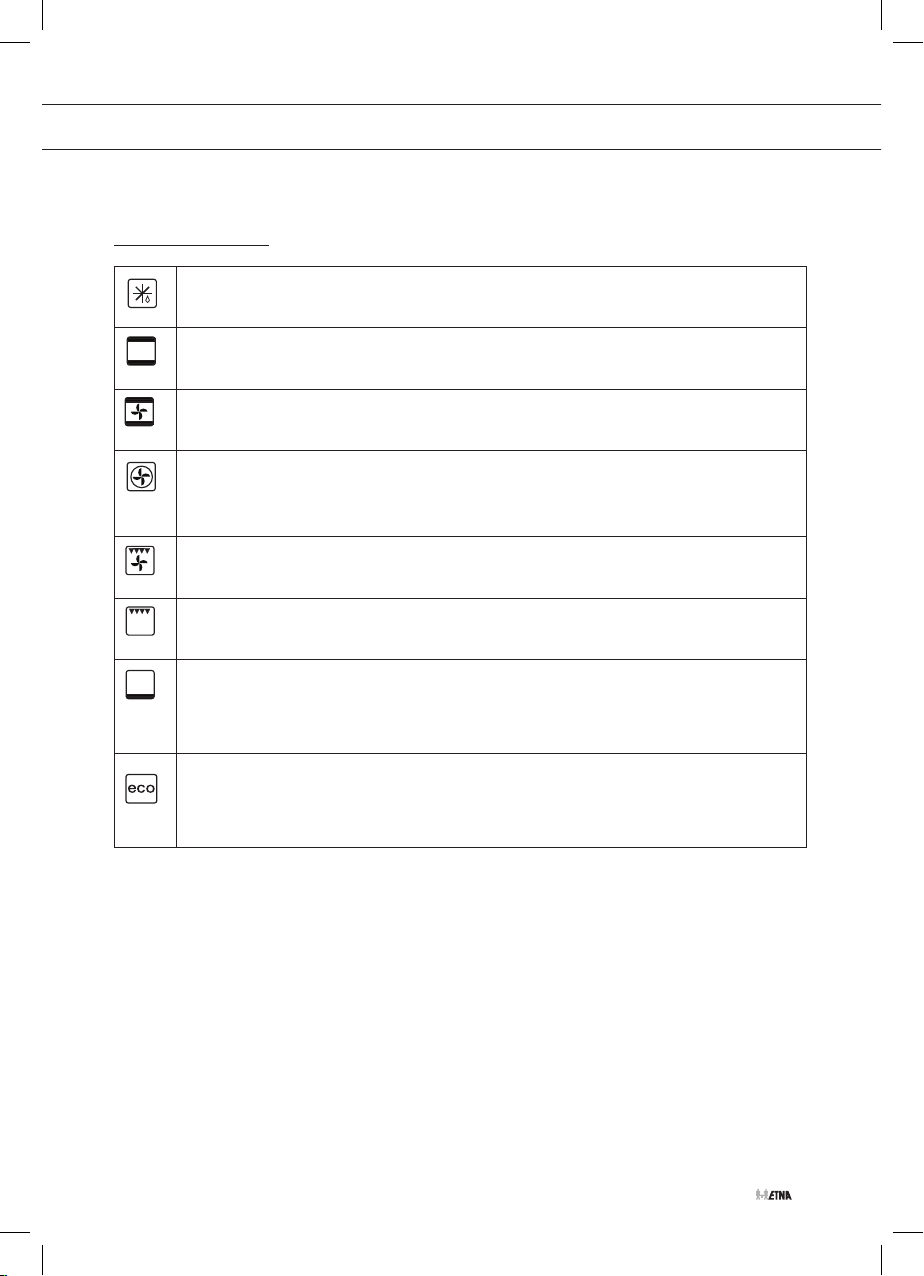
Oven functions
Oven light/defrosting
The oven light switches on, the red indicator light comes on and the fan starts.The air circulates in
the oven without activating the heating element. This method is used for slowly defrosting food.
Top and bottom heat (conventional)
The heating elements at the top and bottom of the oven radiate even heat. There is only one setting
for baking pastries or roasting meat.
Hot air circulation
The fan at the rear of the oven ensures a continuous circulation of hot air around the meat or pastry.
This function is especially suitable for roasting meat and baking cakes on multiple levels.
Hot Air
The fan in the back wall distributes the hot air in the oven. This heats the dishes. You
can bake on multiple levels simultaneously, which will save energy. The convection
fan system is excellent for baking cakes, cookies and apple pies.
Fan with grill
You can grill with the fan running. The radiant heat is distributed around the dish by the fan.
Grill
The grill element at the top of the oven gives off heat. Grilling is especially suitable for cooking small
pieces of meat such as steaks, sausages, schnitzels, chops etc.
Bottom heat
This mode is recommended for dishes where the bottom should be well cooked. The bottoms of
dishes are cooked well.Before you are finished baking (with a quarter of the baking time to go),
switch the function knob to ‘bottom heat’ mode. Adjust the temperature knob to the maximum
setting. The dish will be heated mainly by the bottom element, while continuing to brown on top.
ECO
The ECO function uses software to control the operating time of the heating element. Energy
consumption is reduced by using the residual heat. The ECO function uses a longer cooking time
that other oven functions. This function is suitable for, among other things, the preparation of
meat.
EN 11
Page 40

OPERATING THE OVEN
Operating the oven with the timer
The timer can be used in different ways:
• You can set the end time of your baking/roasting/grilling. The oven
starts immediately. As soon as the set time has elapsed, the oven
will switch off automatically and an alarm will sound.
• You can also use the timer to enter a start or end time
(for an automatic baking process). The oven will start and stop
automatically. As soon as the automatic baking process has ended,
the oven will switch off automatically and an alarm will sound.
• The timer can also be used as a kitchen timer. The kitchen timer will
not switch off the oven.
Programming the end time
1. Press the setting dial twice.
The ‘stop’ indicator lamp will flash.
2. Turn the setting dial right or left to set the end time.
3. Press the setting dial again.
The end time has been set; the ‘stop’ indicator lamp lights up.
4. Select a temperature with the temperature knob and an oven function
with the function knob.
The red function indicator light and the orange temperature indicator
light will light up; the oven is switched on.
▷ When the set time has elapsed, the alarm will sound and the
indicator lamp will flash. Press the setting dial to switch off the
alarm and indicator lamp.
▷ If you don’t do anything, the alarm will switch off automatically
after 1 minute. The indicator lamp will stay flashing until you
have pressed the setting dial.
5. After the cooking time has elapsed, turn the temperature knob and
the function knob to ‘0’ to also switch off the oven indicator lights.
EN 12
Page 41
OPERATING THE OVEN
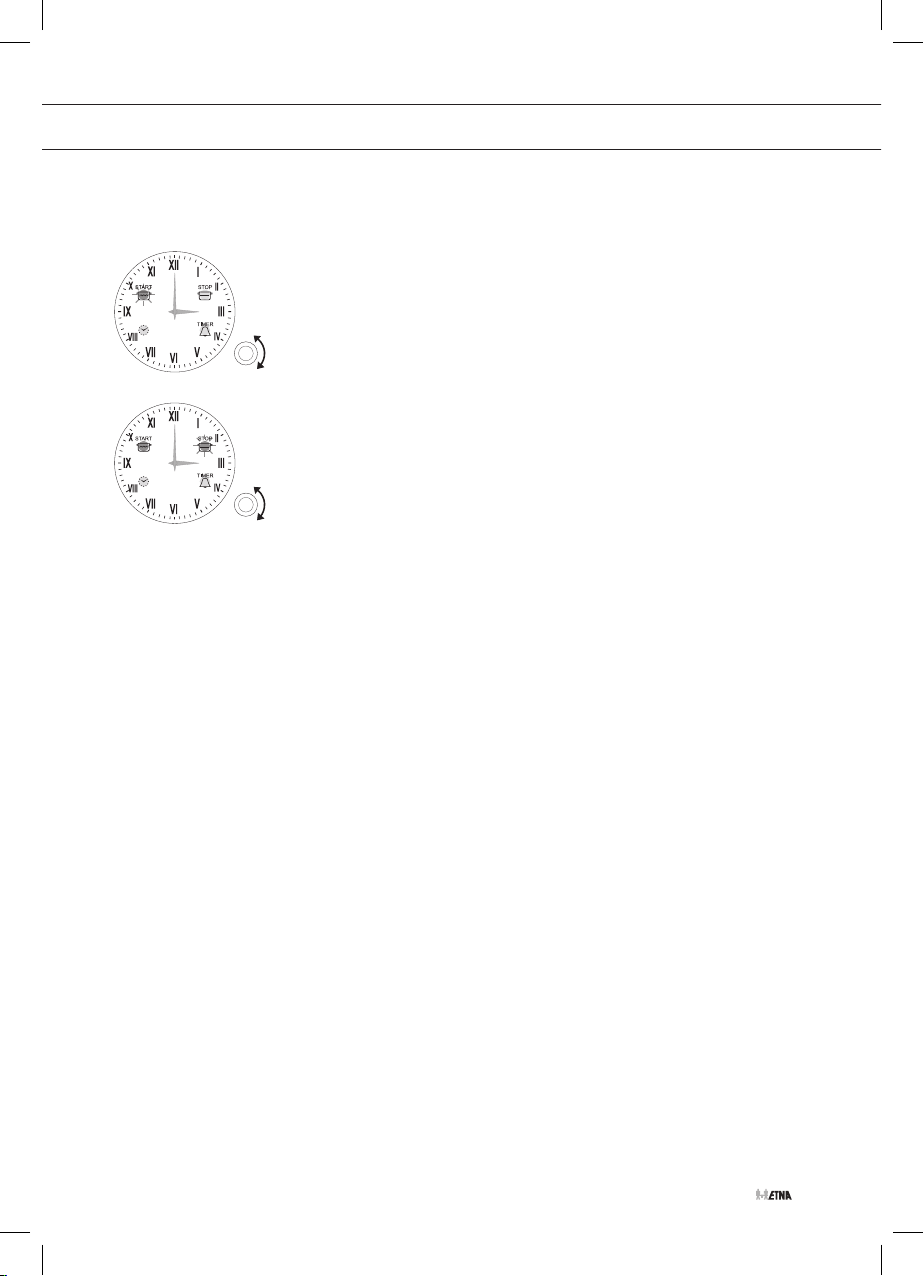
Programming the start and end time
1. Press the setting dial once.
The ‘start’ indicator lamp will flash.
2. Turn the setting dial right or left to set the start time.
3. Press the setting dial again.
The start time has been set; the ‘start’ indicator lamp lights up and
the ‘stop’ indicator lamp flashes.
4. Turn the setting dial right or left to set the end time.
5. Press the setting dial again.
The end time has been set; the ‘stop’ indicator lamp lights up.
6. Select a temperature with the temperature knob and an oven function
with the function knob.
The red function indicator light and the orange temperature
indicator light will light up; the oven switches on when the start time
has been reached.
▷ When the set time has elapsed, the alarm will sound and the
indicator lamps will flash. Press the setting dial to switch off the
alarm and indicator lamps.
▷ If you don’t do anything, the alarm will switch off automatically
after 1 minute. The indicator lamps will stay flashing until you
have pressed the setting dial.
7. After the cooking time has elapsed, turn the temperature knob and
the function knob to ‘0’ to also switch off the oven indicator lights.
EN 13
Page 42

OPERATING THE OVEN
Kitchen timer
The audible signal of the kitchen timer will only sound after the expiry
of the set time. The kitchen timer will not switch off the oven.
1. Press the setting dial three times.
The clock indicator of the kitchen timer (T) flashes.
2. Turn the setting dial right or left to set the time when the alarm
should sound.
3. Press the setting dial again.
The kitchen timer is set; the kitchen timer indicator (T) lights up.
▷ When the set time has elapsed, the alarm will sound and the
kitchen timer indicator lamp will flash. Press the setting dial to
switch off the alarm and indicator lamp.
▷ If you don’t do anything, the alarm will switch off automatically
after 1 minute. The indicator lamp will stay flashing until you
have pressed the setting dial.
Display a set programme
You can display a set programme by pressing the setting dial quickly.
The hands alter to the set time and the accompanying indicator lamp
flashes. The hands then return automatically to the current time and the
set programme continues.
EN 14
Turning off the oven in between uses
1. Press the setting dial for a few seconds until the current programme
indicator lamps go out and you hear a second sound signal.
2. Turn the function knob and temperature knob to ‘0’.
The indicator lamps go out and the appliance switches off.
Cancelling a set programme
You can cancel a set program by pressing the setting dial for a few
seconds until the corresponding indicator lights go out and you hear a
sound signal.
Page 43
OPERATING THE GAS HOB
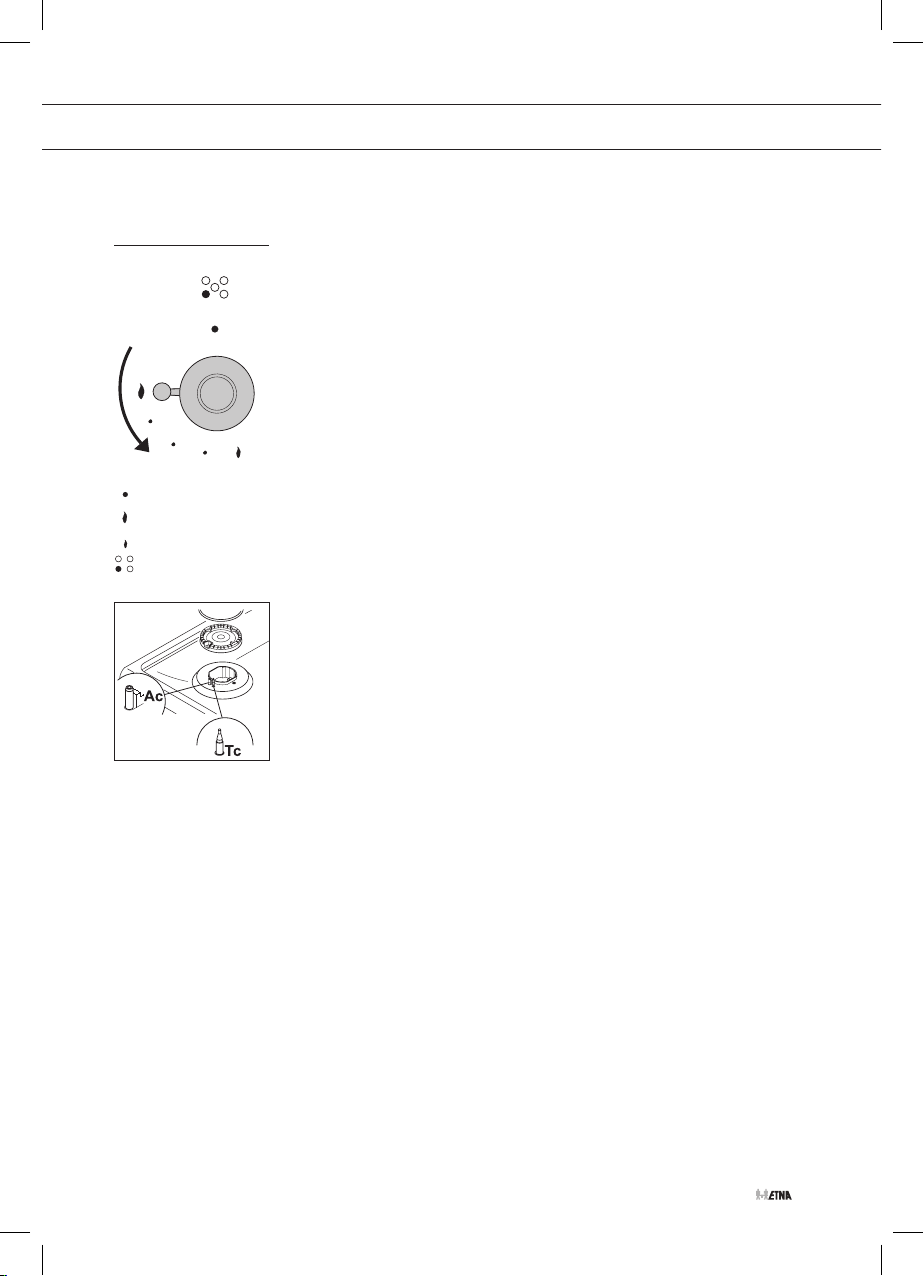
Ignition and adjustment
A symbol next to the control knob indicates which burner is being
operated. Each burner is fully adjustable between high and low settings.
Spark ignition
Push in the control knob and turn it to the left to the high setting.
The burner will ignite.
▷ The control knob should be pushed in and held for about
10 seconds because of the flame safeguard.
0 position
High setting
Low setting
Burner zone
Flame safeguard
Your gas hob has a flame failure device (Tc). This ensures that the gas
supply is shut off if the flame goes out during cooking.
If the burner fails to ignite or doesn’t stay on, check that:
• the burner cap and burner ring are seated correctly in the burner
housing;
• the burner/spark plug (Aa) and thermocouple (Tc) are clean and dry.
EN 15
Page 44
COMFORTABLE COOKING
Optimal use of the hob
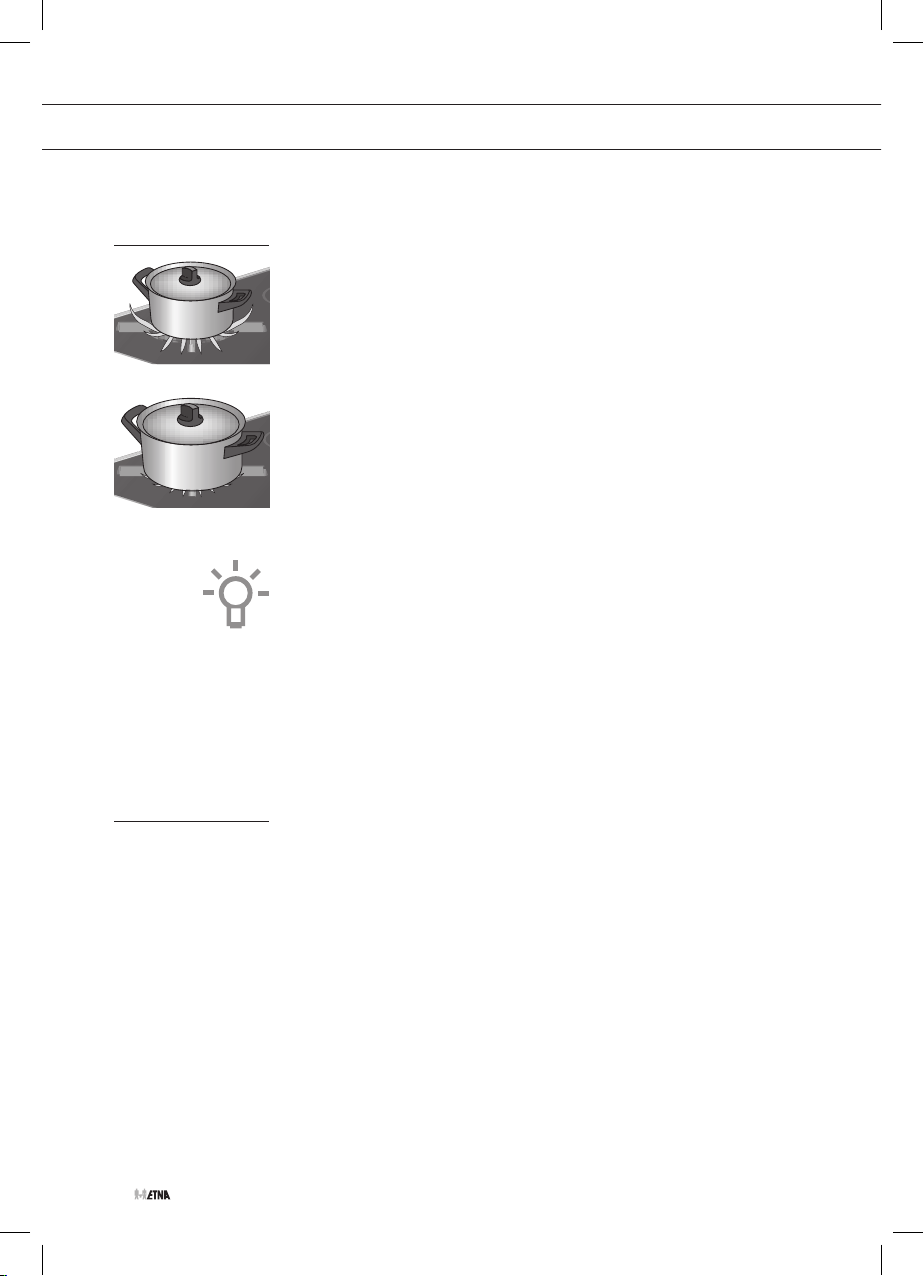
Always ensure that the flames remain under the pan. A lot of energy is
lost when flames burn around the outside of the pan. The handles will
also become too hot. Do not use pans with a base diameter smaller
than 12 cm. Smaller pans will not be stable.
Wrong
Right
• When frying, stir-frying, cooking through large quantities, or deep-
frying, it is best to use the rapid or wok burner.
• Preparing sauces, simmering and boiling can be done best on the
simmer burner. On its high setting this burner is large enough for
cooking food right through.
• Cook with the lid on the pan. This way you save up to 50% energy.
• Use pans with a flat, clean, dry base. Pans with a flat base stand
stably and pans with a clean base transfer the heat more effectively
to the food.
Wok burner
EN 16
With the wok burner you can prepare dishes at a very high temperature.
For this purpose it is important:
• to cut the ingredients into strips, slices or pieces before cooking.
• to use good-quality oil, such as olive, maize, sunflower or peanut
oil when stir-frying. A small quantity is enough. Butter and margarine
on the other hand will burn because of the high heat.
• place the dishes with the longest cooking time in the pan first, so
that at the end of the cooking time all ingredients are cooked al
dente at the same time.
Page 45

MAINTENANCE
Cleaning the oven
Warning!
Disconnect the appliance from the power supply before carrying out
any repairs or cleaning. Preferably unplug the appliance, switch off the
fuses, or set the switch in the meter cupboard to zero.
Do not use steam cleaners or high-pressure steam cleaners to
clean the appliance.
Front of the unit
Clean the surface with a liquid, non-abrasive cleaner for smooth surfaces
and a soft cloth. Apply the cleaning product to the cloth and wipe away
the dirt; then rinse with water. Do not apply the cleaning product directly
onto the surface. Do not use harsh or abrasive detergents, sharp objects
or steel wool, as this can cause scratches on the unit.
Aluminium surfaces
Aluminium surfaces should be cleaned with non-abrasive, liquid cleaning
products designed for such materials. Apply the cleaning product to a
damp cloth and wipe the surface clean; then rinse the surface with water.
Do not apply the cleaning product directly onto the aluminium surface.
Do not use abrasive detergents or scourers. The surface must not come
into contact with oven sprays.
Stainless steel front panels
Clean the surface with a mild detergent (soapsuds) and a soft sponge
that does not scratch the surface. Do not use abrasive or solvent-based
detergents. If you do not follow these instructions the casing may
become damaged.
Varnished and plastic surfaces
Clean the knobs/buttons and door handle with a soft cloth and liquid
cleaning agent suitable for cleaning smooth, varnished surfaces. You can
also use cleaning agents specifically designed for this type of surface.
In this case, follow the instructions of the manufacturer.
EN 17
Page 46

MAINTENANCE
Enamelled parts
The inside of the oven door, the entire oven interior and the baking tray
and griddle are entirely enamelled. They can be cleaned best with warm
soapy water.
Exterior
Clean the oven exterior with warm soapy water or liquid soap.
Rinse with clean water.
Glass
Clean the glass panel with soapy water or Glassex.
Oven
• The oven can be cleaned in the traditional way (with cleaning agents
or oven spray), but only when the oven is very dirty and the stains are
very stubborn.
• The following procedure is recommended for regular cleaning
(after each use):
▷ Set the oven to ‘top and bottom heat’ mode to clean the oven.
Set the temperature knob at 50 °C.
▷ Pour 0.6 litres of water into a baking tin and place it on the
bottom ledge. After half an hour the food residues on the enamel
of the oven will become soft and you can gently wipe them off
with a damp cloth.
EN 18
In the event of stubborn stains, the following should be observed:
The oven should be cooled down before cleaning.
• Clean the oven and the accessories after each use, to prevent the
dirt from burning into the oven.
• The easiest way to remove grease is by using warm soapy water
while the oven is still warm.
• For very stubborn dirt, use conventional oven cleaners. Make sure
to thoroughly rinse the oven afterwards with clean water to remove
any residual cleaning agent.
• Never use aggressive cleaning agents such as steel wool, scouring
pads, stain removers etc.
Page 47
MAINTENANCE
• Varnished, stainless steel, and galvanised surfaces, and aluminium
parts must never come into contact with oven sprays, because this
will damage and discolour them. The same applies to the thermostat
sensor (if the device is equipped with a timer with a sensor), and to
the heating elements that are accessible at the top.
• When purchasing and using cleaning agents, be sure to take account
of the environment and heed the instructions of their manufacturer.
Practical tips
• It is recommended to wrap large pieces of fatty meat in aluminium
foil or put them in a suitable roasting bag to prevent grease from
splashing on the oven walls.
• Put a drip tray under the meat when grilling.
Accessories
Wash any accessories (baking trays, grids, etc.) with warm water and
standard washing-up liquid.
Special enamel coating
The oven, the inside of the door and the baking trays have been
treated with special enamel, which has a smooth and strong surface.
This special coating makes cleaning at room temperature easier.
Removing the oven door
To clean the inside of the oven it is possible to remove the oven door.
EN 19
Page 48

MAINTENANCE
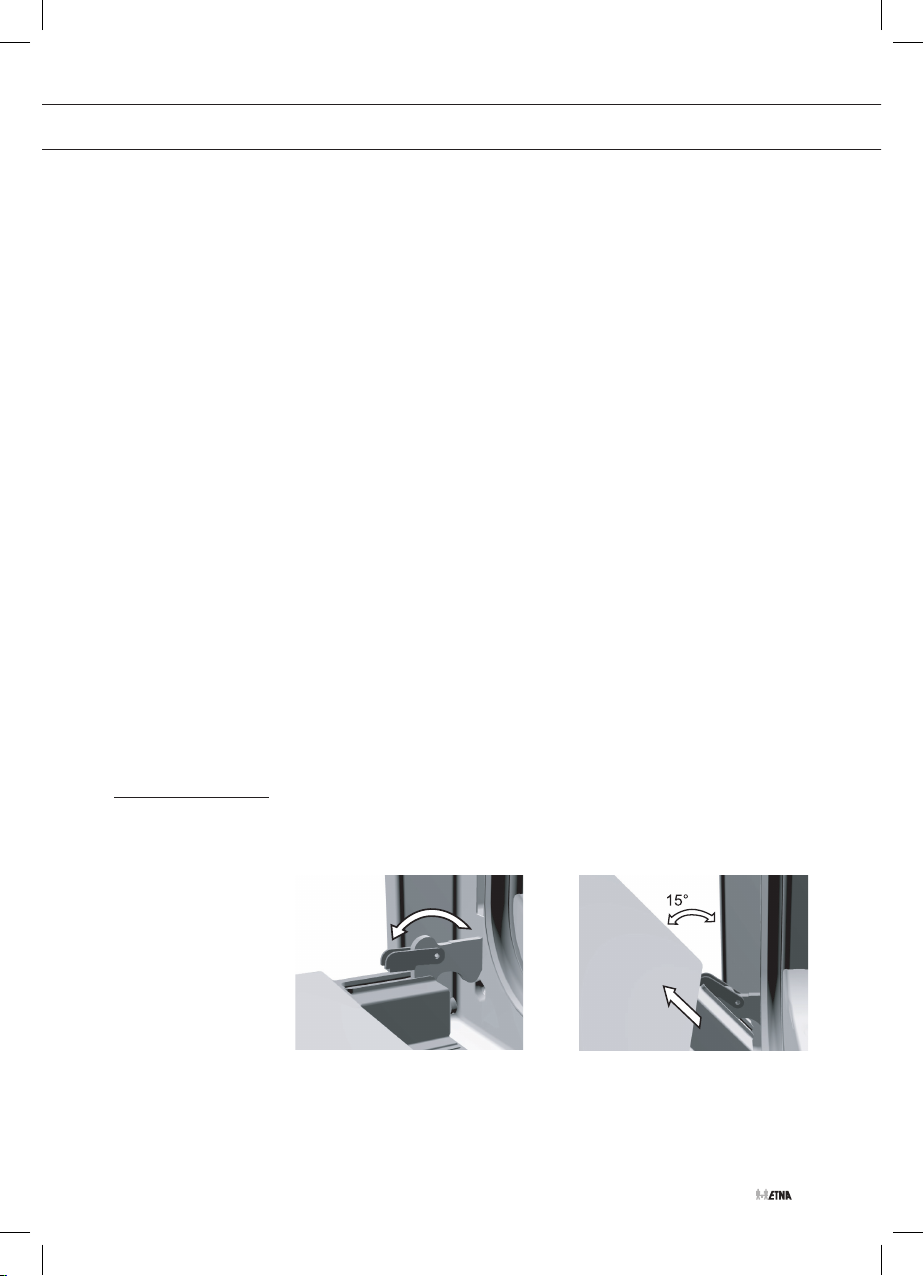
1. Open the oven door fully and turn the pawls back as far
as they will go.
2. Close the door slowly so that the clips are in the flanges (in which
the pawls fit).
3. At approximately 15° (relative to the closed door position) lift the
door slightly upwards and lift it out of both hinge holders.
Use the reverse order to assemble the door.
1. Insert the door at an angle of 15° in the hinges on the front of the
appliance and push the door forwards and downwards so that the
hinges slide into their notches.
Check to be sure the hinge notches are properly in place.
2. Then open the door fully and turn the pawls back to their initial
position.
3. Close the door slowly and check that it closes properly.
If the door does not open or close properly, make sure the hinge
notches are positioned correctly in the hinge holders.
Replacing the oven lamp
Before replacing the oven lamp, switch off the appliance by
removing the plug from the socket or switching off the fuse in the
fuse box.
EN 20
The lamp in this household appliance is only suitable for illumination of
this appliance. The lamp is not suitable for household room illumination.
The lamp is consumable material and is not covered by the guarantee.
1. Unscrew the glass cover (anticlockwise) and replace the oven lamp.
2. Fit a new lamp with the same specifications.
3. Screw the glass cover back on tightly.
Please note: the lamp can be very hot! Use protection when removing
the lamp.
Page 49

MAINTENANCE
Cleaning the gas hob
Your gas hob has been manufactured from high-grade, easy-to-clean
materials.
• Regular cleaning immediately after use prevents food spills from
becoming ingrained and causing stubborn stains that are difficult to
remove. Use a mild cleaning detergent to remove stains. Do not use
too much moisture, as there is a risk that it will penetrate into the
burner or vent holes.
• Clean the control knobs, burners and pan supports first and then
the drip tray. This prevents the drip tray from becoming dirty again
during cleaning.
• The ignition plugs should preferably be cleaned with a cloth. Do this
carefully. Otherwise the spark plug can become defective. The spark
plug will only operate correctly in a dry environment. If the plug is
very dirty, you can clean it with a tiny brush.
• Set the pan supports down vertically, without sliding them over the
drip tray.
• Assemble the burner parts using the guide notches. Pay attention
to the notches for the ignition plug and thermocouple. Make sure
the burner parts are lying flat.
Cleaning the pan supports
Do not clean the pan supports in the dishwasher. The enamel on the pan
supports is suitable for cleaning in the dishwasher, but the connection
with the rubber feet is not. The pan supports might also show some
discolouration if washed in the dishwasher. If the rubber feet are lost,
the pan support is likely to damage the drip tray.
Stubborn stains on enamel (pan supports, burner caps and drip tray)
Stubborn stains can best be removed with a liquid cleaning agent.
Never use scouring powder, scouring pads, sharp objects or aggressive
cleaning products.
Cleaning removable burner components
Burner parts should not be cleaned in the dishwasher. Dishwasher
detergents can corrode burner parts! The removable burner
components (including those of the wok) are best cleaned with a mild
cleaning agent and a soft cloth. For stubborn stains, soak the burner
components in hot soapy water. Never use scouring powder, scouring
pads, sharp objects or aggressive cleaning products.
EN 21
Page 50
FAULTS
Fault table
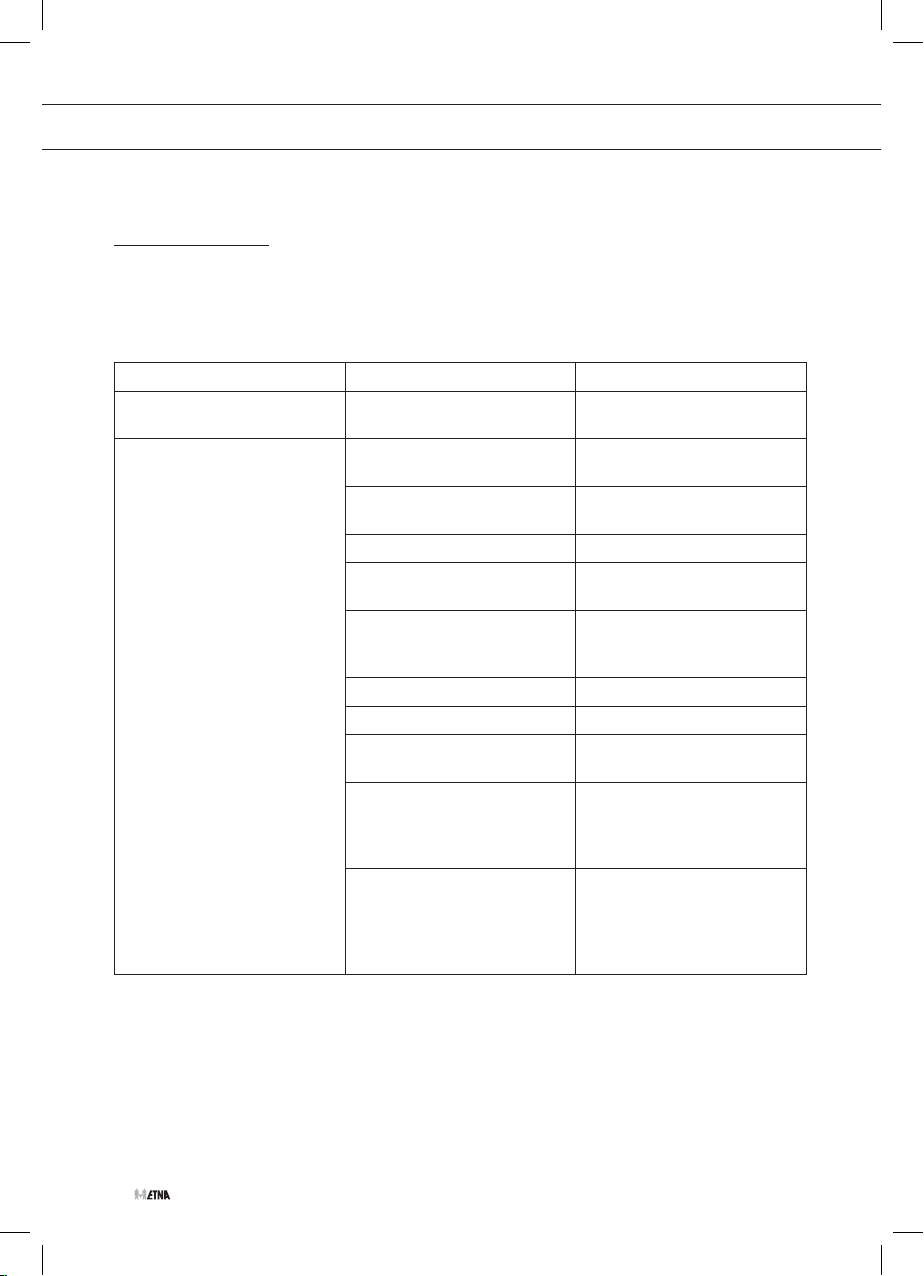
If you are uncertain about whether your appliance is functioning properly,
this does not automatically mean there is a defect. Try to deal with the
problem yourself first by checking the points mentioned below in the
table or visit our website ‘www.etna.nl’ for more information.
Problems with the hob Possible cause Solution
There is a smell of gas in the
vicinity of the appliance.
A burner does not ignite. Plug not in socket. Insert the plug into the wall
The appliance connection is
leaking.
Fuse defective/fuse in meter
cabinet switched off.
Spark plug dirty/damp. Clean/dry the spark plug.
Burner parts not correctly
installed.
Burner parts dirty/damp. Clean/dry the burner
Main gas supply valve closed. Open the main gas valve.
Fault in gas mains. Consult you gas supplier.
Gas bottle or tank is empty. Connect a new gas bottle or
Wrong type of gas used. Check whether the gas used
Control knob not pressed in
far enough.
Turn off the main gas tap.
Contact your installer.
socket.
Replace the fuse or switch on
the fuse in the fuse box.
Assemble the burner parts
using the centring ridges.
components. Make sure that
the outflow holes are open.
have the tank refilled.
is suitable for the appliance.
Contact your installer if it is
not correct.
Keep the control knob pressed
in far enough between full and
low. This can take longer the
first time because of the gas
supply.
EN 22
Page 51
FAULTS
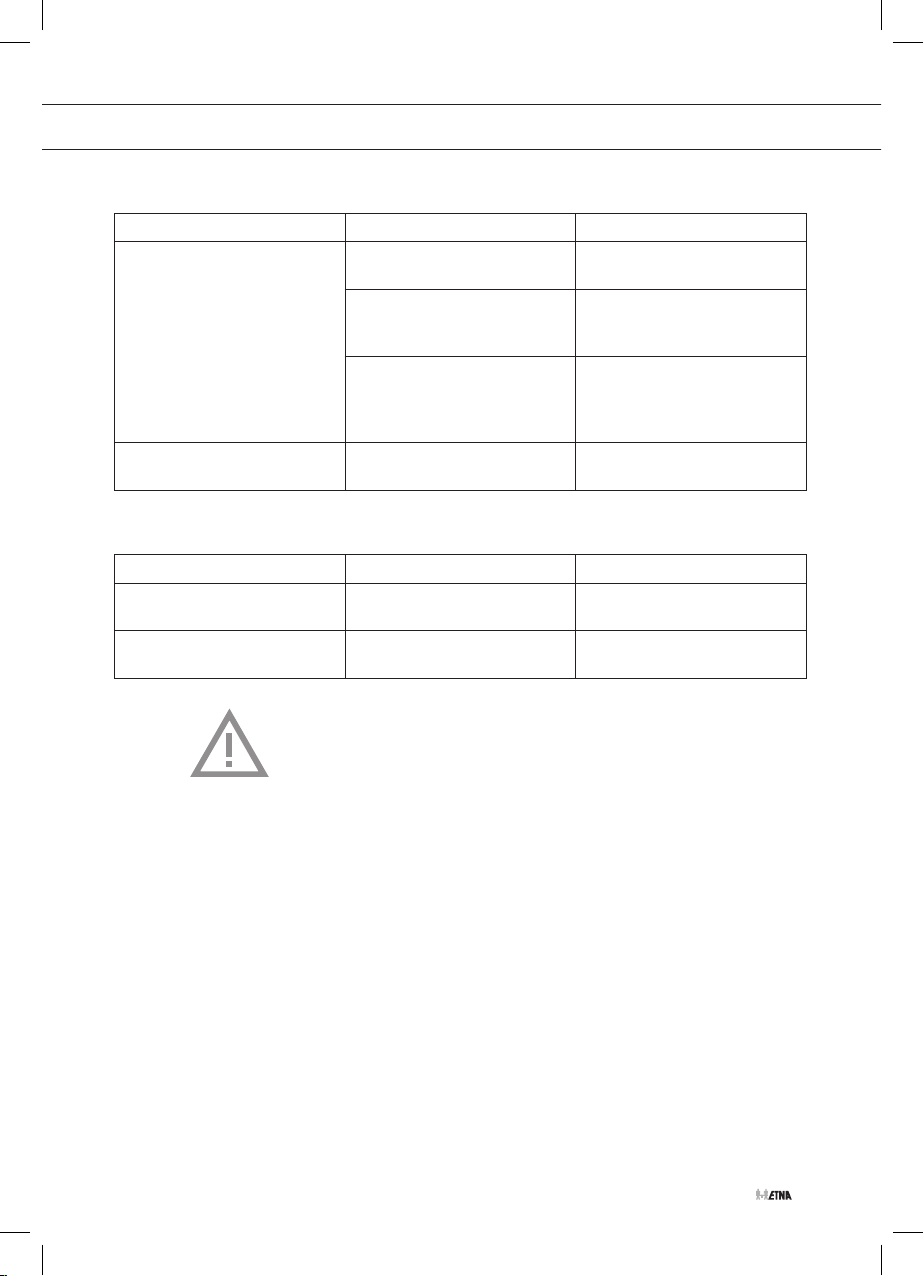
Problems with the hob Possible cause Solution
The burner does not burn
evenly.
The burner goes out after
igniting.
Problems with the oven Possible cause Solution
The oven does not switch on. The oven is not set to manual
The oven does not heat up. No temperature set.
Burner parts not placed
correctly.
Burner parts dirty/damp. Clean/dry the burner
Wrong type of gas used. Check whether the gas used
Control knob not pressed in
long enough.
operation.
Assemble the burner parts
using the centring ridges.
components. Make sure that
the outflow holes are open.
is suitable for the appliance.
Contact your installer if it is
not correct.
Keep the control knob pressed
in for at least 10 seconds.
Set the oven to ‘manual
operation’.
Set the temperature using the
temperature knob.
A visit by a service technician during the warranty period will be
charged if the appliance is not functioning because of improper use!
EN 23
Page 52

INSTALLATION
General
This appliance should only be connected by a registered installer. The
gas connection and the electrical connection must comply with national
and local regulations.
Read the separate safety instructions first!
Note!
This appliance must be earthed at all times.
Installation, maintenance or repairs should only be carried out by
professionals who are authorised by the manufacturer, as failure to do
so will void the guarantee.
The device should be disconnected from the mains prior to installation,
maintenance or repairs. The device is only disconnected from the
electric power if:
• the main switch of the domestic electrical system is switched off, or
• the fuse of the domestic electrical system has been completely
removed, or
• the plug has been pulled out of the socket.
EN 24
Faulty parts may only be replaced with original ETNA parts. Only these
parts are guaranteed by ETNA to meet the safety requirements.
If the connecting cable is damaged, it may only be replaced by the
manufacturer, the manufacturer’s service organisation or equivalently
qualified persons, in order to avoid dangerous situations.
Page 53

INSTALLATION
Gas connection
Electrical connection
• We recommend that the hob be connected by means of a fixed pipe.
Connection using a specially-designed safety hose is also permitted.
• The pipe behind the oven must be made entirely out of metal.
Note!
• A safety hose may not be bent and must not come into contact
with moving parts of kitchen units.
• The connection tap for the appliance must always be positioned
such that it is easily accessible.
• The type of gas and the country for which the appliance has been
designed are shown on the appliance identification card.
Before using the appliance for the first time, check the connections
using water and washing-up liquid to ensure that there are no gas
leaks!
230–240 V~ - 50/60Hz
• The wall plug socket and plug should always be accessible.
• Make sure that the cable does not come into contact with parts of
the oven that may become hot.
• If you want to make a fixed connection, make sure that an omnipolar
switch with a contact separation of at least 3 mm is fitted in the
supply cable.
• The appliance should not be connected to the mains via a multi-
plug adapter or extension cable, as the safe use of the equipment
cannot be guaranteed.
EN 25
Page 54
0
150
180
210
230
250
INSTALLATION
Installation
• When placing the cooker next to a tall cupboard or another wall
made of flammable material, keep at least 50 mm distance between
the cooker and the walls.
• Also keep a minimum distance of 650 mm between the hob and
any cooker hood placed above the cooker.
• If you place the cooker in a kitchen unit, the minimum space must
be adhered to.
• If the cooker is built in between kitchen cabinets, the lining of the
units must be able to withstand temperatures up to 90°C.
0
°C
70
250
100
230
120
210
150
180
EN 26
Levelling
The height of the cooker can be adjusted with the adjusting feet.
If you want to install the cooker on a platform, make sure that it is securely
fastened.
Please note!
After installation of the device, check whether the burners work properly.
The flame pattern should be regular and stable on the high setting, and
the burners must not go out on low.
Page 55

TECHNICAL DATA
The data plate on the underside of the appliance indicates the total nominal load, the
required voltage and the frequency.
This appliance meets all relevant CE guidelines.
Connection 230V - 50Hz
Power output 2.85 kW
External dimensions (mm)
Width 900
Height 850-950
Depth 590/1000 with door open
Volume 114 L
Gas information
Burner Gas Operating
pressure mbar
Rapid (2.8 kW) G25.3 25
Auxiliary (1 kW) G25.3 25
Wok (4 kW) G25.3 25
EN 27
Page 56
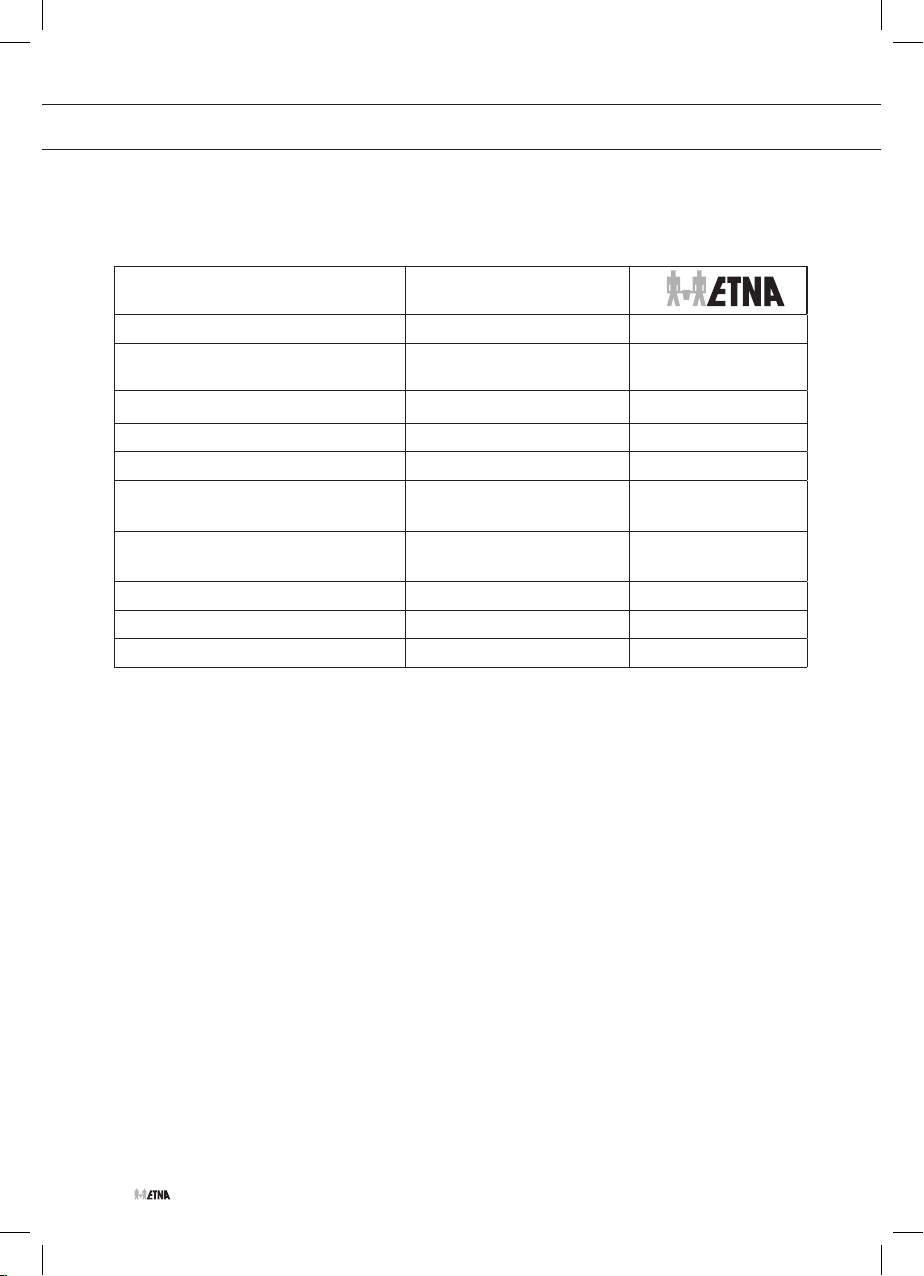
TECHNICAL DATA
Information according regulation (EU) 66/2014
Measurements according EN60350-2
Brand
Model
Type of Oven
Mass Kg
Energy Efficiency Index - cavity
Energy Class
Energy consumption (electricity) -
kWh/cycle
conventional
Energy consumption (electricity) - fan
kWh/cycle
forced
Number of cavities
Heat Source
Volume
Energy Saving Tips for the oven
• Cook the meals together, if possible.
• Keep the pre-heating time short.
• Do not elongate cooking time.
• Do not forget to turn-off the oven at the end of cooking.
• Do not open oven door during cooking period.
FG890ZT
Electric
81.2
87.5
A
1.33
0.89
1
Electric
114
EN 28
Page 57
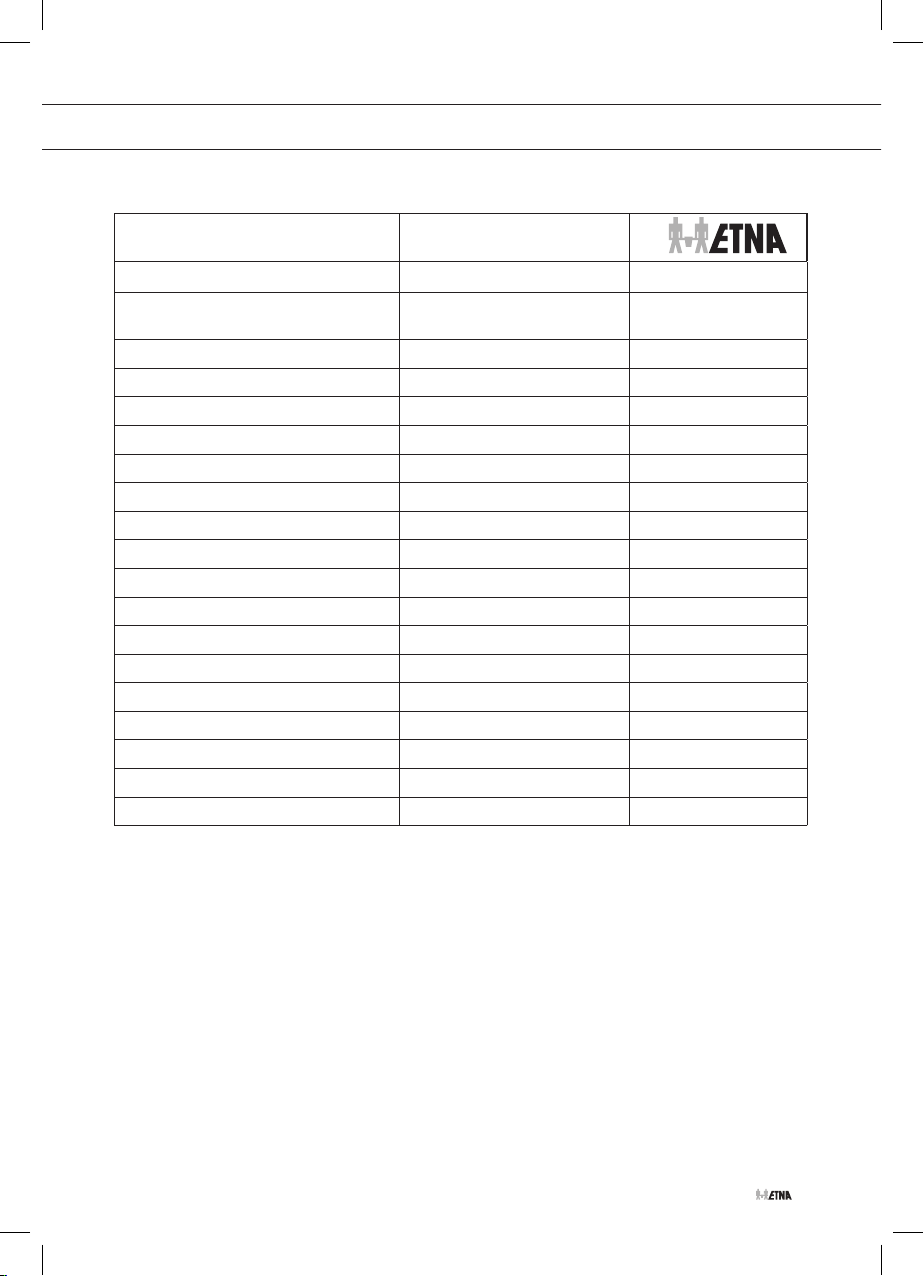
TECHNICAL DATA
Brand
Model
Type of hob Gas
Number of Cooking Zones 5
Heating Technology-1 Gas
Size-1 / Gas rear right cm Auxiliary
Energy Efficiency-1 % -
Heating Technology-2 Gas
Size-2 / Gas rear front cm Rapid
Energy Efficiency-2 % 55.4
Heating Technology-3 Gas
Size-3 / Gas centre cm Wok
Energy Efficiency-3 % 55.5
Heating Technology-4 Gas
Size-4 / Gas front left cm Wok
Energy Efficiency-4 % 56
Heating Technology-5 Gas
Size-5 / Gas rear left cm Rapid
Energy Efficiency-5 % 55.4
Energy Efficiency hob % 55.6
FG890ZT
Energy Saving Tips for the hob
• Use cookwares having flat base.
• Use cookwares with proper size.
• Use cookwares with lid.
• Minimize the amount of liquid or fat.
• When liquid starts boiling, reduce the setting.
EN 29
Page 58
ENVIRONMENTAL ASPECTS
Disposal of packaging and appliance
Sustainable materials have been used during manufacture of this
appliance. This appliance must be disposed of responsibly at the end
of its service life. Ask your local authorities for more information about
how to do this.
The appliance packaging is recyclable. The following materials may
have been used:
• cardboard;
• polyethylene film (PE);
• CFC-free polystyrene (PS rigid foam).
Dispose of these materials in a responsible way and in compliance with
government regulations.
The product has been marked with a crossed-out dustbin symbol to
remind you of the obligation to dispose of electrical household appliances
separately. This means that the appliance may not be included with
normal domestic refuse at the end of its service life. The appliance must
be taken to a special municipal centre for separated waste collection or to
a dealer providing this service.
EN 30
Separate collection of household appliances helps to prevent any potential
negative impact on the environment and on human health caused by
improper disposal. It ensures that the materials of which the appliance is
composed can be recovered to obtain significant savings in energy and
raw materials.
Declaration of Conformity
We hereby declare that our products satisfy the applicable European
directives, orders and regulations, as well as the requirements stated
in the referenced standards.
Page 59

EN 31
Page 60

Houd, wanneer u contact opneemt met de serviceafdeling, het complete
typenummer bij de hand.
When contacting the service department, have the complete type number
to hand.
Adressen en telefoonnummers van de serviceorganisatie vindt u op de garantiekaart.
You will find the addresses and phone numbers of the service organisation on the
guarantee card.
*801808*
801808
801808 / VER 1 / 16-05-2019
 Loading...