

Page 1
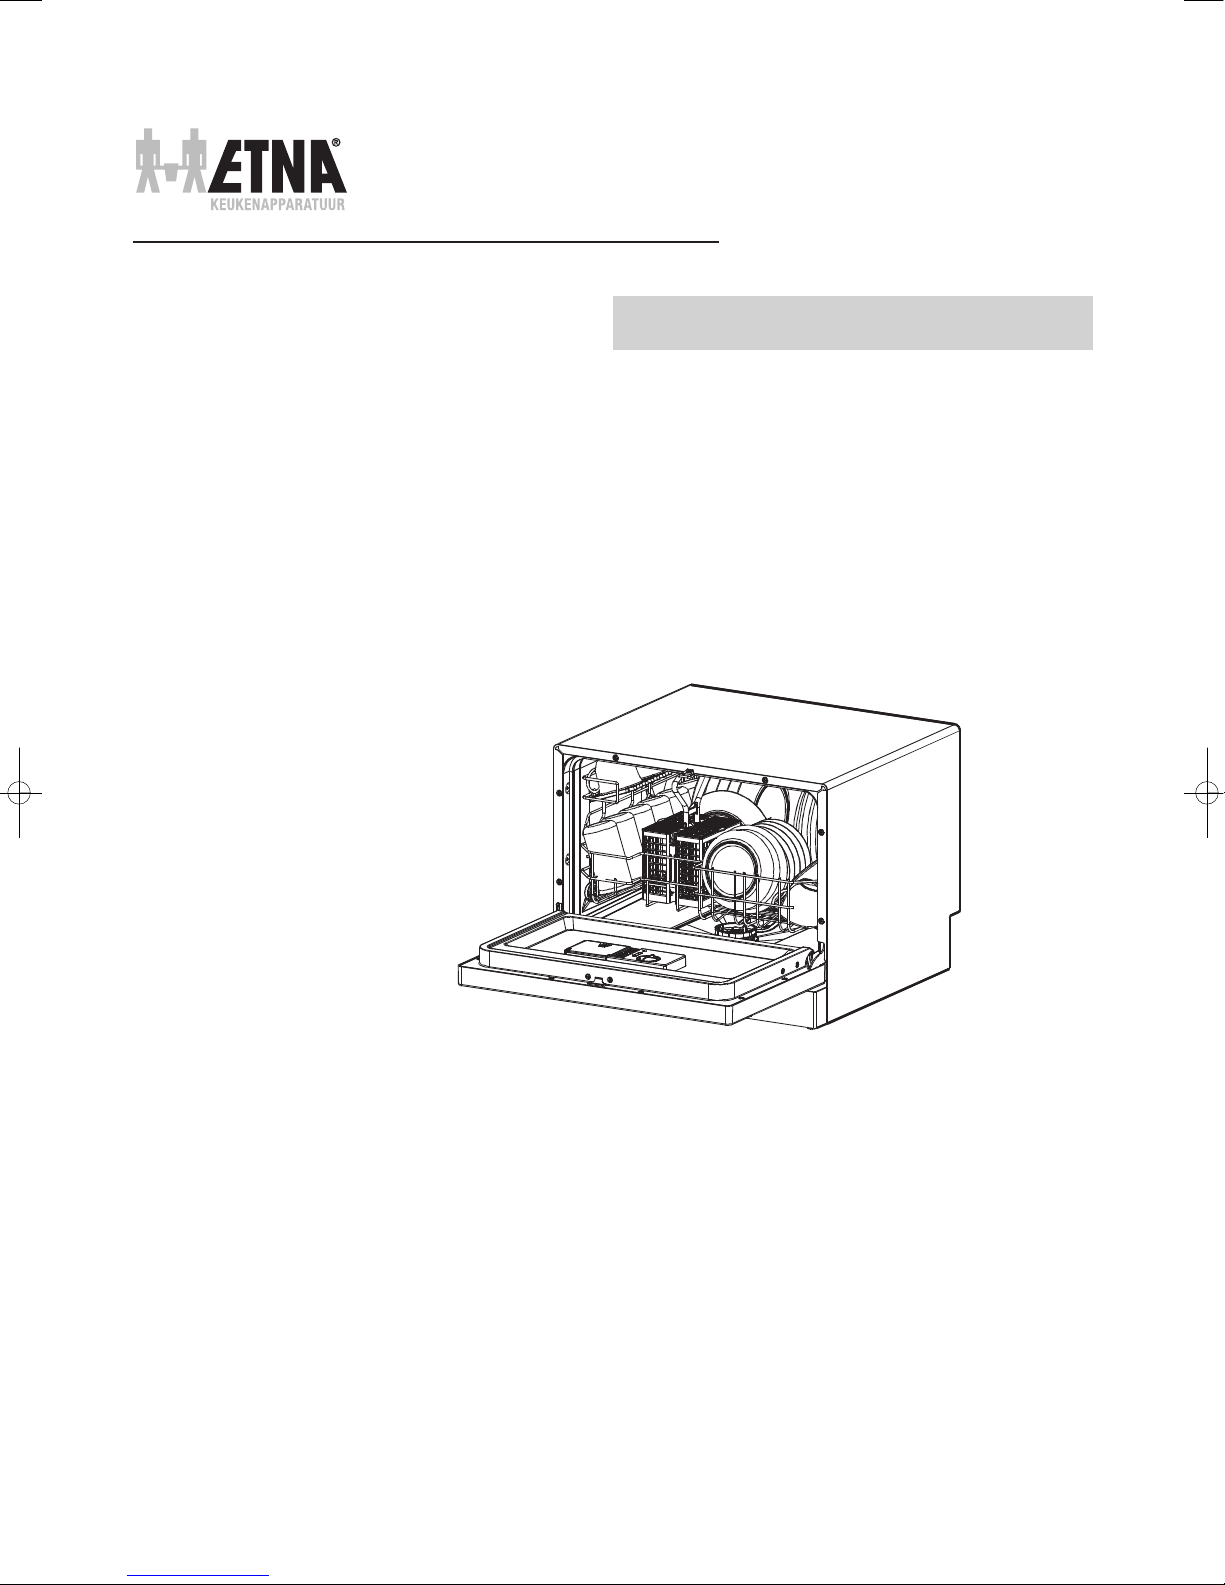
Afwasmachine
HANDLEIDING
ETNA - EVW7860
service art.nr. 700003352000
Page 2

Veiligheidsvoorschriften . . . . . . . . 1
Gebruiksinstructies
Bedieningspaneel . . . . . . . . . . . . . . . . . . . . . . . . . . 2
Vaatwasserspecificaties . . . . . . . . . . . . . . . . . . . . . 2
Wasprogramma tabel . . . . . . . . . . . . . . . . . . . . . . 3
Ingebruikname . . . . . . . . . . . . . . . . . . . . . . . . . . . . .3
Waterontharder . . . . . . . . . . . . . . . . . . . . . . . . . . . . 4
Glansspoelmiddel . . . . . . . . . . . . . . . . . . . . . . . . . . 5
Afwasmiddel . . . . . . . . . . . . . . . . . . . . . . . . . . . . . . . 5
Beladen van de korf . . . . . . . . . . . . . . . . . . . . . . . . 6
Aanzetten toestel . . . . . . . . . . . . . . . . . . . . . . . . . . 7
Filtersysteem . . . . . . . . . . . . . . . . . . . . . . . . . . . . . . . 7
Onderhoud . . . . . . . . . . . . . . . . . . . . . . . . . . . . . . . . 8
Installatie-instructie
Aansluiten aan elektriciteitsnet . . . . . . . . . . . . . 9
Wateraansluiting . . . . . . . . . . . . . . . . . . . . . . . . . . . 9
Problemen oplossen
Voordat u de servicedienst belt . . . . . . . . 11, 12
Verpakking en toestel afvoeren 13
Lees deze handleiding
Deze handleiding behandelt veiligheidsinstructies,
bedieningsinstructies, installatie-instructies en onder
andere het verhelpen van storingen. Goed doorlezen
voor gebruik helpt u bij adequaat gebruik en
onderhoud van de afwasmachine.
Voordat u de
servicedienst belt
Door eerst de lijst voor het opsporen en oplossen van
fouten door te lezen kunt u een aantal problemen zelf
oplossen. U hoeft dan niet de hulp van de servicedienst
in te roepen.
LET OP:
- De fabrikant kan in zijn streven naar een constante productverbetering
zonder nader bericht aanpassingen aan het toestel doorvoeren.
- Veranderingen aan het toestel door de gebruiker zelf aangebracht vallen
niet onder de garantie.
Page 3
1
WAARSCHUWING!
Volg,wanneer u de afwasmachine gaat gebruiken, onderstaande voorzorgsmaatregelen, inclusief het volgende:
BELANGRIJKE VEILIGHEIDSVOORSCHRIFTEN
LEES ALLE INSTRUCTIES VOOR GEBRUIK
AARDINGSINSTRUCTIES
■ Dit toestel moet worden geaard.Aarding verkleint
de kans op een elektrische schok bij storingen en
defecten. Dit toestel is uitgerust met een geaard
snoer en stekker.Steek de stekker in een geaard
stopcontact dat is gemonteerd volgens de lokaal
geldende voorschriften.
WAARSCHUWING!
■ Incorrecte aansluiting van het snoer kan resulteren
in een elektrische schok. Neem in geval van twijfel
contact op met een gekwalificeerde elektriciën of
servicemedewerker.Voer geen veranderingen door
aan de stekker.Laat de stekker, wanneer deze niet in
het stopcontact past, aanpassen door een
gekwalificeerde elektriciën.
■ Gebruik de deur en de korf van de vaatwasser niet
oneigenlijk. Ga er niet op zitten of staan.
■ Reinig geen kunststof vaatwerk in het toestel, tenzij
het is voorzien van een merkteken dat aangeeft dat
het vaatwasserbestendig is.Volg bij vaatwerk, dat
niet is voorzien van een dergelijk merkteken, de
aanwijzingen van de producent.
■ Gebruik alleen was-, glansspoelmiddelen en zout die
zijn bedoeld voor gebruik in een afwasmachine.
Gebruik nooit professionele of horeca-wasmiddelen.
Gebruik nooit gewoon afwasmiddel of wasmiddelen
voor textiel.
■ Bewaar de wasmiddelen buiten bereik van kinderen.
■ Houd was- en glansspoelmiddelen uit de buurt van
kinderen. Houd kinderen uit de buurt van een
geopende afwasmachine. Er zou nog wat
reinigingsmiddel in het toestel aanwezig kunnen
zijn. Bij inslikken direct een arts raadplegen en de
verpakking meenemen.
■ Houd de deur gesloten. U zou kunnen struikelen
over een geopende deur.
■ Verbuig de aan- en afvoerslang en het aansluitsnoer
niet extreem tijdens de installatie. Let op dat deze
niet bekneld raken.
■ Experimenteer niet met het bedieningspaneel.
■ Het toestel is niet bedoeld voor gebruik door jonge
kinderen.
■ Wasmiddelen voor de afwasmachine zijn sterk
alkalisch. Ze zijn bijzonder gevaarlijk bij doorslikken.
Vermijd contact met huid en ogen. Houd bij
geopende deur van de afwasmachine kinderen uit
de buurt.
■ Zorg ervoor dat alle losse onderdelen van de
afwasmachine correct zijn geplaatst. Open de deur
niet tijdens het programmaverloop.
■ Plaats geen zware voorwerpen op de geopende
deur.Ga er ook niet op staan. Het toestel kan
kantelen en er kan schade aan het toestel optreden.
■ Bij het laden van de korven:
Plaats scherpe voorwerpen zodanig dat zij het
deurrubber niet kunnen beschadigen.
■ Indien het aansluitsnoer is beschadigd moet het
vervangen worden door gekwalificeerd
servicepersoneel of elektriciën.
■ Gebruik de afwasmachine uitsluitend voor het doel
waarvoor deze ontworpen is.
■ Laat kinderen niet met het toestel spelen.
WAARSCHUWING! CORRECT GEBRUIK
LEES DEZE VEILIGHEIDSVOORSCHRIFTEN ZORGVULDIG EN VOLG ZE OP.
BEWAAR DEZE INSTRUCTIES.
Page 4
2
BELANGRIJK!
Lees eerst alle bedieningsinstructies om de afwasmachine optimaal te kunnen gebruiken.
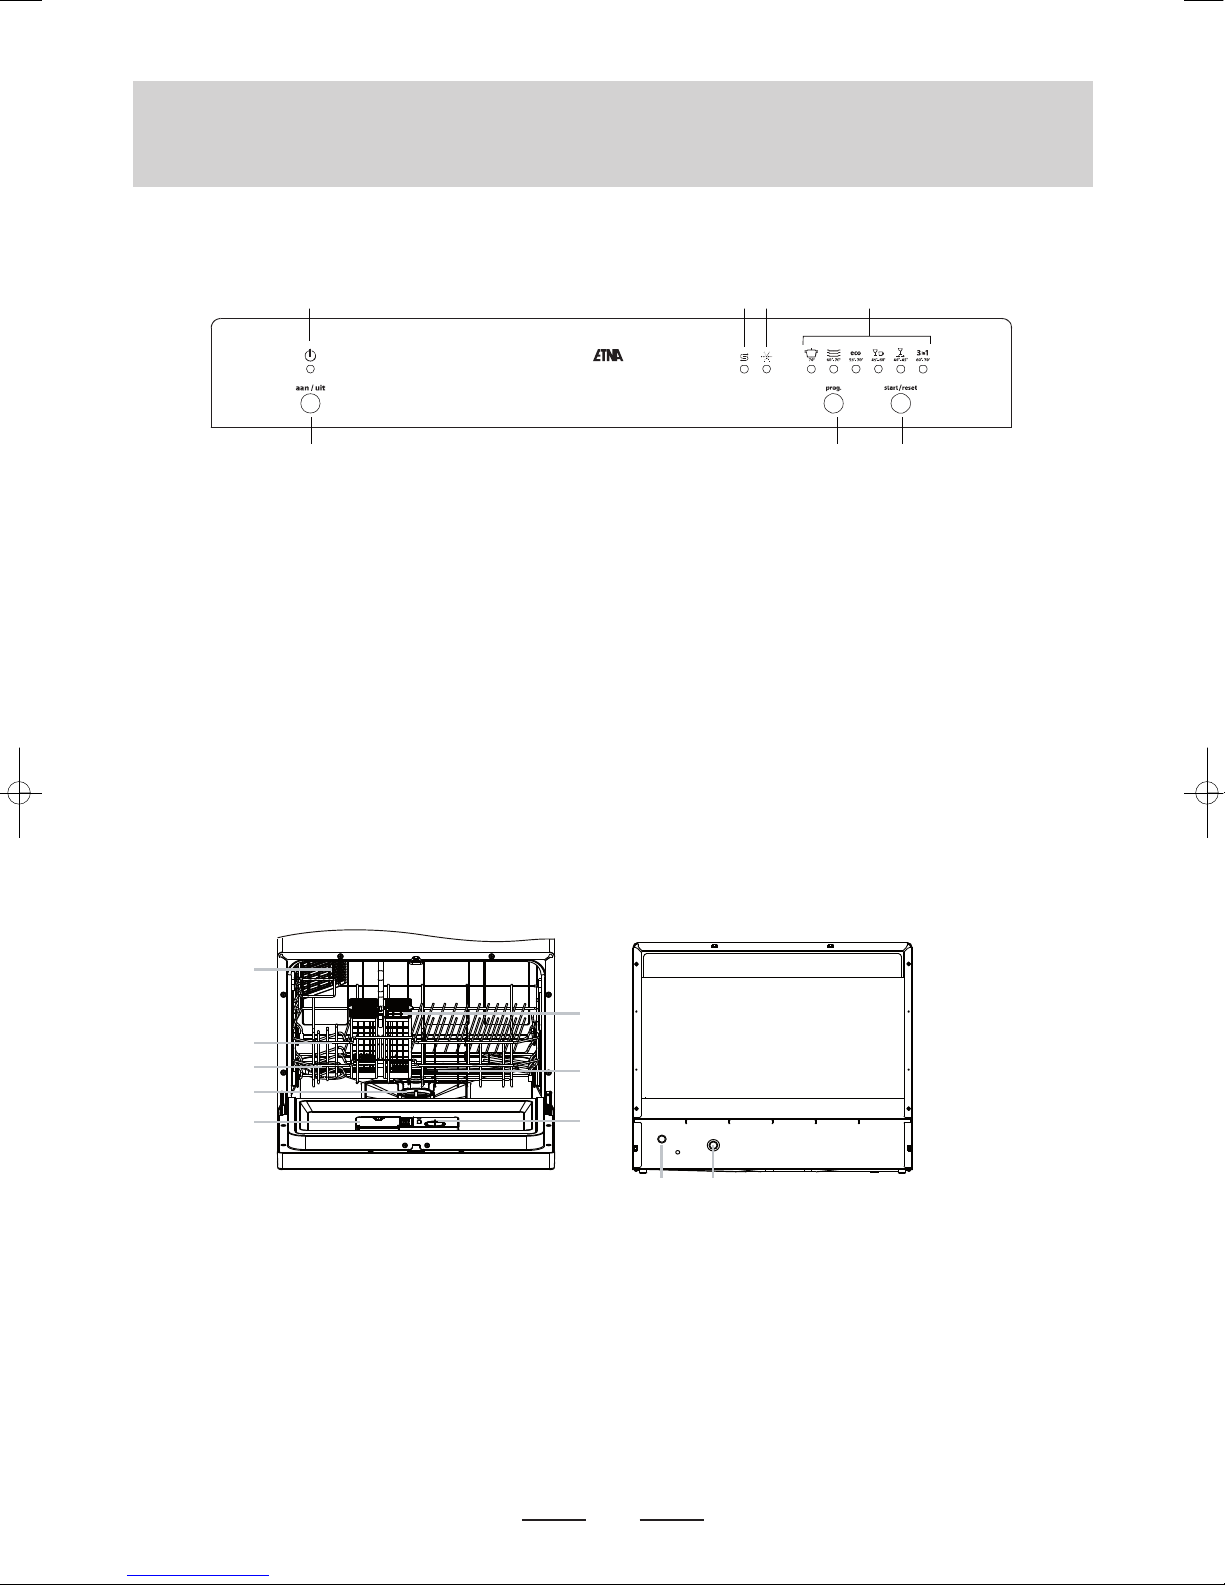
Bedieningspaneel
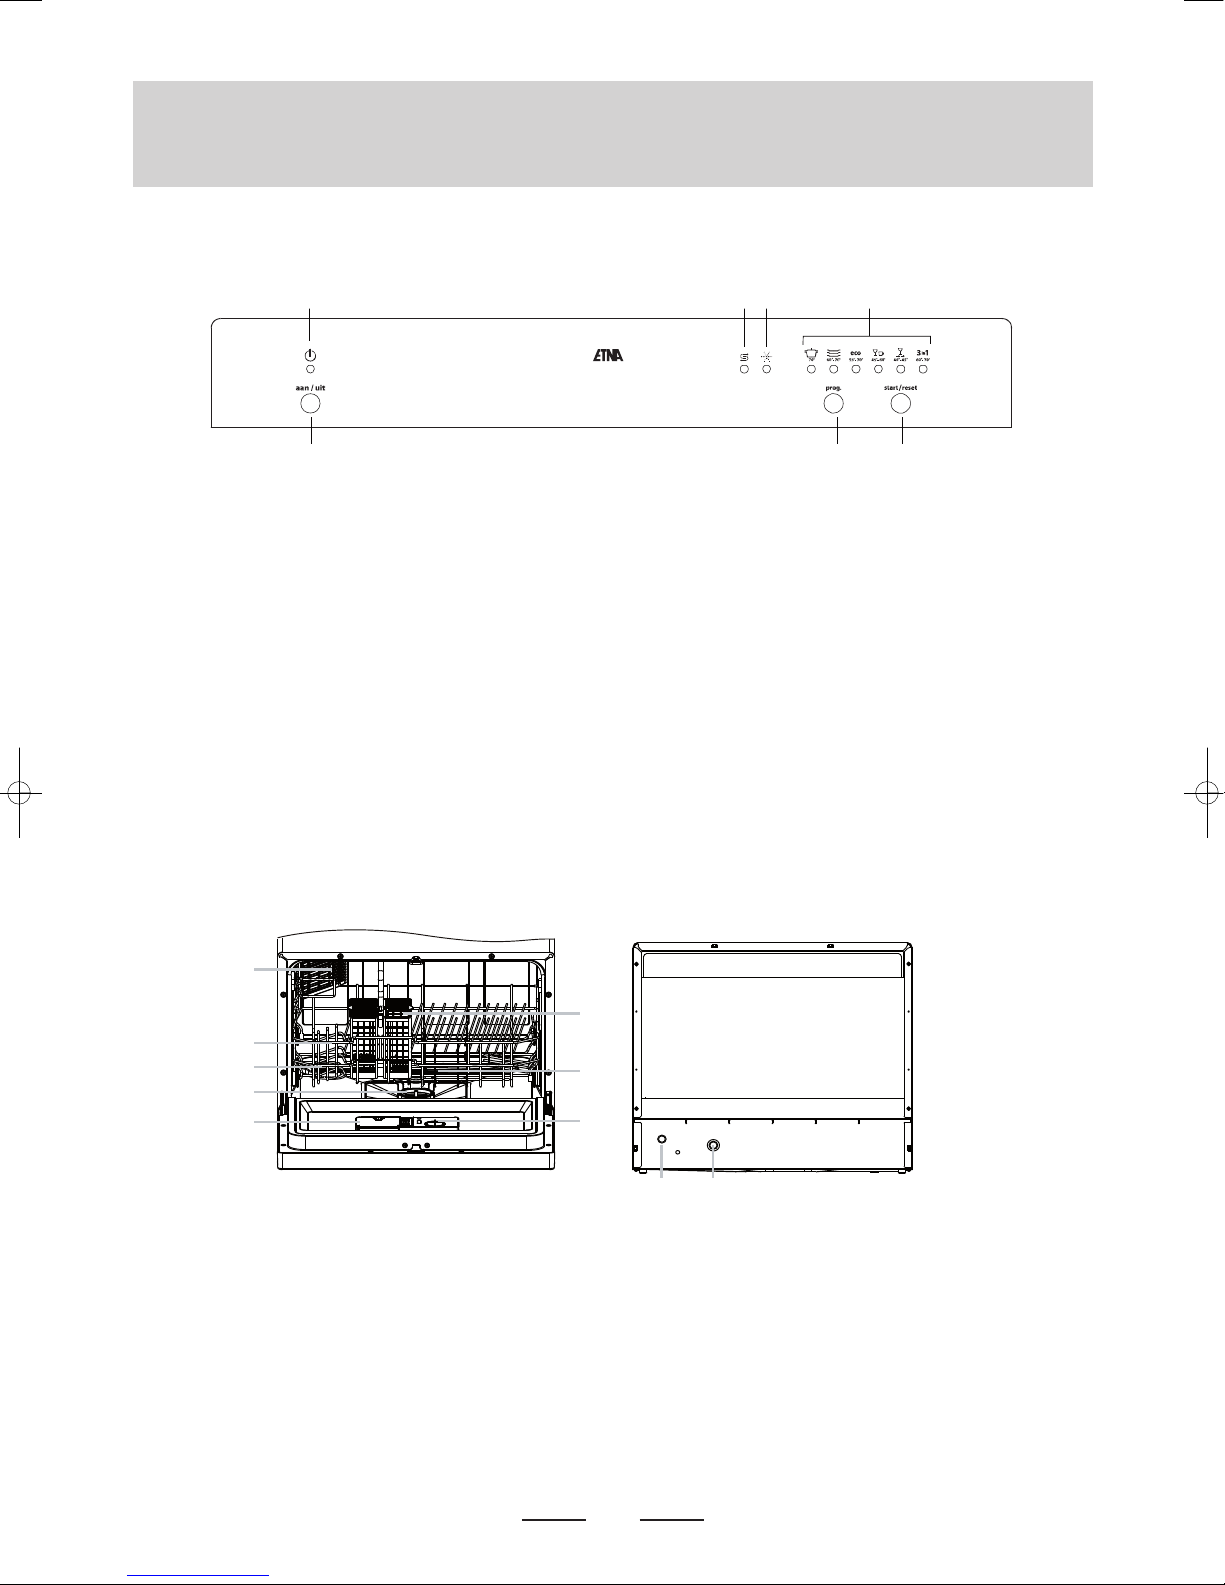
1 Aan/uittoets. Druk op de toets om het toestel in of uit te
schakelen.
2 Aan/uit controlelampje. Het lampje brandt wanneer het
toestel is ingeschakeld.
3 Waarschuwingslampje voor glansspoelmiddel.Het
waarschuwingslampje gaat branden wanneer het
glansspoelmiddel moeten worden bijgevuld.
4 Waarschuwingslampje voor zout.Het waarschuwings-
lampje gaat branden wanneer het onthardingszout
moet worden bijgevuld.
5 Controlelampjes voor geselecteerd programma.
6 Programmaselectietoets. Druk herhaaldelijk op de toets
om het gewenste wasprogramma te selecteren.
7 Start/reset toets. Druk op de toets om het ingestelde
programma te starten, pauzeren of resetten.
1 6 7
2 3 4 5
1 korf
2 sproeiarm
3 waterontharder
4 filtersysteem
5 wasmiddelreservoir
6 kopjesrek
7 bestekmand
8 glansspoelmiddelreservoir
9 aansluiting afvoerpijp
10 aansluiting waterinlaatpijp
1
6
3
5
9 10
4
2
8
7
Specificaties afwasmachine
Page 5
3
INGEBRUIKNAME
■ Stel het zoutgebruik vooraf in.
■ Giet 0,5 liter water in het zoutreservoir en vul het daarna met zout.
■ Vul het glansspoelmiddelreservoir.
■ Vul het afwasmiddelbakje.
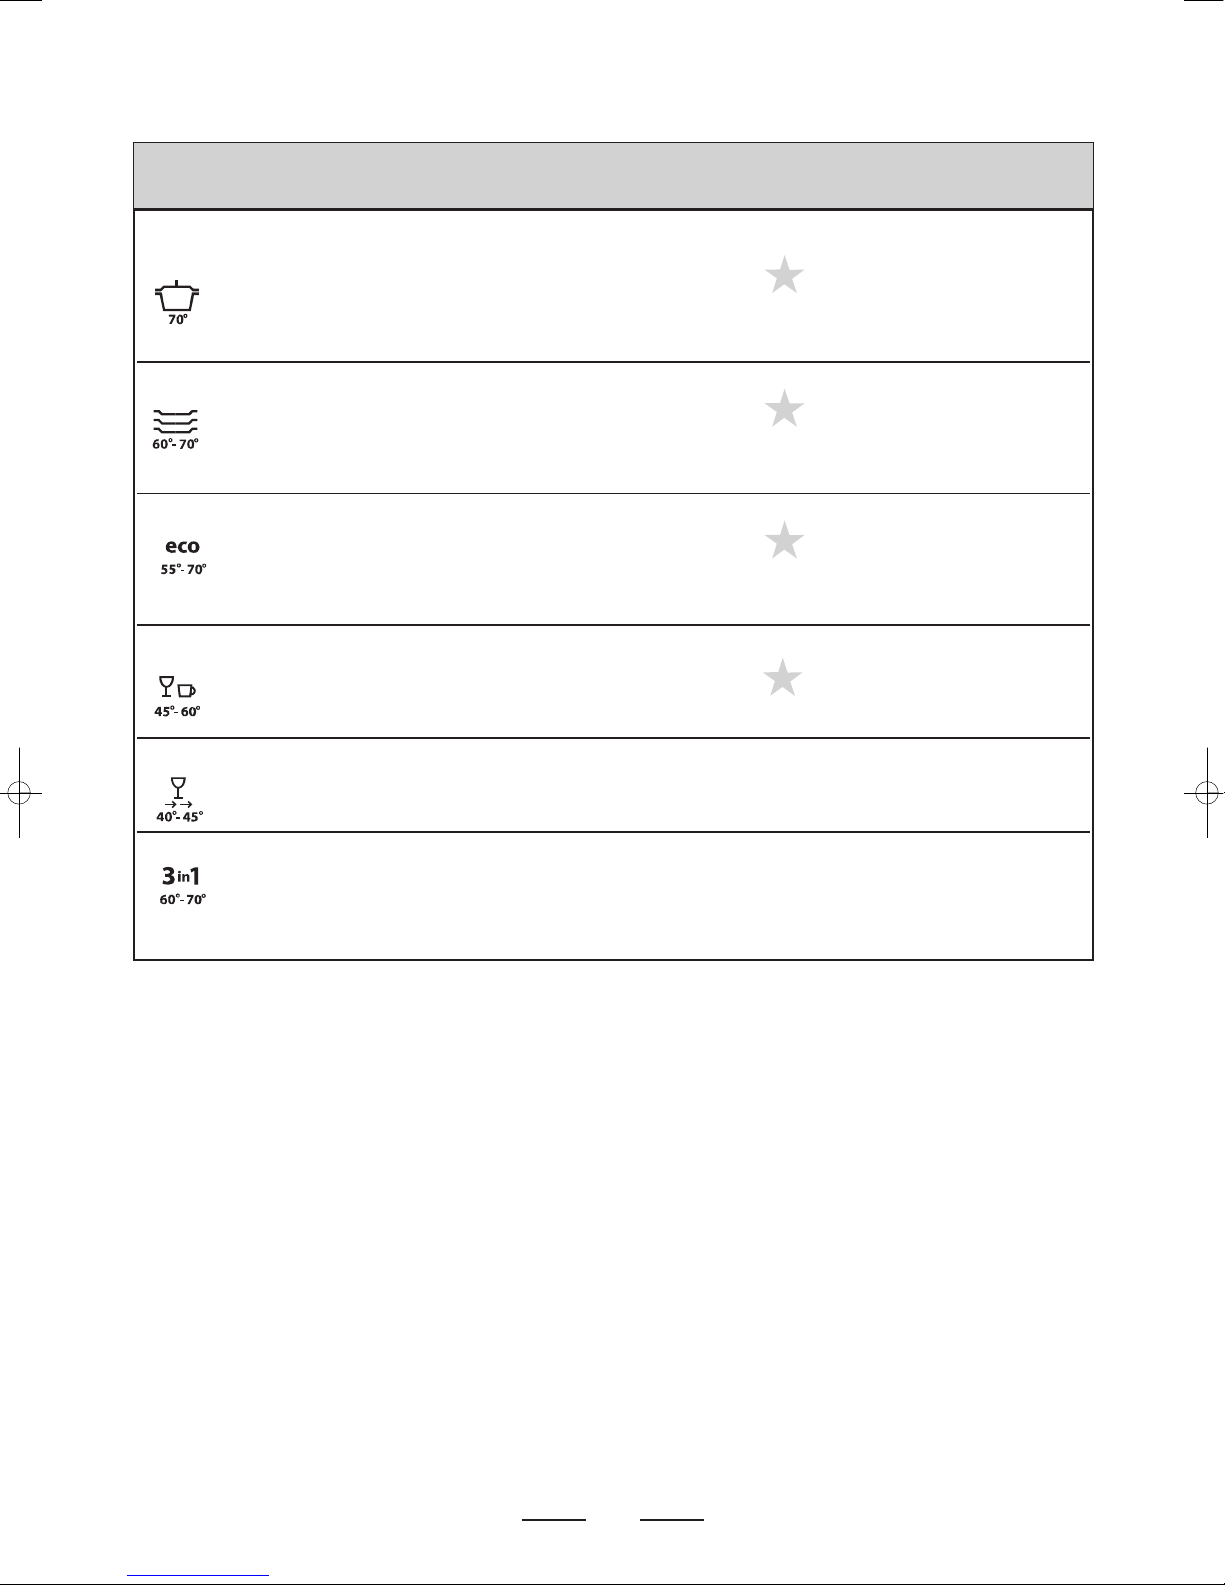
WASPROGRAMMATABEL
voorspoelen (50 °C)
Intensief Zeer vieze vaat, zoals schalen, hoofdwas (70 °C)
pannen, braadpannen,borden, spoelen
145 0,94 11
borden met ingedroogde spoelen 3 /15 gr
voedselresten. spoelen (70 °C)
drogen
Normaal Normaal vieze vaat, zoals voorspoelen
schalen, borden,glazen, niet hoofdwas (60 °C) 3 / 15 gr 125 0,70 8,4
erg vieze pannen. Standaard spoelen
programma. spoelen (70 °C)
drogen
Eco Niet erg vieze vaat, zoals voorspoelen
borden,glazen, kommen hoofdwas (55 °C) 3 / 15 gr. 170 0,63 8,4
en niet ergvieze pannen. spoelen
spoelen (70 ºC)
drogen
Glazen Niet erg vieze vaat, zoals hoofdwas (45 °C)
glazen, kristal en teer spoelen
porselein. spoelen (60 °C) 15 gr.
75 0,48 6,8
drogen
Snel Kort wasprogramma voor hoofdwas (40 °C)
niet erg vieze vaat die niet spoelen 15 gr. 30 0,30 6,0
gedroogd hoeft te worden. spoelen
Normaal vieze vaat, zoals voorspoelen
schalen, borden,glazen, niet hoofdwas (60 °C) 3-in-1 tablet 140 0,70 8,4
erg vieze pannen. Standaard spoelen
programma. spoelen (70 °C)
drogen
PPrrooggrraammmmaa PPrrooggrraammmmaa-- PPrrooggrraammmmaa-- WWaassmmiiddddeell GGllaannssssppooeell TTiijjdd EEnneerrggiiee WWaatteerr
iinnffoorrmmaattiiee vveerrlloooopp vvoooorr--//hhooooffdd mmiiddddeell ((mmiinn)) ((kkWWhh)) ((ll))
Page 6
WATERONTHARDER
Het reservoir vullen met zout (Het reservoir moet te allen tijde gevuld worden)
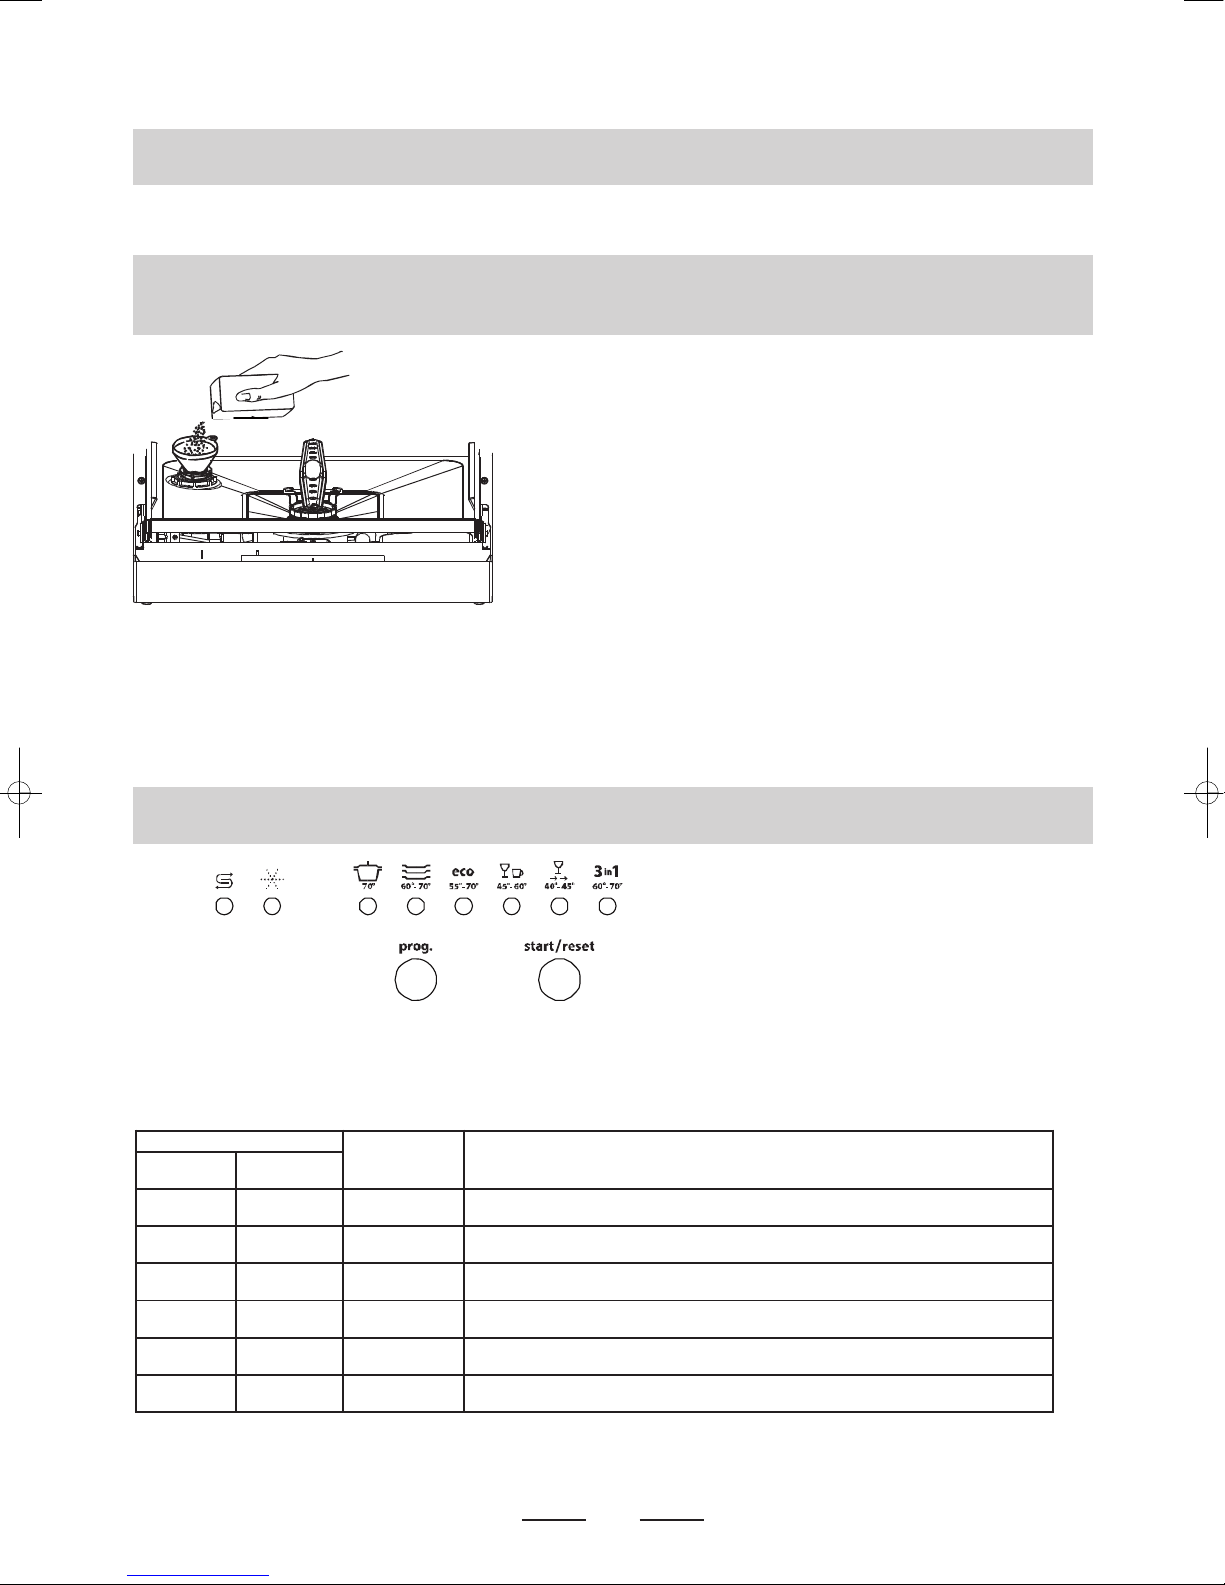
1.
Draai, na eerst de onderste korf te hebben verwijderd, de dop van het
reservoir los.
2. Voordat u het reservoir de eerste keer vult giet u het voor
2
⁄3 vol met water.
3. Plaats de trechter in de reservoiropening. Giet er ongeveer 1,2 kg zout in.Het
is normaal dat er hierbij een beetje water uit de opening stroomt.
LET OP: Gemorst zout verwijderen en direct hierna altijd een volledig
programma draaien teneinde schade aan de bodem te
voorkomen.
4. Draai de dop zorgvuldig vast.
LET OP: Vul het zoutreservoir bij wanneer het waarschuwingslampje van de waterontharder gaat branden. Het kan voorkomen
dat, hoewel het zoutreservoir is gevuld, het lampje blijft enige tijd branden. Het dooft wanneer er voldoende zout in het
water is opgelost.
Zoutverbruik instellen
1. Binnen 60 seconden na inschakelen van de afwasmachine: Houdt de start/reset toets 5 seconden ingedrukt. De
waarschuwingslampjes voor glansspoelmiddel en zout knipperen afwisselend.
2. Kies de gewenste instelling door herhaaldelijk op de programmaselectietoets te drukken. Ieder programma komt overeen met een
bepaalde instelling, zie onderstaand schema.
* Fabrieksinstelling
Informeer bij het waterleidingbedrijf naar de hardheid van het leidingwater om een en ander volgens bovenstaande tabel in te stellen.
Deze machine is uitgerust met een waterontharder.
4
Gebruik alleen zout dat geschikt is voor afwasmachines. Het zoutreservoir bevindt
zich onder de korf en moet als volgt worden gevuld:
U kunt het zoutverbruik instellen op de lokale hardheid van het leidingwater.
Ga hierbij als volgt te werk:
Waterhardheid
Instelling
waterontharder
Aantal lichten geluidssignalen
ºdH mmol/l
0 - 5 0 - 0,9 1 Controlelampje intensief programma brandt en er klinkt 1 geluidssignaal
6 - 11 1,0 - 2,0 2 Controlelampje normaal programma brandt en er klinken 2 geluidssignalen
12 - 17 2,1 - 3,0 3* Controlelampje eco programma brandt en er klinken 3 geluidssignalen
18 - 22 3,1 - 4,0 4 Controlelampje glas programma brandt en er klinken 4 geluidssignalen
23 - 34 4,1 - 6,1 5 Controlelampje snel programma brandt en er klinken 5 geluidssignalen
35 - 45 6,2 - 8,0 6 Controlelampje 3-in-1 programma brandt en er klinken 6 geluidssignalen
Page 7
5
GLANSSPOELMIDDELRESERVOIR
Tijdens de laatste spoelbeurt wordt glansspoelmiddel toegevoegd.
Glansspoelmiddel voorkomt dat er sporen van druppels achterblijven op de
schone vaat. Het zorgt er bovendien voor dat de vaat sneller droogt doordat
het water er gemakkelijk afglijdt.
De afwasmachine is ontworpen voor gebruik van vloeibaar glansspoelmiddel.
Het glansspoelmiddelreservoir bevindt zich op de binnenzijde van de deur,
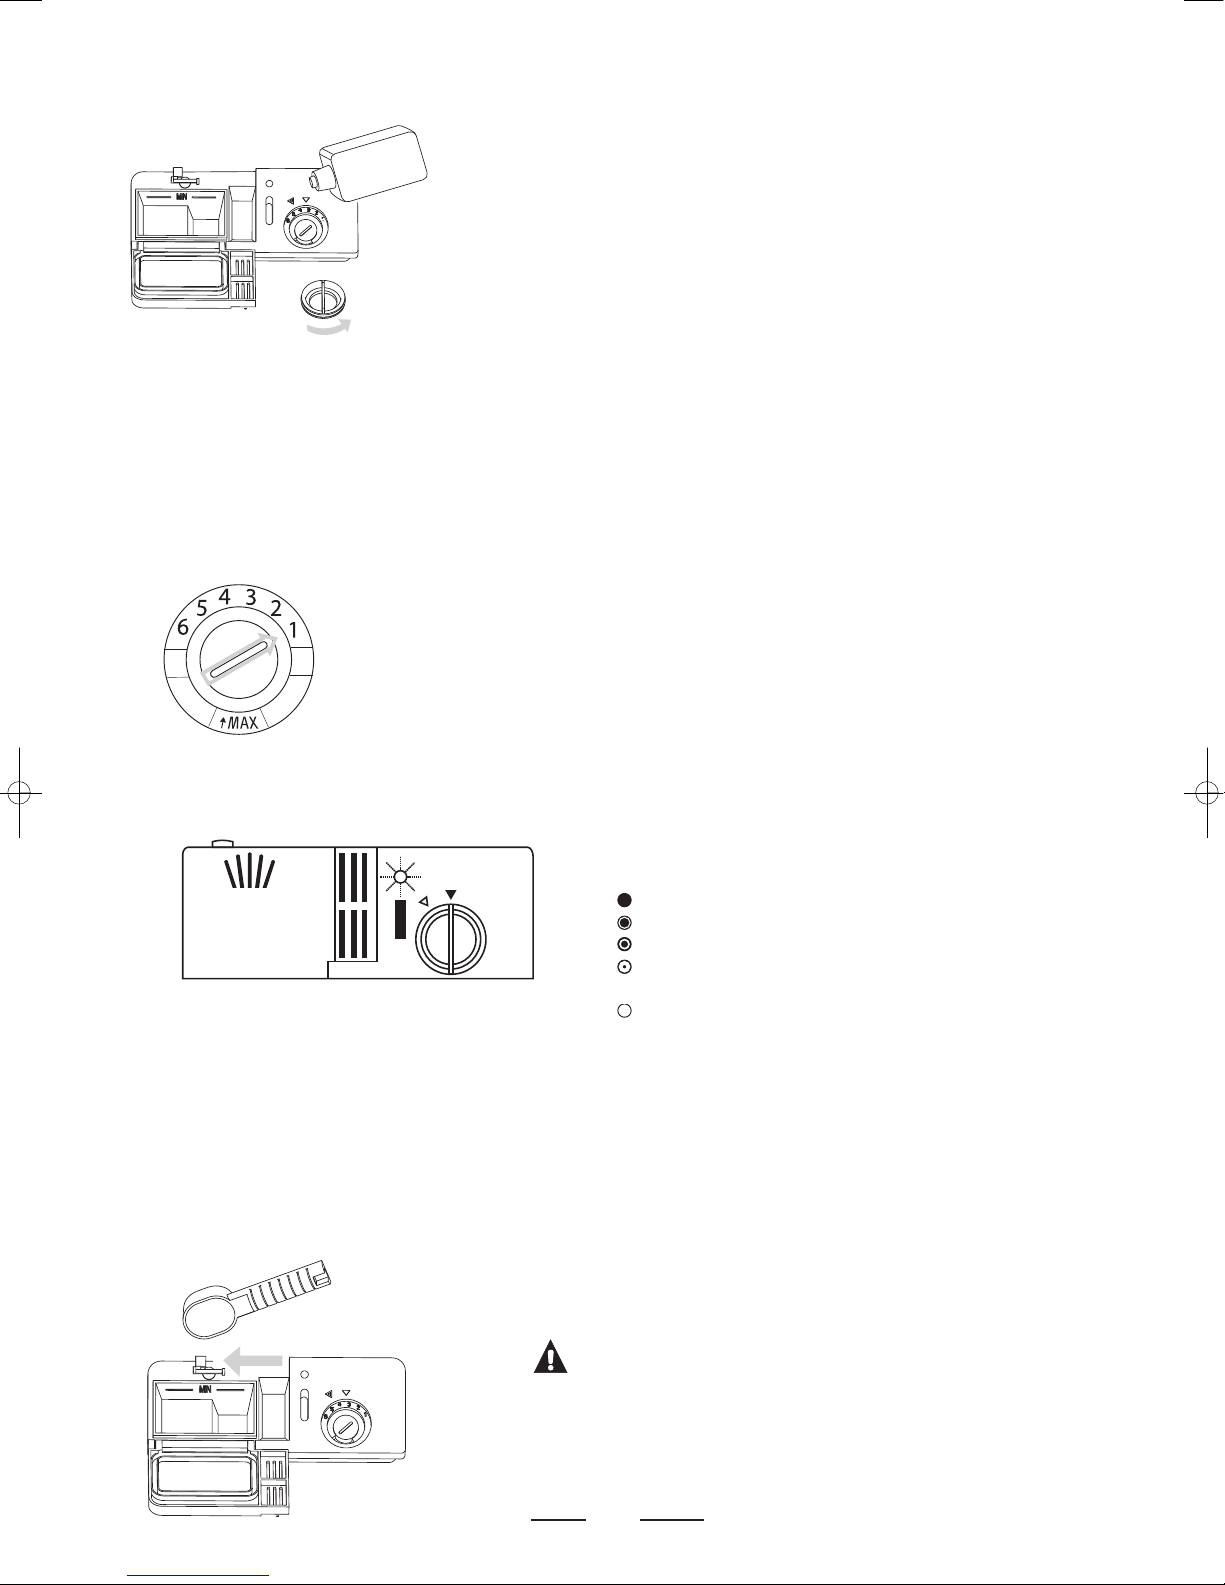
naast het afwasmiddelbakje.Vullen: open de deur volledig en draai de dop van
het glansspoelmiddelreservoir open. Giet glansspoelmiddel in het reservoir. Het
reservoir is gevuld als de niveau-indicator geheel zwart is gekleurd. Het
reservoir heeft een capaciteit van ca. 110 ml.
Let op dat u het glansspoelmiddelreservoir niet te vol giet. Het
glansspoelmiddel stroomt dan over.Gemorst glansspoelmiddel moet
verwijderd worden. Er kan anders lekkage ontstaan door extreme
schuimvorming.Vergeet niet de dop weer vast te draaien voordat u de deur
van de afwasmachine sluit.
De hoeveelheid glansspoelmiddel instellen
Tijdens de laatste spoelbeurt wordt een vastgestelde hoeveelheid glansspoelmiddel toegevoegd.Net
zoals bij afwasmiddel is de hoeveelheid glansspoelmiddel afhankelijk van de waterhardheid bij u in de
buurt. Teveel glansspoelmiddel kan leiden tot strepen op het vaatwerk.
Het glansspoelmiddelreservoir heeft zes standen. Stel het reservoir in eerste instantie in op stand 2.Indien
er in dat geval vlekken op het vaatwerk blijven ontstaan vergroot u de hoeveelheid glansspoelmiddel
door de keuzeknop van het reservoir op stand 3 te draaien. Als dat ook niet helpt stelt u de keuzeknop in
op een hogere stand. Herhaal deze handeling totdat de vaat streeploos droog uit de machine komt.
Wanneer moet u het glansspoelmiddelreservoir vullen?
Met het kleiner worden van de hoeveelheid glansspoelmiddel
neemt de grootte van de stip op de niveau-indicator af.Zie de
illustratie hieronder.
vol
3
⁄4 vol
1
⁄2 vol
1
⁄4 vol - U zou nu moeten bijvullen ter voorkoming van
vlekken op het vaatwerk.
leeg (tevens gaat indicatie LED branden --> bijvullen)
AFWASMIDDELBAKJE
GEBRUIK NIET TE VEEL AFWASMIDDEL. Het zeepbakje moet voor de start van ieder programma gevuld worden (behalve bij een
spoelprogramma), maar doe er niet teveel afwasmiddel in. Volg hierbij de aanwijzingen in de tabel voor de wasprogramma's (pagina
3). Uw afwasmachine gebruikt minder afwasmiddel en glansspoelmiddel dan conventionele afwasmachines. In het algemeen is slechts
één maatschepje afwaspoeder nodig voor een normale afwasbeurt. Gebruik meer afwasmiddel bij sterker vervuild vaatwerk.Vul het
zeepbakje vlak voor de start van het programma. Het afwasmiddel kan anders vochtig worden en daardoor niet volledig oplossen.
Correct gebruik van afwasmiddel
Gebruik alleen wasmiddel dat is bedoeld voor gebruik in een afwasmachine.
Zorg ervoor dat het waspoeder niet vochtig kan worden. Giet waspoeder pas
in het zeepbakje als u direct daarna een wasprogramma draait.
WAARSCHUWING!
Afwasmiddel voor afwasmachines is een bijtend product. Houd het
daarom buiten het bereik van kinderen. Bij inslikken direct een arts
raadplegen en de verpakking meenemen.
■ Draai de dop van het glansspoelmiddelreservoir
open (naar links, naar de pijl met "open").
■ Giet het glansspoelmiddel in het reservoir.Let er
hierbij op dat u er niet teveel in giet.
■ Plaats de dop terug. Zorg ervoor dat hij in lijn ligt
met de "open" pijl en draai hem naar de
"gesloten" pijl.
Page 8
DE KORF BELADEN
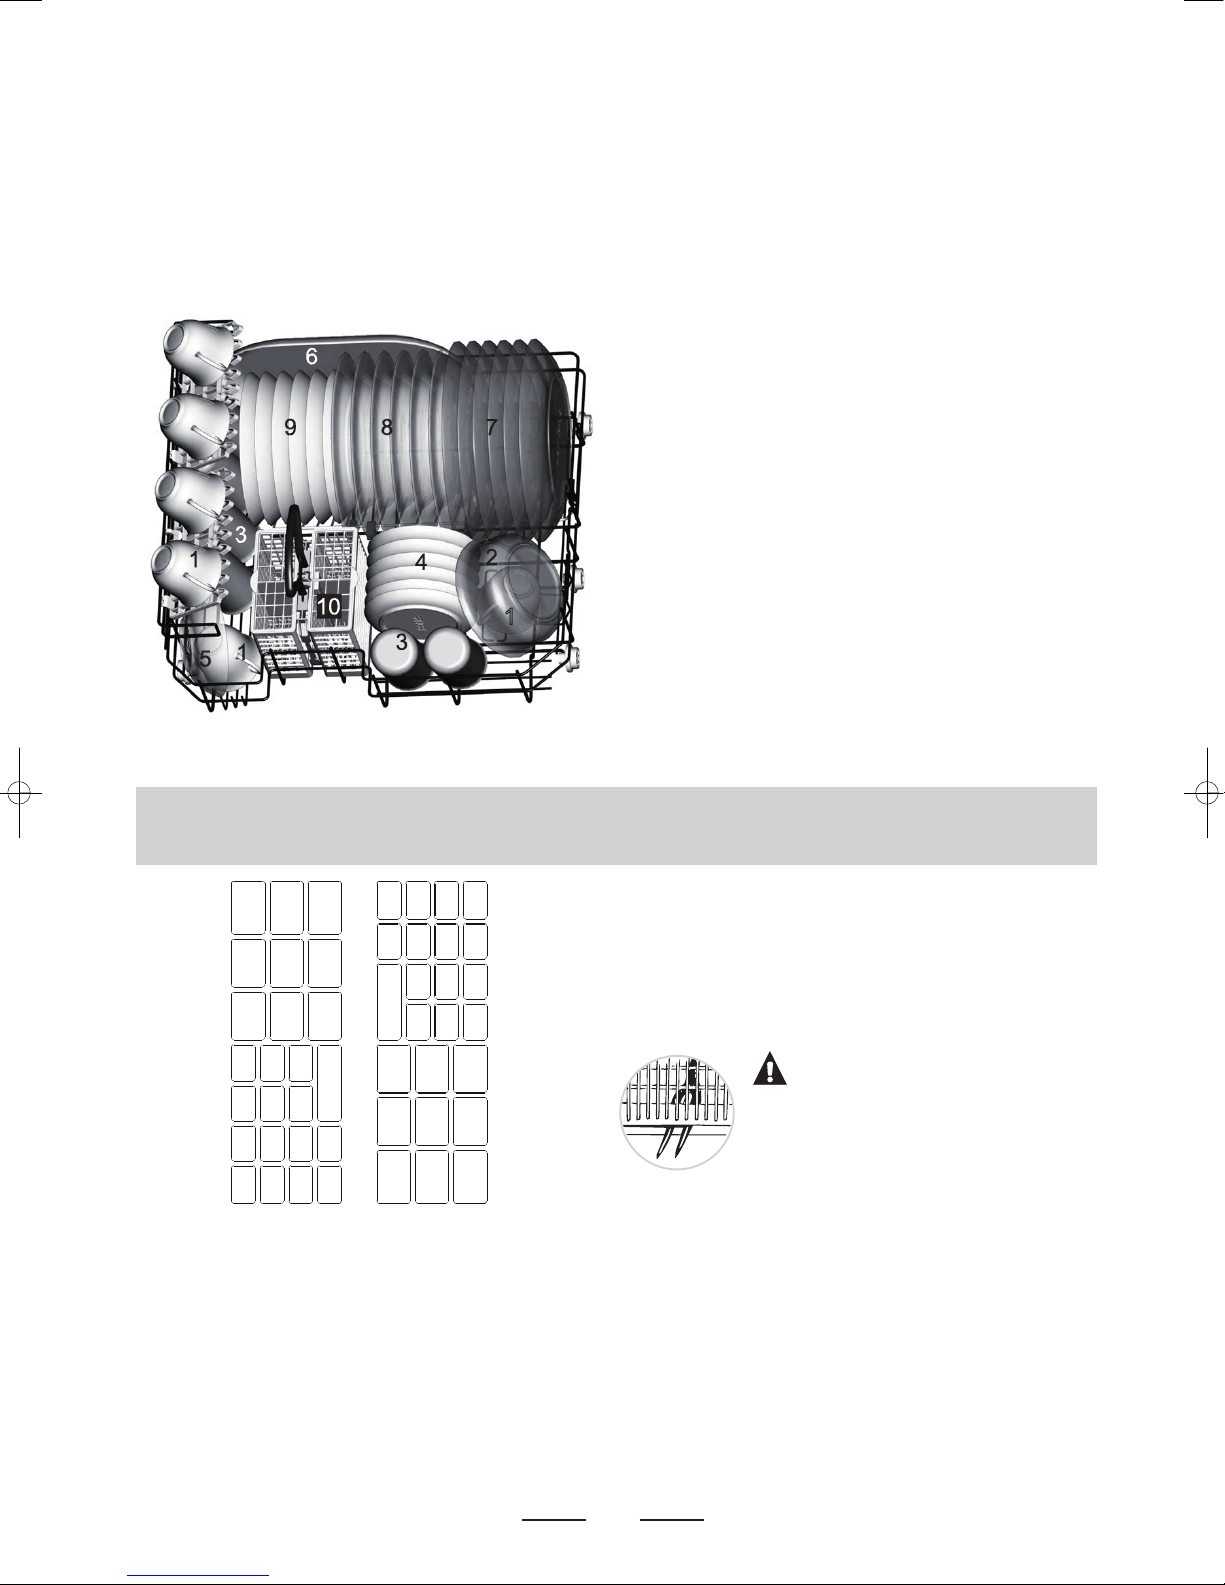
Plaats het vaatwerk zoals aangegeven in de figuur hieronder.
Het verdient voorkeur om ovenschalen en pandeksels aan de zijkant van de korf te plaatsen. Op die manier kunnen ze de sproeiarm
niet hinderen als deze ronddraait.
■ Potten, serveerschalen etc. moeten altijd ondersteboven in de korf geplaatst worden.
■ Diepe kommen moeten schuin, met de opening naar beneden geplaatst worden, zodat het water eruit kan lopen.
■ Door de rekjes naar beneden te klappen kan de onderkorf zodanig worden aangepast dat er ook grotere, of meer, potten en
pannen in passen.
BESTEKMANDJE (beladingsvoorbeeld)
WAARSCHUWING!
Zorg ervoor dat er geen voorwerpen door de
bodem van het bestekmandje kunnen steken.
Hierdoor blokkeert de sproeiarm.
1 kopjes
2 grote kom
3 glazen
4 schotels
5 diepe schotel
6 ovale schaal
7 borden
8 soepborden
9 dessertborden
10 bestekmandje
6
Bestek moet in het bestekmandje worden geplaatst, met de heften naar beneden. Wanneer het bestekmandje is voorzien van
zijvakken moet het bestek stuk voor stuk in de vakken worden geplaatst.Lang keukengerei, zoals pollepels,moeten in een liggende
(horizontale) positie, voorin de bovenkorf worden geplaatst.
512
2
2
2
2
2
1
1
5
51
1
1
5
6
5
5
4
4
8
4
4
4
4
3
3
3
3
3
7
3
1 vorken
2 soeplepels
3 dessertlepels
4 theelepeltjes
5 messen
6 opscheplepels
7 juslepel
8 serveervork
Page 9
7
HET TOESTEL AAN ZETTEN
Een wasprogramma starten...
1 Controleer of de stekker van het aansluitsnoer in het stopcontact zit.
2 Controleer of de waterkraan open staat.
3 Laad de afwasmachine (zie het hoofdstuk "De korf beladen").
4 Doe afwasmiddel in het zeepbakje (zie hoofdstukken over Zout, Afwasmiddel en Glansspoelmiddel).
5 Druk op de aan/uittoets en druk op de programmaselectietoets om het gewenste programma te kiezen.
6 Sluit de deur.Druk op de start/resettoets. Het controlelampje gaat branden.Het wasprogramma start onmiddellijk.
Stopzetten of aanpassen van een wasprogramma
Voorbeeld: Een programma dat al is gestart kan alleen in het beginstadium worden aangepast. Na langere tijd is het afwasmiddel al
over het vaatwerk verspreid of de machine heeft het waswater al weggepompt.In dat geval moet u het zeepbakje opnieuw vullen (zie
hoofdstuk Afwasmiddelbakje).
Druk min. 3 seconden op de start/resettoets. Het programma stopt. Het controlelampje dooft. Selecteer nu opnieuw het gewenste
wasprogramma met de draaiknop. Druk opnieuw op de start/resettoets om het wasprogramma weer te starten.
Na afloop van het wasprogramma
Schakel het toestel uit met de aan/uit toets. Open de deur van de afwasmachine. Wacht enkele minuten voordat u de wasmachine
uitlaadt. Direct na afloop van het programma zijn vaatwerk en bestek nog erg heet.De kans bestaat dat er door de hitte vaatwerk kan
breken. Door het vaatwerk enkele minuten te laten staan droogt het bovendien beter.
WAARSCHUWING!
Het is gevaarlijk om gedurende het wasprogramma de deur geheel te openen. U kunt in aanraking komen met heet water dat
uit de machine spat.
FILTERSYSTEEM
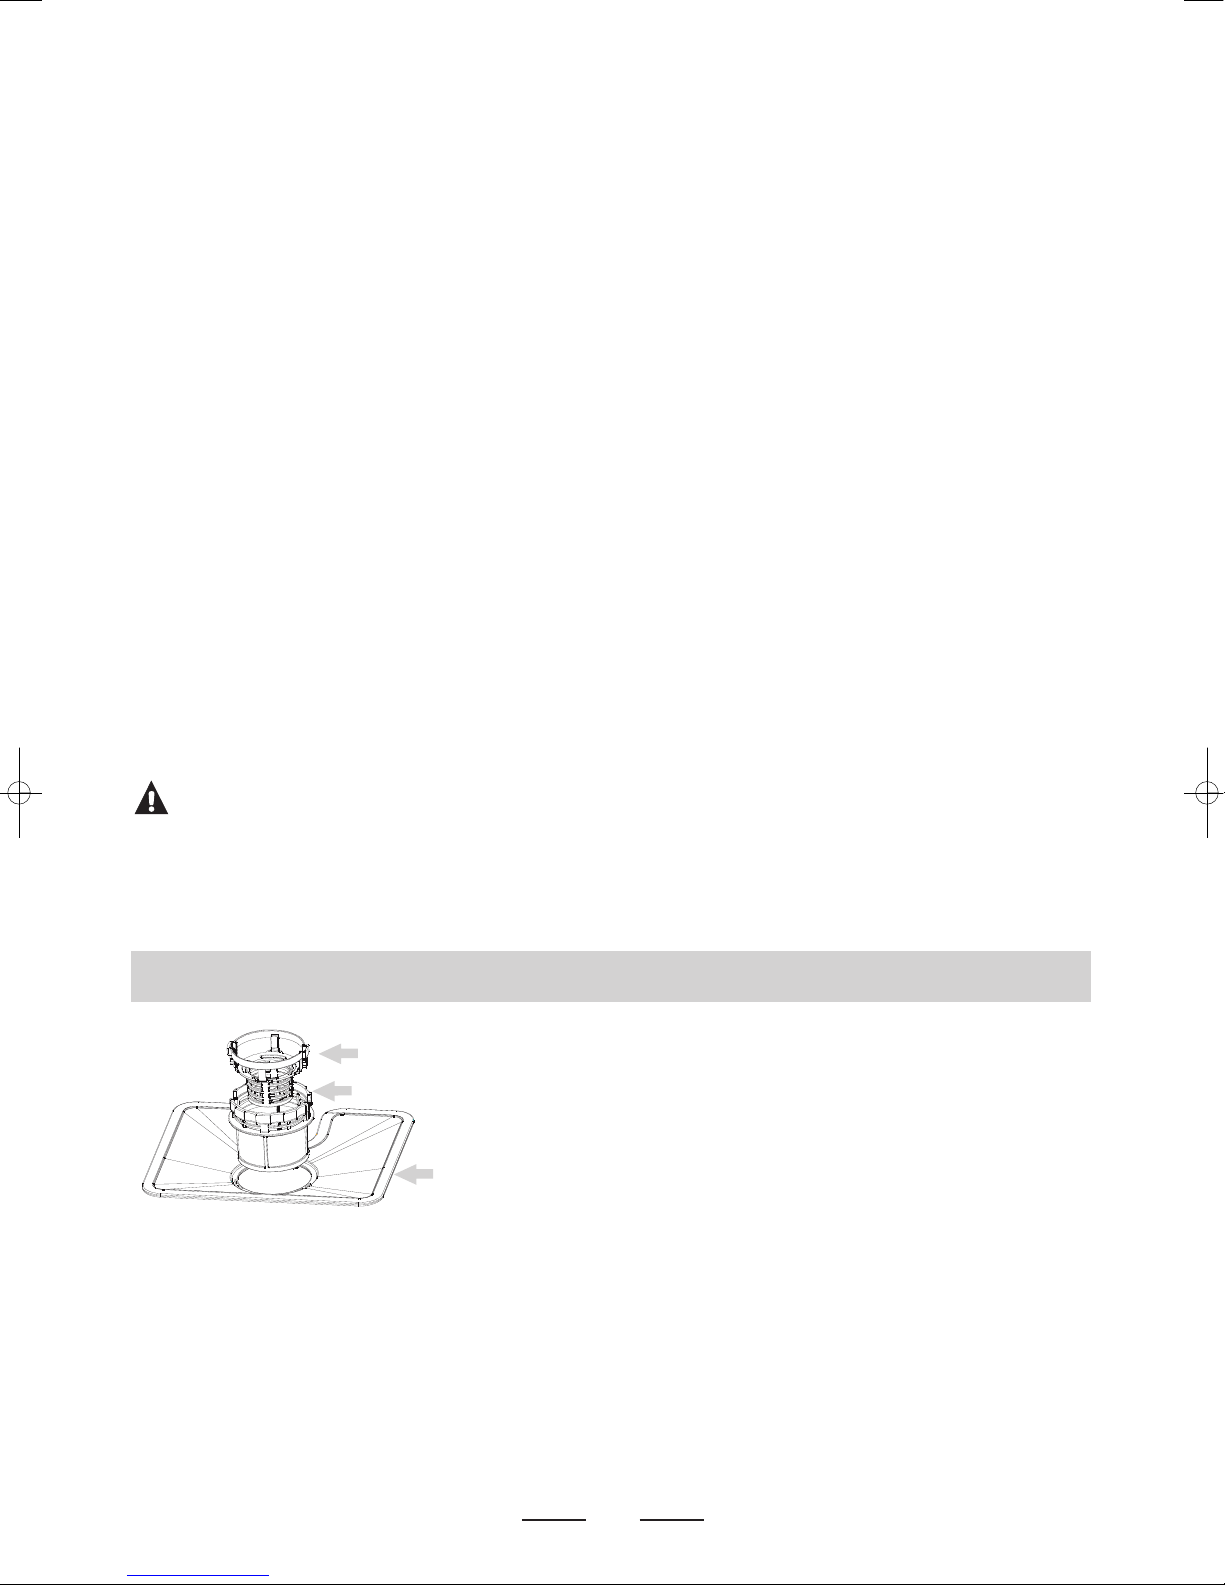
Afhankelijk van het gebruik moeten de zeven regelmatig onder de kraan afgespoeld worden.Het filtersysteem bestaat uit drie
componenten: de grote zeef, de grove zeef en de fijne zeef.
1
3
2
1 Grove zeef
Grotere delen, zoals botresten of stukjes glas die de afvoer zouden kunnen
verstoppen, worden opgevangen in de grove zeef. Om de vervuiling uit de zeef te
verwijderen moet u de de zeef tegen de klok in draaien en naar boven toe
verwijderen.
2 Grote zeef
Etensresten en vuil die op deze zeef terecht komen worden door een speciale
straal op de onderste sproeiarm naar de grote zeef gespoeld.
3 Fijne zeef
Deze zeef houdt vuil en etensresten tegen in de buurt van de afvoerpomp en zorgt
ervoor dat deze resten niet weer over het vaatwerk wordt verspreid tijdens het
programma.
Page 10
8
Reiniging van de filtergroep
Voor een optimale werking van de afwasmachine moet de gehele filtergroep worden
gereinigd. De filtergroep haalt op efficiente wijze voedselresten uit het water en zorgt ervoor
dat het waswater gedurende het wasprogramma kan blijven circuleren. Het is dan ook een
goed idee om na iedere wasbeurt de grotere voedselresten uit de filtergroep te verwijderen
door de halfronde zeef en filterhuis onder stromend water te reinigen.
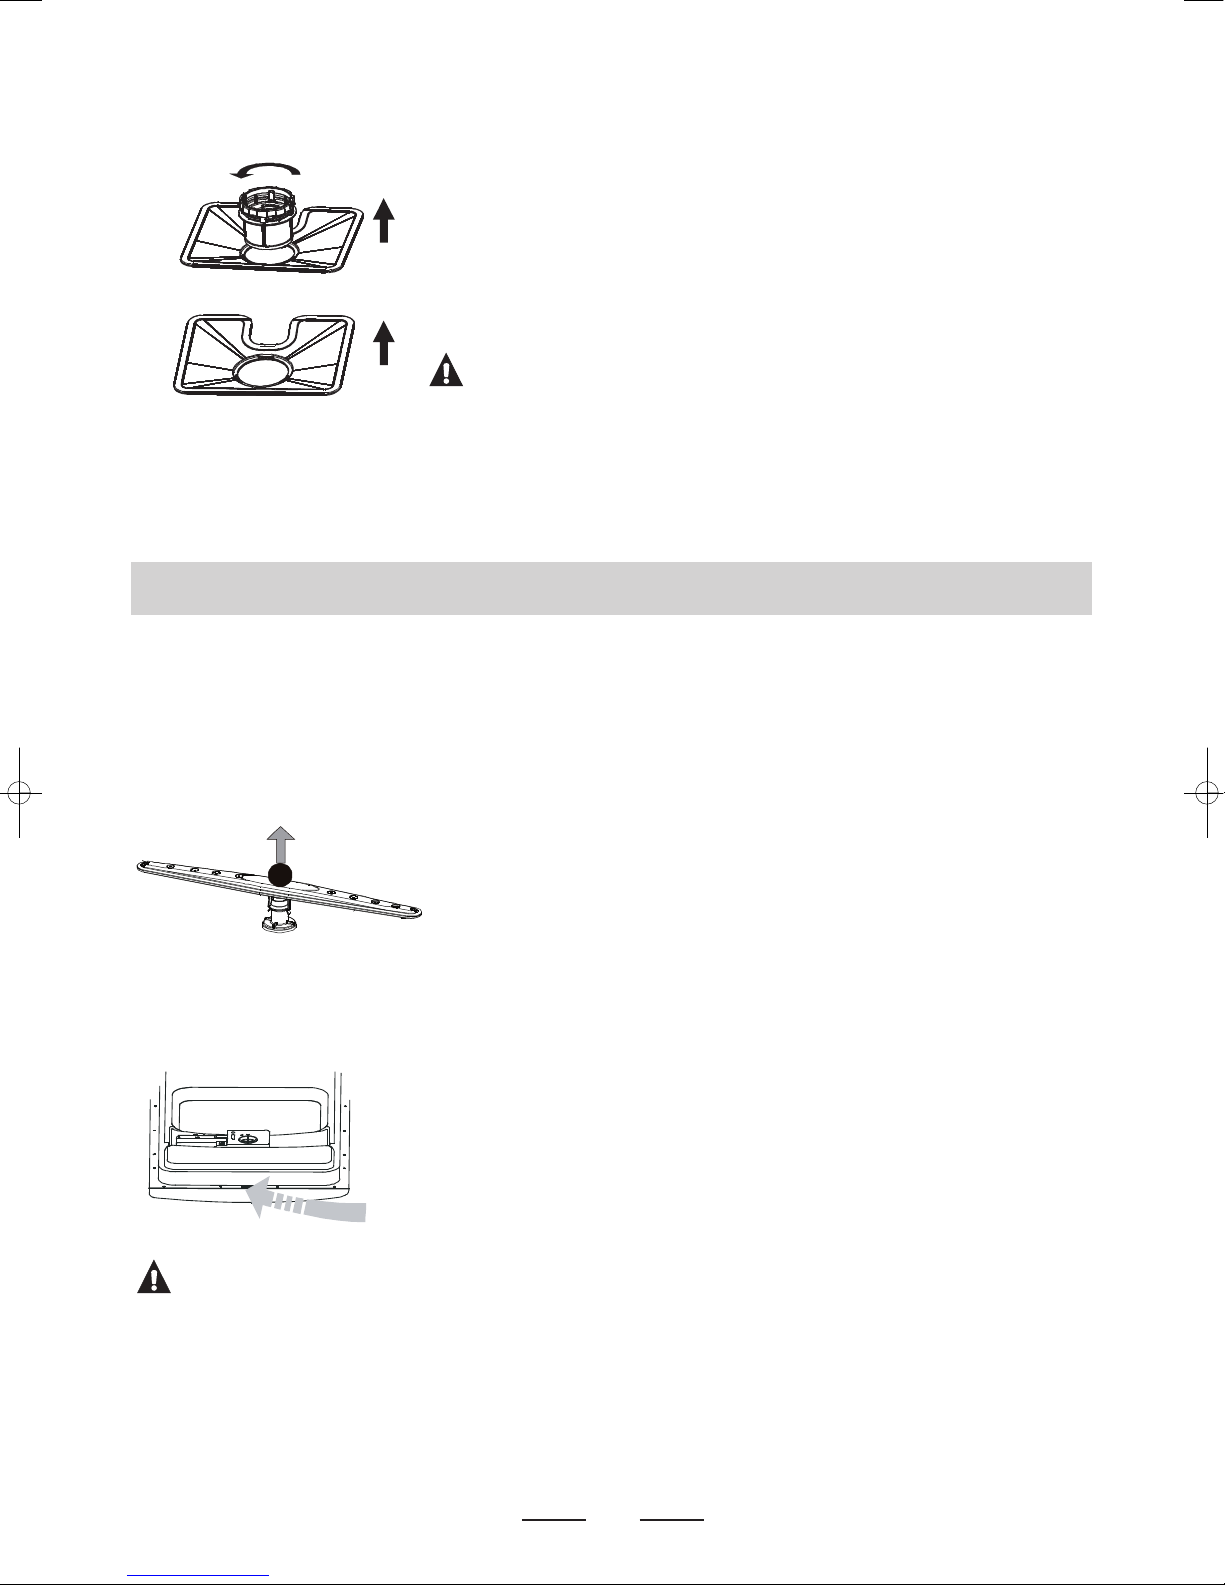
1.Draai de fijne zeef tegen de klok in en.
2. Verwijder de fijne zeef naar boven toe.
3.Verwijder de grote zeef naar boven toe.
Alle onderdelen van de filtergroep moeten minstens een keer per maand gereinigd worden.
Gebruik een afwasborstel om de grove zeef en de fijne zeef schoon te maken. Zet de
filtergroep in omgekeerde volgorde weer in elkaar..
WAARSCHUWING!
Gebruik de vaatwasser nooit zonder correct geplaatste filtergroep.Incorrect terugplaatsen
van de filtergroep heeft tot gevolg dat de afwasmachine niet meer optimaal presteert. Een
ander gevolg kan zijn dat er beschadigingen optreden aan bestek en vaatwerk.
De afwasmachine onderhouden
Bescherming tegen vorst
De afwasmachine moet altijd in een verwarmde vorstvrije ruimte worden opgesteld.
Sproeiarm reinigen
Het is noodzakelijk dat u de sproeiarm regelmatig reinigt.Vervuiling verstopt op den duur de sproeikoppen en de lagers van de
sproeiarm.
Sproeiarm verwijderen:
Verwijder de sproeiarm naar boven toe
Reinig de sproeiarm in een warm sopje en maak de sproeikoppen met een zachte borstel
schoon. Spoel de sproeiarm grondig af en plaats hem terug.
Deur reinigen
Reinig de rand van de deur inclusief het afdichtingsrubber met een zachte,vochtige doek. Zorg
ervoor dat er geen water in het deurslot en de elektrische componenten kan binnendringen.
Gebruik geen schoonmaakmiddelen in een spuitbus. Gebruik ook geen agressieve
schoonmaakmiddelen, zoals schuursponsjes.Deze schoonmaakmiddelen kunnen de lak
beschadigen. Sommige papieren handdoeken kunnen ook krassen achterlaten.
WAARSCHUWING!
Gebruik voor het onderhoud van de deur nooit een schoonmaakmiddel in een spuitbus. Hierdoor kunnen beschadigingen ontstaan
aan het deurslot en de elektrische componenten. Gebruik nooit agressieve of vluchtige schoonmaakmiddelen of bepaalde soorten
papieren handdoeken omdat ze krassen of vlekken veroorzaken op het roestvast-stalen oppervlak.
Maak het bedieningspaneel schoon met een licht vochtige doek. Maak het bedieningspaneel hierna goed droog.
1
1
2
3
Page 11
9
Hoe houdt u de afwasmachine in goede conditie
Over de elektrische aansluiting
Elektrische eisen
Deze afwasmachine is ontworpen voor aansluiting op 220-240 V - 50 Hz,met een groepszekering van 16 Amp.
WAARSCHUWING!
Overtuig u ervan dat het stopcontact geaard is voordat u het toestel erop aansluit.
Elektrische aansluiting
Zorg ervoor dat de aansluitwaarde en de netspanning overeenkomen met die op het gegevensplaatje.Steek de stekker in een geaard
stopcontact. Raadpleeg de installateur indien de stekker van het toestel niet in het stopcontact past.
Koudwateraansluiting
Sluit de koudwateraansluiting aan op een wasmachinekraan incl. beluchter met schroefdraad
(
3
⁄4 inch) en zorg ervoor dat deze goed is bevestigd.
Bij een nieuwe waterleiding of wanneer deze lang niet is gebruikt eerst het water enige tijd door laten stromen om eventuele
verontreinigingen te verwijderen.Wanneer u dit nalaat zou de waterinlaat verstopt en uw toestel beschadigd kunnen raken.
Heetwateraansluiting
De vaatwasmachine is niet geschikt voor heetwater toevoer.
Plaatsen van het toestel
■ Na iedere wasbeurt
Sluit na iedere wasbeurt de watertoevoer af. Laat de deur op
een kier staan zodat nare luchtjes kunnen ontsnappen.
■ Haal de stekker uit het stopcontact
Verwijder,voordat u met onderhouds- of
schoonmaakwerkzaamheden begint, de stekker uit het
stopcontact. Neem geen risico's
■ Geen oplosmiddelen of agressieve
schoonmaakmiddelen
Gebruik geen oplosmiddelen of agressieve
schoonmaakmiddelen voor het onderhoud van de deur en de
rubber delen van de afwasmachine. Gebruik in plaats daarvan
een zachte doek en een warm sopje.
■ Wanneer u op vakantie gaat
Draai, voordat u met vakantie gaat, een wasprogramma
terwijl de afwasmachine leeg is. Trek hierna de stekker uit het
stopcontact, sluit de watertoevoer af en laat de deur op een
kier openstaan. De deurrubbers hebben hierdoor een langere
levensduur en u voorkomt het ontstaan van nare luchtjes.
■ Het toestel verplaatsen
Houd het toestel verticaal wanneer u het gaat vervoeren. Als
het absoluut noodzakelijk is kan de afwasmachine eventueel
op de achterzijde gelegd worden.
■ Deurrubbers
Een van de oorzaken van nare luchtjes zijn etensresten die
zich afzetten in de deurrubbers. U voorkomt dit door de
deurrubbers regelmatig met een vochtige spons af te nemen.
LET OP! voor uw persoonlijke veiligheid:
GEBRUIK GEEN VERLENGSNOER OF EEN VERLOOPSTEKKER BIJ DIT TOESTEL.
VERWIJDER NOOIT DE GROEN/GELE AARDEDRAAD. KNIP NOOIT DE AARDEDRAAD AF!
Plaats het toestel op de gewenste plaats met de achterkant tegen een muur en met de zijkanten in lijn met eventuele (keuken)kastjes
of zijmuren. De vaatwasser is aan de achterzijde voorzien van aansluitingen voor de afvoerpijp en de waterinlaatpijp.
Page 12
10
Aansluiten van de afvoerslang
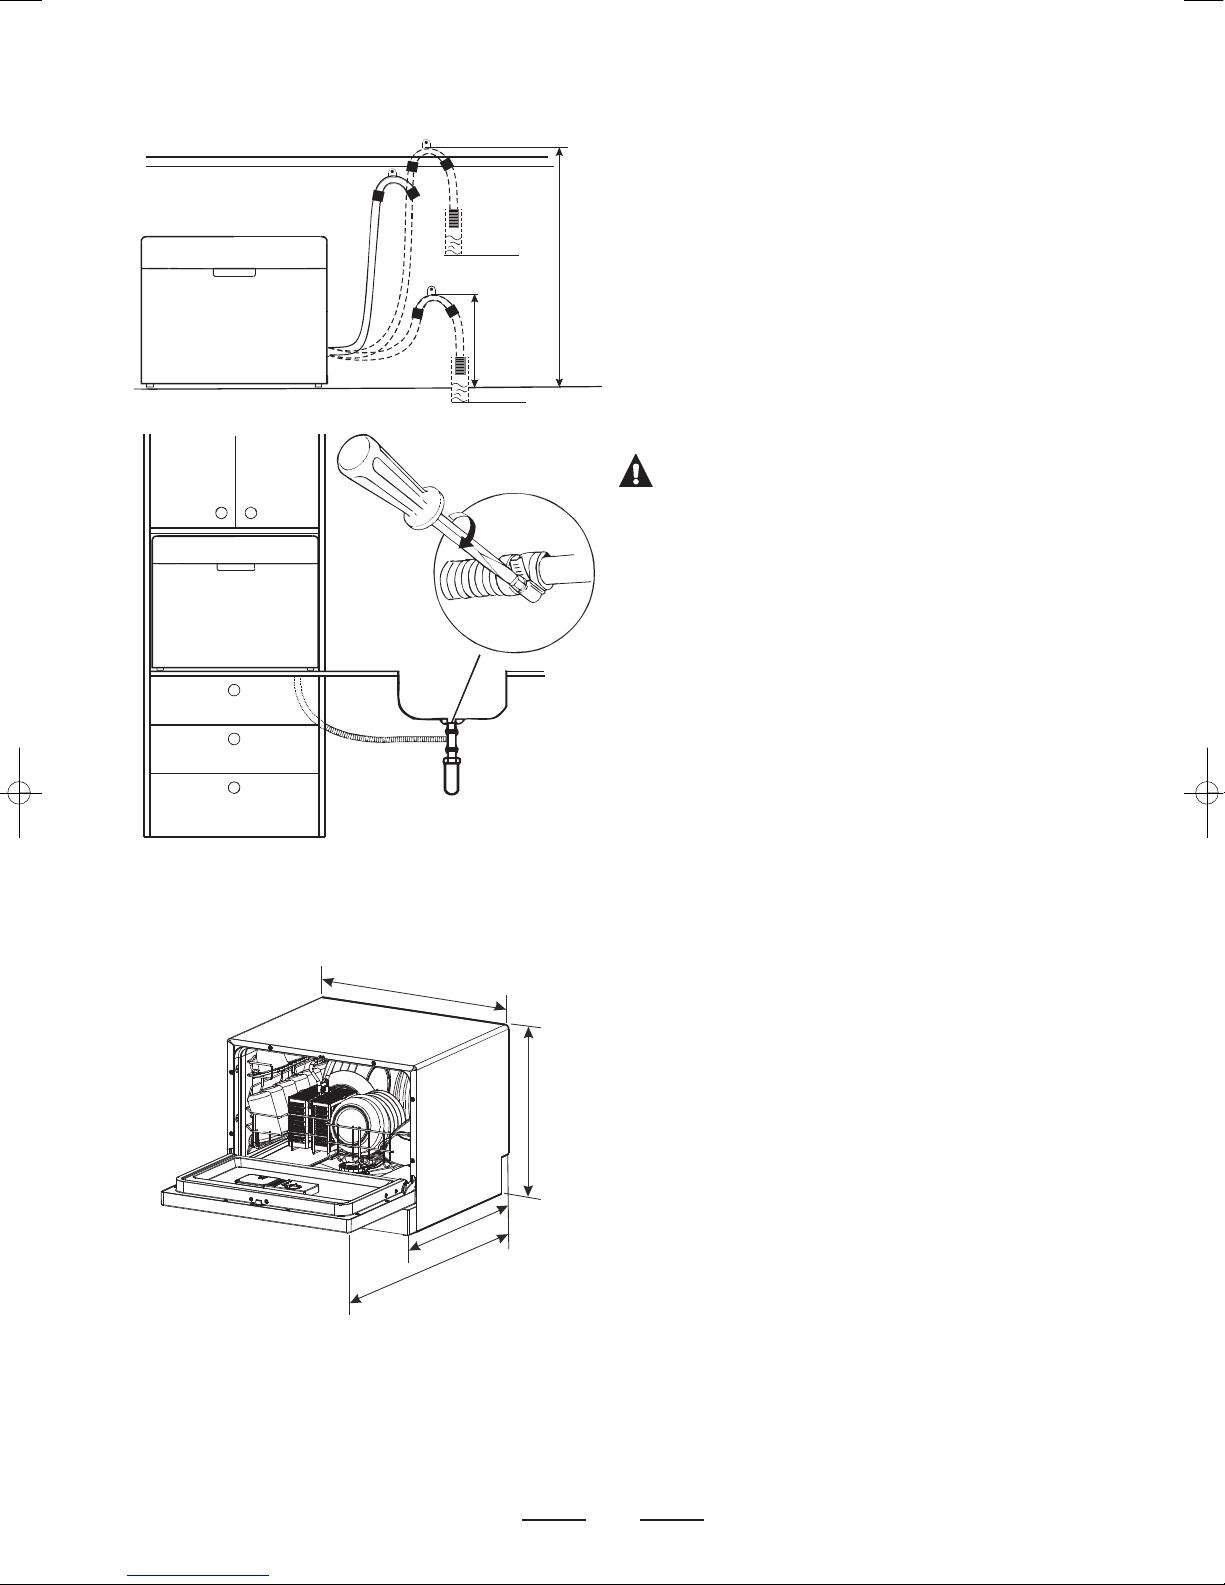
Steek de afvoerslang in een afvoerpijp met een minimale diameter
van 4 cm of leg hem in een wasbak. Gebruik het bijgeleverde
plastic bochtje. Let op dat er geen knik in de afvoerslang zit. Het
vrije uiteinde van de afvoerslang moet zich op een hoogte tussen
de 40 en 100 cm bevinden en mag niet in water ondergedompeld
zijn.
Hoe de afvoerslang te laten
leeglopen
Als de hoogte van de wasbak meer dan 100 cm is kan het water
niet via de wasbak afgevoerd worden. In dat geval moet de
afvoerslang in een schaal of in een geschikte opvangbak worden
gelegd, die lager is dan de wasbak.
WAARSCHUWING!
Sluit de waterkraan na gebruik om te voorkomen dat er teveel
water achterblijft in de waterinlaat (voor modellen zonder
veiligheidsslang).
AFMETINGEN (mm)
min. 400 mm
max. 1000 mm
ø 40 mm
ø 40 mm
500
550
800
438
Page 13
11
Voordat u contact opneemt met de servicedienst
Tips bij het verhelpen van storingen
Bestudeer de storingstabellen op de volgende pagina's.Wellicht hoeft u dan geen contact op te nemen met de
servicedienst.
Probleem
De afwasmachine start niet.
Water wordt niet
weggepompt.
Schuimvorming in de kuip.
Vlekken in de kuip.
Witte aanslag op de
binnenkant van de kuip.
Roestvlekken op vaatwerk.
Kloppend geluid in de
afwasmachine.
Ratelend geluid in de
afwasmachine.
Overige geluiden.
Mogelijke oorzaken
Zekering defect of de
aardlekschakelaar is
geactiveerd.
De elektriciteitsvoorziening
is niet ingeschakeld.
De deur van de
afwasmachine zit niet goed
dicht
Knik in de afvoerslang.
Filter verstopt.
Keukenafvoer verstopt.
Slecht afwasmiddel.
Glansspoelmiddel geknoeid.
Afwasmiddel met een
kleurstof gebruikt.
Hard water.
Vaatwerk is niet
vaatwasserbestendig.
Geen programma gedraaid
na het zout bijvullen.
Hierdoor is zout terecht
gekomen op het vaatwerk
Dop van glansspoelmiddelreservoir zit niet vast.
Een sproeiarm raakt
vaatwerk.
Bestek staat niet rammelvast
in de bestekmand of er is
iets kleins uit korf gevallen.
Sommige geluiden zijn
normaal.
Oplossing
Vervang de zekering of reset de werkschakelaar.
Verwijder andere apparaten die op dezelfde groep zijn
aangesloten.
Overtuig u ervan dat de afwasmachine is ingeschakeld
en de deur gesloten.
Overtuig u ervan dat de stekker in het stopcontact zit.
Controleer of de deur goed dicht zit.
Controleer de afvoerslang.
Reinig de filtergroep (zie pag. 8).
Controleer of de keukenafvoer niet verstopt is en of
het water goed kan weglopen.
Gebruik uitsluitend speciaal afwasmiddel voor
afwasmachines om schuimvorming te voorkomen.
Open de deur van de afwasmachine om het schuim te
laten verdampen. Giet ongeveer 3 liter water in de
kuip, sluit de deur en start daarna het
spoelprogramma.
Veeg geknoeid glansspoelmiddel altijd direct weg.
Gebruik alleen afwasmiddelen zonder kleurstof.
Reinig de kuip met een vochtige spons met
afwasmiddel. Hoger zoutverbruik instellen.
Reinig alleen vaatwasserbestendig keukengerei in de
afwasmachine.
Start altijd het sproelprogramma nadat er zout is
bijgevuld.
Controleer of de dop van het glansspoelmiddelreservoir goed vast zit.
Zorg dat de sproeiarm vrij kan bewegen en niet
gehinderd wordt door het vaatwerk.
Zorg ervoor dat alles stevig in de afwasmachine/
bestekmand staat.
Geluid van omwalspomp/spoelgeluiden; openen van
het afwasmiddelenbakje.
Technische
problemen
Algemene
problemen
Geluid
Page 14
12
Voordat u contact opneemt met de servicedienst
Probleem
Vaatwerk niet schoon.
Wolkachtige vlekken op
glaswerk.
Zwarte of grijze vlekken op
vaatwerk.
Er blijft afwasmiddel achter
in het afwasmiddelenbakje.
Vaatwerk niet droog.
Mogelijke oorzaken
Korf niet goed beladen.
Onjuist programma.
Niet genoeg afwasmiddel
gebruikt.
Sproeiarm wordt
geblokkeerd door vaatwerk.
Filtergroep verstopt of niet
goed geplaatst.
Sproeiarm verontreinigd.
Combinatie van zacht water
en te veel afwasmiddel.
Aluminium kookgerei heeft
langs vaatwerk geschuurd.
Het afwasmiddelenbakje
wordt geblokkeerd door
vaatwerk
Korf niet goed beladen.
Te weinig glansspoelmiddel.
Vaatwasmachine te snel
uitgepakt.
Onjuist programma.
Ongeschikt vaatwerk.
Oplossing
Zie “De korf beladen” op pagina 6.
Selecteer een krachtiger programma, zie pag.3.
Gebruik meer afwasmiddel of probeer een ander merk
afwasmiddel.
Zorg dat de sproeiarm vrij kan bewegen en niet
gehinderd wordt door het vaatwerk.
Reinig de filtergroep en zorg dat deze correct geplaatst
is (zie pag. 8).
Reinig de sproeiarm (zie pag. 8).
Gebruik minder afwasmiddel als u zacht water heeft en
kies een korter programma om het glaswerk te
reinigen.
Verwijder de vlekken met een mild schuurmiddel.
Belaad de korf zodanig dat het vaatwerk het
afwasmiddelenbakje niet langer blokkeert.
Zie “De korf beladen” op pagina 6.
Verhoog de hoeveelheid glansspoelmiddel (zie pag.5).
Pak de vaatwasser niet direct na afloop van het
programma uit. Open de deur van de afwasmachine
iets zodat de stoom kan ontsnappen. Wacht enkele
minuten voordat u de afwasmachine uitpakt. Pak eerst
de onderste korf uit, zo voorkomt u dat water uit de
bovenkorf op vaatwerk in de onderkorf valt.
Bij het snelle programma is de temperatuur lager.
Hierdoor kan het droogresultaat minder goed zijn.
Kies het normale programma.
Sommig vaatwerk (van kunststof, of met een kunststof
coating) is lastiger te drogen in de afwasmachine.
Code
Controlelampje 3-in-1
knippert.
Controlelampje voor glas
programma knippert.
Probleem
Watertoevoer duurt te lang.
Waterlekkage.
Mogelijke oorzaken
Watertoevoerkraan niet geopend,toevoerslang
gekneld of waterdruk te laag.
Een onderdeel van de afwasmachine lekt water.
Servicedienst waarschuwen.
Foutcodes
Onbevredigende
wasresultaten
Onbevredigende
droogresultaten
Page 15
13
Verpakking en toestel afvoeren
■ Verwijder de deur van de afwasmachine of maak het slot onklaar wanneer u het toestel afdankt.
■ Voer verpakkingsmaterialen op verantwoorde wijze en conform de overheidsbepalingen af.
Bij de vervaardiging van dit toestel is gebruik gemaakt van duurzame materialen.
De verpakking van het toestel is recyclebaar.Gebruikt kunnen zijn:
■ karton;
■ papier;
■ polyethyleenfolie (PE);
■ CFK-vrij polystyreen (PS-hardschuim);
■ polypropyleenband (PP).
Deze materialen op verantwoorde wijze en conform de overheidsbepalingen afvoeren.
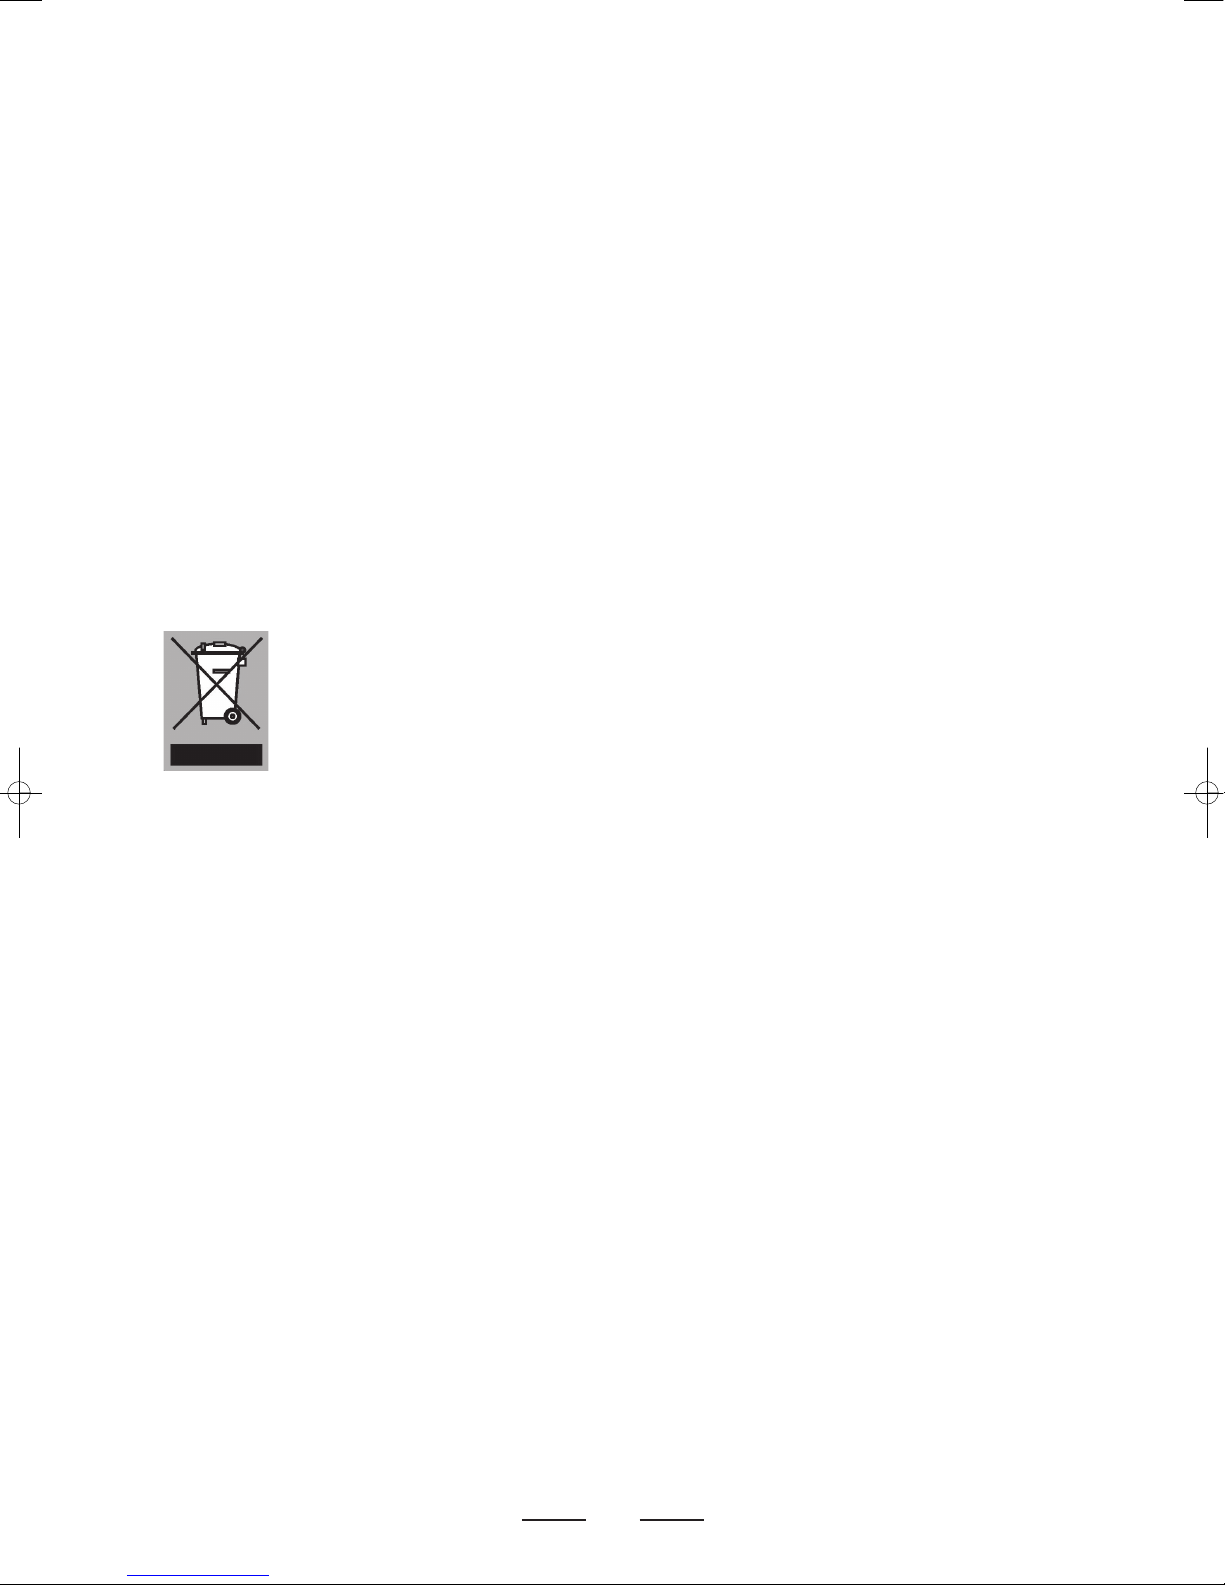
Op het typeplaatje is het symbool van een doorgekruiste vuilnisbak aangebracht:
Dit betekent dat het apparaat aan het einde van zijn levensduur niet bij het gewone huisvuil mag worden gevoegd, maar naar
een speciaal centrum voor gescheiden afvalinzameling van de gemeente moet worden gebracht of naar een verkooppunt dat
deze service verschaft.
Het apart verwerken van een huishoudelijk apparaat zoals deze afwasmachine voorkomt mogelijk negatieve gevolgen voor het
milieu en de gezondheid die door een ongeschikte verwerking ontstaat en zorgt ervoor dat de materialen waaruit het apparaat
bestaat teruggewonnen kunnen worden om een aanmerkelijke besparing van energie en grondstoffen te verkrijgen.
Om op de verplichting tot gescheiden verwerking van elektrische huishoudelijke apparatuur te wijzen, is op het product het
symbool van een doorgekruiste vuilnisbak aangebracht.
Page 16

14
Page 17
Dishwasher
USER MANUAL
ETNA - EVW7860
Page 18

Safety information . . . . . . . . . . . 16
Operating instructions
Control panel . . . . . . . . . . . . . . . . . . . . . . . . . . . . . 18
Dishwasher features . . . . . . . . . . . . . . . . . . . . . . . 18
Washing program table . . . . . . . . . . . . . . . . . . . 19
Before using for the first time . . . . . . . . . . . . . .19
Water softener . . . . . . . . . . . . . . . . . . . . . . . . . . . . 20
Rinse aid . . . . . . . . . . . . . . . . . . . . . . . . . . . . . . . . . . 21
Detergent . . . . . . . . . . . . . . . . . . . . . . . . . . . . . . . . . 21
Loading the dishwasher rack . . . . . . . . . . . . . . 22
Turning on the appliance . . . . . . . . . . . . . . . . . .23
Filtering system . . . . . . . . . . . . . . . . . . . . . . . . . . . 23
Maintenance . . . . . . . . . . . . . . . . . . . . . . . . . . . . . . 24
Installation instruction
Electrical connection . . . . . . . . . . . . . . . . . . . . . . 25
Water connection . . . . . . . . . . . . . . . . . . . . . . . . . 25
Troubleshooting
Before calling for service . . . . . . . . . . . . . . . 27, 28
Disposal of packaging and
appliance . . . . . . . . . . . . . . . . . . . . . 29
Read this manual
This manual contains Safety Instructions, Operating
Instructions, Installation Instructions and
Troubleshooting Tips. Carefully reading it before using
the dishwasher will help you to use and maintain the
dishwasher properly.
Before calling for service
To review the section on Troubleshooting Tips will help
you to solve some common problems by yourself and
not need to ask for the help of professional technicians.
NOTE:
- The manufacturer, following a policy of constant development and
updating of the product, may make modifications without giving prior
notice.
- Modifications to the product made by the user are not covered by the
guarantee.
Page 19
17
WARNING!
When using you dishwasher,follow the below basic precautions including the following:
IMPORTANT SAFETY INFORMATION
READ ALL INSTRUCTIONS BEFORE USING
GROUNDING INSTRUCTIONS
■ This appliance must be grounded. In the event of a
malfunction or breakdown, grounding will reduce
the risk of electric shock by providing a path of least
resistance of electric current.This appliance is
equipped with a cord having an equipmentgrounding conductor and a grounding plug.The
plug must be plugged into an appropriateoutlet
that is installed and grounded in accordance with all
local codes and ordinances.
WARNING!
■ Improper connection of the equipment-grounding
conductor can result in a risk of electric shock. Check
with a qualified electrician or service representative
if you are in doubt whether the appliance is
properly grounded. Do not modify the plug
provided with the appliance if it is not fit for the
outlet. Have a proper outlet installed by a qualified
electrician.
■ Do not abuse, sit on, or stand on the door or dish
rack of the dishwasher.
■ Do not wash plastic items unless they are marked
dishwasher safe or the equivalent. For plastic items
not so marked, check the manufacturer's
recommendations.
■ Use only detergent and rinse additives designed for
an automatic dishwasher.Never use soap, laundry
detergent, or hand washing detergent in your
dishwasher.
■ Store the detergents in a safe place,out of reach of
children.
■ Keep children away from detergent and rinse aid,
keep children away from the open door of the
dishwasher,there could still be some detergent left
inside. Please contact a doctor if detergent is
swallowed and bring along the packaging of the
detergent.
■ The door should not be left in the open position
since this could present a tripping hazard.
■ During installation, the power supply and the water
hoses must not be excessively or dangerously bent
or flattened.
■ Do not tamper with controls.
■ The appliance is not intended for use by young
children.
■ Dishwasher detergents are strongly alkaline.They
can be extremely dangerous if swallowed. Avoid
contact with skin and eyes and keep children away
from the dishwasher when the door is open.
■ Do not operate your dishwasher unless all enclosure
panels are properly in place. Do not open the door
when the dishwasher is operating.
■ Do not place any heavy objects on the door when it
is open, do not stand on the door. The appliance
could tip forward and could be damaged.
■ When loading the racks:
Locate sharp items so that they are not likely to
damage the door seal.
■ If the supply cord is damaged, it must be replaced
by the manufacturer or its service agent or a
similarly qualified person.
■ Use the dishwasher only for its intended function.
■ Young children should be supervised to ensure that
they do not play with the appliance.
WARNING! PROPER USE
READ AND FOLLOW THIS SAFETY INFORMATION CAREFULLY.
SAVE THESE INSTRUCTIONS.
Page 20
18
IMPORTANT!
To get the best performance fromyour dishwasher, read all operating instructions.
Control panel
1 Power button:To turn on/off the power supply.
2 Power light :To be on when the Power button is pressed
down.
3 Rinse aid warning light: To be on when the dispenser
needs to be refilled.
4 Water softener warning light:To be on when the
softener needs to be refilled.
5 Program indicator lights.
6 Washing program selector. Press the button repeatedly
to select the desired washing program.
7 Start/reset button. Press this button to start, pause or
reset the washing program.
1 6 7
2 3 4 5
1 basket
2 spray arm
3 water softener
4 filter assembly
5 detergent dispenser
6 cup shelf
7 cup shelf
8 rinse aid dispenser
9 drain pipe connector
10 inlet pipe connector
1
6
3
5
9 10
4
2
8
7
Dishwasher features
Page 21
19
BEFORE USING FOR THE FIRST TIME
■ Set the water softener.
■ Fill the salt container with 0.5 liter water, then fill it with salt.
■ Fill the he rinse aid dispenser.
■ Fill the detergent dispenser.
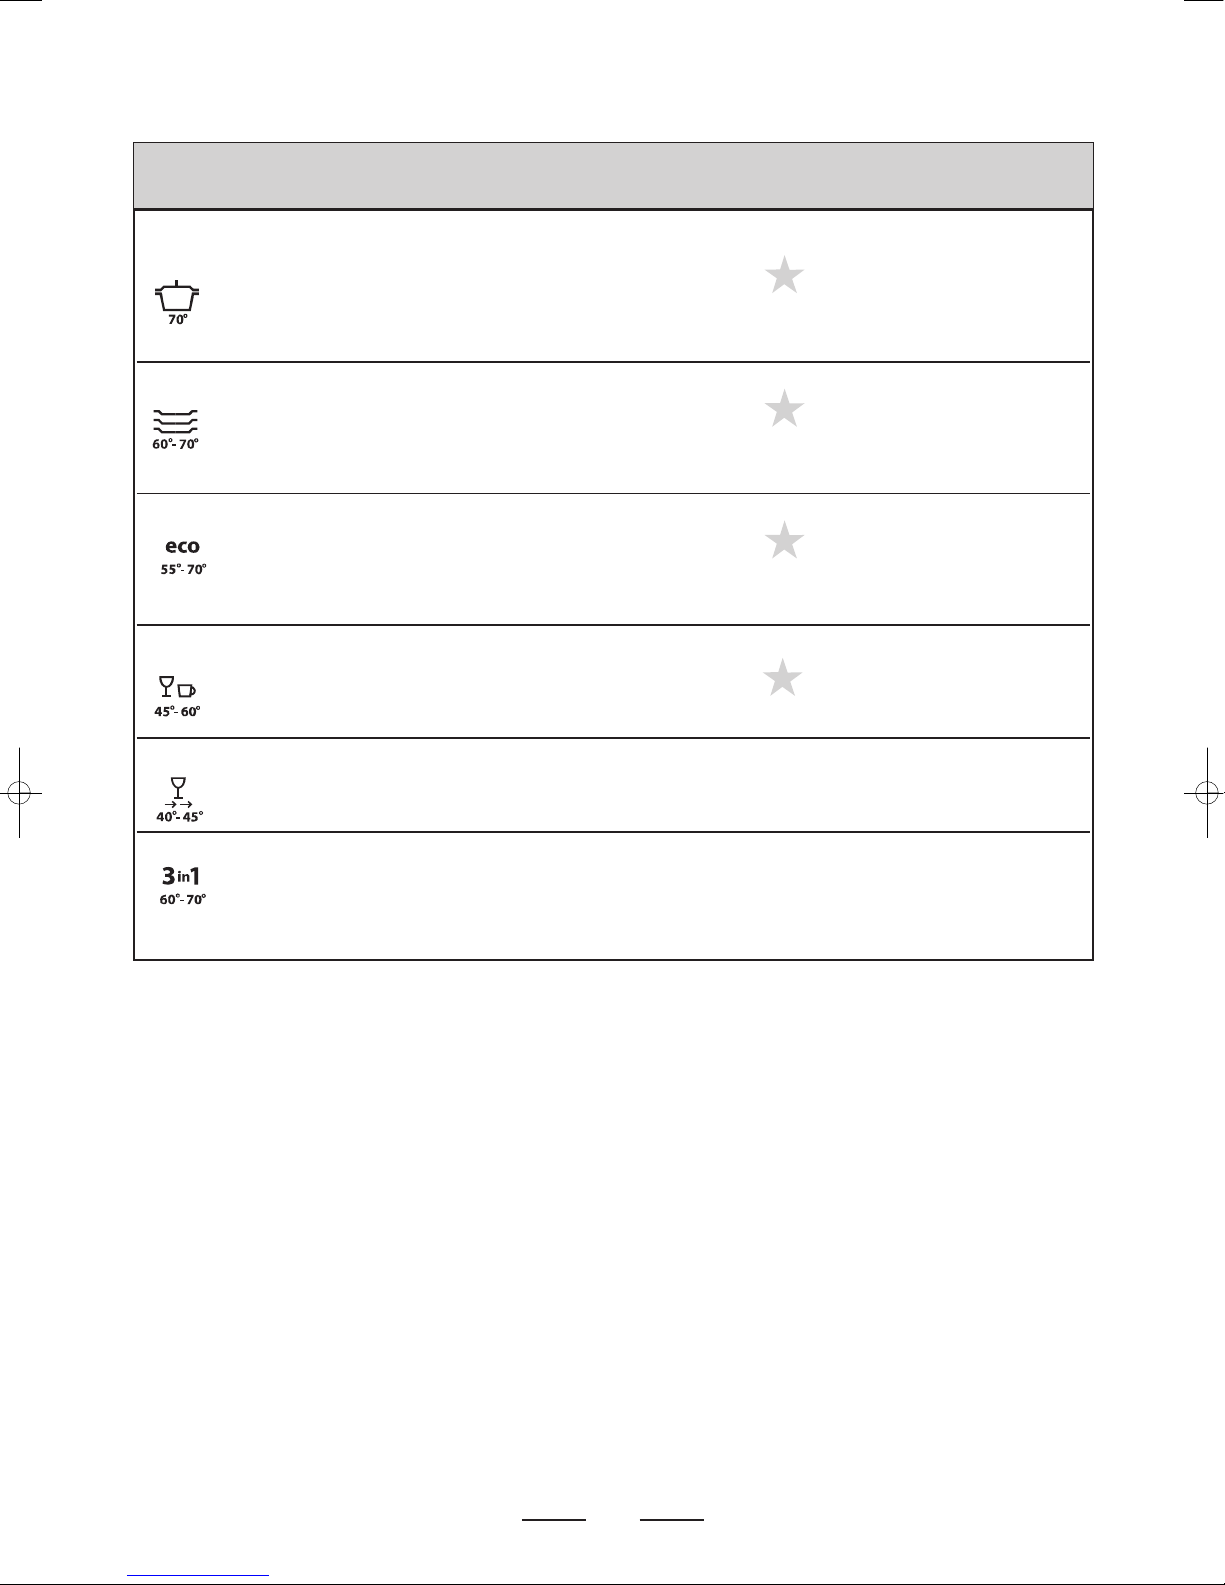
WASHING PROGRAM TABLE
pre-wash (50 °C)
Intensive For the heaviest soiled loads, wash (70 °C)
such as pots, pans,casserole, rinse
145 0.94 11
dishes and dishes that have rinse 3 /15 gr
been sitting with dried food rinse (70 °C)
on them for a while. dry
Normal For normally soiled loads, pre-wash
such as plates, glasses and wash (60 °C) 3 / 15 gr 125 0.70 8.4
lightly soiled pans. Standard rinse
daily cycle. rinse (70 °C)
dry
Eco For lightly soiled loads, such pre-wash
as plates,glasses, bowls and wash (55 °C) 3 / 15 gr. 170 0.63 8.4
elightly soiled pans. rinse
rinse (70 ºC)
dry
Glasses For lightly soiled loads, such wash (45 °C)
as glasses, crystal and delicate rinse
porcelain. rinse (60 °C) 15 gr.
75 0.48 6.8
dry
Rapid A shorter wash for lightly wash (40 °C)
soiled loads that do not rinse 15 gr. 30 0.30 6.0
need drying. rinse
For normally soiled loads, pre-wash
such as plates, glasses and wash (60 °C) 3 in 1 tablet 140 0.70 8.4
lightly soiled pans. Standard rinse
daily cycle. rinse (70 °C)
dry
PPrrooggrraamm PPrrooggrraamm DDeesscciippttiioonn DDeetteerrggeenntt RRiinnssee TTiimmee EEnneerrggyy WWaatteerr
iinnffoorrmmaattiioonn ooff pprrooggrraamm pprree//mmaaiinn aaiidd ((mmiinn)) ((kkWWhh)) ((ll))
Page 22
WATER SOFTENER
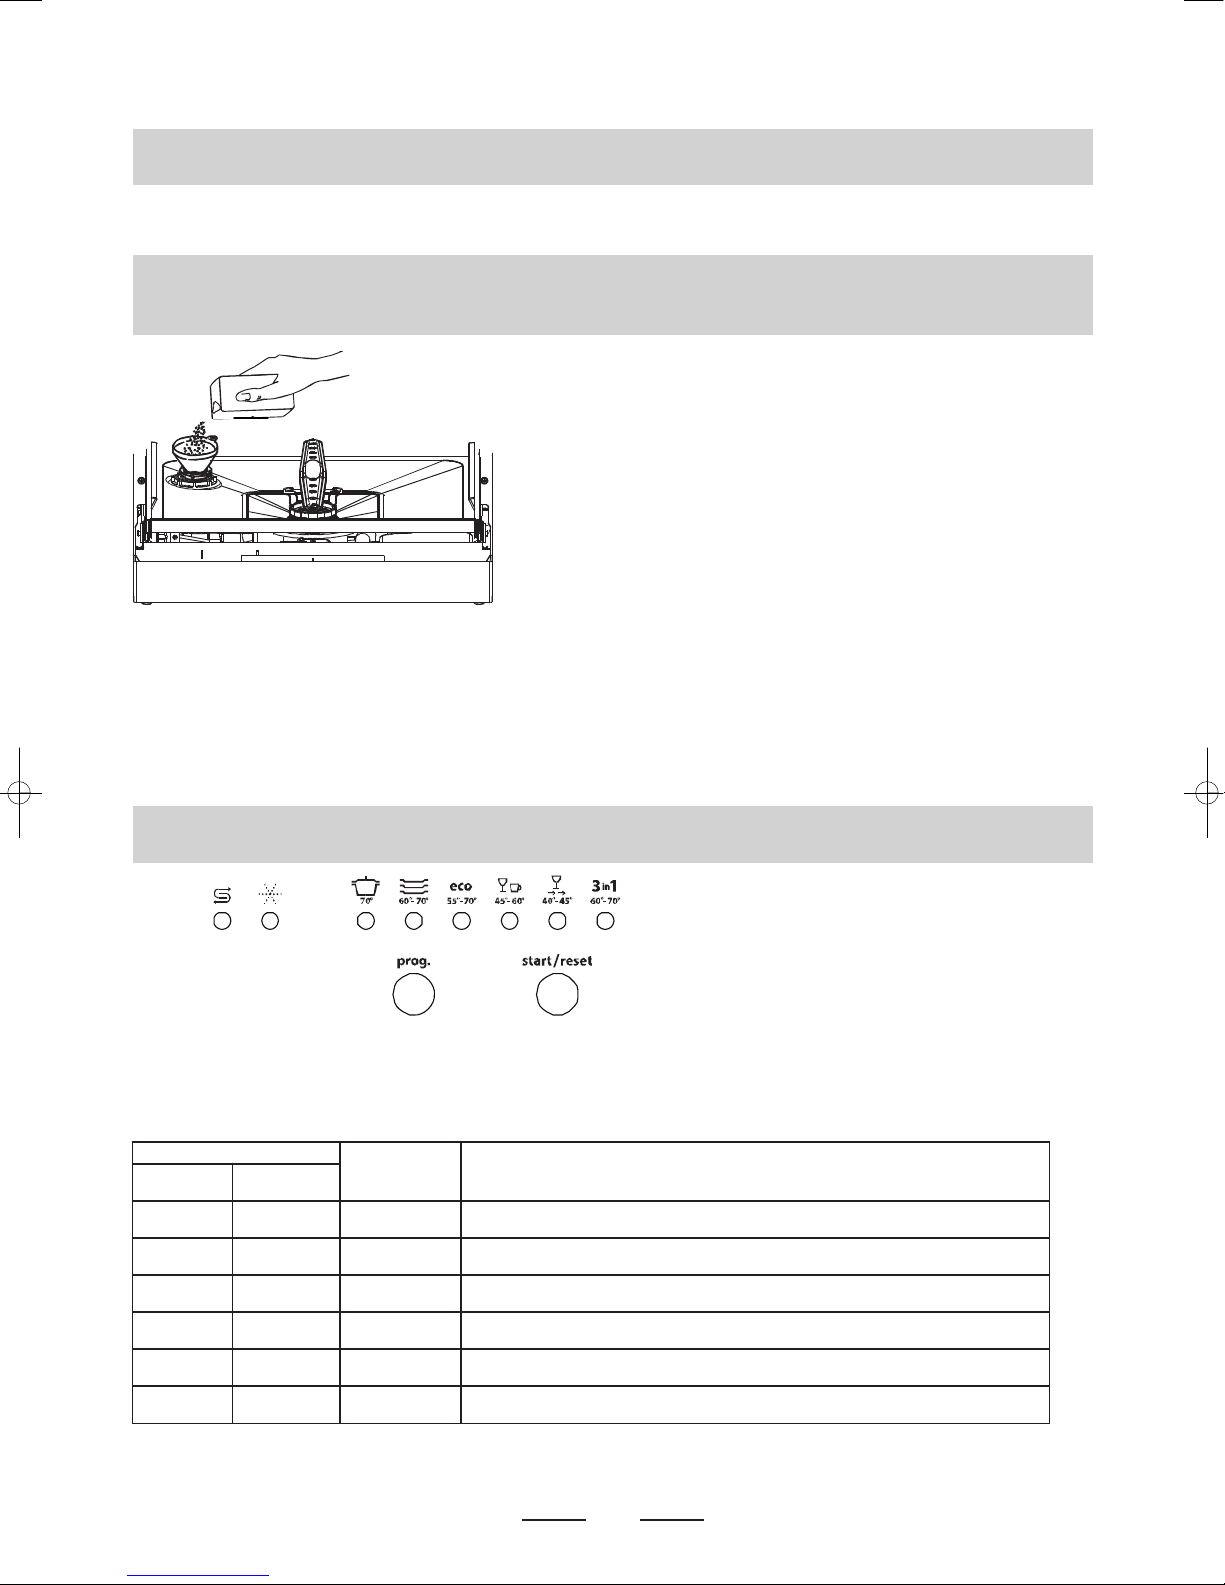
Loading salt into the softener (The container must always be filled)
1.
Remove the lower basket and then unscrew and remove the cap from the
container.
2. If you are filling the container for the first time, fill
2
⁄3 of its volume with
water.
3. Place the end of the funnel (supplied) into the hole and introduce about
1.2 kg of salt. It is normal for a small amount of water to come out of the
salt container.
ATTENTION: Remove spilt salt and start a washing program
immediately to prevent damage to the bottom of the diswasher.
4. Carefully screw the cap back on.
ATTENTION: The salt container must be refilled when the salt warning light in the control panel comes on. Though the salt
container is filled enough, the indicator light may not black out before the salt is fully dissolved.
Adjusting Salt Consumption
1. Within 60 seconds after switching on the diswasher: Press the start/reset button for 5 seconds.The rinse aid warning light and the
water softener warning light will flash alternatively.
2. Select the level of salt consumption by repeatedly pressing the program selector button. Each program corresponds with a certain
setting, see the table below.
* Factory setting
Contact your local water board for information on the hardness of your water supply.
This appliance is equipped with a water softener.
20
Always use salt intended for use with dishwasher. The salt container is located
beneath the rack and should be filled as follows:
You can adjust the amount of salt consumed based on the hardness of the water used.
Proceed as follows:
Water hardness
Water softener
setting
Number of light and sound signals
ºdH mmol/l
0 - 5 0 - 0,9 1 The intensive program indicator light is on and 1 signal sounds
6 - 11 1,0 - 2,0 2 The normal program indicator light is on and 2 signals sound
12 - 17 2,1 - 3,0 3* The ECO program indicator light is on and 3 signals sound
18 - 22 3,1 - 4,0 4 The glass program indicator light is on and 4 signals sound
23 - 34 4,1 - 6,1 5 The rapid program indicator light is on and 5 signals sound
35 - 45 6,2 - 8,0 6 The 3 in 1 program indicator light is on and 6 signals sound
Page 23
21
RINSE AID DISPENSER
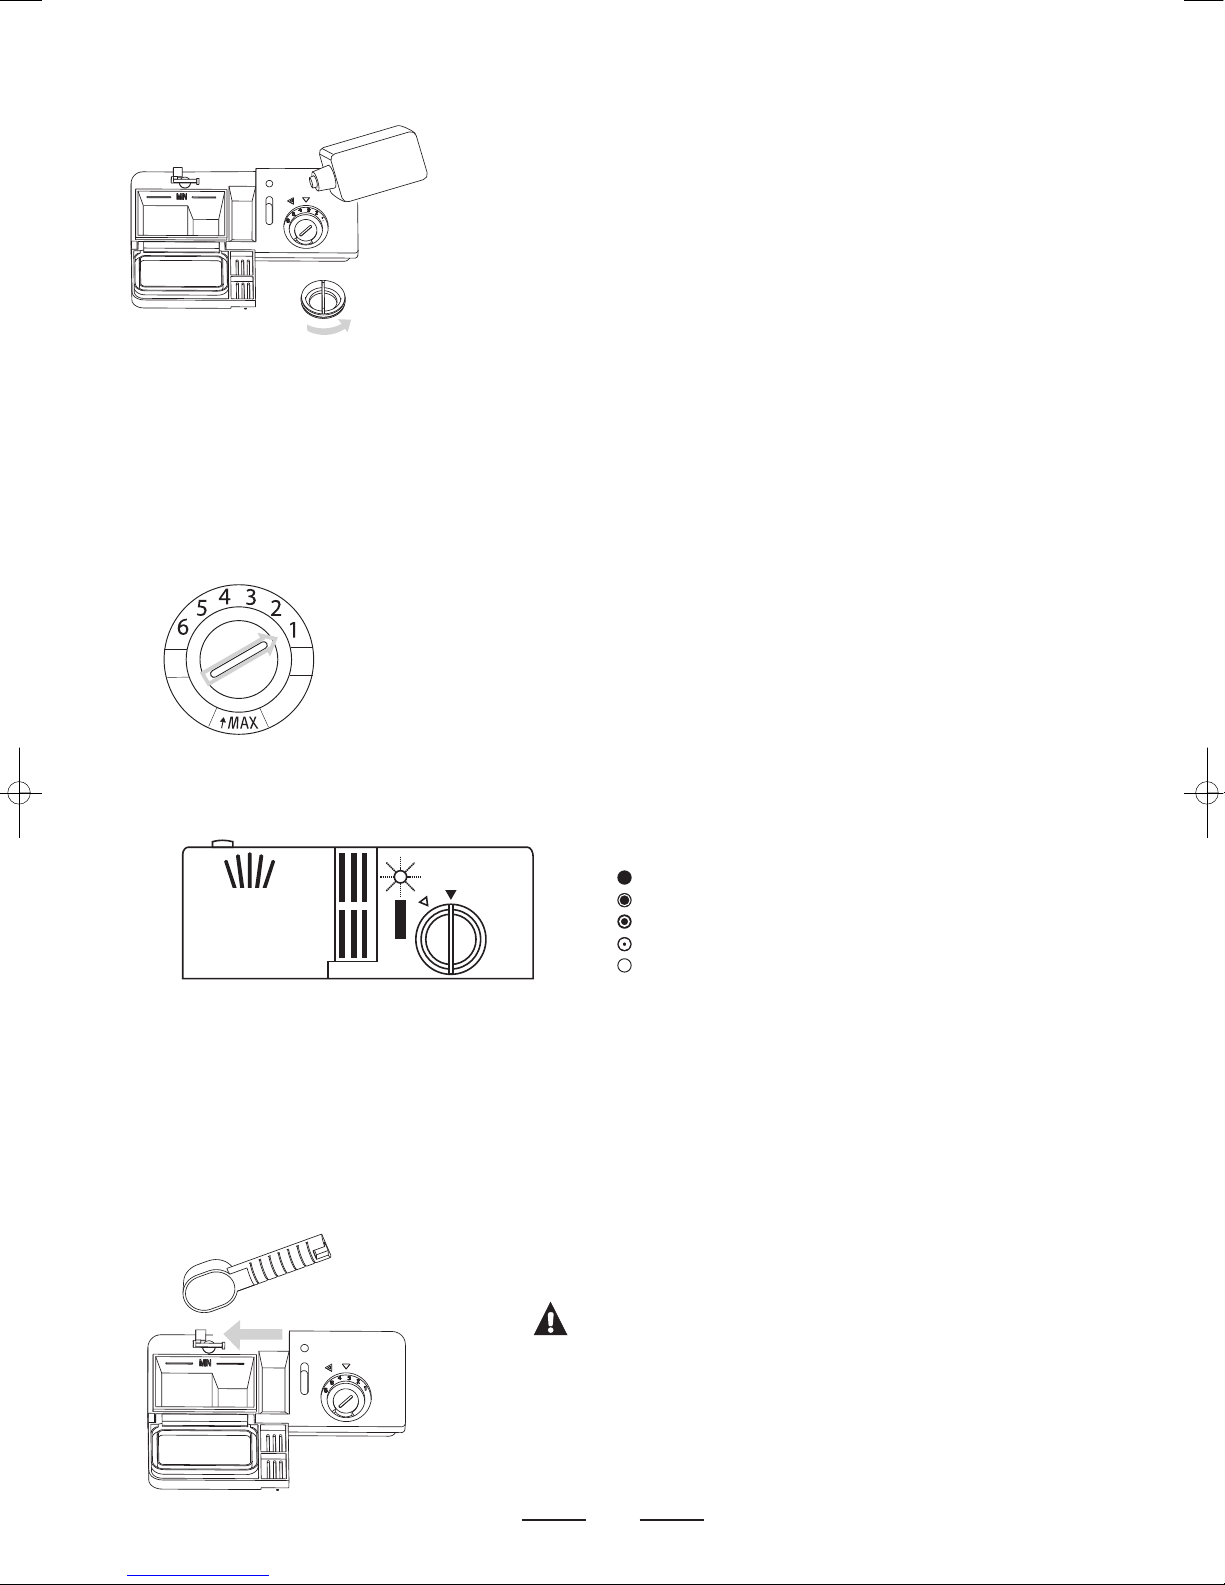
The rinse aid is released during the final rinse to prevent water from forming
droplets on your dishes that can leave spots and streaks.It also improves
drying by allowing water to sheet off the dishes.
Your dishwasher is designed to use liquid rinse aids. The rinse aid dispenser is
located inside the door next to the detergent dispenser.To fill the dispenser,
open the cap and pour the rinse aid into the dispenser until the level indicator
turns completely black.The volume of the rinse aid container is about 140 ml.
Be careful not to overfill the dispenser , because this could cause over sudsing.
Clean up any rinse aid spilt during filling with an absorbent cloth to avoid
excess foaming during the next wash. Don't forget to replace the cap before
you close dishwasher door.
Adjusting the rinse aid dispenser
During the final rinse a certain amount of rinse aid is released. Just like salt, the amount of rinse aid is
based on the hardness of the water used.Too much rinse aid can cause streaks on the dishes.
The rinse aid dispenser has six settings. Always start with the dispenser set on “2”. If spots and poor drying
are problems, increase the amount of rinse aid dispensed by rotating the dial to “3”.If the dishes still are
not drying properly or are spotted, adjust the dial to the next higher number until your dishes are spotfree.
When to refill the rinse aid dispenser
As the rinse aid diminishes, the size of the black dot on the rinse
aid level indicator changes, as illustrated below.
full
3
⁄4 full
1
⁄2 full
1
⁄4 full - You should refill to prevent spots on the dishes.
empty (the indicator light comes on --> refill)
DETERGENT DISPENSER
DO NOT USE TOO MUCH DETERGENT. The dispenser must be refilled before the start of each wash cycle following the instructions
provided in the wash cycle table (see page 3) Your dishwasher uses less detergent and rinse aid than conventional dishwashers.
Generally,only one tablespoon of detergent is needed for a normal wash load. Also, more heavily soiled items need more detergent.
Always add the detergent just before starting dishwasher,otherwise it could get damp and will not dissolve properly.
Proper use of detergent
Use only detergent specifically made for use in dishwashers. Keep your
detergent fresh and dry.Don't put powder detergent into the dispenser until
you're ready to wash dishes.
WARNING!
Dishwasher detergent is corrosive! Take care to keep it out of reach of
children. Please contact a doctor if detergent is swallowed and bring
along the packaging of the detergent.
■ To open the dispenser, turn the cap to the
"open" (left) arrow and lift it out.
■ Pour the rinse aid into the dispenser, being
careful not to overfill.
■ Replace the cap by inserting it aligned with
"open" arrow and turning it to the closed (right)
arrow.
Page 24
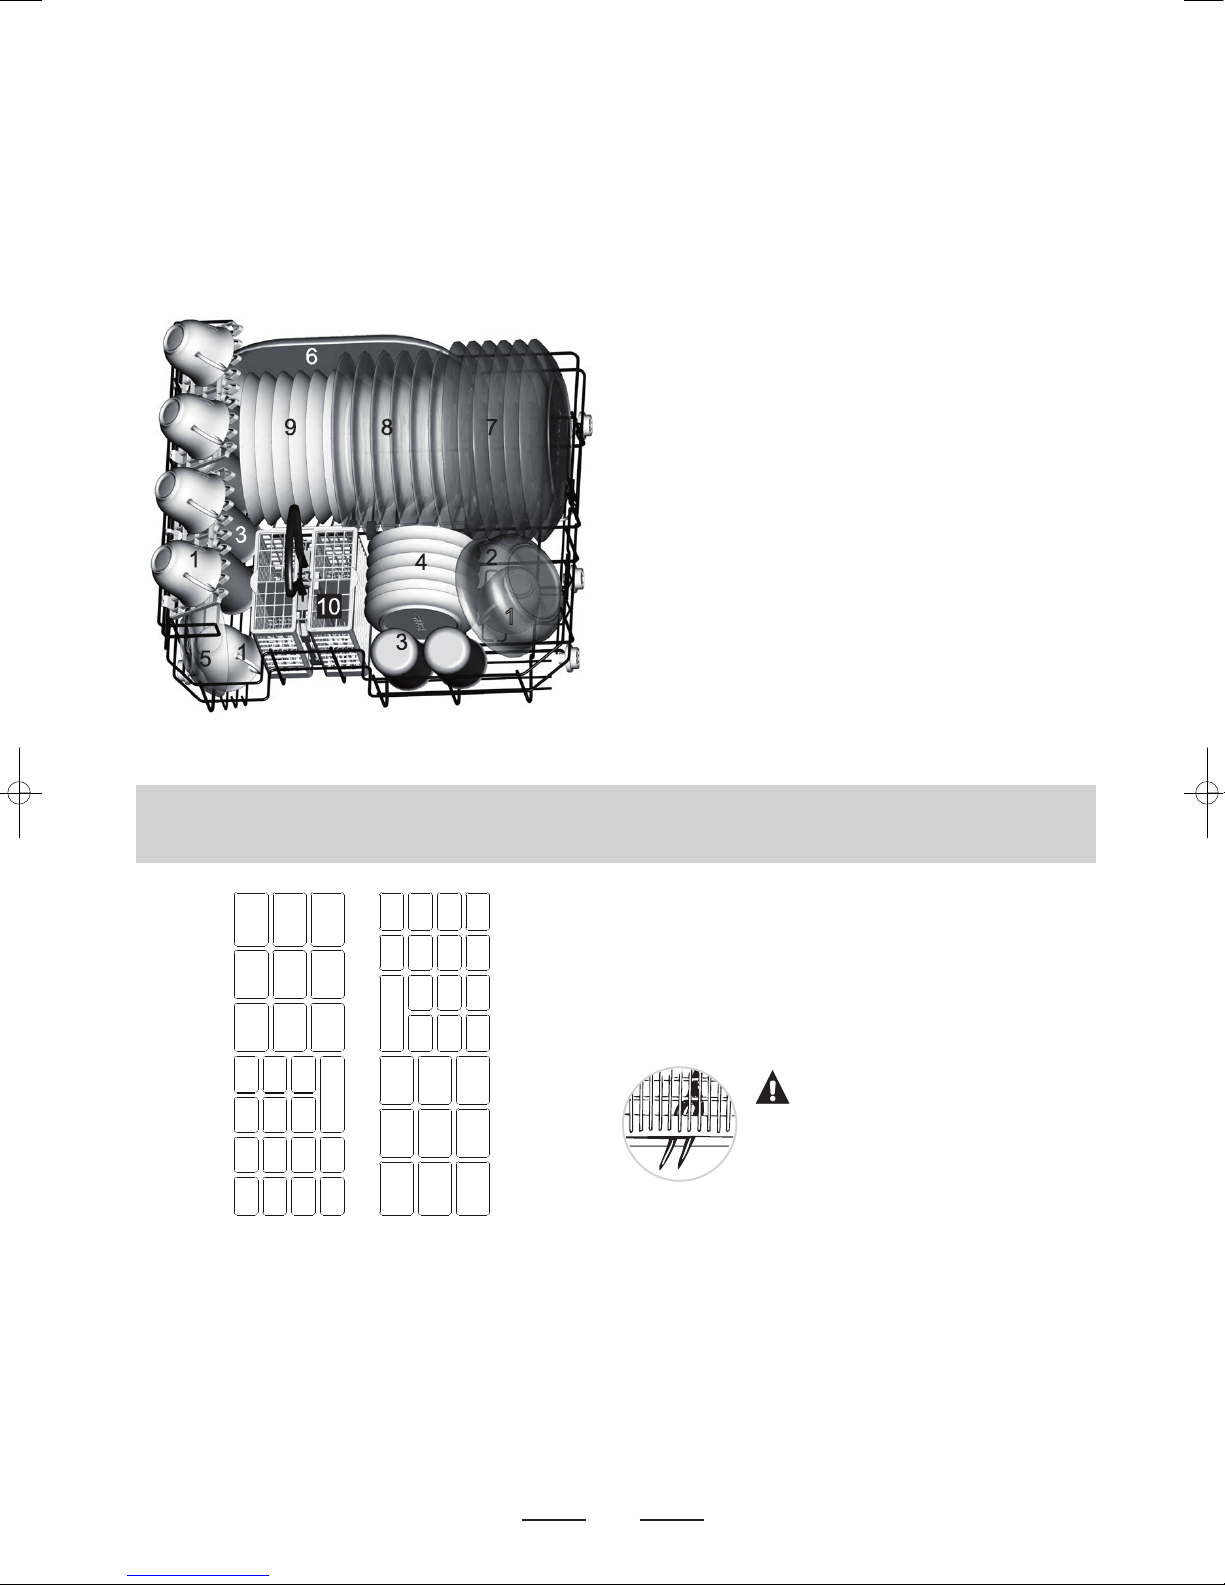
LOADING THE DISHWASHER RACK
We recommend that you place large items which are most difficult to clean into the lower rack: pots, pans, lids, serving dishes and
bowls, as shown in the figure below.
It is preferable to place serving dishes and lids on the side of the racks in order to avoid blocking the rotation of the spray arm.
■ Pots, serving bowls, etc. must always be placed top down.
■ Deep pots should be slanted to allowwater to flow out.
■ The bottom rack feature fold down tine rows so that larger or more pots and pans can be loaded.
■ To improve stacking of pots and pans, the spikes can be folded down.
SILVERWARE BASKET (loading example)
WARNING!
Do not let any item extend through bot tom.
This may block the spray arm.
1 cups
2 large serving bowl
3 glasses
4 saucers
5 saucers
6 oval platter
7 dishes
8 soup dishes
9 dessert dishes
10 silverware basket
Silverware should be placed in the silverware basket with handles at the bottom: If the rack has side baskets,the spoon should be
loaded individually into the appropriate slots, especially long utensils should be placed in the horizontal position at the front of the
upper rack.
22
512
2
2
2
2
2
1
1
5
51
1
1
5
6
5
5
4
4
8
4
4
4
4
3
3
3
3
3
7
3
1 forks
2 soup spoons
3 dessert spoons
4 thea spoons
5 knives
6 serving spoon
7 gravy ladle
8 serving fork
Page 25
23
TURNING ON THE APPLIANCE
Starting a wash cycle...
1 Check if the plug of the connecting cord is in the socket.
2 Check if the water supply is turned on.
3 Load the dishwasher (see chapter "loading the dishwasher rack").
4 Pour in the detergent (see the section entitled "Salt, Detergent and Rinse Aid").
5 Press the power button and press the washing program selector button to select the desired washing program.
6 Close the door.Press the start/reset button. The indicator light comes on. The washing program starts immediately.
Stopping or changing the washing program
Example: A cycle that is underway can only be modified if it has only been running for a short time.Otherwise, the detergent may have
already been released, and the appliance may have already drained the wash water.If this is the case, the detergent dispenser must be
refilled (see the section entitled "Loading the Detergent").
Press the start/reset button more than three seconds .The program stops.The indicator light goes out. Select the desired washing
program with the selector button. Press the start/reset button to restart the washing program.
At the end of the wash cycle
Turn off the appliance using the power button and open the door of the dishwasher. Wait a few minutes before unloading the
dishwasher to avoid handling the dishes and utensils while they are still hot and more susceptible to breakage.They will also dry better.
WARNING!
It is dangerous to open the door when washing, because the hot water may scald you.
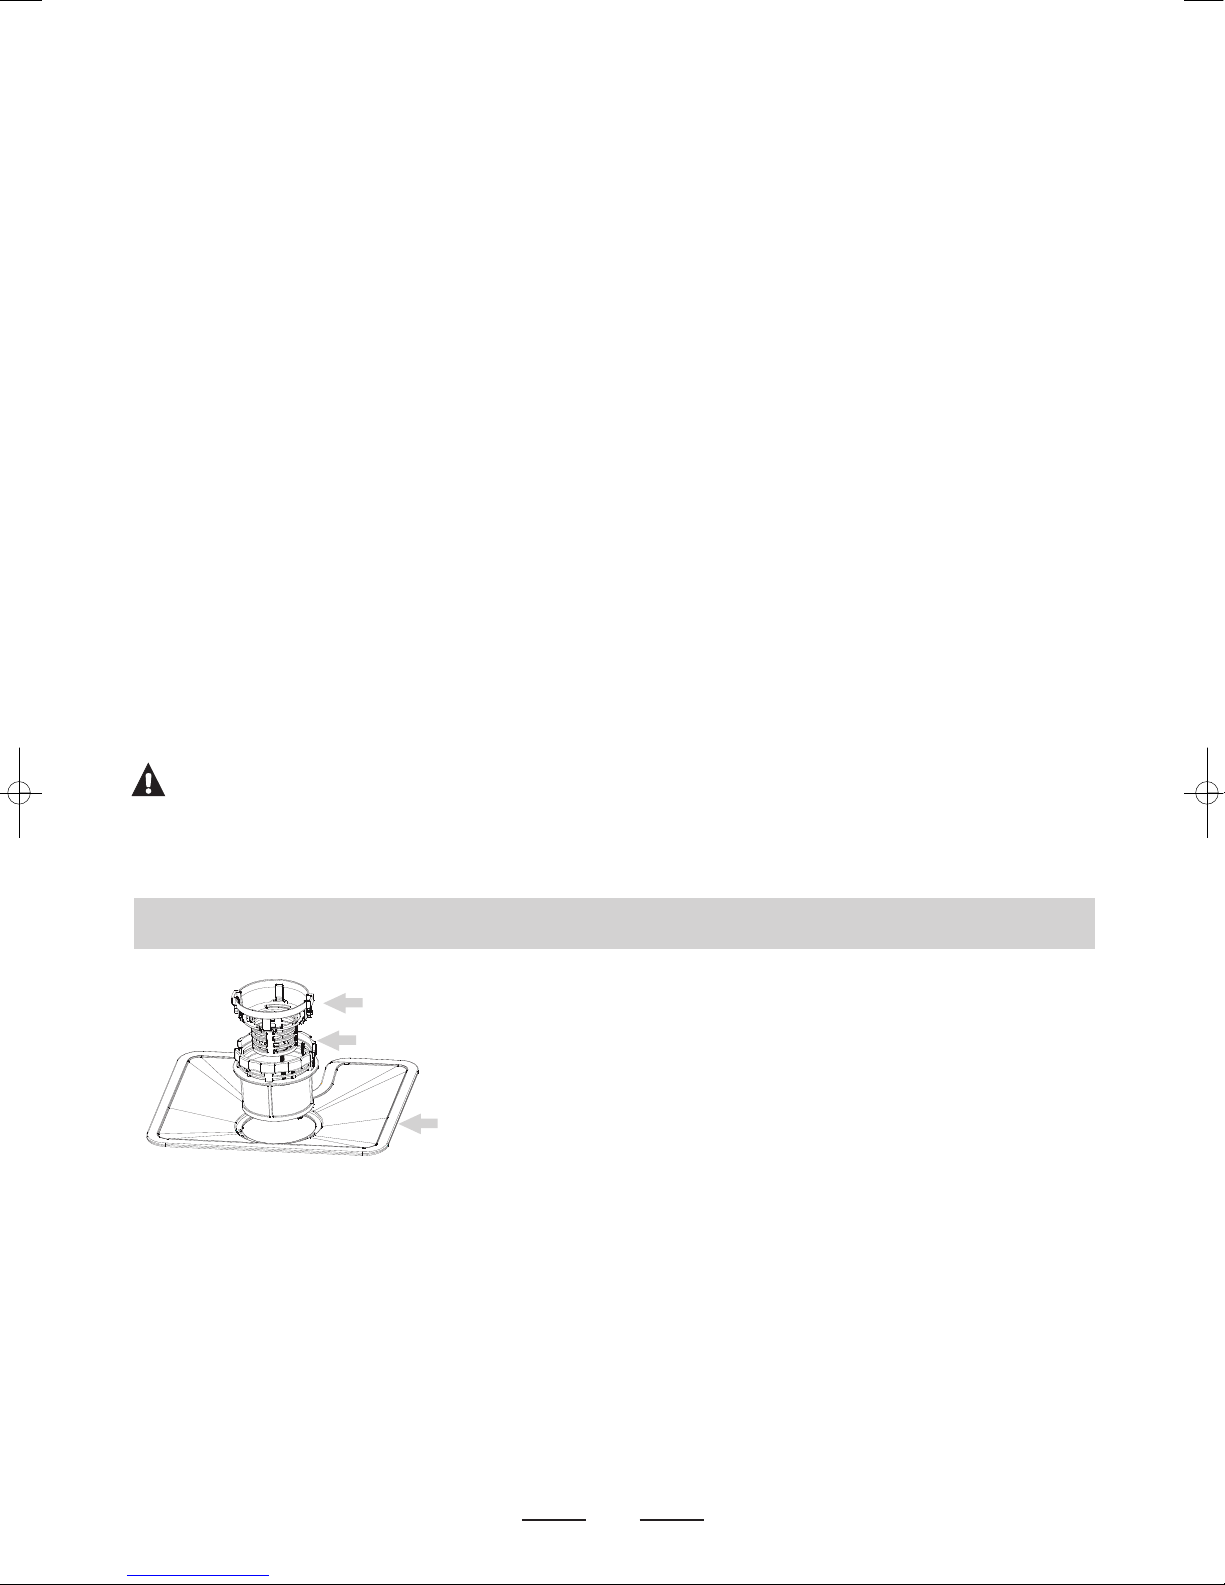
FILTERING SYSTEM
The filter prevent larger remnants of food or other objects fromgetting inside the pump.This residue can occasionally clog up the
filters.The filter system consists of a coarse filter,a flat (main) filter and a microfilter (fine filter).
1
3
2
1 Coarse filter
Larger items, such as pieces of bone or glass, that could clog the drain are trapped in
the coarse filter.To remove an item caught in this filter, gently squeeze the taps on the
top of this filter and lift it out.
2 Main filter
Food and soil particles trapped by this filter are pulverized by a special jet on the lower
spray armand washed down the drain.
3 Fine filter
This filter holds soil and food residue in the sump area and prevents it from being
redeposit on the dishes during a cycle.
Page 26
24
Cleaning the filter assembly
For best performance and results, the filter assembly must be cleaned.
The filter efficiently removes food particles fromthe wash water, allowing it to be recirculated
during the cycle. For this reason, it is a good idea to remove the larger food particles trapped
in the filter after each wash cycle by rinsing the semicircular filter and cup under running
water.
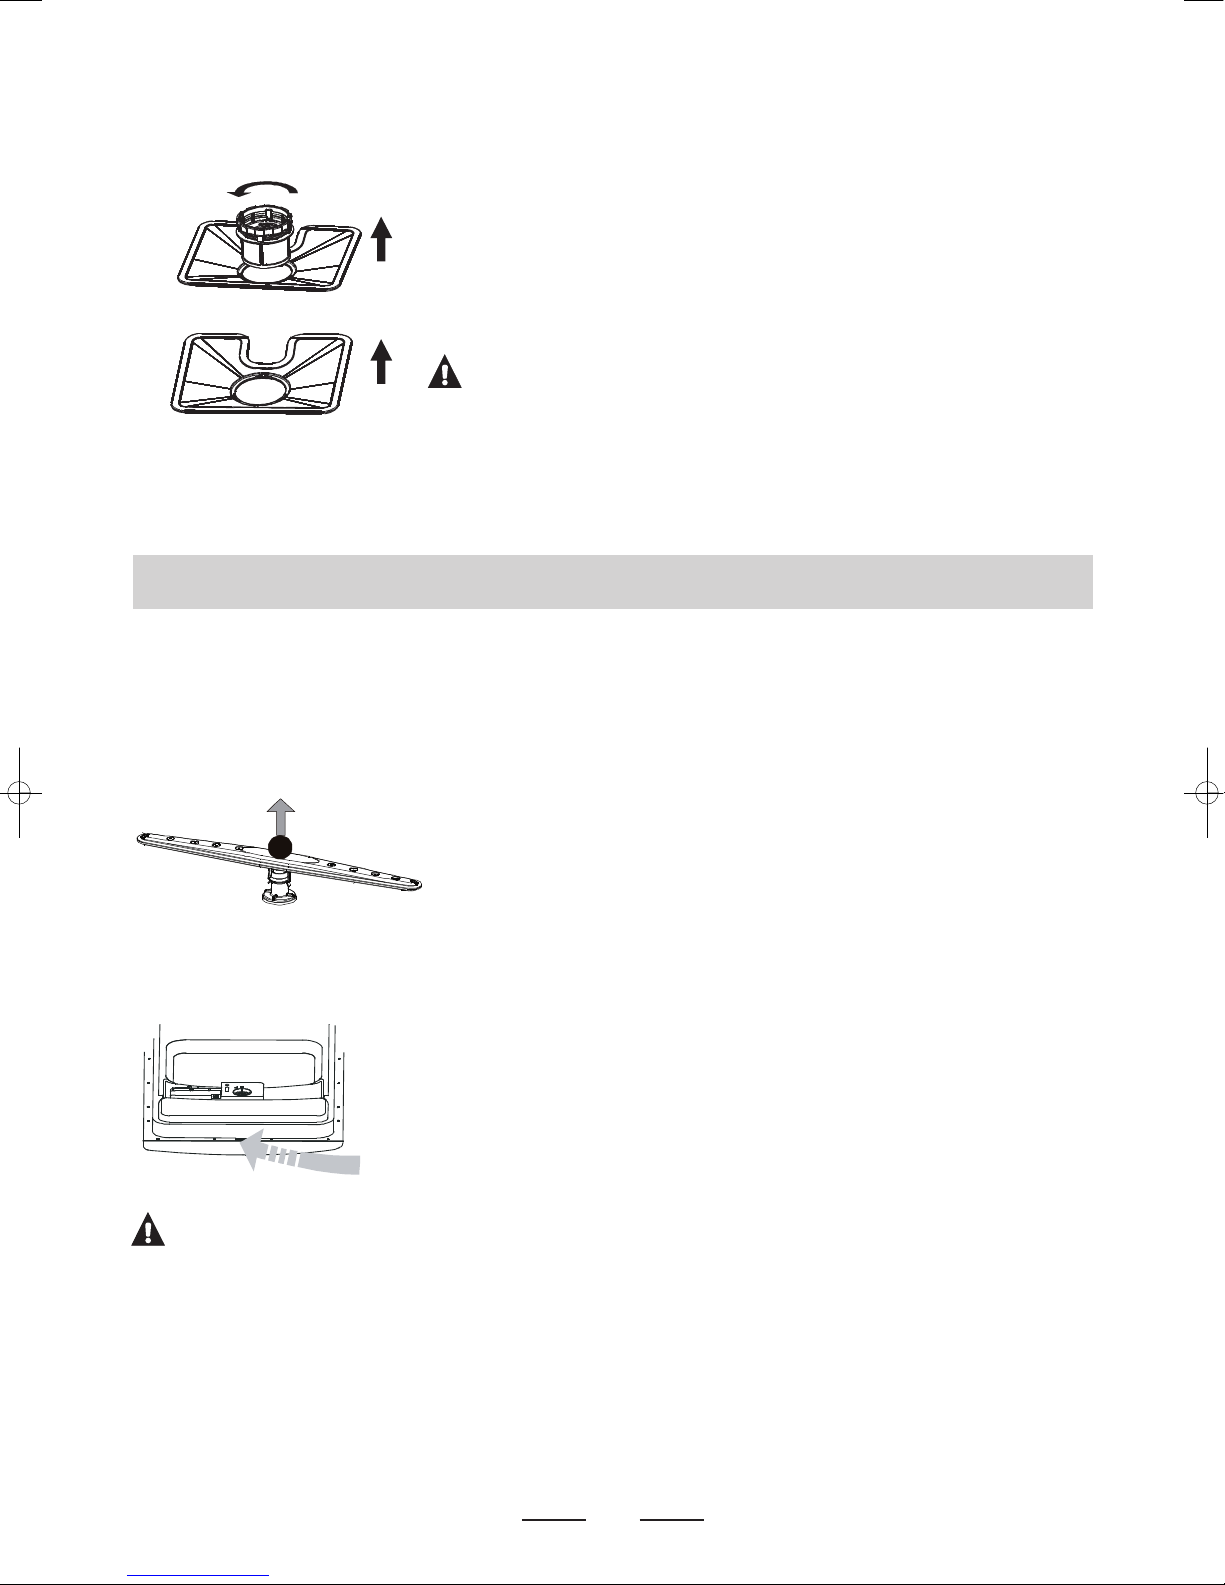
1. Contrarotate the coarse filter and then lift it up.
2. Remove the main filter.
3. Lift the fine filter up.
The entire filter assembly should be cleaned once a month.
To clean the coarse filter and the fine filter,use a cleaning brush. Then, reassemble the filter
parts in reverse order.
WARNING!
The dishwasher must never be used without the filters. Improper replacement of the filter
may reduce the performance level of the appliance and damage dishes and utensils.
Caring for the dishwasher
Protect against freezing
The dishwasher must always be placed in a frost-free room.
Cleaning the spray arm
It is necessary to clean the spray arms regularly for hard water chemicals will clog the spray arm jets and bearings.
To remove the spray arm:
Pull out the spray arm upwards.
Wash the arms in soapy and warm water and use a soft brush to clean the jets.Replace them
after rinsing them thoroughly.
Cleaning the door
To clean the edge around the door, you should use only a soft warm, damp rag. To prevent
penetration of water into the door lock and electrical components, do not use a spray cleaner
of any kind. Also, never use abrasive cleaners or scouring pads on the outer surfaces because they
will scratch the finish. Some papers towels can also scratch or leave marks on the surface.
WARNING !
Never use a spray cleaner to clean the door panel for it could damage the door lock and electrical components.It is not allowed to use
the abrasive agent or some paper towel because of the risk of scratching or leaving spots on the stainless steel surface.
To clean the control panel use a lightly dampened cloth then dry thoroughly.
1
1
2
3
Page 27
25
How to keep your dishwasher in shape
About the electrical connection
Electrical requirements
This dishwasher is designed for connection to 220-240 V - 50 Hz,with a fuse of 16 Amp.
WARNING!
Make sure the electrical socket is earthed before connecting the appliance.
Electrical connection
After making sure that the voltage and the frequency values for the current in the home correspond to those on the rating plate,insert
the plug into an electrical socket which is earthed properly. If the electrical socket to which the appliance must be connected is not
appropriate for the plug,please consult the manufacturer or its service agent or a similarly qualified person.
Cold water connection
Connect the cold water supply hose to a threaded (3⁄4 inch) connector and make sure that it is fastened tightly in place.
If the water pipes are new or have not been used for an extended period of time,let the water run to make sure that the water is clear
and free of impurities. If this precaution is not taken, there is a risk that the water inlet can get blocked and damage the appliance.
Hot water connection
The dishwasher is not suitable for hot water connection.
Positioning the appliance
■ After every wash
After every wash, turn off the water supply to the appliance
and leave the door slightly ajar so that moisture and odors
are not trapped inside.
■ Remove the plug
Before cleaning or performing maintenance, always remove
the plug from the socket. Do not run risks.
■ No solvents or abrasive cleaning
To clean the exterior and rubber parts of the dishwasher, do
not use solvents or abrasive cleaning products. Rather, use
only a cloth and warm soapy water.To remove spots or stains
from the surface of the interior,use a cloth dampened with
water and a little white vinegar,or a cleaning product made
specifically for dishwashers.
■ When you go on holiday
When you go on holiday,it is recommened that you run a
wash cycle with the dishwasher empty and then remove the
plug from the socket, turn off the water supply and leave the
door of the appliance slightly ajar.This will help the seals last
longer and prevent odors from forming within the appliance.
■ Moving the appliance
If the appliance must be moved, try to keep it in the vertical
position. If absolutely necessary, it can be positioned on its
back.
■ Seals
One of the factors that cause odors to form in the dishwasher
is food that remains trapped in the seals. Periodic cleaning
with a damp sponge will prevent this from occurring.
CAUTION! for personal safety:
DO NOT USE AN EXTENSION CORD OR AN ADAPTER PLUG WITH THIS APPLIANCE.
DO NOT, UNDER ANY CIRCUMSTANCES,CUT OR REMOVE THE THIRD GROUNDING PRONG FROM THE POWER CORD.
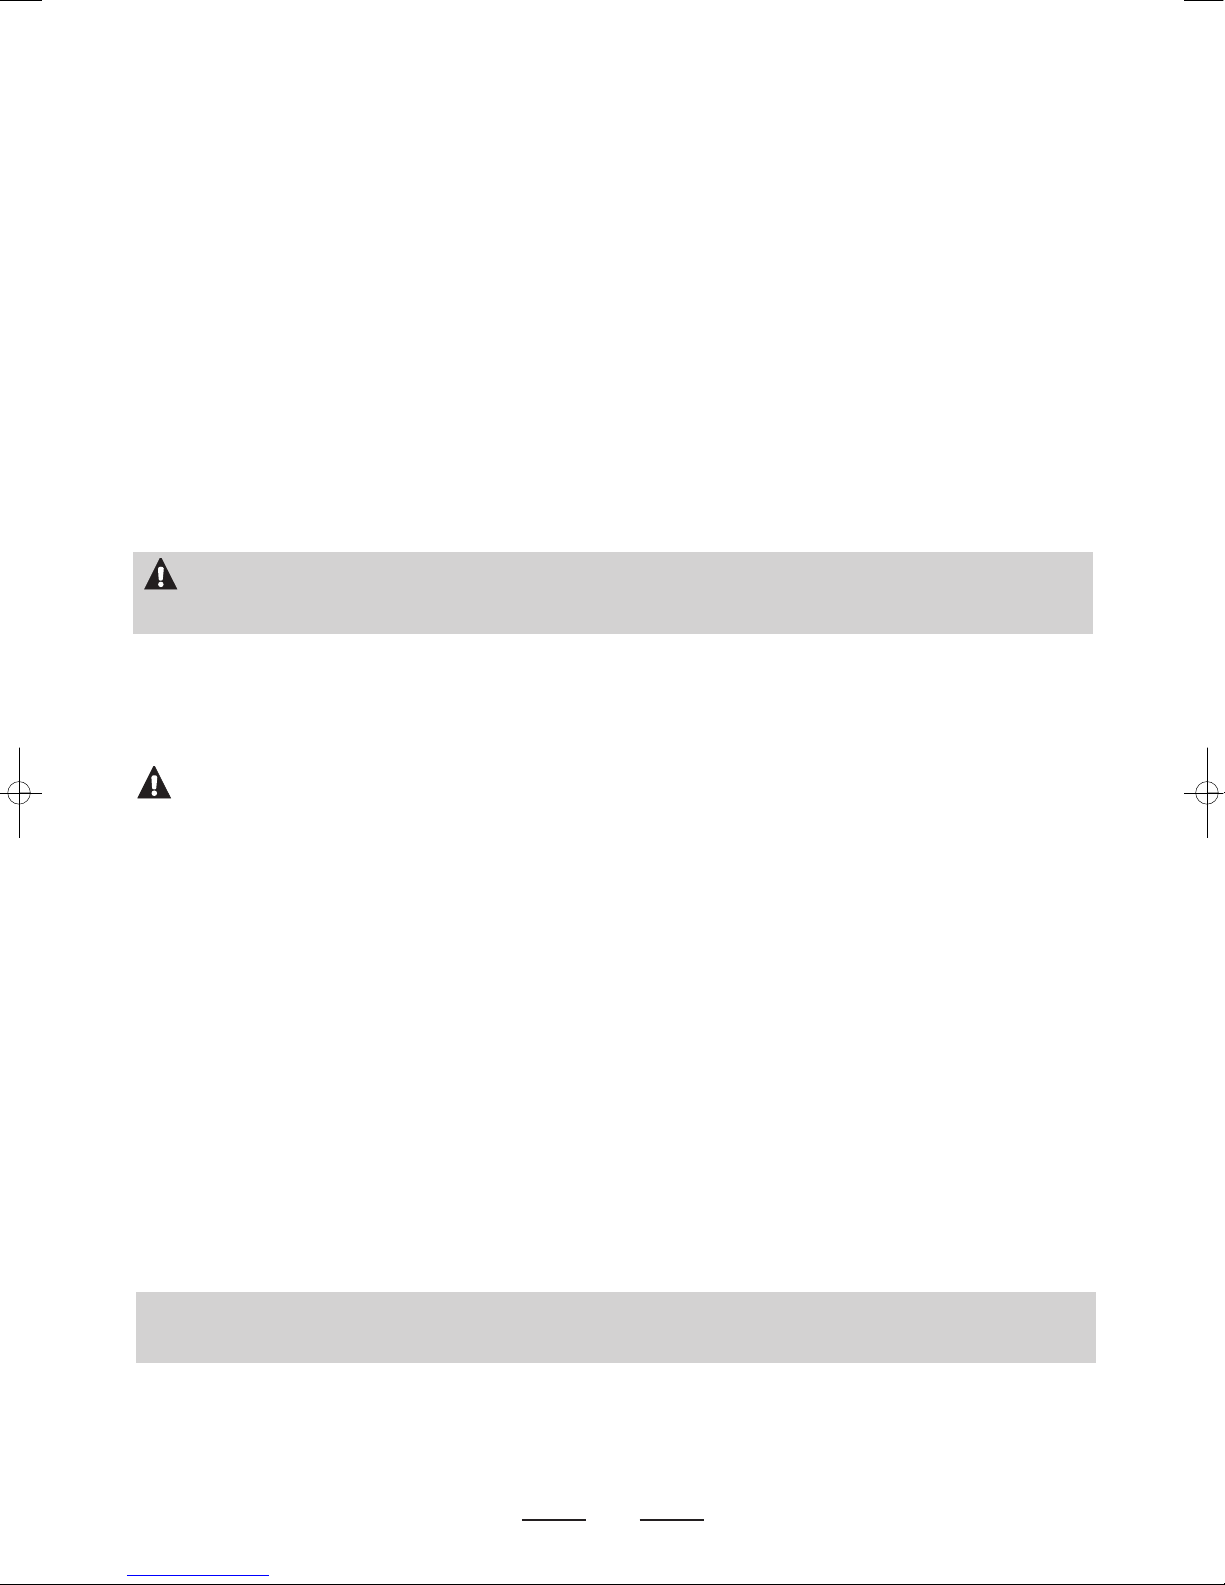
Position the appliance in the desired location.The back should rest against the wall behind it, and the sides, along the
adjacent cabinets or wall.The dishwasher is equipped with water supply and drain hoses that can be positioned to the right
or the left to facilitate proper installation.
Page 28
26
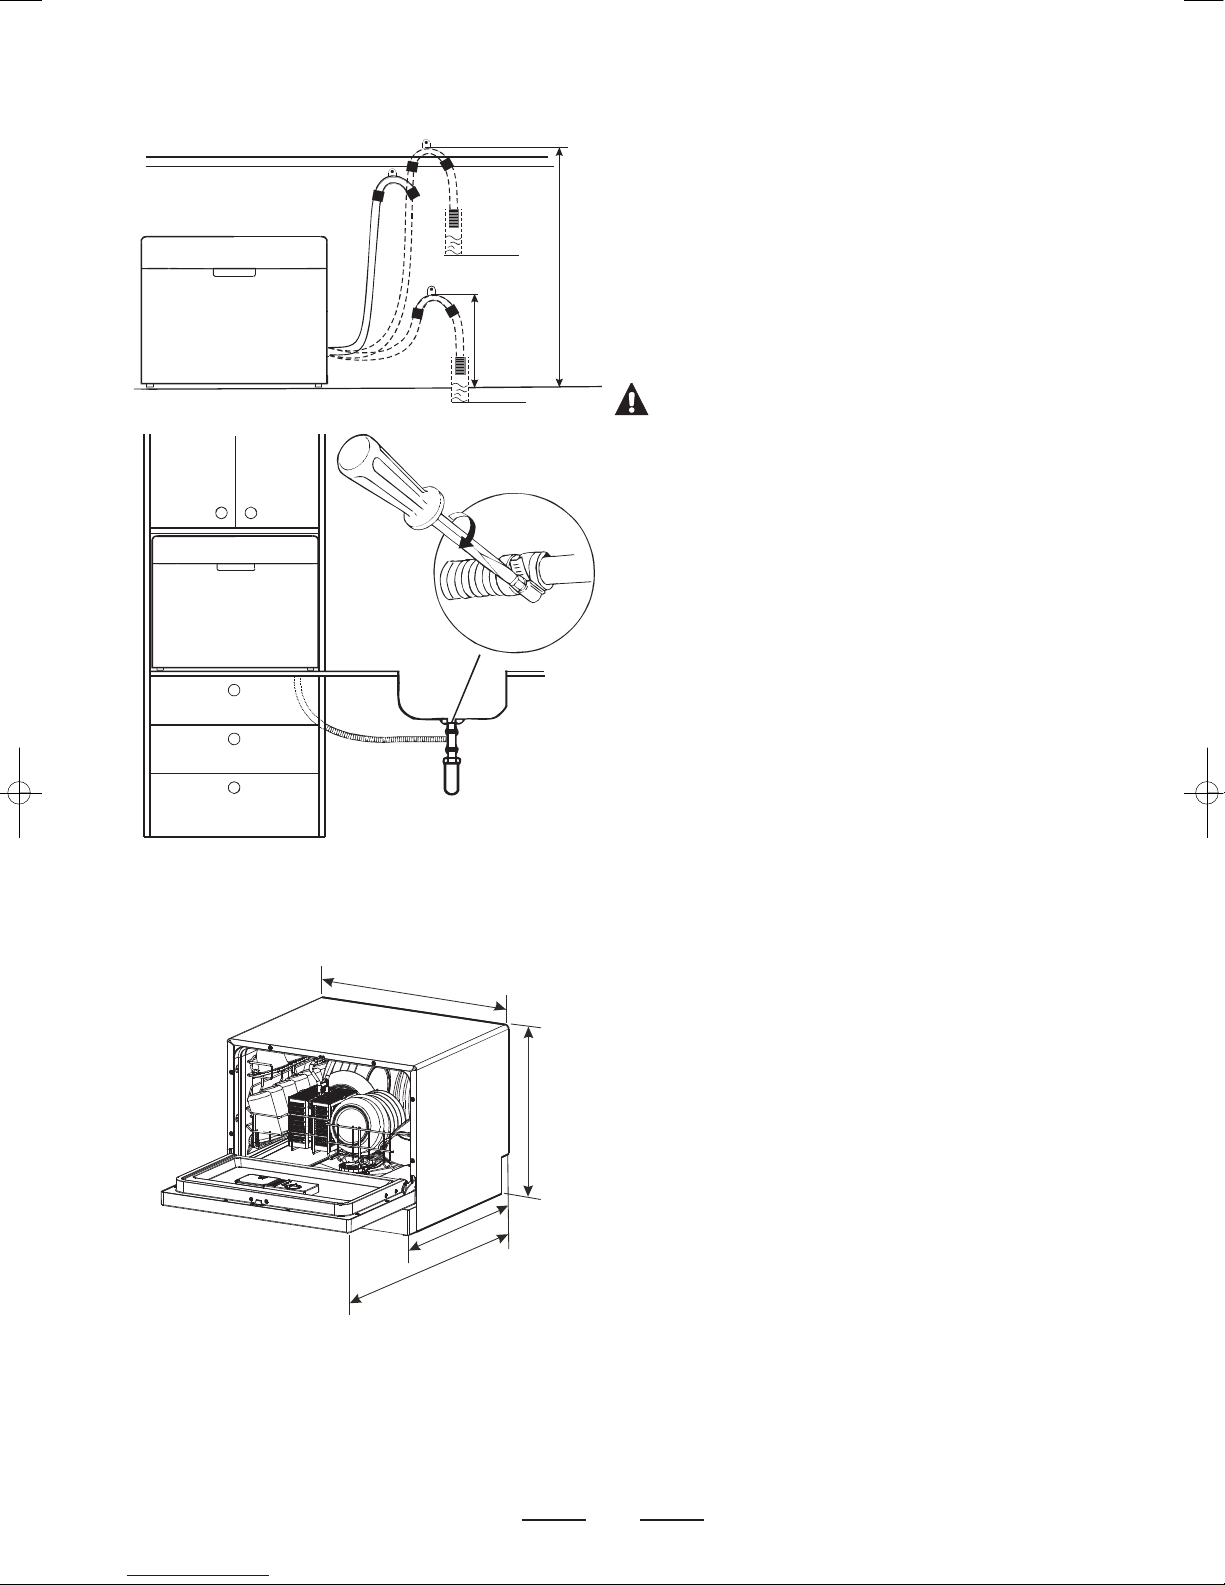
Drain hose connection
Insert the drain hose into a drain pipe with a minimum diameter of
4 cm, or let it run into the sink,making sure to avoid bending or
crimping it. Use the special plastic support that comes with the
appliance.The free end of the hose must be at a height between
40 and 100 cm and must not be immersed in water.
How to empty the drain hose
If the height of the sink is more than 100 cm, the water can not be
drained through the sink. In that case the drain hose must be
placed in a suitable bowl or bin which is lower than the sink.
WARNING!
Close the faucet after use to prevent water staying in the water
inlet (for models without safety hose).
DIMENSIONS (mm)
min. 400 mm
max. 1000 mm
ø 40 mm
ø 40 mm
500
550
800
438
Page 29
27
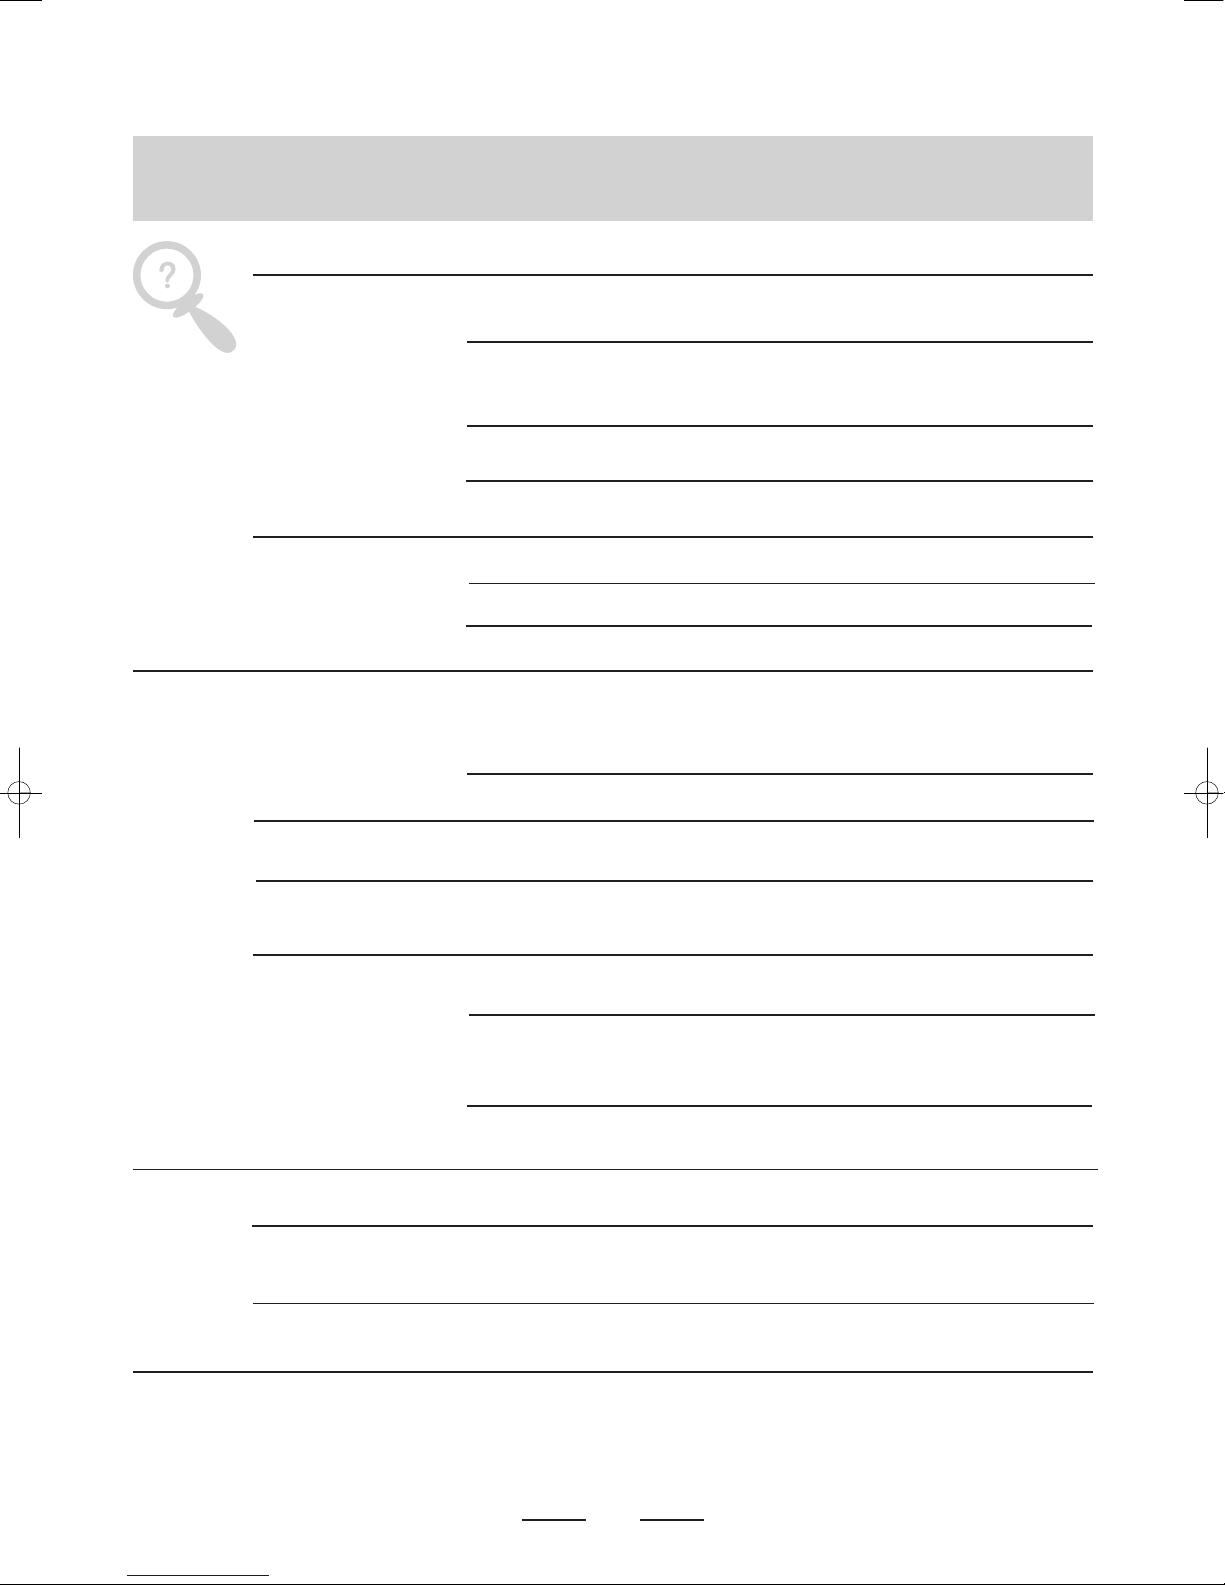
Before calling for service
Hints for troubleshooting
Review the charts on the following pages may make you be free of calling for service.
Problem
Dishwasher doesn’t start.
Water not pumped from the
diswasher.
Suds in the tub.
Stained tub interior.
White film on inside surface.
There are rust stains on
cutlery.
Knocking noise in the
diswasher.
Rattling noise in the
diswasher.
Other sounds.
Possible causes
Fuse blown, or the circuit
breaker acted.
Power supply is not turned
on.
Error code E1: Water pressure
is low.
Door of dishwasher
not properly closed.
Kink in drain hose.
Filter clogged.
Kitchen sink clogged.
Improper detergent.
Spilled rinse-aid.
Detergent with colourant
was used.
Hard water minerals.
Dishware not suitable for
dishwasher.
A programme was not run
after dishwasher salt was
added.Traces of salt have
gotten into the wash cycle.
The lid of the water softer
is loose
A sp ray arm is knocking
against an item in a basket.
Utensils are not secure in the
baskets or something small
has dropped into the basket.
Some audible sounds are
normal.
What to do
Replace fuse or reset circuit breaker.Remove any other
appliances sharing the same circuit with the
dishwasher.
Make sure the dishwasher is turned on and the door is
closed securely.
Make sure the power cord is properly plugged into the
wall socket.
Check that the water supply is connected properly and
the water is turned on.
Make sure to close the door properly.
Check the drain hose.
Check the filter assembly (see page 24).
Check the kitchen sink to make sure it is draining well.
Use only the special dishwasher detergent to avoid
suds. If this occurs, open the dishwasher and let suds
evaporate. Add 1 gallon of cold water to the tub. Close
and latch the dishwasher,then Start the "soak" wash
cycle.
Always wipe up rinse-aid spills immediately.
Make sure that the detergent is the one without
colorant.
Clean the interior,use a damp sponge with
dishwasher detergent. Adjust the water softener to a
higher setting.
Clean only dishwasher proof dishware in the
dishwasher.
Always run the rinse wash programme after adding
dishwasher salt.
Check if the lid of the water softener is properly closed.
Ensure that the spray arm can move freely and is not
obstructed by dishware.
Ensure that everything is secured in the dishwasher/
silverware basket.
Sounds from the pump / rinsing sounds; detergent
dispenser opening.
Technical
problems
General
problems
Noise
Page 30
28
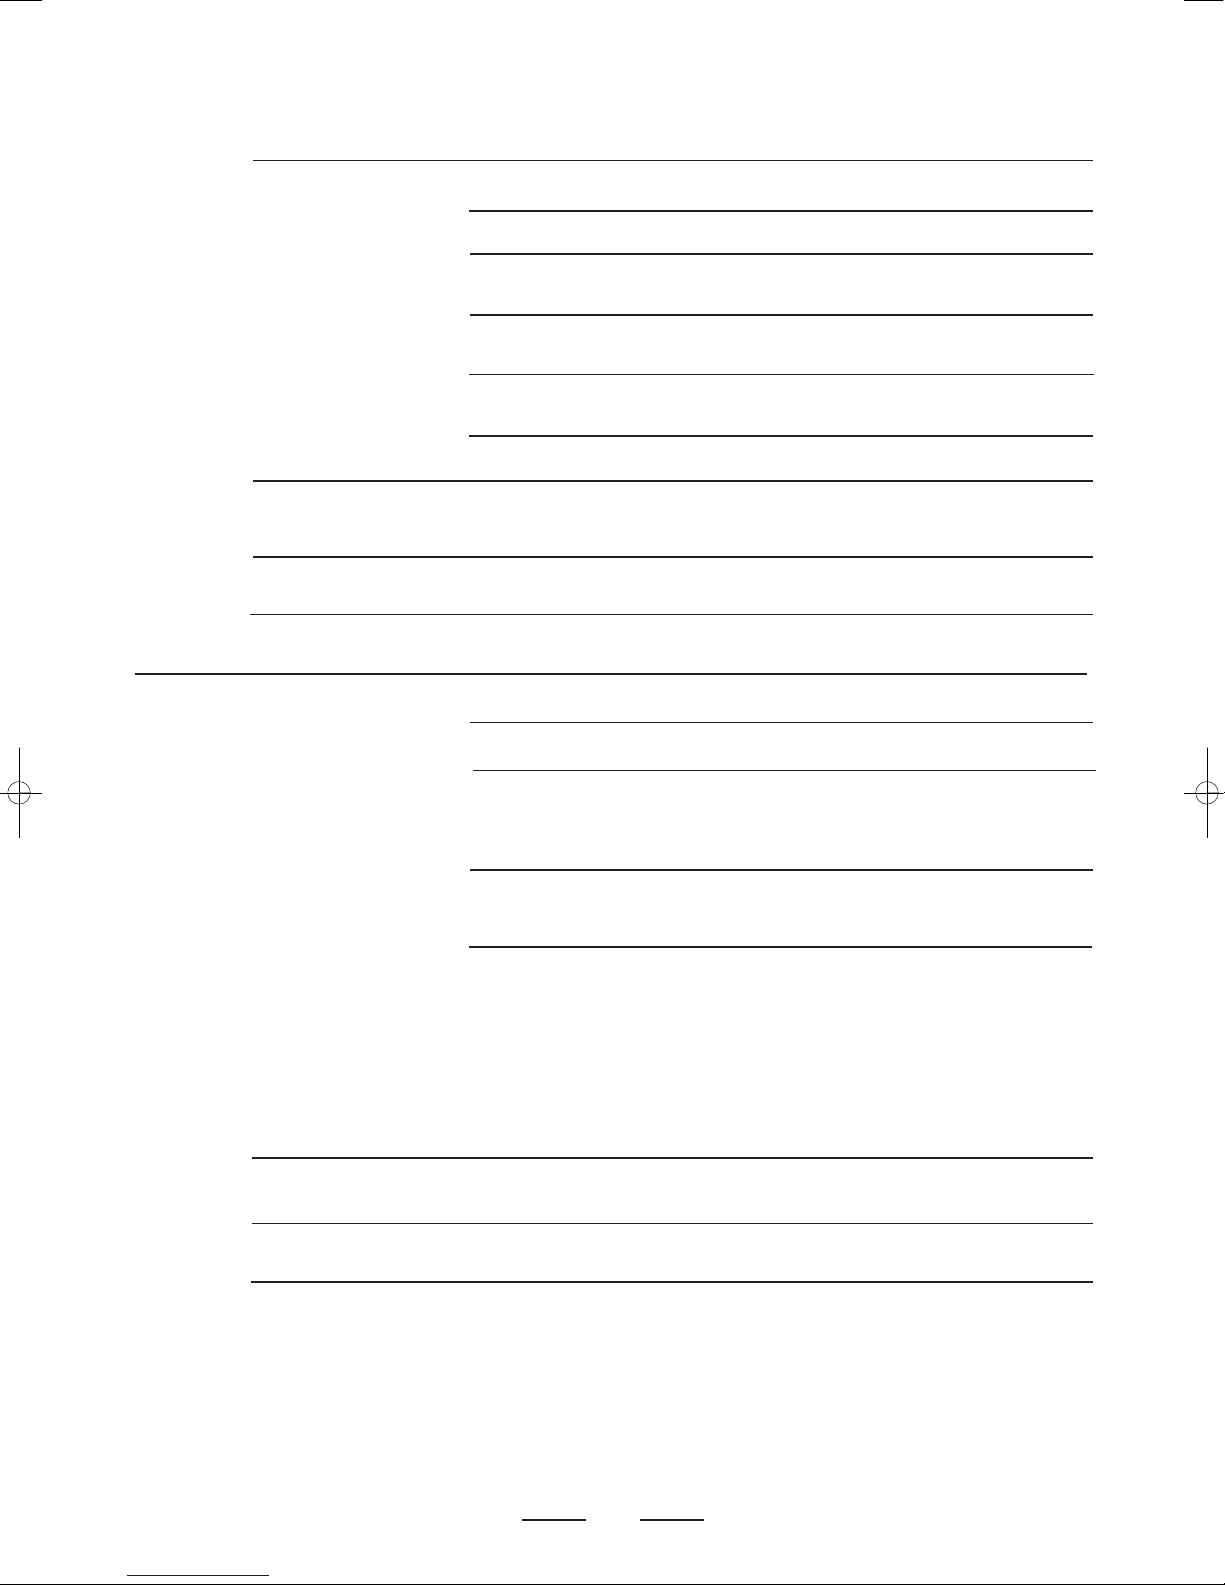
Before calling for service
Problem
Dishes and flatware are not
clean.
Cloudiness on glasware.
Black or gray marks on
dishes.
Detergent left in dispenser
cups.
Dishes are not dried.
Possible causes
Improper rack loading.
Improper program.
Not enough detergent was
dispensed.
Items are blocking the path
of spray arms.
The filter assembly is not
clean or is not correctly
fitted.
Spray arms not clean.
Combination of soft water
and too much detergent.
Aluminum utensils have
rubbed against dishes.
Dishes block detergent cups.
Improper rack loading.
Not enough rinse aid.
Dishes are removed too
soon.
Wrong program has been
selected.
Dishware not suitable for
dishwasher.
What to do
See “Loading the diswasher rack” on page22.
Select stronger program, see page 19.
Use more detergent, or try another brand of detergent.
Rearrange the items so that the spray can rotate freely.
Clean de filter assembly and ensure that it is fitted
correctly (see page 24).
Clean the spray arm (see page 24).
Use less detergent if you have soft water and select a
shorter cycle to wash the glassware and to get them
clean.
Use a mild abrasive cleaner to eliminate the marks.
Re-loading the dishes properly so that they do not
block the detergent dispenser.
See “Loading the diswasher rack” on page 22.
Increase the amount of rinse aid (see page 21).
Do not empty your dishwasher immediately after
washing. Open the door slightly so that the steam can
escape.Wait a couple of minutes before unloading the
diswasher.Empty the low basket first. This prevents
water form dropping off dishes in the upper basket.
In the rapid program the washing temperature is
lower.This also lowers cleaning performance. Choose
the normal program.
Some dishware (plastic or with a plastic coating) is
more difficult to dry in a dishwasher.
Code
3 in 1 program indicator
light flickers fleetly.
Glass program indicator light
flickers fleetly.
Problem
Longer inlet time.
Leakage.
Possible causes
Faucet is not opened,or water intake is restricted, or
water pressureis too low.
Some part of the dishwasher leaks water.
Contact the Service department.
Error codes
Unsatisfactory
washing results
Unsatisfactory
drying results
Page 31
29
Disposal of packaging and appliance
■ Remove the door of the dishwasher or inactivate the door lock when you dispose of the appliance.
■ Dispose of the packaging materials responsibly and in accordance with government regulations.
During the manufacturing of this appliance sustainable materials are used.
The packaging of this appliance is recyclable and could be made of:
■ cardboard;
■ paper;
■ polythene (PE) film;
■ CFC-free polystyrene (PS – hard foam);
■ polypropylene tape (PP).
These materials are to be disposed of responsibly and in accordance with government regulations.
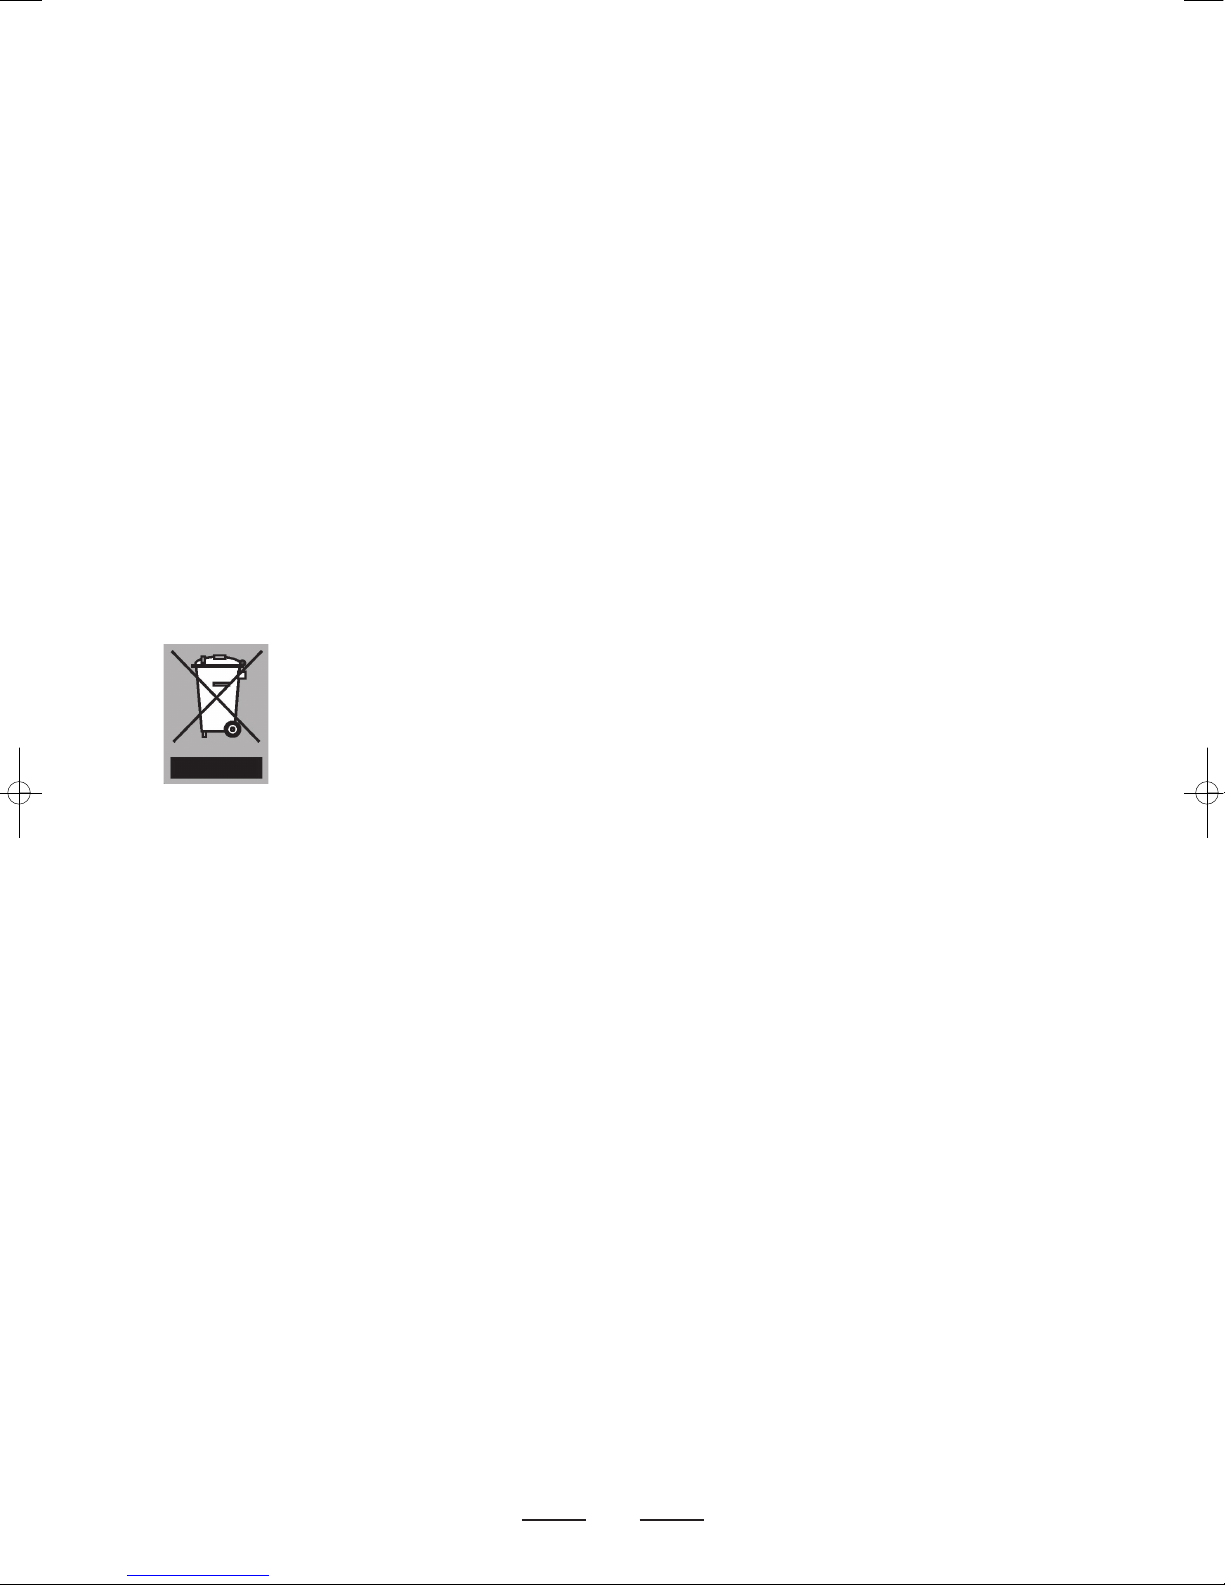
To draw attention to the obligation to process electrical household appliances separately, the product carries the symbol of a
dustbin with a cross through it:
This means that at the end of its working life the product may not be disposed of as household waste, but must be taken to a
segregated waste collection centre run by the local authorities or to a dealer providing this service.
Processing household appliances such as this dishwasher separately prevents negative impacts on the environment and public health,
which might otherwise result from inappropriate processing.
It also enables the recovery of materials used in the production of the appliance, thus realising considerable savings in terms of both
raw materials and energy.
 Loading...