

Page 1
GEBRUIKSAANWIJZING
INSTRUCTIONS FOR USE
VRIESKAST
FREEZER
EVV0852WIT
EVV1432WIT
EVV0860WIT
VV855WIT
Page 2
Inhoud
Veiligheidsvoorschriften. . . . . . . . . . . . . . . . . . 3
Toestelbeschrijving. . . . . . . . . . . . . . . . . . . . . . 6
Inleiding . . . . . . . . . . . . . . . . . . . . . . . . . . . . . . . 7
Ingebruikname . . . . . . . . . . . . . . . . . . . . . . . . . . 8
Voor u het toestel kunt gebruiken. . . . . . . . . . . 8
Instellen van de temperatuur . . . . . . . . . . . . . . 9
Tips . . . . . . . . . . . . . . . . . . . . . . . . . . . . . . . . . . . 10
INHOUD
Bewaartips . . . . . . . . . . . . . . . . . . . . . . . . . . . . . 10
Energietips . . . . . . . . . . . . . . . . . . . . . . . . . . . . . 10
Storingen. . . . . . . . . . . . . . . . . . . . . . . . . . . . . . . 11
Storingen zelf verhelpen . . . . . . . . . . . . . . . . . . 11
Onderhoud. . . . . . . . . . . . . . . . . . . . . . . . . . . . . . 12
Ontdooien . . . . . . . . . . . . . . . . . . . . . . . . . . . . . . 12
Reinigen. . . . . . . . . . . . . . . . . . . . . . . . . . . . . . . . 12
Installatie . . . . . . . . . . . . . . . . . . . . . . . . . . . . . . 13
Wijzigen draairichting van de deur. . . . . . . . . . 13
Bovenblad verwijderen . . . . . . . . . . . . . . . . . . . 14
Milieuaspecten . . . . . . . . . . . . . . . . . . . . . . . . . 15
Afvoeren verpakking en toestel . . . . . . . . . . . . 15
This appliance is in accordance with the following EU guidelines:
2004/108/EC and 2009/125/EC and EC.643/2009 and 2002/96/EC and
2006/95/EC.
2
Page 3
Algemene veiligheidsvoorschriften
Lees zorgvuldig de meegeleverde instructies voor installatie en
gebruik van het apparaat. De fabrikant is niet verantwoordelijk
voor letsel en schade veroorzaakt door een foutieve installatie.
Bewaar de instructies van het apparaat voor toekomstig gebruik.
Veiligheid van kinderen en kwetsbare mensen
• Dit apparaat kan worden gebruikt door kinderen van 8 jaar en ouder
en door mensen met beperkte lichamelijke, zintuiglijke of verstandelijke vermogens of een gebrek aan ervaring en kennis, indien zij onder
toezicht staan of instructies hebben gekregen over het veilig gebruiken
van het apparaat en indien zij de eventuele gevaren begrijpen.
• Laat kinderen niet met het apparaat spelen.
• Reiniging en onderhoud mag niet worden uitgevoerd door kinderen
zonder toezicht.
• Houd alle verpakkingsmaterialen uit de buurt van kinderen.
Algemene veiligheid
• De lampen voor speciale doeleinden (gloeilampen, LED, TL-lampen)
in het apparaat zijn bedoeld om de binnenruimte te verlichten en niet
geschikt als kamerverlichting.
• WAARSCHUWING! Dit apparaat is bedoeld voor huishoudelijk
gebruik of gelijksoortige toepassingen zoals:
– boerderijen, personeelskeukens in winkels, kantoren of andere
werkomgevingen;
– Door gasten in hotels, motels, bed&breakfasts en andere
woonomgevingen.
• WAARSCHUWING! Houd de ventilatieopeningen altijd vrij van
obstructies; dit geldt zowel voor losstaande als ingebouwde modellen.
• WAARSCHUWING! Gebruik geen mechanische of andere middelen
om het ontdooiproces te versnellen, behalve die middelen die door de
fabrikant zijn aanbevolen.
• WAARSCHUWING! Let op dat u het koelcircuit niet beschadigt.
• WAARSCHUWING! Gebruik geen elektrische apparaten in de koelkast,
tenzij deze door de fabrikant worden aanbevolen.
• WAARSCHUWING! Gebruik geen waterstralen of stoom om het
apparaat te reinigen.
• Maak het apparaat schoon met een vochtige, zachte doek. Gebruik
alleen neutrale schoonmaakmiddelen. Gebruik geen schuurmiddelen,
schuursponsjes, oplosmiddelen of metalen voorwerpen.
• WAARSCHUWING! Bewaar geen explosieve substanties zoals spuit-
bussen met drijfgas in dit apparaat.
3 VEILIGHEIDSVOORSCHRIFTEN
Page 4

• Als de voedingskabel beschadigd is, moet de fabrikant of diens
technische dienst of een gekwalifi ceerd persoon deze vervangen
teneinde gevaarlijke situaties te voorkomen.
Montage
• WAARSCHUWING! Alleen een erkende installatietechnicus mag het
apparaat installeren.
• Verwijder alle verpakkingsmaterialen.
• Installeer en gebruik geen beschadigd apparaat.
• Volg de installatie-instructies op die zijn meegeleverd met het
apparaat.
• Wees voorzichtig met het verplaatsen van het apparaat, het is zwaar.
Draag altijd veiligheidshandschoenen.
VEILIGHEIDSVOORSCHRIFTEN
• Zorg ervoor dat rond het apparaat lucht kan circuleren.
• Wacht ten minste 4 uur alvorens het apparaat aan de netstroom aan te
sluiten. Hierdoor kan de olie terug in de compressor stromen.
• Installeer het apparaat niet in de nabijheid van radiators, fornuizen,
ovens of kookplaten.
• De achterzijde van het apparaat moet tegen de muur worden geplaatst.
• Installeer het apparaat niet op een plaats met direct zonlicht.
• Gebruik dit apparaat niet in gebieden die te vochtig of te koud zijn,
zoals bijgebouwen, garages of kelders.
• Til de voorkant van het apparaat op als u hem wilt verplaatsen, om
krassen op de vloer te voorkomen.
Aansluiting op het elektriciteitsnet
• WAARSCHUWING! Gevaar voor brand en elektrische schokken.
• Dit apparaat moet worden aangesloten op een geaard stopcontact.
• Alle elektrische aansluitingen moeten door een gediplomeerd elektromonteur worden gemaakt.
• Controleer of de elektrische informatie op het typeplaatje overeenkomt
met de stroomvoorziening. Zo niet, neem dan contact op met een elektromonteur.
• Gebruik altijd een correct geinstalleerd, schokbestendig stopcontact.
• Gebruik geen meerwegstekkers en verlengsnoeren.
• Zorg dat u de elektrische onderdelen (hoofdstekker, kabel, compressor)
niet beschadigt. Neem contact met de Servicedienst of een elektrotechnicus om de elektrische onderdelen te wijzigen.
• De stroomkabel moet lager blijven dan het niveau van de stopcontact.
• Steek de stekker pas in het stopcontact als de installatie is voltooid.
Zorg ervoor dat het netsnoer na installatie bereikbaar is.
• Trek niet aan het netsnoer om het apparaat los te koppelen. Trek altijd
aan de stekker.
4
Page 5

Gebruik
• WAARSCHUWING! Gevaar op letsel, brandwonden of elektrische
schokken.
• De specifi catie van het apparaat mag niet worden veranderd.
• Plaats geen elektrische apparaten (bijv. ijsmachines) in het apparaat
tenzij uitdrukkelijk geschikt verklaard door de fabrikant.
• Zorg ervoor dat u het koelcircuit niet beschadigt. Het bevat isobutaan
(R600a), aardgas met een hoge ecologische compatibiliteit. Dit gas is
ontvlambaar.
• Als er schade aan het koelcircuit optreedt, zorg er dan voor dat er zich
geen vlammen en andere ontstekingsbronnen in de kamer bevinden.
Ventileer de kamer goed.
• Zet geen hete items op de kunststofonderdelen van het apparaat.
• Bewaar geen ontvlambare gassen en vloeistoffen in het apparaat.
• Plaats geen ontvlambare producten of items die vochtig zijn door
ontvlambare producten in, bij of op het apparaat.
• Raak de compressor of condensator niet aan. Ze zijn heet.
Onderhoud en reiniging
• WAARSCHUWING! Gevaar voor letsel of schade aan het apparaat.
• Schakel het apparaat uit en trek de stekker uit het stopcontact voordat
u onderhoudshandelingen verricht.
• Het koelcircuit van dit apparaat bevat koolwaterstoffen. Enkel
bevoegde personen mogen de eenheid onderhouden en herladen.
• Controleer regelmatig de afvoer van het apparaat en reinig het indien
nodig. Indien de afvoer verstopt is, zal er water op de bodem van het
apparaat liggen.
Verwijdering
• WAARSCHUWING! Gevaar voor letsel of verstikking.
• Haal de stekker uit het stopcontact.
• Snij het netsnoer van het apparaat af en gooi dit weg.
• Verwijder de deur om te voorkomen dat kinderen en huisdieren
opgesloten raken in het apparaat.
• Het koelcircuit en de isolatiematerialen van dit apparaat zijn ozonvriendelijk.
• Het isolatieschuim bevat ontvlambare gassen. Neem contact met
uwplaatselijke overheid voor informatie m.b.t. correcte afvalverwerking
van het apparaat.
• Veroorzaak geen schade aan het deel van de koeleenheid dat zich
naast de warmtewisselaar bevindt.
5 VEILIGHEIDSVOORSCHRIFTEN
Page 6
Toestelbeschrijving
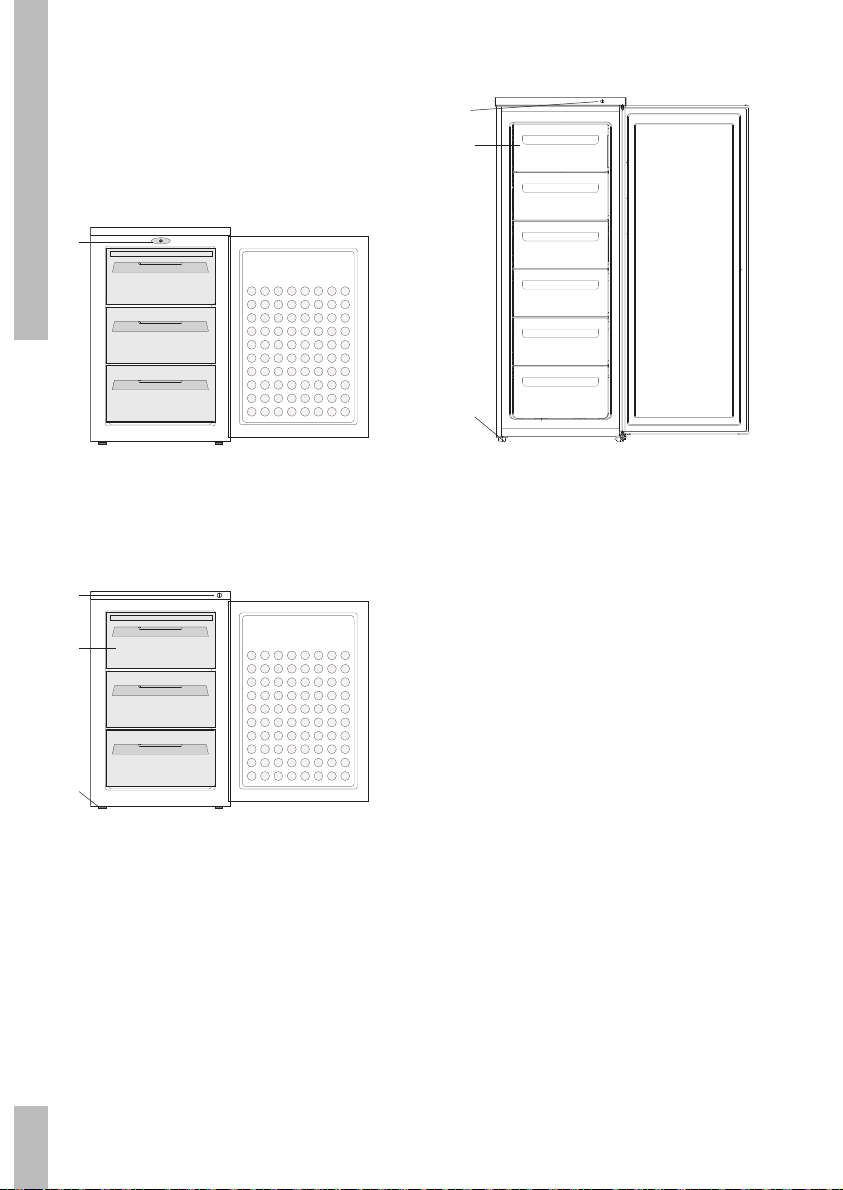
1
2
3
EVV0852WIT/VV855WIT EVV1432WIT
1
2
3
EVV0860WIT
1 bediening thermostaat
2 vrieslade
3 stelvoeten
6 TOESTELBESCHRIJVING
Page 7

Inleiding
Uw nieuwe vrieskast is bestemd voor
huishoudelijke doeleinden. Het toestel
is geschikt voor het bewaren van
levensmiddelen.
De bewaartijden zijn sterk afhankelijk van de
kwaliteit van de levensmiddelen.
Het “Voorlichtingsbureau voor de voeding” in
Den Haag kan u informatie verschaffen over
het bewaren van levensmiddelen.
In deze handleiding vindt u informatie over de
installatie, veiligheid, bediening en onderhoud
van uw toestel.
Als u de informatie doorleest, bent u snel op
de hoogte van alle mogelijkheden van het
toestel.
INLEIDING
Bewaar dit boekje. Een eventueel volgende
gebruiker van dit toestel kan daar zijn
voordeel mee doen.
7
Page 8
Voor u het toestel kunt gebruiken
Opstellen
Plaats het toestel op een plek waar de
omgevingstemperatuur voldoet aan de
klimaatklasse waarvoor het toestel ontworpen
is. U kunt de klimaatklasse vinden op het
typeplaatje. In onderstaande tabel vind
u de klimaatklasses en de bijbehorende
INGEBRUIKNAME
omgevingstemperatuur:
SN 10 - 32 °C (koude omgeving)
N 16 - 32 °C (normaal)
ST 16 - 38 °C (semi-tropisch)
T 16 - 43 °C (tropisch)
Het apparaat moet door minimaal twee personen
worden verplaatst en geïnstalleerd.
Wees voorzichtig bij het verplaatsen van
het apparaat om te voorkomen dat de vloer
beschadigd raakt.
Zorg ervoor dat het apparaat tijdens de
installatie de voedingskabel niet beschadigd.
Reinigen
Maak eerst het interieur schoon en droog.
Gebruik voor het schoonmaken een sopje van
een neutraal schoonmaakmiddel (allesreiniger
of afwasmiddel). Het interieur na het
schoonmaken afnemen met schoon water en
droogwrijven.
Laat het toestel 1 à 2 uur drogen.
Stel de thermostaat in op de middelste stand.
Steek de stekker in het stopcontact. Het
toestel koelt nu continu tot de ingestelde
temperatuur is bereikt.
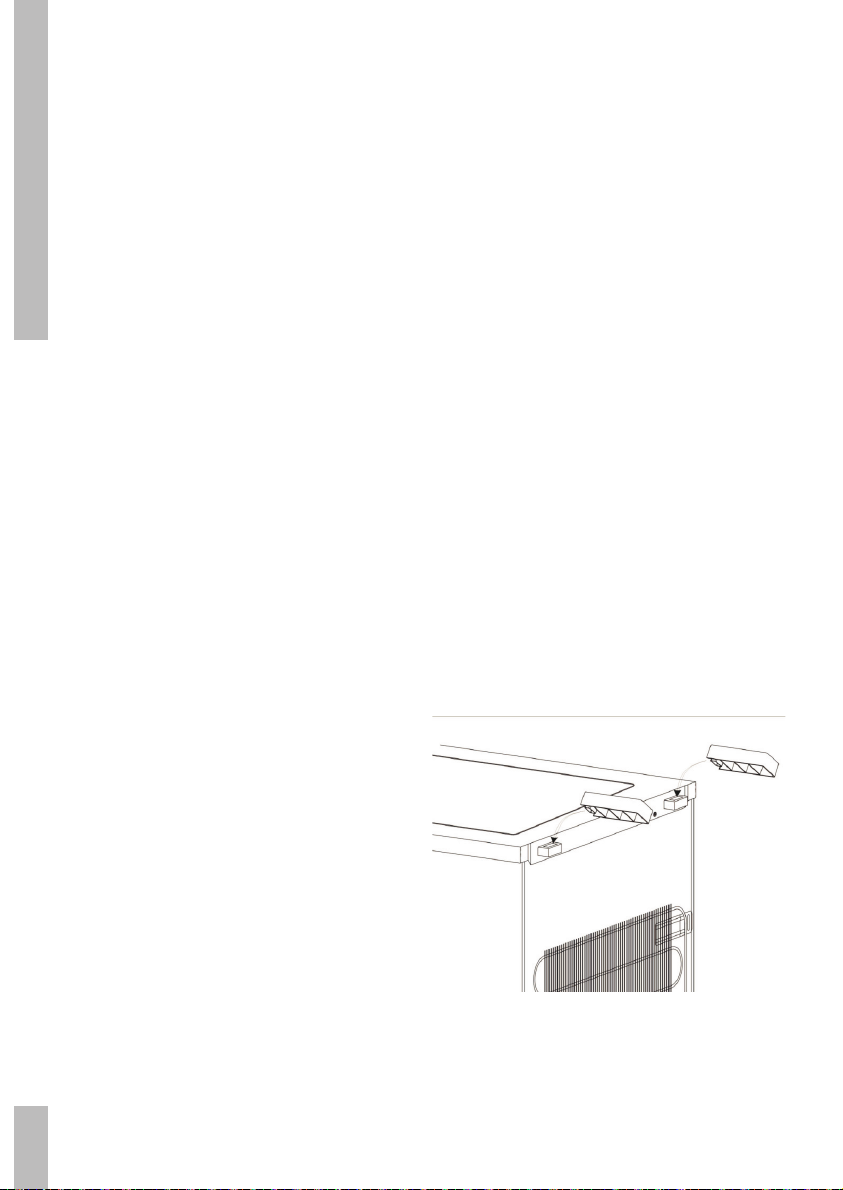
Afstandshouders (EVV1432WIT)
In het zakje accessoires zijn 2 afstands-
houders bijgevoegd. Voor betere
koelprestaties dienen deze afstandshouders
achter op het toestel te worden aangebracht
(zie tekening).
Plaats het toestel op een vlakke, stabiele
ondergrond.
Zorg voor voldoende ventilatie, houd rondom
het toestel minimaal 10 cm ruimte vrij.
Met de stelvoeten kunt u het toestel waterpas
zetten.
Laat het toestel nadat het geplaatst is
minimaal 3 uur staan voordat u de stekker in
het stopcontact steekt.
8
Page 9
Instellen van de temperatuur
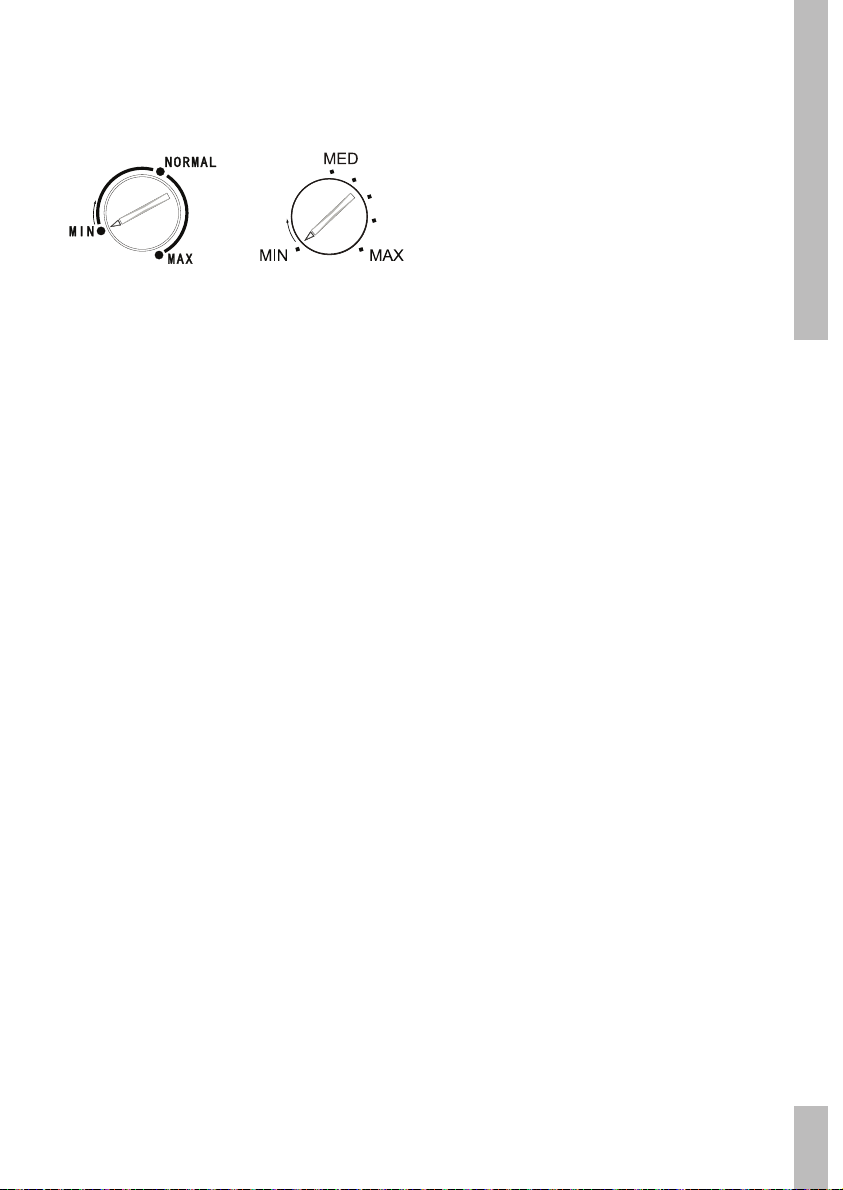
Draai de termostaat naar de gewenste stand.
Stand `min´ = minimale koeling, warm
Stand `max´ = maximale koeling, koud
Draai de temperatuurregelaar bij voorkeur in de
middelste stand.
Wanneer er diepvriesproducten worden
bewaard en de lage diepvriestemperaturen zijn
gewenst, dan is een stand van de
temperatuurregelaar “max” aan te bevelen.
Wilt u de ingevroren levensmiddelen lang
bewaren, dan moet de temperatuur minimaal
-18 °C bedragen. Houd er rekening mee dat de
temperatuur in de kast afhankelijk is van de
omgevingstemperatuur (plaatsing van de kast),
het aantal malen dat de kastdeur geopend wordt
en de ingevroren levensmiddelen.
Zet de temperatuurregelaar indien nodig op een
koudere (= hogere) stand.
INGEBRUIKNAME
9
Page 10
Bewaartips
Koop uitsluitend levensmiddelen in een
onbeschadigde verpakking.
Plaats nooit producten te dicht bij elkaar
en zorg voor voldoende afstand voor een
optimale luchtcirculatie in de koelkast.
TIPS
Leg diepvrieslevensmiddelen zo snel mogelijk
na de aankoop in het vriezer. Zorg ervoor dat
ze tijdens het transport niet ontdooien.
Gebruik
- Open de deur van de vrieskast niet vaker
dan nodig is. Dat geldt in het bijzonder bij
warm en vochtig weer. Zorg er ook voor
dat de vrieskast maar zo kort mogelijk
open is.
- Draai de thermostaatknop van een hogere
op een lagere stand wanneer het gebruik
van het apparaat en de omstandigheden dit
toelaten.
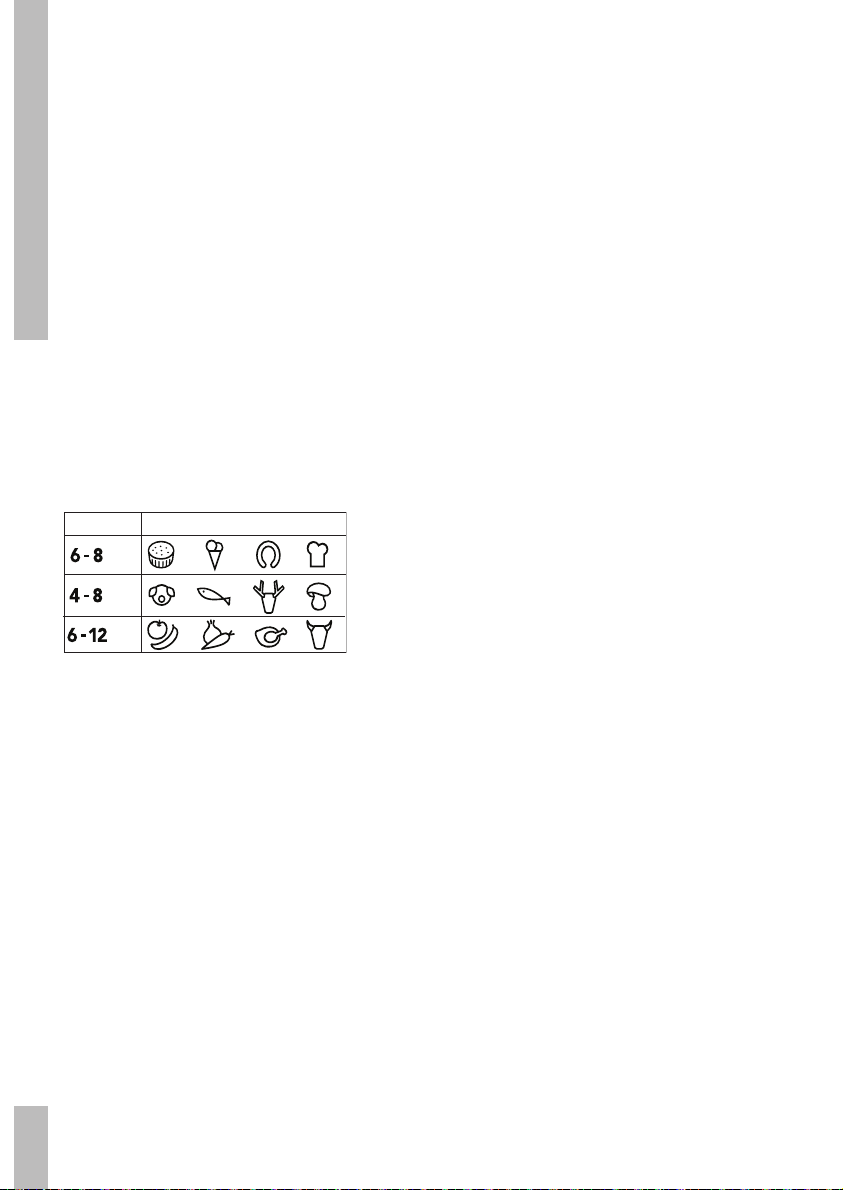
In de onderstaande tabel kunt u zien hoeveel
maanden verse ingevroren levensmiddelen
bewaard kunnen worden in het vriezer.
Maanden Voedsel
Energietips
Opstelling
Hoge omgevingstemperaturen beïnvloeden
het energieverbruik nadelig. Ook direct
zonlicht of andere warmtebronnen in de
buurt van de koelkast hebben een ongunstige
invloed op het energieverbruik.
Ventilatie-openingen vrijhouden. Afgedekte
(vervuilde) openingen geven een hoger
energieverbruik. Zorg voor voldoende
ruimte rondom de vrieskast zodat een goede
ventilatie en luchtstroming rondom de vrieskast
mogelijk is.
- Alvorens levensmiddelen in de vrieskast te
leggen, moeten deze tot kamertemperatuur
worden afgekoeld.
- Rijp of ijslagen doen het stroomgebruik
toenemen, verwijder deze daarom
regelmatig zodra ze 3-5 mm dik zijn.
- Een verkeerd of niet afdichtend deurrubber
kan het stroomverbruik verhogen, daarom
moet het tijdig en vakkundig worden
vervangen.
- De condensor aan de achterkant van de
kast moet altijd schoon en vrij van stof of
ongerechtigheden worden gehouden.
- Controleer af en toe of het apparaat
voldoende koelt (vrije circulatie van de
lucht achter het apparaat).
- Elke instructie uit de hoofdstukken
installatie en energiebesparing die niet
wordt nageleefd, kan leiden tot een hoger
stroomverbruik.
10
Page 11

Storingen zelf verhelpen
Storing
Toestel doet niets; lampje
brandt niet.
Temperatuur in koelkast te
hoog of te laag.
Water loopt uit de koelkast.
Toestel maakt lawaai.
Verlichting brandt niet.
Opmerking:
Het koelcircuit kan borrelen
of expansiegeluiden maken;
dat is normaal.
Oorzaak
Stekker niet in het
stopcontact.
Thermostaat foutief
ingesteld.
Dooiwaterafvoer verstopt.
Onjuiste opstelling
levensmiddelen in de
koelkast.
Er ligt een voorwerp tegen
het toestel.
Lamp defect.
Remedie
Steek de stekker in het
stopcontact.
Stel de thermostaat goed in.
Maak de dooiwaterafvoer
vrij.
Plaats de levensmiddelen op
de juiste wijze in de koelkast.
Verplaats het voorwerp.
Vervang de lamp.
STORINGEN
11
Page 12

Ontdooien
Reinigen
Ontdooi de vriezer wanneer de ijslaag een
dikte van 5 mm bereikt heeft.
Verwijder het vriesgoed.
Schakel de vriezer uit.
ONDERHOUD
Ontdooi de vriezer.
Maak de vriezer schoon en droog.
Schakel de vriezer weer in.
Plaats het vriesgoed weer in de vriezer als de
vriezer op temperatuur is.
U kunt het ontdooien versnellen door een
schaal met heet water in de vriezer te
plaatsen.
Bewaar het vriesgoed op een koele plaats
ingepakt in dekens of kranten.
Waarschuwing
Verwijder ijsaanslag nooit met scherpe
voorwerpen, ontdooisprays, een föhn, een
straalkacheltje of iets dergelijks. Dit kan tot
onveilige situaties leiden en onherstelbare
schade aan het toestel veroorzaken.
Waarschuwing
Trek voor het schoonmaken de stekker uit het
stopcontact. De stekker nooit aan het snoer
uit het stopcontact trekken!
Gebruik voor het schoonmaken een sopje
van een neutraal schoonmaakmiddel
(allesreiniger of afwasmiddel). Het toestel na
het schoonmaken afnemen met schoon water
en droogwrijven. Laat het toestel 1 à 2 uur
drogen.
Reinig de buitenkant met een zachte doek.
Reinig regelmatig de condensor en
ventilatieroosters aan de achterkant van het
apparaat met een stofzuiger of een borstel.
De mantel kunt u eventueel behandelen met
een onderhoudsmiddel voor lakken.
Waarschuwing
Gebruik nooit een stoomreiniger voor het
reinigen van de vriezer. Dit is gevaarlijk.
Gebruik niet te veel vocht.
Vermijd het binnendringen van vocht in
elektrische componenten.
12
Page 13
Wijzigen draairichting deur
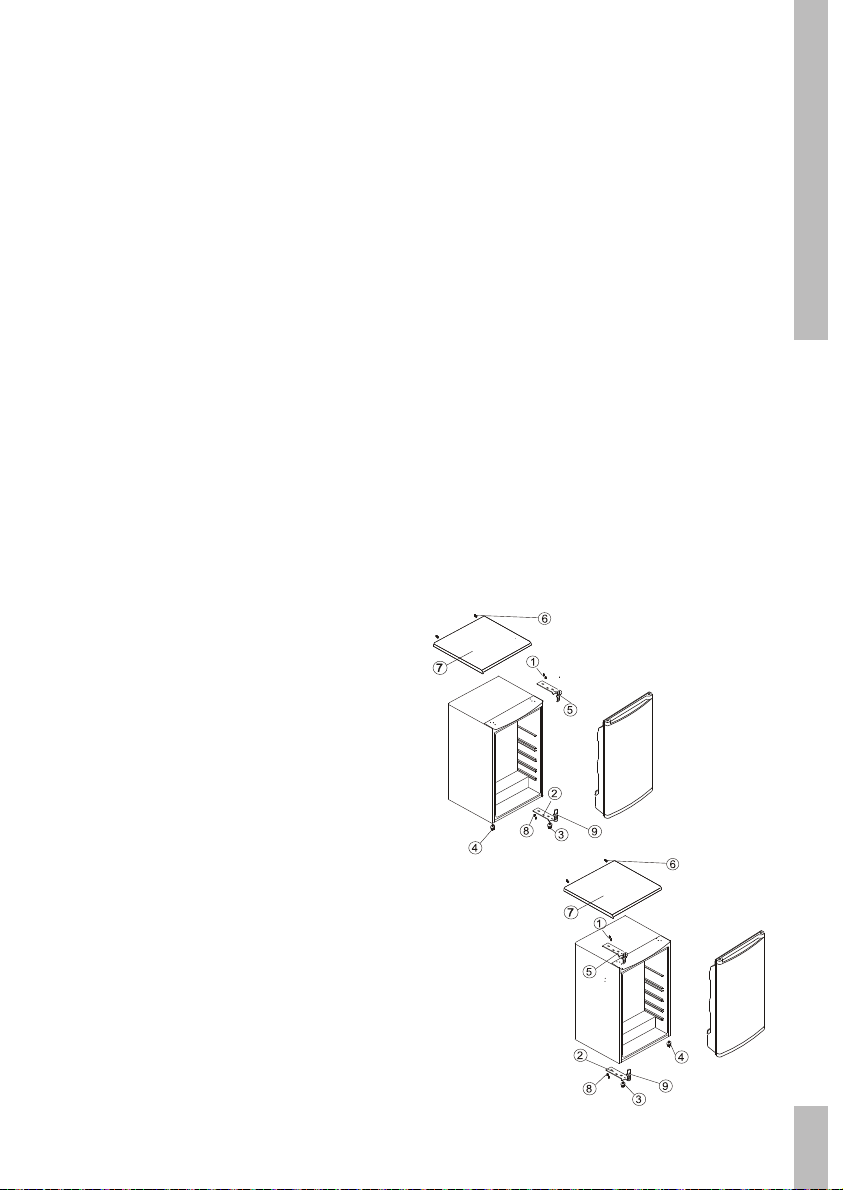
De deur van de koelkast kan aan de rechter-
of linkerkant worden geopend. Bij levering
wordt de deur van het apparaat aan de
linkerkant geopend. Om de openingsrichting
te wijzigen moeten de onderstaande
instructies worden opgevolgd.
Opmerking: alvorens de openingsrichting
van de deur om te keren moet het apparaat
worden afgekoppeld van de voeding, of moet
de voeding worden uitgeschakeld.
1. Verwijder de schroeven (6) terwijl u het
bovenpaneel (7) tegen het apparaat blijft
houden. Verwijder het bovenpaneel
2. Verwijder de twee schroeven (1) terwijl u
het bovenste scharnier (5) (rechterkant)
tegen het frame houdt. Verwijder het
bovenste scharnier (5).
Monteer het onderste scharnier (2) terug
op de linkerkant, met behulp van de twee
schroeven (8).
7. Monteer de scharnierpen (9) in het
onderste scharnier (2).
8. Laat de deur op de pen van het onderste
scharnier (9) zakken.
9. Monteer, terwijl de deur in gesloten
positie is, het bovenste scharnier (5) aan
de linkerkant met behulp van de twee
schroeven (1). Draai de schroeven (1) pas
vast als de deur waterpas is ten opzichte
van de ondergrond van het apparaat.
10. Monteer het bovenpaneel weer met de
schroeven (6).
INSTALLATIE
3. Til de deur op van de pen van het onderste
scharnier en leg hem op een niet-krassend
oppervlak.
4. Verwijder de twee schroeven (8) terwijl u
het onderste scharnier ondersteunt (2).
Verwijder het onderste scharnier (2).
5. Verwijder het pootje links voor (4) en
verplaats het naar de rechterkant.
6. Alvorens het onderste scharnier (2) weer
te plaatsen moet de pen van het scharnier
(9) worden verwijderd en moet de richting
van het scharnier (2) worden omgekeerd.
Deuropening links
Deuropening rechts
13
Page 14
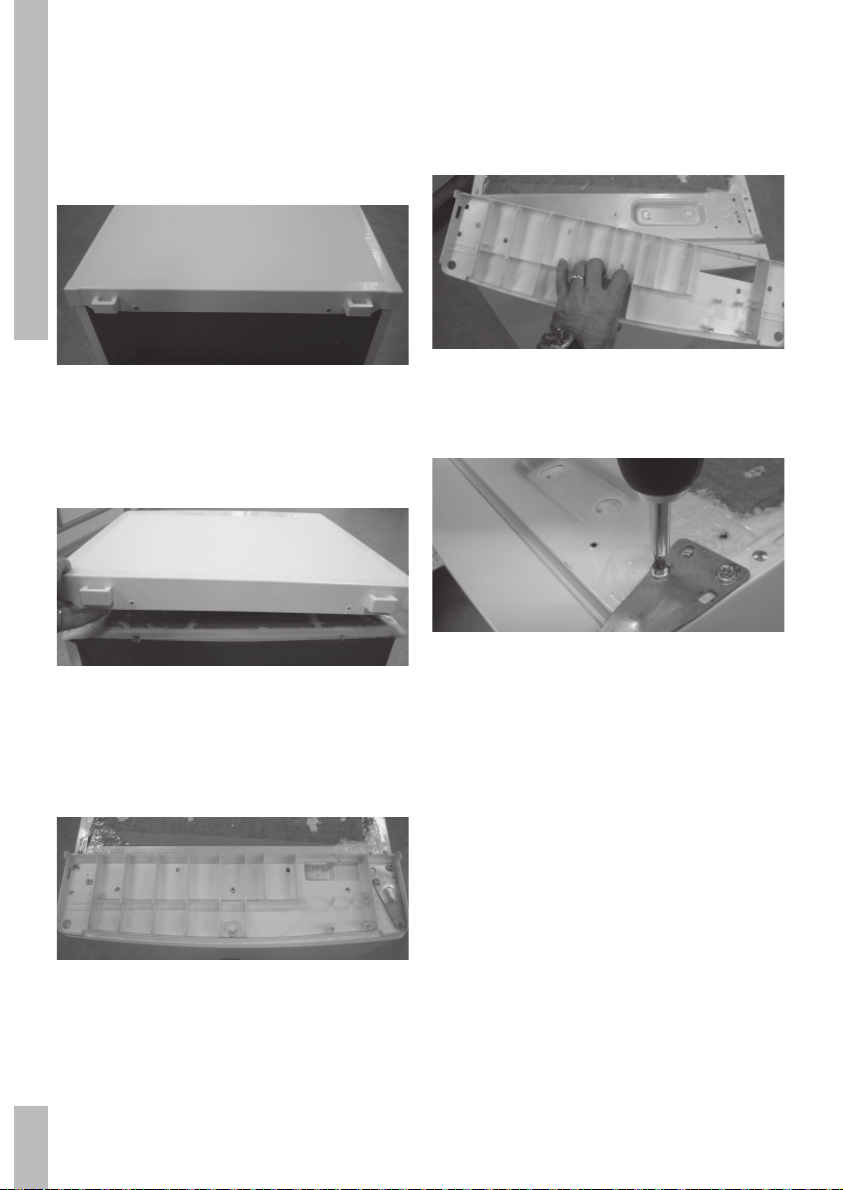
Bovenblad verwijderen
Stap 1
Verwijder de 2 schroeven op de achterkant van
het apparaat.
INSTALLATIE
Stap 2
Til de plaat aan de achterkant op en verwijder
hem uit de voorste bevestigingspunten.
Stap 4
Verwijder het scharnier en het kunststof frame.
Stap 5
Terugzetten en het metalen scharnier weer
monteren met de 2 schroeven.
Stap 3
Verwijder de 10 schroeven op het kunststof
frame en het metalen scharnier.
14
Page 15
Afvoe ren ver pak king en toe stel
De verpakking van het toestel is recyclebaar.
Voor de verpakking kunnen gebruikt zijn:
kar ton
poly-ethy leen folie (PE)
CFK-vrij poly sty reen (PS-hard- schuim)
Deze mate ri a len op ver ant woor de wijze en
con form de overheidsbepa lin gen afvoe ren.
Op het typeplaatje is het symbool van een
doorgekruiste vuilnisbak aangebracht:
Dit betekent dat het apparaat aan het einde
van zijn levensduur niet bij het gewone
huisvuil mag worden gevoegd, maar naar
een speciaal centrum voor gescheiden
afvalinzameling van de gemeente moet
worden gebracht of naar een verkooppunt dat
deze service verschaft.
Het apart verwerken van een huishoudelijk
apparaat voorkomt mogelijk negatieve
gevolgen voor het milieu en de gezondheid
die door een ongeschikte verwerking ontstaat
en zorgt ervoor dat de materialen waaruit
het apparaat bestaat teruggewonnen kunnen
worden om een aanmerkelijke besparing van
energie en grondstoffen te verkrijgen.
Om op de verplichting tot gescheiden
verwerking van elektrische huishoudelijke
apparatuur te wijzen, is op het product het
symbool van een doorgekruiste vuilnisbak
aangebracht.
MILIEUASPECTEN
15
Page 16

16
Page 17
Table of contents
Safety. . . . . . . . . . . . . . . . . . . . . . . . . . . . . . . 18
Appliance description. . . . . . . . . . . . . . . . . . 21
Introduction . . . . . . . . . . . . . . . . . . . . . . . . . 22
Preparing for use . . . . . . . . . . . . . . . . . . . . . 23
Before you can use the appliance . . . . . . . 23
Setting the temperature. . . . . . . . . . . . . . . . . 24
Tips . . . . . . . . . . . . . . . . . . . . . . . . . . . . . . . . 25
Tips on keeping food . . . . . . . . . . . . . . . . . . 25
Energy tips . . . . . . . . . . . . . . . . . . . . . . . . . . 25
Faults . . . . . . . . . . . . . . . . . . . . . . . . . . . . . . . 26
Trouble shooting. . . . . . . . . . . . . . . . . . . . . . 26
Maintenance. . . . . . . . . . . . . . . . . . . . . . . . . 27
Thawing. . . . . . . . . . . . . . . . . . . . . . . . . . . . . 27
Cleaning. . . . . . . . . . . . . . . . . . . . . . . . . . . . . 27
Installation . . . . . . . . . . . . . . . . . . . . . . . . . . 28
Door Swing Reversal . . . . . . . . . . . . . . . . . . 28
Remove the top panel . . . . . . . . . . . . . . . . . 29
Environmental aspects . . . . . . . . . . . . . . . . 30
Disposal of packaging and appliances. . . . 30
TABLE OF CONTENTS
This appliance is in accordance with
the following EU guidelines:
2004/108/EC and 2009/125/EC and
EC.643/2009 and 2002/96/EC and
2006/95/EC.
17
Page 18
General safety regulations
Before the installation and use of the appliance, carefully read
the supplied instructions. The manufacturer is not responsible
if an incorrect installation and use causes injuries and
damages. Always keep the instructions with the appliance
for future reference.
Children and vulnerable people safety
• This appliance can be used by children aged from 8 years and above
SAFETY REGULATIONS
and persons with reduced physical, sensory or mental capabilities or
lack of experience and knowledge if they have been given supervision
or instruction concerning use of the appliance in a safe way and
understand the hazards involved.
• Do not let children play with the appliance.
• Cleaning and user maintenance shall not be made by children without
supervision.
• Keep all packaging away from children.
General Safety
• The lamp in this household appliance is only suitable for illumination of
this appliance. The lamp is not suitable for household room illumination.
• WARNING! This appliance is intended to be used in household and
similar applications such as:
– Farm houses; staff kitchen areas in shops, offi ces and other
working environments;
– By clients in hotels, motels, bed and breakfast and other
residential type environments.
• WARNING! Keep ventilation openings, in the appliance enclosure or
in the built-in structure, clear of obstruction. Do not use mechanical
devices or other means to accelerate the defrosting process, other
than those recommended by the manufacturer.
• WARNING! Do not damage the refrigerant circuit.
• WARNING! Do not use electrical appliances inside the food storage
compartments of the appliance, unless they are of the type
recommended by the manufacturer.
• WARNING! Do not use water spray and steam to clean the appliance.
• WARNING! Clean the appliance with a moist soft cloth. Only use neu-
tral detergents. Do not use abrasive products, abrasive cleaning pads,
solvents or metal objects.
• WARNING! Do not store explosive substances such as aerosol cans
with a fl ammable propellant in this appliance.
18
Page 19

• WARNING! If the supply cord is damaged, it must be replaced by the
manufacturer, its service agent or similarly qualifi ed persons in order
to avoid a hazard.
Installation
• WARNING! Only a qualifi ed person must install this appliance.
• Remove all the packaging.
• Do not install or use a damaged appliance.
• Obey the installation instruction supplied with the appliance.
• Always be careful when you move the appliance because it is heavy.
Always wear safety gloves.
• Make sure the air can circulate around the appliance.
• Wait at least 4 hours before connecting the appliance to the power
supply. This is to allow the oil to fl ow back in the compressor.
• Do not install the appliance close to radiators or cookers, oven or hobs.
• The rear of the appliance must stand against the wall.
• Do not install the appliance where there is direct sunlight.
• Do not install this appliance in areas that are too humid or too colds,
such as the construction appendices, garages or wine cellars.
• When you move the appliance, lift it by the front edge to avoid
scratching the fl oor.
Electrical connection
• WARNING! Risk of fi re and electrical shock.
• The appliance must be earthed.
• All electrical connections should be made by a qualifi ed electrician.
• Make sure that the electrical information on the rating plate agrees
with the power supply. If not, contact an electrician.
• Always use a correctly installed shockproof socket.
• Do not use multi-plug adapters and extension cables.
• Make sure not to cause damage to the electrical components (e.g.
mains plug, mains cable, compressor). Contact the Service or an
electrician to change the electrical components.
• The mains cable must stay below the level of the mains plug.
• Connect the mains plug to the mains socket only at the end of the
installation. Make sure that there is access to the mains plug after the
installation.
• Do not pull the mains cable to disconnect the appliance. Always pull
the mains plug.
19 SAFETY REGULATIONS
Page 20

Use
• WARNING! Risk of injury, burns, electrical shock or fi re.
• Do not change the specifi cation of this appliance.
• Do not put electrical appliances (e.g. ice cream makers) in the
appliance unless they are stated applicable by the manufacturer.
• Be careful not to cause damage to the refrigerant circuit. It contains
isobutene (R600a), a natural gas with a high level of environmental
compatibility. This gas is fl ammable.
• If damage occurs to the refrigerant circuit, make sure that there are no
fl ames and sources of ignition in the room. Ventilate the room.
SAFETY REGULATIONS
• Do not let hot items to touch the plastic parts of the appliance.
• Do not store fl ammable gas and liquid in the appliance.
• Do not put fl ammable products or items that are wet with fl ammable
products in, near or on the appliance.
• Do not touch the compressor or the condenser. They are hot.
Care and cleaning
• WARNING! Risk of injury or damage to the appliance.
• Before maintenance, deactivate the appliance and disconnect the
mains plug from the mains socket.
• This appliance contains hydrocarbons in the cooling unit. Only a
qualifi ed person must do the maintenance and the recharging of the
unit.
• Regularly examine the drain of the appliance and if necessary, clean
it. If the drain is blocked, defrosted water collects in the bottom of the
appliance.
Disposal
• WARNING!Risk of injury or suffocation.
• Disconnect the appliance from the mains supply.
• Cut off the mains cable and discard it.
• Remove the door to prevent children and pets to be closed inside of the
appliance.
• The refrigerant circuit and the insulation materials of this appliance are
zonefriendly.
• The insulation foam contains fl ammable gas. Contact your municipal
authority for information on how to discard the appliance correctly.
• Do not cause damage to the part of the cooling unit that is near the
heat exchanger.
20
Page 21
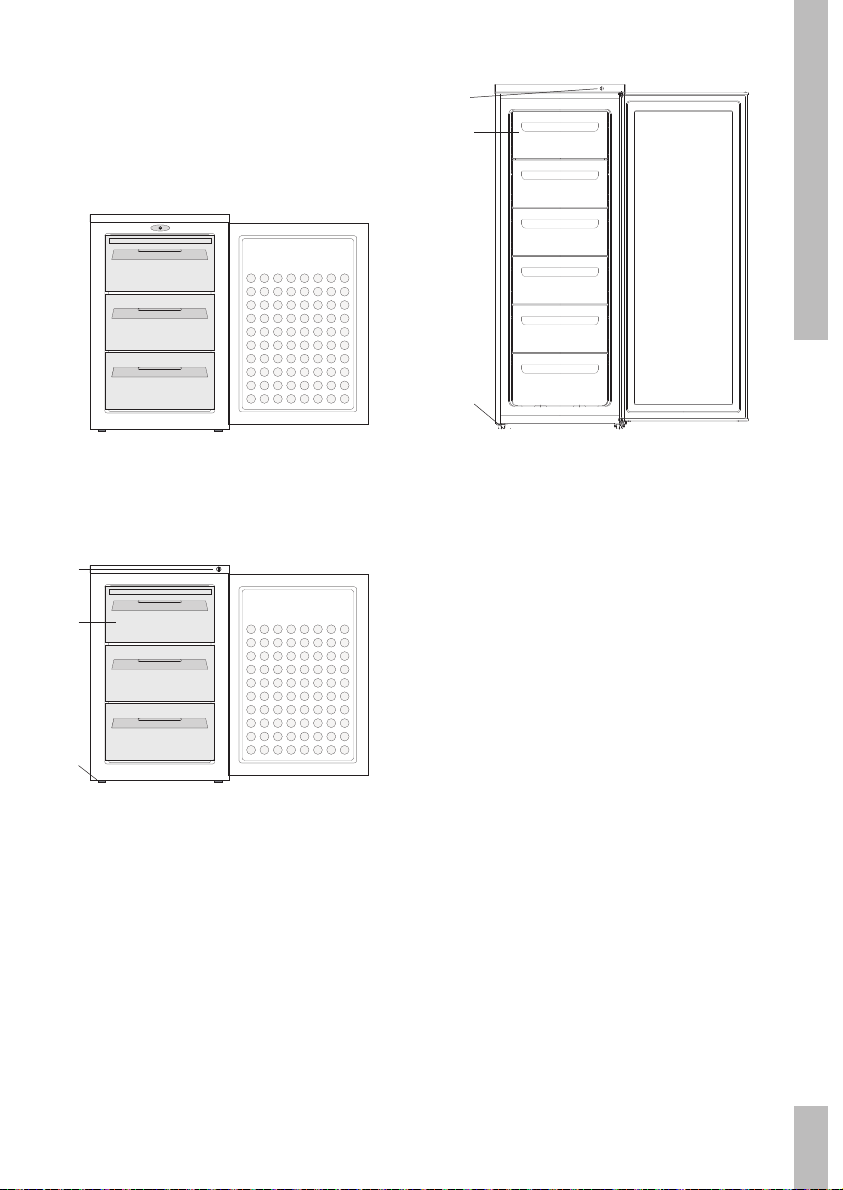
Appliance description
1
2
3
EVV0852WIT/VV855WIT EVV1432WIT
1
2
3
EVV0860WIT
1 control panel with thermostat knob
2 freezer drawer
3 adjustable feet
21 APPLIANCE DESCRIPTION
Page 22

Introduction
Your new freezer is intended for household
use. The appliance is suitable for keeping
food.
The length of time you can keep food depends
very much on the quality of the food.
INTRODUCTION
These instructions for use contain information
about the installation, safety, control and
maintenance of your appliance.
The installation instructions are intended for
the installer, who can install the appliance
safely for you.
By reading the other information, you
will quickly become familiar with all the
appliance’s features.
Please keep this book safely for future use
22
Page 23
Before you can use the appliance
Position
Place the appliance in a location where the
ambient temperature corresponds to the
climate classification for which it is designed.
You can find the climate classification on the
circuit-diagram-serial-plate. The following
table shows this climate classification and its
matching ambient temperature:
SN 10 - 32 °C (cold environment)
N 16 - 32 °C (normal)
ST 16 - 38 °C (semi-tropical)
T 16 - 43 °C (tropical)
The appliance must be handled and installed by
two or more persons.
Be careful not to damage the fl oors when
moving the appliance.
During installation, make sure the appliance
does not damage the power cable.
Cleaning
First, ensure that the interior is clean and
dry. For cleaning, use the suds of a neutral
cleansing agent (a general detergent or
washing-up liquid). After cleaning, rinse the
interior with clean water and rub dry.
Leave the appliance to dry for 1 or 2 hours.
Set the thermostat in the middle position.
Insert the plug into the socket. The appliance
now cools continuously until the set
temperature has been reached.
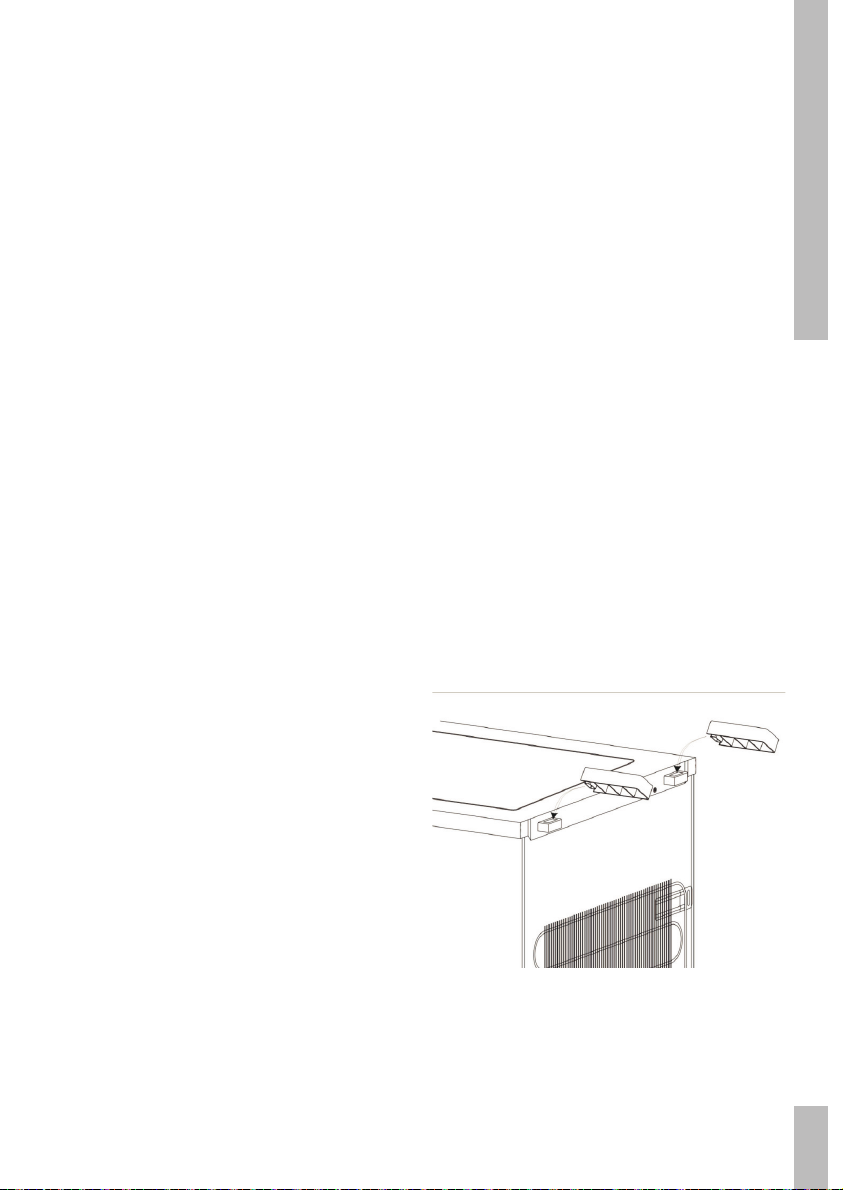
Additional stop (EVV1432WIT)
There are 2 additional stops in the bag of
the instruction manual. In order to get better
cooling performance, we suggest you install
these 2 stops at the back of your freezer (see
illustration).
Make sure that there is sufficient ventilation,
leave a space of 10 cm around the appliance.
You can level the appliance using the
adjustable feet.
Leave the appliance to stand for at least
3 hours before you insert the plug into the
socket.
23 PREPARING FOR USE
Page 24
Setting the temperature
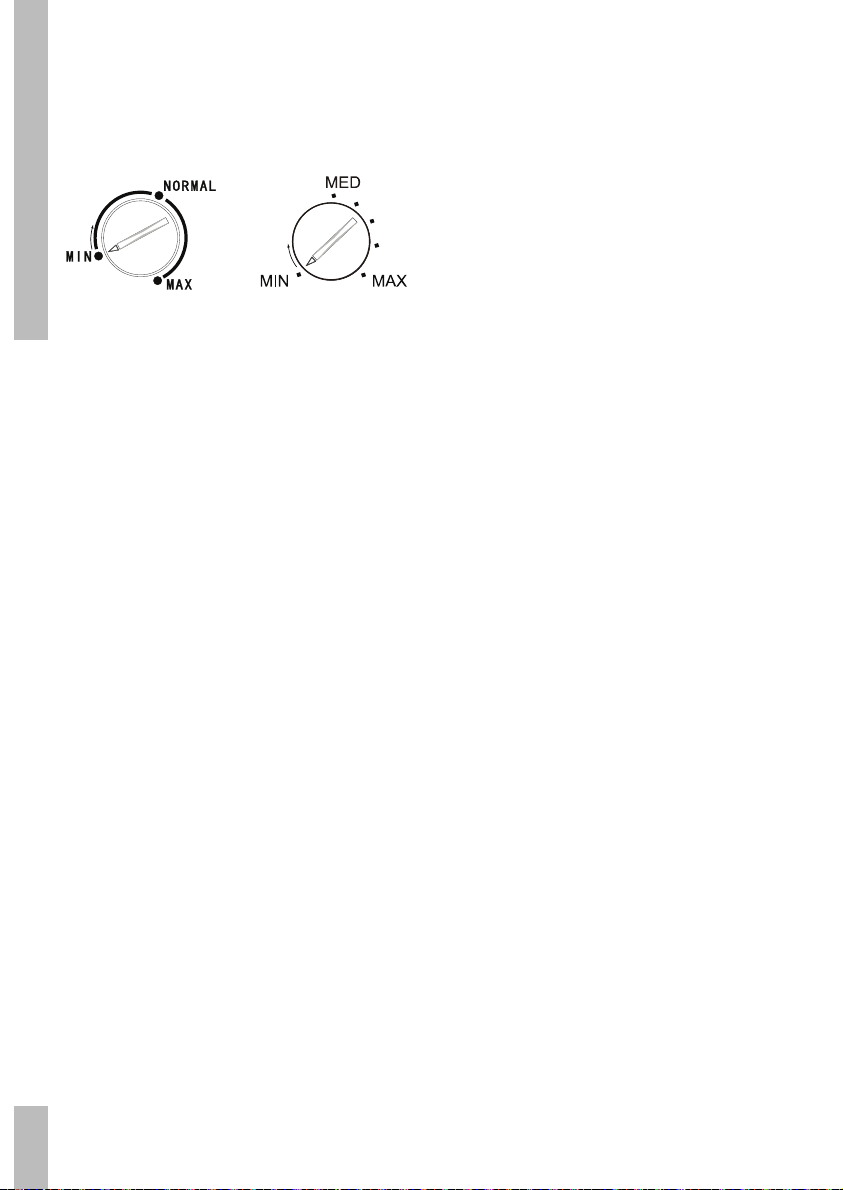
Turn the thermostat control situated in the
control panel in the right position.
PREPARING FOR USE
Setting ‘min’ = lowest cooling setting (highest
temperature)
Setting ‘max’ = highest cooling setting (lowest
temperature)
Recommended temperature setting:
middle position. If frozen products are stored
for a longer period and low temperatures are
required the setting “max” is advised.
The temperature should be ate least -18°C if
frozen food is stored for a longer period.
Remark:
In determining the correct temperature control
setting, below factors have to be considered:
- Room temperature
- How often the door is opened
- How much food is stored
- Position of the appliance
24
Page 25
Tips on keeping food
Only buy food in undamaged packaging.
Never storage product’s too close together
and ensure a sufficient distance for optimum
air circulation in the refrigerator.
Place deep-frozen food in the freezer as soon
as possible after purchase. Make sure that it
doesn’t defrost during transport.
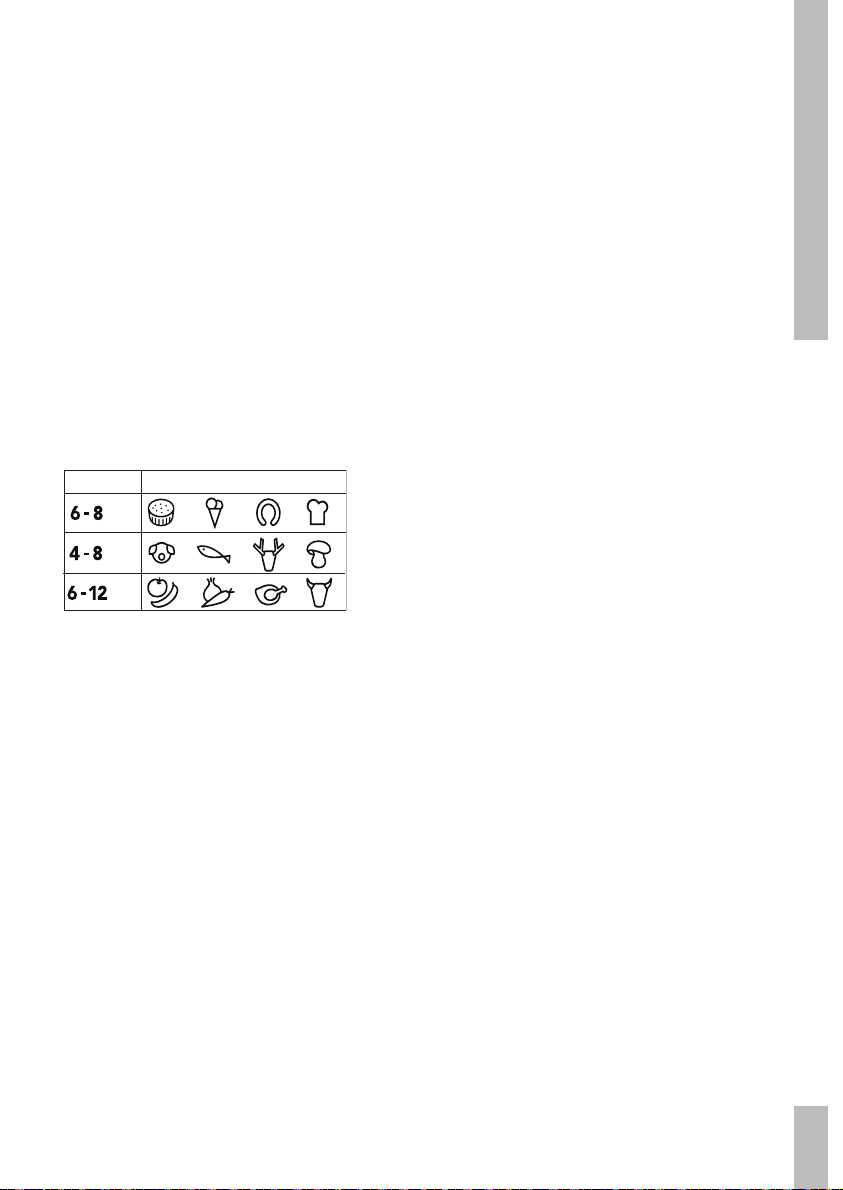
The table below gives the recommended
storage times for frozen fresh foods.
Months Food
Energy tips
Position and arrangement
High ambient temperatures have a negative
effect on energy use. Keep the freezer in a
position away from direct sunlight or other
sources of heat.
Keep ventilation openings free. Clogged (dirty)
openings lead to higher use of energy.
Use
Try not to open the door too often, especially
when the weather is wet and hot. Once you
open the door, mind to close it as soon as
possible.
Turn the thermostat knob from higher to
lower setting as soon as possible (depends
on how loaded the appliance is, ambient
temperature).
Before loading the appliance with fresh
food, make sure it was cooled to ambient
temperature.
Ice and frost layer increase energy
consumption, so do clean the appliance as
soon as the layer is 3-5 mm thick.
If the gasket is damaged or if it turns out that
the sealing is poor, the energy consumption
is substantially higher. To restore efficiency,
replace the gasket.
The condenser on the rear wall should be
always clean, free of dust or any impurities.
Every now and then check if the appliance
is sufficiently ventilated (adequate air
circulation behind the appliance).
Always consider instructions stated in
sections ‘Positioning and Energy Saving
Tips’, otherwise the energy consumption is
substantially higher.
25 TIPS
Page 26

Trouble shooting
Problem
Appliance is not doing
anything; light is not on.
Temperature in refrigerator is
too high or too low.
FAULTS
Water is running out of the
refrigerator.
Appliance is making a noise.
Lightning not operational.
Cause
The plug is not in the socket.
Thermostat has been set
incorrectly.
Melt-water drain is blocked.
Food has been placed
incorrectly in the refrigerator.
Object touching the
appliance.
Lamp defective.
Remedy
Put the plug in the socket.
Set the thermostat correctly.
Clear the melt-water drain.
Place the food correctly in
the refrigerator.
Move the object.
Replace the bulb (see
page 19).
26
Page 27

Thawing
Cleaning
Defrost the freezer when the layer of ice
reaches a thickness of 5 mm.
Remove the contents of the freezer.
Switch the freezer off.
Defrost the freezer.
Clean and dry the freezer.
Switch the freezer on again.
When the freezer reaches its correct
temperature, replace the freezer’s contents.
You can speed up the defrosting process by
placing a bowl of hot water in the freezer.
Keep the contents of the freezer in a
cool place and wrapped in blankets or
newspapers.
Attention
Never remove the ice with the aid of sharp
objects, defrost sprays, a hair-drier, a radiant
heater, or the like. This may lead to unsafe
situations and may cause irreparable damage
to the appliance.
Attention
Before cleaning the appliance, disconnect the
plug from the wall socket. Never disconnect
the plug from the wall socket by pulling on the
lead!
For cleaning, use the suds of a neutral
cleansing agent (a general detergent or
washing-up liquid). After cleaning, rinse the
interior with clean water and rub dry. Leave
the appliance to dry for 1 or 2 hours.
Clean the outside using a soft cloth.
Periodically clean air vents and the
condenser at the rear of the appliance with
a vacuum cleaner or a brush.
You may, if you wish, clean the mantle with an
enamel cleaner.
Attention
Never clean the refrigerator with the aid of a
steam cleaner. This is dangerous.
Do not use too much moisture.
Avoid any moisture getting into electrical
components.
27 MAINTENANCE
Page 28
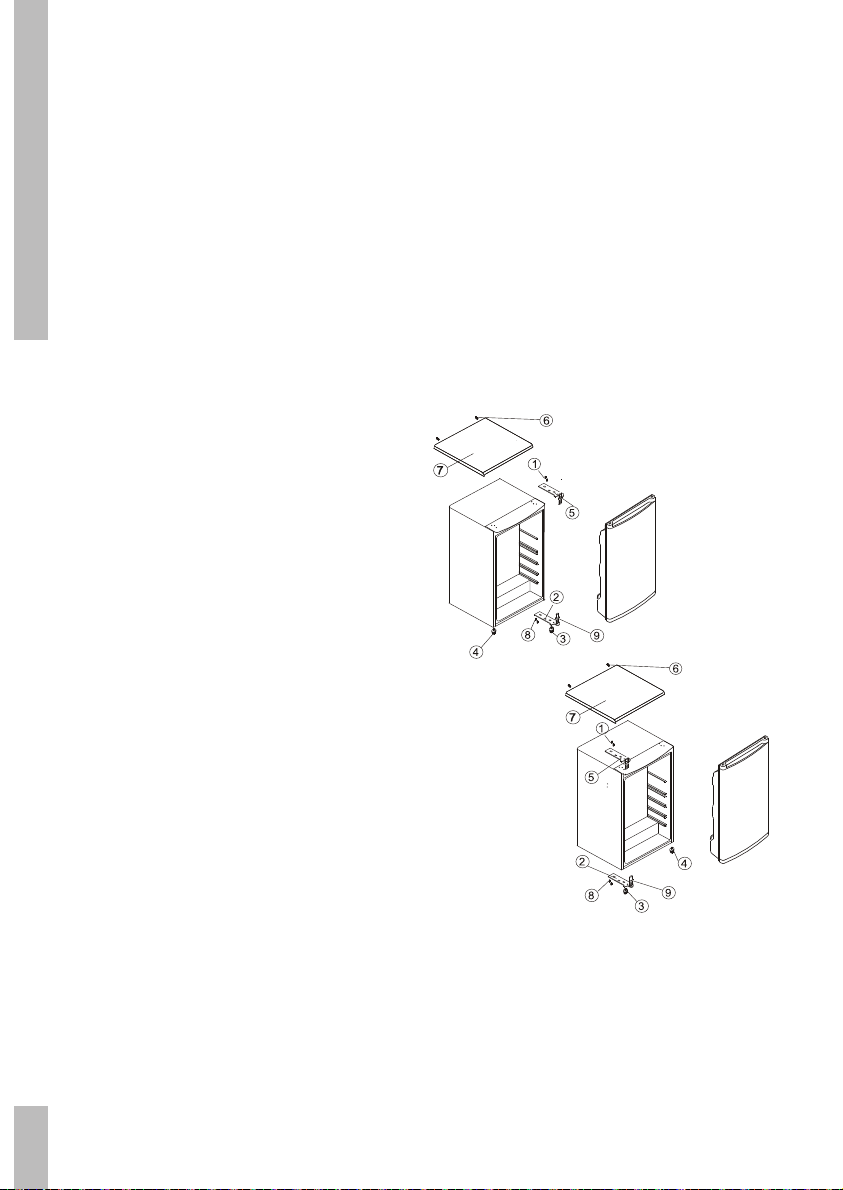
Door Swing Reversal
The refrigerator has the capability of opening
the door from either the left or the right
side. The unit is delivered to you with the
door opening from the left side. To change
the opening direction, please follow these
instructions.
INSTALLATION
Note: Before reversing the door swing, unplug
the appliance from the mains or disconnect
the electrical power supply.
1. Remove the screws (6) holding the top panel
(7) to the unit. Remove the top panel
2. Remove the two screws (1) holding the top
hinge (5) (right side) to the frame. Remove the
top hinge (5).
3. Lift the door off the bottom hinge pin and place
it on a nonscratching surface.
8. Lower the door onto the bottom hinge pin (9).
9. While holding the door in the closed position,
reassemble the top hinge (5) on the left hand
side using the two screws (1). Do not tighten
the screws (1) until the top of the door is level
with the counter top.
10. Refi t the top panel using the screws (6).
Door opening left
4. Remove the two screws (8) holding the bottom
hinge (2). Remove the bottom hinge (2).
5. Remove the left front leg (4) and transfer it to
the right side.
6. Before replacing the bottom hinge (2), remove
the hinge pin (9) and reverse the direction of
the hinge (2). Reassemble the bottom hinge
(2) on the left hand side using the two
screws (8).
7. Refi t the hinge pin (9) into the bottom hinge (2).
28
Door opening right
Page 29
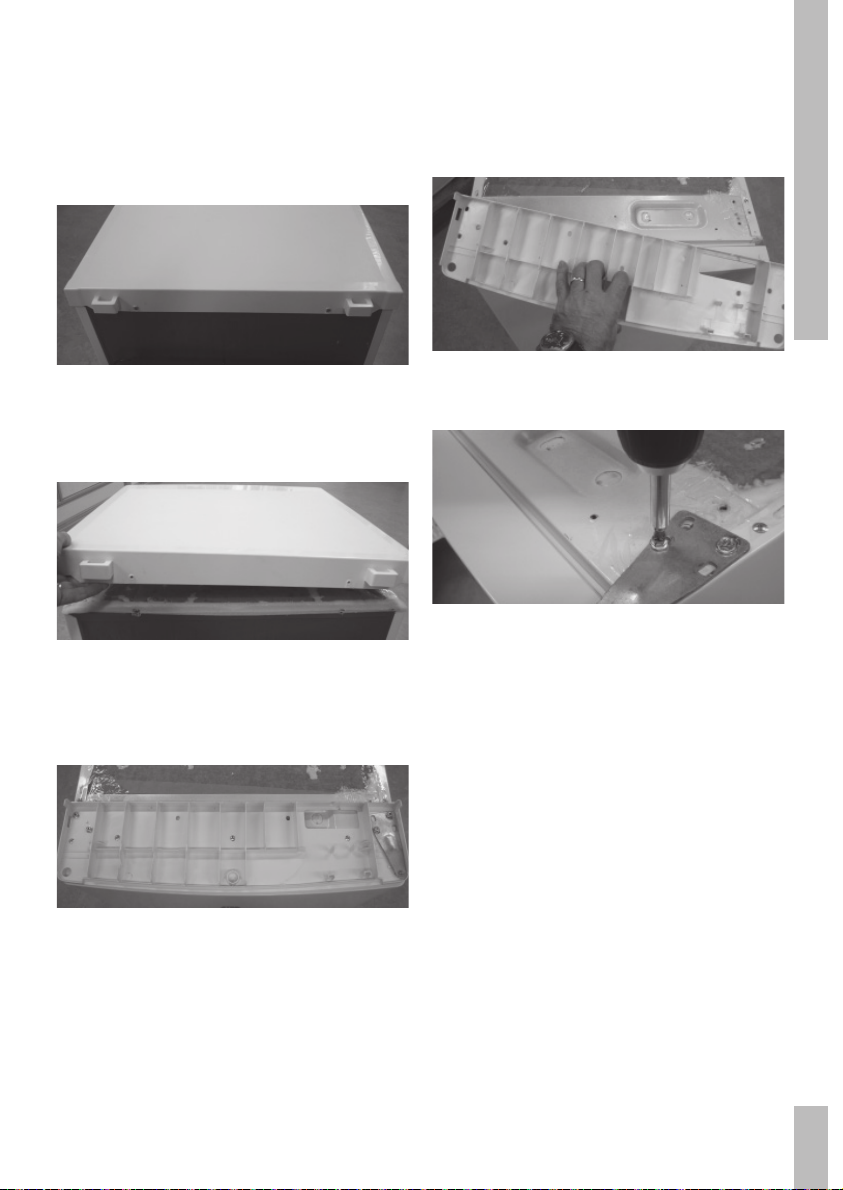
Remove the top panel
Step 1
Remove the 2 screws at the back side of the
appliance.
Step 2
Lift the top panel at the backside and remove it.
Step 3
Remove the 10 screws on the frame and the
metal hinge as well.
Step 4
Remove the frame and the metal hinge.
Step 5
Reassemble the metal hinge using 2 screws.
29 INSTALLATION
Page 30
Disposal of packaging and
appliance
In the manufacturing of this appliance use
has been made of durable materials. The
appliance packaging is recyclable. The
following may have been used:
cardboard;
polythene film (PE);
CFC-free polystyrene (PS hard foam);
ENVIRONMENTAL ASPECTS
Dispose of these materials in a responsible
manner and in accordance with government
regulations.
On the data plate is put the symbol of a
crossed-out wheeled dustbin.
This means that at the end of its working
life, the product must not be disposed of as
urban waste. It must be taken to a special
local authority differentiated waste collection
centre or to a dealer providing this service.
As a reminder of the need to dispose of
household appliances separately, the product
is marked with a crossed-out wheeled
dustbin.
Disposing of a household appliance
separately avoids possible negative
consequences for the environment and
health deriving from inappropriate disposal
and enables the constituent materials to be
recovered to obtain significant savings in
energy and resources.
30
Page 31

31
Page 32
700003906300
 Loading...