

ETM ETM450C, ETM350C User Manual

ETM350C & ETM450C
User Manual
Industrial Ethernet Router
Features ETM350C // ETM450C:
◩ HSDPA/UMTS 850/900/2100MHz // 850/900/1900/2100MHz
◩ GSM/GPRS 900/1800MHz // 850/900/1800/1900MHz
◩ HSUPA 14.4Mbps DL, 5.76Mbps UL (ETM450C only)
◩ HSDPA 3.6Mbps // 7.2Mbps DL, 384Kbps // 2.0Mbps UL
◩ UMTS 384Kbps UL, 384Kbps DL
◩ 1 x Ethernet Port 10/100Mbps
◩ RJ12 Port for power connection
◩ SMA Antenna Connector
◩ Supports Dual SIM with automatic failover
ETM350C ETM450C User ManualV008.docx

Page 2 of 24 For Support Contact +61-2-9956-7377
Or support@etmpacific.com.au
ETM350C ETM450C User ManualV008.docx
Contents
Access to Additional Documentation/Software ....................................................................................... 3
Alternative Access to Docbanq .......................................................................................................... 3
Introduction ........................................................................................................................................ 4
Nomenclature .................................................................................................................................. 4
Overview. ....................................................................................................................................... 4
Applications .................................................................................................................................... 4
Specifications ...................................................................................................................................... 5
Power Supply ...................................................................................................................................... 5
SIM Card ............................................................................................................................................ 5
SIM Pin............................................................................................................................... .......................5
Indicator Lights ................................................................................................................................... 6
LAN ............................................................................................................................................... 6
Status LEDs .................................................................................................................................... 6
Installation .......................................................................................................................................... 7
Checking Correct Operation ................................................................................................................. 7
Understanding basic operation .............................................................................................................. 7
Modem Router Mode ....................................................................................................................... 7
Accessing the Internet Using the ETM350C/450C .................................................................................. 8
Setting Host PC’s Network Environment ........................................................................................... 8
Web Based Management Interface ........................................................................................................ 9
Setting Up a PC to Use the Web Based Management Interface ............................................................. 9
Saving Configurations Changes ......................................................................................................... 9
Connections Settings ...................................................................................................................... 10
WAN Settings............................................................................................................................... ...........11
LAN Settings...........................................................................................................................................13
DMZ Configuration.................................................................................................................................14
Port Forwarding.......................................................................................................................................14
IP Filter Settings............................................................................................................................... .......15
Mac Filter Settings..................................................................................................................................16
Pingin
g............................................................................................................................... ......................16
NTP Settings............................................................................................................................... .............17
DDNS Settings........................................................................................................................................18
Administrator Settings – Name and Password........................................................................................18
Administrator Settings – Saving Configuration......................................................................................18
Administrator Settings -System Logs......................................................................................................19
Administrator Settings - System..............................................................................................................20
Administrator Settings - Update.............................................................................................................. 20
Reboot .......................................................................................................................................... 21
SMS Commands for ETM350C/450C Router ....................................................................................... 22
Page 3 of 24 For Support Contact +61-2-9956-7377
Or support@etmpacific.com.au
ETM350C ETM450C User ManualV008.docx
Access to Additional Documentation/Software
ETM provides access to additional product documentation and software tools via an internet
service (Docbanq) which can be accessed via the following link;
http://www.etmpacific.com.au/content/ETM_Documents.htm
Allow the ActiveX to install
This should allow access to Docbanq, then use the following logon for access to ETM350C
Documentation and software
Account: etm
Login ID: ETMterminal
Password: etMterm1 (case sensitive)
Users of IE8 (Internet Explorer 8)
you may have issues connecting, if the following screen
appears…
… then click on the symbol
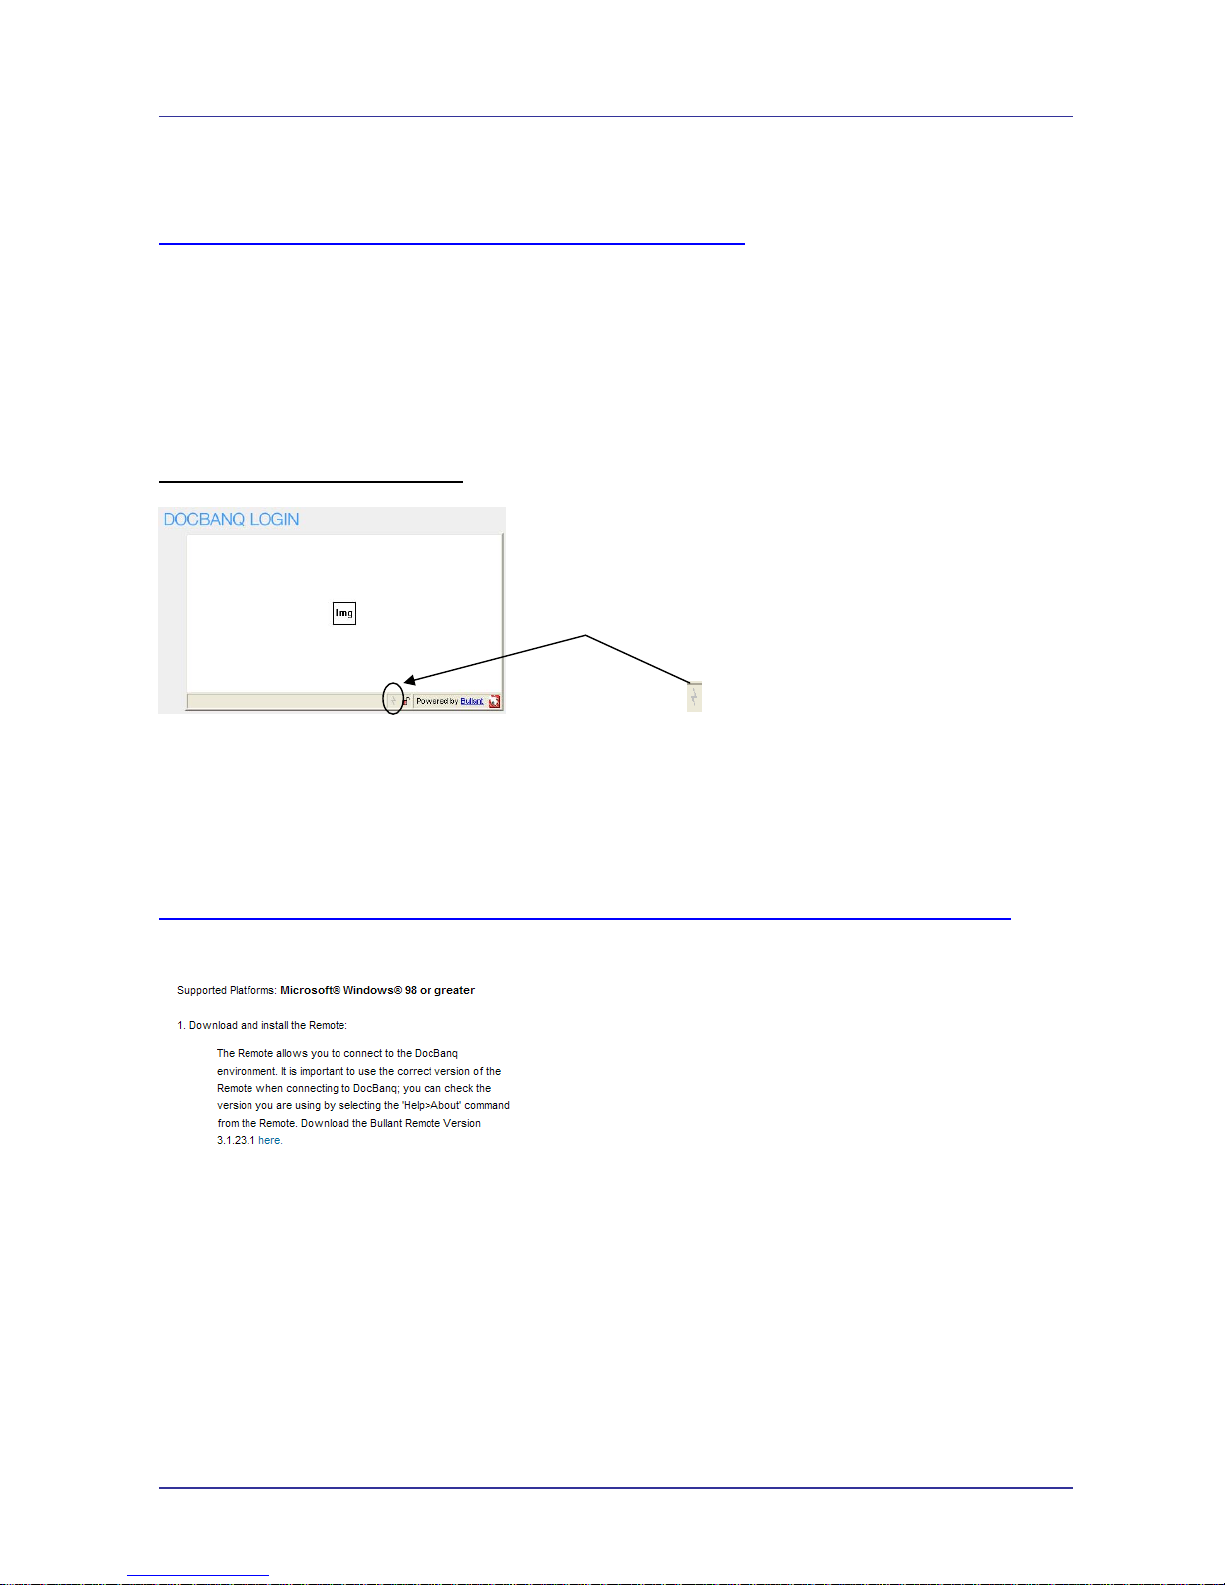
Alternative Access to Docbanq
If your browser does not support the above features, or fails to function correctly, the Bullant
Browser can be downloaded to your PC to provide access to our document system. To access
Docbanq in this method proceed as follows;
Go to
http://www.docbanq.com/component/option,com_fireboard/Itemid,109/func,view/id,28/catid,3/
And find the section on the page shown below...
Select "here" to download the remote for DocBanq.
After downloading the remote the correct address is;
srap://app5.docbanq.com/
Account: etm
Login: ETMterminal1
Password: etMterm1

Page 4 of 24 For Support Contact +61-2-9956-7377
Or support@etmpacific.com.au
ETM350C ETM450C User ManualV008.docx
Introduction
Nomenclature
The ETM350C incorporates the Cinterion EU3-P engine and is intended for use in Asia,
Australasia, and Europe (network and regulatory approvals permitting).
The ETM450C incorporates the Cinterion PH8-P engine and is intended for use in Asia,
Australasia, and Europe (network and regulatory approvals permitting).
Overview.
The ETM350C/450C is an industrial 3G Ethernet Router utilising the Cinterion EU3-P module to
provide reliable always on wireless connection for M2M communications requirements.
Terminal Nomenclature/History
Model Comment Module Installed
ETM350C First Release EU3-P
ETM450C First Release PH8-P
Applications
Typical applications include:
◩ Communications link to concentrators/receivers for Metering
◩ Communications link to Programmable Logic Controllers (PLCs)
◩ Communications link for Security Systems
◩ Telemetry applications
◩ Backup communications
Page 5 of 24 For Support Contact +61-2-9956-7377
Or support@etmpacific.com.au
ETM350C ETM450C User ManualV008.docx
Specifications
Feature ETM350C
ETM450C
3G UMTS/HSDPA Frequency Bands 850/900/2100 MHz
850/900/1900/2100 MHz
2G GSM/GPRS Frequency Bands
900/1800 MHz
850/900/1800/1900 MHz
SIM Voltage
1.8V & 3V
1.8V & 3V
Supply Voltage
5 to 30VDC
5 to 30VDC
Power Consumption
600mA @ 12VDC 600mA @ 12VDC
Weight
260g 260g
Operating Temperature Range -20°C to +60°C
-20°C to +60°C
Power Supply
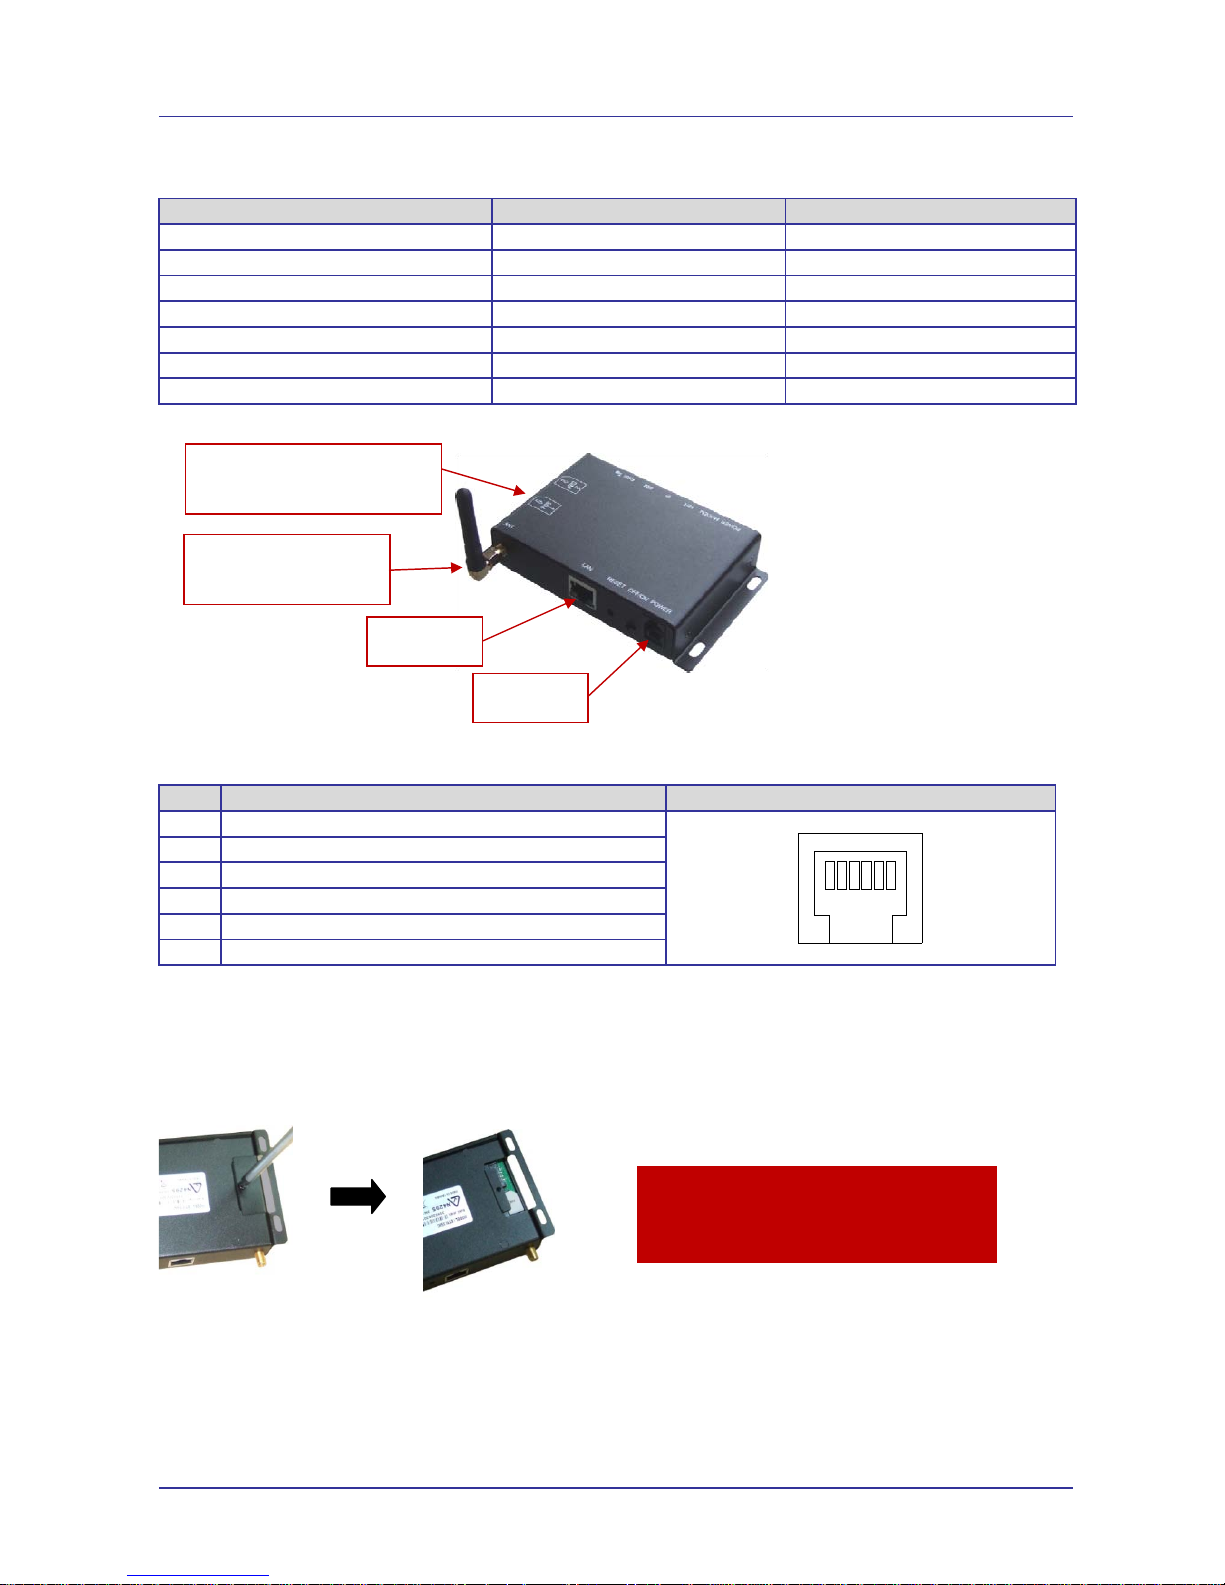
The ETM350C/450C power connection is a 6 pin RJ12 connector, pin allocations are shown below.
Pin Function Looking at Router RJ12 Socket
1 Power Supply (+5 to +30VDC)
2 Not Used
3 Not Used
4 Not Used
5 Not Used
6 GND
SIM Card
The SIM card slots are located on the underside of the ETM350C/450C Router. The unit supports
both 3V and 1.8V SIMs. Any SIM card used needs to be correctly provisioned for the services and
network upon which it is intended to be used.
SIM Pin
If the SIM used has a PIN either;
• The unit can be configured to enter the SIM pin via the Web Based Management Interface.
OR
• The SIM PIN should be deactivated, insert the SIM in a mobile phone and deactivate the
SIM PIN then transfer the SIM into the router.
Caution
Always disconnect power supply before
inserting or removing SIM Card.
123456
RJ12 Power
Connecto
r
Ethernet
Connecto
r
SMA Antenna Connector,
stub antenna supplied
with unit
SIM Access via cover with screw
on underside of unit
Default SIM position is SIM 1

Page 6 of 24 For Support Contact +61-2-9956-7377
Or support@etmpacific.com.au
ETM350C ETM450C User ManualV008.docx
Indicator Lights
LAN
The ETM350C/450C can connect to a Host PC, HUB, Router etc using the embedded 10/100 LAN
port. The RJ-45 connector (LAN port) has two Link-LEDs. The table below shows the each status
of LAN connection.
LED State Description
Green
ON Indicates 10Mbps LAN connected.
BLINK Indicates data activity on 10Mbps LAN.
OFF Indicates 10M LAN disconnected.
Orange
ON Indicates 100Mbps LAN connected.
BLINK Indicates data activity on 100Mbps LAN.
OFF Indicates 100M LAN disconnected.
Status LEDs
The ETM350C/450C has 6-State LED for indicating the current status.
LED Display Description
Power
ON Indicates that power is on
OFF Indicates that power is off
Modem
ON Recognizes the HSPA modem
OFF Does not recognize the HSPA modem.
Net
BLINK When there is data on the wireless mobile network
OFF When there is no data on the wireless mobile network
IP
ON Mobile IP has been acquired from ISP
OFF Mobile IP has not been acquired from ISP
SIM
ON The U-SIM card is ready
OFF The U-SIM card is not ready
RSSI
FLASHING 1 quick flash with 4 seconds off for low signal level
FLASHING 2 quick flash with 4 seconds off for medium level
FLASHING 3 quick flash with 4 seconds off for high level
FLASHING 4 quick flashes for 'excellent' signal
OFF Poor or no signal

Page 7 of 24 For Support Contact +61-2-9956-7377
Or support@etmpacific.com.au
ETM350C ETM450C User ManualV008.docx
Installation
The ETM350C/450C is a wireless mobile internet access device for connecting a PC or other LAN
device to a cellular wireless service.
Please follow the steps below when you install this device.
• Insert U-SIM card. There are 2 positions for SIM1 and SIM2. Only 1 SIM is required, the
second SIM is optional.
• Default position is SIM1.
• Connect an appropriate antenna.
• Connect the LAN cable between PC or LAN Device and the LAN port of the
ETM350C/450C.
• Connect the power adapter.
• Turn on the power switch (if fitted).
Checking Correct Operation
The ETM350C/450C connects by PPP (NAT Router) and the “Always on-line Mode” is the default
state. When you get this device for the first time, please check whether the devices settings are
appropriate for your application.
The following steps can be used to check the device is operating correctly.
1. Install ETM350C as above
Ensure the LAN cable is connected between the Device and the ETM350C/450C.
2. When power is applied, the Power LED should turn ON.
3. The Modem LED should turn ON within 20 seconds
4. The SIM LED should turn ON within 60 seconds
If the LED does not turn ON in 60 seconds, then check the SIM card and ensure it is inserted
correctly
5. The NET LED should blink asynchronously whenever data is being transferred or received
6. The RSSI LED blinks when a signal is present
If RSSI LED is off, check the antenna connection and/or location and suitability
7. The IP LED turns ON when the unit has logged on the network and has acquired an IP
address
Understanding basic operation
There are some basic operations of ETM350C/450C.
Modem Router Mode
In Modem router mode, and when the ETM350C/450C has an IP address, the ETM350C/450C
shares the allocated IP with any connected Host devices via NAT. In this mode the
ETM350C/450C acquires its IP from the mobile network and the device connected to the
ETM350C/450C has a private IP allocated via DHCP from the ETM350C/450C.
There are two options for operation in Modem Router Mode, Always On-line and Demand On-line
under Manual mode. For setting these options, refer to the [WAN] settings section.
Page 8 of 24 For Support Contact +61-2-9956-7377
Or support@etmpacific.com.au
ETM350C ETM450C User ManualV008.docx
Accessing the Internet Using the ETM350C/450C
By default the ETM350C/450C should be set to Modem Router Mode - Always On-line Mode.
Setting Host PC’s Network Environment
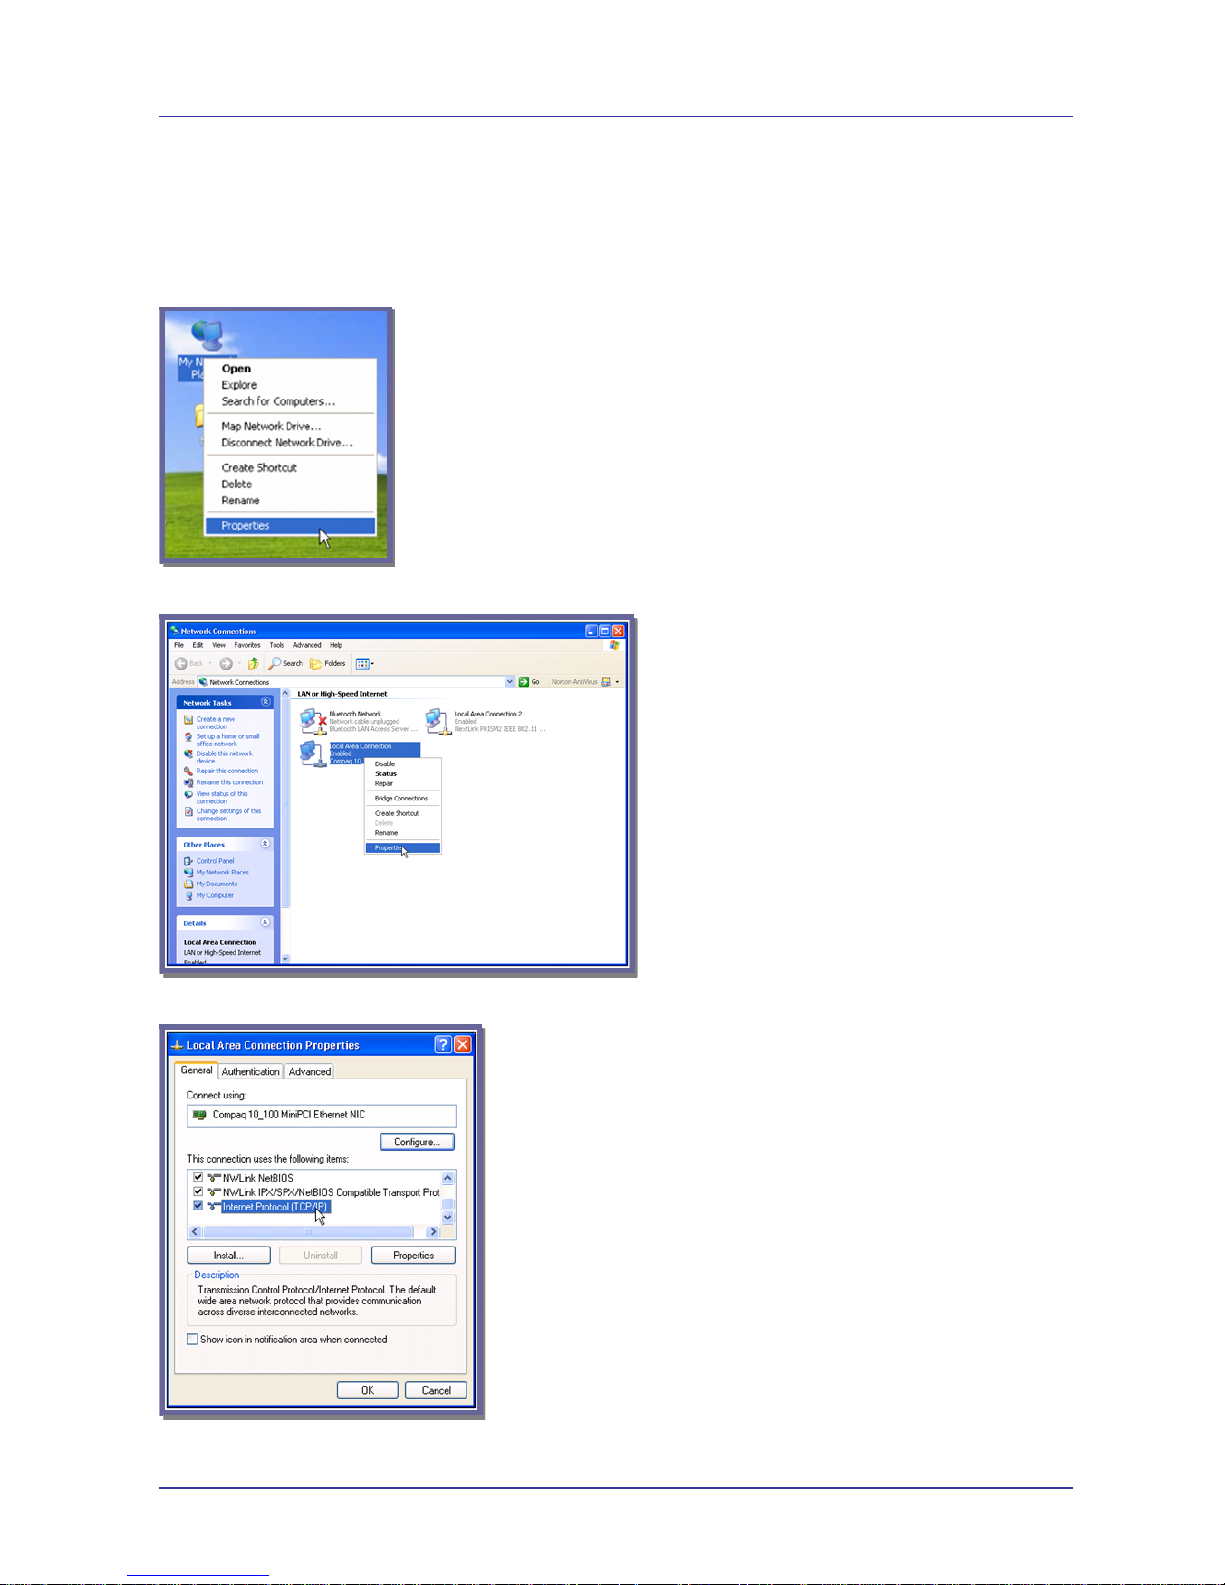
Assuming Windows XP, click “My Network Places” and then click the right mouse button and select
“properties”.
Select “Local Area Connection” then click the right mouse button and select “Properties”
Double click the “Internet Protocol [TCP/IP]” item.
 Loading...