

Page 1
www.etiger.com
ES-CAM4A
Motorized IP Camera
EN
Page 2
2
Specications
- Image sensor: 1/3.2” CMOS, 2 MP
- Video resolution 320x240, 640x480, 1280x720 (H.264)
- Digital zoom: x2
- Rotation: horizontal (-175° / +175°), vertical (0° / 110°)
- Focal: 3.8mm, Aperture: F2.2
- 6 infrared LEDs for night vision (up to 8 m)
- Vision scope: Horizontal: 57° / Vertical: 31° / Diagonal: 66°
- Refresh frequency: up to 25 images/sec.
- Processor: 580MHz, DRAM: 128MB, Flash: 16MB
- Wi-Fi: IEEE 802.11 b/g/n
- Built-in microphone and speaker
- Audio compression: G.711, PCM, AAC
- Dimensions: 107.9 x 107.9 x 116.8 mm
- Weight: 280 g
- Operating conditions: 0°C to 40°C (humidity: 20%~80%, non-condensing)
- Power supply: 5V 2A, 110~240V/ DC Jack
- Compatible with smartphones under iOS and Android / Tablets / PC / Mac
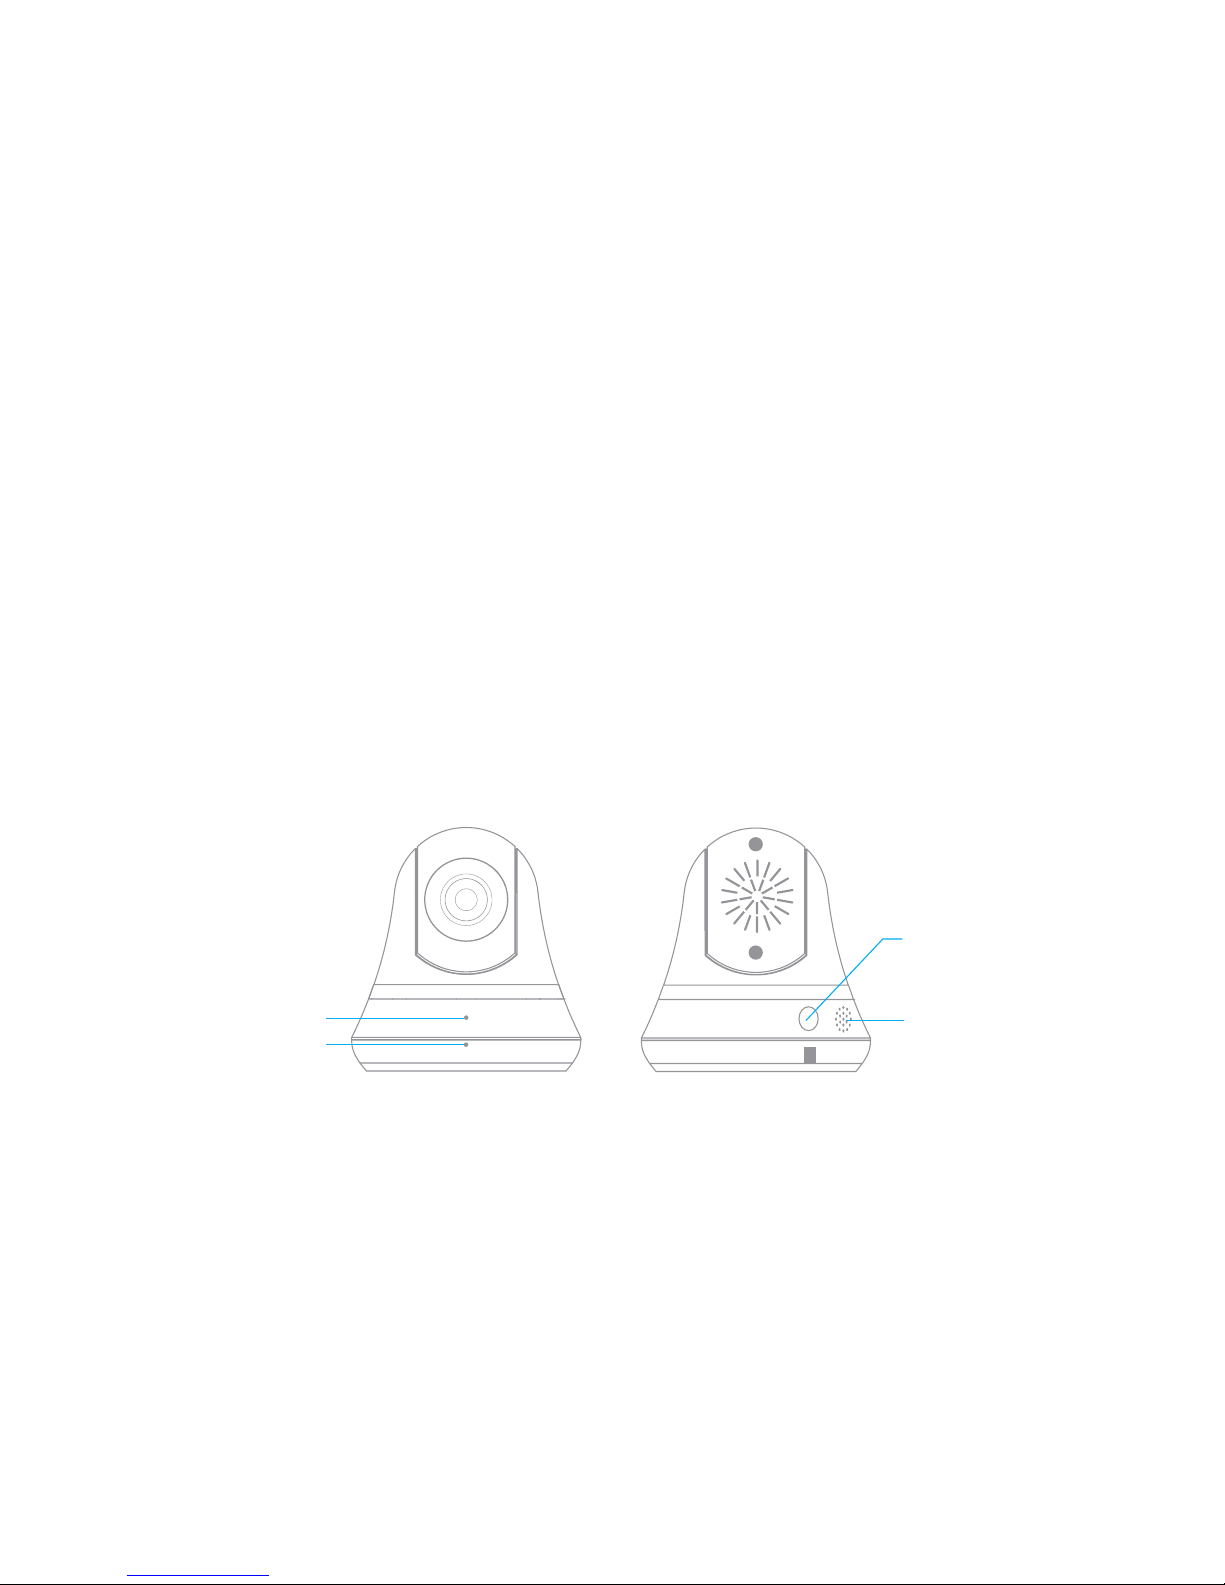
LED indicator
Microphone
Reset button
Speaker
Box content
- ES-CAM4A x1
- Mounting bracket x1
- AC Adaptor x1
- User Manual x1
Page 3
3
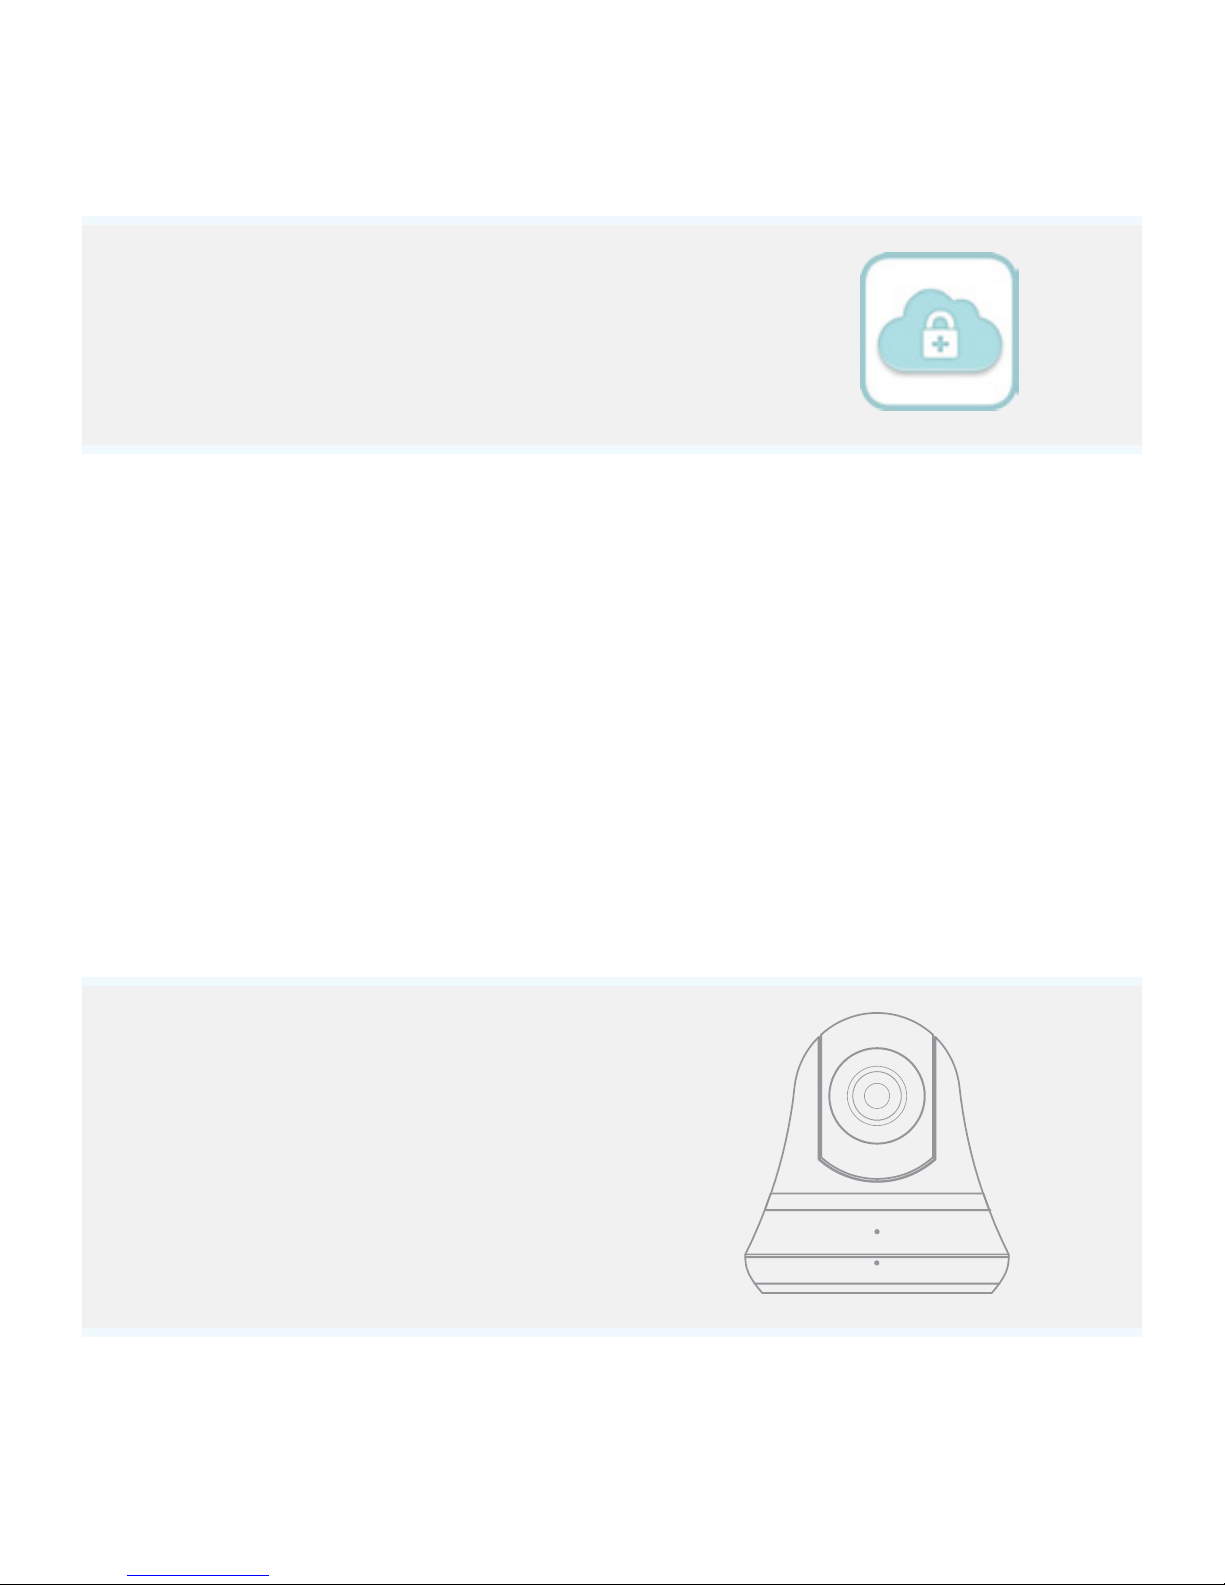
Android and iOS apps
Before using the ES-CAM4A, download the
app iSecurity+ on the App Store or Google
Play.
Plug the camera
Plug the AC adaptor to your ES-CAM4A, and plug the former into the mains.
Attention: never manually rotate the camera upward, downward, toward
the left or the right. This may damage the camera.
Initialization of the setup
Two minutes after having plugged the
ES-CAM4A, the camera rotates and the
LED indicator starts blinking alternately
in green and orange. This indicates that
the camera is now in Connection mode.
Page 4
4
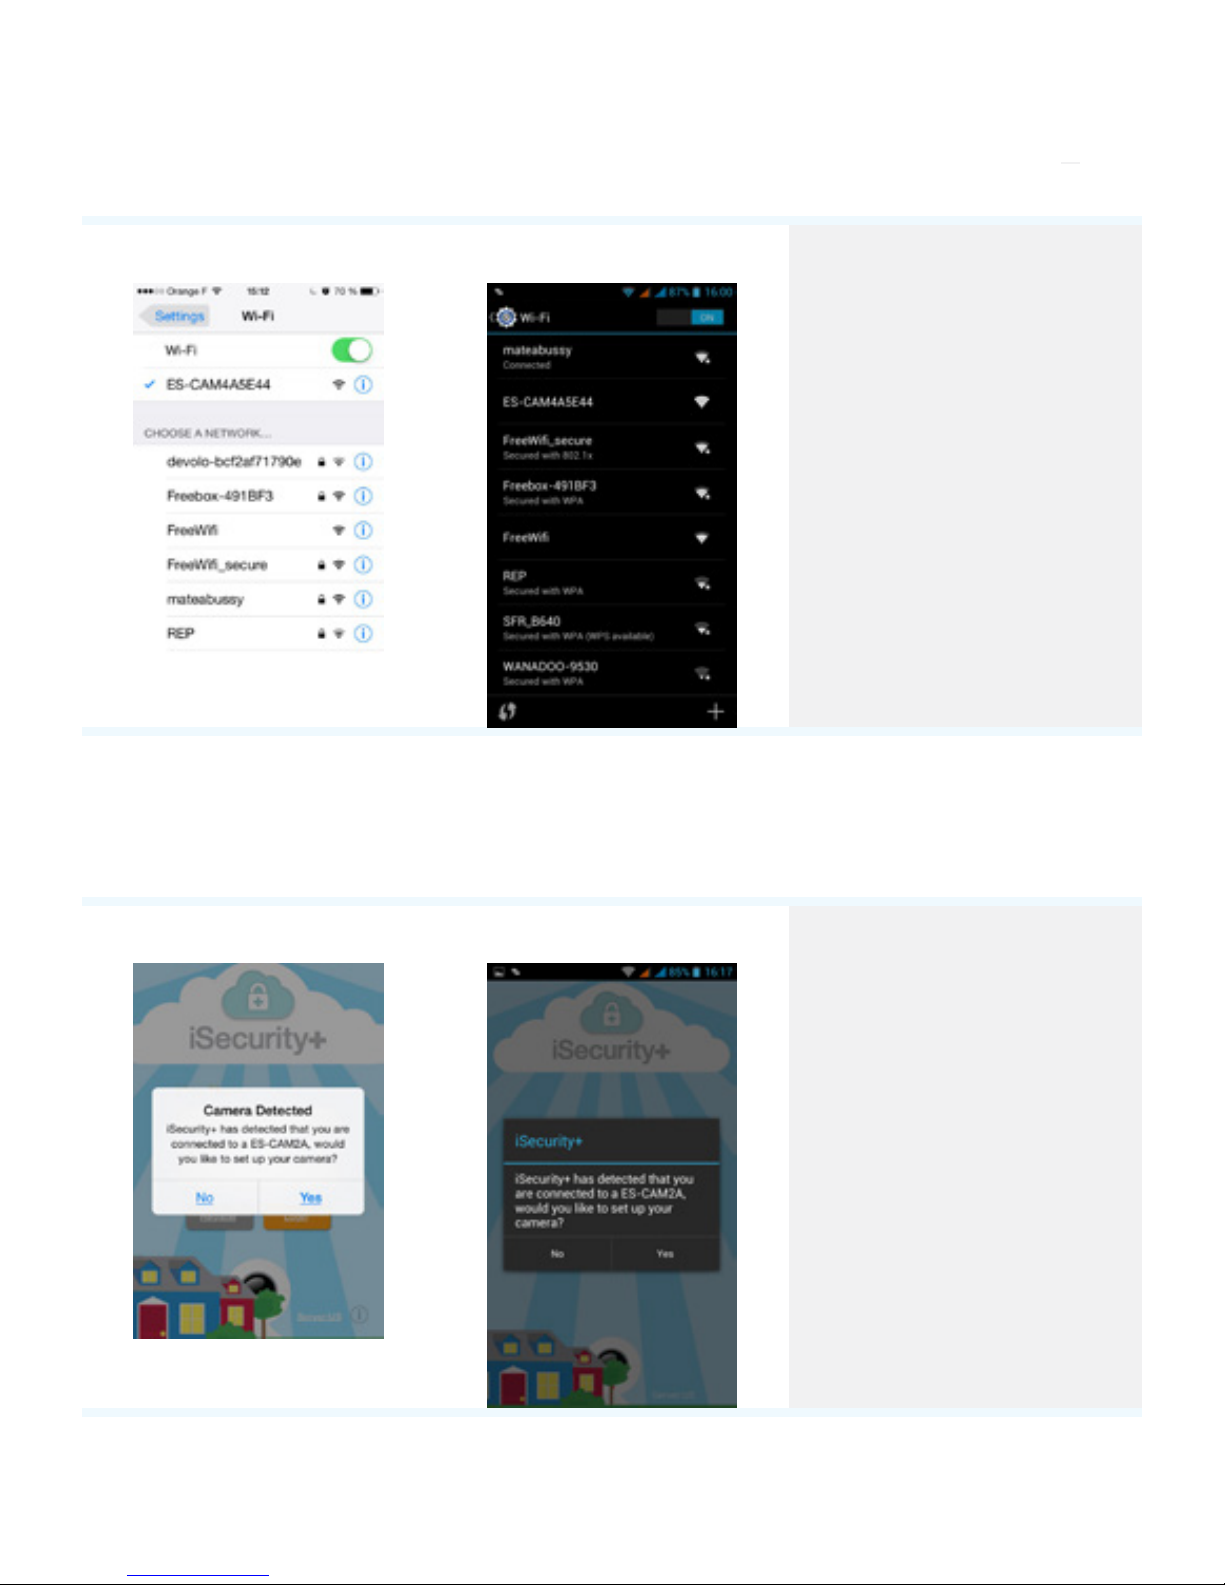
Connect your smartphone to the camera
iOS Android
Go to the Wi-Fi
settings of your
smartphone,
select the network
“ES-CAM4AXXXX”
(the last 4 gures
represent the last 4
gures of the MAC
ID at the back of
your camera).
Launch the app iSecurity+
iOS Android
Once the
connection
has been made
(after around
30 seconds),
launch iSecurity+.
iSecurity+ detects
automatically your
camera.
Select ‘Yes’ to start
the setup of your
camera.
Page 5
5
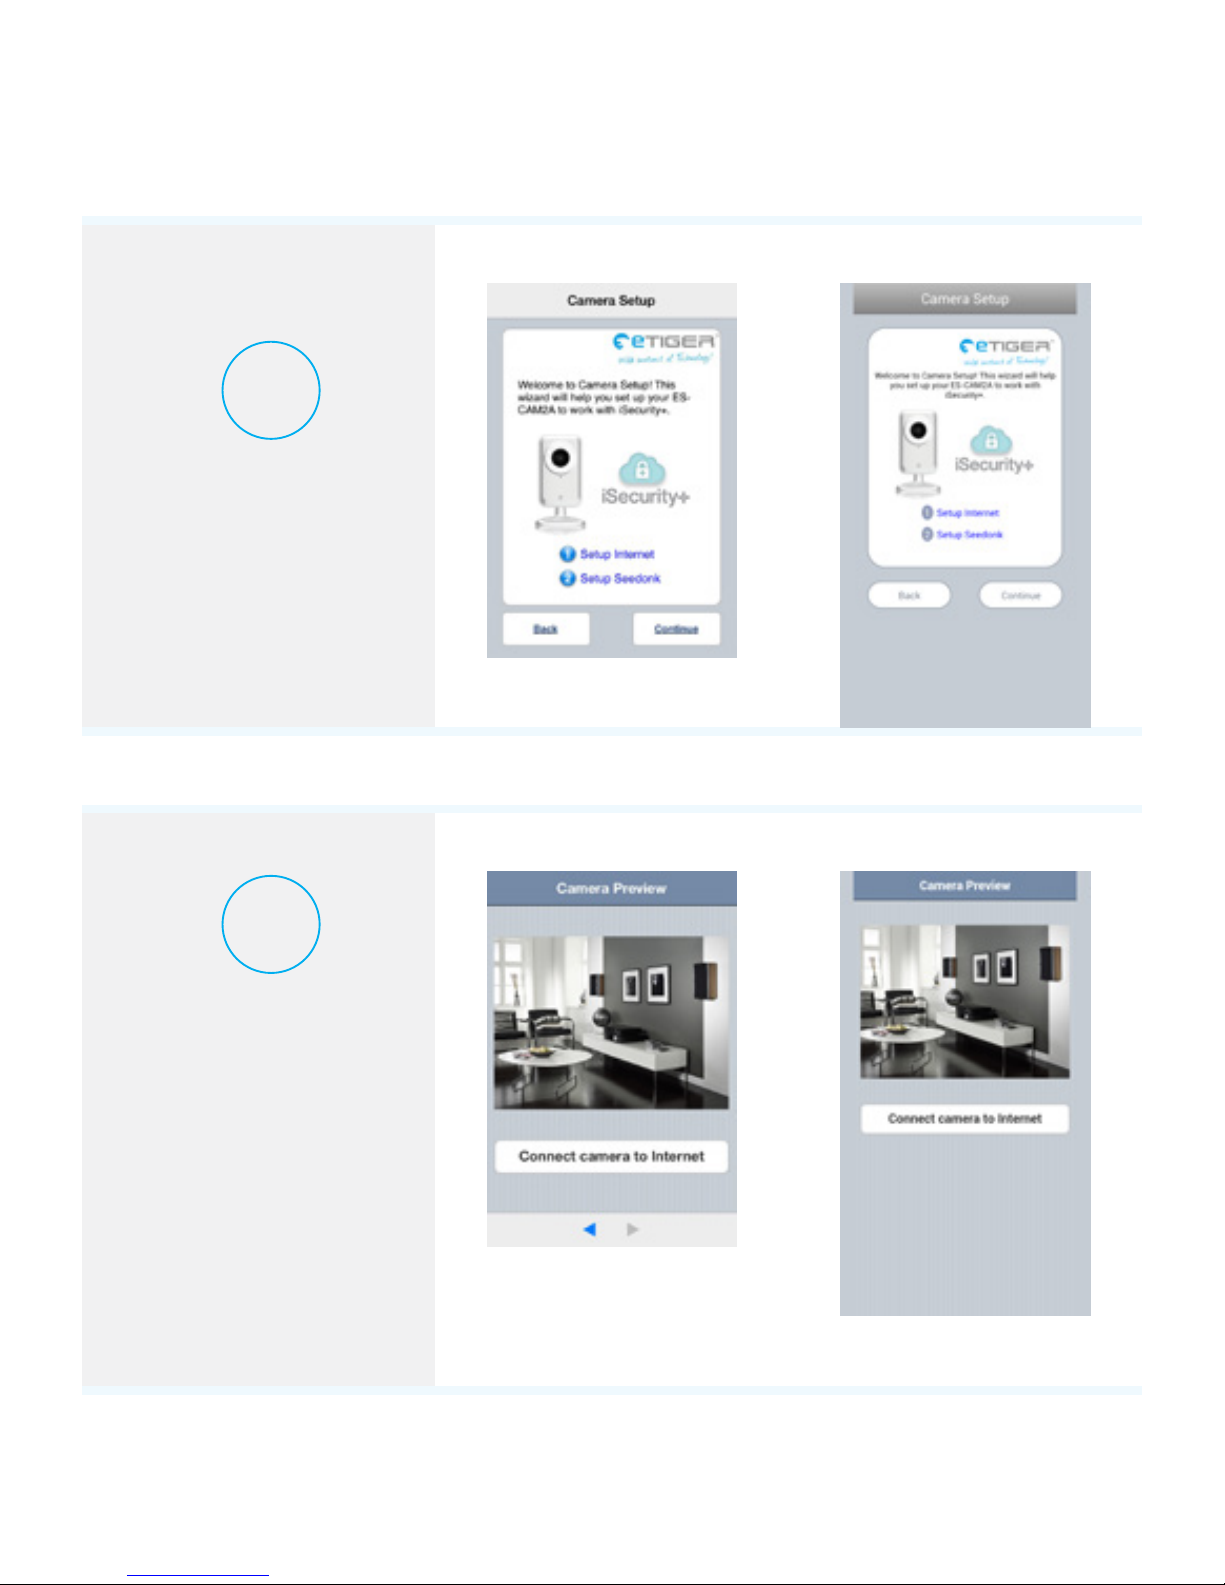
Conguration of the camera
1
Select “Continue”
and follow the
instructions of the
installation assistant.
iOS Android
2
Preview of the
camera
What your camera
views appears in
the interface : your
camera is connected
Select “Connect
camera to Internet”.
iOS Android
Page 6
6
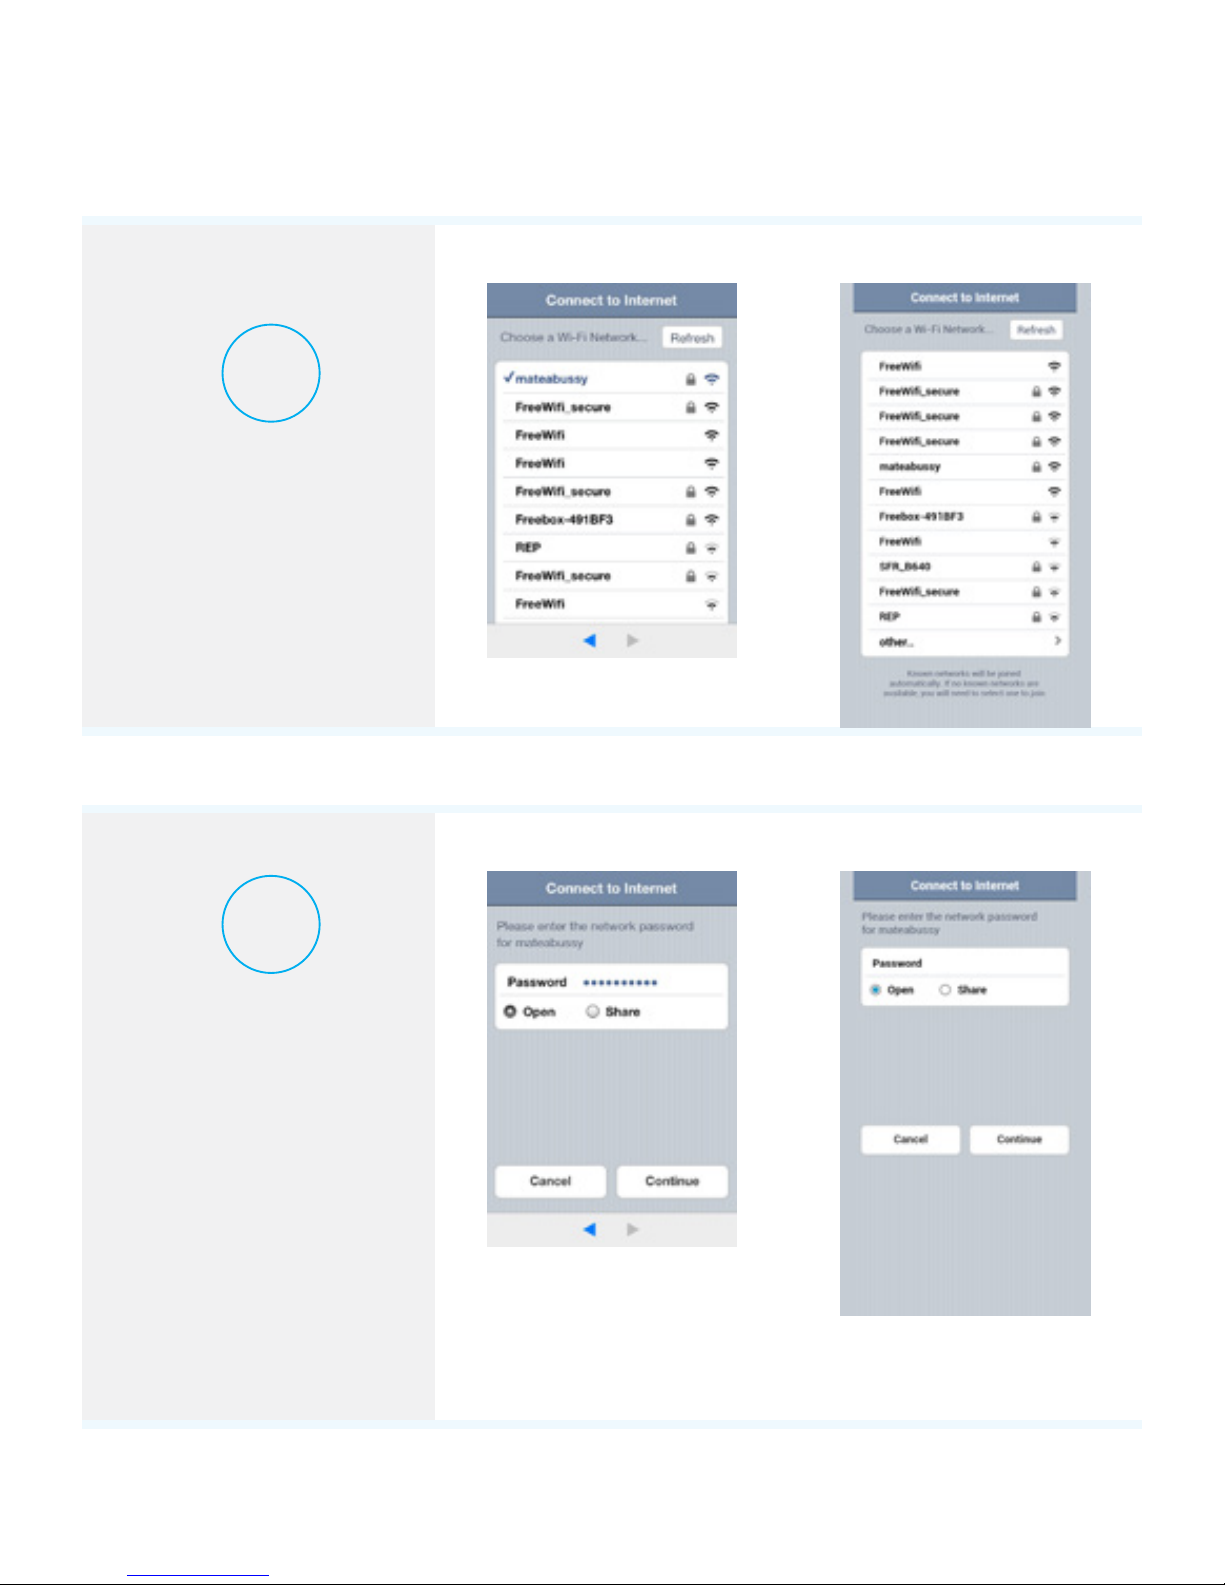
Connection of the camera to the Internet
1
Select the Wi-Fi
network to which
your camera will be
connected (ADSL
box, router, etc...).
iOS Android
2
Enter the password
of the Wi-Fi network
selected and press
“Continue”.
Note
It may take a few
minutes for the
camera to access the
Internet.
iOS Android
Page 7
7
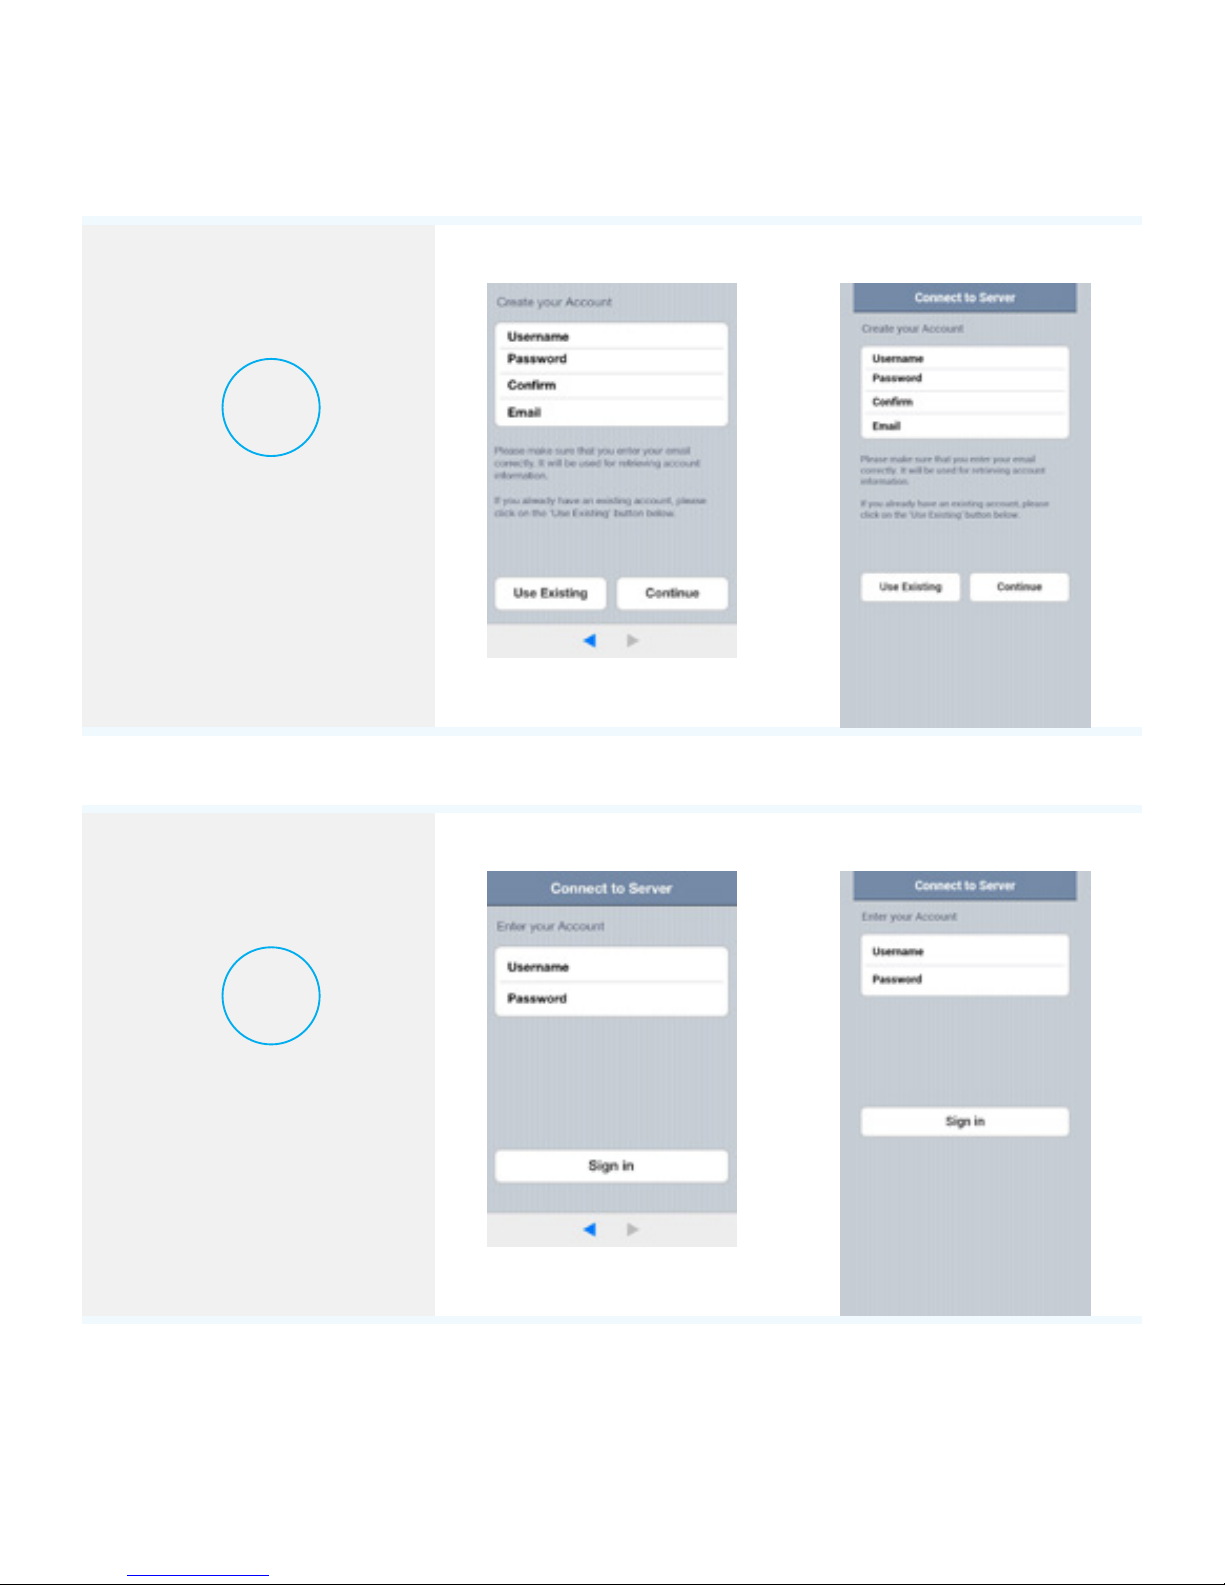
Connection to iSecurity+
1
Create an iSecurity+
account by lling in
the elds.
iOS Android
2
Enter your iSecurity+
username and
password to log in.
iOS Android
Page 8
8
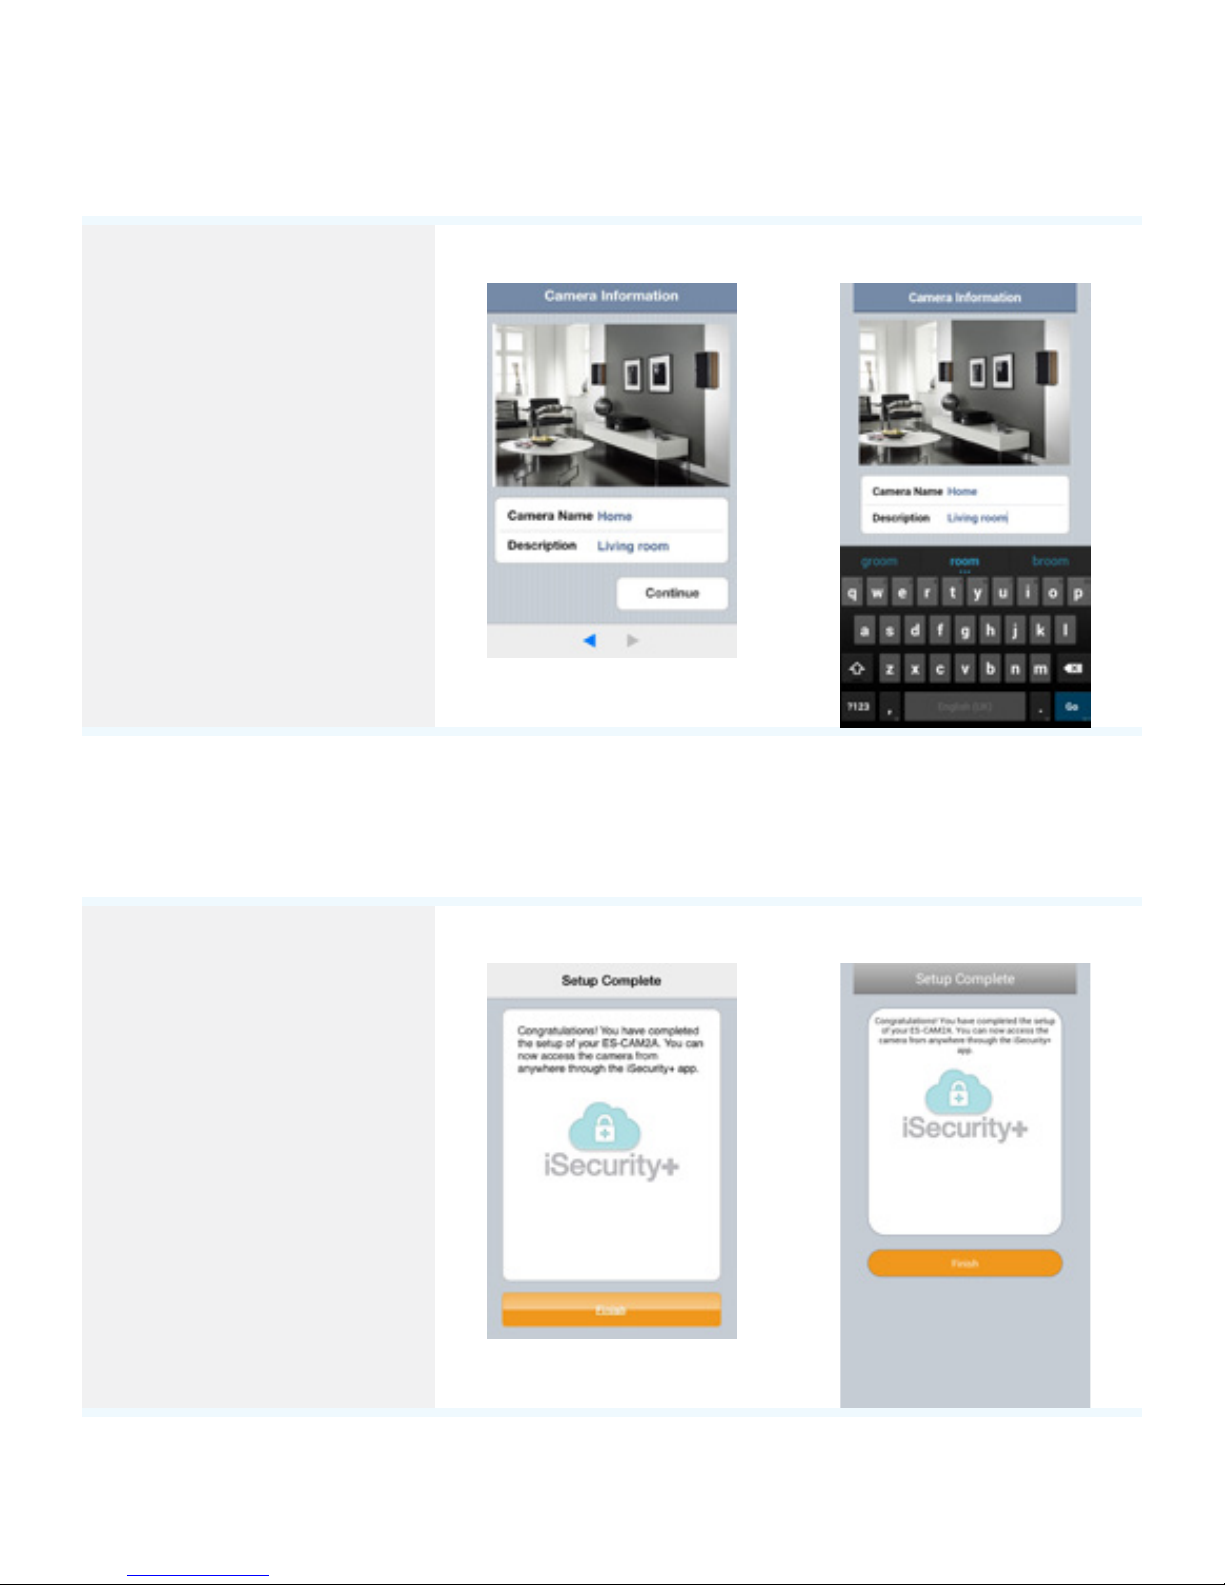
Creation of the prole of your camera
Choose a name and
a description for your
camera and press
“Continue”.
Note
The registration of
your camera on the
iSecurity+ server
will only take a few
seconds.
iOS Android
Finalization of the installation
You can use your
Android or iOS
smartphone / tablet
to access your
camera using an
Internet connection.
iOS Android
To connect another smartphone, press the reset button at the back of the camera
Page 9
9
once. The LED indicator at the front of the camera blinks in green and orange
alternately. You may now start the process again from page 4 “Connect your
smartphone to the camera”.
Remark
If you have pressed the reset button at the back of the camera in error and you do
not wish to connect another smartphone, press the reset button again.
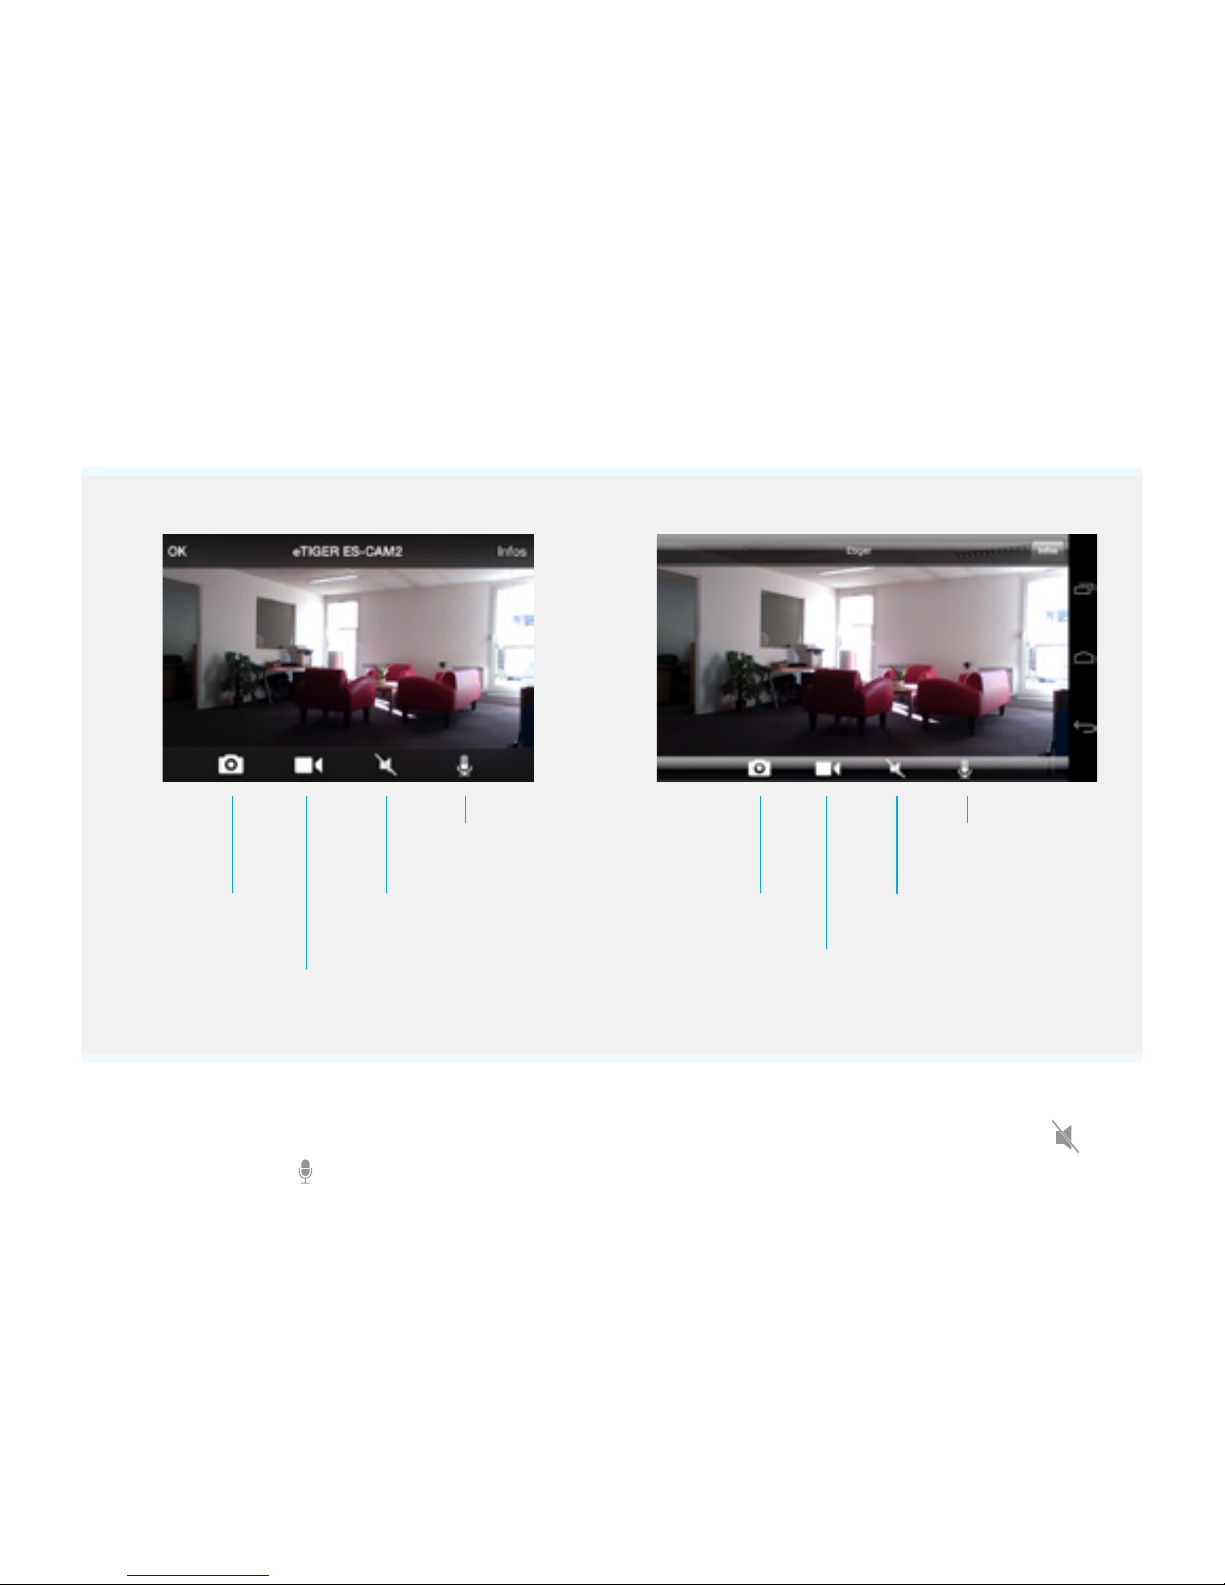
Controls on the camera
iOS Android
Take a picture
Record a video
Sound On / O
Hold and talk
Take a picture
Record a video
Sound On / O
Hold and talk
Speak / listen through the camera
To start a conversation through the camera, enable the sound by clicking on
and hold the icon while talking.
Zoom in / zoom out / rotate
You can zoom in/zoom out by pinching the screen. Click twice on the screen to
reset the zoom.
You can rotate the camera by sliding on the screen. The camera can rotate in four
directions (up, down, right, left).
LED lights indications
Page 10

10
Front LED indicator
Green
Connected to local network
Green - Blinking
Searching Wi-Fi networks
Orange - Blinking
Not connected to any network
Green/Orange - Blinking
Ready to initiate Wi-Fi setup
Reset button (at the back)
Green
Setup mode on
Orange
Setup mode initializing
O
Setup mode o
Motion Detection and Notications
When the camera is on, the iSecurity+ app informs you when the camera detects
an intrusion or a movement. iSecurity+ is available for download on Google Play
and the App Store.
By default, this feature is disabled. You can enable it in the settings of the iSecrurity+
app.
Access your camera from a computer
Follow the link below to access your camera from a computer:
https://app.isecurityplus.com/app/c/login.html
Page 11
11
Installation
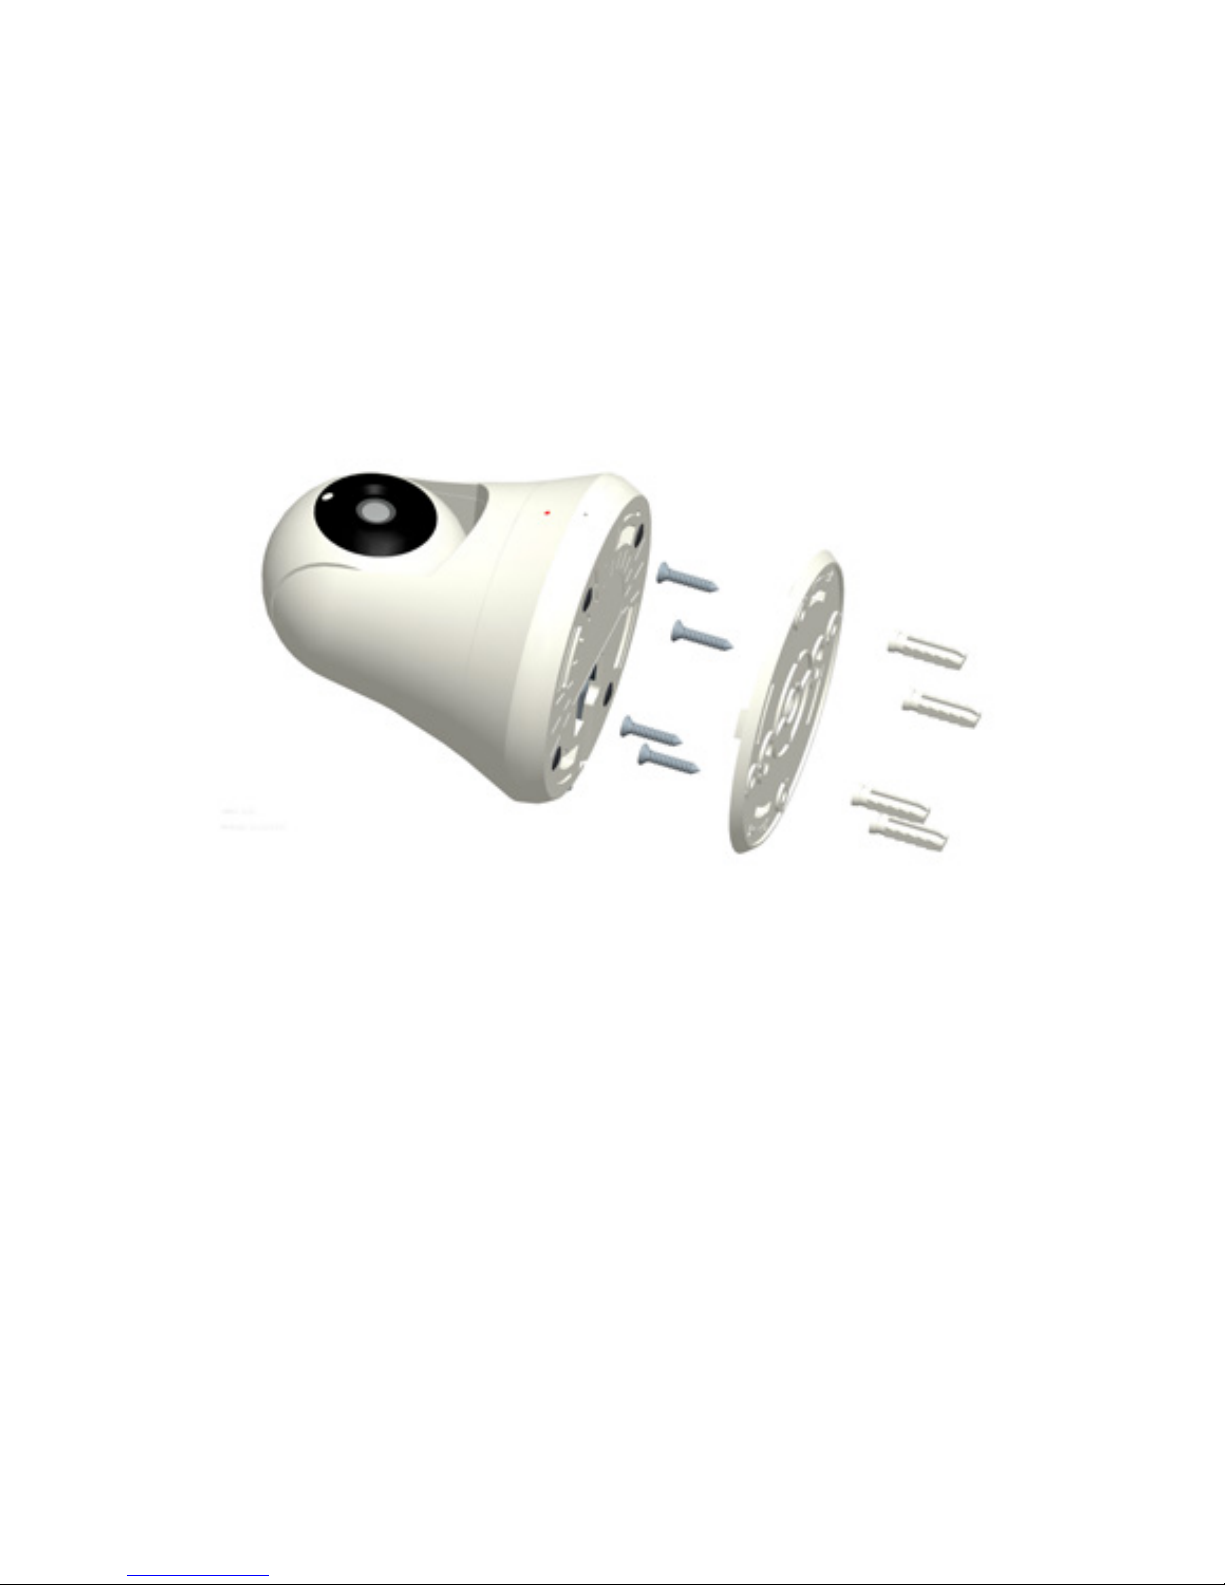
To mount the ES-CAM4A on a wall, remove the base of the camera.
Fasten the base to the wall with the screws and anchors included in the box.
Reattach the camera to the base and screw them together (see drawing below).
Reset
Press the button at the back of the camera for more than 12 seconds until the
front LED indicator blinks orange to restore factory settings.
If you notice connection issues, try restarting the ES-CAM4A by pressing the
button at the back of the camera for 5 seconds.
Page 12
12
Warnings
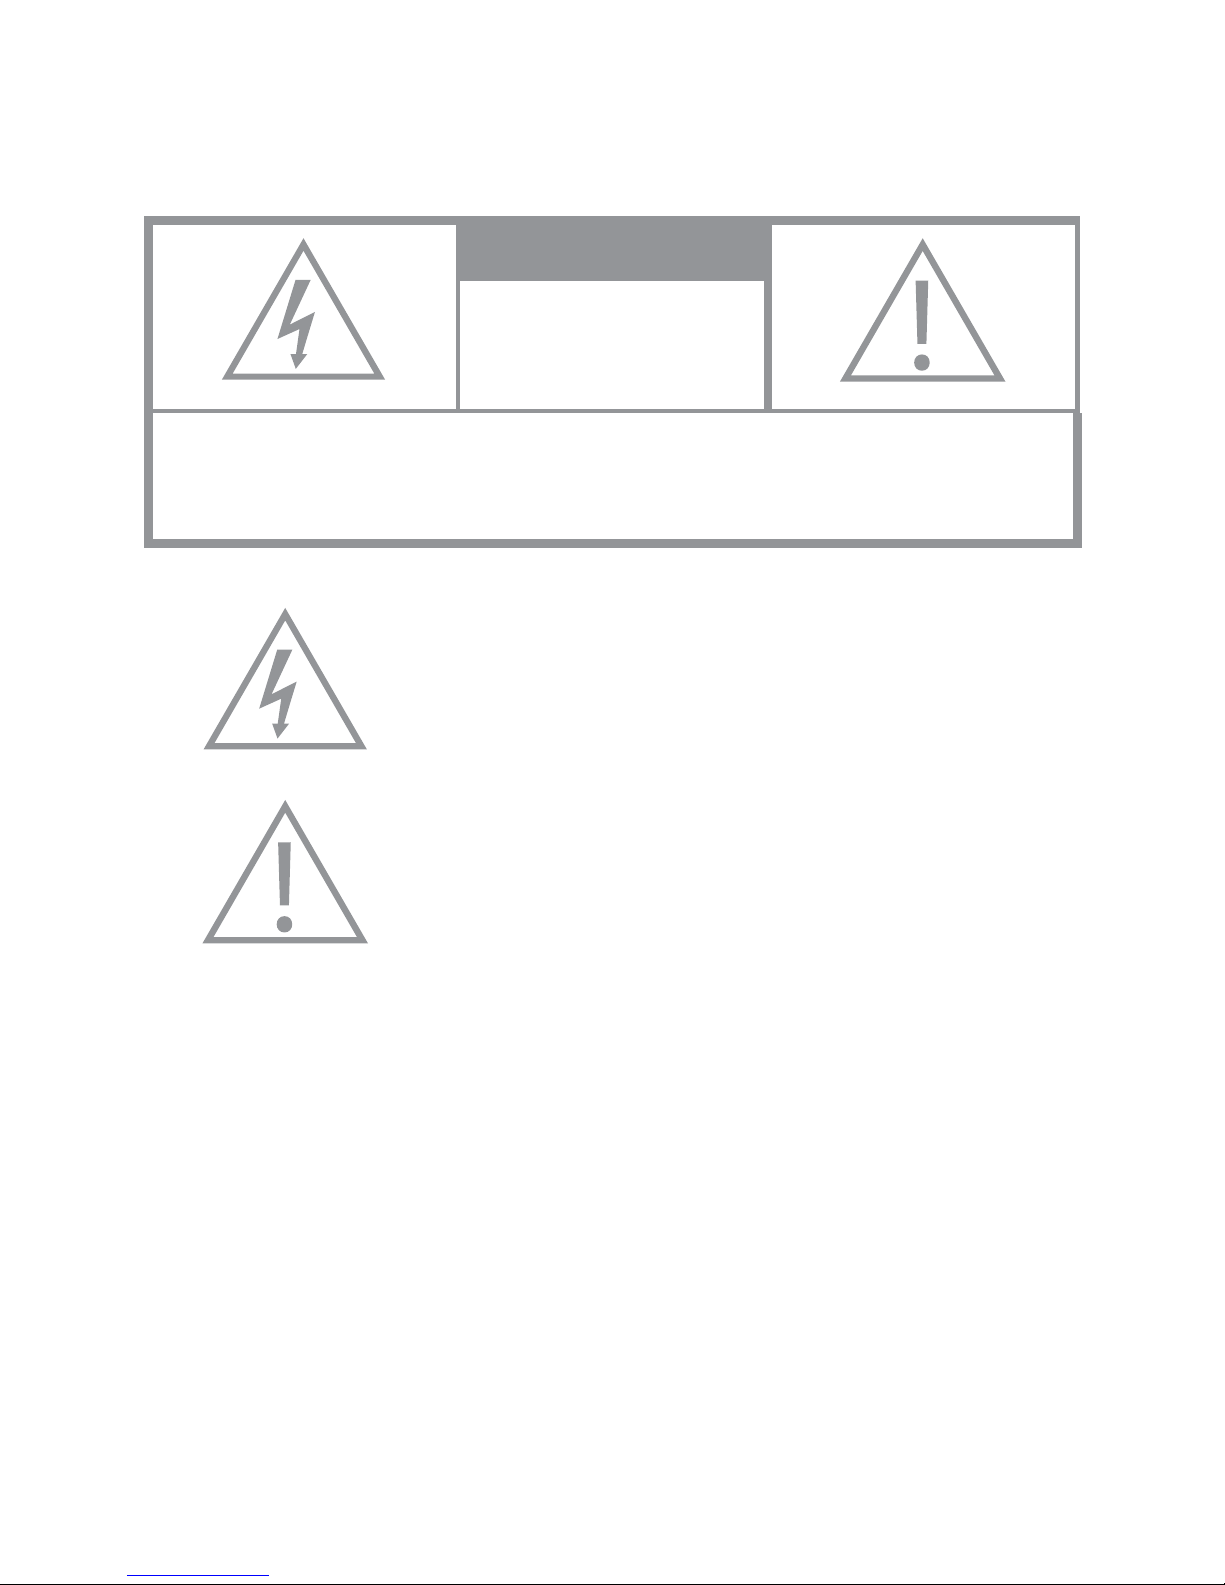
ATTENTION
RISK OF ELECTRIC
SHOCK
DO NOT OPEN
CAUTION TO REDUCE THE RISK OF ELECTRIC SHOCK,DO NOT REMOVE
COVER (OR BACK). NO USER SERVICEABLE PARTS INSIDE, REFER
SERVICING TO QUALIFIED SERVICE PERSONNEL.
This symbol is intended to alert the user to the presence
of uninsulated “dangerous voltage” within the product’s
enclosure that may be of sucient magnitude to
constitute a risk of electric shock to persons.
The exclamation point within an equilateral triangle is
intended to alert the user to the presence of important
operating and maintenance (servicing) instructions in
the literature accompanying the product.
To prevent Fire or Shock Hazards, Do Not Expose This PRODUCT to Rain or
Moisture.
Apparatus shall not be exposed to dripping or splashing and no object lled with
liquids, such as vases, shall be placed on the apparatus.
To avoid electrical shock, do not open the cabinet. Refer servicing to qualied
personnel only.
Regulatory Notices for USA
This equipment has been tested and found to comply with the limits for a digital
device, pursuant to Part 15 of the FCC Rules. These limits are designed to provide
reasonable protection against harmful interference in a residential installation.
This equipment generates, uses, and can radiate radio frequency energy and, if
not installed and used in accordance with the instructions, may cause harmful
Page 13

13
interference to radio communications.
However, there is no guarantee that interference will not occur in a particular
installation. If this equipment does cause harmful interference to radio or
television reception, which can be determined by turning the equipment o and
on, the user is encouraged to try to correct the interference by one or more of the
following measures:
- Reorient or relocate the receiving antenna.
- Increase the separation between the equipment and receiver.
- Connect the equipment into an outlet on a circuit dierent from that to which the
receiver is connected.
- Consult the dealer or an experienced radio / TV technician for help.
Safety instructions
- Do not point the camera directly at the sun to prevent damaging the image sensor.
- Keep the camera away from heat to avoid electric shocks.
- Keep the camera away from rain or moisture.
- Do not attempt to open, dismantle, repair, or service the camera. Doing so may
cause electric shocks and other hazards.
- Any evidence of misuse, abuse, or tampering will void the Warranty.
- To maintain compliance with FCC’s RF exposure guidelines, this equipment
should be installed and operated with minimum distance of 20 cm between the
radiator and your body. Use only the supplied antenna.
NEVER MANUALLY ROTATE THE CAMERA UPWARD, DOWNWARD, TOWARD THE
LEFT OR THE RIGHT. THIS MAY DAMAGE THE CAMERA.
Page 14

14
Standards
This product bears the selective sorting symbol for waste electrical and electronic
equipment (WEEE). This means that this product must be handled pursuant to
European Directive 2002/96/EC in order to be recycled or dismantled to minimize
its impact on the environment.
For further information, please contact your local or regional authorities.
Electronic products not included in the selective sorting process are potentially
dangerous for the environment and human health due to the presence of
hazardous substances.
In compliance with European laws. This product is in compliance with the essential
requirements and other relevant provisions of Directive 1999/5/EC (R&TTE).
This product was designed and manufactured in compliance with Directive
2002/95/EC of the European Parliament and of the Council on the restriction of
use of certain hazardous substances in electrical and electronic equipment (RoHS
Directive - RoHS) and is deemed to comply with the maximum concentration
values set by the European Technical Adaptation Committee (TAC).
iSecurity+ additional features
For more information on the app and its features (subscription to cloud storage,
app settings, etc.) and to download latest updates (rmware or app), visit
iSecurity+’s website : www.isecurityplus.com
ES-CAM4A-UM-EN20150211-1.2-W
Page 15

 Loading...