

Page 1
DOC_DEV_IPL_User Guide_C
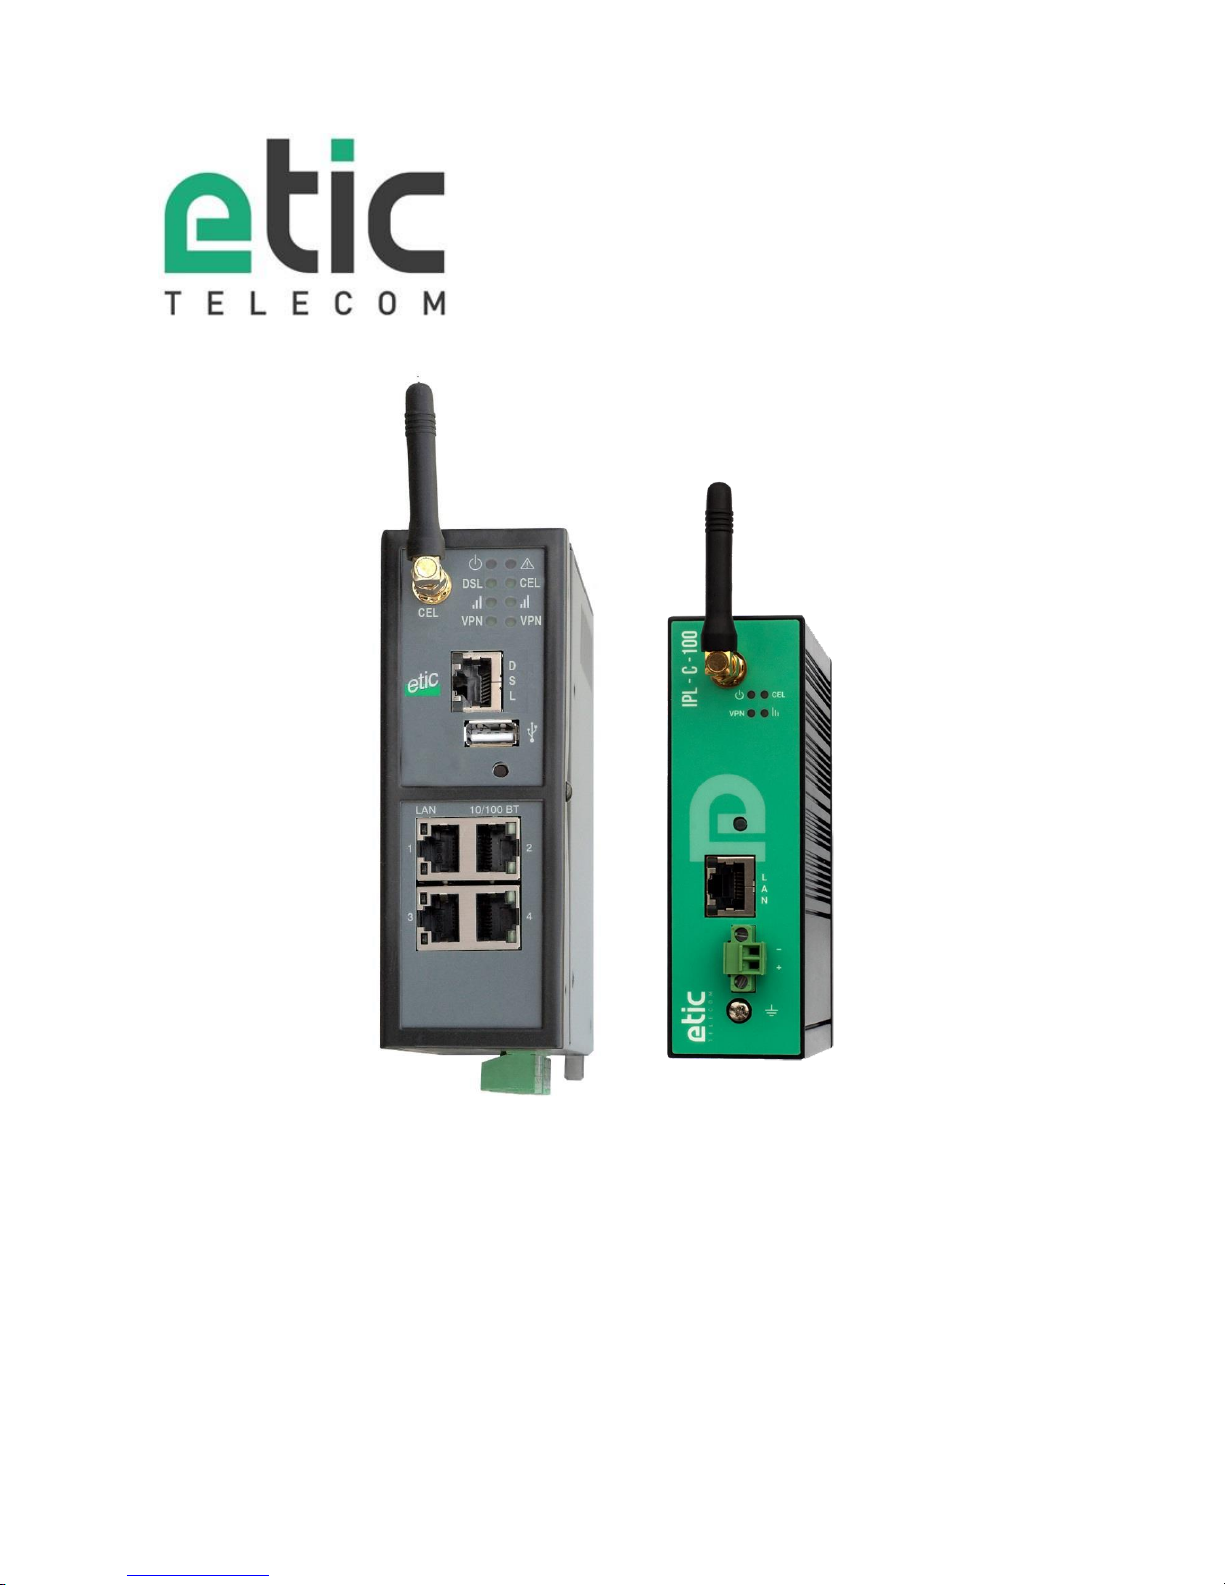
IPL
Router - Firewall
_________________
USER GUIDE
_________________
Page 2

Page 2 DOC_DEV_IPL_User Guide_C
The IPL Industrial Router family is manufactured by
ETIC TELECOM
13 Chemin du vieux chêne
38240 MEYLAN
FRANCE
TEL : + (33) (0)4-76-04-20-05
E-mail : [email protected]
web : www.etictelecom.com
Page 3

DOC_DEV_IPL_User Guide_C Page 3
UE DECLARATION OF CONFORMITY
The manufacturer, ETIC Telecom – 13 chemin du vieux chêne – 38240 Meylan – France, Hereby declares
under sole responsibility that the listed devices conform to
- the Radio Equipment Directive (RED) 2014/53/UE,
- the Restriction of the use of certain Hazardous Substances (RoHS) Directive 2011/65/UE.
Type of device: IP router
Models:
IPL-C-100, IPL-E-100, IPL-EW-100,
IPL-E-400, IPL-E-2XX, IPL-EW-400, IPL-EW-2XX,
IPL-A-400, IPL-A-2XX, IPL-AW-400, IPL-AW-2XX,
IPL-C-400, IPL-C-2XX, IPL-CW-400, IPL-CW-2XX,
IPL-DAC-400, IPL-DEC-400, IPL-DAE-400,
The harmonized standards to which these devices comply are:
Standard
Title
EN 61000-6-2 2006
Immunity:
EN61000-4-2 Electrostatic Discharge
EN61000-4-3 RF Radiated Immunity
EN61000-4-4 EFT/Burst Immunity
EN61000-4-5 Surge Immunity
EN61000-4-6 RF Conducted Immunity
EN61000-4-8 Power Frequency Magnetic Field Immunity
EN 61000-6-4 2007
A1/2011
Emission:
EN55032 Radiated and conducted emission
EN 301 489-1 V1.9.2
EN 301 489-3 V1.6.1
EN 301 489-7 V1.3.1
EN 301 489-17 V2.2.1
EN 301 489-24 V1.5.1
Radio - EMC
EN 301 511 V9.0.2
EN 301 908-1 V6.2.1
EN 301 908-2 V6.2.1
EN 300 328 V1.9.1
EN 301893 V1.8.1
Radio - Spectrum
EN 62368-1 2014
EN 62311 2008
Safety and Health
Date: 7th February 2019
Philippe Duchesne
Technical Director
Page 4

Page 4 DOC_DEV_IPL_User Guide_C
FCC/IC Regulatory notices (IPL-X-100 models)
This device complies with Part 15 of the FCC. Operation is subject to the following two conditions: (1) this
device may not cause interference, and (2) this device must accept any interference, including interference
that may cause undesired operation of the device.
This equipment has been tested and found to comply with the limits for a Class A digital device, pursuant to
Part 15 of the FCC Rules. These limits are designed to provide reasonable protection against harmful
interference when the equipment is operated in a commercial environment. This equipment generates, uses,
and can radiate radio frequency energy and, if not installed and used in accordance with the instruction manual,
may cause harmful interference to radio communications. Operation of this equipment in a residential area is
likely to cause harmful interference in which case the user will be required to correct the interference at his
own expense.
Caution: ETIC Telecom has not approved any changes or modifications to this device by the user. Any changes
or modifications could void the user's authority to operate the equipment.
Page 5

TABLE OF CONTENTS
DOC_DEV_IPL_User Guide_C Page 5
OVERVIEW ..................................................................................................................................... 7
1 Purpose of this manual .................................................................................................................................... 7
2 Products Identification ..................................................................................................................................... 7
3 Specifications.................................................................................................................................................... 9
4 Product overview ............................................................................................................................................ 12
4.1 Applications ......................................................................................................................................... 12
4.2 IPL functions ........................................................................................................................................ 14
INSTALLATION ........................................................................................................................... 17
1 Description ...................................................................................................................................................... 17
1.1 Dimensions .......................................................................................................................................... 17
1.2 Connectors ........................................................................................................................................... 18
1.3 Push-buttons ........................................................................................................................................ 26
1.4 LED indicators ...................................................................................................................................... 27
2 Safety instructions .......................................................................................................................................... 28
3 DIN rail mounting ............................................................................................................................................ 29
4 Cooling ............................................................................................................................................................. 29
5 Power supply ................................................................................................................................................... 30
6 Earthing ........................................................................................................................................................... 30
7 RS232 serial connexion (IPL-X-220, IPL-X-230) ............................................................................................ 30
8 RS485 serial connexion (IPL-X-220) .............................................................................................................. 30
9 RS422 isolated serial connection (IPL-X-260)............................................................................................... 31
10 RS485 isolated serial connection (IPL-X-261) ........................................................................................... 32
11 Digital input and output............................................................................................................................... 33
12 Connecting the IPL to the ADSL line .......................................................................................................... 33
13 Connecting the IPL to the cellular network ................................................................................................ 34
13.1 Controls before installing the IPL ................................................................................................... 34
13.2 Cellular antenna ............................................................................................................................... 35
13.3 Coaxial cable .................................................................................................................................... 35
13.4 Cellular service subscription ........................................................................................................... 35
13.5 Installing the SIM card ..................................................................................................................... 36
13.6 Controlling the conformance of the connection ............................................................................ 37
PREPARING THE SETUP ............................................................................................................ 39
1 Connecting a PC for configuration ................................................................................................................ 39
1.1 Overview ............................................................................................................................................... 39
1.2 First configuration ............................................................................................................................... 40
1.3 Changing the configuration later ........................................................................................................ 40
2 Access to the administration server through the WAN interface ................................................................ 41
3 Working with HTTPS ....................................................................................................................................... 41
4 Temporary return to the factory settings ...................................................................................................... 42
5 Restoring the factory settings ........................................................................................................................ 42
6 Protecting the access to the administration server ...................................................................................... 43
7 Configuration steps ........................................................................................................................................ 43
Page 6

Page 7
OVERVIEW
DOC_DEV_IPL_User Guide_C Page 7
OVERVIEW
1 Purpose of this manual
The present user guide describes the features and the installation of the IPL Industrial Router family.
In this document, these products are named « IPL ».
2 Products Identification
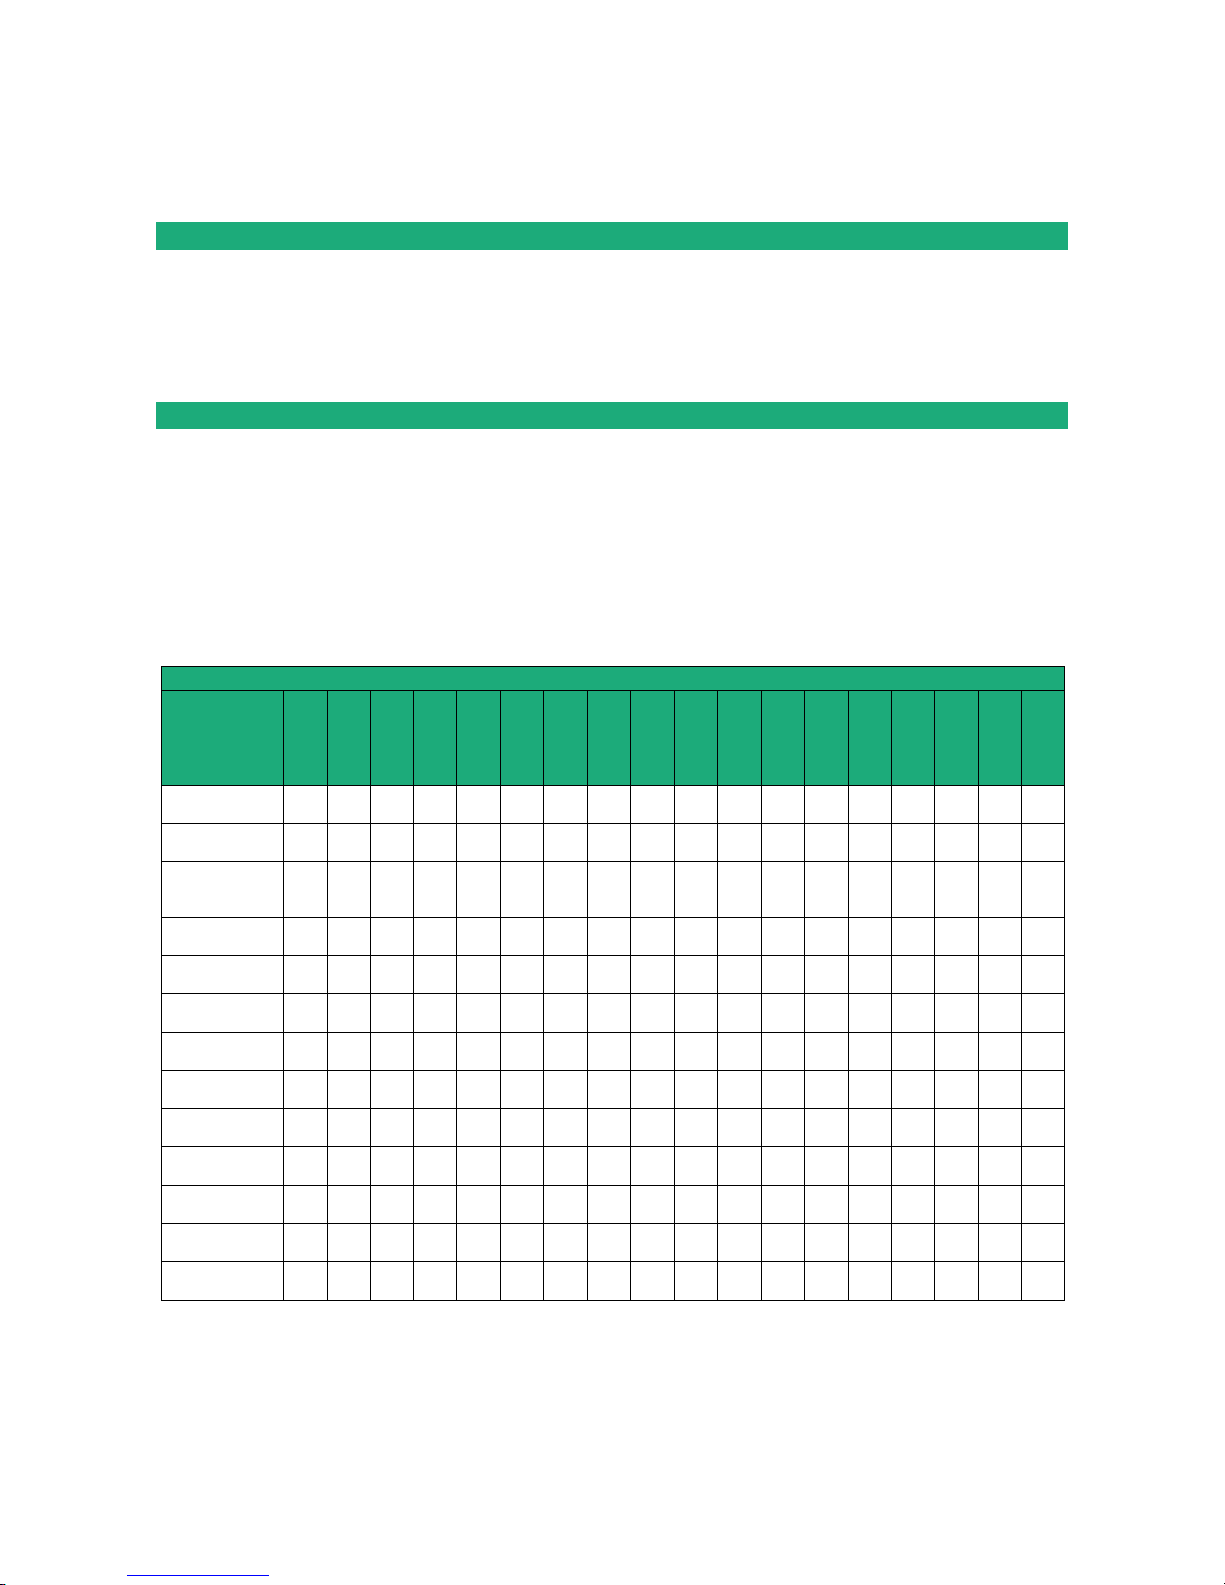
This family of Industrial Router consists of these models:
IPL-C-100, IPL-E-100, IPL-EW-100
IPL-E-400, IPL-E-2XX, IPL-EW-400, IPL-EW-2XX,
IPL-A-400, IPL-A-2XX, IPL-AW-400, IPL-AW-2XX,
IPL-C-400, IPL-C-2XX, IPL-CW-400, IPL-CW-2XX,
IPL-DAC-400, IPL-DEC-400, IPL-DAE-400,
The main features are summarized below:
Models
IPL-
C-100
E-100
EW-100
E-400
E-2XX
EW-400
EW-2XX
A-400
A-2XX
AW-400
AW-2XX
C-400
C-2XX
CW-400
CW-2XX
DAC-400
DEC-400
DAE-400
WAN Ethernet
• • • • •
•
•
•
WAN ADSL
• • •
•
•
•
WAN Cellular
(-HG, -HW : 3G+,
-LE : 4G))
•
• • • • •
•
Wi-Fi 2.4 & 5 GHz
•
•
•
•
•
•
•
LAN Ethernet
10-100 Mb/s
1 1 1 4 2 4 2 4 2 4 2 4 2 4 2 4 4
4
Serial link
RS232 /RS485…
• • • • • •
USB
• • • • • • • • • • • • • • •
Link redundancy
• • •
2 power inputs
• • • • • • • • • • • • • • •
Power supply
VDC
12-24
12-24
12-24
12-48
12-48
12-48
12-48
12-48
12-48
12-48
12-48
12-48
12-48
12-48
12-48
12-48
12-48
12-48
2 SIM readers
• • • • •
•
Digital input
1 1 1 1 1 1 1 1 1 1 1 1 1 1
1
Digital output
1 1 1 1 1 1 1 1 1 1 1 1 1 1
1
Page 8

OVERVIEW
Page 8 DOC_DEV_IPL_User Guide_C
Models with serial interface code:
xx
RS232
RS485
RS422
isolated
RS485
isolated
20 1 1 0 0
30 2 0 0 0
60 0 0 1 0
61 0 0 0 1
In the remainder of this document the term IPL-X is used indifferently for IPL-C, IPL-E, IPL-EW, IPL-A, IPL-AW
and IPL-CW.
Page 9
OVERVIEW
DOC_DEV_IPL_User Guide_C Page 9
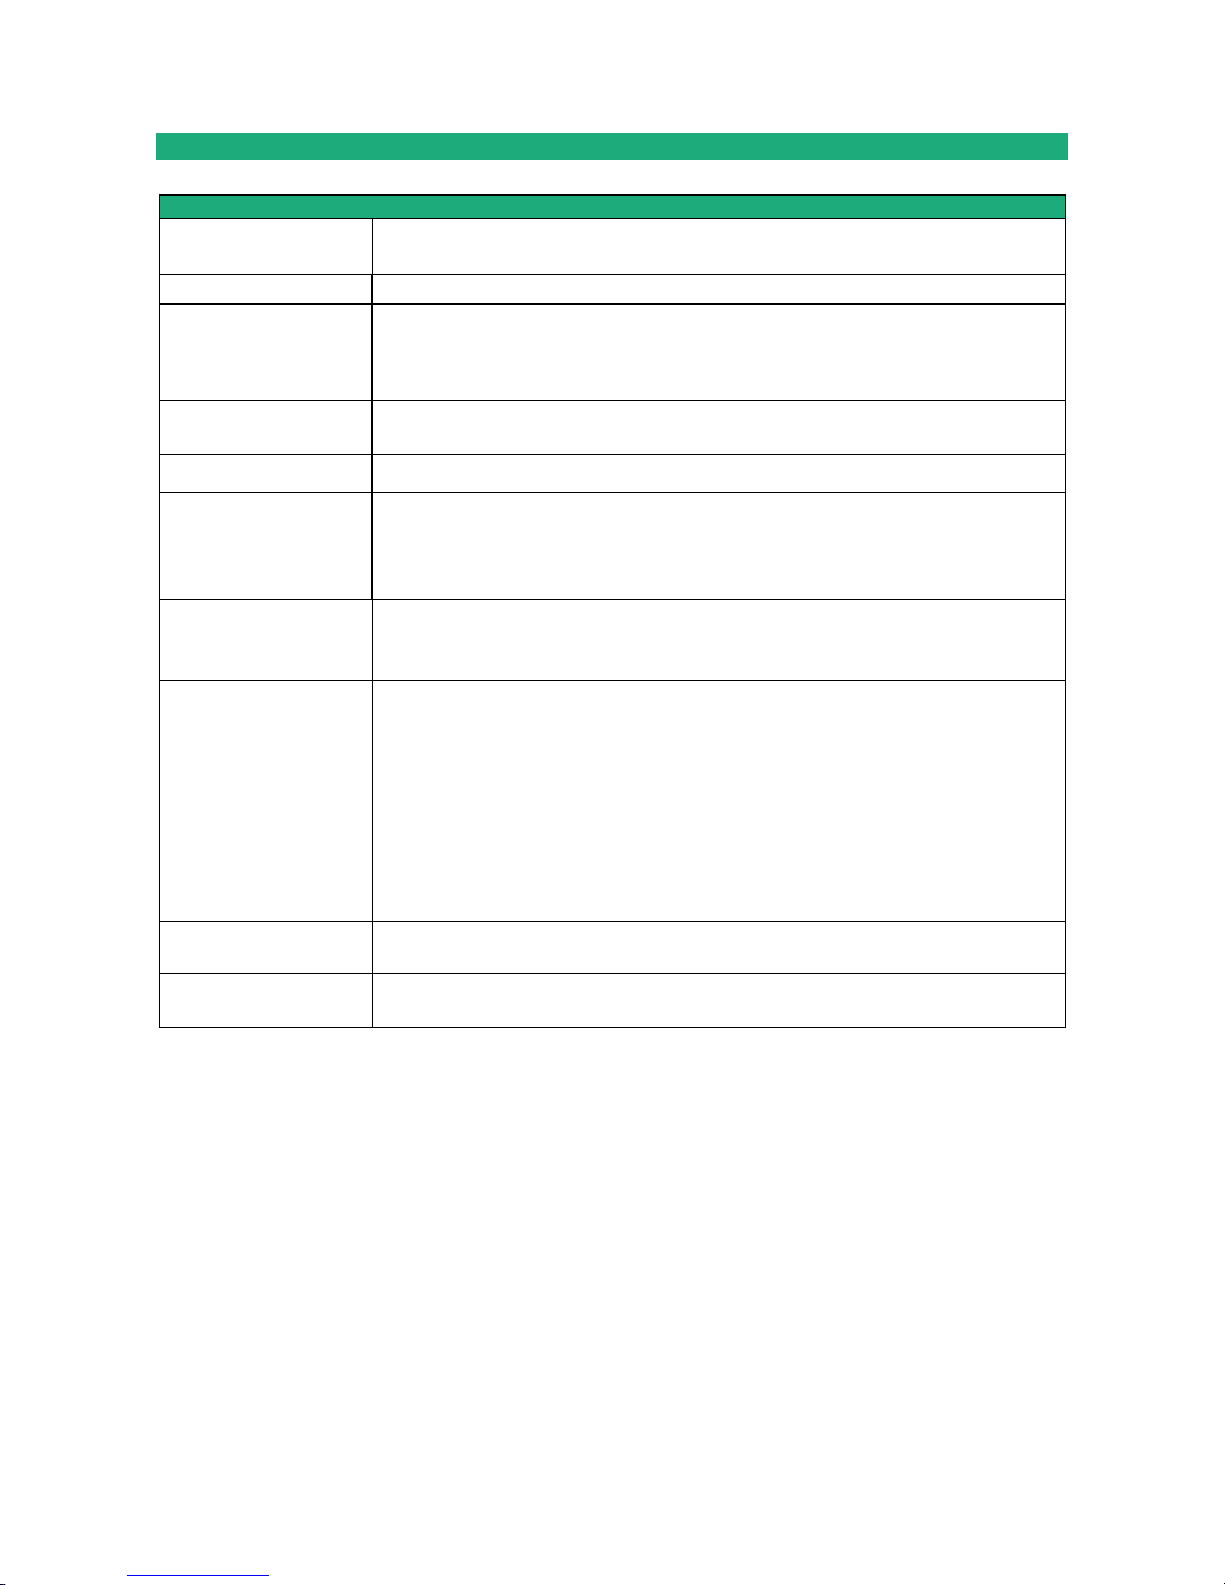
3 Specifications
General characteristics
Dimensions
IPL-X-100: 120 x 37 x 88 mm (h,w,d)
Other IPL: 135 x 47 x 115 mm (h,w,d)
Weight
Max 0.65 kg
Casing
Metallic
IPL- X-100: IP41 – IEC60529
Other IPL: IP20 – IEC60529
DIN rail mounting
Temperature
Non-operating: -40°/ + 85°C
Operating: -20°/ +70°C
Humidity
5 to 95 % relative (non-condensing)
Power supply
Protected against reverse polarity
IPL-X-100: Nominal: 12-24 VDC (min 10 VDC - max 30 VDC)
Other IPL: Nominal: 12-48 VDC (min 10 VDC - max 60 VDC)
2 points Phoenix connector
Consumption
IPL-E : 2W
IPL-A, IPL-C and IPL-EW : 5W
IPL-AW, IPL-CW, IPL-DAC : 8W
EMC
Immunity EN61000-6-2:
EN61000-4-2 : ESD : 4 kV contact – 8kV air
EN61000-4-3 : RF - radiated: 10V/m < 2 GHz
EN61000-4-4 : Burst
EN61000-4-5 : Surge : 4KV line / earth
EN61000-4-6 : RF - conducted
EN61000-4-8 : Magnetic fields
Emission EN61000-6-4:
EN 55032: RF - conducted and radiated
FCC:
IPL-X-100 : FCC Part 15
Electrical safety
IEC/EN 62368-1
IPL-X-100 : CB FR_704843
Hazardous substances
2011/65/UE (RoHS)
REACH
Page 10

OVERVIEW
Page 10 DOC_DEV_IPL_User Guide_C
WAN network
Ethernet
RJ45
Auto : 10/100 full & half duplex MDI/MDI-X
ADSL
ADSL2+ and RE-ADSL
ITU G992.5 (ADSL2+ and Reach Extended ADSL)
Max data rate : UL : 1 Mbps, DL : 24 Mbps
PPPoE : PPP over Ethernet
PPPoA : PPP over ATM
EoA : Ethernet over ATM RFC2684 Bridged
IPoA : Routed IP over ATM, RFC2684 Routed
4G/3G+
-LE : 4G LTE Europe
LTE bands: B1, B2, B3, B4, B5, B7, B8, B20
UMTS bands: B1, B2, B5, B8
GSM bands: 850/900/1800/1900
-CH : 4G LTE China
LTE bands: B1, B3, B8, B38, B39, B40, B41
UMTS bands: B1, B5, B8, B9
GSM bands: 900/1800
-HG : 3G+ HSPA worldwide (except. North America)
UMTS bands: B1, B2, B5, B8
GSM bands: 850/900/1800/1900
-HW : 3G+ HSPA worldwide
UMTS bands: B1, B2, B4, B5, B6, B8, B19
GSM bands: 850/900/1800/1900
Max data rate 4G: UL @ 50 Mbps and DL @ 100Mbps
Max data rate 3G+: UL @ 5,7 Mbps and DL @ 21 Mbps
Max data rate 2G: UL @ 237 Kbps and DL @ 237 Kbps
Antenna connector female SMA
Wi-Fi
Client 2,4 and 5 GHz
802.11 a/b/g/n
Antenna connector female RP-SMA
LAN network
Ethernet
RJ45: 1 to 4 ports depending on model
Auto: 10/100 full & half duplex MDI/MDI-X
Wi-Fi
Access point 2,4 and 5 GHz
802.11 a/b/g/n
Antenna connector female RP-SMA
Routing / @IP
IP Routing
Routing tables
Static routes
RIP or OSPF
Address translation (DNAT, SNAT, NAT 1:1)
IP@ assignment
WAN interface: DHCP client or fixed IP
LAN interface: DHCP server
DNS
WAN interface: compatible with DYNDNS, No-IP or ETIC DNS
LAN interface: relay & server
Redundancy
VRRP RFC 3768 protocol
Multi WAN for backup on some IPL models
Page 11
OVERVIEW
DOC_DEV_IPL_User Guide_C Page 11
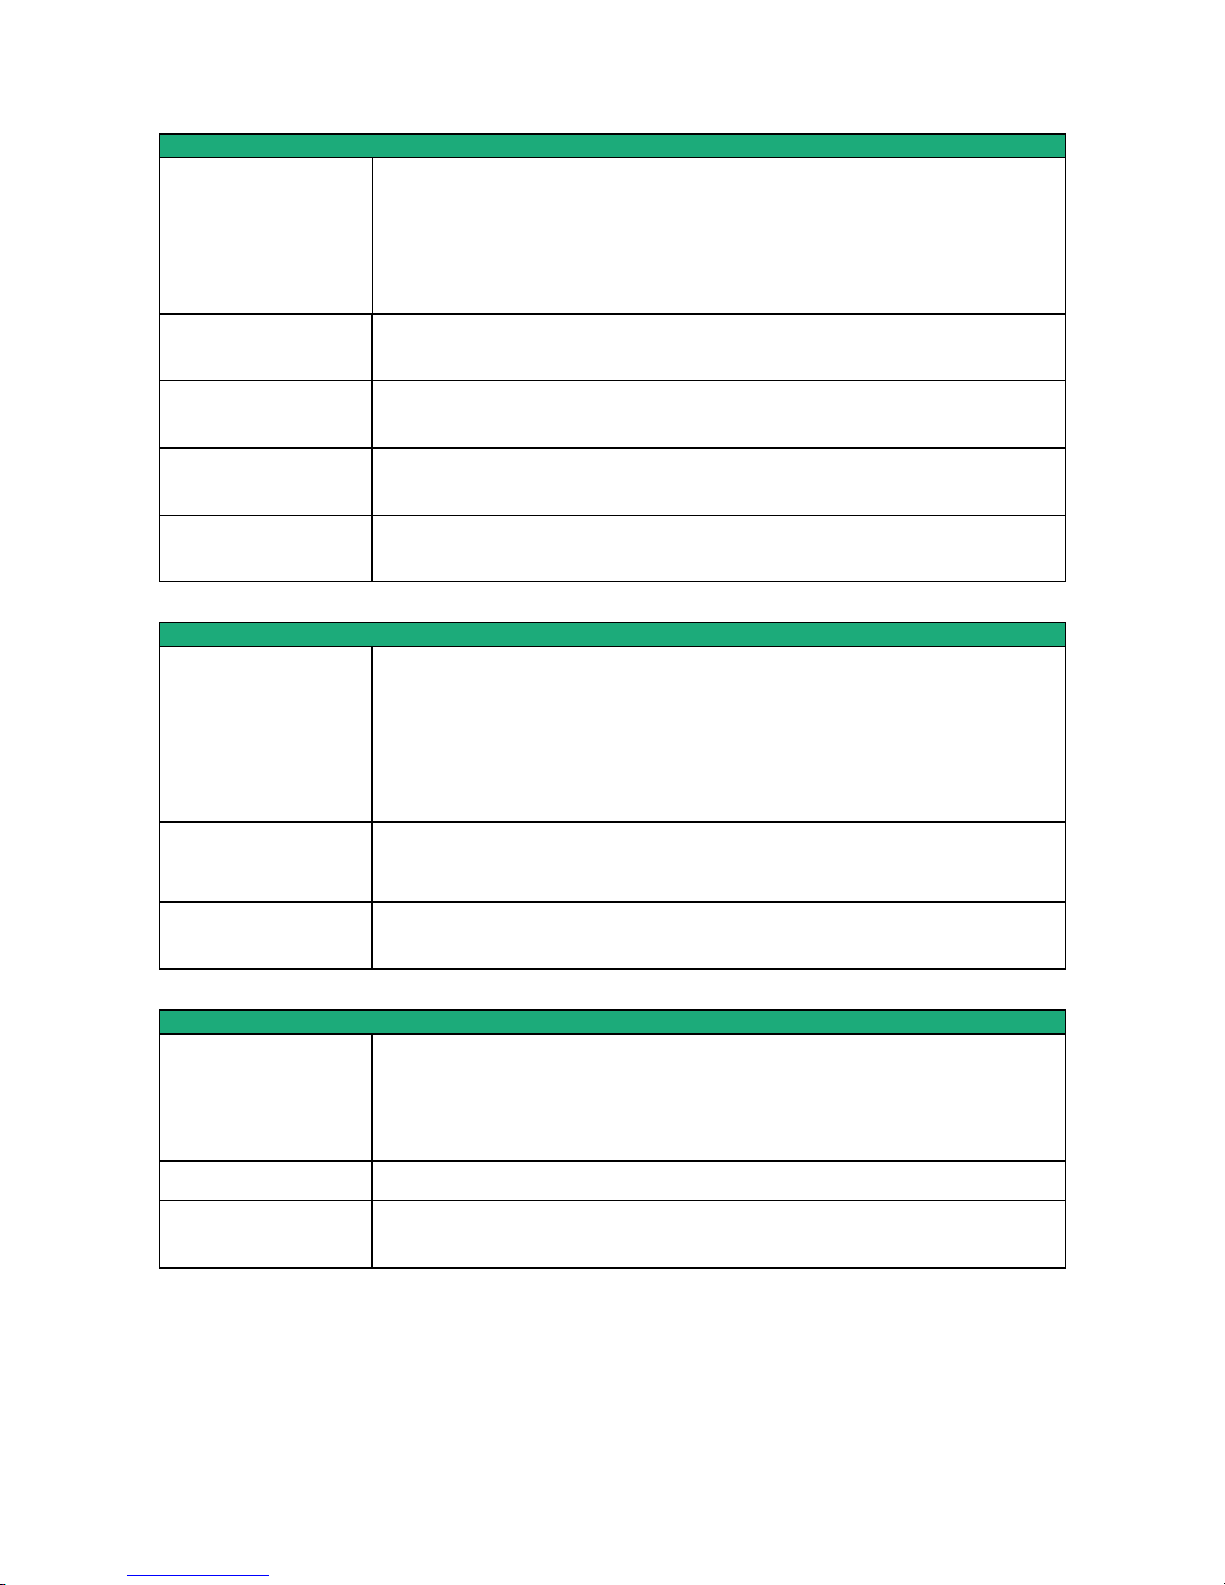
Security
VPN tunnel
OpenVPN (TLS/SSL), IPSEC, L2TP/IPSEC, PPTP
Shared key or X509 certificate
Encryption 3DES & AES 128-192-256
Authentication: MD5 & SHA-1
Up to 10 VPN tunnels
(mix OpenVPN IPSEC allowed)
Firewall
Stafefull packet inspection (SPI: 50 rules)
IP@ and ports filtering
Remote access
Up to 25 remote users
RAS access: Login & Password and Certificate (optional)
Customizable LAN machine network access rights
Log
Timestamped
Events: connection, restart, alarms
Alarms
Digital input: email, SMS, SNMP trap
Digital output: Power supply failure, user connection…
Serial gateways
Gateways
Raw TCP client
Raw TCP server
Raw UDP
Raw Multicast
ModBus TCP client to Modbus RTU/ASCII slave (for master PLC)
Modbus TCP server to Modbus RTU/ASCII master (for slave PLC)
Telway/XIP to Unitelway slave (for master PLC)
Telnet RFC 2217
RS232/RS485
Data rate : 1200 to 115200 kb/s, 10 or 11 bits, parity N / E / O
RS232 : RJ45
RS485 : 2 points Phoenix connector
USB
1 port USB host
PPP client
Misc.
SNMP
Supported MIBs:
RFC1213-MIB (MIB-2)
ADSL-LINE-MIB
ETIC-TELECOM-MIB-1
SNMP traps
Configuration
Web server
Management
Save and restore configurations
Reset product to return to factory configuration
Page 12
OVERVIEW
Page 12 DOC_DEV_IPL_User Guide_C
4 Product overview
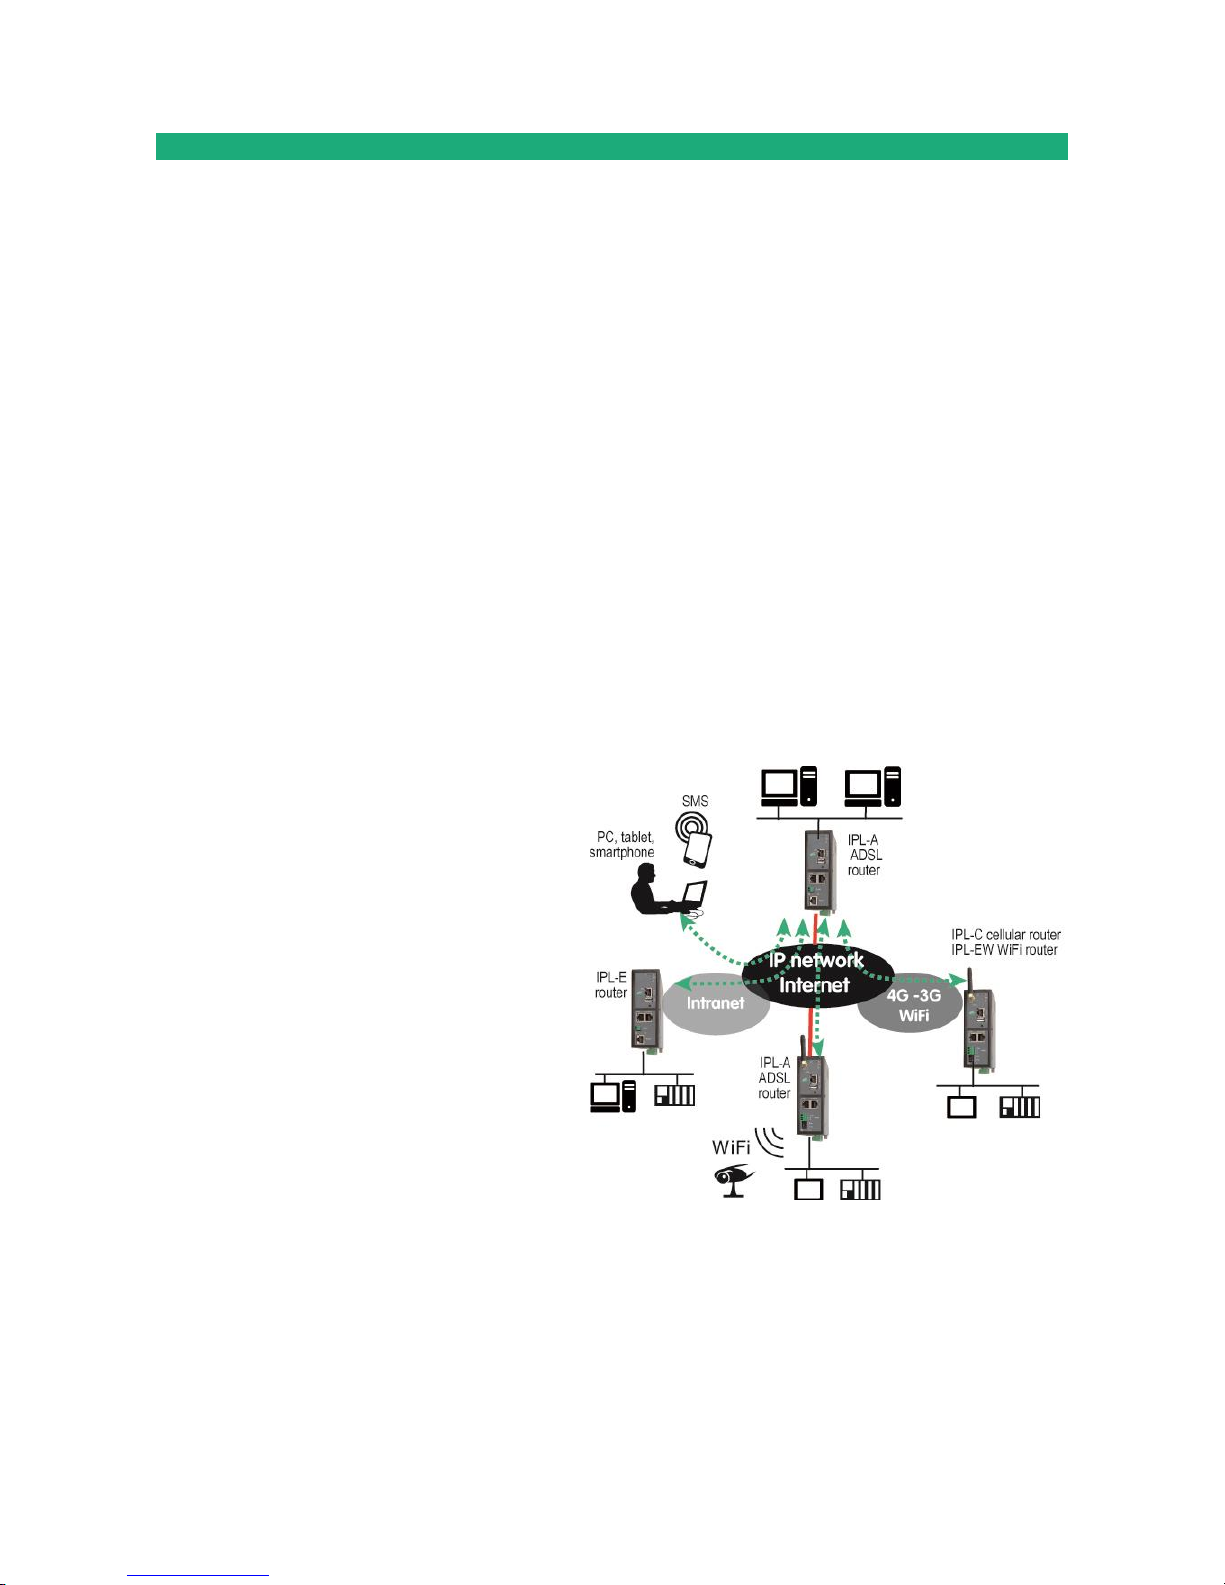
The IPL is both a router, a firewall and a remote access server.
It is designed to connect industrial machines on an intranet or the Internet with a high level of security.
It provides depending on model :
IPL-E : A WAN Ethernet interface
IPL-A : An ADSL modem
IPL-C : A 3G/4G cellular modem
IPL-DAE : An ADSL modem and a WAN Ethernet
IPL-DAC : An ADSL modem and a 3G/4G cellular modem
IPL-DEC : A WAN Ethernet interface and a 3G/4G cellular modem
It offers the following functions:
IP router : Routing table, RIP, SNMP, VRRP.
VPN vlient and server VPN : IPSec or OpenVPN.
Remote access service for remote maintenance or operation with PC, tablet or smartphone.
Firewall SPI
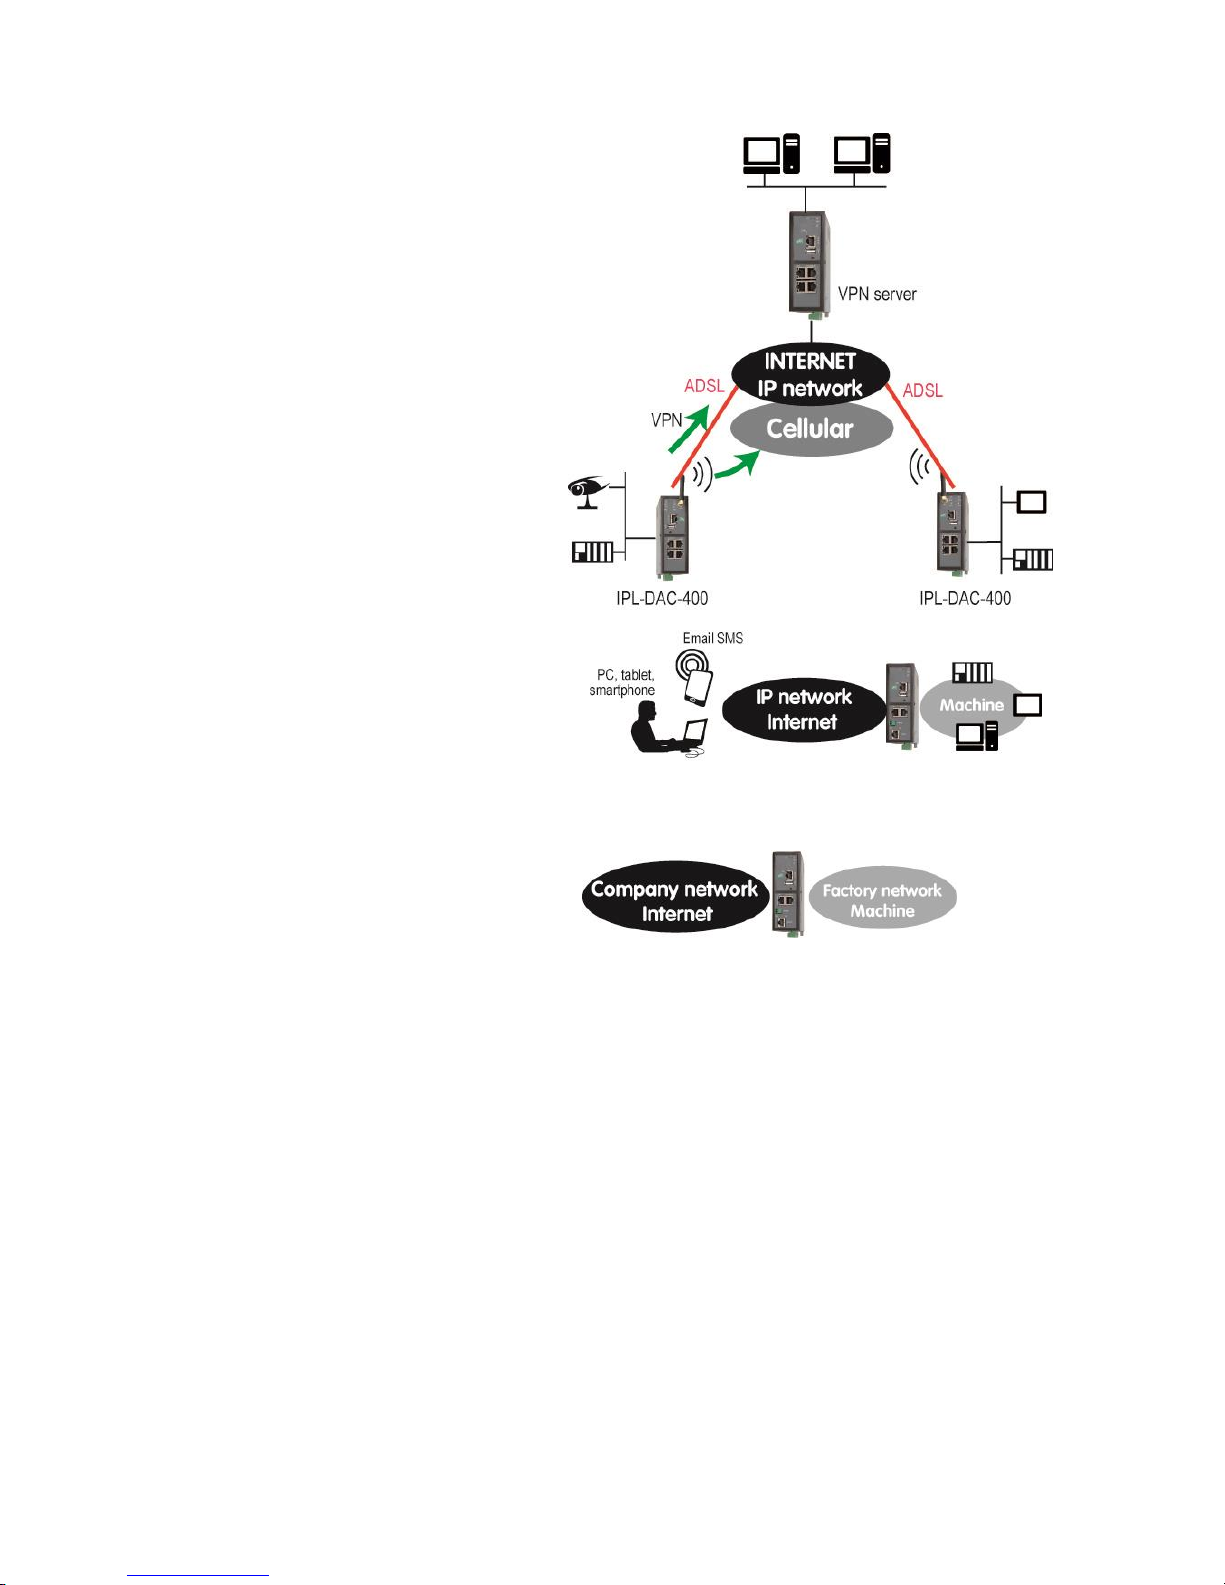
Automatic backup of an ADSL link over the cellular network (IPL-DAC)
Automatic backup of a private VPN network over the cellular network (IPL-DEC)
Serial interface and Wi-Fi : optional
4.1 Applications
Remote SCADA system
The IPL is designed to connect industrial
machines on an intranet or the Internet with a
high level of security.
Page 13
OVERVIEW
DOC_DEV_IPL_User Guide_C Page 13
High availability SCADA system with an
IPL-DAC.
Remote access server for remote operation
A remote user can connect to any device in
the system using a PC, tablet or a
smartphone.
His access rights may be limited according to
his identity.
Traffic filtering (Firewall)
Page 14

OVERVIEW
Page 14 DOC_DEV_IPL_User Guide_C
4.2 IPL functions
IP router
The IPL-C provides powerful, flexible and comprehensive solutions to route IP packets from one network to
other networks :
Static routes, to reach nested networks,
Network address translation d‘adresse (NAT, DNAT, port forwarding),
Routing protocol (RIP),
Domain name management DNS et DynDNS.
IPSec & OpenVPN tunnels
The IPL-E features IPSec and OpenVPN tunnels to provide a high level of security and also compatibility with
existing devices.
The VPN connection guarantees a high level of performance and security
Transparency : The VPN interconnects the two networks so that any machine in one network can
communicate with a machine on the other network.
Authentication : The router that establishes the VPN is authenticated by the one that accepts it and
any other connection is rejected.
Confidentiality : Data traffic via the VPN is encrypted.
IPSec will be chosen when the IPL needs to establish a VPN with an already installed IPSec VPN server.
OpenVPN will be preferred when VPN traffic is routed through intermediate routers to take advantage of the
flexibility of this technique.
Remote access server for PCs, tablets and smartphones
The IPL can also behave like a remote access server.
If he is registered in the user list, a remote user can access to particular devices of a machine network
depending on his identity.
The new HTTPS portal make possible to access easily and safely to HMIs or PLCS web servers using a
tablet, a PC or a smartphone.
Firewall
The firewall protects against the sophisticated attacks coming from the Internet.
It is also able to filter IP frames between the WAN interface or any VPN interface on one hand, and the LAN
interface on the other hand.
VRRP redundancy
VRRP makes possible to use two routers shaping a redundant solution.
Page 15

OVERVIEW
DOC_DEV_IPL_User Guide_C Page 15
Automatic backup of an ADSL link over the cellular network
The IPL-DAC provides an ADSL interface and a cellular interface. It is designed for critical industrial remote
SCADA systems.
In normal situation the data are transmitted via the main interface (usually the ADSL one).
In case of a failure the data are transmitted via the backup interface (usually the cellular one).
Automatic backup of a private VPN network over the cellular network
The IPL-DEC provides a WAN Ethernet interface and a cellular interface. It is designed for critical industrial
remote SCADA systems.
In normal situation the data are transmitted via the main interface (usually the WAN Ethernet).
In case of a failure the data are transmitted via the backup interface (usually the cellular one).
Wi-Fi interface (optional)
The IPL can be equipped with a Wi-Fi 2.4 and 5GHz interface able to behave like a client or an access point.
SNMP
The IPL is an SNMP agent; it complies with the MIB2 standard and transmits an SNMP trap when
configurable events occur.
DNS server
DNS makes it possible to assign Internet names to devices or organizations independently of their public IP
address.
The IPL-E router behaves like a DNS server for the devices connected to the LAN.
DHCP server
On the LAN interface, the IPL can behave like a DHCP server.
Configuration
The IPL is configured using an HTML browser (HTTP or HTTPS).
EticFinder
The ETICFinder software can easily detect all ETIC branded products connected to an Ethernet network to
display their MAC address and their IP address.
Serial gateway
Optionally, the IPL provides 1 or 2 serial RS232, RS485, RS422 interfaces.
The serial gateway features the following modes :
Raw TCP client or server
Raw UDP
Telnet
Modbus master or slave
Unitelway
Page 16

Page 17
INSTALLATION
DOC_DEV_IPL_User Guide_C Page 17
INSTALLATION
1 Description
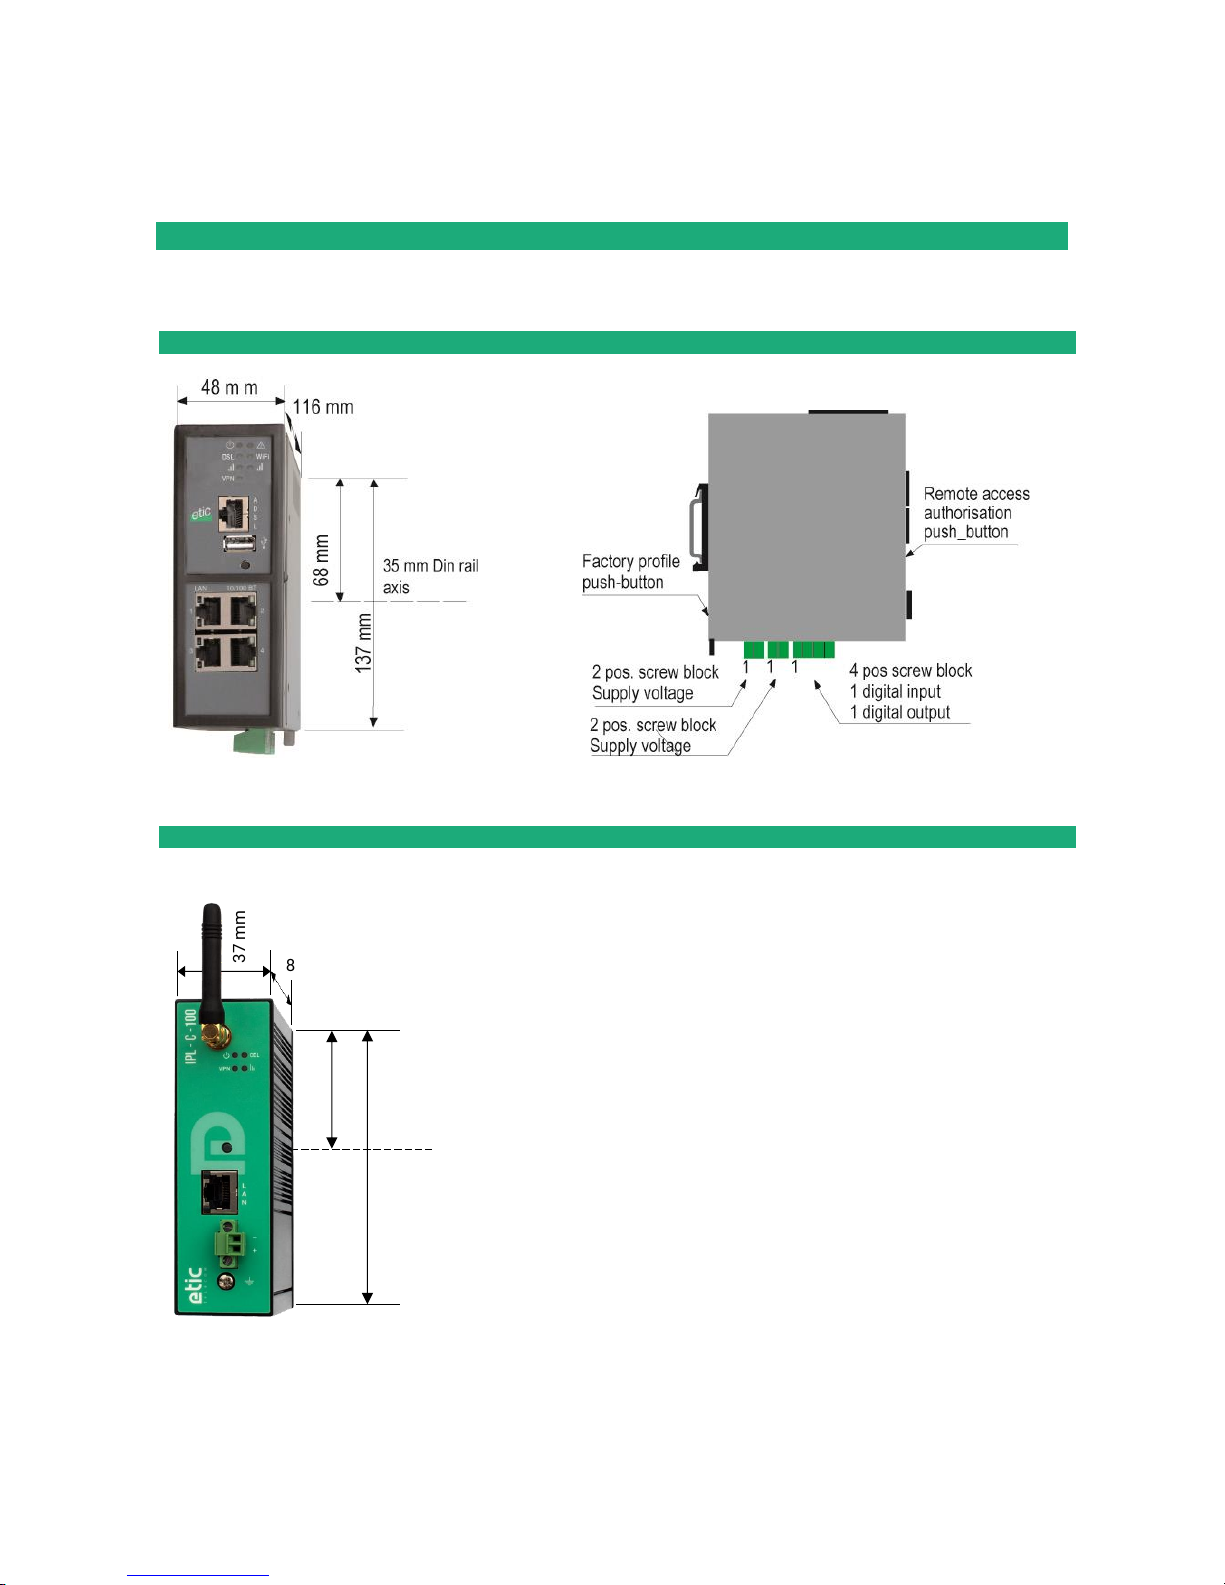
1.1 Dimensions
All models except IPL-X-100
IPL-X-100
37 mm
35 mm Din rail
axis
60 mm
88 mm
120 mm
Page 18
INSTALLATION
Page 18 DOC_DEV_IPL_User Guide_C
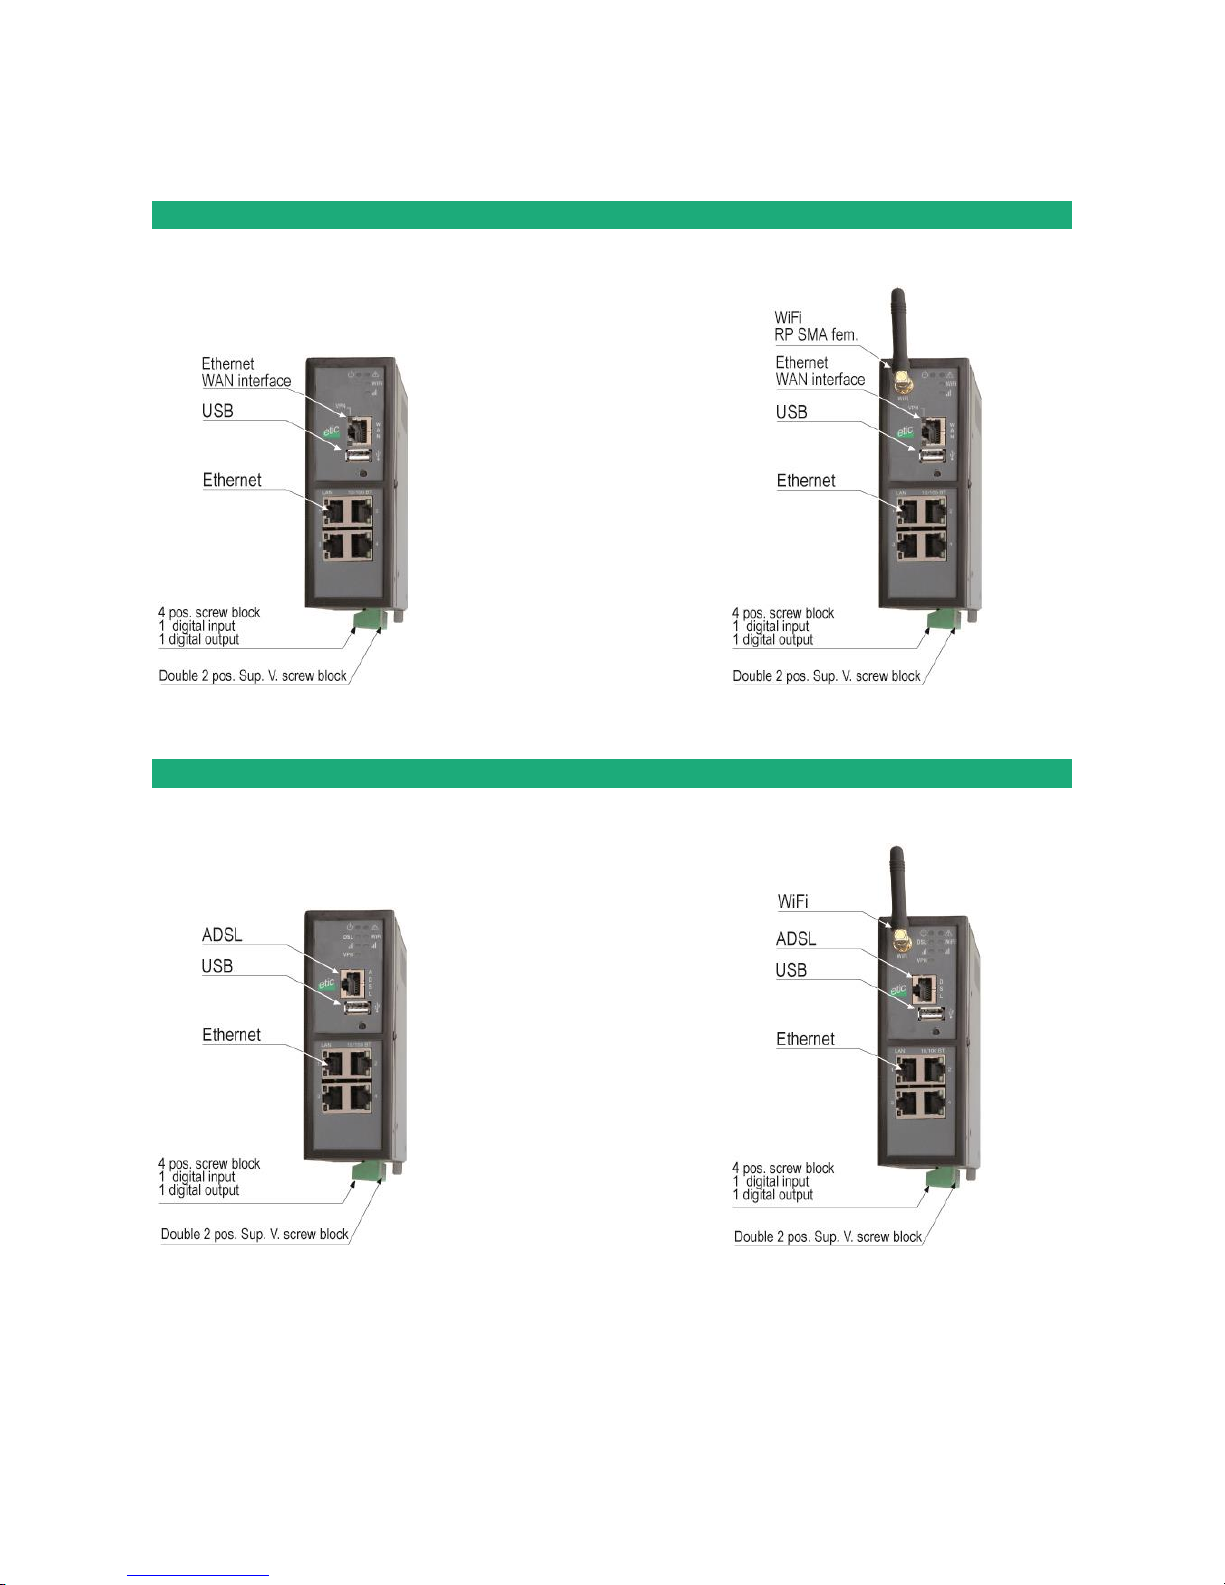
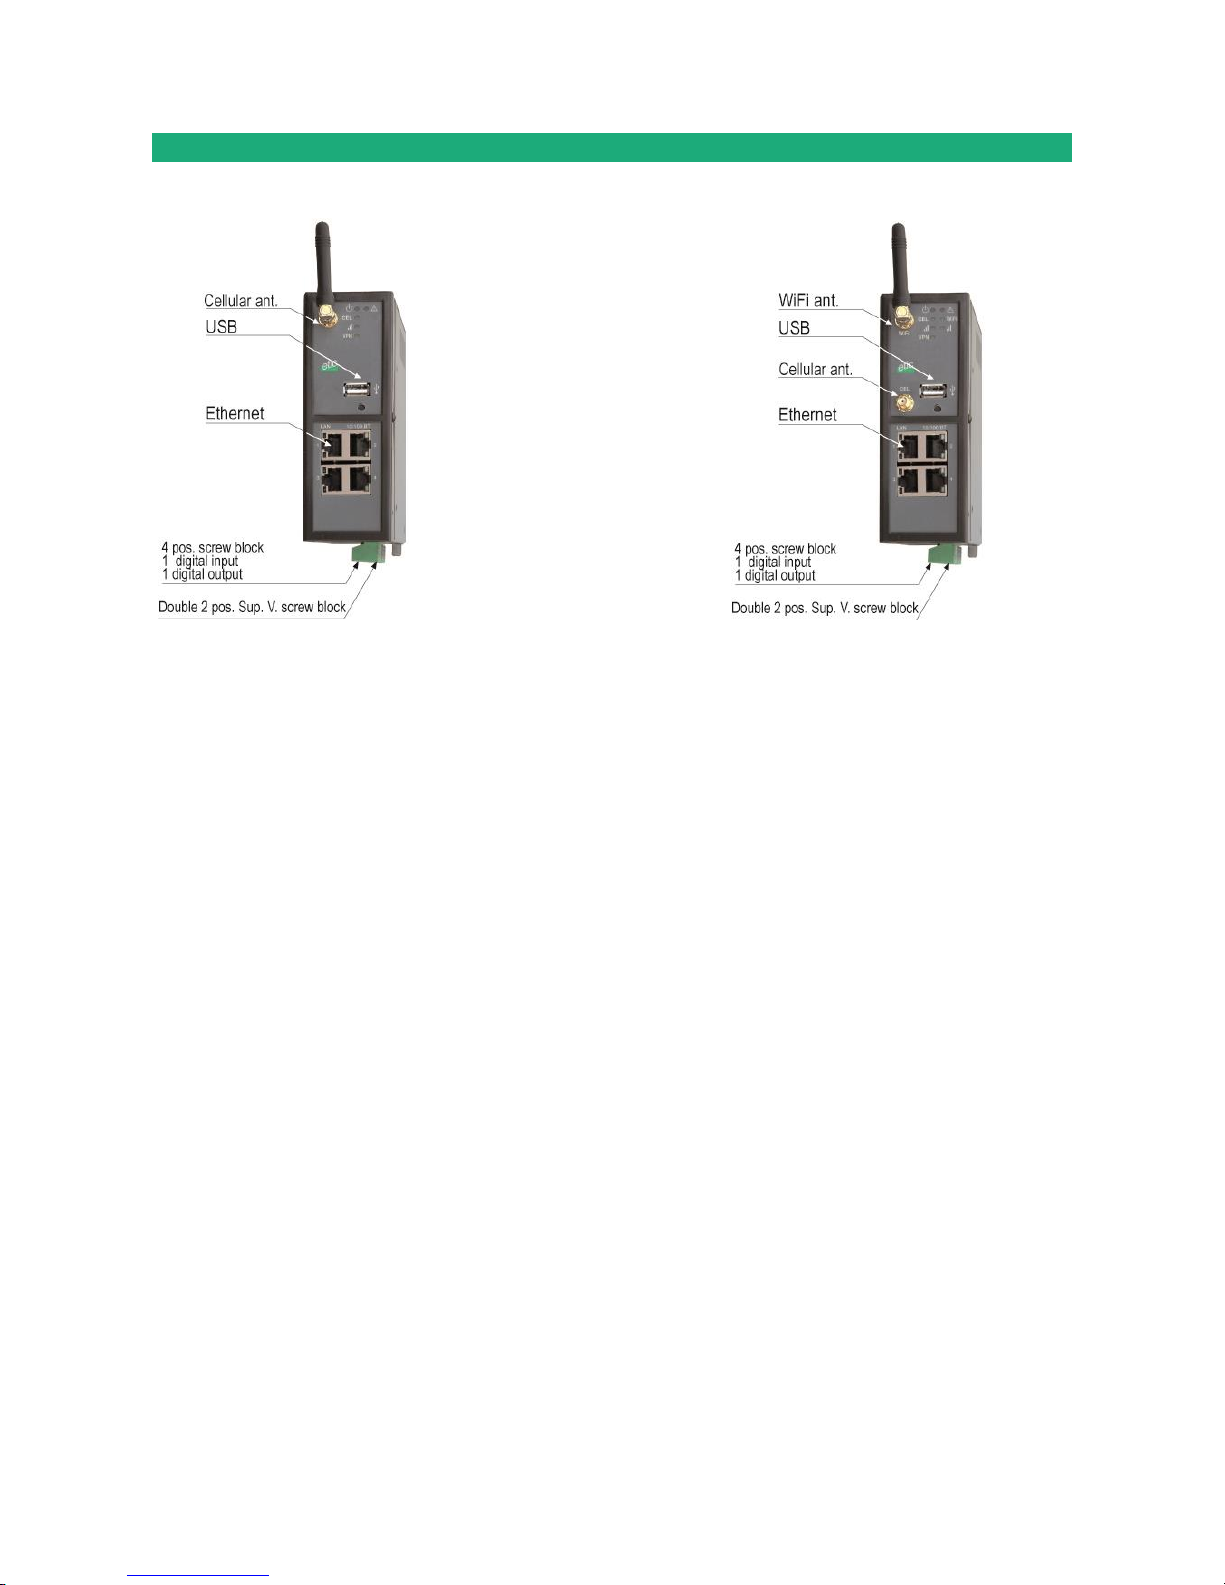
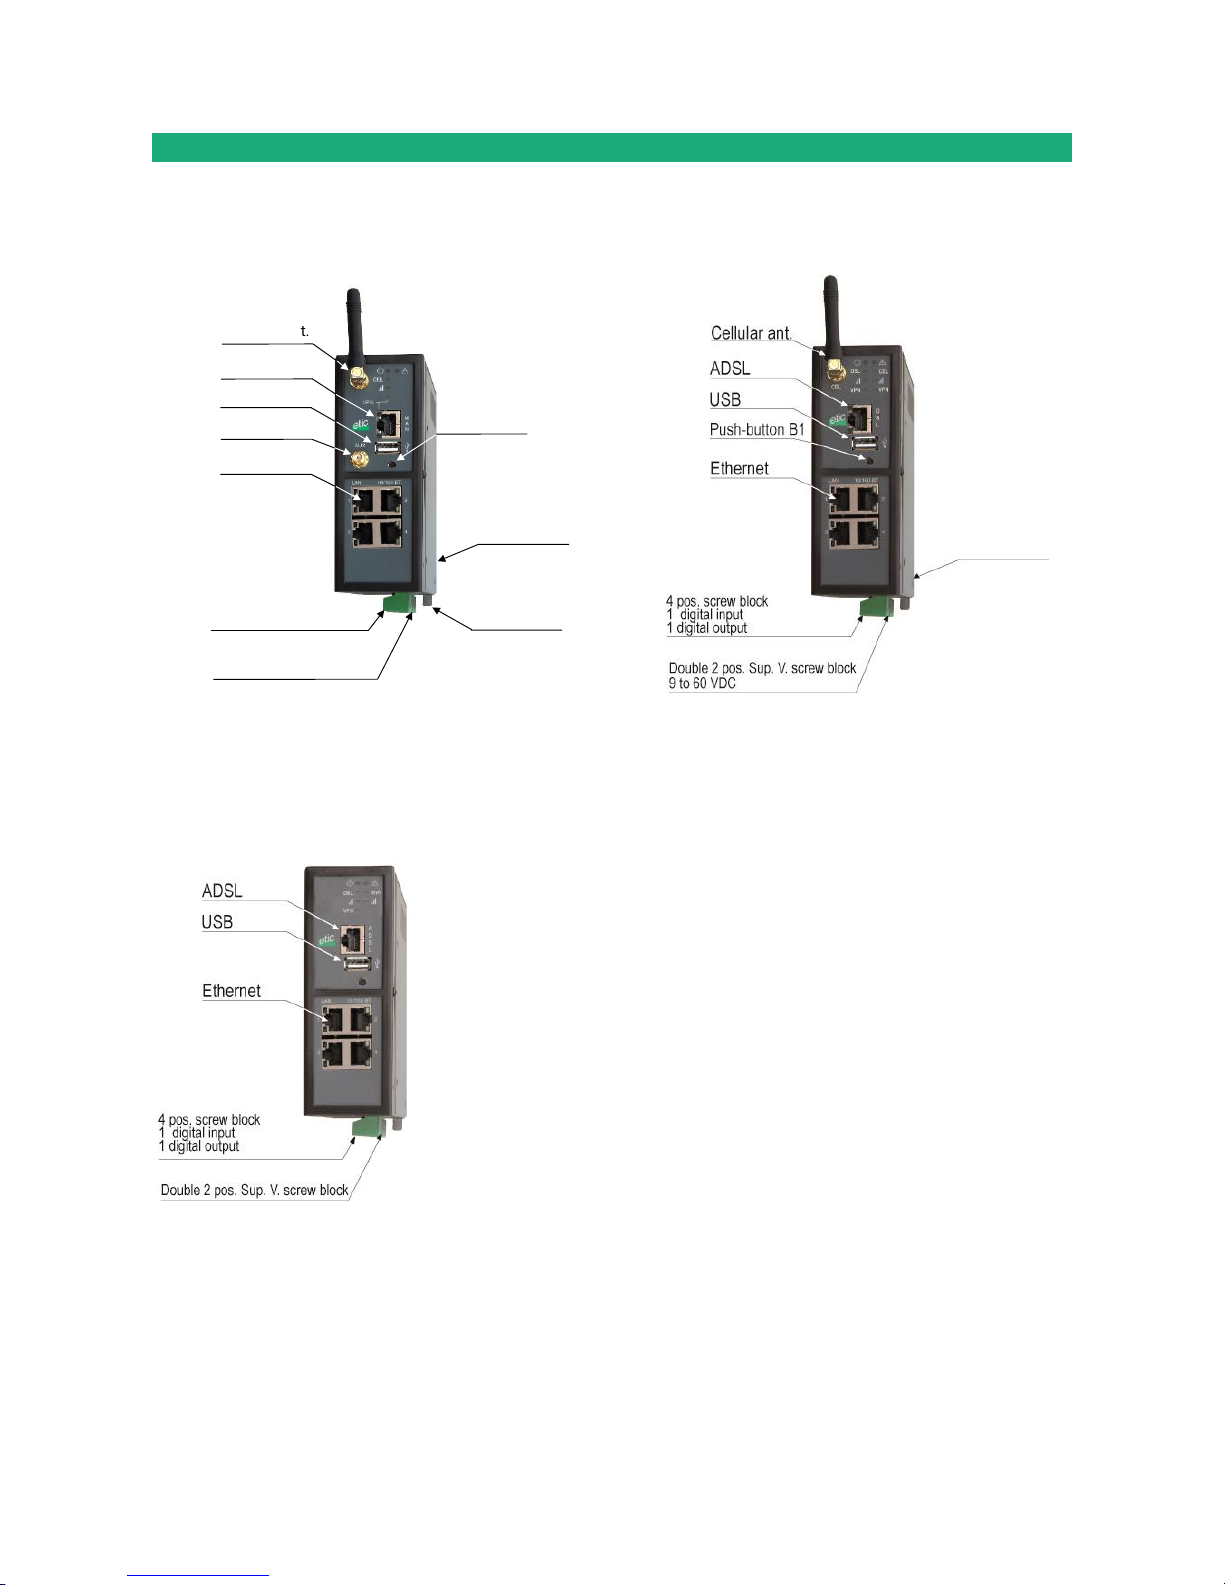
1.2 Connectors
IPL-E-400
IPL-EW-400
IPL-A-400
IPL-AW-400
Page 19
INSTALLATION
DOC_DEV_IPL_User Guide_C Page 19
IPL-C-400
IPL-CW-400
Page 20
INSTALLATION
Page 20 DOC_DEV_IPL_User Guide_C
IPL-DEC-400
IPL-DAC-400
IPL-DAE-400
Cellulaire ant.
Reset push
button on the rear
Ethernet WAN
USB
Auxiliary ant.
Ethernet
Push button B1
4 pos. screw block
1 digital input
1 digital output
Double 2 pos. Screw block
Sup. voltage
Ground terminal
Page 21
INSTALLATION
DOC_DEV_IPL_User Guide_C Page 21
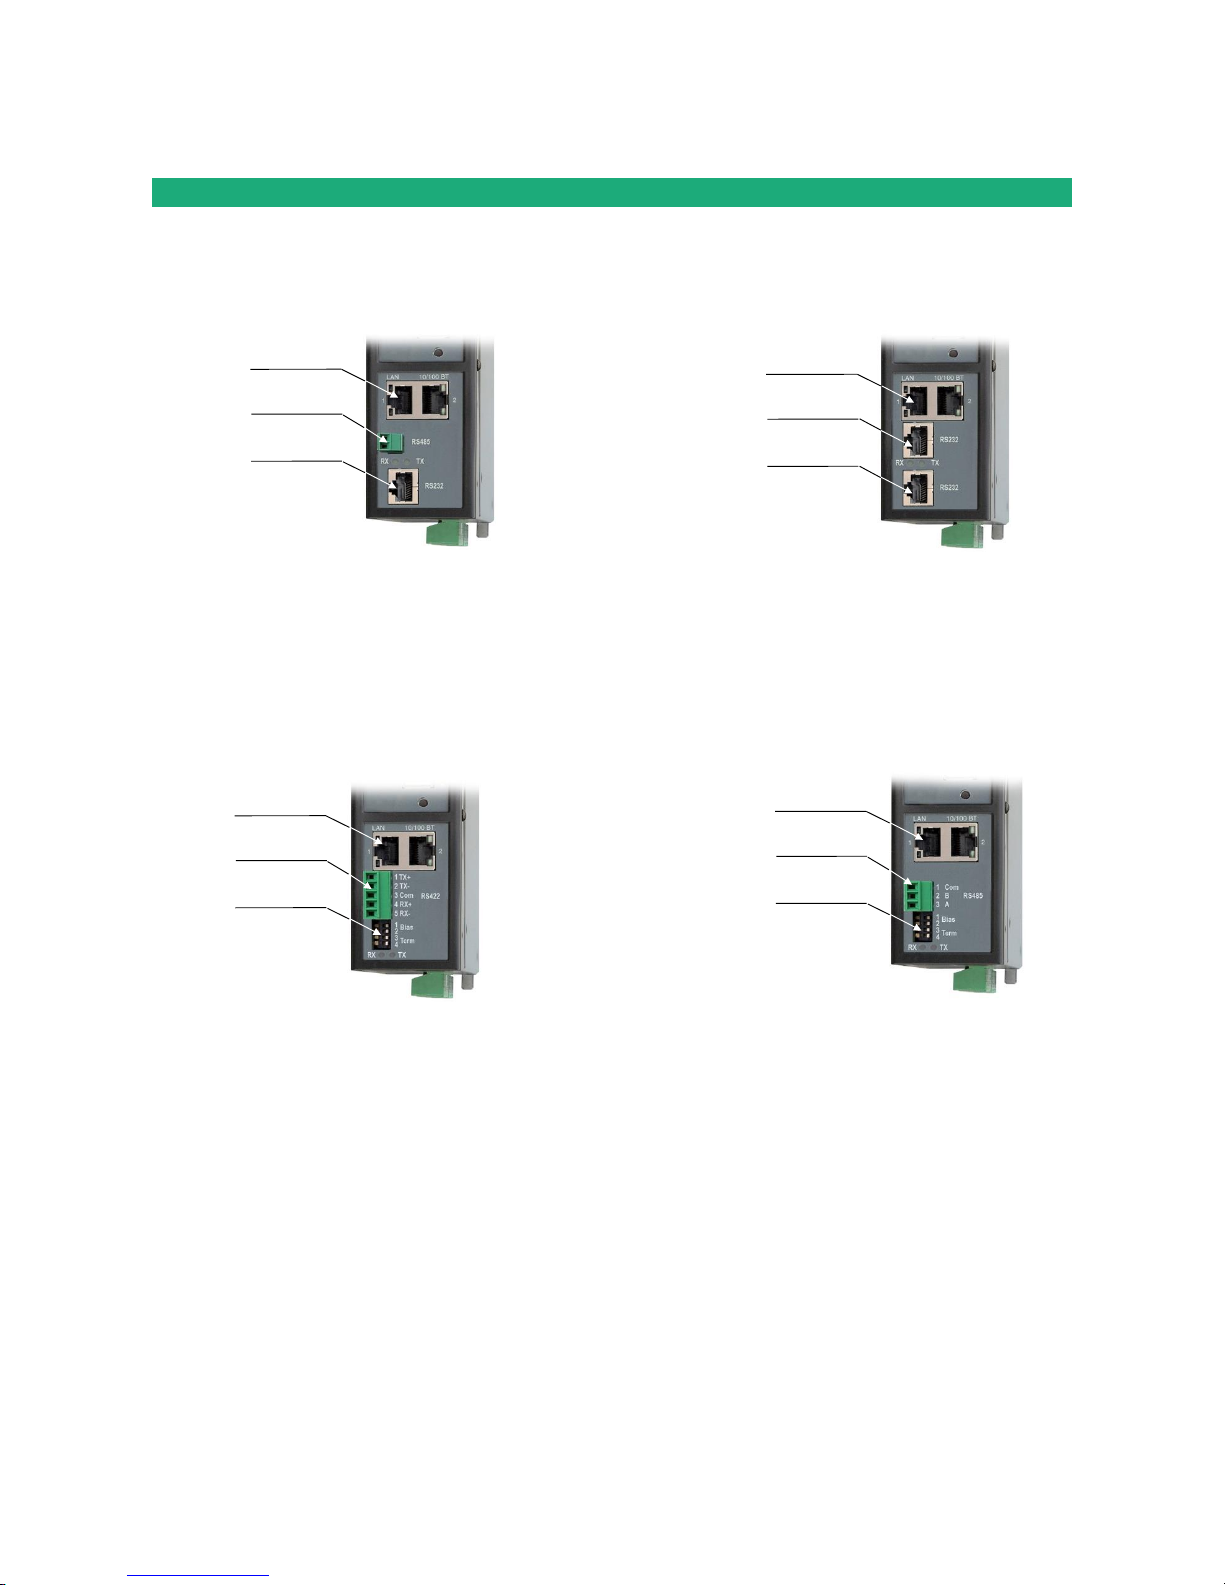
Serial interfaces
IPL-X-220
IPL-X-230
IPL-X-260
IPL-X-261
Ethernet
RS485 (2 wires)
RS232
Ethernet
RS232
RS232
DIP switches
Ethernet
RS422 isolated
(4 wires)
DIP switches
Ethernet
RS485 isolated
(3 wires)
Page 22
INSTALLATION
Page 22 DOC_DEV_IPL_User Guide_C
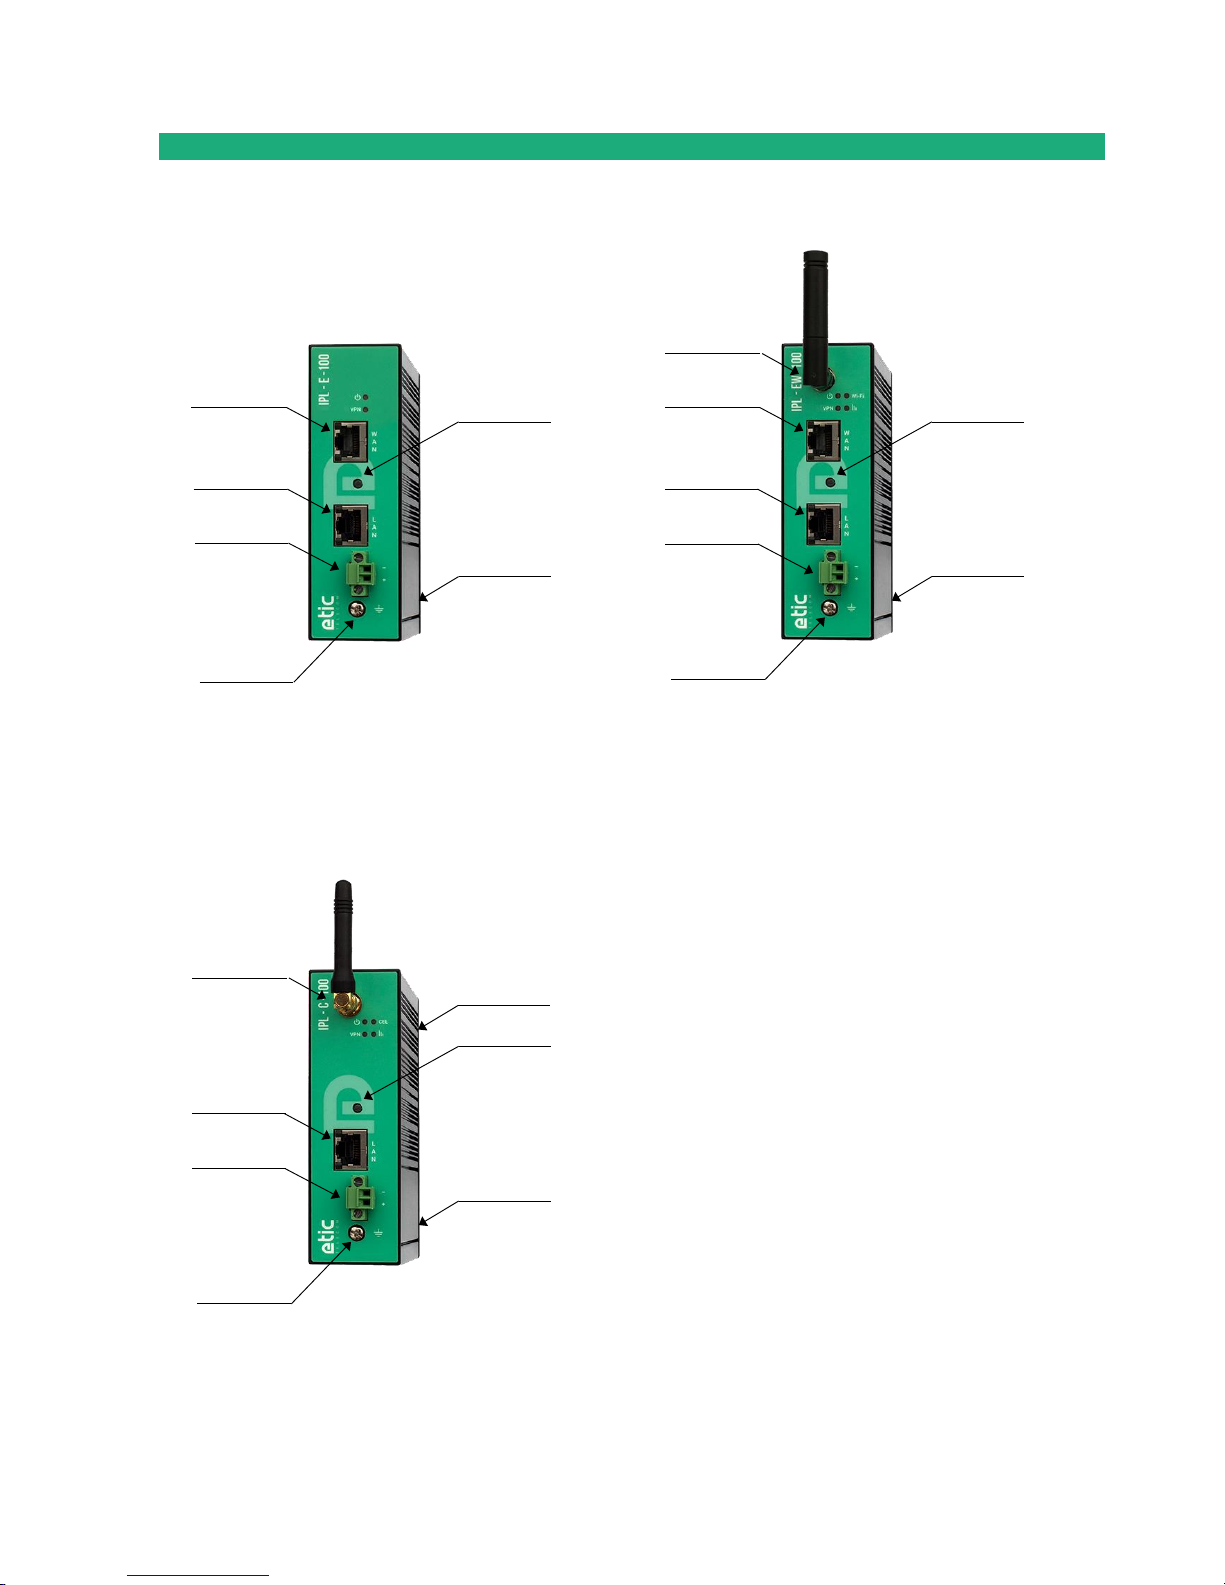
IPL-E-100
IPL-EW-100
IPL-C-100
2 pos. screw block
Power supply
Ethernet WAN
Push button B1
Ethernet LAN
Reset push button
on the rear pannel
Ground terminal
Ethernet WAN
Ethernet LAN
Wi-Fi
2 pos. screw block
Power supply
Reset push button
on the rear pannel
Push button B1
Ground terminal
Ethernet LAN
Cellular
SIM card on the
rear
Push button B1
2 pos. screw block
Power supply
Reset push button
on the rear pannel
Ground terminal
Page 23
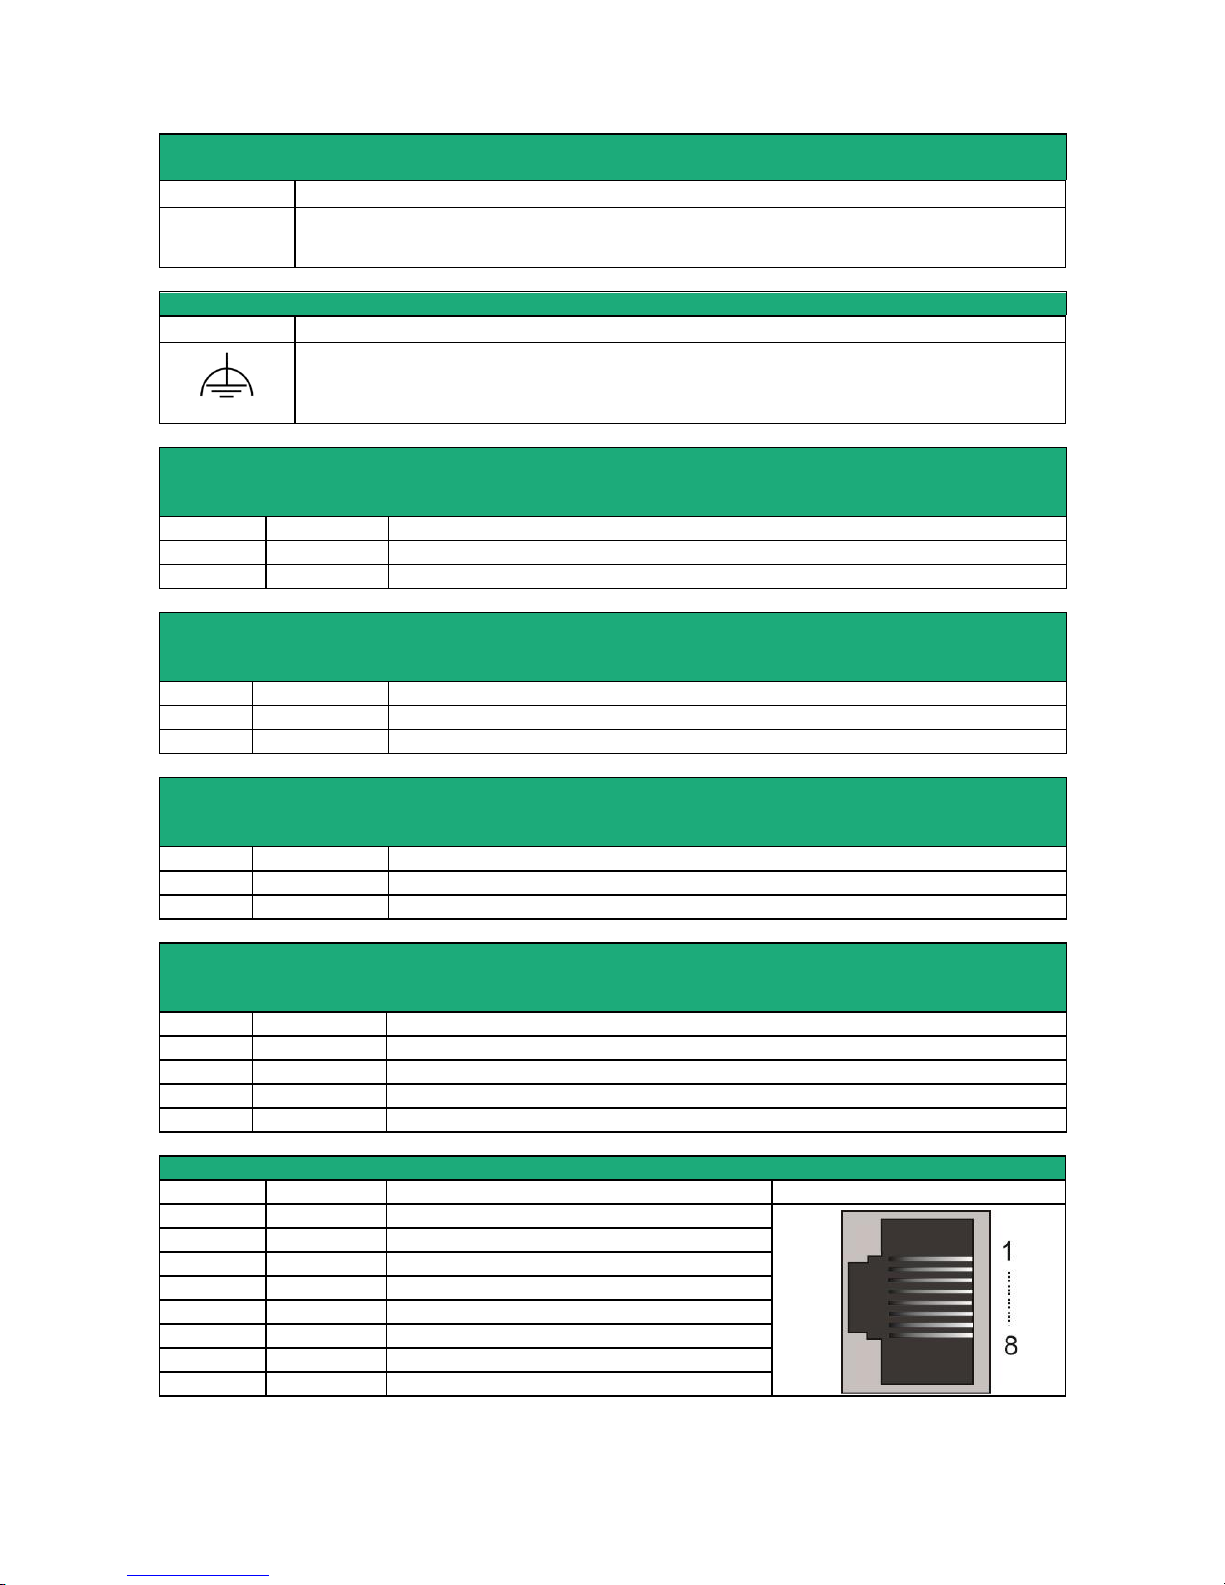
INSTALLATION
DOC_DEV_IPL_User Guide_C Page 23
All models except IPL-X-100
Ground terminal
Symbol
Description
FASTON male lug 6.35 mm
Ground terminal
Symbol
Description
M4 screw terminal
All models except IPL-X-100
2 positions screw terminal: Supply voltage 1
Position 1 at back – Protected against reverse polarity
Position
Signal
Function
1
Power 1 +
12 - 48 VDC
2
Power 1 -
0V
All models except IPL-X-100
2 positions screw terminal: Supply voltage 2
Position 1 at back – Protected against reverse polarity
Position
Signal
Function
1
Power 1 +
12 - 48 VDC
2
Power 1 -
0V
IPL-X-100
2 positions screw terminal: Supply voltage
Protected against reverse polarity
Position
Signal
Function
1
Power 1 +
12 - 24 VDC
2
Power 1 -
0V
All models except IPL-X-100
4 positions screw terminal: Digital input and output
Position 1 at back
Position
Signal
Function
1
0V
Digital input 0V
2
In
Digital input
3
F +
Digital output + (max 50Vdc - 0,1A)
4
F -
Digital output -
Ethernet RJ45 connector
Position
Signal
Function
RJ45
1
Tx +
Emission polarity +
2
Tx -
Emission polarity -
3
Rx +
Reception polarity +
4
N.C - 5
N.C - 6
Rx -
Reception polarity -
7
N.C. - 8
N.C.
-
Page 24
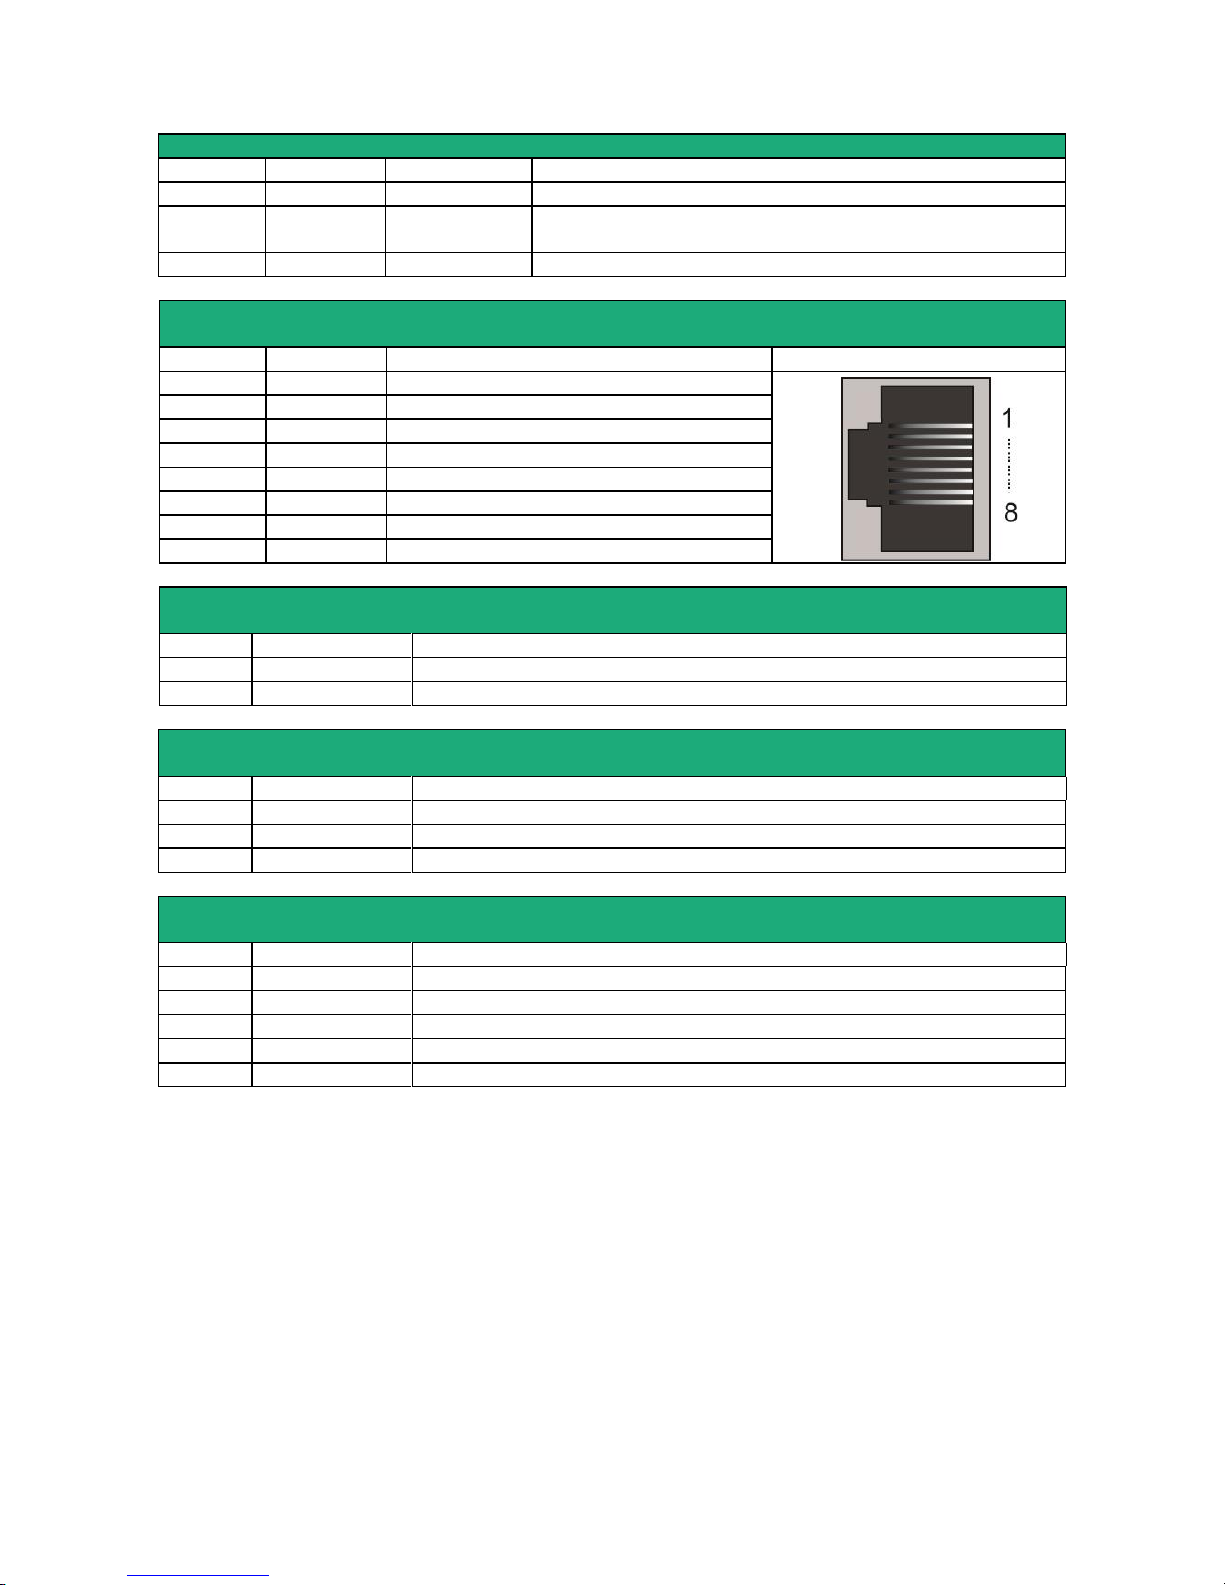
INSTALLATION
Page 24 DOC_DEV_IPL_User Guide_C
Antenna connectors
Antenna
Network
Type
Observation
CEL
Cellular
SMA female
3G et 4G
AUX
Cellular
SMA female
To improve the 4G transmission data rate, 2 antennas can be
connected (RAS-EC-400 -LE and RAS-EC-220-LE only)
Wi-Fi
Wi-Fi
RP-SMA female
Reverse polarity connector compliant with Wi-Fi antennas.
IPL-A, IPL-DAC, IPL-DAE
ADSL RJ45 connector
Position
Signal
Fonction
RJ45
1
N.C.
- 2
N.C. - 3
N.C. - 4
TIP
ADSL line
5
RING
ADSL line
6
N.C. - 7
N.C. - 8
N.C.
-
IPL-X-220
2 positions screw terminal : RS485
Position
Signal
Function
1
A
RS485 polarity A
2
B
RS485 polarity B
IPL-X-261
3 positions screw terminal : RS485 isolated
Position
Signal
Function
1
Com
Common isolated
2
B (+)
RS485 polarity B
3
A (-)
RS485 polarity A
IPL-X-260
5 positions screw terminal : RS422 isolated
Position
Signal
Function
1
Tx+
Emission polarity +
2
Tx-
Emission polarity -
3
Com
Common isolated
4
Rx+
Reception polarity +
5
Rx-
Reception polarity -
Page 25
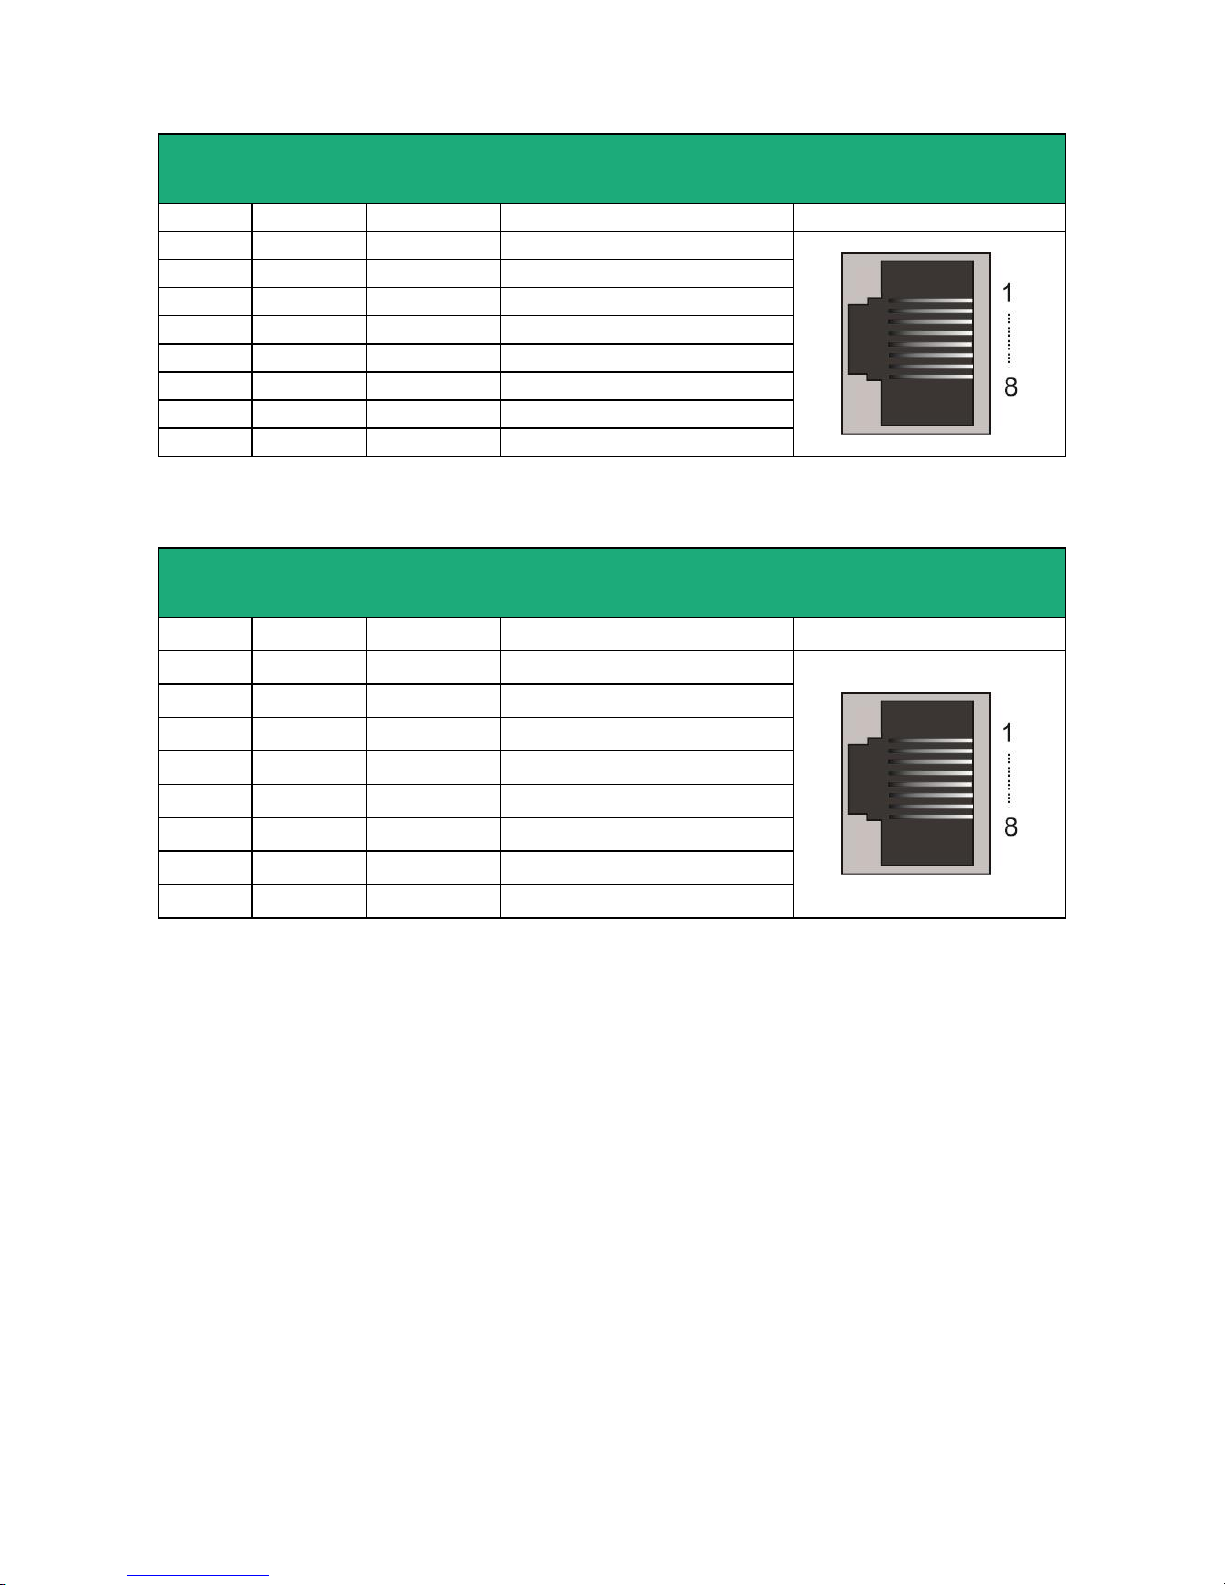
INSTALLATION
DOC_DEV_IPL_User Guide_C Page 25
IPL-X-220 et IPL-X-230
RJ45 connector : RS232
To connect a DCE
Position
Signal
Direction
Function
RJ45
1
DTR - 108
OUT
Data terminal ready
2
TD - 103
OUT
Data Emission
3
RD - 104
IN
Data Reception
4
DSR - 107
IN
Data set ready
5
SG - 102
-
Ground
6
Not used
OUT
-
7
CTS - 106
IN
Clear to send
8
RTS - 105
OUT
Request to send
OUT = Signal supplied by the RAS.
IN = Signal supplied by the external device.
IPL-X-220 et IPL-X-230
RJ45 connector : RS232
To connect a DTE
Position
Signal
Direction
Function
RJ45
1
CD - 109
OUT
Carrier detect
2
RD - 104
OUT
Data Reception
3
TD - 103
IN
Data Emission
4
DTR - 108
IN
Data terminal ready
5
SG - 102
-
Ground
6
DSR - 107
OUT
Data set ready
7
RTS - 105
IN
Request to send
8
CTS - 106
OUT
Clear to send
OUT = Signal supplied by the RAS.
IN = Signal supplied by the external device.
Page 26
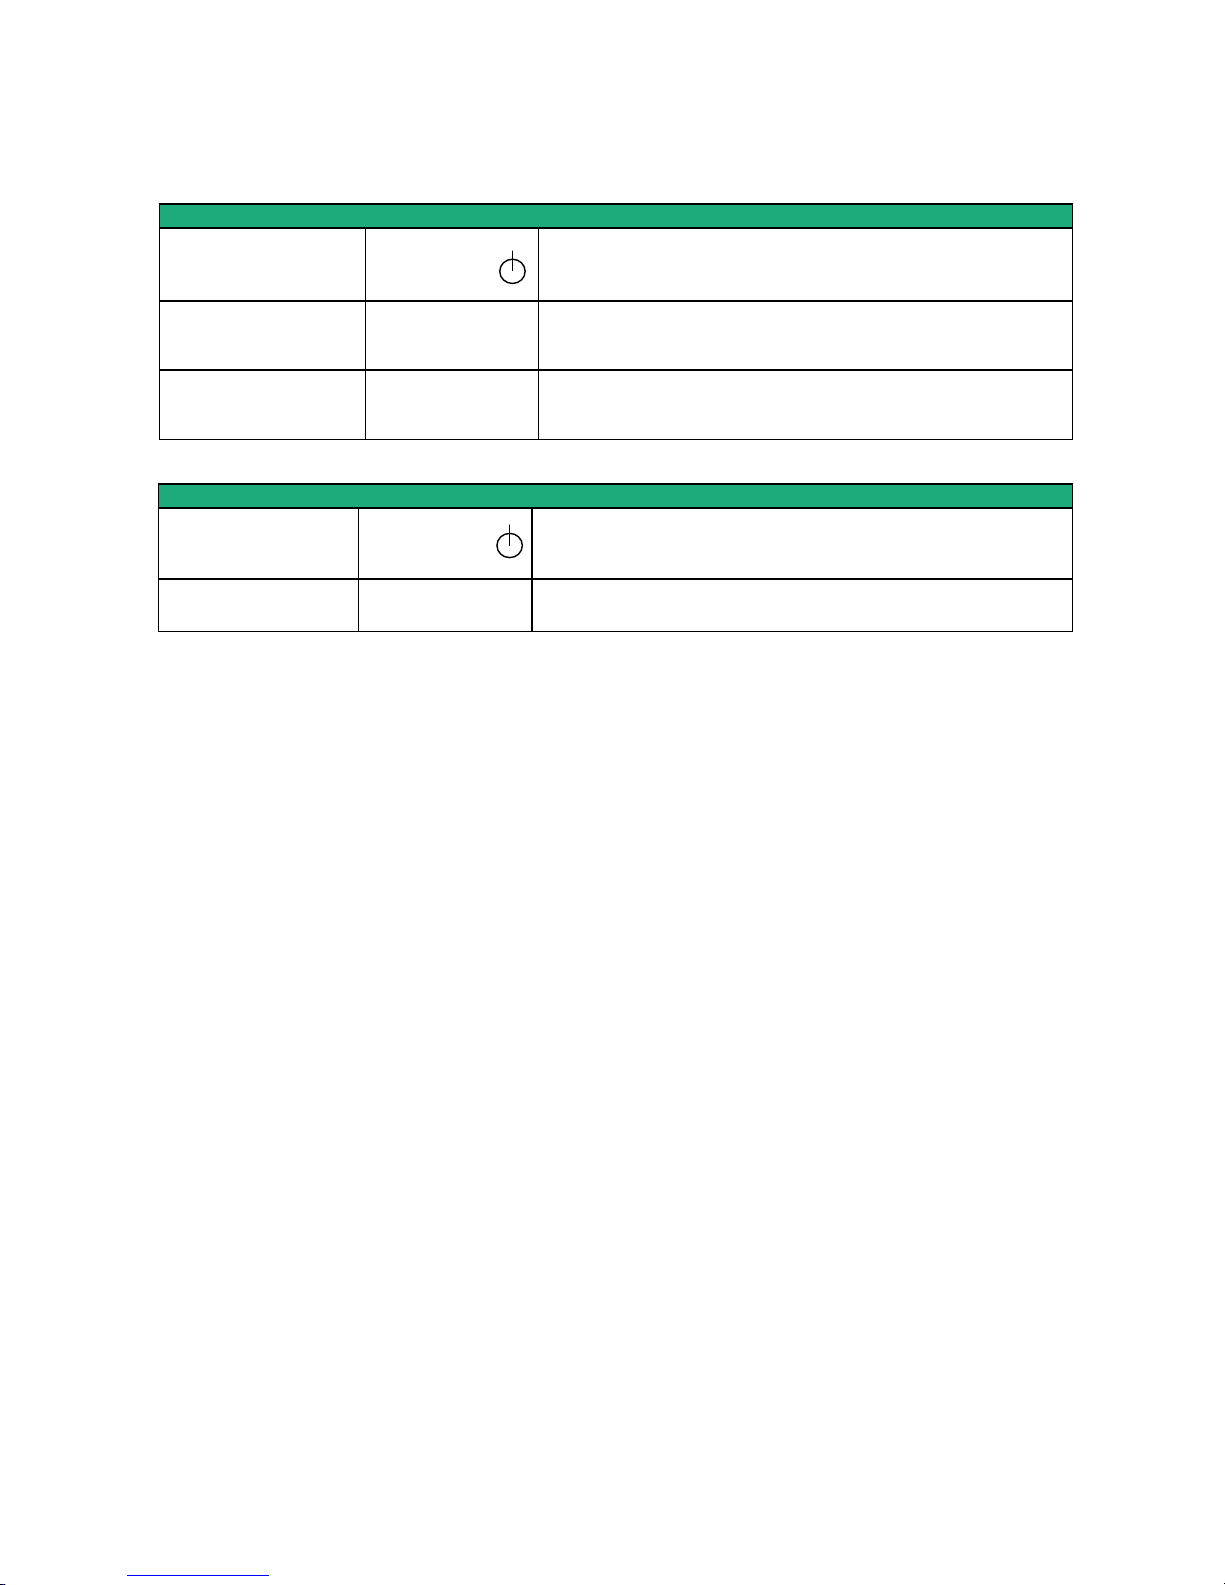
INSTALLATION
Page 26 DOC_DEV_IPL_User Guide_C
1.3 Push-buttons
Rear panel push-button
Pressing the PB
LED
Function
During operation
Flashing red
Temporary return to the factory configuration.
(IP address 192.168.0.128)
The current configuration is not lost.
During power-up
Flashing red
Return to the factory configuration.
The current configuration is deleted except if it has been
saved into a file.
Front panel push-button
Pressing the PB
LED
Function
10 seconds
5 flashes
The hotline of ETICTELECOM is authorized to connect remotely
to the router administration server within a 1 hour delay.
Page 27
INSTALLATION
DOC_DEV_IPL_User Guide_C Page 27
1.4 LED indicators
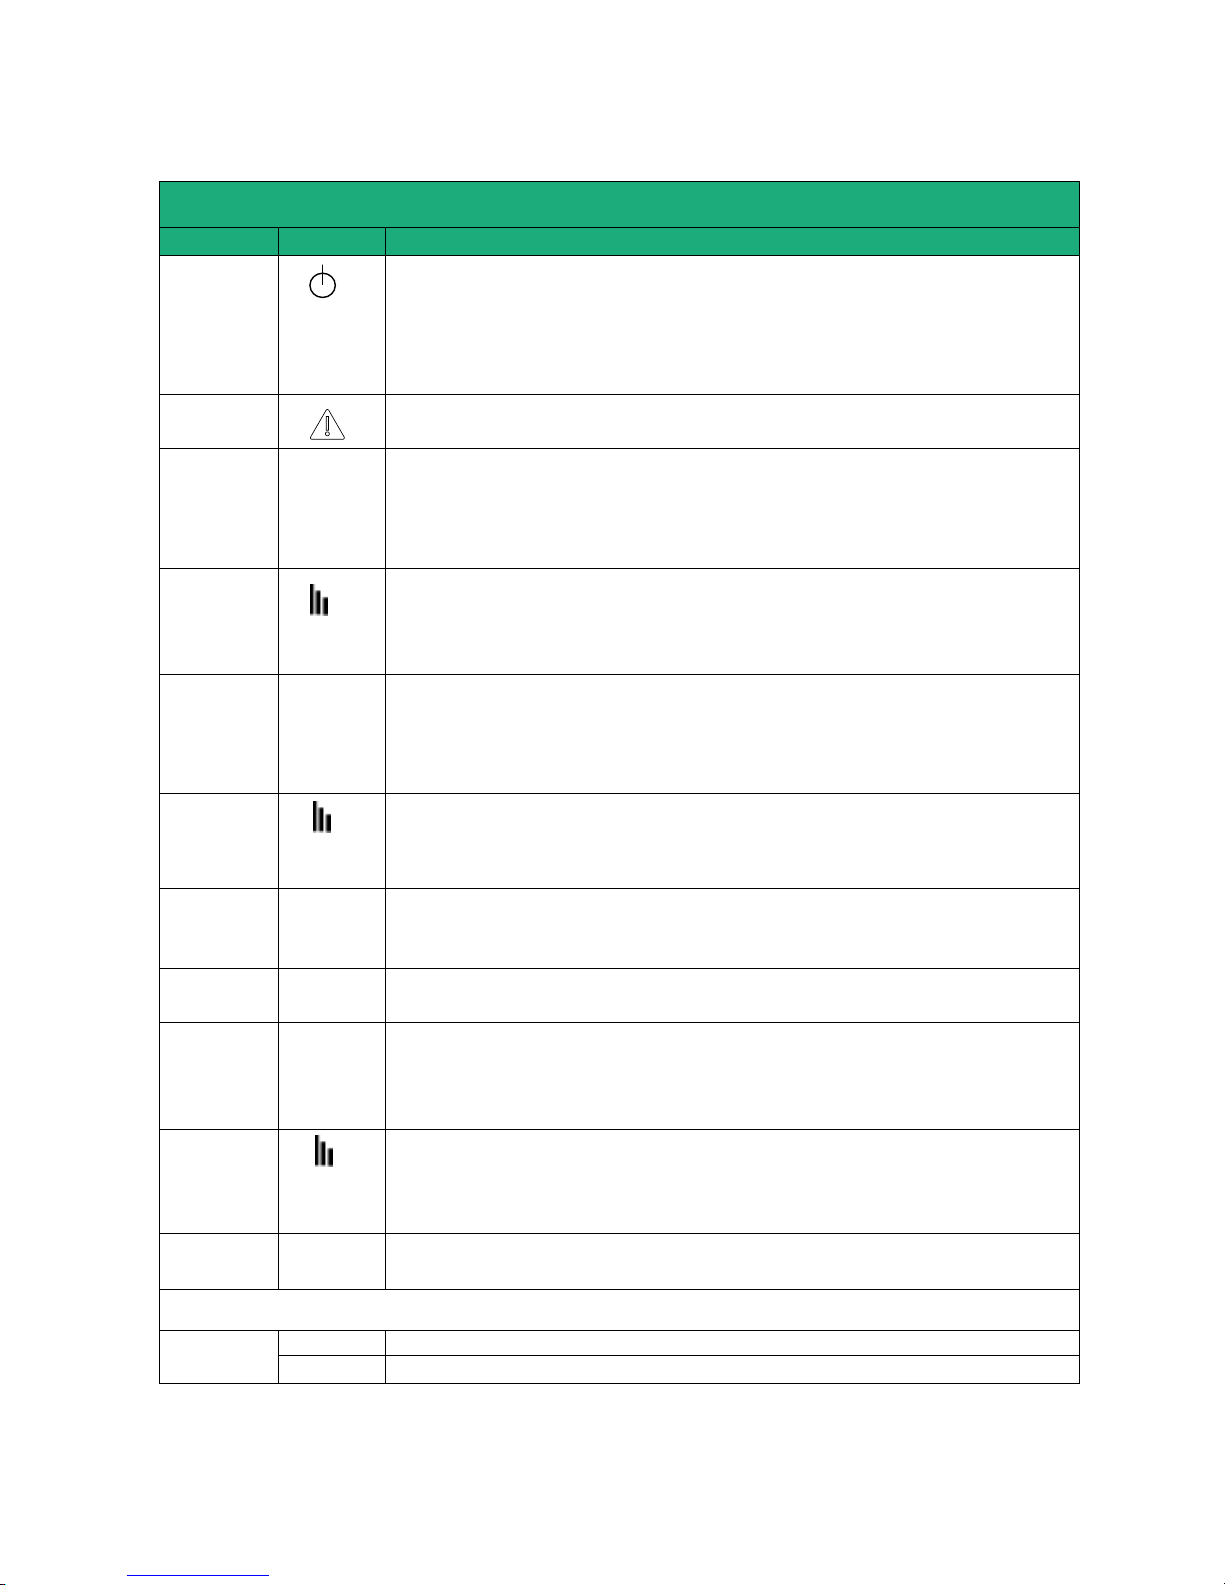
LED indicators
Depending on models
Function
LED
Description
Operation
Off Power off
Steady green The unit is ready
Slow blinking green The unit is busy
Steady red Startup (30s) – Hardware or software failure or SIM card missing
or memory flash drive missing
Fast blinking red Firmware download in progress
Application
alarm
See Alert & Display application
ADSL
connection
DSL
Off ADSL interface disabled
Flashing 4 s ADSL signal not detected / Line not connected
Slow blinking 2 s Connection in progress 1st step (adsl)
Fast blinking 0,5 s Connection in progress 2nd step (password and @ IP)
Steady green Connected / Brief flashing when traffic on link
Qualité du
signal
ADSL
Off No signal measured
1 flash Not sufficient signal
2 flashes Sufficient signal
3 flashes Strong signal
Cellular
connection
CEL
Off SIM card missing - wrong PIN code – Cellular interface disable
Flashing every 4 s Interface enable - not connected
Blinking slowly - 2 s Connection in progress (first step)
Blinking fast - 0,5 s Connection in progress (password and IP@)
Steady green Connected / Brief flashing when traffic on link
Cellular
signal quality
Off No signal measured
1 flash Not sufficient signal
2 flashes Sufficient signal
3 flashes Strong signal
VPN
connexion
VPN
Off No VPN connection in progress
Blinking slowly - 2 s Connection in progress
Steady green At least one VPN is established
Ethernet
WAN
Lower LED
Off Not connected or interface disable
Green Connected / Brief flashing when traffic on link
Wi-Fi
connection
Wi-Fi
Off Interface disable or enable as an access point
Flashing every 4 s Interface enable - not connected
Blinking fast - 0,5 s Connection in progress
Steady green Connected / Brief flashing when traffic on link
Wi-Fi
signal quality
Off Wi-Fi not enabled or enabled as an access point
1 flash Faint not sufficient signal
2 flashes Sufficient signal
3 flashes Strong signal
Ethernet LAN
1 to 4
Lower LED
Off Not connected or interface disable
Green Connected / Brief flashing when traffic on link
IPL-X-220, IPL-X-230, IPL-X-260, IPL-X-261
RS232/RS485
Rx
Characters received from the RS232 or RS485/RS422 serial interface
Tx
Characters transmitted to the RS232 or RS485/RS422 serial interface
Page 28
INSTALLATION
Page 28 DOC_DEV_IPL_User Guide_C
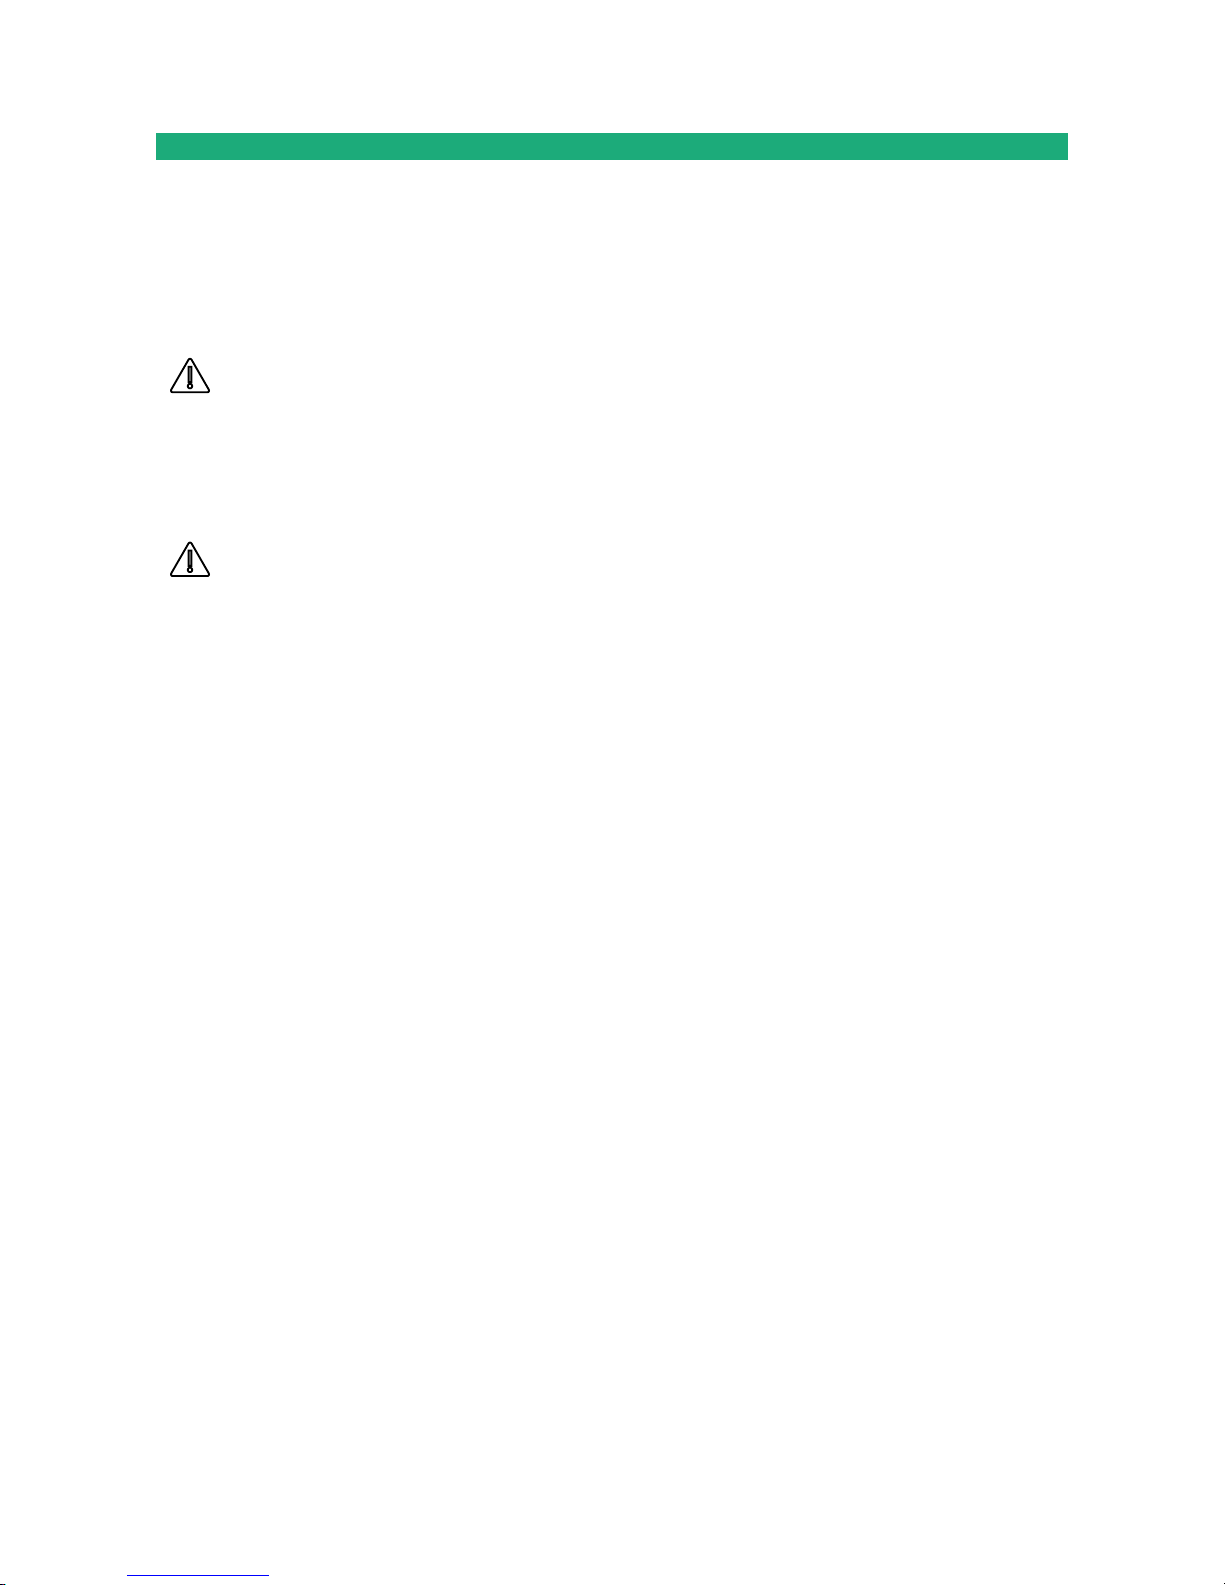
2 Safety instructions
The product shall be installed in a fire electrical resistant cabinet by a qualified operator.
The product shall be connected only to equipment that complies with the IEC60950-1 or IEC62368-1
standards and that meets the following classifications:
• IEC60950-1 : Limited power circuits and SELV type – §2.2 and 2.5
• IEC62368-1 : ES1 & PS2
The IPL-X-100 contain a non-replaceable lithium-metal battery. To avoid any risk of explosion or
leakage of flammable liquid or gas, make sure to:
• not exceed the max temperatures specified during use, storage or transportation.
• not subject the product to a low pressure below 116mBar (15 000 m).
• not put this product into a fire or hot oven or cause mechanical cuts or crushing when
disposing.
To avoid any risk of burns, it is strongly recommended to wear gloves to handle the product in
operation when the ambient temperature exceeds 30 °C.
Cellular or Wi-Fi models:
• The antenna should be installed and operated with minimum distance of 20 cm between the radiator
and your body.
• The antenna must not be co-located or operating in conjunction with any other antenna or transmitter.
Page 29
INSTALLATION
DOC_DEV_IPL_User Guide_C Page 29
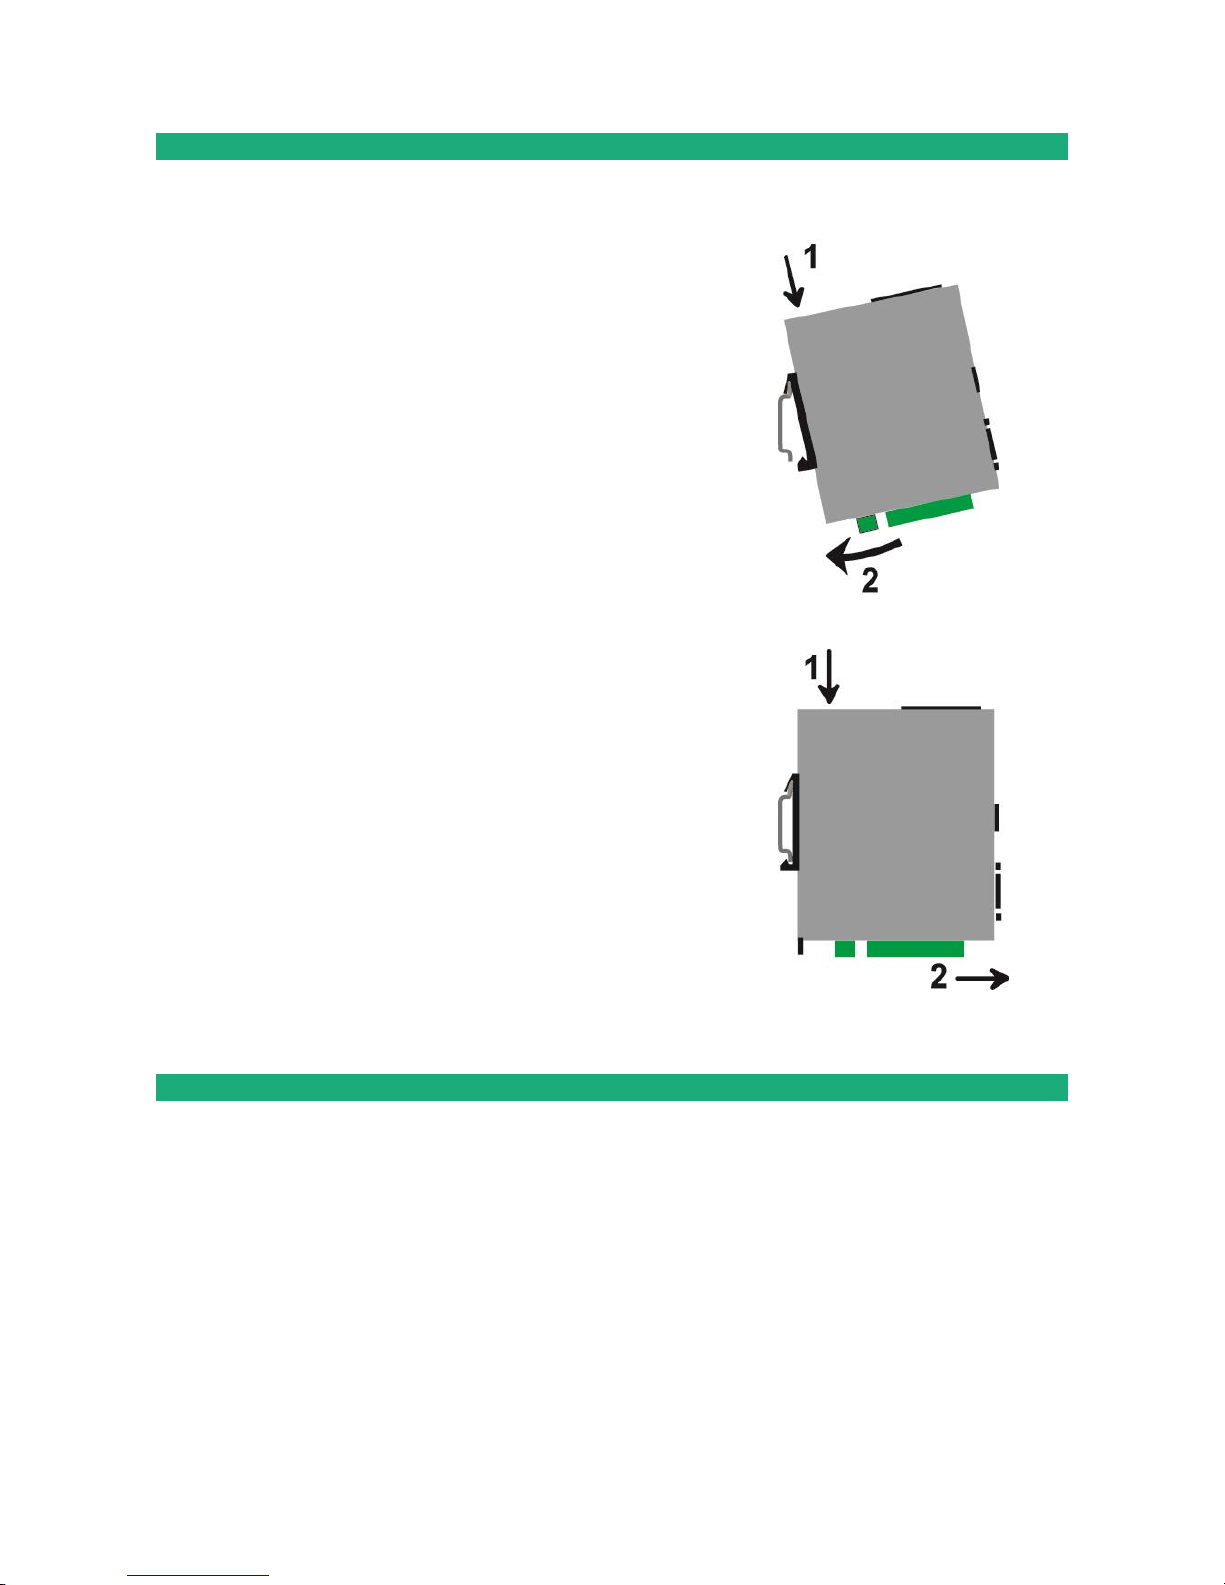
3 DIN rail mounting
Mounting the unit on the 35 mm horizontal DIN rail
Removing the unit from the DIN rail
4 Cooling
The product is designed to be mounted on a 35mm DIN rail.
To avoid obstructing the airflow around the unit, the spacing must be at least 25 mm above and below, and 10
mm left and right.
Page 30
INSTALLATION
Page 30 DOC_DEV_IPL_User Guide_C
5 Power supply
All models except IPL-X-100 :
These products provide a dual power inputs allowing a redundancy power supply.
The supply voltage must be regulated and strictly between 10 and 60 Volt DC (nominal: 12 – 48 VDC).
At power up the inrush current can reach 20 A for 100 µs.
IPL-X-100 :
These products provide a single power input.
The supply voltage must be regulated and strictly between 10 and 30 Volt DC (nominal: 12 – 24 VDC).
At power up the inrush current can reach 20 A for 100 µs.
6 Earthing
IPL-A, IPL-DAC et IPL-DAE :
For safety and EMC reasons, the ground terminal must be connected to the protective earth of the installation.
Other IPL :
For EMC reasons, the ground terminal must be connected to the functional (or protective) earth of the
installation.
7 RS232 serial connexion (IPL-X-220, IPL-X-230)
Cables can be provided to connect the product to DTE and DCE as follows:
RS232 cables
Reference
Connector
Function
CAB592
SubD 9 male
To connect a DCE to the product
CAB593
SubD 9 female
To connect a DTE to the product
CAB609
Wires
To connect a device providing a specific connector
The RS232 cable must be shorter than 10 meters.
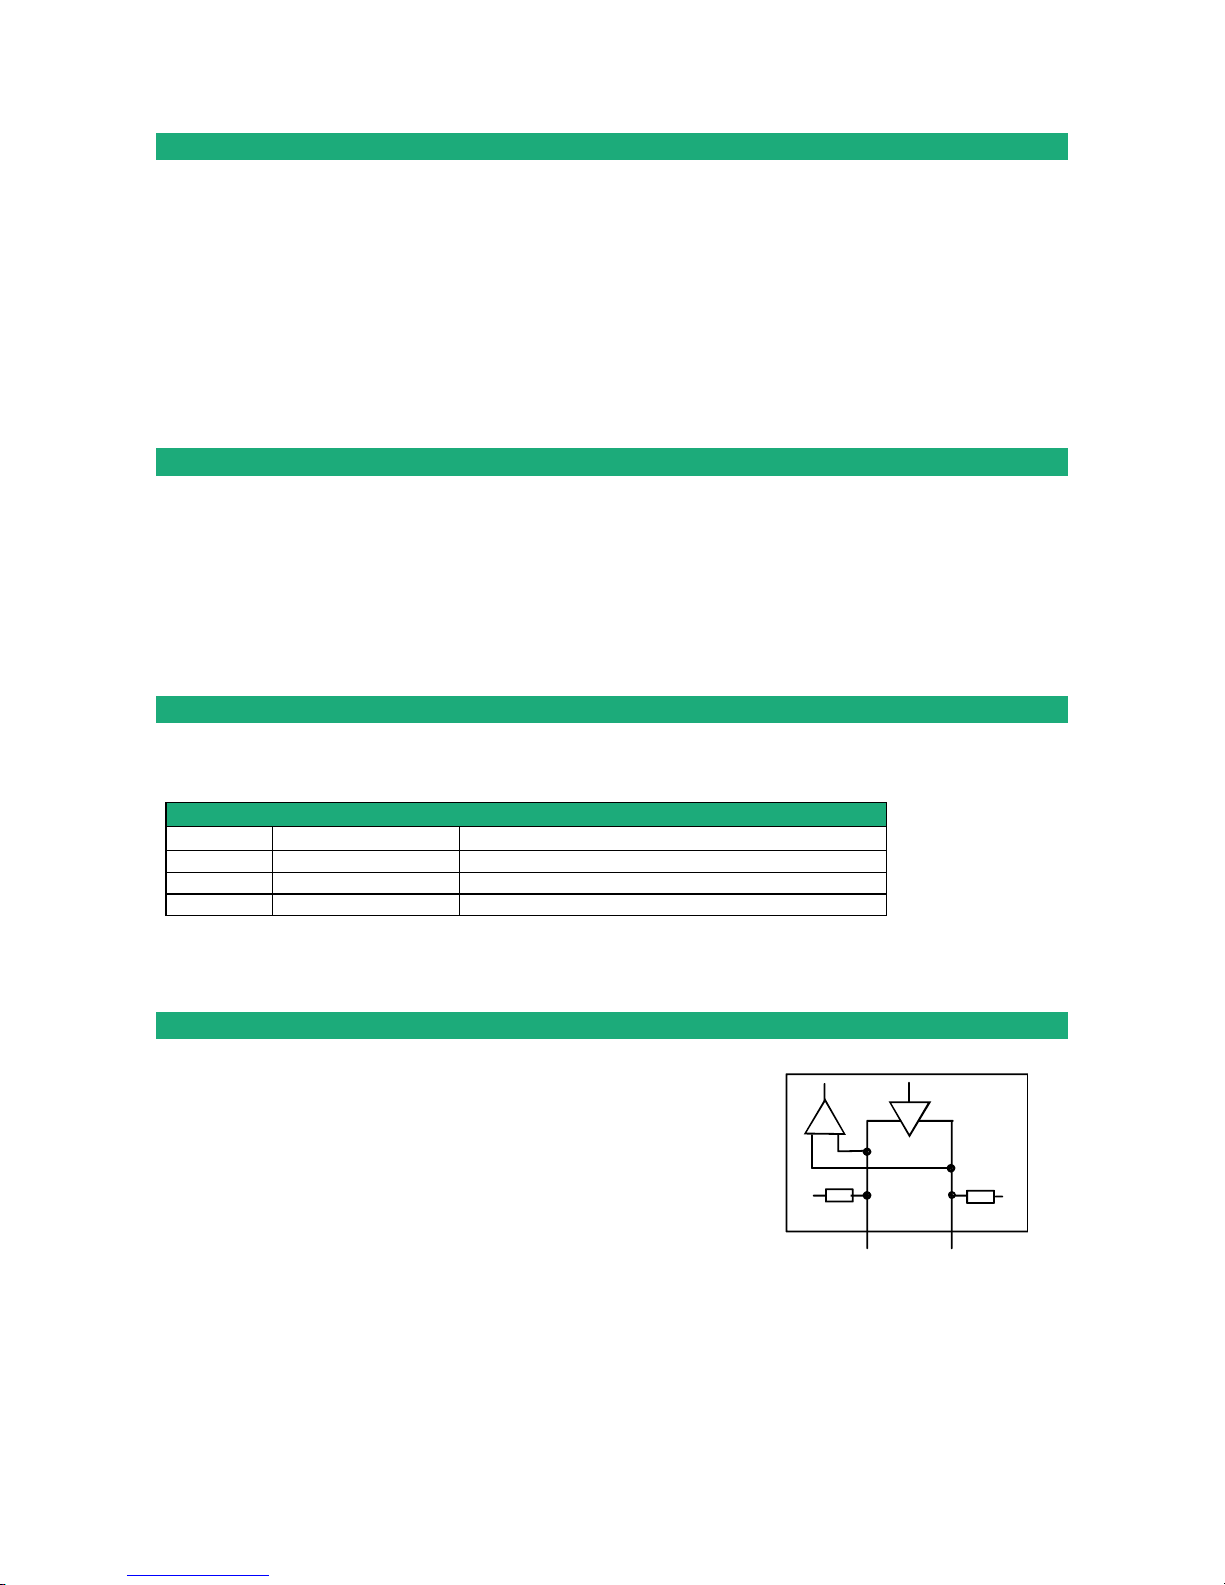
8 RS485 serial connexion (IPL-X-220)
The RS485 interface is not isolated.
Two 10 KOhm bus polarization resistors are included inside the product.
If the RS485 line is longer than10 meters or if the data rate is greater than
19200 b/s, it is necessary to connect one 120 Ohm matching resistor at
each end of the line and two 390 Ohm polarization resistors at one of the
two extremities of the line.
RS485
+
-
B(+)
A(-)
10 KOhm
10 KOhm
Page 31
INSTALLATION
DOC_DEV_IPL_User Guide_C Page 31
9 RS422 isolated serial connection (IPL-X-260)
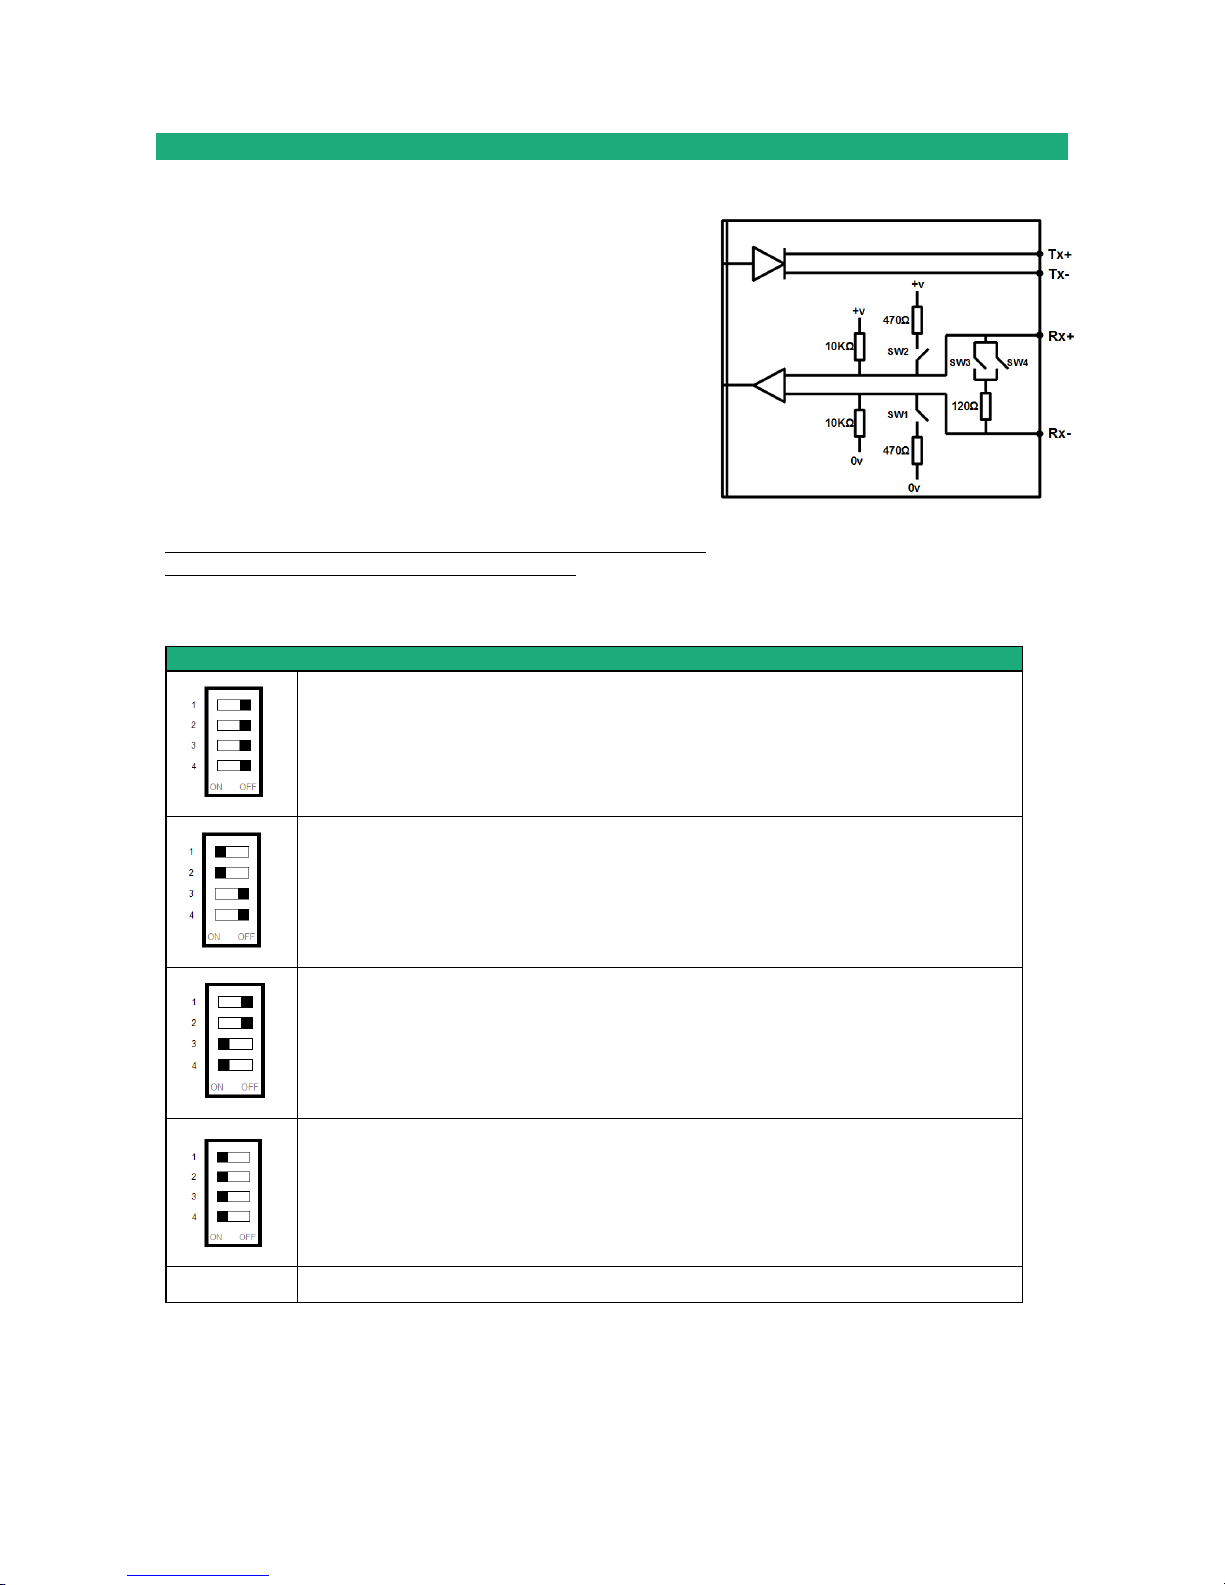
The polarization and termination resistors can be selected with
DIP switches.
The termination resistor must be enabled when the product is
located at the extremity of the RS422 bus.
The polarization resistors must be enabled by one device of the
bus.
Up to 16 devices can be connected to the bus.
We recommend to use a shielded cable and twisted pairs.
When two devices or more are connected to the RS422 bus, the
XSLAN+ must be the only device to transmit data on the TX+/TX-
line towards all the other devices.
It means that the TX+/TX- line of the IXSLAN+ must be connected
to the RX+/RX- of all the other devices of the bus.
Micro-switches
No polarization
No termination resistor
470 Ohm polarization resistors
No termination resistor
No polarization
120 Ohm termination resistor
470 Ohms polarization resistors
120 Ohm termination resistor
All other combinations are prohibited
Page 32
INSTALLATION
Page 32 DOC_DEV_IPL_User Guide_C
10 RS485 isolated serial connection (IPL-X-261)
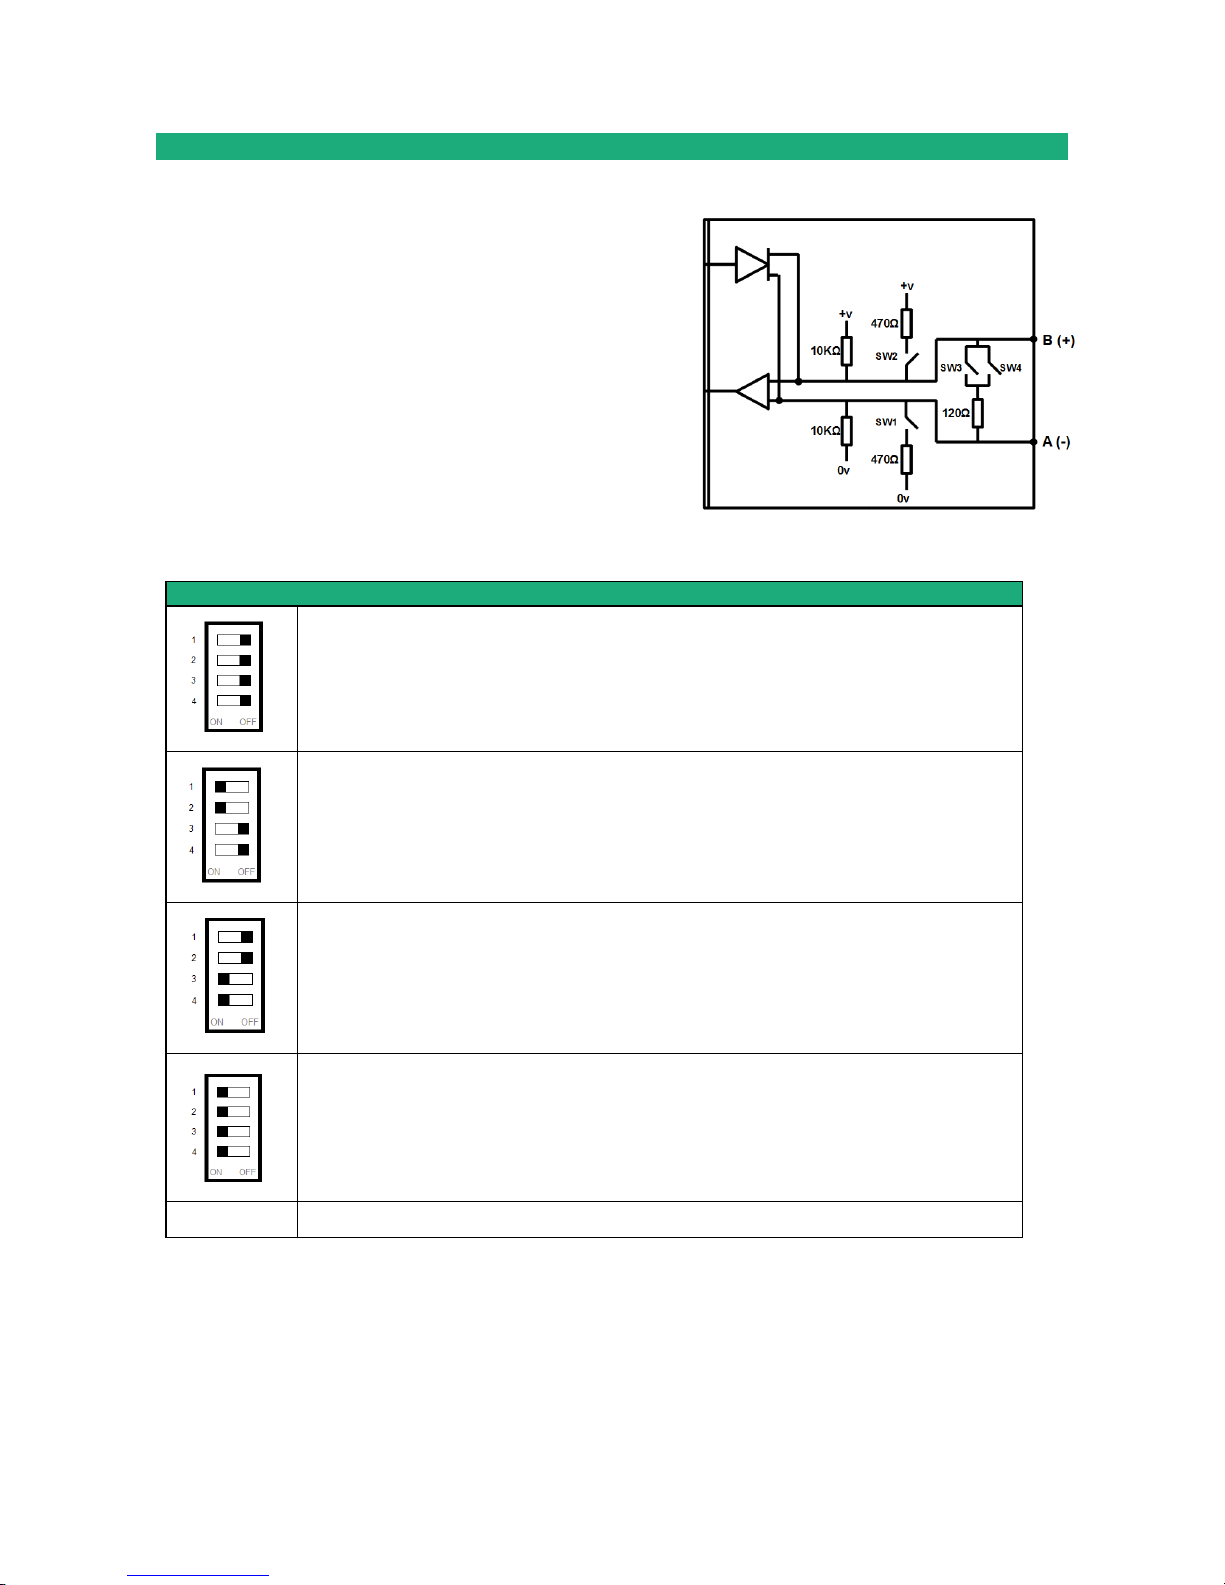
The polarization and termination resistors can be selected with
DIP switches.
The termination resistor must be enabled when the product is
located at the extremity of the RS485 bus.
The polarization resistors must be enabled by one device of the
bus.
Up to 16 devices can be connected to the bus.
We recommend to use a shielded cable and twisted pairs.
Micro-switches
No polarization
No termination resistor
470 Ohm polarization resistors
No termination resistor
No polarization
120 Ohm termination resistor
470 Ohms polarization resistors
120 Ohm termination resistor
All other combinations are prohibited
Page 33
INSTALLATION
DOC_DEV_IPL_User Guide_C Page 33
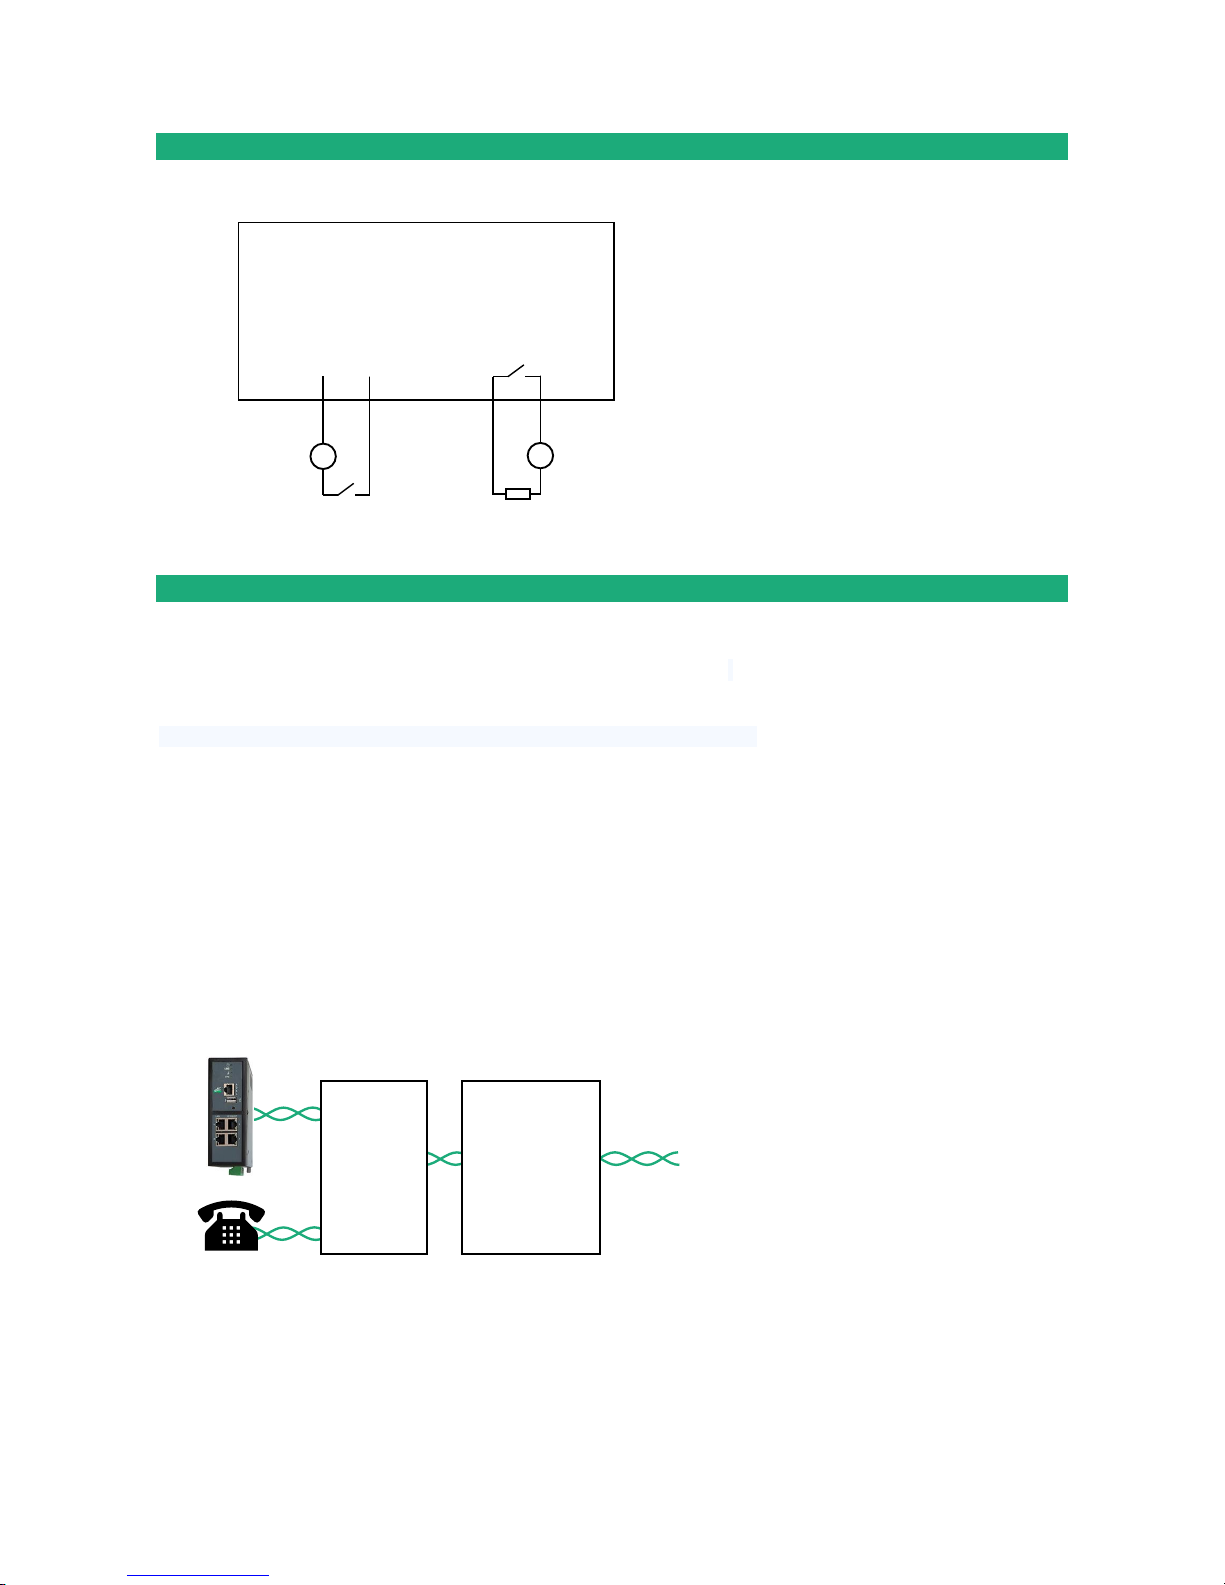
11 Digital input and output
To check that the input and the output are
correctly wired :
In the menu, select
Diagnostics > Hardware > Input/Output
The status of the input is displayed and the
output can be switched ON or OFF.
12 Connecting the IPL to the ADSL line
Line length / signal level :
The IPL-A can be connected to an analogue line telephone line or an unbundled loop when the attenuation of
the reception signal is better than 63 dB
When the reception level is close to the limit, disconnections may occur.
In that situation, we recommend to ask to the ISP to setup the line with the RE-ADSL modulation which is
suited for long line and weak signal.
ADSL filter :
If the line must be used for analogue voice transmission simultaneously with ADSL transmission, it is
necessary to connect an ADSL filter.
Surge arrester :
The ADSL board of the IPL-A is protected very carefully against over voltage coming from the line.
However, when the line is exposed to lightning, we recommend to connect a surge arrester between the line
and the IPL router.
IPL router
Digital input
Non isolated
Digital output
isolated
polarized
OV
1
2
+
-
10 < V < 50 VDC
In
F+
F-
3
4
+
-
10 < V < 50 VDC
I < 0.1 A
Filter
Surge arrester
PSTN
Router
Page 34

INSTALLATION
Page 34 DOC_DEV_IPL_User Guide_C
IP address :
The IP address assigned by the ISP to the ADSL interface of the IPL can be a fixed or a dynamic public IP
address.
If it is dynamic, it changes frequently; for instance at each ADSL connection.
It is why, the router which owns a dynamic IP address can only initiate the communication (initiate a VPN for
instance) towards a router owning a fixed IP address.
Reciprocally, a router owning a dynamic IP address cannot easily receive a connection except a DynDNS or
NoIP service is used.
13 Connecting the IPL to the cellular network
13.1 Controls before installing the IPL
Authorization to use a cellular connection
Check the cellular connection is authorized at the location where the IPL is supposed to be installed.
Control of the reception level before installing the machine
Before installing the IPL, refer to a cell map over the Internet to check that the cellular reception signal is
strong enough at the location where the machine is supposed to be installed.
Select the right mobile service provider.
Reception level confirmation
If the reception seems possible, confirm with a control on site.
The reception level can be measured with a smartphone.
Most smartphones provide the reception level information (parameters or diagnostic menu).
To carry-out that control, use mandatorily a SIM card subscribed with the mobile service provider selected
for the IPL.
Remark:
The IPL itself provides the reception level information in two ways:
A reception level led indicator
The diagnostic menu of the administration web server
Page 35

INSTALLATION
DOC_DEV_IPL_User Guide_C Page 35
13.2 Cellular antenna
The antenna shall not be installed inside metal cases.
The antenna is supplied separately. Use only an approved antenna.
We provide a complete catalog of cellular antennas.
13.3 Coaxial cable
If necessary, the antenna can be connected to the IPL through a coaxial cable.
The signal attenuation in a usual coaxial cable is 0.2 to 0.4 dB / m, that is to say 2 to 4 dB for a 10 meters
long cable.
If a coaxial cable must be used to connect the antenna to the IPL, the attenuation in the cable has to be
taken into account to calculate the effective RF signal received by the IPL.
Refer to our cables and antennas catalogue.
13.4 Cellular service subscription
The IPL is designed to connect to the LTE-UMTS-GPRS data transmission service like the one used by the
tablets.
The subscription should also provide the SMS service if SMS alarms are required.
A telephone service subscription is not needed.
One will take care to subscribe to a service authorizing the right volume of data per month (MB/month) and
to check the price of the MB exceeding the limit of the subscription plan, if it exists.
The subscription must be preferably signed in the country where the machine is supposed to be installed to
avoid roaming costs.
Page 36
INSTALLATION
Page 36 DOC_DEV_IPL_User Guide_C
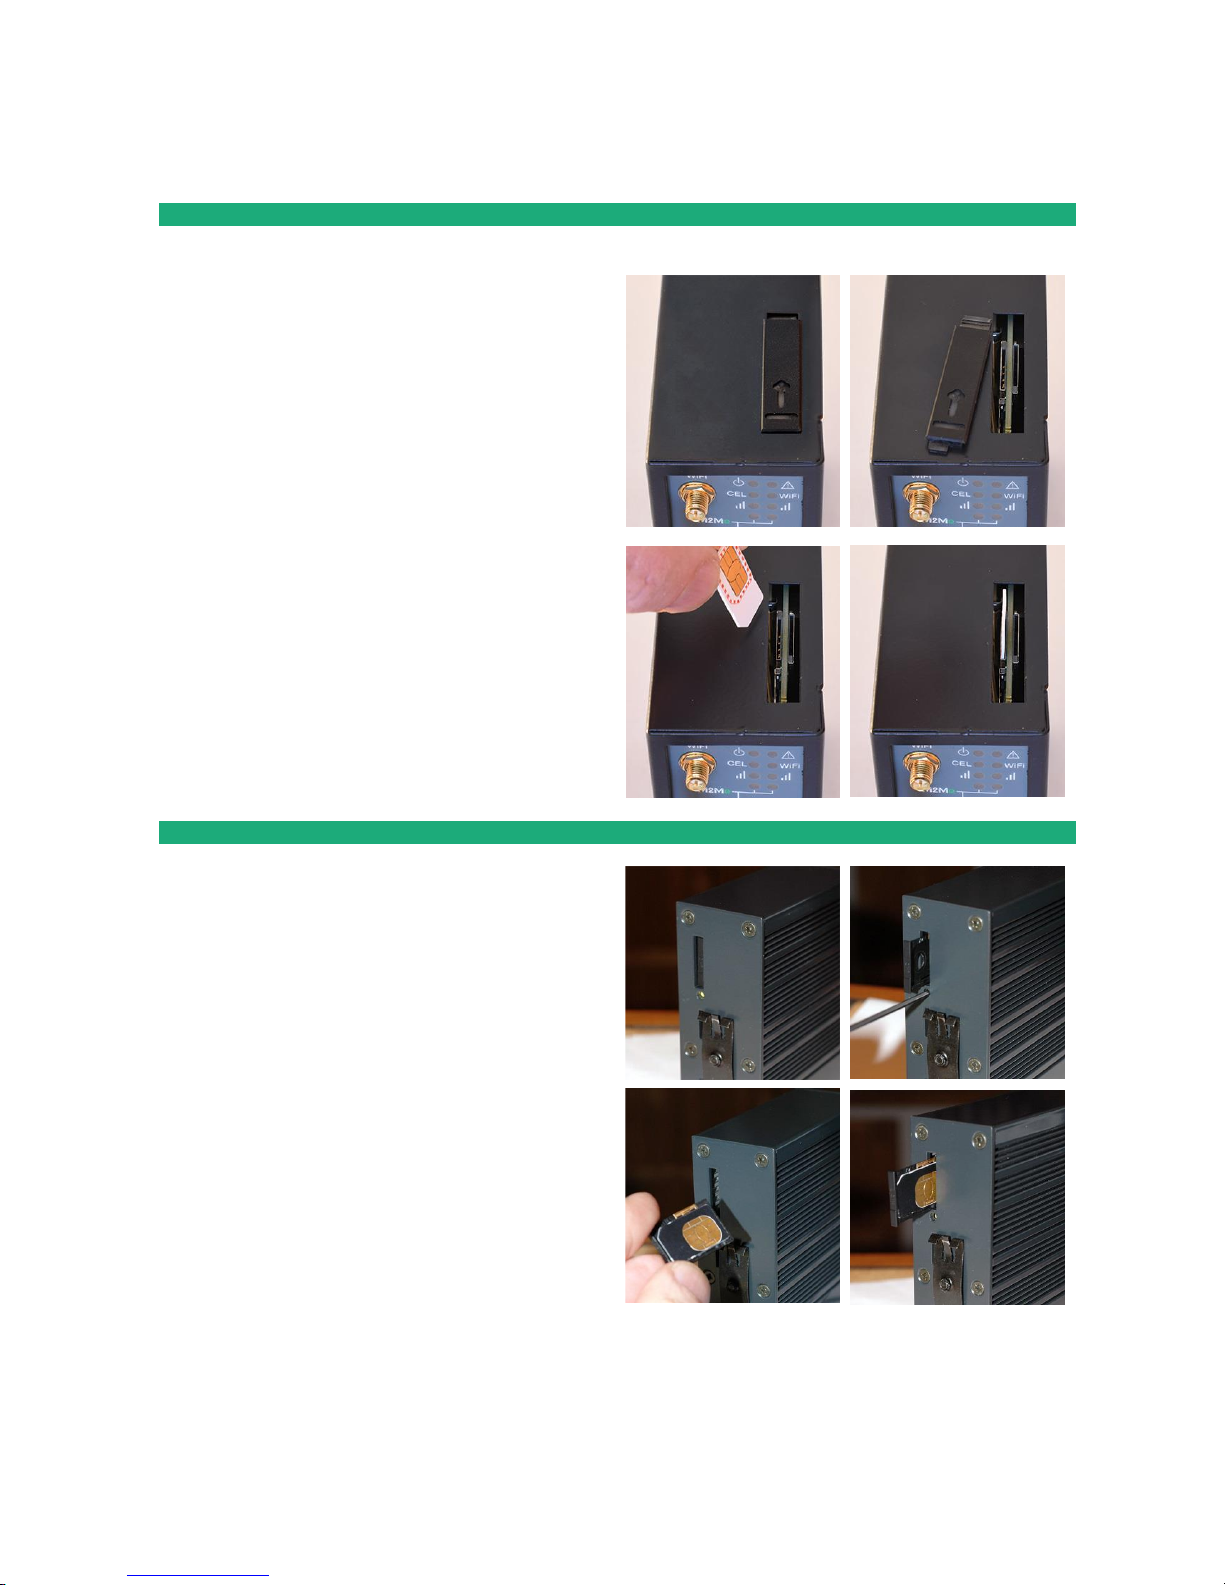
13.5 Installing the SIM card
All cellular IPL models except IPL-C-100,
These models provide two SIM card holders. If you
use only one SIM card, use the SIM card holder Nr 1
(at left on the pictures).
Installing the SIM card:
• Power off the IPL.
• Remove the anti-steal lid at the top of the
product
• Insert the SIM card according to the
drawing.
• Push the card until it locks.
Removing the SIM card:
• Power off the IPL.
• Remove the anti-steal lid at the top of the
product.
• Push on the SIM card to unlock it.
• Remove the SIM card.
IPL-C-100
Installing the SIM card:
• Power off the IPL.
• With a small tool, push on the button to
release the SIM card holder on the back.
• Insert the SIM card into the card holder as
shown in the picture.
• Position the card holder in the slides le.
• Push the card until it locks.
Removing the SIM card:
• Power off the IPL
• With a small tool, push on the button to
release the SIM card holder on the back.
• Remove the SIM card from the card holder
and put it back in place.
Page 37
INSTALLATION
DOC_DEV_IPL_User Guide_C Page 37
13.6 Controlling the conformance of the connection
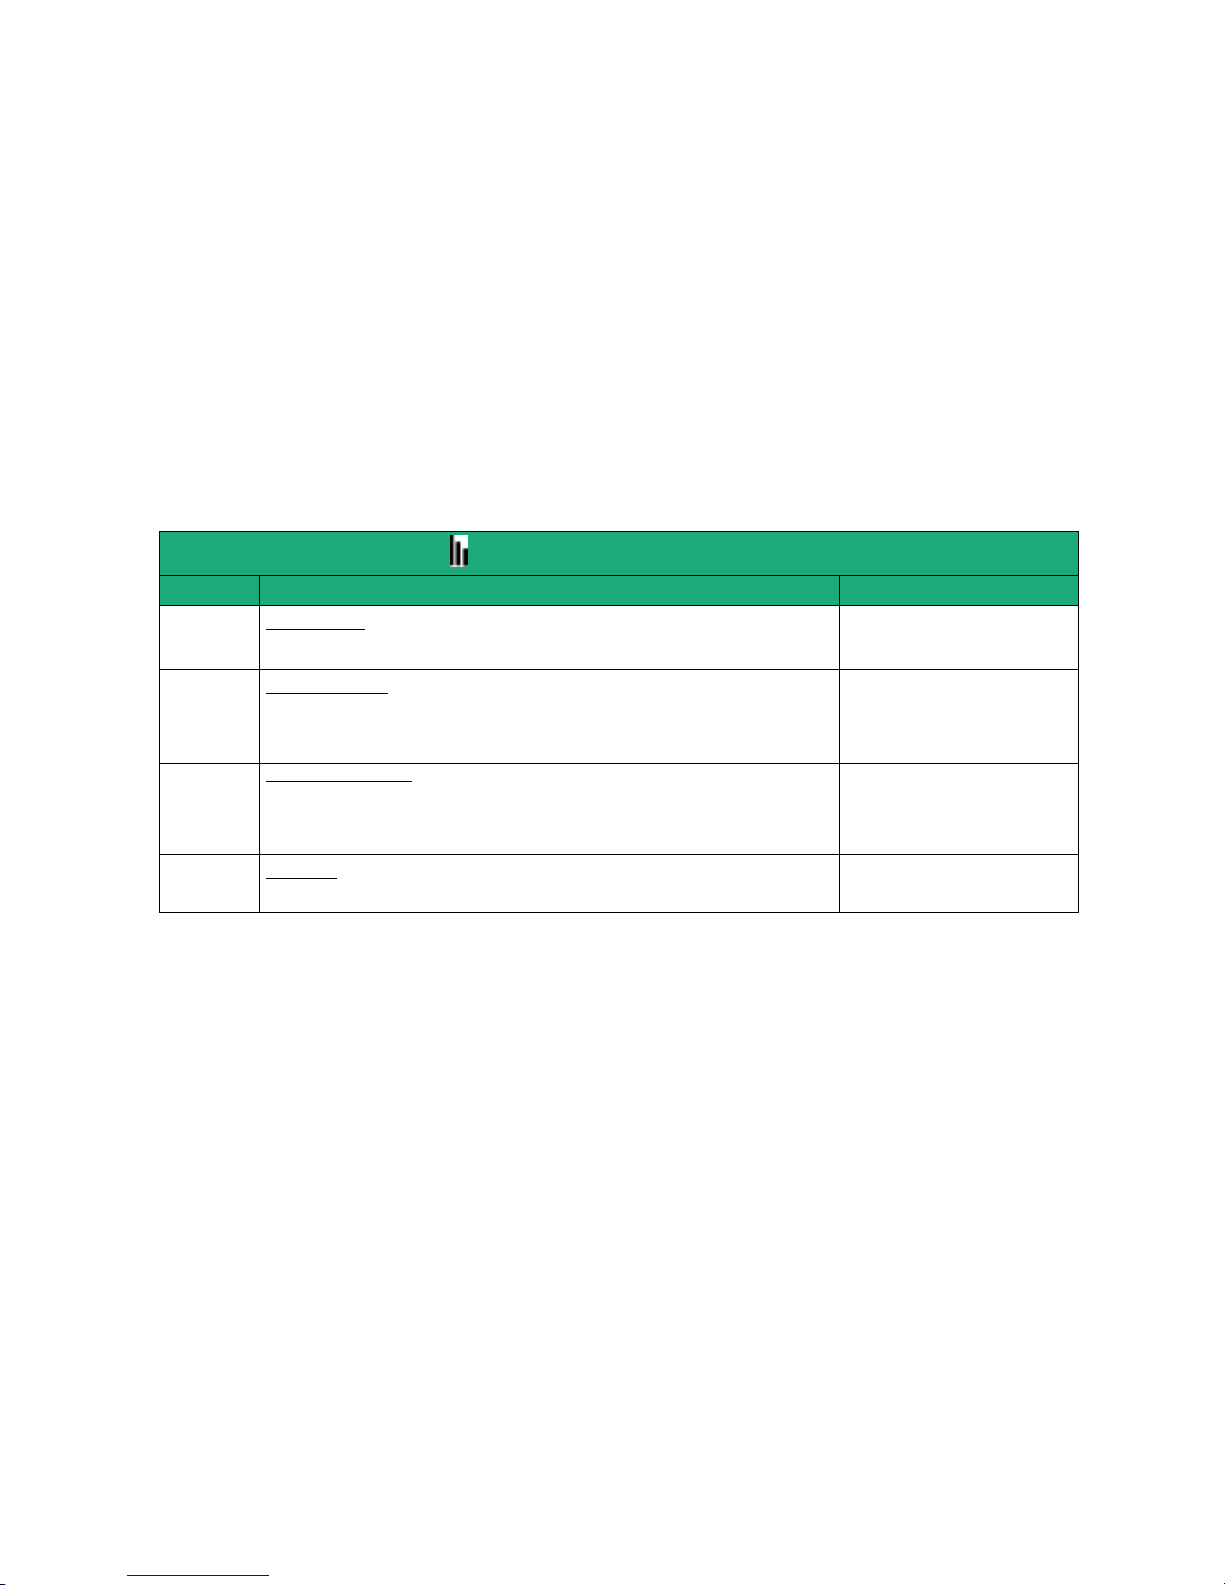
After installing and setting up the IPL, control the conformance of the connection:
Reception level
The reception level must be better than -90 dBm (two flashes of the reception level led indicator).
See the table below.
PING error rate
Each PING request must receive an answer.
Network response delay to a PING request
The response delay must be better than 500 ms.
If the delay is longer than one second, it means the network is overloaded or that the signal level is weak.
If the connection is not conform, change the position of the antenna or select an alternative service like
UMTS instead of LTE for instance.
Cellular network reception level LED
State
Description
Reception level dBm
3 flashs
Strong signal
-50 à - 80
2 flashs
Sufficient signal
The connection is reliable but the data rate may be reduced due to
transmission errors.
-81 à –90
1 flash
No sufficient signal
Connection drops and errors may append.
Try to improve the reception level.
-91 à -110
Off
No signal
Check the antenna connector and the presence of the SIM card.
< -111
To control the signal level with the html server:
• In the menu, select Diagnostics > Network status > Interfaces.
Page 38

Page 39

PREPARING THE SETUP
DOC_DEV_IPL_User Guide_C Page 39
PREPARING THE SETUP
1 Connecting a PC for configuration
1.1 Overview
The IPL is configured using a PC with an HTML browser. No additional software is required.
Online help:
For most pages of the administration server an help page is available by clicking ? located at the top right of
the page.
Administration server address:
When the product is delivered, the IP address of the administration web server is 192.168.0.128.
First setup:
For the first configuration, we advise to connect the PC directly to the LAN interface of the IPL.
Subsequent changes can be made remotely.
Restoring the factory IP address:
The factory IP address 192.168.0.128 can be restored (see the User guide of the product).
Restricted access to the administration server:
If you do not have access to the administration server, it is probably that access has been restricted for
security reasons or for other reasons.
Network IP address:
Later in the text, we often speak of “network IP address”. We mean the lowest value of the addresses of the
network.
For instance, if the netmask of a network is 255.255.255.0, the network IP address of that network is
terminated by a zero (X.Y.Z.0.).
Characters allowed
Accented characters are not supported.
Page 40
PREPARING THE SETUP
Page 40 DOC_DEV_IPL_User Guide_C
1.2 First configuration
Step 1: Create or modify the PC TCP/IP connection
Assign to the PC an IP address different but consistent with the factory IP address of the IPL.
For the first configuration, assign for instance 192.168.0.1 to the PC.
Step 2: Connect the PC to the IPL
Connect the PC directly to the IPL with any Ethernet cable (straight or cross-wired);
Step 3: Launch the web browser
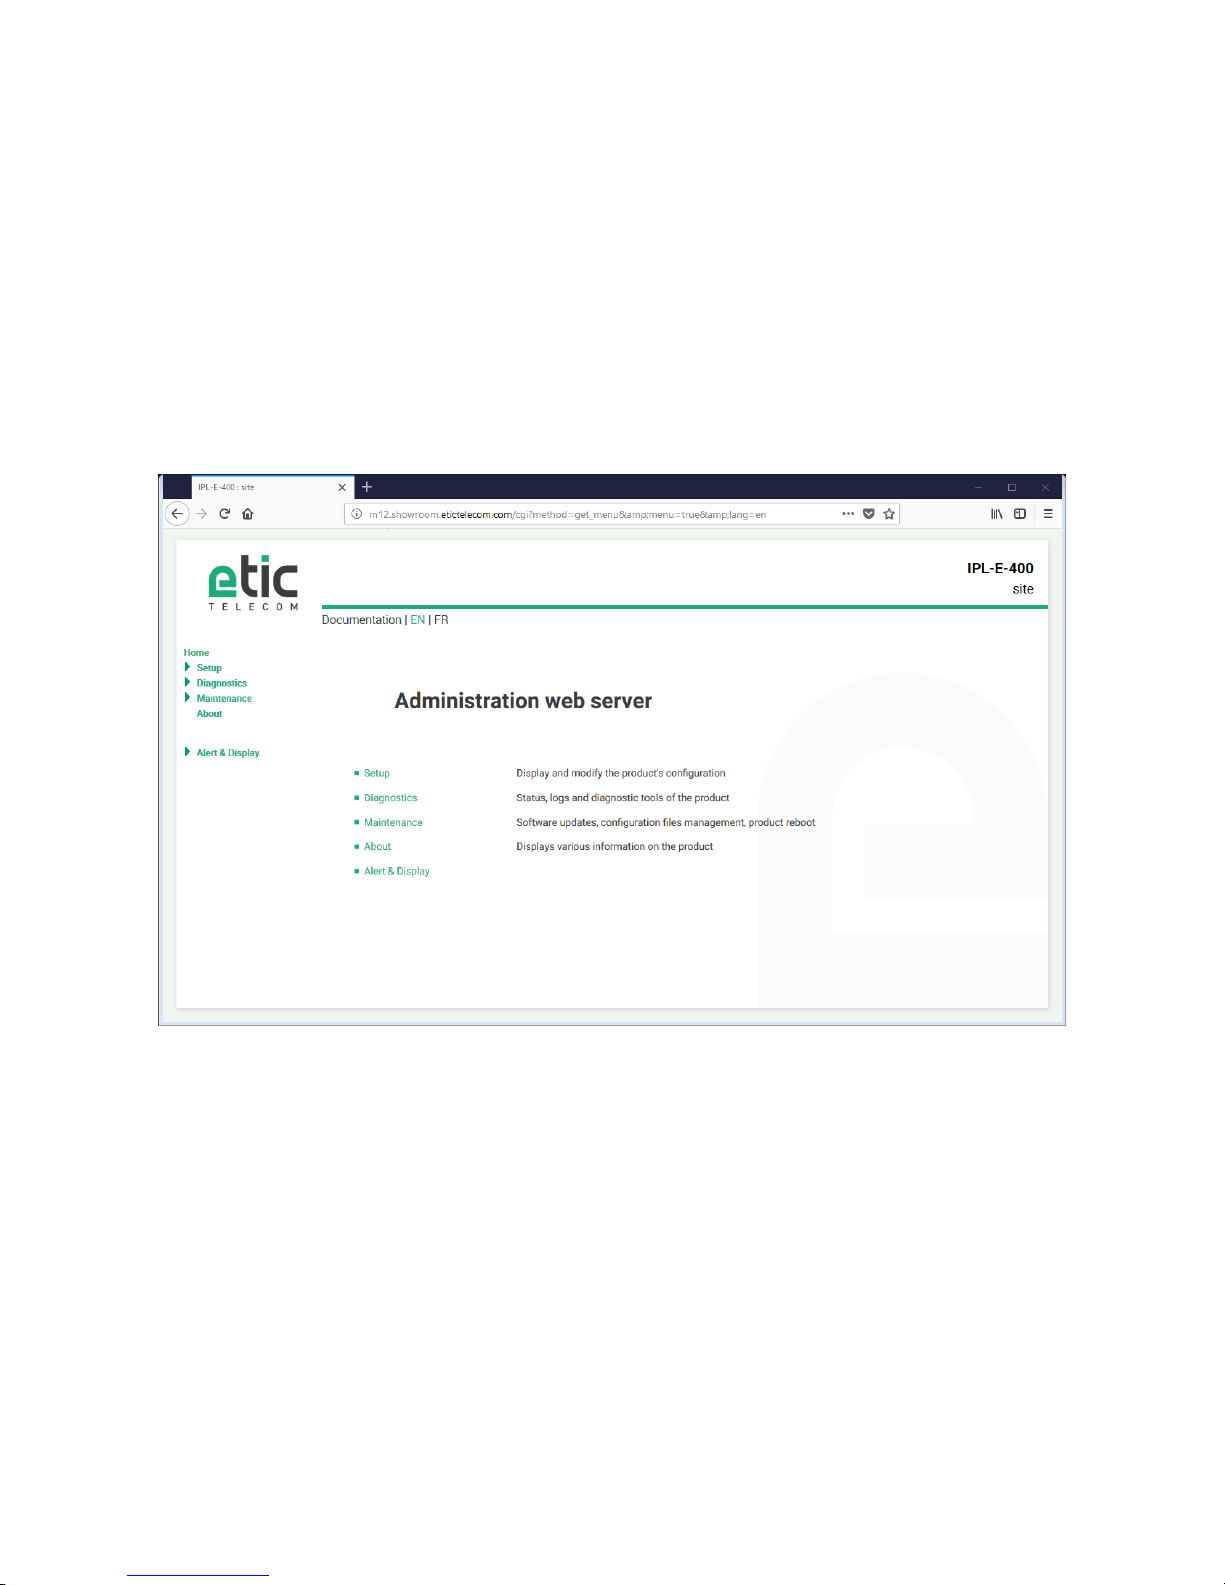
Launch the web browser and then enter the IP address of the IPL : 192.168.0.128
The Home page of the administration server is displayed.
Note: Access to the administration server is not protected when configuring the IPL for the first time.
1.3 Changing the configuration later
Thereafter, the IPL administration server is accessible from the local Ethernet interface or remotely through a
remote connection at the IP address assigned to the product.
By default, the access to the administration web server is not allowed through the WAN interface.
Page 41
PREPARING THE SETUP
DOC_DEV_IPL_User Guide_C Page 41
2 Access to the administration server through the WAN interface
To allow the access to the administration server through the WAN interface:
• In the menu, choose Setup > Security > Administration rights.
• Enter the username and the password.
• Select the protocol to use for configuration HTTPS only or HTTP and HTTPS.
• Tick the Enable access from the WAN(s) checkbox.
The administration server is accessible with HTTPS through the WAN or the LAN interface.
3 Working with HTTPS
Once HTTPS has been selected, proceed as follows:
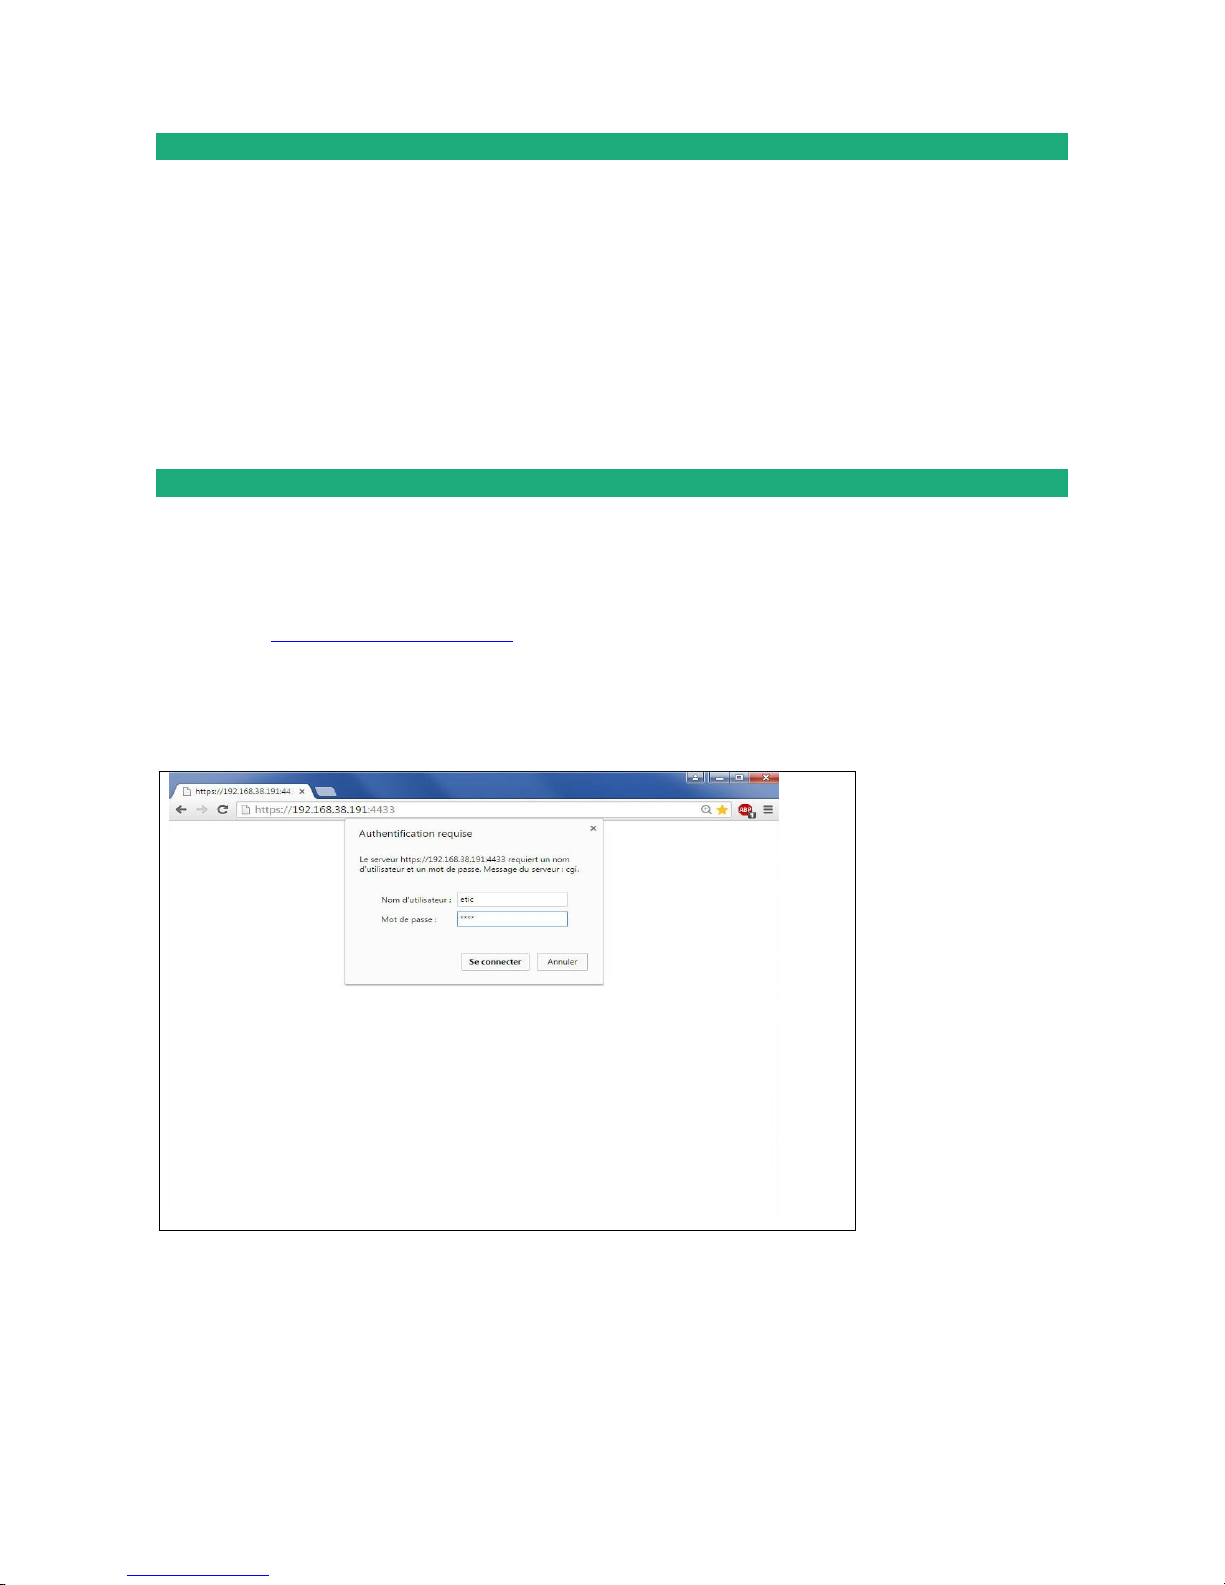
The port 4433 is assigned to administration server.
• Open the web browser and enter the IP address of the IPL administration server:
Example: https://192.168.38.191:4433.
• Click Next when a warning message is displayed
• Enter the user name and password that have been set to protect access to the administration server.
The home page of the administration server is displayed.
Page 42

PREPARING THE SETUP
Page 42 DOC_DEV_IPL_User Guide_C
4 Temporary return to the factory settings
If the IP address of the IPL could not be founded, or if it is impossible to access the administration server, for
example, following a configuration error, it is possible to restore the factory settings without losing the
current configuration.
• Press the push-button located on the back, for example with a small screwdriver
• Keep the push-button pressed for about 3 seconds;
• The LED blinks red rapidly
• The administration server becomes accessible at the factory IP address (192.168.0.128) ; The factory
configuration is temporarily running.
The administration server is accessible without a password in HTTP.
However, the current configuration is not lost and it is the one that is still displayed in the pages of the
Administration Server.
• After reading the IP address or changing some parameters, press again the push button or reboot the
product.
The product can be reached at the registered IP address.
Note:
If the IP address of the IPL is unknown, the software tool EticFinder can be used.
This software detects all ETIC branded products on a local network. After starting the software, click on the
"Search" button, and when the product list is displayed, double-click on the product address to access the
html server.
5 Restoring the factory settings
It is possible to restore the factory configuration permanently using the push button on the rear panel, or by
using the administration server. In this case, the current configuration will be lost unless it has been saved to
a file.
To restore the factory settings using the push button,
• Power off the IPL,
• Press the push-button located on the back, for example with a small screwdriver,
• Power on the IPL, while keeping the push-button pressed at least 10 s.
The LED turns red; the IPL boots and the factory configuration is restored.
Note: The factory configuration can also be restored via the menu Maintenance > Configurations
management of the administration server.
Page 43

PREPARING THE SETUP
DOC_DEV_IPL_User Guide_C Page 43
6 Protecting the access to the administration server
• In the menu, choose Setup > Security > Administration rights
• Enter a user name and password to protect the administration server.
• Tick the Password protect the web site access checkbox
If the username and password to access the administration server are lost, you have to temporarily return to
the factory settings; access to the administration server is then free.
7 Configuration steps
To configure the product, we advise to proceed as follows:
• Set up the LAN interface
• Set up the WAN interface
• Set up the routing functions
• Set up VPNs
• Set up the remote access
• Set up the firewall
• Set up the serial gateways
For details about the advanced setup, refer to the Routing Setup Guide:
Reference: DOC_DEV_Router Setup Guide
Page 44

13, Chemin du Vieux Chêne
38240 Meylan - France
Tel : +33 (0)4 76 04 20 00
[email protected]
www.etictelecom.com
 Loading...