

Page 1

Page 2

1
Table of Contents
Table of Contents………………….……..……..1
Introduction……………....………………..……3
Limited Warranty, Rights and Responsibilities….4
Open-package inspection…………….…………4
Safety information………………………………5
1 Introduction……………………….…………8
1.1 Product description……………….…..……..8
1.2
Outstanding features of MS6612
multi-function
light meter…………………..…….
9
1.3 Name and function of components………...10
1.3.1 Plan view
……………………………..……….
.10
1.3.2 LCD display interface…………….……...11
2 Measurement methods……………………..12
2.1 Notices prior to measurement……………...12
2.2 Action principles………………..………….13
2.2.1 Concepts of illuminance scales..................13
2.2.2 Unit conversion for illuminance scales…..13
2.2.3 Conversion formula for illuminance
and light intensity…………..….….…..…13
2.3 Typical practice cases……………….......…13
Page 3

2
3 Specific Application……………….………17
3.1 Application of manual switchover
of range measurement mode………..…….17
3.2
Application of relative/peak value
measurement mode…………..…………..….19
3.3 Application of maximum/minimum
value inquiry mode………………..………21
3.4 Application of data hold and zero
calibration mode…………..………………22
4 Other Functions……………………………24
4.1 Auto power-off…………………………….24
5 Technical Data……………..………………25
6 Maintenance and Service………….……….27
6.1 Service……………………….…….………27
6.2 Cleaning…………………………..….…….27
6.3 Battery replacement………………….…….28
6.4 Calibration Interval………………….……..29
7 Reference Table for Illumination
Standard of Various Locations………….…30
Page 4

3
Introduction
Thank you for your purchase of the ETHOS 4420
multi-functional light meter. This meter will, with proper
use, provide years of reliable service; therefore, it is
recommended that the user read carefully the user’s
manual before using the light meter and keep it in right
place for reference.
Page 5
4
Limited Warranty, Rights and Responsibilities
The product is guaranteed for one year from date of
purchase against defects in material or workmanship. This
warranty does not extend to damage caused by fire
(fusing), disposable battery (exhausted), accidents,
negligence, misuse, modification, pollution and abnormal
operation. Dealers are not authorized to extend the
warranty coverage on ETHOS’s behalf. During the
applicable limited warranty period, the user may contact
the nearest ETHOS service center to obtain approval of
information, and send the product to the center along with
fault description.
Open-package inspection
Upon reception of the light meter, inspect it
to ensure no damage happened during shipping. If
the user finds obvious damage or malfunction in
operation, please contact the supplier.
Attachments
Instruction manual×1
One 9 V alkaline cell, GL6F22A 1604A
Page 6
5
Safety information
Warning
Do not use the light meter in the environment
full of dusts or having gas substances and
flammable steam substances!
Safety mark description
This manual contains basic information for 4420 safety
operation and maintenance. Please read carefully
following safety information before use.
Table 1: Safety information
Important information which the user
must read before using the light meter
Mark of conformity
Table 2: Warning message
Warning
It indicates that incorrect operation will
lead to serious injury or even fatal
accidents
Notice
It indicates that incorrect operation o
negligence will lead to meter
damage or
wrong measurement results, etc.
Tips
Operation suggestions or prompts
Page 7
6
Operation considerations
User should observe the following notices to
guarantee safe operation and obtain optimum
performance.
1: Preliminary check
Before initial use, please check if the light meter
operates normally and if it is damaged during storage and
transportation. In case of any damage, please contact the
supplier.
2: Placement
Operation
al
temperatu
re and
humidity
range
-10~50℃ (14~122°F)
<80%RH (non-condensed)
Storage
temperatur
e and
humidity
range
-10~+50℃ (14~122°F)
<70%RH (non-condensed)
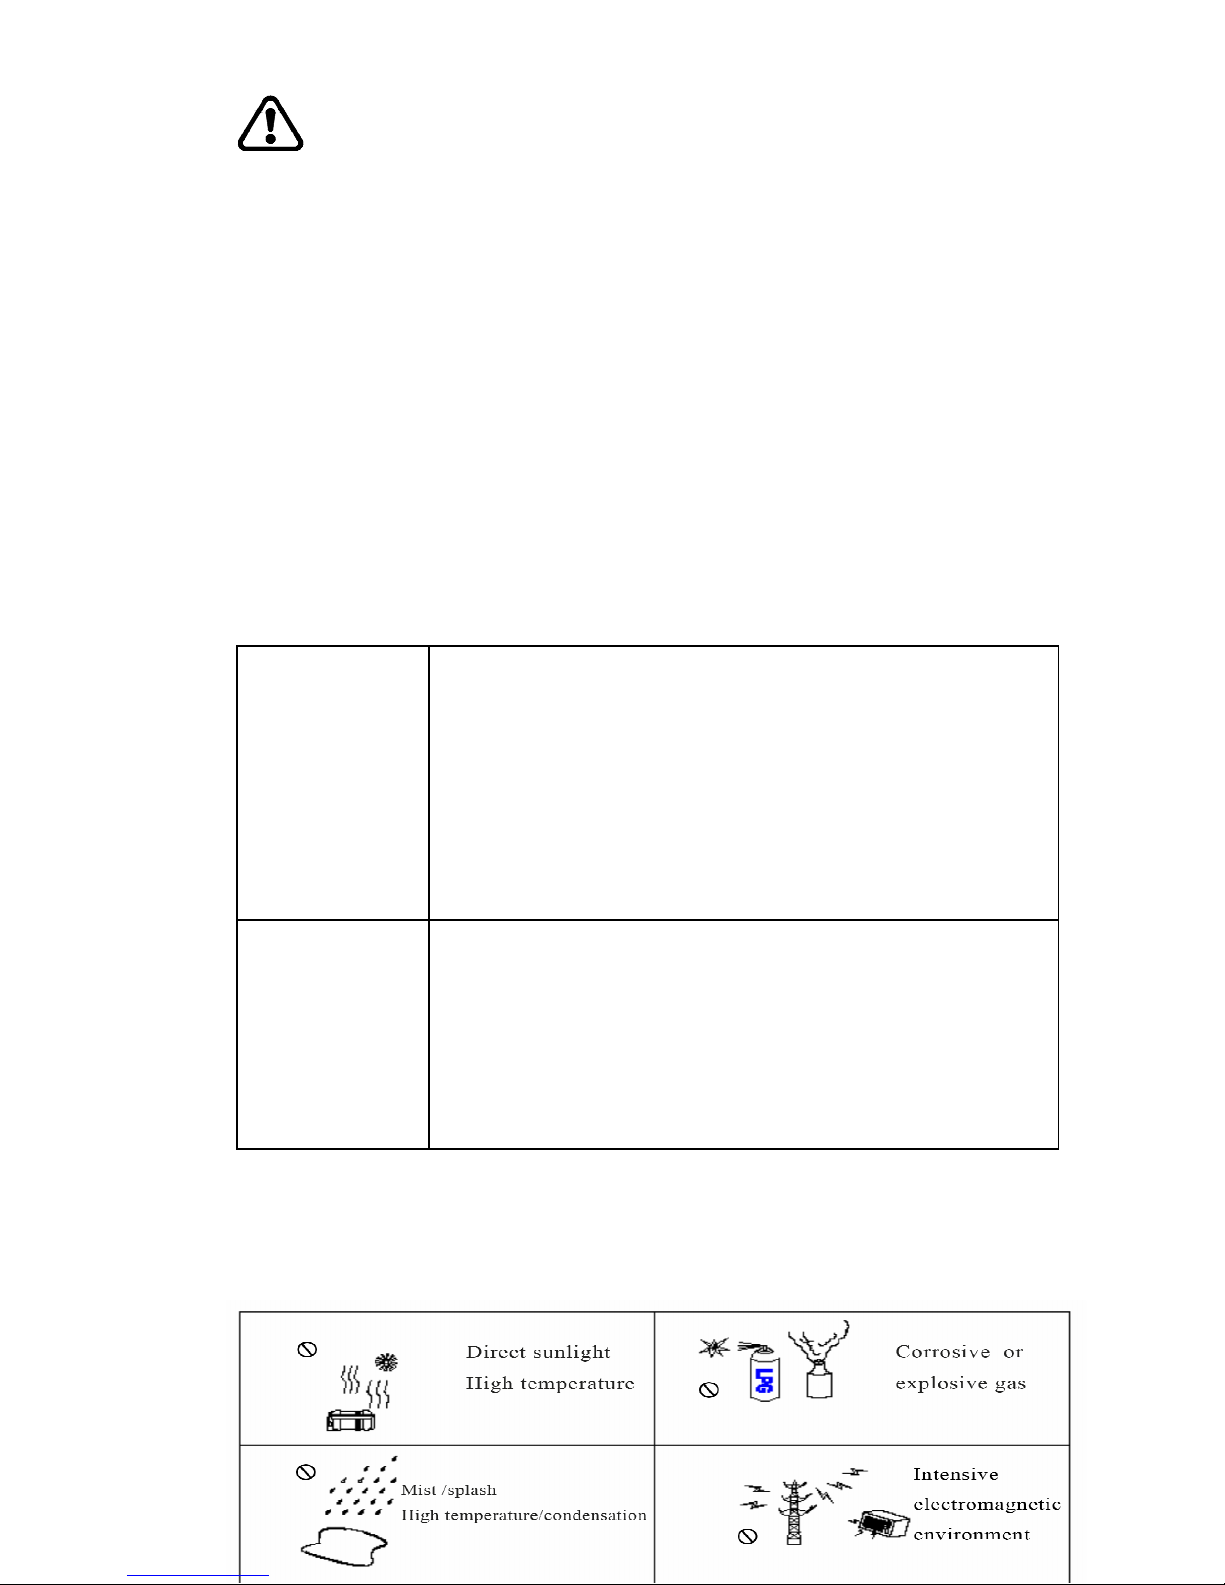
To avoid faults, please DO NOT place the light
meter in following environments:
Page 8

7
3:Use
Notice
1. The operation temperature range for the light meter is
-10-50℃ (14-122°F).
2. In order to avoid damage, especially falling accidents,
handling and use should be avoided during severe
mechanical vibration.
3. The light meter can only be calibrated and repaired by
professional personnel.
4. Before each use, the opto-sensor of light meter should
be checked for damage and dust. Make sure the meter is
in good, smooth and clean conditions. If one or more
functions of the light meter are irregular or not ready
for operation, avoid using the meter.
5. During the operation of the light meter, the meter
measurement value should not be at OL for long time.
6. Keep the meter out of direct sunlight to guarantee its
normal operation and long-term service life.
7. If the meter is subject to effect of intensive
electromagnetic field, its functions will be affected.
8. Only use batteries specified in technical data.
9. Batteries should avoid damp. If the low battery symbol
appears on the display, the user should replace batteries.
Page 9

8
Tips
1. The sensibility of the optical detector will be lessened
due to operation conditions or time. It is recommended
to make periodic calibration to maintain the basic
accuracy.
2. Please keep original package for future mailing (such
as for light meter calibration).
1 Introduction
1.1 Product description
Whether you are a professional or amateur
photographer, while shooting, you pay more attention to
the surrounding illuminance rather than the setting,
because this will help you taking the best shot. Although
the illuminance can be estimated by the photographer,
there is a difference in perception between human and
camera about the requirement for supplementing
illuminance. This difference will lead to a big contrast of
the expected image effect against the actual one. In face of
this, do you wish to possess a light meter? When you
intend to buy a house, you require both good location and
indoor brightness during the day. So, do you wish to
possess a light meter to measure the illuminance in every
corner of the house?
With the progress of human civilization, more and
more people emphasize low carbon life. Architects tend to
figure out how to bring more natural light into the house
while putting up a residential building. However, in many
Page 10

9
cases, fluorescent lights will be used when the natural light
is not enough. In response to the slogan of energy saving
and emission reduction advocated by the state, we should
use the fluorescent lamps based on the actual needs. So, a
professional and convenient light meter can provide you
with a reference regarding illuminance.
The 4420 multi-functional light meter has a friendly
human-machine interface and can be activated by a simple
press of keys. The buzzer activates upon key press to
notify that it is effective. This light meter is able to
measure the visible light produced by fluorescent lamp,
metal-halide lamp, high voltage sodium lamp or electric
incandescent lamp for a vivid and intuitive image display.
1.2 Outstanding features of the MS6612
multi-function light meter
Automatic and manual range switching;
Inquiry function for maximum and minimum values;
Data hold function;
Peak value measurement function;
Relative value measurement function;
Zero calibration function;
3 1/2 bit LCD display, with analog bar display;
Fc/Lux unit conversion function;
Outrange indication (When the measured value
exceeds the current range, LCD will display the signal
“OL” to indicate that the range is overreached);
High precision. Measurement range (0.00~200000Lux);
Page 11
10
Low battery indicator;
Touch tone and mute function;
Auto power-off function (The machine will be
powered off automatically keys are not operated for
more than 10 minutes)
Compact design, durable, and portable.
13 Name and function of components
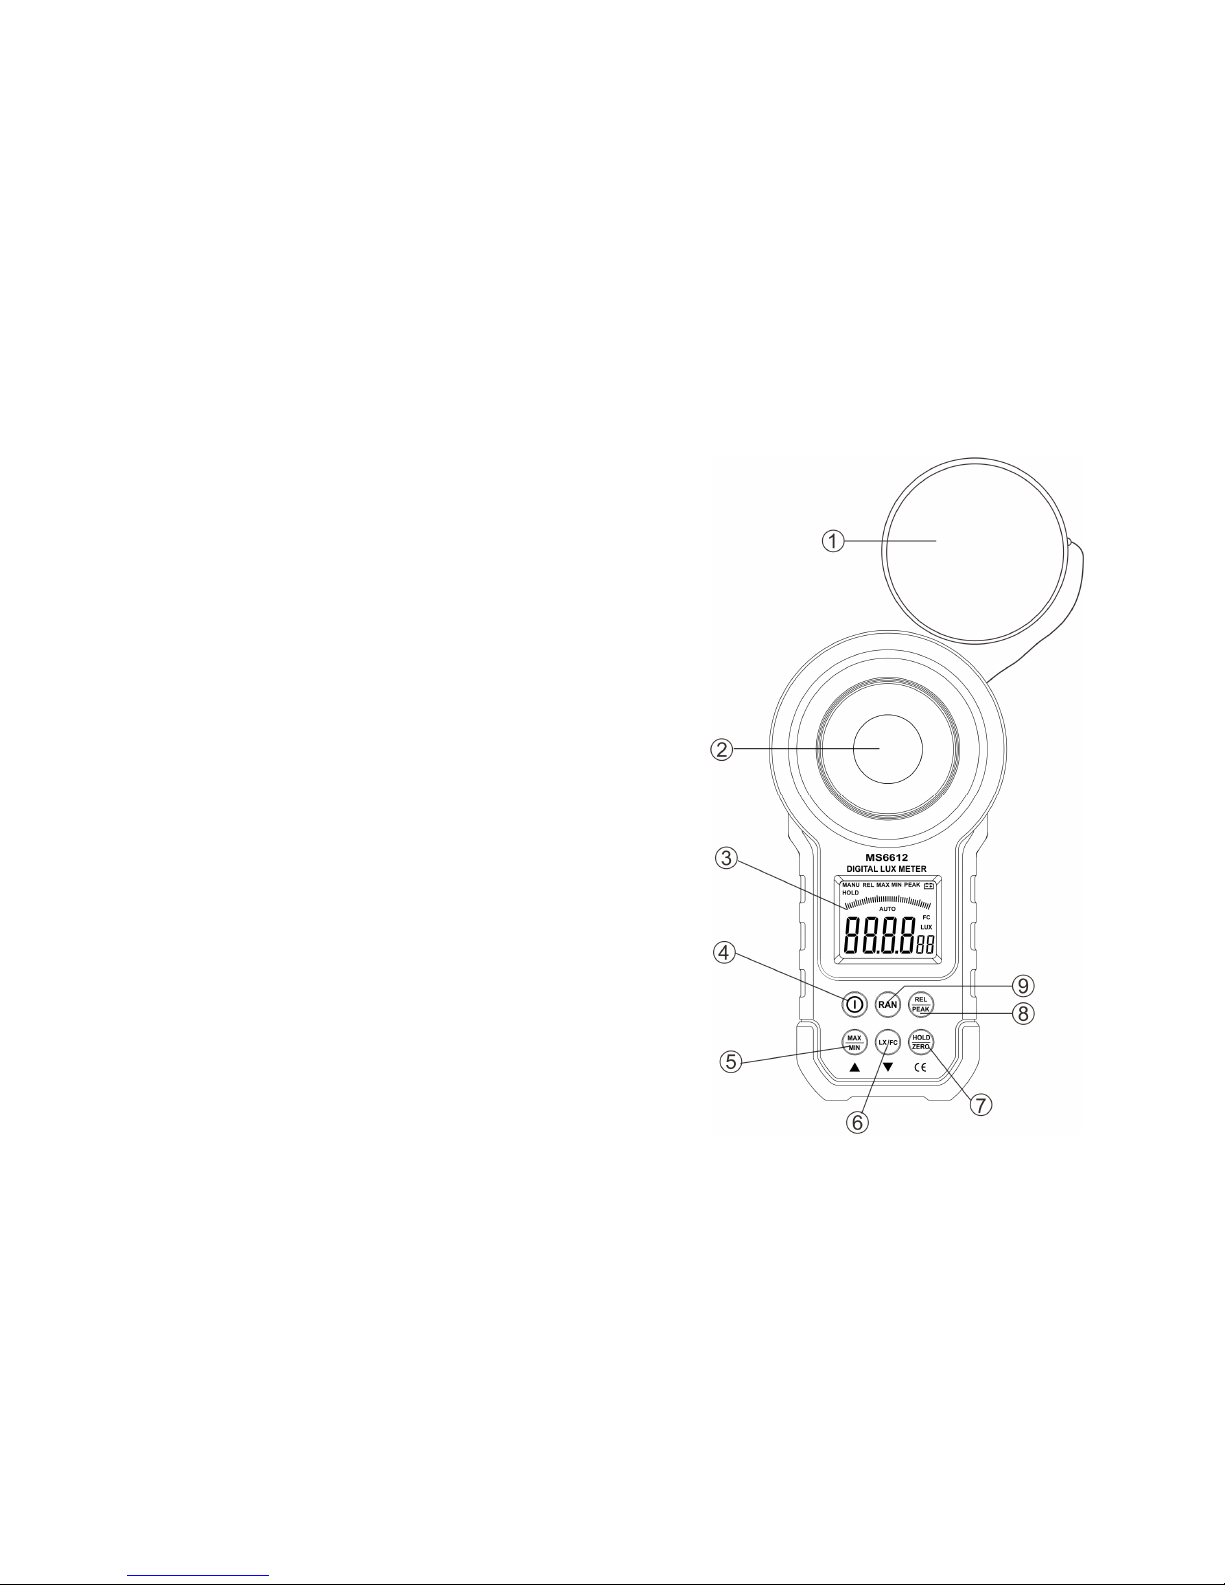
1.3.1 Plan view
Opto-sensor protection cover
Opto-sensor
LCD display screen
Compound key for main
power and touch tone:
Power on/off: Short press the
key to activate the machine
and long press for 1 second to
shut it down.
Touch tone on/off: Under
working mode, short press
the key to turn
on and off the touch tone.
max and min values inquiry key
Lux/Fc unit conversion key
Compound key for data hold
and zero calibration:
Data hold: Short press the key to enter/exit data hold mode.
Zero calibration: Long press for 1 second to perform zero
MS6612 plan
Page 12
11
calibration function.
Compound key for relative value and peak value
measurement:
Relative value measurement: Short press the key to enter/
exit relative value measurement mode.
Peak value measurement: Long press for 1 second to
enter/exit peak value measurement mode.
⑨
Key for manual range switching: Short press the key for
20.00Lux 200.0Lux 2000Lux 20000Lux
200000Lux (or 20.00Fc 200.0Fc 2000Fc
20000Fc) circulation; Long press for 1 second to exit
manual range switching mode.
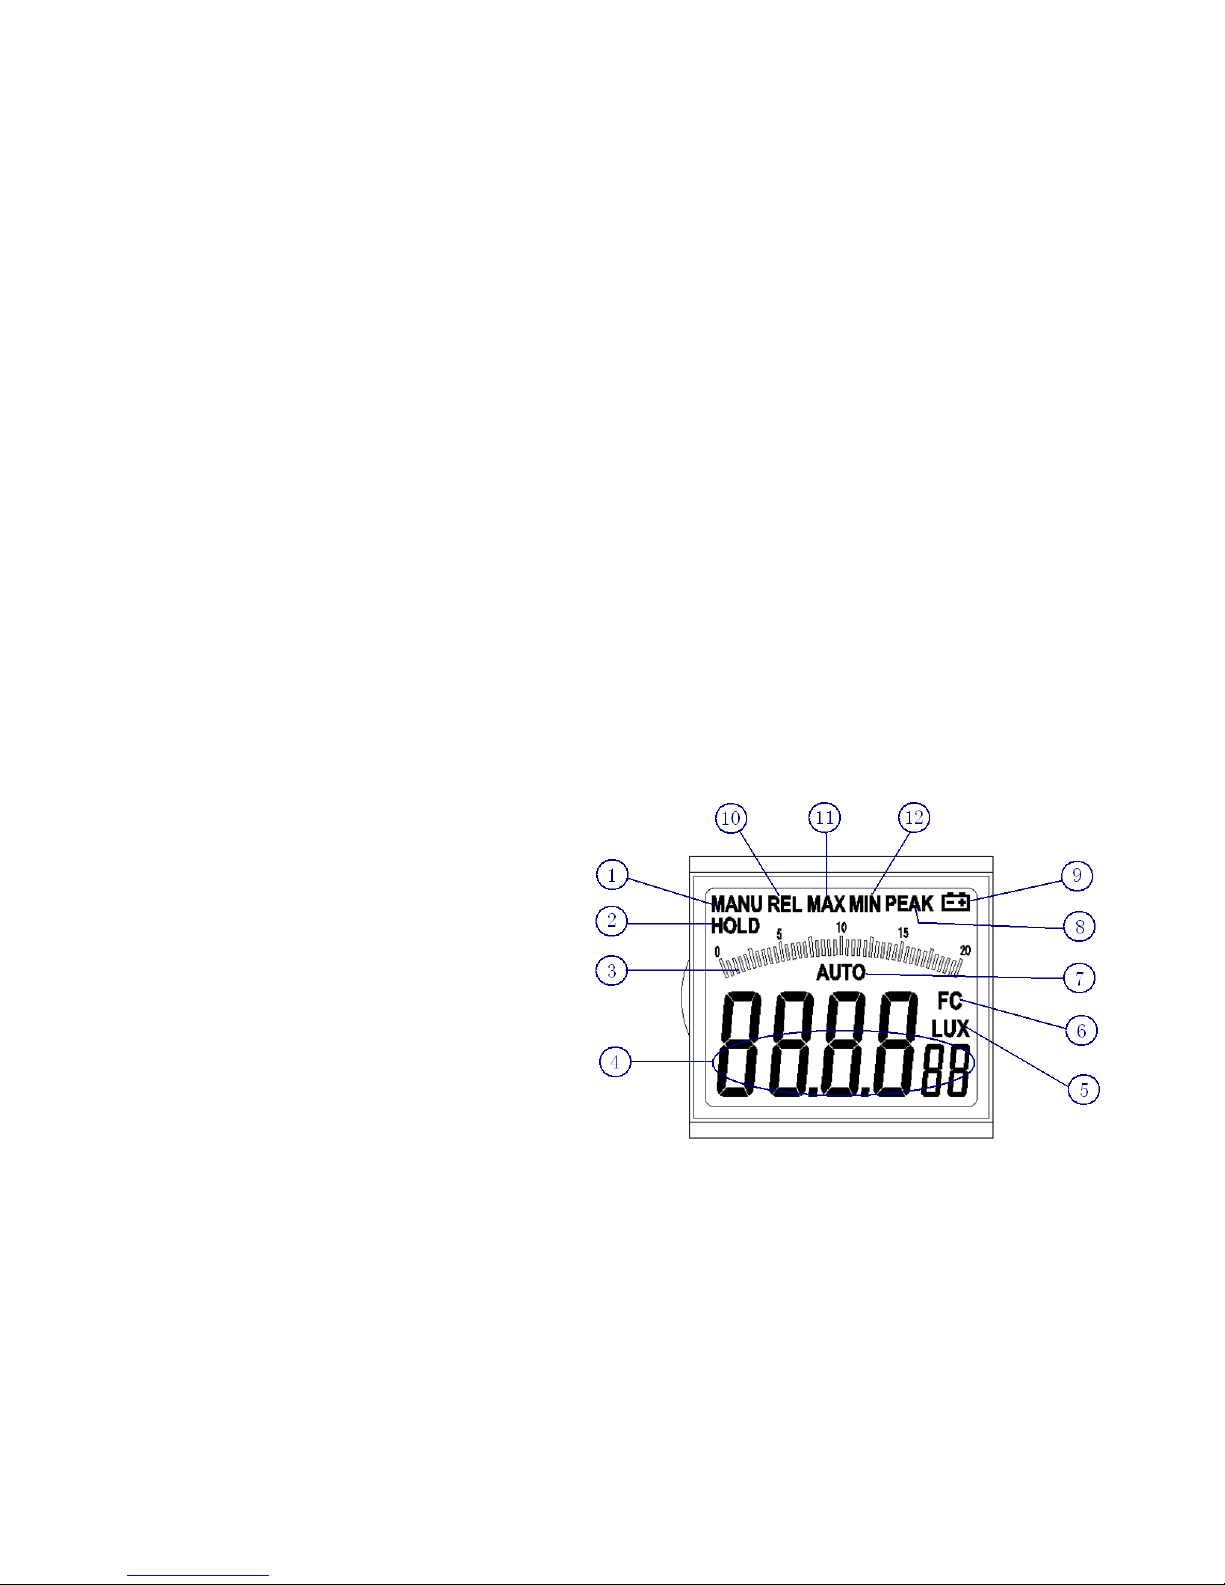
1.3.2 LCD display interface
1. Prompt for manual
range switching
mode
2. Prompt for data
hold mode
3. The analog bar
shows the current
measurement value
information.
4. The digit shows the current measurement value
information.
5. Lux unit
6. FC unit
LCD
display
interface
Page 13

12
7. Prompt for auto measurement mode
8. Prompt for peak value measurement mode
9. Prompt for low battery
10. Prompt for relative value measurement mode
11.12 Prompt for max and min values inquiry
2 Measurement methods
2.1 Notices prior to measurement
Warning
1: Do not use the light meter in environments full of
dusts or having gas substances and flammable
steam substances!
2: Do not use the light meter for measurement in the
place with high temperature and high humidity.
3: Do not use the light meter in environments with
intense infrared or ultraviolet rays!
Tips
1: The opto-sensor of this meter is designed by simulating
the sensitive curve of light obtained through human
eyes. The spectral coverage is between 320mm and
730mm. When it is used for measurement within the
infrared range, there will be a large data deviation.
2: The opto-sensor is calibrated by common electric
incandescent lamp required by CIE under the color
temperature of 2854°K; the provided reading number
Page 14

13
may be different for the spectrum of other lamps.
3: The reference level of light source test is at the top of
the spherical surface illuminated.
4: The optical detector should expose to light for 2 minutes
before measurement.
5: Influence of tester's shadow and other factors on the
optical detector should be avoided.
2.2 Action principles
2.2.1 Concepts of illuminance scales
One lux (lumen) indicates the illuminance got on a
surface of one square meter, all points of which are one
meter from a uniform source of one candela.
One foot-candle (Fc) indicates the illuminance got on
a surface of one square foot, all points of which are one
foot from a uniform source of one candela.
2.2.2 Unit conversion for illuminance scales
1 Fc = 10.764 lux
1 lux = 0.09290 Fc
2.2.3
onversion formula for illuminance and light intensity
E = I / r
2
Wherein E --- illumination value (Unit: Lux);
I --- Light intensity of the light source(Unit: cd);
r --- Distance from the luminous surface of light source to
the optical detector (Unit: m).
During the measurement, the minimum distance
between the luminous surface of light source and the
Page 15

14
opto-sensor should be more than 15 times greater than
maximum size of the luminous surface (or opto-sensor).
2.3 Typical practice cases
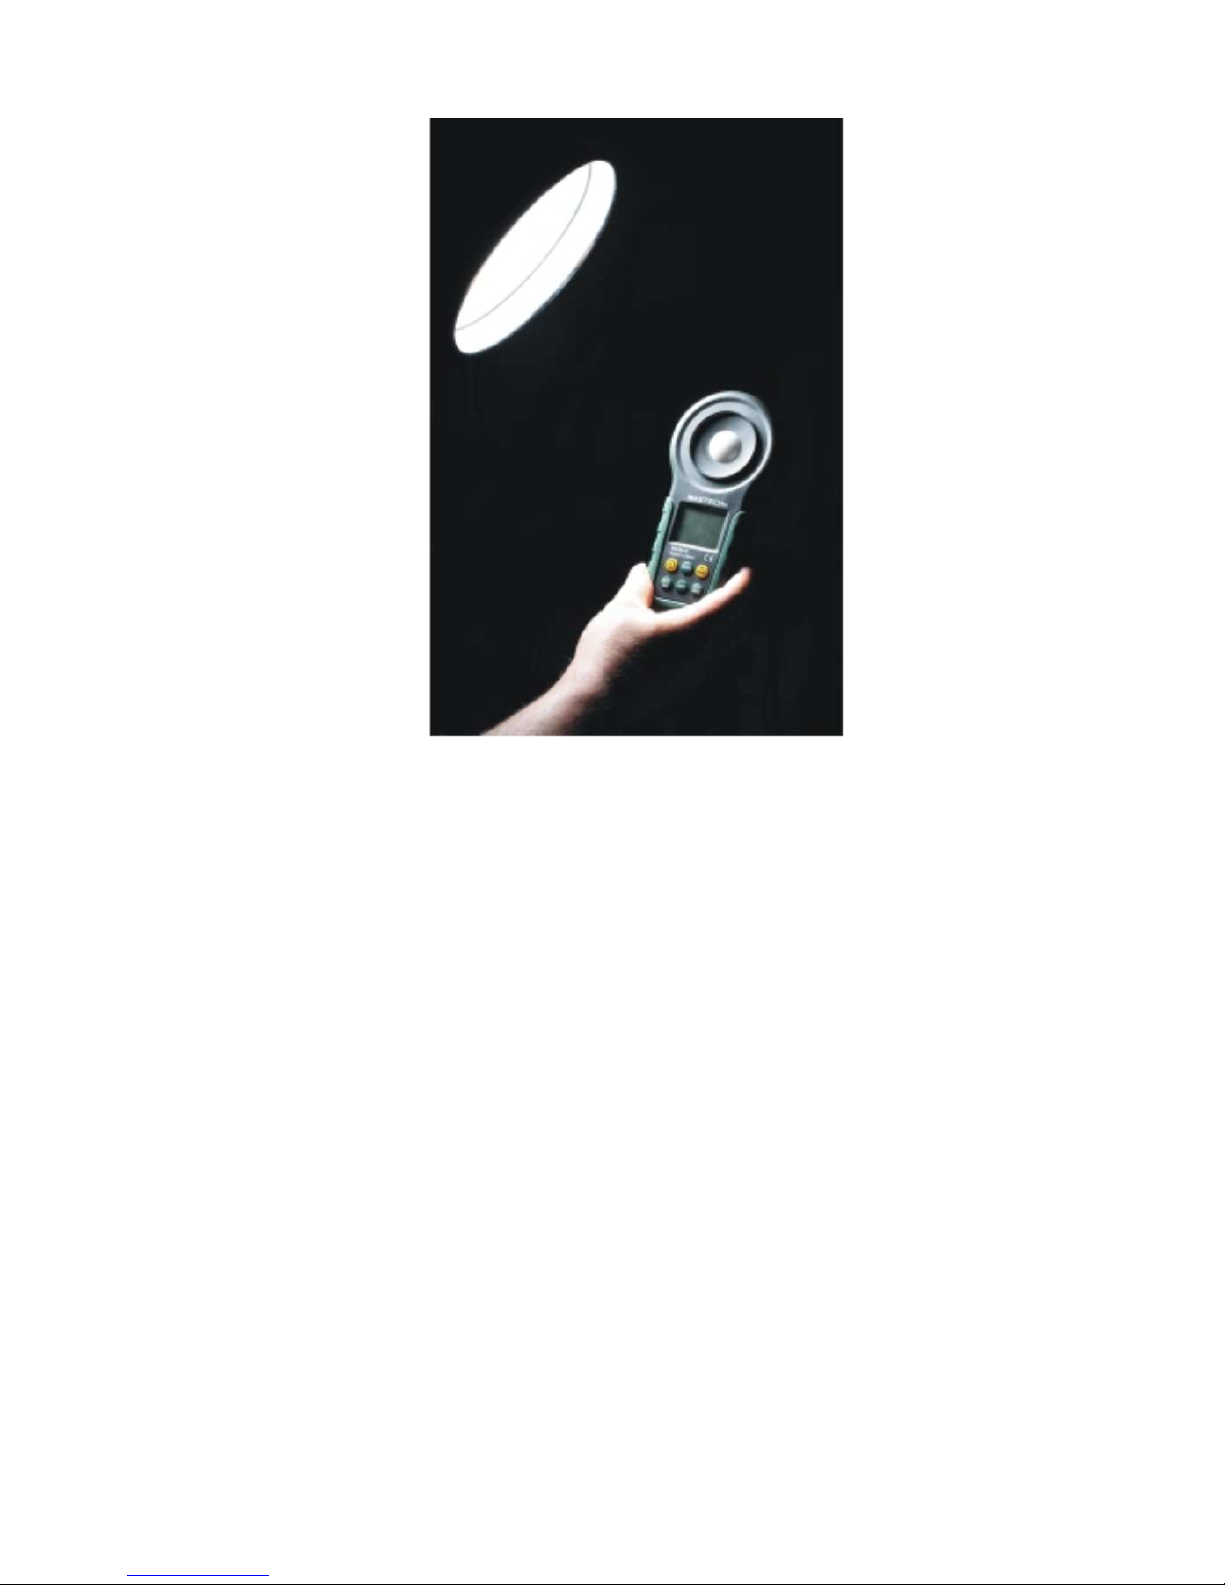
In the following practice cases, the user stands under
a light source. Remove the protection cover of the 4420
multi-functional light meter sensor and place it at right
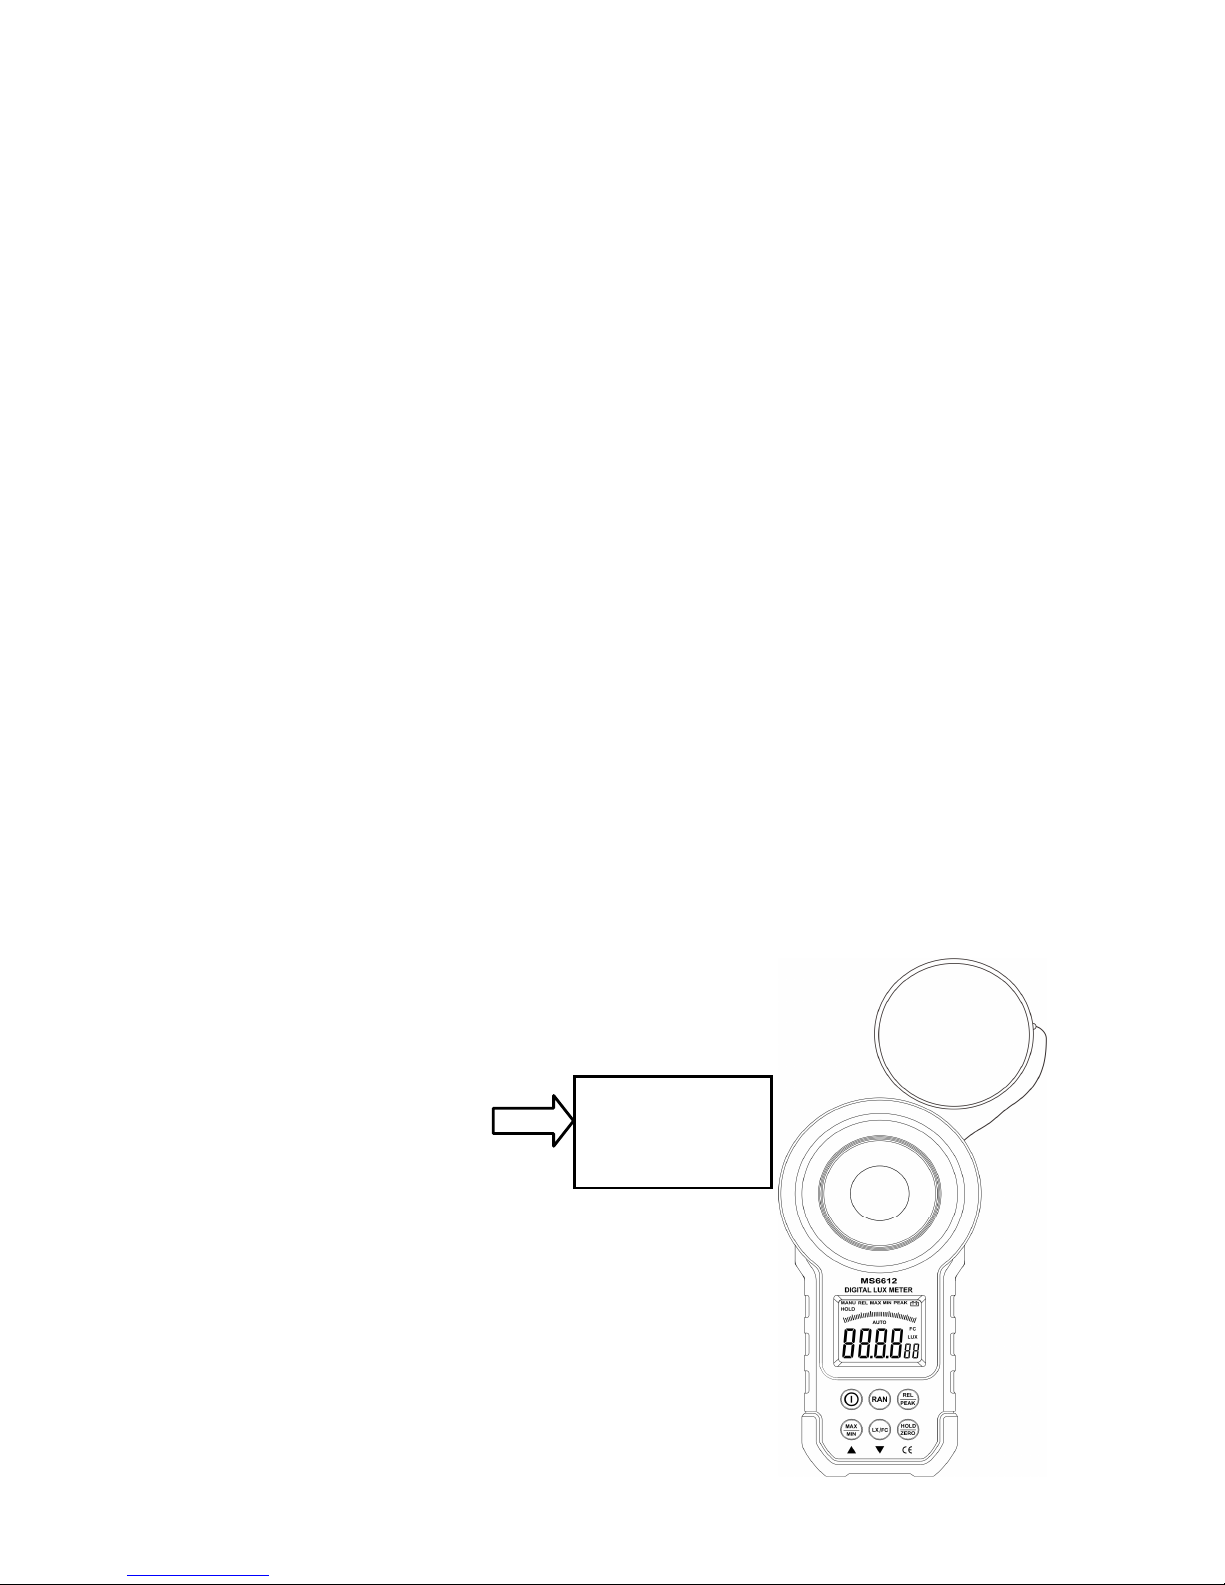
angle to the light source, as shown in figure 2-1.
Press and hold the 4420 power key ④ for a short
time to power on the light meter. The LCD screen will
illuminate(about 5 seconds)with the buzzer beeping twice,
and “AUTO” will appear on the middle of LCD display.
This indicates that the auto measurement mode is ON.
Press and hold the manual range switching key ⑨ of the
MS6612 for a short time, “MANU” will appear on the top
left position of the LCD display, indicating that the manual
range switching mode has been activated. In this mode,
each time press and hold the key for a short time, the
meter will switch to
20.00Lux—>200.0Lux—>2000Lux—>20000Lux—>200
000Lux (or 20.00Fc—>200.0 Fc—>2000 Fc—>20000 Fc)
in sequence; pressing the key for one second will result in
the inscription “MANU” disappearing from top left
position of LCD display, replaced by “AUTO” appearing
in the middle, to indicate that the meter has switched the
manual range switching mode to the auto range switchover.
Press and hold the REL/PEAK key ⑧ of the MS6612 for
a short time, “REL” will appear on the top left position of
Page 16

15
the LCD interface, indicating the activation of the relative
value measurement mode. Press and hold the key ⑧ for a
short time again, the device will exit the relative value
measurement mode and return to the original measurement
mode, and “REL” on the top left position of the LCD
interface will disappear; pressing the key for one second
will lead to the peak measurement mode, “PEAK” and
“MANU” will appear on top right position of LCD display;
press and hold the key for one second once again,
“PEAK” will disappear from the top right position of the
LCD interface, and “AUTO” will appear in the middle of
LCD, and the mode will return to auto measurement mode.
Press and hold max/min value inquiry key ⑤ for a short
time, “MAX” will appear on top position of LCD interface,
switching the device to the max/min value inquiry mode;
in this mode, each short press of the key causes the mode
to change from MAX to MIN or from MIN to MAX; press
and hold the “MAX/MIN” key ⑤ for one second,
“MAX/MIN” on top position of the LCD interface will
disappear, and the mode will exit. Press and hold the data
hold/zero calibration key ⑦ of the MS6612 for a short
time to enter the data hold mode, which will be indicated
by the apparition of “HOLD” on the top left position of
the LCD interface; press and hold the key for a short time
once again, “HOLD” will disappear from the top left
position of the LCD interface, and the device will exit the
data hold mode. In any mode with sensor covered, press
Page 17

16
and hold data hold/zero calibration key ⑦ for one second,
“ADJ” will appear on the LCD interface, and the device
will enter the zero calibration mode: several seconds later
“ADJ” will disappear from the LCD interface, and the
device will exit the data hold mode and return to auto
measurement mode.
Tips
1: The reference position of light source test is at top of
sphere surface under light.
2: In various measurement modes, analog bar in the
middle of the LCD screen will change with figures of
Nixie tubes.
3: When reading, existing data can be locked by pressing
and holding “HOLD/ZERO” key for a short time;
4: In zero calibration mode, the opto-sensor must be
covered by opto-sensor visor before calibration.
5: After completing the test, the sensor protection cover
should be put back to protect light filter and sensor.
Page 18
17
Figure 2-1
3 Specific Application
3.1 Application of manual switchover of range
measurement mode
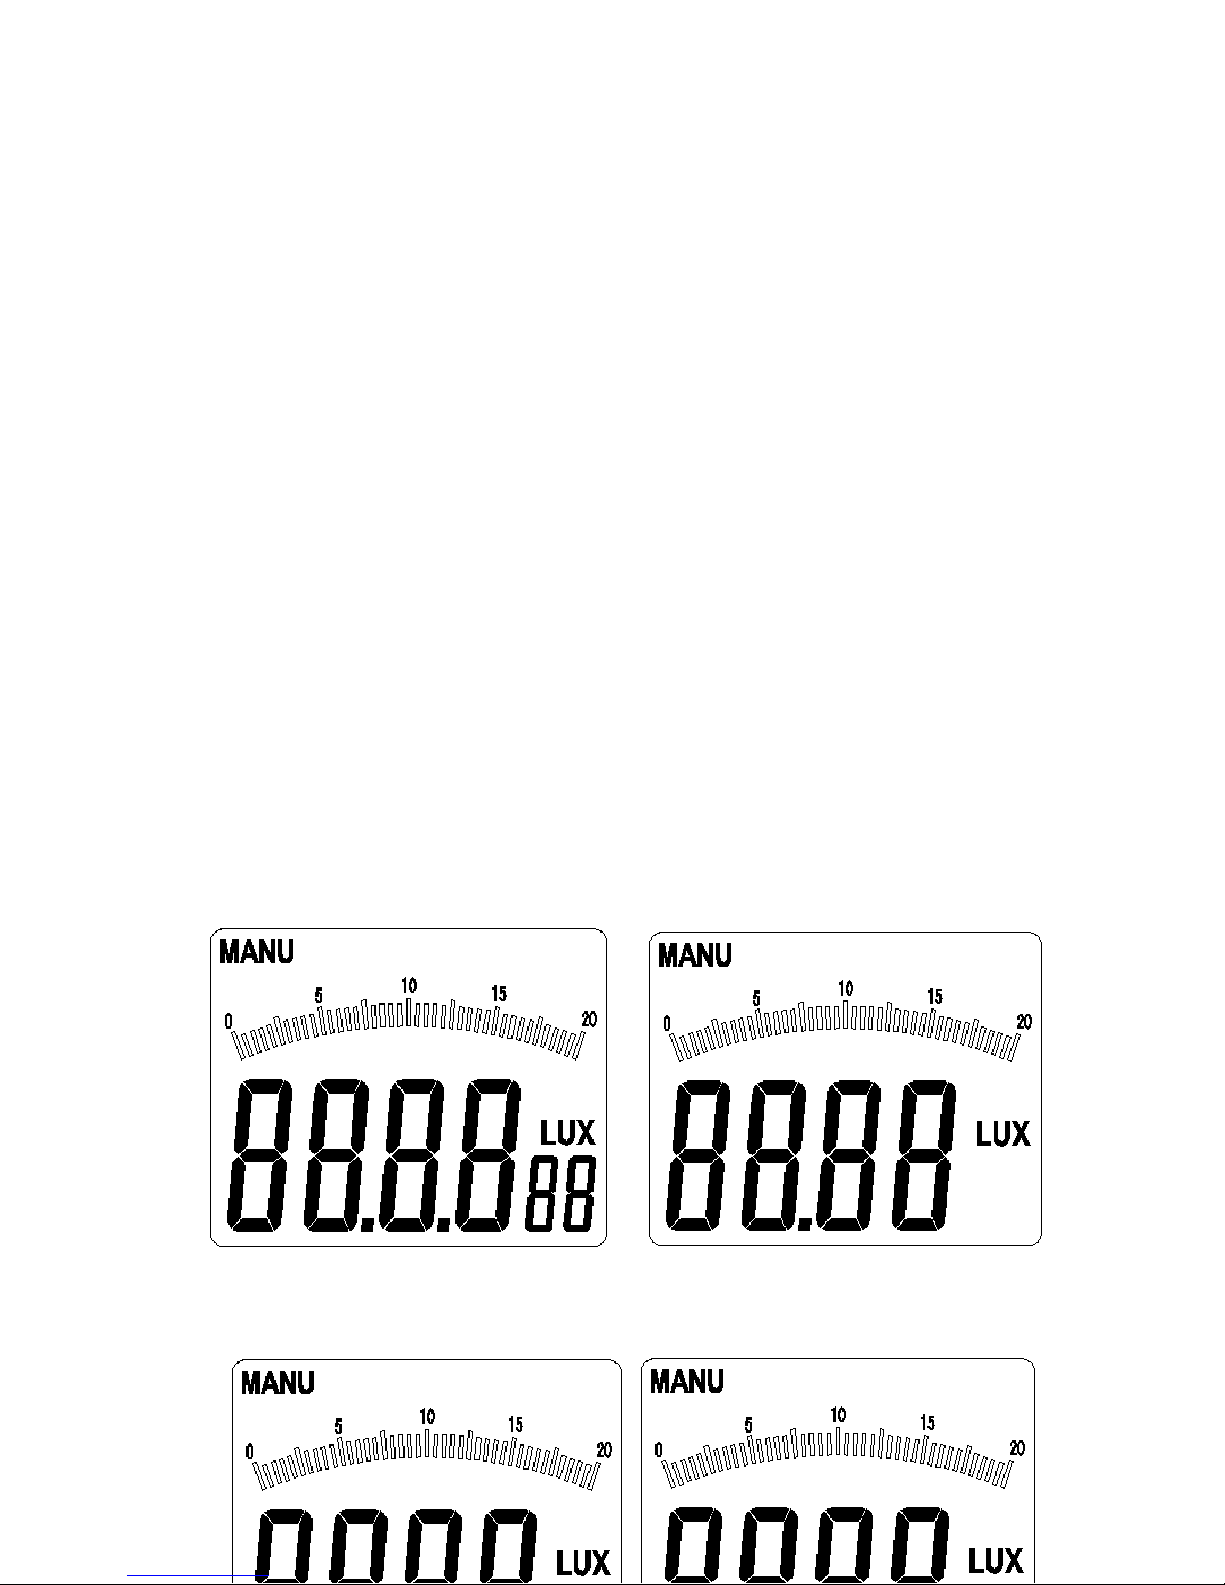
Press and hold the RAN key (range manual switchover
key) for a short time, “MANU” will appear on the top
left position of the LCD interface, and the meter will
enter the manual switchover measurement mode (as
shown in figure 3-1-1);
When entering manual switchover of range function,
press RAN key for a short time each time, it will
switch to 20.00Lux—>200.0Lux—>2000Lux—>
Page 19
18
20000Lux—>200000Lux (or 20.00Fc—>200.0 Fc—>
2000 Fc—>20000 Fc) in sequence;
Press and hold RAN key for one second, “MANU” on
the top left position of the LCD interface will
disappear, and “AUTO” will appear in middle of LCD
interface, and manual range switchover function will
exit and the device will return to auto range
switchover mode;
Figure 3-1-1 20.00Lux interface
Page 20
19
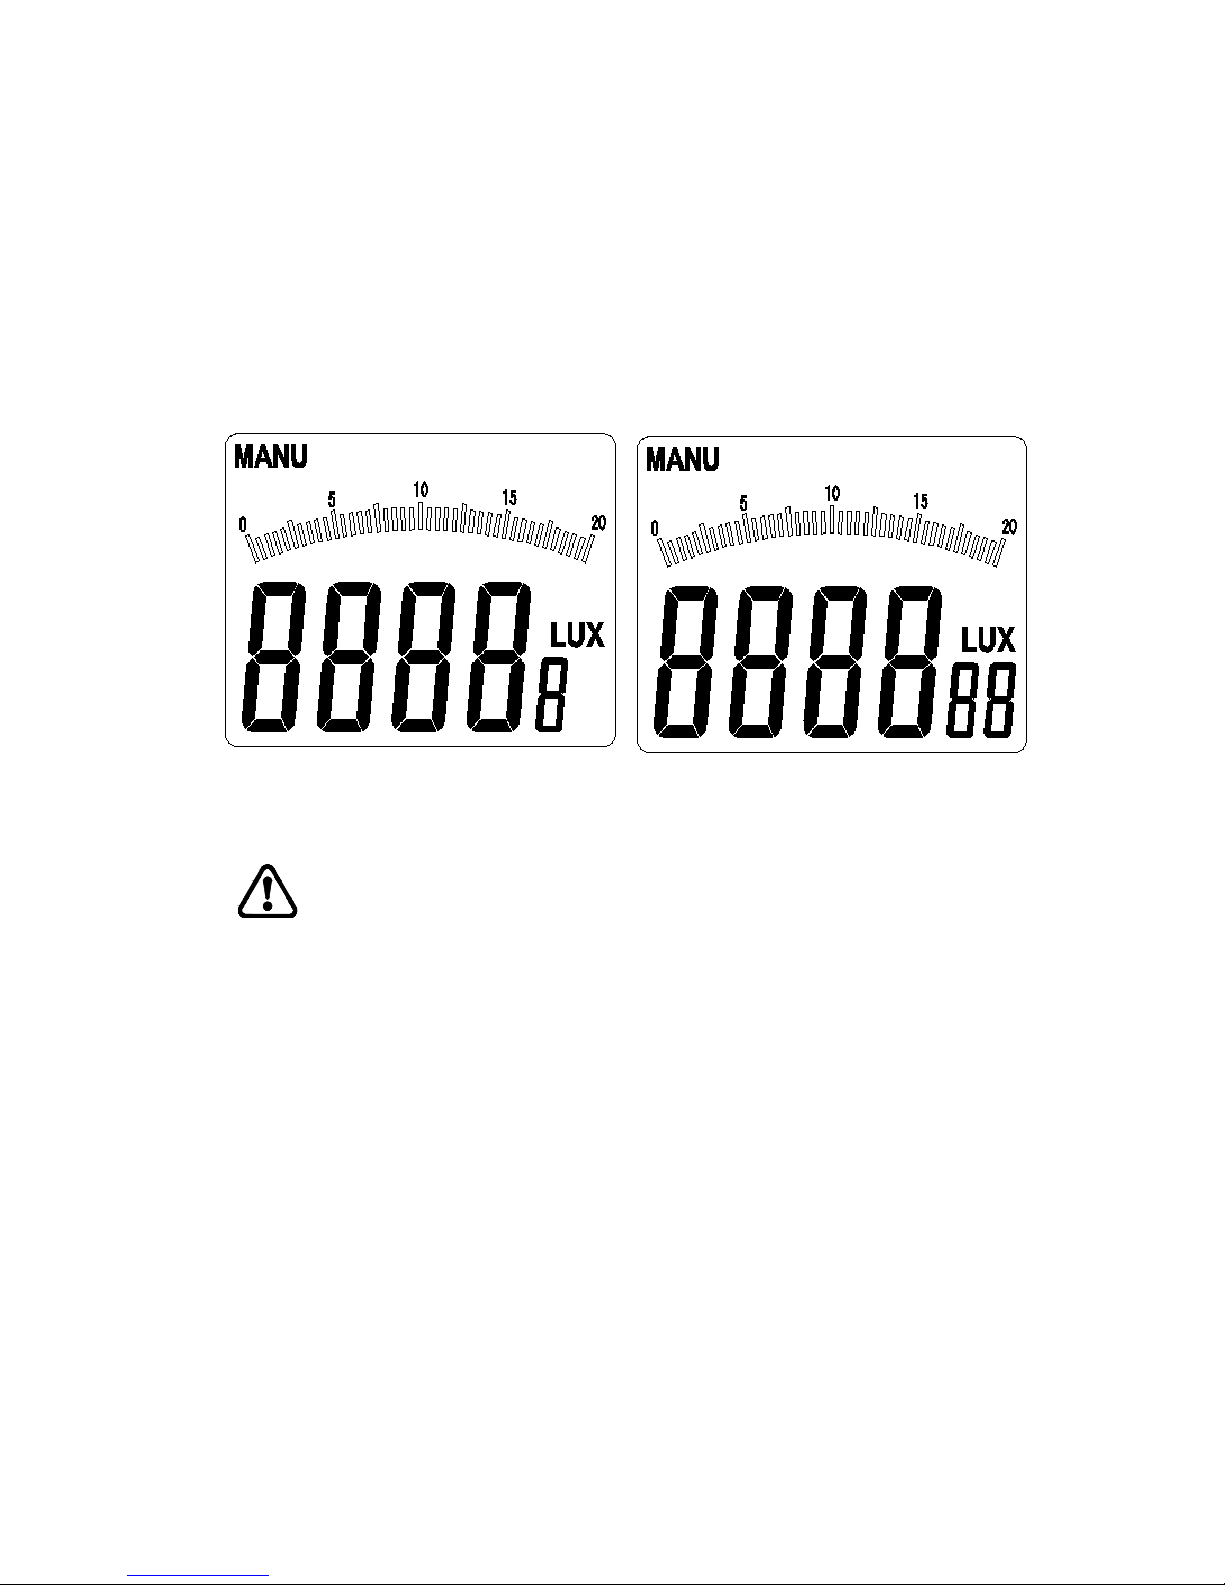
200.0Lux interface 2000Lux interface
20000Lux interface
200000Lux interface
Tips
1: Only in peak value measurement mode, relative value
measurement mode and max/min value inquiry mode, it
will be effective to press RAN key for a short time.
2: In relative value measurement mode and max/min value
inquiry mode, press and hold the key for one second, it
will return to auto switchover of range.
3: In peak value measurement mode, data hold mode and
zero calibration modes, it will be effective to press and
hold RAN key for a long time.
4: In this mode, when measurement value exceeds present
range, “OL” will appear on LCD interface to indicate
Page 21

20
over-range, and the user should switch over the
measurement range at this time.
3.2
Application of relative/peak value measurement
mode
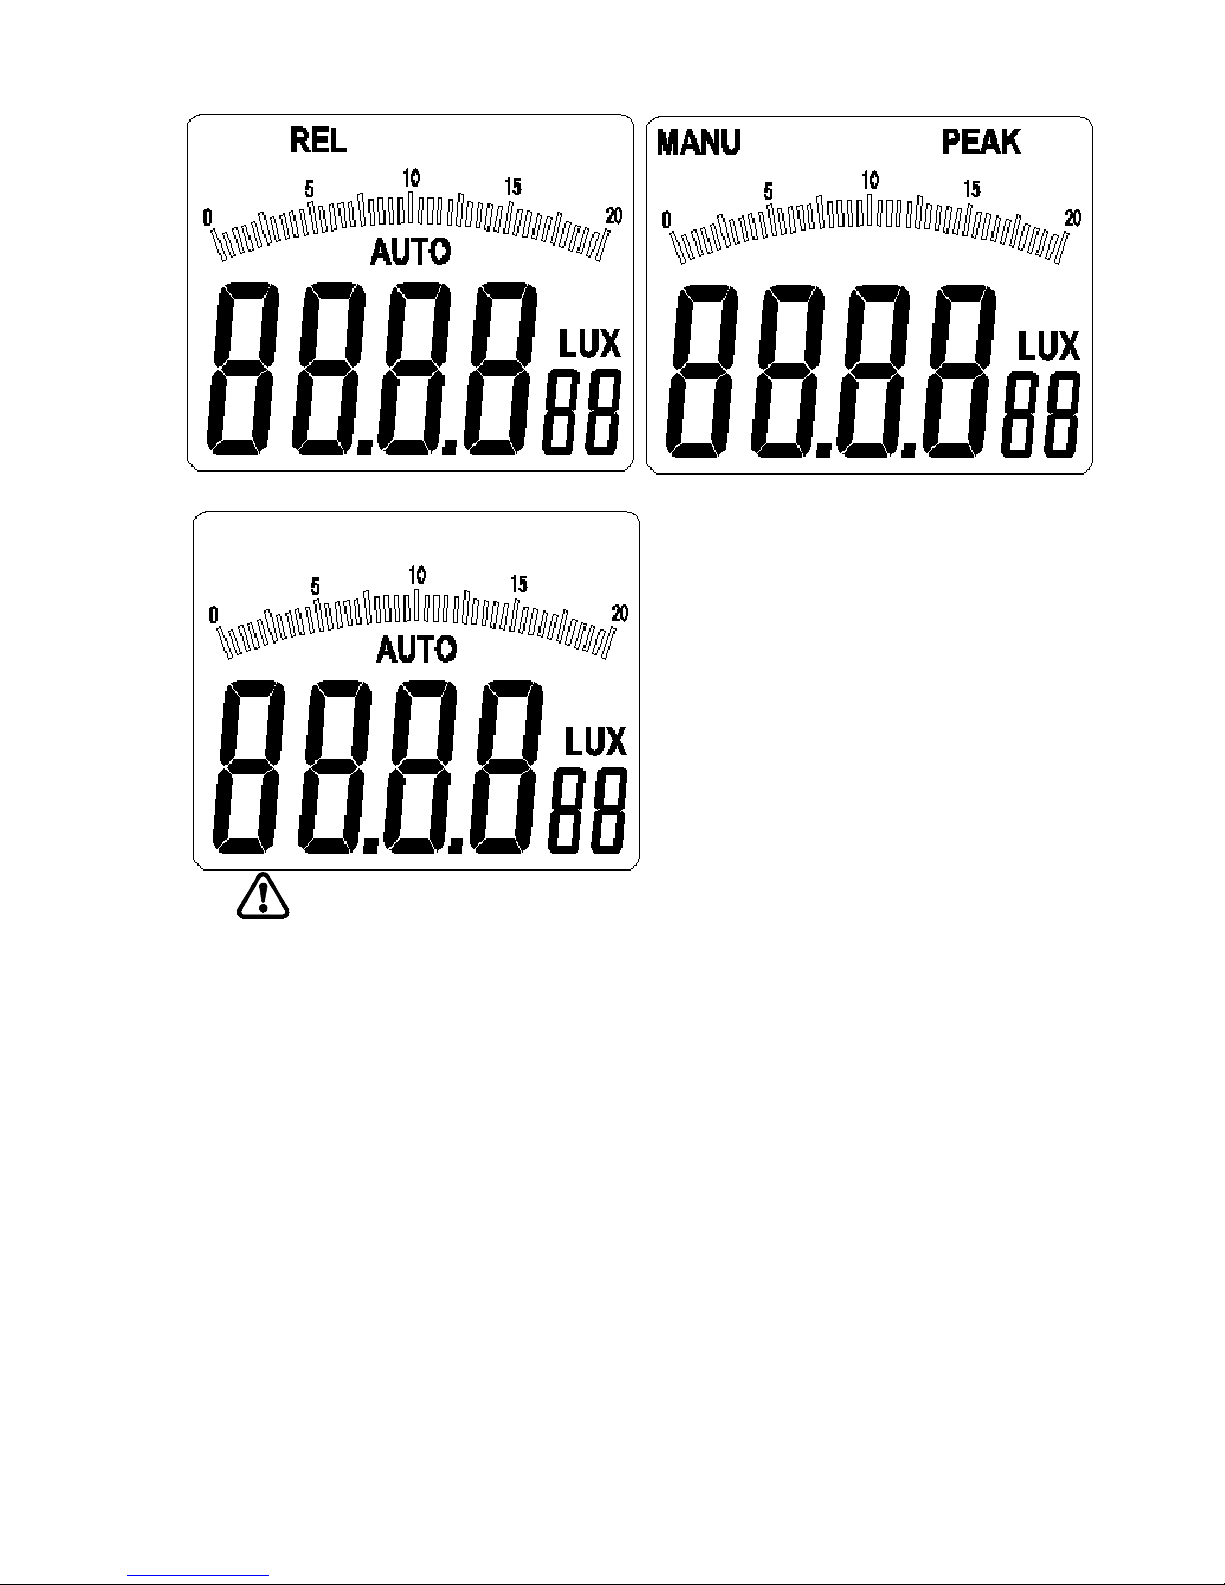
Press and hold REL/PEAK key for a short time
(composite key for relative/peak value measurement),
“REL” will appear on the top left position of the LCD
interface (as shown in figure 3-1-2A), and the device
will enter the relative value measurement mode;
Press and hold REL/PEAK key for a short time again,
“REL” on the top left position of the LCD interface
will disappear, and the device will exit the relative
value measurement mode and return to original
measurement mode;
Press and hold “REL/PEAK” key for one second, the
device will enter the peak value measurement mode,
“PEAK”LCD will appear on the top right position of
the LCD interface, and at the same time, “MENU”
will appear on the top left position of the LCD
interface (as shown in figure 3-1-2B);
Press and hold the key once again for one second,
“PEAK” on top right position of LCD interface will
disappear, and “AUTO” will appear on the middle of
LCD interface, and the device will exit the peak value
measurement mode and return to auto measurement
mode (as shown in 3-1-2C).
Page 22
21
Figure 3-1-2A Figure 3-1-2B
Figure 3-1-2C
Tip
1: Only in auto measurement mode, peak value
measurement mode, max/min value inquiry mode and
data hold mode, it will be effective to press and hold
REL/PEAK key for a short time.
2: In non-zero calibration mode, press and hold
“REL/PEAK” for one second, the device will enter the
peak value measurement mode.
3.3 Application of maximum/minimum value
inquiry mode
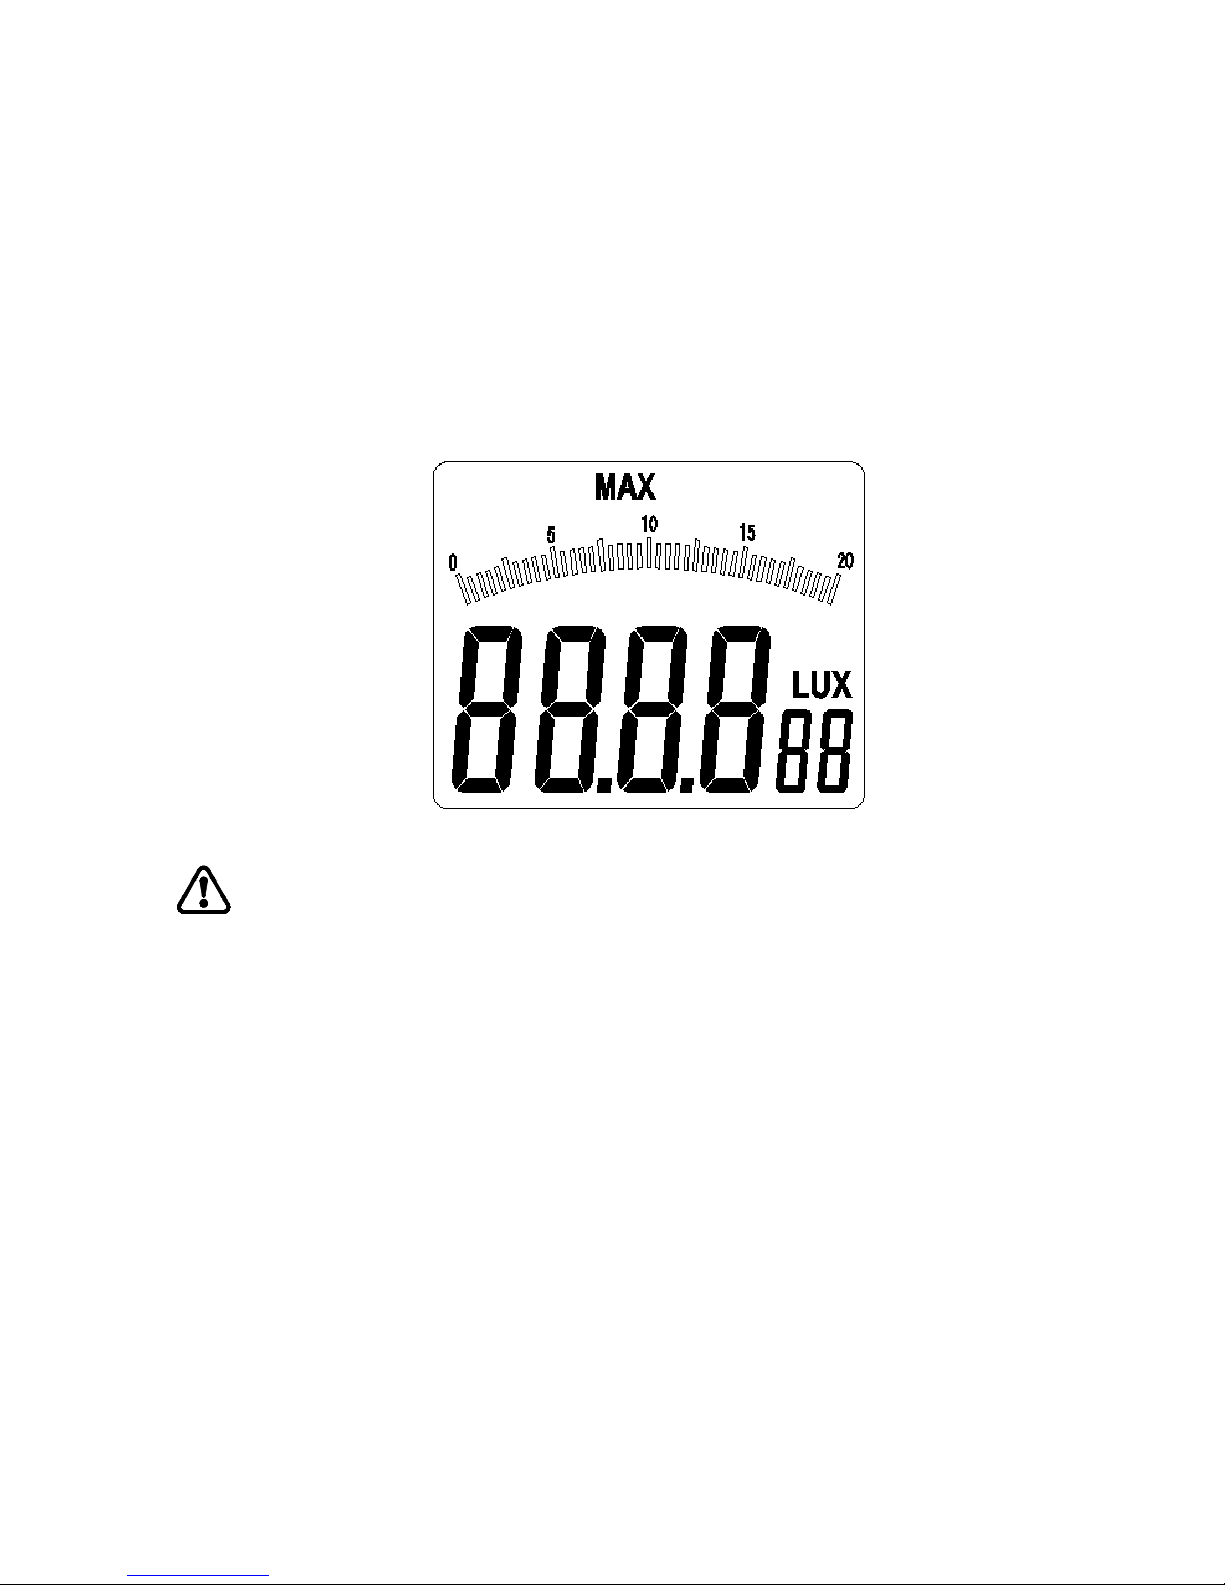
Press and hold “MAX/MIN” key for a short time,
Page 23
22
“MAX” will appear on top LCD interface (as shown in
figure 3-1-3);
In max/min value inquiry mode, press “MAX/MIN” key
once, you will switch MAX to MIN or MIN to MAX;
Press and hold “MAX/MIN” for one second,
“MAX/MIN” on top LCD interface will disappear, and
the max/min value inquiry mode will exit.
Figure 3-1-3
Tips
In non-zero calibration mode, press and hold “MAX/MIN”
key for a short time to use the max/min value inquiry
functions;
Page 24
23
3.4 Application of data hold and zero
calibration mode
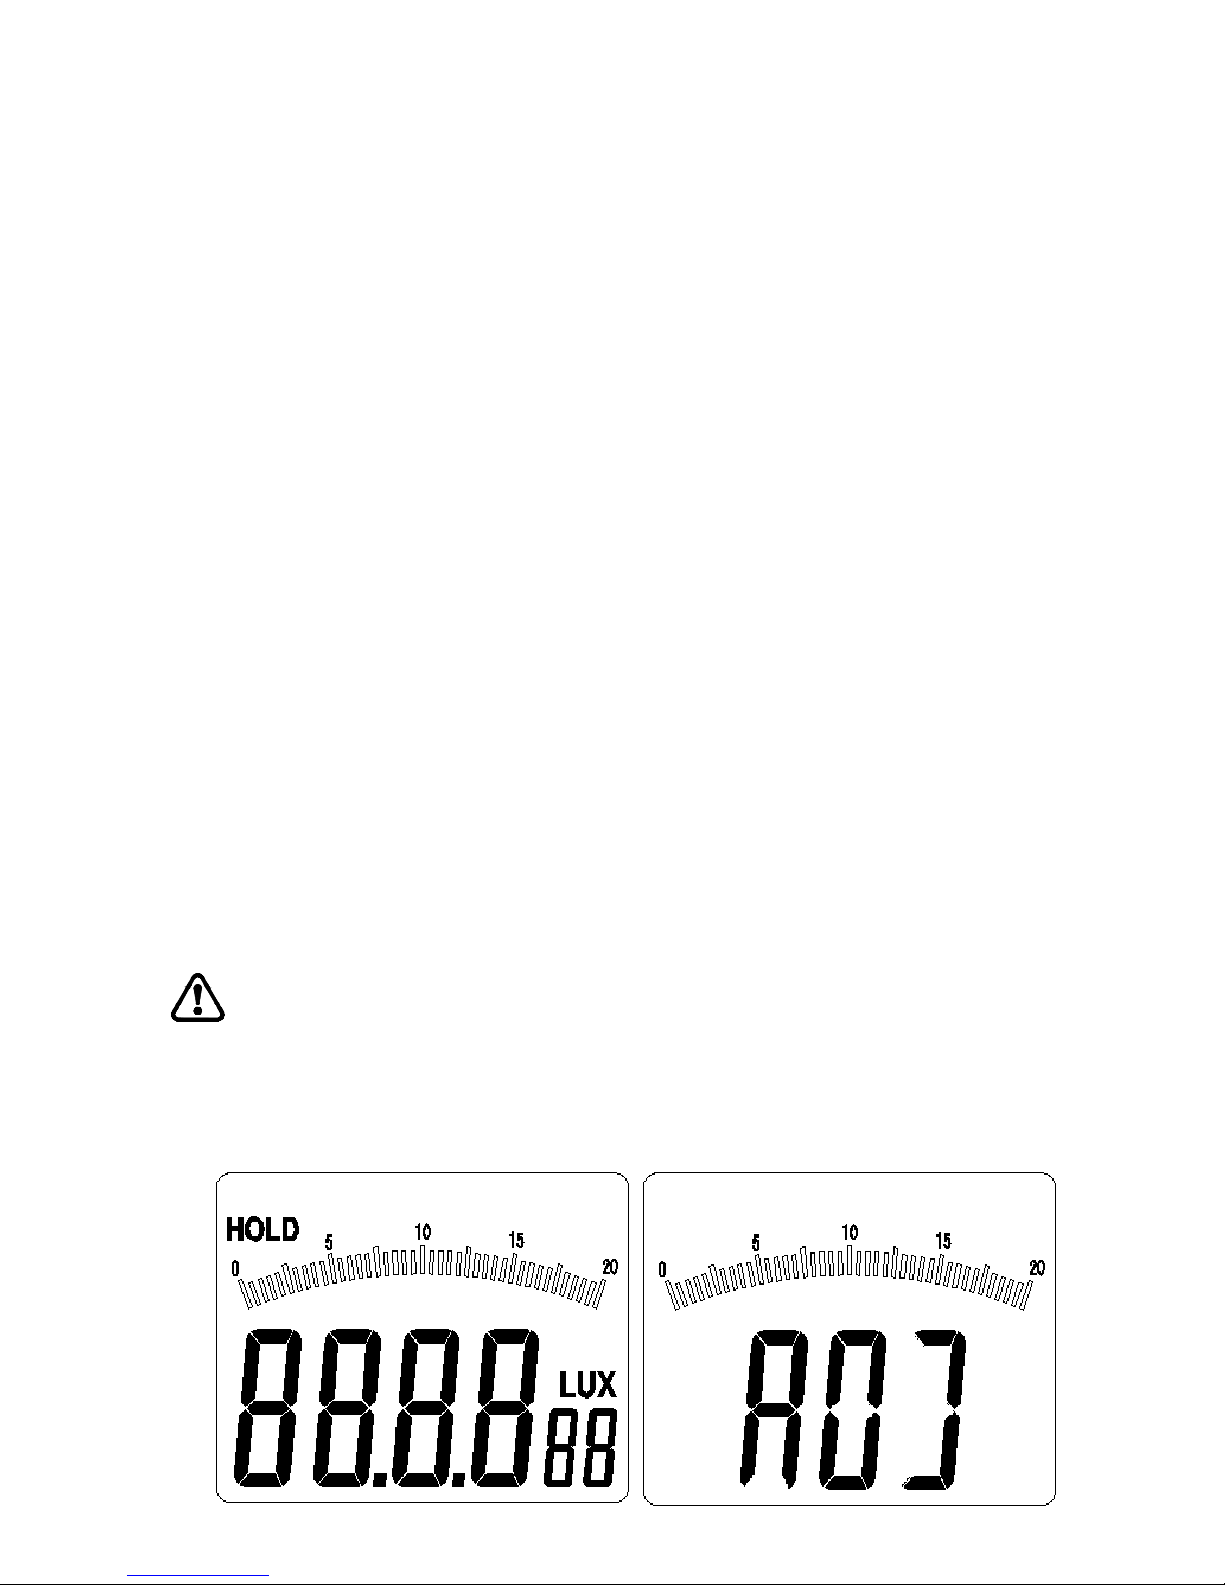
Press and hold “HOLD/ZERO” key for a short time,
“HOLD” will appear on the top left position of the
LCD interface (as shown in 3-1-4A), then the device
will enter the data hold mode;
Press and hold the key again, “HOLD” on the top
left position of the LCD interface will disappear, and
the meter will exit the data hold mode;
Cover the opto-sensor with the visor, and press and
hold “HOLD/ZERO” key for one second, “ADJ”
will appear on LCD interface (as shown in figure
3-1-4B), then the device will enter the zero
calibration mode. Several seconds later, “ADJ” on
LCD interface will disappear, and zero calibration
mode will automatically exit and return to auto
measurement mode.
Notice
Before zero calibration, the opto-sensor must be covered
with the opto-sensor visor.
Page 25

24
Figure 3-1-4A Figure 3-1-4B
Tips
1. In non-zero calibration mode, press and hold
“HOLD/ZERO” key for a short time to enter the
data hold mode.
2. Zero-calibration can be made in any mode.
Page 26

25
4 Other Functions
4.1 Auto power-off
If there is no action on keys of the MS6612 for a long
time, the meter will automatically power off about 10
minutes later.
Page 27

26
5 Technical Data
Temperature range:
Operation:-10~50 OC, max 80 % HR(Non-Condensed)
Storage:-10~50
O
C,max 80 % HR (Non-Condensed)
(removing batteries)
Sampling rate: ≥2 times/s。
Display: 3½ digits, max reading of 1999, with
analog bar display;
Sensor: silicon photoelectric diode
Measured spectral range: 320~730nm
Measurement ranges: 20, 200, 2000, 20000, 200000 Lux
20, 200, 2000, 20000 FC
Operating environment: indoor use
Height: 2000m highest
Battery life: Approx. 200 hours
Power supply: 1×9 V,IEC 6LR61
Dimensions (H×W×D): 190 mm×89 mm×42.5 mm
Weight: Approx. 360 g without batteries
Approx. 420 g with batteries
Accuracy: ±3% (calibrated with incandescent lamps
in 2854K)
±6% other visible light source
Page 28
27
Cosine angle deviation characteristics
Cosine angle Deviations
30° ±2%
60° ±6%
Tips: cosine angle is corrected in accordance with JIS C
1609:1993 and CNS 5119 Grade A General Specification.
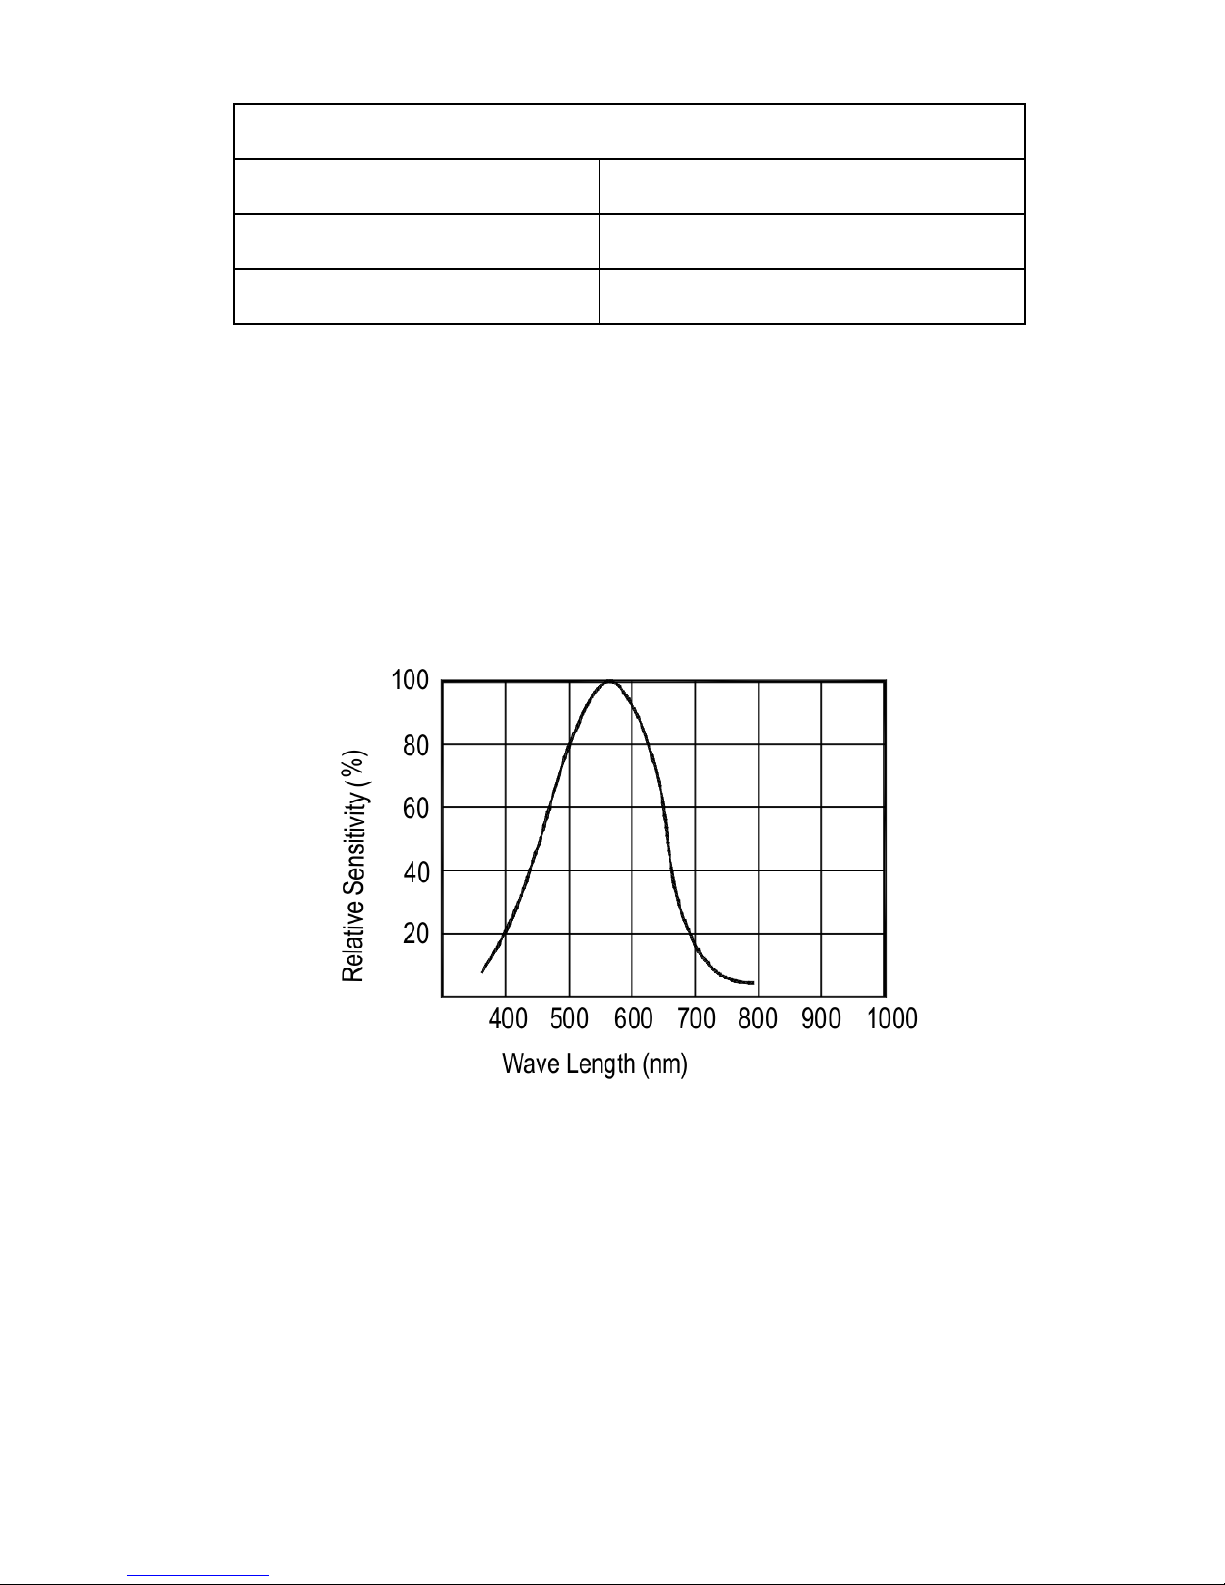
Luminous sensitivity characteristics:
Page 29
28
6 Maintenance and Service
6.1Service
Notice
When the meter seemingly fails during operation,
following steps should be followed to check the fault
problem:
1: Check up batteries. If “ ” appears on the LCD
display, batteries should be replaced.
2: Refer to the operation instructions to check if operation
steps are wrong.
3: Before sending the meter to manufacturer for repair, the
user should remove out the batteries and describe faults
in details, and pack the meter to avoid damages in
transportation. Our company will assume no
responsibility for damages in transformation.
4: Repair on the meter should be performed by service
centers or other qualified servicemen.
6.2 Cleaning
First wipe the meter with a damp soft cloth with clean
water or neutral detergent and then with a dry cloth.
Notice
1: Please make sure the light meter is turned off before
cleaning.
2: Do not use benzene, alcohol, acetone, ethyl ether,
ketones, thinners and gasoline, etc. in cleaning, because
Page 30

29
they will transform or fade the light meter.
3: The light meter can only be used again when it is
completely dry after cleaning.
6.3 Battery replacement
If the battery symbol appears on the LCD accompanied by
buzzer alarm, batteries must be replaced.
Batteries should be replaced as follow:
Turn off the meter;
Remove the screw on the back of the meter and open
the battery compartment;
Remove exhausted batteries;
Replace new batteries observing polarity;
Replace the battery compartment cover and secure
the compartment screw.
Warning
1: Do pay attention to the right polarity of battery when
putting in or replacing batteries. In case of polarity
reversal, the light meter will be damaged, and can even
cause explosion or fire.
2: Neither connects one polarity of the battery to the other
one with wire, nor throws batteries into fire, or it will
cause explosion.
3: Do not attempt to discompose the battery! The battery’s
intensively alkaline electrolyte is corrosive and
endangers the user. In case of contact of the electrolyte
Page 31

30
with skin or clothes, immediately rinse touched parts
with clean water; in case of contact of the electrolyte
with eyes, immediately rinse eyes with clean water and
seek medical advice.
Notice
1: The light meter should be turned off before replacing
batteries.
2: Use batteries specified in technical data only.
3: If the meter is not to be used for a long time, take out
the batteries. In case the meter is polluted due to battery
leak, the meter should be sent by post to the
manufacturer for cleaning and checking.
4: For disposal of used batteries, follow existing
specifications on battery recycling, reuse and treatment.
6.4 Calibration Interval
In order to ensure the accuracy of the meter, periodic
calibration should be performed by our debugging
personnel. It is recommended to make calibration every
year. If the meter is in frequent use or used in poor
environments, the calibration interval should be
accordingly shorten. If the meter is less used, the
calibration interval may prolong to three years.
Page 32
31
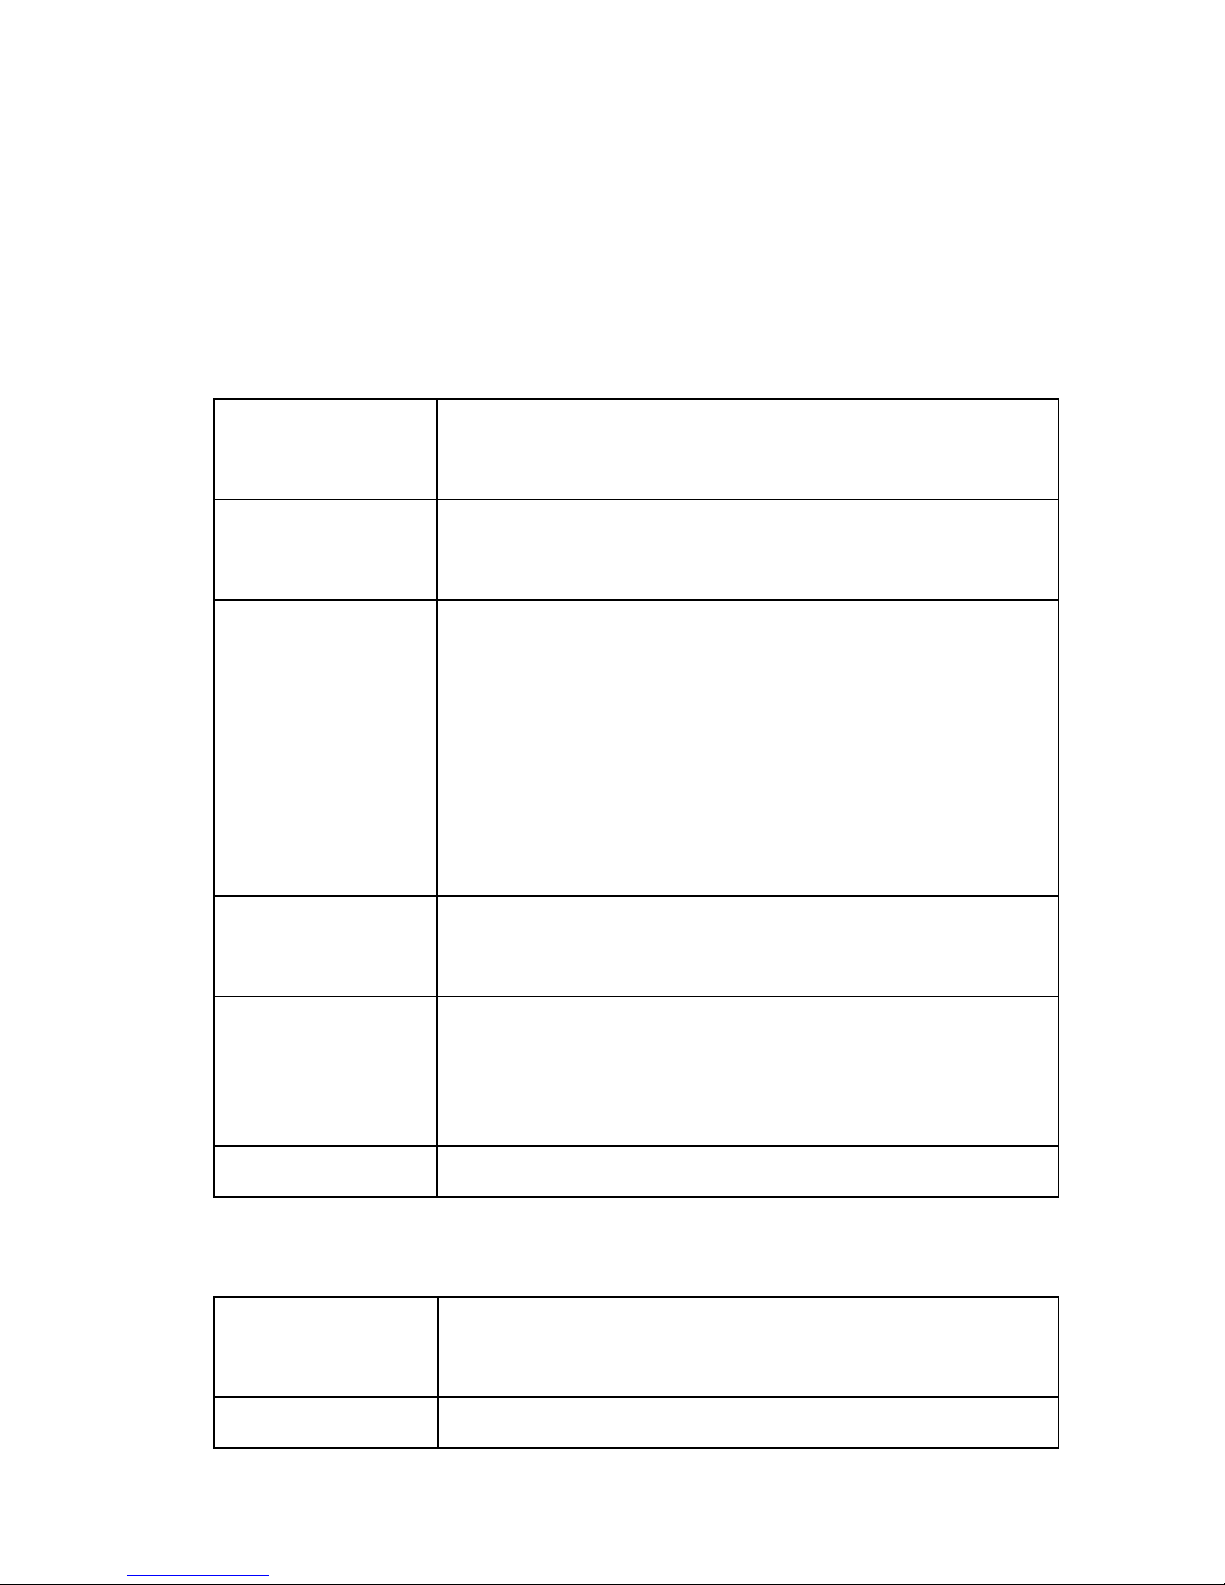
7 Reference Table for Illumination
Standard of Various Locations
Fc illuminance value can be got from Lux
illumination value divided by 10.6.
Schools:
Illuminance
(Lux)
Locations
1500~300
Drafting classroom, sewing classroom,
computer classroom
750~200
Classroom, laboratory, practice workshop,
research room, reading room, stack room,
office, staff lounge, conference room,
health center, restaurant, kitchen, pantry,
radio room, printing room, switchboard
room, guard room, indoor stadium
300~150
Large classroom, auditorium, storage
cabinet room, lounge, staircase
150~75
Corridor, elevator corridor, toilet, duty
room, workers room, bridge, school
outdoor playground
75~30 Warehouse, garage, fire escape
Office:
Illuminance
(Lux)
Locations
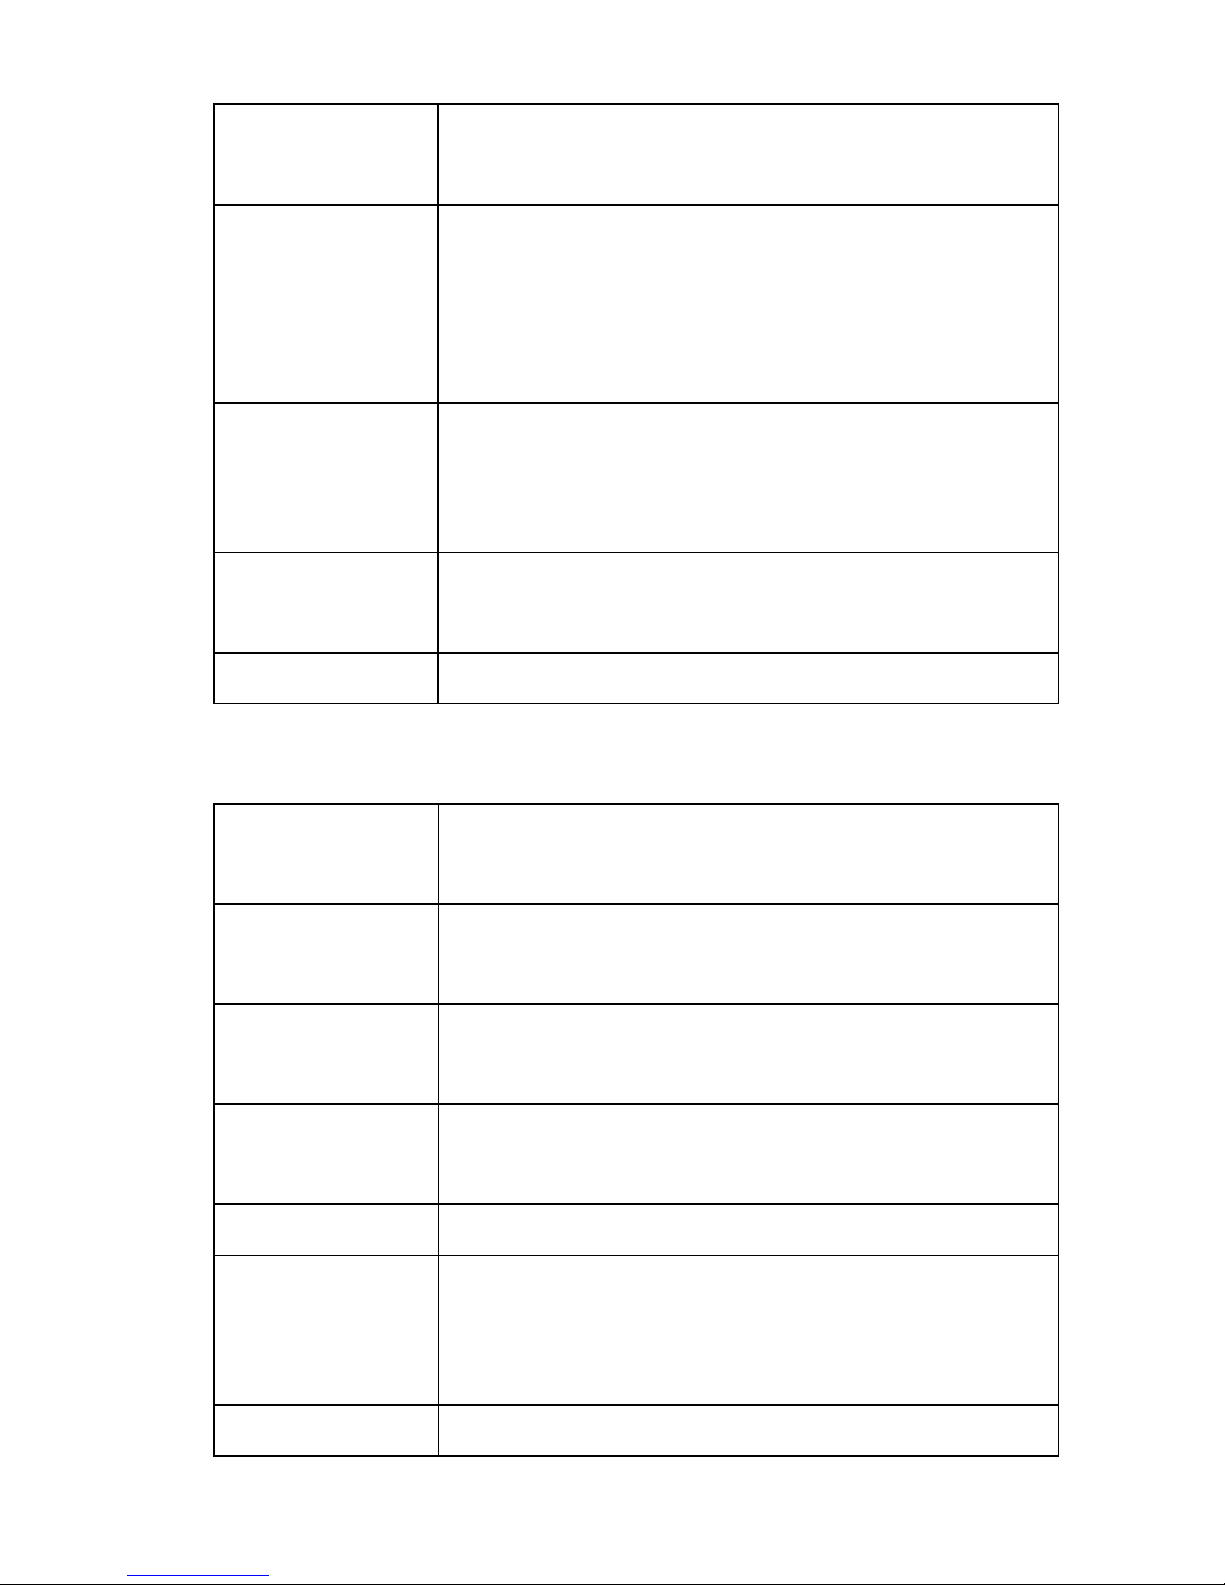
2000~1500 Design office, clerk's office
Page 33
32
1500~750
Hall information channel (daytime),
parlor, drawing office, punching, typing
750~300
Calculator room, conference room,
printing room, switchboard room, control
room, reception room, recreation room,
restaurant
300~150
Stack room, entertainment room, dining
room, lounge, guard room, elevator
(passway), washroom, toilet
150~75
Tea room, changing room, warehouse,
nightwatchmen office (entrance)
75~30 Fire escape
Factories:
Illuminance
(Lux)
Locations
3000~1500
Ultra-precision operation, design,
drafting, precision inspection
1500~750
Design office, analysis, assemble line,
coating
750~300
Packaging, measurement, surface
treatment, warehouse office
300~150 Dyeing, casting, electrical room
150~75
Entrance and exit, corridor, information
channel, staircase, dressing room,
toilet, 、operation warehouse
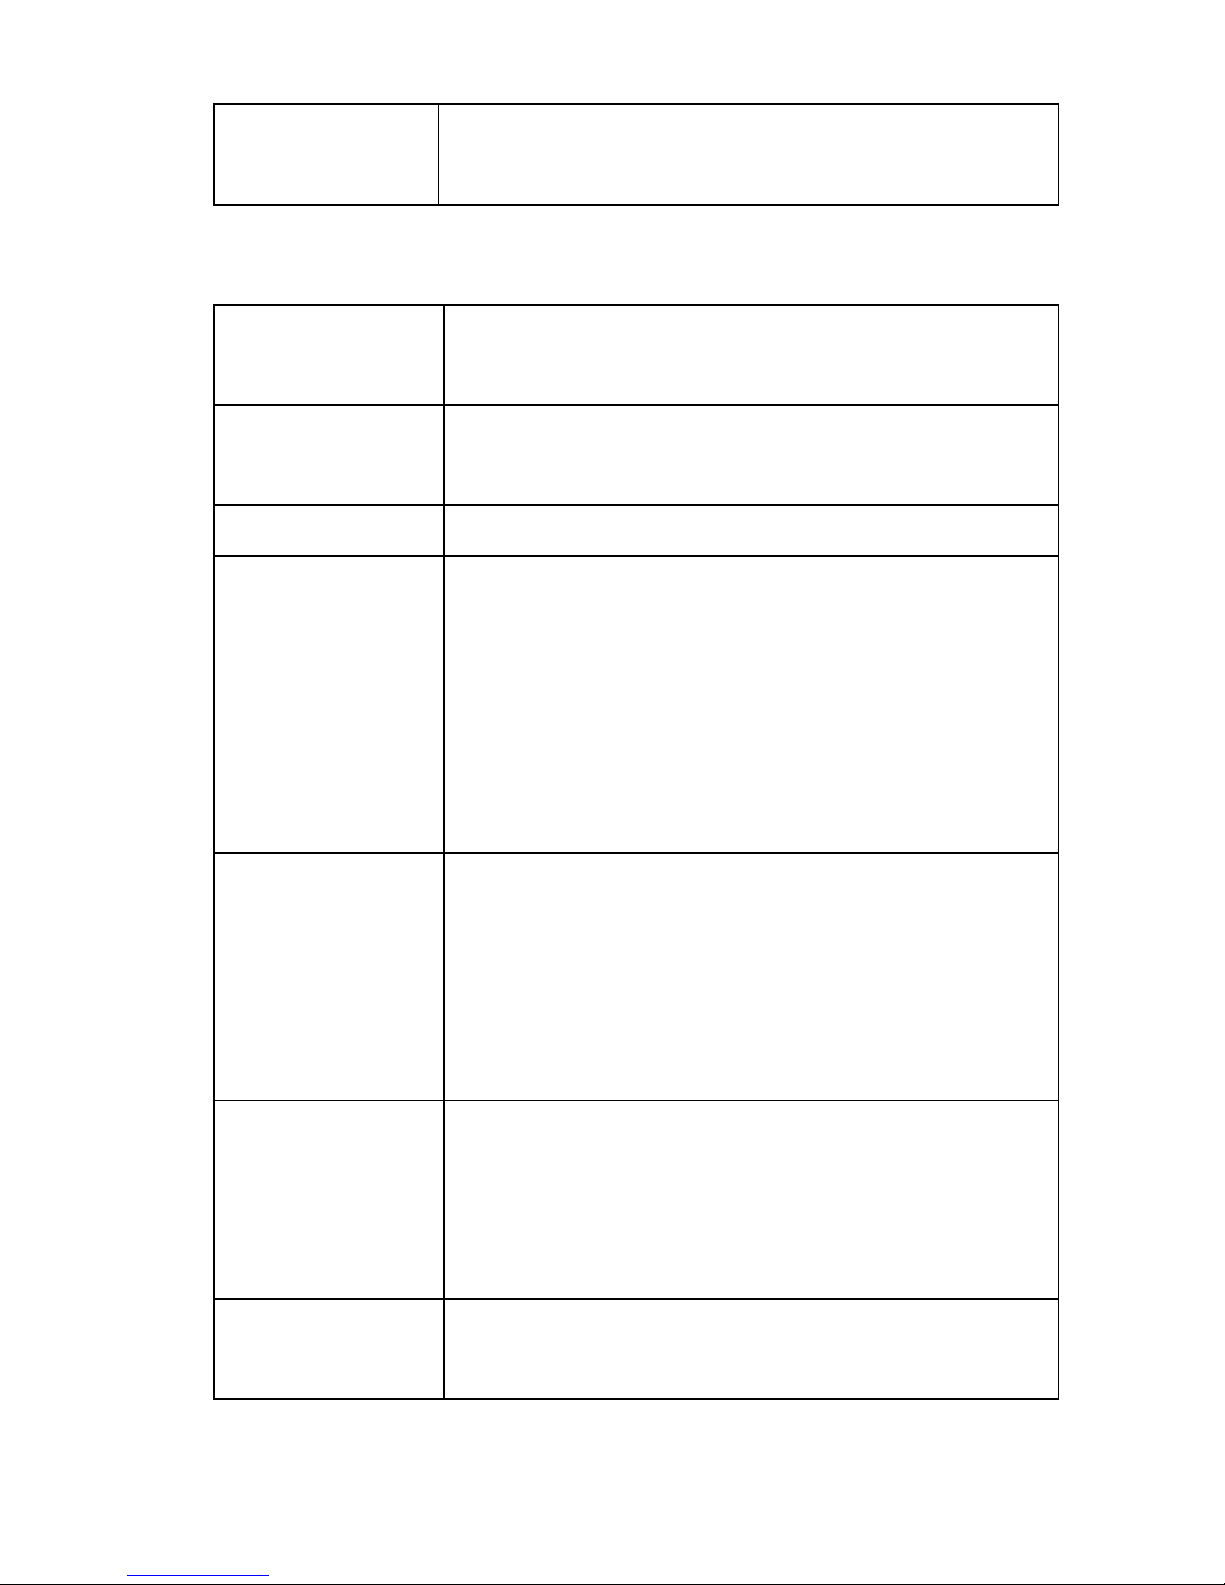
75~30 Fire escape, warehouse, outdoor power
Page 34
33
equipment (loading and unloading,
inventory move operation)
Hospital:
Illuminance
(Lux)
Locations
10000~5000 Visual function test chamber
(ophthalmology light room)
1500~750 Operating room
750~300 Consulting room, treatment room,
pharmacy room, prescription room, drug
store, dissection room, pathological
bacteria room, emergency rooms,
maternity ward, dean’s office, offices,
nursing room, conference room
300~150 Ward, medicine room, bed reading,
medicine changing, plaster bandage for
fractures, infant room, record room,
waiting room, consulting room,
outpatient corridor
150~75 Locker room, physical therapy room,
X-ray room, ward corridor, medicine
room, sterilization room, ward room,
stairs, endoscopy room
75~30 Animal room, dark room (photo), fire
escape
Page 35
34
Hair salon:
Illuminance
(Lux)
Locations
1500~750 Haircut, perm, hair dyeing, cosmetics
750~300
Shave, hairdressing, lobby registration
counter, makeup
300~150 Toilet in salon
150~75 Corridor, stairways
Hotel, restaurant, recreation ground:
Illuminance
(Lux)
Locations
1500~750 Counter
750~300
Halfway, banquet hall, business room,
parking lot, kitchen
300~150
Restaurant, toilet, a large Japanese-style
room
150~75
Recreation room, corridor, stairways,
guest room, bathroom, accent lighting for
gardens, changing room
75~30 Fire escape
Page 36
35
Shop, department store:
Illuminance
(Lux)
Locations
3000~750
Indoor display, decorative window
display, demonstration area, checkout
counter, packaging table
750~300 Elevator lobby, escalators
300~150
Discussion room, dressing room, toilet,
stairs, walkways
150~75 Lounge, general lighting in store
House:
Illuminance
(Lux)
Locations
2000~750 Handcraft, tailoring
1000~500 Writing, work
750~300
Reading, makeup, kitchen table,
processing area, telephone
300~150
Wash sink, entertainment room, living
room, family reunion, entrance (inside)
mirror
150~70
Wardrobe, bedroom, bathroom, stairs,
corridor
75~30 Doorplate, mailbox, doorbell key, terrace
 Loading...