

Page 1
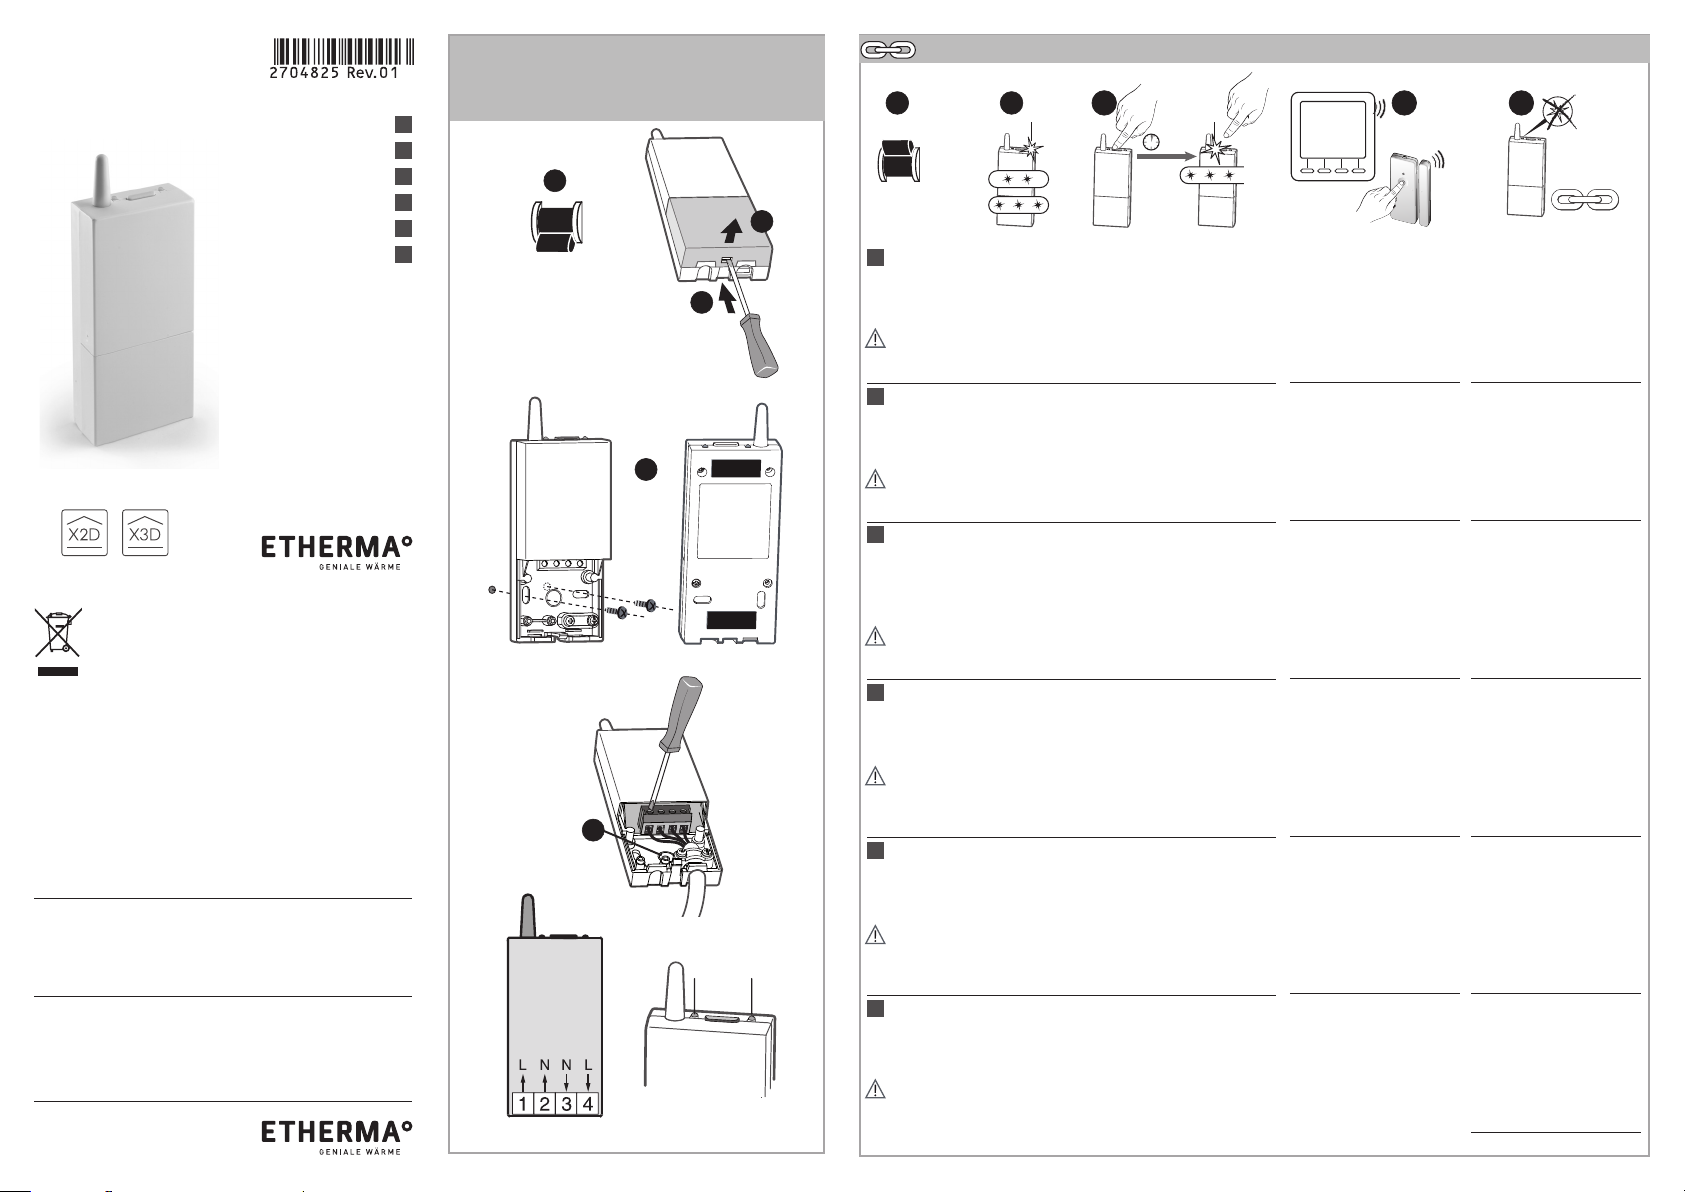
Installation / Installation / Installation
/ Instalación / Installazione /
ET-111A
Radio-controlled receiver 16A
Funkempfänger 16A
Receptor vía radio 16A
Ricevitore via radio 16A
Radiorreceptor de 16 A
ACHTUNG: Elektrische und elektronische Altgeräte enthalten
vielfach noch wertvolle Materialien. Sie können aber auch
schädliche Stoffe enthalten, die für Ihre Funktion und
Sicherheit notwendig waren. Im Restmüll oder bei falscher
Behandlung können diese der Umwelt schaden. Bitte helfen
Sie unsere Umwelt zu schützen! Geben Sie Ihr Altgerät deshalb auf
keinen Fall in den Restmüll. Entsorgen Sie Ihr Altgerät nach den örtlich
geltenden Vorschriften. Verpackungsmaterial, spätere Austauschteile
bzw. Geräteteile ordnungsgemäß entsorgen
WARNING: Electrical and electronic appliances often contain prescious
materials. But they can also contain harmful substances that were
necessary for their function and safety. They can harm the environment
if disposed or mishandled. Please help to protect our environment!
Therefore do not dispose of this device in the residual waste. Dispose of
this unit in accordance with local regulations. Dispose of the packaging
materials, replacement parts or equipment parts properly.
ETHERMA T +43 (0) 6214 / 76 77
Elektrowärme GmbH F +43 (0) 6214 / 76 66
ETHERMA T +49 (0) 25 62 / 81 97 00
Deutschland GmbH F +49 (0) 25 62 / 81 97 029
Récepteur radio 16A
Instalação
FR
EN
DE
ES
IT
PT
1
230V~
50 Hz
OFF
16A
max.
Réf. : 7715703
Association /Association / Verbindung / Asociación / Associazione /Associação
1 2
L2 L1
ON
...
230V~
3
2
50 Hz
FR
Ê
Mettez l’installation sous tension.
Ë
Attendez que le voyant clignote 2 fois(X2D) ou 3 fois(X3D).
Ì
Appuyez 3 secondes sur la touche du récepteur jusqu’à ce que
son voyant clignote. Relâchez.
X2D
X3D
... ...
Dans le cas du Tydom 1.0 X3D (pilotage smartphone), appuyez à
nouveau brièvement sur la touche. Relâchez. Le voyant clignote
plus rapidement.
EN
Ê
Switch on the installation.
Ë
Wait until the LED flashes 2 times (X2D) or 3 times (X3D).
Ì
Press the receiver button for 3 seconds until its LED flashes.
Release.
4
When associating a Tydom 1.0 X3D (smartphone control), press
again but briefly the receiver button. Release. The LED flashes
quickly.
DE
Ê
or
Setzen Sie die Anlage unter Spannung.
Ë
Warten Sie, bis die Kontrollleuchte 2-mal (X2D) oder 3 mal (X3D)
blinkt.
Ì
Drücken Sie 3 Sekunden lang auf die Taste des Empfängers, bis
dessen Kontrollleuchte blinkt. Lassen Sie die Taste los.
Beim Zuordnen eines Tydom 1.0 X3D (Steuerung über Smartphone),
drücken Sie erneut und kurz die Empfängertaste. Lassen Sie die
Taste los. Die Kontrollleuchte blinkt schneller
ES
Ê
Conecte la alimentación.
Ë
Espere hasta que el LED parpadea 2 veces (X2D) o 3 veces (X3D).
Ì
Pulse 3 segundos la tecla del receptor hasta el testigo parpadee.
Deje de pulsar.
Para asociar in Tydom 1.0 X3D (para el control por teléfono
inteligente),pulsar brevemente sobre la tecla. Dejar de pulsar.
El indicador LED parpadea más rápidamente
5
IT
Ê
Mettere l’installazione sotto tensione.
Ë
Attendere che il LED lampeggia 2 volte (X2D) o 3 volte (X3D).
Ì
Premete per 3 secondi il tasto del ricevitore fino a quando la sua
spia lampeggia. Rilasciate.
Per associare un TYDOM 1.0 X3D (comandato da smartphone)
premere nuovamente, brevemente, sul tasto. Rilasciare. il LED
L1 L2
lampeggia piu rapidamente
PT
Ê
Coloque a instalação sob tensão.
Ë
Esperar até que o LED pisca 2 vezes (X2D) ou 3 vezes (X3D).
Ì
Prima a tecla do receptor durante 3 segundos até que o
respetivo indicador luminoso comece a piscar. Solte.
No caso do Tydom 1.0 X3D (controlo via smartphone), prima de novo
a tecla brevemente. Solte. O indicador luminoso começa a piscar
mais rapid.
3 5
4
> 3s
... ... ...
Í
Sur l’émetteur, envoyez
l’ordre d’association (voir
sa notice).
Í
Send the association com-
mand to the transmitter
(refer to the user guide).
Í
Geben Sie über den Sender
die Zuordnungsanweisung
(siehe entsprechende
Anleitung).
Í
En el emisor, envíe la
orden de asociación (ver
las instrucciones).
Í
Sull’emettitore, inviate
l’ordine di associazione
(vedere le relative istruzioni).
Í
No emissor, envie a ordem
de associação
(ver o respetivo aviso).
Î
Vérifiez que le voyant du
récepteur ne clignote
plus. Les produits sont
associés.
Î
Make sure that the
receiver LED has stopped
flashing. The products are
associated.
Î
Achten Sie darauf, dass
die Kontrollleuchte am
Empfänger jetzt nicht
mehr blinkt.
Die Geräte sind nun
miteinander
verbunden.
Î
Compruebe que el testigo
del receptor haya dejado
de parpadear.
Los productos se asocian.
Î Verificate che la spia del
ricevitore non lampeggi più.
I prodotti sono associati.
Î
Verifique se o indicador
luminoso do receptor deixou de piscar.
Os produtos estão
associados.
OFF
OK
Page 2
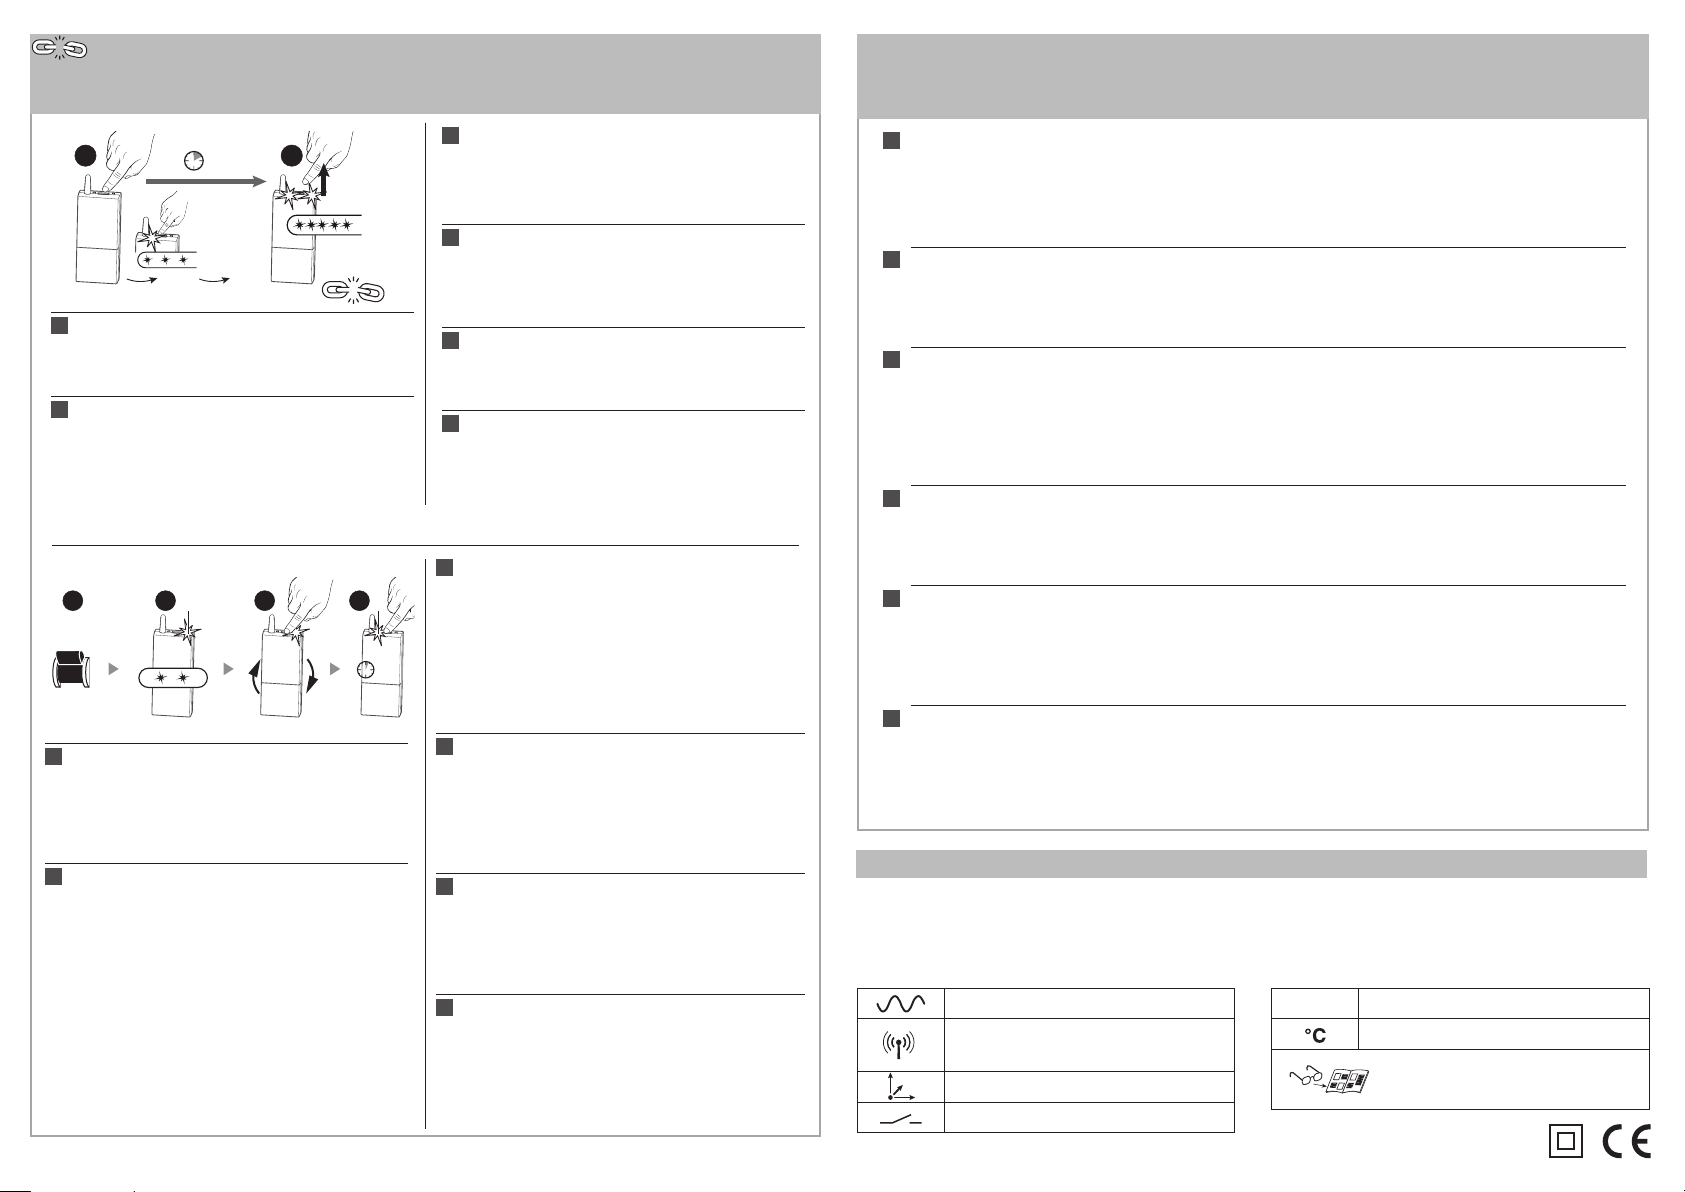
Effacer les associations radio / Delete associations / Zuordnungen
löschen / Borrar las asociaciones radio / Eliminare le associazioni radio /
Apagar as associações via rádio.
DE
Halten Sie die Taste 30 Sekunden lang gedrückt:
1 2
>30s
- Nach 3 Sekunden blinkt die Kontrollleuchte
langsam. Halten Sie die Taste gedrückt bis die 2
Kontrollleuchten blinken. Lassen Sie die Taste
los (Ë).
ES
Mantenga pulsado 30 segundos (Ê):
... ......
OK
3s 27s
FR
Maintenez appuyé 30 secondes (Ê):
- après 3 secondes, le voyant clignote lentement.
Maintenez l’appui jusqu’à ce que les 2 voyants
clignotent. Relâchez (Ë).
EN
Press and hold for 30 seconds (Ê):
- after 3 seconds, the LED flashes slowly.
Keep the receiver button pressed until both
LEDs flash. Release the button (Ë).
- después de 3 segundos, el testigo parpadea
lentamente.
Mantenga pulsado hasta que los dos testigos
parpadeen. Deje de pulsar (Ë).
IT
Mantenete premuto per 30 secondi (Ê):
- dopo 3 secondi, la spia lampeggia lentamente. Mantenere premuto fino a quando le
due spie lampeggiano . Rilasciare (Ë).
PT
Prima continuamente durante 30 segundos (Ê):
- Ao fim de 3 segundos, o indicador luminoso
começa a piscar lentamente.
Continue a premir até que os 2 indicadores
luminosos comecem a piscar. Solte (Ë).
X2d -> X3d / X3d -> X2d
DE
Setzen Sie die Anlage unter Spannung. Die Kontroll-
1 2
L2 L1
3
4
ON
X2D
...
230V~
50 Hz
FR
A la mise sous tension, le voyant L2 clignote 2 fois (X2D)
X2D
X3D
>3s
- Appuyez brièvement sur la touche, le voyant clignote 3
fois (X3D).
- Validez en appuyant 3 secondes sur la touche du
récepteur jusqu’à ce que le voyant L1 clignote. Relâchez.
- Procédez à l’association de l’émetteur (voir sa notice).
EN
Switch on the installation. The LED flashes 2 times (X2D)
iefly on the button, the LED flashes 3 times
- Press br
(X3D).
- Confirm by pressing the button for 3 seconds until LED
L1 flashes. Release.
- You can now associate the transmitter (see transmitter
manua
l).
leuchte blinkt 2-mal (X2D).
- Drücken Sie kurz die Taste. Die Kontrollleuchte blinkt
3-mal (X3D).
- Bestätigen Sie, indem Sie 3 Sekunden lang auf die Taste
des Empfängers drucken, bis dessen Kontrollleuchte
L1 blinkt. Lassen Sie die Taste los.
- Sie können jetzt einen Sender zuordnen (siehe Bedienungsanleitung des Senders).
ES
Conecte la alimentación.
- Espere hasta que la LED parpadee 2 veces (X2D).
- Pulse brevemente en la tecla, la LED parpadea 3 veces (X3D).
- Pulse durante 3 segundos la tecla del receptor hasta el
testigo L1 parpadee. Deje de pulsar.
-
Proceda a la asociación del emisor (ver manual de
instrucciones)
IT
Mettere l’installazione sotto tensione.
- Attendere che il LED lampeggia 2 volte (X2D).
- Premete il tasto, il LED lampeggia 3 volte (X3D).
- Confermate premendo per 3 secondi il tasto del ricevitore fino
a quando la sua spia L1 lampeggia. Rilasciate.
- Procedete con l’installazione dell’ emettitore (vedi istruzioni).
PT
Coloque a instalação sob tensão.
- Esperar até que o LED pisca 2 vezes (X2D).
- Prima brevemente a tecla do receptor durante 3 segundos até que o respetivo indicador L1 luminoso comece
a piscar. Solte.
- Proceda à associação do transmissor (ver manual de
instruções).
Fonctionnement sans thermostat/ Special mode without thermostat / Empfängerverhalten bei fehlender verbindung zum thermostat/ Funcionamiento sin el
termostato / Funzionamento senza termostato / Funcionamento sem termóstato
FR
En l’absence de signal du thermostat pendant plus d’une heure, le récepteur fonctionne en mode
dégradé : (30% en régulation PI, OFF en régulation On/Off).
Les deux voyants clignotent alors simultanément.
Pour passer en mode forcé 100%, appuyez une fois sur le bouton. Le voyant 1 devient fixe, et le
voyant 2 continue de clignoter. Un nouvel appui sur le bouton repasse le récepteur dans le mode
précédent.
EN
Without any signal from the thermostat for more than one hour, the receiver will work in a special
mode (30% in PI regulation, OFF in On/Off regulation).
The two LEDs will flash simultaneously. To switch to the continuous heating mode (100%), press the
receiver button once. The LED 1 will stop flashing (ON) and the LED 2 will continue to flash.
Press one more time the receiver button to go back to the previous mode.
DE
Sollte es über 1 Stunde lang zu einer fehlenden bzw. fehlerhaften Kommunikation zwischen
Thermostat und Empfänger kommen, dann schaltet der Empfänger auf Notbetrieb um (d.h. 30% für
die PI-Regelung, OFF für die ON/OFF Regelung).
Beide Kontrollleuchten blinken dann gleichzeitig.
Um auf Dauerheizung umzuschalten, drücken Sie einmal auf die Taste. Die Kontrollleuchte 1 bleibt
an, die Kontrollleuchte 2 blinkt weiterhin. Sollten Sie nochmals auf die Taste drücken, dann schaltet
der Empfänger in den vorherigen Modus um.
ES
En ausencia de señal del termostato durante más de una hora, el receptor funciona en modo
degradado: (30% en regulación PI, OFF en regulación on/off). Los dos indicadores parpadean
simultáneamente. Para pasar a modo forzado 100%, pulsar un vez sobre el botón.
El indicador 1 se activa de forma continua, y el indicador 2 continua parpadeando.
Al pulsar de nuevo sobre el botón devuelve el receptor en el modo anterior.
IT
In caso di mancata ricezione del segnale radio proveniente dal termostato per più di un ora, il
ricevitore funzionerà in modalità ridotta : ( 30% in regolazione PI o OFF in modalità regolazione ON/
OFF). I due LED lampeggiano allora simultaneamente.
Per forzare il funzionamento al100% premere una volta sul tasto.
Il LED 1 si accende fisso e il LED 2 continua a lampeggiare. Una nuova pressione del tasto riporta il
ricevitore nella modalità precedente.
PT
Na ausência de sinal do termóstato durante mais de 1 hora, o receptor passa a funcionar no modo
degradado: (30% na regulação PI, OFF na regulação On/Off).
Os dois indicadores luminosos começam então a piscar simultaneamente.
Para passar ao modo forçado 100%, prima uma vez o botão. O indicador luminoso 1 fica aceso
continuamente e o indicador luminoso 2 continua a piscar. Uma nova pressão no botão reverte o
receptor para o modo anterior.
A L LG E M E I N E GARANTIEBEDINGUNGEN
Sehr geehrter Kunde, bitte beachten Sie unsere allgemeinen Geschäftsbedingungen. Bei Garantiefällen gelten
die landesspezifischen Rechtsansprüche, die Sie bitte direkt gegenüber Ihrem Händler geltend machen.
VORBEHALT: Technische Änderungen behalten wir uns vor. Änderungen, Irrtümer und Druckfehler begründen
keinen Anspruch auf Schadensersatz
230V~, 50 Hz - 2 VA
X2D : 868MHZ --> 868,6MHz
X3D : 868,7MHZ --> 869,2MHz
54 x 120 x 25 mm
16A, 230Veff Cos j =1
.
IP
44
0°C --> +40°C
Important product information (ËÍ)
 Loading...