

Page 1

INSTALLATION INSTRUCTIONS
A guide for qualied electricians
Model:
Q1200
1.2kW Infra Red Quartz Heater
These instructions are provided as a guideline to assist you.
PLEASE READ THESE INSTRUCTIONS BEFORE INSTALLATION
AND RETAIN FOR FUTURE REFERENCE
Pack contents:
1 x Quartz he ater
1 x Fixing kit
CLEANING:
Always remove the plu g from the electrical s ocket
and allow the heater to co ol down before cleaning
the heater.
Wipe heater with a s oft dry cloth.
Wind the cable ar ound the cable tidy and stor e the
heater in a clean dr y place.
CLEANING WARNING:
Do not immerse the heater in
water.
Do not use any cleaning chemicals
such as detergents and abrasives.
Do not allow the interior to get
wet.
EVENTUALLY, YOU MAY WANT TO
REPLACE THIS PRODUCT:
Regulations require the recycling of Waste from
Electrical and Electronic Equipment (European
“WEEE Direc tive” eective August 20 05—UK
WEEE Regulation s eective 2nd January 20 07).
Environment Agenc y Registered Producer : WEE/
GA0248Q Z.
WHEN YOUR PR ODUCT COMES TO TH E END OF
ITS LIFE OR YO U CHOOSE TO REPLACE I T, PLEASE
RECYCLE IT W HERE FACILITIES E XIST DO NOT
DISPOSE WITH HOUSEHOLD WASTE.
IF YOU EXPERIENCE PROBLEMS:
If you believe your p roduct is defective, p lease return
it to the place where yo u bought it. Our Technical
Team will gladly advise on any Eterna Lighting
product, bu t may not be able to give specic
instructions regarding individual installations.
This heater is not equipped with a device to control the room
temperature. Do not use this heater in small rooms when they
are occupied by persons not capable of leaving the room on
their own, unless constant supervision is provided.
Children of less than 3 years should be kept away from the
heater unless continuously supervised.
Children aged from 3 years and less than 8 years shall only switch on/o the
appliance provided that it has been placed or installed in its intended normal
operating position and they have been given supervision or instruction
concerning use of the appliance in a safe way and understand the hazards
involved. Children aged from 3 years and less than 8 years shall not plug in,
regulate and clean the appliance or perform user maintenance.
WARNING!
SOME PARTS OF THIS
PRODUCT CAN BECOME
VERY HOT AND CAUSE
BURNS. PARTICULAR
ATTENTION HAS TO BE
GIVEN WHERE CHILDREN
AND VULNERABLE
PEOPLE ARE PRESENT.
CAUTION!
Email: sales@eterna-lighting.co.uk / technical@eterna-lighting.co.uk
Visit our website: www.eterna-lighting.co.uk
Made in ChinaIssue 0915
Page 2
READ THIS FIRST:
Check the pack and m ake sure you have all of the
parts liste d on the front of this bookle t. If not,
contact the sup plier where you bought this pro duct
IMPORTANT SAFEGUARDS:
This heater must b e installed by a competent pe rson
in accordance with th e Building Regulations mak ing
reference to the cu rrent edition of the IEE Wirin g
Regulations (BS7671).
As the buyer, install er and/or user of this heater it is
your own responsib ility to ensure that this heater
is t for the purpo se for which you have intended
it. Eterna Lightin g cannot accept any liability fo r
loss, damage or premature failure resulting from
inappropriate use.
This product is designed and constructed according
to the principles o f the appropriate British Stan dard
and is intended fo r normal domestic ser vice.
Switch o the mains be fore commencing installati on
and remove the appropriate circuit fuse.
When working at h eights, please use a suita ble
platform.
Suitable for indoor use only.
This produc t is suitable for use in living are as, and
bathroom dr y (outside) zones only (see diagram
below and curre nt IEE Wiring Regulations for d etails).
It is not suitable f or bathroom zones 0, 1, 2, or other
areas where conta ct with moisture is likely.
If installed w ithin a bathroom, the heater mus t be
wired direc tly to a mains supply via a switche d fused
spur protecte d by a 30mA RCD.
This heater is suit able for installation on sur faces
with normal ammability e.g. wood, plasterboard,
and masonry. It is not s uitable for use on highly
ammable sur faces (e.g. polystyren e, textiles).
Before makin g xing hole(s), check that there are no
obstructi ons hidden beneath the mount ing surface
such as pipes or cab les.
Make sure that the xi ngs are strong enough to
support the co nsiderable weight of the heate r and
holds it rigidl y.
When choosing th e location for your new heater,
ensure that the xin gs will be anchored in a solid
surface e.g. con crete, brick or a joist - do not x
directly onto panelling, cladding, plasterboard etc.
If the location o f your new heater requires the
provision of a new el ectrical supply, the suppl y
must conform with the requirements of the Building
Regulations mak ing reference to the current e dition
of the IEE Wiring Re gulations (BS7671).
The heater is t ted with a 3 pin plug, but can also
be installed us ing a permanent connect ion to
xed wiring: this sh ould be either a suitable cir cuit
(protected w ith a 6 Amp MCB or fuse) or a fused spur
(with a 13 Amp fuse).
Make connecti ons to the electrical supp ly in
accordance with the f ollowing code:
Live: Brown or Red
Neutral: Blue or Black
Earth: Green and Yellow
When making con nections, ensure that the te rminals
are tightened se curely and that no strands of wi re
protrude. Chec k that the terminals are tightene d
onto the bared cond uctors and not onto any
insulation.
This heater must b e connected to Earth.
This appliance is n ot intended for use by person s
(including childr en) with reduced physical, sens ory
or mental capab ilities, or lack of experi ence and
knowledge, u nless they have been given super vision
or instructi on concerning use of the applia nce by a
person resp onsible for their safet y.
IMPORTANT: Always switch o at the m ains and
isolate circuit be fore any maintenance is carried o ut,
any repairs unde rtaken must be by suitable q ualied
electrical engineer.
You are advised at ever y stage of your installatio n to
double-check any electrical connections you have
made. After you h ave completed your installatio n
there are elec trical tests that should b e carried out:
these tests are sp ecied in the Wiring Reg ulations
(BS7671) referred to i n the Building Regulations.
WARNING - To avoid overheating,
do not cover the heater.
SPECIFICATIONS:
VOLT AGE: 240V ~ 50Hz
POWER MAX: 1.2k W
WARNING:
This product becomes hot!
This heater is to be us ed only for the purpose inten ded
by the manufac turer which is for area heating on ly.
Do not put a cover over the applian ce as this would
cause a re hazar d during use.
Install the appliance on ly in a horizontal position .
Do not install th e appliance under a light or xed so urce
of electrical supply.
Avoid installation behind a door.
Do not try to rep air the heater yoursel f, always consult a
suitably qualied engineer.
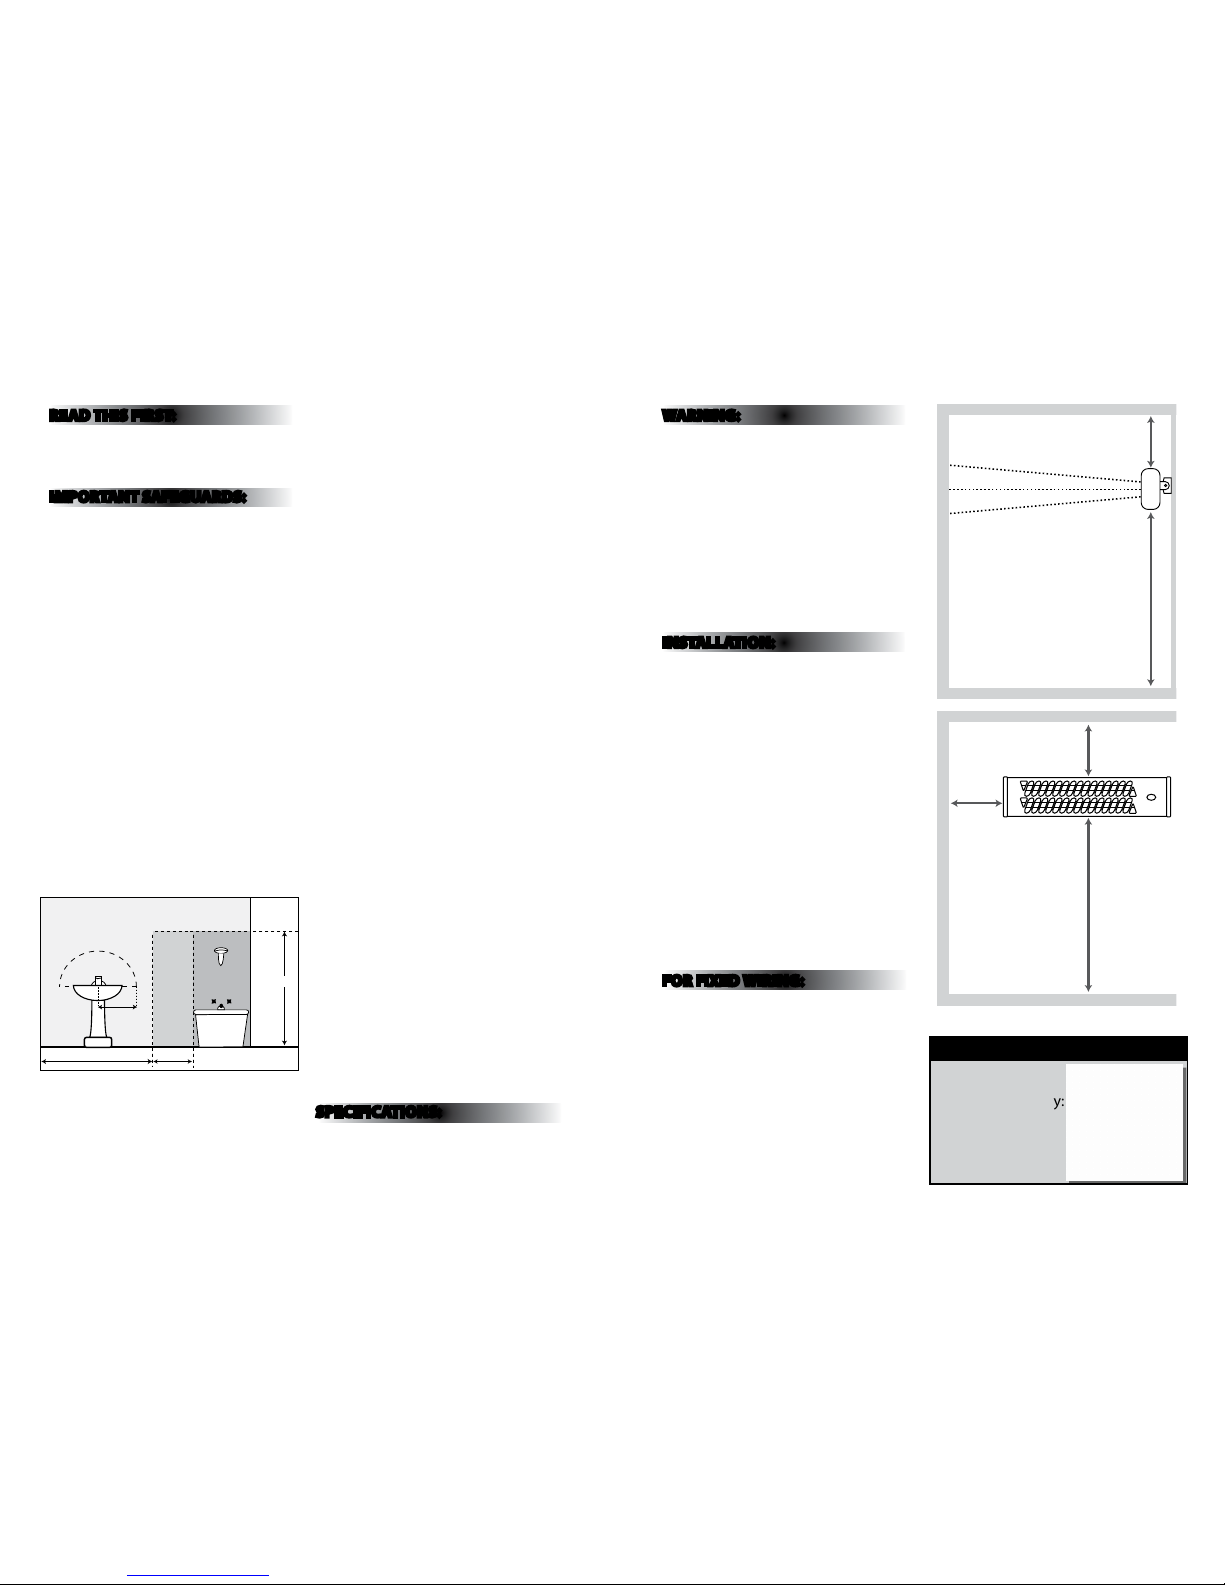
INSTALLATION:
Turn o mains supply befo re commencing with
installation.
Do not install th e heater so that the heat rays
are directed o n to walls or adjacent objects .
Maintain a sucie nt distance between the h eater
and walls/objects, see diagram opposite.
Heaters must be i nstalled at least 1.8m above the
oor level and 50 cm from any given surfaces as
shown opposite:
01) Remove cover plate and p osition the heater
on the wall and mark xing holes.
02) Drill 4 sui table holes and insert t he wall plugs
provided.
03) Fix the he ater in place using suitable scre ws.
04) Re-t the cove r plate.
05) Adjus t the heater direction to the d esired position
via the ratchet me chanism and tighten the screws.
06) Restore power.
FOR FIXED WIRING:
The plug need s to be removed and the wiring
connected to a su itable fused spur. The supply c ircuit
should be prote cted with a 6 Amp MCB or fuse.
Make connecti ons to the electrical supp ly in
accordance with the f ollowing code:
Live: Brown or Red
Neutral: Blue or Black
Earth: Green and Yellow
50cm
180cm
50cm
50cm
50cm
180cm
180cm
225cm
60cm240cm
60cm
radius
from tap
ZONE 1
ZONE 0
ZONE 2
ZONE 2
Bathroom Zones Diagram
Use the pull cord
switch accordingly:
0 = O
1 = 600W
2 = 1.2kW
PULL CORD INSTRUCTIONS:
 Loading...