

Page 1

CAUTION!
Children of less than 3 years should be kept away from the
heater unless continuously supervised.
Children aged from 3 years and less than 8 years shall only
switch on/o the appliance provided that it has been placed
or installed in its intended normal operating position and
WARNING!
they have been given supervision or instruction concerning
use of the appliance in a safe way and understand the hazards involved.
Children aged from 3 years and less than 8 years shall not plug in, regulate
and clean the appliance or perform user maintenance.
SOME PARTS OF THIS
PRODUCT CAN BECOME
VERY HOT AND CAUSE
BURNS. PARTICULAR
ATTENTION HAS TO BE
GIVEN WHERE CHILDREN
AND VULNERABLE
PEOPLE ARE PRESENT.
INSTALLATION INSTRUCTIONS
A guide for qualied electricians
CLEANING:
Always remove the plug from the electrical socket
and allow the heater to cool down before cleaning
the heater.
Wipe heater with a soft dry cloth.
Wind the cable around the cable tidy and store the
heater in a clean dry place.
CLEANING WARNING:
Do not immerse the heater in
water.
Do not use any cleaning chemicals
such as detergents and abrasives.
Do not allow the interior to get
wet.
Email: sales@eterna-lighting.co.uk / technical@eterna-lighting.co.uk
Visit our website: www.eterna-lighting.co.uk
EVENTUALLY, YOU MAY WANT TO
REPLACE THIS PRODUCT:
Regulations require the recycling of Waste from
Electrical and Electronic Equipment (European
“WEEE Directive” eective August 2005—UK
WEEE Regulations eective 2nd Januar y 2007).
Environment Agency Registered Producer: WEE/
GA0248QZ.
WHEN YOUR PRODUCT COMES TO THE END OF
ITS LIFE OR YOU CHOOSE TO REPLACE IT, PLEASE
RECYCLE IT WHERE FACILITIES EXIST DO NOT
DISPOSE WITH HOUSEHOLD WASTE.
IF YOU EXPERIENCE PROBLEMS:
If you believe your product is defec tive, please return
it to the place where you bought it. Our Technical
Team will gladly advise on any Eterna Lighting
product, but may not be able to give specic
instructions regarding individual installations.
Made in ChinaIssue 0618
As with all portable
heating appliances this product is only
suitable for well
insulated spaces
or occasional use.
Pack contents:
1 x Oil lled heater c/w 13A. fused,
3 pin plug tted
2 x Heater wheel clamping plates
4 x Castor wheels
4 x Dome nuts
2 x U clamping bolts
2 x U clamp securing wing nuts
Model:
OILH211TIM
2kW Oil Filled Heater With Timer
These instructions are provided as a guideline to assist you.
PLEASE READ THESE INSTRUCTIONS BEFORE INSTALLATION
AND RETAIN FOR FUTURE REFERENCE
Page 2
READ THIS FIRST:
Check the pack and make sure you have all of the parts
listed on the front of this booklet. If not, contact the
supplier where you bought this product.
IMPORTANT SAFEGUARDS:
When using an electrical appliance, basic safety
precautions should always be observed, including the
following:
This appliance is not intended for use by persons
(including children) with reduced physical, sensory or
mental capabilities, or lack of experience and knowledge,
unless they have been given supervision or instruction
concerning use of the appliance by a person responsible
for their safety.
Extreme caution is necessary where children or persons
with reduced physical, sensor y or mental capabilities may
come into contact with the heater when in use.
This heater is hot when in use. To avoid burns and personal
injury, do not let bare skin touch hot sur faces. Never leave
the heater unattended whilst it is in use.
The product is for household/oce use only.
WARNING -
In order to avoid
overheating when in use, do not
cover the heater or position where it
may come in contact with ammable
materials, such as curtains, drapes etc.
to avoid the risk of re.
WARNING -
When scrapping the
heater, follow the regulations
concerning the disposal of oil.
This heater is lled with a precise quantity of special oil.
In case of leakage or repair which requires opening of
the oil container this should only be carried out by the
manufacturer or qualied engineer.
The heater must not be located adjacent to or against an
electrical socket.
Do not run the cord under carpets/rugs.
Arrange the cord away from high trac areas and where it
will not present a trip hazard.
Do not operate the heater with a damaged cord/plug or if
the heater malfunctions.
If the supply cord is damaged, it must be replaced by
qualied engineer.
Avoid the use of an extension cord as this may overheat
and cause a risk of re.
Use the heater in a well ventilated area.
Do not use the heater in any areas where petrol, paint
or other ammable liquids are stored e.g. garages or
workshops.
Do not use this heater in the immediate surroundings of a
bath, shower, swimming pool or where water is present.
SPECIFICATION:
VOLTAGE: 220-240V ~ 50Hz
POWER MAX: 2kW
WARNING:
Only operate the heater in an upright position with the
feet attached, any other position could cause malfunction.
When in use this product contains hot liquid.
Before each use the user must make a physical inspection
to ensure there is no damage to the metal case of the
product.
Do not try to repair the heater yourself, always consult a
suitably qualied engineer.
Never leave the heater unattended when it is in use.
Do not use the heater in small rooms when they are
occupied by persons who are not capable of leaving
the room on their own, unless constant supervision is
provided.
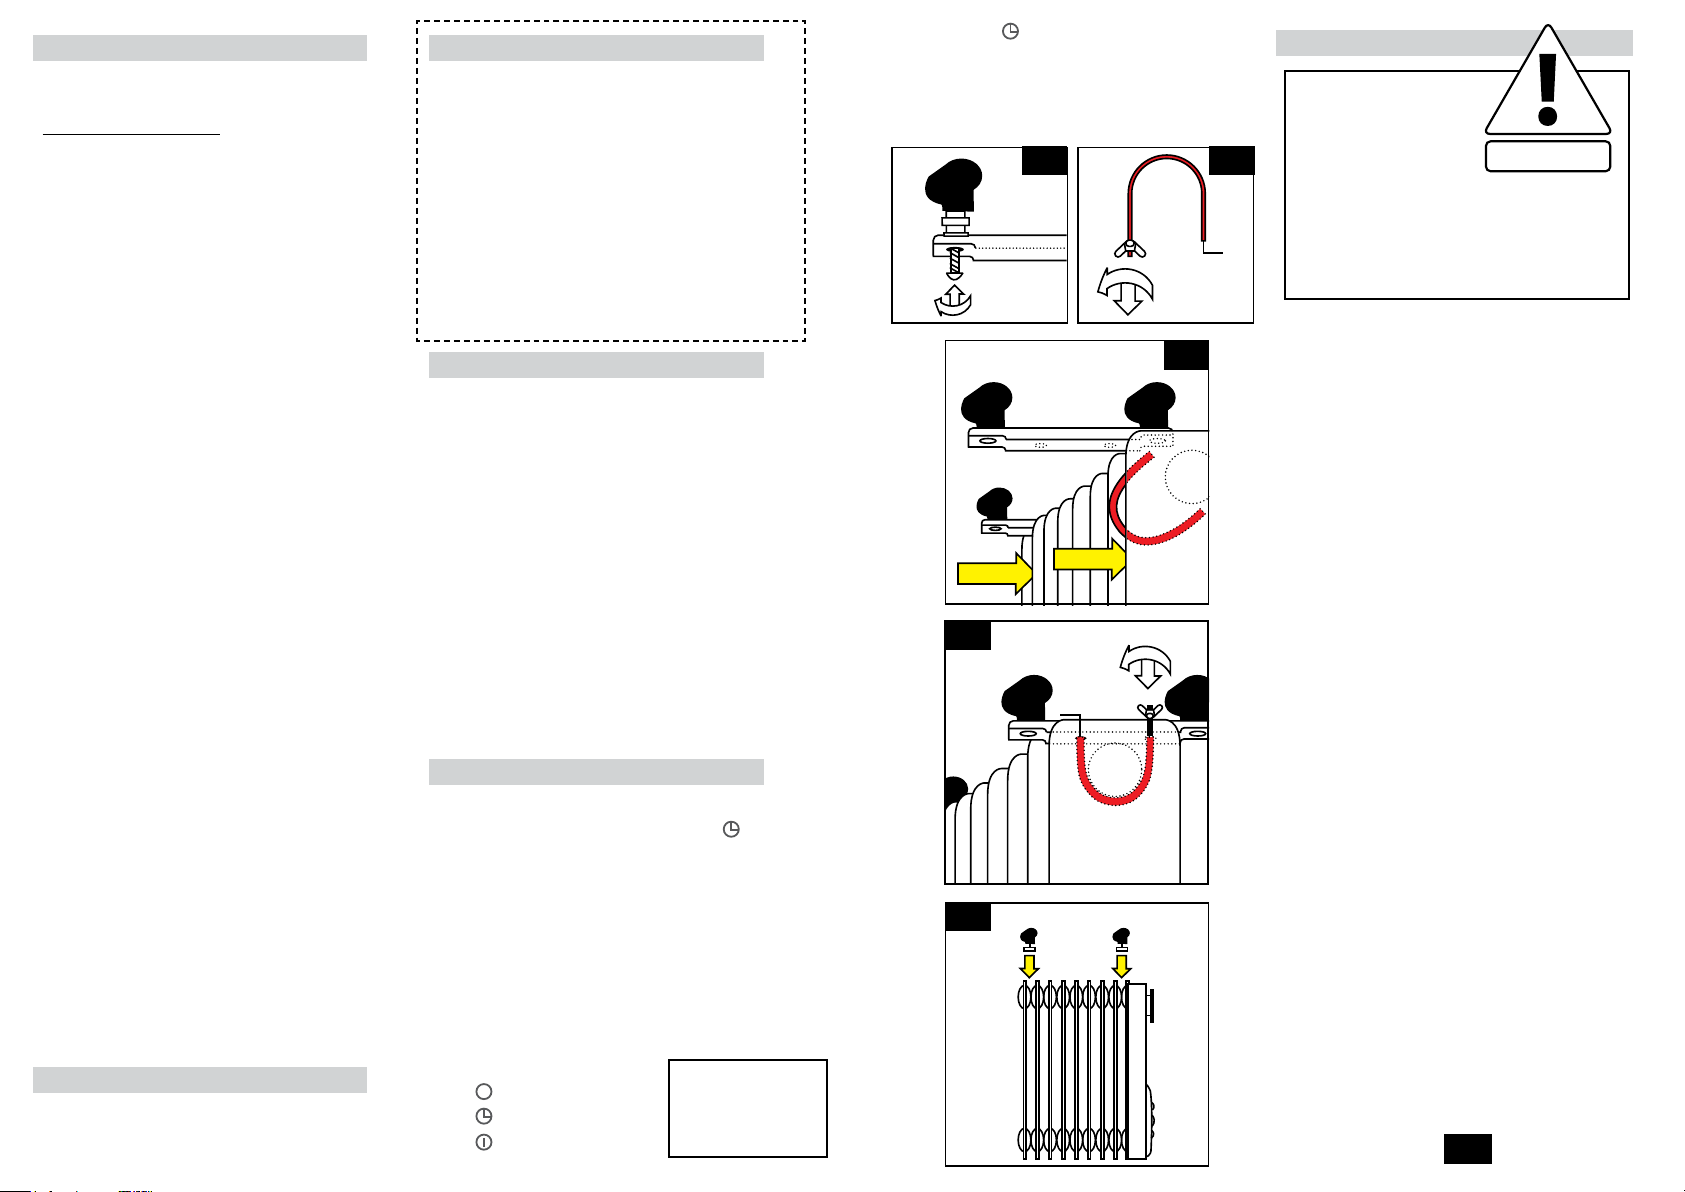
ASSEMBLY INSTRUCTIONS:
YOU MUST ATTACH THE FEET BEFORE OPERATING
THE HEATER.
1. Place the radiator upside-down on a scratch-free
location, making sure it is stable and will not fall.
2. To attach the castors to the mounting plate, unscrew
domed nut and feed through the holes in each end of
the mounting plate. Screw domed nut back in place (g.
1) ensuring that they are fully tightened.
3. Unscrew wing nut from the U-shaped bolt (g. 2). Hook
U-shaped bolt onto the radiator between the rst two
ns (see g. 3).
4. Feed castor mounting plate on to the U-shaped bolt.
(g. 4).
5. Screw wing nut on to ends of U-shaped bolt and fasten
securely (g. 4). Over tightening may cause damage to
the radiator.
6. Now fasten second castor mounting plate between last
two ns (g. 5) and by repeating the above steps.
TIMER INSTRUCTIONS & WARNINGS:
Heater should always be supervised when in use.
The heater will not operate if timer is set to the position
and the pins are not activated according to the times
required.
If the heater loses its electricity supply, e.g. switched o
at the mains socket or in the event of a power failure, the
time should be reset af ter the power is re-established.
The red LED light will be illuminated when the timer is set
to ON position or the timing function is activated.
1. Regulate the timer according to the clock by turning it
clockwise (DO NOT TURN IT ANTI -CLOCKWISE). (See Fig.
6 opposite).
2. The timer has a small
switch with functions as below:
= Unit is always o
0
= Timer function is on
= Unit is always on
NOTE: When in use
ensure full length
of cable is uncoiled
from the cable tidy.
3. Set the timer to position there are 96 small plastic
pins on the timer each correspond to 15 minutes
intervals. Push out the pins corresponding to the time
you want the heater to turn ON and push in the pins
corresponding to the time you want the heater to turn
OF F.
Fig 1 Fig 2
Fig 3
Fig 4
Fig 5
INSTRUCTIONS FOR USE:
WHEN IN USE
THIS PRODUCT
CONTAINS HOT
LIQUID.
WARNING!
BEFORE EACH USE THE USER
MUST MAKE A PHYSICAL
INSPECTION TO ENSURE THERE
IS NO DAMAGE TO THE METAL
CASE OF THE PRODUCT.
NOTE: When the heater is turned on for the rst time
or after having not been used for a long period, it may
smell for a short while.
1. Position the heater on a at and stable sur face.
2. Set all controls to OFF and insert the plug into an
electrical socket.
3. Rotate the thermostat knob clockwise to MAX
position and switch the heater on as follows:
I = Low heat (800W)
II = Medium heat (1.2kW)
I + II = High heat (2kW)
4. When your room reaches the desired temperature,
slowly rotate the thermostat knob counter clockwise
until the red indicator light goes out. The thermostat
can now be left at this setting. As soon as the room
temperature has dropped below the set temperature,
the unit will switch itself on automatically until the set
temperature has been reached again. In this way the
room temperature remains constant with the most
economical use of electricity.
5. To change the room temperature setting, rotate the
thermostat knob clockwise to raise the temperature,
or anti-clockwise to lower it.
6. This heater includes an overheat protection system
that shuts o the heater when parts of the heater get
excessively hot.
7. This unit is tted with anti-tip cut-out protection.
Should the unit not be in the correct vertical position,
the heater will shut o.
8. To completely shut the heater o, turn all the controls
to OFF, and remove plug from the elec trical socket.
NOTE: When using
in timer mode, due
consideration should
be given to the fact that
the heater may come on
whilst unattended.
Fig 6
Page 3

Model Identier(s): OILH157 OILH211 OILH211TIM
Heat output
Nominal heat output Pnom 1.5 2.0 2.0 kW
Minimum heat output (indicative) Pmin 0.0 0.0 0.0 kW
Maximum continuous heat output Pmax,c 1.5 2.0 2.0 kW
Auxiliary electricity consumption
At nominal heat output elmax 0.0 0.0 0.0 kW
At minimum heat output elmin 0.0 0.0 0.0 kW
In standby mode elSB 0.0 0.0 0.0 kW
Type of heat output/room temperature control
With mechanic thermostat room temperature control Yes
Contact details: Eterna Lighting Ltd, Huxley Close, Wellingborough, Northamptonshire NN8 6AB
 Loading...