

Page 1

Pack contents:
1 x Oil lled heater c /w 13A. f used,
3 pin plug tted
2 x Heater wheel cl amping plates
4 x Castor wheels
4 x Dome nuts
2 x U clamping bolt s
4 x U clamp securing w ing nuts
INSTALLATION INSTRUCTIONS
A guide for qualied electricians
Model:
OH211T
2kW 11 Fin Oil Filled Heater With Timer
These instructions are provided as a guideline to assist you.
PLEASE READ THESE INSTRUCTIONS BEFORE INSTALLATION
AND RETAIN FOR FUTURE REFERENCE
Issue 2015
FOR PRODUCT ADVICE:
• T: 01933 673 144
• F: 01933 678 083
• E: sales@eterna-lighting.co.uk
Visit our website:
www.eterna-lighting.co.uk
Made in China
CLEANING:
Always remove the plu g from the electrical s ocket
and allow the heater to co ol down before cleaning
the heater.
Wipe heater with a s oft dry cloth.
Wind the cable ar ound the cable tidy and stor e the
heater in a clean dr y place.
CLEANING WARNING:
Do not immerse the heater in
water.
Do not use any cleaning chemicals
such as detergents and abrasives.
Do not allow the interior to get
wet.
EVENTUALLY, YOU MAY WANT TO
REPLACE THIS PRODUCT:
Regulations require the recycling of Waste from
Electrical and Electronic Equipment (European
“WEEE Direc tive” eective August 20 05—UK
WEEE Regulation s eective 2nd January 20 07).
Environment Agenc y Registered Producer : WEE/
GA0248Q Z.
WHEN YOUR PR ODUCT COMES TO TH E END OF
ITS LIFE OR YO U CHOOSE TO REPLACE I T, PLEA SE
RECYCLE IT W HERE FACILITIES E XIST DO NOT
DISPOSE WITH HOUSEHOLD WASTE.
IF YOU EXPERIENCE PROBLEMS:
If you believe your p roduct is defective, p lease return
it to the place where yo u bought it. Our Technical
Team will gladly advise on any Eterna Lighting
product, bu t may not be able to give specic
instructions regarding individual installations.
SOME PARTS OF THIS
PRODUCT CAN BECOME
VERY HOT AND CAUSE
BURNS. PARTICULAR
ATTENTION HAS TO BE
GIVEN WHERE CHILDREN
AND VULNERABLE
PEOPLE ARE PRESENT.
CAUTION!
Children of less than 3 years should be kept away from the
heater unless continuously supervised.
Children aged from 3 years and less than 8 years shall only
switch on/o the appliance provided that it has been placed
or installed in its intended normal operating position and
they have been given supervision or instruction concerning
use of the appliance in a safe way and understand the hazards involved.
Children aged from 3 years and less than 8 years shall not plug in, regulate
and clean the appliance or perform user maintenance.
WARNING!
Page 2
READ THIS FIRST:
Check the pack an d make sure you have all of the par ts
listed on the fr ont of this booklet. I f not, contact the
supplier where you bought this product.
IMPORTANT SAFEGUARDS:
When using an el ectrical applian ce, basic safety
precautions should always be observed, including the
following:
This appliance i s not intended for use by pe rsons
(including children) with reduced physical, sensory
or mental capa bilities, or lack of exp erience and
knowledge, unless they have been given supervision
or instruct ion concerning use of the ap pliance by a
person responsible for their safety.
Extreme c aution is necessar y where children or
persons wit h reduced physical, sens ory or mental
capabilitie s may come into contact with th e heater
when in use.
This heater is hot w hen in use. To avoid burns and
personal inj ury, do not let bare skin tou ch hot surfaces.
Never leave the hea ter unattended whils t it is in use.
The product is for household/oce use only.
WARNING -
In order to avoid
overheating when in use, do
not cover the heater or position
where it may come in contact
with ammable materials, such as
curtains, drapes etc. to avoid the
risk of re.
WARNING -
When scrapping the
heater, follow the regulations
concerning the disposal of oil.
This heater is l led with a precise quanti ty of special
oil. In case of leakage or repair which requires opening
of the oil contain er this should only be car ried out by
the manufacturer or qualied engineer.
The heater mus t not be located adjace nt to or against
an electri cal socket.
Do not run the cor d under carpets/rug s.
Arrange the cor d away from high trac areas an d
where it will not p resent a trip hazard.
Do not operate t he heater with a damaged co rd/plug
or if the heater malfunctions.
If the supply co rd is damaged, it must be re placed by
qualied engineer.
Avoid the use of an ex tension cord as this may
overheat and cau se a risk of re.
Use the heater in a wel l ventilated area.
Do not use the hea ter in any areas where petro l, paint
or other ammab le liquids are stored e.g . garages or
workshops.
Do not use this heater in the immediate surroundings
of a bath, shower, swim ming pool or where wate r is
present.
SPECIFICATION:
VOLTAGE: 220-240V ~ 50H z
POWER MAX: 2kW
WARNING:
Only operate t he heater in an upright posi tion with
the feet att ached, any other positi on could cause
malfunction.
When in use this product contains hot liquid.
Before each us e the user must make a physica l
inspectio n to ensure there is no damage to t he metal
case of the prod uct.
Do not try to rep air the heater yoursel f, always consult
a suitably qualied engineer.
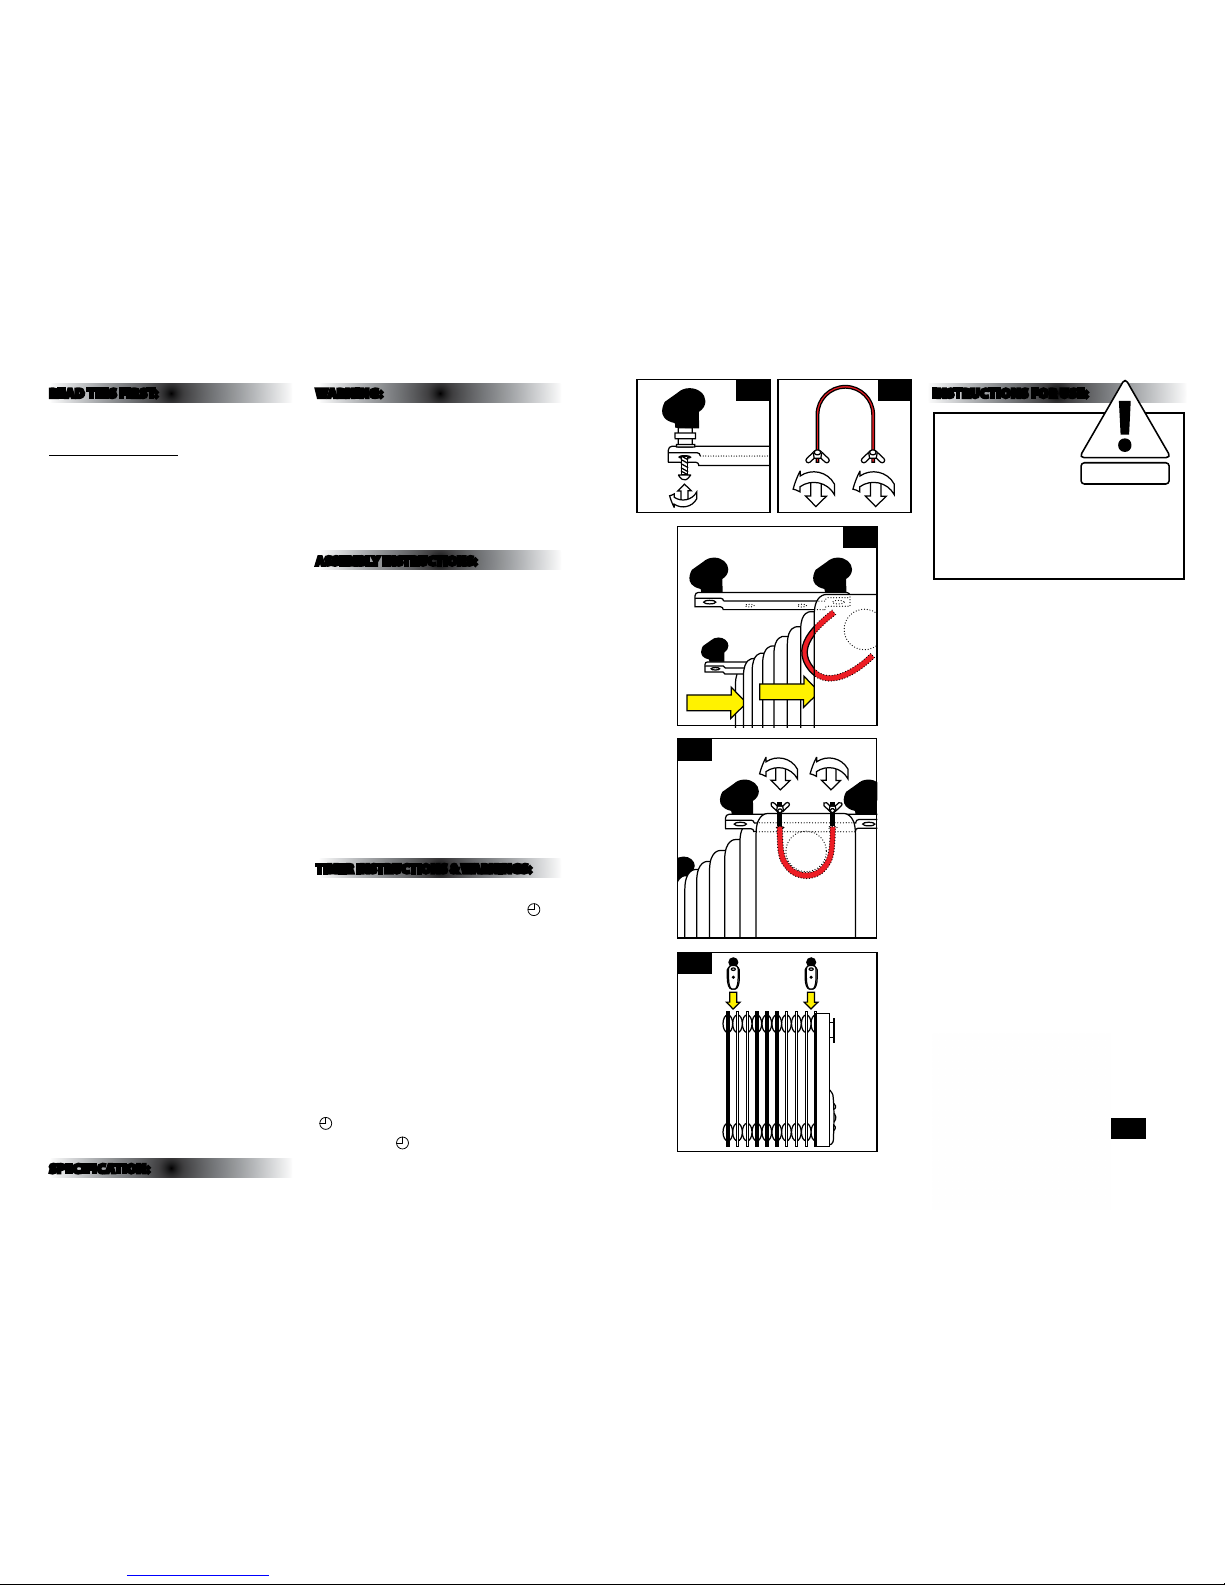
ASSEMBLY INSTRUCTIONS:
YOU MUST ATTACH TH E FEET BEFOR E OPERATIN G
THE HEATER.
1. Place the radiator up side-down on a scr atch-free
location, ma king sure it is stable an d will not fall.
2. To attach the cas tors to the mounting plate, u nscrew
domed nut and f eed through the holes in e ach end
of the mounting p late. Screw domed nut bac k in
place (g. 1) ensuring that th ey are fully tightened.
3. Unscrew wing n ut from the U-shaped b olt (g. 2).
Hook U-sha ped bolt onto the radiat or between the
rst two ns (se e g. 3).
4. Feed casto r mounting plate on to the U- shaped bolt.
(g. 4).
5. Screw wing nut o n to ends of U-shaped bo lt and
fasten secur ely (g. 4). Over tightening may ca use
damage to the rad iator.
6. Now fasten s econd castor mounting p late between
last two ns (g. 5) an d by repeating the above
steps.
TIMER INSTRUCTIONS & WARNINGS:
Heater should a lways be supervise d when in use.
The heater will n ot operate if timer is set to t he
position and th e pins are not activated a ccording to
the times required.
If the heater lo ses its electrici ty supply, e.g. switched
o at the mains soc ket or in the event of a power
failure, the tim e should be reset afte r the power is
re-established.
The red LED light w ill be illuminated when th e timer is
set to ON positi on or the timing functi on is activated.
1. Regulate the time r according to the clock by tur ning
it clockwis e (DO NOT TURN IT ANTI- CLOCKWISE).
(See Fig. 6 opposi te).
2. The timer h as a small switch with func tions as
below:
1 = Unit is always on
= Timer func tion is on
3. Set the timer t o position there are 96 sma ll plastic
pins on the timer e ach correspond to 15 minutes
intervals. P ush out the pins correspon ding to the
time you want the he ater to turn ON and push in the
pins correspo nding to the time you want the h eater
to turn OFF.
INSTRUCTIONS FOR USE:
WHEN IN USE
THIS PRODUCT
CONTAINS HOT
LIQUID.
BEFORE EACH USE THE USER
MUST MAKE A PHYSICAL
INSPECTION TO ENSURE THERE
IS NO DAMAGE TO THE METAL
CASE OF THE PRODUCT.
NOTE: When th e heater is turned on for th e rst time
or after havin g not been used for a lon g period, it may
smell for a shor t while.
1. Position the heater o n a at and stable surf ace.
2. Set all contro ls to OFF and insert the plu g into an
electric al socket.
3. Rotate the the rmostat knob clock wise to MAX
position and s witch the heater on as follow s:
I = Low heat (800W)
II = Medium heat (1.2kW)
I + II = High heat (2kW )
4. When your ro om reaches the desired temper ature,
slowly rotate the thermostat knob counter clockwise
until the red indi cator light goes out. Th e thermostat
can now be lef t at this setting. As so on as the room
temperature has dropped below the set temperature,
the unit will swi tch itself on automatic ally until the set
temperature h as been reached again. I n this way the
room temperature remains constant with the most
economical use of electricity.
5. To change the room tem perature setting, rotate the
thermostat knob clockwise to raise the temperature,
or anti-clo ckwise to lower it.
6. This heater i ncludes an overheat prote ction system
that shuts o the h eater when parts of th e heater get
excessively hot.
7. This unit is tted with a nti-tip cut-out protection.
Should the unit n ot be in the correct ver tical position,
the heater will sh ut o.
8. To completely shu t the heater o, turn all the contr ols
to OFF, and remove plug from th e electrical socke t.
Fig 1 Fig 2
Fig 3
Fig 4
Fig 5
Fig 6
WARNING!
 Loading...