

Eterna HDSS165 Installation Instructions Manual
Issue 2013
Model:
HDSS165
1650W Automatic Hand Dryer
These instructions are provided as a guideline to assist you.
PLEASE READ THESE INSTRUCTIONS BEFORE INSTALLATION
AND RETAIN FOR FUTURE REFERENCE
FOR PRODUCT ADVICE:
• T: 01933 673 144
• F: 01933 678 083
• E: sales@eterna-lighting.co.uk
Visit our website:
www.eterna-lighting.co.uk
INSTALLATION INSTRUCTIONS
A guide for qualied electricians
Pack contents:
1 x Fitting
1 x Fixing pack
CLEANING:
Clean this hand dr yer only with a soft dr y cloth.
Do not use any chemic al or abrasive cleaners.
EVENTUALLY, YOU MAY WANT TO REPLACE THIS PRODUC T:
Regulations re quire the recycling of Waste fr om Electrical and Elec tronic Equipment (European “ WEEE
Directive” e ective August 2005— UK WEEE Regulations eec tive 2nd January 2007). Environmen t Agency
Registered Pro ducer: WEE/GA0248QZ.
WHEN YOUR PR ODUCT COMES TO TH E END OF ITS LIFE OR YOU CH OOSE TO REPLACE IT, PLEA SE RECYCLE IT
WHERE FACILI TIES EXIST DO N OT DISPOSE WITH HO USEHOLD WASTE.
IF YOU EXPERIENCE PROBLEMS:
If you believe your p roduct is defective, p lease return it to the place whe re you bought it. Our Technical Team
will gladly adv ise on any Eterna Lighting produc t, but may not be able to give spe cic instructions rega rding
individual installations.
READ THIS FIRST:
Check the pack and m ake sure you have all of the
parts liste d on the front of this bookle t. If not,
contact the outlet where you bought this product.
This hand drye r must be installed by a compe tent
person in accord ance with the Building Regulat ions
making refere nce to the current edition of the
IEE Wiring Regu lations (BS7671). The Buildin g
Regulations may b e obtained from OPSI (Oce fo r
Public Secto r Information) or the depart ment of
Communities and Lo cal Government and viewed
and downloaded from www.communities.gov.uk
following the lin k for Building Regulations .
As the buyer, install er and/or user of this product
it is your own respon sibility to ensure that this
hand dryer is t f or the purpose for which you
have intended it. Ete rna Lighting cannot accept
any liability fo r loss, damage or premature fai lure
resulting from inappropriate use.
Switch o the mains be fore commencing installati on
and remove the appropriate circuit fuse.
Disconnect t he dryer from the elec trical supply
before ash or hi gh voltage testing.
Suitable for indoor use only.
This produc t is suitable for installatio n on surfaces
with normal ammability e.g. wood, plasterboard,
masonry. It is not sui table for use on highly
ammable sur faces (e.g. polystyren e, textiles).
Before makin g xing hole(s), check that there are no
obstructi ons hidden beneath the mount ing surface
such as pipes or cab les.
The chosen loc ation of your new hand dryer sh ould
allow for the prod uct to be securely mounte d and
safely connec ted to the mains supply.
This produc t is designed for permanent co nnection
to xed wiring: this s hould be either a suitable ci rcuit
(protected w ith a 5 or 6 Amp MCB or fuse) or a fused
spur (with a 5 Amp fuse) via a f used connection
unit. We recommend t hat the supply incorporates a
double pole switch.
Do not cover the hand dr yer.
The dryer sho uld be located where it can not be
splashed.
The dryer mus t be positioned so that ther e is at least
0.5m (500mm) bet ween the outlet vent and any
surface bel ow.
Do not attach to su rfaces which are damp, fresh ly
painted or other wise electricall y conductive (e.g.
metallic sur faces).
If the location o f your new hand dryer requir es the
provision of a new el ectrical supply, the suppl y
must conform with the requirements of the Building
Regulations mak ing reference to the current e dition
of the IEE Wiring Re gulations (BS7671).
The three cores in th e mains supply cable are
coloured in accord ance with the following code:
Live: Brown or Red
Neutral: Blue or Black
Earth: Green and Yellow
When making con nections, ensure that the te rminals
are tightened se curely and that no strands of wi re
protrude. Chec k that the terminals are tightene d
onto the bared cond uctors and not onto any
insulation.
This produc t must be connected to Ear th.
You are advised at ever y stage of your installatio n to
double-check any electrical connections you have
made. After you h ave completed your installatio n
there are elec trical tests that should b e carried out:
these tests are sp ecied in the Wiring Reg ulations
(BS7671) refer red to in the Building Regulati ons.
There are no user s erviceable part s inside, if your
hand dryer deve lops a fault or does not func tion
correctly, it must b e repaired by a suitably quali ed
person.
If the mains cable i s damaged, it should be retur ned
to the manufac turer or agent for repair or rep laced
by a suitably quali ed person.
This produc t is not intended to be used by childr en
and persons wi th sensory, physical and/or ment al
impairments th at would prevent them from using i t
saf ely.
Small children sho uld be supervised to ensu re that
they do not play with th is appliance.
INSTALLATION:
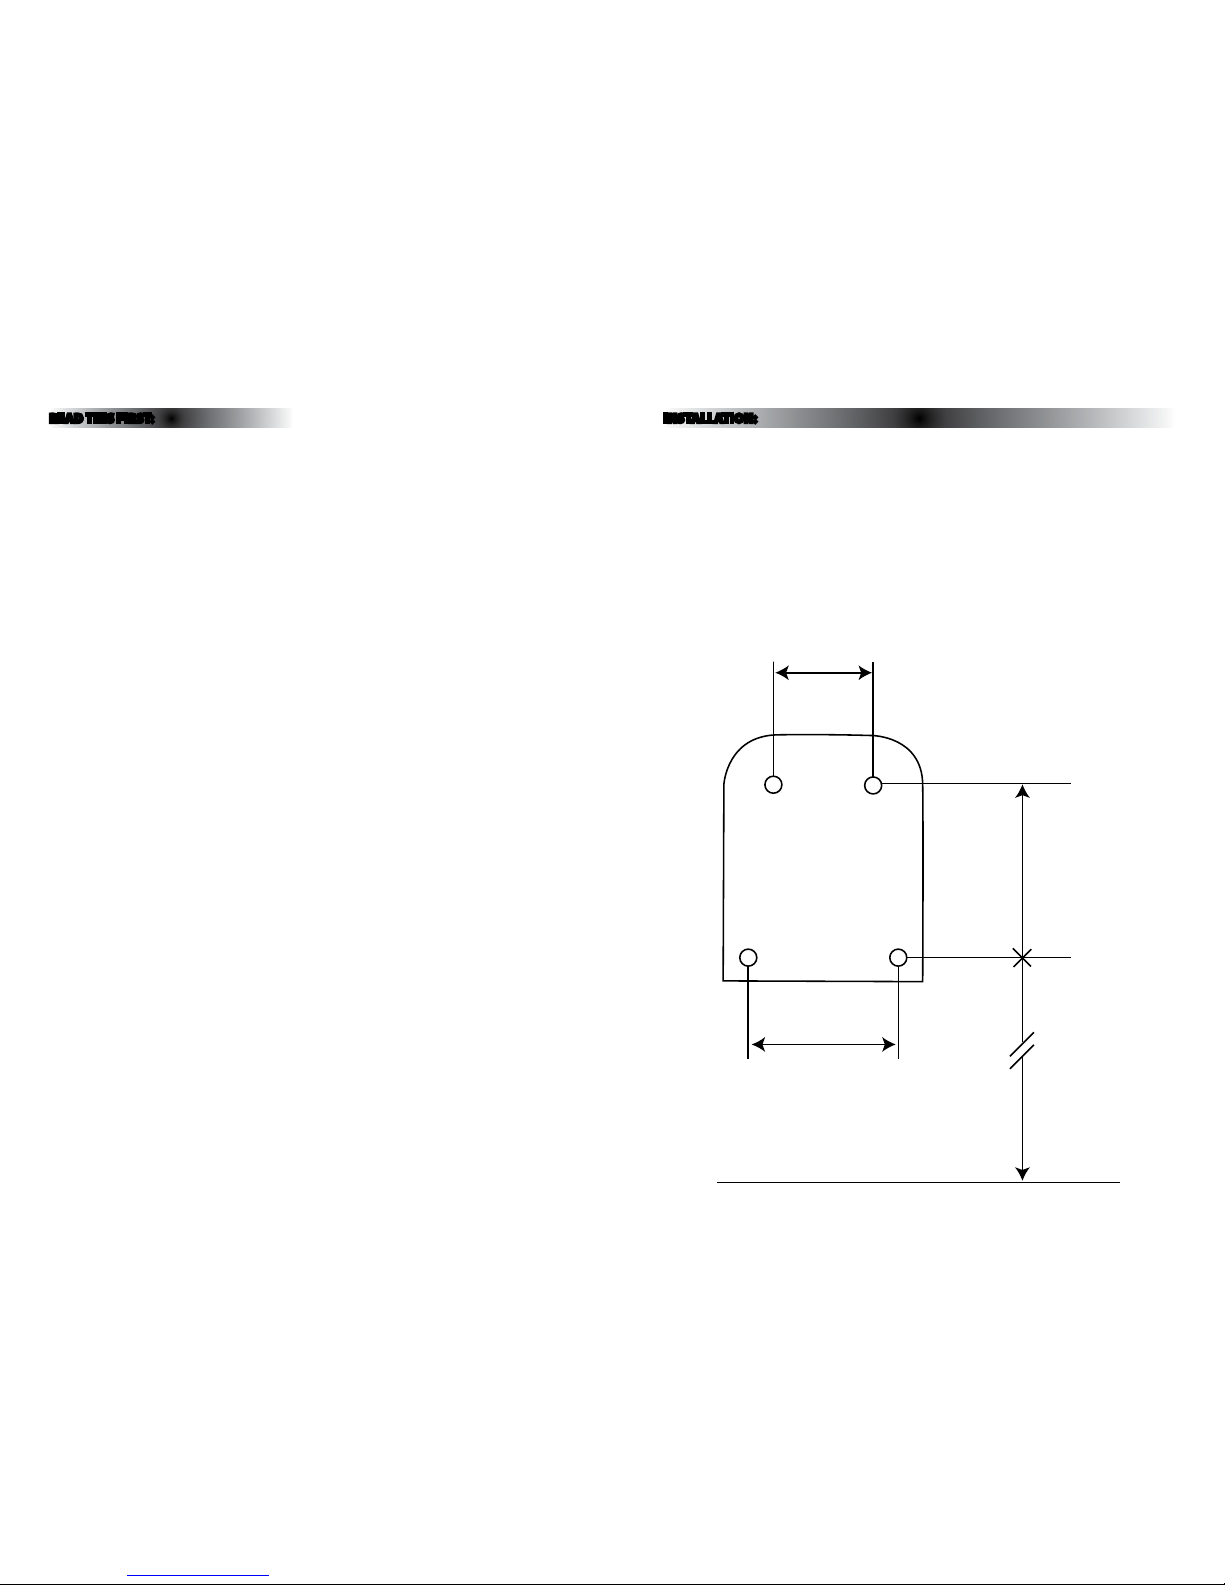
01. Choose the location fo r your new dryer giving consid eration to each of the condition s above.
02. Mark the positio n of the xing holes according to t he diagram below.
03. Make the xing hol es as appropriate to your mounting s urface. If tting to a soli d wall, drill holes 8mm dia.
and 35mm deep. Inser t the plastic plugs supplie d.
04. Remove the scr ews at either side of the botto m of the hand dryer and lif t o the front cover.
05. Secure the dr yer on the wall using the xings sup plied. If the xings suppli ed are not appropriate to your
mounting surface, use suitable alternatives.
06. Replace the f ront cover and secure in positio n using the two screws removed ea rlier.
07. Make the electrical conne ctions according to the colou r code opposite.
08. Restore th e power and switch on.
173mm
Floor
192mm
142mm
1170mm
 Loading...