

Page 1
Pack contents:
1 x 450W frost protec tion
convector heater c /w 3A
fused 3 pin plug
2 x Fixing screws
2 x Wall plugs
INSTALLATION INSTRUCTIONS
A guide for qualied electricians
Issue 2015
FOR PRODUCT ADVICE:
• T: 01933 673 144
• F: 01933 678 083
• E: sales@eterna-lighting.co.uk
Visit our website:
www.eterna-lighting.co.uk
Model:
FROST450
450W Frost Protection Convector Heater
These instructions are provided as a guideline to assist you.
PLEASE READ THESE INSTRUCTIONS BEFORE INSTALLATION
AND RETAIN FOR FUTURE REFERENCE
Made in China
CLEANING:
• Always remove the plu g from the electrical s ocket
and allow the heater to co ol down before cleaning
the heater.
• Wipe heater with a s oft dry cloth.
CLEANING WARNING:
Do not immerse the heater in
water.
Do not use any cleaning chemicals
such as detergents and abrasives.
Do not allow the interior to get
wet.
EVENTUALLY, YOU MAY WANT TO
REPLACE THIS PRODUCT:
Regulations require the recycling of Waste from
Electrical and Electronic Equipment (European
“WEEE Direc tive” eective August 20 05—UK
WEEE Regulation s eective 2nd January 20 07).
Environment Agenc y Registered Producer : WEE/
GA0248Q Z.
WHEN YOUR PR ODUCT COMES TO TH E END OF
ITS LIFE OR YO U CHOOSE TO REPLACE I T, PLEA SE
RECYCLE IT W HERE FACILITIES E XIST DO NOT
DISPOSE WITH HOUSEHOLD WASTE.
IF YOU EXPERIENCE PROBLEMS:
If you believe your p roduct is defective, p lease return
it to the place where yo u bought it. Our Technical
Team will gladly advise on any Eterna Lighting
product, bu t may not be able to give specic
instructions regarding individual installations.
SOME PARTS OF THIS
PRODUCT CAN BECOME
VERY HOT AND CAUSE
BURNS. PARTICULAR
ATTENTION HAS TO BE
GIVEN WHERE CHILDREN
AND VULNERABLE
PEOPLE ARE PRESENT.
CAUTION!
Children of less than 3 years should be kept away from the
heater unless continuously supervised.
Children aged from 3 years and less than 8 years shall only
switch on/o the appliance provided that it has been placed
or installed in its intended normal operating position and
they have been given supervision or instruction concerning
use of the appliance in a safe way and understand the hazards involved.
Children aged from 3 years and less than 8 years shall not plug in, regulate
and clean the appliance or perform user maintenance.
WARNING!
Page 2
READ THIS FIRST:
Check the pack and m ake sure you have all of
the parts lis ted on the front of this book let. If
not, contact th e supplier where you bought th is
product.
IMPORTANT SAFEGUARDS:
This heater must b e installed by a competent
person in accord ance with the Building Regul ations
making refere nce to the current edition of the I EE
Wiring Regulations (BS7671).
As the buyer, installer and/or user of this heater it is
your own responsibility to ensure that this heater is t
for the purpose for which you have intended it. Eterna
Lighting cannot accept any liability for loss, damage
or premature failure resulting from inappropriate use.
This product is designed and constructed according
to the principles of the appropriate British Standard
and is intended for normal domestic service.
Switch o the mains before commencing installation
and remove the appropriate circuit fuse.
Suitable for indoor use only.
This heater is suitable for installation on surfaces
with normal ammability e.g. wood, plasterboard,
and masonry. It is not suitable for use on highly
ammable surfaces.
Before making xing hole(s), check that there are no
obstructions hidden beneath the mounting surface
such as pipes or cables.
Make sure that the xings are strong enough to
support the considerable weight of the heater and
hold it rigidly.
When choosing the location for your new heater,
ensure that the xings will be anchored in a solid
surface e.g. concrete, brick or a joist—do not x
directly onto panelling, cladding, plasterboard etc.
The heater is tted with a 3 pin plug.
This heater must be connected to Earth.
IMPORTANT: Always switch o at the mains and
isolate circuit before any maintenance is carried out,
any repairs undertaken must be by suitable qualied
electrical engineer.
SPECIFICATION:
VOLTAGE: 220 -240V ~ 50H z
POWER MAX: 450W
WARNING:
This produc t must only be operated in an up right
position.
Always ensure that the h eater is mounted on a at
surface with a m inimum clearance area obser ved
all around, and ensu ring that the heater is not
positioned cl ose to ammable materials, such
as curtains, d rapes etc as this could create a re
hazard.
The heater must b e mounted vertically wit h the
thermostat on t he right hand side.
CAUTION: The front of the heate r becomes
extremely hot during operation for extended
periods.
This appliance is n ot intended for use by person s
(including childr en) with reduced physical, sens ory
or mental capab ilities, or lack of experi ence
and knowledg e, unless they have been given
supervisi on or instruction concern ing use of the
appliance by a per son responsible for their s afety.
Extreme c aution is necessary whe n any heater
is used where chil dren or elderly persons a re
present or when ever the heater is left ope rating
unattended.
WARNING -
In order to avoid
overheating when in use do not
cover or obstruct the grille or the
air intake openings.
Do not insert a ny objects into the heater.
Keep the cable away f rom the body of the heater
when in use.
Do not use the heate r in any areas where petrol,
paint or other amm able liquids or ammable
fumes may be prese nt e.g. garages or worksho ps.
Do not install thi s heater in the immediate
surroundings of a b ath, shower, and swimming
pool or where w ater is present.
The product is for indoor domestic/oce use only.
The heater must n ot be located below an elec trical
outlet.
Do not operate th e heater with a damaged cord/
plug or if heater ma lfunctions.
If the supply cord is d amaged, it must be replace d
by a qualied engi neer.
Avoid installation behind a door.
Do not try to rep air the heater yourself, always
consult a suitably qualied engineer.
2
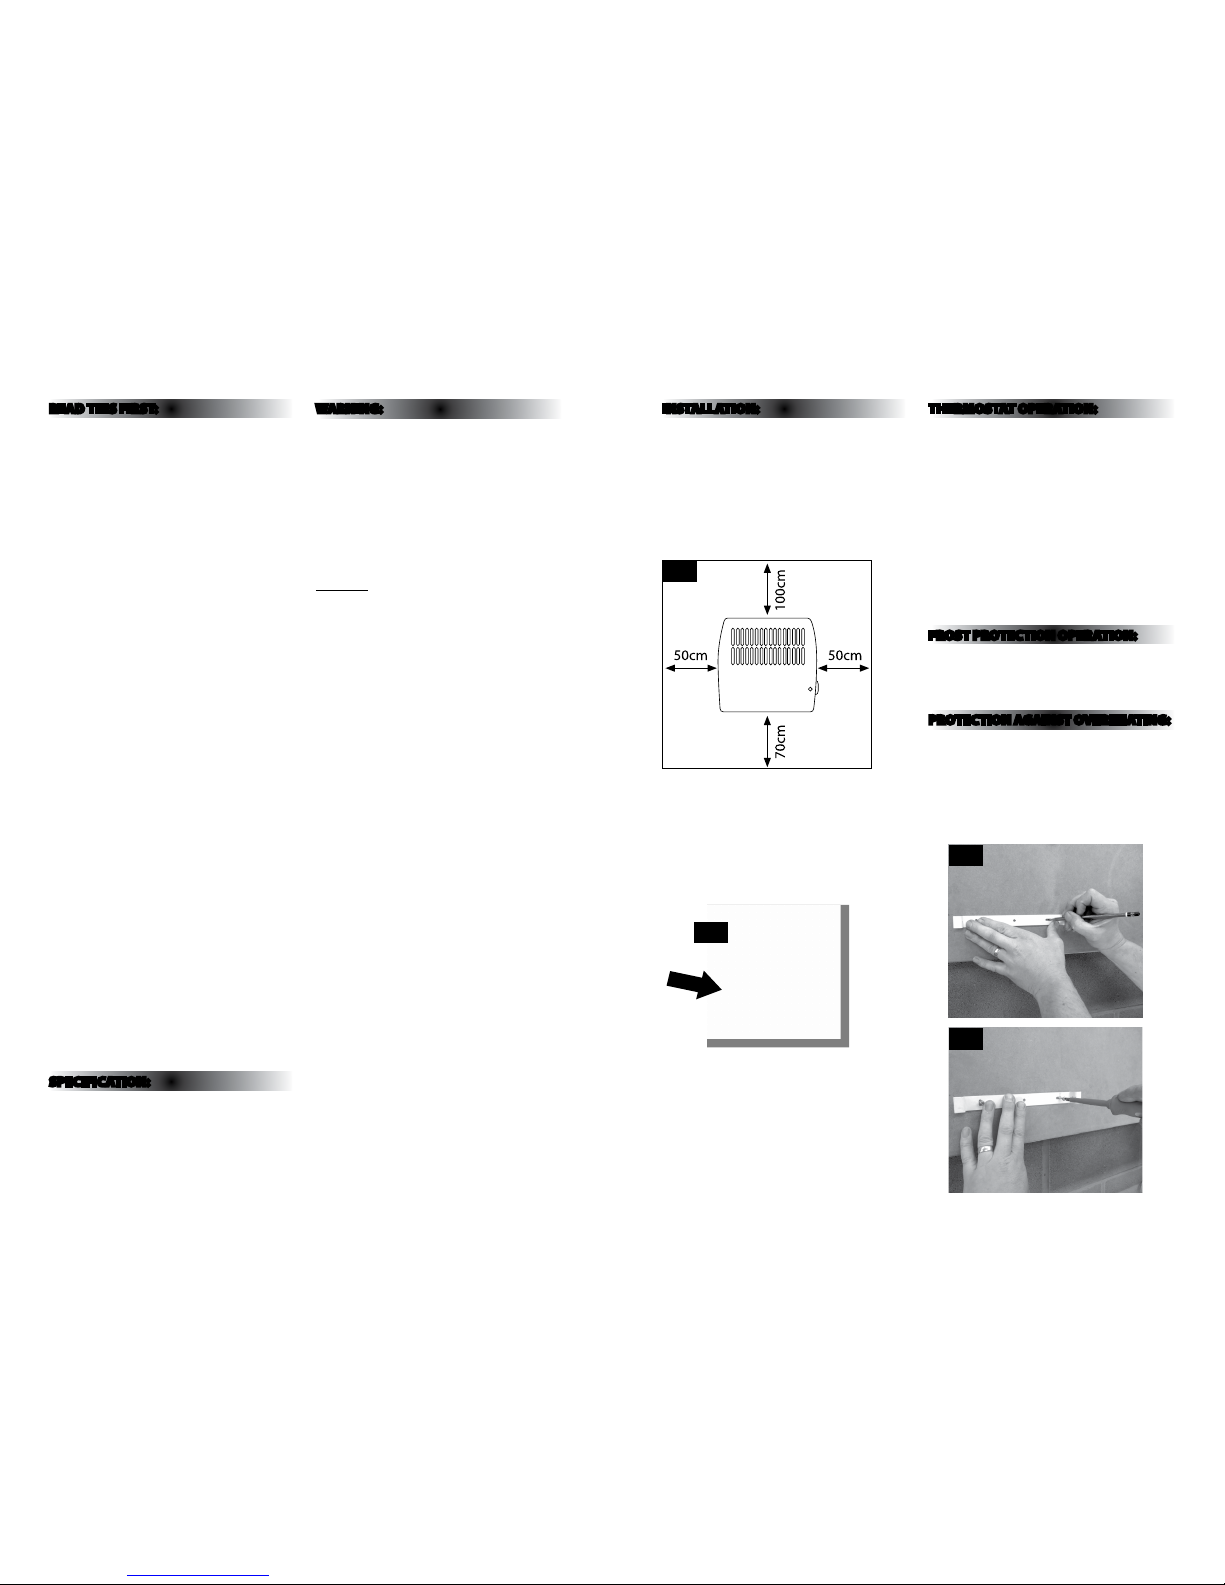
INSTALLATION:
Do not install th e heater so that the heat rays
are directed o n to walls or adjacent objects
Maintain a sucie nt distance between the
heater and walls/obje cts, see diagram bel ow.
Heaters must be i nstalled away from ammabl e
surfaces at lea st 70cm above the oor level,
50cm in front/sid es and 100cm above from
any given surface s as shown below:
1) Choose the location fo r your new heater
according to the guid elines above.
2) Ensure the minimum clea rances are
observed – s ee g.1 above.
3) Remove the xing bra cket from the rear
of heater by removin g the small screws
at either end and sl iding down.
4) Use the bracket as a temp late and mark
the
position of xing holes - see g. 3 opposite.
5) Secure the bracke t in place using xings
supplied - see g. 4 opposite.
6) Slide heater down ont o the bracket and
secure in
place using the screws.
7) Route cable to you r mains socket and plug in.
8) Restore power and s witch on.
THERMOSTAT OPERATION:
1) The thermostat swi tch automatically switches
the frost dete ctor on/o.
2) The thermost at operates within the range of
+5°C to 30°C (approximatel y).
3) To set the thermostat turn fully clockwise. When
the room has reach ed the desired temperature ,
turn the thermos tat back until the heater
switches o.
4) The indicator lam p will light on the front of the
heater when the thermostat has energised the
heating eleme nts and will go out when the
heater switches i tself o.
FROST PROTECTION OPERATION:
Turn the thermostat control fully anti-clockwise.
The heater will op erate when the ambient
temperature fa lls below 5°C (approximately).
PROTECTION AGAINST OVERHEATING:
1) The thermal cut-out wi ll turn o the heater if
it overheats. T his thermal cutout can be rese t
by turning o the pow er to the heater and
leaving to cool for a pproximately 15minutes.
2) If the thermal cut- out continues to trip, check
that the ow of air throu gh the heater is not
obstructed.
Fig 1
Fig 2
Fig 3
Fig 4
 Loading...