

Eterna FPH400 Safety And Installation Instructions Manual
CLEANING:
• Always remove the plug from the electrical socket and allow the heater to cool down
before cleaning the heater.
• Wipe heater with a soft dry cloth.
• Do not tr y to repair the heater yourself, always consult a suitably qualified engineer.
WARNING:
Do not immerse the heater in water.
Do not use any cleaning chemicals such as detergents and abrasives.
Do not allow the interior to get wet.
EVENTUALLY, YOU MAY WANT TO REPLACE THIS HEATER:
New regulations require the recycling of Waste from Electrical and Electronic Equipment
(European “WEEE Directive” effective August 2005—UK WEEE Regulations effective 2nd
January 2007). Environment Agency Registered Producer: WEE/GA0248QZ.
When your heater comes to the end of its life or you choose to replace it, do not dispose of
it with your normal household waste. Please recycle where facilities exist. Check with your
supplier or local authority for suitable options.
SAFETY AND INSTALLATION INSTRUCTIONS
Pack contents:
400W Frost protection convector heater Qty.1
c/w 3A. fused moulded 3 pin plug fitted
Fixing screws Qty.2
Wall plugs Qty.2
IF YOU EXPERIENCE PROBLEMS:
If your heater is defective or develops a fault, please return it to the place where you bought
it. You can call our Helpline for advice. The Helpline will gladly give advice on any aspect of
any Eterna heating product.
SPECIFICATION:
VOLTAGE: 220 – 240V – 50Hz
POWER MAX: 400W
110426-BT
HELPLINE:
• T: 01933 673 144
• F: 01933 678 083
• E: sales@eterna-lighting.co.uk
Visit our website:
www.eterna-lighting.co.uk
Model:
FPH400
400W Frost Protection
Convector Heater
These instructions are provided as a guideline to assist you.
PLEASE READ THESE INSTRUCTIONS BEFORE USING YOUR HEATER
PLEASE RETAIN FOR FUTURE REFERENCE
General Information and Safety Instructions:
Installation:
READ THIS FIRST:
Check the pack and make sure you have all of
the par ts listed on the front of this booklet. If
not, contac t the supplier where you bought this
produc t.
IMPORTANT SAFEGUARDS
This heater must be installed by a competent
person in accordance with the Building
Regulations making reference to the current
edition of the IEE Wiring Regulations (BS7671).
The Building Regulations may be obtained from
OPSI (Office for Public Sector Information)
or the department of Communities and Local
Government and viewed and downloaded from
ww w.communities.gov.uk following the link for
Building Regulations.
• As the buyer, installer and/or user of this heater it
is your own responsibility to ensure that this heater
is fit for the purpose for which you have intended
it. Eterna Lighting cannot accept any liability for
loss, damage or premature failure resulting from
inappropriate use.
• If in any doubt, consult a qualified electrician.
• This product is designed and constructed according
to the principles of the appropriate British Standard
and is intended for normal domestic service.
• Switch off the mains before commencing installation
and remove the appropriate circuit fuse.
• When working at heights, please use a suitable
platform.
• Suitable for indoor use only.
• This heater is suitable for installation on surfaces
with normal flammability e.g. wood, plasterboard,
and masonry. It is not suitable for use on highly
flammable surfaces.
• Before making fixing hole(s), check that there are no
obstructions hidden beneath the mounting surface
such as pipes or cables.
• Make sure that the fixings are strong enough to
support the considerable weight of the heater and
hold it rigidly.
• When choosing the location for your new heater,
ensure that the fixings will be anchored in a solid
surface e.g. concrete, brick or a joist—do not fix
directly onto panelling, cladding, plasterboard etc.
• If the location of your new heater requires the
provision of a new electrical supply, the supply must
conform with the requirements of the Building
Regulations making reference to the current edition
of the IEE Wiring Regulations (BS7671).
• The heater is fitted with a 3 pin plug.
• This heater must be connected to Earth.
IMPORTANT— Always switch off at the mains and
isolate circuit before any maintenance is carried out,
any repairs undertaken must be by suitable qualified
electrical engineer.
• You are advised at every stage of your installation to
double-check any electrical connections you have
made. After you have completed your installation
there are electrical tests that should be carried out:
these tests are specified in the Wiring Regulations
(BS7671) referred to in the Building Regulations. If
in doubt, consult a qualified electrician.
WARNING:
• This product must only be operated in an upright
position.
• Always ensure that the heater is mounted on a
flat sur face with a minimum clearance area of
70cm all around, and ensuring that the heater
is not positioned close to flammable materials,
such as curtains, drapes etc as this could create
a fire hazard.
• The heater must be mounted vertically with the
thermostat on the right hand side.
• CAUTION: The front of the heater becomes
extremely hot during operation for ex tended
periods.
• This appliance is not intended for use by
persons (including children) with reduced
physical, sensory or mental capabilities, or lack
of experience and knowledge, unless they have
been given supervision or instruction concerning
use of the appliance by a person responsible for
their safet y.
• Ex treme caution is necessary when any heater
is used where children or elderly persons are
present or whenever the heater is left operating
unattended.
• In order to avoid overheating when in use do
not cover or obstruc t the grille or the air intake
openings.
• Do not insert any objects into the heater.
• Keep the cable away from the body of the heater
when in use.
• Do not use the heater in any areas where
petrol, paint or other flammable liquids or
flammable fumes may be present e.g. garages or
workshops.
• Do not install this heater in the immediate
surroundings of a bath, shower, and swimming
pool or where water is present.
• The produc t is for indoor domestic/office use
only.
• The heater must not be located below an
electrical outlet.
• Do not operate the heater with a damaged cord/
plug or if heater malfunctions.
• If the supply cord is damaged, it must be
replaced by a qualified engineer.
• Avoid installation behind a door.
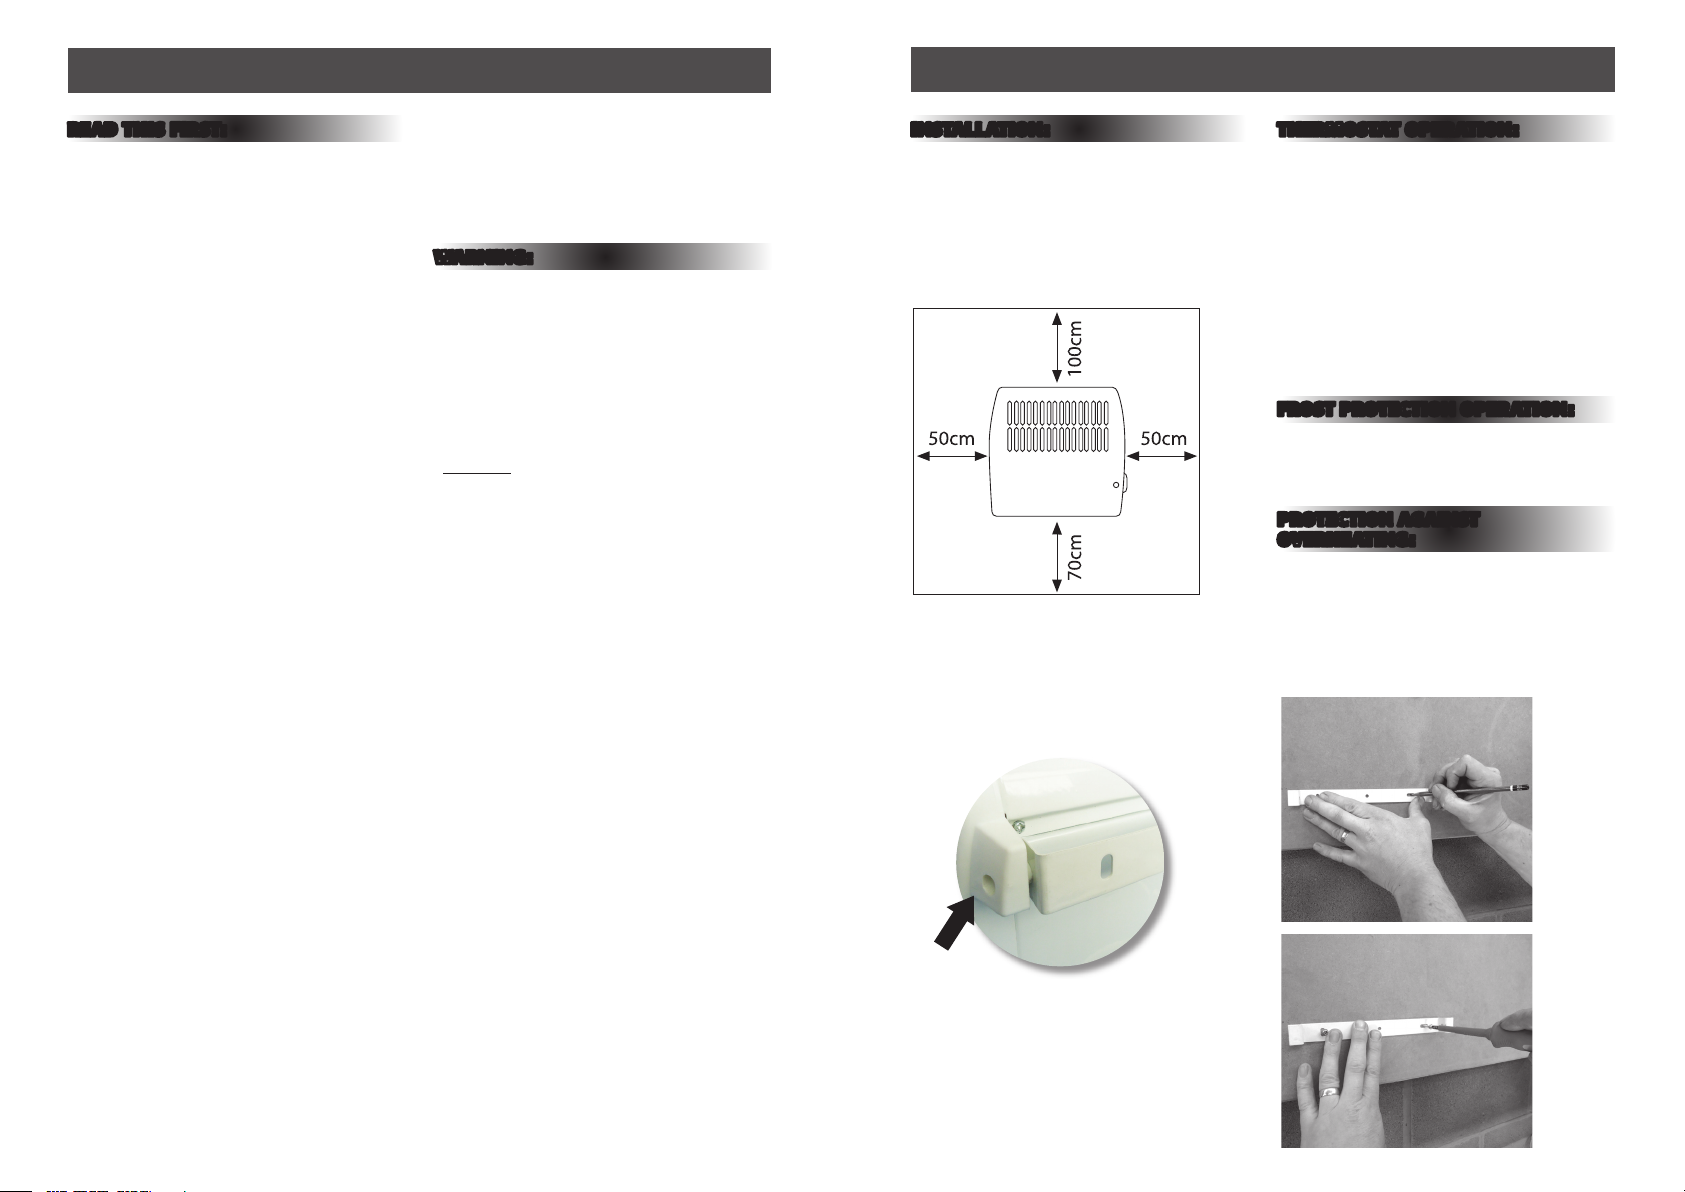
INSTALLATION:
Do not install the heater so that the heat rays
are directed on to walls or adjacent objects
Maintain a sufficient distance bet ween the
heater and walls/objects, see diagram below.
Heaters must be installed away from flammable
surfaces at least 70cm above the floor level,
50cm in front/sides and 100cm above from
any given sur faces as shown in fig. 1 below:
1
1) Choose the location for your new heater
according to the guidelines above.
2) Ensure the minimum clearances are
observed – see fig.1 above.
3) Remove the fixing bracket (fig.2) from
the rear of heater by removing the small
screws at either end and sliding down.
2
4) Use the bracket as a template and mark
position of fixing holes - see fig. 3 opposite.
5) Secure the bracket in place using fixings
supplied - see fig. 4 opposite.
6) Slide heater down onto the bracket and
in place using the screws.
7) Route cable to your mains socket and plug in.
8) Restore power and switch on.
the
secure
THERMOSTAT OPERATION:
1) The thermostat switch automatically
switches the frost detector on/of f.
2) The thermostat operates within the range
of +5°C to 30°C (approximately).
3) To set the thermostat turn fully clockwise.
When the room has reached the desired
temperature, turn the thermostat
back until the heater switches off.
4) The indicator lamp will light on the front
of the heater when the thermostat has
energised the heating elements and will go
out when the heater switches itself off.
FROST PROTECTION OPERATION:
1) Turn the thermostat control fully anti-clockwise.
The heater will operate when the ambient
temperature falls below 5°C (approximately).
PROTECTION AGAINST
OVERHEATING:
1) The thermal cut-out will turn off the heater if
it overheats. This thermal cutout can be reset
by turning off the power to the heater and
leaving to cool for approximately 15minutes.
2) If the thermal cut-out continues to
trip, check that the flow of air through
the heater is not obstructed.
3
4
 Loading...