

Eterna ETH400L, ETH120LWH, ETH400LWH, ETH120L Installation Instructions Manual
Issue 2013
Model:
ETH120L / ETH120LWH / ETH400L / ETH400LWH
Halogen Floodlights
These instructions are provided as a guideline to assist you.
PLEASE READ THESE INSTRUCTIONS BEFORE INSTALLATION
AND RETAIN FOR FUTURE REFERENCE
Pack contents:
1 x Fitting
1 x R7s halogen lamp
FOR PRODUCT ADVICE:
• T: 01933 673 144
• F: 01933 678 083
• E: sales@eterna-lighting.co.uk
Visit our website:
www.eterna-lighting.co.uk
INSTALLATION INSTRUCTIONS
A guide for qualied electricians
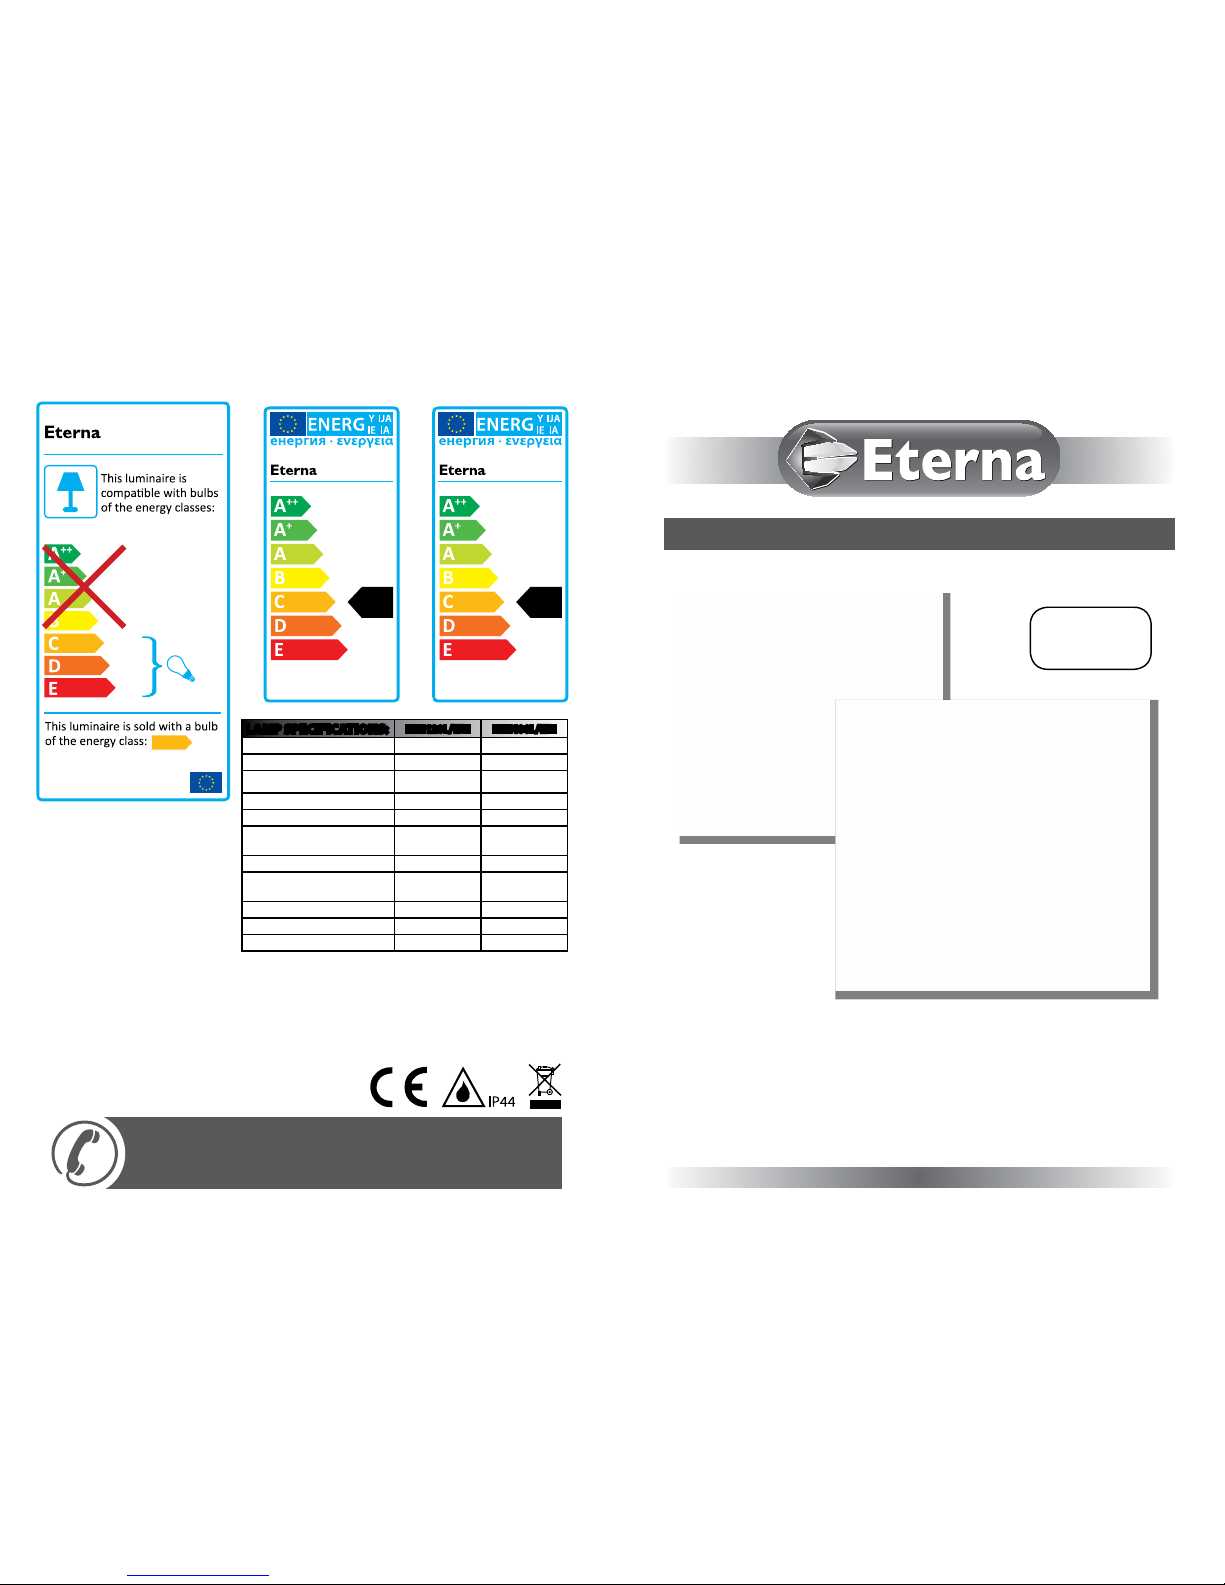
MODELNO.
A
++
XXX kWh/1000h
120
ETH120L/WH
C
MODELNO.
A
++
XXX kWh/1000h
400
ETH400L/WH
C
LAMP SPECIFICATIONS:
ETH120L/WH ETH400L/WH
Voltage 220-240V 220-240V
Frequency 50Hz 50Hz
Nominal lumens
2218 lm 8550 lm
Wattage 120W 400W
Nominal life time of the lamp 2,000 hrs 2,000 hrs
Number of switching cycles
before premature lamp failure
8,000 8,000
Colour temperature 2800K 2800K
Warm-up time up to 60 % of
the full light output
Instant full light Instant full light
Dimmable Yes Yes
Lamp dimensions (mm) 78 x 10 118 x 10
Cap type R7s R7s
120W
400W
874/2012
C
MODELNO.
ETH RANGE

READ THIS FIRST:
Check the pack and m ake sure you have all of the
parts liste d on the front of this bookle t. If not,
contact the outlet where you bought this product.
This produc t contains glass, care must be take n when
assembling, t ting or handling to prevent per sonal
injury or damag e to the product.
This light ttin g must be installed by a compe tent
person in accord ance with the Building Regulat ions
making refere nce to the current edition of the
IEE Wiring Regu lations (BS7671). The Buil ding
Regulations may b e obtained from HMSO or view ed
and downloaded from www.communities.gov.uk
following the lin k for Building Regulations .
As the buyer, install er and/or user of this product it
is your own responsi bility to ensure that this tt ing
is t for the purpo se for which you have intended
it. Eterna Lightin g cannot accept any liability fo r
loss, damage or premature failure resulting from
inappropriate use.
The lamps (bulbs/tubes) supplied with this tting are
consumable par ts and therefore may be out side of
any warranty oered.
Switch o the mains be fore commencing installati on
and remove the appropriate circuit fuse.
When working at h eights, please use a suita ble
platform.
Disconnect t he tting from the elec trical supply
before ash or hi gh voltage testing.
Suitable for outdoor use.
This produc t is suitable for installatio n on surfaces
with normal ammability e.g. wood, plasterboard,
and masonry. It is not s uitable for use on highly
ammable sur faces (e.g. polystyren e, textiles).
Before makin g xing hole(s), check that there are no
obstructi ons hidden beneath the mount ing surface
such as pipes or cab les.
The chosen loc ation of your new tting shou ld allow
for the produc t to be securely mounted and s afely
connected to th e mains supply (lighting circuit).
When choosing th e location for your new tt ing,
ensure that the xin gs will be anchored in a solid
surface e.g. con crete, brick or a joist—do not x
directly onto panelling, cladding, plasterboard etc.
If the location o f your new tting requires th e
provision of a new el ectrical supply, the suppl y
must conform with the requirements of the Building
Regulations mak ing reference to the current e dition
of the IEE Wiring Re gulations (BS7671).
This produc t is designed for permanent co nnection
to xed wiring: this s hould be either a suitable
lighting circuit (p rotected with a 5 or 6 Amp MCB or
fuse) or a fused spu r (with a 3 Amp fuse) via a fused
connection unit.
We recommend that the s upply incorporates a
switch for ease of o peration.
Make connecti ons to the electrical supp ly in
accordance with the f ollowing code:
Live - Brown or Red
Neutral - Blue or B lack
Earth - Gree n and Yellow
When making con nections, ensure that the te rminals
are tightened se curely and that no strands of wi re
protrude. Chec k that the terminals are tightene d
onto the bared cond uctors and not onto any
insulation.
This produc t must be connected to Ear th.
IMPORTANT: Always sw itch o at the mains before
changing the lamp.
You are advised at ever y stage of your installatio n to
double-check any electrical connections you have
made. After you h ave completed your installatio n
there are elec trical tests that should b e carried out:
these tests are sp ecied in the Wiring Reg ulations
(BS7671) re ferred to in the Building Reg ulations
CLEANING:
Disconnect t he power and clean the exte rior only of
this tting wit h a moist (not wet) cloth.
Do not use any chemic al or abrasive cleaners.
EVENTUALLY, YOU MAY WANT TO
REPLACE THIS PRODUCT:
Regulations require the recycling of Waste from
Electrical and Electronic Equipment (European
“WEEE Direc tive” eective August 20 05—UK
WEEE Regulation s eective 2nd January 20 07).
Environment Agenc y Registered Producer : WEE/
GA0248Q Z.
WHEN YOUR PR ODUCT COMES TO TH E END OF
ITS LIFE OR YO U CHOOSE TO REPLACE I T, PLE ASE
RECYCLE IT W HERE FACILITIES E XIST DO NOT
DISPOSE WITH HOUSEHOLD WASTE.
IF YOU EXPERIENCE PROBLEMS:
If you believe your p roduct is defective, p lease return
it to the place where yo u bought it. Our Technical
Team will gladly advise on any Eterna Lighting
product, bu t may not be able to give specic
instructions regarding individual installations.
For breakage inf ormation visit:
www.eterna-lighting.co.uk
INSTALLATION:
01. Choose the location f or your new oodlight
giving consideration to the points above.
02. Remove the bra cket from the light by removing
the screws and nut s on each side.
03. Fix the bracket t o the mounting surface using a
spirit level (if avai lable) to ensure that the bracket
is xed level and using appropriate xings (not
supplie d).
04. Attach t he light tting to the bracket us ing the
screws, washers and nuts you removed earlier.
05. Rotate the t ting in the bracket so that the ligh t
faces directl y downwards, this will give you eas y
access to the connec tion box from above.
06. Remove th e cover from the connection b ox by
removing the fou r screws and lifting o.
07. Remove the gland nut from the si de of the
connection b ox and thread your supply cabl e
through.
08. Remove th e rubber gland from the cabl e entry on
the side of the conne ction box and thread onto
the cable.
09. Thread the sup ply cable into the connect ion box
and make the connec tions according to the
colour code listed opposite and obser ving the
terminal identication markings inside the
connection box.
10. Push the rubber gla nd and nut back along the
cable until they lo cate in the threaded cable e ntry
and tighten the nut su ciently to grip the cable
and make the entr y water-tight.
Do not over-tighten.
11. Replace the connection bo x cover and replace the
four screws. Ensur e that the sealing gasket is
correctly positioned.
12. Adjust the position o f the light so that it
illuminates the des ired area and limiting the
spread of light onto neighbouring propert y.
13. Tighten the bracket xing screws on the side of
the tting to lo ck in position.
14. Undo the screw at the top o f the glass safety
shield on the fro nt of the light tting and allow to
hang from the hinge.
15. Carefully remove the l amp from the box taking
care not to touch it wi th bare hands.
16. Using a soft, dr y, clean cloth, grip the lamp
and t it betwe en the sprung contacts in th e
lampholder.
17. Cl ose the glass safety shie ld and tighten the
screw. Ensure that the water proong gasket in
correctly positioned.
18. Restore the power an d switch on.
SPECIFICATION:
Weatherproof: IP44
Class 1 Protectio n: Class 1 / Earthed
LAMP REPLACEMENT:
01. Switch o the electricit y at the mains.
02. Allow to cool dow n then undo the screw at the
top of the glass safe ty shield and allow to hang
down on the hinge.
03. Remove and rep lace lamp making sure it is of
the same typ e and wattage as stated on t he re
lamping label, d o not touch with bare ngers,
grip the lamp with a tis sue or clean soft cloth.
04. Replace t he glass safety shield an d tighten
the retaining sc rew. Ensure that the gasket is
positioned correctly.
05. Restore the powe r and switch on.
REPLACEMENT LAMP T YPE:
ETH120L / ETH120LWH: requires 120W R7s linear
halogen (Etern a code: LH120).
ETH400L / ETH400LWH: requires 400W R7s linear
halogen (Etern a code: LH400).
 Loading...