

E TEN Information Systems X500 Users Manual

GGPPSS PPoocckkeett PPCC UUsseerr MMaannuuaal
l

FCC Regulations
This mobile phone complies with part 15 of the FCC Rules. Operation is
subject to the following two conditions: (1) This device may not cause
harmful interference, and (2) this device must accept any interference
received, including interference that may cause undesired operation.
This mobile phone has been tested and found to comply with the limits for
a Class B digital device, pursuant to Part 15 of the FCC Rules. These
limits are designed to provide reasonable protection against harmful
interference in a residential installation. This equipment generates, uses
and can radiated radio frequency energy and, if not installed and used in
accordance with the instructions, may cause harmful interference to radio
communications. However, there is no guarantee that interference will not
occur in a particular installation. If this equipment does cause harmful
interference to radio or television reception, which can be determined by
turning the equipment off and on, the user is encouraged to try to correct
the interference by one or more of the following measures:
-Reorient or relocate the receiving antenna.
-Increase the separation between the equipment and receiver.
-Connect the equipment into an outlet on a circuit different from that to
which the receiver is connected.
-Consult the dealer or an experienced radio/TV technician for help.
Changes or modifications not expressly approved by the party responsible
for compliance could void the user’s authority to operate the equipment.

RF Exposure Information (SAR)
4
This model phone meets the government’s requirements for exposure to
radio waves.
This phone is designed and manufactured not to exceed the emission
limits for exposure to radio frequency (RF) energy set by the Federal
Communications Commission of the U.S. Government.
The exposure standard for wireless mobile phones employs a unit of
measurement known as the Specific Absorption Rate, or SAR. The SAR
limit set by the FCC is 1.6W/kg.
*
Tests for SAR are conducted using
standard operating positions accepted by the FCC with the phone
transmitting at its highest certified power level in all tested frequency bands.
Although the SAR is determined at the highest certified power level, the
actual SAR level of the phone while operating can be well below the
maximum value. This is because the phone is designed to operate at multiple
power levels so as to use only the poser required to reach the network. In
general, the closer you are to a wireless base station antenna, the lower the
power output.
The highest SAR value for the model phone as reported to the FCC
when tested for use at the ear is 0.523 W/kg for GSM850 / 0.776 W/kg for
PCS1900 and when worn on the body, as described in this user guide, is
0.667 W/kg for GSM850 / 0.653 W/kg for PCS1900 / 0.136 W/kg for
WLAN 2.4GHz. (Body-worn measurements differ among phone models,
depending upon available enhancements and FCC requirements.)
While there may be differences between the SAR levels of various
phones and at various positions, they all meet the government requirement.

The FCC has granted an Equipment Authorization for this model phone
with all reported SAR levels evaluated as in compliance with the FCC RF
exposure guidelines. SAR information on this model phone is on file with
the FCC and can be found under the Display Grant section of
http://www.fcc.gov/oet/fccid
For body worn operation, this phone has been tested and meets the FCC
RF exposure guidelines for use with an accessory that contains no metal and
the positions the handset a minimum of 1.5 cm from the body. Use of other
enhancements may not ensure compliance with FCC RF exposure guidelines.
If you do no t use a body-worn accessory and are not holding the phone at
the ear, position the handset a minimum of 1.5 cm from your body when the
phone is switched on.
after searching on FCC ID: SPUX500.
Safety Instructions
Please Read Before Proceeding.
♥
This product is not charged when shipped from the factory. When you
♥
use this product the first time, we recommend that you install the battery
as illustrated and fully charge it for about 8 hours before use.
Before you install the SIM card, make sure that tap the ALL OFF
♥
Button in Wireless Manager to turn off your Pocket PC’s mobile phone,
Bluetooth, and wireless LAN functions. And press the “Power Button”
of the Pocket PC to turn off the screen. Otherwise, abnormal
disconnection problems will occur.
When you are on a plane, in a medical facility or at a gas station where
♥
wireless communications devices are not allowed and must be turned off,
please go to Wireless Manager and select the ALL OFF Button to turn
off your Pocket PC’s mobile phone, Bluetooth, and wireless LAN
functions. By pressing the “Power Button” of the Pocket PC, you only
turn off the display.
In case the Pocket PC is damaged, send it back to the dealer for repair.
♥
Do not attempt to disassemble the Pocket PC on your own; otherwise the
warranty will be void.
Where to Find Information
For information on: See this source:
Programs on your Pocket PC This User’s Guide and Pocket PC Help. To
view Help, tap
Additional programs that can
be installed on the Pocket PC
Connecting to and
synchronizing with a desktop
computer
Up-to-date information on
your Pocket PC
This document lists the functions, specifications, and illustrations for
reference only. The actual purchased product should be taken as the
standard.
The Pocket PC Getting Started CD.
Check the user’s guide that comes with this
product or look for the online help relevant
to ActiveSync on the desktop PC or the
Pocket PC.
http://www.microsoft.com/windowsmobile/
and then Help.


UUsseerr MMaannuuaall
S
AFETY INSTRUCTIONS............................................................. 2
WHERE TO FIND INFORMATION ................................................5
Voice Command Satellite Navigation /..................................1-1
1
NAVIGATION DEVICE INSTALLATION .......................................1-1
GPS NAVIGATION SOFTWARE INSTALLATION ......................... 1-2
CONDITIONS FOR USING GPS CAR NAVIGATION .....................1-2
SATELLITE DATA UPDATE........................................................ 1-5
LOCATION SMS........................................................................1-8
GPS VIEWER ............................................................................1-10
Getting Started /......................................................................2-1
2
PACKAGE CONTENT..................................................................2-1
EXTERNAL VIEWS.....................................................................2-2
Hardware Hotkey Functions............................................2-3
Rear Side.......................................................................... 2-4
USING THE POCKET PC FOR THE FIRST TIME ........................... 2-5
Charging Power and Power Supply ................................ 2-5
Re-installation or Replacing the Battery .........................2-7
POWER ON AND OFF................................................................. 2-8
Sleep Mode....................................................................... 2-8
Turn on the Screen...........................................................2-9
Restarting the Pocket PC.................................................2-10
Reset.........................................................................2-11
X-1

Default Settings .......................................................2-12
Clean Boot ...............................................................2-13
Using the Pocket PC /.............................................................3-1
3
START .......................................................................................3-1
Screen...............................................................................3-1
Today Screen....................................................................3-3
Programs .........................................................................3-6
System Application Programs..........................................3-8
M-DESK.................................................................................... 3-10
ENTER INFORMATION ON YOUR POCKET PC............................ 3-13
Enter Text Using the Input Panel ....................................3-13
Type with the Soft Keyboard................................... 3-15
Use Letter Recognizer .............................................3-15
Use Block Recognizer .............................................3-15
Use Transcriber........................................................ 3-16
Select Typed Text ....................................................3-16
X-2
Write on the Screen.......................................................... 3-17
Write on the Screen .................................................3-17
Select Writing .......................................................... 3-18
Convert Writing to Text...........................................3-18
Draw on the Screen .........................................................3-20
Create a Drawing ..................................................... 3-20
Select a Drawing......................................................3-21
Record a Message............................................................3-21
Create a Recording ..................................................3-22
Use My Text ..................................................................... 3-23
Voice Commander ...........................................................3-23

Using the Phone /.....................................................................4-1
4
INSTALLING AND REMOVING THE SIM CARD .......................... 4-2
USING THE PHONE ....................................................................4-4
Adjusting the Phone Volume............................................ 4-5
TURNING THE PHONE ON OR OFF AND MAKING CALLS ....................4-6
Toolbar.............................................................................4-8
Call from Contacts........................................................... 4-9
Call from Speed Dial .......................................................4-9
Call from the Call History ...............................................4-10
CUSTOMIZE YOUR PHONE ........................................................4-11
Add Ringtone....................................................................4-12
PHONE APPLICATION PROGRAMS .............................................4-13
SIM Manager ...................................................................4-13
Standard Display...................................................... 4-13
Full-Screen Display ................................................. 4-14
Copy Phonebook Information..................................4-15
SMS Management ...................................................4-16
SIM Tool Kit.....................................................................4-16
SMS Sender......................................................................4-17
Speed Dial........................................................................ 4-18
Hot Key Switch........................................................ 4-18
Frequently Dialed Screen ........................................4-19
Index Dial ................................................................4-20
Call Filter ........................................................................4-21
Skype Receiver Switch .....................................................4-24
X-3

Customize Your Pocket PC /..................................................5-1
5
ADJUSTING SETTINGS ...............................................................5-1
NOTIFICATIONS.........................................................................5-2
POWER PREFERENCE SETTINGS ................................................5-3
BACKLIGHT .............................................................................. 5-4
MICROPHONE............................................................................5-5
ADJUST VOLUME ......................................................................5-6
SCENARIOS ...............................................................................5-7
QUICK LINK..............................................................................5-8
FIND AND ORGANIZE INFORMATION ........................................ 5-10
NAVIGATION BAR AND COMMAND BAR .................................. 5-11
POP-UP MENUS.......................................................................... 5-12
REDEFINE HOT KEYS................................................................ 5-13
Microsoft ActiveSync /............................................................6-1
6
INSTALLING AND USING ACTIVESYNC .....................................6-2
ActiveSync Frequently Asked Questions.......................... 6-4
USB SYNCHRONIZATION.......................................................... 6-4
SYNCHRONIZING USING BLUETOOTH ....................................... 6-7
Connections /...........................................................................7-1
7
CONNECTING TO THE INTERNET ...............................................7-1
Connection Wizard ..........................................................7-1
Setting the GPRS Connection ..........................................7-3
Starting GPRS Connection .............................................. 7-5
Disconnecting GPRS .......................................................7-6
USING BLUETOOTH...................................................................7-7
X-4
Bluetooth Connection Wizard.......................................... 7-7
Bluetooth Connection Setting .......................................... 7-9

Service .....................................................................7-10
Serial Port ................................................................7-11
Bluetooth Headset.................................................... 7-12
FTP Sharing .............................................................7-12
CSD TYPE ................................................................................ 7-13
CONNECTING WITH A PERSONAL COMPUTER ...........................7-14
WIRELESS LAN TRANSMISSION ...............................................7-14
Using Wireless LAN /..............................................................8-1
8
CONNECTING TO WIRELESS LAN............................................. 8-1
CONFIGURE YOUR WIRELESS NETWORK .................................8-3
WLAN Setup Scenarios ....................................................8-3
Configure Your Wireless Network (Reference
for a normal network setup) ..........................................8-4
Configure Your Wireless Network (Reference
for Proxy setup) .............................................................8-7
Sending and Receiving Messages /........................................9-1
9
E-MAILS AND SMS MESSAGES .................................................9-1
Synchronizing E-mail Messages......................................9-2
Connecting Directly to the Mail Server........................... 9-3
E-mail Server Setup .........................................................9-4
Using E-mails and SMS ...................................................9-5
Direct Push Technology Alert .........................................9-8
Direct Push Technology Alert Settings ................... 9-8
MSN MESSENGER ....................................................................9-10
Setting Up ........................................................................9-11
Working with Contacts ....................................................9-12
Chatting with Contacts .................................................... 9-13
X-5

MMS MESSAGE........................................................................ 9-14
Setting Up MMS Mailbox ................................................9-15
Create and Edit MMS ...................................................... 9-18
Multimedia /............................................................................10-1
10
USING CAMERA ........................................................................10-1
Camera Mode ..................................................................10-2
Camera Mode Using Wizard ................................... 10-3
Managing Pictures Shot by Continuous
Shutter............................................................10-4
Digital Video Mode.......................................................... 10-5
Digital Video Mode Using Wizard.......................... 10-6
Speed Shooting Using the Hardware Hotkeys................. 10-7
MULTIMEDIA MANAGER ..........................................................10-8
Preview Multimedia Information..................................... 10-8
Slide Show Function ........................................................10-9
Multimedia Manager Tools .............................................10-10
IMAGE MAKER..........................................................................10-11
IMAGE WIZARD ........................................................................10-13
FM TUNER................................................................................ 10-14
Companion Programs /...........................................................11-1
11
CALENDAR: SCHEDULING APPOINTMENTS AND MEETINGS .....11-2
Create an Appointment ....................................................11-3
X-6
Use the Summary Screen ................................................. 11-4
Create Meeting Requests .................................................11-4
Schedule a Meeting..................................................11-5

CONTACTS: TRACKING FRIENDS AND COLLEAGUES ................11-6
Create a Contact..............................................................11-7
Find a Contact ................................................................. 11-8
Use the Summary Screen ................................................. 11-9
TASKS: KEEPING A TO DO LIST ................................................11-10
Create a Task...................................................................11-11
Use the Summary Screen ................................................. 11-12
NOTES: CAPTURING THOUGHTS AND IDEAS .............................11-13
Create a Note...................................................................11-14
WORD MOBILE .........................................................................11-15
EXCEL MOBILE .........................................................................11-18
Tips for Working in Excel Mobile.................................... 11-20
POWERPOINT MOBILE ..............................................................11-21
WINDOWS MEDIA PLAYER .......................................................11-22
INTERNET EXPLORE ..................................................................11-24
Using Internet Explore ....................................................11-24
Browse the Internet..................................................11-25
View Mobile Favorites and Channels .....................11-26
The Mobile Favorites Folder........................................... 11-26
Favorite Links..................................................................11-27
Synchronize Mobile Favorites .........................................11-27
Create a Mobile Favorite ......................................... 11-27
Save Pocket PC Memory .........................................11-28
Maintaining the Pocket PC /..................................................12-1
12
BACKUP UTILITY ......................................................................12-1
Storage Space ..................................................................12-1
X-7

Backup Files ....................................................................12-2
Wizard Mode ...........................................................12-2
Standard Mode.........................................................12-2
Advanced Settings Options .............................................. 12-3
Restore Files .................................................................... 12-5
Wizard Mode ...........................................................12-5
Standard Mode.........................................................12-6
ADDING OR REMOVING PROGRAMS ......................................... 12-7
Add Programs Using ActiveSync..................................... 12-7
Add a Program Directly from the Internet ...................... 12-8
Add a Program to the Start Menu....................................12-9
Remove Programs............................................................ 12-10
MANAGE MEMORY................................................................... 12-11
View Memory Status ........................................................ 12-11
Find Available Memory ...................................................12-12
SYSTEM INFORMATION .............................................................12-15
Voice Commander /.................................................................13-1
13
STARTING VOICE COMMANDER ............................................... 13-2
VOICE COMMAND FORMAT ......................................................13-3
VOICE COMMANDER SETTINGS ................................................13-5
Contacts Settings Page .................................................... 13-5
Application Settings Page................................................13-8
Music Settings Page......................................................... 13-10
Digit Training Settings Page ........................................... 13-12
Advanced Settings Page................................................... 13-14
FAQ .........................................................................................13-15
X-8

Specifications /.........................................................................14-1
14
Regulation Notice and Safety Declaration /..........................15-1
15
SAR INFORMATION ..................................................................15-1
HEALTH AND SAFETY INFORMATION .......................................15-2
FAQ /........................................................................................16-1
16
X-9

X-10

/
/
VVooiiccee CCoommmmaanndd SSaatteelllliittee
11
NNaavviiggaattiioonn
Navigation Device Installation
Pocket PC
Car Charger (* optional): when Pocket PC is low on power, recharge by
connecting one end to the car cigarette lighter/12 volt power outlet and the
other end to the socket on base of Pocket PC.
Attention: The GPS signal receiver is built into the Pocket PC. If car
windscreen has heat reflective metallic film, or Pocket PC is
obstructed by objects, then the receptivity of the GPS will be
adversely affected.
Voice Command Satellite Navigation 1-1

GPS Navigation Software Installation
Please follow your car navigation system operating manual’s
instructions on software installation in order to use the navigation function.
Conditions for Using GPS Car Navigation
By using this system you are agreeing to the following conditions:
When using this device, please use with matching car mount. Affix device
1.
securely to the car mount. Please be aware that installation in the areas
depicted below is forbidden and is strictly prohibited.
Do not place where it will obstruct driver vision
Do not place over air bag
Do not place where it can not be securely attached
Do not place in path of activated air bag
1-2

Please set navigation destination before driving. Do not operate this
2.
system while driving.
Please use this system with care. If any harm results from careless use of
3.
this system, the responsibility for safe driving resides with the driver.
GPS positioning is limited by weather and usage location (tall buildings,
4.
tunnels, underpasses, trees, bridges). Most GPS do not work indoors, nor
can GPS signals penetrate buildings, car sun shades and heat reflective
film with metallic content. Please install GPS outdoors with clear line of
sight. Beneath the windscreen at the front of the car is a common choice,
and the windscreen should be free of heat reflective film.
If reception is poor, an external GPS antenna may give better signal
5.
reception.
The GPS system is built and operated by the U.S. Department of Defense
6.
which is also responsible for its maintenance and calibration. Any changes
made by them may affect the operation and accuracy of the GPS system.
Wireless devices (mobile phones, speed radar detectors) will all interfere
7.
with the satellite signal and cause unreliable signal reception.
The GPS position fix is provided only for the driver’s reference and
8.
should not affect actual driver behavior.
The electronic map data provided in the navigation system is for normal
9.
reference only and not intended for high precision applications. The user
should determine their exact location based on actual road conditions.
Voice Command Satellite Navigation 1-3

The route provided by the navigation system, the audio cues and
10.
intersection data are derived from recommended optimal route
calculated using the electronic map data. This is provided for the
driver’s reference only, the driver should decide their chosen route
according to actual road conditions.
When not in use, please do not leave the device inside the car. If
11.
exposed directly to sunlight, the battery may overheat and cause damage
to this device. This may endanger the vehicle as well.
1-4

Satellite Data Update
Tap , Programs, GPS, and then Satellite Data Update.
Login to the provider’s server to download instant satellite data and
enable the GPS function. Note: either of the following connections allows
your Pocket PC to download the latest GPS data. If there is more than one
connection available, the system will automatically select the best connection,
in the following order:
ActiveSync connection: Connect your Pocket PC to a PC (Desktop or
1.
Notebook). Please note that your PC must be online.
Wireless LAN connection.
2.
GPRS connection: Roaming mode cannot update GPS data automatically.
3.
If necessary, change to manual mode.
The system will update GPS data
automatically based on a schedule.
Follow these steps:
Check the automatic update
checkbox.
Set the date.
Set the time.
The text shows the expiration date
of the GPS data. On the due date,
the system will pop up a warning
message. Refer to the following
instruction about the Today screen.
Voice Command Satellite Navigation 1-5

Tap the Download Button to
update the GPS data manually. The
figure on the left shows how to
download using the ActiveSync
connection.
After setting your Pocket PC to the following connection mode and
Tap the Setting Button in the
Satellite Data Update main screen
to open the dialog in the left figure.
Check the expiration checkbox to
activate the reminder function on
the due date.
The default value is checked. The
system will automatically update
the data when online.
Costs will be incurred when
connecting over the GPRS, so
consider carefully before activating
this function.
activating the automatic update and Internet connection functions, the system
will automatically download the latest GPS information periodically.
ActiveSync connection. Make sure that your Pocket PC is connected to the
1.
PC, and that the PC is online.
Wireless LAN connection.
2.
GPRS connection.
3.
1-6

When the GPS data has expired,
the relevant message displays on
the top of the screen.
The icon reminds you that your
GPS data has expired.
Tap the Notification Button to
open the message window.
Tap to close the message window.
Voice Command Satellite Navigation 1-7

Location SMS
Tap , Programs, GPS, and then Location SMS.
You can utilize the GPS function offered by your Pocket PC, to send the
matching location automatically found by this program and the necessary
message to your contacts. This could be helpful in preventing kidnapping,
reporting disastrous situations, calling for help in emergencies or locating an
individual. In addition, we have formulated many SMS templates based on
different situations for your convenience.
It is better to execute this program
1.
at a location with clear signal.
Tap to open the Contacts screen, if
set up in advance, you can choose
contacts directly.
You can directly enter mobile
phone number in the To area. If
there is more than one recipient,
please use “;” to separate
recipients.
You can directly enter your message in this area, such as landmarks,
features or street names.
Automatically searches for GPS information.
Tap to allow you to select, add, edit, or delete your most used messages.
Tap to allow you to send SMS messages and report your location.
1-8
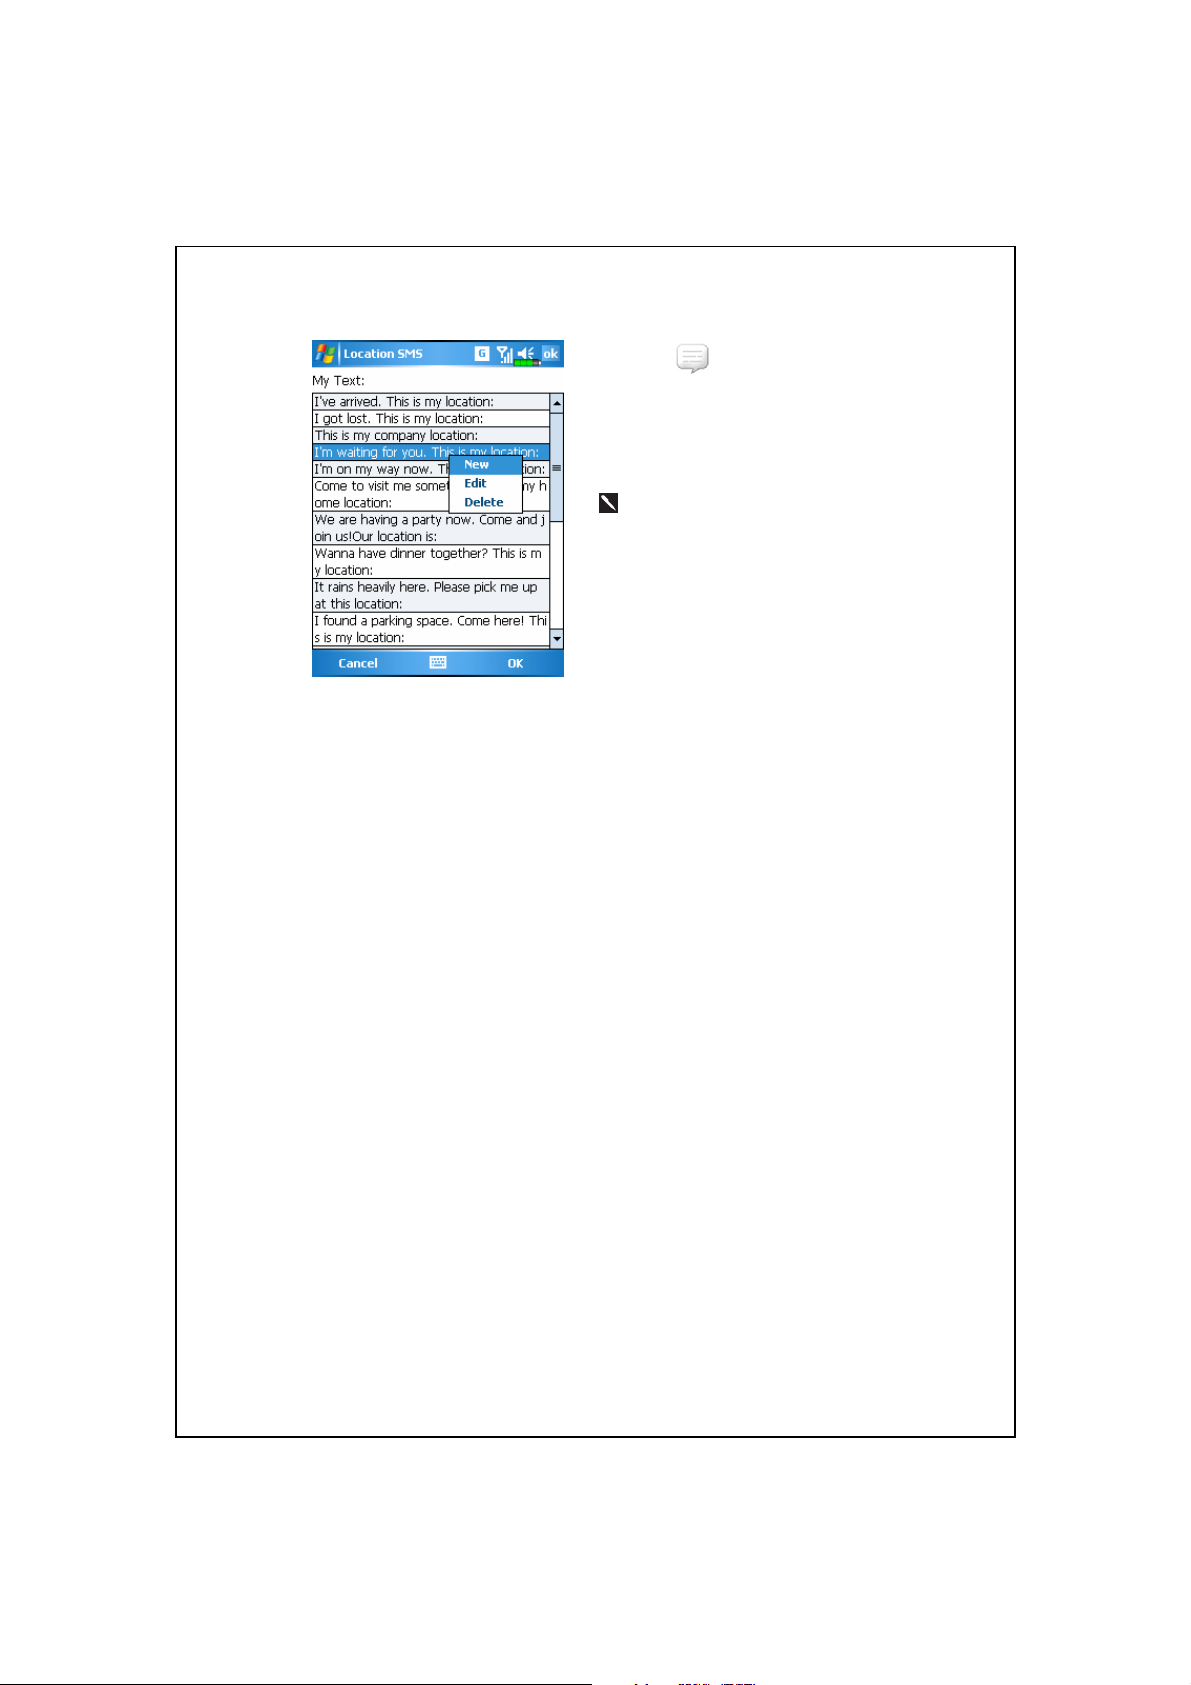
2.
Select
in the main screen,
once in the screen shown on the
left, tap on any message and tap
OK Button to select.
Further, by pressing and holding
anywhere on the screen, together
with the pop-up menu, you can
add, edit or delete your most used
messages.
The content of the message that
3.
your recipient views looks similar
to what is shown on the left. Actual
messages differ depending on the
recipient’s device.
Voice Command Satellite Navigation 1-9

GPS Viewer
Tap , Programs, GPS, and then GPS Viewer.
You may use this Pocket PC to automatically search the GPS
coordinates of your location and check if the GPS functions work properly.
Run this program in a location with
1.
good signal reception.
Greenwich Mean Time (GMT):
After connecting to a satellite and
obtaining the GMT, it will be
displayed on the screen.
Report GPS tracking information.
Switch to Satellite mode.
1-10
Tap Satellite to switch to Satellite
2.
mode.
Red: Satellite detected (In View).
Blue: Satellite data detected (Data
Valid).
Green: Tracking completed
(Tracker).
Signal strength: The larger the
figures, the stronger the signal.
Satellite ID: The IDs expressed in
numbers in this field correspond to
the IDs on the earth image above.
Switch to Compass mode.

GGeettttiinngg SSttaarrtteedd
22
Package Content
Pocket PC, stylus, Battery, Getting Started CD, User Guide, AC adapter,
USB cable, headset and Leather case.
/
/
Pocket PC
User Guide USB Cable
Stylus
Battery
AC Adapter
Getting Started CD
Getting Started 2-1
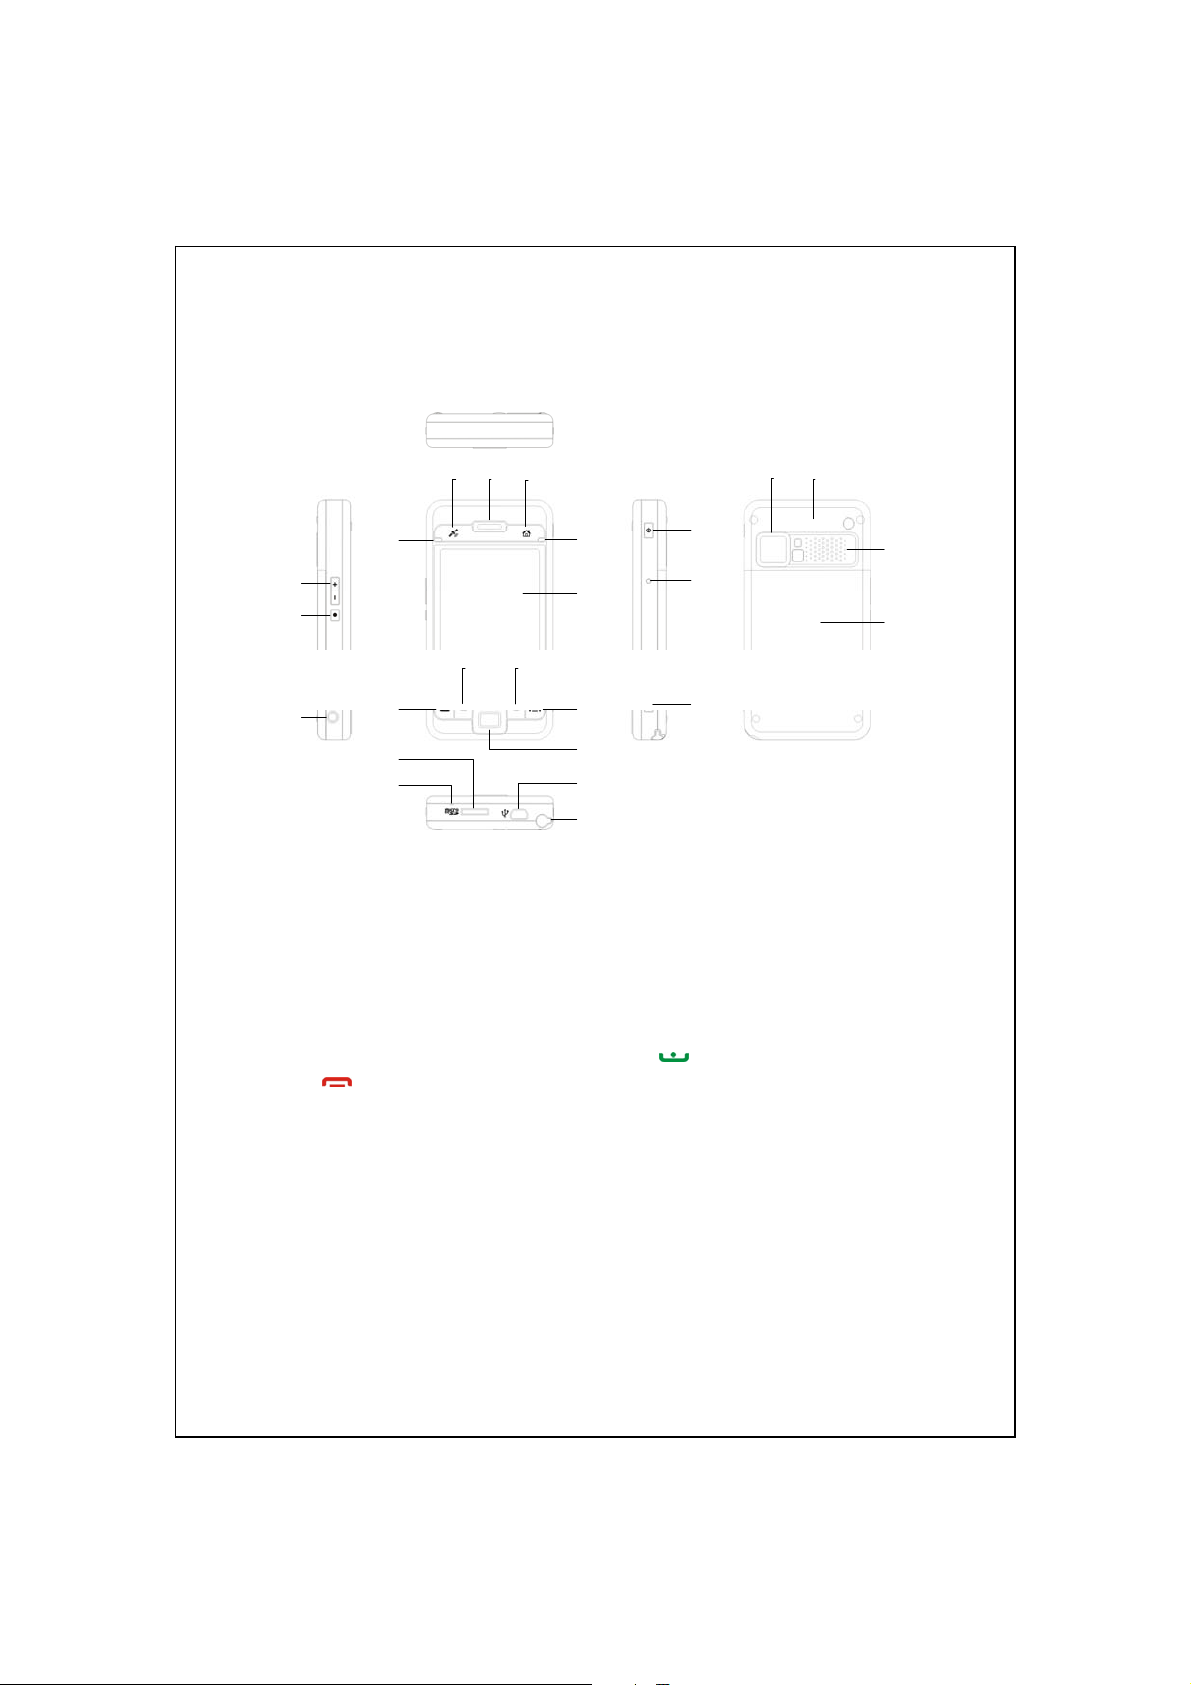
External Views
5
4
7
1
2
10 11
3
Volume control key
1
Earphone and microphone jack
3
Cell Phone speaker
5
WLAN Active LED (Orange)
7
12
15
16
6
Bluetooth Active LED
(Blue, blinks once)
GPS Active LED (Blue, blinks twice)
Touch screen
9
Right Soft-Key
11
End button
13
MicroSD Slot
15
Mini USB port
17
Power button
19
Camera Shutter
21
Hidden antenna for Cell Phone
23
Back cover. Battery is inside.
25
8
9
13
14
17
18
22
23
19
20
21
Voice Commander
2
Hot key reserved for GPS AP
4
M-Desk hot key
6
Power Charging LED (Red)
8
Cell phone Active LED (Green)
Left Soft-Key
10
Send button
12
Navigation button. Press the
14
center of the button to set as
launch key.
Microphone
16
Stylus holder. Slide the stylus
18
out of the holder. This is a
two-stage push-pull stylus.
Reset button
20
Built-in camera lens/ preview
22
mirror
Speaker
24
24
25
2-2
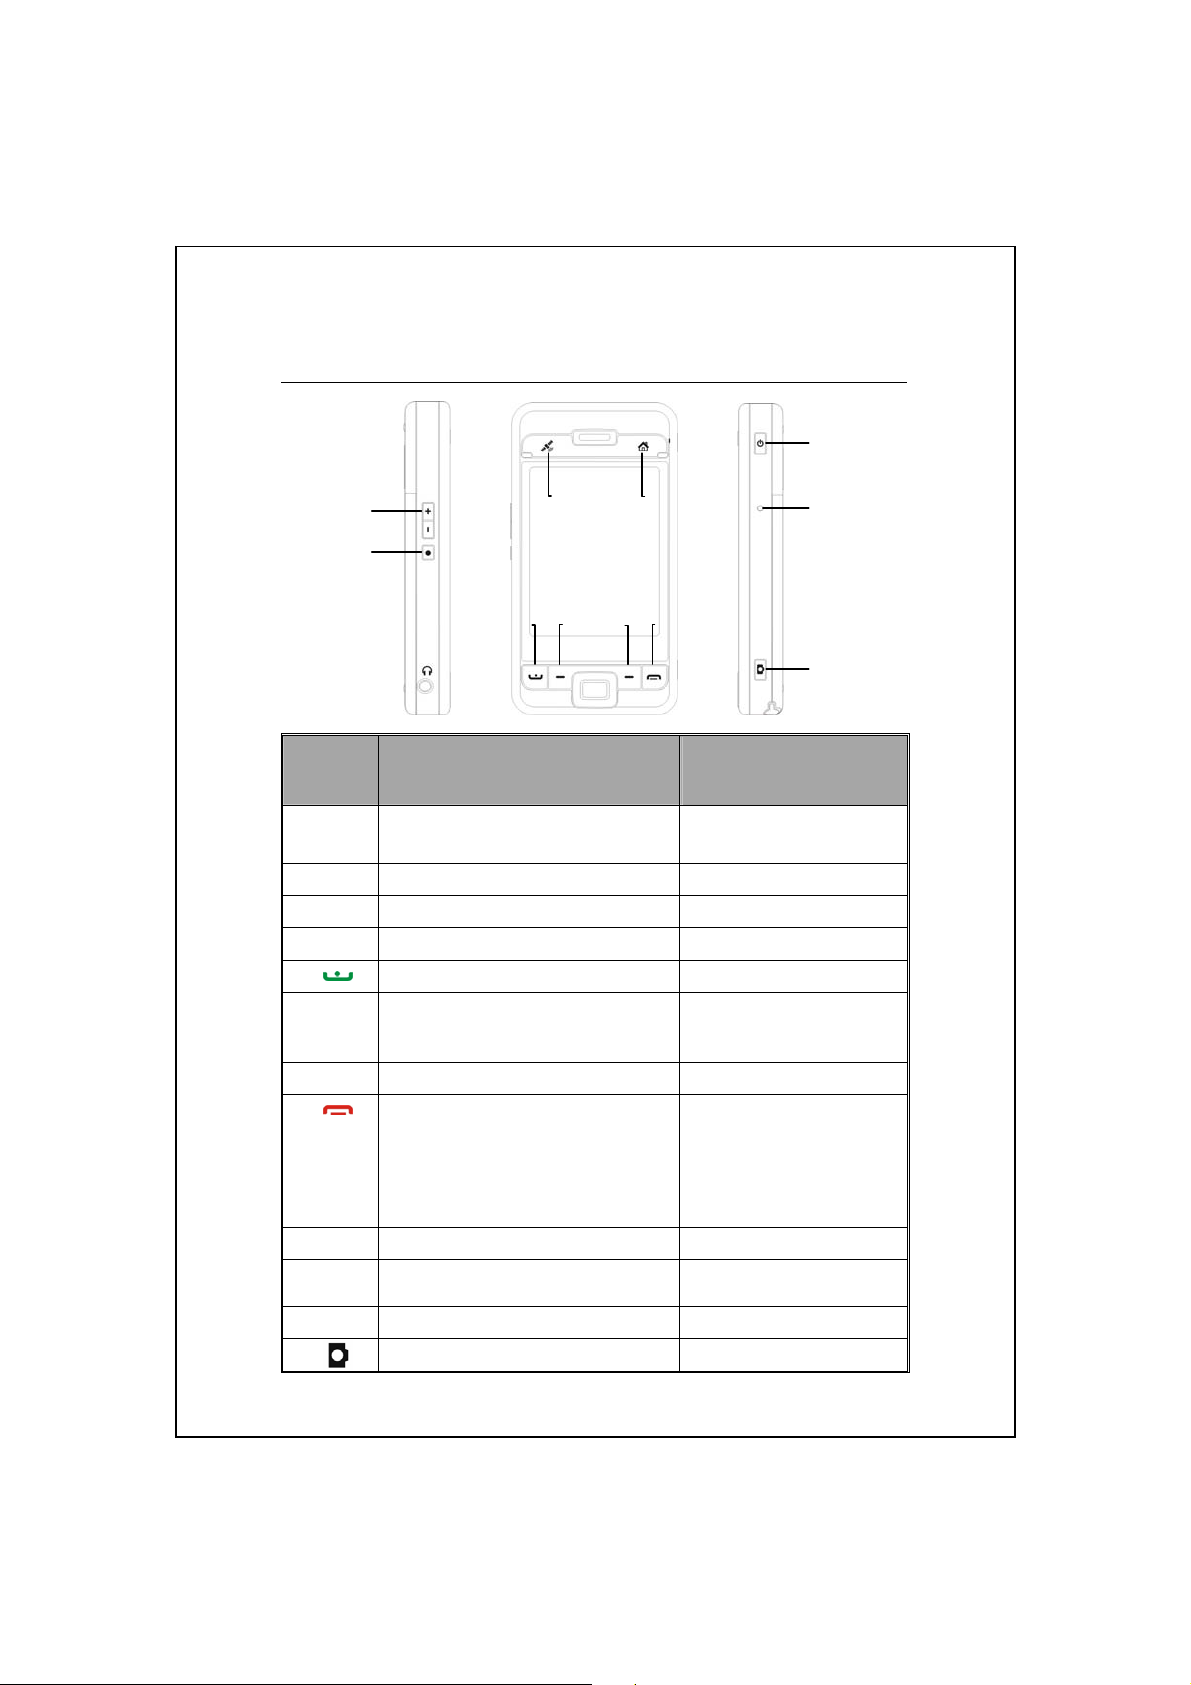
Hardware Hotkey Functions
Hardware
Button
Short Press
(Press once and release)
Adjust volume
Zoom in/out during camera mode
Connect to Voice Commander Connect to Notes
Hot key reserved for GPS AP --
Connect to M-Desk --
Connect to Phone/dial/redial/answer Telephone hold
Left Soft-Key: Soft-keys on left and
right to operate function buttons at
bottom of display.
Right Soft-Key --
Hang up during call
Disconnect during GPRS
connection
Skip to Today’s screen while in
other programs
Power Button = open or close screen --
Power Button + Reset Button
= Cold boot
Reset Button --
Camcorder Video recorder
--
--
--
Long Press
(Press for a few seconds
and release)
Turn off phone if it is on
Turn on phone when it is
off
Getting Started 2-3

Rear Side
Insert the SIM card into the SIM
1
card slot with its golden contacts
facing down. Follow the picture
indicated on the Pocket PC.
Back cover
3
Main battery lock
5
Installing the SIM Card
Main battery
2
Follow the direction in the
4
illustration to install the main
battery.
Installing the Battery
2-4
4
1
2
Unlock
5
3
Lock
 Loading...