

E-tech IPCM02, IPCM01 ADVANCED MANUAL

E-Tech IPCM01/02
CHAPTER 1
1.1 Introduction
Today, more and more people are aware of their personal, home and office
security and are finding solutions to protect themselves. Our E-Tech
IPCM01/02 Camera provides the ideal solution by operating easily with your
Internet Explorer web browser. The E-Tech IP Camera has a built-in
high-speed image and network processor providing you with a powerful
embedded device with many Internet services such as Email, FTP, DDNS,
PPPoE, NTP, User Manager, and Image Control. The E-Tech IP Camera
includes a high quality CMOS sensor with 6 infrared LEDs that provide
excellent imaging in dark and low light situations.
1.2 Product Features
1. High Resolution Image Processor (640*480:15fps,320x240:30 fps) with
built-in MPEG encoder.
2. Ethernet RJ-45,10/100 Base-T with auto-sensing.
3. Remote view through the IE browser, simply type in the IP address.
4. 6 infrared LEDs provide imaging in the dark.
5. Many Valuable Internet services: Email, FTP, PPPoE, Dynamic DNS,
NTP service, User Management, and Image quality Control.
6. USB 1.1 Interface making it useful as a webcam. Compatible with
Microsoft MSN Messenger and NetMeeting.
1.3 System and network environment
1. LAN: 10Base-T Ethernet or 100Base TX Fast Ethernet.
2. More than one fixed IP address is recommended.
3. A 10/100Base-T switch HUB is required.
Microsoft Internet Explorer 5.0 or above. Pentium III 1G CPU or above.
3. 64MB RAM or above.
4. VGA card with 8MB Memory or above (800x600 or above).
5. Windows 2000/XP is recommended.
Attention: A fixed IP address is not required to access the camera
from the Internet. However if your IP address is dynamic, you need to
ask your Internet service provider for the Dynamic DNS service.
1.4 Package Contents
1. E-Tech IPCM01/02
2. Mount
3. User’s Manual
4. Driver CD (Surveillance software is optional)
5. USB Cable
6. RJ-45 Cable (cross over wire)
7. 5V DC Adapter
Page 1
Page 2
CHAPTER 2
Hardware Description and Connection
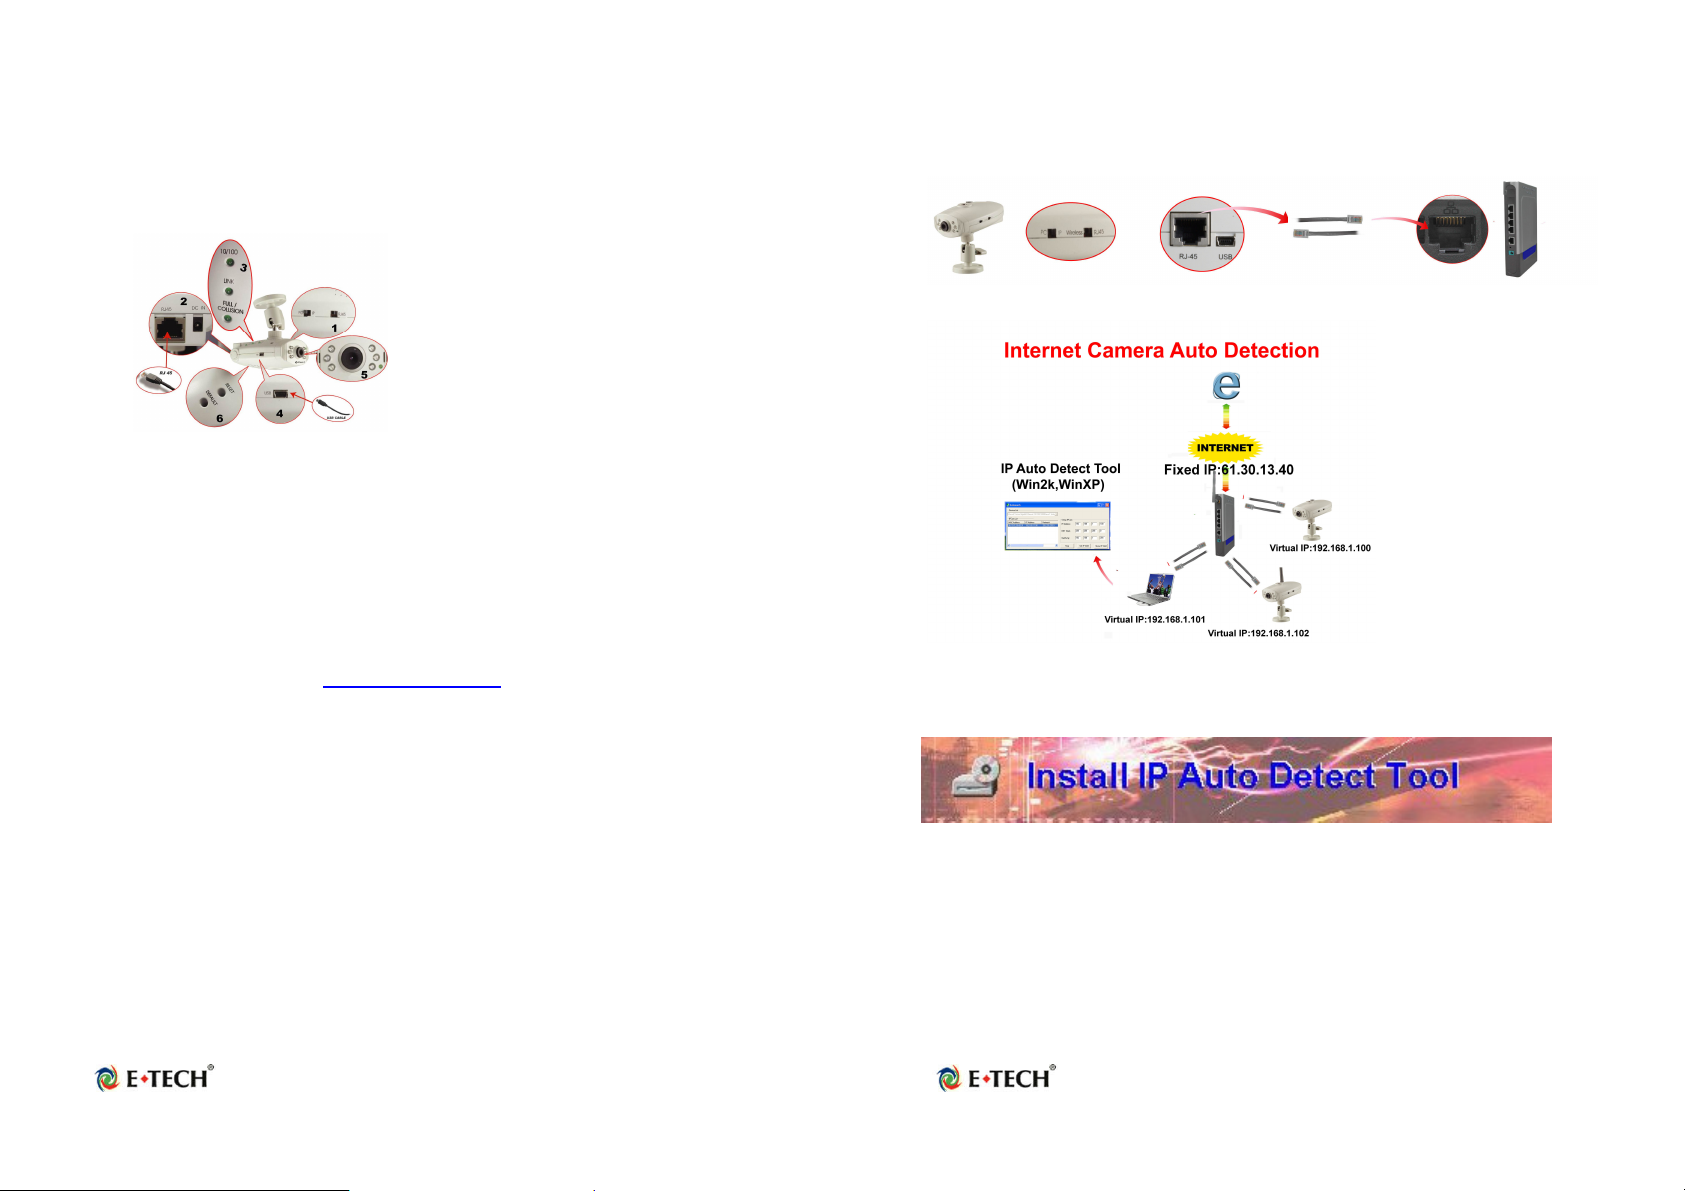
2.1 Hardware description
1. Camera switch: Change between Web Camera (USB) ,IP
Camera and WiFi Camera mode.
2. Connections and Interface: USB 1.1, RJ45 and Power adapter
3. Reset and Default:
• Reset: When you change between PC Cam IP Camera ,Wifi Camera
or set the Camera mode, you must reset (reboot) the system.
• If you forget the IP address or ID Password, you can restore the
original default parameters.
• Default IP address: http://192.168.1.100.
Default User ID: root
Default User Password: admin
4. Connections and Interface: USB 1.1, RJ45 and Power adapter
5. A Ready LED: the IP Camera can be operated in IP or WiFi Camera
mode when the ready LED is on (it takes about 30 ~ 40 seconds before
the ready LED goes on).
6. Six infrared LEDs with night-vision lens
7. The indicator LED:
• Link LED: When IP Camera is connected to the network, this light
will be turned on.
• 10/100 TBase LED: Indicates the network status, as well as
indicating whether the connection is high speed or not.
2.2 Quick Start: IP Camera Auto Detection
Please connect the IP Camera with your Gateway or Ethernet Hub. The
following figure suggests the recommended set-up:
Step 1: Please install the IP Auto Detect Tool (Only supports WinXP and
Win2000).
Page 3
Page 4
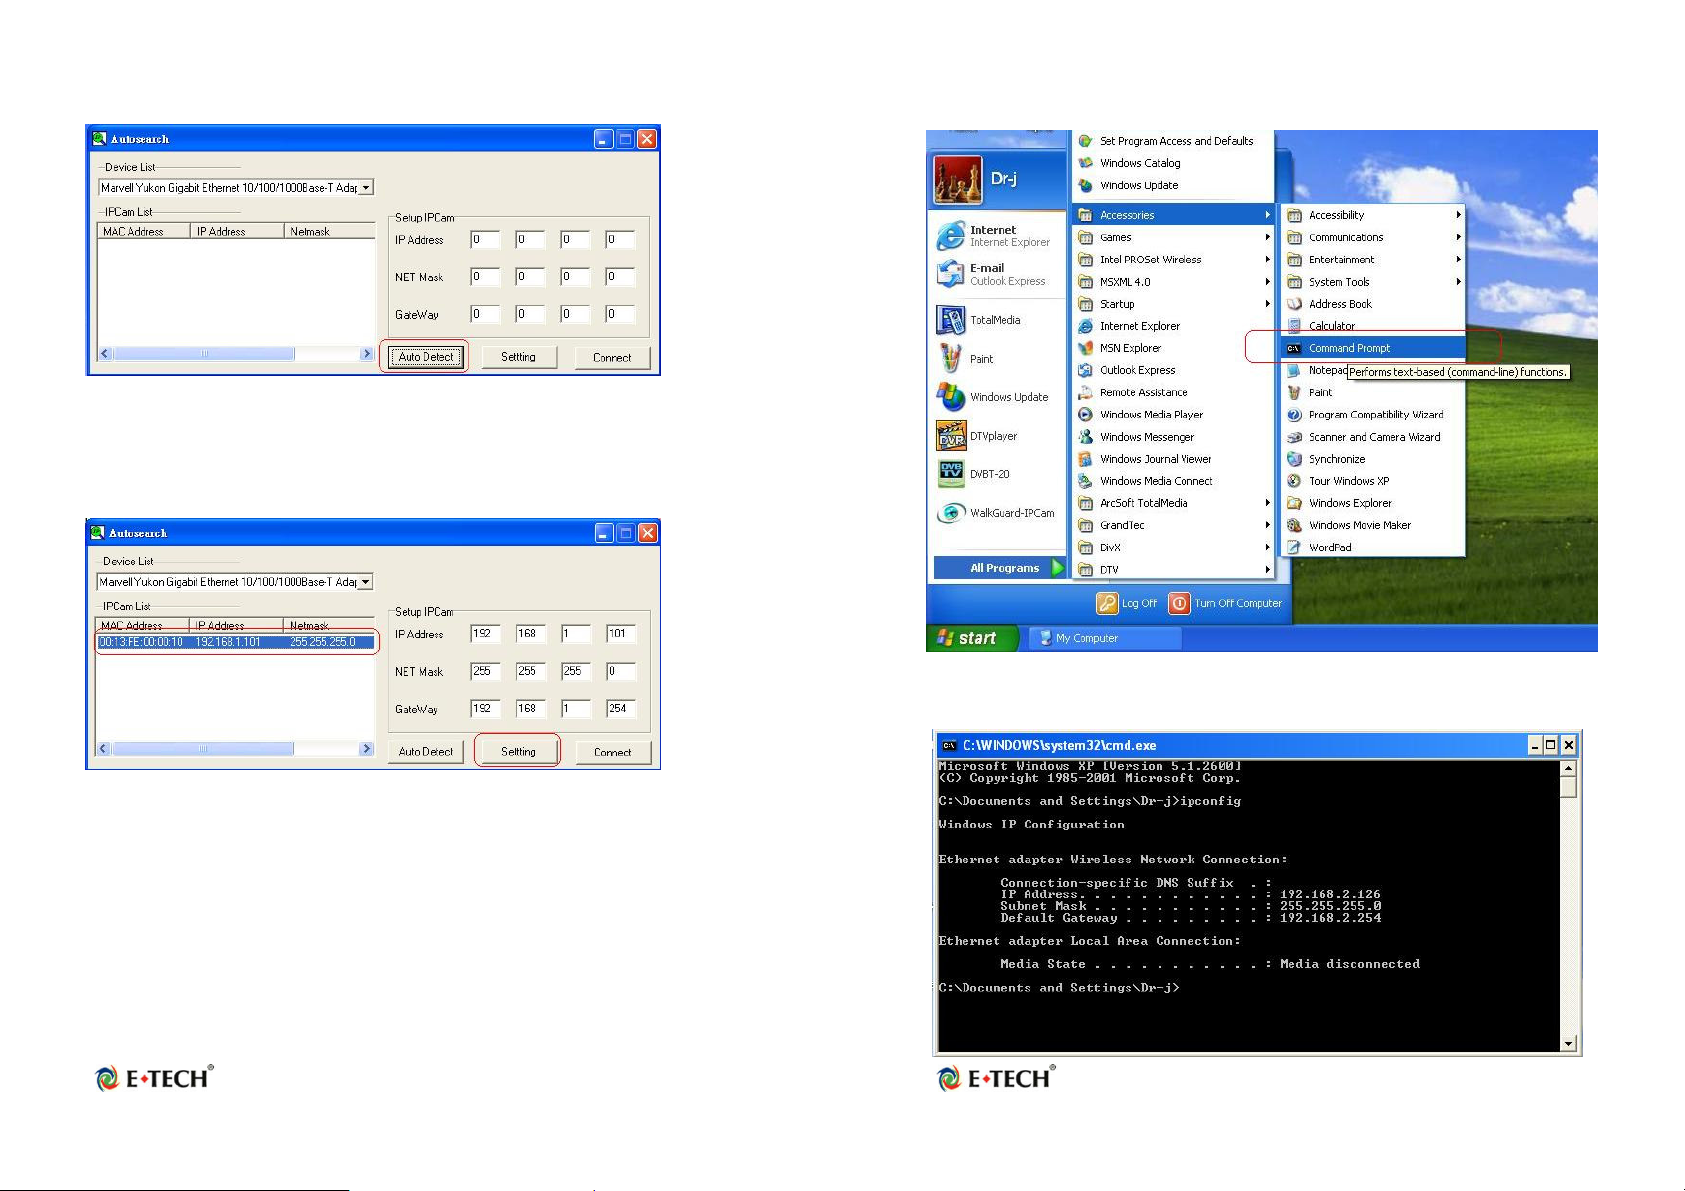
Step2: Execute the software “IPDetect.exe” on the Desktop
Step 3: Select a LAN Device; Network Adapter (It can not support wireless
Network Adapters) and click the button “Auto Detect”
Step 4: Find the Internet Camera by highlighting it in the “IPCam List” and
assign the IP address by clicking the button “Setting”
Step5: Click Start->All Programs->Accessories->Command Prompt
Step 6: Type the command “ipconfig” to get the network information
After that you have to follow the next steps to get Network information
(Subnet, NET Mask and Default Gateway Address):
Page 5
Page 6
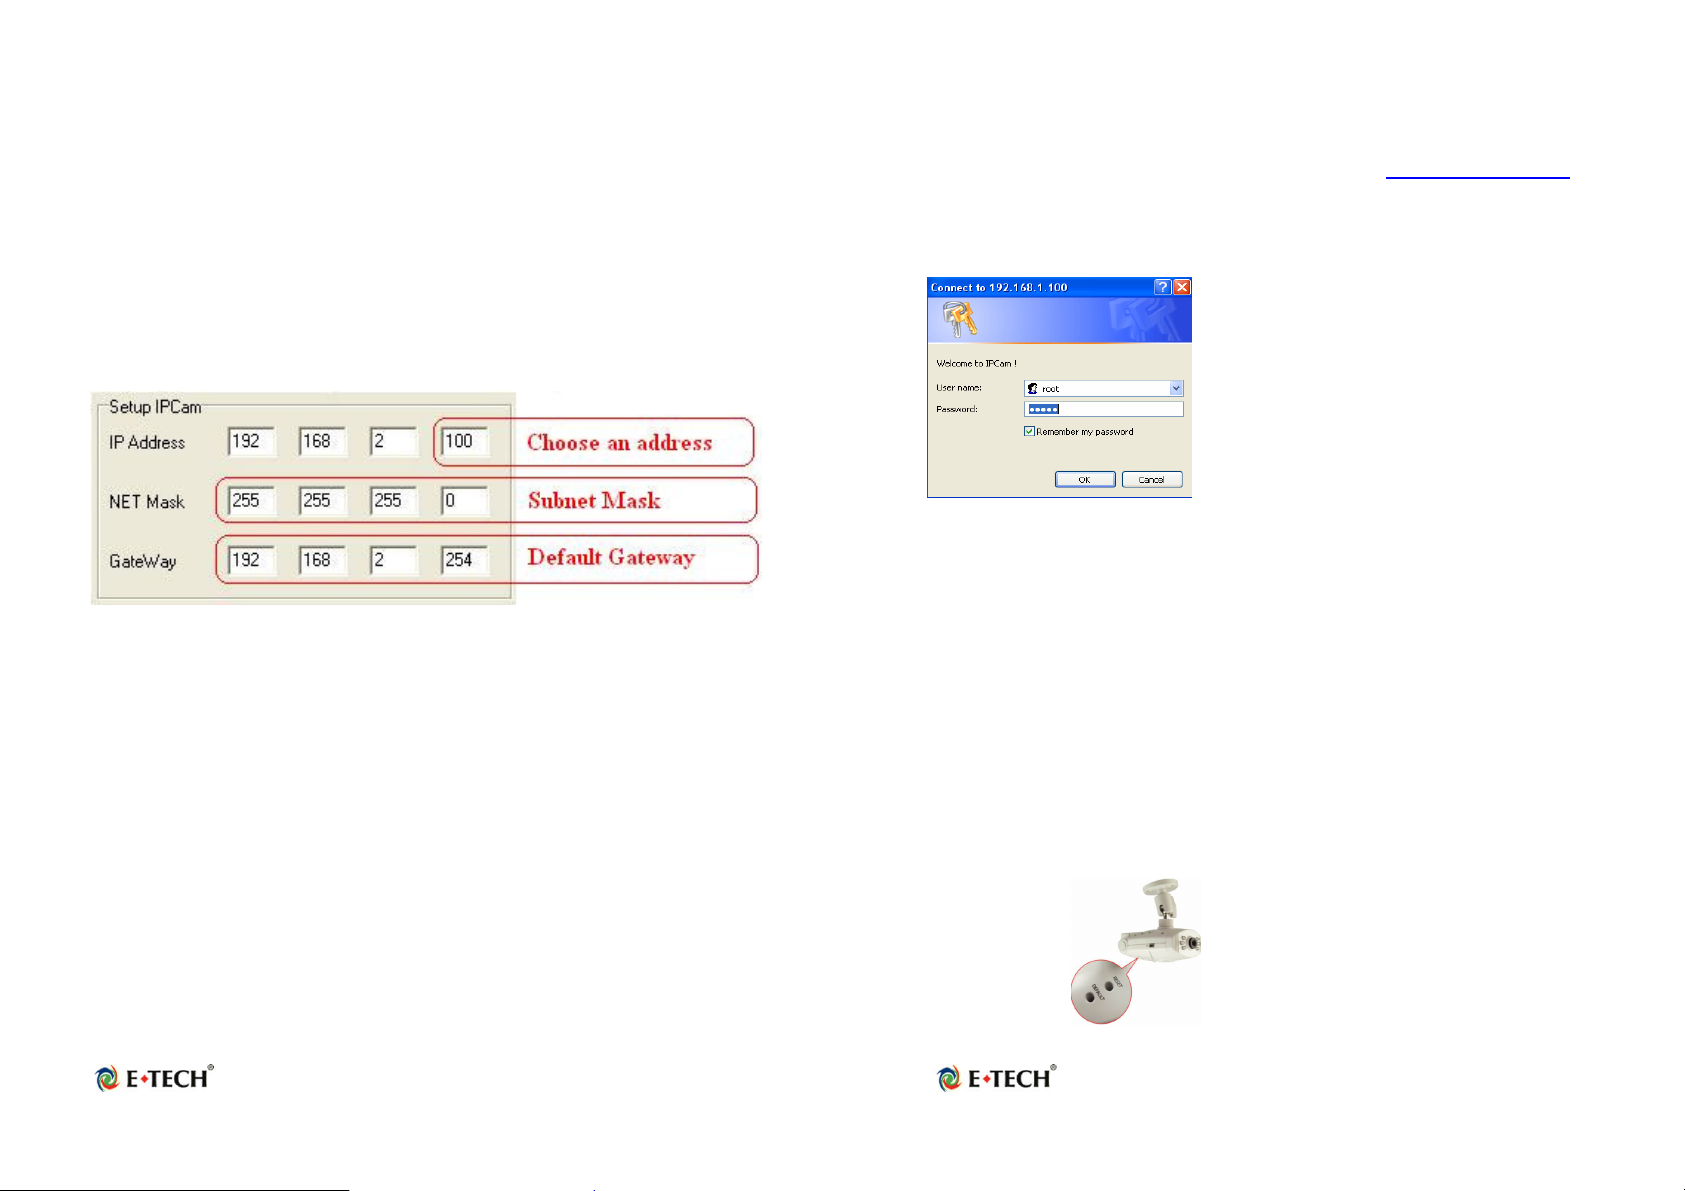
Step 7: Assign the IP Address, Subnet Mask (NET Mask) and
Default Gateway (GateWay) to the IP Camera
In this example just must use the Subnet Mask”
255.255.255.0“ and the GateWay ”192.168.2.254”
Step 8: You can use any IP Address between 192.168.2.1-254, but please
make sure that the IP Address you use is not being
used by any other IP cliënt device in your network.
For Example: Type the following parameters and click “setting”
Step 9 Click the button “Connect”, then you can connect to the Camera.
2.3 Access the IP Camera via Internet Explorer
The default IP Camera’s IP address is 192.168.1.100. To open the
homepage of the IP Camera, please type the adres http://192.168.1.100
(from the example above) in Internet Explorer and then press the ”Enter”
button on your keyboard.
Log in with username: root and password: admin.
Login Screen
Default Username: root
Default Password: admin
Default IP address: 192.168.1.100
If you cannot connect to the webpage you have to modify your network
settings. The IP Camera can be used to manually configure the camera’s
network settings. Please use command “Ping” (Appendix A) to check the
connection for more detail.
Attention: If you have forgotten the IP address or ID Password from
the camera, please click the “Default” button (Appendix D) on the
body of IP Camera until the ready light has been turned off.
Page 7
Page 8
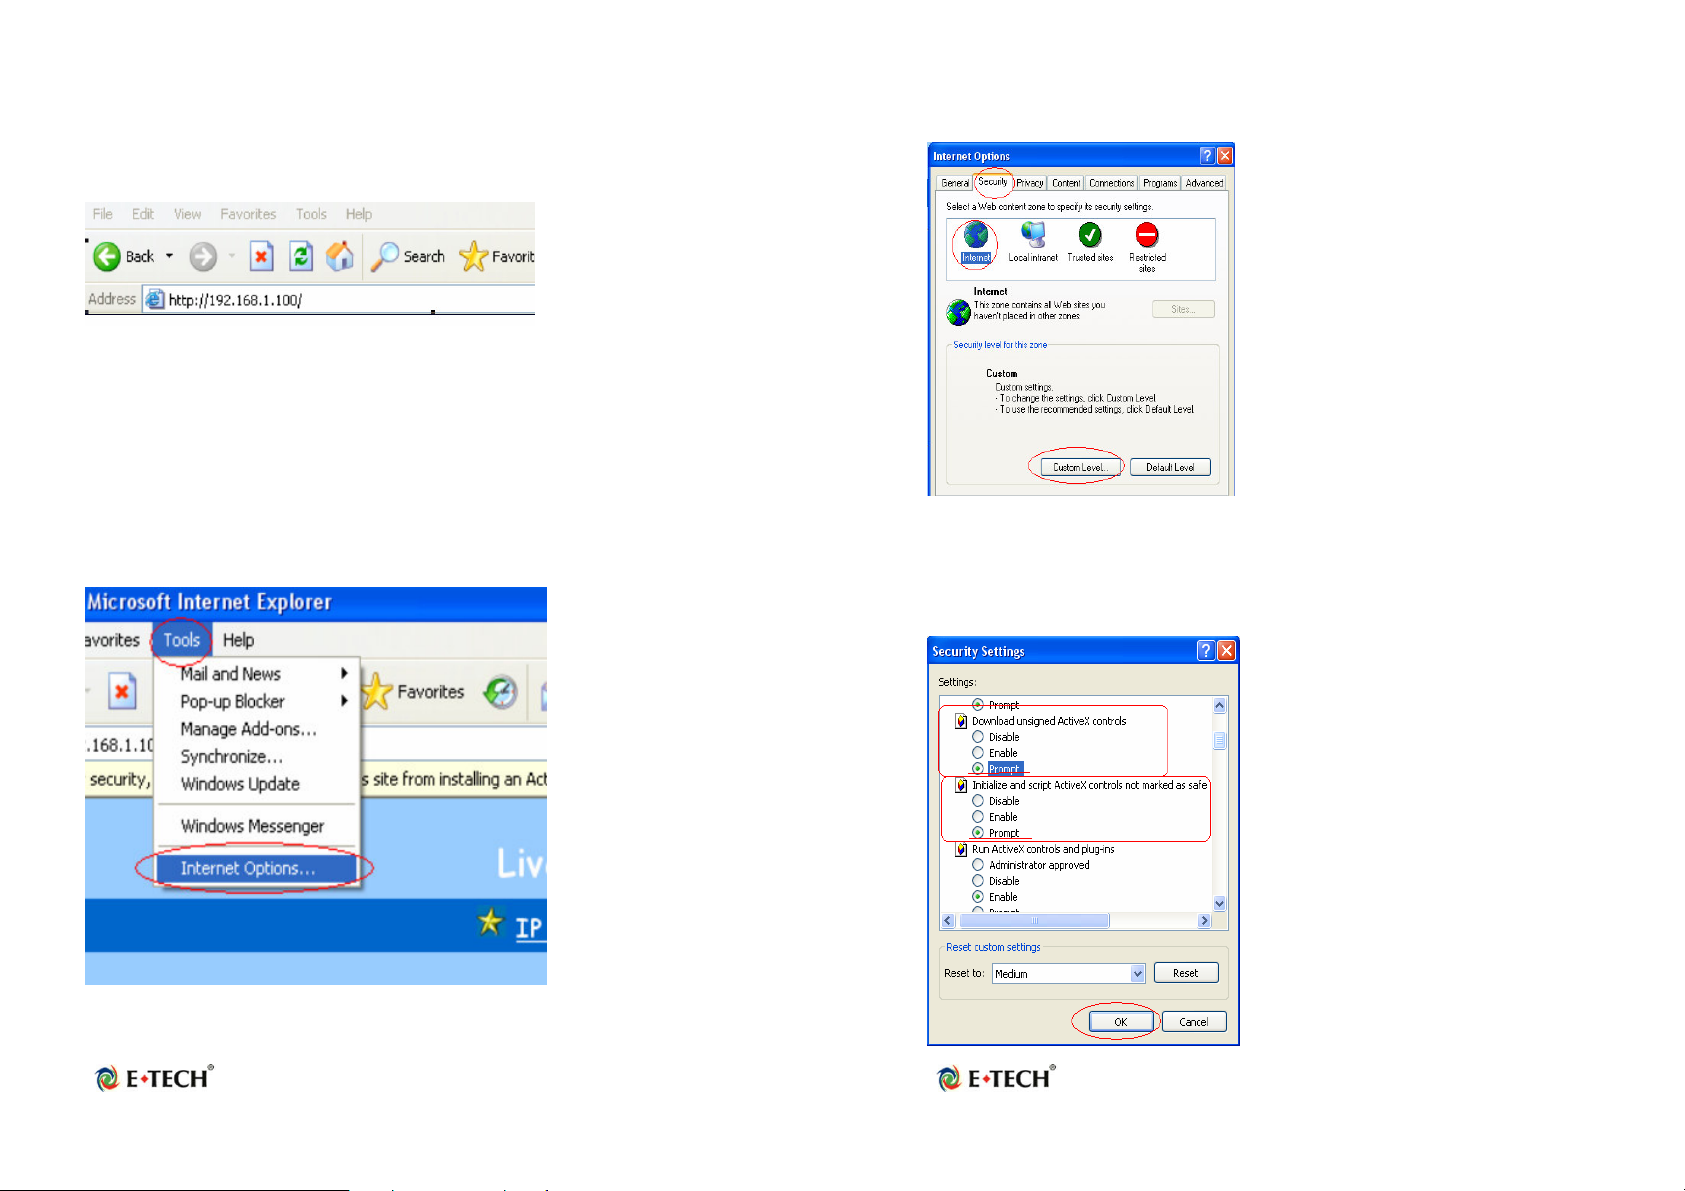
2.4 WEB Browser Configuration
1. From any PC on the local network, start Internet Explorer and enter the
camera’s IP address in the address bar, as the picture shows below:
IP Camera’s IP Address in Internet Explorer
2. When accessing the web server for the first time, you will need to install
an ActiveX component for your Internet Explorer. This can be changed in
your Internet Explorer Security.
Internet Explorer Security Setting:
Step1 : Click “Tool” => “Internet Options” => “Security” => “Custom
Level”.
Internet Explorer Internet Options
Internet Explorer Security Modify
Step2 : Then click ”Custom Level” and set the parameters as follows:
Page 9
Page 10

ActiveX Security Settings
Please remember these two features must be active: “Download
unsigned ActiveX controls” and “Initialize and script controls not
marked as safe” If you want to learn more, please refer to the
troubleshooting section in Chapter 5 : Frequently Asked Questions.
3. Snapshot E-mail: Send the Live Video Screen capture via E-mail
Please refer to the settings about [Configuration] => [Advanced
Configuration] => [E-mail service Setup].
2.5 IP Address Configuration:
Please click Basic Setup. Depending on your
network setup, you should see the following
figures:
Please set the parameters IP Adress, Subnet Mask, Gateway IP Address
and Domain Name Service if there is a fixed IP Address. You can ask your
Broadband/Cable Internet Service Provider for more information.
2.6 Administrator Configuration
Click Device Admin
Attention: We use the same default Password with each IP Camera, so
we suggest that you change the password.
Important: Each IP Camera has his own unique MAC Address, so we
suggest you do not change the item ”MAC Address”.
Page 11
Page 12
 Loading...