

Page 1

44 P
Poorrttss
A
A
D
DSS
L
L22//22++
R
Roouutteerr
UUsseerr M
Maannuuaall
FFOORR AANNNNEEXX AA//B
B
Page 2

Copyright
The contents of this publication may not be reproduced in any part or as a whole, stored, transcribed in an
information retrieval system, translated into any language, or transmitted in any form or by any means,
mechanical, magnetic, electronic, optical, photocopying, manual, or otherwise, without the prior written
permission.
Trademarks
All product, company, brand names are trademarks or registered trademarks of their respective companies.
They are used for identification purpose only. Specifications are subject to be changed without prior notice.
4 Ports ADSL2/2+ Router i
Page 3

FCC Interference Statement
This equipment has been tested and found to comply with the limits for a Class B digital device pursuant to
Part 15 of the FCC Rules. These limits are designed to provide reasonable protection against radio
interference in a residential environment. This equipment can generate, use and radiate radio frequency
energy and, if not installed and used in accordance with the instructions in this manual, may cause harmful
interference to radio communications.
However, there is no guarantee that interference will not occur in a particular installation. If this equipment
does cause harmful interference to radio or television reception, which is found by turning the equipment ON
and OFF, the user is encouraged to try to reduce the interference by one or more of the following measures:
y Adjust or relocate the receiving antenna
y Increase the separation between the equipment or device
y Consult a dealer or an experienced technician for assistance
CE Declaration of Conformity
This is to certify that this device complies the essential protection requirements of the European Council
Directive 89/336/EEC, Article 4a. Conformity is declared by the application of EN 55 022 Class B (CISPR 22).
Compliance with the applicable regulations is dependent upon the use of shielded cables. It is the
responsibility of the user to procure the appropriate cables.
4 Ports ADSL2/2+ Router ii
Page 4

4 Ports ADSL2/2+ Router iii
Contents
CHAPTER 1 INTRODUCTION........................................................................................... 1
1.1 Features....................................................................................................................................................... 2
1.2 Scope........................................................................................................................................................... 5
1.3 Audience ...................................................................................................................................................... 6
1.4 Document Structure..................................................................................................................................... 7
1.5 System Requirement ................................................................................................................................... 8
1.6 Packet Contents .......................................................................................................................................... 9
CHAPTER 2 KNOWING THE 4 PORTS ADSL2/2+ ROUTER ........................................ 10
2.1 Front Panel ................................................................................................................................................ 10
2.2 Back Panel..................................................................................................................................................11
2.3 Connection Mechanism: ............................................................................................................................ 12
CHAPTER 3 SETTING UP THE TCP/IP IN WINDOWS................................................... 14
3.1 Windows ME / 98....................................................................................................................................... 15
3.2 Windows 2000 ........................................................................................................................................... 16
3.3 Windows XP .............................................................................................................................................. 17
3.4 Checking TCP/IP Configuration................................................................................................................. 18
CHAPTER 4 DEVICE ADMINISTRATION....................................................................... 21
4.1 Login .......................................................................................................................................................... 21
4.2 EZ SETUP ................................................................................................................................................. 24
4.3 CONFIG..................................................................................................................................................... 35
4.3.1 CONFIG - WAN Setup............................................................................................................................ 36
4.3.1.1 CONFIG - WAN Setup – New Connection.......................................................................................... 37
4.3.1.1.1 New Connection - PPPoE Connection Setup................................................................................... 38
4.3.1.1.2 New Connection - PPPoA Connection Setup................................................................................... 41
4.3.1.1.3 New Connection - Static Connection Setup ..................................................................................... 43
4.3.1.1.4 New Connection - DHCP Connection Setup.................................................................................... 45
4.3.1.1.5 New Connection - Bridge Connection Setup.................................................................................... 47
4.3.1.1.6 New Connection - CLIP Connection Setup ...................................................................................... 49
4.3.1.2 CONFIG - WAN Setup - Modem ......................................................................................................... 51
4.3.2 CONFIG - LAN Setup ............................................................................................................................. 52
4.3.2.1 LAN Setup - LAN Configuration........................................................................................................... 53
4.3.2.1.1 LAN Configuration - Unmanaged ..................................................................................................... 54
4.3.2.1.2 LAN Configuration – Obtain an IP Address Automatically................................................................ 55
Page 5

4 Ports ADSL2/2+ Router iv
4.3.2.1.3 LAN Configuration – PPP IP Address............................................................................................... 56
4.3.2.1.4 LAN Configuration – Use The Following Static IP Address .............................................................. 57
4.3.3 LAN Setup - Firewall/NAT Services........................................................................................................ 59
4.3.4 CONFIG – Save All................................................................................................................................. 60
4.4 ADVANCED ............................................................................................................................................... 61
4.4.1 ADVANCED - UPnP................................................................................................................................62
4.4.2 ADVANCED - SNTP ............................................................................................................................... 63
4.4.3 ADVANCED - SNMP............................................................................................................................... 64
4.4.4 ADVANCED - IP QoS ............................................................................................................................. 66
4.4.5 ADVANCED - Port Forwarding ............................................................................................................... 68
4.4.6 ADVANCED - IP Filters........................................................................................................................... 71
4.4.7 ADVANCED - LAN Clients...................................................................................................................... 73
4.4.8 ADVANCED - LAN Isolation ................................................................................................................... 74
4.4.9 ADVANCED - Bridge Filters.................................................................................................................... 75
4.4.10 ADVANCED – Web Filters.................................................................................................................... 77
4.4.11 ADVANCED - Multicast......................................................................................................................... 78
4.4.12 ADVANCED – Static Routing................................................................................................................ 79
4.4.13 ADVANCED – Dynamic Routing........................................................................................................... 80
4.4.14 ADVANCED – Access Control.............................................................................................................. 81
4.4.15 ADVANCED – Save All ......................................................................................................................... 82
4.5 TOOLS....................................................................................................................................................... 83
4.5.1 TOOLS - System Commands................................................................................................................. 84
4.5.2 TOOLS - Remote Log............................................................................................................................. 86
4.5.3 TOOLS - User Management................................................................................................................... 87
4.5.4 TOOLS - Update Gateway...................................................................................................................... 88
4.5.5 TOOLS - Ping Test.................................................................................................................................. 90
4.5.6 TOOLS - Modem Test............................................................................................................................. 91
4.5.7 TOOLS – Save All................................................................................................................................... 92
4.6 STATUS..................................................................................................................................................... 93
4.6.1 STATUS - Network Statistics .................................................................................................................. 94
4.6.1.1 STATUS - Network Statistics - Ethernet .............................................................................................. 95
4.6.1.2 STATUS - Network Statistics - DSL..................................................................................................... 96
4.6.2 STATUS – Connection Status................................................................................................................. 97
4.6.3 STATUS - DHCP Clients......................................................................................................................... 98
4.6.4 STATUS - Modem Status........................................................................................................................ 99
4.6.5 STATUS - Product Information ............................................................................................................. 100
4.6.6 STATUS - System Log.......................................................................................................................... 101
APPENDIX A: ROUTER TERMS....................................................................................102
Page 6

4 Ports ADSL2/2+ Router v
APPENDIX B: HELPS ....................................................................................................104
APPENDIX C: FREQUENTLY ASKED QUESTIONS.....................................................109
APPENDIX D: TROUBLESHOOTING GUIDE................................................................111
APPENDIX E: UPNP SETTING ON WINDOWS XP.......................................................114
APPENDIX F: GLOSSARY.............................................................................................118
Page 7

Chapter 1 Introduction
Congratulations on your purchase of this outstanding 4 Ports ADSL2/2+ Router. This device is a Four Ports
Ethernet ADSL2/2+ Router combines an “Always-On” high speed Asymmetric Digital Subscriber Line
(ADSL/ADSL2/ADSL2+) connection to the Telephone Line, and four 10/100BASE-T Ethernet Switch
connection to a host PC or other Ethernet device to enable the widest array of host connectivity. This 4 Ports
ADSL2/2+ Router is specially designed for residential, industries and SOHO users.
ADSL2/2+ is a transmission technology used to carry user data over a single twisted-pair line between the
Central Office and the Customer Premises. The downstream data rates can go up to 24 Mbps and the
upstream data rates can go up to 1Mbps with length reach up to 22Kft. This asymmetric nature lends itself to
applications such as Internet access and video delivery.
With minimum setup, you can install and use the router within minutes.
4 Ports ADSL2/2+ Router 1
Page 8

4 Ports ADSL2/2+ Router 2
1.1 Features
The 4 Ports ADSL2/2+ Router provides the following features:
y Compliant to ANSI T1.413 Issue 2, ITU-T G.992.1, ITU-T G.992.2, ITU-G.992.3, ITU 992.4,
ITU G.992.5 and READSL2 standards. Support all Digital Loop ITU G.992.3 annex I and J
specifications.Fully compliant with Annex A/B/B (U-R2) ADSL specifications.
y Downstream and Upstream data rates up to 24Mbps and 1Mbps.
y Support RFC 1483 Bridge/Routing over ATM over ADSL.
y Support PPPoE, PPPoA and IPoA Routing ATM over ADSL.
y ATM Layer with Traffic Shaping QoS support ( UBR, CBR, VBR-rt, VBR-nt ).
y Support UPnP functionality.
y Web-based setup for installation and management.
y Built-in 4*10/100 Mbps Fast Ethernet Switch port for LAN connection.
y Compliant with IEEE 802.3/802.3u and auto-negotiation.
y Support full-duplex 802.3 flow control.
y Support IP Filtering, MAC Filtering, Web Filtering and IPSec Pass-Through security
functionality.
y Support Dying Gasp functionality (Optional).
y Flash memory for firmware upgrade.
y Hardware Reset button for fast default setting recovery.
y HTTP Web-Based Management/Configuration.
y LEDs indicator indicates connection status.
ADSL Standards
y Full rate ANSI T1.413 Issue2, ITU-T G.992.1 and ITU-T G.992.2 standards compliant.
y ITU G.992.3, ITU G.992.5 and READSL2 ADSL2/2+ standards compliant.
y Downstream and Upstream data rates up to 24Mbps and 1Mbps.
y Reach length up to 22Kft.
y Support Dying Gasp functionality (Optional).
Page 9

4 Ports ADSL2/2+ Router 3
ATM Protocols
y Support ATM ALL0, ALL2 & ALL5.
y Support up to 16PVCs.
y Support ATM UBR, CBR, VBR-rt and VBR-nt Traffic Shaping QoS.
y Support OAM F4/F5 Loop Back.
y Support PPPoA (RFC2364).
y Support PPPoE (RFC2516).
y Router/Bridged Ethernet over ATM (RFC2864 / RFC1483).
y Classical IP over ATM (RFC2225 / RFC1577).
Router Mode
y IP Routing – RIPv1 and RIPv2.
y Static Routing.
y DHCP Server, Relay and Client.
y Support DNS Relay/Server.
y Support DMZ functionality.
y Support NAT and NAPT (PAT) functionality with extensive ALG supported.
y Support IPSec, L2TP, PPTP Pass-Through.
y Support VPN Pass-Through.
y Support SNMP functionality.
y Support ICMP and IGMP.
y Support PAP and CHAP PPP Authentication.
Bridge Mode
y Support Transparent Bridging ( IEEE 802.1D ).Support RFC 2684/1483 Bridged.Firewall
y Built in Firewall functionality.
y Support IP Filtering.
y Support MAC Filtering.
y Support Web Filtering.
y IPSec Pass-Through.
y Protection against IP and MAC address spoofing.
UPnP
y Support UPnP functionality.
Page 10

4 Ports ADSL2/2+ Router 4
Ethernet Standards
y Built-in 4 Ports 10/100Mbps Ethernet Switch which compliant with IEEE 802.3x standards
y Automatic MDI/MDI-X crossover for 100BASE-TX and 10BASE-T ports.
y Auto-negotiation and speed-auto-sensing support.
y Port based VLAN supported in any combination.
Web-Based Management
y Web-based Configuration / Management.
y Remote / Local Management / Configuration.
y Firmware upgrade and Reset to default via Web management.
y Telnet, TFTP and FTP Management / Configuration.
y SNMP MIB-II.
y Restore factory default setting via Web or hardware reset button.
y WAN and LAN connection statistics.
y Configuration of static routes and routing table, NAT/NAPT and VCs.
y Support Password Authentication.
Page 11

4 Ports ADSL2/2+ Router 5
1.2 Scope
This document provides the descriptions and usages for the 4 Ports ADSL2/2+ Router’s Web pages that are
used in the configuration and setting process. Both basic and advanced descriptions and concepts are
discussed. To help the reader understand more about these Web pages, some questions and answers (Q&A)
are appended after the definition of each Web page along with the appendices at the end of the guide.
Page 12

4 Ports ADSL2/2+ Router 6
1.3 Audience
This document is prepared for use by those customers who purchase the 4 Ports ADSL2/2+ Router and using
the provided or embedded firmware. It assumes the reader has a basic knowledge of ADSL/ADSL2/ADSL2+
and networking.
Page 13

4 Ports ADSL2/2+ Router 7
1.4 Document Structure
Chapter 1: Introduction, provides a brief introduction to the product and user guide.
Chapter 2: Knowing The 4 Ports ADSL2/2+ Router, provides device specifications and hardware
connection mechanism.
Chapter 3: Setting Up TCP/IP In Windows, provides Windows system Network’s configurations.
Chapter 4: Device Administration, describes the pages found under the Admin menu. These pages
allow the user to view, change, edit, update, and save the 4 Ports ADSL2/2+ Router’s
configurations or settings.
Appendix A: Router Terms, provides an introduction to basic Router Terms.
Appendix B: Helps, provides Help description for Firewall, Bridge Filters, LAN Clients and PPP
connection.
Appendix C: Frequently Asked Questions, is a compilation of useful questions regarding the 4 Ports
ADSL2/2+ Router.
Appendix D: Troubleshooting Guide, is a compilation of questions and answers relating to common
problems dealing with Windows networking and the 4 Ports ADSL2/2+ Router
configurations.
Appendix E: UPnP Setting, provides UPnP configurations procedures under Windows XP.
Appendix F: Glossary, provides definitions of terms and acronyms of this 4 Ports ADSL2/2+ Router.
Page 14

4 Ports ADSL2/2+ Router 8
1.5 System Requirement
Check and confirm that your system confirm the following minimum requirements:
Personal computer ( PC/Notebook ).
Pentium II compatible processor and above.
Ethernet LAN card installed with TCP/IP protocol.
USB Port ( Optional )
64 MB RAM or more.
50 MB of free disk space ( Minimum ).
Internet Browser.
CD-ROM Drive.
Page 15

4 Ports ADSL2/2+ Router 9
1.6 Packet Contents
The 4 Ports ADSL2/2+ Router package contains the following items :
One 4 Ports ADSL2/2+ Router
One Power Adapter
One RJ-11 ADSL Cable
One CAT-5 Ethernet Cable
One CD-ROM ( Driver / Manual / Quick Setup Guide )
If any of the above items are damaged or missing, please contact your dealer immediately.
Page 16
Chapter 2 Knowing The 4 Ports ADSL2/2+ Router
2.1 Front Panel:
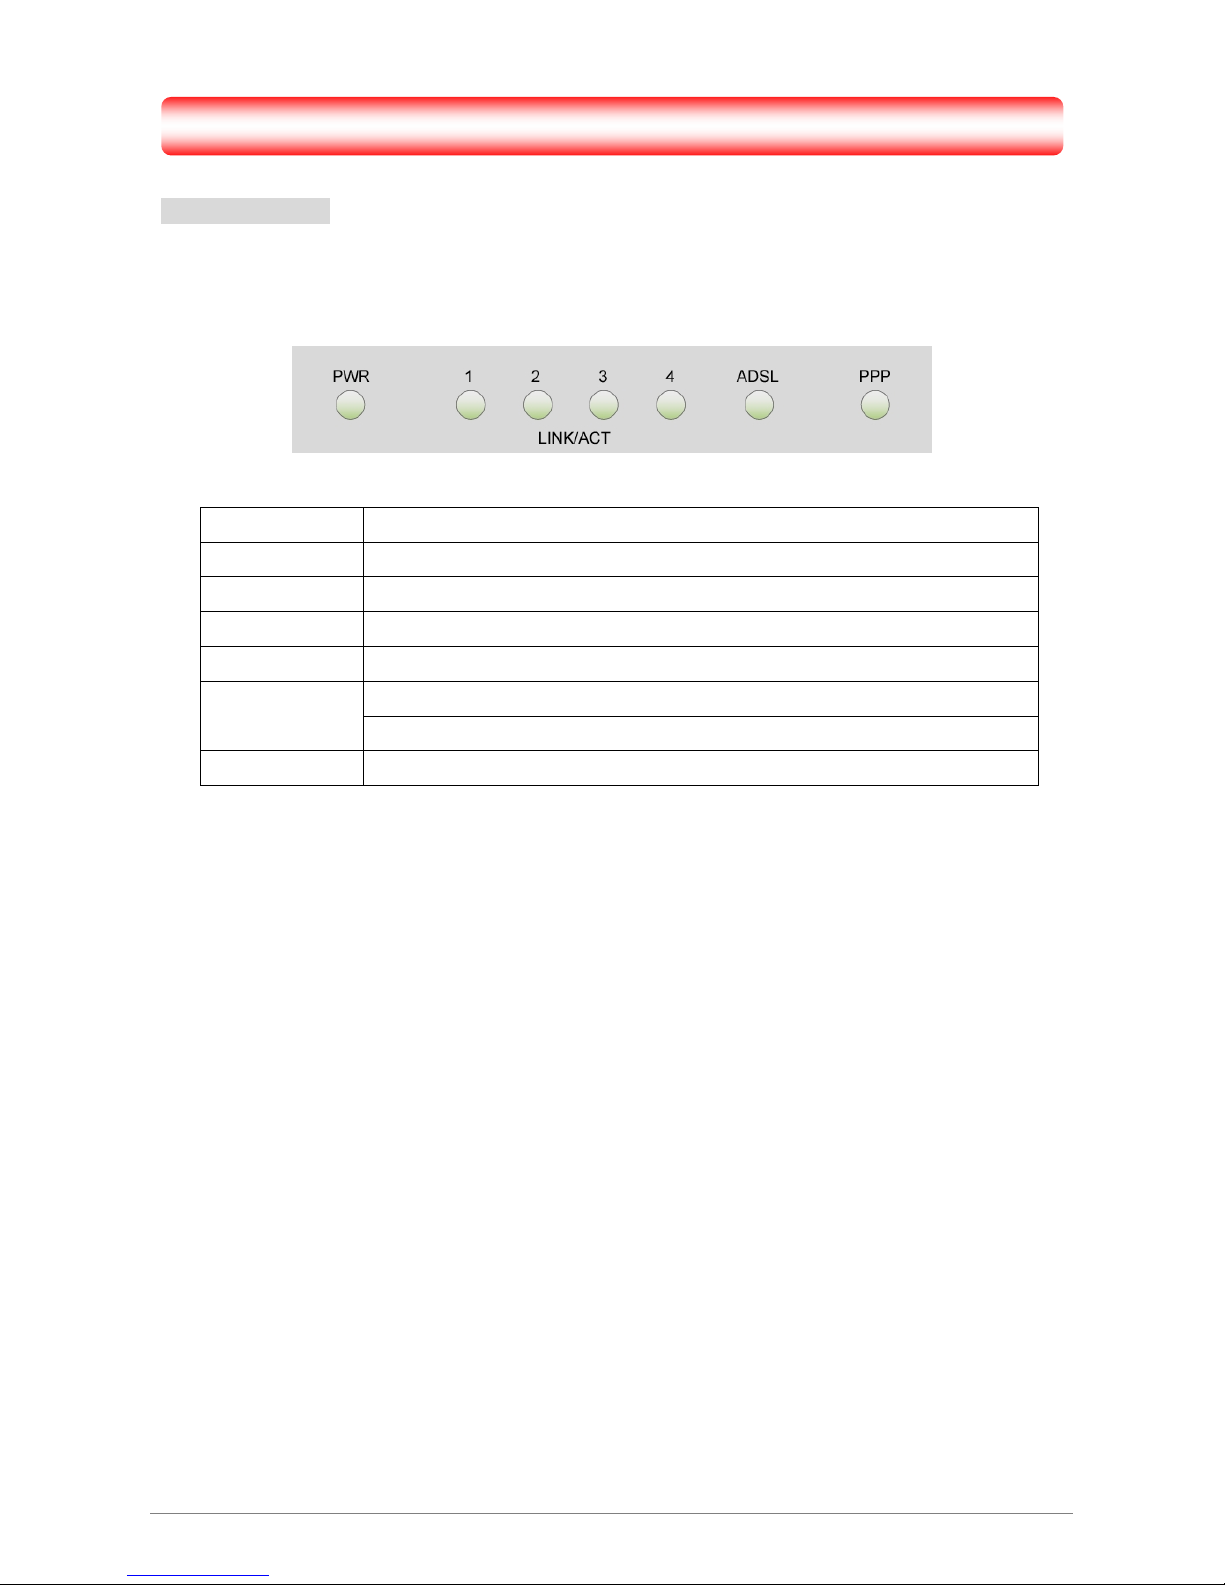
The 4 Ports ADSL2/2+ Router’s LEDs indicators display information about the device’s status.
PWR Lights up when 4 Ports ADSL2/2+ Router is powered on.
1 LINK/ACT Blinking when 4 Ports ADSL2/2+ Router is Sending/Receiving data.
2 LINK/ACT Blinking when 4 Ports ADSL2/2+ Router is Sending/Receiving data.
3 LINK/ACT Blinking when 4 Ports ADSL2/2+ Router is Sending/Receiving data.
4 LINK/ACT Blinking when 4 Ports ADSL2/2+ Router is Sending/Receiving data.
Blinking when 4 Ports ADSL2/2+ Router is ready.
ADSL
Lights up when a successful ADSL connection is established.
PPP Lights up when a PPP connection is established.
4 Ports ADSL2/2+ Router 10
Page 17

4 Ports ADSL2/2+ Router 11
2.2 Back Panel:
The back panel of the 4 Ports ADSL2/2+ Router contains ADSL, Ethernet Switches, Reset and Power
Adapter connection.
ADSL Port for connecting to the ADSL2/2+ Service Provider.
Ports 1~4 Four 10/100Mbps Ethernet Ports for connecting to the network devices
RESET Restore the 4 Ports ADSL2/2+ Router to factory default setting.
POWER 12V DC/1A or 9V AC/1A Power adapter connector.
All the Ethernet port of the 4 Ports ADSL2/2+ Router supports
auto-crossover capability.
!
RESET Button:
Reboot & Restore the 4 Ports ADSL2/2+ Router to factory defaults.
!
Resetting Factory Defaults:
The reboot and restore to factory defaults feature will set the device to its factory default configuration by
resetting the 4 Ports ADSL2/2+ Router.
To Reset the 4 Ports ADSL2/2+ Router:
Ensure that the device is powered on.
Press the Reset button for 10~15 seconds and release. Wait for 30 seconds after release the
Reset button. Do not power off the device during the reset process.
The default settings are now restored after 30 seconds.
Page 18
4 Ports ADSL2/2+ Router 12
2.3 Connection Mechanism:
This section describes the hardware connection mechanism of 4 Ports ADSL2/2+ Router on your Local Area
Network (LAN) connected to the Internet, how to configure your 4 Ports ADSL2/2+ Router for Internet access
or how to manually configure your Internet connection.
You need to prepare the following items before you can establish an Internet connection through your 4 Ports
ADSL2/2+ Router:
1. A computer/notebook which must have an installed Ethernet Adaptor and an Ethernet Cable,
2. ADSL/ADSL2/ADSL2+ service account and configuration information provided by your Internet
Service Provider (ISP). You will need one or more of the following configuration parameters to
connect your 4 Ports ADSL2/2+ Router to the Internet:
a. VPI/VCI parameters
b. Multiplexing Method or Protocol Type
c. Host and Domain Names
d. ISP Login Name and Password
e. ISP Domain Name Server (DNS) Address
f. Fixed or Static IP Address.
Figure below shows the overall hardware connection mechanism of your 4 Ports ADSL2/2+ Router.
Page 19
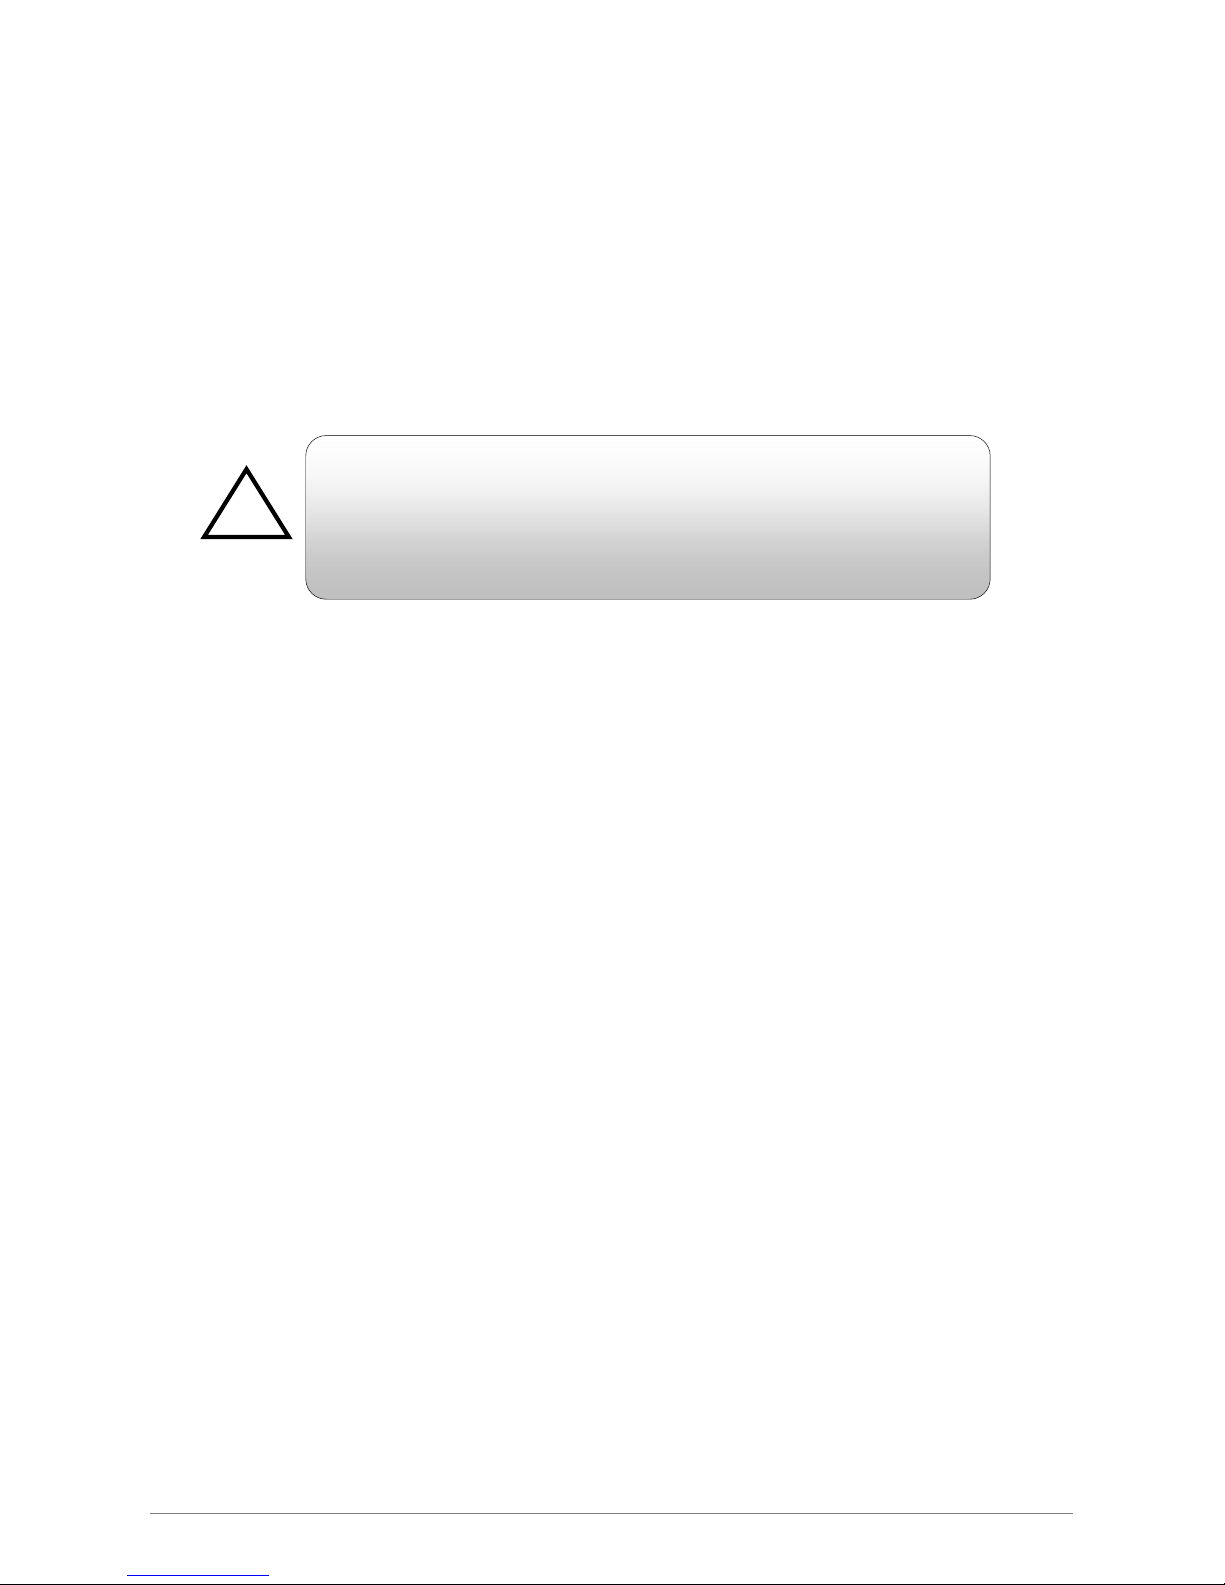
Following are the steps to properly connect your 4 Ports ADSL2/2+ Router:
1. Turn off your computer/notebook.
2. Connect the ADSL port of your 4 Ports ADSL2/2+ Router to the wall jack of the
ADSL/ADSL2/ADSL2+ Line with a RJ-11 cable.
3. Connect the Ethernet cable (RJ-45) from your 4 Ports ADSL2/2+ Router (Switch) to the Ethernet
Adaptor in your computer.
4. Connect the Power adaptor to the 4 Ports ADSL2/2+ Router and plug it into a Power outlet.
The Power light will lit after turning on the 4 Ports ADSL2/2+ Router.
Auto and self-diagnostic process might turn the LED indicators ON and
OFF during the process.
!
5. Turn on your computer.
6. Refer to the next section to setup or configure your system’s Network Adaptor.
4 Ports ADSL2/2+ Router 13
Page 20
Chapter 3 Setting up the TCP/IP in Windows
The instruction in this chapter will help you configure your computers to be able to communicate with this 4
Ports ADSL2/2+ Router.
Computers access the Internet using a protocol called TCP/IP (Transmission Control Protocol/ Internet
Protocol). Each computer/notebook on your network must have TCP/IP installed and selected as its
networking protocol. If a Network Interface Card (NIC) is already installed in your PC, then TCP/IP is probably
already installed as well.
The following description assumes 4 Ports ADSL2/2+ Router been set to factory default. (If not, please hold
the reset button down for 5~10 seconds). The default of the 4 Ports ADSL2/2+ Router’s LAN IP is
192.168.1.1.
Follow the procedures below to set your computer/notebook function as a DHCP Client.
Restart and Reboot your Windows syst em might be necessary after setting your
computer function as a DHCP Client. In order to properly activate your choice, click
“OK” to restart your Windows system.
!
4 Ports ADSL2/2+ Router 14
Page 21
4 Ports ADSL2/2+ Router 15
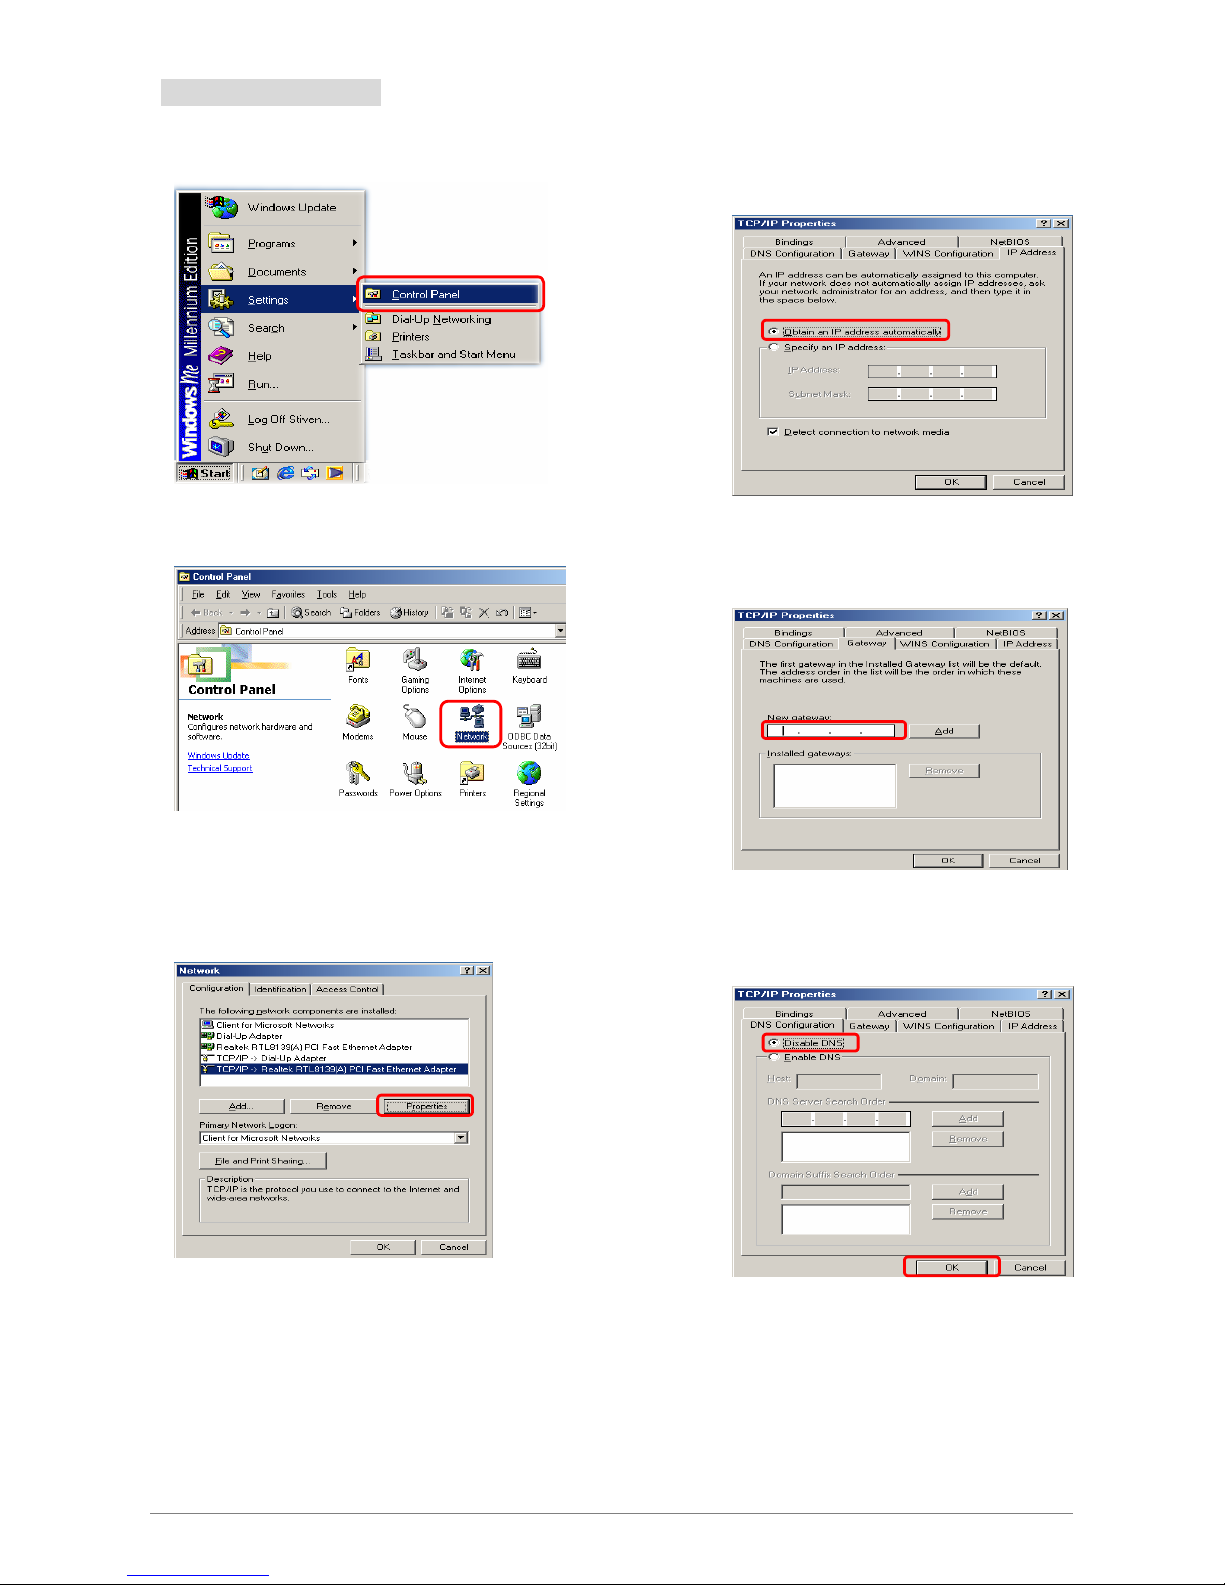
3.1 Windows ME / 98
Step 1: Click Start→Settings→Control Panel.
Step 2: Double-click the Network icon.
Step 4: Go to IP Address icon and select
Obtain an IP address.
Step 3: Go to Configuration icon, select network
adapter installed and click Properties.
Step 5: Go to Gateway icon and erase all
previous setting.
Step 6: Go to DNS Configuration icon, select
Disable DNS and click OK.
1
2
2
Page 22
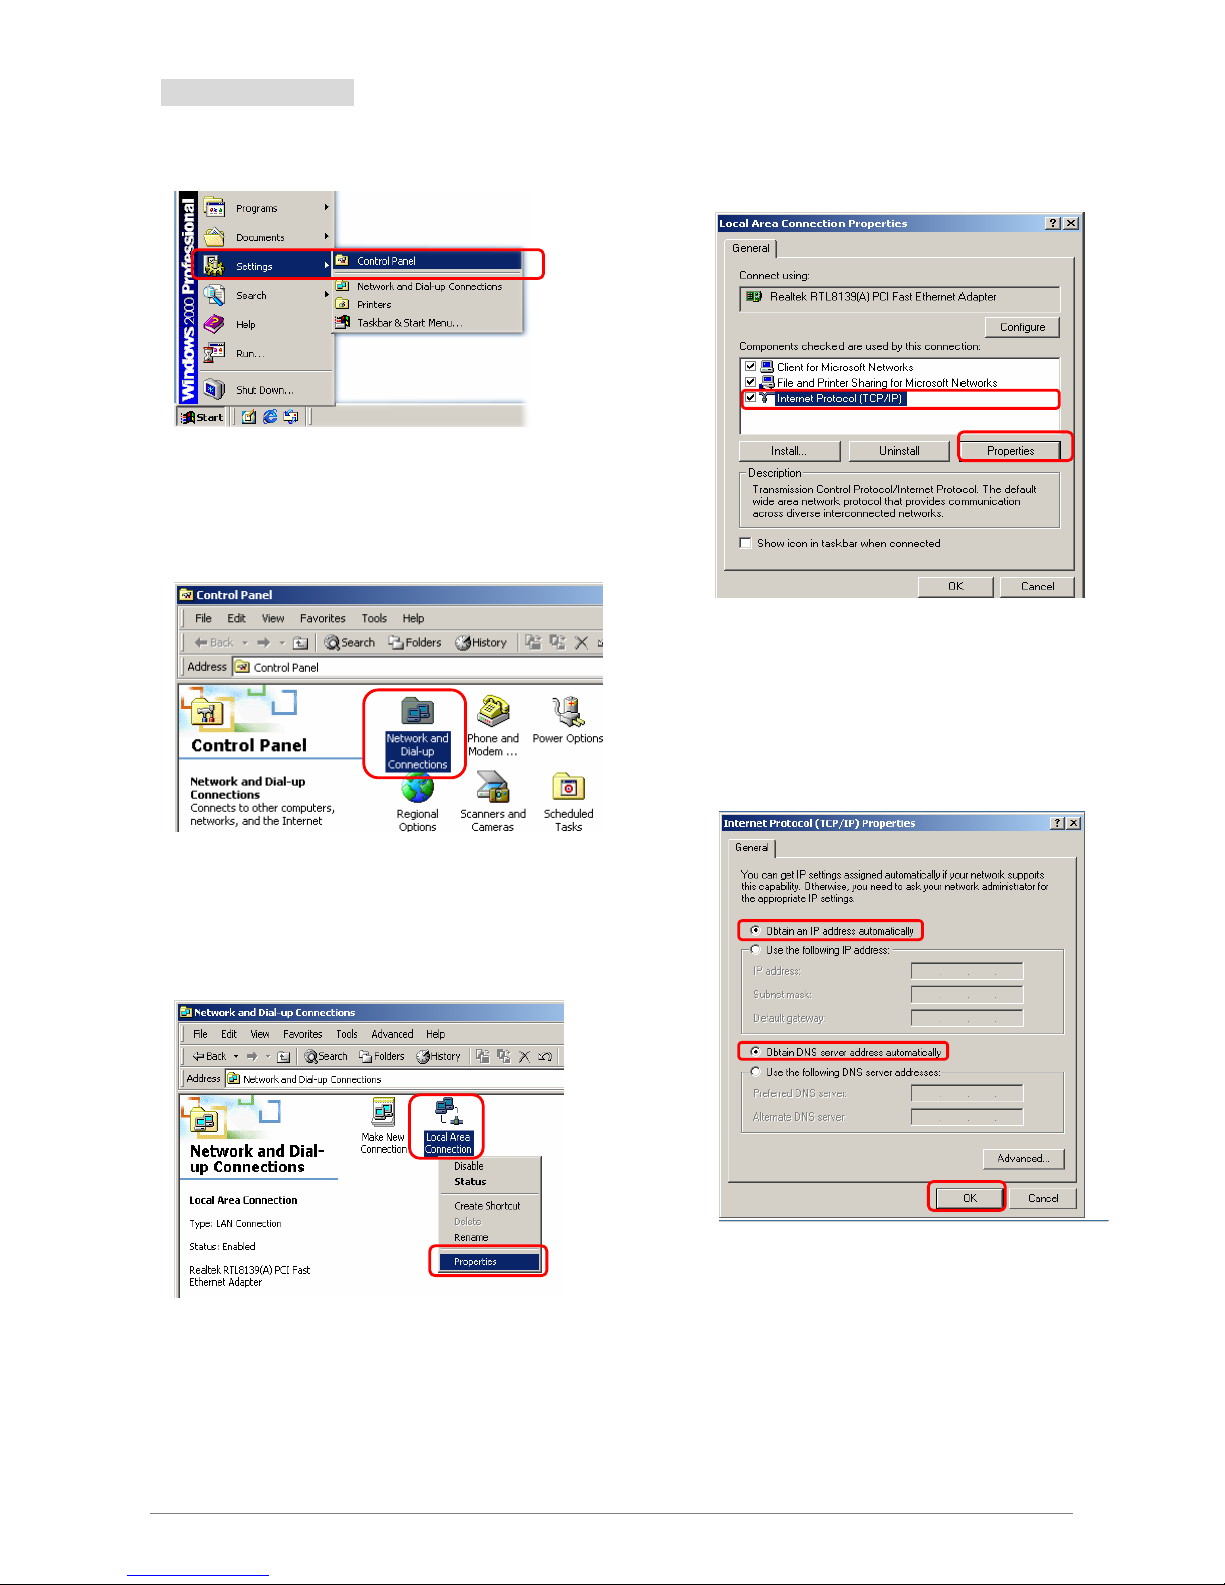
3.2 Windows 2000
4 Ports ADSL2/2+ Router 16
Step 1: Click Start→Settings→Control Panel.
Step 4: Select Internet Protocol (TCP/IP) and click
Properties.
Step 2: Double-click the Network and Dial-up
Connections.
Step 5: Select Obt ain an IP address automatically
and DNS server address automatically.
Then, click OK.
Step 3: Right Click the Local Area Connection and
select Properties.
2
1
1
2
3
1
2
Page 23
4 Ports ADSL2/2+ Router 17
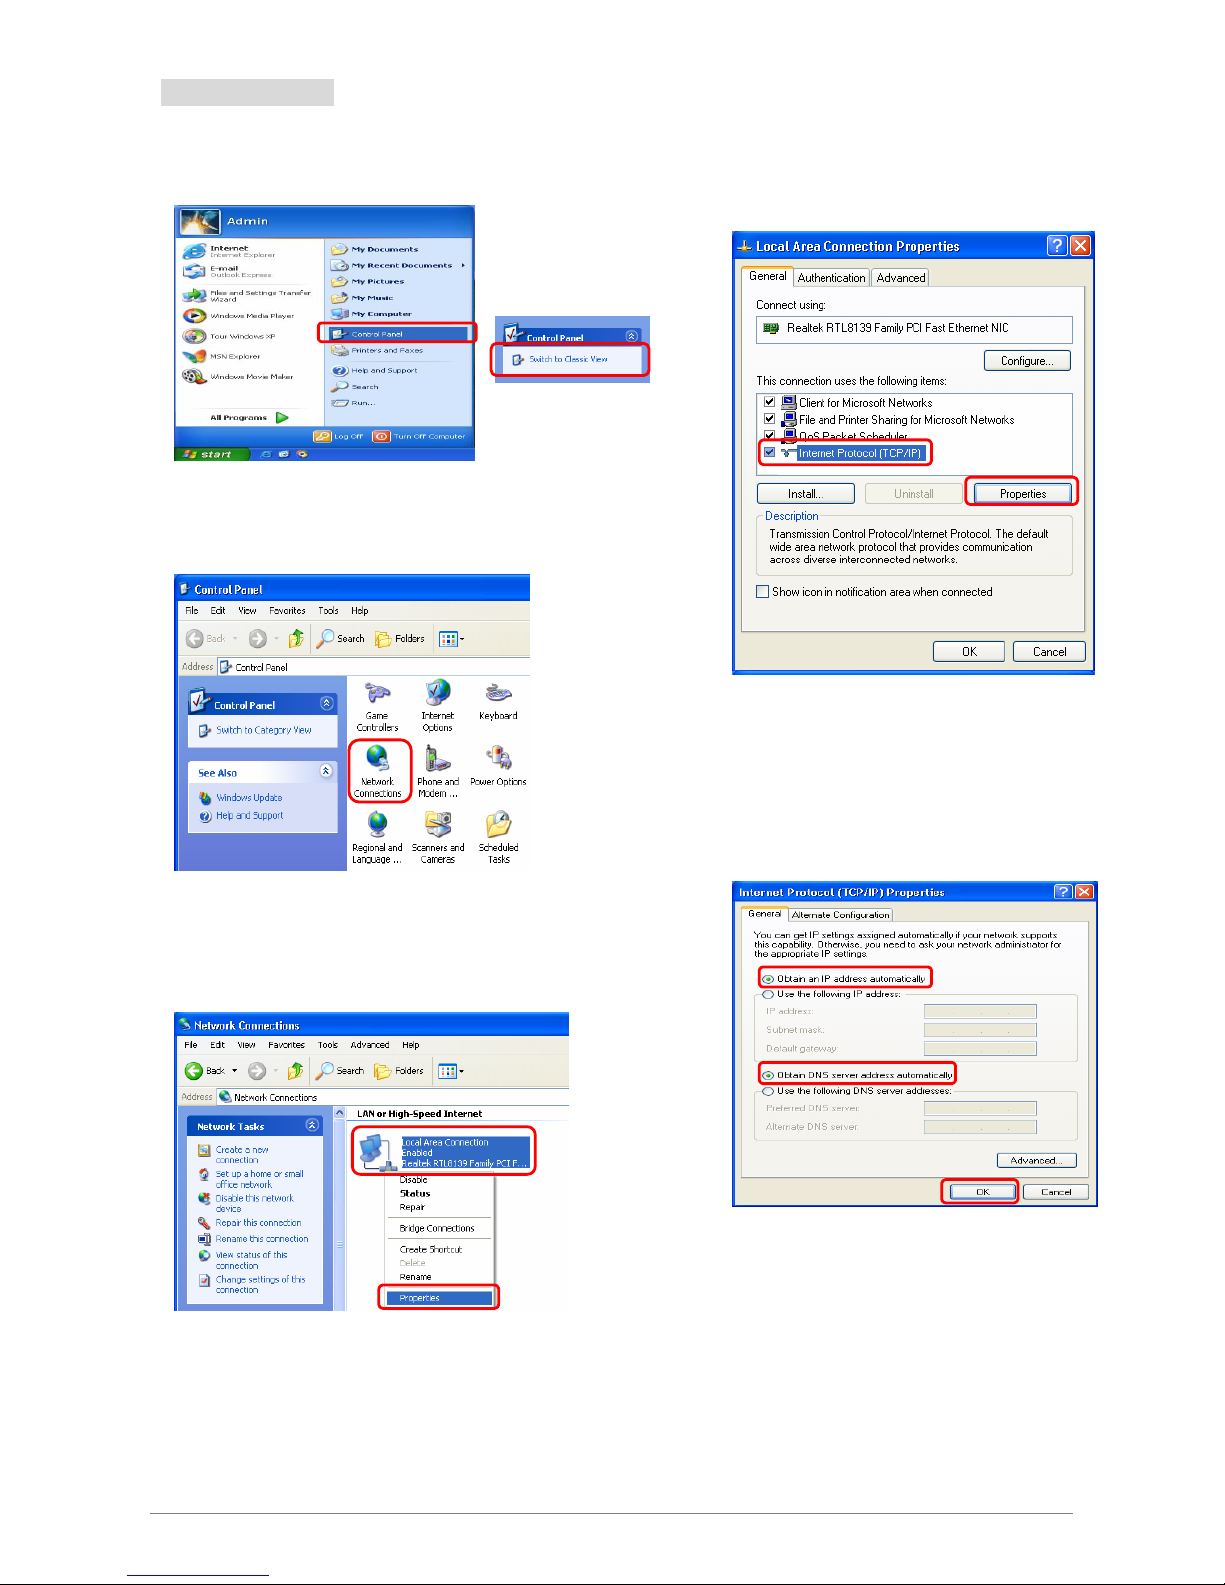
3.3 Windows XP
Step 1: Click Start→Control Panel→Classic View.
Step 4: Go to General icon, select Internet Protocol
(TCP/IP) and click Properties.
Step 2: Double-click the Network Connections.
Step 5: Go to General icon, select Obtain an IP
address automatically and DNS server
address automatically.
Then, click OK.
Step 3 : Right Click on the Local Area Connection and
select Properties.
1
2
1
3
1
2
2
Page 24
4 Ports ADSL2/2+ Router 18
3.4 Checking TCP/IP Configuration
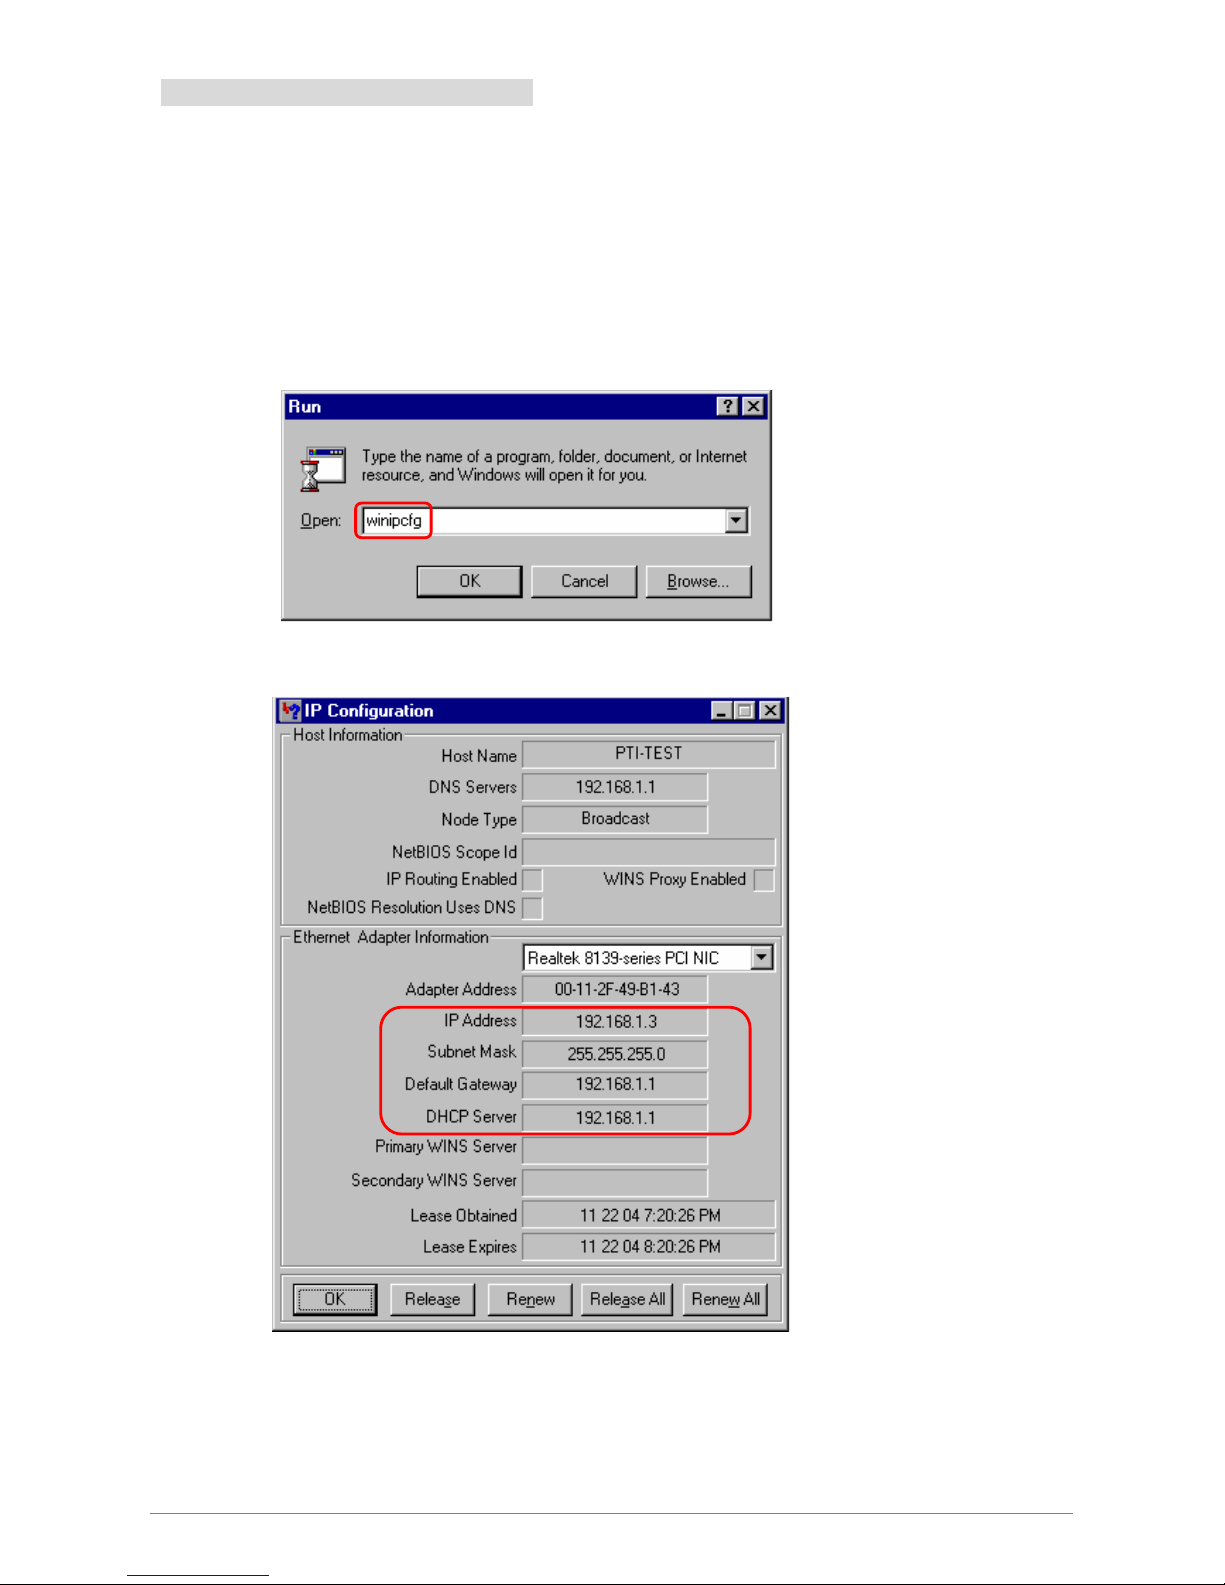
After your PC is configured and the system has rebooted, you can check the TCP/IP configuration using the
following utility provided by your Windows system:
A. Windows 98/ME:
1. Click on “Start” and “Run”.
2. In the open field, enter “winipcfg”, then press “OK”.
3. All the Ethernet adapter information will be shown in the appears Windows. Check if you can
get the following setting:
The IP Address as 192.168.1.x
The Subnet Mask as 255.255.255.0
The Default Gateway as 192.168.1.1
4. Type “OK” to end up the process.
Page 25
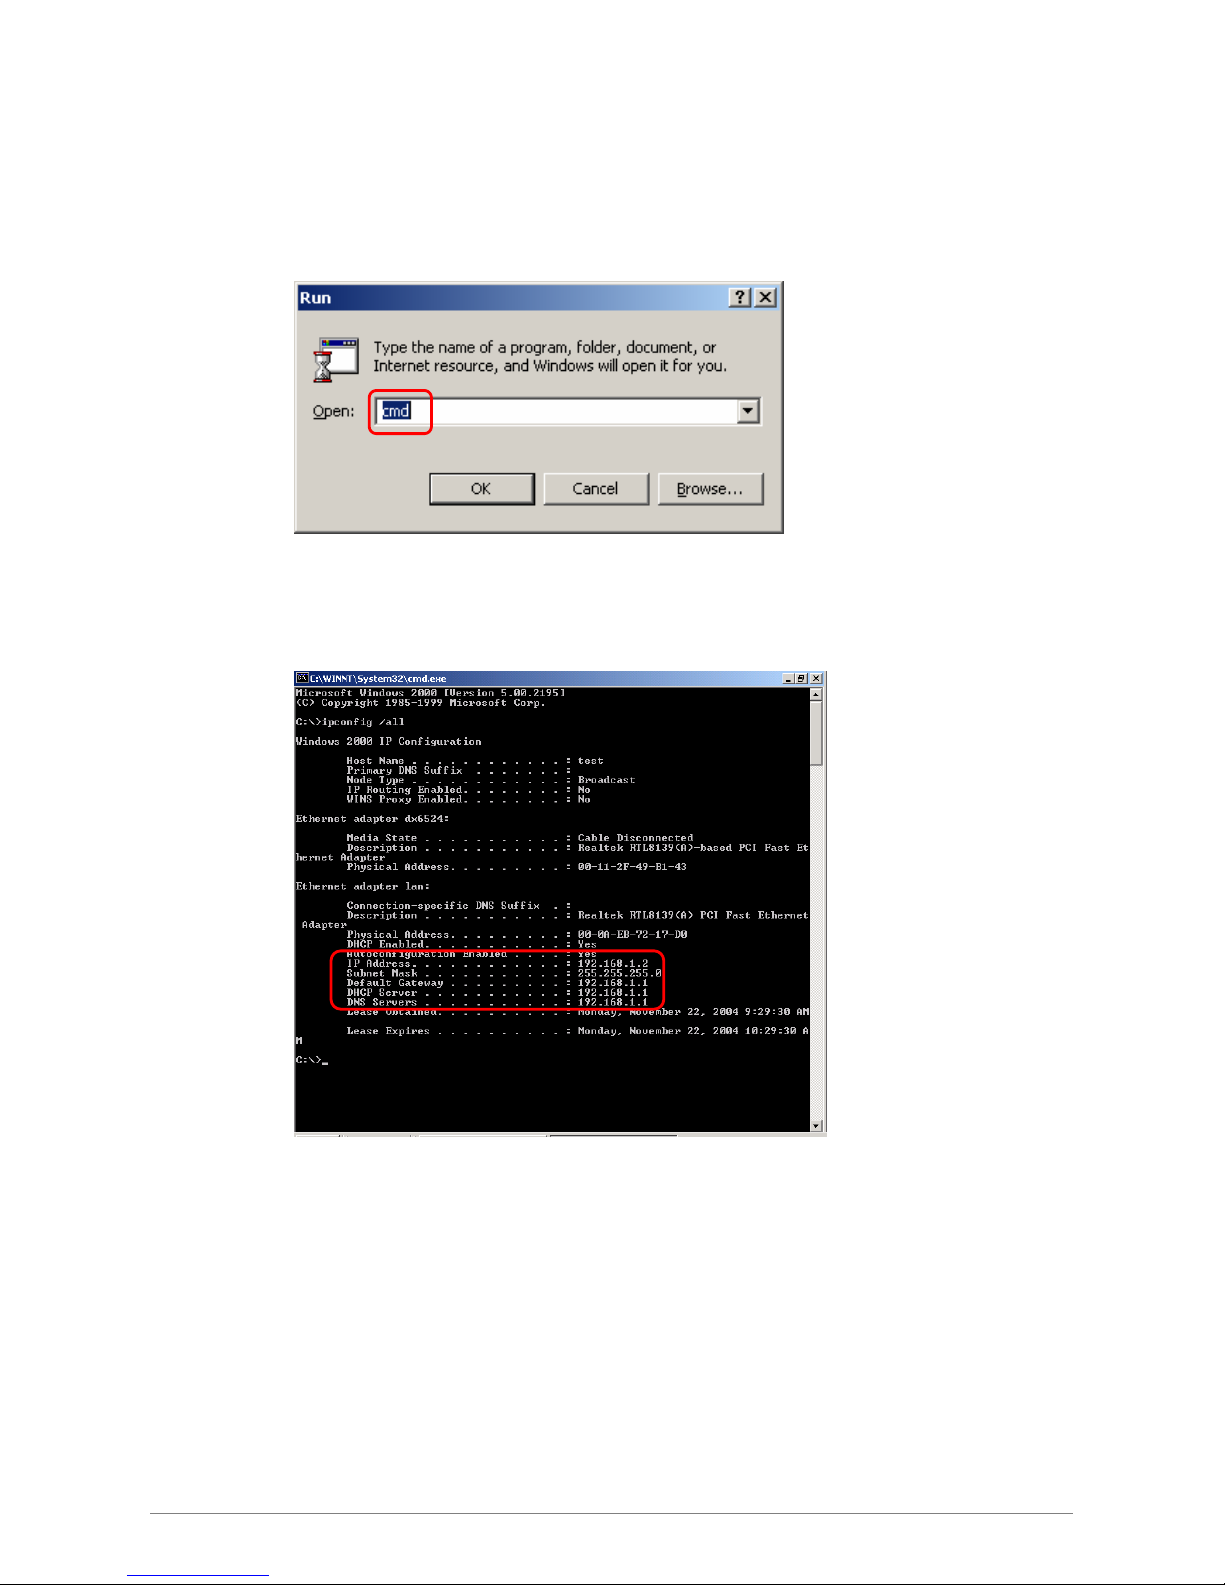
B. Windows 2000:
1. Click “Start” and “Run”.
2. In the open field, enter “cmd” then click “OK”.
3. In the command prompt, type “ipconfig /all”, then press “Enter”.
All the Ethernet adapter information will be shown in the appear Windows. Check if you can
get the following setting:
The IP Address as 192.168.1.x
The Subnet Mask as 255.255.255.0
The Default Gateway as 192.168.1.1
4. Type “Exit” to end up the process.
4 Ports ADSL2/2+ Router 19
Page 26
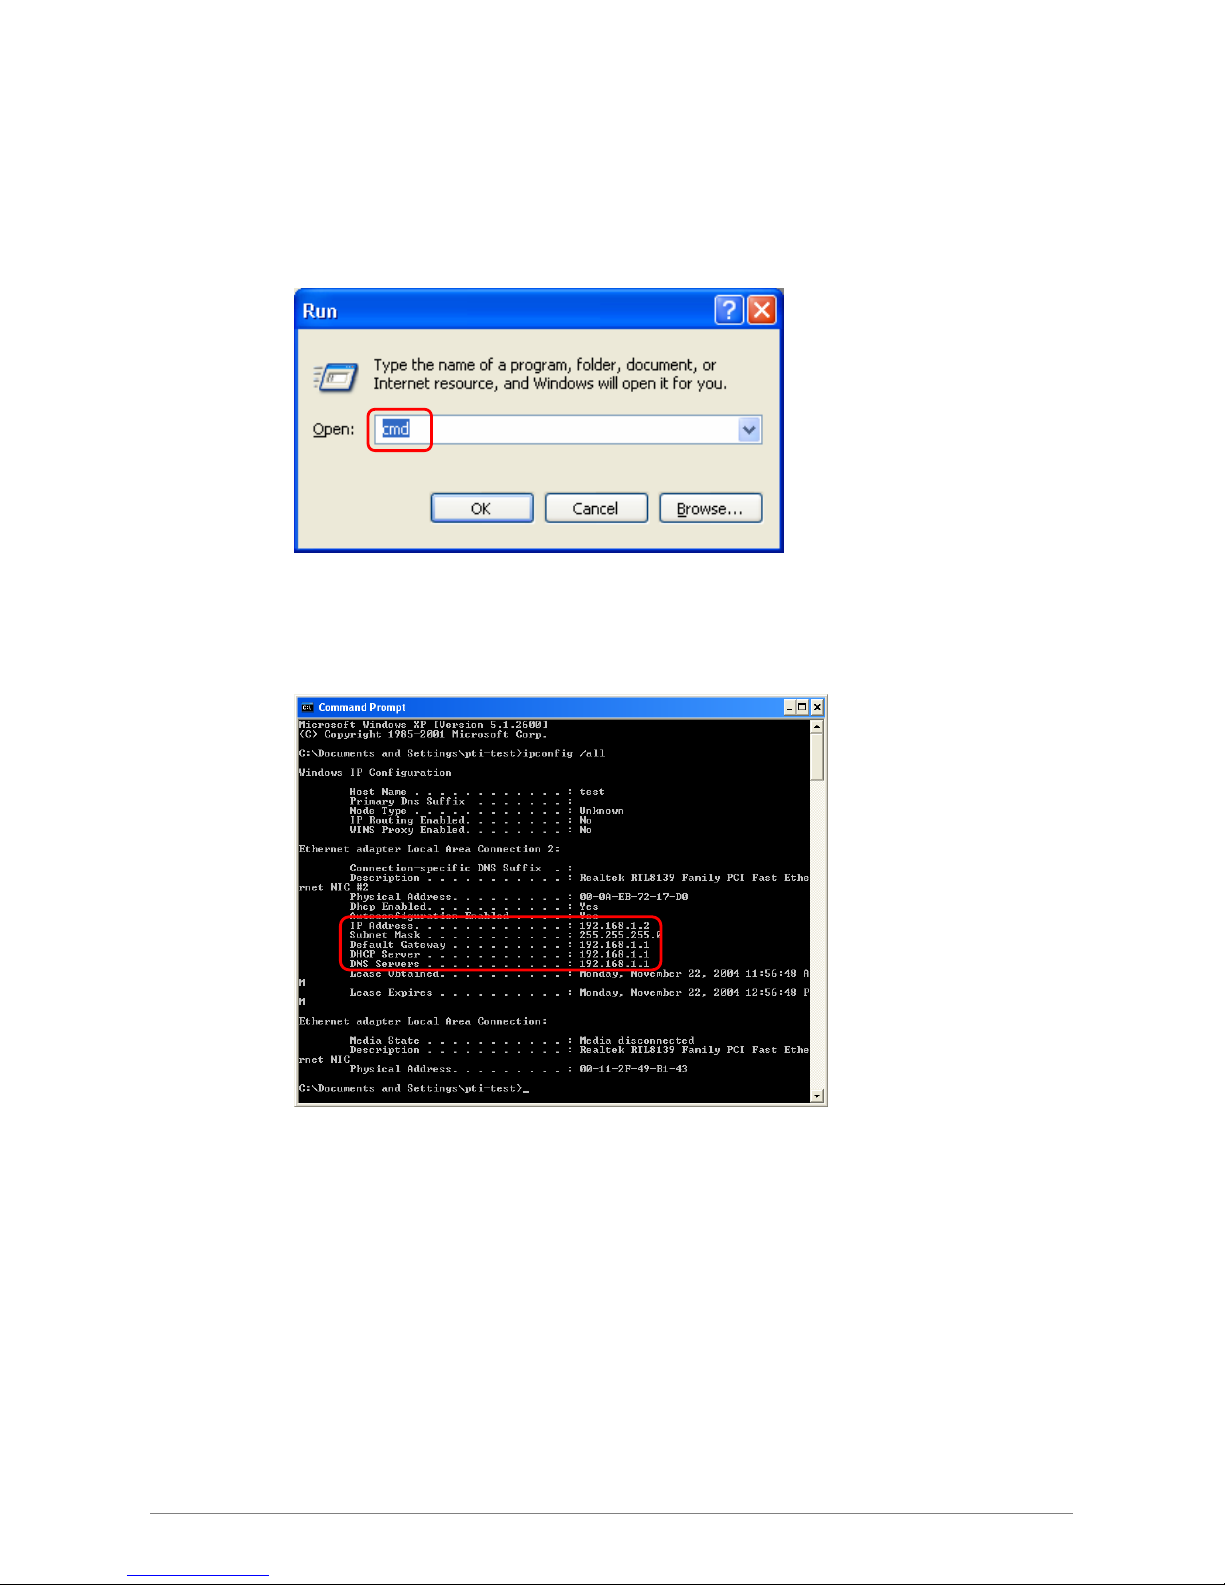
C. Windows XP:
1. Click “Start” and “Run”.
2. In the open field, enter “cmd” then click “OK”.
3. In the command prompt, type “ipconfig /all”, then press “Enter”
All the Ethernet adapter information will be shown in the appear Windows. Check if you can
get the following setting:
IP address as 192.168.1.x
The Subnet Mask as 255.255.255.0
the default gateway as 192.168.1.1
4. Type “Exit” to end up the process.
4 Ports ADSL2/2+ Router 20
Page 27
Chapter 4 Device Administration
For your convenience, an Administrative Utility has been programmed into 4 Ports ADSL2/2+ Router. This
chapter will explain all the functions in this utility. All the 4 Ports ADSL2/2+ Router based administrative tasks
are performed through this web utility.
4.1 Login
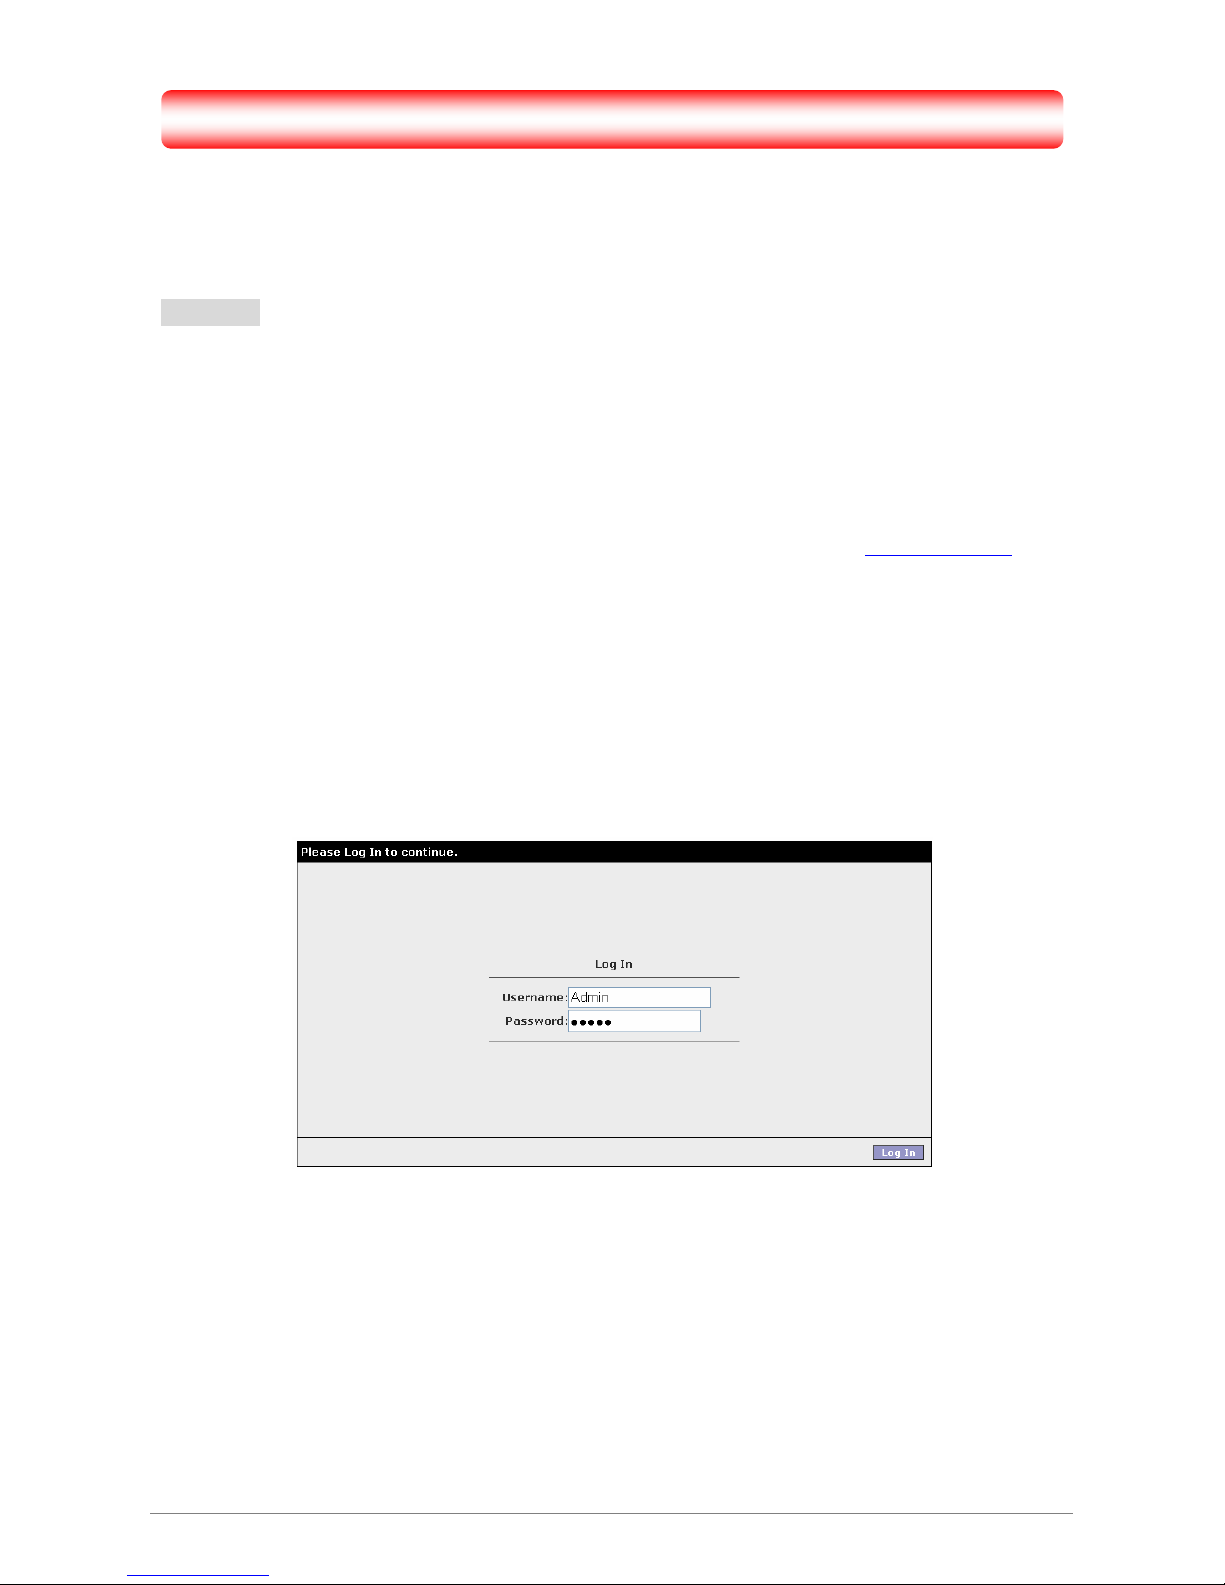
To access the 4 Ports ADSL2/2+ Router Configuration screens, follow the following steps will enable you to
log into the 4 Ports ADSL2/2+ Router:
1. Launch the Web browser (Internet Explorer, Netscape, etc).
2. Enter the 4 Ports ADSL2/2+ Router default IP address (Default Gateway)
http://192.168.1.1 in the
address bar then press Enter to Log in.
3. Entry of the username and password will be prompted. Enter the default login “Username” and
“Password”: The default login Username of the administrator is “Admin”, and the default login
Password is “Admin”.
Note that the Username and Password are case sensitiv e.
“Username” and “Password” can be changed after login. Refer to the Tools configuration
section for further instruction.
4 Ports ADSL2/2+ Router 21
Page 28
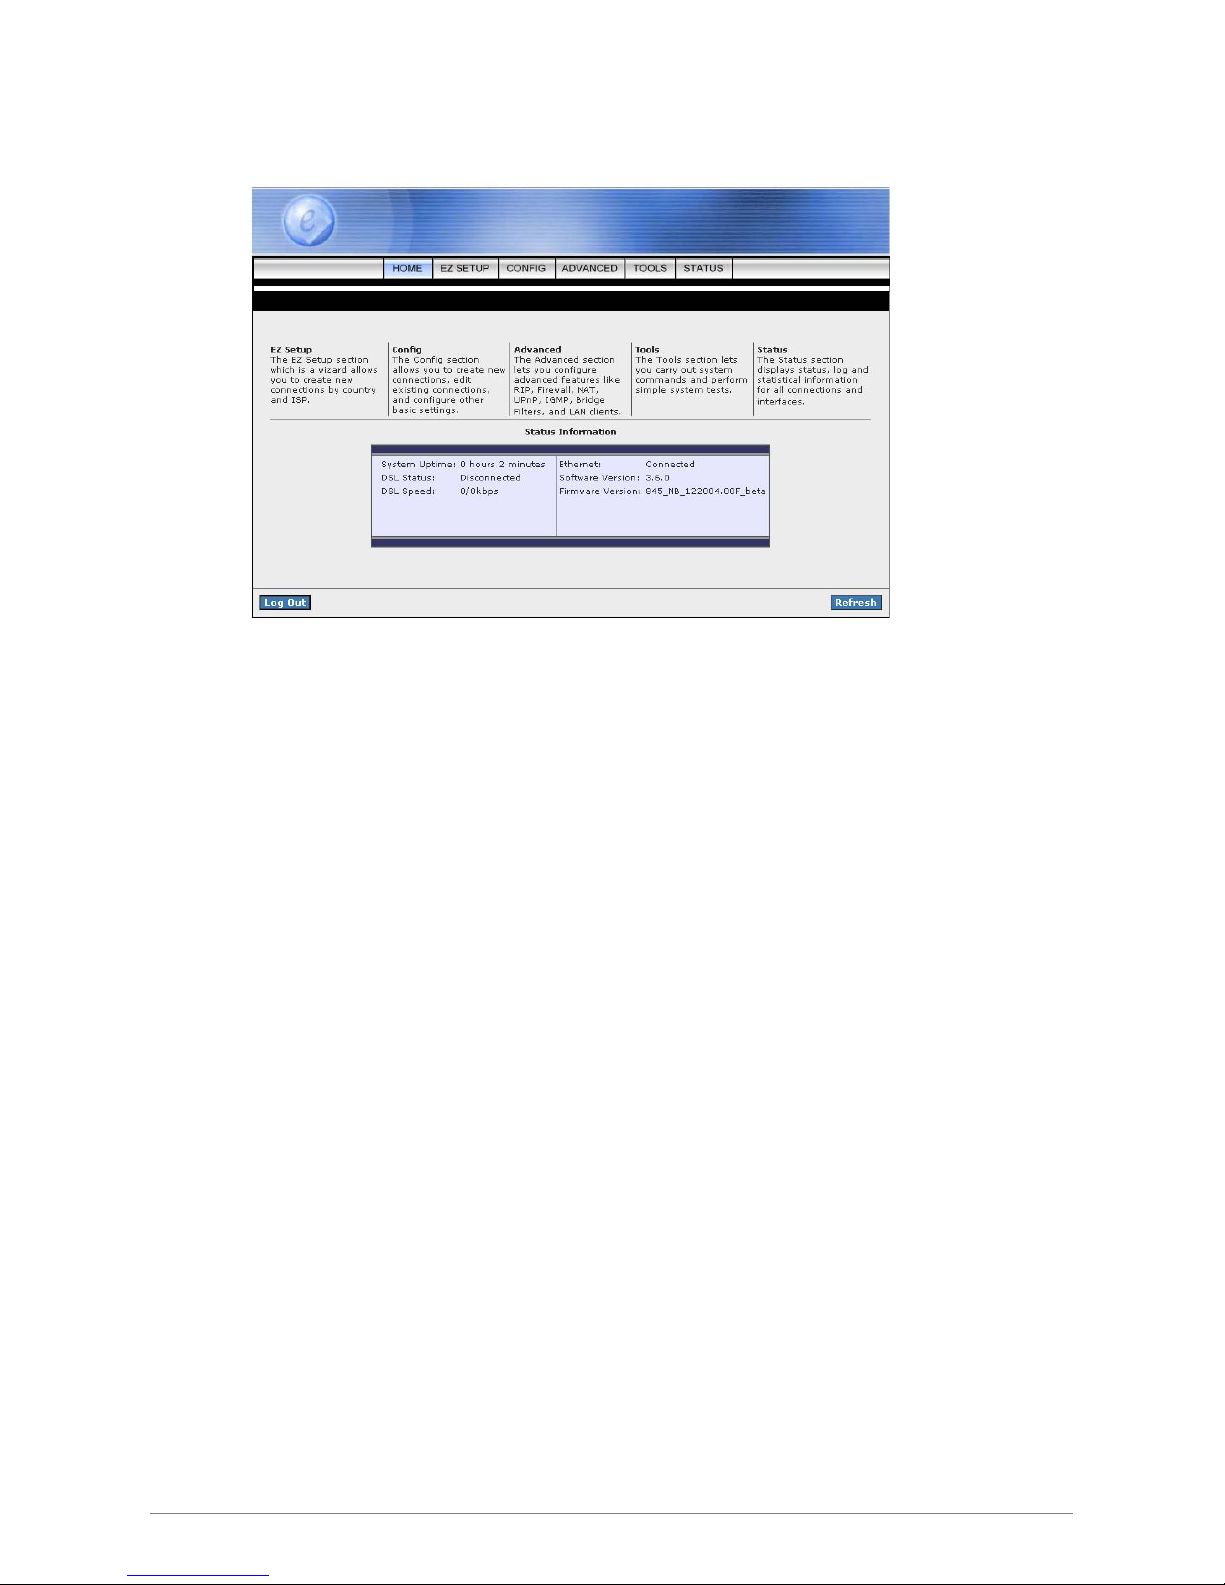
Upon entering the address into the web browser, the configurable HOME page with all the device
configuration information will pop up as shown in Figure below.
HOME: The Home section show the current 4 Ports ADSL2/2+ Router’s function information
under different links.
EZ SETUP: The EZ Setup is meant to help you install the 4 Ports ADSL2/2+ Router quickly and
easily.
CONFIG: The Config section allows you to create new connections, edit existing connections,
and configure other basic settings.
ADVANCED: The Advanced section lets you configure advanced features like RIP, Firewall, NAT,
UPnP, IGMP, Bridge Filters, and LAN clients.
TOOLS:
The
Tools section lets you carry out system commands and perform simple system tests.
STATUS: The Status section displays status, log and statistical information for all connections and
interfaces.
4 Ports ADSL2/2+ Router 22
Page 29

4 Ports ADSL2/2+ Router 23
Status Information: Shows the current device connection status.
; System Uptime: This field displays the time of the 4 Ports ADSL2/2+ Router has been in
operation.
; DSL Status: Shows the 4 Ports ADSL2/2+ Router connection status.
; DSL Speed: This field displays the 4 Ports ADSL2/2+ Router Downstream/Upstream data
rate in Kbps
; Ethernet: This field displays the link up or down for the Ethernet connection.
; USB: This field displays the link up or down for the USB connection (Optional).
; Software Version: This field displays the 4 Ports ADSL2/2+ Router’s software version.
; Firmware Version: This field displays the 4 Ports ADSL2/2+ Router’s firmware version.
Log Out: Click to Log Out the Administration configuration page.
Refresh: Click to Refresh current page.
Page 30
4 Ports ADSL2/2+ Router 24
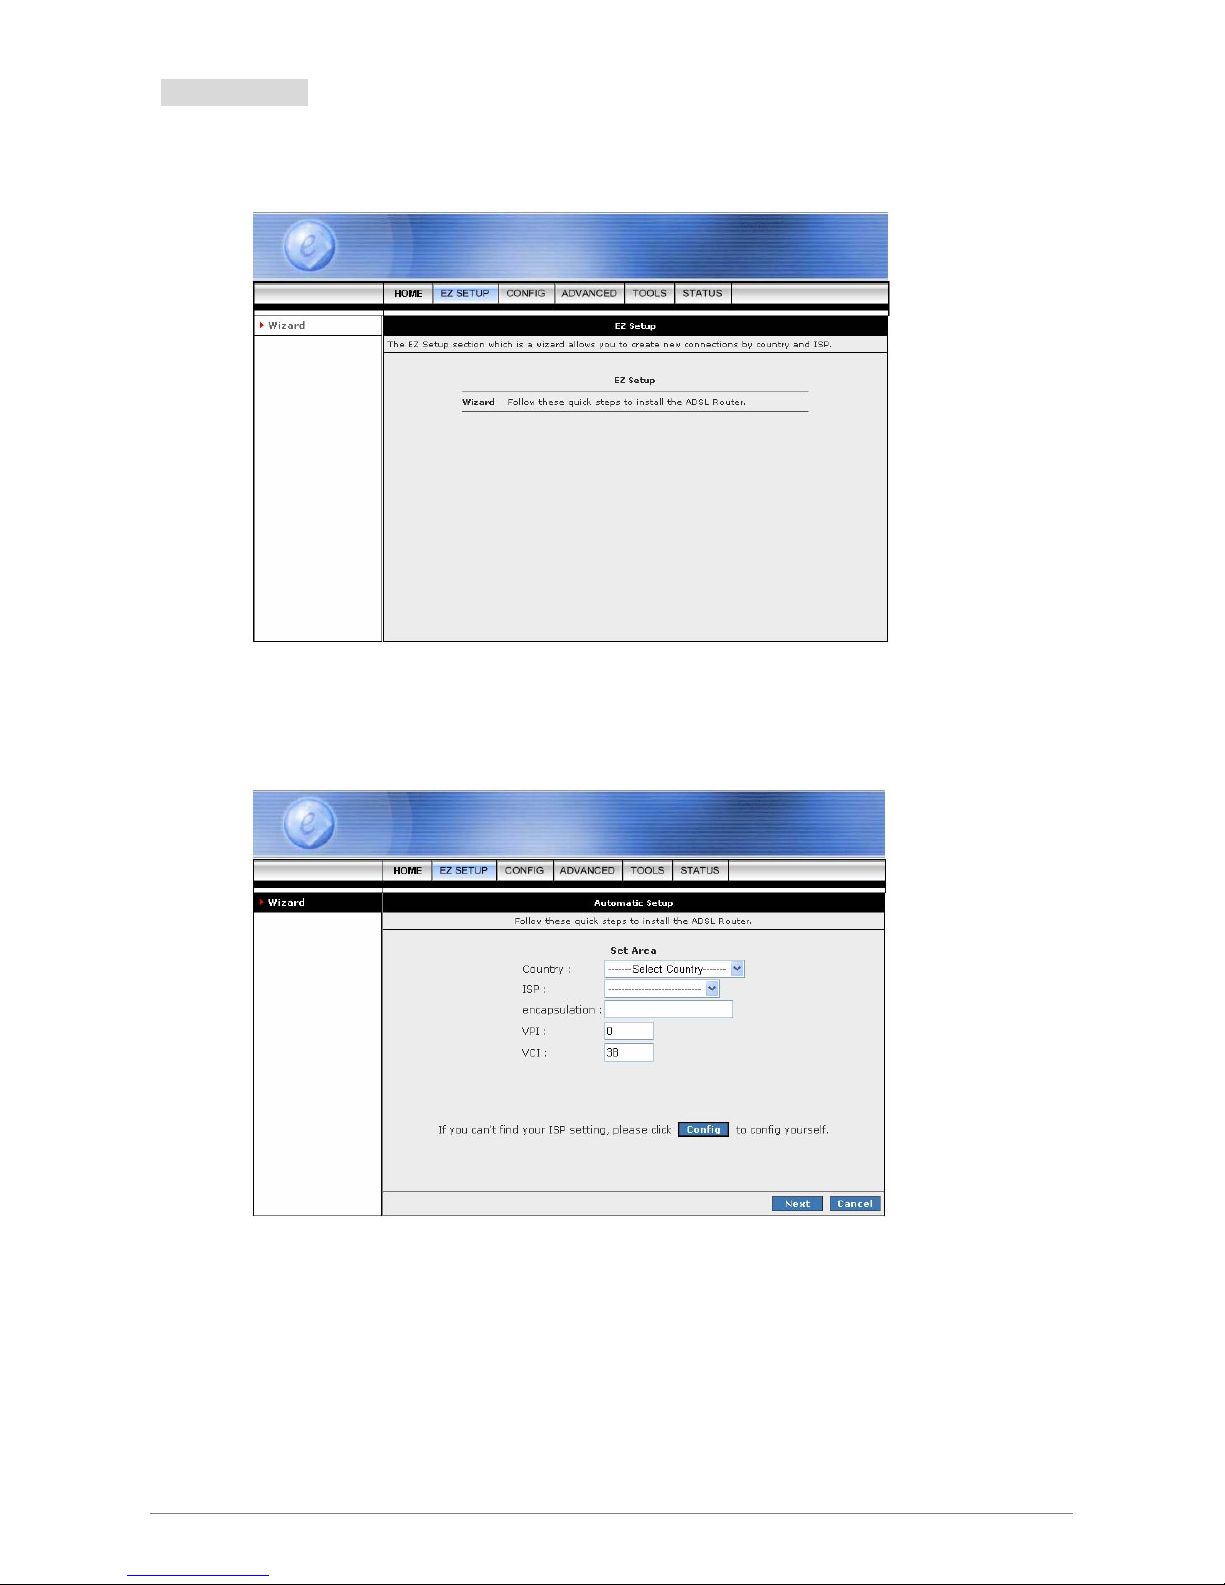
4.2 EZ SETUP
The EZ SETUP is meant to help you install the 4 Ports ADSL2/2+ Router quickly and easily.
Click on “Wizard” and the following screen will pop-up. Follow the Steps describe below to complete your
installation.
Page 31
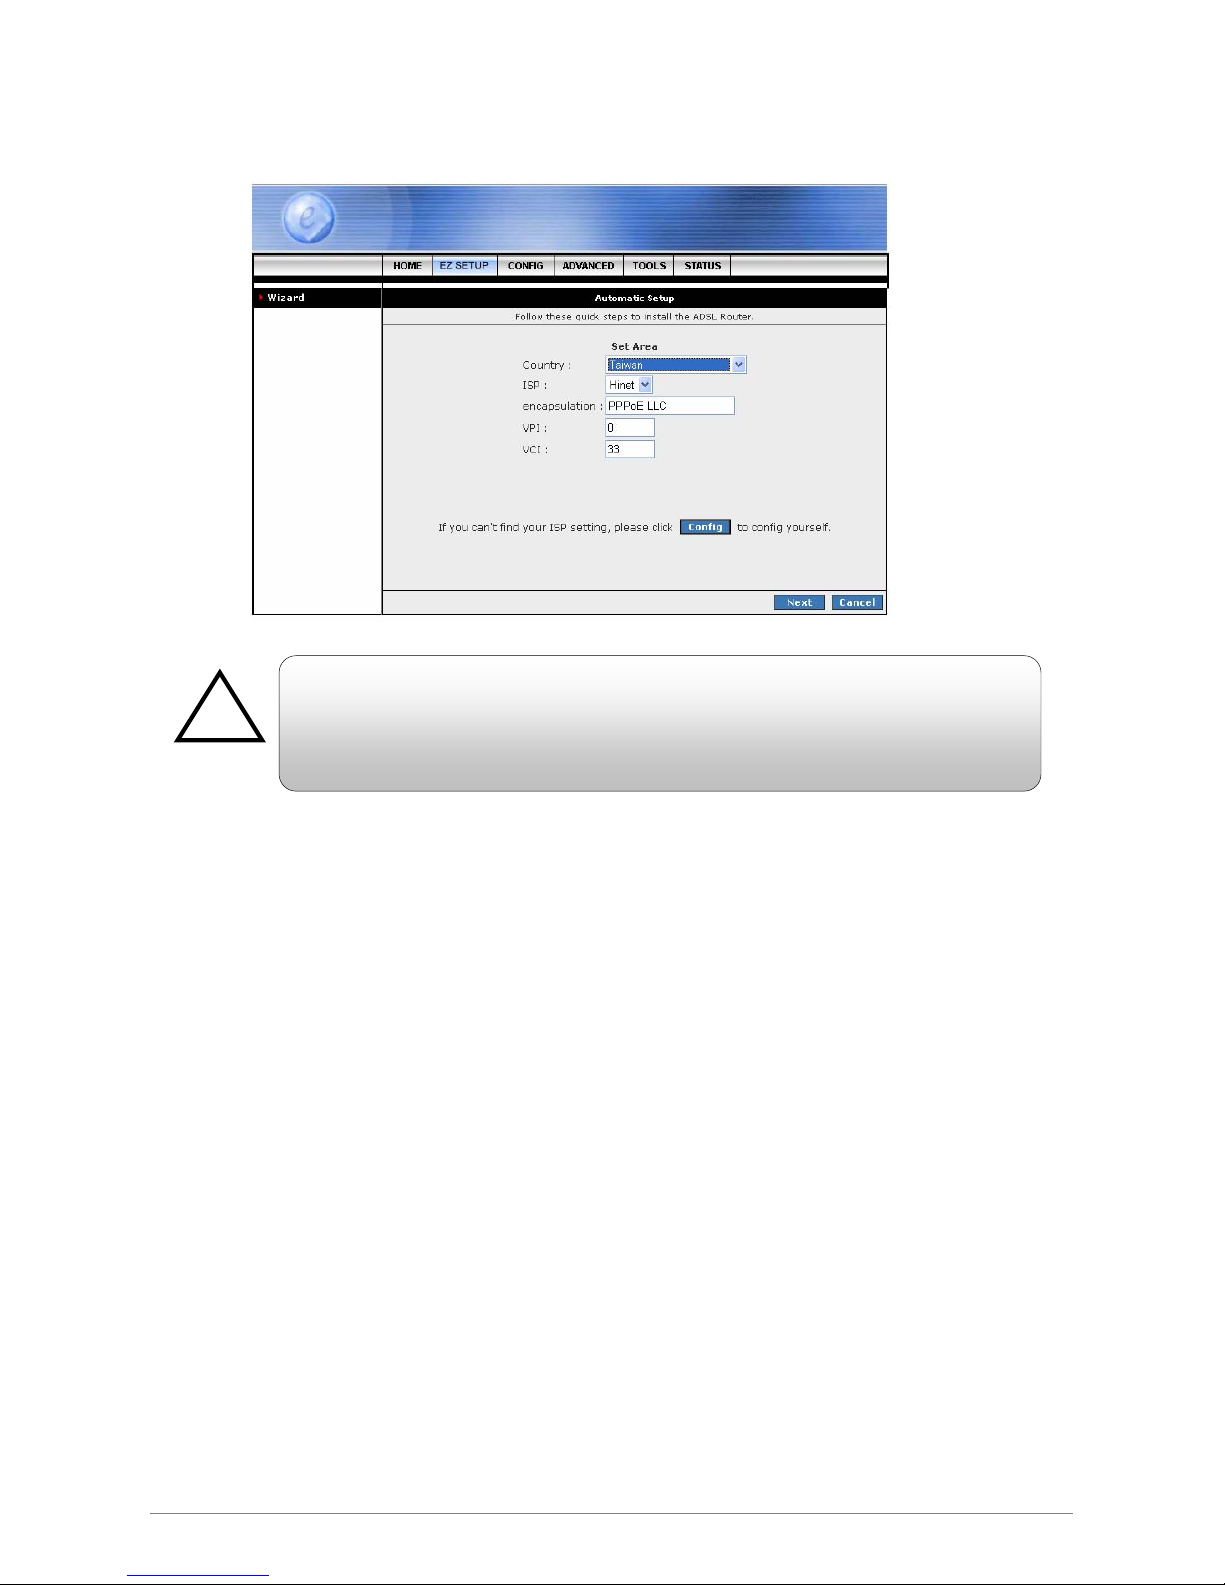
STEP 1. Select your country from the Country list and the ADSL service provider from the ISP List (If there
are more than two ISP in your country) and note the “Encapsulati on” type and “VPI/VCI” setting.
The “Encapsulation” type differs in each country and there are two different kinds of setup
windows wizard that will pop-up:
Click “Config” if you can’t find any available parameters from the
presetting country list.
Check your ISP immediately for the setting/configuration details.
!
4 Ports ADSL2/2+ Router 25
Page 32
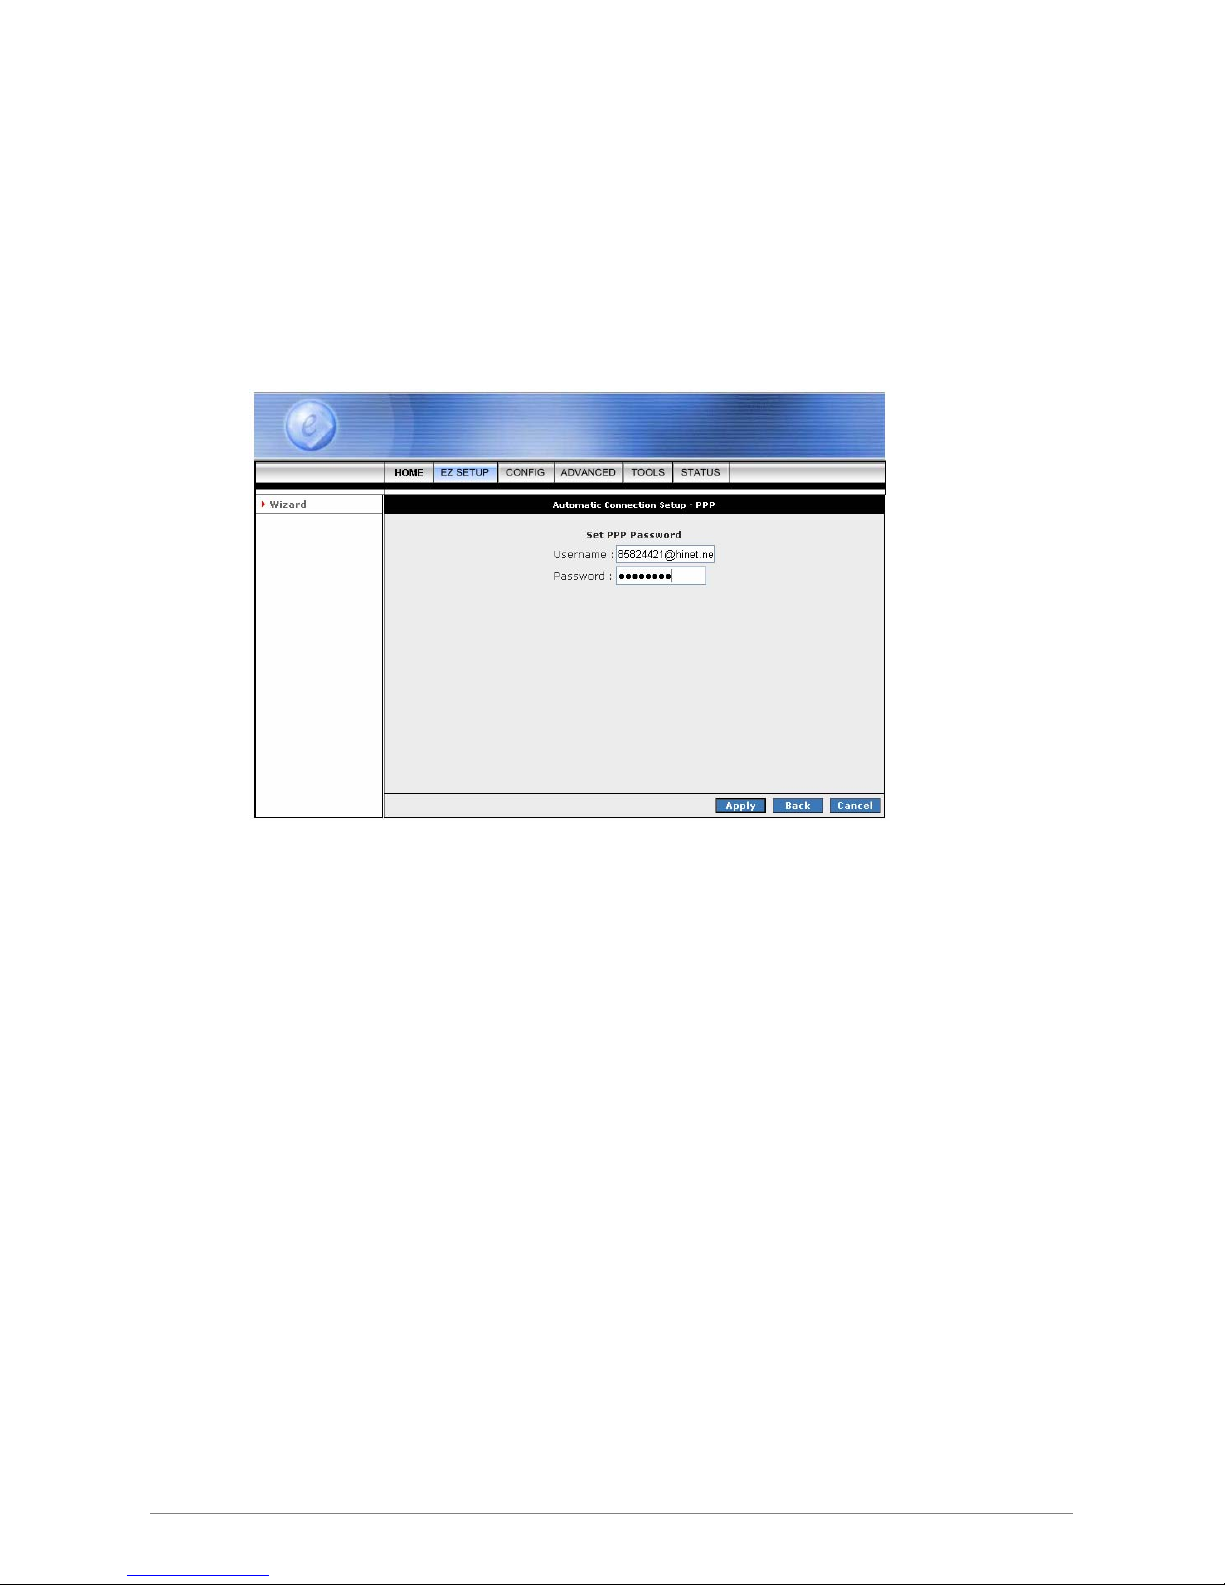
A. For the following “Encapsulation” type after clicking the “Next” button, the pop-up setup window
wizard is shown below:
; PPPoA VC-Mux
; PPPoA LLC
; PPPoE LLC
Manually enter your “User Name” and “Password” which will be provided by your Service
Provider (ISP). Click “Apply” after setup.
4 Ports ADSL2/2+ Router 26
Page 33

B. For countries with the following “Encapsulation” type after clicking the “Next” button, the pop-up
window is shown below:
; 1483 Bridged LLC
; 1483 Routed VC-MUX
In this current window, you will find THREE different Conn ection Type:
4 Ports ADSL2/2+ Router 27
Page 34
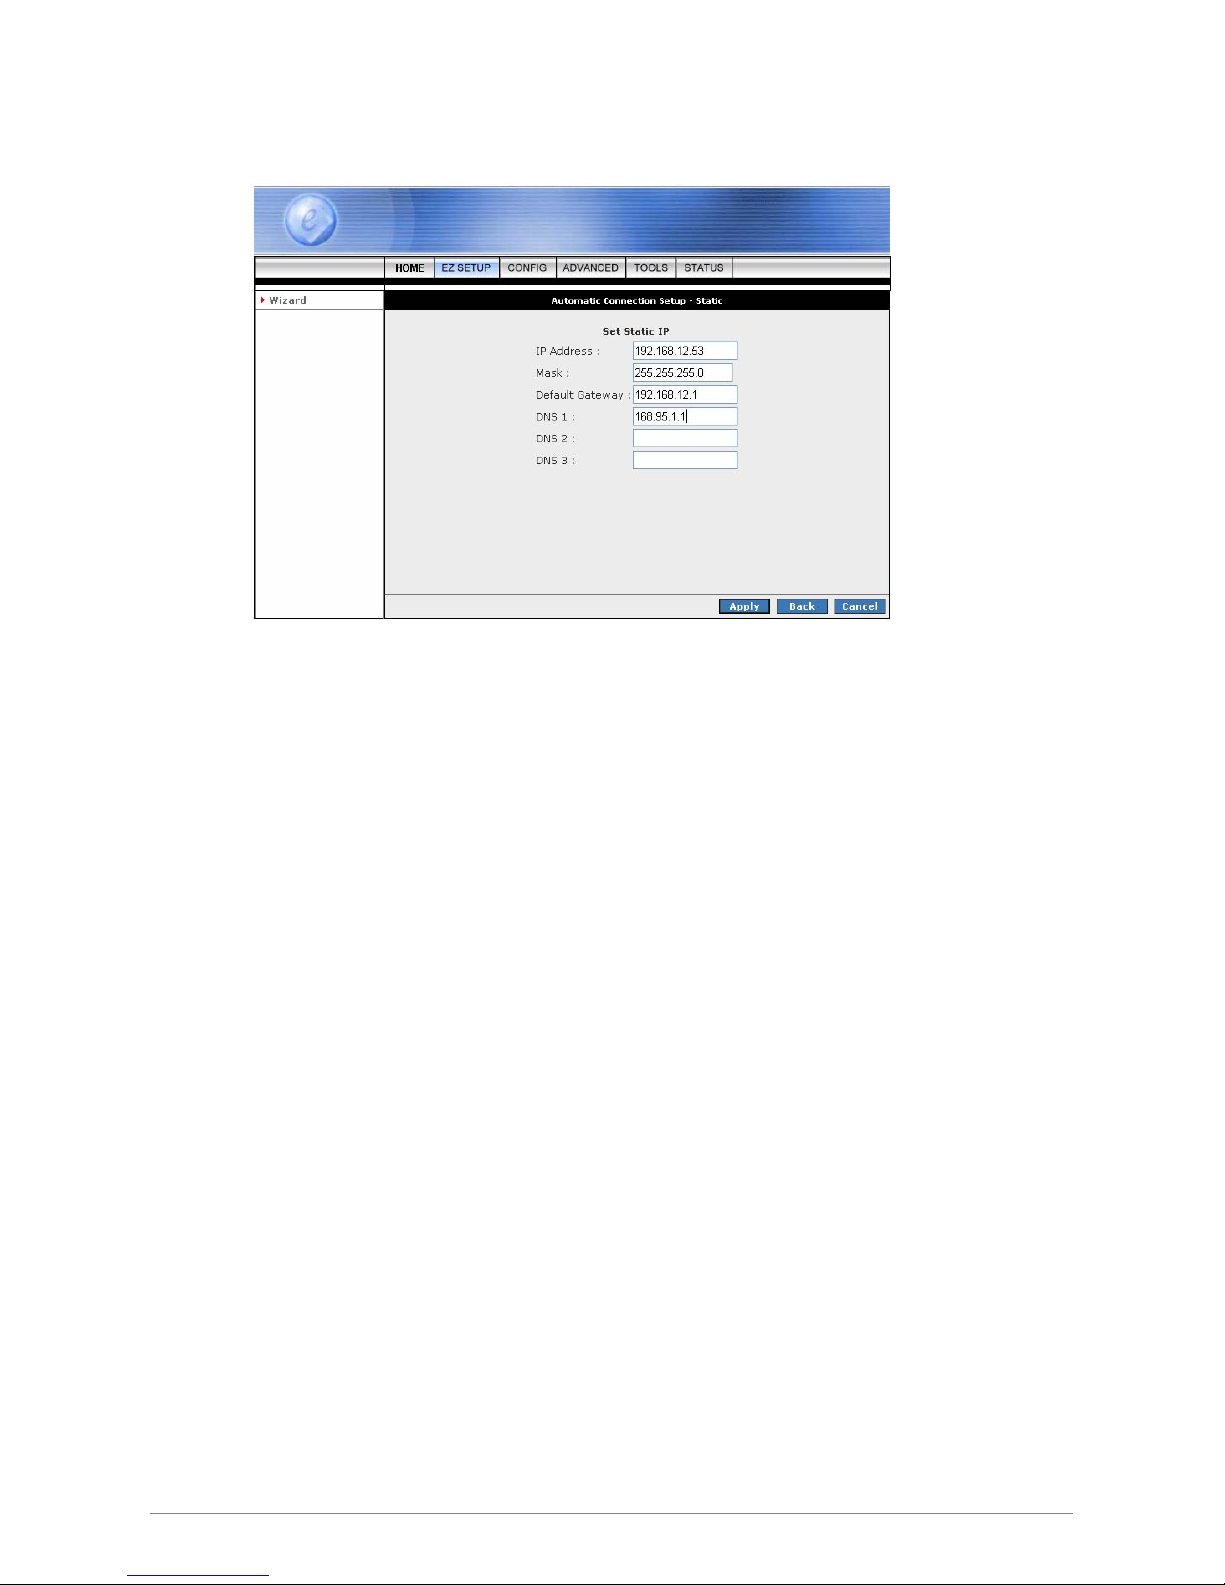
1. Static (Fixed IP by ISP): Click the radio button to enable Static (Fixed IP by ISP) option, then click
“Next”, the following window will pop-up:
Set IP Address: Static IP Settings are for users who have a Static IP Address ( WAN side ) from
their ISP.
; “IP Address”: This is the static IP Address given by the ISP.
Range for IP Address is x.x.x.y, where 0 x 255 and 1 y 254.
≦≦ ≦≦
; “Mask”: This is the subnet mask given by the ISP.
Range for Subnet Mask is x.x.x.x, where 0 x 255
≦≦
.
; “Default Gateway”: This is the Gateway given by the ISP.
Range for Gateway is x.x.x.y, where 0 x 255 and 1 y
≦≦ ≦≦
254.
“DNS”: This is the DNS address specify by the user or ISP. Check your ISP for setting
detail.
Range for DNS Address is x.x.x.y, where 0 x 255 and 1 y 254.
≦≦ ≦≦
Click “Apply” after your setting.
4 Ports ADSL2/2+ Router 28
Page 35
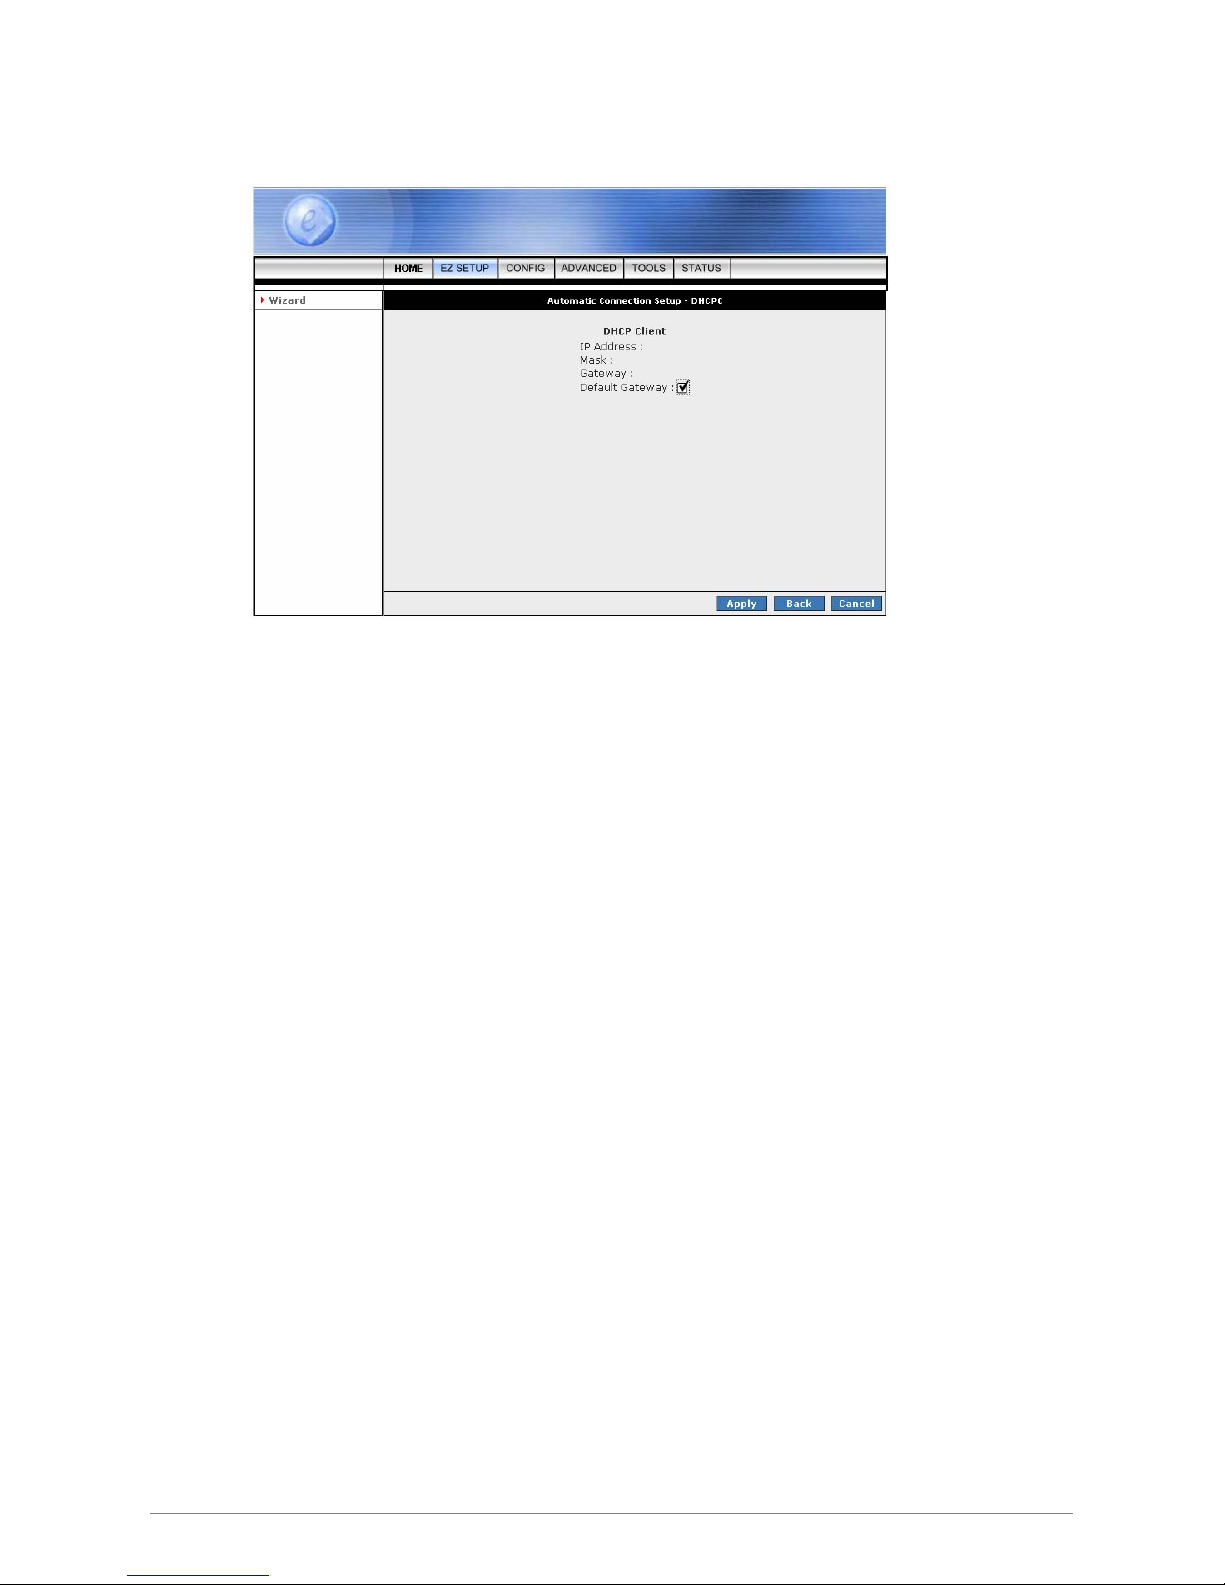
2. DHCP (Get IP dy namically from ISP): Click the radio button to enable DHCP (Get IP dynamically from
ISP). Click “Next” after your choice and the following window will pop-up:
Place a check to enable the Default Gateway. The Default Gateway Address is provided by the
ISP.
Click “Apply” after your setting.
4 Ports ADSL2/2+ Router 29
Page 36
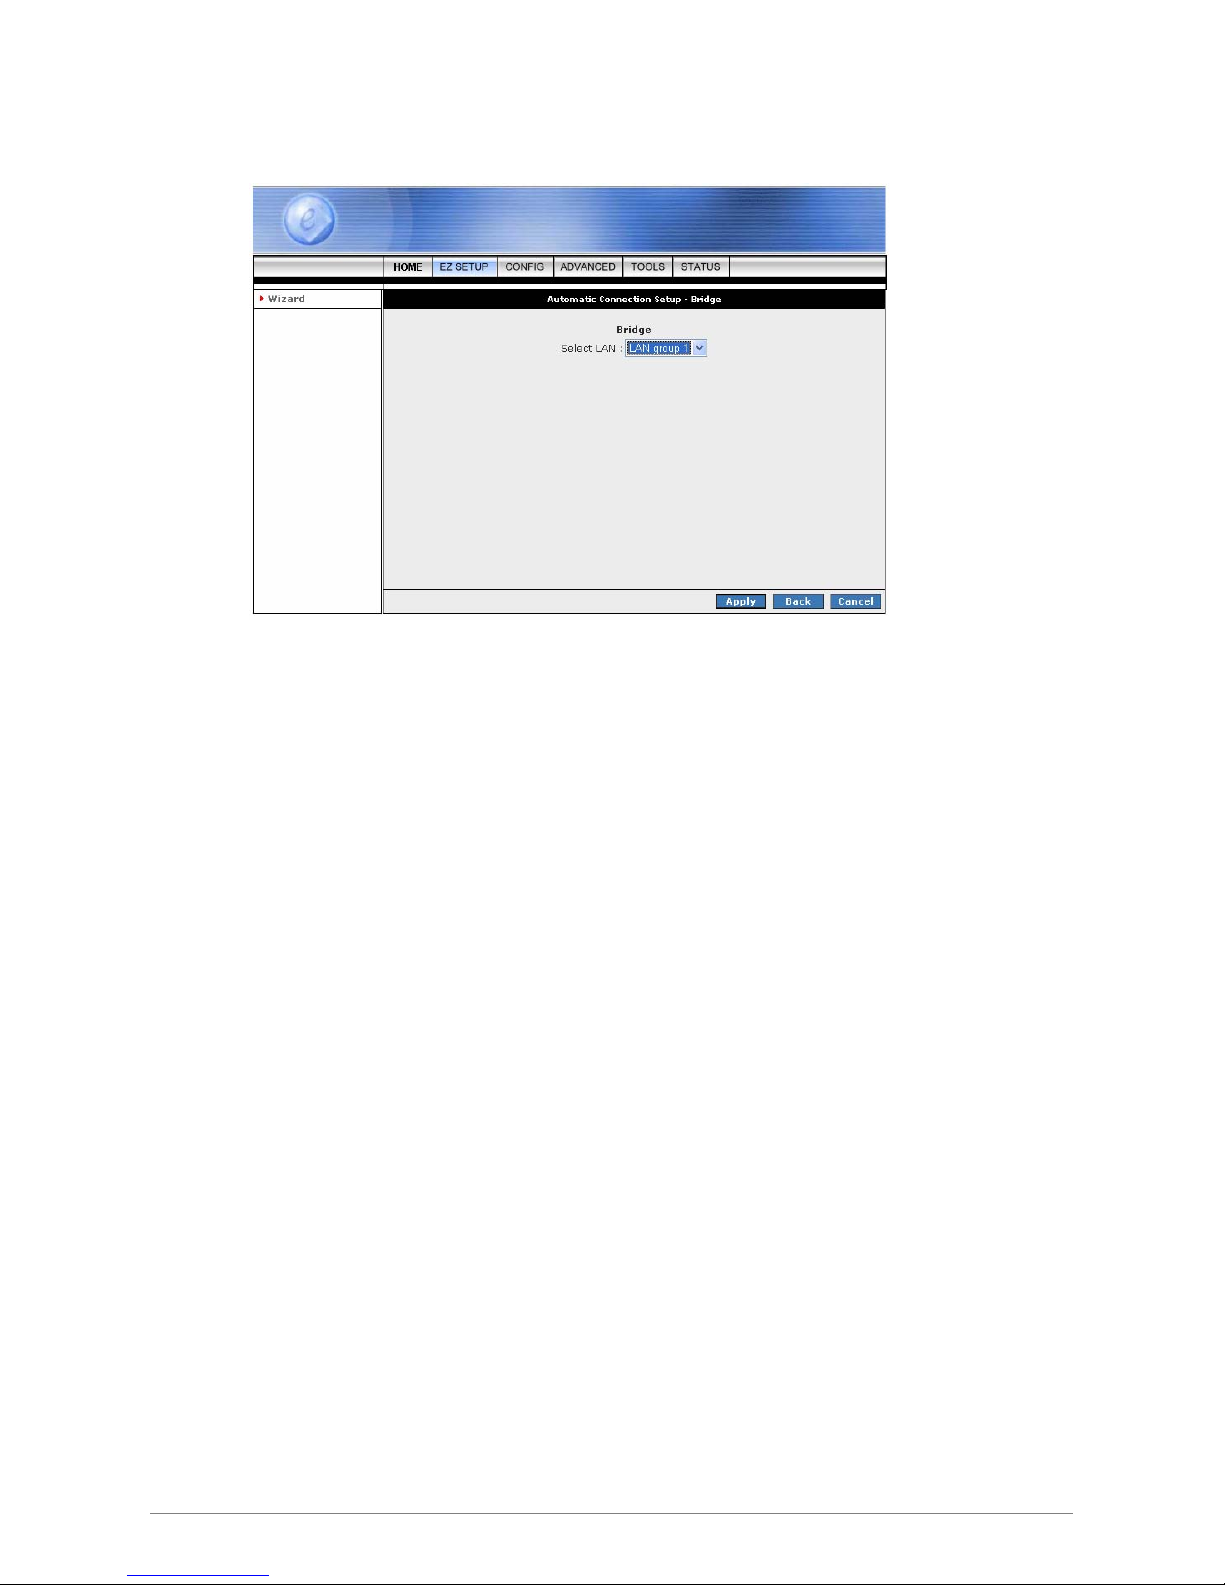
3. Bridge: Click the radio button to enable DHCP (Get IP dynamically from ISP). Click “Next” after your
choice and the following screen will pop-up:
Select LAN: Select LAN group from the drop down manual or leave it as it’s default then click
“Apply” after your setting.
Click “Apply” after your setting.
4 Ports ADSL2/2+ Router 30
Page 37

STEP 2. Click “Apply” after setup. Following windows will pop-up.
The device’s system will save and activate your setting after clicking the “Apply” button. The following
windows will pop up after the reboot process.
Check the following items when the above window pop-up.
; Name: Show the ISP name selected in STEP 1.
; Type: Show the Encapsulation type selected in STEP 1.
; Username: Show the Username manually entered in STEP 1.
; Password: Show the Password manually entered in STEP 1.
; VPI: Show the VPI setting as shown in STEP 1.
; VCI: Show the VCI setting as shown in STEP 1.
A Connection Profile (Normally show the ISP Name) will be added to the left side of the
configuration frame under WAN Setup.
4 Ports ADSL2/2+ Router 31
Page 38

4 Ports ADSL2/2+ Router 32
NOTE: If the final setting are differ from what you’d selected in STEP 1, click EZ SETUP and redo the setup
procedures or else check your dealer immediately for technical support.
NOTE: The 4 Ports ADSL2/2+ Router can be configured to maintain up to 8 Connection Profiles. Different
Connection Profiles may be required if you connect to more than one ADSL service provider, or if you
vary the connection type/setting you use.
Note that in many cases, only one Connection Profile will be required and only one Connection
Profile in used at one time.
To complete and save the new Connection Profile, click the Apply button, and then click Save All.
Page 39

STEP 3. Go to “STATUS” Æ “Modem Status” and the following window will pop-up. Check the
“Connection Status”, “Us Rate” and “Ds Rate”, the numbers/data show you the actual ADSL
connection speed in Kbps.
4 Ports ADSL2/2+ Router 33
Page 40

STEP 4.
Launch your web browser, and enter the Google Website Address:
“www.google.com”
in the
address field then press “Enter”.
The following Google website index page will display on your screen. This shows your ADSL connection is
correctly set and access to the Internet is now available.
4 Ports ADSL2/2+ Router 34
Page 41

4 Ports ADSL2/2+ Router 35
4.3 CONFIG
The CONFIG configuration page allows you to create new connections, edit existing connections, and
configure other basic settings in WAN and LAN mode.
The CONFIG Menu is divided into two sections: LAN Setup and WAN Setup. WAN Setup will be dealt with
first.
Page 42

4 Ports ADSL2/2+ Router 36
4.3.1 CONFIG - WAN Setup
WAN Setup: The WAN configuration page allows you to set the configuration for the WAN/ADSL ports.
ADSL connections can be configured in a variety of ways depending on the ISP/WAN configuration, and the
requirements of your home or office LAN. This 4 Ports ADSL2/2+ Router supports the following ADSL
connection types:
; PPPoE (RFC2516)
; PPPoA (RFC2364)
; DHCP
; Static
; Bridged (RFC1483)
; CLIP (RFC1577)
Configuring the 4 Ports ADSL2/2+ Router to match these connection types may require entry of some or all of
the following values:
; ISP Account Username and Password
; VPI/VCI Setting
; Encapsulation Type/Multiplexing ( Either LLC or VC, check with your ISP for details )
; ADSL Handshaking Mode ( Default setting is MMODE )
; Network Settings for Bridged Mode operation:
For Bridged Mode connections (RFC1483), the ISP will need to provide the following information:
; DSL Fixed Internet IP address
; Subnet Mask
; Default Gateway IP Address
; Primary DNS IP address.
The next sections will describe in detail how to set up each of these connection types and save them as
Connection Profiles.
Page 43

4 Ports ADSL2/2+ Router 37
4.3.1.1 CONFIG - WAN Setup – New Connection
Click New Connection to setup a new connection profile. Different connection profiles may be required if you
connect to more than one ADSL service provider, or if you vary the connection type you use, or if this 4 Ports
ADSL2/2+ Router is used in different locations or countries.
This 4 Ports ADSL2/2+ Router can be configured to maintain up to 8 Connection Profiles.
The WAN Setup configuration page enable the user to create, save and select connection profiles as
required. (In many cases, only one connection profile will be required and only one connection profile will be
used at one time).
To complete and save the new Connection Profile, click Save All after clicking the Apply button.
Page 44
4 Ports ADSL2/2+ Router 38
4.3.1.1.1 New Connection - PPPoE Connection Setup
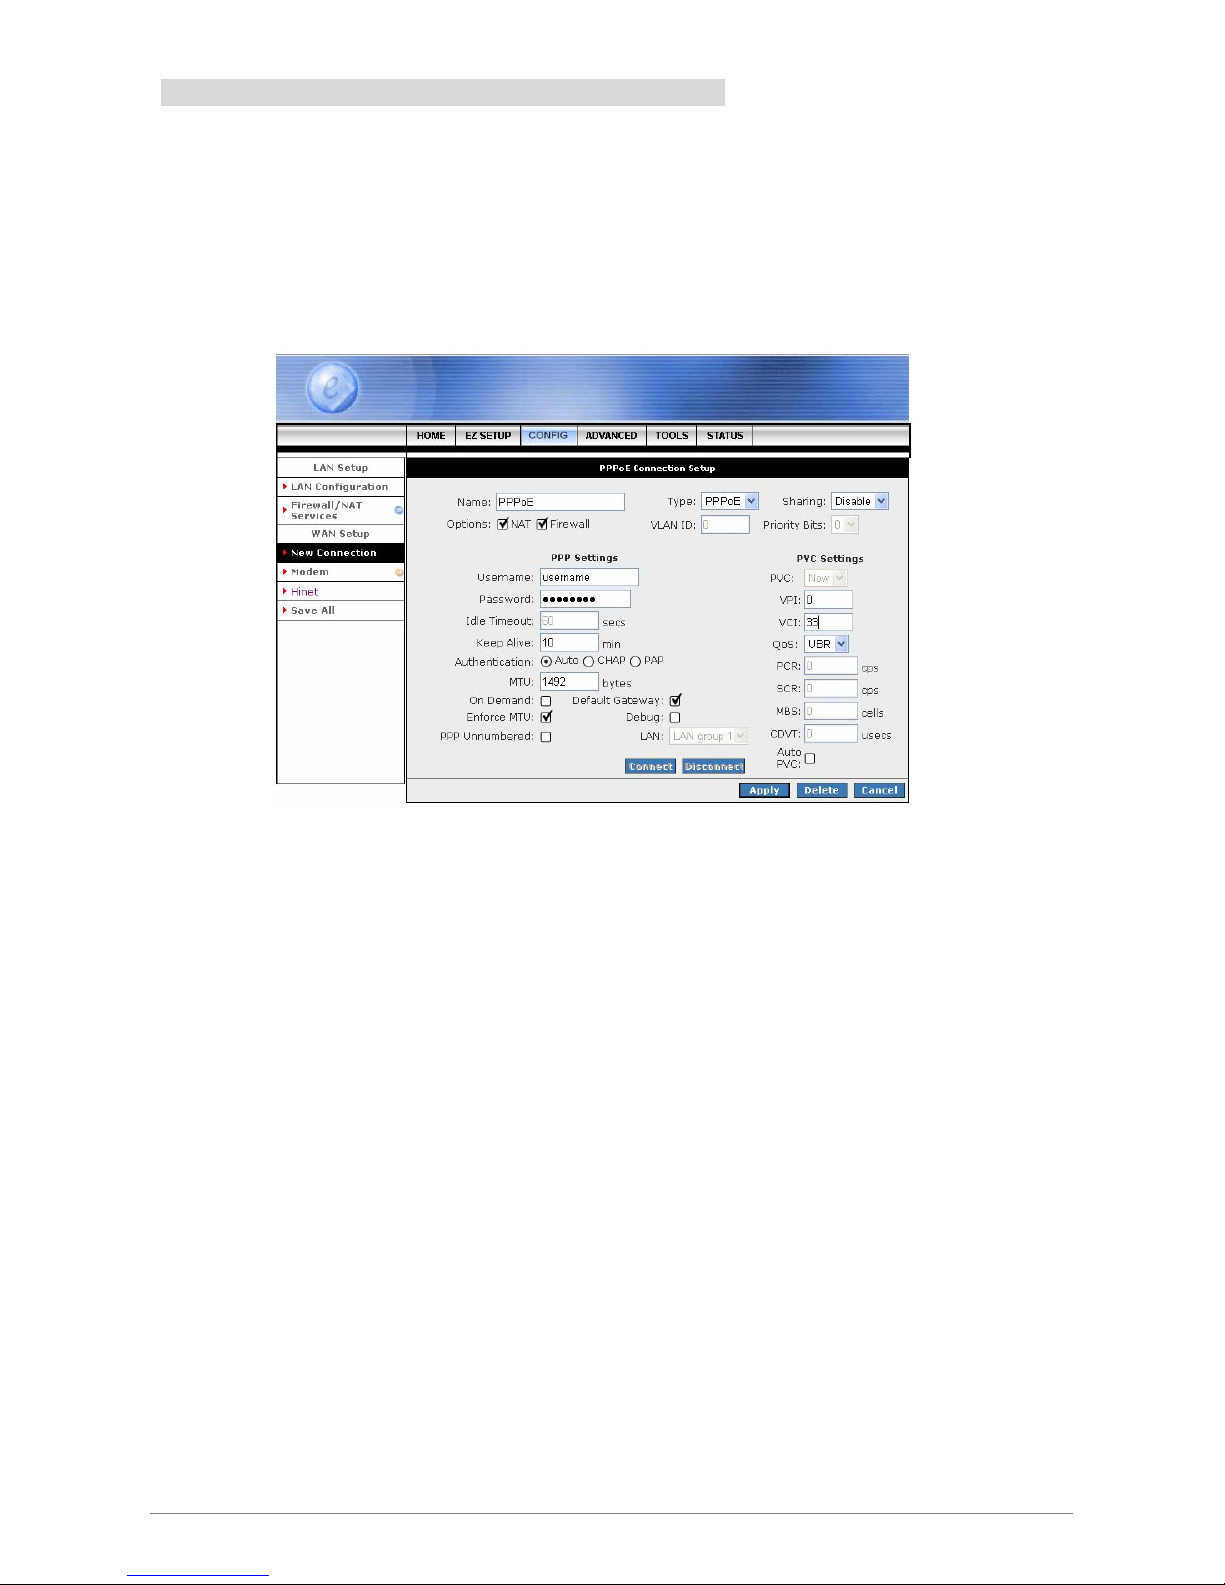
PPPoE: When PPPoE Mode is selected, the following screen will pop-up. Point-to-Point Protocol ( PPP ) is a
method of establishing a network connection between network hosts. PPPoE, also known as RFC 2516,
adapts PPP to work over Ethernet for ADSL connections. PPPoE provides a mechanism for authenticating
users by providing User Name and Password fields and it is a connection type provided by many ISP or
Telecom.
Name: Enter the PPPoE connection name. The name must be unique and must not contain
spaces and must not begin with a number.
Type: Connection Type : PPPoE.
Sharing: Select “Disable”, “Enable” or “VLAN” sharing. Default setting is “Disable”.
Options: Click to enable “NAT” and/or “Firewall” functionality. Default is “Enable”.
VLAN ID: If “VLAN” is selected, manually enter the “VLAN ID” and select “Priority Bits” from
the drop down manual.
PPP Settings:
; Username: Your ISP Account ID. Check your ISP for details.
; Password: Your ISP Account Password. Check your ISP for details.
; Idle Timeout: The Idle Timeout allows you to set the specific period of time, in seconds, to
disconnect from the ISP if the link has no activity detected.
; Keep Alive: When the On-Demand option is not enabled, this value specifies the time to
wait without being connected to your provider before terminating the connection. To ensure
that the link is always active, enter 0 in this field.
Page 45

4 Ports ADSL2/2+ Router 39
; Authentication: The different types of available authentications are:
z Auto: When auto is selected, PAP mode will run by default. However, if PAP fails,
then will run as the secondary protocol. This is the default setting.
z PAP: Password Authentication Procedure. Authentication is done through username
and password.
z CHAP: Challenge-Handshake Authentication Protocol. Typically more secure than
PAP, CHAP uses username and password in combination with a randomly generated
challenge string which has to be authenticated using a one-way hashing function.
; MTU: Maximum Transmission Unit. The largest size packet that can be sent by the modem.
If the network stack of any packet is larger than the MTU value, then the packet will be
fragmented before the transmission. This can be set from a minimum 128 to maximum 1500.
; On Demand: If enable On Demand mode, the connection will be dropped if no activity is
detected after the specified Idle Timeout value.
; Default Gateway: Check box to make this the default connection.
; Enforce MTU: Check box if you experience problems accessing the Internet over a PPPoE
connection. This feature will force all TCP traffic to conform with PPP MTU by changing TCP
Maximum Segment Size to PPP MTU. MTU (Maximum Transmission Unit) is defined as the
maximum packet size (In bytes), that a particular interface can handle.
; Debug: Click to enable the PPP connection debugging facilities.
; PPP Unnumbered: Click to enable PPP Unnumbered function then select LAN Group from
the LAN dropdown manual.
PVC Settings:
; PVC: This field allows you to choose the specific PVC for the PPP session.
; VPI: Virtual Path Identifier is a virtual path used for cell routing that is identified by an eight bit
field in the ATM cell header. The VPI field specifies this eight bit identifier for routing.
; VCI: A Virtual Channel Identifier is a virtual channel that is identified by a unique numerical
tag that is defined by a 16-bit field in the ATM cell header. The purpose of the virtual channel
is to identify where the cell should travel. The VCI field specifies this 16 bit numerical tag that
determines the destination.
; QoS: Select the Quality of Service (QoS) type. If in doubt leave as default.
; PCR: Peak Cell Rate. This is an ATM (Asynchronous Transfer Mode) term to describe the
rate cells per second that the source device may never exceed. Available only when VBR
QoS is chosen.
; SCR: Security Cell Rate. This is an ATM (Asynchronous Transfer Mode) term to describe the
security cell transmitted per second.
;
MBS: Maximum Burst Size. A term used in ATM (Asynchronous Transfer Mode) to specify
the maximum number of cells which can be transmitted at the contracted PCR (Peak Cell
Rate). Available only when VBR QoS is chosen.
Page 46

4 Ports ADSL2/2+ Router 40
; CDVT: Cell Delay Variation Time. The Cell Delay Variation is a term used in ATM
(Asynchronous Transfer Mode) to describe the time difference that is acceptable between
cells being presented at the receiving host. Available only when VBR QoS is chosen.
; Auto PVC: Click to enable Auto PVC features. Auto PVC allows detection of virtual channels
via the built-in mechanism for communicating ATM Layer information from DSLAM to the 4
Ports ADSL2/2+ Router.
Connect: Click Connect to establish a PPP connection under this connection profile.
Disconnect: Click Disconnect to drop the PPP connection under this connection profile.
Apply: Click Apply to complete and save the connection profile.
Delete: Click Delete to delete a connection.
Cancel: Click Cancel to ignore all the changes.
Save All: To complete and save the setting, click Save All after clicking the Apply button.
Page 47
4 Ports ADSL2/2+ Router 41
4.3.1.1.2 New Connection - PPPoA Connection Setup
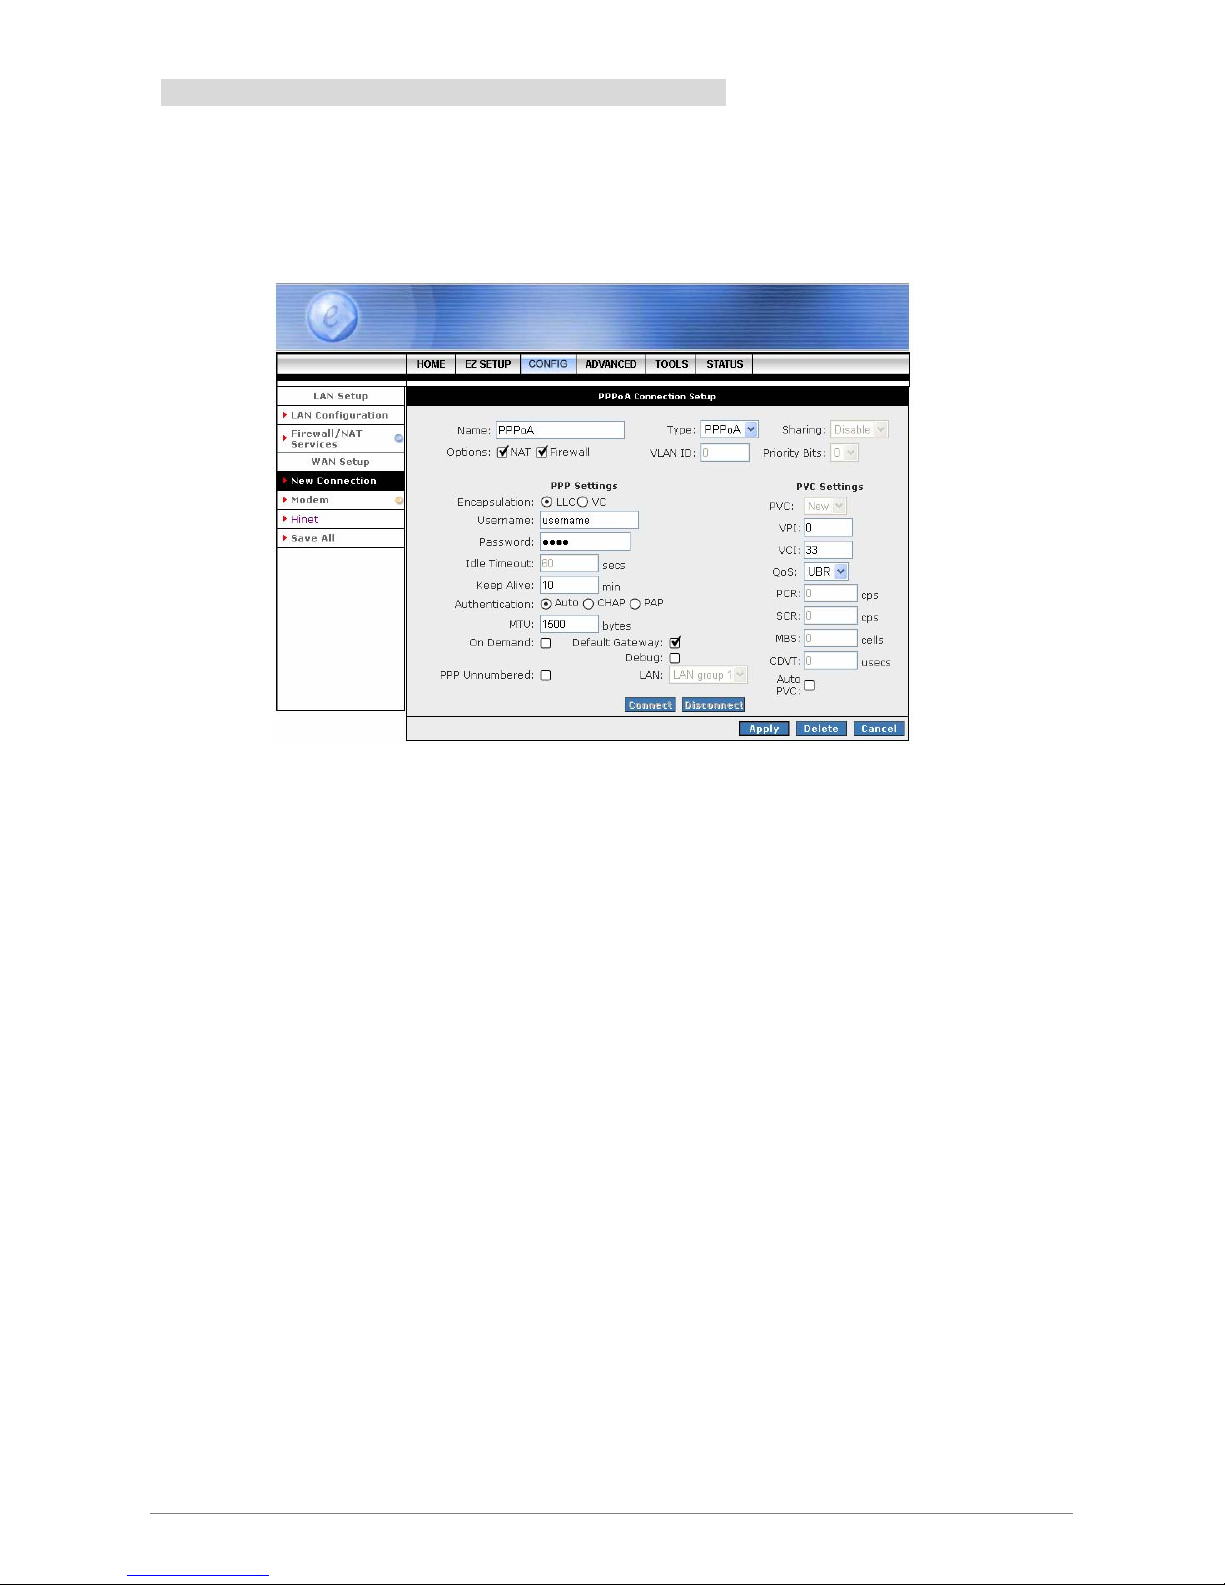
PPPoA: When PPPoA mode is selected, the following screen will pop-up. Point-to-Point Protocol ( PPP ) is a
method of establishing a network connection between network hosts. PPPoA, also known as RFC 2346,
adapts PPP to work over ATM cells for ADSL connections.
Name: Enter the PPPoA connection name. The name must be unique and must not contain
spaces and must not begin with a number.
Type: Connection Type : PPPoA.
Options: Click to enable “NAT” and/or “Firewall” functionality. Default is “Enable”.
PPP Settings:
; Username: Your ISP Account ID. Check your ISP for details.
; Password: Your ISP Account Password. Check your ISP for details.
; Idle Timeout: The Idle Timeout allows you to set the specific period of time, in seconds, to
disconnect from the ISP if the link has no activity detected.
; Keep Alive: When the On-Demand option is not enabled, this value specifies the time to
wait without being connected to your provider before terminating the connection. To ensure
that the link is always active, enter 0 in this field.
; Authentication: The different types of available authentications are:
z Auto: When auto is selected, PAP mode will run by default. However, if PAP fails,
then will run as the secondary protocol. This is the default setting.
z PAP: Password Authentication Procedure. Authentication is done through username
and password.
z CHAP: Challenge-Handshake Authentication Protocol. Typically more secure than
PAP, CHAP uses username and password in combination with a randomly generated
challenge string which has to be authenticated using a one-way hashing function.
Page 48

4 Ports ADSL2/2+ Router 42
; MTU: Maximum Transmission Unit. The largest size packet that can be sent by the modem.
If the network stack of any packet is larger than the MTU value, then the packet will be
fragmented before the transmission. This can be set from a minimum 128 to maximum 1500.
; On Demand: If enable On Demand mode, the connection will be dropped if no activity is
detected after the specified Idle Timeout value.
; Default Gateway: Check box to make this the default connection.
; Debug: Click to enable the Debug function. The complete debugging information will show
and listed in the System Log file.
; PPP Unnumbered: Click to enable PPP Unnumbered function then select LAN Group from
the LAN dropdown manual.
PVC Settings:
; VPI: Virtual Path Identifier is a virtual path used for cell routing that is identified by an eight bit
field in the ATM cell header. The VPI field specifies this eight bit identifier for routing.
; VCI: A Virtual Channel Identifier is a virtual channel that is identified by a unique numerical
tag that is defined by a 16-bit field in the ATM cell header. The purpose of the virtual channel
is to identify where the cell should travel. The VCI field specifies this 16 bit numerical tag that
determines the destination.
; QoS: Select the Quality of Service (QoS) type. If in doubt leave as default.
; PCR: Peak Cell Rate. This is an ATM (Asynchronous Transfer Mode) term to describe the
rate cells per second that the source device may never exceed. Available only when VBR
QoS is chosen.
; SCR: Security Cell Rate. This is an ATM (Asynchronous Transfer Mode) term to describe the
security cell transmitted per second.
; MBS: Maximum Burst Size. A term used in ATM (Asynchronous Transfer Mode) to specify
the maximum number of cells which can be transmitted at the contracted PCR (Peak Cell
Rate). Available only when VBR QoS is chosen.
; CDVT: Cell Delay Variation Time. The Cell Delay Variation is a term used in ATM
(Asynchronous Transfer Mode) to describe the time difference that is acceptable between
cells being presented at the receiving host. Available only when VBR QoS is chosen.
; Auto PVC: Click to enable Auto PVC features. Auto PVC allows detection of virtual channels
via the built-in mechanism for communicating ATM Layer information from DSLAM to the 4
Ports ADSL2/2+ Router.
Connect: Click Connect to establish a PPP connection under this connection profile.
Disconnect: Click Disconnect to drop the PPP connection under this connection profile.
Apply: Click Apply to complete and save the connection profile.
Delete: Click Delete to delete a connection.
Cancel: Click Cancel to ignore all the changes.
Save All: To complete and save the setting, click Save All after clicking the Apply button.
Page 49

4 Ports ADSL2/2+ Router 43
4.3.1.1.3 New Connection - Static Connection Setup
Static: When Static mode is selected, the following screen will pop-up. Most Internet users are provided with
a dynamic IP address by their ISP for each session, however certain situations call for a Static IP address.
This is typically when you want to host a website, or use VoIP or video-conferencing applications where other
users must regularly connect to your computer. Static IP numbers are generally made available by ISPs for
these purposes for an additional fee.
Name: Enter the Static connection name. The name must be unique and must not contain spaces
and must not begin with a number.
Type: Connection Type : Static.
Sharing: Select “Disable”, “Enable” or “VLAN” sharing. Default setting is “Disable”.
Options: Click to enable “NAT” and/or “Firewall” functionality. Default is “Enable”.
VLAN ID: If “VLAN” is selected, manually enter the “VLAN ID” and select “Priority Bits” from
the drop down manual.
Static Settin gs:
; Encapsulation: Select the encapsulation type (LLC or VC) according to the information
provided by the ISP.
; IP Address: Enter the IP Address provided by your ISP.
; Mask: Enter the Subnet mask specified by your ISP.
; Default Gateway: Enter the Default Gateway as specified by the ISP.
; DNS: Up to three Domain Name Server (DNS) addresses can also be specified.
; Mode: For static configuration, you can also select a bridge connection or a routed
connection. Since a Static IP address is typically used to host WEB servers, Bridged
connection is usual however Routed is provided also. Check with ISP for confirmation.
Page 50

4 Ports ADSL2/2+ Router 44
PVC Settings:
; PVC: This field allows you to choose the specific PVC for the PPP session.
; VPI: Virtual Path Identifier is a virtual path used for cell routing that is identified by an eight bit
field in the ATM cell header. The VPI field specifies this eight bit identifier for routing.
; VCI: A Virtual Channel Identifier is a virtual channel that is identified by a unique numerical
tag that is defined by a 16-bit field in the ATM cell header. The purpose of the virtual channel
is to identify where the cell should travel. The VCI field specifies this 16 bit numerical tag that
determines the destination.
; QoS: Select the Quality of Service (QoS) type. If in doubt leave as default.
; PCR: Peak Cell Rate. This is an ATM (Asynchronous Transfer Mode) term to describe the
rate cells per second that the source device may never exceed. Available only when VBR
QoS is chosen.
; SCR: Security Cell Rate. This is an ATM (Asynchronous Transfer Mode) term to describe the
security cell transmitted per second.
; MBS: Maximum Burst Size. A term used in ATM (Asynchronous Transfer Mode) to specify
the maximum number of cells which can be transmitted at the contracted PCR (Peak Cell
Rate). Available only when VBR QoS is chosen.
; CDVT: Cell Delay Variation Time. The Cell Delay Variation is a term used in ATM
(Asynchronous Transfer Mode) to describe the time difference that is acceptable between
cells being presented at the receiving host. Available only when VBR QoS is chosen.
; Auto PVC: Click to enable Auto PVC features. Auto PVC allows detection of virtual channels
via the built-in mechanism for communicating ATM Layer information from DSLAM to the 4
Ports ADSL2/2+ Router.
Apply: Click Apply to complete and save the connection profile.
Delete: Click Delete to delete a connection.
Cancel: Click Cancel to ignore all the changes.
Save All: To complete and save the setting, click Save All after clicking the Apply button.
Page 51
4 Ports ADSL2/2+ Router 45
4.3.1.1.4 New Connection - DHCP Connection Setup
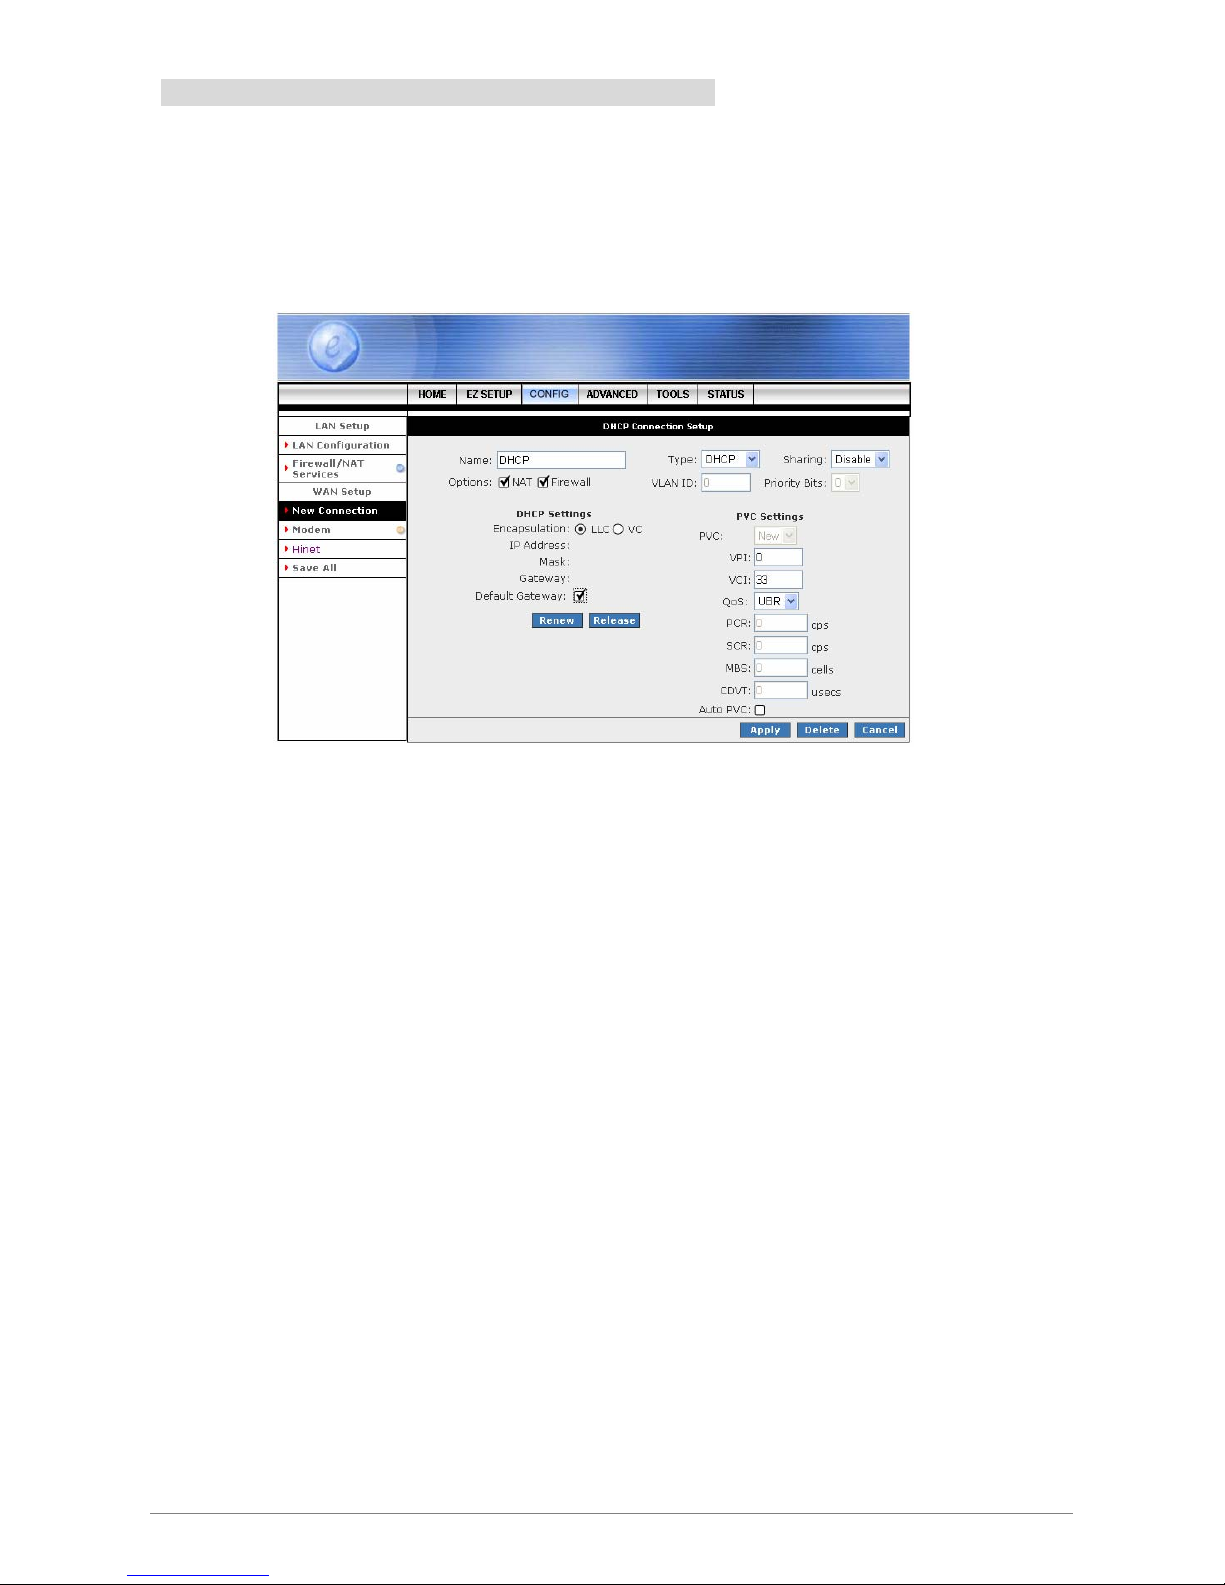
DHCP: When DHCP mode is selected, the following screen will pop-up. Dynamic Host Configuration Protocol
(DHCP) allows the ADSL Router to automatically obtain the IP address from the server. This option is
commonly used in situations where the IP address is dynamically assigned and is not known prior to
assignment.
Name: Enter the DHCP connection name. The name must be unique and must not contain spaces
and must not begin with a number.
Type: Connection Type : DHCP.
Sharing: Select “Disable”, “Enable” or “VLAN” sharing. Default setting is “Disable”.
Options: Click to enable “NAT” and/or “Firewall” functionality. Default is “Enable”.
VLAN ID: If “VLAN” is selected, manually enter the “VLAN ID” and select “Priority Bits” from
the drop down manual.
DHCP Settings:
; Encapsulation: Select the encapsulation type (LLC or VC) according to the information
provided by the ISP.
; Default Gateway: Click to enable the Default Gateway.
PVC Settings:
; PVC: This field allows you to choose the specific PVC for the PPP session.
; VPI: Virtual Path Identifier is a virtual path used for cell routing that is identified by an eight bit
field in the ATM cell header. The VPI field specifies this eight bit identifier for routing.
; VCI: A Virtual Channel Identifier is a virtual channel that is identified by a unique numerical
tag that is defined by a 16-bit field in the ATM cell header. The purpose of the virtual channel
is to identify where the cell should travel. The VCI field specifies this 16 bit numerical tag that
determines the destination.
Page 52

4 Ports ADSL2/2+ Router 46
; QoS: Select the Quality of Service (QoS) type. If in doubt leave as default.
; PCR: Peak Cell Rate. This is an ATM (Asynchronous Transfer Mode) term to describe the
rate cells per second that the source device may never exceed. Available only when VBR
QoS is chosen.
; SCR: Security Cell Rate. This is an ATM (Asynchronous Transfer Mode) term to describe the
security cell transmitted per second.
; MBS: Maximum Burst Size. A term used in ATM (Asynchronous Transfer Mode) to specify
the maximum number of cells which can be transmitted at the contracted PCR (Peak Cell
Rate). Available only when VBR QoS is chosen.
; CDVT: Cell Delay Variation Time. The Cell Delay Variation is a term used in ATM
(Asynchronous Transfer Mode) to describe the time difference that is acceptable between
cells being presented at the receiving host. Available only when VBR QoS is chosen.
; Auto PVC: Click to enable Auto PVC features. Auto PVC allows detection of virtual channels
via the built-in mechanism for communicating ATM Layer information from DSLAM to the 4
Ports ADSL2/2+ Router.
Renew: Click the Renew button and the gateway will retrieve the IP Address, Subnet Mask, and
Gateway Address.
Release: Click the Release button to release the IP Address, Subnet Mask and Gateway Address.
Apply: Click Apply to complete and save the connection profile.
Delete: Click Delete to delete a connection.
Cancel: Click Cancel to ignore all the changes.
Save All: To complete and save the setting, click Save All after clicking the Apply button.
Page 53
4 Ports ADSL2/2+ Router 47
4.3.1.1.5 New Connection - Bridge Connection Setup
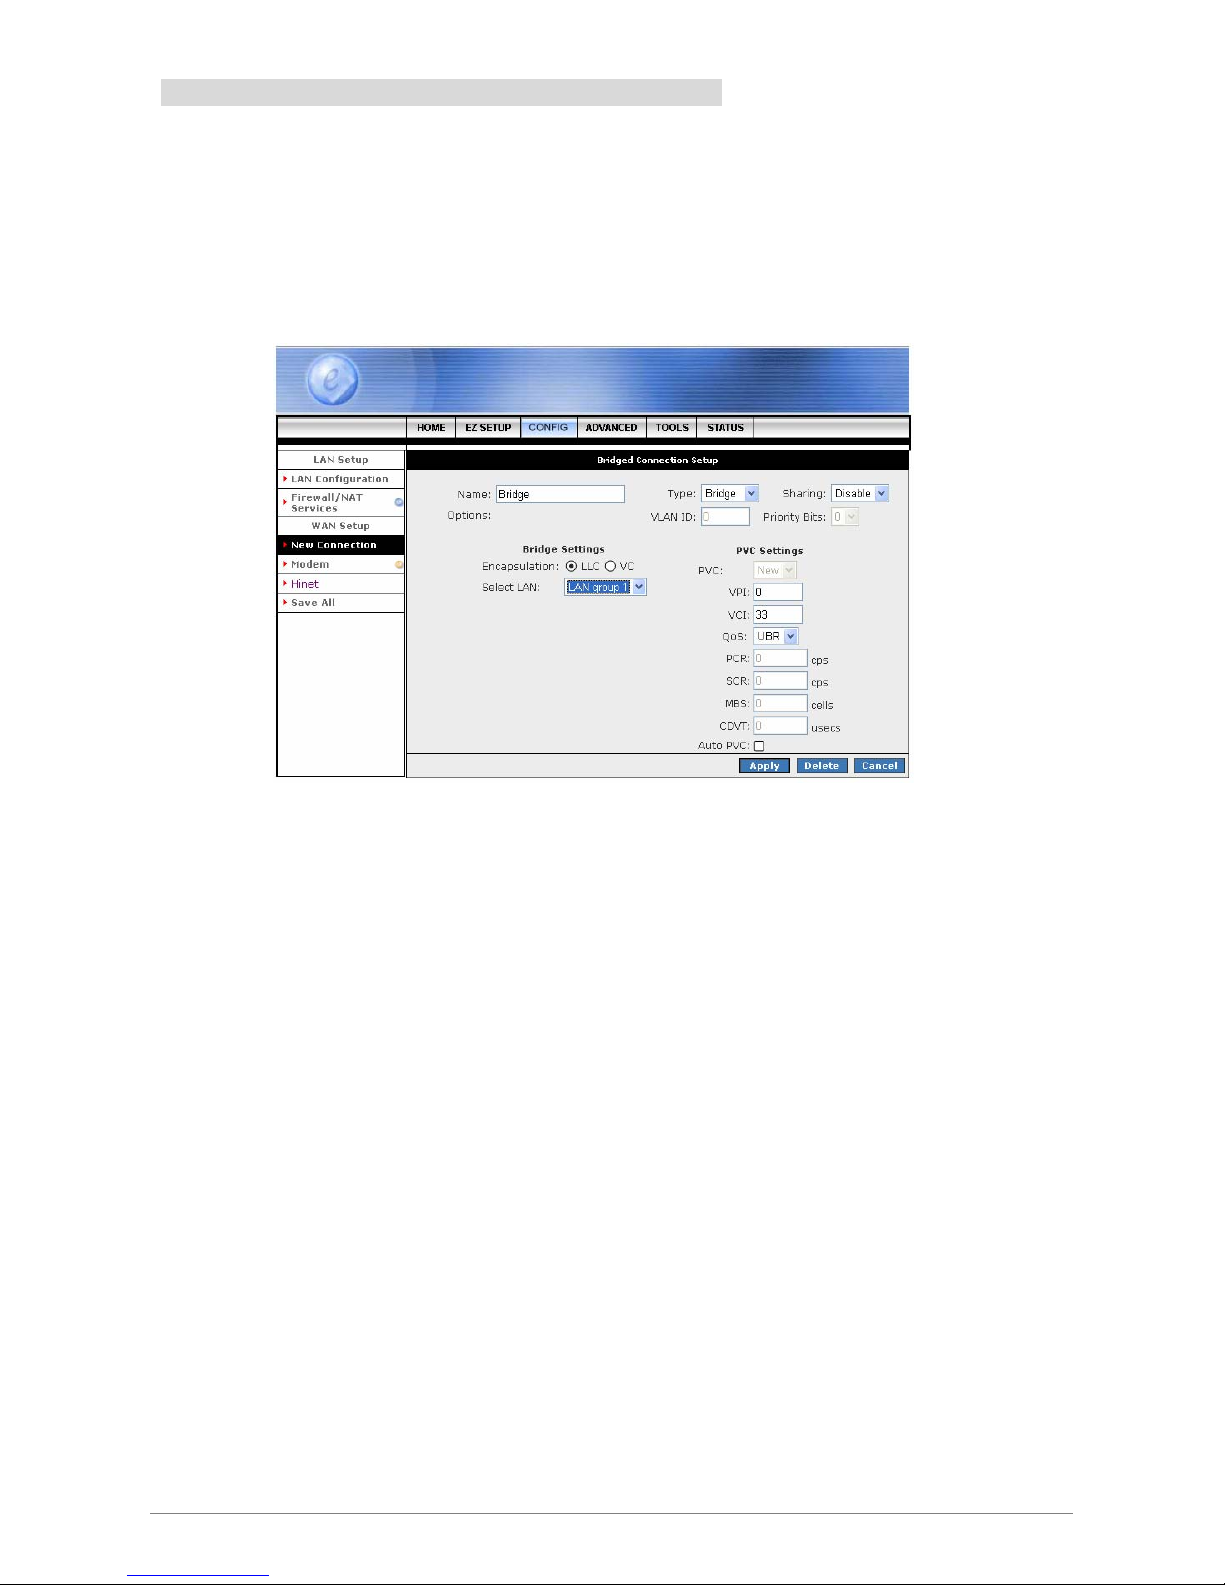
Bridge: When Bridge mode is selected, the following screen will pop-up. A Bridged connection basically
disables the routing, firewall and NAT features of the 4 Ports ADSL2/2+ Router. In a Bridged connection, the
4 Ports ADSL2/2+ Router acts as a modem or hub, and just transmits packets between the WAN interface
and the LAN interface. A Bridged connection assumes that another device is providing the routing
functionality that is now disabled in the 4 Ports ADSL2/2+ Router.
Name: Enter the Bridge connection name. The name must be unique and must not contain spaces
and must not begin with a number.
Type: Connection Type : DHCP.
Sharing: Select “Disable”, “Enable” or “VLAN” sharing. Default setting is “Disable”.
VLAN ID: If “VLAN” is selected, manually enter the “VLAN ID” and select “Priority Bits” from
the drop down manual.
Bridge Settings:
; Encapsulation: Select the encapsulation type (LLC or VC) according to the information
provided by the ISP.
; Select LAN: Up to three LAN Group can be specified. Select your LAN Group from the drop
down manual.
PVC Settings:
; PVC: This field allows you to choose the specific PVC for the PPP session.
; VPI: Virtual Path Identifier is a virtual path used for cell routing that is identified by an eight bit
field in the ATM cell header. The VPI field specifies this eight bit identifier for routing.
; VCI: A Virtual Channel Identifier is a virtual channel that is identified by a unique numerical
tag that is defined by a 16-bit field in the ATM cell header. The purpose of the virtual channel
is to identify where the cell should travel. The VCI field specifies this 16 bit numerical tag that
determines the destination.
Page 54

4 Ports ADSL2/2+ Router 48
; QoS: Select the Quality of Service (QoS) type. If in doubt leave as default.
; PCR: Peak Cell Rate. This is an ATM (Asynchronous Transfer Mode) term to describe the
rate cells per second that the source device may never exceed. Available only when VBR
QoS is chosen.
; SCR: Security Cell Rate. This is an ATM (Asynchronous Transfer Mode) term to describe the
security cell transmitted per second.
; MBS: Maximum Burst Size. A term used in ATM (Asynchronous Transfer Mode) to specify
the maximum number of cells which can be transmitted at the contracted PCR (Peak Cell
Rate). Available only when VBR QoS is chosen.
; CDVT: Cell Delay Variation Time. The Cell Delay Variation is a term used in ATM
(Asynchronous Transfer Mode) to describe the time difference that is acceptable between
cells being presented at the receiving host. Available only when VBR QoS is chosen.
; Auto PVC: Click to enable Auto PVC features. Auto PVC allows detection of virtual channels
via the built-in mechanism for communicating ATM Layer information from DSLAM to the 4
Ports ADSL2/2+ Router.
Apply: Click Apply to complete and save the connection profile.
Delete: Click Delete to delete a connection.
Cancel: Click Cancel to ignore all the changes.
Save All: To complete and save the setting, click Save All after clicking the Apply button.
Page 55
4 Ports ADSL2/2+ Router 49
4.3.1.1.6 New Connection - CLIP Connection Setup
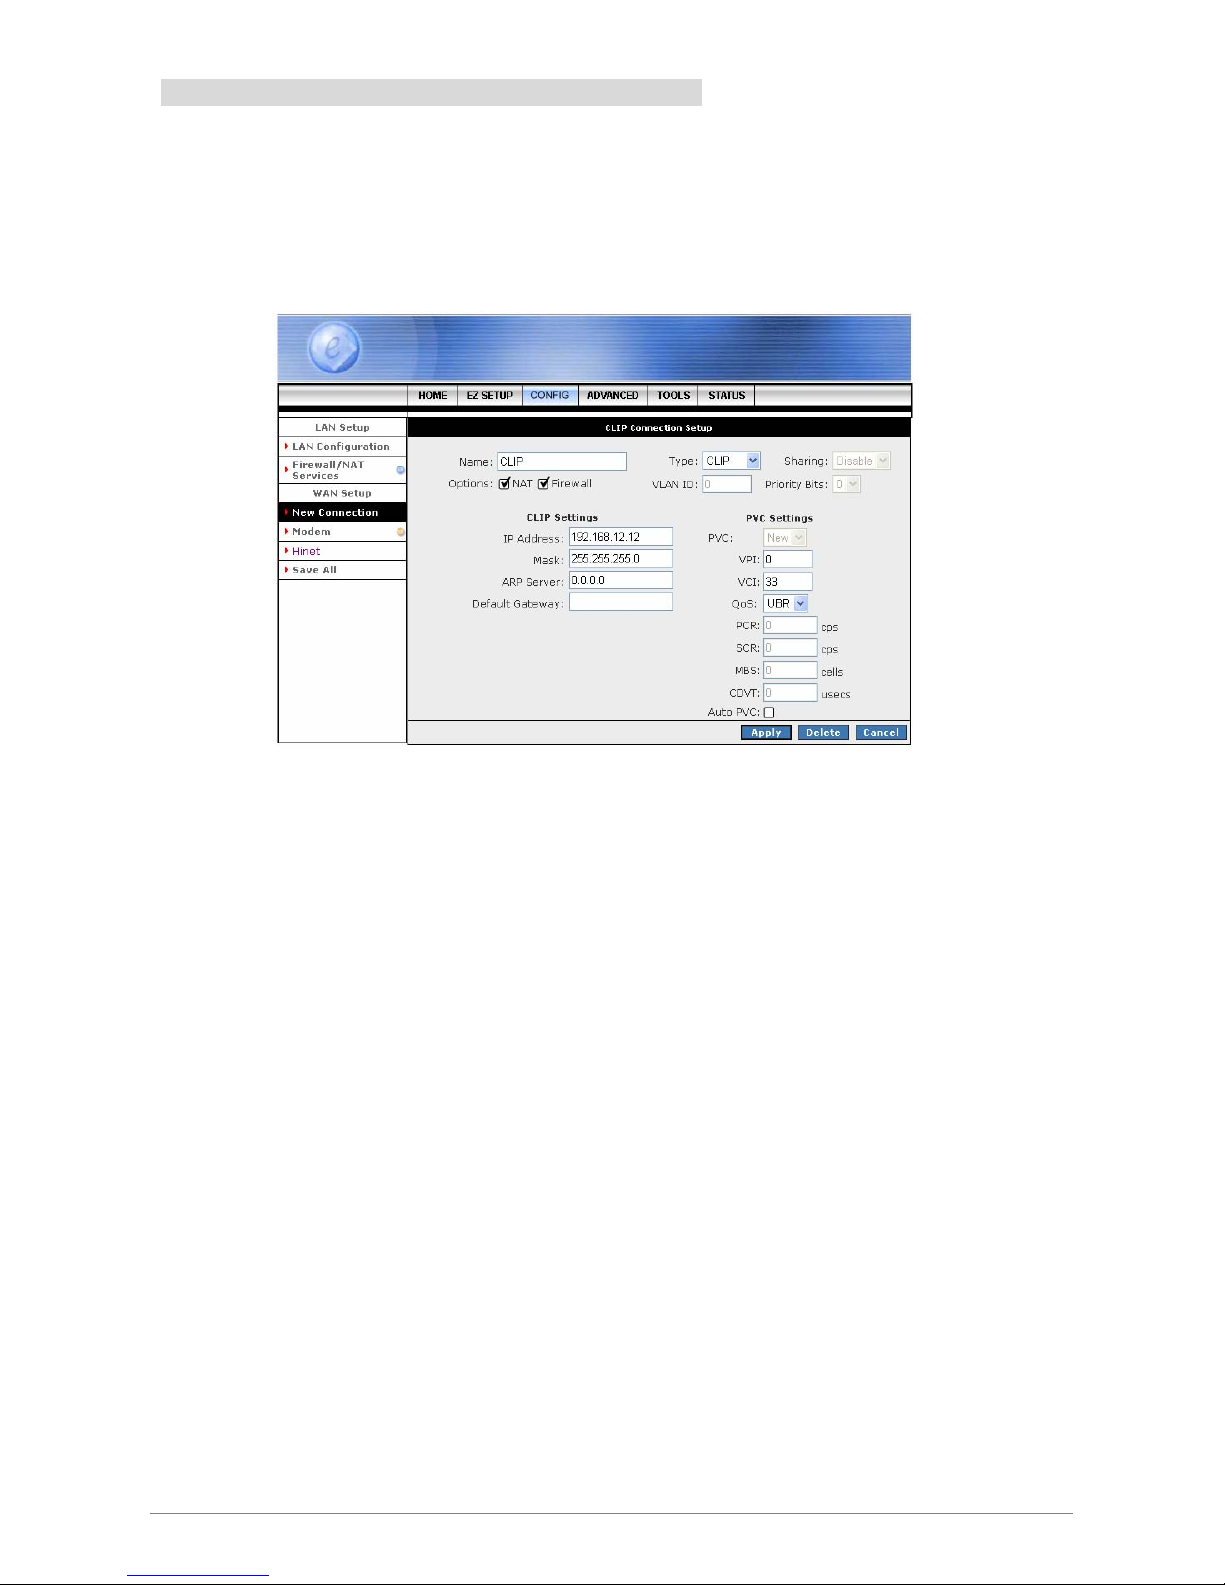
CLIP: When CLIP mode is selected, the following screen will pop-up. The Classical IP over ATM (CLIP)
support provides the ability to transmit IP packets over an ATM network, CLIP support will encapsulate IP in
an AAL5 packet data unit (PDU) frame using RFC1577and utilizes an ATM-aware version of the ARP
protocol.
Name: Enter the CLIP connection name. The name must be unique and must not contain spaces
and must not begin with a number.
Type: Connection Type : CLIP.
CLIP Settings:
; IP Address: Enter the IP Address provided by your ISP.
; Mask: Enter the Subnet mask specified by your ISP.
; ARP Server: Leave as Default ( 0.0.0.0 ) unless advised by ISP.
; Default Gateway: Enter the Default Gateway as specified by the ISP.
PVC Settings:
; VPI: Virtual Path Identifier is a virtual path used for cell routing that is identified by an eight bit
field in the ATM cell header. The VPI field specifies this eight bit identifier for routing.
; VCI: A Virtual Channel Identifier is a virtual channel that is identified by a unique numerical
tag that is defined by a 16-bit field in the ATM cell header. The purpose of the virtual channel
is to identify where the cell should travel. The VCI field specifies this 16 bit numerical tag that
determines the destination.
; QoS: Select the Quality of Service (QoS) type. If in doubt leave as default.
; PCR: Peak Cell Rate. This is an ATM (Asynchronous Transfer Mode) term to describe the
rate cells per second that the source device may never exceed. Available only when VBR
QoS is chosen.
Page 56

4 Ports ADSL2/2+ Router 50
; SCR: Security Cell Rate. This is an ATM (Asynchronous Transfer Mode) term to describe the
security cell transmitted per second.
; MBS: Maximum Burst Size. A term used in ATM (Asynchronous Transfer Mode) to specify
the maximum number of cells which can be transmitted at the contracted PCR (Peak Cell
Rate). Available only when VBR QoS is chosen.
; CDVT: Cell Delay Variation Time. The Cell Delay Variation is a term used in ATM
(Asynchronous Transfer Mode) to describe the time difference that is acceptable between
cells being presented at the receiving host. Available only when VBR QoS is chosen.
; Auto PVC: Click to enable Auto PVC features. Auto PVC allows detection of virtual channels
via the built-in mechanism for communicating ATM Layer information from DSLAM to the 4
Ports ADSL2/2+ Router.
Apply: Click Apply to complete and save the connection profile.
Delete: Click Delete to delete a connection.
Cancel: Click Cancel to ignore all the changes.
Save All: To complete and save the setting, click Save All after clicking the Apply button.
Page 57
4 Ports ADSL2/2+ Router 51
4.3.1.2 CONFIG - WAN Setup - Modem
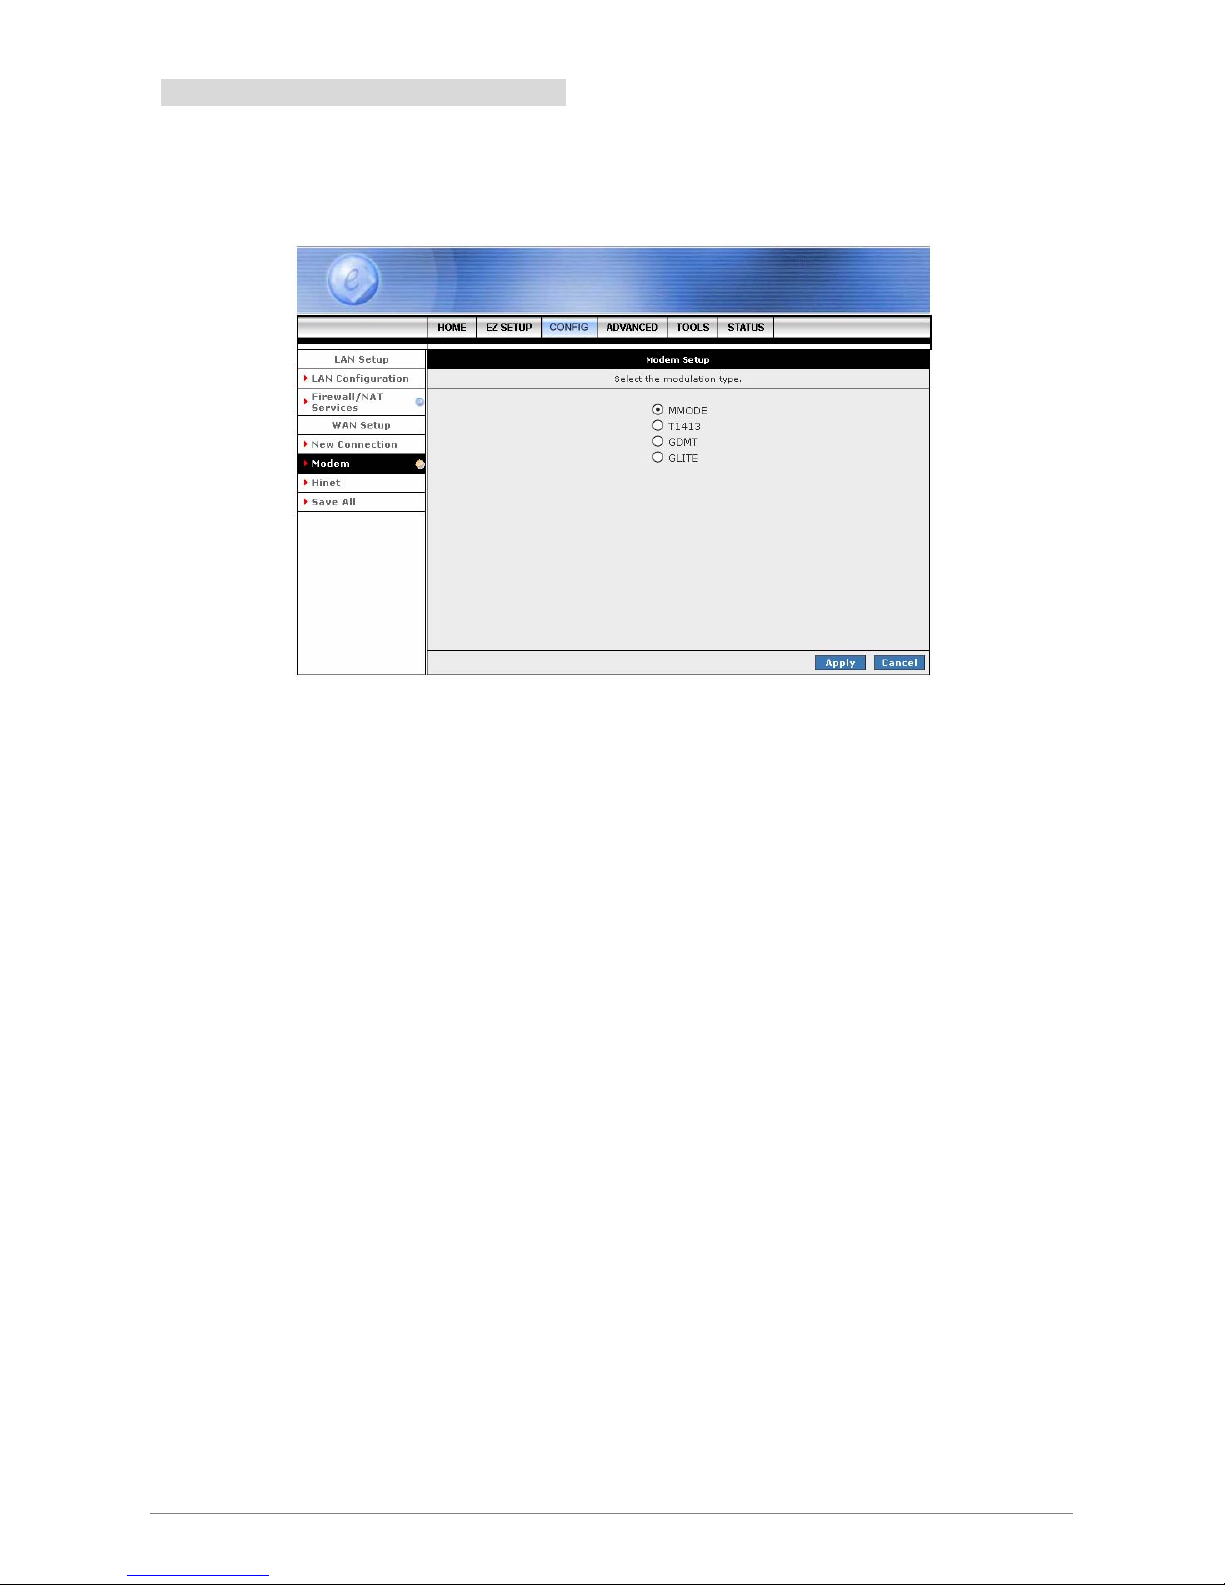
Modem: This field allows you to select from the following ADSL handshake protocols. Check your ISP for the
connection type.
MMODE: Multiple Mode ( Default ).
T1413: T1.413 Mode.
GDMT: G.dmt Mode.
GLITE: G.Lite Mode.
Apply: Click Apply to complete and save the connection profile.
Cancel: Click Cancel to ignore all the changes.
Save All: To complete and save the setting, click Save All after clicking the Apply button.
Page 58

4 Ports ADSL2/2+ Router 52
4.3.2 CONFIG - LAN Setup
The LAN Configuration pages allow you to select or assign physical interfaces to LAN group and configure
LAN IP Address and DHCP functionality.
Page 59

4 Ports ADSL2/2+ Router 53
4.3.2.1 LAN Setup - LAN Configuration
Click LAN Configuration and the following screen will be shown.
Click Add or Remove Interfaces from list under the different LAN Group. The LAN Group features
only supported under Bridge Mode setting. Interfaces under the same LAN Group (Ethernet and
USB(Optional)) will have the ability to communicate with each other. Different LAN Group are
prohibited to communicate with one another.
Click Configure for detail LAN Group setting. Refer to next section for detail configuration and
setting.
Apply: Click Apply to complete and save the connection profile.
Cancel: Click Cancel to ignore all the changes.
Save All: To complete and save the setting, click Save All after clicking the Apply button.
Page 60

4 Ports ADSL2/2+ Router 54
4.3.2.1.1 LAN Configuration - Unmanaged
Unmanaged: Click the Unmanaged radio button, the following configuration screen will pop-up. All filling
items are hidden except the Server and Relay Off (Unchangeable) radio button will turn on.
Click the Services items will guides you to detail setting. Refer to ADVANCED section for
setting/configuration details.
Apply: Click Apply to complete and save the connection profile.
Cancel: Click Cancel to ignore all the changes.
Save All: To complete and save the setting, click Save All after clicking the Apply button.
Page 61

4 Ports ADSL2/2+ Router 55
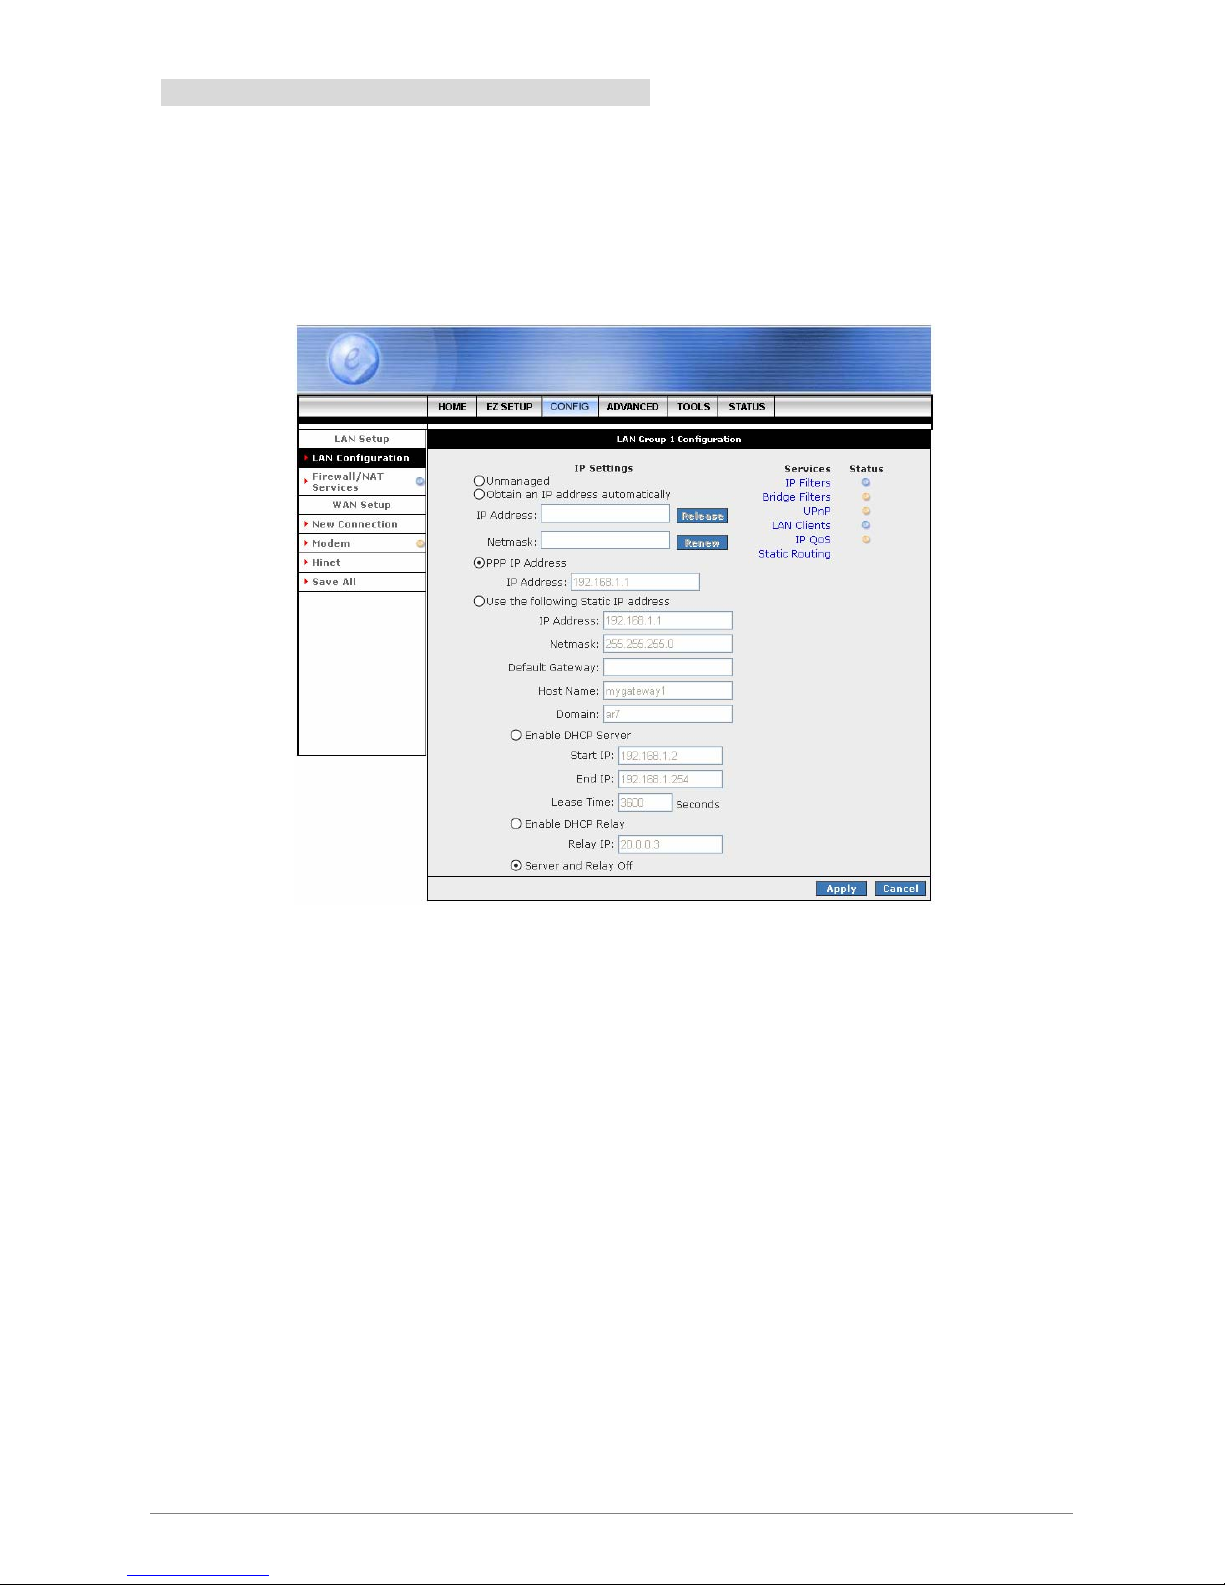
4.3.2.1.2 LAN Configuration – Obtain an IP Address Automatically
Obtain an IP address automatically: The following configuration screen will pop-up. All filling items will be
hidden except Host Name, Domain Name and Server and Relay Off (Unchangeable) radio button will turn
on.
Click Services selection items will guides you to detail setting. Refer to ADVANCED section for
setting/configuration details.
Host Name: Can be any alpha-numeric expression that does not contain spaces.
Domain Name: Used in conjunction with the host name to uniquely identify the gateway. To
access the 4 Ports ADSL2/2+ Router's web pages, the user can type 192.168.1.1 (The default IP
Address) or type mygateway1.ar7 in the Web browser’s address bar.
Apply: Click Apply to complete and save the connection profile.
Cancel: Click Cancel to ignore all the changes.
Save All: To complete and save the setting, click Save All after clicking the Apply button.
Page 62
4 Ports ADSL2/2+ Router 56
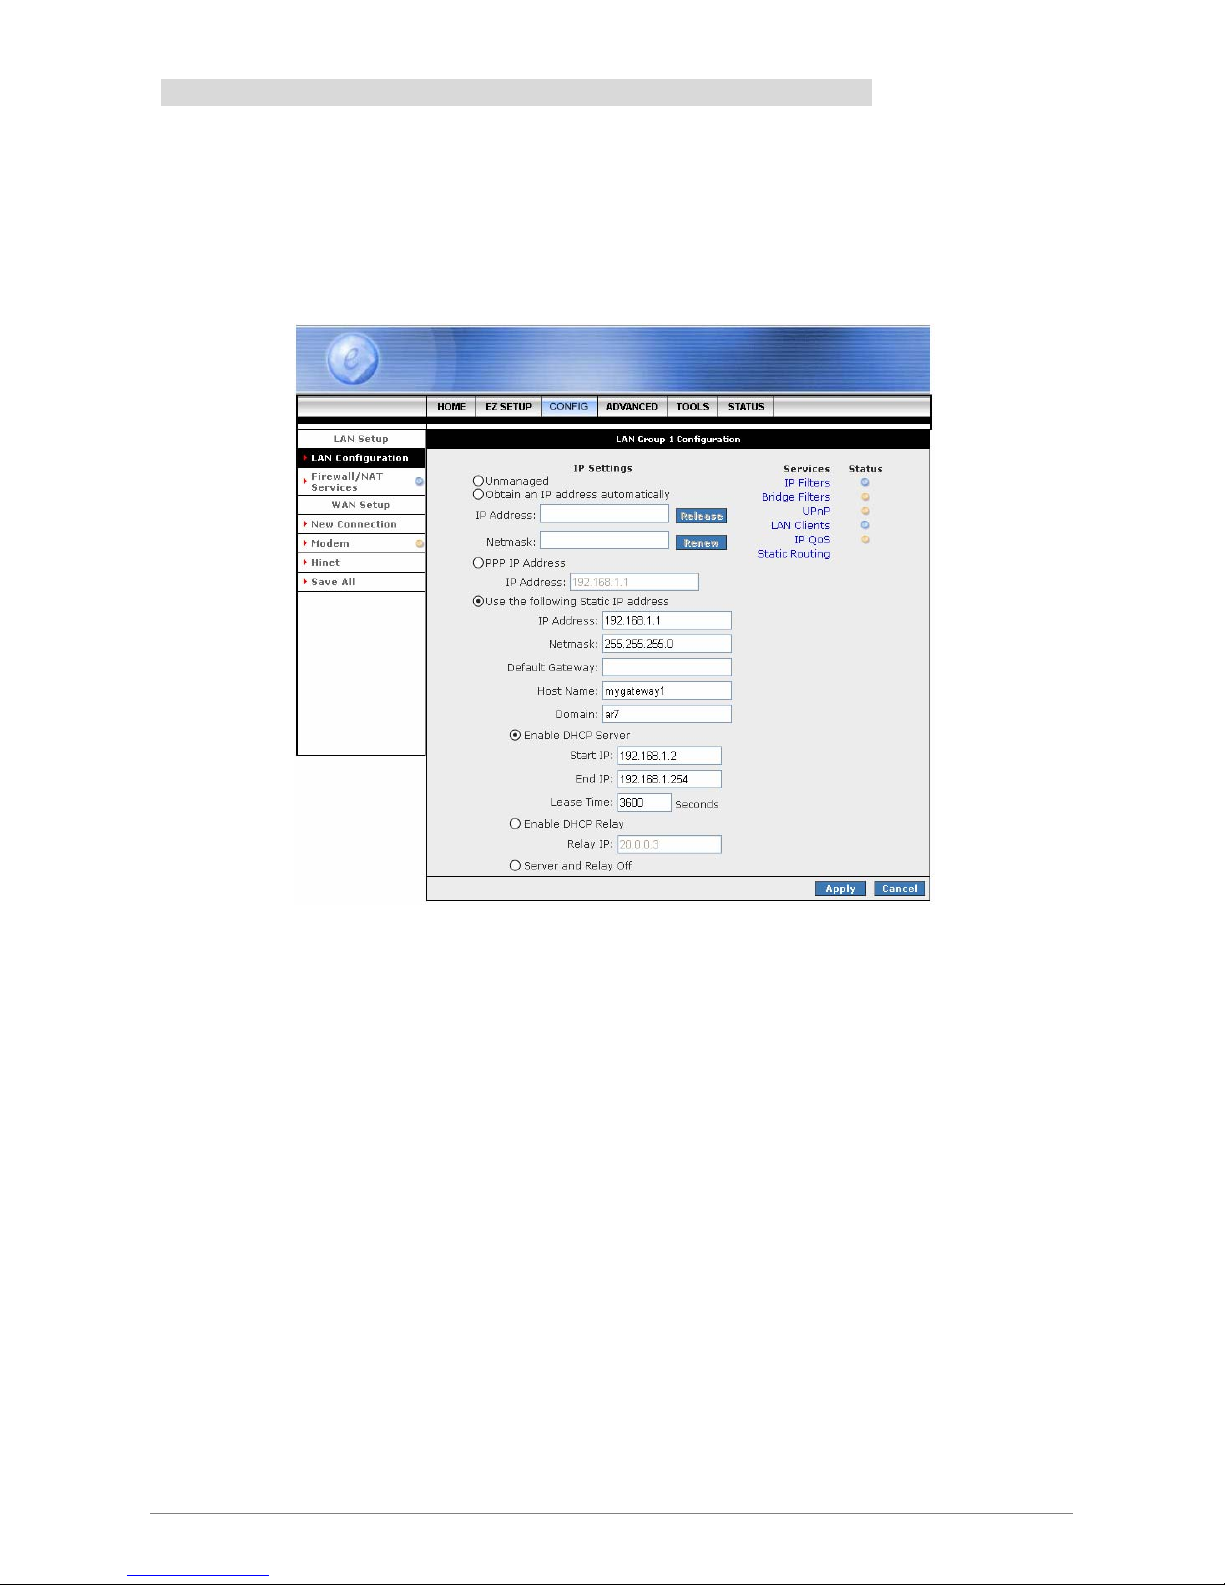
4.3.2.1.3 LAN Configuration – PPP IP Address
PPP IP Address: The following configuration screen will pop-up. All filling items will be hidden except the
Server and Relay Off (Unchangeable) radio button will turn on.
Click Services selection items will guides you to detail setting. Refer to ADVANCED section for
setting/configuration details.
Apply: Click Apply to complete and save the connection profile.
Cancel: Click Cancel to ignore all the changes.
Save All: To complete and save the setting, click Save All after clicking the Apply button.
Page 63
4 Ports ADSL2/2+ Router 57
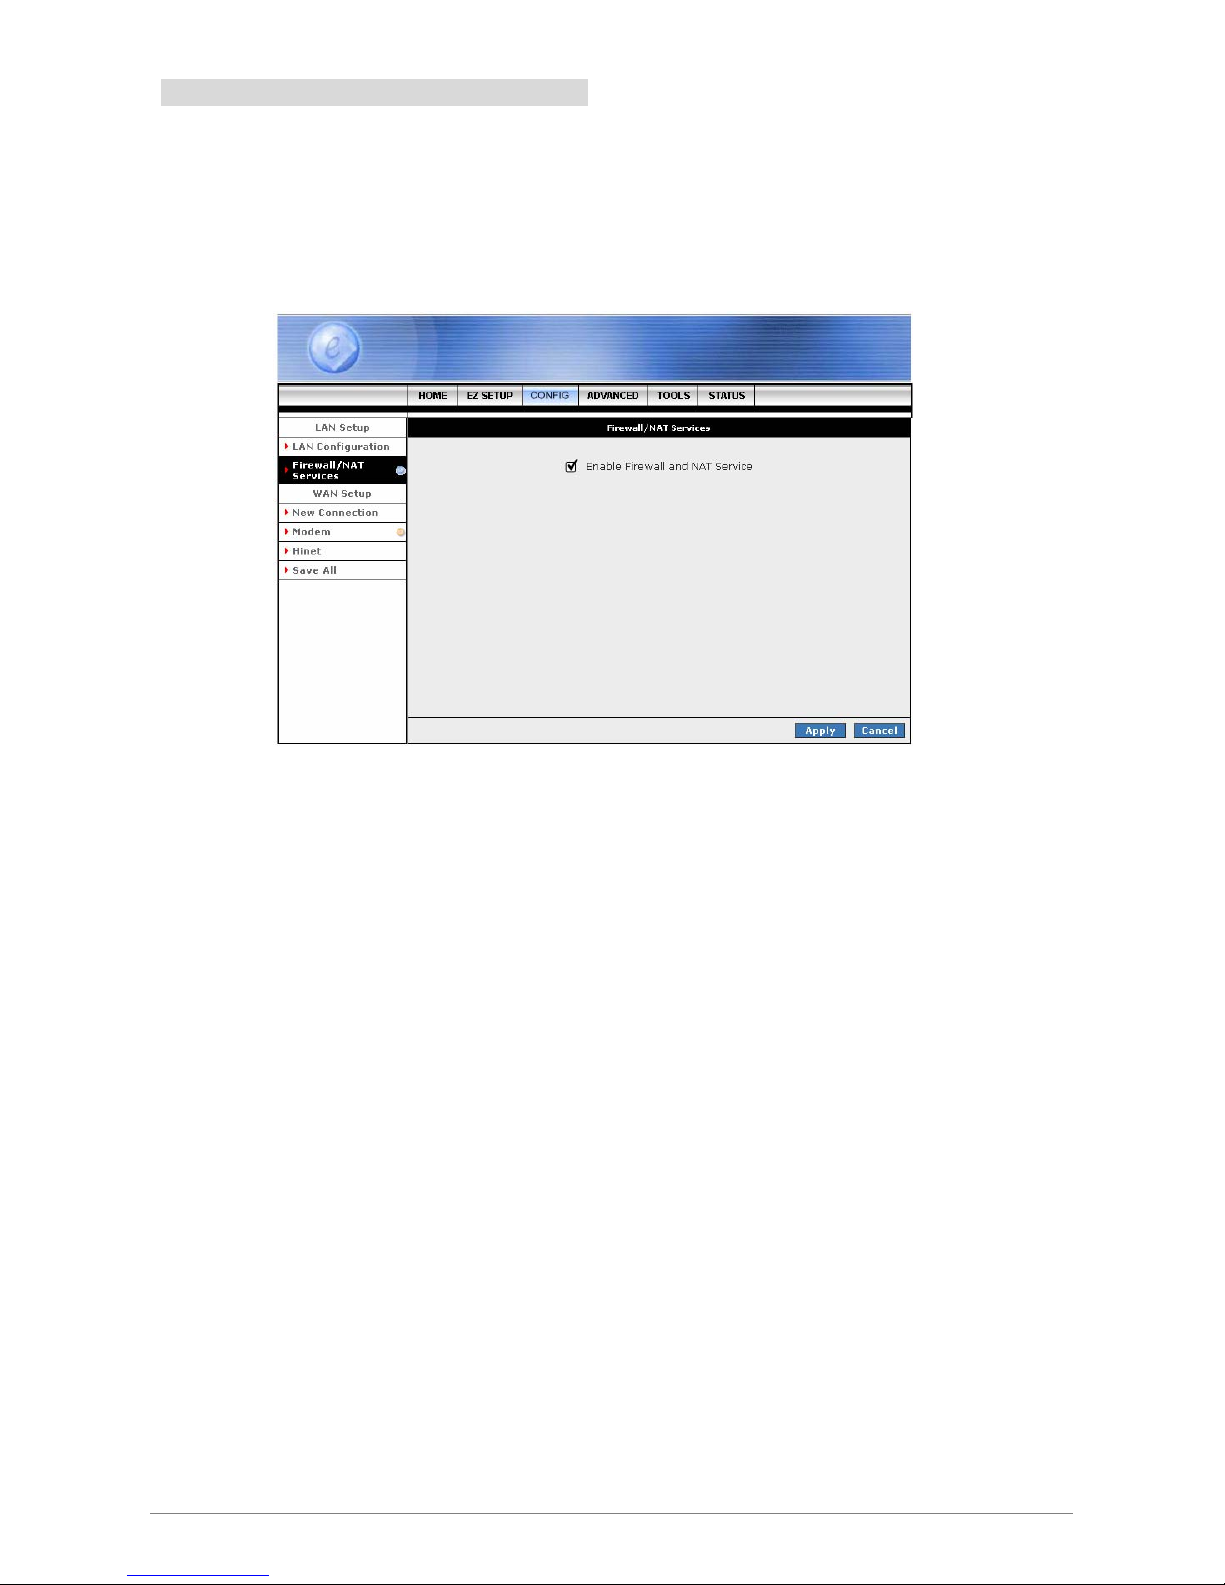
4.3.2.1.4 LAN Configuration – Use The Following Static IP Address
Use the following Static IP address: The following configuration screen will pop-up.
Click the radio button to select Enable DHCP Server or Enable DHCP Relay or Server and Relay Off.
Manually enter the necessary items based on each selection.
IP Address: This is the static IP Address given by the ISP.
Netmask: This is the subnet mask given by the ISP.
Default Gateway: This is the Gateway given by the ISP.
Host Name: Can be any alpha-numeric expression that does not contain spaces.
Domain: Used in conjunction with the host name to uniquely identify the gateway.
Enable DHCP Server: Click the radio button to enable the DHCP Server.
; Start IP: The Start IP Address indicates the beginning of the range at which the DHCP server
starts issuing IP addresses.
This value must be greater than the Routers IP address value. If the Routers IP address is
192.168.1.1 (The default) than the starting IP address must be 192.168.1. 2 or higher.
; End IP: The End IP Address indicates the end of the IP address range.
The ending address must not exceed a Subnet Limit of 253; hence the maximum value that
can be entered in this example is 192.168.1.254.
; Lease Time: Lease Time is the amount of time a network user will be allowed connection to
the 4 Ports ADSL2/2+ Router with their current Dynamic IP address. The amount of time is in
units of minutes; the default value is 3600 minutes (60 hours).
Page 64

4 Ports ADSL2/2+ Router 58
Enable DHCP Relay: Click the radio button to enable the DHCP Relay.
; Relay IP: This is the IP Address given by the ISP.
Server and Relay Off: Click the radio button to enable.
Caution: If the Server and Relay Off function is selected, careful attention must be paid to the IP
Address setup of each computer on the LAN. IP Addresses will no longer be allocated automatically.
Apply: Click Apply to complete and save the connection profile.
Cancel: Click Cancel to ignore all the changes.
Save All: To complete and save the setting, click Save All after clicking the Apply button.
Page 65
4 Ports ADSL2/2+ Router 59
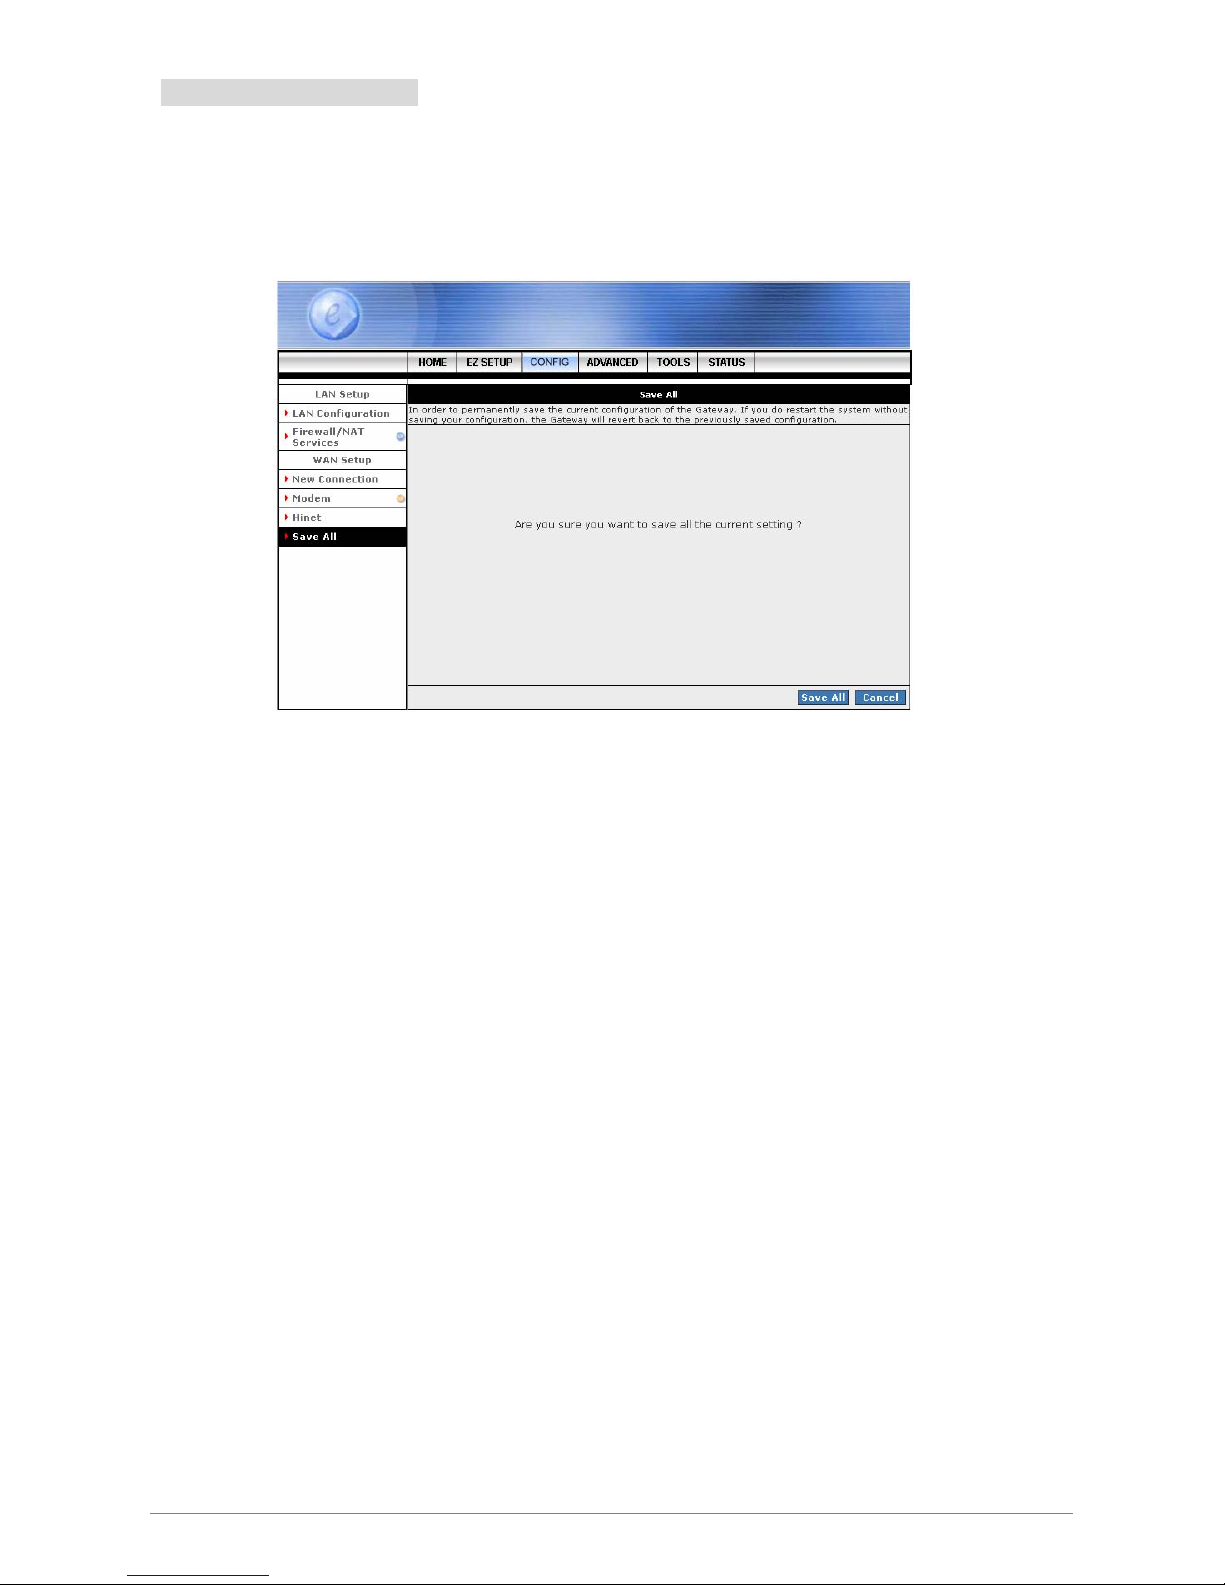
4.3.3 LAN Setup - Firewall/NAT Services
Firewall/NAT Services: Place a check to “Enable” the most basic Firewall and NAT Service to secure your
system. The 4 Ports ADSL2/2+ Router is equipped with advanced Firewall features to provide security from
malicious attack, hacking or eavesdropping across the Internet. It’s strongly recommend that you enable this
feature for security purpose. The default setting is “Enable”.
Apply: Click Apply to complete and save the connection profile.
Cancel: Click Cancel to ignore all the changes.
Save All: To complete and save the setting, click Save All after clicking the Apply button.
Page 66
4 Ports ADSL2/2+ Router 60
4.3.4 CONFIG – Save All
Save All: Click Save All in order to permanently save the current configuration of the 4 Ports ADSL2/2+
Router. If you do restart the system without saving your configuration, the 4 Ports ADSL2/2+ Router will revert
back to the previously saved configuration.
Save All: Click Save All to complete and permanently save the setting.
Cancel: Click Cancel to ignore all the changes.
Page 67

4 Ports ADSL2/2+ Router 61
4.4 ADVANCED
The Advanced Menu provides access to advanced networking, management and routing capabilities. Click
the ADVANCED tab and the following screen will pop-up.
UPnP: Configure UPnP for different connections.
SNTP: Configure SNTP to configure time server on Internet.
SNMP: Configure SNMP Management.
IP QoS: Configure IP Quality of Service for different connections.
Port Forwarding: Configure Firewall and NAT pass-through to your hosted applications.
IP Filters: Configure Firewall to block your LAN PCs from accessing the Internet.
LAN Clients: Configure LAN Clients.
LAN Isolation: Disable traffic between LANs.
Bridge Filters: Select to setup Bridge Filters.
Web Filters: Select to setup Web Filters.
Multicast: Configure Multicast pass-through for different connections.
Static Routing: Configure Static routes.
Dynamic Routing: Configure RIP.
Access Control: Configure access control list.
Save All: Click in order to permanently save the current configuration.
Page 68
4 Ports ADSL2/2+ Router 62
4.4.1 ADVANCED - UPnP
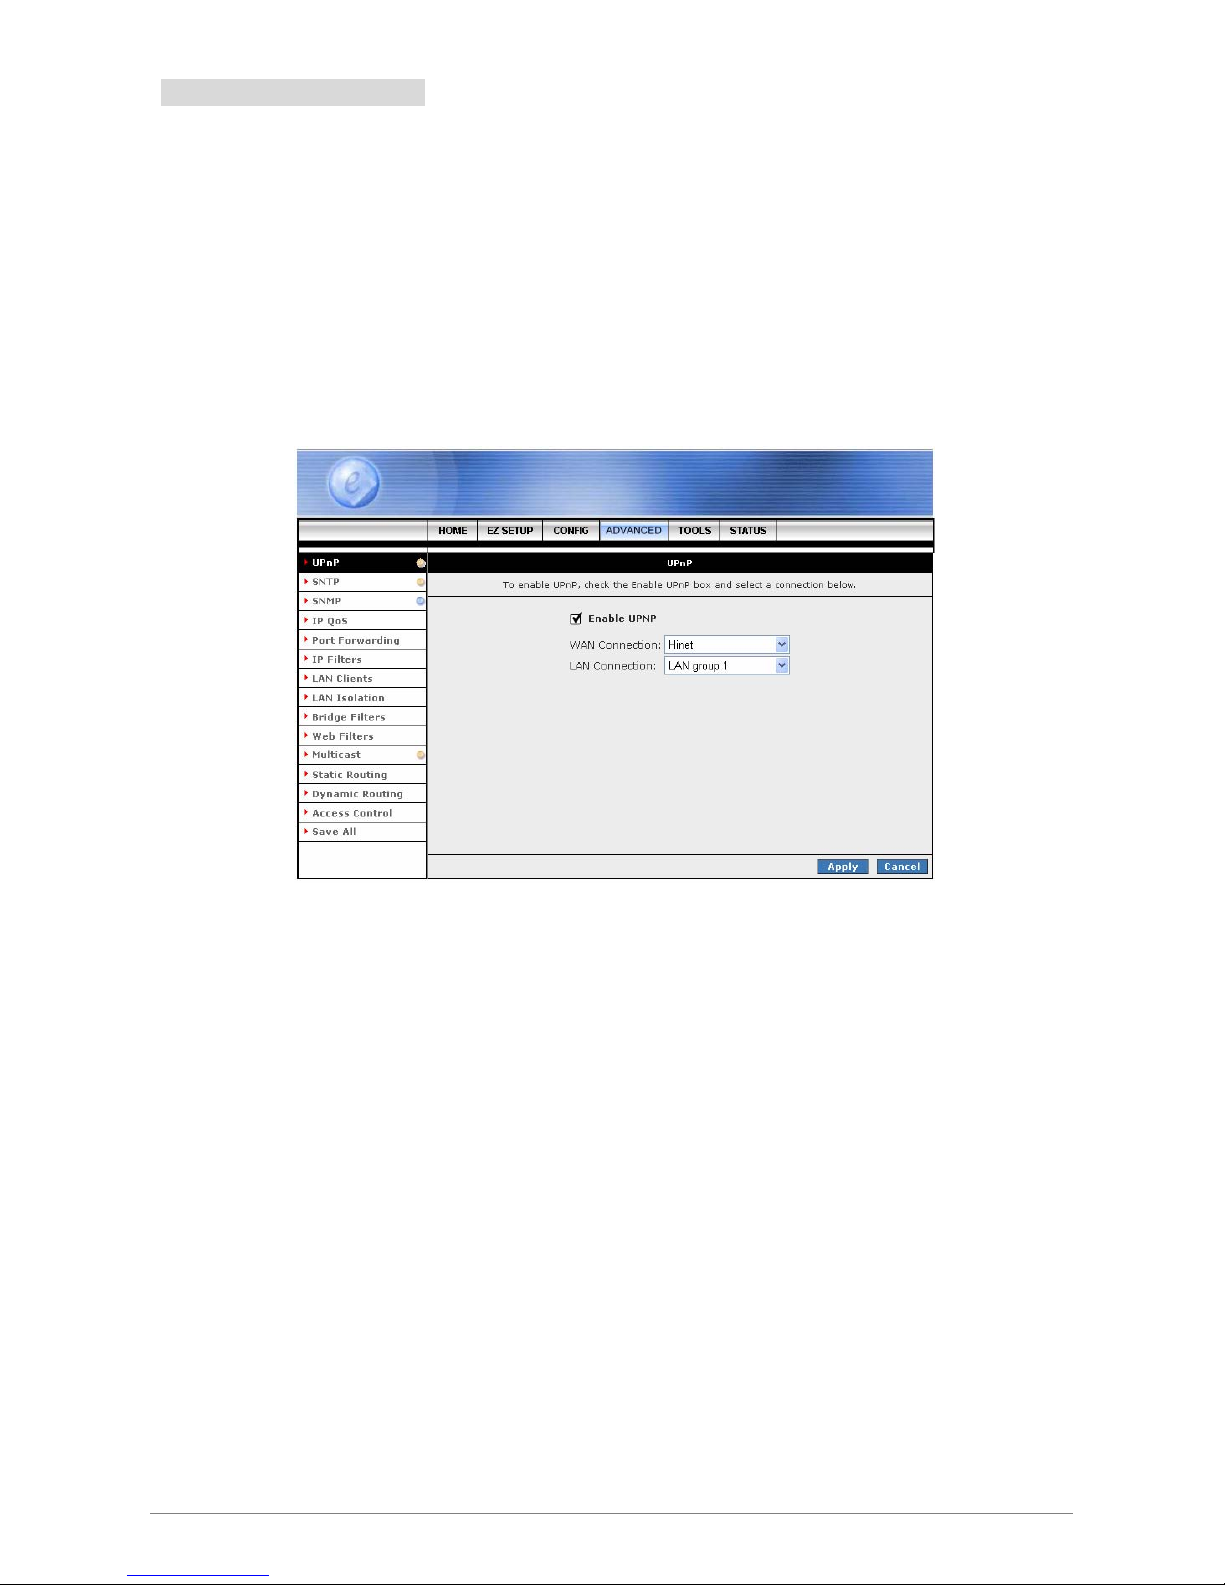
UPnP: Universal Plug and Play is a protocol which automates connectivity between network devices,
including computers, game consoles, digital cameras and other systems which connect via TCP/IP.
Applications which implement the UPnP protocol are able to negotiate a connection with a UPnP-enabled
device without requiring manual device configuration.
To enable UPnP, place a check at the Enable UPNP. This will reveal the Enable UPnP screen. UPnP can
only be enabled on a saved Connection Profile ( Refer to EZ SETUP or CONFIG Æ WAN Setup for
information on creating Connection Profiles ).
Enable UPNP: Place a check to enable the UPnP feature.
WAN Connection: Select the required WAN Connection Profile by clicking on the drop down
button adjacent to the Connection Profile name.
LAN Connection: Select the LAN Group from the drop down manual.
Apply: Click Apply to complete and save the connection profile.
Cancel: Click Cancel to ignore all the changes.
Save All: To complete and save the setting, click Save All after clicking the Apply button.
Page 69
4 Ports ADSL2/2+ Router 63
4.4.2 ADVANCED - SNTP
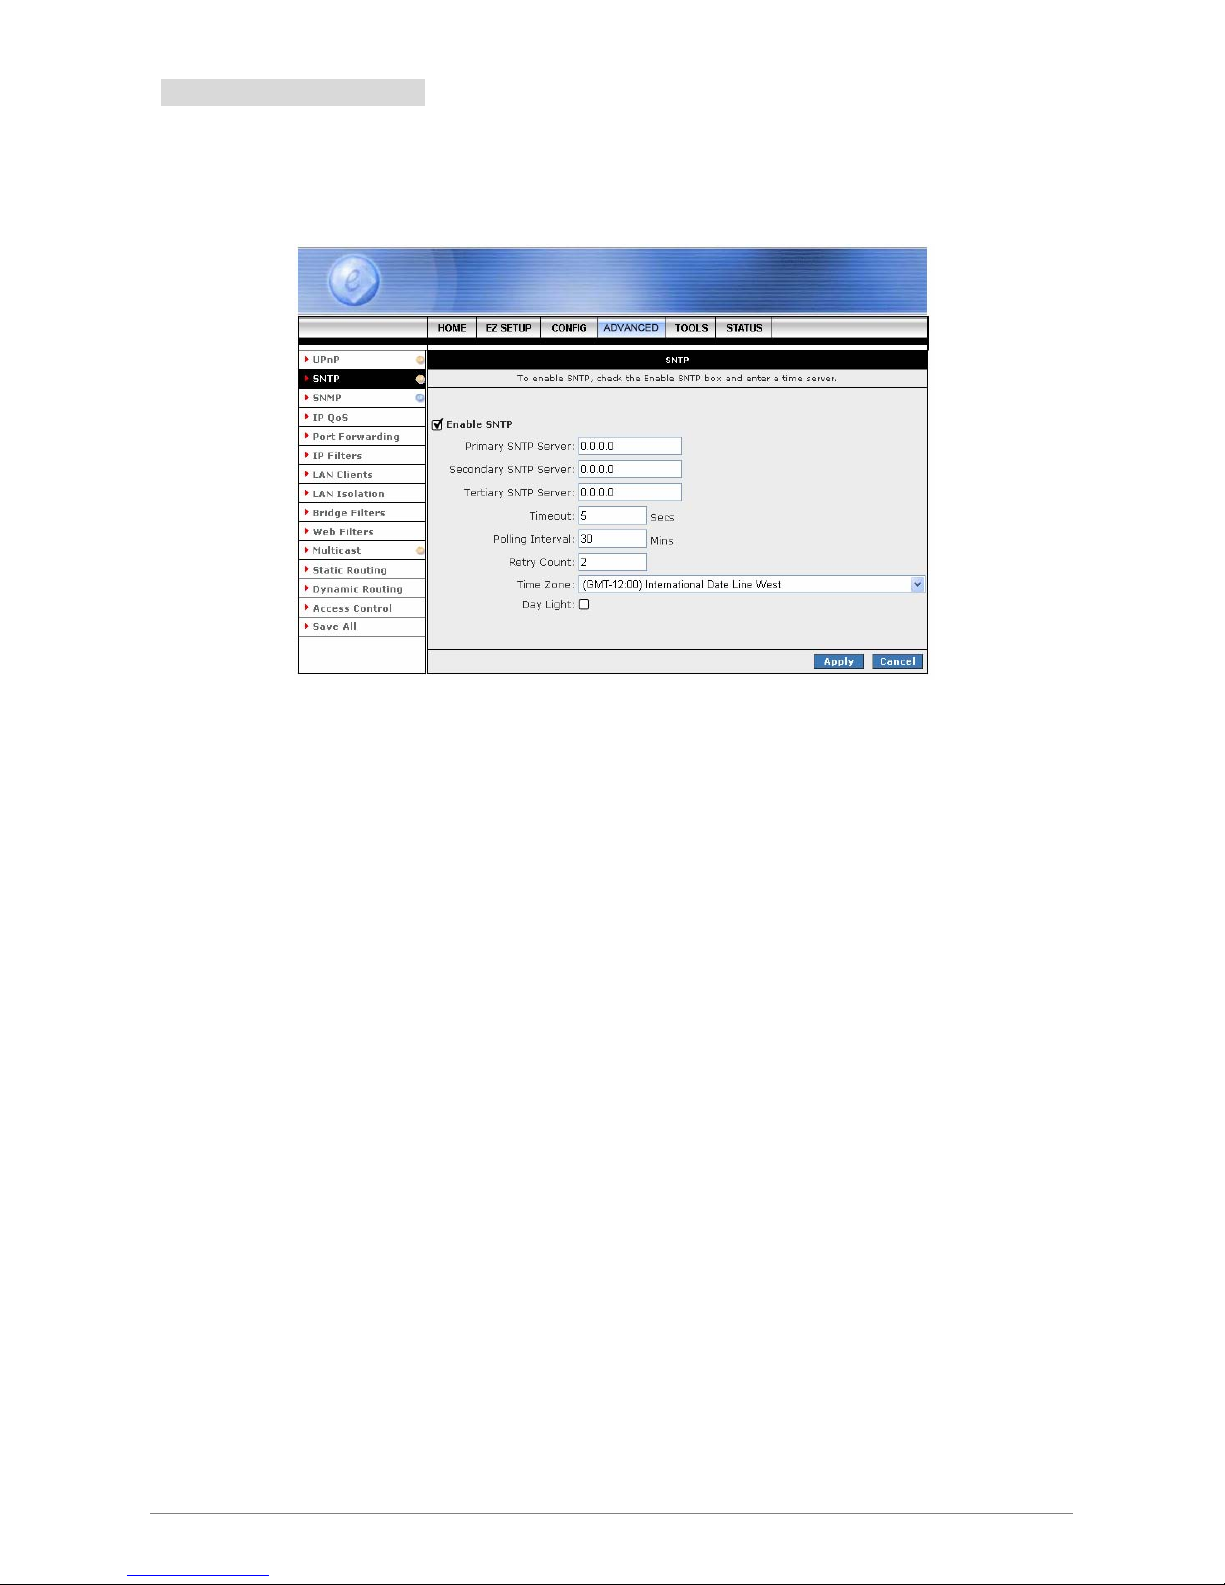
SNTP: Simple Network Time Protocol is an efficient method of obtaining the time from a Time Server. Place a
check at Enable SNTP to enable the SNTP functionality.
Enable SNTP: Place a check to enable SNTP feature.
SNTP Server: Enter the SNTP Server IP Address. This 4 Ports ADSL2/2+ Router support up to
three SNTP Server IP Address; Primary, Secondary and Tertiary SNTP Server.
Timeout: A time limit for an operation.
Polling Interval: The length of time (In Minutes) the 4 Ports ADSL2/2+ Router retrieves the time
from the SNTP Server.
Retry Count: Enter the Retry Count to access the SNTP Server.
Time Zone: This specifies the time zone ( Geographical location ).
Day Light: Place a check at the Day Light to activate Daylight Savings Time.
Apply: Click the Apply button to confirm your setting.
Cancel: Click Cancel to ignore all the changes.
Save All: To complete and save the setting, click Save All after clicking the Apply button.
Page 70

4 Ports ADSL2/2+ Router 64
4.4.3 ADVANCED - SNMP
SNMP: Simple Network Management Protocol ( SNMP ) is an application layer protocol that is used for
managing networks. There are several components that make up the SNMP structure, including agents,
network management stations ( NMS ), network management protocols, and a management information
base ( MIB ).
SNMP Agent: Click to enable the SNMP Agent. An SNMP agent is a node that resides on the
network, typically a computer or a router. The SNMP agent is controlled and configured by the
NMS by sending SNMP messages between one another. SNMP agents are logged and identified
in a Management Information Base (MIB), in which they are identified by an object identifier (OID).
SNMP Traps: Click to enable the SNMP Traps. SNMP traps are used to notify network managers
of significant events that have taken place in the network. These traps are sent to the SNMP NMS
( NMS Server located at Trap IP ) through the specified Ports.
SNMP System Identification: The Name, Contact, Location and Vendor OID (Optional) are
provided to identify the SNMP NMS. The Vendor OID is the ID number placed in all Trap reports.
The System Name, System Contact, and System Location can be up to 127 characters.
Community ReadOnly: This is the password to access public information. The Community
ReadOnly can be up to 127 characters. Default is “Public”.
Community ReadWrite: This is the password to access private information. The Community
ReadWrite can be up to 127 characters.
Page 71

4 Ports ADSL2/2+ Router 65
Trap Destination IP: This is the IP address to which SNMP traps are sent. There can be up to 5
different SNMP trap destination IP addresses.
Trap Community: This is the password to access and view SNMP traps. The Trap Community
can be up to 127 characters. Default is “Trap community”.
Trap Version: Select from Version 1 or Version v2c. Default is “Version 1”.
Apply: Click the Apply button to confirm your setting.
Cancel: Click Cancel to ignore all the changes.
Save All: To complete and save the setting, click Save All after clicking the Apply button.
Page 72
4 Ports ADSL2/2+ Router 66
4.4.4 ADVANCED - IP QoS
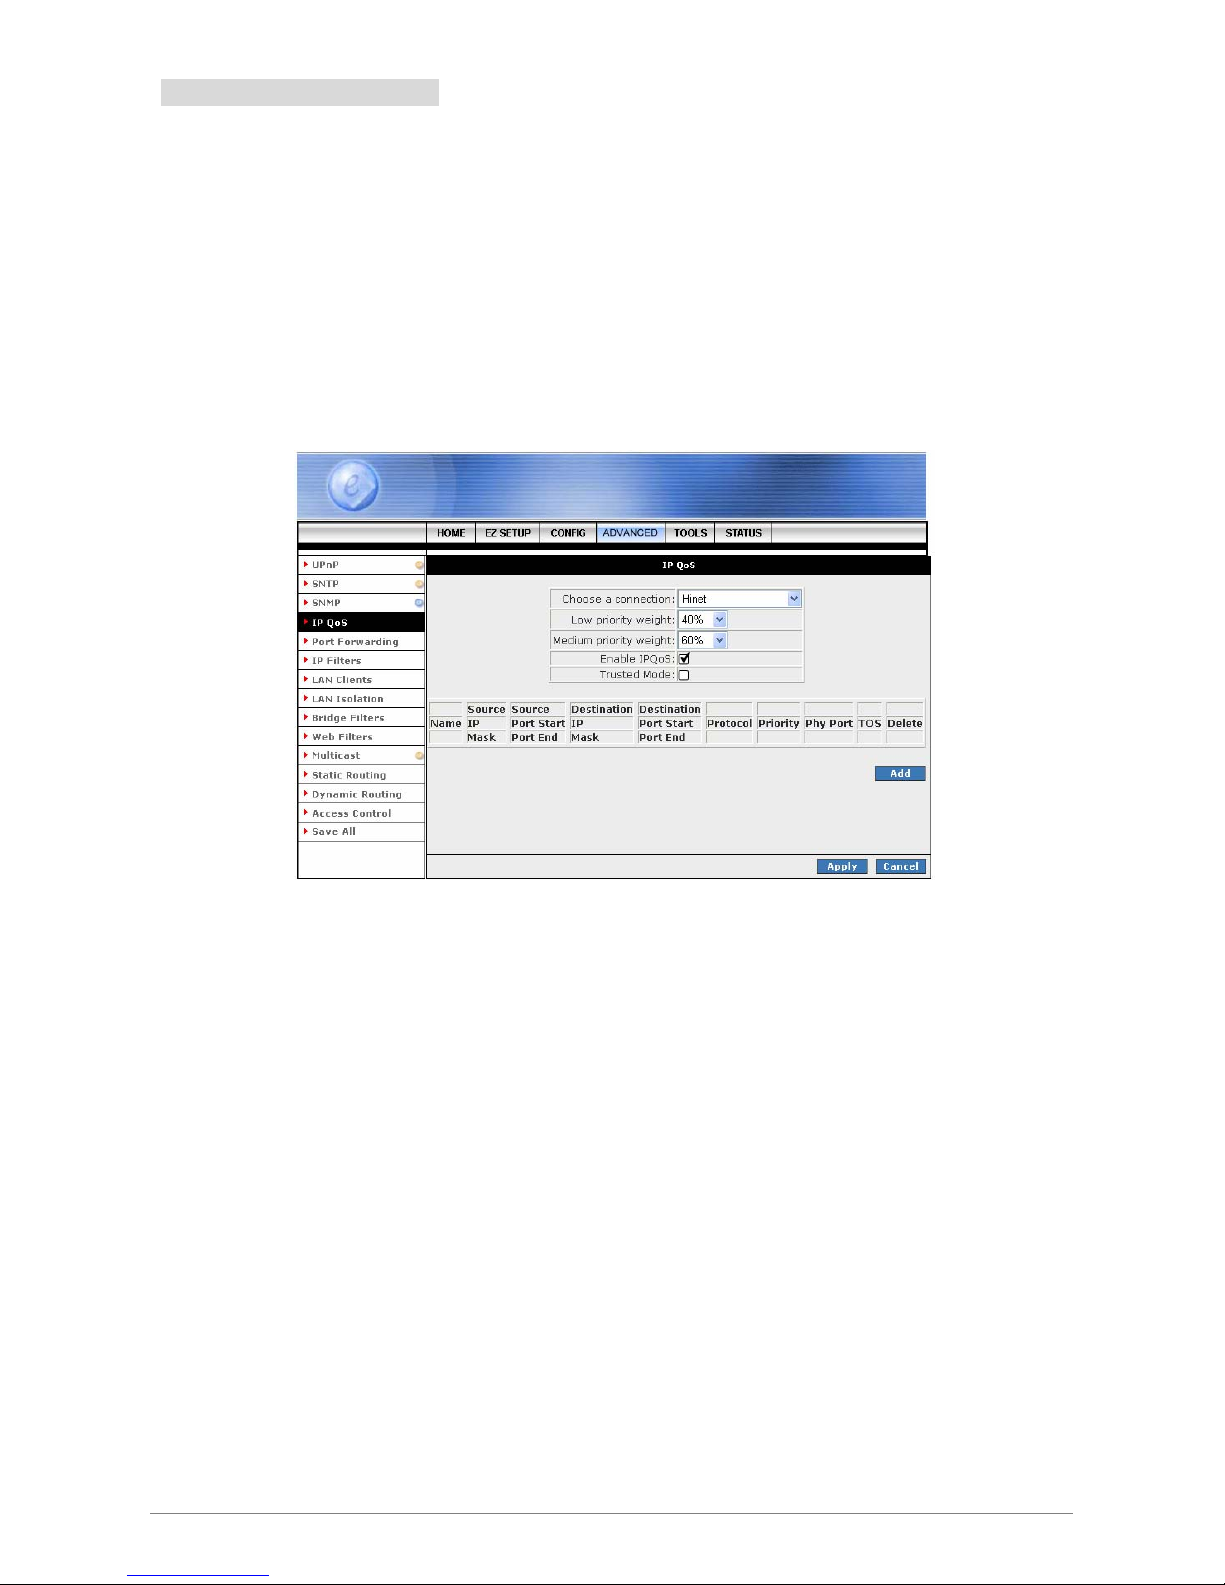
IP QoS: IP Quality of Service (QoS) prioritize data streams to ensure that basic connectivity is maintained
when running multiple services over one connection.
For example, if you are using a peer-to-peer file-sharing program at the same time as performing normal web
browsing, you can configure QoS to limit the resources dedicated to the peer-to-peer session in order to
ensure web browser connectivity.
Leave it at its default setting if you do not know the QoS.
Choose a connection: Click to select a LAN group from the drop down manual.
Low priority weight : Click to select the low priority weight from the drop down manual. The
default is 40%.
Medium priority weight: Click to select the low priority weight from the drop down manual. The
default is 60%.
Enable IPQoS: Click to enable IP QoS features.
Trusted Mode: Click to enable Trusted Mode.
Apply: Click the Apply button to confirm your setting.
Cancel: Click Cancel to ignore all the changes.
Page 73

Add: To add an IP QoS session, place a check at the Enable IPQoS then click Add button. The
following screen will pop-up.
Rule Name: Enter the IP QoS session name.
Source IP: Enter the Source IP Address.
Source Netmask: Enter the Source IP Subnet Mask.
Source Start Port: Enter the Source IP Start Port which PPP session can be activated.
Source End Port: Enter the Source IP End Port which PPP session can be activated.
Destination IP: Enter the Destination IP Address.
Destination Netmask: Enter the Destination IP Subnet Mask.
Destination Start Port: Enter the Destination IP Start Port which PPP session can be activated.
Destination End Port: Enter the Destination IP End Port which PPP session can be activated.
Protocol: Select the protocol from the drop down manual. The protocols supported are TCP, UDP,
ICMP and ANY.
Physical Port: Select the QoS Physical Port from the drop down manual.
Traffic Priority: Click and select the QoS session Traffic Priority from the drop down manual.
TOS Marking: Place a check at the Normal Service or select the TOS Marking from the list.
Apply: Click the Apply button to confirm your setting.
Cancel: Click Cancel to ignore all the changes.
Save All: To complete and save the setting, click Save All after clicking the Apply button.
4 Ports ADSL2/2+ Router 67
Page 74

4 Ports ADSL2/2+ Router 68
4.4.5 ADVANCED - Port Forwarding
Port Forwarding: Port Forwarding is necessary because NAT ( Network Address Translation ) only forwards
traffic from the Internet to the LAN if a specific port mapping exists in the NAT translation table. Because of
this, the NAT provides a level of protection for computers that are connected to your LAN. However, this also
creates a connectivity problem when you want to make LAN resources available to Internet clients, which you
may want to do to play network games or host network applications.
Thus Port Forwarding is necessary to run certain games, chat clients, video-conferencing and other kinds of
application. You might also need to configure port-forwarding if you intend to host a web server or mail server
that is to be visible outside your LAN.
WAN Connection: Select the WAN Connection profile from the drop down manual.
Allow Incoming Ping: Place a check to enable the incoming ping.
Select LAN Group: Select the LAN Group from the drop down manual.
LAN IP: Enter the Router’s LAN IP address.
Page 75
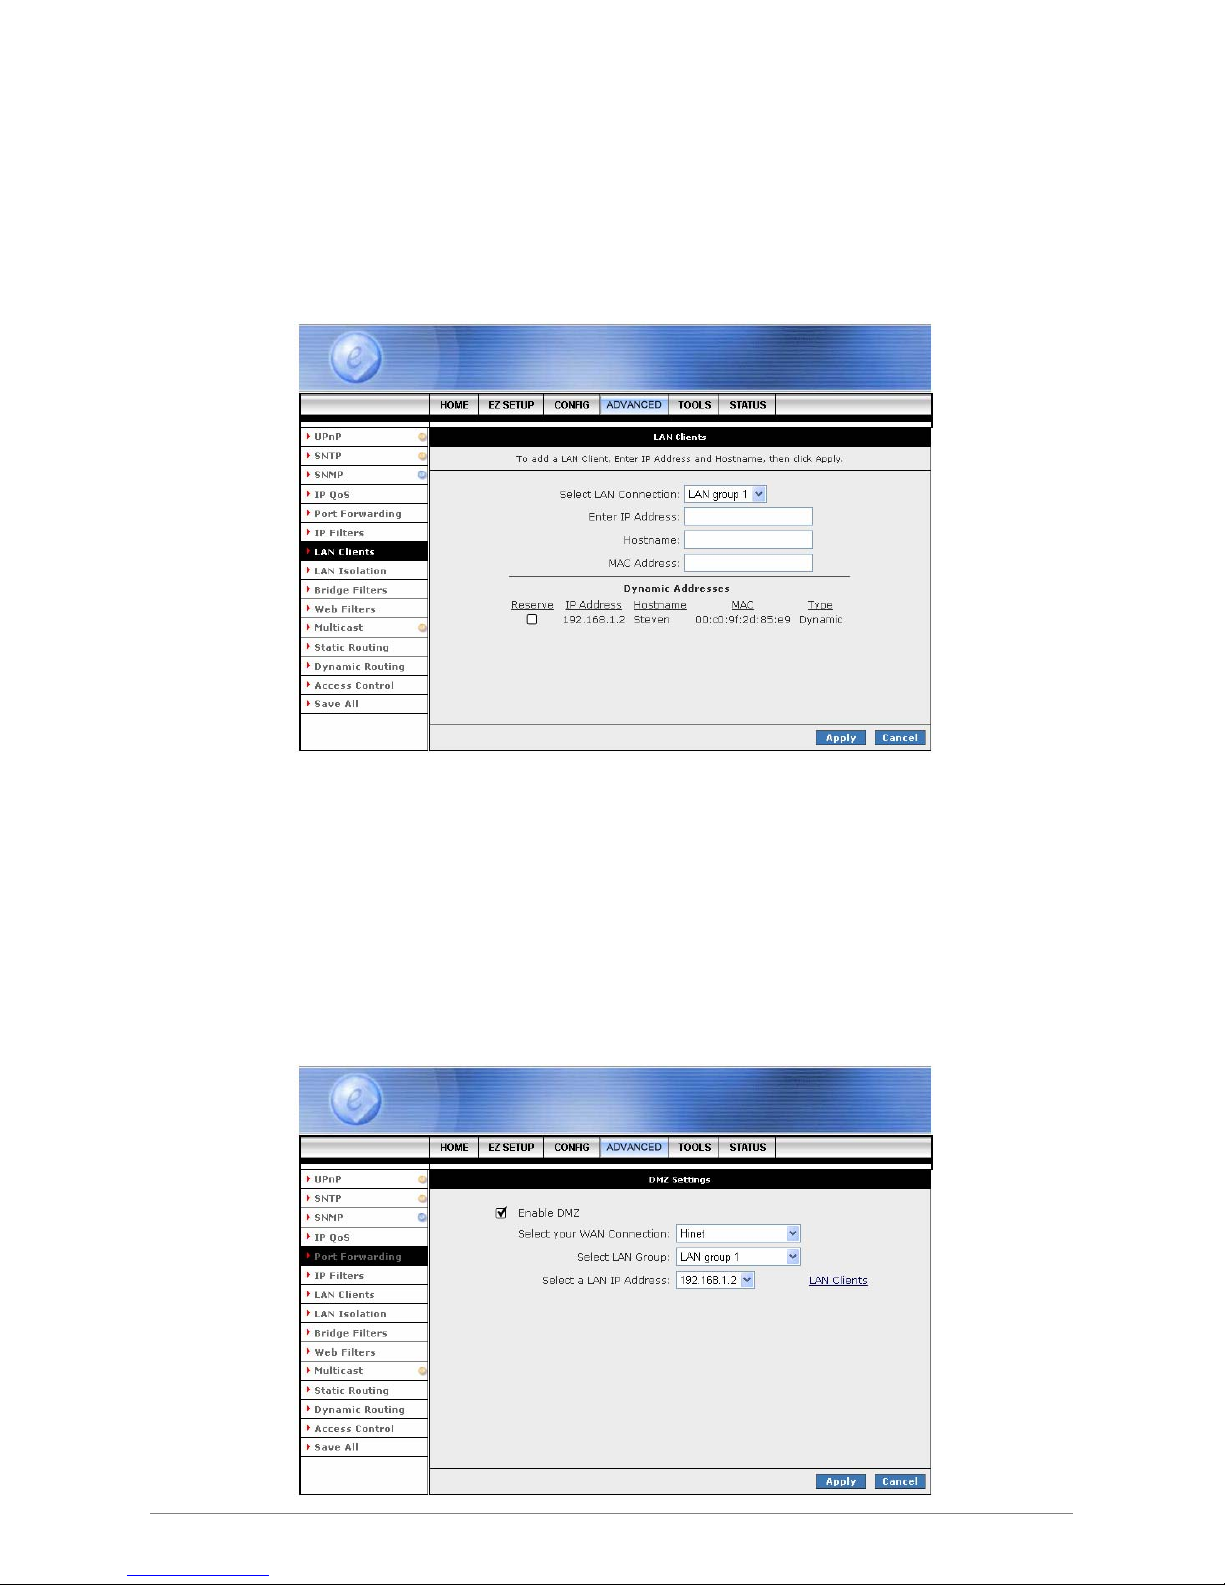
New IP: If you wish to manually add a LAN client so that you can apply rules to it, click on the New
IP button. The following screen will pop-up. Refer to ADVANCED Î LAN Clien ts setting for more
details.
Enter the IP Address, Hostname and MAC Address as shown then click Apply to save your
setting.
DMZ: A DMZ ( Demilitarized Zone ) is added between a protected network and an external
network, in order to provide an additional layer of security. When there is a suspected packet
coming from WAN, the firewall will forward this packet to the DMZ host.
The following screen will pop-up after clicking the DMZ button. Place a check to enable the DMZ
functionality. Select the WAN Connection, LAN Group and LAN IP Address from the drop down
manual. Click Apply to save and activate your setting.
4 Ports ADSL2/2+ Router 69
Page 76

Custom Port Forwarding: If there is no pre-defined Port Forwarding Rule for a particular
application, a user rule can be created which defines the required Ports, Protocols and Port
forwarding rules. Click the Custom Port Forwarding button and the following screen will pop-up.
To create a custom rule you will need to know the specific port number and port type that the
application requires. Some applications specify a range of ports in which case you will need to
know both the starting and ending port numbers in the range, which are mapped by the start port
and end port fields.
The Port Map specifies the internal port that the data will be directed to on the LAN Client. When
dealing with port ranges, the Internal Port will be the same as the first port in the range. When you
simply want to forward a single port from outside to inside, then all three fields (Port Start, Port End
and Port Map) will have the same port number.
Available pre-defined rules are categorized according to the application type. Click the radio button
adjacent to the appropriate Category, and then select the required application name. Click on the
Add button to move the application into the Applied Rules box. To remove a rule from the Applied
Rules box, select the rule and click on the Remove button. To complete and save the setting, click
Save All after clicking the Apply button.
4 Ports ADSL2/2+ Router 70
Page 77

4 Ports ADSL2/2+ Router 71
4.4.6 ADVANCED - IP Filters
The IP Filters page allows you to specify normal Port Forwards, Block traffic to specific LAN Clients or
specify Custom IP Filters that will control the flow of data across the router.
Select LAN Group: Select LAN Group from the drop down manual.
LAN IP: Enter the router’s LAN IP Address.
Block All Traffic: Click to enable blocking all traffic to specific LAN Clients.
Block Outgoing Ping: Click to enable blocking all outgoing ping from LAN clients.
NEW IP: Click NEW IP if you wish to manually add a LAN client so that you can apply rules to it.
Page 78

Custom IP Filters: Custom IP Filters allow you to specify individual rules that will deny traffic by
defining the following:
; Source IP address or Source IP Subnet Mask.
; Destination IP address or Destination IP Subnet Mask.
; Port or Port range.
; Protocol.
Customer IP Filter is different from Port forwards, or Block All traffic because they allow greater
scopes of IP addresses to be included in the block.
Apply: Click the Apply button to confirm your setting.
Cancel: Click Cancel to ignore all the changes.
Save All: To complete and save the setting, click Save All after clicking the Apply button.
4 Ports ADSL2/2+ Router 72
Page 79

4 Ports ADSL2/2+ Router 73
4.4.7 ADVANCED - LAN Clients
LAN Client names are a way of applying specific Port-forwarding, Access Control and QoS rules to individual
computers on the LAN. If DHCP is used, all DHCP clients are automatically assigned and are designated as
a LAN client.
Enter the IP Address, Hostname and MAC Address as shown. To complete and save the setting, click Save
All after clicking the Apply button.
Page 80
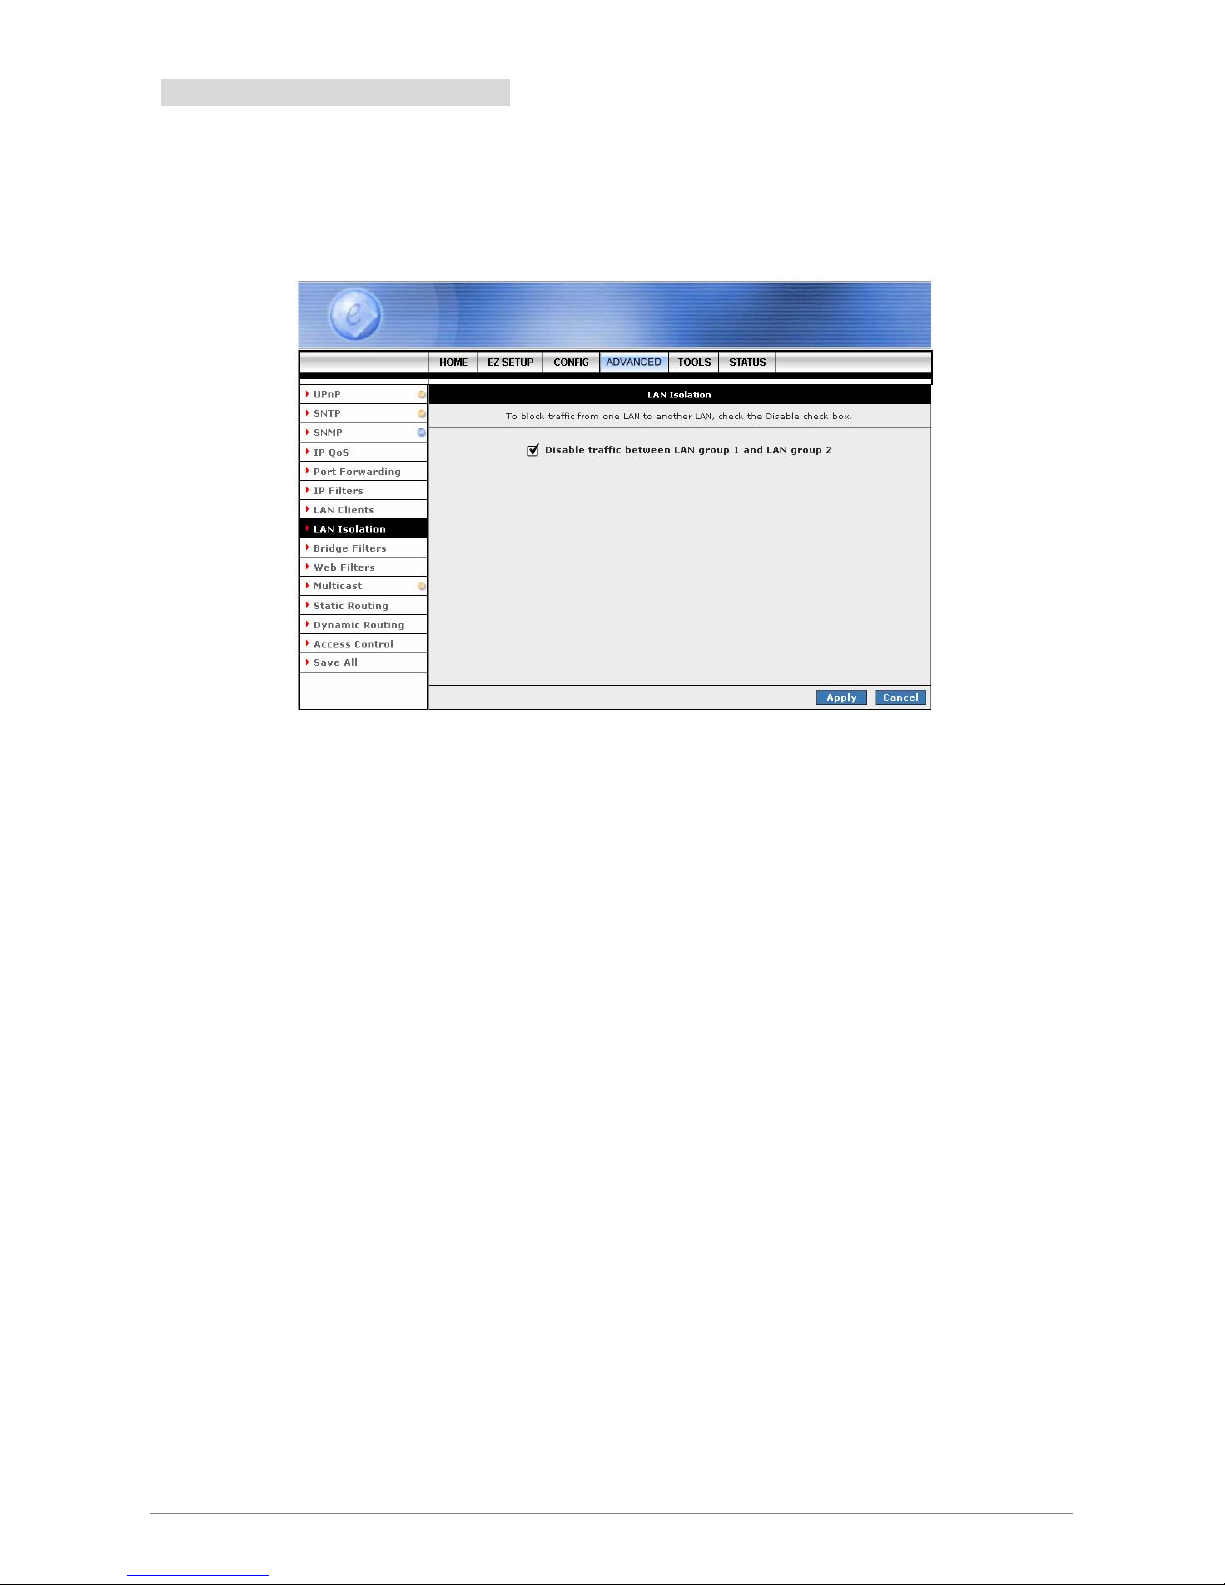
4 Ports ADSL2/2+ Router 74
4.4.8 ADVANCED - LAN Isolation
LAN Isolation provide blocking traffic from one LAN to another LAN. Place a check at the selected rules and
click Apply to activate your setting. To complete and save the setting, click Save All after clicking the Apply
button.
Page 81
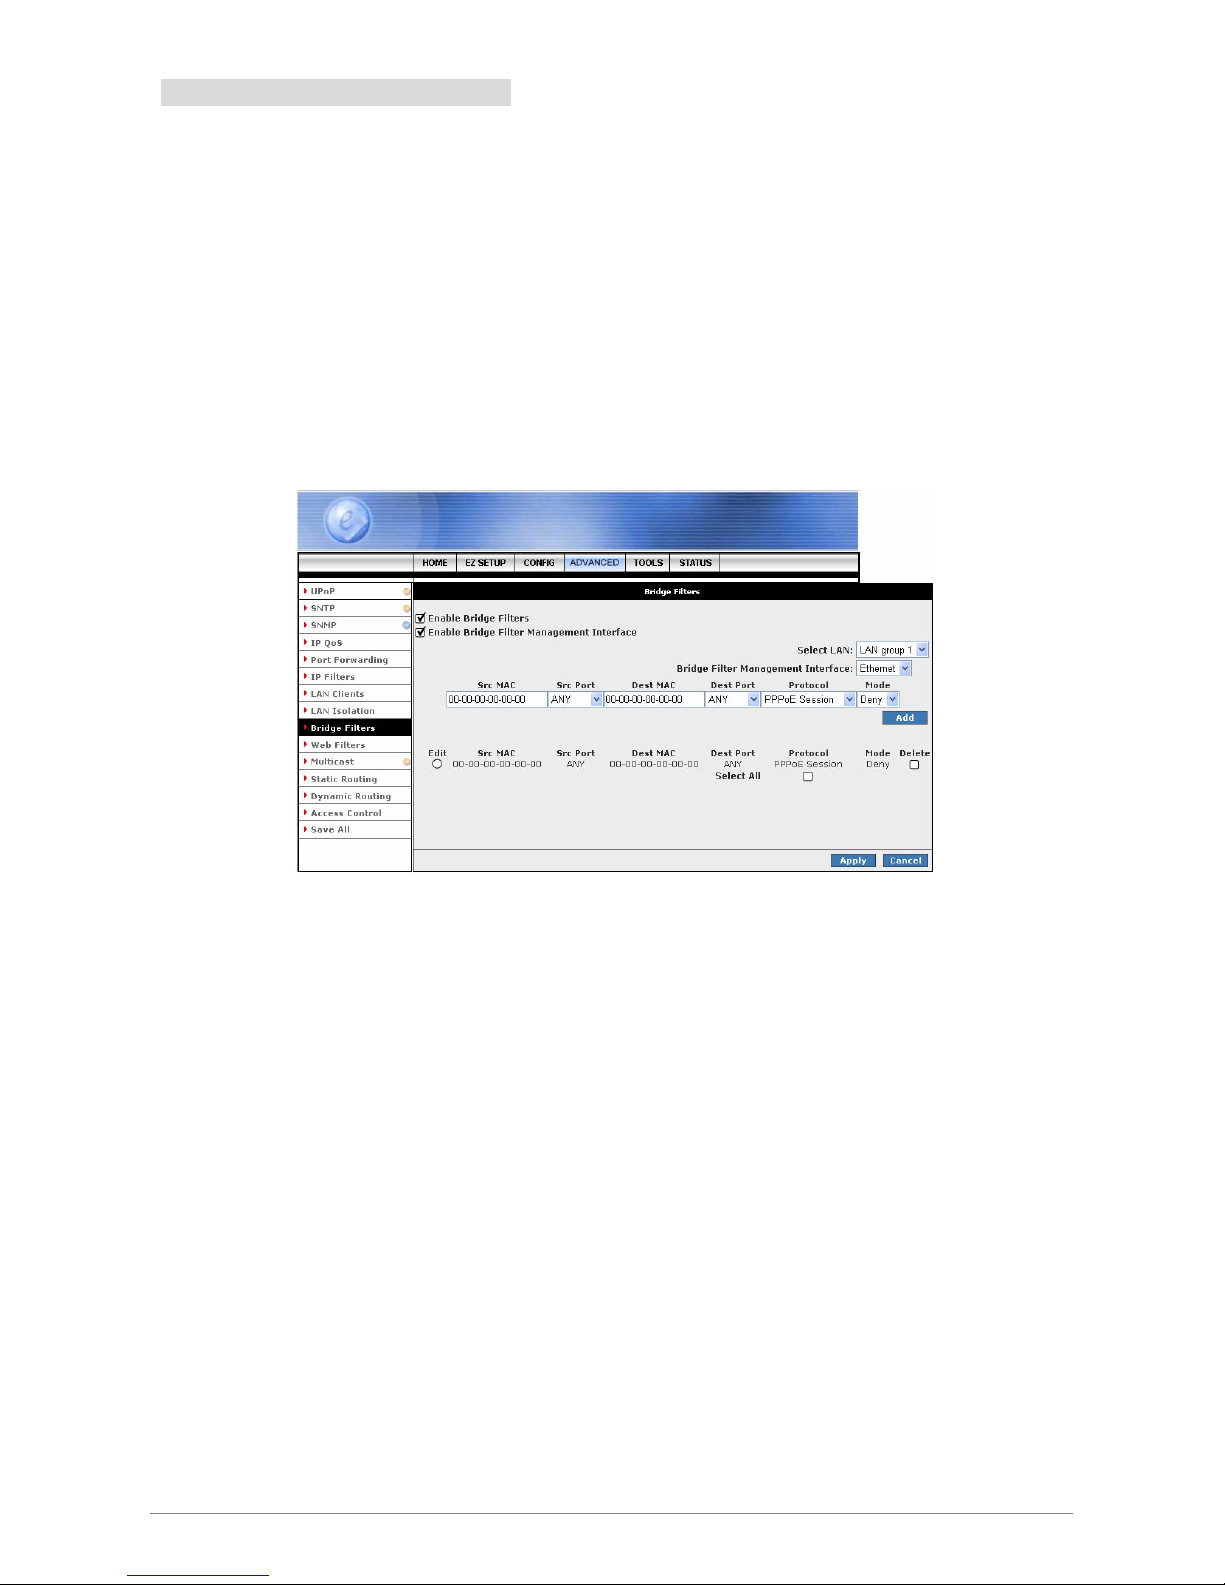
4 Ports ADSL2/2+ Router 75
4.4.9 ADVANCED - Bridge Filters
Bridge Filtering allows packets to be forwarded or blocked, depending on the MAC address. The Bridge
Filtering configuration page allows you to set the configuration of MAC filtering.
Bridge Filter ( Or sometimes known as MAC Filter ) enable rules to be defined which allow or deny data to
pass through the Router based on the source and destination MAC address and data type of each data
frame.
Most of the Bridge Filter Rule is to specify which computers on a network are allowed Internet access; or to
determine which particular computers are allowed to access services provided by the Router.
Enable Bridge Filters: Place a tick at the check box to enable the Bridge Filters functionality. If
the check box is selected, Bridge Filtering is enabled according to the list of Bridge Filter Rules
that has been created. If the box is de-selected, Bridge Filtering will not be enabled, even if Bridge
Filter Rules have been created.
Enable Bridge Filter Management Interface: Place a check to enable the Bridge Filter
Management Interface.
Select LAN: Select LAN Group from the drop down manual.
Bridge Filter Management Interface: Select the management interface from the drop down
manual.
Add: Click Add button to add the rule to the list of rules.
Edit: To edit an existing Bridge Filter Rule, click the Edit radio button adjacent to the Bridge Filter
Rule name.
Src MAC: This is the Source MAC to block or from which to forward. The Source MAC must
consist of 12 hexadecimal characters.
Src Port: Select the Source Port from the drop down manual.
Page 82

4 Ports ADSL2/2+ Router 76
Dest MAC: This is the Destination MAC to block or to forward to. The Destination MAC must
consist of 12 hexadecimal characters.
Dest Port: Select the Destination Port from the drop down manual.
Protocol: Select the Protocol type for the rule from the drop down manual. Place a check to make
chances to the existing Bridge Filter Rule.
Mode: Select t Allow or Deny for the rule.
Delete: Place a check adjacent to the Bridge Filter Rule and click Apply to Delete the Bridge Filter
Rule.
Apply: Click the Apply button to confirm your setting.
Cancel: Click Cancel to ignore all the changes.
Save All: To complete and save the setting, click Save All after clicking the Apply button.
; Create Bridge Filter Rules:
Enter the Source MAC ( Src MAC ) and Destination MAC ( Dest MAC ) details.
Select the Source Port and Destination Port from the drop down manual.
Select the protocol type from the drop down manual. Protocol provides the choice of
protocol type for the rule.
Mode provides the choice of Allow or Deny for the rule.
When all selections are made, click on Add to add the rule to the list of rules. A
maximum of 20 MAC Filter Rules can be defined and saved.
; Edit or Delete MAC Filter Rules: To edit an existing MAC Filter Rule, click the radio button
adjacent to the Filter Rule name ( Edit ). The Rule will then appear in the top of the MAC
Filter control screen where it can be edited. When editing is complete, click Add to return
the Rule to the list of existing rules.
; To delete MAC Filter Rules: click on the Delete tick box. Select All will select every rule.
When the desired selections are made, effect deletion by clicking on Apply.
Page 83
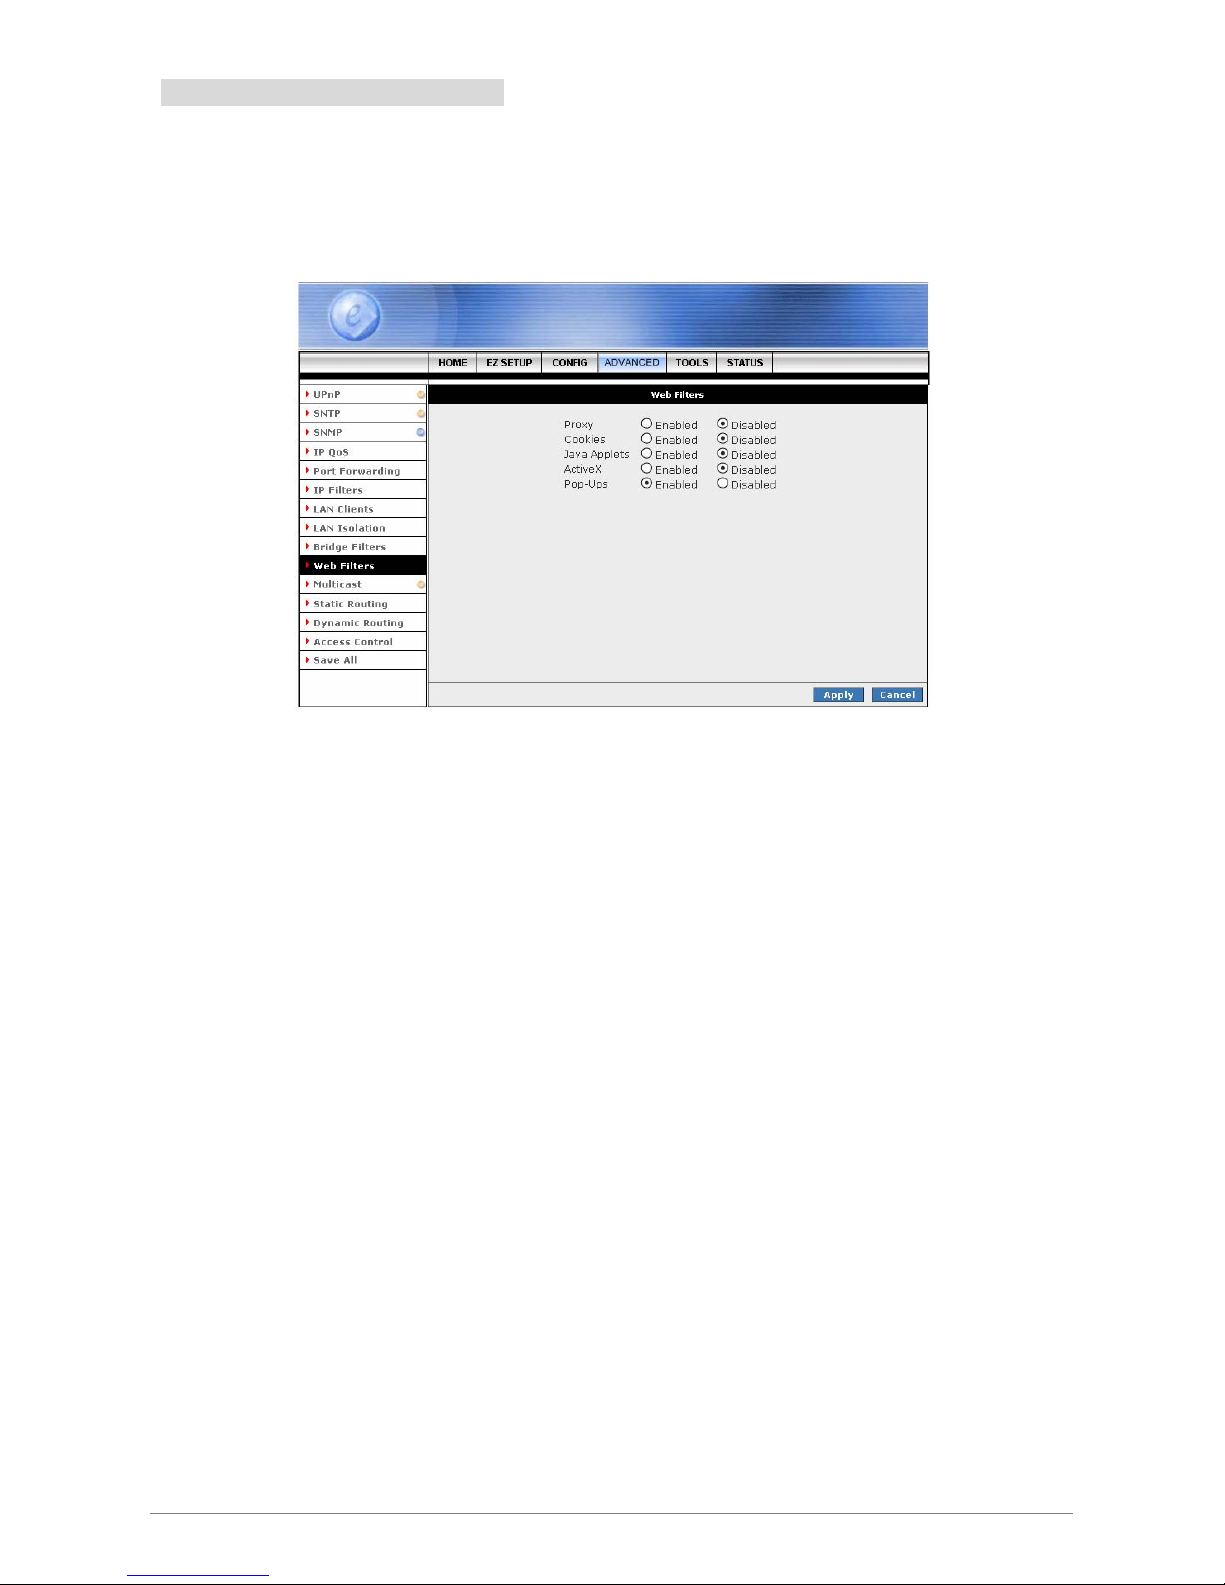
4 Ports ADSL2/2+ Router 77
4.4.10 ADVANCED – Web Filters
Web Filter is a tool that has the ability to filter Internet content. Using an easy, category-based listing, you can
control exactly what website content can or can not be accessed. Click the radio button to Enable or Disable
the filter rules to ensure an accurate representation of the world of information reachable on the Internet.
Apply: Click the Apply button to confirm your setting.
Cancel: Click Cancel to ignore all the changes.
Save All: To complete and save the setting, click Save All after clicking the Apply button.
Page 84
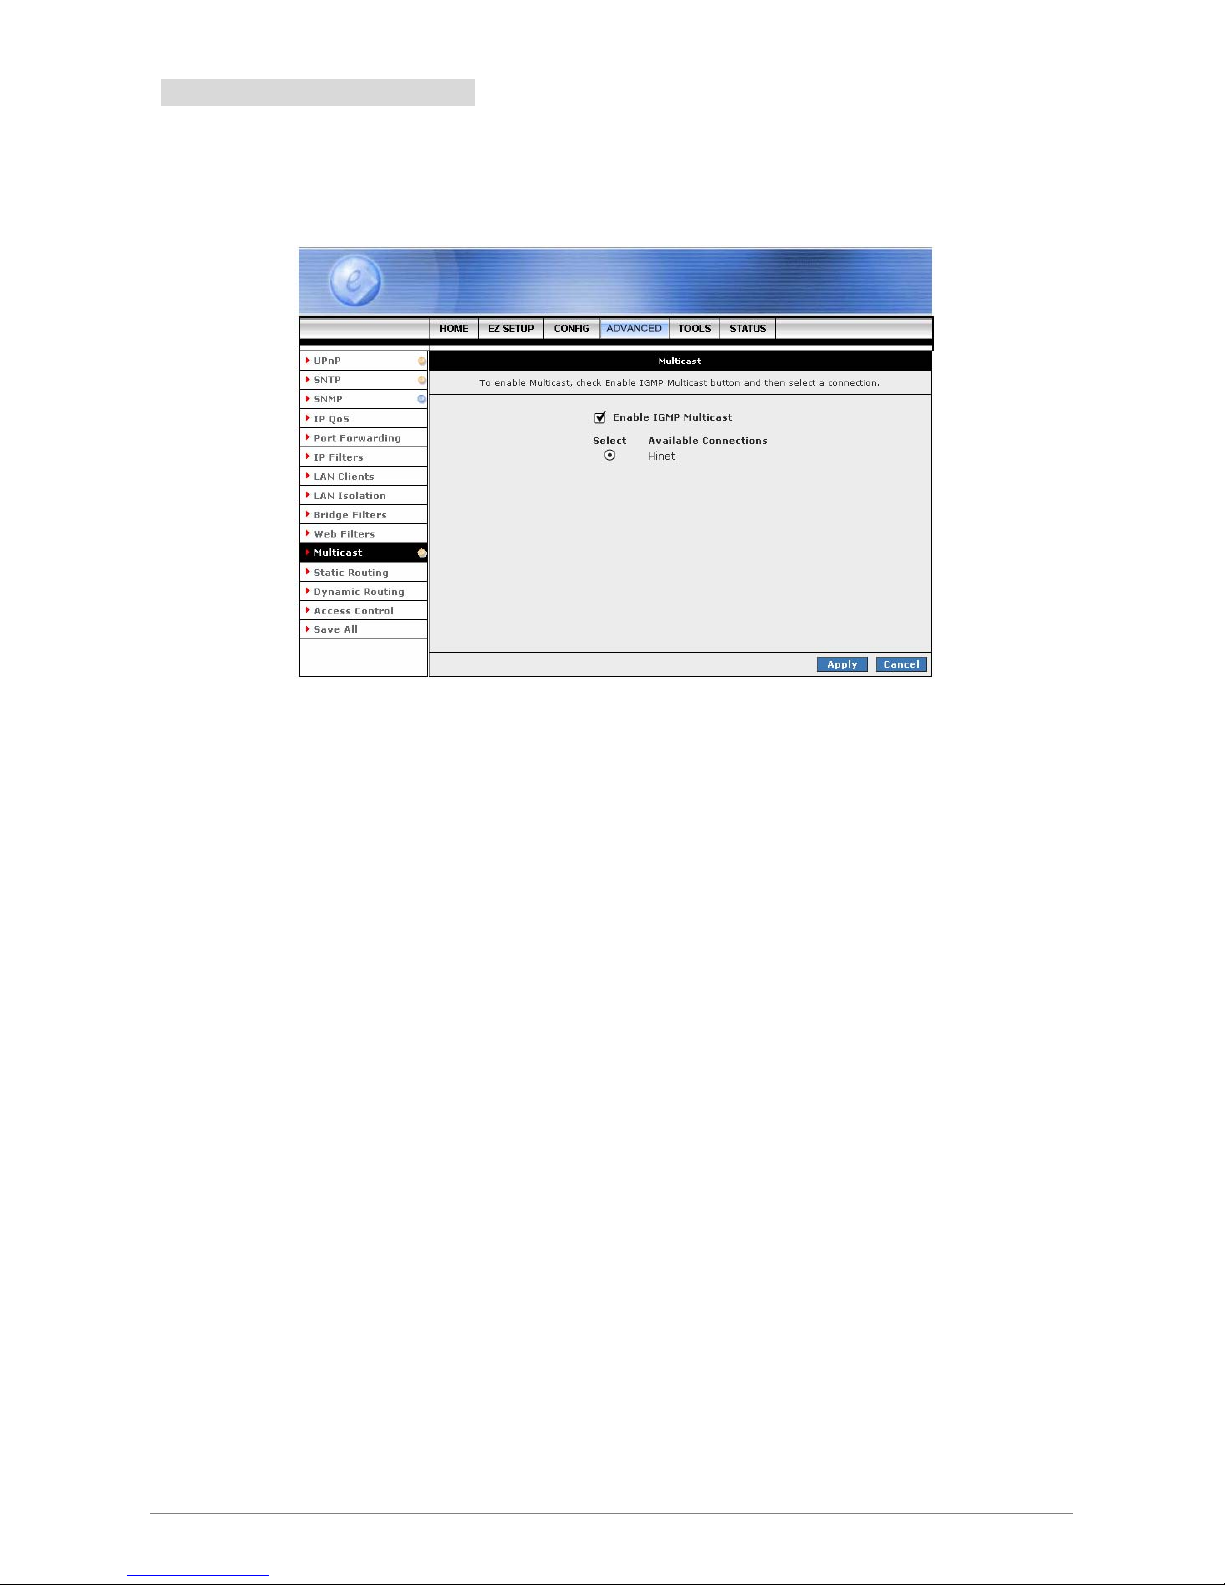
4 Ports ADSL2/2+ Router 78
4.4.11 ADVANCED - Multicast
IGMP (Internet Group Management Protocol) Multicast enables communication between a single sender and
multiple receivers on a network. It is used when data needs to be sent from one to many devices.
Enable IGMP Multicast: Click to enable IGMP Multicast and then select a connection listed.
Select: Click to select the available connection from the connection profile list.
Apply: Click the Apply button to confirm your setting.
Cancel: Click Cancel to ignore all the changes.
Save All: To complete and save the setting, click Save All after clicking the Apply button.
Page 85
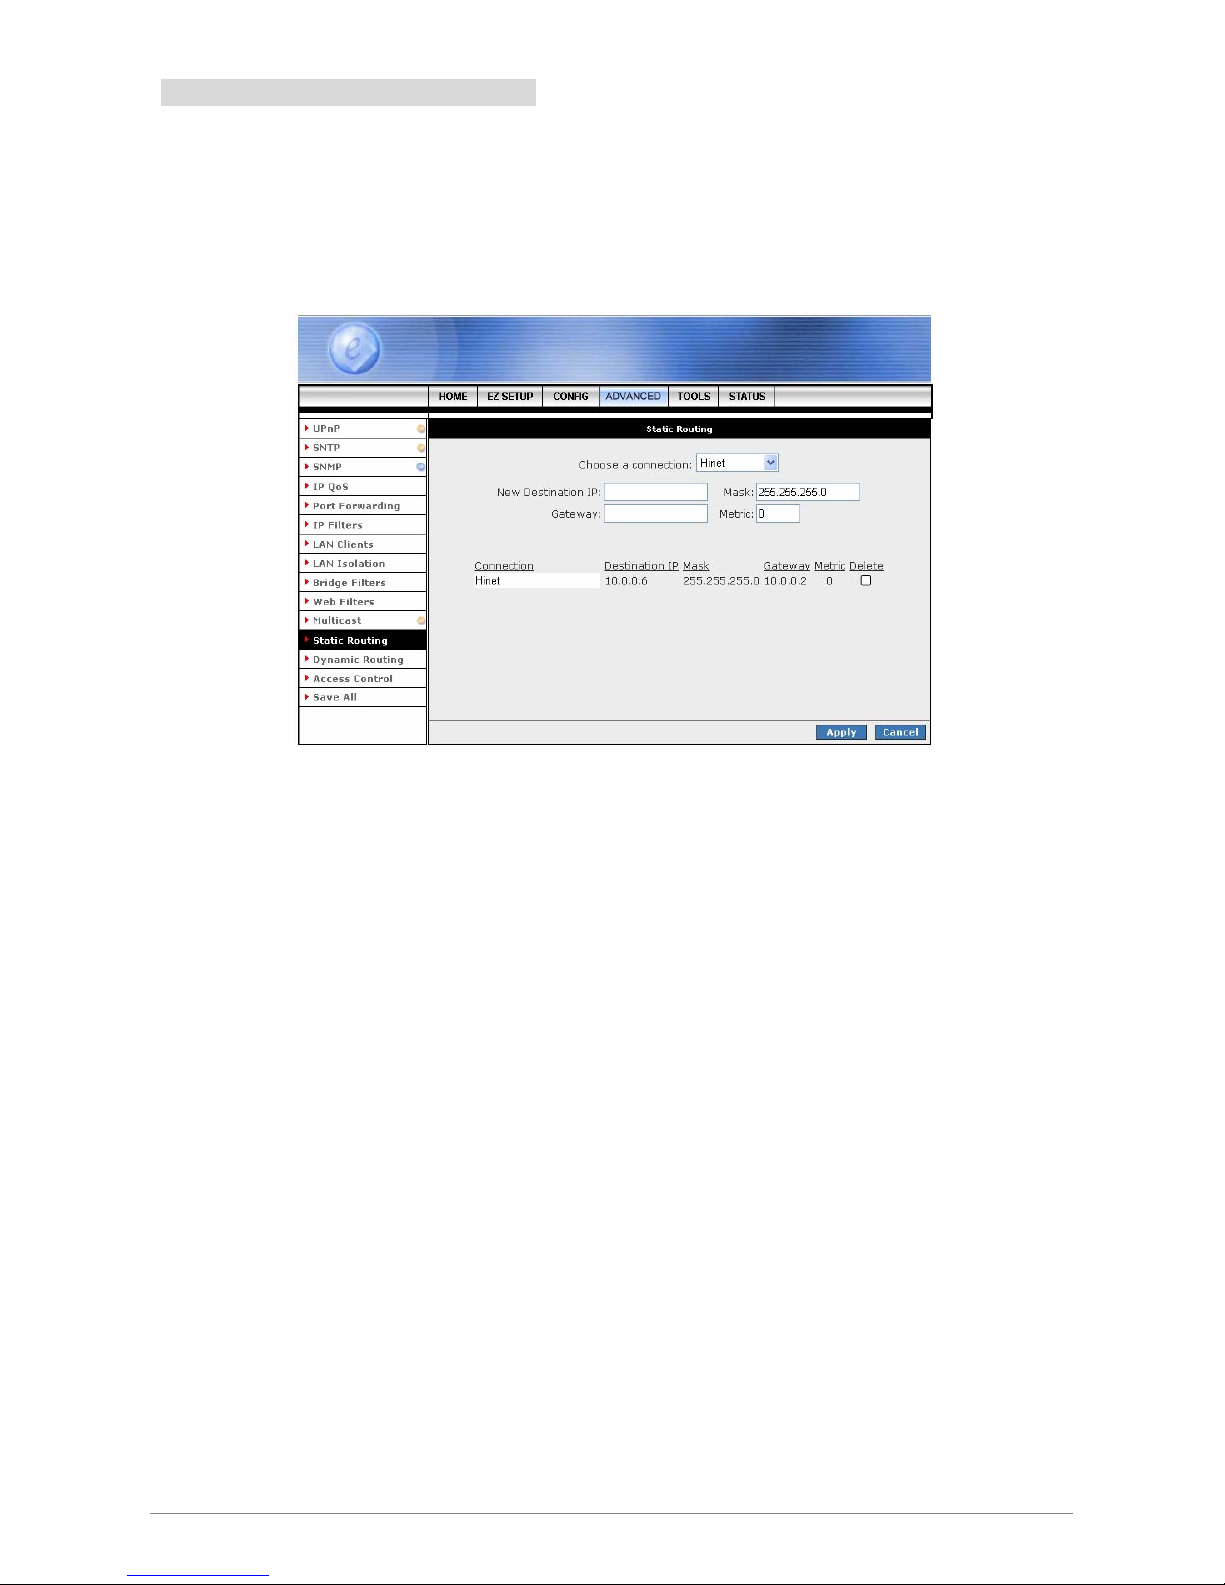
4 Ports ADSL2/2+ Router 79
4.4.12 ADVANCED – Static Routing
If the Router is required to serve more than one network, you will need to set up a Static Route between the
networks. Static routing can be used to allow users from one IP domain to access the Internet through the
Router in another domain. A Static Route provides the defined pathway that network information must travel
to reach the specific host or network which is providing Internet access.
Configuring Static Routing: If the Router is connected to more than one network, it may be
necessary to set up a static route between them. A static route is a pre-determined pathway that
network information must travel to reach a specific host or network. Follow the following steps to
create a Static Route:
; Choose a Connection: Presents list of saved Connections. Select appropriate connection
from the list.
; The New Destination IP: Enter the address of the remote LAN network or host to which
you want to assign a static route.
; Mask: The Subnet Mask identifies which portion of an IP address is the network portion,
and which portion is the host portion. The subnet mask defaults to 255.25.255.0
; Gateway: The Gateway IP address is the IP address for the gateway device that provides
contact between the gateway and the remote network.
; Metric: Enter the Metric or cost for the destination.
; Delete: Place a check adjacent to the rule and click Apply to Delete the rule from the list.
Apply: Click the Apply button to confirm your setting.
Cancel: Click Cancel to ignore all the changes.
Save All: To complete and save the setting, click Save All after clicking the Apply button.
Page 86
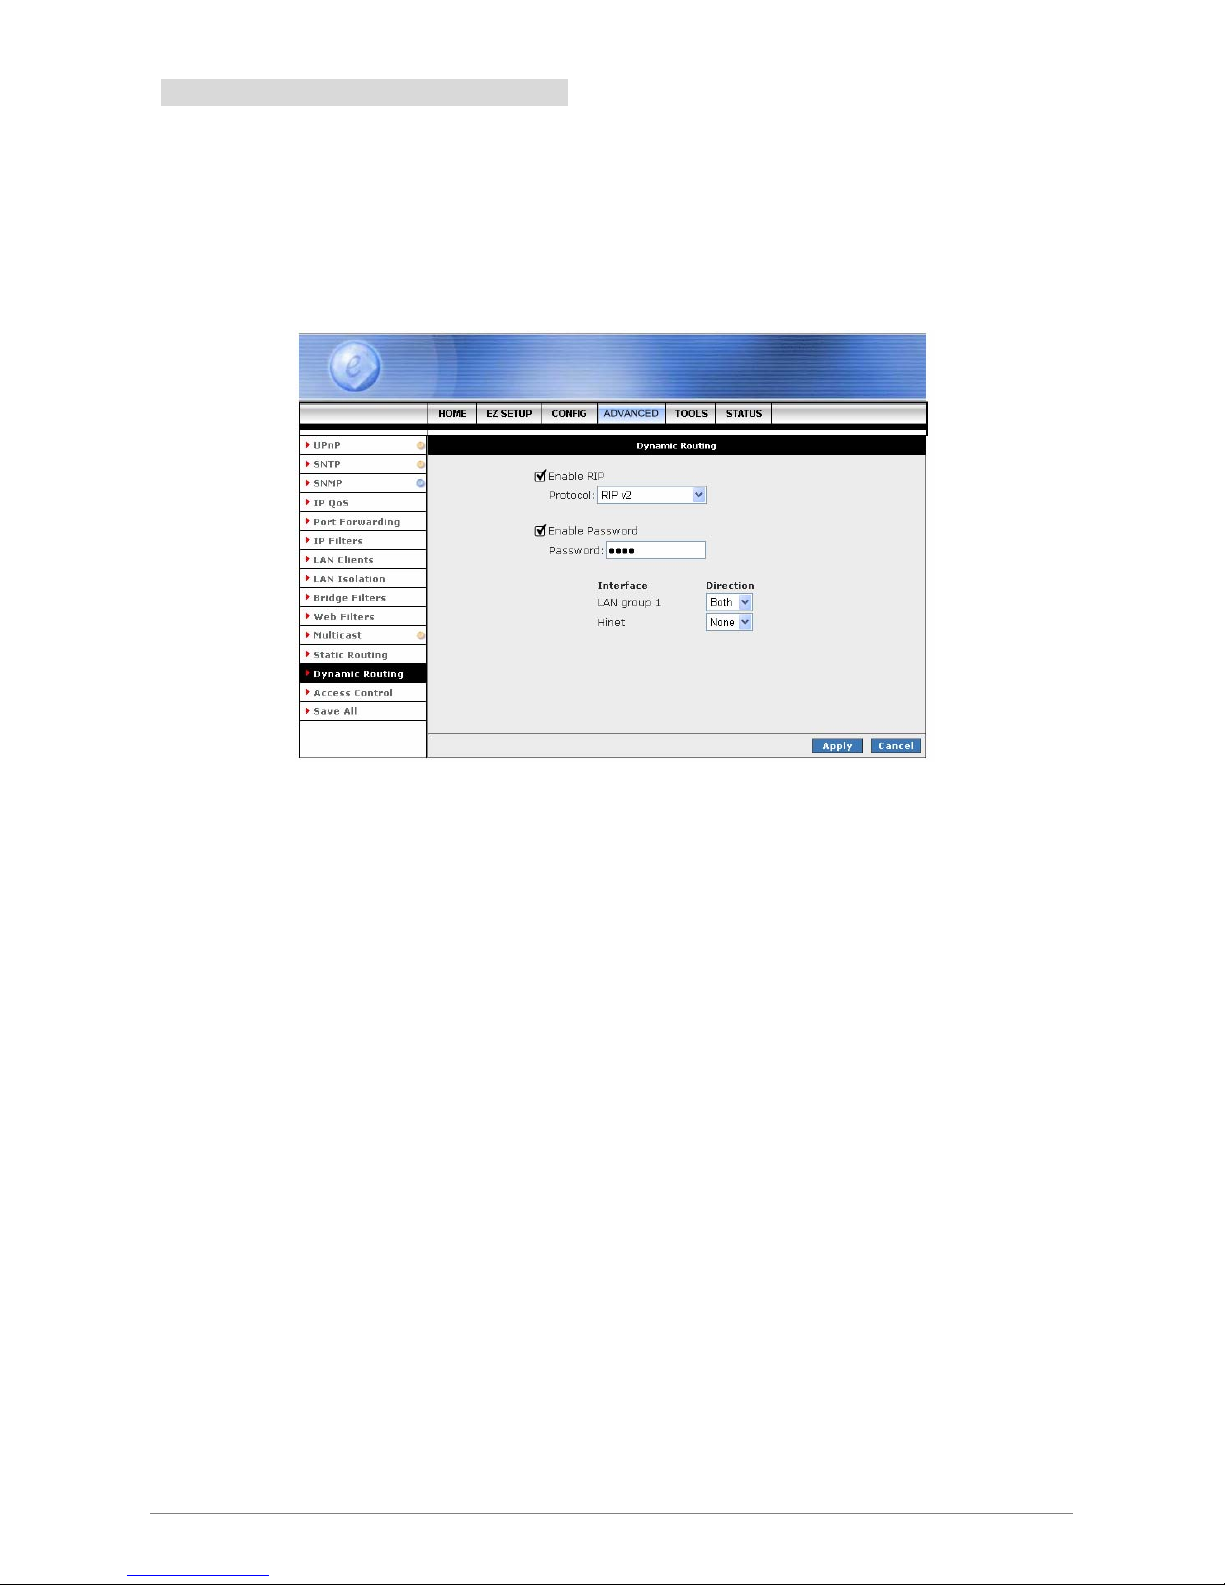
4 Ports ADSL2/2+ Router 80
4.4.13 ADVANCED – Dynamic Routing
Dynamic Routing makes use of the RIP Protocol to allow the ADSL2/2+ Router to automatically adjust to
physical changes in the network. This 4 Ports ADSL2/2+ Router, using the RIP (v1 or v2 ) protocol, will
determine the network packet route based on the fewest number of hops between the Source and the
Destination. The RIP protocol regularly broadcasts routing information to other ADSL Routers on the network
and is part of the IP suite.
Enable RIP: If this box is checked, Dynamic Routing is enabled.
Protocol: Select the protocol from the drop-down manual. The choice is dependent upon the
network environment. Most networks support Rip v1. If RIP v1 is selected, routing data will be sent
in RIP v1 format. If Rip V2 is selected, routing data will be sent in RIP v2 format using Subnet
Broadcasting. If Rip V1 Compatible is selected, routing data will be sent in RIP v2 format using
Multicasting.
; RIPv1: RIP Version 1: One of the first dynamic routing protocols introduced used in the
Internet, RIPv1 was developed to distribute network reach ability information for what is
now considered simple topologies.
; RIPv2: RIP Version 2: Shares the same basic concepts and algorithms as RIPv1 with
added features such as subnet masks, authentication, external route tags, next hop
addresses, and multicasting in addition to broadcasting.
Enable Password: Place a check to enable the entered password.
Direction: Determines the direction that RIP routes will be updated.
; In: the Router will only incorporate received RIP information.
; Out: the ADSL Router will only send out RIP information.
; Both: the ADSL Router will both incorporate received RIP information and send out
updated RIP information.
Apply: Click the Apply button to confirm your setting.
Cancel: Click Cancel to ignore all the changes.
Save All: To complete and save the setting, click Save All after clicking the Apply button.
Page 87
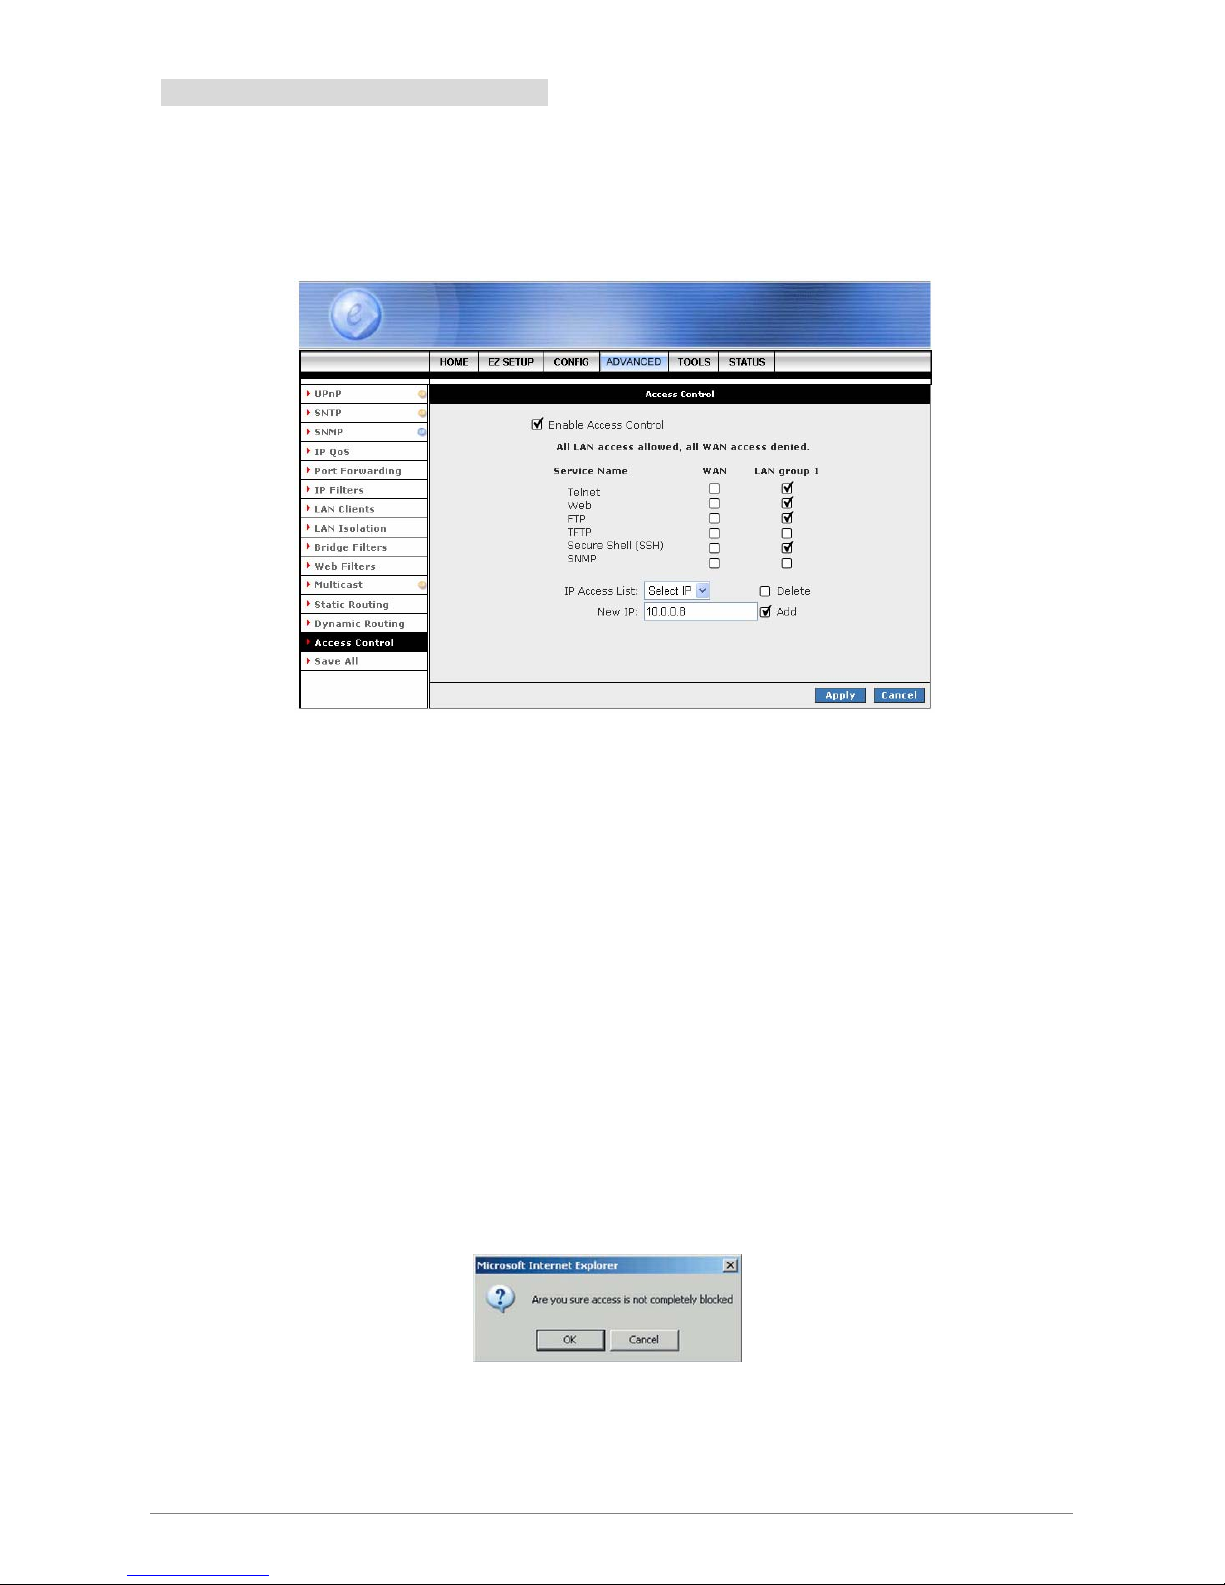
4 Ports ADSL2/2+ Router 81
4.4.14 ADVANCED – Access Control
Use Access Control to configure advanced security functions by customizing the 4 Ports ADSL2/2+ Router.
Access control enables the user to selectively direct such traffic, for example to a Web Host in the DMZ or to
specific ports opened for such applications as Telnet, Web, TFTP or FTP.
Enable Access Control: Check this box to enable selective access from the WAN to your LAN for
applications of the class indicated by the relevant check boxes. If Access Control is not enabled,
the individual check boxes cannot be checked.
The default configuration enables Telnet, Web, FTP and SSH access from LAN to WAN. If Access
Control is enabled, and an enable WAN checkbox is selected, then the WAN access to the
matching service is enabled.
IP Access List: This enables you to specify which LAN/WAN IP addresses are allowed access to
the 4 Ports ADSL2/2+ Router configuration services specified.
Delete: Delete the IP Access List from the drop down manual.
Add: Add new IP Access to the list.
Apply: The following dialog box will pop-up when clicking the Apply button indicates that you
should not disable LAN Web Access or else you might not be able to connect to the device. Click
OK or Cancel to confirm your setting.
Cancel: Click Cancel to ignore all the changes.
Save All: To complete and save the setting, click Save All after clicking the Apply button.
Page 88
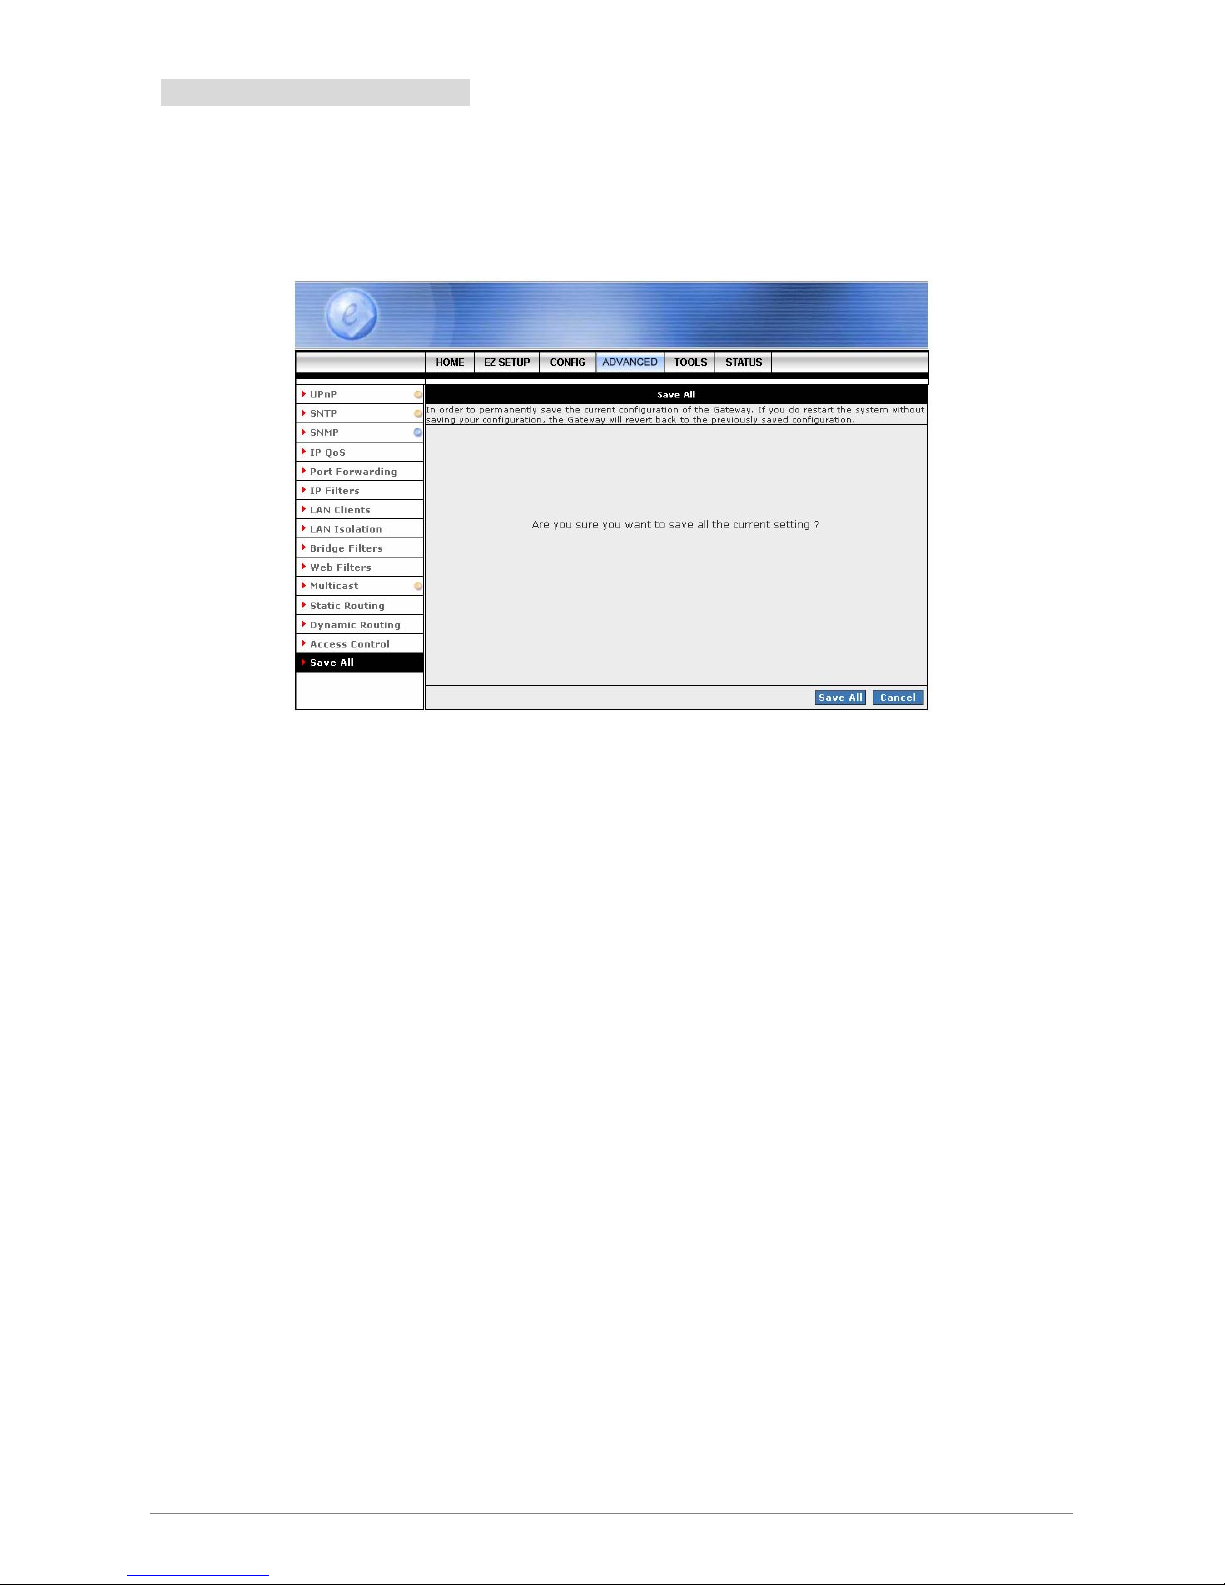
4 Ports ADSL2/2+ Router 82
4.4.15 ADVANCED – Save All
Save All: Click Save All in order to permanently save the current configuration of the 4 Ports ADSL2/2+
Router. If you do restart the system without saving your configuration, the 4 Ports ADSL2/2+ Router will revert
back to the previously saved configuration.
Save All: Click Save All to complete and permanently save the setting.
Cancel: Click Cancel to ignore all the changes.
Page 89
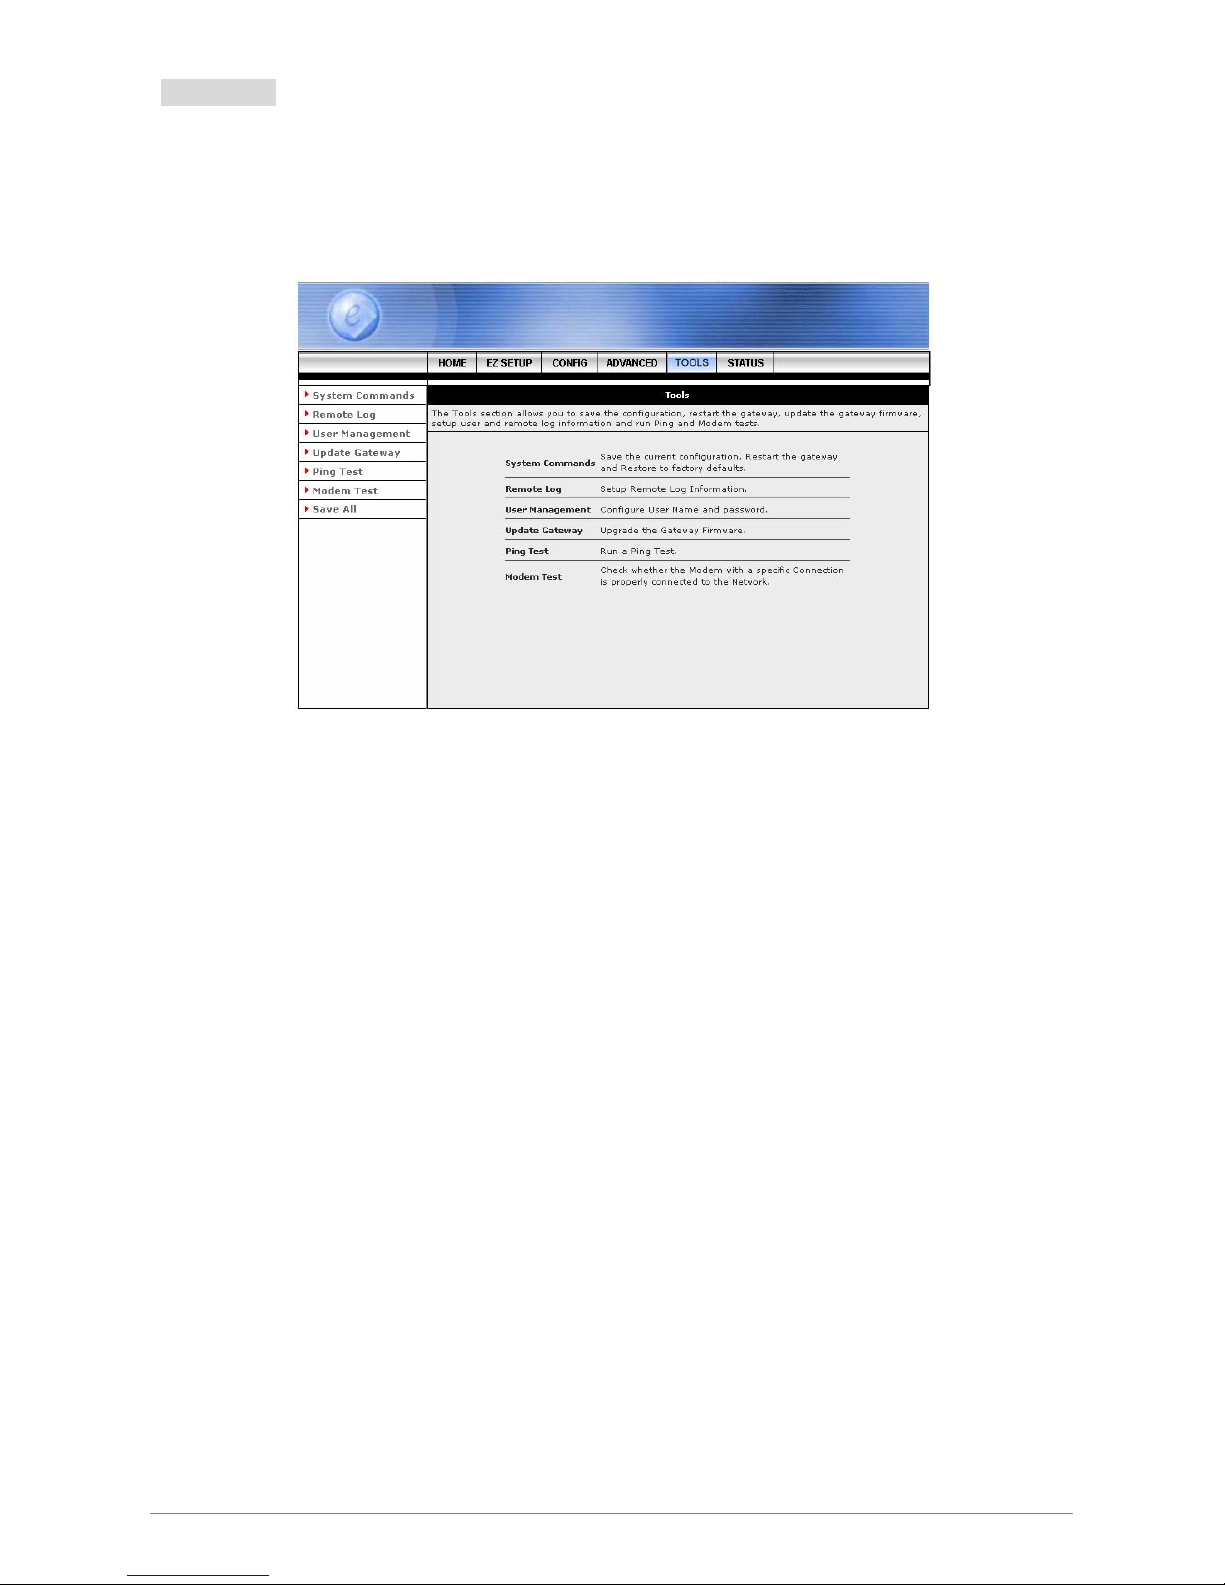
4 Ports ADSL2/2+ Router 83
4.5 TOOLS
TOOLS: The TOOLS page allows you to save the configuration, restart the device, update the
firmware/image code, setup user and remote log information and run ping/test of the 4 Ports ADSL2/2+
Router.
System Commands: Save the current configuration, restart the 4 Ports ADSL2/2+ Router and
restore to factory defaults setting.
Remote Log: Setup Remote Log Information.
User Management: Configure user name and password.
Update Gateway: Upgrade the 4 Ports ADSL2/2+ Router firmware.
Ping Test: Run a ping test.
Modem Test: Check whether the modem with a specific connection is properly connected to the
network.
Save All: Click Save All to complete and permanently save the setting.
Page 90

4 Ports ADSL2/2+ Router 84
4.5.1 TOOLS - System Commands
The System Commands page allow you to carry out basic system actions.
Restart: Use this button to restart the 4 Ports ADSL2/2+ Router’s system. The following window
will pop-up. Click OK to confirm your setting.
NOTE: You will be redirected to the 4 Ports ADSL2/2+ Router Homepage after the unit has
successfully rebooted.
Page 91
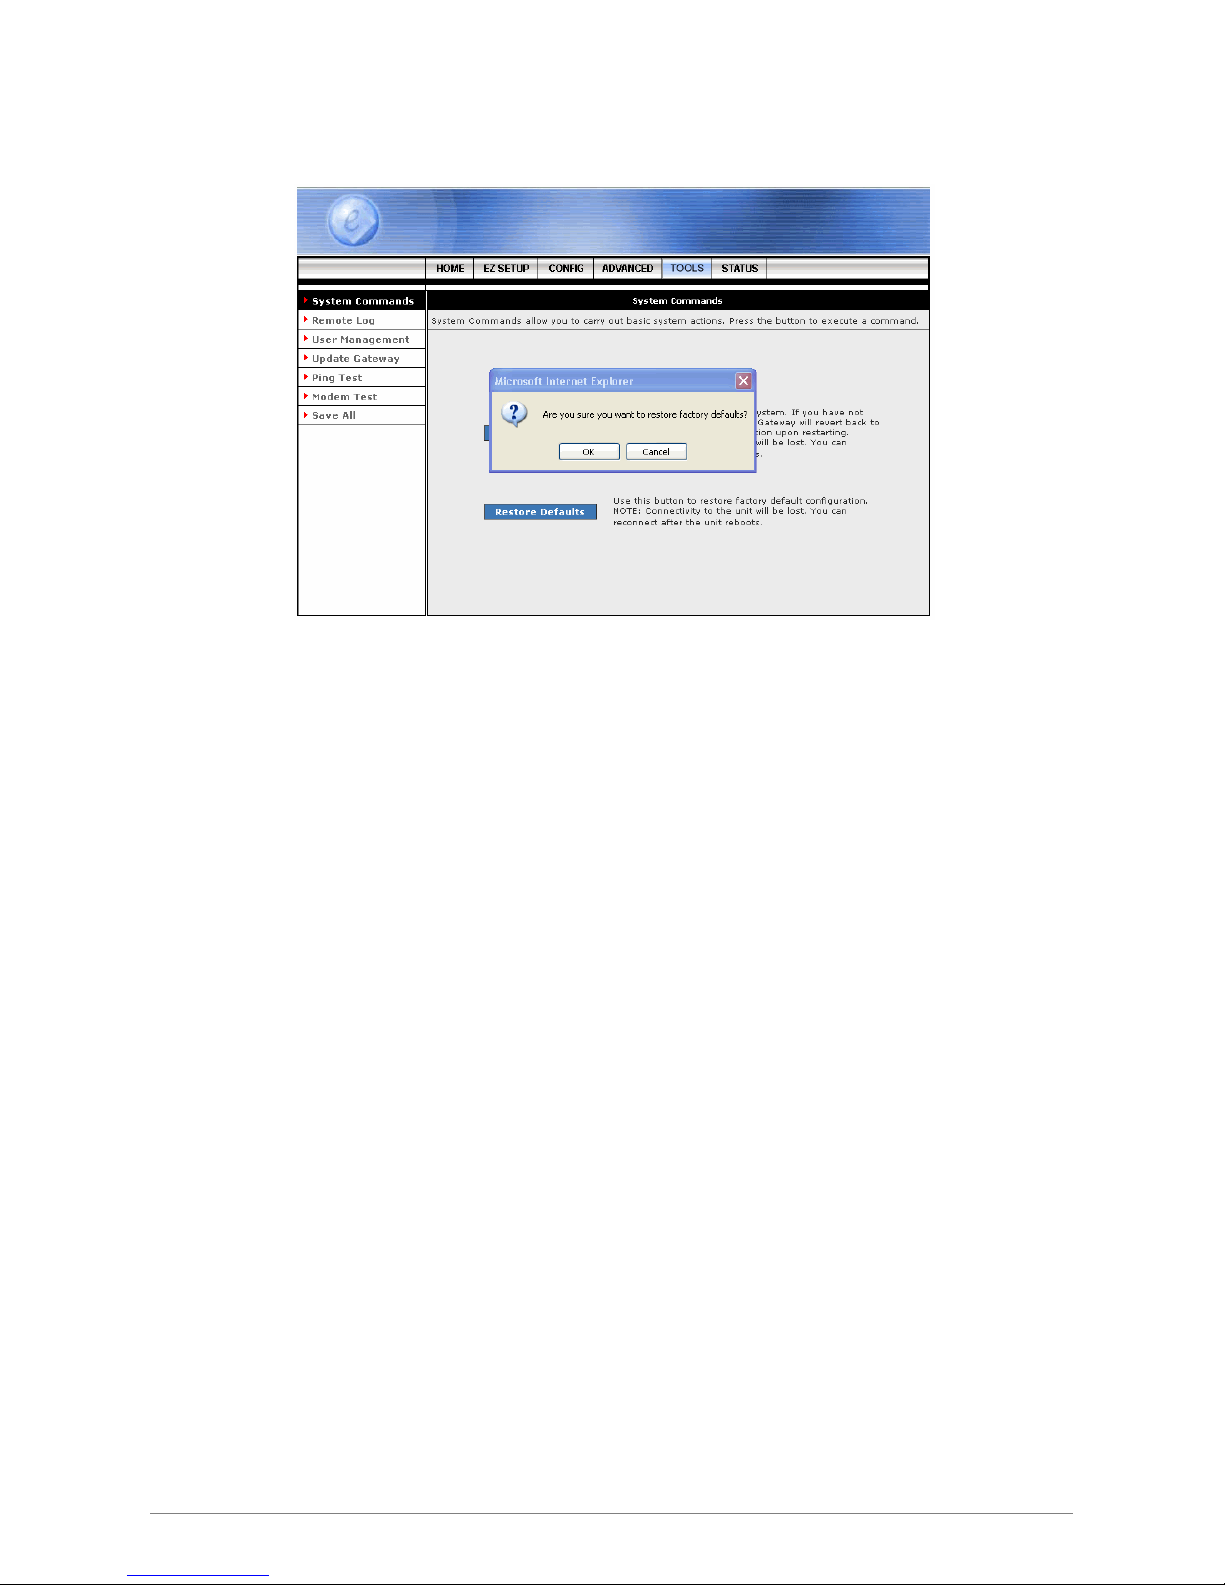
Restore Defaults: Use this button to restore factory default configurations. The following window
will pop-up. Click OK to confirm your setting.
NOTE: You will be redirected to the 4 Ports ADSL2/2+ Router Homepage after the unit has
successfully been restored to factory default configurations.
4 Ports ADSL2/2+ Router 85
Page 92
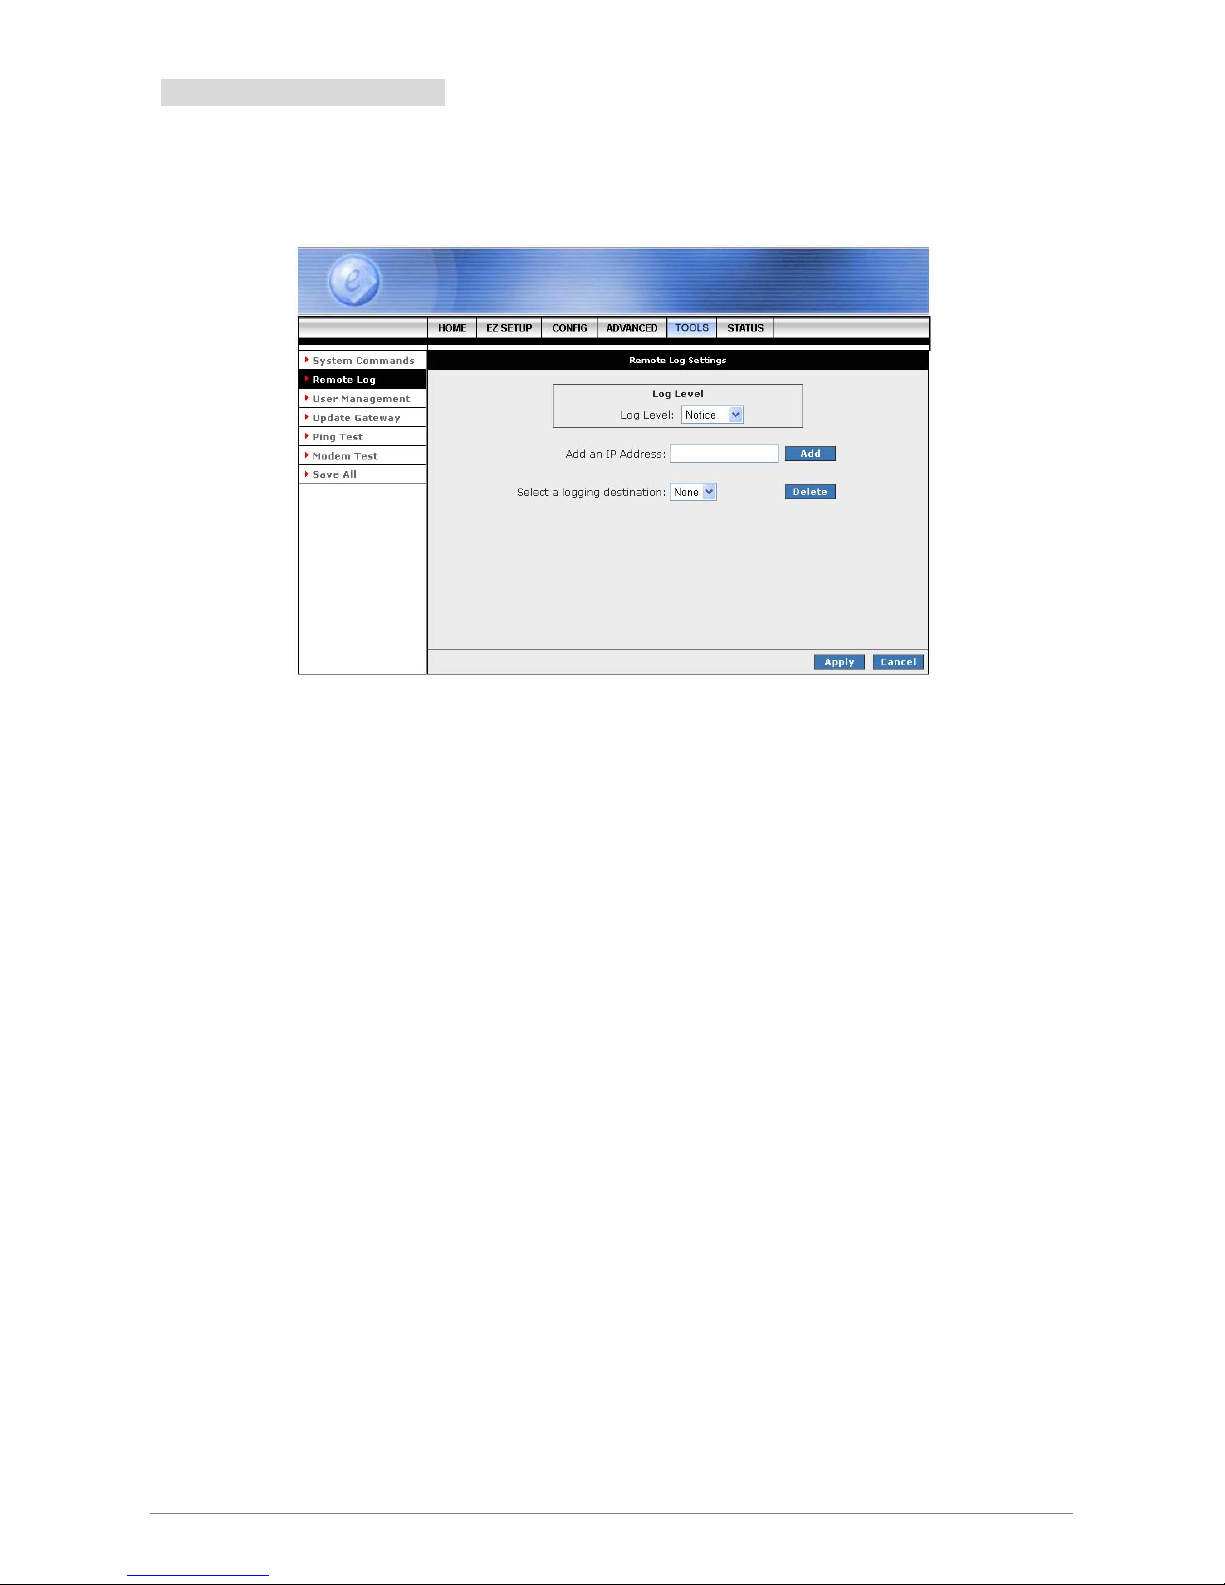
4 Ports ADSL2/2+ Router 86
4.5.2 TOOLS - Remote Log
Remote Log: Using the Remote Log page, you can allow a user or users on the Internet to configure,
upgrade and check the status of your 4 Ports ADSL2/2+ Router.
Log Level: Select the Log Level from the drop down manual. The 4 Ports ADSL2/2+ Router
provides the following Log Level: Panic, Alert, Critical, Error, Warning, Notice, Info and Debug.
Add an IP Address: Manually enter the logging destination IP Address then click Add button to
add your entry.
Delete: Delete the logging destination IP Address from the drop down list.
Apply: Click the Apply button to confirm your setting.
Cancel: Click Cancel to ignore all the changes.
Save All: To complete and save the setting, click Save All after clicking the Apply button.
Page 93

4 Ports ADSL2/2+ Router 87
4.5.3 TOOLS - User Management
User Management: The User Management page enables you to change your User Name and/or Password.
It is recommended that you change the User Name and password from the default Admin to ensure the
security of the 4 Ports ADSL2/2+ Router.
For security reasons, the router has its own user name and password. Also, after a period of inactivity for a
set length of time, the administrator login will automatically disconnect. When prompted, enter the router User
Name: Admin and the router Password: Admin to log in.
NOTE: If you forget your user name and password, access to the 4 Ports ADSL2/2+ Router can only be
gained by resetting the unit to factory defaults. Pressing the “Reset” button for 10 seconds, the LED
indicators will turns OFF and ON again indicates that the Reset process is successfully done.
User Name: Enter the user specify User Name
Password: Enter the user specify Password.
Idle Timeout: For security, the administrator's login to the router configuration will timeout after a
period of inactivity.
Apply: Click the Apply button to confirm your setting.
Cancel: Click Cancel to ignore all the changes.
Save All: To complete and save the setting, click Save All after clicking the Apply button.
Page 94
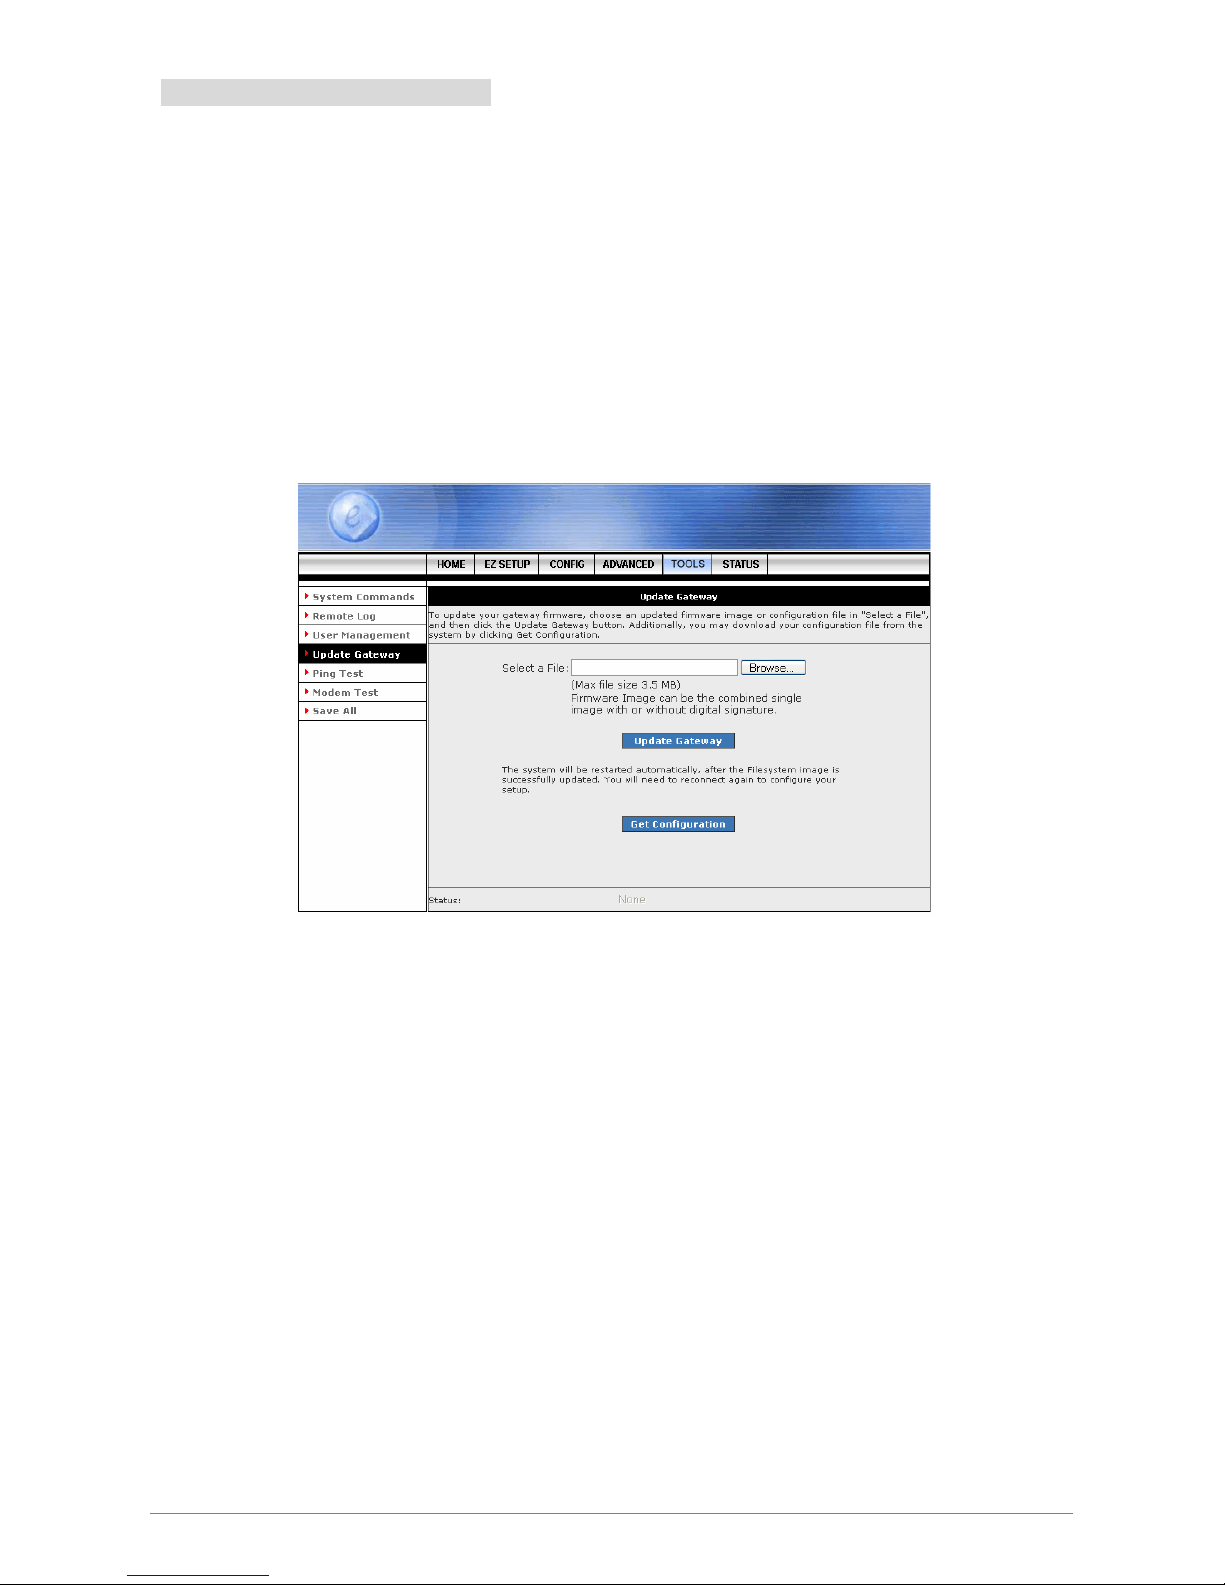
4 Ports ADSL2/2+ Router 88
4.5.4 TOOLS - Update Gateway
Update Gateway: Firmware is the software that controls the 4 Ports ADSL2/2+ Router and also provides the
user interface that is subject of this manual. The Firmware resides in the 4 Ports ADSL2/2+ Router internal
Flash memory; currently loaded firmware version can be found under STATUS Æ Product Information.
Note: It is recommends that you back up your configuration before doing a firmware upgrade. After the
upgrade is complete, you may need to restore your configuration settings.
To access Firmware Updates, click on TOOLS Æ Update Gateway. The following window screen will
pop-up.
Select a File: Click on the Browse… button to locate the Firmware or update image file from your
computer's hard drive.
Update Gateway: Click the Update Gateway button to upgrade your 4 Ports ADSL2/2+ Router.
The system will be restarted automatically after the Firmware/Image is successfully uploaded. You
will need to reconnect again to configure your setup.
Get Configuration: You may download your configuration file from the system by clicking Get
Configuration. Follow the instruction and save your configuration file in your hard drive.
Page 95
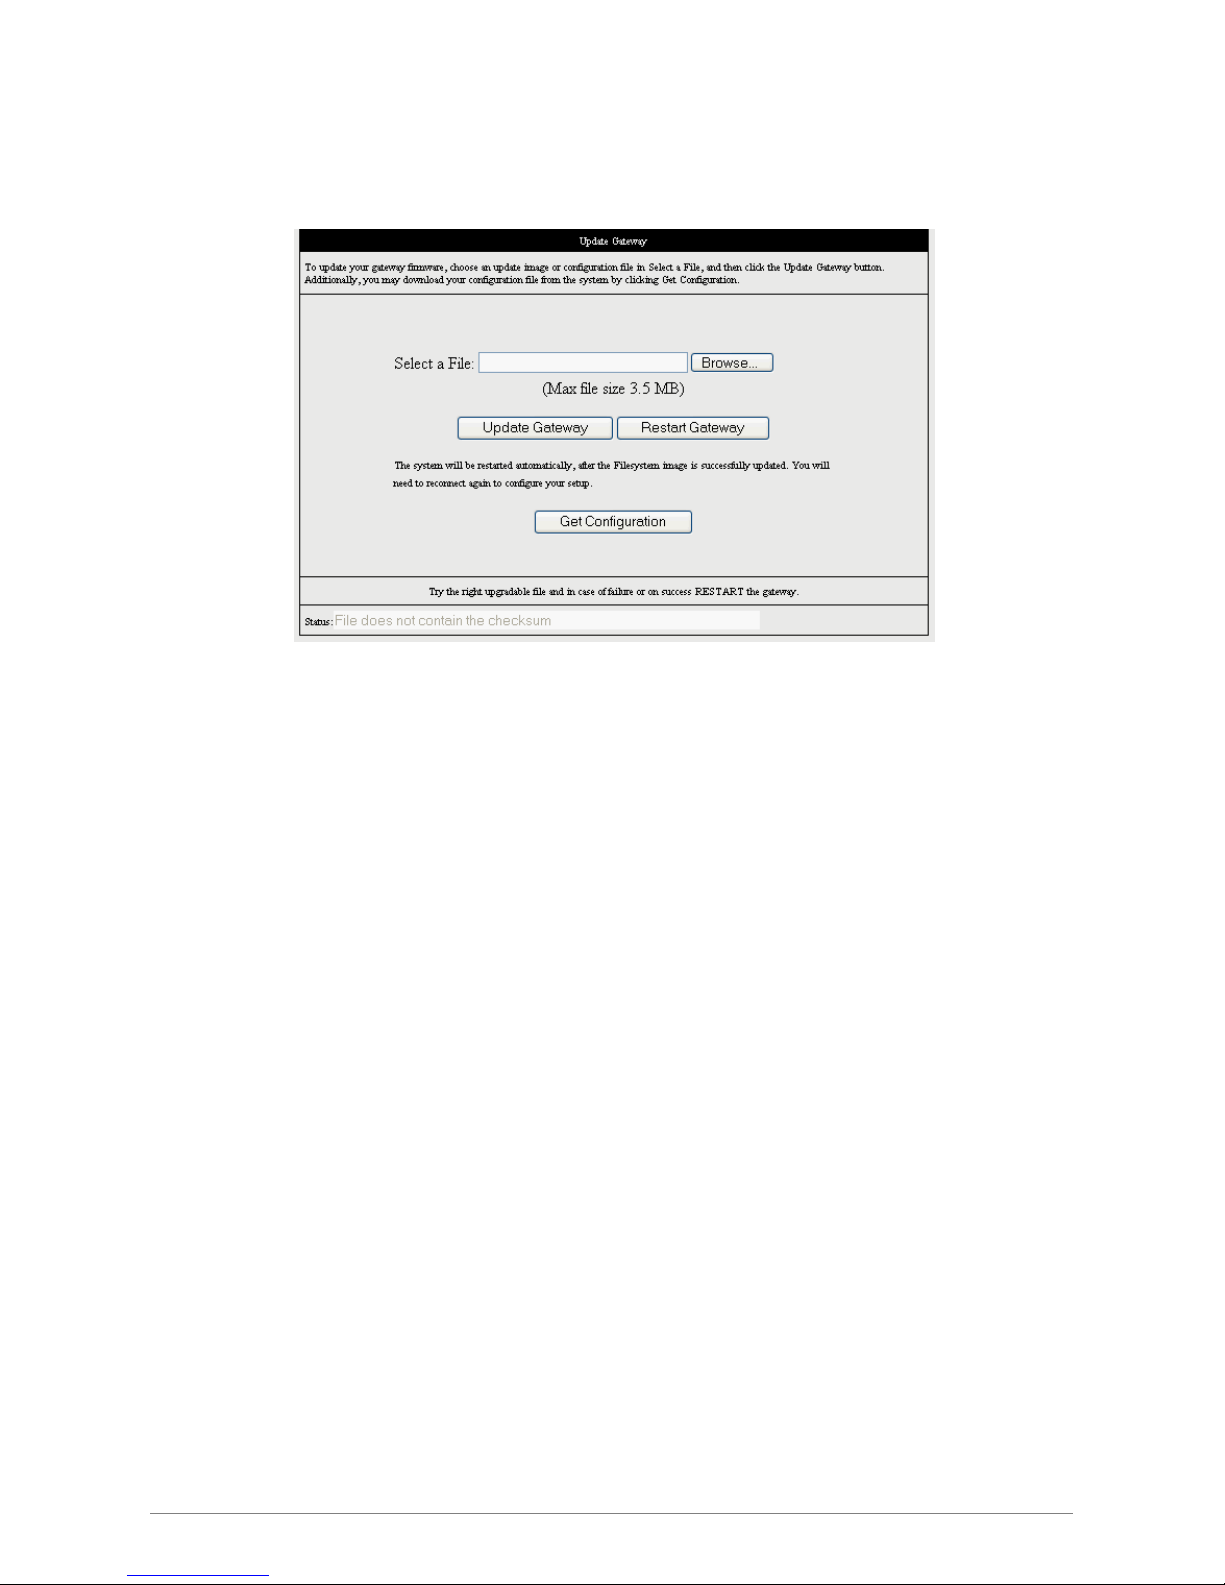
The following screen will pop-up when clicking the Update Gateway button. Click Browse… button to locate
the configuration file or update image file from your computer's hard drive then click Update Gateway. After
the configuration file upgrade process, click Restart Gateway to activate your previous setting.
Select a File: Click on the Browse… button to locate the configuration file from your computer's
hard drive.
Update Gateway: Click the Update Gateway button to upgrade your configuration file.
Restart Gateway: Click Restart Gateway after the upgrade process to activate your setting.
Note: When uploading Firmware/Configuration File to the 4 Ports ADSL2/2+ Router, it is important not
to interrupt the Web browser by closing the window, clicking a link, or loading a new page. If the browser
is interrupted, it may corrupt the upgrading process. When the upload is complete, your 4 Ports
ADSL2/2+ Router will automatically reboot and restart. The upgrade process will typically take about
1~2 minutes.
4 Ports ADSL2/2+ Router 89
Page 96
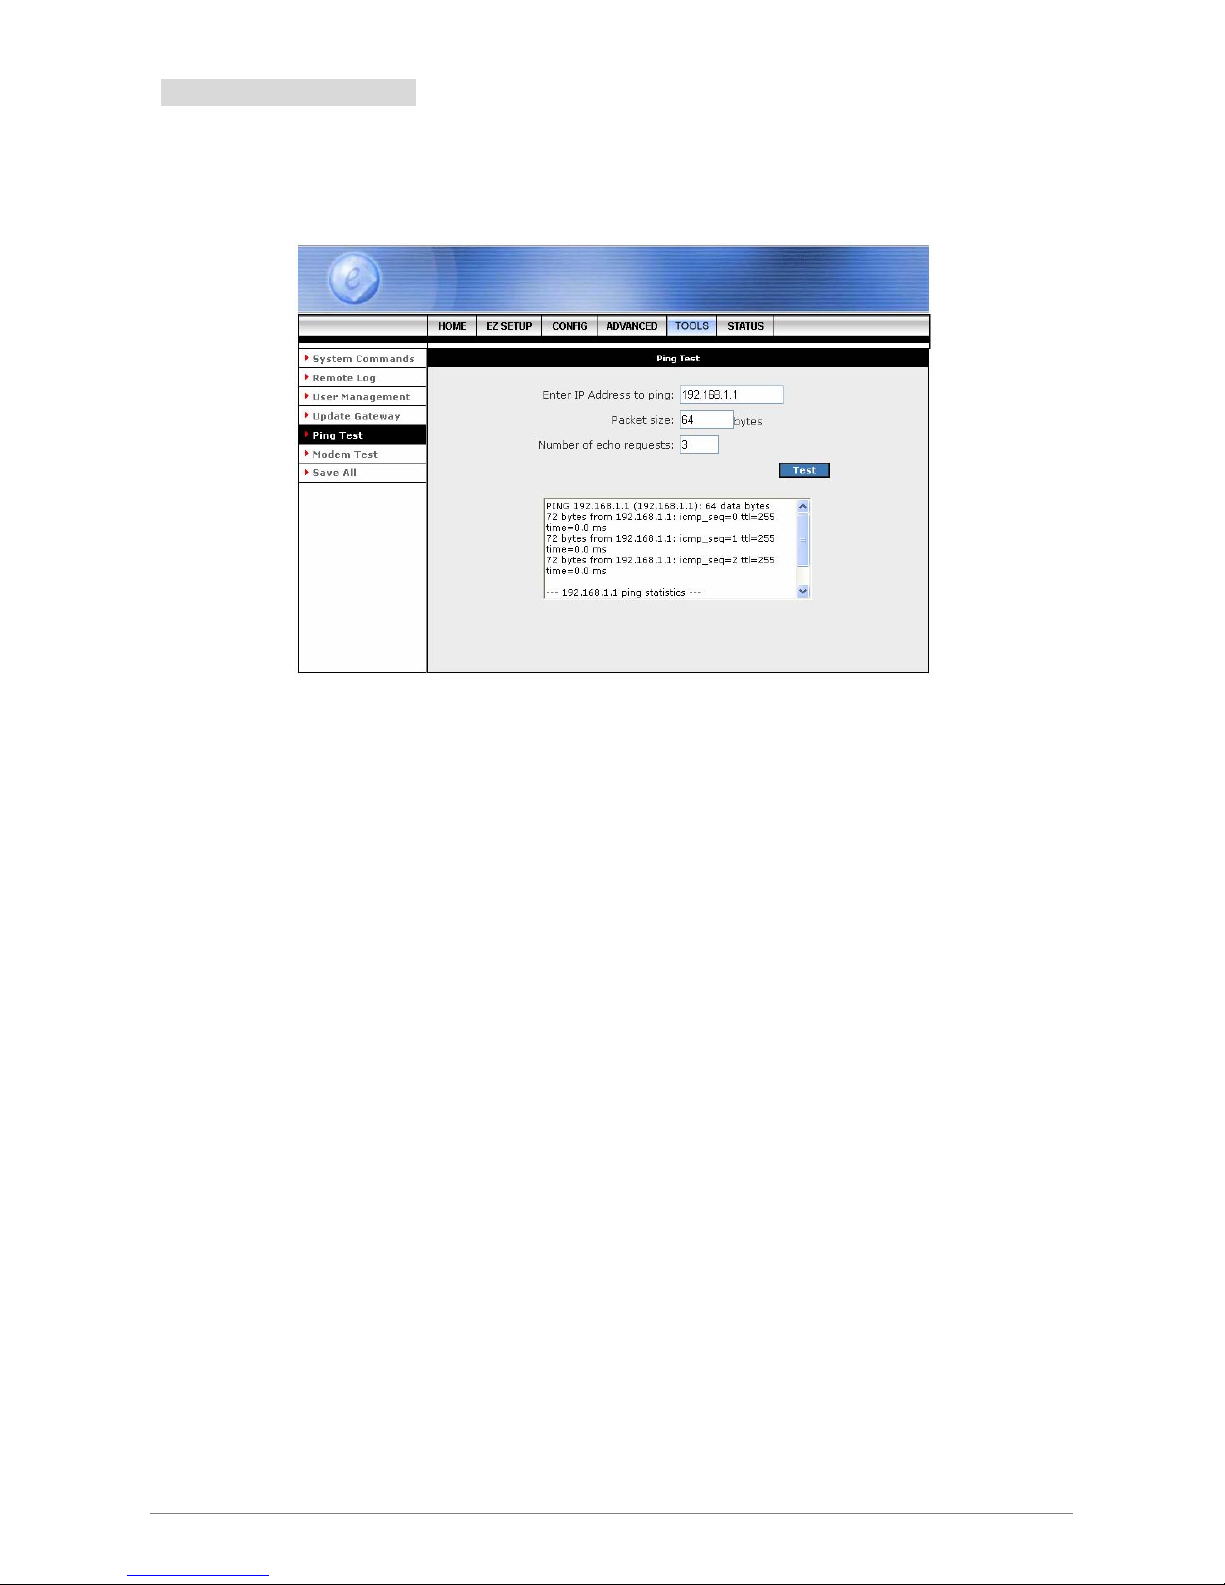
4 Ports ADSL2/2+ Router 90
4.5.5 TOOLS - Ping Test
Ping Test: The Ping Test page provides an easy way to ping the 4 Ports ADSL2/2+ Router without invoking
the command line interface.
Enter IP Address to ping: Enter the IP Address to ping.
Packet size: Enter the packet size in bytes.
Number of echo requests: Enter the number of echo request.
Test: Click Test to start the ping test. The result will be shown in the window underneath.
Page 97
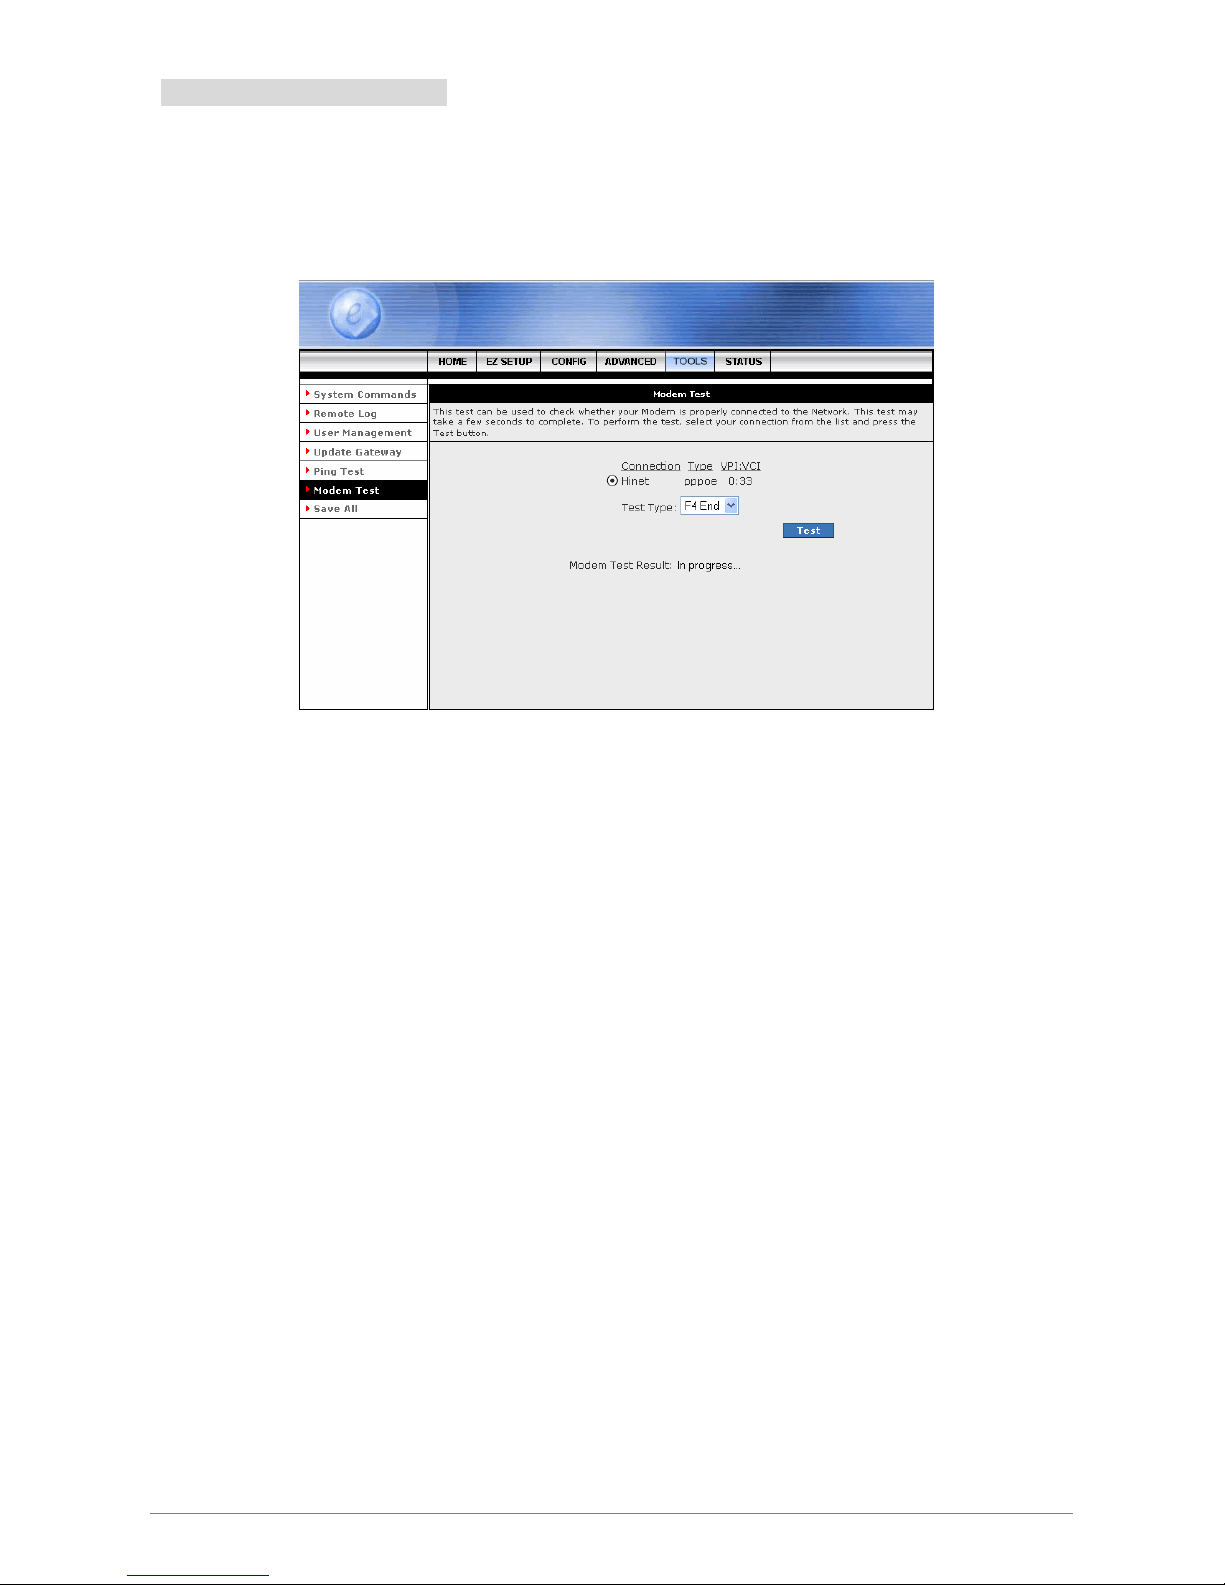
4 Ports ADSL2/2+ Router 91
4.5.6 TOOLS - Modem Test
Modem Test: The Modem Test page can be used to check whether your Modem is properly connected to the
Network. This test may take a few seconds to complete. To perform the test, select your connection from the
list and press the Test button. The value returned will either be Success or Fail.
Page 98

4 Ports ADSL2/2+ Router 92
4.5.7 TOOLS – Save All
Save All: Click Save All in order to permanently save the current configuration of the 4 Ports ADSL2/2+
Router. If you do restart the system without saving your configuration, the 4 Ports ADSL2/2+ Router will revert
back to the previously saved configuration.
Save All: Click Save All to complete and permanently save the setting.
Cancel: Click Cancel to ignore all the changes.
Page 99
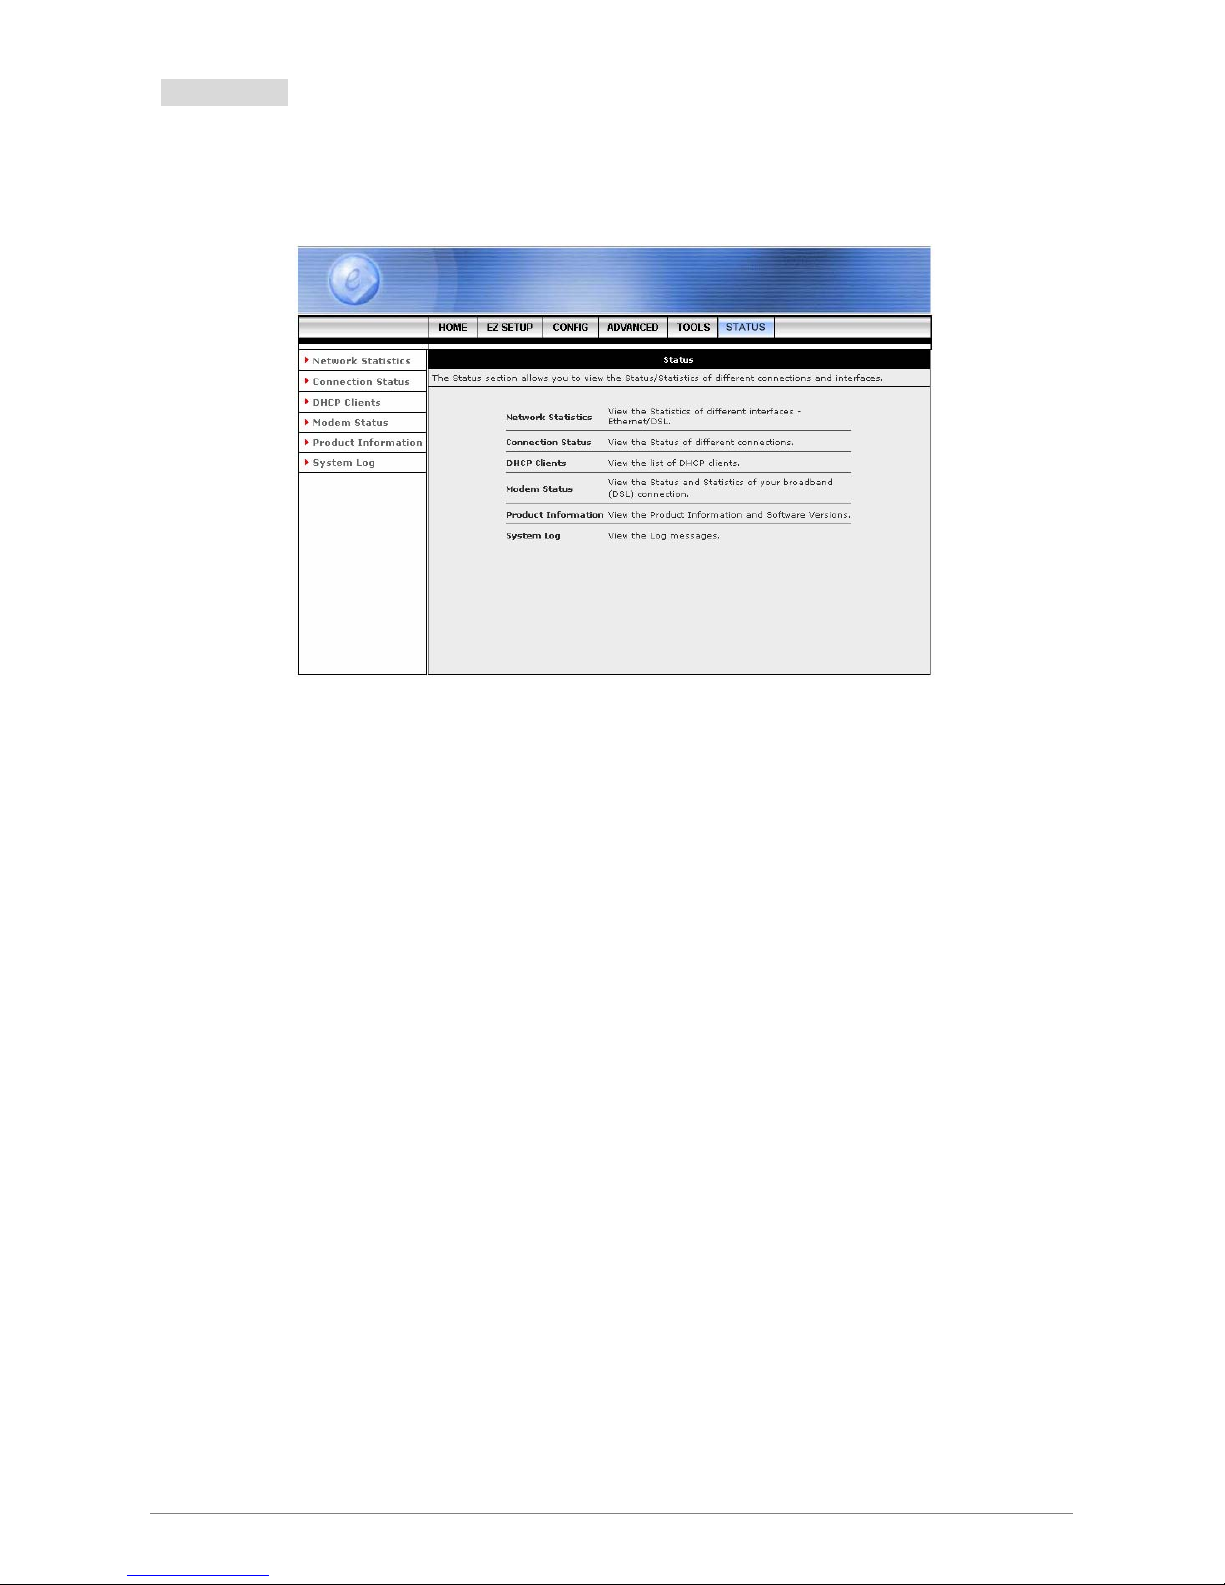
4 Ports ADSL2/2+ Router 93
4.6 STATUS
The Status Menu provides a dynamically-updated information about your 4 Ports ADSL2/2+ Router’s
Network Status, Connection Status, Modem Status and device performance.
Network St atistics: View the Statistics of different interfaces - Ethernet/USB/ADSL.
Connection St atus : View the Status of different connections.
DHCP Clients: View the list of DHCP clients.
Modem Status: View the Status and Statistics of your broadband (DSL) connection.
Product Information: View the Product Information and Software Versions.
System Log: View the Log messages.
Page 100

4 Ports ADSL2/2+ Router 94
4.6.1 STATUS - Network Statistics
The Network Statistics show the Select Network Interface type to peruse statistics for each type of connection.
Click Ethernet, USB(Optional) or DSL to view your Network Statistics.
 Loading...