

Etec PT-8505G User Manual

Copyright
The contents of this publication may not be reproduced in any part or as a whole, stored, transcribed in
an information retrieval system, translated into any language, or transmitted in any form or by any means,
mechanical, magnetic, electronic, optical, photocopying, manual, or otherwise, without the prior written
permission.
Trademarks
All product, company, brand names are trademarks or registered trademarks of their respective
companies. They are used for identification purpose only. Specifications are subject to be changed without
prior notice.
4 Ports 11g Wireless ADSL2/2+ Router i

FCC Radiation Norm
This equipment has been tested and found to comply with limits for a Class B digital device pursuant to 47
CFR, Part 2 and Part 15 of the Federal Communication Commission (FCC) rules. Operation is subject to the
following two conditions:
1. This device may not cause harmful interference
2. This device must accept any interference received including interferences that may cause
undesired operations.
CE Radiation Norm
This equipment has been tested and found to comply with the limits of the European Council Directive
99/5/EC on the approximation of the law of the member states relating to EN 300 328 V1.4.1 (2003-04), EN
301 489-1 V1.4.1 (2002-08) and EN 301 489-17 V1.2.1 (2002-08) and EN 60950.
FCC & CE Compliance Statement
These limits are designed to provide reasonable protection against radio interference in a residential
environment. This equipment can generates, uses and radiate radio frequency energy and, if not installed
and used in accordance with the instructions, may cause harmful interference to radio communications.
However, there is no guarantee that interference will not occur in a particular installation. If this equipment
does cause harmful interference to radio or television reception, which is found by turning the equipment ON
and OFF, the user is encouraged to try to reduce the interference by one or more of the following measures:
• Reorient or relocate the receiving antenna
• Increase the separation between the equipment and the receiver
• Connect the equipment into an outlet on a circuit different from that to which the receiver is connect to
• Consult a dealer or an experienced technician for assistance
CAUTION!
The Federal Communication Commission warns the user that changes or modifications to the unit not
expressly approved by the party responsible for compliance could void the user’s authority to operate the
equipment.
4 Ports 11g Wireless ADSL2/2+ Router ii

Contents
COPYRIGHT......................................................................................................................................................I
CHAPTER 1 INTRODUCTION.........................................................................................................................1
1.1 Features ...................................................................................................................................................... 2
1.2 Scope ..........................................................................................................................................................5
1.3 Audience...................................................................................................................................................... 6
1.4 Document Structure..................................................................................................................................... 7
1.5 System Requirement...................................................................................................................................8
1.6 Packet Contents .......................................................................................................................................... 9
CHAPTER 2 KNOWING THE 4 PORTS 11G WIRELESS ADSL2/2+ ROUTER...........................................10
2.1 Front Panel:...............................................................................................................................................10
2.2 Back Panel: ............................................................................................................................................... 11
2.3 Connection Mechanism:............................................................................................................................ 12
CHAPTER 3 SETTING UP THE TCP/IP IN WINDOWS.................................................................................14
3.1 Windows ME / 98 ......................................................................................................................................15
3.2 Windows 2000........................................................................................................................................... 16
3.3 Windows XP .............................................................................................................................................. 17
3.4 Checking TCP/IP Configuration ................................................................................................................ 18
CHAPTER 4 DEVICE ADMINISTRATION......................................................................................................21
4.1 Login.......................................................................................................................................................... 22
4.2 Setup Wizard.............................................................................................................................................25
4.3 Tools .......................................................................................................................................................... 34
4.3.1 Tools – System Commands.................................................................................................................... 35
4.3.2 Tools – Remote Log ............................................................................................................................... 37
4.3.3 Tools – User Management ..................................................................................................................... 39
4.3.4 Tools – Update Gateway ........................................................................................................................ 41
4.3.4.1 Update Gateway Procedure................................................................................................................42
4.3.5 Tools – System Log ................................................................................................................................ 44
4.3.6 Tools – Ping Test .................................................................................................................................... 45
4.3.6.1 Ping Test Procedure............................................................................................................................46
4.3.7 Tools – ATM Test .................................................................................................................................... 47
4.4 Advanced................................................................................................................................................... 48
4.4.1 Advanced – Advanced ............................................................................................................................ 49
4.4.2 Advanced – SNMP ................................................................................................................................. 51
4.4.3 Advanced – UPnP .................................................................................................................................. 53
4 Ports 11g Wireless ADSL2/2+ Router iii

4.4.3.1 Configure UPnP ..................................................................................................................................54
4.4.4 Advanced – SNTP .................................................................................................................................. 55
4.4.4.1 SNTP Configuration Procedure........................................................................................................... 57
4.4.5 Advanced – TR-069................................................................................................................................ 58
4.4.5.1 Configure TR-069................................................................................................................................60
4.4.6 Advanced – Port Forwarding.................................................................................................................. 61
4.4.6.1 Port Forwarding Configuration Procedure........................................................................................... 63
4.4.6.2 Port Forwarding – New IP ................................................................................................................... 66
4.4.6.3 Port Forwarding – DMZ....................................................................................................................... 67
4.4.6.3.1 DMZ Configuration Procedure ......................................................................................................... 68
4.4.6.4 Port Forwarding – Custom Port Forwarding........................................................................................ 69
4.4.7 Advanced – IP Filter ...............................................................................................................................71
4.4.7.1 IP Filters Configuration Procedure ...................................................................................................... 72
4.4.7.2 IP Filters – Custom IP Filters............................................................................................................... 75
4.4.8 Advanced – TR-068................................................................................................................................ 77
4.4.8.1 Create Temporary User Account (WAN-Side)..................................................................................... 78
4.4.9 Advanced – Routing ...............................................................................................................................79
4.4.9.1 Dynamic Routing Configuration Procedure......................................................................................... 83
4.4.9.2 Static Routing Configuration Procedure.............................................................................................. 84
4.4.10 Advanced – DDNS ............................................................................................................................... 86
4.4.10.1 Enable Dynamic DNS........................................................................................................................ 87
4.4.11 Advanced – IGMP................................................................................................................................. 88
4.4.11.1 Configure WAN Interface as Upstream IGMP Proxy......................................................................... 90
4.4.11.2 Configure LAN Interface as Upstream IGMP Proxy.......................................................................... 92
4.4.12 Advanced – Web Access Control......................................................................................................... 94
4.4.12.1 Enable Web Access Control (WAN-Side)..........................................................................................95
4.4.13 Advanced – Bridge Filter ...................................................................................................................... 96
4.4.13.1 Bridge Filters Configuration Procedure................................................................................
............. 98
4.4.14 Advanced – Web Filters ....................................................................................................................... 99
4.4.15 Advanced – Policy Routing ................................................................................................................ 100
4.4.15.1 Example – Traffic Segregation ........................................................................................................ 103
4.4.15.2 Example – Handling DNS Packets.................................................................................................. 104
4.4.16 Advanced – Ingress ............................................................................................................................ 105
4.4.16.1 Ingress Untrusted Mode..................................................................................................................106
4.4.16.2 Ingress Layer 2 Configuration ......................................................................................................... 107
4.4.16.2.1 Ingress Layer 2 Priority Bits to CoS Configuration....................................................................... 108
4.4.16.3 Ingress Layer 3 Configuration ......................................................................................................... 109
4.4.16.3.1 Ingress Layer 3 Configuration ...................................................................................................... 110
4.4.16.4 Ingress Static Configuration .............................................................................................................111
4.4.16.4.1 Ingress Static Configuration Procedures...................................................................................... 112
4.4.16.5 Ingress Payload Database Configuration........................................................................................ 113
4.4.16.6 WLAN Ingress Support.................................................................................................................... 115
4 Ports 11g Wireless ADSL2/2+ Router iv

4.4.17 Advanced – Egress ............................................................................................................................ 116
4.4.17.1 No Egress Mode.............................................................................................................................. 117
4.4.17.2 Egress Layer 2 Configuration.......................................................................................................... 118
4.4.17.3 Egress Layer 3 Configuration.......................................................................................................... 119
4.4.17.4 WLAN Egress Support .................................................................................................................... 120
4.4.18 Advanced – Shaper ............................................................................................................................ 121
4.4.18.1 HTB Queue Discipline Enabled....................................................................................................... 122
4.4.19 Advanced – SSH Access Control....................................................................................................... 123
4.5 Advanced – LAN...................................................................................................................................... 124
4.5.1 Advanced – LAN – LAN Configuration................................................................................................. 125
4.5.1.1 LAN Configuration Procedures ......................................................................................................... 126
4.5.1.2 LAN Group Configuration..................................................................................................................128
4.5.1.2.1 LAN Group Configuration – Unmanaged ....................................................................................... 131
4.5.1.2.2 LAN Configuration – Obtain an IP Address Automatically ............................................................. 132
4.5.1.2.3 LAN Configuration – PPP IP Address ............................................................................................ 133
4.5.1.2.4 LAN Configuration – Use The Following Static IP Address............................................................ 134
4.5.2 Advanced – LAN – Ethernet Switch ..................................................................................................... 137
4.5.3 Advanced – LAN – LAN Clients ........................................................................................................... 139
4.5.3.1 LAN Clients Configuration Procedure ............................................................................................... 140
4.5.4 Advanced – LAN – LAN Isolation.........................................................................................................141
4.5.4.1 LAN Isolation Configuration Procedure............................................................................................. 142
4.5.5 Advanced – WAN ................................................................................................................................. 143
4.5.5.1 Advanced – WAN – ADSL................................................................................................................. 144
4.5.5.2 Advanced – WAN Connection........................................................................................................... 145
4.5.5.2.1 Advanced – WAN – New Connection............................................................................................. 146
4.5.5.2.1.1 Advanced – WAN – Host Trigger ................................................................................................147
4.5.5.2.2 New Connection – PPPoE Connection Setup ...............................................................................148
4.5.5.2.2.1 PPPoE Configuration Procedures............................................................................................... 152
4.5.5.2.3 New Connection – PPPoA Connection Setup..............................................................................
.. 156
4.5.5.2.3.1 PPPoA Configuration Procedures............................................................................................... 160
4.5.5.2.4 New Connection – Static Connection Setup .................................................................................. 164
4.5.5.2.4.1 Static Configuration Procedures..................................................................................................168
4.5.5.2.5 New Connection – DHCP Connection Setup.................................................................................172
4.5.5.2.5.1 DHCP Configuration Procedures ................................................................................................ 175
4.5.5.2.6 New Connection – Bridge Connection Setup................................................................................. 179
4.5.5.2.6.1 Bridge Configuration Procedures ................................................................................................ 182
4.5.5.2.7 New Connection - CLIP Connection Setup....................................................................................186
4.5.5.2.7.1 CLIP Configuration Procedures ..................................................................................................189
4.6 Advanced – Wireless ............................................................................................................................... 193
4.6.1 Save Your Changes.............................................................................................................................. 194
4.6.2 Wireless – Setup .................................................................................................................................. 195
4.6.2.1 Wireless – Setup – User Isolation ..................................................................................................... 197
4 Ports 11g Wireless ADSL2/2+ Router v

4.6.3 Wireless – Security............................................................................................................................... 198
4.6.3.1 Wireless – Security – None...............................................................................................................199
4.6.3.2 Wireless – Security – WEP ............................................................................................................... 200
4.6.3.2.1 How to configure WEP? ................................................................................................................. 202
4.6.3.3 Wireless – Security – 802.1x............................................................................................................. 203
4.6.3.4 Wireless – Security – WPA................................................................................................................ 204
4.6.4 Wireless – Configuration ...................................................................................................................... 206
4.6.4.1 Configure Multiple SSID .................................................................................................................... 209
4.6.5 Wireless – Management....................................................................................................................... 211
4.6.5.1 Wireless – Management – Access List ............................................................................................. 212
4.6.5.1.1 Access List Configuration Procedure ............................................................................................. 213
4.6.5.1.2 Wireless – Management – Associated Stations.............................................................................214
4.6.6 Wireless – WDS ................................................................................................................................... 215
4.7 Advanced – Status...................................................................................................................................217
4.7.1 Status – Network Statistic..................................................................................................................... 218
4.7.1.1 Status – Network Statistic – Ethernet................................................................................................219
4.7.1.2 Status – Network Statistic – DSL....................................................................................................... 220
4.7.1.3 Status – Network Statistic – Wireless................................................................................................ 221
4.7.2 Status – DDNS Status .......................................................................................................................... 222
4.7.3 Status – DHCP Clients ......................................................................................................................... 223
4.7.4 Status – ADSL Status ........................................................................................................................... 224
4.7.5 Status – Info ......................................................................................................................................... 225
4.7.6 Status – WDS Report ........................................................................................................................... 226
APPENDIX A: ROUTER TERMS ................................................................................................................. 227
APPENDIX B: FREQUENTLY ASKED QUESTIONS.................................................................................. 229
APPENDIX C: TROUBLESHOOTING GUIDE.............................................................................................233
APPENDIX D: UPNP SETTING ON WINDOWS XP (OPTIONAL).............................................................. 236
APPENDIX E: GLOSSARY..........................................................................................................................240
4 Ports 11g Wireless ADSL2/2+ Router vi

Chapter 1 Introduction
Congratulations on your purchase of this outstanding 4 Ports 11g Wireless ADSL2/2+ Router. This
device is an IEEE 802.11g Wireless and 4 Port Switch built-in ADSL2/2+ Router that allows
ADSL/ADSL2/ADSL2+ connectivity while providing Wireless LAN capabilities for residential, industries and
SOHO environments. Wireless-G or the so-called 11g is the upcoming 54Mbps wireless networking standard
that’s almost 5 times faster than the widely deployed Wireless-B or the so-called 11b products found in homes,
businesses, and public wireless hotspots around the world.
ADSL2/2+ is a transmission technology used to carry user data over a single twisted-pair line between
the Central Office and the Customer Premises. The downstream data rates can go up to 24 Mbps and the
upstream data rates can go up to 1Mbps with length reach up to 22Kft for ADSL2/2+ connection and 54Mbps
transfer data rate for the 11g connection. This device allows ADSL2/2+ connectivity while providing Wireless
LAN capabilities for home or office users. This asymmetric nature lends itself to applications such as Internet
access and video delivery.
With minimum setup, you can install and use the router within minutes.
4 Ports 11g Wireless ADSL2/2+ Router 1

1.1 Features
ADSL Standards Compliance
Full rate ANSI T1.413 Issue2, ITU-T G.992.1 and ITU-T G.992.2 standards compliant.
ITU G.992.3, ITU G.992.5 and READSL2 ADSL2/2+ standards compliant.
Support Annex M and Annex L specification.
Downstream and Upstream data rates up to 24Mbps and 1Mbps.
Reach length up to 22Kft.
Support Dying Gasp functionality.
ATM and PPP Protocols
Support ATM ALL0, ALL2 & ALL5.
Support OAM F4/F5 loop back.
Support up to 8PVCs.
Multiple Protocols over AAL5 (RFC 2684 / RFC 1483).
Support Bridged and Routed Ethernet Encapsulation.
Classical IP over ATM (RFC2225 / RFC1577).
Support VC and LLC based Multiplexing.
Support PPPoA (RFC 2364) standard.
Support PPPoE (RFC 2516) standard.
Support UBR, CBR, rt-VBR and nrt-VBR Traffic shaping QoS.
Support TR-068 (VPI/VCI Auto-Detection functionality).
Support TR-069 (WAN-side CPE Remote Management features).
Network Protocols & Features
IP Routing – RIPv1 and RIPv2.
Support Static Routing.
DHCP Server, Relay and Client.
Support DNS Relay.
Support DDNS features.
Support SNMP functionality.
Support SNTP functionality.
Support IP QoS features.
Support IGMP functionality
IP Filter, Bridge Filter and Web Filter features supported.
Support Port Forwarding features.
Support DMZ functionality.
Support NAT and NAPT (PAT) functionality with extensive ALG supported.
Support IPSec, L2TP, PPTP Pass-Through.
Support VPN Pass-Through.
Built-in Firewall features.
4 Ports 11g Wireless ADSL2/2+ Router 2

Bridging
Support IEEE 802.1d Transparent Bridging.
Support IGMP Snooping.
Support WAN Bridge functionality.
Support MAC Learning Address features.
IEEE 802.11g Wireless Standards
IEEE 802.11b/g standards compliant.
Support data rates up to 54Mbps (Auto-Rate Capable).
Support 11g+ with data transmission rate up to 125Mbps (Optional)
Support OFDM (64QAM, 16QAM, QPSK, BPSK) and DSSS (DBPSK, DQPSK, CCK)
modulation.
Conforms to Wireless Ethernet Compatibility Alliance (WECA) Wireless Fidelity (Wi-Fi)
Standard.
Support WEP/WPA/WPA2/802.1X Encryption for data security.
Support AP Client features.
Support Wireless Access Control functionality.
Support Hidden SSID and Multiple SSID features.
Support WDS features.
Support WMM features.
Support 2.412GHZ ~ 2.484GHz frequency ranges.
Management
Web-based Configuration / Management.
Support FTP/TFTP/Telnet Management / Configuration.
Support Remote Access Management / Configuration.
Support SSH features.
Firmware upgrade and Reset to default via Web management.
Restore factory default setting via Web or hardware reset button.
WAN and LAN connection statistics.
Support Password Authentication.
Device System Log.
Built-in Diagnostic Test.
UPnP
Support UPnP functionality (Optional).
4 Ports 11g Wireless ADSL2/2+ Router 3

Ethernet Standards
Built-in 4 Ports 10/100Mbps Ethernet Switch which compliant with IEEE 802.3x standards
Automatic MDI/MDI-X crossover for 100BASE-TX and 10BASE-T ports.
Auto-negotiation and speed-auto-sensing support.
Port based VLAN supported in any combination (Optional).
4 Ports 11g Wireless ADSL2/2+ Router 4

1.2 Scope
This document provides the descriptions and usages for the 4 Ports 11g Wireless ADSL2/2+
Router’s Web pages that are used in the configuration and setting process. Both basic and advanced
descriptions and concepts are discussed. To help the reader understand more about these Web pages,
some questions and answers (Q&A) are appended after the definition of each Web page along with the
appendices at the end of the guide.
4 Ports 11g Wireless ADSL2/2+ Router 5

1.3 Audience
This document is prepared for use by those customers who purchase the 4 Ports 11g Wireless
ADSL2/2+ Router and using the provided or embedded firmware. It assumes the reader has a basic
knowledge of ADSL/ADSL2/ADSL2+ Wireless and networking.
4 Ports 11g Wireless ADSL2/2+ Router 6

1.4 Document Structure
Chapter 1: Introduction, provides a brief introduction to the product and user guide.
Chapter 2: Knowing The 4 Ports 11g Wireless ADSL2/2+ Router, provides device specifications
and hardware connection mechanism.
Chapter 3: Setting Up TCP/IP In Windows, provides Windows system Network’s configurations.
Chapter 4: Device Administration, describes the pages found under the Admin menu. These pages
allow the user to view, change, edit, update, and save the 4 Ports 11g Wireless
ADSL2/2+ Router’s configurations or settings.
Appendix A: Router Terms, provides an introduction to basic Router Terms.
Appendix B: Frequently Asked Questions, is a compilation of useful questions regarding the 4 Ports
11g Wireless ADSL2/2+ Router.
Appendix C: Troubleshooting Guide, is a compilation of questions and answers relating to
common problems dealing with Windows networking and the 4 Ports 11g Wireless
ADSL2/2+ Router Configurations.
Appendix D: UPnP Setting, provides UPnP configurations procedures under Windows XP.
Appendix E: Glossary, provides definitions of terms and acronyms of this 4 Ports 11g Wireless
ADSL2/2+ Router.
4 Ports 11g Wireless ADSL2/2+ Router 7

1.5 System Requirement
Check and confirm that your system confirm the following minimum requirements:
Personal computer ( PC/Notebook ).
Pentium III compatible processor and above.
Ethernet LAN card or IEEE 802.11b or IEEE 802.11g Wireless adaptor installed with TCP/IP
protocol.
USB Port ( Optional )
64 MB RAM or more.
50 MB of free disk space ( Minimum ).
Internet Browser.
CD-ROM Drive.
4 Ports 11g Wireless ADSL2/2+ Router 8

1.6 Packet Contents
The 4 Ports 11g Wireless ADSL2/2+ Router package contains the following items:
One 4 Ports 11g Wireless ADSL2/2+ Router
One Power Adapter
One RJ-11 ADSL Cable
One CAT-5 Ethernet Cable
One CD-ROM ( Driver / Manual / Quick Setup Guide )
If any of the above items are damaged or missing, please contact your dealer immediately.
4 Ports 11g Wireless ADSL2/2+ Router 9

Chapter 2 Knowing The 4 Ports 11g Wireless ADSL2/2+ Router
2.1 Front Panel:
The 4 Ports 11g Wireless ADSL2/2+ Router’s LEDs indicators display information about the
device’s status.
PWR Lights up when 4 Ports 11g Wireless ADSL2/2+ Router is powered on.
WL/ACT
1
2
3
4
ADSL
PPP Lights up when a PPP connection is established.
Lights up when Wireless system is ready.
Blinking when 4 Ports 11g Wireless ADSL2/2+ Router is sending/receiving data.
Blinking when Port 1 of this 4 Ports 11g Wireless ADSL2/2+ Router is Sending or
Receiving data.
Blinking when Port 2 of this 4 Ports 11g Wireless ADSL2/2+ Router is Sending or
Receiving data.
Blinking when Port 3 of this 4 Ports 11g Wireless ADSL2/2+ Router is Sending or
Receiving data.
Blinking when Port 4 of this 4 Ports 11g Wireless ADSL2/2+ Router is Sending or
Receiving data.
Lights up when a successful ADSL2/2+ connection is established.
Blinking when 4 Ports 11g Wireless ADSL2/2+ Router is sending/receiving data.
4 Ports 11g Wireless ADSL2/2+ Router 10
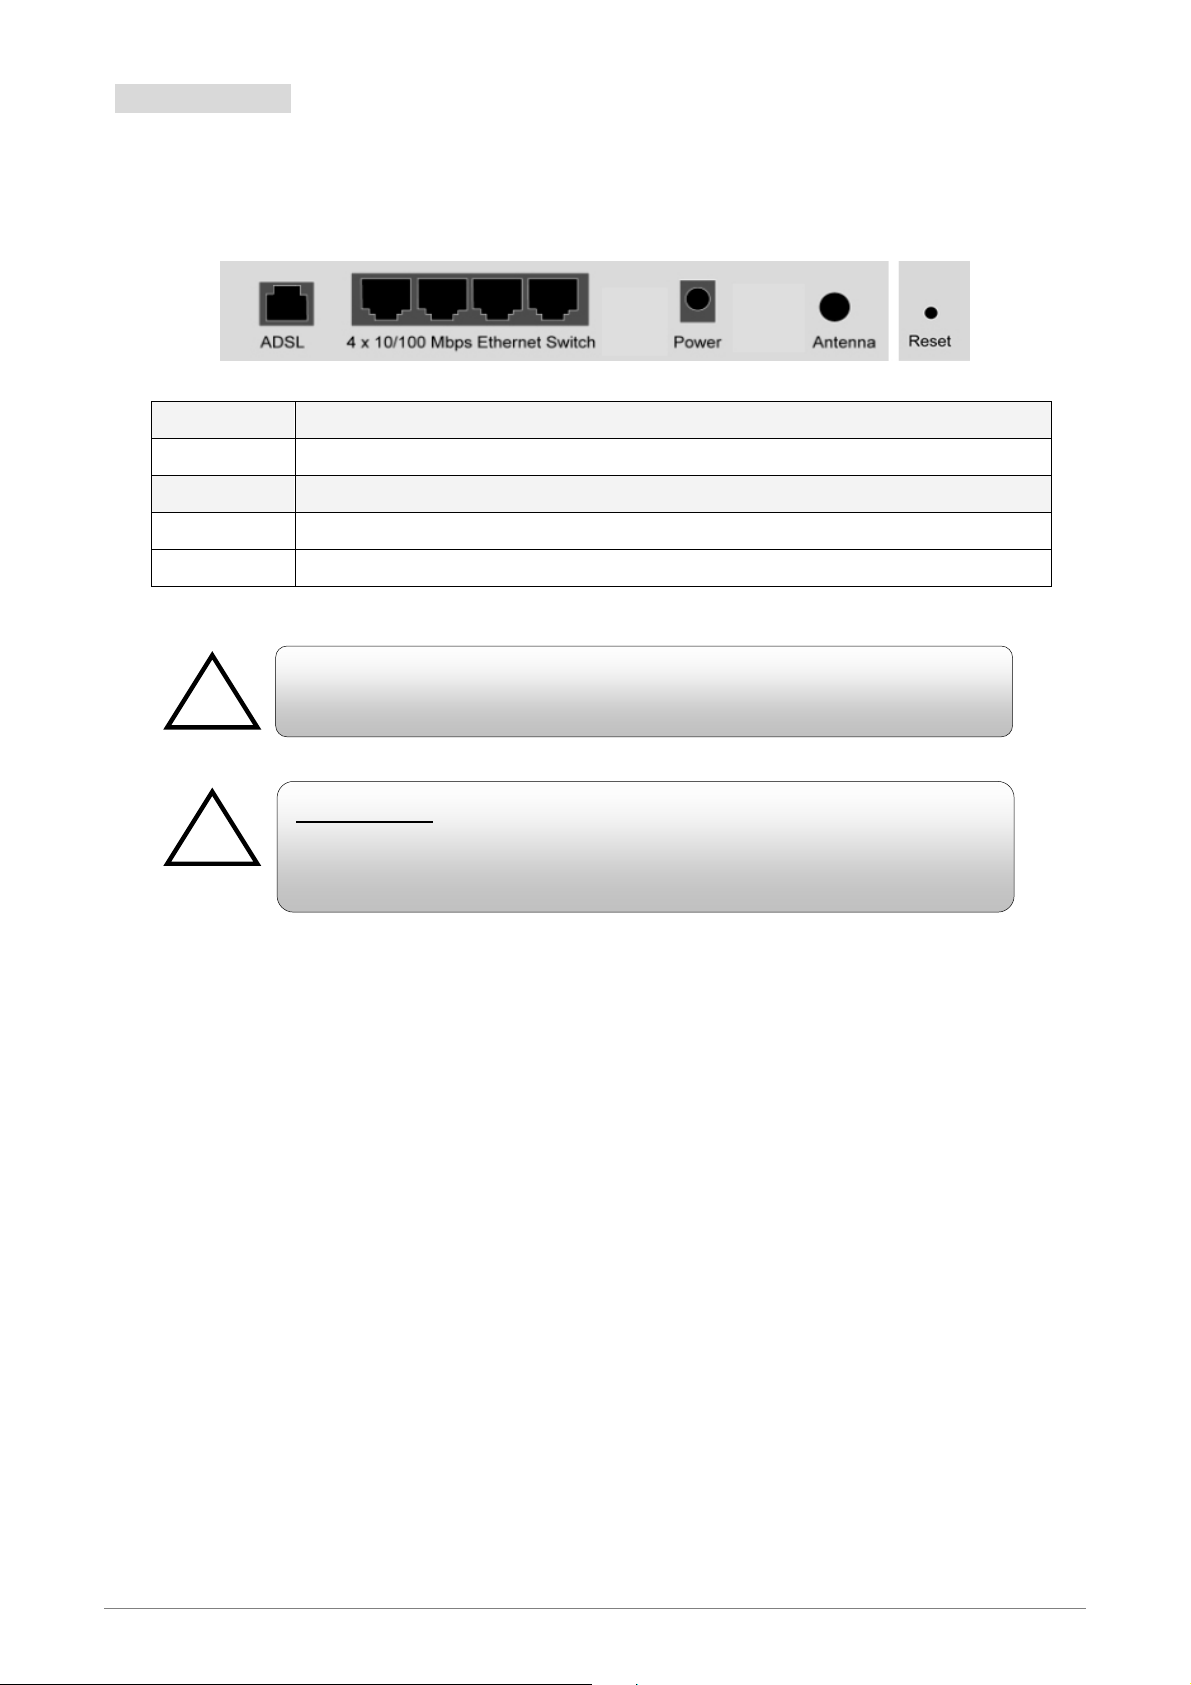
2.2 Back Panel:
A
r
!
!
The back panel of the 4 Ports 11g Wireless ADSL2/2+ Router contains ADSL, Ethernet Switches, ,
Power Adapter connection, 2.4GHz Dipole Antenna connector and Reset button.
ADSL Port for connecting to the ADSL/ADSL2/ADSL2+ Service Provider.
Ports 1~4 Four 10/100Mbps Ethernet Ports for connecting to the network devices.
Power Power adapter connector.
Antenna 2.4GHz dipole Antenna
Reset Restore the 4-ports 11g wireless ADSL 2/2+ Router to factory default setting.
ll the Ethernet port of the 4 Ports 11g Wireless ADSL2/2+ Route
supports auto-crossover capability.
RESET Button:
Reboot & Restore the 4 Ports 1 1g Wir eless ADSL2/2+ Router to factory
defaults.
Resetting Factory Defaults:
The reboot and restore to factory defaults feature will set the device to its factory default configuration by
resetting the 4 Ports 11g Wireless ADSL2/2+ Router.
To Reset the 4 Ports 11g Wireless ADSL2/2+ Router:
Ensure that the device is powered on.
Press the Reset button for 10~15 seconds and release. The LED indicators will turns OFF and ON
again indicates that the reset is in progress. Do not power off the device during the reset process.
Reset is completed when the LED indicator return to steady green. The default settings are now
restored.
4 Ports 11g Wireless ADSL2/2+ Router 11
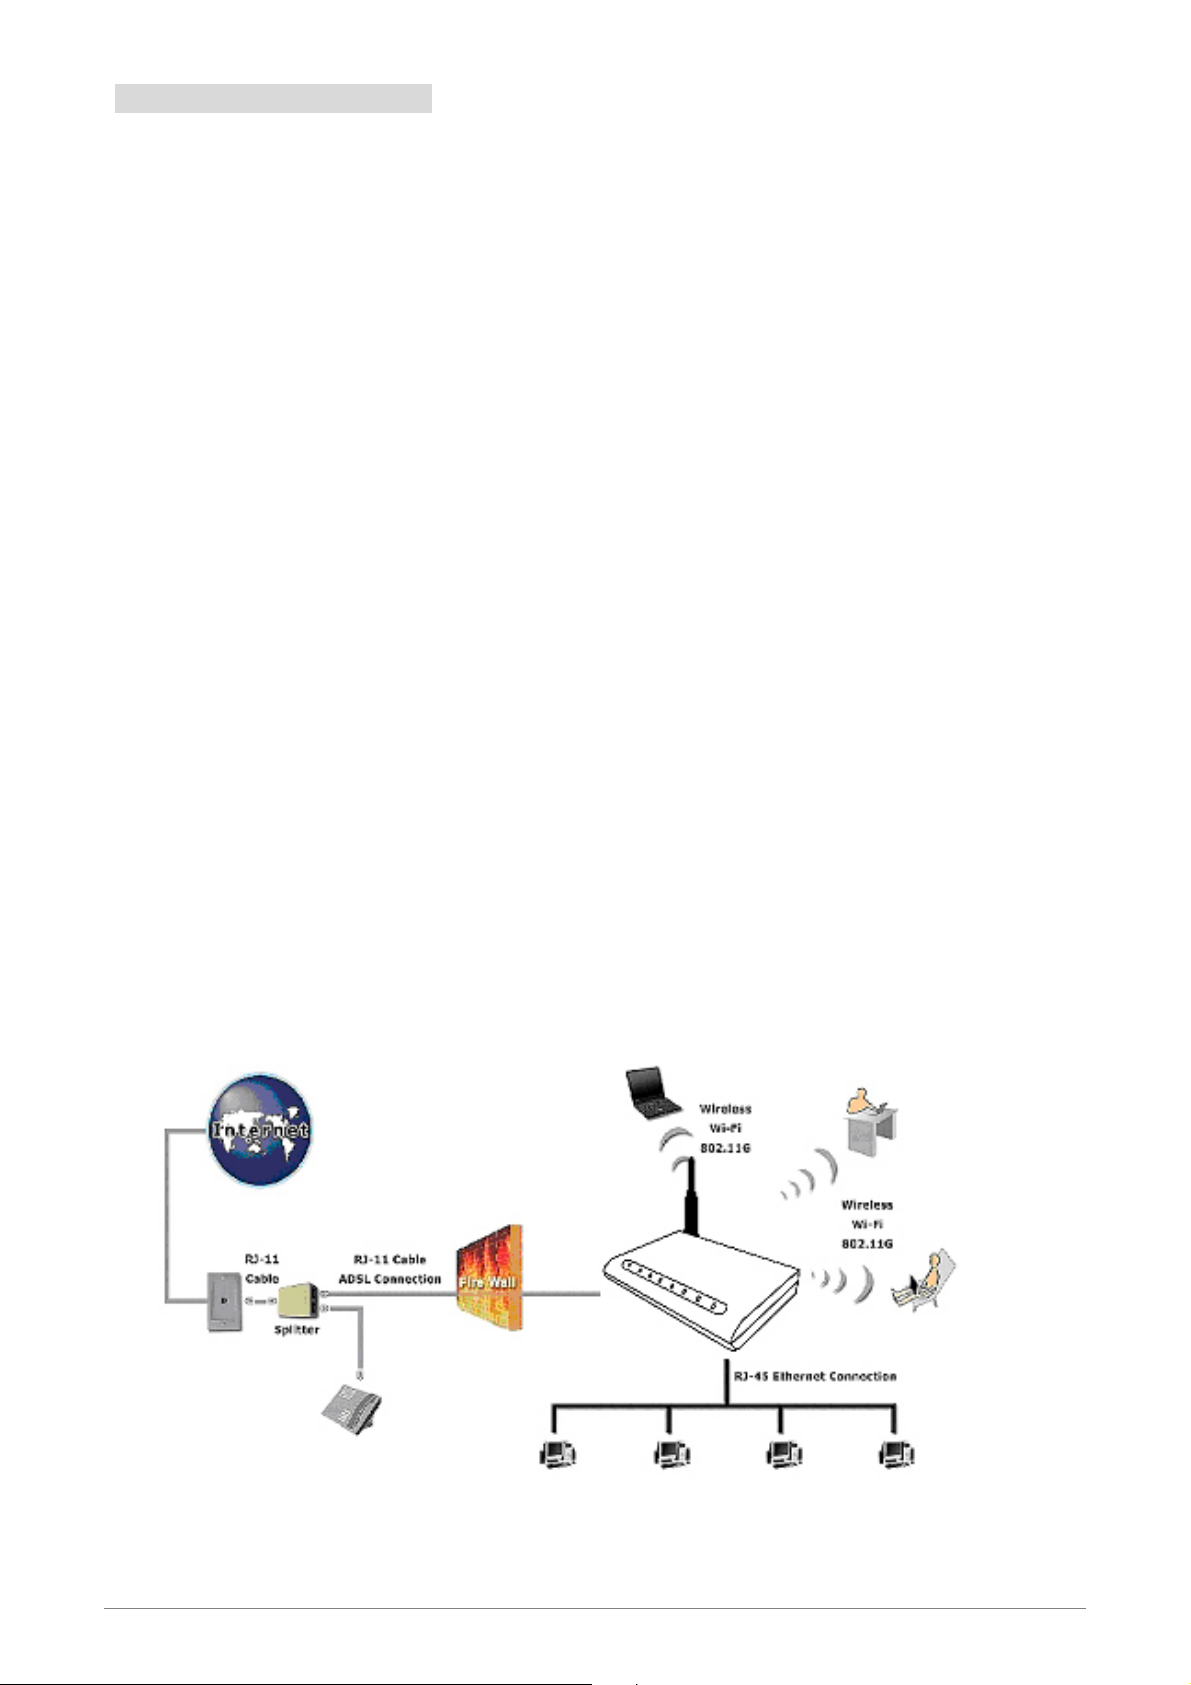
2.3 Connection Mechanism:
This section describes the hardware connection mechanism of 4 Ports 11g Wireless ADSL2/2+ Router
on your Local Area Network (LAN) connected to the Internet, how to configure your 4 Ports 11g Wireless
ADSL2/2+ Router for Internet access or how to manually configure your Internet connection.
You need to prepare the following items before you can establish an Internet connection through your 4
Ports 11g Wireless ADSL2/2+ Router:
1. A computer/notebook which must have an installed Ethernet Adaptor and an Ethernet Cable, or
2. A computer/notebook which have Wireless-b or Wireless-g wireless adaptor properly installed.
3. ADSL/ADSL2/ADSL2+ service account and configuration information provided by your Internet
Service Provider (ISP). You will need one or more of the following configuration parameters to
connect your 4 Ports 11g Wireless ADSL2/2+ Router to the Internet:
a. VPI/VCI parameters
b. Multiplexing Method or Protocol Type or Encapsulation Type
c. Host and Domain Names
d. ISP Login Name and Password
e. ISP Domain Name Server (DNS) Address
f. Fixed or Static IP Address.
Figure below shows the overall hardware connection mechanism of your 4 Ports 11g Wireless ADSL2/2+
Router.
4 Ports 11g Wireless ADSL2/2+ Router 12
Following are the steps to properly connect your 4 Ports 11g Wireless ADSL2/2+ Router:
A
Au
!
!
1. Turn off your computer/notebook.
2. Connect the ADSL port of your 4 Ports 11g Wireless ADSL2/2+ Router to the wall jack of the
ADSL/ADSL2/ADSL2+ Line with a RJ-11 cable.
3. Connect the Ethernet cable (RJ-45) from your 4 Ports 11g Wireless ADSL2/2+ Router (Switch ) to
the Ethernet Adaptor in your computer.
4. Connect the Power adaptor to the 4 Ports 11g Wireless ADSL2/2+ Router and plug it into a Power
outlet.
The Power light will lit after turning on the 4 Ports 11g Wireless
DSL2/2+ Router.
to and self-diagnostic process will turn the LED indicators ON and
OFF during the process.
Use the Power Adaptor exclusively in combinatio n with the equipment
5. Turn on your computer.
6. Refer to the next section to setup or configure your system’s Network Adaptor.
supplied and do not use any other kind of power adaptor for the
equipment.
4 Ports 11g Wireless ADSL2/2+ Router 13

Chapter 3 Setting up the TCP/IP in Windows
y
k
The instruction in this chapter will help you configure your computers to be able to communicate with this
4 Ports 11g Wireless ADSL2/2+ Router.
Computers access the Internet using a protocol called TCP/IP (Transmission Control Protocol/ Internet
Protocol). Each computer/notebook on your network must have TCP/IP installed and selected as its
networking protocol. If a Network Interface Card (NIC) is already installed in your PC, then TCP/IP is probably
already installed as well.
The following description assumes 4 Ports 11g Wireless ADSL2/2+ Router been set to factory default. (If
not, please hold the reset button down for 5~10 seconds). The default of the 4 Ports 11g Wireless ADSL2/2+
Router’s LAN IP is 192.168.1.1.
Follow the procedures below to set your computer/notebook function as a DHCP Client.
!
Restart and Reboot your Windows system might be necessary after se tting your
computer function as a DHCP Client. In order to properl
“OK” to restart your Windows system.
activate your choice, clic
4 Ports 11g Wireless ADSL2/2+ Router 14
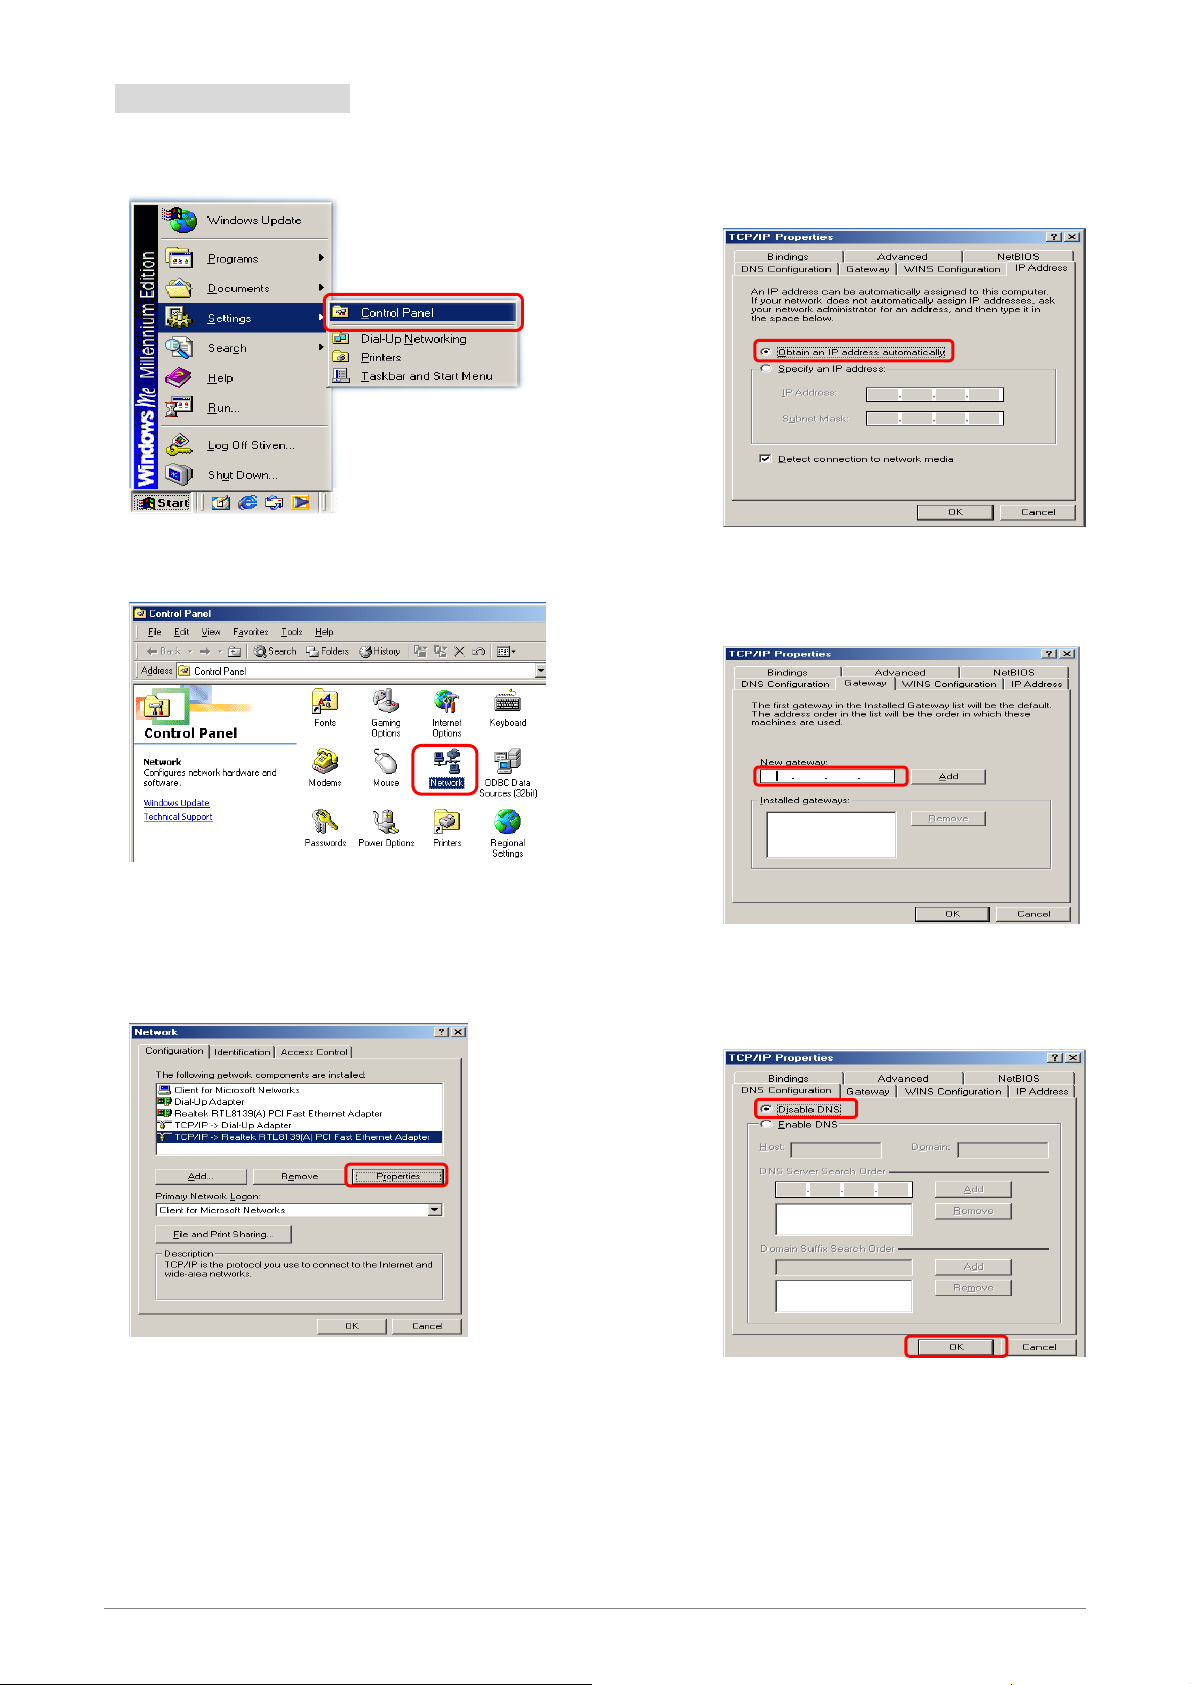
3.1 Windows ME / 98
Step 1: Click Start→Settings→Control Panel.
Step 2: Double-click the Network icon.
Step 4: Go to IP Address icon and select
Obtain an IP address.
Step 5: Go to Gateway icon and erase all
previous setting.
Step 3: Go to Configuration icon, select network
adapter installed and click Properties.
1
2
Step 6: Go to DNS Configuration icon, select
Disable DNS and click OK.
4 Ports 11g Wireless ADSL2/2+ Router 15
2
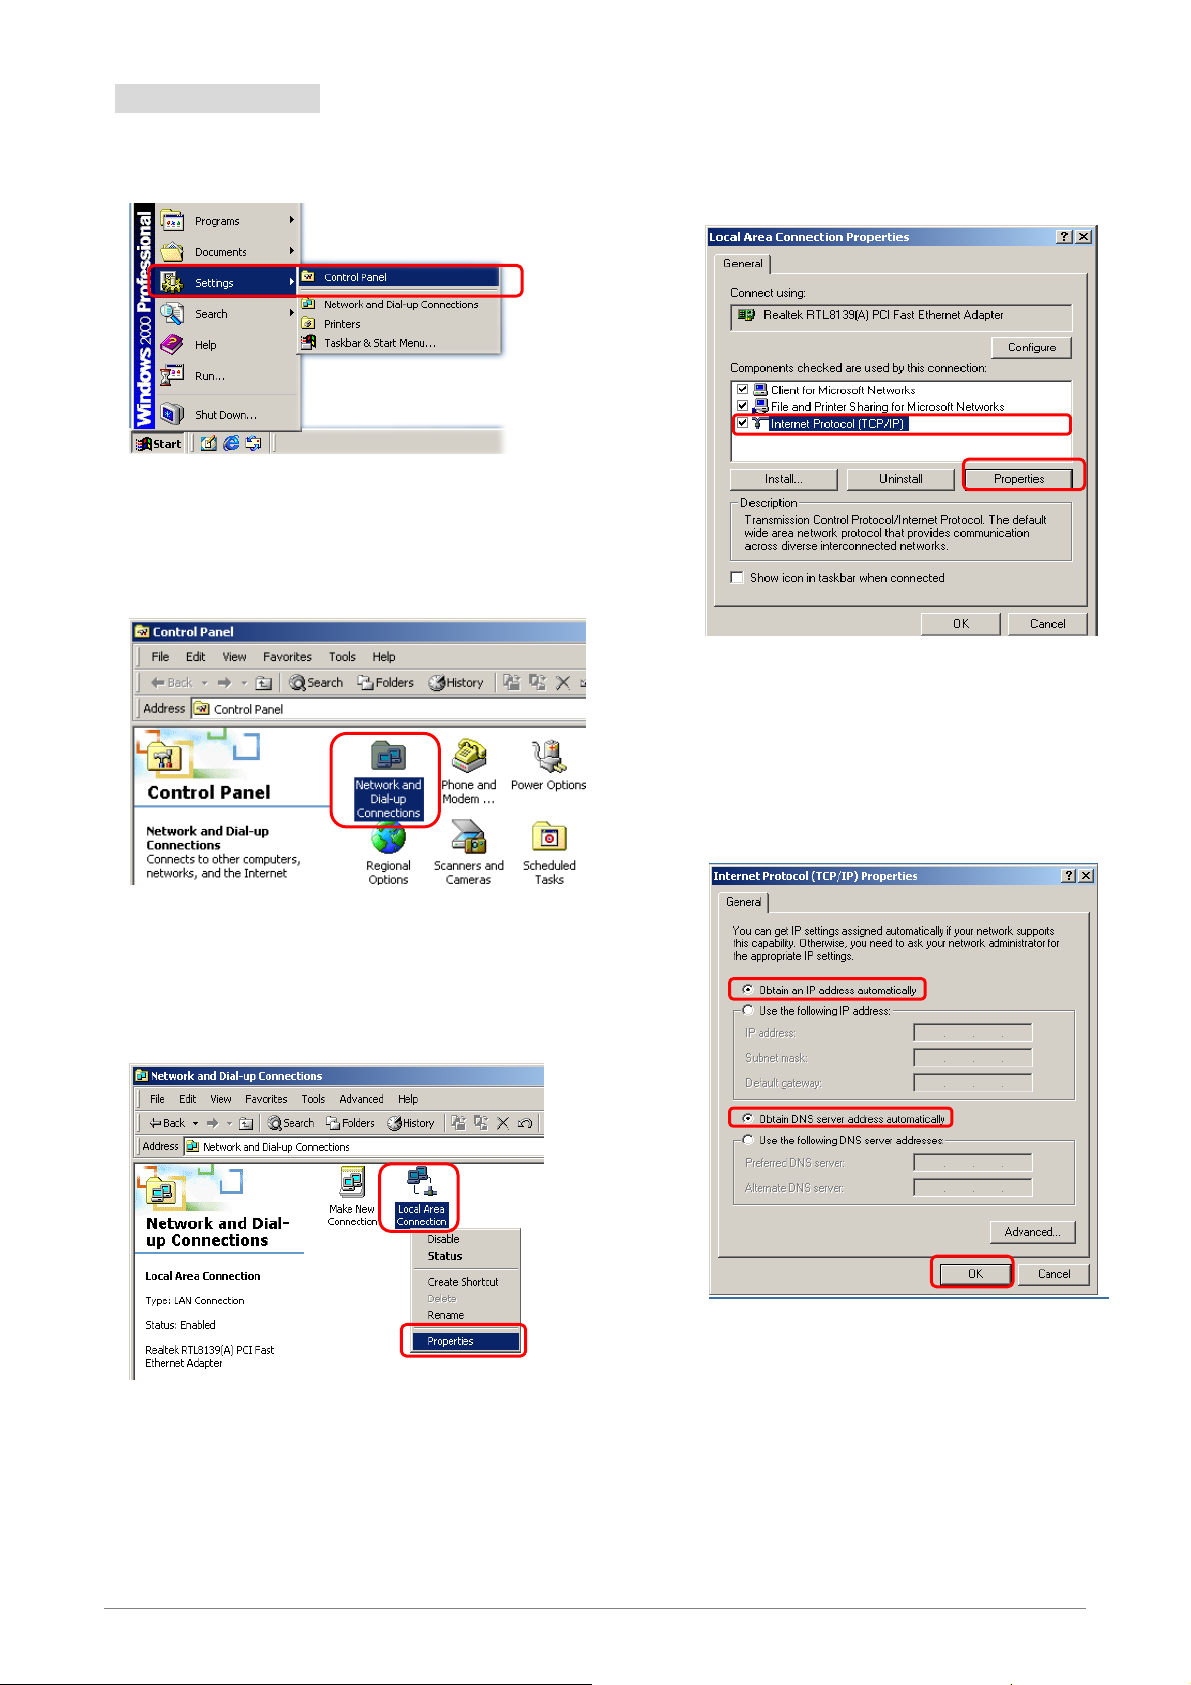
3.2 Windows 2000
k
Step 1: Click Start→Settings→Control Panel.
Step 4: Select Internet Protocol (TCP/IP) and clic
Properties.
1
Step 2: Double-click the Network and Dial-up
Connections.
Step 3: Right Click the Local Area Connection and
select Properties.
2
Step 5: Select Obtain an IP address automatically
and DNS server address automatically.
Then, click OK.
1
2
1
3
2
4 Ports 11g Wireless ADSL2/2+ Router 16
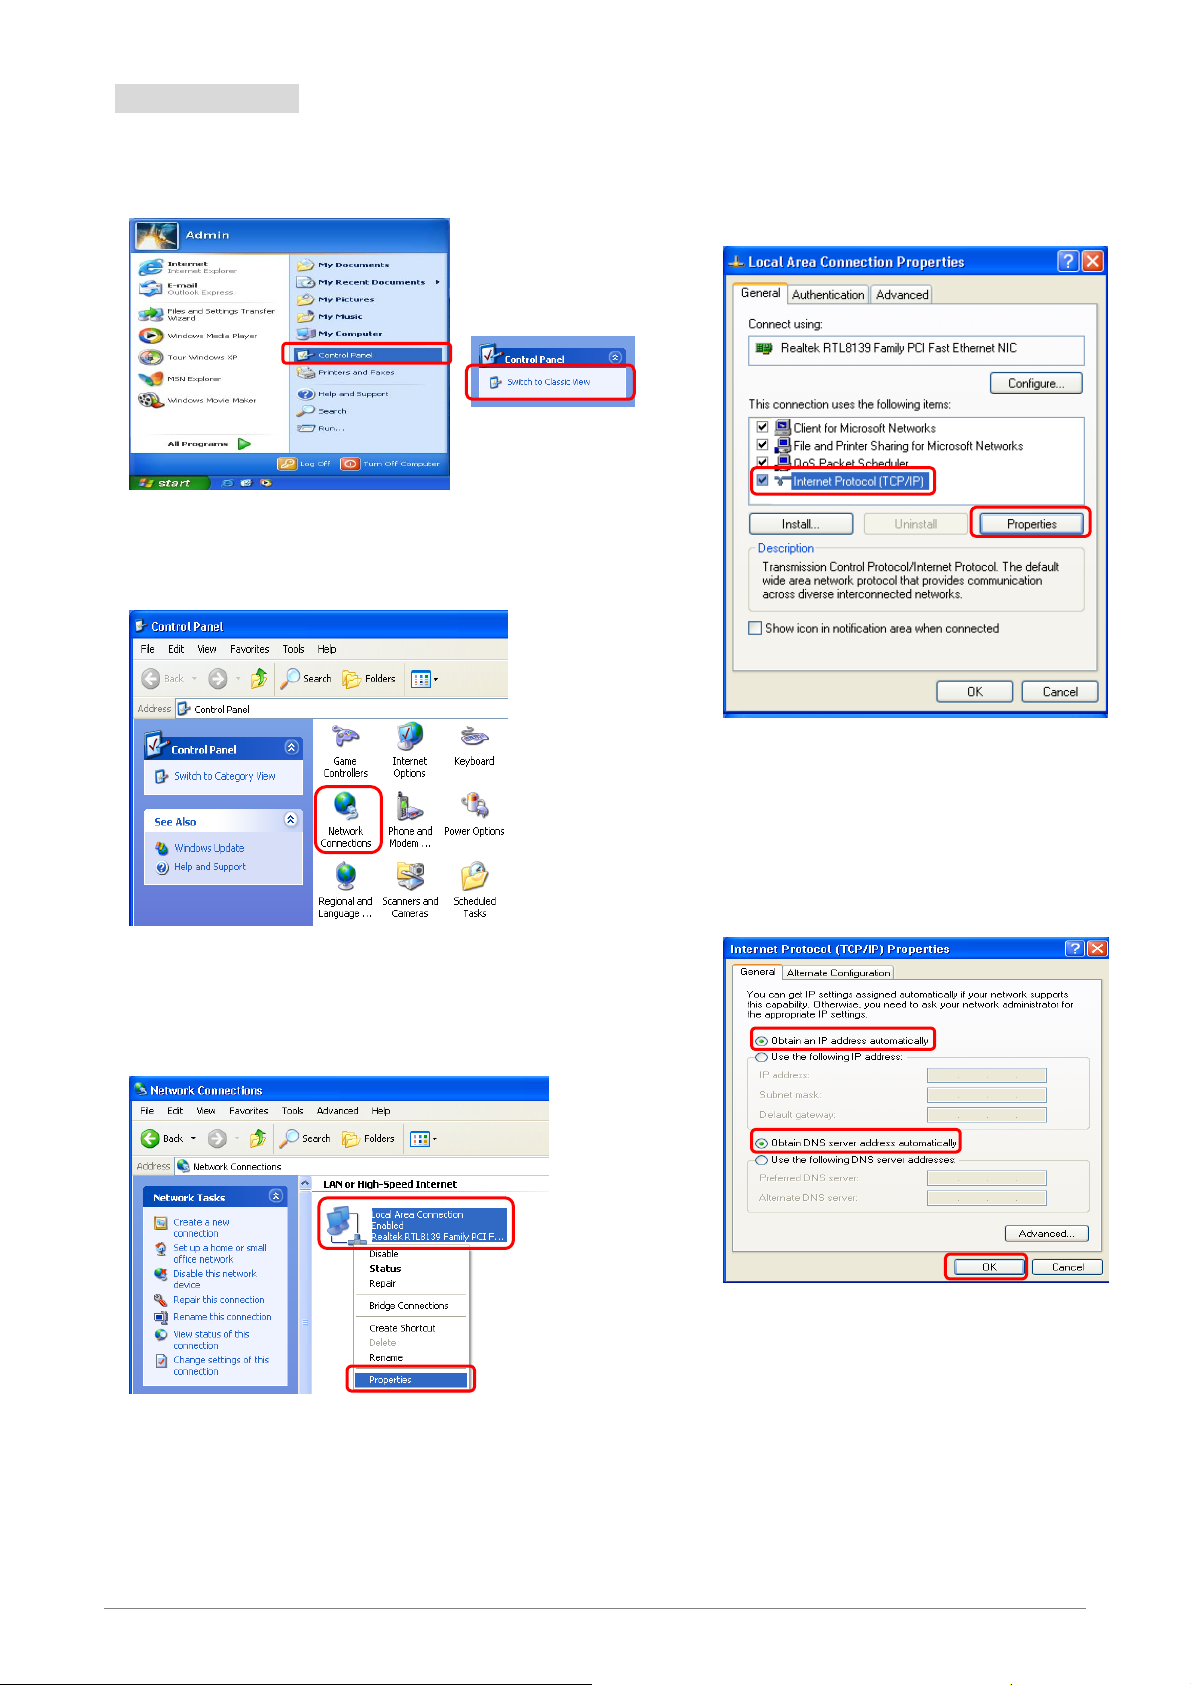
3.3 Windows XP
Step 1: Click Start→Control Panel→Classic View.
Step 2: Double-click the Network Connections.
Step 4: Go to General icon, select Internet Protocol
(TCP/IP) and click Properties.
1
2
Step 3: Right Click on the Local Area Connection and
select Properties.
1
Step 5: Go to General icon, select Obtain an IP
address automatically and DNS server
address automatically.
Then, click OK.
1
2
3
4 Ports 11g Wireless ADSL2/2+ Router 17
2
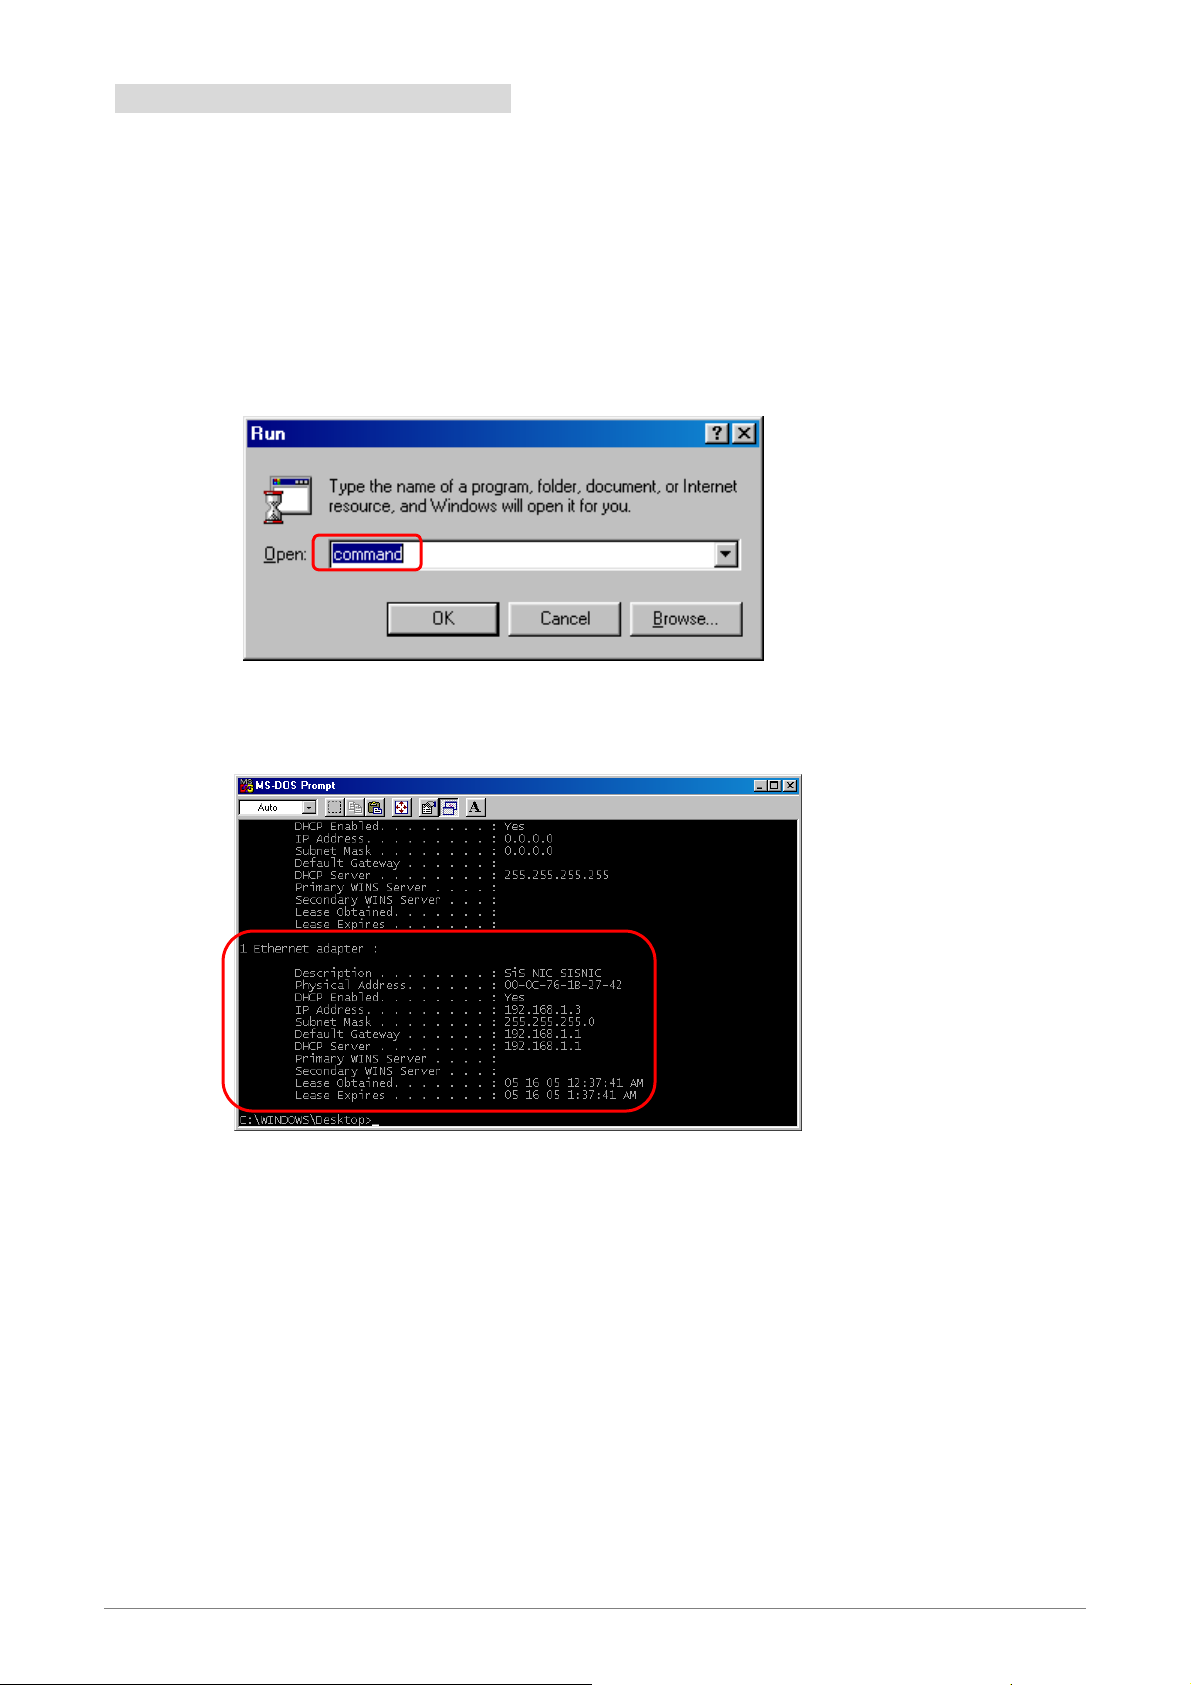
3.4 Checking TCP/IP Configuration
After your PC is configured and the system has rebooted, you can check the TCP/IP configuration using
the following utility provided by your Windows system:
A. Windows 98/ME:
1. Click on “Start” and “Run”.
2. In the open field, enter “Command”, then press “OK”.
3. In the command prompt, type “Winipcfg”, and then press “Enter”. All the Ethernet adapter
information will be shown in the appears Windows. Check if you can get the following setting:
The IP Address as 192.168.1.x
The Subnet Mask as 255.255.255.0
The Default Gateway as 192.168.1.1
4. Type “Exit” to end up the MS-DOS Prompt.
4 Ports 11g Wireless ADSL2/2+ Router 18

B. Windows 2000:
1. Click “Start” and “Run”.
2. In the open field, enter “cmd” then click “OK”.
3. In the command prompt, type “ipconfig /all”, then press “Enter”.
All the Ethernet adapter information will be shown in the appear Windows. Check if you can
get the following setting:
The IP Address as 192.168.1.x
The Subnet Mask as 255.255.255.0
The Default Gateway as 192.168.1.1
4. Type “Exit” to end up the process.
4 Ports 11g Wireless ADSL2/2+ Router 19
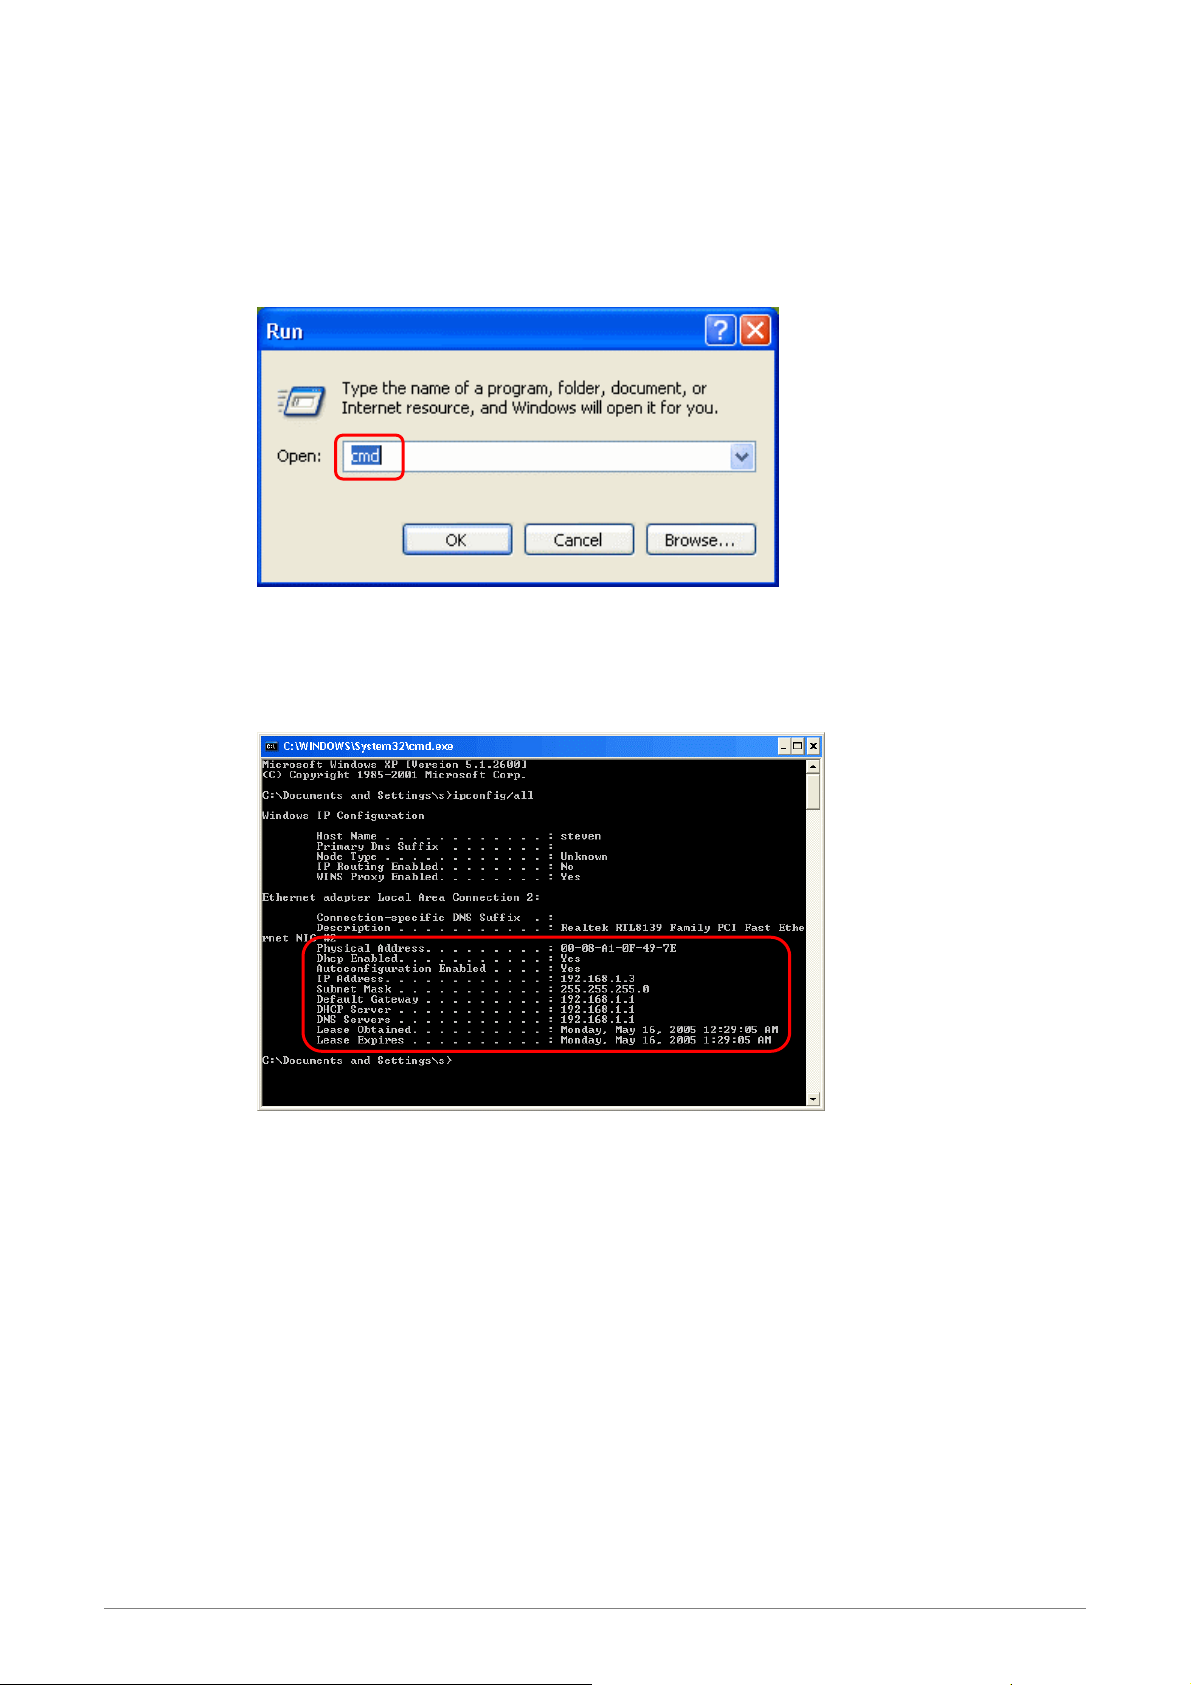
C. Windows XP:
1. Click “Start” and “Run”.
2. In the open field, enter “cmd” then click “OK”.
3. In the command prompt, type “ipconfig /all”, then press “Enter”
All the Ethernet adapter information will be shown in the appear Windows. Check if you can
get the following setting:
IP address as 192.168.1.x
The Subnet Mask as 255.255.255.0
the default gateway as 192.168.1.1
4. Type “Exit” to end up the process.
4 Ports 11g Wireless ADSL2/2+ Router 20

Chapter 4 Device Administration
For your convenience, an Administrative Utility has been programmed into 4 Ports 11g Wireless ADSL2/2+
Router. This chapter will explain all the functions in this utility. All the 4 Ports 11g Wireless ADSL2/2+ Router
based administrative tasks are performed through this web utility.
4 Ports 11g Wireless ADSL2/2+ Router 21
4.1 Login
To access the 4 Ports 11g Wireless ADSL2/2+ Router Configuration screens, follow the following steps will
enable you to log into the 4 Ports 11g Wireless ADSL2/2+ Router:
1. Launch the Web browser (Internet Explorer, Netscape, etc).
2. Enter the 4 Ports 11g Wireless ADSL2/2+ Router default IP address (Default Gateway)
http://192.168.1.1
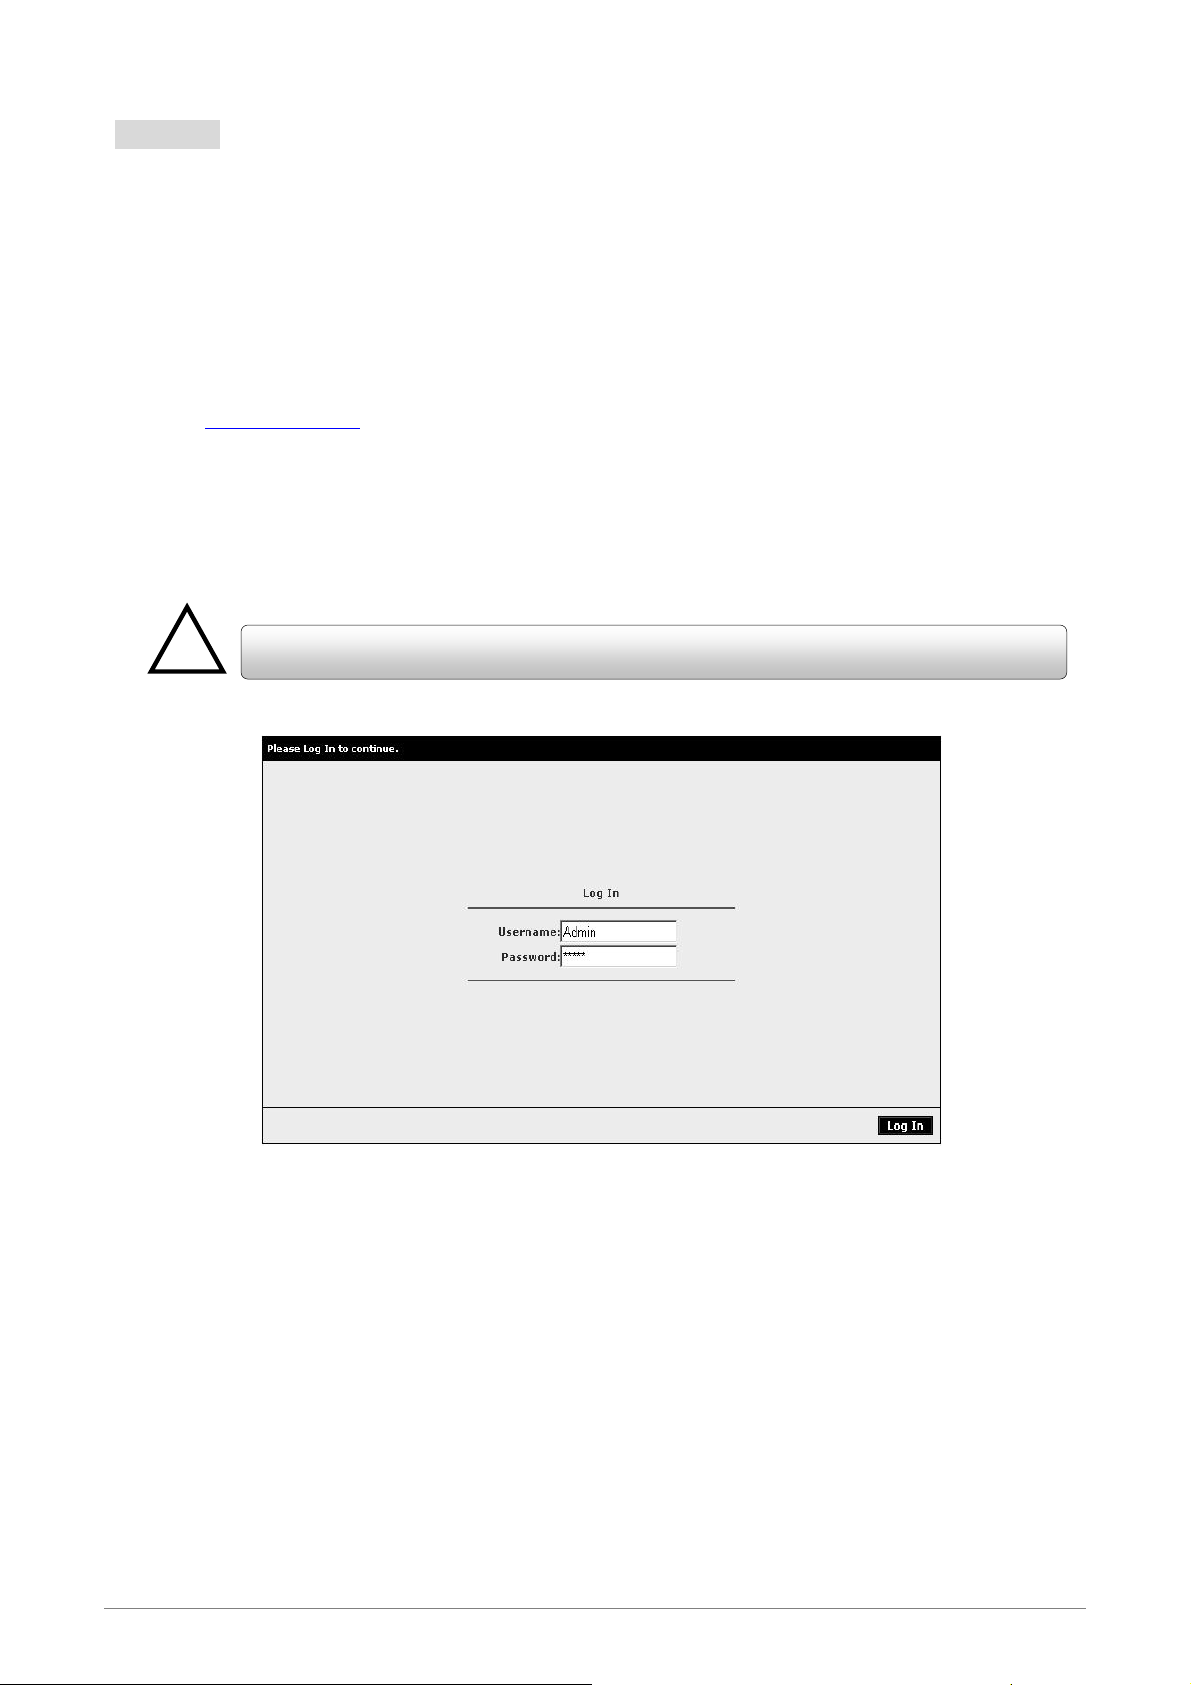
3. Entry of the username and password will be prompted. Enter the default login “Username” and
“Password”: The default login Username of the administrator is “Admin”, and the default login
Password is “Admin”.
!
in the address bar then press Enter to Log in.
Note that the Username and Password are case sensitive.
“Username” and “Password” can be changed after login. Refer to the Tools configuration
section for further instruction.
4 Ports 11g Wireless ADSL2/2+ Router 22
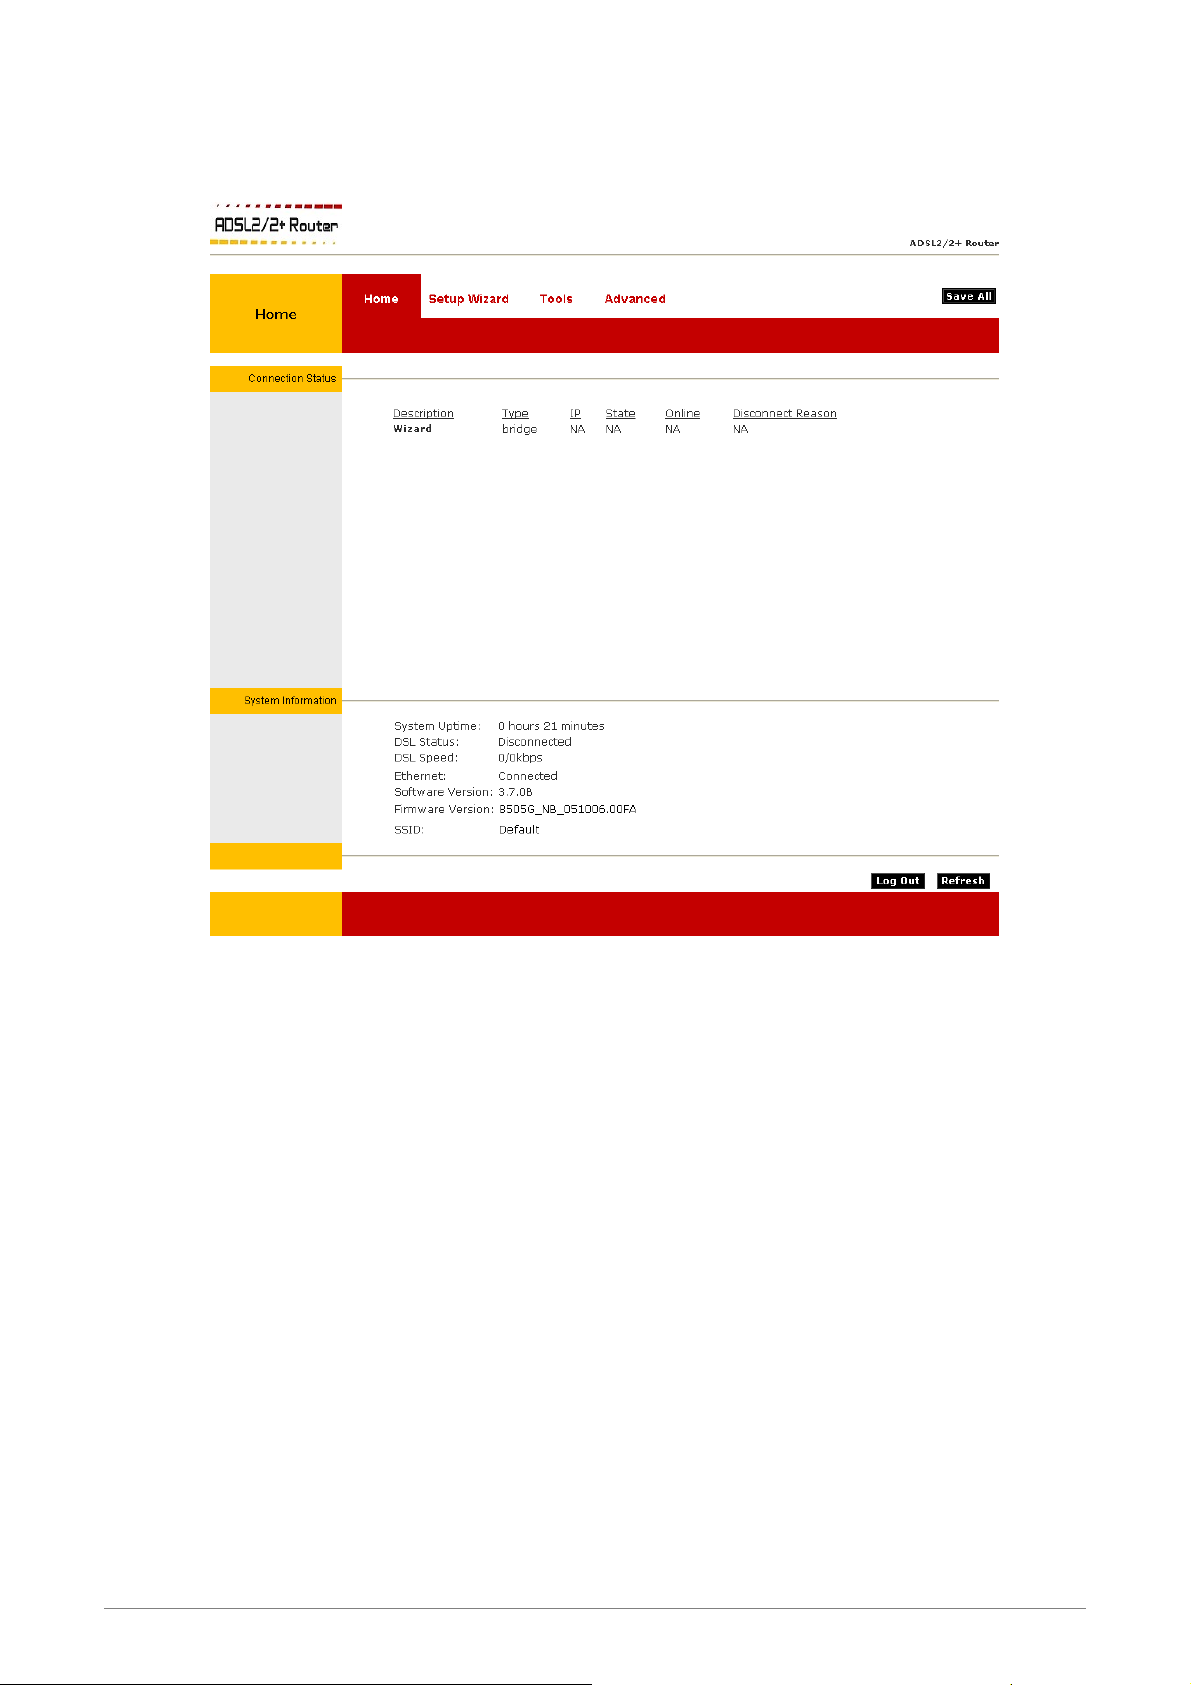
Upon entering the address into the web browser, the system HOME page with all the device information
will pop up as shown below:
Home: The Home section show the current 4 Ports 11g Wireless ADSL2/2+ Router’s connection
status and System information.
Setup Wizard: The Setup Wizard is a presetting wizard which meant to help you install the 4
Ports 11g Wireless ADSL2/2+ Router quickly and easily.
Tools:
management and perform simple system tests.
The
Tools section lets you carry out system commands, firmware update, device
Advanced: The Advanced section lets you configure advanced features like RIP, SNTP, SNMP,
IP QoS … etc.
4 Ports 11g Wireless ADSL2/2+ Router 23
 Loading...