

Etec PF9100 User Manual
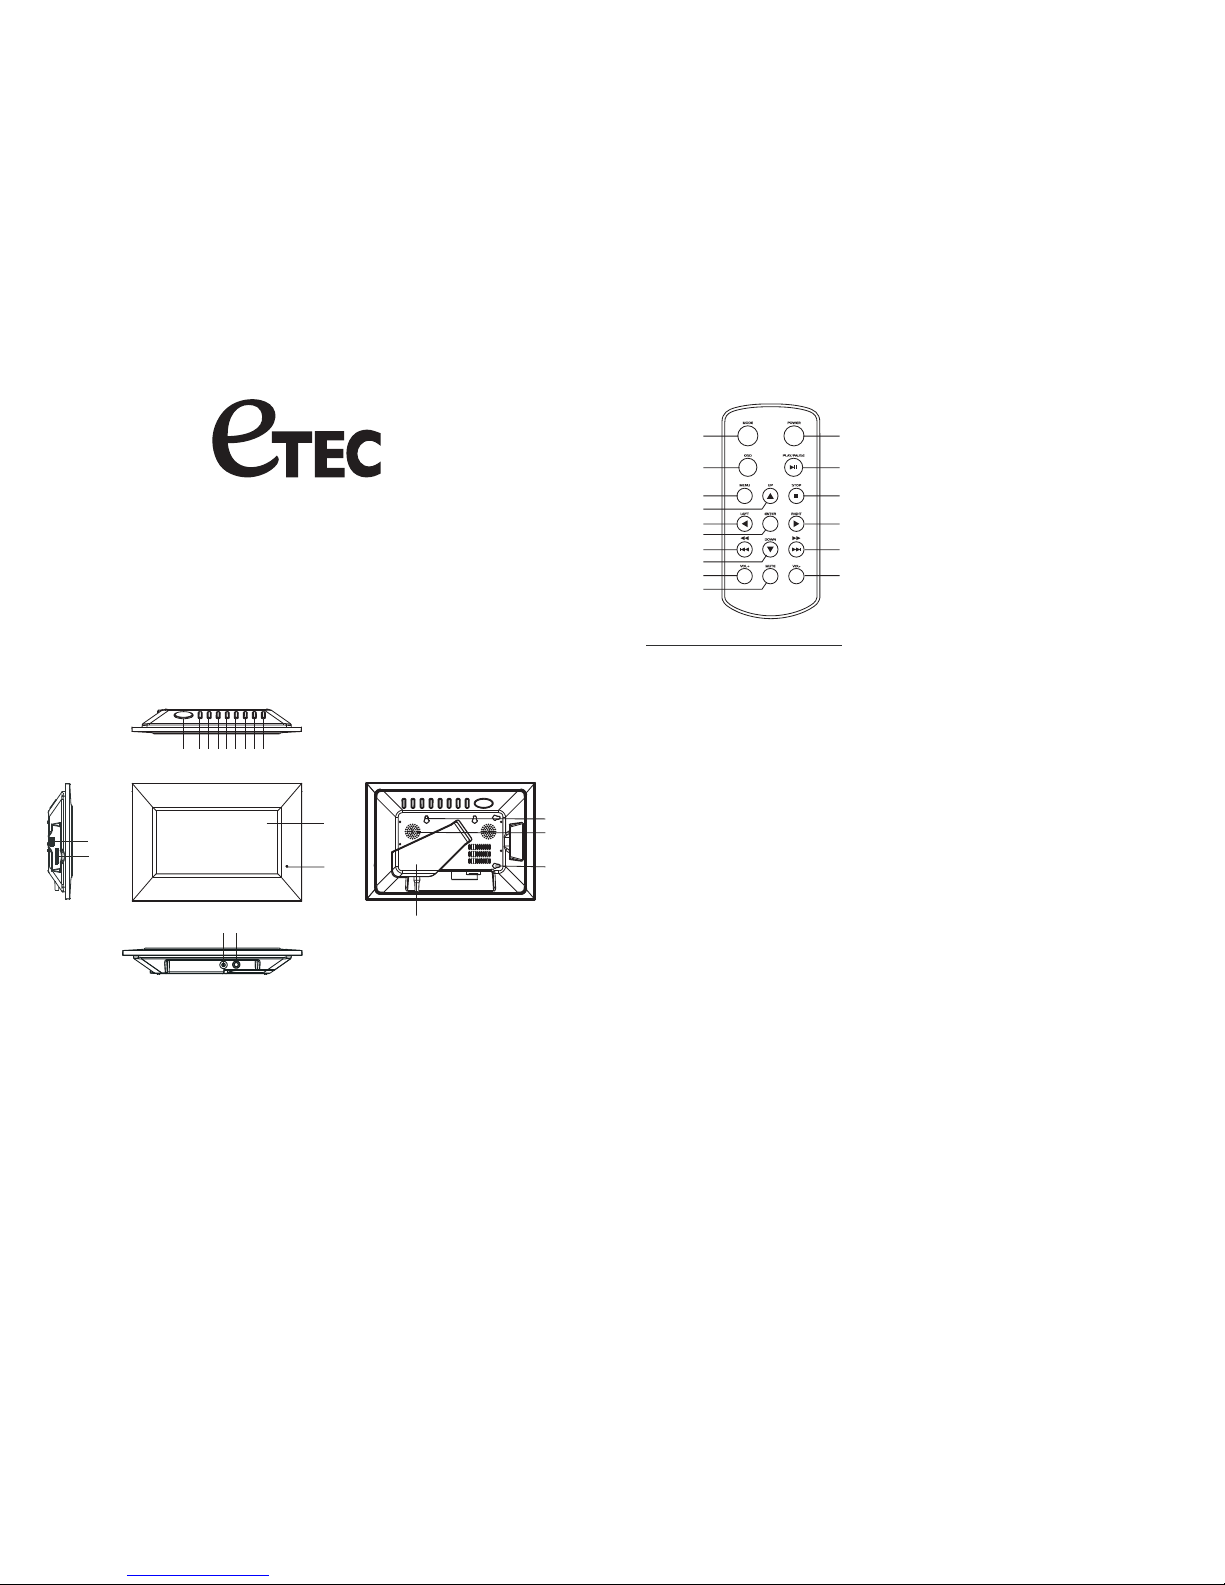
MAIN UNIT
1. Snooze/Alarm OFF button
2. Mode
3. Navigation left
4. Navigation right
5. Navigation up
6. Navigation down
7. Return
8. Play/Enter
9. Power
10. USB Port
11. LCD display screen
12. Remote sensor
13. SD/MMC/XD/MS CARD READER
14. DC jack
15. Headphones Jack
16. Hanging holes
17. Speakers
18. Bracket
DIGITAL PHOTO FRAME
USER MANUAL
Please read these instructions before you operate the unit
1
2
1
2
3
4
5
6
7
8
9
10
11
12
13
14
15
16
Remote Control Function Explained
1) Mode: Press MODE once to display the clock time, press this button a 2nd time to display the calendar,
Press this button a 3rd time to return to the main menu.
2) OSD: Press OSD (On Screen Display) once to display the root file name and the file number. Press a
2nd time to display the resolution and date of the currently playing file. Press a 3rd time to exit.
3) Menu: Press MENU to display the Main Menu selections. Press during playback to return the main
menu.
4) Navigation Up
5) Navigation Left
6) ENTER: ENTERPress to confirm your menu selection
7) Fast Reverse or Previous
8) Navigation Down
9) Volume Increase
10) Mute: Press to silence audio sound. Press again to hear again.
11) Power
12) Play/Pause: Press once to begin PLAY, press a 2nd time to PAUSE current play.
13) Stop: ENTERPress to end a slideshow and the "Thumbnail" view.
14) Navigation Right
15) Fast Forward or Next
16) Volume Decrease
23456789
11
12
16
18
16
1
17
Model:PF9100
10
13
14
15
IMPORTANT Operational Notes:
-The "Delete" function will permanently delete the selected files from your internal or external memory
device. Deleted files cannot be retrieved.
-To change the frame color, remove the existing frame by gently pulling it away from the main unit. Then
insert the pegs on the rear of the desired frame color into the rubber insert holes on the main unit of the
player and press together firmly.
-You can view your photos in Full-Screen (taking full advantage of this large"9" LCD screen) or
Auto-Fit modes
-You cannot play photo slideshows from the internal memory and an external memory card or USB device
simultaneously.
-Only video files in the .AVI format will play on this unit.

Power supply
Headphone jack
USB port
To safely
remove the USB device from the port- press STOP, then press MENU and the Main Menu Interface
will appear. Now you can safely remove the USB device from the USB port.
SD/MMC/XD/MS
To safely remove the SD/MMC/XD/MS card from the reader slot - press STOP, then press MENU and
the Main Menu Interface will appear. Now you can safely remove the SD/MMC/XD/MS card from the
card reader slot.
SNOOZE/ALARM OFF button
ENTER
NAVIGATION buttons
MAIN MENU- The Main Menu is the default starting point after turning the unit "ON" .
Plug one end of the 9V AC adaptor into the DC input jack, then plug the other end into AC wall outlet.
For private listening, plug headphones into the headphone jack.
CAUTION: Listening at high volume for an extended period of time could cause damage to your ears.
Insert a USB data device into the USB port to enjoy photo, audio, or .AVI video & movie files.
Insert an SD/MMC/XD/MS card into the card reader slot to enjoy photo, audio, or video files.
When the alarm sounds there are two options for turning the alarm off, regular OFF and Snooze.
1) To turn the alarm off the alarm off, press and hold the SNOOZE/ALARM OFF button for 3 seconds to
disable the alarm function. If you want to sleep for an additional five minutes after the alarm sounds, lightly
press and release the SNOOZE/ALARM OFF button to activate the snooze function and the alarm will
sound again after about five minutes. Press and hold the SNOOZE /ALARM OFF button to end the snooze
cycle and turn the alarm completely off.
Press the Play/ button to begin playback or confirm a menu selection.
The Navigation buttons on the rear of the unit and the Remote Control are identified by and . Use
these buttons to move through the all of the Menu selections. As you move through the Menu selections
stop when the Menu selection of your choice is highlighted.
Turn the Power ON to the Photo Frame unit by pressing Power button on the rear of the unit or on the
Remote Control. When the Power turns ON the Main Menu of the Photo Frame will be seen.
The Main Menu screen shows the ten main function options listed below.
Insert a USB data device or SD/MMC/XD/MS card into the reader / ports on the rear of the unit. Use the
NAVIGATION buttons , , , and to select one of the following Main Menu functions.
1. Photo
2. Music
3. Photo & Music
4. Movie (Video)
5. Setup
6. Calendar
7. Clock
8. Alarm
9. Copy/Delete
10. Favorite
,,,
To Begin Using this Photo Frame
PLAY/ENTER button
ENTER button
ENTER
ENTER"
ENTER
The button on the Remote Control is used to confirm your Menu selections. The
"PLAY/ button on the rear of the unit can also be used to confirm your selections. When the Menu
selection of your choice is highlighted press the button to confirm your selection.
PHOTO (View Photos)
MUSIC
PHOTOS / MUSIC -
MOVIE
Press theNAVIGATION buttons and select the PHOTO option, press to confirmthis
selection. The Photo Frame will read the internal memory or the connected USB or
SD/MMC/XD/MS memorydevice for severalseconds and willbegin to playthrough each picture
automatically oneby one. Duringplayback press PLAY/PAUSE to pause, to resume playback
press PLAY/PAUSE again. Use the buttons on the remote to skip forward or backward
through theplaying photos.
When playingphotos, press theSTOP button at any time to view small versions (called
"Thumbnails") ofeach photo willappear on thescreen, you canselect a thumbnailto begin
playing infull scale byusing the NAVIGATION buttons and then pressing to play.
Using theNAVIGATION buttons, select Music from the Main Menu and press to confirm
the selectionand the playerwill begin toplay music filesautomatically. Browse the menu that
appears onthe screen anduse the NAVIGATION UP/DOWN buttons to highlight a desired music
file, andthen press to play the selected file.
Using theNAVIGATION buttons, select Photo & Music from the Main Menu and press to
start yourphoto slideshow withmusic playing simultaneously.
Using theNAVIGATION buttons, select Movie from the Main Menu and press to confirm
the selectionand the playerwill begin toplay movie filesautomatically. Browse the menu that
appears onthe screen anduse the NAVIGATION UP/DOWN buttons to highlight desired movie
file, thenpress to playselected file. Pressand hold the buttons on the remote
control toFast Forward, orFast Reverse throughthe video ormovie file.
Tochoose the intervaltimes, transition effects, and play modes for your photos,
highlight theSETUP selection from the MAIN Menu and press .
Choose theinterval time andtransition effects for your photo slideshow. There are several time
interval optionsto choose frombetween photo changes:5 seconds, 10seconds, 15 seconds,30
seconds, 1minute, and 3minutes.
Select oneof the 16transition effects to insert between changing photos
The optionsof auto playinclude
a. on oroff
b. on oroff
c. on oroff.
The optionsof Display Setupinclude
a. : toadjust LCD Brightnesssettings.
b. to adjustLCD Contrast settings.
c. to adjustthe LCD ColorSaturation settings.
a. : to selectthe On ScreenDisplay languages ofEnglish, French, and
Spanish
ENTER
- Viewing "Thumbnails"
ENTER
(Playing Music)
ENTER
ENTER
(Play Photoswith Music)
ENTER
(Play Video or Movie Files)
ENTER
ENTER
ENTER
A.) PhotoSettings
a. IntervalTime-
b. Transition Effect-
B.) Auto-Play
photomusic movie -
LCD Brightness
LCD Contrast:
LCD ColorSaturation:
D.)CustomSetup
OSD Language
This PhotoFrame will onlyplay .AVI format video or movie files.
87
87oror
SETUP MENU -
c. Show Type- Full-Screen or Auto-Fit Viewing modes
C.) DisplaySetup
Your photos can be viewed in Full-Screen (taking full advantage of this large 9 "LCD screen) or in Auto-Fit
3 4
 Loading...