

Page 1

MP3 Digital
Audio Player
Models: MP201 & MP202
User Manual
Page 2

General Description of Functions
•USB 2.0 transmission speed.
•Supporting multiple audio formats
MP3, WMA, WAV.
•For use with Microsoft Windows® 2000 or newer and MAC operating systems
•Voice Record
•7-Band EQ
Normal, Rock, Pop, Classic, Soft, Jazz, Bass
•Color Backlit Display
•Multiple play MODEs
Normal, repeat- one, repeat-all, random play, and browse play modes
•Auto OFF
•Fast forward and Fast reverse
•Sync lyric
Safety Precautions
1. To ensure your safety, please do not use the Player in a damp location or allow any liquids to come in
contact with the player.
2. It is recommended not to use the Player in very hot/cold, dusty or humid environment.
3. Please do not disassemble or re pair the Player by yourself or it may affect the operatio n and sound
quality of the Player. The MP3 Player has no parts that can be serviced by the user.
4. We do not recommend that you use earphones when you are driving
5. Your hearing ability may be harmed permanently due to listening at a loud volume level. Therefor e, it
is recommended that you adjust the volume of MP3 Player to a proper level magnitude to avoid
damaging your hearing ability.
6. If you do not intend to use the Player for an extended period of time, please remove the ba ttery to
avoid possible corrosion and damage to the Player caused from battery leakage
7. Avoid dropping the Player.
Page 3

STATEMENT
Thank you for purchasing this ETEC digital MP3 Player.
Prior to using the product, it is recommended that you read the USER MANUAL for your best
experience and use of this player.
.
The contents of the manual may be modified without prior notice when there is any change of
performance and function of the product.
Quick start guide
For experienced computer users the MP201 / MP202 is very easy to use. This Quick start guide
allows users to load and start playing music files, but we recommend reading the entire manual
to understand all of the MP201 / MP202 features.
As with any ‘plug and play’ USB storage device, digital media files can be added to the MP201 /MP202
from the host computer simply by using the ‘drag and drop’ approach familiar to most Windows users.
Page 4

Downloading files to the MP201 / MP202
1) For Windows (Microsoft Windows® 2000 or newer operating systems only) and MAC users
downloading digital media files is easy – just connect the player via USB and start loading files
immediately.
2) Once connected to a computer, the MP201 / MP202 will appear as a ‘Removable disk’ or ‘USB
storage device’ and files can be copied directly onto the player using the ‘drag and drop’
approach.
If your computer does not automatically detect the MP201 / MP202, open the ‘My Computer’ icon
from the desktop and click on the ‘Removable disk’ or ‘USB storage device’ to access the MP201
/ MP202 USB memory. For MAC users open the FINDER window and click on th e removable
USB drive in the upper portion of the Finder menu.
3) The MP201 / MP202 will automatically organize digital music, recorded voice files and open them
using the appropriate application from the player’s main menu. For example, if MP3 or WMA
files are loaded on to the Player, user will be able to play these files when opening the Music
playback mode from the main menu.
Page 5
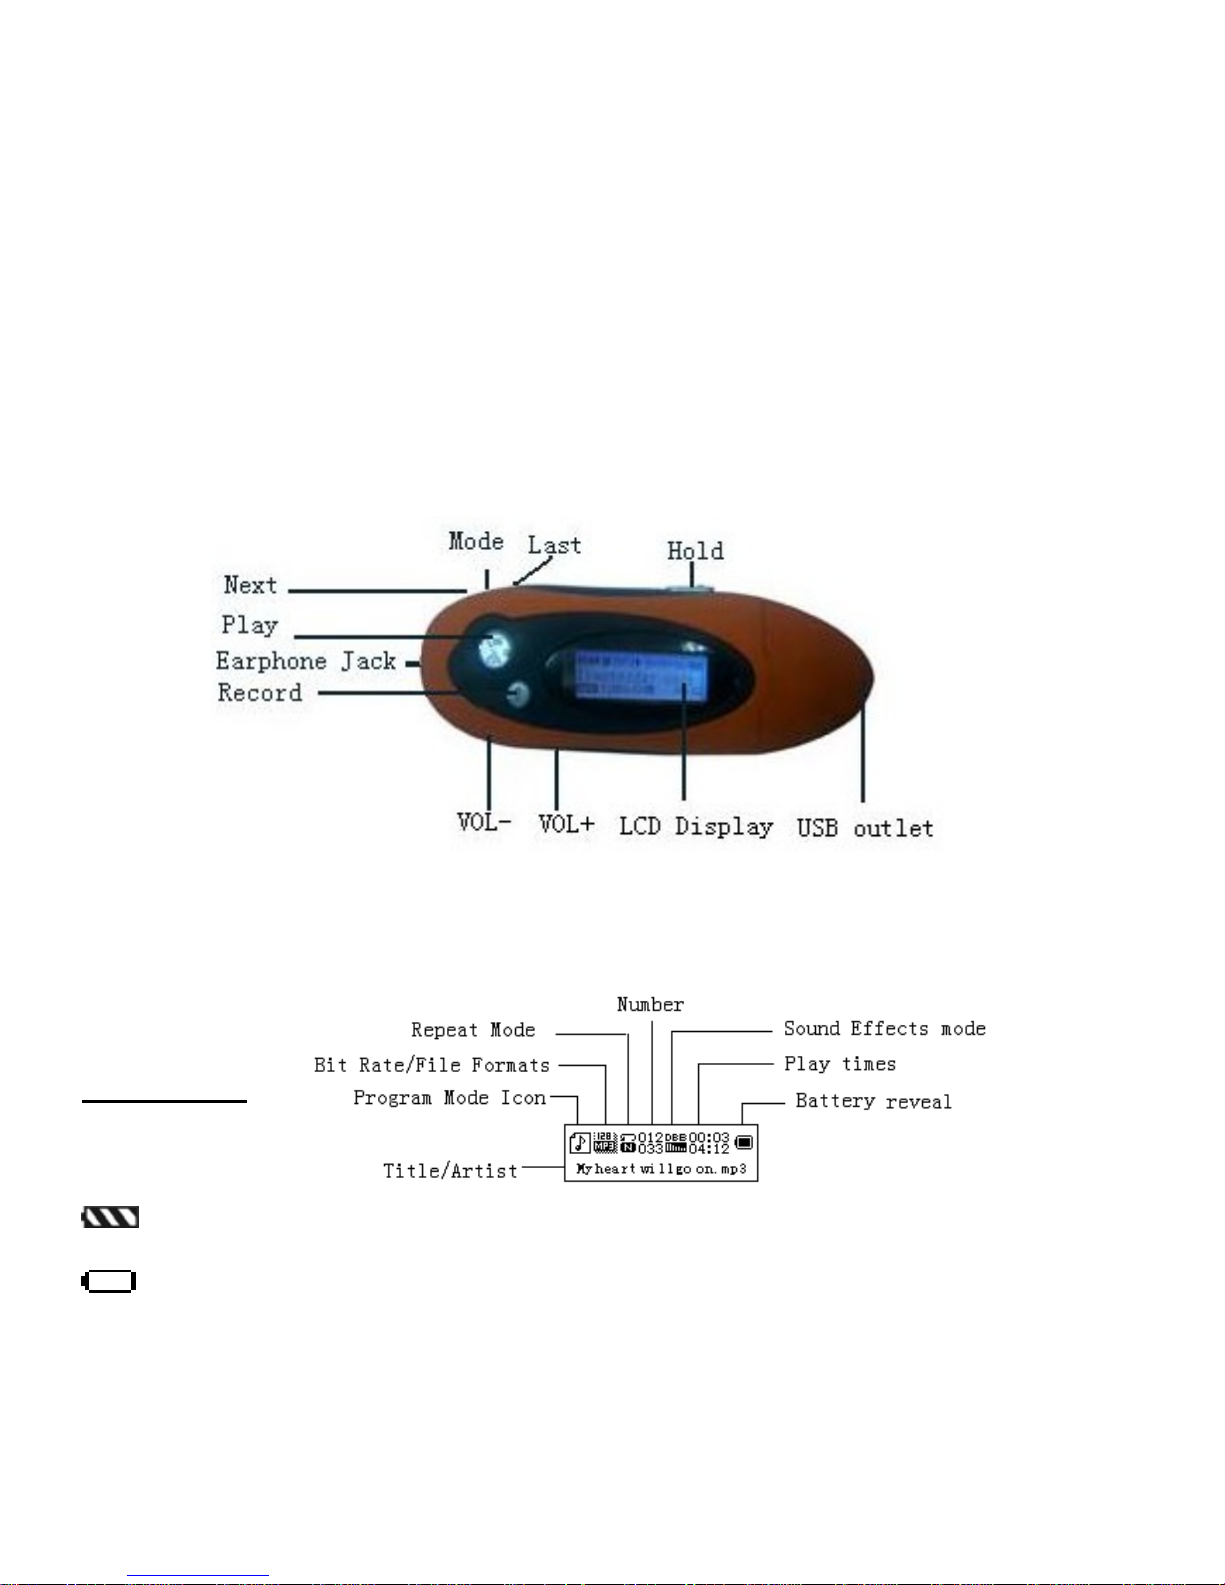
Know your Player
Outline and key
Display screen
Battery capacity
Indicates the full battery capacity of 1.5V has reached. The power capacity indication will be
decreased as the operation time increases.
The inside of battery capacity icon will be blank when the battery capacity is almost finished.
Page 6

When the icon flashes, it is time to change the battery.
Button operation
Definition of key functions
1. “PLAY”: ON/ PLAY/ STOP/OFF, hereafter referred to as “PLAY key”.
2. “MODE”: to select the entry and to enter the menu, hereafter referred to as “MODE key”.
3. “VOL+”: volume increase, fast increase.
4. “VOL–”: volume decrease, fast decrease.
5. “NEXT”: NEXT entry, fast forward.
6. “LAST”: LAST entry, fast reverse.
7. "RECORD”: Short Press RECORD,Long Press saves the recording.
8. “USB”: USB jack.
9. “Headphone Jack”: standard 3.5mm headphone jack.
Definition of button operations
The button operation includes Short Press
, Long Press, Press & Hold, and Press. The instructions that
follow below refer to Short Press unless otherwise stated.
1. Short Press: Press the button once for the command to take effect.
2. Long Press: Press & Hold the button for about a second for the command to take effect.
3. Press: Press the button and the command takes effect when the button is released
4. Press & Hold: The c ommand will begin a t the moment the bu tton is pressed and stop the
moment the button is released. This i s used for commands such as; “Fast forward/Fast
reverse”.
Basic Function
Enter menu
It is available to enter the various menus by pressing down the MENU button. Long Press the button to
enter the PLAY menu status and Short Press to enter the menu at stop status.
Entering the different function MODEs
Different function MODEs may be entered from the Main Menu.
Page 7
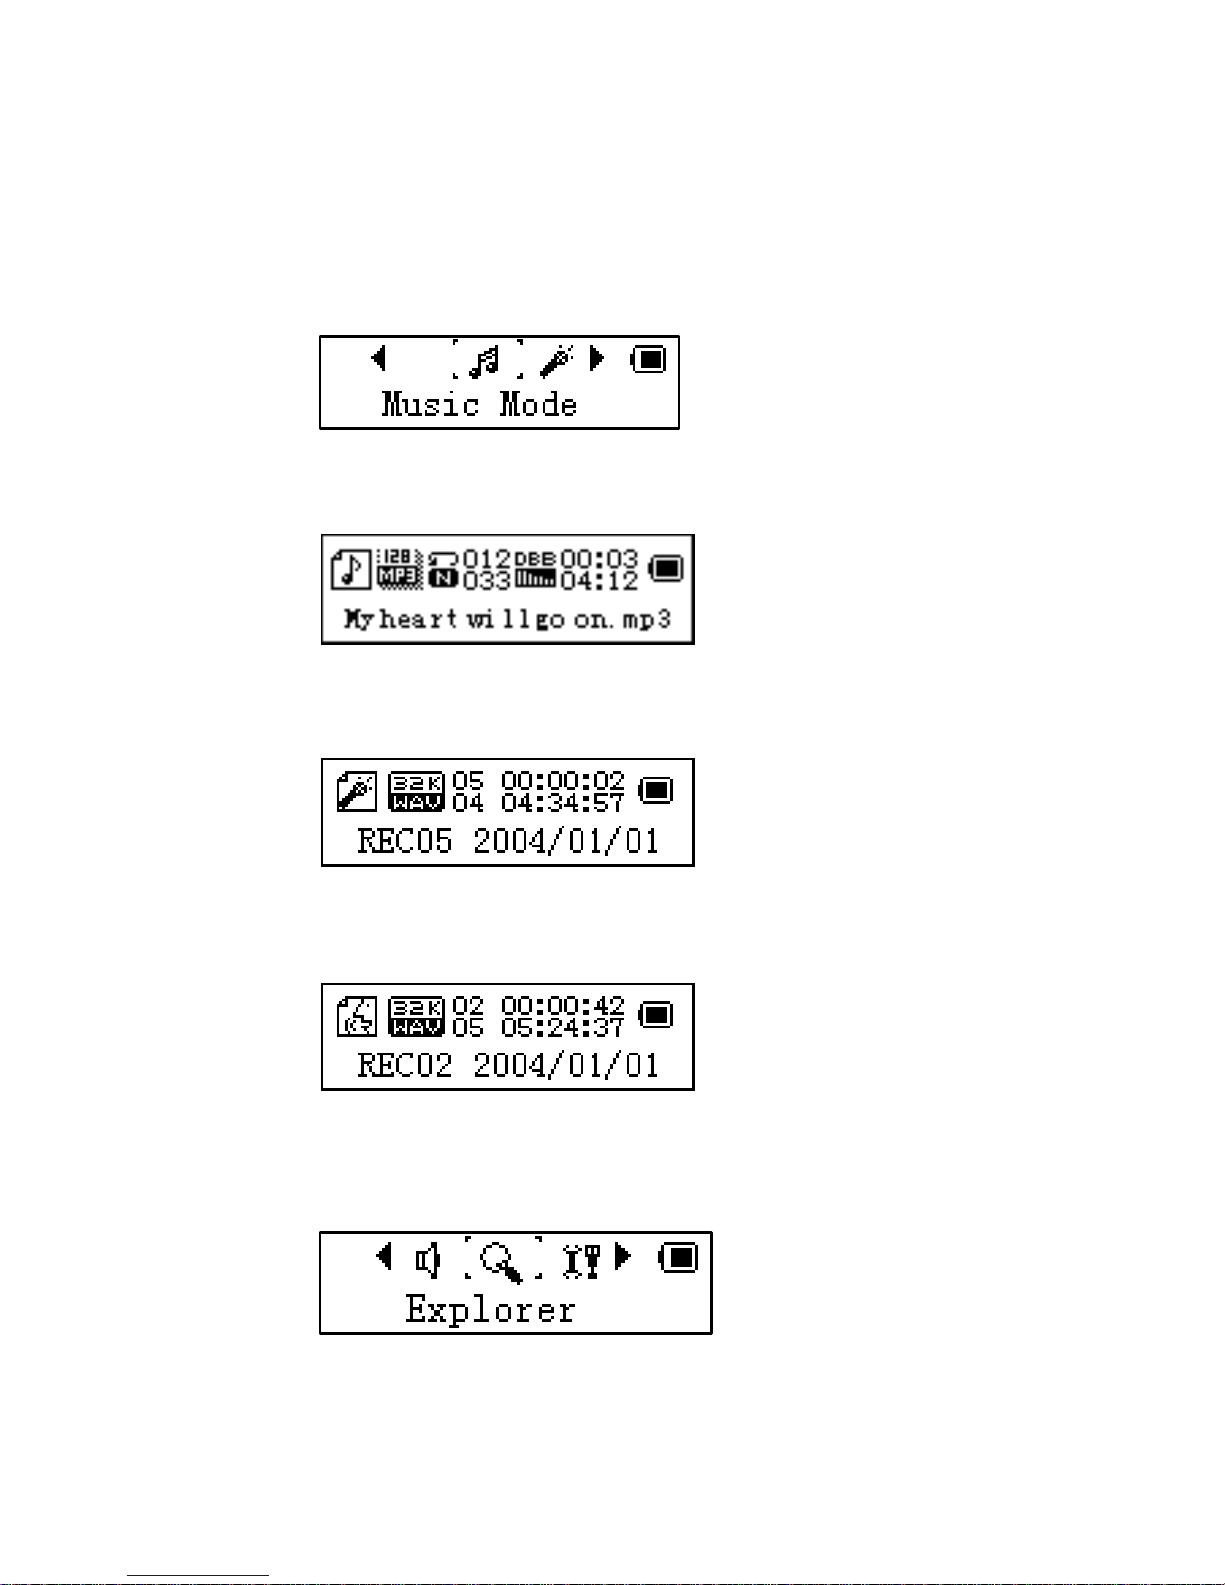
Menu: (Long Press MODE button to enter the Main Menu. Press the MODE button to select.
Music MODE:
Record MODE:
Play MODE:
Browse play:
Page 8
System setting:
Connecting PC to enter USB MODE:
Volume adjust
“VOL+” increase volume.
“VOL–” decrease volume.
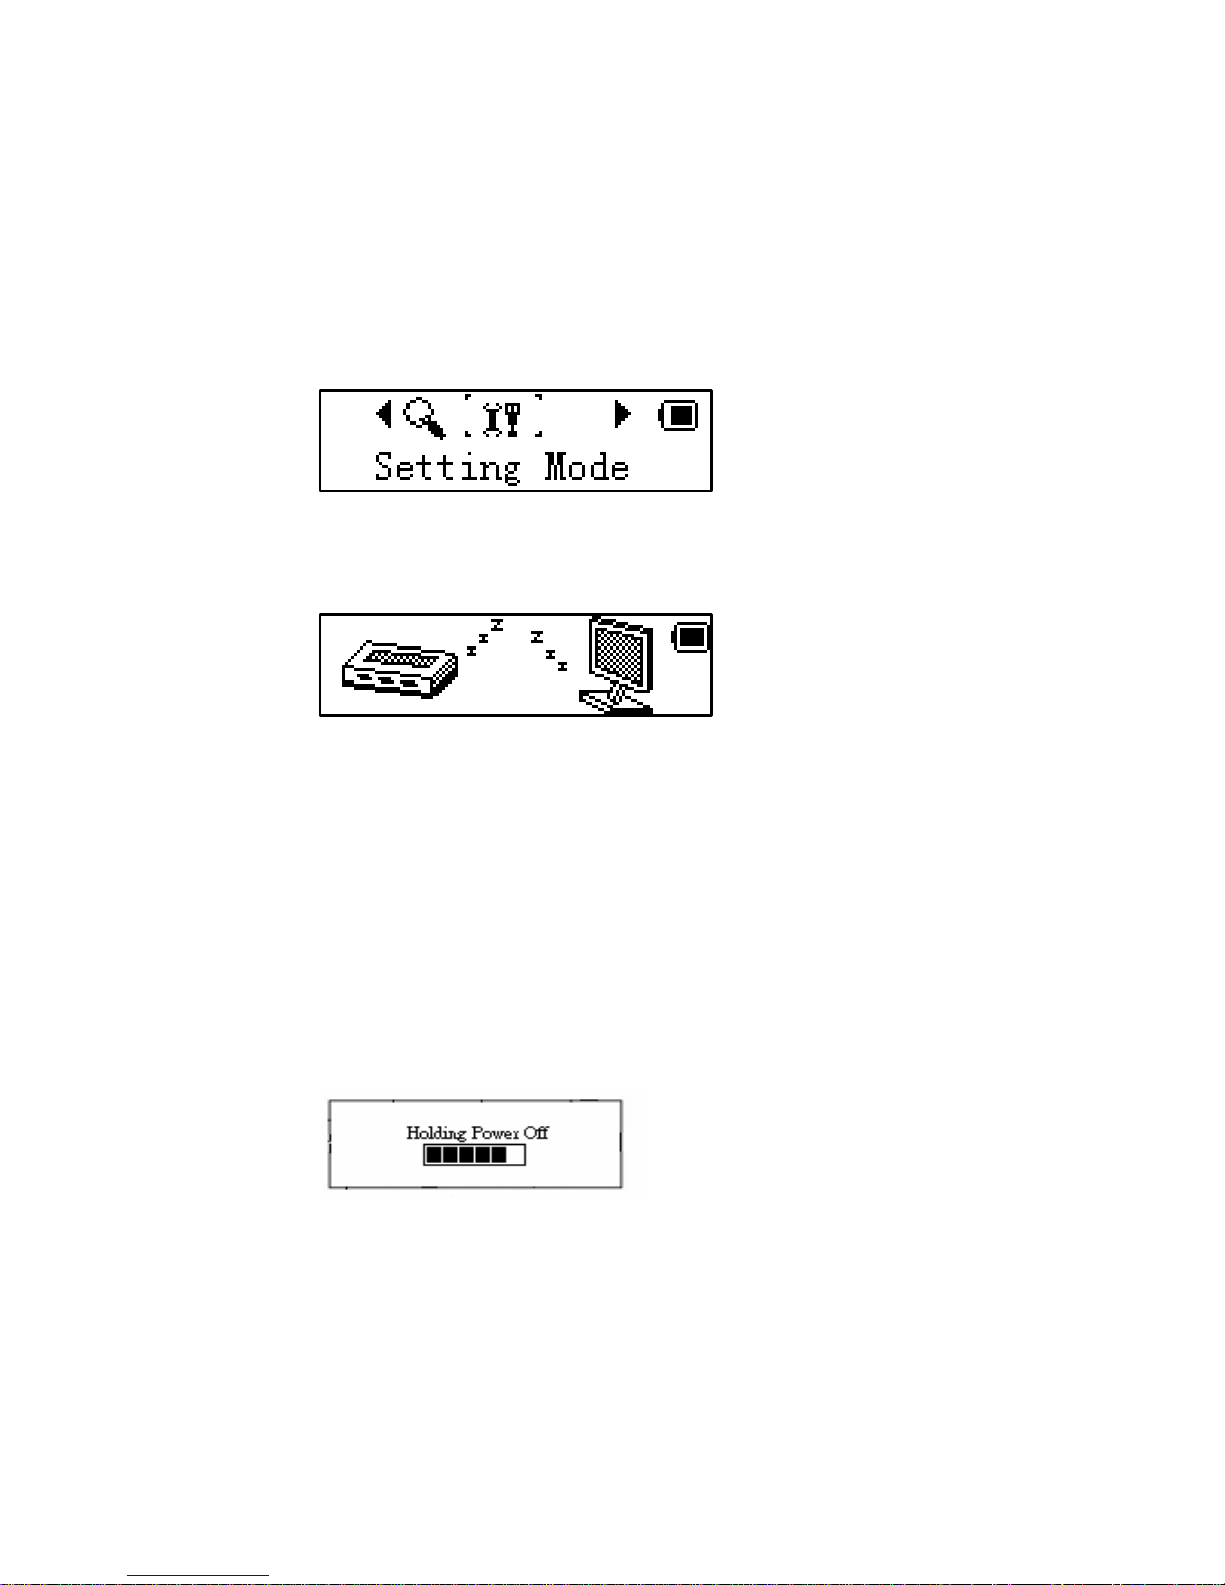
Power ON/OFF
At power OFF status, Short Press the PLAY button to turn the power ON.
In the power ON status, Long Press PLAY button to turn the power OFF.
Play or stop (under record MODE, with pause function);
When in the music MODE, Short Press PLAY button to play music.
When playing music, Short Press the PLAY button to stop Play.
Page 9

Record/pause (Short Press), stop record (Short Press)
In the RECORD status, Short Press PLAY button to pause recording. Short Press PLAY again, to stop
recording. Short Press the MODE button to enter PLAY status for the recorded file.
Play music
Simple operation
1. Plug the headphones into the earphone jack.
2. Short Press the PLAY button to turn ON and to enter the “Music MODE ”, Short Press PLAY button
again to begin playing music.
3. Select music: LAST key: select the previous music file
NEXT key: select the next music file
4. Volume adjustments: VOL+: to increase the volume VOL-: to reduce the volume
Sync lyric display
The Player supports lyric files with ‘.LRC’ suffix, and will display the lyrics synchronously with the
music.
How to use lyric file?
Please make sure the lyric has the same name to the music.
For example:
Music file: My heart will go on.mp3
Lyric file: My heart will go on .lrc
How to know if lyric available?
If lyric matched, the icon “
” will be replaced into “ ”.
Page 10

For example:
Long Press MODE to turn ON the lyrics display.
Short Press MODE to
exit lyric display
Equalizer MODE
1. When playing music:
2. Press MODE to enter PLAY submenu;
3. Push NEXT choosing Equalizer MODE
4. Press MODE to enter ‘Equalizer MODE’ submenu.
Page 11

Select an equalizer:
5. Detail of each equalizer (EQ):
6. Push NEXT to select an EQ and press MODE to confirm.
Voice record
It is recommended to have enough battery capacity to carry out recording operation.
The Player supports storage of multiple recorded files under each folder.
Record at “Record MODE”
1. To enter the menu, slide NEXT button to select RECORD MODE.
2. Short Press MODE button to enter the RECORD MODE and the picture is given below:
Page 12

3. Short Press the PLAY button to pause the RECORD, a nd Short Press MODE button to enter the
RECORD PLAY MODE.
Quick record operation:
RECORD function can be turned on under any MODE by "Short Press on RECORD button” for
Recording and "Long Press on RECORD button” for ending;
The recorded voice is saved in the designated folder of “MICIN.DIR”.
Only PLAY button and MODE button can work when recording
Play recorded file
1. Enter the menu
2. Slide NEXT button to select “Voice MODE”
3. Short Press MODE button to enter the PLAY MODE interface.
4. Press PLAY button again to begin.
5. Select the recorded file.
LAST key: select the LAST RECORD file
NEXT key: select the NEXT RECORD file
6. Volume adjust
VOL+: to increase the volume
Page 13

VOL-: to decrease the volume
System setting
How to enter
1. Enter the menu.
2. Slide NEXT button to select the menu and Short Press the MODE button to enter “Settings”.
3. Press MODE to enter.
Options introduction:
System Time Setting date and time when saving Recorded file
Backlight Time Backlight time setting after pressing a button.
Language Choosing different languages
Power off Setting time switch
Contrast Setting Setting the contrast on the display.
Online MODE Options for ‘Secret Space’ function
Memory Status See over memory space and usage status
Page 14

Firmware Version. Version of player’s firmware
Exit Exit from this submenu
List of menus:
“Recording time” Setting
1. System setting interface
2. Push MODE to enter ‘Recording time’ interface
Recording time:
3. Push VOL+ setting from year (VOL- on opposite)
4. Push NEXT the recording time will increase - Push LAST to decrease the time
5. After setting, press MODE to exit.
“Backlight time “Setting
Page 15

1.System setting interface
2. Push NEXT scrolling to ‘Backlight
time’
3. Push MODE to enter setting interface
Backlight time:
4. Push NEXT/LAST to setting time
5. After setting, press MODE to exit.
Language Setting
Please refer to ‘Sound Setting’
Turning off Setting
Please refer to ‘Backlight time setting’
Note:
You can set the time in seconds on ‘Battery Saving’ MODE allowing the player to
automatically turn OFF when pla yer beco mes idl e for the time period set. T his funct ion id
voids if the time is set to 0.
Page 16

You can set time in minutes in ‘Sleep Mode’ to allow the player to turn OFF automatically
(regardless of the player status) for the time period you have set. It is designed for
listening to music before sleep. Please note: Sleep MODE is valid only once after setting,
you have to set again if you want to use it NEXT time.
Contrast Adjustment
Please refer to ‘Backlight time setting’
Online MODE Setting
Please consult into ‘Sound Setting’
Some operation systems (Windows 2K SP4 or prior) may not recognize a USB disk with
two symbols. Therefore, you have to choose an active disk here when using ‘Secret Space’
function only the active disk can be found in PC.
Memory status
You can check total memory space and the percentage of usage.
Tips: Pressing PLAY will quickly exit the current menu. This function is valid on all other menus.
Application of USB Disc
This Player includes a standard USB disc function.
The display after connecting to a computer:
Page 17

Computer connection and realization of flash disk function
1. USB transmission and MP3 file up-load
(1) If your operating system is: Microsoft Windows® 2000 or newer and MAC OS X, USB op eratio n
is automatic. After proper connection of USB data line, a movable disk will appear in the
resource manager of your computer and you can now use the MP3 player as a USB data
storage device as shown in the picture below:
Other settings
z Choose other fold (Stop submenu)
You can classify files into several different folders that ease to manage them (folder s should b e
created on PC). The Player can identify 9 folders in root.
Page 18

1.When stopped
2.Press MODE to enter Stop submenu
3.Press MODE to enter folder choosing
interface
4. Press NEXT or LAST to choose a folder
5.Press MODE to entry the selected folder
Please note: You can set up folders as needed for the Music, Recorder, & Play Modes.
z Delete files (Stop submenu)
1. When Stopped. (No stop interface in FM MODE)
2. Push MODE to enter Stop submenu
Page 19

3. Push NEXT or LAST to choose ‘Single file’ or ‘All
files’
4. Push MODE to enter delete interface.
5.Push NEXT to choose “YES” 6. Press MODE to confirm delete
‘Delete all’ will delete all files in current folder of current MODE. Selecting ‘Delete all’ in the
Music mode will delete all music files, Recorded files will not be affected.
Safely remove the Player and disconnect the USB cable after deleting files on your PC or some files
may not be removed.
z Play MODE (Play submenu)
You can choose different PLAY modes (i.e. repeat, shuffle) when playing music or
recorded files.
The first option on PLAY submenu is ‘Play Mode’
○ REPEAT
Page 20

Normal
Playing music files in sequence until the end of folder
Repeat One
Repeat single music file
Folder
PLAY all music files in folder
Repeat Folder
Repeat all music files in folder
Repeat All
Repeat all music files
○SHUFFLE
Random
PLAY music files in folder randomly
○INTRO
(Intro)
PLAY the first 10 seconds of each music files in sequence
z Play speed (Play submenu)
You can choose different PLAY speed and not affect to sound. (Only valid to MP3 files)
1. While playing music
2. Push MODE to enter PLAY submenu
3. Push NEXT scrolling to ‘PLAY speed’ option
4. Push MODE to enter
5. Push NEXT for faster, LAST for slower
Page 21

Note:
Play speed (tempo) will apply to all music files
z Repeat MODE (Play submenu)
■ Enter from the PLAY submenu:
○ A-B Repeat
1. When playing music or recorded files
2. Push MODE to enter PLAY submenu
3. Push NEXT scrolling into ‘Repeat MODE’ option
4. Push MODE to enter
Repeat MODE: ‘A’ of Symbol
flashes, waiting for starter A
5. Push NEXT to select ‘A’
‘B’ of symbol
flashes, waiting ender B
6. Push NEXT to select B
This symbol
appears A-B playing begins. When A-B playing, you can push LAST to
reset the A point.
In repeat MODE, you can press VOL+ or VOL- to adjust the playing tempo (speed).
Page 22

1. A-B repeating
2.Push NEXT to enter the A-B MODE
3. Repeat symbol ’ ’ will be replaced
with this symbol ’
’ and the Player
begins playing the recorded voice to the
length of the A-B repeat period.
4.After the player has completed playing the
A-B selection, the unit will resume play in
the current mode and the symbol replaced
with: ’
’, Push NEXT to enter the contrast
function.
Pressing LAST returns to Repeat A-B status.
○ Contrast Function (Does not function in PLAY MODE)
1. When in the Contrast function , the repeat
symbol will be displayed as: “
”,
2. When finished, the repeat symbol will
be replaced with: .
Push LAST return to ‘A-B Play MODE’
Press MODE to exit the Repeat Mode for all three Modes above.
Page 23

z Repeat times (Play submenu)
le
ber of times A-B will repeat until e xiting t he A-B r epeat
ode
Please consult the ‘Backlight time Setting’ above
e period (in seconds) between repeating the selected
ble Shooting:
Problem Solution
P ase consult the ‘Backlight time Setting’ above
Repeat time determines the num
m
z Repeat interval (Play submenu)
Repeat interval determines the tim
file.
Trou
No power Check if the battery is installed correctly.
Check if the power is ON.
No sound can be heard from the hat the volume is not at 0 status
y and
earphone.
Confirm t
Ensure the earphone is connected properl
clean
Unrecognized words displayed
on the screen.
Please confirm that correct language is selected.
Page 24

Not able to download music
normally.
Check the USB connection line and see if it is
connected properly.
Check if the driver is properly installed. (Win 98)
Check if there is still space in the memory.
Technical Parameters
Items Parameters
Music format MP3 & WMA (.WAV for voice recordings only)
Bit rate 56Kbps~256Kbps
Frequency range 20Hz~20KHz
Signal/noise ratio ≥86DB
Separation ≥85DB (1KHZ referenced signal)
Frequency response ≤3DB (20HZ~20KHZ)
Output power of the earphone L 4mW, R 4mW
EQ MODE Normal, Rock, Pop, Classic, Soft, Jazz, Bass
Display LCD
Type of port 2.0,Compatible with USB1.1
Memory media FLASH
Memory 1GB, 2GB,4GB,& 8GB
Play current ≤80mA
Power OFF current ≤300uA
Battery One AAA Size alkaline battery
Playing time About 10 hours
File system FAT, FAT32
Page 25

LIMITED 90 DAY WARRANTY
We warrant this product to be free from defects in material and workmanship under
normal use for a 90-day period after purchase. W e will repair or replace the unit free
of charge should it become defective under this warranty, providing you submit
proof of purchase (sales slip) along with the unit and all accessories.
During the initial 90 day period after original purchase, we will service or exchange,
at no charge. To obtain warranty service or replac ement within the duration of the
90-day warranty, return the product freight prepaid
to the address below.
ETEC USA
823 Old Settlers Trail
Page 26

Suite 100
Hopkins, Minnesota 55343
Please enclose a copy of the sales receipt with the date of purchase and provide a
detailed description of the problem. Failure to enclose required information will
result in delay of your shipment. Please allow 4-6 weeks for product service or
replacement.
This warranty does not cover any product, which has been subject to damage due
to an act of Nature, misuse, neglect, accident, abuse, commercial use, or
modification of, or to, any part of the product, including the antenna. Damage to
external devices such as speakers and other memory devices are not covered nor
is the cost incurred in shipping the unit for warranty repair. Under no circumstances
shall ETEC USA, be liable for any loss (direct, indirect, incidental, foreseen,
unforeseen, special or consequential) or for any damage arising out of, or in
connection with, the use of this product.
UNDER NO CIRCUMSTANCES WILL ETEC USA BE LIABLE FOR ANY
Page 27

INCIDENTAL OR CONSEQUENTIAL DAMAGES.
This warranty does not cover re-manufactured units, or product sold ‘As Is’.
This warranty is valid only in the United States and grants specific legal rights.
 Loading...