

Page 1
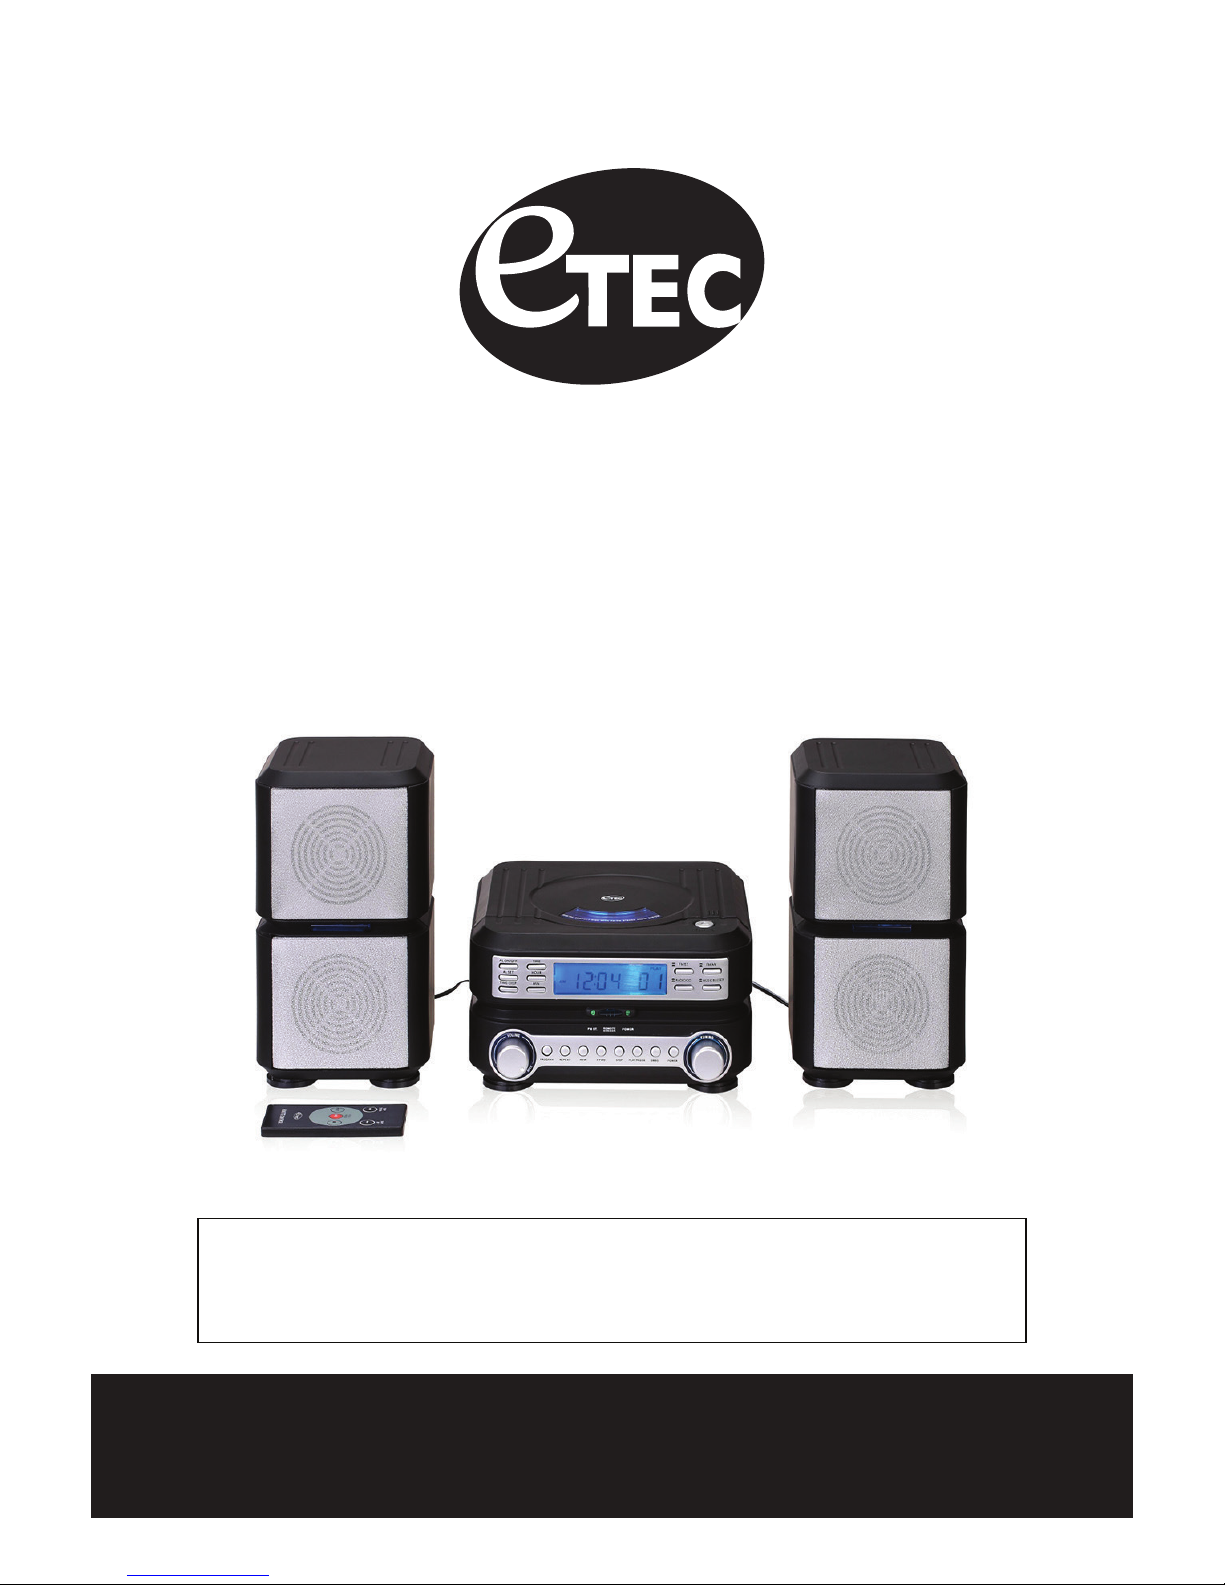
Model: EFL400
CD AM/FM Stereo System
with Audio Input for MP3 Players
For technical assistance or troubleshooting please
PLEASE READ THIS USER MANUAL COMPLETELY BEFORE
OPERATING THIS UNIT AND RETAIN THIS BOOKLET FOR
call 1-855-994-3832 or visit www.SIBrandssupport.com
FUTURE REFERENCE.
Page 2
IMPORTANT SAFETY INSTRUCTIONS
WARNINGS
CAUTION
DO NOT OPEN
1) Read these instructions.
2) Keep these instructions.
3) Heed all warnings.
4) Follow all instructions.
5) Do not use this apparatus near water.
6) Clean only with dry cloth.
7) Do not block any ventilation openings. Install in accordance with the manufacturer's instructions.
8) Do not install near any heat sources such as radiators, heat registers, stoves, or other apparatus (including amplif
that produce heat.
9) Do not defeat the safety purpose of the polarized or grounding-type plug. A polarized plug has two blades with one
wider than the other. A grounding type plug has two blades and a third grounding prong. The wide blade and/or the
third prong are provided for your safety. If the provided plug does not fit into your outlet, consult an electrician for
replacement of the obs
10) Protect the POWER cord from being walked on or pinch particularly at plugs, convenience receptacles, and the point
where they exit from the apparatus.
11) Only use attachments/accessories specified by the manufacturer.
12) Use only with the cart, stand, tripod, bracket, or table specified by the manufacturer, or sol d with the apparatus. When
a cart is used, use caution when mo
13) Unplug this apparatus during lightning storms or when unused for long periods of time.
14) Refer all servicing to qualified service personnel. Servicing is required when the apparatus has been
damaged in any way, such as POWER-supply cord or plug is damaged, liquid has been spilled or objects have fallen
into the apparatus, the appar
dropped.
15) This appliance shall not be exposed to dripping or splashing water and that no object filled with liquid such as vases
shall be placed on the apparatus.
16) CAUTION: Visible and Invisible Laser Radiation when open and interlock defeated.
DO NOT STARE INTO BEAM.
17) Rating label is located at the bottom of en
18) "CAUTION" mark is also located at the bottom of enclosure.
olete outlet.
ving the cart/apparatus combination to avoid injury from tip -over.
atus has been exposed to rain
closure.
or moisture, does not operate normally, or has been
iers)
• Caution: use of any controls, adjustments, or procedures other than those specified herein may result in hazardous
radiation exposure.
• Caution: danger of explosion if battery is incorrectly replaced. Replace only with the same or equivalent type.
• To prevent fire or shock hazard, do not use this plug with an extension cord, receptacle or other outlet unless the
blades can be fully inserted to pr
• Warning: to reduce the risk of fire or electric shock, do not expose this appliance to rain or moisture.
• Warning: the batteries shall not be exposed to excessive heat from direct sunlight, fire, or other heat sources.
event blade exposure.
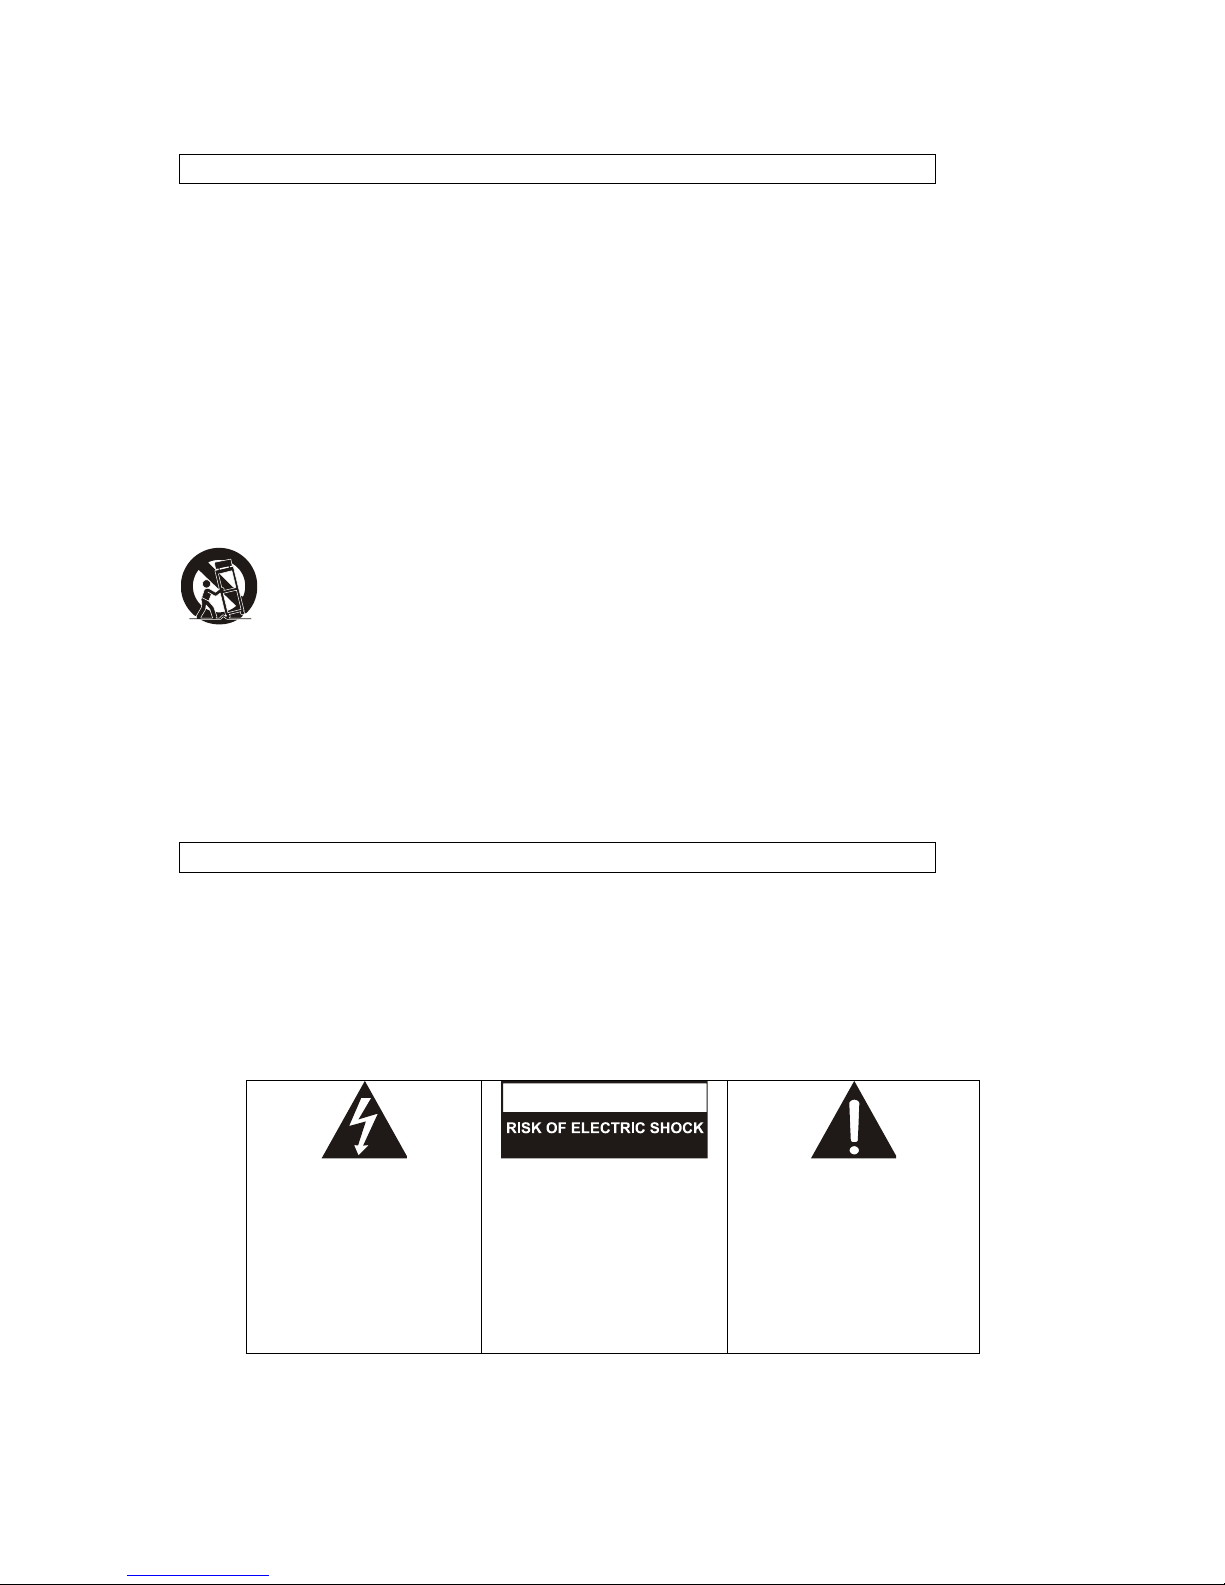
THE LIGHTNING FLASH WITH
ARROWHEAD SYMBOL, WITHIN
AN EQUILATERAL TRIANGLE, IS
INTENDED TO ALERT THE
USER TO THE PRESENCE OF
NON-INSULATED "DANGEROUS
VOLTAGE" WITHIN THE
PRODUCT'S ENCLOSURE THAT
MAY BE OF SUFFICIENT
MAGNITUDE TO CONSTITUTE A
RISK OF ELECTRIC SHOCK TO
PERSONS.
WARNING: TO REDUCE THE
RIS
K OF ELECTRIC SHOCK, DO
NOT REMOVE THE FRONT OR
REAR COVER. NO USER
SERVICEABLE PARTS ARE
INSIDE. REFER SE
QUALIFIED SERVICE
PERSONNEL.
RVICING TO
THE EXCLAMATION POINT
WITHIN AN EQUILATERAL
TRIANGLE IS INTENDED TO
ALERT THE USER TO THE
PRESENCE OF IMPORTANT
OPERATING AND MAINTENANCE
(SERVICING) INSTRUCTIONS IN
THE LITERATURE
ACCOMPANYING THE
APPLIANCE.
Page 3

FCC WARNINGS
WARNING: Changes or modifications to this unit not expressly approved by the party responsible for
compliance could void the user’s authority to operate the equipment.
NOTE t to Part
15 of the FCC Rules. These limits are designed to provide reasonable protection against harmful interference in a
residential installation. This equipment generates, uses, and can radiate radio frequency energy and, if not installed and
used in accordance with the instructions, may cause harmful interference to radio communications. However, there is no
guarantee that interference will not occur in a particular ins
radio or television reception, which can
to correct the interference by one or more of the following measures:
• Reorient or relocate the receiving antenna.
• Increase the separation between the equipment and receiver.
• Connect the equipment into an outlet on a circuit different from that
• Consult the dealer or an experienced radio/TV technician for help.
be determined by turning the equipment off and on, the user is encouraged to try
tallation. If this equipment does cause harmful interference to
to which the receiver is connected.
Page 4
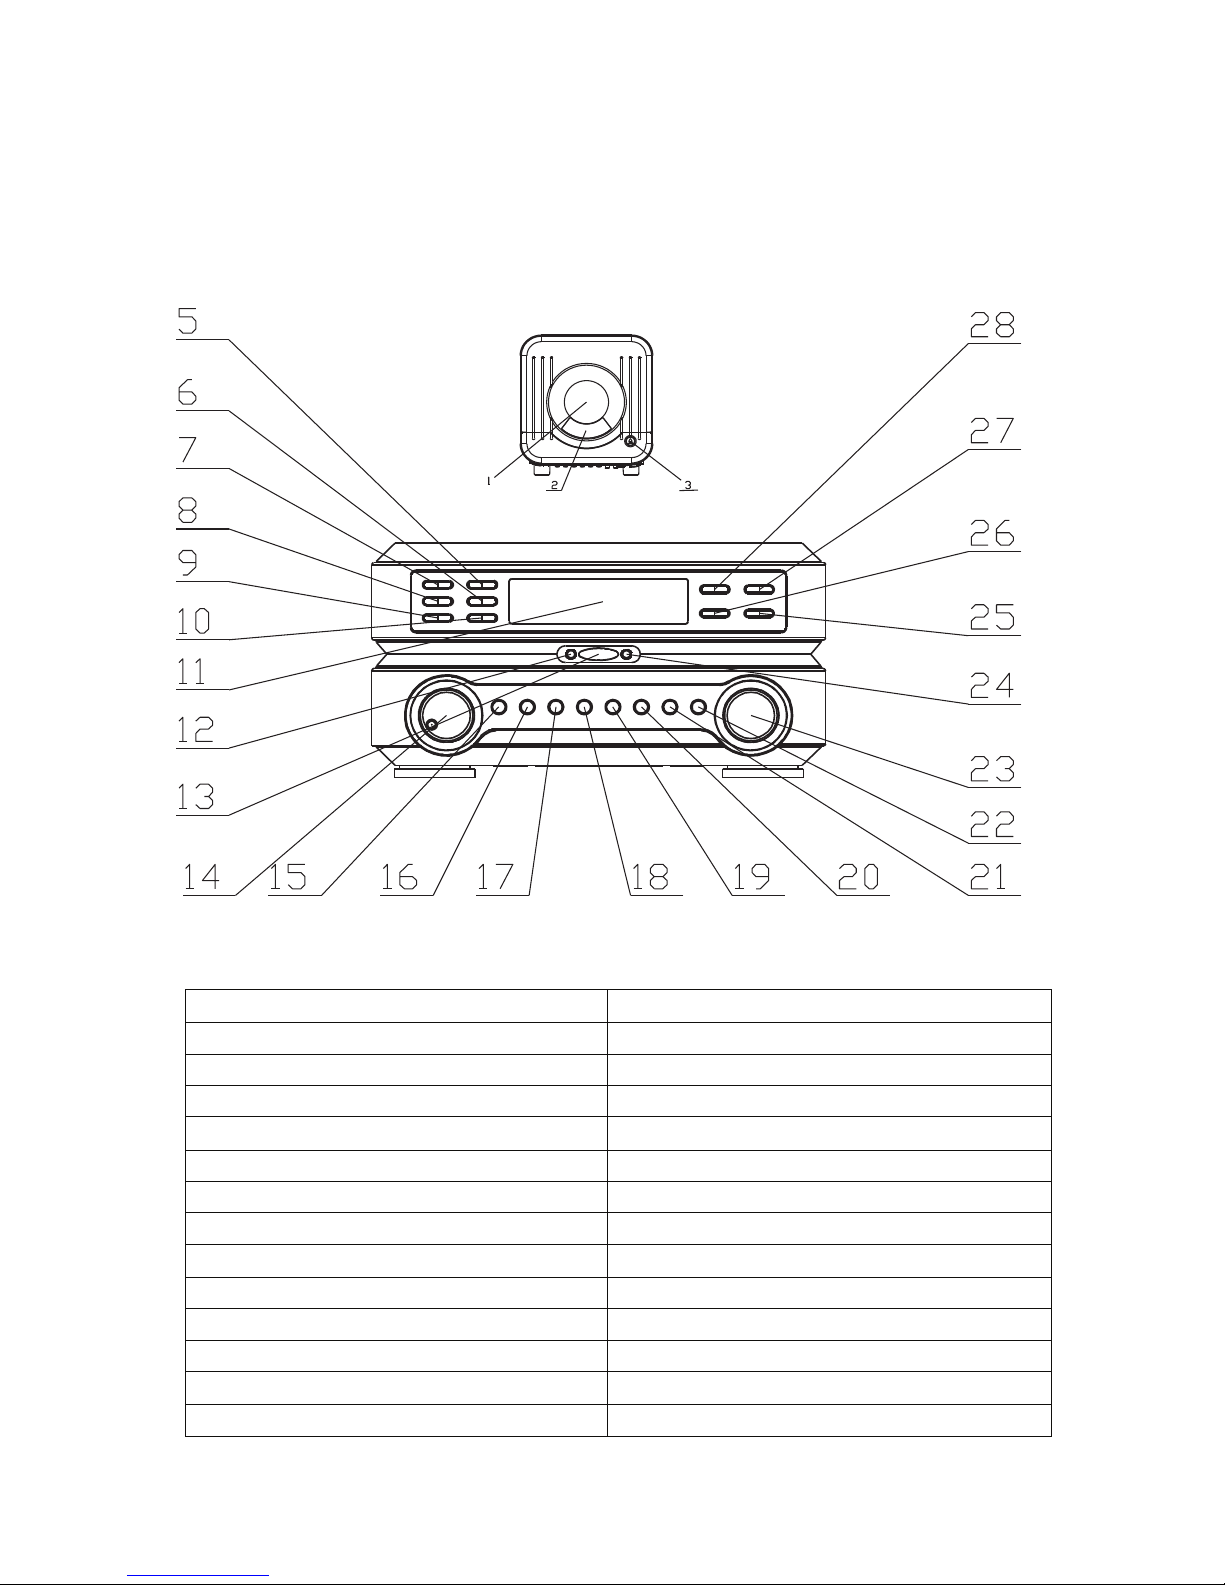
1. CD Door
15. Program button
2. CD Door Window
16. Repeat button
3. Open/Close button
17. Previous/F.Rev button
4. Left & Right Speaker
18. Next/F.Fwd button
5. Time Set button
19. Stop button
6. Hour button (clock hour setting)
20. Play/Pause button
7. Alarm ON/OFF button
21. DBBS button
8. Alarm Set button
22. POWER button
9. Time Display button
23. Radio Tuning Control
10. Minute button (Clock min setting)
24. POWER Indicator Light
11. LCD Display
25. Music/Buzzer button
12. DBBS Indicator Light
26. CD/Radio button
13. Remote Sensor
27. AM/FM button
14. Volume Control
28. Dimmer button
OVERVIEW OF THE SYSTEM CONTROLS
Page 5
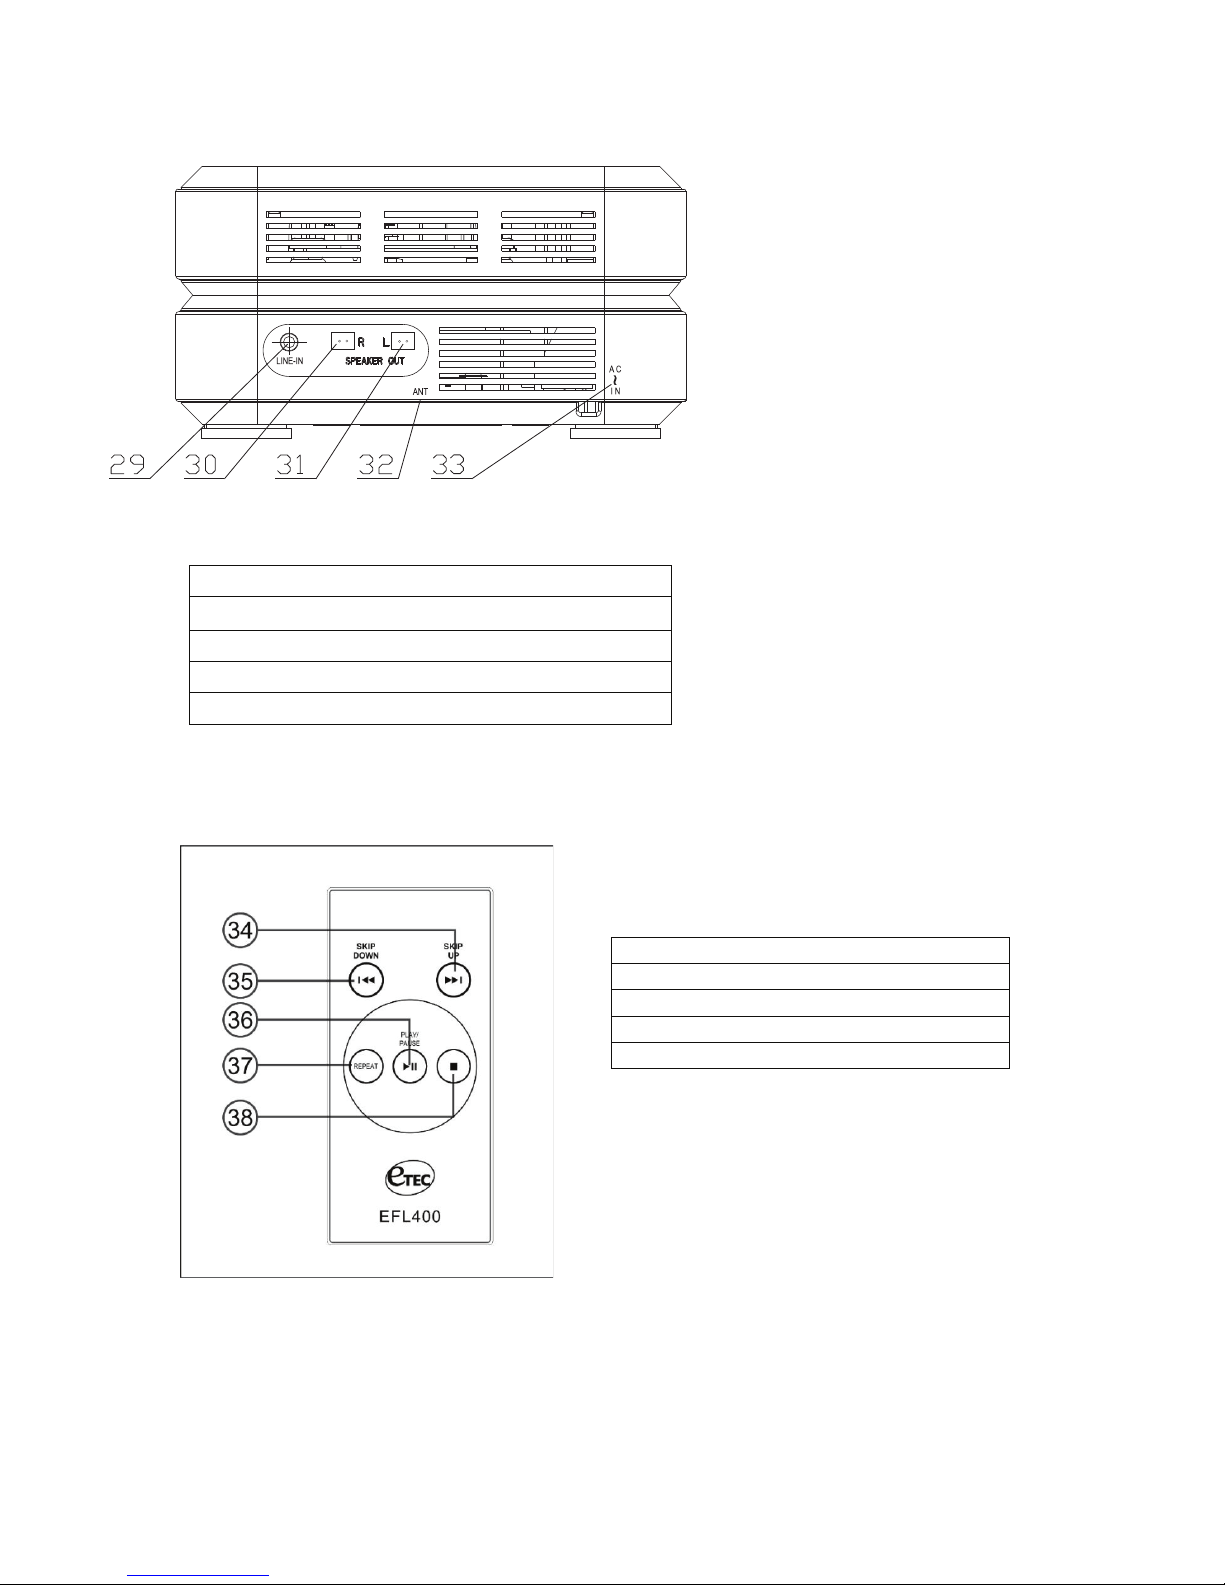
29. Auxiliary Line Input
30. Right Speaker Output Jack
31. Left Speaker Output Jack
32. FM Antenna
33. AC Power Cord
34. Skip/Search Forward button
35. Skip/Search Backward button
36. Play/Pause button
37. Repeat button
38. Stop button
Page 6
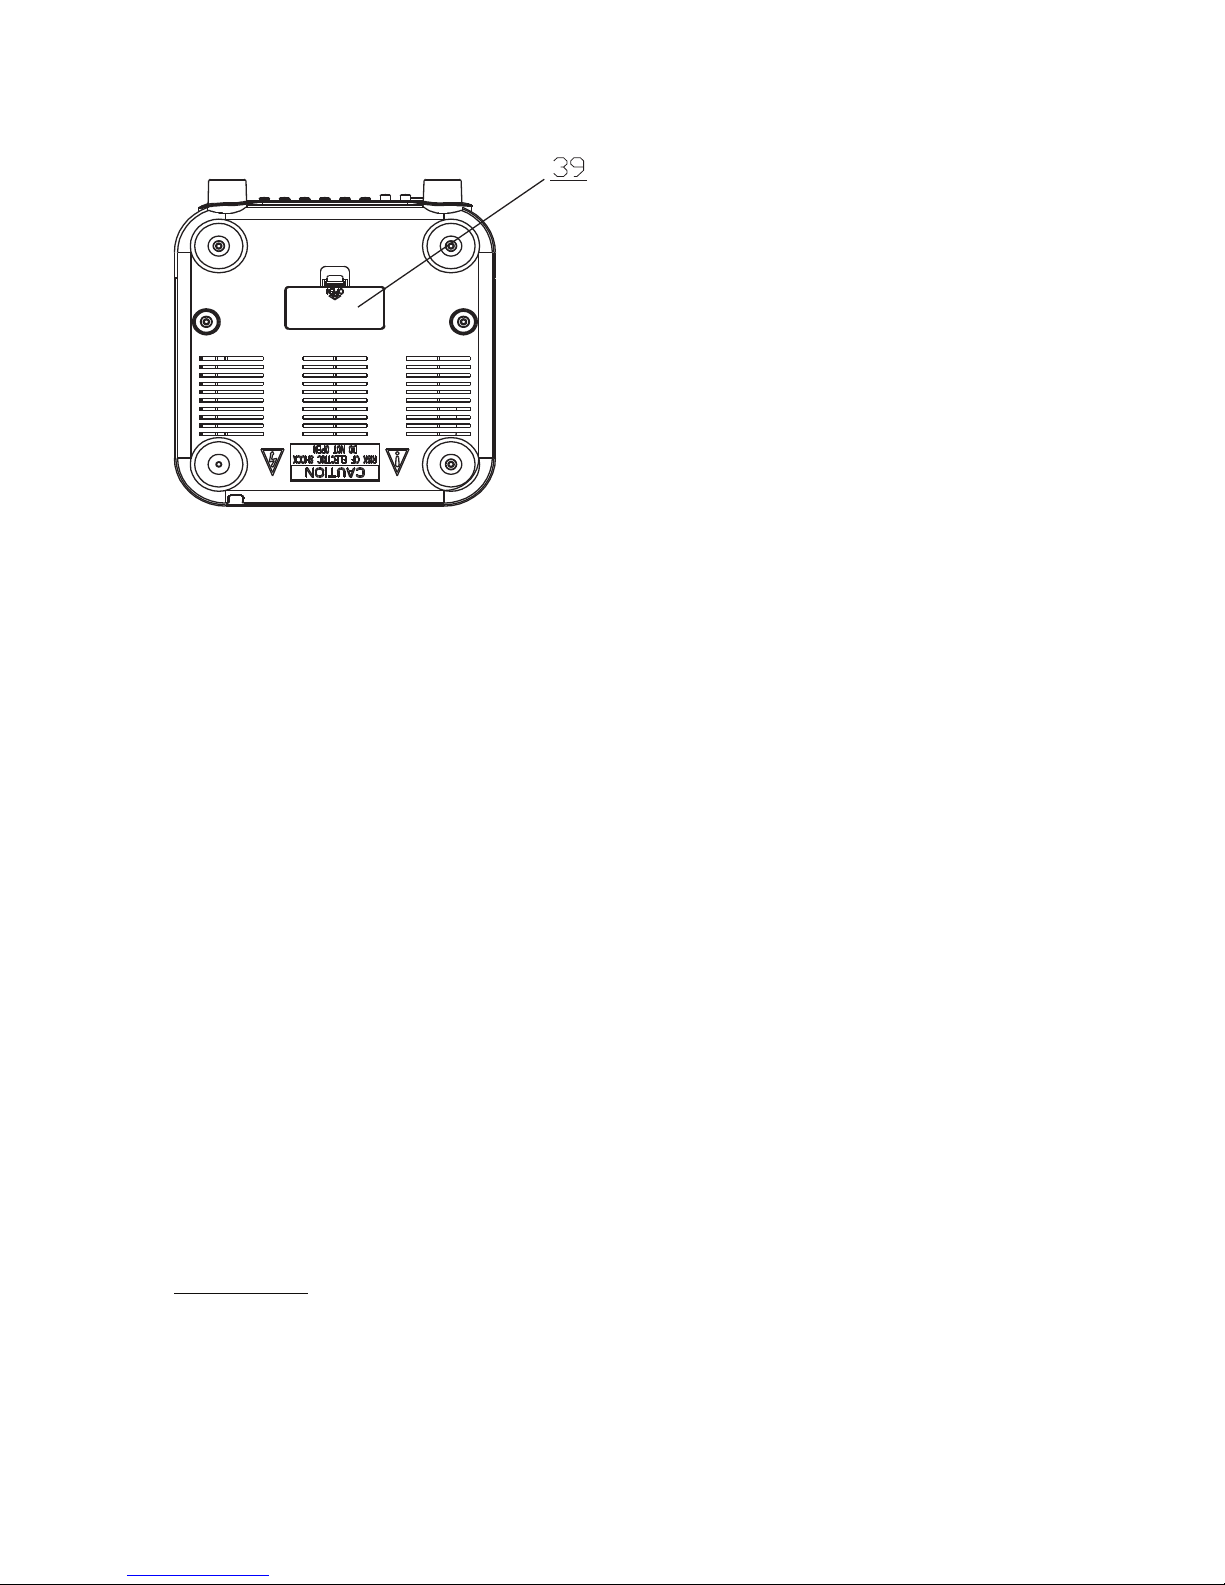
Battery Installation for the Power Backup - Requires 2 AAA Batteries - (Not Included)
NOTE: In the case of a Power failure, the Power backup will keep the Clock & Alarm times accurate
until the main power has been restored.
• Open the Battery cover (39) on the underside of the unit.
• Insert 2 AAA batteries (not included) following the
• Close the Battery cover (39).
IMPORTANT:
• Be sure that the batteries are installed correctly.
• Wrong polarity (+ or -) may damage the unit and void the warranty.
• For best performance and long
Alkaline type batteries.
CAUTION
• Do not mix old and new batteries.
• Do not mix alkaline, standard (carbo
• If the unit is not going to be used for an extended period of time, remove the batteries from
the unit.
• Old or leaking batteries can cause damage to the unit and may void the warran
• Do not dispose of batteries in fire as batteries may explode or leak.
er operating time, we recommend using good quality Super
n-zinc) or rechargeable (nickel-cadmium) batteries.
polarity as indicated in the compartment.
+ /-
ty.
IMPORTANT:
• This unit operates on AC 120V~ 60Hz.
Do not attempt to operate this unit on any other power source. You could cause damage
•
to the unit and void your warranty.
Please be sure the power outlet you plug this unit into is working and receives constant
•
unswitched power.
Page 7

POWER
1. Plug the attached AC power cord into a 120V AC~ 60Hz wall outlet.
2. Press the POWER button (22) once to turn the unit ON. The Power Indicator Light (24)
will turn ON. Press the POWER button (22) again to turn the unit OFF.
VOLUME
Adjust the VOLUME control (14) to the desired level.
PLAYING A CD
• Press the OPEN/CLOSE button (3) to open the CD door.
•
Insert a CD with the label facing up.
Close the CD Door.
•
Press the CD/RADIO button (26) to select the CD function.
•
Press the PLAY/PAUSE button (20) or (36) to start CD playback from the first track.
•
Press the PLAY/PAUSE button (20) or (36) again to momentarily pause playback.
•
•
To stop the playback, press the STOP button (19) or (38).
SKIPPING TRACKS
• During CD play, press the PREVIOUS/F.REV button (17) or (35) to move to the previous
track
Press the NEXT/F.FWD button (18) or (34) to move to the next track.
•
SEARCHING TRACKS
• During CD play press and hold the PREVIOUS/F.REV button (17) or (35) to scan Fast
Reverse through the current track.
•
Press and hold the NEXT/F.FWD button (18) or (34) to scan Fast Forward through the
current track
PROGRAMMED PLAYBACK
1. Up to 20 tracks can be programmed to play in any desired sequence.
Press the PROGRAM button (15) until "PROG" flashes in display.
2.
Press the NEXT/F.FWD button (18) / (34) or the PREVIOUS/F.REV button (17) / (35) to
3.
select a desired track to be programmed.
Press the PROGRAM button (15) to program the track.
4.
Repeat steps 3 & 4 to program more tracks.
5.
Press PLAY/PAUSE button (20) or (36) to start playing.
6.
To cancel program play, press the STOP button (19) or (38) twice.
7.
REPEAT PLAY
• To Repeat a Single Track
o Press the REPEAT button (16) or (37) while the track you want to repeat is
playing. "REP 1" is shown in display.
o To repeat another track, press the PREVIOUS/F.REV button (17) / (35) or the
Page 8

NEXT/F.FWD button (18) / (34).
o To cancel repeat play, press the REPEAT button (16) or (37) twice.
• To Repeat All Tracks
o Press the REPEAT button (16) or (37) twice during play. The "REP ALL" will
appear in the display.
o All tracks will be played through in sequence and then the sequence will be
repeated continuously.
o To cancel repeat play, press the REPEAT button (16) or (37) once.
PLAYING YOUR iPod® or MP3 PLAYER THROUGH THIS SYSTEM
• Connect a 3.5mm stereo audio cable from the headphone jack or other audio output on
your iPod® or MP3 player into the Aux Input (29) on the rear of this unit.
• Adjust the volume control on the connected device to an acceptable level.
• Use the controls of the connected device to control audio playback.
• NOTE: When a 3.5mm cable is connected, the CD and Radio modes will be
automatically disconnected. To
AUX Input on the player rear.
resume CD or Radio play, unplug the audio cable from the
LISTEN TO AM/FM STEREO RADIO
• Press the CD/RADIO button (26) to select the RADIO function.
• Press the AM/FM button (27) to select AM or FM.
• Turn the RADIO TUNING CONTROL (23) to select the desired Radio station.
While in Radio Mode, the LCD Display (11) will indicate the current station frequency.
•
To view the current time, press the Time Display button (9), the time will be shown on
the LCD display and will disappear automatically.
NOTE: You cannot set the time or the alarm while the Radio is in use.
•
ANTENNAS
The AM & FM antennas are built-in to the cabinet of this player. To improve reception of radio stations
simply move the entire player to another location until reception improves.
SETTING THE CLOCK
• Turn the unit POWER (22) OFF before setting the time.
• To set the clock, press and hold the TIME SET button (5).
• While holding the TIME SET button (5) press the HOUR (6) or the MINUTE buttons (10)
respectively until the correct time is displayed.
SETTING THE ALARM
• Turn the unit POWER (22) OFF before setting the alarm.
• Press and hold the ALARM SET button (8) to set the alarm time.
• While holding the ALARM SET button (8) press the HOUR button (6) or MINUTE button
(10) respectively until the proper time is set.
• Turn on the alarm function by pressing the ALARM ON/OFF button (7) until the Alarm
icon appears in the LCD DISPLAY (11).
• To turn off the alarm,
disappears f
rom the LCD DISPLAY (11).
press the ALARM ON/OFF button (7) until the Alarm icon
Page 9
• After setting the Alarm to your desired time press the MUSIC/BUZZER button (25) to the
CD player will not turn on
AC Cord not connected
Plug AC Cord into power
Disc will not play
Disc inserted incorrectly
Reinsert disc with label side
Erratic CD playback
Dirty or defective disc
Clean or replace disc
No sound
Plug not inserted property
Reinsert Speaker Plug into
Noise or Sound distorted on
Station not tuned properly
Retune AM or FM broadcast
desired selection.
• If you are waking to CD press the MUSIC/BUZZER button (25) until “CD” appears in the
LCD DISPLAY (11).
• If you are waking to RADIO press the MUSIC/BUZZER button (25) until “♪” appears in the
USING THE DIGITAL BASS BOOST FEATURE
LCD DISPLAY (11).
• If you are waking to BUZZER press the MUSIC/BUZZER button (25) until only the alarm icon
appears in the LCD DISPLAY (11).
• To stop the Alarm while it is playing, simply press the ALARM ON/OFF button (7) once.
• To enhance the low frequency bass sound, press the DBBS button (21). The DBBS Indicator
Light (12) will turn ON.
• Press the DBBS button (21) again to turn the Digital Bass Boost OFF.
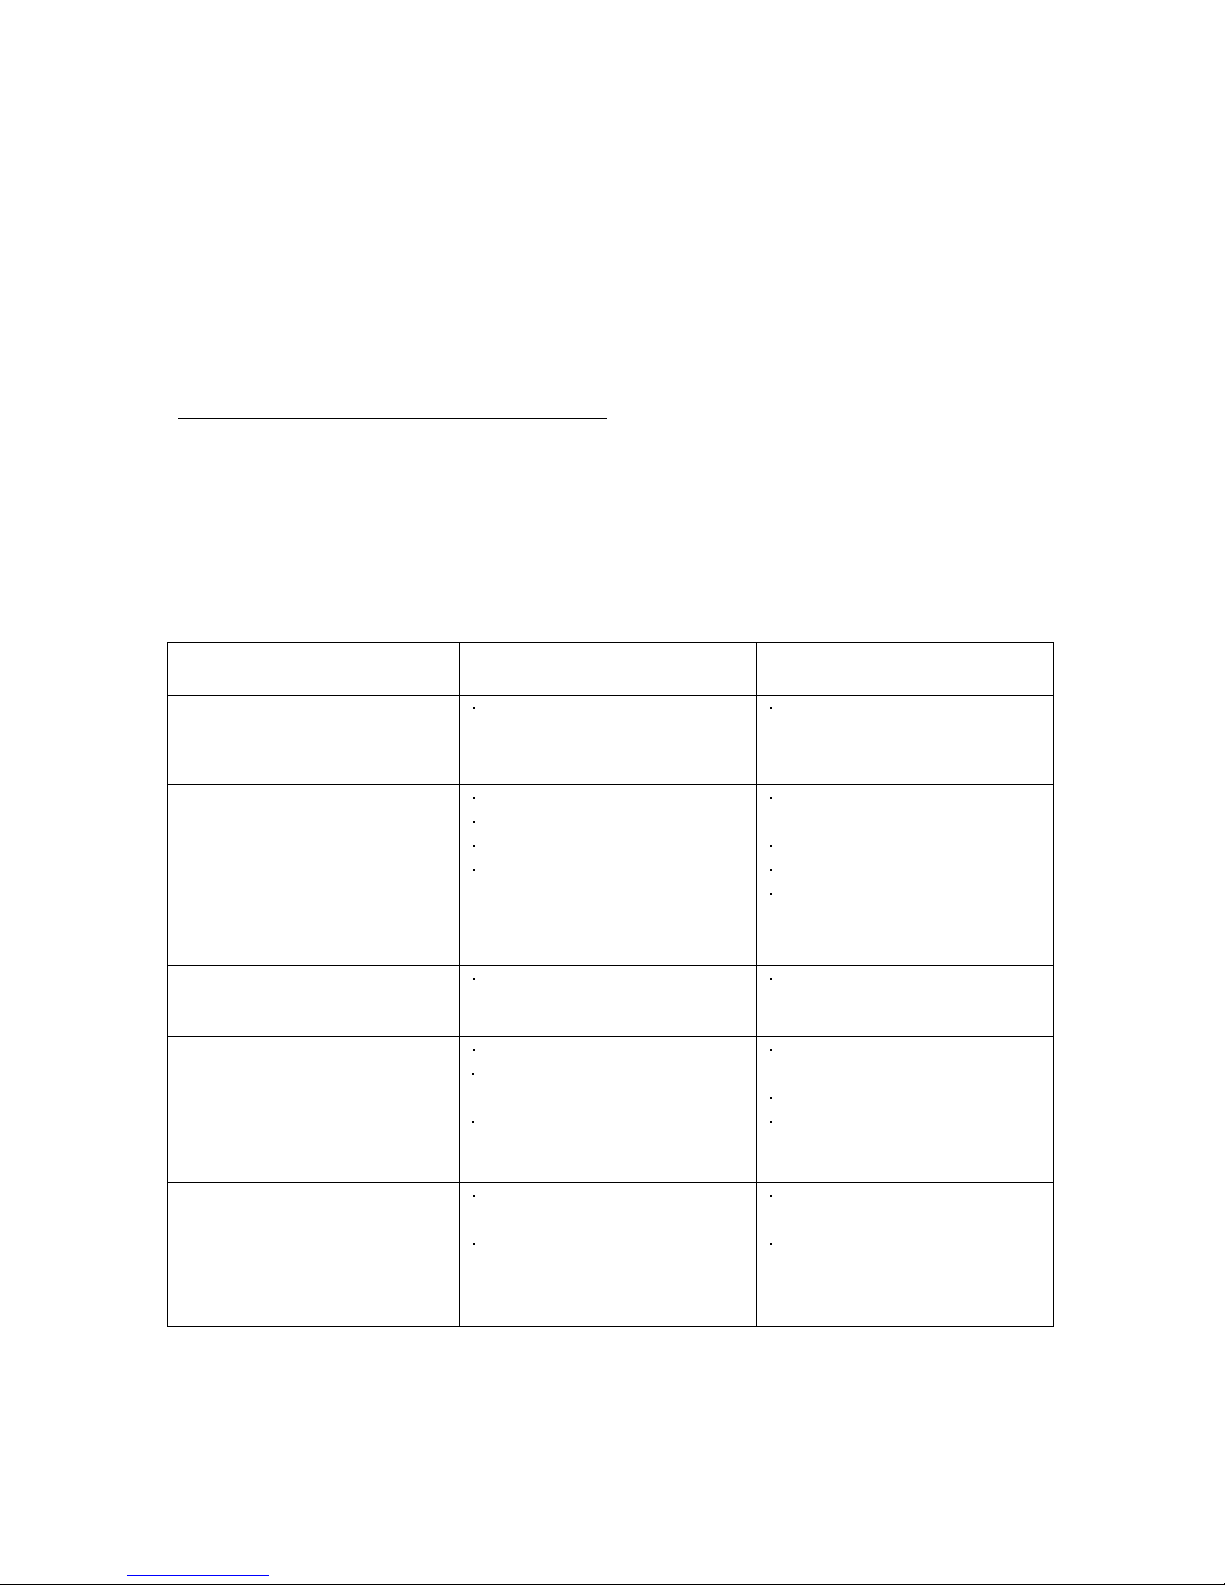
TROUBLESHOOTING GUIDE
You experience a problem with this unit check the chart below before calling of service.
SYMPTOM CAUSE SOLUTION
radio
properly
Defective compact disc
CD compartment not closed
Moisture condensation on
disc
Volume control set to
minimum
Defective compact disc
for AM or FM
Unit is not positioned
correctly
outlet
facing up
Try another compact disc
Close CD compartment
Wipe disc with soft cloth
Speaker jack
Increase the volume
Try another compact disc
station
Rotate unit until best
reception is obtained
Page 10

LIMITED 90-DAY WARRANTY
We warrant this product to be free from defects in material and workmanship under normal use for a ninety-day
period from the original date of purchase from an authorized ETEC dealer.
Should you be missing any of the included accessories or other components (screws, pieces, etc.), please contact
the Customer Support Center to secure a replacement. It is not necessary to bring the unit back to the store. When
calling, please reference the parts list found in the Instruction Manual to help us accurately identify the missing
parts and promptly provide replacements.
We will replace the unit free of charge should it become defective under this warranty, providing you, the original
purchaser, have your original dated sales receipt.
To obtain warranty service or replacement within the ninety-day warranty period, please return the product with all
parts and accessories along with your original dated store receipt to the original place of purchase and the unit will
be exchanged at no charge. It is not necessary to contact the manufacturer for warranty replacement.
Our Customer Support Center is available Monday - Saturday (10:00AM to 7:00PM EST) for technical assistance
or troubleshooting. To contact us, please call 1-855-994-3832.
This warranty applies only under conditions of normal use. Our products are not intended for outdoor use.
There are no consumer serviceable parts contained in this product and any attempt by the owner to service or
repair the unit will immediately void all warranty coverage.
This warranty does not cover any product which has been subject to damage due to an act of nature, misuse,
neglect, accident, abuse, commercial use, or modification of, or to, any part of the product, including the antenna.
Damage to any external media such as DVD & CD discs, and/or USB or other memory devices are not covered
nor is the cost incurred in shipping the unit for warranty repair or exchange. Under no circumstances shall ETEC
be liable for any loss (direct, indirect, incidental, foreseen, unforeseen, special or consequential) or for any
damage arising out of, or in connection with, the use of this product.
UNDER NO CIRCUMSTANCES WILL ETEC BE LIABLE FOR ANY INCIDENTAL OR CONSEQUENTIAL
DAMAGES.
This warranty does not cover re-manufactured, refurbished, or repaired units, or any products sold 'As Is'.
This warranty is valid only to the original purchaser of the Product in the United States and Canada and grants
specific legal rights.
Page 11

This page is intentionally left blank
Page 12

Schoenfeld International Inc and ETEC
5001 American Boulevard West
Suite 275
Bloomington, MN 55437
©Schoenfeld International Inc, 2014
PN: EFL400 Rev 1.4V December, 2014
 Loading...