

Page 1
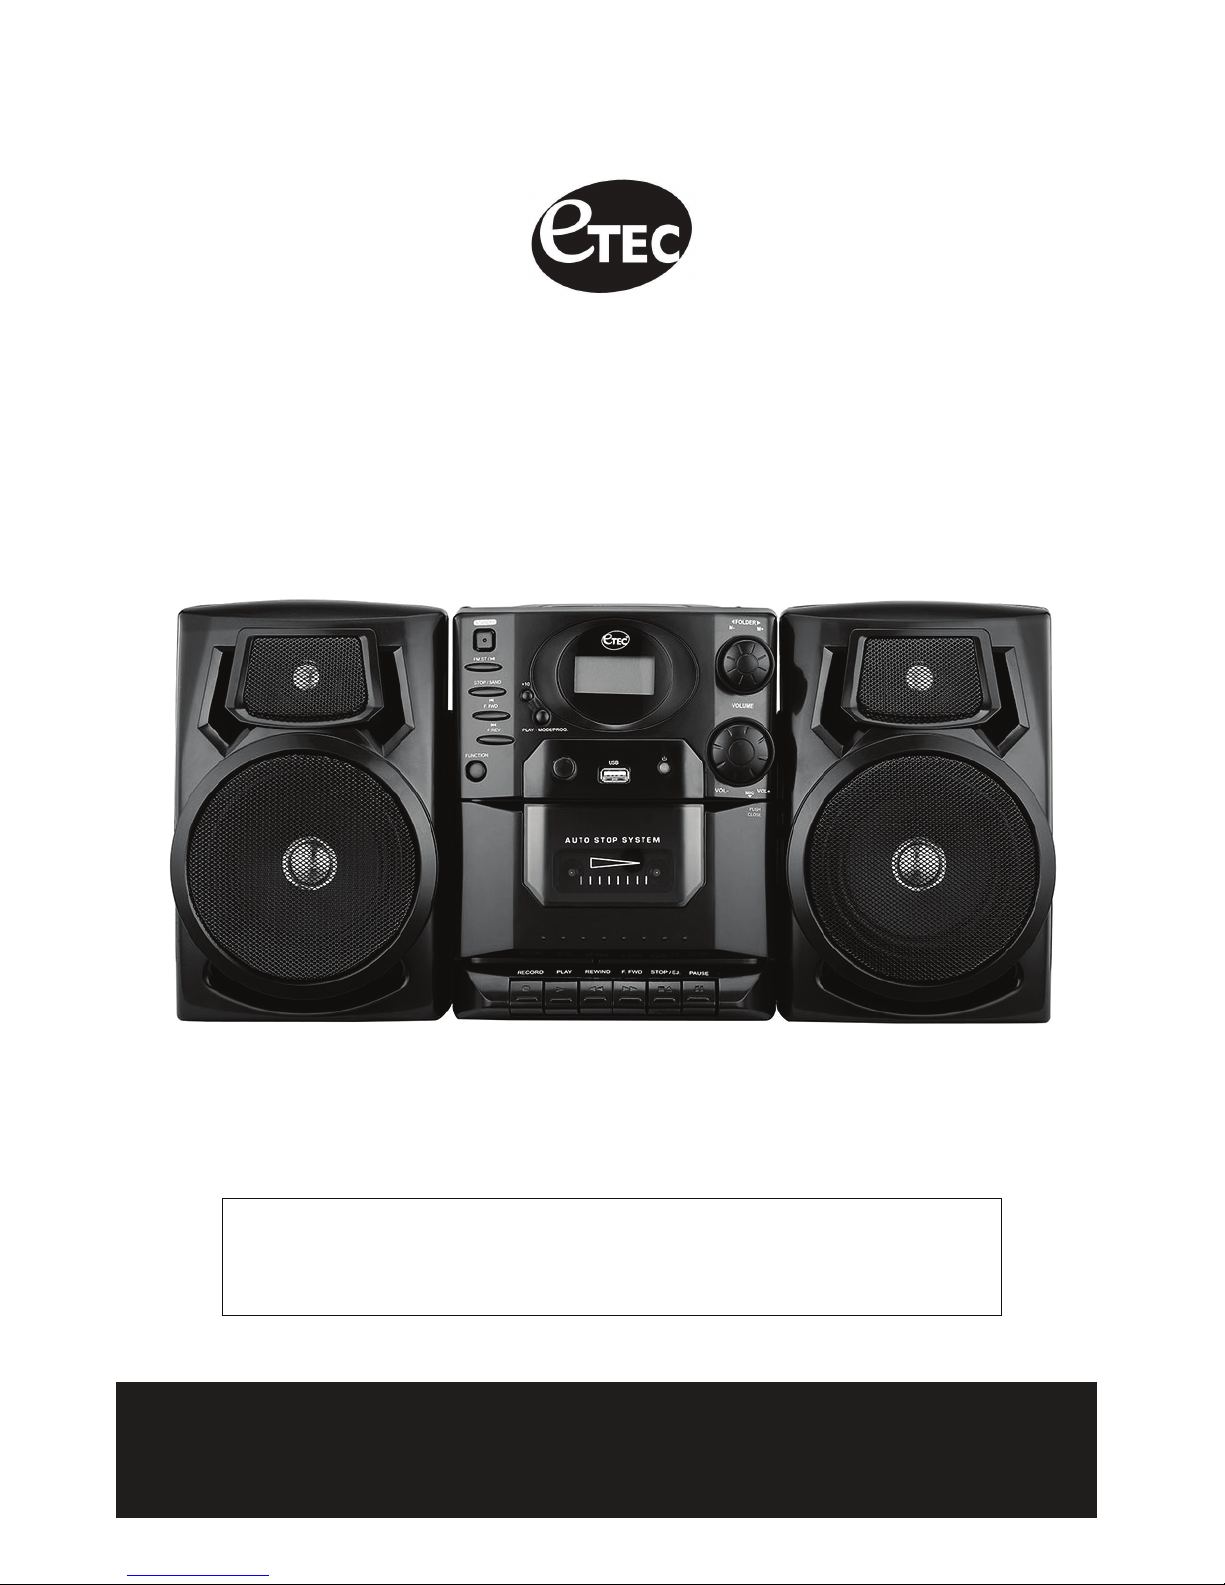
CD AM/FM Portable Mini System
Model: E6335
PLEASE READ THIS USER MANUAL COMPLETELY BEFORE
OPERATING THIS UNIT AND RETAIN THIS BOOKLET FOR
FUTURE REFERENCE.
For technical assistance or troubleshooting please
call 1-855-994-3832 or visit www.sibrandssupport.com
Page 2

WARNINGS
• To reduce the risk of fire or electric shock, do not expose this appliance to rain or moisture.
• To reduce the risk of electric shock, do not open the cabinet. No user serviceable parts are inside. Refer
servicing to qualified personnel.
• This appliance uses a Laser System. To prevent direct exposure to the laser beam do not open the cabinet.
Visible and invisible laser radiation is present when the cabinet is open. Avoid direct exposure and do not stare
into the beam.
• Batteries should not be exposed to excessive heat such as direct sunlight, fire, or other heat sources.
• Caution: Do not expose this appliance to dripping or splashing liquids. Do not put objects filled with liquid, such
as vases on or near the appliance.
• Caution: To turn this appliance off completely, the POWER cord must be unplugged from the wall outlet. The
power cord must be easily accessible at all times.
THE LIGHTNING FLASH WITH
ARROWHEAD SYMBOL, WITHIN
AN EQUILATERAL TRIANGLE,
IS INTENDED TO ALERT THE
USER TO THE PRESENCE OF
NON-INSULATED "DANGEROUS
VOLTAGE" WITHIN THE
PRODUCT'S ENCLOSURE THAT
MAY BE OF SUFFICIENT
MAGNITUDE TO CONSTITUTE
A RISK OF ELECTRIC SHOCK
TO PERSONS.
CAUTION
DO NOT OPEN
WARNING: TO REDUCE THE
RISK OF ELECTRIC SHOCK, DO
NOT REMOVE THE FRONT OR
REAR COVER. NO USER
SERVICEABLE PARTS ARE
INSIDE. REFER SERVICING TO
QUALIFIED SERVICE
PERSONNEL.
THE EXCLAMATION POINT
WITHIN AN EQUILATERAL
TRIANGLE IS INTENDED TO
ALERT THE USER TO THE
PRESENCE OF IMPORTANT
OPERATING AND MAINTENANCE
(SERVICING) INSTRUCTIONS IN
THE LITERATURE
ACCOMPANYING THE
APPLIANCE.
FCC WARNINGS
WARNING: Changes or modifications to this unit not expressly approved in this manual could void the
user’s authority to operate the equipment.
NOTE: This equipment has been tested and found to comply with the limits for a Class B digital device, pursuant to
Part 15 of the FCC Rules. These limits are designed to provide reasonable protection against harmful interference in
a residential installation. This equipment generates, uses, and can radiate radio frequency energy and, if not installed
and used in accordance with the instructions, may cause harmful interference to radio communications. However,
there is no guarantee that interference will not occur in a particular installation. If this equipment does cause harmful
interference to radio or television reception, which can be determined by turning the equipment off and on, the user is
encouraged to try to correct the interference by one or more of the following measures:
• Reorient or relocate the receiving antenna.
• Increase the separation between the equipment and receiver.
• Connect the equipment into an outlet on a circuit different from that to which the receiver is connected.
• Consult the dealer or an experienced radio/TV technician for help.
IMPORTANT SAFETY INSTRUCTIONS
1) Read these instructions.
2) Keep these instructions.
3) Heed all warnings.
4) Follow all instructions.
5) Do not use this apparatus near water.
6) Clean only with dry cloth.
7) Do not block any ventilation openings. Install in accordance with the manufacturer's instructions.
8) Do not install near any heat sources such as radiators, heat registers, stoves, or other apparatus (including
amplifiers) that produce heat.
9) Do not defeat the safety purpose of the polarized or grounding-type plug. A polarized plug has two blades with
one wider than the other. A grounding type plug has two blades and a third grounding prong. The wide blade
and/or the third prong are provided for your safety. If the provided plug does not fit into your outlet, consult an
electrician for replacement of the obsolete outlet.
10) Protect the POWER cord from being walked on or pinched particularly at plugs, convenience receptacles, and
the point where they exit from the apparatus.
11) Only use attachments/accessories specified by the manufacturer.
12) Use only with the cart, stand, tripod, bracket, or table specified by the manufacturer, or sold
with the apparatus. When a cart is used, use caution when moving the cart/apparatus
combination to avoid injury from tip-over.
13) Unplug this apparatus during lightning storms or when unused for long periods of time.
14) Refer all servicing to qualified service personnel. Servicing is required when the apparatus has been damaged in
any way, such as POWER-supply cord or plug is damaged, liquid has been spilled or objects have fallen into the
apparatus, the apparatus has been exposed to rain or moisture, does not operate normally, or has been dropped.
Page 3
1
2
3
4
5
6
7
8
9
10
11
12
13
14
15
17 181920 212223 24
25
16
16
26 27
28
29
31
30
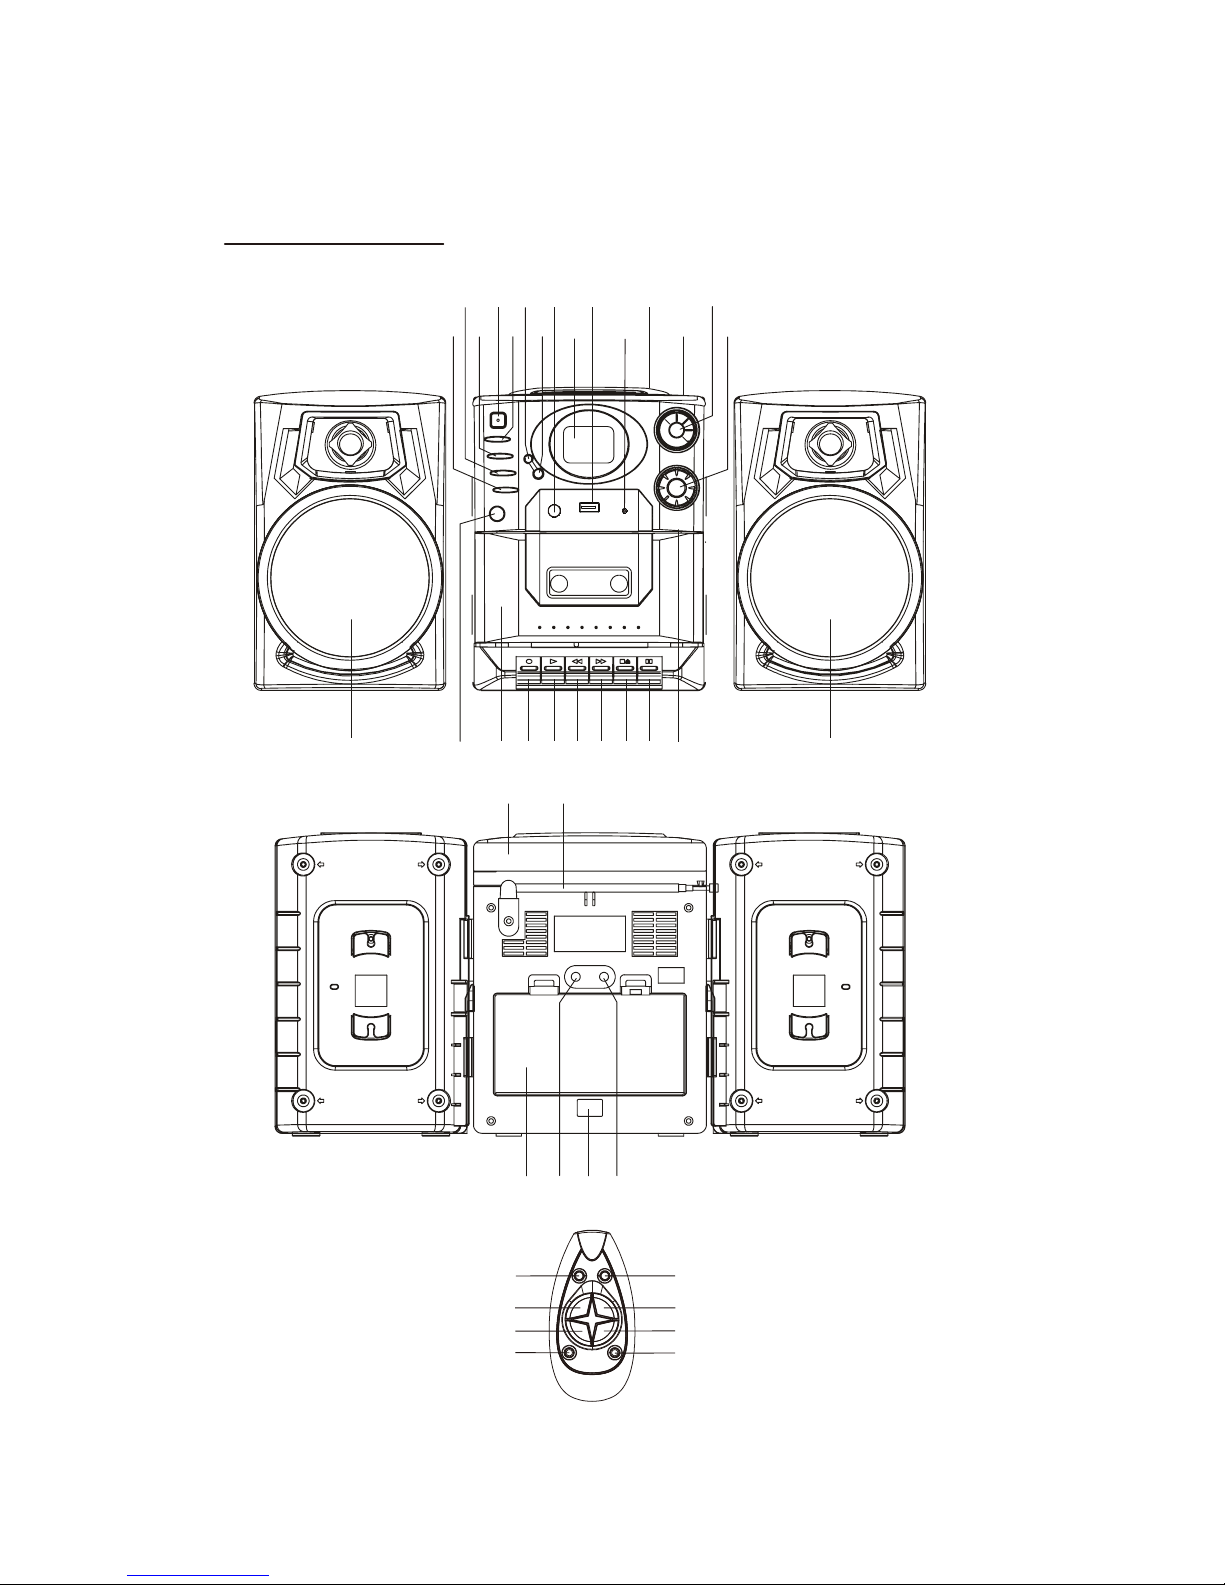
OVERVIEW OF THE PLAYER
32
33
34
35
36
37
38 39
Page 4

LOCATION OF CONTROLS (MAIN UNIT)
1. PREVIOUS / F.REV Button
2. NEXT / F.FWD Button
3. STOP / BAND Button
4. STANDBY Button
5. PLAY / PAUSE / FM STEREO Button
6. +10 Button
7. PLAY MODE / PROGRAM Button
8. Remote Sensor
9. LCD Display
10. USB PORT
11. POWER Indicator
12. CD Door
13. CD Door OPEN / CLOSE
14. FOLDER / MEMORY Knob
15. VOLUME Knob
16. Speakers
17. FUNCTION Button
18. Cassette Door
19. CASSETTE RECORD Button
20. CASSETTE PLAY Button
21. CASSETTE REWIND Button
22. CASSETTE FAST FORWARD Button
23. CASSETTE STOP / EJECT Button
24. CASSETTE PAUSE Button
25. Built
-in Microphone
26. Handle
27.Telescoping Antenna
28. Battery Compartment
29. RIGHT Speaker Jack
30. LEFT Speaker Jack
31. AC Socket
LOCATION OF CONTROLS (REMOTE CONTROL)
32. STANDBY Button
33. FUNCTION Button
34. PLAY / PAUSE / FM STEREO Button
35. STOP / BAND Button
36. PREVIOUS / F.REV Button
37. NEXT / F.FWD Button
38. VOLUME DOWN Button
39. VOLUME UP Button
SPEAKER CONNECTIONS
To Attach the speakers to the main unit, align the grooves of the main unit with the grooves
on the side of one of the speakers. Slide the speaker downward until the latch on the
speaker firmly attaches to the main unit.
• To Detach the speakers simply press and hold the latch on the side of each speaker
and lift the speaker upwards.
• For the RIGHT speaker insert the attached 3.5mm plug into the RIGHT SPEAKER
JACK (29)
• For the LEFT speaker insert the attached 3.5mm plug into the LEFT SPEAKER
JACK (30)
Page 5

POWER
AC POWER (Wall Outlet)
1. Plug the supplied AC Power Cord into the AC Socket (31) on the rear of the unit.
2. Insert the wall plug of the AC Power Cord into an electrical wall outlet.
3. To turn the unit ON press the STANDBY button (4).
BATTERY POWER
1. Open the Battery Compartment (28) by gently sliding the compartment door in the
direction indicated on the bottom of the unit.
2. Insert 8 ‘D’ size batteries (not included) into the Battery Compartment (28). Be sure
to place the
batteries in the same polarity (+ or -) direction indicated on the engraved
diagram inside the Battery Compartment (28).
3. Replace the door to the Battery Compartment (28) by carefully sliding it back into
place.
4. To turn the unit ON press the STANDBY button (4).
VOLUME
The volume is adjusted by turning the VOLUME Knob (15) on the left side of the unit.
• To Increase the Volume: Rotate the VOLUME Knob (15) clockwise to the right.
• To Decrease the Volume: Rotate the VOLUME Knob (15) counterclockwise to the
left.
PLAYING A CD
1. Open the CD Door (12) by gently pressing on the CD DOOR OPEN / CLOSE (13).
2. Insert a CD with the label side facing UP.
3. Close the CD Door (12) by gently pressing down on the door with your finger.
4. Press the FUNCTION button (17) until CD appears on the LCD Display (9). The
player will automatically show the total number of tracks (songs) on the CD on the
LCD Display (9).
5. Press the PLAY / PAUSE / FM STEREO button (5) to start playing the CD. Press the
PLAY / PAUSE / FM STEREO button (
5) again to momentarily pause playback. To
resume playback press the PLAY / PAUSE / FM STEREO button (5) again.
6. To Stop playing the CD press the STOP / BAND button (3).
SKIPPING TRACKS (SONGS)
• To skip to the next track press the NEXT / F.FWD button (2)
• To move to the beginning of the current track press the PREVIOUS / F.REV button (1)
• To skip to a previous track press the PREVIOUS / F.REV button (1) multiple times in
a row until the desired track is shown on the LCD Display (9).
SEARCHING TRACKS
• While playing a CD press and hold the NEXT / F.FWD button (2) to scan Fast
Forward through the current track. Release the button when you reach the desired
portion of the track you want to hear.
• Press and hold the PREVIOUS / F.REV button (1) to Fast Reverse through the
current track. Release the button when you reach the desired portion of the track you
want to hear.
Page 6

PROGRAMMED PLAYBACK
Up to 20 tracks of a CD can be programmed to play in any desired order.
1. To set a Program order, first make sure the CD is not currently playing by pressing
the STOP / BAND button (3)
2. Press the PLAY MODE / PROGRAM button (7). The LCD Display (9) will show “01”
3. Press the NEXT / F.FWD (2) or PREVIOUS / F.REV (1) button to until the number of
the first track you want to program is blinking in the LCD Display (9).
4. Press the PLAY MODE / PROGRAM button (7) to program the track. The LCD
Displ
ay (9) will automatically show “02”.
5. Repeat steps 3 & 4 to program up to 20 different tracks.
6. When you have finished selecting tracks, press the PLAY / PAUSE / FM STEREO
button (5) to start playing the CD in the order you have programmed. The LCD
Display (9) will show “PROG” during Programmed Playback.
7. To stop Programmed Playback press the STOP / BAND button (3) twice. The
“PROG” indicator will automatically turn OFF.
REPEAT PLAYBACK
• To Repeat a Single Track press the PLAY MODE / PROGRAM button (7) once. The
word “REPEAT” will automatically start blinking in the LCD Display (9).
• To Repeat the Entire CD press the PLAY MODE / PROGRAM button (7) again until
the word “REPEAT” is ON (not blinking) in the LCD Display (9).
• To cancel Repeat Playback press the PLAY MODE / PROGRAM button (7)
continuously until the “REPEAT” is no longer shown in the LCD Display (9).
LISTEN TO AM/FM RADIO
1. Press the FUNCTION button (17) to the RADIO setting. The current radio station will
be shown on the LCD Display (9).
2. Press the STOP / BAND button (3) to your desired setting (AM or FM).
3. Use the NEXT / F.FWD (2) or PREVIOUS / F.REV (1) button to select the desired
Radio station.
• TIPS FOR BEST RECEPTION
o The AM antenna is built-in to the cabinet of this player. To improve
reception of radio stations simply move the entire player to another
location until reception improves.
o The
Telescoping Antenna (27) can be adjusted for FM reception.
When listening to a FM station fully extend the antenna and slowly rotate
it until reception improves.
SETTING RADIO PRESETS
This unit can store 20-FM & 20-AM radio stations in the Preset memory. To store preset
stations follow the steps below.
1. Use the NEXT / F.FWD (2) or PREVIOUS / F.REV (1) button to select the desired
Radio station to be programmed.
2. Press the PLAY MODE / PROGRAM button (7) “P01” will begin flashing in the LCD
Display (8)
3. Use the FOLDER / MEMORY Knob (14) to set the desired Preset number (1-20).
4. Press the PLAY MODE / PROGRAM button (7) to enter the radio station into
the
Preset memory.
5. Repeat steps 1-4 to enter additional radio stations into the Preset memory.
To tune directly to your Radio Presets simply use the FOLDER / MEMORY knob (14) to
cycle through the Presets stored in the memory.
Page 7

USB PLAYBACK
This unit can play MP3 files from a USB flash drive.
1. Insert a USB flash drive into the USB Port (10)
2. Press the FUNCTION button (17) until the LCD Display (9) shows “USB”. The unit
will automatically start reading the files stored on the USB flash drive. When reading
has completed the total number of songs on the USB flash drive will be shown on the
LCD Display (9).
3. Press the PLAY / PAUSE / FM STEREO button (5) to start playing your MP3 files.
• NOTE: if you have MP3 files stored in multiple folders on your flash drive you can
use the FOLDER / MEMORY Knob (14) to cycle through the individual folders.
Each time you adjust the FOLDER / MEMORY Knob (14) the unit will skip to the
next folder on the flash drive.
CASSETTE PLAYBACK
1. Press the FUNCTION button (17) until the LCD Display (9) shows the “TAPE”
setting.
2. Press the CASSETTE STOP / EJECT button (23) to open the Cassette Door (18).
3. Insert a cassette so the tape side of the cassette is inserted into the bottom of the
Cassette Door (18).
4. Gently push the Cassette Door (18) inward until it fully closes.
5. Press the CASSETTE PLAY Button (20) to begin playback.
a. To REWIND the cassette press the CASSETTE REWIND button (21)
b. To FAST FORWARD the cassette press the CASSETTE FAST FORWARD
button (22)
6. Press the CASSETTE STOP / EJECT button (23) to stop playback. Press the
CASSETTE STOP / EJECT button (23) again to eject the cassette.
CASSETTE RECORDING
RECORDING FROM A CD
1. Insert a blank cassette tape into the Cassette Door (18) with the full tape reel on the
left-hand side of the cassette.
2. Begin playing the CD by following the steps described in this manual
3. When the music arrives at the point you want to begin recording press the
CASSETTE RECORD (19) and CASSETTE PLAY (20) buttons at the same time to
begin recording.
4. When the music arrives at the point you want to stop recording simply press the
CASSETTE STOP / EJECT button (23) and recording will automatically stop.
RECORDING FROM RADIO
1. Insert a blank cassette tape into the Cassette Door (18) with the full tape reel on the
left-hand side of the cassette.
2. Tune to the radio station you wish to record by following the steps described in this
manual
3. When the radio station arrives at the point you want to begin recording press the
CASSETTE RECORD (19) and CASSETTE PLAY (20) buttons at the same time to
begin recording.
4. When the radio station arrives at the point you want to stop recording simply press
the CASSETTE STOP / EJECT button (23) and recording will automatically stop.
RECORDING FROM USB
1. Insert a blank cassette tape into the Cassette Door (18) with the full tape reel on the
left-hand side of the cassette.
2. Begin playing the files on your USB Flash Drive by following the steps described in
this manual
Page 8

3. When the music arrives at the point you want to begin recording press the
CASSETTE RECORD (19) and CASSETTE PLAY (20) buttons at the same time to
begin recording.
4. When the music arrives at the point you want to stop recording simply press the
CASSETTE STOP / EJECT button (23) and recording will automatically stop.
SETTING THE CLOCK
1. Turn the power to the unit OFF before setting the clock.
2. Press and hold the PLAY MODE / PROGRAM button (7) to enter clock setup mode.
3. The LCD Display (9) will begin flashing either “24H” for using a 24-hour clock or
“12H” for using a 12-hour clock setting. Use the NEXT / F.FWD (2) or PREVIOUS /
F.REV (1) buttons to select “24H” or “12H” then press the PLAY MODE / PROGRAM
button (7) to enter your choice and automatically move on to setting the HOUR.
4. Use the NEXT / F.FWD (2) or PREVIOU
S / F.REV (1) buttons to select the correct
HOUR setting. Press the PLAY MODE / PROGRAM button (7) to enter your choice
and automatically move on to setting the MINUTES.
5. Use the NEXT / F.FWD (2) or PREVIOUS / F.REV (1) buttons to select the correct
MINUTES setting. Press the PLAY MODE / PROGRAM button (7) to enter your
choice.
Once the MINUTES setting has been entered the unit will automatically exit clock setup mode
and the current time will be shown on the LCD Display (9).
Page 9

TROUBLESHOOTING
Symptom
Possible Cause
Solution
Noise or sound
distorted on AM or
FM broadcast
- Station not tuned properly for
AM or FM.
- FM: Player is not positioned
correctly
- AM: Player is not positioned
correctly
- Retune the AM or FM
broadcast station.
- FM: Reposition the unit until
the best reception is obtained.
- AM: Reposition the unit until
the best reception is obtained.
AM or FM no sound
- Player not in “RADIO” mode.
- Volume set at minimum
- Change the Function to the
“RADIO” position.
- Increase Volume.
CD player will not
play
- Unit not in CD mode.
- CD is not loaded properly.
- If the CD is CD-R, the media
used may not be compatible
with the player.
- Select CD function mode.
- Load CD with label side
up.
- Burn a better quality blank CD
and retest.
CD skips while
playing
- Disc is dirty or scratched.
- Wipe CD with clean cloth or use
another disc.
Intermittent sound
from CD player
- Dirty or defective disc
- Player is subject to excessive
shock or vibration
- Clean or replace the defective
disc.
- Relocate the player away from
shock or vibration.
Sound appears
distorted at high
volume setting
- Volume control is set to
maximum.
- Adjust Volume Control to a
lower comfortable level.
Page 10

LIMITED 90-DAY WARRANTY
We warrant this product to be free from defects in material and workmanship under normal
use for a ninety-day period from the original date of purchase from an authorized ETEC
dealer.
Should you be missing any of the included accessories or other components (screws, pieces,
etc.), please contact the Customer Support Center to secure a replacement. It is not
necessary to bring the unit back to the store. When calling, please reference the parts list
found in the Instruction Manual to help us accurately identify the missing parts and promptly
provide replacements.
We will replace the unit free of charge should it become defective under this warranty,
providing you, the original purchaser, have your original dated sales receipt.
To obtain warranty service or replacement within the ninety-day warranty period, please
return the product with all parts and accessories along with your original dated store receipt to
the original place of purchase and the unit will be exchanged at no charge. It is not necessary
to contact the manufacturer for warranty replacement.
Our Customer Support Center is available Monday - Saturday (10:00AM to 7:00PM EST) for
technical assistance or troubleshooting. To contact us, please call 1-855-994-3832, or visit
www.sibrandssupport.com
This warranty applies only under conditions of normal use. Our products are not intended for
outdoor use.
There are no consumer serviceable parts contained in this product and any attempt by the
owner to service or repair the unit will immediately void all warranty coverage.
This warranty does not cover any product which has been subject to damage due to an act of
nature, misuse, neglect, accident, abuse, commercial use, or modification of, or to, any part of
the product, including the antenna. Damage to any external media such as CD discs,
Cassette Tapes, and/or USB or other memory devices are not covered nor is the cost
incurred in shipping the unit for warranty repair or exchange. Under no circumstances shall
ETEC be liable for any loss (direct, indirect, incidental, foreseen, unforeseen, special or
consequential) or for any damage arising out of, or in connection with, the use of this product.
UNDER NO CIRCUMSTANCES WILL ETEC BE LIABLE FOR ANY INCIDENTAL OR
CONSEQUENTIAL DAMAGES.
This warranty does not cover re-manufactured, refurbished, or repaired units, or any products
sold 'As Is'.
This warranty is valid only to the original purchaser of the Product in the United States and
Canada and grants specific legal rights.
Page 11

THIS PAGE IS INTENTIONALLY LEFT BLANK
Page 12

Schoenfeld International Inc. and ETEC
5001 American Boulevard West
Suite 275
Bloomington, Minnesota 55437
©Schoenfeld International Inc., 2015
E6335 Ver. 1.1 October 2015
 Loading...