

Page 1

Lighting Control Console
Service Documents
Copyright © Electronic Theatre Controls, Inc.
All Rights reserved.
Product information and specifications subject to change.
Part Number: Pending
Released: May 2007
Page 2

Page 3

Face Panel Diagnostics . . . . . . . . . . . . . . . . . . . . . . . . . . . . . . . . . . . . . . . . . . . . . . . . . . . . . . . . . . . . . 1
MIDI, Telephone, and Remote Macro Test . . . . . . . . . . . . . . . . . . . . . . . . . . . . . . . . . . . . . . . . . . . . . . 5
LCD Replacement . . . . . . . . . . . . . . . . . . . . . . . . . . . . . . . . . . . . . . . . . . . . . . . . . . . . . . . . . . . . . . . . . 7
Encoder Replacement . . . . . . . . . . . . . . . . . . . . . . . . . . . . . . . . . . . . . . . . . . . . . . . . . . . . . . . . . . . . . 13
Video Card Replacement . . . . . . . . . . . . . . . . . . . . . . . . . . . . . . . . . . . . . . . . . . . . . . . . . . . . . . . . . . 19
Hard Drive Replacement . . . . . . . . . . . . . . . . . . . . . . . . . . . . . . . . . . . . . . . . . . . . . . . . . . . . . . . . . . . 23
DMX Driver Chip Replacement . . . . . . . . . . . . . . . . . . . . . . . . . . . . . . . . . . . . . . . . . . . . . . . . . . . . . . 29
Power Supply Replacement . . . . . . . . . . . . . . . . . . . . . . . . . . . . . . . . . . . . . . . . . . . . . . . . . . . . . . . . 35
Main Board Replacement . . . . . . . . . . . . . . . . . . . . . . . . . . . . . . . . . . . . . . . . . . . . . . . . . . . . . . . . . . 41
Master Wing LCD Replacement . . . . . . . . . . . . . . . . . . . . . . . . . . . . . . . . . . . . . . . . . . . . . . . . . . . . . 49
Master Wing Main Board Replacement . . . . . . . . . . . . . . . . . . . . . . . . . . . . . . . . . . . . . . . . . . . . . . . . 51
Congo™ jr v4.3 I/O Software Code Installation . . . . . . . . . . . . . . . . . . . . . . . . . . . . . . . . . . . . . . . . . . 53
Congo jr Service Documents - Page i
Page 4

Congo jr Service Documents - Page ii
Page 5
ETC® Service Note
Congo™ jr Face Panel Diagnostics
Tools Needed:
DVI Monitor, or VGA w/ DVI adapters
USB Keyboard
USB Mouse
Procedure:
Step 1: Connect all USB cables to the Congo jr USB ports
Step 2: Turn on the console
Step 3: At the main Congo screen press [Crtl]+[Alt]+[Delete] from the USB Keyboard
Step 4: Select Task Manager
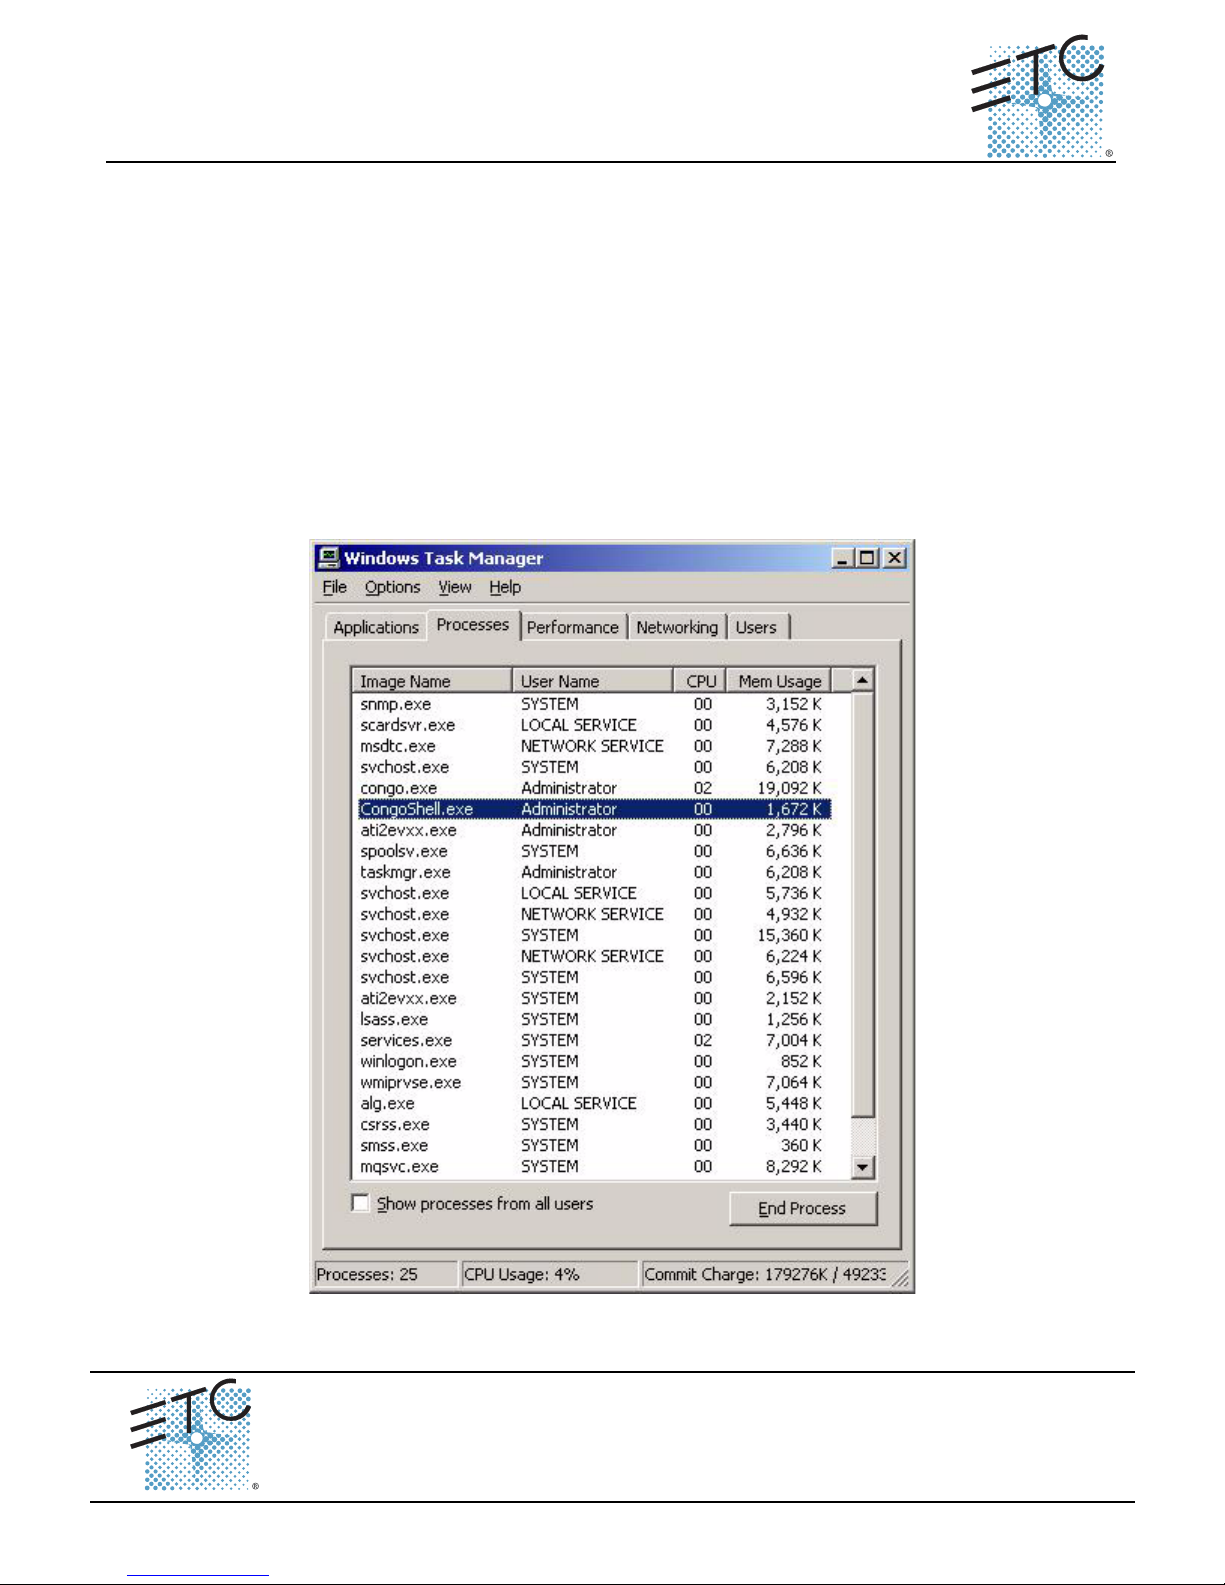
Step 5: Select the Processes Tab
Step 6: Locate “CongoShell” Right click on it and click on End Task, then click OK
Step 7: Locate “Congo” Right click on it and click on End Task, then click OK
Face Panel Diagnostics
Face Panel Diagnostics
Corporate Headquarters
London, UK
Rome, IT
Holzkirchen, DE
Hong Kong Room 1801, 18/F, Tower 1 Phase 1, Enterprise Square, 9 Sheung Yuet Road, Kowloon Bay, Kowloon, Hong Kong
Service:
Web:
Pending
Congo™ jr Face Panel Diagnostics Page 1
Unit 26-28, Victoria Industrial Estate, Victoria Road, London W3 6UU, UK Tel +44 (0)20 8896 1000 Fax +44 (0)20 8896 2000
Via Ennio Quirino Visconti, 11, 00193 Rome, Italy Tel +39 (06) 32 111 683 Fax +39 (06) 32 656 990
(Americas) [email protected]
www.etcconnect.com
Rev A Released 02/2007
3031 Pleasant View Road, P.O. Box 620979, Middleton, Wisconsin 53562-0979 USA Tel +608 831 4116 Fax +608 836 1736
Ohmstrasse 3, 83607 Holzkirchen, Germany Tel +49 (80 24) 47 00-0 Fax +49 (80 24) 47 00-3 00
Copyright © 2006 ETC. All Rights Reserved. Product information and specifications subject to change.
(UK) [email protected] (DE) [email protected]
Tel +852 2799 1220 Fax +852 2799 9325
(Asia) [email protected]
Page 6
ETC Service Note
Congo™ jr Face Panel Diagnostics
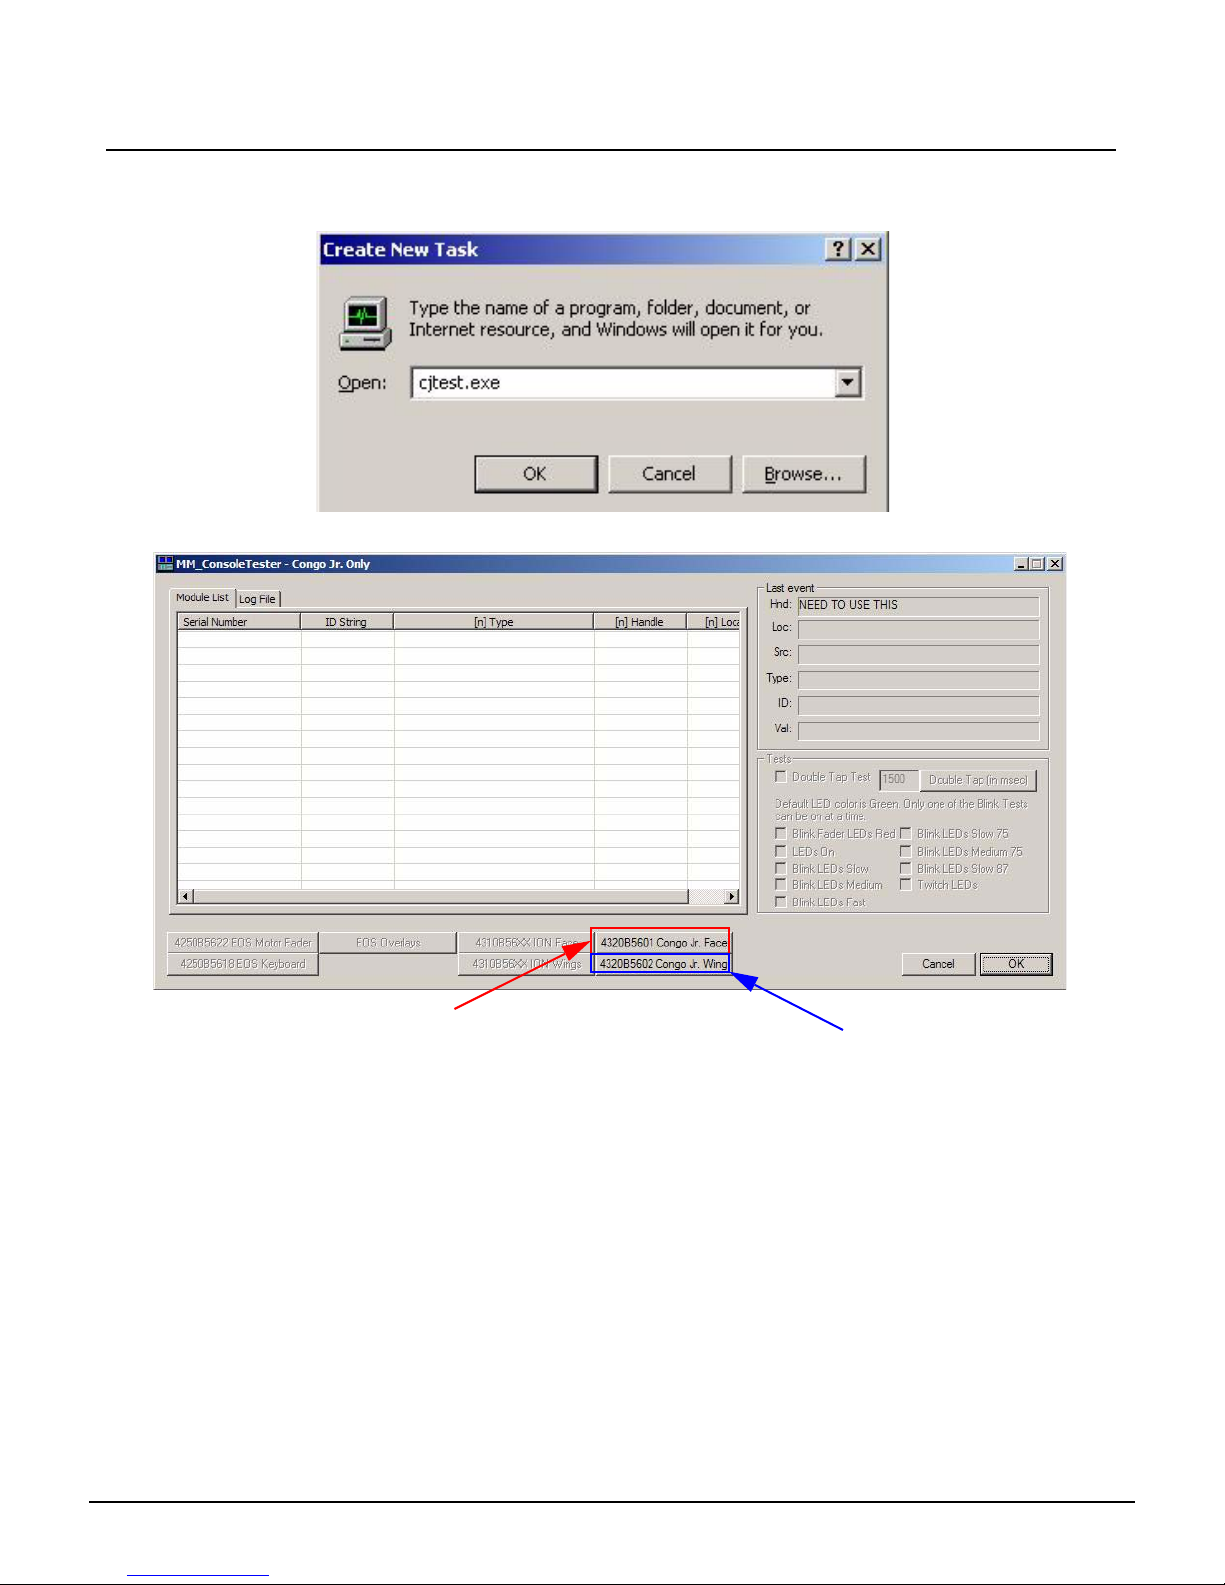
Step 8: Select File -> New Task (run)
Step 9: Type “cjtest.exe” [ENTER]
Step 10: The following program will pop up:
Click here for face panel diagnostics
Step 11: Click on either the Congo jr Face button or the Congo jr Wing button.
Congo™ jr Face Panel Diagnostic s Page 2 Electronic Theatre Controls, Inc.
Click here for wing diagnostics
Page 7
ETC Service Note
Congo™ jr Face Panel Diagnostics
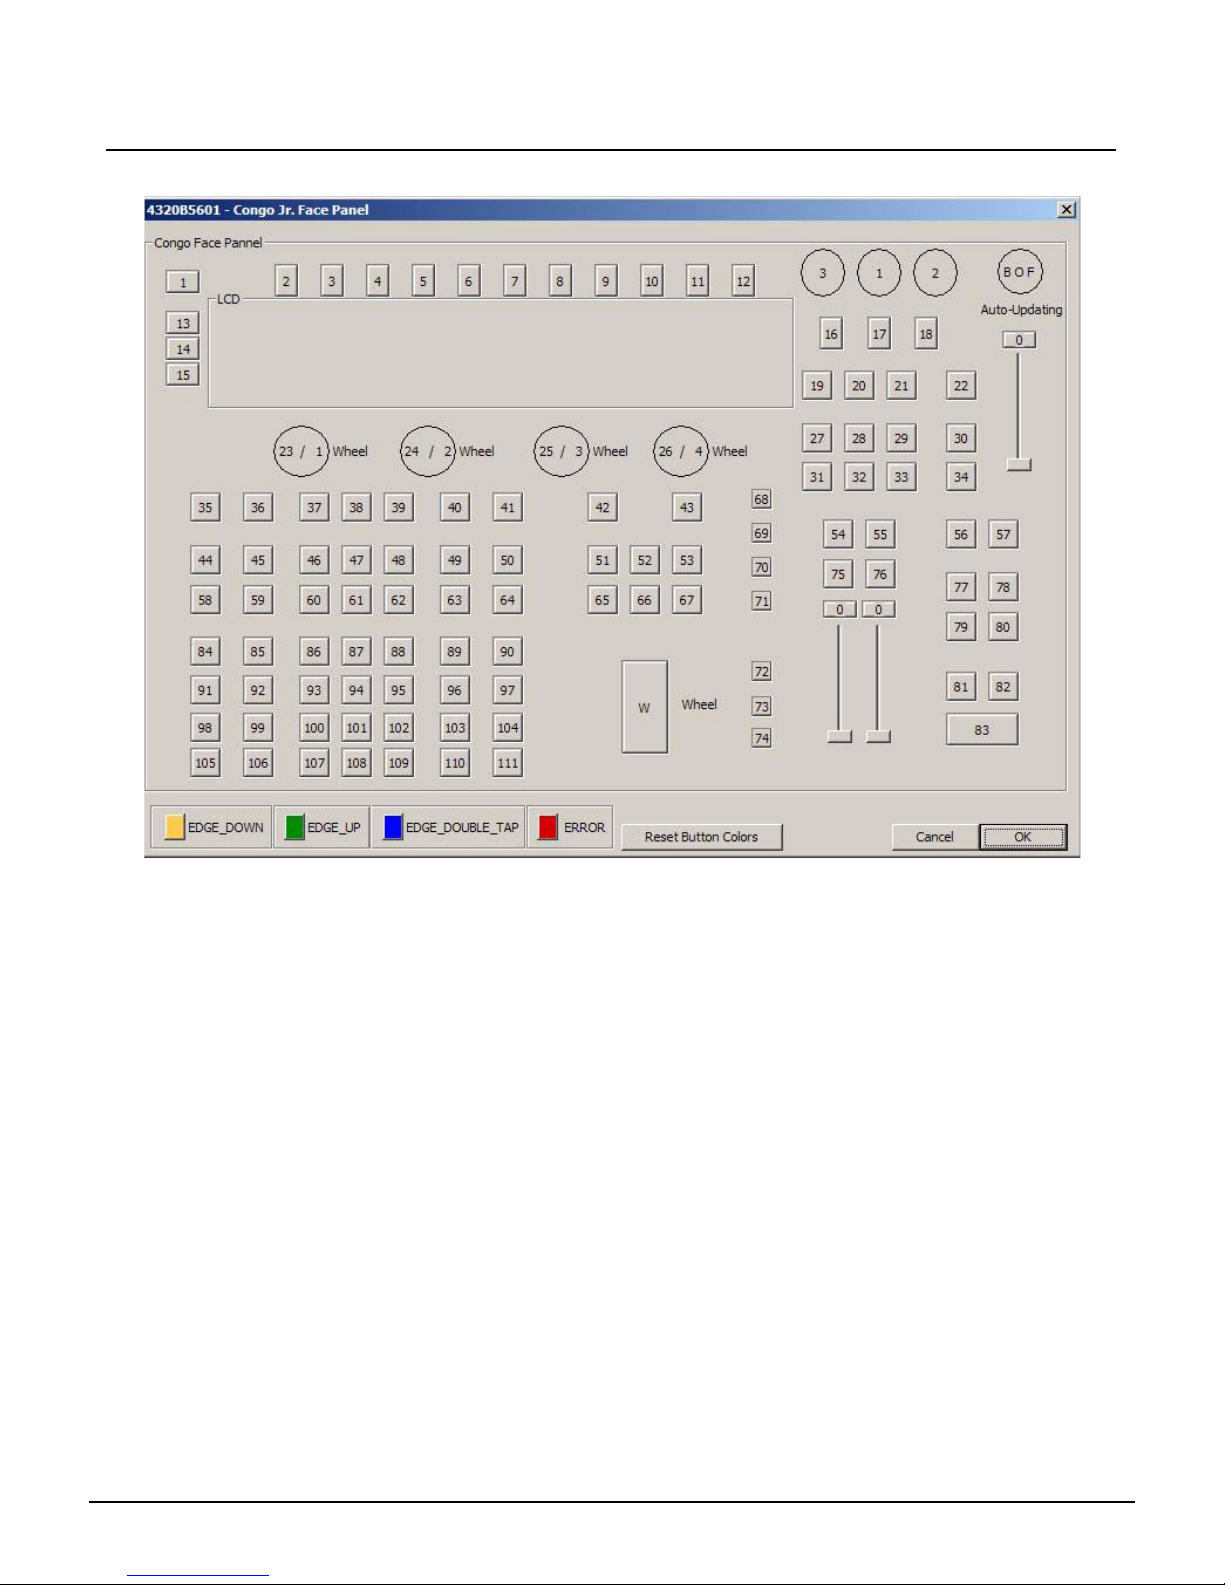
Step 12: The following window will pop up if you click the Congo jr Face button:
Congo™ jr Face Panel Diagnostic s Page 3 Electronic Theatre Controls, Inc.
Page 8
ETC Service Note
Congo™ jr Face Panel Diagnostics
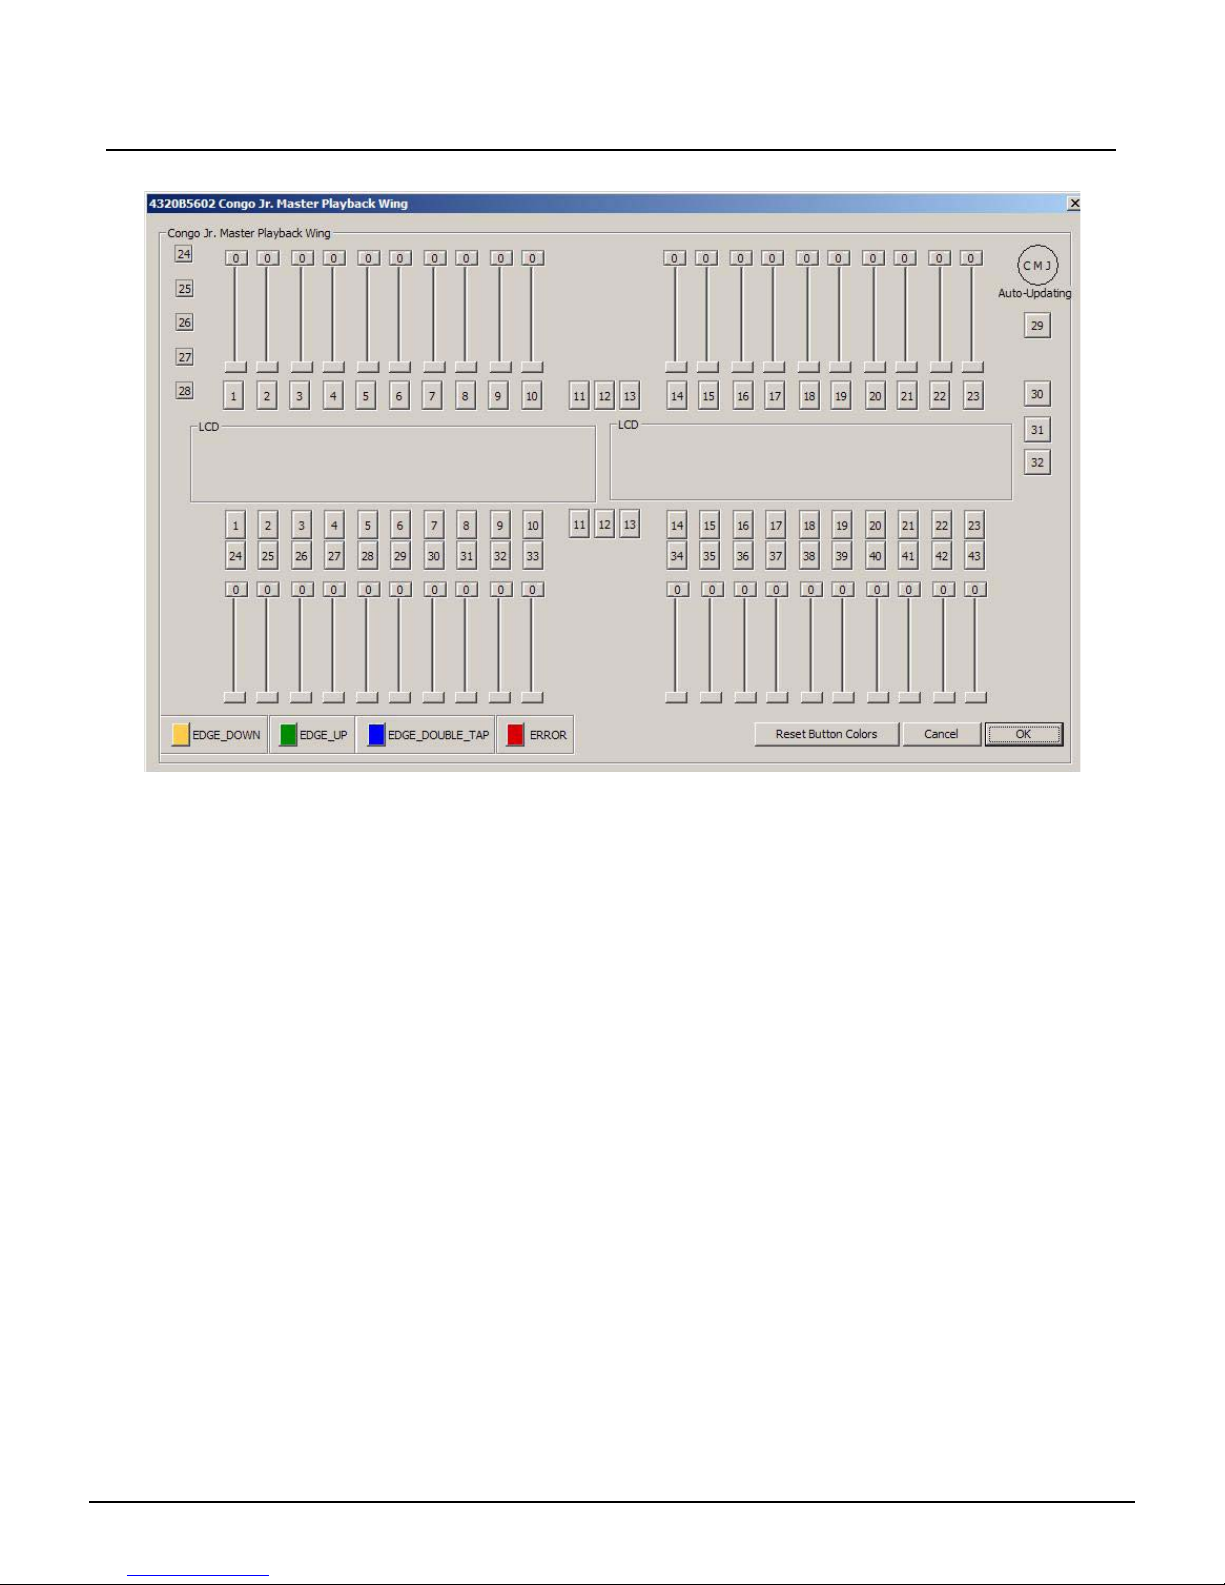
Step 13: The following window will pop up if you click the Congo JR. Wing button:
Step 14: Move every slider and press every button on the face panel/master wing. Each button
will change color to indicate that the hardware is functional.
Step 15: Every slider move will indicate a range from 0-255.
Step 16: When each button and slider tests out ok; close the window and power the Congo jr
down.
Congo™ jr Face Panel Diagnostic s Page 4 Electronic Theatre Controls, Inc.
Page 9

ETC® Service Note
Congo™ jr MIDI, Phone and Macro Test
Tools Needed:
Remote Macro Test board
Standard telephone and cable
MIDI cable (5 Pin Din)
DVI monitor, or VGA w/ DVI adapters
USB Keyboard
USB Mouse
Procedure :
Step 1: Connect all cables to the Congo jr Console
Step 2: Turn on the console
Step 3: At the main Congo screen press [Crtl]+[Alt]+[Delete] from the USB keyboard.
Step 4: Select Task Manager
Step 5: Select the Processes Tab
Step 6: Locate “CongoShell” Right click on it and click on End Task, then click Yes
Step 7: Locate “Congo” Right click on it and click on End Task, then click Yes
MIDI, Telephone, and Remote Macro Test
Corporate Headquarters
London, UK
Rome, IT
Holzkirchen, DE
Hong Kong Room 1801, 18/F, Tower 1 Phase 1, Enterprise Square, 9 Sheung Yuet Road, Kowloon Bay, Kowloon, Hong Kong
Service:
Web:
Pending
Unit 26-28, Victoria Industrial Estate, Victoria Road, London W3 6UU, UK Tel +44 (0)20 8896 1000 Fax +44 (0)20 8896 2000
Via Ennio Quirino Visconti, 11, 00193 Rome, Italy Tel +39 (06) 32 111 683 Fax +39 (06) 32 656 990
(Americas) [email protected]
www.etcconnect.com
Rev A Released 02/2007
3031 Pleasant View Road, P.O. Box 620979, Middleton, Wisconsin 53562-0979 USA Tel +608 831 4116 Fax +608 836 1736
Ohmstrasse 3, 83607 Holzkirchen, Germany Tel +49 (80 24) 47 00-0 Fax +49 (80 24) 47 00-3 00
Congo™ jr MIDI, Phone and Macro Test Page 5 Electronic Theatre Controls, Inc.
Copyright © 2006 ETC. All Rights Reserved. Product information and specifications subject to change.
(UK) [email protected] (DE) [email protected]
Tel +852 2799 1220 Fax +852 2799 9325
(Asia) [email protected]
Page 10
ETC Service Note
Congo™ jr MIDI, Phone and Macro Test
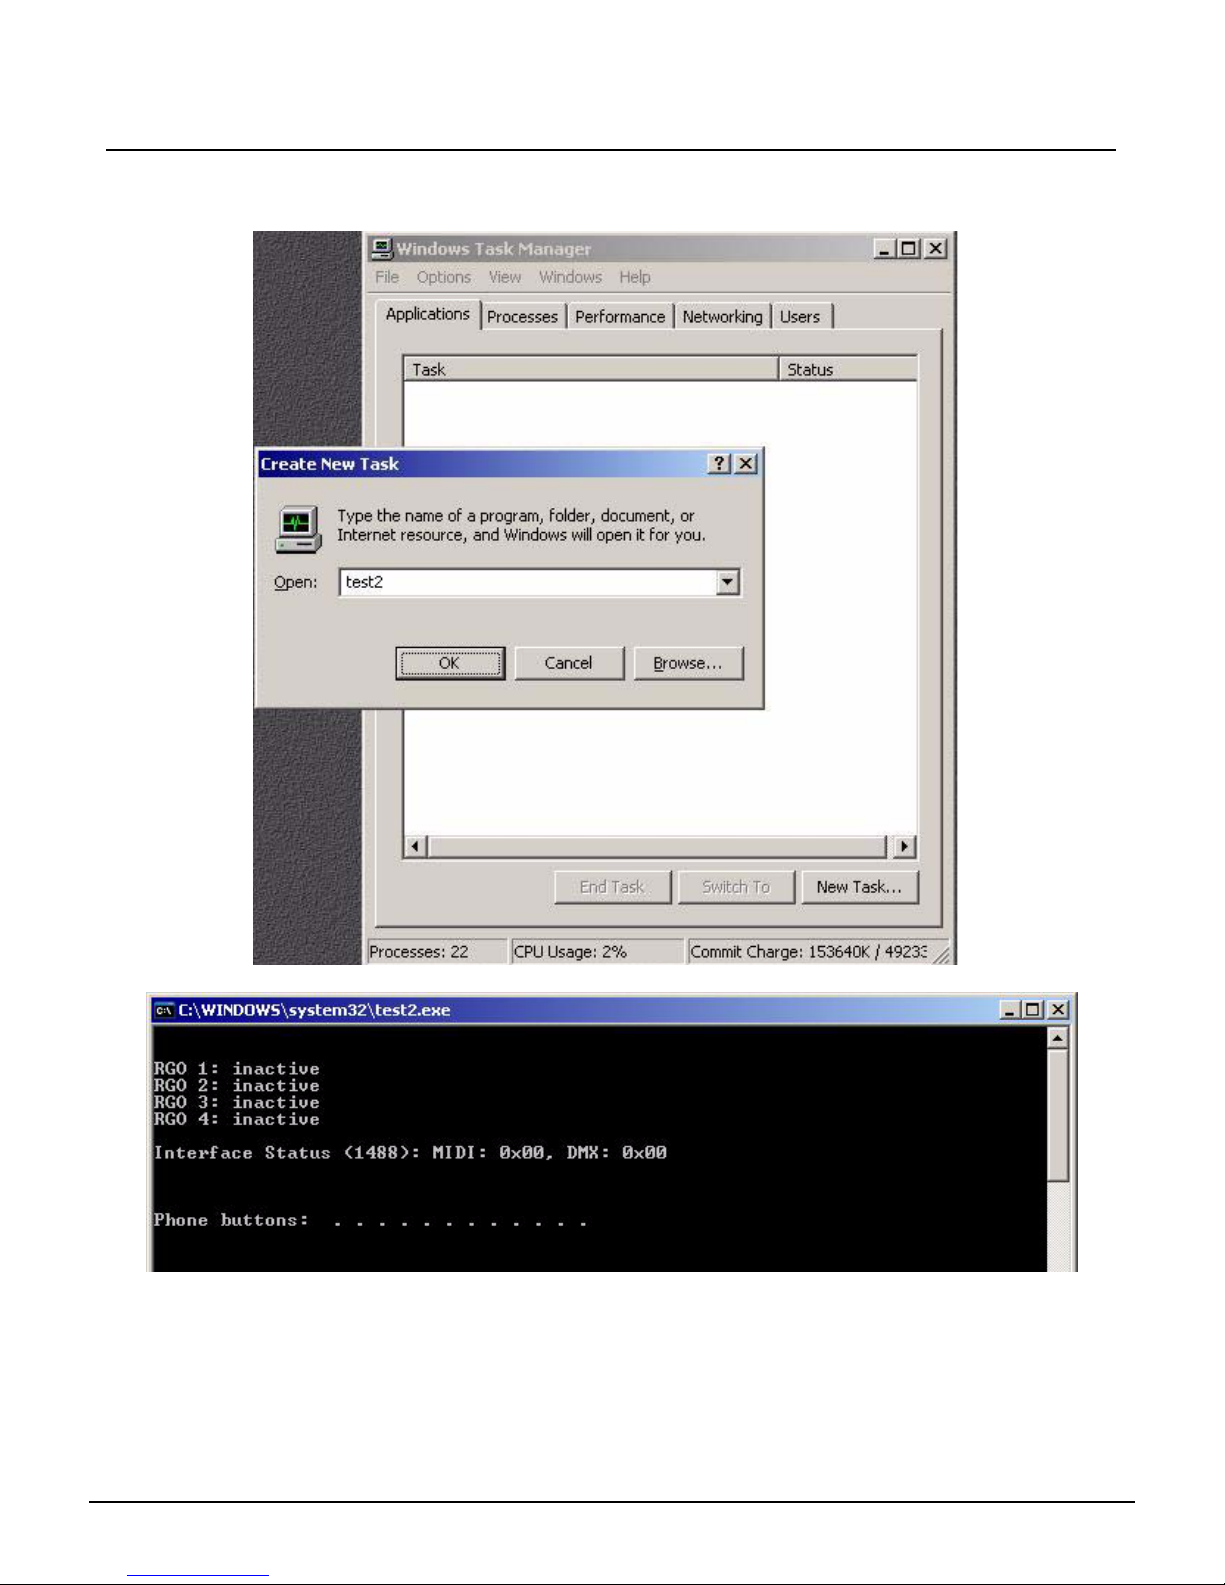
Step 8: Select File -> New Task (run)
Step 9: Type “test2” in the text field, then click the “OK” button]
Step 10: The following window will pop up:
Step 11: Watch for the 2 LEDS to flash on the Remote Macro Test Board
Step 12: Press the 4 buttons on the LED Remote Macro Test Board (if present), look for
“ACTIVE” on -the screen
Step 13: Look for MIDI IN messages of 32 and 33 repeating
Step 14: Press all 12 buttons on the phone individually and look for corresponding numbers on
the screen
Step 15: Close the command window
Step 16: Shut the console down.
Congo™ jr MIDI, Phone and Macro Te st Page 6 of 6 Electronic Theatre Controls, Inc.
Page 11

ETC® Service Note
Congo™ jr LCD Replacement
Tools Required:
#1 Phillips Screwdriver
#2 Phillips Screwdriver
Side Cutter
4" replacement zip ties
Procedure:
Step 1: Remove the protective side panels from the Congo jr Console.
Step 2: Remove the 7 screws indicated in Red below.
Step 3: Loosen the 3 screws indicated in Blue below.
NOTE: DO NOT remove the 3 screws.
Remove these screws
Loosen these screws
2 full turns
LCD Replacement
Corporate Headquarters
London, UK
Rome, IT
Holzkirchen, DE
Hong Kong Room 1801, 18/F, Tower 1 Phase 1, Enterprise Square, 9 Sheung Yuet Road, Kowloon Bay, Kowloon, Hong Kong
Service:
Web:
Pending
Unit 26-28, Victoria Industrial Estate, Victoria Road, London W3 6UU, UK Tel +44 (0)20 8896 1000 Fax +44 (0)20 8896 2000
Via Ennio Quirino Visconti, 11, 00193 Rome, Italy Tel +39 (06) 32 111 683 Fax +39 (06) 32 656 990
(Americas) [email protected]
www.etcconnect.com
Rev A Released 02/2007
Congo™ jr LCD Replacement Page 7 Electronic Theatre Controls, Inc.
3031 Pleasant View Road, P.O. Box 620979, Middleton, Wisconsin 53562-0979 USA Tel +608 831 4116 Fax +608 836 1736
Ohmstrasse 3, 83607 Holzkirchen, Germany Tel +49 (80 24) 47 00-0 Fax +49 (80 24) 47 00-3 00
Copyright © 2006 ETC. All Rights Reserved. Product information and specifications subject to change.
(UK) [email protected] (DE) [email protected]
Tel +852 2799 1220 Fax +852 2799 9325
(Asia) [email protected]
Page 12
ETC Service Note
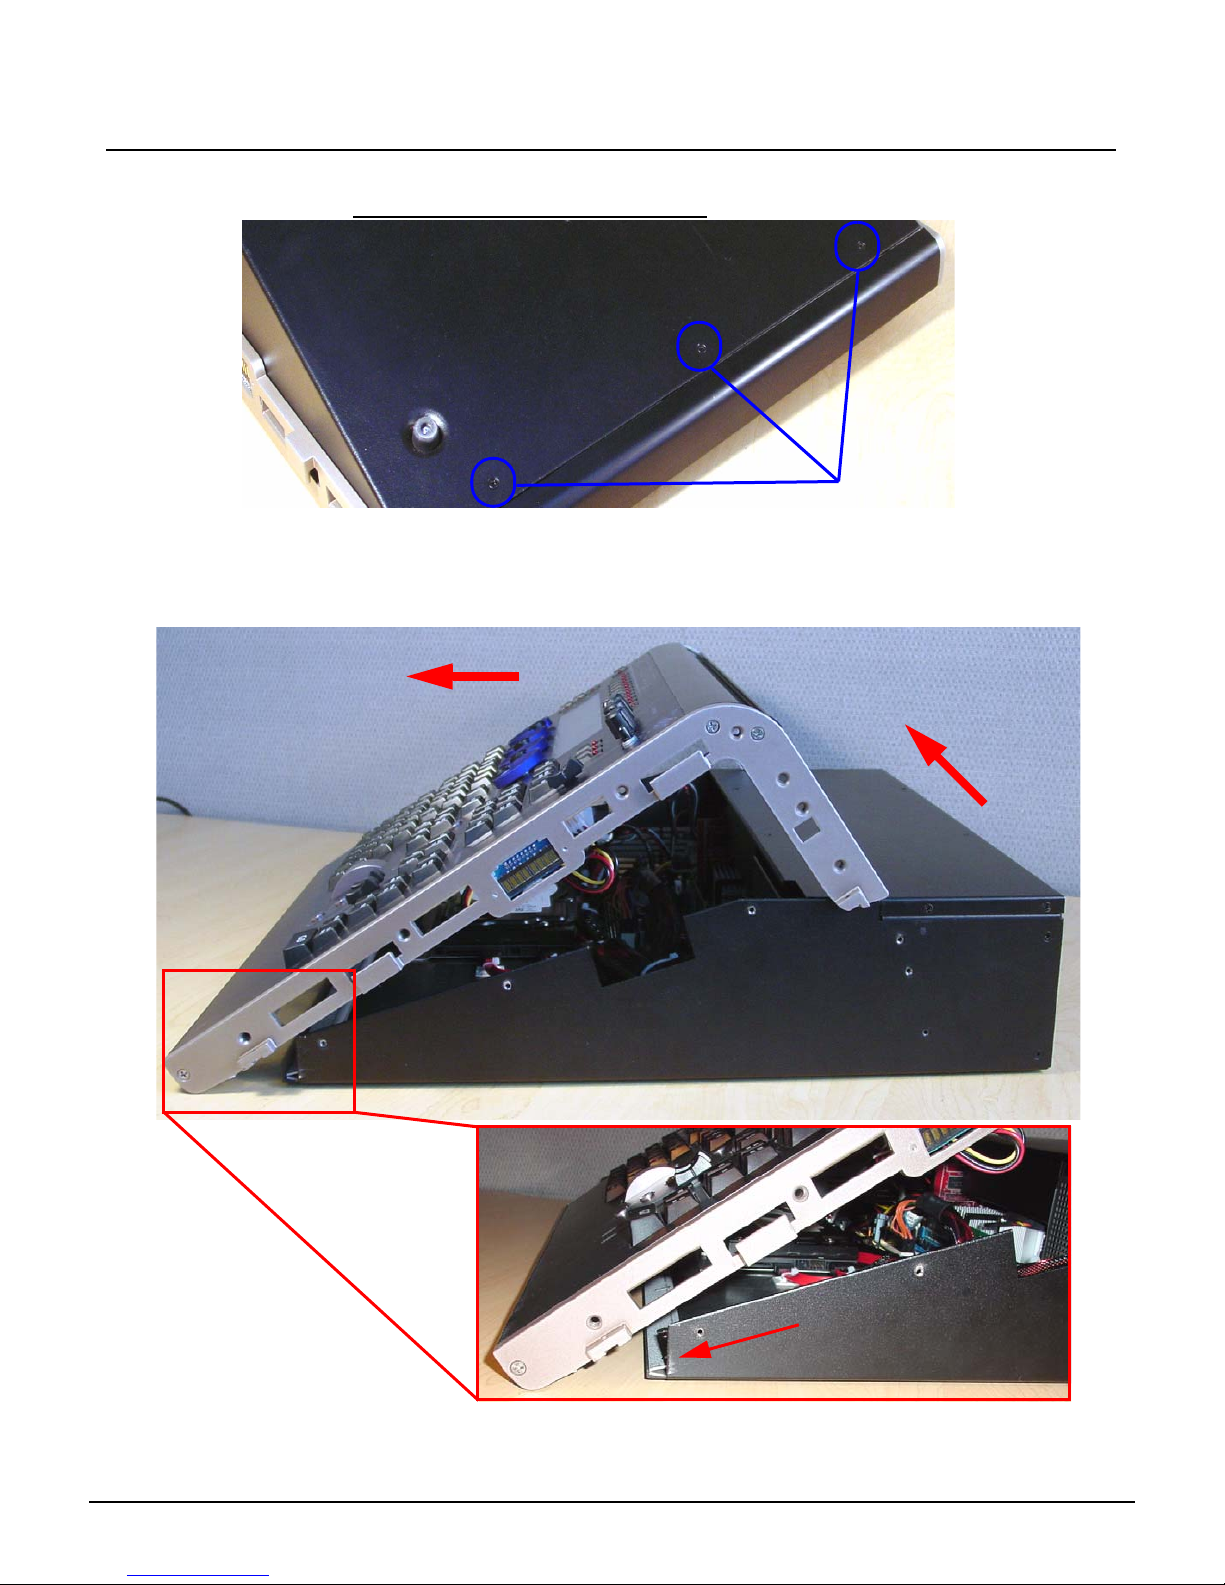
Step 4: Carefully flip over the console and loosen the 3 screws in blue below:
NOTE: DO NOT remove the 3 screws.
Step 5: Flip the console back onto the base.
Step 6: Lift the back side of the face panel upwards away from the base.
Step 7: Slide the face panel towards the front of the console. The face panel will slip under
the base pressure plate.
2. Slide face panel forwards
Congo™ jr LCD Replacement
Loosen these screws
1. Tilt face panel upwards
Congo™ jr LCD Replacement Page 8 Electronic Theatre Controls, Inc.
Base Pressure Plate
Page 13
ETC Service Note
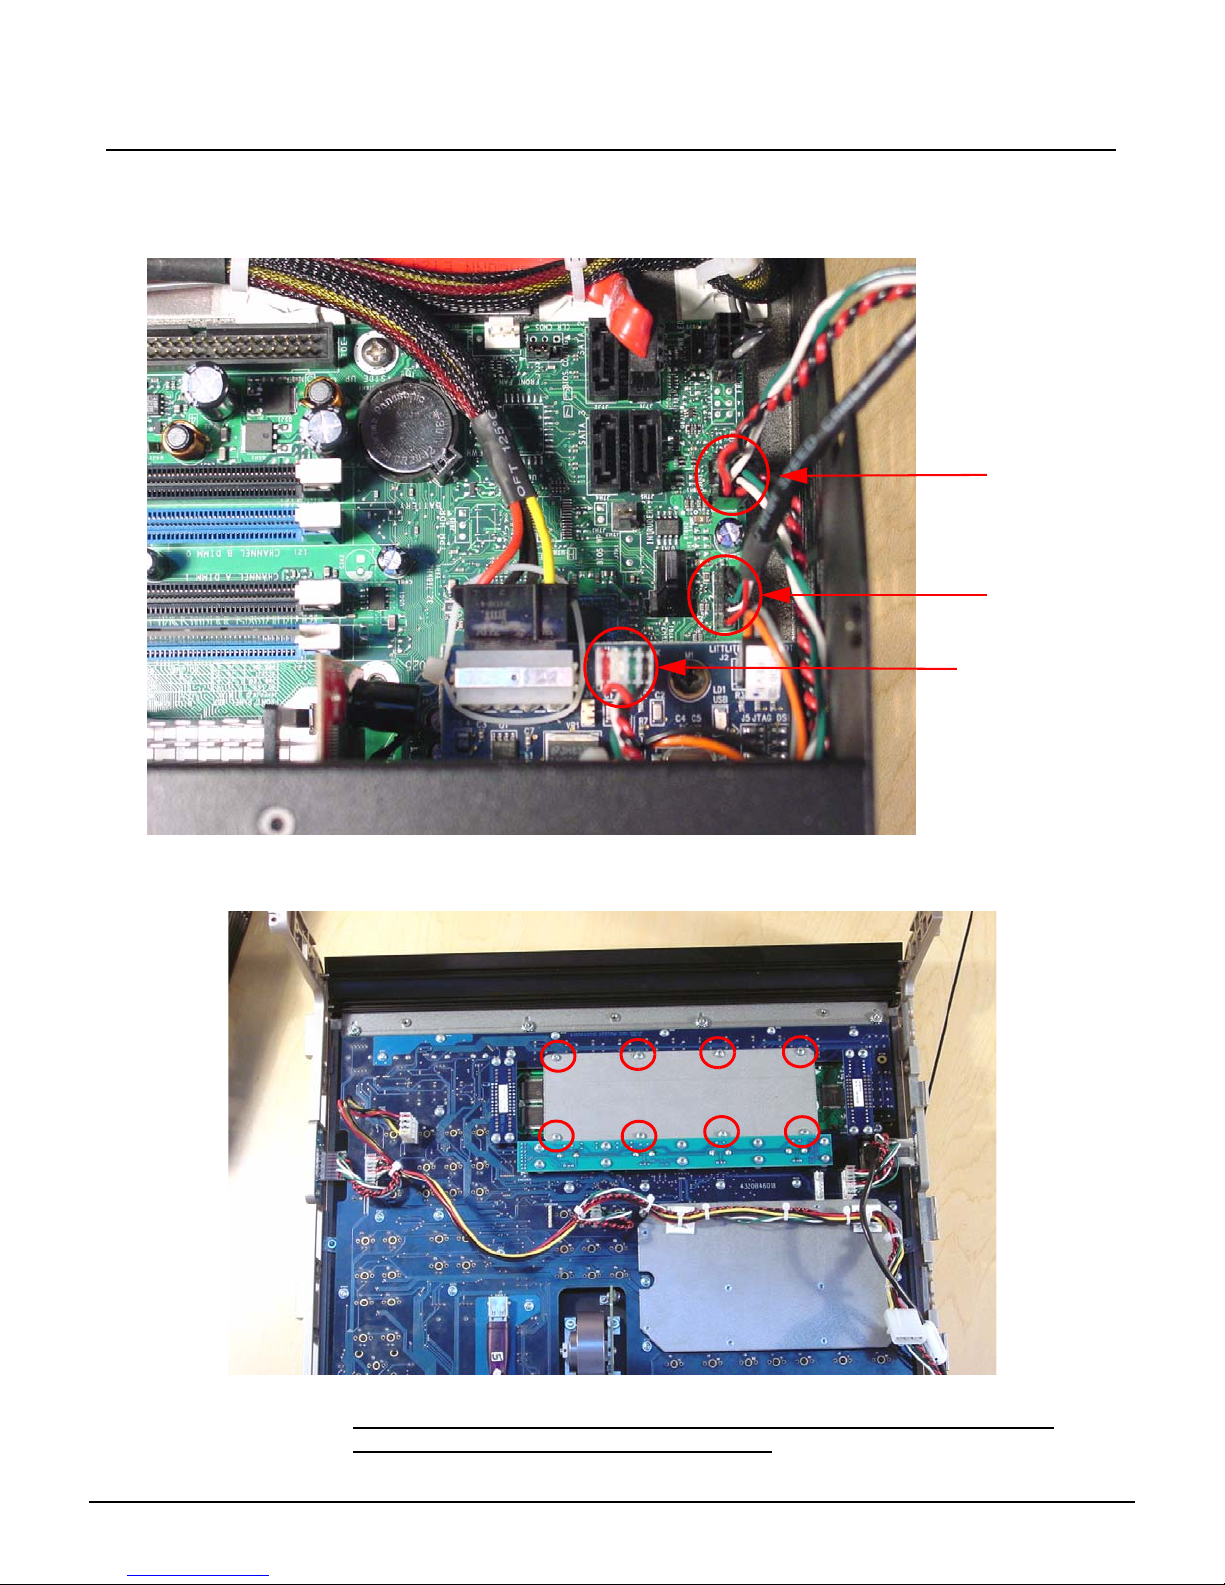
Step 8: Disconnect the J1 USB Uplink from the I/O card.
Step 9: Disconnect the face panel USB 1&2 connectors from the Congo jr motherboard.
Step 10: Clip the zip ties holding the face panel cables to the base of the unit.
Congo™ jr LCD Replacement
FP USB 1
FP USB 2
J1 - USB Uplink
Step 11: Carefully set the Congo jr face panel face down exposing the back side of the face
panel PCB.
Step 12: Remove the 8 short screws from the LCD pressure plate.
NOTE: Be sure that you keep these 8 screws separated from the other FP
screws as these are shorter than the others.
Congo™ jr LCD Replacement Page 9 Electronic Theatre Controls, Inc.
Page 14
ETC Service Note
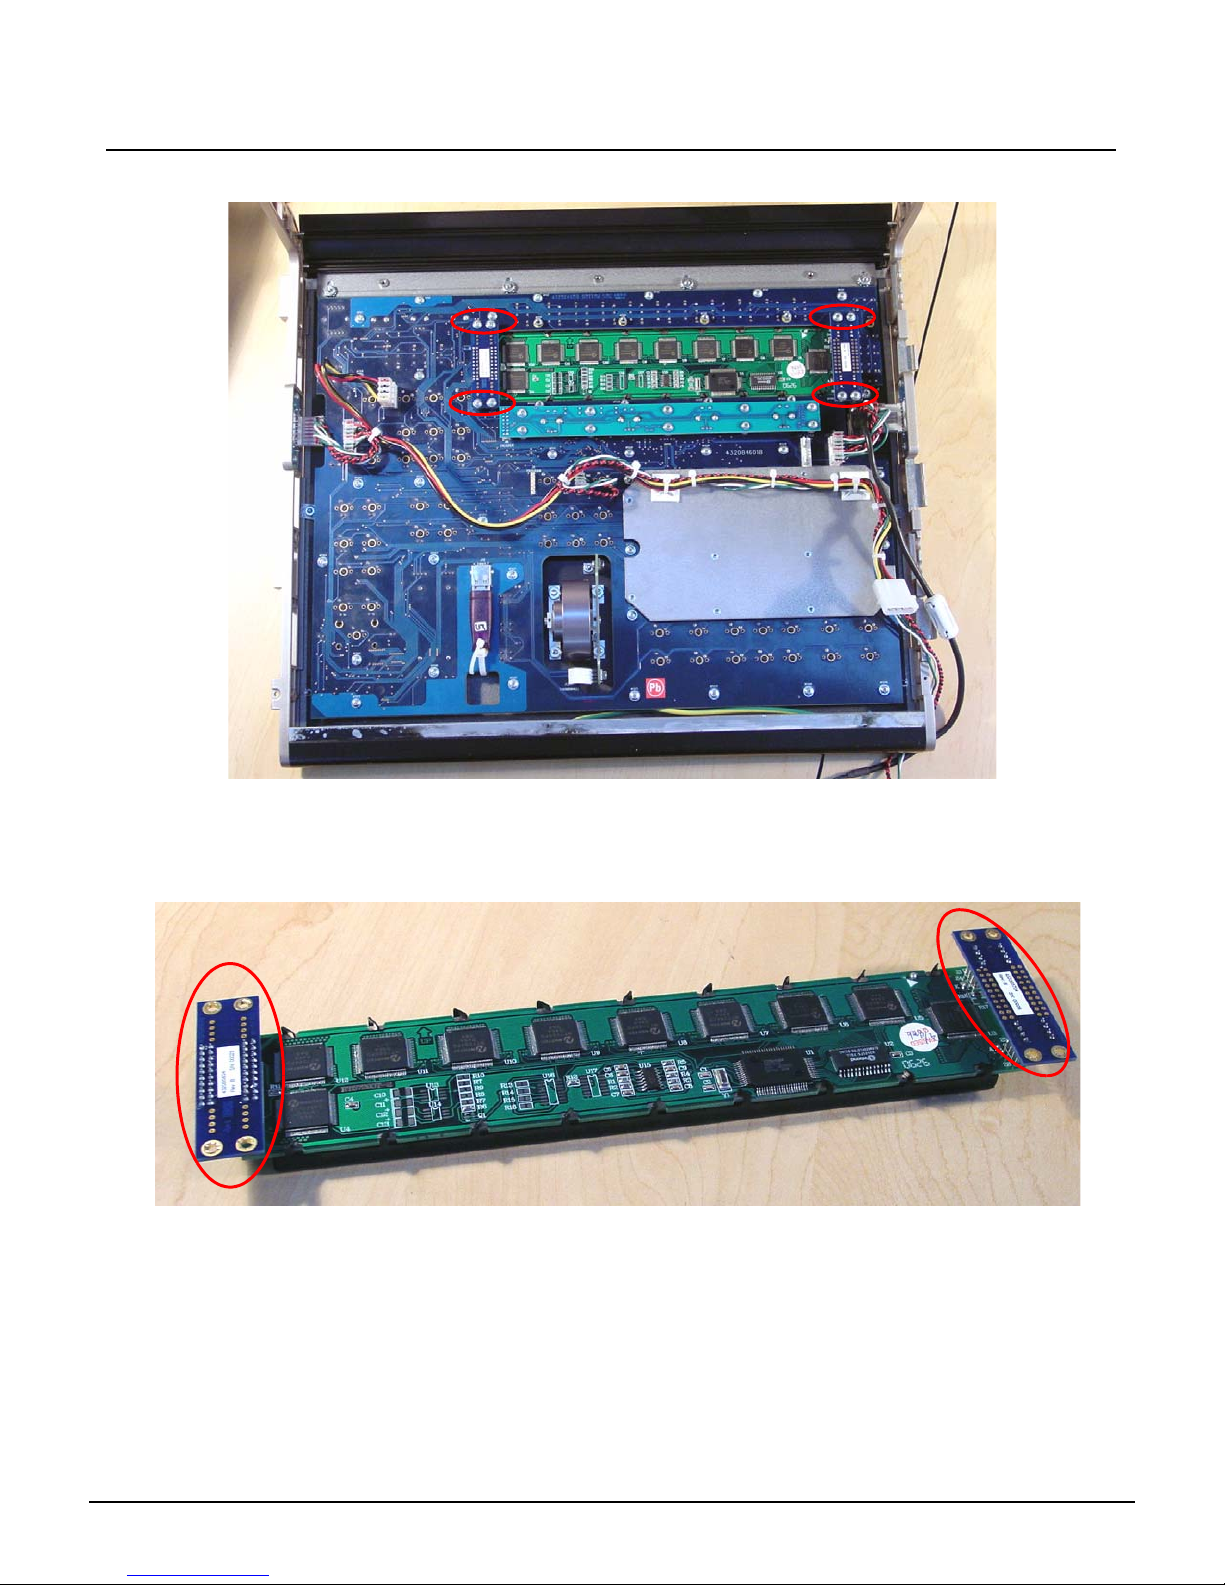
Step 13: Remove the 8 face panel LCD Jumper screws
Congo™ jr LCD Replacement
Step 14: Lightly lift each side of the LCD Screen socket circuit board to remove the LCD screen
from the Congo jr face panel.
Step 15: Replace the LCD screen by removing each of the 2 face panel LCD Jumper circuit
boards. Re-attach the LCD jumper circuit boards to the new LCD screen.
Step 16: Place the LCD screen back into the face panel and screw the circuit board into the
standoffs.
Step 17: Place the LCD pressure plate back over the LCD screen and screw the 8 short screws
back into the standoffs.
Congo™ jr LCD Replacement Page 10 Electronic Theatre Controls, Inc.
Page 15
ETC Service Note
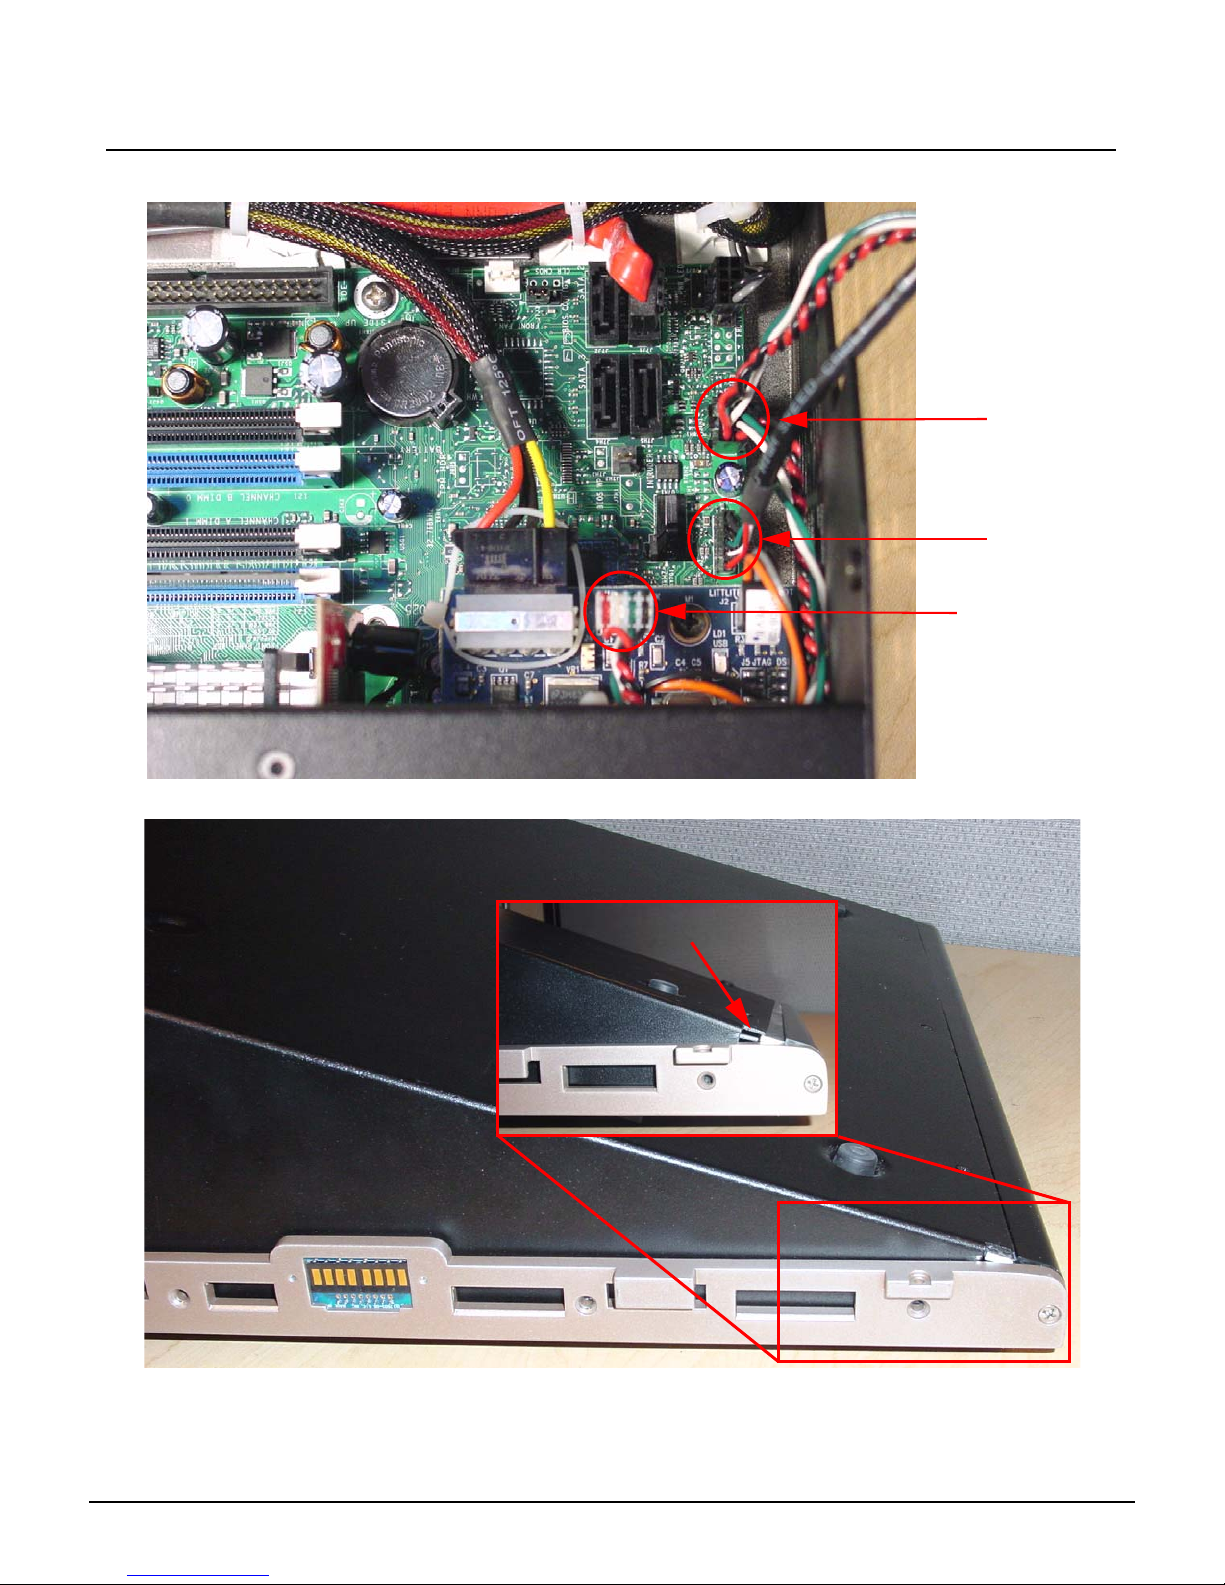
Step 18: Re-attach the USB Connectors to the motherboard.
Congo™ jr LCD Replacement
FP USB 1
FP USB 2
J1 - USB Uplink
Step 19: Slide the face panel back under the base pressure plate.
Base Pressure Plate
Step 20: Re-attach all 7 screws from each side of the console face panel.
Step 21: Flip the face panel over and tighten the 3 screws on the base of the console.
Step 22: Power the console up and verify correct face panel operation and LCD screen
operation.
Congo™ jr LCD Replacement Page 11 Electronic Theatre Controls, Inc.
Page 16

ETC Service Note
Congo™ jr LCD Replacement
Congo™ jr LCD Replacement Page 12 Electronic Theatre Controls, Inc.
Page 17
ETC® Service Note
Congo™ jr Encoder Replacement
Tools Required:
#2 Phillips Screwdriver
#1 Phillips Screwdriver
Side Cutter
Needle Nose Pliers
Soldering Iron
Lead Free Solder
4" Replacement zip ties
.050 angled Hex key
Procedure:
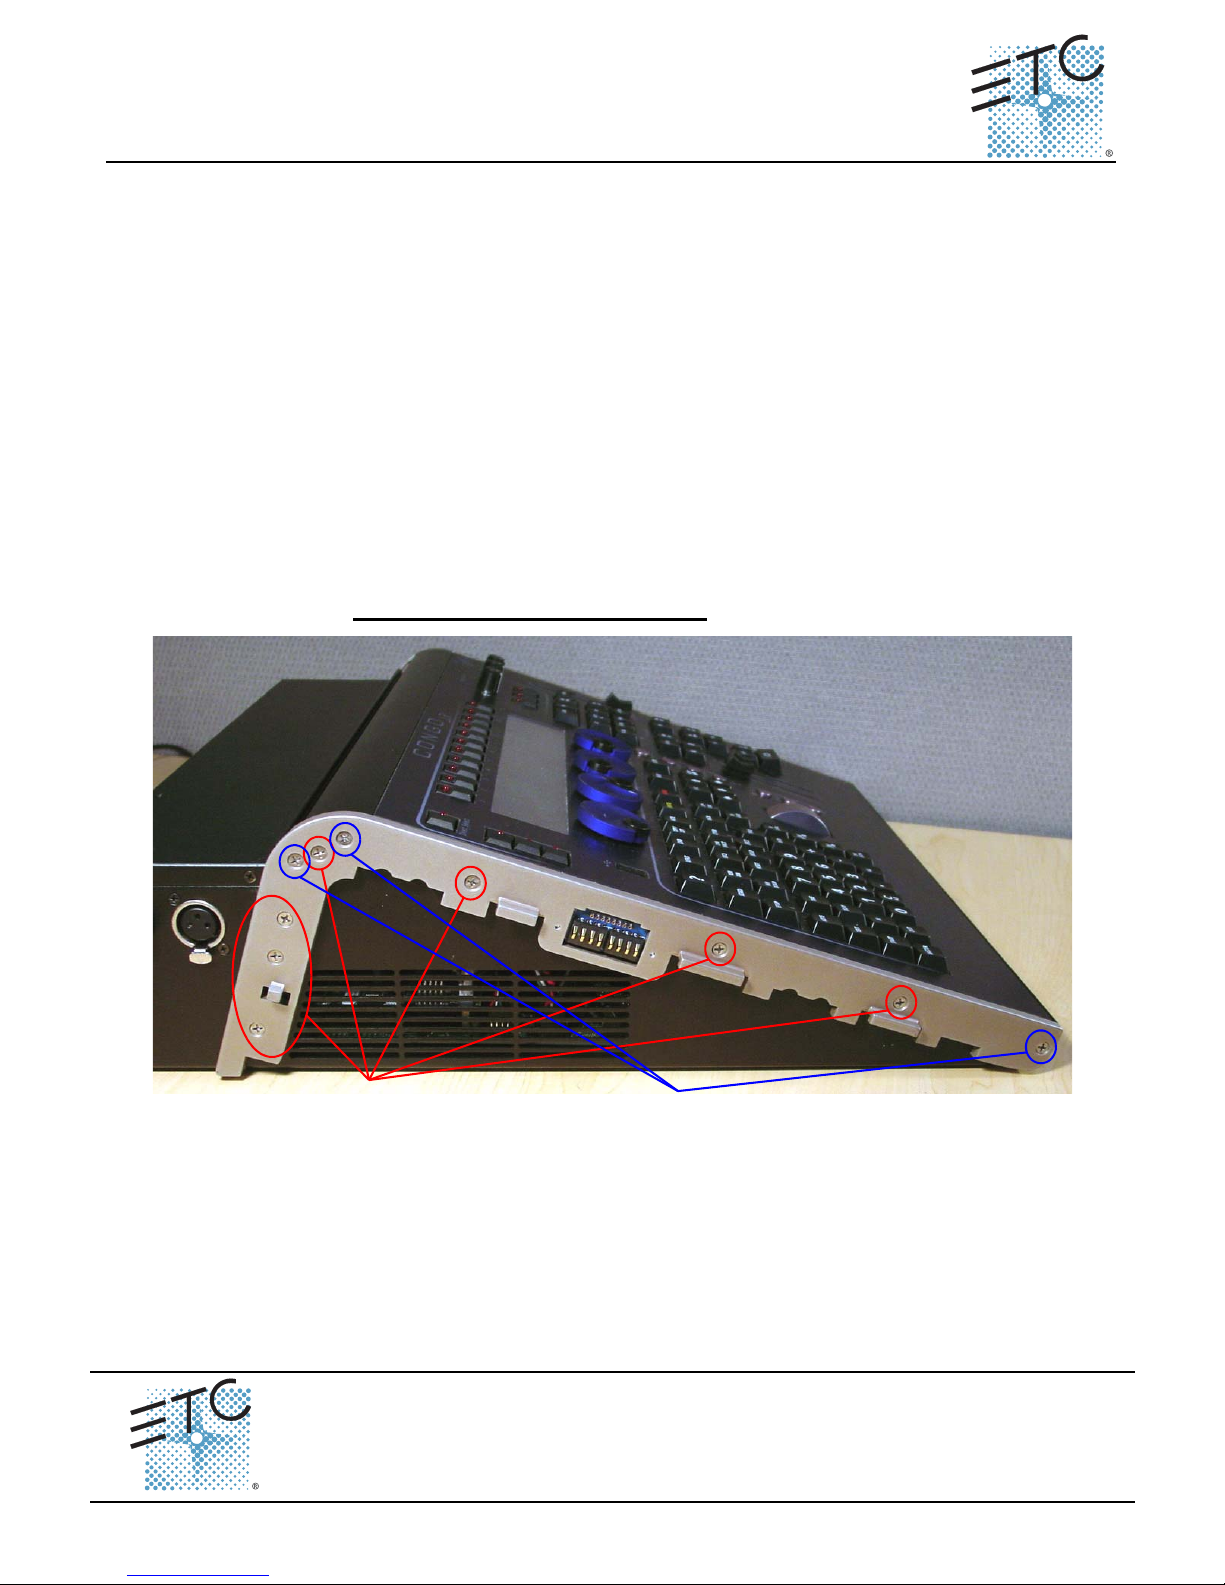
Step 1: Remove the protective side panels from the Congo jr Console.
Step 2: Remove the 7 screws indicated in Red below.
Step 3: Loosen the 3 screws indicated in Blue below.
NOTE: DO NOT remove the 3 screws.
Remove these screws
Encoder Replacement
Corporate Headquarters
London, UK
Rome, IT
Holzkirchen, DE
Hong Kong Room 1801, 18/F, Tower 1 Phase 1, Enterprise Square, 9 Sheung Yuet Road, Kowloon Bay, Kowloon, Hong Kong
Service:
Web:
Pending
Unit 26-28, Victoria Industrial Estate, Victoria Road, London W3 6UU, UK Tel +44 (0)20 8896 1000 Fax +44 (0)20 8896 2000
Via Ennio Quirino Visconti, 11, 00193 Rome, Italy Tel +39 (06) 32 111 683 Fax +39 (06) 32 656 990
(Americas) [email protected]
www.etcconnect.com
Rev A Released 02/2007
Congo™ jr Encoder Replacement Page 13 Electronic Theatre Controls, Inc.
3031 Pleasant View Road, P.O. Box 620979, Middleton, Wisconsin 53562-0979 USA Tel +608 831 4116 Fax +608 836 1736
Ohmstrasse 3, 83607 Holzkirchen, Germany Tel +49 (80 24) 47 00-0 Fax +49 (80 24) 47 00-3 00
Loosen these screws
2 full turns
Copyright © 2006 ETC. All Rights Reserved. Product information and specifications subject to change.
(UK) [email protected] (DE) [email protected]
Tel +852 2799 1220 Fax +852 2799 9325
(Asia) [email protected]
Page 18
ETC Service Note
Congo™ jr Encoder Replacement
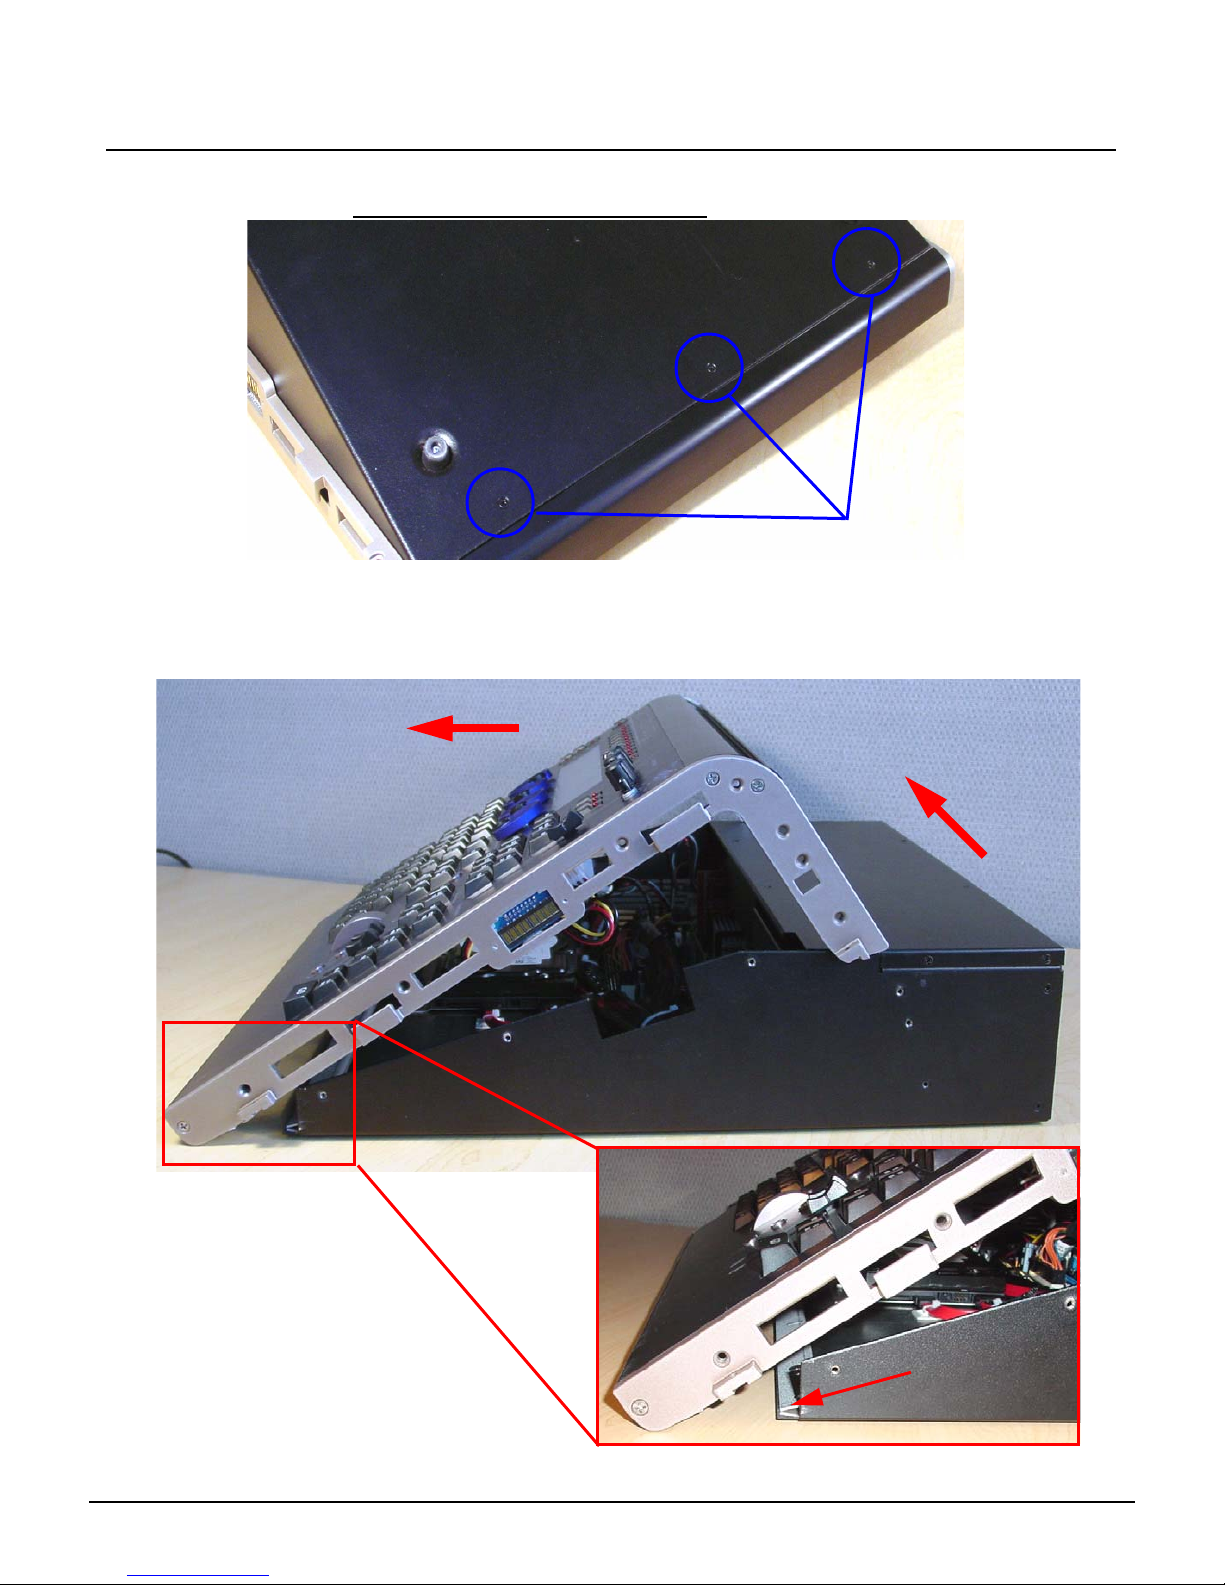
Step 4: Carefully flip over the console and loosen the 3 screws in blue below:
NOTE: DO NOT remove the 3 screws.
Step 5: Flip the console back onto the base.
Step 6: Lift the back side of the face panel upwards away from the base.
Step 7: Slide the face panel towards the front of the console. The face panel will slip under
the base pressure plate.
Loosen these screws
2. Slide face panel forwards
1. Tilt face panel upwards
Congo™ jr Encoder Replacement Page 14 Electronic Theatre Controls, Inc.
Base Pressure Plate
Page 19
ETC Service Note
Congo™ jr Encoder Replacement
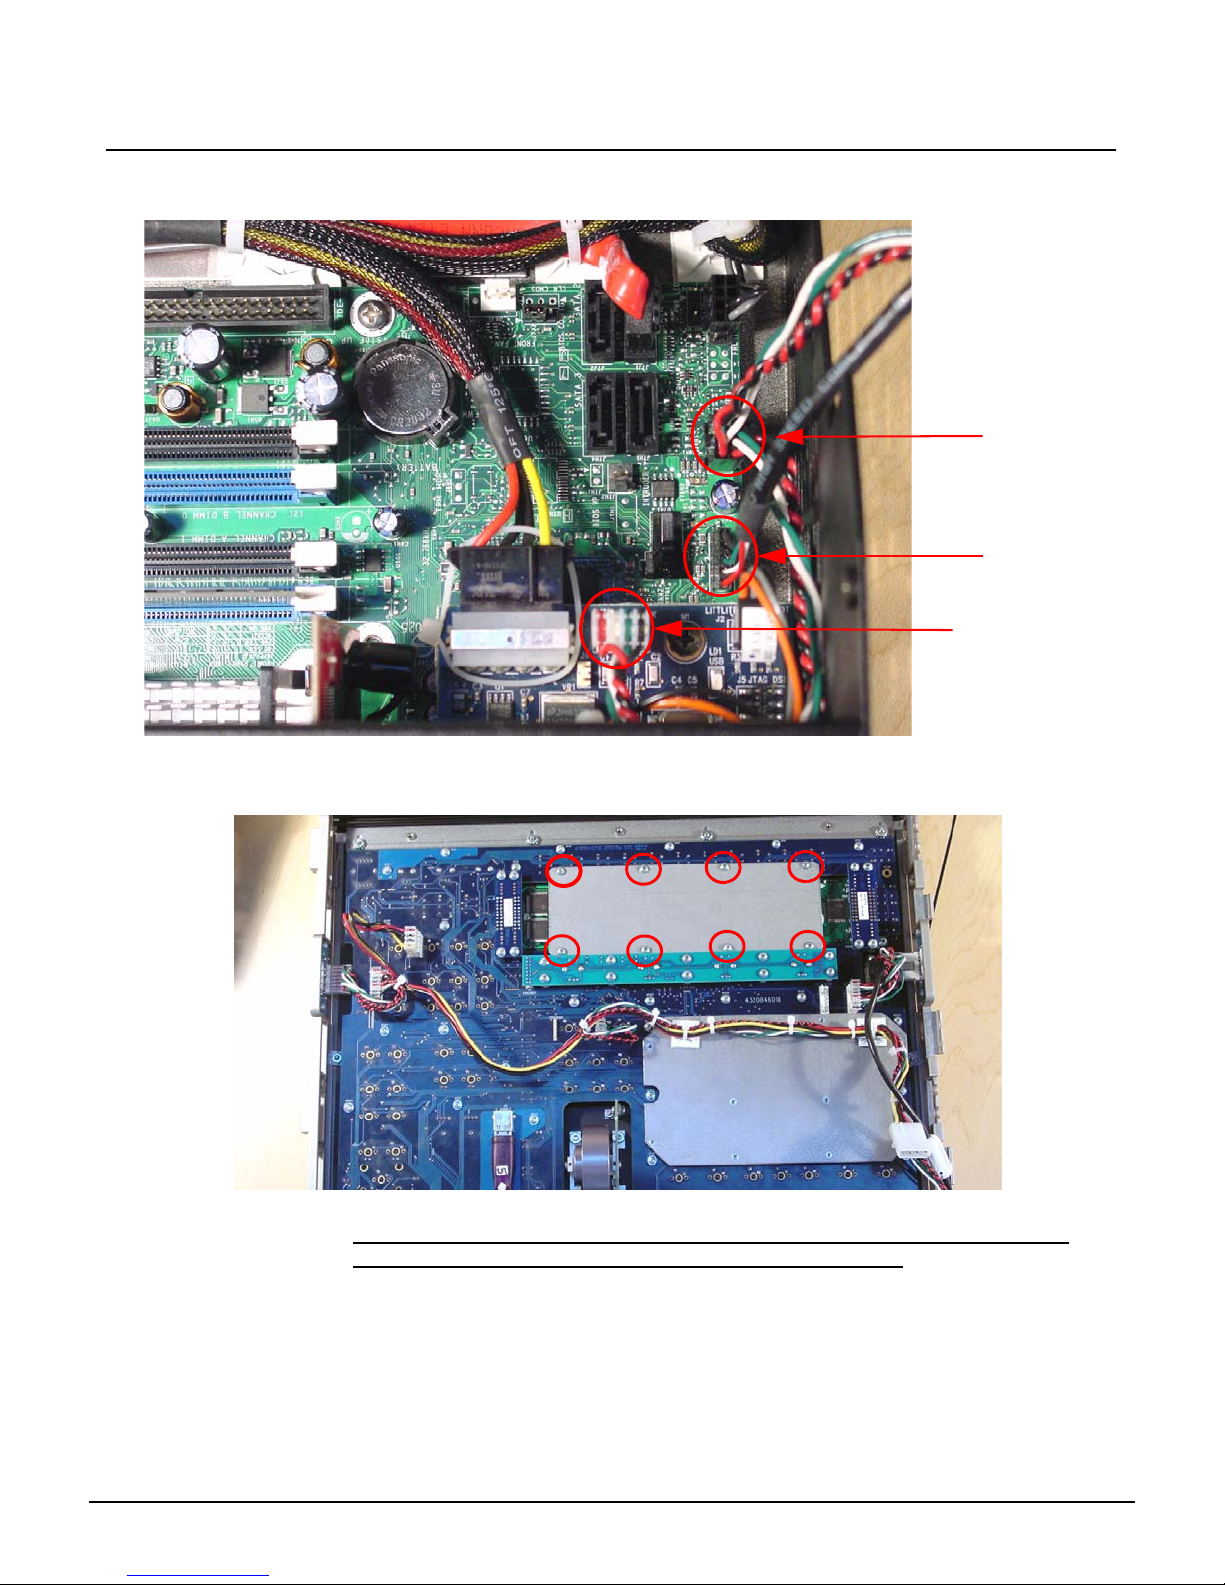
Step 8: Disconnect the J1 USB uplink from the I/O card.
Step 9: Disconnect the face panel USB 1&2 connectors from the Congo jr Motherboard.
FP USB 1
FP USB 2
J1 - USB Uplink
Step 10: Clip the zip ties holding the face panel cables to the base of the unit.
Step 11: Carefully set the Congo jr face panel face down exposing the back side of the face
panel PCB.
Step 12: Remove the 8 short screws from the LCD pressure plate.
NOTE: Be sure that you keep these 8 screws separated from the other face
panel screws as these are shorter screws than the others.
Congo™ jr Encoder Replacement Page 15 Electronic Theatre Controls, Inc.
Page 20
ETC Service Note
Congo™ jr Encoder Replacement
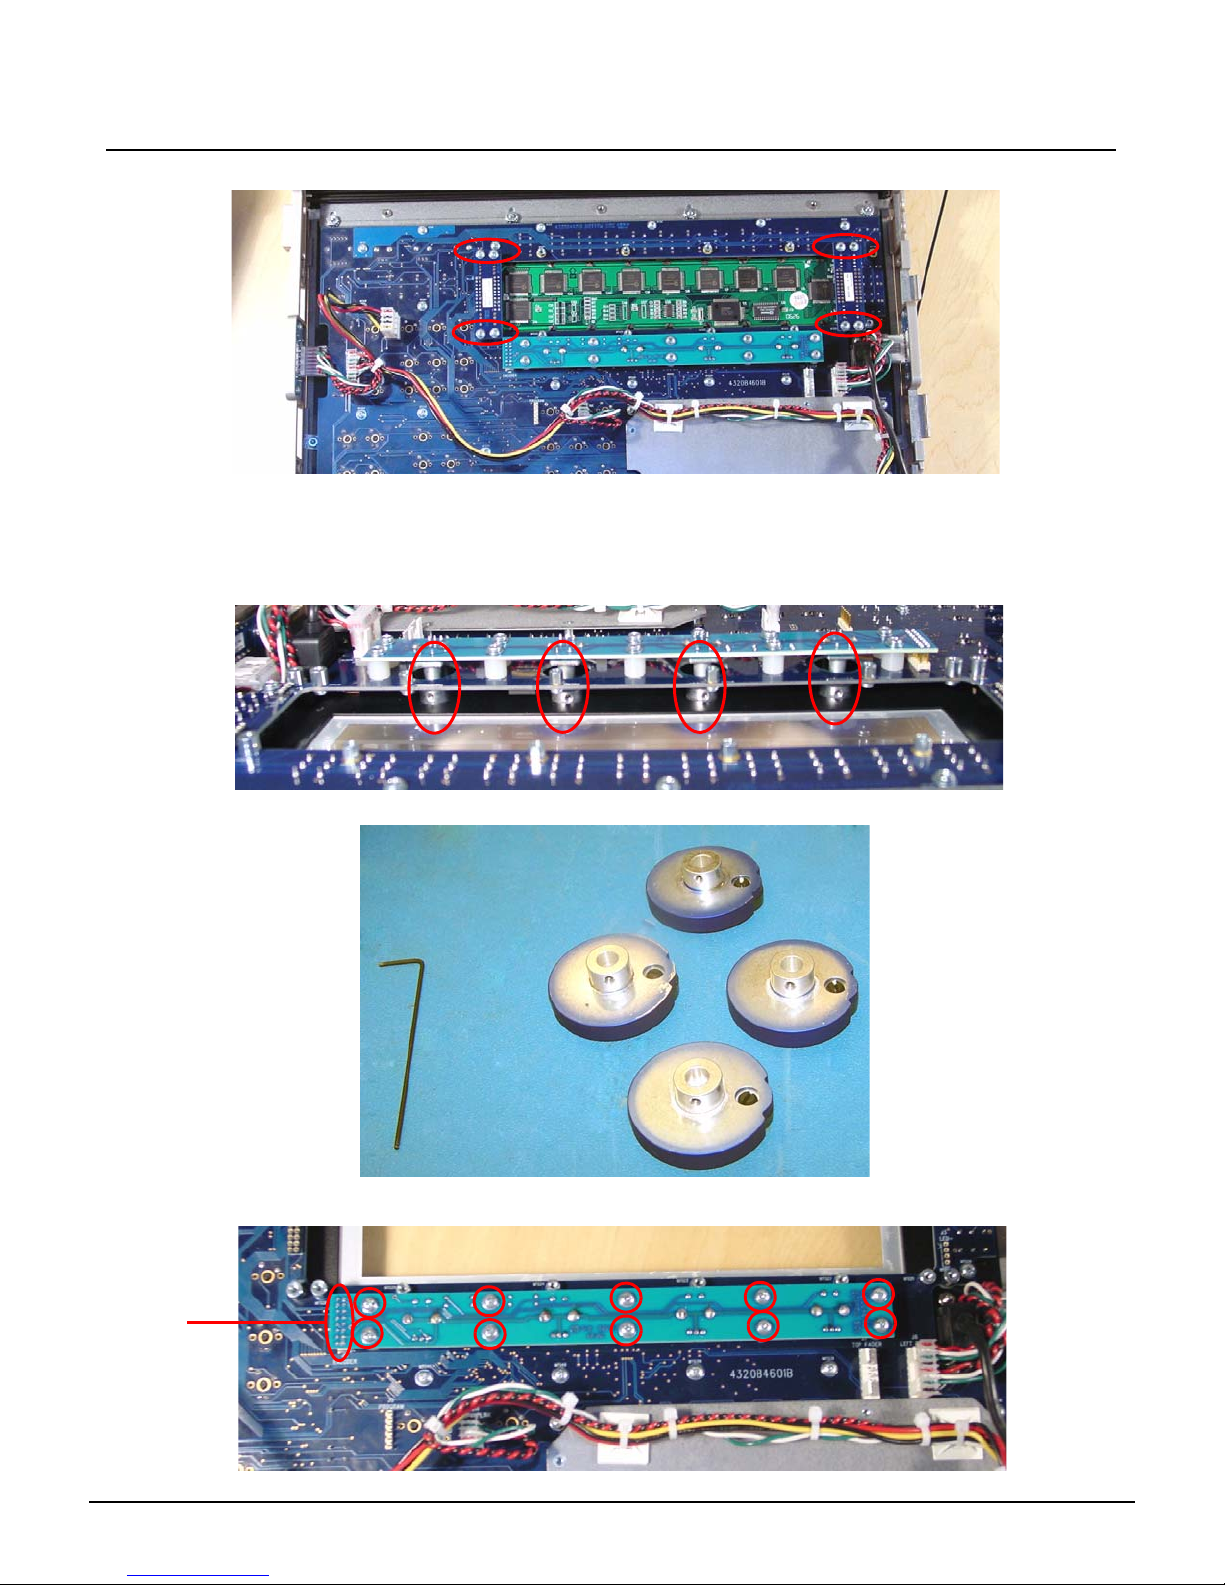
Step 13: Remove the 8 face panel LCD Jumper screws
Step 14: Lightly lift each side of the LCD screen socket circuit board to remove the LCD Scre en
from the Congo jr face panel.
Step 15: With the LCD screen removed from the face panel, you can now access the encoder
knob shafts.
Step 16: Spin the encoder shaft until the hex nut is visible.
Soldered
Pins
Step 17: Loosen the hex nut until the encoder falls from the shaft.
Step 18: Loosen all 10 screws from the encoder PCB board.
Congo™ jr Encoder Replacement Page 16 Electronic Theatre Controls, Inc.
Page 21
ETC Service Note
Congo™ jr Encoder Replacement
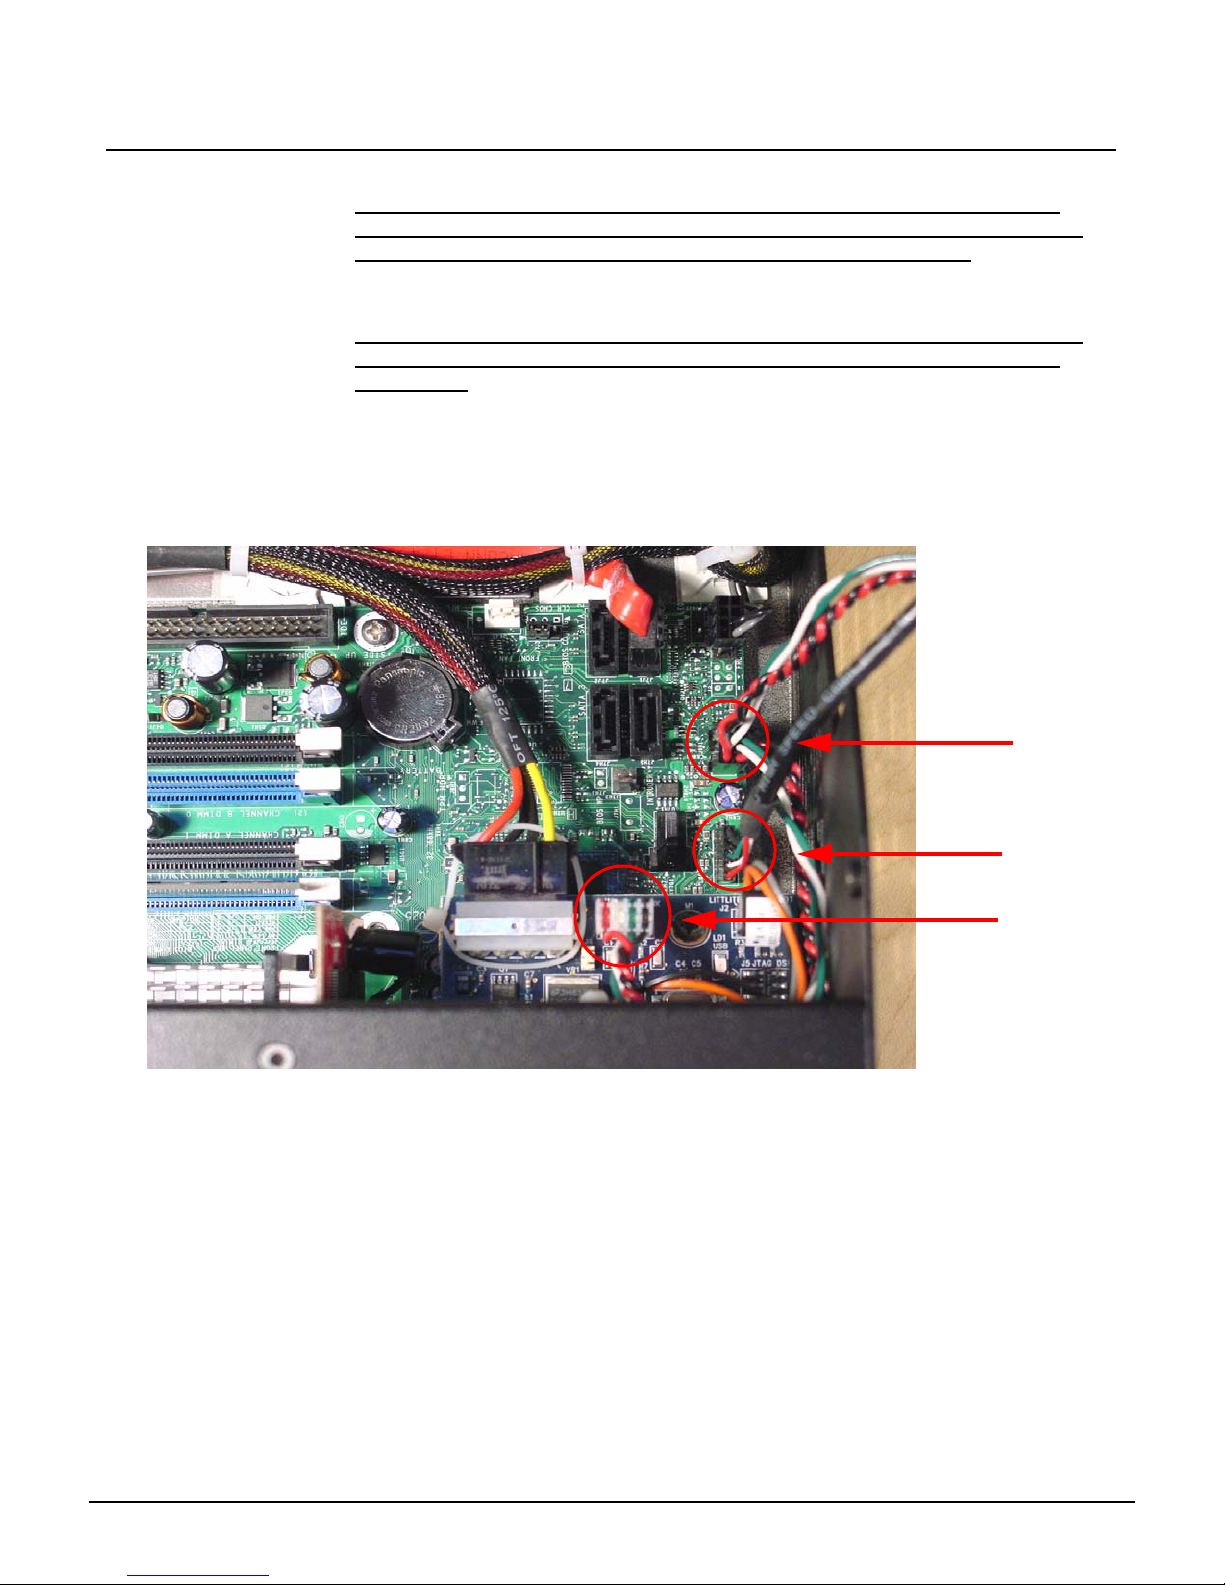
Step 19: Replace encoders as needed on PCB or replace the whole board.
NOTE: Pins on this board are soldered, not socketed. You will need to desolder each of the 16 pins. DO NOT THROW THESE PINS AW AY. You will need
to re-solder the pins once the encoder/board has been replaced.
Step 20: Once the encoder/board has been replaced, re-solder the 16 pins on the lef t sid e of
this board. Re-attach all 10 screws of the encoder board to the appropriate stand off.
NOTE: The stand offs used on this b oard are plastic. DO NOT OVER TIGHTEN;
doing so will strip the standoff. Attach these screws with a manual screw
driver only.
Step 21: Replace the LCD Screen and attach all 8 of the screws on either side of the LCD
Jumper Board.
Step 22: Place the LCD Pressure plate back over the LCD Screen and attach the 8 short
screws back into their respective standoff.
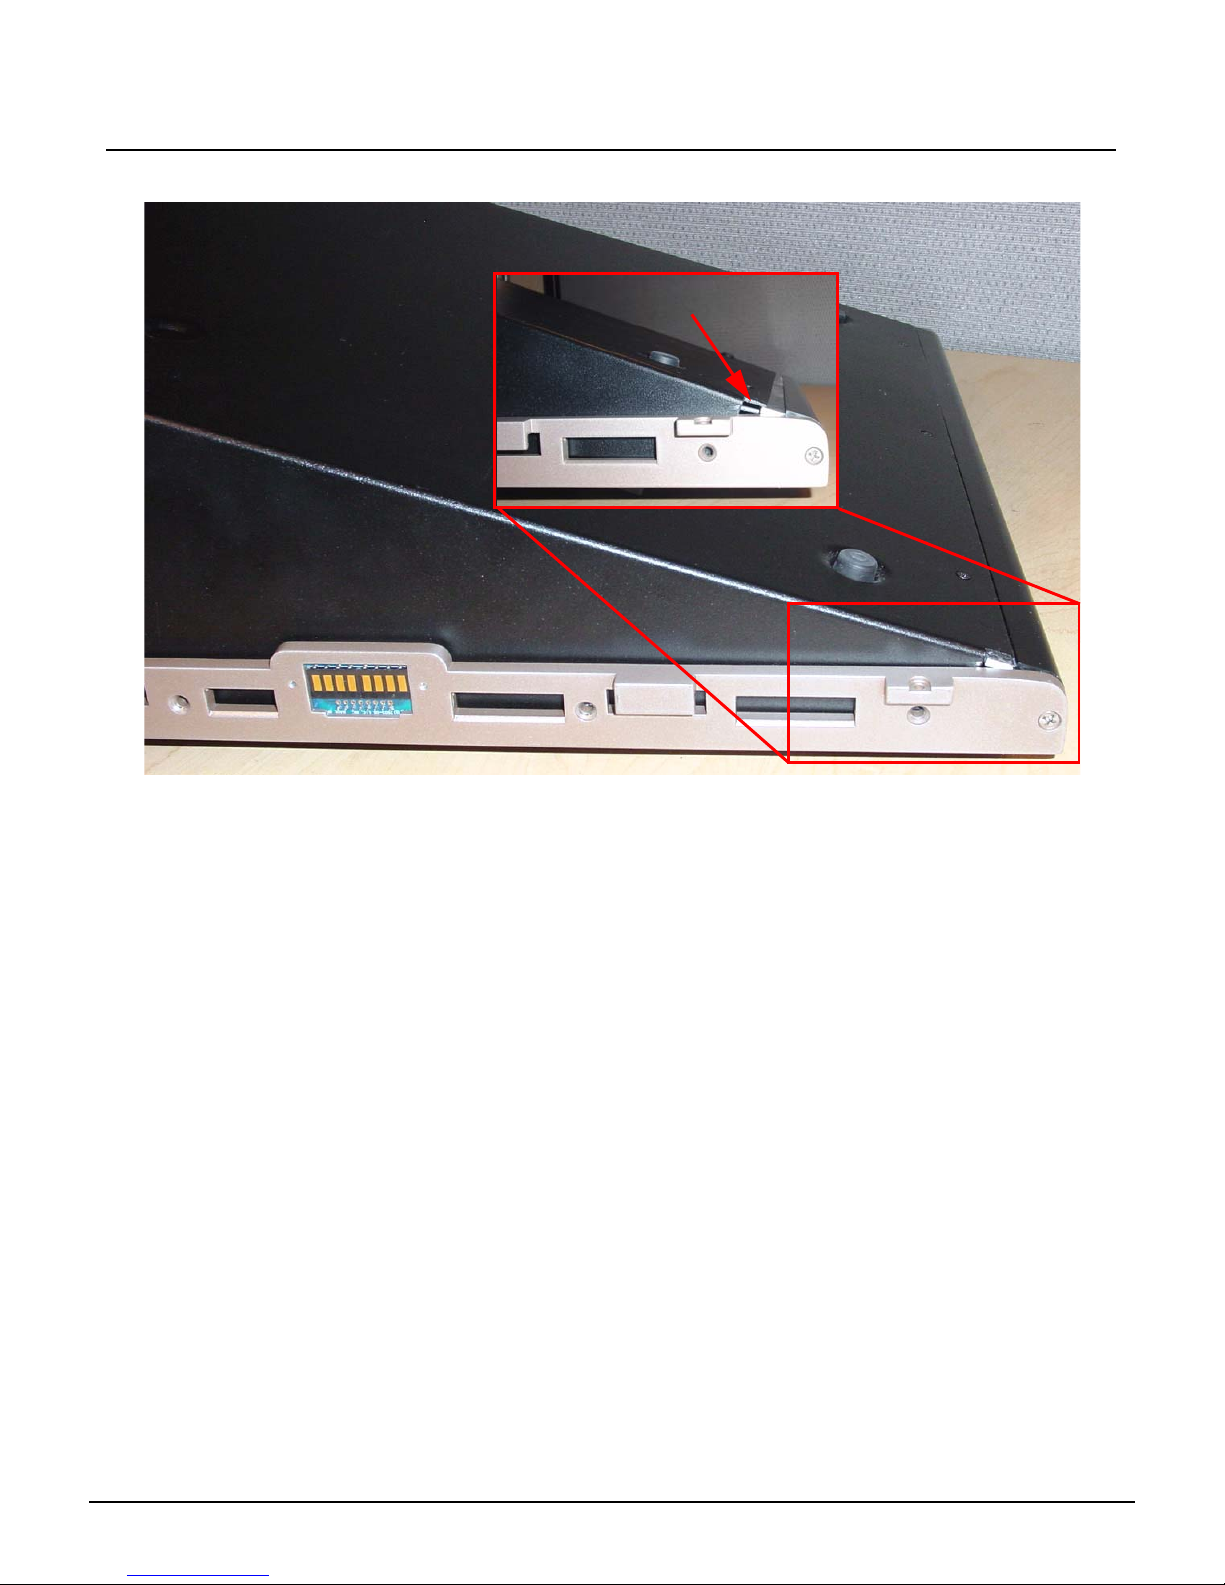
Step 23: Re-attach the USB Connectors to the motherboard.
FP USB 1
FP USB 2
J1- USB Uplink
Congo™ jr Encoder Replacement Page 17 Electronic Theatre Controls, Inc.
Page 22
ETC Service Note
Congo™ jr Encoder Replacement
Step 24: Slide the face panel back under the Base pressure plate.
Base Pressure Plate
Step 25: Re-attach all 7 screws from each side of the console face panel.
Step 26: Flip the face panel over and tighten the 3 screws on the base of the console.
Step 27: Power the console up and verify correct console operation.
Congo™ jr Encoder Replacement Page 18 Electronic Theatre Controls, Inc.
Page 23
ETC® Service Note
Congo™ jr Video Card Replacement
Tools Required:
#2 Phillips Screwdriver
#1 Phillips Screwdriver
Procedure:
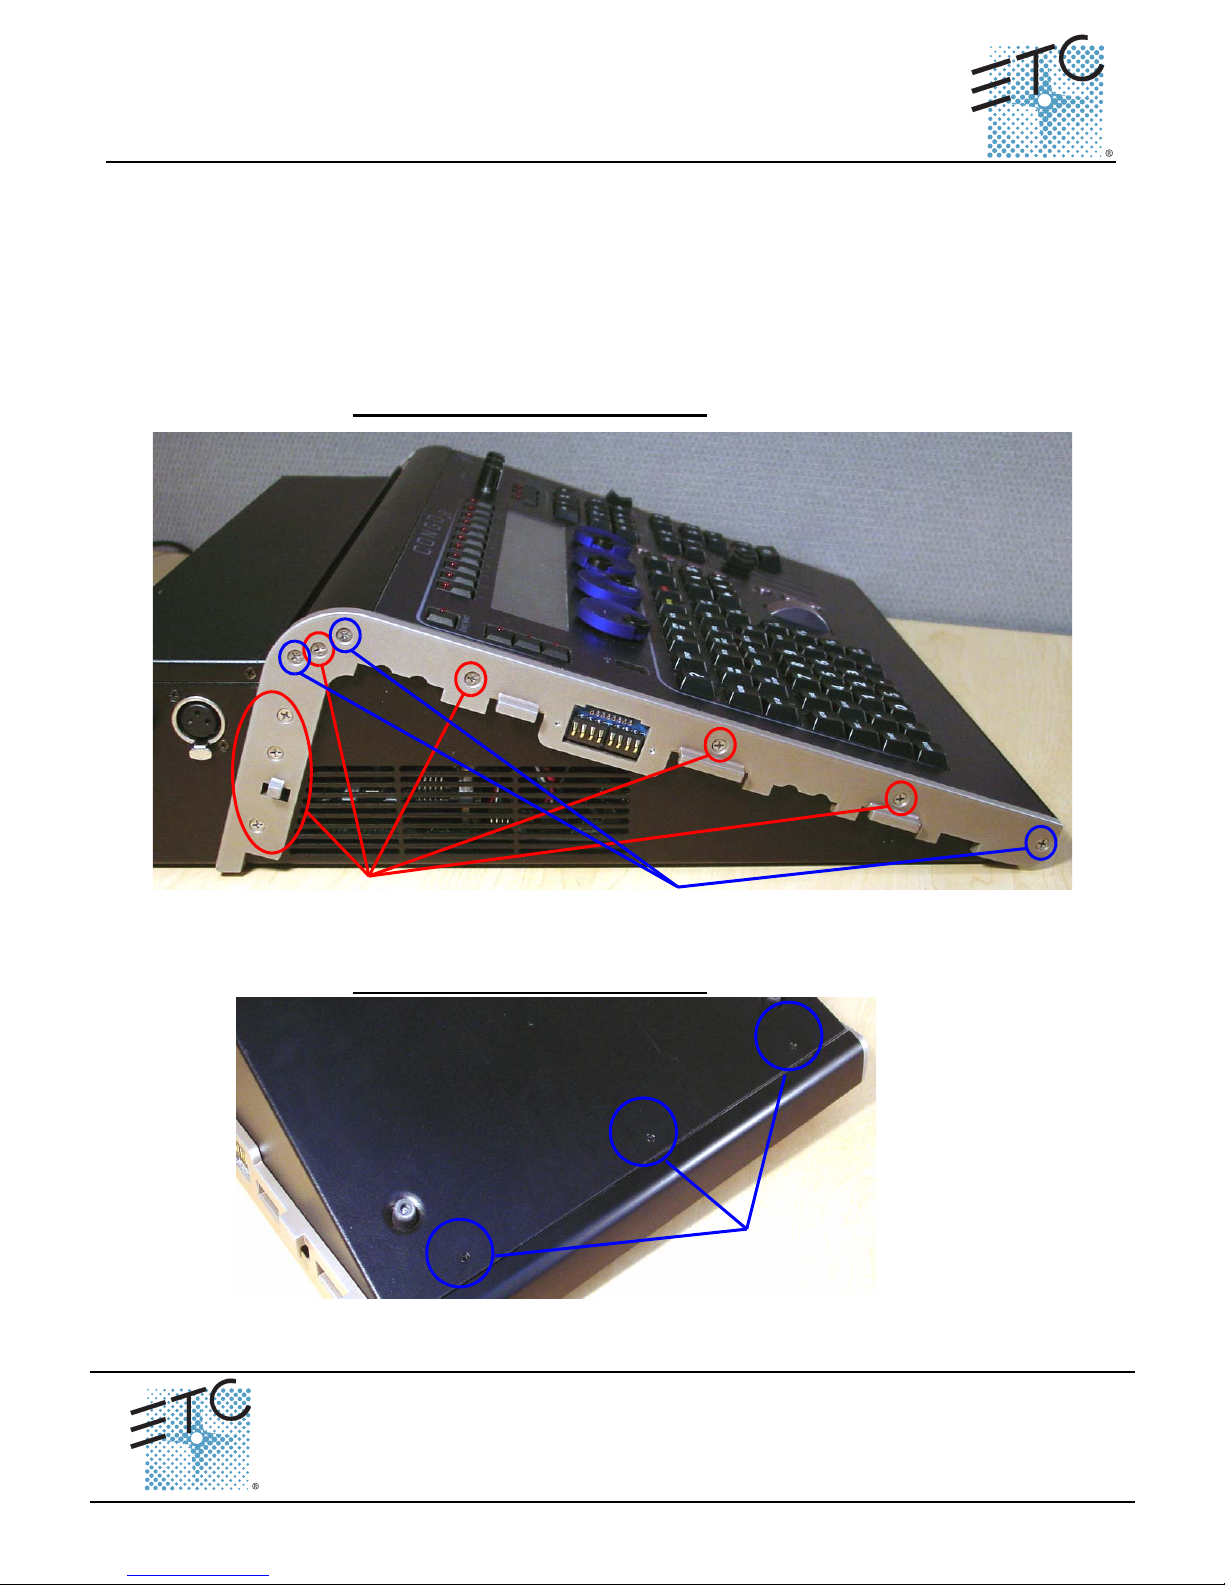
Step 1: Remove the protective side panels from the Congo jr Console.
Step 2: Remove the 7 screws indicated in Red below.
Step 3: Loosen the 3 screws indicated in Blue below.
NOTE: DO NOT remove the 3 screws.
Remove these screws
Step 4: Carefully flip over the console and loosen the 3 screws in blue below:
NOTE: DO NOT remove the 3 screws.
Video Card Replacement
Corporate Headquarters
London, UK
Rome, IT
Holzkirchen, DE
Hong Kong Room 1801, 18/F, Tower 1 Phase 1, Enterprise Square, 9 Sheung Yuet Road, Kowloon Bay, Kowloon, Hong Kong
Service:
Web:
Pending
Unit 26-28, Victoria Industrial Estate, Victoria Road, London W3 6UU, UK Tel +44 (0)20 8896 1000 Fax +44 (0)20 8896 2000
Via Ennio Quirino Visconti, 11, 00193 Rome, Italy Tel +39 (06) 32 111 683 Fax +39 (06) 32 656 990
(Americas) [email protected]
www.etcconnect.com
Rev A Released 02/2007
3031 Pleasant View Road, P.O. Box 620979, Middleton, Wisconsin 53562-0979 USA Tel +608 831 4116 Fax +608 836 1736
Ohmstrasse 3, 83607 Holzkirchen, Germany Tel +49 (80 24) 47 00-0 Fax +49 (80 24) 47 00-3 00
Copyright © 2006 ETC. All Rights Reserved. Product information and specifications subject to change.
Loosen these screws
2 full turns
Loosen these screws
(UK) [email protected] (DE) [email protected]
Tel +852 2799 1220 Fax +852 2799 9325
(Asia) [email protected]
Congo™ jr Video Card Replaceme nt Page 19 Electronic Theatre Controls, Inc.
Page 24
ETC Service Note
Congo™ jr Video Card Replacement
Step 5: Flip the console back onto the base.
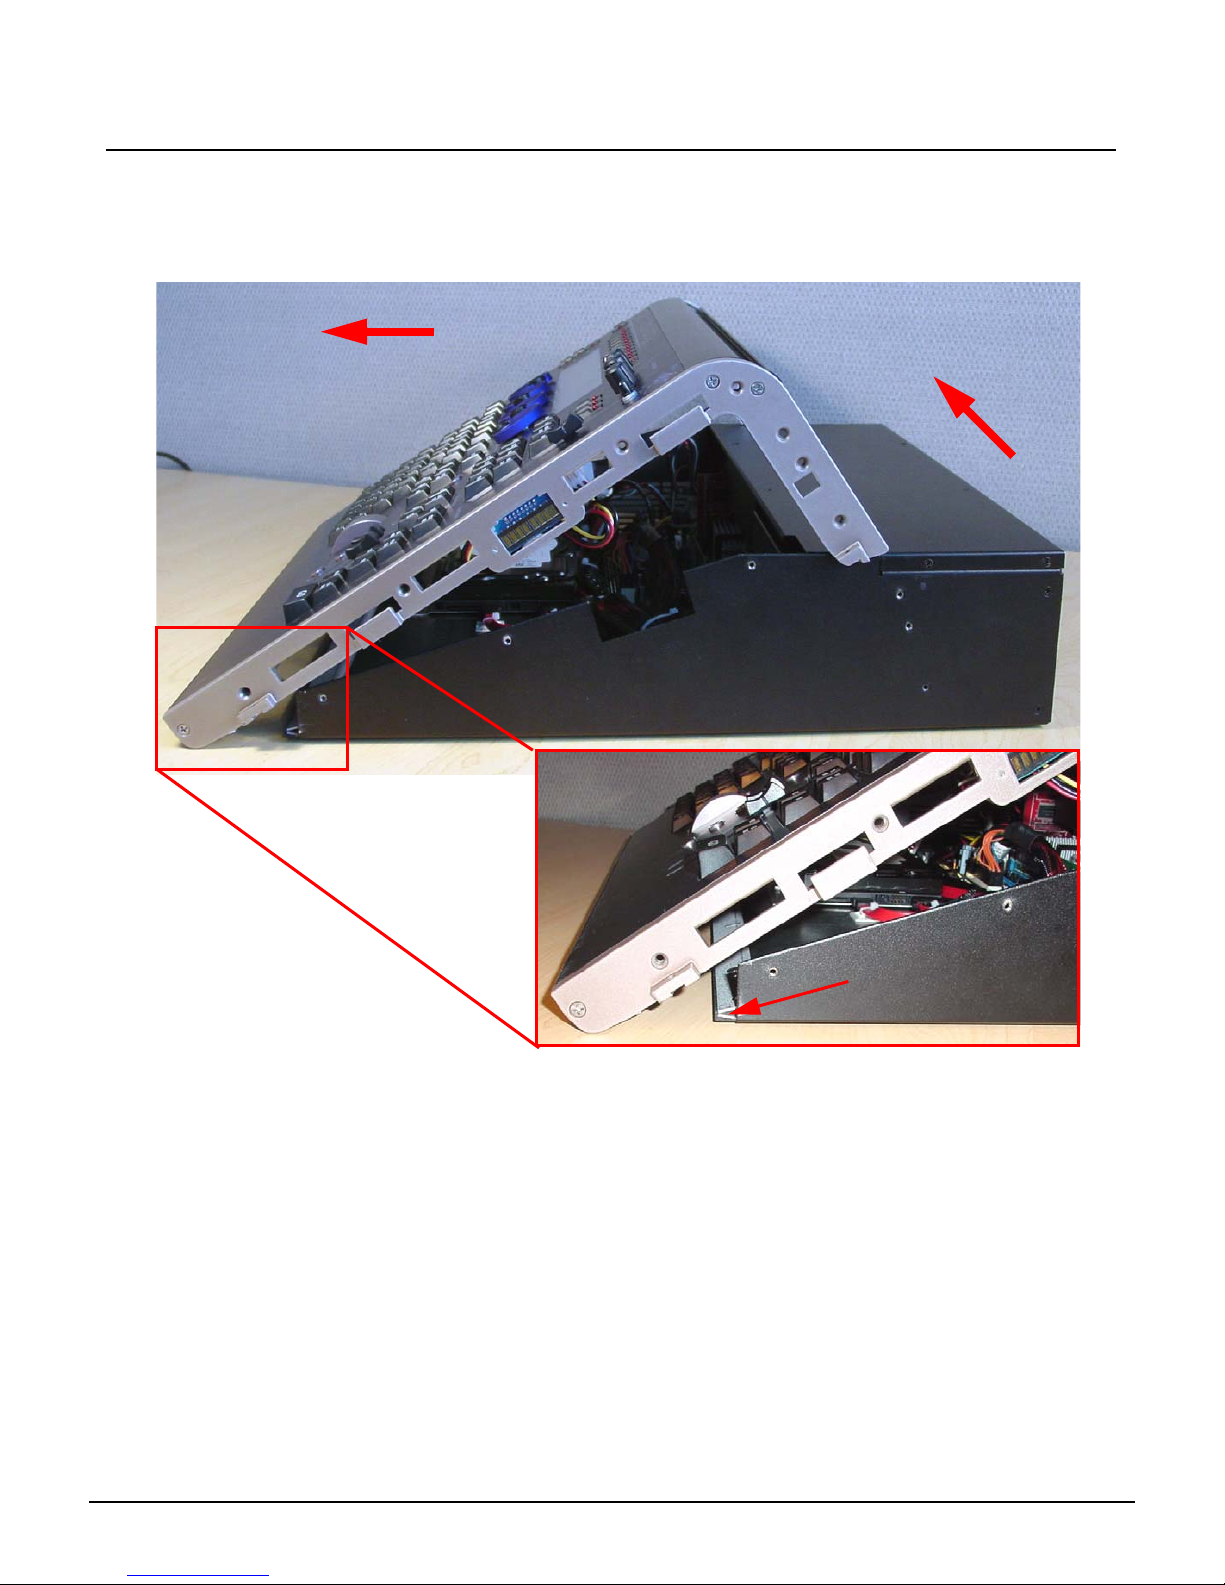
Step 6: Lift the back side of the face panel upwards away from the base.
Step 7: Slide the face panel towards the front of the console. The face panel will slip under
the base pressure plate.
2. Slide face panel forwards
1. Tilt face panel upwards
Base Pressure Plate
Step 8: Rest the face panel off to the left side of the base unit. (the side with the DMX
connectors) There is no need to remove the face panel cables when replacing the
video card.
Congo™ jr Video Card Replacement Page 20 Electronic Theatre Controls, Inc.
Page 25
ETC Service Note
Congo™ jr Video Card Replacement
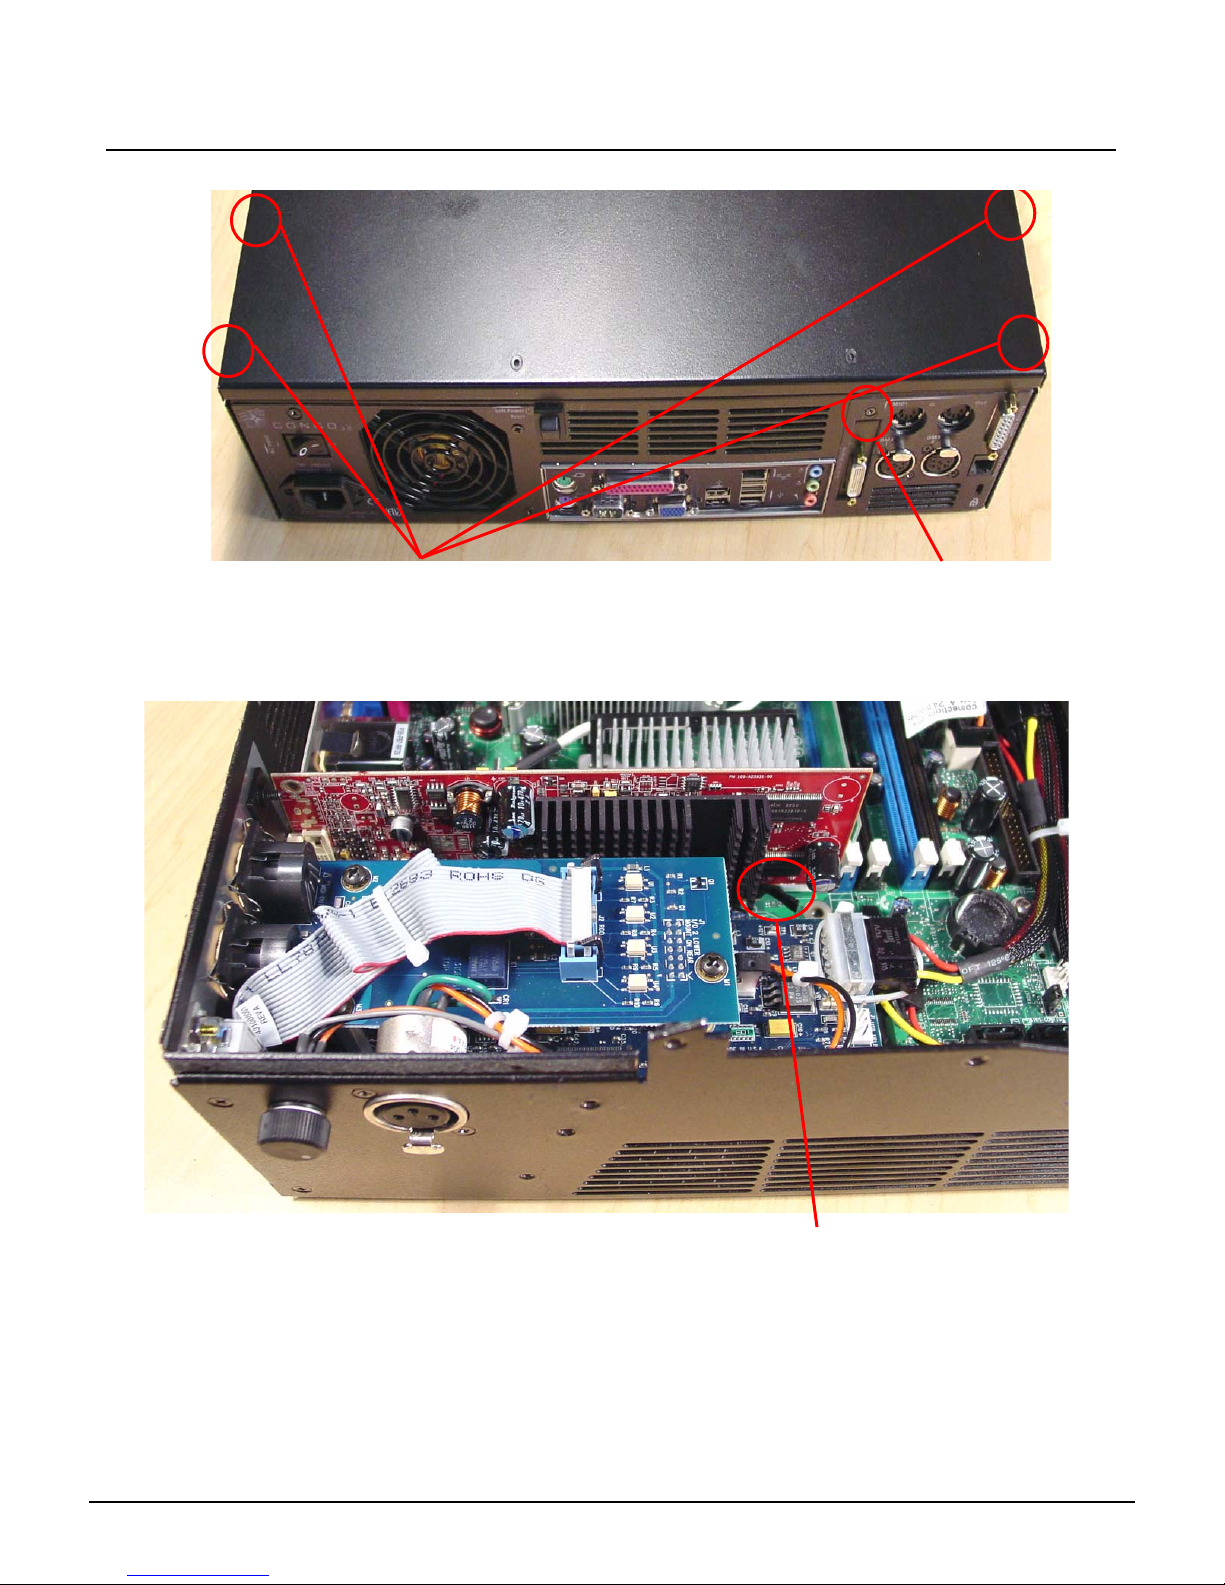
Step 9: Remove all 5 screws from both sides and the rear of the base.
Remove these screws
Step 10: Remove the base cover, and set aside.
Step 11: Locate the AGP video card near the MIDI and DMX connectors.
Step 12: Pull back the AGP slot locking tab towards the DMX I/O Card. At the same time, pull
the video card up and out of the AGP slot.
(located on side of chassis)
Remove this screw
Congo™ jr Video Card Replacement Page 21 Electronic Theatre Controls, Inc.
Pull APG slot tab towards
DMX I/O Card
Page 26
ETC Service Note
Congo™ jr Video Card Replacement
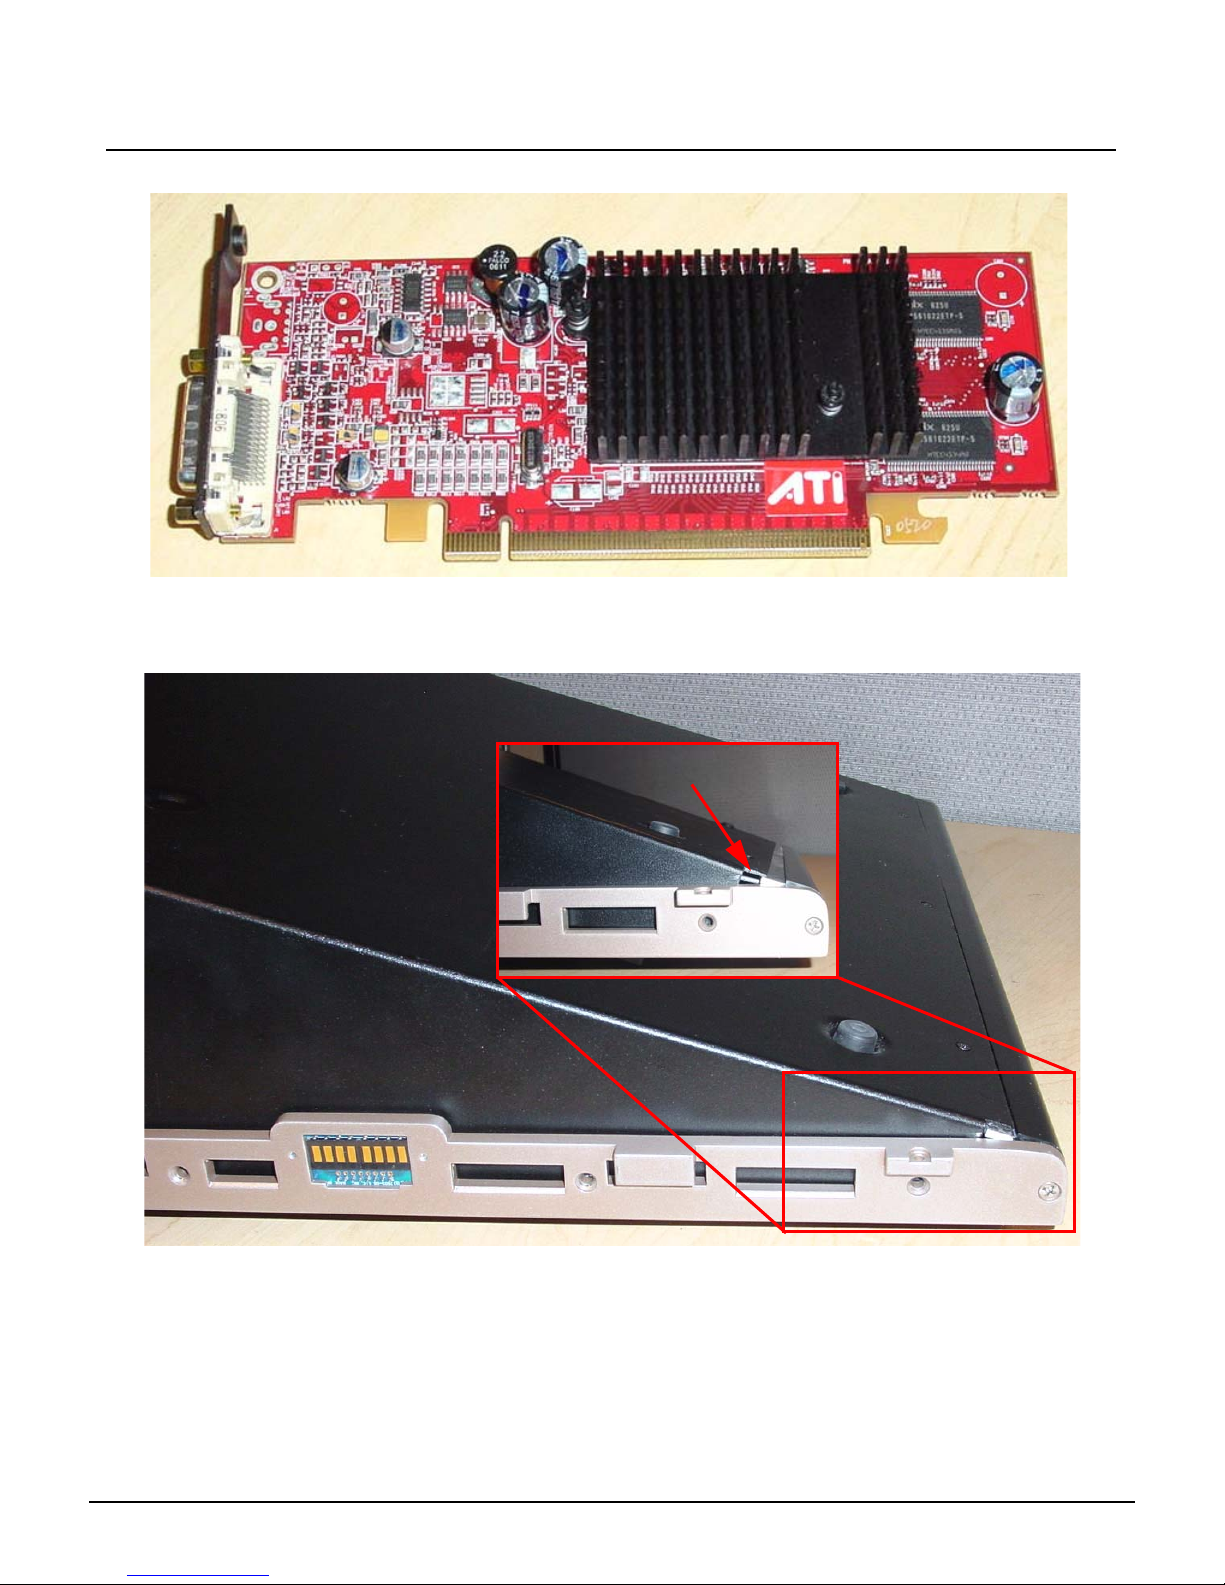
Step 13: Set the defective/damaged video card aside.
Step 14: Insert the new video card into the motherboard. There should be a click heard/felt
when the video card is seated all the way into the AGP Slot.
Step 15: Place the base cover back onto the base of the console and re-attach all 5 screws.
Base Pressure Plate
Step 16: Slide the face panel back under the base pressure plate.
Step 17: Re-attach all 7 screws from each side of the console face panel.
Step 18: Flip the face panel over and tighten the 3 screws on the base of the console.
Step 19: Power the console up and verify console operation.
Congo™ jr Video Card Replacement Page 22 Electronic Theatre Controls, Inc.
Page 27
ETC® Service Note
Congo™ jr Hard Drive Replacement
Tools Required:
#2 Phillips Screwdriver
#1 Phillips Screwdriver
Side Cutter
(3) 4" Replacement zip ties
Procedure:
Step 1: Remove the protective side panels from the Congo jr Console.
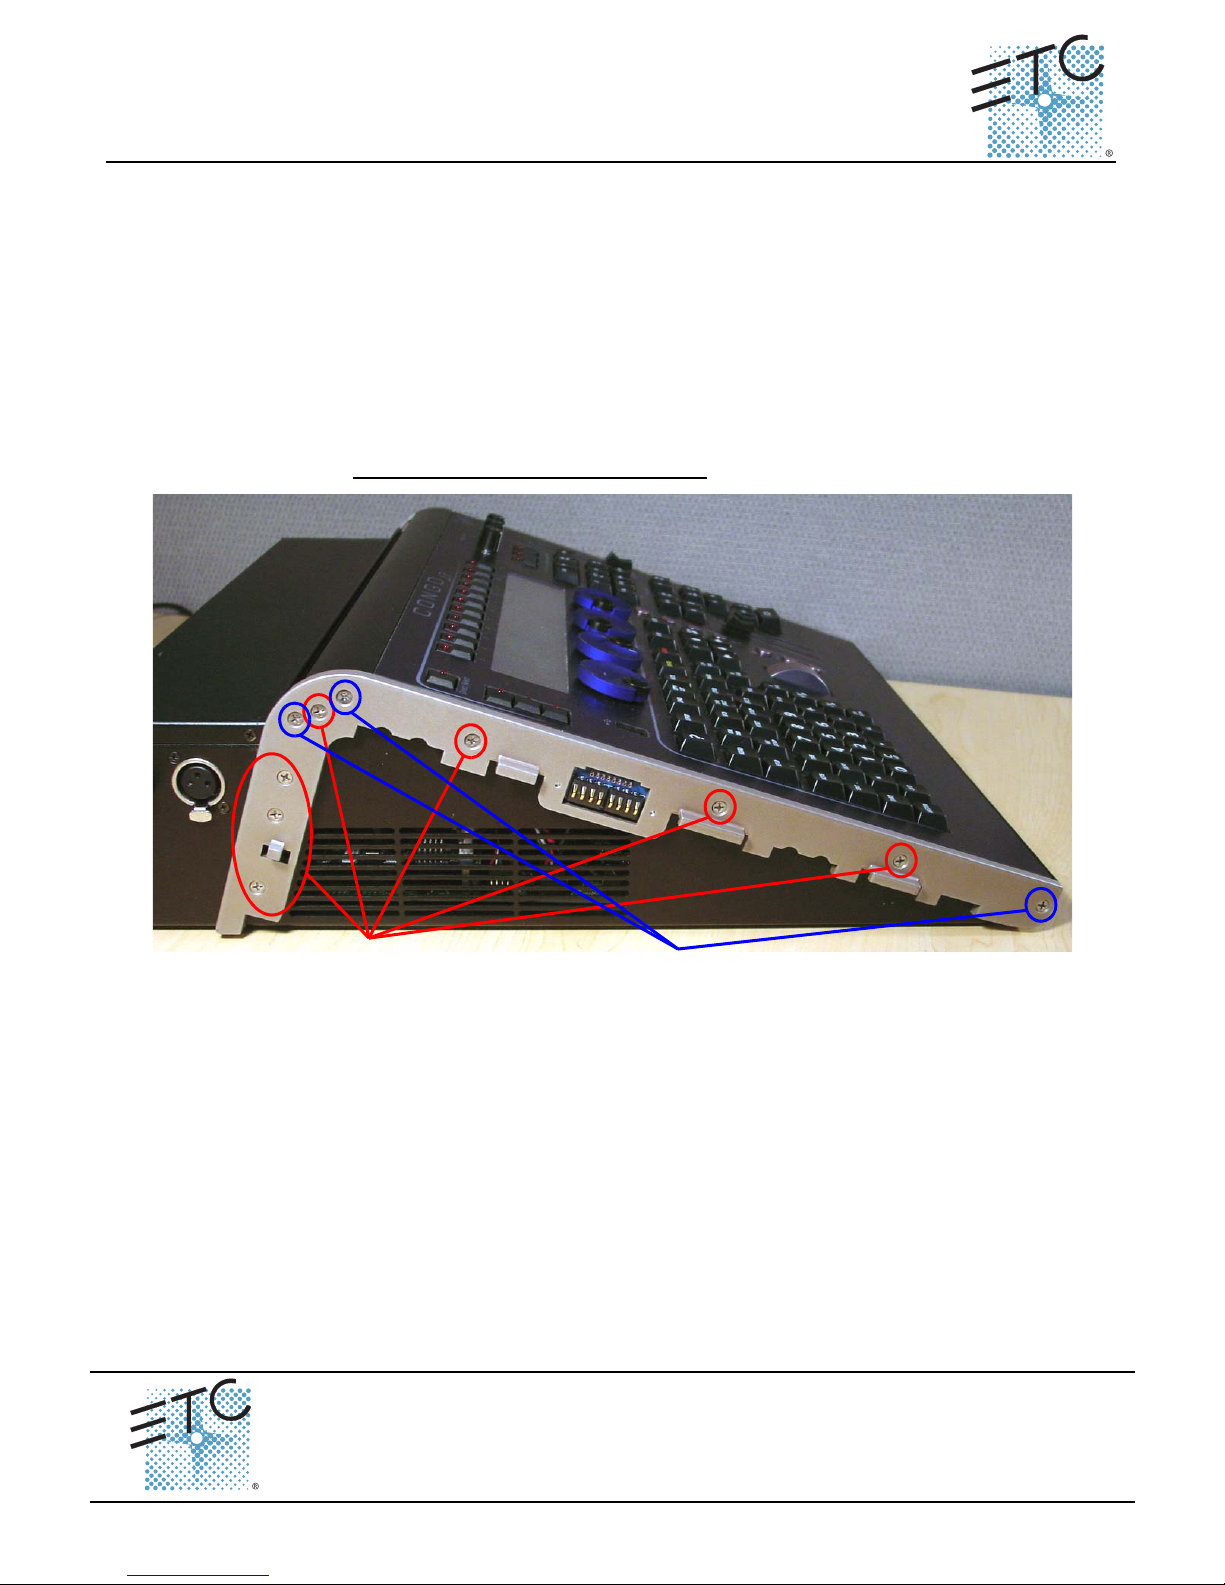
Step 2: Remove the 7 screws indicated in Red below.
Step 3: Loosen the 3 screws indicated in Blue below.
NOTE: DO NOT remove the 3 screws.
Remove these screws
Loosen these screws
2 full turns
Hard Drive Replacement
Corporate Headquarters
London, UK
Rome, IT
Holzkirchen, DE
Hong Kong Room 1801, 18/F, Tower 1 Phase 1, Enterprise Square, 9 Sheung Yuet Road, Kowloon Bay, Kowloon, Hong Kong
Service:
Web:
Pending
Unit 26-28, Victoria Industrial Estate, Victoria Road, London W3 6UU, UK Tel +44 (0)20 8896 1000 Fax +44 (0)20 8896 2000
Via Ennio Quirino Visconti, 11, 00193 Rome, Italy Tel +39 (06) 32 111 683 Fax +39 (06) 32 656 990
(Americas) [email protected]
www.etcconnect.com
Rev A Released 02/2007
Congo™ jr Hard Drive Replacement Page 23 Electronic Theatre Controls, Inc.
3031 Pleasant View Road, P.O. Box 620979, Middleton, Wisconsin 53562-0979 USA Tel +608 831 4116 Fax +608 836 1736
Ohmstrasse 3, 83607 Holzkirchen, Germany Tel +49 (80 24) 47 00-0 Fax +49 (80 24) 47 00-3 00
Copyright © 2006 ETC. All Rights Reserved. Product information and specifications subject to change.
(UK) [email protected] (DE) [email protected]
Tel +852 2799 1220 Fax +852 2799 9325
(Asia) [email protected]
Page 28
ETC Service Note
Congo™ jr Hard Drive Replacement
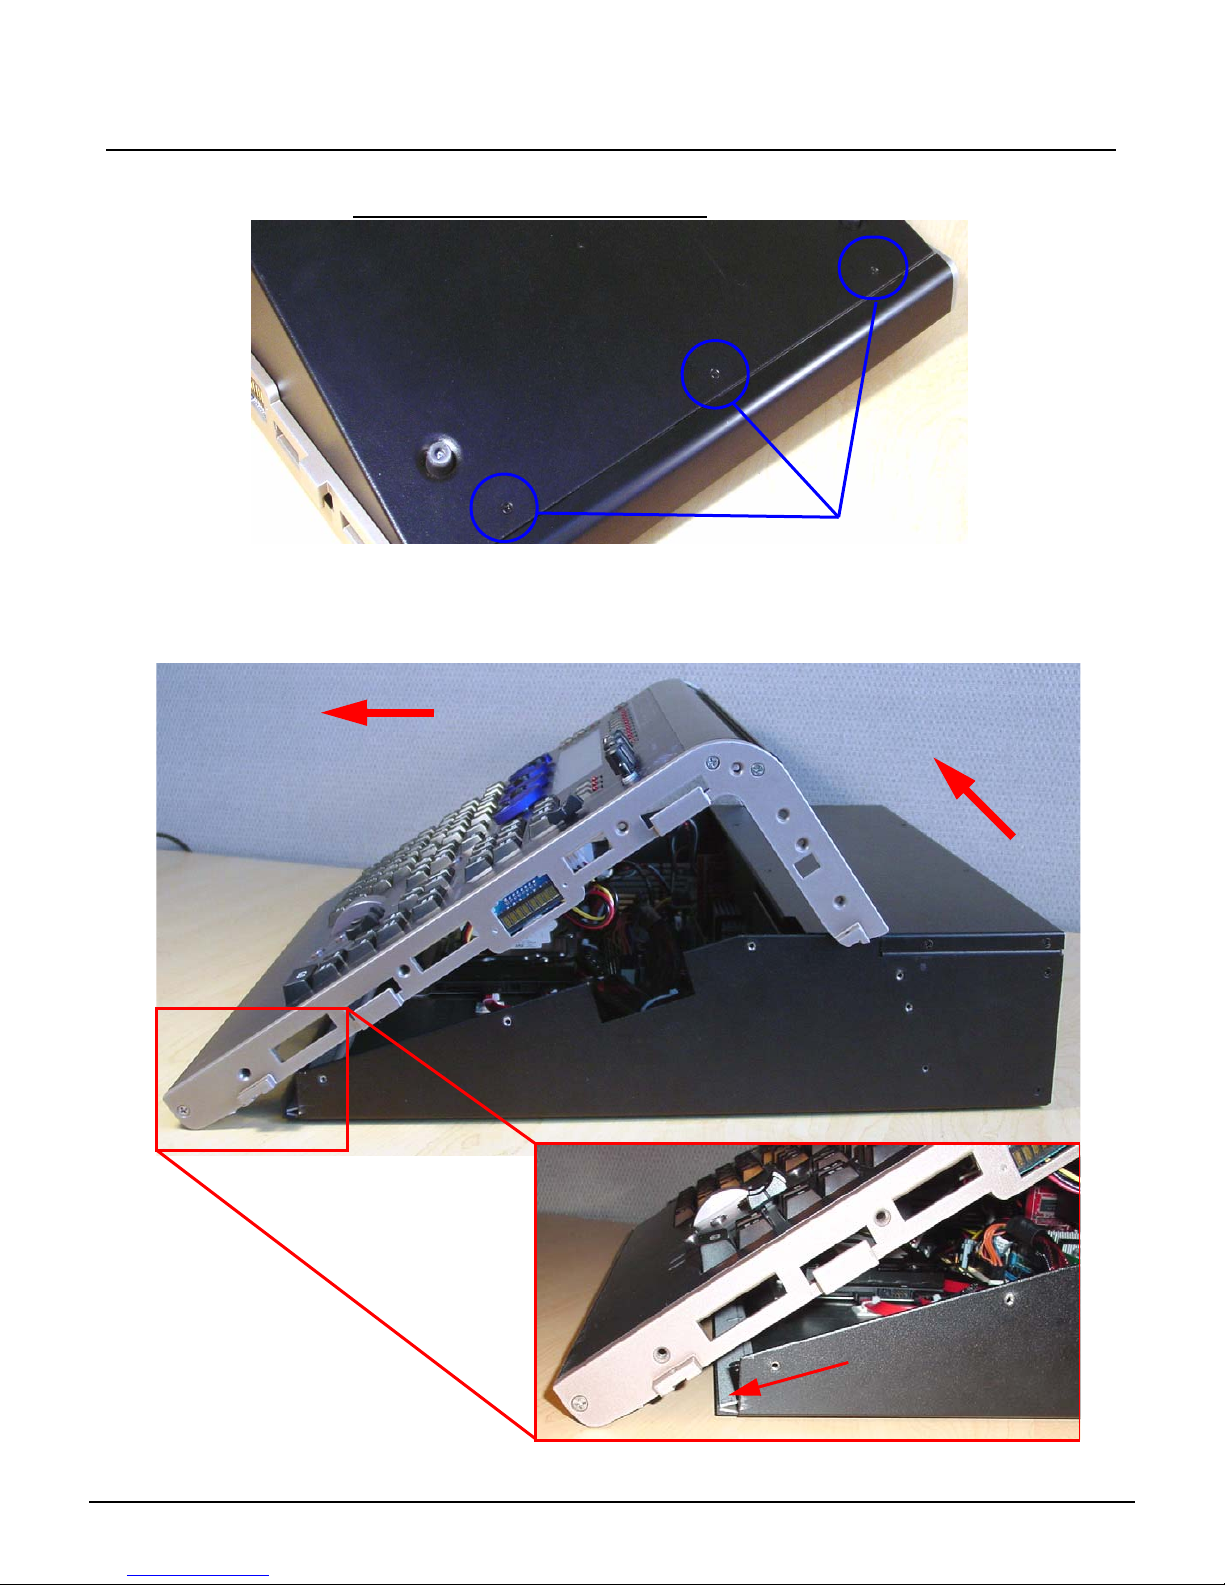
Step 4: Carefully flip over the console and loosen the 3 screws in blue below:
NOTE: DO NOT remove the 3 screws.
Step 5: Flip the console back onto the base.
Step 6: Lift the back side of the face panel upwards away from the base.
Step 7: Slide the face panel towards the front of the console. The face panel will slip under
the base pressure plate.
Loosen these screws
2. Slide face panel forwards
1. Tilt face panel upwards
Congo™ jr Hard Drive Replacement Page 24 Electronic Theatre Controls, Inc.
Base Pressure Plate
Page 29
ETC Service Note
Congo™ jr Hard Drive Replacement
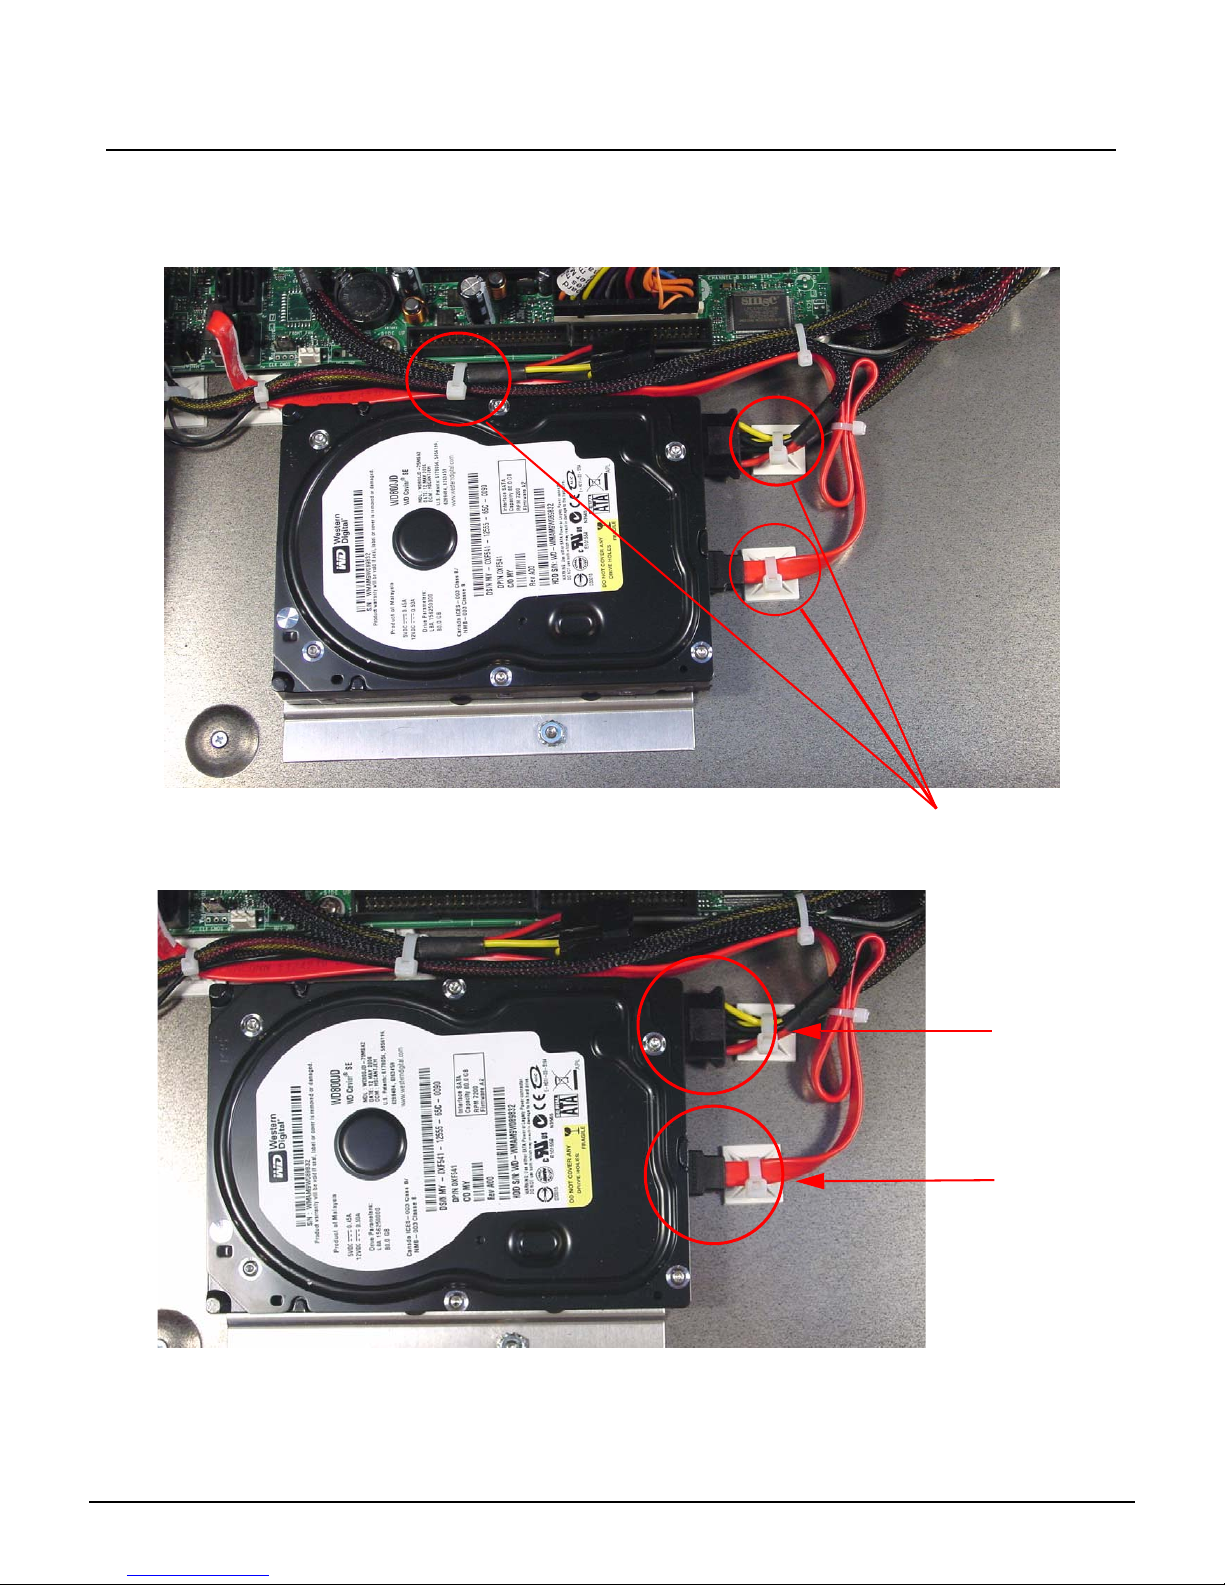
Step 8: Rest the face panel off to the left side of the base unit. (the side with the DMX
connectors) There is no need to remove the face panel cables when replacing the
hard drive.
Step 9: Clip all 3 zip ties holding the Power supply and SATA cables.
Remove these zip ties
Step 10: Disconnect the Power and SATA connectors from the hard drive.
Power Cable
SATA Cable
Congo™ jr Hard Drive Replacement Page 25 Electronic Theatre Controls, Inc.
Page 30
ETC Service Note
Congo™ jr Hard Drive Replacement
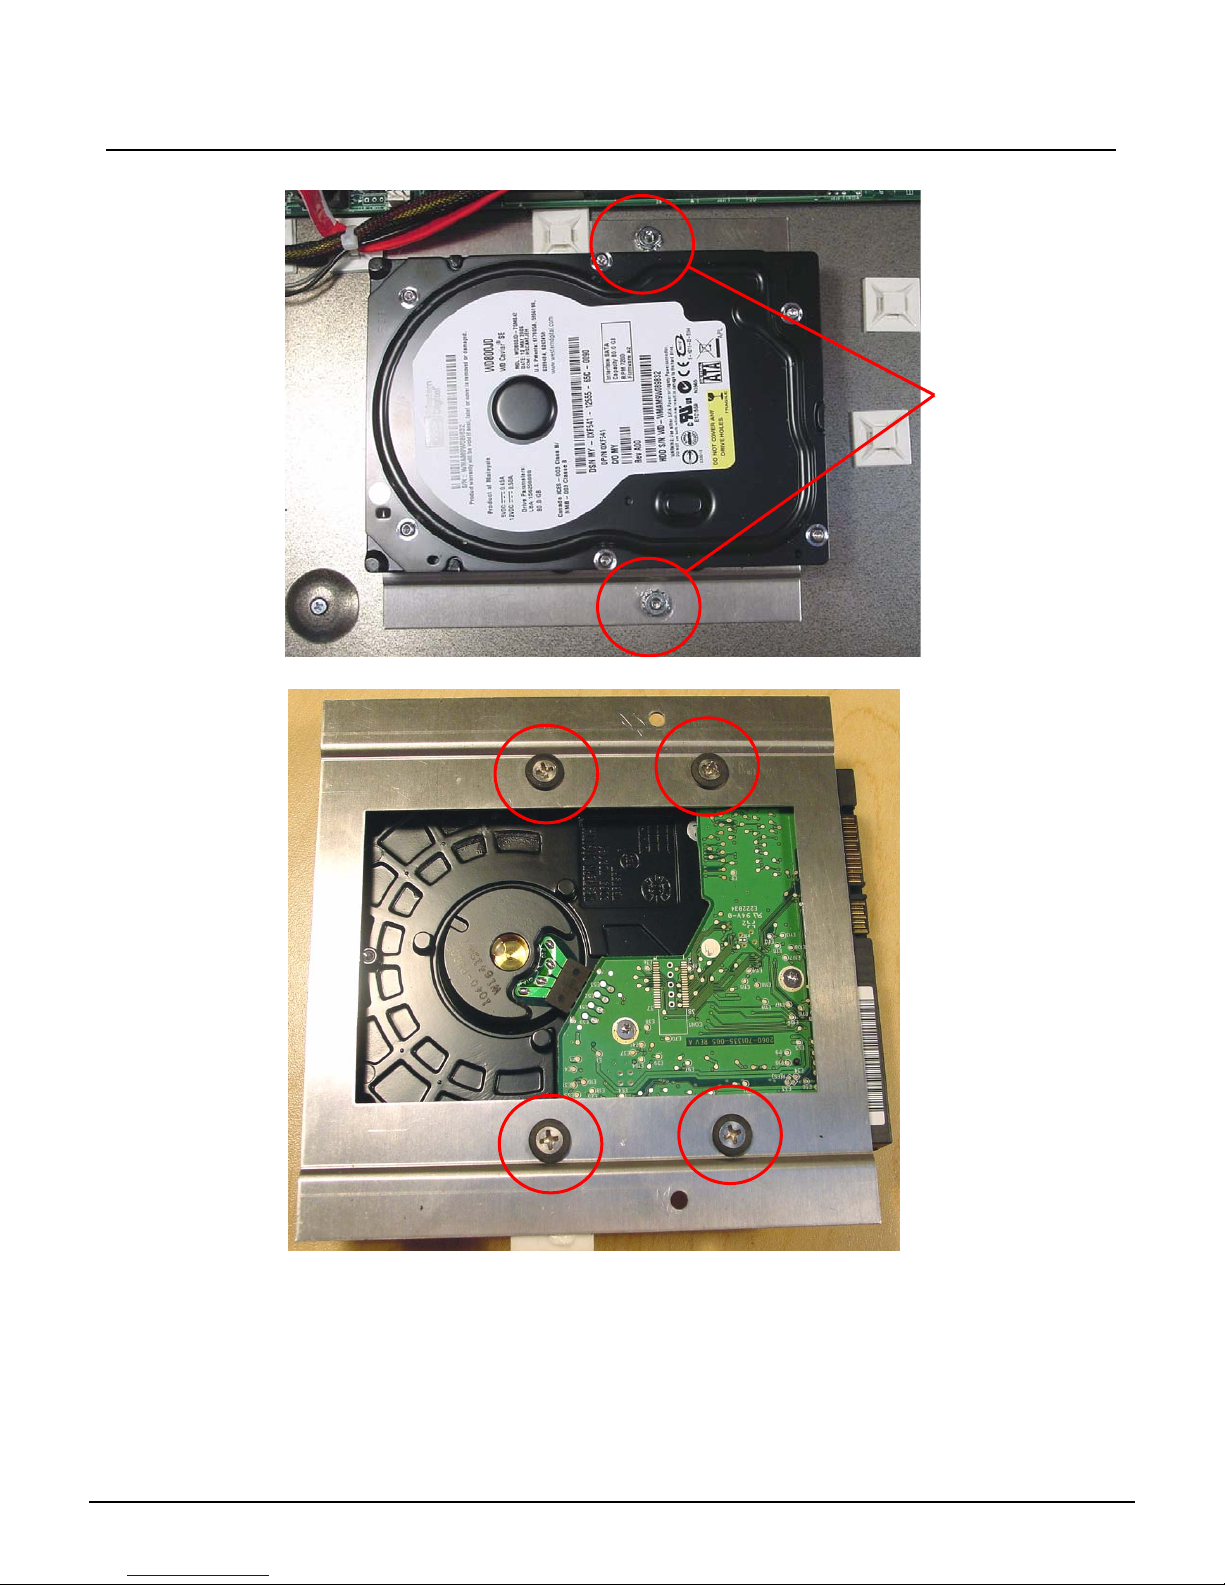
Step 11: Using a 5/16” nut driver, remove both nuts from the hard drive plate.
Remove both
5/16” nuts
Step 12: Remove all 4 Hard Drive Plate Screws.
Step 13: Swap the old Hard Drive fo rthe one one. Replace all fo ur screws holding it to the Hard
Drive Mounting plate.
Step 14: Place the Hard Drive Plate over the screws and tighten down both 5/16” nuts.
Step 15: Re-attach the Hard Drive Power and SATA cables back into the hard drive.
Step 16: Replace all 3 zip ties around the sticky backs.
Step 17: Trim the excess tail off the zip ties.
Congo™ jr Hard Drive Replacement Page 26 Electronic Theatre Controls, Inc.
Page 31
ETC Service Note
Congo™ jr Hard Drive Replacement
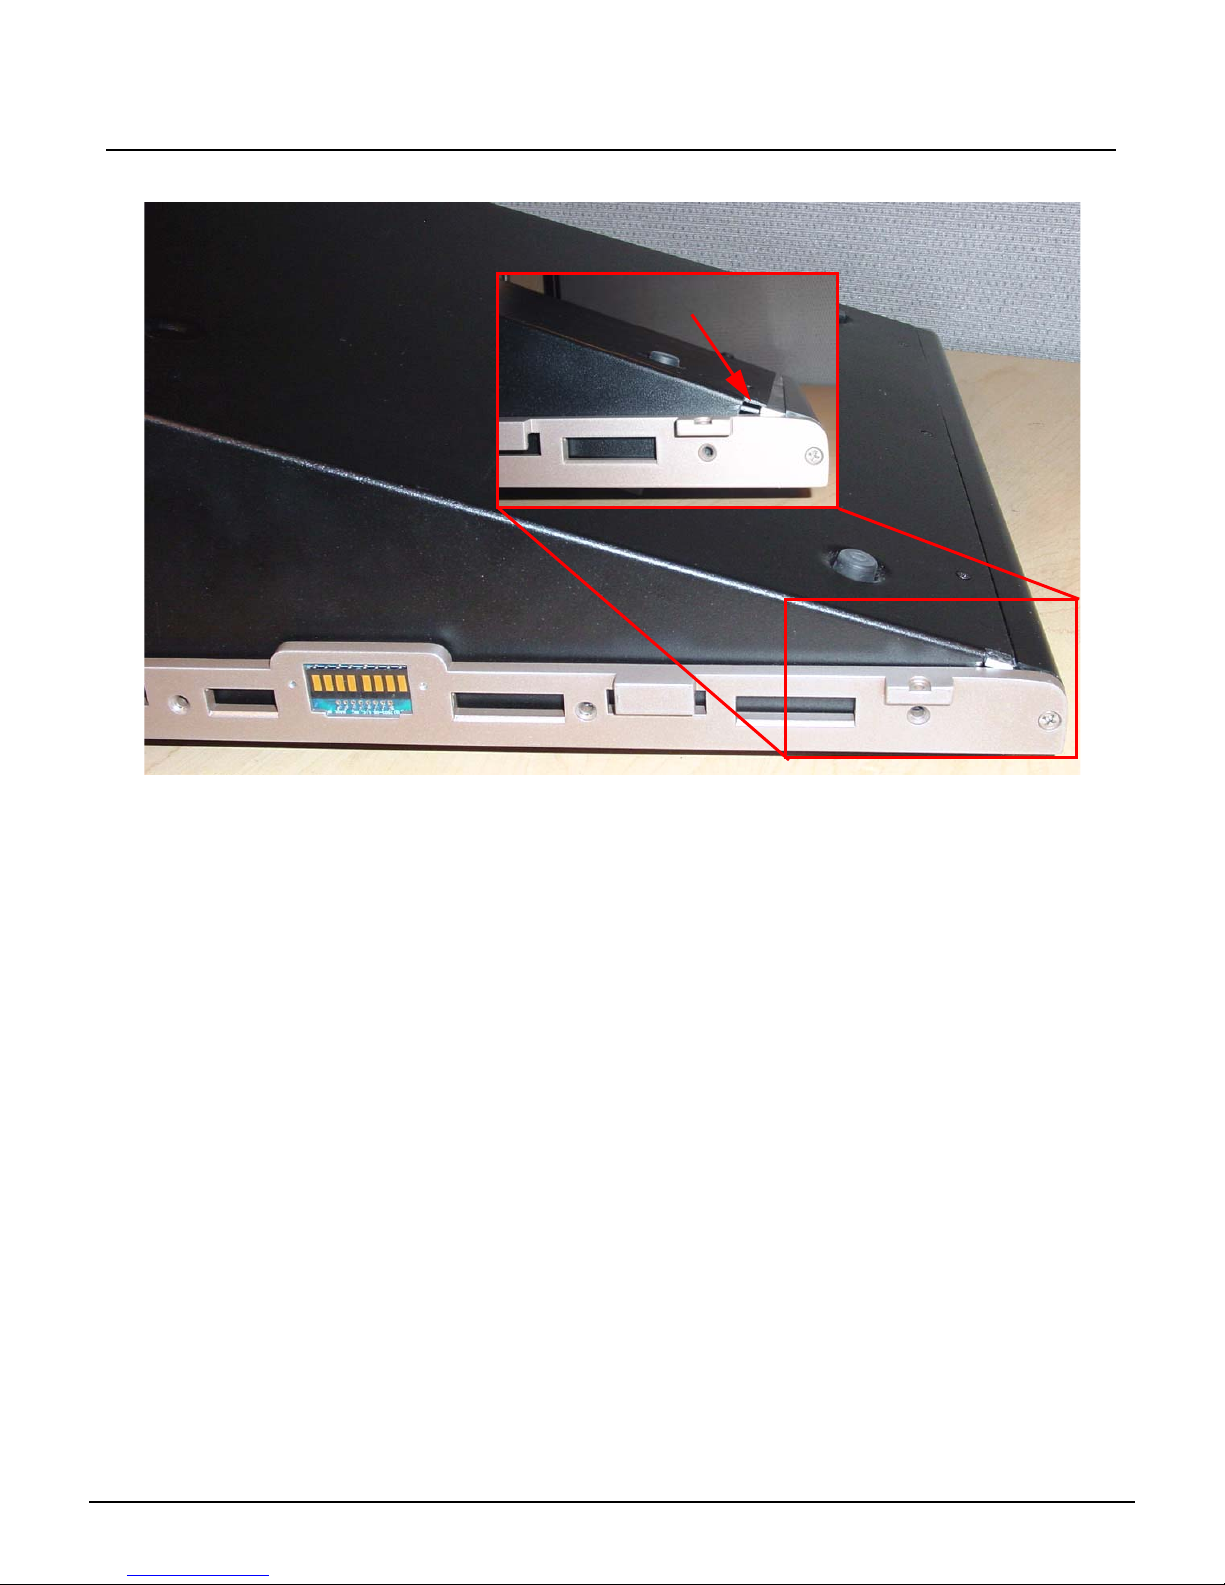
Step 18: Slide the face panel back under the pressure plate..
Base Pressure Plate
Step 19: Re-attach all 7 screws from each side of the console face panel.
Step 20: Flip the face panel over and tighten the 3 screws on the base of the console.
Step 21: Power the console up and verify correct face panel operation and LCD screen
operation.
Step 22: Update console software as necessary.
Congo™ jr Hard Drive Replacement Page 27 Electronic Theatre Controls, Inc.
Page 32

ETC Service Note
Congo™ jr Hard Drive Replacement
Congo™ jr Hard Drive Replacement Page 28 Electronic Theatre Controls, Inc.
Page 33
ETC® Service Note
Congo™ jr DMX Driver Chip Replacement
Tools Required:
#2 Phillips Screwdriver
#1 Phillips Screwdriver
Procedure:
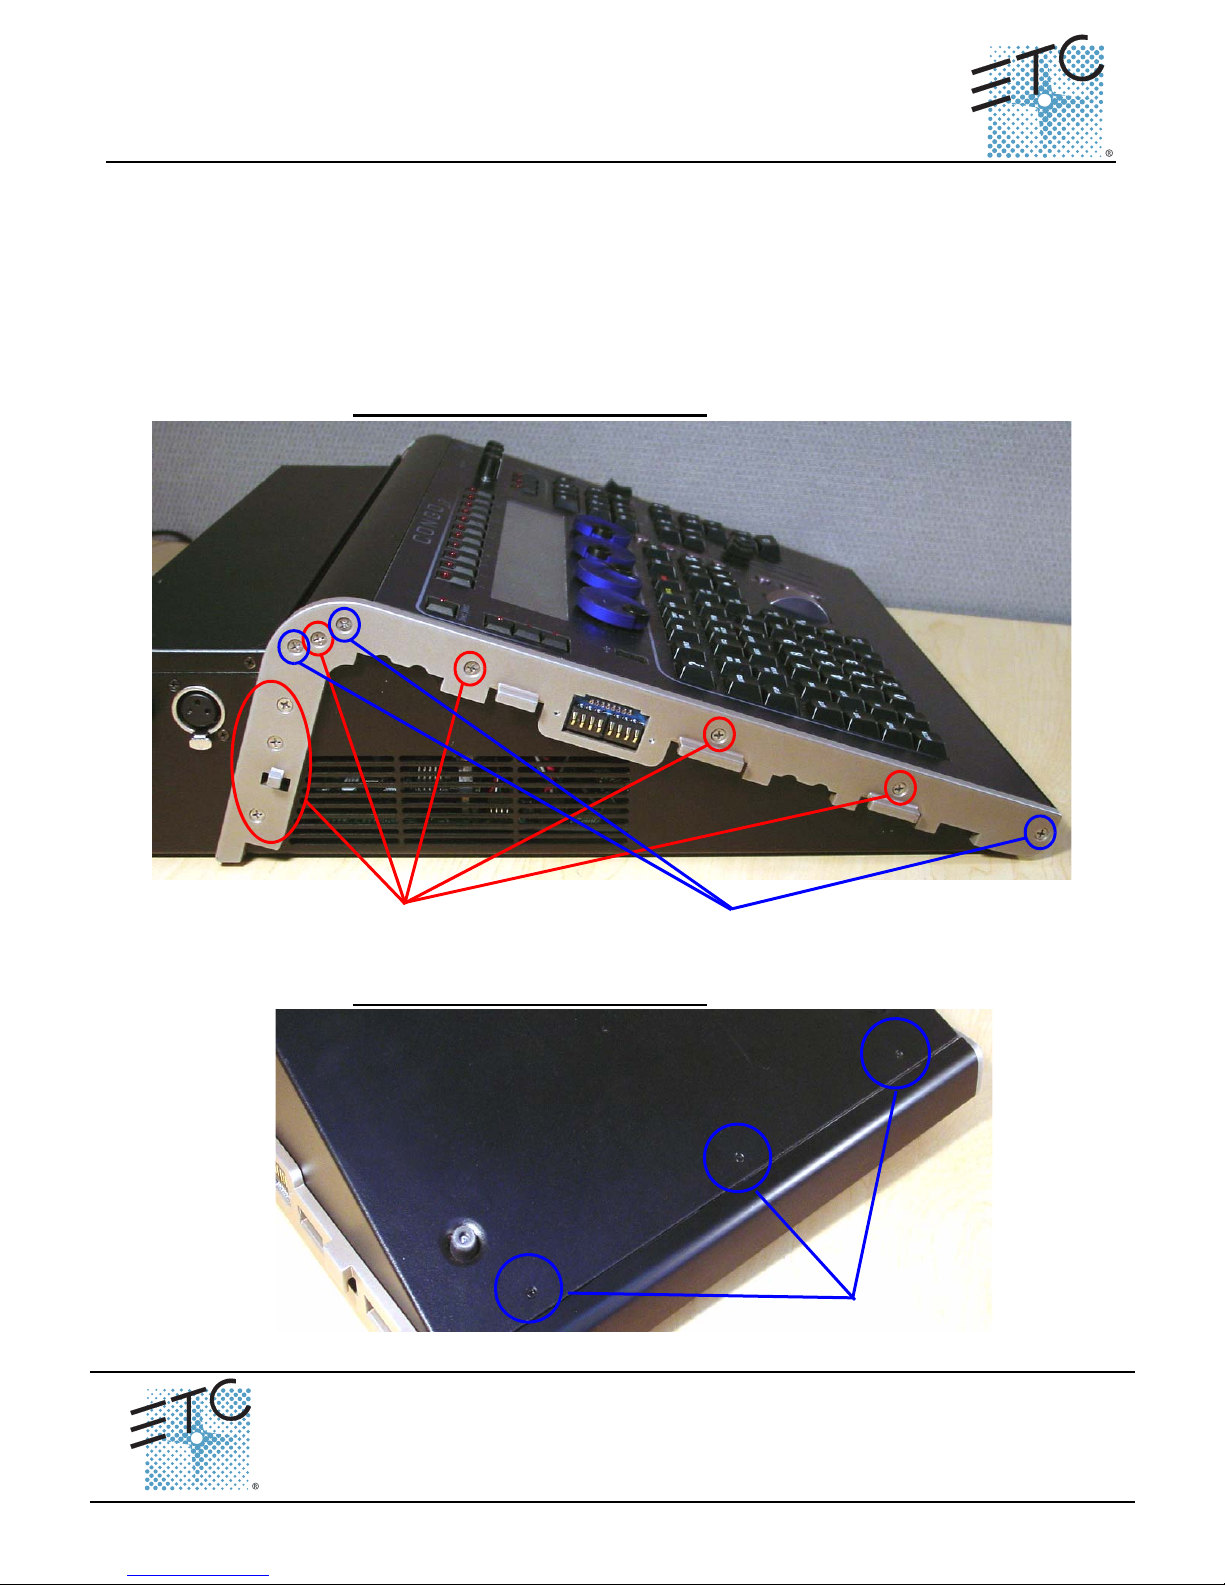
Step 1: Remove the protective side panels from the Congo jr Console.
Step 2: Remove the 7 screws indicated in Red below.
Step 3: Loosen the 3 screws indicated in Blue below.
NOTE: DO NOT remove the 3 screws.
Remove these screws
Step 4: Carefully flip over the console and loosen the 3 screws in blue below:
DMX Driver Chip Replacement
Corporate Headquarters
London, UK
Rome, IT
Holzkirchen, DE
Hong Kong Room 1801, 18/F, Tower 1 Phase 1, Enterprise Square, 9 Sheung Yuet Road, Kowloon Bay, Kowloon, Hong Kong
Service:
(Americas) [email protected]
Web:
www.etcconnect.com
Pending
Rev A Released 02/2007
Loosen these screws
2 full turns
NOTE: DO NOT remove the 3 screws.
Loosen these screws
Unit 26-28, Victoria Industrial Estate, Victoria Road, London W3 6UU, UK Tel +44 (0)20 8896 1000 Fax +44 (0)20 8896 2000
Via Ennio Quirino Visconti, 11, 00193 Rome, Italy Tel +39 (06) 32 111 683 Fax +39 (06) 32 656 990
3031 Pleasant View Road, P.O. Box 620979, Middleton, Wisconsin 53562-0979 USA Tel +608 831 4116 Fax +608 836 1736
Ohmstrasse 3, 83607 Holzkirchen, Germany Tel +49 (80 24) 47 00-0 Fax +49 (80 24) 47 00-3 00
Copyright © 2006 ETC. All Rights Reserved. Product information and specifications subject to change.
(UK) [email protected] (DE) [email protected]
Tel +852 2799 1220 Fax +852 2799 9325
(Asia) [email protected]
Congo™ jr DMX Driver Chip Replacement Page 29 Electronic Theatre Controls, Inc.
Page 34
ETC Service Note
Congo™ jr DMX Driver Chip Replacement
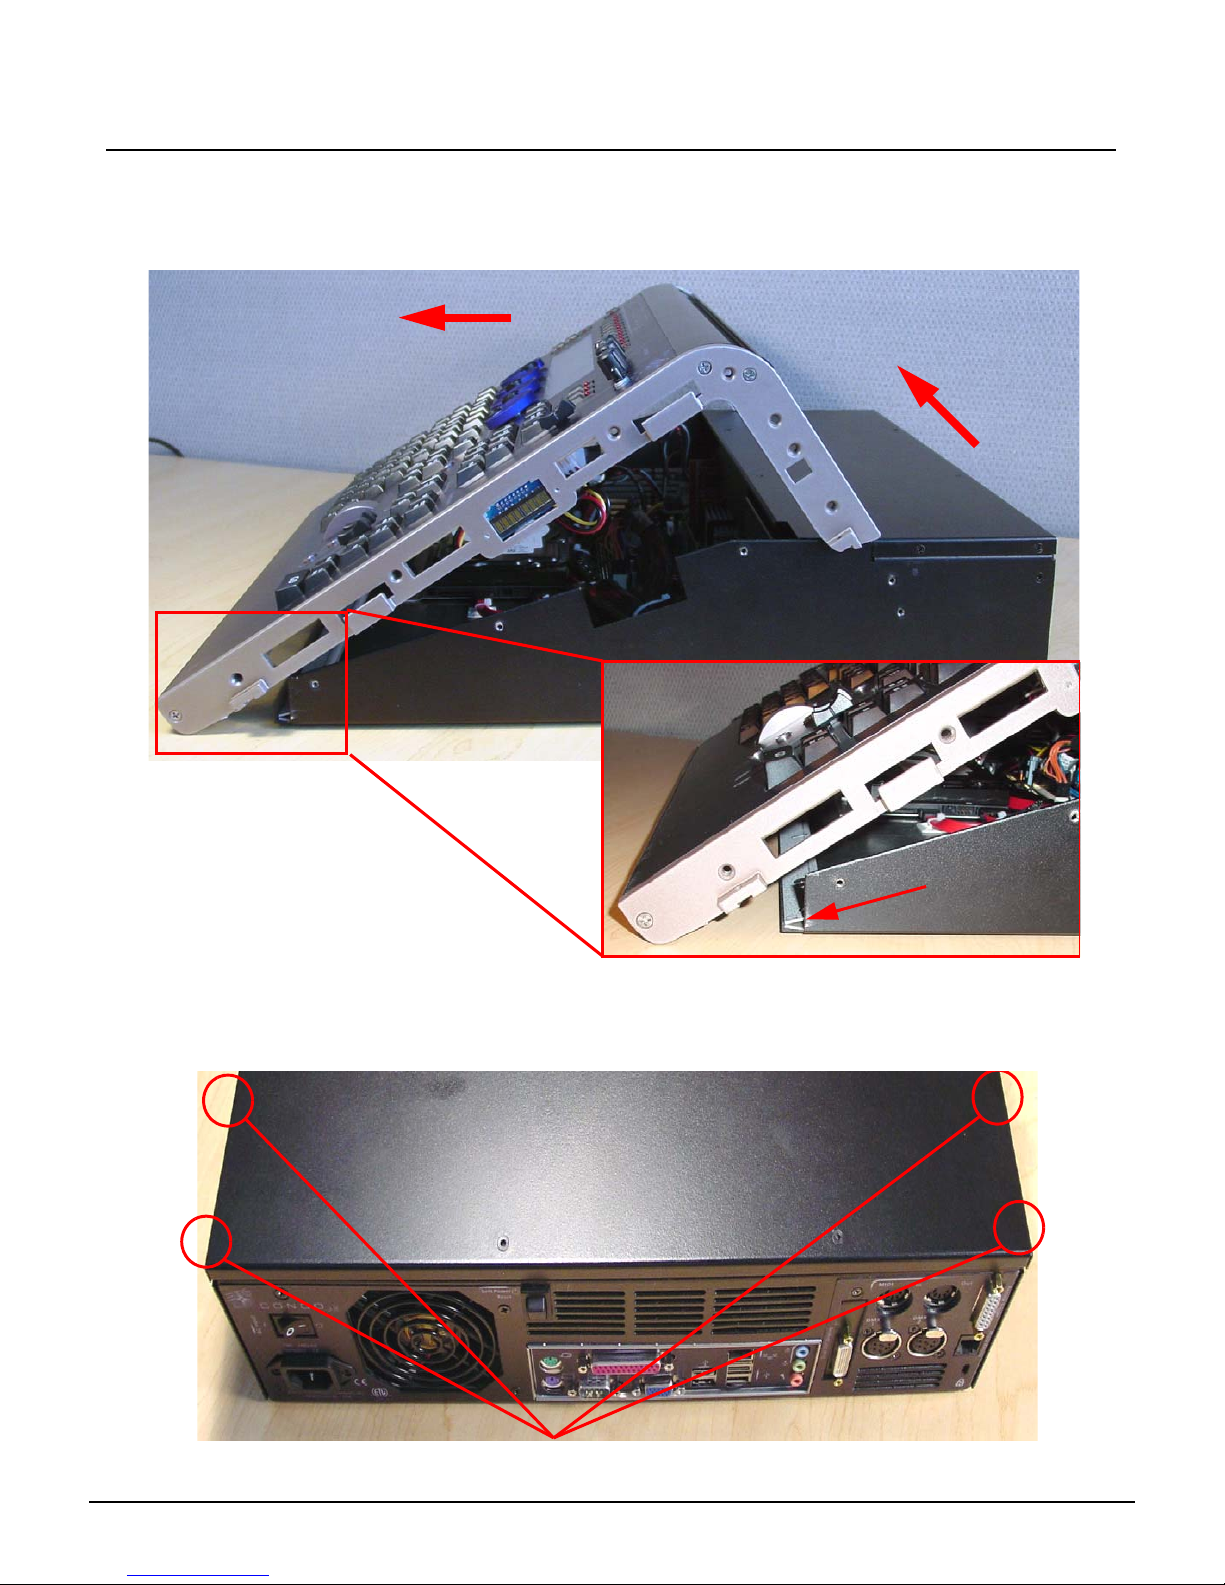
Step 5: Flip the console back onto the base.
Step 6: Lift the back side of the face panel upwards away from the base.
Step 7: Slide the face panel towards the front of the console. The face panel will slip under
the base pressure plate.
2. Slide face panel forwards
1. Tilt face panel upwards
Base Pressure Plate
Step 8: Rest the face panel off to the left side of the base unit. (The side with the DMX
connectors) There is no need to remove the face panel cables when replacing the
DMX connectors.
Step 9: Remove all 4 screws from both sides of the base.
Congo™ jr DMX Driver Chip Replacemen t Page 30 Electronic Theatre Controls, Inc.
Remove these screws
(located on side of chassis)
Page 35
ETC Service Note
Congo™ jr DMX Driver Chip Replacement
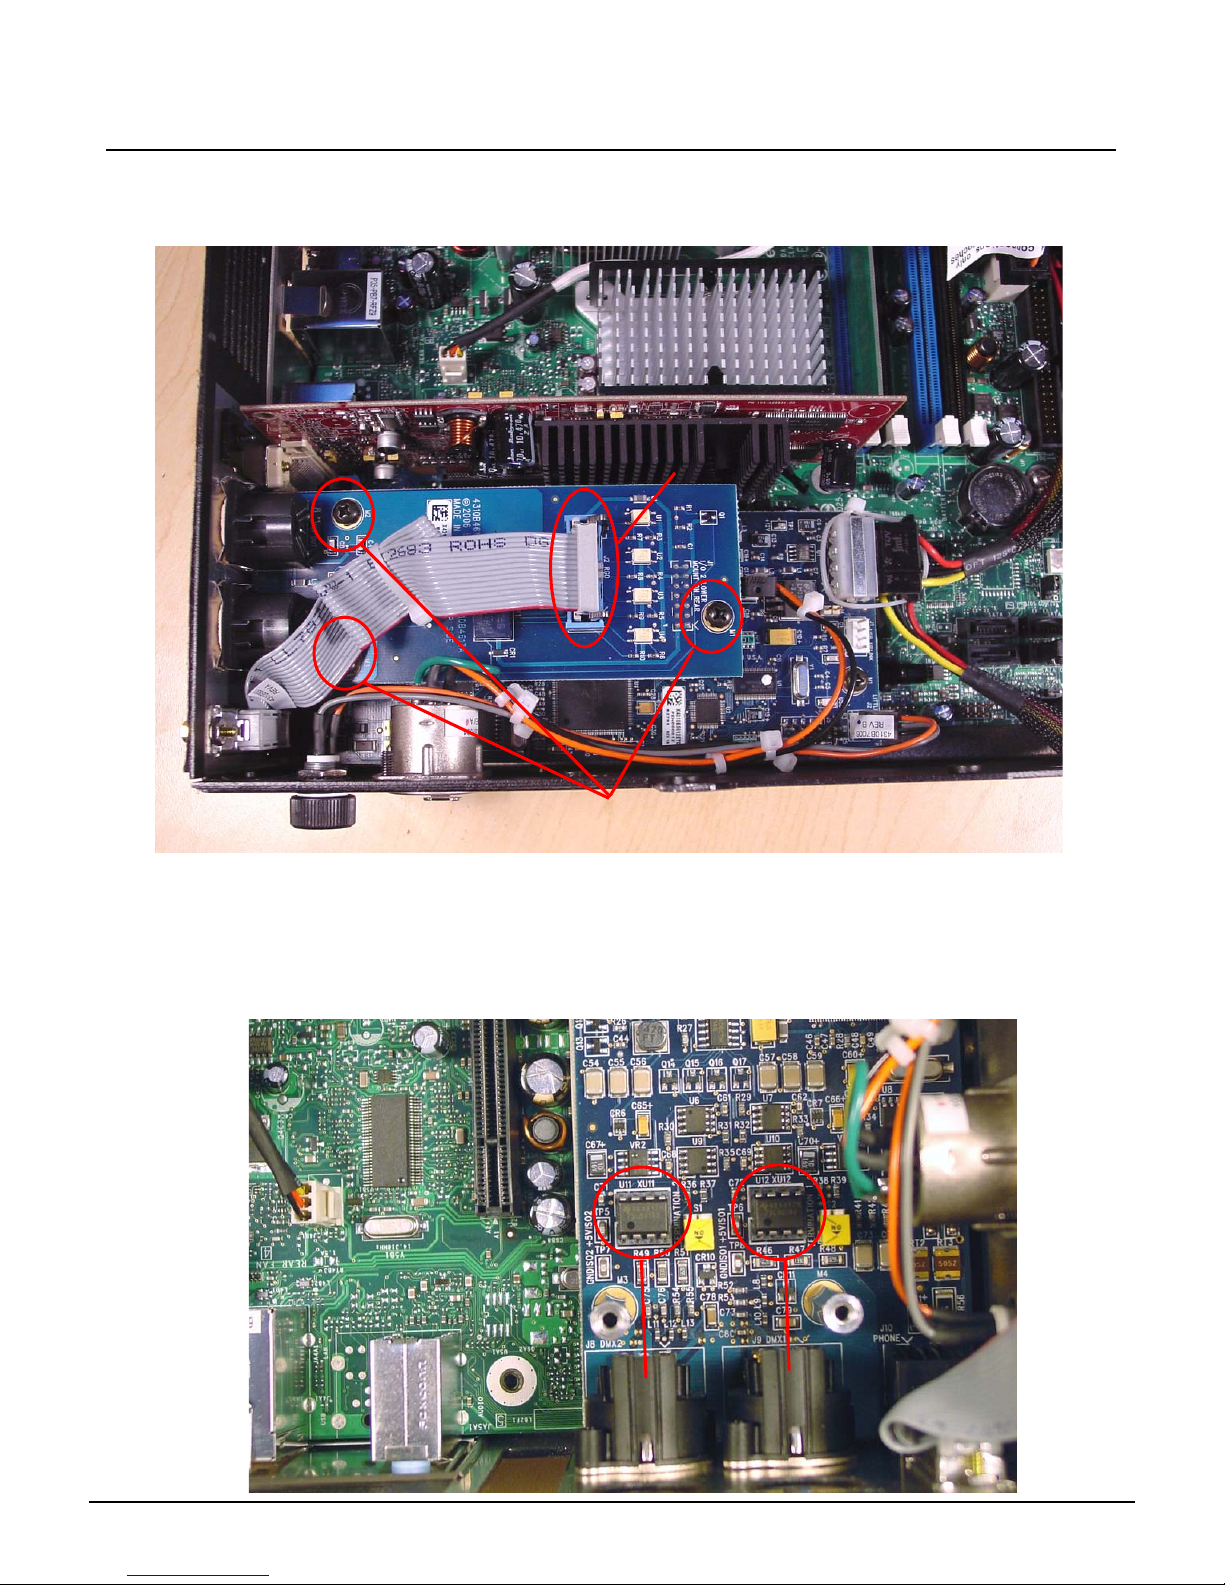
Step 10: Remove the base cover, and set aside.
Step 11: Locate the MIDI riser card near the Video Card, and above the DMX I/O Card.
Step 12: Remove the ribbon cable from the MIDI riser card, and remove the 3 screws.
Disconnect this
ribbon cable
Remove these
3 Screws
Step 13: Lift up on 2 sides of the MIDI card being careful not to bend any of the pins below the
card.
Step 14: Set the MIDI card aside.
Step 15: Locate either DMX Driver Chip:
U11 - DMX Port 1
U12 - DMX Port 2
DMX
P1
DMX
P2
Congo™ jr DMX Driver Chip Replacemen t Page 31 Electronic Theatre Controls, Inc.
Page 36
ETC Service Note
Congo™ jr DMX Driver Chip Replacement
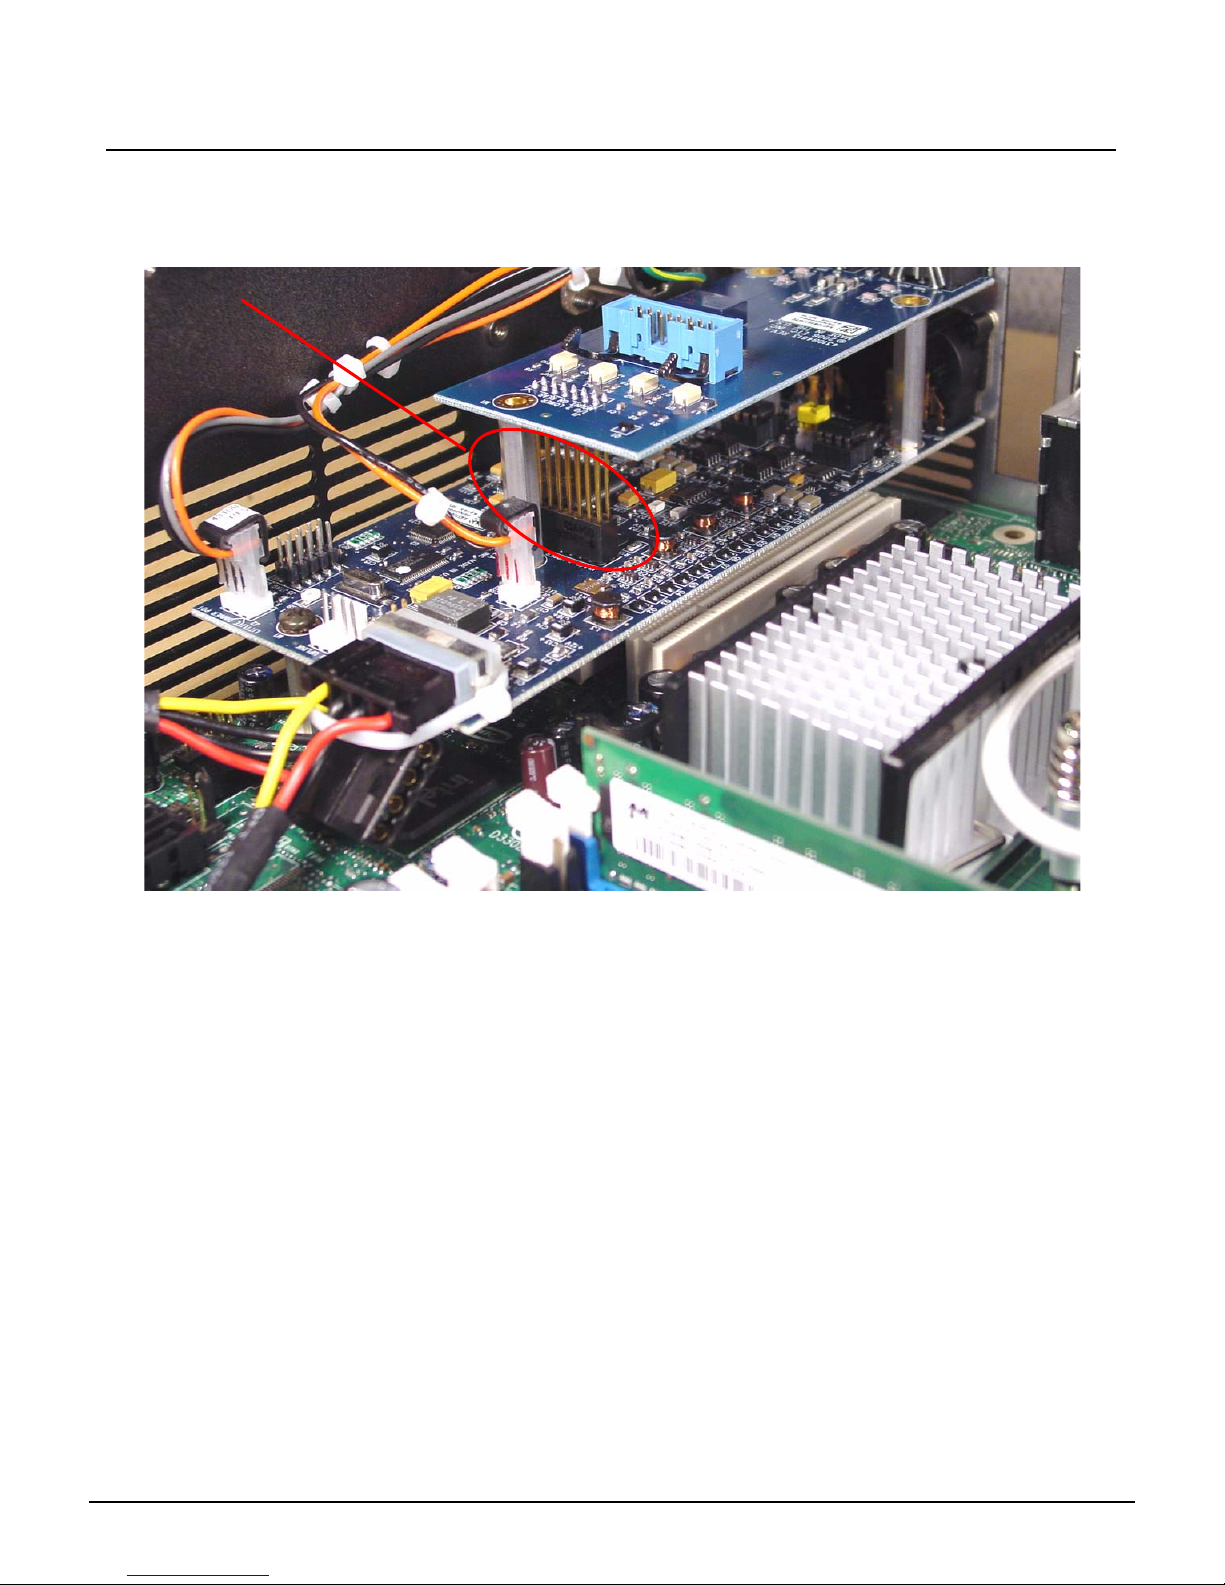
Step 16: Replace the desired DMX driver chip. (75L BC182) ETC Part Number Z1458-F.
Step 17: Re-connect the MIDI riser card to the DMX I/O card. Line up all 14 pins with the I/O
socket. Once the pins are aligned, gently push down on the MIDI riser card to seat
it into the socket.
MIDI Riser Socket
Step 18: Place the base cover back onto the base of the console and re-attach all 4 screws.
Congo™ jr DMX Driver Chip Replacemen t Page 32 Electronic Theatre Controls, Inc.
Page 37
ETC Service Note
Congo™ jr DMX Driver Chip Replacement
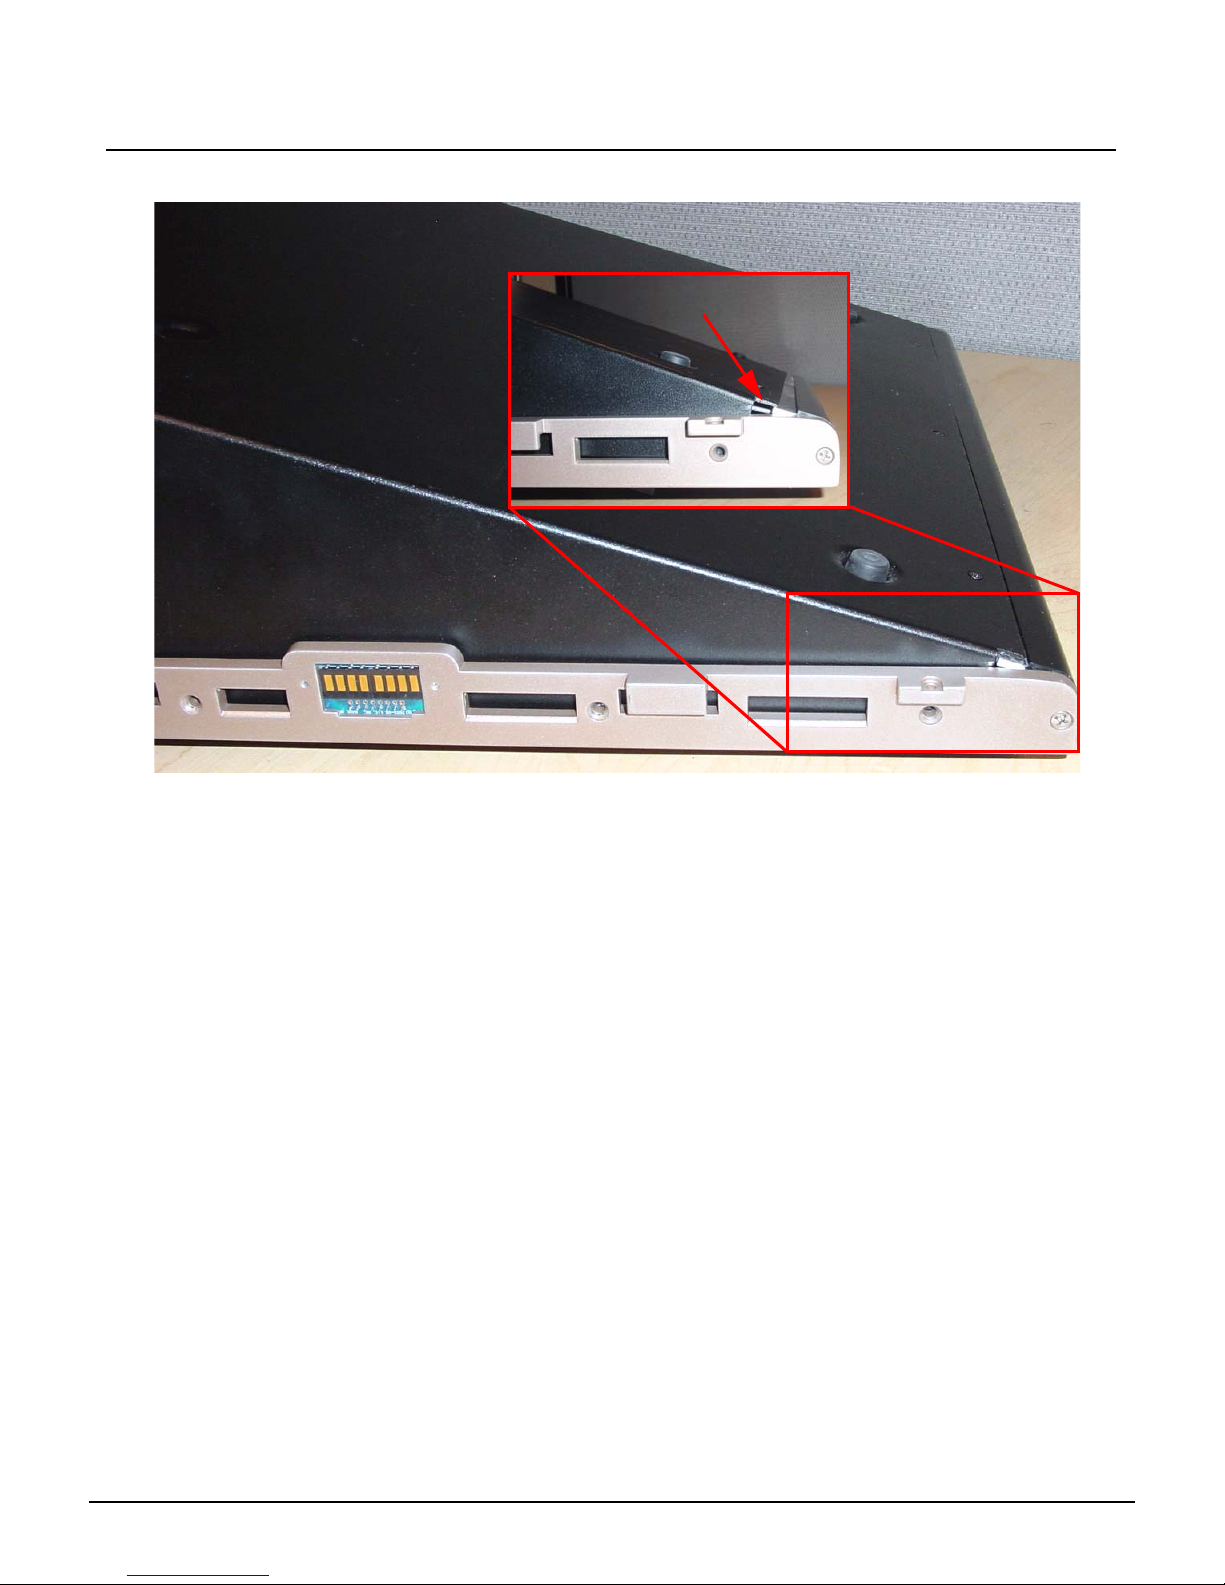
Step 19: Slide the face panel back under the base pressure plate.
Base Pressure Plate
Step 20: Re-attach all 7 screws from each side of the console face panel.
Step 21: Flip the face panel over and tighten the 3 screws on the base of the console.
Step 22: Power the console up and verify correct console operation and verify DMX outputs on
both ports.
Congo™ jr DMX Driver Chip Replacemen t Page 33 Electronic Theatre Controls, Inc.
Page 38

ETC Service Note
Congo™ jr DMX Driver Chip Replacement
Congo™ jr DMX Driver Chip Replacemen t Page 34 Electronic Theatre Controls, Inc.
Page 39
ETC® Service Note
Congo™ jr Power Supply Replacement
Tools Required:
#2 Phillips Screwdriver
#1 Phillips Screwdriver
Side Cutter
4 Replacement zip ties
Procedure:
Step 1: Remove the protective side panels from the Congo jr Console.
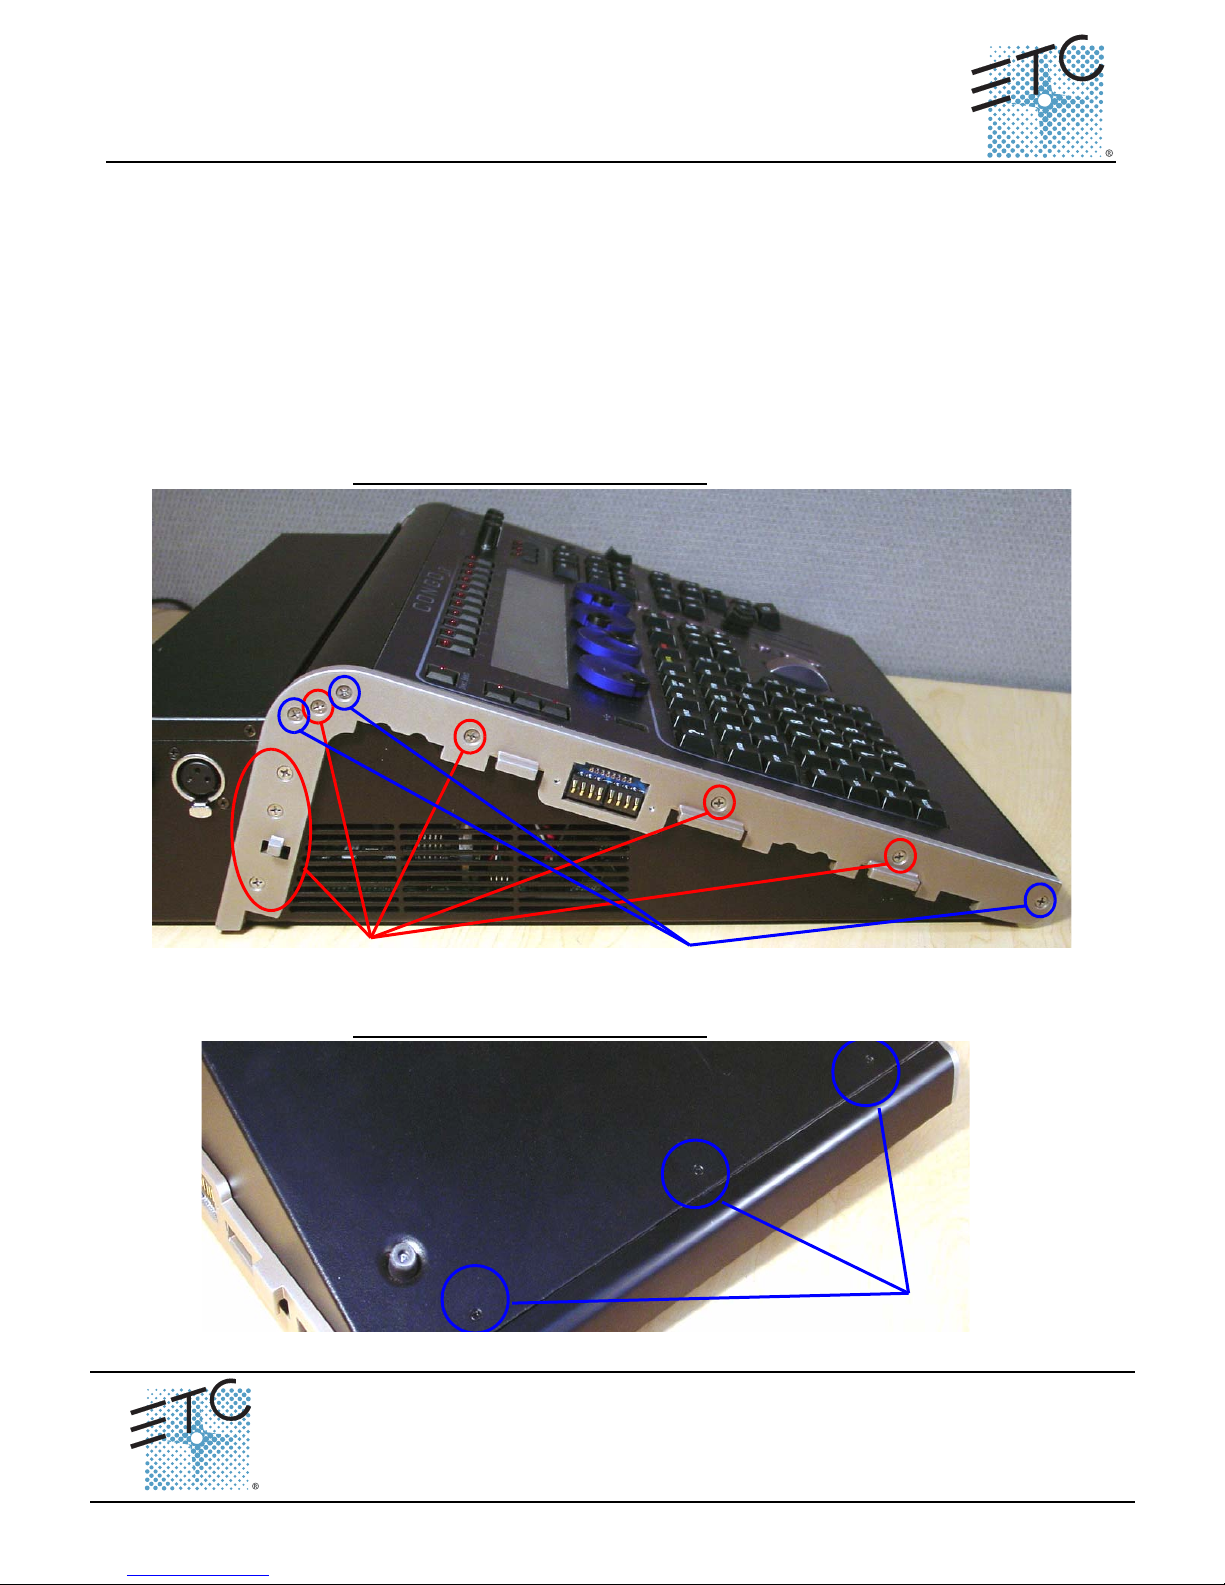
Step 2: Remove the 7 screws indicated in Red below.
Step 3: Loosen the 3 screws indicated in Blue below.
NOTE: DO NOT remove the 3 screws.
Remove these screws
Loosen these screws
2 full turns
Step 4: Carefully flip over the console and loosen the 3 screws in blue below:
NOTE: DO NOT remove the 3 screws.
Loosen these screws
P
ower Supply Replacement
Corporate Headquarters
London, UK
Rome, IT
Holzkirchen, DE
Hong Kong Room 1801, 18/F, Tower 1 Phase 1, Enterprise Square, 9 Sheung Yuet Road, Kowloon Bay, Kowloon, Hong Kong
Service:
Web:
Pending
Unit 26-28, Victoria Industrial Estate, Victoria Road, London W3 6UU, UK Tel +44 (0)20 8896 1000 Fax +44 (0)20 8896 2000
Via Ennio Quirino Visconti, 11, 00193 Rome, Italy Tel +39 (06) 32 111 683 Fax +39 (06) 32 656 990
(Americas) [email protected]
www.etcconnect.com
Rev A Released 02/2007
Congo™ jr Power Supply Replacement Page 35 Electronic Theatre Controls, Inc.
3031 Pleasant View Road, P.O. Box 620979, Middleton, Wisconsin 53562-0979 USA Tel +608 831 4116 Fax +608 836 1736
Ohmstrasse 3, 83607 Holzkirchen, Germany Tel +49 (80 24) 47 00-0 Fax +49 (80 24) 47 00-3 00
Copyright © 2006 ETC. All Rights Reserved. Product information and specifications subject to change.
(UK) [email protected] (DE) [email protected]
Tel +852 2799 1220 Fax +852 2799 9325
(Asia) [email protected]
Page 40
ETC Service Note
Congo™ jr Power Supply Replacement
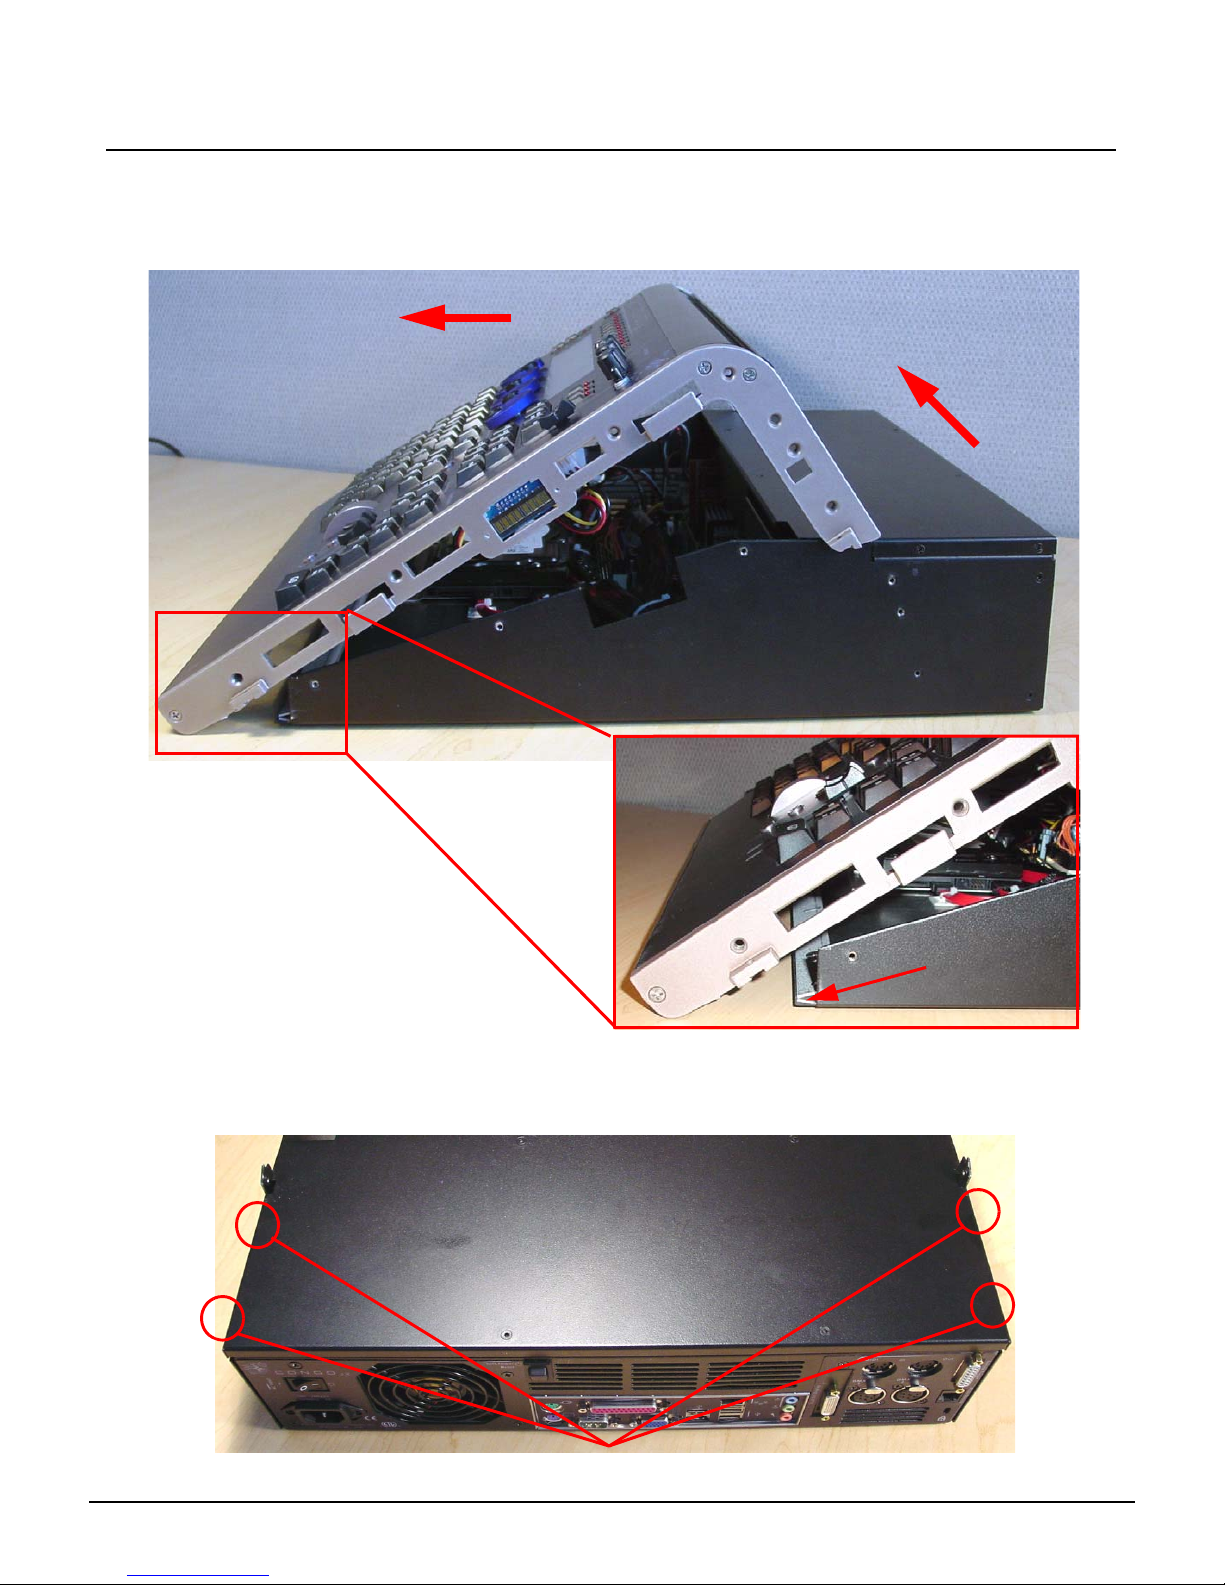
Step 5: Flip the console back onto the base.
Step 6: Lift the back side of the face panel upwards away from the base.
Step 7: Slide the face panel towards the front of the console. The face panel will slip under
the base pressure plate.
2. Slide face panel forwards
1. Tilt face panel upwards
Base Pressure Plate
Step 8: Rest the face panel off to the left side of the base unit. (the side with the DMX
connectors) There is no need to remove the face panel cables when replacing the
power supply.
Step 9: Remove all 4 screws from both sides of the base.
Remove these screws (located on the side of chassis)
Congo™ jr Power Supply Replacement Page 36 Electronic Theatre Controls, Inc.
Page 41
ETC Service Note
Congo™ jr Power Supply Replacement
Step 10: Remove the base cover and set aside.
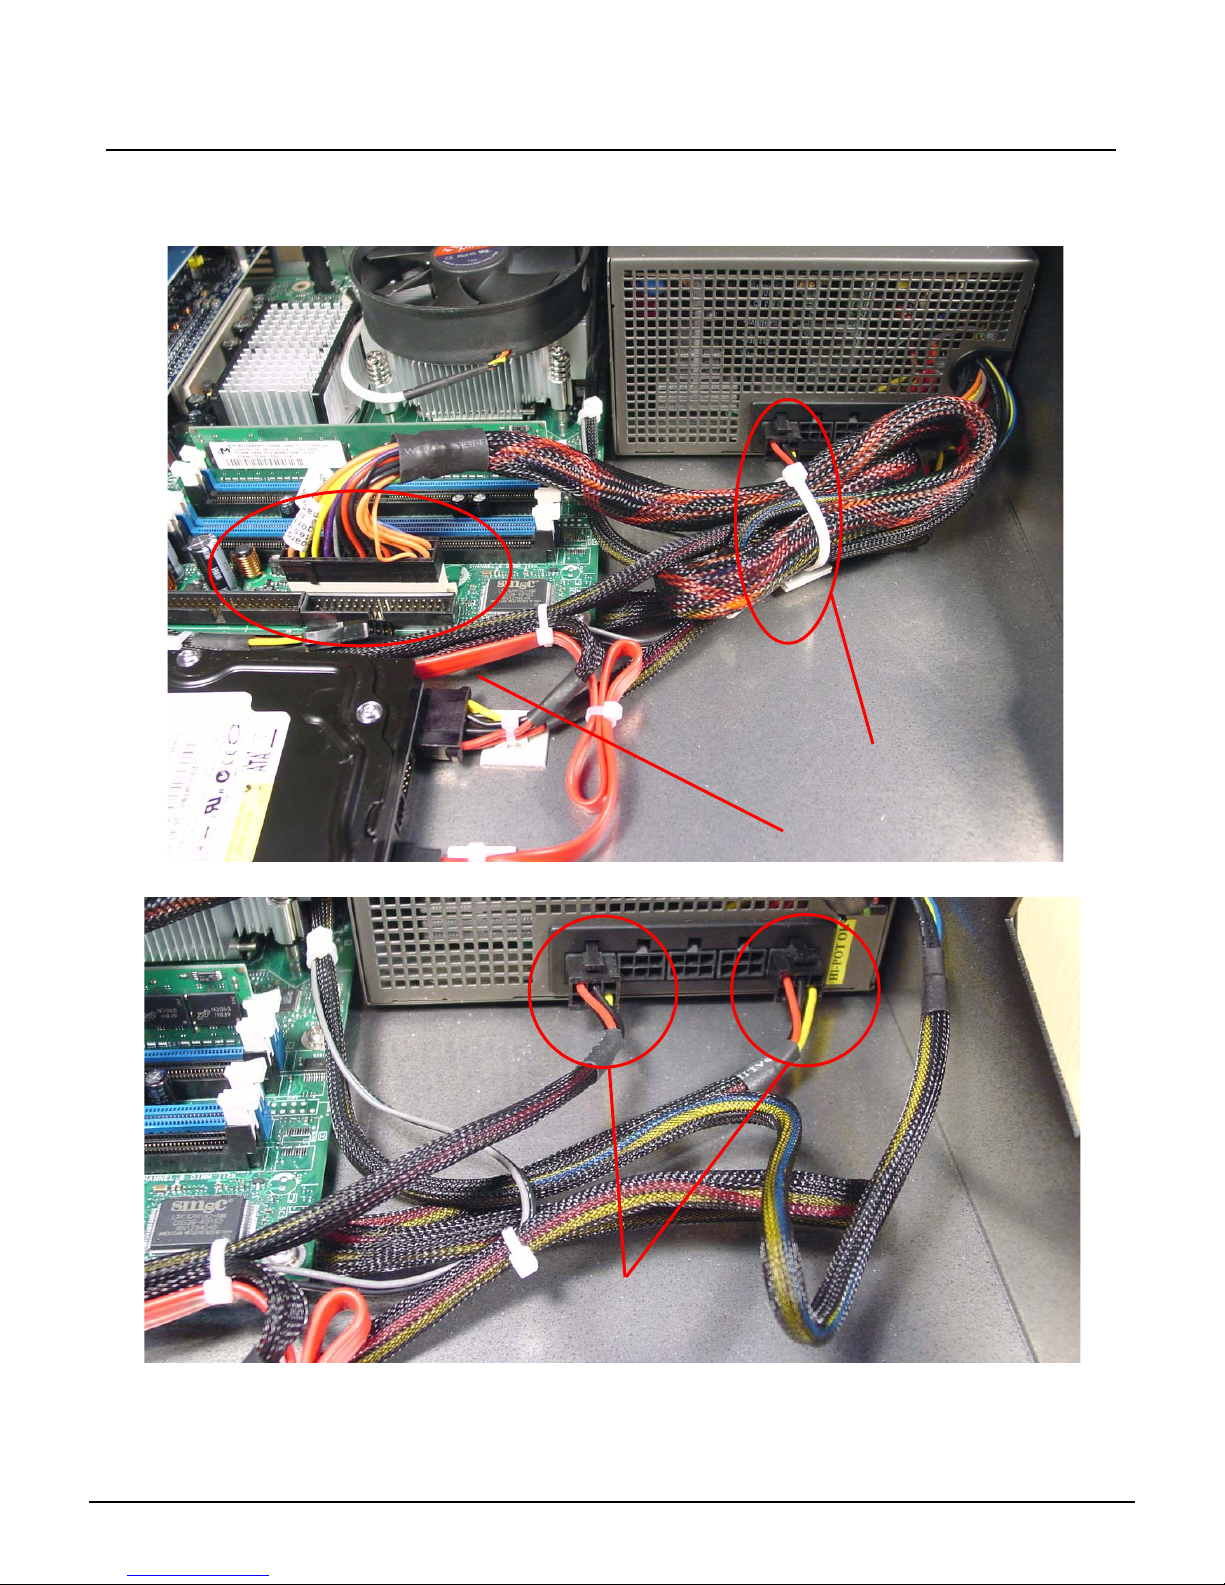
Step 11: Locate the Power Supply and cut the zip tie around the large bundle of cable.
Step 12: Disconnect the motherboard power connector.
Cut this zip tie
Motherboard Power Connector
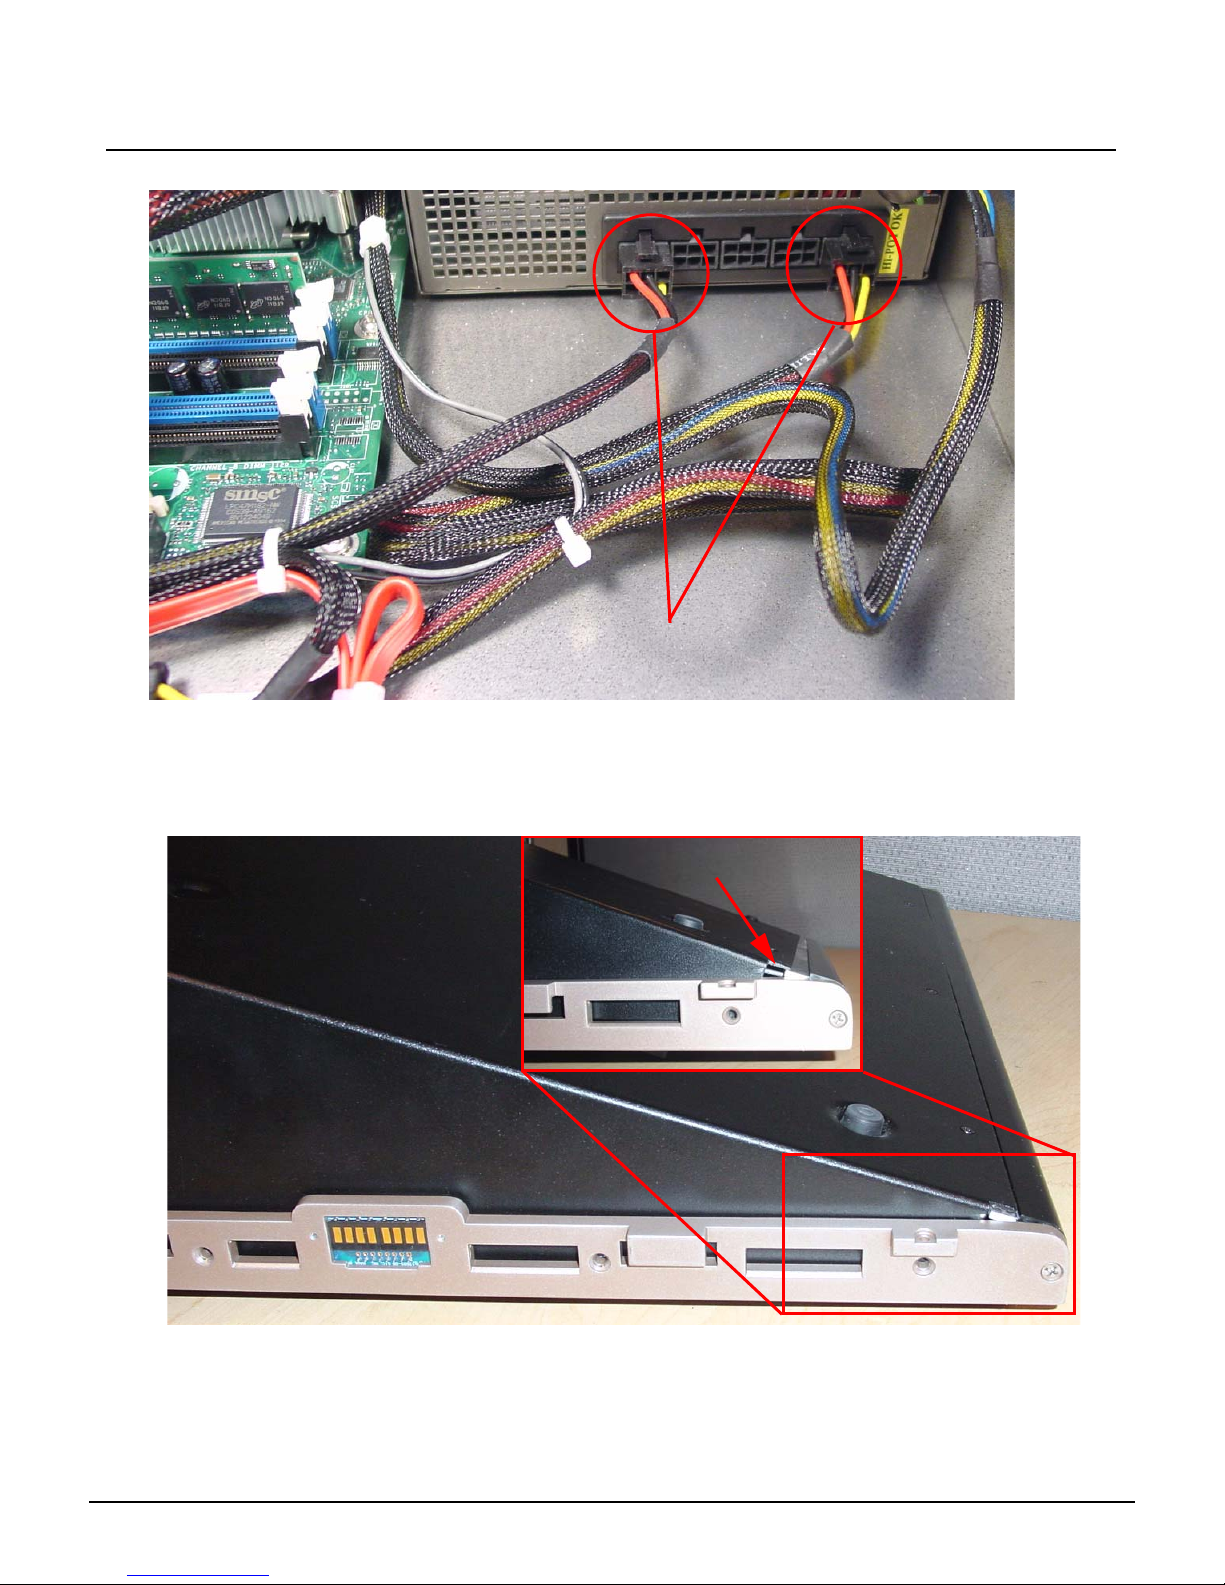
Step 13: Remove the 2 power connectors attached to the Power Supply.
Remove these 2
power connectors
Congo™ jr Power Supply Replacement Page 37 Electronic Theatre Controls, Inc.
Page 42
ETC Service Note
Congo™ jr Power Supply Replacement
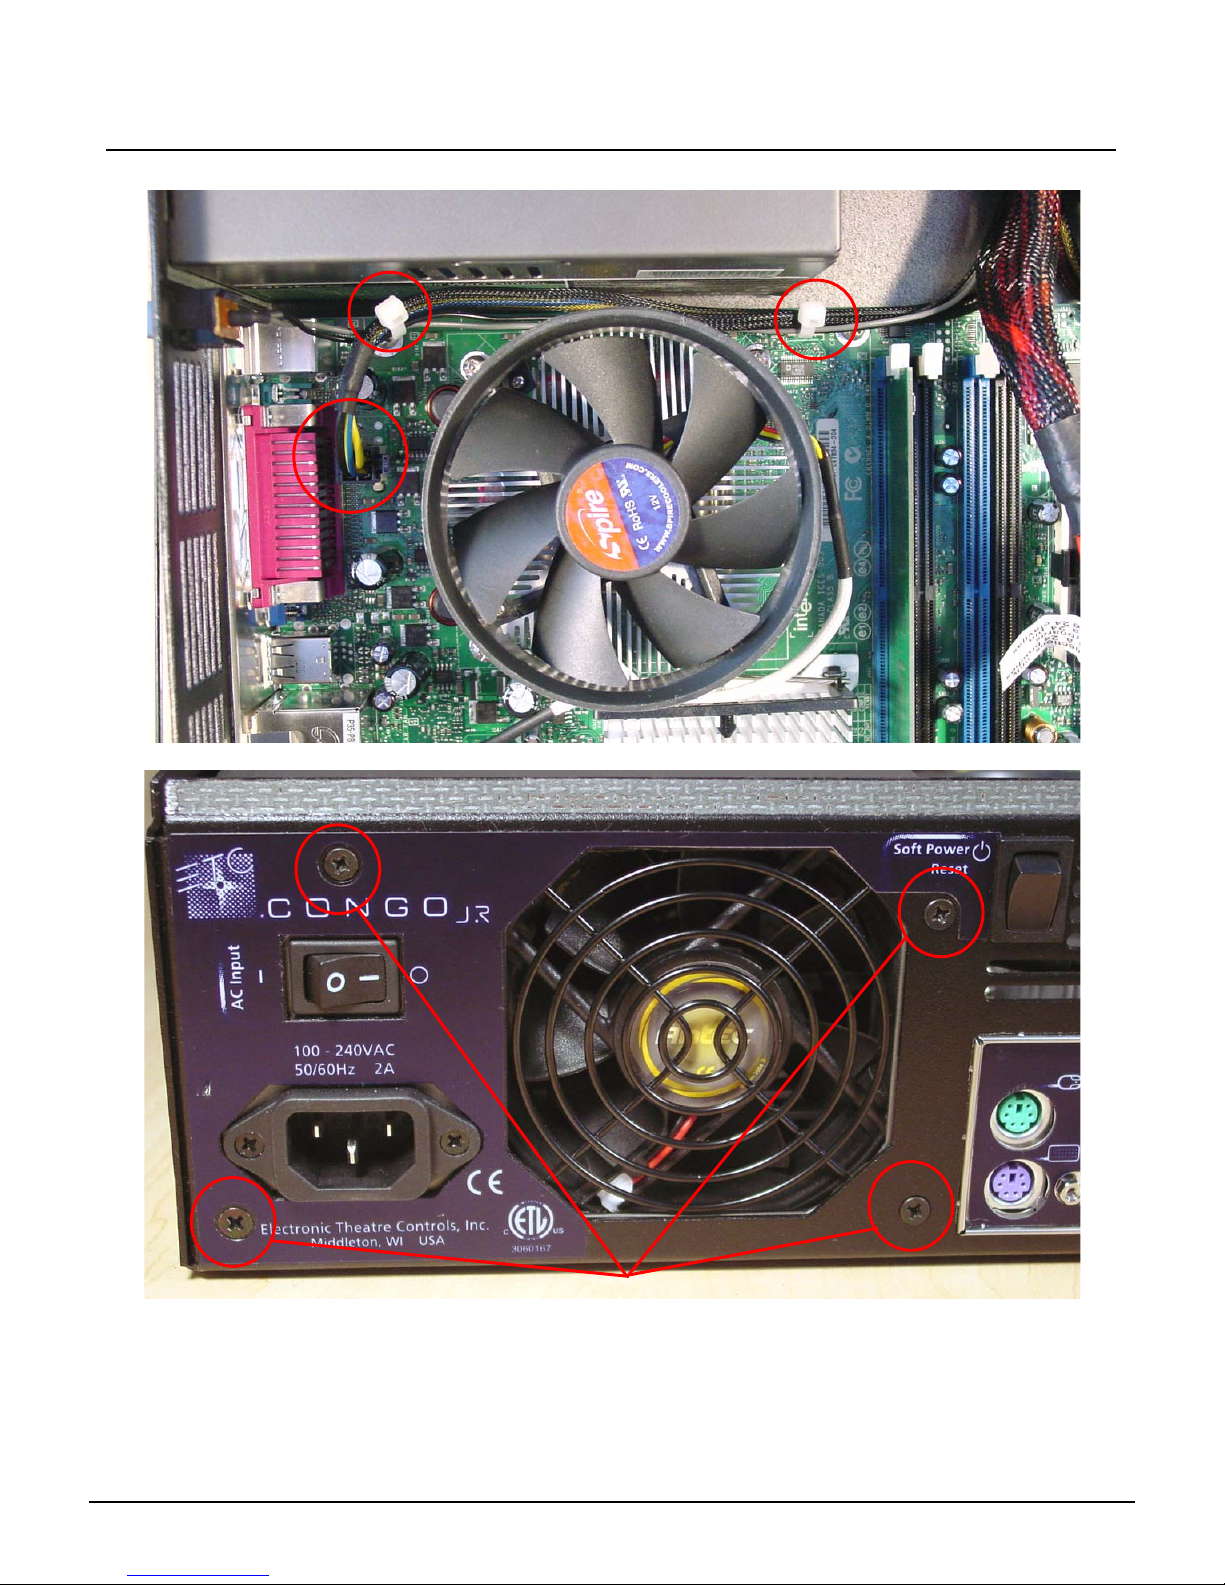
Step 14: Cut both zip-ties and disconnect the Motherboard Aux Power.
Step 15: Remove the 4 Screws holding the Power Supply in place.
Remove these 4 screws
Step 16: Swap out the power supply for a new power supply.
Step 17: Attach the power supply by screwing in the 4 screws from the ba ck of the console.
Step 18: Re-connect the 12v motherboard aux power.
Step 19: Place 2 zip-ties around the 12v motherboard aux power supply and the soft power
switch cables.
Congo™ jr Power Supply Replacement Page 38 Electronic Theatre Controls, Inc.
Page 43
ETC Service Note
Congo™ jr Power Supply Replacement
Step 20: Re-connect the 2 Power connectors back into the power supply.
Re-connect these 2
power connectors
Step 21: Re-connect the large Motherboard connector into the Motherboard.
Step 22: Place a 4" zip-tie around the large bundle of wire and thru the sticky back on the base
of the console.
Step 23: Place the base cover back onto the base of the console and re-attach all 4 screws.
Step 24: Slide the face panel back under the base pressure plate.
Base Pressure Plate
Step 25: Re-attach all 7 screws from each side of the console face panel.
Step 26: Flip the face panel over and tighten the 3 screws on the base of the console.
Step 27: Power the console up and verify correct face panel operation and LCD screen
operation.
Congo™ jr Power Supply Replacement Page 39 Electronic Theatre Controls, Inc.
Page 44

ETC Service Note
Congo™ jr Power Supply Replacement
Congo™ jr Power Supply Replacement Page 40 Electronic Theatre Controls, Inc.
Page 45
ETC® Service Note
Congo™ jr Main Board Replacement
Tools Required:
#2 Phillips Screwdriver
#1 Phillips Screwdriver
Side Cutter
Needle Nose Pliers
5/16" nut driver
Right angle hex key (0.050)
4" Replacement zip ties
Procedure:
Step 1: Remove the protective side panels from the Congo JR Console.
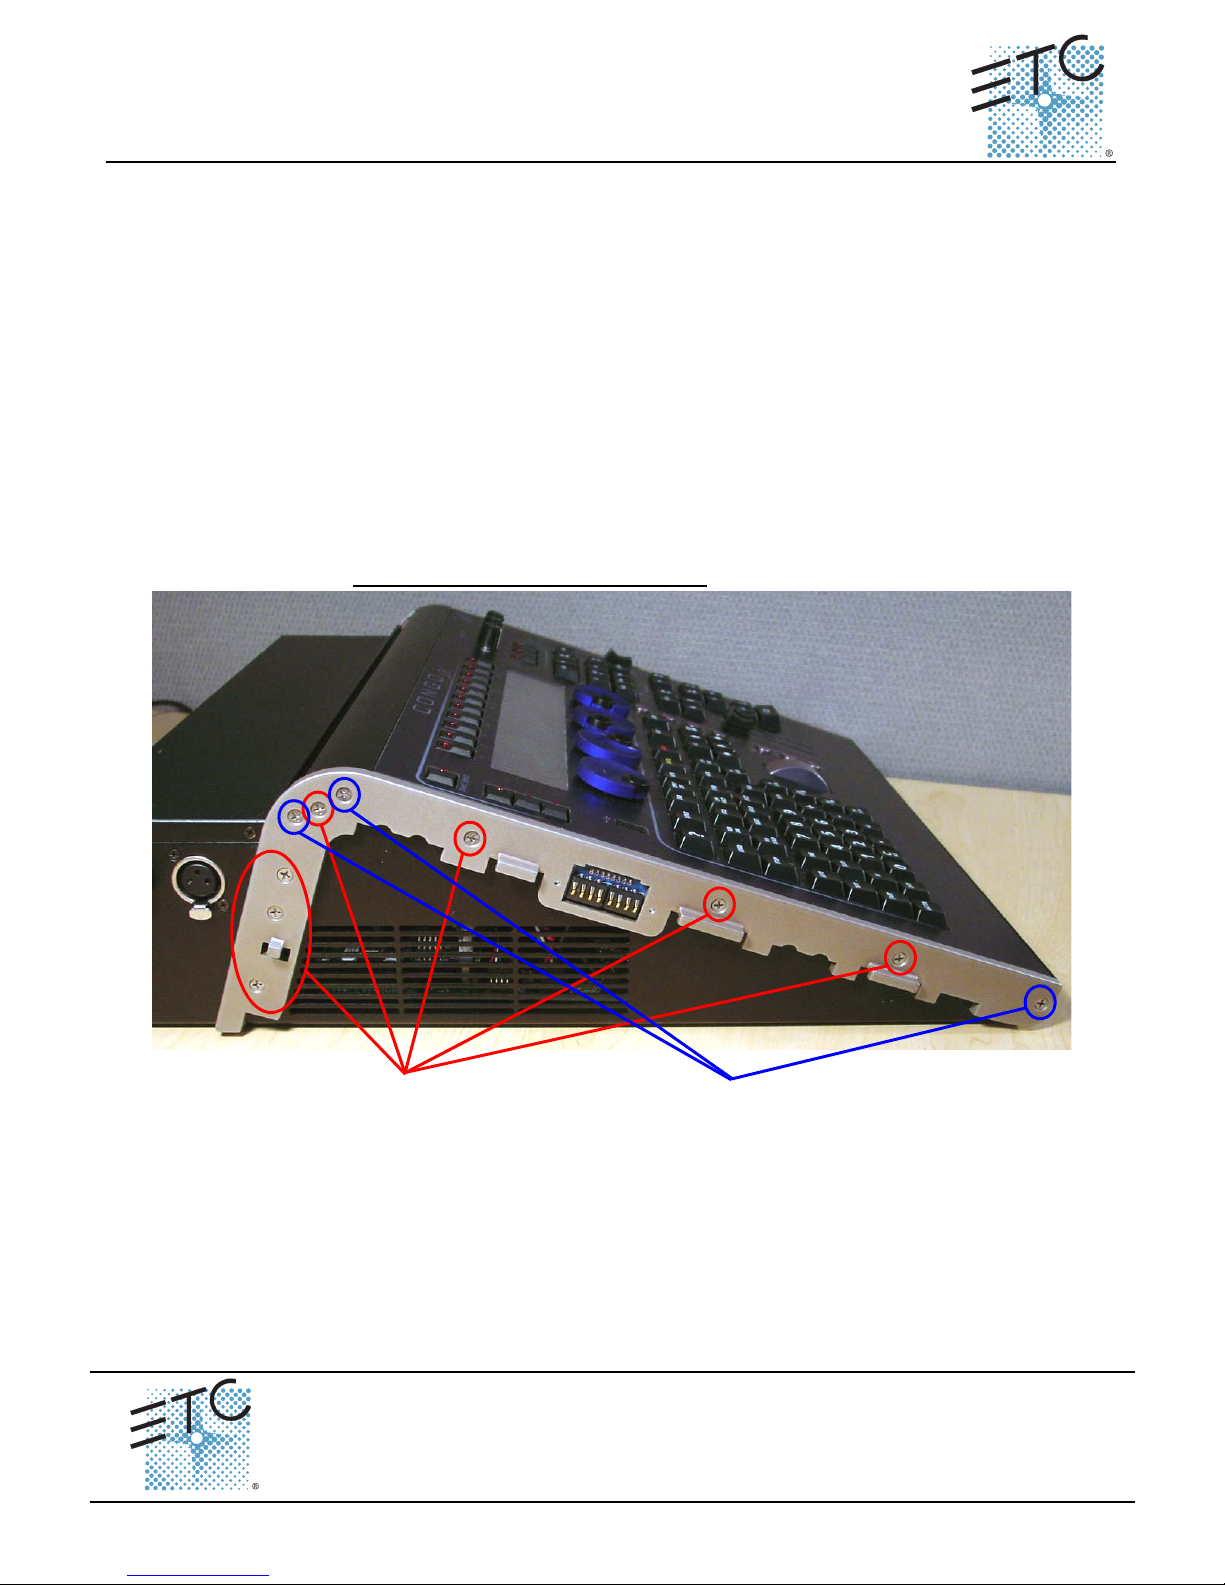
Step 2: Remove the 7 screws indicated in Red below.
Step 3: Loosen the 3 screws indicated in Blue below.
NOTE: DO NOT remove the 3 screws.
Remove these screws
Main Board Replacement
Corporate Headquarters
London, UK
Rome, IT
Holzkirchen, DE
Hong Kong Room 1801, 18/F, Tower 1 Phase 1, Enterprise Square, 9 Sheung Yuet Road, Kowloon Bay, Kowloon, Hong Kong
Service:
Web:
Pending
Unit 26-28, Victoria Industrial Estate, Victoria Road, London W3 6UU, UK Tel +44 (0)20 8896 1000 Fax +44 (0)20 8896 2000
Via Ennio Quirino Visconti, 11, 00193 Rome, Italy Tel +39 (06) 32 111 683 Fax +39 (06) 32 656 990
(Americas) [email protected]
www.etcconnect.com
Rev A Released 02/2007
Congo™ jr Main Board Replacement Page 41 Electronic Theatre Controls, Inc.
3031 Pleasant View Road, P.O. Box 620979, Middleton, Wisconsin 53562-0979 USA Tel +608 831 4116 Fax +608 836 1736
Ohmstrasse 3, 83607 Holzkirchen, Germany Tel +49 (80 24) 47 00-0 Fax +49 (80 24) 47 00-3 00
Loosen these screws
2 full turns
Copyright © 2006 ETC. All Rights Reserved. Product information and specifications subject to change.
(UK) [email protected] (DE) [email protected]
Tel +852 2799 1220 Fax +852 2799 9325
(Asia) [email protected]
Page 46
ETC Service Note
Congo™ jr Main Board Replacement
Step 4: Carefully flip over the console and loosen the 3 screws in blue below:
NOTE: DO NOT remove the 3 screws.
Loosen these screws
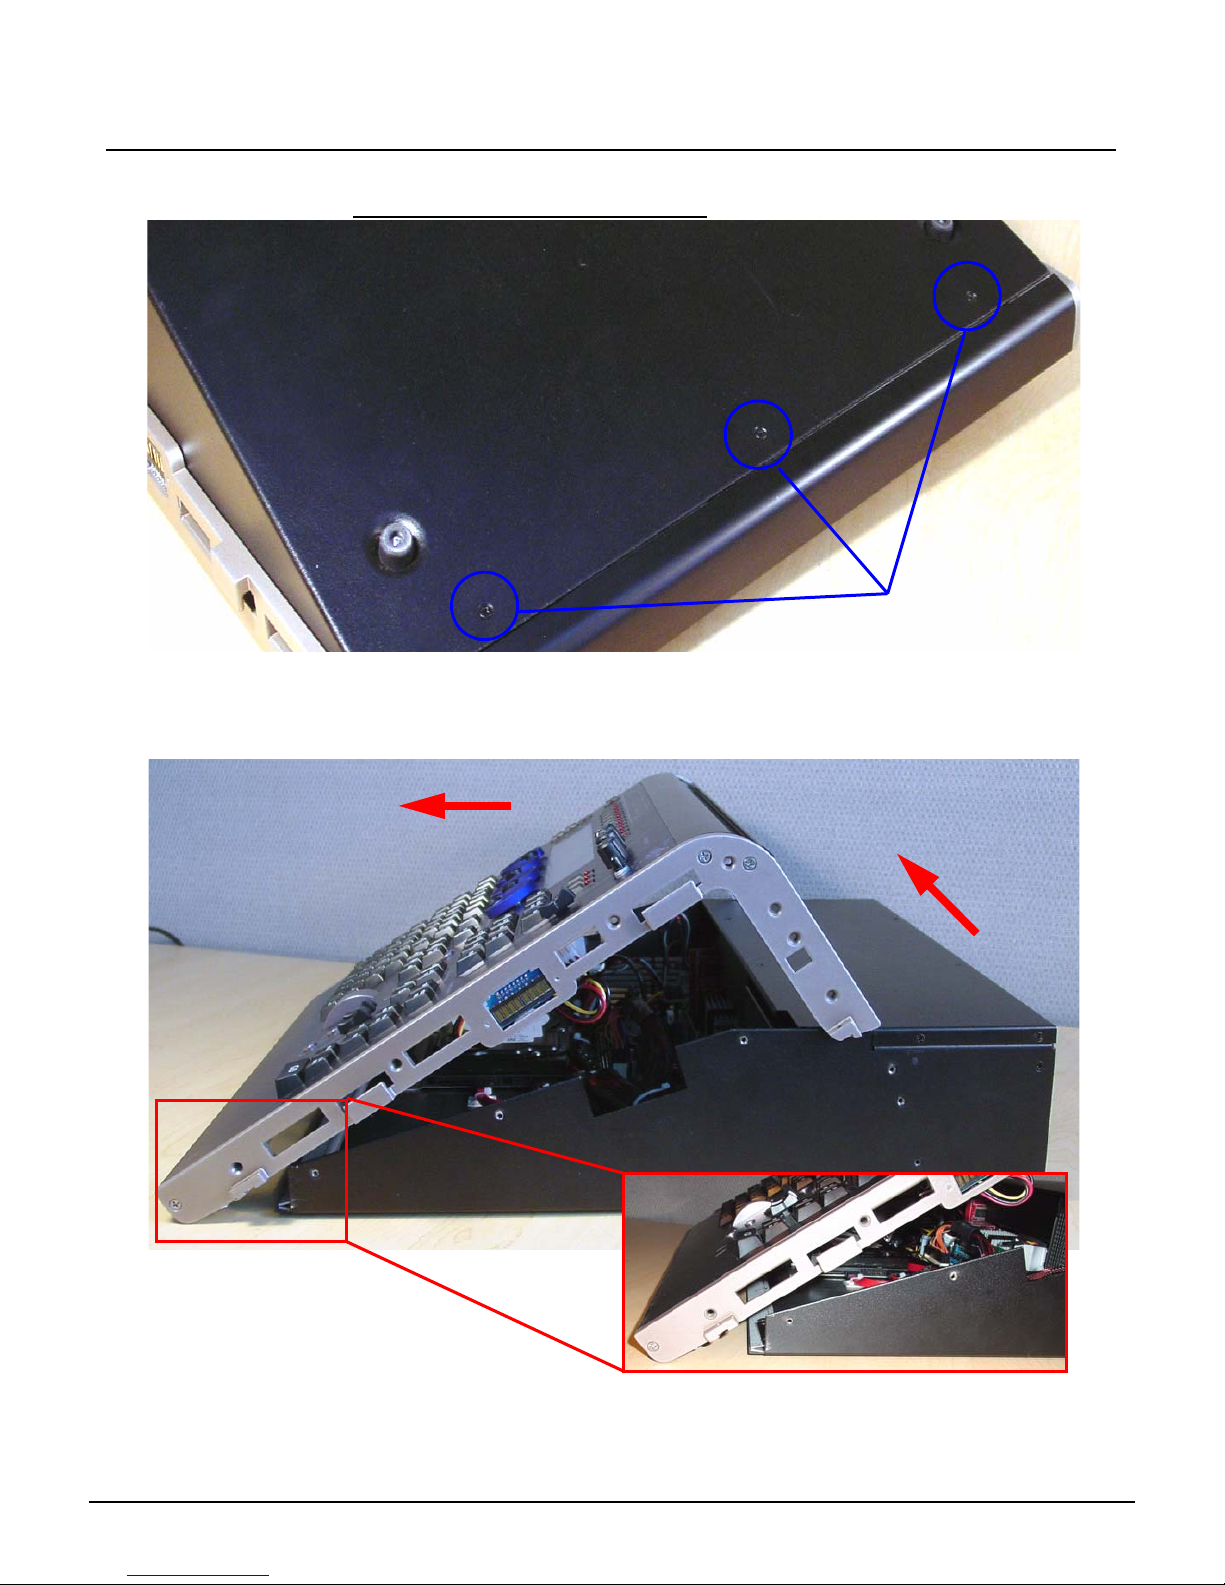
Step 5: Flip the console back onto the base.
Step 6: Lift the back side of the face panel upwards away from the base.
Step 7: Slide the face panel towards the front of the console. The face panel will slip under
the base pressure plate.
2. Slide face panel forwards
1. Tilt face panel upwards
Congo™ jr Main Board Replacement Page 42 Electronic Theatre Controls, Inc.
Page 47
ETC Service Note
Congo™ jr Main Board Replacement
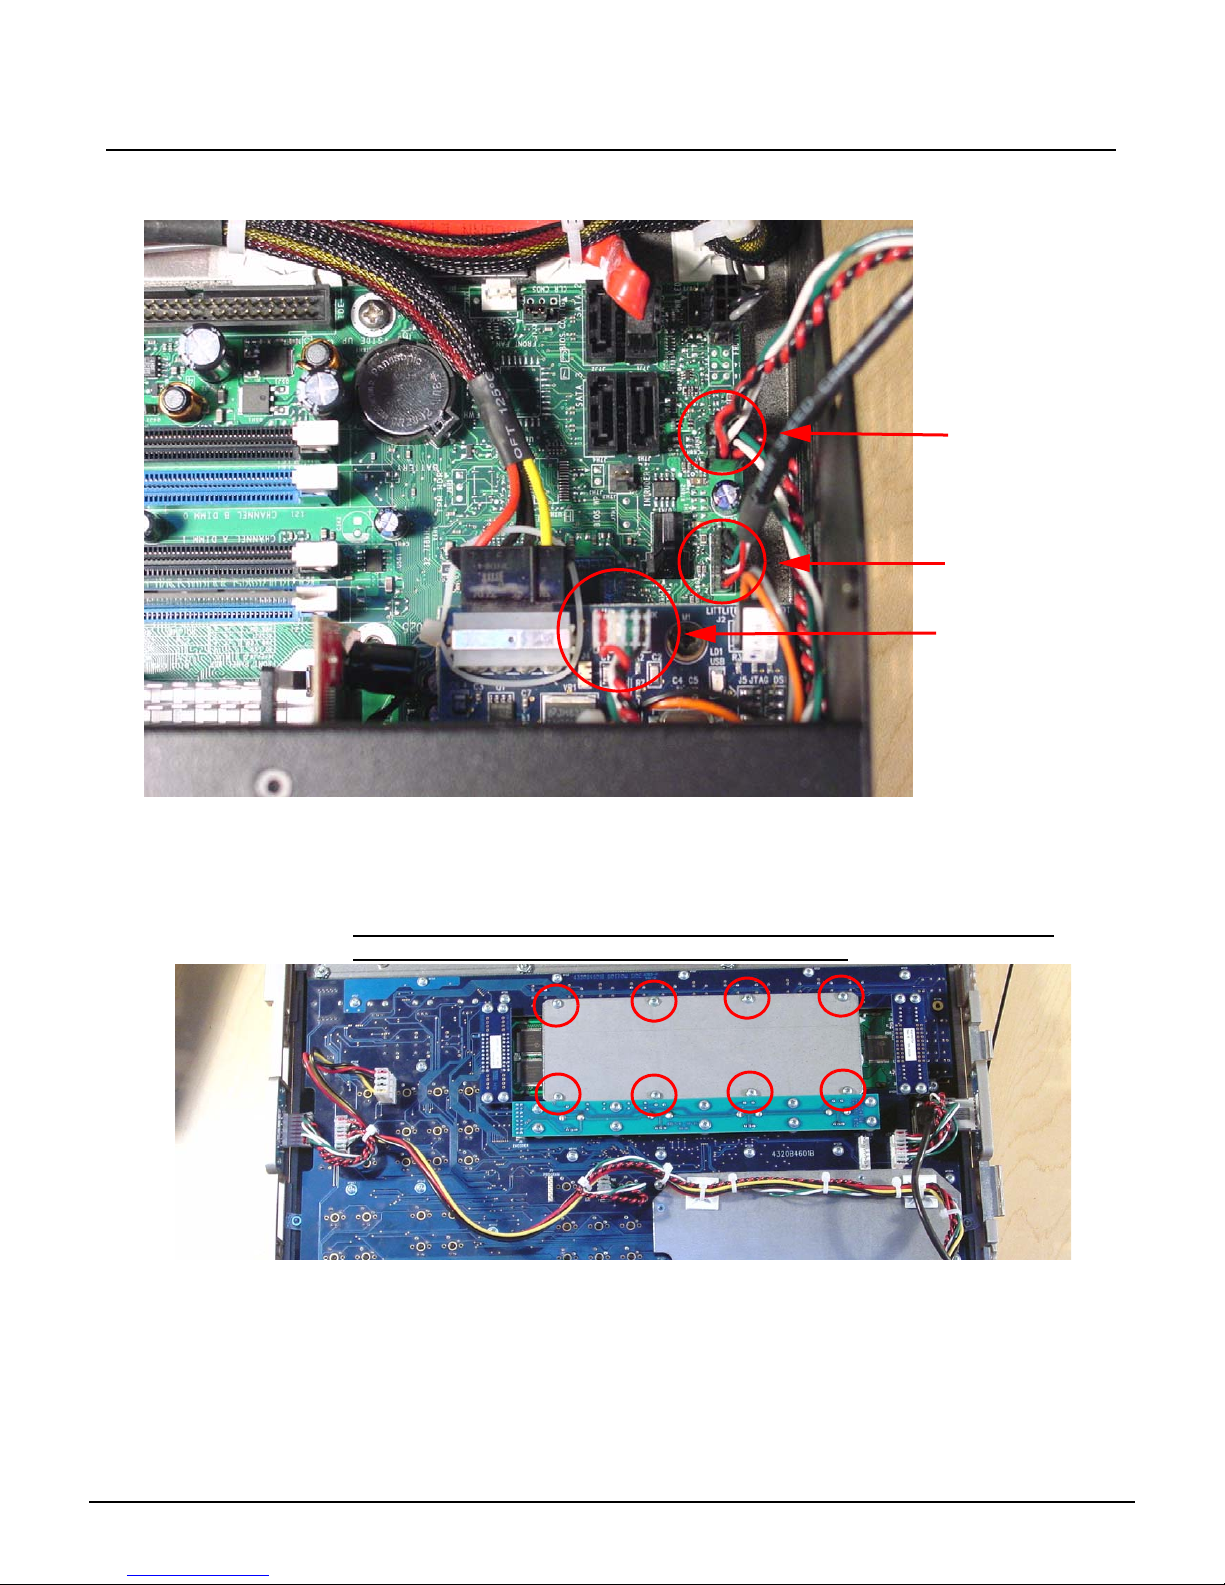
Step 8: Disconnect the J1 USB uplink from the I/O Card
Step 9: Disconnect the face panel USB 1&2 connectors from the Congo jr motherboard.
FP USB 1
FP USB 2
J1 USB Uplink
Step 10: Clip the zip ties holding the face panel cables to the base of the unit.
Step 11: Carefully set the Congo jr face panel face down exposing the back side of the face
panel PCB.
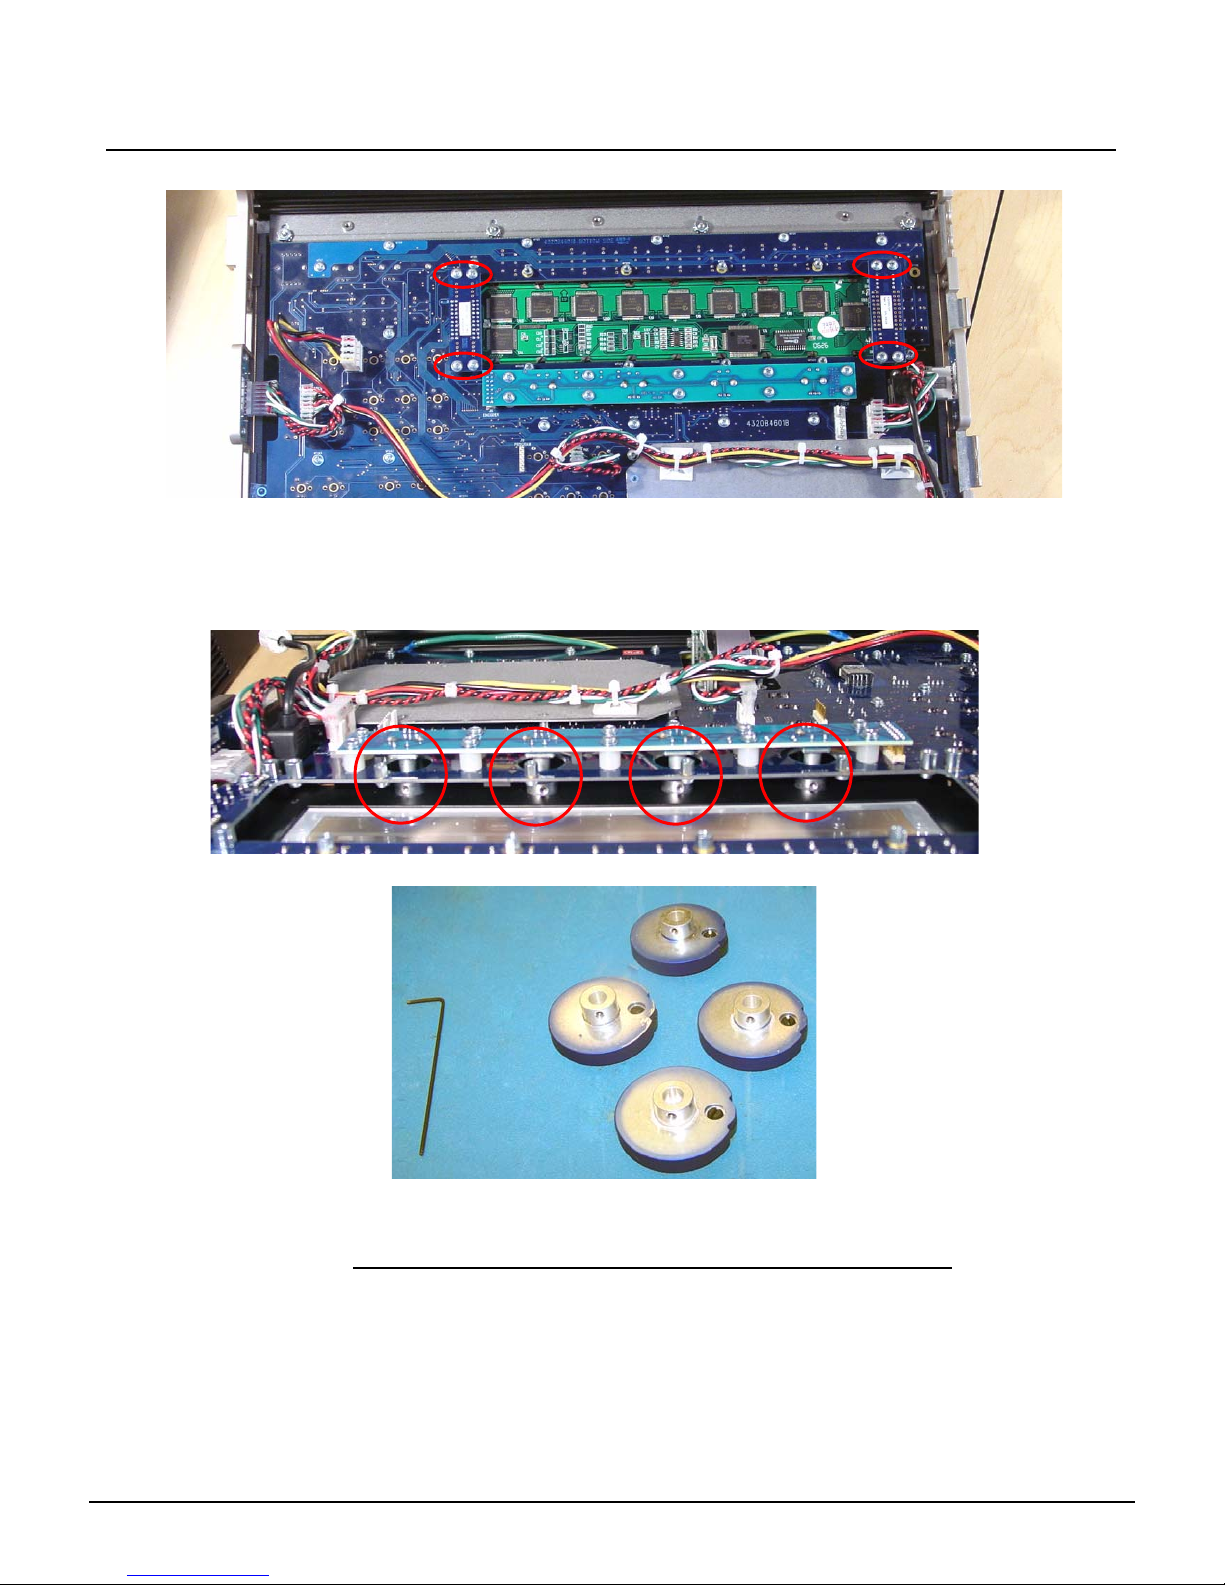
Step 12: Remove the 8 short screws from the LCD pressure plate.
NOTE: Be sure that you keep these 8 screws separated from the other FP
Screws as these are shorter screws than the others.
Congo™ jr Main Board Replacement Page 43 Electronic Theatre Controls, Inc.
Page 48
ETC Service Note
Congo™ jr Main Board Replacement
Step 13: Remove the 8 face panel LCD jumper screws
Step 14: Lightly lift each side of the LCD screen socket circuit board to remove the LCD screen
from the Congo jr face panel and set it aside.
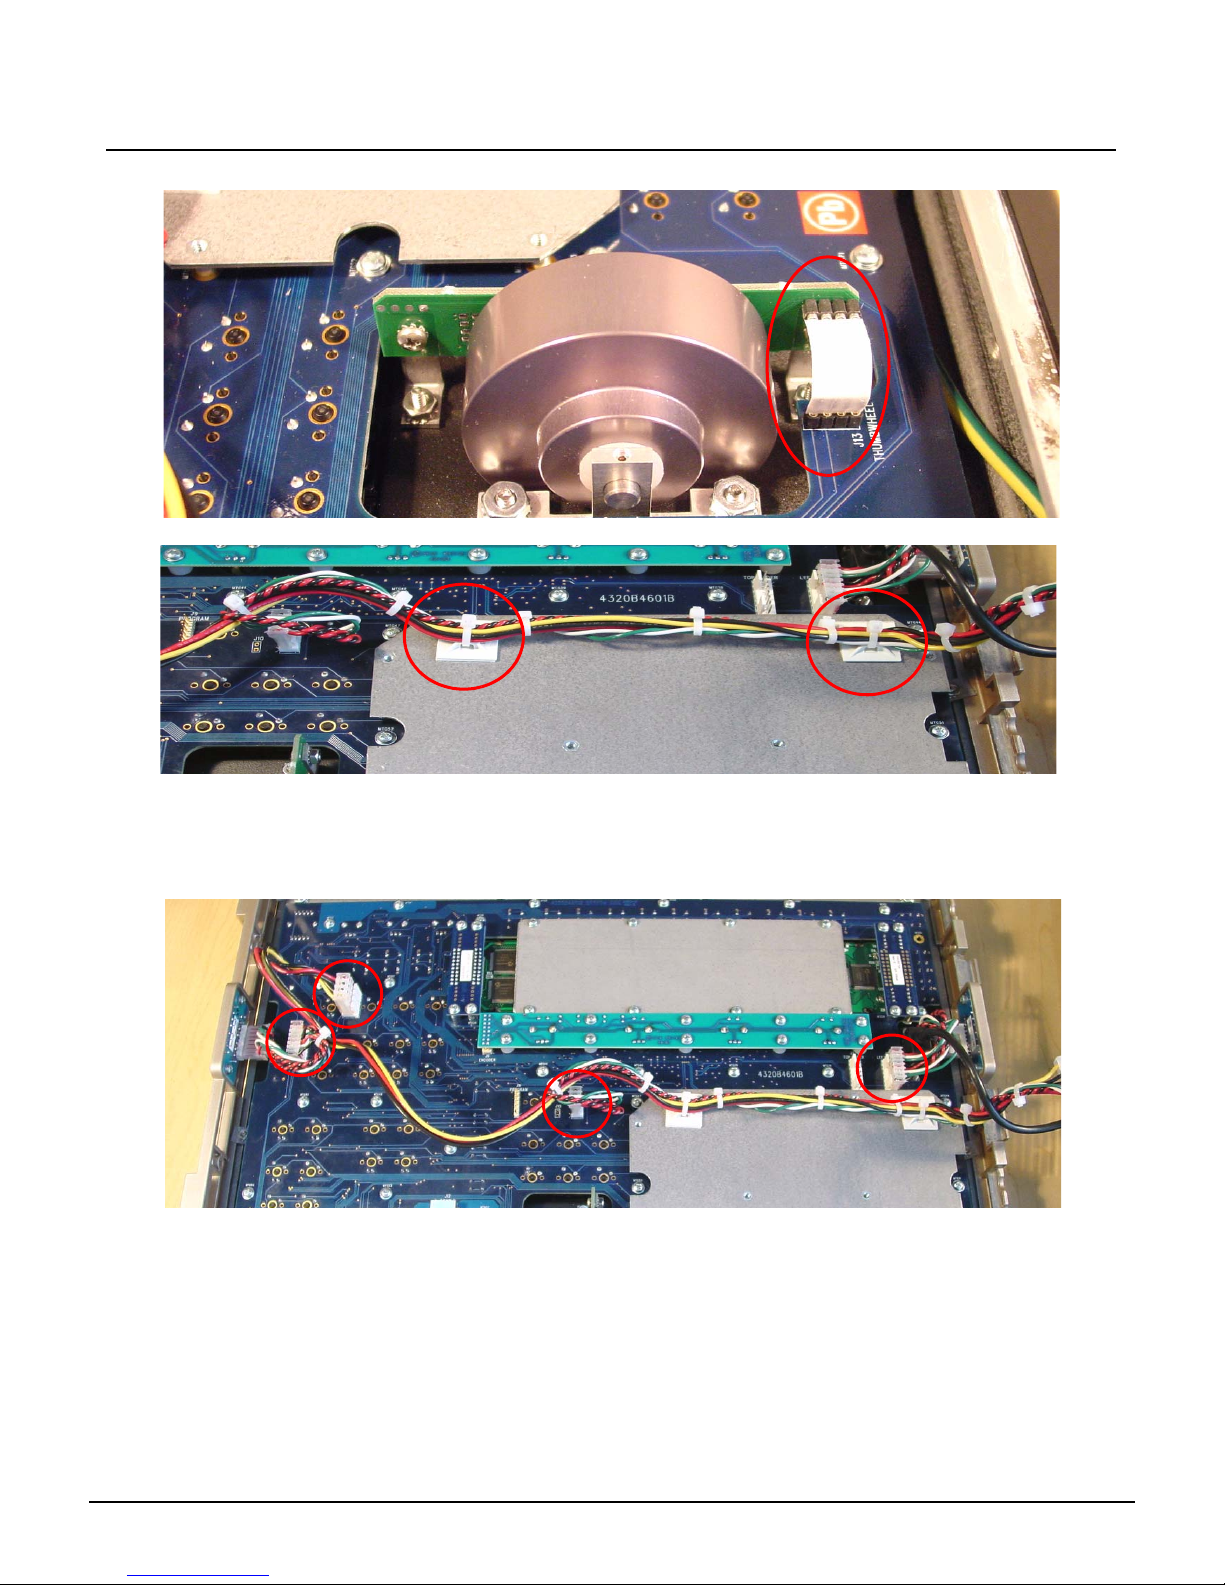
Step 15: With the LCD screen removed from the face panel, you can now access the encoder
knob shafts.
Step 16: Spin the encoder shaft until the hex nut is visible.
Step 17: Loosen the hex nut until the encoder falls from the shaft.
Step 18: Flip the face panel back over exposing the keypad and faders.
Step 19: Lift up the Independents, and BO, ON, FREEZE knob caps.
NOTE: You can lift these caps up with the tip of your fingernail.
Step 20: Once you expose the inside of the knob, you can remove it by loosening the internal
nut inside the knob with the 5/16" nut driver.
Step 21: Remove the 3 fader caps from the Grandmaster and A/B Fader Pair.
Step 22: Flip the face panel back over on the front side.
Congo™ jr Main Board Replacement Page 44 Electronic Theatre Controls, Inc.
Page 49
ETC Service Note
Congo™ jr Main Board Replacement
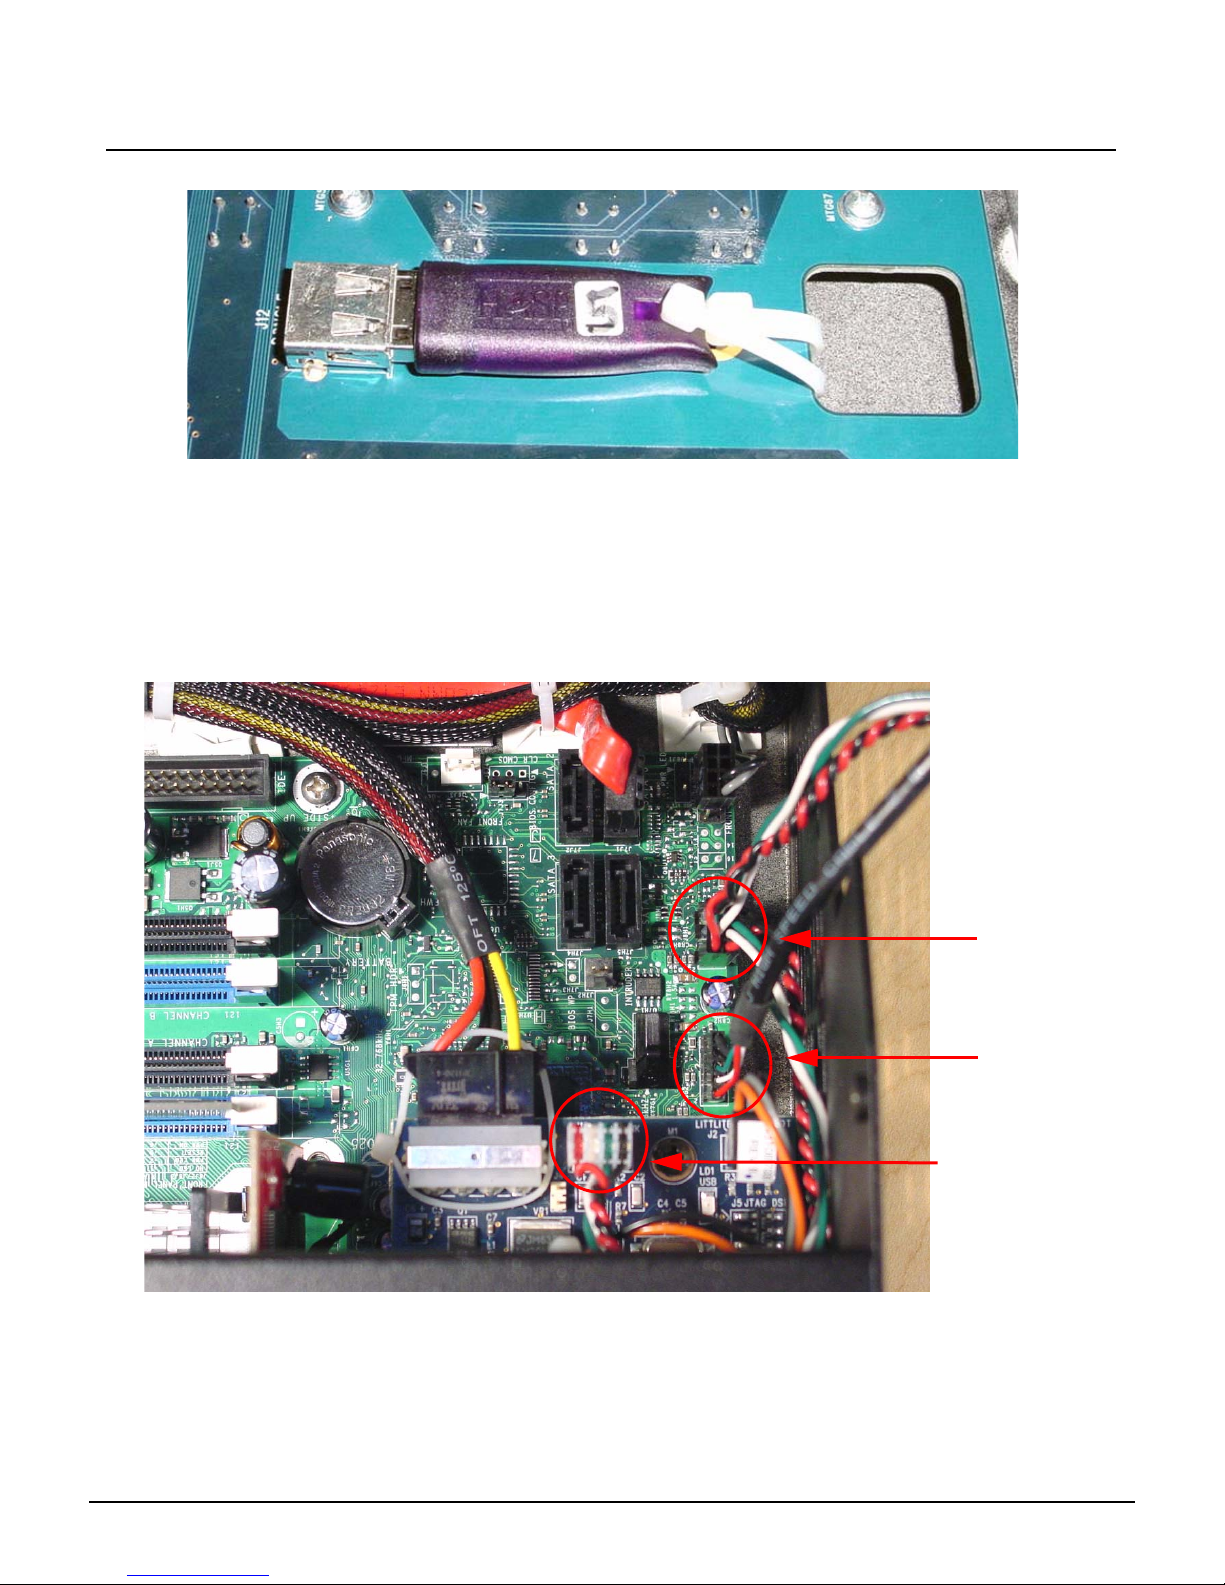
Step 23: Remove the level wheel ribbon cable from the encoder board.
Step 24: Clip the 2 zip ties attached to sticky backs on the keypad reinforcement plate.
Step 25: Disconnect the following headers from the motherboard.
• J5 - Right Fader
• J8 - Left Fader
• J11 - USB Uplink
•J4 - Power
J4
Power
J5
Right Fader
J11
USB Uplink
Step 26: Set the face panel wire harness aside.
Step 27: Remove all 32 screws holding the face panel main board in place.
Step 28: Swap out the main board for the new one.
Step 29: Clip the zip ties from the USB key attached to the old board.
J8
Left Fader
Congo™ jr Main Board Replacement Page 45 Electronic Theatre Controls, Inc.
Page 50
ETC Service Note
Congo™ jr Main Board Replacement
Step 30: Move the USB key to the new face panel and replace the zip tie.
Step 31: Replace all 32 screws that hold the face panel motherboard in place.
Step 32: Re-connect the encoder board and encoders.
Step 33: Re-connect the LCD screen, screws, and pressure plate.
Step 34: Re-connect the level wheel ribbon cable.
Step 35: Connect the J4, J5, J8, J11 connectors back on the main board.
Step 36: Place 2 zip ties around the face panel wire harness through the sticky backs. Trim of f
the excess zip tie tails.
Step 37: Re-attach the USB connectors to the motherboard.
FP USB 1
FP USB2
J1 USB Uplink
Congo™ jr Main Board Replacement Page 46 Electronic Theatre Controls, Inc.
Page 51
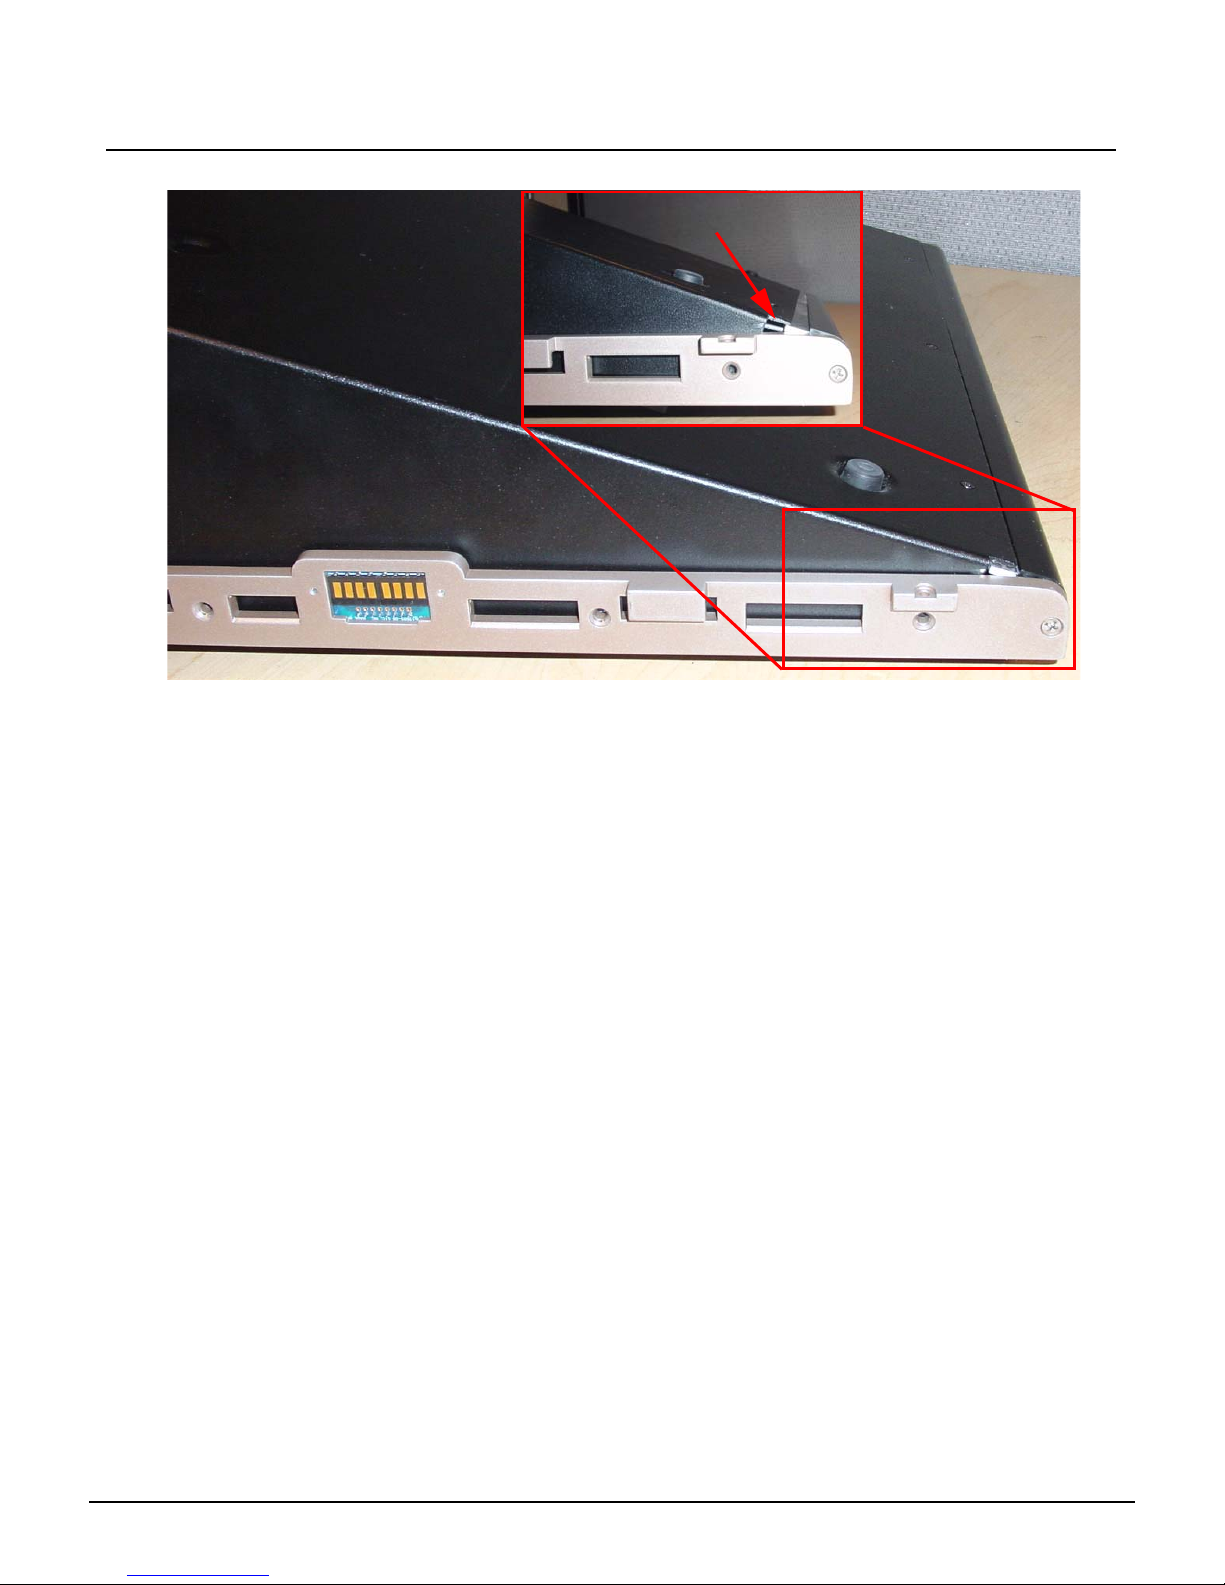
ETC Service Note
Congo™ jr Main Board Replacement
Step 38: Slide the face panel back under the base pressure plate.
Base Pressure Plate
Step 39: Re-attach all 7 screws from each side of the console face panel.
Step 40: Flip the face panel over and tighten the 3 screws on the base of the console.
Step 41: Power the console up and verify correct console operation.
Congo™ jr Main Board Replacement Page 47 Electronic Theatre Controls, Inc.
Page 52

ETC Service Note
Congo™ jr Main Board Replacement
Congo™ jr Main Board Replacement Page 48 Electronic Theatre Controls, Inc.
Page 53
ETC® Service Note
Congo™ jr Master Wing LCD Replacement
Tools Required:
#1 Phillips Screwdriver
Soldering Iron
Lead Free Solder
Procedure:
Step 1: Remove the protective side panels from the Congo jr Master Wing.
Step 2: Place the master wing face down exposing the back side.
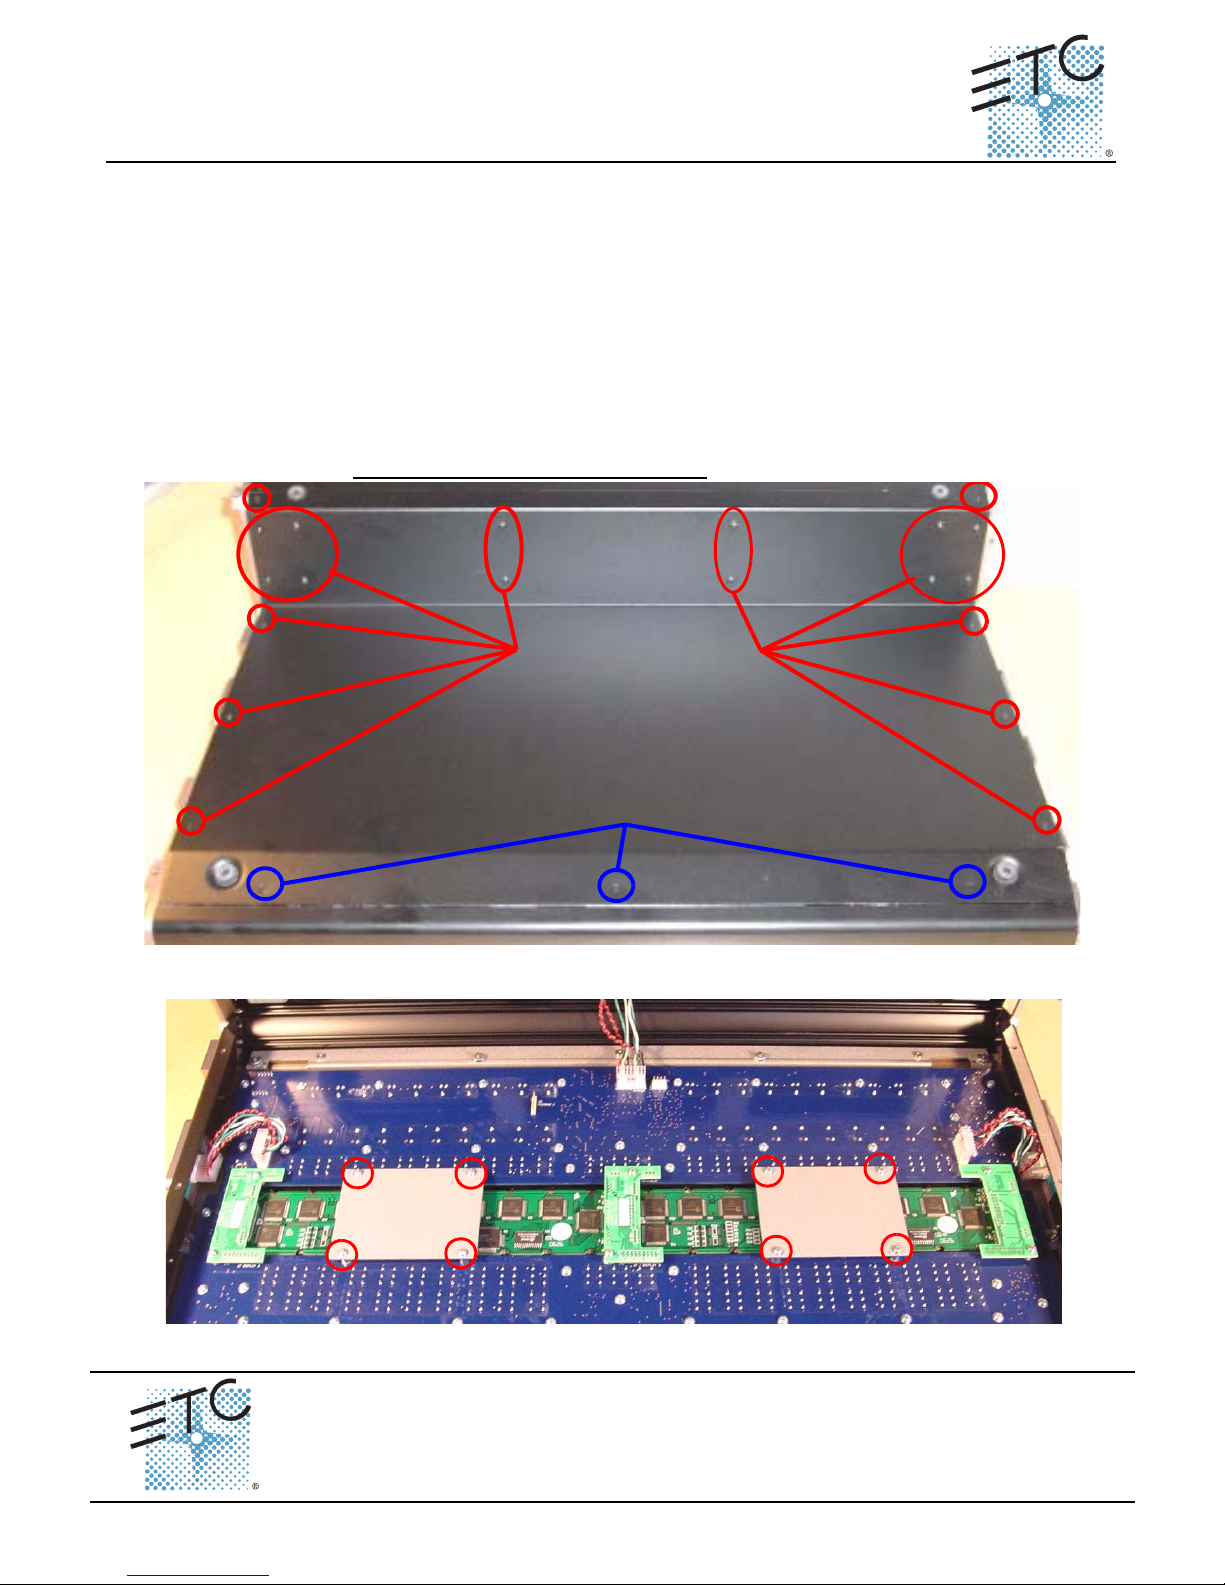
Step 3: Remove the 20 screws indicated in Red below.
Step 4: Loosen the 3 screws indicated in Blue below.
NOTE: DO NOT remove the 3 screws.
Remove these screws
Step 5: Remove the master wing bottom plat e an d se t it aside .
Step 6: Remove the 8 screws from the LCD pressure plates. Set the screws and plates aside.
Master Wing LCD Replacement
LCD
Pressure Plate
Loosen these screws
3 Full Turns
LCD
Pressure Plate
Corporate Headquarters
London, UK
Rome, IT
Holzkirchen, DE
Hong Kong Room 1801, 18/F, Tower 1 Phase 1, Enterprise Square, 9 Sheung Yuet Road, Kowloon Bay, Kowloon, Hong Kong
Service:
Web:
Pending
Unit 26-28, Victoria Industrial Estate, Victoria Road, London W3 6UU, UK Tel +44 (0)20 8896 1000 Fax +44 (0)20 8896 2000
Via Ennio Quirino Visconti, 11, 00193 Rome, Italy Tel +39 (06) 32 111 683 Fax +39 (06) 32 656 990
(Americas) [email protected]
www.etcconnect.com
Rev A Released 02/2007
3031 Pleasant View Road, P.O. Box 620979, Middleton, Wisconsin 53562-0979 USA Tel +608 831 4116 Fax +608 836 1736
Ohmstrasse 3, 83607 Holzkirchen, Germany Tel +49 (80 24) 47 00-0 Fax +49 (80 24) 47 00-3 00
Congo™ jr Master Wing LCD Replacement Page 49 Electronic Theatre Controls, Inc.
Copyright © 2006 ETC. All Rights Reserved. Product information and specifications subject to change.
(UK) [email protected] (DE) [email protected]
Tel +852 2799 1220 Fax +852 2799 9325
(Asia) [email protected]
Page 54
ETC Service Note
Congo™ jr Master Wing LCD Replacement
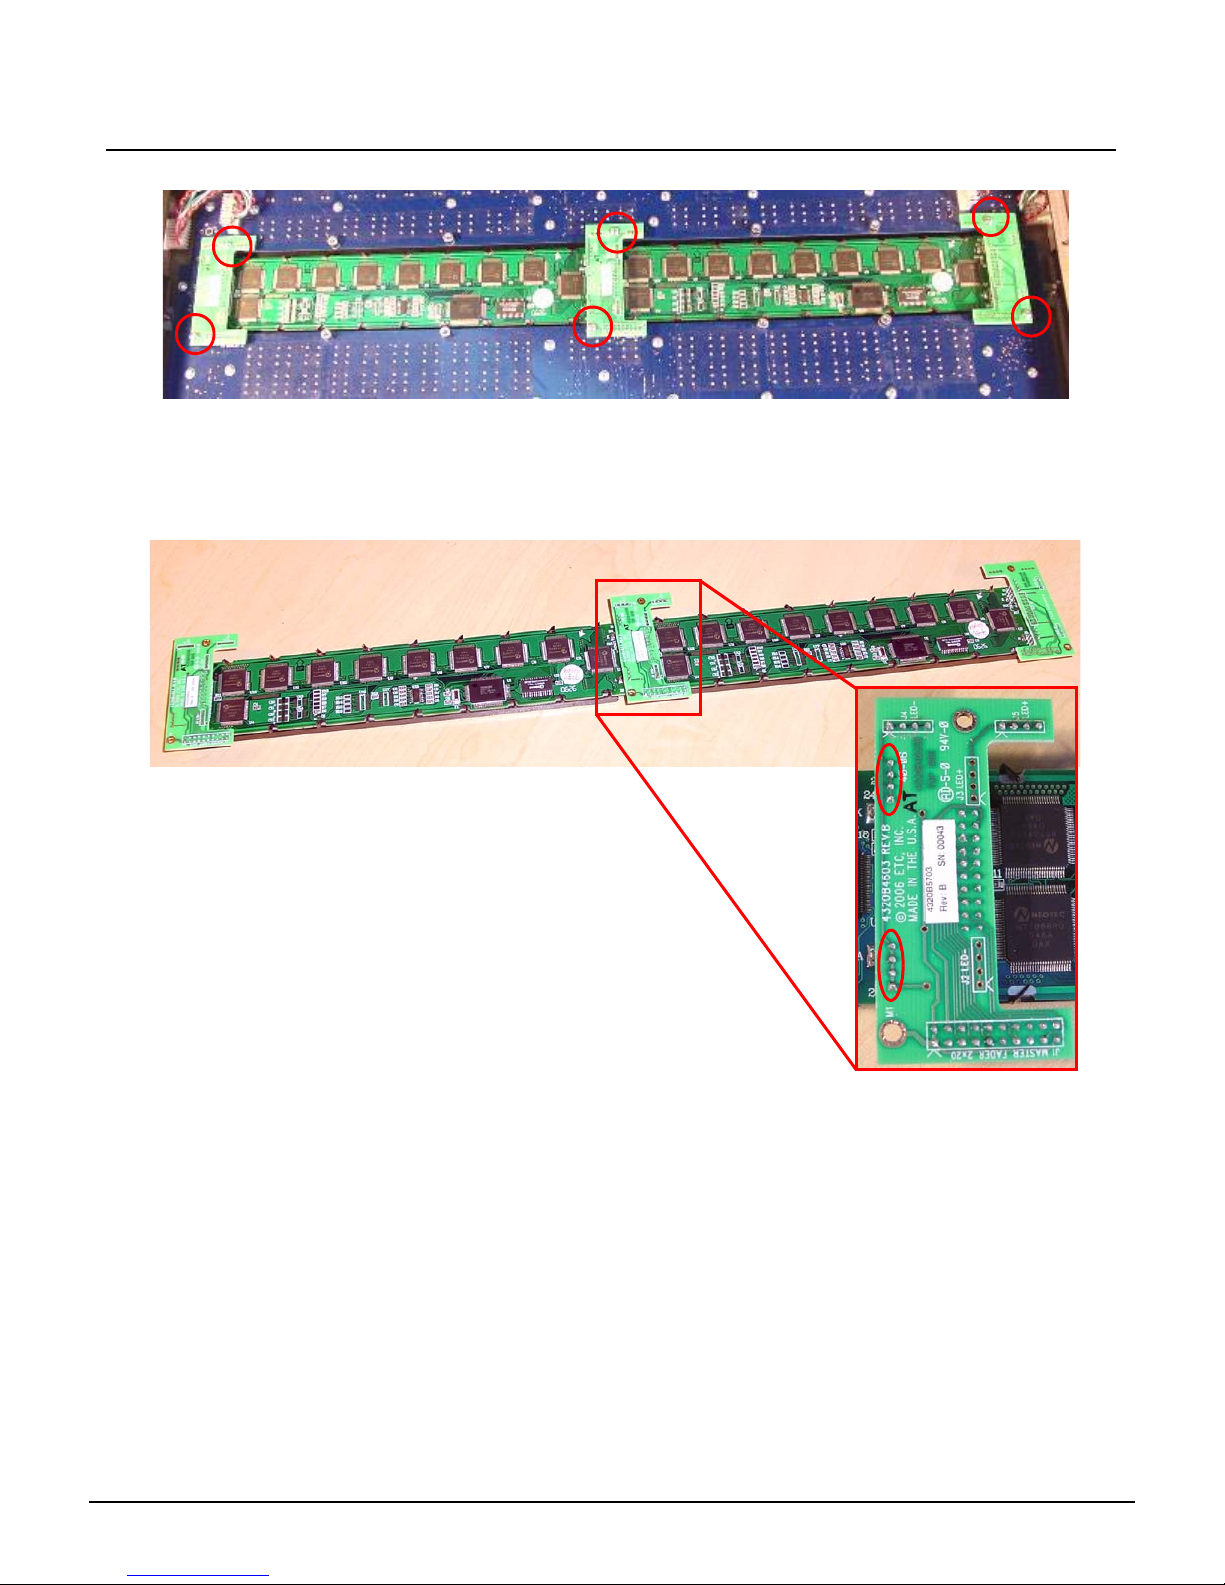
Step 7: Remove the 6 screws holding the LCD Jumper board in place.
Step 8: Gently lift up all 3 Master LCD jumper boards; removing all the pins from each socket.
Step 9: Lift both LCD screens from the center and gently lift the screens away from the master
wing.
Step 10: Set the pair of LCD screens aside.
Step 11: De-solder the below-circled jumpers to disconnect the 2 LCD screens.
Step 12: Replace the Left or Right LCD screen w/ the LCD Jumper pre-soldered. Line up the
above pictures 8 pins and solder the 2 LCD screens
Step 13: Once the pins are aligned with the Master Wing Main Board, gently press each board
into its socket.
Step 14: Secure each of the 6 screws back into the LCD jumper board, connecting them to the
sandoffs.
Step 15: Place each of the LCD pressure plates back over the LCD screens and tighten all 8
screws back into the appropriate holes.
Step 16: Place the 2 LCD screens back into the Master Wing. Line up all of the pins on each
of the 3 LCD jumper boards.
Step 17: Place the master wing bottom plate over the back side of the master wing face panel.
Step 18: Re-attach and tighten all 23 Screws.
Step 19: Connect the Master Wing to the console and run the face p anel dia gnostics tests to
verify proper LCD, fader, and button operations.
Congo™ jr Master Wing LCD Replacement Page 50 Electronic Theatre Controls, Inc.
Page 55
ETC® Service Note
Congo™ jr Master Wing Main Board Replacement
Tools Required:
#1 Phillips Screwdriver
Procedure:
Step 1: Remove the protective side panels from the Congo jr Master Wing.
Step 2: Place the master wing face down exposing the back side.
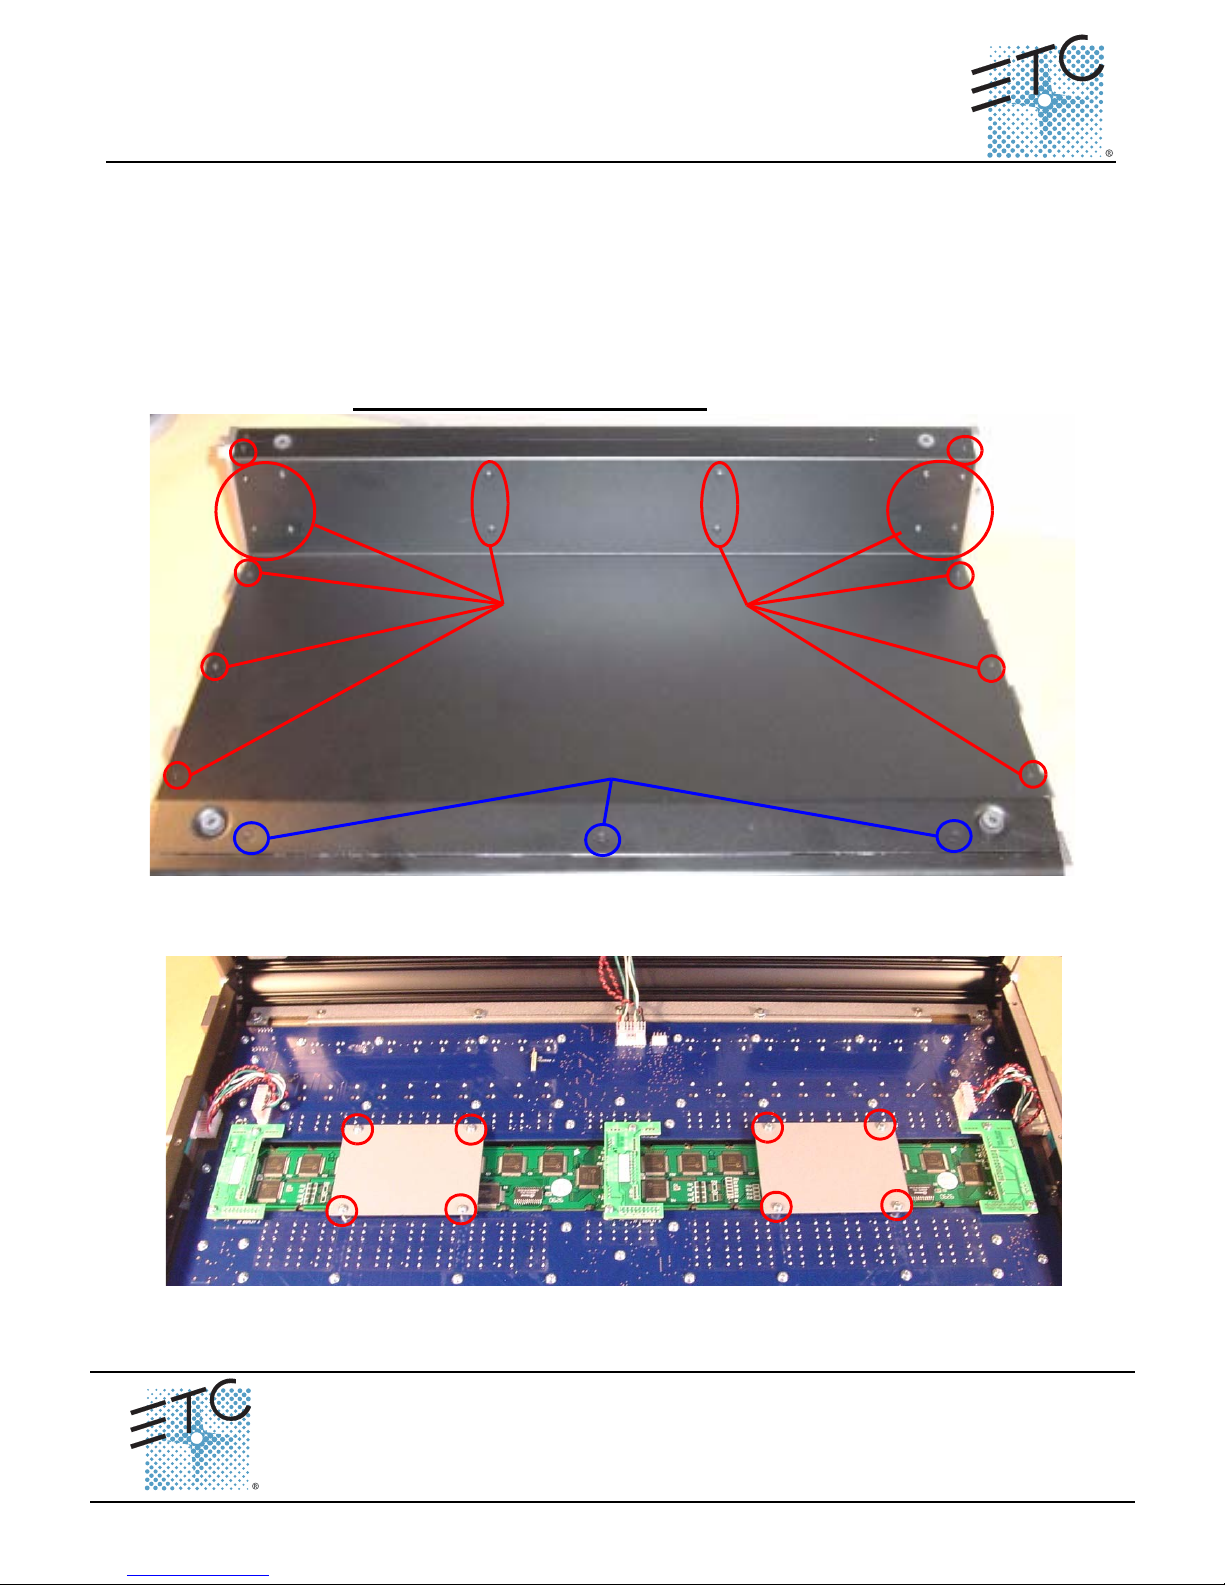
Step 3: Remove the 20 screws indicated in Red below.
Step 4: Loosen the 3 screws indicated in Blue below.
NOTE: DO NOT remove the 3 screws.
Remove these screws
Loosen these screws
3 Full Turns
Step 5: Remove the master wing bottom plat e an d se t it aside
Step 6: Remove the 8 screws from the LCD Pressure Plates. Set the screws and plates
aside.
LCD
Pressure Plate
LCD
Pressure Plate
Master Wing Main Board Replacement
Corporate Headquarters
London, UK
Rome, IT
Holzkirchen, DE
Hong Kong Room 1801, 18/F, Tower 1 Phase 1, Enterprise Square, 9 Sheung Yuet Road, Kowloon Bay, Kowloon, Hong Kong
Service:
Web:
Pending
Unit 26-28, Victoria Industrial Estate, Victoria Road, London W3 6UU, UK Tel +44 (0)20 8896 1000 Fax +44 (0)20 8896 2000
Via Ennio Quirino Visconti, 11, 00193 Rome, Italy Tel +39 (06) 32 111 683 Fax +39 (06) 32 656 990
(Americas) [email protected]
www.etcconnect.com
Rev A Released 02/2007
3031 Pleasant View Road, P.O. Box 620979, Middleton, Wisconsin 53562-0979 USA Tel +608 831 4116 Fax +608 836 1736
Ohmstrasse 3, 83607 Holzkirchen, Germany Tel +49 (80 24) 47 00-0 Fax +49 (80 24) 47 00-3 00
Congo™ jr Master Wing LCD Replacement Page 51 Electronic Theatre Controls, Inc.
Copyright © 2006 ETC. All Rights Reserved. Product information and specifications subject to change.
(UK) [email protected] (DE) [email protected]
Tel +852 2799 1220 Fax +852 2799 9325
(Asia) [email protected]
Page 56
ETC Service Note
Congo™ jr Master Wing Main Board Replacement
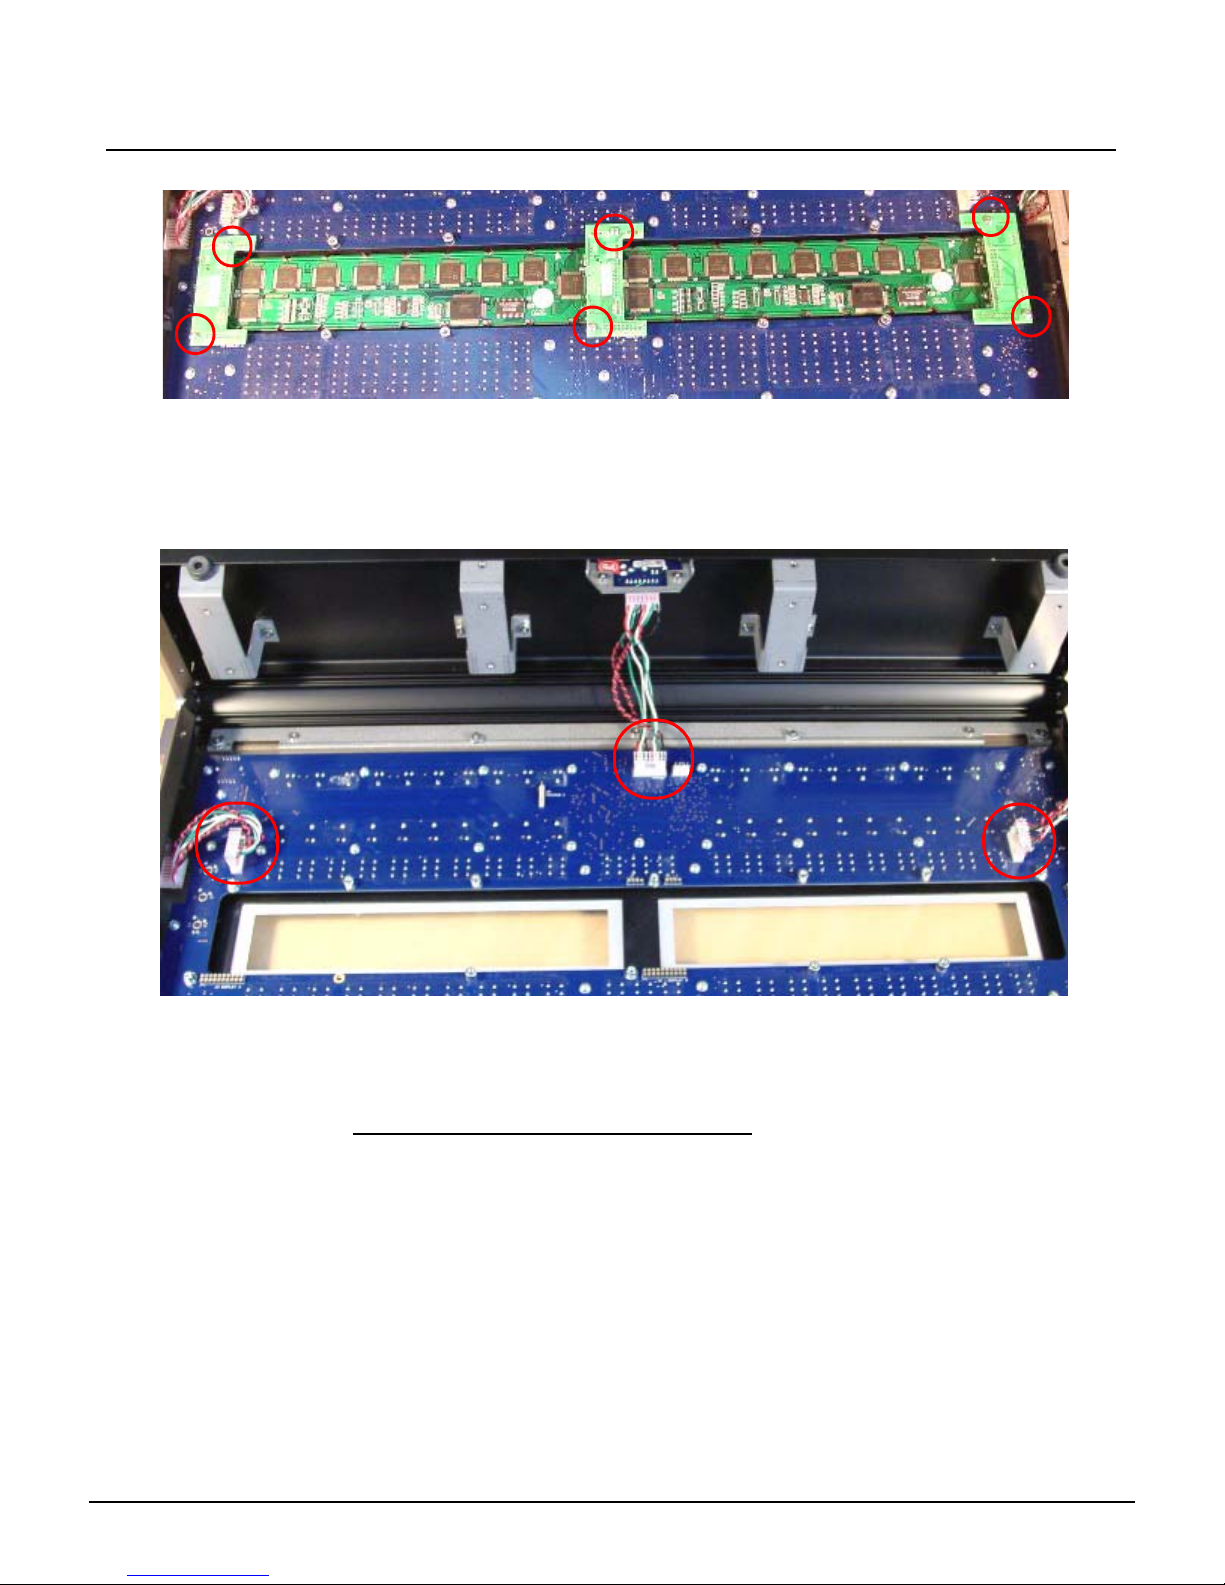
Step 7: Remove the 6 screws holding the LCD Jumper board in-place.
Step 8: Gently lift up all 3 Master LCD jumper boards; removing all the pins from each socket.
Step 9: Lift both LCD Screens from the center and gently lift the screens away from the
master wing.
Step 10: Set the pair of LCD screens aside
Step 11: Remove the J9, J12, and J8 headers from the Master Wing Main Board.
J12
12v/USB
J9
Right Fader
Step 12: Remove all 50 #1 Phillips head screws from the mainboard.
Step 13: Swap out the Master Wing main board for the new board.
Step 14: Attach all 50 #1 Phillips head screws back into the master wing.
Step 15: Re-connect each of the J9, J12, and J8 headers at the master wing main board.
Note the cable orientation pictured above.
Step 16: Place the 2 screens back into the Master Wing. Line up all of the pins on each of the
3 LCD jumper boards.
Step 17: Once the pins are aligned with the Master Wing main board, gently press each boar d
into the socket.
Step 18: Secure each of the 6 screws back into the LCD jumper board, connecting them to the
standoffs.
Step 19: Place each of the LCD pressure plates back over the LCD Screens and place all 8
screws back into the appropriate holes.
Step 20: Place the Master Wing bottom plate over the ba ck side of the Master Wing face panel.
Re-attach and tighten all 23 Screws.
Step 21: Connect the Master Wing to the console and run the face p anel dia gnostics tests to
verify proper LCD, fader, and button operations.
J8
Left Fader
Congo™ jr Master Wing LCD Replacement Page 52 Electronic Theatre Controls, Inc.
Page 57
ETC® Service Note
Congo™ jr v4.3 I/O Software Code Installation
Description:
This service note describes how to install new I/O firmware for your Congo jr console. This version
of firmware fixes a software bug that caused the DMX power supply to be under powe red; resulting
in flickering levels or loss of control of some DMX devices.
This firmware update should be performe d after the 4.3 software installation .
Tools Needed:
Computer
Congo jr Console
DVI Monitor, or VGA with DVI adapters
USB Keyboard
USB Mouse
USB Flash Drive
Procedure:
Step 1: Download the Congo jr firmware Software.zip from www.etcconnect.com
Step 2: Insert USB Flash Drive into computer
Step 3: Create a folder titled: Software
Step 4: Unzip the Software.zip contents into the newly created "so ftwar e" folder on the USB
flash drive
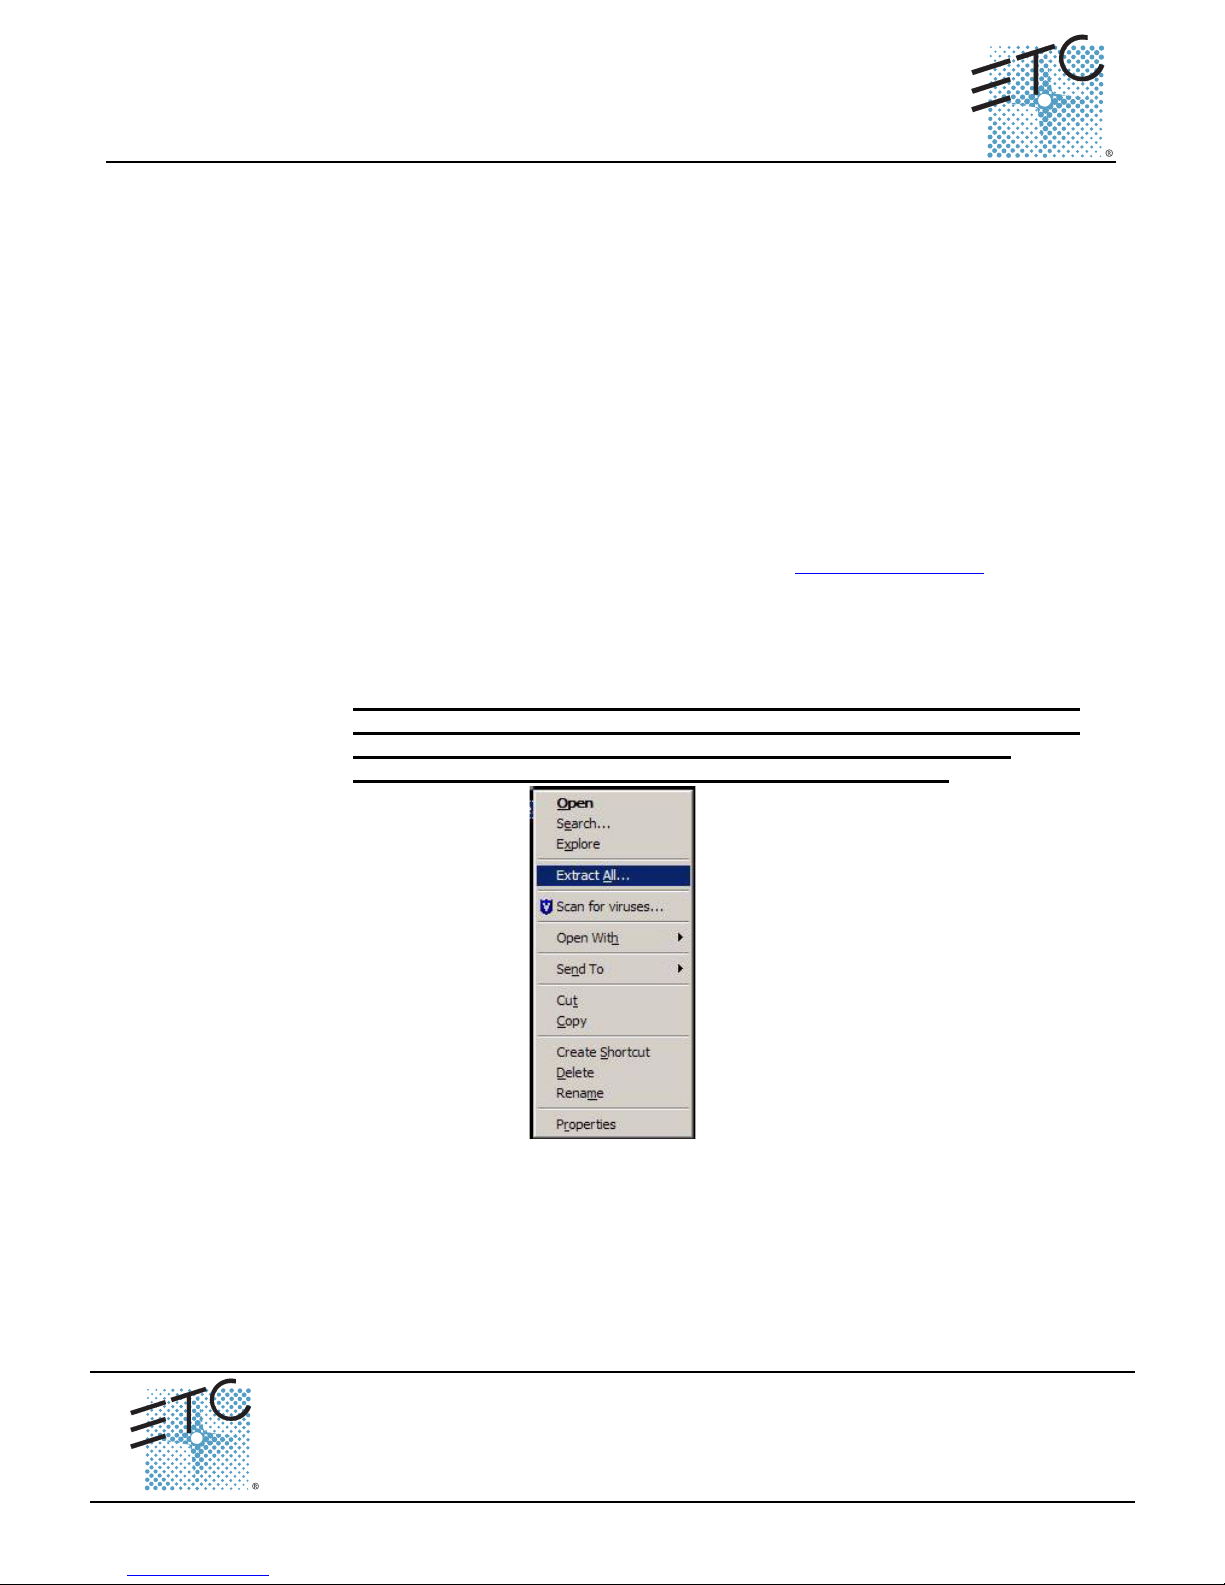
Note: There are various .zip file extraction programs. When using windows
XP, you do not need to create a folder. When you unzip the file, Windows will
automatically create a folder titled "software." To open the Windows
extraction wizard, right click on the file and select "Extract All"
Use the Windows extraction wizard to extract the files to your USB Stick.
Step 5: Remove this drive from the computer
Step 6: Connect keyboard and mouse to the Congo jr
Step 7: Turn the Congo jr Console on
Step 8: Insert the USB flash drive into the Congo jr
Congo™ jr v4.3 I/O Software Code Insta llation
Corporate Headquarters
London, UK
Rome, IT
Holzkirchen, DE
Hong Kong Room 1801, 18/F, Tower 1 Phase 1, Enterprise Square, 9 Sheung Yuet Road, Kowloon Bay, Kowloon, Hong Kong
Service:
Web:
Pending
Congo™ jr v4.3 I/O Software Code Installation Page 53 Electronic Theatre Controls, Inc.
Unit 26-28, Victoria Industrial Estate, Victoria Road, London W3 6UU, UK Tel +44 (0)20 8896 1000 Fax +44 (0)20 8896 2000
Via Ennio Quirino Visconti, 11, 00193 Rome, Italy Tel +39 (06) 32 111 683 Fax +39 (06) 32 656 990
(Americas) [email protected]
www.etcconnect.com
Rev A Released 04/2007
3031 Pleasant View Road, P.O. Box 620979, Middleton, Wisconsin 53562-0979 USA Tel +608 831 4116 Fax +608 836 1736
Ohmstrasse 3, 83607 Holzkirchen, Germany Tel +49 (80 24) 47 00-0 Fax +49 (80 24) 47 00-3 00
Copyright © 2006 ETC. All Rights Reserved. Product information and specifications subject to change.
(UK) [email protected] (DE) [email protected]
Tel +852 2799 1220 Fax +852 2799 9325
(Asia) [email protected]
Page 58
ETC Service Note
Congo™ jr v4.3 I/O Software Code Installation
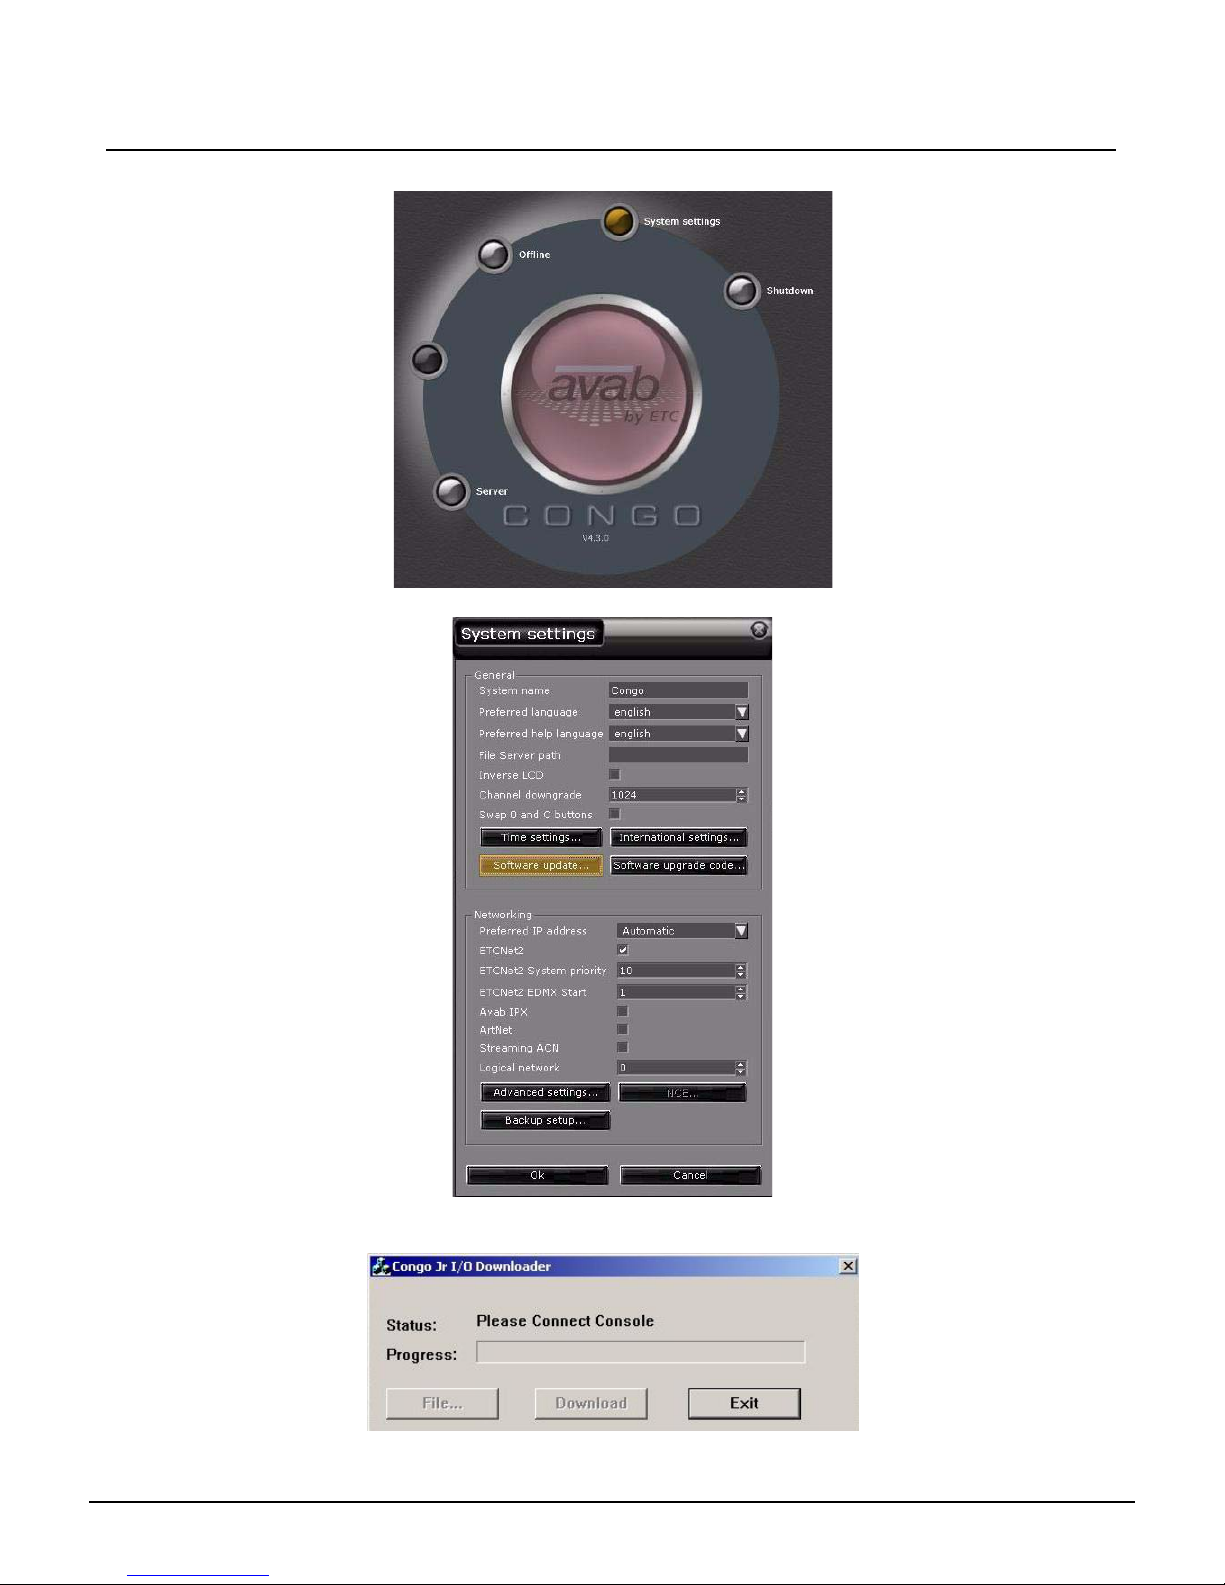
Step 9: At the Main login Screen, click on the System Settings button
Step 10: The following window will pop up:
Step 11: Click on the software update button
Step 12: The following window will pop up:
Congo™ jr v4.3 I/O Software Code Installation Page 54 Electronic Theatre Controls, Inc.
Page 59
ETC Service Note
Congo™ jr v4.3 I/O Software Code Installation
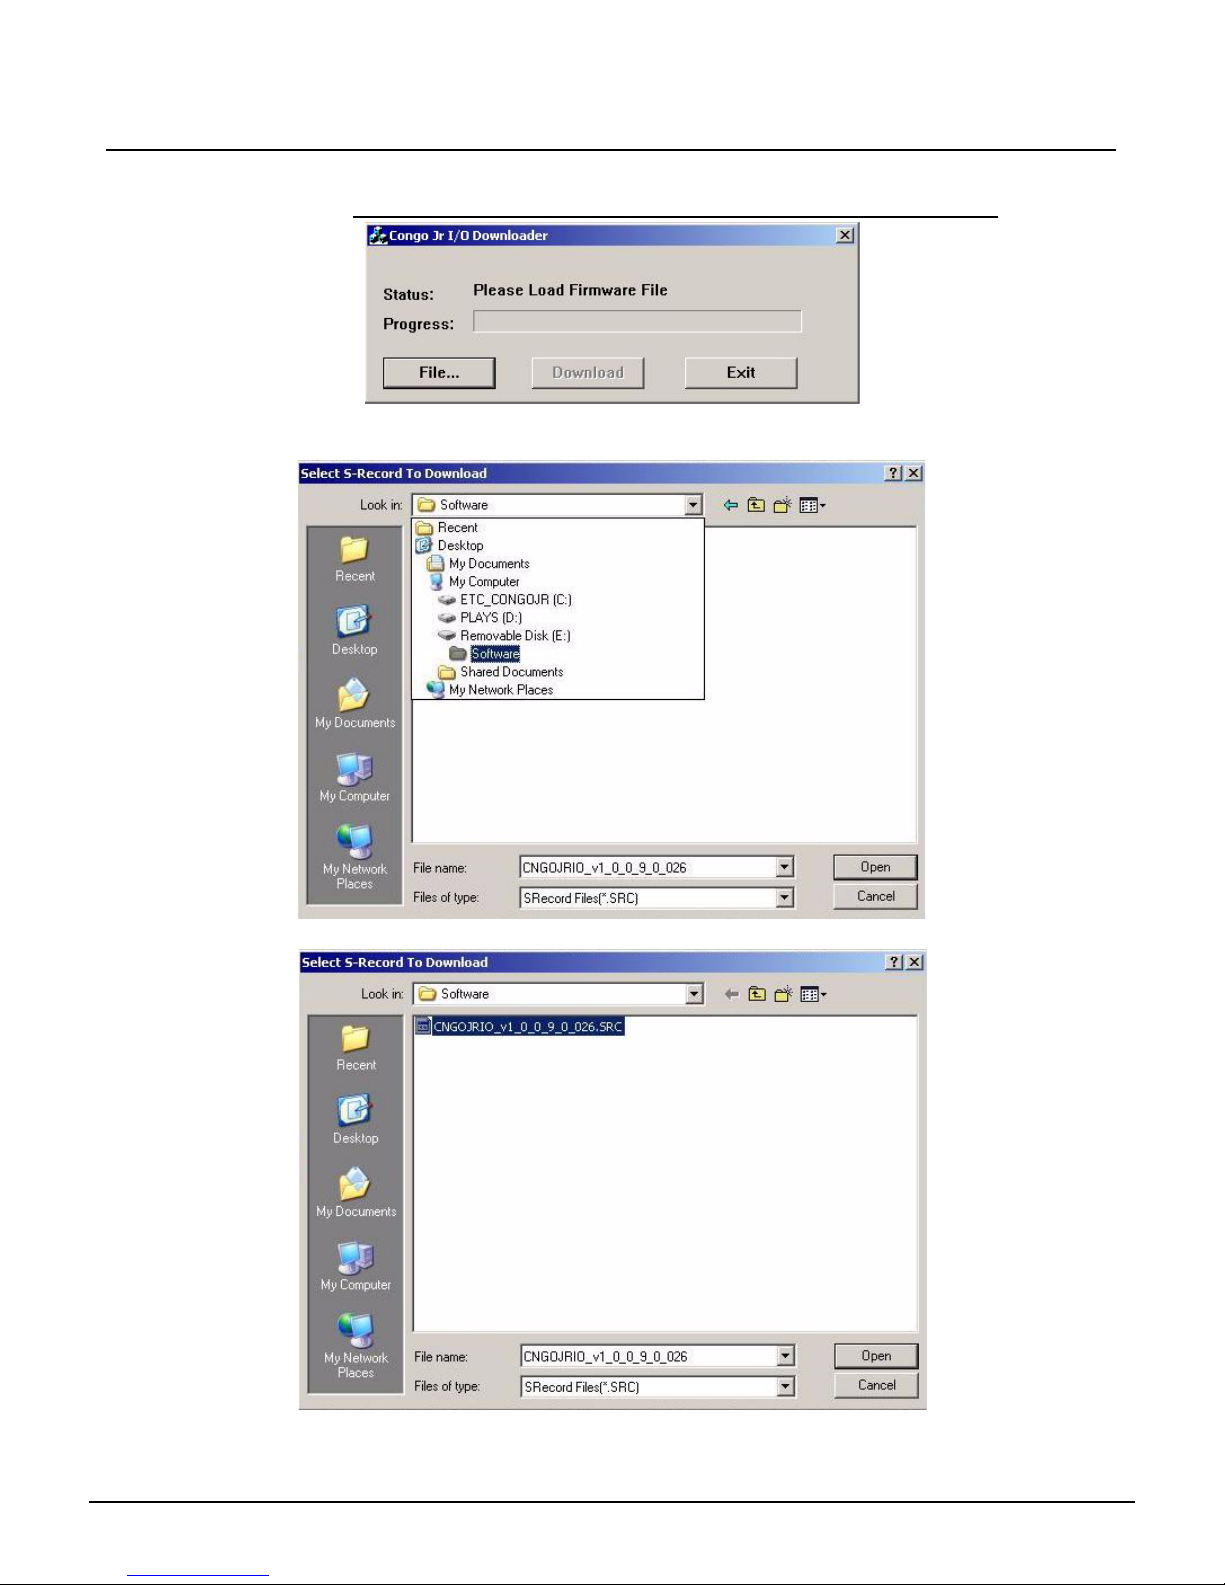
Step 13: Wait until the window displays "Please load Firmware File"
Note: It may take up to 10 seconds for this message to be displayed
Step 14: Click on the File button
Step 15: Browse to the USB Flash Drive's software folder
Step 16: Select the file labeled" CNGOJRIO_v1_0_0_9_0_026.src
Step 17: Click the Open button
Congo™ jr v4.3 I/O Software Code Installation Page 55 Electronic Theatre Controls, Inc.
Page 60
ETC Service Note
Congo™ jr v4.3 I/O Software Code Installation
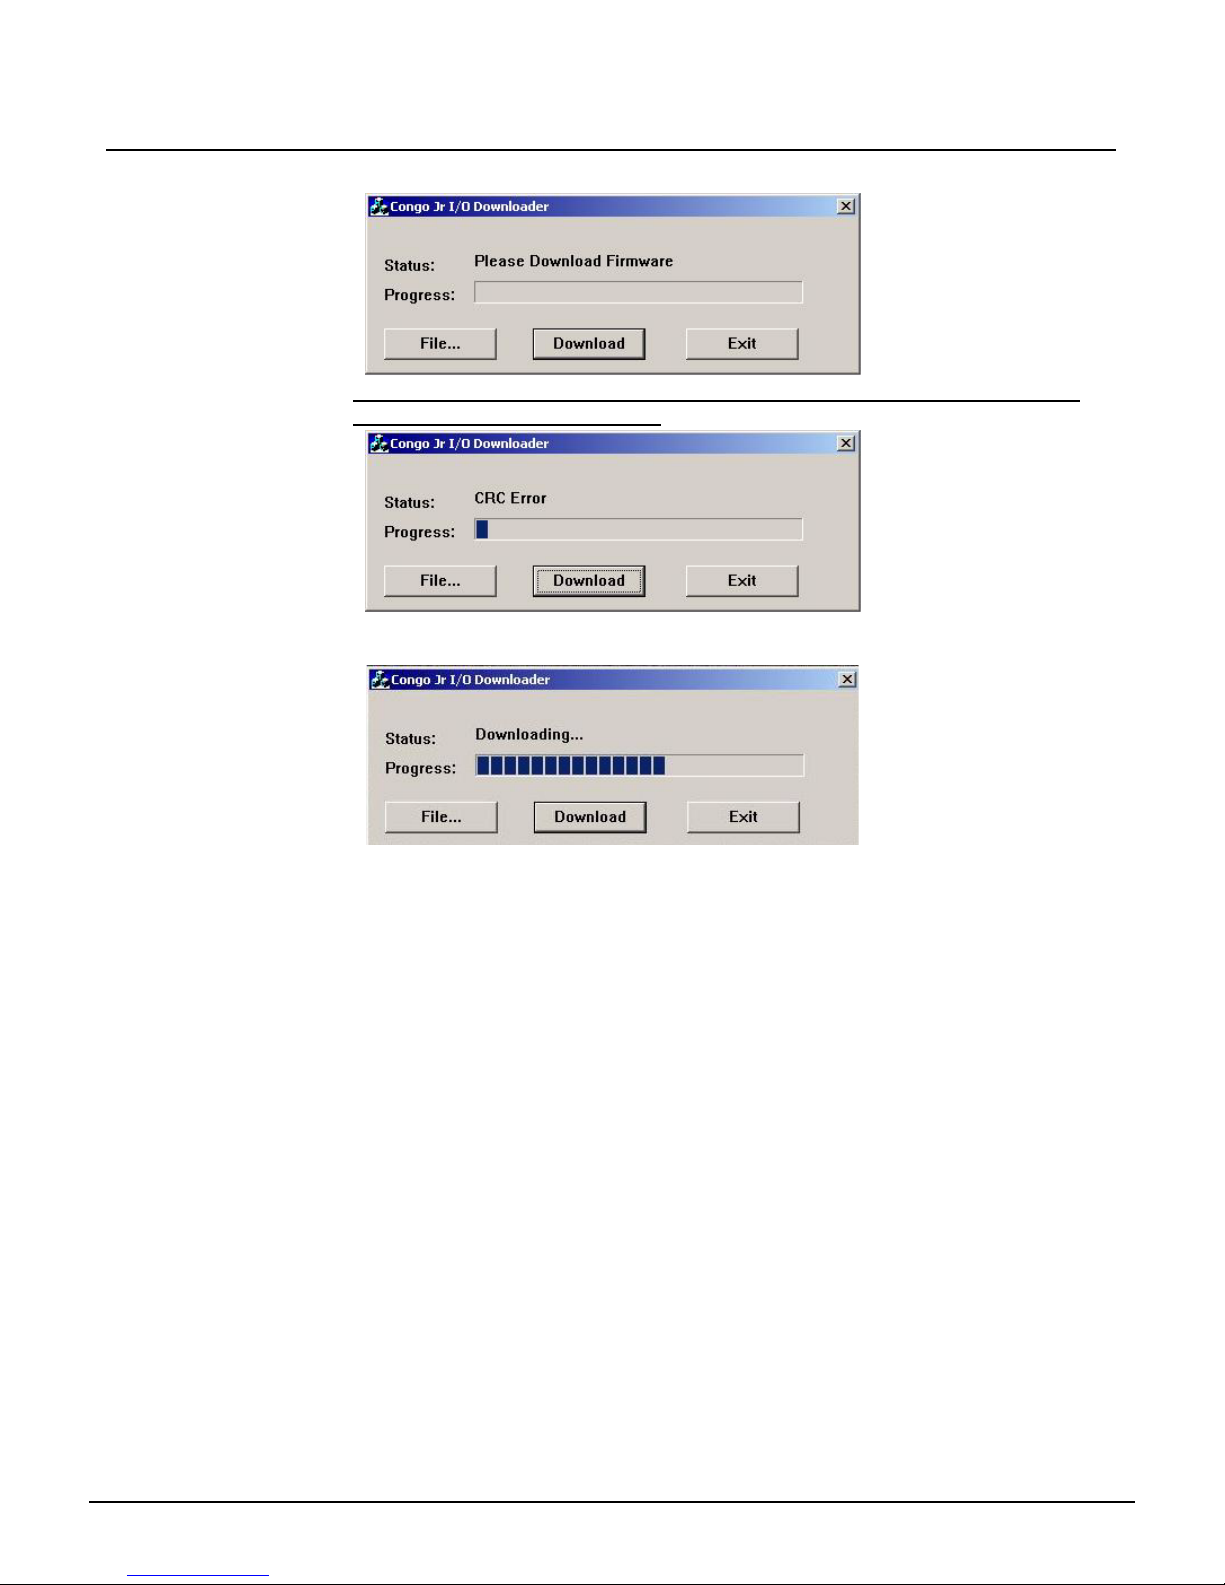
Step 18: Click on the Download button
Note: In some instances you will see a "CRC Error," disregard this error; the
software will continue to install.
Step 19: The software update will take about 30 seconds. The progress bar will show the
installation status.
Step 20: The status will indicate that the progress has finished and display "Download
Complete." When this message is displayed click the Exit button. The Congo jr
console will reboot
Step 21: Remove the USB flash drive while the Congo jr is rebooting
Step 22: After the Congo jr has rebooted, at the main login screen, select shut down.
Physically switch off the desk and back on.
Step 23: Your Firmware update is now complete.
If you have any questions on this update, please contact ETC Technical Services.
Congo™ jr v4.3 I/O Software Code Installation Page 56 Electronic Theatre Controls, Inc.
Page 61

Page 62

Americas
3031 Pleasant View Road, P.O. Box 620979, Middleton, Wisconsin 53562-0979 USA Tel: +1 608 831 4116 800 688 41 16 Fax: +1 608 836 1736 800 555 8912
Europe
Unit 5, Victoria Industrial Estate, Victoria Road, London W3 6UU, UK Tel: +44 (0)20 8896 1000 Fax: +44 (0)20 8896 2000
Asia
Room 605-606, Tower III Enterprise Square, 9 Sheung Yuet Road, Kowloon Bay, Kowloon, Hong Kong Tel: +852 2799 1220 Fax: +852 2799 9325
Web
: www.etcconnect.com
Service
: [email protected] T o ll free: 800 775 4382 Comments about this document: [email protected]
Rev Released 05/2007
Email
Copyright © 2005 Electronic Theatre Controls, Inc. All Rights Reserved.
 Loading...