

Etec 8505G Quick Start Manual

A
D
S
L
2
/
2
+
+
+
E
T
L
L
L
T
T
E
E
E
E
E
E
S
S
S
R
R
R
S
S
S
1
1
1
2
2
2
5
5
5
M
M
M
M
M
M
O
O
O
A
A
b
b
b
D
D
D
D
D
p
p
p
E
E
E
S
S
s
s
s
M
M
M
L
L
W
W
W
/
/
/
R
R
R
2
2
O
/
/
I
R
I
R
I
R
O
O
2
2
U
U
E
E
U
4
4
4
P
P
P
O
O
O
Q
Q
Q
R
R
R
U
U
U
T
T
T
I
I
I
C
C
C
E
E
E
K
K
K
T
T
T
H
H
H
S
S
S
E
E
E
T
T
T
R
R
R
A
A
A
N
N
N
R
R
R
E
E
E
T
T
T
T
T
T
G
G
G
U
U
S
S
S
U
W
W
W
I
D
I
D
I
D
I
T
I
T
I
T
E
E
E
C
C
C
H
H
H
www.etec-components.co.uk
4 Ports 11g Wireless ADSL2/2+ Router
1

CCoonntteennttss
1. Panel Descriptions ................................................................................................
2. Connecting the Etec 4 Port 11g Wireless ADSL2/2+ Router .............................
3. Setting up the TCP/IP in Windows .......................................................................
Windows ME/98 ....................................................................................................
Windows 2000 ......................................................................................................
Windows XP ..........................................................................................................
4. Setting up the Etec 4 Port 11g Wireless ADSL2/2+ Router ................................
This symbol on the product or in the instructions means that your electrical and electronic equipment should
be disposed at the end of its life separately from your household waste. There are separate collection systems
for recycling in the EU.
For more information, please contact the local authority or your retailer where you purchased the product.
4 Ports 11g Wireless ADSL2/2+ Router
2
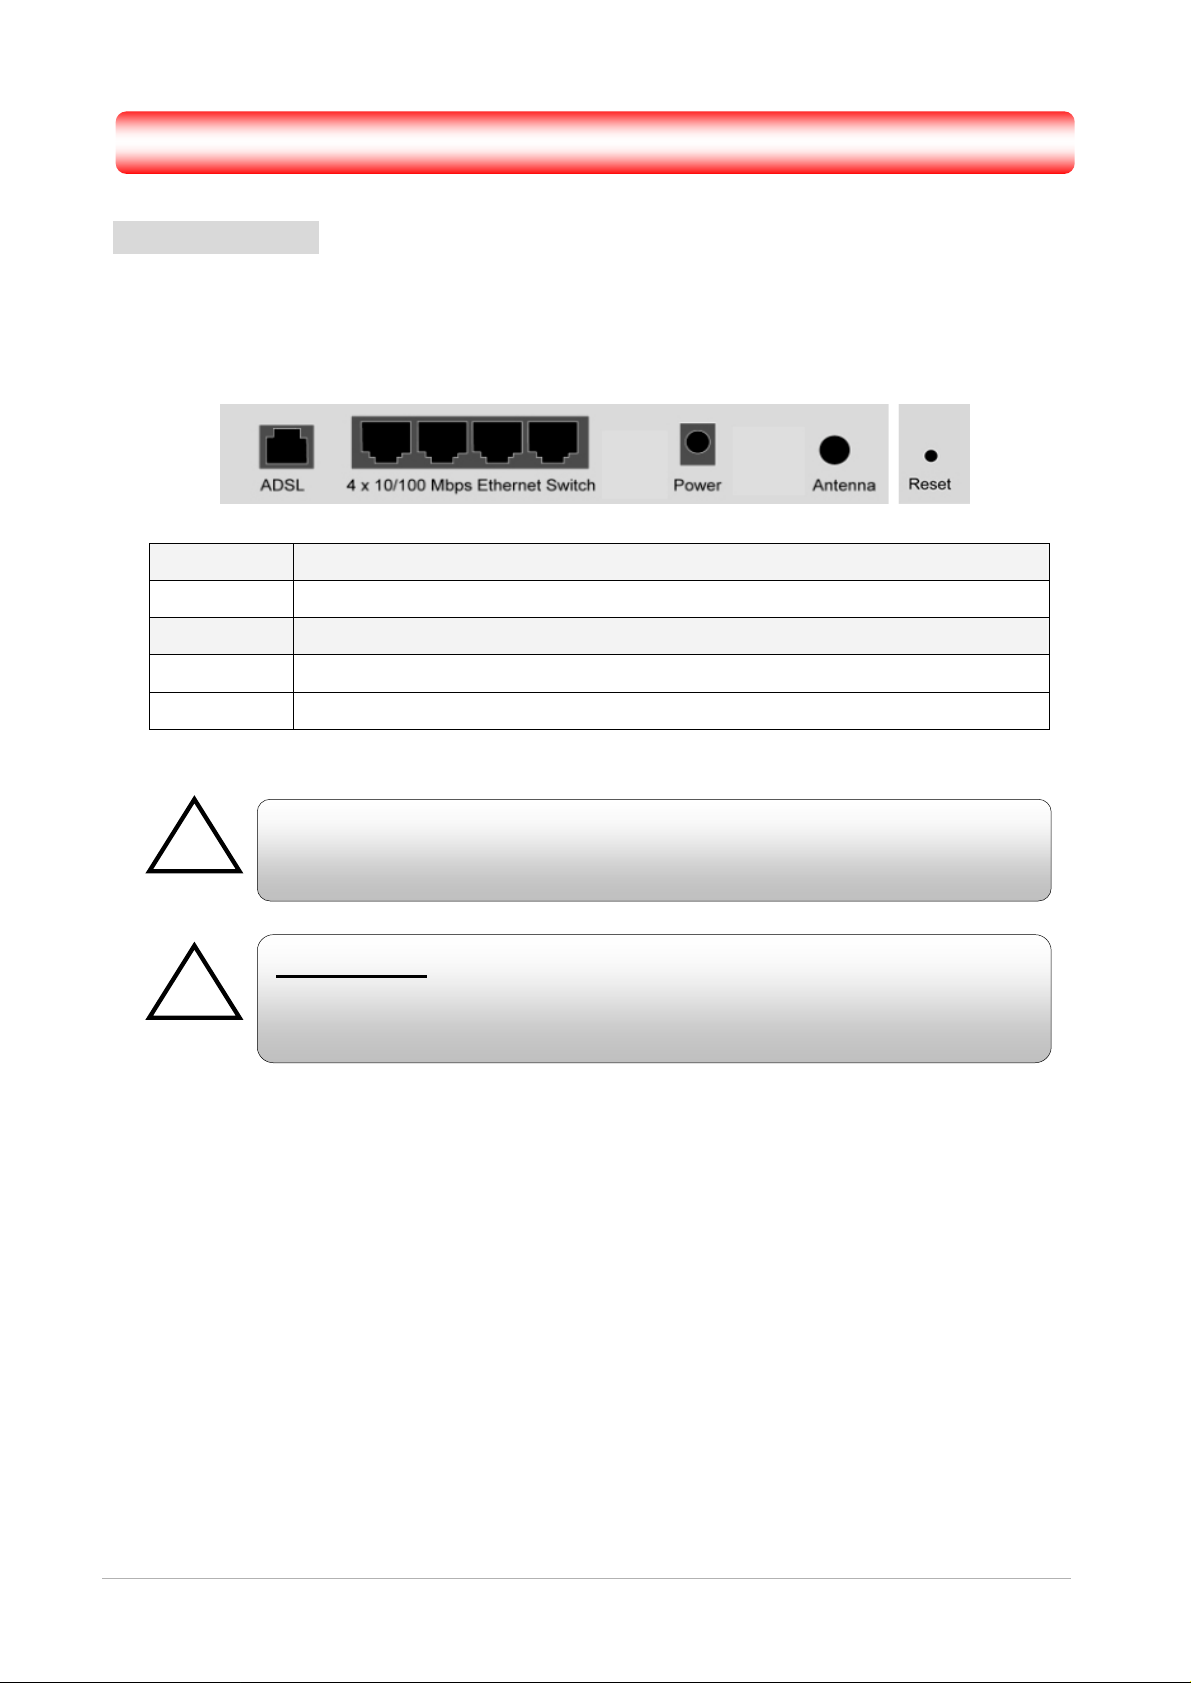
11.. PPaanneell DDeessccrriippttiioonnss
!
!
1.1 Back Panel:
The back panel of the Etec 4 Port 11g Wireless ADSL2/2+ Router contains ADSL, Ethernet
Switches, Power Adaptor connection and 2.4GHz Dipole Antenna Connector and Reset button.
ADSL Port for connecting to the ADSL/ADSL2/ADSL2+ Service Provider.
Ports 1~4 Four 10/100Mbps Ethernet Ports for connecting to the network devices.
Power Power adapter connector.
Antenna 2.4GHz dipole Antenna
Reset button Restore the 4-port 11g wireless ADSL 2/2+ Router to factory default setting.
All the Ethernet ports of the Etec 4 Port 11g Wireless ADSL2/2+ Router
support auto-crossover capability.
RESET Button:
Reboot & Restore the Etec 4 Port 11g Wireless ADSL2/2+ Router to
factory default.
To “Reset” the Etec 4 Port 11g Wireless ADSL2/2+ Router to factory default:
n Ensure that the device is powered on.
n Press the Reset button for 10~15 seconds and release. Wait for 30 seconds after release
of the Reset button. Do not power off the device during the reset process.
n The default settings are now restored.
4 Ports 11g Wireless ADSL2/2+ Router
3
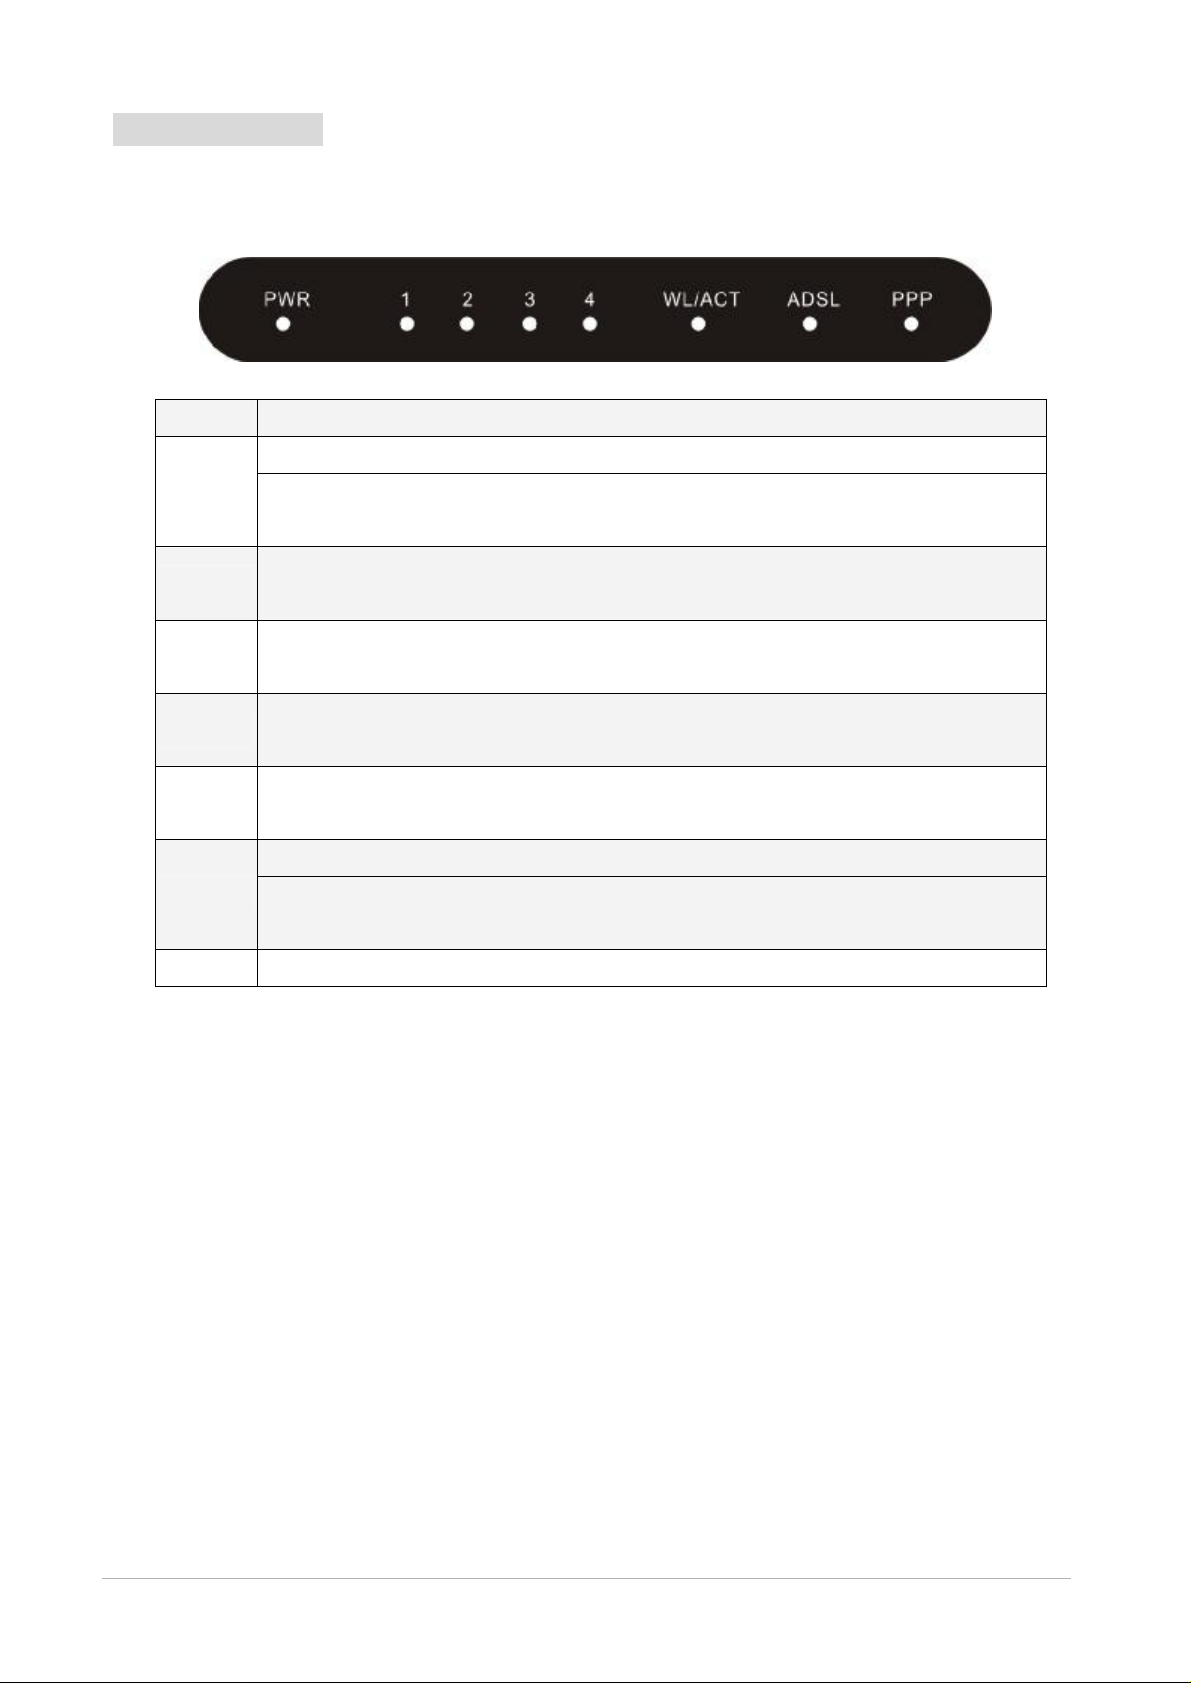
1.2 Front Panel:
sending or receiving
1g Wireless ADSL2/2+ Router is sending or
11g Wireless ADSL2/2+ Router is sending or
11g Wireless ADSL2/2+ Router is sending or
11g Wireless ADSL2/2+ Router is sending or
sending or receiving
The Etec 4 Port 11g Wireless ADSL2/2+ Router’s LED indicators display information about the
device’s status.
PWR Lights up when the 4 Port 11g Wireless ADSL2/2+ Router is powered on.
Lights up when the Wireless system is ready.
WL/ACT
1
2
3
4
ADSL
PPP Lights up when a PPP connection is established.
Blinking when the 4 Port 11g Wireless ADSL2/2+ Router is
data.
Blinking when Port 1 of the 4 Port 1
receiving data.
Blinking when Port 2 of the 4 Port
receiving data.
Blinking when Port 3 of the 4 Port
receiving data.
Blinking when Port 4 of the 4 Port
receiving data.
Lights up when a successful ADSL2/2+ connection is established.
Blinking when the 4 Port 11g Wireless ADSL2/2+ Router is
data.
4 Ports 11g Wireless ADSL2/2+ Router
4
22.. CCoonnnneeccttiinngg tthhee EEtteecc 44 PPoorrtt 1111gg WWiirreelleessss AADDSSLL22//22++ RRoouutteerr
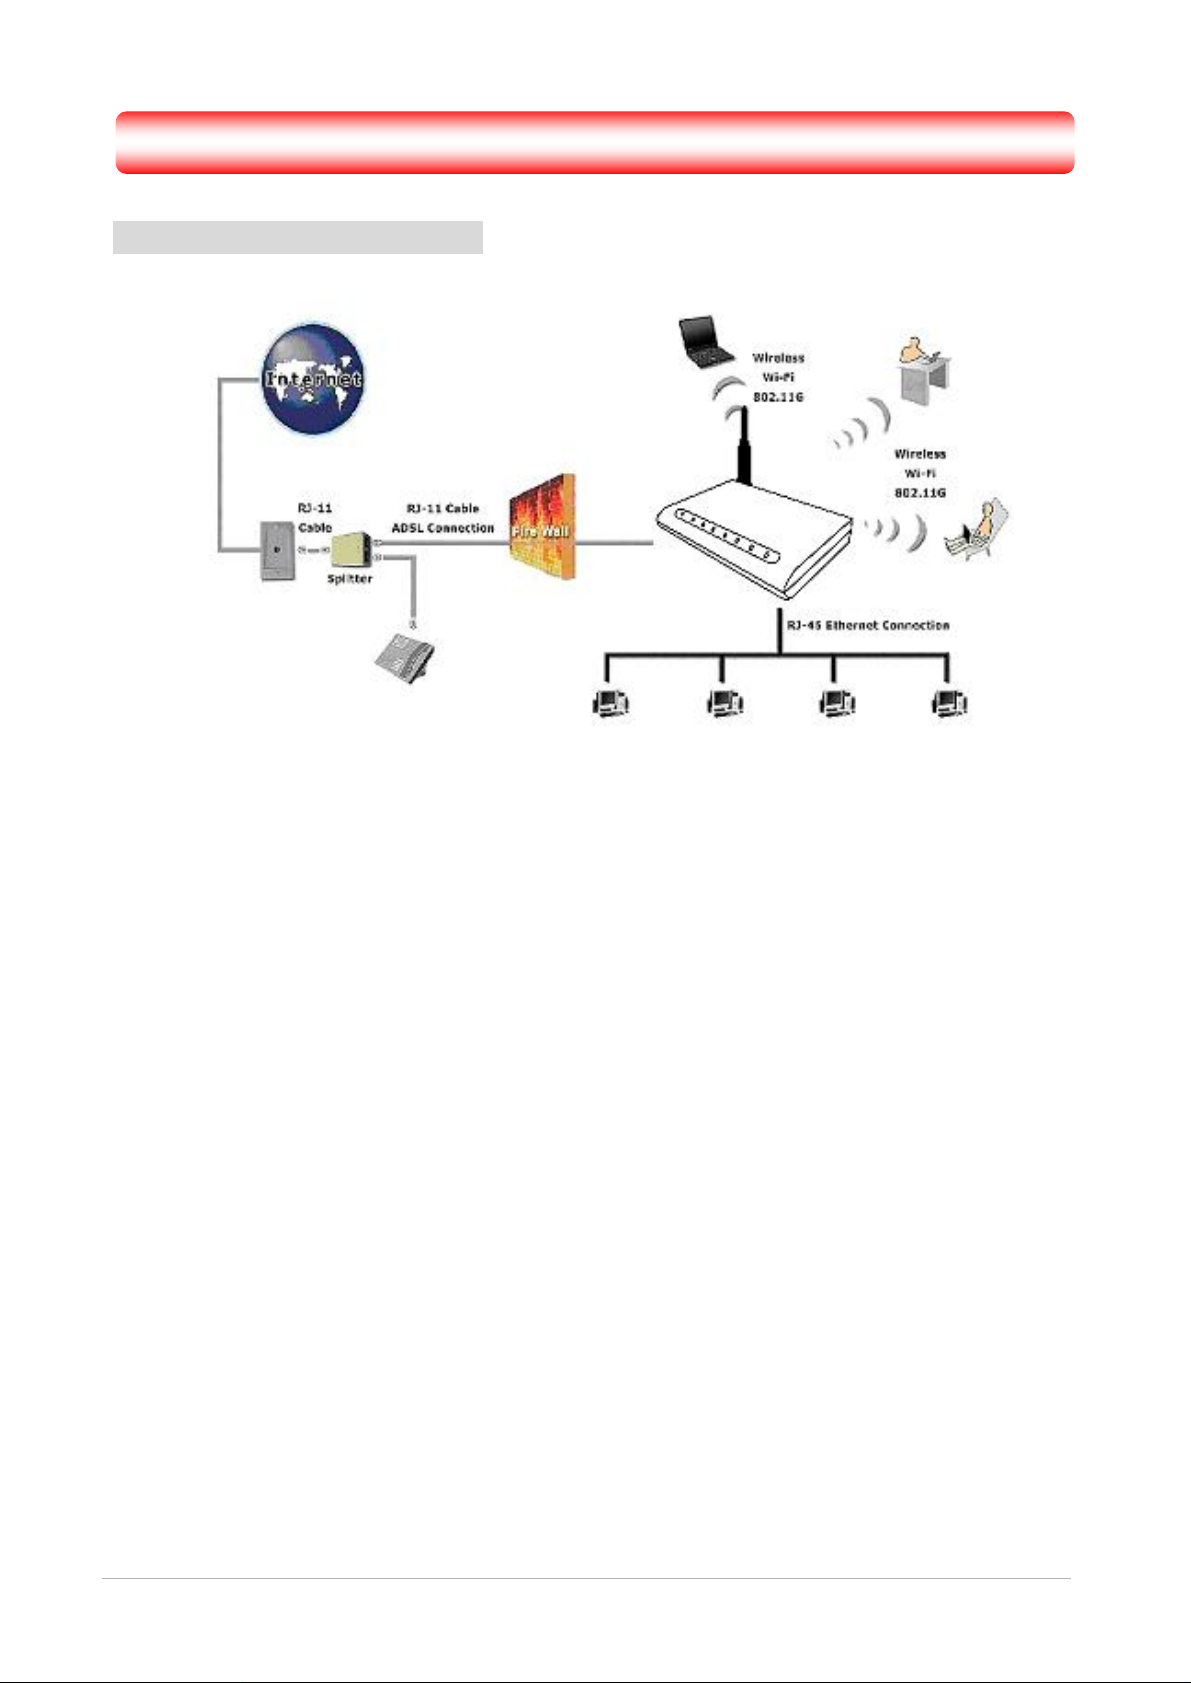
2.1 Connection Mechanism:
This section describes the hardware connection mechanism of your Etec 4 Port 11g Wireless
ADSL2/2+ Router.
Before you can establish an Internet or Wireless connection through your Etec 4 Port 11g Wireless
ADSL2/2+ Router, make sure you have the following:
1. A Computer/Notebook with an installed Ethernet Adaptor and an Ethernet Cable, OR
2. A Computer/Notebook with a Wireless-b or Wireless-g Wireless adaptor installed (For Wireless
Access).
3. An ADSL service account and configuration information provided by your Internet Service
Provider (ISP). You should need only a Username and Password, but you can check with
your ISP to see if you require any of the other following configuration parameters to connect
your Etec 4 Port 11g Wireless ADSL2/2+ Router to the Internet:
a. ISP Username and Password
b. VPI/VCI parameters
c. Multiplexing Method
d. Host and Domain Names
e. ISP Domain Name Server ( DNS ) Address
f. Fixed or Static IP Address.
4 Ports 11g Wireless ADSL2/2+ Router
5
2.2 Connection Steps:
!
!
!
The following are the steps to properly connect your Etec 4 Port 11g Wireless ADSL2/2+ Router:
1. Turn off your computer.
2. If you do not have an ADSL faceplate installed by your service provider, you must ensure ADSL
splitters (also called microfilters or filters) are fitted to all telephone sockets in use.
3. Connect the supplied ADSL RJ-11 cable from the splitter/filter of your chosen telephone socket
(or ADSL faceplate if you have one) to the ADSL Port of your Etec 4 Port 11g Wireless
ADSL2/2+ Router.
4. Connect the Ethernet cable (RJ-45) from one of the Ethernet ports of your Etec 4 Port 11g
Wireless ADSL2/2+ Router to the Network Adaptor in your computer.
5. Connect the Power adaptor to the Etec 4 Port 11g Wireless ADSL2/2+ Router and plug the other
end into a Power outlet. Power up the unit.
6. Turn on your computer.
7. Refer to the next chapter to setup or configure your system’s Network Adaptor.
8. Refer to Chapter 4 to configure your Etec 4 Port 11g Wireless ADSL2/2+ Router.
The Power light will come on after turning on the Etec 4 Port 11g Wireless
ADSL2/2+ Router.
Auto and self-diagnostic process will turn the LED indicators ON and OFF
during power up.
Use the Power Adaptor exclusively in combination with the equipment
supplied and do not use any other kind of power adaptor for the equipment.
All the configuration/setting procedures described in this Quick Start Guide
are run through RJ-45 Ethernet connection. For Wireless setting, please
refer to the user manual on the CD for details.
4 Ports 11g Wireless ADSL2/2+ Router
6
 Loading...