

Page 1
32E40
Ver 2.0
USER’S MANUAL
32” LED TELEVISION
For technical support, the ETEC Technical Support Center is available 24-hours a day, 7days a week for technical assistance or troubleshooting. To contact us by phone, please
call 1-800-936-1168.
Page 2
Important Safety Instructions
1. Read these instructions.
2. Keep these instructions.
3. Heed all warnings.
4. Follow all instructions.
5. Do not use this apparatus near water.
6. Clean only with dry cloth.
7. Do not block any ventilation openings. Install in accordance with the manufacturer’s instructions.
8. Do not install near any heat sources such as radiators, heat registers, stoves, or other apparatus (includ-
9. Do not defeat the safety purpose of the polarized or grounding-type plug. A polarized plug has two blades
with one wider than the other. A grounding type plug has two blades and a third grounding prong. The
consult an electrician for replacement of the obsolete outlet.
10. Protect the power cord from being walked on or pinched particularly at plugs, convenience receptacles,
and the point where they exit from the apparatus.
paratus. When a cart is used, use caution when moving the cart / apparatus combination to avoid injury
from tip-over.
13. Unplug this apparatus during lightning storms or when unused for long periods of time.
damaged in any way, such as power-supply cord or plug is damaged, liquid has been spilled or objects
have fallen into the apparatus, the apparatus has been exposed to rain or moisture, does not operate
normally, or has been dropped.
15. WARNING: To Reduce The Risk Of Fire Or Electric Shock, Do Not Expose This Apparatus To Rain Or
Moisture.
shall be palced on the apparatus.
17. The mains plug or appliance coupler shall remain readily opeable.
18. Use in outdoor: This TV is not designed for outdoors installation. Do not expose the TV to rain, as it may
become damaged.
CAUTION
RISK OF ELECTRIC SHOCK
DO NOT OPEN
Safety:
TO REDUCE THE RISK OF ELECTRICAL SHOCK DO NOT REMOVE COVER
(OR BACK). NO USER SERVICEABLEPARTS ARE INSIDE. REFER TO QUALIFIED
SERVICE TECHNICIAN ONLY.
intended to alert the user to thepresence of uninsulated “dangerous voltage” within the product’s
Instruction: The exclamation point within an equilateral triangle is intended to alert the user to the
presence of important operating and servicing instructions in the literature accompanying the
appliance.
to constitute a risk of electric shock to the users.
32E40-1
Page 3

Safety Instructions
Please read these instructions carefully.
This product complies with all applicable US federal safety requirements, as well as those of the Canadian
Standards Association.
1. Cleaning
Always unplug the TV before cleaning. Do not use liquid or aerosol cleaners. Use a soft, slightly damp cloth to
clean.
2. Water and Moisture
Do not use this TV near water. Avoid using this TV in an excessive
3. Stand
This TV should always be placed on a solid, sturdy surface.
4. Ventilation
To prevent overheating, do not block or obstruct the vent openings on the TV’s back panel. Also, avoid placing this
TV in a confined area with poor air flow.
5. Power Sources
This TV should be operated only from the type of power source indicated on the marking label. If you are not sure of
The type of power supply to your home, consult your electronics retailer or local power company.
ly damp environment.
6. Power Cord Polariza
This TV is equipped with a three-wire grounding type plug,a plug with a third (grounding) pin. As a safety feature, this
plug will only t into grounded power outlet. If you are unable to insert the plug into the outlet, contact your electrician
to replace the obsolete outlet. Do not defeat the safety purpose of the grounding-type plug.
7. Power Cord Protection
Power-supply cords should be routed so that they are not likely to be walked on or pinched by items placed upon or
against them, Pay particular attention to cords at plugs,conve
the TV.
8. Lightning
To protect the TV during a lightning storm, or when it is left unattended and unused for long periods of time,unplug it
from the wall outlet and disconnect the antenna or cable system. This will prevent damage to the TV from lightning
and power-line surges.
tion
nience receptacles, and the point where they exit from
32E40-2
Page 4
Safety Instructions
9. Outdoor Antenna Grounding
If an outside antenna or cable system is connected to the TV be sure the antenna or cable system is grounded so
as to provide some protection against voltage surges and built up static charges. Article 810 of the National Electrical Code (U.S. A.), ANSI / NFPA 70 provides information with regard to proper grounding of the mast and supporting
structure, grounding of the lead-in wire to an antenna discharge unit, size of grounding conductors, location of antenna-discharge unit, connection to grounding electrodes, and requirements for the grounding electrode.
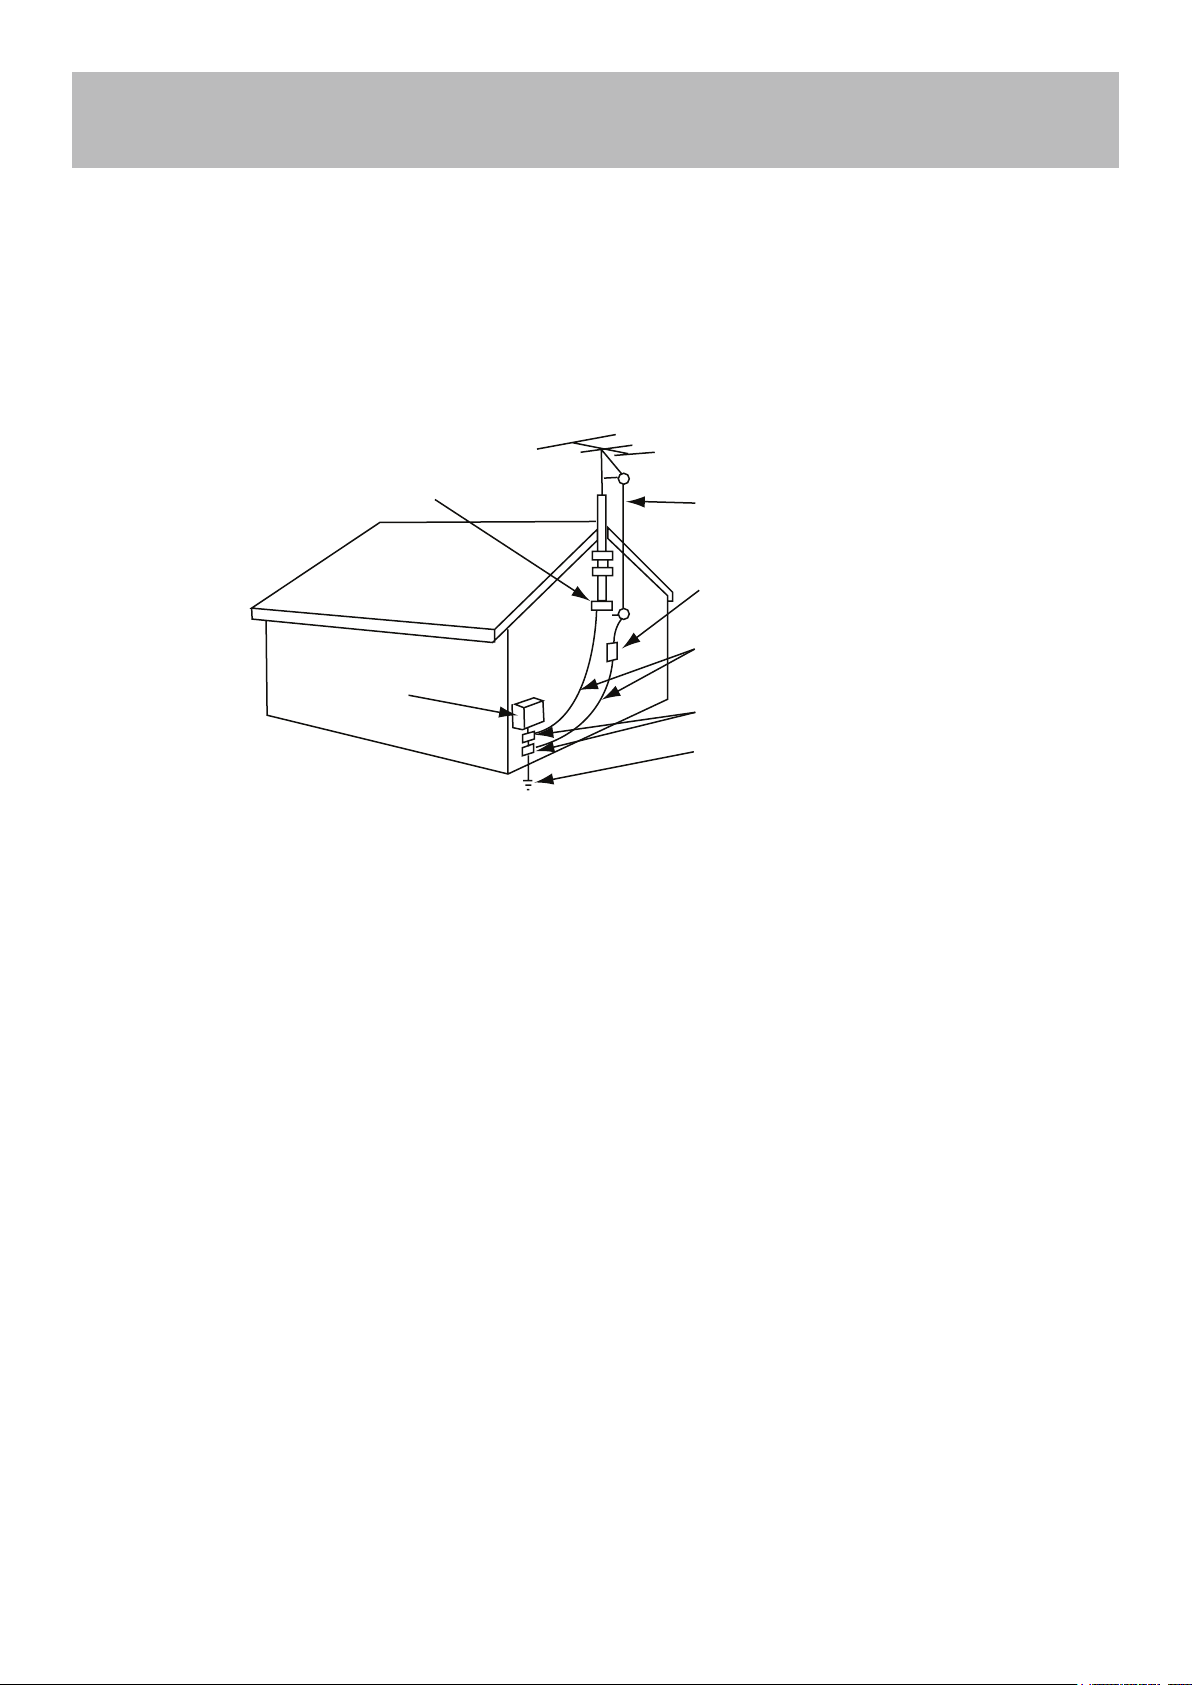
Example of Grounding According to National
Electrical Code Instructions
Ground Clamp
Electric Service
Equipment
NEC - National Electrical Code
10. Power Lines
An outside antenna system should not be located in the vicinity of overhead power lines or other electric light or power
circuits, or where it can fall on to power lines or circuits. When installing an outside antenna system, extreme care
should be taken to keep from touching such power lines or circuits as contact with them might be fatal.
11. Overloading
Do not overload wall outlets and extension cords as this can result in a risk of re or electric shock.
12. Object and Liquid Entry
Never push objects of any kind into this TV through openings as they may touch dangerous voltage points or short-out
parts that could result in a re or electric shock. Never spill liquid of any kind on or inside the TV.
Antenna Lead in Wire
Antenna Discharge Unit
(NEC Section 810-20)
Grounding Conductor
(NEC Section 810-21)
Ground Clamps
Power Service Grounding
Electrode System (NEC
Art 250, Part H)
13. Servicing
Do not attempt to service this TV yourself as opening or removing covers may expose you to dangerous voltage or
other hazards. Refer all servicing to a qualied service technician.
14. Damage Requiring Service
Unplug from the wall outlet and refer servicing to a qualied service technician under the following conditions:
a. If the power-supply cord or plug is damaged.
b. If liquid has been spilled, or objects have fallen into the product.
c. If the TV has been exposed to rain or water.
d. If the TV does not operate normally by following the operating instructions. Adjust only those controls that are
covered by the operating instructions as an improper adjustment of other controls may result in damage and will
often require extensive work by a qualied technician to restore the product to its normal operation.
e. If the TV has been dropped or the cabinet has been damaged.
f. If the TV exhibits a distinct change in performance.
32E40-3
Page 5

Safety Instructions
15. Replacement Parts
When replacement parts are required, be sure that only an authorized service technician has used replacement parts
specied by Apex Digital or have the same characteristics as the original part. Unauthorized substitutions may result in
re, electric shock, or other hazards and void any warranty.
16. Safety Check
Upon completion of any service or repairs to this TV, ask the service technician to perform safety checks to determine
whether the product is in proper operating condition.
17. Wall Mounting
The TV should be mounted to a wall only by a professional. The TV may slide or fall, causing serious injury to a child
or adult, and serious damage to the product. Warranty shall be voided.
18. Heat
The TV should be situated away from heat sources such as radiators, heat registers, stoves, or other products
(including ampliers) that produce heat.
NOTE TO CABLE / TV INSTALLER:
This reminder is provided to call the CATV system installer’s attention to Article 820-40 of the National Electric
Code(U.S.A.). The code provides guidelines for proper grounding and, in particular, species that the cable ground
should be connected to the grounding system of the building, as close to the point of the cable entry as practical.
FCC REGULATORY INFORMATION:
This television has been tested and found to comply with the limits for a Class B digital device, pursuant to Part 15
of the FCC Rules. These limits are designed to provide reasonable protection against harmful interference in a residential installation. This television generates, uses and can radiate radio frequency energy and, if not installed and used
in accordance with the instructions, may cause harmful interference to radio communications. However, there is no
guarantee that interference will not occur in a particular installation. If this television does cause interference to other
electronic equipment, which can be determined by turning the television off and on, then the user is encouraged to try
to correct the interference by one or more of the following measures:
- Reorient or relocate the receiving antenna.
- Increase the separation between the equipment and television.
- Connect the equipment into an outlet on a circuit different from that to which the television is connected.
- Consult your dealer or an experienced radio / TV technician for assistance.
Any changes or modications not expressly approved by the party responsible for compliance may void the user’s
authority to operate the equipment.
32E40-4
Page 6

Table of Contents
Important Safety Instructions .........................................................................................................................................1
Table of Contents ..........................................................................................................................................................5
Introduction ....................................................................................................................................................................6
Installing the Base .........................................................................................................................................................7
Remote Control
Battery Install .................................................................................................................................................................8
Overview .......................................................................................................................................................................9
TV Overview
Front & Side Panel ......................................................................................................................................................11
Rear Panel .................................................................................................................................................................12
Installation
Connection to Antenna & Cable / Satellite Box ...........................................................................................................13
Connection to HDMI Input ...........................................................................................................................................14
Connection to Component YPbPr Input ......................................................................................................................15
Connection to Composite Input ...................................................................................................................................16
Connection to a Personal Computer ...........................................................................................................................17
Connection to a Home Theater System ......................................................................................................................18
TV Setup
Initial Setup Wizard .....................................................................................................................................................19
TV Channel Setup & Channel Auto Scan ....................................................................................................................20
Picture Setting
Contrast .......................................................................................................................................................................21
Brightness ...................................................................................................................................................................21
Color ............................................................................................................................................................................21
Tint ...............................................................................................................................................................................21
Sharpness ...................................................................................................................................................................21
Color Temp. .................................................................................................................................................................21
Audio Settings
Bass ............................................................................................................................................................................22
Treble ..........................................................................................................................................................................22
Balance .......................................................................................................................................................................22
Surround ......................................................................................................................................................................22
SPDIF Type .................................................................................................................................................................22
Audio Language ..........................................................................................................................................................22
Date & Time Settings .............................................................................................................................................23
Setup Settings
Menu Languages .........................................................................................................................................................24
Transparency ...............................................................................................................................................................24
Zoom Mode .................................................................................................................................................................24
Noise Reduction ..........................................................................................................................................................24
Restore Default ...........................................................................................................................................................24
Closed Captions........................................................................................................................................................25
Advanced Settings ...................................................................................................................................................26
Parental Control .......................................................................................................................................................27
Channel Settings
Favorite .......................................................................................................................................................................29
Show / Hide .................................................................................................................................................................29
Channel Label .............................................................................................................................................................29
Aspect Modes ............................................................................................................................................................30
USB Modes .................................................................................................................................................................31
Specications ..........................................................................................................................................................32
Troubleshooting .......................................................................................................................................................33
32E40-5
Page 7
Introduction
Please refer to this guide whenever you have questions about features and fuctions. This instruction book will get
you up and running with the best possible connection type for your devices. Enjoy!
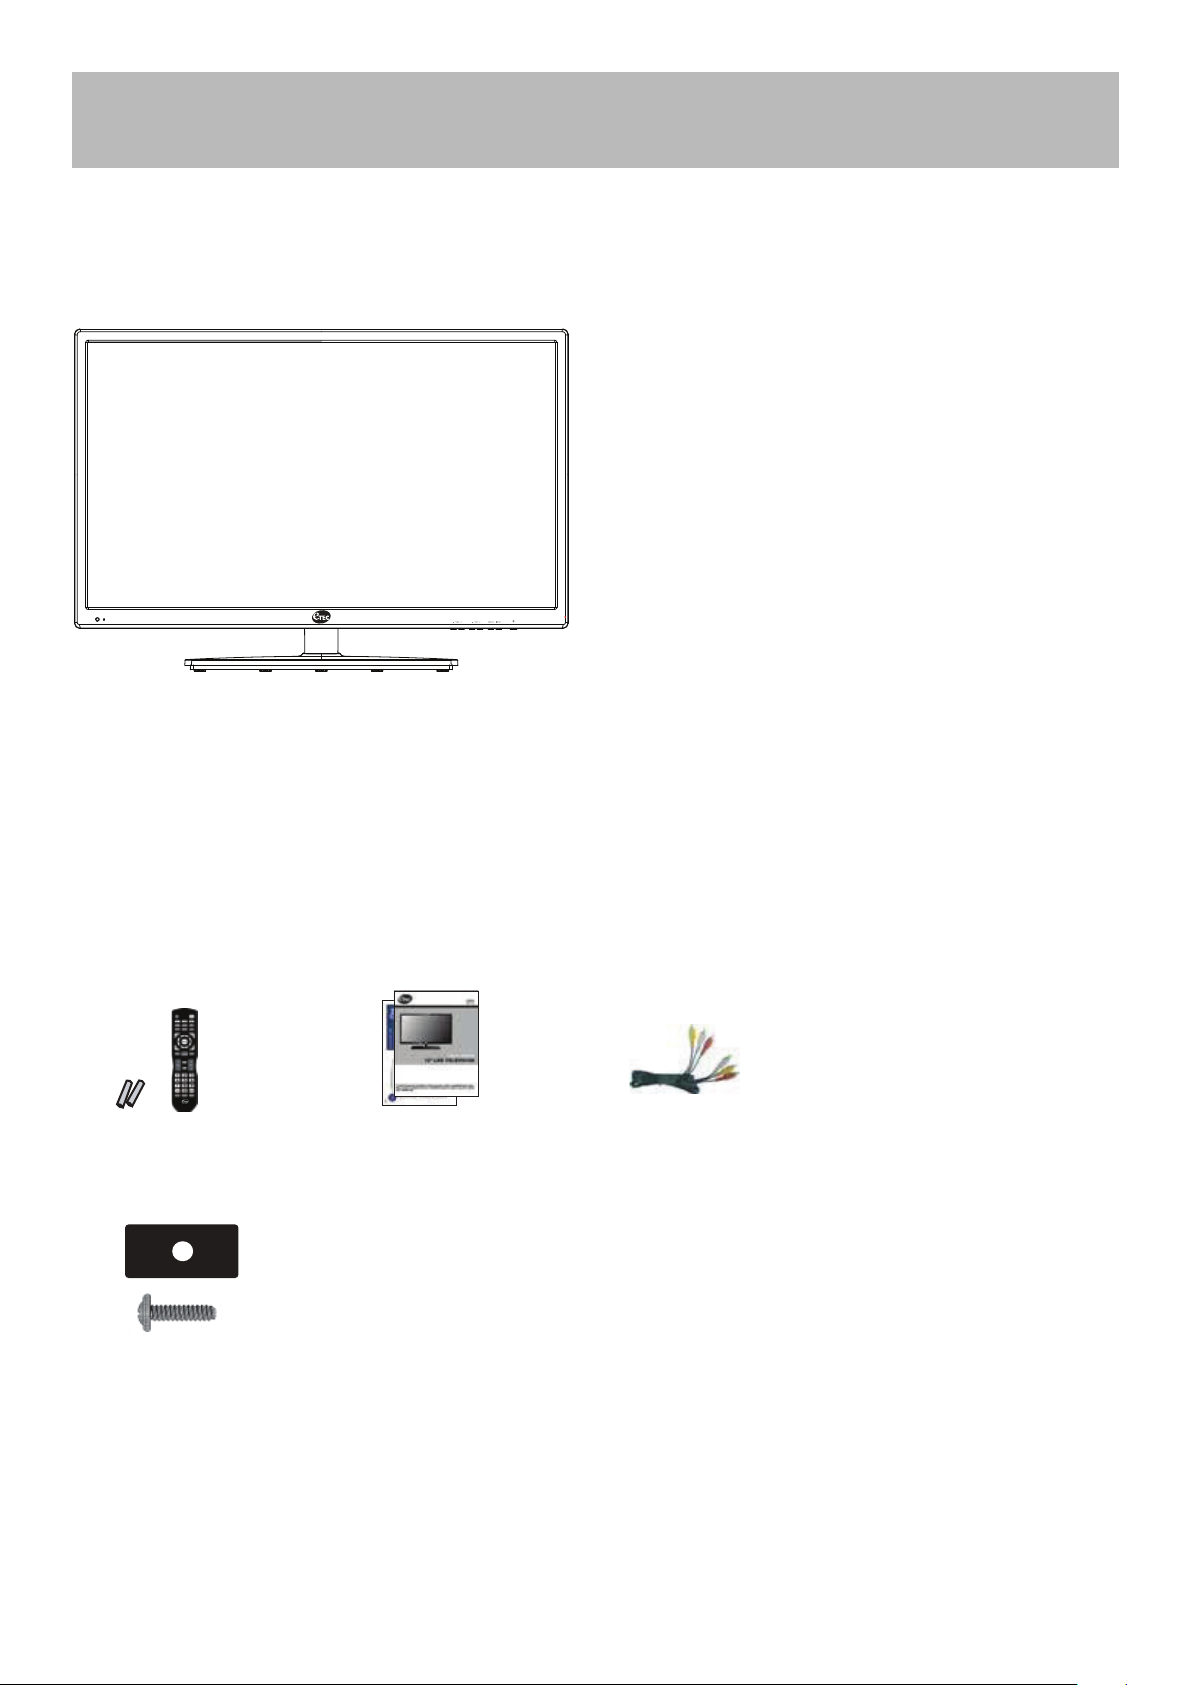
What’s In The Box
The 32E40 package includes the following items. Save the carton & packing for future shipping
• Remote Control
• AAA Batteries (2)
• Quick Start Guide
• User Manual
• Child Safety
• Audio / Video Cable
• Pedestal Base
• Screws of Pedestal Base (6)
32E40
• Remote Control
• AAA
Batteries x 2
• User manual
• Quick Start Guide
• Child Safety
• Audio / Video Cable
• Pedestal Base
• Screw of Pedestal
Base(6)
Wall Mount Information
This TV uses a 100x100 VESA mounting bracket attachment pattern. Please take this information with you when
purchasing a wall mount for this TV.
32E40-6
Page 8
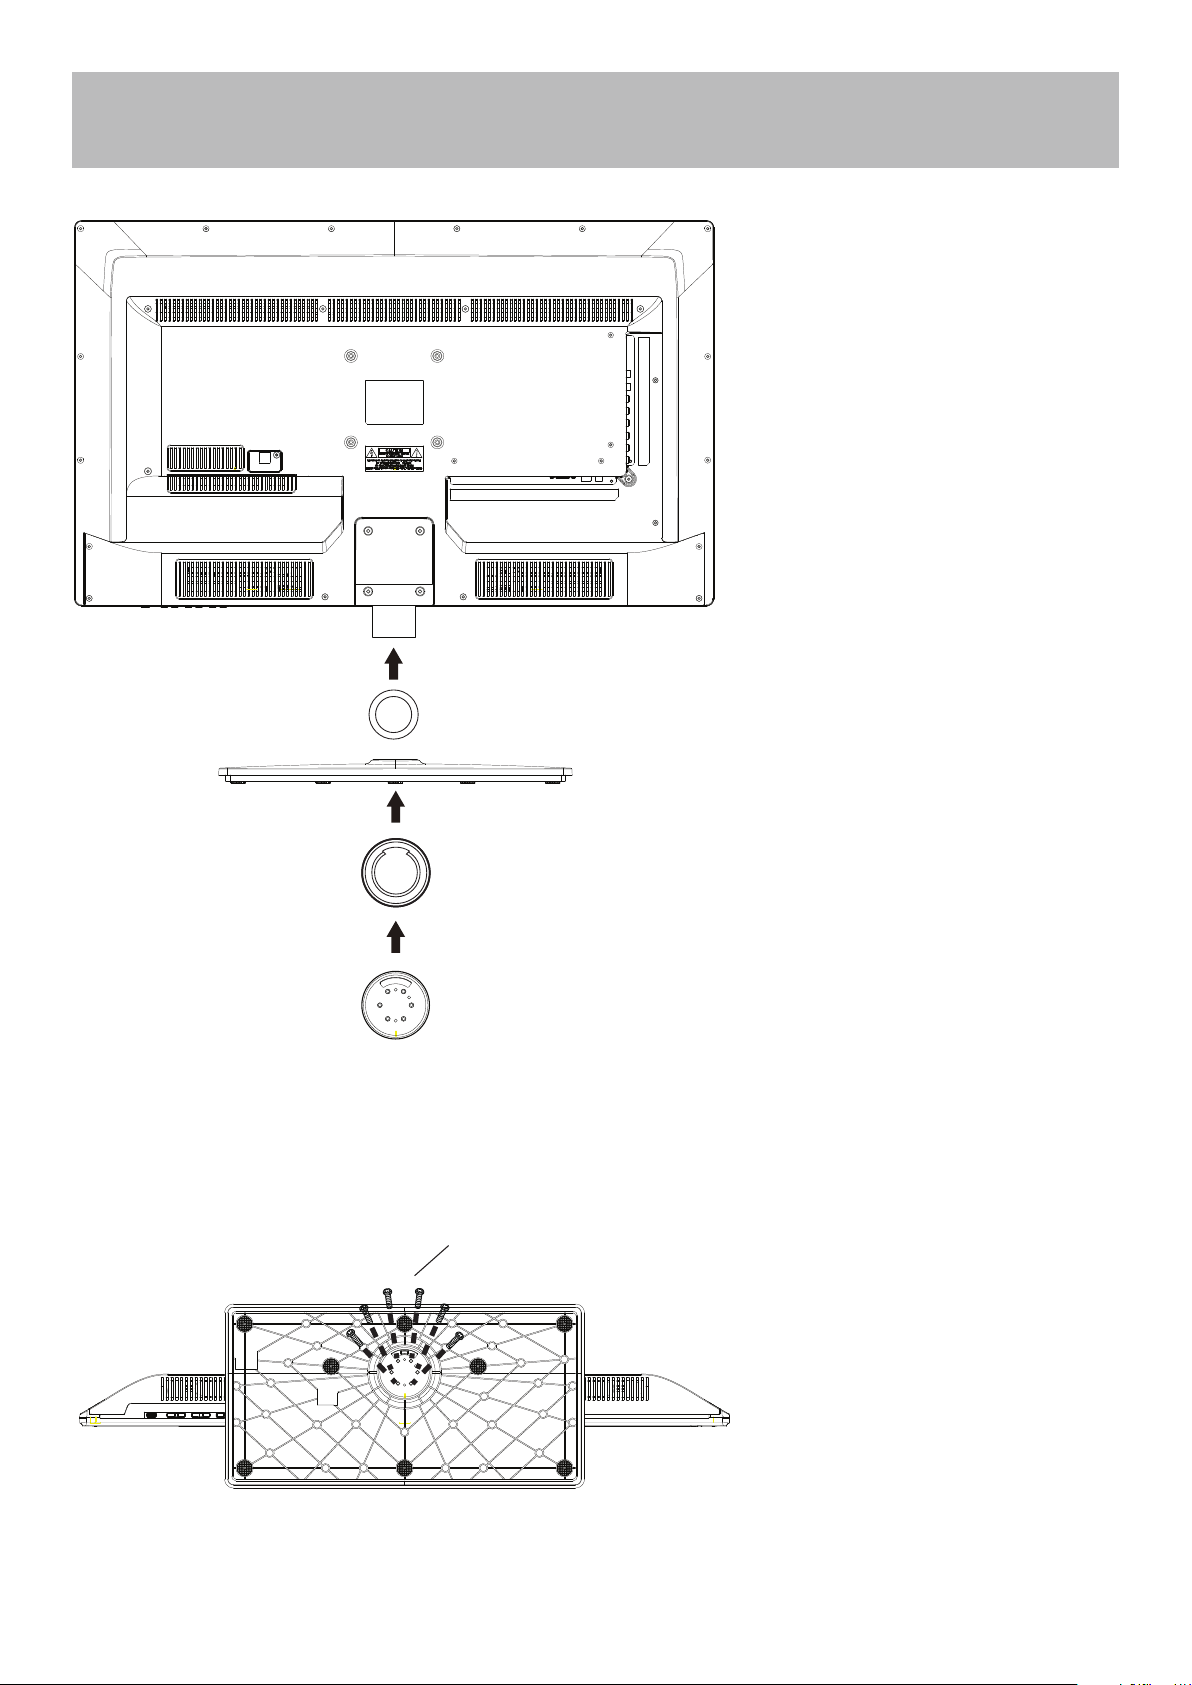
Installing the Base
Place the TV face down
on a soft cloth or cushion.
Position gaskets as
pictured.
(M4*12)x6
Insert 6 screw(provided)
into the holes along the
pedestal base.
32E40-7
Page 9
Remote Control
30 30
IR Receiver
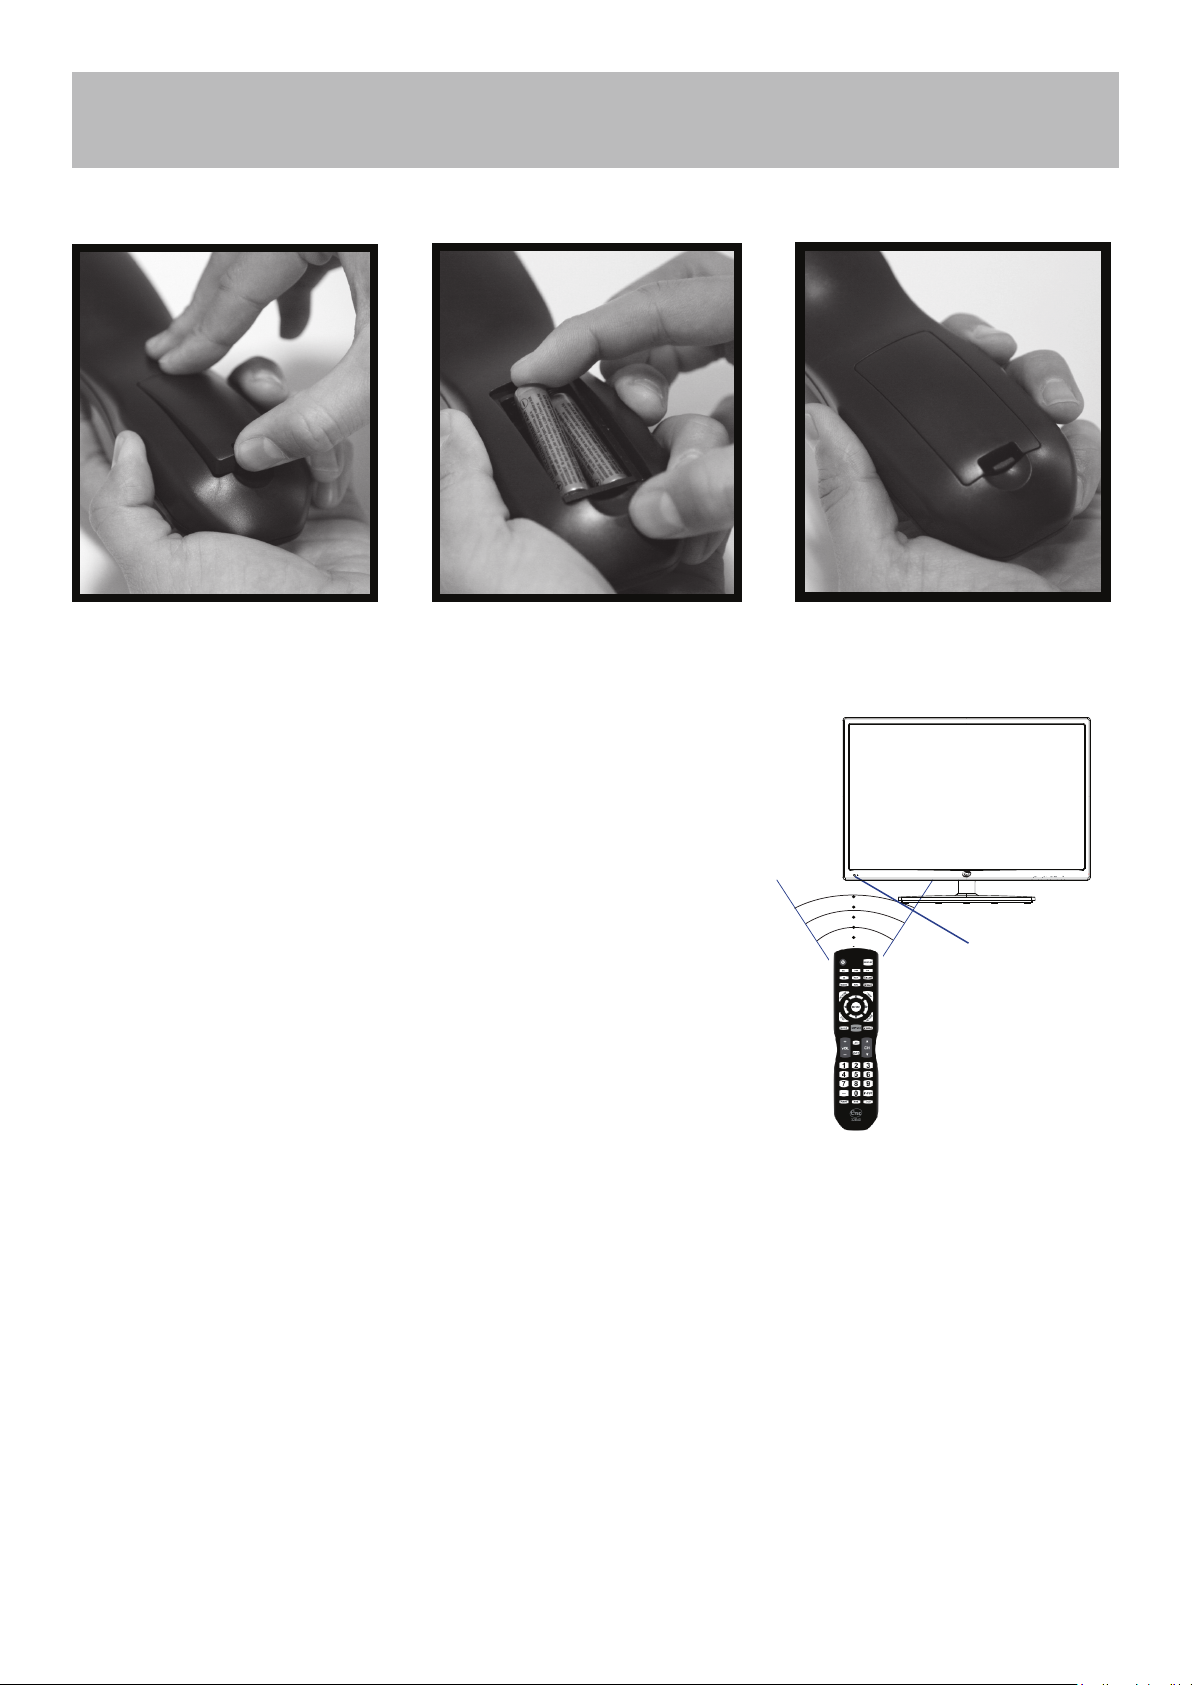
Battery Install
Your remote control handset is powered by two (2) AAA type batteries
• Turn the remote over and remove
battery cover.
• Place two (2) “AAA” batteries into
the battery compartment with the “+”
and “-“ ends facing as indicated.
• Effective remote range is approximately 16 feet at an
angle of no greater than 30° to the left / right or 20° up /
down to the IR sensor.
• To avoid possible damage from battery chemical
leakage, remove the batteries if you do not plan to use
the remote for an extended period of time. Do not mix
batteries of different age and / or type. Always discard
used batteries safely.
• Do not expose the remote control to liquids, direct sun-
light or sources of excessive heat.
• The IR receiver on the TV will not work properly if the set
is in direct sunlight .
NOTE: Improper use of batteries can result in a chemical
leakage or explosion.
• Replace the cover
Cable / Satellite Remote Control Codes:
NOTE: The remote control from your Cable/Satellite provider can be programmed to operate most
of the major functions of this TV model which include: POWER, INPUT / SOURCE, VOLUME +,
VOLUME - , CHANNEL +, CHANNEL - , SELECT/OK/ENTER (based on your remote), and NUMBER
buttons. For non-major TV functions not listed, use the remote control included with this TV.
To program your Cable / Satellite remote to operate this ETEC TV, follow the programming instruc-
tions included with your providers’ remote and use the following codes.
Comcast or Direct TV : 10030
AT & T (U-verse) : 1043
Dish Network : 506
RCA Universal : 0030
32E40-8
Page 10
Remote Control
Overview
32E40
32E40-9
Page 11
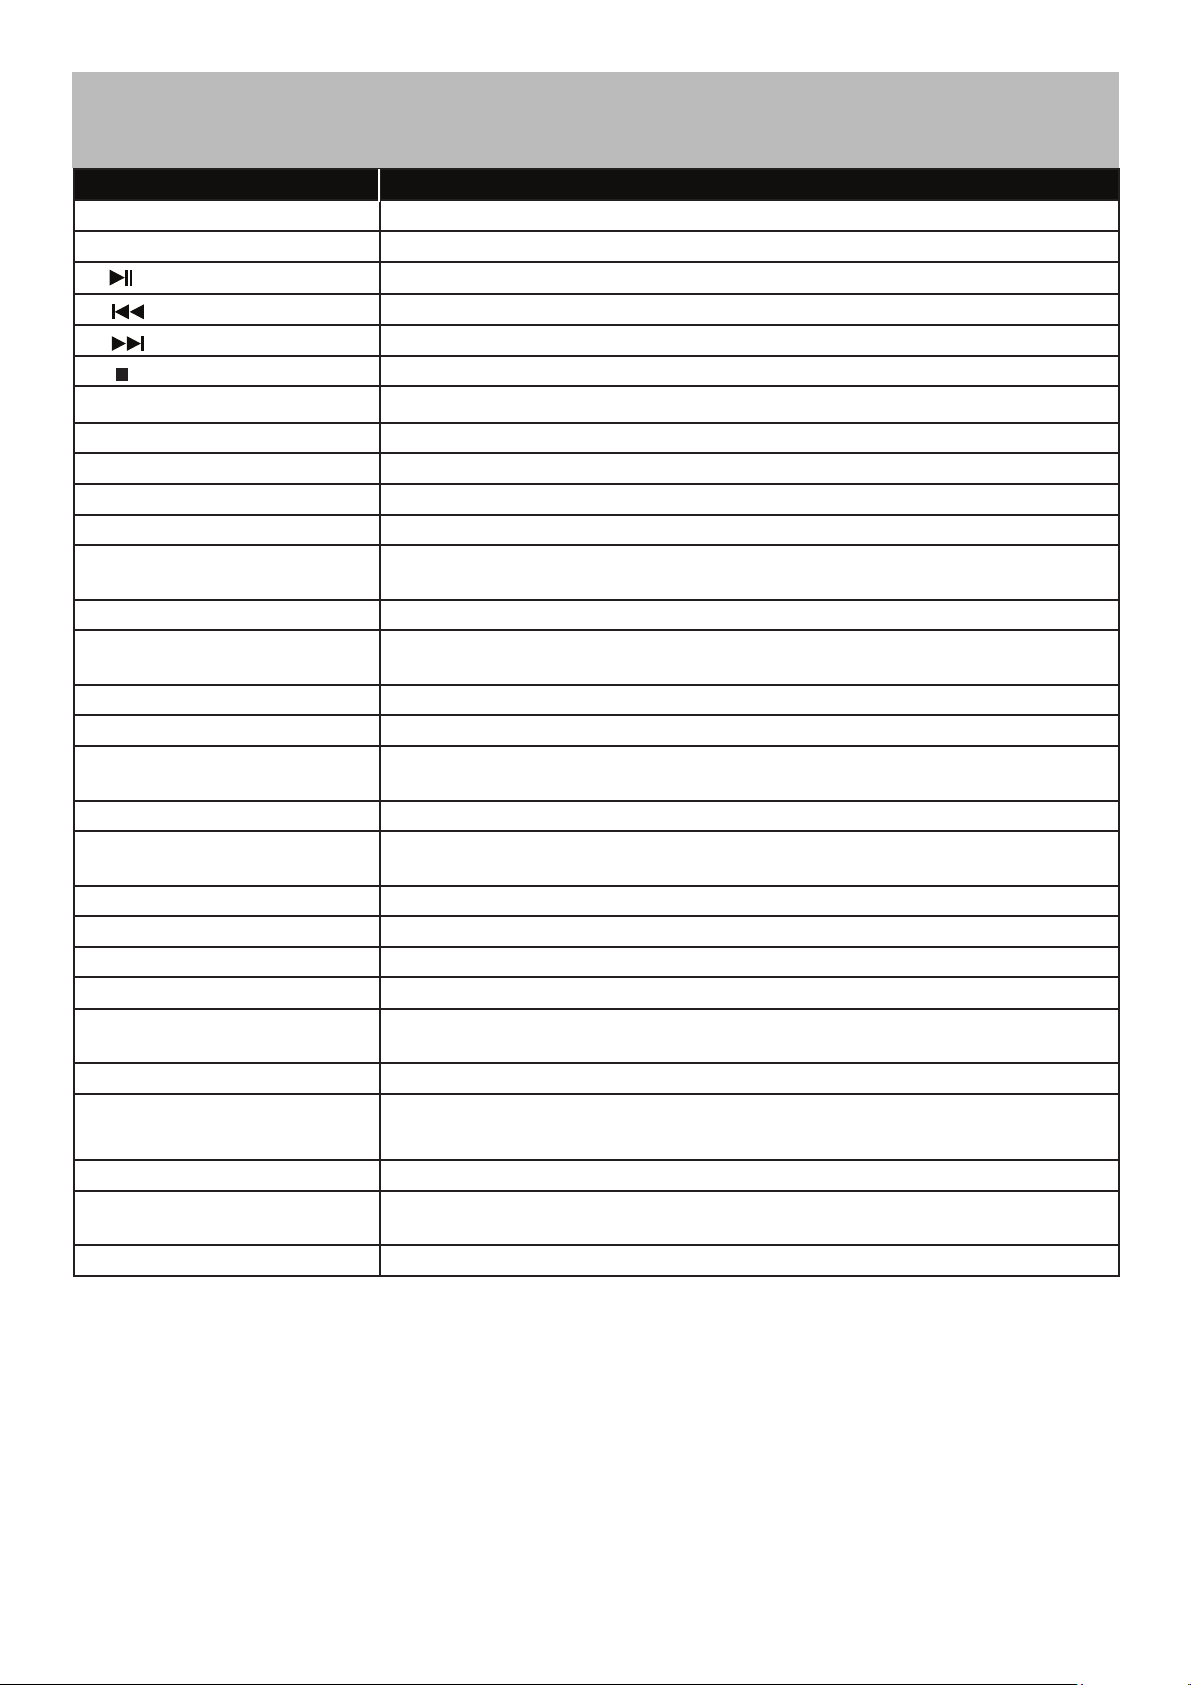
Remote Control
Button Function
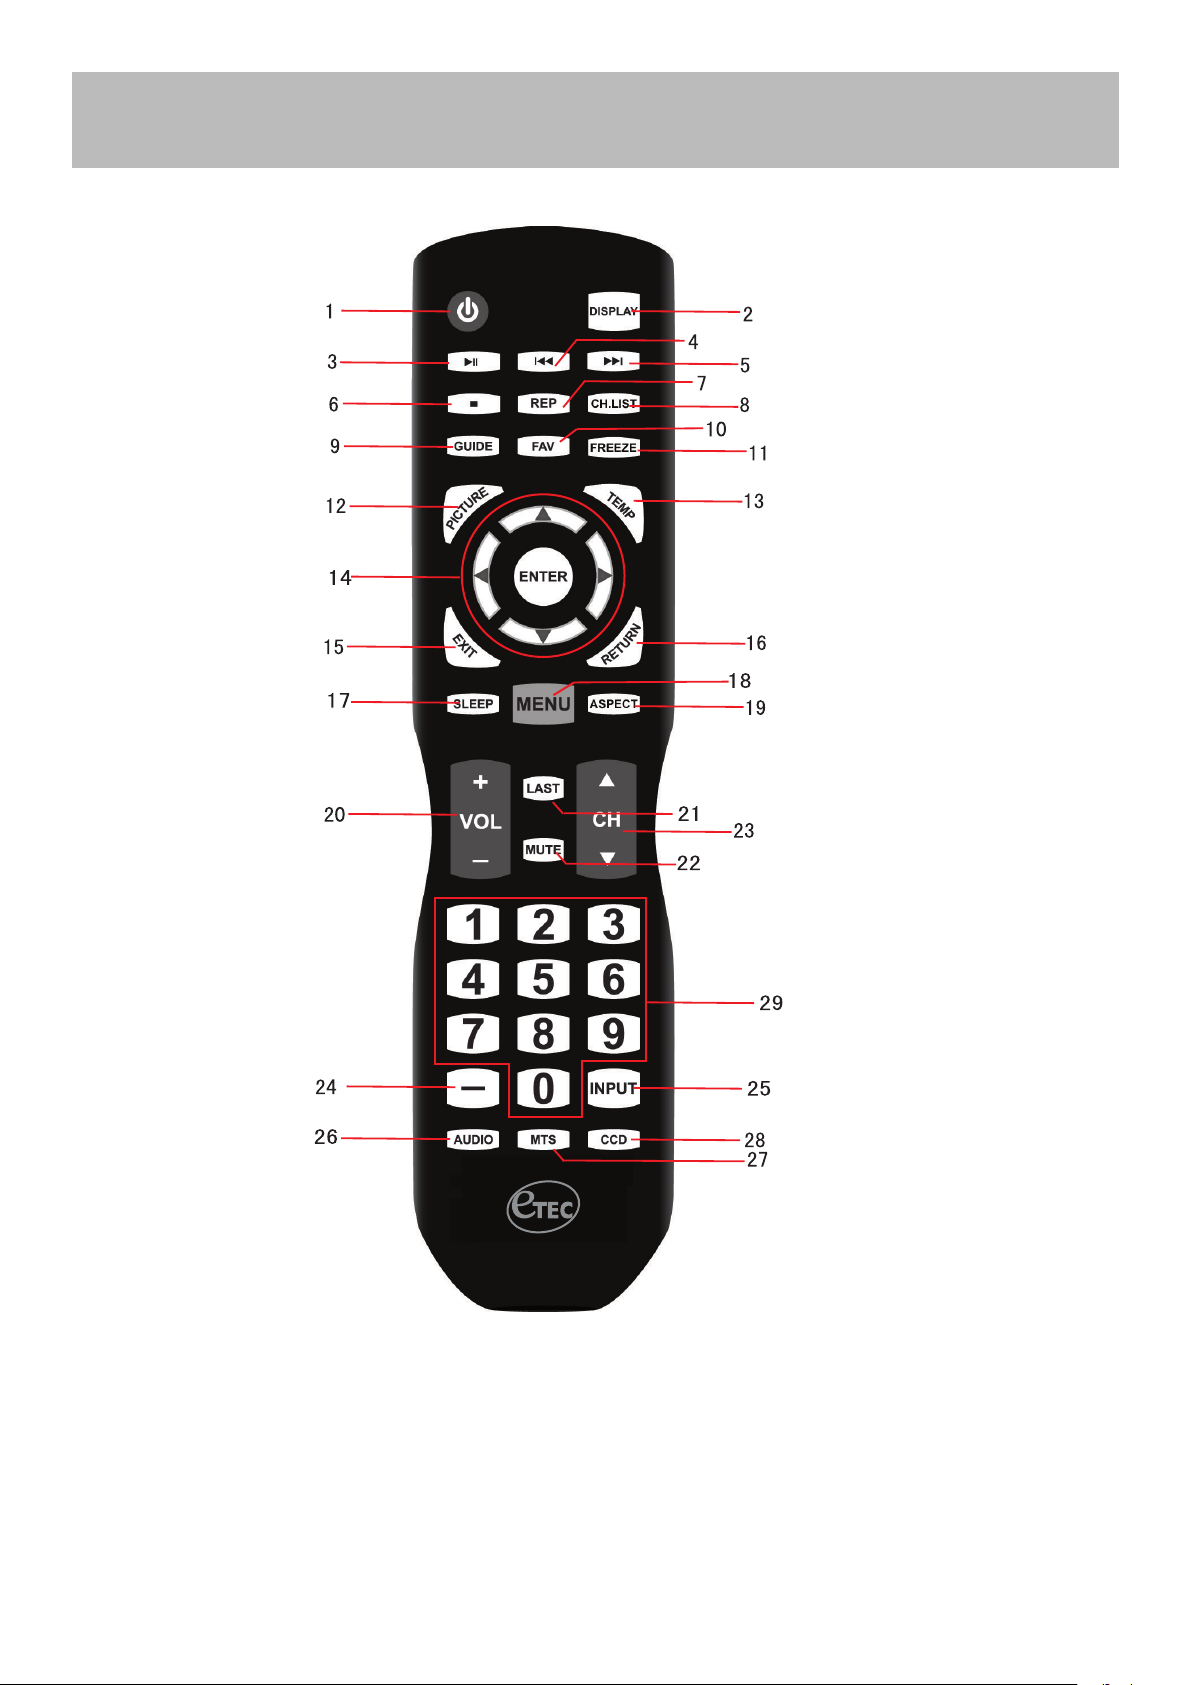
1. POWER Turn the display ON or OFF (Standby).
2. DISPLAY Provides program information currently viewed.
3.
4. PREVIOUS (USB)
5. NEXT (USB)
6. STOP (USB)
7. REP REPEAT (USB)
8. CH.LIST Press to display a list of channels saved in the TV tuner memory.
9. GUIDE Press to review scheduled programming for the currently viewed channel.
10. FAV Press to display a listing of your favorite TV channels. (Page. 29)
11. FREEZE Pause and still-frame the current image on the display. Press again for live TV.
12. PICTURE Select from various preset picture modes: Dynamic > Standard > Mild > User.
13. TEMP Select the Color Temperature COOL > NORMAL > WARM. (Page. 21)
14. ARROWS / ENTER
15. EXIT Press to exit a displayed menu.
16. RETURN Press to return to the previous menu.
17. SLEEP Press to activate the Sleep function. The TV will automatically turn off after; 5 >
18. MENU Press to display the Main menu.
19. ASPECT Select the viewable display aspect options: Normal, Wide, Zoom, or Cinema.
20. VOLUME (+ / -) Adjust the volume up (+) or the volume down (-).
21. LAST Press to switch between the current channel and previously viewed channel.
22. MUTE Press to temporarily turn off the TV audio. Press again to resume.
23. CHANNEL( )
24. NUMBERS / DASH Select desired TV channel directly. For example: to select digital channel 4-1,
25. INPUT Press to display all of the input sources on screen. (Page. 14-17)
26. AUDIO Press to select from various preset audio modes: USER> STANDARD> MUSIC>
PAUSE (USB)
(Page. 21)
Press the navigation buttons for moving through the menu options. Press the
ENTER button to select / conrm.
10 > 15 > 30 > 45 > 60 > 90 > 120 > 180 > 240> (minutes)> OFF.
(Page. 30).
Change the channel up or down.
press “4”, press “-”, and press “1” = (4-1).
MOVIE (page. 22)
Overview
27. MTS Press to select a program’s second audio channel (if available). (page. 22)
28. CCD Press to select closed caption subtitles (if available) Off> On > CC on mute. (Page.
25)
29. NUMBER KEYS Press number keys to enter channel numbers.
32E40-10
Page 12

TV Overview
Input Source
VGA
USB
HDMI1
HDMI2
HDMI3
IR Receiver
A soft blue light illuminates when the
television power is on.
Front & Side Panel
1. POWER - Press the POWER button to turn the TV ON/ OFF (standby). The screen image will appear within a few seconds, and the Blue LED will turn off.
2. INPUT - After connecting your DVD, cable box, etc. select the appropriate input source to view. Press the
SOURCE button to display the input options.Press the CH+ / CH- buttons to highlight the input source and
press the VOL+ button to select.
3. MENU - Press the MENU button to display. Press VOL+ to select from the 6 menu options available.
Press the CH+ / CH- buttons to select a feature from the selected menu then press the VOL+/VOL- buttons
to adjust the volume settings.
4. Channel (-CH+) - Press the CH- / CH+ buttons to select a channel in the TV mode.
5. Volume (-VOL+) - Press the VOL- / VOL+ buttons to adjust the volume up or down.
32E40-11
Page 13

TV Overview
VGAHDMI3HDMI2HDMI1
RF
PC AUDIO
EARPHONE
COAXIAL OUT
V L R Y Pb Pr L R
AV
YPBPR AUDIO OUT
Rear Panel
Wall Mounting
It is recommended that you
consult a professional before
mounting this TV a wall.
Use VESA 100 x 100 wall
mount hardware.
1.EARPHONE - Connect a strereo headphone (3.5mm – not included) for private listening.
NOTE: You must remove the
pedestal before wall mounting.
2. USB Input Port - Connect to portable USB device such as USB ash/hard drive (max storage capacity 400GB,
supports MP3 and JPEG.
3. HDMI - Connects to digital AV equipment that feature HDMI connectivity. HDMI supports enhanced high denition
video and up to 7.1-channel digital audio all from one cable. Recommended for best performance. HDMI cable not
included.
4. PC Audio Input (3.5mm) - 3.5mm audio cable (not included) for sound.
5. VGA Input - Connect an optional VGA cable (not included) from your personal computer.
6. RF - Connect an antenna or cable connection for television reception.
Note: Use an outdoor antenna, cable or satellite for best reception.
7. COAXLAL OUT - Connect an optional coaxial digital cable (not included) through a compatible amp/receiver to
enjoy superior audio sound.
8. AV - Connect a external device to the composite VIDEO(V) and AUDIO (L/R) out jacks found on most video equipment.
9. Component Y Pb Pr Input - Connect to an AV device that features component (Y Pb Pr) video and audio output
jacks.
10. R/L Audio Out- Connect to audio receiver.
32E40-12
Page 14

Connection to Antenna &
VGAHDMI3HDMI2HDMI1
RF
PC AUDIO
EARPHONE
COAXIAL OUT
Installation
Cable / Satellite Box
We recommend using a high quality roof top antenna, digital cable, or satellite box for the best display and
performance.
Note: Reception quality is determined by your location, geographical terrain, distance form the local
broadcast transmitter, and strength of antenna.
Connecting to POWER IN
• Connect the power cord to a properly grounded AC outlet, then to your TV.
Roof Antenna / Cable Outlet Installation
TV REAR PANEL
Connecting an antenna or basic cable
service:
• Connect the RF coaxial (75 ohm) cable from
existing roof top / in door antenna, or wall outlet.
• Finger tighten the Coaxial / RF Cable end to the
TV input on the rear panel.
• See pages 20 for TV setup and Channel Auto
Scan.
Coaxial / RF Cable (not included)
Ant./Cable
Wall Outlet
32E40-13
Page 15

Installation
VGA
HDMI3
HDMI2HDMI1
RF
PC AUDIO
COAXIAL OUT
Input Source
VGA
USB
HDMI1
HDMI2
HDMI3
Connection to HDMI Input
Digital Cable / Satellite Set Top Box
Optional HDMI cable ( not included )
TV REAR PANEL
Cable / Satellite
set top box
Coaxial / RF Cable
How to connect
• On the back of your device, connect the HDMI cable form HDMI out on device to HDMI in on rear panel.(pictured
above)
How to Use
• Press the INPUT button on the remote, the use the arrows to highlight HDMI 1,2, or 3. Press ENTER.
NOTE: You can also connect a digital cable/satellite box using an RF coaxial (75 ohm) cable. Most systems must be
set to Ch. 3 or 4 to display a picture.
(not included)
Blu-ray, HD DVD, or Game Console
TV REAR PANEL
EARPHONE
How to Connect
HDMI1
HDMI3HDMI2
Optional HDMI cable ( not included )
• On the back of your device, connect the HDMI cable form HDMI out on
device to HDMI in on rear panel.(pictured above)
How to Use
• Press the INPUT button on the remote, then use the arrows to
highlight HDMI 1, 2 , or 3. Press ENTER.
Digital set top box, gaming console,or
blu-ray w / HDMI interface
HDMI
32E40-14
Page 16

Connection to Component
TV REAR PANEL
Optional Component cables
(not included)
Digital set top box, gaming console or DVD
R
AV
L
V L R
Y
Pb
Pr L
R
AV
YPBPR AUDIO OUT
Input Source
VGA
USB
HDMI1
HDMI2
HDMI3
Installation
YPbPr Input
Connecting a device with a Component connection.
How to Connect
• Match and insert the green(Y), blue (Pb), and red(Pr) cables into
the device and TV. Next, connect the red and white (L & R) audio
cables.
*NOTE: The picture will be black & white if hooked up incorrectly.
You must hook up audio cables seperately.
How to Use
• Press the INPUT button on the TV remote. Then use the
arrow buttons to highlight component. Press ENTER.
32E40-15
Page 17

Installation
TV REAR PANEL
Audio Video Cable ( included )
Digital set top box, gaming console or DVD
V L R
Y Pb Pr
AV
YPBPR
Input Source
VGA
USB
HDMI1
HDMI2
HDMI3
Connection to Composite Input
Connecting a device with a Component connection.
How to Connect
• Match and insert the yellow, red, and white A / V cables into the
device and TV.
How to Use
• Press the INPUT button on the remote. Then use the arrow
buttons to highlight AV. Press ENTER.
32E40-16
Page 18

Installation
VGAHDMI3HDMI2HDMI1
RF
PC AUDIO
COAXIAL OUT
Input Source
USB
VGA
HDMI1
HDMI2
HDMI3
Connection to a Personal Computer
Connecting a PC or laptop
TV REAR PANEL
Recommended computer display resolution:1366x768@60 Hz
VGA & Audio Cable (not included)
How to Connect a PC
• Connect using a male to male VGA cable (not included) from your PC to
the “VGA” on the TV’s rear panel.
How to Connect Audio Sound
• Connect a 3.5mm audio cable (not included) from the computer’s mini
audio output jack to the audio input on the TV’s rear panel.
How to Use
• Press the INPUT button on the remote control. Use the buttons to
highlight PC. Press ENTER.
NOTE: If your PC uses a standard signal mode, the screen will adjust
automatically.
Connecting to an amplifer or home theater system
TV REAR PANEL
V L R Y Pb Pr L R
AV
YPBPR AUDIO OUT
Audio Cable (not included)
How to Connect to an amplier / surround sound system
• Match and insert the red and white audio cables from “Line Out”
on the TV to “Line In” on your amplier.
NOTE: The TV’s speakers will still output audio. You can turn the
TV’s speaker volume to 0 to prevent echoing.
32E40-17
Audio Amplier
Page 19

Connection to a Home
Optional digital cable
(not included)
TV REAR PANEL
L
R
AUDIO OUT
VGAHDMI3
RF
PC AUDIO
COAXIAL OUT
Surround
On
PCM
Front Left
Speaker
Front Right
Speaker
Center Channel
Dolby Surround
Connection Illustration
Optional cables
(not included)
Surround Left
Speaker
Surround Right
Speaker
Digital set top box, gaming
console or DVD
TV REAR PANEL
Dolby Prologic
Surround Receiver
V L R Y Pb Pr L R
AV
YPBPR AUDIO OUT
Installation
Theater System
Connection to a Home Theater Audio System
Connecting to a Home Theater System
Digital audio can deliver optimal 2 - channel stereo or 5.1 surround sound with
Five discrete full range channels plus a separate channel for a sub woofer.
Connect an optional digital cable directly to the television’s COAXIAL OUT
audio output and listen through all inputs except VGA. (VGA does not support
digital audio)
How To Setup Digital Output
• Press the MENU button on the remote control.
• Press the right arrow button to select Sound.
• Press the down arrow button to highlight Digital Audio output.
• Press to select Raw or PCM
Connecting to a Stereo Receiver / Amplier
How to Use (Video)
Press the appropriate INPUT button on the remote. Use ▼ ▲ arrow buttons to
highlight the input source to view and then press ENTER.
How to Use (Audio)
Select the appropriate input from your audio equipment.
*NOTE: Refer to the User Manual from your home theater equipment for recommended audio settings.
32E40-18
Page 20

TV Setup
Setup Wizard
Move Select Exit
Air/Cable
Menu Language English
Cable
Cable System AUTO
Auto Scan
Setup Wizard
Move Select Exit
Menu Language English
Auto Scan
Cable System AUTO
Air/Cable Cable
Setup Wizard
Move Select Exit
RF CH : 1
Found : 0
Setup Wizard
Move Select Exit
Air/Cable
Menu Language English
Cable
Cable System AUTO
Auto Scan
Initial Setup Wizard
Initial Setup Wizard
The Initial Setup Wizard will only appear the rst time the TV is turned on.
Step 1: Select a Language
• Press the t u buttons to select a menu language (English > Francais > Español).
• Press the q arrow button to select Go to next step .
• Press the u button to conrm.
Step 2: Select a Cable system
• Press the q arrow button to highlight AIR/CABLE based on your antenna connection.
when Cable is selected, ‘AUTO’ is recommended, Then press the t u arrow button to
select STD > IRC > HRC > Auto .
Step 3: Auto Scan
Next
• Press the u arrow button to choose Auto Scan.
• Go to next step .
• Press the u arrow button to initiate auto scan.
NOTE: Channel Auto Scan may take several minutes to complete.
32E40-19
Page 21

TV Channel Setup
Move Return
Cable System AUTO
Start to Scan
Move Next
Next
Return
RF CH : 1
Found : 0
Move Select Return
Show/Hide
Channel No.
Channel Label
DTV Signal :
Air/Cable Cable
Auto Scan
Favorite
Move Return
Cable System AUTO
Start to Scan
Move Next
Next
Return
RF CH : 1
Found : 0
Move Select Return
Show/Hide
Channel No.
Channel Label
DTV Signal :
Air/Cable
Air
Auto Scan
Favorite
TV Setup
& Channel Auto Scan
Select antenna options and perform Channel Auto Scan to receive channels .
To enter TV Mode:
• Press the MENU button
• Using the arrow buttons; scroll to highlight Channel mode
• Press the down arrow button to highlight Air / Cable
Select Cable if you subscribe to a pay television service without a set top box.
• Press the arrow button to highlight Cable.
• Press the arrow button to select Auto Scan. Press ENTER and Cable System will be displayed next.
NOTE: Channel Auto Scan may take several minutes to complete.
Cable Mode
Next
Select Air when TV is connected to an indoor / outdoor antenna.
• Press the arrow button to highlight Air.
• Press the arrow button to select Auto Scan. Press the right arrow button twice to start Channel Auto Scan.
NOTE: Channel Auto Scan may take several minutes to complete.
Air Mode
Next
NOTE: For digital cable or satellite users , connect your cable or satellite set top box to one of the available inputs.
See page 14-16 for connection details.
32E40-20
Page 22

Menu Adjustments
Brightness
Color
Tint
Sharpness
Color Temp
Picture Mode Standard
Contrast 50
50
50
0
50
Normal
Adjust ReturnMove
Picture Setting
The Picture menu offers options to enhance and rene the picture displayed on your TV based on ambient room light
and personal preferences. Adjustment options include contrast, brightness, color, sharpness and color temperature.
How to Navigate:
Press the MENU button on the remote control. Navigate using t u arrow buttons to select Picture. Press the down
q arrow button to highlight Picture Mode, then press the u arrow button to select your viewing preference from 4
factory options: Standard > Dynamic > Mild > User . The Standard setting is recommended for most brightly lit viewing
environments.
• Contrast
Press down q arrow button to highlight Contrast. Navigate
using the t u arrow buttons to increase or decrease contrast
intensity.
• Brightness
Press down q arrow button to highlight Brightness. Navigate
using the t u arrow buttons to increase or decrease overall
brightness.
• Color
Press down q arrow button to highlight Color. Navigate using
the t u arrow buttons to increase or decrease color intensity.
• Tint
Press down q arrow button to highlight Tint. Navigate using
thet u arrow buttons to adjust colors toward green or red tint.
• Sharpness
Press down q arrow button to highlight Sharpness. Navigate
using the t u arrow buttons to soften or view crisper edges in
the picture.
• Color Temp
Press down q arrow button to highlight your Color Temp.
preference. Navigate using the t u arrow buttons to select
Cool(more blue tone), Normal or Warm setting.
Note: When adjustments are completed, you may select another menu by pressing the Menu button.
32E40-21
Page 23

Menu Adjustments
Surround
On
PCM
The Audio menu offers options to make sound enhancements while listening through the built-in speakers.
How to Navigate:
Press the MENU button on the remote control. Navigate using arrow buttons to select Audio. Press the arrow
button to highlight Sound Mode, then press the arrow button to select your sound preference from 4 factory op-
tions: User > Standard > Music > Movie.
To make more critical adjustments based on your own preferences in User
• Bass
Press down arrow button to highlight Bass. Navigate using
the arrow buttons to increase or decrease low frequency
intensity.
• Treble
Press down arrow button to highlight Treble. Navigate using
the arrow buttons to increase or decrease high frequency
intensity.
• Balance
Press down arrow button to highlight Balance. Navigate using the arrow buttons to adjust sound towards the left or
right speaker.
• Surround
Press down arrow button to highlight Surround. Navigate using the arrow buttons to turn surround sound effect from
built-in speakers on or off.
• SPDIF Type
Press down arrow button to highlight SPDIF Type. Navigate
using the arrow buttons to select between PCM (Ana-
logue Audio) > RAW(Digital Audio).
• Audio Language
Press down arrow button to highlight Audio Language. Navigate using the arrow buttons
to select to listen to an alternative language broad-
c a s t ( i f a v a i l a b l e ) E n g l i s h > S p a n i s h > F r e n c h .
NOTE: You may select an alternative language using the
remote control by pressing MTS)
Audio Settings
Note: When adjustments are completed, you may select another menu by pressing the Menu button.
32E40-22
Page 24

Menu Adjustments
Select Move Exit
Sleep Timer
Time Zone
Daylight Saving Time
Off
Of
Pacific
f
The Time menu includes adjustment of settings for your local time zone and daylight savings time. The clock will adjust
automatically after the initial Channel Auto Scan of available broadcast channels in your area.
How to Navigate:
Press the MENU button on the remote control. Navigate using arrow buttons to select Time.
• Press down arrow button to highlight Sleep Timer then
press the arrow button to select time to view before the
television timer turns the set off: 5 Min > 10 Min > 15 Min > 30
Min > 45 Min > 60 Min > 90 Min > 120Min > 180 Min > 240 Min
> OFF.
• Press down arrow button to highlight Time Zone then
press the arrow button to select between: Eastern > Central
> Mountain > Pacic > Alaska > Hawaii.
• Press down arrow button to highlight Daylight Savings
Time. Navigate using the arrow buttons to turn this
feature on or off.
Date & Time Settings
Note: When adjustments are completed, you may select another menu by pressing the Menu button.
32E40-23
Page 25

Menu Adjustments
Setup Settings
In the Setup menu you can change system language, menu display, computer monitoring,closed captions, or reset
TV factory default settings.
How to Navigate:
Press the MENU button on the remote control. Navigate using arrow buttons to select Setup. Gain access to
display options by pressing the down arrow button to highlight Menu Language or other options, then press
arrow button on your remote to select.
• Menu Languages • Transparency • Zoom Mode
Other languages include Spanish
and French.
Navigate using the arrow
buttons to turn Off / On the translucent
effect of the User menu.
Navigate using the arrow
buttons to select the viewing mode
displayed: Normal > Wide > Zoom >
Cinema .
Menu Language
Transparency
Zoom Mode
Noise Reduction
Advanced
Closed Caption
DLC
Restore Default
Move Move Return
English
Off
Wide
Middle
On
Menu Language
Transparency
Zoom Mode
Noise Reduction
Advanced
Closed Caption
DLC
Restore Default
Move Select Return
• Noise Reduction • Restore Default
Navigate using the arrow buttons
to reduce video noise: Off > Weak >
Middle > Strong (Default setting: Mid-
Press the arrow button to
au tomatically reset all adjustments
back to their original factory settings.
dle).
Menu Language
Transparency
Zoom Mode
Noise Reduction
Advanced
Closed Caption
DLC
Restore Default
Move Select Return
English
Off
Wide
Middle
On
Menu Language
Transparency
Zoom Mode
Noise Reduction
Advanced
Closed Caption
DLC
Restore Default
Move Next Return
English
Off
Wide
Middle
On
English
Off
Wide
Middle
On
Menu Language
Transparency
Zoom Mode
Noise Reduction
Advanced
Closed Caption
DLC
Restore Default
Move Select Return
Are you sure?
No Yes
MoveSelect Return
English
Off
Wide
Middle
On
NOTE: Closed Caption and Advanced are features described on the following pages.
32E40-24
Page 26

Menu Adjustments
Closed Captions
The Setup menu includes adjustments for activating the Closed Caption text feature for on-screen display and customizing CC display types and font styles.
How to Navigate:
Press the MENU button on the remote control. Navigate using arrow buttons to select Setup.
• Press the down arrow
button to highlight Closed Caption
then press the arrow button to
highlight CC Mode.
Menu Language
Transparency
Zoom Mode
Noise Reduction
Advanced
Closed Caption
DLC
Restore Default
Move Return
Next
English
Off
Wide
Middle
On
• Press down arrow button to
highlight Advanced Selection.
Navigate using the arrow
buttons to select Service 1-6.
CC Mode
Basic Selection
Advanced Selection
Option
Move Select Return
Off
CC1
Service1
• Navigate using the
arrow buttons to select Off > On >
CC on Mute.
CC Mode Off
Basic Selection
Advanced Selection
Option
Move Select Return
CC1
Service1
• Press down arrow
button to highlight Option. Press
the arrow button to enter a menu
with options to customize text fonts,
colors and opacities.
Mode
Font Style
Font Size
Font Edge Style
Font Edge Color
FG Color
BG Color
FG Opacity
BG Opacity
Move Select Return
Default
Default
Default
Default
Default
Default
Default
Default
Default
• Press down arrow but-
ton to highlight Basic Selection.
Navigate using the arrow
buttons to select CC 1-4, Text 1-4.
CC Mode
Basic Selectio
Advanced Selection
Option
n
Move Select Return
Off
CC1
Service1
Note: When adjustments are completed, you may select another menu by pressing the Menu button.
32E40-25
Page 27

PC Menu Adjustments
Advanced Settings
In the Setup menu you may adjust the position of images displayed on screen once you connect an input signal from
your PC. The recommended resolution is 1366x768. For use with a laptop computer, refer to your computer’s user
manual on instruction for proper display output. If your PC system uses a standard signal mode, the TV screen will
adjust automatically. Connect an optional 3.5mm audio cable for stereo sound. See page 17 for details.
How to Navigate:
After connecting to a PC, press the INPUT button on the remote control, Use the buttons to highlight the VGA
input and press ENTER. Press the MENU button on the remote control and navigate using arrow buttons to
select Setup.
• Gain access to position adjustment
options by pressing the down
arrow button to highlight Advanced,
then press arrow button to select
from the following options.
Menu Language
Transparency
Zoom Mode
Noise Reduction
Advanced
Closed Caption
DLC
Restore Default
Select Next Return
English
Off
Wide
Middle
On
• Highlight Clock. Navigate
using the arrow buttons to
control the width of the image.
H-POS
V-POS
Clock
Phase
Auto
50
27
50
98
• Highlight H-Pos. Navigate
using the arrow buttons to
adjust the position of images
displayed from side to side.
H-POS
V-POS
Clock
Phase
Auto
Move Adjust Return
• Highlight Phase. Navigate
using the arrow buttons to
improve focus and image stability.
H-POS
V-POS
Clock
Phase
Auto
• Highlight V-Pos. Navigate
using the arrow buttons to
adjust the position of images
displayed up and down.
50
27
50
98
H-POS
V-POS
Clock
Phase
Auto
Move Adjust Return
50
27
50
98
• Highlight Auto. Press the
arrow button to automatically adjust
the display to the best setting.
50
27
50
98
H-POS
V-POS
Clock
Phase
Auto
50
27
50
98
Move Adjust Return
Move Adjust Return
32E40-26
Move Next Return
Page 28

Menu Adjustments
Parental Control
In the Lock menu, you may block television and movie programming based on TV ratings and Motion Picture Association
guidelines. To gain access and select your preferences within the Parental menu make certain your input is set to TV.
How to Navigate:
Press the MENU button on the remote control. Navigate using arrow buttons to select Lock. Gain access to
parental rating options by pressing the down arrow button to highlight Enter Password. Enter your 4 digit code
(factory default code is “0000”) unless previously changed.
Enter Password
Select Move
Exit
• To set parental controls for television
programming or DVD movies, press
the arrow buttons to highlight US.
Navigate using the buttons to
highlight TV/MPAA menu.
• To change the password, press
arrow button to display a screen
to enter your new password, then
conrm again. (Not illustrated)
Change Password
System Lock
US
Canada
PRT Setting
Reset RRT
Move Next Return
Off
• Highlight TV, then press the
arrow button to enter the TV Ratings
menu and select your preference.
TV-Y Appropriate for all children
TV-Y7 Appropriate for all children over 7
TV-G General Audience
TV-PG Parental Guidance Suggested
TV-14 Parents Strongly Cautioned
TV-MA Mature Audience Only
• To make changes to parental
controls, highlight System Lock
then press the arrow button to
select On or OFF.
Change Password
System Lock
US
Canada
PRT Setting
Reset RRT
Move Select Return
On
• Highlight MPAA, then press the
arrow button repeatedly to select
your movie rating preference.
G General Audience
PG Parental Guidance Suggested
PG-13 Parents Strongly Cautioned
R Restricted
NC-17 No One Under 17 Permitted
X Adults Only
N/A Not applicable
TV
MPAA N/A
Move Next Return
TV-Y
TV-Y7
TV-G
TV-PG
TV-14
TV-MA
Move Next Return
ALL FV
TV RATING
V S L D
Press ENTER to Lock or Unlock: Lock
NOTE: RRT Setting and Reset RRT are not user adjustable settings.
32E40-27
TV
MPAA G
Move Select Return
Page 29

Menu Adjustments
Parental Control
In the Lock menu, you may block television and movie programming based on Canadian TV and movie rating guidelines.
To gain access and select your preferences within the Parental menu make certain your input is set to TV.
How to Navigate:
Press the MENU button on the remote control. Navigate using arrow buttons to select Lock. Gain access to
rating options by pressing the down arrow button to highlight Enter Password. Enter your 4 digit code (factory
default code is “0000”) unless previously changed. See the last page for information on how to change your password.
Then press the arrow buttons to highlight Canada. Navigate using the buttons to highlight Canada English.
• Navigate using down arrow button to highlight
Canada English then press the arrow button
repeatedly to select your ratings preference.
E Appropriate for everyone
C Appropriate for all children
C8+ Appropriate for everyone 8 years old and up
G General Audience
PG Parental Guidance
Canada English
Canada French E
E
14+ Appropriate for Children over 14 years old
18+ Mature Audience Only
Move Select Return
• Navigate using down arrow button to highlight
Canada French then press the arrow button
repeatedly to select your ratings preference.
Canada English
Canada French E
Move Select Return
E
E Appropriate for everyone
G General Audience
8 ans+ Appropriate for Children 8 years old and up
13 ans+ Appropriate for Children 13 years old and up
16 ans+ Appropriate for Children 16 years old and up
18 ans+ Mature Audience Only
Note: When adjustments are completed, you may select another menu by pressing the Menu button.
32E40-28
Page 30

Menu Adjustments
Channel Settings
The Channel provides the setup/changes of your television to receive broadcast channels, store your favorite channels,
add or skip channels in memory and label or name channels.(For antenna and Auto Channel Scan setup, please refer
to page 20.)
How to Navigate:
Press the MENU button on the remote control. Navigate using arrow buttons to select Channel. Press the
down button to highlight your preferences.
• Favorite
• Highlight Favorite to add channels to your Favorites List. Navigate using the ◄►▼▲ arrow buttons to select channels to be
added or deleted from your list. Press ENTER to add or delete a channel. A checkmark indicates a channel has been added.
You may also display your list of Favorite channels by pressing the FAV button on the remote control.
Air/Cable
Auto Scan
Favorite
Show/Hide
Channel No.
Channel Label
DTV Signal:
Move Next Return
Cable
2-0
Channel Channel Name
46-1
50-0
50-1
50-2
50-3
Move Press ENTER change Return
Favorite
• Show/Hide
• Highlight Show/Hide to select or skip channels already in memory. Navigate using the ◄►▼▲ arrow buttons to
access the list of available channels. Press ENTER to change the channels status. A checkmark indicates a channel
has been added.
Air/Cable
Auto Scan
Favorite
Show/Hide
Channel No.
Channel Label
DTV Signal:
Cable
2-0
Channel Channel Name
7-0
7-1
7-2
7-3
9-0
KABC-DT
KABC-SD
KABC-WN
KCAL-DT
Add/Delete
Move Next Return
Move Press ENTER change Return
• Channel Label
• Highlight Channel Label to name or rename a broadcast channel. Navigate using the arrow button to enter the
screen menu to relabel a channel. Use the arrow buttons to spell out each letter, number or character. Use
arrow buttons to advance to the next space.
Air/Cable
Auto Scan
Favorite
Show/Hide
Channel No.
Channel Label
DTV Signal:
Move Next Return
Cable
2-0
Select Move Return
NOTE: The DTV SIGNAL is a measurement of signal strength for the current channel viewed.
32E40-29
Page 31

Aspect Modes
The ASPECT function offers several viewing display options on the 16:9 screen. Press the ASPECT button to cycle
through the following widescreen settings.
Press ASPECT to cycle through
the following widescreen settings.
1. NORMAL
Recommended for viewing native widescreen content and undistorted 4:3
images (with black bars).
2. WIDE
Stretches certain 4:3 content and may reduce visible black bars.
3. ZOOM
Stretches the image both vertically and horizontally to ll the screen when
viewing widescreen content. The Zoom effect will crop images somewhat.
4. CINEMA
When viewing 4:3 content, Cinema mode will ll the entire screen eliminating
visible side black bars. It may also eliminate or reduce black bars on certain
widescreen movies.
32E40-30
Page 32

USB Modes
1. Press the INPUT button on the remote control to display the Input menu. Use the ▲▼ buttons to select USB.
2. Use the ◄/► buttons to highlight an individual USB option.
Press the ◄/► buttons to select Photo, and then
press the ENTER button to enter.
Select the option you want to play using the
Navigation buttons.
Press Exit button to go back.
Press the ◄/► buttons to select Music, and then
press the ENTER button to enter.
Select the option you want to play using the
Navigation buttons.
Press Exit button to go back.
32E40-31
Page 33

Specications
Display LED
Size (inch)
Aspect Ratio 16:9
Digital Compatibility 480p / 720p / 1080i / 1080p
Resolution 1366 x 768
Brightness (cd/m2) 280
Dynamic Contrast Ratio 1200:1
Vertical Viewing Angle (degrees) 178°
Horizontal Viewing Angle (degrees) 178°
Maximum Colors (millions) 16.7M
Power Consumption 80W
Audio Power 2 X 6W
Dimension without Stand
Weight without Stand 12.1 lbs
31.5” Diagonal
29.1” x 2.3” x 17.6”
Composite Video (1)
Input Connections
Y Pb Pr (1)
HDMI (3)
RF (1)
COAXIAL (1)
PC/VGA (1)
PC Audio IN (3.5mm) (1)
Headphone Jack (3.5mm) (1)
USB (1)
Audio Out (L/R) (1)
32E40-32
Page 34

Troubleshooting
Symptom Possible Solutions
Cannot receive certain
channels through the
antenna
No color • Check the video installation of your external A / V equipment.
Video noise or choppy picture • Readjust antenna. Keep TV away from noise sources, neon lights,
TV blocked on certain channels • Perform Channel Scan to add channels into the TV tuner memory.
Cannot use certain functions • If the item chosen in a menu is shown in gray text, that item cannot be
No sound • Check that connected audio cables are completely inserted.
Black box on screen • The “Text” option is enabled and no text is available.
No power • Batteries in the remote control may need replacing.
No picture • Digital TV channel signal maybe weak, try another channel.
Remote control does not function • Replace batteries with new ones.
• Perform Channel Scan to add channels into the TV tuner memory.
See page 29.
• Readjust your antenna and retry Auto Channel Scan.
• Signal from the TV station may be weak in your area.
See pages 13-18.
and microwave appliances.
See page 29.
• Check whether the channel was deleted. See page 29.
• Check parental control settings. See page 30,31.
• Restore default settings. See page 24.
selected in the current input.
• Verify you have selected the correct audio source from your amplier.
See page 22.
• Mute function may be enabled, press mute on the remote.
• Press the CCD button on the remote control to turn off.
• Re-attach AC plug to wall outlet.
• Press INPUT button to verify the desired input selected.
• Re-connect the antenna or cable wiring.
• Restore default settings. See page 27
• Check that battery polarity is correct.
• Point remote directly at the TV’s IR receiver. See page 8.
32E40-33
Page 35

LIMITED ONE-YEAR TELEVISION WARRANTY
We warrant this product to be free from defects in material and workmanship under normal use
for a one-year period from the original date of purchase from an authorized ETEC dealer. We
will repair or replace the unit free of charge should it become defective under this warranty,
providing you, the original purchaser, submit proof of purchase (sales slip) along with the TV
and all accessories.
During the one-year period from the original purchase date, we will service or exchange the TV,
at no charge. To obtain warranty service or replacement within the duration of the one-year
warranty, please return the product and all accessories to the original place of purchase.
For technical support, the ETEC Technical Support Center is available 24-hours a day, 7-days
a week for technical assistance or troubleshooting at 1-800-936-1168.
This warranty does not cover any product which has been subject to damage due to an act of
nature, misuse, neglect, accident, abuse, commercial use, or modification of, or to, any part of
the product, including the antenna. Damage to any external media such as DVD, CD, and/or
USB or other memory devices are not covered nor is the cost incurred in shipping the unit for
warranty repair. Under no circumstances shall ETEC be liable for any loss (direct, indirect,
incidental, foreseen, unforeseen, special or consequential) or for any damage arising out of, or
in connection with, the use of this product.
UNDER NO CIRCUMSTANCES WILL ETEC BE LIABLE FOR ANY INCIDENTAL OR
CONSEQUENTIAL DAMAGES.
This warranty does not cover re-manufactured units, or product sold 'As Is'
This warranty is valid only to the original purchaser of the Product in the United States,
Canada, and Mexico and grants specific legal rights.
32E40-34
 Loading...