

Page 1
32A66
USER’S MANUAL
For technical assistance or troubleshooting, please call 1-800-936-1168 or email
[email protected]. The Technical Support
Center is available 24-hours a day,
32” LCD TELEVISION
32A66-1
7-days a week.
Page 2
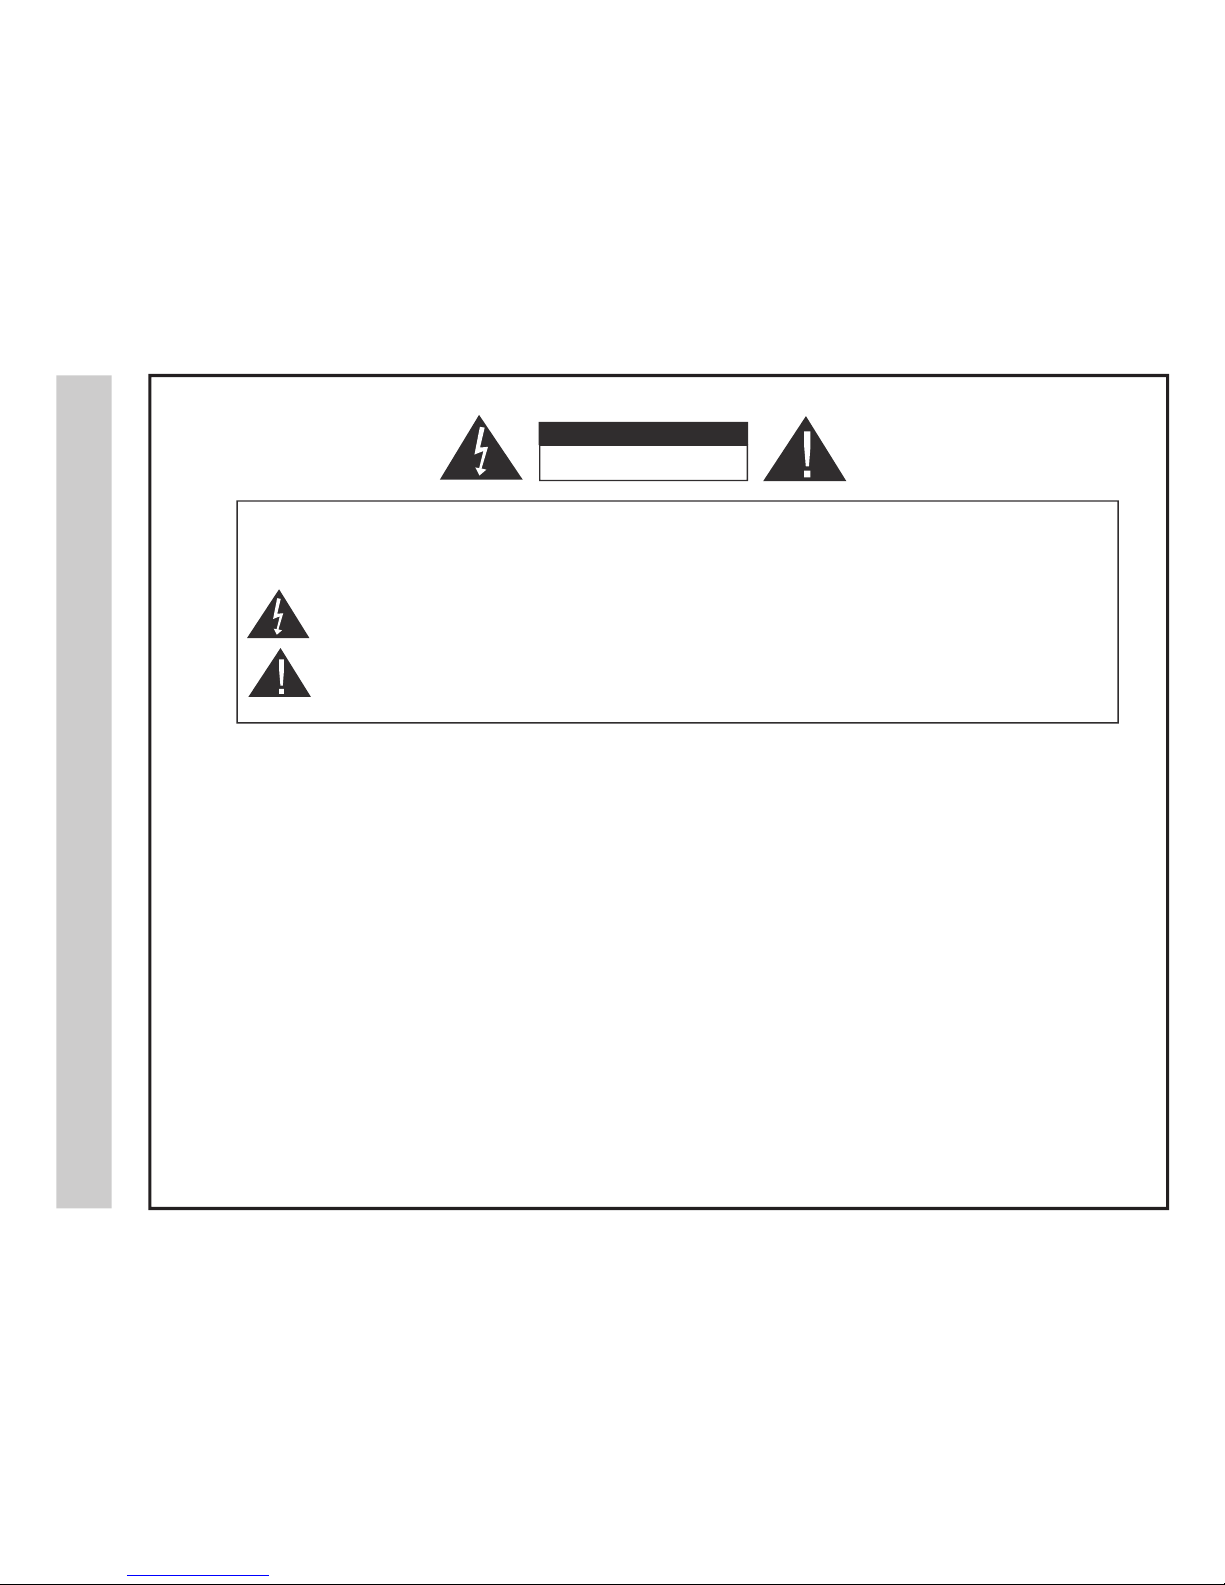
RISK OF ELECTRIC SHOCK
DO N
OT OPEN
The lightning flash with arrowhead symbol, within an equilateral triangle, is intended to alert the user to the
presence
of uninsulated “dangerous voltage” within the product’s enclosure that may be of sufficient magnitude
to
constitute a risk of electric shock to the users.
The
exclamation point within an equilateral triangle is intended to alert the user to the presence of important
operating
and maintenance (servicing) instructions in the literature accompanying the television.
WARNING:
Safety:
TO PREVENT FIRE OR SHOCK HAZARDS, DO NOT EXPOSE THIS PRODUCT TO RAIN OR MOISTURE.
NOTE TO CABLE / TV INSTALLER:
This reminder is provided to call the CATV system installer’s attention to Article 820-40 of the National Electric Code
(U.S.A.). The
code provides guidelines for proper grounding and, in particular, specifies that the cable ground shall
be
connected to the grounding system of the building, as close to the point of the cable entry as practical.
FCC REGULATORY INFORMATION:
This television has been tested and found to comply with the limits for a Class B digital device, pursuant to Part 15
of
the FCC Rules. These limits are designed to provide reasonable protection against harmful interference in a residential
installation. This
television generates, uses and can radiate radio frequency energy and, if not installed and
used
in accordance with the instructions, may cause harmful interference to radio communications. However, there
is
no guarantee that interference will not occur in a particular installation. If this television does cause interference
to
other electronic equipment, which can be determined by turning the television off and on, then the user is
encourage
d to try to correct the interference by one or more of the following measures:
- Reorient or relocate the receiving antenna.
- Increase the separation between the equipment and television.
- Connect the equipment into an outlet on a circuit different from that to which the television is connected.
- Consult your dealer or an experienced radio / TV technician for assistance.
Any changes or modifications not expressly approved by the party responsible for compliance may void the user’s
authority
to operate the equipment.
TO REDUCE THE RISK OF ELECTRICAL SHOCK DO NOT REMOVE COVER (OR BACK). NO
USER SE
RVICEABLE PARTS ARE INSIDE. REFER TO QUALIFIED SERVICE TECHNICIAN ONLY.
s
noi
t
cu
r
tsn
I
y
t
e
f
aS
CAUTION
32A66-2
Page 3
s
n
o
i
t
c
u
r
t
s
n
I
y
t
e
f
a
S
32A66-3
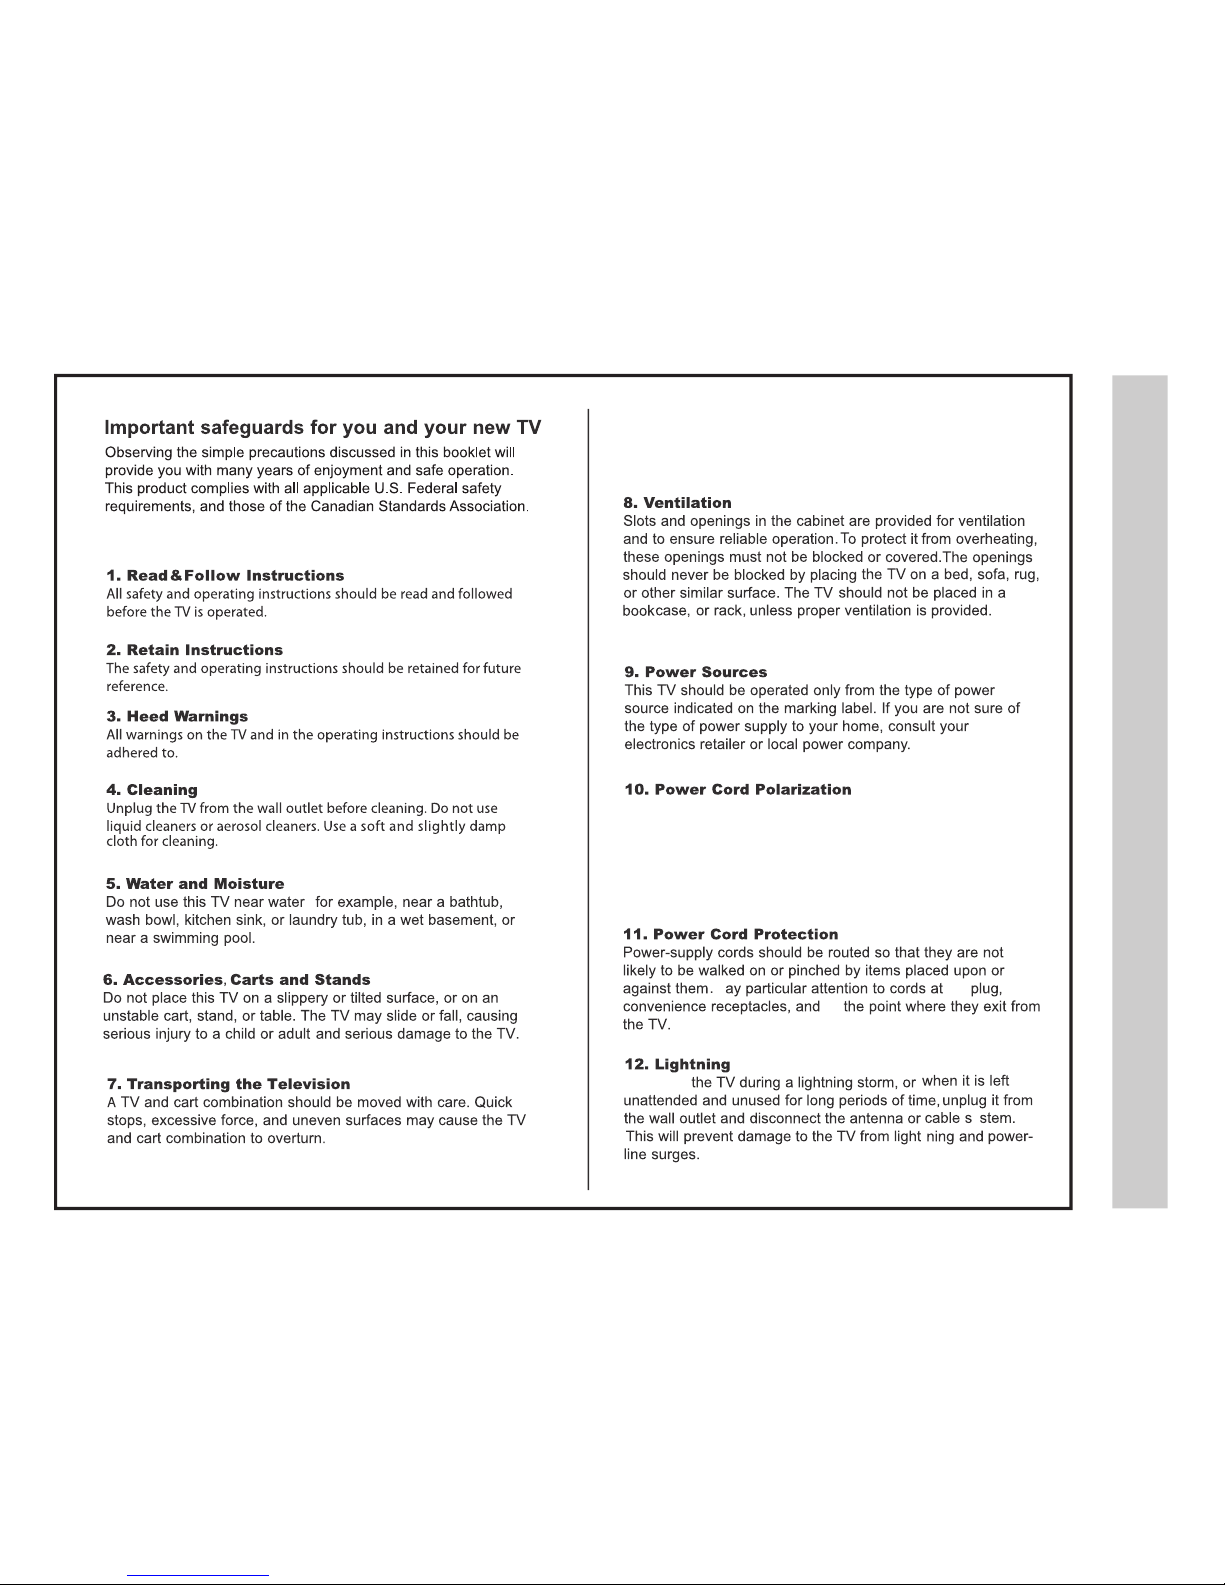
cabinet,
P
the
at
To protect
y
;
This TV is equipped with a three-wire grounding type plug,a plug
with a third (grounding) pin. As a safety feature, this plug will only
fit into a grounded power ourlet. If you are unable to insert the plug
into the outlet, contact your electrician to replace the obsolete outlet.
Do not defeat the safety purpose of the grounding-type.
Page 4
s
noi
t
cu
r
tsn
I
y
t
e
f
aS
32A66-4
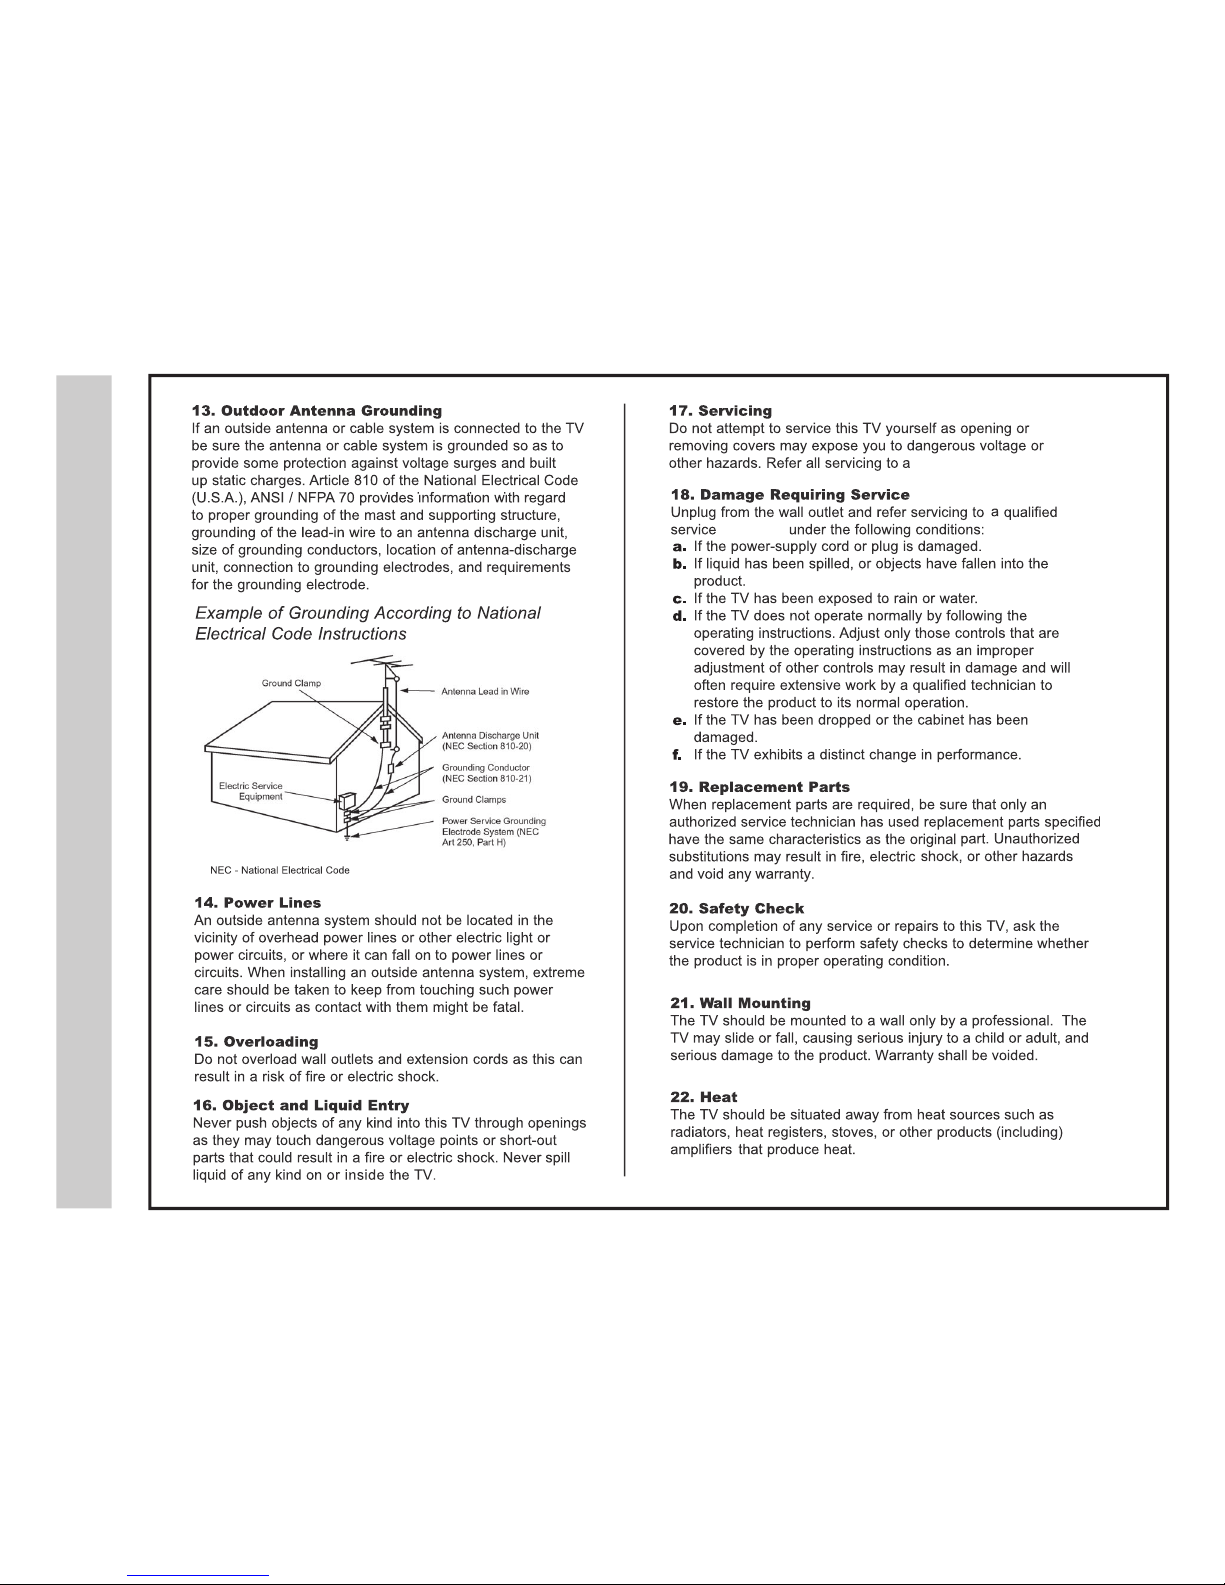
qualified service technician.
technician
Page 5
s
tn
e
tn
o
C
f
oe
l
b
a
T
32A66-5
Safety Instructions ................................................................................................
Table of Contents .................................................................................................
Introduction / What’s In the Box ...........................................................................
Remote Control
Remote Control - Battery Install ...........................................................................
Remote Control Overview ....................................................................................
TV Overview
Side Panel ............................................................................................................
Rear Panel ...........................................................................................................
Pedestal Stand Removal / Wall Mounting ............................................................
Installation
Connection to Coaxial / RF Cable / Antenna
Satellite Box / Connection to HDMI Inputs ............................................................
Connection to Component (Y Pb Pr) Input .............................................................
Connection to AV Composite Input........................................................................
Connection to a Personal Computer .....................................................................
......................................................
Connection to a Receiver / Amp ...........................................................................
Initial TV Setup
Initial Setup Wizard ...............................................................................................
TV Channel Setup & Channel Auto Scan .............................................................
Picture Settings
Contrast ................................................................................................................
Brightness .............................................................................................................
Color .....................................................................................................................
Tint ........................................................................................................................
Sharpness .............................................................................................................
Color Temperature ................................................................................................
.....................................................................................................
Troubleshooting
Specification
s
..................................................................................................
Index ....................................................................................................................
Audio Settings
Bass / Treble / Balance .........................................................................................
Audio Language ....................................................................................................
Date & Time Settings
.......................................................................................
Setup Settings
Menu Language ....................................................................................................
Transparency.... ....................................................................................................
Aspect Mode ..........................................................................................................
Noise Reduction ...................................................................................................
DLC ......................................................................................................................
Restore Default ....................................................................................................
Closed Caption Settings ....................................................................................
Advanced Setting for PC .......................................................................................
Parental Control - USA.........................................................................................
Parental Control - Canada ....................................................................................
TV Settings
Favorite .................................................................................................................
Add / Delete ............................................................................................................
Channel Label ......................................................................................................
DTV Signal ...........................................................................................................
Aspect Modes ........................................................................................................
USB Modes ........................................................................................................
2-4
5
6
7
8
9
10
10
11
12
13
14
15
16
17
Connection to the Power Source ............................................................................
17
18
19
19
19
19
19
19
30
31
32
20
20
21
22
22
22
22
22
22
23
24
25
26
27
27
27
27
28
29
Page 6
n
o
itcudor
t
nI
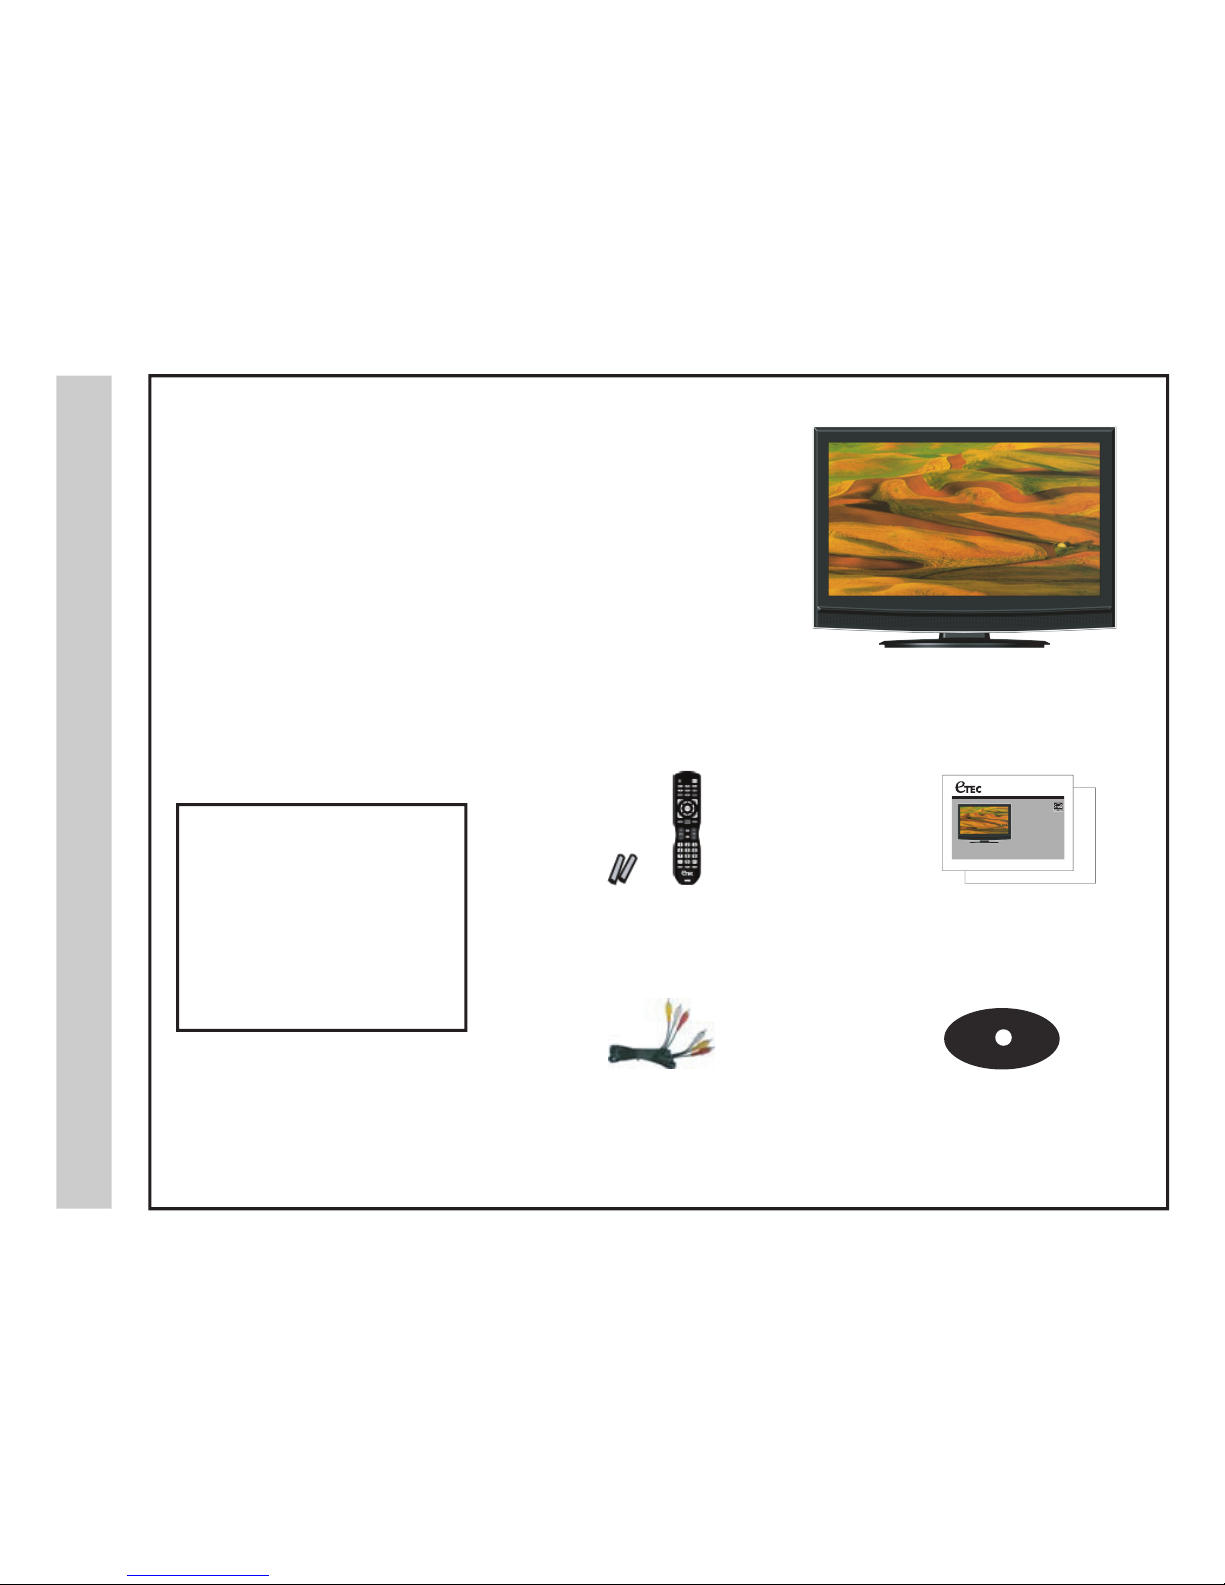
The 32A66 LCD package includes
the following items. Save the carton
& packing for future shipping
.
• Pedestal Base / Hardware
• Remote Control
• AA
A Batteries (2)
• Quick Start Guide
• User Manual
• Audio / Video Cable
• Pedestal Base
xoB
e
h
T
nIs’tahW
32A66-6
• User manual
• Quick Start Guide
QUICK S TART GUIDE
• Remote Control
• AA
A Batteries x 2
32A66
USER’S MANUAL
32” LCD TELEVISION
19A88
Thank you for purchacing the energy efficient 32A66 LCD television. It has been designed to
offer today’s high definition television experience. With a display resolution of 1366x768
you are assured of one of the finest quality televisions available today.
Your television provides both analog and digital inputs including two (2) High Definition
Multimedia Interface (HDMI) interconnects for the purest audio and video digital signal
when connected to compatible HD sources (ie: HD set-top box, high definition DVD player
or gaming console).
We recommend that you read the user manual thoroughly before use to familiarize yourself
with the installation and adjustment options available to you; thereby, enjoying all the
features of the 32A66 for many years to come.
• Audio / Video Cable
Page 7
lo
r
tn
o
Ce
tome
R
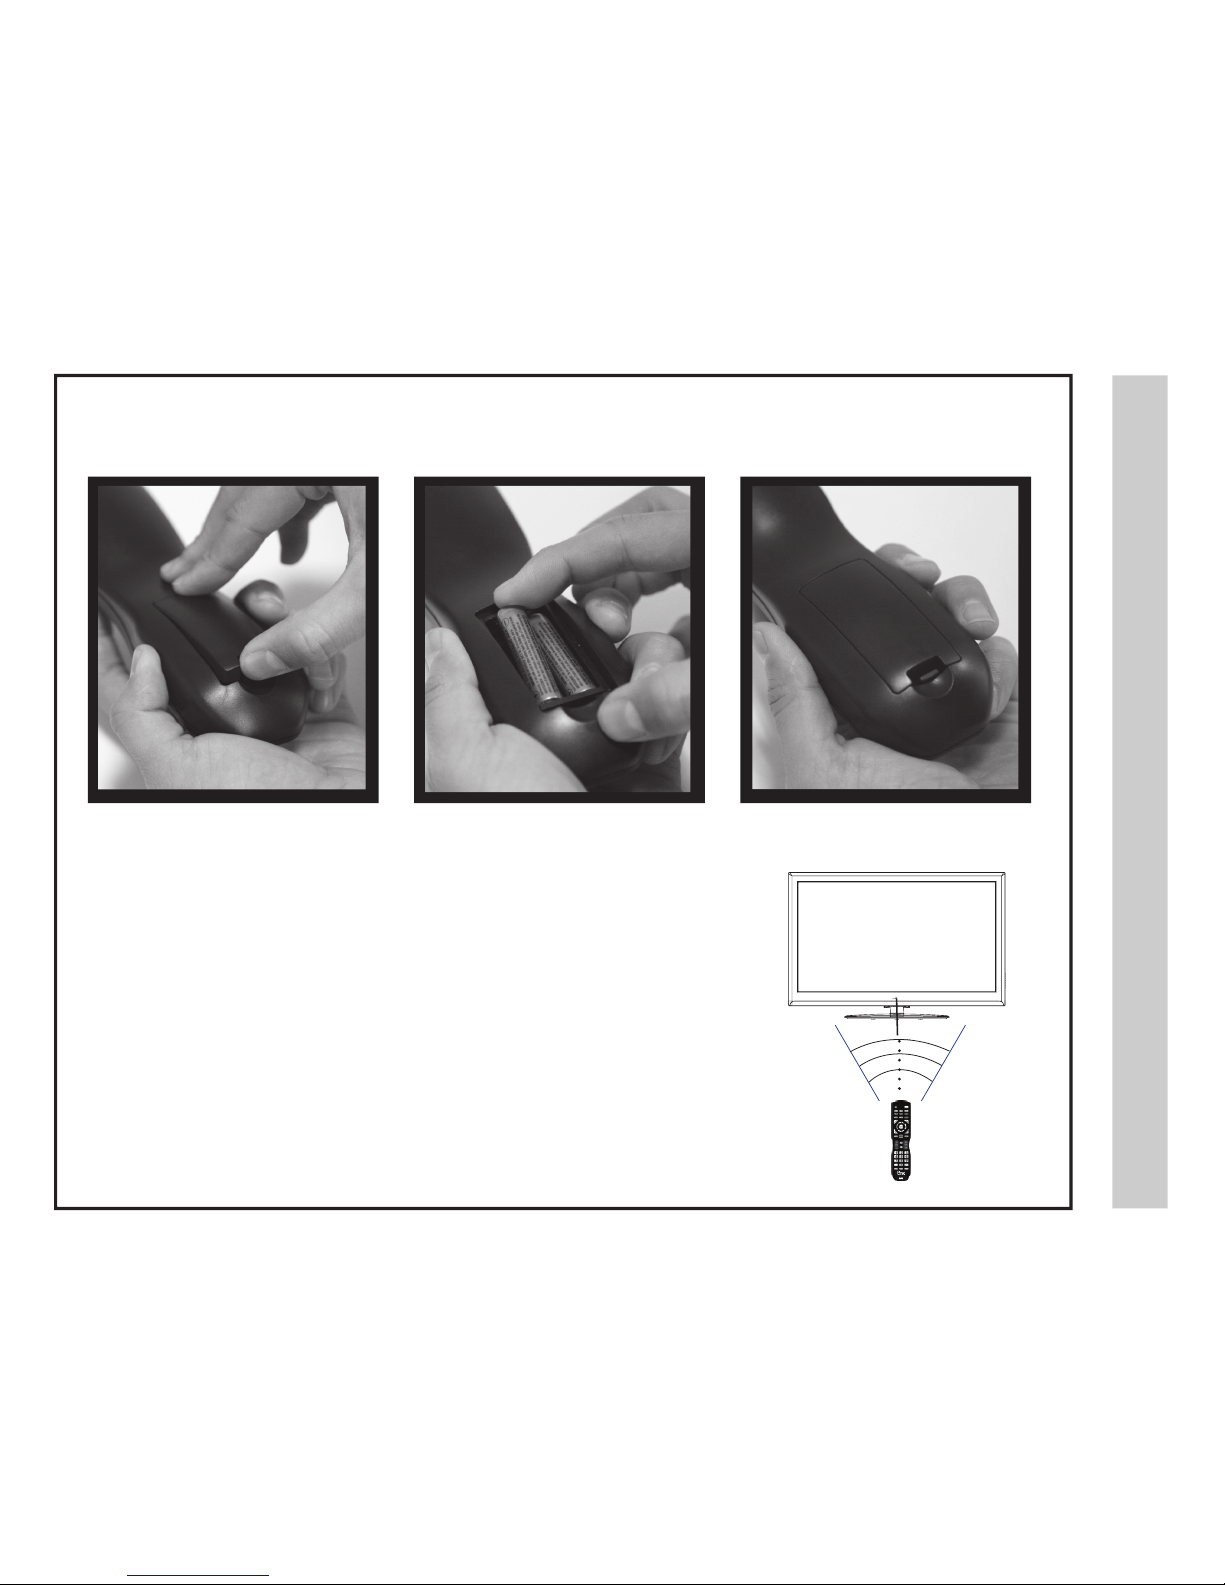
Your remote cont rol handset is p owered by t wo (2) AAA type b atteries
l
lats
n
I
y
r
e
t
t
aB
32A66-7
•
•
When pointed towards the television, the effective range of the remote is approximately 16 feet from the
front of the TV IR receiver and at an angle of no greater than 30° to the left
/ right or 20° up / down.
To avoid possible damage from battery chemical leakage, remove the batteries if you do
not plan to use the remote control for an extended period of time. Do not mix batteries of
different age and/or type. Always discard used batteries safely.
Do not expose the remote control to liquids, direct sunlight or sources of excessive heat.
The IR receiver on the TV will not work properly if the set is in direct sunlight or an object is in the path
between the remote control and the IR receiver on the front of the TV.
•
•
• To insert the batteries, turn the remote
control over and remove the battery
cover.
• Place two (2) “AAA” batteries into the battery
compartment with the “+” and “-“ ends facing the
correct way as shown in the battery compartment.
• Replace the cover.
NOTE: Improper use of batteries can result in a chemical leakage or explosion.
30° 30°
IR Receiver
Page 8
lortno
Ce
tomeR
we
ivr
ev
O
32A66-8
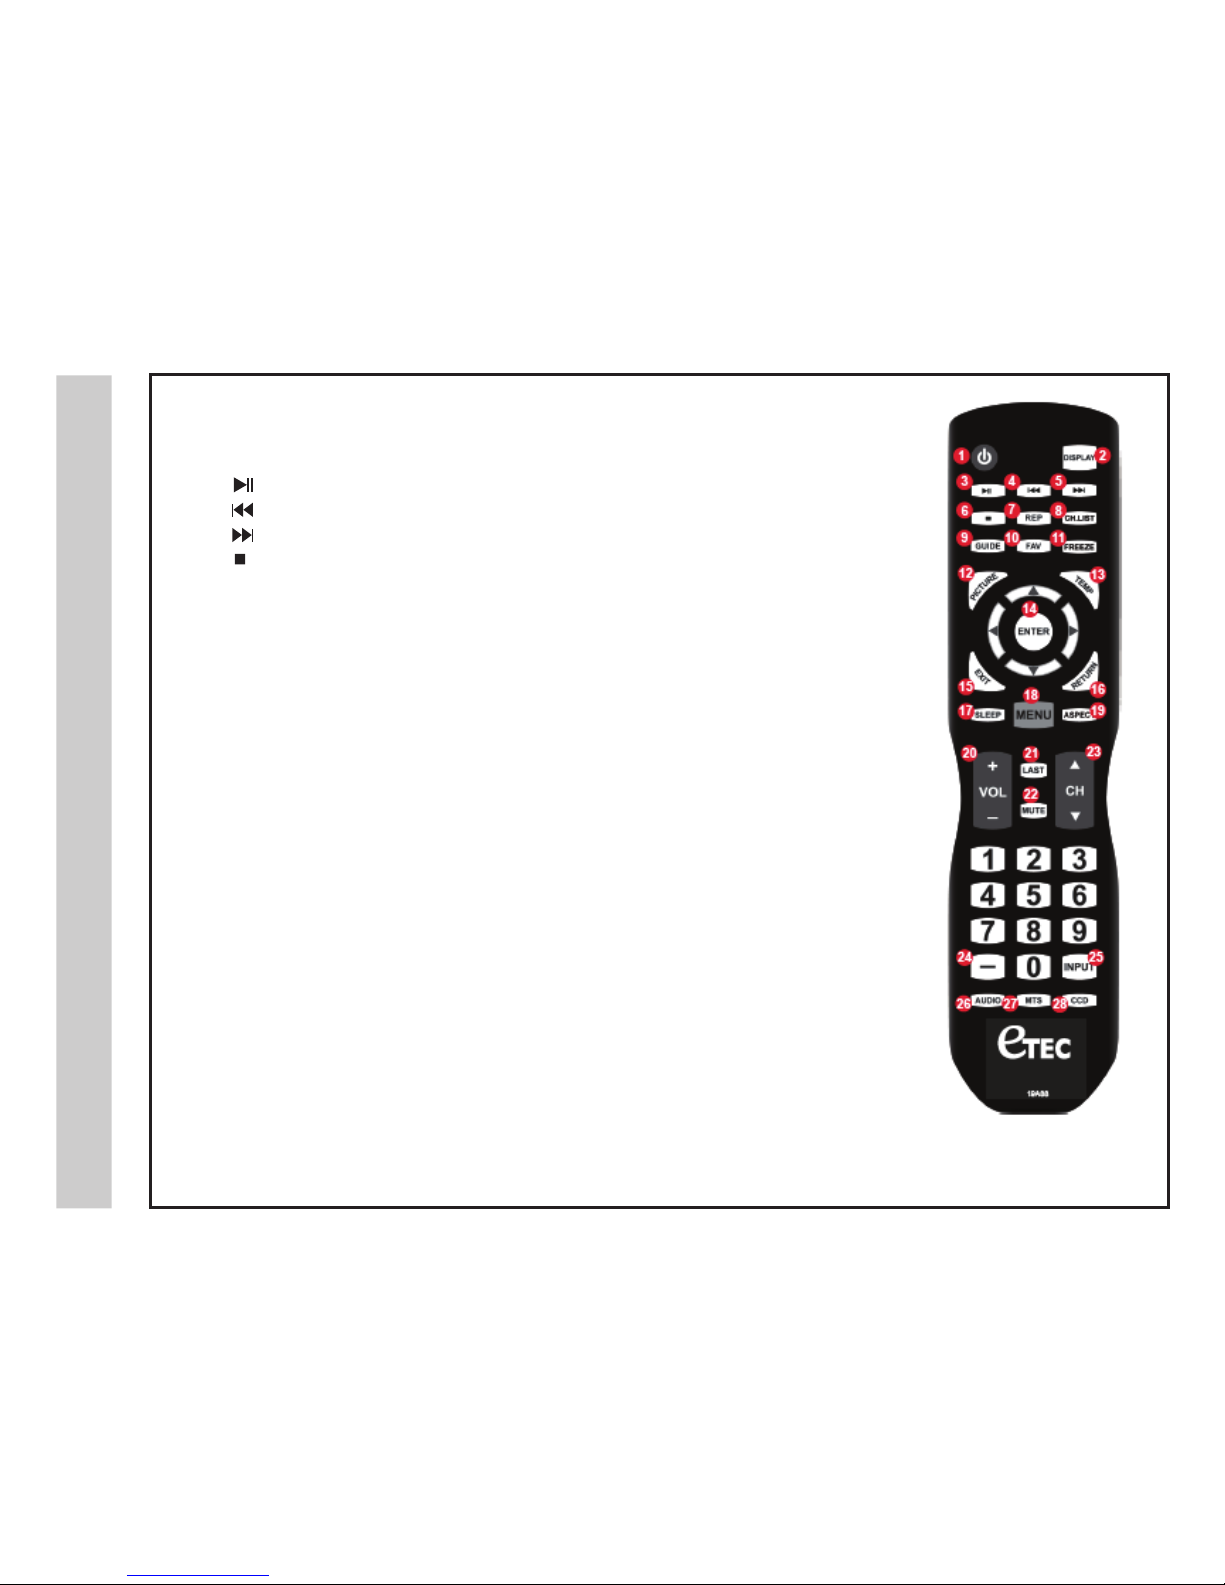
The Remote Control
POWER – 1. Turn the LCD display ON or OFF (Standby).
DISPLAY –
2. Provides program information currently viewed.
–
3. PAUSE (USB)
–
4. PREVIOUS (USB)
–
5. NEXT (USB)
– 6. STOP (USB)
7.
8. Press to display a list of channels saved in the TV tuner memory.
Pause and still-frame the current image on the displa
y. Press again for live TV.
GUIDE –
9. Press to review scheduled programming for the currently viewed channel.
FAV –10. Press to display a listing of your favorite TV channels. (pg. 27)
FREEZE –
11.
REPEAT (USB)
REP –
CH.LIST –
PICTU
RE – 12. Select from various preset picture modes: Dynamic > Standard > Movie > Personal. (pg. 19)
TEMP – 13. Select the Color Temperature COOL > NORMAL > WARM. (pg. 19)
14. ARROWS / ENTER – Press the navigation buttons for moving through the menu options.
Press the ENTER button to select / confirm.
EXIT –
15. Press to exit a displayed menu.
RETURN – 16. Press to return to the previous menu.
SLEEP –
17. Press to activate the Sleep function. The TV will automatically turn off after; 5> 10> 15> 30>
45> 60> 90> 120> 180> 240> (minutes)> OF
F.
MENU –
18. Press to display the Main menu.
ASPECT –
19. Select the viewable display aspect options: Normal, Wide, Zoom, or Cinema. (pg. 28)
VOLUME (+/-) – 20. Adjust the volume up (+) or the volume down (-).
LAST –
21. Press to switch between the current channel and previously viewed channel.
MUTE –
22. Press to temporarily turn off the TV audio. Press again to resume.
CHANNEL –
23. / Change the channel up or down.
NUMBE
RS / DASH –24. Select desired TV channel directly. For example: to select digital channel 4-1,
press “4”, press “-”, and press “1” = (4-1).
INPUT –
25. Press to display all of the input sources on screen. (pgs. 10-15)
AUDIO – 26. Press to select from various preset audio modes: PERSONAL> STANDARD> MUSIC> MOVIE (pg. 20)
MTS –
27. Press to select a program’s second audio channel (if available).
CCD –
28. Press to select closed caption subtitles (if available) OFF> ON. (pg. 23)
NOTE: When using the remote
control, point it directly at the TV.
1
3
4
5
6
7
8
9
10
12
15
17
20
18
21
22
24
26 27
28
25
14
13
16
19
23
11
2
19A88
Page 9
1
2
3
4
5
wei
v
r
e
vO
V
T
IR Receiver
Side
l
e
n
aPe
d
i
S
&
t
n
or
F
32A66-9
Panel
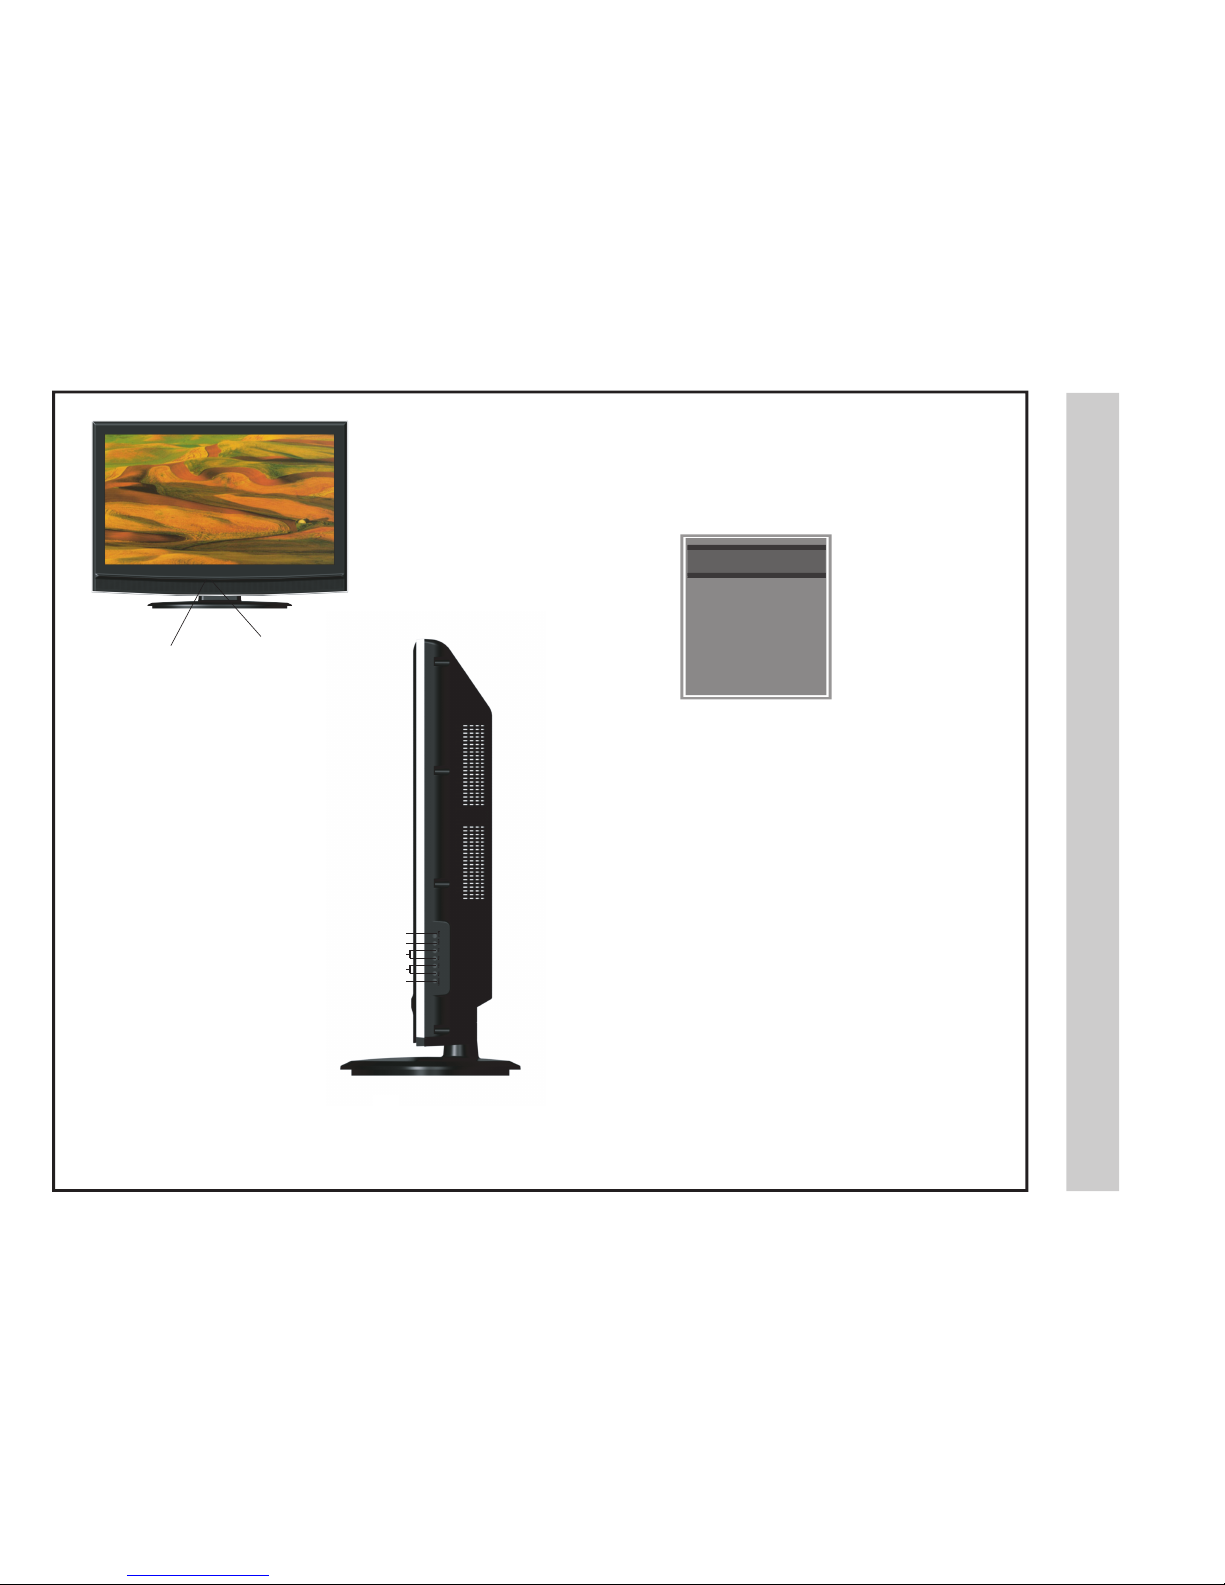
A soft blue light illuminates
when the television
power is on.
1. Input - After connecting your DVD, cable box, etc., select the
appropriate input source to
view. Press the INPUT button to display
the input options. Press the CH+ / CH- buttons to highlight the input
source and press the
VOL+ button t o select.
2. Menu - Press the MENU button to display. Press VOL+ to
select from the 6 menu options available. Press the CH+ / CH-
buttons to select a feature from the selected menu then press the
VO
L+ / VOL- buttons to adjust the volume settings.
3. Channel (CH+ / CH-) - Press the CH+ / CH- buttons to select
a chann
el in the TV mode.
4. Volume (VOL+ / VOL-) - Press the VOL+ / VOL- buttons to
adjust the volume up or down.
5. Power - Press the POWE R button to turn the LED display ON /
OF
F (standby). When the power is on, the blue LED illuminates. The
screen image will appear within a few seconds.
IN PUT SOUR CE
IN PUT SOUR CE
TV
AV
Component
HDMI 1
HDMI 2
USB
VGA
Page 10
weiv
r
evOVT
l
e
n
aP
r
aeR
l
av
om
e
Rl
ats
e
d
eP&
32A66-10
Wall Mounting
It is recommended that you call your local TV
dealer or a licensed contractor to secure the
television to the wall using a suitable VESA
400
x 200 wall mount hardware.
Removal of TV Pedestal
for Wall Mounting
To remove the pedestal base from the
television, unscrew the (5) Philips head
screws and remove the entire assembly.
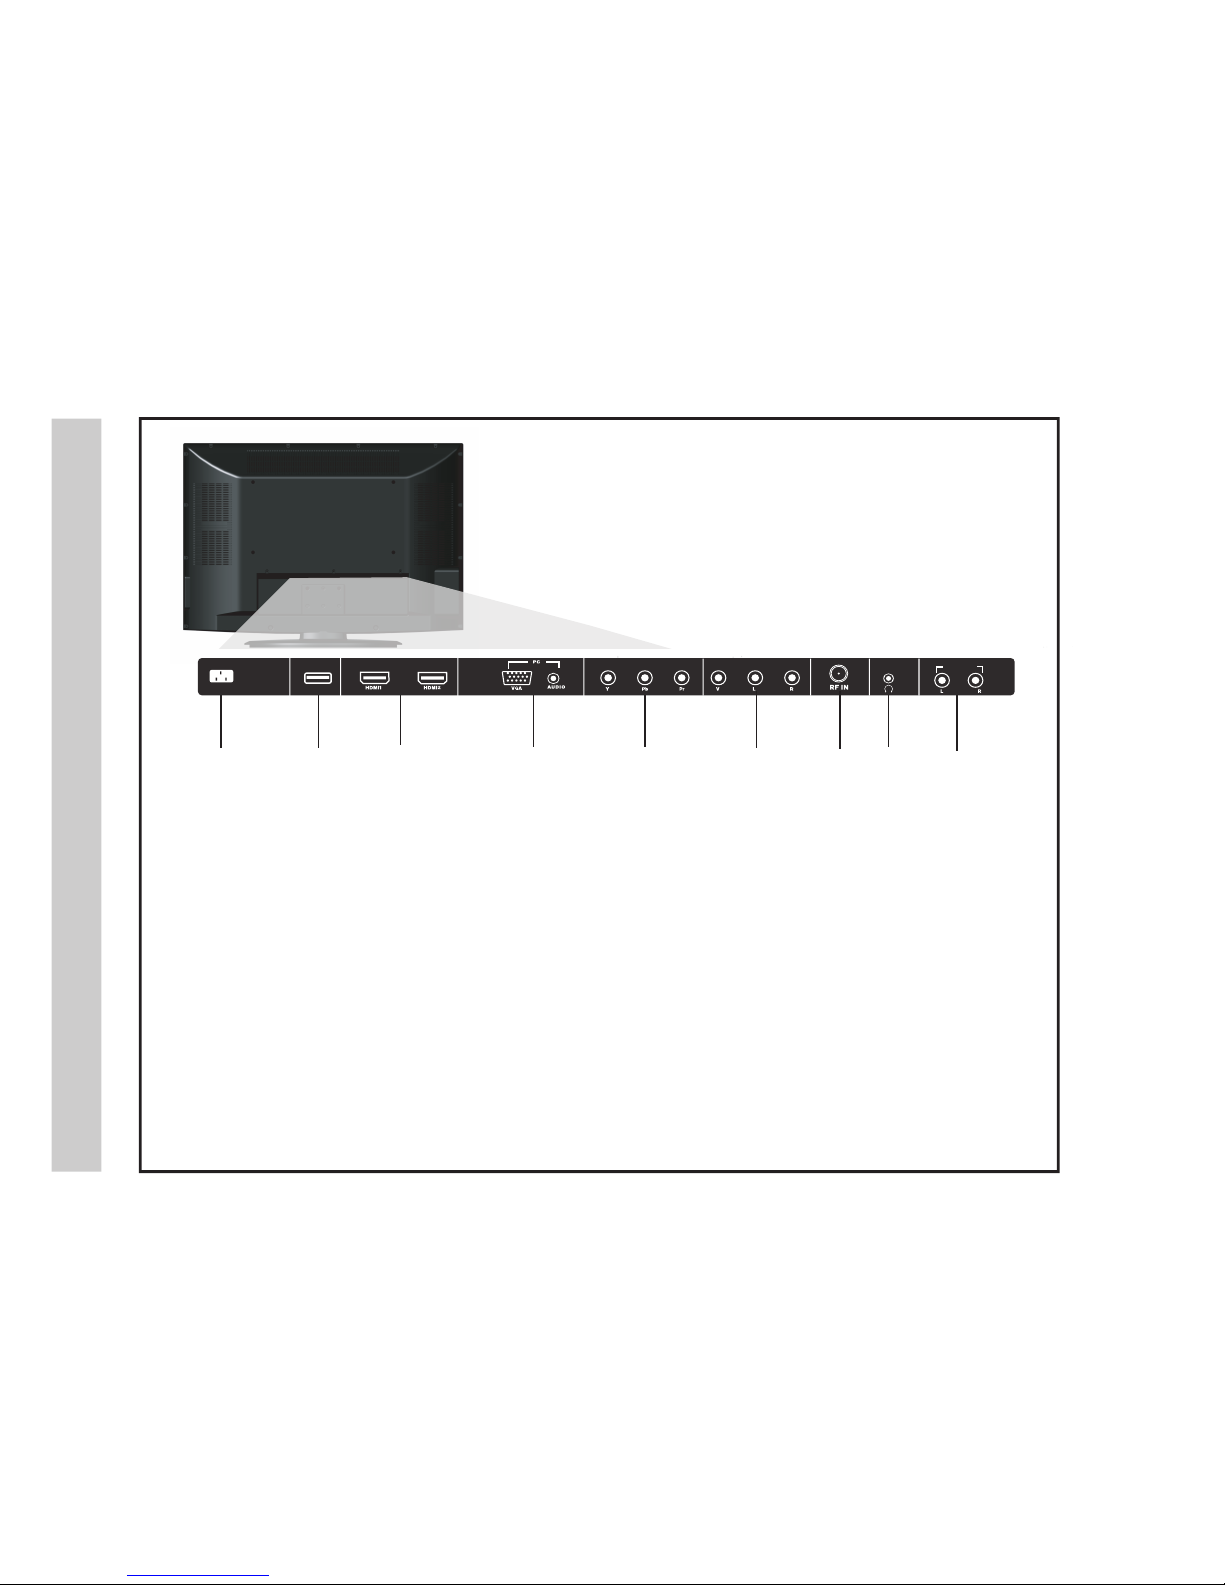
1. AC Power Plug – Insert power plug during initial setup.
2. USB Input Port - Connect to portable USB device such as USB
flash / hard drive (max storage capacity 400GB), supports MP3 and JPEG.
3. HDMI Inputs (2)
- Connects to digital AV equipment that feature HDMI
video and
connectivity. HDMI supports enhanced high definition
up to 7.1
- channel digital audio all from one cable. Recommended
for best performance. HDMI cable not included.
4. PC IN
- VGA Input - Connect an optional VGA cable (not included)
from your personal computer
.
PC Audio Input (3.5mm)
- 3.5mm audio cable (not included)
for sound.
8. Headphone Jack - Connect a stereo headphone (3.5mm – not included)
for private listening.
5. Component Y Pb Pr Input
- Connect to an AV device that
features component (Y Pb Pr) video and audio output jacks.
6. AV Input
- Connect an external device to the composite VIDEO
(Y) and AUDIO (L / R) output jacks found on most video equipment.
7. RF Input
- Connect an antenna or cable connection
for television reception.
Note: Use an outdoor antenna, cable or satellite for best reception.
9. L / R Audio Out
- Connect to audio receiver.
1 2 3 4 5 6
8
9
POWER
AUDIO OUT
USB
7
Page 11
noi
talla
t
sn
I
TV REAR PANEL
Connection to Coaxial / RF Cable / Antenna
Ant./Cable
Wall Outlet
an
n
e
t
nA
o
tn
o
i
tc
en
n
o
C
e
t
i
ll
e
t
aS
/e
l
ba
C
&
32A66-11
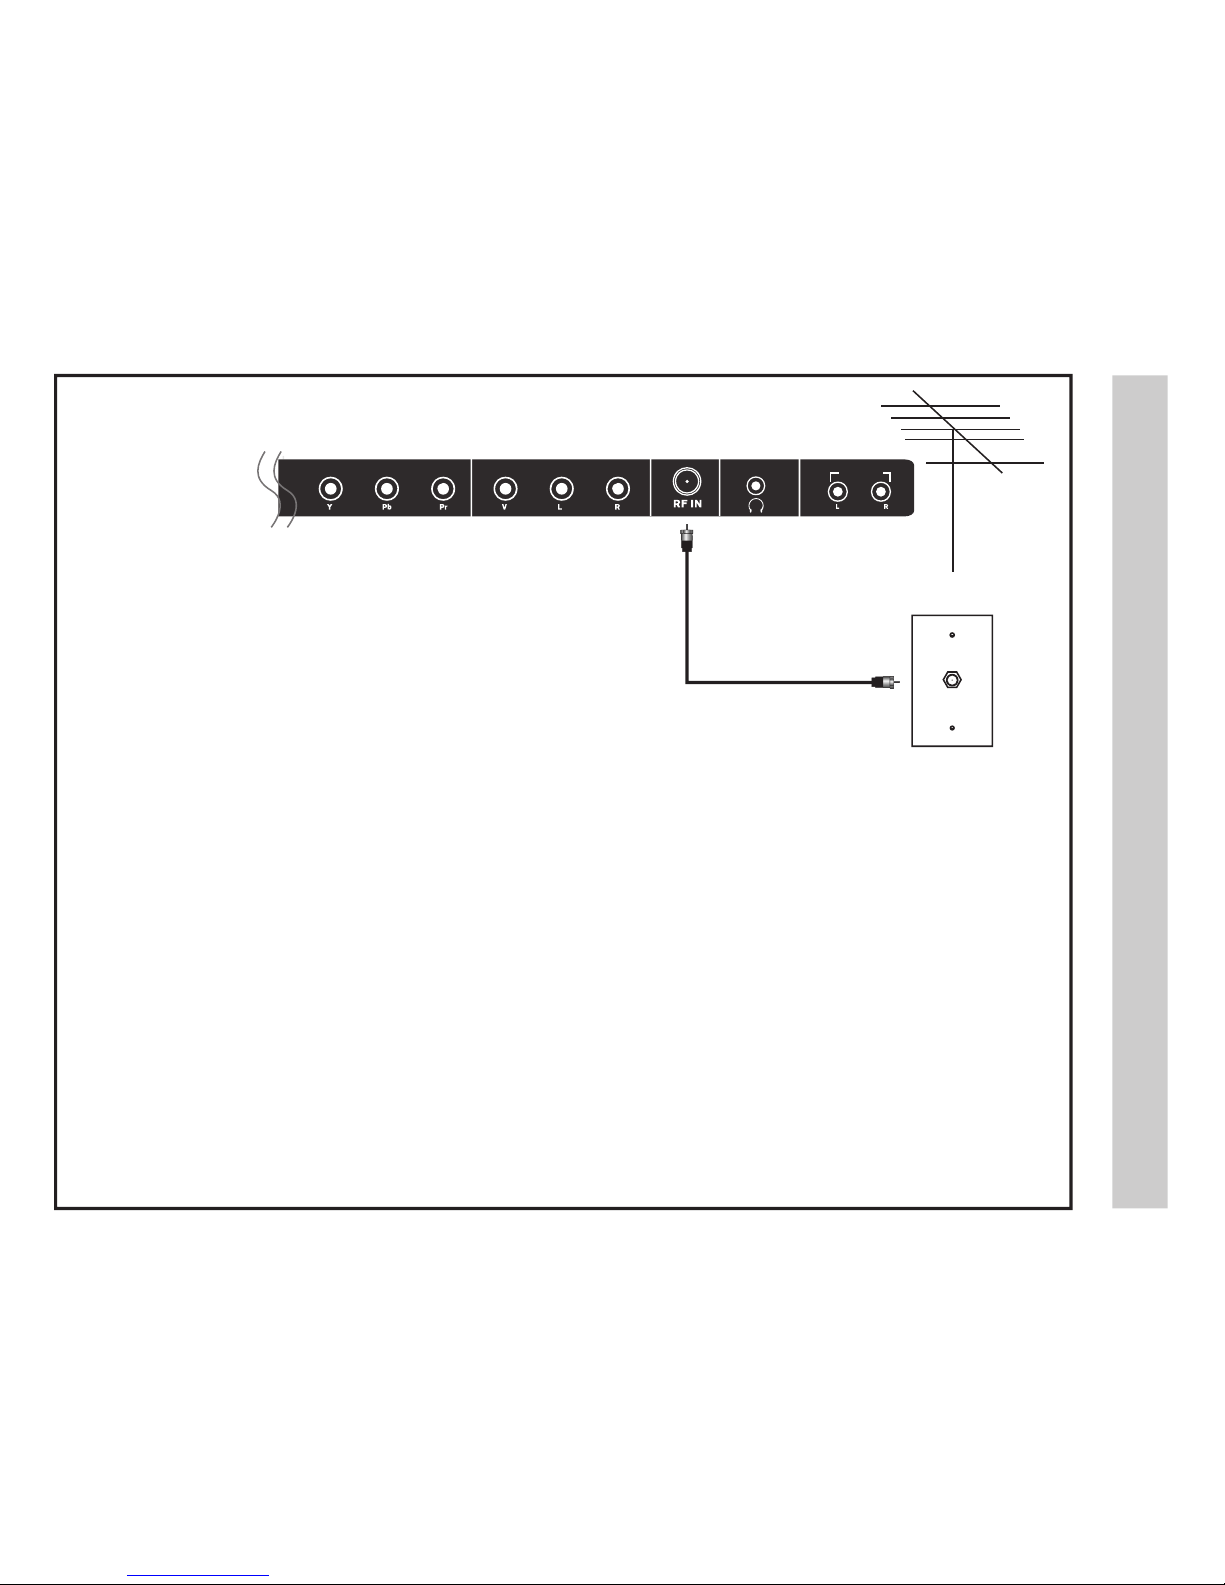
• Connect the RF coaxial (75 ohm) cable from your existing roof top / indoor
anten
na, or wall outlet. Finger tighten the Coaxial / RF Cable end to the
TV input on the rear panel.
•
•
See pages 17-18 for TV setup and Channel Auto Scan.
Tune to TV programming directly from the television tuner.
Coaxial / RF Cable (not included)
AUDIO OUT
How to connect to an indoor or rooftop antenna
Page 12
n
o
i
tal
l
a
t
s
n
I
TV REAR PANEL
HDMI
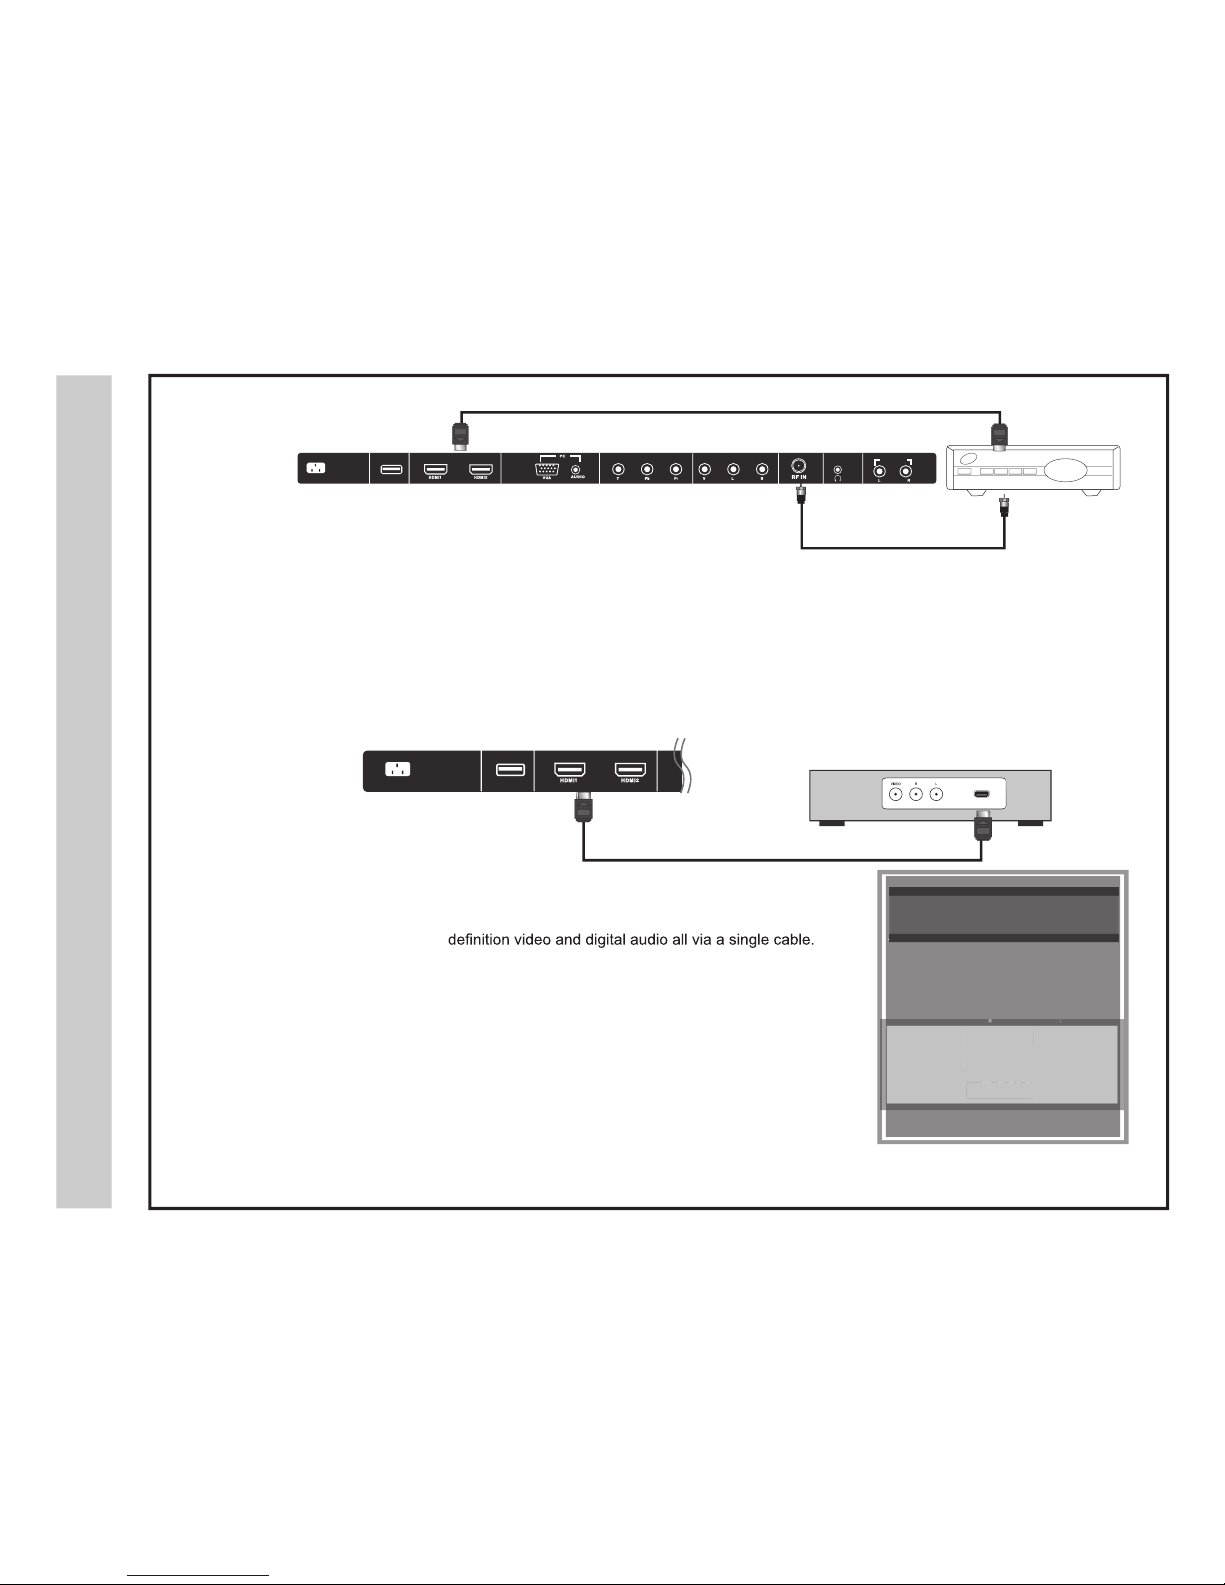
For BEST video performance
Connect to external equipment that offers HDMI, an uncompressed, all digital video / audio
interface found on today’s HD digital set top boxes and Blu-ray players. Use of this pure digital
technology offers enhanced high
There are two (2) HDMI inputs available for use with devices such as an HD set top box,
gaming console, and Blu-ray player.
How to Connect HDMI
•
From your external digital equipment, connect an HDMI cable from the
HDMI output to the HDMI input on the TV’s rear panel.
How To Use
•
Press the INPUT button on the remote control. Use arrow buttons
to highlight the input to view (HDMI 1, 2) then press ENTER.
Connecting to an HD Set-Top Box or Blu-Ray DVD Player Using HDMI
Digital set top box, gaming console,
or Blu-ray / HDMI interface
Optional HDMI cable(not included)
s
t
u
p
n
I
IMDH ot noitcennoC
32A66-12
IN PUT SOU RCE
IN PUT SOU RCE
TV
AV
Component
HDMI 1
HDMI 2
HDMI3
USB
How to connect with Digital Cable / Satellite Set Top Box
• Connect the RF coaxial (75 ohm) cable from the video outlet of your cable /
Satellite box to the RF input on the TV’s rear panel. Select Ch. 3 or 4 on the
TV and select a channel.
• For greater performance, if possible, use component or an HDMI installation shown below.
Refer to your set top box user manual.
• See pages 17-18 for TV setup and Channel Auto Scan.
RF / Coaxial Cable ( not included )
Optional HDMI cable ( not included )
Digital Cable / Satellite Set Top Box
Cable / Satellite set top box
VGA
POWER
AUDIO OUT
USB
USB
POWER
Page 13
noi
talla
t
sn
I
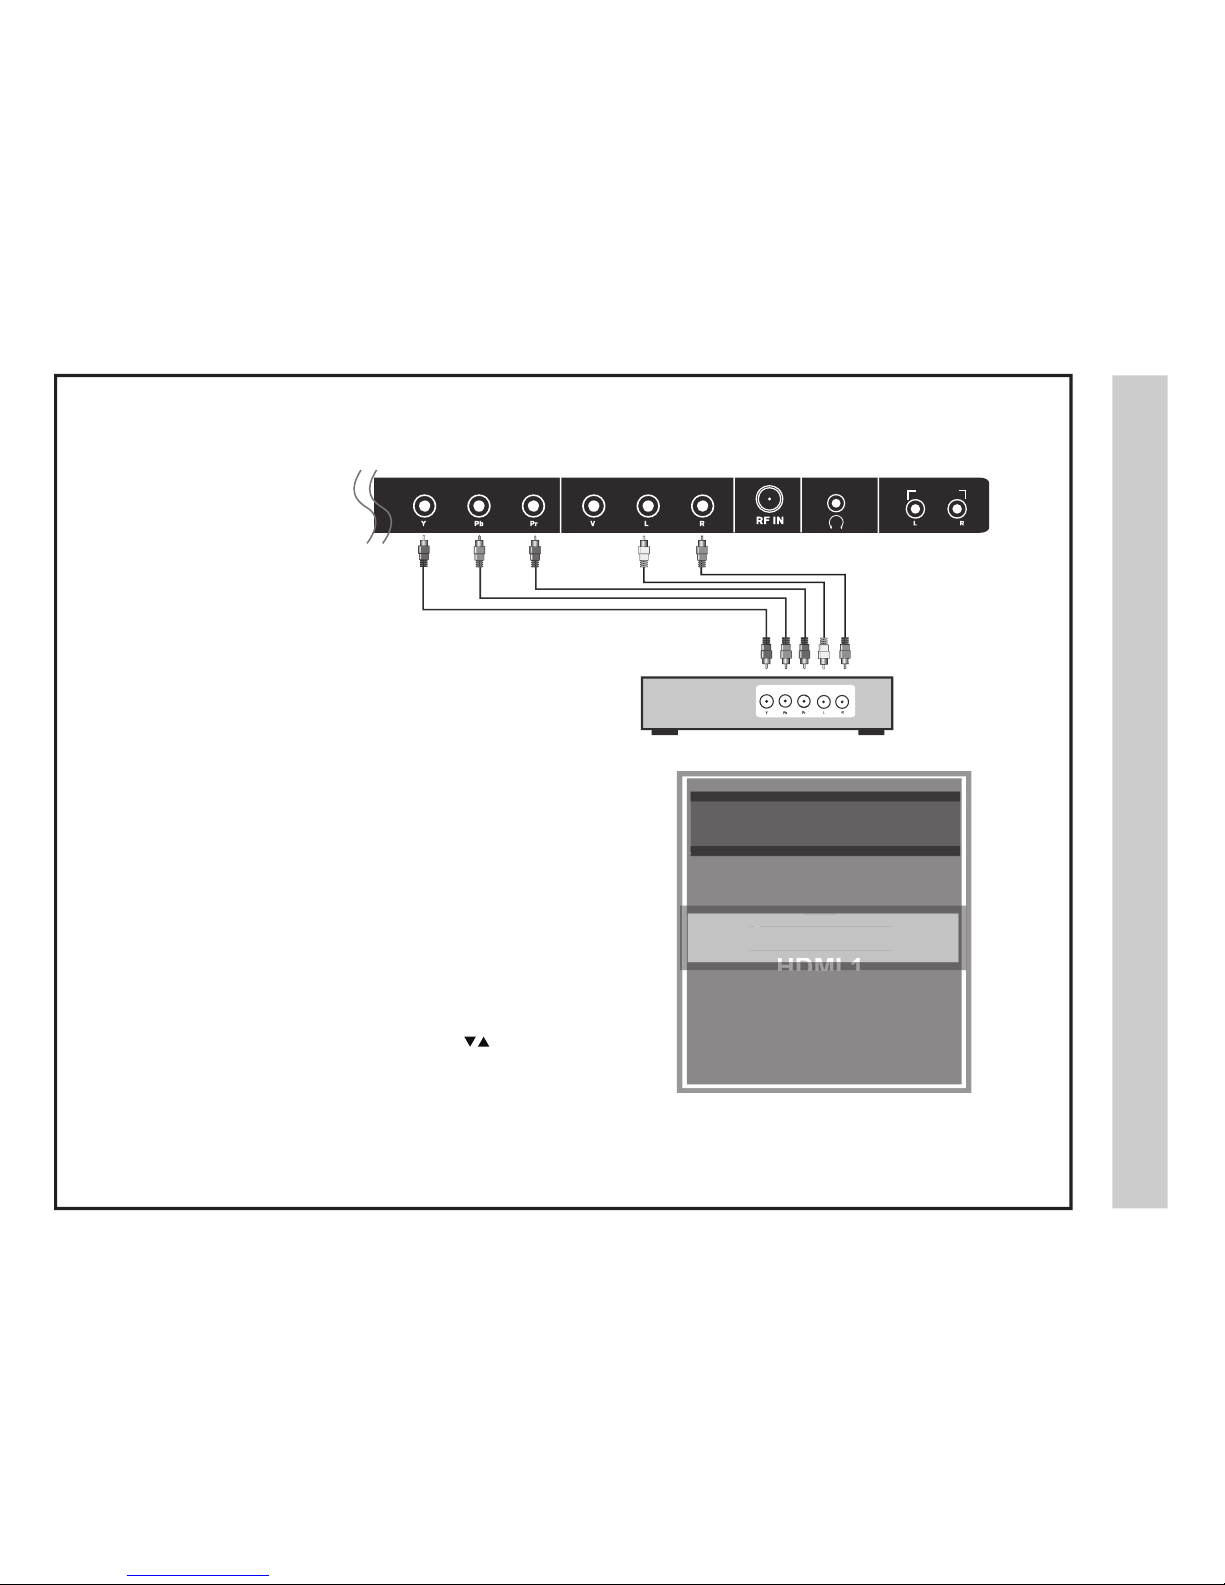
Connecting External Equipment to Component Video IN (Y Pb Pr)
tn
en
o
p
mo
Co
tno
i
tc
e
n
no
C
t
u
pn
I
rP
bPY
32A66-13
TV REAR PANEL
Optional
Component cables
(not included)
INPUT SOURCE
IN PUT S OURCE
TV
AV
Component
HDMI 1
HDMI 2
USB
VGA
AV
For BETTER video performance
Connect to external equipment that features component video output jacks
for better performance. Use the Component Y Pb Pr video and audio
inputs with a set top box, gaming console or DVD player.
•
When connecting external equipment to your television, match the colors
of the connec
ting jacks (Video: Blue, Green, Red; Audio: White / Red ).
•
Connec
t the optional component video cables (blue, green, red) (not included)
from the video output jacks (Y, Pb, Pr) on your external equipment to the
Component Y Pb Pr input on the TV’s rear panel.
• Connect white / red audio cables for sound from the audio (L/R) output
jacks on your external equipment to the AV L/R input jacks on the TV’s
rear panel.
How to Use
• Press the INPUT button on the remote control. Use the buttons
to highlight the input to view (Component) then press ENTER.
Digital set top
box, gaming
cons
ole or DVD
How to Connect Component
AUDIO OUT
Page 14
noitallatsnI
TV REAR PANEL
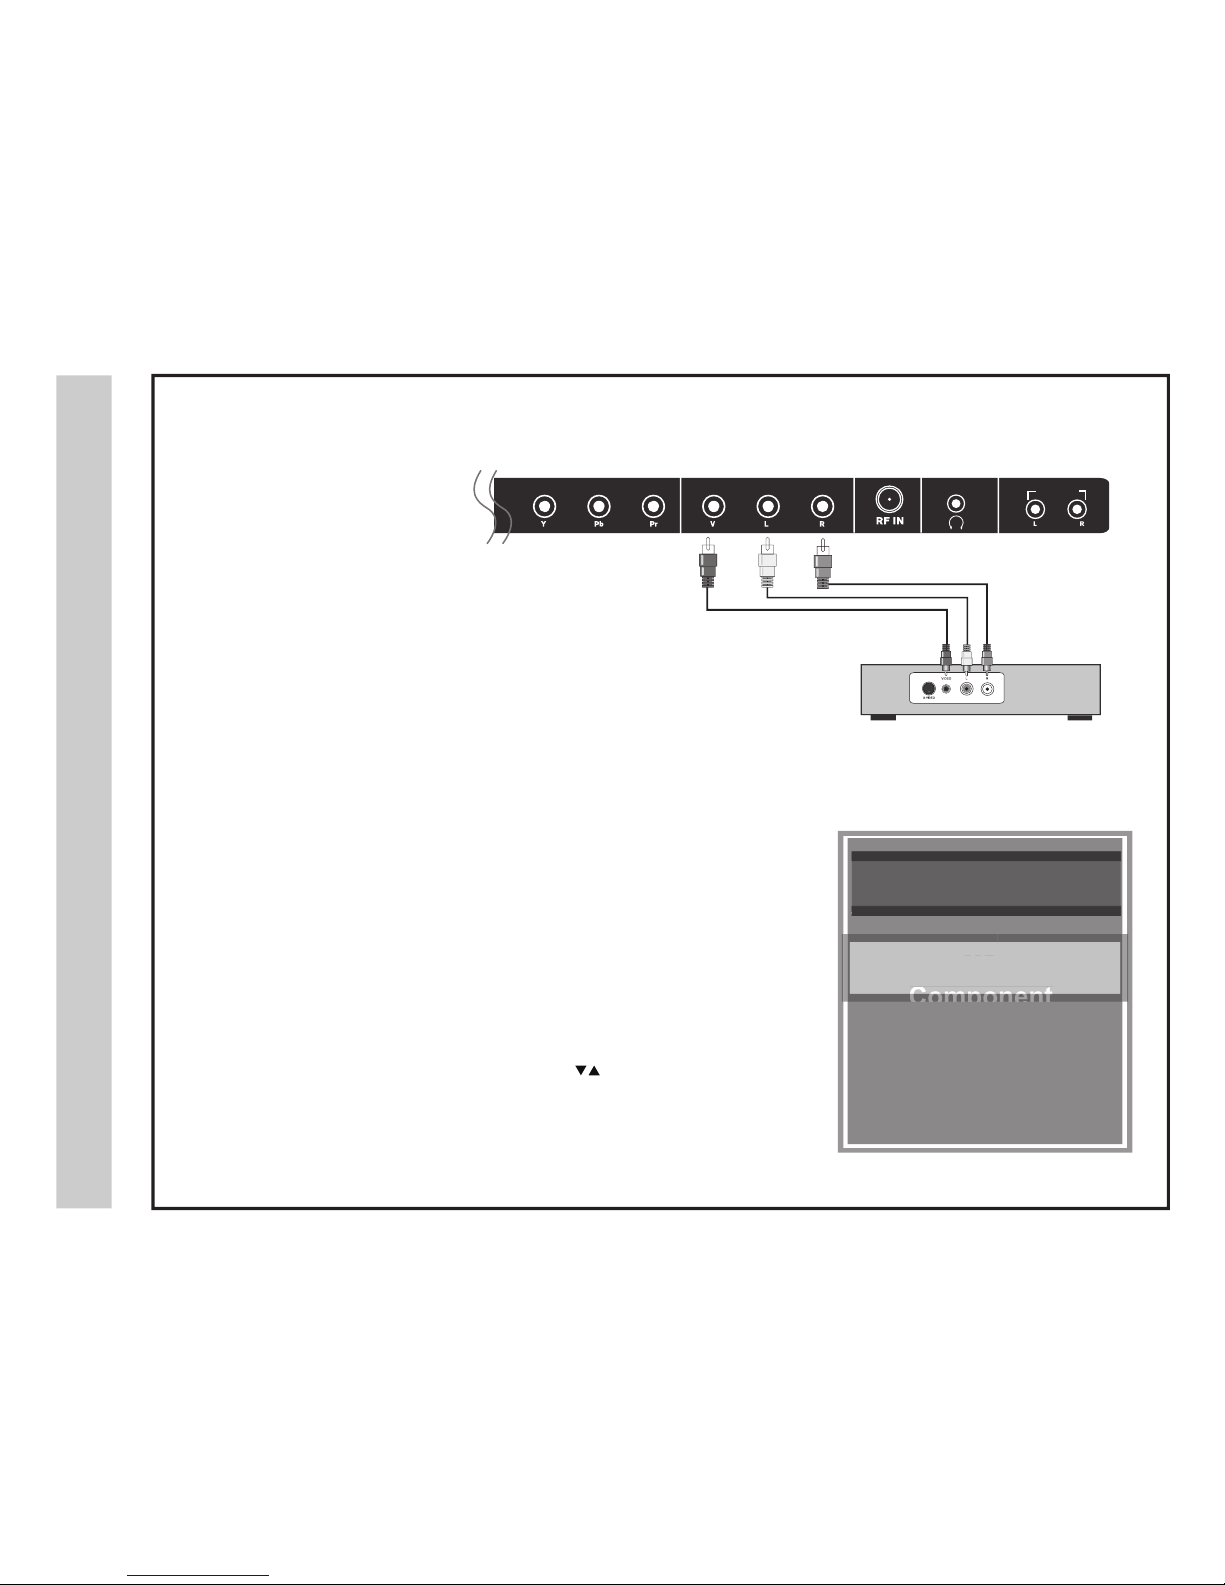
Connecting External Equipment to AV Composite IN on your television
Set top box, gaming console, and DVD
Audio Video Cable (not included)
AVotn
oitc
e
n
n
oC
32A66-14
INPUT SOURCE
IN PUT S OURCE
TV
AV
Component
HDMI 1
HDMI 2
VGA
USB
AV
For GOOD video performance
Connect to external equipment using optional video and audio cables.
outpu
t jacks are available on most set top cable/satellite boxes and DVD players.
(HDMI and Component connections are recommended for the best performance).
• When connecting external equipment to your television, match the colors of the
connec
ting jacks (Video: Yellow - Audio: White & Red).
•
•
Connect the y
ellow video cable from the video output jack on your external A/V
eq
uipment (i.e.: DVD player, set top box) to AV input on the TV’s side panel.
Connect the w
hite / red audio cables for sound from the audio (L / R ) output jacks
on yo
ur external equipment (i.e.: DVD Player, set top box) to the AV (L / R) jacks
on the
TV’s rear panel.
How to Use
•
Press the INPUT button on the remote control. Use the buttons to
highlight the input to view (AV) then press ENTER .
the included
Composite
How to Connect Composite AV
AUDIO OUT
Composite Input
Page 15
noi
talla
t
sn
I
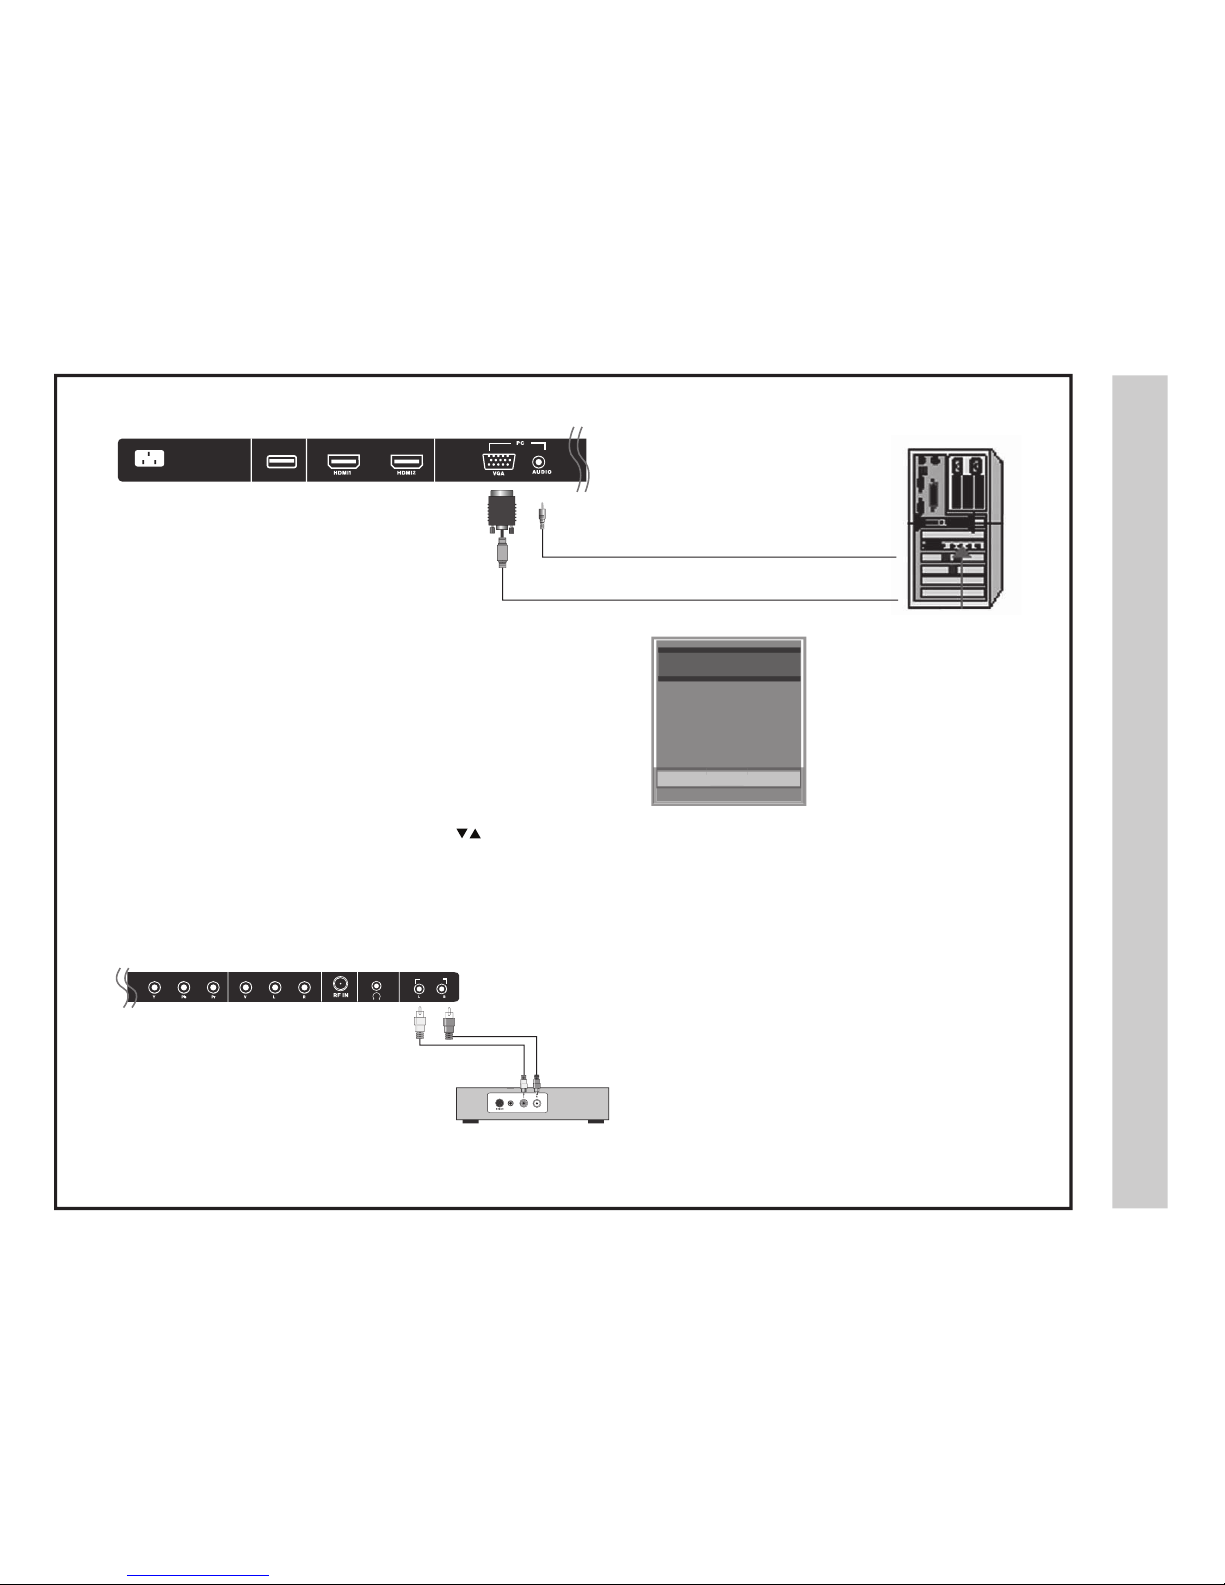
Connecting a Personal Computer with VGA to Your Television
Connecting to an amplifer or home theater system
a
ot
n
o
i
tce
n
n
o
C
r
e
t
u
pm
o
Cl
a
nosr
eP
32A66-15
VGA & Audio Cable (not included)
IN PUT SOUR CE
IN PUT SO URCE
TV
AV
Component
HDMI 1
HDMI 2
VGA
TV REAR PANEL
Audio Amplifier
Audio cables (not included)
Recommended computer display resolution: 1366x768 @ 60 HZ
• Connect using an optional male to male VGA cable (not included
no
t included
) from
yo
ur PC to the VGA input on the TV’s rear panel.
• Connect an optional 3.5mm audio cable ( ) from the computer’s
mini audio output jack to the audio input on the TV’s rear panel.
How to Use
• Press the INPUT button on the remote control. Use the
button
s
to
highlight the VGA input and press the ENTER button.
NOTE: If your PC uses a standard signal mode, the screen will adjust automatically.
How to Connet Audio Outc
Connec
t the TV’S Audio (L/R) output jacks to an Audio Amplifier
u
sing an audio patch cable with RCA cable ends (not included).
NOTE: The speakers of this TV still will output audio at this time.
How to Connect a PC
How to Connect Audio Sound
USB
AUDIO OUT
USB
POWER
Page 16
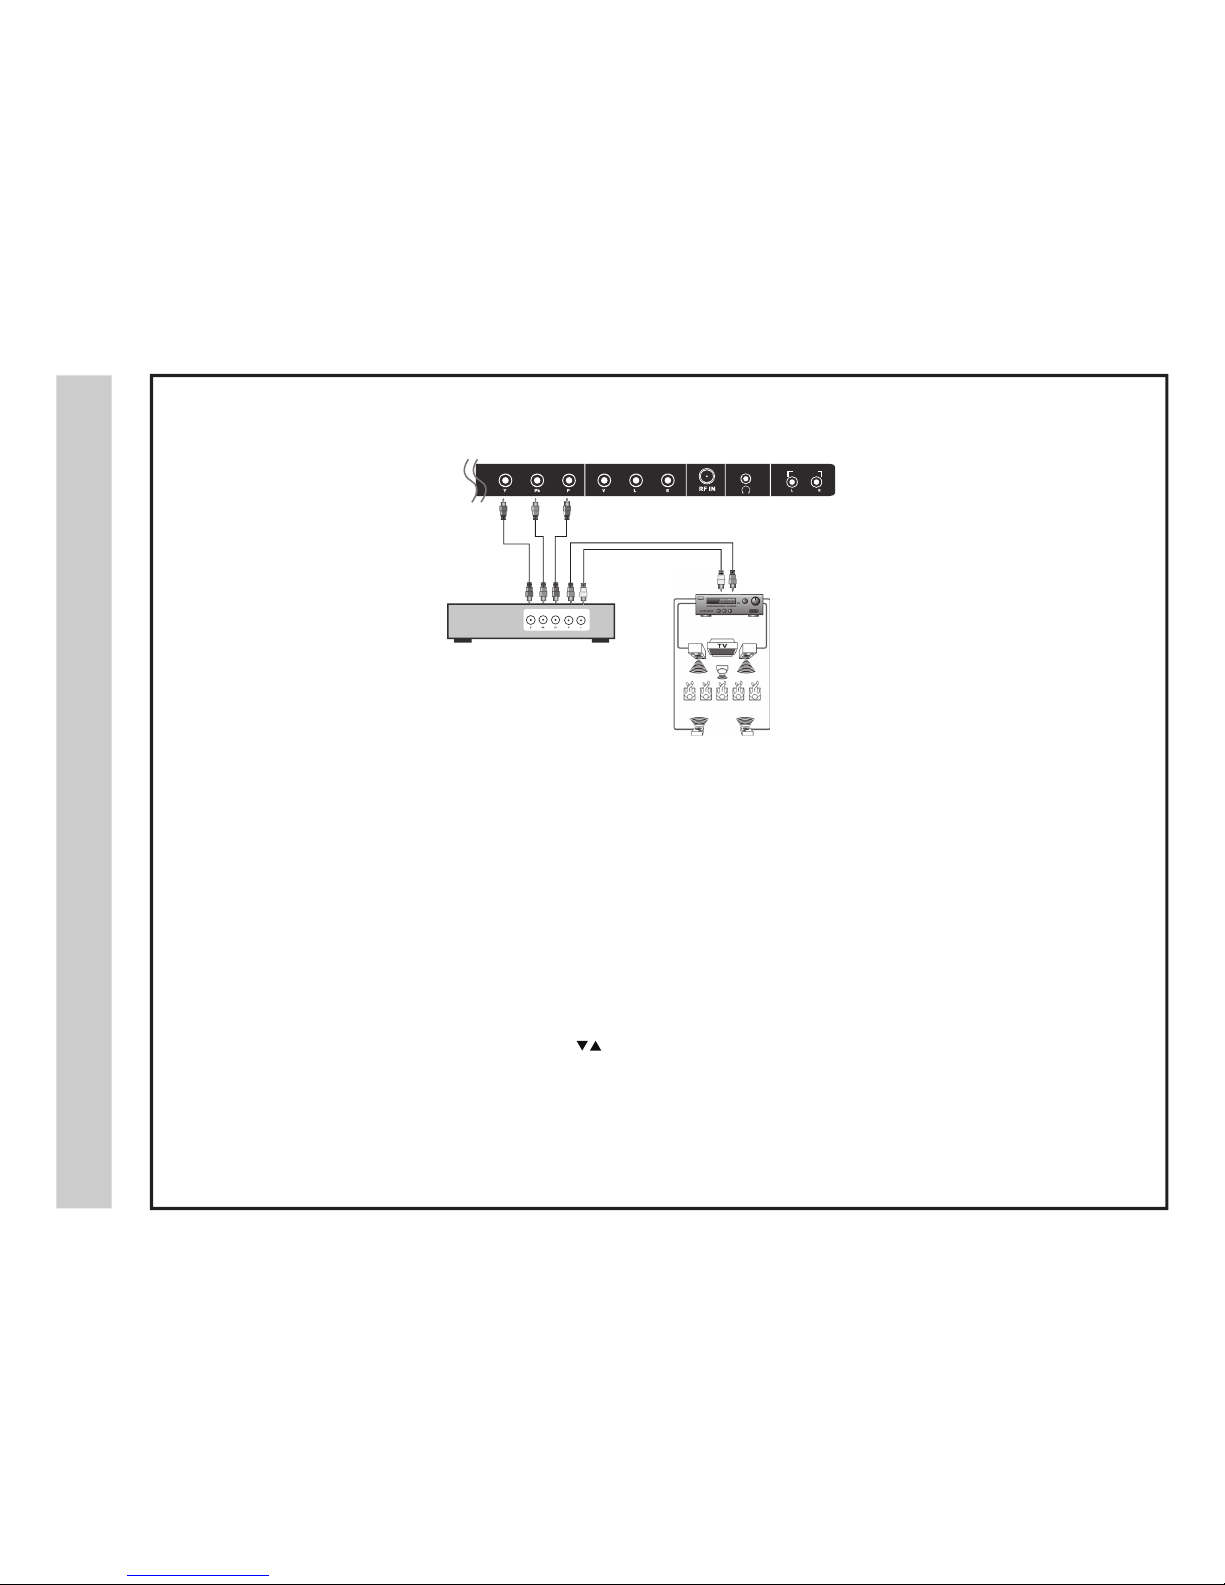
Connection to a Home Theater Audio System
noitallatsnI
*NOTE: Refer to the User Manual from your home theater equipment for recommended audio settings.
em
o
H
aotnoitcennoC
m
e
tsy
S
retaehT
32A66-16
TV REAR PANEL
Front Left
Speaker
Front Right
Speaker
Center Channel
Surround Right
Speaker
Surround Left
Speaker
Dolby Surround
Connection Illustration
Prologic
Surround Receiver
Digital set top box, gaming
console or DVD
optional cables (not included)
Connecting to a Stereo
Enjoy realistic sound from your home theater system through a stereo / receive
r
amplifier or Prologic sound system when connected to your AV
eq
uipment.
Example: The diagram illustrates the connection of audio cables directly from
yo
ur AV equipment (like a cable box) to a stereo receiver instead of using the
au
dio (L/R) jacks on the TV’s rear panel.
NOTE: When audio cables are connected to a stereo / receive
r amplifier, no audio
sound will be heard from the TVs built-in speakers.
How to Use
Press the appropriate INPUT button on the remote control. Use
arrow buttons to highlight the input source to view and then press ENTER .
How to Use (Audio )
(Video )
Select the appropriate input from your audio equipment.
AUDIO OUT
Page 17
16
dr
az
i
W
p
u
t
eSl
a
i
t
i
n
I
32A66-17
pu
t
e
S
V
T
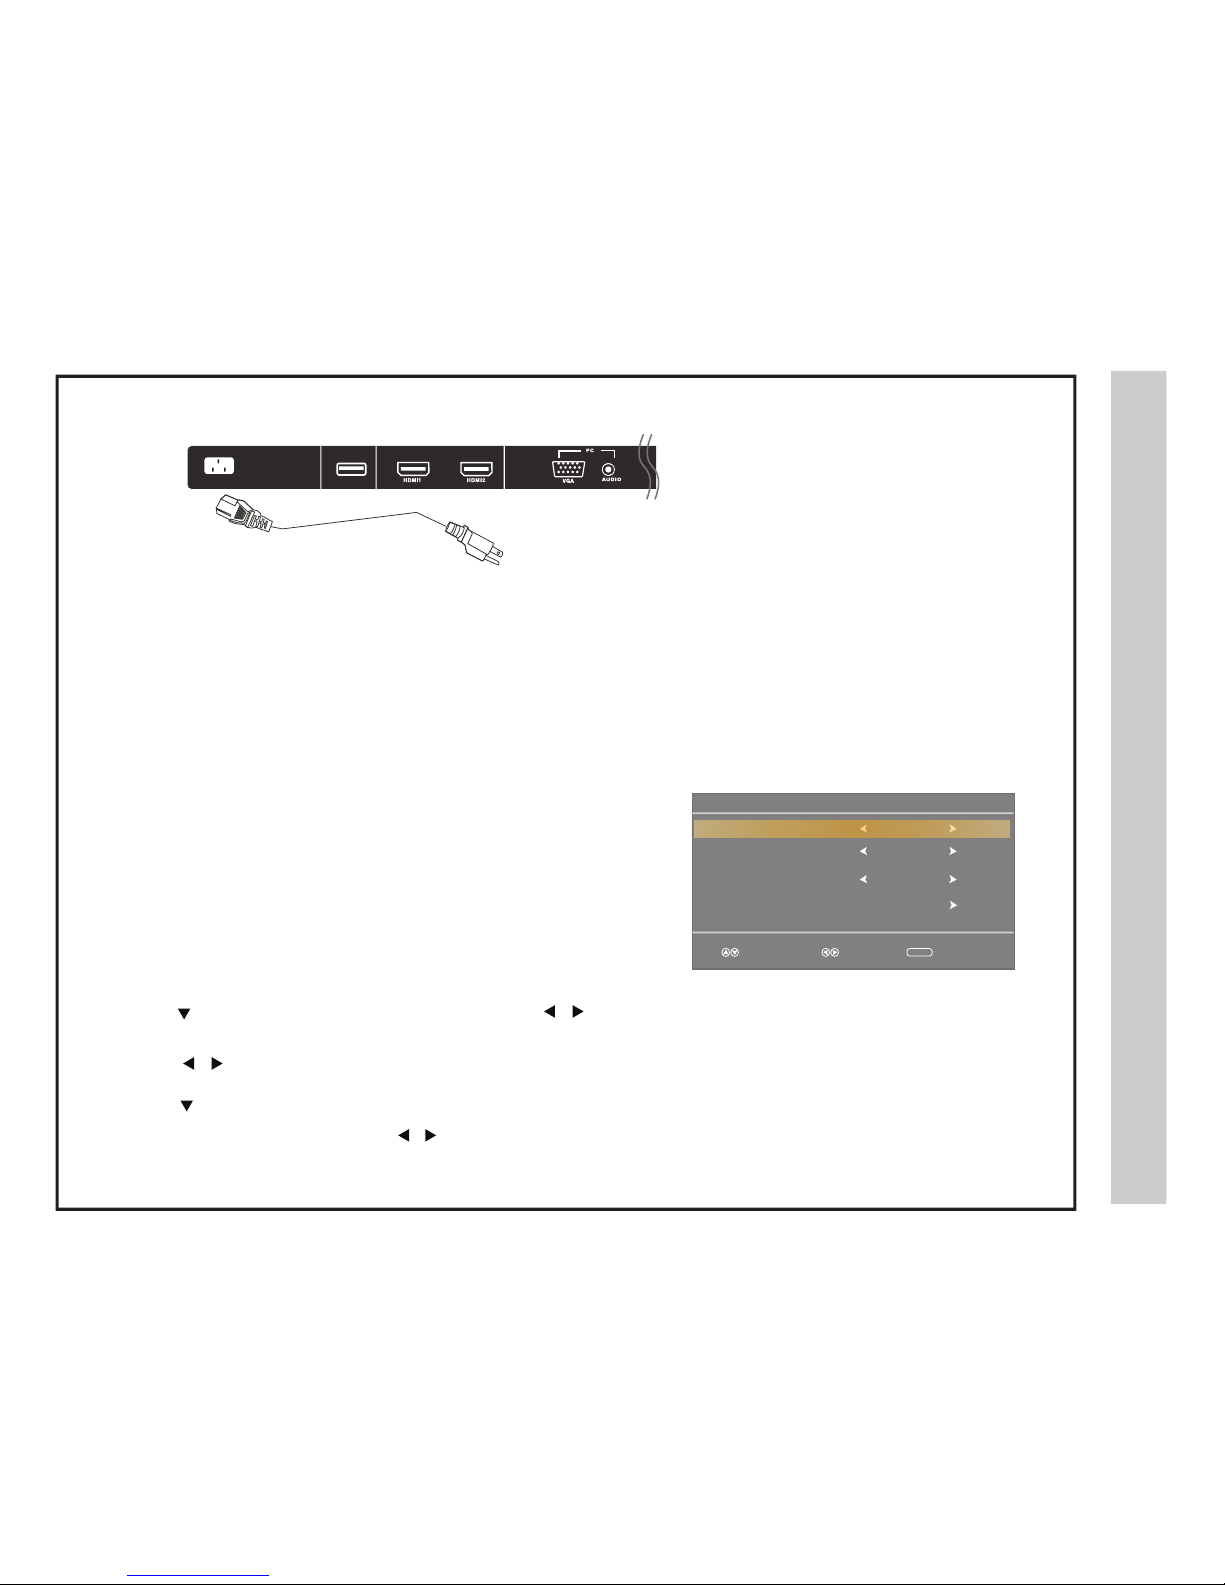
Initial Setup Wizard
Setup Wizard
Air/Cable
Cable System
Auto Scan
English
Cable
STD
Sele ct M ov e Ex it
M E N U
Menu Language
After connecting the antenna o r cable connect ion to you r TV, turn the te levision on
The Quick Setup W izard will display on-screen. Select you r preferr ed pictu re setting
followed by antenna opt ions. The n perform an Auto Channel Scan to sto re local
broadcast channels in the TV tune r mem ory.
How to Navigate
Menu Language
Cable or AIR
• P ress the button to highli ght Menu Language and then p ress the
buttons to select an on - screen display (OSD) language.
• P ress the
button to highlight C AB LE o r A IR based on you r antenna c onnection .
Pr ess the bu tton to s elect Auto Scan and press ENTER . N ote: when Cab l e is sele cted, ‘ AU TO ’ is the
recommended sett ing . O ther wise, p ress the
button to
se lec t the Cab le S ys tem: ST D > IRC > HRC > A uto .
How to connect with Power Cord
Connection to Power Source
AC INPUT
Power Cord
.
Connect the power cord to the rear of the TV and plug power cord into wall recepticle.
USB
POWER
Page 18
puteSVT
p
u
t
eSlennahCVT
n
ac
Sot
uAlennahC&
32A66-18
Cable Mode Air Mode
Lock
Channel
Lock
Channel
Lock
Channel
Lock
Channel
Lock
Channel
Lock
Channel
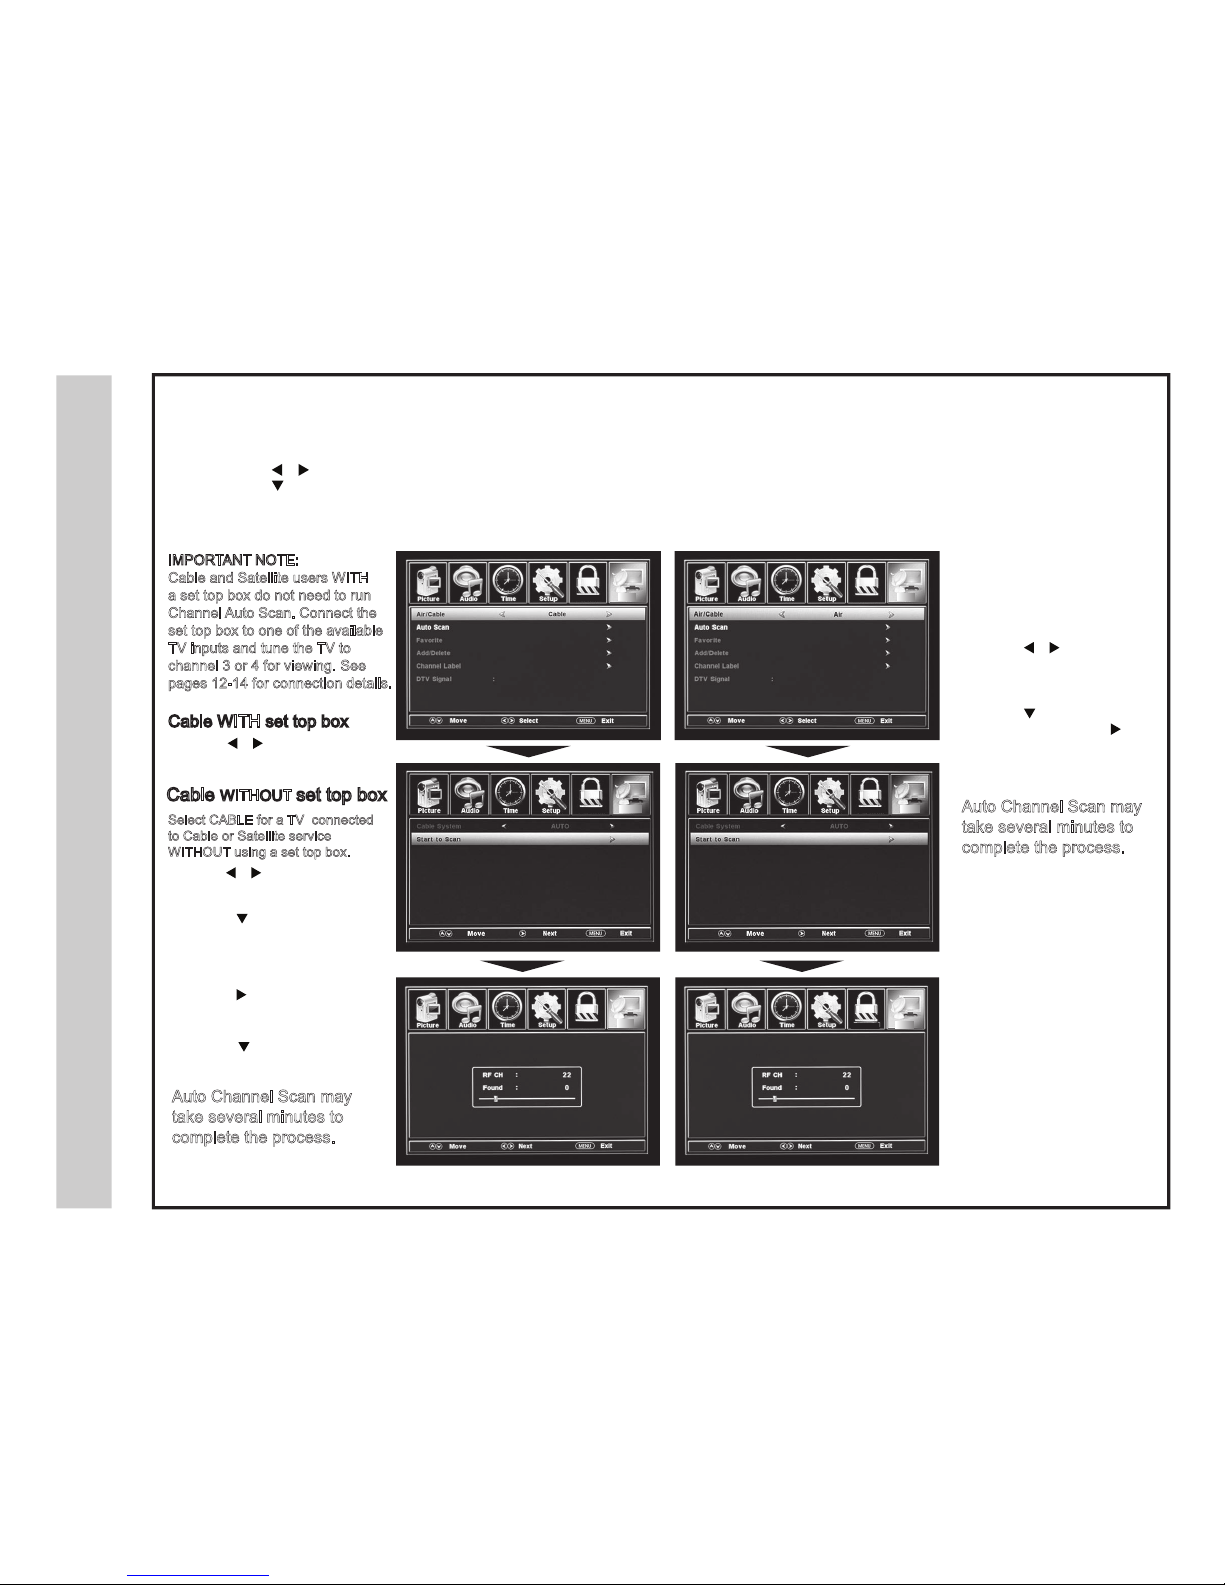
Select the antenna option and perform an Auto Channel Scan to receive and store broadcasted television channels into the TV tuner memory.
To
•
•
•
Enter the TV Mode:
Press the MENU button
Using the
buttons
; scroll to highlight the TV mode
Press the
button to
highlight; CABLE or AIR
• Use the button to
highlight CABLE.
• Press the
button to select
AUTO SCAN. Press the ENTER
button and CABLE SYSTEM will be
displayed next.
• Press the
button to
select STD > IRC > HRC > Aut
o
(Auto is recommended).
••Press the button to select
Auto Scan and press ENTER .
Cable WITHOUT set top box
Cable WITH set top box
• Use the button to
highlight CABLE and press ENTER.
Auto Channel Scan may
take several minutes to
complete the process.
IMPORTANT NOTE:
Cable and Satellite users WITH
a set top box do not need to run
Channel Auto Scan. Connect the
set top box to one of the available
TV inputs and tune the TV to
channel 3 or 4 for viewing. See
pages 12-14 for connection details.
Select CABLE for a TV connected
to Cable or Satellite service
WITHOUT using a set top box.
Select AIR when the TV is
connected to an indoor / outdoor
anten
na.
•
Press the
button to
highlight AIR.
• Press the
button to select
Auto Scan then press the
butt
on twice to start the Auto
Chan
nel Scan.
•
Auto Channel Scan may
take several minutes to
complete the process.
Page 19
s
tn
em
t
sujd
A
un
e
M
s
g
n
i
t
te
Ser
u
tc
iP
32A66-19
Note: When adjustments are complete, you may select another menu by pressing the MENU button.
MEMC
High
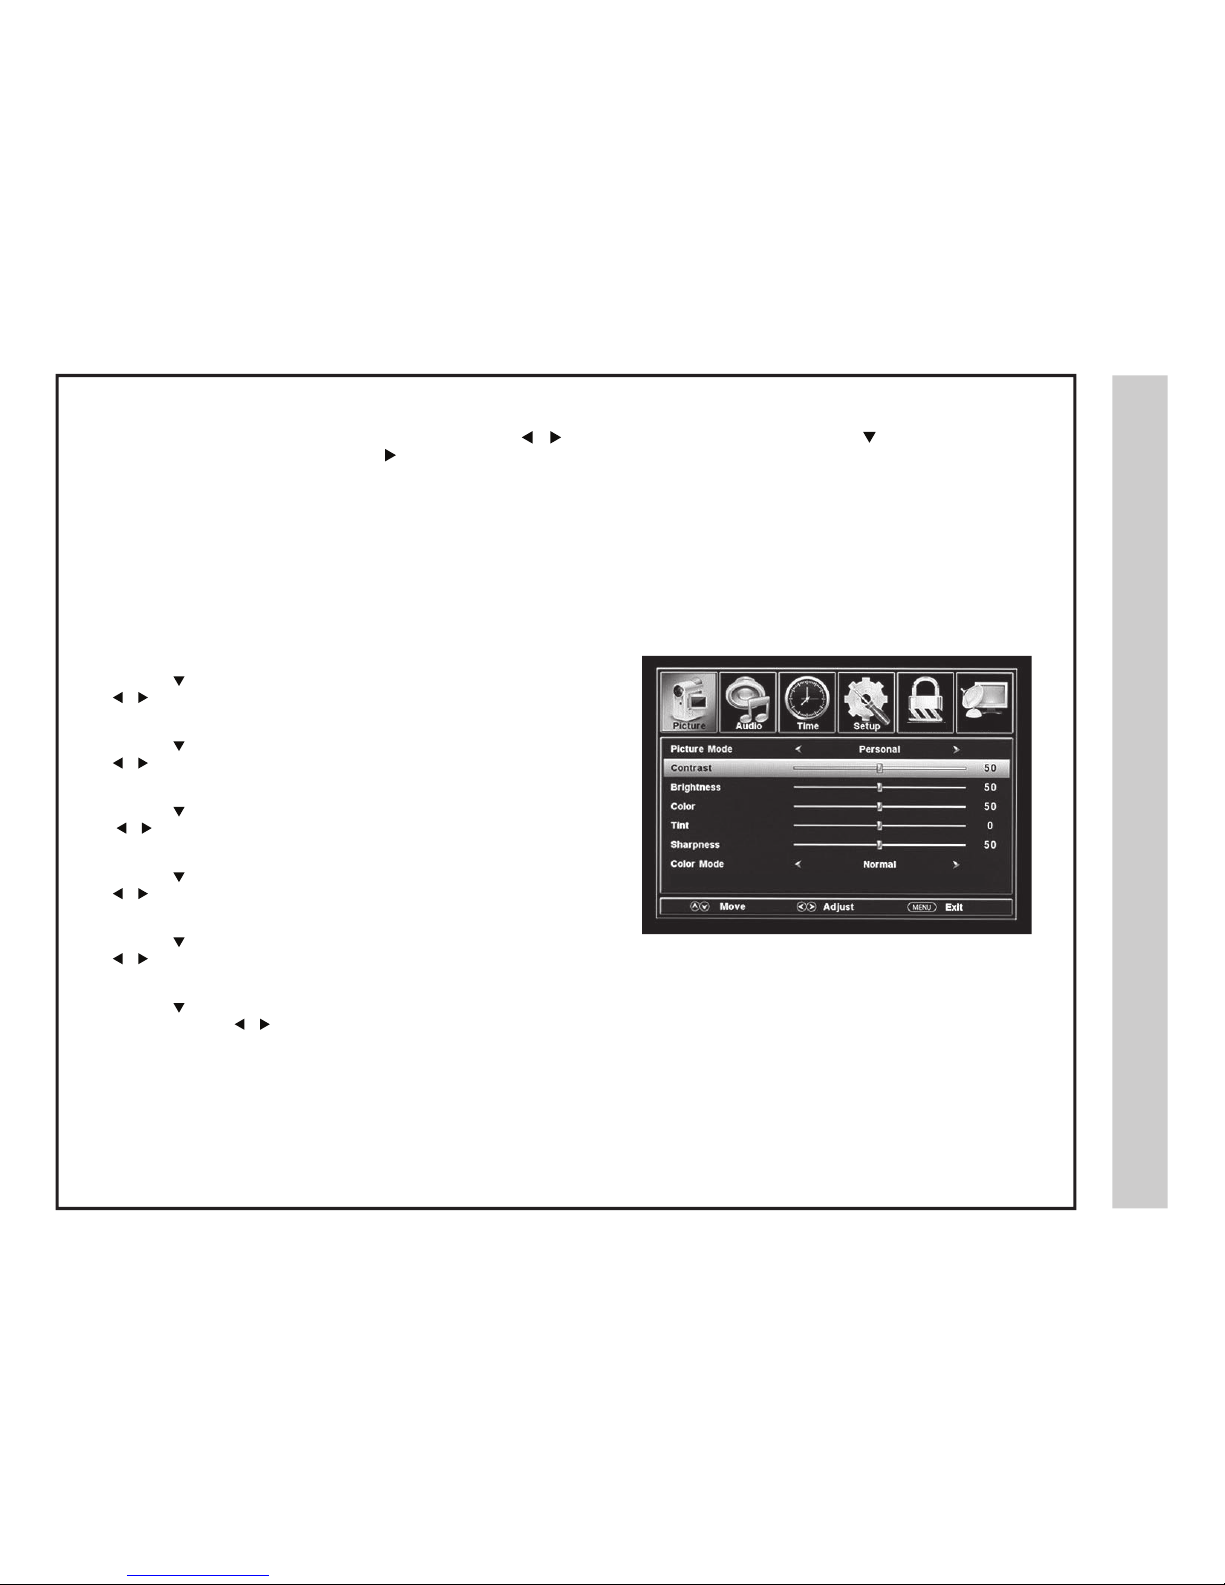
How to Navigate:
Press the MENU button on the remote control. Navigate using
buttons to select PICTURE. Press the down
button to
highlight PICTURE MODE, then press the
button to select your viewing preference from 4 options:
ST
ANDARD > DYNAMIC > MILD > USER. The STANDARD setting is recommended for most viewing environments. Depending on
the ambient light level in the room, you may find one of the other options more pleasing.
Lock
Channel
To make more critical adjustments based on your own preferences in PERSONAL:
• Contrast
Press the button to highlight Contrast. Use the
buttons to increase or decrease contrast intensity.
•
Brightness
Press the button to highlight Brightness. Use the
buttons to increase or decrease overall brightness.
•
Color
Press the button to highlight Color. Use the
buttons to increase or decrease color intensity.
•
Tint.
Press the button to highlight Tint. Use the
buttons to adjust the tint colors toward green or reddish tint.
•
Sharpness
Press the button to highlight Sharpness. Use the
buttons to view softer or crisper edges in the picture.
•
Color Temperature
Press the button to highlight your Color Temperature
preference. Use the
buttons to select COOL
(more Bluish tone), NORMAL or WARM (less Bluish tone) settings.
Page 20
stnemtsujdAuneM
s
gn
i
t
t
e
Soi
duA
32A66-20
Surround
Lock
Channel
Note: When adjustments are complete, you may select another menu by pressing the MENU button..
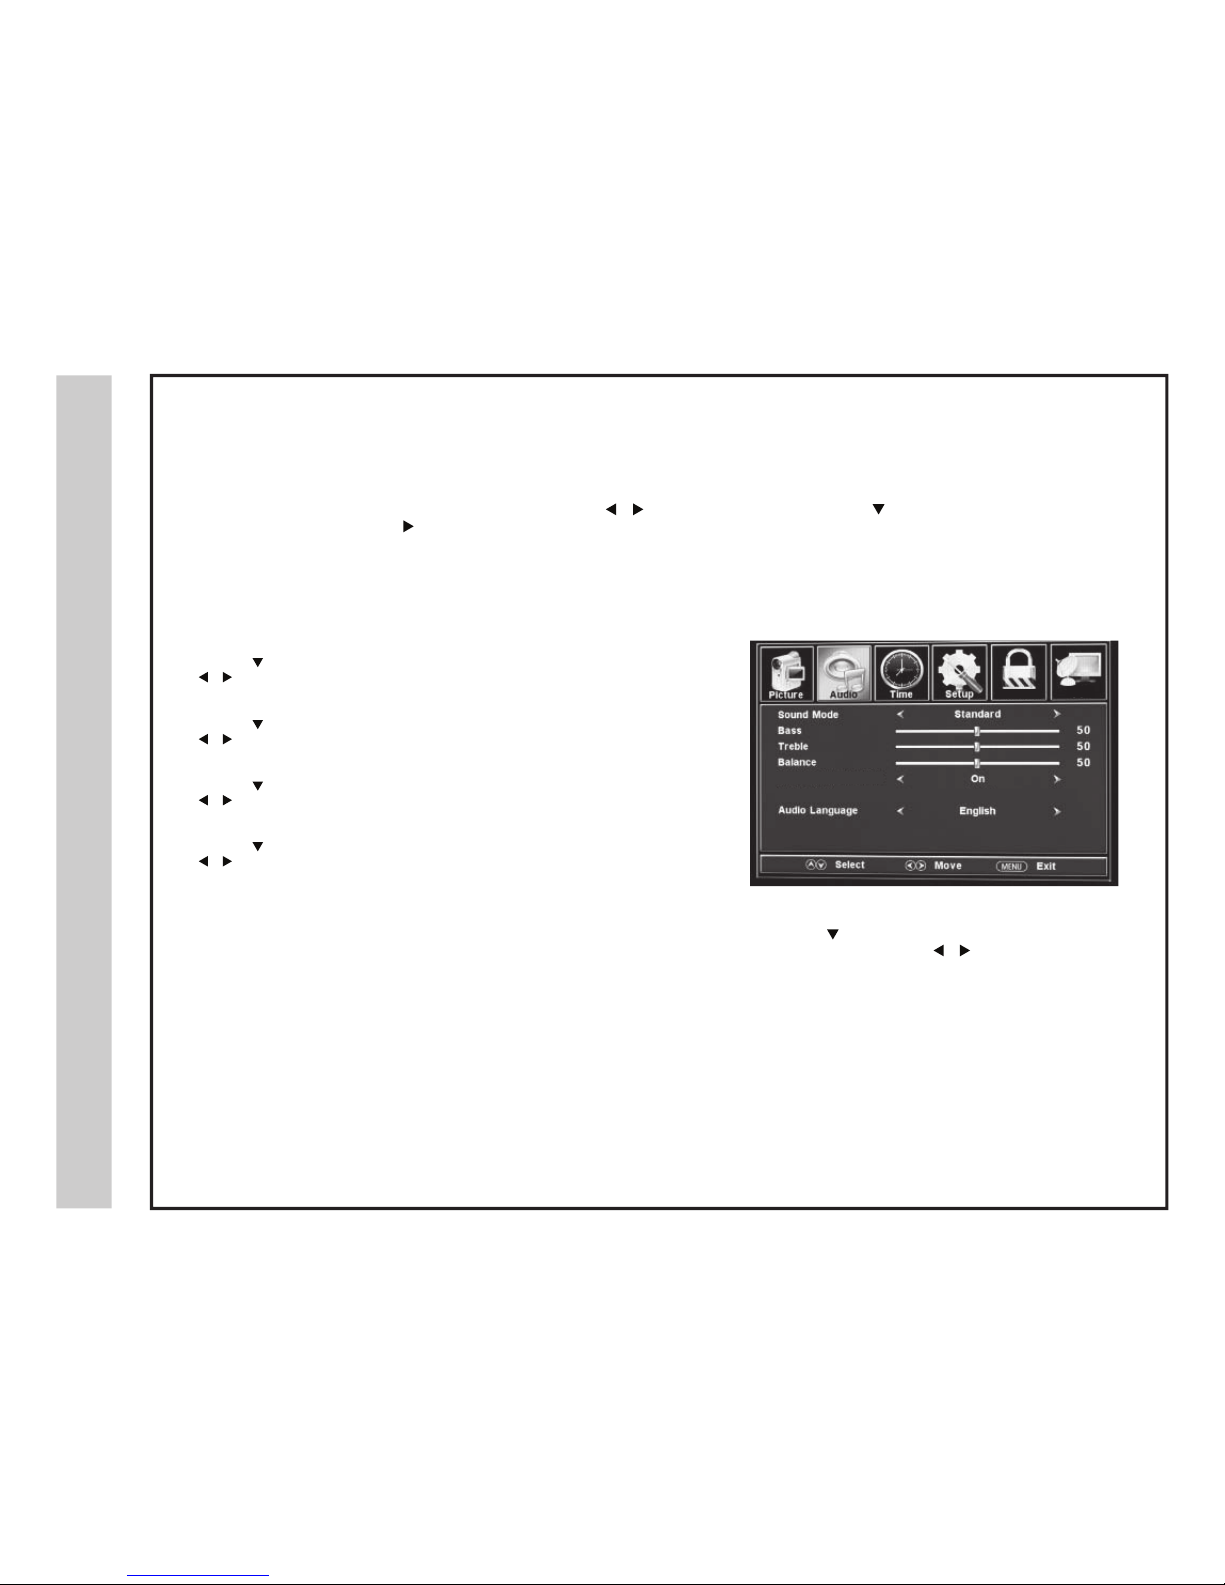
• Audio Language
Press the button to highlight Audio Language.
Scroll using the Navigation
buttons to select an
alternative language broadcast (if available). Choose from:
English > Spanish > French.
Note: This feature is not available when text is
grayed out.
You may select an alternative language using the
remote control by pressing MTS.
To make more critical sound adjustments based on your own preferences in the PERSONAL options:
• Bass
Press the
button to highlight Bass. Use the
buttons to
increase or decrease low frequency Bass intensity.
•
Treble
Press the button to highlight Treble. Use the
buttons to increase or decrease high frequency Treble intensity.
• Bal
ance
Press the
button to
highlight Balance. Use the
buttons t
o balance the sound between the left or right speaker.
•
Surround
Press the
button to highlight Surround. Use the
buttons to select between; ON > OFF.
The AUDIO menu offers options to make audio enhancements for listening through the built-in speakers or to select digital audio options
when connected to a Digital receiver though the Digital Audio Output.
How to Navigate:
Press the MENU button on the remote control. Navigate using the
buttons to select AUDIO. Press the button to highlight
SOUND MODE and then press the button to select your sound preference from 4 factory options:
PERSONAL > STANDARD > MUSIC > MOVIE.
Page 21
s
tn
em
t
sujd
Aun
e
M
s
g
nit
t
eS
em
i
T
&e
t
a
D
32A66-21
Lock
Channel
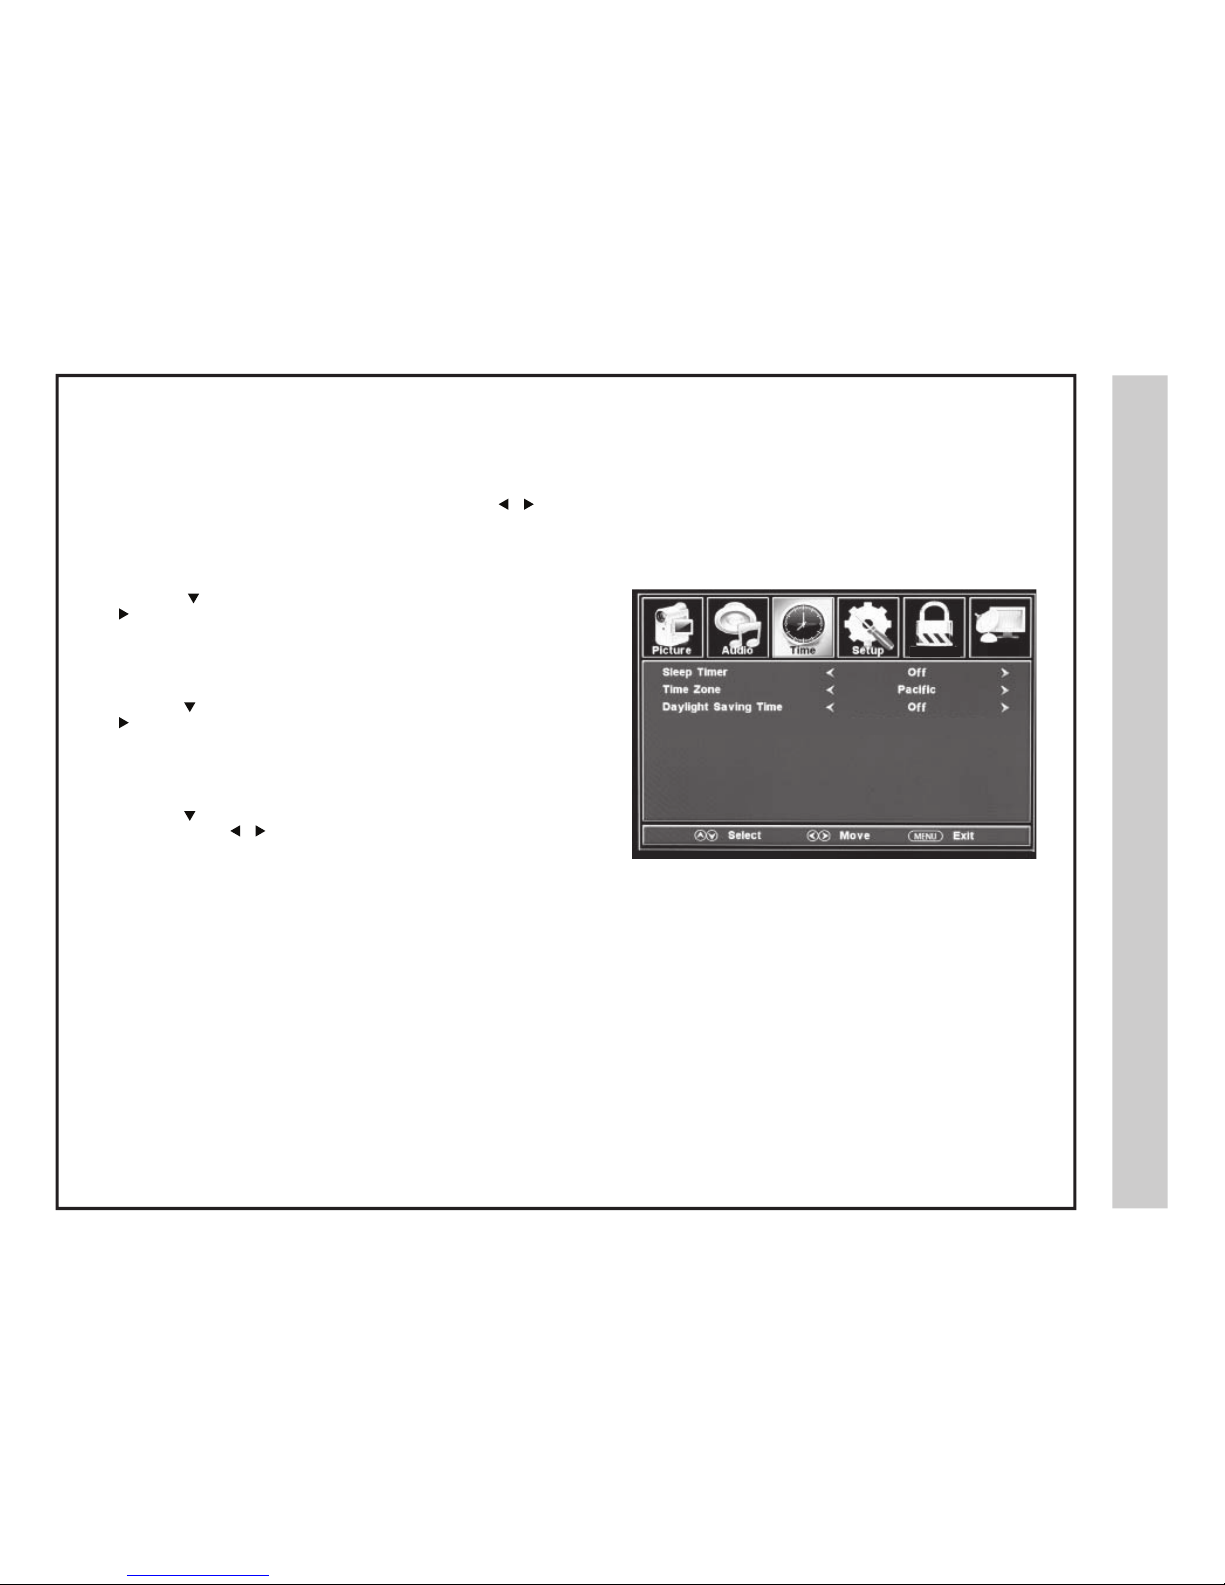
The TIME menu includes adjustments for the settings of your local time zone and daylight savings time. The clock will adjust automatically after
you p
erform the Channel Auto Scan of available broadcast channels in your area. (See page 18 for TV Setup)
How to Navigate:
Press the MENU button on the remote control. Navigate using the
buttons to s
elect TIME .
• Press the button to highlight the Sleep Timer. Then press the
button to select the amount of time to view before the television timer turns
th
e set off: 5 Min > 10 Min > 15 Min > 30 Min > 45 Min > 60 Min > 90 Min > 120
Min > 180 Min > 240 Min > OFF.
• Press the button to highlight Time Zone. Then press the
button to s
elect between: EASTERN > CENTRAL > MOUN-
TAIN > PACIFIC > ALASKA > HAWAII.
• Press the button to highlight “Daylight Savings Time”.
Navigate using the
buttons to t
urn this feature on or off.
Note: This feature is not available when text is grayed out.
Note: When adjustments are complete, you may select another menu by pressing the MENU button .
Page 22
.
stnemtsujdAuneM
s
gn
i
t
t
e
Spu
teS
32A66-22
DLC
DLC
DLC
DLC
DLC
DLC
Lock
Channel
Lock
Channel
Lock
Channel
Lock
Channel
Lock
Channel
Lock
Channel
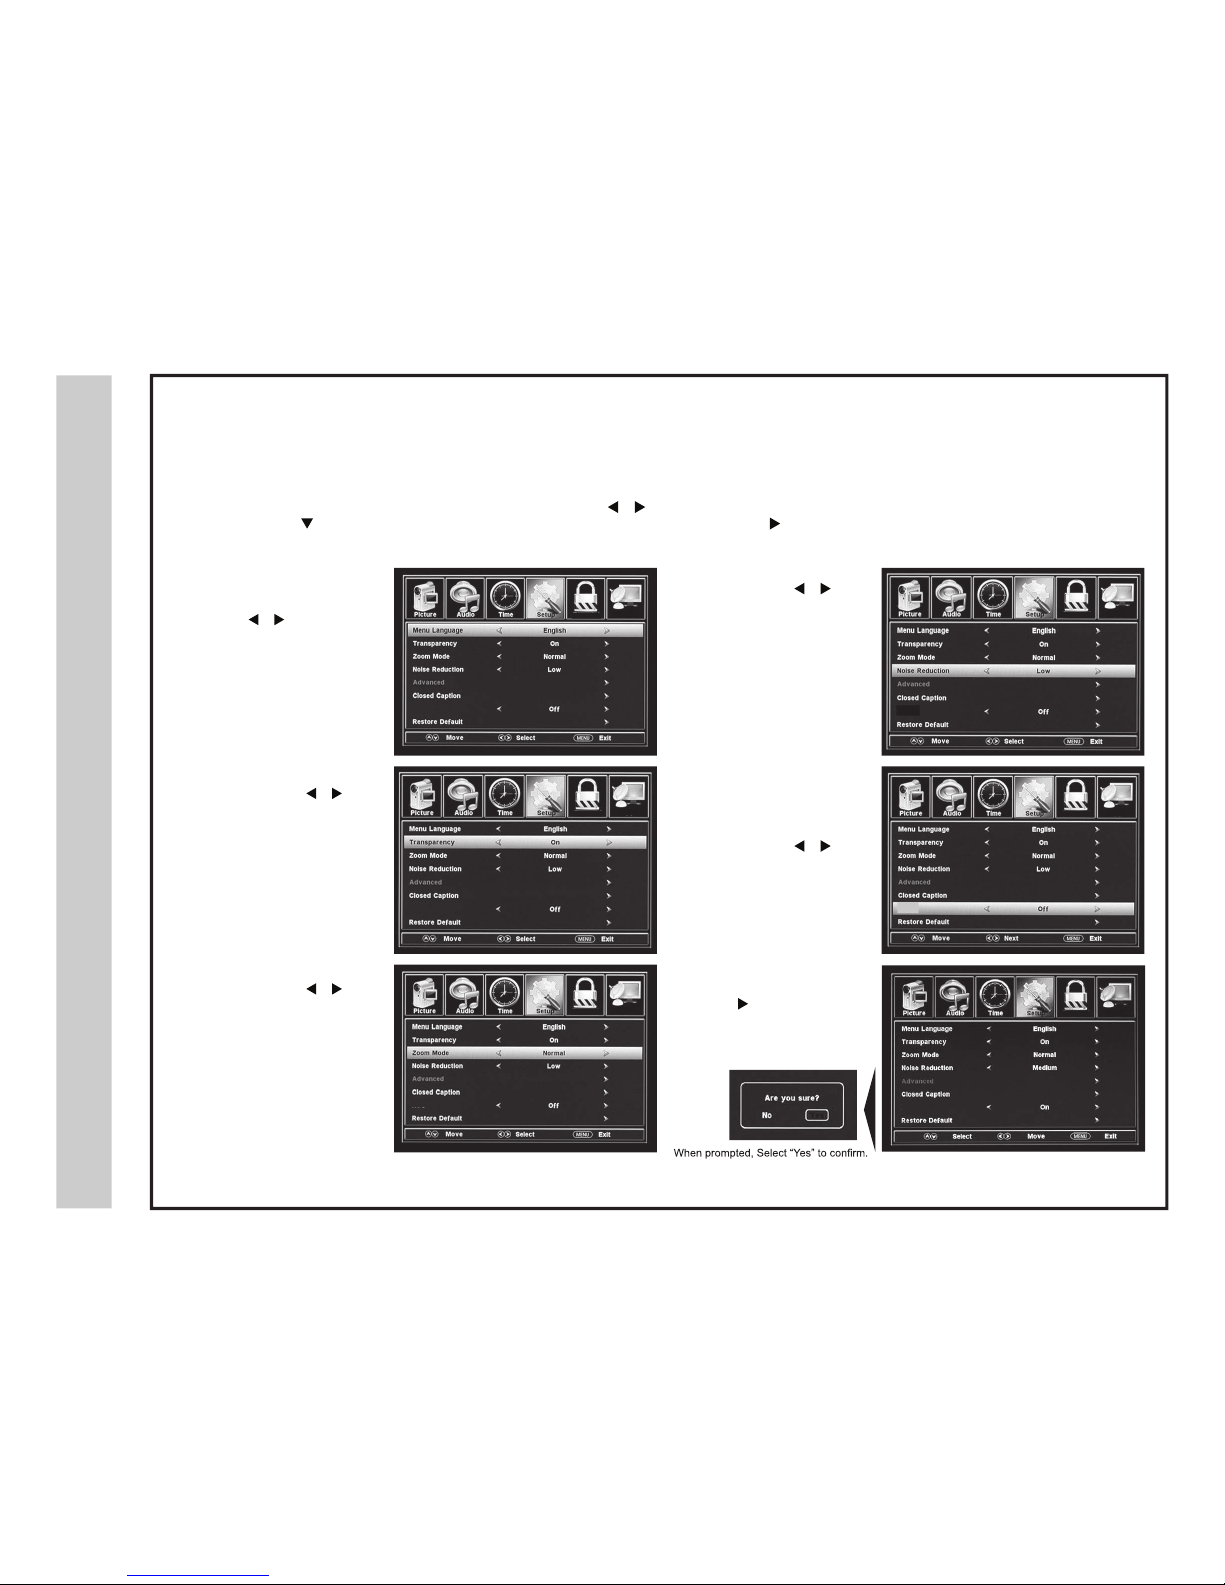
In the SETUP menu, you may change the initial setup preferences that include settings for language, menu display, computer monitoring,
closed captions, enhancement of contrast details in the picture and resetting your TV back to its factory default settings.
How to Navigate:
Press the MENU button on the remote control. Navigate using the
buttons to s
elect SETUP . Enter the display options by
pressing the down
button to
highlight the Menu Language or other options, then press the button to select the menu choice.
• Languages
Other languages include
Spanish and French. Navigate
using the
buttons to
select a different menu language.
• Transparency.
Navigate using the
buttons to turn OFF or ON
the translucent effect of the
User menu.
• Aspect (Zoom Mode)
Navigate using the
buttons to select the viewing
asp
ect to be displayed:
Normal > Wide > Zoom >
Cinema.
The Aspect feature is also
available on the remote control.
(See page
28)
• Noise Reduction.
Navigate using the
buttons to reduce video noise:
OFF > Weak > Middle > Strong.
• DLC.
The DLC feature provides
noticeable contrast detail
enhancement.
Navigate using the
buttons to select; OFF > ON.
• Restore Factory Defaults.
Press the button to
automatically reset all current
adjustments back to their original
factory settings.
NOTE: Closed Caption and Advanced are features described on the following pages.
Page 23
s
tn
em
t
sujd
Aun
e
M
s
n
oit
p
a
Cd
es
o
l
C
32A66-23
Lock
Channel
Lock
Channel
Lock
Channel
Lock
Channel
Lock
Channel
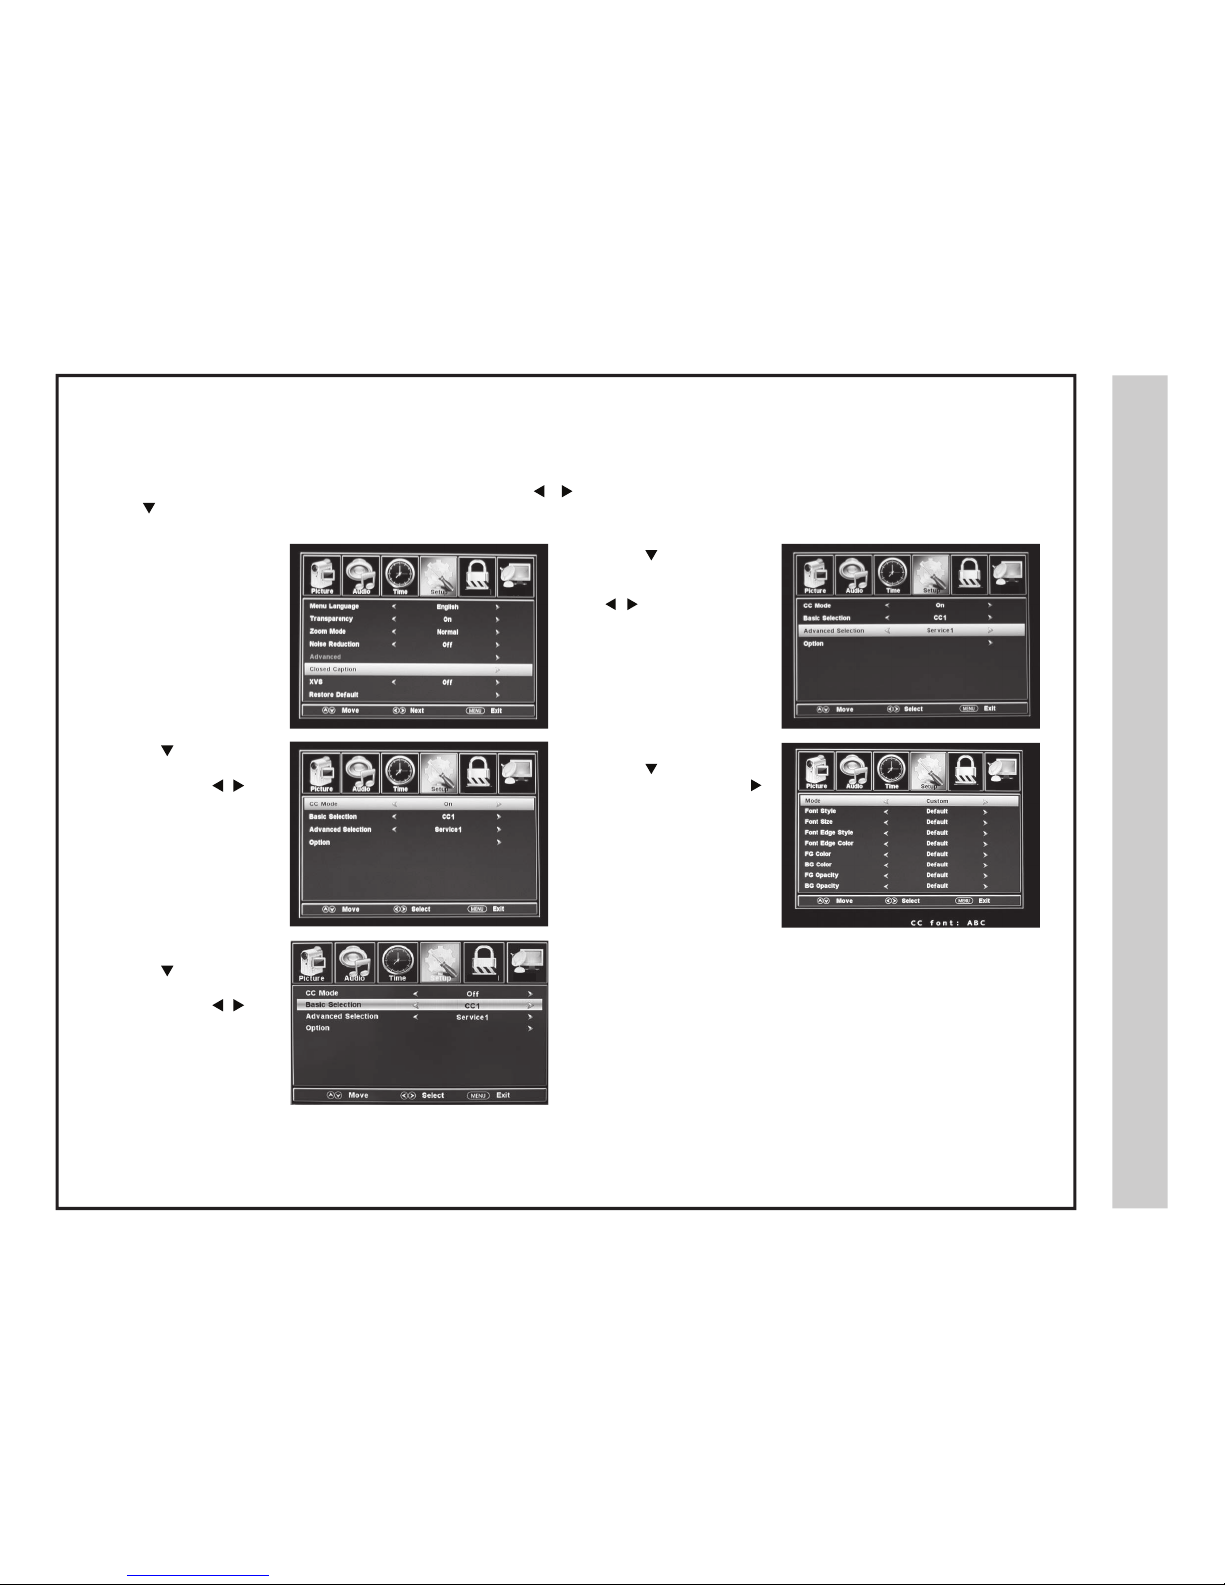
The SETUP menu includes adjustments for activating the Closed Caption (CC) feature for display on the television and customization of the CC display
typ
es and font styles.
How to Navigate:
Press the MENU button on the remote control. Navigate using arrow
buttons to s
elect SETUP .
Press the arrow button to highlight Closed Caption.
• Press the arrow button
to
highlight Advanced
Selection. Navigate using
th
e buttons to
select Service 1-6.
• Press the button to
highlight Option. Press the
button to enter a menu option to
customize text fonts, colors
and opa
cities.
• Press the
button t
o
highlight the CC Mode.
Navigate using the
buttons. Select Off > On
> CC or Mute.
• Press the button to
highlight Basic Selection.
Navigate using the
buttons and select CC 1-4,
Text 1-4.
Note: When adjustments are complete, you may select another menu by pressing the MENU button. Features are not available.
when text
is grayed out.
Page 24
stnemtsujdAuneMCP
sgn
i
tteSdecnavdA
32A66-24
Lock
Channel
Lock
Channel
Lock
Channel
Lock
Channel
Lock
Channel
Lock
Channel
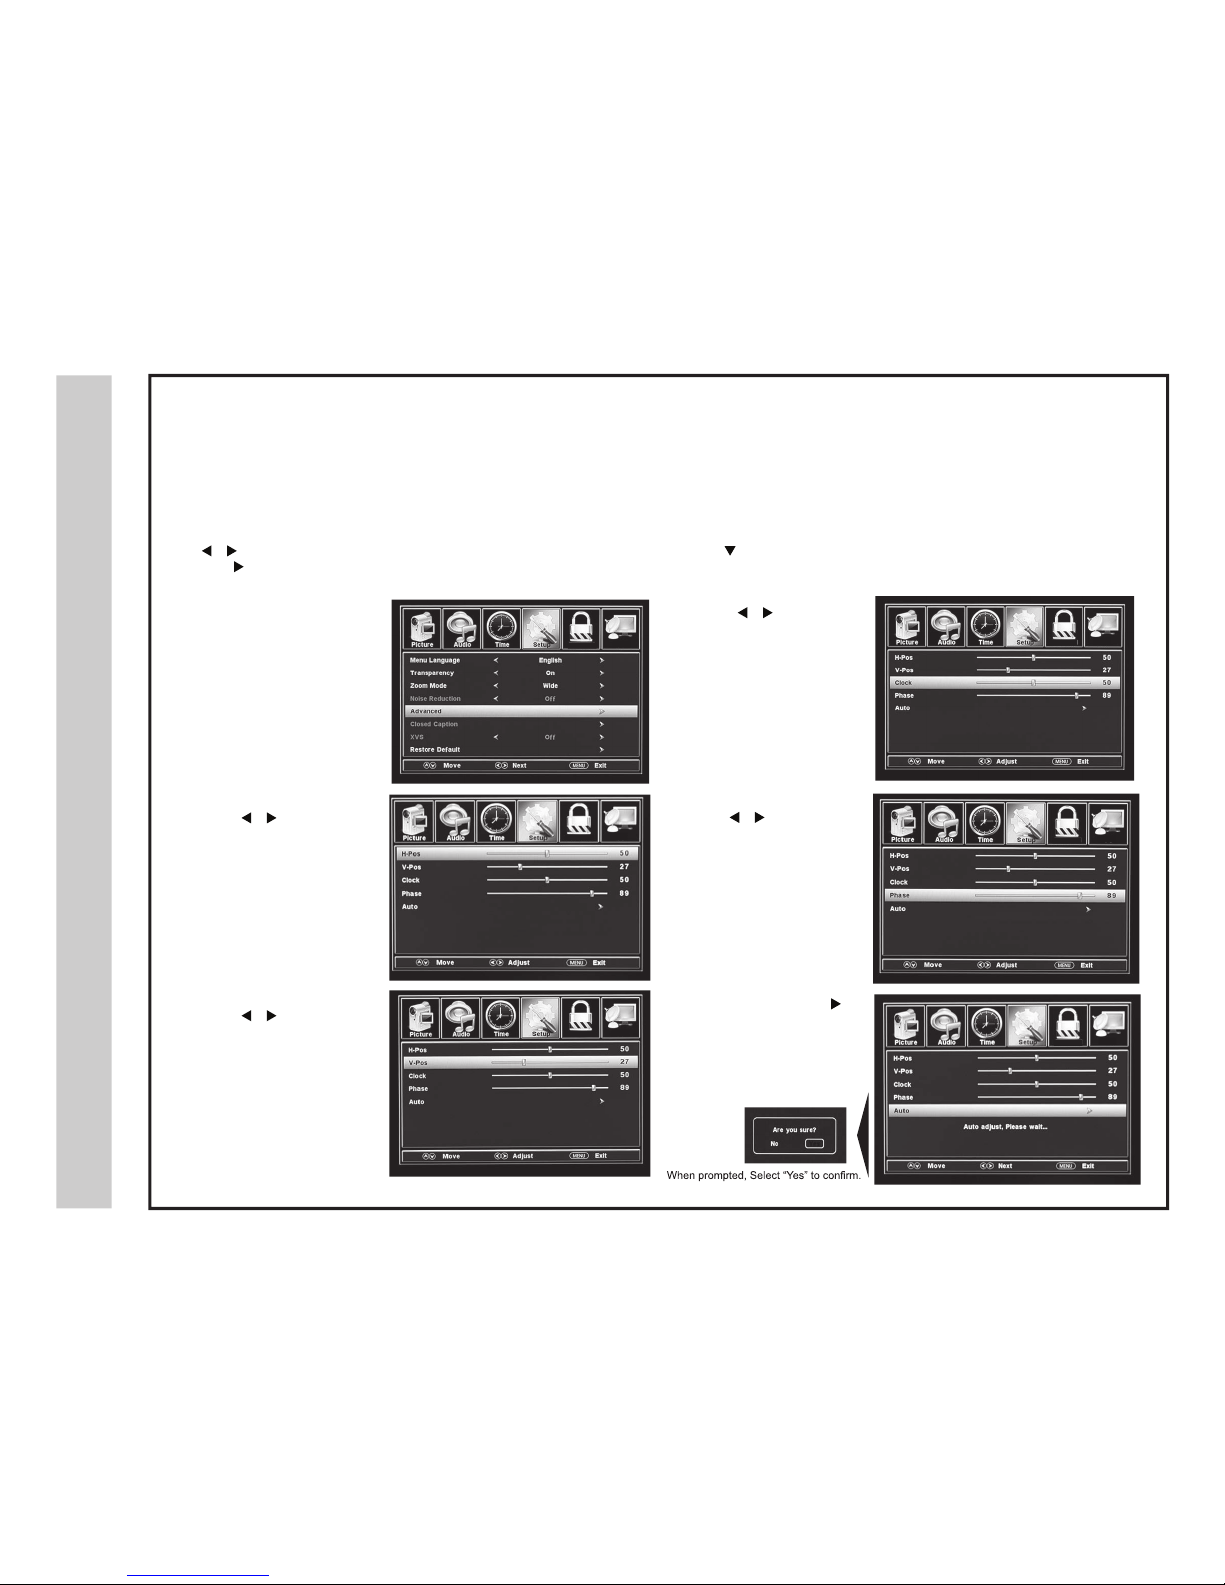
In the SETUP menu, you may adjust the position of images displayed on screen once you connect your PC. The recommended resolution setting
is 1366 x 766. For use with a laptop computer, refer to the owners manual for instruction on proper display output.
If yo
ur PC system uses a standard signal mode, the TV screen will adjust automatically. Connect an optional 3.5mm audio cable (not included)
for stereo sound. See page 15 for details.
How to Navigate:
After connecting to a PC, press the VGA button on your remote control. Press the MENU button on the remote control and navigate using
The
buttons to select SETUP. Access the position adjustment options by pressing the
button to
highlight Advanced. Then
press the
button to s
elect from the following options.
• Highlight Clock. Navigate
using the buttons
to control the width of the
image.
• Highlight H-Pos. Navigate
using the
buttons to
adjust the position of images
displayed from side to side.
• Highlight Phase. Navigate
using the
buttons
to improve focus and image
stability.
• Highlight V-Pos. Navigate
using the buttons to
adjust the position of images
displayed up and down.
• Highlight Auto. Press the
button to automatically
adjust the display to the best
setting. When prompted, select
Yes to confirm.
Page 25
s
tn
em
t
sujd
Aun
e
M
l - USA
or
t
n
o
Cl
a
t
n
er
aP
32A66-25
Lock
Channel
Lock
Channel
Lock
Channel
Lock
Channel
Lock
Channel
Lock
Channel
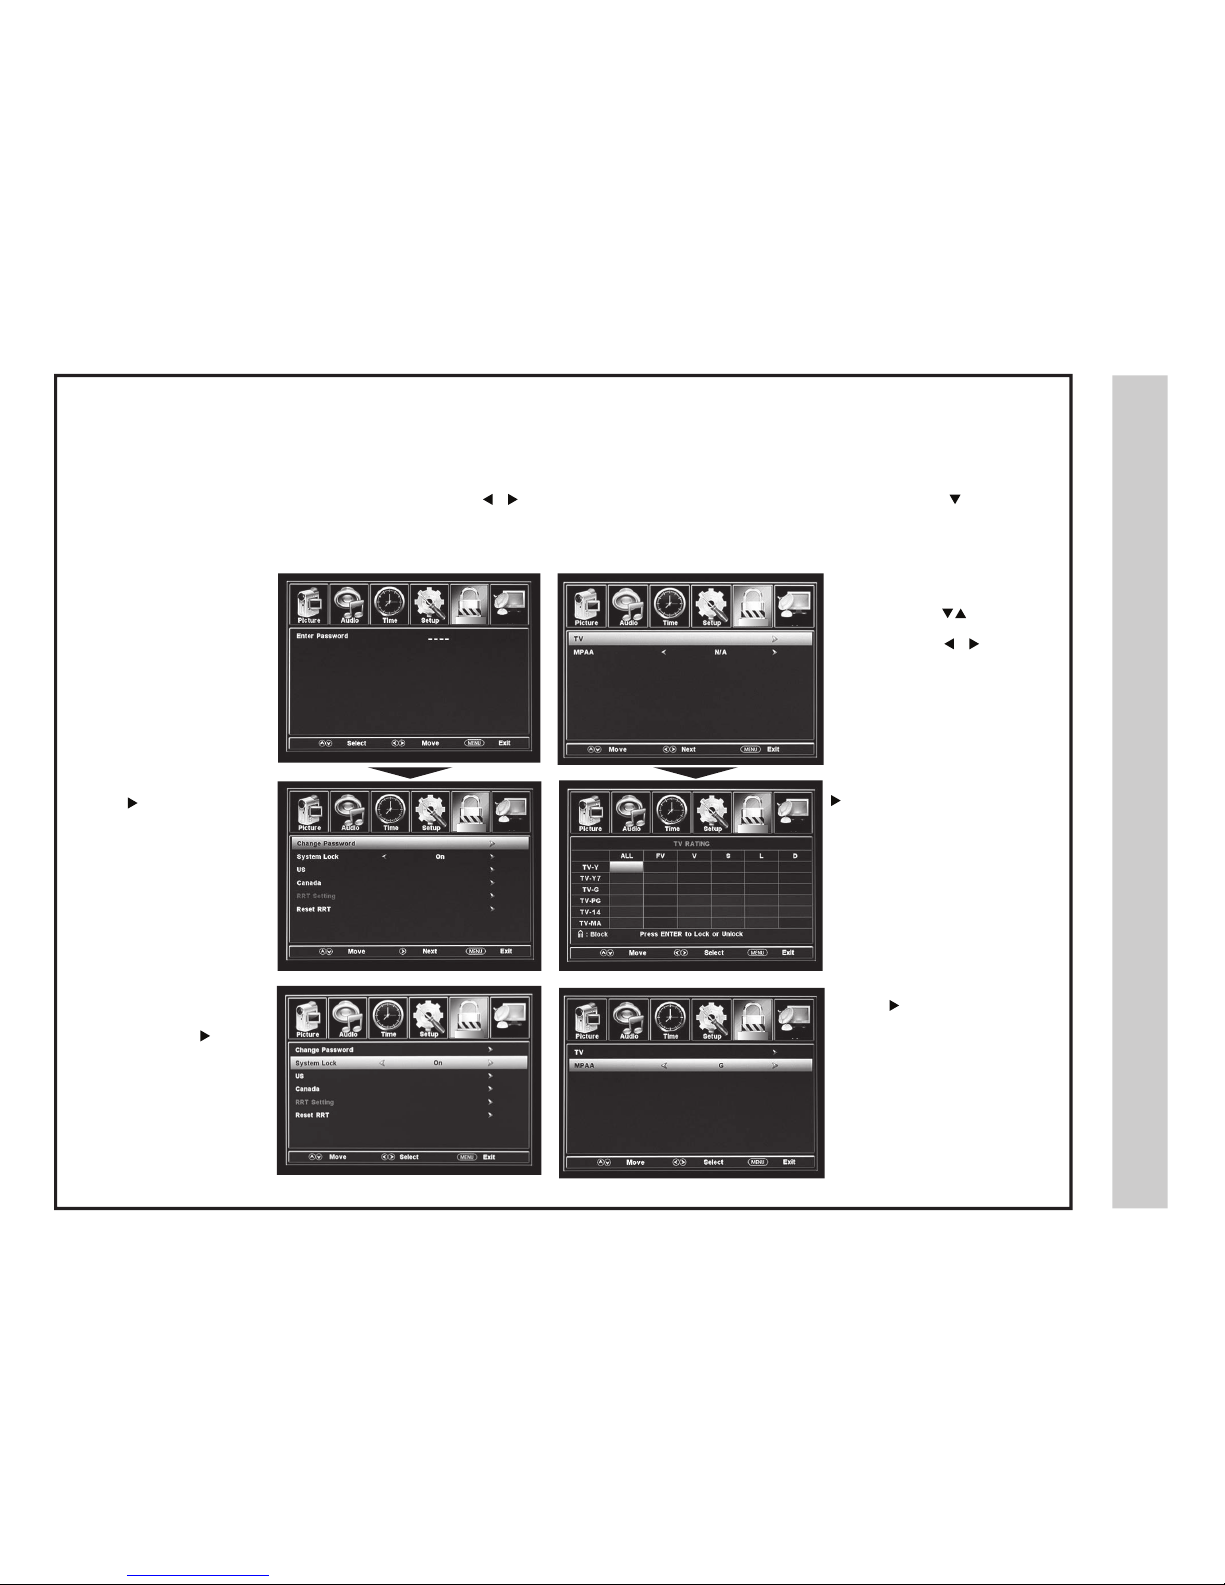
In the PARENTAL menu, you may block television and movie programming based on TV ratings and Motion Picture Association of America guidelines.
To gain access and select your preferences within the Parental Control menu, make certain your input selection is set to TV.
How to Navigate:
Press the MENU button on the remote control. Navigate using the
buttons to s
elect PARENTAL. Access the rating options by pressing the button
to
highlight ENTER PASSWORD. Enter your 4 digit password code. The factory default code is “0000” unless you have previously changed it.
See page 24 for information on how to change your password.
• To set parental controls for
television programming or DVD
movies, press the buttons to
highlight US (United States).
Navigate using the
buttons
to highlight the TV / MPAA menu.
• To change the password,
press the button to display
the screen to enter your new
password, then confirm
again.
(not illustrated)
• Highlight TV, then press the
button to enter the TV
ratings menu to select your
preference.
TV-Y
TV-Y7
TV-G
TV-PG
TV-14
TV-MA
Appropriate for all children
Appropriate for all children over 7
General Audience
Parental Guidance Suggested
Parents Strongly Cautioned
Mature Audience Only
• To make changes to your
PARENTAL control settings,
highlight the SYSTEM LOCK
setting then press the
button to turn the system ON.
• Highlight the MPAA menu then
press the button repeatedly to
select your movie rating preference.
G - General Audience
PG - Parental Guidance Suggested
PG 13 - Parents Strongly Cautioned
R - Restricted
NC17 - No One Under 17 Permitted
X - Adults Only
NOTE: Features are not available when text is grayed out.
Page 26
stnemtsujdAuneM
l - Canada
o
r
tn
o
Cla
tn
eraP
32A66-26
Lock
Channel
Lock
Channel
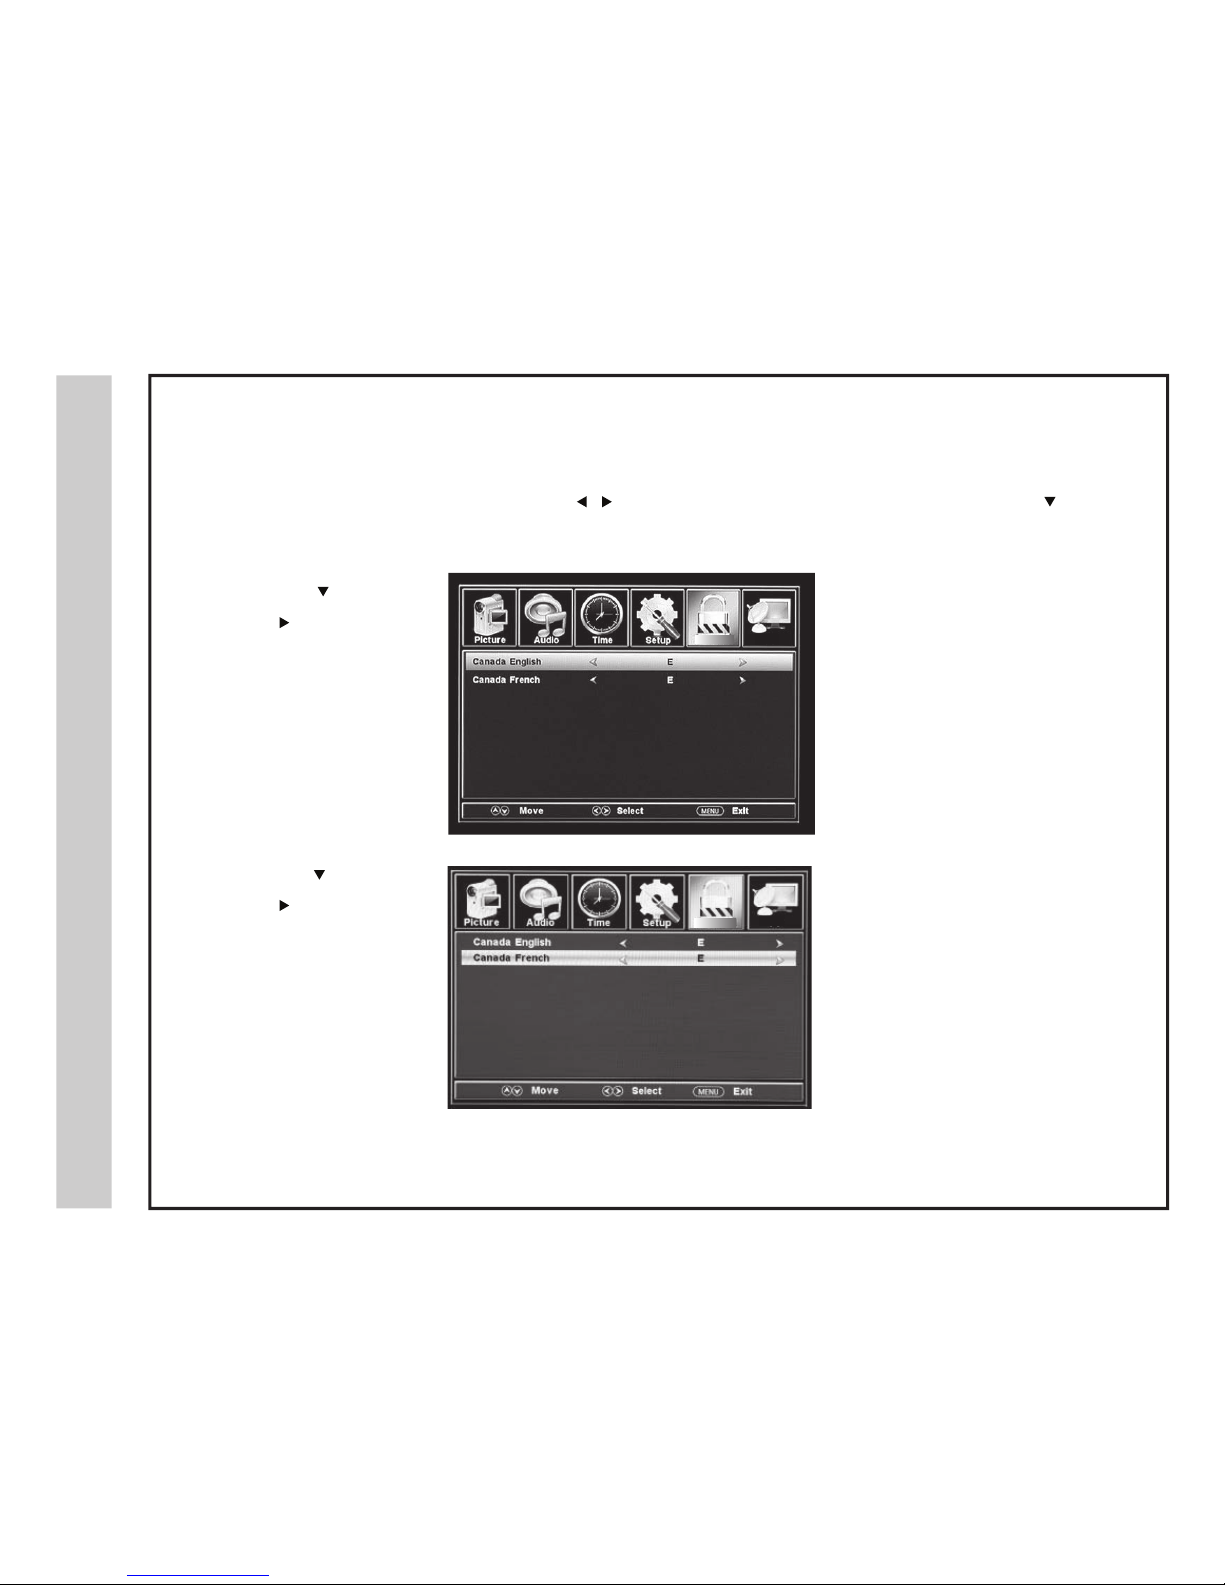
In the PARENTAL menu, you may block television and movie programming based on Canadian TV and movie rating guidelines. To gain access
and s
elect your preferences in the Parental Control menu, make certain your input selection is set to TV.
How to Navigate:
Press the MENU button on the remote control. Navigate using the
buttons to select PARENTAL. Access the rating options by pressing the
button
to
highlight ENTER PASSWORD. Enter your 4 digit password code. The factory default code is “0000” unless you have previously changed it.
See page 24 for information on how to change your password.
• Navigate using the button to
highlight CANADA ENGLISH
then
press the
button
repeatedly to select your ratings
preference.
E
C
C8+
G
PG
14+
18+
Appropriate for everyone
Appropriate for all children
Appropriate for everyone 8 years old and up
General Audience
Parental Guidance
Appropriate for Children over 14 years old
Mature Audience Only
• Navigate using the
button to
highlight CANADA FRENCH
then
press the button
repeatedly to select your ratings
preference.
E
G
8 ans+
13 ans+
16 ans+
18 ans+
Appropriate for everyone
General Audience
Appropriate for Children 8 years old and up
Appropriate for Children 13 years old and up
Appropriate for Children 16 years old and up
Mature Audience Only
Note: When adjustments are complete, you may select another menu by pressing the MENU button.
Page 27
s
tn
em
t
sujd
Aun
e
M
s
g
n
i
t
t
eS
VT
32A66-27
Press ‘ENTER’To Change
Press ‘ENTER
’To Change
Lock
Channel
Lock
Channel
Lock
Channel
Lock
Channel
Lock
Channel
Lock
Channel
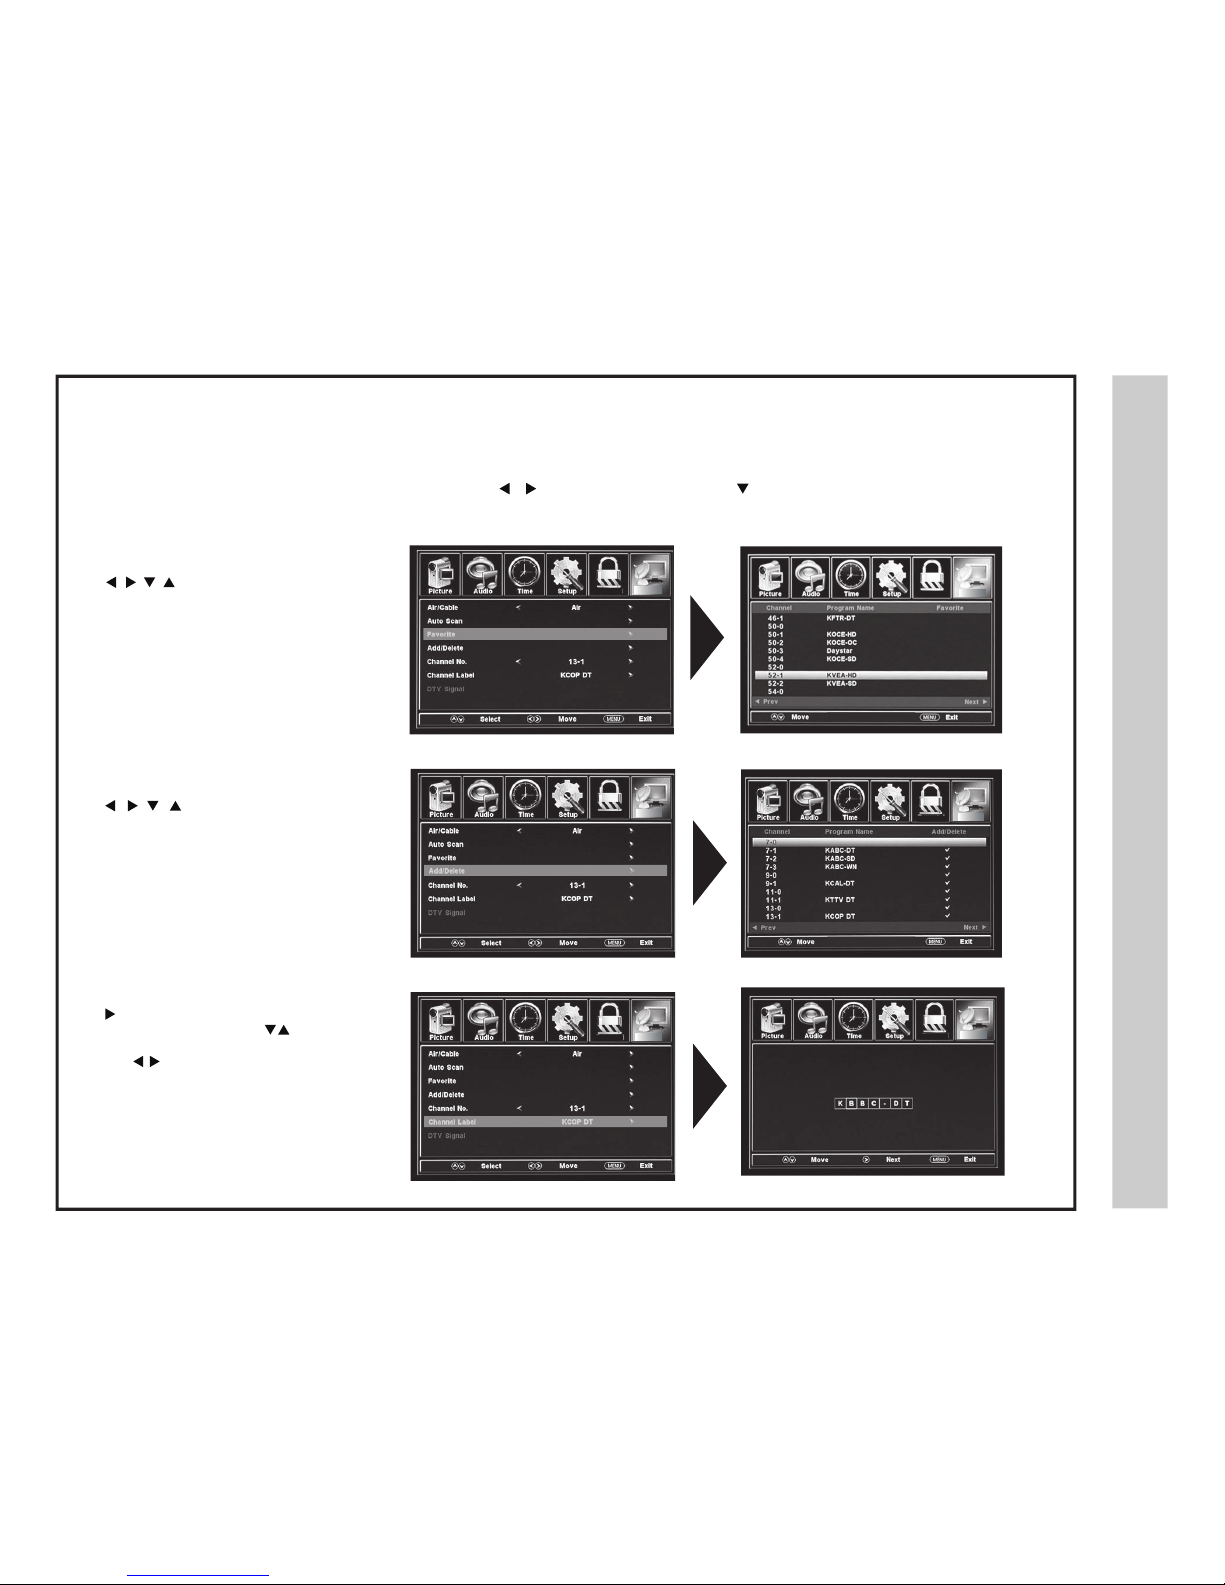
The TV menu provides the setup / changes of your television to receive broadcast channels, store your favorite channels, add or skip channels in memory
and label or name channels. For antenna and Auto Channel Scan setup, please refer to page 18.
How to Navigate:
Press the MENU button on the remote control. Navigate using the buttons to select TV. Press the button to highlight your preferences.
• Highlight FAVORITE to add channels to
yo
ur Favorites memory list. Navigate using
th
e buttons to select channels
to be added
or deleted from your favorites list.
Press the ENTER button to add or delete a
channel. A checkmark indicates a channel
has been added. You may also display your
list o
f FAVORITE channels by pressing the
FA
V button on the remote control.
• Highlight ADD / DELETE to select or skip
a channel already in memory. Navigate using
th
e
buttons to access the
list of av
ailable channels. Press ENTER to
change the
channels’ status. A checkmark
indicates a channel has been added to memory.
• Highlight CHANNEL LABEL to name or
rename a broadcast channel. Navigate using
the button to enter the screen menu
to re-label a channel. Use the buttons
to spell out each letter, number or character.
Use the buttons to advance to the next space.
NOTE: The DTV SIGNAL is a measurement
of signal strength for the current channel
viewed.
Page 28
sedoM
TCEPSA
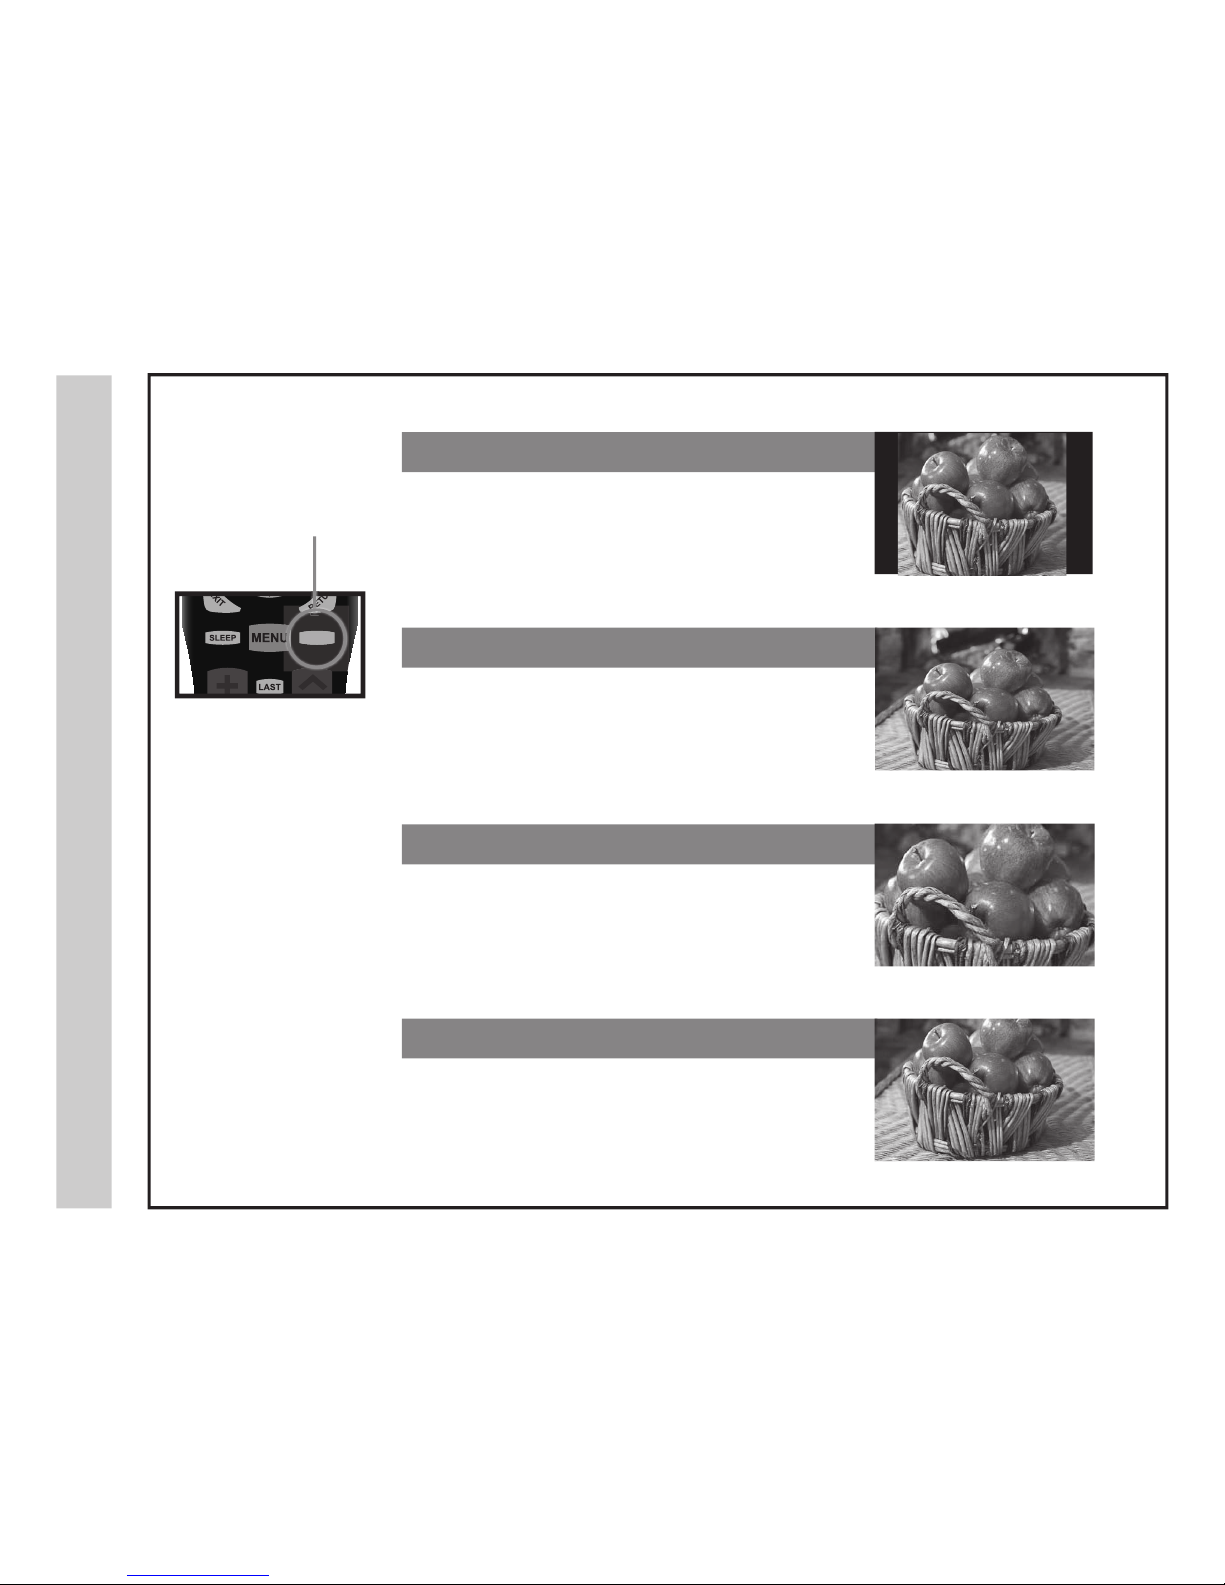
screen eliminating the side black bars. It may also eliminate or
When viewing 4:3 content, Cinema mode will fill the entire
reduce black bars on certain widescreen movies.
1. NORMAL
2. WIDE
3. ZOOM
4. CINEMA
32A66-28
ASPECT
The ASPECT function offers several viewing display options on the 16:9 screen. Press the ASPECT button to cycle through the following
widescreen settings.
Press ASPECT to cycle
through the following widescreen
set
tings
The Normal aspect is recommended for viewing native widescreen content
and undistorted 4:3 images.
Stretches certain 4:3 content and may reduce the black bars.This aspect
will also cause images to appear shorter and wider
Stretches the image both vertically and horizontally to fill the
screen when viewing widescreen content. The zoom effect will
also crop images somewhat.
Page 29
s
e
do
M
B
SU
32A66-29
USB
Photo Music c:\
c:\
1.jpg
1.jpg
2.jpg
3.jpg
Play File :4
Total size:3.7GB
Unused size:658MB
011/013 730x484 267.6KB
Select Move Repeat
USB
Photo Music c:\
c:\
1.mp3
1.mp3
Title:
Artist:
Album:
Year:
Play:
Bit Rate:128kbps
1.jpg
2.mp3
3.mp3
Play File :3
Total size:3.7GB
Unused size:658MB
011/013
Select Move Repeat
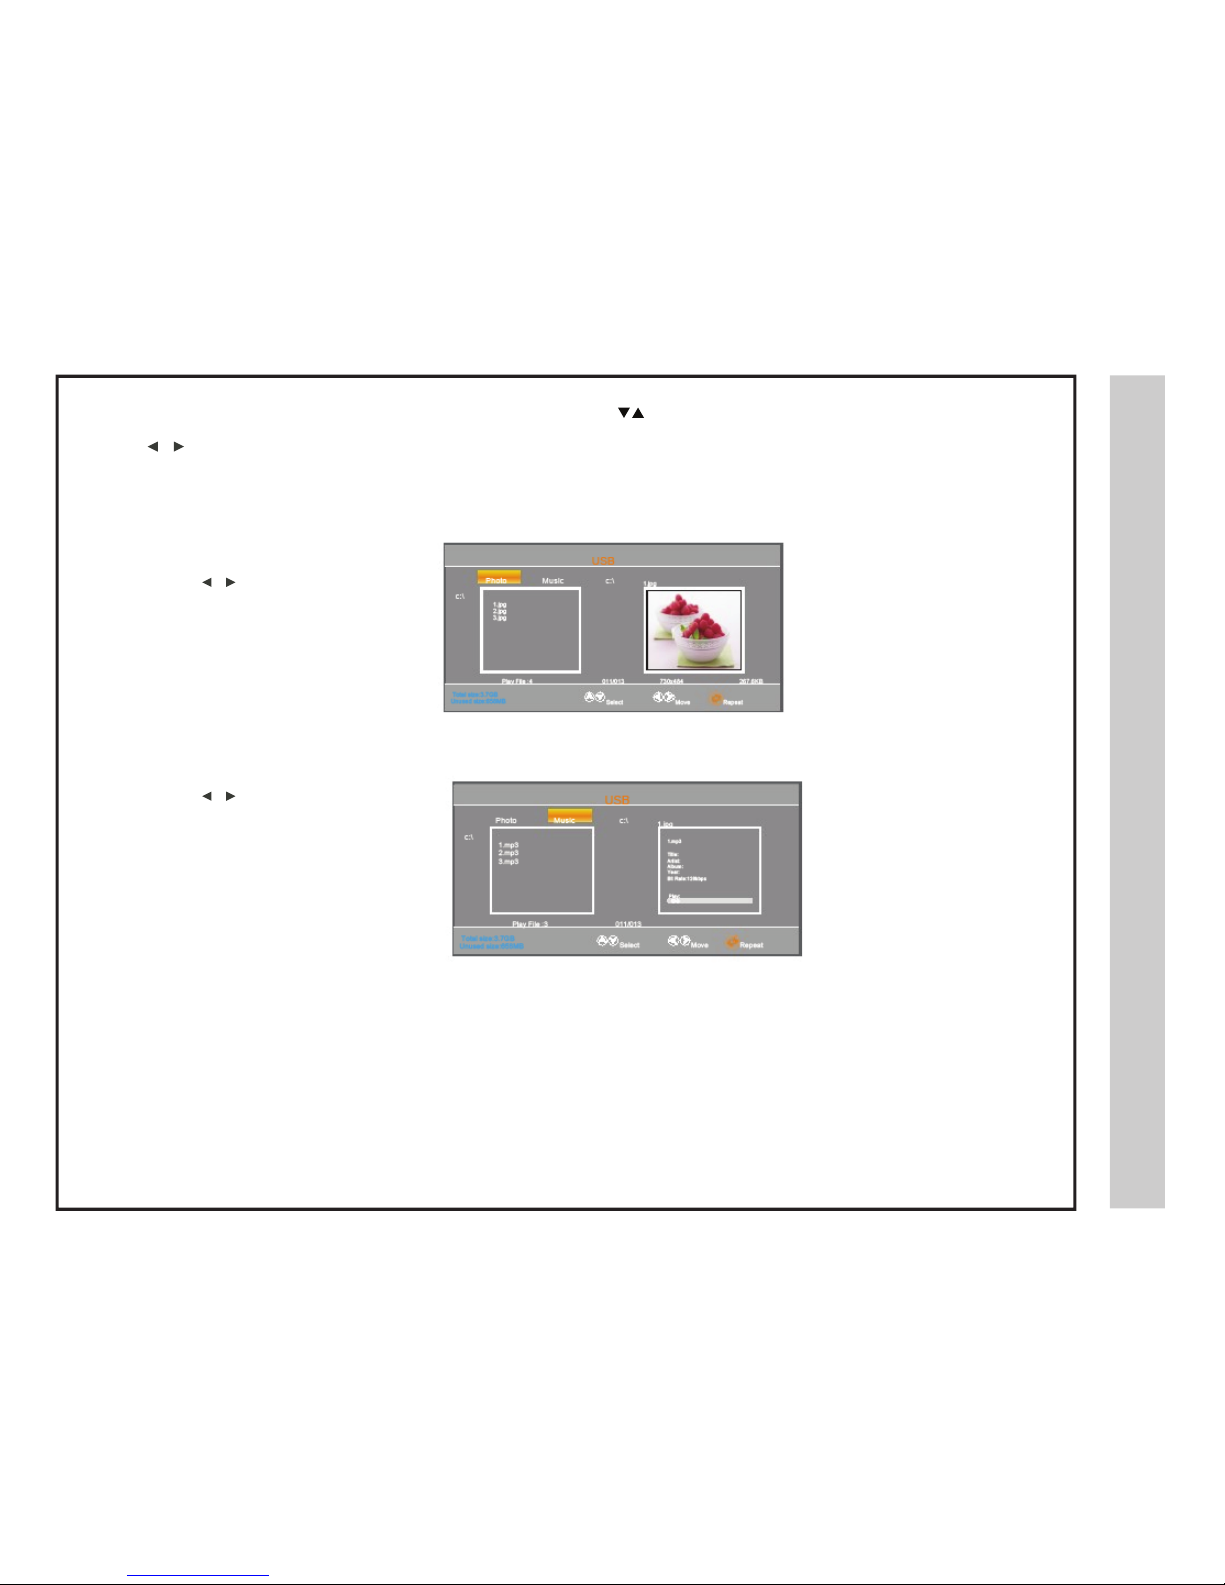
1.Press the INPUT button on the remote control to display the Input menu. Use the
buttons to select USB.
2.Use the buttons to highlight an individual USB option.
Press the
button
s to select Photo,
and then
press the ENTER button to enter.
and then
press the ENTER button to enter.
Select the option you want to play using the
Navigation buttons.
P
ress EXIT button to go back.
P
ress EXIT button to go back.
Press the button to select Music,
Select the option you want to play using the
Navigation buttons.
Page 30
32A66-30
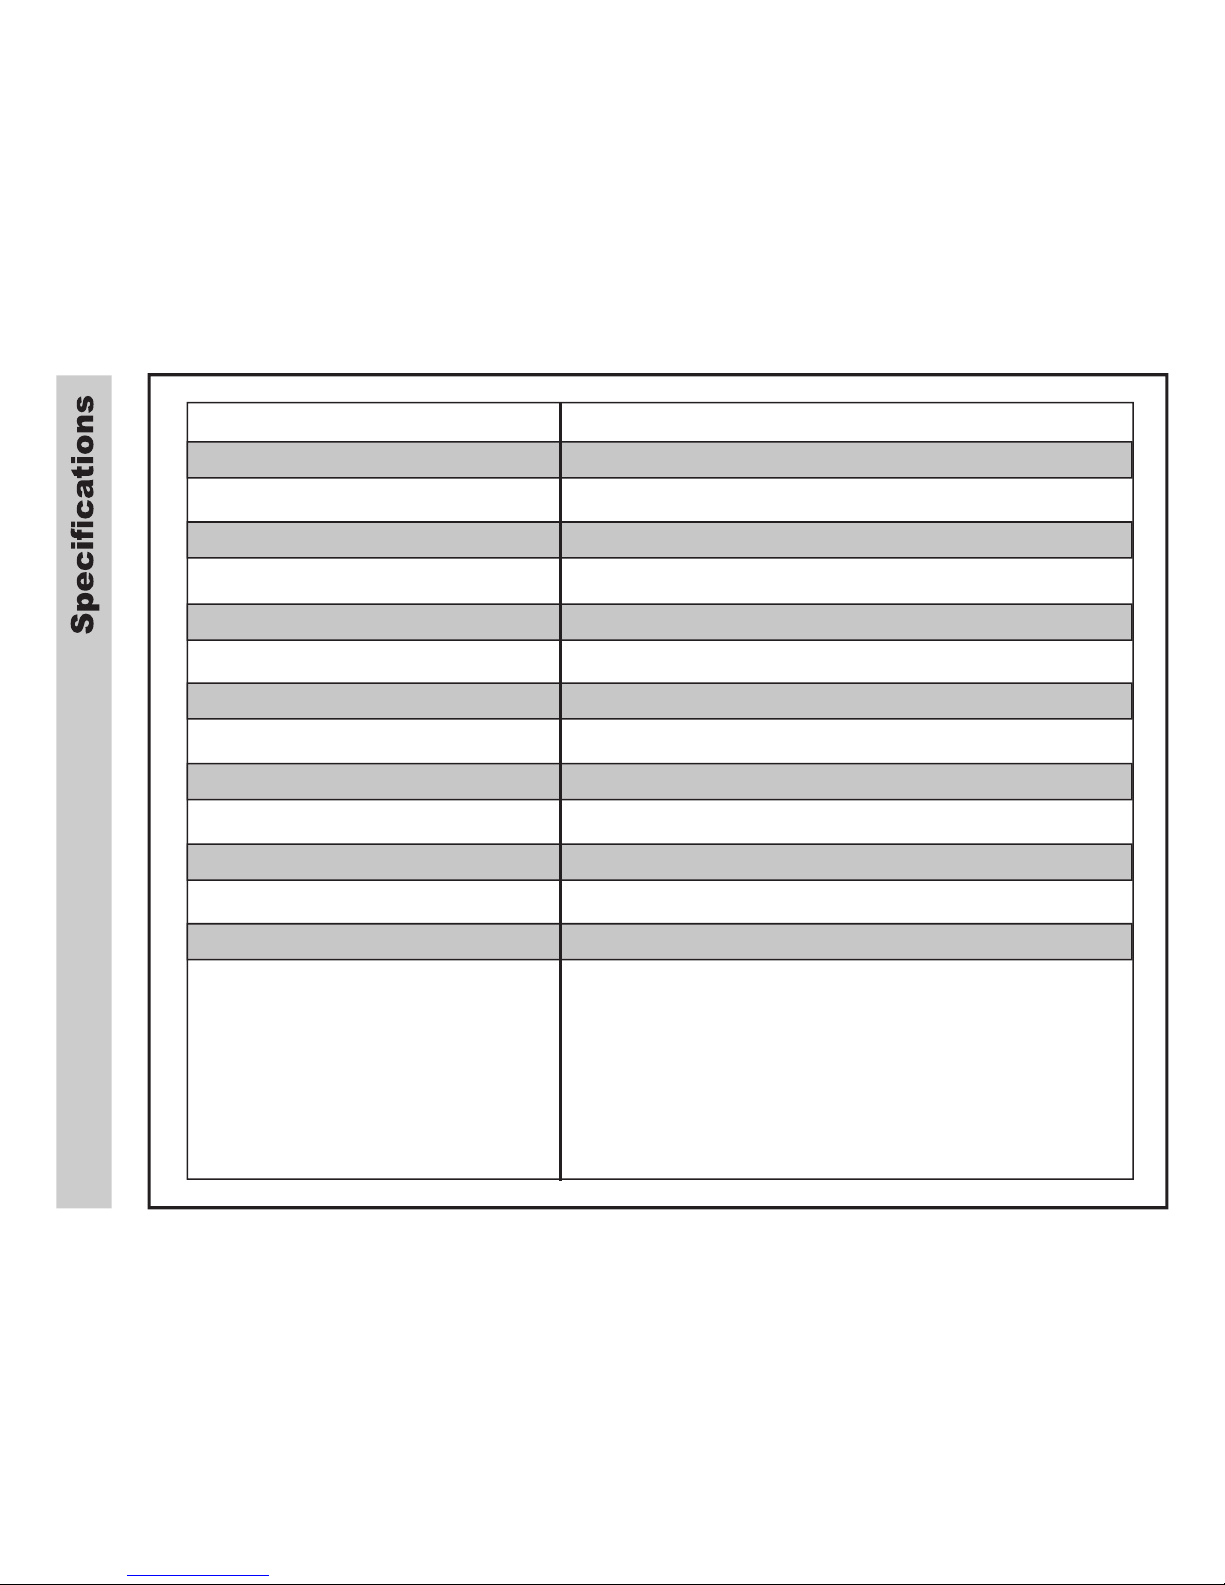
Display
Size (inch)
Aspect Ratio
Digital Compatibility
Resolution
Brightness (cd/m2)
Dynamic Contrast Ratio
Vertical Viewing Angle (degrees)
Horizontal Viewing Angle (degrees)
Maximum Colors (millions)
Power Consumption
Audio Power
Dimension without Pedestal Installed
Weight without Pedestal
Input Connections
Composite Video
Y Pb Pr
HDMI
RF
PC/VGA
PC Audio IN (3.5mm)
Headphon
e
USB
Jack (3.5mm)
(1)
(1)
(2)
(1)
(1)
(1)
(1)
(1)
LCD
31.5” Diagonal
16:9
480i / 480p / 720p / 1080i / 1080p
1366 x 768
450
3000:1
176°
176°
16.7M
140Watts
2 X 8 W
31.4” x 4.13”x 21.9”inches
19.8lbs
Page 31
gni
t
ooh
selb
u
o
rT
32A66-31
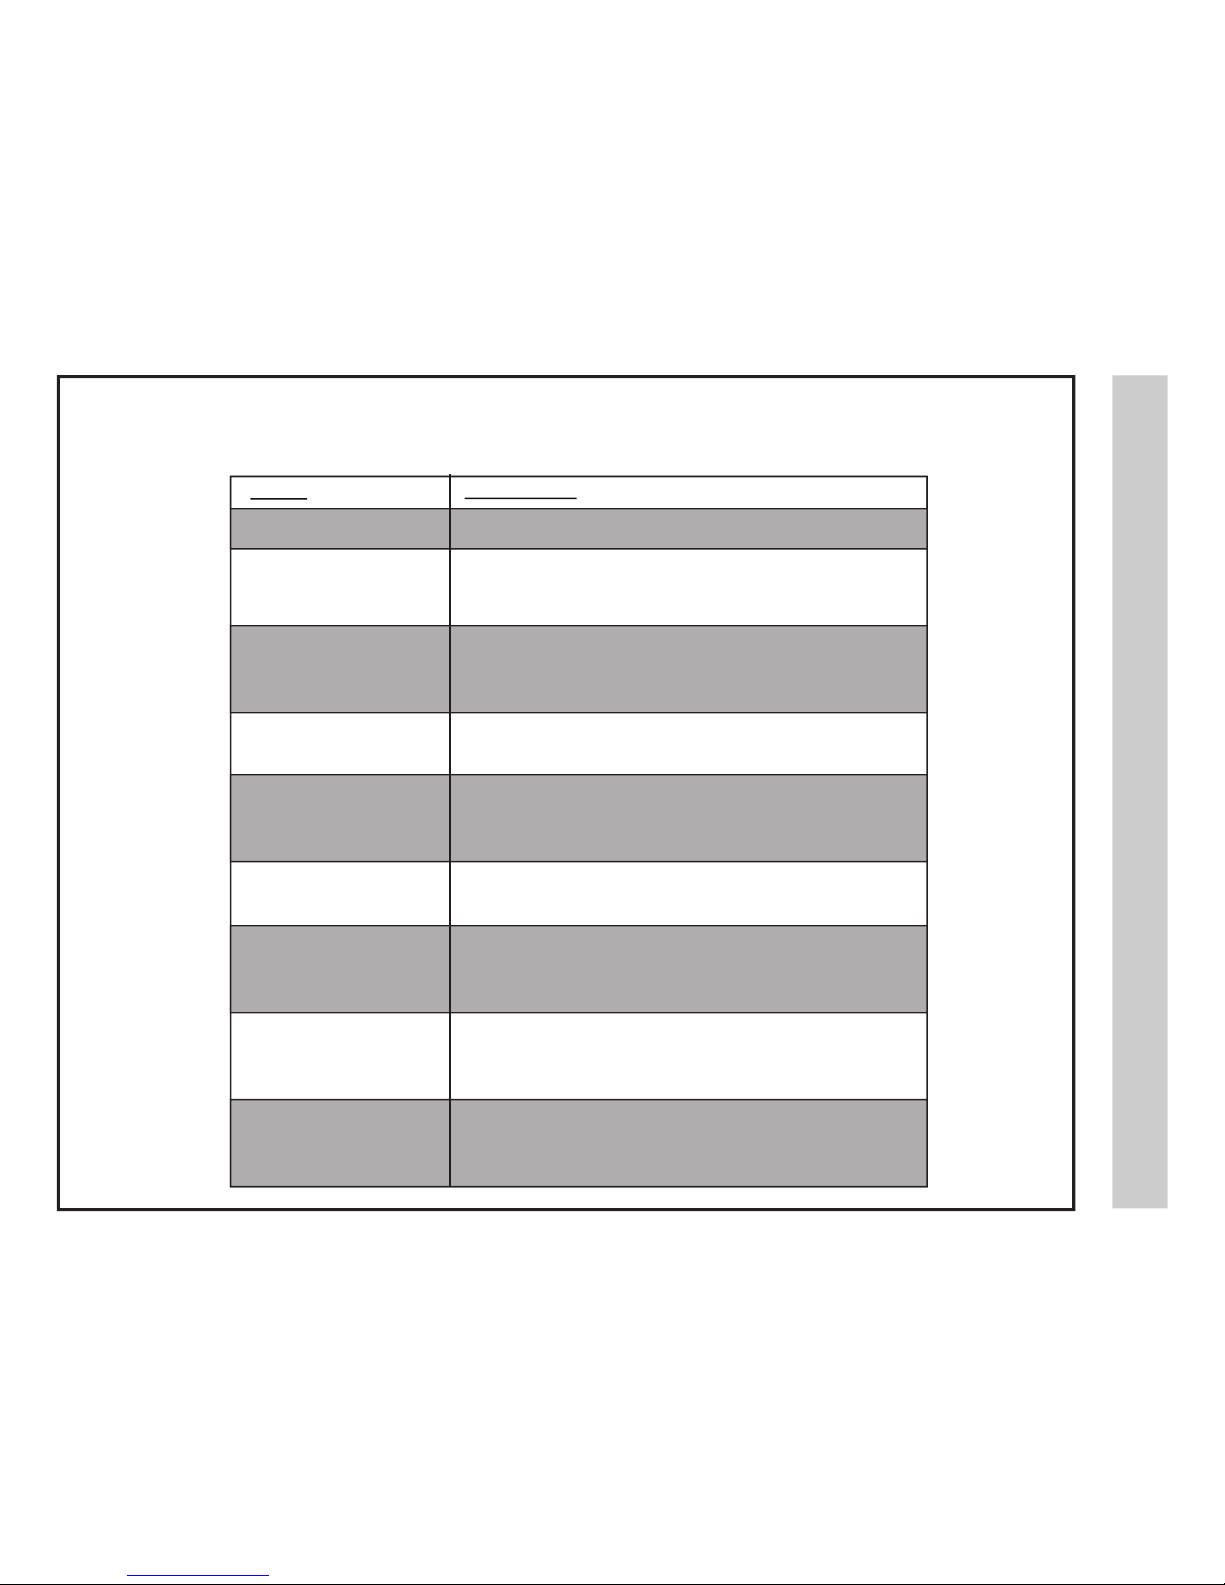
Check for a possible solution to a symptom before contacting a customer service representative.
Symptom
No color
Cannot receive certain
channels through the
antenna
TV signal is blocked on certain
channels
Video noise or choppy picture
No sound
Black box on screen
No power
No picture
Remote control does not
function
Possible Solutions
• Check the video installation of your external A / V equipment.
See pages 10-15.
• Perform Channel Scan to add channels into the TV tuner memory.
See page 18.
• Readjust your antenna and retry Auto Channel Scan.
• Signal from the TV station may be weak in your area.
• Perform Channel Scan to add channels into the TV tuner memory.
See page 18.
• Check whether the channel was deleted. See page 27.
• Check parental control settings. See pages 25, 26.
• Readjust the antenna. Keep the TV away from electronic noise sources such
as neon lights and microwave appliances.
• Check that connected audio cables are fully inserted.
• Verify you have selected the correct audio source from your
amplifier. See page 16.
• Mute function may be enabled, press mute on the remote to disable.
• The “Text” option is enabled and no text is available.
• Press the CCD button on the remote control to turn off.
• Batteries in the remote control may need replacing.
• Re-attach the AC plug to wall outlet.
•
•
•
•
Digital TV channel signal strength may be weak, try another channel.
Press INPUT button to verify the desired input selected.
Re-connect the antenna or cable wiring.
Restore default settings. See page 22.
• Replace batteries with new ones.
• Check that battery polarity is correct.
• Point remote directly at the TV’s IR receiver. See page 7.
Page 32
x
e
dnI
32A66-32
A
Add/Delete channels
Advanced mode
Advanced selection
Air/Cable
Antenna installation
Arrow buttons
Aspect Mode
Audio Setup & Adj.
Audio Language
27
24
23
11, 17
-18
11
8
8, 22, 28
8,16, 20
20
B
Balance Adjustment
Bass Adjustment
Batteries
Brightness Adjustment
20
20
7
19
C
CCD (Closed Caption)
Cable Installation
Canadian Ratings
Channel Up/Down
Channel Auto Scan
Channel Label
Channel List
Clock
Cinema Zoom
Coaxial Digital Output
Color Adjustment
Color Temperature
Composite Input
Component Input
Computer Connection
Contrast Adjustment
8, 23
11, 17-18
26
8-9
17-18
27
8
21, 24
28
16
19
19
14
13
15, 24
19
8
21
22
11
11
16
8
15
22
D
Dash ( - )
Daylight Savings Time
Default Settings
Digital Cable
Digital Set Top Box
Digital Audio
Display
Display Modes for PC
DLC
E
F
Exit
Favorite Channels
8, 27
G
H
Guide
8
HDMI Inputs
Headphone
Home Theater
12
10
16
I
IR Receiver
Input
7, 9
8-9, 12-15
L
Languages
Last
LED light
20, 22
8
9
M
Master Power
MEMC
Menu
MTS
Motion Technology 60Hz
Mute
Movie Ratings
Movie Mode
9-10
19
8-9, 17-27
8
6
8
25-26
19
28
22
8
25-26
25-26
10
10, 15, 24
24
N
Normal Aspect
Noise Reduction
Number Buttons
P
Parental Control
Password
Pedestal Stand Removal
PC
Phase
Picture Modes
Power Conection
8, 19
17
RAW
Ratings (TV, Movie)
Remote Control
RF Input
Restore Default setting
Reset Password
Roof Antenna
R
16
25-26
7-8
10, 11
22
25
11
S
Satellite Installation
Sleep T
imer
Sharpness adjustment
Standby
Speakers (built
-in)
11
-14
8, 21
19
8-9
16, 20
T
Time Zone
Tint Adjustment
Treble Adjustment
Transparency
21
19
22
20
Video Adjustment
Volume Adjustment
VGA Installation & Adj.
V
19
8-9
10, 15, 24
W
Wall Mounting
Wide Aspect
10
28
Y Pb Pr 10, 13
XYZ
Page 33
LIMITED ONE-YEAR TELEVISION WARRANTY
We warrant this product to be free from defects in material and workmanship under normal
use for a one-year period from the original date of purchase from an authorized ETEC
dealer. We will repair or replace the unit free of charge should it become defective under
this warranty, providing you, the original purchaser, submit proof of purchase (sales slip)
along with the TV and all accessories.
During the one-year period from the original purchase date, we will service or exchange the
TV, at no charge. T o obtain warranty service or replacement within the duration of the
one-year warranty, please return the product and all accessories to the original place of
purchase.
For technical support, the ETEC Technical Support Center is available 24-hours a day,
7-days a week for technical assistance or troubleshooting at 1-800-936-1168.
This warranty does not cover any product which has been subject to damage due to an act
of nature, misuse, neglect, accident, abuse, commercial use, or modification of, or to, any
part of the product, including the antenna. Damage to any external media such as DVD,
CD, and/or USB or other memory devices are not covered nor is the cost incurred in
shipping the unit for warranty repair. Under no circumstances shall ETEC USA be liable for
any loss (direct, indirect, incidental, foreseen, unforeseen, special or consequential) or for
any damage arising out of, or in connection with, the use of this product.
UNDER NO CIRCUMSTANCES WILL ETEC USA BE LIABLE FOR ANY INCIDENTAL
OR CONSEQUENTIAL DAMAGES.
This warranty does not cover re-manufactured units, or product sold 'As Is'
This warranty is valid only to the original purchaser of the Product in the United States,
Canada, and Mexico and grants specific legal rights.
 Loading...