

Page 1
Page 2

CONTENT
I. Attention ....................................................................................... 1
II. Brief Introduction ........................................................................ 3
III. Specification .............................................................................. 5
1.Model of Series .................................................................. 5
2. Ranges and Accuracy of Measurement .............................. 5
3. Specifications ...................................................................... 6
IV. Structure of Meter ...................................................................... 7
V. Liquid Crystal Display ................................................................. 8
1. LCD Screen ......................................................................... 8
2. Description of Special Symbols........................................... 9
3. Examples Illustrated .......................................................... 10
VI. Operating Method ....................................................................11
1.Boot up ................................................................................11
2.Shutdown ......................................................................... 12
3.Resistance Measurement ................................................ 13
*4.Current Measurement .................................................... 14
5.Date Lock/Release/Storage............................................. 15
6.Data Access ..................................................................... 16
7.Alarm Settings ................................................................. 16
8.Access to Alarm Critical Value ......................................... 17
9.Clear Data........................................................................ 17
VII. Measurement Principle .......................................................... 18
1. Principle of Resistance Measurement .............................. 18
2. Principle of Current Measurement .................................... 18
VIII. Measurement Method of Earth Resistance .......................... 19
Page 3

1. Multi-Point Grounding System ............................................ 19
2. Limited Point Grounding System ........................................ 20
3. Single-Point Grounding System.......................................... 21
IX. Bill of Loading .......................................................................... 24
X. Parts List and Assembly Details............................................... 25
1. Parts List ........................................................................... 25
2. Assembly Details ............................................................... 26
XI.Trouble shooting ...................................................................... 27
Page 4

-1-
I. Attention
Thank you for purchasing this pincers earth tester from ETCR
Electronic Technology Company. In order to make better use of the
product, please be certain:
----To read this user manual carefully.
----To comply with the operating cautions presented in
this manual.
1 Under any circumstances, use the Meter should pay special
attention to safety.
2 Pay attention to the measurement range of the Meter and the
using environment provided.
3 Pay attention to the text labeled on the panel and back plane
of the Meter.
4 Before booting up, the trigger should be pressed for 1-2 times
to ensure the jaws are well closed.
5 At Boot time, DO NOT press the trigger, nor clamp any wire.
6 Before the auto inspection is completed and the "OL Ω"
symbols are showed, the measured objects cannot be
clamped on.
7 The jaw planes contact must be maintained clean, and should
not be polished with corrosive and rough materials.
8 Avoid any impact onto this Meter, especially the Jaw contact
surface.
9 This Meter will have some buzzing sound in measurement
Page 5

-2-
process, and it is normal.
10 The measurement current of the wire should not exceed the
upper limit of the Meter.
11 Please take out the batteries in the case of the Meter being
idle for a long time.
12 The dismantling, calibration and maintenance the Meter shall
be operated by the authorized staff.
13 If the continuing use of it would be dangerous, the Meter
should be stopped using immediately, and immediately sealed
for the treatment by the authorized agencies.
14 The contents in this user manual marked with "*" are limited to
C+.
Page 6

-3-
II. Brief Introduction
This instrument was designed by technical department of
ETCR Electronic Technology Company. Its performance is mainly
reflected in:
u Breakthrough in self-test the boot a long time to wait, start
immediately into the test.
u Breakthrough relay self-test mode, using the most
advanced processing algorithms and digital integration
technology, a fully intelligent.
u Break the old product to heavy issues, more in line with
characteristics of handheld devices.
u New design, panel operation with 6 buttons, better
performance.
u An increase of sound and light alarm, "beep—beep--beep
--" alarm sound.
u Increase the interference signal recognition indicator.
u Improved anti-jamming capability and test stability.
u Stored data: 99 Units.
u Wider range: 0.01Ω-1200Ω
u Lower power consumption: Maximum operating current
not exceeding 50mA.
ETCR series of Pincers Earth Tester is widely used in the
grounding resistance measurement of the power,
telecommunications, meteorology, oilfield, construction and the
Page 7
-4-
industrial and electrical equipment.
ETCR series of Pincers Earth Tester, in the measurement of a
grounding system with loop current, does not require breaking
down the grounding wire, and need no auxiliary electrode. It is safe,
fast and simple in use.
ETCR series of Pincers Earth Tester can measure out the
faults beyond the reach of the traditional methods, and can be
applied in the occasions not in the range of the traditional methods.
ETCR series of Pincers Earth Tester can measure the
integrated value of the grounding body resistance and the
grounding lead resistance.
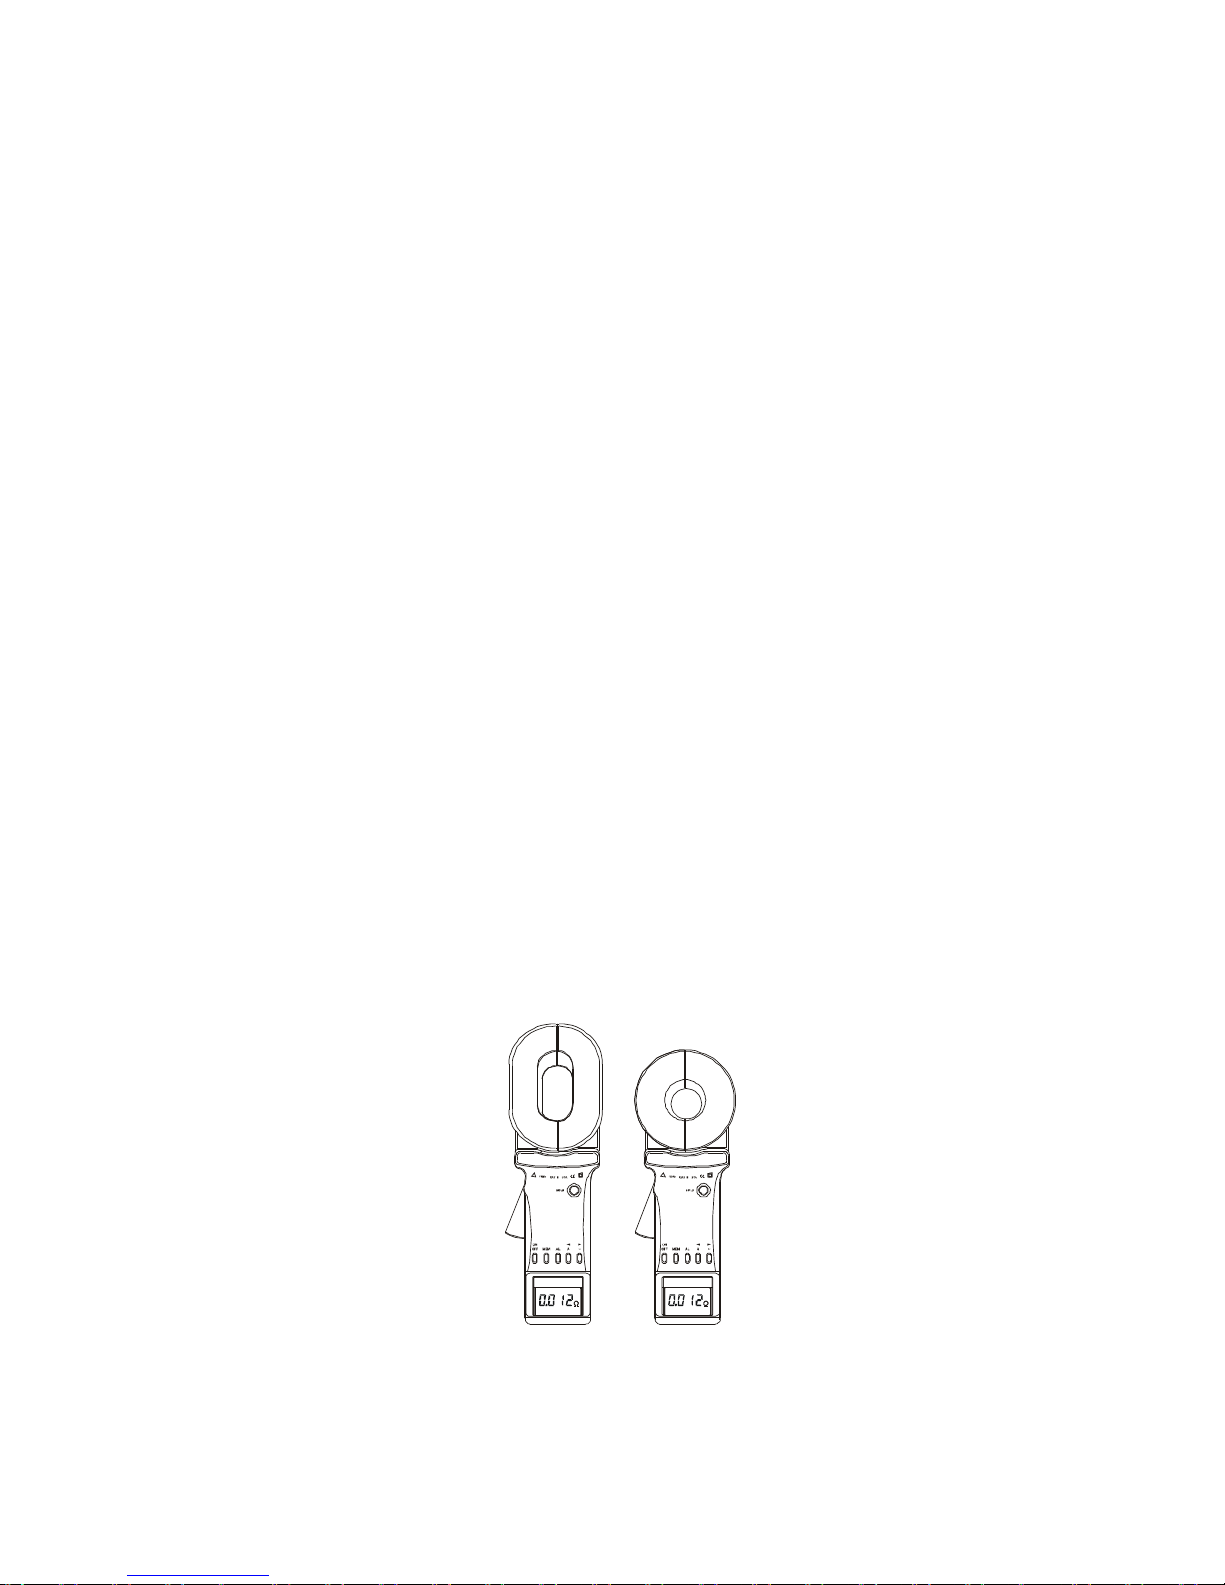
ETCR series of Pincers Earth Tester is equipped with a long
jaw, as indicated in the figure below. A long jaw is particularly
suitable for the occasion of grounding with the flat steel.
In addition,
C+ Pincers Earth Tester is also able to measure the leakage
current and the neutral current in the grounding system.
Page 8
-5-
III. Specification
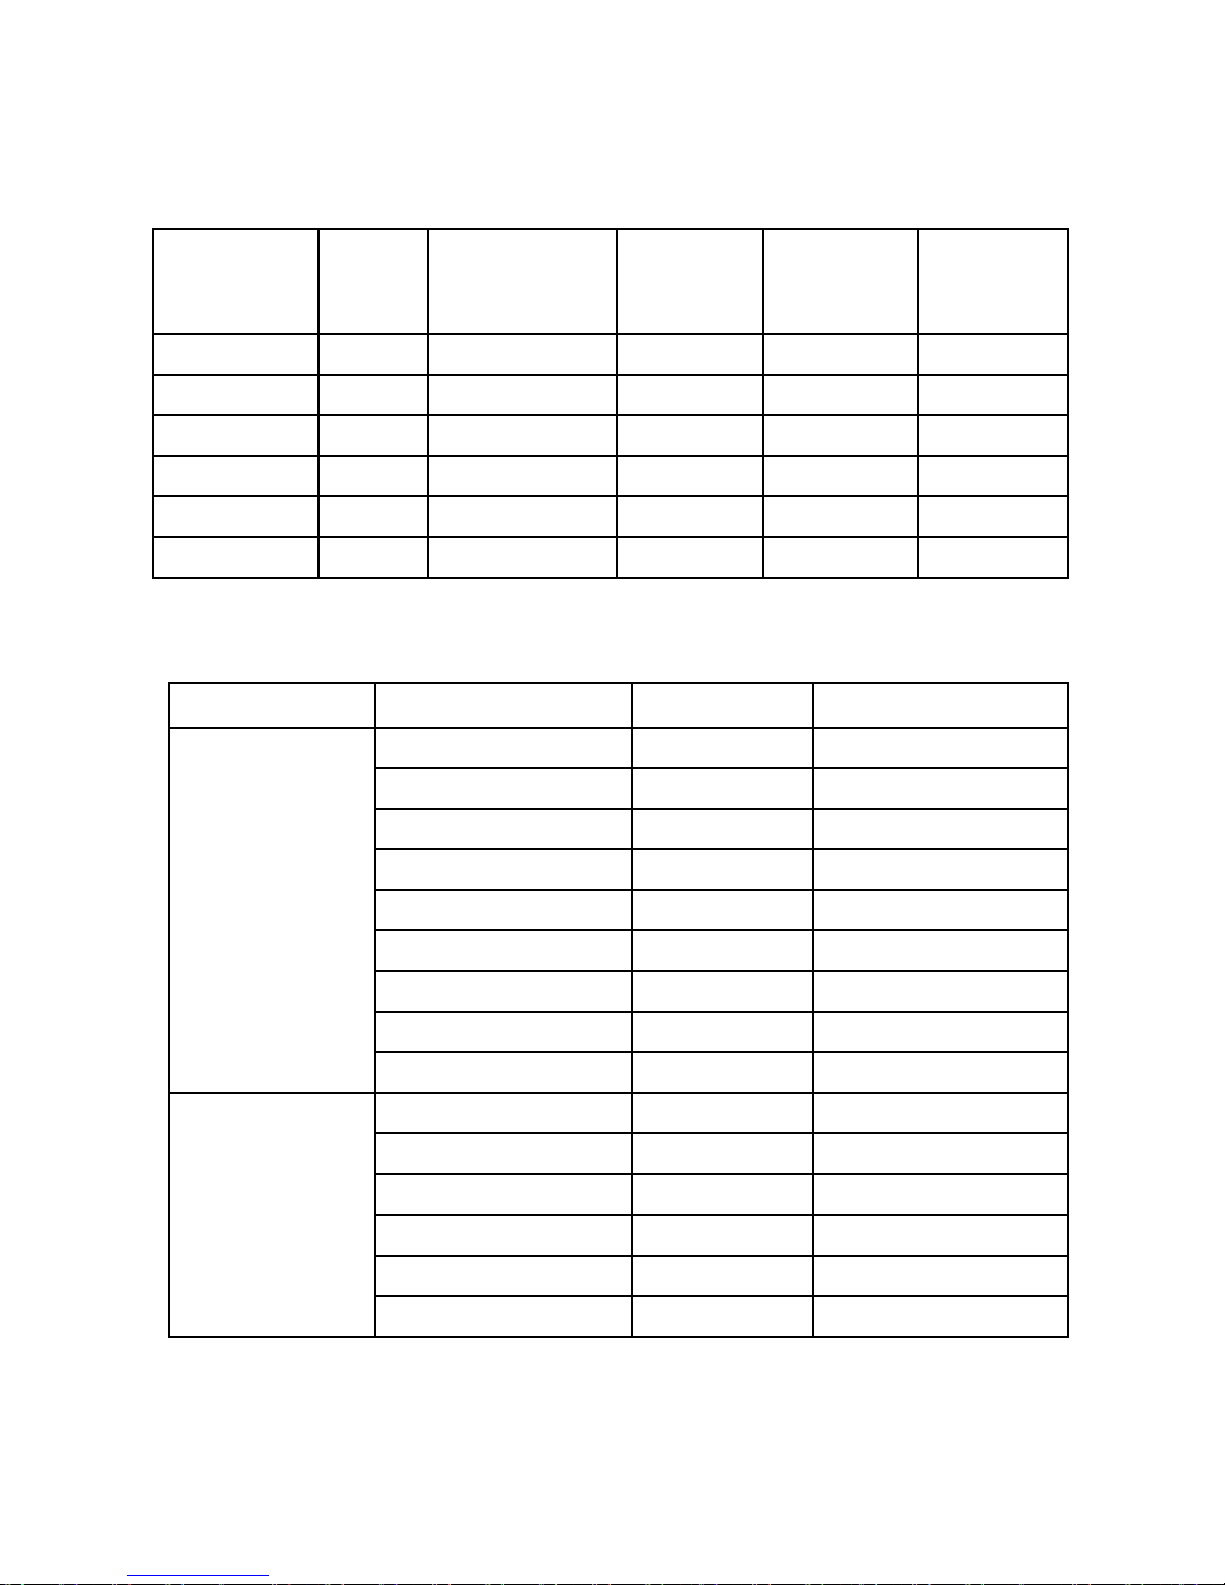
1. Model of Series
Model
Jaw
Size
(mm)
Range of
Resistance
(Ω)
Range of
Current
(A)
Storage
Function
Alarm
Function
ETCR2000+ 65×32
0.01--1200 -- 99 Units
√
ETCR2000A+
65×32
0.01--200 -- 99 Units
√
ETCR2000C+
65×32
0.01--1200 0.0--20.0 99 Units
√
ETCR2100+ φ32 0.01--1200 -- 99 Units
√
ETCR2100A+
φ32 0.01--200 -- 99 Units
√
ETCR2100C+
φ32 0.01--1200 0.0--20.0 99 Units
√
Note: “√” means available.
2. Ranges and Accuracy of Measurement
Mode Range Resolution
Accuracy
Resistance
0.010Ω-0.099Ω 0.001Ω ±(1%+0.01Ω)
0.10Ω-0.99Ω 0.01Ω ±(1%+0.01Ω)
1.0Ω-49.9Ω 0.1Ω ±(1%+0.1Ω)
50.0Ω-99.5Ω 0.5Ω ±(1.5%+0.5Ω)
100Ω-199Ω 1Ω ±(2%+1Ω)
200Ω-395Ω 5Ω ±(5%+5Ω)
400-590Ω 10Ω ±(10%+10Ω)
600Ω-880Ω 20Ω ±(20%+20Ω)
900Ω-1200Ω 30Ω ±(25%+30Ω)
*Current
(True-RMS)
0.00mA -9.00mA 0.05mA ±(2.5%+2mA)
10.0mA -99.0mA 0.1mA ±(2.5%+10mA)
100mA -300mA 1mA ±(2.5%+20mA)
0.30A-2.99A 0.01A ±(2.5%+0.1A)
3.0A-9.9A 0.1A ±(2.5%+0.5A)
10.0A-20.0A 0.1 A ±(2.5%+1 A)
Resistance Measurement Frequency: >1KHz
Measured Current Frequency: 50Hz/60Hz
Setting Range of Resistance Alarm Critical Value: 1Ω-199Ω
*Setting Range of Current Alarm Critical Value:1mA -499mA
Page 9

-6-
3. Specifications
Instrument safety: IEC/EN61010-1, IEC/EN6010-2-032
Insulation: double insulation
Pollution degree: class II
Overvoltage category: CAT III 150V to ground, Max 20A
Degrees of protection:
-IP30, Group III equipment as per EN 60529 Ed 92
-IK04, as per EN 50102 Ed 95
Dimensions(L×W×H):
-Long elliptic jaw: 285mm×90mm×66mm; (11×4×3 inches)
-Round jaw: 260mm×90mm×66mm;(10×4×3 inches)
Span of Jaw: Long elliptic jaw 35mm; round jaw 32mm
Weight (including batteries): Long elliptic jaw-1160g, Round
jaw-1120g
Battery type: 4 ×1.5V alkaline LR6 AA battery
Low battery indication: is displayed
Internal consumption: <50mA
Auto Power off: after 5 minutes of idleness
Display: 4 LCD, sign, decimal point and backlight
Memory size: 99 Units of Reading
Environment (Temperature & Relative Humidity):
-Working: -10°C~55°C, 10%RH-90%RH
-Storage: -20°C ~60°C, below 70%RH
Range shift: Full range automatic shifting
External magnetic field: <40A/m
External electric field: <1V/m
Data upload interface: RS232 (Optional)
Page 10
-7-
IV. Structure of Meter
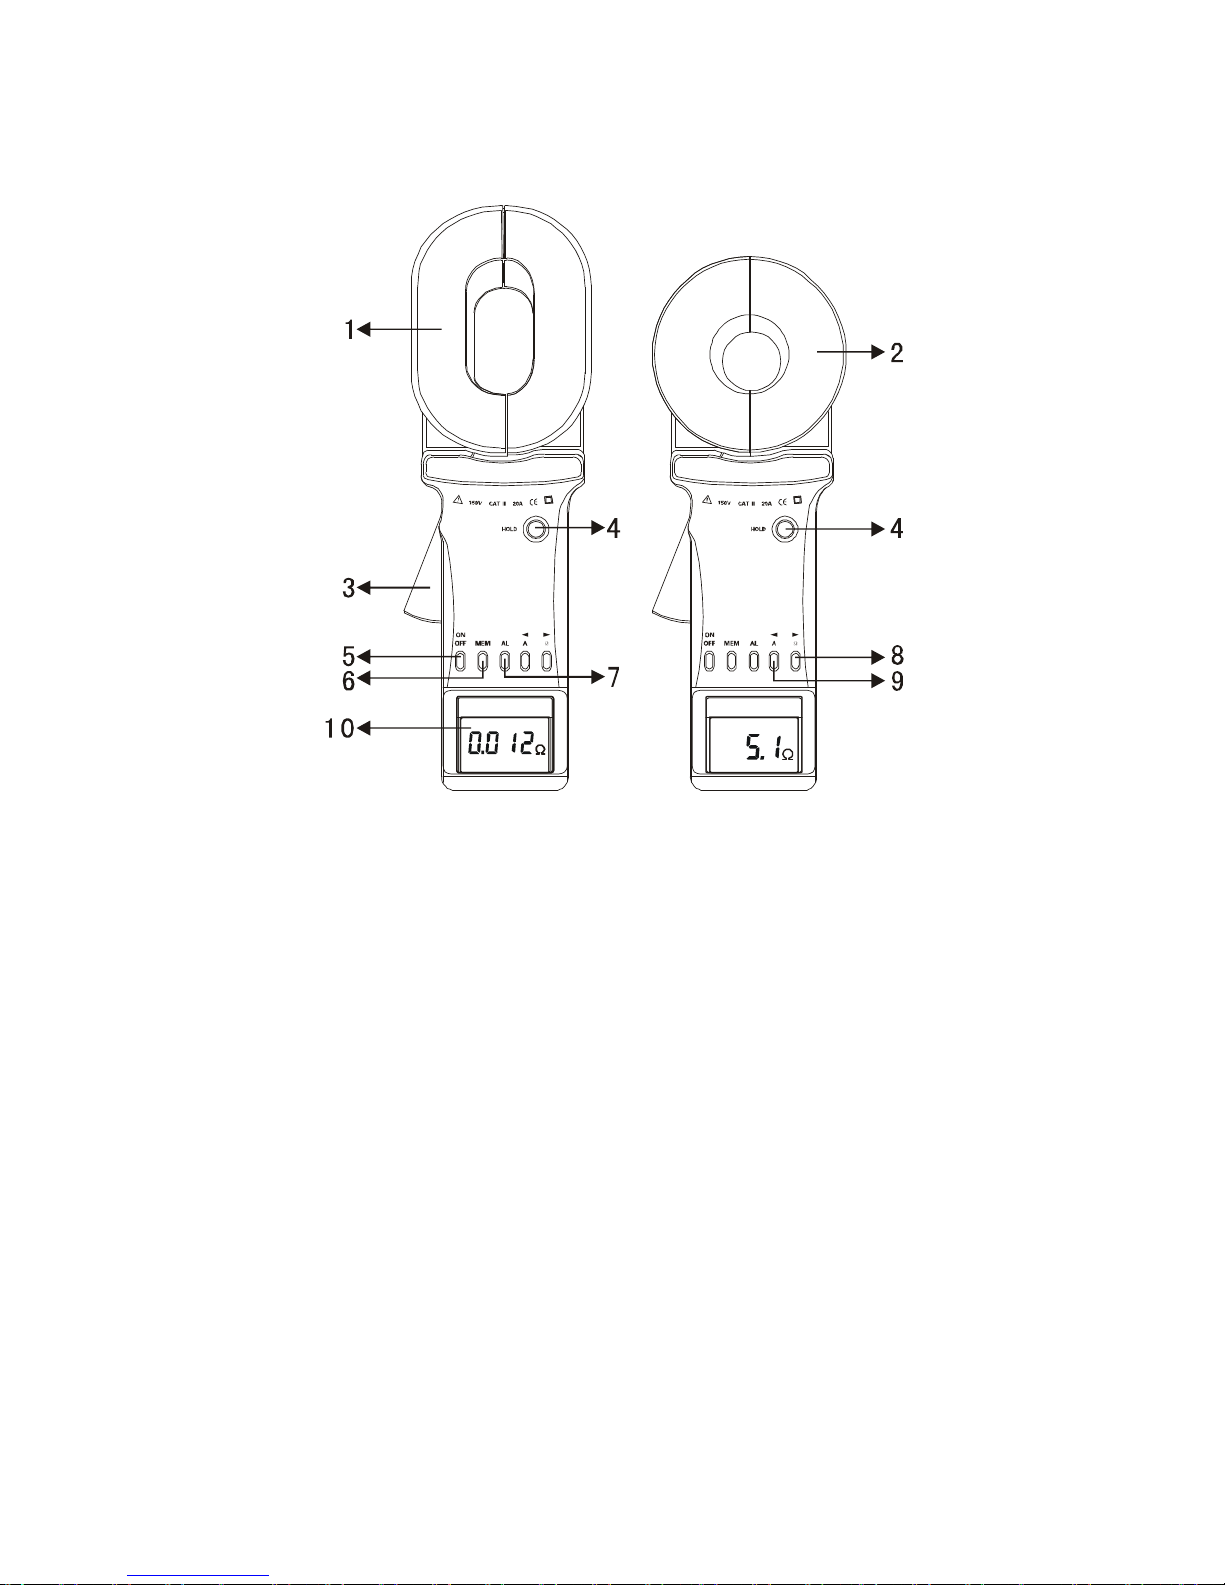
1. Long Pincers Jaw : 65mmx32mm
2. Round Pincer Jaw : φ32mm
3. Trigger: to control opening and closing of jaw
4. HOLD Key: lock / Release display / Storage
5. POWER Key: Boot Up / Shutdown /*Quit /Clear Data
6. MEM Key: Data Access / Clear Data
7. AL Alarm Function Key: Alarm Open / Turn Off / Alarm Critical
Value Setting
8. Resistance Measure Switch Key Ω (Right Arrow Key)
9. *Current Measure Switch Key A (Left Arrow Key)
10. Liquid Crystal Display (LCD)
Note: "*" is limited to C+.
Page 11
-8-
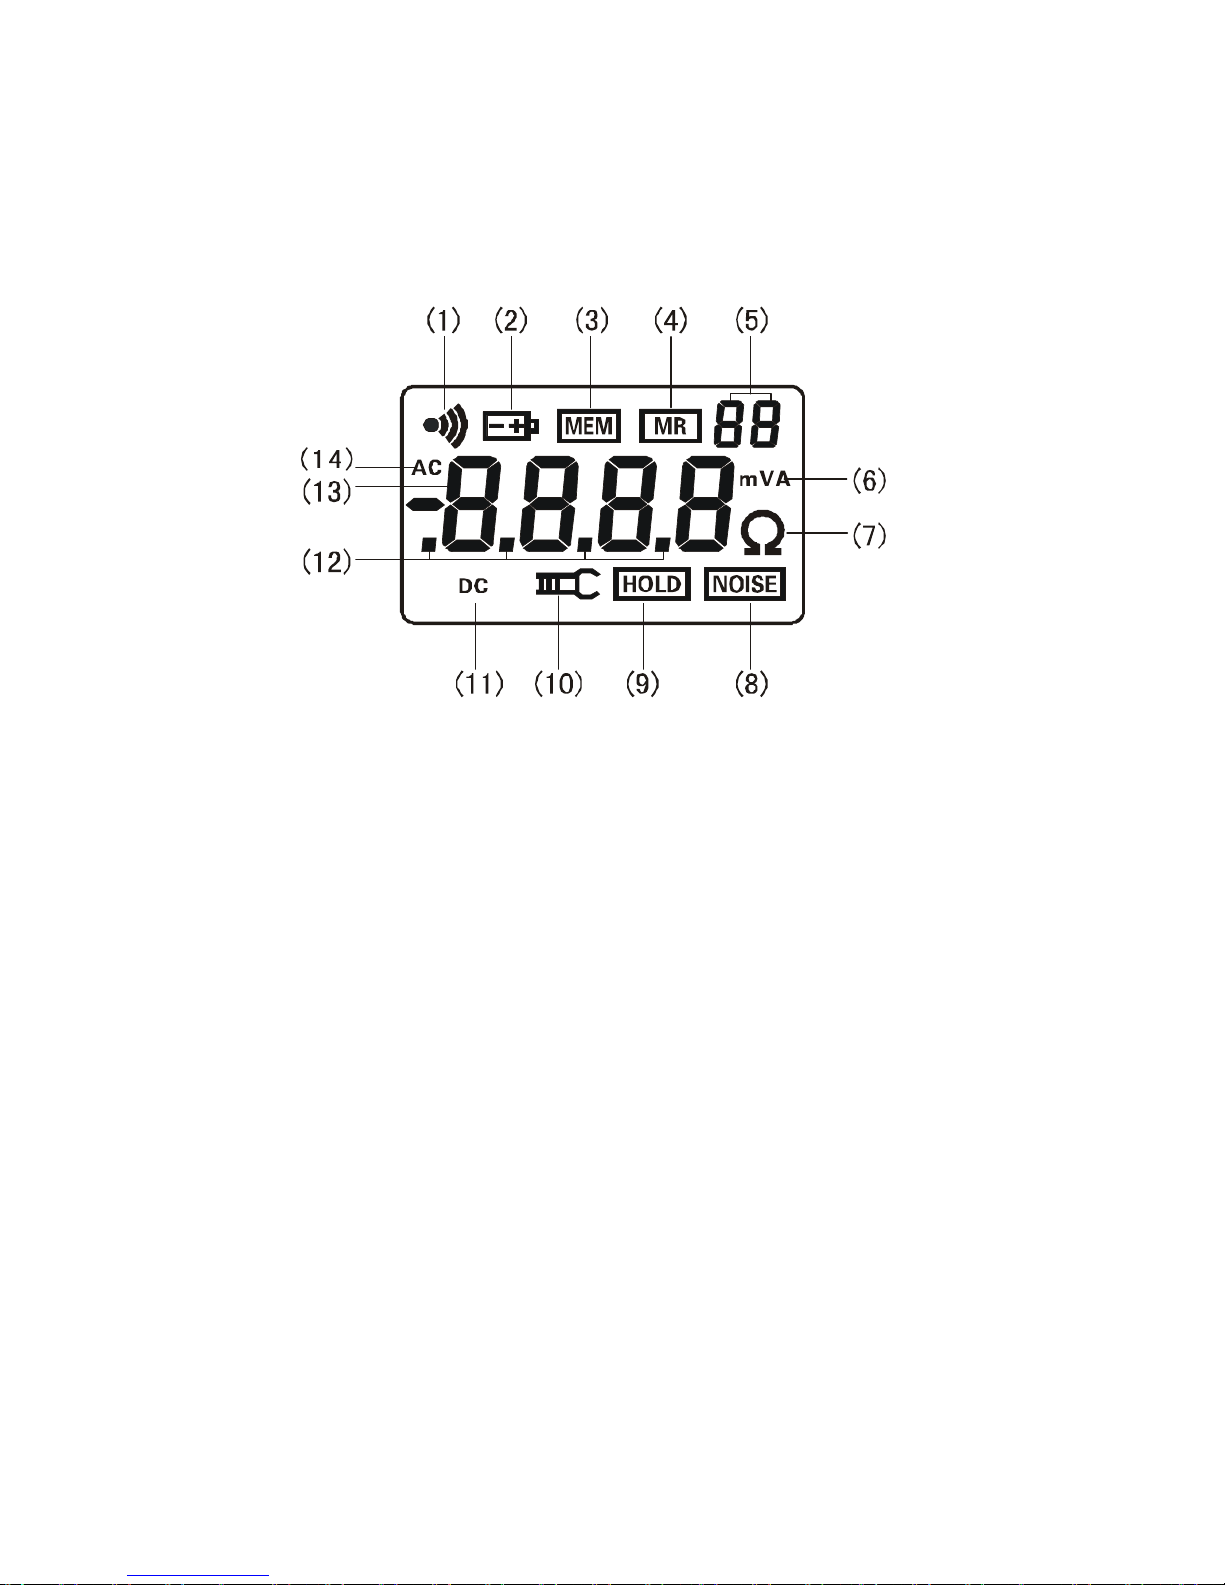
V. Liquid Crystal Display
1. LCD Screen
(1). Alarm Symbol
(2). Symbol of low battery & voltage
(3). Symbol of full data storage
(4). Symbol of data access
(5). 2-Digital No. Of Data Storage Unit
(6). Current unit
(7). Resistance unit
(8). Noise signal
(9). Data lock symbol
(10).Symbol of an open jaw
(11). Symbol of DC
(12). Metrication decimal point
(13). 4-digital LCD figures display
(14). Symbol of AC
Page 12

-9-
2. Description of Special Symbols
Note: "*" is limited to C+.
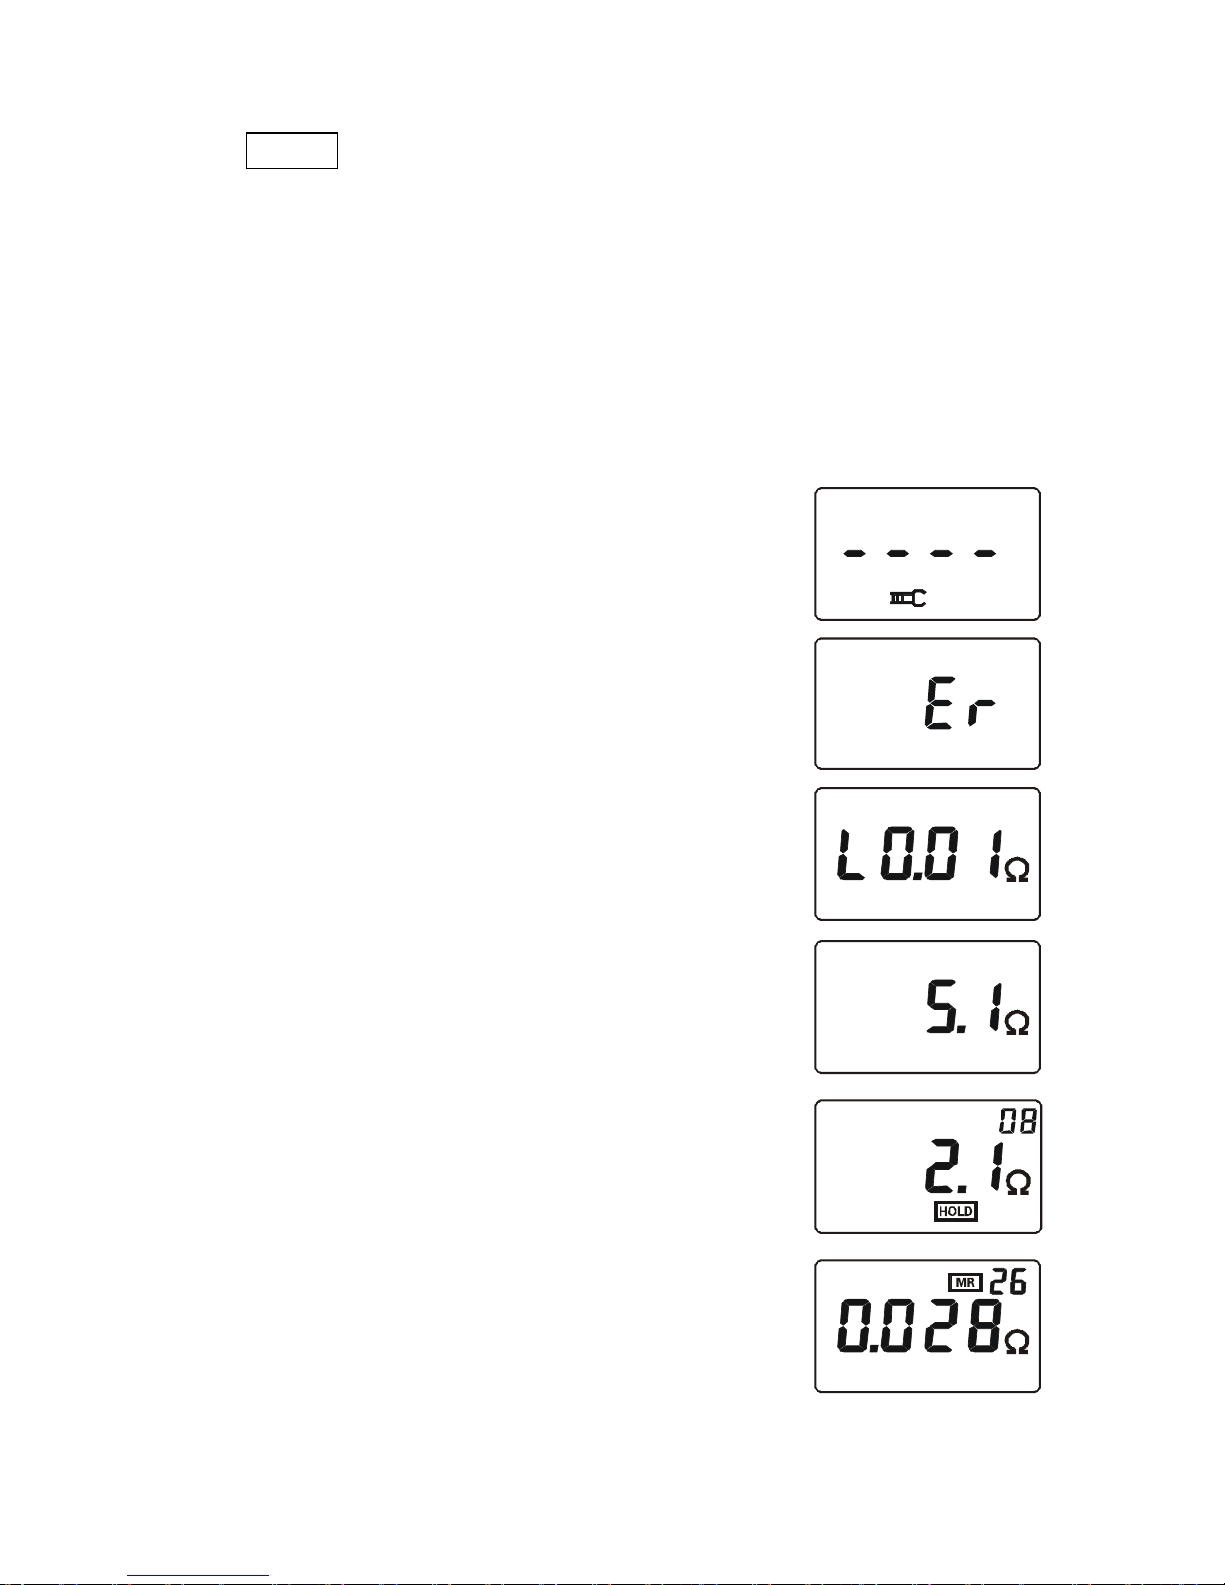
. ⑴ Symbol of an open jaw: As a jaw is in the open state, the
symbol shows. At this point, trigger may be artificially pressed,
or the jaws have been seriously polluted, and can no longer
continue to measure.
. ⑵ “Er” Boot error symbol, May be pressing trigger when boot or
jaw has been opened.
.⑶ Symbol of low battery & voltage: when the battery
voltage is lower than 5.3V, the symbol shows. At this time, it
cannot guarantee accuracy of the measurements. Batteries
should be replaced.
. ⑷ "OL Ω" symbol indicates that the measured resistance has
exceeded the upper limit of the Meter.
.⑸ "L0.01Ω" symbol indicates that the measured resistance has
exceeded the lower limit of the Meter.
* . ⑹ "OL A" symbol indicates that the measured current has
exceeded the upper limit of the Meter.
.⑺ Alarm symbol: when the measured value is greater than
the critical value of alarm setting, the symbol flashes, and the
meter issued by intermittent "beep--beep –beep--" sound.
. ⑻ MEM Symbol of full data storage: memory is full of data units
of 99, and can no longer continue to store data. MEM symbol
flashes.
. ⑼ MR Symbol of access to data: to display in an access to data,
also including the number of data.
Page 13
-10-
. ⑽ NOISE signal: when the symbol flashes, in the measurement
of grounding resistance at a greater interference current in
the loop. At this time it cannot guarantee accuracy of the
measurements.
3. Examples Illustrated
Note: "*" is limited to C+.
.⑴ ---Jaw is in open state, and cannot
measure
⑵. ---Boot error instructions Er (Error)
⑶. ---Measured loop resistance is less
than 0.01Ω
.⑷ ---Measured loop resistance is 5.1Ω
.⑸ ---Measured loop resistance is 2.1Ω
---Lock the current measurement
value: 2.1Ω
---Auto storage as 08 set data
. ⑹ ---Access to the stored data of Unit No.26
---Measured loop resistance is 0.028Ω
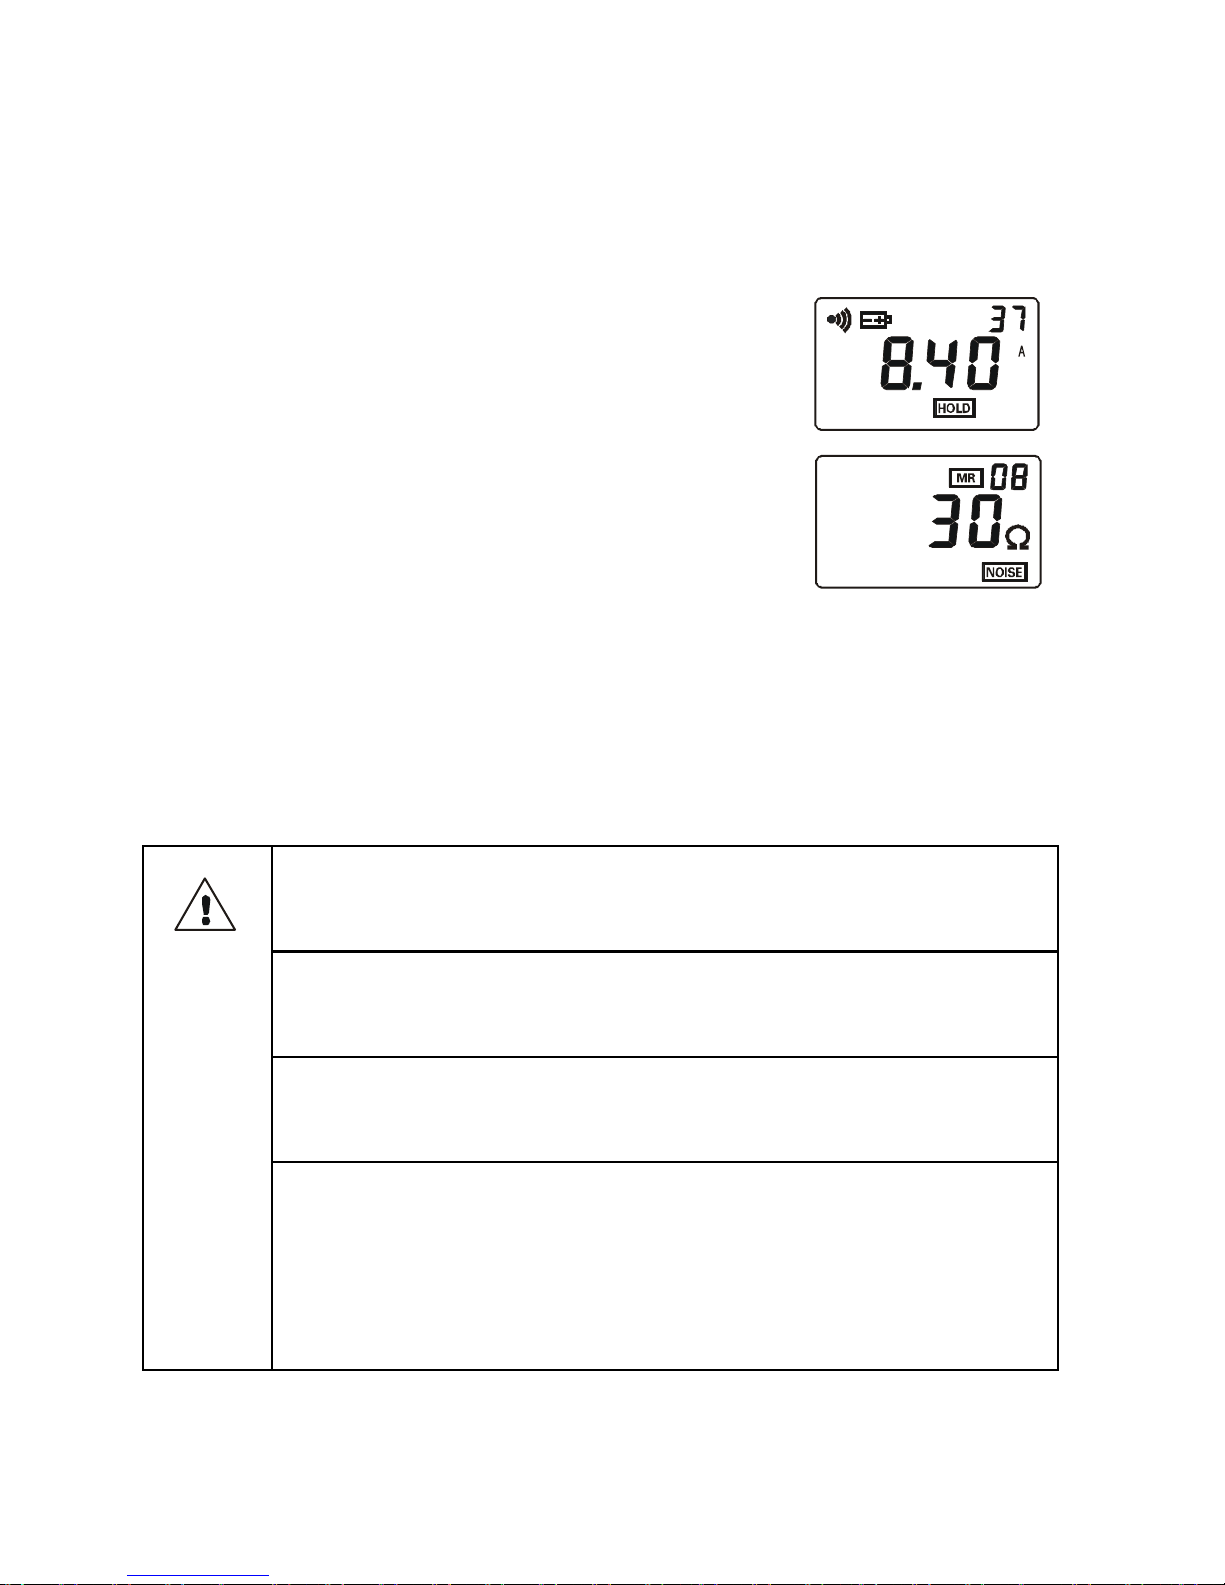
* .⑺ ---Alarm function activated, the measured current exceeded
Page 14
-11-
the critical value of alarm setting
---Low battery & voltage is displayed. At this time, it not
guarantee the accuracy of the measurements
---Measured current is 8.40A
---Lock the current value displayed
---Store the current value as the data
Unit No.37
. ⑻ --- Access to the stored data unit No.8
--- Measured resistance is 30Ω
--- This data is measured in a lot of signals interference
VI. Operating Method
1.Boot up
Boot , DO NOT press the trigger, don’t open jaws, nor
clamp any wire
Boot complete, show “OL Ω”, then press the trigger,
open jaws, clamp the measured wire
Before booting up, the trigger should be pressed for
a couple of times to ensure the jaws are well closed.
Boot, must maintain clamp meter natural resting
state, don’t flip Clamp, don’t be imposed outside
force on the jaw, otherwise can not guarantee the
accuracy of measurement
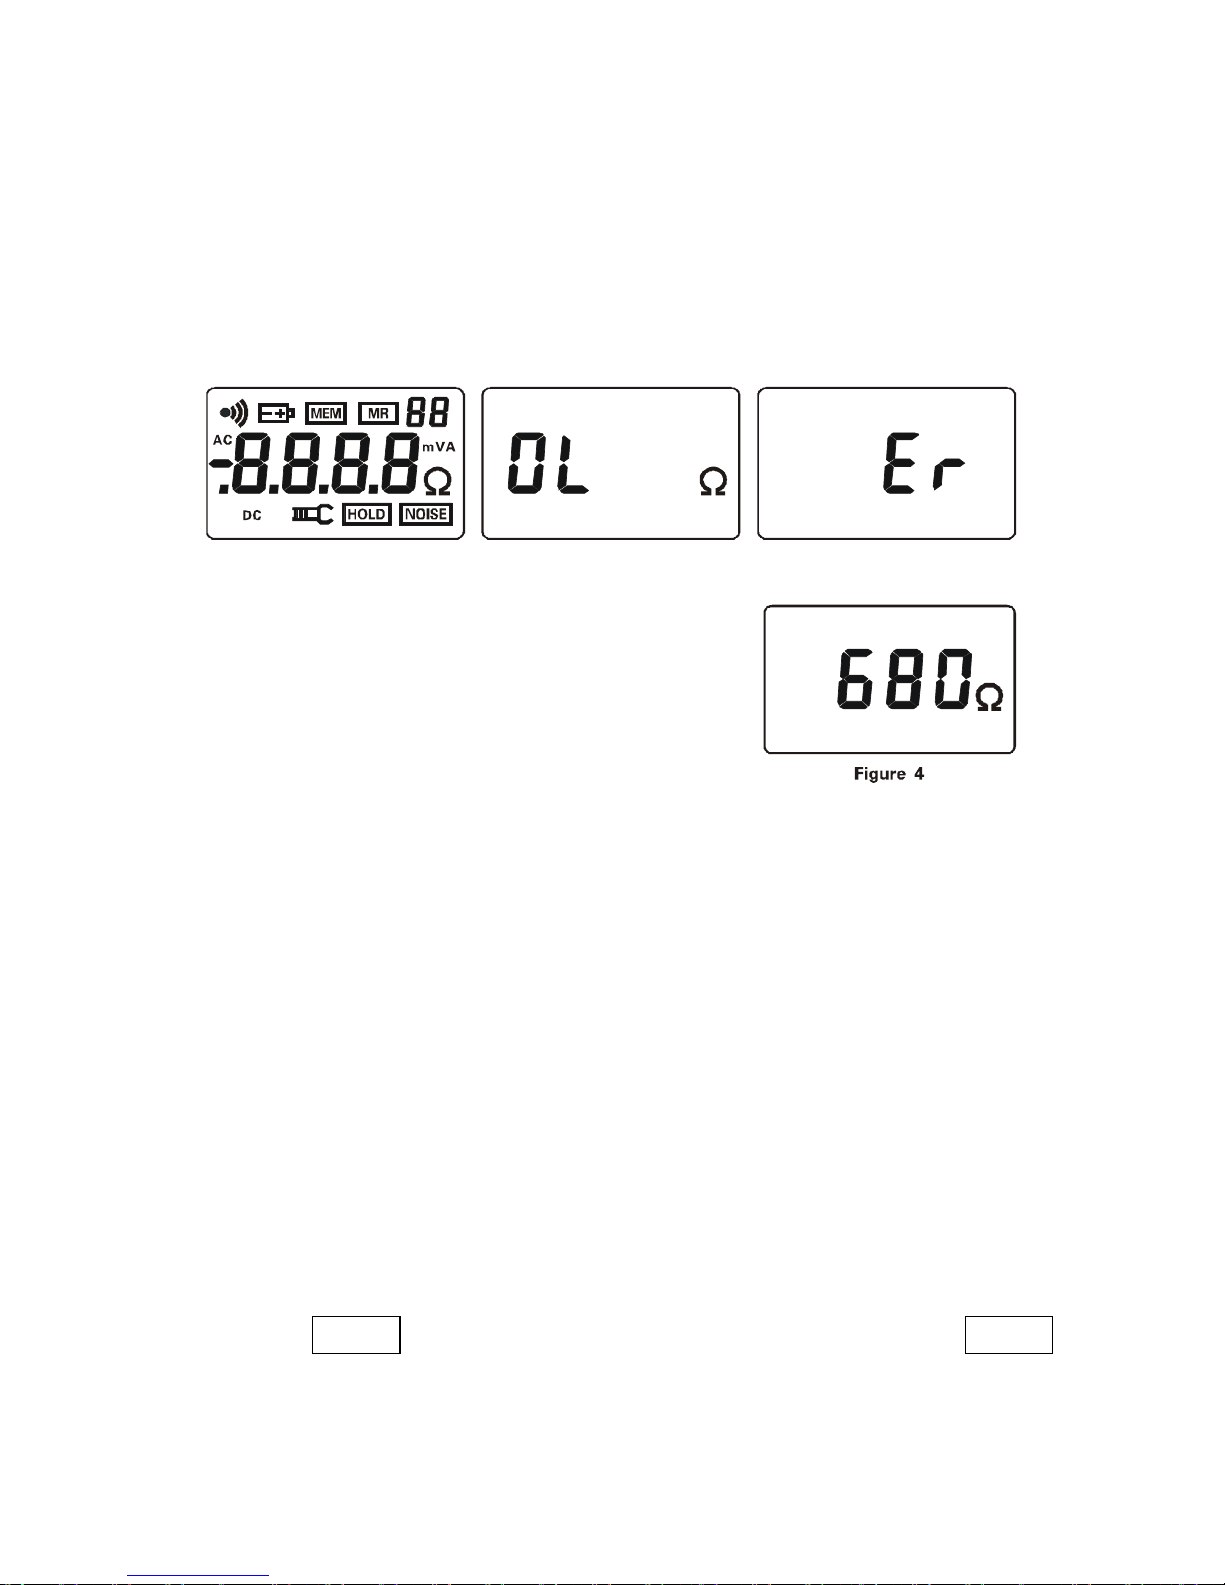
Press POWER Key to Boot, first, automated testing LCD,
Page 15
-12-
show all of its symbols (Figure 1). Meanwhile the instrument
auto-calibration, after boot displayed "OL Ω", automatically enter
the resistance measurement mode (Figure 2).If there is no normal
boot self-calibration, instrument will show "Er" symbol, said boot
error. need to check the cause and reboot (Figure 3).
Figure 1 Figure 2 Figure 3
After Power On and Self Test if
not appear "OL Ω",but shows a large
resistance (Figure 4).
However, when measured with the
test ring, still gives the correct result, indicating Clamp measured
only in the high-value (for example, more than 100Ω) has large
errors, When measuring a small resistance retains the original
Accuracy, the user can rest assured use.
2.Shutdown
Press POWER Key to Shutdown.
5 minutes after boot, LCD display into the blinking state. To
reduce battery consumption, blinking state for 30 seconds
automatically shut down. In the blinking state press POWER key to
delay shutdown, Clamp continue to work.
In the HOLD state, need to press HOLD key to exit the HOLD
state, then press POWER key to shut down.
In setting Alarm Critical Value state, need to press the
Page 16
-13-
POWER key or press the AL key for 3 seconds, exit Alarm Critical
Value state, then press POWER key to shut down.
3.Resistance Measurement
After the booting auto-inspection is completed, it shows "OL Ω" and
will be able to proceed with resistance measurement. At this point,
press the trigger and open the jaws, clamp the target loop, reading
to get the resistance value.
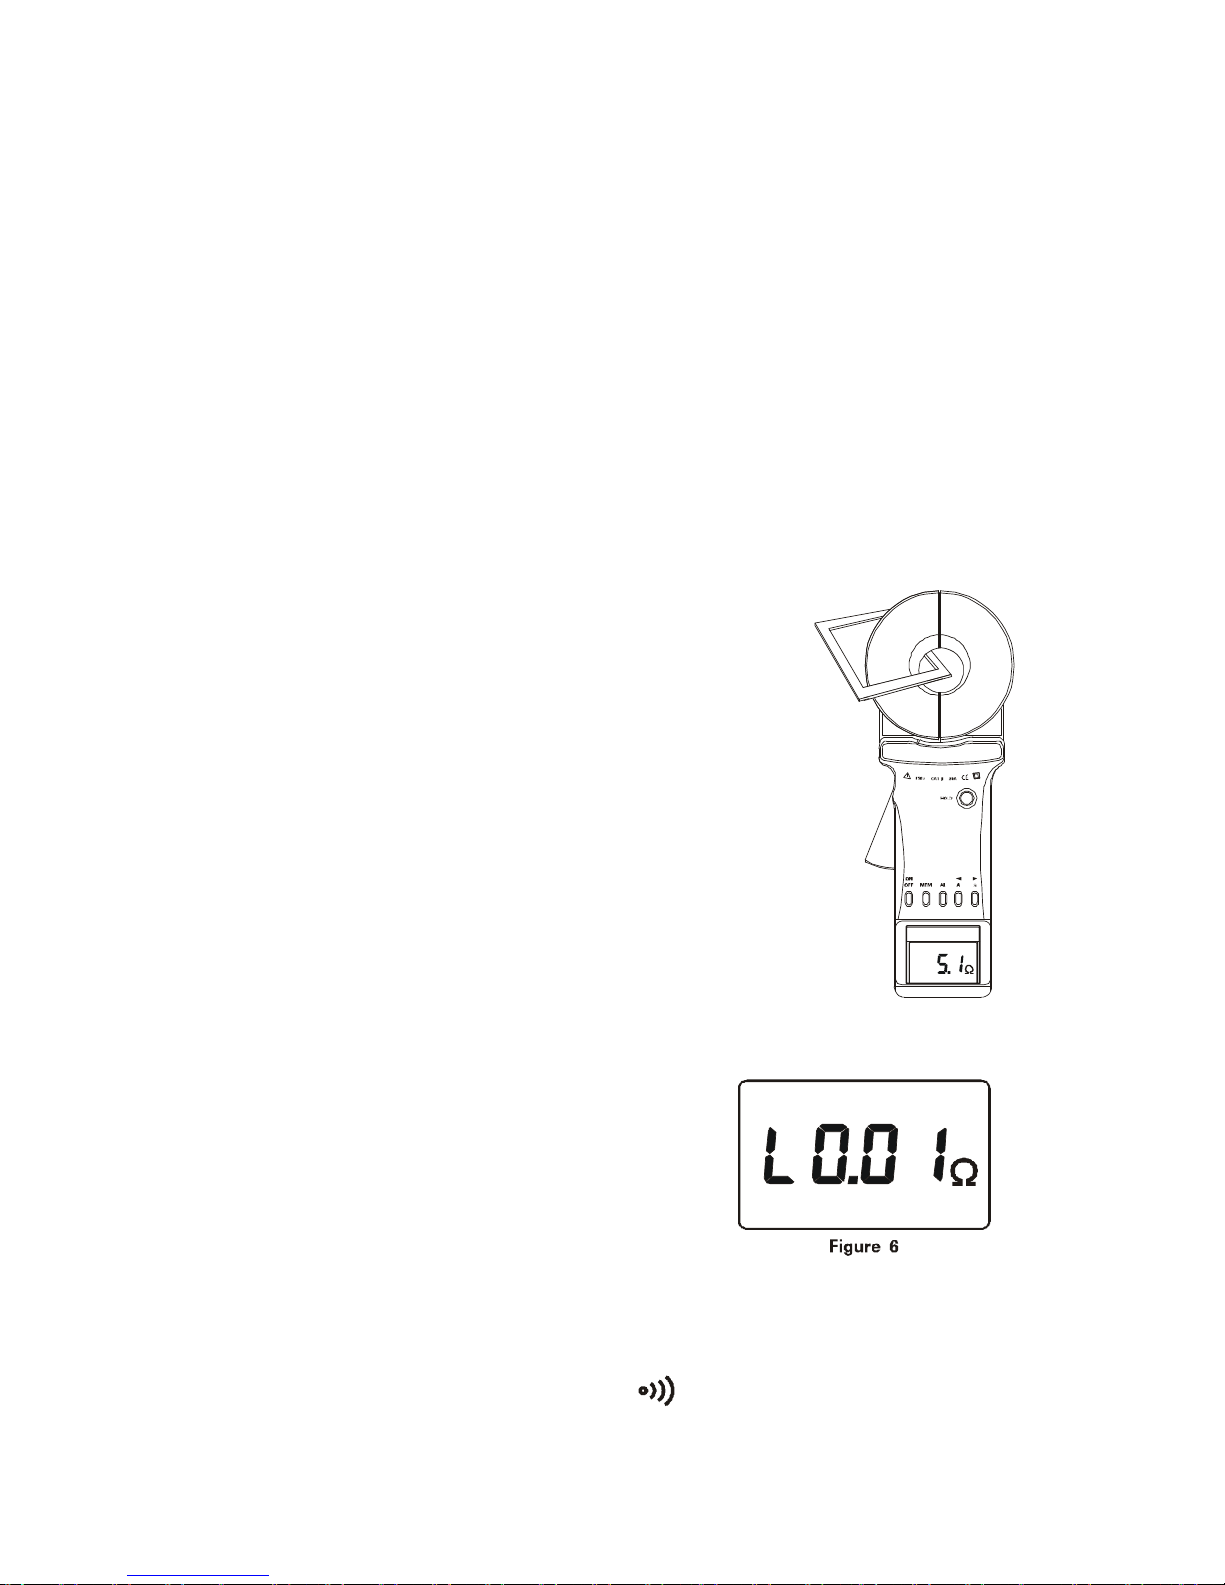
If the user thinks it necessary, the test can be done with the ring as
shown in the following figure 5. Its show value should be consistent
with the normal value on the test ring (5.1Ω).
The normal value on the test ring is the
value at a temperature of 20°C.
It is normal to find the difference of
numerical 1 word between the show
value and the nominal value,
For instance: If the nominal value of
test ring is 5.1Ω, it would be normal
showing 5.0Ω or 5.2Ω. Figure 5
It shows "OL Ω”, indicating that the
measured resistance value exceeded
the upper limit of Meter, see Figure 2.
It shows "L0.01Ω”, indicating that the
measured resistance value exceeded the lower limit of Meter, see
Figure 6.
Flashing display symbols , go with intermittent
"beep--beep--beep--" sound, indicating the measured resistance
Page 17
-14-
exceeds the resistance of Alarm Critical Value.
In the HOLD state, need to press HOLD key to exit the HOLD
state, then continue measurement.
In the MR state, need to press MEM key to exit the MR state,
then continue to measurement.
In setting Alarm Critical Value state, need to press the
POWER key or press the AL key for 3 seconds, exit Alarm Critical
Value state, then continue to measurement.
*In the current test mode, press Ω key to switch to
resistance test mode.
*4.Current Measurement
After the booting auto-inspection is completed, the Meter
automatically enter the resistance measurement mode. Upon
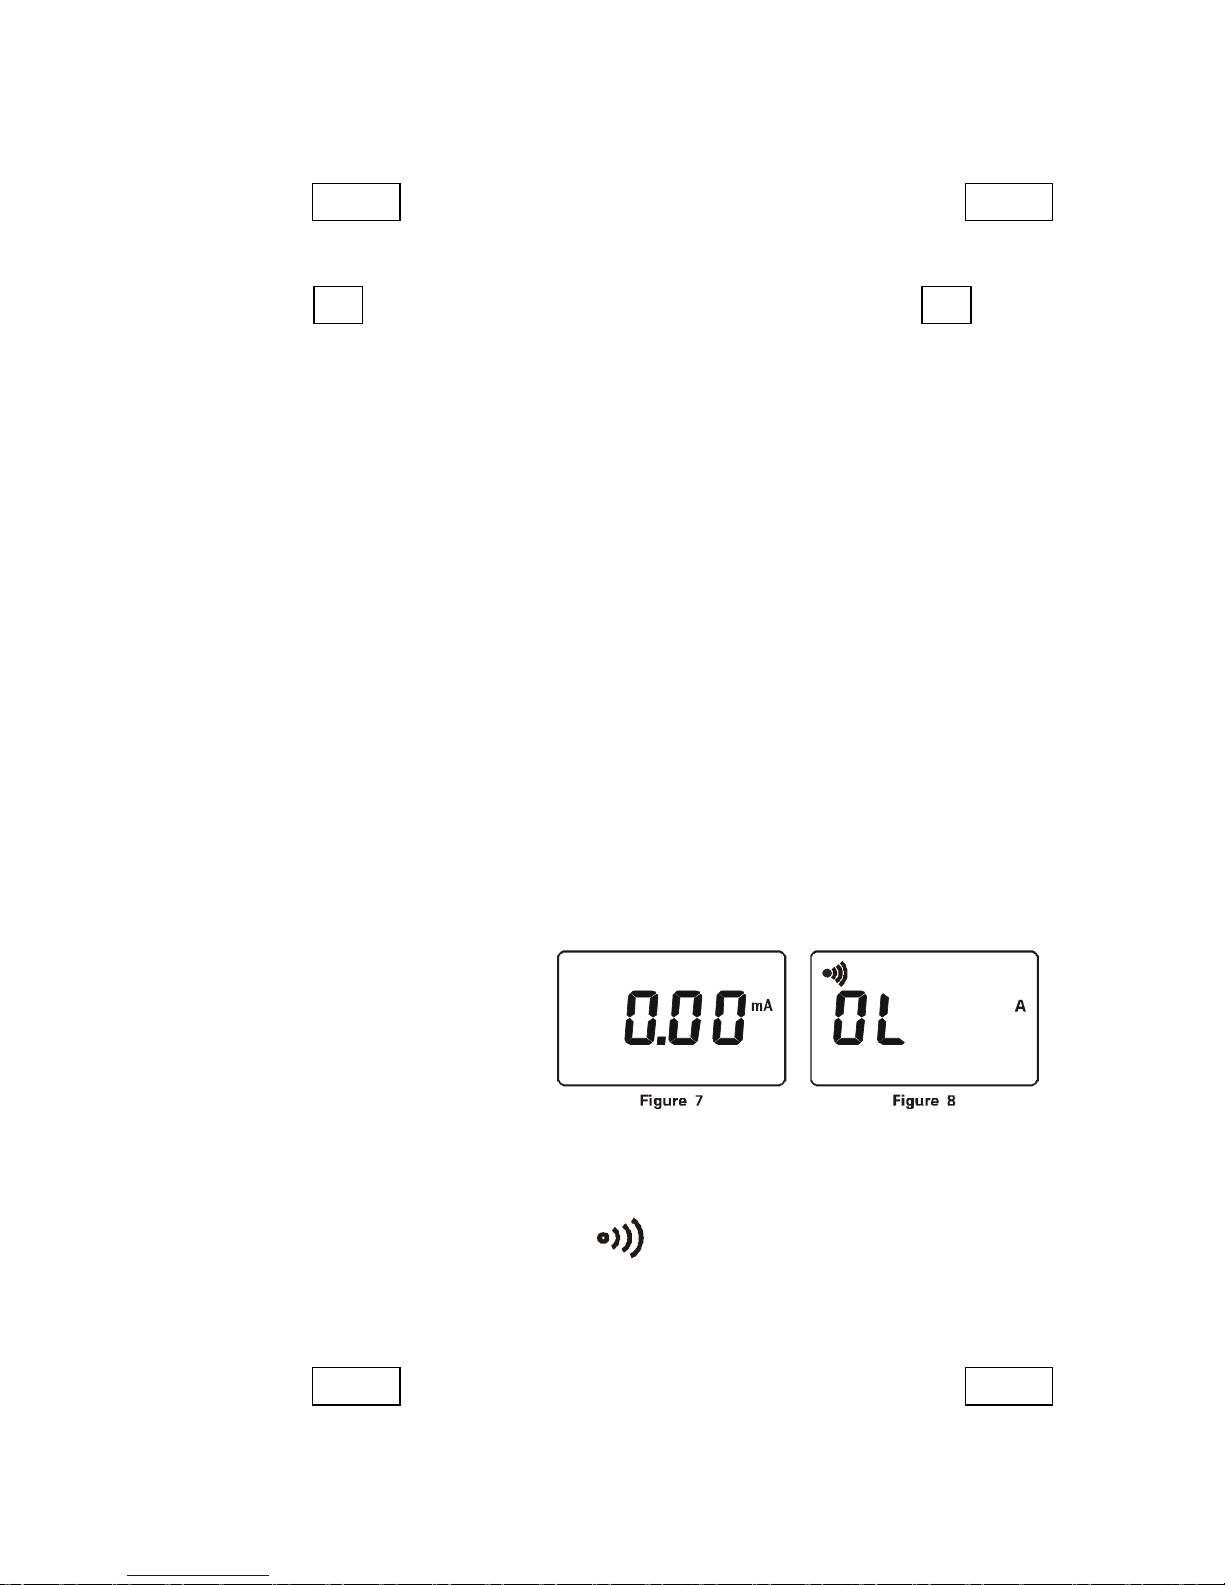
showing "OL Ω", press A key, and the Meter enter the current
measurement mode, showing "AC 0.00mA", see Figure 7. At this
point, press the trigger and open the jaws, clamp the target wire,
reading to get
the current value.
It shows "OL A”, indicating
that the measured current value exceeded the upper limit of Meter,
see Figure 8.
Flashing display symbols , go with intermittent "beep
--beep--beep--" sound, indicating the measured current exceeds
the current of Alarm Critical Value.
In the HOLD state, need to press HOLD key to exit the HOLD
state, then continue measurement.
Page 18
-15-
In the MR state, need to press MEM key to exit the MR state,
then continue to measurement.
In setting Alarm Critical Value state, need to press the
POWER key or press the AL key for 3 seconds, exit Alarm Critical
Value state, then continue to measurement.
In the resistance test model, press A key to switch to current
test model.
5.Date Lock/Release/Storage
In test model, press HOLD key to Lock currently displayed
value and HOLD symbol. At the same time, this lock-values as a
set of data followed by auto-ID and store, and then press HOLD
key to cancel the lock, HOLD symbol disappeared, can continue
to measure. Loop operation, can store 99 sets of data. If the
memory is full, blinking display MEM symbol.
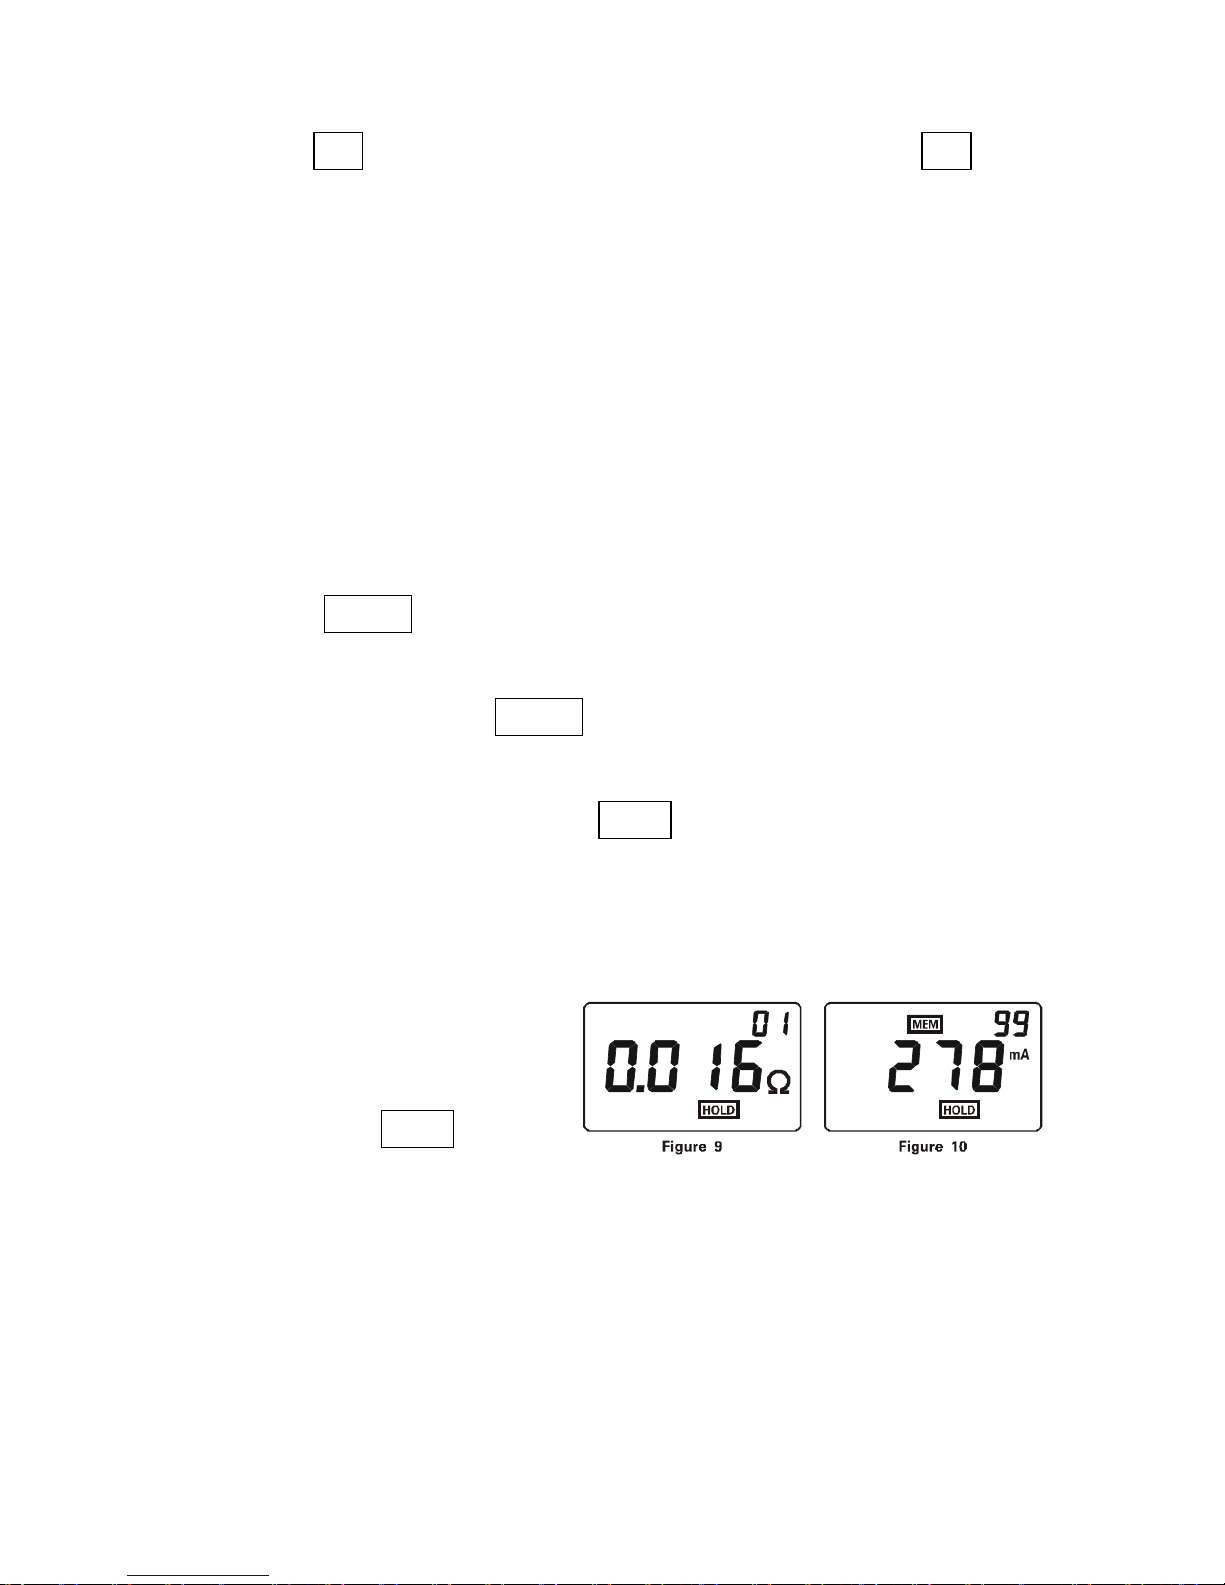
Figure 9,Lock measured resistance 0.016Ω, at the same time
as the first 01 sets of data storage.
*As indicated in Figure 10, lock the measured current 278mA, and
save it as data unit No.99.
And the memory is full now.
blinking display MEM symbol.
In the Date Access Model, press MEM key to exit, then can
lock and storage the data.
In setting Alarm Critical Value state, need to press the
POWER key or press the AL key for 3 seconds, exit Alarm Critical
Value state, then can lock and storage the data.
Shutdown and then boot up, don’t lose stored data.
Page 19
-16-
6.Data Access
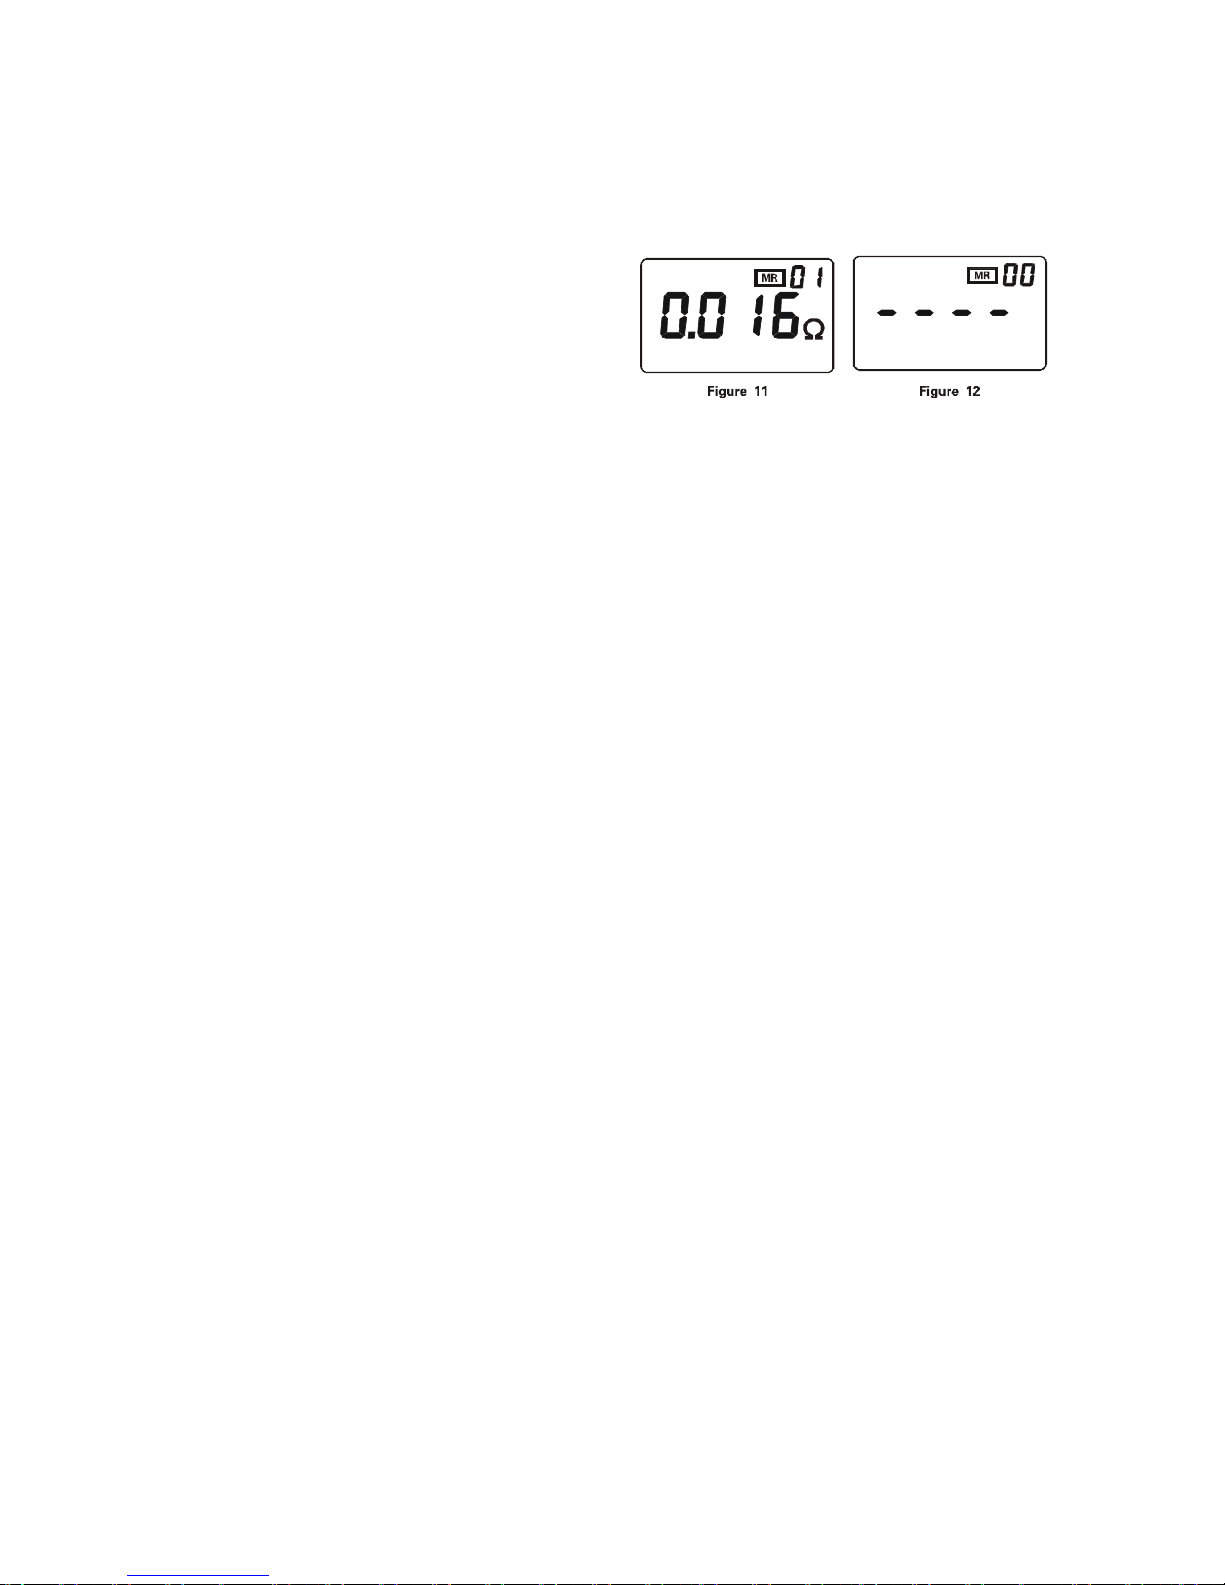
Press MEM key to enter Data Access Model, the default
display stored in the first 01 Units
of data, shown in Figure 11. Then
the right arrow keys, up, read the
data stored, press the left arrow key,
scroll down to the data stored. If not store data, display shown in
Figure 12.
In setting Alarm Critical Value state, need to press the POWER
key or press the AL key for 3 seconds, exit Alarm Critical Value
state, then press MEM key to enter data storage model.
7.Alarm Settings
In the test model, press AL key to turn on or shutdown alarm
function.
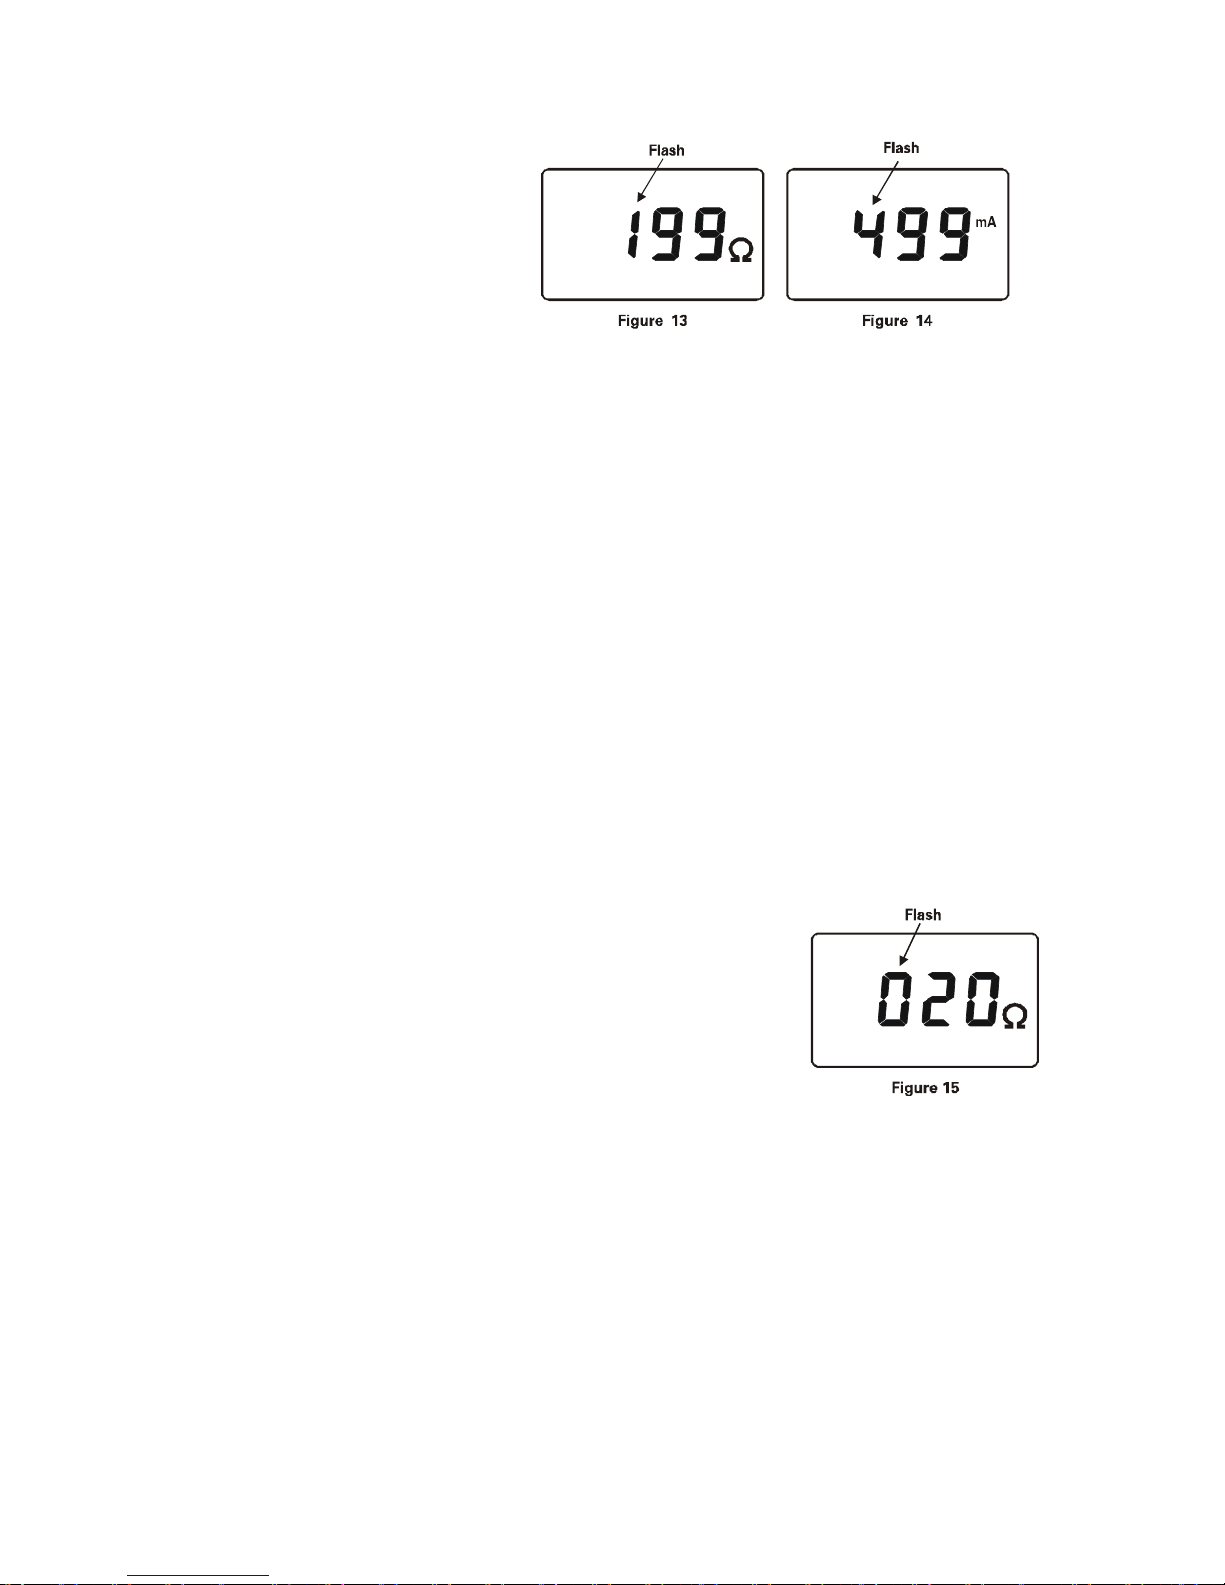
In test model, press AL key for 3 seconds, then enter to set
alarm critical value function, temporality, the highest-digit flashing,
first set a maximum bit, shown in Figure 13, Figure 14. Press AL
key to switch to the low number, in the current digit flashing, press
the left/right arrow keys to change the "0,1, ... 9" figures, after the
number finished setting, press the AL key for 3 seconds to confirm
the current set alarm critical value, when set the alarm function
successful, opening alarm function, then automatically return to
measurement mode. If the load bigger than the alarm critical,
meter will be flashing an
Page 20
-17-
alarm symbol, also
issued intermittent
"beep--beep--beep--"
sound.
Setting process, press POWER key to exit Alarm Critical
Value setting function, return to measurement status, does not
change the previous settings.
In data access model, press MEM key to exit, then setting
Alarm Critical Value.
8.Access to Alarm Critical Value
Press AL key to enter the mode of resistance or current
measurement. Press down AL key for 3 sec, you can access to
check the alarm critical value, which would flashes in high-digit.
The value accessed was set in the last time. And again press down
AL key for 3 sec or POWER key to quit from the access state and
return to the measuring state.
As indicated in Figure 15, the alarm critical
value of resistance set in the last time is 20Ω.
9.Clear Data
In the data access model, press MEM+POWER, automatism
clear all the stored data. After clearing display show in Figure 12.
The data can’t be restore after clear.
Note: "*" is limited to C+.
Page 21
-18-
VII. Measurement Principle
1. Principle of Resistance Measurement
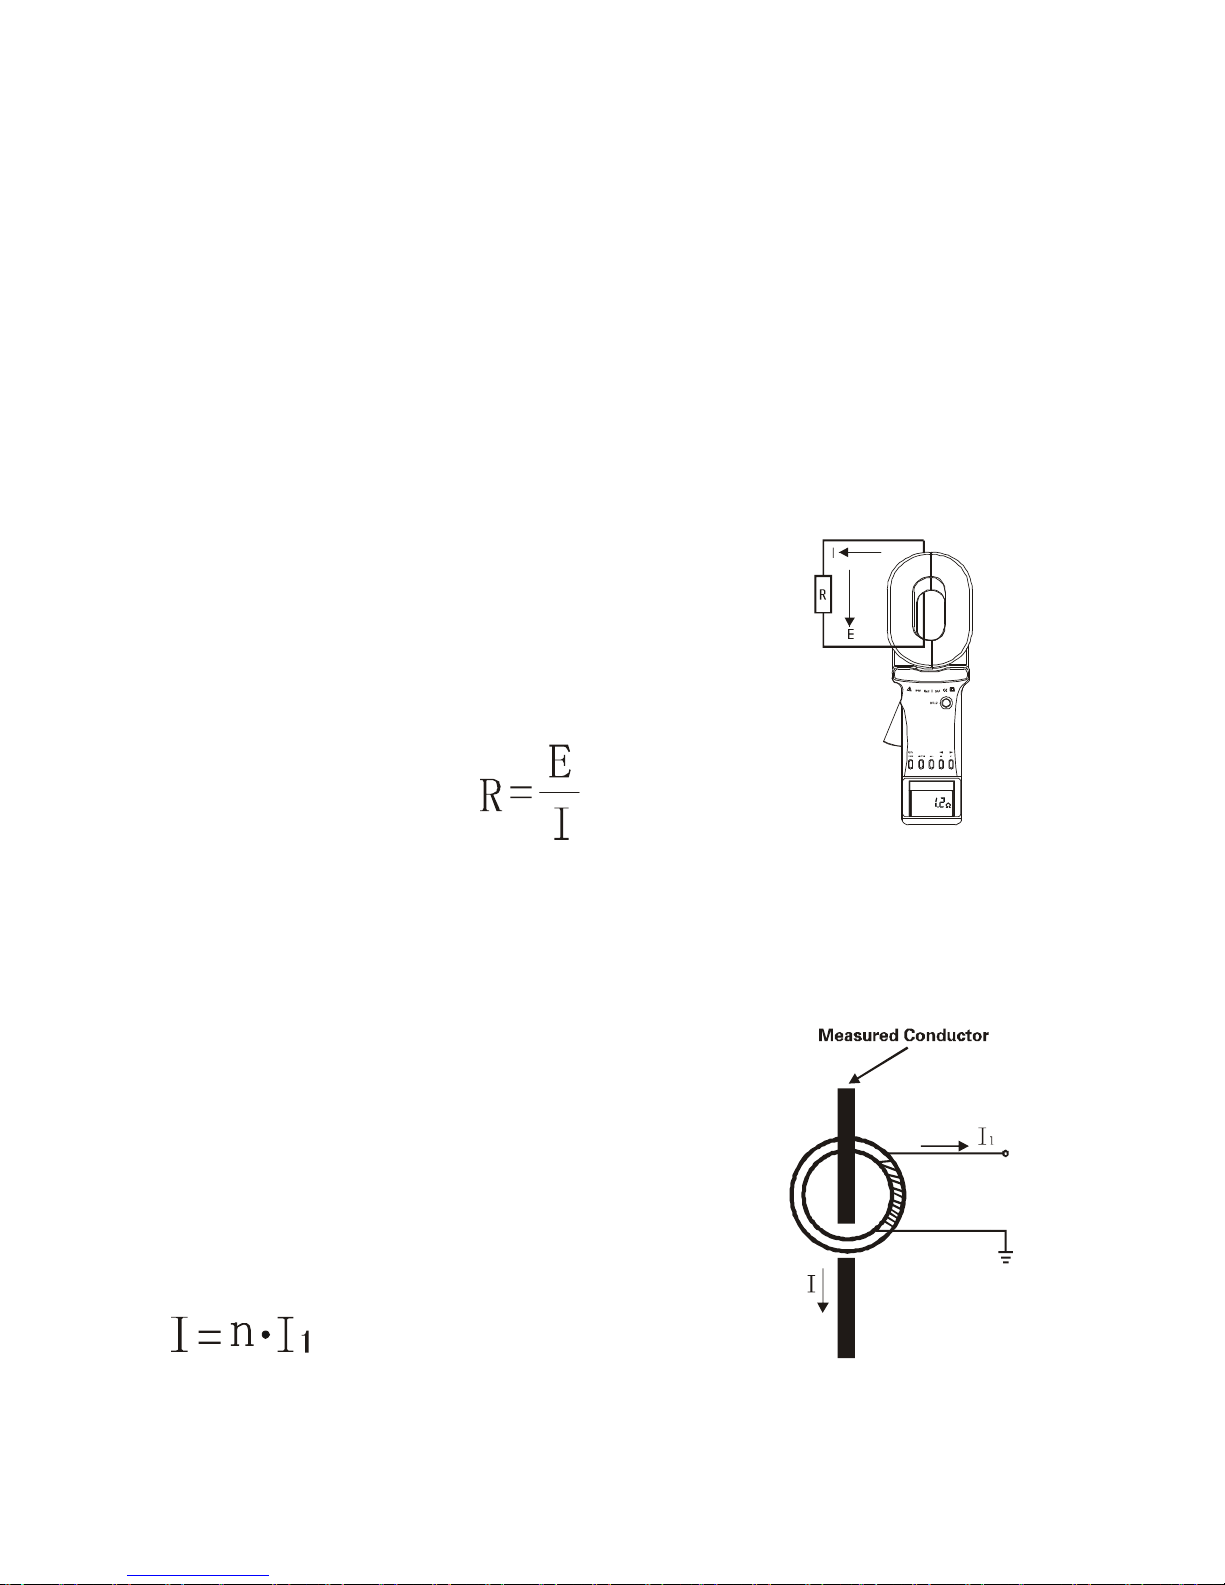
The basic principle of ETCR in the measurement of resistance is to
measure the loop resistance, as shown in the figure below. The jaw
part of the Meter is comprised of voltage coil and current coil. The
voltage coil provides excitation signal, and will induce a potential E
on the measured loop. Under the effects of the potential E, the
current I can generate on the measured
loop. The Meter will measure E & I, and
the measured resistance R can be
obtained by the following formula.
2. Principle of Current Measurement
The basic principle of C+ in the measurement of current is the
same with that of the measurement of resistance, as shown in the
figure below. The AC current on the measured
wire, through the current magnetic loop
and coil, can generate a induction
current I1; The Meter will measure I1,
and the measured current I can be
obtained by the following formula.
Where: n is the turn ratio of the secondary side vs. primary side.
Page 22
-19-
VIII. Measurement Method of Earth Resistance
1. Multi-Point Grounding System
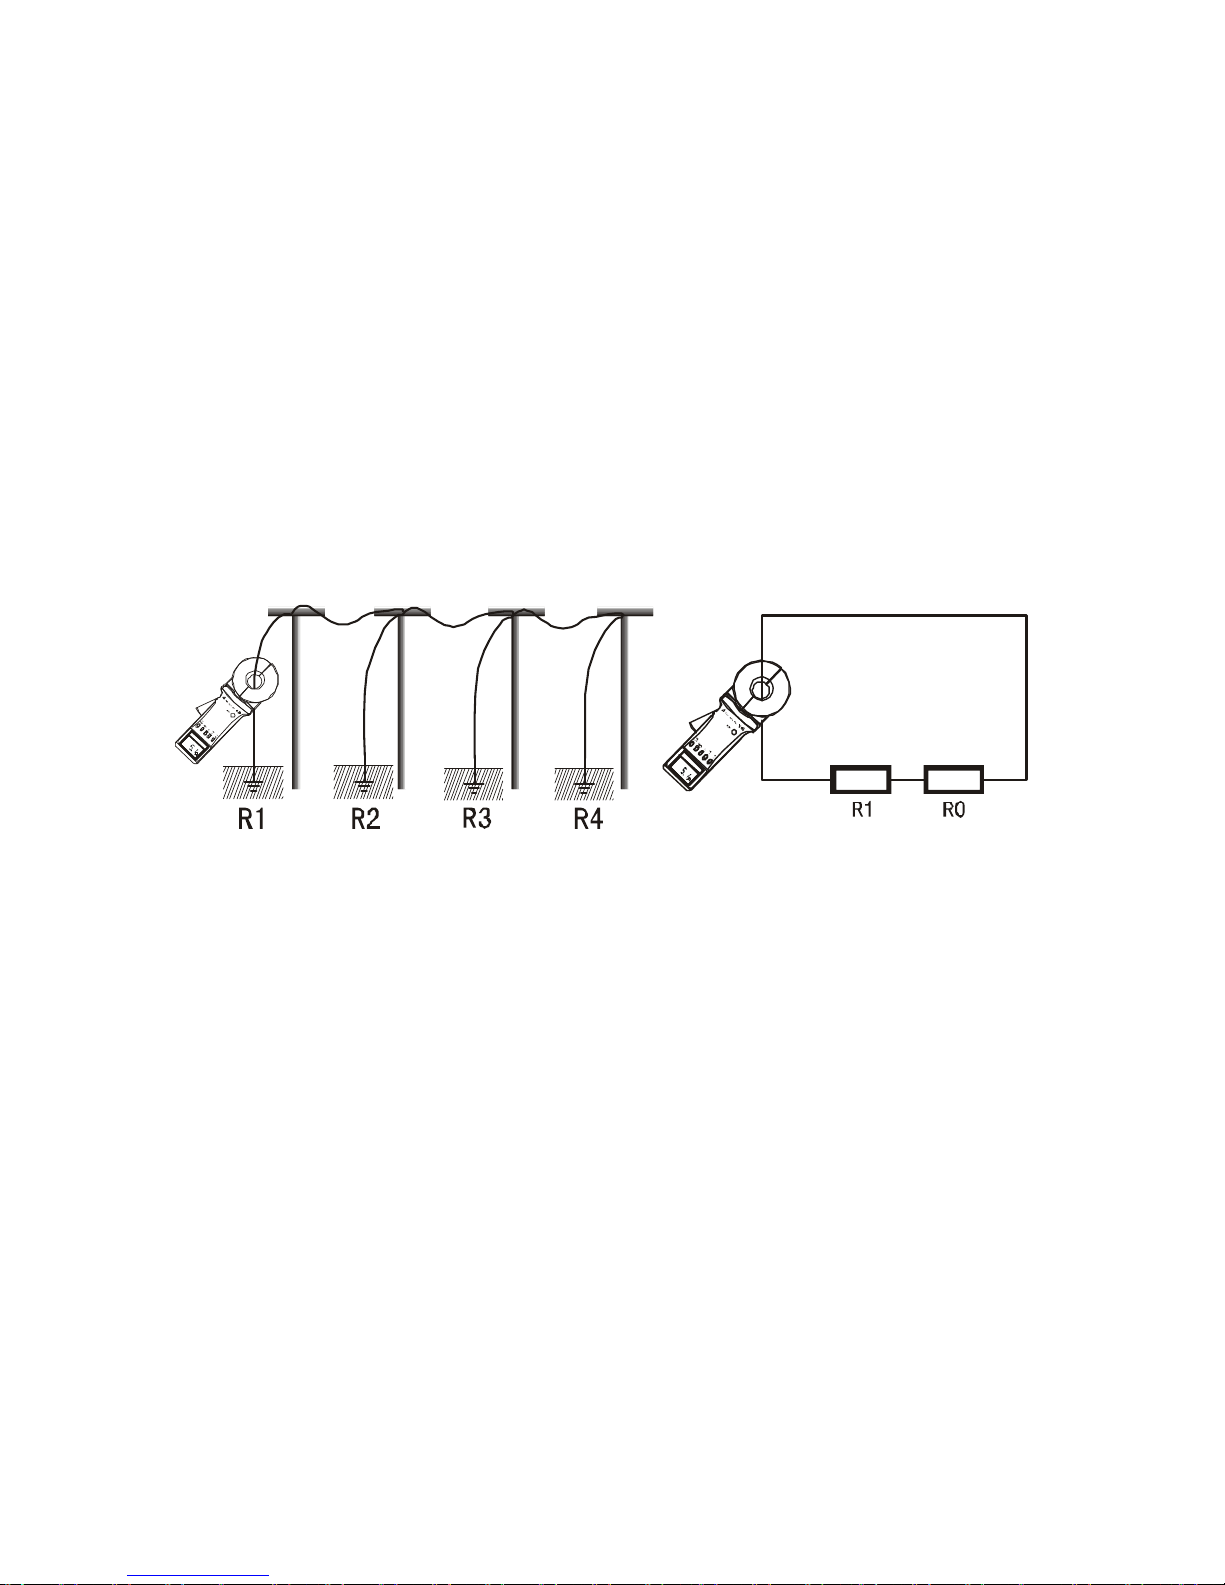
As for the multi-point grounding system (such as electricity
transmission tower grounding system, grounding cable
communications systems, certain buildings, etc.), They usually
pass the overhead ground wire (cable shielding layer) connected
to form a grounding system.
As the Meter is in the above measurement, its equivalent electric
circuit is shown in the figure below:
Where: R1 is the target grounding resistance.
R0 is the equivalent resistance of the other entire tower
grounding resistances paralleled.
Although strictly on the theoretical grounding, because of the
existence of so-called "mutual resistance”, R0 is not the usual
parallel value in the sense of electrical engineering (slightly higher
than its IEC parallel output value). But because a tower-grounding
hemisphere was much smaller than the distance between the
towers, and with a great number of locations after all, R0 is much
smaller than R1. Therefore, it can be justified to assume R0=0 from
an engineering perspective. In this way, the resistance we
Page 23

-20-
measured should be R1.
Times of comparing tests in different environments and different
occasions with the traditional method proved that the above
assumption is entirely reasonable.
2. Limited Point Grounding System
This is also quite common. For example, in some towers, five
towers are linked with each other through overhead ground wire;
Besides, the grounding of some of the buildings is not an
independent grounding grid, but several grounding bodies
connected with each other through the wire.
Under such circumstances, the above R0 regarded as 0, will yield
more error on the results of the measurement.
Due to the same reasons mentioned above, we may ignore the
impact of the mutual resistance; and the equivalent resistance of
the grounding resistance paralleled is calculated by the usual
sense. Thus, for the grounding system of N (N is smaller, but larger
than 2) grounding bodies, it can offer N equations:
.
.
R1T
R
R3
R2
R1
1 ......
1 1 1
= + + + +
T
N
R
RRR
R
2
31
2
1
......
11
1
=
+++
+
Page 24

-21-
.
Where: R1、R2、……RN are grounding resistances of N grounding
bodies.
R1T、R2T、……RNT are the resistances measured with the
Meter in the different grounding branches.
It is nonlinear equations with N unknown numbers and N equations.
It indeed has a definite solution, but it is very difficult to solve the
issue artificially, even impossible when N is larger.
Therefore, you’re expected to buy the Limited-Point Grounding
System Solution software produced by this Company. Users can
use the office computer or notebook computer to carry out
solutions.
In principle, in addition to ignoring the mutual resistance, this
method does not have the measurement error caused by
neglecting R0.
However, users need to pay attention to that: in response to the
number of the grounding bodies mutually linked in your grounding
system, it is necessary to measure the same number of the testing
values for calculating of the program, not more or less. And the
program would output the same number of grounding resistance
values.
3. Single-Point Grounding System
From the measuring principle, ETCR series Meter can only
NT
N
N
R
RRR
R =
+++
+
− )1(21
1
......
11
1
Page 25
-22-
measure the loop resistance, and the single-point grounding is not
measured. However, users will be able to use a testing line very
near to the earth electrode of the grounding system to artificially
create a loop for testing. The following presented is two kinds of
methods for the single-point grounding measurement by use of the
Meter. These two methods can be applied to the occasions beyond
the reach of the traditional voltage-current testing methods.
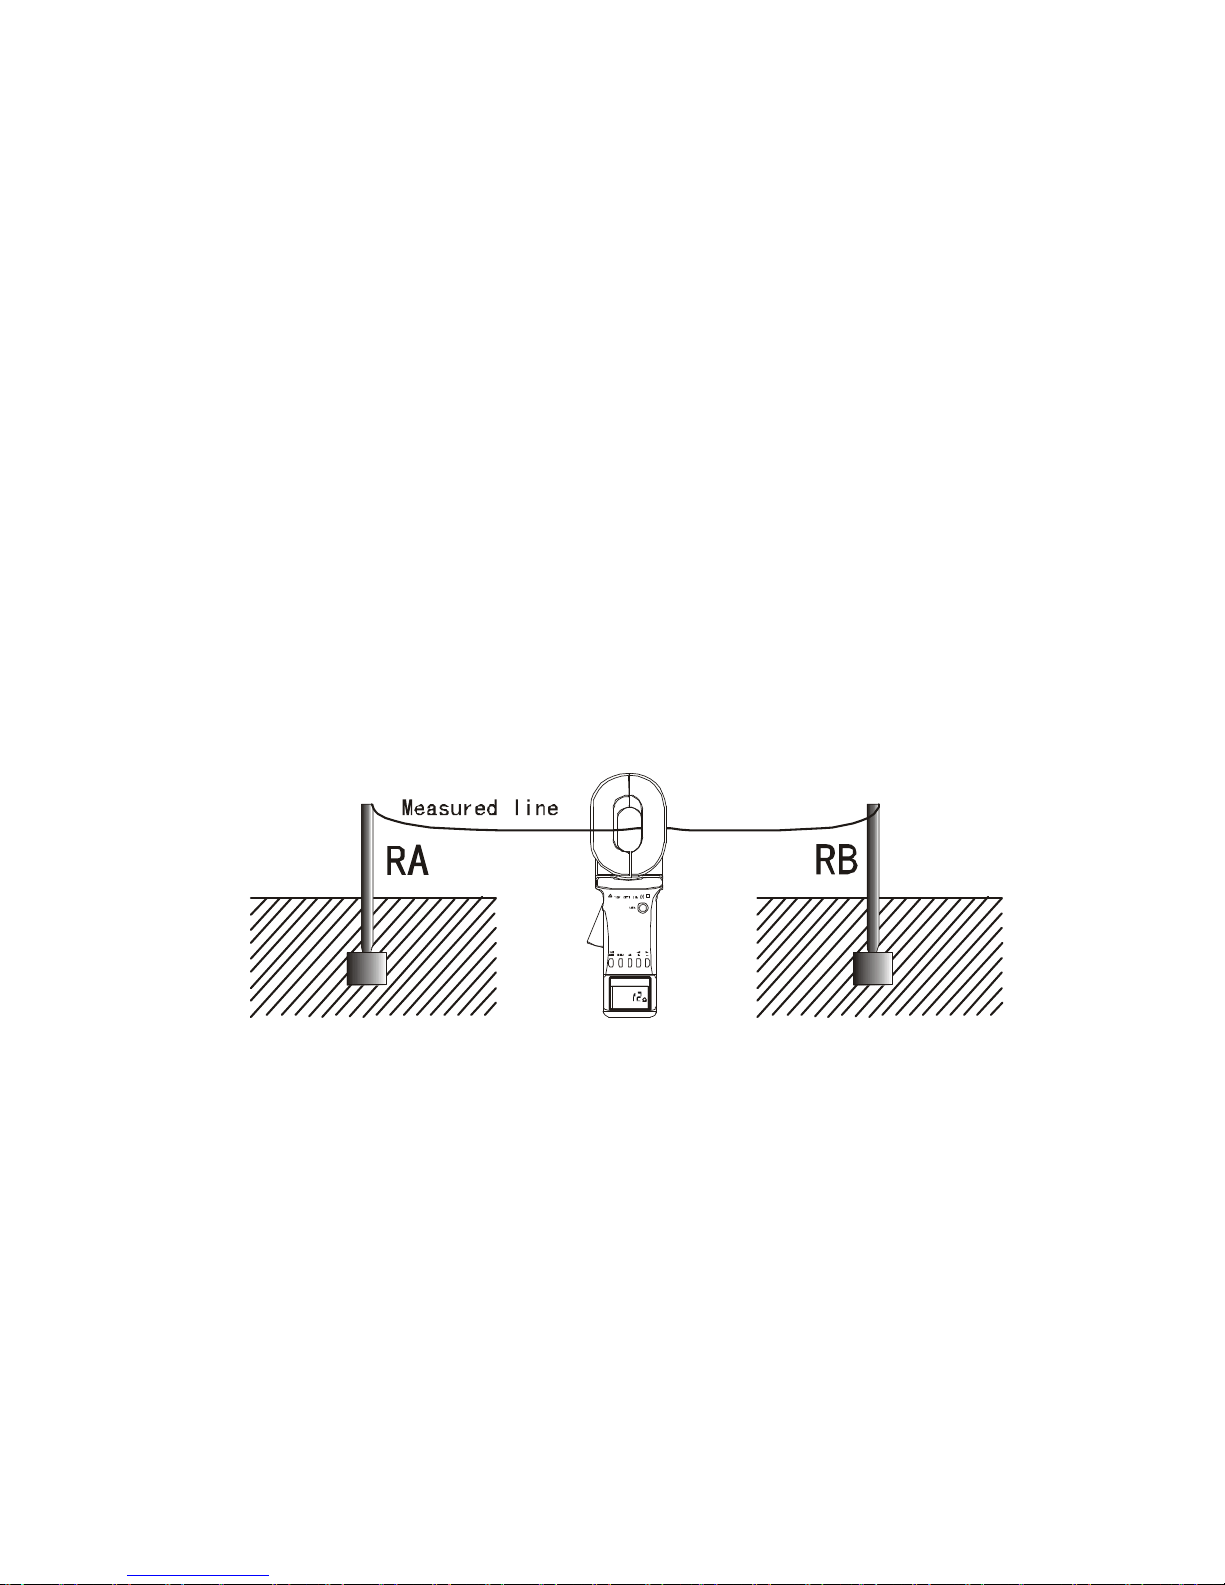
.Two⑴ -Point Method
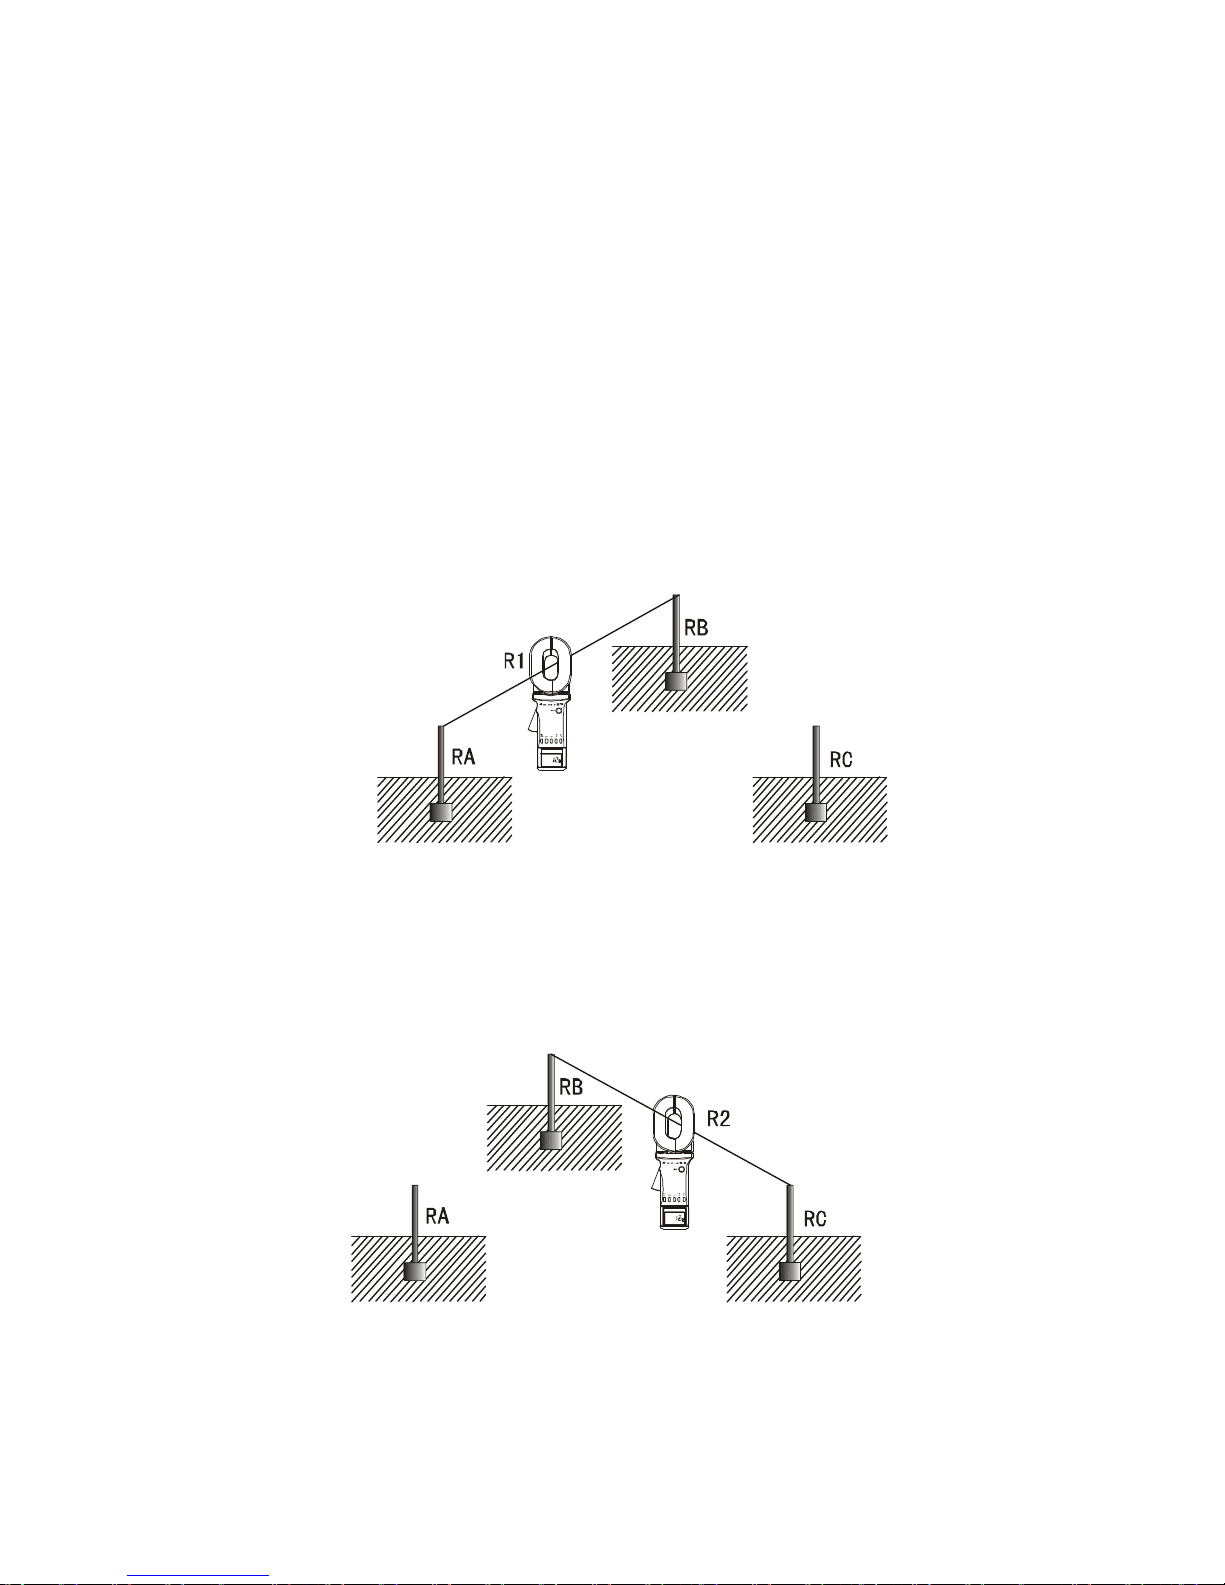
As shown in the figure below, in the vicinity of the measured
grounding body RA, find an independent grounding body of better
grounding state RB (for example, near a water pipe or a building).
RA and RB line will connect to each other using a single testing line.
As the resistance value measured by the Meter is the value of the
series resistance from the testing line and two grounding
resistances.
RT=RA + RB + RL
Where: RT is the resistance value measured with the Meter.
RL is the resistance value of the testing line. Meter can
measure out the resistance value by connecting the test lines with
both ends.
Page 26
-23-
So, if the measurement value of the Meter is smaller than the
allowable value of the grounding resistance, then the two
grounding bodies are qualified for grounding resistance.
(2) Three-Point Method
As shown in the figure below, in the vicinity of the measured
grounding body RA, find two independent grounding bodies of
better grounding state RB and R
C.
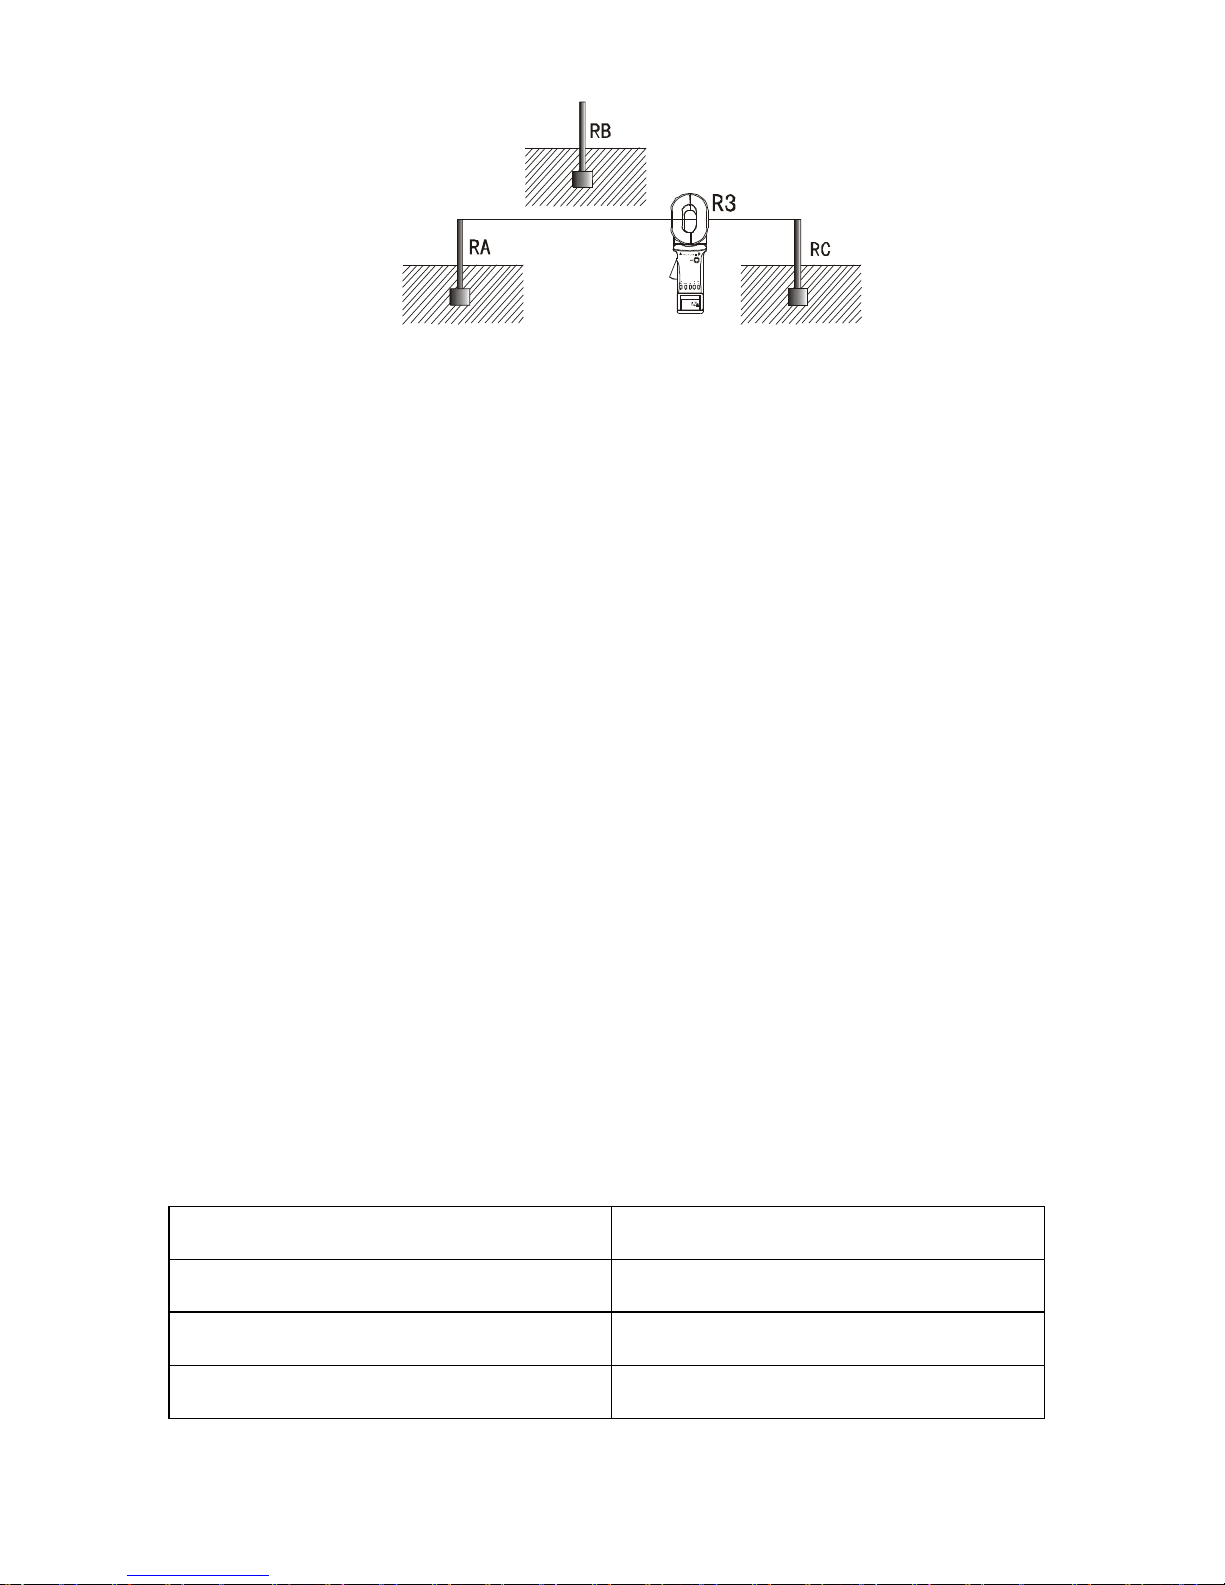
First, link RA and RB with a test line; use the Meter to get the first
reading R1.
Second, have RB and RC linked up, as shown in the following figure.
Use the Meter to get the second reading R2.
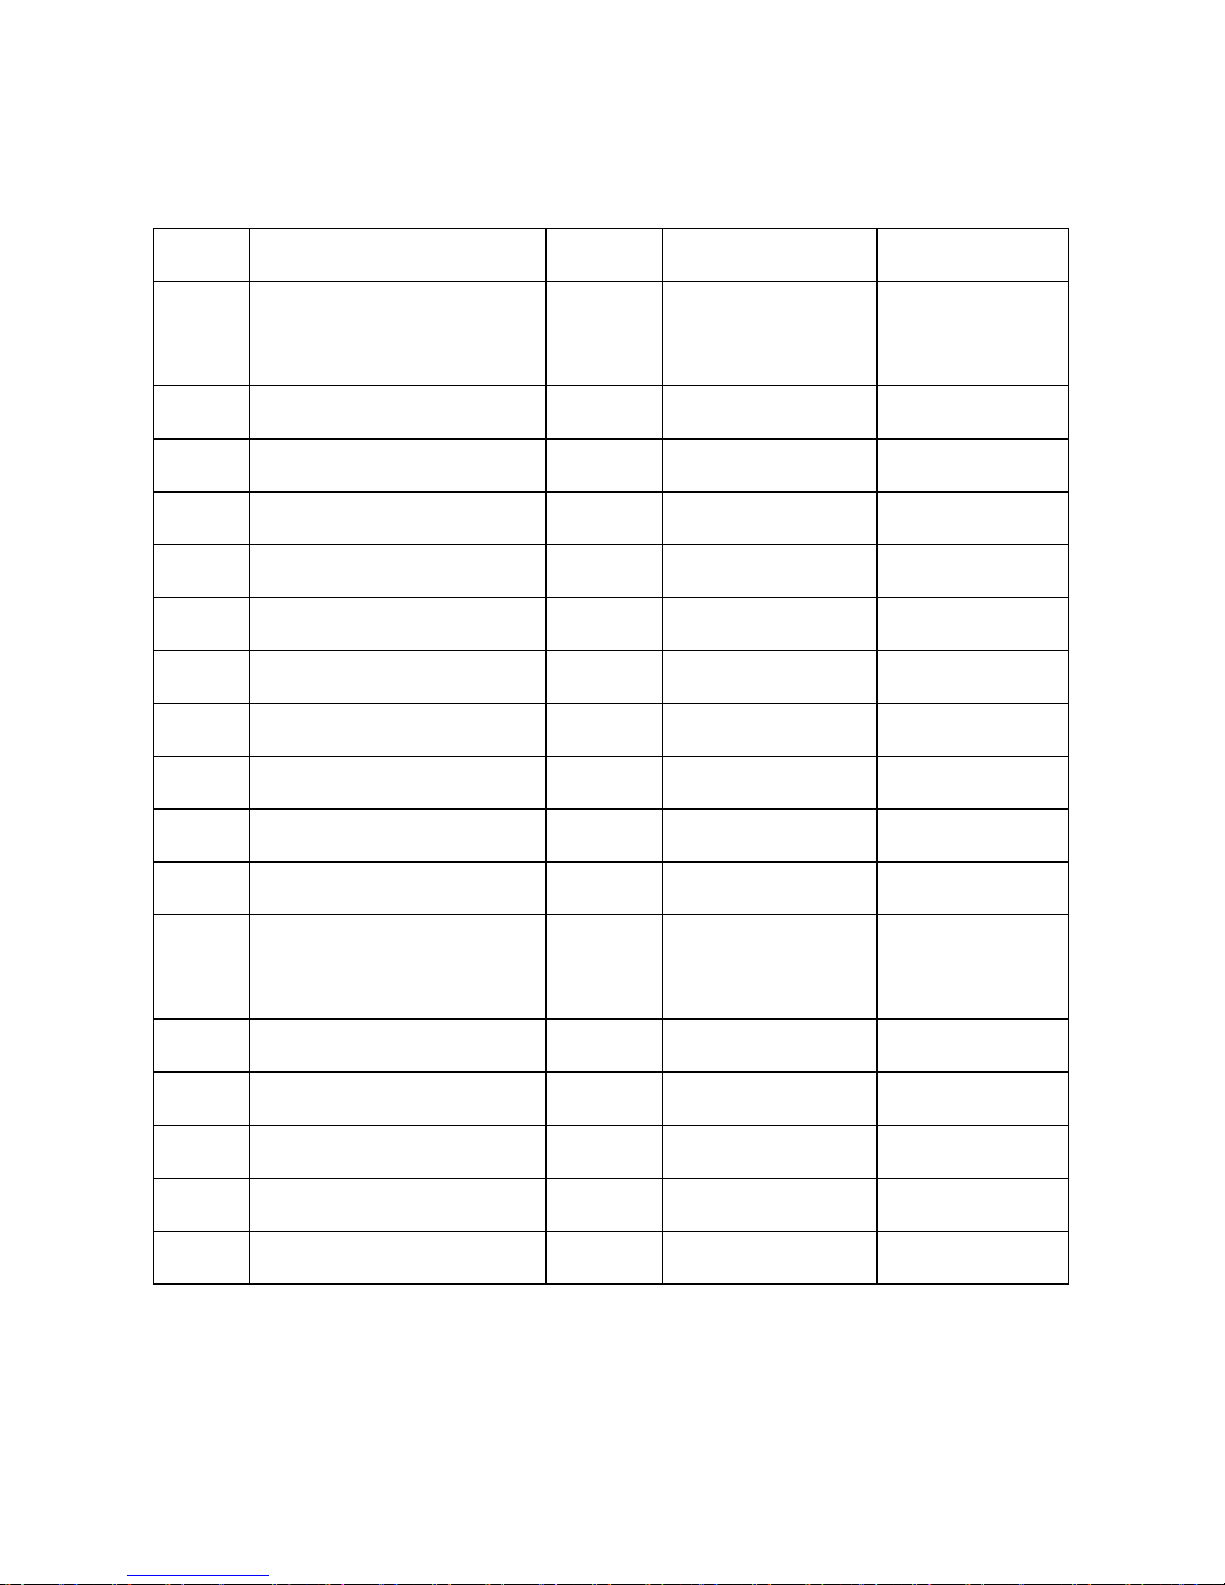
Third, have RC and RA linked up, as shown in the following figure.
Use the Meter to get the third reading R3.
Page 27
-24-
In the above three steps, the reading measured in each step is the
value of the two series grounding resistance. In this way, we can
easily calculate the value of each grounding resistance:
From: R1=RA+RB R2=RB+RC R3=RC+RA
We get: RA=(R1+R3-R2)÷2
This is the grounding resistance value of the grounding body RA.
To facilitate the memory of the above formula, these three
grounding bodies scan be viewed as a triangle; then the measured
resistance is equivalent to the value of the resistance values of the
adjacent edges plus or minus resistance value of the opposite
sides, and divided by 2.
As the reference points, the grounding resistance values of the
other two grounding bodies are:
RB=R1-RA
RC=R3-RA
IX. Bill of Loading
Earth Tester 1 piece
Test Loop 1 piece
Carrying Case 1 piece
User’s Manual 1 piece
Page 28
-25-
X. Parts List and Assembly Details
1. Parts List
NO.
NAME Part Quantity/PCS
Remark
1
Screws of battery
cover
DS01 1 M3X8
2 AA alkaline batteries DS02 4
3 Battery cover DS03 1
4 Upper shell DS04 1
5 Subjacent shell DS 05
1
6 Tension spring DS 06
2
7 Clamp DS 07
1
8 LCD DS 08
1
9 HOLD key DS09 1
10 LCD cover DS10 1
11 PCB DS11 1
12
Connect screws of
shells
DS12 3 ST2.9X10
13 Clamp screws DS13 2 ST2.9X25
14 Shaft DS14 1
15 Push button DS15 5
16 Screws for PCB fix DS16 2 ST2.2X6
17 Screws for LCD fix DS17 2 ST2.2X6
Page 29
-26-
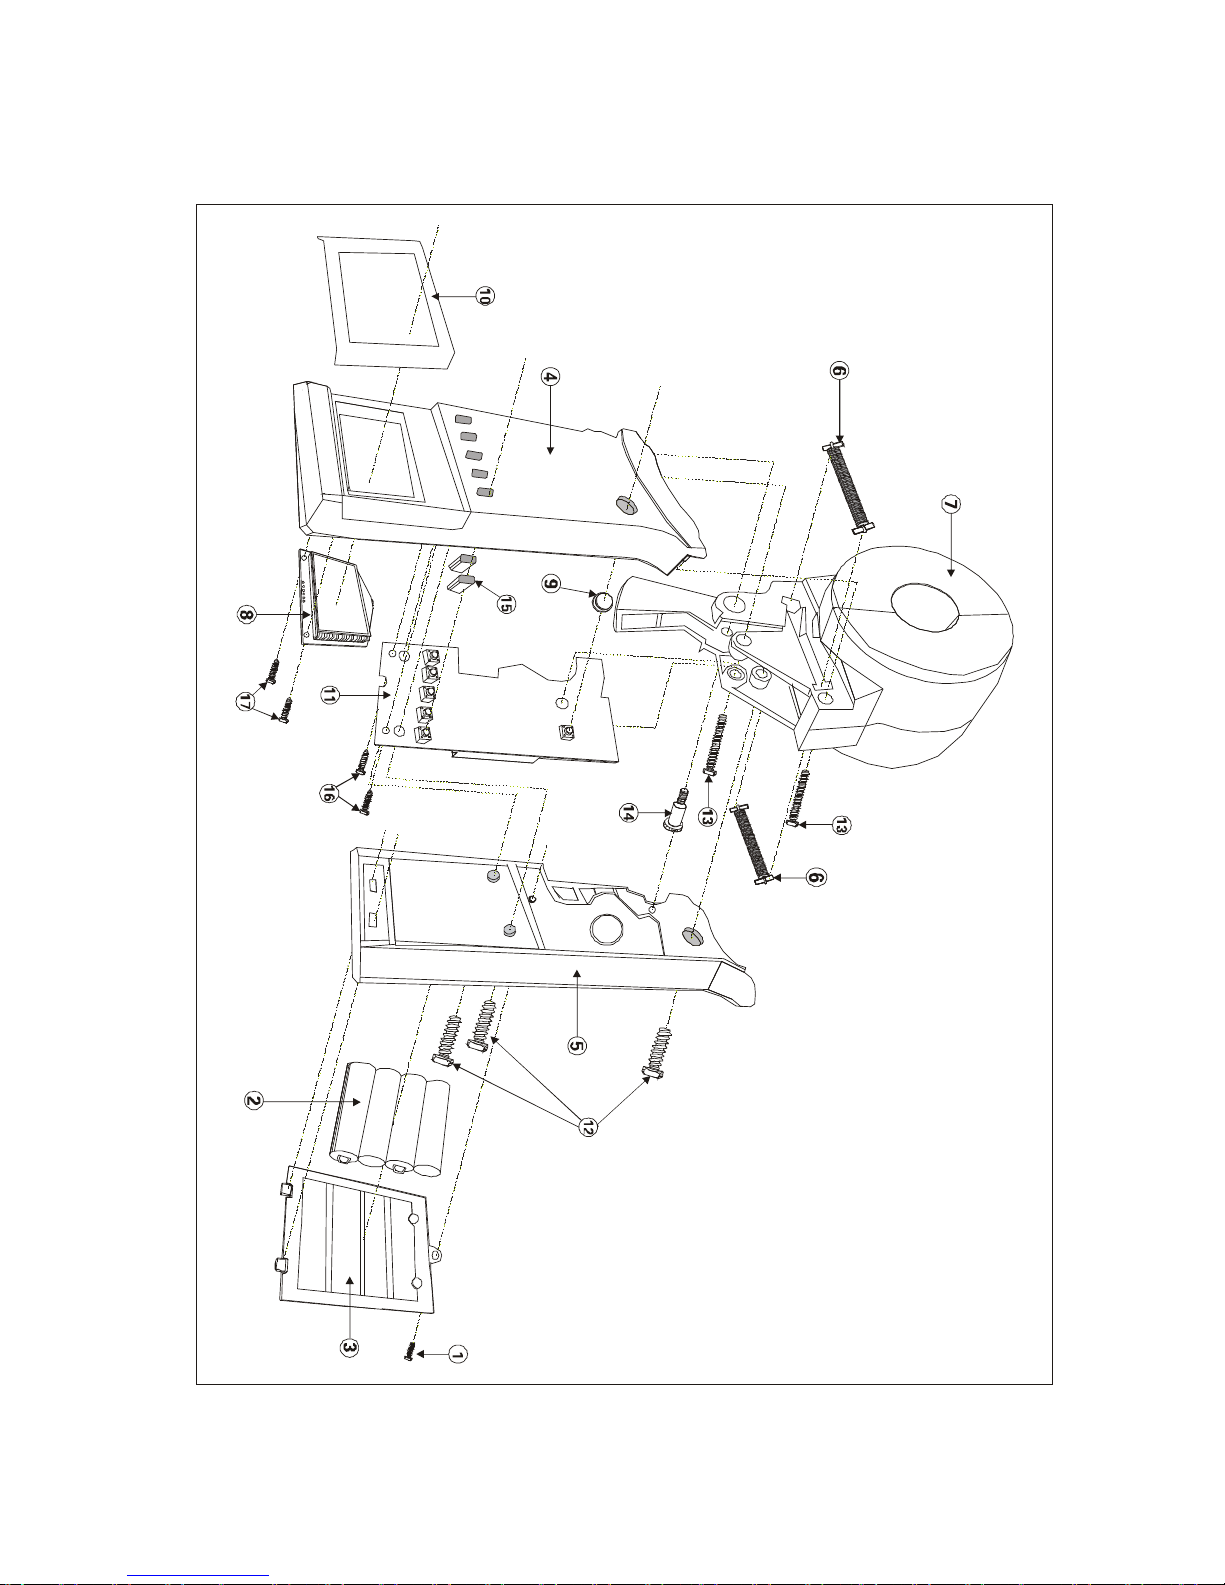
2. Assembly Details
Page 30
-27-
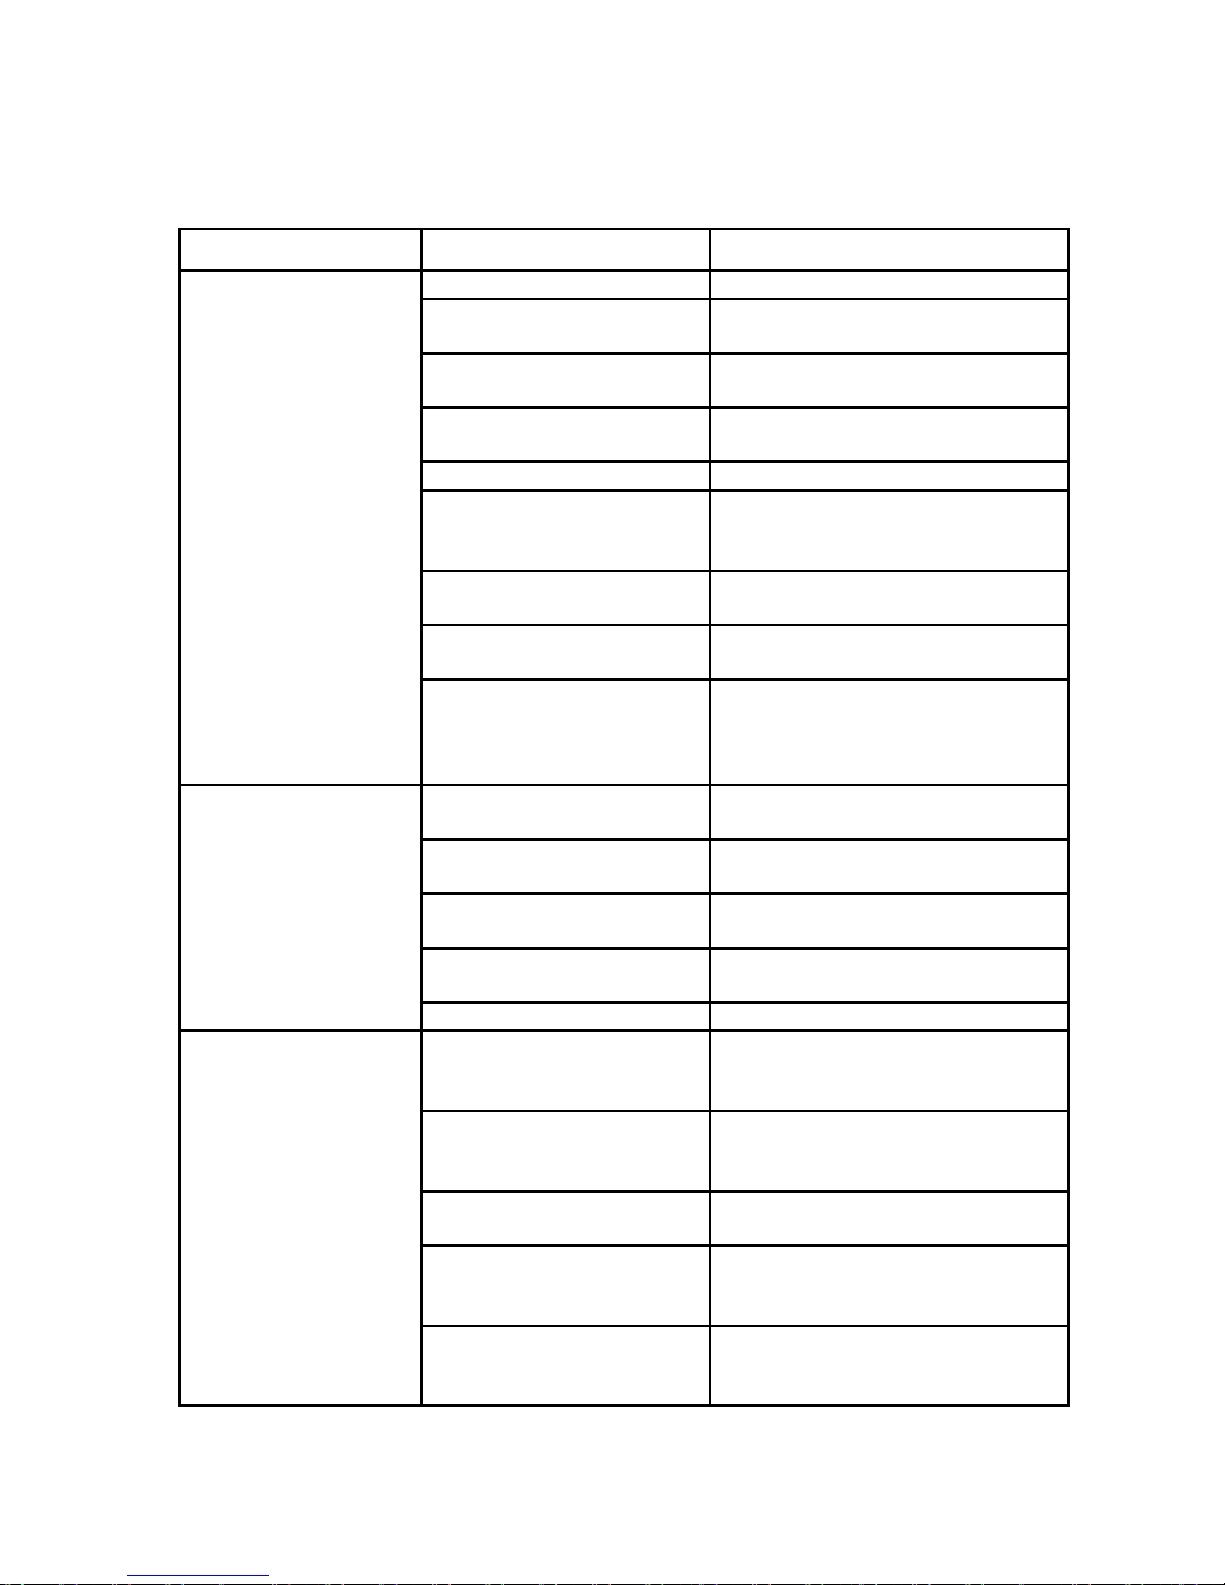
XI.Trouble shooting
Symptoms Possible Causes Remedies
The instrument
cannot be buttoned
on.
No batteries.
Set the batteries.
Faulty battery polarity
Install batteries in correct
polarity.
Insufficient capacity of
battery
Replace the batteries.
Poor contact of battery
contacts
Replace the battery contacts.
Wrong battery type
Replace with right type.
A break in a battery
harness
Make a continuity test of test
lead. If there is no continuity,
replace the battery harness.
Departure of the
POWER button
Re-assemble the button.
Poor contact of powe
r
plug
Re-plug or replace a plug.
Defect of circuit
component
Defect of PCB; when current
consumption is about 100mA
or more at 6V of battery
voltage. Replace the PCB.
Indicating ERROR
(Display “Err”, big
error results or
results unstable)
Insufficien
t capacity of
battery
Replace the batteries.
Contact surface of jaw is
polluted by dust, oil etc.
Clean the surface.
Poor enclose of jaw
Trigger the clamp several times
and then re
-
boot.
Defect of circuit
component
Replace the PCB.
Measure in w
rong steps
Study the manual and follow it.
Incapable
measurement of
resistance
Insufficient capacity of
battery
Replace the battery when “Low
battery” mark is displayed on
the LCD.
Poor enclose of jaw,
indicating “jaw-open”
symbol on LCD
Trigger the clamp several times
and then re-boot.
Contact surface of jaw is
polluted by dust, oil etc.
Clean the surface.
Without self-calibration
before test
Re-boot follow the manual,
conduct measurement after
self-calibration finished.
Defect of circuit
component
Check above points first. If
there is no problem, replace the
PCB, and do re
-
adjustment.
Page 31
-28-
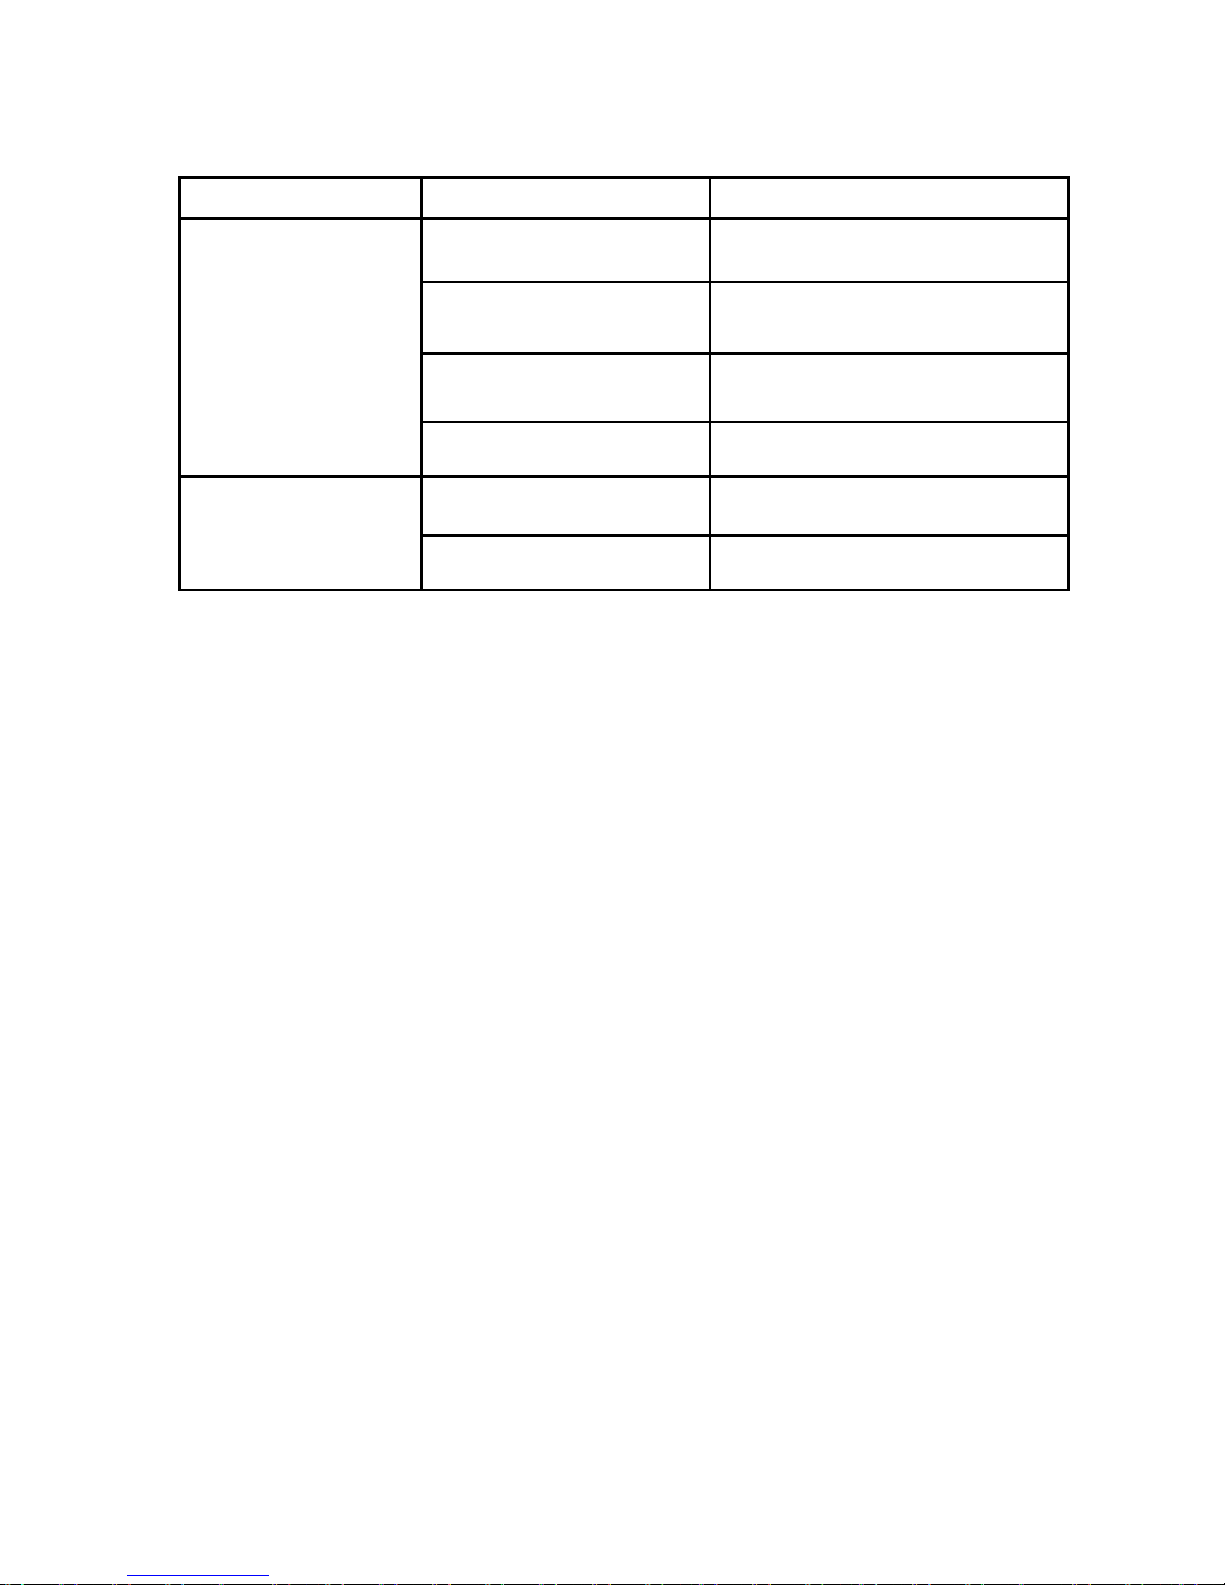
Symptoms Possible Causes Remedies
LCD Indication
error
(chip of segment,
arithmetic
point, unit and so
on)
Poor contact of LCD
connection wire
Re-plug the LCD connect plug
or replace the plug.
Defect of LCD Replace the LCD.
Insufficient capacity of
battery
Replace the batteries.
Defect of circuit
component
Replace the PCB.
Incapable to hold
reading
HOLD button Depart
from the position
Re- assemble the button.
Defect of circuit
component
Replace the PCB.
Page 32

Manufactured by
ETCR Electronic Technology Company
Address: F-3F, No.4 Pengshang Zhifu Road, Jiahe, Baiyun
District, Guangzhou, Guangdong, China
Post Code: 510440
Tel: (86-20)62199556 62199554
Fax: (86-20)62199550
E-mail: [email protected]
Website: www.etcr.cc
 Loading...