

Page 1
Dimmer
Installation Guide
Overview
The Source Four Dimmer is a universal voltage input, single dimmer that can be field installed to an existing
Source Four fixture.
The Source Four Dimmer provides a simple user interface for local manual control, allowing setting of the DMX
address and setting a manual level. In addition the DMX In and Thru connectors allow control, RDM discovery
and configuration. RDM configuration includes setting the DMX start address, selecting the output curve, and
receiving status and feedback from the dimmer.
Three kit models are available including:
Model Description NotesWeight
S4Dim-S4
S4Dim-PAR
S4Dim-JR
S4 Dimmer with Ellipsoidal lamp burner kit
S4 Dimmer with PAR lamp burner kit
S4 Dimmer with jr lamp burner kit
(dimmer only)
4.25 lbs
1.93 kg
Prepare for Installation
Installation of the Source Four Dimmer to a Source Four is simple. Before you begin, please consider the
following very important instructions:
Kit includes S4 lamp burner
Kit includes S4 PAR lamp burner and replacement yoke
Kit includes S4 jr lamp burner
Source Four Dimmer Kit
Mounts to Source Four Ellipsoidal style
fixture yokes
Includes attached model specific lamp
burner
UL/cUL Listed to UL508
DMX 512 compliant
Remote Device Management (RDM)
USITT / ANSI E1.20 standard
Operating environment maximum
ambient of 50°C with humidity levels
between 10-95%, non-condensing.
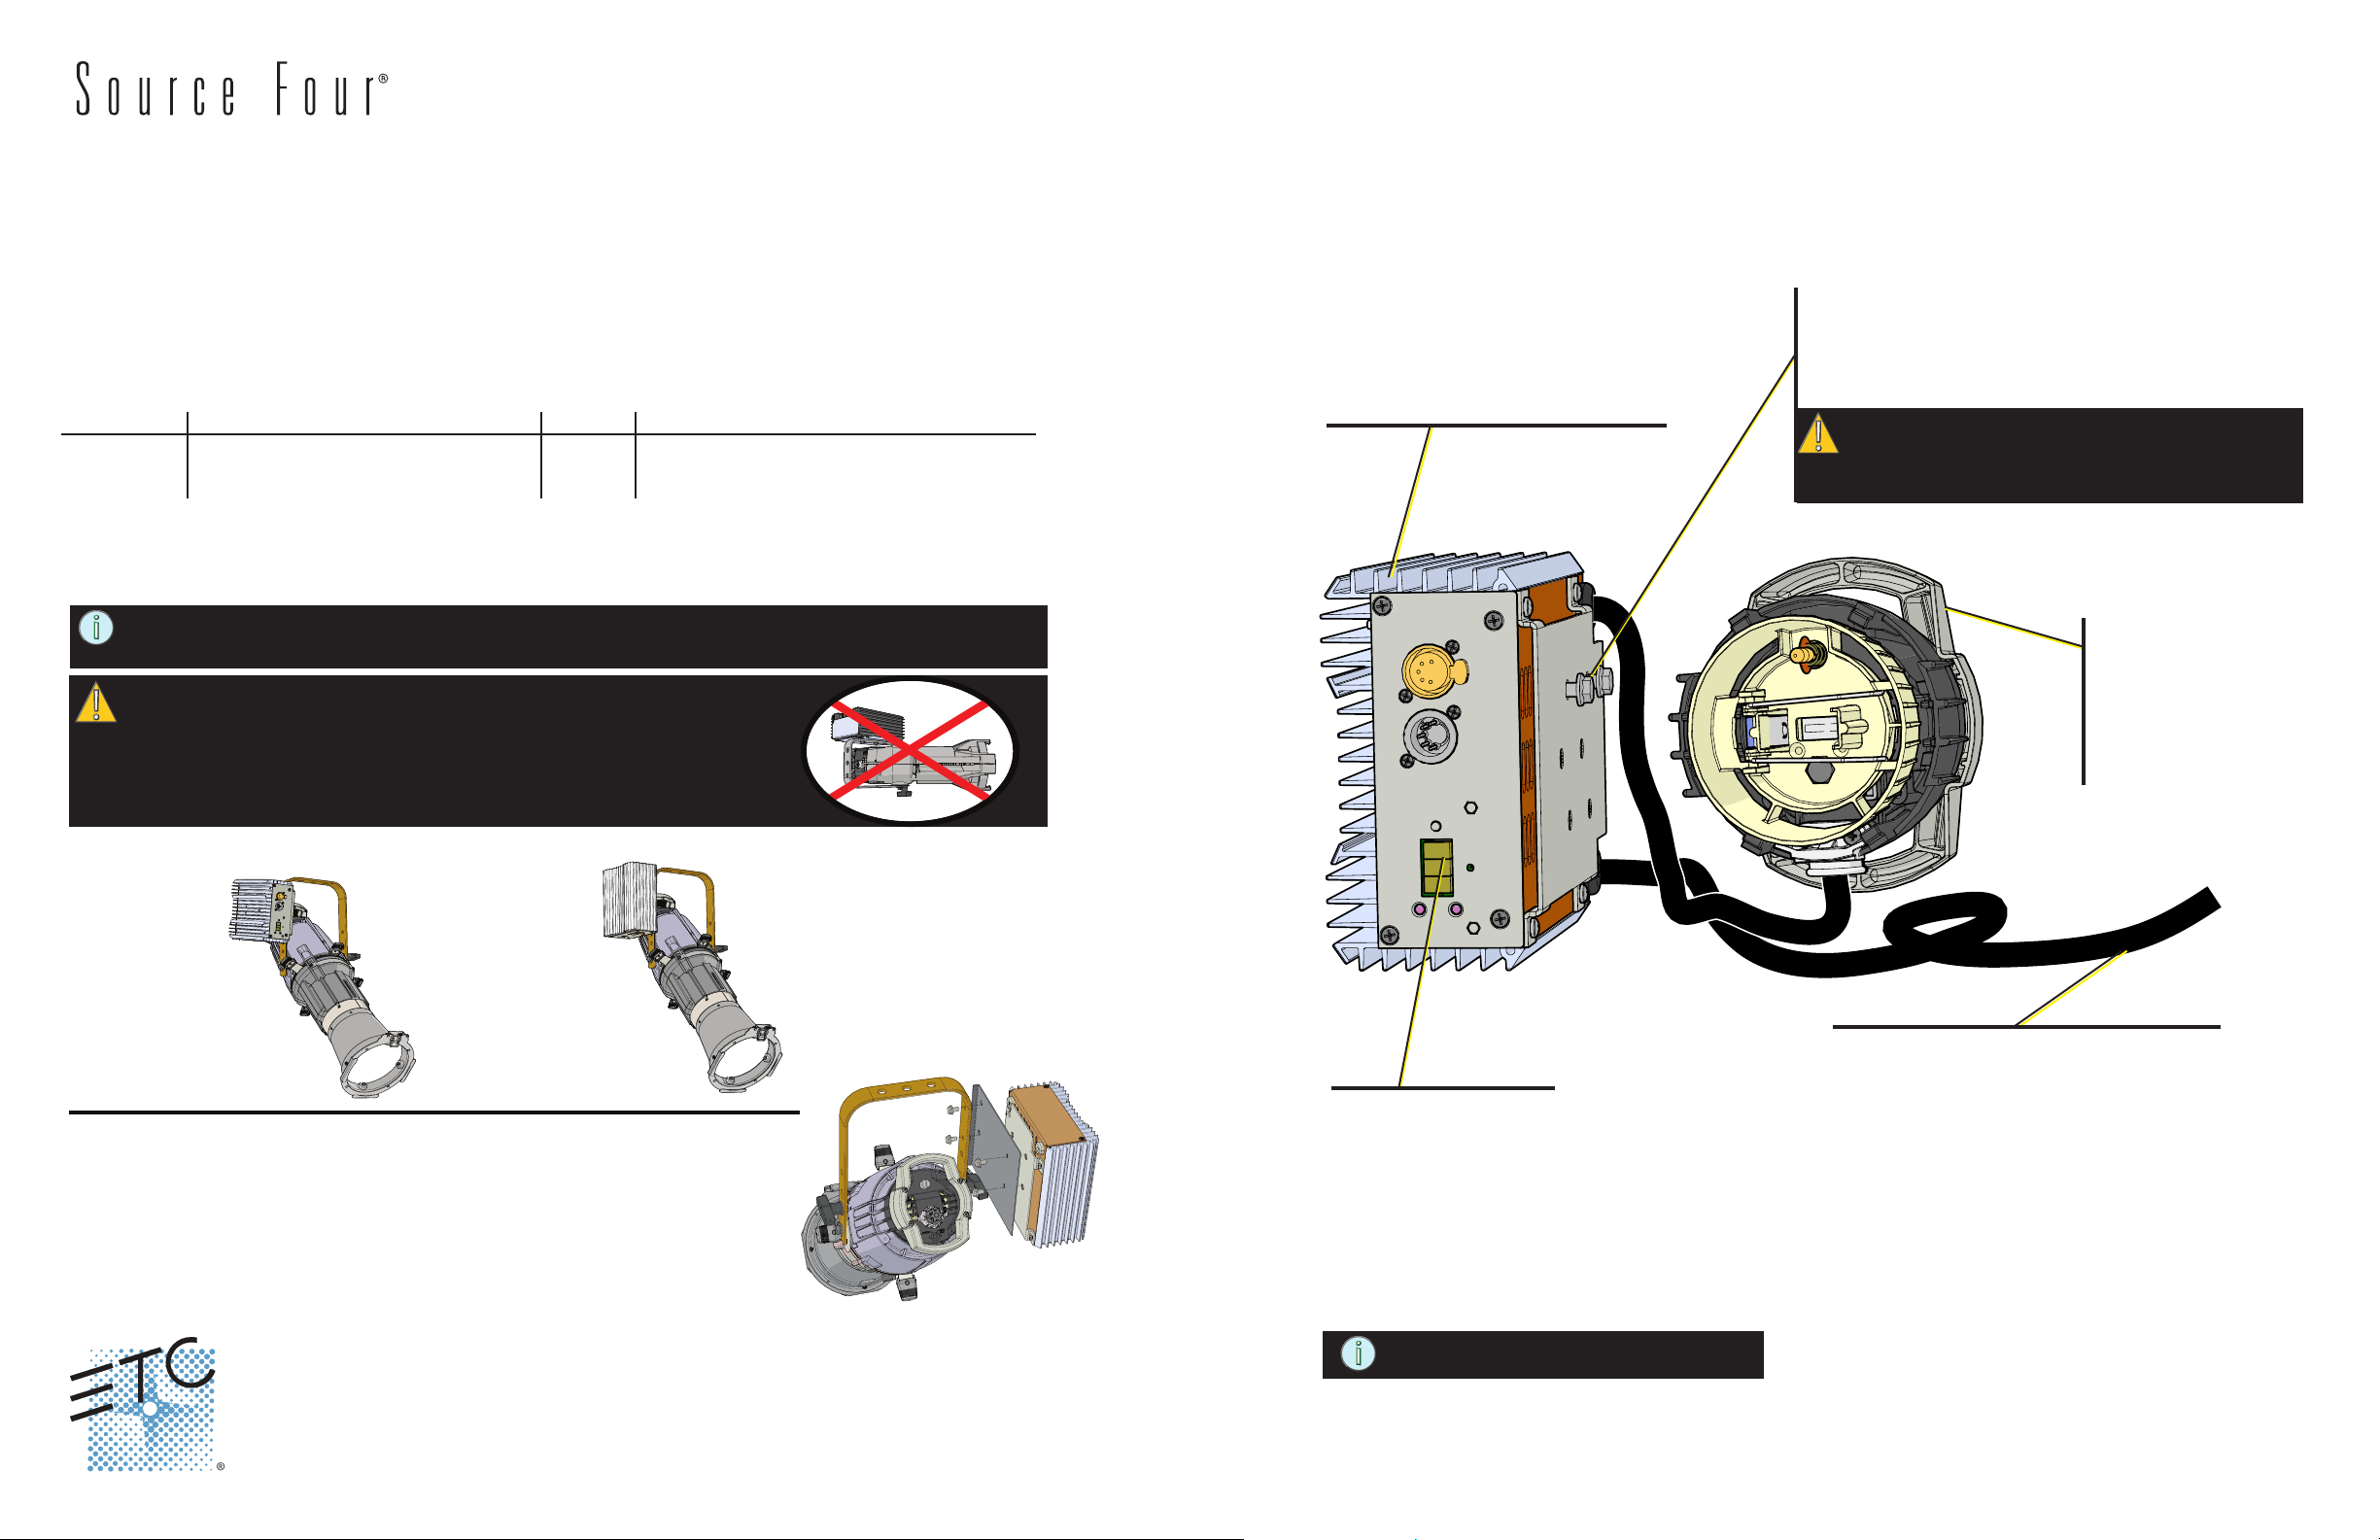
Mounting
Installs to the left side of a Source Four yoke with
supplied hardware.
Eight mounting options are available including horizontal,
vertical, top and bottom mounting holes.
CAUTION: Do not install the Source Four dimmer
positioned above a fixture that is in a
yoke out position. Dimmer overtemp and
shutdown may occur.
NOTE: Minimum clearance between installed fixtures with the Source Four Dimmer should be no closer
than 18 inches (46 cm) on center.
CAUTION: Do not install the Source Four dimmer positioned
above a fixture that is in a yoke out position.
Dimmer overtemp and failure may occur.
ETC reccomends that the fins of the dimmer be mounted vertically for optimal cooling.
Dimmer fins
positioned
horizontally.
ETC reccommended
mounting with fins
positioned vertically.
Double Clutch Mounting
In order to mount the Souce Four Dimmer to a double clutch fixture such as a Source
Four Zoom, you will need the offset bracket kit; ETC part number 7145K1401.
Step 1: The kit contains two screws and the custom bracket. Use both screws to
attach the bracket to the fixture.
Step 2: Use the screws provided with the dimmer kit to attach the dimmer to the
bracket. Do not attach the dimmer to the yoke as you would with other similar fixtures.
User Interface
Simple three character display
with a three button interface providing
local manual control.
A “Status LED” provides feedback
DMX In and DMX Thru on XLR style connector
RDM configuration
Supports three output curves (modified through
RDM)
Lamp Burner
Lamp burner is specific
to the model of fixture it
will be installed to.
Available models include
ellipsoidal, jr, and PAR
style.
Power Input
Supplied by default with a 3’ (.914m) bareend power input cord or can be supplied with
a factory installed connector (Edison, TwistLock, or Stage-Pin).
120V or 230/240V input, 50/60Hz, drives a
115V, 375W, 575W or 750W HPL lamp.
Corporate Headquarters 3031 Pleasant View Road, P.O. Box 620979, Middleton, Wisconsin 53562-0979 USA
London, UK
Rome, IT
Holzkirchen, DE
Hong Kong
Service: (Americas)
Web:
7145M2100
Unit 26-28, Victoria Industrial Estate, Victoria Road, London W3 6UU, UK
Via Pieve Torina, 48, 00156 Rome, Italy Tel +39 (06) 32 111 683 Fax +44 (0) 20 8752 8486
Ohmstrasse 3, 83607 Holzkirchen, Germany Tel +49 (80 24) 47 00-0 Fax +49 (80 24) 47 00-3 00
Rm 1801, 18/F, Tower 1 Phase 1, Enterprise Square, 9 Sheung Yuet Road, Kowloon Bay, Kowloon, Hong Kong
www.etcconnect.com
service@etcconnect.com
Rev B Release Date 2012-10 ETC intends this document to be provided in its entirety.
Copyright © 2012 ETC. All Rights Reserved. Product information and specifications subject to change.
(UK)
service@etceurope.com
Tel +44 (0)20 8896 1000 Fax +44 (0)20 8896 2000
(DE)
techserv-hoki@etcconnect.com
Tel +608 831 4116 Fax +608 836 1736
(Asia)
Tel +852 2799 1220 Fax +852 2799 9325
service@etcasia.com
NOTE: DMX thru is not self terminating.
Page 1 of 2
Page 2
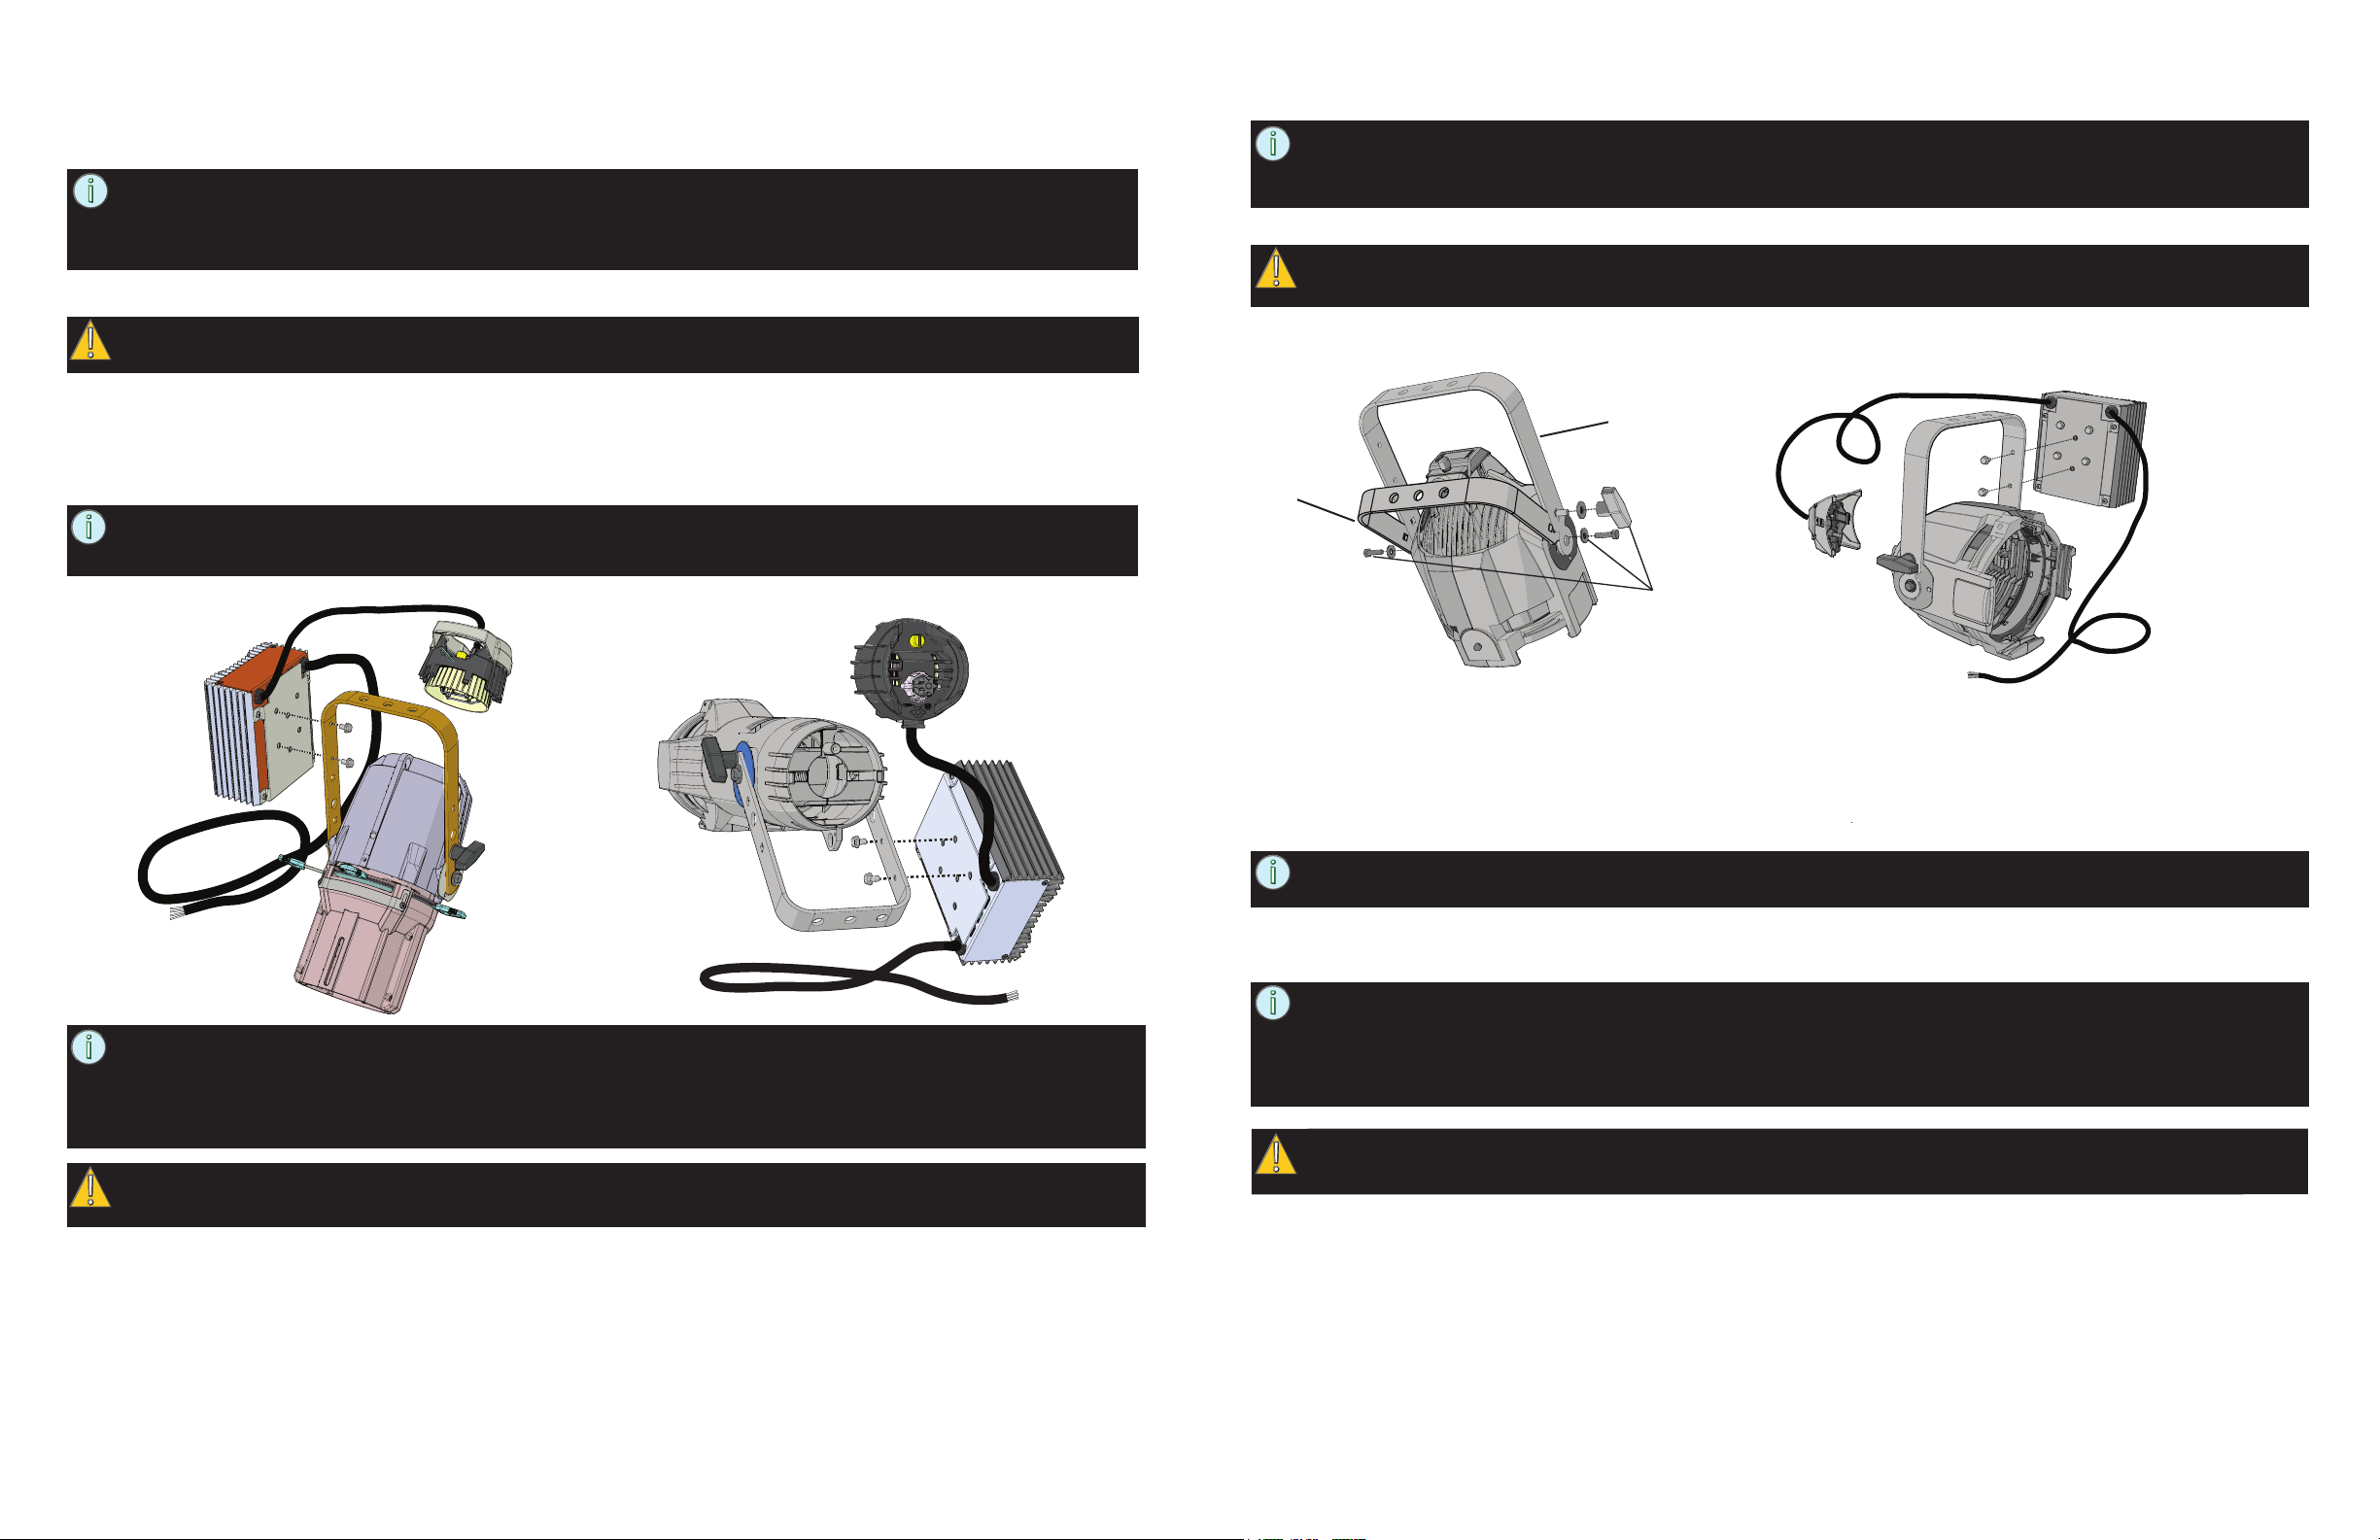
Installation to a Source Four Ellipsoidal or Source Four jr
The procedure for installation of the Source Four Dimmer to a Source Four ellipsoidal and Source Four jr fixture are
similar. Use these same instructions for either fixture model.
NOTE: These instructions are specific to the installation of the Source Four Dimmer. Refer to the
related fixture product user manual for all details and instructions that are related to the fixture.
User manuals can be downloaded from the ETC website at
http://www.etcconnect.com/downloads.aspx.
Step 1: Disconnect power to the Source Four.
CAUTION: Allow the Source Four and lamp to cool before proceeding with the installation.
Installation to a Source Four PAR
NOTE: T
Step 1: Disconnect Power to the Source Four PAR.
CAUTION: Allow the Source Four and lamp to cool before proceeding with the installation.
Step 2: Remove bolts attaching the current yoke to the PAR fixture.
Step 3: Remove yoke and set aside.
hese instruction are specific to the installation of the Source Four Dimmer. Refer to the related fixture
product user manual for all details and instructions that are related to the fixture. User manu
downloaded from the ETC website at http://www.etcconnect.com/downloads.aspx.
als can be
Step 2: Loosen the knurled bolt on the back of the lamp burner then pull the lamp burner out of the fixture. This lamp
burner is no longer required. A new lamp burner is provided with the Source Four Dimmer kit.
Step 3: Squeeze and lift the lamp retaining clip.
Step 4: Remove the HPL lamp from the lamp burner. Store the lamp in a safe place for re-installation later.
NOTE: To avoid premature lamp failure, do not touch the lamp glass. If you do, clean it carefully with
isopropyl alcohol and a clean lint-free cloth. Allow the lamp to dry completely before operation.
Step 5: Using the two bolts provided in the Source Four Dimmer kit, attach the Source Four Dimmer to the outside of
the fixture yoke.
Source Four
Dimmer attached
Source Four
to Source Four jr
Dimmer attached
to Source Four
NOTE: The fixture yoke offers one set of access holes on one side for Dimmer attachment. Mounting
holes are provided on the Source Four Dimmer to allow horizontal or vertical mounting to the
fixture yoke. ETC recommends installing the Dimmer in a vertical orientation with the user
interface parallel to the yoke (directed up or down). Alternative installation can be perpendicular
to the yoke (with the user interface facing towards the front or back).
CAUTION: Do not install the Source Four dimmer positioned above a fixture that is in a yoke out position.
Dimmer overtemp and failure may occur.
Step 6: For Source Four Dimmers with bare-end power input cables, attach a grounding -type attachment plug with
integral cord grip rated for 120V or 240V and at least 15 amps.
St ep 7: Replace the lamp to the new lamp burner. Reference the related fixture user manual for instructions to
“Replace the HPL lamp” and “Center the lamp and adjust the field”.
Step 8: Reinstall the lamp burner by aligning the bolt hole and tightening the knurled bolt.
Install yoke
Remove
yoke and
set aside
provided with
Dimmer kit.
Source Four
Dimmer
attached to
Source Four
Remove
PAR
Hardware
Step 4: Attach the new yoke that has been provided with Source Four Par Dimmer kit using the new hardware that has
also been provided.
Step 5: Loosen the knurled bolt on the back of the lamp burner then pull the lamp burner out of the fixture. This lamp
burner is no longer required. A new lamp burner is provided with the Source Four Dimmer kit.
Step 6: Remove the HPL lamp from the lamp burner. Store the lamp in a safe place for re-installation later.
NOTE: To avoid premature lamp failure, do not touch the lamp glass. If you do, clean it carefully with
isopropyl alcohol and a clean lint-free cloth. Allow the lamp to dry completely before operation.
Step 7: Using the two remaining bolts provided in the Source Four Dimmer kit, attach the Source Four Dimmer to the
outside of the newly installed fixture yoke.
NOTE: The fixture yoke offers one set of access holes on one side for Dimmer attachment. Mounting
holes are provided on the Source Four Dimmer to allow horizontal or vertical mounting to the
fixture yoke. ETC recommends installing the Dimmer in a vertical orientation with the user
interface parallel to the yoke (directed up or down). Alternative installation can be perpendicular
to the yoke (with the user interface facing towards the front or back).
CAUTION: Do not install the Source Four dimmer positioned above a fixture that is in a yoke out position.
Dimmer overtemp and failure may occur.
Step 8: For Source Four dimmers with bare-end power input cables, attach a grounding-type attachment plug with
integral cord grip rated for 120v or 240v and at least 15 amps.
Step 9: Replace the lamp to the new lamp burner. Reference the related fixture user manual for instructions to “replace
the HPL lamp: and ”center the lamp and adjust the field”.
Step 10: Reinstall the lamp burner by aligning the bolt hole and tightening the knurled bolt.
Reference the Source Four Dimmer Programming Guide for power-up and configuration instructions.
Reference the Source Four Dimmer Programming Guide for power-up and configuration instructions.
See previous page for information on mounting to double clutch fixtures.
Page 2 of 2
 Loading...