

Page 1

ETC® Service Note
Power Cube Replacement in L86 Dimmer Modules
Overview:
L86 dimmer cards have one or two power cubes within their tray. The power cube is responsible
for chopping the wave so that we are able to dim conventional sources. This is done by allowing
the power cube to receive a low voltage control signal that turns the solid state relay on and off at
the proper times to achieve our dimming goals.
Reasons for failure come from short circuits in the cable or fixture. Due to V = IR V is a constant,
as resistance approaches 0, our current approaches infinity , which in this case will trip the breaker
or burn out the power cube.
Symptoms of a burnt out power cube may include a dimmer being stuck on or off.
Through the years ETC has had many revisions on parts and pieces that are used in the L86
dimmer card. Because of this we recommend that you see additional information before
proceeding, to see if this manual applies to you.
Note: If your power cube has screw terminals instead of crimp connections, please contact
ETC for assistance on choosing the appropriate power cube.
Tools Needed:
Phillips #2 Screwdriver
Pliers
Rubber gloves
Thermal Joint compound
Rubbing alcohol
Towels or rags
5/8” Nut driver with ground down tip (see additional information)*
3/8” Nut driver with ground down tip (see additional information)*
Note: See additional Information for tools marked with a *
Procedure:
Step 1: With your pliers, pull off circled wire crimps from relay.
Corporate Headquarters
London, UK
Rome, IT
Holzkirchen, DE
Hong Kong Rm 1801, 18/F, Tower I Phase 1 Enterprise Square, 9 Sheung Yuet Road, Kowloon Bay, Kowloon, Hong Kong Tel +852 2799 1220 Fax +852 2799 9325
Service:
Web:
Technical Services
Power Cube Replacement in L86 Dimmer Modules Page 1 Electronic Theatre Controls, Inc.
Unit 26-28, Victoria Industrial Estate, Victoria Road, London W3 6UU, UK Tel +44 (0)20 8896 1000 Fax +44 (0)20 8896 2000
Via Ennio Quirino Visconti, 11, 00193 Rome, Italy Tel +39 (06) 32 111 683 Fax +44 (0) 20 8752 8486
(Americas) service@etcconnect.com
www.etcconnect.com
3031 Pleasant View Road, P.O. Box 620979, Middleton, Wisconsin 53562-0979 USA Tel +608 831 4116 Fax +608 836 1736
Ohmstrasse 3, 83607 Holzkirchen, Germany Tel +49 (80 24) 47 00-0 Fax +49 (80 24) 47 00-3 00
QSF 4.1.9.1
Rev A Released 2009-07
Copyright © 2009 ETC. All Rights Reserved. Product information and specifications subject to change.
(UK) service@etceurope.com (DE) techserv-hoki@e tcetcco nnect.com .com
(Asia) service@etcasia.com
Page 2
ETC Service Note:
Power Cube Replacement in L86 Dimmer Modules
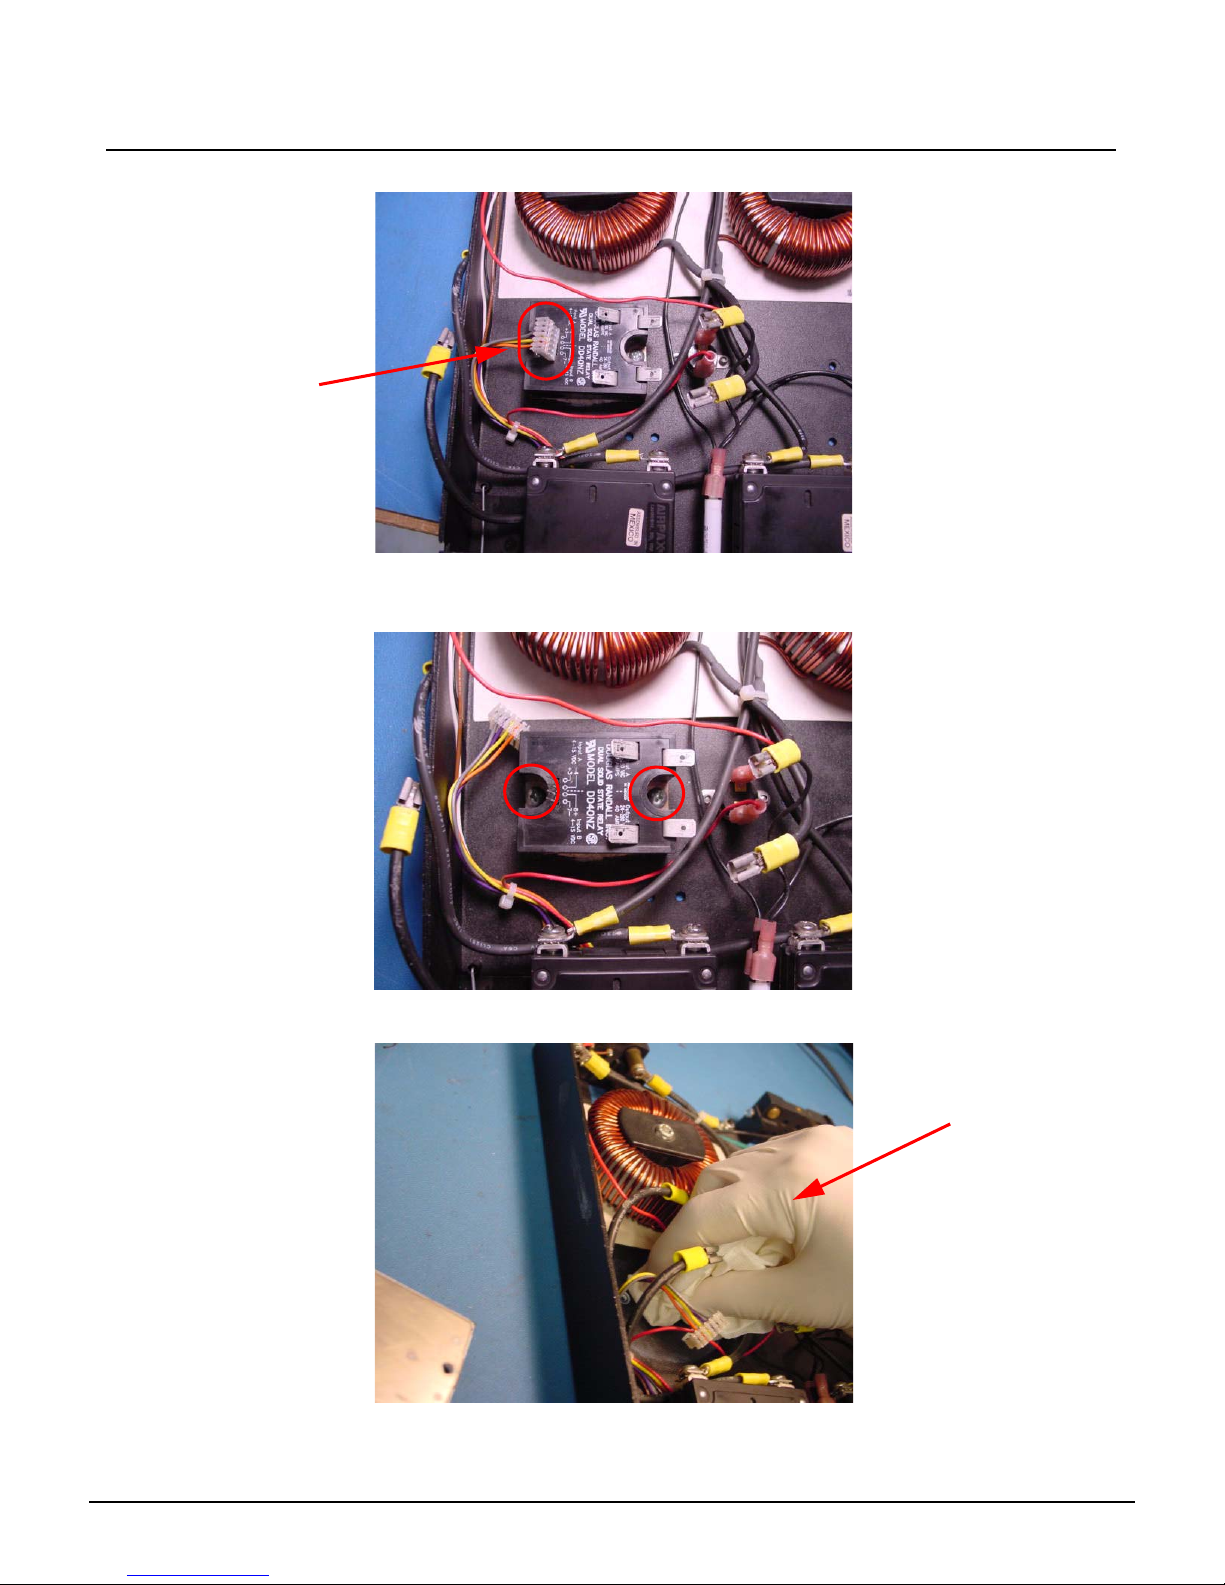
Step 2: Next remove control from relay.
Note the connector on
this card has 6 possible
connections but only
the center 4 are used.
Step 3: Remove 2 circled screws. Keep in mind that differe nt models might have nuts on
them. This will require you to use specially modified tools. See additional
information for more details.
Step 4: With a towel or rag, remove the joint compound. Apply rubbing alcohol as needed to
remove excess residue left behind.
Power Cube Replacement in L86 Dimmer Modul es Page 2 Electronic Theatre Controls, Inc.
If you are using chemicals to
remove old joint compound, we
recommend wearing gloves.
Page 3

ETC Service Note:
If you are truly replacing this power cube, you
would want to clean old joint compound off with
the same process as in Step 4.
Breaker 1
Choke 1
Choke 2
Breaker 2
Power Cube Replacement in L86 Dimmer Modules
Step 5: Using your finger, spread a thin layer of therma l joint compound onto the back of th e
new power cube. (More is not better when it comes to thermal compound). Keep in
mind that this stuff can make a big mess. You might want to have a towel nearby
and/or keep on the gloves from the last step.
Step 6: Replace the new power cube, reconnect your 4 crimp connections and connect your
control cable. Make sure that the 4 pins on the control connector line up.
Power Cube Replacement in L86 Dimmer Modul es Page 3 Electronic Theatre Controls, Inc.
Page 4

ETC Service Note:
The tip of this 5/16th nut driver was ground down so that it could remove the shown nut. Without
grinding down the tool, you would not be able to fit it into the power cube.
Power Cube Replacement in L86 Dimmer Modules
Additional Information:
Due to multiple revisions of the L86 dimmer module, there are many small differences between a
few cards. These differences may require you to have different tools to make your life easier.
Examples of this would be for the removal of some power cubes, there might be a 3/8”or a 5/16”
nut holding it in place. A normal nut driver will not fit in the power cube so you need to take the
circled portion of your nut driver to a grinder.
On some older models of the L86 dimmer modules, instead of using joint compound, ETC used a
Sil Pad. When replacing the power cube, do not reuse this Sil Pad. Instead install the new power
cube with joint compound.
Part Numbers for Power cubes:
Part Number Description
Q114 L86 Power Cube 25A, for 1.2kW dimmer
Q116 L86 Power Cube 40A, for 2.4kW Dimmer
Q115 L86 Power Cube 80A, for 6kW Dimmer
Sil Pad peeling off
Power Cube Replacement in L86 Dimmer Modul es Page 4 Electronic Theatre Controls, Inc.
 Loading...