

Page 1
ETC Desire® Quick Guide
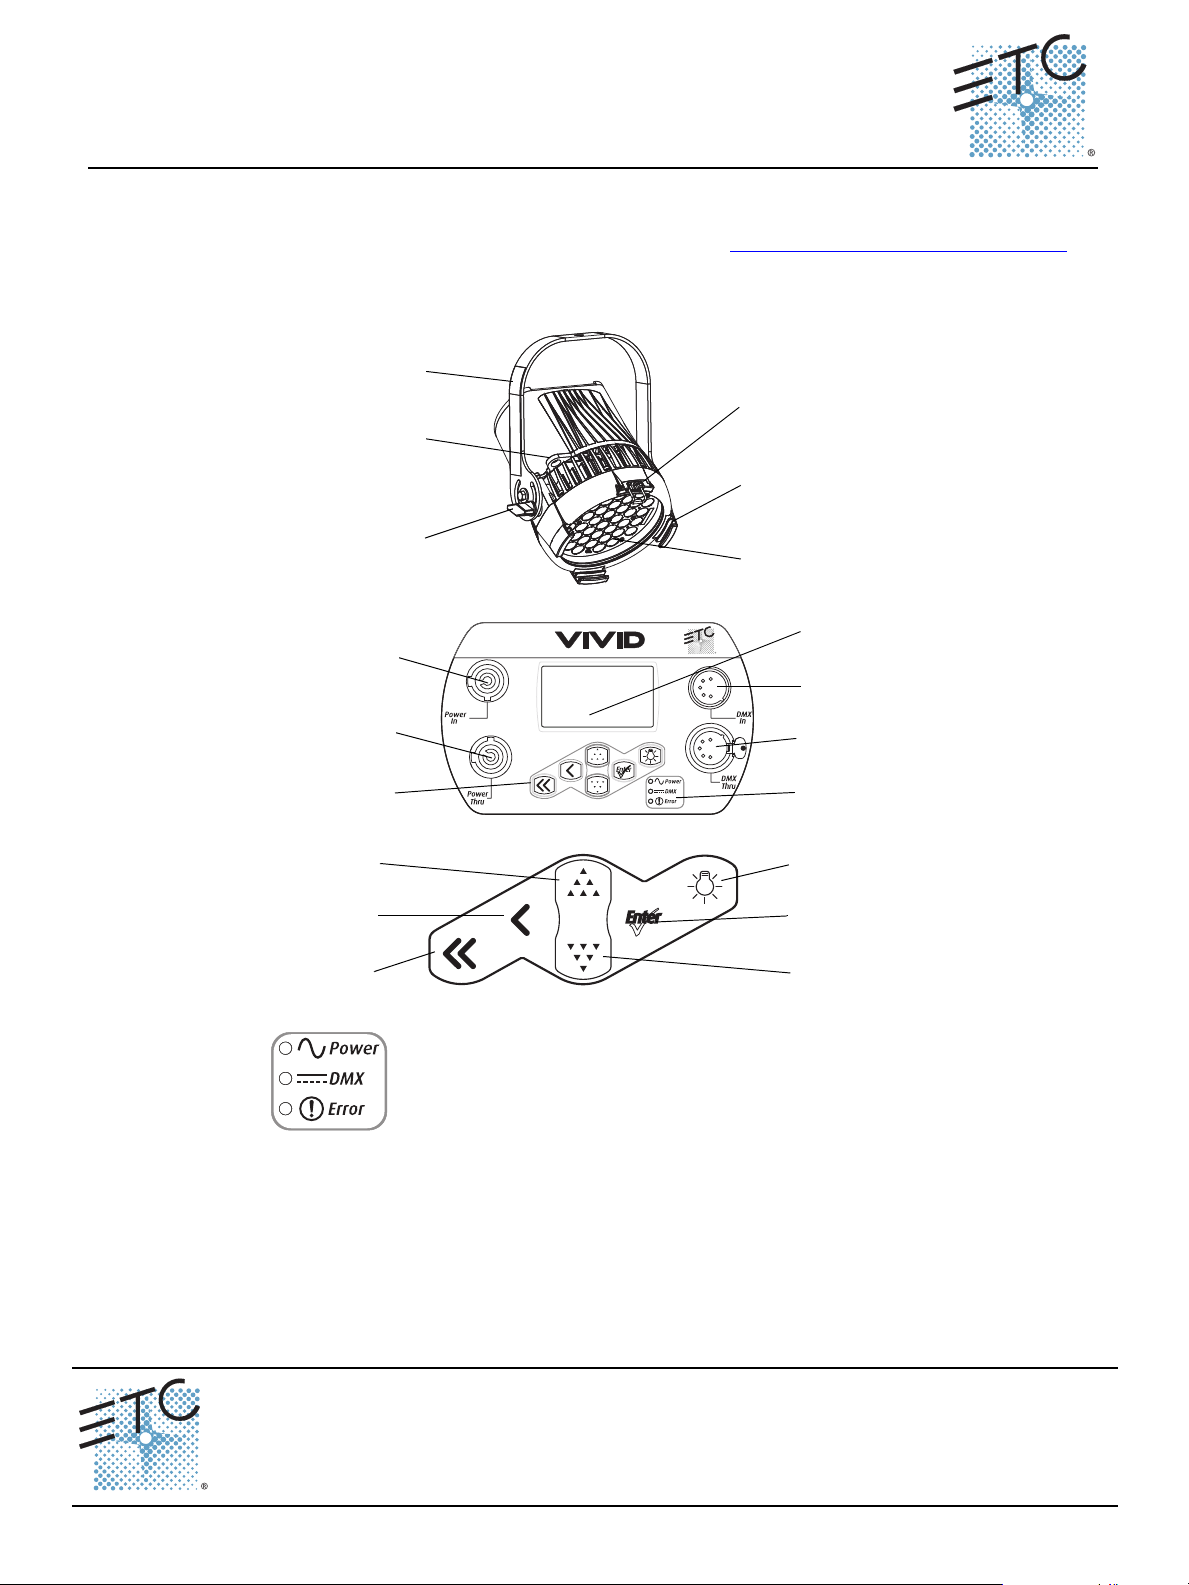
LED array
Accessory
holder
Yoke
Accessory
retainer
Yoke
locking knob
Safety cable
loop
PUSH
Power In
Power Thru
Keypad
LCD
DMX In
DMX Thru
Status
indicators
Light Bulb
Home
Back
Up
Enter
Down
Power – Indicates AC power is On.
DMX – Indicates control signal is Active.
Error – Indicates data error, high temperature, or other unusual status.
D22, D40, D40XT, D60
Overview
For complete information and step-by-step instructions, see Desire Series by ETC D22, D40, D40XT,
D60 User Manual. ETC documentation can be downloaded at www.etcconnect.com/downloads.aspx
The features shown in the following graphics may not appear on all Desire Series fixtures.
.
Corporate Headquarters
London, UK
Rome, IT
Holzkirchen, DE
Hong Kong Rm 1801, 18/F, Tower 1 Phase 1, Enterprise Square, 9 Sheung Yuet Road, Kowloon Bay, Kowloon, Hong Kong Tel +852 2799 1220 Fax +852 2799 9325
Service:
Web:
7410M1300-1.6.0
D22, D40, D40XT, D60 v1.6.0 Quick Guide Page 1 of 8 Electronic Theatre Controls, Inc.
Unit 26-28, Victoria Industrial Estate, Victoria Road, London W3 6UU, UK Tel +44 (0)20 8896 1000 Fax +44 (0)20 8896 2000
Via Pieve Torina, 48, 00156 Rome, Italy Tel +39 (06) 32 111 683 Fax +44 (0) 20 8752 8486
(Americas) service@etcconnect.com
www.etcconnect.com
3031 Pleasant View Road, P.O. Box 620979, Middleton, Wisconsin 53562-0979 USA Tel +608 831 4116 Fax +608 836 1736
Ohmstrasse 3, 83607 Holzkirchen, Germany Tel +49 (80 24) 47 00-0 Fax +49 (80 24) 47 00-3 00
Rev A Released 2014-02
Copyright © 2014 ETC. All Rights Reserved. Product information and specifications subject to change.
(UK) service@etceurope.com (DE) techserv-hoki@etcconnect.com
ETC intends this document to be provided in its entirety.
(Asia) service@etcasia.com
Page 2
ETC Desire Quick Guide
With yoke
Accessory holder and clip
With floor stand
Canopy mount
(D22 only)
Track mount
(D22 only)
Power In
DMX In
DMX Thru
Power Thru
(Power Thru not
available on D22)
Desire D22, D40, D40XT, D60 v1.6.0
Install
D22 Portable, D40, D40XT, D60
Step 1: Hang or mount the fixture.
Step 2: Attach safety cable.
Step 3: Insert secondary lens with smooth side out, if desired.
Step 4: Insert additional accessories if desired. (top hat, egg crate, etc.)
WARNING:
D22 Canopy and D22 Track
See the Desire Series D22 Installation Guide for details on installing the Canopy and Track mounted
options of the D22 fixture.
Connect
D22 Portable, D40, D40XT, and D60
Step 1: If using external DMX or RDM control, attach a 5-pin XLR cable to DMX In.
Step 2: Connect power cable to AC power.
Step 3: Plug the XLR cable into data source, if applicable.
Step 4: Link any additional fixtures via Power Thru and DMX Thru connectors.
• The D22 fixture does not have the Power Thru option.
Use only hardware rated for total weight of fixture and accessories.
The safety cable (or other approved safety device) must be securely attached
to the safety cable loop before loosening the clamp.
PUSH
WARNING:
D22, D40, D40XT, D60 v1.6.0 Quick Guide Page 2 of 8 Electronic Theatre Controls, Inc.
• Do not link more than nine fixtures when using Power Thru (nondimming, 100 to 240 VAC, 50/60 Hz). Power Thru is not available on all
Desire Series fixtures.
• Up to 32 devices can be daisy-chained together per data run.
• Disconnect Power and DMX before all cleaning and maintenance.
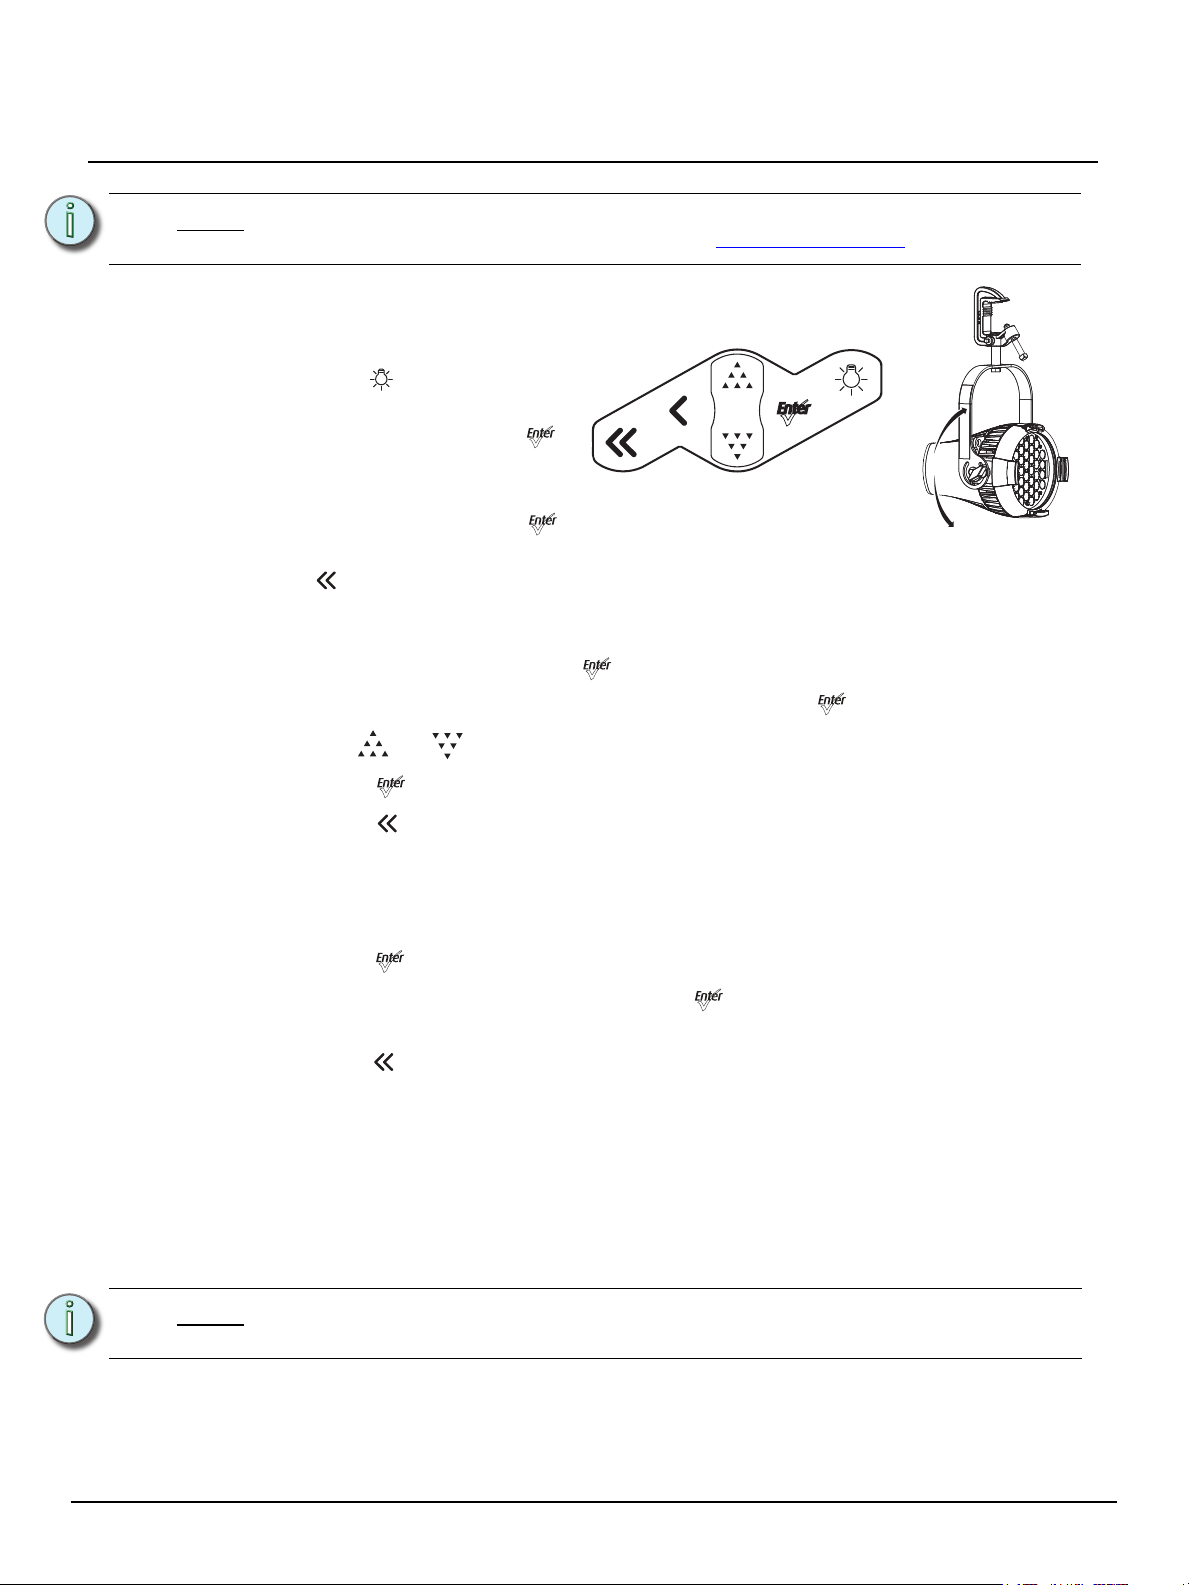
Page 3
ETC Desire Quick Guide
Desire D22, D40, D40XT, D60 v1.6.0
Note:
Focus
Address
For setup of D22 track and canopy mounted fixtures, see the D22 Installation Guide.
ETC documentation can be downloaded at www.etcconnect.com.
Step 1: Supply power and wait for the
fixture to boot up.
Step 2: Press [] to open Presets &
Sequences.
Step 3: Select Focus and press []
to turn on LED array.
Step 4: Adjust fixture's position.
Step 5: Once focus is set, press []
to turn off LED array and then
[] to return to home screen.
Step 1: From the home screen, press [] to open Main Menu.
Step 2: On the Main Menu, scroll to DMX Start Address, press [].
Step 3: Use [] or [] to scroll to desired address.
Step 4: Press [] to select address number.
Step 5: Press [] to return to home screen.
* DMX address is not needed if using standalone or master/slave control.
Features Quick Setup
Step 1: On the Main Menu, scroll to Quick Setups.
Step 2: Press [].
Step 3: Scroll to the desired setup and then press [].
An asterisk (*) indicates which setup is active.
Step 4: Press [] to return to the home screen.
The top line of the home screen displays the name of the active setup.
Individual features and settings are adjustable under the Advanced menu. Consult the User Manual for
more information on advanced features of Desire fixtures.
Quick Color (Vivid, Lustr+, Fire and Ice, Studio HD)
Quick Color allows you to easily select a color and its intensity from a predefined menu. This
feature overrides any presets or sequences previously selected and is only available when
there is no external DMX signal to the fixture.
Note:
Exiting the Quick Color menu will return the fixture to the state it was in prior to entering
the menu.
D22, D40, D40XT, D60 v1.6.0 Quick Guide Page 3 of 8 Electronic Theatre Controls, Inc.
Page 4

ETC Desire Quick Guide
Desire D22, D40, D40XT, D60 v1.6.0
To select a Quick Color:
Step 1: Press the [] to access the Presets and Sequences screen.
Step 2: Within the Presets and Sequences screen, scroll to Quick Color and press [].
Step 3: Scroll to Color and press [].
Step 4: Scroll to the desired color and press [].
Step 5: Scroll to adjust the fixture’s intensity and press [] to commit the selection.
Step 6: To exit the Quick Color menu, press [].
Quick Setups
D40, D40XT and D60 – Vivid, Lustr+, Fire, Ice, Studio HD D22 – Lustr+, Studio HD
Quick Setup Features Recommended For:
General
Stage
XT Arch
High Impact
Studio
Smooth dimming, good consistency, direct
color control.
Tungsten-like dimming, HSI color control with
Plus-7 fine tuning.
Maximum consistency in extreme
applications, reduced brightness.
Maximum brightness, quick response, RGB
color control, reduced consistency.
Three-point control—White Point (CCT),
Intensity and Tint; standalone operation.
General lighting, rentals, indoor applications.
Theatrical lighting, installations mixed with
tungsten.
High-temperature environments, installations
with limited access.
Video-based control, effects lighting, concerts.
Video and film lighting, white light-only
applications.
Parameter General Stage XT Arch High Impact Studio
DMX Settings
Profile Direct HSI HSI RGB Studio
Strobe Enabled Enabled Enabled Enabled Enabled
Data Loss
Setting
Plus Seven N/A Enabled Disabled Disabled Disabled
Fan Control
(D60 only)
Output Setting Regulated Regulated Protected Boost Regulated
Dimming
Curve
Red Shift N/A Disabled Disabled Disabled N/A
White Point N/A 3200 3200 5600 N/A
Status
Indicators
Overtemp Dark Dark Visible Dark Visible
Instant Instant HLL-4ever Instant N/A
DMX DMX DMX DMX DMX
LED Settings
Standard Incandescent Standard Quick Linear
Local Settings
On On On On On
D22, D40, D40XT, D60 v1.6.0 Quick Guide Page 4 of 8 Electronic Theatre Controls, Inc.
Page 5

ETC Desire Quick Guide
Desire D22, D40, D40XT, D60 v1.6.0
D22, D40, D40XT and D60 – Studio Tungsten and Daylight
Quick Setup Features Recommended For:
Studio
Stage
Single
Channel
Linear dimming, simple standalone operation
via the UI.
Tungsten-like dimming, stage-friendly
settings, DMX fan control.
Standard dimming, automatic fan, only 1
DMX channel.
Parameter Studio Stage Single Channel
DMX Settings
Profile Intensity Intensity Intensity
Strobe Enabled Enabled Disabled
Data Loss Setting N/A Instant Instant
Fan Control (D60 only) DMX DMX Automatic
LED Settings
Output Setting Regulated Regulated Regulated
Dimming Curve Linear Incandescent Standard
Local Settings
Status Indicators On On On
Overtemp Visible Dark Dark
Video or film lighting, installations without
DMX control.
Theatrical lighting, installations mixed with
tungsten.
Architectural applications with streamlined
control.
DMX Profiles
D22, D40, D40XT and D60 – Studio Tungsten and Studio Daylight
Channel Control
1 Intensity
2
3
Fan control
D40 – Vivid, Lustr+, Fire, Ice, Studio HD D22 – Lustr+, Studio HD
Channel HSI HSIC RGB Studio Direct
1 Hue Hue Red Intensity Color 1
2 Hue fine Hue fine Green Color temp Color 2
3 Saturation Saturation Blue Tint Color 3
4 Intensity Intensity N/A N/A Color 4
5 Strobe* Strobe* Strobe* Strobe* Color 5
6 N/A Color temp N/A N/A Color 6
7
8
9
10
11
12
13
14
Plus7 on/off
*
Strobe
Plus7 - (1)
Plus7 - (2)
Plus7 - (3)
Plus7 - (4)
Plus7 - (5)
Plus7 - (6)
Plus7 - (7)
*
*
Plus7 on/off
*
*
*
*
*
*
*
Plus7 - (1)
Plus7 - (2)
Plus7 - (3)
Plus7 - (4)
Plus7 - (5)
Plus7 - (6)
Plus7 - (7)
*
Plus7 on/off
*
*
*
*
*
*
*
Plus7 - (1)
Plus7 - (2)
Plus7 - (3)
Plus7 - (4)
Plus7 - (5)
Plus7 - (6)
Plus7 - (7)
*
*
*
*
*
*
*
*
Plus7 on/off
Plus7 - (1)
Plus7 - (2)
Plus7 - (3)
Plus7 - (4)
Plus7 - (5)
Plus7 - (6)
Plus7 - (7)
*
*
*
*
*
*
*
*
Color 7
Intensity
Strobe*
N/A
N/A
N/A
N/A
N/A
D22, D40, D40XT, D60 v1.6.0 Quick Guide Page 5 of 8 Electronic Theatre Controls, Inc.
Page 6

ETC Desire Quick Guide
Desire D22, D40, D40XT, D60 v1.6.0
D60 – Vivid, Lustr+, Fire, Ice, Studio HD
Channel HSI HSIC RGB Studio Direct
1 Hue Hue Red Intensity Color 1
2 Hue fine Hue fine Green Color temp Color 2
3 Saturation Saturation Blue Tint Color 3
4 Intensity Intensity N/A N/A Color 4
5 Strobe* Strobe* Strobe* Strobe* Color 5
6
Fan control
*
Fan control
7 N/A Color temp N/A N/A Color 7
8
9
10
11
12
13
14
15
Plus7 on/off
Plus7 - (1)
Plus7 - (2)
Plus7 - (3)
Plus7 - (4)
Plus7 - (5)
Plus7 - (6)
Plus7 - (7)
*
Plus7 on/off
*
*
*
*
*
*
*
Plus7 - (1)
Plus7 - (2)
Plus7 - (3)
Plus7 - (4)
Plus7 - (5)
Plus7 - (6)
Plus7 - (7)
*
*
*
*
*
*
*
*
*
Fan control
Plus7 on/off
Plus7 - (1)
Plus7 - (2)
Plus7 - (3)
Plus7 - (4)
Plus7 - (5)
Plus7 - (6)
Plus7 - (7)
*
*
*
*
*
*
*
*
*
Fan control
Plus7 on/off
Plus7 - (1)
Plus7 - (2)
Plus7 - (3)
Plus7 - (4)
Plus7 - (5)
Plus7 - (6)
Plus7 - (7)
*
*
*
*
*
*
*
*
*
Color 6
Intensity
*
Strobe
Fan control
N/A
N/A
N/A
N/A
N/A
*
* When this feature is enabled.
Typical Power Consumption (D22)
Lustr+
Idle Power / Current 7.8W / 0.111 7.6W / 0.111A 7.4W / 0.094A
100% Boost Power / Current 56.8W / 0.578 56.5W / 0.475A 55.1W / 0.288
Studio Tungsten
Idle Power / Current 7.6W / 0.11A 7.6W / 0.11A 7.2W / 0.094A
100% Boost Power / Current 52.4W / 0.532A 51.8W / 0.445A 50.9W / 0.276
Studio Daylight
Idle Power / Current 7.3W / 0.093A 7.2W / 0.091A 7.3W / 0.124A
100% Boost Power / Current 55.2W / 0.556A 55W / 0.462A 53.8W / 0.268
Studio HD
Idle Power / Current 6.7W / 0.095A 6.7W / 0.098A 6.7W / 0.118A
100% Boost Power / Current 55W / 0.555A 54.6W / 0.464A 53.3W / 0.271A
100V 120V 230V
100V 120V 230V
100V 120V 230V
100V 120V 230V
D22, D40, D40XT, D60 v1.6.0 Quick Guide Page 6 of 8 Electronic Theatre Controls, Inc.
Page 7

ETC Desire Quick Guide
Desire D22, D40, D40XT, D60 v1.6.0
Typical Power Consumption (D40 and D40XT)
Vivid
100V 120V 240V
Idle Power / Current 10.5W / 0.135A 11W / 0.098A 12.7W / 0.078A
100% Boost Power / Current 102W / 1.12A 98W / 0.82A 95.6W / 0.403
Lustr+
100V 120V 240V
Idle Power / Current 10.3W / 0.125A 10.5W / 0.094A 12.2W / 0.074A
100% Boost Power / Current 104W / 1.16A 102W / 0.861 99.7 W / 0.418
Fire
100V 120V 240V
Idle Power / Current 10.5W / 0.125A 10.8W / 0.096A 12.5W / 0.076A
100% Boost Power / Current 91.2W / 1.02A 88.2W / 0.74A 87.2W / 0.369A
Ice
Idle Power / Current 11.0W / 0.123A 11.2W / 0.099A 12.8W / 0.077A
100% Boost Power / Current 104.2W / 1.17A 102.2W / 0.867A 99.5W / 0.42A
Studio HD
Idle Power / Current 11.1W / 0.134A 11W / 0.097A 12.8W / 0.077A
100% Boost Power / Current 106.2W / 1.19A 103.5W / 0.883A 101.3W / 0.426A
Studio Daylight
Idle Power / Current 10.6W / 0.123A 10.6W / 0.095A 12.4W / 0.076A
100% Boost Power / Current 105.1W / 1.12A 103.3W / 0.878A 100.8W / 0.424A
Studio Tungsten
Idle Power / Current 10W / 0.111A 10.1W / 0.093A 11.9W / 0.075A
100% Boost Power / Current 104W / 1.05A 103.1W / 0.872A 100.3W / 0.422A
100V 120V 240V
100V 120V 240V
100V 120V 240V
100V 120V 240V
D22, D40, D40XT, D60 v1.6.0 Quick Guide Page 7 of 8 Electronic Theatre Controls, Inc.
Page 8

ETC Desire Quick Guide
Desire D22, D40, D40XT, D60 v1.6.0
Typical Power Consumption (D60)
Vivid
100V 120V 240V
Idle Power / Current 7.6W / 0.083A 7.7W / 0.083A 9.2W / 0.087A
100% Boost Power / Current 139W / 1.41A 136.1W / 1.15A 130.3W / 0.549A
Lustr+
100V 120V 240V
Idle Power / Current 7.3W / 0.1A 7.4W / 0.77A 9W / 0.086A
100% Boost Power / Current 143W / 1.46A 140.1W / 0.97A 135.1W /
Fire
100V 120V 240V
Idle Power / Current 7.9W / 0.105A 7.9W / 0.086A 9.4W / 0.089A
100% Boost Power / Current 129W / 1.35A 126.5W / 1.35A 122.7W / 0.52A
Ice
Idle Power / Current 7.3W / 0.095A 7.4W / 0.081A 9W / 0.085A
100% Boost Power / Current 148.5W / 1.53A 147W / 1.28A 140.2W / 0.592A
Studio HD
Idle Power / Current 7.2W / 0.086A 7.3W / 0.082A 8.9W / 0.086A
100% Boost Power / Current 146W / 1.5A 143.7W / 1.24A 138.2W / 0.58A
Studio Daylight
Idle Power / Current 7.5W / 0.09A 7.6W / 0.084A 9.3W / 0.089A
100% Boost Power / Current 145.5W / 1.48A 142.8W / 1.22A 136W / 0.573A
Studio Tungsten
Idle Power / Current 7.4W / 0.088A 7.5W / 0.083A 9.1W / 0.088A
100% Boost Power / Current 145.8W / 1.49A 143.3W / 1.23A 137.1W / 0.577A
100V 120V 240V
100V 120V 240V
100V 120V 240V
100V 120V 240V
D22, D40, D40XT, D60 v1.6.0 Quick Guide Page 8 of 8 Electronic Theatre Controls, Inc.
 Loading...